Does your living space feel dull, washed out, or simply uninspired? A lack of vibrant color can sometimes drain the energy from a room, leaving it feeling cold and unwelcoming. Many people hesitate to introduce bold hues, worrying they might clash or overwhelm the existing decor.

It does not take a full remodel or a massive paint job to inject vitality into your home. Often, the simplest, most intentional color additions create the greatest impact. Brightening your space is about balance, texture, and finding those focused color moments that reflect your personality.
Get ready to transform your neutral backdrop into a lively, expressive sanctuary. We have gathered thirty-eight colorful, inspiring decor ideas, ranging from striking DIY projects to sophisticated color pairings. Discover how to use everything from brilliant art and soft textiles to bold furniture to turn up the brightness in your home.
1. Refreshing Mediterranean-Inspired Gallery Wall

This image beautifully demonstrates how a few carefully chosen pieces can infuse a space with vibrant energy while maintaining a bright, open feeling. The room, primarily painted in crisp white, serves as a serene backdrop, allowing the accent colors to truly shine. Notice the striking contrast provided by the rich, earthy terracotta counter and the deep indigo throw pillow.
A captivating gallery wall anchors the sitting area. It mixes a large, modern abstract piece featuring bright blue and white clouds with smaller, intricately patterned ceramic tiles. This combination adds a lovely touch of Mediterranean charm and texture. The natural jute rug and the towering ceramic vases introduce warmth and an organic feel, keeping the overall design balanced and inviting. Adding these small pops of color is an easy way to brighten any area.
DIY Project: Painted Ceramic Accent Tiles
This project lets you create your own patterned accent tiles, mimicking the beautiful blue and yellow pieces seen on the wall, adding a personalized splash of color to your home.
Material Required
- Plain white ceramic tiles (4×4 inches or similar)
- Acrylic paint in vibrant colors (e.g., cobalt blue, sunny yellow, emerald green)
- Fine-point permanent marker (optional, for tracing)
- Clear acrylic sealer spray (gloss or matte finish)
Equipment Required
- Small, fine-tipped artist paintbrushes
- Small container for water
- Paper towels or rags
- Stencils with geometric or floral patterns (optional)
DIY Instruction Step by Step
- Prepare Your Surface: Ensure the ceramic tiles are completely clean and dry. Wipe them down with a damp cloth and let them air dry thoroughly. Lay out newspaper or a drop cloth to protect your work area.
- Plan Your Design: Decide on the pattern you want for each tile. You might choose simple geometric shapes like stars, diamonds, or small floral motifs. Use a pencil or a fine-point permanent marker to lightly sketch the design onto the tile surface.
- Apply the First Color: Using your finest paintbrush, carefully apply the first color (perhaps cobalt blue) to the main sections of your pattern. Aim for an even coat. It is better to apply two thin coats than one thick, messy coat. Allow the first coat to dry completely before proceeding.
- Add Accent Colors: Once the first color is dry, introduce your second and third colors (like yellow or green) to fill in smaller details or borders. Take your time to keep the lines crisp. Wait until all painted colors are dry before moving to the next step.
- Seal the Tiles: Take the fully dried tiles to a well-ventilated area. Following the instructions on the can, lightly spray the top surface of the tile with the clear acrylic sealer. Apply two or three thin coats, allowing adequate drying time between each coat. This step protects your vibrant design and adds a polished finish.
- Display Your Work: Once the sealer is cured, you can use mounting putty or adhesive strips to hang the tiles on your wall to create a lively accent feature.
2. Desert Oasis Inspired Living Room

This inviting living room masterfully blends warm desert tones with botanical art and natural textures. A rich olive green wall creates a calming backdrop, beautifully complemented by a soft blush pink on the adjacent wall, adding depth and visual interest. The plush brown leather sofa exudes comfort, draped with a cozy textured throw in a neutral hue.
Art pieces featuring flowering cacti adorn the green wall, bringing a vibrant pop of pink that ties into the overall color scheme. Various real cacti in stylish planters further enhance the desert theme, adding lively greenery and unique shapes. Elements like the copper floor lamp, woven wall hangings, and a charming leather ottoman introduce rustic charm and varied textures, making the space feel layered and deeply personal. It’s a truly harmonious blend of color, comfort, and nature.
DIY Project: Botanical Wall Art with Pressed Flowers
Create your own unique botanical art inspired by the framed prints in this room. This project uses pressed flowers to capture natural beauty and add a delicate touch of color.
Material Required
- Plain white cardstock or watercolor paper
- Assorted fresh flowers and leaves suitable for pressing (e.g., small wildflowers, fern fronds, thin rose petals)
- Heavy books or a flower press
- Craft glue or Mod Podge
- Tweezers (helpful for delicate placement)
- Picture frame with glass front
Equipment Required
- No special equipment beyond the materials listed.
DIY Instruction Step by Step
- Press Your Flowers: Gather your chosen flowers and leaves. Carefully arrange them between sheets of absorbent paper (like blotting paper or plain printer paper) within the pages of heavy books, or use a dedicated flower press. Make sure they are laid flat. Close the books or tighten the press and leave for 2-4 weeks until the flowers are completely dry and flattened.
- Prepare Your Background: Select your cardstock. This will be the background for your art. You might choose to leave it plain white, or gently tint it with a watercolor wash for a subtle effect, allowing it to dry fully if you do.
- Arrange Your Design: Once your flowers are pressed, carefully remove them from the press using tweezers. Experiment with different arrangements on your cardstock until you find a design you like. Consider grouping similar flowers or creating a pattern.
- Adhere the Flowers: One by one, apply a tiny dab of craft glue or Mod Podge to the back of each pressed flower or leaf. Gently place it onto your chosen spot on the cardstock. Press down lightly for a few seconds to ensure adhesion. Work meticulously, as pressed flowers are fragile.
- Let it Dry: Allow the glue to dry completely, which usually takes a few hours. Ensure all parts of the flowers are securely attached to prevent them from shifting.
- Frame Your Art: Once dry, carefully place your botanical artwork into a picture frame. The glass front will protect your delicate creation and allow you to display it beautifully on your wall or a shelf.
3. Playful Acrylic Pop Art Room

This room bursts with an undeniable zest for life, showcasing a brilliant array of primary colors and modern, clean lines. Against a crisp white backdrop, the bold hues of royal blue, sunny yellow, and vibrant pink create an energetic and utterly contemporary atmosphere. The bright blue sofa instantly draws the eye, providing a comfy anchor in the center of the space.
Acrylic furniture pieces, transparent and colorful, add a playful, almost ethereal quality. They catch and refract light, contributing to the room’s dynamic feel. A striking arrangement of geometric shapes in blue, yellow, and pink adorns the wall, embodying a pop art sensibility. Even the potted plant, housed in a bright green container, enhances the lively color scheme. This space celebrates audacious color and playful design in a truly unique way.
DIY Project: Geometric Acrylic Wall Art
Channel the vibrant energy of this room by creating your own set of geometric wall art pieces using colorful acrylic sheets.
Material Required
- Acrylic sheets in various vibrant colors (e.g., blue, yellow, pink, green – choose lightweight sheets, 1/8 inch thickness is good)
- Acrylic-safe adhesive or strong double-sided mounting tape
- Cardboard or paper for templates
- Fine-grit sandpaper (optional, for smoothing edges)
Equipment Required
- Jigsaw, scroll saw, or acrylic cutting tool (for cutting shapes; always wear safety glasses)
- Ruler and pencil for marking
- Safety glasses (essential when cutting acrylic)
- Gloves (optional, to avoid fingerprints)
DIY Instruction Step by Step
- Design Your Shapes: Sketch out various geometric shapes (circles, squares, triangles, abstract forms) onto cardboard or thick paper. Experiment with different sizes and compositions until you have a pleasing arrangement. These will be your templates.
- Cut the Acrylic: Carefully place your cardboard templates onto the acrylic sheets. Trace around them with a pencil or marker. Using a jigsaw, scroll saw, or acrylic cutting tool, cut out your shapes. Always wear safety glasses and follow the tool’s safety instructions. Take your time to make clean cuts. If edges are rough, gently sand them smooth with fine-grit sandpaper.
- Clean the Pieces: Once all your shapes are cut, wipe them down with a soft, lint-free cloth to remove any dust or fingerprints. You can use an acrylic cleaner if needed.
- Plan Your Wall Arrangement: On your wall, use painter’s tape to temporarily mark out where you want each acrylic shape to go. Step back and adjust the placement until you are happy with the overall composition.
- Mount the Shapes: Apply acrylic-safe adhesive or strong double-sided mounting tape to the back of each acrylic shape. Press each piece firmly onto the wall in its designated spot. Hold each piece for a few seconds to ensure it adheres well.
- Enjoy Your Art: Step back and admire your new, vibrant, and playful geometric wall art. It will instantly add a modern and colorful touch to your space.
4. Rich Bohemian Sanctuary

This room is a feast for the senses, overflowing with rich textures, intricate patterns, and deep, jewel-toned colors that create a luxurious and cozy bohemian haven. The walls are adorned with layered textiles and vibrant tapestries in shades of magenta, crimson, and gold, instantly immersing you in a world of opulence. A light blue sofa offers a serene counterpoint, its cool tone contrasting beautifully with the surrounding warmth.
The sofa is laden with an assortment of throw pillows, each a tiny masterpiece of embroidery and pattern, in hues of yellow, pink, and turquoise. Moroccan-style lanterns add an exotic glow, while carved wooden screens lend an air of intricate craftsmanship. Plush floor cushions and a richly patterned rug further enhance the feeling of comfort and bohemian grandeur. Every element contributes to a space that feels deeply personal and wonderfully vibrant.
DIY Project: Embellished Throw Pillows
Create your own vibrant, pattern-rich throw pillows inspired by the eclectic collection in this bohemian sanctuary. This project involves adding embroidery or fabric paint details to plain pillow covers.
Material Required
- Plain pillow covers (cotton or linen, in a solid color like light blue, yellow, or cream)
- Embroidery floss in various vibrant colors
- Embroidery needles
- Fabric paint in assorted colors (optional, for stenciling or freehand designs)
- Stencils with geometric or floral patterns (optional, if using fabric paint)
- Small artist brushes or sponge applicators (if using fabric paint)
- Iron and ironing board (for heat-setting fabric paint)
Equipment Required
- Embroidery hoop (optional, but helpful for even stitches)
- Scissors
DIY Instruction Step by Step
- Prepare Your Pillow Cover: Ensure your pillow cover is clean and ironed flat. If using an embroidery hoop, center your chosen design area within the hoop and tighten it. If using fabric paint, insert a piece of cardboard inside the pillow cover to prevent the paint from bleeding through to the other side.
- Choose Your Technique:
- Embroidery: Sketch your desired pattern lightly onto the pillow cover with a washable fabric marker. Begin embroidering using different stitches (e.g., running stitch, satin stitch, French knots) and colors. Experiment with layering colors and textures. Once finished, tie off and trim your floss on the inside of the cover.
- Fabric Paint: If using stencils, position them securely on the pillow cover. Apply fabric paint using a brush or sponge, dabbing gently to prevent bleeding under the stencil. For freehand designs, use small brushes to paint your patterns directly. Allow the paint to dry completely.
- Heat Set (if using fabric paint): Once the fabric paint is thoroughly dry, follow the manufacturer’s instructions for heat setting. This typically involves ironing the painted area for a specific duration to make the design permanent and washable.
- Insert Pillow Insert: Once your embellishments are complete and (if applicable) heat-set, remove any cardboard or embroidery hoop. Insert your pillow form into the decorated cover.
- Arrange and Enjoy: Place your newly embellished pillow on your sofa or bed to add a touch of handcrafted, vibrant bohemian style to your space.
5. Electric Modern Workspace

This striking workspace makes a powerful statement with its dark, moody ambiance punctuated by dazzling neon lights. The deep charcoal walls create a sophisticated, almost dramatic backdrop, allowing the brilliant greens and blues of the neon art to truly pop. This unexpected use of light transforms the space from merely functional into an experience.
A sleek black desk area, complete with a bright lime green office chair, introduces a jolt of energetic color that contrasts sharply with the dark surroundings. The minimalist furniture maintains a contemporary feel, ensuring the focus remains on the captivating light features. This room exemplifies how strategic lighting and a single bold accent color can completely redefine a modern interior, creating a dynamic and inspiring environment.
DIY Project: Simple Neon-Style LED Sign
Create your own personalized neon-style sign using flexible LED strip lights. This project allows you to add a cool, customized glow to any room.
Material Required
- Flexible LED strip lights (choose a color like green or blue, ideally with a silicone diffuser for a “neon” look)
- Clear acrylic sheet (or a thin, sturdy board like MDF, painted black)
- Strong adhesive (e.g., E6000 or hot glue gun with strong glue sticks)
- Power supply for the LED strip (usually included or specified with the lights)
- Mounting hardware (screws, wall anchors, or picture hanging wire)
Equipment Required
- Scissors (to cut LED strip, if applicable, at designated points)
- Ruler and pencil for marking
- Safety glasses (essential when cutting acrylic)
- Gloves (optional, to avoid fingerprints)
DIY Instruction Step by Step
- Design Your Sign: On paper, sketch out the word or simple graphic you want to create. Keep it somewhat simple, as you will be bending the LED strip to follow your lines. If using an acrylic sheet, ensure your design fits.
- Prepare the Base: If using an acrylic sheet, you can leave it clear or paint the back black for more contrast. If using an MDF board, paint it black and let it dry completely. Transfer your design onto the base using a pencil or marker.
- Attach the LED Strip: Carefully begin to adhere the flexible LED strip along your drawn design. The strips often have an adhesive backing; peel and press firmly. For curves and corners, you might need to use additional strong adhesive for better hold. If your strip allows cutting, trim it at the designated cut marks if your design requires it.
- Connect Power: Once the LED strip is fully adhered, connect it to its power supply. Test the sign to ensure all lights are working properly. Make any adjustments to the strip’s placement if needed.
- Mount Your Sign: Decide how you want to hang your sign. You can drill small holes near the edges of the acrylic or board and use picture hanging wire, or directly screw it into the wall using appropriate anchors. Ensure the power cable is routed neatly.
- Illuminate Your Space: Hang your custom neon-style sign in your chosen spot. Plug it in and enjoy the vibrant, modern glow it adds to your room, creating an electric atmosphere.
6. Bold Primary Pop Art Bedroom

This lively bedroom is a masterclass in using bold primary colors to create a youthful, energetic, and unapologetically modern space. A stark white canvas allows the vibrant reds, blues, and yellows to command attention, preventing the room from feeling cluttered despite its colorful inhabitants. The minimal furniture shapes and clean lines contribute to its contemporary pop art aesthetic.
A bright blue abstract artwork hangs prominently, echoing the vibrant hues found throughout the room. Red drawers on the low media console provide a striking contrast and practical storage. The bed is adorned with playful throw pillows and a blanket featuring a graphic, geometric pattern in primary colors, ensuring the bed itself becomes a central piece of art. Even the wire-frame pendant lights add a cool, industrial touch, balancing the bright colors.
DIY Project: Geometric Color Block Blanket
Create a visually striking blanket inspired by the one on the bed, using color blocking and primary colors. This project involves sewing together fabric squares in a bold, geometric pattern.
Material Required
- Fabric (cotton or fleece works well) in primary colors: red, yellow, blue, and black. You’ll need about 1-2 yards of each color, depending on your desired blanket size.
- Coordinating thread
- Fabric scissors or rotary cutter and cutting mat
Equipment Required
- Sewing machine
- Iron and ironing board
- Ruler or measuring tape
- Straight pins
DIY Instruction Step by Step
- Cut Your Fabric Squares: Decide on the size of your fabric squares (e.g., 8×8 inches, 10×10 inches). Using your fabric scissors or rotary cutter, precisely cut an equal number of squares from each of your chosen fabric colors (red, yellow, blue, black). The more squares you cut, the larger your blanket will be.
- Plan Your Layout: On a large, clean floor space, arrange your fabric squares into the desired geometric pattern. Experiment with different arrangements until you find a pleasing composition. Take a photo to remember your layout.
- Sew Rows Together: Starting with the first row, take two adjacent squares, place them right sides together, and sew them along one edge with a 1/2-inch seam allowance. Continue adding squares to create your first complete row. Press the seams open or to one side with an iron. Repeat this process for all your rows.
- Join the Rows: Once all your individual rows are sewn, take the first two rows and place them right sides together, carefully aligning the seams. Pin them in place, then sew along the long edge with a 1/2-inch seam allowance. Press the seam open.
- Continue Joining Rows: Continue joining the remaining rows in the same manner until your entire blanket top is assembled.
- Finish the Edges: To finish the blanket, you can either hem the edges by folding them under twice and sewing, or add a simple border of a contrasting fabric if you wish.
- Enjoy Your Blanket: Drape your colorful, geometrically patterned blanket over your bed or sofa. It will add an immediate pop art punch and a cozy, handmade touch to your room.
7. Lush Emerald Sanctuary

This room is a breathtaking ode to the beauty of nature, enveloping you in a rich, emerald green palette that feels both luxurious and incredibly calming. The deep green walls create a dramatic backdrop, enhanced by a striking botanical artwork that brings vibrant tropical foliage indoors. This space proves that a monochrome approach, when done with varying textures and shades, can be incredibly dynamic.
Abundant live plants, from leafy floor plants to delicate hanging vines, are strategically placed, making the room feel like a vibrant, living ecosystem. A plush green armchair and a velvet side chair invite relaxation, while the dark marble coffee table and console add an element of sophisticated elegance. Gold accents, such as the mirrors and lamp fixtures, provide subtle glints of warmth, elevating the overall opulent jungle aesthetic.
DIY Project: Vertical Hanging Planter
Create a lush, space-saving vertical planter to add more greenery to your room, inspired by the hanging plants in this emerald sanctuary.
Material Required
- Strong, durable fabric (e.g., canvas, felt, or an old denim piece)
- Sturdy wooden dowel or branch
- Strong string or rope for hanging
- Small potted plants (succulents, herbs, or small trailing plants work well)
- Potting soil (if repotting)
Equipment Required
- Sewing machine (or strong needle and thread for hand-sewing)
- Scissors
- Ruler or measuring tape
- Fabric marker (optional)
DIY Instruction Step by Step
- Prepare Your Fabric: Cut a rectangular piece of strong fabric to your desired size for the back panel of your planter. For example, 18 inches wide by 30 inches long. Hem all four edges for a neat finish.
- Create Pockets: Decide on the size and number of pockets you want for your plants. Cut several rectangular pieces of fabric for the pockets (e.g., 8 inches wide by 6 inches tall). Hem the top edge of each pocket piece.
- Attach Pockets: Lay your main fabric panel flat. Position the pocket pieces evenly on the main panel, leaving space between them for growth. Pin the sides and bottom of each pocket piece to the main panel. Using your sewing machine (or hand-sewing with strong stitches), sew the sides and bottom edges of each pocket securely to the main panel, leaving the top edge open.
- Create a Dowel Sleeve: At the top of your main fabric panel, fold down about 2 inches of fabric towards the back. Sew this fold down to create a sleeve or channel. This is where your dowel will go.
- Assemble and Hang: Slide your wooden dowel or branch through the sleeve you just created. Cut two equal lengths of string or rope. Tie one end of each string to either end of the dowel. Bring the free ends of the strings together and tie them in a knot, creating a loop for hanging.
- Add Your Plants: Carefully place your small potted plants (or repot plants into the fabric pockets directly with soil) into each pocket. Hang your vertical planter in a desired spot, allowing the lush greenery to thrive and enhance your space.
8. Ombre Coral Dream Space

This space bathes in a warm, ethereal glow, using a sophisticated ombre effect to create a truly unique and calming atmosphere. The walls transition gracefully from a soft white at the top to a rich, inviting coral peach towards the bottom, echoed beautifully in the custom ombre curtains. This gradient effect adds depth and visual interest without overwhelming the senses.
Against this radiant backdrop, a plush, rounded white sofa offers a comfortable spot for relaxation. Copper pendant lights hang elegantly, their metallic finish complementing the warm coral tones of the room. A clean white desk and chair maintain a minimalist aesthetic, ensuring the focus remains on the captivating color transitions. This room feels light, airy, and wonderfully cohesive, proving the power of a well-executed gradient design.
DIY Project: Ombre Dip-Dyed Curtains
Recreate the stunning ombre effect seen in the curtains by dip-dyeing plain white curtains in a beautiful coral hue.
Material Required
- Plain white cotton or linen curtains (pre-washed and dried)
- Fabric dye in your chosen color (e.g., coral, peach, or a mix of red and orange)
- Large bucket or plastic tub
- Rubber gloves
- Salt (helps dye adhere to fabric)
- Measuring cups and spoons
- Old towels or drop cloth
Equipment Required
- Long stirring stick or dowel
- Clothesline or drying rack
- Washing machine
DIY Instruction Step by Step
- Prepare Your Work Area: Lay down old towels or a drop cloth to protect your floor and surfaces. Fill your large bucket or tub with hot water.
- Mix the Dye: Following the fabric dye instructions, mix the dye with the hot water and salt in your bucket. Stir well until the dye is completely dissolved. Wear rubber gloves to protect your hands.
- Plan Your Ombre: Decide how much of your curtain you want to be the darkest shade, and how gradual you want the transition to be. The longer a section stays in the dye, the darker it will become.
- Dip-Dye the Curtains: Gently immerse the bottom portion of your pre-washed, damp curtain into the dye bath. For a gradual ombre, only dip the very bottom few inches first, letting it sit for about 10-15 minutes. Then, lower a bit more of the curtain into the dye, and continue this process, lifting the curtain slightly each time. The lowest section will have the longest dye exposure, creating the darkest shade.
- Achieve the Gradient: Continue to slowly lower more of the curtain into the dye bath at intervals. This creates the smooth transition from light to dark. Keep track of the time each section is submerged. Once you are happy with the gradient, carefully lift the curtain out of the dye.
- Rinse and Wash: Rinse the curtain thoroughly under cold running water until the water runs clear. Then, wash the curtain in your washing machine on a gentle cycle with a mild detergent, ensuring any excess dye is removed.
- Dry and Hang: Hang the curtain to air dry, or tumble dry on low heat. Once dry, hang your new ombre dip-dyed curtains and enjoy the soft, colorful glow they bring to your room.
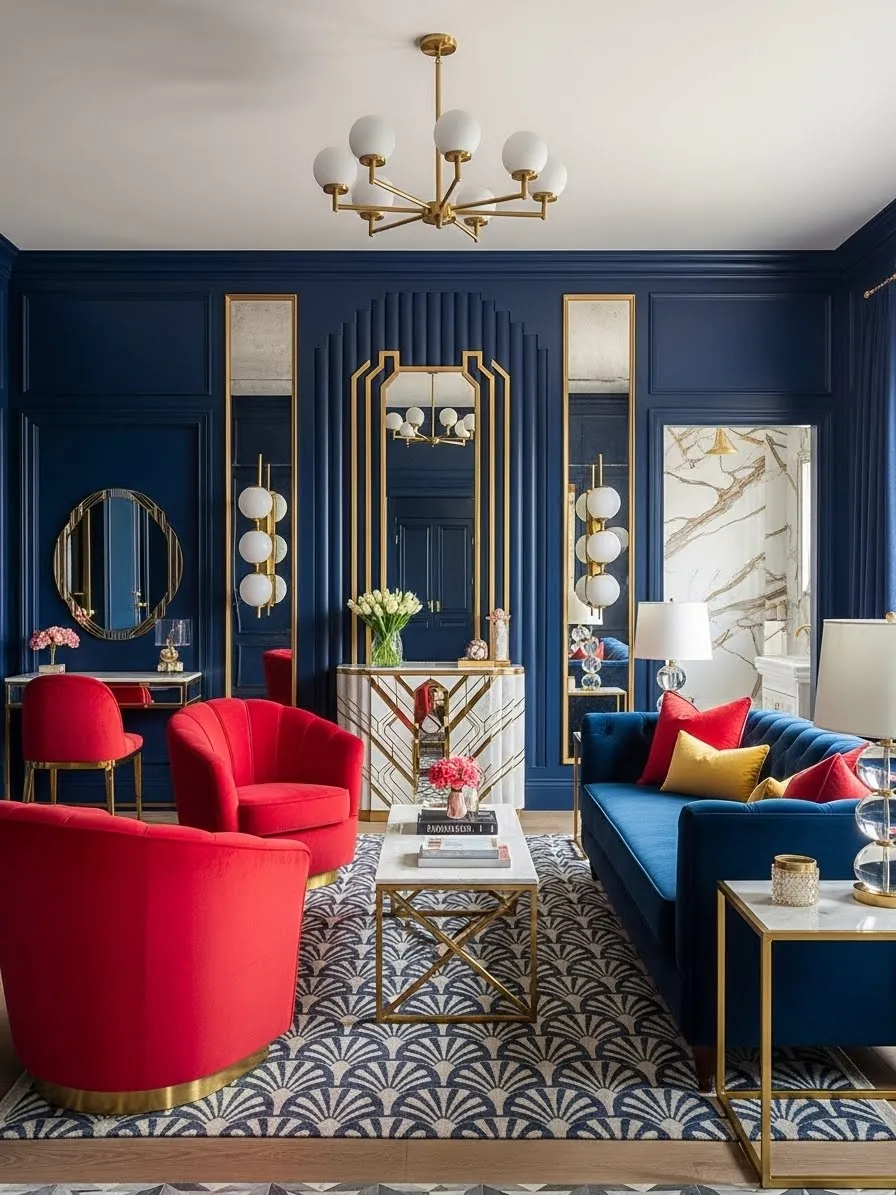
9. Regal Blue and Red Opulence

This living room exudes an air of timeless sophistication and bold drama, combining deep blues with fiery reds for a truly opulent effect. The walls are a striking, rich navy, creating an immediate sense of grandeur and intimacy. Intricate gold paneling and mirrors add a touch of Art Deco elegance, reflecting light and enhancing the luxurious feel.
Plush red armchairs and throw pillows introduce powerful pops of color, providing a vibrant contrast to the dominant blue. A sumptuous blue velvet sofa continues the rich color story, offering comfort and style. The patterned rug, featuring swirling blue and white motifs, grounds the space while adding another layer of visual interest. Every detail, from the gold chandelier to the decorative lamps, contributes to an atmosphere of refined and dramatic beauty.
DIY Project: Gold Leaf Accent Mirrors
Elevate plain mirrors with gold leaf accents to achieve the sophisticated, opulent look seen in this regal living room.
Material Required
- Plain mirror with a simple frame (or no frame, if you want to apply directly to the glass edge)
- Gold leaf sheets (imitation gold leaf is more affordable and easy to use)
- Gold leaf adhesive (gilding size)
- Soft brush for applying adhesive
- Soft, dry brush for burnishing (like a large makeup brush or soft painter’s brush)
- Clear acrylic sealer spray (optional, for added durability)
- Soft cloth
Equipment Required
- No special equipment beyond the materials listed.
DIY Instruction Step by Step
- Prepare Your Mirror: Ensure the mirror frame (or glass edge) is clean and dry. If the frame is painted, make sure the paint is cured. Protect the mirror’s glass with painter’s tape if you’re only working on the frame.
- Apply Adhesive: Using the soft brush, apply a thin, even layer of gold leaf adhesive (gilding size) to the areas where you want the gold leaf. Follow the product’s instructions for drying time; the adhesive usually needs to become “tacky” (sticky to the touch but not wet) before applying the leaf. This can take 10-30 minutes.
- Apply Gold Leaf: Once the adhesive is tacky, carefully place a sheet of gold leaf over the sticky area. Gently press it down with your fingers or a soft, dry brush. The gold leaf is very delicate, so handle it with care. Overlap the sheets slightly if needed to cover the area.
- Burnish and Remove Excess: Once the gold leaf is in place, use your soft, dry burnishing brush to gently rub over the leaf. This helps it adhere fully and removes any excess flakes. The excess will crumble away, revealing the smooth gold surface beneath.
- Repeat as Needed: Continue applying adhesive and gold leaf in sections until your desired areas are covered. Take your time to achieve an even finish.
- Seal (Optional): If you desire extra durability, especially for a high-traffic item, carefully spray a thin, even coat of clear acrylic sealer over the gold leaf once it has completely set (usually after 24 hours).
- Display Your Mirror: Remove any painter’s tape. Your mirror now boasts a beautiful, luxurious gold leaf accent, adding a touch of regal opulence to your space.
10. Serene Green and Citrus Zen

This calming space strikes a wonderful balance between fresh greenery and vibrant citrus accents, creating an atmosphere of serene invigoration. A two-tone wall, featuring crisp white above and a soft sage green below, sets a tranquil foundation. This subtle color blocking is both modern and inviting, giving the room a sense of grounded tranquility.
The natural wood room divider and light wood side table introduce warmth and organic textures, enhancing the peaceful aesthetic. A beautiful white orchid brings an elegant touch of nature, while strategically placed yellow cushions and bright orange fruit in a bowl provide unexpected, cheerful pops of color. Framed citrus prints on the floor further reinforce the fresh, zesty theme, proving that even small details can make a big impact in brightening a space.
DIY Project: Citrus Art Prints
Create your own vibrant citrus art prints, like those seen in the image, to add a zesty and fresh touch of color to your walls.
Material Required
- Heavyweight white paper (e.g., watercolor paper or cardstock)
- Watercolors or acrylic paints in bright orange, yellow, and green
- Paintbrushes (various sizes, including a fine detail brush)
- Pencil
- Paper towels
- Water container
- Picture frames (optional)
Equipment Required
- No special equipment beyond the materials listed.
DIY Instruction Step by Step
- Gather Your Supplies: Lay out your white paper, paints, brushes, water, and paper towels on a protected work surface.
- Sketch Your Citrus: Lightly sketch outlines of citrus fruits (oranges, lemons, limes, or cross-sections) onto your paper with a pencil. You can draw whole fruits or artistic slices. Don’t worry about perfection; a slightly illustrative style works well.
- Apply Base Colors: Begin by applying the main colors for your fruits. Use bright yellow for lemons, vibrant orange for oranges, and fresh green for limes. Apply the paint evenly within your sketched outlines. Allow the first layer to dry somewhat.
- Add Details and Texture: Once the base colors are mostly dry, use slightly darker shades of the same colors to add shadows and define segments within your fruit slices. For whole fruits, you can add subtle texture with small dots or strokes. Use a fine brush for any small leaves or stems in green.
- Layer and Refine: If you want more vibrancy, apply a second thin layer of paint to intensify the colors. Allow each layer to dry before adding more. Take your time to build up the colors and details, making them as vivid or as subtle as you like.
- Let it Dry Completely: Ensure your artwork is completely dry before handling or framing. This might take several hours, especially if you used multiple layers of paint.
- Frame and Display: Once dry, place your cheerful citrus art prints into frames. Hang them on your wall or lean them against it as a refreshing, colorful accent that brings a touch of sunshine to your room.
11. Holographic Bright White Studio

This space maximizes light and illusion, offering a futuristic and clean aesthetic grounded in bright white surfaces. The brilliance of the room comes from the strategic use of reflective surfaces and holographic materials that scatter light into every color of the rainbow. The large, faceted mirror leans against the wall, its geometric design creating depth and reflecting the light play.
Mirrored and clear acrylic furniture, including the stunning glass dining table and chairs, feature an iridescent, prismatic finish. This finish captures the light from the modern sputnik chandelier, projecting vibrant, shifting hues across the room. A striking, abstract painting bursts with neon color, reinforcing the high-energy, modern vibe. This room beautifully demonstrates how to achieve explosive color through light interaction rather than painted surfaces.
DIY Project: Holographic Window Film Application
Add vibrant, shifting colors to your room, mimicking the effect on the window, using specialty holographic film. This is an easy way to achieve an immediate, dramatic change.
Material Required
- Roll of iridescent/holographic window film (decorative or privacy type)
- Spray bottle with water and a few drops of dish soap
- Utility knife or craft blade
- Ruler or measuring tape
- Squeegee or credit card (for smoothing)
- Lint-free cloth
Equipment Required
- No special equipment beyond the materials listed.
DIY Instruction Step by Step
- Clean the Window: Thoroughly clean the window pane where the film will be applied. Use a lint-free cloth to ensure no dust or residue remains on the glass, as this will prevent the film from adhering smoothly.
- Measure and Cut: Carefully measure the exact height and width of the window glass you plan to cover. Using a ruler and utility knife, cut the holographic film to size. It’s generally better to cut slightly larger and trim precisely after application.
- Prepare the Glass: Generously spray the clean glass surface with the soapy water solution. This solution allows you to slide and reposition the film easily.
- Apply the Film: Peel the protective backing from the film (this step can be tricky; make sure you remove the correct clear layer). Carefully position the film onto the wet glass, starting at the top edge. The water should allow you to slide it into the correct position.
- Squeegee and Smooth: Once the film is positioned, use the squeegee or credit card to gently push the water and air bubbles out from under the film. Start from the center and move outwards toward the edges. Keep a lint-free cloth handy to wipe up the excess water.
- Trim Edges: If you cut the film slightly too large, use the utility knife and ruler to carefully trim the excess film right along the edge of the window frame for a clean, professional finish.
- Enjoy the Color: Let the film dry completely (usually 24-48 hours). Sunlight streaming through the new film will now cast vibrant, shifting colors into your room.
12. Pastel Pop Paradise

This space is a joyful celebration of soft, yet vibrant, pastel hues, primarily blending lovely pink and fresh mint green. The walls are bathed in a calming light pink, contrasted sharply by the mint green ceiling trim and furniture pieces. This color combination feels playful, tropical, and highly feminine.
Rounded, textured armchairs in mint green immediately invite you to relax. They are accessorized with an array of coordinating pillows in gingham, stripes, and solid pinks and blues, adding patterned interest. Geometric lamps and a palm-themed artwork reinforce the modern tropical aesthetic. The shaggy pink rug anchors the seating area, providing a plush, warm texture underfoot and uniting the room’s two dominant colors. This space is a bright, cheerful testament to the power of pastels.
DIY Project: Geometric Table Lamps
Give simple table lamps a vibrant, modern update by painting the bases in a striking mint green or pink geometric design, inspired by the lamps in the image.
Material Required
- Plain table lamp bases (ceramic or wood)
- Acrylic or chalk paint in vibrant colors (mint green and light pink)
- Painter’s tape (low tack)
- Fine-grit sandpaper (optional)
- Clear sealing spray or varnish
Equipment Required
- Small, flat-edged paintbrushes
- Pencil and ruler
DIY Instruction Step by Step
- Prepare the Lamp: Carefully dismantle the lamp, removing the shade and setting aside the electrical components. Clean the lamp base thoroughly. If the surface is very glossy, lightly sand it with fine-grit sandpaper to help the paint adhere.
- Apply Base Coat: Apply a base coat of your primary color (e.g., white or one of your chosen pastels) to the entire lamp base. Allow this coat to dry completely. You may need two coats for full coverage.
- Create Geometric Sections: Once the base coat is fully dry, use a ruler and pencil to lightly mark the geometric design you want to paint. Use low-tack painter’s tape to meticulously mask off the sections you want to remain the base color, or the sections you want to paint next. Press the tape edges down firmly to prevent paint bleed.
- Apply Accent Color: Paint the exposed, unmasked sections with your accent color (e.g., mint green onto a pink base). Use smooth, even strokes. If the design requires multiple colors, repeat the masking process after the previous color has dried.
- Remove Tape: Crucially, remove the painter’s tape immediately after the final coat is applied but while the paint is still wet. This prevents the paint from curing to the tape, ensuring clean, sharp lines.
- Seal the Design: Allow the paint to cure fully according to the paint instructions (usually 24 hours). In a well-ventilated area, spray a light, even coat of clear sealant or varnish over the painted base to protect your design.
- Reassemble: Once the sealant is dry, reassemble your lamp. The geometric design in bold pastels will bring a fresh, playful energy to your desk or bedside table.
13. Jewel Toned Library Retreat

This library or study area is a testament to dramatic color and cozy richness, achieved through deep jewel tones and traditional decor. The walls and built-in shelving are painted a sophisticated deep navy, creating a wonderful cocoon-like effect that feels secluded and luxurious. This dark backdrop allows the bright, vibrant velvet furniture to truly shine.
A plush purple velvet settee and a striking fuchsia armchair inject intense color and texture. An accent chair in deep teal velvet adds another layer of jewel-toned sophistication. Gold accents, found in the picture frames and decorative lanterns, provide warm, traditional sparkle. The rich color scheme, coupled with the patterned rug and antique portraiture, makes this room feel like a historic yet profoundly comfortable sanctuary.
DIY Project: Velvet Upholstered Footstool/Pouf
Create a richly colored accent piece like a footstool or pouf using vibrant velvet fabric, adding a punch of jewel tone to your room.
Material Required
- Wooden crate, old sturdy ottoman, or firm foam block (for the base)
- High-density foam batting (for padding)
- Velvet fabric in a jewel tone (e.g., fuchsia, teal, or deep purple)
- Upholstery tacks or staple gun and staples
- Scissors
- Measuring tape
Equipment Required
- Staple gun or hammer for upholstery tacks
- Scissors
- Measuring tape
DIY Instruction Step by Step
- Prepare the Base: If you are using a wooden crate or hard base, wrap it generously with the foam batting. This creates a soft, rounded surface for the velvet. Secure the batting in place with small amounts of adhesive or light stapling.
- Cut the Fabric: Measure the total surface area of your base, allowing extra fabric on all sides for pulling, wrapping, and securing underneath (at least 4-6 inches extra on each edge). Cut your velvet fabric to this size.
- Position the Fabric: Lay your velvet fabric flat, wrong side up. Center your padded base onto the fabric. Bring the fabric edges up and over the sides of the base.
- Upholster the Sides: Start stapling the fabric to the underside or inside edge of the base, pulling it taut as you go. Work on opposite sides first to maintain tension and avoid wrinkles on the top surface. For corners, fold the fabric neatly, creating clean pleats, and secure them firmly.
- Secure All Edges: Continue pulling and securing the fabric around the entire piece, ensuring the velvet is smooth and wrinkle-free on all visible sides. Trim any excess fabric neatly.
- Finishing Touches: If desired, add decorative upholstery tacks along the bottom edge for a polished, traditional look.
- Add to Your Space: Place your newly upholstered jewel-toned footstool or pouf next to an armchair. It offers a luxurious spot for resting feet and brings a significant, colorful texture contrast to the room.
14. Cheerful Citrus Yellow Sunlight

This room is flooded with the cheerful, optimistic glow of sunshine yellow, demonstrating how a single, powerful color can define an entire space. Crisp white walls and furniture provide the clean, bright foundation, allowing the yellow accents to truly sing. The large, abstract canvas on the wall commands attention, its solid yellow hue acting like a giant burst of sunlight.
The area rug, throw pillows, and various small accents consistently carry the yellow theme, creating a cohesive and energetic palette. Natural woven baskets introduce a lovely organic texture and a hint of warm beige, grounding the bright color scheme. Subtle brass accents, such as the pendant light fixtures, complement the yellow beautifully, adding a refined, metallic warmth. This space feels incredibly refreshing, positive, and instantly uplifting.
DIY Project: Large Abstract Color Block Painting
Create a large, modern abstract painting in a vibrant, single color, similar to the canvas on the wall, to serve as an instant, high-impact focal point.
Material Required
- Large stretched canvas (at least 30×40 inches)
- Acrylic paint in your chosen vibrant color (e.g., sunny yellow, cobalt blue, hot pink)
- Large, flat paintbrush or roller
- Small container for water and paint mixing
- Drop cloth or newspaper
Equipment Required
- No special equipment beyond the materials listed.
DIY Instruction Step by Step
- Prepare the Canvas: Lay down a drop cloth or newspaper to protect your work area. Ensure the surface of your canvas is clean and dry.
- Mix the Paint: Pour a generous amount of your chosen acrylic paint color into a container. You may want to add a tiny amount of water to improve flow, but be careful not to make it too thin.
- Apply the First Layer: Using a large, flat brush or roller, begin applying the paint to the canvas. Cover the entire surface, including the edges, with broad, smooth, and intentional strokes. The goal is to achieve a uniform block of color, but allow some slight variations in texture or tone to show through for a truly abstract feel.
- Dry and Recoat: Allow the first layer of paint to dry completely. Acrylics usually dry quickly, but be patient. Apply a second coat to deepen the color saturation and ensure complete coverage. Continue applying thin layers until you achieve the depth and richness of color you desire.
- Refine the Edges: Pay special attention to the sides of the canvas, painting them neatly to match the main surface. This gives the finished piece a polished, ready-to-hang look.
- Allow to Cure: Let the painting dry and cure completely before handling or hanging. This may take up to 72 hours for thick layers.
- Hang Your Art: Hang the large, single-color canvas in your living room or bedroom. The monumental block of color will instantly brighten the space and create a sophisticated, modern focal point.
15. Scandi Sunset Contrast

This serene bedroom beautifully juxtaposes a calm, neutral Scandi aesthetic with bursts of high-intensity color, capturing the warmth of a sunset against a cool, winter landscape. The light grey walls and natural pine wood furniture create a minimalist, grounded feeling. Copper pendant lights hang elegantly, their warm, metallic sheen complementing the vibrant accents.
A plush armchair upholstered in fiery orange immediately draws the eye, providing an incredibly welcoming splash of warmth. This striking orange is balanced by a bold hot pink throw blanket draped across the bed. The interplay between the warm colors (orange, pink, copper) and the cool greys and whites achieves a vibrant yet sophisticated feel. Framed art featuring snowy landscapes and a vivid sunset reinforces the contrast between cool and warm tones, making the room both cozy and invigorating.
DIY Project: Dip-Dyed/Color Block Throw Blanket
Create a simple, vibrant color block blanket using two contrasting colors (like the orange chair and pink blanket) to add a strong color pop to your bedding or seating.
Material Required
- Plain blanket or large piece of woven cotton/fleece fabric in a neutral color (e.g., white or light grey)
- Fabric dye in a vibrant accent color (e.g., hot pink or orange)
- Large bucket or plastic tub
- Salt (helps dye adhere to fabric)
- Rubber gloves
- Scissors
- Sewing machine and thread (if adding a contrasting edge)
Equipment Required
- No special equipment beyond the materials listed.
DIY Instruction Step by Step
- Prepare the Blanket: Wash and dry your neutral blanket or fabric piece. Lay down a drop cloth or old towels to protect your work area.
- Mix the Dye: Prepare your fabric dye in the large bucket following the instructions, usually requiring hot water and salt. Wear rubber gloves.
- Dip-Dye the Edge: Decide how far up you want the color block to go (e.g., 12-18 inches). Fold the rest of the blanket out of the way. Carefully dip the end of the blanket into the dye bath up to your desired line.
- Maintain the Color Block: Keep the submerged portion in the dye for the time specified on the dye package for maximum saturation. Unlike an ombre, you want a crisp line, so try to keep the blanket edge steady at the same level throughout the dyeing process.
- Rinse and Wash: Remove the blanket from the dye bath. Rinse the dyed section thoroughly under cold running water until the water runs clear. Then, wash the entire blanket in the washing machine on a gentle cycle with mild detergent.
- Dry and Finish: Air dry the blanket or tumble dry on low heat. Once dry, you can use the blanket as is, or for a more finished look, sew a simple, contrasting colored border or edge binding around the entire blanket.
- Introduce the Contrast: Drape your colorful, color block blanket over the bed or arm of a chair. The simple, bold color addition instantly revitalizes the room’s neutral palette.
16. Industrial Jungle Glam

This striking space merges the raw aesthetic of industrial design with the explosive color and life of a tropical jungle. The rough, exposed concrete walls provide a textured, moody background. Against this backdrop, lime green and electric blue erupt in sharp contrast, creating a dynamic and edgy environment.
A velvety lime green sofa and matching metal bar stools inject intense, nearly neon color. Large-format canvas prints featuring magnified monstera leaves—one in deep green, one in electric blue, and another in vivid yellow—dominate the walls, emphasizing the tropical theme. The open shelving, crafted from dark metal and reclaimed wood, introduces an industrial touch, perfectly offset by bright blue vases. This room is a vibrant, modern fusion of urban decay and tropical lushness.
DIY Project: Blue or Yellow Color-Pop Planters
Give plain terracotta or concrete planters an immediate, vibrant lift by painting them in a bold, singular color, like the electric blue or sharp yellow seen in the art.
Material Required
- Plain terracotta or concrete planters (cleaned and dried)
- Primer (suitable for masonry or ceramic)
- Outdoor acrylic or masonry paint in a vibrant color (e.g., electric blue, sunny yellow, lime green)
- Paintbrush (medium size, flat bristle)
- Sealer spray (matte or gloss, suitable for painted outdoor items)
Equipment Required
- No special equipment beyond the materials listed.
DIY Instruction Step by Step
- Clean and Prime: Ensure your planters are free of dirt and completely dry. Apply one even coat of primer to the entire exterior surface of the planter. Allow the primer to dry fully according to the instructions on the can. This step is important for vibrant colors to pop.
- Apply Color: Using your medium-sized brush, apply the first coat of your vibrant paint color (electric blue or sunny yellow) to the primed planter. Aim for smooth, consistent coverage. You can choose to paint the inside lip as well for a fully finished look.
- Dry and Recoat: Allow the first coat to dry completely. Apply a second coat to deepen the saturation and achieve a solid, opaque color. A third coat may be necessary for very bright colors.
- Seal the Paint: Once the final coat of paint is completely dry, take the planter to a well-ventilated area and apply a clear sealer spray. This protects the color from moisture and UV fading, keeping it vibrant.
- Pot Your Plants: Once the sealer is cured, place your favorite tropical plants or greenery into the brightly painted planter.
- Display the Pop: Use the newly colored planters to introduce powerful, focused color next to your furniture or shelving unit, instantly brightening the industrial backdrop.
17. Warm Autumnal Grandeur

This bedroom radiates an intense, luxurious warmth, embracing a rich palette of deep rusts, burnt oranges, and golden ochres. The walls, painted a deep, warm mustard, cast a cozy glow over the entire space. Traditional artwork, featuring dark floral still lifes and landscape paintings, is framed in ornate gold, enhancing the room’s antique, grand feeling.
Matching wrought iron canopy beds, dressed in layers of rich, textured bedding in creams, burgundies, and browns, create a symmetrical and opulent atmosphere. Terracotta-colored leather poufs add texture and seating, while a large, aged ceramic vase serves as a powerful centerpiece. The entire space, with its antique rug and ornate wall sconces, evokes the beautiful, deep colors of a classic autumn harvest.
DIY Project: Faux Aged Ceramic Vase
Give a plain, large ceramic or terracotta vase an antique, aged patina to match the rustic, grand style of the large vase in this space.
Material Required
- Large, plain ceramic or terracotta vase
- Matte paint in two colors: a light beige/cream and a warm, medium brown/ochre
- Dark wax or a dark brown glaze/wash
- Water
- Small sea sponge or rough cloth
- Coarse bristle brush (optional, for texture)
Equipment Required
- No special equipment beyond the materials listed.
DIY Instruction Step by Step
- Prepare the Vase: Ensure your vase is clean and dry. If it is glossy, a very light sanding can help the paint adhere, but it is not always necessary for a distressed look.
- Apply Base Coat: Paint the entire vase with the light beige or cream-colored paint. This is your “under-layer.” Allow it to dry completely. Apply a second coat if needed for full coverage.
- Add Texture and Age: Once the base coat is dry, mix a small amount of the warm brown/ochre paint with water to create a thin wash. Using a sea sponge or rough cloth, lightly and irregularly dab the brown wash onto the vase. Wipe some of it off immediately with a dry cloth, focusing the brown on recessed areas or natural lines to simulate accumulated dirt and age.
- Create Patina (Wax/Glaze): Once the wash is dry, apply a very small amount of dark wax or dark brown glaze with a brush. Immediately use a clean, soft cloth to rub most of it off, leaving only traces of the dark color in crevices and areas where dirt would naturally settle over time. This step dramatically deepens the aged look.
- Dry and Display: Allow the faux finish to dry and cure completely. The resulting vase will have a beautiful, weathered, and aged appearance, perfectly complementing the autumnal grandeur of your room.
18. Cheerful Cottagecore Explosion

This bedroom is a maximalist celebration of cheerful, nostalgic patterns and vibrant, contrasting colors, embodying a whimsical cottagecore style. The walls are covered in a busy floral wallpaper, creating an immediate, visually rich backdrop. This pattern is boldly contrasted with vibrant pops of pink and green gingham and solid hues.
The bright pink iron bed frame, paired with floral bedding in contrasting pinks and greens, ensures the bed is the room’s focal point. Windows are framed by playful gingham valances in alternating bright green and hot pink. A bright green cane-backed chair and a light wood chair add traditional, cozy elements. The abundance of color and pattern, including the embroidered art, makes this room feel exceptionally happy, warm, and full of homespun charm.
DIY Project: Gingham Valances
Create simple, tie-up gingham valances in bright colors to add a cheerful, quick blast of pattern and color to your windows.
Material Required
- Gingham fabric in a vibrant color (e.g., bright green, hot pink, yellow)
- Coordinating thread
- Fabric scissors
- Sewing machine (or needle and thread for hand sewing)
- Measuring tape
- Iron and ironing board
Equipment Required
- No special equipment beyond the materials listed.
DIY Instruction Step by Step
- Measure and Cut: Measure the width of your window frame and decide on the desired drop length for your valance (e.g., 12-18 inches). To ensure a nice gathering effect, cut the fabric width to about 1.5 to 2 times the width of the window. Cut the length to your desired drop plus 3 inches for hemming and a rod pocket. Also, cut strips of the same or a contrasting fabric (about 2 inches wide by 8 inches long) for the ties.
- Sew the Ties: Take your small tie strips. Fold them in half lengthwise, right sides together, and sew the long edge and one short edge. Turn the tubes right side out and press them flat. Repeat for all the ties you need (usually two per side of the window).
- Hem the Valance: On the main valance fabric, hem the side and bottom edges by folding the fabric under twice and sewing.
- Create the Rod Pocket: At the top edge, fold the fabric down 1/2 inch and press. Then, fold it down again, deep enough to easily accommodate your curtain rod (usually 1.5-2 inches). Sew along the bottom edge of this fold to create the rod pocket.
- Attach the Ties: Sew the open end of your fabric ties securely to the top seam of the rod pocket, positioning them where you want them to drape.
- Hang and Gather: Slide the valance onto your curtain rod. Hang the rod. Once hung, gently gather the fabric evenly along the rod. Tie the straps into neat bows to lift the valance slightly and create a charming, personalized cottage look.
19. Aquatic Coral and Teal Bedroom

This bedroom is a refreshing immersion in cool, watery tones, elevated by vibrant coral accents, creating a feeling reminiscent of a luxurious seaside retreat. The walls are painted a clear, soothing aqua blue. A key feature is the striking headboard wall, which is finished in a textured, iridescent teal tile, adding depth and a subtle shimmer that mimics light on water.
The bedding, done in crisp whites and deep teal, provides a calm base. This cool palette is dramatically energized by throw pillows in a lively coral hue and a beautiful, textured artwork that contrasts coral and seafoam green. The stunning teal glass chandelier, featuring bubble-like forms, reinforces the aquatic theme. Small glass bottles and a lamp in vibrant blue and teal continue the cool, oceanic color story.
DIY Project: Textured Two-Tone Canvas Art
Create a unique textured artwork that features two contrasting colors, such as the coral and seafoam green, using joint compound or modeling paste to add tactile interest.
Material Required
- Stretched canvas (various sizes)
- Acrylic paints in two contrasting colors (e.g., coral and seafoam green)
- Modeling paste or lightweight spackling/joint compound
- Palette knife or stiff plastic scraper
- Small plastic containers for mixing paint
- Paintbrushes
- Drop cloth
Equipment Required
- No special equipment beyond the materials listed.
DIY Instruction Step by Step
- Prepare the Canvas: Lay down a drop cloth. Ensure the canvas is clean.
- Apply Texture: Use the palette knife or scraper to spread a layer of modeling paste or joint compound onto the canvas. Apply it in a thick, expressive manner, creating peaks, valleys, and swirling texture. You might choose to cover the whole canvas or only specific sections. Allow the paste to dry completely, which may take 24 hours or more depending on the thickness.
- Mix the Colors: Once the texture is dry, mix small batches of your acrylic paint colors (coral and seafoam green) in separate containers.
- Apply the First Color: Using a brush, paint the first half of your canvas with the coral color, pushing the paint into the texture. Let this layer dry.
- Apply the Second Color: Paint the second half of the canvas with the seafoam green color. Carefully blend the area where the two colors meet. You can also mix a third color by blending the two to create a transitional stripe. Allow all paint to dry.
- Refine (Optional): If you want a more multi-dimensional effect, dry-brush a lighter shade of the respective color over the peaks of the texture to catch the light.
- Display: Hang your textured, two-tone canvas. The raised texture and vibrant colors will create a dynamic, modern focal point for your bedroom.
20. Memphis Style Color Play

This room is a vivid explosion of color, pattern, and geometric shapes, taking inspiration from the energetic and playful Memphis design movement of the 1980s. Against a stark white backdrop, furniture and accessories leap out with unapologetic blocks of primary and secondary colors: yellow, red, blue, and lilac. The look is immediately eye-catching and fun.
The desk and console tables are covered in a bold, black-and-white squiggly pattern, perfectly illustrating the movement’s love for unexpected graphic design. Modular shelving units feature colorful box inserts, providing both display space and strong color segmentation. Simple geometric vases in matching hues complete the aesthetic. This room is a high-energy testament to the joy of color and audacious, unconventional design.
DIY Project: Memphis Style Graphic Furniture Decal
Transform plain furniture (like a table or desk) by covering it with a bold, black-and-white graphic pattern, reminiscent of the Memphis style.
Material Required
- Plain table or desk with a smooth surface
- Contact paper or vinyl in black
- White paint pen (oil-based works best)
- Ruler and pencil
- Utility knife or scissors
Equipment Required
- No special equipment beyond the materials listed.
DIY Instruction Step by Step
- Prepare the Surface: Ensure the furniture surface is clean, dry, and free of dust. If the surface is dark, you may need to paint it white first.
- Plan the Design: Sketch the graphic pattern you want (like the squiggly lines or simple geometric blocks) onto a piece of paper. The design should be bold and repetitive.
- Apply the Pattern (Option 1: Freehand): Using the white paint pen, start drawing your chosen pattern directly onto the surface of the furniture. Work slowly and intentionally, repeating the motif across the entire surface. Allow the paint pen design to dry completely.
- Apply the Pattern (Option 2: Decal): If using a pre-printed black and white contact paper, measure the surface and cut the paper to size. Peel the backing and carefully apply the paper to the tabletop, smoothing out any bubbles as you go.
- Seal the Design (Option 1 Only): If you painted the design freehand, apply a clear, water-based polyurethane or lacquer to the tabletop. This protects the painted design and gives it a durable finish. Follow the product instructions for drying time.
- Add Color Accents: Once the pattern is complete, use objects like a bright yellow lamp or red and blue vases on the surface to complete the Memphis look. The graphic pattern serves as the base for the colorful accessories.
- Enjoy the Style: Your new piece of furniture will inject immediate, graphic energy and color play into your room.
21. Regal Blue and Lime Living Room

This incredibly elegant space masterfully combines deep, royal blue with vibrant, energetic lime green for a truly striking and sophisticated effect. The walls are painted a rich navy, establishing a sense of classic grandeur. Intricate white molding and ceiling details add to the room’s traditional charm, while a gilded chandelier sparkles overhead.
In the foreground, plush lime green armchairs and a matching sofa command attention, their audacious color providing a contemporary twist against the regal blue backdrop. A large, ornate gold mirror sits above the fireplace, reflecting light and adding to the luxurious feel. A bold, abstract painting in primary colors rests on the mantel, injecting another layer of playful modernism. This room feels both deeply classic and refreshingly modern, a testament to daring color choices.
DIY Project: Gilded Mirror Frame Revitalization
Give a plain or aged mirror frame a luxurious, antique gold finish similar to the grand mirror, using gold spray paint and a touch of antiquing glaze.
Material Required
- Plain mirror with a wooden or plastic frame (or a thrift store find)
- Gold metallic spray paint (gloss or satin finish)
- Dark brown or black antiquing glaze/wax (optional, for an aged look)
- Soft cloth or brush for glaze
- Painter’s tape
- Newspaper or drop cloth
- Fine-grit sandpaper (optional, for prep)
Equipment Required
- No special equipment beyond the materials listed.
DIY Instruction Step by Step
- Prepare the Mirror: Lay newspaper or a drop cloth in a well-ventilated area. Carefully clean the mirror frame. If the frame has a glossy finish, lightly sand it with fine-grit sandpaper to help the paint adhere. Use painter’s tape to meticulously mask off the mirror’s glass, ensuring no gold paint gets on it.
- Apply Gold Spray Paint: Hold the gold metallic spray paint can about 8-10 inches from the frame. Apply light, even coats, moving the can steadily to avoid drips. It is better to apply several thin coats than one thick coat. Allow each coat to dry according to the manufacturer’s instructions before applying the next. Aim for complete, even coverage.
- Add Antiquing (Optional): Once the gold paint is completely dry and cured (wait at least 24 hours), apply a small amount of dark antiquing glaze or wax with a soft cloth or brush. Work in small sections, rubbing the glaze into the crevices of the frame. Immediately wipe away most of the glaze with a clean, soft cloth, leaving just enough in the details to create an aged, rich patina.
- Dry and Remove Tape: Allow the glaze to dry fully. Once dry, carefully remove the painter’s tape from the mirror glass.
- Display: Hang your newly gilded mirror. Its luxurious gold frame will add a touch of regal elegance and brightness to your space, reflecting light and enhancing the room’s grandeur.
22. Op-Art Chevron Workspace

This workspace is a bold, monochromatic masterpiece, using high-contrast black and white chevron patterns to create a visually dynamic and engaging environment. The graphic zigzag pattern dominates the walls, floor, and even parts of the furniture, generating an optical illusion that is both stylish and immersive. This strong pattern choice prevents the black and white scheme from feeling stark.
Bright orange accents—a vibrant desk chair, a modern vase, and various decorative objects—provide powerful pops of color that cut through the monochrome. Sleek metal shelving units and a modern black desk maintain a contemporary edge. The deliberate placement of the chevron pattern, varying in scale and direction, ensures that every corner of this room offers visual interest, making it a truly unique and energetic place to work or create.
DIY Project: Chevron Patterned Desk Drawers
Give plain desk drawers an instant, eye-catching update by painting a bold black and white chevron pattern on them, mimicking the graphic intensity of this room.
Material Required
- Plain desk with drawers (wood or laminate with a smooth surface)
- White acrylic or chalk paint
- Black acrylic or chalk paint
- Painter’s tape (various widths if desired)
- Ruler and pencil
- Small, flat-edged paintbrushes
- Clear topcoat (e.g., polyurethane, lacquer)
Equipment Required
- No special equipment beyond the materials listed.
DIY Instruction Step by Step
- Prepare the Drawers: Remove the drawers from the desk and take off any hardware (knobs, pulls). Clean the drawer fronts thoroughly. If the surface is glossy, lightly sand it for better paint adhesion.
- Apply Base Coat: Paint the entire drawer front with two coats of white paint. Allow each coat to dry completely. This creates a clean, bright foundation for your chevron pattern.
- Measure and Mark the Chevron: Once the white paint is dry, use a ruler and pencil to lightly mark out your chevron pattern. Decide on the width of your stripes and the angle of your zigzags. A common method is to mark horizontal lines, then diagonal lines that connect, forming the V-shape.
- Tape the Pattern: Apply painter’s tape along the pencil lines, masking off the sections you want to remain white. Ensure the tape is pressed down firmly to prevent paint bleed. If you want alternating black and white stripes, tape off all the sections that will eventually be black.
- Paint the Black Sections: Carefully paint the exposed sections with black paint. Apply thin, even coats. Allow the paint to dry to the touch.
- Remove Tape: While the black paint is still slightly wet (but not so wet it will smudge), carefully peel off the painter’s tape. This is crucial for crisp lines. If you wait until it’s completely dry, the paint might peel with the tape.
- Seal the Design: Allow the paint to cure fully (at least 24 hours). Apply a clear topcoat over the painted drawer fronts to protect the design and provide durability.
- Reassemble: Once the topcoat is dry, reattach the hardware and put the drawers back in the desk. Your desk now boasts a bold, op-art graphic design that adds incredible energy to your workspace.
23. Earthy Bohemian Living Room

This living room exudes a warm, inviting bohemian charm, built around a palette of muted earth tones and rich, handcrafted textures. Soft, sandy-beige walls provide a soothing backdrop, allowing the varied textiles and natural materials to take center stage. The room feels incredibly grounded and organic.
A blush pink sofa offers a gentle, unexpected touch of softness, while a rustic wooden coffee table anchors the seating area. The true heart of the room is the patterned area rug, boasting geometric motifs in shades of teal, rust, and mustard yellow. An array of throw pillows in matching colors, some with tassels, adds layers of comfort and visual interest. Terracotta pottery and natural woven elements further enhance the earthy, handcrafted aesthetic, creating a truly serene and global-inspired retreat.
DIY Project: Tasseled Throw Pillows
Add a playful and textural bohemian touch to plain throw pillows by attaching handmade tassels in coordinating vibrant colors.
Material Required
- Plain throw pillow covers (cotton or linen, in a solid color like teal, mustard, or rust)
- Embroidery floss or yarn in various vibrant colors that match your room (e.g., deep blue, bright yellow, coral)
- Scissors
- Needle with a large eye
- Small piece of cardboard (about 3-4 inches wide)
Equipment Required
- No special equipment beyond the materials listed.
DIY Instruction Step by Step
- Make the Tassels:
- Wrap your chosen yarn or embroidery floss around the piece of cardboard about 30-50 times, depending on your desired tassel thickness.
- Carefully slide the wrapped yarn off the cardboard.
- Tie a small piece of yarn tightly around the top loop of the wrapped bundle to create the tassel “head.”
- Cut the bottom loops of the yarn to create the tassel fringe. Trim the ends evenly.
- Repeat this process to make as many tassels as you need for your pillow.
- Prepare the Pillow Cover: Ensure your pillow cover is clean and ironed.
- Attach the Tassels: Using a needle with a large eye, thread a length of yarn through the top loop of each tassel. Decide where you want to place the tassels on your pillow cover—along the corners, along one edge, or even in the middle for a unique accent.
- Secure the Tassels: Push the needle through the pillow cover fabric from the front to the back at your chosen attachment point. Tie a secure knot on the inside of the pillow cover to hold the tassel in place. Repeat for all your tassels.
- Insert Pillow Insert: Once all tassels are attached, insert your pillow form into the decorated cover.
- Display Your Boho Pillow: Arrange your new tasseled pillows on your sofa or accent chair. They will instantly bring a vibrant, handcrafted, and playful bohemian touch to your living space.
24. Pop Art Industrial Loft

This vibrant industrial loft is a playful explosion of pop art sensibility, contrasting raw, concrete textures with bright, candy-colored elements. The exposed brick and pipework create an edgy, urban backdrop, which is immediately softened and energized by shocking pinks and electric greens. The large, green “POP” sign on the wall acts as a bold statement piece, defining the room’s ethos.
A luxurious pink velvet sofa offers a plush counterpoint to the hard industrial elements. Mismatched chairs in bright lime green and vivid red surround a quirky, silver-textured coffee table, adding an eclectic, fun vibe. The kitchen area continues the theme with hot pink subway tiles and shelves, punctuated by bright green mugs. Even oversized lollipops add to the whimsical, high-energy, and utterly unique character of this space.
DIY Project: Oversized Lollipop Wall Decor
Create whimsical, oversized lollipop decorations to add a playful, pop-art touch to your walls, mimicking the large lollipops in the image.
Material Required
- Circular wooden plaques or foam core boards (various sizes, e.g., 12-24 inches diameter)
- Acrylic paints in bright colors (e.g., hot pink, lime green, white)
- Paintbrushes
- Long wooden dowels (for the stick)
- Strong adhesive (e.g., E6000 or wood glue)
- Clear glossy sealer spray
- Pencil
Equipment Required
- No special equipment beyond the materials listed.
DIY Instruction Step by Step
- Prepare the Circles: Clean your circular plaques or foam core boards. If using foam core, you might want to lightly sand the edges for a smoother finish.
- Paint the Swirls: Lightly draw a spiral or swirl pattern from the center outwards on each circle with a pencil. Start with one vibrant color (e.g., hot pink) and paint a section of the swirl. Once dry, paint the next section with a contrasting color (e.g., white or lime green). Alternate colors to create the classic lollipop swirl. Allow all paint to dry completely between colors and layers.
- Seal the Lollipop Heads: In a well-ventilated area, spray the painted circles with several coats of clear glossy sealer. This will give them a shiny, candy-like finish and protect the paint.
- Attach the Sticks: Once the sealer is completely dry, apply a generous amount of strong adhesive to one end of a wooden dowel. Press the dowel firmly onto the back of each painted circle, ensuring it is centered and secure. Let the adhesive cure for the recommended time (usually 24 hours).
- Display Your Lollipops: Mount your oversized lollipops on the wall using appropriate hanging hardware or lean them in a corner, propped up against the wall. These fun, colorful accents will instantly bring a whimsical, pop-art vibe to your space.
25. Mondrian Inspired Minimalism

This room is a study in minimalist design, powerfully defined by the iconic primary colors and geometric lines of Piet Mondrian’s art. Against a pristine white backdrop, bold red and electric blue elements create a striking visual rhythm. The absence of clutter keeps the focus squarely on the interplay of color and form.
Large abstract artworks, inspired by Mondrian, dominate the walls, their black lines, and blocks of red and blue defining the space. A sleek white sofa is subtly accented by a vibrant blue throw. Red storage cubes, a side table, and a sculptural stool provide sharp, focused bursts of color. Every element is deliberately placed, creating a room that feels artistic, intellectual, and incredibly clean while still being deeply colorful.
DIY Project: Mondrian-Style Color Block Boxes
Transform plain storage boxes or cubes into striking Mondrian-inspired accents, adding primary color and geometric order to your room.
Material Required
- Plain white or natural wood storage boxes/cubes
- Acrylic paints in red, blue, and black
- Painter’s tape (various widths if desired)
- Ruler and pencil
- Small, flat-edged paintbrushes
- Clear matte or satin sealer spray
Equipment Required
- No special equipment beyond the materials listed.
DIY Instruction Step by Step
- Prepare the Boxes: Ensure your boxes are clean and dry. If they are natural wood, you might want to apply a base coat of white paint first and let it dry.
- Sketch the Design: Lightly sketch a Mondrian-inspired grid onto the sides of your boxes with a pencil. Think about creating rectangular and square sections.
- Apply Black Lines: Use painter’s tape to mask off the areas that will remain white or get colored. Paint the black lines first. Apply the black paint in thick, bold strokes along your taped lines, creating the characteristic grid. Remove the tape while the paint is still wet for crisp edges. Let the black lines dry completely.
- Add Primary Color Blocks: Once the black lines are dry, use painter’s tape again to mask off the areas around a chosen rectangle or square that you want to color. Paint that section with either red or blue acrylic paint. Remove the tape while the paint is wet. Repeat for other sections, alternating between red and blue, leaving some areas white.
- Dry and Seal: Allow all the paint to dry completely. In a well-ventilated area, apply a clear matte or satin sealer spray to protect your design and give it a finished look.
- Display Your Art Boxes: Arrange your Mondrian-style color block boxes on shelves or as standalone accents. They will instantly bring a touch of classic modern art and vibrant color to your space, offering both storage and sculptural beauty.
26. Emerald and Gold Opulence

This magnificent room is a lavish display of deep, jewel-toned emerald green combined with rich, shimmering gold, creating an atmosphere of unparalleled luxury and classical elegance. The walls are painted a deep, lustrous teal or emerald, providing a dramatic backdrop for the intricate gold detailing. Ornate gold mirrors and wall sconces further enhance the regal ambiance.
A sumptuous sofa, upholstered in a patterned fabric with shades of gold and green, anchors the seating area, adorned with plush velvet pillows in deep green, fuchsia, and purple. A gold coffee table adds to the lavishness. The entire space, with its patterned rug, heavy drapes, and abundant decorative objects, speaks to a maximalist aesthetic where every element contributes to a feeling of grand, timeless sophistication. The bottom panels show how this theme extends to other parts of the home, maintaining consistency.
DIY Project: Gold Leaf Trim Accent Wall
Give a wall a touch of classical opulence by adding delicate gold leaf trim, mimicking the detailed gold molding in this luxurious room.
Material Required
- Gold leaf sheets (imitation gold leaf is fine)
- Gold leaf adhesive (gilding size)
- Small, fine-tipped paintbrush
- Soft, dry brush for burnishing (like a large makeup brush)
- Clear acrylic sealer spray (optional)
- Measuring tape and pencil (for marking lines)
- Painter’s tape (optional, for straight lines)
Equipment Required
- No special equipment beyond the materials listed.
DIY Instruction Step by Step
- Prepare the Wall: Choose a section of your wall where you want to add the gold trim. Ensure it is clean and dry. Use a measuring tape and pencil to lightly mark out the lines for your trim. You can choose to create simple geometric boxes or follow existing architectural lines. For very crisp lines, you can apply painter’s tape just outside your pencil marks.
- Apply Adhesive: Using the fine-tipped paintbrush, carefully apply a thin, even line of gold leaf adhesive along your marked lines. Follow the adhesive’s instructions for drying time; it needs to become “tacky” (sticky but not wet) before applying the leaf.
- Apply Gold Leaf: Once the adhesive is tacky, carefully place a sheet of gold leaf over the sticky line. Gently press it down with your fingers or a soft, dry brush. The gold leaf is very delicate, so handle it with care.
- Burnish and Remove Excess: Use your soft, dry burnishing brush to gently rub over the leaf. This helps it adhere fully and removes any excess flakes. The excess will crumble away, revealing the smooth gold line beneath.
- Repeat and Refine: Continue applying adhesive and gold leaf in sections until your desired trim pattern is complete. Take your time to achieve an even, continuous line.
- Seal (Optional): Once all the gold leaf is in place and the adhesive has completely set (usually after 24 hours), you can lightly spray a clear acrylic sealer over the gold leaf to protect it.
- Admire Your Gold Trim: Step back and appreciate your new, opulent gold leaf trim. It will add an instant touch of classical elegance and shimmer to your walls.
27. Moroccan Bazaar Inspired Living

This living space transports you to a vibrant Moroccan bazaar, brimming with rich textures, intricate patterns, and the warm glow of metallic accents. The muted, neutral walls allow the spectacular array of textiles and handcrafted items to truly shine. The floor is covered with layered rugs, each boasting unique patterns and earthy, jewel-toned colors.
A beautiful wall hanging made of woven fibers and abstract patterns adds texture and a focal point. Brass serving trays, both on the floor and hanging on the wall, catch the light and add an exotic shimmer. Low wooden tables and an assortment of plush floor cushions and poufs, upholstered in colorful striped and patterned fabrics, create an inviting, informal seating arrangement. Large terracotta pots and metal lanterns complete the authentic, global-inspired ambiance, making the room feel both deeply cultural and wonderfully comfortable.
DIY Project: Patterned Floor Poufs
Create your own vibrant, low-to-the-ground floor poufs with global-inspired patterns, similar to those scattered in the image, to add casual seating and color.
Material Required
- Sturdy fabric with a global-inspired pattern (e.g., Kilim print, striped, geometric)
- Strong upholstery thread
- Zipper (optional, for removable cover)
- Fabric scissors
- Sewing machine (or hand-sewing needle)
- Poly-fil stuffing, old blankets, or foam pieces for filling
Equipment Required
- Sewing machine
- Measuring tape
- Straight pins
DIY Instruction Step by Step
- Measure and Cut Fabric: Decide on the size of your square or rectangular pouf. You will need one top piece, one bottom piece, and four side pieces. Add a 1/2-inch seam allowance to all edges. For example, for a 20x20x10 inch pouf, cut two 21×21 inch squares and four 21×11 inch rectangles.
- Sew Side Panels: Take two side panels, place them right sides together, and sew along one short edge. Repeat until all four side panels are sewn together to form a loop. Press the seams open.
- Attach Top Panel: Pin the top square piece to the top edge of the side panel loop, right sides together. Carefully sew all four sides.
- Attach Bottom Panel (with zipper optional):
- With Zipper: Pin the zipper to one side of the bottom panel, then sew it to one side of the side panel loop. Then sew the remaining three sides of the bottom panel to the loop, leaving a gap for the zipper to open.
- Without Zipper: Pin the bottom square piece to the bottom edge of the side panel loop, right sides together, but leave a 6-8 inch opening along one side for stuffing. Sew the remaining three sides.
- Turn and Stuff: Turn the pouf cover right side out. Begin stuffing it tightly with poly-fil, shredded fabric, or foam pieces until it is firm and holds its shape.
- Close the Opening: If you left an opening for stuffing, hand-stitch it closed using a ladder stitch for an invisible seam. If you installed a zipper, simply zip it closed.
- Arrange and Enjoy: Place your newly created patterned floor poufs around a low table. They add vibrant color, comfortable seating, and an authentic global feel to your living area.
28. Emerald Elegance with Neoclassical Art

This sophisticated bedroom or living area showcases a dramatic fusion of deep emerald green with crisp white and classic black, creating an atmosphere of refined elegance and artistic flair. The walls are painted a clean white, allowing the rich green to truly pop. Heavy velvet curtains in a stunning emerald hue frame the windows, adding texture and grandeur.
A plush emerald green sofa and matching upholstered headboard provide luxurious seating and a cozy bed. The striking black-and-white neoclassical artwork, particularly the large bust of a Greek or Roman figure, adds an intellectual and artistic dimension to the room. Gold accents, subtly introduced in the chandeliers and table bases, provide a touch of warmth and opulence. This space is a masterclass in using bold color and classic art to create a truly timeless and elegant interior.
DIY Project: Large-Scale Neoclassical Silhouette Art
Create a dramatic, large-scale silhouette artwork inspired by the neoclassical bust, using a simple profile and high-contrast colors.
Material Required
- Large stretched canvas (at least 30×40 inches)
- Black acrylic paint
- White acrylic paint (for background, if needed)
- Paintbrushes (various sizes, including a fine-tipped one)
- Pencil
- Projector (optional, for tracing)
- Carbon paper or tracing paper (optional)
- Reference image of a neoclassical bust or profile
Equipment Required
- Computer with photo editing software (optional, for adjusting contrast/color)
- Projector (optional, for tracing)
DIY Instruction Step by Step
- Prepare the Canvas: Lay down a drop cloth. If your canvas isn’t already white, paint it with two coats of white acrylic paint and let it dry completely.
- Transfer the Image: Find a reference image of a neoclassical bust or profile that you like.
- Projector Method: Project the image onto the canvas and lightly trace the outline with a pencil.
- Tracing Method: Print the image to your desired size. Use carbon paper or rub pencil heavily on the back of the printout, then place it on the canvas and trace the outline to transfer it.
- Freehand Method: If confident, lightly sketch the profile directly onto the canvas.
- Paint the Silhouette: Using black acrylic paint and a medium-sized brush, carefully fill in the traced profile. Work slowly and use a steady hand to maintain clean, crisp edges. Use a fine-tipped brush for any delicate details or sharp lines.
- Refine Edges: Once the main silhouette is filled, use a fine brush with white paint (if needed) to clean up any wobbly edges, ensuring a sharp contrast against the black.
- Allow to Dry: Let the painting dry completely. This might take several hours or even a full day for thick paint.
- Hang Your Masterpiece: Hang your large-scale neoclassical silhouette art. Its bold, high-contrast design will make a powerful artistic statement, adding elegance and a sense of history to your modern green and white room.
29. Luminous Lavender Dreamscape

This room is an ethereal and serene dreamscape, bathed entirely in soft, luminous lavender, creating a tranquil and inviting atmosphere. The walls, rug, and even some furniture pieces are saturated in varying gentle shades of this enchanting color, making the space feel wonderfully cohesive and immersive. Subtle white accents prevent the single color from feeling overwhelming.
Modern, rounded lavender armchairs offer plush comfort, while clear acrylic side tables maintain an airy, weightless feel. A striking feature is the glowing LED strip light that delineates the bed, adding a futuristic and soft ambient glow. A single lemon and a yellow throw blanket provide unexpected, sunny pops of contrast, making the lavender feel even more vibrant. This room is a peaceful retreat, showcasing the gentle power of a monochromatic, light-filled palette.
DIY Project: Subtle LED Strip Lighting Accent
Add soft, ambient lighting and define a space, like the glowing line under the bed, using easy-to-install LED strip lights.
Material Required
- Flexible LED strip light kit (choose a color that complements your room, or a tunable white/RGB if you want options)
- Scissors (to cut LED strip, if applicable, at designated points)
- Measuring tape
- Rubbing alcohol and clean cloth
- Mounting clips or adhesive (some strips have adhesive backing)
Equipment Required
- No special equipment beyond the materials listed.
DIY Instruction Step by Step
- Plan Placement: Decide where you want your LED strip to glow. Good places are under a bed frame, along the back of a shelf, or underneath a desk. Measure the length you need.
- Clean the Surface: Thoroughly clean the surface where the LED strip will be applied with rubbing alcohol and a clean cloth. This ensures the adhesive (if your strip has it) sticks properly.
- Cut the Strip (if needed): If your LED strip is too long, carefully cut it at the designated cut marks (usually every few inches, marked with a copper line or scissor icon). Never cut anywhere else.
- Install the Strip:
- Adhesive Backing: Peel off a small section of the protective backing from the LED strip. Press the strip firmly onto your cleaned surface, working in small sections. Continue peeling and pressing until the entire length is installed.
- Mounting Clips: If your strip uses clips, screw them into place along your chosen path, then snap the LED strip into the clips.
- Connect Power: Connect the LED strip to its power supply and plug it into an outlet. Test to ensure it works. Route any excess cabling neatly.
- Enjoy the Glow: The soft, continuous glow of the LED strip will instantly add a modern, ambient light to your room, highlighting furniture or creating a calming, ethereal effect.
30. Bold Primary Playroom

This bright and lively playroom is a joyful explosion of primary colors, designed to stimulate creativity and fun. Against a clean white backdrop, vivid red, blue, yellow, and green elements are introduced through modular storage and soft furnishings, creating an energetic and organized space for children. The room feels both expansive and clearly defined by color.
White cube storage units are filled with brightly colored fabric bins, making organization both practical and playful. Large, soft floor poufs in solid primary colors—red, blue, yellow, and green—offer comfortable and versatile seating for play and learning. Chalkboards and whiteboards provide surfaces for creative expression. This space perfectly demonstrates how to use bold, contrasting colors to create a stimulating yet harmonious environment for young minds.
DIY Project: Colorful Fabric Storage Bins
Create vibrant, color-blocked fabric storage bins for cube shelving units, like those in the image, to organize and brighten any playroom or office.
Material Required
- Stiff fabric (e.g., canvas or duck cloth) in various bright colors (red, blue, yellow, green)
- Stiff fusible interfacing (to add structure)
- Coordinating thread
- Fabric scissors
- Sewing machine (or hand-sewing needle)
- Measuring tape
- Iron and ironing board
Equipment Required
- Sewing machine
- Measuring tape
- Iron and ironing board
- Straight pins
DIY Instruction Step by Step
- Measure and Cut Fabric: Measure the dimensions of your cube shelving (width, height, depth). You will need one bottom piece, four side pieces, and two handle pieces for each bin. Add a 1/2-inch seam allowance to all edges. Also, cut corresponding pieces from your fusible interfacing.
- Fuse Interfacing: Iron the fusible interfacing to the wrong side of each fabric piece according to the interfacing manufacturer’s instructions. This will give your bins structure and make them stand up.
- Create Handles: Take your handle pieces. Fold each strip in half lengthwise and press. Fold the raw edges inwards and press again. Stitch along both long edges to create strong, finished handles.
- Assemble Side Panels: Take two side panels, place them right sides together, and sew along one edge. Repeat until all four side panels are sewn together to form a loop. Press seams open.
- Attach Bottom Panel: Pin the bottom square piece to the bottom edge of the side panel loop, right sides together. Carefully sew all four sides.
- Attach Handles: Decide where you want your handles. Fold the top edge of your bin opening down about 1 inch, press, and stitch. Pin the handles securely to the outside of the bin, centered on two opposite sides. Stitch them firmly in place, reinforcing the stitching.
- Finish the Top Edge: Fold the remaining top raw edge of the bin down twice and press. Stitch along the folded edge to create a clean, finished top.
- Organize and Brighten: Your colorful fabric storage bins are now ready! Place them into your cube shelving units. They will add a fantastic burst of color and provide organized storage for toys, craft supplies, or other items.
31. Terracotta and Teal Geometric Harmony

This room masterfully blends warm, earthy terracotta with refreshing teal green in a sophisticated geometric design. The walls feature large, half-arch painted shapes in terracotta against crisp white, creating soft architectural interest. This fluid design contrasts beautifully with the sharp lines of the black shelving unit and the striking geometric pattern on the floor tile or rug.
Natural terracotta pottery, from large floor vases to smaller decorative pieces, brings a rustic, handcrafted feel. Round mirrors with delicate gold frames add a touch of warmth and reflect light. A bold, geometric art piece in teal and white leans against the wall, perfectly tying together the room’s color scheme and artistic focus. This space feels both modern and deeply connected to natural, global aesthetics.
DIY Project: Painted Geometric Wall Arches
Add soft, contemporary color blocks to your walls by painting large, half-arch shapes in a warm color like terracotta, as seen in the image.
Material Required
- Painter’s tape (delicate surface or low tack)
- String or measuring tape
- Pencil
- Terracotta or rust-colored interior paint (matte or eggshell finish)
- Paint roller and tray
- Small paintbrush for edges
- Drop cloth or newspaper
Equipment Required
- No special equipment beyond the materials listed.
DIY Instruction Step by Step
- Prepare the Wall: Ensure your wall is clean and dry. Lay down a drop cloth to protect your floor.
- Create the Arch Outline:
- For a Half Arch from the Floor: Decide on the width of your arch. Mark the center point at the base of your wall. Measure up from this point to determine the height of your arch. Tie a pencil to one end of a string. Hold the other end of the string at the center point on the floor. Draw a half-circle on the wall with the pencil, keeping the string taut.
- For an Arch Floating on the Wall: Decide on the center point of your arch. Use a nail or pushpin at this center point. Tie a string to the nail and the pencil to the other end. Draw your desired arch directly onto the wall.
- Tape the Straight Edge: Use painter’s tape to create a straight vertical line for the flat side(s) of your arch (if applicable).
- Paint the Arch: Carefully paint inside your arch outline and up to your tape lines using your chosen terracotta paint. Use a small brush for the curved edge for precision, and a roller for the larger flat areas. Apply two coats for even coverage, allowing the first coat to dry completely.
- Remove Tape: Remove the painter’s tape immediately after the final coat of paint is applied but while it is still wet. This helps ensure clean, crisp lines.
- Allow to Cure: Let your painted arch dry and cure completely. This bold, graphic element will add significant warmth and contemporary style to your room.
32. Bohemian Tapestry Wonderland

This bedroom is a maximalist explosion of color, pattern, and rich textiles, creating an immersive bohemian wonderland. The walls are a canvas for vibrant tapestries and intricate wallpapers, showcasing deep reds, fuchsias, and blues. Every surface is adorned with layers of texture, from carved wooden furniture to string lights and lush fabrics.
The bed features a beautifully carved headboard, dressed with an abundance of pillows in sunny yellow, bright blue, and multi-colored stripes. A thick, patterned rug covers the floor, inviting bare feet. The desk area is equally adorned, with a brightly painted chair and a desk lamp in a striking blue. The room feels both incredibly personal, inviting, and bursting with handcrafted charm and global influences.
DIY Project: Layered Patterned Rugs
Create a rich, bohemian floor texture by layering multiple patterned rugs of varying sizes, choosing colors that coordinate with your vibrant room.
Material Required
- Two to three (or more) rugs of different sizes and patterns (e.g., a large base rug, a smaller patterned rug, a sheepskin or jute rug for texture)
- Non-slip rug pads (optional, but recommended for safety)
Equipment Required
- No special equipment beyond the materials listed.
DIY Instruction Step by Step
- Choose Your Rugs: Select rugs with complementary colors and patterns. For a bohemian look, mix different geometric, floral, or abstract designs. Consider different textures too, like a woven flat-weave with a shag or jute rug.
- Place the Largest Rug: Lay down your largest rug first. This will be the base layer and should define the main seating or bed area. If desired, place a non-slip rug pad underneath.
- Position the Second Rug: Place your second, slightly smaller rug on top of the first. You can center it, or offset it for a more casual, layered look. Experiment with the angle; sometimes a slight diagonal adds interest.
- Add Accent Rugs (Optional): If you have a third, smaller rug (like a sheepskin, a round jute rug, or a highly patterned accent rug), place it on top of the second layer. This adds another dimension of texture and color. You can place it near a key piece of furniture, like the side of the bed or in front of a chair.
- Adjust and Enjoy: Step back and adjust the placement of each rug until you are happy with the composition. The layered rugs will instantly add warmth, intricate patterns, and a rich bohemian feel to your room.
33. Teal and Lime Modern Office

This modern office space is a refreshing burst of color and clean lines, combining a sophisticated deep teal with a vibrant, electrifying lime green. The expansive teal wall creates a dramatic, yet calming backdrop, allowing the crisp white furniture and bright accents to pop. The overall aesthetic is sleek, minimalist, and energetic.
White modular storage units and a clean-lined desk define the workspace, maintaining a sense of order. The electric lime green appears as a bold, horizontal stripe on the abstract wall art, and again in a modern desk lamp, providing a shocking, invigorating contrast. Large, clear glass vessels add a sculptural element without introducing visual clutter. This room proves that even a highly functional space can be infused with powerful, contemporary color.
DIY Project: Lime Green Horizontal Accent Strip Art
Create modern, high-contrast abstract art similar to the pieces on the wall, featuring a bold, horizontal lime green stripe on a black and white background.
Material Required
- Stretched canvas (two different sizes for a gallery effect)
- White acrylic paint
- Black acrylic paint
- Electric lime green acrylic paint
- Painter’s tape
- Ruler
- Small, flat-edged paintbrushes
- Drop cloth or newspaper
Equipment Required
- No special equipment beyond the materials listed.
DIY Instruction Step by Step
- Prepare the Canvas: Lay down a drop cloth. Ensure your canvases are clean. Paint the entire surface of both canvases with two coats of white acrylic paint. Let each coat dry completely.
- Create Black and White Sections: On the larger canvas, lightly sketch a horizontal line across the middle. Use painter’s tape to mask off a square or rectangular section on the left side of the canvas, extending from the top to the horizontal line. Paint this masked section with black acrylic paint. You can add another smaller black block in the lower left if desired. Remove the tape while the black paint is still wet. Let the black paint dry.
- Add the Lime Stripe: Once the black paint is completely dry, use painter’s tape to create a thin, horizontal stripe across both canvases where you want the lime green accent. Ensure the tape creates a crisp line.
- Paint the Lime Stripe: Carefully paint within the taped stripe with your electric lime green acrylic paint. Apply two coats for vibrant coverage, allowing the first coat to dry to the touch before the second.
- Remove Tape and Refine: Remove the painter’s tape immediately after the final lime green coat is applied, while the paint is still wet, for the cleanest lines. If any edges need tidying, use a small brush with white or black paint.
- Dry and Display: Allow the paintings to dry and cure completely. Hang your high-contrast, modern abstract art pieces in a staggered arrangement. The vibrant lime green stripe will provide a fantastic burst of color against the geometric black and white.
34. Emerald Library with Fuchsia Flourish

This majestic library or study is a deeply inviting space, characterized by rich emerald green built-in bookshelves and a striking pop of fuchsia. The ceiling and crown molding are a crisp white, contrasting with the dramatic green walls and cabinetry. The room feels traditional, intellectual, and incredibly sophisticated.
The centerpiece is a plush fuchsia armchair, its vibrant color providing a bold, unexpected counterpoint to the deep green. This single piece of furniture immediately energizes the classic library setting. Gold accents, from the chandelier to the library ladder hardware and desk lamps, add warmth and a touch of antique glamour. The detailed patterned rug grounds the space, adding another layer of texture and traditional balance. It is a space where color brings life to classic design.
DIY Project: Upholstered Velvet Accent Chair
Give a plain armchair a dramatic color transformation by reupholstering the seat cushion and backrest in a vibrant fuchsia velvet, inspired by the chair in the image.
Material Required
- An old armchair with a removable seat cushion and backrest (or a simple frame to build upon)
- Velvet fabric in a vibrant fuchsia (or another bold color)
- Upholstery foam (if replacing old foam)
- Batting (cotton or polyester)
- Staple gun and staples
- Fabric scissors
- Flathead screwdriver or staple remover (for deconstruction)
- Measuring tape
Equipment Required
- Staple gun
- Fabric scissors
- Screwdriver/staple remover
DIY Instruction Step by Step
- Deconstruct the Chair: Carefully remove the existing fabric from the seat cushion and backrest. Use a flathead screwdriver or staple remover to pry out all old staples. Keep the old fabric pieces as templates for cutting your new velvet.
- Cut New Fabric: Lay your old fabric pieces onto the new fuchsia velvet. Pin them down and cut out new pieces, adding an extra 3-4 inches around all edges for wrapping and stapling. If replacing foam, cut new foam to size and wrap it in batting.
- Upholster the Seat Cushion:
- Place the new foam/batting on top of the seat base.
- Center the velvet fabric, wrong side up, over the cushion.
- Flip the cushion over. Start stapling the velvet to the underside of the seat base, pulling the fabric taut as you go. Work on opposite sides first to ensure even tension and avoid wrinkles on the top. Neatly fold corners and secure with staples.
- Upholster the Backrest: Repeat the same process for the backrest. You might need to glue the batting to the backrest frame first before stretching the velvet.
- Reassemble the Chair: Once both the seat cushion and backrest are completely upholstered, reattach them to the armchair frame.
- Style Your Chair: Place your newly upholstered fuchsia velvet armchair in your library or living room. It will serve as an immediate, stunning focal point, injecting a powerful burst of color and luxurious texture into the traditional setting.
35. Glamorous Rust and Gold Dining

This dining and living area radiates warmth and opulence, featuring a rich palette of rust, terracotta, and gold against a crisp white backdrop. The room feels incredibly inviting, luxurious, and perfectly poised for entertaining. Deep burgundy velvet curtains frame the windows, adding a touch of drama and softness.
The main seating area is anchored by plush armchairs in a vibrant rust velvet, their texture inviting relaxation. A large, abstract artwork on the wall features a dramatic splash of gold on a deep burgundy background, acting as a striking focal point. Glamorous gold accents abound, from the ornate sunburst mirror to the modern chandelier, floor lamp, and various decorative objects. Mirrored and fluted gold side tables further enhance the luxurious, shimmering atmosphere, making this a truly glamorous space.
DIY Project: Sunburst Mirror Transformation
Give a plain or existing round mirror a dazzling, glamorous upgrade by adding a sunburst effect around its frame using wooden dowels and gold spray paint.
Material Required
- Plain round mirror (with or without a frame)
- Wooden dowels (various lengths, 1/4 or 1/2 inch diameter)
- Gold metallic spray paint
- Strong adhesive (e.g., E6000 or construction adhesive)
- Cutting tool for dowels (utility knife or small saw)
- Measuring tape and pencil
- Newspaper or drop cloth
- Painter’s tape
Equipment Required
- Cutting tool for dowels (utility knife or small saw)
- Measuring tape
DIY Instruction Step by Step
- Prepare the Mirror: Clean the mirror surface. Lay newspaper or a drop cloth on your work surface. Use painter’s tape to mask off the mirror’s glass, ensuring no gold paint gets on it.
- Cut the Dowels: Decide on the lengths and pattern for your sunburst rays. You can use varying lengths for a more dynamic look, or uniform lengths for a symmetrical design. Cut the wooden dowels to your desired lengths using a utility knife or small saw.
- Arrange the Dowels: Arrange your cut dowels around the back of the mirror frame (or directly around the edge of the glass if no frame), experimenting with spacing and lengths until you achieve your desired sunburst pattern.
- Adhere the Dowels: Once happy with the arrangement, apply strong adhesive to one end of each dowel and press it firmly onto the back of the mirror. Hold each dowel in place for a few seconds to ensure it adheres. Allow the adhesive to cure completely (usually 24 hours).
- Spray Paint Gold: In a well-ventilated area, spray all the dowels with several light, even coats of gold metallic spray paint. Ensure complete coverage, allowing each coat to dry according to the manufacturer’s instructions.
- Remove Tape: Once the paint is completely dry, carefully remove the painter’s tape from the mirror glass.
- Hang Your Sunburst Mirror: Hang your new glamorous sunburst mirror. Its radiating gold rays will add a brilliant touch of warmth, luxury, and artistic flair, becoming a stunning focal point in your room.
36. Abstract Geometric Playroom

This vibrant and imaginative playroom is a celebration of abstract geometric forms and bold, primary colors, creating an incredibly stimulating and playful environment. Against a clean white backdrop, the room features large-scale geometric artworks and a unique room divider, all showcasing striking blocks of blue, green, and black. The overall effect is dynamic and modern.
The geometric art pieces, with their intersecting lines and color blocks, draw inspiration from contemporary abstract art. A simple white desk with blue accents provides a functional workspace, while a comfortable blue floor pillow invites relaxed play. The room is cleverly designed to encourage creativity and engagement with shapes and colors, making it both a visually exciting and functional space for learning and fun.
DIY Project: Geometric Room Divider/Screen
Create a dynamic and colorful geometric room divider, similar to the one in the image, using simple wooden panels and bold paint.
Material Required
- Plywood or MDF panels (3-4 panels, each about 2ft x 6ft, or desired size)
- Hinges (2 per panel connection)
- Acrylic paints in blue, green, black, and white
- Painter’s tape
- Ruler and pencil
- Paintbrushes (various sizes)
- Drop cloth or newspaper
- Sandpaper (medium grit)
Equipment Required
- Drill (for attaching hinges)
- Screwdriver
- Sandpaper
DIY Instruction Step by Step
- Prepare Panels: Lightly sand your plywood or MDF panels to ensure smooth surfaces. Wipe away dust. Lay them on a drop cloth.
- Sketch Geometric Design: On each panel, lightly sketch out a bold geometric design using your ruler and pencil. Think about large blocks, intersecting lines, and circular segments. You can mimic the design in the image or create your own.
- Tape and Paint Colors: Use painter’s tape to mask off sections for your different colors. Start with white for any background areas, then move to blue, green, and black. Paint one color at a time, allowing each color to dry completely before masking and painting the next. Remove tape while paint is still wet for crisp lines.
- Add Black Details: Once all the color blocks are dry, use painter’s tape to create thin black lines (or use a fine brush for freehand lines) to define the geometric shapes, similar to the image. This adds graphic definition.
- Hinge the Panels: Once all paint is dry and cured, lay two panels side by side, right sides up. Attach two hinges to the connecting edges, ensuring they are evenly spaced. Repeat this for all panel connections. Make sure the hinges allow the panels to fold in both directions (double-action hinges).
- Set Up Your Divider: Stand up your new geometric room divider. Use it to define areas in a larger room, add a colorful backdrop, or simply as a striking piece of functional art that brings a burst of abstract design and color to your space.
37. Midnight Floral Opulence

This bedroom is a dramatic and luxurious sanctuary, defined by a deep, rich midnight blue palette dramatically contrasted with vibrant fuchsia. The walls are a sophisticated dark blue, creating a moody, intimate atmosphere. This dark canvas allows the vivid pink floral artwork and bedding to truly pop, creating a powerful visual impact.
The bed is a lavish display of color, with a rich fuchsia duvet and coordinating pillows, softened by deep teal accents. Large framed artworks of fuchsia orchids, glistening with dew, hang prominently, bringing a natural yet intensely colorful element to the room. A plush teal chair with a matching throw adds another layer of comfort and jewel-toned elegance. The dark wood shelving provides warmth and traditional balance, making the entire space feel opulent, inviting, and deeply expressive.
DIY Project: High-Contrast Floral Photography Prints
Create your own dramatic floral art prints, similar to the orchid photos, by printing high-quality close-up images of vibrant flowers on a dark background.
Material Required
- High-resolution digital photos of vibrant flowers (e.g., orchids, roses) on a dark or moody background
- Photo printer and quality photo paper, or a professional printing service
- Picture frames with mats (optional)
Equipment Required
- Computer with photo editing software (optional, for adjusting contrast/color)
- Photo printer (or access to a print shop)
DIY Instruction Step by Step
- Select Your Images: Choose several high-resolution digital photographs of your favorite vibrant flowers. Look for close-up shots where the flower is well-lit and stands out against a darker, perhaps blurred, background. You can take these photos yourself or find royalty-free images online.
- Edit for Contrast (Optional): If desired, use photo editing software to enhance the contrast and saturation of the flower colors. You can also slightly darken the background further to make the flower pop even more dramatically.
- Choose Print Size and Format: Decide on the size of your prints. Consider printing a few different sizes for a gallery wall effect, similar to the image. Select a high-quality photo paper (matte or semi-gloss will work well for a painterly feel, or glossy for vivid detail).
- Print Your Photos: Print your photos using a high-quality photo printer at home, or upload them to a professional photo printing service for superior results.
- Frame Your Prints: Once printed, place your floral photographs into simple black or dark-colored frames. Adding a white mat around the print can further enhance its visual impact and draw the eye to the vibrant flower.
- Hang and Display: Arrange your high-contrast floral prints on your wall. The vivid colors of the flowers against the dark background will create a striking and luxurious artistic statement, bringing a powerful splash of nature and color to your bedroom.
38. Pastel Rainbow Sheer Curtains

This delightful bedroom is a breath of fresh air, characterized by a soft, dreamlike palette of pastel rainbow colors that create a serene and uplifting atmosphere. The room is predominantly white, allowing the gentle hues to infuse the space with subtle vibrancy. Light streams in through sheer curtains, which are artfully layered in shades of mint green, sunny yellow, and delicate lavender.
These pastel curtains instantly brighten the room, casting soft, colored light. A crisp white bed is adorned with cushions in matching pastel watercolor patterns, continuing the theme of gentle color blending. A light blue-green rug adds a calming element underfoot. The overall effect is airy, whimsical, and incredibly peaceful, showing how soft colors can dramatically transform a bright, minimalist space.
DIY Project: Layered Pastel Sheer Curtains
Create a soft, rainbow-inspired light effect by layering sheer curtains in pastel colors, similar to the ethereal window treatment.
Material Required
- Multiple sets of plain, sheer white curtains (enough for each window)
- Fabric dye in various pastel colors (e.g., mint green, light yellow, lavender, pale pink)
- Large buckets or plastic tubs (one for each color)
- Rubber gloves
- Salt (helps dye adhere to fabric)
- Curtain rods and hardware
Equipment Required
- No special equipment beyond the materials listed.
DIY Instruction Step by Step
- Prepare Curtains: Pre-wash and dry all your sheer white curtains. This removes any sizing and ensures the dye takes evenly. Lay down a drop cloth or old towels to protect your work area.
- Prepare Dye Baths: In separate buckets, prepare each pastel fabric dye color according to the package instructions (usually involving hot water and salt). Stir well.
- Dye the Curtains: Immerse one set of sheer curtains into each dye bath. Gently agitate the curtains in the dye for the recommended time for a pastel shade (usually shorter than for a deep color). You can test the color on a scrap piece if unsure.
- Rinse and Wash: Remove the curtains from the dye bath. Rinse each set thoroughly under cold running water until the water runs clear. Then, wash each set separately in your washing machine on a gentle cycle with a mild detergent.
- Dry and Iron: Air dry the curtains, or tumble dry on low heat. Once dry, lightly iron them to remove any wrinkles and ensure a smooth hang.
- Layer and Hang: Install your curtain rods. Hang your newly dyed pastel sheer curtains, layering them on the rod so that the different colors overlap slightly, creating a beautiful gradient effect when light shines through.
- Enjoy the Soft Glow: The layered pastel curtains will filter the light, casting soft, colorful hues into your room, creating a serene and dreamlike atmosphere.
Bringing vibrant color into your home is an exciting and accessible way to dramatically change your environment. We have explored thirty-eight ways to inject energy into every corner, from the regal navy and lime of a modern living room to the whimsical pinks and greens of a cottagecore bedroom. Remember that color is more than decoration; it is a powerful tool that influences mood and defines space.
You do not need to choose just one style. Mix textures, layer patterns, and use unexpected color combinations to create an area that is truly unique. Whether you opt for a bold, singular canvas of yellow or an entire room immersed in emerald green, these projects offer a path to a more joyful, expressive home. Embrace these ideas, grab a paintbrush, and start brightening your world today.
Key Takeaways
Strategic Color Placement
Focusing on small, high-impact pieces often yields the best results. Utilize accent walls, throw pillows, and art to deliver precise bursts of color against a neutral background. This technique prevents the space from feeling cluttered or overwhelming.
The Power of Textiles
Fabric offers the quickest and easiest path to color change. Use velvet, linen, or patterned rugs and blankets in vibrant hues like fuchsia, teal, or sunny yellow to layer warmth and visual interest throughout a room.
DIY for Custom Vibrancy
Handmade accents personalize your space like nothing else. Projects like painting geometric wall arches, dip-dyeing curtains, or creating custom abstract art allow you to introduce exact shades and unique patterns on a budget.
Unexpected Color Combinations
Do not be afraid to pair seemingly disparate colors. Rich pairings like emerald green and shocking pink, or royal blue and fiery red, create sophisticated contrast and add dramatic energy.
Light and Reflection
Use mirrors, metallic accents (like gold and copper), and unique lighting (such as neon signs or iridescent films) to maximize light reflection. This multiplies the effect of any color, ensuring your space feels luminous and bright.