
Walking through a cluttered home feels exhausting. You might think you need a bigger house to breathe. Most of the time, the solution is right in front of your eyes.

Look up at your walls right now. You will likely see vast stretches of empty drywall. This is your hidden storage gold mine. By using the height of your rooms, you can clear the floors and find peace.
Vertical storage is not just about stacking boxes. It is about creating a functional flow that works for your life. From the kitchen to the bedroom, every inch of height counts. This guide will show you how to reclaim that lost room effectively.
1 Floor to Ceiling Recessed Library
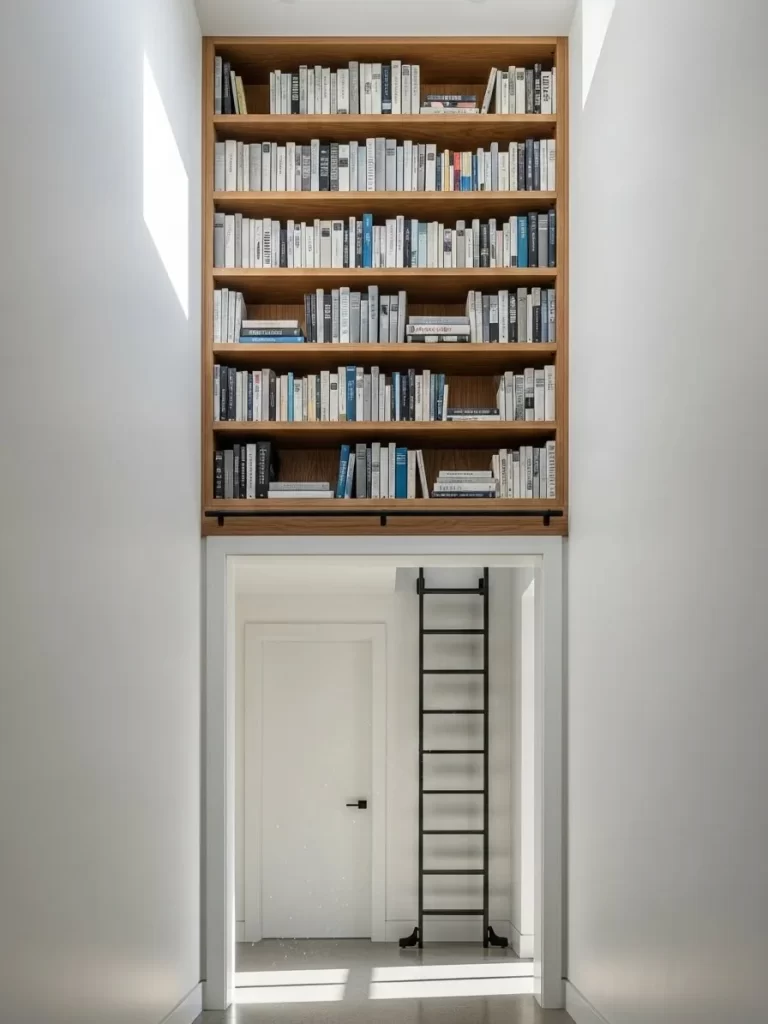
Empty wall space above a doorway often remains forgotten and unused. This clever design turns that blank area into a sophisticated home library without taking up a single inch of floor room. The warm wood tones contrast beautifully against the crisp white walls, creating a focal point that draws the eye upward and makes the ceiling feel much higher.
Adding a sleek metal ladder ensures every book stays within reach while giving the hallway a scholarly, modern vibe. You can reclaim this air space to store your entire collection or display meaningful treasures. It is a smart way to clear clutter from your living areas while adding architectural interest to a simple passageway.
Material Required List Oak or plywood sheets for the shelving box Heavy duty wall anchors and long wood screws Metal library ladder kit with a rolling rail Wood glue and finishing nails Sandpaper (120 and 220 grit) Wood stain or clear polyurethane finish
Equipment Required List Circular saw or table saw Power drill and driver bits Spirit level (at least 2 feet long) Stud finder Tape measure and pencil Clamps
DIY Instruction Step by Step
- Measure and Map Your Space: Use your tape measure to find the width of the wall above the door frame and the height reaching to the ceiling. Use a stud finder to mark every vertical wood stud inside the wall where the shelf will sit.
- Construct the Outer Box: Cut your wood sheets to create a large rectangular frame that fits snugly into the wall recess. Connect the corners using wood glue and screws, ensuring the box is perfectly square.
- Install the Internal Shelves: Determine the height of your books and cut horizontal boards to fit inside the frame. Secure these shelves by screwing through the outside of the main box or using adjustable shelf pins.
- Prepare the Wall Recess: If your wall is not already recessed, you may need to build the shelf to sit flush against the surface. Ensure you have solid blocking or studs to support the massive weight of books.
- Mount the Unit: Lift the shelving unit into place with a helper. Drive long screws through the back of the shelf directly into the wall studs you marked earlier. Use a spirit level to make sure everything is straight.
- Add the Ladder Rail: Measure the width of the shelf base and install the metal rail kit. Fasten it securely into the structural wood of the shelf so it can support the weight of a person on the ladder.
- Finish and Load: Sand any rough edges and apply your choice of stain or paint. Once the finish is dry, hook your ladder onto the rail and fill your new library with books.
2 Modular Plywood Pegboard Wall
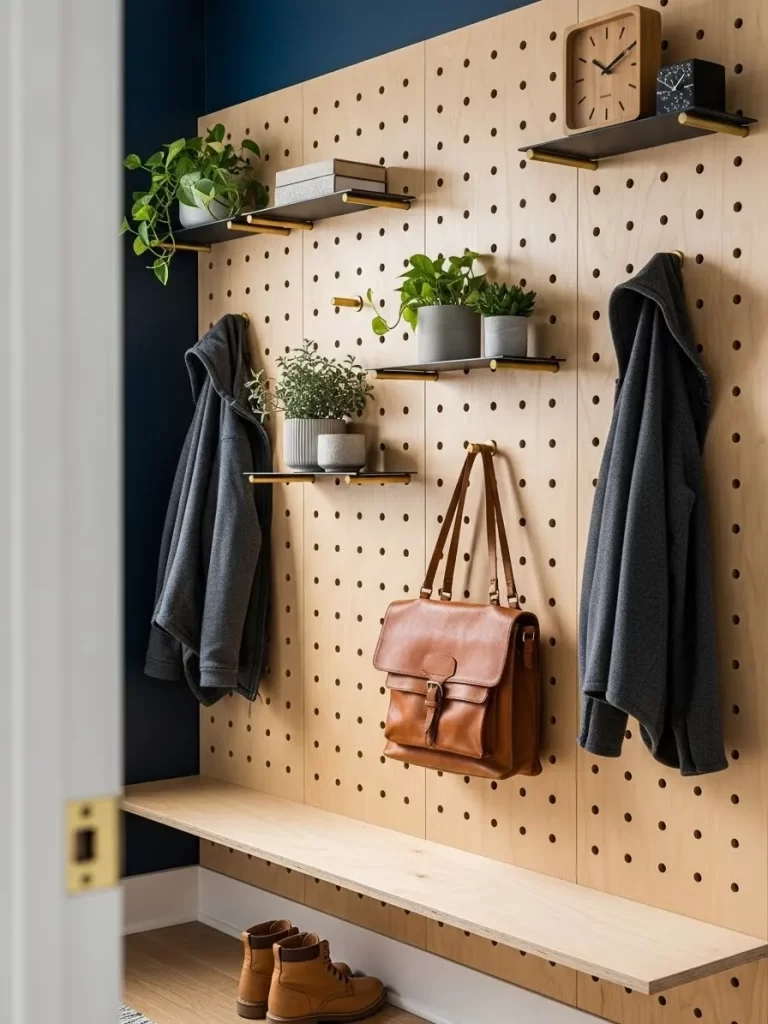
Empty wall space in an entryway often becomes a magnet for clutter. This modular plywood pegboard system transforms a blank surface into a highly functional organization hub. The light wood finish adds a warm, organic feel to the room while providing a flexible grid for hooks and shelves.
You can customize the layout in seconds by moving the wooden pegs to accommodate different bags, coats, or decorative plants. It keeps daily essentials at eye level and off the floor, making small hallways feel much larger. This setup is a smart way to blend utility with a minimalist aesthetic that grows with your needs.
Material Required List 3/4 inch Birch plywood sheet 1 inch thick wooden dowels Small plywood scraps for shelves Wood sealant or clear coat Heavy duty wall mounting cleats
Equipment Required List Power drill with 1 inch Forstner bit Measuring tape and pencil Orbit sander with 120 and 220 grit sandpaper Spirit level Stud finder
DIY Instruction Step by Step
- Map Your Grid: Lay the plywood flat and draw a precise grid with intersections spaced 6 inches apart. Use a long straight edge to ensure all lines are perfectly square.
- Drill the Peg Holes: Use the 1 inch Forstner bit to drill through the plywood at every marked intersection. Hold the drill vertically to ensure the pegs sit straight.
- Smooth the Wood: Sand the front surface and the inside of every hole thoroughly. Removing splinters ensures that the pegs can slide in and out without snagging.
- Prepare the Pegs: Cut the wooden dowels into 6 inch lengths. Round the ends with sandpaper to create a professional finish.
- Mount the Support Cleats: Locate the wall studs and screw the mounting cleats into place. This system must be strong enough to hold the weight of heavy coats and bags.
- Set Up the Board: Lift the pegboard onto the wall cleats. Insert your pegs and rest the small plywood scraps on top of them to create custom shelving.
3 Professional Overhead Pan Rack
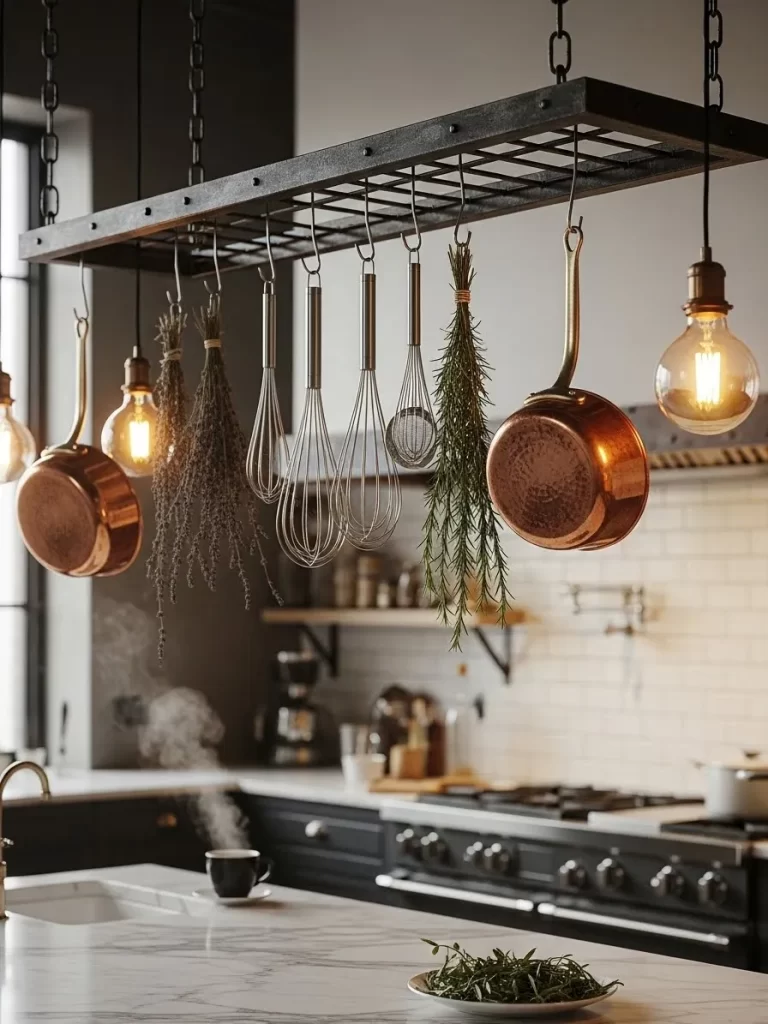
Professional kitchens often utilize the space above a central island to keep tools within easy reach. This industrial metal rack hangs from the ceiling, turning your cookware into a stunning visual display. The matte black frame features a sturdy grid that allows you to hook pans and drying herbs exactly where you need them.
Integrated lighting adds a warm glow to your preparation area, combining utility with atmosphere. Hanging your heavy pans prevents them from getting scratched in crowded drawers or cabinets. It creates a bold focal point in the kitchen while reclaiming valuable cabinet space for smaller appliances.
Material Required List Steel mesh or heavy duty metal grate Black iron pipes and elbow joints Heavy duty ceiling eye bolts Metal hanging chains Large S hooks
Equipment Required List Power drill Pliers or wire cutters Ladder Stud finder Spirit level
DIY Instruction Step by Step
- Construct the Frame: Connect the iron pipes and elbow joints to form a rectangle around your mesh panel. Tighten the joints firmly so the frame remains rigid.
- Secure the Mesh: Attach the wire grate to the pipe frame using heavy duty wire or metal clips. Ensure the grid is centered and tight.
- Identify Ceiling Joists: Use a stud finder to locate the structural beams in your ceiling. Never hang a heavy rack into drywall alone as it will not hold.
- Install Ceiling Hooks: Screw the large eye bolts deep into the ceiling joists. Space them to match the four corners of your frame for even weight distribution.
- Attach the Chains: Connect the chains to the ceiling hooks and the corners of the rack. Adjust the links until the rack hangs at a height you can reach comfortably.
- Organize the Rack: Place your S hooks onto the mesh grid. Hang your pots, pans, and whisks, ensuring the weight is distributed evenly across the unit.
4 Magnetic Stainless Steel Knife Strip
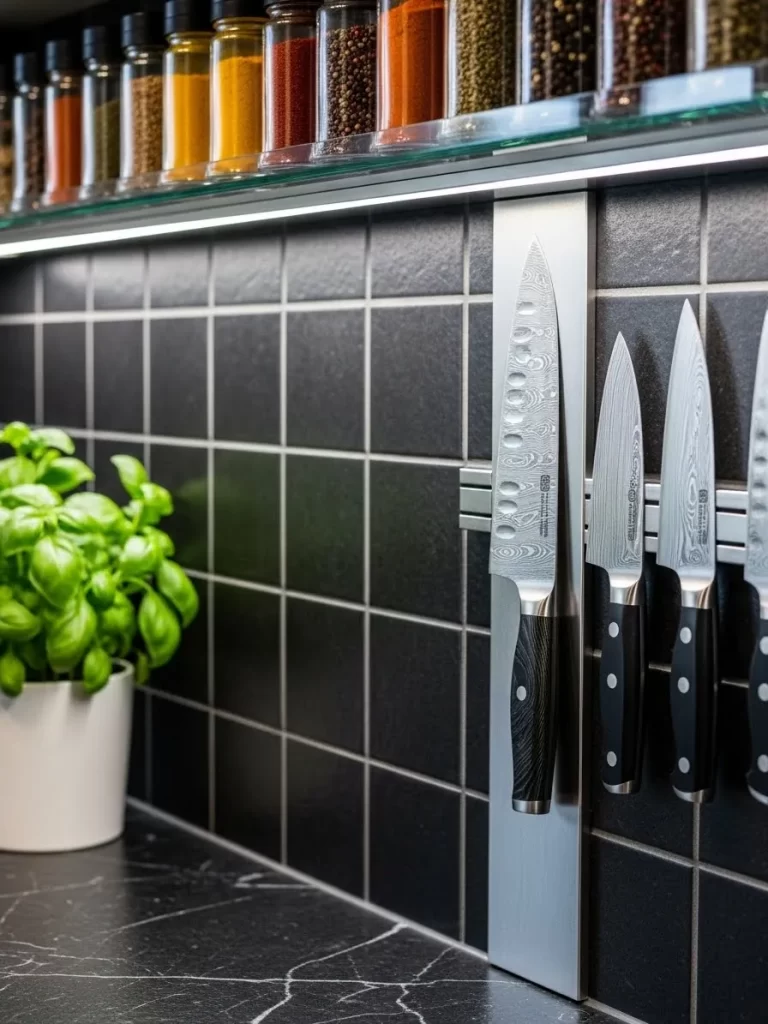
Tucking high quality knives into a drawer can dull the blades and creates a safety risk. This vertical magnetic strip offers a sleek, professional solution for any kitchen backsplash. The brushed stainless steel finish looks sharp against dark tiles and keeps your most used tools instantly accessible.
The strong internal magnets hold heavy chef knives securely in place. It prevents the moisture buildup that often occurs in traditional wooden knife blocks. This setup turns your kitchen tools into a clean visual statement while keeping your countertops completely clear for food prep.
Material Required List Magnetic knife bar kit Heavy duty wall anchors and screws Rubbing alcohol for cleaning Masking tape
Equipment Required List Power drill Small spirit level Screwdriver Pencil
DIY Instruction Step by Step
- Select the Location: Pick a spot on the wall between your stove and prep area. Make sure the knives will not be bumped by cabinet doors.
- Clean the Wall: Wipe the tile or wall surface with rubbing alcohol to remove grease. This ensures the mounting bracket sits flush against the surface.
- Level and Mark: Hold the mounting plate against the wall and use a level to ensure it is horizontal. Mark the screw holes with a pencil.
- Drill the Mounting Holes: If drilling into tile, use a diamond tipped bit and go slowly to prevent cracking. Insert the plastic anchors into the holes.
- Secure the Base: Screw the backplate of the magnetic bar into the anchors. Tighten the screws until the base feels completely solid against the wall.
- Snap the Magnet: Place the magnetic cover over the base plate. Test the strength with your smallest knife before arranging your full collection.
5 Minimalist Wall Mounted Wine Pegs
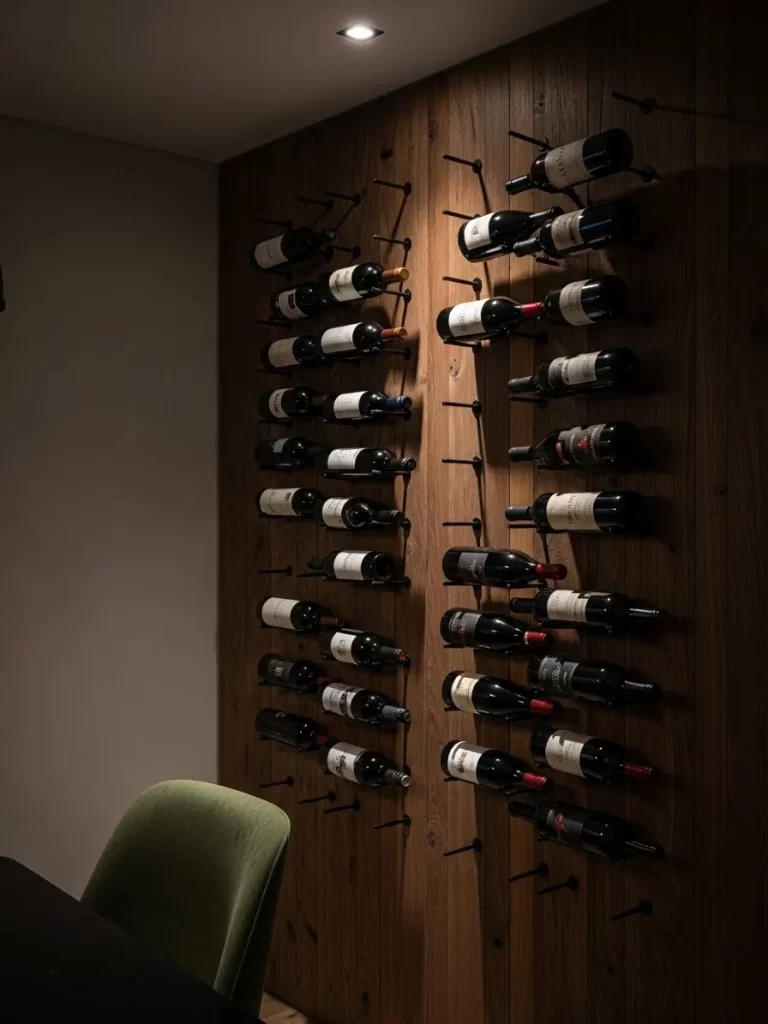
Bulky wine racks can overwhelm a room and take up significant floor space. These individual wall pegs offer a sophisticated way to display your collection as if it were art. By holding the bottles horizontally, the corks stay moist, which is essential for preserving the quality of your wine.
The dark wood paneling adds a rich, cellar style feel to any modern dining area. You can customize the peg pattern to fit any wall size, from a small nook to a large accent wall. This system allows you to see labels clearly, making it easy to select the right vintage.
Material Required List Stainless steel or matte black wine pegs Solid wood backing board (optional) Wood stain and sealant High strength wall anchors
Equipment Required List Power drill Wrench or pliers Tape measure Spirit level Stud finder
DIY Instruction Step by Step
- Design Your Pattern: Mark your peg locations on the wall or backing board. Space the pegs roughly 7 inches apart to support both the base and neck of the bottle.
- Prepare the Surface: If using a wood panel, stain and seal it before mounting. This protects the wood from drips and gives it a professional finish.
- Drill Pilot Holes: Drill holes slightly smaller than the peg bolts to ensure a tight thread. This is critical for preventing the pegs from sagging under weight.
- Anchor into Studs: Because full wine bottles are heavy, you must secure the pegs or backing board into wall studs. Use a stud finder to be certain.
- Install the Pegs: Thread the bolts into the holes and use a wrench to tighten the pegs against the surface. They should feel completely immobile.
- Load the Bottles: Place your wine onto the pegs with the labels facing forward. Check that each bottle rests securely and is perfectly level.
6 Floating Modern Living Room Sideboard

Heavy floor standing furniture can make a living room feel cramped and cluttered. This floating sideboard solves that by lifting the storage off the ground, which makes the floor appear continuous and the room feel larger. The dark wood finish provides a sophisticated look while hiding media and linens.
Warm LED lighting underneath creates a depth enhancing glow that highlights the floor texture. It transforms a standard storage cabinet into a stylish architectural feature. The top surface remains clear for a few select pieces of art, helping you maintain a calm and tidy home environment.
Material Required List Pre built cabinet unit or plywood for custom build Heavy duty French cleat system LED light strip with adhesive backing Wood screws and finishing caps
Equipment Required List Power drill Long spirit level Stud finder Tape measure Pencil
DIY Instruction Step by Step
- Determine the Height: Decide how high you want the unit to sit. Usually, 20 to 24 inches from the floor provides a balanced look and easy access.
- Locate Wall Studs: Use a stud finder to mark every stud along the wall where the sideboard will hang. Every mounting screw must hit a stud.
- Install the Wall Cleat: Screw the wall side of the French cleat into your marked studs. Use a long level to ensure the rail is perfectly horizontal.
- Prepare the Cabinet: Attach the matching half of the French cleat to the back of your sideboard. Ensure it is centered and fastened with several screws.
- Hang the Unit: Lift the sideboard with a helper and slide it onto the wall cleat. The angled pieces will lock together, holding the unit firmly.
- Add the Lighting: Stick the LED strip to the bottom edge of the cabinet. Run the cord to the nearest outlet to create the floating atmospheric effect.
7 Skylight Vertical Garden Wall
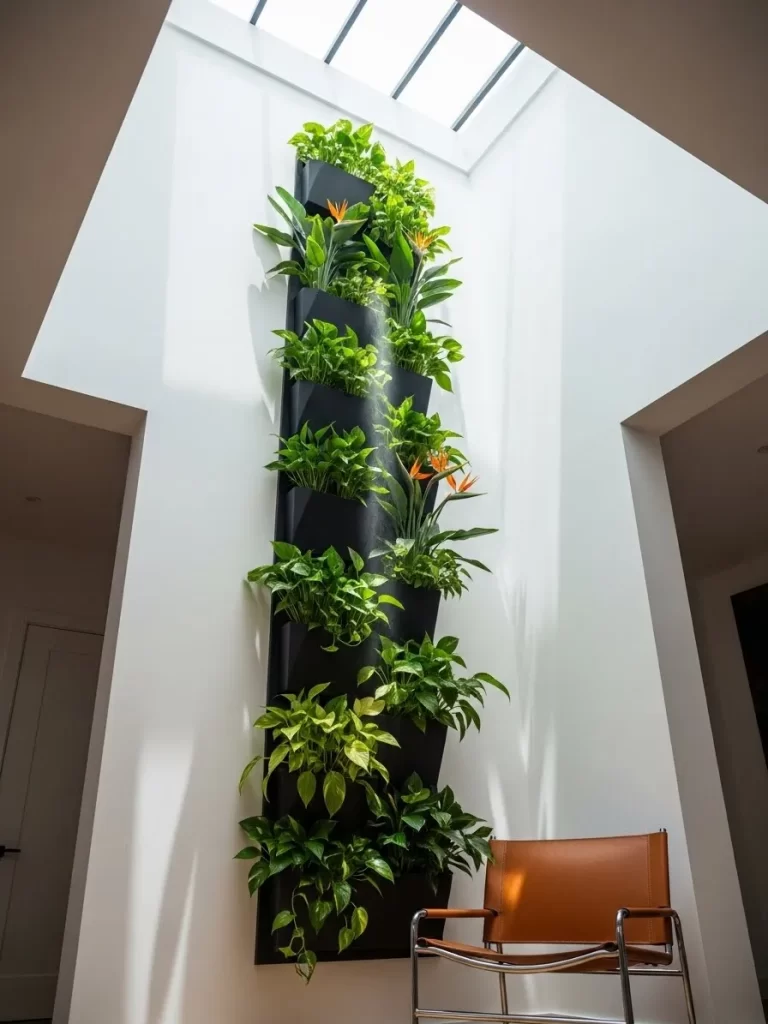
Finding space for plants can be a challenge in narrow homes or apartments. This towering vertical garden utilizes a high wall to create a lush, living tapestry of greenery. Positioned directly under a skylight, it receives the natural sun needed to keep tropical plants healthy.
The black pocket system holds the soil and roots, blending into the shadows so the leaves take center stage. This living wall acts as a natural air filter and brings a sense of tranquility to the room. It is a stunning way to add life to an unreachable vertical space.
Material Required List Vertical garden pocket system or planter trays Waterproof plastic backing sheet Tropical indoor plants (Ferns, Pothos, Ivy) Lightweight potting mix
Equipment Required List Power drill Wall anchors and screws Spirit level Watering can Step ladder
DIY Instruction Step by Step
- Protect the Wall: Fix a waterproof plastic membrane to the wall area. This prevents moisture from the plants from seeping into your drywall and causing damage.
- Mount the Planter: Screw the pocket system or trays into the wall over the membrane. Use a level to keep the rows perfectly horizontal for even watering.
- Select Your Plants: Choose varieties that thrive in indirect or filtered sunlight. Draping plants are excellent for covering the pockets quickly and creating a full look.
- Pot the Greenery: Fill each pocket with soil and tuck your plants inside. Pack the soil firmly to ensure the roots have good support within the pocket.
- Arrange for Texture: Mix different shades of green and leaf shapes to create visual interest. Place larger plants at the bottom to act as a visual anchor.
- Maintenance: Water the top pockets and allow the moisture to trickle down to the lower levels. Trim any yellow leaves regularly to keep the display looking fresh.
8 Slim Industrial Display Tower
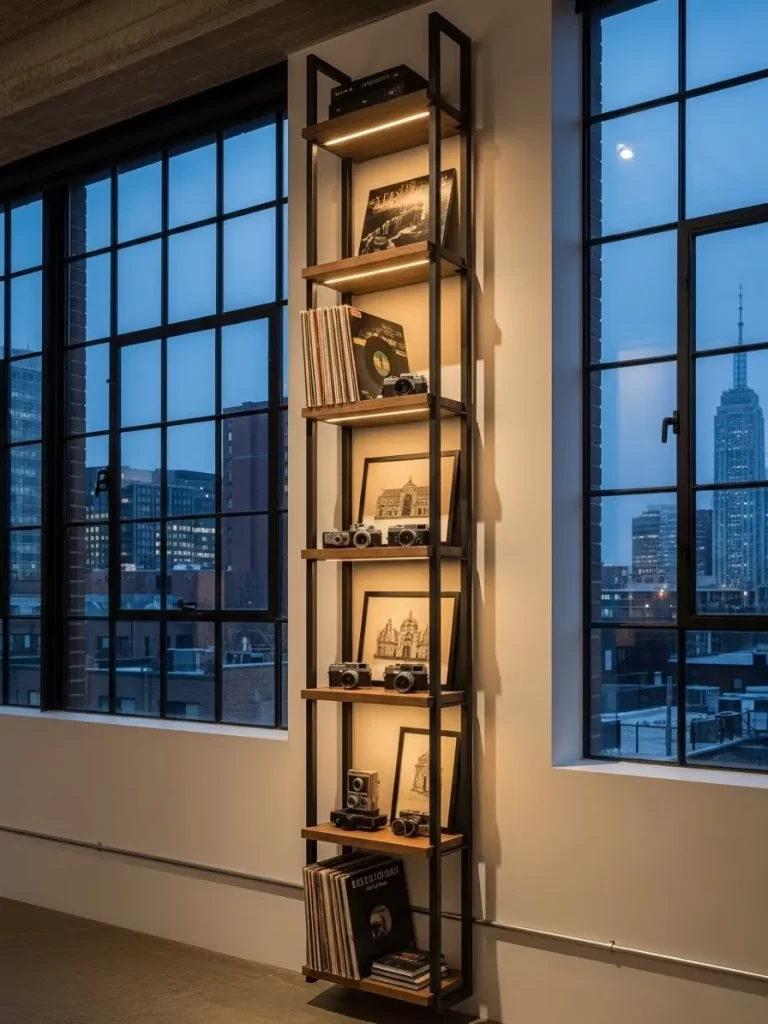
Narrow gaps between windows or in corners are frequently wasted, but a slim tower can turn them into a gallery. This industrial style rack uses high quality wood and metal to store a large collection in a tiny footprint. The open design allows light to pass through, keeping the room bright.
Integrated shelf lighting makes your treasures stand out, from vintage cameras to vinyl records. It is a smart way to display your personality without cluttering your main living or walking areas. This vertical unit makes a statement by filling the height of the room rather than the width.
Material Required List Square steel tubing for the frame Solid wood shelf boards (Oak or Walnut) LED puck lights or thin light strips Heavy duty wall anchors
Equipment Required List Power drill Spirit level Tape measure Screwdriver Pencil
DIY Instruction Step by Step
- Assemble the Frame: Connect the vertical metal supports with horizontal crossbeams. Ensure all connections are tight and the frame stands perfectly straight.
- Paint the Metal: Apply a coat of matte black spray paint to the frame if it isn’t already finished. This provides a clean, modern look.
- Prepare the Shelves: Sand your wood boards and apply a clear coat or wax. This protects the wood and makes the grain stand out against the black metal.
- Install the Lighting: Attach small LED lights to the underside of each wooden shelf. Route the wires down the back of the frame to keep them hidden.
- Secure the Shelves: Slide the wood boards into the frame and secure them with small screws. Ensure each shelf is perfectly level.
- Anchor to the Wall: This tall, narrow unit must be attached to the wall for safety. Screw the top of the frame directly into a wall stud.
9 Executive Workspace Hutch
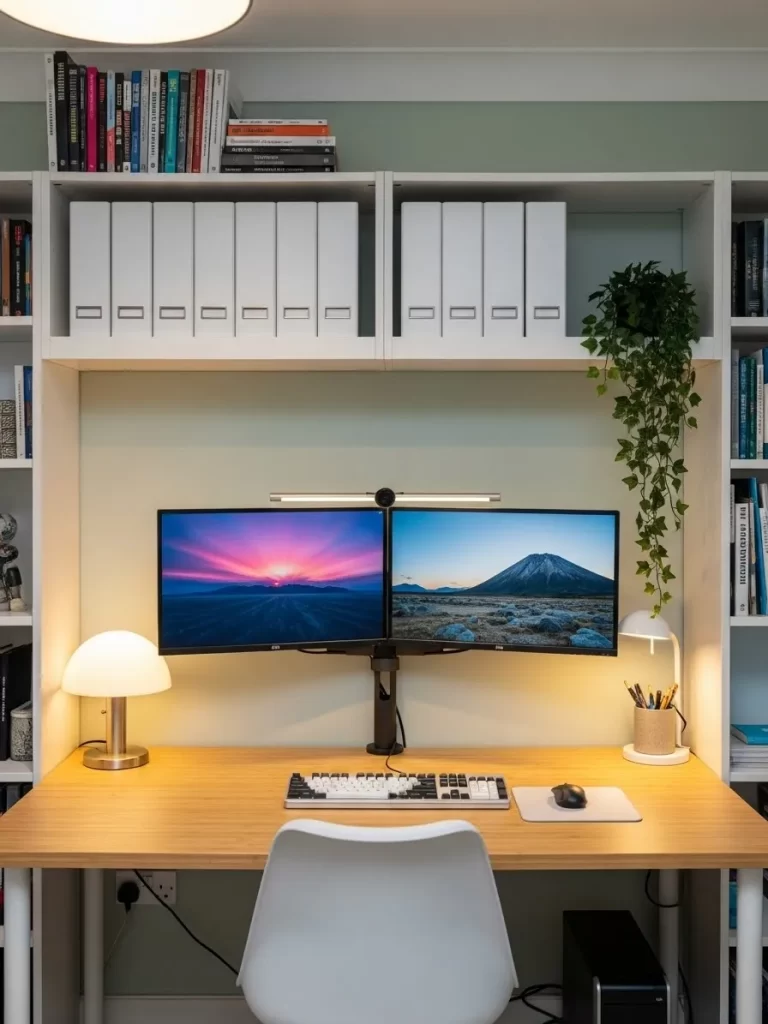
A busy home office needs more than just a desk surface to stay organized and productive. This integrated hutch system uses the entire wall above your monitors to store files and reference books. The white finish helps the large unit blend into the room, preventing it from feeling heavy.
Using matching white binders keeps the visual noise to a minimum and hides messy paperwork. You can keep everything you need within arm’s reach while maintaining a clean environment. It is a complete organizational solution that turns a simple desk into a professional suite.
Material Required List Desktop surface (Wood or Laminate) Prefabricated white shelving units Upper bridge shelf White document binders Wood screws and finishing caps
Equipment Required List Power drill Stud finder Spirit level Measuring tape Pencil
DIY Instruction Step by Step
- Position the Desk: Place your main desk surface at a comfortable height. Make sure you have clear access to power outlets for your monitors and computer.
- Build Side Supports: Assemble two tall, narrow bookcases to stand on either side of the desk. These provide the structural base for the upper hutch.
- Install the Bridge: Connect the two side units with a wide horizontal shelf that spans over your monitors. This creates the hutch look and offers extra storage.
- Secure to the Wall: Drive screws through the back of the shelving units into the wall studs. This is a large piece of furniture and must be safely anchored.
- Add Adjustable Shelves: Insert shelf pins into the side units at heights that suit your books and equipment. This allows for future flexibility as your needs change.
- Organize the Space: Fill the upper shelves with matching white binders. Group your books by size or color to keep the workspace looking tidy and professional.
10 Vertical Wall Mounted File Organizer

Important mail and project folders often clutter desk surfaces, but this wall organizer moves the mess upward. The tiered pockets allow you to see exactly what needs your attention without digging through a pile. Frosted fronts keep the contents private while maintaining a clean look.
Labeling the pockets helps you sort incoming papers the moment they arrive at your home or office. It is a simple tool that saves time and keeps your daily tasks highly visible. This vertical system is a smart addition to any entryway for managing a busy household’s paperwork.
Material Required List Tiered wall file organizer kit Printed labels or cardstock Heavy duty wall anchors and screws Large metal binder clips
Equipment Required List Power drill Spirit level Screwdriver Pencil
DIY Instruction Step by Step
- Choose the Height: Mount the unit where you can easily reach the top pocket while standing. Shoulder height is usually best for most users.
- Mark the Wall: Hold the organizer against the wall and use a level to ensure it is straight. Mark the mounting holes with a pencil.
- Install the Anchors: Drill holes into your marks and push in the plastic wall anchors. These provide the grip needed to hold a heavy stack of paper.
- Secure the Unit: Screw the file organizer into the anchors. Tighten the screws until the unit is flush and firm against the wall surface.
- Label the Tiers: Create clear labels for categories like Urgent, To File, or Inspiration. Slide these into the slots on the front of each pocket.
- Sort Your Paperwork: Move your current projects and mail into the folders. Use the binder clips to hold thick booklets or loose notes to the outside.
11 Ceiling Mounted Hanging Nightstand

Traditional bedside tables take up valuable floor area and can make a small bedroom feel cramped. This hanging nightstand utilizes a sturdy rope or chain from the ceiling to suspend a sleek wooden surface right next to your bed. It creates an airy, weightless look that opens up the visual space around your sleeping area.
The floating design allows you to easily clean underneath without moving heavy furniture. It provides just enough room for your evening book and a glass of water while keeping the room looking modern and uncluttered. This simple change can make a massive difference in how spacious your bedroom feels.
Material Required List Solid wood round or square slab Heavy duty cotton rope or decorative metal chain Large ceiling hook (eye bolt) Wood finish or wax Sandpaper
Equipment Required List Power drill Stud finder Scissors or wire cutters Level Tape measure
DIY Instruction Step by Step
- Find Your Anchor: Use a stud finder to locate a ceiling joist directly above where you want the table to hang. It is vital to screw the hook into solid wood to support the weight of the table and your items.
- Prepare the Wood: Sand your wooden slab until it is smooth to the touch. Apply a coat of wood finish or wax to protect the surface and enhance the natural grain.
- Drill the Table: Drill three or four holes near the outer edges of the wooden slab, depending on how many support lines you want. Ensure the holes are slightly larger than your rope or chain.
- Install the Hook: Drill a pilot hole into the ceiling joist and screw in your heavy duty eye bolt. Make sure it is tight and secure.
- Thread the Support: Run your rope or chain through the holes in the wood. Tie thick, secure knots underneath the slab to keep it from slipping.
- Balance and Hang: Loop the rope over the ceiling hook. Use a level to ensure the table surface is perfectly flat before tightening your final knots.
12 Tiered Over the Door Shoe Gallery

Floor standing shoe racks often become a messy pile in the bottom of a closet. This vertical over the door system turns your footwear into a organized gallery, making use of the large empty surface area of your bedroom or closet door. The clear or mesh pockets allow you to see every pair at a glance, saving you time during your morning rush.
By moving your shoes onto the door, you reclaim several square feet of floor space for other storage needs. It keeps your shoes protected from dust and helps them maintain their shape longer. This setup is a game changer for anyone living in an apartment where every inch of floor counts.
Material Required List Over the door tiered organizer Padded door hooks Adhesive strips (optional for stability) Small labels
Equipment Required List Measuring tape Scissors
DIY Instruction Step by Step
- Measure Your Door: Check the height and width of your door to ensure the organizer won’t interfere with the handle or the door frame when closing.
- Attach the Hooks: Place the padded metal hooks over the top edge of the door. The padding prevents the metal from scratching your paint or wood.
- Hang the Organizer: Loop the grommets or holes of the organizer onto the hooks. Let it hang freely to see how it sits against the surface.
- Secure the Bottom: If the organizer swings when you move the door, use adhesive strips or small tacks at the bottom corners to keep it flush.
- Sort Your Shoes: Group your footwear by style or color. Place your most frequently worn pairs in the middle pockets for the easiest access.
- Add Labels: If the pockets are not transparent, add small labels to the front so you know exactly which pair is in which slot without searching.
13 Back of Cabinet Spice Tier

Kitchen cabinets often have a lot of dead air between the shelves and the door. This slim vertical rack attaches directly to the inside of the cabinet door, turning that wasted space into a hidden spice library. It keeps your jars organized and prevents you from having to dig through dark corners to find the cumin.
The tiered design ensures that every label is visible the moment you open the door. It frees up your main shelves for larger items like plates and bowls. This simple addition makes your cooking process much smoother by putting your flavorings right at your fingertips.
Material Required List Slim wire or plastic spice rack kit Small wood screws Adhesive mounting strips (for lightweight needs) Uniform spice jars
Equipment Required List Power drill with small bits Screwdriver Level Pencil
DIY Instruction Step by Step
- Check the Clearance: Hold the rack against the inside of the door and close it. Ensure there is enough space between the rack and the internal shelves so the door shuts fully.
- Mark Your Spots: Use a level to ensure the rack is straight. Mark the mounting holes on the door with a pencil.
- Drill Pilot Holes: Very carefully drill shallow pilot holes into the door. Be extremely cautious not to drill all the way through to the front of the cabinet.
- Mount the Rack: Line up the rack with your holes and drive the small screws in. If your door is very thin, consider using high strength adhesive strips instead.
- Transfer the Spices: Move your spices into uniform jars if they don’t fit the rack properly. This creates a much cleaner and more organized look.
- Arrange by Use: Place your most common spices at eye level. This saves you time and keeps your most important ingredients within reach.
14 Fluted Glass Bathroom Cabinet
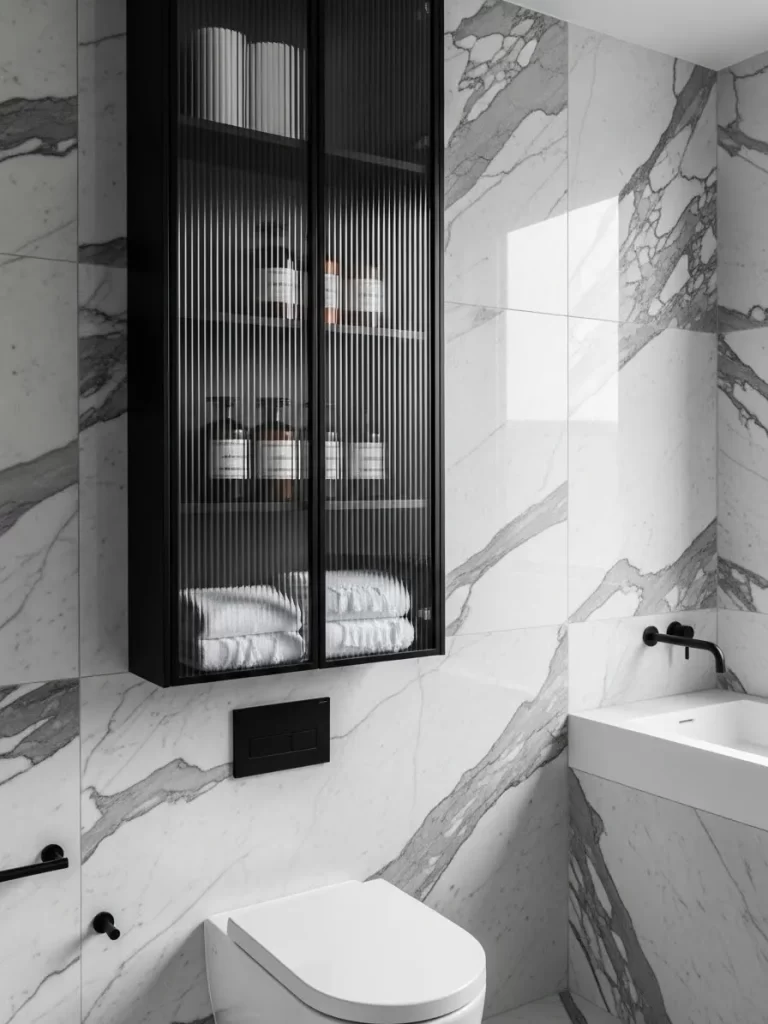
Wall space in a bathroom is often limited to a small mirror, but a tall cabinet can double your storage. This unit uses fluted glass doors to hide personal items while maintaining a bright and airy feel. The black metal frame provides a modern contrast against marble tiles, turning storage into a design feature.
Storing towels and toiletries vertically keeps your vanity top clear of clutter. The textured glass blurs the contents, so your bathroom always looks tidy even if the shelves are disorganized. It is a smart way to add luxury and organization to a small footprint.
Material Required List Wall mounted cabinet with fluted glass Heavy duty toggle bolts or masonry anchors Clear silicone sealant Microfiber cloth Leveling shims
Equipment Required List Power drill Diamond tipped masonry bit Spirit level Screwdriver Pencil
DIY Instruction Step by Step
- Mark the Height: Hold the cabinet against the wall above the toilet or next to the mirror. Mark the top edge with a pencil.
- Find a Safe Spot: Use a deep scan stud finder to ensure there are no water pipes behind the wall before you start drilling.
- Drill the Tile: Mark your mounting holes. Use a diamond bit and a slow speed to drill through the tile without cracking it.
- Install the Anchors: Push the heavy duty anchors into the holes. These are necessary to support the weight of the glass and metal unit.
- Mount the Cabinet: Have a helper hold the unit while you drive the screws into the anchors. Use a level to ensure it is perfectly straight.
- Seal the Edges: Apply a thin bead of silicone where the cabinet meets the wall. This prevents moisture from getting trapped behind the unit in a humid bathroom.
15 Corner Tension Shower Caddy
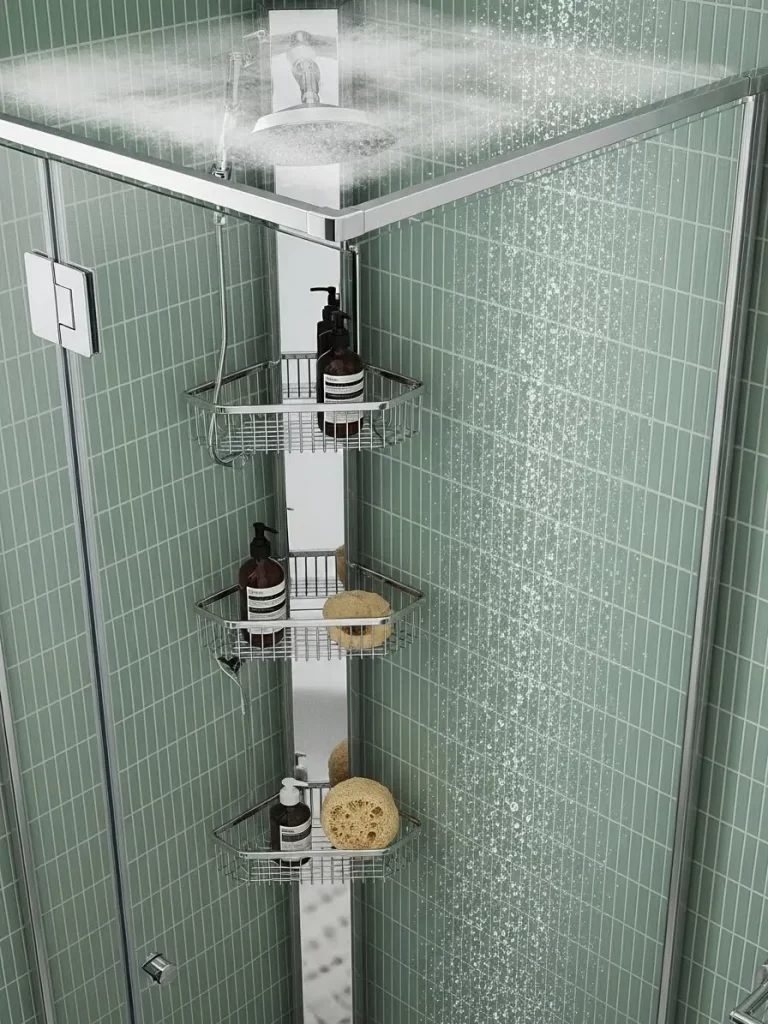
The corners of a shower are frequently wasted, but a tension pole caddy turns them into a functional storage zone. This floor to ceiling system adds three levels of shelving without requiring any permanent changes to your tile. The chrome finish resists rust and matches standard bathroom fixtures.
Placing your soaps and sponges on these wire racks allows them to air dry quickly. This prevents the buildup of mold that often occurs on the floor or tub ledge. It keeps all your bathing essentials at eye level, making your morning routine much more efficient.
Material Required List Tension pole shower caddy kit Rubber gaskets and feet Wire basket attachments Internal spring mechanism
Equipment Required List Tape measure Step stool Cleaning cloth
DIY Instruction Step by Step
- Clean the Corner: Scrub the ceiling and floor corner where the pole will sit. Removing soap residue ensures the rubber feet won’t slip during use.
- Measure the Height: Check the distance from the shower floor to the ceiling. Adjust the number of pole sections to match your bathroom’s height.
- Assemble the Pole: Slide the wire baskets and rubber gaskets onto the pole sections. Place the spring in the top section as directed by the kit.
- Set the Base: Place the bottom foot in the corner of the shower. Tilt the pole upward toward the ceiling until it is roughly vertical.
- Lock the Tension: Compress the spring loaded top section and slide it into place against the ceiling. Release it so the tension holds the pole firm.
- Adjust the Baskets: Move the wire shelves to heights that suit your shampoo bottles. Tighten the locking mechanisms to ensure they stay in place.
16 Pulley System Laundry Drying Rack
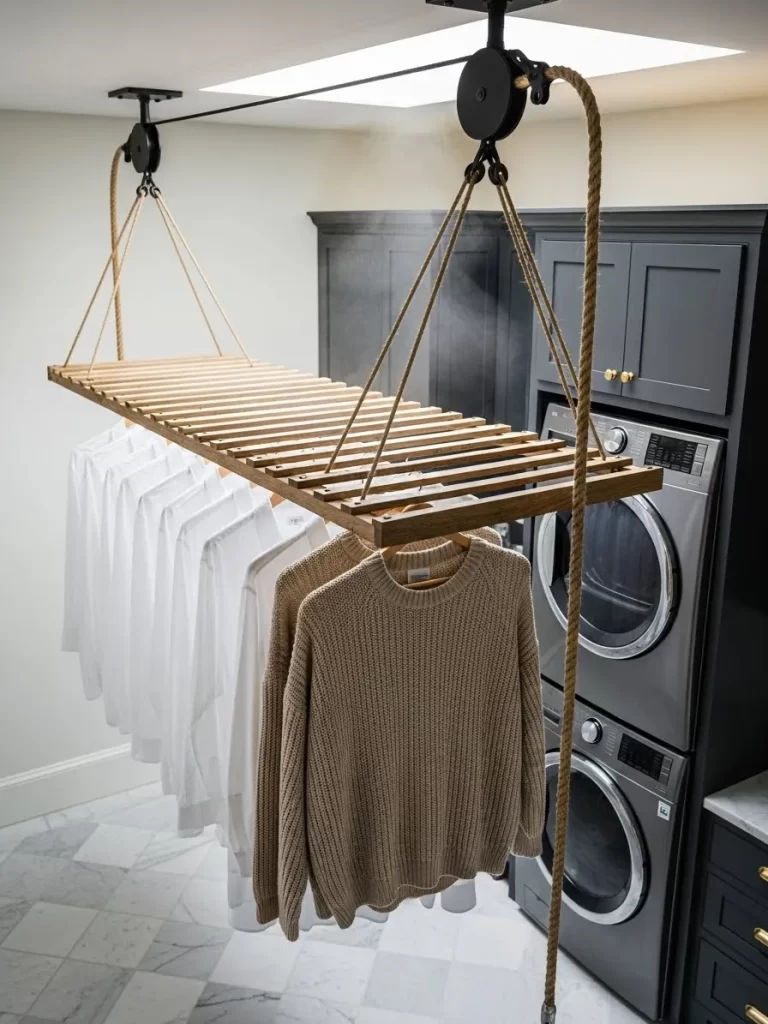
Small laundry rooms often lack the floor space for bulky folding drying racks. This wooden unit hangs from the ceiling and uses a pulley system to move up and down. It utilizes the warm air that naturally rises to the ceiling, drying your clothes much faster than a floor unit.
You can lower the rack to hang your shirts and then hoist it out of the way to continue your chores. The natural wood slats provide excellent airflow and look much better than plastic alternatives. It is a classic, functional solution that saves space and reduces energy costs.
Material Required List Wooden lath rack frame Heavy duty sash cord or rope Double and single pulley wheels Wall mounted cleat hook Ceiling hooks
Equipment Required List Power drill Stud finder Screwdriver Ladder Pencil
DIY Instruction Step by Step
- Identify Ceiling Joists: Use a stud finder to locate the structural beams in the ceiling. These must support the weight of the rack and wet clothes.
- Install Ceiling Hooks: Screw the pulley hooks into the joists. Space them apart to match the length of your wooden frame for stability.
- Thread the Rope: Run the cord through the pulleys. One end will attach to the rack, and the other will lead to the wall mounted cleat.
- Assemble the Rack: Ensure the wooden slats are securely fastened to the crossbeams. Most kits use simple bolts to hold the frame together firmly.
- Balance the Hang: Attach the ropes to the four corners of the rack. Adjust the knots until the rack hangs perfectly level when raised.
- Mount the Wall Cleat: Screw the metal cleat into a wall stud at waist height. This is where you will wrap the rope to lock the rack in position.
17 Wall Mounted Folding Craft Table
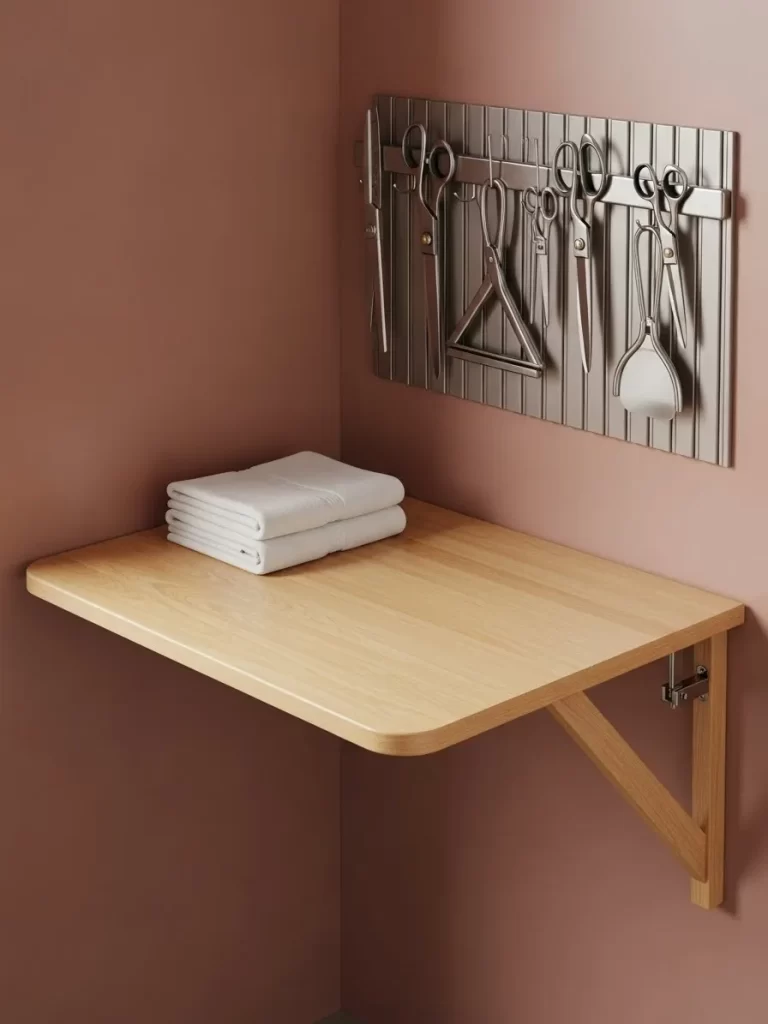
A dedicated craft or sewing room needs a large flat surface, but these tables can block traffic. This folding wall desk provides a sturdy workspace that disappears when your project is finished. The wood finish matches the room’s decor, creating a seamless look when tucked away.
A vertical tool board above the desk keeps scissors and supplies organized and within reach. This setup allows you to transform any corner into a hobby station in seconds. It is a smart way to maximize a multi purpose room without sacrificing any floor area.
Material Required List Solid wood tabletop Heavy duty folding shelf brackets Wall mounted slatwall or pegboard Wood screws and anchors
Equipment Required List Power drill Spirit level Stud finder Tape measure Pencil
DIY Instruction Step by Step
- Locate Wall Studs: Mark the studs where the folding brackets will go. This table needs a strong connection to hold the pressure of your work.
- Mount the Brackets: Screw the folding brackets into the studs at your desired height. Usually, 29 inches is standard for a comfortable sitting height.
- Attach the Tabletop: Lay your wood board across the brackets. Screw from underneath to secure the board to the metal supports without visible holes.
- Test the Fold: Lift the table to lock it in place. Then, use the release levers to ensure it folds flat against the wall without hitting anything.
- Install the Tool Board: Mount the slatwall directly above the table. Use spacers so the hooks have room to fit behind the board’s surface.
- Organize Your Tools: Add hooks and bins to the board for your scissors and thread. Now your workspace is complete and ready to be used or hidden.
18 Vertical Stuffed Animal Zoo
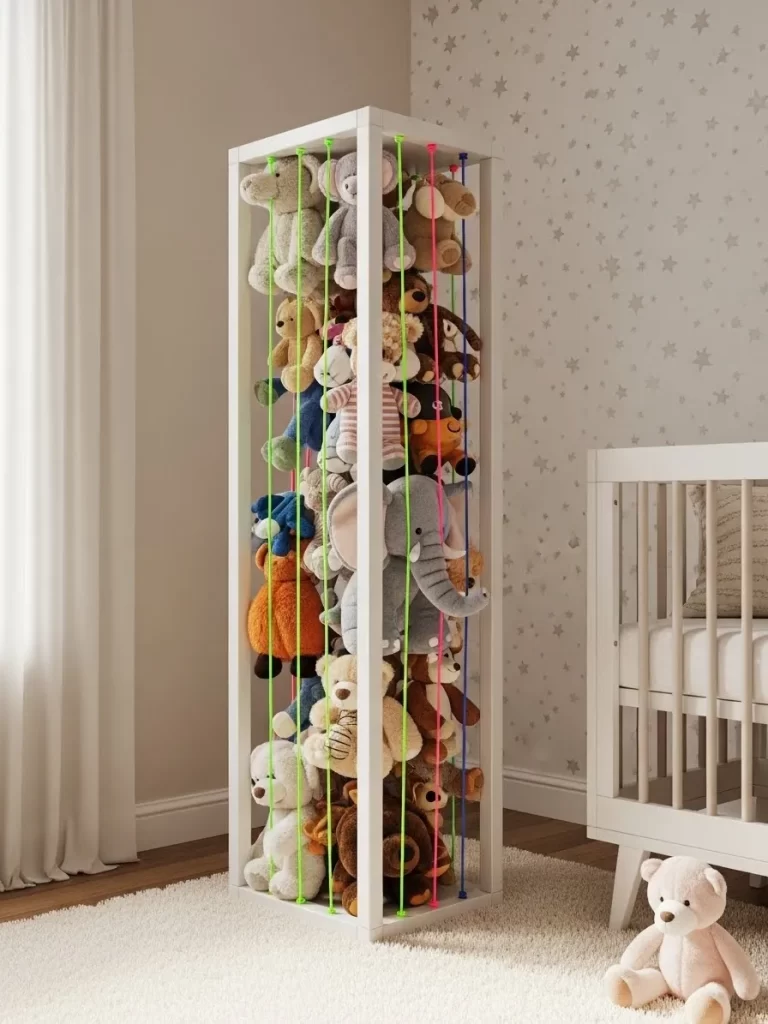
Nurseries and playrooms often get taken over by soft toys scattered across the floor. This vertical zoo uses elastic cords to keep stuffed animals contained while keeping them visible for the kids. The tall, narrow design fits into small corners that would otherwise go unused.
Children can easily pull a toy through the bars and put it back when playtime is over. It encourages tidiness by making the cleanup process fun and easy. This unit keeps the floor clear for play while displaying a colorful collection of plush friends.
Material Required List 1×2 wood boards for the frame Bungee cord or thick elastic string Wood glue and screws Child safe paint or finish
Equipment Required List Power drill Saw Measuring tape Staple gun Pencil
DIY Instruction Step by Step
- Build the Top and Bottom: Cut four wood pieces to form two identical squares. These will act as the ceiling and floor of your toy zoo.
- Connect the Verticals: Attach four long boards to the corners of your squares to create a tall rectangular frame. Use glue and screws for strength.
- Drill the Cord Holes: Mark holes every 4 inches along the top and bottom frames. Ensure the holes on the top line up perfectly with the bottom.
- Thread the Bars: Run the bungee cord through the holes in a continuous loop. Keep the cord tight enough to hold toys but loose enough for hands.
- Secure the Ends: Knot the elastic cord on the outside of the frame or use a staple gun to hide the ends under the wood surface.
- Anchor for Safety: Use an L bracket to attach the top of the zoo to a wall stud. This prevents the unit from tipping over if a child pulls on it.
19 Floating Picture Ledge Library

Traditional bookshelves are often too deep for narrow hallways or behind bedroom doors. These slim picture ledges allow you to display books with the covers facing forward, turning a library into a wall of art. It is a smart way to use long, empty walls without blocking the path.
The low profile makes it easy for even the smallest family members to reach their favorite stories. You can stack several rows from the floor to the ceiling to maximize your storage. It keeps your books organized and makes the entire hallway feel like an inviting gallery.
Material Required List Pre made picture ledges or 1×3 wood boards Wall anchors and long screws Wood glue Paint or stain
Equipment Required List Power drill Spirit level Stud finder Measuring tape Pencil
DIY Instruction Step by Step
- Plan the Spacing: Measure the height of your tallest books. Mark lines on the wall to ensure you leave enough room between each shelf row.
- Identify Wall Studs: Mark the studs along your horizontal lines. These ledges will hold a lot of weight once filled, so hitting studs is essential.
- Assemble Custom Ledges: If building your own, glue and screw a narrow strip of wood to the front of a wider board to create a safety lip.
- Mount the First Row: Hold the ledge to your mark and use a level. Screw directly through the back of the ledge into the wall studs.
- Repeat for Upper Rows: Move upward, checking the level on every shelf. Ensure the vertical alignment looks consistent across the entire wall.
- Arrange Your Books: Place your books on the ledges with the covers facing out. Mix sizes and colors to create a vibrant and engaging vertical display.
20 Height Adjustable Closet Pulldown
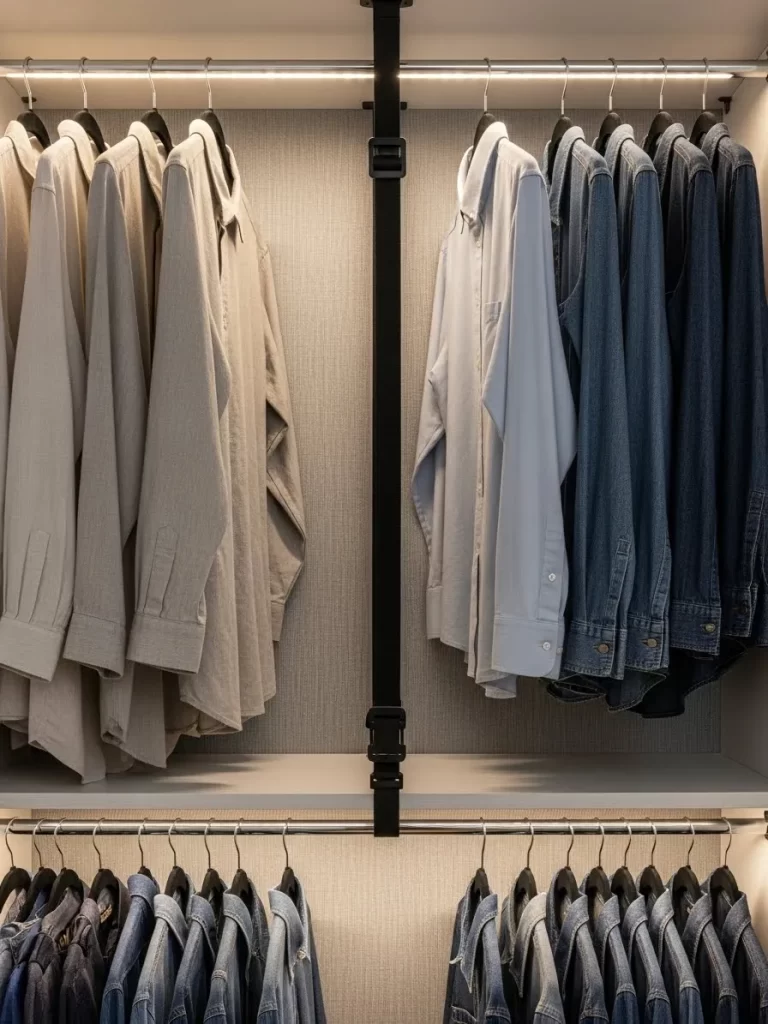
High shelves in a closet often become a black hole for clothes you never wear because you can’t reach them. This vertical pulldown system uses a hydraulic arm to bring the entire clothing rack down to your level. It allows you to use the very top of your closet for daily items.
The integrated lighting ensures you can see every shirt and jacket clearly even in the back of the closet. This system doubles your hanging space by allowing for two rows of clothes on a single wall. It turns a standard closet into a high efficiency wardrobe.
Material Required List Closet pulldown rod kit Extra long mounting screws LED light strip (battery or plug in) Wood blocks for reinforcement
Equipment Required List Power drill Spirit level Tape measure Screwdriver Pencil
DIY Instruction Step by Step
- Measure the Opening: Ensure your closet is wide enough for the pulldown arms to swing freely without hitting the door frame or other shelves.
- Install Side Brackets: Screw the heavy duty metal brackets into the side walls of your closet. These must be anchored into studs or solid wood.
- Attach the Arms: Connect the hydraulic arms to the brackets. These arms provide the tension that makes lifting a full rack of clothes feel light.
- Mount the Rod: Slide the hanging rod into the arms and lock it into place. Ensure the handle for pulling the rack down is centered and accessible.
- Add the Lighting: Stick an LED strip to the top of the closet or the rod itself. This prevents the upper row of clothes from casting shadows below.
- Test the Tension: Pull the rack down several times to ensure smooth movement. Most kits allow you to adjust the tension based on the weight of your clothes.
21 Vertical Boot Organization Rack
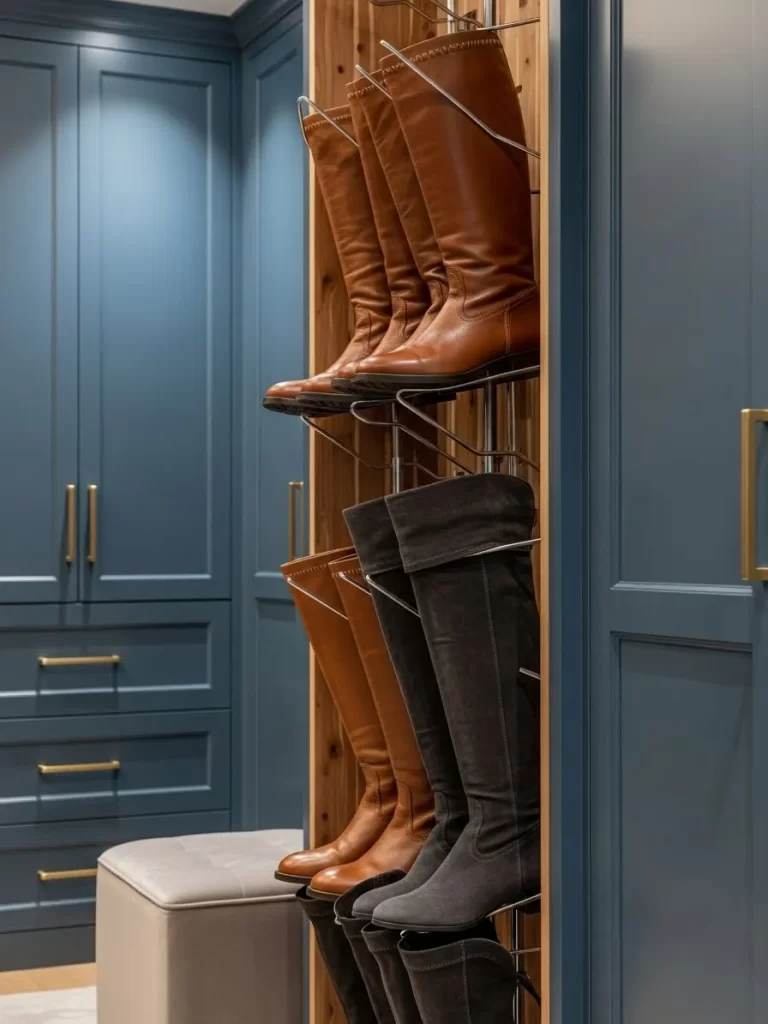
Tall boots are notoriously difficult to store without them flopping over and losing their shape. This vertical rack uses a slim metal frame to hold boots upright, utilizing the height of your closet rather than the floor. It keeps your footwear organized and prevents creases in expensive leather or suede.
By lifting your boots off the floor, you make it much easier to clean your closet. The tiered design allows you to see every pair at a glance, making it simple to choose the right shoes for your outfit. It is a smart way to add a professional boutique feel to your home wardrobe.
Material Required List Metal boot rack frame Wall mounting brackets Rubber coated boot clips Wood screws
Equipment Required List Power drill Spirit level Tape measure Pencil
DIY Instruction Step by Step
- Choose Your Spot: Select a narrow section of your closet wall. Ensure there is enough vertical clearance for your tallest boots to hang freely.
- Mark the Wall: Use a level to mark a straight vertical line where the rack will sit. Mark the locations for the top and bottom mounting brackets.
- Drill the Holes: Drill into the wall studs or use heavy duty anchors if studs are not available. Secure the mounting brackets to the wall.
- Assemble the Rack: Connect the metal vertical bars and horizontal tiers. Ensure all screws are tightened to prevent the rack from wobbling.
- Mount to the Wall: Lift the rack and secure it into the brackets. Check that it is perfectly vertical before doing the final tightening of the screws.
- Organize Your Boots: Use the clips to hang your boots by the tops. Arrange them by color or style to create a clean and organized display.
22 Lit Skateboard Display Wall
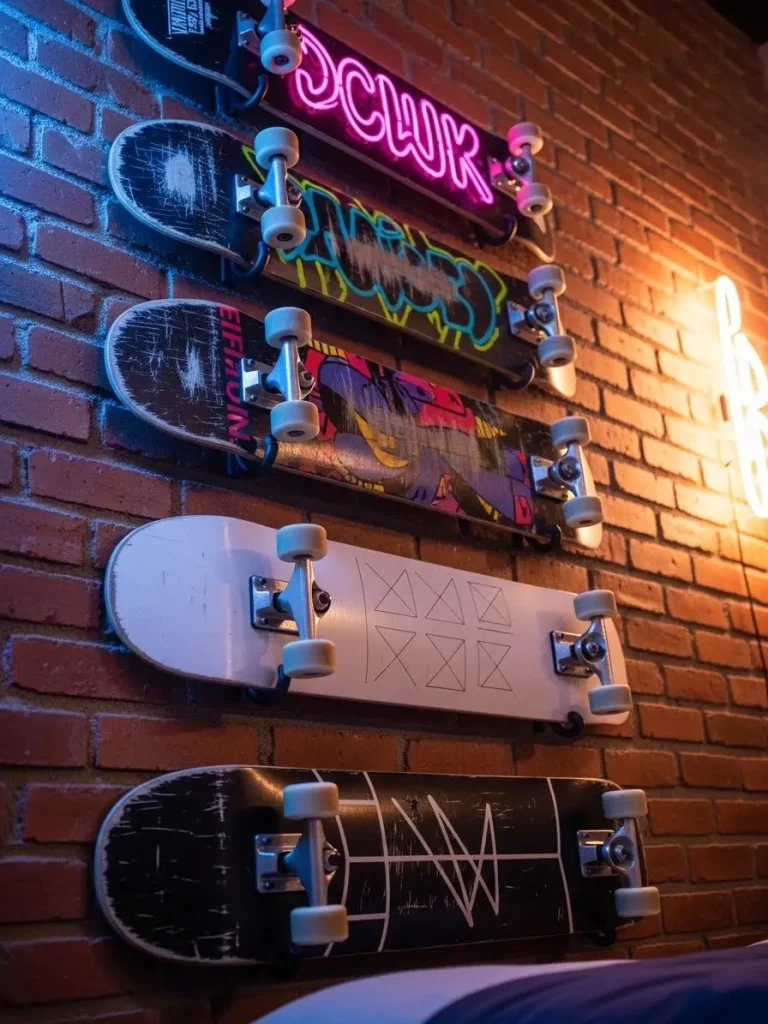
Skateboards are often tossed in a corner, but they can serve as vibrant wall art when displayed vertically. This setup uses a brick accent wall and custom lighting to highlight the graphics on each deck. It turns a collection of sports equipment into a high energy focal point for a bedroom or studio.
The neon lighting adds a modern, urban vibe to the room. By mounting the boards on the wall, you keep your floors clear and protect the wheels and decks from damage. It is a smart way to showcase your hobbies while adding a unique lighting element to your space.
Material Required List Skateboard wall mounts Neon LED light strips Brick style wall panels (optional) Wall anchors and screws
Equipment Required List Power drill Spirit level Tape measure Screwdriver Pencil
DIY Instruction Step by Step
- Prepare the Wall: If using brick panels, install them first. Ensure they are level and securely attached to the wall surface before mounting the boards.
- Mark the Layout: Decide how many boards you want to display and space them out evenly. Use a level to ensure the mounts will be perfectly horizontal.
- Install the Mounts: Screw the skateboard brackets into the wall. Most mounts hold the board by the truck holes, so ensure they are the correct size.
- Set Up the Lighting: Attach the neon LED strips behind or around the board positions. Route the wires carefully to hide them from view.
- Mount the Boards: Slide your skateboards into the brackets. Ensure they are secure and that the graphics are facing out for the best visual impact.
- Plug and Play: Turn on the lights and adjust the colors to match your decks. This setup creates a stunning glow that brings the whole wall to life.
23 Minimalist Vertical Bike Rack
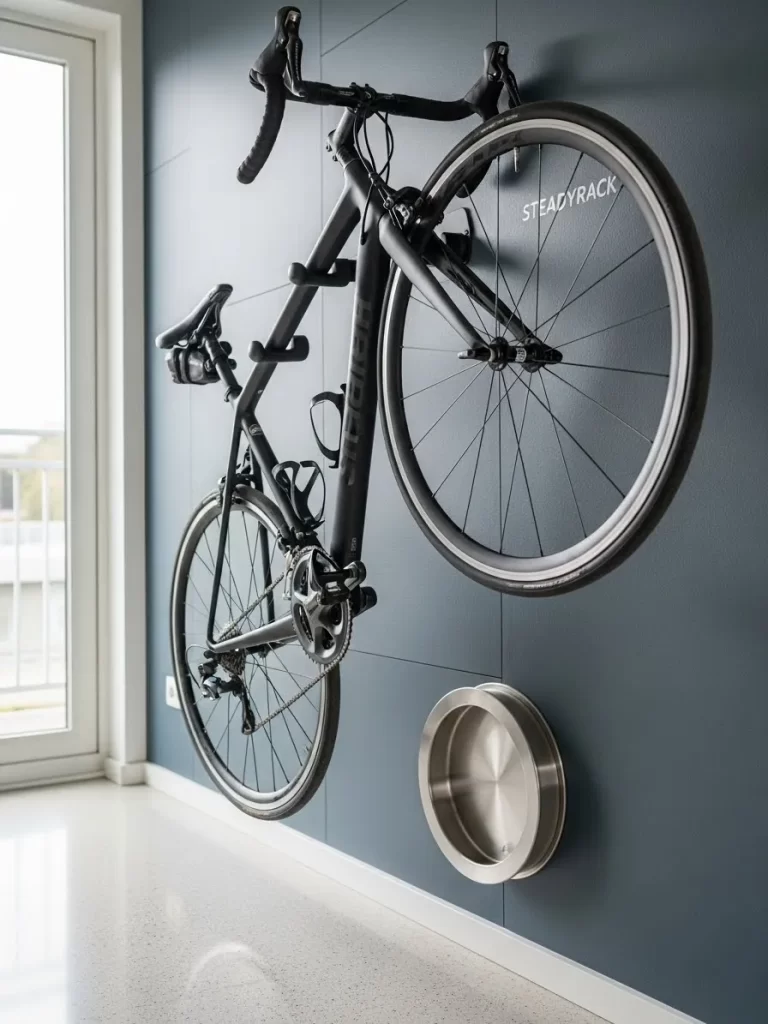
Bicycles are bulky and often block hallways when parked on the floor. This vertical rack lifts the bike onto the wall, turning it into a piece of industrial decor. The slim metal support holds the wheel securely, keeping the bike stable and out of the way of foot traffic.
The dark wall color makes the bike’s silhouette stand out, creating a modern and clean aesthetic. By storing your bike vertically, you reclaim several feet of floor space in your entryway or apartment. It is a smart solution for active urban dwellers who value both form and function.
Material Required List Vertical bike wall hook Rear wheel wall protector Heavy duty wall anchors Long wood screws
Equipment Required List Power drill Stud finder Spirit level Tape measure Pencil
DIY Instruction Step by Step
- Find a Stud: Bicycles are heavy, so the hook must be mounted into a wall stud. Use a stud finder to locate the center of the vertical beam.
- Determine the Height: Lift your bike and hold it against the wall. Mark where the front wheel touches the wall when the bike is vertical.
- Install the Hook: Screw the main bike hook into the wall stud at your marked height. Ensure the screws are driven deep into the wood for safety.
- Add the Wheel Protector: Mark where the rear wheel touches the wall. Attach a small plastic or metal plate there to prevent tire marks on your paint.
- Test the Hang: Lift the bike by the front wheel and hook it onto the mount. The bike should hang straight and stay close to the wall surface.
- Check for Stability: Give the bike a gentle push to ensure the hook is solid. Now your bike is safely stored and your floor is completely clear.
24 Heavy Duty Garage Storage System
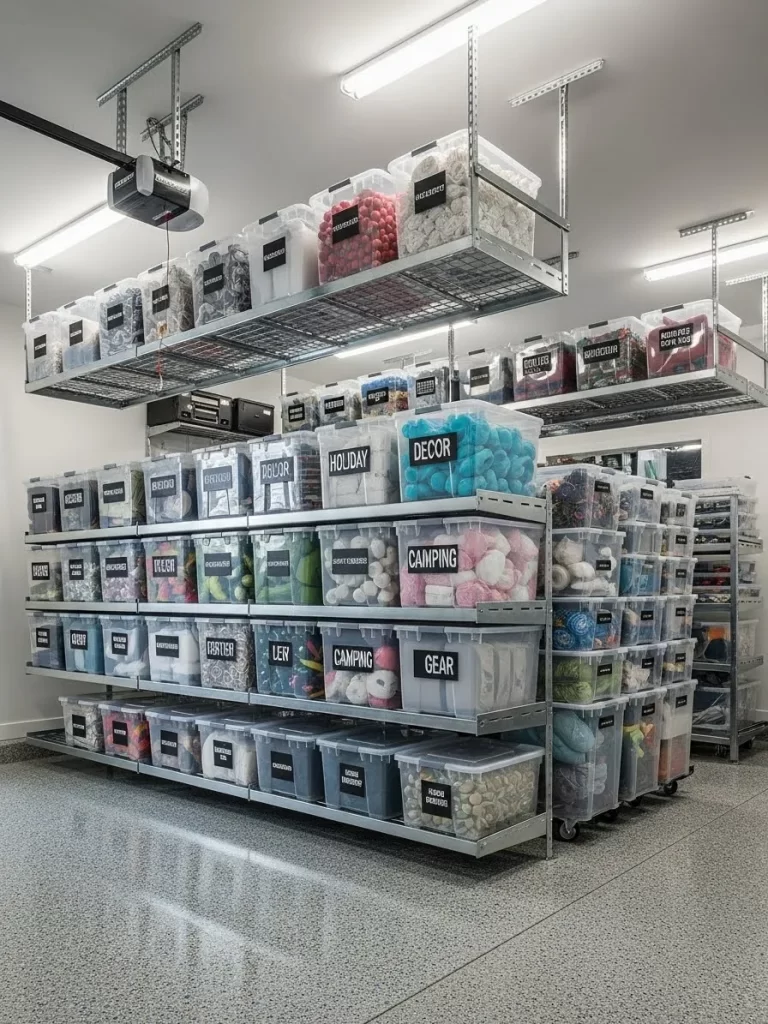
Garages often become a dumping ground for boxes, but vertical shelving can restore order. This system uses floor to ceiling metal racks and overhead hanging platforms to maximize every inch of space. Clear bins with bold labels allow you to find your camping gear or holiday decor in seconds.
The overhead racks utilize the space above the garage door that usually goes to waste. By lifting everything off the floor, you protect your items from moisture and make room to actually park your car. It is a smart way to manage large scale storage while keeping your garage looking professional.
Material Required List Industrial metal shelving units Overhead ceiling storage racks Clear plastic bins with lids Large adhesive labels Heavy duty masonry anchors
Equipment Required List Power drill with masonry bit Socket wrench set Ladder Spirit level Tape measure
DIY Instruction Step by Step
- Plan Your Zones: Decide which items go on the floor racks and which go overhead. Keep frequently used items at eye level on the standing racks.
- Install Floor Racks: Assemble the metal shelving units. Bolt them to the wall or floor to prevent them from tipping over when loaded with heavy bins.
- Mount Overhead Racks: Identify the ceiling joists and bolt the hanging rack brackets into the wood. This is a two person job for safety.
- Level the Platforms: Use a level to ensure the overhead racks are horizontal. Adjust the hanging height to leave enough room for your garage door to operate.
- Label Your Bins: Fill the clear bins with your items. Use a bold marker or label maker to clearly mark the contents on the front of each bin.
- Load the System: Place the heaviest bins on the bottom of the floor racks. Use the overhead space for seasonal items like holiday lights or tents.
25 Indoor Hydroponic Herb Tower
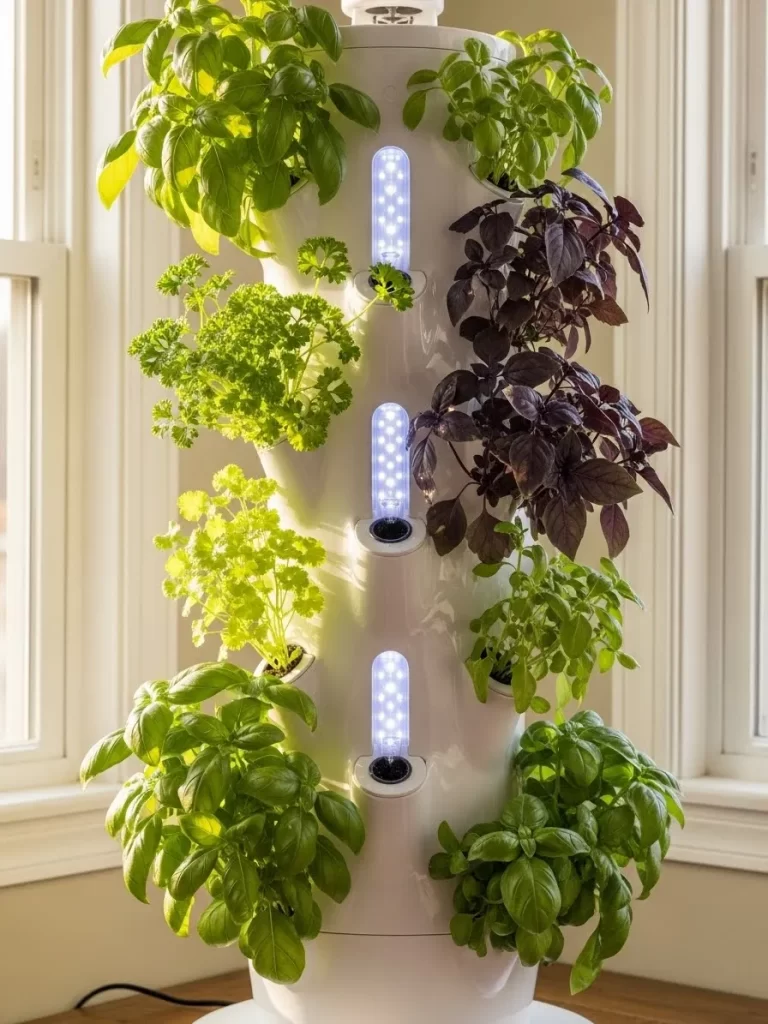
Fresh herbs are a luxury in a home kitchen, but they often take up too much counter space. This vertical hydroponic tower allows you to grow several varieties of basil, parsley, and mint in a tiny footprint. The built in LED lights ensure your plants get enough sun even in a dark corner of the room.
The sleek white design fits perfectly into a modern kitchen or dining area. Growing your herbs vertically keeps them away from pests and makes harvesting as simple as reaching out while you cook. It is a smart way to bring nature indoors while adding fresh flavor to every meal you prepare.
Material Required List Hydroponic tower kit Net pots and growing medium (like clay pebbles) Nutrient rich water solution LED grow light strips Herb seedlings or seeds
Equipment Required List Tape measure Cleaning cloth Small pitcher for filling
DIY Instruction Step by Step
- Assemble the Tower: Connect the vertical sections of the tower. Ensure each level is securely locked into the one below it to prevent leaks.
- Install the Lights: Attach the LED grow lights to the vertical supports. These should be positioned to provide even light to every plant level.
- Prepare the Water: Fill the base reservoir with water and add the recommended amount of liquid nutrients. This solution feeds the plants without soil.
- Plant Your Herbs: Place your seedlings into the net pots with the growing medium. Slide the pots into the openings on the side of the tower.
- Set the Timer: Plug in the pump and the lights. Most towers use a timer to ensure the plants get a cycle of water and light throughout the day.
- Maintain the System: Check the water level once a week and top it off as needed. Trim your herbs regularly to encourage full, bushy growth.
26 Hidden Mirror Jewelry Cabinet

Jewelry boxes often clutter up the top of a dresser and make it hard to find matching sets. This full length mirror opens to reveal a vertical organizer for all your necklaces, rings, and earrings. It turns a functional piece of bedroom furniture into a hidden high capacity storage center.
The integrated LED lighting inside ensures you can find the right piece even in the early morning. By mounting this on the wall, you save floor space and keep your valuables organized and tangle free. It is a smart way to streamline your morning routine while keeping your bedroom looking elegant.
Material Required List Wall mounted jewelry mirror cabinet Heavy duty wall anchors Long wood screws Microfiber cloth for the mirror
Equipment Required List Power drill Spirit level Stud finder Tape measure Pencil
DIY Instruction Step by Step
- Find the Best Height: Hold the cabinet against the wall so the mirror is at a height where you can see your full outfit. Mark the top edge.
- Locate Wall Studs: Use a stud finder to find the internal beams. This cabinet will be heavy once filled with jewelry, so it must be securely anchored.
- Mark Mounting Holes: Hold the cabinet backplate against the wall and use a level to ensure it is straight. Mark the screw holes with a pencil.
- Drill the Wall: Drill into the studs or use heavy duty anchors. Screw the mounting brackets into place and ensure they are solid.
- Hang the Cabinet: Lift the mirror unit and slide it onto the brackets. Check that it opens and closes smoothly without hitting any other furniture.
- Organize Your Gems: Fill the interior with your jewelry. Use the hooks for long necklaces to prevent tangles and the slots for rings and earrings.
27 Vertical Vinyl Record Library
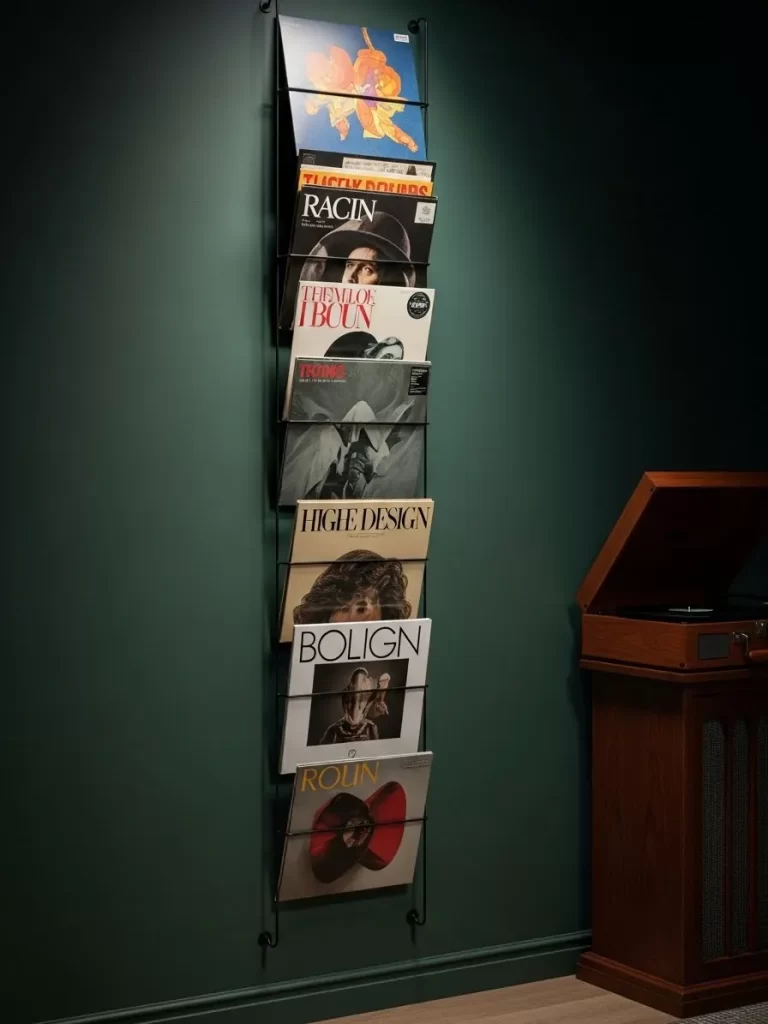
Storing vinyl records in crates on the floor makes it hard to browse your collection and takes up space. This vertical wire rack holds your favorite albums flat against the wall, turning the cover art into a rotating gallery. It is a smart way to use the height of a music room while keeping your records safe and accessible.
The dark green wall provides a sophisticated backdrop for the colorful album covers. This setup allows you to display your most played records at eye level while keeping your turntable area clear of clutter. It is a must have for any audiophile who values both sound and style.
Material Required List Vertical wire record rack Wall anchors and screws Spirit level Microfiber cloth
Equipment Required List Power drill Screwdriver Tape measure Pencil
DIY Instruction Step by Step
- Select Your Wall: Choose a spot near your record player that is away from direct sunlight and heat sources to prevent record warping.
- Mark the Height: Decide where the top record should sit. Mark a level line across the wall where you want to mount the rack.
- Drill the Holes: Hold the rack against your line and mark the screw holes. Drill into the wall and insert the appropriate anchors for your wall type.
- Secure the Rack: Screw the wire frame into the wall. Ensure it is tight against the surface so the records don’t lean too far forward.
- Arrange the Covers: Slide your favorite albums into the slots. You can organize them by genre or color to create a unique piece of wall art.
- Rotate Your Display: Change the records every few weeks to keep the display fresh. This also ensures that your most used albums are always within reach.
28 Elegant Corner Display Cabinet
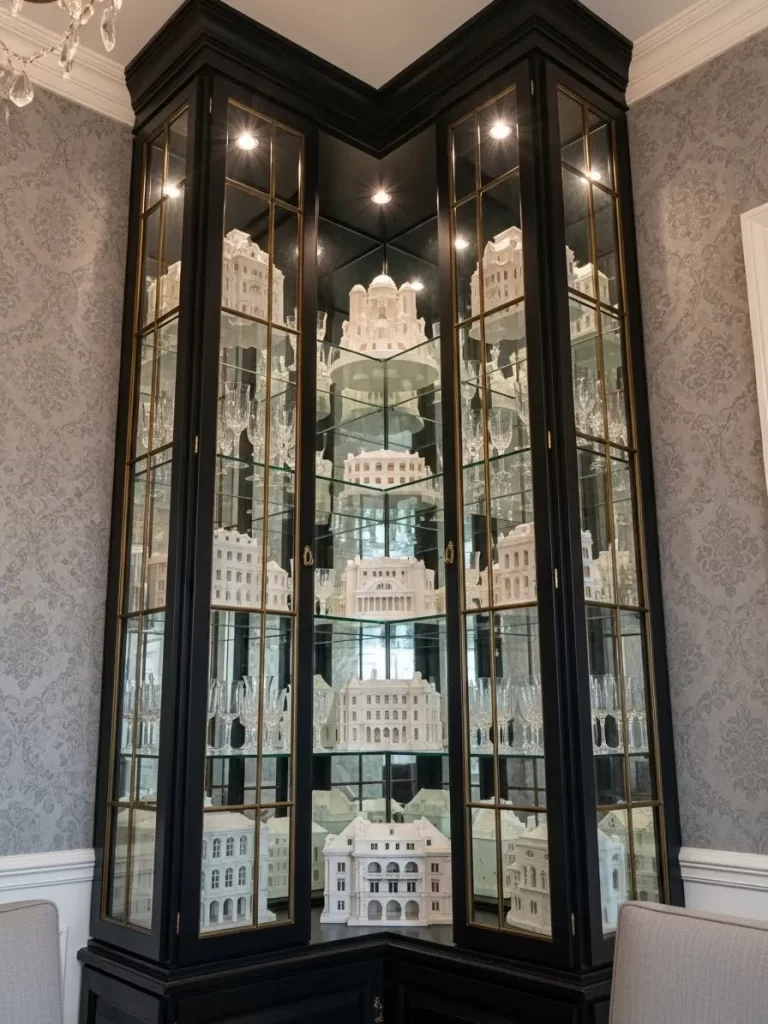
The corners of a dining room are often left empty, but a tall glass cabinet can turn them into a showcase. This elegant unit uses mirrored back panels and glass shelves to display fine china or architectural models. The vertical design draws the eye upward, making the room’s ceiling feel much higher.
Integrated spotlights at the top of the cabinet highlight the intricate details of your collection. By fitting into the corner, the cabinet uses space that would otherwise be wasted while providing massive storage. It is a smart way to add a touch of formal luxury to your home.
Material Required List Corner display cabinet unit Glass shelf inserts Integrated LED spotlights Glass cleaner and soft cloth Wall safety straps
Equipment Required List Power drill Spirit level Tape measure Screwdriver
DIY Instruction Step by Step
- Clear the Corner: Move any furniture or decor away from the corner to ensure the cabinet can sit flush against both walls.
- Assemble the Base: Follow the instructions to build the main frame of the cabinet. Ensure the base is level before you add the taller sections.
- Install the Shelves: Carefully slide the glass shelves into their supports. Ensure they are pushed all the way back to prevent them from slipping.
- Set Up the Lighting: Wire the spotlights into the top panel. Route the cable down the back of the cabinet to a nearby power outlet.
- Secure for Safety: Use a wall strap to anchor the top of the cabinet to a wall stud. This is vital for tall, narrow units to prevent tipping.
- Display Your Items: Arrange your collection on the glass shelves. Place the most intricate or reflective pieces near the lights for the best effect.
29 Pull Out Pantry Spice Rack
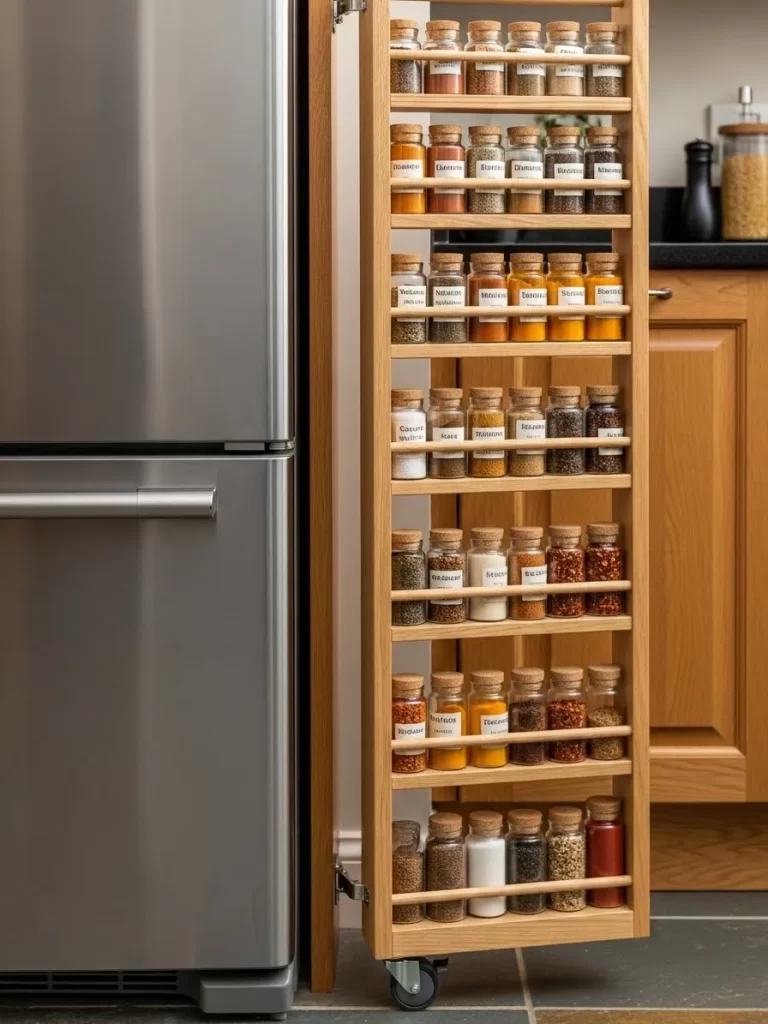
The narrow gap next to a refrigerator is one of the most wasted vertical spaces in any kitchen. This slim pull out rack turns that few inches of width into a high capacity spice pantry. The tiered shelves allow you to store dozens of jars in a way that is easy to browse and reach.
The wood finish and rolling wheels make it a seamless and functional addition to your cabinetry. It keeps your spices away from the heat of the stove, which helps them stay fresh longer. This is a smart way to maximize storage in even the smallest apartment kitchens.
Material Required List Slim rolling pantry kit or plywood Heavy duty casters (wheels) Wooden dowels for shelf lips Wood stain and clear coat Small metal handle
Equipment Required List Power drill Saw Spirit level Tape measure Pencil
DIY Instruction Step by Step
- Measure the Gap: Check the width and depth of the space next to your fridge. Ensure the rack will have enough room to roll out without hitting anything.
- Build the Frame: Construct a tall, narrow box out of plywood. The height should match your countertop or the top of your refrigerator.
- Install the Shelves: Space the internal shelves based on the size of your spice jars. Add small wooden dowels across the front of each shelf to act as a lip.
- Add the Wheels: Attach four heavy duty casters to the bottom of the rack. Ensure they are positioned to allow the rack to roll straight in and out.
- Finish the Wood: Sand the entire unit and apply a stain that matches your kitchen cabinets. Let it dry completely before adding the hardware.
- Mount the Handle: Screw a small metal handle onto the front panel. Load your spices onto the shelves and roll your new pantry into its home.
30 Massive Thread Organization Wall
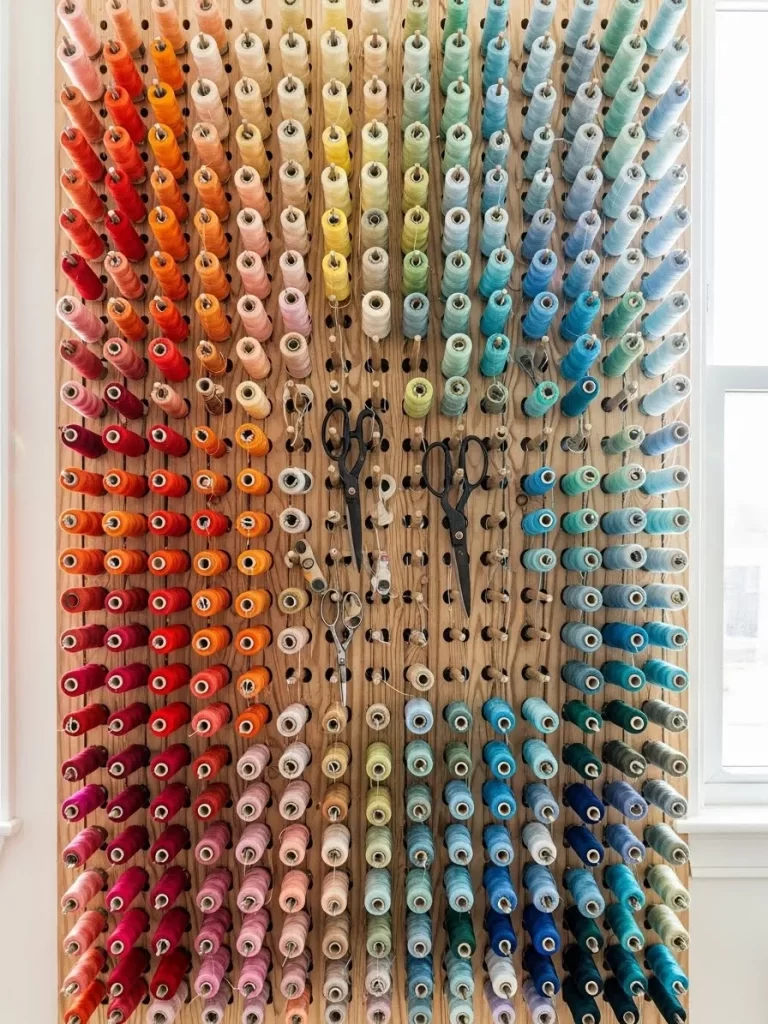
For anyone who sews or crafts, managing dozens of spools of thread can be a nightmare. This vertical pegboard turns a collection of thread into a vibrant, rainbow colored piece of wall art. It keeps every color visible and easy to reach, saving you from digging through messy drawers.
The natural wood grain of the pegboard provides a neutral backdrop that makes the colors pop. By mounting this on the wall, you free up valuable table space for your sewing machine and cutting mat. It is a smart way to stay organized while adding a creative energy to your craft room.
Material Required List Large plywood sheet Hundreds of small wooden pegs Wood glue Heavy duty wall mounting hardware Sandpaper
Equipment Required List Power drill with small bit Spirit level Tape measure Pencil Mallet
DIY Instruction Step by Step
- Map the Grid: Lay your plywood flat and mark a dense grid with points spaced 2 inches apart. This spacing is perfect for standard spools of thread.
- Drill the Holes: Drill a small hole at every mark. Ensure you don’t drill all the way through if you want the back to remain smooth.
- Glue the Pegs: Dip the end of each wooden peg in wood glue and tap it into a hole using a mallet. Ensure all pegs are sitting at the same angle.
- Sand the Surface: Once the glue is dry, sand the edges of the plywood and the tips of the pegs to remove any rough spots or splinters.
- Mount to the Wall: Secure the board to the wall studs using heavy duty screws. Use a level to ensure the rows of thread will be perfectly horizontal.
- Organize by Color: Place your spools on the pegs, arranging them in a gradient or rainbow pattern. This makes it easy to find exactly the shade you need.
31 Integrated Slide Out Pan Organizer
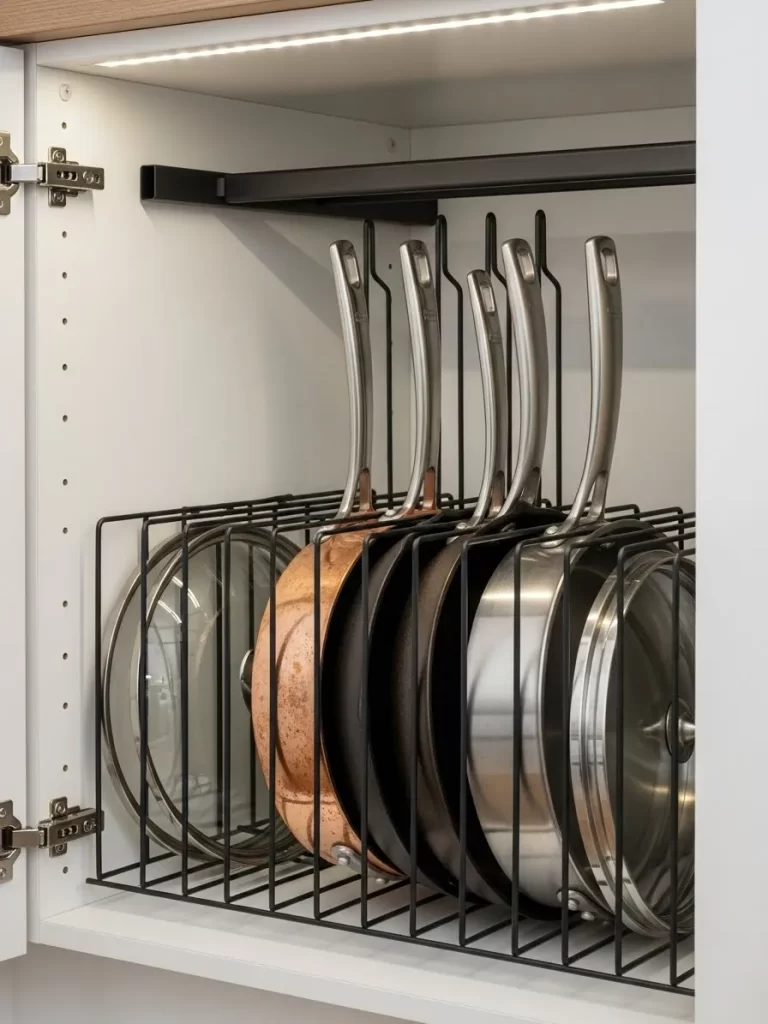
Searching for the right lid in a deep cabinet is a common kitchen struggle. This vertical slide out rack brings order to the chaos by storing pans and lids on their sides. The heavy duty metal frame glides smoothly on a track, ensuring every piece of cookware is visible and accessible.
Sleek black wire dividers separate each item to prevent scratches on delicate non stick surfaces. This system utilizes the full depth of your base cabinets while keeping the arrangement slim and upright. It turns a messy pile into a streamlined culinary station that makes cooking and cleanup significantly faster.
Material Required List Pull out cabinet organizer kit Heavy duty drawer slides Wooden base board (if not included in kit) Mounting screws Silicone bumper pads
Equipment Required List Power drill Measuring tape Screwdriver Level Pencil
DIY Instruction Step by Step
- Empty and Measure: Clear out your base cabinet and measure the internal width and depth. Ensure the organizer has at least a half inch of clearance on both sides to avoid hitting the door hinges.
- Mark the Tracks: Place the bottom tracks on the cabinet floor. Use a pencil to mark the screw holes, ensuring the tracks are perfectly parallel to the side walls so the unit glides straight.
- Secure the Base: Drill small pilot holes into the cabinet floor at your marks. Screw the tracks down firmly, making sure they do not wiggle when you apply pressure.
- Assemble the Rack: Connect the vertical wire dividers to the sliding base. Space them according to the thickness of your widest pans and shallowest lids for a custom fit.
- Test the Slide: Insert the rack into the tracks until it clicks into place. Pull it in and out several times to check for smooth movement and ensure it clears the cabinet door when fully extended.
- Load Your Cookware: Slide your pans into the slots with the handles facing upward or toward the front. Place matching lids in the adjacent narrow slots to keep sets together.
32 Ultra Slim Vertical Step Stool Niche

Most kitchens have a tiny gap between the cabinets and the wall that simply collects dust. This vertical storage solution utilizes that sliver of space to house a folding step stool. The custom fit bracket keeps the stool upright and hidden, ensuring it is always nearby when you need to reach high shelves.
The metallic finish of the hardware looks intentional and modern against dark cabinetry. It removes a bulky item from your floor or pantry while keeping it accessible for daily use. This is a smart way to reclaim dead space and maintain a clutter free, functional kitchen environment.
Material Required List Slim folding step stool Custom vertical wall bracket or heavy duty J hooks Wall anchors for drywall or masonry Decorative trim (optional)
Equipment Required List Power drill Stud finder Spirit level Tape measure Screwdriver
DIY Instruction Step by Step
- Measure the Gap: Measure the width of the space next to your cabinet. Ensure your chosen folding stool is thin enough to slide in and out without scraping the paint.
- Locate the Stud: Use a stud finder on the wall inside the gap. A step stool is relatively heavy, so the mounting bracket should be secured into a vertical wood stud if possible.
- Position the Bracket: Hold your stool against the wall to determine the best hanging height. Mark the screw holes for the bracket so the stool sits slightly above the baseboard.
- Install Hardware: Drill pilot holes and screw the bracket into the wall. If you cannot hit a stud, use high quality toggle bolts that can support at least fifty pounds of weight.
- Check for Clearance: Slide the stool onto the bracket. Ensure it does not protrude past the front of the cabinets and that the bracket holds it securely upright.
- Add Protection: Place small felt or silicone pads on the side of the stool that faces the cabinet. This prevents metal on wood scratching during frequent use.
33 Built in Laundry Command Center
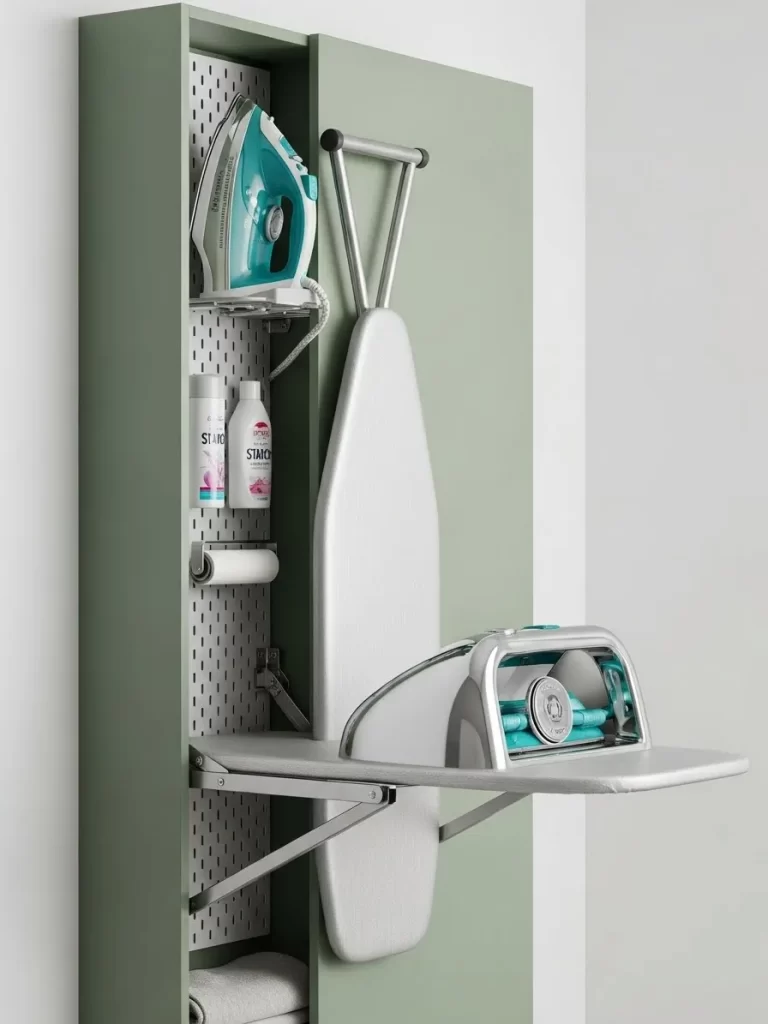
Laundry rooms are often cramped, leaving no room for a full sized ironing board. This vertical wall cabinet hides a fold down ironing station and provides dedicated spots for your iron and starch. The sage green exterior blends into the wall, keeping the room looking calm and organized.
Inside, a pegboard backing allows you to customize the placement of small tools and rolls. The fold out table provides a sturdy surface for quick touch ups before being tucked away. It is a smart, all in one solution that keeps your laundry essentials organized in a very small footprint.
Material Required List Recessed or wall mount ironing board cabinet Pegboard hooks and bins Heat resistant iron holster Wood screws and heavy duty anchors
Equipment Required List Power drill Level Stud finder Tape measure Screwdriver
DIY Instruction Step by Step
- Choose Your Height: Determine the comfortable ironing height, usually around thirty six inches. Mark the wall where the bottom of the cabinet will sit.
- Find the Framing: Use a stud finder to locate the vertical supports in your wall. This cabinet must be screwed into at least two studs to handle the downward pressure of ironing.
- Mount the Cabinet: Hold the cabinet against the wall and use a level to ensure it is straight. Drive long screws through the back of the unit into the wall studs.
- Install the Hardware: Attach the folding leg and hinge mechanism to the ironing board according to the manufacturer’s guide. Ensure the board locks firmly in the horizontal position.
- Organize the Interior: Place the heat resistant holster in the top section for the iron. Use the pegboard area to hang scissors, lint rollers, and spray bottles.
- Add Finishing Touches: Ensure the cabinet door opens and closes smoothly. You now have a professional grade pressing station that disappears when the task is done.
34 Floating Window Herb Garden
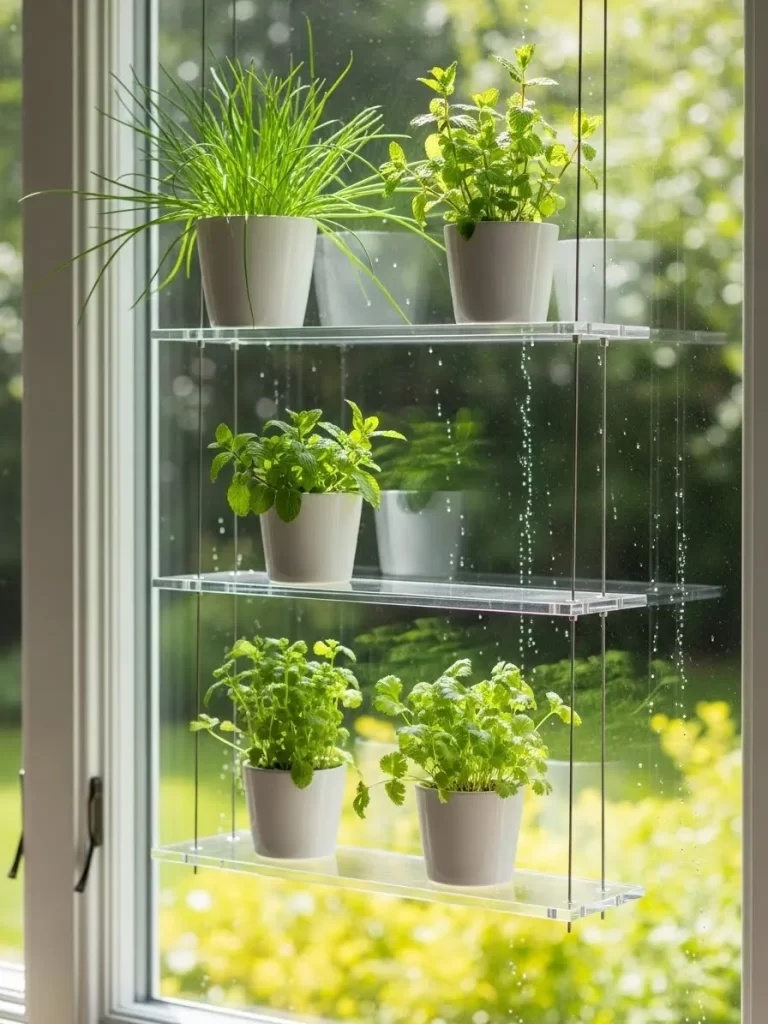
Large windows offer the best light for plants but often lack a sill wide enough for pots. This vertical hanging system uses clear acrylic shelves suspended by thin cables to create a floating garden. It allows your herbs to soak up maximum sunlight without blocking your view of the outdoors.
The transparent design makes the greenery appear to hover in mid air, adding a fresh, ethereal vibe to your kitchen. It utilizes the entire height of the window glass, doubling or tripling your growing space. This setup keeps your fresh basil and mint at eye level, making it easy to snip what you need for dinner.
Material Required List Thick clear acrylic or plexiglass sheets Steel aircraft cable or heavy duty fishing line Cable crimps and hardware Ceiling hooks or top of frame brackets Small lightweight white pots
Equipment Required List Power drill with acrylic bit Pliers or crimping tool Tape measure Level Ladder
DIY Instruction Step by Step
- Cut the Shelves: Measure the width of your window and cut the acrylic sheets to fit inside the frame. Leave an inch of space on each side for the cables.
- Drill the Corners: Use a specialized acrylic drill bit to make holes in the four corners of each shelf. Going slowly prevents the plastic from cracking or melting.
- Set the Cables: Attach your hooks to the top of the window frame or the ceiling. Thread the cables through the hooks and let them hang down.
- Level the Shelves: Slide the first shelf onto the cables. Use cable crimps or small clamps underneath the shelf to hold it at the desired height, checking it with a level.
- Space the Rows: Repeat the process for the remaining shelves, leaving enough vertical room for your herbs to grow upward. Ensure the cables stay taut.
- Add Your Greenery: Place your potted herbs onto the shelves. The clear surface allows light to reach the bottom plants, ensuring your whole vertical garden thrives.
35 Corner Plushie Hammock
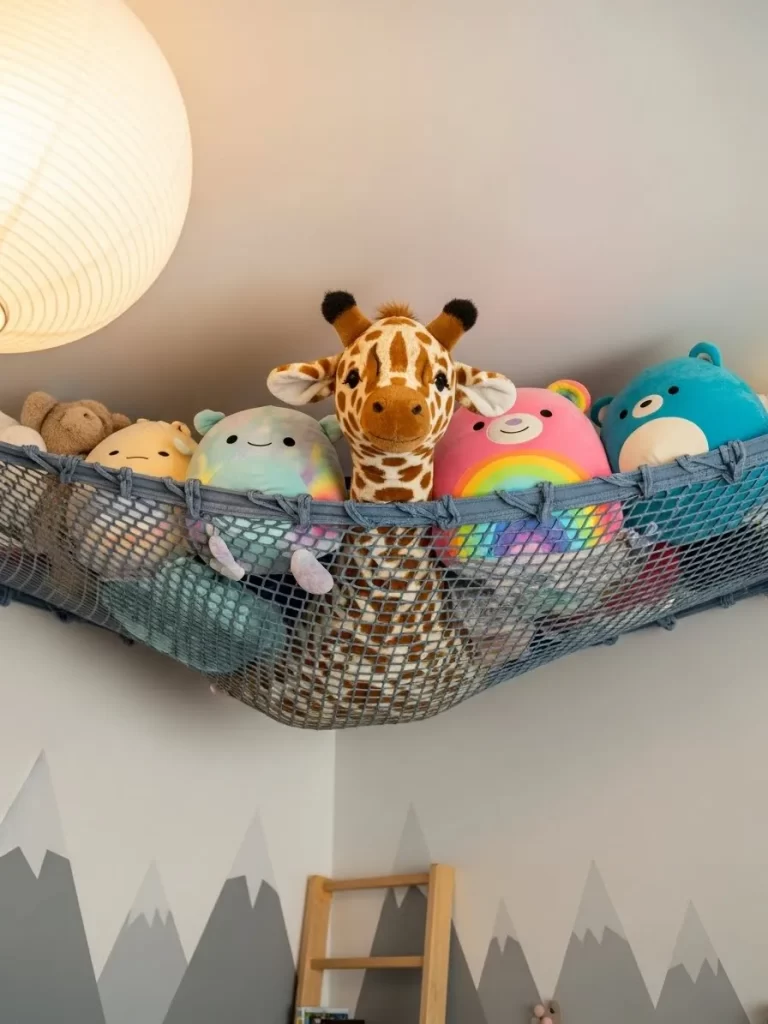
Nurseries often struggle with an overflow of soft toys that end up scattered across the carpet. This vertical corner hammock utilizes the highest point of the room to keep plushies organized and out of the way. The soft blue mesh stretches to accommodate a surprising number of stuffed animals.
By using the corner, you turn a wasted architectural space into a colorful and functional storage area. It keeps the toys visible for the children while ensuring the floor remains clear for play. This simple addition adds a whimsical touch to the decor and makes evening cleanup a breeze.
Material Required List Elastic mesh or netting fabric Three heavy duty wall hooks Fabric binding or ribbon Wall anchors
Equipment Required List Power drill Measuring tape Pencil Ladder
DIY Instruction Step by Step
- Pick the Corner: Select a corner of the room that is away from light fixtures or ceiling fans for safety. Mark a spot in the corner and two spots on the adjacent walls.
- Check the Height: Ensure the hammock is high enough to be out of the way but low enough that the toys are still a visible part of the room’s theme.
- Install the Anchors: Drill holes at your three marks. Insert plastic wall anchors to ensure the hooks do not pull out of the drywall when the hammock is full.
- Screw in Hooks: Twist your decorative hooks into the anchors. Ensure the openings of the hooks face upward to hold the netting securely.
- Hang the Net: Stretch the corners of your mesh over the three hooks. If the netting is too loose, you can tie small knots in the corners to shorten the reach.
- Load the Plushies: Place the largest stuffed animals in the center and tuck smaller ones around the edges. The weight will naturally pull the mesh into a secure pouch shape.
36 Reclaimed Wood Towel Ladder
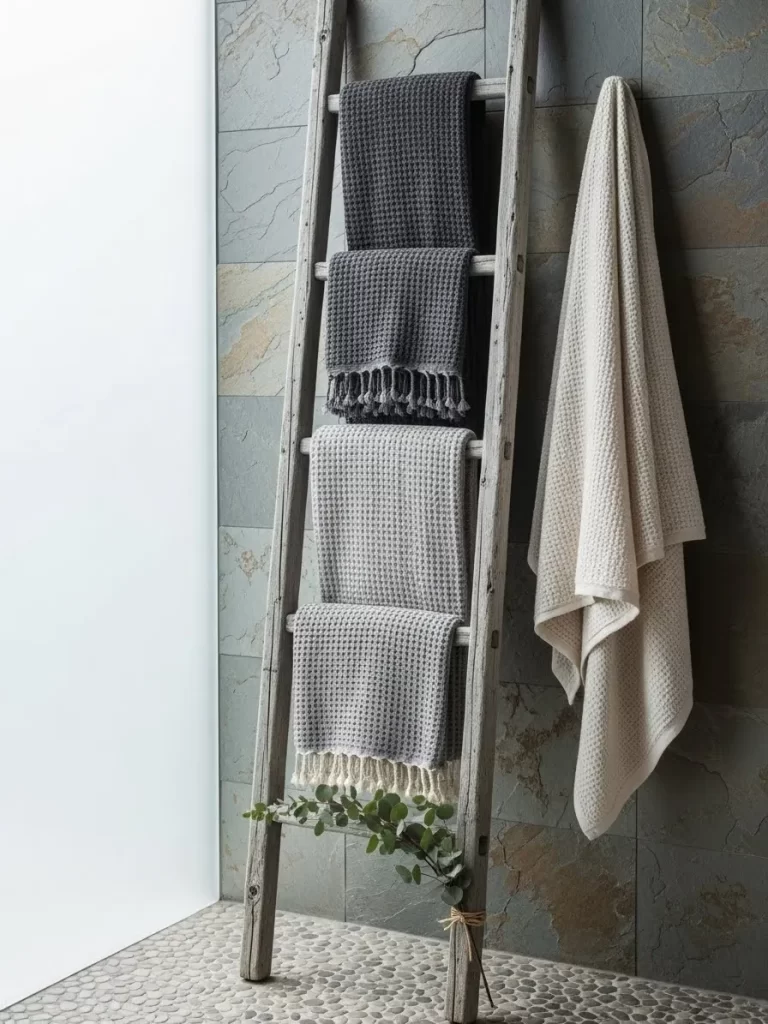
Bathrooms often lack enough wall hooks for a full family’s worth of towels. This vertical towel ladder leans against the wall, providing multiple rungs of storage in a very narrow footprint. The weathered grey wood adds a rustic, spa like texture to the room while keeping linens dry.
This mobile solution requires no drilling into expensive tile or stone walls. You can easily move it to different corners of the room as your needs change. It is a smart way to display decorative textiles while ensuring your daily towels are always within easy reach.
Material Required List Two long 2×4 boards (for sides) Four or five 1×2 dowels or boards (for rungs) Wood glue Outdoor grade wood sealer (to resist humidity) Rubber feet for the bottom
Equipment Required List Miter saw or hand saw Power drill Measuring tape Sandpaper Pencil
DIY Instruction Step by Step
- Cut the Sides: Cut your long side boards to about six feet. Angle the bottom ends at ten degrees so the ladder leans safely against the wall.
- Prepare the Rungs: Cut your cross pieces to a uniform width, typically around eighteen inches. Sand all edges thoroughly to prevent splinters from snagging your towels.
- Mark the Intervals: Lay the side boards flat and mark the positions for the rungs, spacing them about twelve inches apart. Ensure the marks are identical on both sides.
- Assemble the Frame: Apply wood glue to the ends of the rungs and screw them into the side boards at your marks. Countersink the screws for a cleaner look.
- Seal the Wood: Apply a moisture resistant sealer or stain. This step is vital in a bathroom to prevent the wood from warping or growing mold from damp towels.
- Add Grip: Attach rubber pads to the bottom feet and the top points where the ladder touches the wall. This prevents sliding and protects your surfaces.
37 Vertical Workshop Tool Wall

A cluttered workbench makes any DIY project feel overwhelming and slow. This vertical tool wall uses a custom cleat system to keep drills, chisels, and saws perfectly organized and visible. The natural wood slats allow you to move tool holders around as your collection grows.
By moving your heavy equipment onto the wall, you free up the entire surface of your workbench for actual building. Dedicated slots for each tool mean you never have to hunt for a specific bit again. It turns a messy garage or basement into a professional grade maker space.
Material Required List 3/4 inch plywood for the backing 1×3 pine boards for cleats Wood screws and glue Specialized tool holsters or scrap wood for custom holders
Equipment Required List Table saw or circular saw Power drill Level Stud finder Measuring tape
DIY Instruction Step by Step
- Install the Backing: Screw a large sheet of plywood directly into the wall studs. This provides a solid foundation for holding the weight of heavy power tools.
- Cut the Cleats: Rip your pine boards at a forty five degree angle down the center. This creates two interlocking strips—one for the wall and one for the tool holder.
- Mount the Wall Strips: Screw several rows of the angled boards horizontally across the plywood backing. Ensure the angled hook faces upward and away from the wall.
- Build Tool Holders: Create small wooden boxes or brackets for your specific tools. Attach the matching interlocking wood strip to the back of each holder.
- Hang and Arrange: Hook your tool holders onto the wall strips. The gravity of the tool holds the two angled pieces of wood together in a secure lock.
- Label Everything: Use a marker or label maker to identify where each tool belongs. This ensures your vertical workshop stays organized even after a long day of building.
38 Floating Window Sill Display Shelf
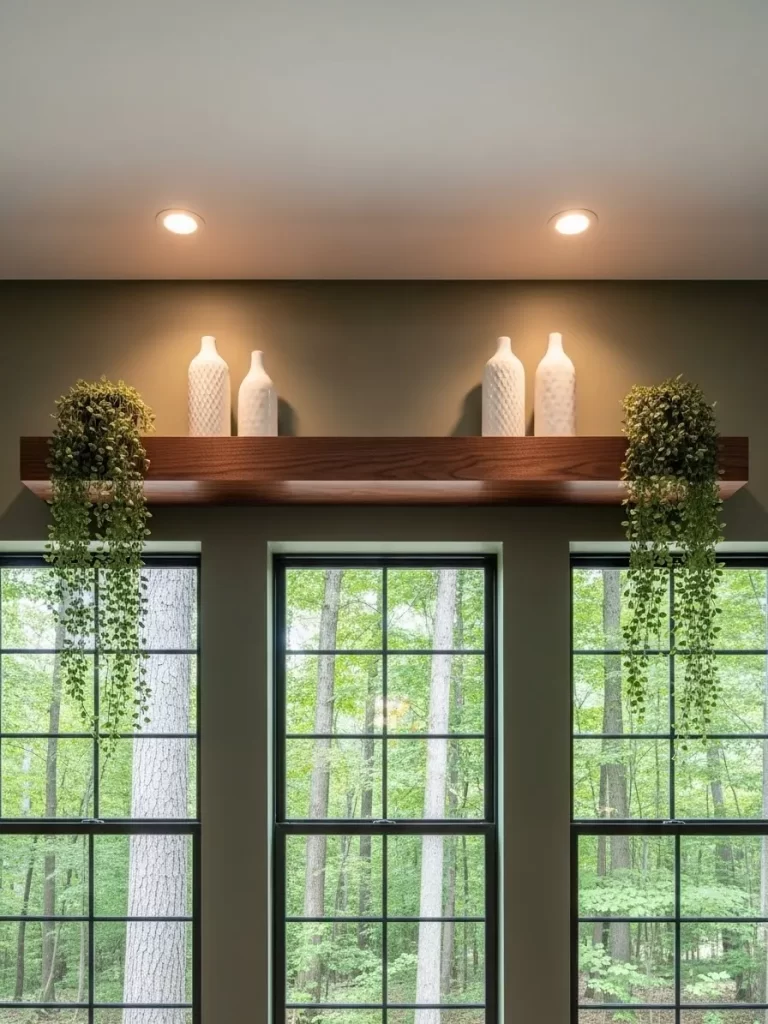
The space above a window is a prime vertical real estate that usually remains empty. This long, thick floating shelf utilizes that area to display white ceramic vases and trailing plants. The dark wood finish grounds the light coming through the window, creating a sophisticated frame for the view.
Integrated downlighting underneath the shelf highlights the greenery and provides soft ambient light in the evening. It is a smart way to add a gallery feel to a living room or kitchen without cluttering the walls at eye level. This setup draws the gaze upward, making the room feel grander.
Material Required List Thick solid wood beam or hollow box shelf Heavy duty hidden floating shelf brackets Wood stain and sealant Small puck lights or LED strip High quality wall anchors
Equipment Required List Power drill Long level Stud finder Tape measure Pencil
DIY Instruction Step by Step
- Locate the Header: Use a stud finder to find the solid wood header above the window frame. This is the strongest point to mount a heavy shelf.
- Mark the Line: Use a long level to draw a perfectly straight line above the window. Ensure the shelf will be centered and has enough clearance from the ceiling.
- Install the Brackets: Screw the heavy duty metal brackets into the wall header. These brackets must be perfectly level to prevent the shelf from tilting or sagging.
- Prepare the Shelf: If using a solid beam, drill deep holes in the back to match the bracket rods. If using a box shelf, ensure the internal frame is secure.
- Slide into Place: Push the wood shelf onto the bracket rods. Use a rubber mallet to gently tap it flush against the wall for a seamless, floating look.
- Style and Light: Attach your lights to the underside of the shelf. Place your vases and trailing plants on top, ensuring the weight is distributed evenly across the beam.
39 Designer Vertical Shoe Gallery

Small closets often lead to shoes being kicked into a dark pile on the floor. This floor to ceiling shoe gallery uses back lit vertical bays to turn your footwear into a organized display. The white shelving and gold wallpaper background make your closet feel like a high end fashion boutique.
Every pair has a dedicated home, preventing scuffs and keeping your shoes in pristine condition. The vertical orientation allows you to store dozens of pairs in a very narrow width. It makes choosing your outfit a joy and ensures your floor remains completely clear and easy to clean.
Material Required List Pre fabricated tall shelving units LED tape lighting with diffusers Decorative wallpaper or paint for the back panel Edge banding for a professional finish Furniture safety straps
Equipment Required List Power drill Level Tape measure Utility knife (for wallpaper) Screwdriver
DIY Instruction Step by Step
- Prepare the Backing: Apply your gold wallpaper or chosen paint to the wall before installing the shelves. This is much easier than trying to fit it into small cubbies later.
- Assemble the Towers: Build the tall, narrow shelving units. Use edge banding on any exposed plywood edges to give the unit a high end, finished look.
- Install the Lighting: Route your LED strips vertically along the inside front edges of the shelves. Use plastic diffusers to create a soft, even glow rather than harsh dots.
- Secure to the Wall: These towers are tall and thin. You must use furniture safety straps or screw the top of the unit directly into a wall stud to prevent tipping.
- Adjust the Heights: Set your shelf heights based on your shoes. Leave more room for boots at the bottom and less for flats or sneakers at the top.
- Curate the Display: Arrange your shoes by color or style. The bright lighting and organized vertical layout will make even your oldest sneakers look like a work of art.
Key Takeaways for Success
First, always look for structural support. Heavy shelves need wall studs to stay safe and solid. Never hang heavy items on drywall alone.
Second, keep your most used items at eye level. This makes your daily routine faster and easier. Store seasonal or rarely used items near the ceiling.
Third, use lighting to make storage look like art. Small LED strips can turn a simple rack into a beautiful feature. This adds depth and warmth to any room.
Fourth, choose materials that match your style. Wood brings warmth while metal adds an industrial feel. Consistency makes the storage feel like part of the original design.
Conclusion
Building a more organized home does not have to be a massive task. You can start with just one corner or one wall. Every small project adds more breathing room to your daily life.
Vertical space is the most valuable asset in any small home. These thirty nine ideas prove that you do not need more square footage. You simply need to look at your walls with a new perspective.
Take your time with each project. Follow the steps and enjoy the new sense of order in your house. Your floors will thank you for the extra room to move.