
Your front door serves as the initial greeting for every visitor who approaches your home. A plain entrance feels like a missed opportunity to share your personality and warmth. Valentine Day offers the best excuse to swap out mundane wreaths for something far more romantic and creative.

Crafting your own decor allows you to express affection in a way store bought items simply cannot match. You can turn a simple piece of wood or a bunch of balloons into a masterpiece of love. These projects transform your porch from a quiet walkway into a festive celebration.
Friends and neighbors will appreciate the effort you put into making the neighborhood feel a bit more cheerful. You do not need a massive budget to create a high impact look. Most of these ideas use everyday items found in your local craft store or even around your house.
1. Floating Heart Balloon Backdrop
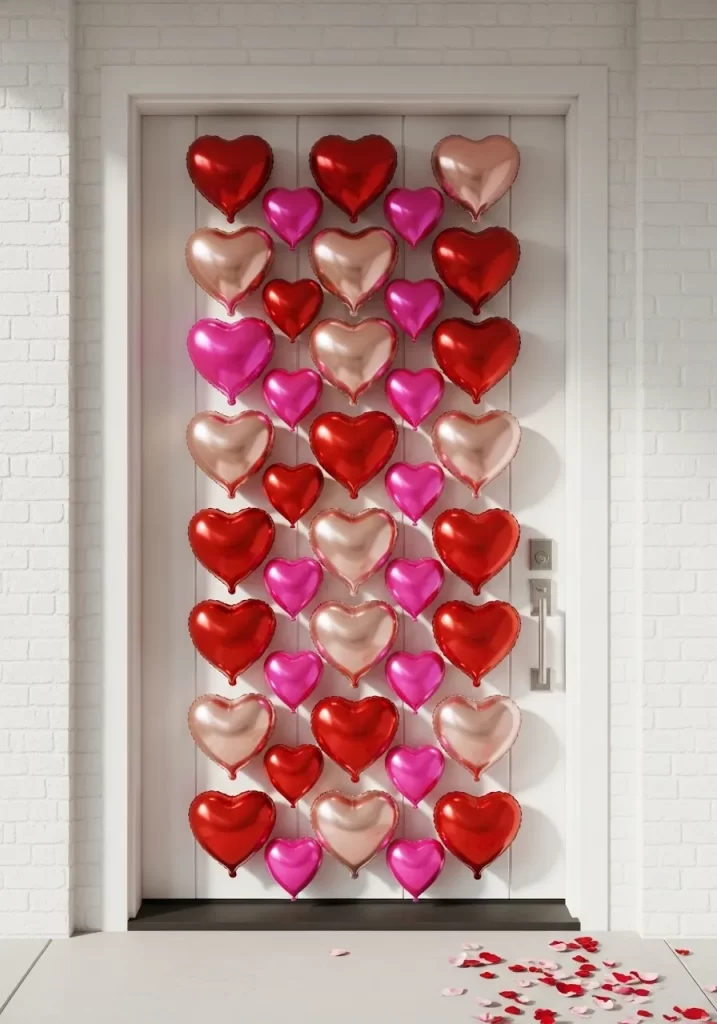
Transform your entryway into a vibrant celebration of affection with this stunning balloon display. Using a mix of metallic red, soft rose gold, and bright pink heart shapes creates a multidimensional look that instantly grabs attention.
This design replaces traditional wreaths with something more modern and playful. Visitors will feel a warm welcome before they even knock on the door. The glossy finish of the foil reflects light beautifully during the day. It offers a high impact visual without requiring a massive budget. Setting up this display is remarkably simple and rewarding. You can customize the color palette to match your home exterior or personal style. It provides a cheerful pop of color against neutral doors. This project turns a plain entrance into a festive photo opportunity for friends and family.
Materials Required
- Heart shaped foil balloons in red, pink, and rose gold
- Double sided removable mounting tape or glue dots
- Decorative silk flower petals for the floor
Equipment Required
- Handheld balloon pump or electric inflator
- Measuring tape
- Level tool
DIY Instructions Step by Step
- Clean your door surface thoroughly with a damp cloth to ensure the adhesive sticks properly.
- Inflate all your heart balloons to a uniform size using the pump but avoid overfilling them to prevent popping.
- Lay the balloons out on the floor in front of the door to plan your color pattern and spacing.
- Start at the top center of the door and apply a piece of mounting tape to the back of the first balloon.
- Press the balloon firmly against the door and hold for five seconds.
- Continue adding balloons in vertical rows, alternating colors and sizes to create a balanced look.
- Use the level tool occasionally to make sure your rows stay straight as you work your way down.
- Leave enough space around the door handle and lock so you can still use them easily.
- Scatter the silk flower petals on the porch floor at the base of the door to complete the romantic scene.
2. Be Mine Striped Round Sign
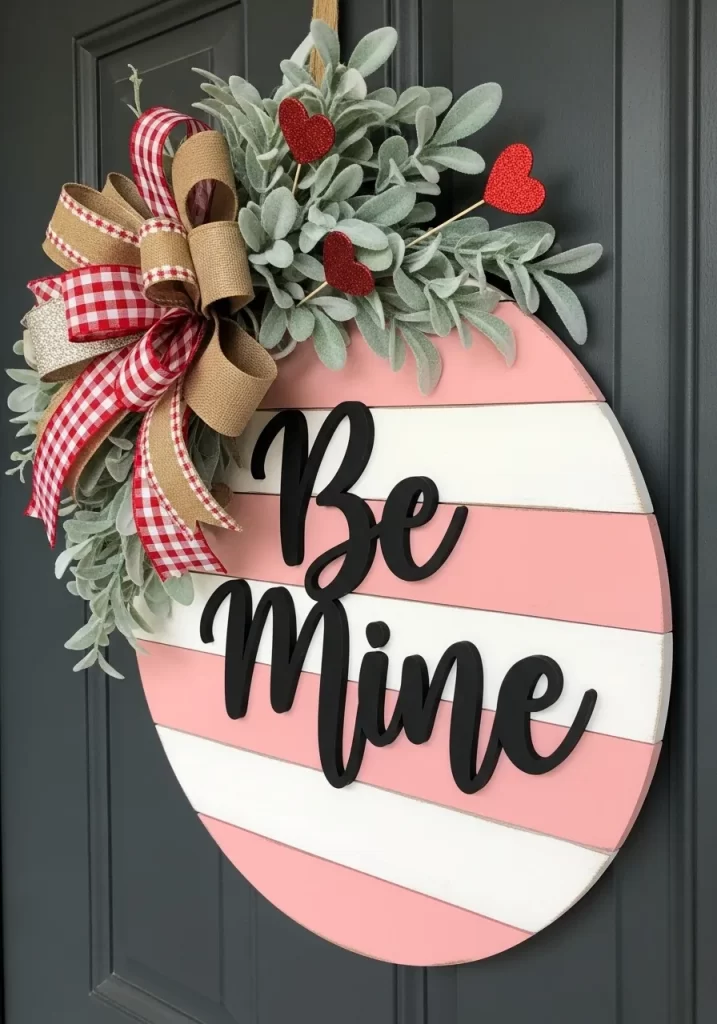
Brighten your entryway with a charming wooden round that screams farmhouse chic. This decoration features a soft pink and white striped background that feels both modern and nostalgic. A bold Be Mine script in black adds a sophisticated touch to the playful colors. Fluffy green foliage and a multi textured burlap bow frame the top beautifully.
Tiny red glitter hearts peek out from the greenery to add a hint of sparkle. It offers a stylish alternative to traditional floral wreaths. The contrast between the dark door and the bright sign ensures your home stands out on the block. It invites guests into your home with a sweet and trendy message.
Materials Required
- Unfinished circular wood plaque
- Pink and white acrylic outdoor paint
- Black wooden or laser cut Be Mine letters
- Artificial lambs ear or eucalyptus stems
- Burlap and red checkered ribbon
- Small red glitter heart picks
- Painter tape
Equipment Required
- Paint brushes or foam rollers
- Hot glue gun and glue sticks
- Heavy duty twine for hanging
- Scissors
DIY Instructions Step by Step
- Sand your wood plaque until the surface is smooth to the touch.
- Paint the entire front of the circle with white paint and let it dry completely.
- Apply strips of painter tape horizontally across the wood to create evenly spaced stripes.
- Fill the exposed gaps with pink paint to create the striped pattern.
- Remove the tape carefully while the paint is still slightly tacky for clean lines.
- Center your black letters on the lower half of the circle and secure them with hot glue.
- Gather your greenery and glue it to the top left curve of the wooden round.
- Create a large multi loop bow using your different ribbons and glue it over the stem ends of your greenery.
- Insert the small red heart picks into the leaves for a finished look.
- Staple or glue a loop of twine to the back for easy hanging.
3. Ombre Rose Heart Installation
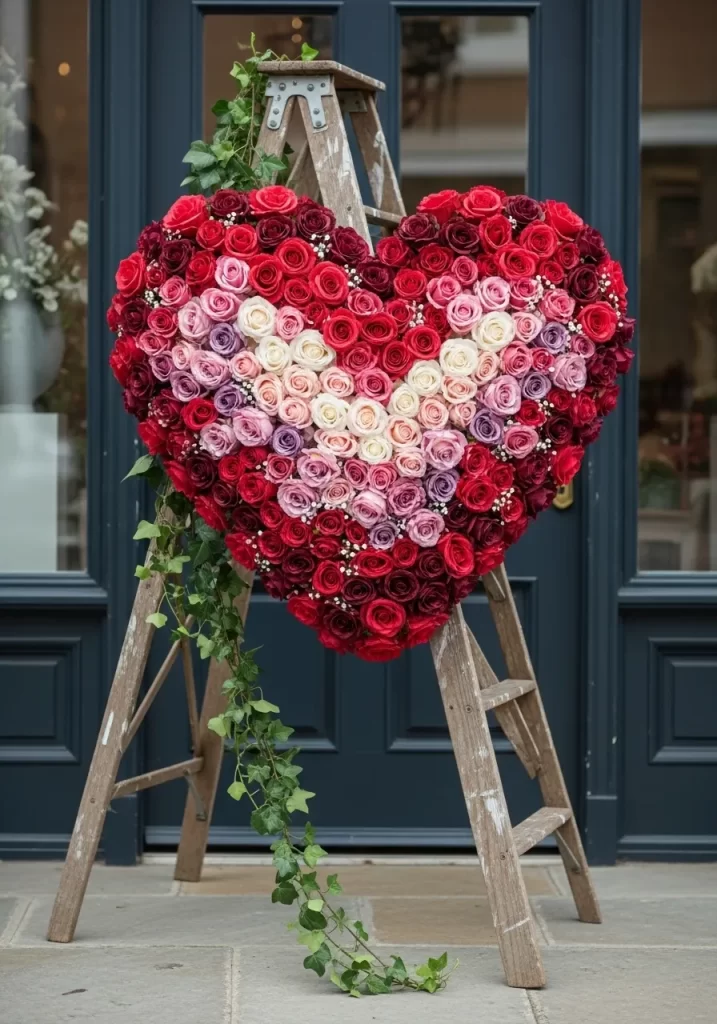
Make a grand statement with a massive heart shaped floral display that looks like it came from a professional boutique. This piece uses hundreds of roses to create a breathtaking ombre effect. The colors transition from deep crimson on the outer edges to soft pinks and creams in the center. Trailing ivy vines add an organic feel to the structured heart shape.
Propping this against an old ladder adds a rustic, vintage touch to your porch. It provides a lush and romantic atmosphere that captivates anyone who walks by. This decoration serves as a stunning backdrop for Valentine Day photos.
Materials Required
- Large heart shaped foam board or wire frame
- Faux roses in various shades of red, dark pink, light pink, and cream
- Artificial ivy or vine greenery
- Wooden display ladder
Equipment Required
- Wire cutters or scissors
- Hot glue gun
- Zip ties
DIY Instructions Step by Step
- Decide on the size of your heart and cut your foam board or prepare your wire frame.
- Sort your rose heads by color so you can easily grab the next shade in the ombre sequence.
- Start at the outermost edge of the heart and glue a row of the darkest red roses.
- Move inward by one row and begin gluing the next lightest shade of red or dark pink.
- Continue this process of moving toward the center while using lighter shades of pink with each new row.
- Fill the very center of the heart with your cream or white roses to complete the ombre transition.
- Ensure no gaps are visible between the flower heads for a full, professional appearance.
- Drape the ivy vines around one side of the heart and let them hang down naturally.
- Secure the heart to your wooden ladder using zip ties or strong wire so it stays upright against the wind.
4. Minimalist Peony Heart Wreath

Capture elegance with a simple yet striking heart shaped wreath that balances bold color with soft textures. This design features large, vibrant red beads that form the iconic heart silhouette. The smooth finish of the beads provides a clean and polished aesthetic. A cluster of lush white peonies and dark green leaves rests on one side to break the symmetry beautifully.
It looks sophisticated against modern wood slat doors or minimalist exteriors. This project proves that you do not need a lot of clutter to show off your holiday spirit. It remains timeless and can be used for years to come.
Materials Required
- Thick gauge craft wire
- Large red wooden or plastic beads
- Artificial white peony blossoms
- Silk green leaves
Equipment Required
- Pliers
- Hot glue gun
- Clear fishing line or a small hook
DIY Instructions Step by Step
- Cut a long piece of craft wire and bend it into a sharp V shape for the bottom of the heart.
- Thread your red beads onto both sides of the wire until you reach the desired height.
- Curve the top of each wire side inward to form the classic heart arches.
- Twist the two wire ends together at the top center to lock the beads in place.
- Use your pliers to tuck any sharp wire ends inward so they do not scratch your door.
- Take three or four white peony heads and glue them to the left side of the heart.
- Tuck and glue green leaves behind the flowers to add depth and hide the wire.
- Add a small loop of fishing line to the top twist for a nearly invisible hanging solution.
5. Rustic Heart Porch Plank
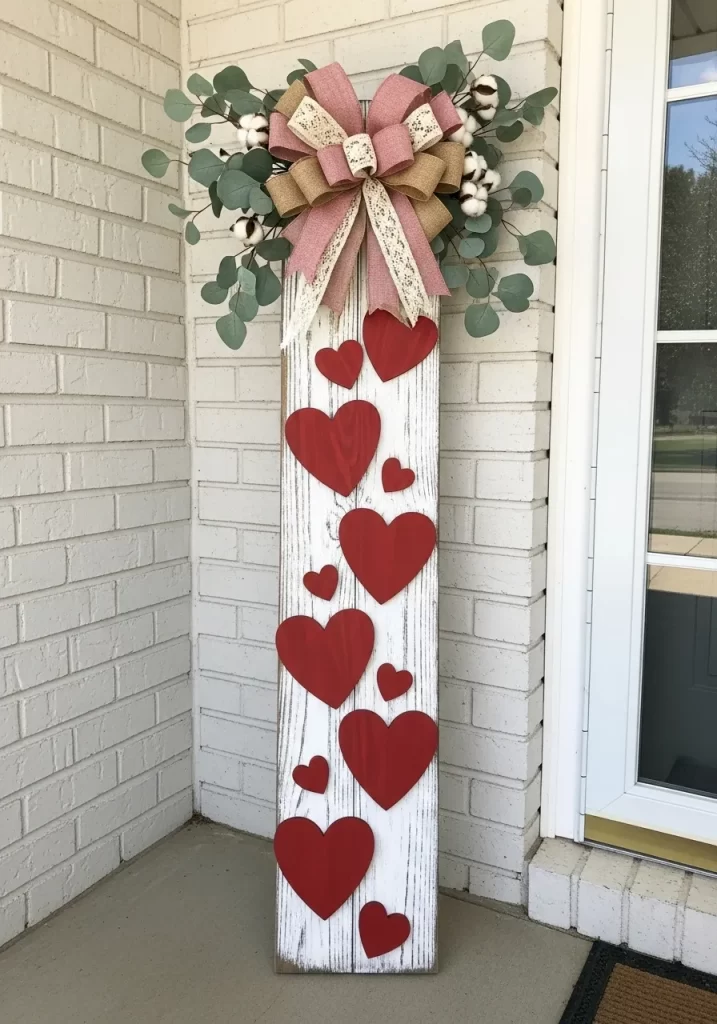
Welcome your neighbors with a tall, weathered wood sign that brings a cozy farmhouse vibe to your doorstep. The white washed finish on the wood creates a beautiful canvas for the deep red hearts. These hearts appear to float or tumble down the board in various sizes.
A large, multi layered burlap and pink bow sits at the top to add height and texture. Eucalyptus sprigs and cotton bolls provide a natural, earthy element that feels fresh and inviting. This vertical sign is a great way to decorate without taking up space on the actual door.
Materials Required
- Tall wooden plank approx 4-5 feet
- White chalk paint or acrylic paint
- Red wooden heart cutouts in various sizes
- Burlap, lace, and pink fabric ribbons
- Artificial eucalyptus and cotton boll stems
Equipment Required
- Sandpaper
- Paint brush
- Hot glue gun
- Wood glue
DIY Instructions Step by Step
- Sand any rough edges on your wooden plank to prevent splinters.
- Apply a thin layer of white paint and wipe some away with a rag to achieve a distressed, shabby chic look.
- Lay the plank flat and arrange your red hearts in a scattered, cascading pattern from top to bottom.
- Use wood glue to secure the hearts once you are happy with the layout.
- Glue the eucalyptus and cotton boll stems to the top center of the board so they fan out sideways.
- Create a large bow by layering the burlap, lace, and pink ribbons together.
- Attach the bow over the center of the greenery with hot glue.
- Lean the board against the wall next to your door or secure it with a bracket for stability.
6. Winter Berry Hello Sign
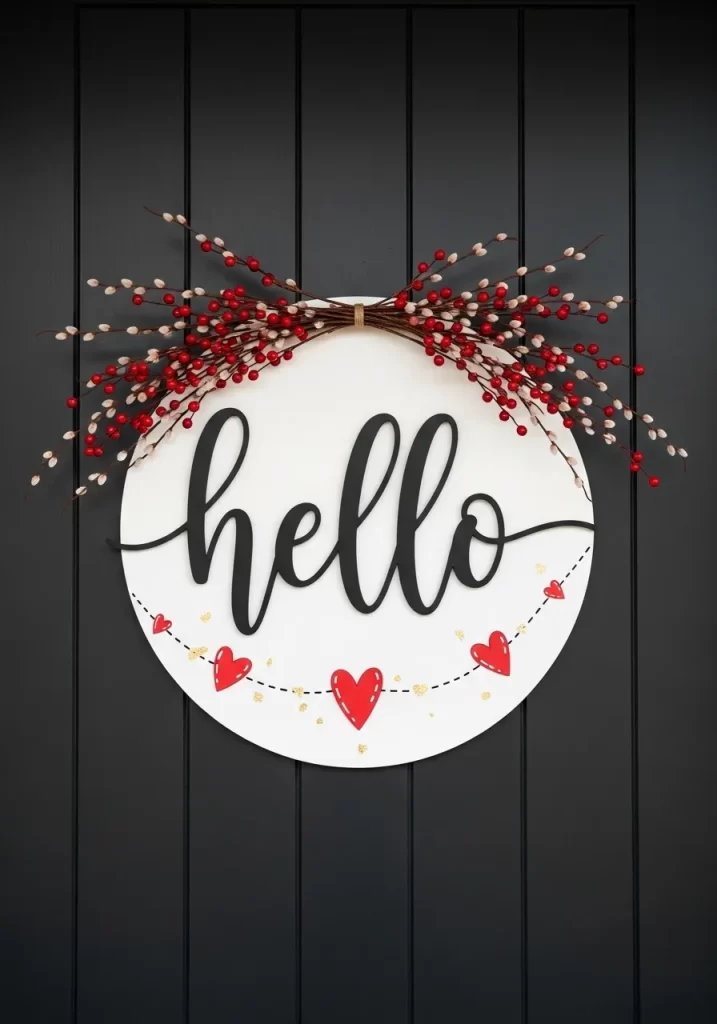
Greet your guests with a sophisticated round sign that blends the end of winter with the start of the season of love. The crisp white background makes the black hello script pop with modern flair. Red berries and pussy willow branches arch over the top like a natural crown.
Small hand painted hearts and gold speckles dance along the bottom edge for a whimsical touch. This decoration feels light and airy while still making a clear festive statement. It works especially well on dark colored doors where the white contrast can shine.
Materials Required
- Round white wooden sign base
- Black hello wooden cutout
- Faux red berry stems
- Faux pussy willow or thin brown branches
- Red paint and gold glitter or gold paint pen
Equipment Required
- Hot glue gun
- Fine tip paint brush
- Twine for hanging
DIY Instructions Step by Step
- Paint your round base white if it is not already finished.
- Glue the black hello cutout slightly above the center of the circle.
- Take two berry stems and two willow stems and cross them at the top center of the sign.
- Glue the stems down so they follow the curve of the wood.
- Wrap a small piece of twine around the center point where the stems meet to hide the glue.
- Use your red paint to add a few small hearts along the bottom curve of the sign.
- Add tiny gold dots or splatters around the hearts for a festive, starry effect.
- Attach a hanging loop to the back and display it proudly.
7. Fabric Heart Flower Pot

Create a whimsical garden of love on your porch with this creative potted heart arrangement. Instead of real flowers, this display uses stuffed fabric hearts on long stems. The mix of red gingham, floral patterns, and velvet textures adds a wonderful variety to the visual.
A grey fluted pot serves as the base, topped with moss and a large burlap bow. This decoration is durable and will not wilt, making it a smart choice for outdoor use. It adds height and color to your entryway in a unique way.
Materials Required
- Large outdoor planter or pot
- Assorted Valentine themed fabrics (gingham, floral, solid red)
- Poly fill stuffing
- Long green dowels or thick wire for stems
- Green felt for leaves
- Floral foam and dried moss
- Burlap ribbon with red trim
Equipment Required
- Sewing machine or needle and thread
- Hot glue gun
- Scissors
DIY Instructions Step by Step
- Cut heart shapes out of your different fabrics—two pieces for each heart.
- Sew the pieces together, leaving a small opening at the bottom.
- Turn the fabric right side out and stuff it firmly with poly fill.
- Insert a green dowel into the opening and glue it shut around the stem.
- Cut leaf shapes out of green felt and glue them to the dowels.
- Place floral foam inside your pot and push the dowels into the foam at different heights.
- Cover the top of the foam with dried moss so it looks like a real plant.
- Wrap the burlap ribbon around the pot and tie a large bow in the front.
8. Cookie Style Be Mine Hanger
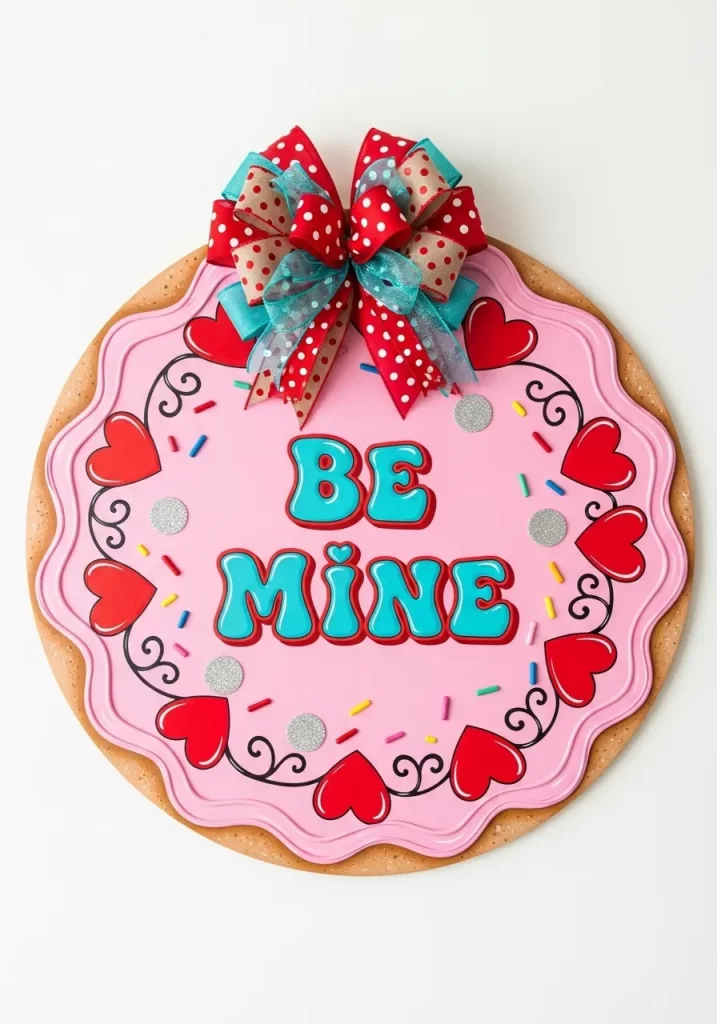
Sweeten your door with a decoration that looks good enough to eat. This round sign mimics a giant frosted sugar cookie with pink icing and colorful sprinkles. The Be Mine text is rendered in a bubbly, retro font that adds a fun and youthful energy to your decor.
A massive, vibrant bow on top features polka dots and teal accents for an extra splash of color. This is a great choice for families or anyone who loves a playful, sweet theme for the holiday. It stands out because of its unique texture and culinary inspiration.
Materials Required
- Round wood or foam board base
- Light brown paint for the cookie and bright pink paint for icing
- Colorful wooden sprinkles or painted dowel pieces
- Large multi-patterned ribbons (red, white, teal)
- Be Mine letter cutouts
Equipment Required
- Paint brushes
- Hot glue gun
- Scissors
DIY Instructions Step by Step
- Paint the outer edge of your circle light brown to look like a baked cookie crust.
- Paint a large pink wavy shape in the center to look like poured icing.
- Glue your sprinkles randomly across the pink icing section.
- Paint your Be Mine letters in a contrasting color like teal or red and glue them to the center.
- Create a very full messy bow using several types of ribbon.
- Glue the bow to the top center of the cookie.
- Add a hanging wire to the back to secure it to your door.
9. Valentine Dispatch Envelope Door
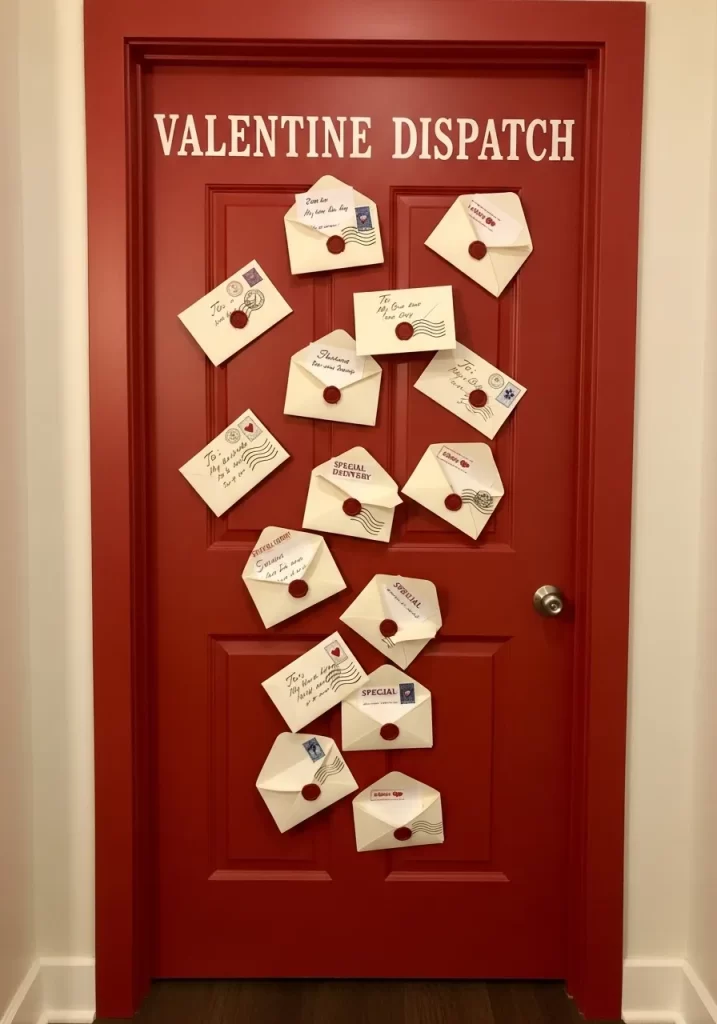
Turn your door into a romantic post office with this Valentine Dispatch theme. This creative idea uses several white envelopes scattered across a bright red door. Each envelope is adorned with a red wax seal and vintage style stamps.
Some envelopes are slightly open to reveal a hint of a love letter inside. The white text at the top clearly defines the theme for anyone walking by. This is a low cost but high impact way to decorate a red door for the season. It tells a story and engages the imagination of your visitors.
Materials Required
- White legal or invitation sized envelopes
- Red sealing wax or red wax look stickers
- Faux vintage stamps or printed stamp images
- White vinyl lettering or white paint pen
Equipment Required
- Double sided mounting tape (removable)
- Black pen for addresses
DIY Instructions Step by Step
- Write romantic addresses or “Special Delivery” on several envelopes using your black pen.
- Place a faux stamp in the corner of each envelope.
- Use a wax seal kit or stickers to seal the back of the envelopes.
- If your door is not already red, consider a temporary red cover or just work with your current door color.
- Apply “VALENTINE DISPATCH” in white letters across the top of the door.
- Use removable tape to stick the envelopes to the door in a scattered, floating pattern.
- Angle them differently so it looks like they are falling or being delivered.
10. Eucalyptus and Gold Heart Wreath
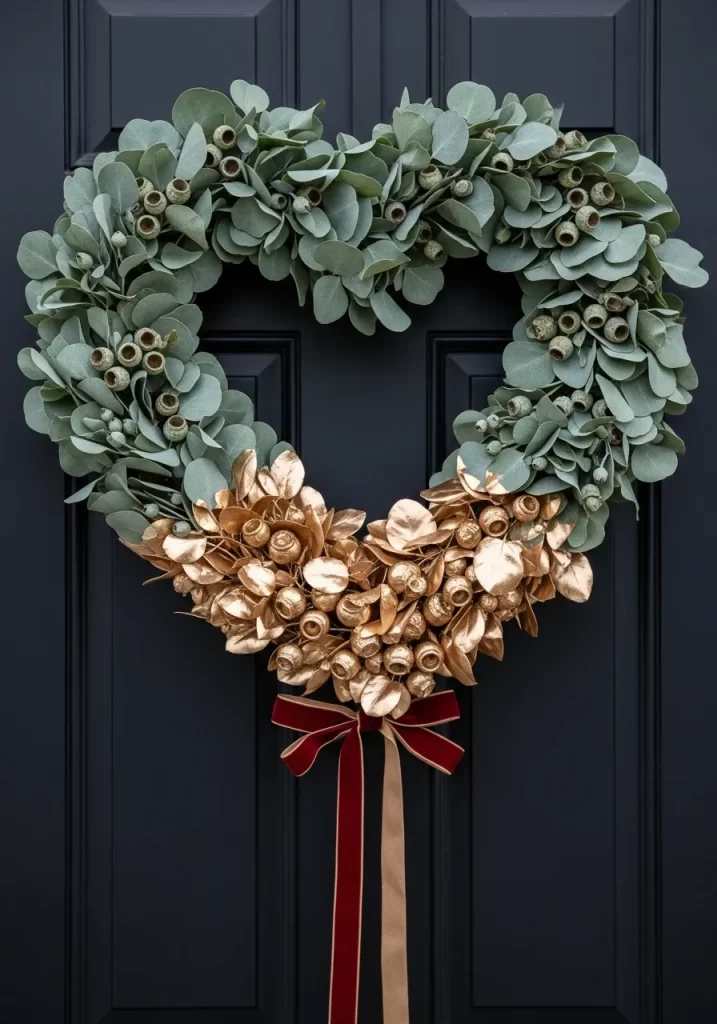
Celebrate love with a sophisticated wreath that combines natural greenery with a touch of luxury. This heart shaped piece features dusty green eucalyptus leaves on the top half. The bottom half transitions into shimmering gold leaves and berries for a high end look.
A deep burgundy velvet bow with long trailing ribbons adds a classic romantic finish. This wreath is for those who prefer a more muted and grown up Valentine Day style. It looks exceptionally elegant on dark or black doors.
Materials Required
- Heart shaped wreath frame (wire or grapevine)
- Artificial eucalyptus stems
- Gold spray paint or pre-painted gold leaves and berries
- Burgundy velvet ribbon
- Thin gold ribbon
Equipment Required
- Hot glue gun
- Floral wire
- Wire cutters
DIY Instructions Step by Step
- Attach your green eucalyptus stems to the top half of the heart frame using floral wire.
- Ensure the leaves point downward toward the bottom point of the heart.
- Take your gold leaves and berries and secure them to the bottom half of the frame.
- Overlap the gold and green sections slightly so the transition looks natural.
- Use hot glue to fill in any small gaps with extra leaves for a full look.
- Tie a large bow using the burgundy velvet ribbon and the gold ribbon together.
- Secure the bow to the bottom point of the heart where the gold leaves meet.
- Let the ribbon tails hang long for a dramatic, elegant effect.
11. Sweet Conversation Heart Collage
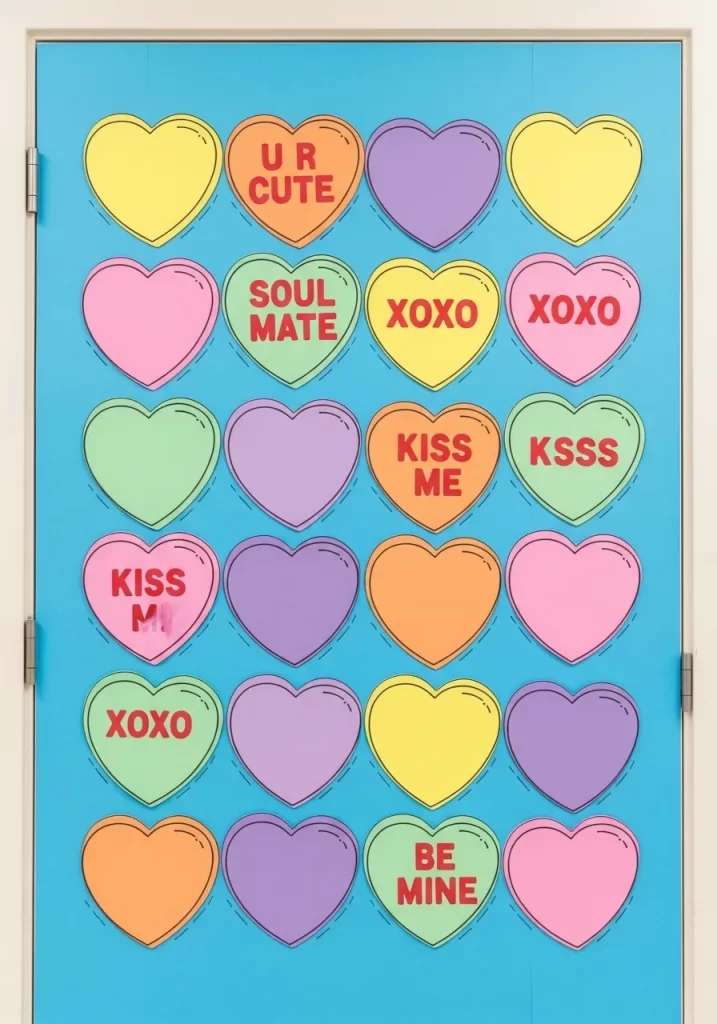
Welcome everyone with a nostalgic trip down memory lane using this adorable candy themed door. This design mimics the classic conversation hearts we all loved as kids. Bright pastel shades of yellow, orange, purple, and green pop against a vibrant blue background.
Each heart features a sweet message like Soul Mate or Kiss Me in bold red text. The clean lines and simple shapes make this display incredibly modern and cheerful. It covers the entire surface of the door for a high impact look that neighbors will notice from the street. You can customize the messages to include family names or inside jokes. This project is a fantastic way to add a playful and youthful energy to your home.
Materials Required
- Large sheets of colored cardstock or poster board (pink, yellow, orange, green, purple)
- Red adhesive vinyl or red permanent markers
- Blue wrapping paper or butcher paper for the background
- Removable mounting putty or painter tape
Equipment Required
- Large heart shaped stencil or template
- Scissors or a precision craft knife
- Ruler
DIY Instructions Step by Step
- Measure your door dimensions and cut the blue background paper to fit the entire surface.
- Secure the blue paper to the door using painter tape along the edges.
- Use your stencil to trace several heart shapes onto the different colored cardstock sheets.
- Cut out each heart carefully with your scissors.
- Create the candy messages by cutting letters out of red vinyl or writing them clearly with a red marker.
- Space the hearts out on the floor first to ensure an even grid pattern.
- Apply mounting putty to the back of each heart.
- Stick the hearts onto the door starting from the top and working your way down in rows.
- Cut out holes for the doorknob and lock so the door remains functional.
12. Rustic Love Clothesline Display
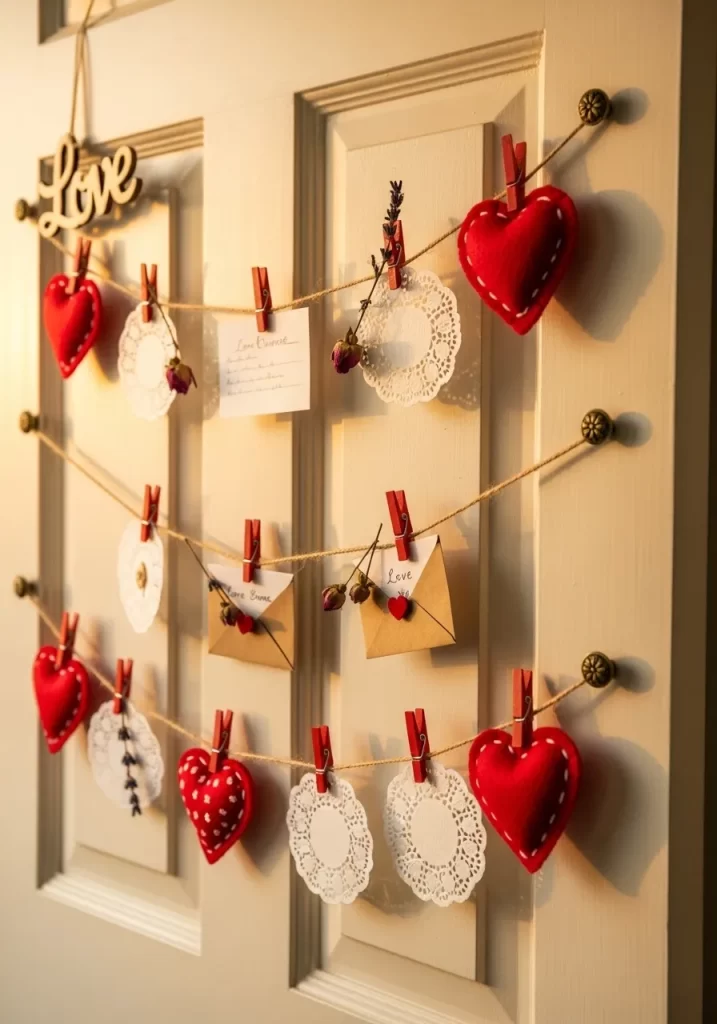
Create a cozy and sentimental entrance with this beautiful laundry line of affection. This decoration uses natural twine and miniature clothespins to hang various romantic tokens. Soft felt hearts, delicate paper doilies, and tiny love notes dangle gracefully across the door panels.
The warm lighting highlights the textures of the burlap and paper. Dried flower buds tucked into the clips add a botanical touch that feels very organic. This style is excellent for those who appreciate a vintage or cottage core aesthetic. It looks especially lovely on traditional paneled doors.
Materials Required
- Natural jute twine
- Mini wooden clothespins (painted red or left natural)
- Red felt heart cutouts
- White paper doilies in various sizes
- Small kraft paper envelopes and note cards
- Dried lavender or rose buds
- Small wooden Love sign
Equipment Required
- Command hooks or small clear adhesive clips
- Scissors
- Hot glue gun
DIY Instructions Step by Step
- Attach four or five clear adhesive hooks to the vertical edges of your door at different heights.
- String the twine back and forth between the hooks to create a zigzag clothesline effect.
- Tie the twine tightly so it does not sag too much once you add the decorations.
- Glue your wooden Love sign to the top corner of the first line.
- Use the mini clothespins to clip the felt hearts and paper doilies along the twine.
- Write sweet messages on the note cards and tuck them into the small envelopes before clipping them up.
- Add a few dried flower stems to the clips for a pop of natural color and scent.
- Arrange the items so the heavier pieces are near the hooks for better support.
13. Modern Geometric Heart Pulse
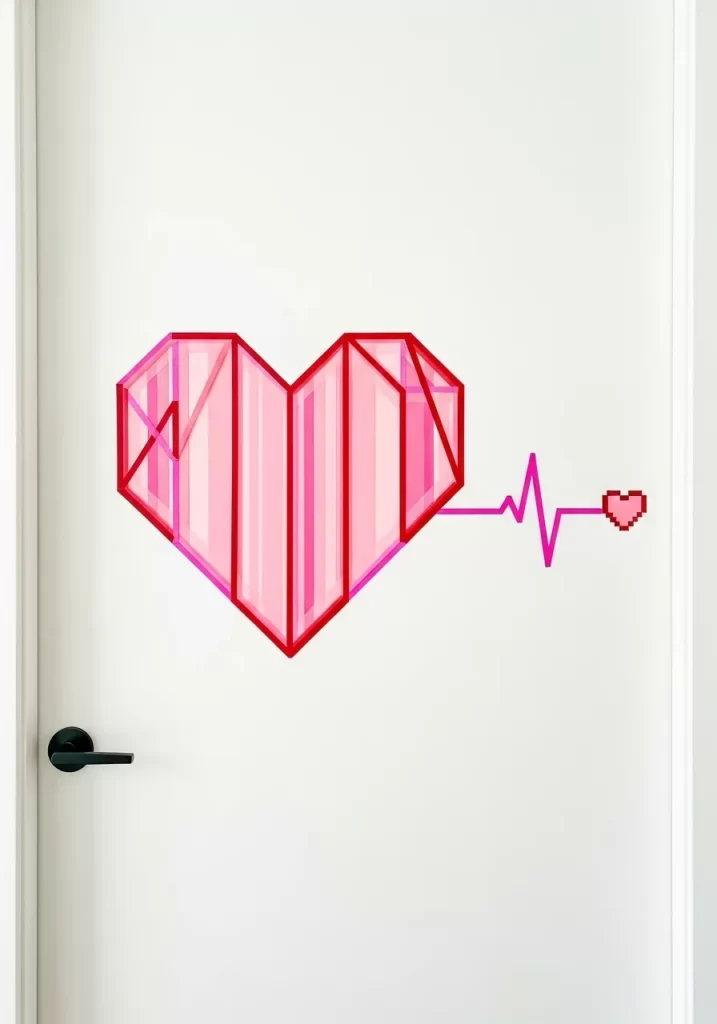
Show your home has a heartbeat with this sleek and contemporary geometric design. This installation uses clean lines and sharp angles to form a stylized heart and an EKG pulse line. The vibrant pink and red tones look striking against a white door.
The pixelated small heart at the end of the pulse adds a fun digital age touch. This is the ultimate choice for a minimalist who wants to celebrate the holiday without traditional ruffles or lace. It feels fresh, tech savvy, and very artistic.
Materials Required
- Thin decorative washi tape in red and hot pink
- Red and pink vinyl sheets or cardstock
- Removable adhesive
Equipment Required
- Level tool
- Measuring tape
- Precision craft knife
DIY Instructions Step by Step
- Use your measuring tape to find the exact center of the door for your main heart.
- Lightly mark the outline of a large geometric heart using a pencil.
- Apply the red and pink washi tape over your pencil lines to create the outer frame and internal segments.
- Cut small triangles and trapezoids out of the vinyl sheets to fill in some of the geometric sections for a 3D effect.
- Use a level to ensure the horizontal pulse line extending to the right is perfectly straight.
- Create the jagged EKG peaks using short segments of tape.
- Cut a small heart out of pink cardstock and use the craft knife to give it a stair-step or pixelated edge.
- Stick the pixel heart at the very end of the pulse line.
14. The Key to My Heart Wreath
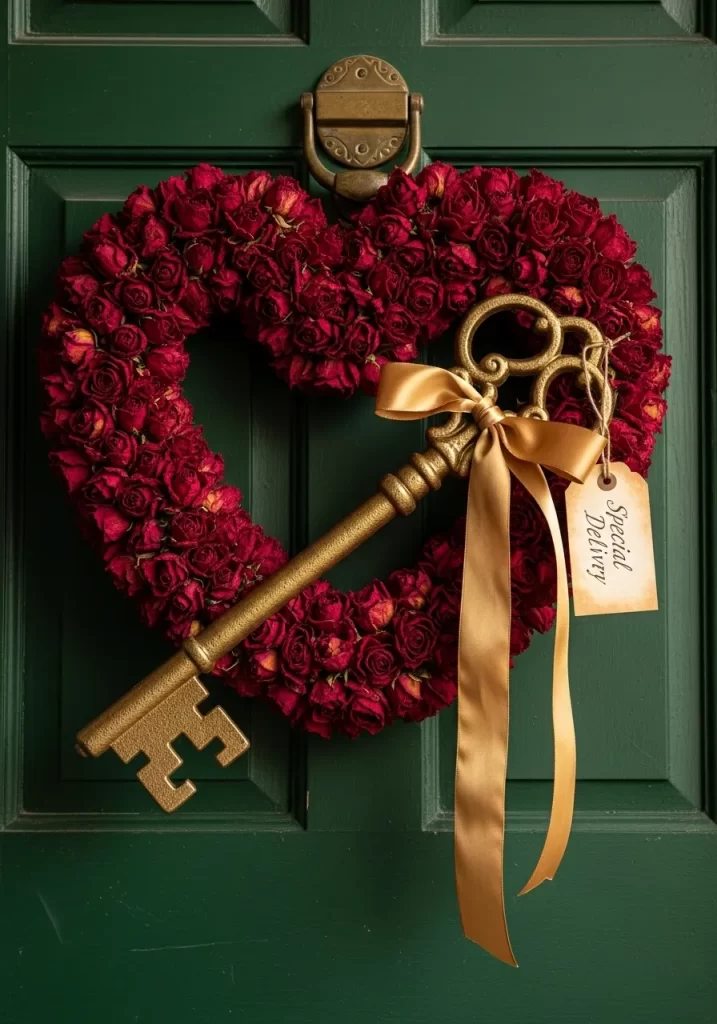
Capture a sense of classic romance with this deep red floral wreath featuring a vintage twist. This heart shaped base is packed with hundreds of miniature dark red rosebuds. The rich texture and deep color create a very sophisticated look.
A large, ornate golden key is draped across the front, secured with a shimmering gold satin ribbon. A small Special Delivery tag hangs from the key to complete the theme. This decoration looks incredibly high end on a dark green or black door.
Materials Required
- Heart shaped grapevine or foam wreath base
- Artificial dark red mini roses
- Large plastic or metal skeleton key painted gold
- Wide gold satin ribbon
- Small manila shipping tag
- Black ink pen
Equipment Required
- Hot glue gun
- Wire cutters
DIY Instructions Step by Step
- Use wire cutters to trim the stems off your artificial roses so the heads are flat.
- Glue the rose heads onto your wreath base, starting from the outside and moving inward.
- Pack the flowers tightly together so none of the base shows through.
- Tie a large, elegant bow with the gold satin ribbon and leave long tails.
- Secure the golden key diagonally across the heart using thin wire or glue.
- Write “Special Delivery” on your paper tag in your best handwriting.
- Tie the tag and the gold bow to the top handle of the key.
- Use a wreath hanger to mount this heavy piece securely to your door.
15. Tulle Pom Pom Heart Explosion
Transform your entrance into a soft and dreamy wonderland with a massive tulle installation. This design features dozens of fluffy tulle pom poms in shades of fuchsia, bubblegum pink, and white. They are clustered together to form a cascading heart shape that spills down the door.
Long, shimmering ribbons hang from the bottom to create movement whenever the door opens. Silver glitter hearts on picks emerge from the fluff for a bit of sparkle. This decoration is incredibly tactile and feminine. It creates a whimsical cloud of love that everyone will want to touch.
Materials Required
- Rolls of tulle in various pinks and white
- Silver glitter cardstock for hearts
- Long satin and organza ribbons in matching colors
- Large piece of cardboard for the base
Equipment Required
- Hot glue gun
- Scissors
- Heavy duty mounting tape
DIY Instructions Step by Step
- Cut a large heart shape out of cardboard to serve as your mounting base.
- Create tulle pom poms by wrapping tulle around your hand multiple times, tying the center, and cutting the loops.
- Glue the pom poms onto the cardboard base, mixing the colors for a blended look.
- Ensure the edges of the cardboard are completely hidden by the fluffy tulle.
- Cut several heart shapes out of the silver glitter cardstock and glue them onto thin sticks or wires.
- Tuck these glitter picks into the tulle clusters.
- Attach long lengths of ribbon to the bottom point of the cardboard heart so they trail down.
- Mount the entire cardboard base to the door using strong, removable mounting tape.
16. XOXO Industrial Wood Sign

Bring a touch of modern farmhouse style to your porch with this vertical XOXO plank. This design uses a natural wood board as a warm, organic backdrop. Large galvanized metal letters are bolted to the wood to spell out the hugs and kisses.
A bright, glossy red heart at the bottom provides a bold focal point and breaks up the metallic tones. This sign is great for leaning against the wall next to your door. It feels sturdy, stylish, and high quality.
Materials Required
- Long wooden plank approx 5 feet tall
- Large metal or galvanized look letters X, O, O
- Large wooden heart cutout
- Red high gloss paint
- Wood stain (optional)
Equipment Required
- Drill and screws
- Paint brush
- Wood glue
DIY Instructions Step by Step
- Sand your wooden plank and apply a coat of stain if you want a darker, richer color.
- Paint your wooden heart with the glossy red paint and let it dry.
- Lay your plank on the ground and arrange the letters and heart to check the spacing.
- Mark the spots where the screws for the letters will go.
- Drill pilot holes and screw the metal letters into the wood.
- Apply wood glue to the back of the red heart and press it firmly onto the bottom of the plank.
- Once the glue is dry, lean the sign next to your front door for a chic, industrial greeting.
17. Paper Rose Ombre Wreath
Admire the intricate beauty of a wreath made entirely of hand rolled paper roses. This stunning piece features a tight spiral of flowers that transition in color. The outer edges are a soft pink, while the inner petals of each rose feature a deeper red center.
The uniform size of the roses gives the wreath a very clean and organized appearance. It hangs from a simple grey ribbon, allowing the detail of the paper craft to take center stage. This project is a labor of love that results in a truly artistic decoration.
Materials Required
- Thick scrapbooking paper in shades of pink and red
- Round wreath form (foam or flat cardboard)
- Wide grey grosgrain ribbon
Equipment Required
- Hot glue gun
- Scissors or a circular paper cutter
- Quilling tool or a pencil
DIY Instructions Step by Step
- Cut your paper into circles of various sizes.
- Cut a spiral shape into each circle, starting from the outside and moving toward the center.
- Start at the outer tip of the spiral and roll the paper tightly around a pencil or quilling tool.
- Let the roll loosen slightly to form a rose shape, then glue the bottom to the center tab of the spiral.
- Repeat this until you have enough roses to cover your entire wreath form.
- Glue the roses onto the form, keeping them as close together as possible.
- Wrap the grey ribbon around the top of the wreath and tie it in a simple loop for hanging.
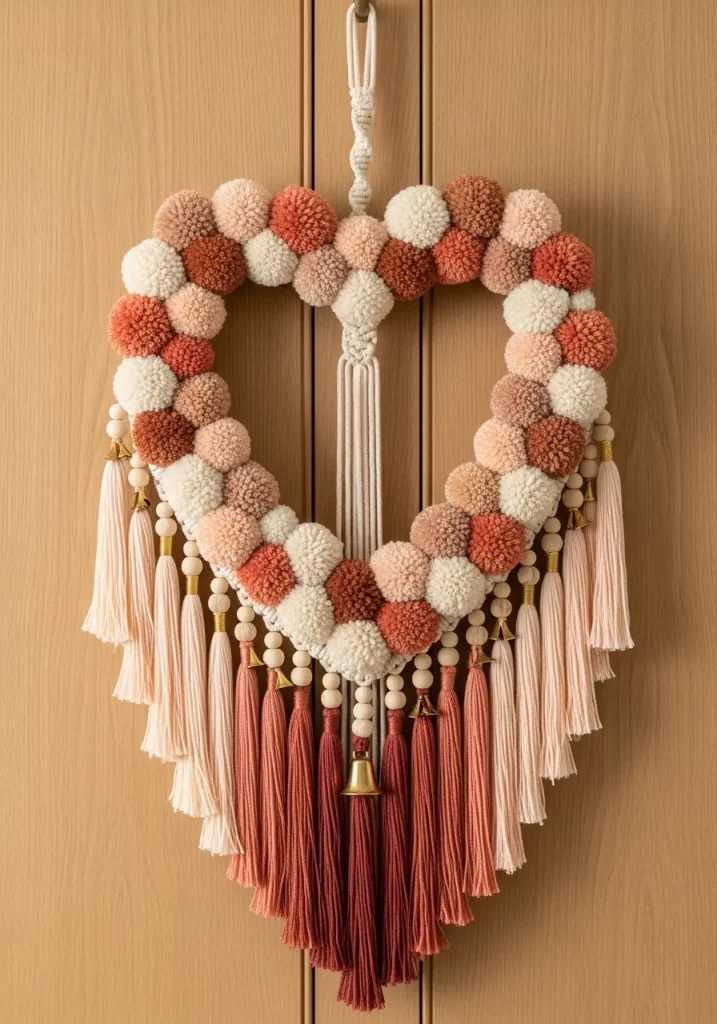
18. Yarn Wrapped Heart Wall Hanging
Add a cozy, handcrafted feel to your home with a beautiful yarn wrapped heart display. This decoration features a natural branch as the horizontal support. Several yarn hearts in muted tones like terracotta, mustard, and dusty rose hang at different lengths.
Each heart is adorned with a single white ranunculus flower for a touch of elegance. Long yarn tassels at the bottom of each heart add a trendy boho vibe. This is a wonderful alternative to a standard wreath and covers a larger area of the door.
Materials Required
- Sturdy fallen branch or driftwood piece
- Cardboard for heart templates
- Chunky yarn in various earthy colors
- Artificial white and pink flowers
- Cotton twine or cream colored yarn for hanging
Equipment Required
- Scissors
- Hot glue gun
DIY Instructions Step by Step
- Cut several heart shapes of different sizes out of cardboard.
- Secure the end of your yarn to a cardboard heart with a dab of glue.
- Wrap the yarn around the heart in different directions until the cardboard is completely hidden.
- Repeat this for all your hearts using different colors of yarn.
- Tie a long piece of twine to the top of each heart.
- Attach the other ends of the twine to your branch so the hearts hang at staggered heights.
- Glue a small flower to the center or top corner of each heart.
- Create simple tassels by wrapping yarn around your hand, tying the top, and cutting the bottom loops.
- Tie a tassel to the bottom point of each heart.
- Use a long piece of twine tied to both ends of the branch to hang the entire piece on your door.
19. Burlap and Buffalo Check LOVE Wreath
Embrace the classic farmhouse look with a wreath that combines rustic burlap and trendy patterns. This full, ruffled burlap base provides incredible volume and texture. Large wooden letters spelling LOVE are centered in the middle, featuring a black and white buffalo check print.
Red hydrangeas and cotton bolls are clustered on one side to add a pop of color and a touch of nature. This wreath is large and bold, making it a statement piece. It feels warm, inviting, and very high quality.
Materials Required
- Wire wreath frame
- Rolls of natural burlap ribbon
- Wooden LOVE letters
- Buffalo check scrapbook paper or fabric
- Artificial red hydrangeas
- Faux cotton boll stems
Equipment Required
- Pipe cleaners or floral wire
- Mod Podge (if using paper for letters)
- Hot glue gun
DIY Instructions Step by Step
- Create the base by weaving the burlap ribbon through the wire frame in loops, securing them with pipe cleaners.
- Pull and fluff the loops as you go to create a full, ruffled look.
- Cover your wooden letters with the buffalo check paper using Mod Podge and let them dry.
- Glue the letters across the center of the burlap wreath.
- Group your red hydrangeas and cotton bolls together and secure them to the left side of the wreath with wire.
- Ensure the flowers are nestled into the burlap for a natural appearance.
- Add a wire loop to the back of the frame for hanging.
20. Love Bugs Classroom Door
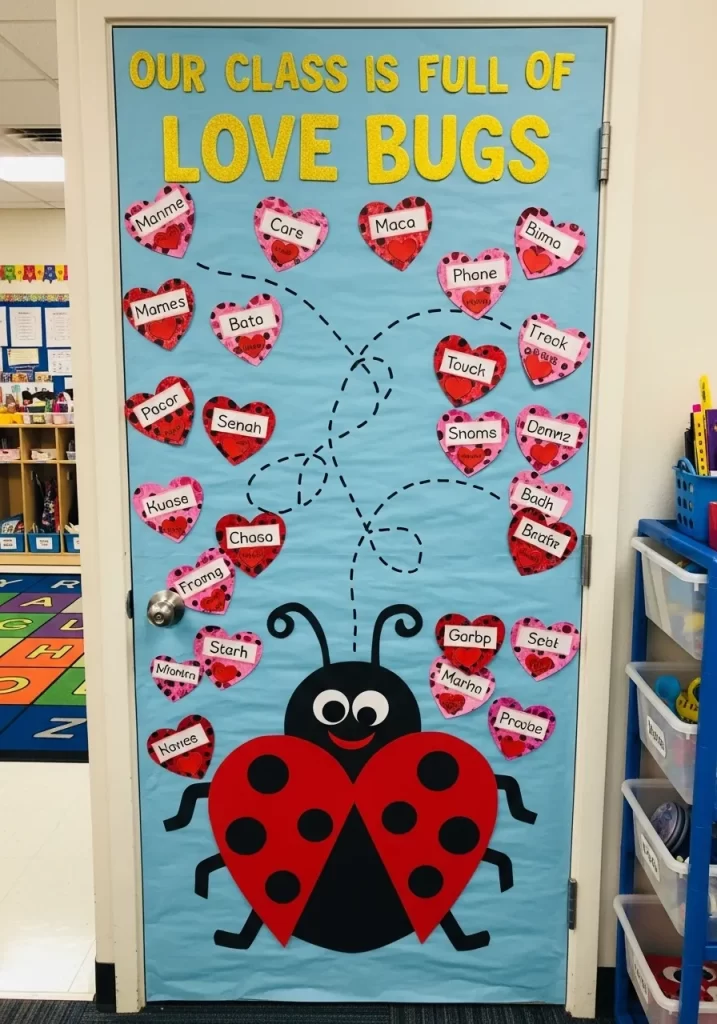
Celebrate the holiday with a fun and educational theme that is great for schools or playrooms. This “Our Class is Full of Love Bugs” design features a giant, friendly ladybug at the bottom. The ladybug has a large red heart for a shell with big black spots.
Dotted trails lead up the door to several smaller hearts, each representing a love bug. You can write the names of children or family members on these smaller hearts. The bright blue background and yellow felt letters make the whole display feel very joyful.
Materials Required
- Blue, red, black, and yellow butcher paper or poster board
- White paper for name labels
- Black marker
Equipment Required
- Scissors
- Glue stick or tape
- Large circle stencil
DIY Instructions Step by Step
- Cover your door with blue paper to create the sky background.
- Cut a large black circle for the ladybug body and a smaller one for the head.
- Cut a large red heart and snip it down the middle to create the ladybug wings.
- Glue black spots onto the red wings and attach them to the black body.
- Add eyes and antennae to the ladybug head using scrap paper.
- Cut “Our Class is Full of Love Bugs” out of yellow paper and glue it to the top of the door.
- Cut many small red hearts and add black spots to make them look like mini bugs.
- Write names on white labels and glue them to the center of each small heart.
- Use a black marker to draw dashed flight paths from the big ladybug to all the small hearts.
21. Musical Notes Sheet Heart Display
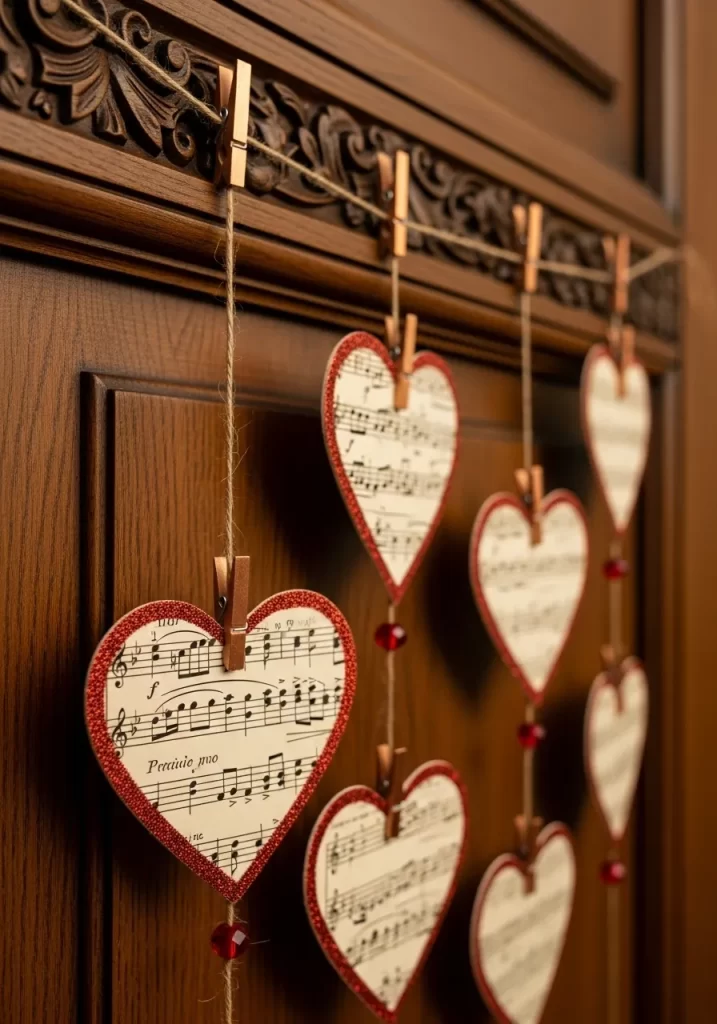
Bring a rhythmic charm to your entryway with this elegant hanging display. This design features delicate heart shapes cut from vintage sheet music, bordered with a fine red glitter edge for a subtle festive sparkle. Each musical heart hangs from a natural jute twine by a small wooden clothespin.
The soft cream tones of the paper look sophisticated against rich wood door panels. Small red beads are interspersed along the vertical strings to add pops of color and weight. It provides a poetic and melodic greeting for all your visitors. This project is a beautiful way to recycle old music books into something meaningful.
Materials Required
- Vintage sheet music or printed music paper
- Red glitter glue or fine red glitter
- Natural jute twine
- Miniature wooden clothespins
- Small red decorative beads
- Red cardstock for backing
Equipment Required
- Scissors
- Glue stick
- Ruler
- Clear adhesive hooks
DIY Instructions Step by Step
- Trace heart shapes onto your sheet music and cut them out carefully.
- Cut slightly larger hearts out of red cardstock to serve as a sturdy base.
- Glue the music hearts onto the cardstock hearts using the glue stick.
- Apply a thin line of red glitter glue around the very edge of each heart.
- Let the glitter dry completely before moving to the next stage.
- Cut several length of twine to different measurements for a staggered look.
- Thread two or three red beads onto the bottom of each twine string and knot them in place.
- Secure a horizontal line of twine across your door using clear adhesive hooks.
- Use the clothespins to attach the vertical strings to the horizontal line.
- Clip one musical heart to the middle of each vertical string to complete the display.
22. Luxury Chocolate Box Frame
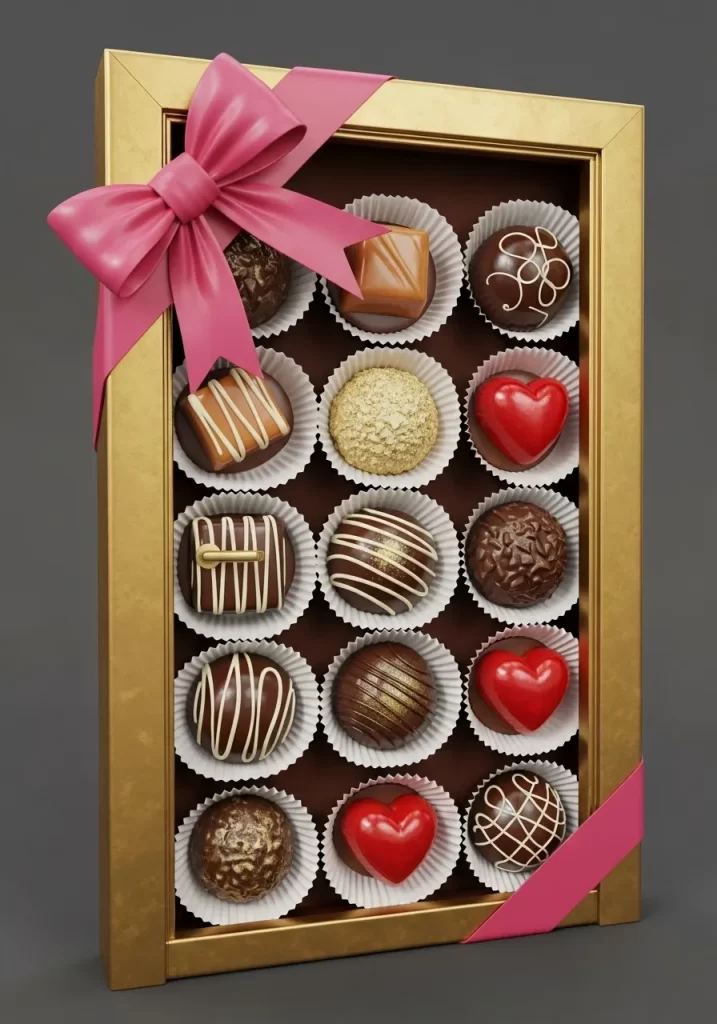
Treat your guests to a visual feast with this creative shadow box that mimics a high end box of Valentine chocolates. The deep brown background serves as the canvas for a variety of truffles and caramels. Each piece is crafted with intricate details like gold drizzling and tiny red heart toppers.
The display is housed in a bold gold frame that adds an air of sophistication. A large, glossy pink bow sits at the corner to finish the gift wrapped look. This unique decoration is a conversation starter that looks almost edible. It offers a fun and indulgent twist on traditional holiday wreaths.
Materials Required
- Large deep set picture frame painted gold
- Dark brown foam board or heavy cardstock
- Various round and square foam shapes for chocolates
- White paper cupcake liners
- Pink, brown, and white acrylic paint
- Wide pink satin ribbon
Equipment Required
- Hot glue gun
- Paint brushes
- Gold paint pen
DIY Instructions Step by Step
- Remove the glass from your frame and paint the wood with metallic gold paint.
- Cut your dark brown foam board to fit snugly inside the back of the frame.
- Paint your foam shapes to look like different types of chocolate candies.
- Use a gold paint pen to draw swirls, lines, or drizzle on the dried chocolate shapes.
- Glue some small red plastic hearts onto a few of the chocolates for a romantic touch.
- Place each finished chocolate inside a white cupcake liner.
- Arrange the liners in a neat grid pattern on the brown board.
- Secure each liner and chocolate to the board using a generous dab of hot glue.
- Place the board back into the frame and secure it.
- Tie a large pink bow and glue it to the top left corner of the gold frame.
23. Scrabble Tile LOVE Entrance
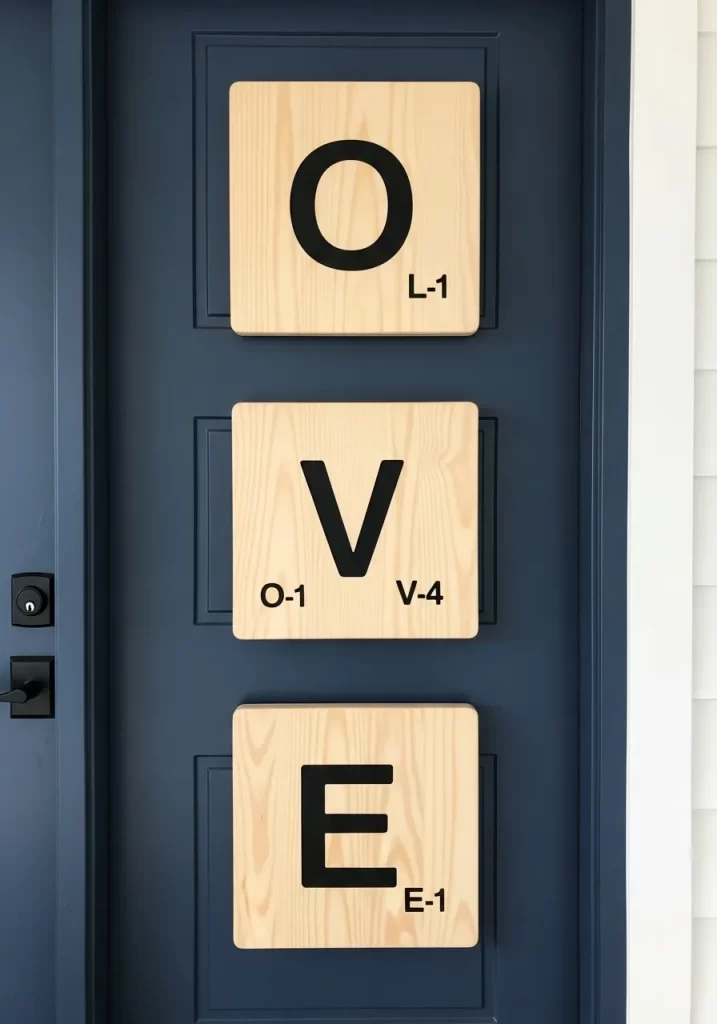
Spell out your affection in a big way with these oversized Scrabble inspired tiles. This minimalist design uses light grained wood squares to create a clean and modern aesthetic. Each tile features a large black letter and its corresponding point value, just like the classic board game.
Arranged vertically, the tiles spell LOVE with the first tile shared by another word for a clever layout. The natural wood grain stands out beautifully against dark or navy blue doors. This is an excellent choice for word lovers and fans of contemporary home decor. It provides a structured and organized look for your porch.
Materials Required
- Four square wooden plaques approx 12×12 inches
- Large black vinyl letter stickers (L, O, V, E)
- Small black vinyl number stickers for point values
- Clear outdoor sealant
Equipment Required
- Measuring tape
- Level tool
- Heavy duty mounting tape
DIY Instructions Step by Step
- Sand the wooden plaques until they are smooth and free of any splinters.
- Apply a coat of clear sealant to protect the wood from outdoor moisture.
- Use a measuring tape to find the exact center of each wood square.
- Press the large black letters onto the center of each tile firmly.
- Place the small point value numbers in the bottom right corner of each tile.
- Clean your door surface to ensure the mounting tape adheres properly.
- Start with the top tile and use a level to make sure it is perfectly straight.
- Apply heavy duty mounting tape to the back of each tile and press them onto the door.
- Space the tiles evenly apart in a vertical line to create a balanced visual flow.
24. Frosted Lavender Rose Wreath
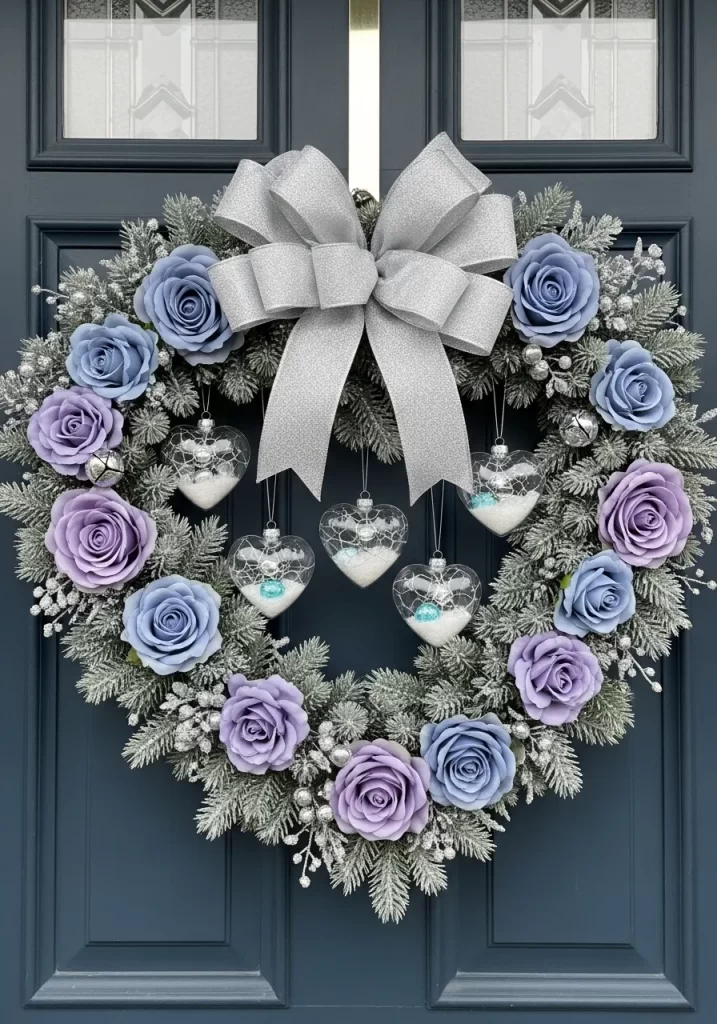
Invite a sense of calm and elegance to your home with this stunning lavender and silver wreath. Moving away from traditional red, this piece uses soft purple and dusty blue roses for a refreshing change. The greenery is lightly flocked with snow to bridge the gap between winter and spring.
Delicate glass heart ornaments hang from the center, filled with faux snow and tiny teal gems. A large, shimmering silver bow anchors the top of the design. This wreath looks particularly striking on grey or blue doors. It offers a sophisticated and cool toned take on Valentine Day.
Materials Required
- Large evergreen or pine wreath base
- Artificial roses in lavender and dusty blue
- Silver glittered berry picks
- Glass heart shaped ornaments
- Wide silver glitter ribbon
- Faux snow spray
Equipment Required
- Hot glue gun
- Floral wire
- Scissors
DIY Instructions Step by Step
- Lay your wreath base flat and lightly spray the tips with faux snow for a frosted look.
- Arrange your lavender and blue roses around the circle and secure them with hot glue.
- Tuck silver berry picks into the gaps between the flowers for extra sparkle.
- Tie thin silver threads to your glass heart ornaments at different lengths.
- Hang the hearts from the top inner curve of the wreath so they dangle in the center.
- Create a large, multi-loop bow with the silver ribbon.
- Attach the bow to the top center of the wreath using floral wire.
- Ensure all elements are secure before hanging the wreath on your door.
25. Growing Love Doily Tree
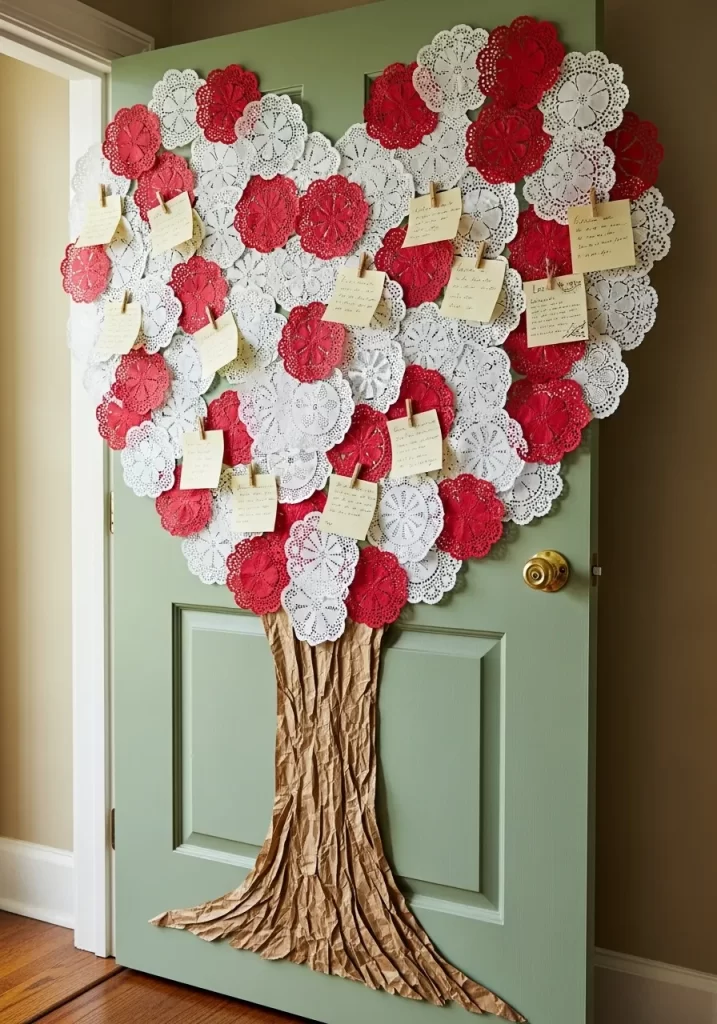
Create a whimsical and artistic display with this tree of love that grows right on your door. The trunk is crafted from crinkled brown paper to give it a realistic, textured appearance. The leaves of the tree are made from dozens of white and red paper doilies clustered together into a large heart shape.
Tiny yellow notes are pinned to the doilies, allowing you to leave sweet messages for your family. This project is lightweight and easy to install on any interior or exterior door. It brings a soft, vintage feel to your holiday decorations. It is a wonderful way to involve the whole family in sharing kind words.
Materials Required
- Brown kraft paper or a recycled grocery bag
- Large pack of paper doilies (red and white)
- Small yellow sticky notes or cardstock
- Miniature wooden clothespins
Equipment Required
- Painter tape or removable adhesive
- Scissors
- Black pen
DIY Instructions Step by Step
- Crinkle a long strip of brown paper and twist it slightly to form a tree trunk.
- Tape the trunk to the bottom half of your door using painter tape.
- Spread the top of the paper out to create a few main branches.
- Start sticking the paper doilies to the door above the branches, overlapping them as you go.
- Shape the cluster of doilies into one large, full heart silhouette.
- Mix the red and white doilies randomly to create a vibrant and textured canopy.
- Write short love notes or names of family members on the yellow notes.
- Use the mini clothespins to attach the notes to the edges of the doilies.
26. Buffalo Check Embroidery Hoop
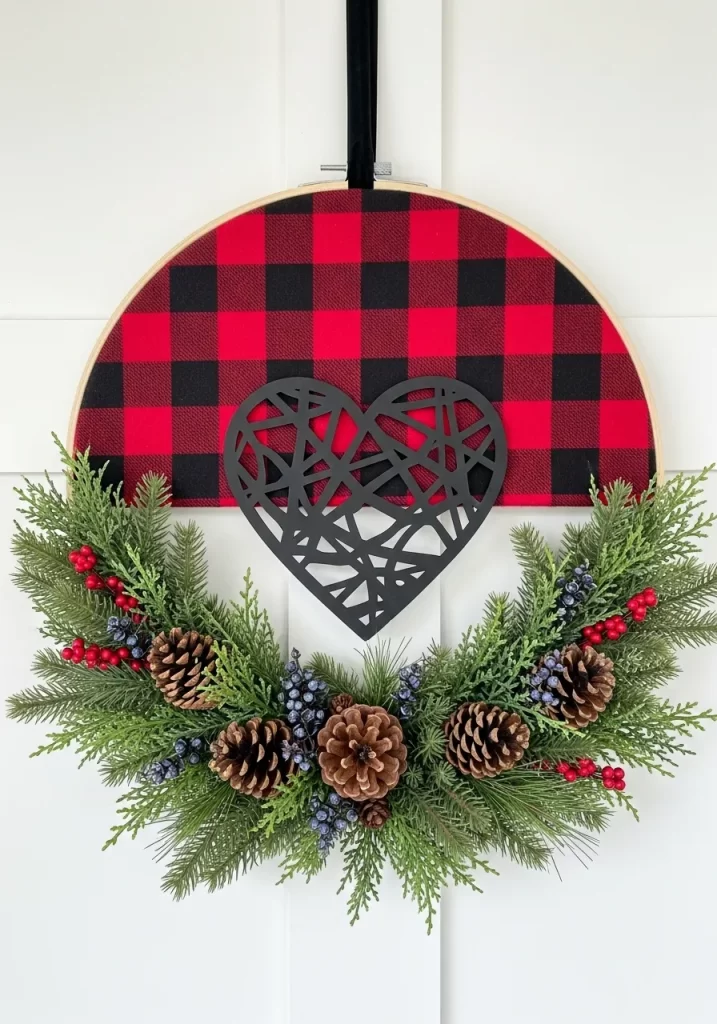
Combine rustic charm with modern graphic design using this unique embroidery hoop wreath. The top half features a bold red and black buffalo check fabric that provides a cozy farmhouse feel. A black geometric heart is centered over the fabric for a contemporary contrast.
The bottom half is adorned with lush evergreen branches, pinecones, and bright red berries. This decoration feels sturdy and grounded, making it great for a cabin or a traditional home. It offers a balanced mix of textures and patterns. The circular shape is framed beautifully by the natural wood of the hoop.
Materials Required
- Large wooden embroidery hoop
- Buffalo check fabric (red and black)
- Black cardstock or thin wood heart (geometric style)
- Artificial pine branches and pinecones
- Small red berry picks
- Black velvet ribbon
Equipment Required
- Scissors
- Hot glue gun
- Staple gun (optional)
DIY Instructions Step by Step
- Stretch your buffalo check fabric across the inner ring of the embroidery hoop.
- Tighten the outer ring over it and trim away the excess fabric from the back.
- Glue your geometric black heart onto the center of the fabric section.
- Arrange the pine branches along the bottom curve of the hoop and secure them with hot glue.
- Nest and glue the pinecones among the branches for a natural look.
- Add the red berry picks to the greenery to provide pops of holiday color.
- Loop the black velvet ribbon around the top screw of the hoop for hanging.
27. Pizza My Heart Whimsical Door

Serve up some fun with this hilarious and colorful pizza themed door decoration. This display features a massive pepperoni pizza slice that covers nearly the entire door. The pepperonis are shaped like hearts, making the pun “You got a pizza my heart” come to life.
A large speech bubble at the center clearly displays the playful message. The edges of the door are framed with crinkled tan paper to represent a giant pizza crust. This is a fantastic choice for a classroom, a kids room, or anyone who loves a good food joke. It is bright, energetic, and guaranteed to make people smile.
Materials Required
- Large sheets of yellow, red, and tan butcher paper
- Red markers or crayons
- White poster board for the speech bubble
- Black permanent marker
Equipment Required
- Scissors
- Tape or glue stick
DIY Instructions Step by Step
- Cover your door with yellow paper to create the cheese base.
- Cut many medium sized hearts out of red paper and draw small circles on them to look like pepperoni.
- Glue the red hearts randomly across the yellow background.
- Crinkle long strips of tan paper and tape them around the entire border of the door to form the crust.
- Cut a large cloud-like speech bubble out of white poster board.
- Write “You got a PIZZA my heart!” in bold letters inside the bubble.
- Tape the speech bubble to the center of the door.
- Place a few discarded paper pizza slices at the bottom of the door for a 3D effect.
28. Origami Crane Heart Path
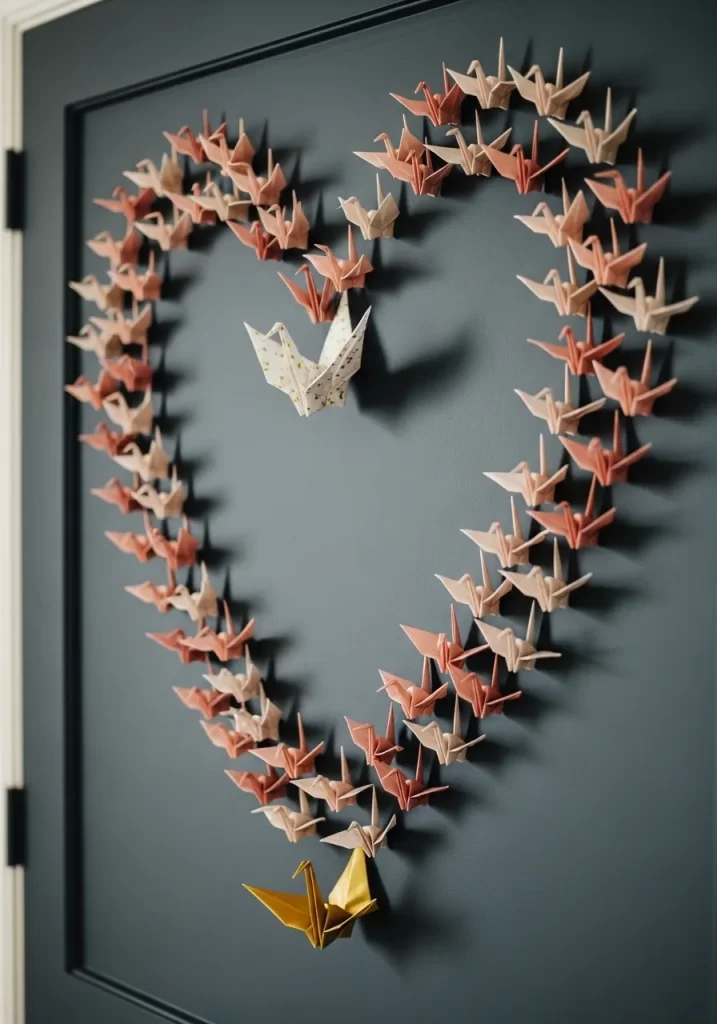
Capture the beauty of traditional paper folding with this peaceful and symbolic origami display. Dozens of hand folded paper cranes in shades of terracotta, peach, and cream form a large heart outline. Each crane is meticulously placed to create a sense of flight and movement.
A single, larger white crane sits inside the heart, while a shimmering gold crane anchors the bottom point. This decoration represents peace, longevity, and deep devotion. It looks exquisite against a dark matte door where the delicate paper shapes can stand out. This project is for those who enjoy slow, meditative crafting.
Materials Required
- Origami paper in terracotta, peach, cream, and white
- One sheet of gold foil origami paper
- Removable adhesive dots
Equipment Required
- Ruler
- Pencil for light marking
DIY Instructions Step by Step
- Fold approximately 40 to 50 small origami cranes using your colored papers.
- Fold one slightly larger crane in white and one in gold.
- Lightly trace a large heart shape on your door using a pencil and a ruler to ensure symmetry.
- Start at the top arches of the heart and stick the colored cranes along the line using adhesive dots.
- Angle the cranes so they look like they are flying upward and around the heart.
- Place the large white crane in the upper center area inside the heart.
- Secure the gold crane at the very bottom point of the heart to act as a focal point.
- Gently pull the wings of each crane outward to give the display a full 3D look.
29. Giant Sweethearts Candy Jar
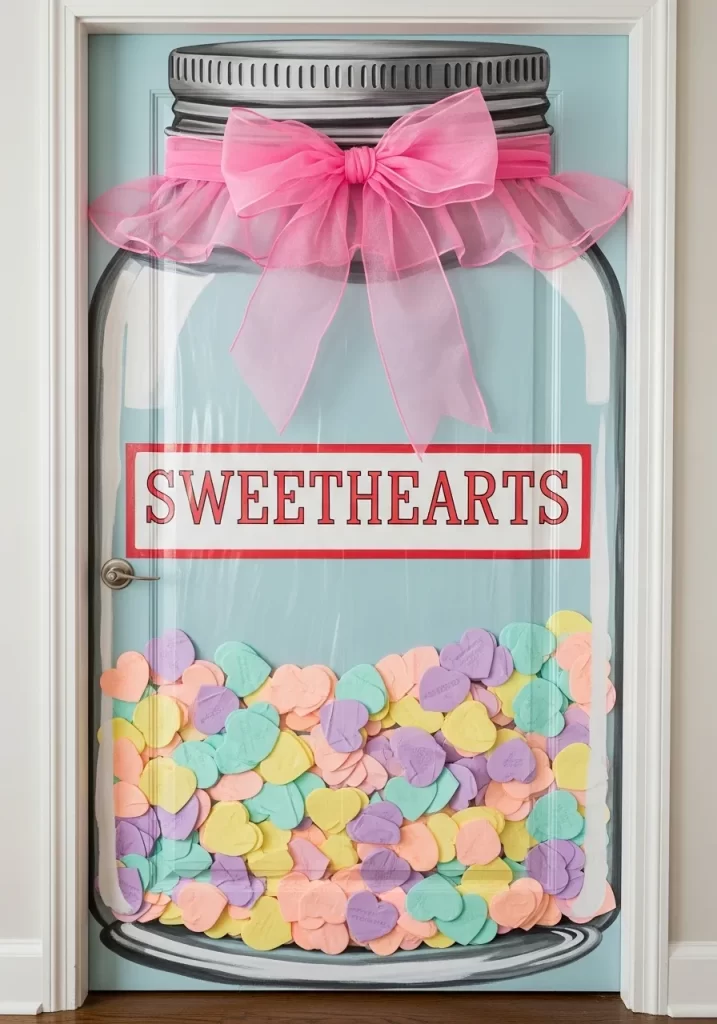
Turn your entire entrance into a massive jar of iconic Valentine Day candy. This design features a large glass jar shape drawn onto the door, filled to the brim with pastel conversation hearts. A giant pink organza bow is tied around the neck of the jar for a soft, decorative touch.
The label clearly reads SWEETHEARTS in a classic red font. Each paper heart inside can be customized with sweet phrases or names. This is a high impact, colorful display that brings a sense of joy and sweetness to the neighborhood. It is a creative way to use the door height to its full advantage.
Materials Required
- Light blue or clear plastic sheeting for the “jar” look
- Large quantity of pastel colored cardstock (pink, yellow, green, purple)
- White and red poster board for the label
- Large pink organza or tulle ribbon
Equipment Required
- Scissors
- Black marker
- Removable mounting tape
DIY Instructions Step by Step
- Cut your light blue paper or plastic into a large jar shape that fits your door.
- Tape the jar shape to the door, leaving the top area for the lid.
- Cut out dozens of small heart shapes from your pastel cardstock.
- Write classic candy messages like “Be Mine” or “Hug Me” on each heart.
- Tape the hearts inside the jar area, layering them so they look like they are piled up.
- Create a white rectangular label with a red border and write “SWEETHEARTS” in the center.
- Glue the label across the middle of the jar.
- Use grey paper to create a metal lid at the very top of the door.
- Tie a massive bow with the pink organza and secure it just below the lid.
30. Monogrammed Red Rose Heart
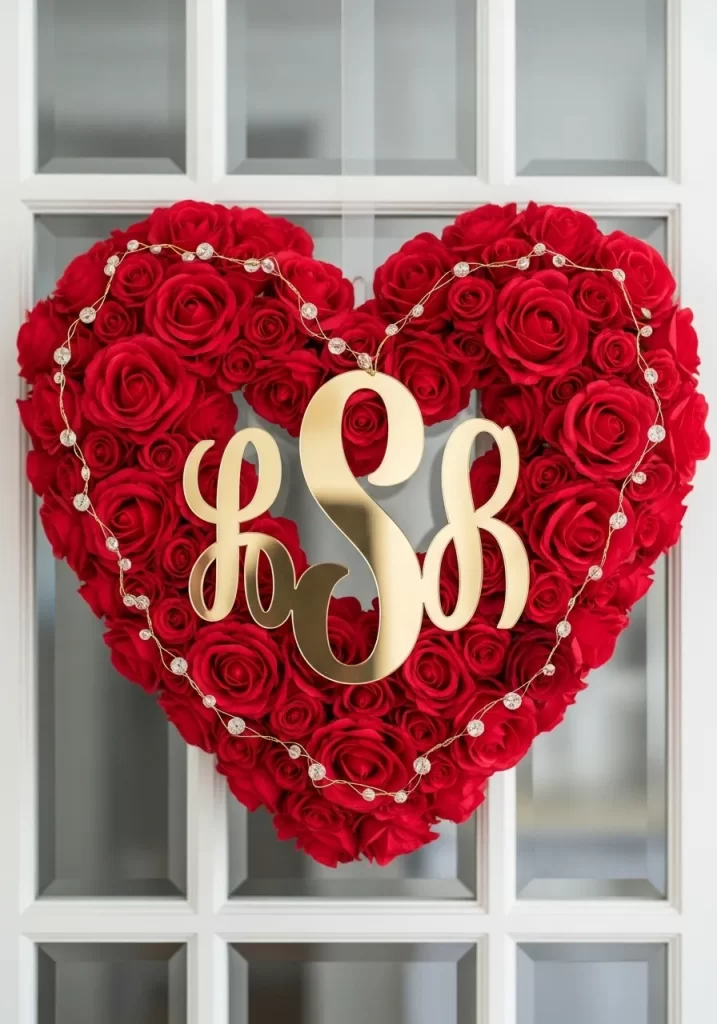
Make your holiday decor personal with this lush and luxurious monogrammed wreath. The heart shaped base is overflowing with deep red roses, creating a thick and velvety texture. A large, gold finished monogram of your family initial is placed prominently in the center.
A delicate string of warm white fairy lights is woven through the flowers to provide a magical glow at night. This decoration combines classic romance with a sense of pride in your home. It looks incredibly elegant on white framed or glass paneled doors. It is a timeless piece that feels both custom and high end.
Materials Required
- Heart shaped floral foam wreath base
- Large quantity of artificial red roses
- Large wooden or acrylic monogram letter painted gold
- Battery operated LED fairy lights
- Thin gold wire
Equipment Required
- Hot glue gun
- Wire cutters
DIY Instructions Step by Step
- Trim the stems of your roses so they can be pushed easily into the foam base.
- Cover the entire heart with the red roses, ensuring no foam is visible from the front or sides.
- Use hot glue to extra secure the rose heads if they feel loose.
- Center your gold monogram letter in the middle of the heart.
- Use thin gold wire to tie the letter to the wreath frame through the flowers.
- Carefully weave the fairy lights through the rose petals, hiding the wire as much as possible.
- Tape the small battery pack to the back of the wreath frame where it will not be seen.
- Hang the wreath and turn on the lights for a stunning evening display.
31. Archers Target Layered Heart
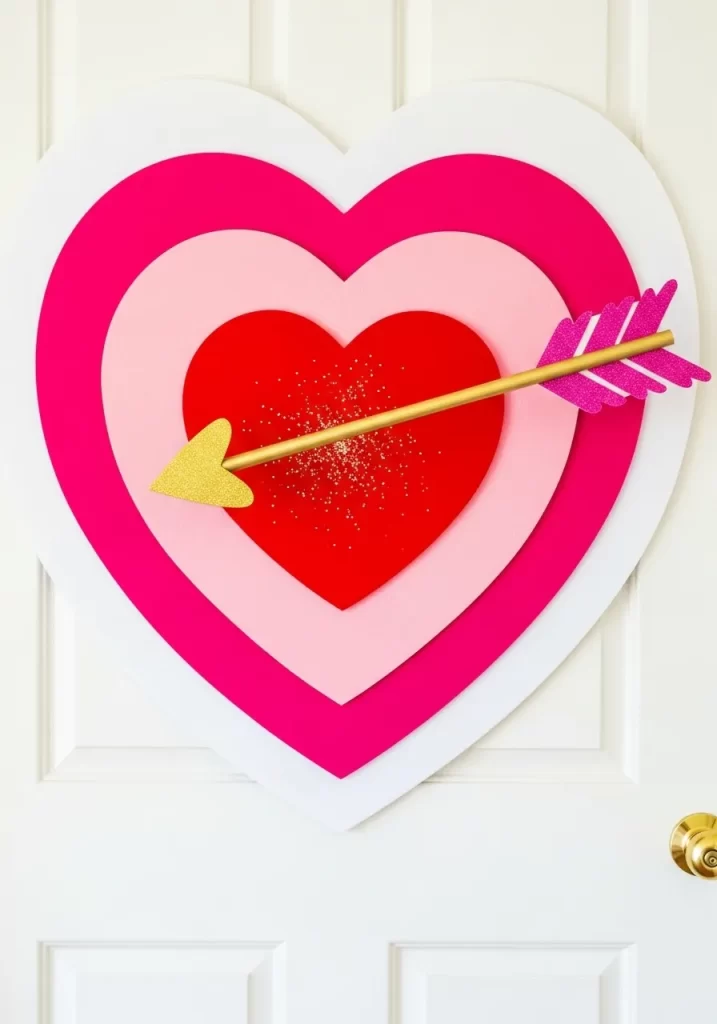
Hit a bullseye in the department of style with this playful and graphic door installation. This design uses concentric heart shapes in white, light pink, and hot pink to create a classic target effect. A bright red heart sits at the center, serving as the ultimate mark of affection.
The standout feature is a golden arrow piercing the center, complete with glittery pink fletching. It offers a clean, modern look that works beautifully on plain white doors. This project is a fun nod to Cupid that feels both artistic and whimsical.
Materials Required
- Large foam board sheets (white, light pink, hot pink, and red)
- Gold glitter cardstock
- Pink glitter cardstock
- Wooden dowel 1/2 inch diameter
- Gold spray paint
Equipment Required
- Precision craft knife
- Hot glue gun
- Sandpaper
- Measuring tape
DIY Instructions Step by Step
- Trace four heart templates in graduating sizes, ensuring the white one is the largest.
- Cut the hearts out of the corresponding colored foam boards using your craft knife.
- Sand any rough edges of the foam board for a professional, smooth finish.
- Paint your wooden dowel with gold spray paint and let it dry completely.
- Stack the hearts from largest to smallest and glue them together, centering each layer.
- Cut an arrowhead from the gold glitter cardstock and fletching feathers from the pink glitter cardstock.
- Glue the arrowhead to one end of the dowel and the feathers to the other.
- Cut the dowel at a sharp angle in the middle so it appears to disappear into the red heart.
- Glue the front half of the arrow to the red heart and the back half to the outer pink layer.
- Use removable mounting tape to secure the entire target to your front door.
32. Living Succulent Heart Wreath
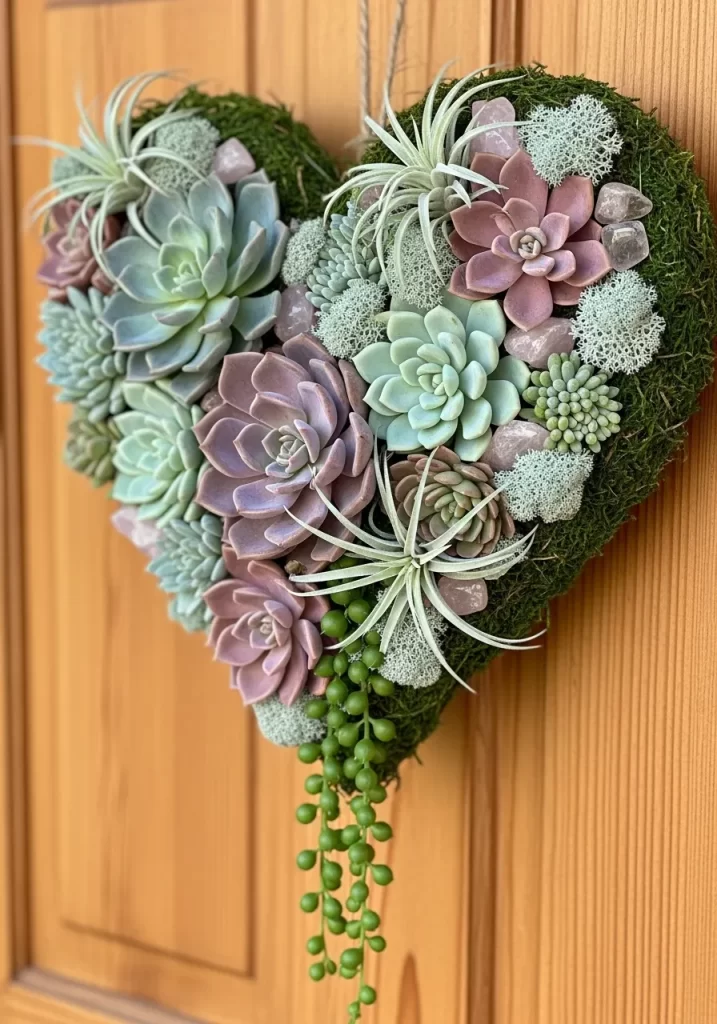
Bring a breath of fresh air to your entryway with a lush, living heart shaped garden. This decoration replaces traditional flowers with a variety of hardy succulents in shades of sage, plum, and seafoam green.
The base is made of thick, vibrant green moss that provides a rich, organic texture. Tiny raw crystals and string of pearls vines add a touch of magic and movement. This piece is a sophisticated choice for nature lovers who want a decoration that lasts long after February. It creates a tranquil and earthy welcome for every guest.
Materials Required
- Heart shaped wire wreath frame with a moss backing
- Assorted live succulent cuttings or faux succulents
- Extra sphagnum moss
- Floral pins
- Small raw rose quartz or amethyst stones
- String of pearls succulent vine
Equipment Required
- Floral wire cutters
- Spray bottle for water
- Tweezers
DIY Instructions Step by Step
- Soak your moss backed frame in water until it is fully saturated, then let the excess drip off.
- Poke small holes into the moss where you want to place your largest succulent heads.
- Insert the stems of the succulents into the holes and secure them with floral pins.
- Work in clusters, mixing different colors and textures of succulents for a natural look.
- Fill any small gaps between the plants with extra bits of loose green moss.
- Glue the raw crystals onto the wire frame so they peek out from between the leaves.
- Attach the string of pearls vine to the bottom point of the heart so it drapes downward.
- Lay the wreath flat for a few days to allow live roots to take hold if using real plants.
- Mist the wreath lightly with water once a week to keep the greenery fresh.
33. Buffalo Plaid Heart Gnome

Invite a bit of folklore and whimsy to your porch with this oversized Valentine gnome. Standing tall against your door, this character features a signature tall hat in classic red and black buffalo check.
A large, fluffy white beard covers most of its body, giving it a cozy and soft appearance. The gnome holds a plush red heart embroidered with XOXO as a sweet holiday greeting. This decoration is a fantastic way to add personality and a touch of humor to your home. It is particularly popular for families with children who enjoy the love bug theme.
Materials Required
- Large cone shaped base (foam or heavy cardstock)
- Buffalo check fabric (red and black)
- White faux fur fabric
- Small wooden ball for the nose
- Red velvet fabric and poly fill stuffing
- Grey felt for mittens
Equipment Required
- Hot glue gun
- Scissors
- Needle and white thread
DIY Instructions Step by Step
- Wrap your cone base with the buffalo check fabric and secure it with hot glue to create the hat.
- Cut a large triangle of white faux fur and glue it just under the rim of the hat for the beard.
- Glue the wooden ball in the center, resting slightly on top of the fur and under the hat.
- Sew a simple heart shape out of red velvet, stuff it with poly fill, and close the seam.
- Embroider “XOXO” on the heart or use a white fabric marker for a similar effect.
- Cut small mitten shapes out of grey felt and glue them to the sides of the beard.
- Attach the heart to the gnome hands so he appears to be holding it out.
- Place the gnome on a small stool or secure him directly to the lower half of your door.
34. Gilded Drip Art Heart
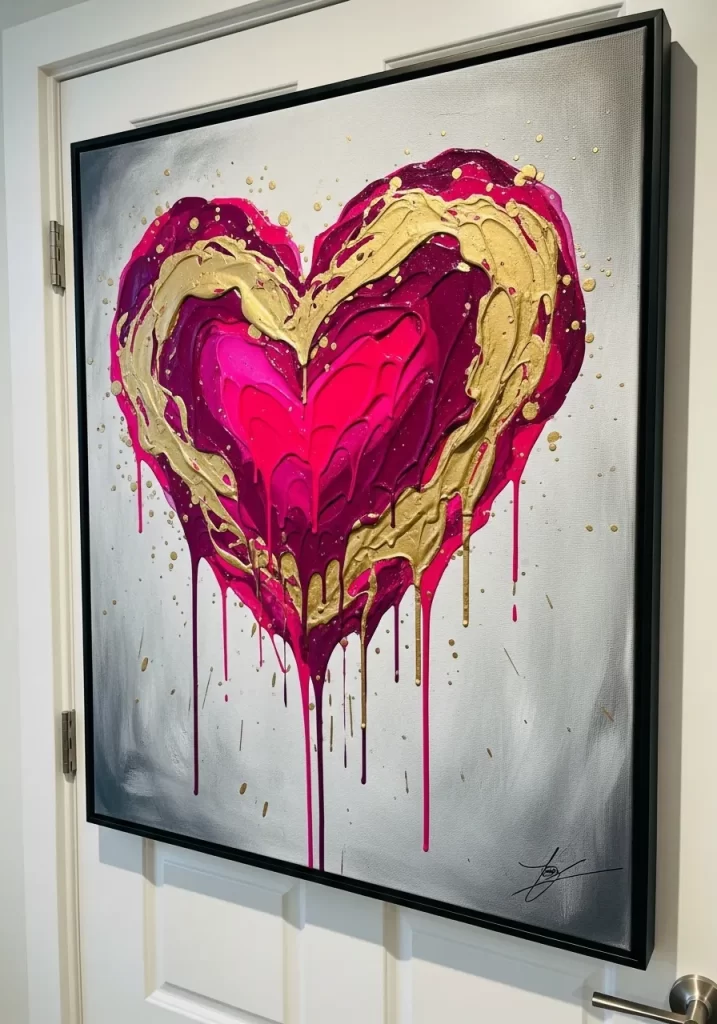
Make a bold artistic statement with a canvas that celebrates the messy, beautiful nature of love. This high contrast piece features a heart rendered in vibrant layers of fuchsia, magenta, and deep plum. Metallic gold paint is layered over the top, allowed to drip down the canvas in a modern, abstract style.
The textured impasto look gives the heart a three dimensional quality that catches the light. This is an excellent choice for an interior door or a protected entryway for someone who loves gallery style decor. It proves that holiday decorations can be sophisticated and museum worthy.
Materials Required
- Large square canvas (30×30 or larger)
- Acrylic paints (magenta, pink, purple, and white)
- Metallic gold liquid leaf or heavy body gold paint
- Black floating frame
Equipment Required
- Palette knives
- Large flat brushes
- Drop cloth
DIY Instructions Step by Step
- Paint your entire canvas in a light grey or white wash to create a clean background.
- Use a palette knife to glob thick layers of pink and purple paint into a rough heart shape.
- Swirl the colors together slightly but leave visible peaks and textures.
- While the paint is still wet, pour the metallic gold paint along the top curve of the heart.
- Tilt the canvas vertically and let the gold paint run naturally toward the bottom.
- Use a brush to flick small splatters of gold across the entire canvas for a cohesive look.
- Let the painting dry completely, which may take 24 hours due to the thick paint.
- Pop the canvas into a black floating frame to give it a finished, professional look.
- Hang the frame on your door using a heavy duty wreath hanger or command strips.
35. Jungle Love Wild About You Door
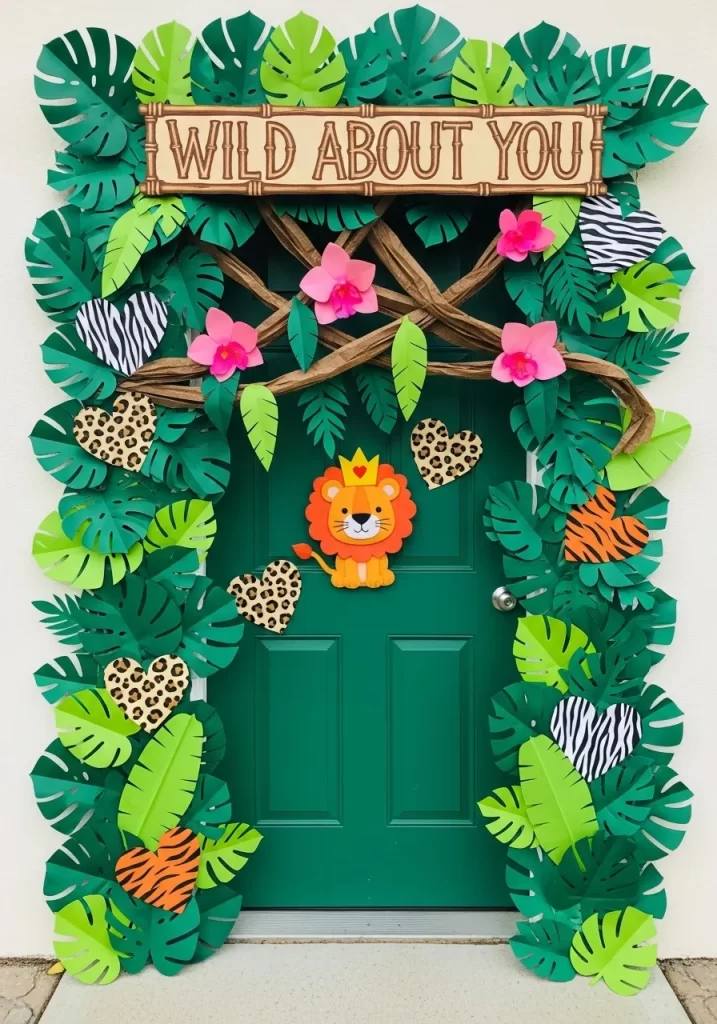
Go on a safari of the heart with this vibrant and energetic jungle themed door. This design frames the entrance with layers of oversized tropical leaves in varying shades of emerald and lime. A “Wild About You” bamboo style sign hangs at the top, setting a playful tone.
The center features a friendly lion king wearing a tiny crown, surrounded by hearts in zebra and leopard prints. This is for school classrooms or nurseries. It uses bright colors and animal patterns to create a fun, high energy environment.
Materials Required
- Green cardstock in three different shades
- Animal print scrapbook paper (zebra, leopard, tiger)
- Tan poster board for the sign
- Orange and yellow felt for the lion
Equipment Required
- Leaf shaped stencils
- Scissors
- Brown marker
- Double sided tape
DIY Instructions Step by Step
- Trace and cut dozens of large tropical leaves (monstera and palm styles) from the green cardstock.
- Fold the leaves down the center slightly to give them a 3D, realistic shape.
- Layer the leaves around the frame of your door using double sided tape, starting from the top corners.
- Cut a long rectangle from the tan board and draw bamboo lines on it with a brown marker.
- Write “WILD ABOUT YOU” in bold black letters on the sign and tape it to the top center.
- Cut heart shapes out of your animal print papers and scatter them among the green leaves.
- Create a simple lion face from felt and cardstock, adding a small gold crown on top.
- Place the lion in the center of the door just above the handle for a cute focal point.
36. Crocheted Heart Garland
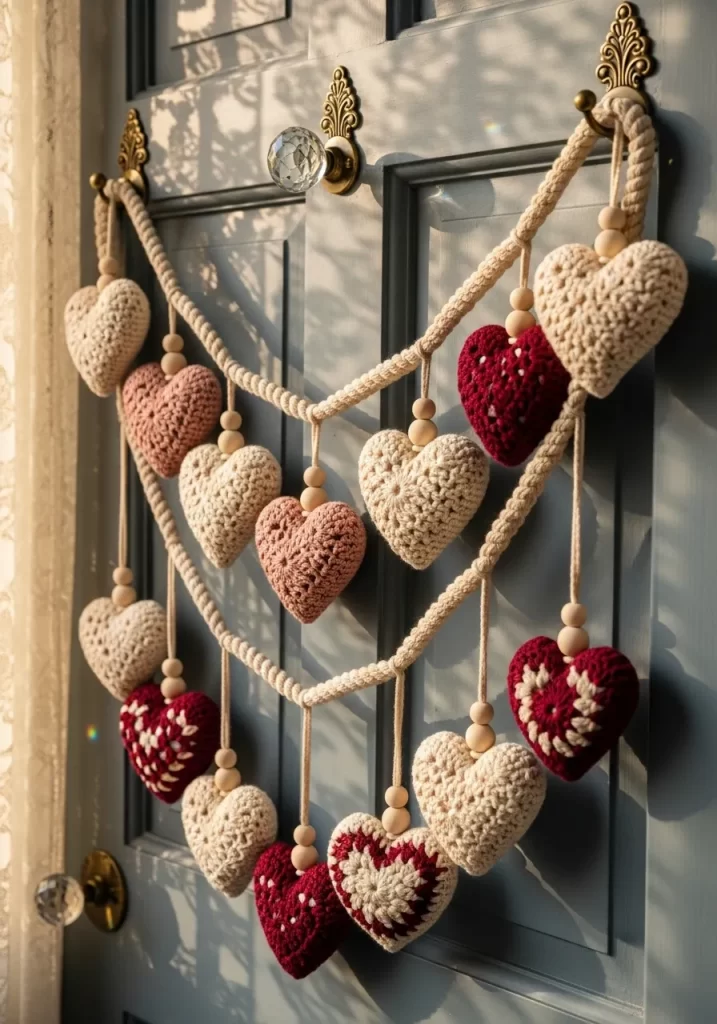
Add a touch of handmade warmth with a beautiful garland of soft, textured hearts. This decoration features chunky crocheted hearts in cream, dusty rose, and deep burgundy.
They are strung along a thick macrame cord with natural wooden beads acting as spacers. The garland drapes in elegant swags across the door, providing a cozy and tactile feel. This style is a wonderful fit for a rustic or bohemian home aesthetic. It feels personal and provides a hygge inspired welcome to everyone who enters.
Materials Required
- Chunky cotton or wool yarn (cream, pink, and red)
- Thick macrame cord or braided rope
- Large hole wooden beads
- Small decorative hooks
Equipment Required
- Crochet hook size appropriate for your yarn
- Large yarn needle
- Scissors
DIY Instructions Step by Step
- Crochet 10 to 12 small hearts using a simple heart pattern (magic ring, double crochets, and slips).
- Leave a long tail on each heart to make it easier to attach to the main cord.
- Cut two lengths of macrame cord that are slightly wider than your door.
- Slide several wooden beads onto the cord, grouping them between where the hearts will hang.
- Tie each crocheted heart to the cord, ensuring they are evenly spaced.
- Use your yarn needle to weave the loose ends back into the hearts for a clean look.
- Mount two hooks on the upper half of your door and one in the center at a lower point.
- Drape the garland across the hooks to create two soft U shaped swags.
37. What I Love Most Mirror Display
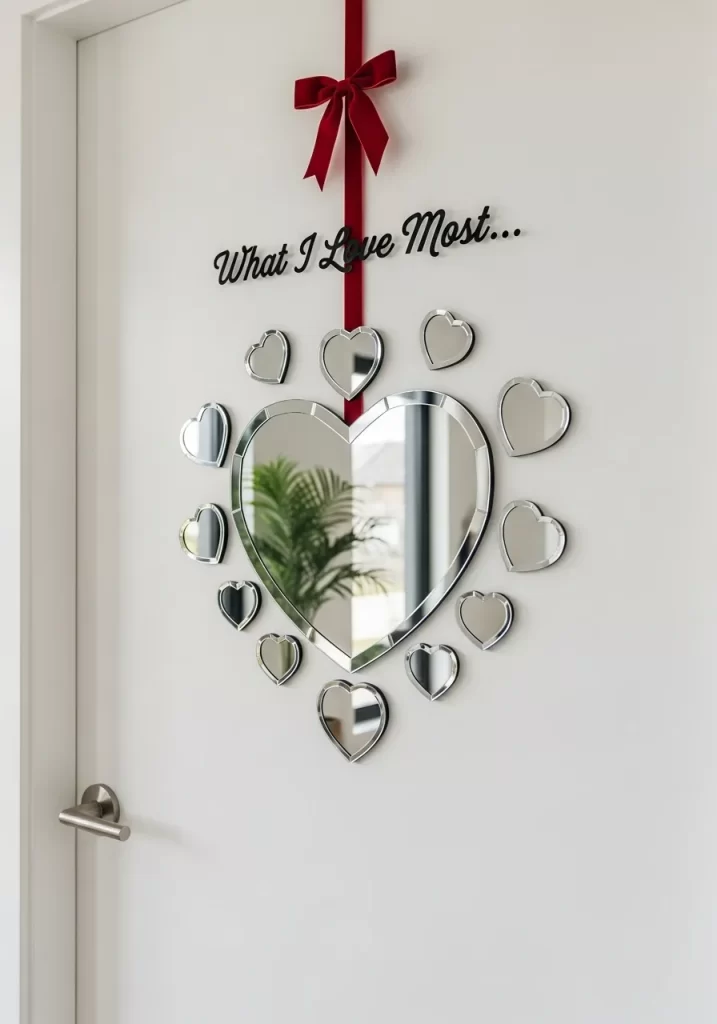
Create a thoughtful and interactive entrance with a display that literally reflects love. This design features a large heart shaped mirror as the centerpiece, surrounded by smaller mirrored hearts. A black script sign above reads “What I Love Most,” suggesting that the viewer is the answer.
A deep red velvet ribbon and bow add a classic holiday touch to the top. This minimalist and sleek decoration is great for modern homes. It serves as a beautiful reminder of self love and appreciation for every person who walks through the door.
Materials Required
- Large heart shaped wall mirror
- Set of 10-12 small adhesive mirrored hearts
- Black vinyl lettering or black cardstock
- Wide red velvet ribbon
Equipment Required
- Glass cleaner
- Measuring tape
- Level tool
DIY Instructions Step by Step
- Clean your door surface and the back of your mirrors to ensure a strong bond.
- Measure the vertical center of the door and hang the large heart mirror at eye level.
- Use your level to ensure the mirror is perfectly straight.
- Place the smaller mirrored hearts in a circular halo pattern around the main mirror.
- Apply the “What I Love Most” lettering in an arch above the mirror display.
- Tie a large, elegant bow with the red velvet ribbon.
- Secure the bow to the top of the door frame and let the long tails drape down toward the mirror.
- Clean the mirrors one last time so they sparkle brilliantly.
38. Macrame Pom Pom Heart
Combine the art of knotting with the fun of pom poms for a truly unique wall hanging. This heart is framed by a delicate macrame fringe and hanging tassels in earthy terracotta and rose tones.
The center of the heart is filled with soft, fuzzy pom poms in a variety of coordinating colors. Small brass bells are tucked into the fringe to provide a gentle chime whenever the door moves. This decoration is trendy, bohemian, and full of interesting textures. It adds a soft, artistic layer to your entryway that feels both modern and nostalgic.
Materials Required
- Heart shaped metal hoop
- Macrame cord (natural or cream)
- Pre-made or handmade yarn pom poms (peach, rust, and cream)
- Large wooden beads
- Small brass bells
Equipment Required
- Hot glue gun
- Scissors
- Comb to fringe the cord
DIY Instructions Step by Step
- Tie several long lengths of macrame cord to the bottom half of the metal hoop using larks head knots.
- Comb out the ends of the cord to create a soft, brushed out fringe.
- Trim the fringe into a pointed V shape that follows the bottom of the heart.
- Glue your colorful pom poms onto the top half of the metal hoop until the wire is hidden.
- Thread wooden beads and brass bells onto a few of the central cords for a decorative touch.
- Create a few long tassels and tie them to the bottom point of the heart.
- Tie a loop of cord to the top of the hoop for hanging.
39. Vintage Valentine Postcard Door
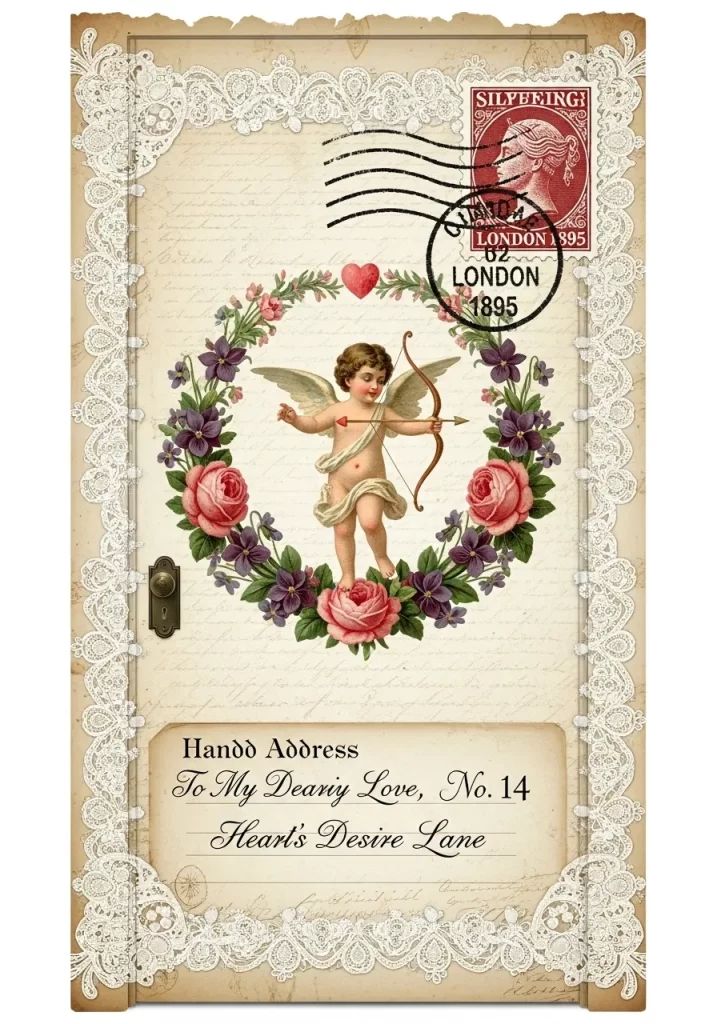
Step back in time with a door that looks like a giant Victorian greeting card. This design features a sepia toned background with intricate lace borders.
A classic cherub holding a bow is centered within a floral wreath of roses and violets. The bottom section features a handwritten address to a loved one, adding to the old world charm. A large red London stamp provides a historical focal point at the top. This is an incredible choice for history buffs or fans of the dark academia style. It is nostalgic, romantic, and deeply detailed.
Materials Required
- Large sheets of cream or parchment colored paper
- Printed vintage clip art (cherubs, roses, vintage stamps)
- White paper lace doilies
- Tea bags for staining paper
Equipment Required
- Spray adhesive
- Black calligraphy pen
- Large sponge
DIY Instructions Step by Step
- Stain your large paper sheets by dabbing them with wet tea bags and let them dry for a weathered look.
- Cover your door with the stained paper using spray adhesive.
- Glue the white doilies along the entire outer edge of the door to create a lace frame.
- Place your large cherub and floral wreath images in the center of the door.
- Apply the vintage stamp image to the top right corner.
- Use the calligraphy pen to write a romantic address like “To My Dearest Love” at the bottom.
- Draw postmark lines over the stamp to give it an authentic mailed appearance.
40. All You Need Is Love Musical Door
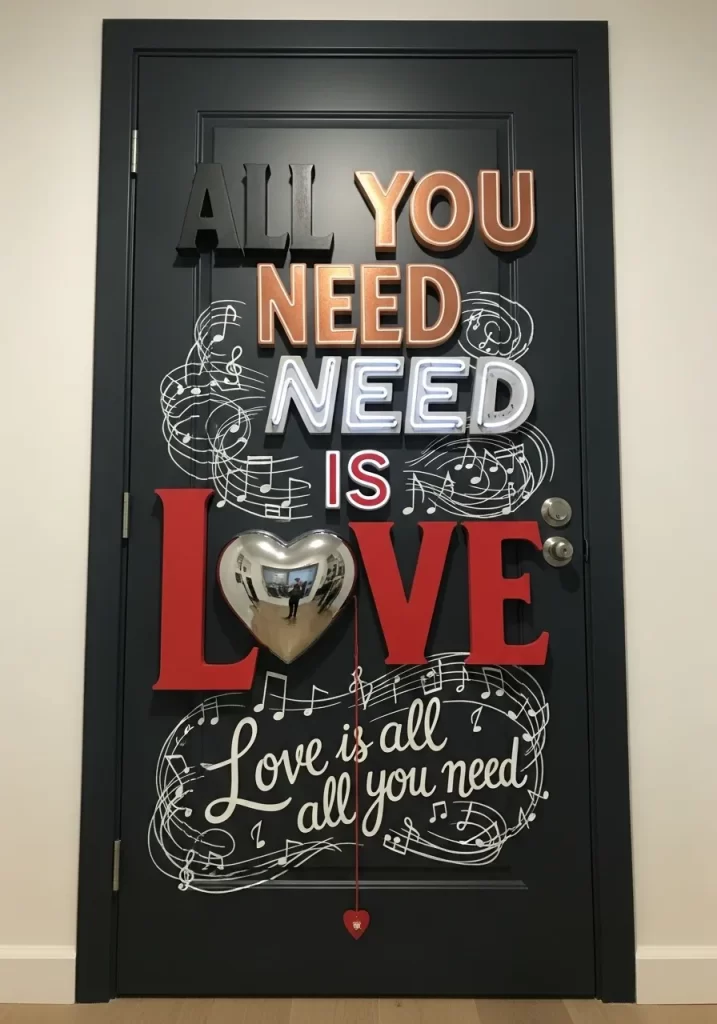
Sing your heart out with a door inspired by the greatest love songs. This design features a dark matte background that makes the 3D lettering “All You Need Is Love” pop in gold and red.
Whimsical white musical notes and staff lines are drawn by hand around the text. A shimmering silver heart balloon is tethered to the center, adding a playful 3D element. This is a high style, artistic choice that feels like a modern art installation. It is for musicians or anyone who believes that love and music go hand in hand.
Materials Required
- Black or navy blue butcher paper
- Large 3D cardboard letters spelling the quote
- Gold and red metallic paint
- White chalk marker or paint pen
- Silver foil heart balloon
Equipment Required
- Hot glue gun
- Painter tape
- String
DIY Instructions Step by Step
- Cover your door with the dark paper to create a dramatic, high contrast base.
- Paint your cardboard letters in alternating gold and red, then glue them to the door.
- Use the white marker to draw swirling musical notes and staff lines around the letters.
- Ensure the drawings have a hand sketched feel for an artistic touch.
- Inflate your silver heart balloon and tie a long red string to the end.
- Tape the balloon to the center of the door so it looks like it is floating.
- Glue a tiny red heart to the end of the string at the very bottom of the door.
41. Enchanted Message Wreath

Capture a sense of mystery and deep affection with this breathtaking floral arrangement. This wreath features a base of dark burgundy peonies and black calla lilies tipped with shimmering gold. The rich, moody tones provide a striking contrast against a dark door, creating a sophisticated aesthetic.
Delicate fairy lights are woven throughout the petals to offer a soft, magical glow during the evening. Five small glass bottles hang from golden chains at the base, each containing a rolled parchment for secret love notes. It is a poetic decoration that combines visual beauty with a personal, interactive element.
Materials Required
- Grapevine wreath base
- Artificial dark burgundy peonies
- Black and gold tipped artificial calla lilies
- Thin gold metal chains
- Five small glass cork stopper bottles
- Parchment paper scraps
- Gold twine
Equipment Required
- Hot glue gun
- Wire cutters
- Battery operated LED fairy lights
DIY Instructions Step by Step
- Trim the stems of your peonies and calla lilies using wire cutters so they sit flush against the base.
- Glue the large peony heads around the wreath form first to establish a full, lush texture.
- Tuck the black and gold calla lilies into the gaps between the peonies and secure them with glue.
- Wrap the fairy lights around the floral arrangement, hiding the thin wire behind the leaves and petals.
- Attach five lengths of gold chain to the bottom curve of the wreath at staggered intervals.
- Use gold twine to tie the necks of the glass bottles to the ends of the chains.
- Write short, sweet messages on small pieces of parchment paper and roll them tightly.
- Slide one message into each bottle and seal them with the cork stoppers.
- Mount the wreath on your door and tuck the battery pack for the lights out of sight.
42. Eternal Love Scroll Display
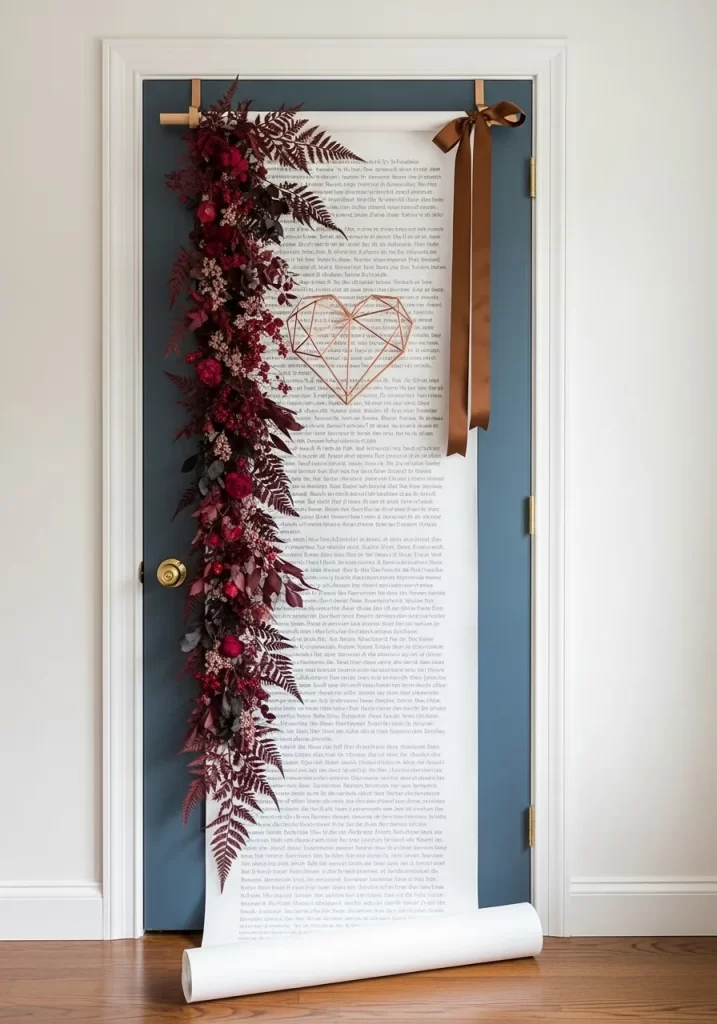
Make a grand, literary statement with this unique vertical scroll installation. A long roll of white paper drapes from the top of the door to the floor, mimicking an unrolled love letter. A sprawling cascade of deep red ferns and roses runs down the left side, adding a natural and romantic frame.
A geometric rose gold heart is centered on the paper, symbolizing a modern and structured love. The display is topped with a rich brown satin bow for a polished finish. This decoration is high impact and artistic, turning your entire entryway into a piece of fine art.
Materials Required
- Large roll of heavy white craft paper or banner paper
- Artificial deep red fern fronds and small roses
- Rose gold wire or a pre-made geometric heart
- Wide brown satin ribbon
- Wooden dowel rod
Equipment Required
- Scissors
- Double sided mounting tape
- Hot glue gun
DIY Instructions Step by Step
- Cut a length of paper that is roughly one foot longer than the height of your door.
- Attach the top of the paper to a wooden dowel rod to help it hang straight and heavy.
- Secure the dowel to the top of the door frame using strong mounting tape or hooks.
- Let the paper unroll down the door, allowing the excess to curl naturally on the porch floor.
- Glue your red fern fronds in a vertical S curve starting from the top left corner down to the middle.
- Nest small red roses within the ferns to add depth and a traditional romantic touch.
- Place your rose gold geometric heart in the center of the paper and secure it with a small dab of glue.
- Tie a large, elegant bow with the brown satin ribbon and attach it to the top right corner of the scroll.
- Ensure the paper is taut against the door by using small pieces of double sided tape at the bottom edges.
Creating a welcoming atmosphere starts with small, thoughtful details at your very first threshold. Each of these projects offers a chance to tell a story of affection and creativity. You can choose a style that fits your personal taste from rustic farmhouse to sleek modern art.
Sharing your handmade creations brings a sense of pride and joy to the entire household. Your guests will feel the love before they even step through the doorway. It is time to stop letting your home entrance look ordinary during the most romantic season of the year.
Gather your supplies and start building something that makes you smile every time you return home. Love is in the details, and your door is the best place to show it. Happy crafting to everyone ready to spread some Valentine cheer.
Key Takeaways
1 Decorating your door creates an immediate welcoming vibe for guests and neighbors.
2 You can achieve high impact looks using budget friendly materials like paper, balloons, and twine.
3 Personalizing your entryway with monograms or custom messages adds a unique touch to your home exterior.
4 Various styles ranging from minimalist to whimsical ensure there is a project for every personality.
5 Handcrafted decorations provide a rewarding creative outlet and a more meaningful way to celebrate the holiday.