
February brings a unique chance to warm up your living space with love. You do not need a massive budget to create a romantic atmosphere. A few simple projects can change the entire mood of your house.

Handmade decor adds a level of charm that store bought items often lack. These projects focus on high end looks that anyone can achieve at home. You will find inspiration for every corner of your property.
Get your tools ready and prepare to craft. These thirty six ideas offer a fresh take on classic holiday themes. Your home will feel cozy and celebratory in a very short time.
1 Elegant Floral Heart Ladder Display
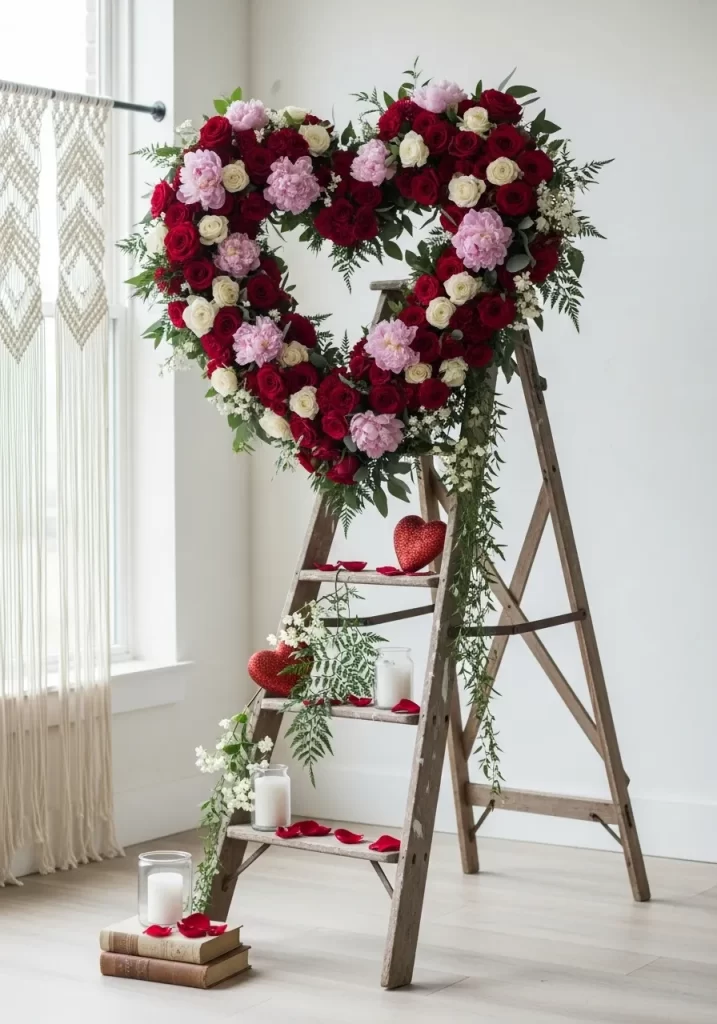
Transform an ordinary wooden ladder into a stunning focal point for your home this February. This decoration uses a large heart shaped wreath filled with lush roses and peonies to create a romantic atmosphere. Soft pinks and deep reds pop against the rustic wood of the ladder.
Adding small details makes a huge difference in your living space. Scattered petals and glowing candles on the steps provide a warm light that feels cozy and inviting. This setup works beautifully in a corner or near a window where natural light can highlight the textures.
Greenery drapes naturally from the top to the bottom to give the piece a finished look. You can use faux flowers to keep this display looking fresh throughout the entire season. It is a simple way to bring high end style into your home with a personal touch.
Materials Required
- Heart shaped wire or foam wreath frame
- Red silk roses
- Pink silk peonies
- White accent flowers
- Faux fern leaves and trailing greenery
- Decorative red heart cushions
- White pillar candles in glass jars
- Loose red flower petals
- Vintage books for staging
Equipment Required
- Rustic wooden A frame ladder
- Hot glue gun and glue sticks
- Wire cutters
- Green floral wire or zip ties
DIY Instructions
- Place your heart frame on a flat work surface to begin the assembly.
- Use your wire cutters to trim the stems of your silk flowers so only two inches remain.
- Attach the largest pink peonies first by poking them into the foam or wiring them to the frame to create balanced focal points.
- Fill the remaining gaps with red roses and smaller white flowers until no part of the frame is visible.
- Glue small sprigs of fern leaves around the edges of the heart to add a natural texture.
- Lean your wooden ladder against a secure wall in your preferred room.
- Secure the finished floral heart to the top rungs of the ladder using floral wire or hidden zip ties.
- Drape long strands of trailing greenery from behind the heart so they hang down the sides of the ladder.
- Arrange the glass candles and red heart cushions on different steps to create a tiered visual effect.
- Scatter loose petals on the steps and around the base of the ladder for a final romantic touch.
2 Minimalist Jute Heart Framed Art
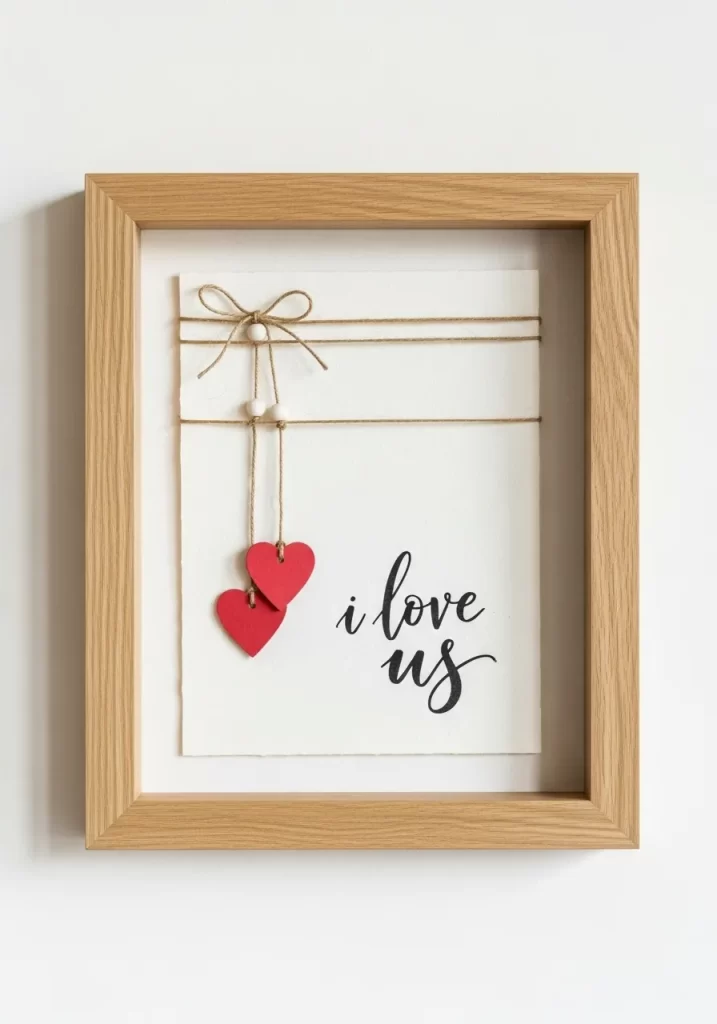
This elegant piece brings a touch of modern simplicity to your walls. A clean white backdrop features delicate jute twine wrapped horizontally to create a textured base. Two small red wooden hearts hang from the twine, symbolizing a close bond between two people.
The handwritten script at the bottom adds a deep personal sentiment to the artwork. Using a natural wood frame ensures the piece fits seamlessly into any room style. It is a subtle way to celebrate love without overcomplicating your decor.
Materials Required
- Deep set wooden shadow box frame
- Thick white cardstock or watercolor paper
- Natural jute twine
- Two small red wooden heart cutouts
- Four small white wooden beads
- Black archival ink pen or marker
Equipment Required
- Scissors
- Clear craft glue or hot glue gun
- Measuring ruler
- Pencil
DIY Instructions
- Remove the back of your frame and cut your white paper to fit the inner dimensions exactly.
- Measure three inches down from the top of the paper and mark light pencil dots on both sides.
- Wrap the jute twine around the paper at these marks three times to create horizontal lines.
- Secure the ends of the twine to the back of the paper using a small amount of glue.
- Cut two separate pieces of twine, each about five inches long, to act as hanging strings.
- Thread two white beads onto each string and tie a small red heart to the bottom end.
- Loop the top of these strings over the horizontal twine lines and glue them in place so the hearts hang at different heights.
- Tie a small bow with a separate scrap of twine and glue it over the top of the hanging strings.
- Carefully write your chosen phrase in the bottom right corner using a steady hand.
- Place the paper back into the frame and secure the latches.
3 Vintage Milk Glass Carnation Centerpiece
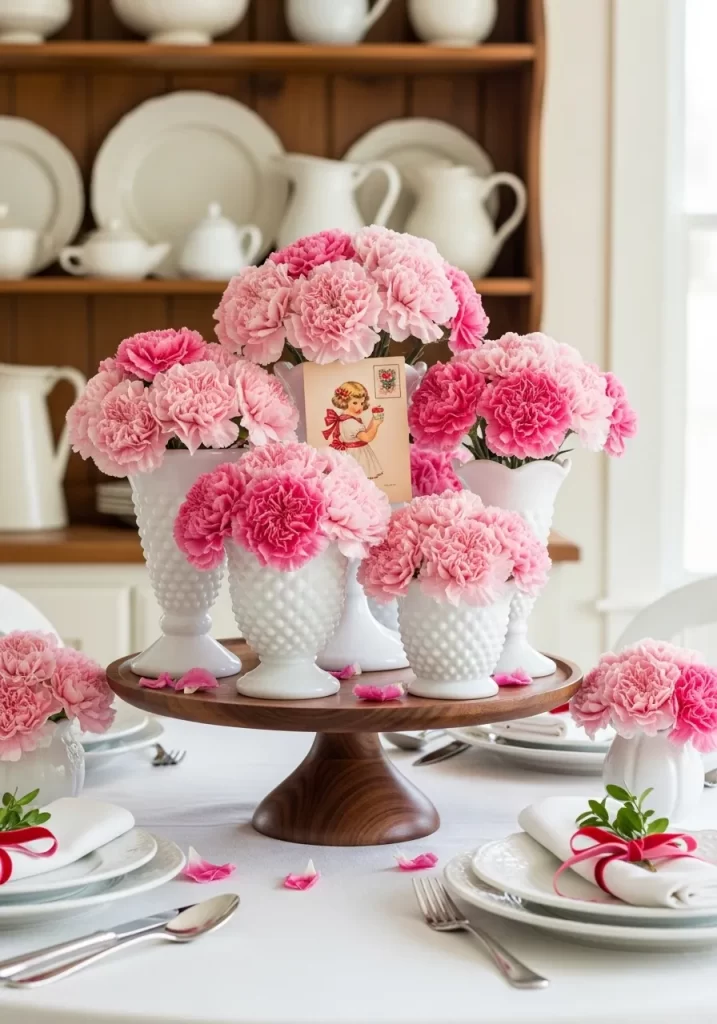
Create a stunning table display using various heights of white hobnail milk glass. These textured vases provide a classic look that contrasts beautifully with soft pink carnations. Grouping multiple small arrangements together makes a bigger visual impact than a single large bouquet.
A vintage postcard tucked into the flowers adds a nostalgic and charming element to the scene. This setup sits on a wooden cake stand to give the arrangement extra height and presence. It is a sophisticated choice for a brunch or a romantic dinner.
Materials Required
- Assorted white milk glass or hobnail vases
- Two dozen fresh pink carnations
- One vintage style Valentine’s Day postcard
- Small green leafy sprigs
- Water for the vases
- Red velvet ribbon for napkins
Equipment Required
- Wooden pedestal cake stand
- Sharp floral shears or kitchen scissors
DIY Instructions
- Fill each of your white vases halfway with room temperature water.
- Use your shears to trim the carnation stems at a sharp angle so they sit snugly against the rim of the vases.
- Group three to five flowers in each vase to create a dense, rounded “pom pom” look.
- Place your wooden cake stand in the center of your dining table.
- Arrange the tallest vase in the center of the stand and place the smaller vases around it.
- Gently slide a vintage postcard into the center bouquet so it stands upright.
- Place any extra small vases directly on the tablecloth near the base of the stand.
- Scatter a few loose pink petals around the cake stand for a relaxed feel.
- Tie small red ribbons around your white cloth napkins to match the floral theme.
- Check the water levels daily to keep your blooms looking vibrant.
4 Romantic Rose and Velvet Mantel Garland

Frame your fireplace with a lush greenery garland woven with deep red roses. This decoration brings a high end, classic feel to your living room. The long red velvet ribbons hanging from the mantel add movement and a soft texture to the display.
Golden candlesticks on either side provide a regal touch and help balance the weight of the greenery. This design draws the eye toward the warmth of the fire. It creates a cozy atmosphere that encourages long conversations on cold evenings.
Materials Required
- Six feet of faux or fresh ruscus greenery garland
- Twelve large red silk or real roses
- Ten yards of wide red velvet ribbon
- Two gold taper candle holders
- Two cream colored taper candles
Equipment Required
- Clear adhesive mantel hooks
- Floral wire
- Scissors
- Lighter
DIY Instructions
- Clean the top surface of your mantel to ensure the adhesive hooks stick properly.
- Space four hooks evenly across the front edge of the mantel.
- Drape your greenery garland across the hooks, allowing the ends to hang down the sides.
- Use small loops of floral wire to secure the roses into the greenery at equal intervals.
- Cut your red velvet ribbon into six pieces, each measuring about 1.5 yards long.
- Tie five large bows and attach them to the garland where it meets the hooks.
- Let the long “tails” of the bows hang down toward the floor for a dramatic look.
- Place your gold candlesticks on the top corners of the mantel, tucked slightly behind the greenery.
- Trim the rose stems very short if using real flowers and use water tubes to keep them fresh.
- Step back to adjust the “swag” of the garland so it curves gracefully in the center.
5 Hanging Honeycomb Heart Mobile
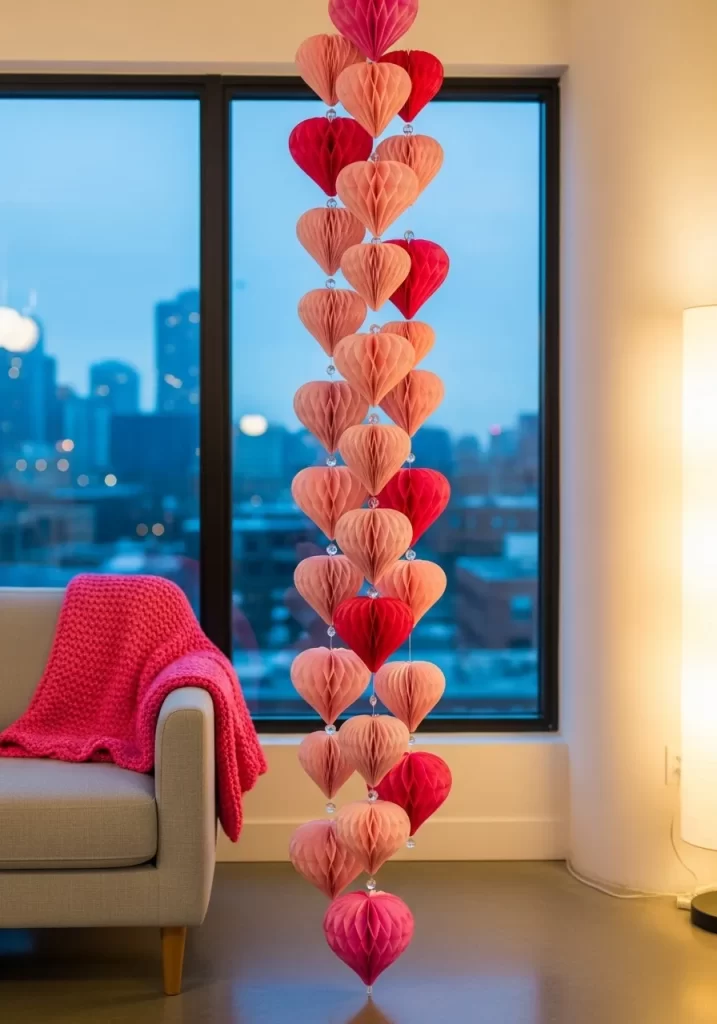
Add height and color to your window with a vertical string of paper hearts. This project uses honeycomb paper balls in shades of red, pink, and peach to create a playful 3D effect. The light from the window catches the paper edges, making the colors glow.
Small crystal beads between each heart add a touch of sparkle as the mobile rotates. This is a great way to decorate a modern apartment without taking up floor space. It looks professional but is very simple to assemble at home.
Materials Required
- Twelve honeycomb paper hearts (mixed sizes and colors)
- Strong clear fishing line
- Large glass or acrylic spacer beads
- One metal hoop or wooden dowel for hanging
Equipment Required
- Scissors
- Double sided tape (usually included with honeycomb sets)
- Ceiling hook
DIY Instructions
- Open your honeycomb hearts and use the built in adhesive or double sided tape to fan them out into full spheres.
- Cut a length of fishing line that is six feet long.
- Tie a large knot or a bead at the very bottom of the line to act as a stopper.
- Thread the line through the center of your first paper heart.
- Add a glass bead above the heart and tie a simple knot to keep the bead in place.
- Measure six inches up the line and tie another knot for your second heart.
- Repeat this process, alternating colors and sizes until you reach the top.
- Ensure the beads are tight against the knots so the hearts do not slide down.
- Tie the end of the fishing line securely to your ceiling hook or a hanging rod.
- Hang the mobile near a vent or window so the hearts gently spin in the breeze.
6 Lush Faux Fur Valentine Table Setting
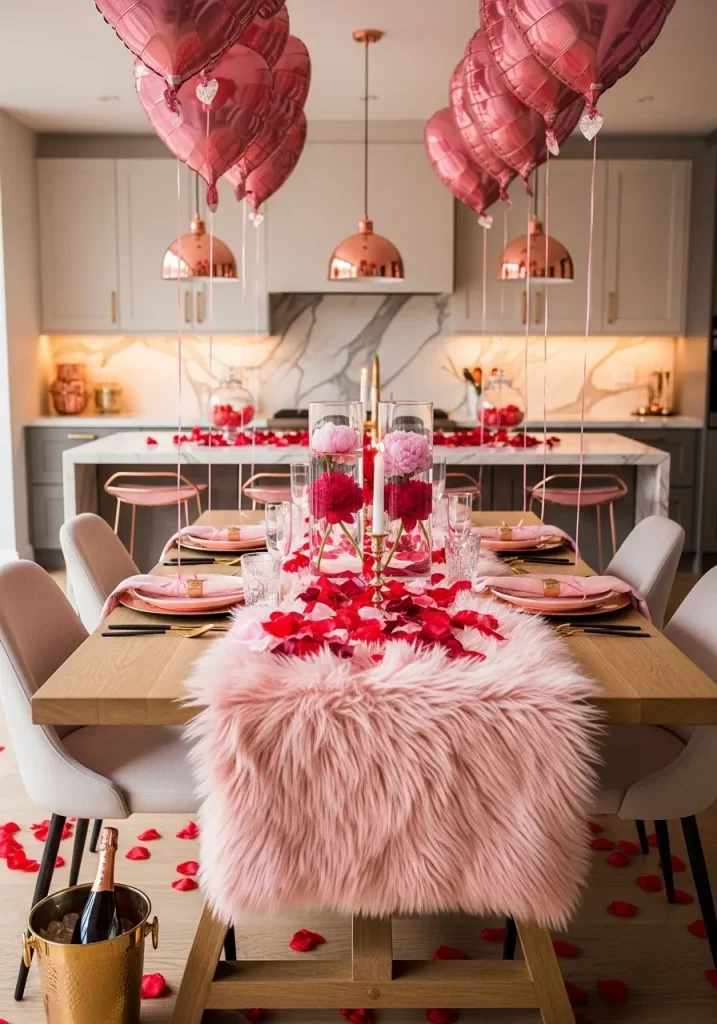
Elevate your dining experience with a soft pink faux fur runner that adds instant luxury to your table. This design balances the plush texture of the fur with sleek rose gold accents and glowing candles. Red rose petals scattered across the center create a path of color that leads the eye down the length of the display.
Floating pink peonies inside tall glass cylinders serve as a sophisticated centerpiece without blocking your view of guests. Heart shaped balloons floating above add a playful vertical element to the room. It is a bold way to make a holiday meal feel like a high end event.
Materials Required
- Pink faux fur fabric runner
- Two tall glass cylinder vases
- Four large pink peony blooms
- Three bags of fresh or silk red rose petals
- Rose gold charger plates
- Pink fabric napkins
- Pink heart shaped foil balloons
- One bottle of champagne
Equipment Required
- Rose gold cutlery set
- Stemless wine glasses
- Helium tank for balloons
- Gold ice bucket
DIY Instructions
- Lay your pink faux fur runner down the center of your wooden dining table.
- Shake the runner gently to fluff up the fibers so it looks full and soft.
- Fill two tall glass vases with water and place one large peony in each so it floats at the top.
- Position these vases in the middle of the table to act as your main focal point.
- Take handfuls of red rose petals and sprinkle them generously over the fur runner.
- Set your places using rose gold chargers and top them with neatly folded pink napkins.
- Fill your heart balloons with helium and tie them to the back of each chair or weight them to the table.
- Place a gold ice bucket at the end of the table to keep your drinks cold during the meal.
- Light a few small white candles and place them between the vases for a warm glow.
- Scatter remaining petals on the floor around the table base to finish the scene.
7 Crimson Bead and Floral Door Heart
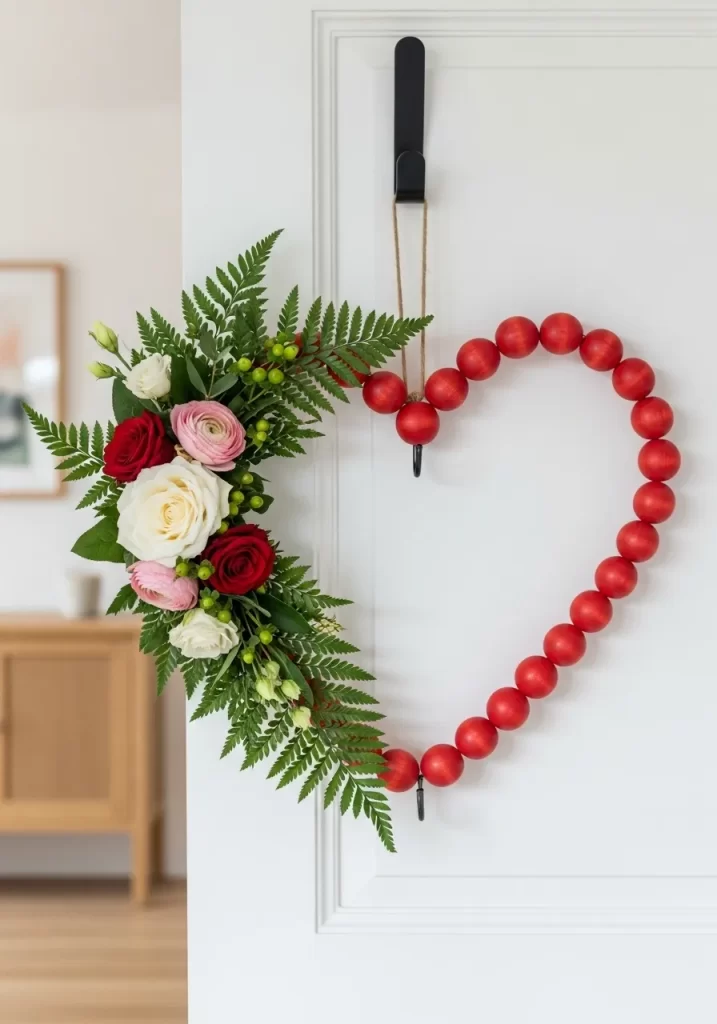
Greet your guests with a unique door hanger that combines rustic wood textures with fresh botanical beauty. This decoration features a heart shaped frame made of large red painted wooden beads. One side is heavily accented with a cluster of roses and ferns to create a striking asymmetrical look.
The mix of white, pink, and red flowers against the dark green leaves makes the colors vibrate. Hanging this on a white door allows the deep red of the beads to stand out clearly. It is a modern take on a traditional wreath that feels fresh and artistic.
Materials Required
- Large wooden craft beads
- Red acrylic paint
- Thick gauge floral wire
- Fresh or silk red and white roses
- Pink ranunculus flowers
- Large leather leaf fern fronds
- Natural twine for hanging
Equipment Required
- Paintbrush
- Wire cutters
- Hot glue gun
- Black over the door hook
DIY Instructions
- Slide your wooden beads onto a string and paint them with two coats of bright red acrylic paint.
- Let the beads dry completely before you start the assembly process.
- Bend a thick piece of floral wire into a large heart shape and twist the ends together at the top.
- Thread the dry red beads onto the wire heart until the entire frame is covered.
- Use your hot glue gun to secure a layer of green fern leaves to the left side of the heart.
- Trim the stems of your roses and ranunculus very short using your wire cutters.
- Glue the largest white rose in the center of the greenery to act as the base.
- Cluster the smaller red and pink flowers around the white rose until the left curve is full.
- Tie a loop of twine to the top center dip of the beaded heart.
- Hang the finished piece on your door hook and adjust the greenery so it sits flat against the surface.
8 Serene Elephant Love Candle Holder
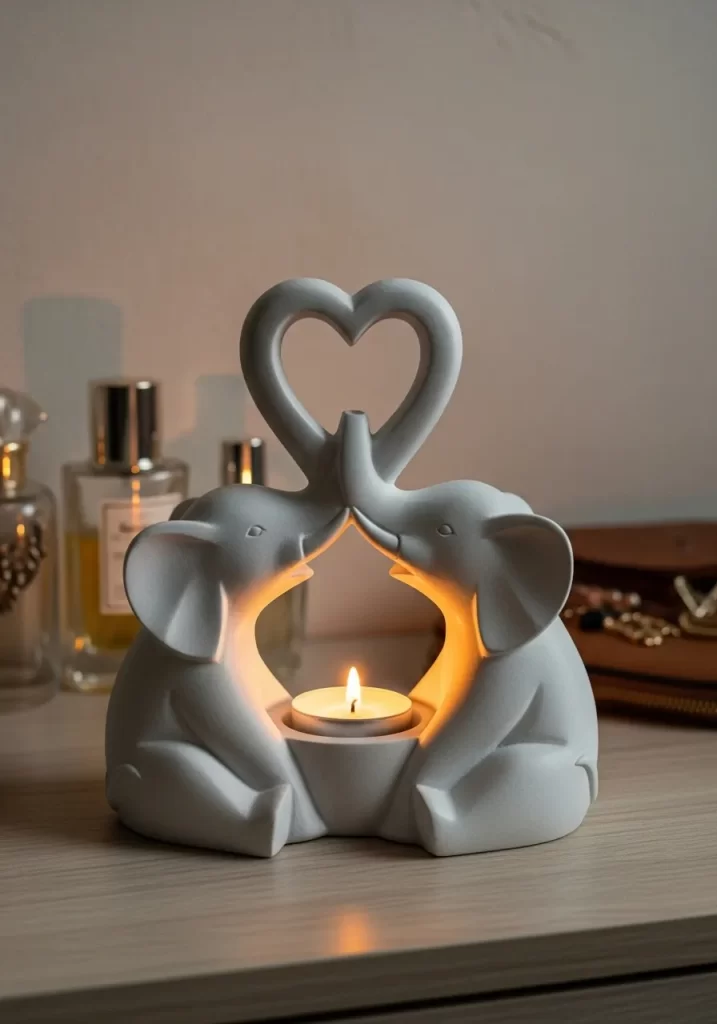
Bring a sense of peace and companionship to your bedroom or vanity with this minimalist sculpture. Two white elephants face each other with their trunks raised to form a heart shape. This piece acts as a functional candle holder that casts a soft light between the two figures.
The matte white finish looks clean and expensive against any wooden furniture. Small details like the curved trunks and steady base make it a sturdy yet delicate accent piece. It serves as a gentle reminder of love and loyalty in your daily life.
Materials Required
- Two small ceramic or clay elephant figurines
- White matte spray paint
- One white unscented tea light candle
- Small circular mirror or tray for the base
Equipment Required
- Sandpaper (fine grit)
- Strong ceramic adhesive or epoxy
- Cardboard box for painting
DIY Instructions
- Use fine sandpaper to lightly scuff the surface of your elephant figurines so paint sticks better.
- Wipe away any dust with a damp cloth and let the figures dry.
- Apply a thin coat of white matte spray paint to both elephants while working in a well ventilated area.
- Let the first coat dry for thirty minutes before applying a second coat for full coverage.
- Place the elephants on a flat surface facing each other.
- Adjust their positions until the tips of their trunks touch to form a heart.
- Apply a small bead of strong adhesive to the bottom of the elephants and press them onto your base tray.
- Ensure there is enough space between their bodies to safely fit a standard tea light.
- Place the tea light in the center and light it to see how the trunks frame the flame.
- Display the finished sculpture on a nightstand or dresser away from flammable materials.
9 3D Layered Paper Heart Wall Mural
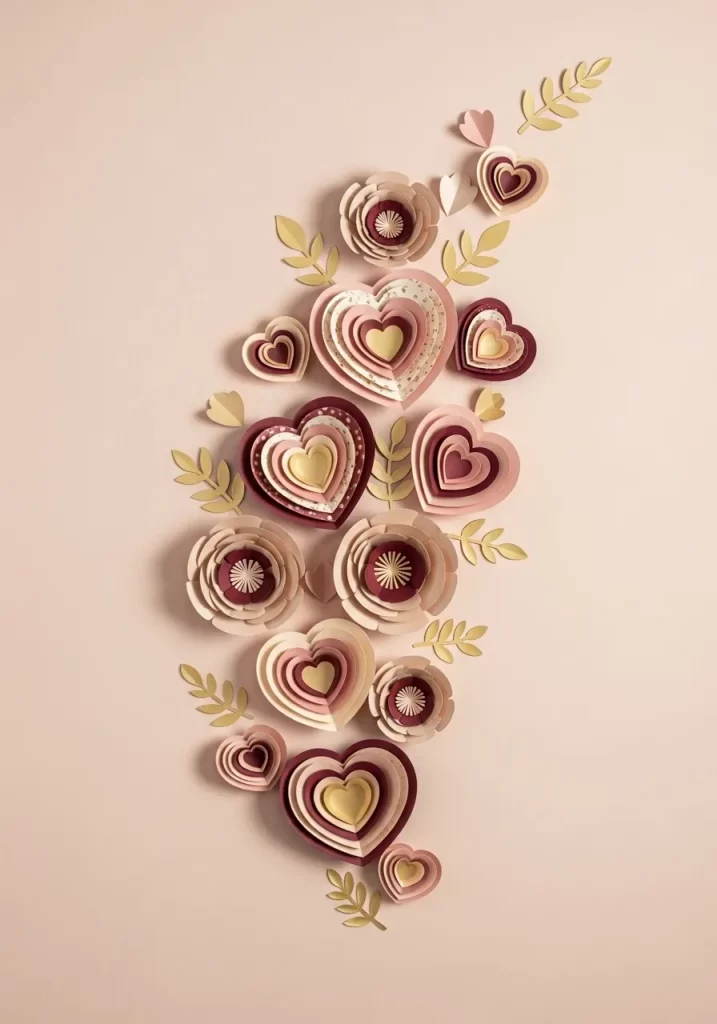
Turn a blank wall into a masterpiece with a flowing arrangement of 3D paper hearts and flowers. This mural uses layers of cardstock in dusty rose, burgundy, and cream to create depth and shadow. The addition of gold paper leaves gives the display a touch of elegance and shine.
Arranging the pieces in an upward sweeping motion creates a sense of movement across the room. Each heart is constructed from multiple layers that pop out from the wall. This project allows you to fill a large space with color without the need for heavy frames.
Materials Required
- Heavy cardstock in red, pink, cream, and gold
- Removable wall adhesive putty
- Small gold paper leaf cutouts
- Tiny pearl stickers for flower centers
Equipment Required
- Heart shaped paper punches (various sizes)
- Scissors
- Scoring tool or bone folder
DIY Instructions
- Cut out dozens of hearts in different sizes using your paper punches or scissors.
- Fold each heart in half vertically using a scoring tool to create a crisp center crease.
- Glue two hearts of the same size together along the fold to create a 3D “butterfly” effect.
- Create paper flowers by layering circular cutouts and curling the edges upward with your fingers.
- Place a small pearl sticker in the center of each flower for a finished look.
- Start at the bottom of your wall and use adhesive putty to stick the largest burgundy hearts in a cluster.
- Add the pink and cream hearts moving upward and outward in a gentle curve.
- Tuck the gold leaves between the hearts to add contrast and fill small gaps.
- Use the smallest hearts at the very top of the mural to give the illusion of them floating away.
- Press firmly on each piece to ensure it stays secured to the wall surface.
10 Sophisticated Trio of Heart Art
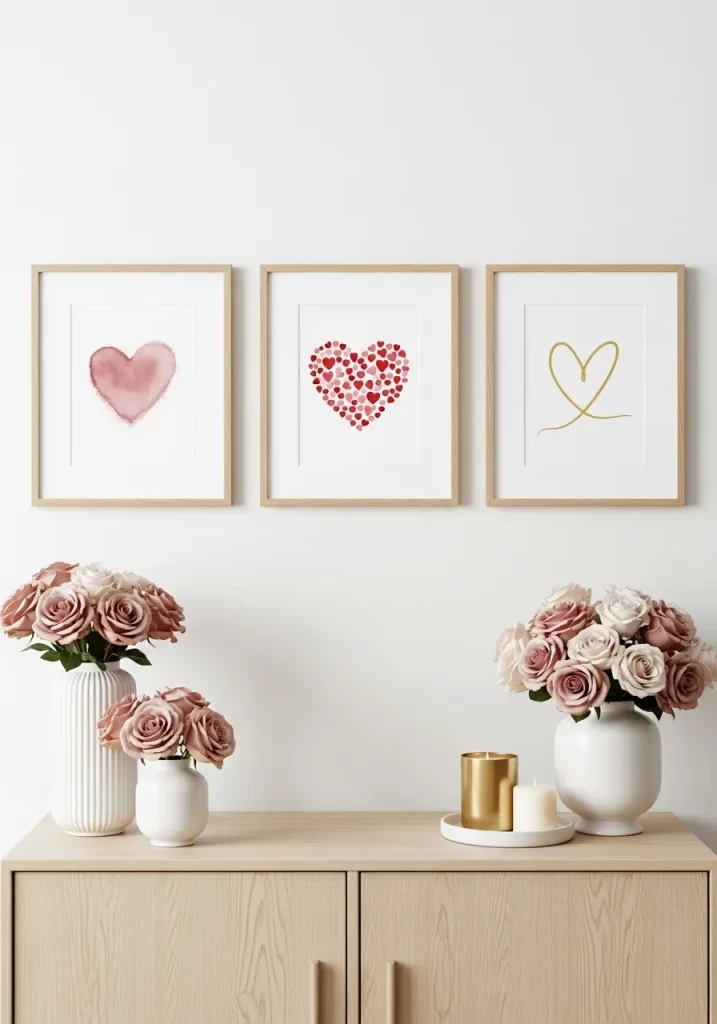
Create a curated look on your sideboard with a set of three matching frames featuring different heart styles. The first frame shows a soft watercolor wash, the second a mosaic of tiny hearts, and the third a simple gold line drawing. This variety keeps the eye moving while maintaining a consistent theme.
Placing white vases with dusty pink roses in front of the art adds a layer of real texture to the display. Gold candles on a small tray tie the metallic elements of the art together. It is a professional way to style a hallway or entryway for the season.
Materials Required
- Three identical light wood picture frames
- Three sheets of white art paper
- Pink watercolor paint
- Small red heart stickers
- Gold metallic paint pen
- Two white ribbed ceramic vases
- One dozen pink roses
- Two gold candle tins
Equipment Required
- Paintbrush
- Water cup
- Level for hanging frames
DIY Instructions
- Paint a large, watery pink heart on your first sheet of paper and let the edges bleed naturally.
- Take your second sheet and arrange small red heart stickers into one large heart shape in the center.
- Use the gold paint pen on the third sheet to draw a single, continuous line heart with a long tail.
- Place each finished piece of art into the wooden frames and secure the backs.
- Space the frames evenly on your wall, about two inches apart, using a level to keep them straight.
- Fill your white ceramic vases with water and trim your pink roses to fit inside.
- Place one vase on each side of your sideboard or cabinet to frame the artwork.
- Set the gold candles on a small tray in the center of the surface.
- Adjust the height of your vases by placing books under one if you want an asymmetrical look.
- Clean the glass on the frames with a soft cloth to remove any fingerprints.
11 Hanging Polaroid Memory Banner
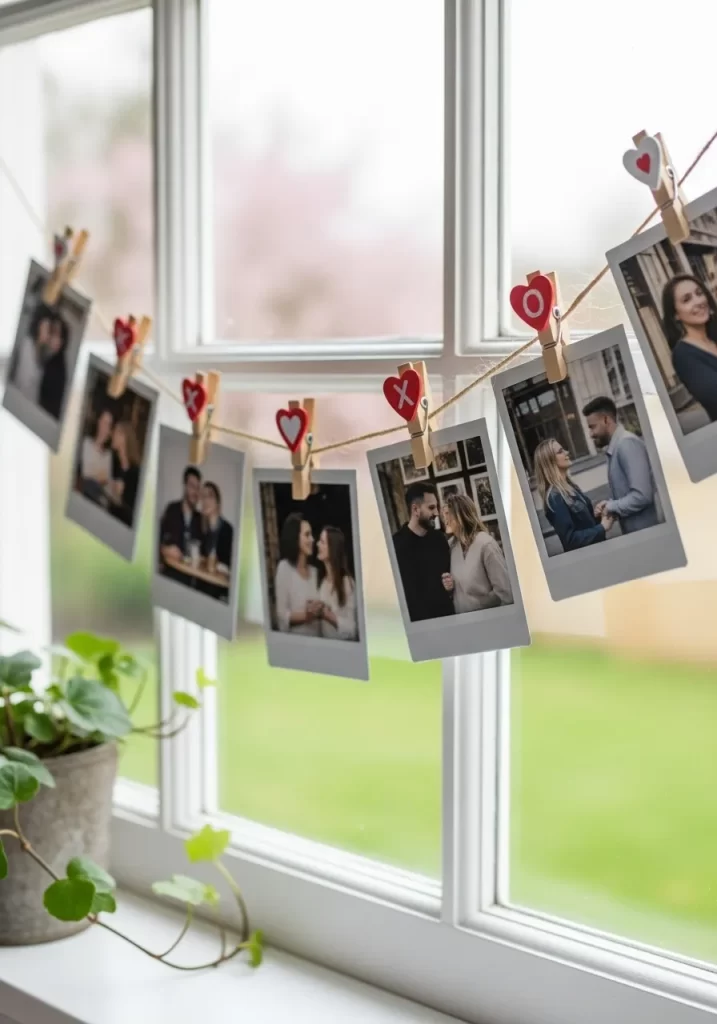
Celebrate your personal love story by displaying your favorite photos along a window or wall. This DIY uses a simple twine string and mini wooden clothespins decorated with hearts. It is a wonderful way to bring personal memories into your holiday decor.
The natural light from a window makes the photos stand out during the day. You can easily swap out the pictures as you make new memories throughout the year. It adds a cozy, sentimental touch to any room without needing heavy hardware.
Materials Required
- Natural jute twine
- Ten to fifteen Polaroid or small printed photos
- Mini wooden clothespins
- Small red and white foam heart stickers
- Command hooks or small nails
Equipment Required
- Scissors
- Measuring tape
DIY Instructions
- Measure the width of your window or wall area where you want to hang the banner.
- Cut a piece of twine that is twelve inches longer than your measurement.
- Stick a small foam heart onto the front of each wooden clothespin.
- Attach your hooks or nails to the top corners of your window frame.
- Tie the ends of the twine to the hooks, leaving a slight “sag” in the middle for a relaxed look.
- Select your favorite photos of friends, family, or travels.
- Space your clothespins evenly along the twine string.
- Clip one photo into each clothespin, ensuring they are all facing forward.
- Adjust the spacing so the photos do not overlap each other.
- Add a few extra heart stickers directly to the twine between the photos for more color.
12 “Grow in Love” Hoya Heart Planters
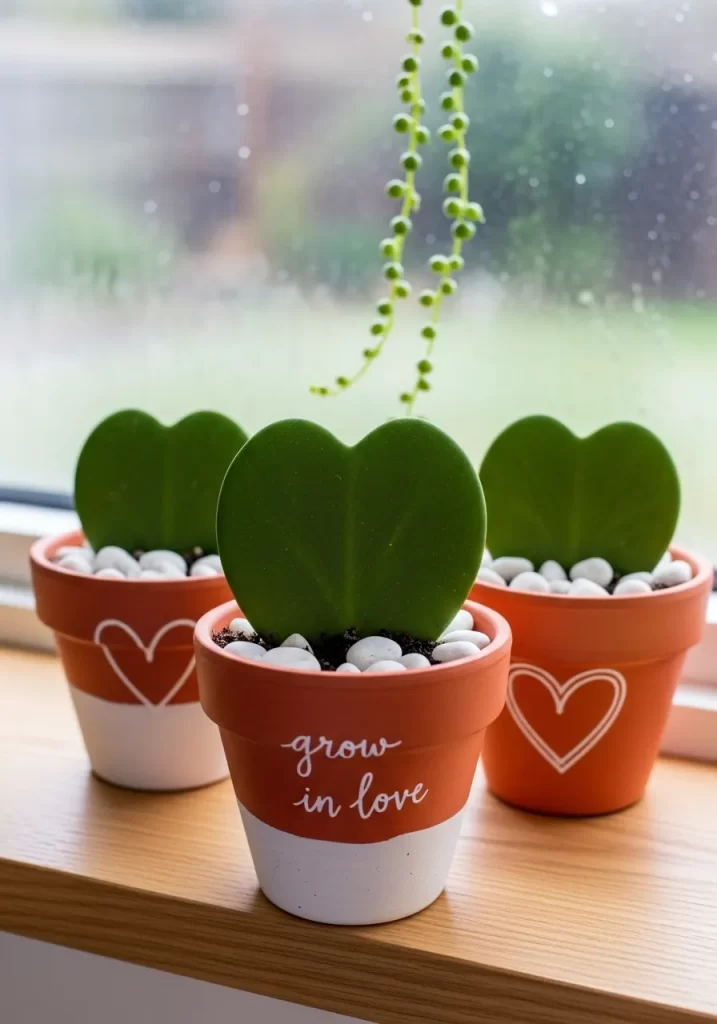
Bring a bit of nature indoors with these charming heart shaped succulent planters. Hoya kerrii leaves are naturally shaped like hearts and stay green with very little maintenance. Painting the terracotta pots with white and red designs makes them feel festive and unique.
These small plants look great on a windowsill or a desk. The white pebbles on top of the soil provide a clean, finished appearance. It is a long lasting decoration that continues to grow well after the holiday is over.
Materials Required
- Three small terracotta pots
- Three Hoya kerrii (heart leaf) succulents
- White and red acrylic paint
- Small white decorative pebbles
- Succulent potting soil
Equipment Required
- Small paintbrushes
- Potting trowel or large spoon
DIY Instructions
- Paint the bottom half of your terracotta pots with white acrylic paint and let dry.
- Use a fine brush to paint a red heart or the phrase “grow in love” on the front of each pot.
- Fill the bottom of each pot with a small amount of succulent potting soil.
- Carefully place one Hoya heart leaf into the center of each pot.
- Add more soil around the base of the leaf, pressing down gently to secure it.
- Leave about half an inch of space at the top of the pot for the pebbles.
- Pour a layer of white pebbles over the soil until it is completely covered.
- Wipe any dust or dirt off the green leaves with a soft, damp cloth.
- Place the three pots in a row on a sunny windowsill.
- Give each plant a small splash of water, taking care not to over soak the soil.
13 Glowing Blush Tulle Heart Wreath
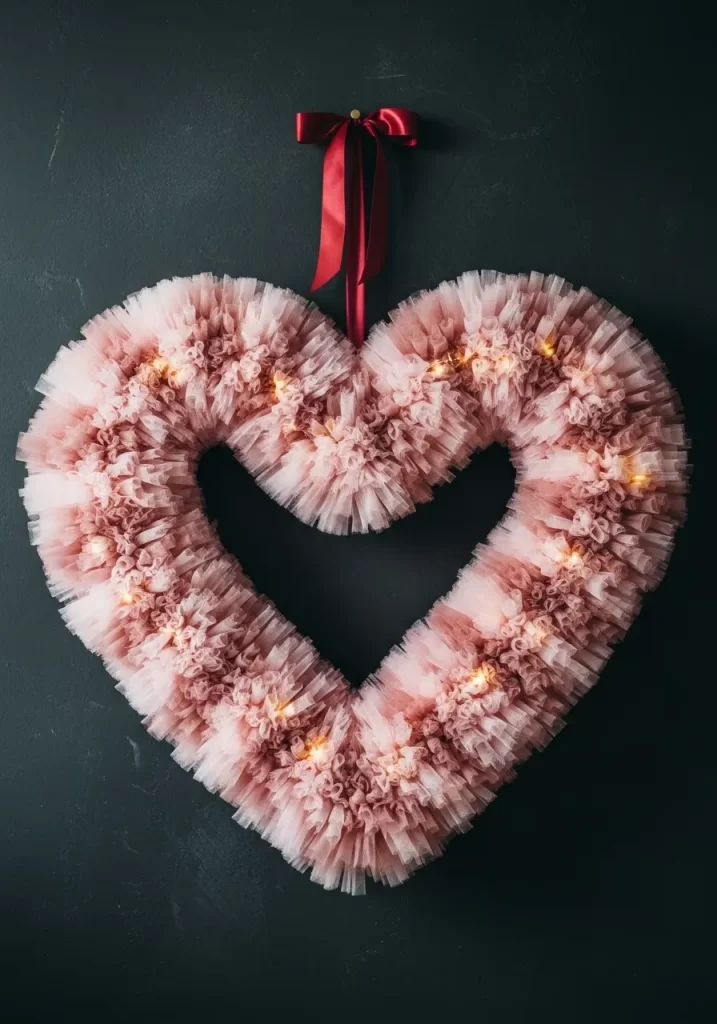
Soft and ethereal, this tulle wreath adds a romantic glow to any dark wall. The layers of pink fabric create a voluminous, cloud like texture that feels incredibly feminine. Tiny fairy lights tucked inside the tulle make the whole heart shimmer from within.
A deep red velvet ribbon at the top provides a bold contrast to the soft pink tones. This piece works beautifully in a bedroom or a cozy reading nook. It is a high impact decoration that feels light and airy.
Materials Required
- Heart shaped wire wreath frame
- Three rolls of pink tulle fabric
- One string of battery operated LED fairy lights
- Two yards of red velvet ribbon
Equipment Required
- Scissors
- Clear zip ties
DIY Instructions
- Cut your pink tulle into dozens of strips, each about eight inches long.
- Tie each strip of tulle around the wire frame using a simple double knot.
- Slide the knots close together until the wire is no longer visible and the heart looks fluffy.
- Weave your string of fairy lights through the tulle, starting from the top.
- Use small clear zip ties to secure the battery pack to the back of the frame.
- Fluff the tulle around the lights so they are buried slightly within the fabric.
- Tie a large bow with the red velvet ribbon.
- Secure the bow to the top center of the heart with a piece of wire.
- Trim the ends of the ribbon at an angle for a professional look.
- Hang the wreath on your wall and turn on the lights to see the soft pink glow.
14 Magical Heart Mason Jar Lanterns
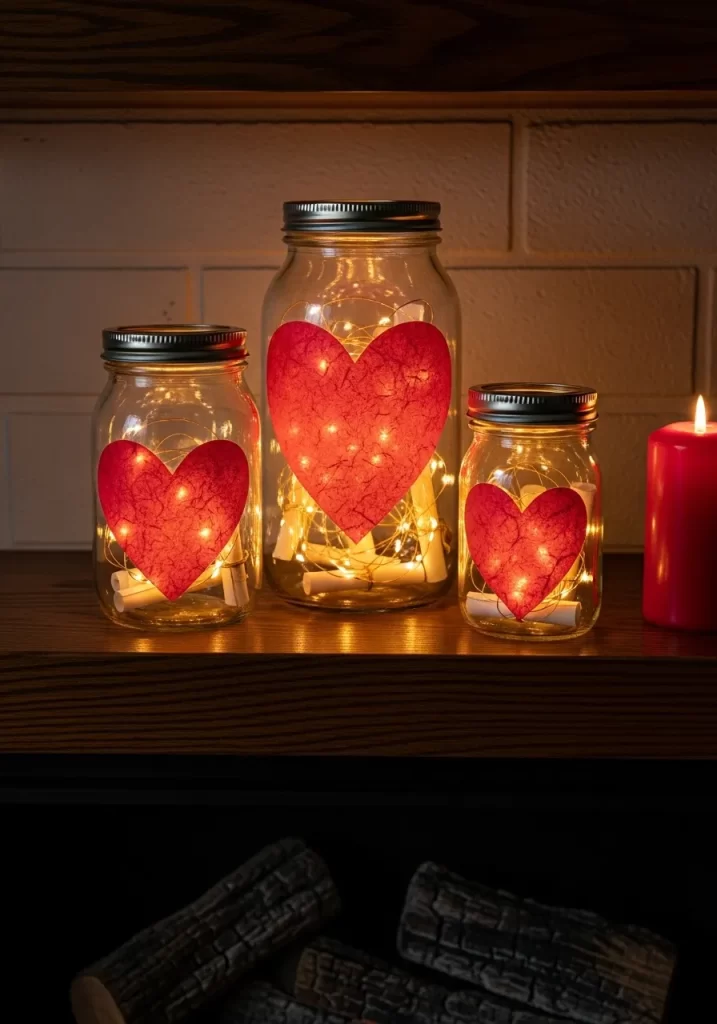
Create a warm and inviting glow on your mantel with these easy paper cut lanterns. Large red paper hearts are attached to the front of glass jars, allowing light to shine through the silhouette. Filling the jars with fairy lights makes them look like they are full of captured fireflies.
Using different sizes of jars adds visual interest to your display. These lanterns are safe to use and provide a soft light that is better than harsh overhead bulbs. They are a simple way to add a touch of magic to your evening.
Materials Required
- Three glass mason jars (small, medium, and large)
- Red tissue paper or thin cardstock
- Three strings of battery operated fairy lights
- Red pillar candle for staging
Equipment Required
- Scissors
- Glue stick
- Tweezers
DIY Instructions
- Clean your glass jars thoroughly and remove any sticky labels from the surface.
- Cut out three large hearts from your red tissue paper, sized to fit your jars.
- Apply a thin layer of glue to the back of each heart.
- Press one heart onto the front of each jar, smoothing out any air bubbles with your fingers.
- Untangle your fairy light strings and check the batteries.
- Place one string of lights into each jar, coiling them loosely so they fill the space.
- Tuck the battery pack at the bottom or behind the jar so it stays hidden.
- Screw the lids back onto the jars if you prefer a closed look.
- Arrange the three jars in a cluster on your mantel or shelf.
- Place a red pillar candle nearby to enhance the warm color palette.
15 Sculptural Red Heart Wishing Tree
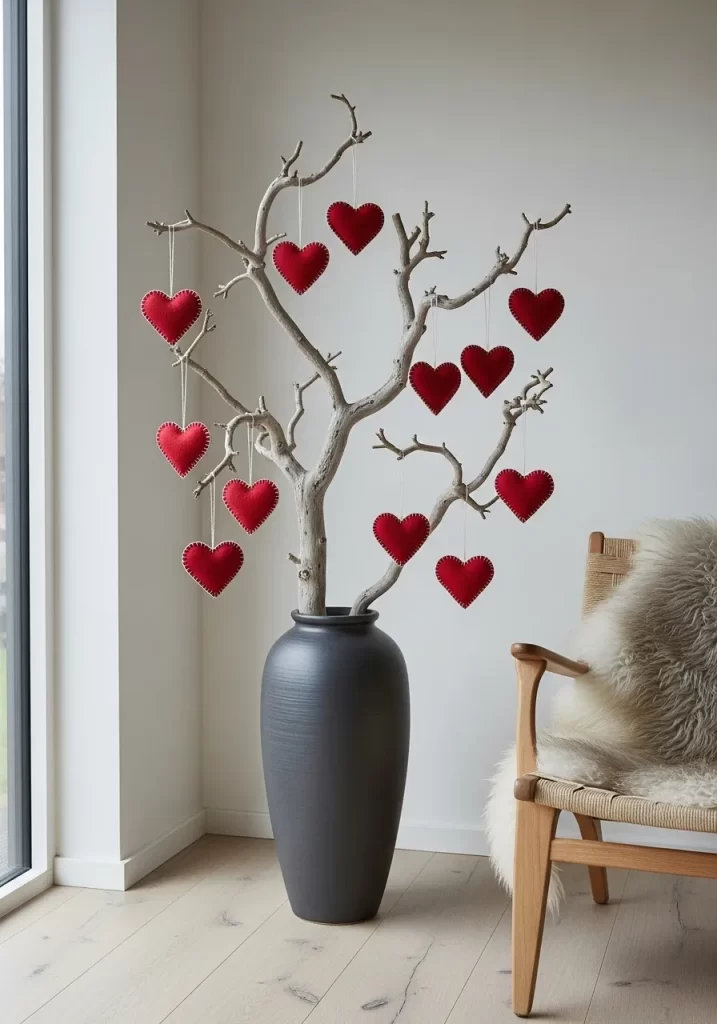
Bring an artistic and organic element to your home with a white branch display. A tall, gray vase holds several natural branches decorated with small red felt hearts. This “wishing tree” serves as a striking vertical accent that fills an empty corner beautifully.
The contrast between the stark branches and the soft red hearts is visually stunning. This project is a great way to use materials found in your own backyard. It feels modern yet rustic and can be customized with different colors to match your furniture.
Materials Required
- Several tall, sturdy tree branches
- One large floor vase (dark gray or black)
- Red felt fabric
- White embroidery thread
- Cotton balls for stuffing
Equipment Required
- White spray paint (optional)
- Scissors
- Sewing needle
- Sand or heavy stones to weigh down the vase
DIY Instructions
- Clean your branches and spray paint them white or light gray if you want a cleaner look.
- Fill the bottom of your large vase with sand or stones to keep it from tipping over.
- Arrange the branches in the vase so they fan out naturally.
- Cut out pairs of small hearts from your red felt fabric.
- Sew two hearts together around the edges, leaving a small gap at the top.
- Stuff a tiny bit of cotton into the heart to give it a 3D shape.
- Sew the gap closed and attach a loop of white thread for hanging.
- Repeat this until you have twelve to fifteen felt hearts.
- Hang the hearts on different branches, spreading them out from top to bottom.
- Place the vase near a window where the light can highlight the silhouette of the branches.
16 “You Hold the Key” Vintage Frame Art
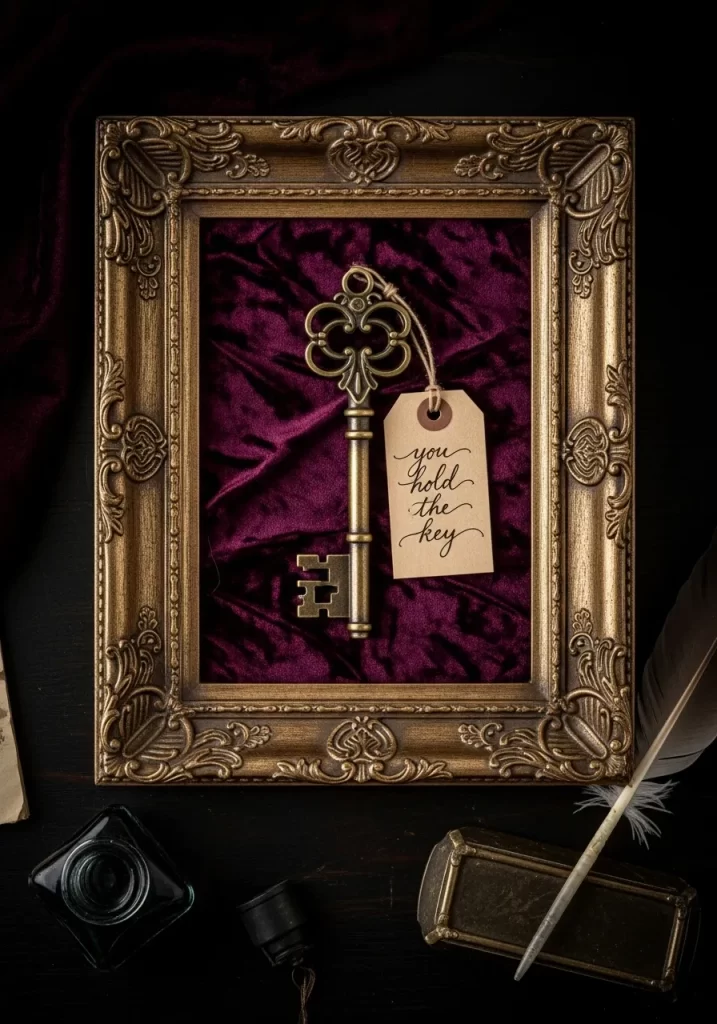
Capture a classic romantic sentiment with this sophisticated shadow box project. A vintage gold frame holds a large ornate skeleton key resting on a bed of rich purple velvet. The handwritten tag adds a personal and poetic touch to the display.
This piece looks like a precious heirloom and adds a sense of history to your decor. The deep colors and metallic textures feel very high end. It is a perfect focal point for a library, office, or bedroom wall.
Materials Required
- Ornate gold picture frame
- Small piece of purple velvet fabric
- Large decorative brass or bronze skeleton key
- Small brown paper gift tag
- Thin twine
Equipment Required
- Glue gun
- Black ink pen
- Scissors
DIY Instructions
- Remove the glass and back from your gold frame.
- Cut your purple velvet fabric so it is one inch larger than the frame’s backing board.
- Wrap the velvet around the board and glue the edges to the back so the front is smooth.
- Place the velvet covered board back into the frame.
- Write “You hold the key” on your paper tag in your best handwriting.
- Tie the tag to the top of the skeleton key using a short piece of twine.
- Apply a generous amount of hot glue to the back of the key.
- Press the key onto the center of the velvet and hold it until the glue sets.
- Ensure the key is straight and the tag hangs naturally to the side.
- Hang the frame on your wall or lean it against a stack of vintage books.
17 Sunset Heart Cascade Window Display

Turn your window into a colorful light show with hundreds of tiny paper hearts. This vertical garland uses a gradient of colors from pale peach to deep red to mimic a sunset. When the sun shines through the window, the paper hearts glow and cast colorful shadows into the room.
The sheer volume of hearts creates a dramatic and beautiful effect. A pile of loose hearts at the bottom of the window adds a playful and finished look. It is a great way to celebrate the season while making the most of your natural light.
Materials Required
- Tissue paper or light cardstock (peach, pink, and red)
- Clear fishing line
- Small adhesive wall hooks or a thin rod
Equipment Required
- Heart shaped paper punch
- Sewing machine or clear tape
- Scissors
DIY Instructions
- Punch out hundreds of hearts from your various colors of paper.
- Sort the hearts into piles based on their color.
- Cut twenty pieces of fishing line, each as long as your window height.
- Start with a peach heart and tape it to the top of your first string.
- Continue adding hearts down the string, transitioning from peach to pink to red.
- Space the hearts about two inches apart for a light, airy feel.
- Repeat this for all twenty strings to create a full curtain.
- Attach your rod or hooks to the top of the window frame.
- Tie each string to the rod, spacing them about three inches apart.
- Let the extra hearts fall to the floor to create a colorful “pool” of paper.
18 Eucalyptus and Paper Rose Mirror Garland
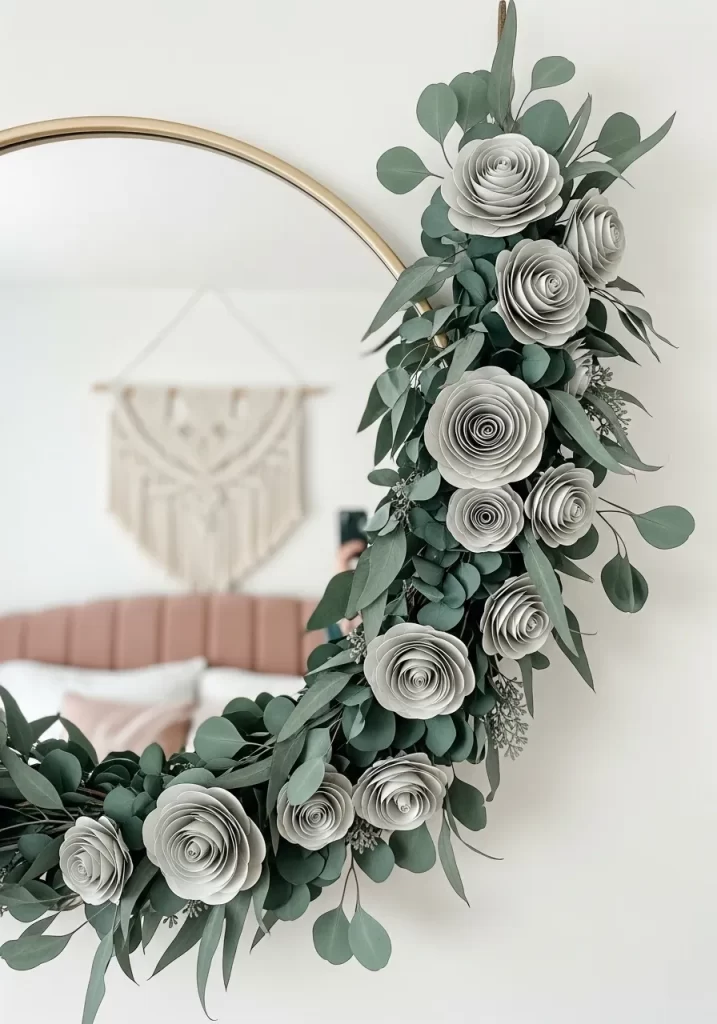
Add a touch of botanical elegance to your bedroom mirror with a lush greenery swag. This DIY combines silver dollar eucalyptus leaves with handmade gray paper roses for a modern, muted color palette. The soft curves of the garland follow the shape of the mirror perfectly.
This decoration brings a fresh, spa like feeling to your morning routine. The paper roses are easy to make and will never wilt. It is a sophisticated way to decorate without using traditional bright red colors.
Materials Required
- Large bundle of fresh or faux eucalyptus
- Heavy gray cardstock
- Floral wire
- Clear adhesive mirror hooks
Equipment Required
- Scissors
- Hot glue gun
- Pencil
DIY Instructions
- Draw a spiral on a square piece of gray paper and cut along the line.
- Roll the paper from the outside in to create a rose shape and glue the bottom.
- Make ten to twelve roses in different sizes.
- Use floral wire to bundle several stems of eucalyptus together into a long chain.
- Secure three adhesive hooks to the right side of your round mirror.
- Drape the eucalyptus garland over the hooks so it curves around the glass.
- Glue your paper roses into the greenery at different points.
- Add smaller sprigs of eucalyptus to fill any gaps and hide the wire.
- Ensure the roses are facing forward so they are visible in the reflection.
- Mist the eucalyptus with water occasionally if using fresh stems to keep them fragrant.
19 “You Are My Anchor” Message in a Bottle
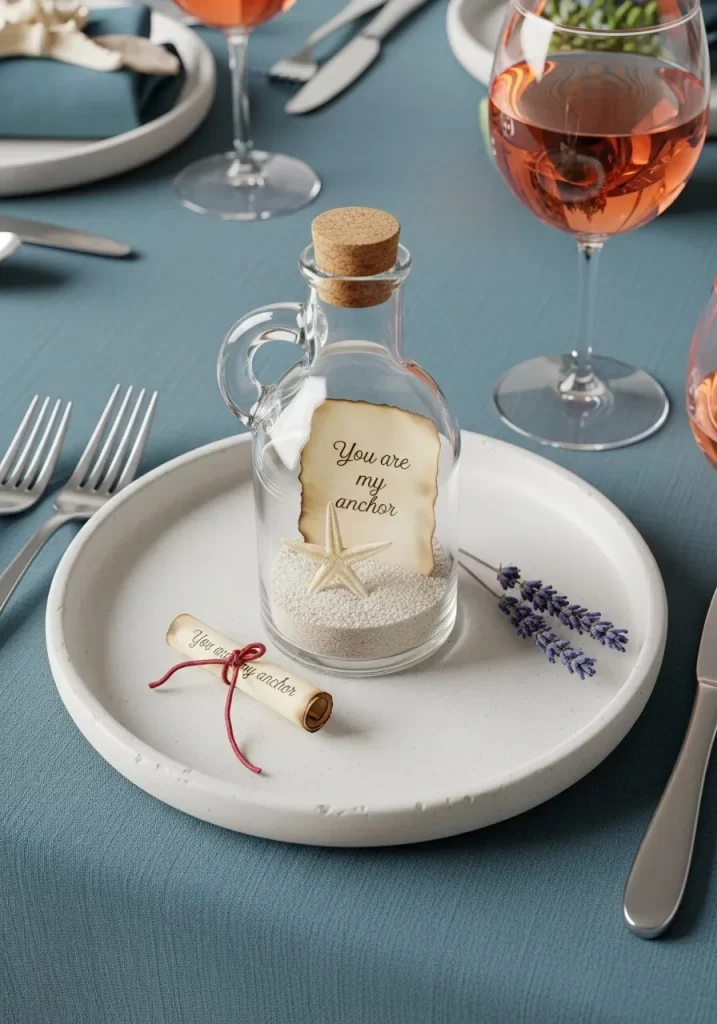
Create a romantic nautical themed centerpiece with a message in a bottle. This project uses white sand and a small starfish to create a miniature beach scene inside a glass carafe. The rolled up scroll inside holds a sweet message for a loved one.
This decoration works beautifully for a seaside themed dinner or a coastal home. Placing it on a white plate with a sprig of lavender adds a touch of fragrance and color. It is a thoughtful and creative way to express your feelings.
Materials Required
- Small glass bottle or carafe with a cork
- Fine white sand
- One small dried starfish
- Parchment paper
- Red twine
- Fresh lavender sprig
Equipment Required
- Funnel
- Tweezers
- Lighter (to singe paper edges)
DIY Instructions
- Use a funnel to pour two inches of white sand into the bottom of your bottle.
- Carefully drop the starfish onto the sand using tweezers to position it.
- Cut a small rectangle of parchment paper and singe the edges with a lighter for a vintage look.
- Write “You are my anchor” or another short message on the paper.
- Roll the paper into a tight scroll and tie it with a piece of red twine.
- Drop the scroll into the bottle so it rests against the glass.
- Press the cork firmly into the top of the bottle.
- Place the bottle in the center of a white ceramic plate.
- Lay a sprig of lavender and a second small scroll next to the bottle.
- Set this at each place setting for a romantic dinner surprise.
20 Cozy Heart Crochet Coaster Set
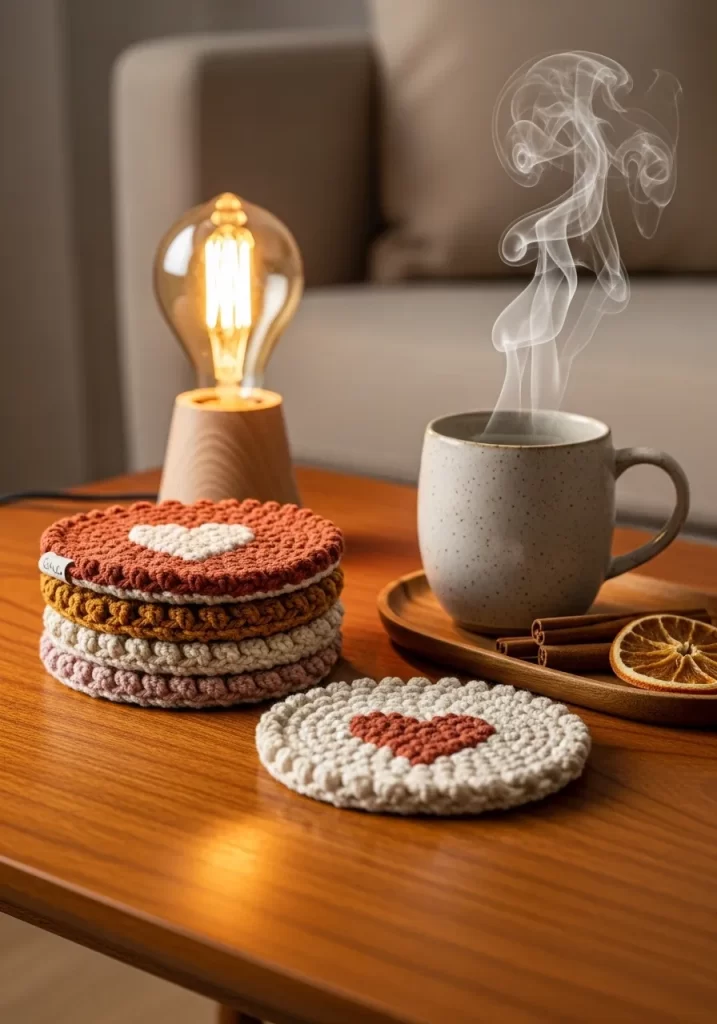
Protect your coffee table in style with these handmade textured coasters. This project uses thick yarn to create a durable and soft surface for your mugs. The contrasting heart in the center adds a pop of color that is perfect for a cozy morning coffee.
Stacking the coasters next to a warm drink and a candle creates an inviting scene. These are great for beginners to practice their stitching. They make a wonderful gift and add a personal, homemade touch to your living room.
Materials Required
- Cotton yarn in cream, rust, and pink
- Small wooden tray
- Cinnamon sticks and dried orange slices for staging
Equipment Required
- Crochet hook (size 5mm)
- Yarn needle
- Scissors
DIY Instructions
- Start by crocheting a flat circle with your cream yarn using a double crochet stitch.
- In the center of your circle, switch to the rust colored yarn to form the heart shape.
- Follow a basic heart pattern, working your stitches into the previous row of cream.
- Switch back to cream yarn to finish the outer edges of the coaster.
- Tie off the ends and use a yarn needle to weave the loose threads back into the stitches.
- Create a set of four coasters using different color combinations for the hearts.
- Stack the finished coasters on your wooden coffee table.
- Place a wooden tray nearby with a mug of tea and a few cinnamon sticks.
- Light a warm toned bulb or candle to highlight the texture of the yarn.
- Use these every day to bring a little bit of handmade love to your home.
21 Hand Painted Crepe Paper Peony Bouquet

Brighten your kitchen island with a stunning arrangement of handmade paper peonies. These flowers use thick crepe paper in shades of purple and pink to mimic the lush layers of real petals. Placing them in a crystal vase adds a touch of elegance that makes them look like fresh cut blooms.
The addition of hand painted watercolor details on the petals gives each flower a unique, artistic character. This bouquet stays vibrant all month long without needing a single drop of water. It is a creative way to bring a burst of color into your home.
Materials Required
- Double sided crepe paper (pink, lavender, and magenta)
- Floral tape (green)
- Thick floral stem wire
- Yellow floral stamen centers
- Watercolor paint set
Equipment Required
- Sharp scissors
- Hot glue gun
- Paintbrush
- Crystal vase
DIY Instructions
- Cut out petal shapes from your crepe paper in three different sizes (small, medium, and large).
- Gently stretch the center of each petal with your thumbs to create a cupped shape.
- Use your watercolor brush to add light purple streaks to the edges of the pink petals.
- Hot glue several yellow stamens to the tip of a floral wire to create the flower center.
- Glue the smallest petals around the center first, overlapping them slightly.
- Continue adding the medium and then the largest petals until the flower looks full.
- Wrap green floral tape around the base of the petals and down the entire length of the wire.
- Repeat this process to create ten to twelve peonies in various shades.
- Arrange the finished flowers in your crystal vase, varying the heights of the stems.
- Place the vase in a prominent spot like a countertop or dining table.
22 “Love Day” Rustic Chalkboard Countdown
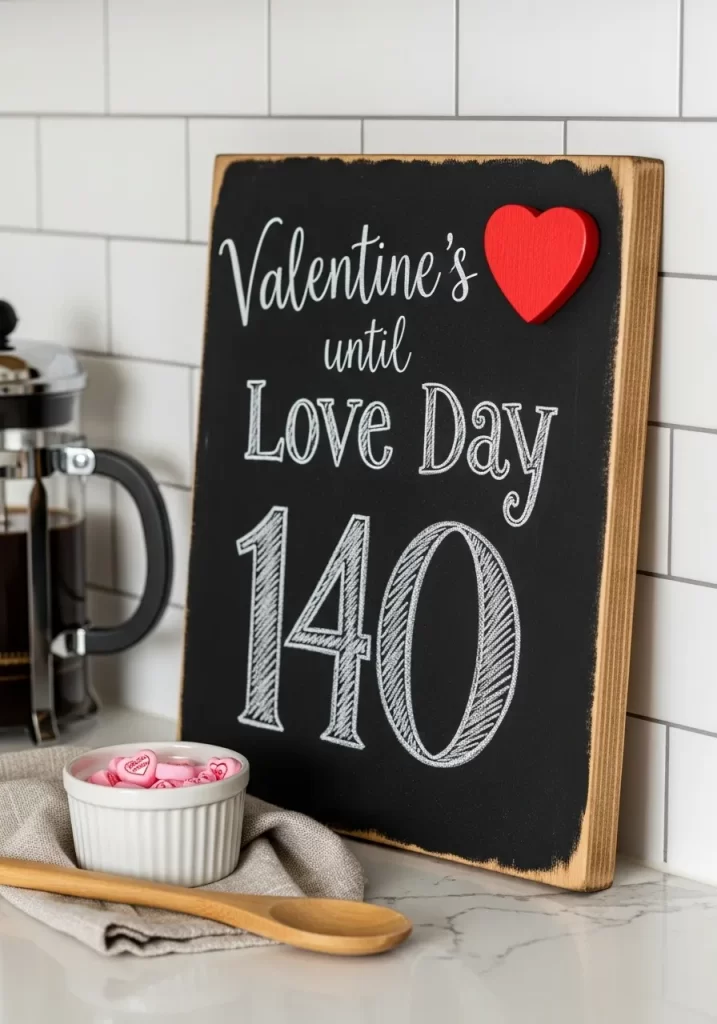
Build excitement for the holiday with a personalized wooden countdown board. This dark chalkboard features elegant white lettering and a bright red heart accent in the corner. It is a functional piece of decor that fits perfectly next to your morning coffee station.
Changing the numbers each morning becomes a fun ritual for the whole family. The rustic wood frame gives it a warm, farmhouse feel that complements a modern kitchen. It is a simple project that makes every day leading up to February 14th feel special.
Materials Required
- Rectangular wooden board (9×12 inches)
- Chalkboard paint
- Small wooden heart cutout
- Red acrylic paint
- White chalk marker
Equipment Required
- Paintbrush
- Sandpaper
- Wood glue
- French press for staging
DIY Instructions
- Sand the surface of your wooden board until it is smooth to the touch.
- Apply two thick coats of chalkboard paint to the front of the board, allowing time to dry between layers.
- Paint your small wooden heart with bright red acrylic paint.
- Glue the red heart to the top right corner of the board once the paint is dry.
- Use your white chalk marker to write “Valentine’s until Love Day” at the top.
- Draw a large number in the center of the board to represent the days remaining.
- Season the chalkboard by rubbing a piece of white chalk sideways over the entire surface and wiping it off.
- Lean the board against your kitchen backsplash or a white tiled wall.
- Place a small bowl of pink heart candies and a wooden spoon nearby for decoration.
- Update the number every morning to keep the countdown accurate.
23 “XOXO” Pom Pom Throw Pillow
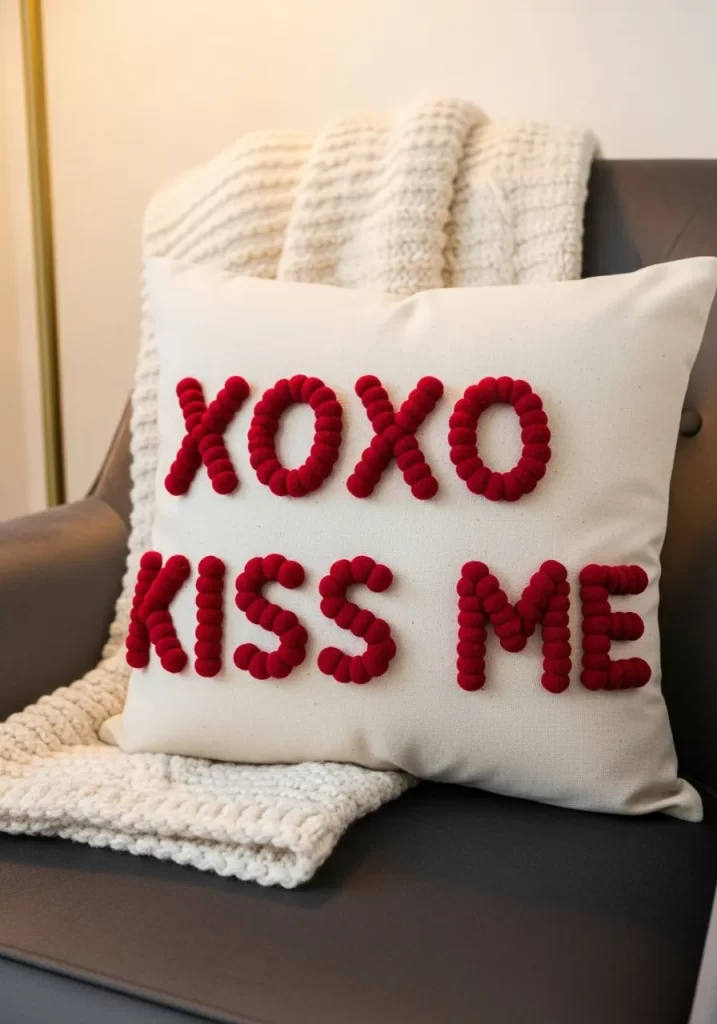
Add a playful and tactile element to your favorite armchair with a custom pom pom pillow. This project uses a plain cream canvas cover as a backdrop for bold red letters. Thick, fuzzy pom poms form the words “XOXO” and “KISS ME” to create a cozy 3D effect.
The contrast between the soft yarn and the sturdy canvas looks professionally made. This pillow is perfect for snuggling up during a movie night. It brings a pop of holiday color to your living room without being too overwhelming.
Materials Required
- Square cream canvas pillow cover
- Pillow insert
- Two large skeins of red yarn
- Red embroidery thread
Equipment Required
- Pom pom maker tool
- Scissors
- Fabric chalk or pencil
- Large needle
DIY Instructions
- Use your fabric chalk to lightly sketch the words “XOXO” and “KISS ME” onto the pillow cover.
- Make thirty to forty small red pom poms using your pom pom maker tool.
- Trim the long threads of each pom pom so they are neat and round.
- Thread your needle with red embroidery thread and tie a secure knot at the end.
- Pass the needle through the center of a pom pom and then through the canvas at your first letter mark.
- Secure each pom pom with several stitches so it stays firmly attached to the fabric.
- Follow your chalk lines closely to ensure the letters are clear and easy to read.
- Repeat this until all the letters are filled with fluffy red pom poms.
- Slide the pillow insert into the cover and zip it closed.
- Place the pillow on a dark gray or neutral chair to let the red color stand out.
24 Modern Copper Heart Air Plant Stand
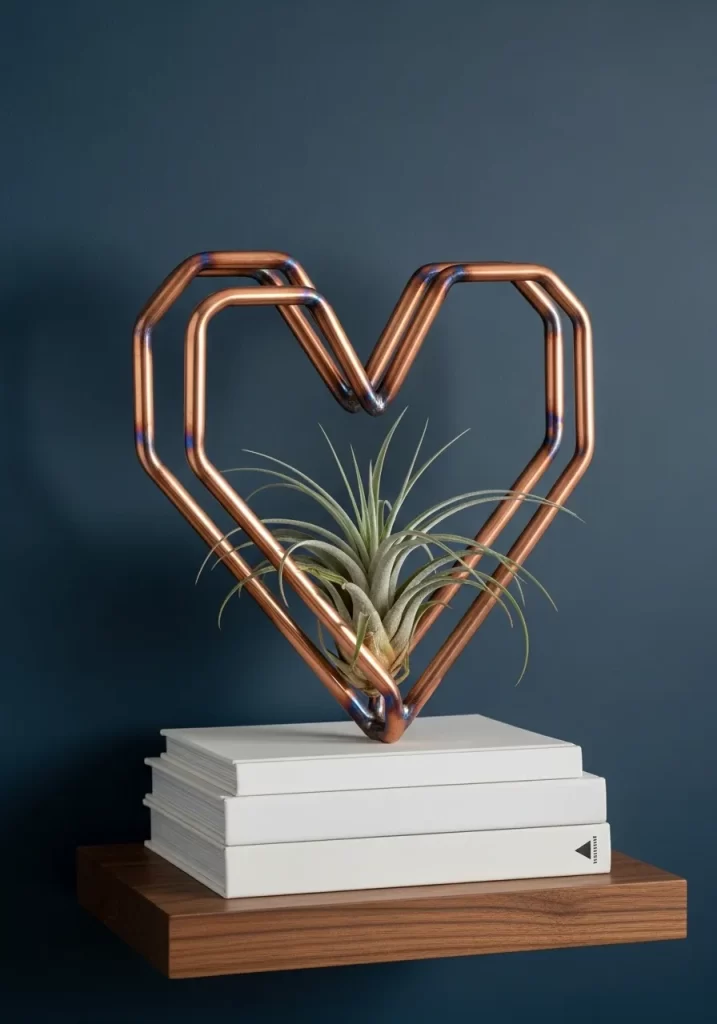
Combine industrial materials with living greenery for a chic, modern desk accessory. This stand uses copper piping bent into two overlapping heart shapes that cradle a small air plant. The warm metallic tones look stunning against a dark blue or moody wall.
Air plants are incredibly easy to care for and do not require any soil. This sculptural piece acts as both a plant holder and a work of art. It is a great way to add a masculine or modern touch to your seasonal decorations.
Materials Required
- Soft copper refrigerator tubing (1/4 inch diameter)
- One medium sized Tillandsia (air plant)
- Three white hardcover books for the base
Equipment Required
- Copper tube bender or a sturdy round object (like a bottle)
- Tube cutter or hacksaw
- Super glue or copper epoxy
- Gloves
DIY Instructions
- Measure and cut two pieces of copper tubing, each about twenty four inches long.
- Wear gloves to prevent fingerprints on the copper surface.
- Slowly bend each piece of tubing into a heart shape using your hands or a tube bender.
- Ensure both hearts are roughly the same size and shape.
- Place the two hearts together so they overlap, creating a 3D “cage” in the center.
- Apply a small drop of super glue or epoxy where the tubes touch at the top and bottom.
- Hold the pieces together until the glue is completely set.
- Polish the copper with a soft cloth to give it a high shine finish.
- Place your air plant gently into the center opening of the copper hearts.
- Set the finished stand on a stack of clean white books to give it height on your shelf.
25 Lavender Scented Heart Sachets
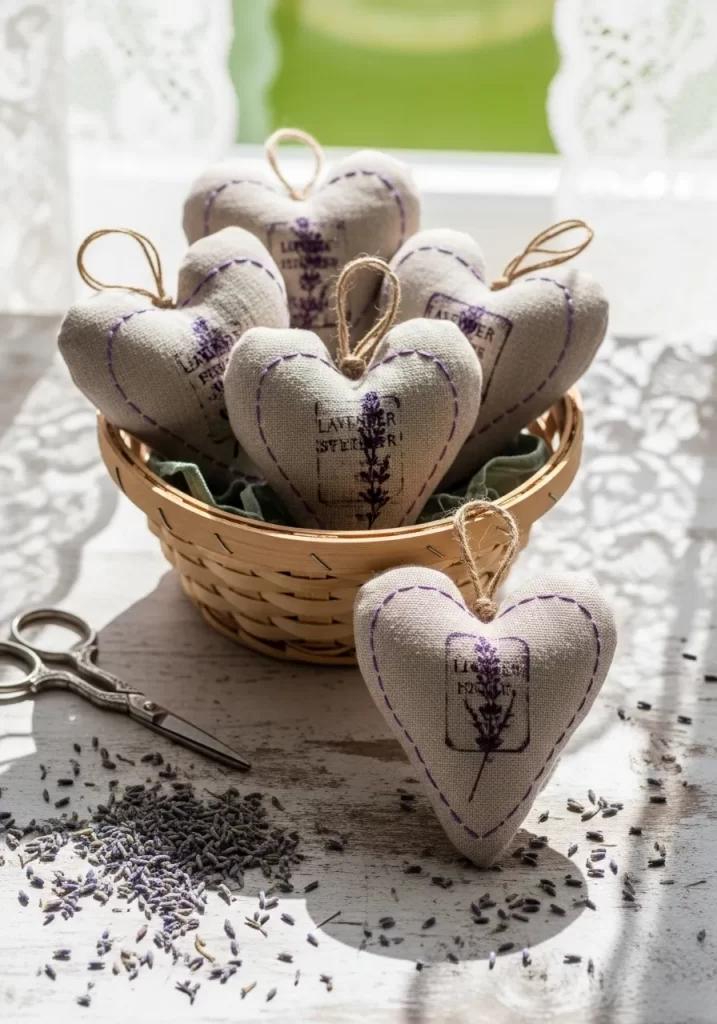
Fill your home with the relaxing aroma of fresh lavender using these handmade linen sachets. Each heart is sewn from natural linen and features a delicate stamped lavender design. These are perfect for tucking into drawers or displaying in a small wicker basket.
Purple stitching around the edges adds a subtle hint of color that matches the scent. These sachets are a thoughtful way to add a sensory layer to your Valentine’s Day decor. They look beautiful and help keep your living space feeling calm and fresh.
Materials Required
- Natural linen fabric
- Dried lavender flowers
- Lavender rubber stamp
- Purple fabric ink pad
- Purple embroidery thread
Equipment Required
- Fabric scissors
- Needle or sewing machine
- Small funnel
- Wicker basket for display
DIY Instructions
- Cut out pairs of heart shapes from your natural linen fabric.
- Press your lavender stamp into the purple ink and stamp the center of half the hearts.
- Let the ink dry completely before you begin sewing.
- Place a stamped heart and a plain heart together with the “right” sides facing each other.
- Sew around the edges, leaving a one inch gap at the top.
- Turn the heart inside out through the gap so the lavender design is on the outside.
- Use a funnel to fill the heart with dried lavender until it is plump.
- Hand stitch the opening closed with your purple thread.
- Add a decorative “blanket stitch” around the outer edge for a handmade look.
- Pile five or six sachets into a small basket and place it on a sunlit table.
26 Botanical Pressed Flower Pillar Candles
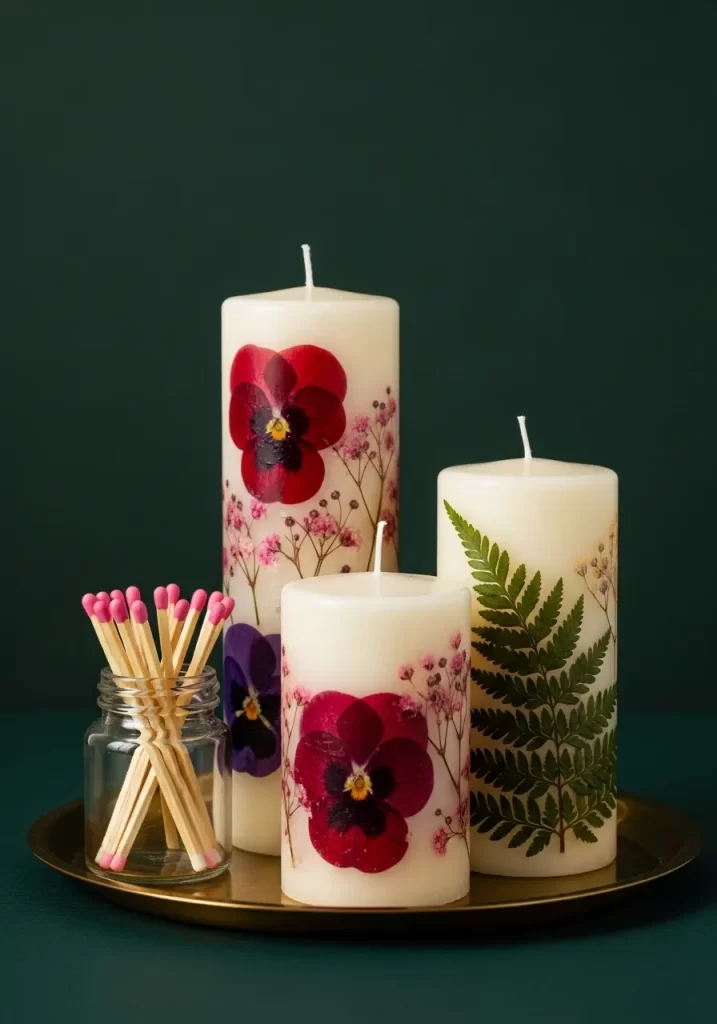
Turn plain white candles into works of art using real pressed flowers and ferns. This project features deep red pansies and delicate pink blooms “melted” into the wax surface. The result is a set of sophisticated candles that look like they belong in a high end boutique.
Placing these on a gold tray creates a regal and warm display for your coffee table. When the candles are lit, the light shines through the petals for a beautiful effect. It is a wonderful way to preserve the beauty of nature inside your home.
Materials Required
- Three white pillar candles of varying heights
- Selection of pressed flowers (pansies, baby’s breath, and ferns)
- Small amount of clear wax or a tea light
Equipment Required
- Metal spoon
- Lighter or candle flame
- Tweezers
- Gold decorative tray
- Small jar of pink tipped matches
DIY Instructions
- Lay your pressed flowers on a flat surface to plan your design for each candle.
- Hold a metal spoon over a candle flame for ten seconds until the back of it is warm.
- Use tweezers to place a flower against the side of your pillar candle.
- Gently rub the warm back of the spoon over the flower.
- The heat will melt a thin layer of wax which then covers and seals the flower in place.
- Repeat this process until you have a floral pattern that wraps around the candle.
- Be careful not to hold the spoon in one spot too long or you will create a deep dent.
- Wipe away any excess melted wax with a soft cloth once it cools.
- Arrange the three finished candles on a gold tray in the center of your table.
- Add a small glass jar of matches nearby to complete the elegant setup.
27 Rustic Reclaimed Wood Wall Heart
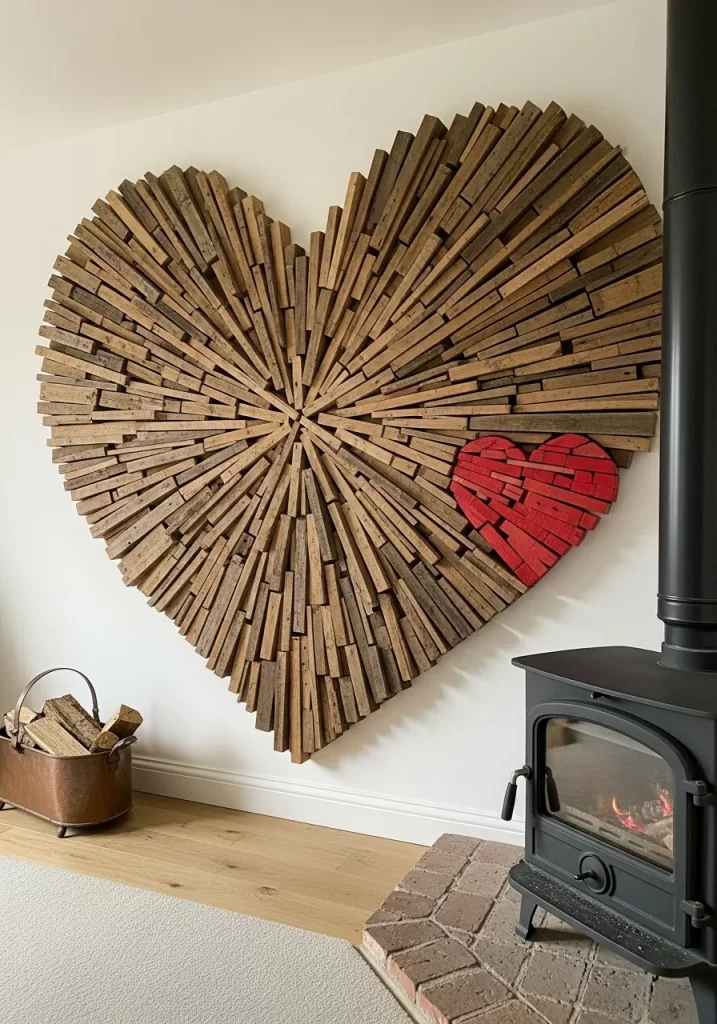
Make a bold statement with a large scale heart constructed from sun bleached wooden slats. This mural features hundreds of pieces of wood fanning out from a central point to create a dramatic sunburst effect. A smaller red wooden heart is layered on top to provide a striking focal point.
This decoration brings a warm, architectural feel to your living room. It works perfectly on a large blank wall near a fireplace. Using reclaimed materials gives the piece a history and texture that feels authentic and grounded.
Materials Required
- Large quantity of thin wooden slats (reclaimed pallets work well)
- Plywood backing sheet cut into a heart shape
- Red wood stain or acrylic paint
- Strong wood glue
Equipment Required
- Circular saw or miter saw
- Hammer and small finishing nails
- Sandpaper
- Level
DIY Instructions
- Cut your plywood backing into a large heart shape (about three feet wide).
- Sort your wooden slats by length and color to ensure a balanced look.
- Start at the very center of the heart and glue your first few slats in a vertical line.
- Begin fanning the other slats out from this center point, cutting them at angles to fit the heart shape.
- Use a few finishing nails to hold the slats in place while the glue dries.
- Continue until the entire plywood base is covered and no gaps are visible.
- Sand the outer edges of the heart so the wood pieces are flush with the backing.
- Stain a small cluster of slats bright red and assemble them into a smaller heart.
- Glue the red heart onto the lower right side of the main wooden display.
- Mount the finished piece to your wall using heavy duty picture hangers and a level.
28 Calligraphy Scroll Paper Table Runner
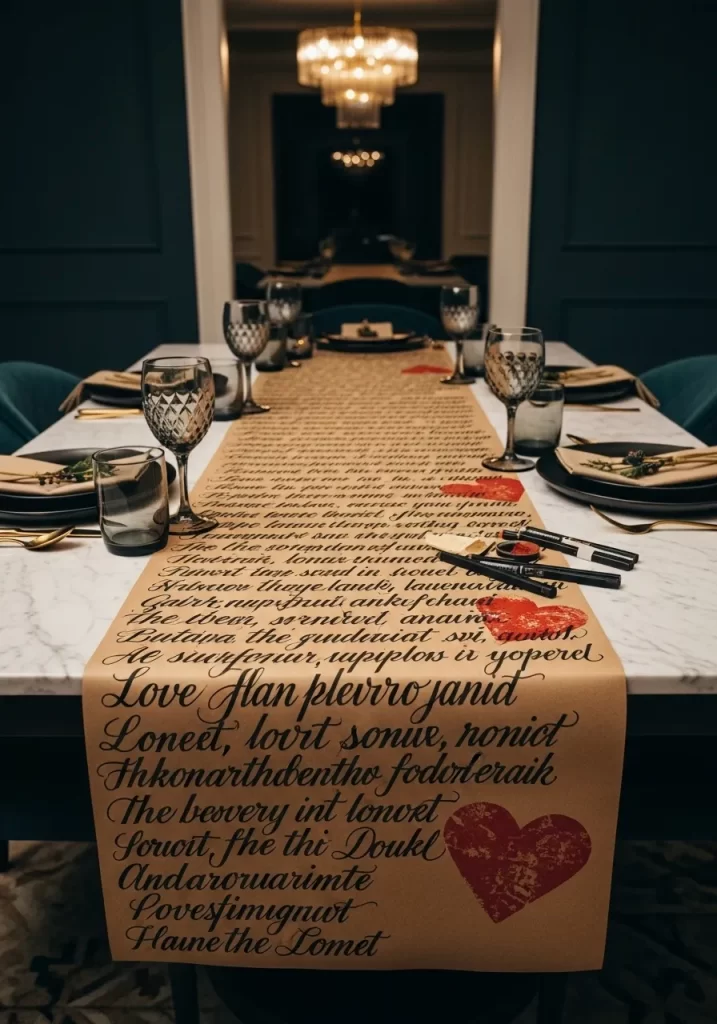
Create a poetic and romantic dinner setting with a custom paper table runner. This project uses long rolls of brown kraft paper covered in beautiful black ink calligraphy. Red stamped hearts are scattered throughout the text to add a touch of seasonal color.
The runner drapes elegantly over the ends of a marble table for a high contrast look. It is a great conversation piece that feels deeply personal and artistic. This setup is perfect for an intimate dinner where you want to emphasize the power of words.
Materials Required
- Roll of brown kraft paper
- Black calligraphy ink or thick felt markers
- Red ink pad
- Heart shaped rubber stamp
Equipment Required
- Scissors
- Measuring tape
- Weights (like smooth stones) to hold the paper flat while working
DIY Instructions
- Measure the length of your dining table and add two feet so the paper hangs off the ends.
- Cut a long strip of kraft paper to this measurement, ensuring the edges are straight.
- Unroll the paper on a long flat floor or table and weight down the corners.
- Use your black ink to write out your favorite love poems, song lyrics, or personal letters.
- Do not worry about perfect handwriting; a loose, flowing script looks more authentic.
- Vary the size of your writing to keep the design visually interesting.
- Once the black ink is dry, use your red heart stamp to add pops of color between the paragraphs.
- Let the entire runner dry for at least one hour before moving it.
- Center the runner on your table and smooth it out with your hands.
- Set your places with dark plates and gold cutlery to match the sophisticated theme.
29 Earthy Tassel and Clay Heart Mobile
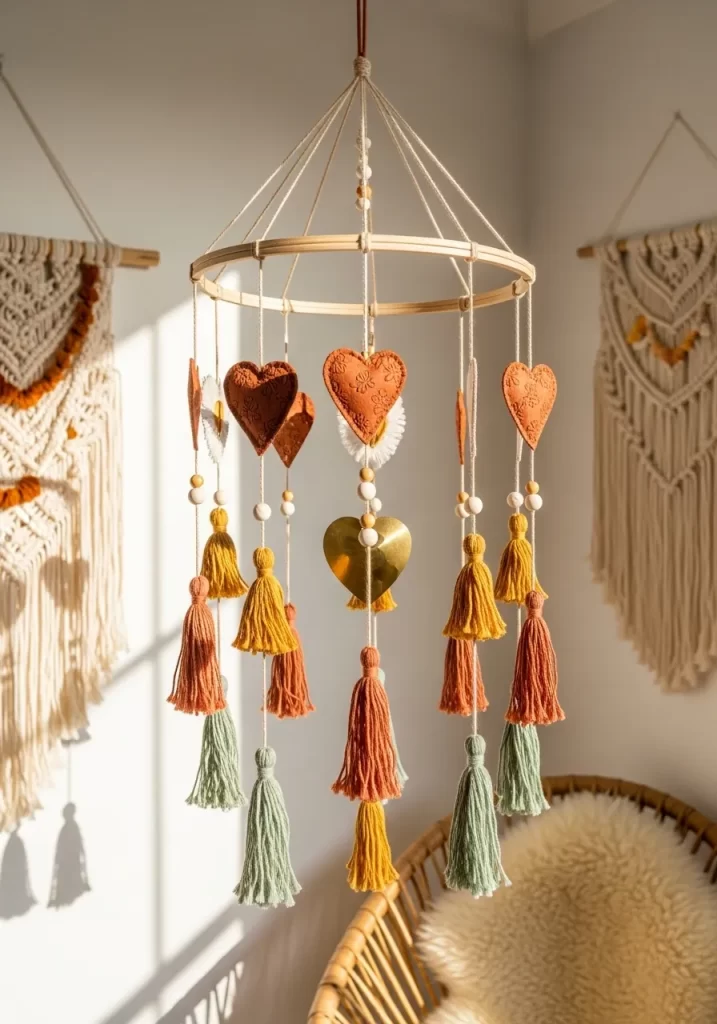
Add a bohemian touch to your home with a mobile featuring terracotta hearts and colorful yarn tassels. This decoration uses natural materials like wood and clay in muted tones of sage green, rust, and mustard. It hangs beautifully from a ceiling hook, catching the sunlight and moving gently.
The combination of different textures makes this piece feel curated and unique. It is a great alternative to traditional red and white decor for those who prefer an earthy palette. This mobile brings a sense of calm and warmth to any room.
Materials Required
- Air dry terracotta clay
- Wooden embroidery hoop (inner ring only)
- Cotton yarn in sage, rust, mustard, and cream
- Wooden beads
- Strong twine
Equipment Required
- Heart shaped cookie cutter
- Scissors
- Large needle
- Rolling pin
DIY Instructions
- Roll out your air dry clay to a quarter inch thickness.
- Use the cookie cutter to create five or six clay hearts.
- Poke a small hole in the top of each heart with a needle and let them dry for twenty four hours.
- Make several yarn tassels in different colors by wrapping yarn around your hand and tying it at the top.
- Cut the bottom loops of the yarn to create the fringe of the tassel.
- Tie a piece of twine to each clay heart and thread on a few wooden beads.
- Attach the twine strings to the wooden hoop at different heights.
- Alternate between hanging a clay heart and a yarn tassel around the circumference of the hoop.
- Tie four long pieces of twine to the hoop and join them at the top to create a hanging loop.
- Hang the mobile from a ceiling hook in a corner of your living room or bedroom.
30 Ornate Silver Heart Wine Charms
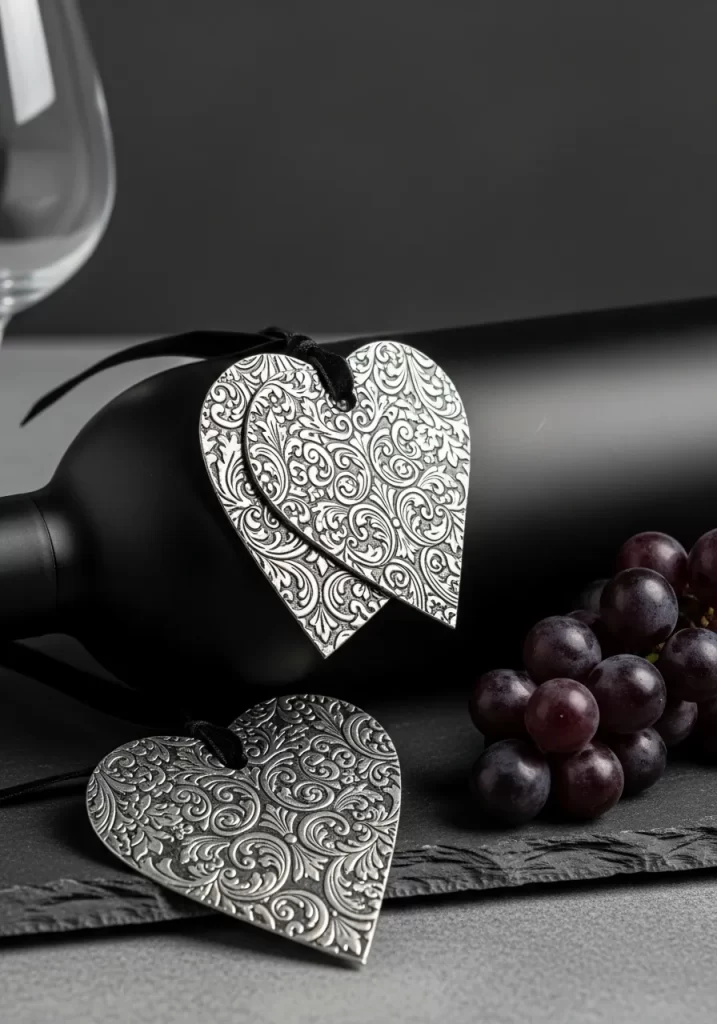
Add a touch of vintage glamour to your next gathering with these engraved heart charms. These solid silver toned hearts feature intricate floral patterns and hang from a black velvet ribbon. They serve as a beautiful way to distinguish wine bottles or glasses during a party.
The dark velvet contrast makes the silver metal shine even brighter. Placing these next to fresh grapes and dark glass creates a moody and romantic atmosphere. They are small details that show your guests you have thought of everything.
Materials Required
- Three ornate metal heart pendants (silver or pewter)
- Thin black velvet ribbon
- One bottle of dark red wine
Equipment Required
- Scissors
- Jewelry pliers (if adding jump rings)
- Slate serving board for staging
DIY Instructions
- Clean your metal heart pendants with a soft cloth to ensure they are shiny and free of dust.
- Cut your black velvet ribbon into three pieces, each eight inches long.
- Thread one piece of ribbon through the loop at the top of each heart.
- Tie the ribbon into a neat bow, leaving enough of a loop to slide over a bottle neck.
- If using them for wine glasses, make the ribbon loop smaller so it stays secure on the stem.
- Trim the ends of the velvet ribbon at a sharp angle to prevent fraying.
- Slide one charm over the neck of your favorite bottle of wine.
- Place the bottle on a dark slate board to emphasize the silver and black colors.
- Add a cluster of dark grapes and a wine glass to the board for a finished look.
- Use different patterned hearts so guests can easily identify their own bottle or glass.
31 Origami Patterned Heart Bouquet
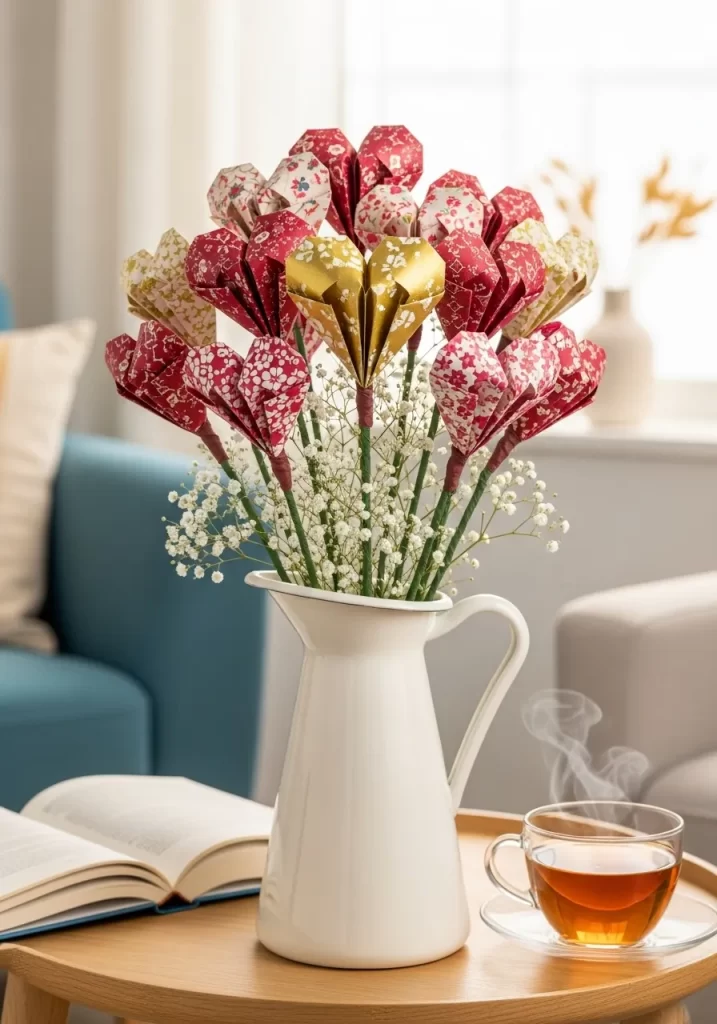
Bring a pop of color to your breakfast nook with a charming bouquet of paper hearts. This project uses colorful patterned origami paper to create 3D hearts that sit atop slender green stems. Mixing floral prints with solid colors adds a whimsical and handcrafted feel to the arrangement.
Placing these in a clean white pitcher keeps the focus on the vibrant patterns above. Sprigs of baby’s breath tucked between the paper stems provide a soft, natural texture that balances the sharp folds of the paper. It is a creative way to use scrap paper to brighten your morning view.
Materials Required
- Square origami paper in various floral and red patterns
- Floral wire stems (green)
- Dried or fresh baby’s breath
- White ceramic pitcher or vase
Equipment Required
- Scissors
- Hot glue gun
- Pencil
DIY Instructions
- Select a square piece of origami paper and fold it in half both ways to find the center.
- Fold the bottom edge up to the middle crease to begin the heart shape.
- Turn the paper over and fold the bottom corners into the center to create a point.
- Flip it back over and fold the top edges down to meet the center line.
- Tuck the top corners into the small pockets created by your previous folds.
- Gently puff out the sides of the paper to give your heart a 3D, rounded look.
- Apply a small bead of hot glue to the top of a green floral wire stem.
- Insert the stem into the bottom opening of the paper heart and hold until set.
- Repeat these steps until you have fifteen to twenty hearts in different patterns.
- Arrange the hearts in a white pitcher and fill the gaps with airy sprigs of baby’s breath.
32 Love Themed Stone Tic-Tac-Toe
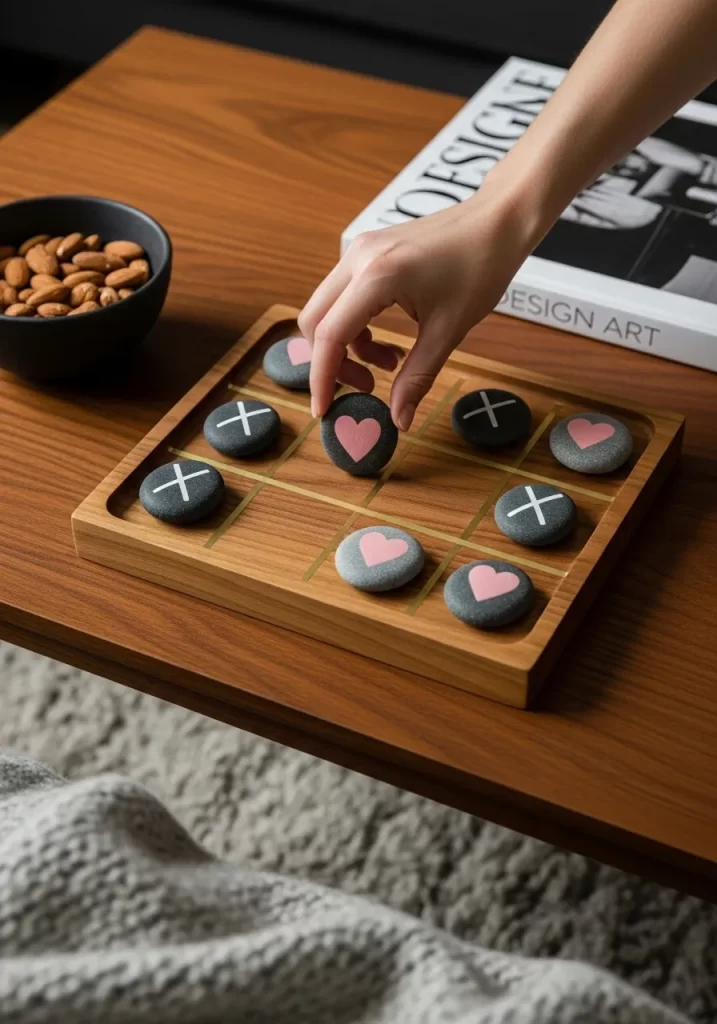
Turn a classic game into a romantic coffee table accent with hand painted stones. This project features smooth river rocks decorated with simple pink hearts and white crosses. A wooden tray with a permanent gold grid serves as the game board, keeping everything organized and stylish.
The natural texture of the stones feels grounded and organic against the warm wood. It is a playful decoration that encourages interaction and fun in your living room. This game looks just as good as a static display as it does in the middle of a match.
Materials Required
- Ten smooth, flat river stones (dark gray or black)
- Small wooden tray (square)
- Pink acrylic paint
- White acrylic paint
- Gold paint pen
- Clear matte sealant spray
Equipment Required
- Small paintbrushes
- Measuring ruler
- Pencil
DIY Instructions
- Wash your stones with soap and water to remove any dirt and let them dry completely.
- Use your ruler and pencil to mark a three by three grid on the inside of the wooden tray.
- Trace over your pencil lines with the gold paint pen to create a crisp, permanent grid.
- Divide your stones into two groups of five.
- Paint a simple pink heart in the center of the first five stones using a fine brush.
- Paint a white “X” on the remaining five stones to act as the second game piece.
- Apply a second coat of paint if the colors look transparent against the dark stone.
- Spray all the stones and the tray with a clear matte sealant to prevent the paint from chipping.
- Once dry, arrange the stones on the grid in a mid game position for a staged look.
- Place the tray on your coffee table next to a bowl of almonds or a stack of design books.
33 Heart Shaped Birch Bark Succulent Planter
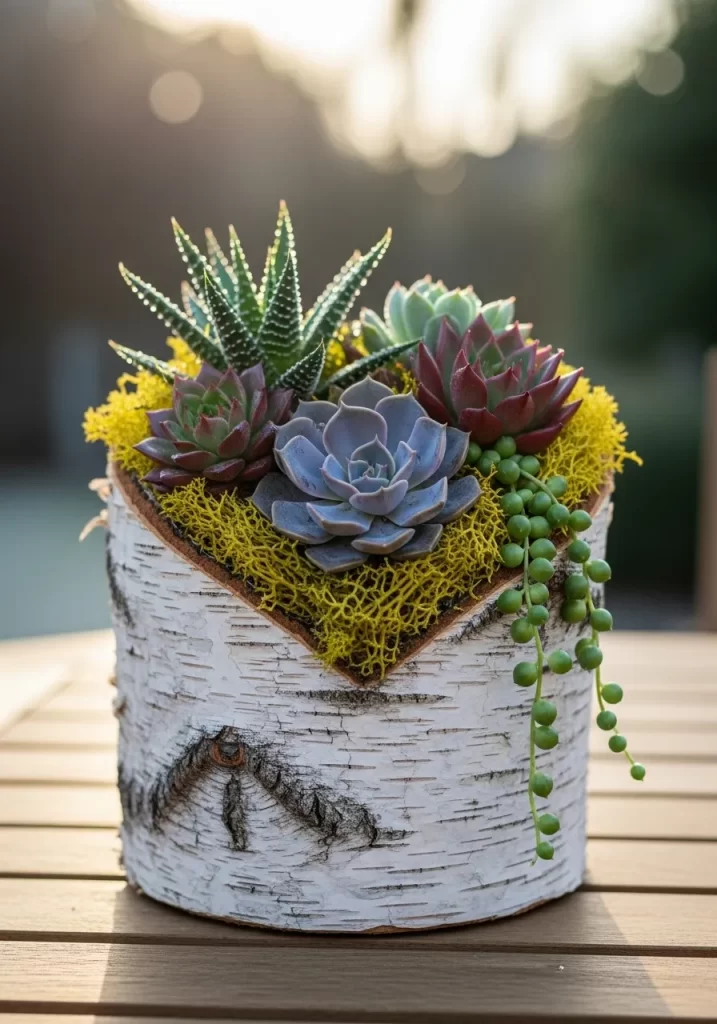
Bring an earthy, rustic vibe to your outdoor space with a planter made from natural birch bark. This design features a heart shaped cutout in the side of a birch log, filled with vibrant green and purple succulents. The white bark provides a stunning contrast to the lush colors of the plants.
Draping succulents like string of pearls adds movement and a touch of elegance to the display. This piece works beautifully on a patio table or a sunlit garden bench. It is a unique way to celebrate nature while adding a seasonal touch to your greenery.
Materials Required
- One thick birch log (about eight inches tall)
- Small assorted succulents (echeveria, string of pearls, aloe)
- Preserved yellow reindeer moss
- Cactus potting soil
Equipment Required
- Wood chisel and hammer
- Small garden trowel
- Power drill with a large spade bit
DIY Instructions
- Secure your birch log on a sturdy work surface and mark a heart shape on the side.
- Use a power drill to hollow out the center of the log from the top down.
- Carefully use your chisel and hammer to carve the heart shaped opening into the side of the log.
- Sand the edges of the heart cutout to ensure they are smooth and clean.
- Fill the hollow center of the log with cactus potting soil through the top.
- Plant your largest succulents in the center so they peek out through the heart opening.
- Tuck small pieces of yellow reindeer moss around the plants to hide the soil and add color.
- Place a “string of pearls” plant near the edge so it can hang down the side of the bark.
- Lightly mist the succulents with water, taking care not to soak the bark too much.
- Set the planter on a wooden outdoor table where it can receive plenty of indirect sunlight.
34 Enchanted Rose Under Glass Dome
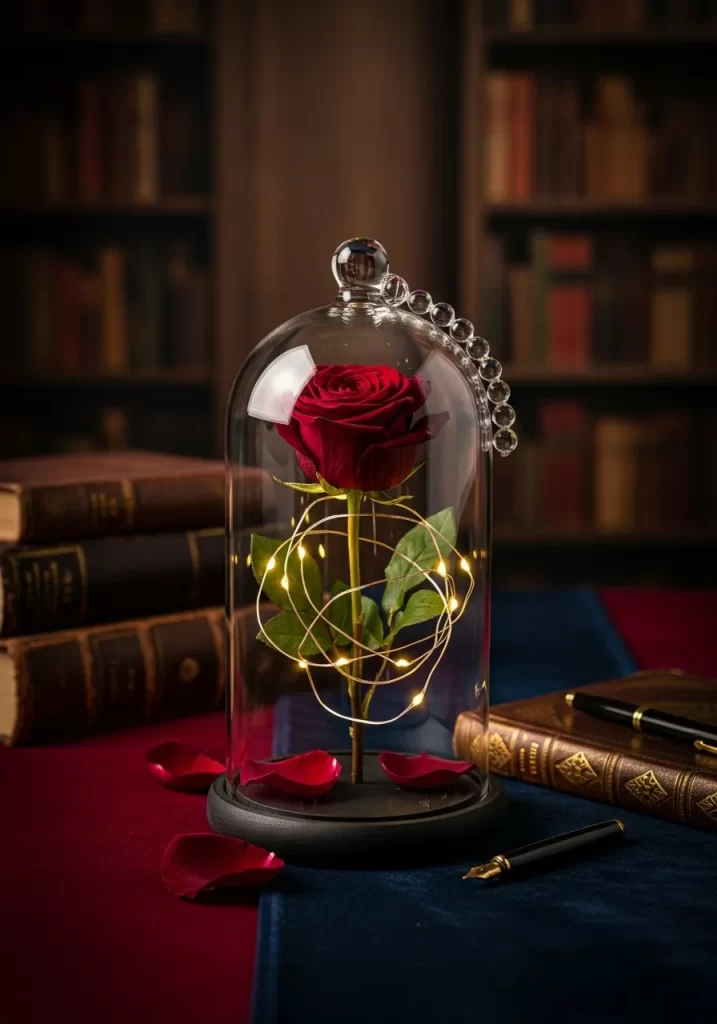
Channel a sense of classic fairytale romance with a single deep red rose preserved under glass. This decoration features a high quality silk rose surrounded by delicate fairy lights that spiral around the stem. The glass dome protects the flower and creates a beautiful reflection of the tiny glowing bulbs.
Setting this on a dark velvet runner next to vintage books adds to the mysterious and elegant atmosphere. It is a timeless piece that works perfectly as a nightstand lamp or a library accent. The soft light provides a cozy glow that is perfect for quiet evenings.
Materials Required
- One high quality silk red rose with a long stem
- Glass cloche or dome with a wooden base
- Thin copper wire fairy lights (battery operated)
- Loose red rose petals
- Black acrylic paint
Equipment Required
- Hot glue gun
- Wire cutters
- Paintbrush
DIY Instructions
- Paint the wooden base of your cloche with black acrylic paint for a sophisticated look.
- Use wire cutters to trim the rose stem so the flower sits two inches below the top of the glass.
- Apply hot glue to the bottom of the stem and press it firmly into the center of the base.
- Unwrap your fairy lights and check the batteries to ensure they are working.
- Begin at the bottom and wrap the wire lights loosely up the stem of the rose.
- Tuck a few of the tiny bulbs under the rose petals at the top for an internal glow.
- Hide the battery pack behind the base or inside a hollowed out area if the base allows.
- Scatter a few loose red petals on the base around the stem for a “fallen” look.
- Carefully lower the glass dome over the rose, ensuring no wires are pinched.
- Place the finished dome on a table next to a fountain pen and old books to complete the scene.
35 Stamped Heart Canvas Tote Bag

Add a touch of handmade charm to your daily errands with a custom stamped canvas bag. This project uses various sizes of red heart stamps to create a scattered, artistic pattern across a plain tote. The large central heart features an intricate lace like texture that serves as a focal point.
Hanging this on a simple black hook near your entryway makes it part of your functional decor. It is a great way to display your personality while keeping your shopping essentials organized. The bright red ink pops beautifully against the natural cream fabric of the bag.
Materials Required
- Plain cream canvas tote bag
- Red fabric ink pad
- Large heart stamp with a decorative pattern
- Small solid heart stamps in different sizes
Equipment Required
- Iron and ironing board
- Piece of thick cardboard
- Lint roller
DIY Instructions
- Iron your canvas bag to remove any wrinkles so the stamps transfer clearly.
- Slide a piece of thick cardboard inside the bag to prevent ink from bleeding through to the back.
- Use a lint roller to remove any stray fibers from the surface of the fabric.
- Press your large decorative heart stamp firmly into the red ink pad.
- Center the large heart on the bag and press down with even pressure for ten seconds.
- Carefully lift the stamp straight up to avoid smearing the intricate pattern.
- Use the smaller heart stamps to create a random pattern around the central design.
- Let the ink dry for at least twenty four hours to ensure it is fully set.
- Remove the cardboard and iron the back of the stamped area to “heat set” the fabric ink.
- Hang the bag on a wall hook and fill it with fresh flowers or a magazine for a stylish look.
36 Curated Love Story Shadow Box
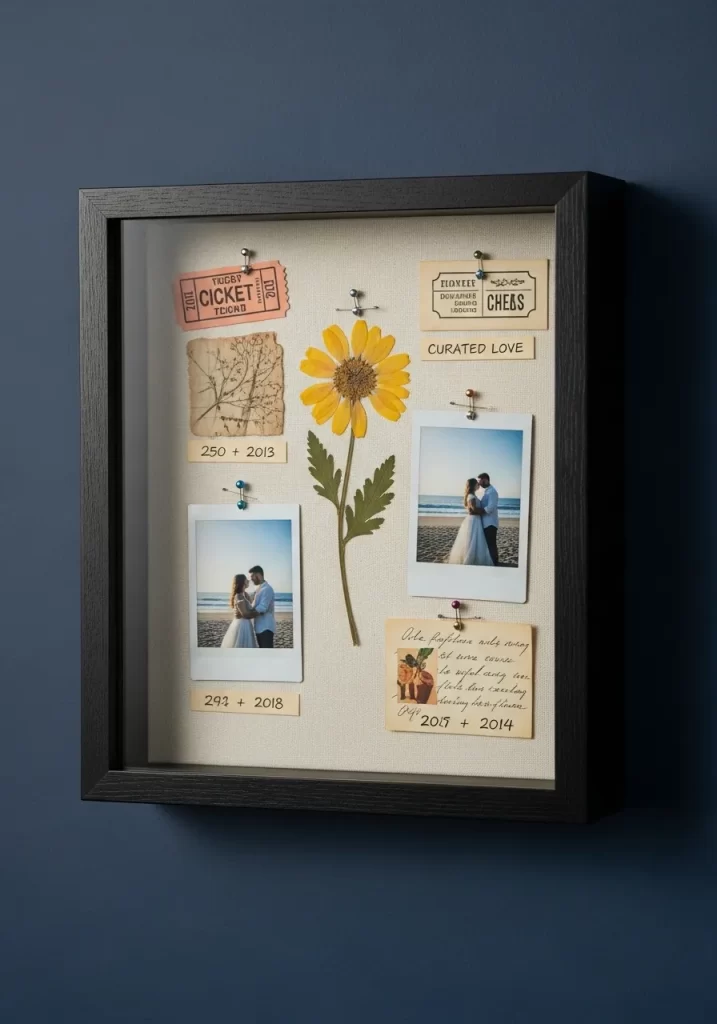
Preserve your most cherished moments in a sophisticated black shadow box display. This project combines personal photos, ticket stubs, and pressed flowers to tell a visual story of your relationship. Hand labeled dates and locations add a curated, museum like quality to the piece.
A single large yellow sunflower in the center provides a bright focal point that anchors the smaller items. Using vintage style pins to secure the mementos gives the display a tactile, three dimensional feel. It is a deeply personal piece of art that celebrates your unique history.
Materials Required
- Large black shadow box frame (12×12 inches)
- Cream linen or cardstock for the background
- Two small Polaroid style photos
- One large pressed yellow sunflower with leaves
- Vintage ticket stubs or postcards
- Scraps of parchment paper
- Small decorative pins with colored heads
Equipment Required
- Black ink pen
- Double sided adhesive tape
- Scissors
DIY Instructions
- Remove the back of the shadow box and secure your cream linen background to the board.
- Lay your items out on the linen to find a balanced layout before securing them.
- Place the large sunflower in the center and use a pin to secure the stem at the top and bottom.
- Use small pieces of double sided tape to attach your photos on either side of the flower.
- Pin your ticket stubs and postcards in the upper corners to fill the space.
- Cut small strips of parchment paper and write dates or short phrases in your best handwriting.
- Place these labels directly under the corresponding photos or tickets.
- Add a few extra pins around the edges of the photos to enhance the “curated” aesthetic.
- Clean the glass of the frame on both sides to ensure the display is clear.
- Reassemble the shadow box and hang it in a prominent place like a hallway or bedroom wall.
Key Takeaways
1 Handmade items bring a unique personality to seasonal decor that feels more intimate.
2 Repurposing common household objects saves money while looking sophisticated and stylish.
3 Layering different textures like fur and velvet creates a high end feel in any room.
4 Natural elements like greenery and wood help ground the bright holiday colors for a balanced look.
Decorating for Valentine’s Day is about celebrating the people who matter most to you. Your home should reflect that warmth and care through personal touches. These DIY projects prove that great style is accessible to everyone.
Take pride in the items you create with your own hands. Small changes often make the biggest impact on your daily environment. We hope these ideas spark your creativity throughout the entire season.