
Many people feel a bit sad when the holiday season ends and the house looks empty. You might look at your twinkling Christmas tree and wish the festive spirit could stay a little longer. Keeping your tree up past December is actually a wonderful way to celebrate the season of love.

Transforming your evergreen into a Valentine masterpiece is easier than you think. You can swap out the reindeer and snowflakes for hearts, flowers, and romantic trinkets. This transition saves you from the chore of packing everything away while giving your home a fresh, cozy glow.
We have gathered forty unique ways to repurpose your tree for February fourteenth. Whether you love rustic wood or modern neon, there is a design here to suit your personality. Let these creative projects inspire you to keep the lights on and the love flowing throughout your living space.
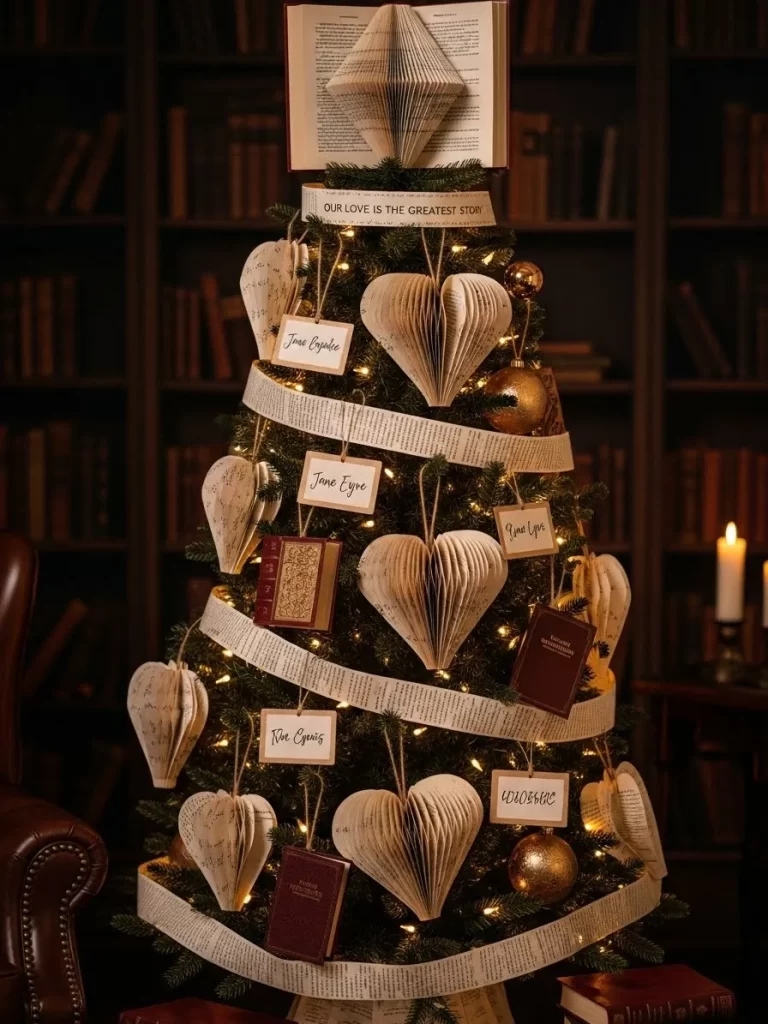
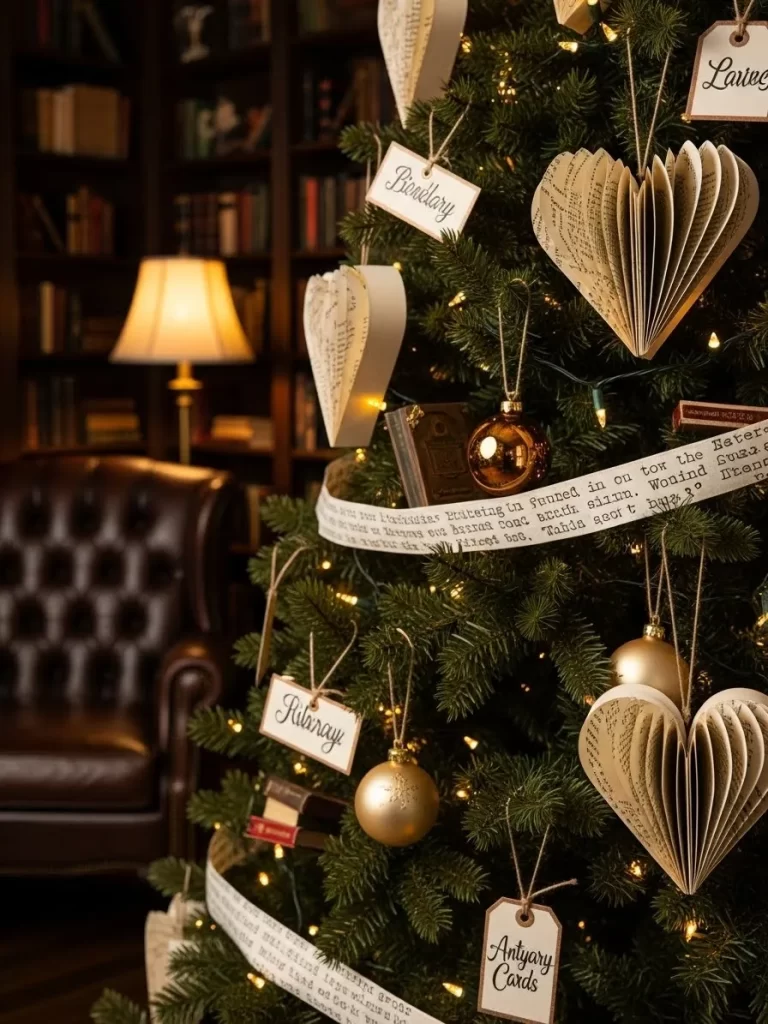
1 Vintage Love Letter Tree
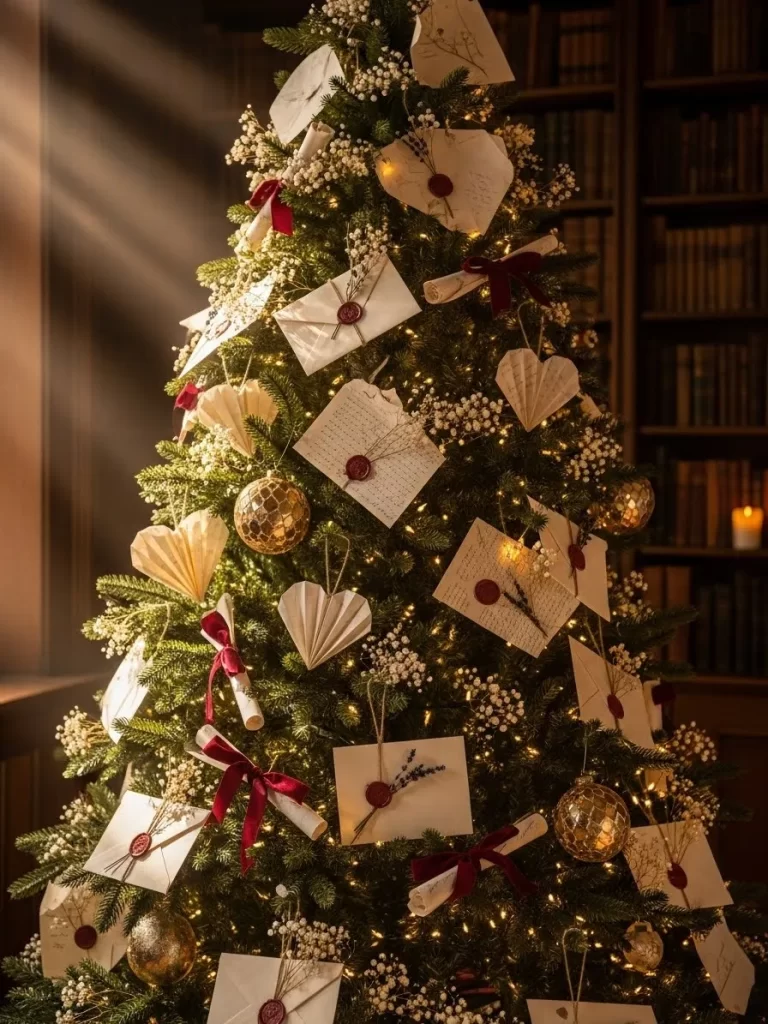
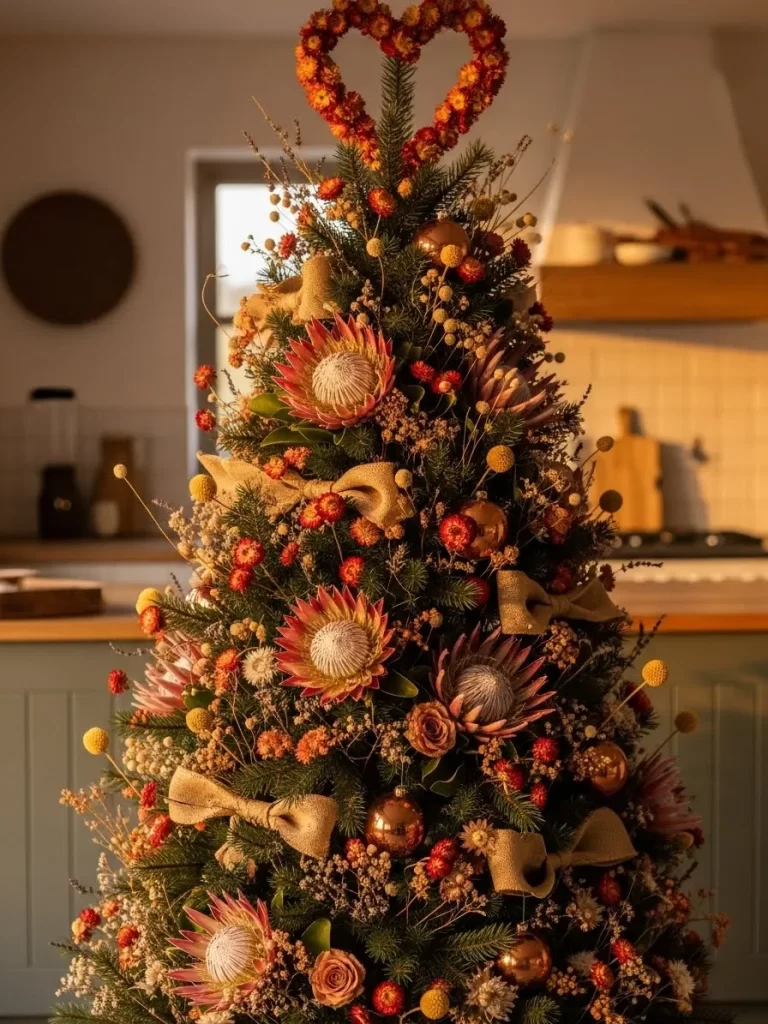
Repurpose your holiday greenery with a nostalgic touch using old letters and cream colored paper. This design brings a romantic library feel into your home with handwritten notes and soft textures. Deep red wax seals provide a rich contrast against the light paper and dark needles. Tiny bunches of white flowers fill the gaps to create a soft and full silhouette.
Burgundy velvet ribbons are tied around rolled scrolls to add a sophisticated pop of color. Gold baubles reflect the warm glow of the twinkle lights hidden within the branches. You can use photocopies of old family letters to make this look personal and meaningful. Each envelope tells a silent story of affection that transforms your tree into a beautiful center piece.
Material required list
- Cream colored paper
- Plain white envelopes
- Red wax sticks
- Dried lavender stems
- Babys breath flowers
- Burgundy velvet ribbon
- Gold ornaments
- Twine or string
Equipment required list
- Wax seal stamp
- Melting spoon
- Small candle
- Scissors
- Ink pen
DIY instruction step by step
- Write short messages or poems on the cream colored paper using your ink pen.
- Fold the paper carefully and place it inside a plain white envelope.
- Light your small candle and hold the melting spoon over the flame.
- Place a piece of red wax into the spoon and wait for it to turn into liquid.
- Pour the liquid wax onto the flap of the envelope in a small circle.
- Press your wax seal stamp firmly into the center of the liquid wax.
- Place a tiny sprig of dried lavender into the wax before it becomes hard.
- Cut several pieces of burgundy velvet ribbon using your scissors.
- Roll up some sheets of paper to look like scrolls and tie a ribbon around the middle.
- Create paper hearts by folding square sheets back and forth like a fan.
- Pinch the bottom of the folded paper together and spread the top part out to make a heart shape.
- Tie a small loop of twine to each decoration so you can hang them on the tree.
2 Golden Noir Heart Tree
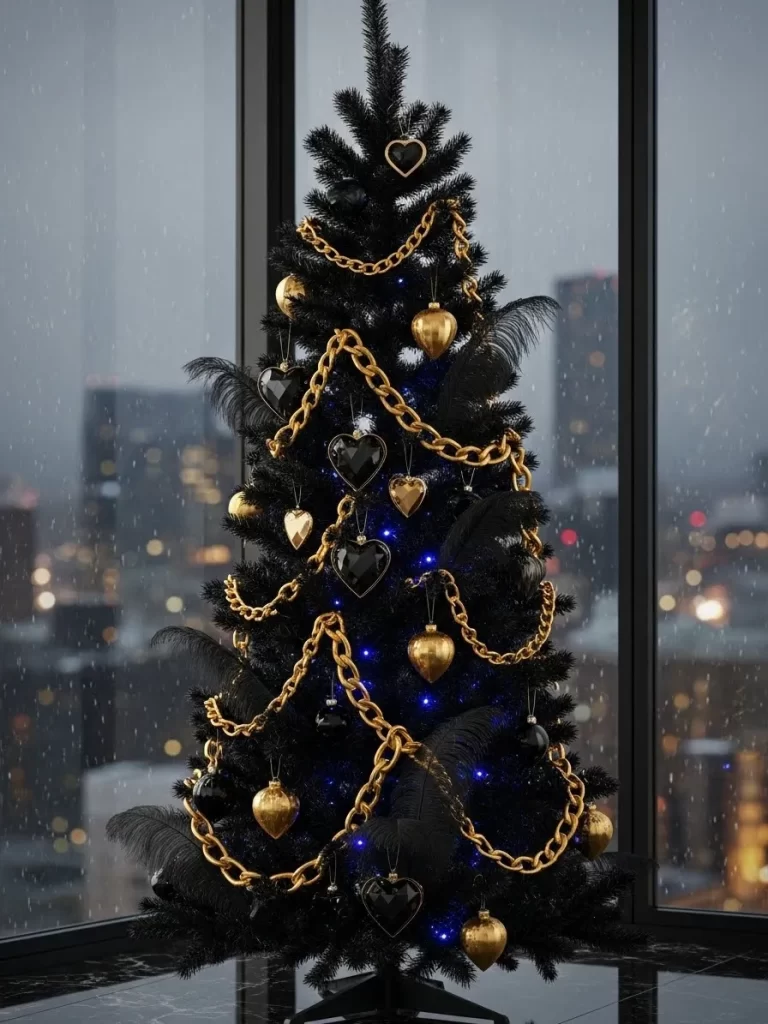
Celebrate romance with a bold and modern look using a black artificial tree. This style relies on the heavy contrast between dark branches and shimmering gold accents. Thick gold chains drape across the tree like jewelry to provide a high fashion feel. Large black feathers add soft texture and volume to the sleek silhouette.
Heart shaped ornaments in metallic gold and glossy black create a unified theme. Tiny blue fairy lights sparkle from deep within the branches to mimic a city skyline at night. This setup works well in a contemporary living space. It offers a sophisticated alternative to traditional red and pink decorations.
Material required list
- Black artificial tree
- Large gold plastic chain
- Gold heart ornaments
- Black heart ornaments
- Large black feathers
- Blue LED string lights
- Gold ornament hooks
Equipment required list
- Scissors
- Wire cutters
DIY instruction step by step
- Assemble your black tree and fluff the branches until it looks full.
- Wrap the blue LED string lights around the trunk and outward to the tips.
- Take your gold plastic chain and drape it in wide loops around the tree.
- Secure the chain to the branches using small pieces of wire or ornament hooks.
- Hang the large gold heart ornaments in a zigzag pattern from top to bottom.
- Place the black heart ornaments in the spaces between the gold ones.
- Slide the stems of the black feathers into the branches so they point outward.
- Adjust the feathers to hide any gaps or visible wires.
- Ensure the gold chain hangs loosely to create a graceful draped effect.
3 Sweetheart Candy Lane Tree
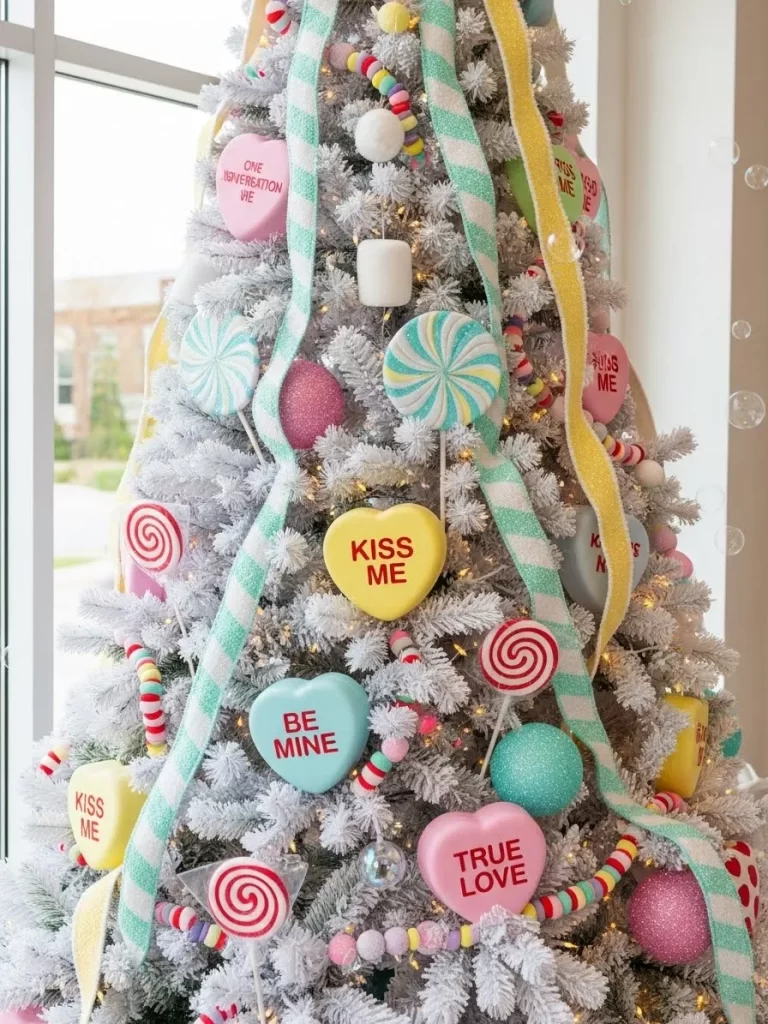
Create a sugary wonderland with a white flocked tree and pastel candy decor. This theme features oversized lollipops with colorful swirls stuck directly into the branches. Large conversation hearts with classic phrases like BE MINE serve as the main focal points. The snowy white branches make the bright pinks and teals stand out vividly.
A garland made of soft pastel beads and faux marshmallows wraps around the tree for extra sweetness. Striped ribbons in mint green and white add a playful touch of pattern. Small bubbles floating nearby enhance the magical and lighthearted feeling of the display. This is a choice for a festive kitchen corner.
Material required list
- White flocked tree
- Large faux lollipops
- Foam conversation hearts
- Pastel bead garland
- Faux marshmallow string
- Striped mint ribbon
- Pink glitter baubles
- Yellow ribbon
Equipment required list
- Hot glue gun
- Scissors
- Floral wire
DIY instruction step by step
- Set up the white flocked tree and ensure the branches are spread out.
- Wrap the pastel bead garland around the tree in a spiral shape.
- Add the faux marshmallow string on top of the bead garland.
- Cut long strips of striped mint ribbon and tuck them into the branches.
- Glue floral wire to the back of the foam conversation hearts.
- Attach the hearts to the tree by twisting the wire around the branches.
- Insert the sticks of the large faux lollipops into the center of the tree.
- Angle the lollipops so they peek out from different heights.
- Hang the pink glitter baubles to fill any small empty spots.
- Use the yellow ribbon to create small bows for the top of the tree.
4 Secret Garden Peony Tree

Bring the beauty of a spring garden into your home with this floral focused tree. Large silk peonies in soft pink and white are the stars of this romantic design. Long strands of wisteria and ivy vines drape down the sides to create an organic flow. The lush greenery makes the tree feel like a living piece of art.
Glass globes filled with green moss add an earthy and natural element to the branches. These ornaments provide a unique texture that contrasts with the soft petals. Clear lights woven throughout the foliage make the flowers look like they are glowing. This design is excellent for someone who loves botanical styles.
Material required list
- Green Christmas tree
- Large silk peonies
- Faux wisteria stems
- Artificial ivy vines
- Clear glass ornaments
- Dried green moss
- Warm white fairy lights
Equipment required list
- Wire cutters
- Hot glue gun
DIY instruction step by step
- Start by wrapping the tree in warm white fairy lights for a soft base glow.
- Open the clear glass ornaments and stuff them with bits of dried green moss.
- Close the ornaments and hang them evenly across the middle section of the tree.
- Take the ivy vines and wrap them loosely around the tree from top to bottom.
- Use wire cutters to trim the stems of the silk peonies to about four inches.
- Push the peony stems into the branches so the flower heads face outward.
- Cluster some peonies together to create a more natural floral look.
- Tuck the wisteria stems into the upper branches and let them hang down.
- Arrange the hanging wisteria so it looks like it is growing over the tree.
5 Cupids Bullseye Target Tree

Decorate with a fun archery theme to celebrate the holiday. This creative setup features wooden arrows with red feathers stuck into a green tree. Circular targets with red and white rings are scattered among the branches to show where Cupid has aimed. A silver tinsel garland adds a touch of classic holiday shine to the scene.
Red baubles and silver ornaments complement the color scheme and add traditional sparkle. The theme is playful and works well for a Valentine party or a family room. You can make the arrows yourself to give the tree a handcrafted feel. This bold look turns a standard tree into an action packed story of love.
Material required list
- Green tree
- Wooden dowels
- Red craft feathers
- Red and white cardstock
- Silver tinsel garland
- Red ornaments
- Silver ornaments
- String or twine
Equipment required list
- Hot glue gun
- Scissors
- Circular objects to trace
DIY instruction step by step
- Wrap the silver tinsel garland around the tree in horizontal layers.
- Hang the red and silver ornaments in the gaps between the tinsel.
- Trace three circles of different sizes on the red and white cardstock.
- Cut the circles out and glue them on top of each other to make a target.
- Glue a loop of string to the back of each target and hang them on the tree.
- Glue red feathers to the end of the wooden dowels to create arrows.
- Cut small triangles from the red cardstock and glue them to the other end.
- Slide the arrows into the tree at different angles as if they were shot.
- Aim some arrows directly at the centers of the hanging targets.
6 Parisian Patisserie Macaron Tree
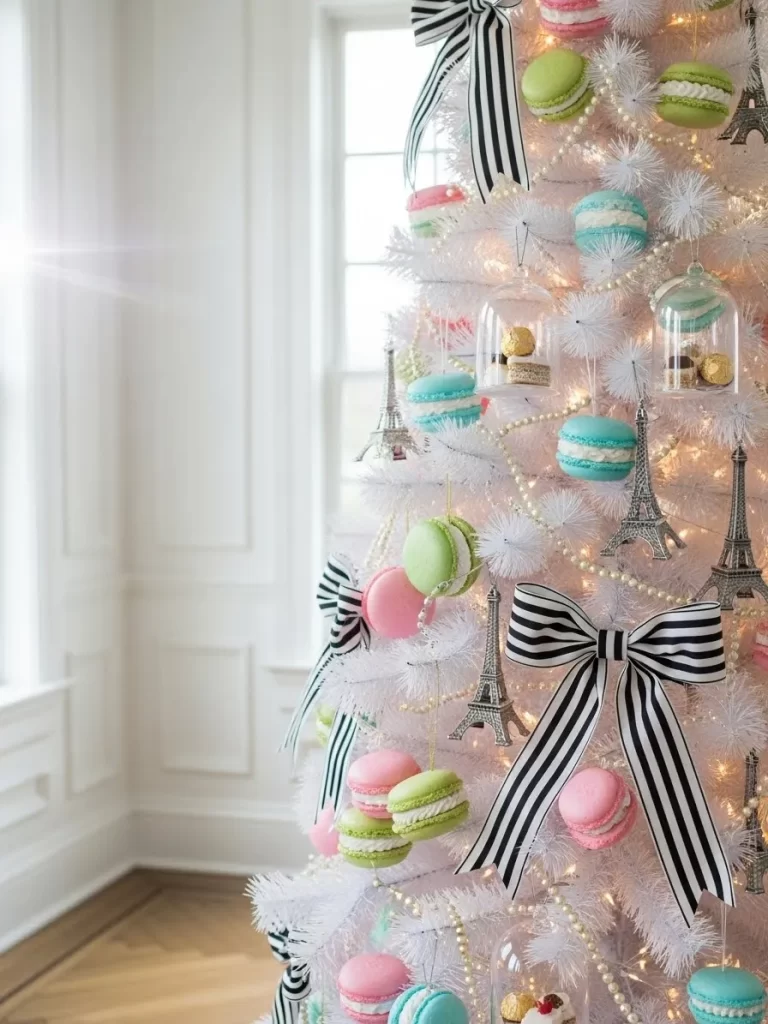
Imagine you are in a French bakery with this elegant white and pastel tree. Delicate faux macarons in shades of pink, mint green, and sky blue hang from every branch. Large black and white striped bows provide a chic contrast that looks very stylish. Strings of pearls act as a luxurious garland that drapes softly over the white needles.
Miniature silver Eiffel Tower ornaments add a travel inspired touch to the theme. Some macarons are placed under small glass domes to look like expensive treats. This tree feels light, airy, and very feminine. It is a wonderful choice for a boutique style bedroom.
Material required list
- White artificial tree
- Faux colorful macarons
- Black and white striped ribbon
- Pearl bead garland
- Mini Eiffel Tower ornaments
- Small clear plastic domes
- Warm white lights
Equipment required list
- Hot glue gun
- Scissors
- Ornament hooks
DIY instruction step by step
- Wrap the white tree with warm white lights to create a bright base.
- Drape the pearl bead garland in swags around the tree.
- Cut the striped ribbon and tie several large bows with long tails.
- Attach the bows to the branches using the wire found on the tree.
- Glue a small macaron inside each clear plastic dome using a tiny dot of glue.
- Use ornament hooks to hang the macaron domes and the Eiffel Towers.
- Scatter the remaining loose macarons throughout the branches.
- Tuck some macarons deep into the tree and place others on the tips.
- Ensure the colors are balanced so the pink and green are spread out.
7 Amethyst Geode Crystal Tree
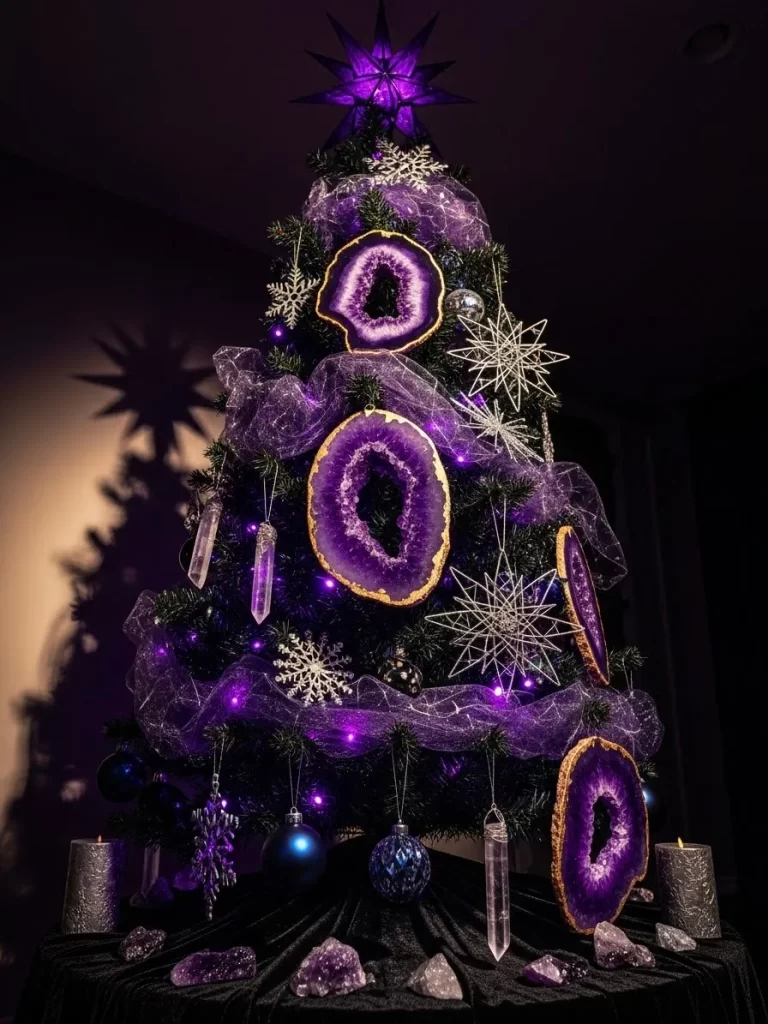
Focus on natural beauty with a tree inspired by crystals and stones. Large purple agate slices with gold edges serve as the primary ornaments for this dark tree. They catch the light and show off beautiful patterns found in nature. Clear quartz points hang like icicles to add a touch of sparkle and magic.
A sheer purple mesh garland wraps around the branches to create a soft, ethereal look. Silver and white star ornaments add a celestial vibe to the overall design. This tree is for anyone who loves mysticism or unique mineral specimens. It creates a calm and enchanting atmosphere in any room.
Material required list
- Black or dark green tree
- Purple agate slices
- Clear quartz crystals
- Purple mesh ribbon
- Silver star ornaments
- Blue and purple baubles
- Purple string lights
Equipment required list
- Thin wire
- Pliers
- Scissors
DIY instruction step by step
- Light the tree with purple string lights to set a moody tone.
- Weave the purple mesh ribbon loosely around the tree to create volume.
- Wrap thin wire around the top of the quartz crystals to create a loop.
- Hang the crystals so they dangle from the ends of the branches.
- Use ornament hooks to secure the heavy agate slices to sturdy branches.
- Place the largest agate slices in the middle and bottom sections of the tree.
- Add the silver star ornaments to create a sky inspired theme.
- Hang the blue and purple baubles to fill any remaining dark spots.
- Top the tree with a large purple or silver star to complete the look.
8 Safari Leopard Heart Tree
Go wild this Valentine Day with a safari themed tree. This design features large plush hearts covered in leopard and cheetah prints. Gold painted tropical leaves like monstera and palms are tucked into the branches for a jungle feel. Tall plumes of dried pampas grass stick out from the top and sides to add height and texture.
Small animal figurines like lions and zebras are nestled within the greenery. A giant animal print bow serves as a dramatic topper for the entire display. The warm gold and brown tones create an inviting and adventurous look. This style is excellent for a home with bold decor.
Material required list
- Green Christmas tree
- Leopard print fabric hearts
- Gold faux tropical leaves
- Dried pampas grass
- Animal print ribbon
- Lion and zebra figurines
- Gold baubles
- Red berry sprigs
Equipment required list
- Scissors
- Floral wire
- Hot glue gun
DIY instruction step by step
- Place the tree in a sturdy basket or base for a rustic look.
- Create a very large bow using the animal print ribbon for the top.
- Insert the pampas grass stems behind the bow so they fan out upward.
- Tuck more pampas grass into the sides of the tree at different angles.
- Slide the gold tropical leaves into the branches to cover the inner trunk.
- Wire the leopard print hearts onto the tree in a balanced pattern.
- Place the animal figurines on flat branches so they look like they are climbing.
- Add gold baubles and red berry sprigs to provide small pops of color.
- Step back to ensure the animal prints are distributed evenly.
9 Nordic Wood Heart Tree
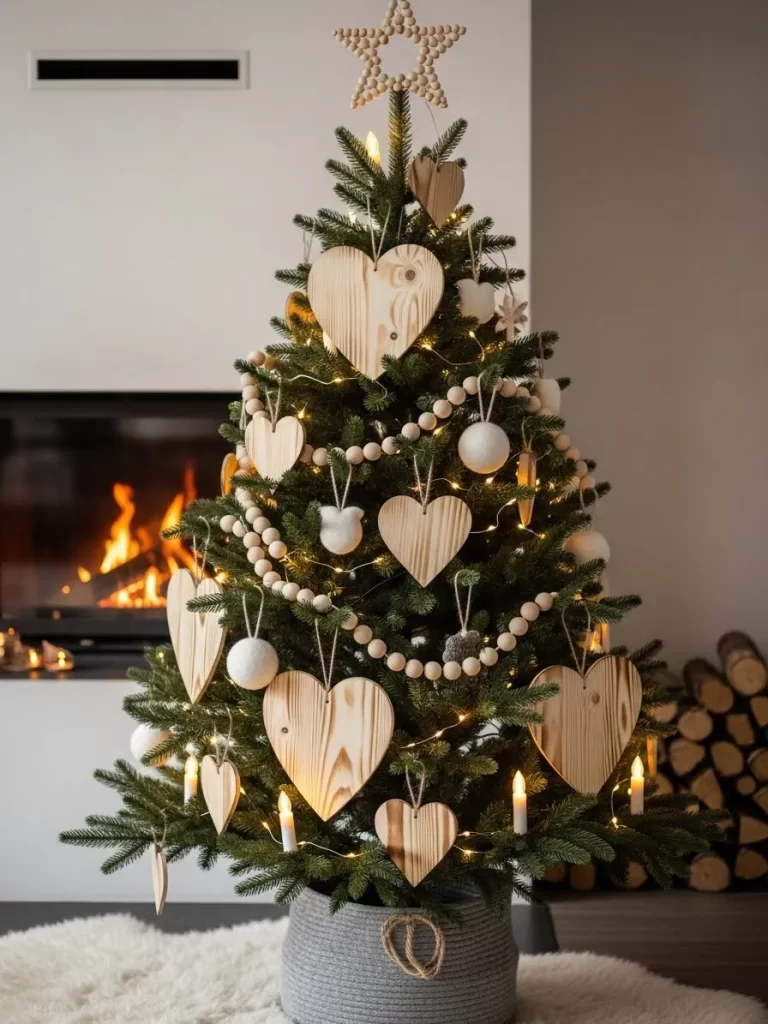
Embrace simplicity with a rustic tree focused on natural materials. Large hearts cut from light colored wood hang from simple twine loops. A long garland made of wooden beads wraps around the tree to provide a clean and organized look. White felt balls add a soft and cozy texture that feels very inviting.
Small battery operated candles sit on the branches to provide a warm and flickering glow. A matching wooden bead star sits at the very top of the tree. This design is for a farmhouse or Scandinavian style home. It celebrates love in a quiet way using earth tones and organic shapes.
Material required list
- Green Christmas tree
- Unfinished wooden hearts
- Wooden bead garland
- White felt ball ornaments
- Wooden bead star topper
- Battery operated clip on candles
- Twine
Equipment required list
- Scissors
- Drill with small bit
DIY instruction step by step
- Drape the wooden bead garland around the tree in simple swags.
- Drill a small hole in the top of each wooden heart if they are plain.
- Thread a piece of twine through the hole and tie it in a loop.
- Hang the wooden hearts evenly across the green branches.
- Distribute the white felt balls to add contrast to the wood tones.
- Clip the battery operated candles onto the sturdier branches near the tips.
- Place the wooden bead star on the top branch of the tree.
- Ensure the candles are spaced out so the light is balanced.
- Keep the bottom of the tree simple with a neutral tree skirt or basket.
10 Lavender Lace Vintage Tree
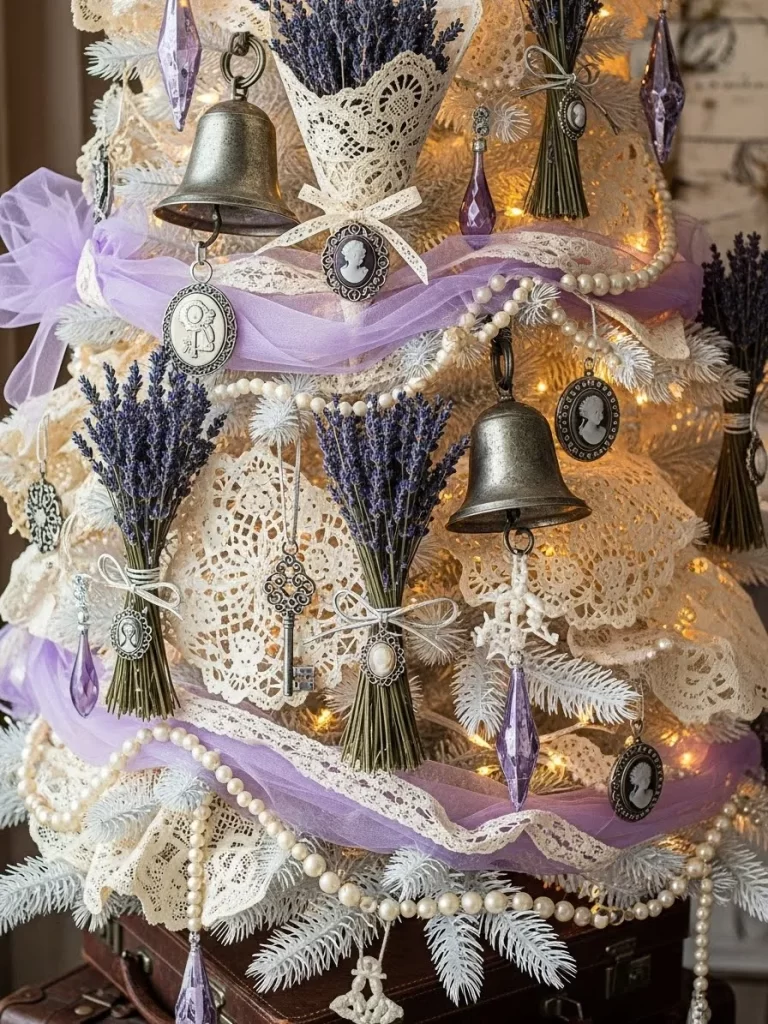
Create a romantic and fragrant display with a vintage lace theme. This white tree is decorated with bundles of dried lavender tied with white string. Delicate lace doilies and ribbons are draped over the branches to create a soft and feminine look. Antique style brass bells and silver lockets add a sense of history and charm.
Small pearl garlands weave through the lace to add a subtle shine to the tree. Large purple fabric bows provide a soft pop of color that matches the lavender. This tree feels like a collection of treasures from an old attic. It is a wonderful choice for a cozy reading nook.
Material required list
- White Christmas tree
- Dried lavender bundles
- Lace doilies
- White and purple ribbon
- Brass bells
- Silver locket charms
- Pearl bead garland
- Warm white lights
Equipment required list
- Scissors
- Twine
- Hot glue gun
DIY instruction step by step
- Wrap the white tree with warm white lights for a gentle glow.
- Drape the pearl bead garland around the tree in overlapping loops.
- Fold the lace doilies over the branches to act as soft ornaments.
- Tie small bunches of lavender together with twine and a white bow.
- Hang the lavender bundles throughout the tree using small hooks.
- Attach the brass bells and silver lockets to the branches.
- Tie large purple ribbon bows and place them near the lavender.
- Weave extra lace ribbon in and out of the branches to fill gaps.
- Place a few vintage keys or charms among the lace for extra detail.
11 Neon Disco Girl Power Tree
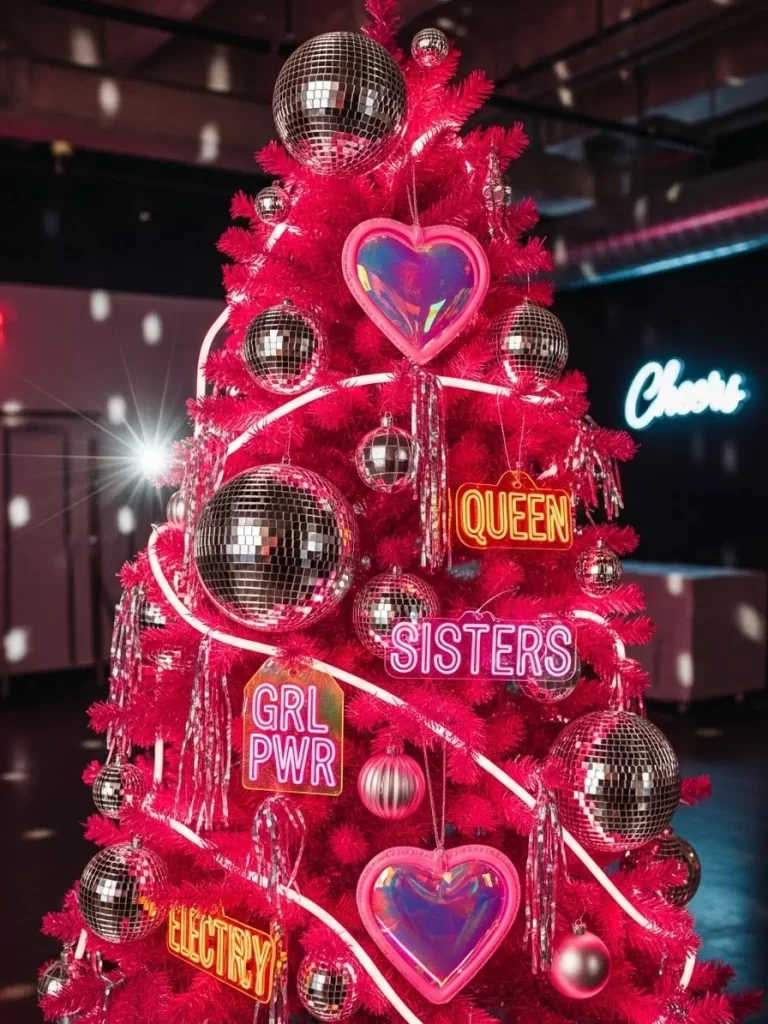
Get ready to celebrate with a vibrant pink tree that honors friendship and empowerment. This bold design features shiny silver disco balls in many different sizes to catch every ray of light. Neon signs with words like Queen and Sisters glow brightly against the hot pink needles for a modern party vibe. Iridescent heart ornaments dangle between the globes to create a rainbow of shifting colors.
Silver tinsel and glittery baubles add layers of shine to this energetic setup. This tree is a fantastic choice for a Galentine party or a fun bedroom update. The reflective surfaces of the disco balls fill the room with dancing light when the sun hits them. It is an exciting way to show love for your friends and yourself.
Material required list
- Hot pink artificial tree
- Silver disco balls
- Small neon signs
- Iridescent heart ornaments
- Silver tinsel strands
- Pink and silver baubles
- Clear string lights
Equipment required list
- Extension cord
- Zip ties
- Scissors
DIY instruction step by step
- Assemble the pink tree and ensure it is stable for the heavy disco balls.
- Wrap clear string lights around the branches to make the pink color pop.
- Use zip ties to secure the larger disco balls deep into the tree for safety.
- Hang smaller disco balls on the outer branches using standard ornament hooks.
- Carefully place the neon signs on flat branches and secure them with thin wire.
- Run the power cords for the signs down the back of the tree to hide them.
- Add the iridescent heart ornaments to fill the spaces between the shiny balls.
- Drape silver tinsel over the branches for a retro party feel.
- Add the pink and silver baubles last to complete the look.
12 Buffalo Plaid Cabin Tree
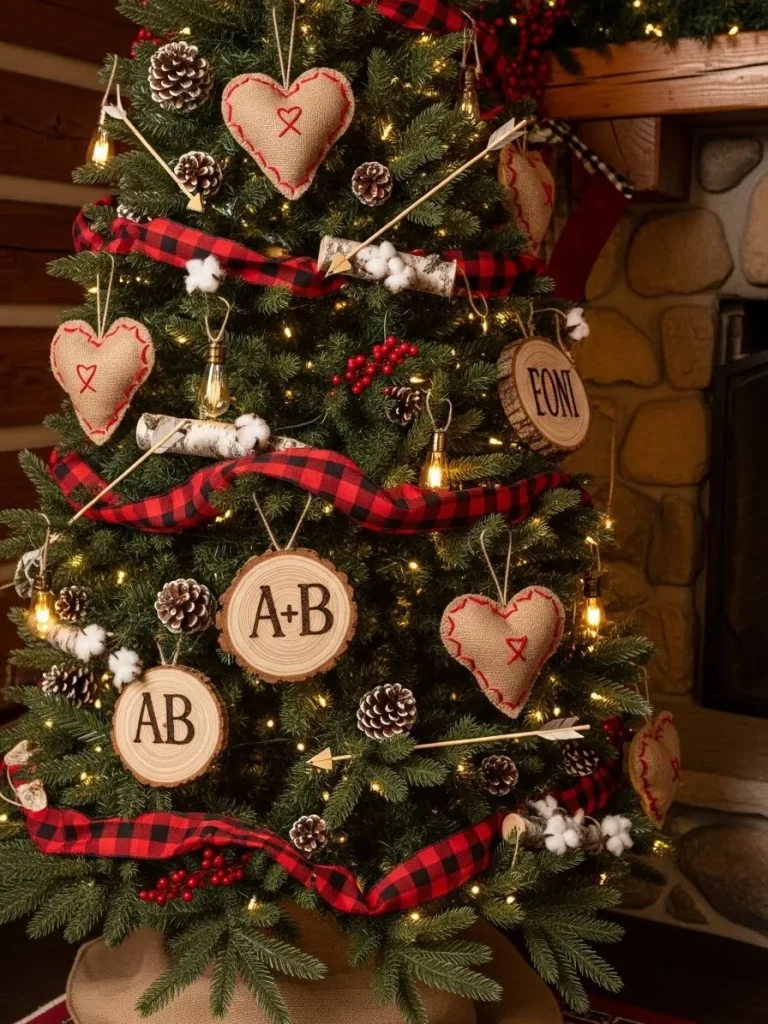
Bring a cozy mountain cabin feel to your home with a rustic plaid theme. This green tree features a wide red and black buffalo plaid ribbon used as a bold garland. Heart shaped ornaments made of burlap and wood slices give the tree a warm, handmade touch. Natural pine cones and sprigs of cotton add earthy textures to the evergreen display.
Small Edison style light bulbs provide a warm and vintage glow to the branches. Wooden discs with initials or words like Love add a personal element to your holiday decor. This style is excellent for a family room with a stone fireplace. It creates an inviting space for a cozy Valentine evening.
Material required list
- Green Christmas tree
- Buffalo plaid ribbon
- Burlap heart ornaments
- Natural pine cones
- Wood slice ornaments
- Cotton stems
- Edison bulb string lights
- Red berry sprigs
Equipment required list
- Hot glue gun
- Twine
- Scissors
DIY instruction step by step
- String the Edison style lights around the tree for a vintage amber look.
- Weave the wide buffalo plaid ribbon in and out of the branches in a spiral.
- Glue loops of twine to the top of the pine cones and wood slices for hanging.
- Hang the burlap hearts and wood slices in a balanced pattern across the tree.
- Tuck the cotton stems into the branches to create soft, white snowy spots.
- Place red berry sprigs near the pine cones for a touch of natural color.
- Use a permanent marker to write initials on the wood slice ornaments.
- Add a few arrows made of dowels to tie in a Cupid theme if you like.
- Cover the base of the tree with a burlap sack or a plaid blanket.
13 Succulent Terrarium Tree
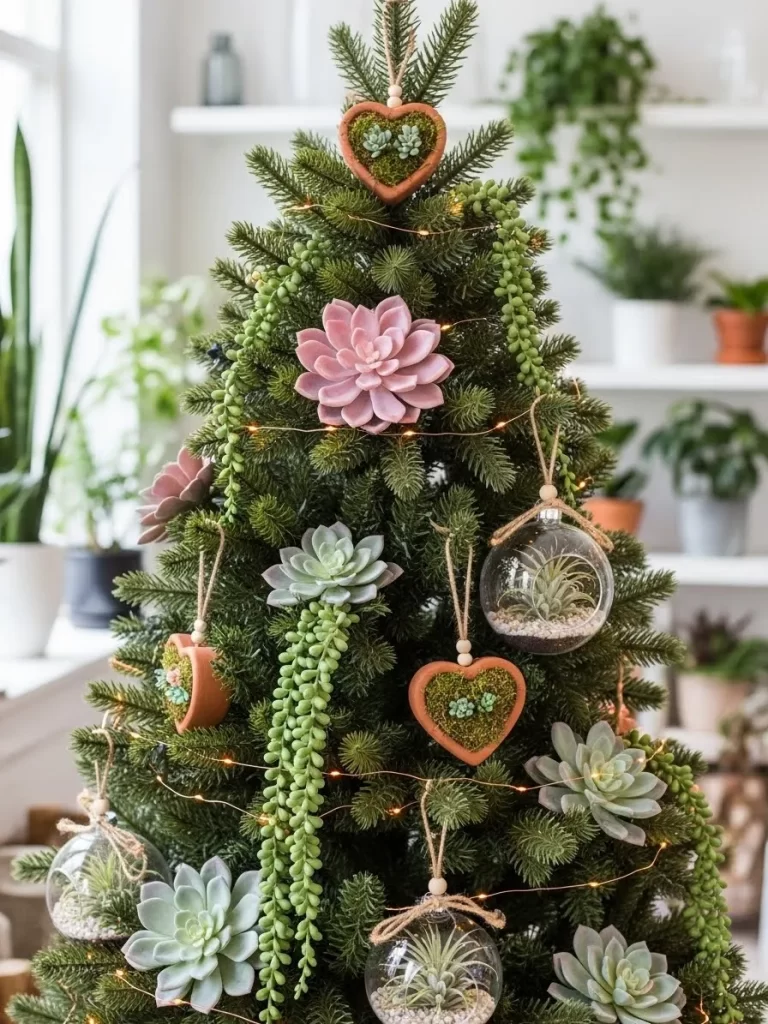
Focus on greenery and life with a unique succulent themed tree that feels very fresh. This design features large faux succulents in shades of pink, green, and blue nestled in the needles. Clear glass terrariums containing air plants and white pebbles hang from simple twine strings for a modern look. Long trails of string of pearls succulents drape down like a natural green garland.
The tree feels contemporary with its mix of desert plants and traditional evergreen branches. Tiny fairy lights are woven throughout to highlight the different shapes of the succulents. This is a wonderful choice for a bright sunroom or an apartment with many plants. It offers a sophisticated and calming take on February decorations.
Material required list
- Green Christmas tree
- Faux succulent heads
- Clear glass terrarium globes
- Faux air plants
- White decorative pebbles
- Artificial string of pearls
- Warm white fairy lights
- Twine
Equipment required list
- Hot glue gun
- Scissors
DIY instruction step by step
- Wrap the tree with thin fairy lights to create a subtle and magical glow.
- Pour a small amount of white pebbles into the bottom of the glass globes.
- Place a faux air plant on top of the pebbles inside each globe.
- Tie a loop of twine to the top of the globes and hang them on the tree.
- Glue or wire the large succulent heads directly onto the branches for stability.
- Space the succulents out so they look like they are growing from the tree naturally.
- Drape the string of pearls succulents over the branches from the top down.
- Adjust the green vines so they hang naturally and cover any gaps in the tree.
- Add a few terracotta colored heart ornaments to match the plant theme.
14 Frosted Glow Love Tree

Create a serene and icy look with a white flocked tree and transparent ornaments. This design uses clear plastic hearts and glowing Love signs to create a minimalist aesthetic. The entire tree is bathed in a soft purple or pink light from a spotlight at the base. A large crystal star sits at the top to reflect the light beautifully through the room.
White and silver baubles are mixed in to provide different textures without adding heavy colors. The tree looks like it is made of ice and light, making it very elegant. This setup is for a minimalist home or a winter themed celebration. It creates a romantic atmosphere that feels calm and very sophisticated.
Material required list
- White flocked tree
- Clear plastic heart ornaments
- Light up Love signs
- White and silver baubles
- Crystal star topper
- Purple or pink spotlight
- White string lights
Equipment required list
- Extension cords
- Batteries for signs
- Scissors
DIY instruction step by step
- Assemble the white flocked tree and fluff the branches for maximum volume.
- Wrap the tree in white string lights to create a bright and clean foundation.
- Hang the clear plastic hearts evenly from the top to the bottom.
- Place the light up Love signs on flat branches where they are easily visible.
- Add the white and silver baubles to fill any gaps in the snowy greenery.
- Place the crystal star topper on the highest branch of the tree.
- Set up a purple or pink spotlight at the base of the tree pointing upward.
- Adjust the spotlight until the entire tree has a soft and uniform colored glow.
- Hide all cords and battery packs behind the tree or under the tree skirt.
15 Retro Marquee XOXO Tree

Go for a bold and graphic look with a black tree and marquee style letters. This design features large red and white letters that spell out XOXO all over the branches. Polka dot ornaments and striped ribbons add a fun and retro feel to the entire display. A glowing red XOXO sign sits at the top as a bright and cheerful topper.
The high contrast between the black tree and the red decorations makes a strong visual statement. This style is for a modern living room or a fun office space. It uses simple shapes and colors to create a very effective and memorable design. Your guests will love the playful and energetic vibe of this holiday setup.
Material required list
- Black artificial tree
- Large marquee style letters
- Red and white polka dot baubles
- Black and white striped ribbon
- Red glossy ornaments
- Glowing XOXO tree topper
- Red string lights
Equipment required list
- Wire or zip ties
- Scissors
- Batteries for marquee letters
DIY instruction step by step
- Set up the black tree and wrap it in red string lights for a deep glow.
- Weave the black and white striped ribbon around the tree in a spiral.
- Secure the large marquee letters to the branches using wire or zip ties.
- Arrange the letters to spell XOXO at different levels of the black tree.
- Hang the red and white polka dot baubles in the remaining spaces.
- Add solid red glossy ornaments to create depth and extra shine.
- Place the glowing XOXO topper on the very top and turn it on.
- Ensure all letters are facing forward and are easily readable from the front.
- Hide the battery packs for the letters deep inside the black branches.
16 Rustic Love Note Paper Chain Tree

Celebrate personal connections with a tree covered in handwritten messages of love. This design features small brown paper notes clipped to the branches with tiny wooden clothespins. A classic red and white paper chain serves as a nostalgic and handmade garland. The simple green branches provide a perfect backdrop for the warm, organic paper tones.
Sentiments like Thank You For Being You make this tree feel very special and intimate for families. This is a project to do with kids where everyone can add their own note. It turns the tree into a beautiful collection of gratitude and affection. The natural and recycled materials give the tree a humble and heartwarming look.
Material required list
- Green Christmas tree
- Brown craft paper
- White paper
- Red cardstock
- Small wooden clothespins
- Warm white lights
- Red ornaments
Equipment required list
- Scissors
- Glue stick
- Black marker
DIY instruction step by step
- Light the tree with warm white lights to create a cozy and soft base.
- Cut strips of red and white paper to create the classic paper chain.
- Loop the strips together and secure them with a glue stick to form a garland.
- Drape the paper chain around the tree from the top down in swags.
- Cut small rectangles out of the brown craft paper to use as notes.
- Write messages of love or gratitude on each piece of paper with the marker.
- Use the small wooden clothespins to clip the notes to the green branches.
- Hang a few red ornaments to add a traditional holiday touch to the tree.
- Place a large paper heart or a simple star at the top of the tree.
17 Celestial Moon Back Tree
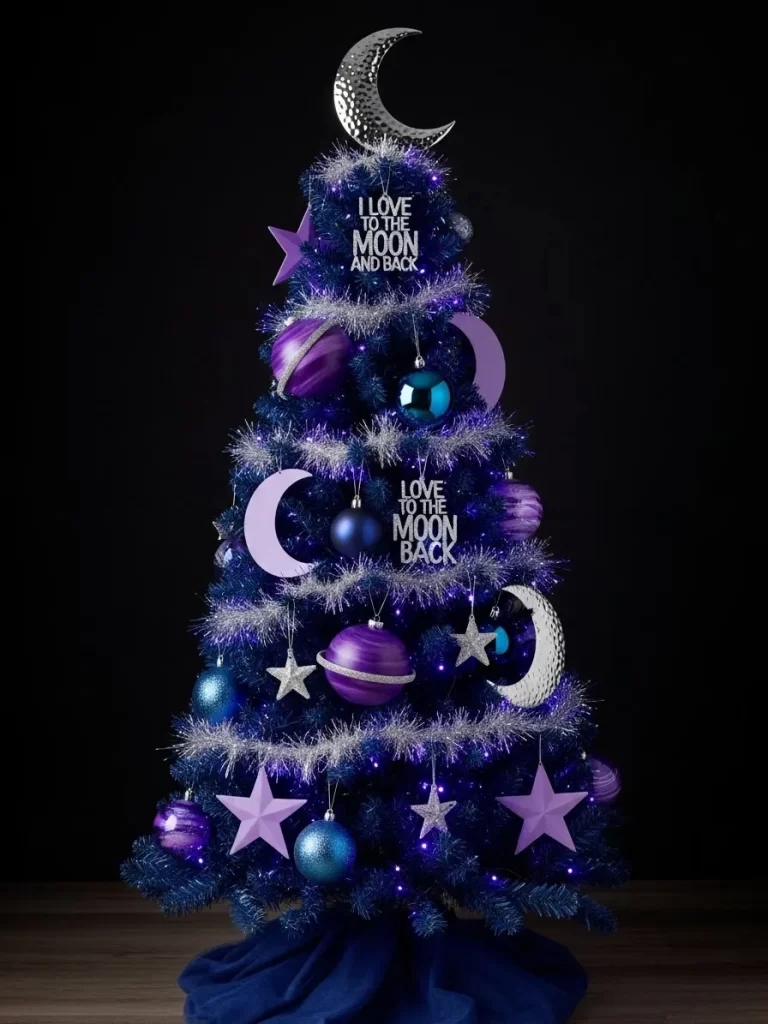
Show someone you love them to the moon and back with this starry night theme. This blue tree features silver crescent moons and large purple planets with shimmering rings. Signs with romantic celestial quotes are nestled among the glittering silver tinsel. Purple and blue baubles add to the deep night sky feeling of the entire display.
A hammered silver crescent moon serves as a unique and striking tree topper for this theme. Small silver stars of different sizes are scattered like constellations across the blue branches. This tree is a choice for someone who loves astronomy or dreamy decor. It creates a magical and peaceful atmosphere that shines brightly in the dark.
Material required list
- Blue artificial tree
- Silver crescent moon ornaments
- Purple planet ornaments
- Celestial quote signs
- Silver tinsel garland
- Purple and blue baubles
- Silver star ornaments
- Silver moon tree topper
Equipment required list
- Ornament hooks
- Scissors
DIY instruction step by step
- Set up the blue tree and fluff the branches to look very full.
- Wrap the silver tinsel garland around the tree in loose and shiny swags.
- Hang the large purple planet ornaments in the middle section of the tree.
- Place the silver crescent moons around the planets to create a space scene.
- Attach the celestial quote signs to the branches using hooks or thin wire.
- Scatter the silver stars throughout the tree like a night sky constellation.
- Hang the purple and blue baubles to fill any remaining gaps in the branches.
- Place the large hammered silver moon topper on the highest branch.
- Ensure the lights on the tree make all the silver elements sparkle.
18 Rich Chocolate and Gold Truffle Tree

Indulge your senses with a tree inspired by gourmet Valentine chocolates and candies. This design uses deep brown velvet baubles with gold drips that look like melting chocolate. Wrapped candy ornaments in shimmering copper and gold are scattered throughout the green branches. A wide satin ribbon in a rich chocolate brown color wraps elegantly around the tree.
Gold bells and glittery ornaments add a touch of luxury and celebration to the sweet theme. The warm metallic tones create a very sophisticated and mature look for a dining room. This tree feels expensive and decadent, much like a box of fine truffles. It is a fantastic choice for anyone who appreciates the sweeter things in life.
Material required list
- Green Christmas tree
- Brown velvet ornaments
- Copper wrapped candy ornaments
- Chocolate brown satin ribbon
- Gold bells
- Gold glitter baubles
- Warm white lights
Equipment required list
- Gold paint or glitter glue
- Scissors
- Hot glue gun
DIY instruction step by step
- Light the tree with warm white lights to enhance the deep gold tones.
- Weave the wide chocolate brown ribbon around the tree in large loops.
- Create the melting look by applying gold paint or glitter glue to the top of brown ornaments.
- Let the paint dry completely before hanging the ornaments on the green tree.
- Hang the copper wrapped candy ornaments in a balanced pattern.
- Add the gold bells to provide a classic holiday sound and metallic shine.
- Fill the remaining spaces with gold glitter baubles for extra sparkle.
- Use a brown or gold tree skirt to complete the decadent look.
19 Ombre Velvet Bow Tree
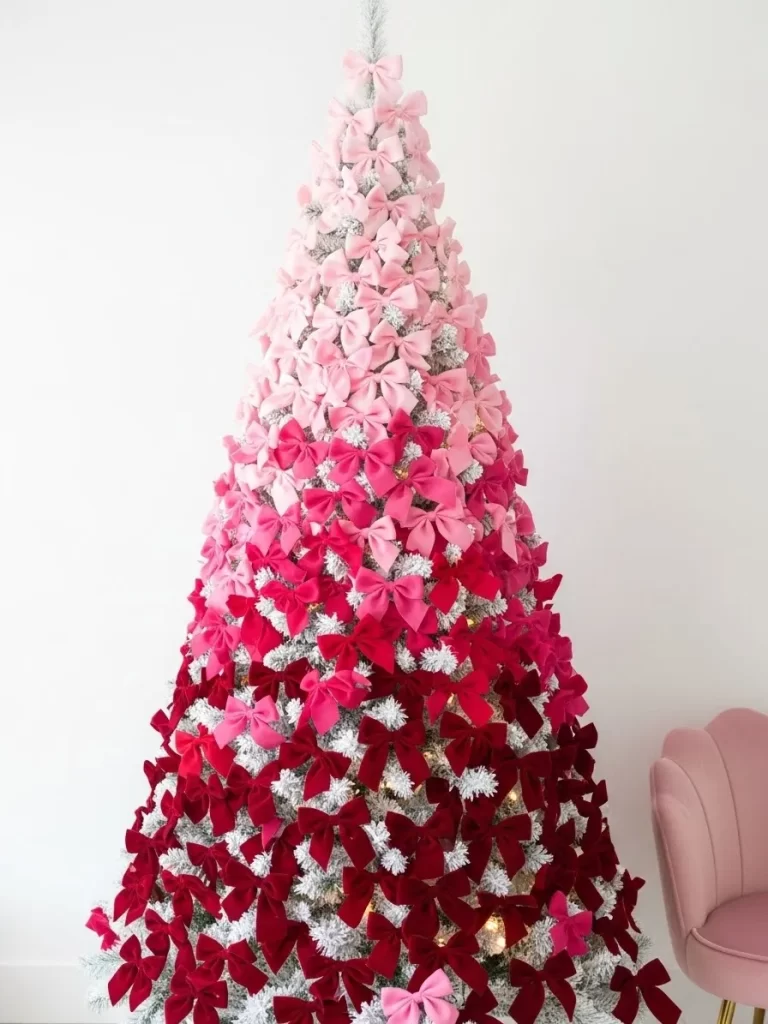
Create a visual impact with a tree covered entirely in soft velvet bows. This design features a color gradient that moves from pale pink at the top to deep red at the bottom. The white flocked tree provides a bright background that makes the velvet textures stand out. Every branch is decorated with a neatly tied bow for a full appearance.
This simple theme relies on color and repetition for its romantic beauty. It feels very feminine, modern, and high fashion all at the same time. This tree is a project for someone who loves crafting with ribbon. It turns a standard tree into a giant piece of art that everyone will admire.
Material required list
- White flocked tree
- Pale pink velvet ribbon
- Medium pink velvet ribbon
- Hot pink velvet ribbon
- Deep red velvet ribbon
- Warm white lights
Equipment required list
- Scissors
- Thin wire or pipe cleaners
DIY instruction step by step
- Wrap the white flocked tree with warm white lights for a soft glow.
- Cut the different colors of ribbon into equal lengths for all the bows.
- Tie dozens of bows in each color, ensuring they are all the same size.
- Use a small piece of wire on the back of each bow for easier hanging.
- Start at the top of the tree and attach the pale pink bows first.
- Move down the tree and transition to the medium pink bows.
- Continue the gradient with hot pink bows in the middle section of the tree.
- Fill the bottom third of the tree with the deep red velvet bows.
- Ensure the bows are packed closely together so the tree looks very lush.
20 Seaside Starfish Heart Tree

Bring the beach home with a coastal inspired Valentine tree that feels very light. This design features a large tan fishing net draped loosely over the green branches. Pink and white starfish are scattered throughout the net as natural and organic ornaments. Heart shaped wooden signs with XO written on them add a touch of romance to the theme.
Small glass bottles with rolled up messages inside hang from twine to represent love letters at sea. White glittery baubles look like sea foam or pearls against the dark needles. This tree is for a coastal home or anyone who loves the ocean breeze. It offers a fresh and breezy take on traditional February decorations.
Material required list
- Green Christmas tree
- Tan fishing net
- Dried pink and white starfish
- Wooden heart signs
- Small glass bottles with corks
- White glitter baubles
- Twine
- Sand or white pebbles
Equipment required list
- Hot glue gun
- Scissors
DIY instruction step by step
- Drape the fishing net over the tree so it hangs naturally and unevenly.
- Glue small loops of twine to the back of the dried starfish.
- Hang the starfish on the net and branches in a random beach pattern.
- Place a small scroll of paper inside each glass bottle and cork it securely.
- Tie twine around the neck of the bottles and hang them from the branches.
- Attach the wooden heart signs to the sturdier parts of the tree.
- Add the white glitter baubles to look like sea foam or water bubbles.
- Use a piece of driftwood or a large shell as a tree topper.
- Wrap the base of the tree in a piece of sailcloth or a sandy blanket.
21 Enchanted Woodland Fairy Tree
This magical display looks like it belongs in a deep forest glade or a fairytale book. Tiny fairy dolls with sparkling wings sit among the green branches as if they are resting. Small wooden doors are nestled deep within the pine needles to create a hidden forest village. Warm lanterns hang from the boughs to guide the tiny folk during the night.
Pink glitter hearts add a touch of romance to this natural and wild setting. Large pine cones and mossy patches make the tree feel organic and very earthy. Red mushrooms with white dots sit at the base to complete the woodland look. It is a wonderful way to bring fantasy into your home for the holiday.
Material required list
- Fairy doll figurines
- Small decorative wooden doors
- Miniature black lanterns
- Pink glitter heart ornaments
- Natural pine cones
- Red mushrooms with white spots
- Faux green moss
- Warm white fairy lights
Equipment required list
- Thin floral wire
- Hot glue gun
- Scissors
DIY instruction step by step
- Wrap the warm white fairy lights around the branches of your tree.
- Place the green moss at the base of the tree to look like a floor.
- Set the red mushrooms on top of the moss around the tree stand.
- Use floral wire to attach the fairy dolls to different branch heights.
- Nestle the small wooden doors into the tree to look like tiny homes.
- Hang the miniature lanterns on the tips of the sturdier green branches.
- Fill the remaining spaces with the pink glitter hearts and pine cones.
- Ensure the lanterns are turned on to create a soft and mystical glow.
22 Cherry Blossom Spring Tree
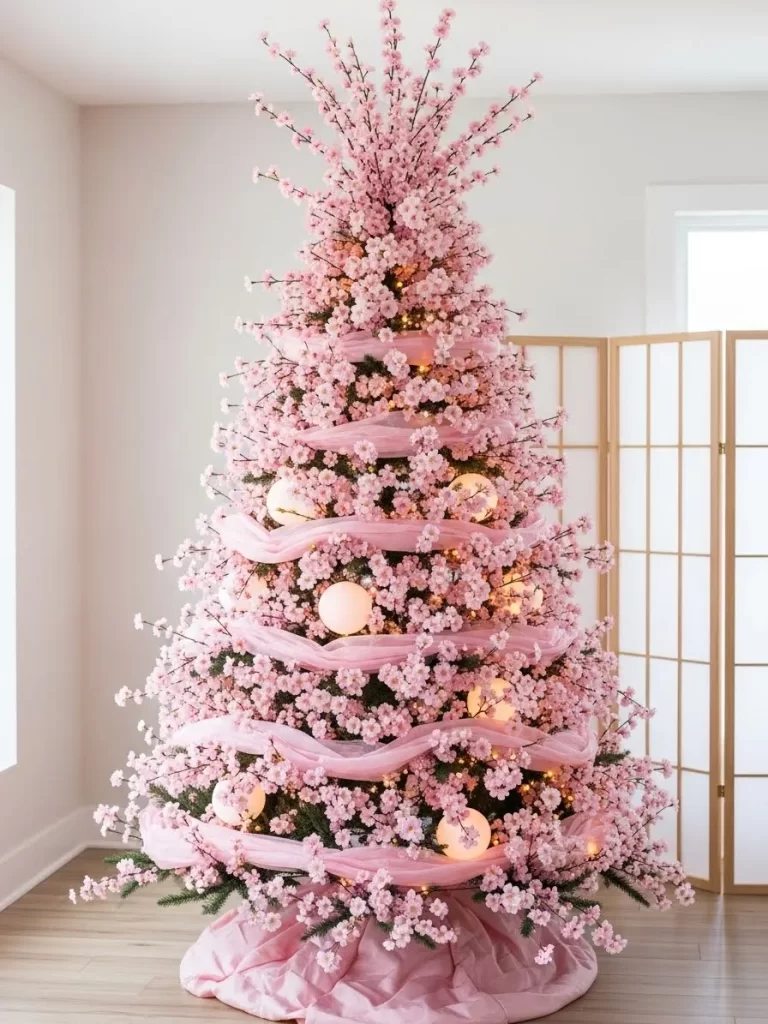
Celebrate the beauty of nature with a tree that looks like a blooming cherry orchard. Thousands of small pink blossoms cover every inch of the branches from top to bottom. Soft pink fabric drapes around the tree in graceful swirls to mimic a gentle spring breeze. Glowing white globes are tucked inside the flowers to provide a soft radiance.
The tree has a full and soft appearance that feels light and airy in the room. Longer flower stems stick out from the top to give the tree extra height. This design is excellent for creating a romantic and peaceful atmosphere in a bright space. It marks the transition from winter to the sweetness of the spring season.
Material required list
- Faux cherry blossom stems
- Pink tulle or sheer fabric
- Round white glow lights
- Pink ribbon
- Small white flower filler
Equipment required list
- Wire cutters
- Clear zip ties
DIY instruction step by step
- Start by placing the round white glow lights throughout the inner tree.
- Cut the cherry blossom stems into smaller pieces using your wire cutters.
- Push the stems into the tree branches until the greenery is hidden.
- Focus on making the tree look thick and round with flowers.
- Wrap the pink tulle or sheer fabric around the tree in a spiral.
- Tuck the fabric into the flowers so it stays in place without ties.
- Insert the longest blossom stems at the very top of the tree.
- Add the small white flowers to any gaps to make the pink stand out.
23 Key To My Heart Vintage Tree

Unlock a world of romance with this unique and nostalgic antique tree design. Dozens of gold and bronze skeleton keys hang from the branches on simple twine strings. Green ivy vines wrap around the tree to add a touch of ancient charm and mystery. Small silver birdcages with tiny birds inside are nestled among the leaves to complete the scene.
Copper colored hearts and lockets are scattered throughout to reinforce the theme of love. A very large vintage key serves as a striking and unusual tree topper. The dark green needles provide a rich background for the shimmering metallic gold accents. This tree tells a story of secrets and affection through its antique treasures.
Material required list
- Assorted skeleton keys
- Faux ivy vines
- Miniature birdcages
- Copper heart ornaments
- Silver locket charms
- Large decorative key
- Twine or brown string
- Bronze baubles
Equipment required list
- Scissors
- Hot glue gun
DIY instruction step by step
- Weave the faux ivy vines around the tree from the base to the top.
- Cut several pieces of twine and tie them to the loops of the keys.
- Hang the keys at various heights so they look like they are floating.
- Place the miniature birdcages on flat branches where they sit securely.
- Hang the copper hearts and silver locket charms in the spaces between the keys.
- Use the bronze baubles to fill any large empty areas near the trunk.
- Secure the large decorative key to the top branch using string.
- Adjust the ivy leaves so they peek through the gold ornaments.
24 Heavenly Cloud Feather Tree

Create a soft and dreamlike display with a white tree covered in fluffy textures. Large white hearts made of feathers serve as the ornaments for this angelic design. Long white plumes stick out from the branches to give the tree a light and airy feel. The entire tree looks like it is floating on a cloud inside your bedroom.
Iridescent baubles and clear droplets add a touch of sparkle that looks like frozen dew. A large feather heart sits at the top to finish the elegant and soft look. This tree is choice for a room where you want a sense of calm. The monochromatic white palette is sophisticated and modern for February.
Material required list
- White flocked or white artificial tree
- Large white feather hearts
- Long white ostrich feathers
- Iridescent ornaments
- Clear glass droplets
- White glitter baubles
- Warm white lights
Equipment required list
- Scissors
- Ornament hooks
DIY instruction step by step
- Wrap the white tree with warm white lights for a soft internal glow.
- Hang the large feather hearts in a balanced pattern around the tree.
- Slide the long ostrich feathers into the branches so they point outward.
- Add the iridescent ornaments to catch the light and create reflections.
- Hang the clear glass droplets near the lights to make them sparkle.
- Fill any small gaps with the white glitter baubles for extra texture.
- Place the largest feather heart on the top branch as your topper.
- Step back and fluff the feathers to ensure the tree looks very soft.
25 Rainbow Heart Gradient Tree
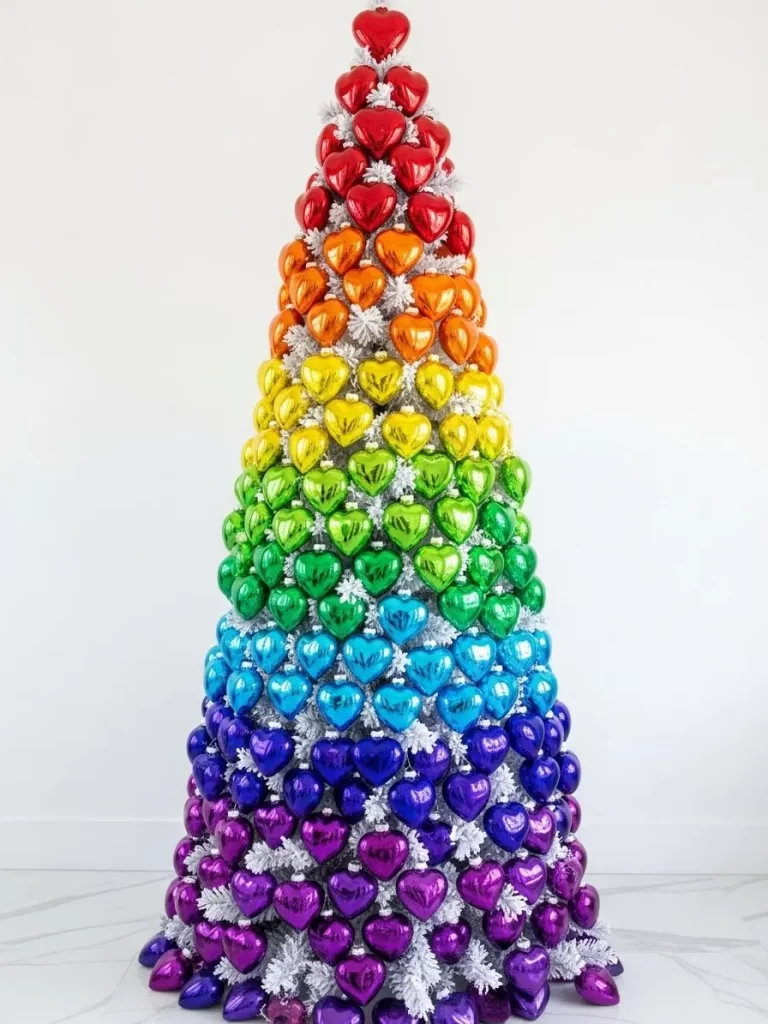
Bring a burst of color into your home with a tree that celebrates every shade of love. This white tree is covered in hundreds of shiny heart ornaments arranged in a rainbow. It starts with deep purple and blue at the bottom and moves through green and yellow. The top of the tree glows with bright and cheerful orange and red hearts.
The tight arrangement of the hearts creates a satisfying transition of color. A single red heart sits at the top to anchor the entire colorful design. This tree is a bold statement piece that is sure to make everyone smile. It is an excellent choice for a modern home or a fun Valentine party.
Material required list
- White artificial tree
- Heart ornaments in purple and blue
- Heart ornaments in green and yellow
- Heart ornaments in orange and red
- Ornament hooks
Equipment required list
- None
DIY instruction step by step
- Assemble your white tree and fluff the branches so they are full.
- Sort your heart ornaments into piles based on their specific colors.
- Start at the bottom of the tree and hang the purple and blue hearts.
- Place the hearts very close together so you cannot see the white branches.
- Create the next layer using the green ornaments and then the yellow.
- Ensure the colors blend into each other as you move up the tree.
- Add the orange hearts and finish the top section with the red hearts.
- Place the final red heart on the highest point of the white tree.
26 Coffee Lover Bean Mine Tree

Warm up your Valentine Day with a tree dedicated to your favorite morning brew. This design features small ornaments shaped like coffee cups with heart latte art. Brown burlap bags filled with coffee beans sit at the base to provide a wonderful natural scent. Small tags with phrases like Bean Mine are clipped to the branches.
Brown baubles and cream colored lace ribbons add to the cozy and rustic cafe theme. A chain made of dark brown links wraps around the tree like a coffee bean garland. This tree is a charming and quirky idea for a kitchen or a breakfast nook. It celebrates a love for coffee and the comfort of a warm shared drink.
Material required list
- Small coffee cup ornaments
- Burlap fabric
- Whole coffee beans
- Cream colored lace ribbon
- Brown baubles
- Cardstock tags
- Twine
- Dark brown plastic chain
Equipment required list
- Black marker
- Scissors
- Hot glue gun
DIY instruction step by step
- Wrap the dark brown plastic chain around the tree as your garland.
- Weave the cream colored lace ribbon in and out of the chain loops.
- Hang the coffee cup ornaments using small pieces of simple twine.
- Write Bean Mine and other coffee puns on the tags using your marker.
- Punch a hole in the tags and hang them on the branches with twine.
- Add the brown baubles to the inner parts of the tree for depth.
- Create small sacks out of the burlap and fill them with coffee beans.
- Glue the sacks shut and place them around the base of the tree.
27 Gothic Dark Romance Tree
Explore the mysterious side of love with a tree that features a dark and moody aesthetic. This black tree is decorated with anatomical hearts and shimmering silver spider webs. Red roses provide a splash of deep color against the black needles and silver accents. White candles sit on the branches to provide a flickering and haunting light.
Small skulls and silver keys are hidden among the foliage for a gothic and romantic touch. Black and red velvet ribbons drape across the tree in heavy and dramatic swags. This tree is choice for anyone who loves a bit of drama and non traditional decor. It creates a romantic atmosphere that is both bold and very sophisticated.
Material required list
- Black artificial tree
- Anatomical heart ornaments
- Artificial red roses
- Silver spider web decorations
- Battery operated clip on candles
- Small silver skulls
- Red and black velvet ribbon
- Silver ornaments
Equipment required list
- Scissors
- Hot glue gun
DIY instruction step by step
- Set up the black tree and wrap it with red or white string lights.
- Drape the red and black velvet ribbons loosely around the branches.
- Attach the anatomical heart ornaments to the center of the tree.
- Nestle the silver spider webs into the branches so they look natural.
- Clip the battery operated candles onto the ends of the black branches.
- Tuck the red roses into any gaps to add a soft and romantic texture.
- Hang the small skulls and silver ornaments to fill the remaining spaces.
- Place a large red rose or a silver skull at the top as the topper.
28 Golden Sunburst Copper Tree

Glow with the warmth of a sunset using this elegant and metallic copper and gold theme. Large heart ornaments made of thin gold wire hang alongside shiny copper baubles. A wide orange fabric ribbon wraps around the tree to add a soft and textured element. The entire tree is lit with warm yellow lights that make the surfaces shine.
Dried autumn leaves are tucked into the branches to provide an earthy and natural touch to the design. A large golden sunburst serves as a unique and powerful tree topper. This tree is for a living room with warm wood tones and cozy furniture. It celebrates love with a color palette that feels rich and timelessly elegant.
Material required list
- Gold wire heart ornaments
- Copper baubles
- Wide orange or rust ribbon
- Dried orange leaves
- Golden sunburst topper
- Warm yellow string lights
- Gold glitter sprigs
Equipment required list
- Scissors
- Floral wire
DIY instruction step by step
- Wrap the tree with warm yellow lights for a golden foundation.
- Weave the wide orange ribbon around the tree in large and soft loops.
- Hang the copper baubles and wire hearts in a balanced pattern.
- Tuck the dried leaves and gold sprigs into the branches for volume.
- Use floral wire to secure the golden sunburst topper to the top.
- Ensure the topper is straight and visible from across the room.
- Add a few gold glitter ornaments near the lights for extra sparkle.
- Adjust the ribbon so it looks like it is flowing through the tree.
29 Missing Piece Puzzle Tree

Show how your loved ones complete you with this creative and colorful puzzle theme. The tree is covered in hundreds of puzzle pieces in bright and bold primary colors. Large heart ornaments made of two interlocking puzzle pieces are the main attraction here. Messages like Missing Piece are written on the hearts to show your deep affection.
A wide red ribbon wraps around the tree to tie all the colorful elements together. This design is fun for children and meaningful for families to build together. It uses simple materials to create a look that is both playful and touching. The tree sits on a base decorated with large puzzle piece cutouts for extra flair.
Material required list
- Large puzzle piece cutouts
- Small loose puzzle pieces
- Foam heart shapes
- Red fabric ribbon
- Primary colored ornaments
- Black marker
- Glue
Equipment required list
- Hot glue gun
- Scissors
DIY instruction step by step
- Wrap the tree with the red fabric ribbon as a simple spiraling garland.
- Use a black marker to write messages on the foam heart shapes.
- Glue two different colored foam pieces to look like they are interlocking.
- Hang these large puzzle hearts in prominent spots on the tree.
- Glue small puzzle pieces to your ball ornaments for extra detail.
- Scatter the remaining loose puzzle pieces onto the green branches.
- Place the large puzzle piece cutouts at the base of the tree.
- Top the tree with a large heart made of four different colored pieces.
30 Woven Paper Heart Tree
Go back to basics with a tree that features beautiful and handmade paper crafts. Large woven hearts in shades of red and pink hang from the branches on simple red strings. Pink paper fans and white lace doilies add a delicate and lighthearted touch to the green needles. A paper chain garland in red and white wraps around the tree for a nostalgic feel.
This tree is a project for a rainy afternoon and uses very simple supplies from your desk. It has a charming and humble look that feels very personal and warm for the holiday. The different patterns of the paper add visual interest without being too busy. It is a lovely way to decorate a classroom or a family home.
Material required list
- Red and pink construction paper
- White lace paper doilies
- Red and white paper strips
- Red string or yarn
- White cardstock
- Glue stick
Equipment required list
- Scissors
- Pencil
DIY instruction step by step
- Create the paper chain by looping strips of paper together with glue.
- Drape the finished paper chain around the tree from top to bottom.
- Fold and cut your paper into strips to weave into a heart shape.
- Use your glue stick to secure the ends of the woven hearts together.
- Punch a hole in the hearts and hang them with the red string.
- Fold white paper into fans and staple them to make a flower shape.
- Attach the lace doilies to the branches using small pieces of string.
- Place a large white paper star or a woven heart at the very top.
31 Bubbly Champagne Celebration Tree
Toast to love with a glamorous gold tinsel tree that sparkles like a glass of champagne. This design features miniature champagne bottles and clear glass bubbles that look like carbonation. A shimmering translucent ribbon wraps around the tree to mimic the flow of a poured drink. Glowing yellow lights enhance the metallic gold color of the branches for a luxury feel.
Deep burgundy baubles are added to represent the rich color of fine wine or berries. This tree is choice for a sophisticated dinner party or a home bar area. It creates a festive and upscale atmosphere that celebrates the joy of being together. The reflective surfaces make the entire room feel bright and very elegant.
Material required list
- Gold tinsel tree
- Miniature champagne bottles
- Clear glass ball ornaments
- Translucent gold ribbon
- Burgundy glossy baubles
- Warm white string lights
- Small corks
Equipment required list
- Hot glue gun
- Ornament hooks
- Scissors
DIY instruction step by step
- Assemble the gold tinsel tree and fluff the shiny branches.
- Wrap the warm white lights around the tree for a golden base glow.
- Weave the translucent ribbon loosely around the tree from top to bottom.
- Attach ornament hooks to the necks of the miniature bottles for hanging.
- Distribute the clear glass bubbles to look like they are rising up.
- Add the burgundy baubles to provide a deep contrast to the gold.
- Glue small corks to some of the branches for a fun themed detail.
- Place a few extra bottles at the base of the tree as a display.
- Ensure the lights are tucked in to make the glass ornaments shine.
32 Globe Trotter Travel Tree

Celebrate a love for adventure and the world with a travel themed Valentine tree. This design features small globes and vintage style suitcases nestled within the green branches. Postcards from famous cities like Paris and London are clipped to the tree with red clothespins. A garland made of vintage maps wraps around the tree to show the way to new places.
A heart shaped compass sits at the very top as a unique and meaningful tree topper. Signs with phrases like Adventure Is Better Together add a romantic touch to the journey. This tree is choice for a couple that loves to travel or for an office space. It turns your decorations into a beautiful roadmap of your shared life.
Material required list
- Green Christmas tree
- Small globe ornaments
- Miniature suitcase boxes
- Postcards or travel photos
- Vintage map paper
- Red wooden clothespins
- Toy airplanes
- Compass topper
Equipment required list
- Scissors
- Glue stick
- String
DIY instruction step by step
- Wrap the tree with warm lights and the vintage map garland.
- Hang the small globe ornaments evenly across the green branches.
- Place the miniature suitcases on flat branches to act as platforms.
- Use red clothespins to attach postcards to the outer branch tips.
- Tie string to the toy airplanes and hang them as if they are flying.
- Add small tags with airport codes for places you have visited.
- Place the heart shaped compass topper on the highest branch.
- Tuck in a few red ornaments to keep the Valentine theme strong.
- Adjust the map garland so it flows naturally from top to bottom.
33 Prima Ballerina Tulle Tree
Create a tree that is as graceful and soft as a dancer on a stage. This design uses layers of pink and white tulle to create a ruffled and voluminous appearance. Satin ballet slippers and white swan figurines are the stars of this delicate and feminine theme. Shimmering snowflakes and pearl strands add a touch of winter magic to the soft fabric.
A pair of dancing swans sits at the top to create a romantic and beautiful topper. The tree looks like it is wearing a giant tutu, making it very unique and charming. This is a wonderful choice for a girls bedroom or a studio space. It celebrates the elegance of movement and the softness of February romance.
Material required list
- Pink and white tulle fabric
- Pink satin ballet slippers
- White swan figurines
- Pearl bead garland
- Silver snowflake ornaments
- Pink satin ribbon
- Feather plumes
Equipment required list
- Safety pins or zip ties
- Scissors
- Hot glue gun
DIY instruction step by step
- Wrap the tree in lights first to create a glow under the fabric.
- Tie long strips of tulle around the tree in layers to create a skirt.
- Fluff the tulle out so the tree looks very wide and soft.
- Drape the pearl bead garland over the tulle in graceful swags.
- Hang the ballet slippers from the branches using the satin ribbons.
- Place the swan figurines securely among the layers of pink tulle.
- Add the silver snowflakes to provide a bit of shine and sparkle.
- Insert feather plumes at the top to add height and extra softness.
- Place the two dancing swans on the top branch as your topper.
34 Storybook Romance Library Tree
Turn your love for reading into a beautiful centerpiece with this literary theme. This tree features hearts made from the pages of old books and miniature leather volumes. A long scroll of paper with romantic quotes written on it wraps around the tree like a garland. Small tags with the names of famous literary couples are scattered throughout the branches.
A book folded into a diamond shape serves as a creative and intellectual tree topper. The dark green branches look like the shelves of a cozy library filled with history. This design is choice for a study, office, or for anyone who loves a good story. It celebrates the timeless tales of love found in literature.
Material required list
- Green Christmas tree
- Old book pages
- Miniature book ornaments
- Long paper scroll
- Kraft paper tags
- Gold baubles
- Twine
- Ink pen
Equipment required list
- Scissors
- Glue stick
- Hole punch
DIY instruction step by step
- Wrap the long paper scroll around the tree in a gentle spiral.
- Cut heart shapes out of old book pages and fold them for texture.
- Tie twine loops to the book paper hearts and hang them on the tree.
- Write quotes from your favorite stories on the paper scroll garland.
- Label the kraft paper tags with names like Romeo and Juliet.
- Hang the miniature book ornaments near the warm white lights.
- Add gold baubles to fill any gaps and add a touch of classic shine.
- Create the diamond book topper by folding the pages of a small book.
- Secure the book topper to the top branch using a sturdy wire.
35 Vintage Script and Lace Tree
Celebrate the art of handwritten letters with this nostalgic and soft vintage theme. This tree features paper hearts made from antique script and delicate lace ribbons. Small tags with elegant handwriting are clipped to the branches with twine. Gold baubles and warm lights provide a soft glow that feels like a quiet evening at home.
The natural and neutral color palette is sophisticated and very easy on the eyes. This design is choice for a rustic home or for someone who loves the look of aged paper. It celebrates love through the written word and the simple beauty of a handcrafted note. Each ornament feels like a small piece of history saved for the holiday.
Material required list
- Green Christmas tree
- Antique script paper
- Lace ribbon or trim
- Gold ball ornaments
- Kraft paper tags
- Small wooden clips
- Warm white lights
- Twine
Equipment required list
- Scissors
- Ink pen
- Glue stick
DIY instruction step by step
- Wrap the tree with warm white lights for a soft and cozy foundation.
- Drape the lace ribbon around the tree in loose and elegant swags.
- Cut hearts out of the script paper and glue them to the lace or branches.
- Write beautiful words on the kraft paper tags using your ink pen.
- Use twine to hang the tags or clip them directly to the green tips.
- Add the gold ornaments to reflect the light and add a metallic touch.
- Place a few small old books at the base of the tree for extra decor.
- Create a paper fan out of the script paper to use as a topper.
- Ensure the lace is tucked in so it looks like it belongs on the tree.
36 Winner of My Heart Game Tree

Have some fun with your holiday decor by using a playful game theme for your tree. This black tree features giant X and O letters that look like a game of tic tac toe. A red heart sign at the top says WINNER to show who has captured your affection. Large red baubles and checkered ribbons add a bold and graphic look to the scene.
The black and white colors are modern and contrast perfectly with the bright red hearts. This design is excellent for a family game room or for a couple that loves to play together. It uses simple shapes and words to create a fun and memorable holiday display. Your guests will love the playful and competitive spirit of this unique tree.
Material required list
- Black artificial tree
- Large white X and O letters
- Red glossy baubles
- Black and white checkered ribbon
- Red Winner heart sign
- White string lights
- Thin wire
Equipment required list
- Scissors
- Hot glue gun
- Wire cutters
DIY instruction step by step
- Set up the black tree and wrap it with bright white string lights.
- Weave the checkered ribbon around the tree in a bold spiral.
- Use thin wire to secure the X and O letters to the black branches.
- Arrange the letters to look like a game board from top to bottom.
- Hang the red glossy baubles in the remaining spaces for color.
- Place the Winner heart sign on the highest branch as the topper.
- Add a few smaller red hearts to fill in any dark gaps in the needles.
- Ensure the checkered ribbon is visible between all the large letters.
- Hide all the wires and battery packs behind the black branches.
37 Velvet Heart and Button Tree
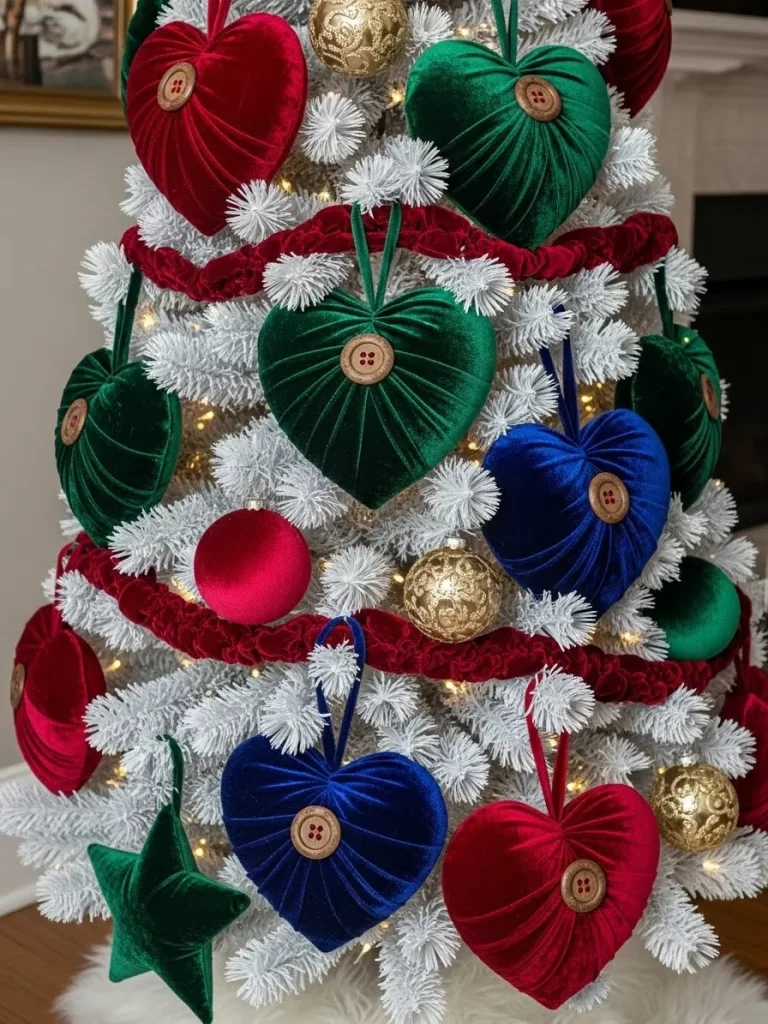
Focus on soft textures and handmade charm with this cozy velvet heart theme. This white flocked tree is covered in large plush hearts in deep red, emerald green, and royal blue. Each heart features a wooden button in the center for a rustic and craft inspired look. A thick red velvet garland wraps around the tree to add even more soft texture.
Gold glittery baubles and stars are mixed in to provide a touch of holiday sparkle. The bright colors pop against the snowy white branches, making the tree look very festive. This design is choice for a family living room where you want a warm and touchable feel. It celebrates the simple joy of handmade gifts and colorful decorations.
Material required list
- White flocked tree
- Velvet fabric in red, green, and blue
- Large wooden buttons
- Fiberfill stuffing
- Red velvet rope or garland
- Gold glitter baubles
- Warm white lights
Equipment required list
- Needle and thread
- Scissors
- Hot glue gun
DIY instruction step by step
- Light the white flocked tree with warm white string lights.
- Cut heart shapes out of the colorful velvet fabric and sew the edges.
- Fill the fabric hearts with stuffing and sew them shut completely.
- Glue a large wooden button to the center of each velvet heart.
- Attach a loop of thread to the top of the hearts for easy hanging.
- Wrap the red velvet garland around the tree in soft and heavy swags.
- Hang the velvet hearts evenly across the snowy white branches.
- Fill any remaining spaces with the gold glitter baubles for shine.
- Place a large velvet star at the top of the tree as your topper.
38 Message in a Bottle Beach Tree

Create a romantic and mysterious seaside display with this unique bottle theme. This green tree is covered in dozens of small glass bottles, each containing a tiny love letter. Shimmering teal and blue baubles represent the colors of the ocean waves. A garland made of corks and sea glass wraps around the tree for a natural coastal feel.
Natural driftwood pieces and starfish are tucked into the branches to complete the scene. The tree feels like a collection of treasures found on a romantic beach walk. This design is choice for a coastal home or for anyone who misses the sea. It tells a story of distant lands and secret messages sent across the water.
Material required list
- Green Christmas tree
- Small glass bottles with corks
- Teal and blue glossy baubles
- Cork and sea glass garland
- Driftwood pieces
- Dried starfish
- White sand or pebbles
- Twine
Equipment required list
- Scissors
- Hot glue gun
- Paper for notes
DIY instruction step by step
- Wrap the tree with blue and white lights for an oceanic glow.
- Drape the cork and sea glass garland around the tree in swags.
- Write tiny love notes and roll them up to fit inside the bottles.
- Add a few grains of sand to the bottles before corking them shut.
- Tie twine around the necks of the bottles and hang them on the tree.
- Tuck the driftwood pieces and starfish into the green branches.
- Hang the teal and blue baubles to represent the deep water colors.
- Place a large shell or a piece of seaglass at the top as the topper.
- Ensure the bottles are hanging straight so the notes are visible.
39 Origami Crane Peace Tree
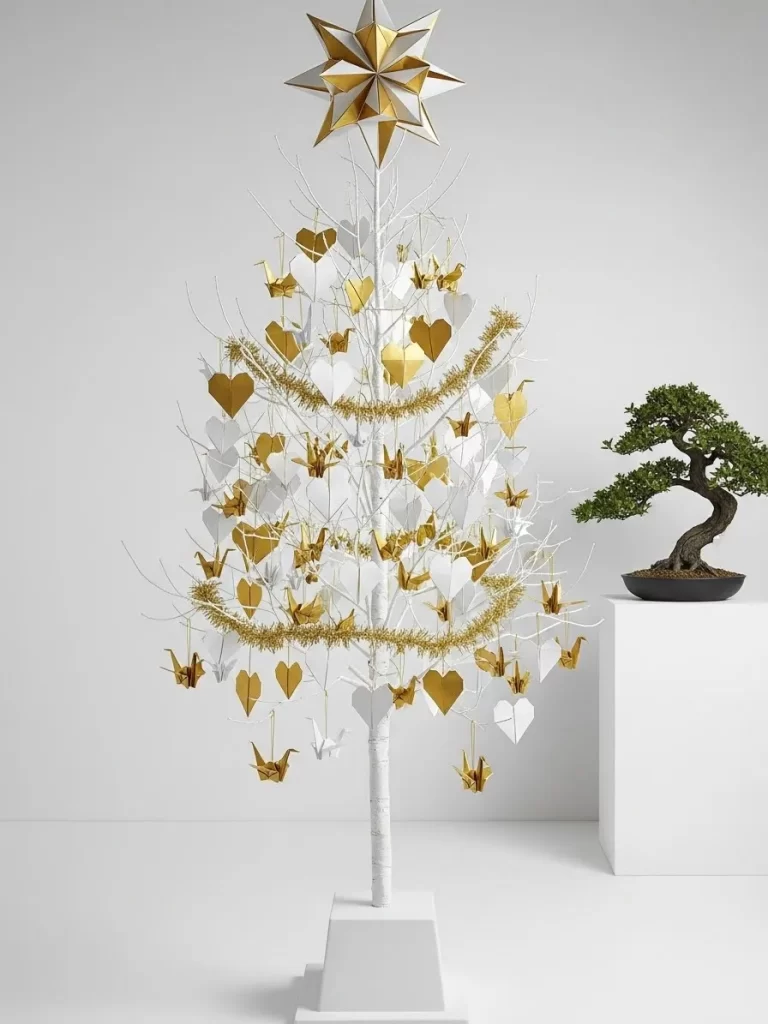
Celebrate love and peace with a beautiful tree covered in handmade origami cranes. This white tree features dozens of gold and white paper cranes that represent long life and luck. Shimmering gold tinsel wraps around the branches to add a touch of holiday glamour. A large geometric gold star sits at the top to complete the elegant and modern look.
The clean lines and simple colors make this tree a sophisticated choice for any room. This design is for someone who loves the art of paper folding and minimalist decor. It creates a calm and peaceful atmosphere that focuses on the beauty of the craft. Your guests will admire the detail and patience required to create this display.
Material required list
- White artificial tree
- Gold and white origami paper
- Gold tinsel garland
- Geometric gold star topper
- Thin gold wire
- White baubles
- Warm white lights
Equipment required list
- None (just your hands for folding)
- Scissors
DIY instruction step by step
- Light the white tree with warm white lights for a soft glow.
- Wrap the gold tinsel garland around the tree in a simple spiral.
- Fold your gold and white paper into the shape of traditional cranes.
- Thread a thin piece of wire through the back of each crane for hanging.
- Distribute the cranes evenly throughout the tree as if they are flying.
- Add the white baubles to fill any gaps and add a different texture.
- Place the geometric gold star topper on the highest branch.
- Ensure the cranes are pointing in different directions for a natural look.
- Keep the bottom of the tree simple with a white or gold tree skirt.
40 Tropical Protea Heart Tree
Bring a touch of the exotic to your Valentine Day with this bold floral theme. This green tree features large protea flowers in shades of pink and orange for a striking look. Natural burlap bows and gold baubles add a rustic yet elegant touch to the tropical design. A heart made of small orange flowers sits at the top as a vibrant and unique topper.
The warm colors and large flower heads create a lush and full appearance. This tree is choice for a warm climate or for anyone who loves tropical plants. It celebrates love with a color palette that feels like a beautiful island sunset. Your home will feel bright and energetic with this floral focused holiday display.
Material required list
- Green Christmas tree
- Faux protea flowers
- Orange and pink flower filler
- Burlap fabric for bows
- Gold glossy baubles
- Dried flower heart topper
- Warm white lights
- Floral wire
Equipment required list
- Wire cutters
- Scissors
- Hot glue gun
DIY instruction step by step
- Light the green tree with warm white lights to highlight the flowers.
- Cut the burlap fabric into strips and tie them into large bows.
- Use floral wire to attach the protea flowers deep into the branches.
- Cluster the flowers together in groups of three for a natural look.
- Tuck the orange and pink flower fillers into the gaps between proteas.
- Attach the burlap bows to the branches near the large flower heads.
- Hang the gold baubles to add a touch of metallic shine to the greenery.
- Place the dried flower heart topper on the very top of the tree.
- Step back and adjust the flowers so they face forward and out.
Redecorating your Christmas tree for Valentine Day is a brilliant way to extend the joy of the holidays. It allows you to express your creativity while making your home feel warm and inviting during the chilly winter months. Each of these forty ideas shows that any tree can become a stunning tribute to affection.
You do not need an expensive budget to create a beautiful look. Many of the designs we shared use simple paper, recycled materials, and items you likely already have in your craft closet. The most important part is having fun with the process and making something that makes you smile.
We hope these themes help you see your tree in a brand new light. Whether you chose a vintage aesthetic or a bold disco theme, your home will surely feel more festive. Celebrate the people you love by keeping the spirit of the season alive in your own unique way.
Key Takeaways
- Repurposing your tree saves time and storage space during the post holiday slump.
- Personalized decorations add more meaning than store bought items.
- Mixing different textures like lace, velvet, and wood creates a rich visual experience.
- Themes can range from classic romantic to fun and quirky to match any room style.
- Using artificial flowers and paper crafts makes redecorating affordable for any budget.