
Empty shelves often make a room feel unfinished or cold. Blank ledges provide a missed opportunity to show off your unique personality. Seasonal changes offer the best time to refresh your living space with warmth.

Valentines Day decor goes far beyond simple red hearts or paper cards. Crafting a beautiful display allows you to use textures and lights in new ways. Tiny adjustments can turn a boring shelf into a focal point that sparks joy.
Forty unique concepts wait for you in this comprehensive guide. Readers can choose from rustic farmhouse looks to modern minimalist designs. Follow the detailed steps to build charming displays without any stress.
1 The Enchanted Rose Cloche
A deep red rose takes center stage under a clear glass dome. It rests on a lush green moss base that adds a fresh organic feel. Sunlight hits the glass and creates soft shadows against the wall. This setup brings a touch of nature into your home while maintaining a sophisticated look.
Ornate gold frames hold handwritten notes nearby to enhance the vintage aesthetic. Old leather bound books sit stacked together to provide height and texture. Twinkling fairy lights wrap around the cloche to give the whole shelf a warm romantic glow. These elements combine to create a nostalgic atmosphere that feels both cozy and elegant.
Material required list
- One red rose
- Glass cloche with base
- Pack of dried moss
- Small battery lights
- Block of floral foam
Equipment required list
- Sharp scissors
- Hot glue gun
DIY instruction step by step
- Clean the glass dome first to ensure a clear view.
- Secure a small square of foam to the wooden base with glue.
- Measure the height of the dome before you trim the rose stem.
- Stick the stem into the center of the foam block.
- Spread the moss over the base until you can no longer see the foam.
- Coil the string lights around the moss bed.
- Put the glass lid on top to complete your new shelf decor.
2 The Fresh Tulip Tiered Display
White shelves against a beadboard wall create a bright backdrop for spring decor. Terracotta pots with a distinctive whitewashed finish hold lush green eucalyptus plants. Small glass vases display single pink tulips to add pops of fresh color. A delicate babys breath garland with paper heart cutouts hangs across the middle shelf.
The bottom shelf features a white decorative birdcage filled with pink and white flower petals. More white roses in pots flank the birdcage to complete the look. This arrangement feels light, airy, and full of natural romance.
Material required list
- Whitewashed terracotta pots in various sizes
- Artificial or real eucalyptus branches
- Small clear glass vases
- Fresh pink tulips
- Babys breath garland
- White paper heart cutouts
- White decorative birdcage
- Pink and white rose petals
- Potted white roses
Equipment required list
- Scissors
- Twine or ribbon
DIY instruction step by step
- Start with the top shelf by placing large pots of eucalyptus on either end.
- Fill the spaces between them with smaller empty pots for balance.
- Drape the babys breath garland along the front edge of the middle shelf.
- Tie small white heart cutouts onto the garland with twine.
- Place three small glass vases on the middle shelf.
- Trim pink tulip stems so the blooms sit just above the vase rim.
- Add water and place one tulip in each vase.
- Fill the bottom of the white birdcage with a mix of pink and white rose petals.
- Set it in the center of the bottom shelf.
- Add potted white roses and more eucalyptus on either side of the cage.
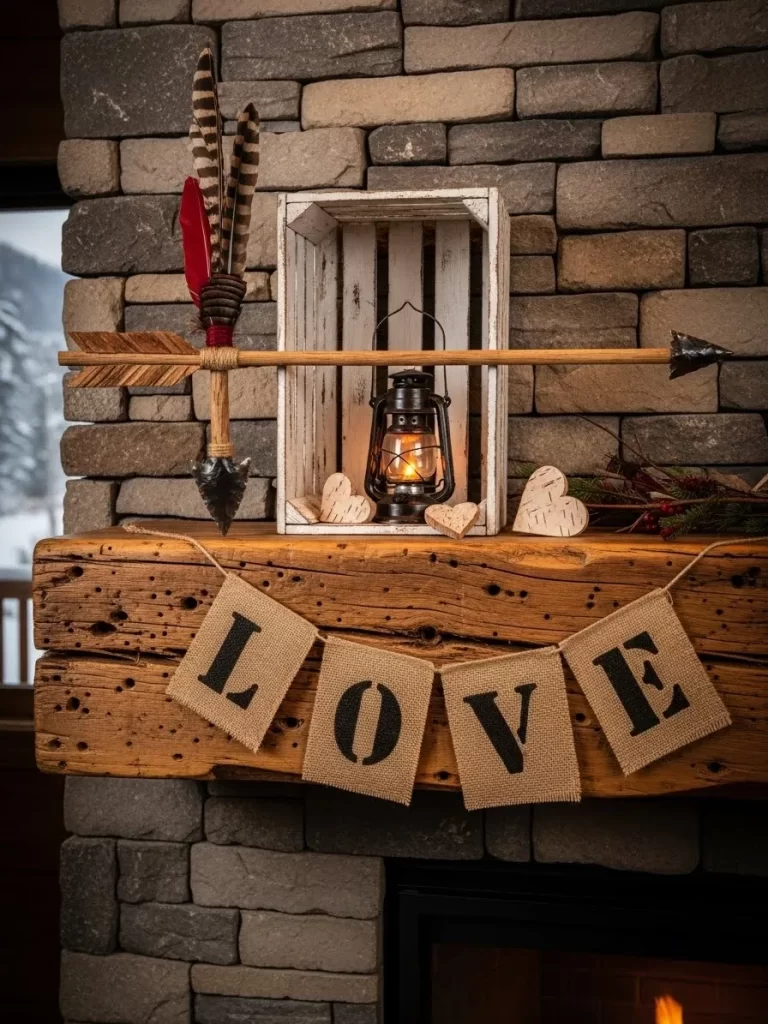
3 The Rustic Cabin Love Mantel
A rough wood mantelpiece serves as the foundation for this cozy display. A burlap banner with bold black letters spelling LOVE hangs across the front. Above it a decorative arrow with feathers rests horizontally.
A white painted crate stands on end to frame a small black lantern with a lit candle inside. Wooden heart shapes are scattered around the base of the crate. Evergreen branches and red berries add a touch of winter texture to the stone background.
Material required list
- Burlap LOVE banner
- Decorative wooden arrow with feathers
- Small white wooden crate
- Black lantern
- Small candle or LED light
- Wooden heart cutouts
- Faux evergreen sprigs
- Red berry stems
Equipment required list
- Hammer and small nails or adhesive hooks
DIY instruction step by step
- Attach the burlap banner to the front face of the wooden mantel using small nails or adhesive hooks.
- Ensure it hangs evenly.
- Place the white wooden crate in the center of the mantel so it stands tall.
- Put the black lantern inside the crate and insert a candle.
- Lay the decorative arrow across the front of the crate.
- Scatter the wooden hearts around the base of the lantern and crate.
- Tuck sprigs of evergreen and red berries behind the crate to add greenery against the stone wall.
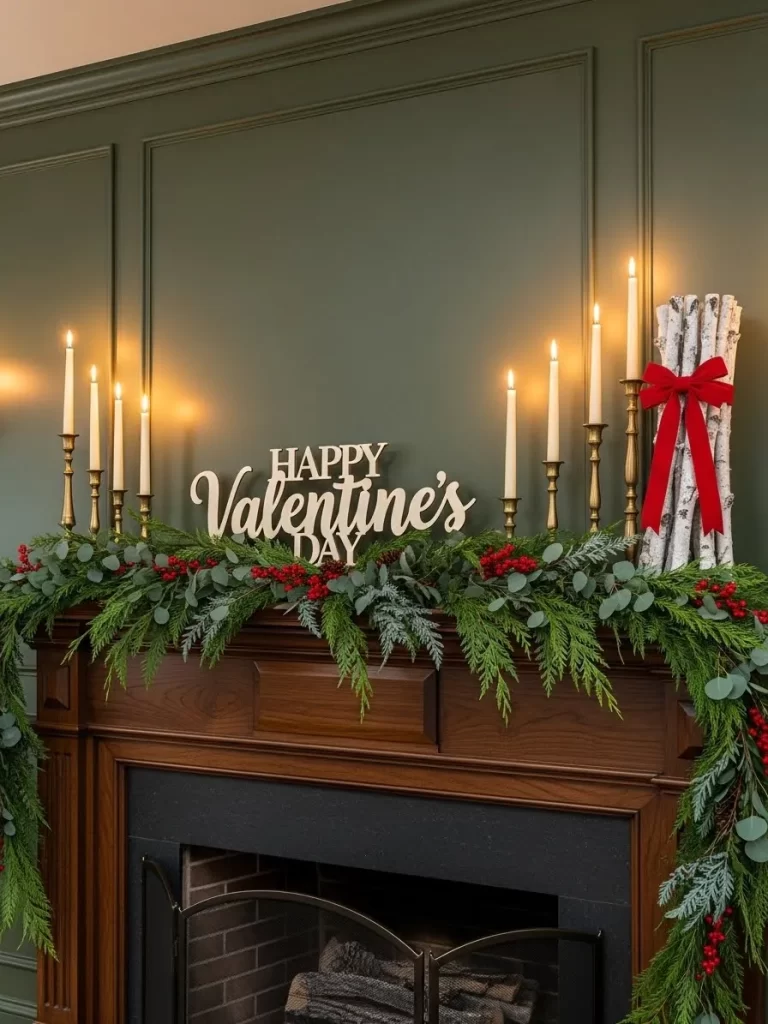
4 The Elegant Gold and Greenery Fireplace
A rich dark green wall contrasts beautifully with a wood fireplace mantel. Tall gold candlesticks with slender white candles frame the display on both sides. A thick garland made of mixed cedar and eucalyptus drapes across the entire mantelpiece.
Red berries are woven throughout the greenery for a festive pop of color. In the center sits a wooden cutout sign that reads Happy Valentines Day. On the far right a bundle of white birch logs is tied with a bright red ribbon.
Material required list
- Assorted tall gold candlesticks
- White taper candles
- Mixed evergreen garland containing cedar and eucalyptus
- Stalks of faux red berries
- Wooden Happy Valentines Day sign
- White birch logs
- Wide red ribbon
Equipment required list
- Wire cutters
- Scissors
DIY instruction step by step
- Lay the mixed evergreen garland across the top of the mantel.
- Fluff the branches so it looks full and drapes slightly over the edge.
- Use wire cutters to separate stems of red berries and tuck them into the garland at regular intervals.
- Place the wooden sign in the exact center of the mantel amidst the greenery.
- Arrange graduated heights of gold candlesticks on the left and right sides.
- Insert white taper candles into them.
- Tie a bundle of white birch logs together with a large red ribbon bow and place it on one end of the hearth.
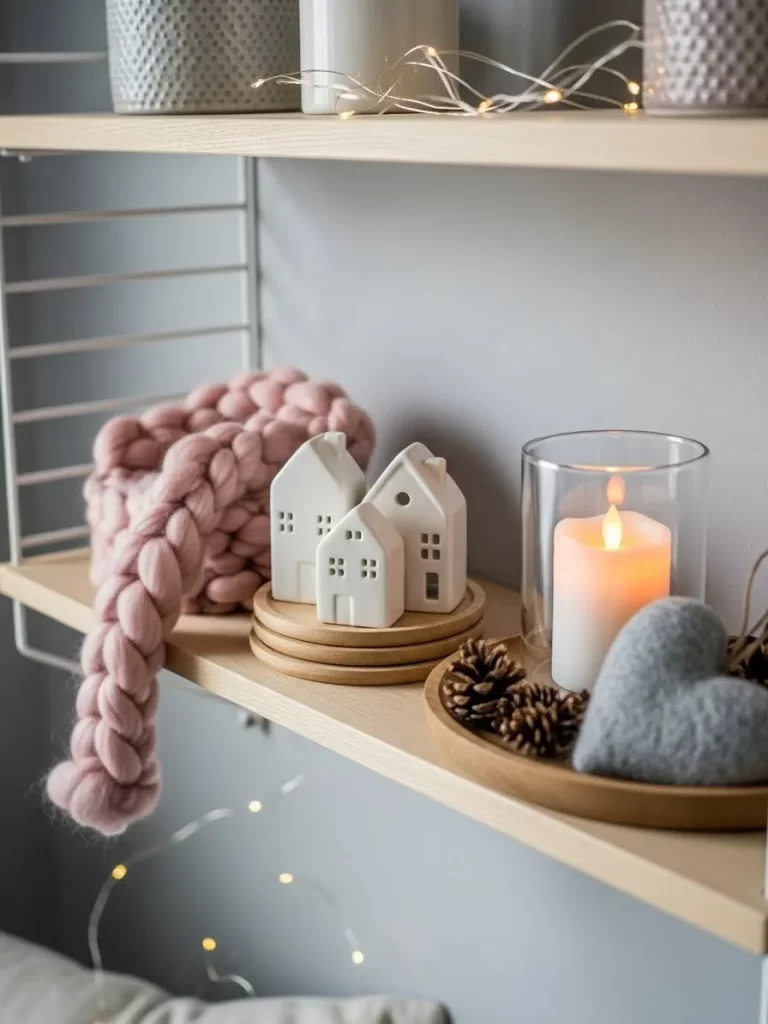
5 The Cozy Minimalist Shelf
This light wood shelf features a clean Scandi inspired look. Three small white ceramic houses with window cutouts sit on a stack of round wooden coasters. A thick pink chunky knit blanket is draped casually over the left side.
On the right a clear glass hurricane holds a large white pillar candle. A grey felt heart and some small pinecones rest on a wooden tray next to the candle. Delicate copper wire LED lights are strung across the back to add a warm sparkle.
Material required list
- Small white ceramic houses
- Round wooden coasters
- Pink chunky knit yarn or small blanket
- Clear glass candle holder
- White pillar candle
- Small wooden tray
- Grey felt heart
- Small pinecones
- Copper wire fairy lights
Equipment required list
- None specifically required
DIY instruction step by step
- Weave the copper wire fairy lights along the back wall behind the shelf and turn them on.
- Drape the bulky pink knit material over the left edge of the shelf so it hangs down slightly.
- Stack two or three wooden coasters in the middle.
- Arrange the white ceramic houses on top of the stack.
- Place a wooden tray on the right side.
- Set the glass candle holder with the candle inside onto the tray.
- Finish by adding the grey felt heart and a few small pinecones next to the glass onto the wooden tray.
6 The Glamorous Velvet and Mercury Glass Tower
A sleek chrome shelving unit holds a luxurious display. The top shelf features three plush velvet heart pillows in varying shades of dusty rose and pink. Next to them is a tall silver mercury glass vase filled with white babys breath.
The middle shelf holds a round silver tray with multiple lit mercury glass votives. A textured pink crushed velvet heart pillow sits beside a round ombre candle. The bottom shelf shows stacks of fashion magazines topped with a small mercury glass bowl and a strand of pearls.
Material required list
- Velvet heart pillows in pink shades
- Tall mercury glass vase
- Fresh or dry babys breath
- Round silver tray
- Assorted mercury glass votive holders
- Tealights
- Textured crushed velvet heart pillow
- Round ombre candle
- Fashion magazines
- Small mercury glass bowl
- Faux pearl strand
Equipment required list
- Scissors
- Lighter
DIY instruction step by step
- On the top shelf arrange the three smooth velvet hearts so they overlap slightly.
- Place the tall vase filled with trimmed babys breath beside them.
- Set the silver tray on the middle shelf and fill it with the mercury glass votives.
- Light the tealights inside using a lighter.
- Place the textured velvet heart and the round candle next to the tray.
- Stack two or three fashion magazines on the bottom shelf.
- Top them with the small mercury glass bowl.
- Drape a strand of faux pearls over and out of the small bowl.
- Add another vase of babys breath to balance the bottom shelf.
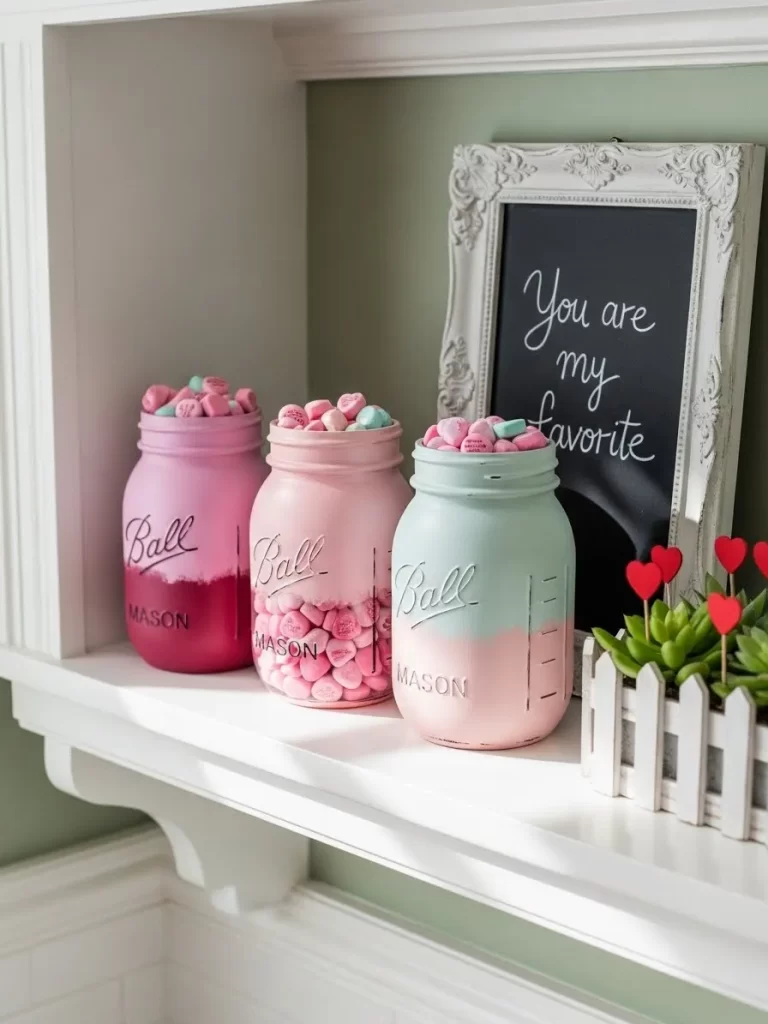
7 The Sweetheart Mason Jar Trio
Three glass mason jars sit on a white mantelpiece. Each jar is painted in a different color block style using matte chalk paint. The first is dark pink and light pink the second is entirely light pink and the third is mint green and pink.
They are filled to the brim with colorful conversation heart candies. To the right a white framed chalkboard sign reads You are my favorite in script. A small white picket fence planter with succulents and red heart picks sits nearby.
Material required list
- Three glass mason jars
- Chalk paint in dark pink light pink and mint green
- Conversation heart candies
- White chalkboard frame
- Chalk or chalk marker
- Small white planter
- Succulents real or fake
- Small red heart picks
Equipment required list
- Painters tape
- Paintbrushes
DIY instruction step by step
- Clean the mason jars thoroughly.
- Use painters tape to create sharp lines for the color blocking on two jars.
- Paint one jar solid light pink.
- Apply the dark pink and mint green paint to the taped jars.
- Let them dry completely before removing the tape carefully.
- Apply a second coat if needed.
- Once dry fill all three jars to the top with conversation heart candies.
- Write the message on the chalkboard sign and place it behind the jars.
- Arrange the small succulent planter next to the frame and insert the red heart picks into the soil.
8 The Modern Black and Gold Gallery
A floating black shelf against a dark wall creates a dramatic mood. Two gold framed prints lean against the wall the larger one is a black and white photo of holding hands and the smaller one says LOVE in gold foil.
Three geometric faceted heart sculptures in black and gold sit in front of the frames. A freestanding gold LOVE letter sign is placed next to them. On the right a matte black vase holds gold painted eucalyptus stems tied with a red ribbon.
Material required list
- Two gold frames in different sizes
- Black and white photo print
- LOVE gold foil print
- Geometric heart sculptures in black and gold
- Gold LOVE letter sign
- Matte black vase
- Dried eucalyptus stems
- Gold spray paint
- Red ribbon
Equipment required list
- Gold spray paint
- Scissors
DIY instruction step by step
- Spray paint dried eucalyptus stems gold in a well ventilated area and let them dry completely.
- Place the large black and white photo print in a gold frame and lean it against the back wall.
- Lean the smaller LOVE print in front of it so it overlaps slightly.
- Arrange the three geometric hearts in front of the frames.
- Set the gold LOVE letter sign next to the hearts.
- Tie a red ribbon around the neck of the black vase.
- Insert the gold eucalyptus stems and place the vase on the right end of the shelf.
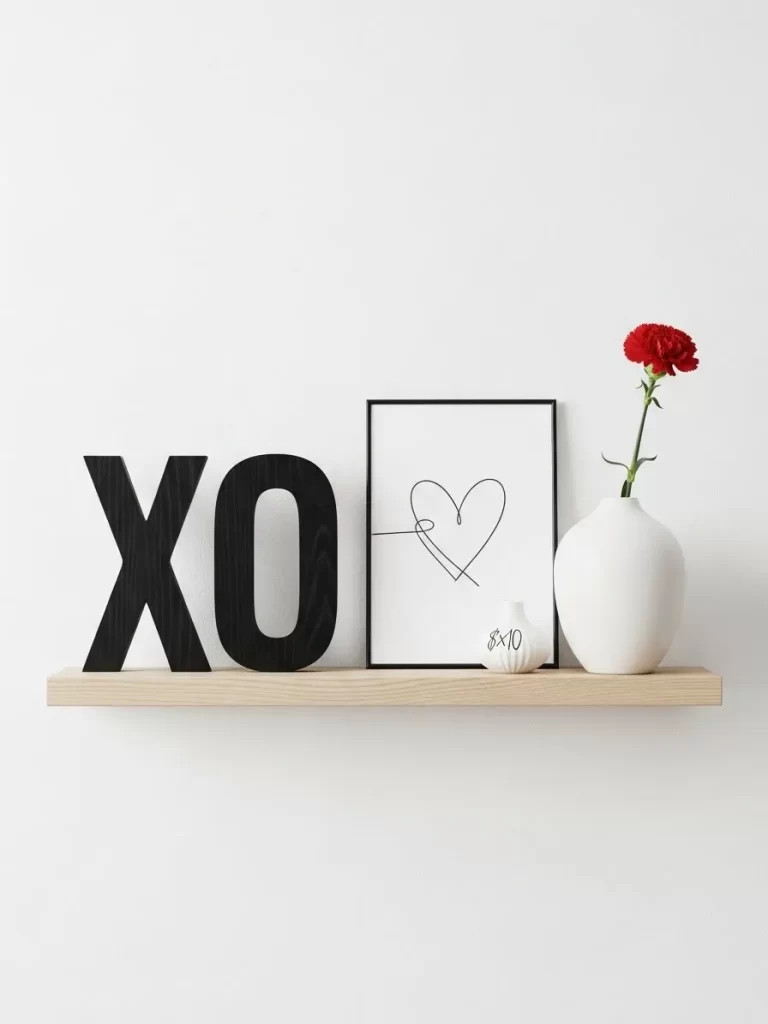
9 The Scandi XO Minimalist Shelf
A simple light wood floating shelf hangs against a stark white wall. Large black wooden letters spelling XO dominate the left side. Next to them leans a thin black frame containing simple black line art of a heart.
A small white ceramic bud vase with a xoxo graphic holds a single bright red carnation. The look is clean modern and uncluttered.
Material required list
- Large black wooden letters X and O
- Thin black picture frame
- Heart line art print
- Small white ceramic bud vase
- Single red carnation fresh or faux
Equipment required list
- Scissors
DIY instruction step by step
- Place the large black X and O letters on the left side of the wooden shelf.
- Insert the heart line art print into the black frame.
- Lean the frame against the wall next to the letters.
- Fill the small bud vase with water if using a fresh flower.
- Trim the stem of the red carnation with scissors to fit the vase height.
- Place the vase on the right side of the shelf to balance the composition.
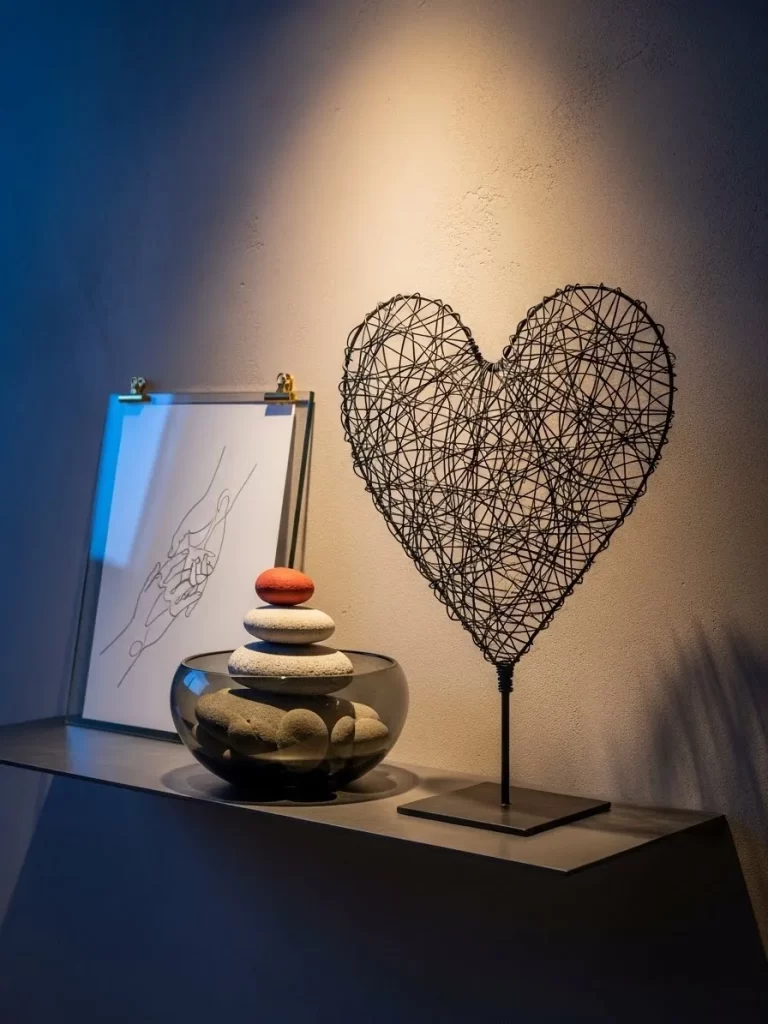
10 The Zen Wire Heart Display
A dark grey shelf against a textured concrete wall sets a calming tone. A large intricate heart sculpture made of black wire stands on a metal base on the right. To the left a clear glass bowl holds a stack of balanced Zen stones topped with a single red stone.
Behind the bowl leaning against the wall is a simple frame with line art showing hands holding each other. Moody blue and warm lighting highlights the textures.
Material required list
- Large black wire heart sculpture on a stand
- Clear glass shallow bowl
- Assorted smooth river stones
- One smooth red stone
- Simple picture frame
- Hand line art print
Equipment required list
- None specifically required
DIY instruction step by step
- Place the large wire heart sculpture on the right side of the dark shelf.
- Set the clear glass bowl on the left side.
- Carefully stack the river stones inside the bowl from largest to smallest to create a stable cairn.
- Place the single red stone at the very top of the stack.
- Lean the framed line art print against the wall behind the glass bowl.
- Adjust nearby lighting to create dramatic shadows through the wire heart.
11 Sweet Celebration Candy Jars
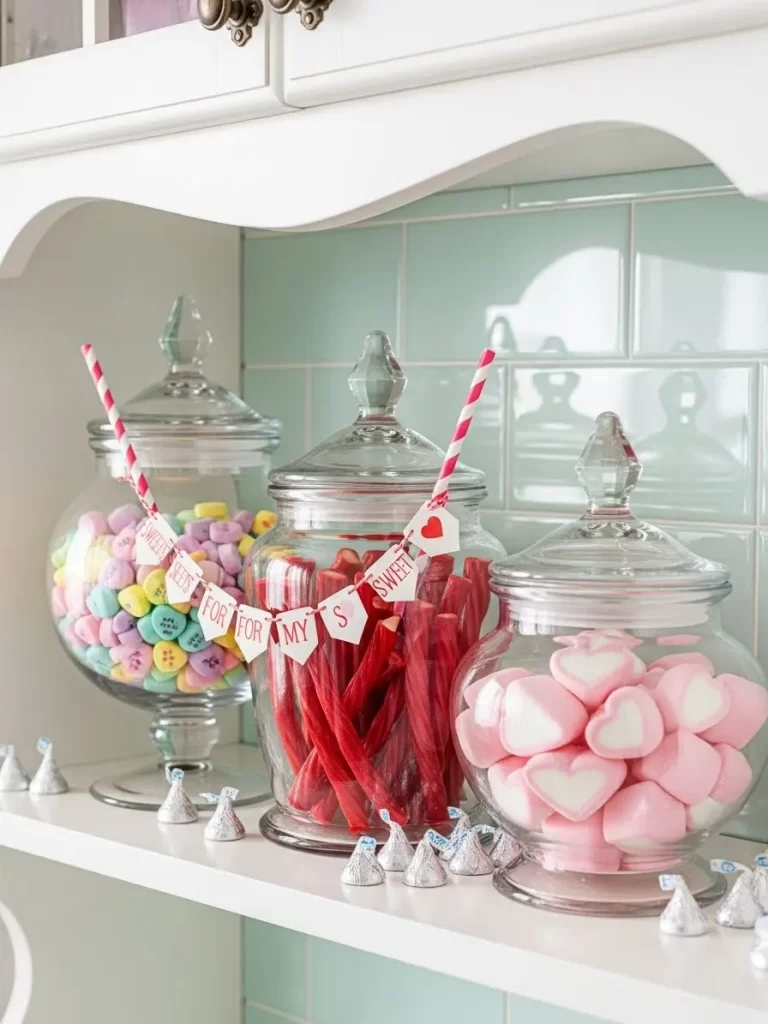
Glass apothecaries stand filled with colorful treats on a crisp white shelf. One jar holds pastel conversation hearts while the middle one features bright red licorice sticks. A miniature bunting with tiny letters spells out a sugary message across the front.
Rows of silver wrapped chocolates sit at the base to add a metallic shimmer. The soft mint green tile background makes the vibrant colors of the candy pop. This setup creates a playful and inviting corner in any kitchen or dining area.
Material required list
- Three glass jars with lids
- Assorted conversation heart candies
- Red licorice twists
- Pink heart marshmallows
- Silver wrapped chocolates
- Small paper bunting pieces
- Striped straws or sticks
- Baker twine
Equipment required list
- Scissors
- Clear tape
DIY instruction step by step
- Clean your glass containers until they sparkle.
- Pour the heart candies into the first jar until full.
- Stand the licorice sticks upright in the center jar.
- Fill the third jar with the soft pink marshmallows.
- Cut a short length of twine to fit across the middle jar.
- Tape tiny paper flags with letters onto the string.
- Tie the bunting ends to the striped straws.
- Place the straws inside the licorice jar so the sign hangs in front.
- Scatter silver chocolates along the shelf ledge.
12 Spring Nest of Love
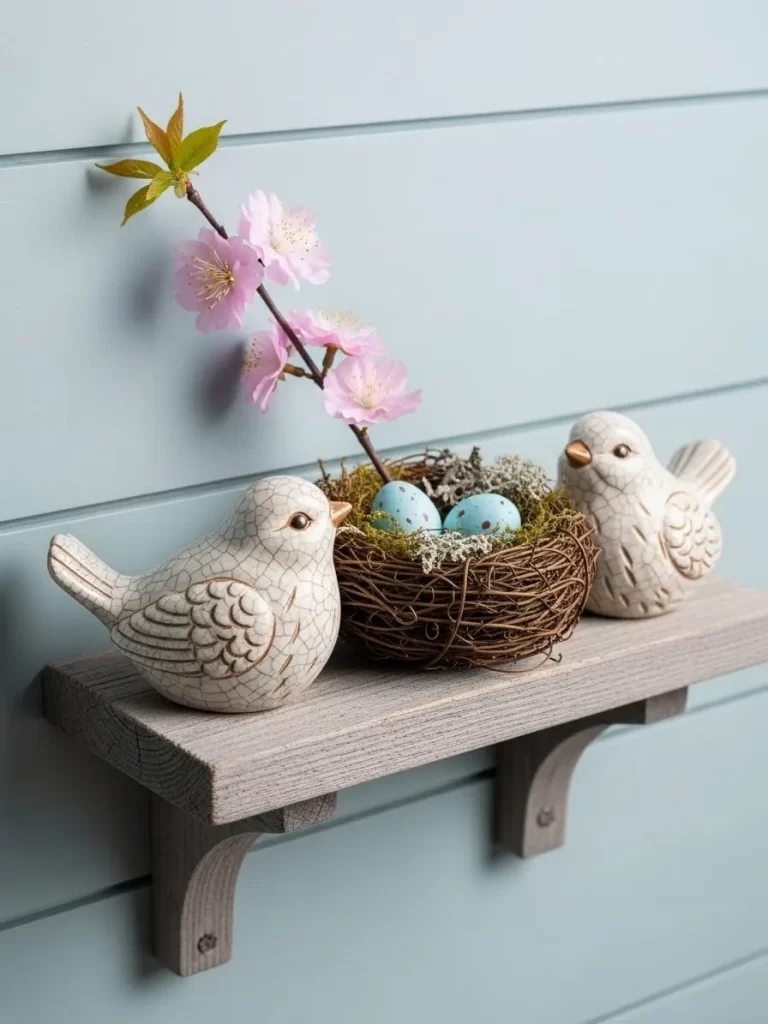
Two ceramic birds with a cracked glaze finish guard a tiny woven nest. A delicate branch of pink cherry blossoms rises from the center of the display. Soft blue speckled eggs rest inside on a bed of green moss.
The rustic wood shelf adds a weathered charm to the soft pastel colors. This nature inspired theme brings the beauty of a garden into your home. It feels peaceful and marks the transition into a new season.
Material required list
- Two ceramic bird figurines
- Small woven twig nest
- Faux cherry blossom branch
- Three decorative speckled eggs
- Dried green moss
- Small wooden shelf
Equipment required list
- None
DIY instruction step by step
- Place your wooden shelf at eye level on the wall.
- Set the twig nest in the center of the wood surface.
- Tuck a small amount of moss into the bottom of the nest.
- Position the blue eggs gently on top of the moss.
- Slide the base of the blossom branch behind the nest.
- Lean the branch against the wall for stability.
- Put one ceramic bird on each side of the central display.
13 Retro Disco Romance
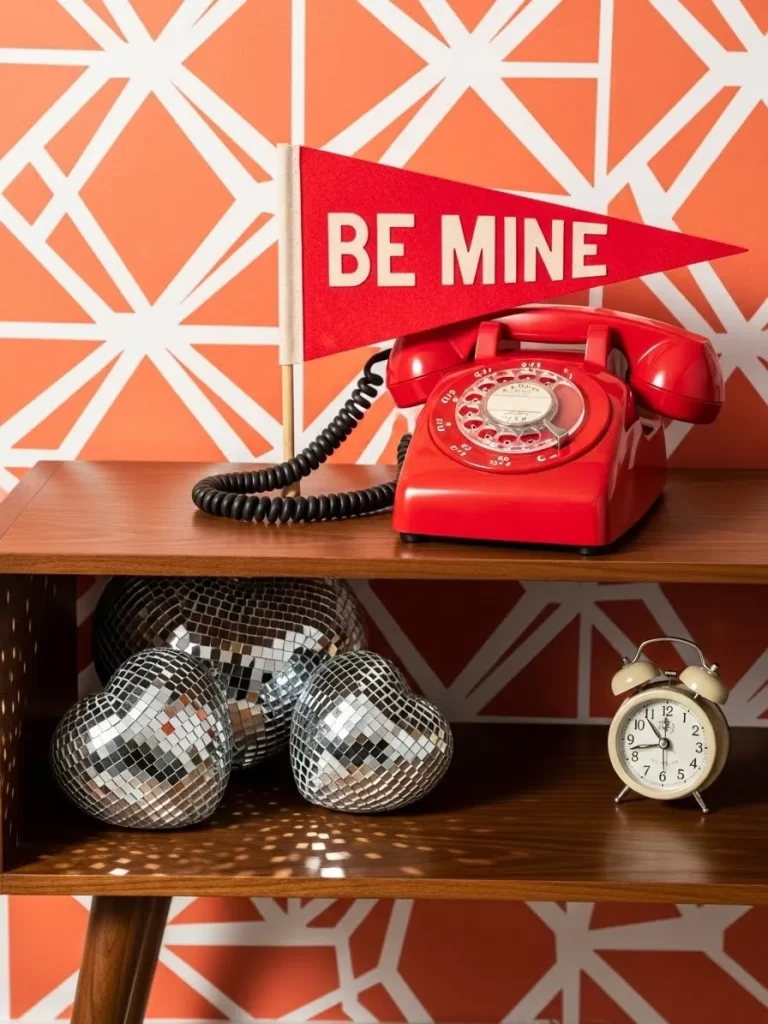
A vintage red rotary phone sits on a dark wood cabinet. A red pennant flag with white letters stands tall behind it. Three sparkling silver disco hearts rest on the shelf below to catch the light.
Geometric orange wallpaper adds a bold retro vibe to the entire scene. An old fashioned alarm clock sits nearby to complete the nostalgic look. This arrangement blends fun textures with a classic color palette.
Material required list
- Red vintage style phone
- Red felt pennant with a stick
- Three heart shaped disco balls
- Small cream alarm clock
- Wooden side table or shelf
Equipment required list
- None
DIY instruction step by step
- Clean the dust off your vintage phone.
- Place the phone on the top surface of your cabinet.
- Prop the pennant flag up behind the phone base.
- Arrange the three disco hearts on the lower shelf area.
- Group the hearts together so they overlap slightly.
- Set the alarm clock on the right side for balance.
14 Written in the Stars Shelf
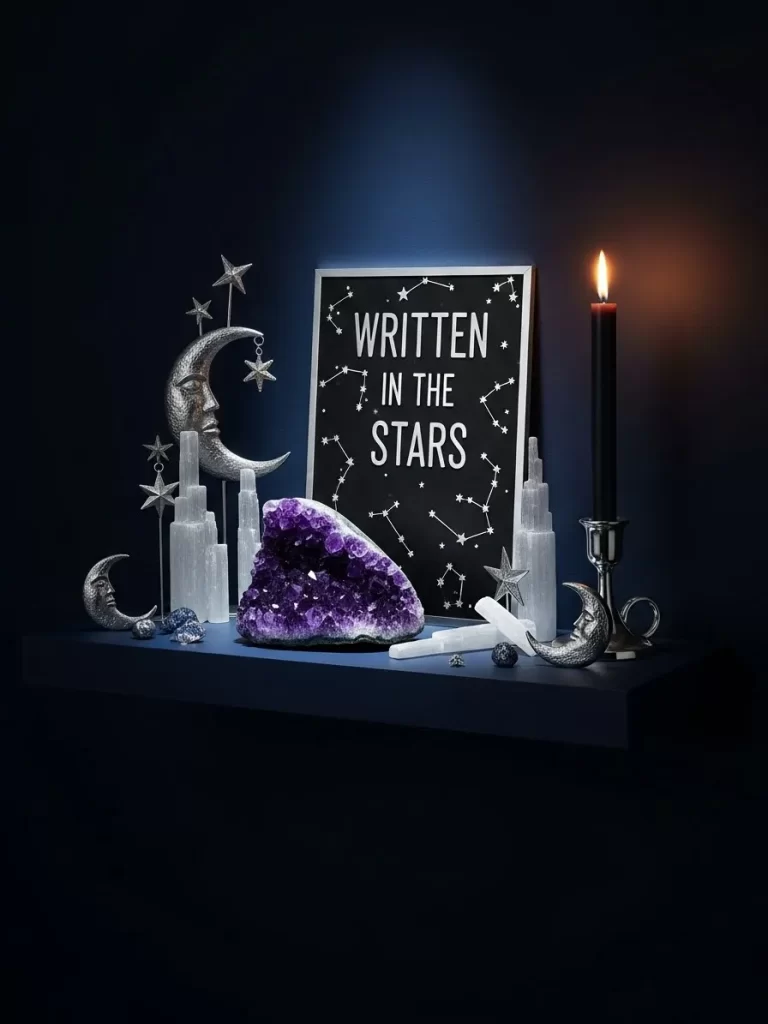
Dark blue walls create a mysterious backdrop for this celestial display. A black sign with white stars and lettering sits at the heart of the shelf. Silver moon sculptures and tall white crystals flank the central frame.
A single black candle in a silver holder provides a flickering flame. Small scattered stones and star ornaments add detail to the flat surface. This theme celebrates a love that feels as vast as the universe.
Material required list
- Black celestial art print
- Two silver moon figurines
- Assorted selenite crystal towers
- One large purple amethyst geode
- Black taper candle
- Silver candlestick holder
- Small star ornaments
Equipment required list
- Lighter or matches
DIY instruction step by step
- Lean your star themed sign against the back wall.
- Position the purple amethyst geode directly in front of the sign.
- Place the tall white crystals on either side of the geode.
- Set the silver moons at the far ends of the shelf.
- Put the black candle into its holder on the right side.
- Light the wick to create a warm glow.
- Scatter small stars around the base of the objects.
15 Midnight in Paris Console
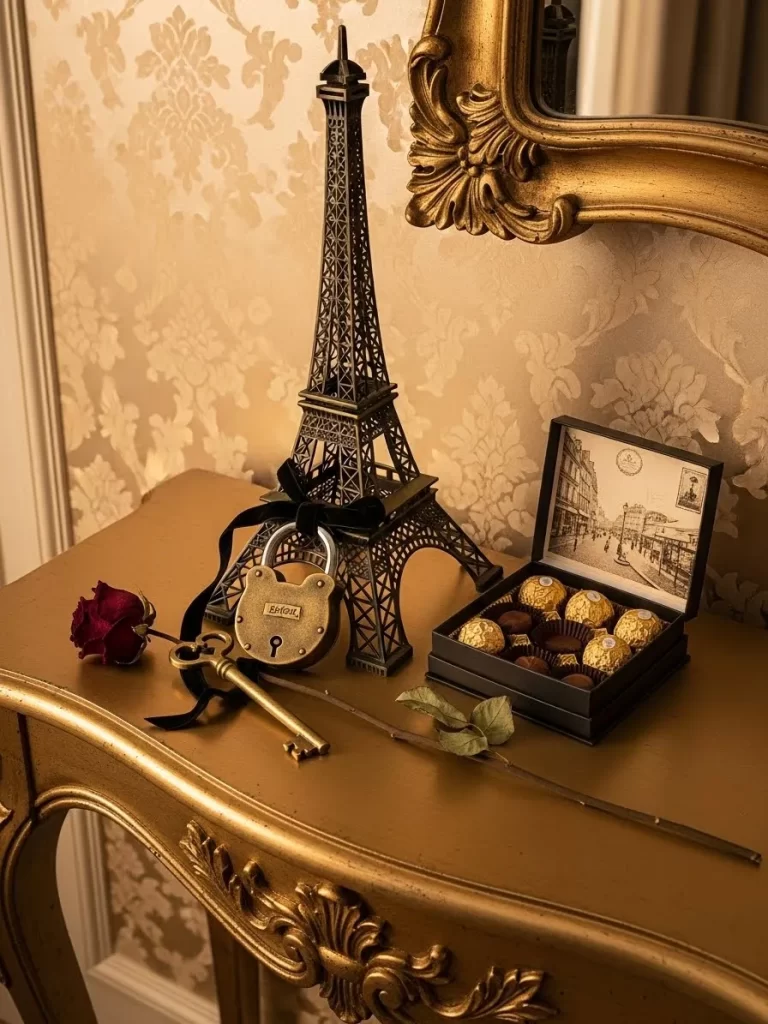
A bronze Eiffel Tower model stands tall on a gold console table. A box of gourmet gold wrapped chocolates sits open to invite guests. A single dark red rose with a long stem lies gracefully across the surface.
Ornate gold mirrors and damask wallpaper enhance the luxurious feel. A large vintage key and a brass lock with a black ribbon add a touch of mystery. This setup brings the romance of the city of lights into your living room.
Material required list
- Bronze Eiffel Tower statue
- Box of gold wrapped truffles
- One dried or fresh red rose
- Large decorative gold key
- Ornate brass padlock
- Black velvet ribbon
Equipment required list
- Scissors
DIY instruction step by step
- Place the Eiffel Tower statue in the center of the table.
- Set the open box of chocolates to the right of the tower.
- Tie a black velvet bow onto the brass padlock.
- Lay the lock and the gold key on the left side.
- Position the red rose so the bloom faces the tower.
- Adjust the stem so it runs parallel to the table edge.
16 Artistic Heart Canvas Gallery
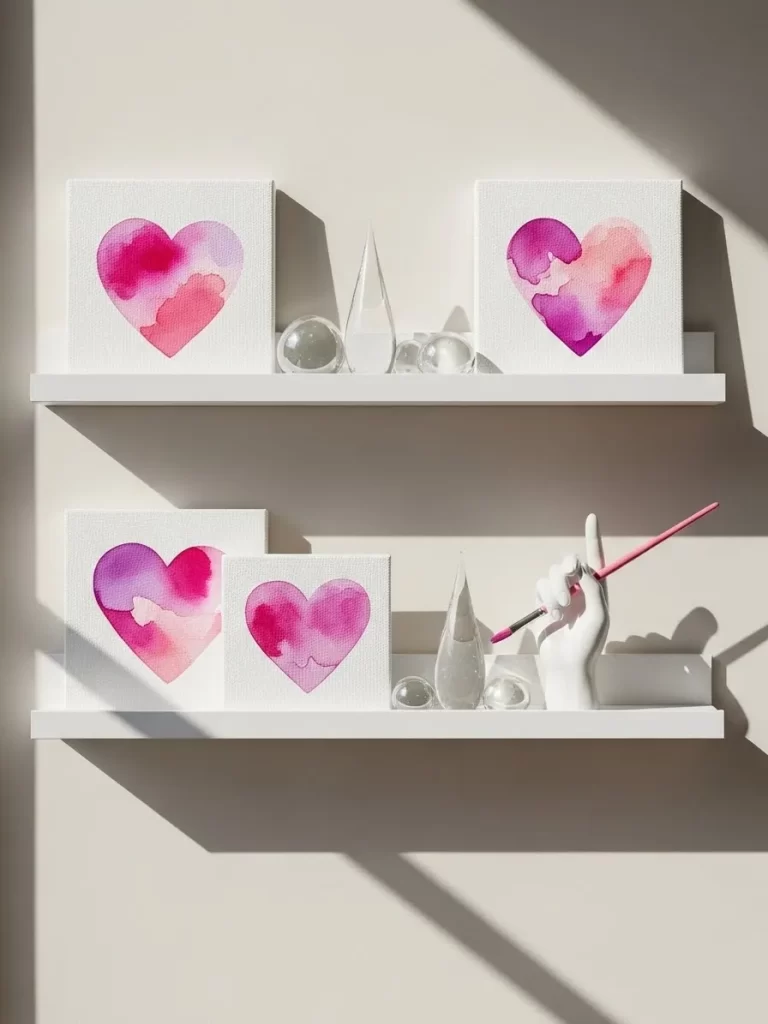
Four small canvases display vibrant watercolor hearts in shades of pink and purple. They sit on two white floating shelves to create a modern art display. Clear glass spheres and tall cones add a sculptural element between the paintings.
A white ceramic hand holds a pink paintbrush to represent the creative process. Sharp shadows from the sunlight create interesting shapes on the wall. This look is clean, bright, and full of artistic energy.
Material required list
- Four small square canvases
- Watercolor paints in pink and purple
- Two white floating shelves
- Decorative glass globes
- Clear acrylic cone sculptures
- Ceramic hand sculpture
- Pink paintbrush
Equipment required list
- Paintbrush
- Water cup
DIY instruction step by step
- Paint a large heart on each canvas using watercolor techniques.
- Blend different shades of pink to create a soft effect.
- Let the canvases dry completely before moving them.
- Install the white shelves on a sunny wall.
- Place two canvases on the top shelf and two on the bottom.
- Arrange the glass spheres and cones between the art pieces.
- Set the ceramic hand on the lower shelf holding the brush.
17 Growing Love Plant Display
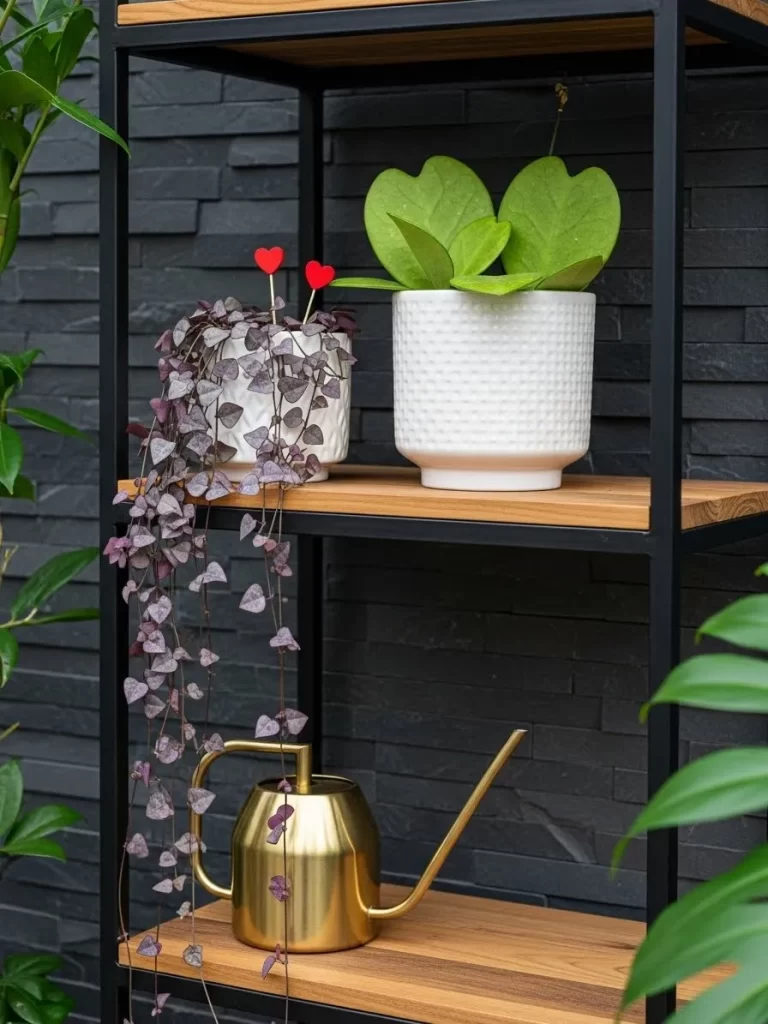
A cascading string of hearts plant spills over the side of a white textured pot. Two red heart picks stand tall among the leaves to add a festive touch. A second heart shaped plant sits nearby in a similar white vessel.
Dark stone walls provide a dramatic contrast to the bright green foliage. A golden watering can with a long spout sits on the shelf below. This display celebrates growth and natural beauty in a modern way.
Material required list
- String of Hearts trailing plant
- Hoya Kerrii heart plant
- Two white ceramic pots
- Two red heart garden picks
- Gold watering can
- Wood and metal shelving unit
Equipment required list
- None
DIY instruction step by step
- Place your trailing plant in the top pot.
- Arrange the vines so they hang down the front of the shelf.
- Insert the two red heart picks into the soil.
- Set the heart shaped succulent in the second pot next to it.
- Position the gold watering can on the shelf below the plants.
- Ensure the plants receive bright indirect light to stay healthy.
18 Cloud of Love Ladder
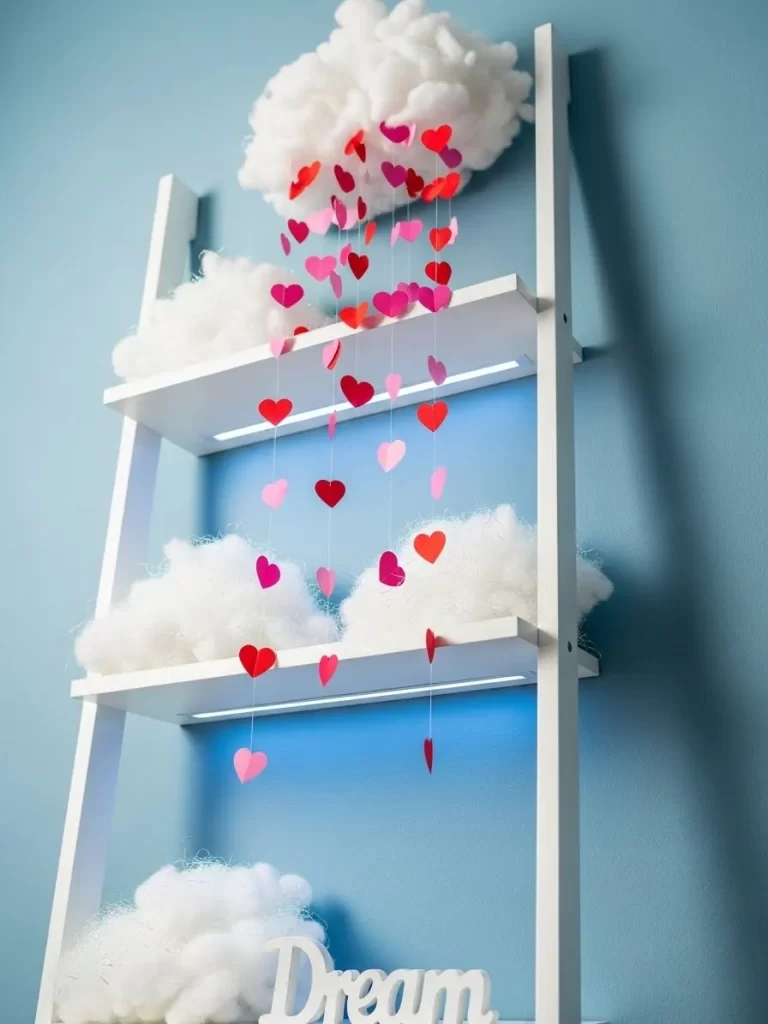
White fluffy clouds rest on the rungs of a white ladder shelf. Strings of red and pink paper hearts hang down from the clouds like rain. Blue LED lights glow from behind the shelves to create a dreamy sky effect.
A wooden sign with the word dream sits at the bottom of the ladder. This whimsical display turns your home into a magical landscape. It captures a sense of wonder and soft romance.
Material required list
- White ladder shelf
- Large bag of polyester fiberfill
- Red and pink cardstock paper
- Thin white thread
- Blue LED light strips
- Wooden dream sign
Equipment required list
- Glue gun
- Scissors
DIY instruction step by step
- Attach blue LED lights to the back of each ladder rung.
- Shape the fiberfill into large puffy cloud shapes.
- Glue the clouds onto the top of the shelves.
- Cut out many small hearts from your red and pink paper.
- Tape the hearts onto long pieces of white thread.
- Hang the threads from the bottom of the clouds.
- Place the wooden sign on the lowest shelf for a final touch.
19 You and Me Memory String
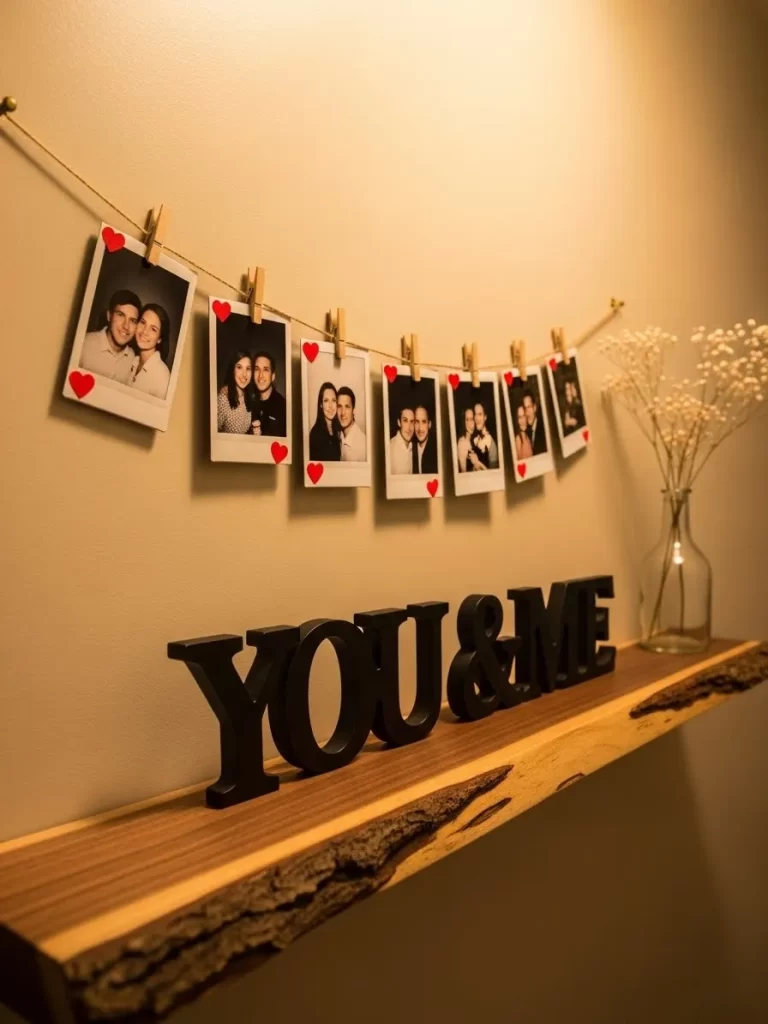
Polaroid photos of a happy couple hang from a simple twine string. Small wooden clothespins hold each picture in place along the wall. Red heart stickers add a pop of color to the corners of the frames.
Large black letters spelling out you and me sit on a rustic wood shelf. A glass vase with white babys breath adds a soft texture to the side. This personal display highlights your favorite moments together.
Material required list
- Printed polaroid photos
- Natural twine string
- Miniature wooden clothespins
- Red heart stickers
- Black wooden letters
- Glass bud vase
- Dried babys breath
Equipment required list
- Two small wall hooks
- Scissors
DIY instruction step by step
- Secure two hooks to the wall above your shelf.
- Tie the twine between the hooks so it sags slightly.
- Clip your photos to the string using the small clothespins.
- Press a red heart sticker onto the corner of each photo.
- Place the black letters on the wooden shelf below the string.
- Fill the glass vase with the dried white flowers.
- Set the vase on the far right end of the shelf.
20 Rose Quartz Glow Tray
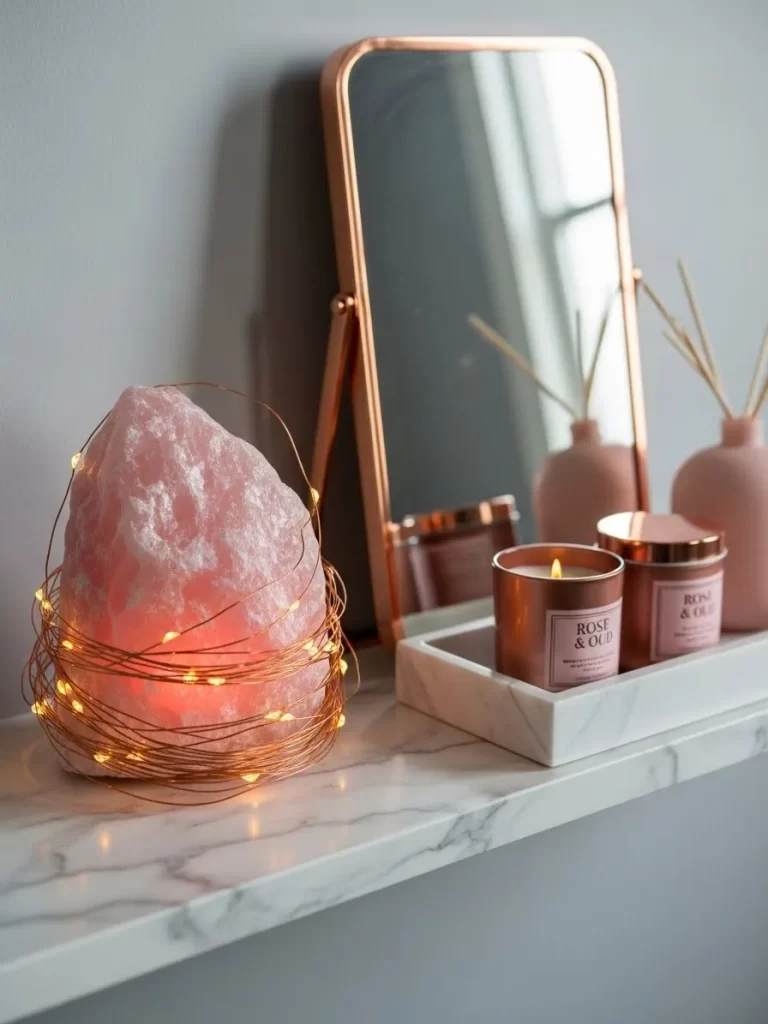
A large raw rose quartz crystal wrapped in copper fairy lights sits on a white marble shelf. The soft pink light reflects off a rose gold mirror in the background. Two copper candles with labels sit on a white tray nearby.
Pink ceramic bottles with wooden reeds add a gentle scent to the air. The mix of marble and metallic accents creates a high end spa feeling. This arrangement works well for a bedroom or a vanity area.
Material required list
- Large rose quartz crystal
- Copper wire fairy lights
- Rose gold tabletop mirror
- Two copper tin candles
- White marble tray
- Two pink reed diffusers
Equipment required list
- None
DIY instruction step by step
- Clean your marble shelf and tray with a damp cloth.
- Wrap the copper fairy lights tightly around the rose quartz.
- Place the glowing crystal on the left side of the shelf.
- Set the rose gold mirror behind the crystal to bounce the light.
- Arrange the marble tray on the right side.
- Put your candles and reed diffusers inside the tray for a tidy look.
21 Macrame Heart Wall Hanging
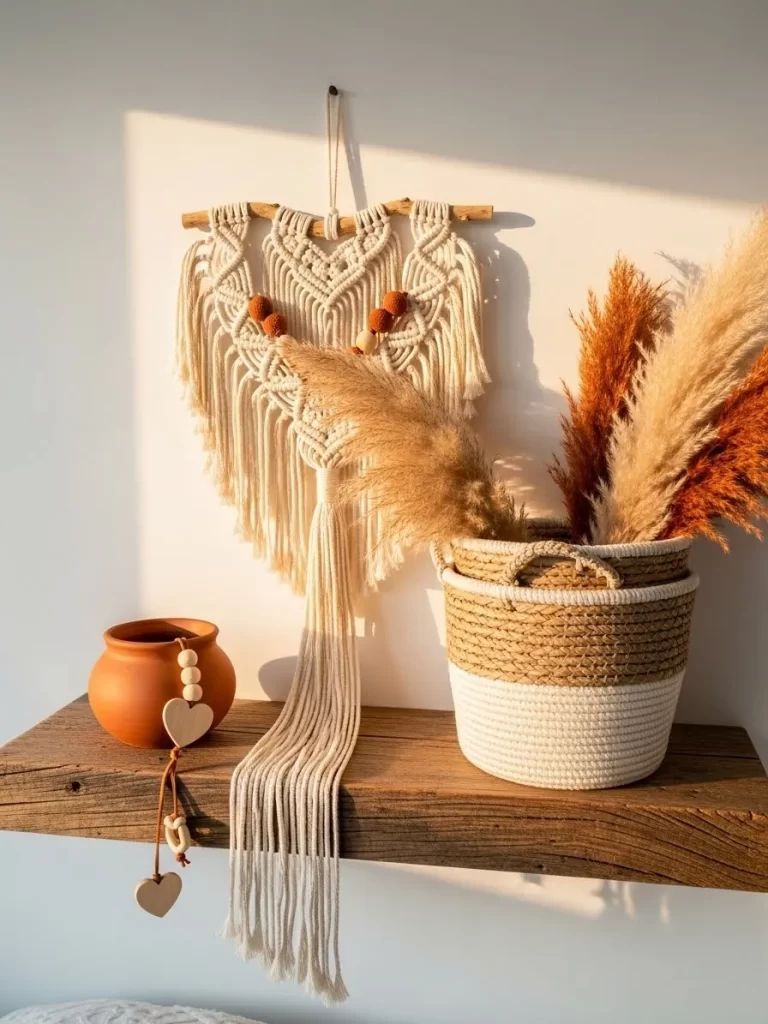
A beautiful cream macrame piece hangs from a natural wood branch. The center of the weaving forms the shape of a large heart. Earthy brown beads add a rustic detail to the fringe at the bottom.
A terracotta pot sits on the shelf below with tall fluffy pampas grass. A small wooden heart on a string hangs from the pot for extra charm. The warm sunlight makes this boho corner feel inviting and soft.
Material required list
- Macrame heart wall hanging
- Wooden branch
- Terracotta clay pot
- Tall pampas grass stems
- Wooden heart charm
- Leather cord
Equipment required list
- None
DIY instruction step by step
- Hang your macrame heart on the wall above the shelf.
- Fill the terracotta pot with the dried pampas grass.
- Fluff the grass so it looks full and airy.
- Set the pot on the right side of the wooden shelf.
- Tie the wooden heart charm to the pot with the leather cord.
- Place the display in a spot that gets plenty of afternoon sun.
22 Vintage Typewriter Love Letter
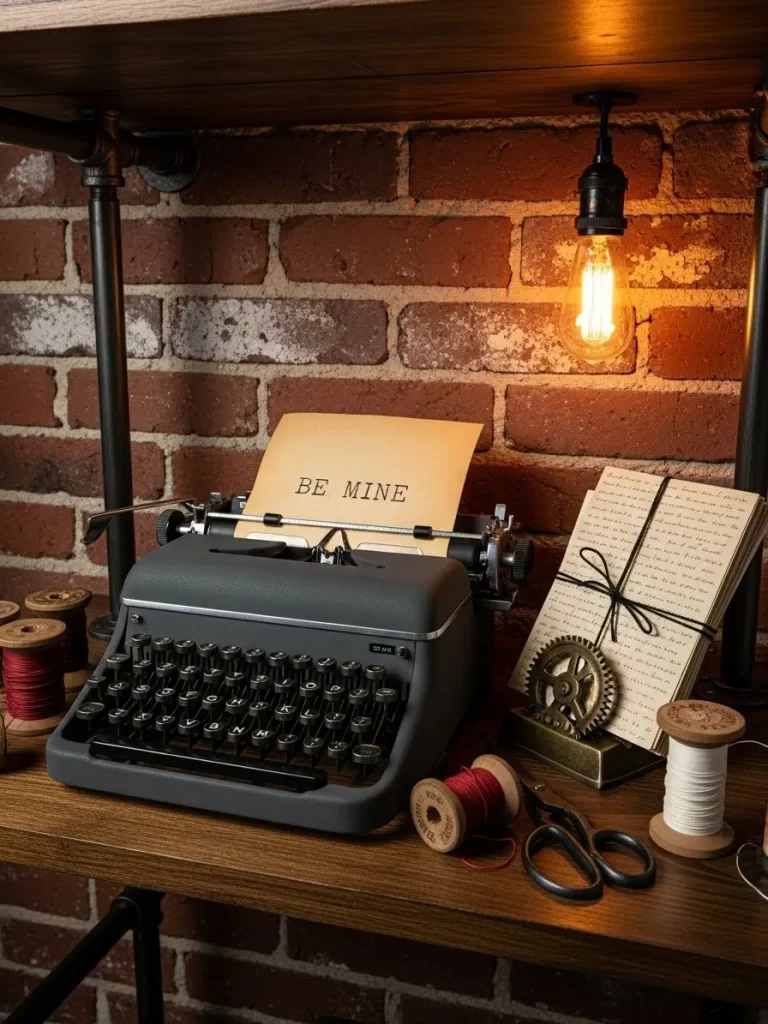
An old grey typewriter rests on a dark wood desk under a warm light. A piece of yellow paper is tucked inside with the words BE MINE typed in black. Several wooden spools of red and white thread sit nearby.
A stack of handwritten letters is tied together with a simple black string. A metal gear and vintage scissors add a touch of industrial style to the scene. This nostalgic setup tells a story of classic romance.
Material required list
- Vintage typewriter
- Yellow paper
- Red and white thread spools
- Stack of old letters
- Black string
- Metal gear sculpture
- Antique scissors
Equipment required list
- None
DIY instruction step by step
- Place the typewriter in the center of your desk or shelf.
- Type BE MINE on the yellow paper and roll it into the machine.
- Tie your bundle of letters with the black string and set them on the right.
- Put the metal gear on top of the letters to hold them down.
- Scatter the colorful thread spools on the left side.
- Lay the vintage scissors next to the spools to finish the look.
23 Shabby Chic Lavender Bouquet
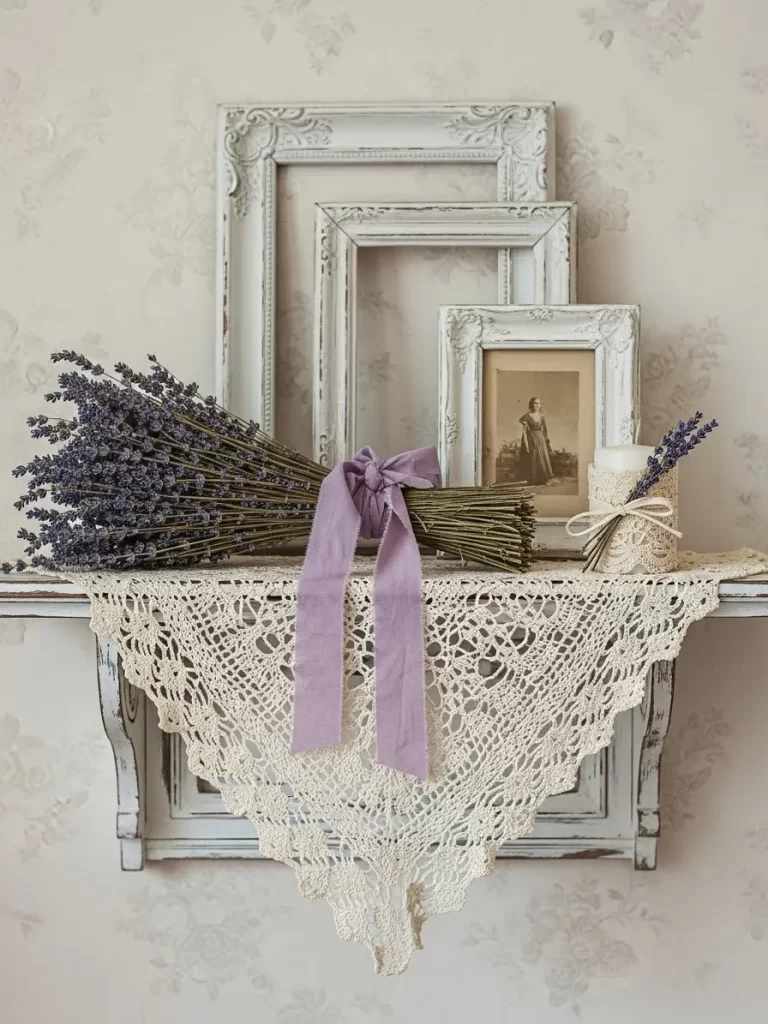
A large bundle of dried lavender is tied with a soft purple ribbon. It lies across a white lace cloth on a distressed wooden shelf. Three empty white picture frames of different sizes lean against the floral wallpaper.
A single white candle sits in a lace covered jar next to a vintage photo. One small sprig of lavender is tucked into the ribbon on the jar. This French country style feels very elegant and calm.
Material required list
- Dried lavender bundle
- Purple fabric ribbon
- White lace table runner
- Three distressed white frames
- Vintage black and white photo
- Glass jar with lace wrap
- White candle
Equipment required list
- Scissors
DIY instruction step by step
- Lay the lace cloth over the top of your shelf.
- Tie the lavender bundle with the purple ribbon and place it on the left.
- Lean the three white frames against each other in the center.
- Put the vintage photo inside the smallest frame.
- Wrap the glass jar in a piece of lace and tie it with a string.
- Place the candle inside the jar and set it on the right side.
24 Boho Skull and Heart Succulents
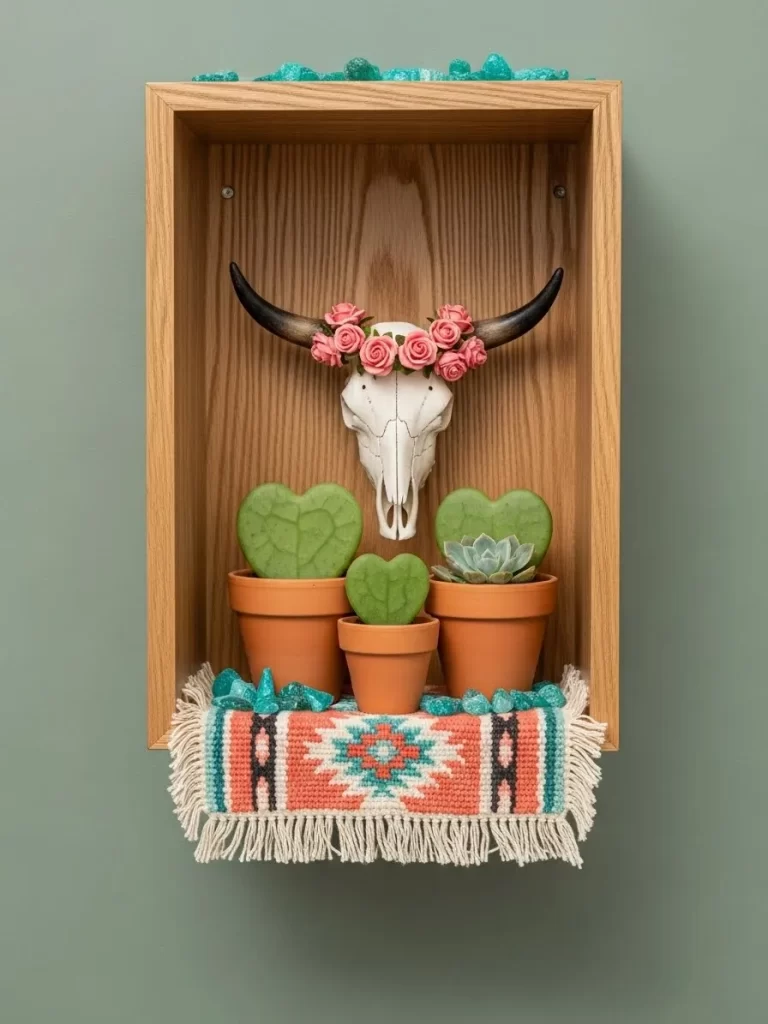
A white cow skull with pink roses on its head hangs inside a wooden box shelf. Three heart shaped succulents in terracotta pots sit directly below it. Small blue stones are scattered around the base of the pots.
A small colorful rug with fringe hangs over the front edge of the shelf. The mix of natural wood and bright colors creates a southwest vibe. This unique display is both edgy and sweet.
Material required list
- Faux cow skull
- Small pink silk roses
- Three Hoya Kerrii heart succulents
- Terracotta pots
- Blue decorative stones
- Mini woven rug with fringe
- Wooden shadow box shelf
Equipment required list
- Glue gun
DIY instruction step by step
- Glue the small pink roses onto the forehead of the cow skull.
- Mount the skull inside the wooden shadow box.
- Plant your heart succulents in the terracotta pots.
- Arrange the pots in a row at the bottom of the box.
- Sprinkle the blue stones around the pots to cover the wood.
- Drape the mini rug over the bottom lip of the shelf.
25 Pixel Art Gamer Heart
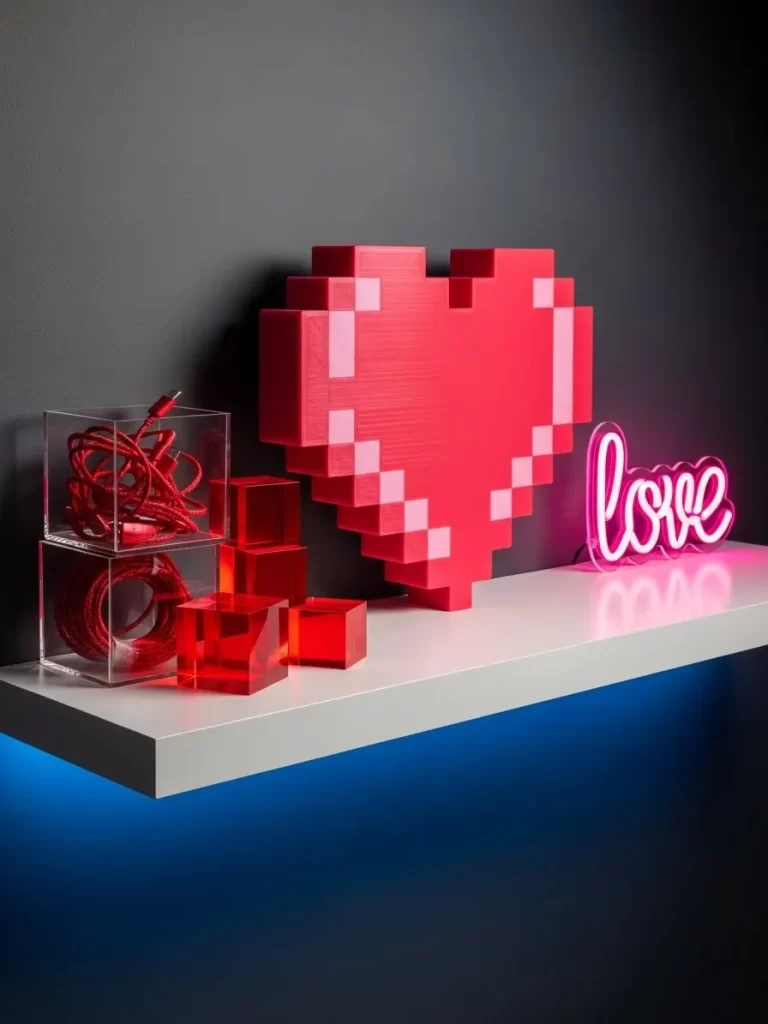
A large red 3D pixel heart glows on a white floating shelf. A pink neon sign next to it spells out the word love in script. Transparent red cubes are stacked on the left to add a modern look.
Bright red cables are coiled inside a clear plastic box to keep the theme going. Blue lights shine from under the shelf to create a cool gaming atmosphere. This setup is great for a tech lover or a modern bedroom.
Material required list
- Large red pixel heart light
- Pink neon LOVE sign
- Stackable red acrylic cubes
- Red USB cables
- Two clear plastic display boxes
- White floating shelf
- Blue LED underglow strip
Equipment required list
- None
DIY instruction step by step
- Install the blue LED strip under the white shelf.
- Place the pixel heart in the center of the shelf and turn it on.
- Set the neon LOVE sign on the right side.
- Stack the red acrylic cubes on the left side.
- Coil the red cables and put them inside the clear boxes.
- Stack the boxes next to the red cubes to finish the display.
26 Luxury Marble Bookends
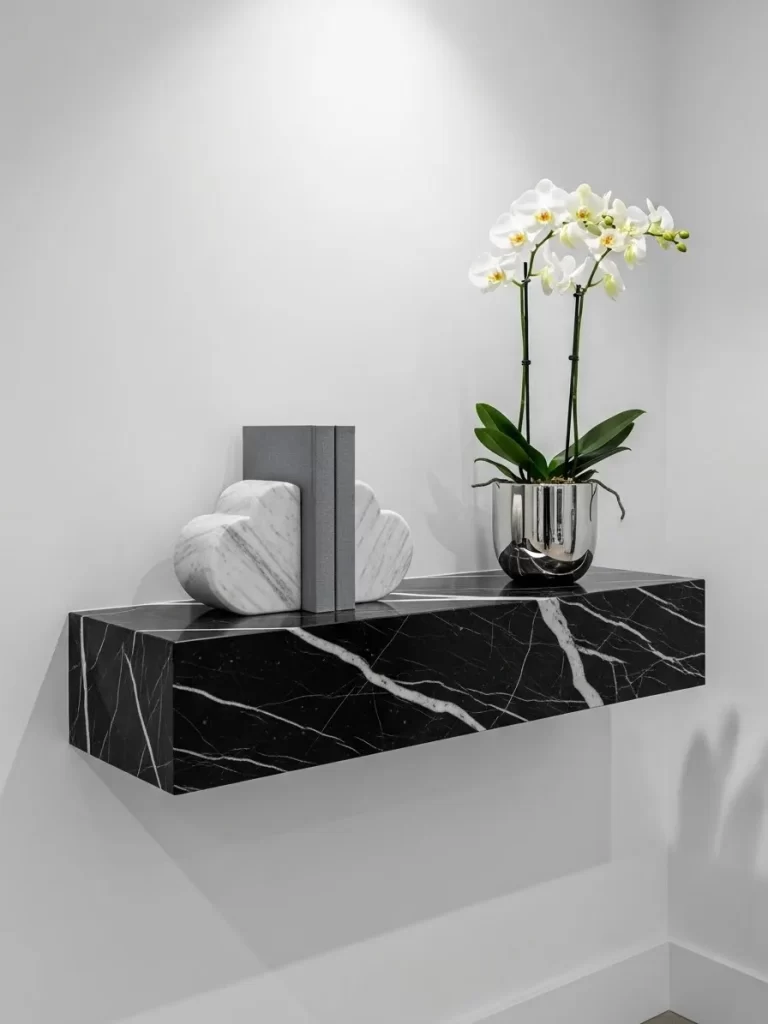
Two large white marble hearts serve as heavy bookends on a black marble shelf. They hold up a single grey book in a very clean and simple way. A silver pot with a tall white orchid sits on the right.
The contrast of the white stone against the black shelf looks very expensive. Every surface is polished to a high shine to reflect the room light. This minimalist style is perfect for a modern office.
Material required list
- Two large marble heart bookends
- Grey hardback book
- Polished silver plant pot
- White orchid plant
- Black marble floating shelf
Equipment required list
- None
DIY instruction step by step
- Mount your black marble shelf on a white wall.
- Place the grey book in the center of the shelf.
- Use the marble hearts to pinch the book from both sides.
- Put the orchid plant into the silver pot.
- Set the plant on the right end of the shelf.
- Clean the marble with a soft cloth to make it shine.
27 Modern Line Art Trio
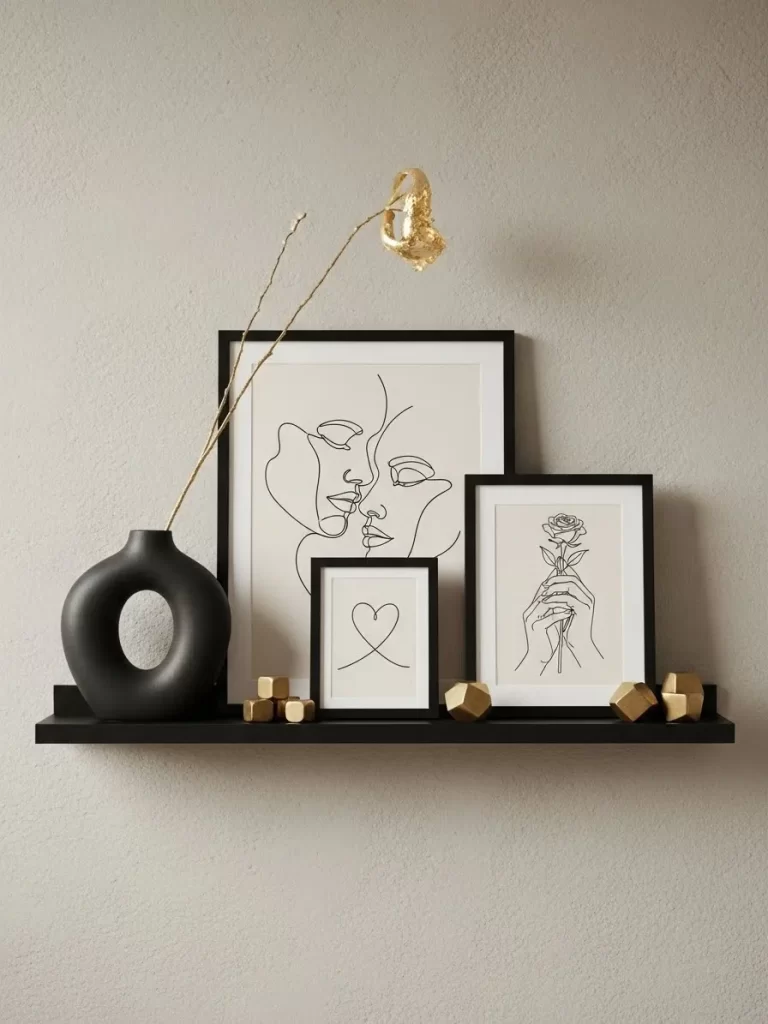
Three black frames of different sizes lean on a black shelf against a beige wall. The art inside features simple black lines showing faces and a heart. A matte black vase with a single gold branch stands on the left.
Small gold cubes are scattered around the frames to add a touch of luxury. The look is very sophisticated and works well as a focal point. This art gallery feel is easy to recreate with simple prints.
Material required list
- Three black picture frames
- Set of line art prints
- Matte black donut vase
- Gold spray painted branch
- Small gold geometric cubes
- Black floating shelf
Equipment required list
- None
DIY instruction step by step
- Put your line art prints into the three black frames.
- Place the largest frame in the middle of the shelf.
- Lean the smaller frames on each side of the big one.
- Insert the gold branch into the black vase and set it on the left.
- Arrange the gold cubes in small groups in front of the frames.
- Space everything out so the display does not look crowded.
28 Copper Mug Cinnamon Spiced Shelf
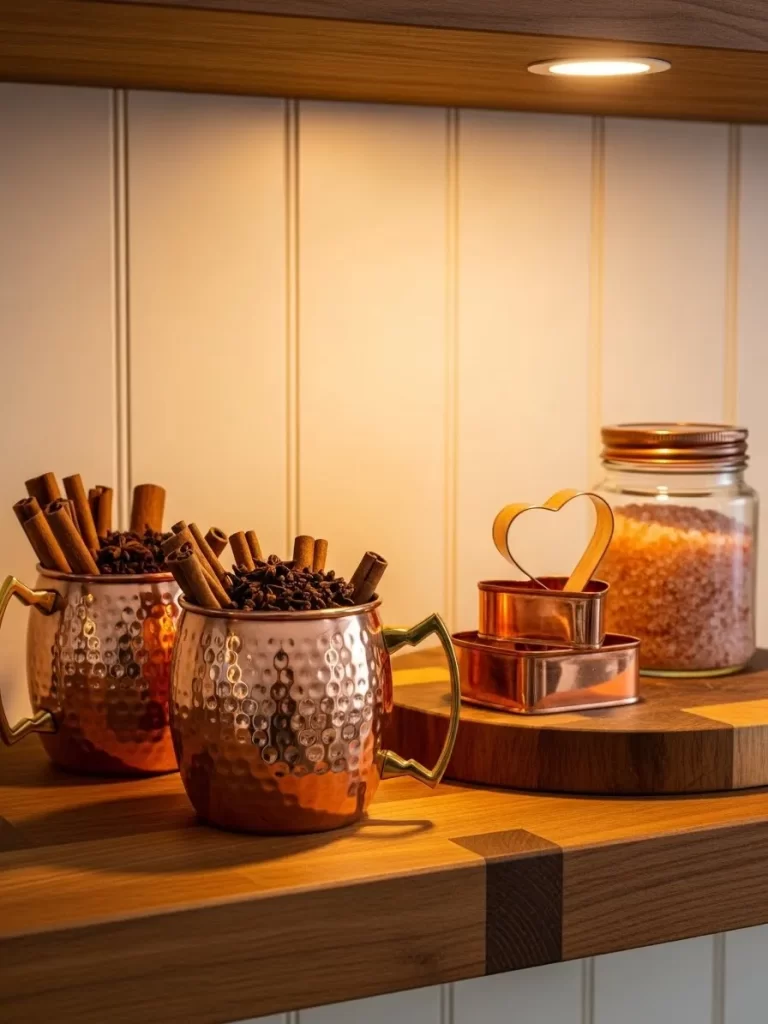
Two hammered copper mugs are filled with cinnamon sticks and star anise. They sit on a thick wooden shelf under a warm recessed light. A heart shaped copper cookie cutter stands on a small wood block.
A glass jar of pink sea salt sits in the background to add texture. The warm metallic tones make this kitchen shelf feel very cozy. This setup smells as good as it looks.
Material required list
- Two hammered copper mugs
- Large pack of cinnamon sticks
- Star anise pods
- Copper heart cookie cutter
- Round wooden serving board
- Glass jar with pink salt
- Wood shelf with light
Equipment required list
- None
DIY instruction step by step
- Fill both copper mugs with a mix of cinnamon and star anise.
- Place the mugs on the left side of the wooden board.
- Stack the copper heart cutter on the right side of the board.
- Set the glass jar of pink salt behind the heart.
- Place the whole board under the shelf light.
- Add a few extra spices around the base of the mugs.
29 Coastal Beach Love Shelf
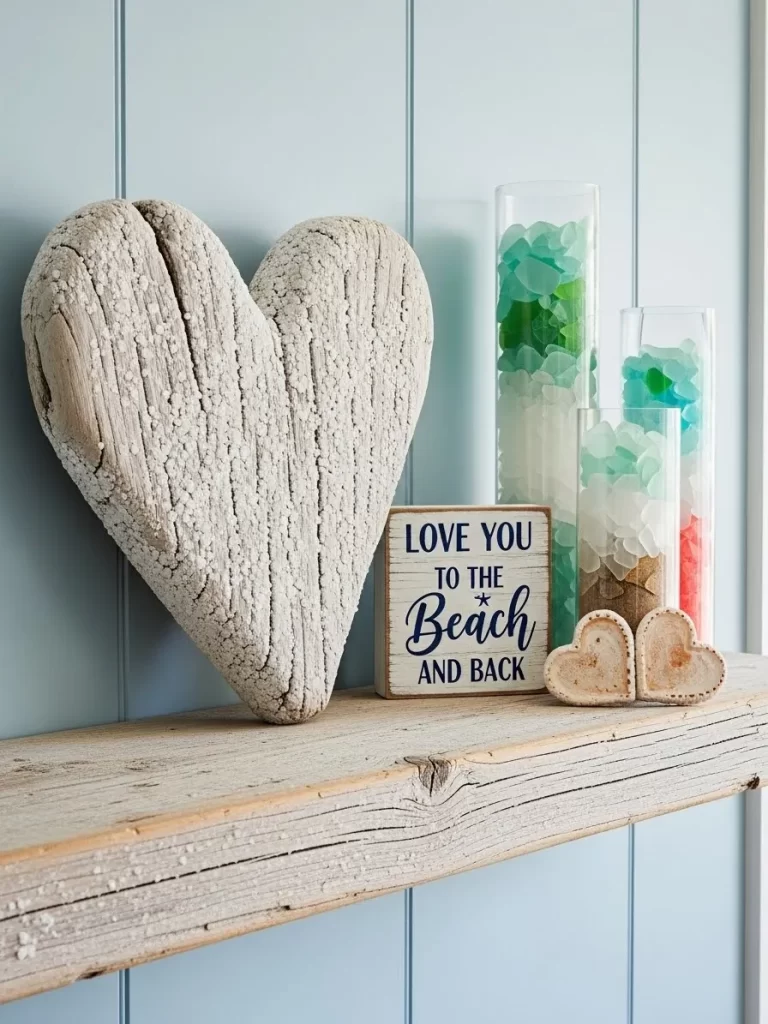
A large heart made of weathered driftwood leans against a blue wall. Three tall glass cylinders are filled with green and white sea glass. A small wooden sign reads LOVE YOU TO THE BEACH AND BACK.
Two small heart shaped shells rest on the edge of the rustic shelf. The cool colors and natural wood create a relaxing seaside theme. This is a great way to use vacation treasures.
Material required list
- Large driftwood heart
- Three glass cylinder vases
- Green and white sea glass
- Wooden beach sign
- Two heart shaped shells
- Rough wood floating shelf
Equipment required list
- None
DIY instruction step by step
- Lean the driftwood heart against the wall on the left.
- Fill the glass vases with layers of sea glass.
- Place the vases in a row on the right side.
- Set the wooden sign in front of the middle vase.
- Put the two small shells on the far right edge.
- Keep the arrangement loose for a natural beach look.
30 Dark Academia Anatomical Heart
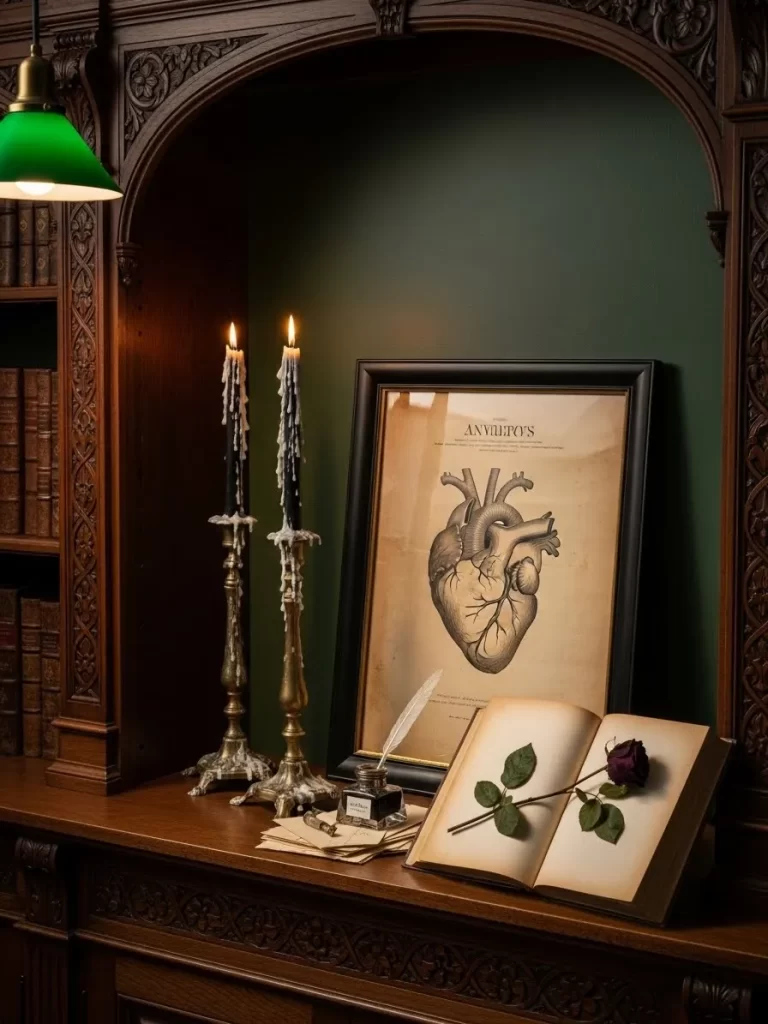
A vintage anatomical drawing of a human heart sits in a black frame. Two tall gold candlesticks hold black candles covered in white wax drips. An open book lies on the wooden desk with a dried red rose inside.
A glass inkwell with a white feather pen sits on a stack of old letters. Dark green walls and heavy wood create a serious and romantic mood. This style is for those who love history and science.
Material required list
- Anatomical heart art print
- Black and gold picture frame
- Two gold candlesticks
- Two black taper candles
- Old hardback book
- Dried red rose
- Glass inkwell and white quill
- Stack of aged paper
Equipment required list
- Lighter
DIY instruction step by step
- Frame the heart drawing and lean it against the dark wall.
- Put the black candles in the holders and light them to create wax drips.
- Blow the candles out and place them on the left.
- Open the old book to the middle and lay the rose on the pages.
- Set the book in front of the heart frame.
- Place the inkwell and letters on the right to finish the scene.
31 Meant to Bee Honey Shelf

Three glass jars filled with golden honey sit on a wooden shelf with a decorative rail. Tiny wire bees on springs pop out of the jars to add a playful touch. A wooden sign shaped like a beehive says MEANT TO BEE nearby.
A glass bowl of red and yellow candies sits on the right for guests to enjoy. The bright yellow wall makes the whole display feel sunny and happy. This theme is sweet and very easy to put together.
Material required list
- Three glass jars of honey
- Red and white checkered ribbon
- Wire bee decorations
- Wooden beehive sign
- Glass candy bowl
- Red and yellow hard candies
- Wood shelf with brackets
Equipment required list
- Scissors
DIY instruction step by step
- Tie a checkered ribbon around the neck of each honey jar.
- Stick the wire bees into the top of the jars.
- Place the jars in a row on the left side of the shelf.
- Set the wooden beehive sign behind the jars.
- Fill the glass bowl with the colorful candies.
- Put the bowl on the right side to balance the display.
32 Adventure and Love Travel Shelf
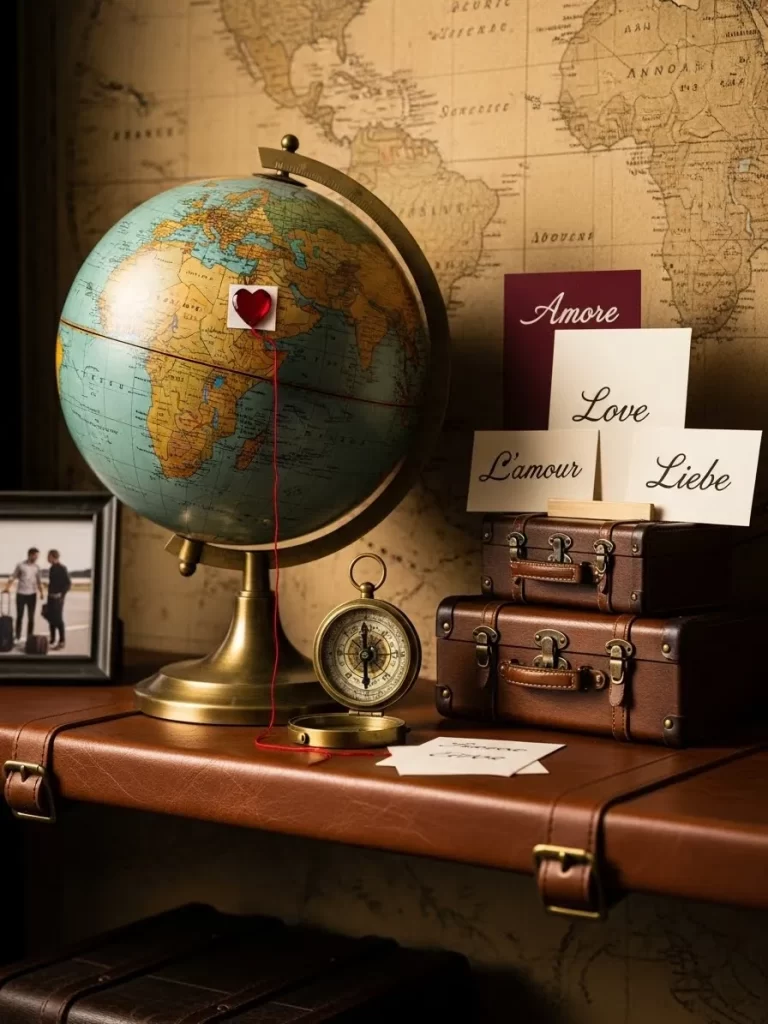
A large globe with a red heart sticker on Africa sits on a leather surface. Three small cards with the word love in different languages lean against a stack of suitcases. A vintage gold compass sits open in the foreground.
An old map and a photo of a couple add a personal touch to the travel theme. The warm brown tones make the display feel like a classic library. This is a great way to celebrate a shared love for journeying.
Material required list
- Desktop globe
- Red heart sticker
- Two small leather suitcases
- Gold vintage compass
- Three white cards with Love in different languages
- Framed couple photo
- Large world map for the wall
Equipment required list
- None
DIY instruction step by step
- Put the red heart sticker on your favorite spot on the globe.
- Stack the two leather suitcases on the right side of the desk.
- Stand the three love cards on top of the suitcases.
- Place the globe on the left and lean the framed photo next to it.
- Set the gold compass in the middle and open the lid.
- Hang the large map on the wall behind the whole arrangement.
33 Coffee Lover Letter Board
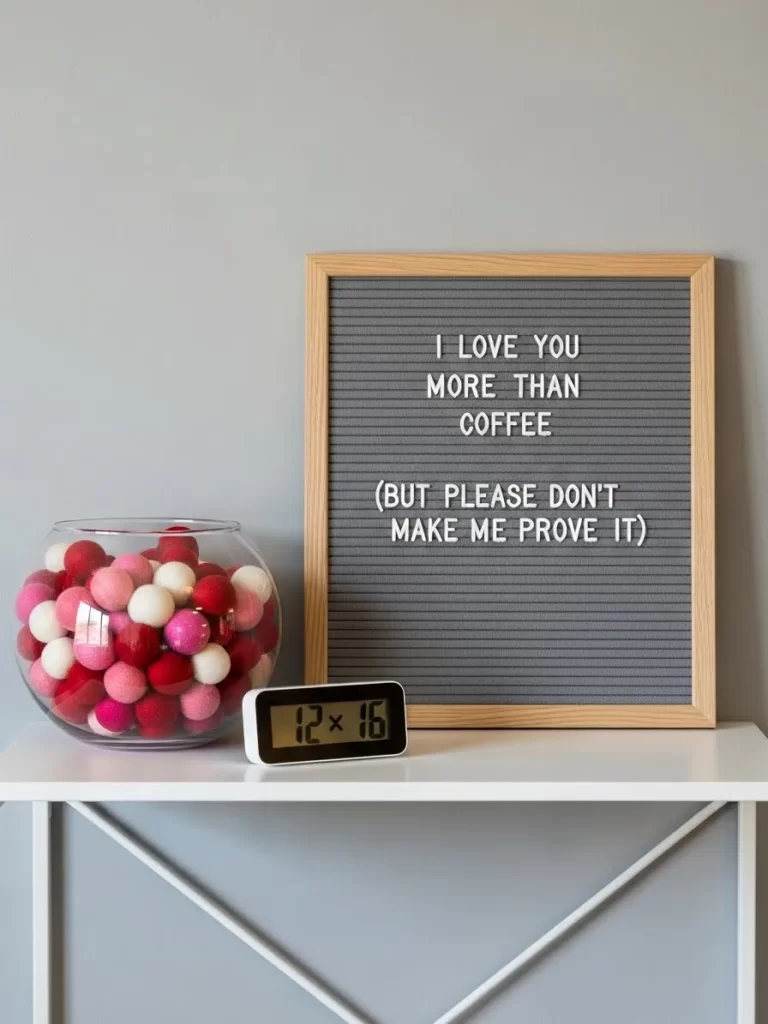
A grey felt letter board in a wood frame sits on a white table. It displays a funny message about loving someone more than coffee. A glass bowl full of pink and red felt balls sits to the left.
A small digital clock shows the time in a sleek white case. The simple grey wall makes the white furniture stand out. This modern look is perfect for a kitchen or a breakfast nook.
Material required list
- Grey felt letter board
- Plastic letters
- Glass fishbowl vase
- Pink red and white felt poms
- White digital clock
- White metal table
Equipment required list
- None
DIY instruction step by step
- Use the plastic letters to write your funny message on the board.
- Place the board in the center of the white table.
- Fill the glass bowl with all of the colorful felt poms.
- Set the bowl on the left side of the board.
- Put the white clock on the right side.
- Make sure the board is leaning at a slight angle for easy reading.
34 Happy Heart Day Plush Display
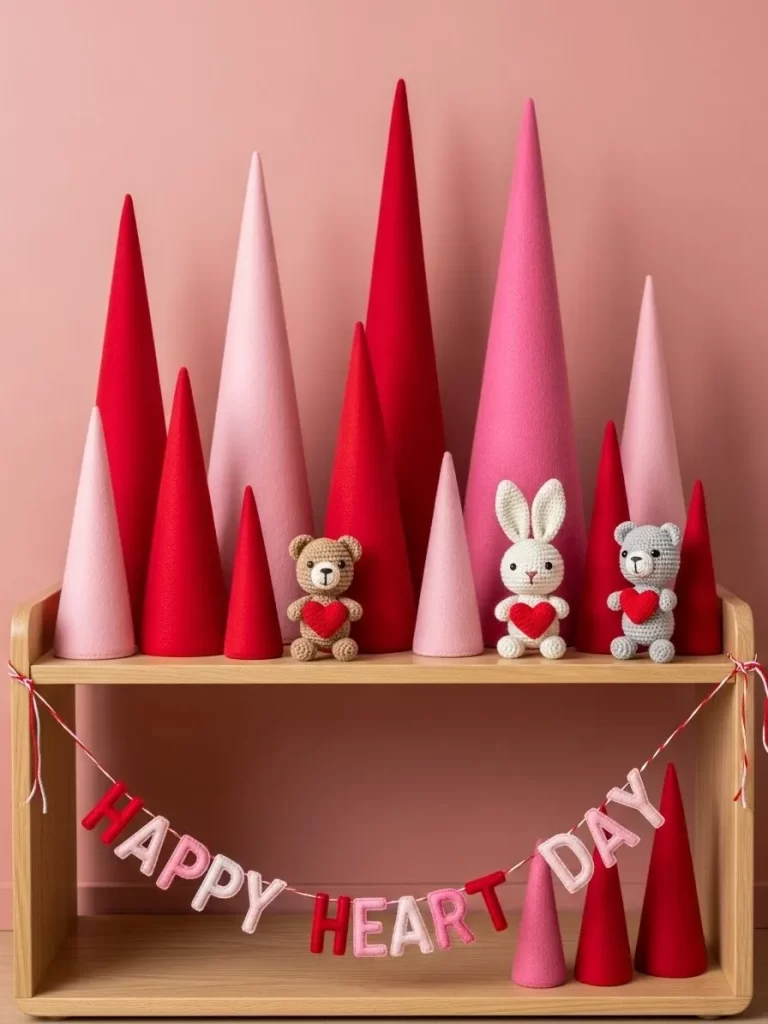
A group of tall pink and red cones creates a forest on a wooden shelf. Three small crocheted animals sit among the cones holding red hearts. A banner with the words HAPPY HEART DAY hangs across the front.
The soft pink wall in the background makes the red colors look very bright. This whimsical display is great for a childs room or a playroom. Every piece feels soft and friendly.
Material required list
- Pink and red foam cones in various sizes
- Crocheted bear rabbit and dog
- Small red felt hearts
- Felt letter banner
- Red and white baker twine
- Wood shelf unit
Equipment required list
- Glue gun
DIY instruction step by step
- Group the pink and red cones on the top of the shelf.
- Place the three small animals in the spaces between the cones.
- Glue a red felt heart to the paws of each animal.
- String the felt letters onto the baker twine to make the banner.
- Tie the banner to the front corners of the wooden shelf.
- Adjust the cones so the tallest ones are in the back.
35 Peppermint Heart Candy Bar
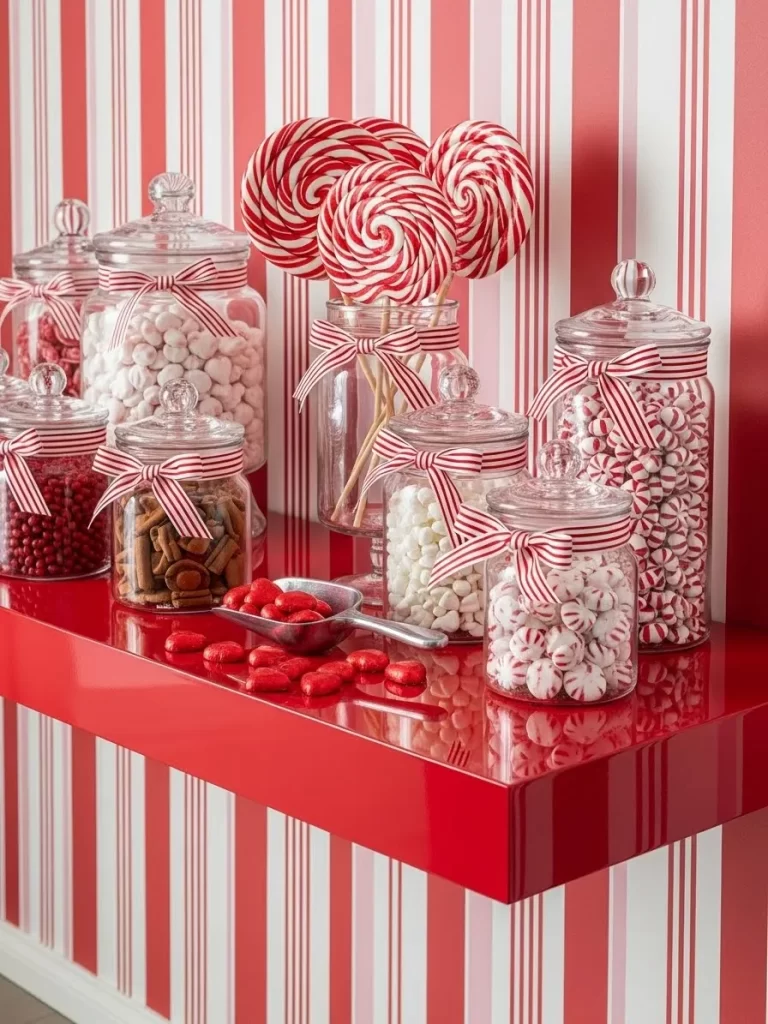
Glass jars with red striped ribbons are filled with white and red candies. Three large peppermint swirl lollipops stand tall in a jar in the center. A red metal scoop sits on the bright red shelf next to some loose heart candies.
The red and white striped wallpaper creates a bold festive look. This candy station is a fun way to treat guests during the holiday. It looks like an old fashioned sweet shop.
Material required list
- Six glass jars with lids
- Red and white striped ribbon
- Red heart chocolates
- Peppermint round candies
- Large swirl lollipops
- White marshmallows
- Red metal candy scoop
- Red glossy shelf
Equipment required list
- Scissors
DIY instruction step by step
- Tie a striped ribbon bow around the top of every jar.
- Fill the jars with different red and white sweets.
- Put the large lollipops into the tallest jar.
- Arrange the jars in two rows on the red shelf.
- Place the metal scoop in the middle of the display.
- Scatter some red chocolate hearts around the base of the scoop.
36 Woof You Dog Lover Shelf
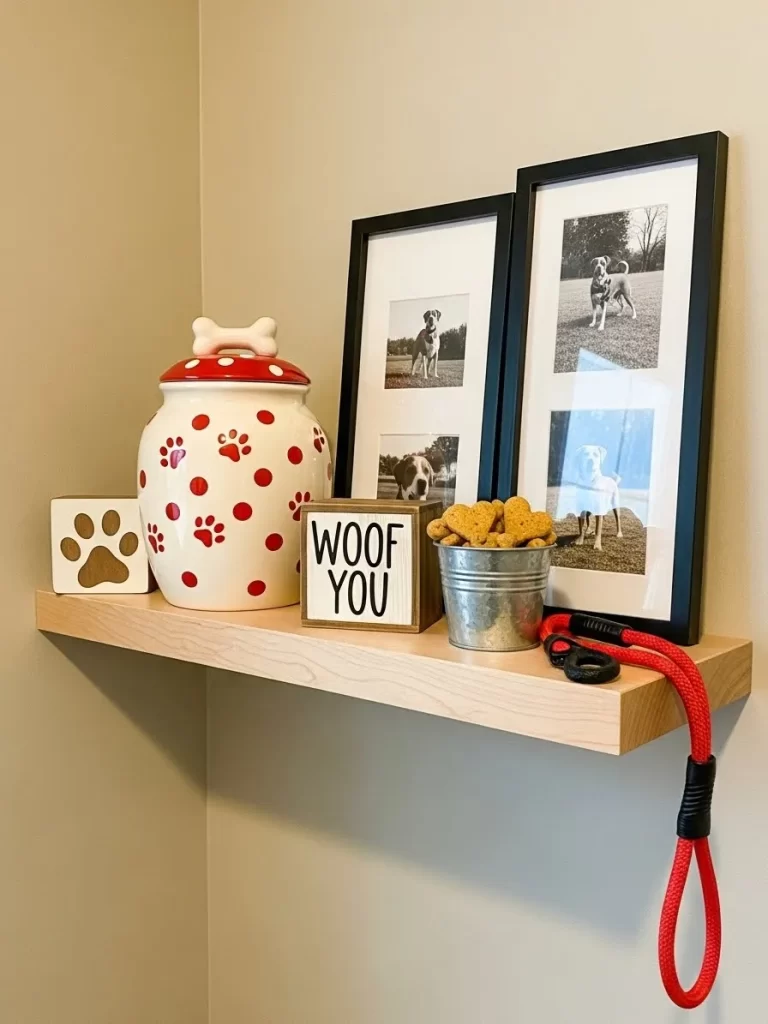
A white jar with red paw prints and a bone lid sits on a wood shelf. Two black frames hold photos of a pet dog in a grassy field. A small wooden block says WOOF YOU in black letters.
A small metal bucket is full of heart shaped dog treats. A red rope leash hangs over the edge of the shelf to finish the look. This is a sweet way to include your pet in the holiday.
Material required list
- Paw print treat jar with bone lid
- Two black picture frames
- Photos of your dog
- WOOF YOU wood block
- Small galvanized metal bucket
- Heart shaped dog cookies
- Red rope leash
- Wood floating shelf
Equipment required list
- None
DIY instruction step by step
- Put your favorite dog photos into the black frames.
- Place the treat jar on the left side of the shelf.
- Set the WOOF YOU block next to the jar.
- Fill the metal bucket with the heart cookies and set it on the right.
- Lean the photo frames behind the bucket.
- Drape the red leash over the end of the shelf.
37 Birch Heart Pine Garland
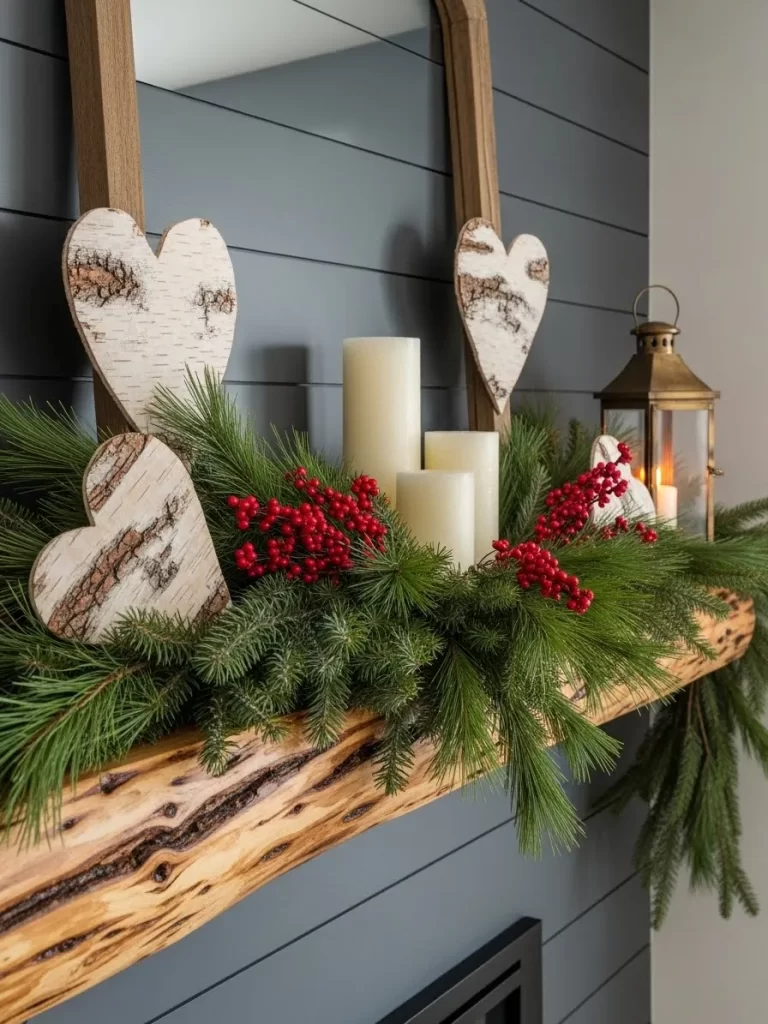
A thick garland of pine needles and red berries sits on a rustic wood mantel. Three large white candles of different heights glow in the center. Hearts made of birch bark hang from a mirror frame above the greenery.
A gold lantern with a lit candle stands on the right end of the display. The dark grey wall highlights the natural textures of the wood and plants. This forest theme feels very cozy and traditional.
Material required list
- Pine needle garland
- Faux red berry stems
- Three white pillar candles
- Birch bark heart cutouts
- Gold metal lantern
- Large wood framed mirror
Equipment required list
- Twine
DIY instruction step by step
- Lay the pine garland across the wood mantel and add the berries.
- Place the three pillar candles in the middle of the greenery.
- Hang the birch hearts from the mirror using pieces of twine.
- Put the gold lantern on the far right side.
- Light all of the candles to create a warm atmosphere.
- Fluff the pine branches so they look full and natural.
38 Crystal Heart Reflection Shelf

Three large glass hearts sit on a clear shelf and catch the sunlight. A round silver mirror behind them creates bright reflections and rainbows on the wall. Two tall silver candlesticks hold slender white candles.
The clear glass and silver metal look very clean and bright. This setup is great for a room with lots of windows. Every piece sparkles when the sun shines through the glass.
Material required list
- Three large faceted glass hearts
- Round silver wall mirror
- Two silver taper candle holders
- Two white taper candles
- Glass floating shelf
Equipment required list
- Glass cleaner
DIY instruction step by step
- Clean the glass shelf and mirror until they shine.
- Mount the round mirror on the wall above the shelf.
- Place the three glass hearts in a row on the left side.
- Set the silver candle holders on the right side.
- Insert the white candles into the holders.
- Position the shelf so it catches the morning sun.
39 Treat Yourself Spa Tray
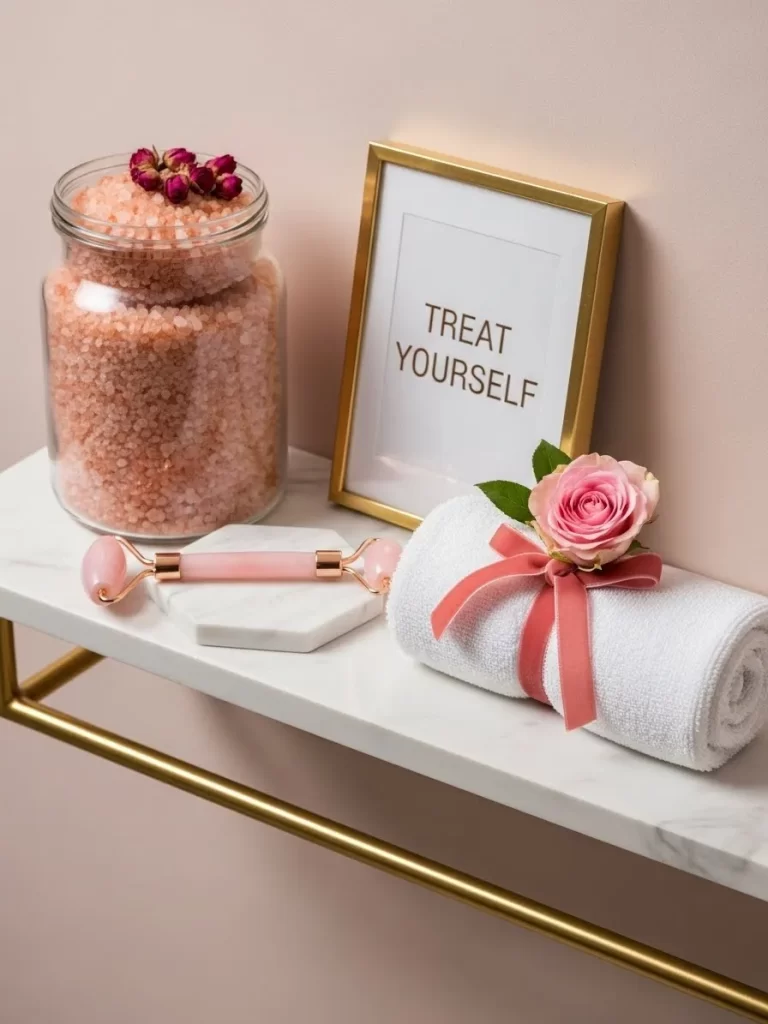
A white marble shelf holds a jar of pink bath salts and a rose quartz roller. A small gold frame displays a card that says TREAT YOURSELF. A white towel is rolled up and tied with a pink velvet ribbon and a rose.
Everything is arranged on a white stone tile for a clean look. The soft pink wall makes the bathroom feel like a luxury spa. This is a great way to remind yourself to relax.
Material required list
- Glass jar with pink bath salts
- Rose quartz face roller
- Gold mini frame
- TREAT YOURSELF print
- White hand towel
- Pink velvet ribbon
- One pink silk rose
- White marble shelf
Equipment required list
- Scissors
DIY instruction step by step
- Fill the glass jar with the pink salts and set it on the left.
- Put the rose quartz roller on a small marble tile next to the jar.
- Place the TREAT YOURSELF card into the gold frame.
- Roll the white towel tightly and tie it with the pink ribbon.
- Tuck the pink rose into the ribbon on top of the towel.
- Set the frame and the towel on the right side of the shelf.
40 Envelope Love Advent Calendar
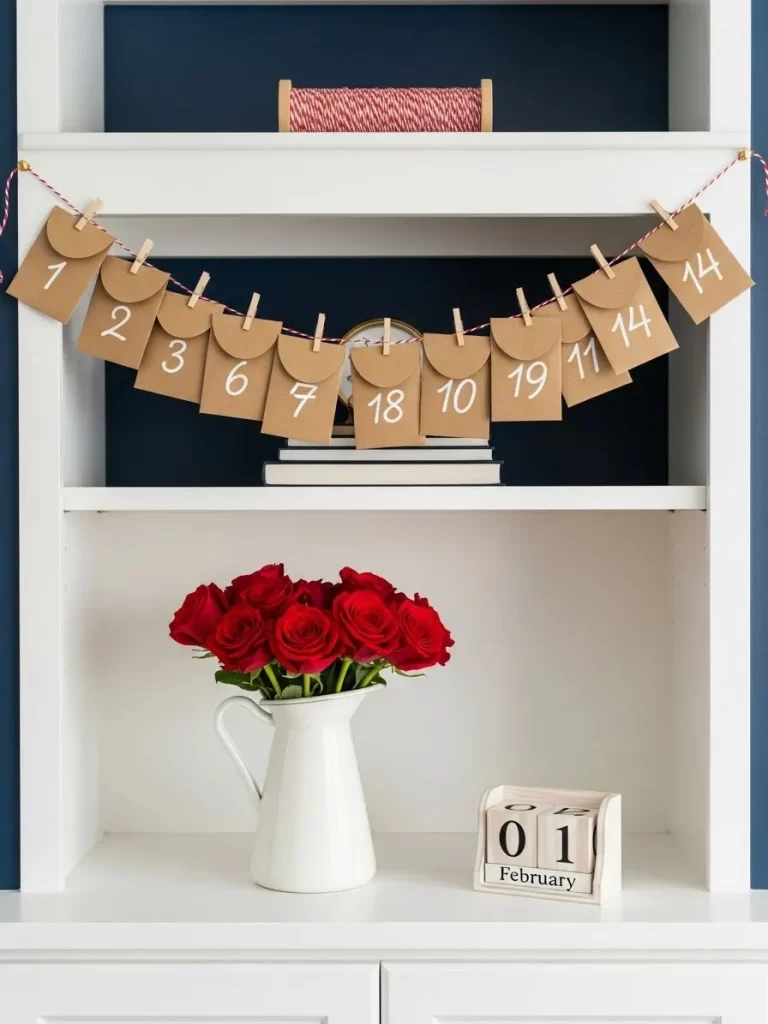
A white shelf displays a garland made of small brown envelopes. Each envelope has a white number from one to fourteen written on it. A white pitcher full of red roses sits on the bottom level.
A wooden block calendar shows the date of February first. This is a fun way to count down the days until the big holiday. You can put a small note or a treat inside every envelope.
Material required list
- Fourteen small brown envelopes
- White paint marker
- Red and white twine
- Tiny wooden clothespins
- White ceramic pitcher
- One dozen red roses
- Wooden block calendar
- White bookshelf
Equipment required list
- None
DIY instruction step by step
- Use the white marker to write numbers one through fourteen on the envelopes.
- String the twine across the middle of your bookshelf.
- Use the tiny pins to hang the envelopes in order.
- Fill the white pitcher with water and the red roses.
- Set the pitcher on the bottom shelf.
- Place the block calendar next to the roses and set it to the current date.
Decorating your home for this special day does not require a big budget. Using simple materials allows anyone to create a high end look at home. Most of these projects take very little time to complete.
Spend an afternoon trying out these different themes to see what fits your house. Bright colors and soft lighting will change the entire mood of your room. These displays serve as a constant reminder of the beauty in small details.
Key Takeaways
Variety in textures creates visual interest on flat surfaces.
Adding natural elements like moss brings organic life to your shelf.
Using different heights helps the eye move across the entire display.
Proper lighting sets a warm and inviting atmosphere for guests.
Small personal touches like photos make the decor feel more special.