
Most apartment dwellers ignore their small outdoor areas during the winter months. You might see your balcony as just a place for storage or a spot that collects dust. February provides a great excuse to change that mindset and reclaim your square footage.

Romance does not require a massive garden or a fancy restaurant reservation. Small balconies offer a private and intimate setting that large spaces simply cannot match. You can turn a cold concrete floor into a warm sanctuary with a few creative touches.
Empty balconies feel lonely and neglected when they should be celebrating love. This guide will show you how to use lighting and textiles to create magic. Every square inch of your home deserves attention this Valentine season.
1 Glowing Parisian Cafe Table
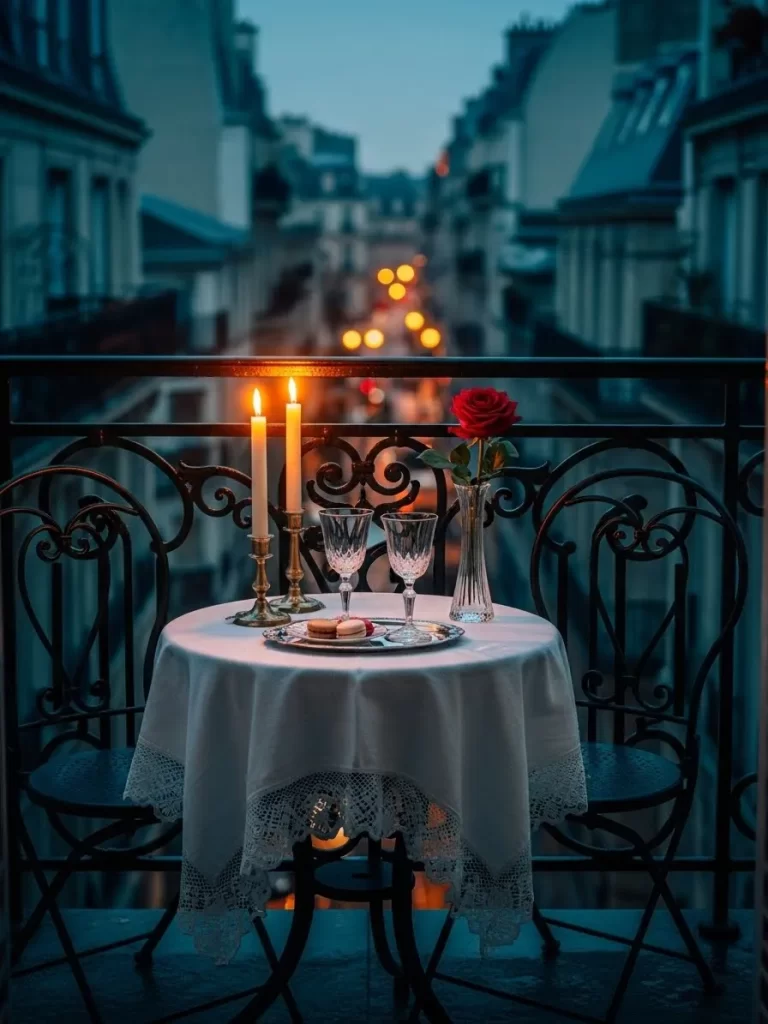
Imagine transforming your tiny outdoor ledge into a private corner of a French city. This setup uses a small bistro set covered in a delicate white lace cloth to create an intimate mood. Two tall candles provide a warm flicker that dances against the backdrop of city lights. A single red rose sits in a glass vase, acting as a bold focal point for your Valentine celebration.
Crystal glasses and a small plate of treats sit ready for a quiet evening. The dark metal chairs blend into the night, making the bright table stand out beautifully. You can achieve this high end look even with very limited square footage. Soft lighting from the flames ensures the space feels cozy and inviting without needing massive furniture.
Materials Required
- Small round bistro table
- White lace tablecloth
- Two tall taper candles
- Pair of brass or gold candle holders
- Slim clear glass bud vase
- One fresh long stemmed red rose
- Two crystal wine or water glasses
- Small silver serving tray
- Assorted macarons or cookies
Equipment Required
- Long reach lighter or matches
- Scissors to trim the rose stem
- Damp cloth for cleaning the table surface
DIY Instruction Step by Step
- Clear your balcony of any clutter to make room for the bistro set.
- Place the small round table in the center or against the railing for the best view.
- Spread the white lace tablecloth over the table so it hangs evenly on all sides.
- Position the two candle holders on the left side of the table surface.
- Insert the taper candles into the holders and ensure they stand straight.
- Fill the slim glass vase with a small amount of water.
- Use scissors to cut the rose stem at an angle and place it inside the vase.
- Set the vase on the right side of the table to balance the height of the candles.
- Lay the silver tray in the middle and arrange your sweet treats on it.
- Put the two crystal glasses behind the tray so they are easy to reach.
- Use the lighter to ignite the candles just before your guest arrives.
2 Boho Pallet Picnic Corner
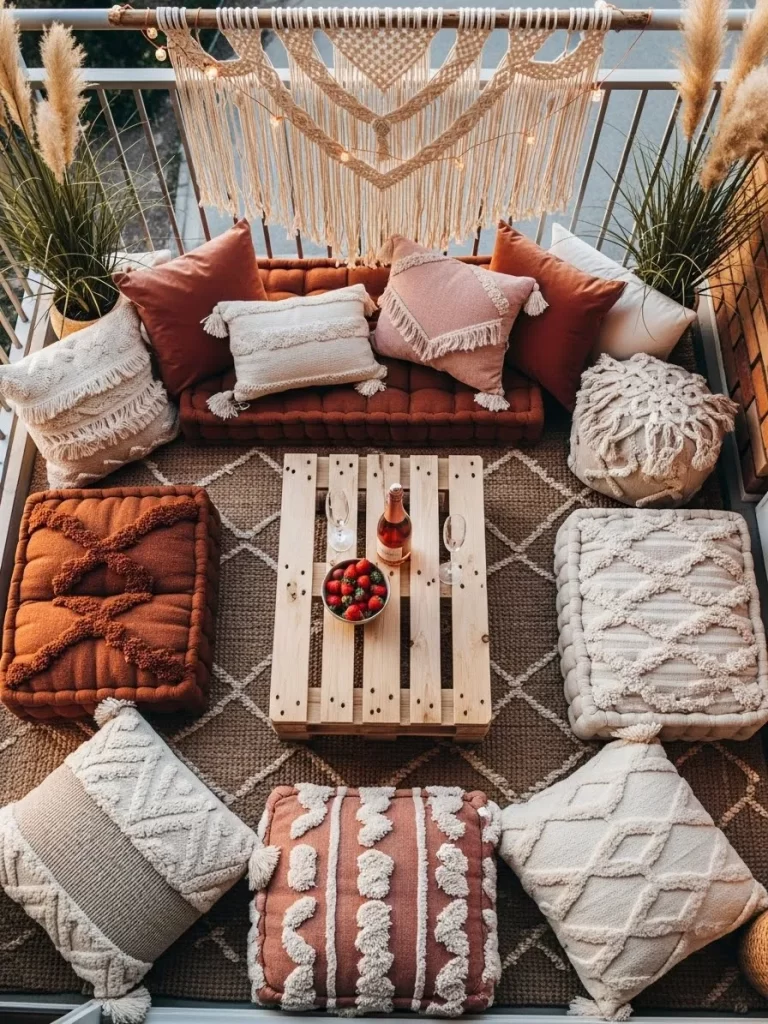
Low seating creates a relaxed and intimate atmosphere for a Valentine date. This design uses a wooden shipping pallet as a low table centerpiece. Terracotta and cream cushions surround the wood to offer a soft place to sit. A macrame hanging acts as a beautiful backdrop against the railing.
Pampas grass in tall vases adds height and a natural feel to the corners. Small string lights provide a gentle glow as the sun sets. Every element works together to turn a concrete floor into a warm boho retreat. You can enjoy snacks and wine while lounging comfortably on the textured rug.
Materials Required
- One large woven rug
- One wooden shipping pallet
- Four large floor cushions in terracotta
- Six smaller throw pillows with tassels
- Two tall vases
- Dried pampas grass bundles
- One macrame wall hanging
- One bottle of rose wine
- One bowl of fresh strawberries
- String of battery operated lights
Equipment Required
- Sandpaper
- Measuring tape
- Small clear adhesive hooks
DIY Instruction Step by Step
- Clear the entire balcony floor of any debris or dust.
- Lay down the woven rug so it covers the center of the space.
- Use sandpaper to smooth down any rough parts of the wooden pallet.
- Place the pallet in the middle of the rug to serve as a table.
- Set the large floor cushions around three sides of the pallet.
- Toss the smaller decorative pillows on top of the large cushions.
- Fill the tall vases with pampas grass and place them in the back corners.
- Attach the macrame hanging to the railing using the adhesive hooks.
- Drape the string lights over the macrame for a soft evening glow.
- Put the wine and fruit on the pallet just before your partner arrives.
3 Celestial Stargazing Suite

Imagine bringing the beauty of the cosmos right to your outdoor terrace. A high quality galaxy projector casts a swirling nebula onto the ceiling and walls. Deep blue velvet blankets cover the lounge chairs to keep you warm during the night. Large star shaped lanterns glow on the floor to mimic the night sky.
Ornate metal lanterns add a touch of classic charm to this modern light show. Sipping hot cocoa from white mugs makes the experience even more cozy. This setup works wonderfully for small spaces because the decor stays mostly on the floor. You will feel like you are floating among the stars without leaving your home.
Materials Required
- One galaxy star projector
- Two lounge chairs
- Two dark blue velvet blankets
- Two light blue accent pillows
- Three large star shaped paper lanterns
- Two tall Moroccan metal lanterns
- Two battery operated pillar candles
- Two ceramic mugs
- Small side table
Equipment Required
- Power bank for the projector
- Screwdriver to open battery covers
DIY Instruction Step by Step
- Position your chairs in the corner so you can look up easily.
- Cover each chair with a velvet blanket for a plush feeling.
- Place a light blue pillow on each seat for comfort.
- Set the galaxy projector on a flat surface in front of the chairs.
- Angle the lens so the lights cover the most visible wall.
- Distribute the star shaped lanterns around the base of the chairs.
- Put the pillar candles inside the metal lanterns and turn them on.
- Locate the small side table between the two seating spots.
- Prepare your favorite hot drink and set the mugs on the table.
- Switch off the main balcony lights to let the projection shine.
4 Neon Love Lounge
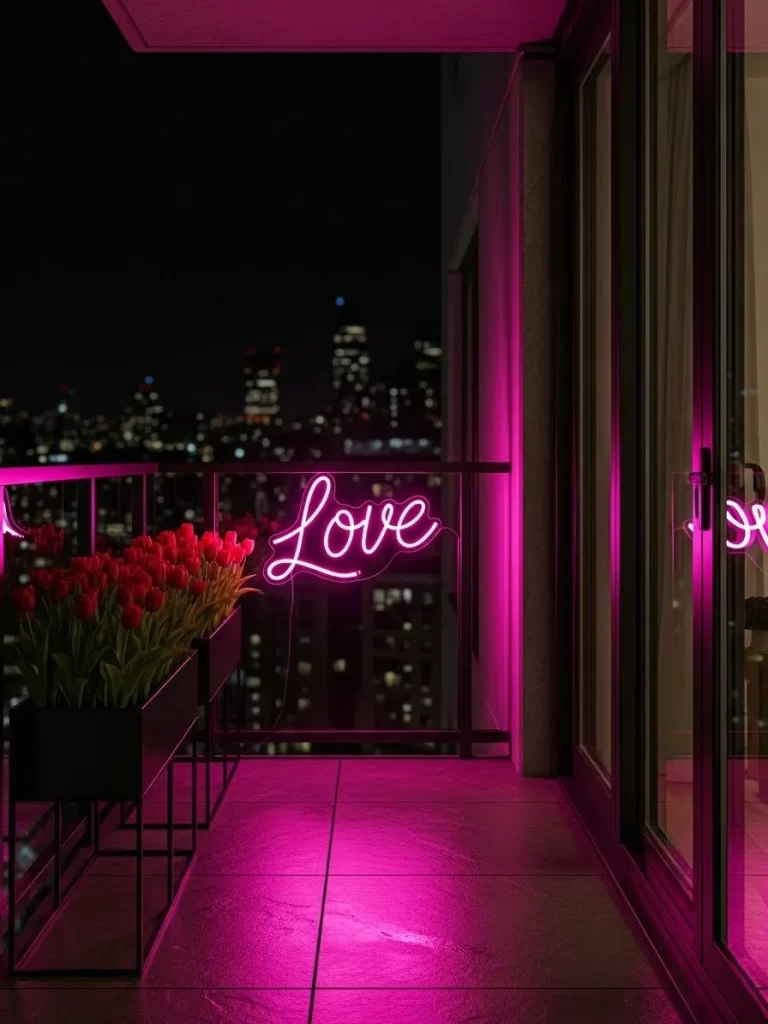
Bold pink light transforms a dark balcony into a trendy city escape. A neon sign with the word Love becomes the glowing heartbeat of the area. Black planter boxes filled with bright red tulips add a touch of traditional romance. This contrast between modern light and natural flowers creates a striking visual.
City lights in the distance provide the backdrops for your private lounge. Reflections of the pink glow bounce off the glass doors to double the effect. You do not need much furniture when the light is this powerful. This design is excellent for couples who enjoy a vibrant and energetic atmosphere.
Materials Required
- One LED neon sign
- Two black rectangular planter boxes
- Twenty artificial red tulips
- One power extension cord
- Five transparent zip ties
Equipment Required
- Step ladder
- Scissors to trim ties
DIY Instruction Step by Step
- Clean the top railing of your balcony with a damp cloth.
- Hold the neon sign against the rail to find the best height.
- Secure the sign to the bars using the transparent zip ties.
- Snip off the long ends of the ties so they are invisible.
- Place the black planters on the floor right under the sign.
- Insert the red tulips into the planters until they look full.
- Run the power cord along the bottom of the railing to the outlet.
- Plug the sign in and check that it is centered correctly.
- Arrange the flowers to hide any visible wires from the sign.
- Clear the rest of the floor to keep the focus on the neon glow.
5 Enchanted Ivy Sanctuary
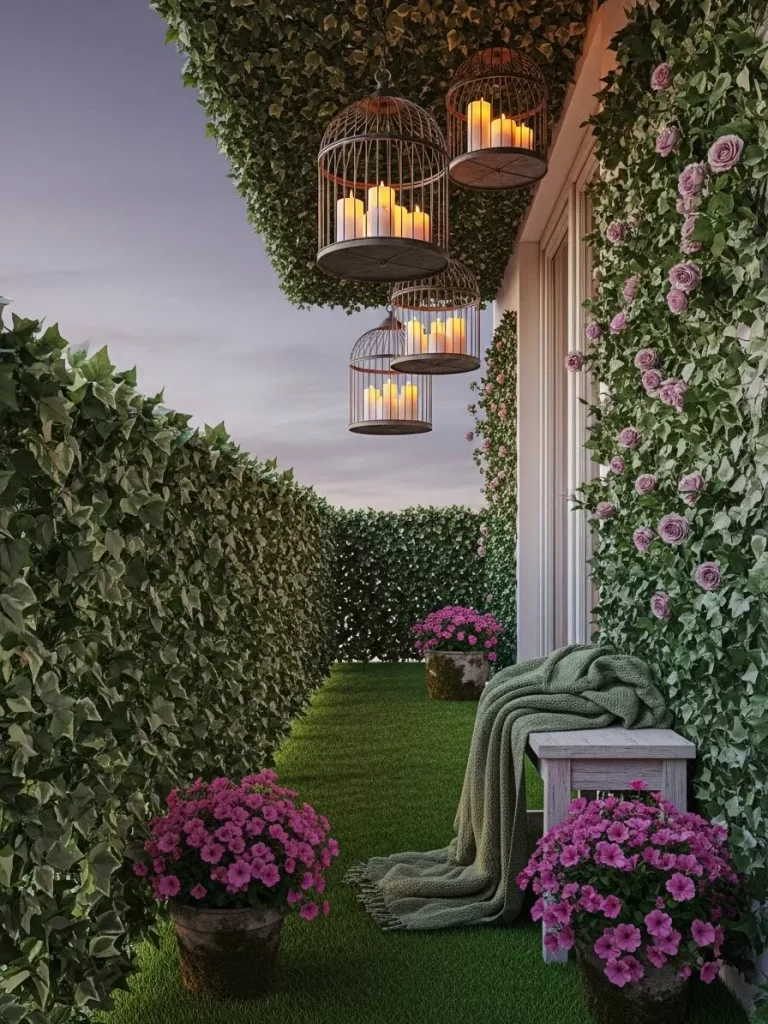
Thick green ivy panels turn a plain wall into a lush secret garden. Hanging birdcages filled with warm candles provide a whimsical and fairytale look. Pink petunias in rustic pots ground the design with a splash of floral color. A soft green knit blanket rests on a white bench for a touch of comfort.
Every inch of the railing is covered in greenery to ensure your total privacy. The artificial grass rug feels soft under your feet and completes the garden theme. Lighting the candles in the cages creates a magical flicker as evening falls. You can escape the noise of the city in this secluded green paradise.
Materials Required
- Six artificial ivy wall panels
- Three decorative metal birdcages
- Nine battery operated candles
- Two large terracotta pots
- Pink flowering plants
- One small white wooden bench
- One green knit throw blanket
- One artificial grass rug
Equipment Required
- Heavy duty staple gun
- Ceiling hooks for the cages
DIY Instruction Step by Step
- Roll out the artificial grass rug to cover the balcony floor.
- Fasten the ivy panels to the back wall using the staple gun.
- Check that the ivy covers every part of the concrete or brick.
- Install the hooks into the ceiling or the top of the rail.
- Place three candles inside each birdcage at different heights.
- Hang the cages from the hooks so they sit at various levels.
- Set the white bench against the new ivy wall.
- Fold the green blanket and place it neatly on the bench.
- Put the pink flowers into the pots and set them on the grass.
- Turn on all the candles using a remote or the base switches.
6 Bubbles and Bliss Station
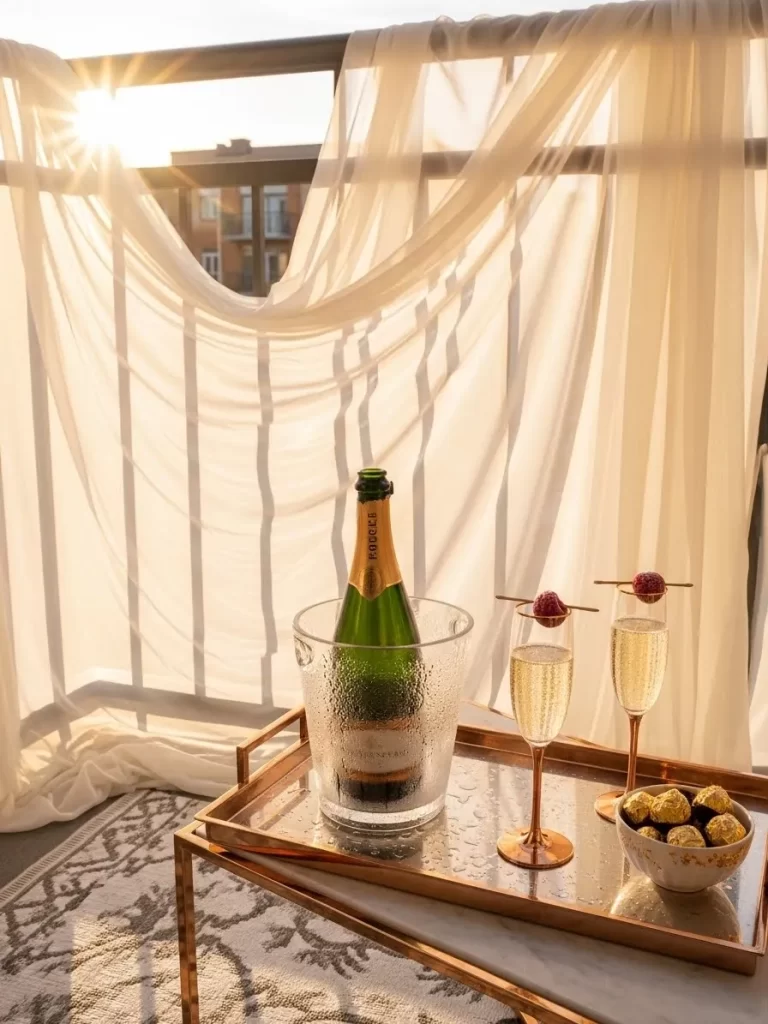
Sunlight filters through sheer white curtains to create a dreamy and soft environment. A gold tray table holds chilled champagne and luxury chocolates for a refined date. The metal railing disappears behind the fabric to give you a private nook. This simple setup focuses on quality and elegance for a romantic afternoon.
Golden accents on the tray and glasses catch the warm rays of the sun. Red raspberries inside the glasses add a tiny pop of color to the golden drink. Using a tall tray table is a smart way to save space on a narrow balcony. You will feel like you are at a high end resort right at home.
Materials Required
- Two sheer white curtain panels
- One gold tray table
- One bottle of champagne
- One glass ice bucket
- Two gold stemmed glasses
- One small white bowl
- Ten gold wrapped chocolates
- Two fresh raspberries
- One small patterned rug
Equipment Required
- One curtain rod or strong twine
- Fresh ice cubes
DIY Instruction Step by Step
- Place the patterned rug in the middle of your balcony floor.
- Secure the white curtains to the top of the railing with twine.
- Arrange the fabric so it overlaps slightly for better privacy.
- Set the gold tray table on top of the rug.
- Fill the ice bucket with cubes and nestle the bottle inside.
- Position the two glasses next to the bucket on the tray.
- Drop one raspberry into each glass for a garnish.
- Fill the small bowl with chocolates and place it on the tray.
- Pull the curtains closed to block the wind or sun.
- Ensure the table is steady before you start pouring the drinks.
7 Fireside Cabin Retreat
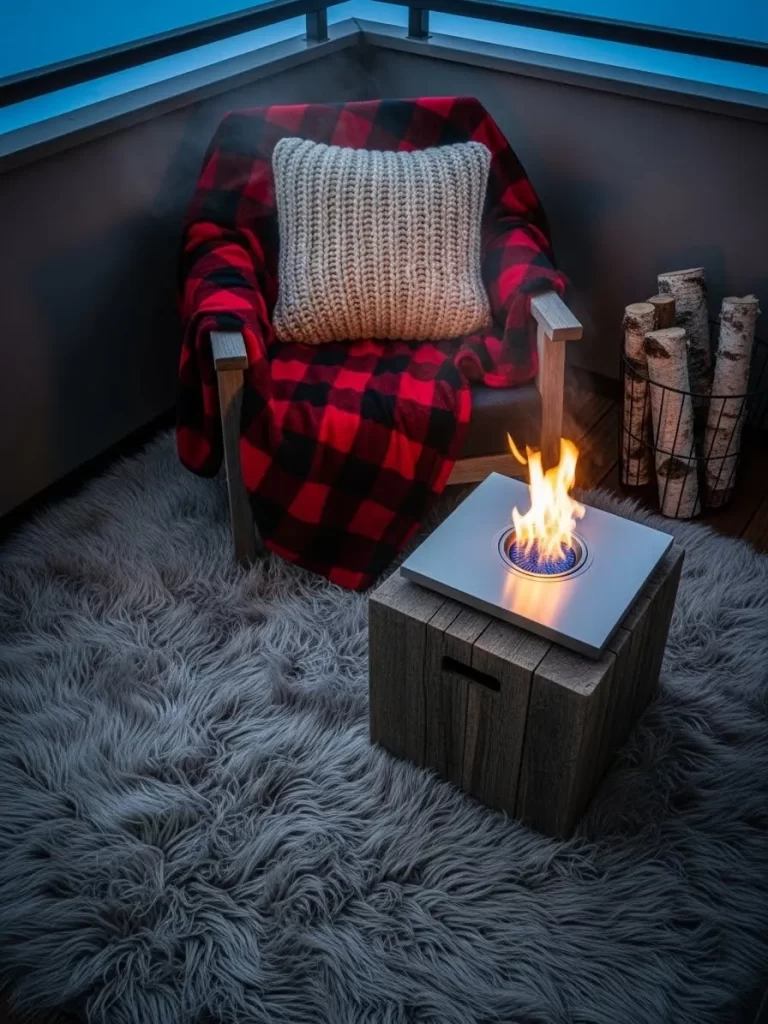
Warmth and texture make this winter balcony feel like a mountain cabin. A tabletop fire pit provides a safe flame to enjoy while you sit outside. Red plaid blankets offer a classic look that keeps the cold away from your legs. A thick gray rug covers the cold floor to provide a soft surface for your feet.
Stacks of birch wood in a wire basket add a rustic and authentic touch. One comfortable armchair is all you need for a quiet evening of conversation. The fire provides enough light to create a cozy glow without needing lamps. This design is a great way to use your balcony during the colder months.
Materials Required
- One tabletop bioethanol fire pit
- One wooden crate
- One gray faux fur rug
- One black armchair
- One red plaid blanket
- One gray knit pillow
- One wire basket
- Three birch logs
- Bioethanol fuel
Equipment Required
- Long reach lighter
- Pouring funnel
DIY Instruction Step by Step
- Spread the faux fur rug over the balcony floor area.
- Place the black armchair in the corner of the space.
- Toss the red plaid blanket over the back of the chair.
- Set the gray knit pillow in the center of the seat.
- Put the wooden crate in front of the chair to act as a stand.
- Place the fire pit securely on top of the crate.
- Fill the burner with fuel using the funnel to avoid spills.
- Stack the birch logs inside the wire basket nearby.
- Use the long lighter to ignite the fire pit safely.
- Adjust the chair so you are at a comfortable distance from the heat.
8 Moroccan Midnight Tea
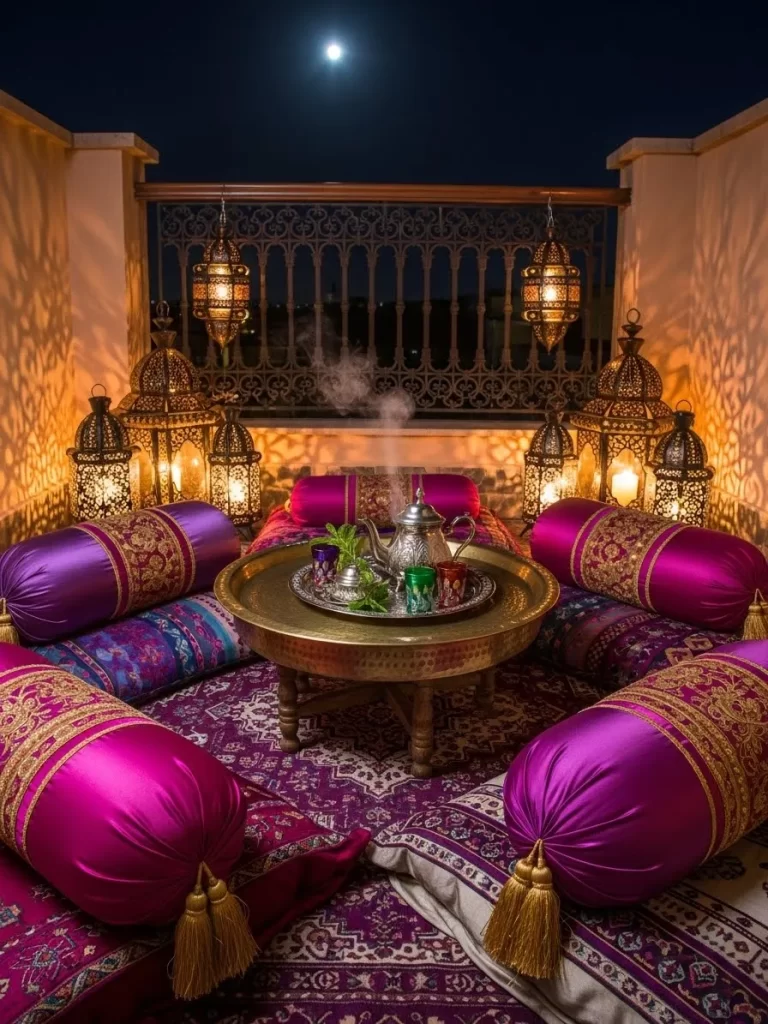
Rich purple bolsters and patterned rugs transport you to a vibrant market. Ornate brass lanterns cast complex shadows that dance across the walls. A low table holds a traditional silver teapot ready for a fresh mint drink. This floor based design makes a tiny balcony feel much more spacious and open.
Large lanterns sit on the floor to provide a warm and flickering light. Purple and gold fabrics create a sense of luxury and exotic mystery. You can spend hours talking while lounging on the soft cushions under the moon. Every detail works together to provide a sensory and romantic experience.
Materials Required
- One large patterned floor rug
- Two purple bolster pillows
- Four square floor cushions
- One low round brass table
- One silver Moroccan teapot
- Two colorful tea glasses
- Fresh mint leaves
- Four hanging brass lanterns
- Two large floor lanterns
Equipment Required
- S hooks for hanging
- Hot water for tea
DIY Instruction Step by Step
- Lay the patterned rug down to cover the entire concrete floor.
- Place the long purple bolsters against the back wall for support.
- Set the square cushions in a circle on the rug.
- Put the brass table in the center of the cushions.
- Hang the four smaller lanterns from the top rail using hooks.
- Position the large lanterns on the floor in opposite corners.
- Place the teapot and glasses on the brass table surface.
- Add fresh mint to the glasses before pouring the tea.
- Light the candles inside every lantern for the full shadow effect.
- Use the bolsters to lean back and enjoy the evening view.
9 Modern Minimalist Nook

Clean lines and a white color palette make a small balcony feel airy. Clear acrylic chairs allow light to pass through so the space stays open. A single red throw blanket provides a bold focal point for Valentine’s Day. One large black lantern on a pedestal table offers a simple and elegant light source.
Minimalist design focuses on the view rather than heavy furniture or decor. The lack of clutter creates a calm and sophisticated atmosphere for two people. You can enjoy a quiet drink while watching the sunset in this chic corner. This style is a smart choice for modern apartment living.
Materials Required
- Two clear acrylic ghost chairs
- One white cylindrical pedestal table
- One large black metal lantern
- One white pillar candle
- One bright red throw blanket
- White outdoor paint
Equipment Required
- Paint roller
- Glass cleaner
- Microfiber cloth
DIY Instruction Step by Step
- Paint the balcony walls with white outdoor paint for a fresh look.
- Use glass cleaner to make the acrylic chairs sparkle.
- Place the white pedestal table in the center of the balcony.
- Set the two clear chairs on either side of the table.
- Drape the red blanket over the back of one chair.
- Make sure the blanket hangs straight for a clean look.
- Put the white pillar candle inside the black lantern.
- Center the lantern on the pedestal table.
- Remove any other items from the floor to keep it clear.
- Light the candle to add a warm glow to the white space.
10 Floating Heart Canopy
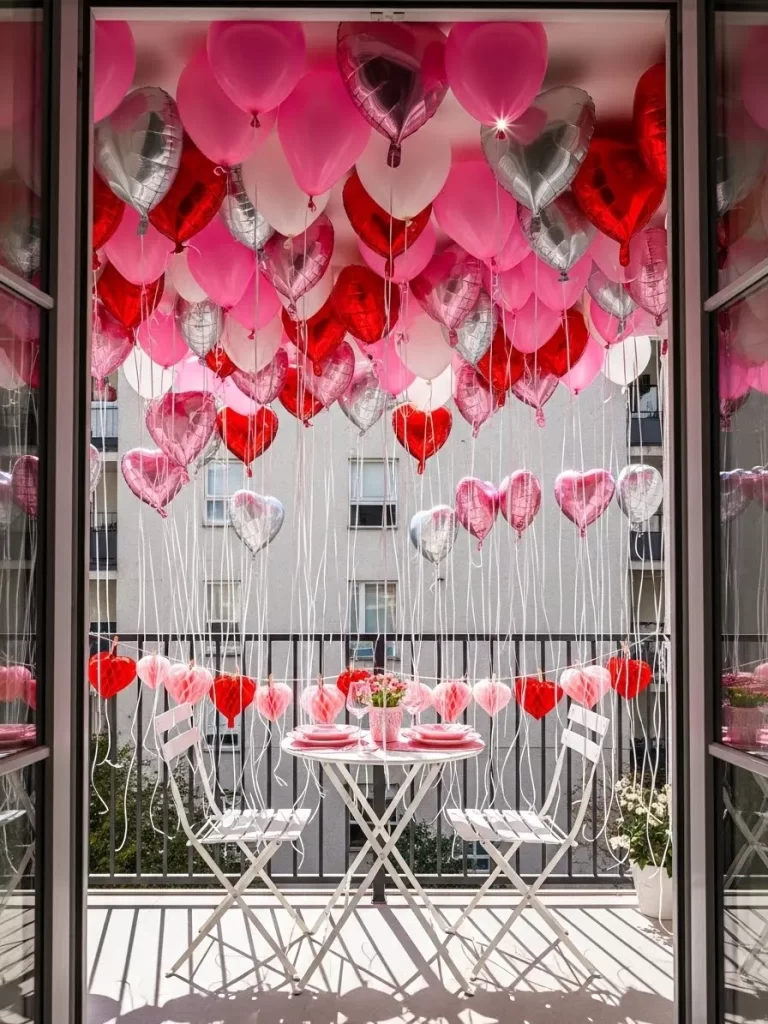
Balloons in shades of pink and red create a ceiling of pure joy. Heart shapes float above your head to turn the balcony into a festive tent. A heart garland hangs along the rail to tie the whole theme together. This playful design uses vertical space to make a big impact without taking up floor room.
White folding chairs and a small table provide a clean base for the color. Pink plates and a small vase of flowers complete the Valentine’s Day table setting. You will feel surrounded by love in this whimsical and airy environment. This setup is a fun way to celebrate with a sense of wonder.
Materials Required
- Fifty heart shaped balloons in pink and red
- Helium tank
- White curling ribbon
- Heart shaped paper garland
- One white folding table
- Two white folding chairs
- Pink dinner plates
- Small vase with flowers
Equipment Required
- Scissors
- Double sided tape
DIY Instruction Step by Step
- Inflate all the heart balloons with helium using the tank.
- Tie a long white ribbon to the neck of each balloon.
- Let the balloons float up to cover the entire balcony ceiling.
- Use small pieces of tape to secure some ribbons to the walls.
- String the heart garland across the top of the balcony rail.
- Unfold the white table and chairs in the middle of the floor.
- Set the pink plates and napkins on the table surface.
- Place the small vase of flowers in the center of the table.
- Curl the ends of the balloon ribbons using your scissors.
- Check that the balloons are distributed evenly across the top.
11 Candlelit Crate Bench
Clusters of white candles and recycled wood create a magical glow for your outdoor area. Three wooden crates are stacked together to form a low and rustic seating bench. Fluffy white faux fur rugs cover the wood to make the space feel soft and expensive.
Grouping thirty pillar candles on the floor adds a dramatic layer of flickering light. This design uses neutral tones to let the warm yellow flames become the main focus. You can transform a plain corner into a luxury retreat with very basic materials. Soft gray pillows provide a comfortable backrest against the balcony wall for a long night of talking.
Materials Required
- Three large wooden shipping crates
- Three fluffy white faux fur rugs
- Four square gray outdoor cushions
- Thirty white pillar candles in varying heights
- One small wooden side table
- Matches or a gas lighter
Equipment Required
- Measuring tape
- Level tool
- Soft brush for cleaning wood
DIY Instruction Step by Step
- Clean the wooden crates with a brush to remove any dirt or splinters.
- Place two crates on the floor horizontally and side by side.
- Set the third crate on top of the first two to create a higher back.
- Lay the gray cushions on the lower crates to provide a soft seat.
- Drape the white faux fur rugs over the cushions and onto the floor.
- Arrange the pillar candles in small groups on the floor and side table.
- Space the candles at least three inches apart for safety.
- Put the small wooden table next to the bench for your drinks.
- Light the candles starting from the back to avoid reaching over flames.
- Check that no fabric is touching the candle wax.
12 Starlit Movie Night
Watching a classic film under the night sky is a wonderful way to celebrate Valentine day. A simple white bed sheet serves as a large screen against the brick wall of your house. Large navy blue floor cushions and a thick knit blanket create a cozy viewing spot.
Small globe lights along the floor provide a safe path without creating too much glare. A big bowl of popcorn and two glasses of wine sit ready on a tray. This setup makes the most of a narrow space by keeping the furniture low to the ground. You can enjoy a cinema experience in total privacy while the city lights twinkle far away.
Materials Required
- One portable video projector
- One white cotton bed sheet
- Two large navy floor cushions
- One thick gray knit blanket
- Four gray throw pillows
- One string of warm globe lights
- Large bowl of popcorn
- One small serving tray
- Two wine glasses
Equipment Required
- Eight sturdy clothespins
- Tripod for the projector
- Power extension cord
DIY Instruction Step by Step
- Find a flat wall on your balcony to act as the screen area.
- Clip the white sheet to the top of the wall or railing using clothespins.
- Pull the bottom of the sheet tight and secure it so there are no wrinkles.
- Place the navy cushions on the floor facing the white sheet.
- Spread the thick blanket over the cushions for extra warmth.
- Set the projector on its tripod about five feet away from the screen.
- Run the power cord along the wall and plug it into the projector.
- Adjust the lens until the image on the sheet looks sharp and clear.
- Lay the string of globe lights along the edge of the floor.
- Put the tray with wine and popcorn between the two cushions.
13 Neon Blue Bistro

Modern lighting and classic flowers create a high energy look for your terrace. A bright blue LED strip along the floor illuminates the space with a futuristic glow. Red geraniums in navy blue planter boxes provide a bold and romantic contrast.
Musical instruments like a cello or accordion add an artistic and personal touch to the design. Two white chairs with navy striped cushions offer a smart and nautical feel. This theme works well for couples who enjoy art and a contemporary urban vibe. Soft light from a glass candle holder on the table keeps the atmosphere intimate and warm.
Materials Required
- Two white chairs
- Two navy and white striped cushions
- One small black square table
- Three navy blue planter boxes
- Ten red geranium plants
- One long blue LED light strip
- One glass hurricane candle holder
- One white pillar candle
- Decorative musical instruments
Equipment Required
- Adhesive backing for the lights
- Watering can
- Glass cleaner
DIY Instruction Step by Step
- Wipe the balcony floor with a damp cloth and let it dry.
- Peel the backing off the LED strip and press it along the wall base.
- Plug the lights in to ensure they cover the whole length of the floor.
- Hook the blue planter boxes onto the outside of the balcony railing.
- Place the red geraniums inside the boxes so they look full and lush.
- Set the black table in the middle of the balcony space.
- Position the two chairs on opposite sides of the table.
- Put the striped cushions on the seats for added comfort.
- Place the candle holder in the center of the table and light it.
- Lean the musical instruments against the wall to complete the scene.
14 Crimson Petal Path
Walking through a sea of red rose petals is a grand and unforgettable gesture. This design covers the entire floor with thousands of petals to create a soft carpet. Tall black lanterns with glowing white candles line the walkway to guide your partner.
The deep red color looks stunning against the purple light of a city sunset. A small table with champagne and glasses waits at the end of the path. This setup focuses on one bold element to make a huge visual impact. You can create a royal atmosphere even on a very small and narrow balcony.
Materials Required
- Two thousand artificial red rose petals
- Ten tall black metal lanterns
- Ten large white battery candles
- One small round bistro table
- One bottle of champagne
- Two champagne glasses
- One silver ice bucket
Equipment Required
- Broom for cleaning
- Measuring tape
DIY Instruction Step by Step
- Sweep the balcony floor thoroughly to remove all dust.
- Place five lanterns in a straight line along the left wall.
- Put the other five lanterns in a line along the right railing.
- Ensure the lanterns are spaced about two feet apart.
- Insert a battery candle into each lantern and turn it on.
- Pour the rose petals onto the floor between the two rows of lanterns.
- Use your hands to spread the petals so the floor is hidden.
- Set the bistro table at the far end of the balcony.
- Fill the ice bucket and place the champagne bottle inside.
- Put the two glasses on the table next to the bucket.
15 Zen Stone Terrace

Balance and peace are the main goals of this Japanese inspired outdoor design. Smooth gray river stones and fine white sand create a calm and grounded floor. Pink cherry blossom cushions sit on top of tatami mats for a traditional tea ceremony.
A small stone water basin adds the relaxing sound of trickling water to your date. Every item is arranged with simplicity and clear lines in mind. This setup is a great choice for couples who want to relax and meditate together. The mixture of hard stone and soft fabric feels very stable and natural.
Materials Required
- Four bags of smooth gray river stones
- One bag of fine white sand
- Two tatami floor mats
- Two pink cushions with floral patterns
- One low wooden tray
- Two ceramic tea bowls
- One small white vase
- One flowering branch
- One stone water basin
Equipment Required
- Small rake
- Leveling tool
DIY Instruction Step by Step
- Divide your floor into four equal sections using a pencil.
- Fill the first section with a thick layer of gray river stones.
- Pour the white sand into the second section of the floor.
- Use the small rake to draw circles and lines in the sand.
- Lay the tatami mats in the remaining two sections.
- Place the pink cushions in the center of the mats.
- Set the stone water basin on top of the river stones.
- Put the wooden tray on the mat between the two cushions.
- Place the tea bowls and the vase on the tray.
- Put the flowering branch into the vase to add a natural touch.
16 Garden High Tea
Classic elegance and sweet treats make for a sophisticated Valentine afternoon. A vintage lace runner covers a white wooden table to add a touch of history. Tiered porcelain stands hold delicious scones and sandwiches for a shared meal.
Lavender and roses in a floral pitcher provide a wonderful scent for the air. An antique teal radio plays soft music to set a nostalgic mood. This design is excellent for daylight hours when you can enjoy the fresh breeze. You will feel like you are in a high end garden party right at home.
Materials Required
- One white wooden table
- One ivory lace table runner
- One three tiered serving stand
- One floral ceramic teapot
- Two matching tea cups and saucers
- One vintage teal radio
- One floral pitcher vase
- Fresh lavender and pink roses
- Assorted tea sandwiches and scones
Equipment Required
- Small tongs
- Batteries for the radio
- Fresh water for the flowers
DIY Instruction Step by Step
- Clean the table surface to ensure it is bright and white.
- Lay the lace runner down the center of the table.
- Place the tiered serving stand in the middle of the lace.
- Arrange the food on the tiers starting with sandwiches at the bottom.
- Set the teapot on the left side of the table.
- Put the cups and saucers in front of the two chairs.
- Fill the pitcher with water and add the roses and lavender.
- Position the vase in the back corner of the table.
- Turn on the vintage radio and find a station with soft music.
- Sit the radio on the far corner to leave room for the food.
17 Rose Arch Portal
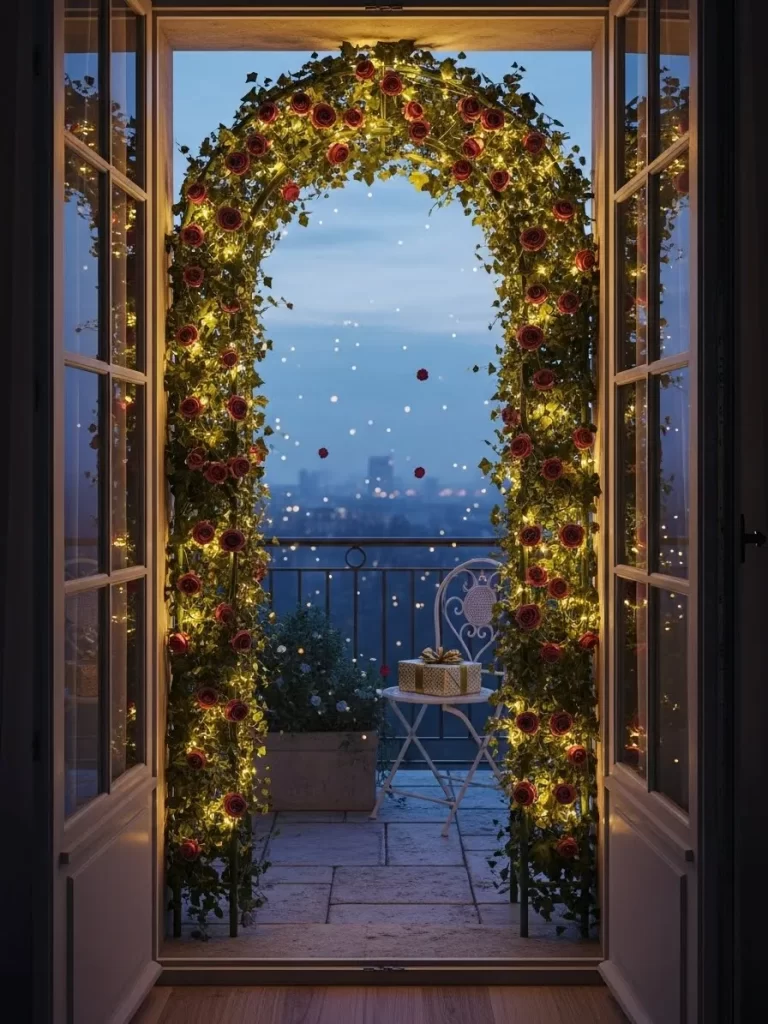
Walking through a wall of flowers makes your balcony feel like a secret world. This design uses a metal arch covered in thick green ivy and red roses. Tiny fairy lights sparkle within the leaves to create a glowing entrance.
The arch frames your city view and makes the small space feel very important. A single white chair and a gold gift box wait for your partner inside the floral frame. This setup is a powerful way to surprise someone with a grand romantic gesture. You can turn a regular door into a magical portal with just a few hours of work.
Materials Required
- One metal garden arch
- Four artificial ivy vines
- Fifty artificial red roses
- Two strings of battery fairy lights
- One white metal chair
- One small round table
- One gold gift box
- Green floral wire
Equipment Required
- Step ladder
- Wire cutters
- Pliers
DIY Instruction Step by Step
- Build the metal arch according to the package instructions.
- Place the arch directly in front of your balcony door.
- Secure the frame to the railing using wire so it stays steady.
- Wrap the ivy vines around the metal bars of the arch.
- Use floral wire to attach the red roses to the ivy.
- Space the roses evenly to cover any gaps in the greenery.
- Weave the fairy lights through the roses from top to bottom.
- Place the white chair behind the arch in the center.
- Set the small table next to the chair for the gift.
- Put the gold gift box on the table as the main focal point.
18 Modern Marble Bar

Sleek materials and clean lines provide a very chic and urban atmosphere. A round marble table with a black pedestal offers a high end surface for cocktails. Silver wire chairs allow light to pass through so the balcony stays open and airy.
One large black lantern on the table provides a simple and modern light source. Professional bar tools like a gold shaker sit ready for a master mixologist. This design is a smart choice for a small apartment with a great city view. You can enjoy a sophisticated drink in a setting that feels like a luxury rooftop lounge.
Materials Required
- One round marble top table
- Two silver wire chairs
- One gold cocktail shaker
- Two crystal martini glasses
- One black square candle lantern
- One white pillar candle
- One glass of fresh ice
Equipment Required
- Glass cleaner
- Microfiber polishing cloth
- Leveling tool
DIY Instruction Step by Step
- Use the microfiber cloth to polish the marble table top.
- Place the table in the corner of the balcony near the glass rail.
- Set the two wire chairs around the table facing the view.
- Put the black lantern on the left side of the marble surface.
- Insert the white candle and light it for a clean glow.
- Position the gold shaker in the center of the table.
- Place the two martini glasses next to the shaker.
- Ensure the table is level so the drinks do not slide.
- Clean the wire chairs with a damp cloth to remove dust.
- Clear any extra items from the floor to keep the minimalist look.
19 Sunset Velvet Escape
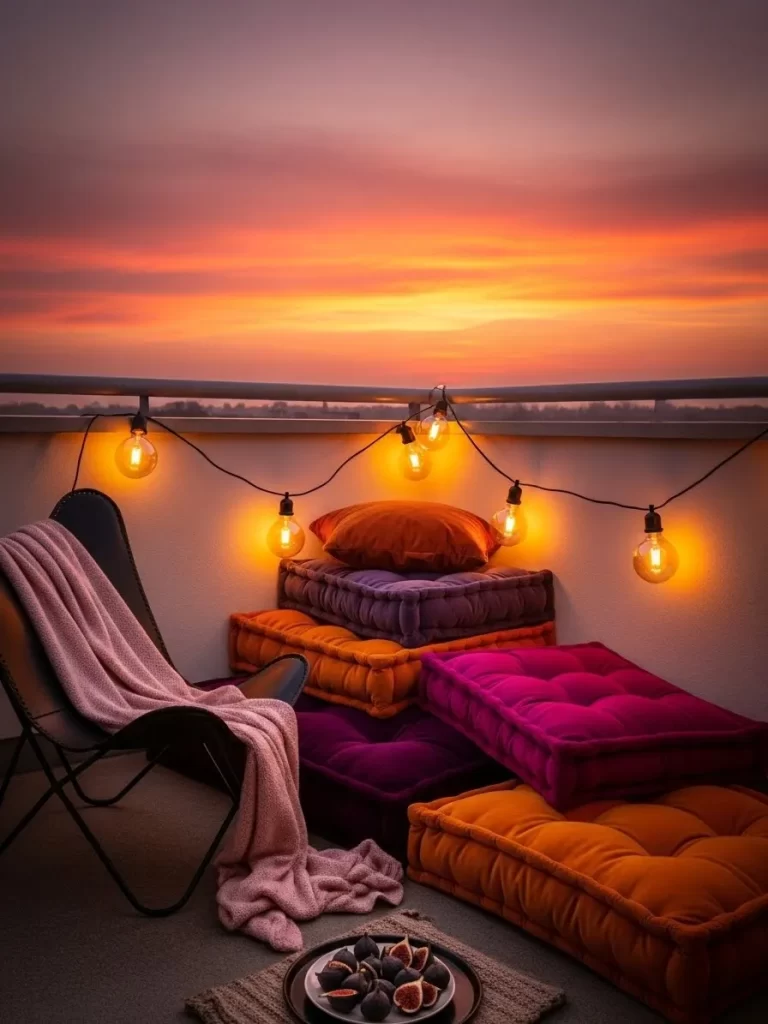
Bold colors and soft textures make this the most comfortable spot on the balcony. Large velvet cushions in shades of purple, orange, and pink are piled high for lounging. A string of Edison globe lights hangs above the railing to provide a warm and nostalgic glow.
Watch the sky change colors while resting on this plush bed of pillows. A simple dark tray with fresh figs provides a light and healthy snack. This low profile seating keeps your view of the horizon completely open. You will feel relaxed and grounded in this colorful and cozy corner.
Materials Required
- Three large square cushions in purple and orange
- One extra large pink floor cushion
- One black armchair
- One pink knit throw blanket
- One string of Edison bulbs
- One dark circular tray
- One plate of fresh figs
- One small brown rug
Equipment Required
- Extension cord
- Heavy duty adhesive tape
DIY Instruction Step by Step
- Lay the brown rug in the corner of your balcony floor.
- Stack the purple and orange cushions on the rug.
- Place the large pink cushion next to the stack for more room.
- Set the black armchair on the other side of the rug.
- Drape the pink blanket over the seat of the chair.
- String the Edison bulbs along the top of the balcony railing.
- Use tape to secure the wire so the bulbs hang evenly.
- Put the tray with the figs on the floor rug.
- Adjust the cushions so they provide a good backrest.
- Turn on the lights just as the sun begins to set.
20 Ombre Heart Backdrop

Handmade decorations add a personal and sweet touch to your Valentine date. This design features hundreds of paper hearts hanging in a beautiful ombre pattern. The colors fade from white at the top to deep red at the bottom of the wall.
A simple wooden bench with a white pillow provides a quiet place for photos. These hearts move gently in the breeze to add life and texture to the space. This budget friendly idea makes a massive impact on the look of your balcony. You can cover a plain wall and create a romantic scene in just one afternoon.
Materials Required
- Two hundred paper hearts in white, pink, and red
- Twenty pieces of thin white string
- One wooden garden bench
- One white square pillow
- Clear adhesive tape
- Glue stick
Equipment Required
- Scissors
- Ruler
- Step ladder
DIY Instruction Step by Step
- Group your paper hearts by color from lightest to darkest.
- Glue the hearts onto the white strings with two inches of space.
- Make sure each string has an even fade from white to red.
- Tape the top of the first string to the left side of the wall.
- Hang the other nineteen strings side by side to cover the wall.
- Check that the hearts are all facing the same direction.
- Place the wooden bench in front of the new heart wall.
- Set the white pillow on one side of the bench.
- Ensure the bench is centered with the heart pattern.
- Trim any extra string from the bottom of the hearts.
21 Santorini Sunset Suite
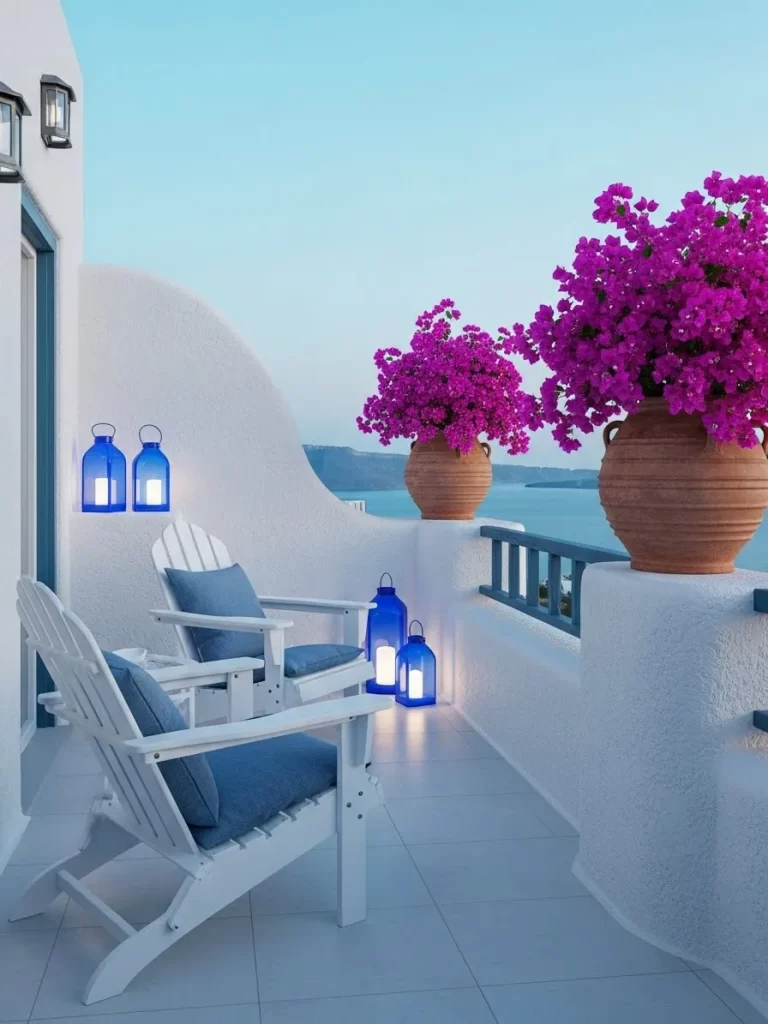
Bring the charm of a Greek island to your narrow balcony with bright whites and deep blues. White wood chairs provide a clean look that makes the space feel bigger. Large clay pots filled with vibrant pink bougainvillea add a splash of natural beauty.
Blue glass lanterns sit on the floor to cast a soft light as the sun goes down. This color palette mimics the famous sights of Santorini. You can enjoy a refreshing drink while feeling like you are on vacation. Simple lines and bold colors ensure the decor does not feel crowded.
Materials Required
- Two white wood chairs
- Two deep blue seat cushions
- Two large terracotta clay pots
- Two climbing pink bougainvillea plants
- Three cobalt blue glass lanterns
- Three white battery candles
- Small white side table
- Blue and white outdoor rug
Equipment Required
- Watering can
- Garden trowel
DIY Instruction Step by Step
- Sweep the floor to ensure the white furniture stays clean.
- Lay the blue and white rug in the center of the balcony.
- Position the white chairs on the rug facing the best view.
- Place a blue cushion on each chair for comfort.
- Set the large clay pots in the far corners of the balcony.
- Plant the bougainvillea in the pots and secure them to the wall.
- Put the small side table between the two chairs.
- Group the blue lanterns on the floor near the pots.
- Insert the battery candles into the lanterns and turn them on.
- Step back to check that the blue colors are balanced across the space.
22 Retro Heart Diner
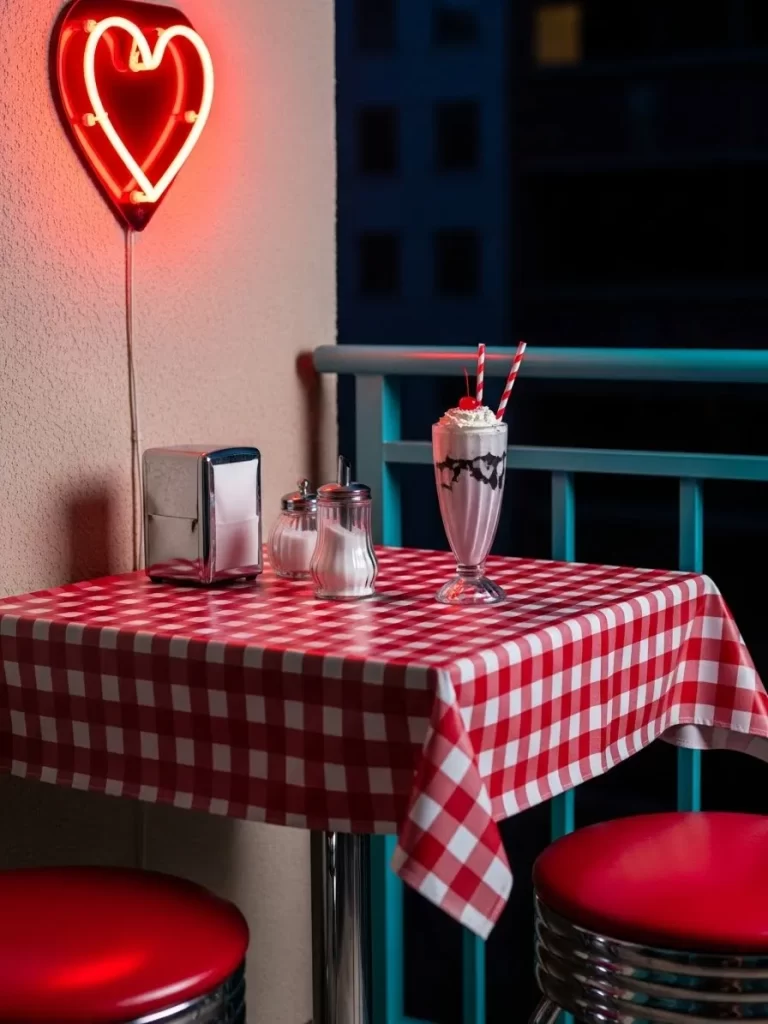
Create a fun and nostalgic date night with a retro diner theme. A red and white checkered tablecloth instantly brings a sense of energy to your small table. Red leather stools offer a comfortable place to sit while you share a milkshake.
A neon heart sign on the wall provides a bright and glowing focal point. This setup feels like a scene from a classic movie. You can enjoy sweet treats and good music in your private outdoor corner. The bold red colors stand out against the dark night sky.
Materials Required
- Small round metal pedestal table
- Two red vinyl swivel stools
- Red and white checkered tablecloth
- One neon heart wall sign
- Tall milkshake glass and two red straws
- Silver napkin dispenser
- Glass sugar pourer
- Red cherry for the garnish
Equipment Required
- Power strip for the neon sign
- Measuring tape for the table height
DIY Instruction Step by Step
- Clean the balcony wall where you want to hang the sign.
- Mount the neon heart sign at eye level using safe hooks.
- Plug the sign into the power strip and check the glow.
- Center the pedestal table directly under the heart sign.
- Spread the checkered tablecloth over the table so it hangs evenly.
- Place the two red stools on opposite sides of the table.
- Set the napkin dispenser and sugar pourer in the middle.
- Prepare a thick milkshake and pour it into the tall glass.
- Add a scoop of whipped cream and a cherry on top.
- Put the two straws in the glass and serve immediately.
23 Midnight Scholar Nook
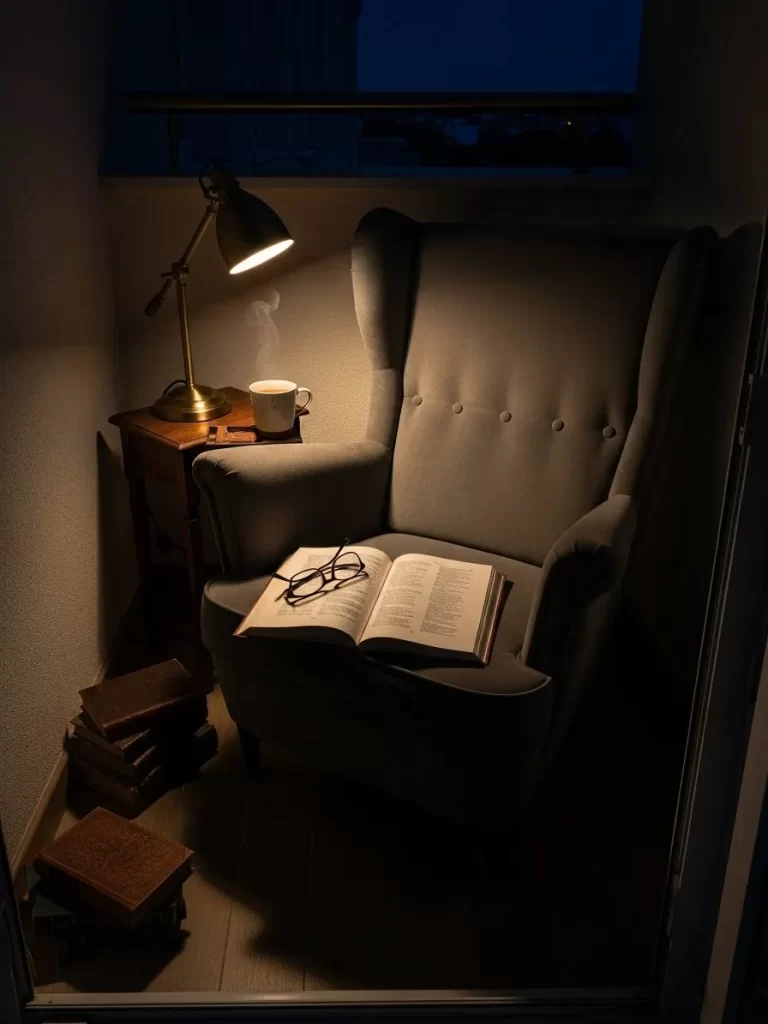
Escape into a world of stories with a dark and moody reading corner. A large gray wingback chair provides total comfort for a long night of reading. A classic brass lamp on a wooden table offers a warm and focused light.
Stacks of old books on the floor add to the scholarly atmosphere. The scent of fresh coffee fills the air as you turn the pages. This design is great for those who want a quiet and intellectual Valentine evening. Dark shadows and warm light create a sense of mystery and peace.
Materials Required
- Gray velvet wingback chair
- Small dark wood side table
- Brass adjustable desk lamp
- Ten vintage hardcover books
- One pair of reading glasses
- Ceramic coffee mug
- Small dark brown floor rug
Equipment Required
- Light bulb with warm yellow light
- Extension cord
DIY Instruction Step by Step
- Lay the brown rug in the quietest corner of the balcony.
- Position the wingback chair on the rug so it faces away from the wind.
- Place the side table on the right side of the chair.
- Set the brass lamp on top of the side table.
- Plug the lamp into the extension cord and test the brightness.
- Stack five books on the floor next to the chair.
- Place the remaining books on the side table near the lamp.
- Set the reading glasses on top of the open book on the seat.
- Prepare a hot cup of coffee and place it on the table.
- Adjust the lamp arm so the light hits the pages perfectly.
24 Tuscan Harvest Table

Celebrate the season of love with a rustic vineyard aesthetic on your terrace. Wooden crates are stacked to create a textured and multi level table surface. Fresh purple grapes and a bottle of red wine bring the flavors of Italy to your home.
Green vine leaves wrap around the railing to provide a lush and natural screen. This setup feels grounded and authentic because of the raw wood and glass. You can enjoy a cheese board while watching the sun set over the horizon. The warm tones of the wood glow in the late afternoon light.
Materials Required
- Four vintage wooden wine crates
- One large wooden serving board
- One bottle of red wine
- Two crystal wine glasses
- Two large bunches of purple grapes
- One block of aged cheese
- Artificial or real grape vine leaves
- Terracotta floor tiles
Equipment Required
- Staple gun for the vines
- Polishing cloth for the glass
DIY Instruction Step by Step
- Wipe the wooden crates to remove any dust or dirt.
- Stack two crates horizontally in the center of the balcony.
- Place one crate vertically on each side of the main stack.
- Drape the vine leaves over the balcony railing and secure them.
- Weave some of the vines around the base of the crates.
- Set the wooden serving board on top of the central crates.
- Place the wine bottle and the two glasses on the board.
- Arrange the grapes and cheese around the wine bottle.
- Polish the glasses so they catch the afternoon sunlight.
- Ensure the crates are steady before you start the meal.
25 Levitating Candle Canopy

Fill the air with magic by hanging dozens of candles from the ceiling. This design creates a floating forest of light that dances in the breeze. The floor stays completely clear for you to move or sit as you please.
Using candles of different lengths makes the space feel deep and vast. This concept is inspired by fairytale castles and grand halls. You will feel like you are in another world when you step outside. The soft flickering light provides a romantic mood without any harsh bulbs.
Materials Required
- Thirty battery operated LED taper candles
- Spool of clear fishing line
- Thirty adhesive ceiling hooks
- Extra batteries for the candles
- Remote control for the lights
Equipment Required
- Step ladder
- Scissors
DIY Instruction Step by Step
- Clean the ceiling or the underside of the balcony roof.
- Stick the adhesive hooks across the ceiling in a random pattern.
- Cut thirty pieces of fishing line in various lengths from one to three feet.
- Tie one end of the line to the top of each taper candle.
- Attach the other end of the line to a ceiling hook.
- Space the candles out so they do not hit each other.
- Ensure the candles are hung at different heights for a tiered look.
- Insert batteries into all the candles before you hang them.
- Use the remote control to turn on all the candles at once.
- Check that the candles are secure and hanging straight.
26 Gilded Orchid Lounge
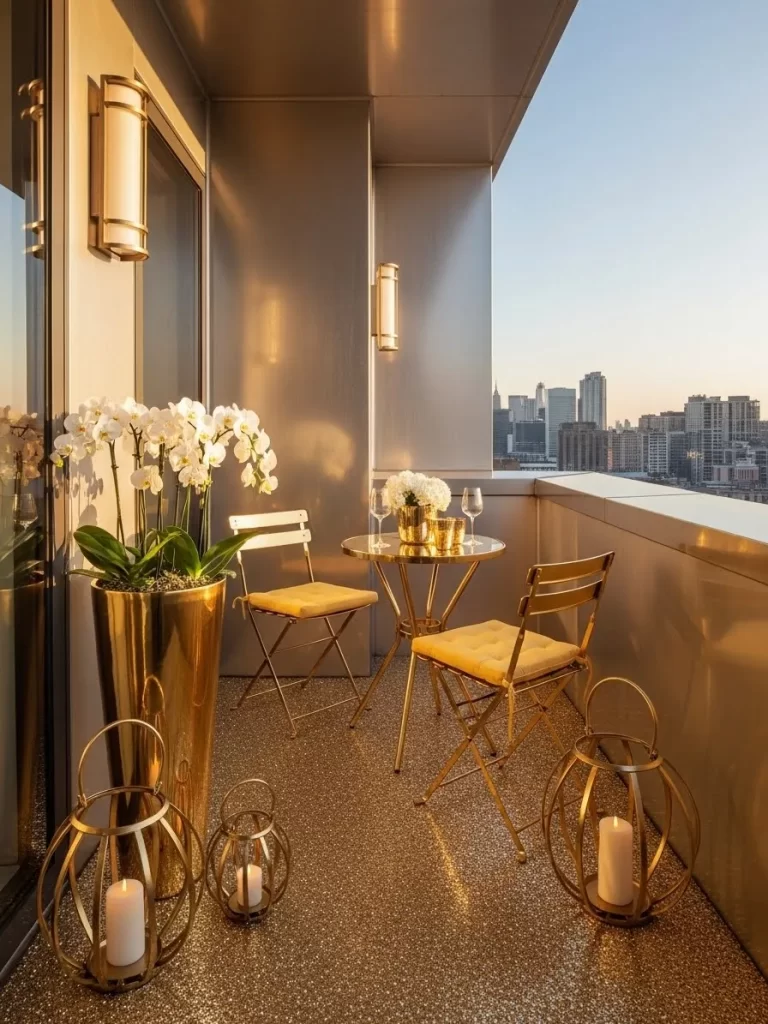
Gold accents and white flowers create a look of total luxury and glamour. A gold metal table and matching chairs shine beautifully in the sunset. Large gold planters holding tall white orchids add height and elegance to the corners.
The floor is covered in a shimmering rug to complete the theme. This design feels like a high end hotel balcony in a major city. You can enjoy a glass of champagne while surrounded by expensive textures. White and gold provide a clean and sophisticated color palette for the evening.
Materials Required
- Two gold folding bistro chairs
- One round gold bistro table
- Two tall gold cylindrical planters
- Four large white orchid plants
- Two gold geometric floor lanterns
- Two white pillar candles
- Gold shimmering outdoor rug
- Two gold rimmed champagne glasses
Equipment Required
- Soft cloth for polishing metal
- Plant food for the orchids
DIY Instruction Step by Step
- Roll out the gold shimmering rug to cover the balcony floor.
- Polish the gold table and chairs to remove any fingerprints.
- Place the table in the center of the rug near the railing.
- Set the two chairs on opposite sides of the gold table.
- Put the tall gold planters in the back corners of the space.
- Carefully place the orchid plants inside the gold planters.
- Set the geometric lanterns on the floor near the table base.
- Place the white pillar candles inside the floor lanterns.
- Put the champagne glasses on the table just before the date.
- Turn on the candles to see the light reflect off the gold surfaces.
27 Enchanted Moss Meadow
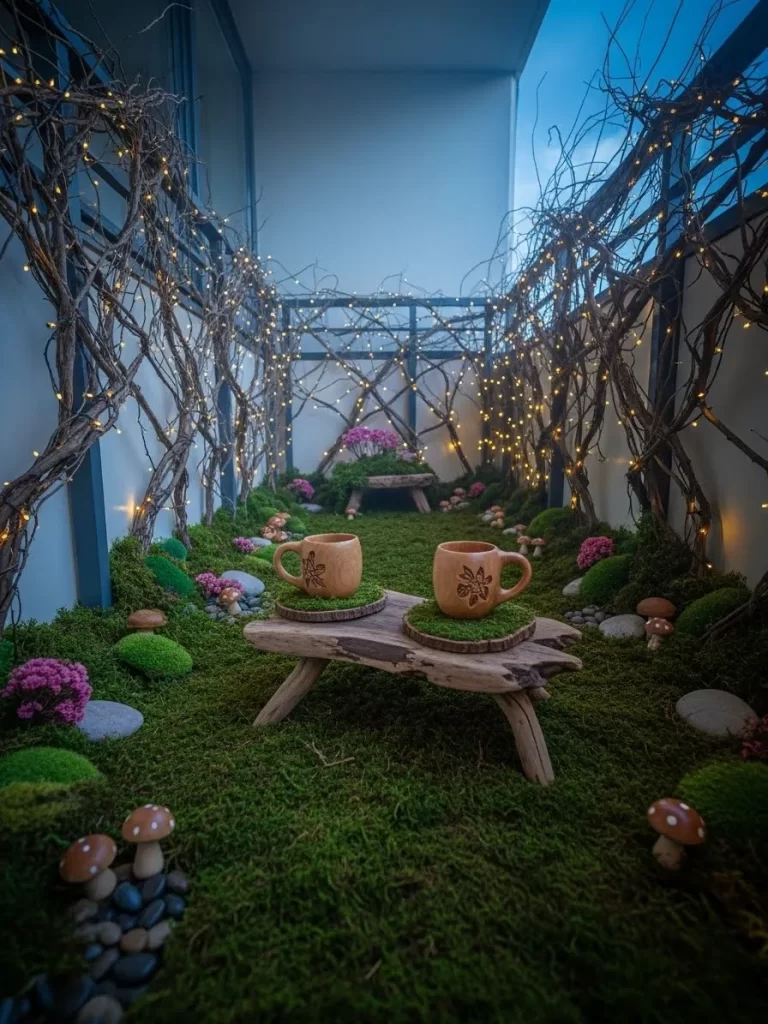
Turn your balcony into a soft and green fairytale forest with a moss floor. Thick layers of green moss cover the ground to provide a natural and lush texture. Low wooden stumps serve as stools for a grounded seating experience.
Fairy lights are wrapped around twisted branches to mimic fireflies in the trees. Small ceramic mushrooms peek out from the greenery for a playful touch. This design brings the mystery of the deep woods to your apartment. You will feel connected to nature while sitting in the heart of the city.
Materials Required
- Ten square feet of sheet moss
- Two low wooden tree stump stools
- One small rustic wood table
- Three long twisted decorative branches
- One string of warm fairy lights
- Five ceramic garden mushrooms
- Small river stones
- Two wooden mugs
Equipment Required
- Spray bottle with water
- Clear zip ties
DIY Instruction Step by Step
- Lay the sheet moss across the entire balcony floor area.
- Mist the moss with water to keep it green and soft.
- Place the two wooden stumps in the center of the moss.
- Set the rustic wood table between the two stools.
- Secure the twisted branches to the balcony railing with zip ties.
- Wrap the fairy lights around the branches from bottom to top.
- Scatter the ceramic mushrooms around the base of the stools.
- Place the river stones in small clusters near the mushrooms.
- Put the wooden mugs on the table for a rustic drink.
- Turn on the fairy lights to create the enchanted glow.
28 Parisian Picnic Rug
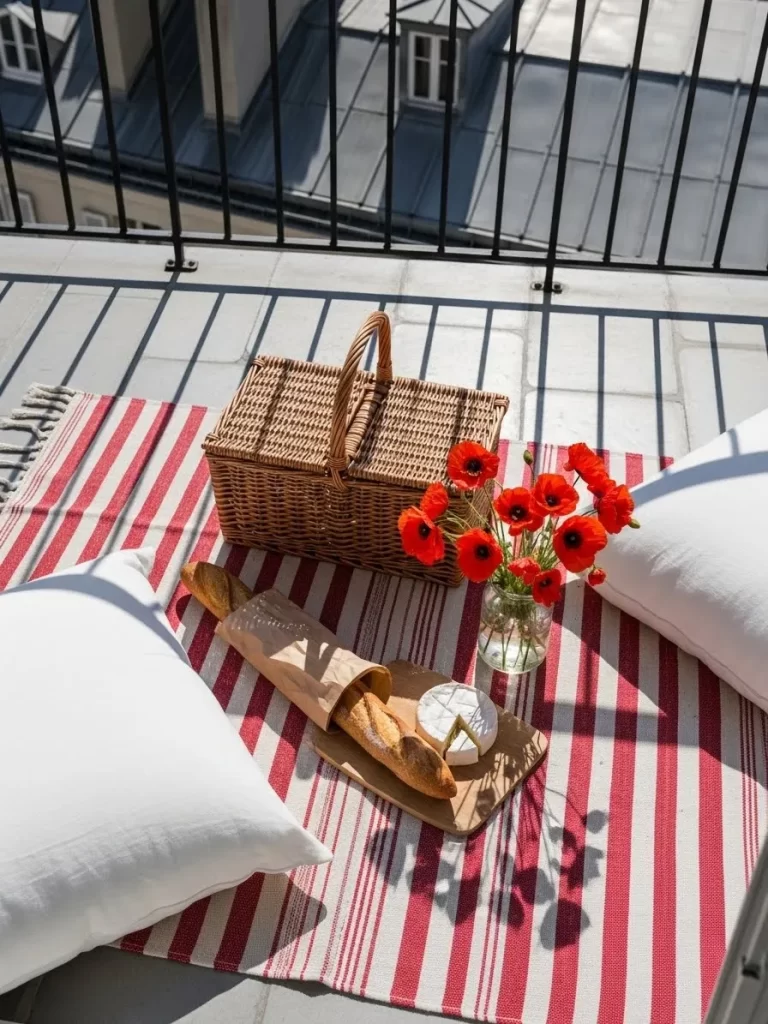
Enjoy a simple and romantic lunch with a classic picnic on the floor. A red and white striped rug provides a bright and clean base for your meal. A large wicker basket holds all the bread, cheese, and fruit you need for the day.
Fresh red poppies in a glass jar bring a touch of the French countryside to your view. The sun shines on the white railing to create a bright and airy atmosphere. This setup is very easy to prepare and requires no heavy furniture. You can relax on the soft pillows while watching the street below.
Materials Required
- Red and white striped outdoor rug
- Two large white floor pillows
- One large wicker picnic basket
- One wooden cutting board
- One fresh baguette
- One wheel of brie cheese
- Glass jar with fresh red poppies
- Red and white cloth napkins
Equipment Required
- Bread knife
- Cheese spreader
DIY Instruction Step by Step
- Clear the balcony floor and lay the striped rug down.
- Place the two white pillows at one end of the rug.
- Set the wicker basket in the middle of the space.
- Put the wooden cutting board on top of the basket or the rug.
- Slice the baguette and place it on the board.
- Set the wheel of cheese next to the bread on the board.
- Fill the glass jar with water and add the red poppies.
- Position the flower jar in the corner of the rug for safety.
- Lay out the napkins and any utensils you might need.
- Prop the basket lid open to show off the snacks inside.
29 Scarlet Bloom Studio
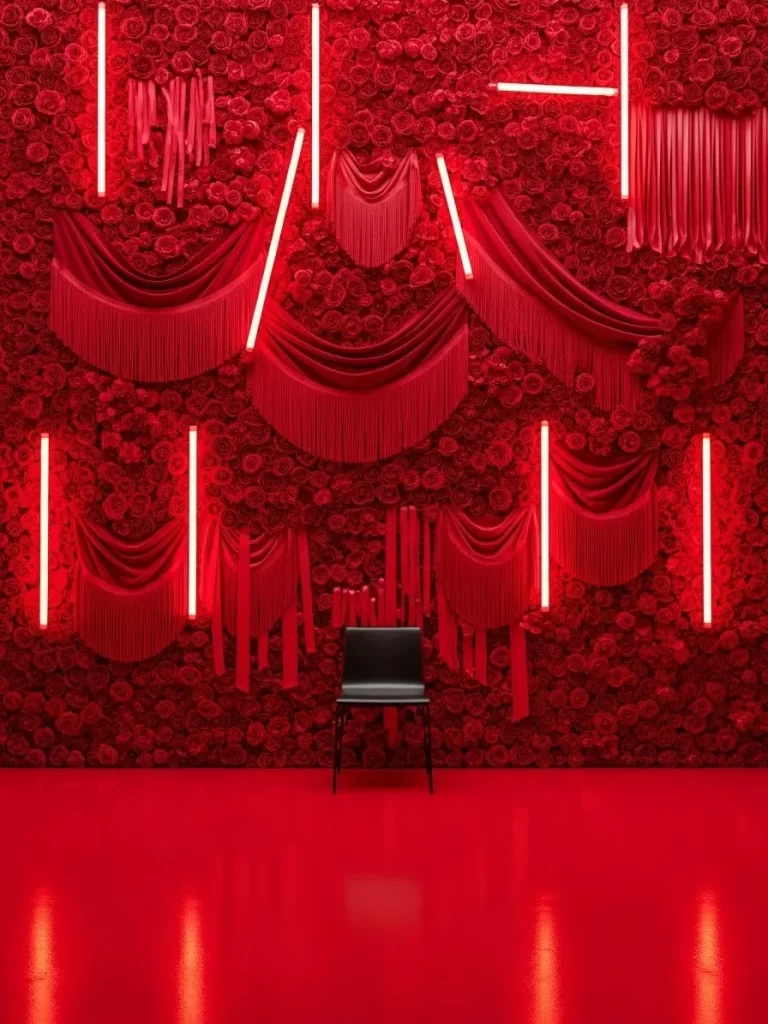
Surround yourself with a wall of red roses for a bold and dramatic look. This design covers every inch of the back wall with deep red flowers. Vertical neon light tubes provide a modern and edgy glow against the petals.
The entire floor is covered in red to create a sense of total immersion in color. A single black chair serves as a stark contrast to the bright environment. This setup is great for couples who love fashion and modern art. You will feel like you are in a high end photo studio for your date.
Materials Required
- Five hundred artificial red rose heads
- Large foam backing boards
- Six vertical red LED neon tubes
- Red outdoor floor covering
- One modern black chair
- Red fabric drapes
- Heavy duty adhesive
Equipment Required
- Paint roller or brush
- Glue gun
- Level tool
DIY Instruction Step by Step
- Cover the balcony floor with the red outdoor material.
- Glue the rose heads to the foam boards until they are fully covered.
- Mount the rose boards to the back wall of the balcony.
- Hang the red fabric drapes on the sides to frame the flower wall.
- Attach the vertical neon tubes to the wall at even intervals.
- Plug the neon lights in to check the glow against the roses.
- Place the black chair in the center of the red floor.
- Angle the chair slightly to the side for a better photo.
- Ensure the rose wall is secure and there are no visible gaps.
- Turn off the main lights to let the red neon take over.
30 Zen Blossom Bench
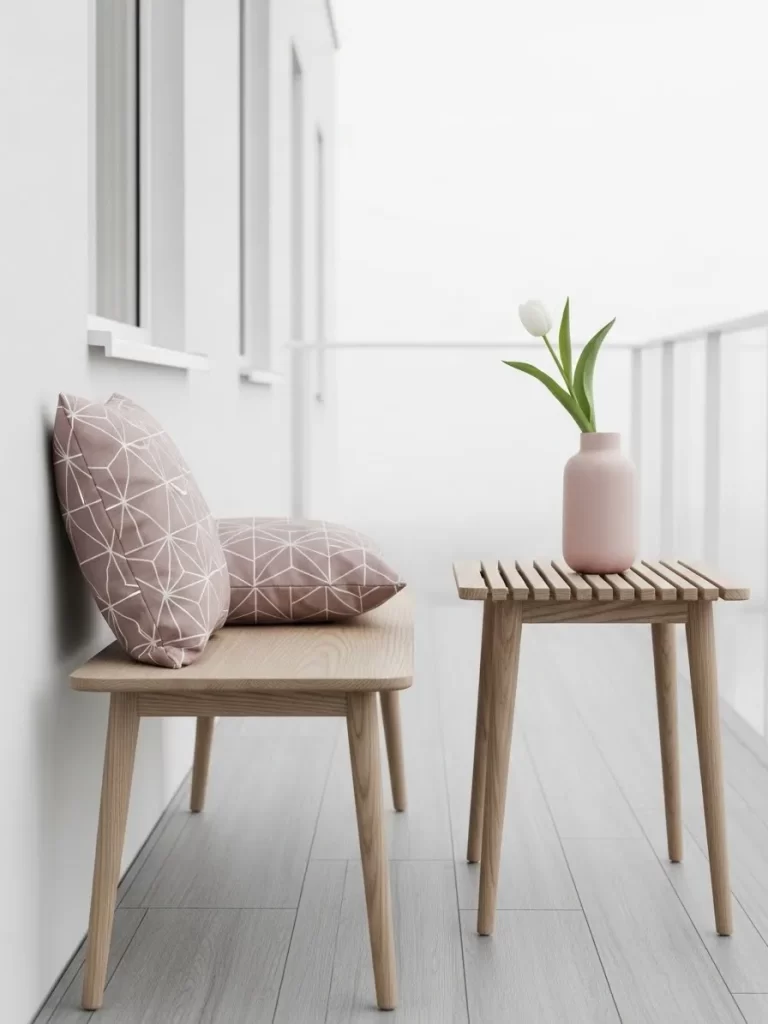
Find your inner peace with a minimalist and clean Scandinavian design. A light wood bench provides a simple and sturdy place to sit and relax. Soft pink pillows with geometric patterns add a touch of color and comfort.
A small matching table holds a single white tulip in a pink vase. The white walls and floor make the balcony feel wide and full of light. This style focuses on the beauty of empty space and simple forms. You can clear your mind while enjoying a quiet conversation with your partner.
Materials Required
- One light oak or pine bench
- One small light wood slatted table
- Two pink cushions with white patterns
- One matte pink ceramic vase
- One fresh white tulip
- White outdoor floor rug
Equipment Required
- Sandpaper for the wood
- Cleaning cloth
DIY Instruction Step by Step
- Lay the white rug down to create a clean base.
- Sand the wooden bench to ensure the surface is smooth.
- Place the bench against the longest wall of the balcony.
- Set the pink pillows on the left side of the bench.
- Put the small wood table in front of the bench area.
- Fill the pink vase with a small amount of water.
- Trim the tulip stem and place it inside the vase.
- Center the vase on the slatted wooden table.
- Remove any extra items to keep the space looking minimalist.
- Adjust the pillows so they are straight and look neat.
31 Whimsical Teacup Rail
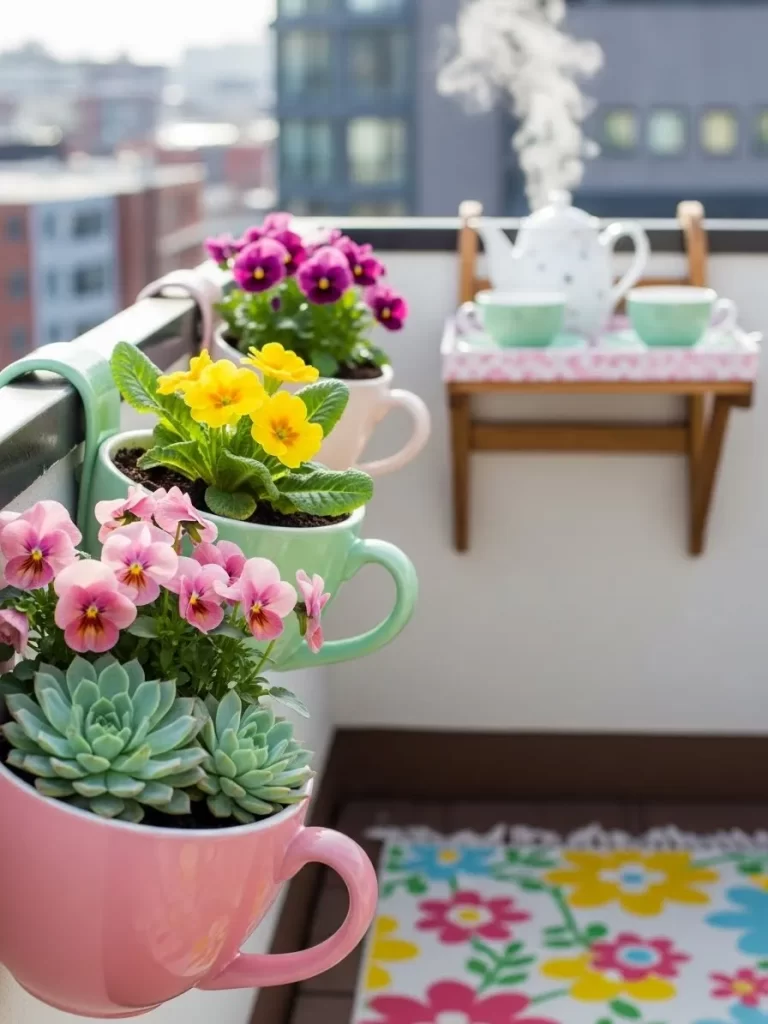
Turn your railing into a colorful garden using giant ceramic teacups. These unique planters hang from the metal bars to save space on the floor. Vibrant flowers like pansies and succulents fill the cups with life and color.
A bright floral rug on the ground ties all the colors together beautifully. A small folding table holds a teapot and cups for a sunny afternoon tea. This design is cheerful and full of personality for a creative couple. You can enjoy the view through a frame of blooming flowers every day.
Materials Required
- Five large ceramic teacup planters with hooks
- Assorted pansies and succulents
- Potting soil for flowers
- Colorful floral outdoor rug
- Small wooden wall shelf
- White ceramic teapot
- Two light green tea cups
Equipment Required
- Trowel
- Measuring tape for the railing
DIY Instruction Step by Step
- Lay the colorful floral rug down on the balcony floor.
- Attach the teacup planters to the top rail of the balcony.
- Space the cups evenly so they do not overlap each other.
- Fill each teacup with potting soil and the chosen plants.
- Mount the small wooden shelf to the back wall of the balcony.
- Place the teapot and green cups on the wooden shelf.
- Ensure the shelf is level and secure before adding the ceramics.
- Water the plants carefully to avoid spilling on the rug.
- Arrange the colors of the flowers to match the pattern of the rug.
- Check that the teacup hooks are tight on the metal railing.
32 Aromatic Copper Sanctuary

Engage all your senses with a balcony designed for total relaxation and scent. Large copper bowls are filled with water and floating orange petals. A brass incense burner releases a soft cloud of lavender smoke into the air.
A bright pink patterned rug provides a soft and warm place for your feet. Dried lavender bundles in copper pots add a rustic and fragrant touch to the corners. This design is all about slowing down and enjoying the present moment. You can sit on a low stool and enjoy the sound of the water.
Materials Required
- Three large copper or bronze bowls
- One brass incense burner and coil
- One small wooden three legged stool
- One pink and orange patterned rug
- Two bundles of dried lavender
- One copper vase
- Assorted orange flower petals
- Fresh water
Equipment Required
- Matches for the incense
- Polishing cloth for the copper
DIY Instruction Step by Step
- Lay the pink patterned rug in the center of the terrace.
- Place the wooden stool on the left side of the rug.
- Set the brass incense burner on top of the wooden stool.
- Position the three copper bowls on the floor in a cluster.
- Fill the bowls halfway with fresh and clean water.
- Sprinkle the orange petals onto the surface of the water.
- Put the dried lavender into the copper vase.
- Set the vase behind the bowls to add height to the display.
- Light the incense coil and let the smoke rise slowly.
- Polish the copper surfaces to ensure they reflect the light.
33 Shadow Lattice Lounge
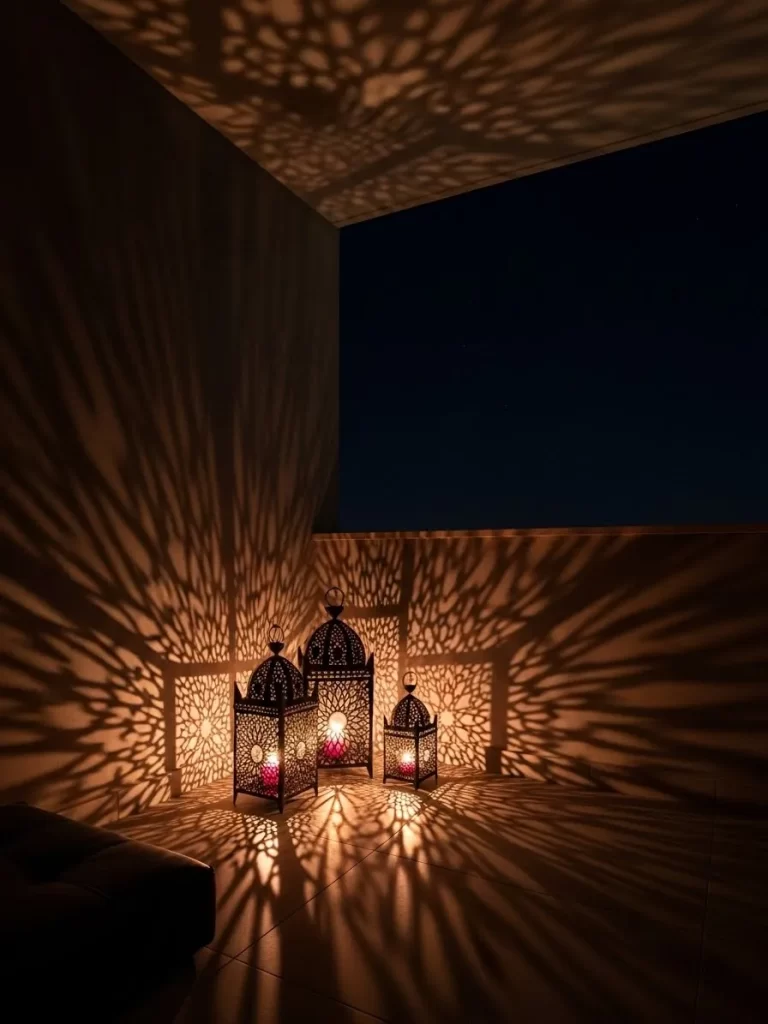
Use the power of light and shadow to create art on your balcony walls. Ornate metal lanterns with complex cutout patterns provide a dramatic light show. Large patterns are cast across the floor and walls as the candles flicker inside.
The rest of the balcony stays dark to let the shadows become the main feature. A simple black cushion in the corner offers a place to sit and watch the light. This design feels very mysterious and high end for a late night date. You do not need any other decor when the walls are covered in moving art.
Materials Required
- Three large black metal lanterns with lattice cutouts
- Three large purple pillar candles
- One large black floor cushion
- Extra long lighter
- Dark gray floor rug
Equipment Required
- Cleaning cloth for the lantern glass
- Ruler for spacing
DIY Instruction Step by Step
- Ensure the balcony floor is dark to help the shadows stand out.
- Place the floor cushion in the back corner of the space.
- Arrange the three lanterns in a triangle in the middle of the floor.
- Space the lanterns so the patterns do not overlap too much.
- Clean the inside of the lanterns to remove any old wax or dust.
- Place one purple pillar candle inside each of the lanterns.
- Use the long lighter to ignite the candles carefully.
- Close the lantern doors to focus the light through the cutouts.
- Sit on the cushion and adjust the lantern positions for the best shadows.
- Turn off any other light sources on the balcony or in the room.
34 Frosty Cocoa Corner
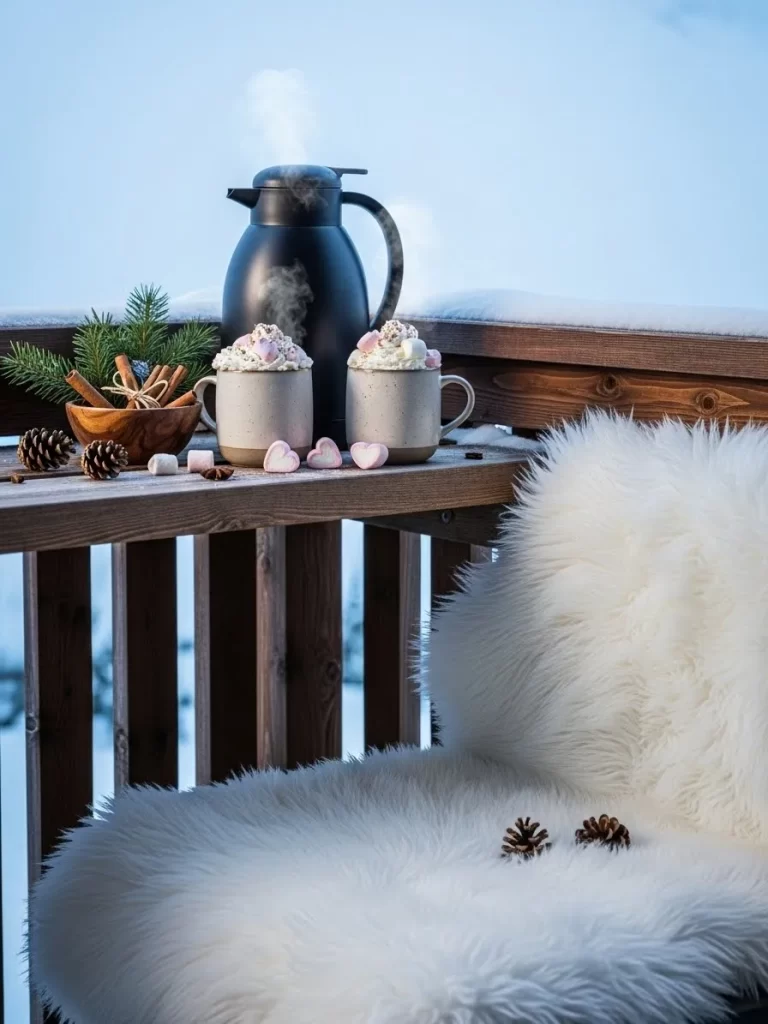
Enjoy the winter air with a cozy and warm drink station on your railing. A thick white faux fur rug covers a wooden bench to keep you warm and soft. Two ceramic mugs are topped with huge piles of whipped cream and pink hearts.
Pine cones and evergreen branches bring a touch of the winter forest to your home. A large black thermos keeps your cocoa hot for the entire evening. This setup is great for a chilly Valentine date under a blanket. The white and brown colors feel very natural and comforting against the blue sky.
Materials Required
- One wooden balcony bench
- One extra large white faux fur rug
- One large black insulated thermos
- Two large ceramic mugs
- One bowl of whipped cream and marshmallows
- Five large pine cones
- Three evergreen branches
- Small wooden bowl
- Cinnamon sticks
Equipment Required
- Scissors
- Brush for the fur
DIY Instruction Step by Step
- Brush the white fur rug to make it look fluffy and soft.
- Drape the fur rug over the wooden bench so it covers the seat.
- Place the evergreen branches on the back edge of the bench.
- Set the black thermos on the right side of the wooden surface.
- Fill the mugs with hot cocoa and add the whipped cream.
- Top the mugs with the pink heart marshmallows.
- Put the pine cones in the wooden bowl and place it on the left.
- Add some cinnamon sticks to the bowl for a nice scent.
- Ensure everything is steady so it does not fall through the rail.
- Sit on the fur and enjoy the warmth of the hot drink.
35 Eternal Love Lock Rail
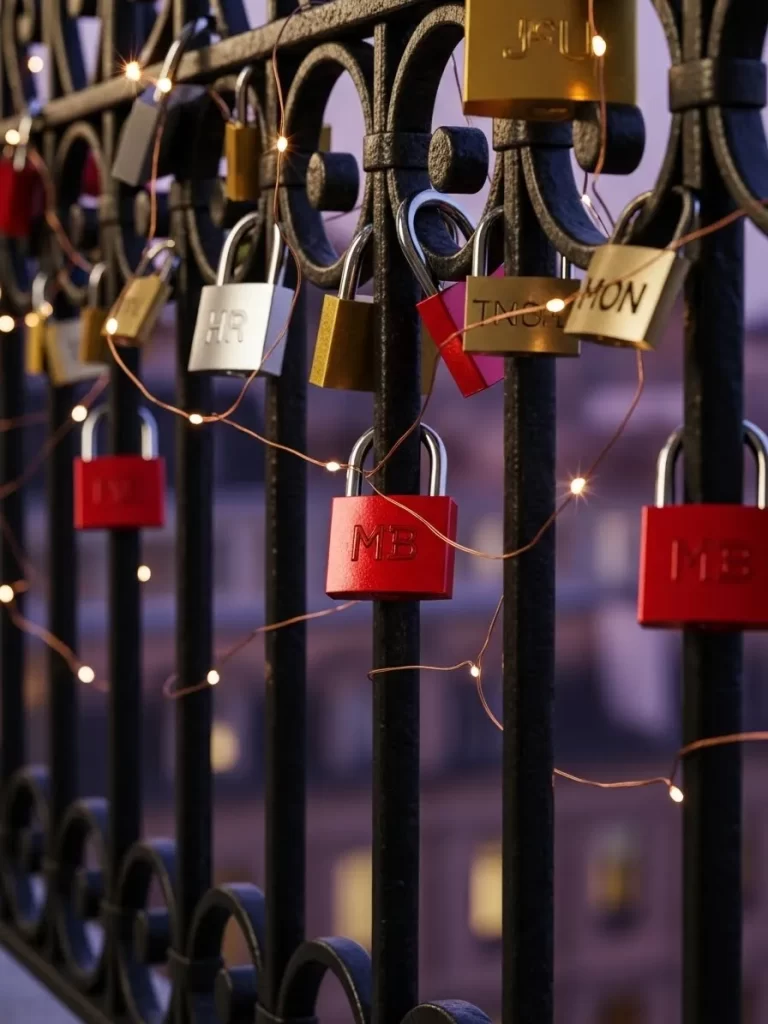
Create a lasting memory by covering your railing with locks of love. This design uses hundreds of red and gold padlocks to make a colorful statement. Strings of tiny copper fairy lights are woven through the locks for a magical sparkle.
The lights reflect off the metal surfaces to create a glowing fence of love. This concept is inspired by famous bridges around the world. You can write your names on a new lock and add it to the collection together. It is a powerful and visual way to celebrate your relationship.
Materials Required
- Twenty red heart shaped padlocks
- Twenty gold and silver padlocks
- One permanent black marker
- Two strings of copper fairy lights
- Battery pack for the lights
- Clear tape
Equipment Required
- Wire cutters
- Cleaning spray for the metal rail
DIY Instruction Step by Step
- Clean the metal railing of the balcony so it is shiny and dry.
- Use the marker to write names or dates on the padlocks.
- Attach the locks to the vertical bars of the railing.
- Mix the red and gold colors to create a random pattern.
- Group some locks together in clusters for more visual weight.
- Weave the copper fairy lights through the handles of the locks.
- Wrap the lights tightly so they do not hang loose.
- Secure the battery pack to the underside of the rail with tape.
- Turn on the lights to see the metal glow in the evening.
- Add a new lock every year to keep the tradition growing.
36 Infinite Rose Hallway
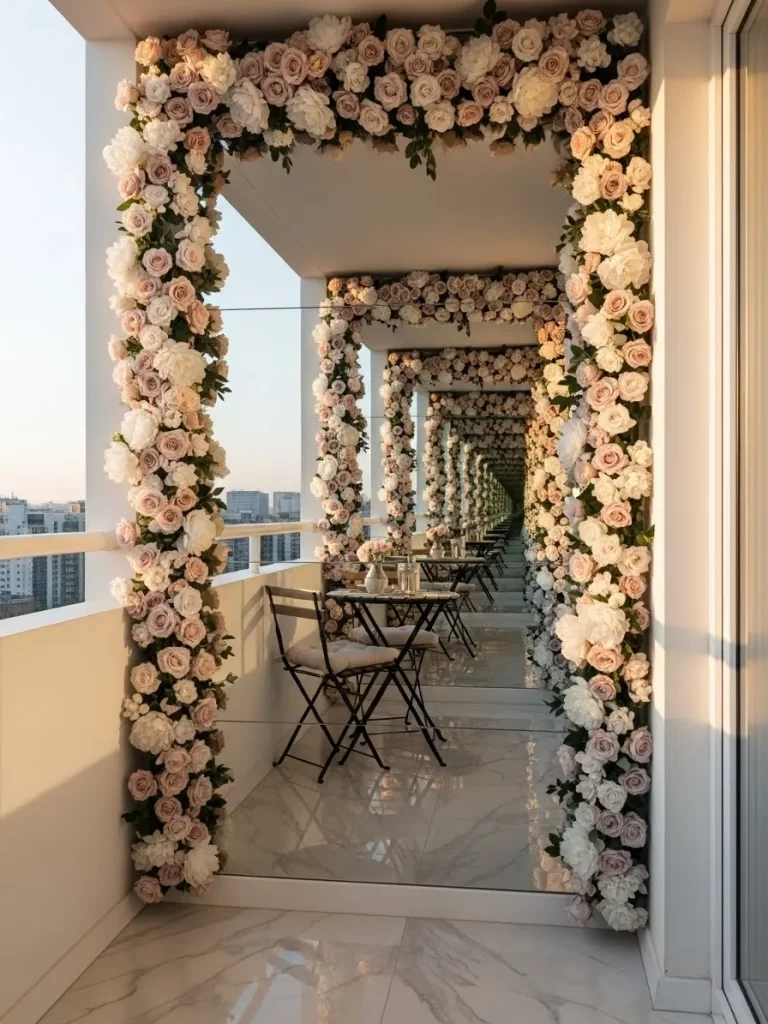
Double the beauty of your balcony with large mirrors and thousands of flowers. This design uses a mirror at the end of the balcony to create a tunnel effect. Arches of pink and white roses wrap around the mirror and the railing.
Every surface is covered in soft petals to make the space feel like a floral hall. The reflection makes the small balcony look like it goes on forever. This setup is the ultimate romantic gesture for a Valentine celebration. You will feel surrounded by a never ending garden of roses.
Materials Required
- One large floor to ceiling outdoor mirror
- Six large artificial floral arches
- Five hundred pink and white silk roses
- One small bistro table and chairs
- One white ceramic vase
- White outdoor floor rug
- Strong adhesive hooks
Equipment Required
- Glass cleaner
- Level tool
- Heavy duty tape
DIY Instruction Step by Step
- Clean the mirror surface until it is perfectly clear and bright.
- Mount the mirror at the very end of the balcony against the wall.
- Secure the mirror with heavy duty tape and hooks for safety.
- Install the floral arches over the mirror to frame the reflection.
- Wrap more rose vines around the side walls and the railing.
- Check the mirror to ensure the reflection shows only the flowers.
- Place the bistro table and chairs in front of the mirrored wall.
- Put a single vase with roses on the table for more detail.
- Lay the white rug down to brighten the entire area.
- Step back and check that the “infinite” effect is working correctly.
1 Small outdoor changes provide a gift that keeps on giving. 2 Big budgets are not necessary to create a massive impact. 3 Handmade retreats show deep effort and thought for your partner. 4 Quiet corners of your home hold the best memories. 5 Unique themes ensure your celebration stands out this year. 6 Romantic destinations are now within your reach.
Key Takeaways
1 Lighting serves as the most important element for evening mood. 2 Vertical surfaces should hold flowers and signs to save floor area. 3 Warmth comes from textiles like rugs and thick blankets. 4 Special decorations feel authentic when they include personal touches.