Standard holiday decor often feels loud and cluttered. You might want to celebrate romance without filling your rooms with red plastic hearts. This guide offers a sophisticated approach to seasonal styling.

Modern homes thrive on subtle textures and deep colors. We focus on high quality materials like stone, velvet, and natural wood. These elements create an intimate mood that feels mature and current.
You can transform your space using simple DIY projects that look expensive. Our list of thirty eight ideas will help you design a home you love. Let us explore how to bring a classy touch to every corner of your house.
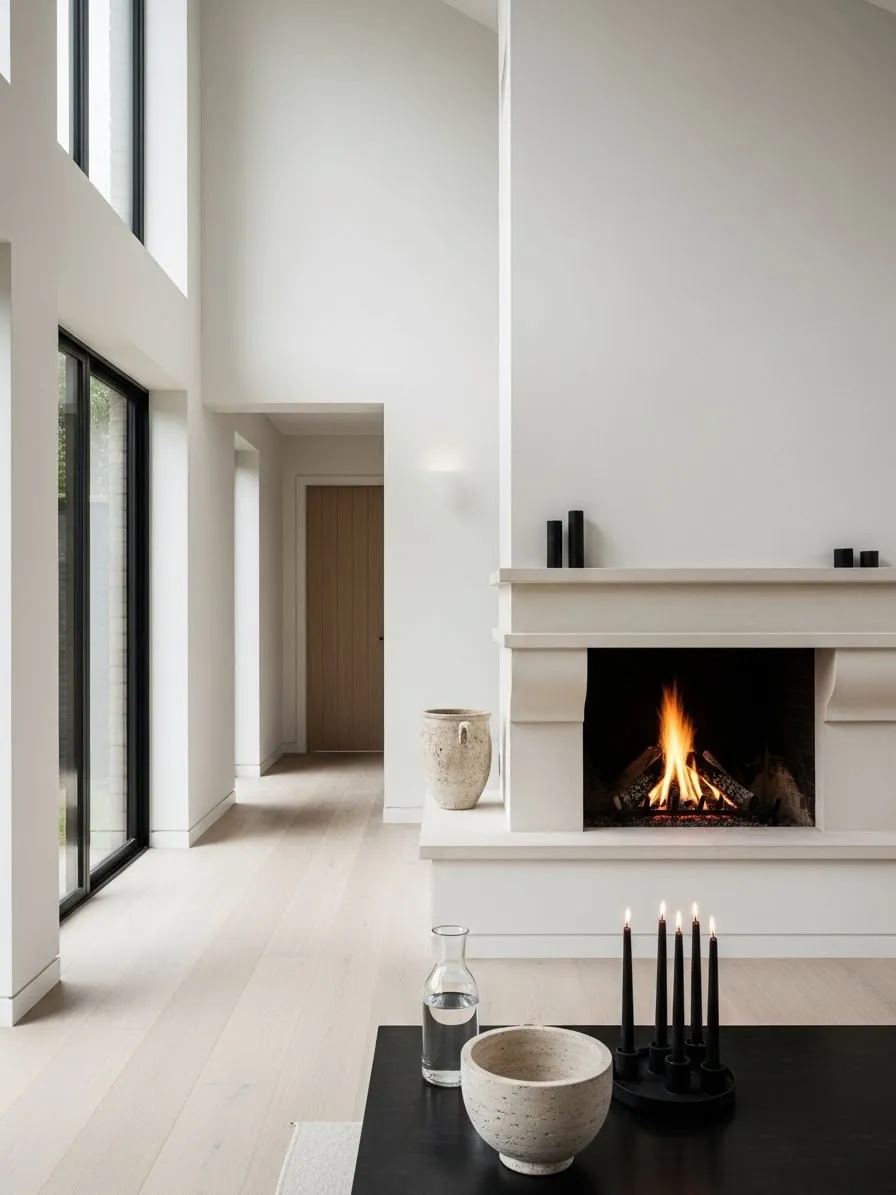
1 Elegant Noir Taper Candle Display
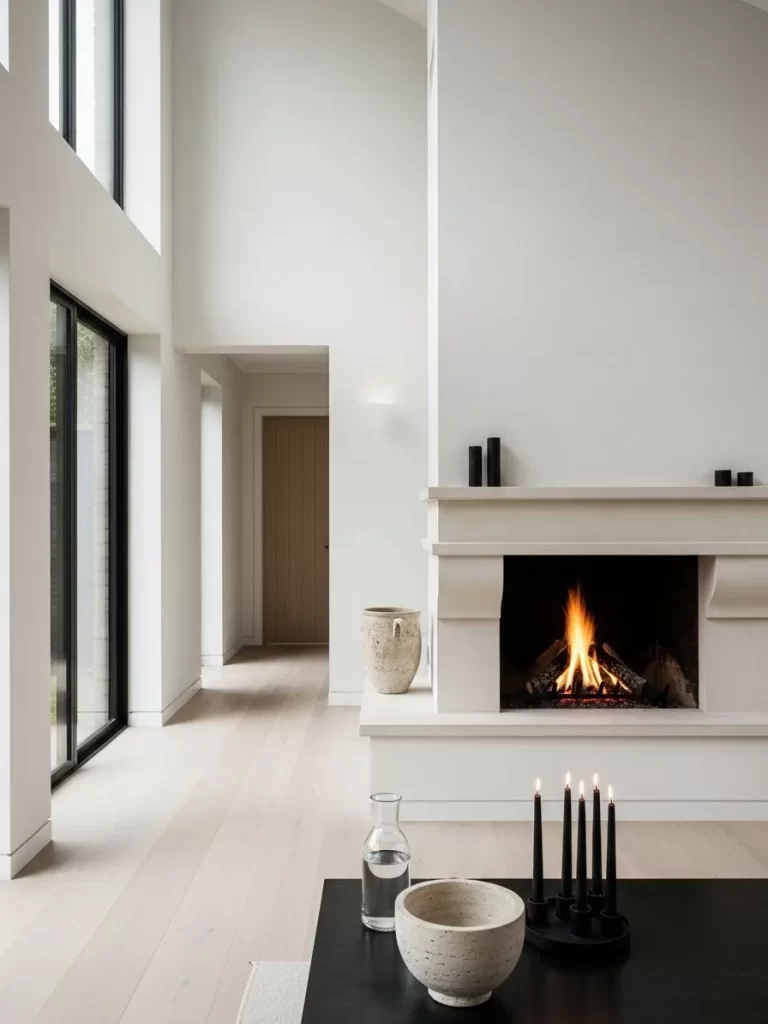
Valentine’s Day often brings to mind bright reds and pinks. You can achieve a sophisticated vibe by choosing deep black accents instead. This minimalist setup uses sleek taper candles to create a romantic atmosphere without the usual holiday clutter.
Dark tones pop beautifully against a neutral white fireplace or light wood floors. Adding natural textures like stone or glass keeps the space feeling warm and grounded. Choosing a matte black finish for your candle holders adds a layer of modern luxury.
It is a fresh take on holiday decor that stays stylish long after February ends. Small touches like a clear glass carafe of water nearby reflect the flickering flames. This look proves that romance does not require flashy colors or heart shapes.
Material Required List
- Five black taper candles
- One matte black candle holder with multiple slots
- Large textured stone bowl
- Clear glass water carafe
Equipment Required List
- Lighter or matchsticks
- Microfiber cloth for dusting
DIY Instruction Step by Step
- Clear your tabletop of all items and wipe it clean with a microfiber cloth.
- Place your black candle holder in the center of your coffee table or mantel.
- Press the base of each black taper candle into the holder slots.
- Ensure every candle stands straight up so wax does not drip unevenly.
- Set a large stone bowl on the left side of the candles to create a balanced look.
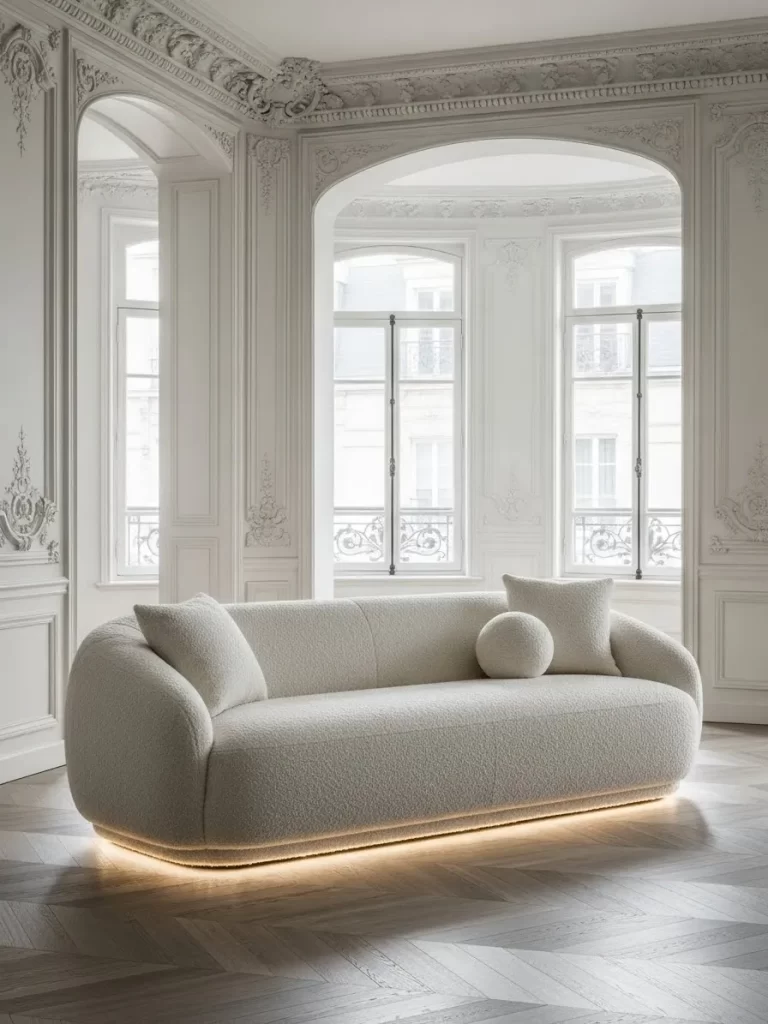
- Fill a glass carafe with water and place it on the right side of the arrangement.
- Trim the candle wicks to about one quarter inch before lighting them.
- Ignite each wick carefully and enjoy the warm glow in your modern space.
2 Moody Dark Linen Tablescape
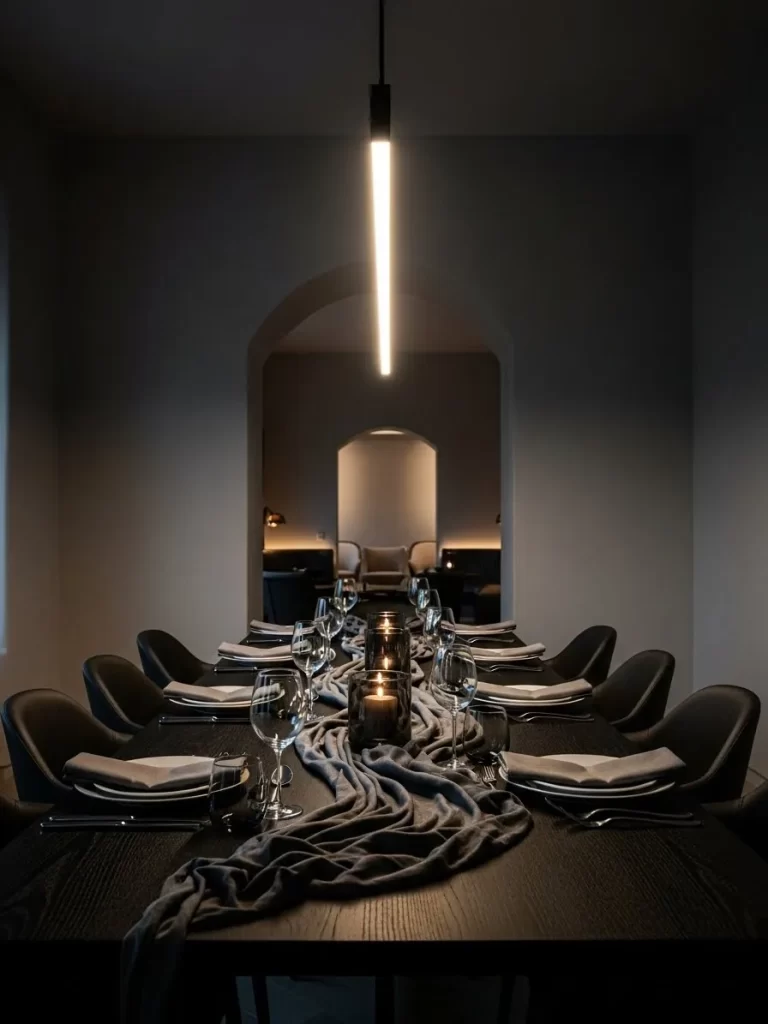
Dark dining setups bring an air of mystery and high end drama to your dinner. This look swaps traditional bright linens for a heavy charcoal or black fabric that flows across the table. The fabric bunches naturally to create shadows and depth.
Warm light from glass candle holders reflects off the dark wood and polished wine glasses. It feels intimate and expensive without needing many extra items. Using simple white plates keeps the focus on the rich textures of the cloth.
Your guests will feel like they are in a private corner of a luxury lounge. It is a bold choice for anyone who finds typical red decor too cliché. This style works best with soft, low lighting and a few flickering flames to catch the eye.
Material Required List
- One long piece of dark charcoal linen or cheesecloth
- Six glass cylinder candle holders
- Six black pillar candles
- White ceramic plates
- Clear wine glasses
Equipment Required List
- Measuring tape
- Handheld steamer
- Matches
DIY Instruction Step by Step
- Measure the length of your dining table to ensure your fabric is at least two feet longer than the surface.
- Use a handheld steamer to remove large wrinkles from your linen while keeping some natural texture.
- Lay the fabric down the center of the table so it hangs off both ends evenly.
- Pinch the fabric every few inches and pull it upward to create a ruffled wavy effect.
- Place your glass candle holders in a staggered line down the middle of the runner.
- Drop a black pillar candle into each glass holder and ensure they sit flat.
- Set your white plates at each seat to provide a sharp contrast against the dark wood.
- Light the candles just before guests arrive to set a calm and romantic mood.
3 Sculptural Terracotta Pottery Wall
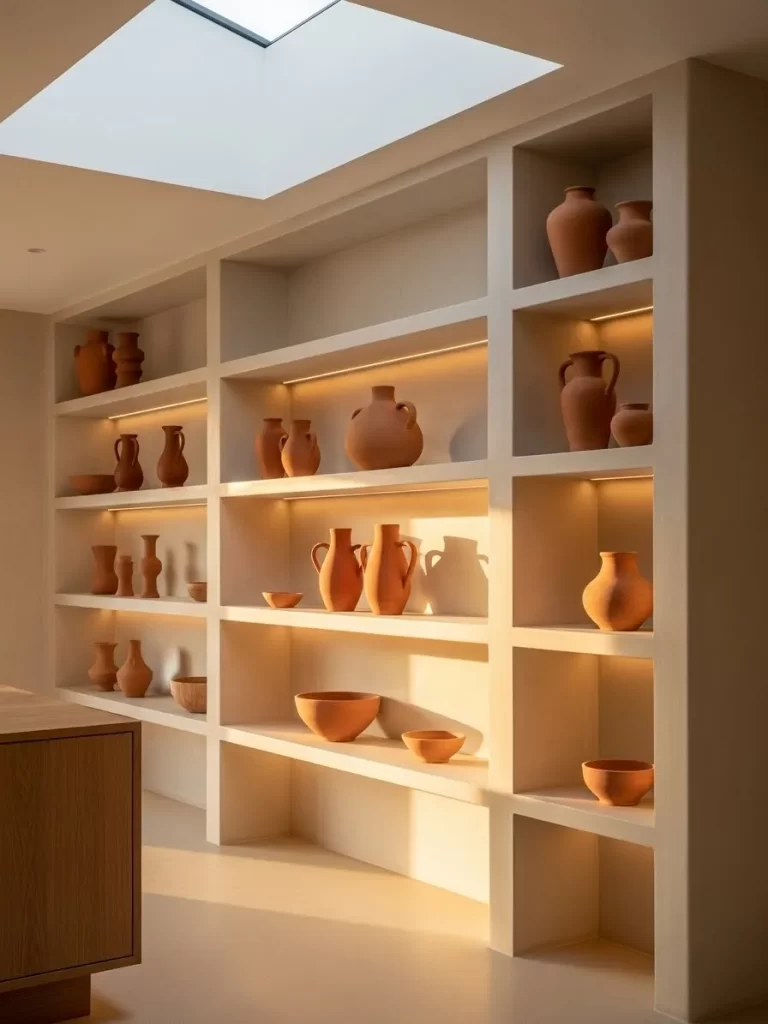
Earthy tones offer a grounded and warm feeling for a modern home. This display uses built in shelving to showcase a collection of terracotta vases in various shapes. The clay material brings a natural warmth that mimics the feeling of a cozy sunset.
Lighting plays a huge role here by casting soft shadows behind each unique pot. You do not need expensive art when the shapes of the pottery create such visual interest. It looks curated and intentional while staying very simple.
Mixing different heights and widths prevents the shelves from looking too stiff. This approach celebrates craftsmanship and organic beauty. It is a great way to fill a large wall with a look that feels both ancient and very current.
Material Required List
- Twelve terracotta vases in different sizes
- Three wide clay bowls
- LED strip lights with a warm yellow glow
Equipment Required List
- Level tool
- Soft cloth for dusting
DIY Instruction Step by Step
- Empty your shelving unit completely and wipe every surface with a soft cloth.
- Group your vases by size so you can see the variety of shapes you have.
- Install LED strip lights under the front lip of each shelf to create a hidden glow.
- Place the largest and heaviest vases on the bottom shelves to anchor the look.
- Set two or three medium vases on the middle shelves and leave space between them.
- Put the smaller bowls and narrow vases on the top shelves where the light hits them best.
- Step back and check if the arrangement looks balanced or if one side feels too heavy.
- Adjust the pots until the gaps between them feel even and the lighting highlights the curves of the clay.
4 Emerald Velvet Reading Nook
Rich jewel tones like emerald green add a touch of royal comfort to a quiet corner. A velvet throw draped over a leather chair creates a cozy spot for two or a solo evening. The fabric catches the light and adds a soft texture that contrasts with the smooth leather.
Warm lamp light makes the green hue look even deeper and more inviting. This setup is all about relaxation and tactile beauty. Books on nearby shelves add a sense of history and quietness to the room.
It is a simple way to update a living room for the holiday without using hearts. The combination of wood, leather, and velvet feels timeless. You can easily spend hours here with a good book and a warm drink.
Material Required List
- One emerald green velvet throw blanket
- One brown leather armchair
- Brass floor lamp
- Stack of vintage books
Equipment Required List
- Lint roller
DIY Instruction Step by Step
- Position your leather armchair in a corner near a bookshelf or a dark wall.
- Run a lint roller over the velvet throw to remove any dust or stray hairs.
- Hold the blanket by one corner and let it fall naturally over the back of the chair.
- Tuck the middle of the blanket slightly into the seat crack so it does not slide off.
- Arrange the bottom of the throw so it cascades down toward the floor in soft folds.
- Place your brass floor lamp behind the chair so the light shines directly onto the seat.
- Stack a few books on a side table or the shelf next to the chair for easy access.
- Turn on the lamp to see how the light emphasizes the sheen of the velvet fabric.
5 Luminous Alabaster Stone Votives
Natural stone has a weight and quality that plastic or glass cannot match. These alabaster candle holders glow from within when a small light is placed inside. The white and grey veins in the stone make every piece a one of a kind art object.
Setting these on a marble table creates a layered look that feels very clean. The soft orange glow through the stone softens the hard edges of the room. It is a subtle way to bring fire and warmth into a minimalist space.
Pairing them with smooth stone spheres adds to the sculptural feel of the display. This arrangement looks professional and high end. It provides a calm light that is very soothing for a late night conversation.
Material Required List
- Four alabaster or marble tea light holders
- Two polished stone spheres
- Four unscented tea light candles
Equipment Required List
- Microfiber towel
- Long reach lighter
DIY Instruction Step by Step
- Clean your marble table surface with a damp microfiber towel and let it dry.
- Arrange the four alabaster holders in a tight cluster in the center of the table.
- Place one holder slightly further back to create a sense of depth in the group.
- Set the two stone spheres next to the cluster to break up the vertical lines.
- Gently drop one tea light into the center of each stone holder.
- Ensure the candles are centered so they heat the stone evenly.
- Use a long reach lighter to ignite the wicks without moving the holders.
- Watch as the stone begins to glow from the heat and light of the flames.
6 Minimalist Scribble Line Art
Modern art can be simple and still make a massive statement in a bedroom. This large framed piece features a continuous black line that creates an abstract shape. It draws the eye without overwhelming the rest of the neutral room.
A thin gold frame adds just enough sparkle to feel special for Valentine’s Day. This look is clean and sophisticated. It sits perfectly above a textured headboard to ground the sleeping area.
The art feels personal and creative like a hand drawn note. It fits well in a space that values white space and quiet moments. Using twin spotlights above the frame makes the art feel like a gallery feature.
Material Required List
- Large abstract line art print
- Thin gold picture frame
- Two small wall mounted spotlights
- White textured bedding
Equipment Required List
- Power drill
- Measuring tape
- Spirit level
- Hammer and nails
DIY Instruction Step by Step
- Measure the width of your headboard to find the exact center point on the wall.
- Place your art print inside the gold frame and secure the back clips tightly.
- Mark a spot on the wall about twelve inches above the headboard for the bottom of the frame.
- Use a spirit level to ensure your marks are perfectly horizontal before you drill.
- Hammer in your picture hanging nails or install a heavy duty wall anchor.
- Hang the frame carefully and check the level one last time to avoid a tilted look.
- Install the small spotlights on the ceiling or wall so they point toward the center of the art.
- Turn on the lights to highlight the texture of the paper and the shimmer of the gold frame.
7 Sinuous Wavy Taper Candles
Traditional straight candles are getting a modern makeover with these fun wavy shapes. These sculptural candles act as decor even when they are not lit. The neutral beige color keeps them looking classy rather than like a novelty item.
Grouping them in different heights creates a rhythmic look on a sideboard or mantel. They look like moving ribbons of wax frozen in time. This is a very trendy way to add a romantic touch to a modern home.
The curves provide a soft contrast to the straight lines of modern furniture. They are a conversation starter for any guest who visits. These candles prove that you can be playful while maintaining a high end aesthetic.
Material Required List
- Three tall wavy taper candles
- Three short wavy taper candles
- Small hidden metal candle plates
Equipment Required List
- Utility lighter
- Soft paintbrush for dusting
DIY Instruction Step by Step
- Choose a flat surface like a wooden sideboard or a stone mantelpiece.
- Use a soft paintbrush to remove any dust from the curves of the candles.
- Place the tallest candles at the back to create a high point for your display.
- Arrange the shorter candles in front of the tall ones in a staggered pattern.
- Overlap the curves slightly so the candles look like they are flowing together.
- Use small hidden metal plates or a bit of melted wax to secure the bases.
- Ensure each candle is standing vertically and does not lean to one side.
- Light only the top wicks to keep the beautiful wavy shapes intact for longer.
8 Serene Monochrome Bedroom Retreat
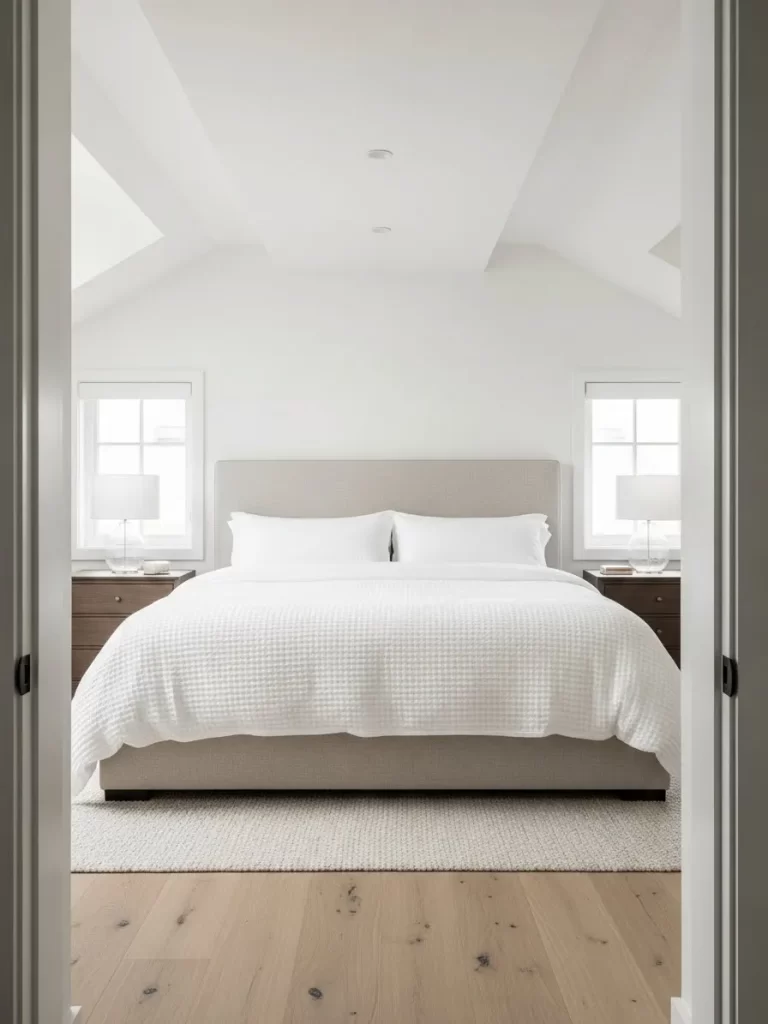
A bedroom should be a sanctuary of peace and love. Using a strictly white and beige palette creates a high end hotel feeling at home. The different layers of white fabric add comfort without any visual noise.
Large windows and natural light make the space feel open and airy. A simple textured rug under the bed adds warmth for your feet in the morning. This design focuses on quality materials rather than bright colors.
It is a great choice for a romantic morning in bed. The lack of clutter helps you focus on your partner and your rest. It feels fresh, clean, and very modern.
Material Required List
- White waffle knit duvet cover
- Four plush white sleeping pillows
- Large beige textured area rug
- Two glass bedside lamps
Equipment Required List
- Vacuum cleaner
- Fabric steamer
DIY Instruction Step by Step
- Clear the floor and use a vacuum to clean the area where the bed sits.
- Slide your large beige rug under the bottom two thirds of the bed frame.
- Pull the rug so it sticks out evenly on both sides and at the foot of the bed.
- Put your duvet inside the white waffle knit cover and shake it to distribute the weight.
- Steam the duvet cover while it is on the bed to get a crisp and smooth look.
- Fluff your pillows and stack them two by two against the headboard.
- Place your glass lamps on the nightstands and use warm white bulbs for a soft glow.
- Keep the rest of the room empty of extra items to maintain the calm and serene vibe.
9 Glamorous Gold Bar Cart

Valentine’s Day is the best time to bring out the fancy glassware and spirits. A gold bar cart adds a touch of mid century modern style to any dining or living room. The vertical bars and glass shelves look light and elegant.
Polished crystal decanters catch the light and show off the rich colors of your drinks. A small gold mushroom lamp on the bottom shelf provides a unique warm glow. It turns a functional item into a beautiful piece of glowing furniture.
This setup is great for serving a romantic cocktail before dinner. The metallic finish adds a festive sparkle that feels very sophisticated. It is a mobile party station that looks good in any corner.
Material Required List
- Two tier gold metal bar cart
- Three crystal liquor decanters
- Two cut glass tumblers
- Small gold mushroom style desk lamp
Equipment Required List
- Glass cleaner
- Microfiber cloth
DIY Instruction Step by Step
- Use glass cleaner and a microfiber cloth to make the bar cart shelves shine.
- Place the gold mushroom lamp on the bottom shelf to light the floor and lower tier.
- Arrange your crystal decanters on the top shelf starting from the back corner.
- Set the cut glass tumblers next to the decanters for easy serving.
- Keep the bottles spaced out so you can see the gold bars behind them.
- Tuck the lamp cord along the back frame of the cart so it is hidden from view.
- Plug in the lamp and watch how the light reflects off the gold and the glass.
- Place a small bowl of garnish or a cocktail shaker on the top shelf to finish the look.
10 Vibrant Orchid Tray Display

A single pop of color can transform a neutral room from plain to stunning. These tall purple orchids stand out against a backdrop of white sofas and marble floors. The thin black stems add a delicate and architectural look to the coffee table.
Placing the pot on a mirrored tray doubles the visual impact of the flowers. The reflection adds light and a sense of luxury to the center of the room. It is a simple way to bring life into a modern living space.
Orchids last a long time and represent beauty and strength. They are a classy alternative to the usual bunch of roses. This display looks expensive and carefully planned.
Material Required List
- Large potted purple orchid with two or three stems
- Circular mirrored vanity tray
- Large marble coffee table
- Two white sofas
Equipment Required List
- Watering can
- Mirror spray cleaner
DIY Instruction Step by Step
- Wipe your marble coffee table with a damp cloth to remove any dust or spots.
- Clean the mirrored tray with a specialized spray until it is streak free and shiny.
- Place the mirrored tray exactly in the center of the coffee table.
- Set your potted orchid in the middle of the tray so its reflection is clear.
- Turn the plant so the flowers face toward the main seating area of the room.
- Use a watering can to give the plant a small amount of water at the base.
- Position your sofas so they face the table to create a balanced conversation spot.
- Add a thick art book next to the tray to give the arrangement more height and interest.
11 Spa Retreat Bath

Turning your bathroom into a private spa helps you relax after a long day. A wooden bridge over the tub holds everything you need for a warm soak. White pillar candles on the ledge create a calm and romantic atmosphere.
Neutral grey tiles provide a clean background for the wood and white porcelain. Soft waffle towels wait nearby to keep you warm and dry. This look is all about peace and self care in a modern setting.
Material Required List
- One wooden bathtub caddy or bridge
- Three white pillar candles of varying heights
- One small wooden bowl of bath salts
- Two beige waffle knit towels
Equipment Required List
- Utility lighter or matches
- Soft dry cloth
DIY Instruction Step by Step
- Scrub your bathtub clean and wipe the ledges with a dry cloth.
- Position the wooden bridge across the widest part of the tub.
- Place the wooden bowl of bath salts on the right side of the bridge.
- Set one white pillar candle on the bridge and the other two on the tub corner.
- Fold your waffle towels into long rectangles and drape them over the tub edge.
- Fill the bathtub with warm water and add a handful of salts.
- Light the candles carefully to avoid getting wax on the wooden bridge.
- Dim the main bathroom lights to let the candle flames create a soft glow.
12 Modern Coffee Nook
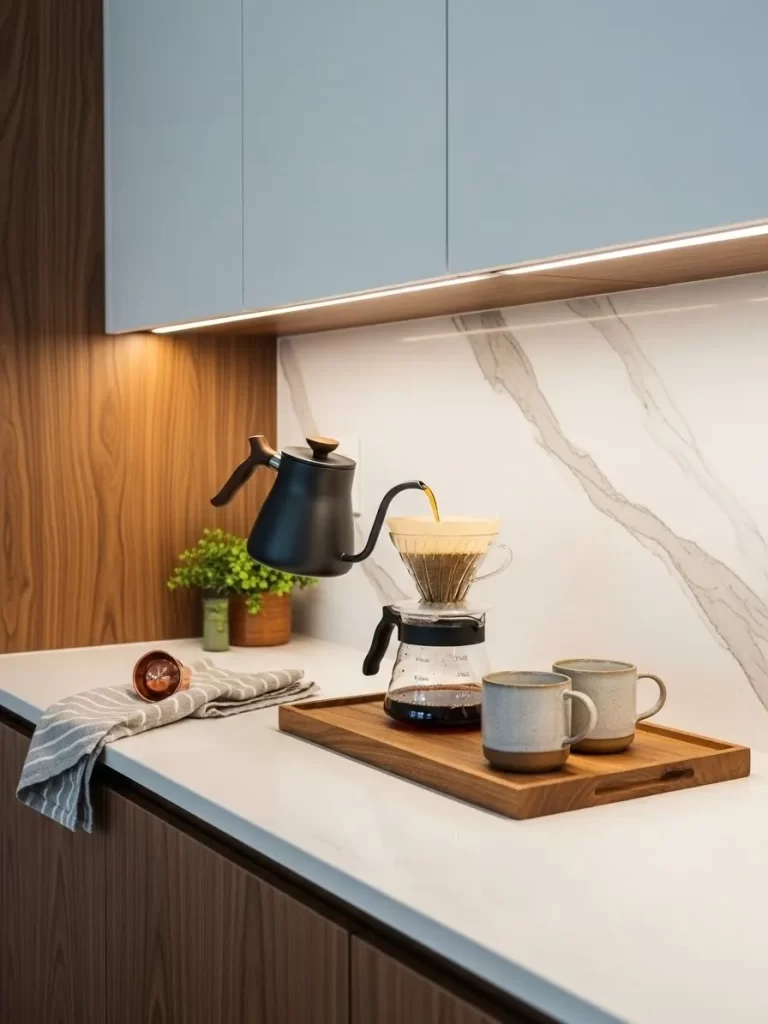
Morning coffee feels more special in a dedicated and stylish space. This setup uses a wooden tray to keep your mugs and carafe organized. A sleek black kettle adds a professional touch to the white marble counter.
Warm lighting under the cabinets highlights the marble veins and the wood grain. A small green plant in the corner brings a bit of nature into the kitchen. It looks clean and ready for a quiet start to your morning.
Material Required List
- One rectangular wooden serving tray
- One black gooseneck electric kettle
- One glass coffee carafe with a filter
- Two ceramic mugs with brown bases
- One small potted green plant
Equipment Required List
- Damp cloth for cleaning
- Electrical outlet
DIY Instruction Step by Step
- Clear a corner of your kitchen counter and wipe the marble surface clean.
- Place the wooden tray near a power outlet for the kettle.
- Set the black gooseneck kettle on the counter right next to the tray.
- Place the glass carafe in the center of the wooden tray.
- Set the two ceramic mugs on the right side of the carafe.
- Put the small potted plant behind the mugs to add some color.
- Arrange a striped kitchen towel on the left side of the tray.
- Plug in the kettle and fill the carafe with fresh coffee to enjoy your nook.
13 Soft Pink Textures

Delicate textures can bring a romantic feeling without using bold colors. These soft pink bunny tails sit in a grey concrete vase for a modern look. The rough stone contrasts with the fluffy tops of the dried stems.
Placing this on a wood console table adds warmth to an entryway. A gold framed mirror behind the vase reflects the soft shapes and the light. It is a quiet and sophisticated way to welcome guests into your home.
Material Required List
- One bunch of dried pink bunny tail grass
- One grey concrete geometric vase
- One gold framed wall mirror
- One small gold metal tray
Equipment Required List
- Scissors
- Microfiber cloth
DIY Instruction Step by Step
- Clean your wooden console table and polish the gold mirror with a cloth.
- Place the concrete vase on the left side of the table surface.
- Trim the ends of the bunny tail stems so they stand at different heights.
- Arrange the stems inside the vase so they fan out in a natural circle.
- Position the vase so it is partially reflected in the gold mirror.
- Set a small gold tray on the right side of the table to hold keys or mail.
- Add a single cream candle on the tray to finish the balanced look.
- Adjust the bunny tails until the arrangement looks full and airy.
14 Cozy Fireside Seat
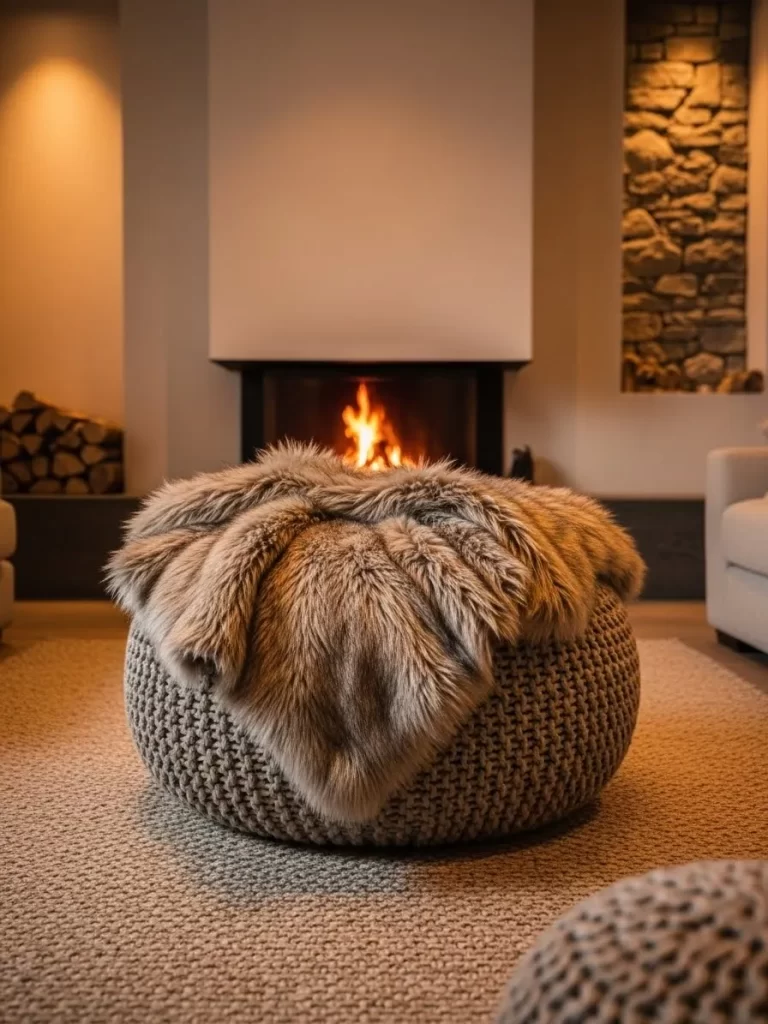
Winter evenings are better when spent by a warm and bright fire. A large knitted pouf with a thick faux fur throw makes a soft seat. The texture of the fur adds a layer of luxury to the neutral carpet.
Warm light from the fireplace fills the room with a golden glow. Stone walls in the background add an earthy and solid feeling to the space. It is a wonderful spot for sharing a conversation or a warm drink.
Material Required List
- One large round grey knitted pouf
- One thick brown faux fur throw blanket
- One large textured area rug
- Fresh firewood logs
Equipment Required List
- Fabric brush
- Fireplace tools
DIY Instruction Step by Step
- Lay your large textured rug in front of the fireplace hearth.
- Place the round knitted pouf in the center of the rug.
- Use a fabric brush to fluff up the hairs of the faux fur throw.
- Drape the fur blanket over the top of the pouf so it hangs unevenly.
- Tuck one edge of the blanket under the pouf to keep it in place.
- Stack a few extra logs in the wall niche or a basket nearby.
- Light a fire in the fireplace and wait for the flames to grow large.
- Turn off the overhead lights to let the fire glow reflect off the fur.
15 Minimal Branch Arrangement
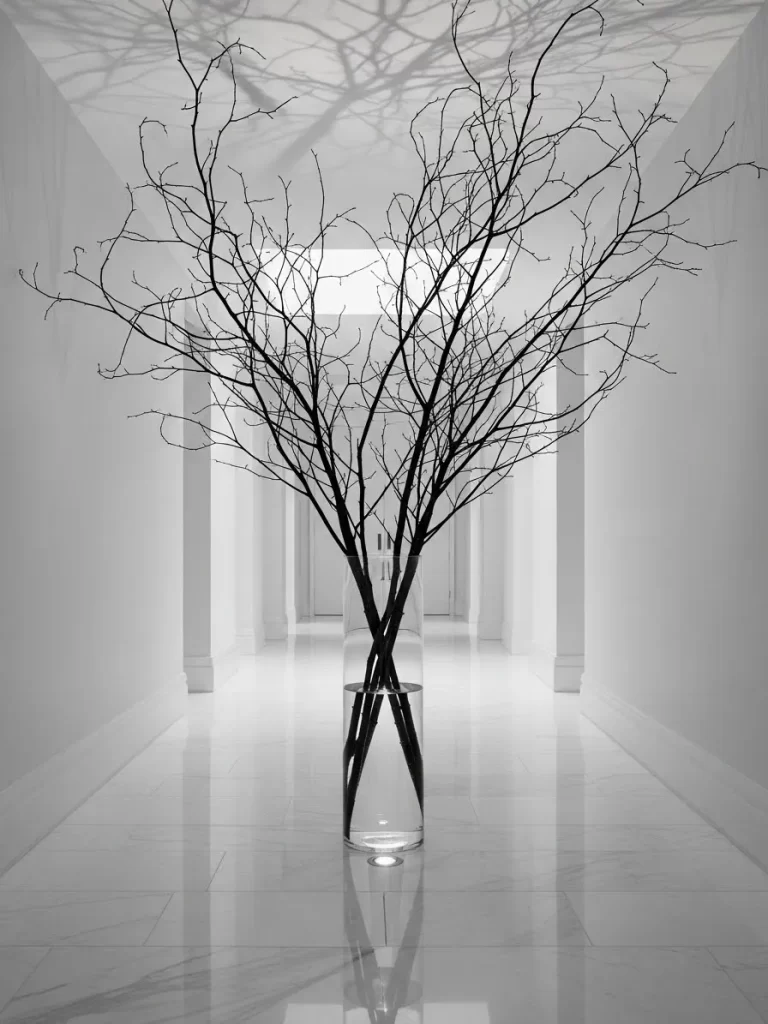
Bare branches in a tall glass vase create a dramatic and clean look. This display uses a long white hallway to show off the height of the stems. The shadows on the ceiling look like art made of light and dark.
Polished marble floors reflect the clear water and the dark branches. It feels like a gallery in a very modern and expensive home. You only need a few items to make this massive visual statement.
Material Required List
- One tall clear glass cylinder vase
- Three large bare black branches
- Fresh filtered water
- One small floor spotlight or uplight
Equipment Required List
- Pruning shears
- Glass cleaner
DIY Instruction Step by Step
- Spray the glass vase with cleaner and wipe it until it is perfectly clear.
- Fill the vase one third of the way with fresh filtered water.
- Use pruning shears to trim any small messy twigs from the main branches.
- Place the branches in the vase so they cross each other at the bottom.
- Adjust the tops of the branches so they spread wide across the hallway.
- Set the vase in the center of a hallway or entryway floor.
- Place a small floor spotlight behind the vase pointing up at the ceiling.
- Turn on the light to create beautiful branch shadows on the white walls.
16 Moody Plum Accents
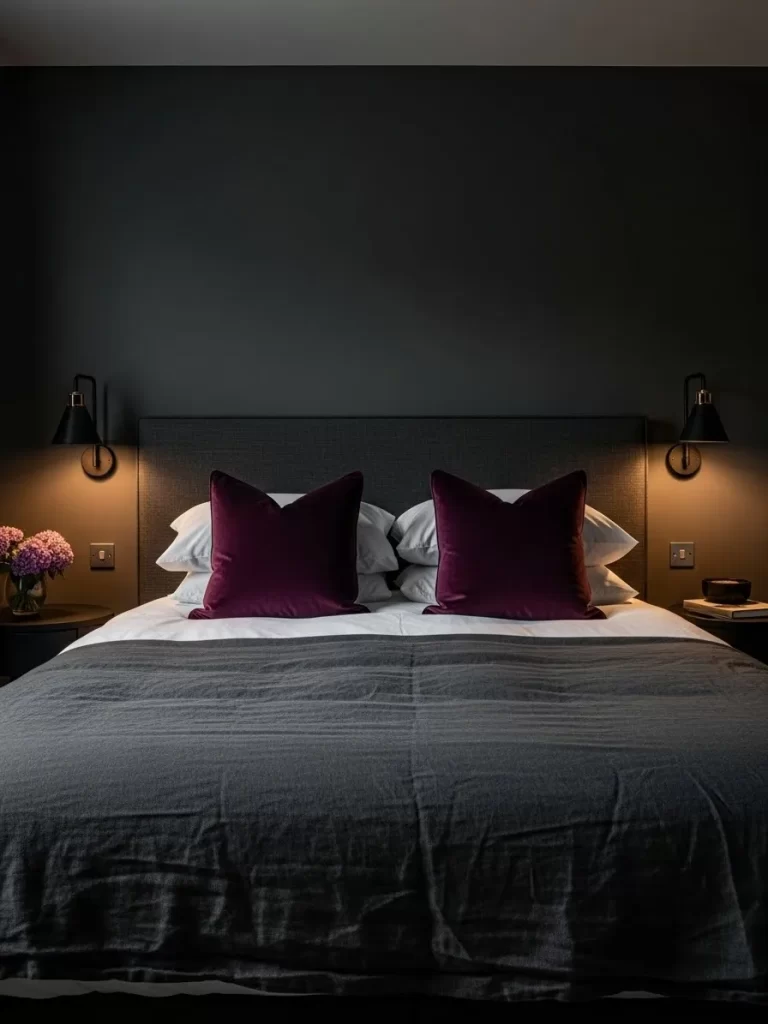
Deep purple pillows add a touch of romance to a dark and moody bedroom. This look uses a charcoal wall and black lamps to create drama. The velvet texture of the pillows looks soft and inviting against the bed.
Warm light from the wall lamps highlights the rich color of the fabric. Small touches like a bowl of dark berries add to the intimate feeling. It is a bold design that feels very high end and private.
Material Required List
- Two plum purple velvet throw pillows
- One charcoal grey linen duvet cover
- Two black wall mounted reading lamps
- One small bowl of fresh hydrangeas
Equipment Required List
- Screwdriver for lamps
- Pillow fluffer
DIY Instruction Step by Step
- Install your black reading lamps on the wall on both sides of the bed.
- Put the charcoal grey cover on your duvet and smooth it over the bed.
- Place your large white sleeping pillows against the headboard.
- Set the two plum velvet pillows in front of the white pillows.
- Give each velvet pillow a firm chop in the middle to create a fold.
- Place a small vase of purple hydrangeas on the left nightstand.
- Set a small bowl of dark fruit or snacks on the right nightstand.
- Turn on the wall lamps to see how the plum color glows against the dark wall.
17 Natural Wood Elements
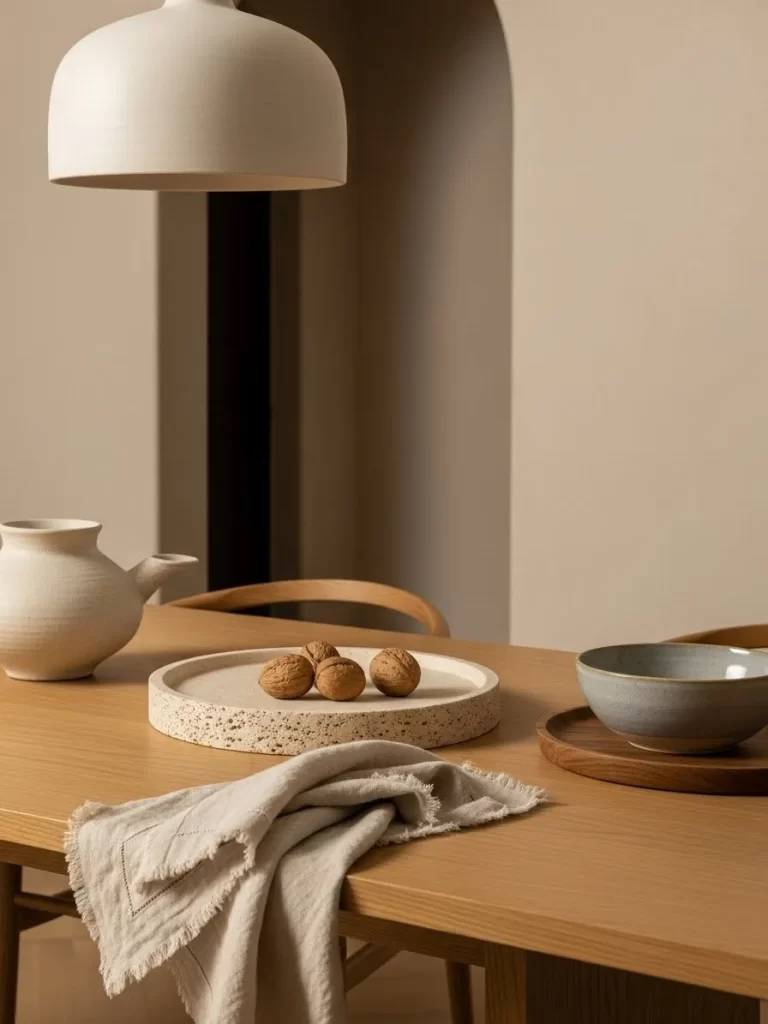
Earthy materials make a dining space feel warm and very welcoming. A textured stone tray holds simple walnuts on a light wood table. The neutral tones of the linen napkin add a soft touch to the setup.
Simple ceramic pots and bowls keep the look clean and organic. A large pendant light above the table provides a soft and even glow. It is a great way to celebrate the beauty of natural things during a meal.
Material Required List
- One light oak dining table
- One circular textured stone tray
- Five whole walnuts
- One beige linen fringed napkin
- One white ceramic teapot and bowl
Equipment Required List
- Soft wood polish
- Clean cloth
DIY Instruction Step by Step
- Wipe your oak table with a clean cloth and a bit of wood polish.
- Place the circular stone tray in the center of the table.
- Scatter five walnuts in the middle of the tray for a natural look.
- Fold the linen napkin and let it hang off the table edge near the tray.
- Set the white ceramic teapot on the left side of the table.
- Place the matching bowl on a small wooden coaster next to the teapot.
- Position the pendant light directly over the center of the stone tray.
- Check the balance of the items to ensure the table does not look cluttered.
18 Gold Veined Porcelain
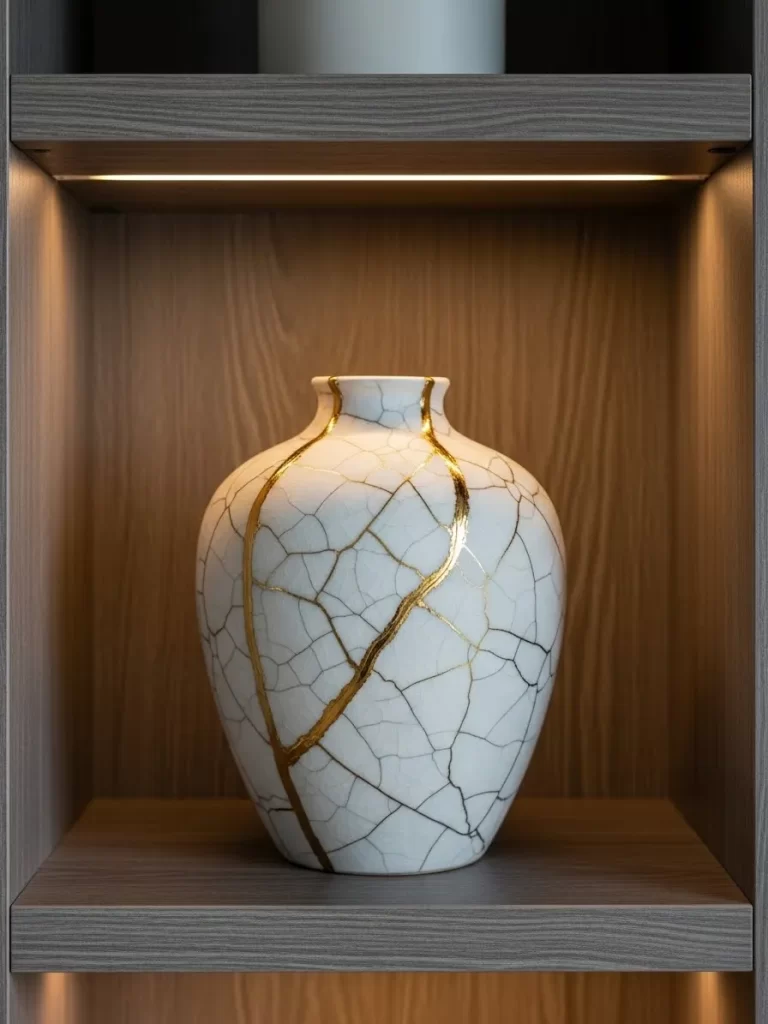
Traditional pottery gets a luxury look with gold kintsugi details. This white vase sits in a wooden niche with warm light from above. The gold lines look like lightning frozen on the surface of the clay.
The dark wood of the shelf makes the white porcelain stand out beautifully. It looks like a precious treasure that has been carefully repaired. This style adds a sense of history and value to a modern home.
Material Required List
- One white ceramic vase with gold kintsugi veins
- One dark wood shelving unit
- One warm LED puck light
Equipment Required List
- Double sided adhesive tape
- Feather duster
DIY Instruction Step by Step
- Dust the inside of your wooden shelf niche with a feather duster.
- Use double sided tape to stick the LED puck light to the ceiling of the niche.
- Place the gold veined vase in the exact center of the shelf.
- Rotate the vase until the most detailed gold lines are facing forward.
- Turn on the puck light to see how it reflects off the gold paint.
- Ensure there are no other items on the shelf to distract from the vase.
- Adjust the light position if it creates a harsh glare on the porcelain.
- Enjoy your museum style display piece in a quiet corner of the room.
19 Organic Kitchen Textures

A kitchen looks more high end when you show off natural materials. A thick olive wood cutting board leans against a white tiled wall. The swirling grain of the wood adds a beautiful and natural pattern.
A small clay pot with fresh rosemary adds a nice scent and green color. Soft lighting under the cabinets makes the white marble counter shine. It is a functional and stylish way to decorate your cooking space.
Material Required List
- One large olive wood cutting board with live edges
- One aged terracotta plant pot
- One fresh rosemary plant
- White marble countertop
Equipment Required List
- Food safe mineral oil
- Soft sponge
DIY Instruction Step by Step
- Rub a small amount of mineral oil into the wood board to protect it.
- Clean your white tiled wall and marble counter with a damp sponge.
- Lean the olive wood board against the wall at a slight angle.
- Place the rosemary plant inside the terracotta pot.
- Set the pot on the marble counter right next to the wood board.
- Position the plant so its leaves slightly overlap the edge of the board.
- Turn on your under cabinet lights to highlight the wood texture.
- Keep the area around these items clear of plastic or colorful clutter.
20 Clear Quartz Decor
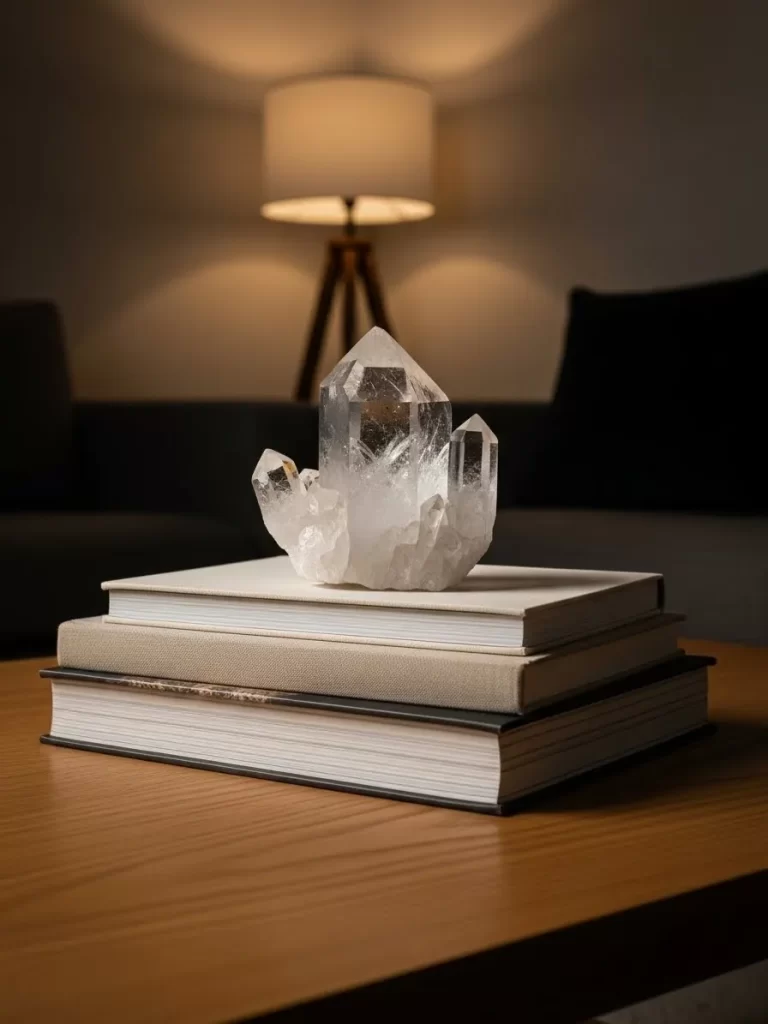
Crystals bring a touch of natural wonder and light to a living room. A large clear quartz cluster sits on a stack of neutral books. The sharp edges of the stone contrast with the smooth paper of the covers.
A wooden tripod lamp in the background provides a soft and warm light. This setup looks curated and smart on a wooden coffee table. It is a subtle way to add sparkle without using glitter or sequins.
Material Required List
- One large clear quartz crystal cluster
- Three hardback books with white and grey covers
- One wooden tripod floor lamp
- One oak coffee table
Equipment Required List
- Microfiber cloth for the crystal
DIY Instruction Step by Step
- Wipe your oak coffee table and the crystal cluster with a microfiber cloth.
- Stack the three hardback books from largest to smallest.
- Ensure the book spines are aligned and face toward the main seat.
- Place the clear quartz cluster on the top book in the stack.
- Position the tripod lamp about three feet behind the coffee table.
- Turn the lamp so the light bulb is hidden by the shade.
- Switch on the lamp to see how the light passes through the quartz.
- Move the book stack until the crystal catches the light most beautifully.
21 Bouclé Curved Lounge
Soft textures and rounded shapes create a feeling of modern luxury. This large white bouclé sofa features a curved back that looks very inviting. The nubby fabric adds a layer of comfort to a large open room.
Warm light from under the sofa base makes the furniture look like it is floating. Large arched windows in the background let in plenty of natural daylight. It is a sophisticated centerpiece for a high end living area.
Material Required List
- One curved white bouclé sofa
- One round bouclé throw pillow
- One LED light strip for furniture bases
- Light grey herringbone wood floors
Equipment Required List
- Fabric cleaner
- Extension cord
DIY Instruction Step by Step
- Position your curved sofa in the center of the room facing the windows.
- Wipe the floor under the sofa to remove all dust and hair.
- Attach the LED light strip to the bottom edge of the sofa frame.
- Hide the power cord under the sofa and run it to the nearest outlet.
- Place one round throw pillow on the right side of the seat.
- Set one square pillow on the left side to create a balanced look.
- Turn on the LED strip to create a warm glow on the floor.
- Open your curtains to let the sunlight highlight the texture of the fabric.
22 Indigo Tie Dye Pillow
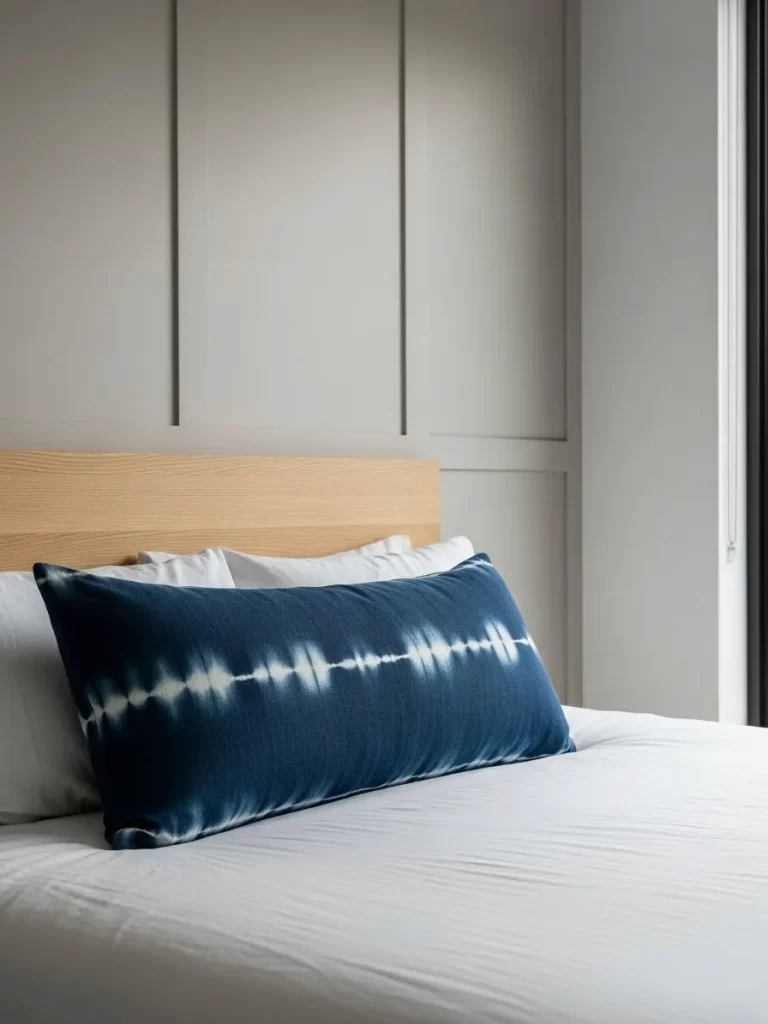
A single bold pattern can refresh a bedroom without changing the whole decor. This long lumbar pillow features a deep blue indigo tie dye design. It adds a touch of bohemian style to a very clean and modern bed.
The blue color looks striking against the crisp white sheets and light wood headboard. It provides a focal point that draws your eye as soon as you enter. This look is simple to create and easy to change whenever you want.
Material Required List
- One long indigo tie dye lumbar pillow
- Two large white sleeping pillows
- One white cotton duvet cover
- One light oak headboard
Equipment Required List
- Iron for bed sheets
- Lint roller
DIY Instruction Step by Step
- Iron your white duvet cover and sheets so they are perfectly flat.
- Make the bed and pull the covers tight toward the headboard.
- Place your two white sleeping pillows side by side against the wood.
- Set the long indigo pillow in front of the white pillows.
- Center the lumbar pillow so it covers the gap between the sleeping pillows.
- Smooth out any wrinkles on the surface of the blue fabric.
- Use a lint roller to remove any stray threads from the white bedding.
- Step back to ensure the pillow is straight and centered on the bed.
23 Linear Minimalist Candle Runner
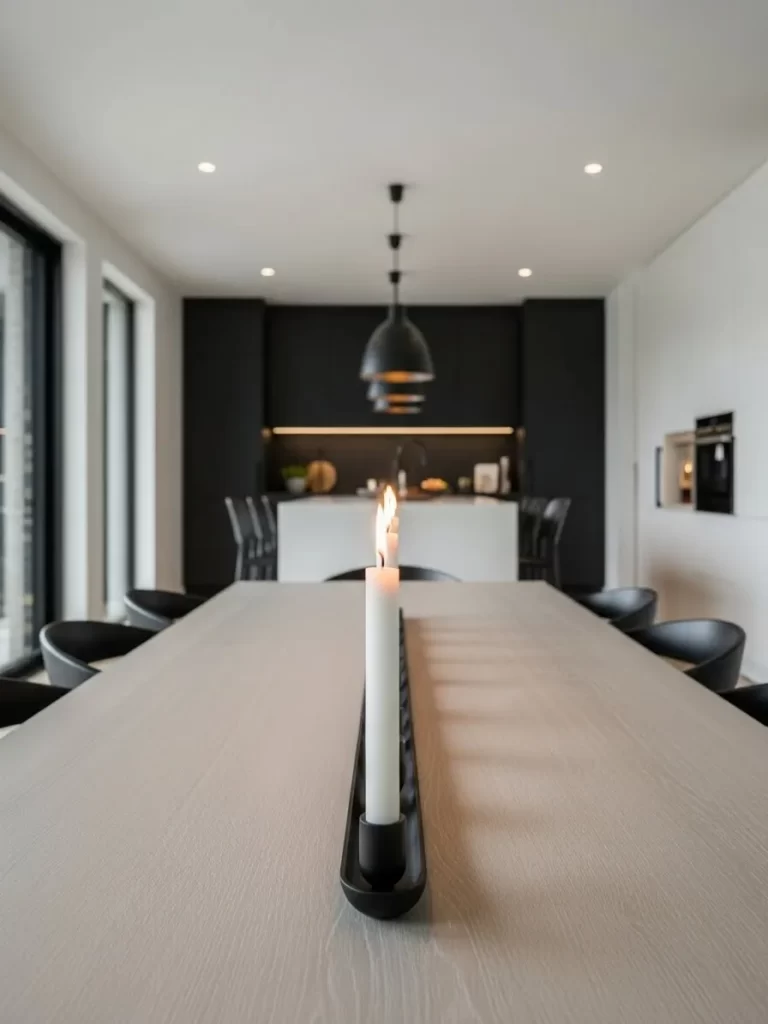
Dining tables look best when the center of the table remains clean and low. This long black candle runner holds multiple white tapers in a single line. It creates a sense of length and order in a modern dining room.
The black metal base contrasts with the light wood of the table and the white candles. Warm light from the flames reflects off the black cabinets in the background. It is a classy way to light a romantic dinner for two or more.
Material Required List
- One long black metal candle trough or holder
- Ten white taper candles
- One light grey wooden dining table
- Black kitchen cabinets
Equipment Required List
- Measuring tape
- Long reach lighter
DIY Instruction Step by Step
- Measure the center of your dining table to find the midpoint.
- Place the black candle runner exactly in the middle of the table.
- Line up the runner so it is parallel to the long edges of the table.
- Press the base of each white taper candle into the holder slots.
- Space the candles evenly so they create a perfect repeating line.
- Ensure every candle is standing straight so they burn at the same rate.
- Wipe away any fingerprints from the black metal with a soft cloth.
- Light all the candles at the same time just before dinner is served.
24 Dried Palm Fan Statement
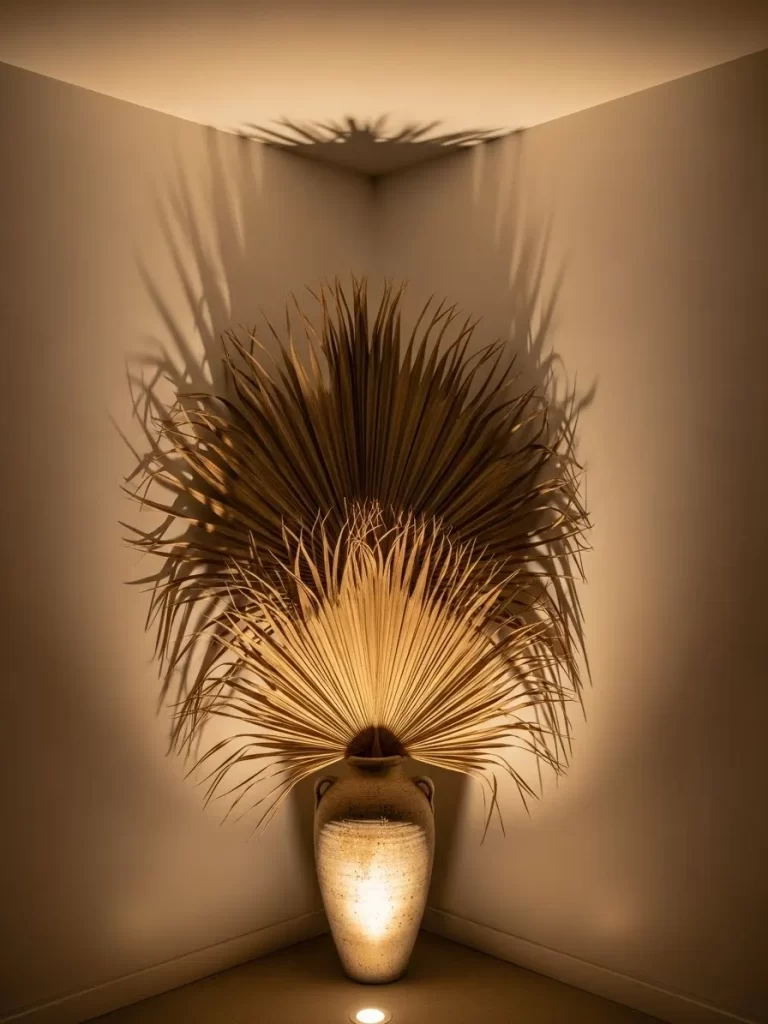
Large natural elements can fill an empty corner with style and texture. This display uses two giant dried palm fans in a tall stone vase. The light from below creates dramatic shadows on the white walls.
The neutral beige tones of the leaves work well with any modern color palette. This setup adds height and interest without needing expensive furniture. It looks like a piece of organic sculpture in your home.
Material Required List
- Two large dried palm fan leaves
- One tall textured ceramic vase
- One small floor spotlight or uplight
- Floral foam or sand
Equipment Required List
- Scissors
- Soft brush
DIY Instruction Step by Step
- Clean the floor corner and wipe the ceramic vase with a brush.
- Fill the bottom of the vase with sand or a block of floral foam.
- Push the stem of the largest palm fan into the center of the foam.
- Place the second palm fan in front of the first at a slightly different angle.
- Trim the stems with scissors if the leaves sit too high in the vase.
- Set the vase in the corner where two white walls meet.
- Place the floor spotlight directly in front of the base of the vase.
- Turn on the light and adjust the palm fans to get the best shadows.
25 Matte Black Bathroom Essentials
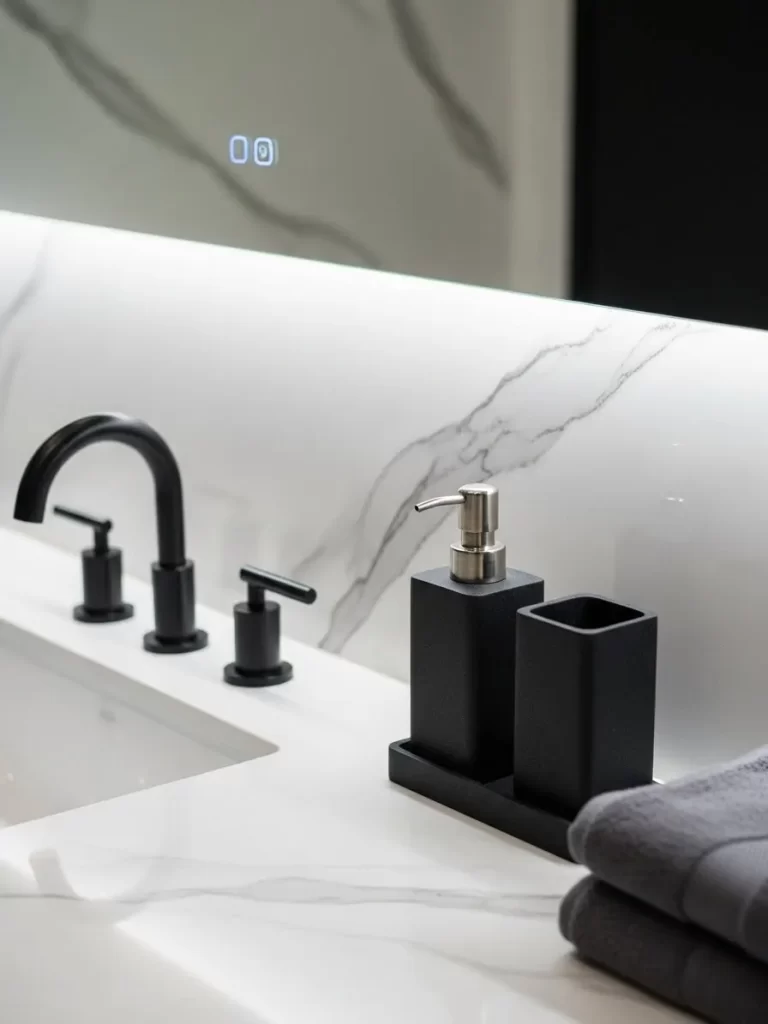
A modern bathroom looks best when the small details are consistent. This vanity features a matte black faucet and matching soap dispensers. The dark metal looks very sharp against the white marble backsplash.
Using a small black tray to hold the dispensers keeps the counter looking neat. A soft grey towel nearby adds a bit of texture to the smooth stone. It is a high end hotel look that you can easily recreate at home.
Material Required List
- One matte black soap dispenser
- One matte black toothbrush holder
- One small black rectangular tray
- One dark grey cotton hand towel
- White marble vanity top
Equipment Required List
- Glass cleaner
- Soft sponge
DIY Instruction Step by Step
- Clean your marble countertop and faucet with a soft sponge and water.
- Place the black rectangular tray on the right side of the sink.
- Fill the soap dispenser with your favorite clear or white liquid soap.
- Set the dispenser and the toothbrush holder on the black tray.
- Align the items so they face forward and look neat.
- Fold the grey hand towel into thirds and place it next to the tray.
- Wipe any water spots off the matte black faucet with a dry cloth.
- Check that the light reflects clearly off the white marble surface.
26 Natural Jute Round Rug
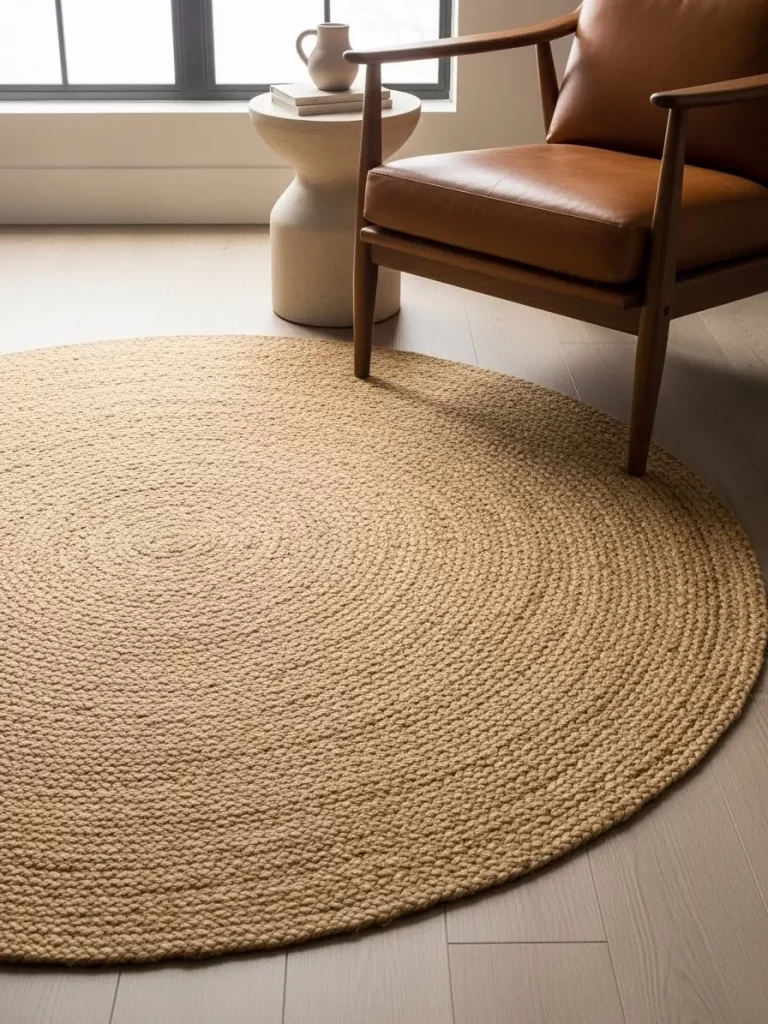
Circular shapes can soften the hard lines of modern furniture and floors. This large round jute rug adds a rustic and natural texture to the room. The woven pattern creates a sense of movement under your feet.
A brown leather chair sitting on the edge of the rug creates a cozy corner. The light wood floors and large windows make the natural fibers look bright. It is a simple and durable way to decorate a quiet reading spot.
Material Required List
- One large round woven jute rug
- One brown leather armchair
- One small concrete side table
- Light wood flooring
Equipment Required List
- Vacuum cleaner
- Non slip rug pad
DIY Instruction Step by Step
- Clean your wood floor with a vacuum to remove all dust.
- Lay a non slip rug pad down to prevent the jute from sliding.
- Place the round jute rug in the center of your reading area.
- Pull the edges of the rug until it sits flat without any bumps.
- Position your leather armchair so the front legs sit on the rug.
- Set the small concrete side table next to the arm of the chair.
- Place a small book or vase on the table to finish the scene.
- Vacuum the rug on a low setting to remove any loose fibers.
27 Amber Glass Reed Diffuser
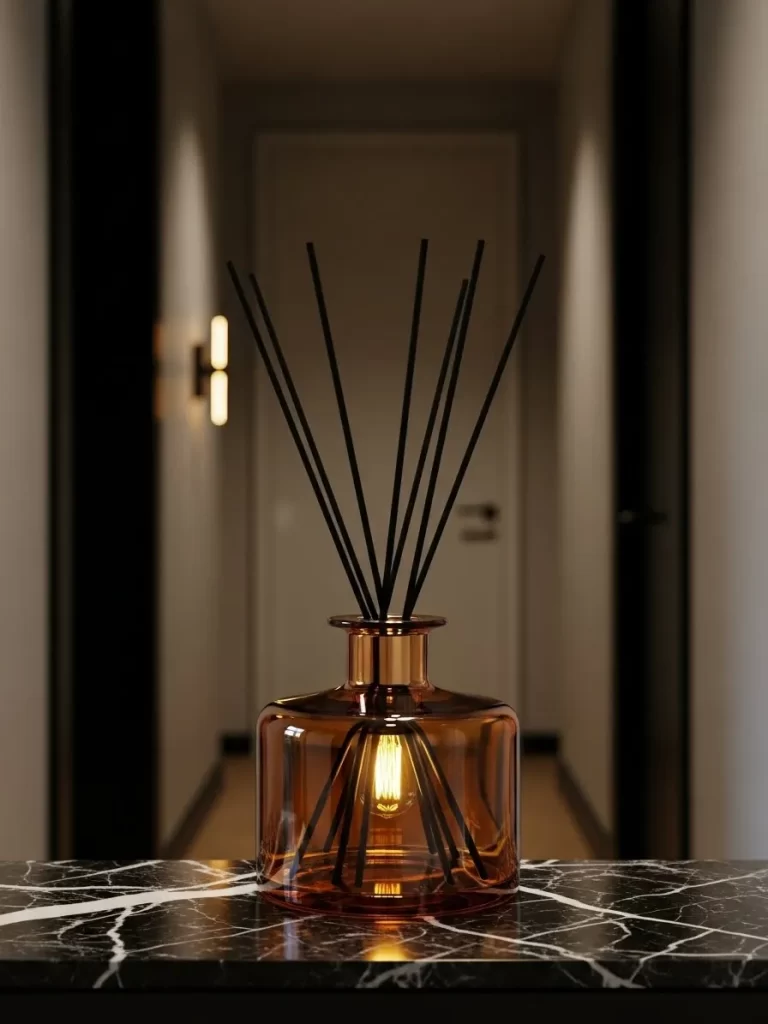
Scent is a powerful way to set a romantic mood for Valentine’s Day. This large amber glass bottle holds several long black diffuser reeds. The warm color of the glass looks beautiful on a dark marble surface.
The light from a nearby wall lamp makes the amber glass glow like a candle. It is a stylish and safe alternative to burning incense or candles in a hallway. The black reeds add a modern and linear look to the arrangement.
Material Required List
- One large amber glass bottle
- Ten black fiber diffuser reeds
- One bottle of scented diffuser oil
- Black marble tabletop
Equipment Required List
- Funnel
- Paper towel
DIY Instruction Step by Step
- Place your amber glass bottle on a flat surface protected by paper towels.
- Use a funnel to pour the scented oil into the glass bottle.
- Fill the bottle about three quarters of the way to avoid spills.
- Insert the ten black reeds into the neck of the bottle.
- Spread the reeds out so they point in different directions.
- Place the bottle in the center of your black marble table or shelf.
- Wait one hour for the oil to travel up the reeds before flipping them.
- Flip the reeds once a week to keep the scent fresh and strong.
28 Floating Shelf Gallery
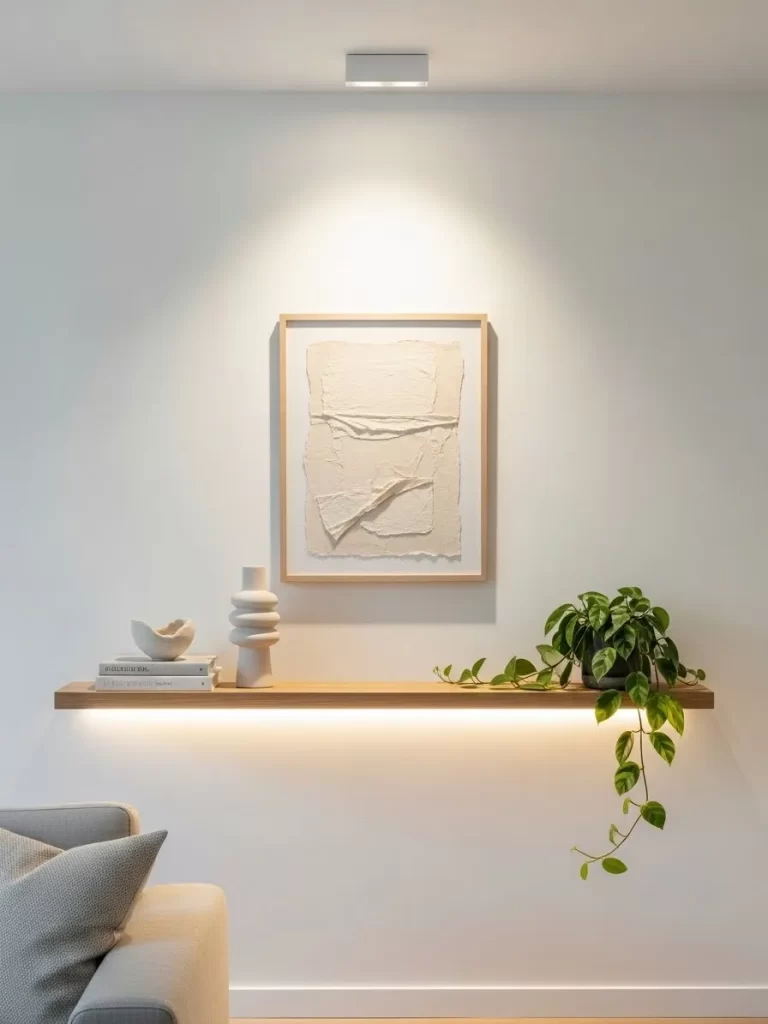
Floating shelves are a great way to display your favorite art and plants. This wooden shelf features a piece of textured paper art in a light wood frame. A trailing green plant adds life and movement as it hangs down the side.
The light under the shelf illuminates the items and the white wall below. It creates a clean and organized look that feels very intentional. Using a few well chosen items keeps the space from looking cluttered.
Material Required List
- One light wood floating shelf
- One framed piece of textured paper art
- One white ceramic sculptural vase
- One potted trailing ivy or pothos plant
- One LED under shelf light strip
Equipment Required List
- Power drill
- Wall anchors
- Spirit level
DIY Instruction Step by Step
- Use a spirit level to mark a straight line on your wall for the shelf.
- Drill holes and install the wall anchors and shelf brackets securely.
- Slide the wooden shelf onto the brackets and check that it is level.
- Attach the LED light strip to the underside of the shelf.
- Place the framed art in the center of the shelf leaning against the wall.
- Set the white ceramic vase on the left side of the art.
- Put the potted plant on the right edge so the leaves hang down.
- Turn on the shelf light to create a beautiful glow on your display.
29 Grouped Paper Lantern Display

Paper lanterns can turn a boring corner into a magical glowing feature. This group of white lanterns hangs at different heights to create a sculptural cloud. The soft light through the paper is very flattering and romantic.
The different shapes of the lanterns add visual interest to the ceiling. This look works well in a bedroom or a quiet corner of a living room. It is an affordable way to add a lot of style and warmth to your home.
Material Required List
- Seven white paper lanterns in various shapes
- Seven light bulb cords with plugs
- Warm white LED bulbs
- White ceiling hooks
Equipment Required List
- Step ladder
- Measuring tape
DIY Instruction Step by Step
- Assemble all seven paper lanterns according to the package instructions.
- Install a warm white LED bulb into each light cord socket.
- Place the bulbs inside the lanterns and secure the wire frames.
- Use a ladder to screw seven hooks into your ceiling corner.
- Hang the lanterns from the hooks at different heights.
- Ensure the largest lanterns are at the top and the smaller ones below.
- Bundle the cords together and run them down the corner to an outlet.
- Turn on the lights to see your glowing paper cloud effect.
30 Sheer Linen Drapes
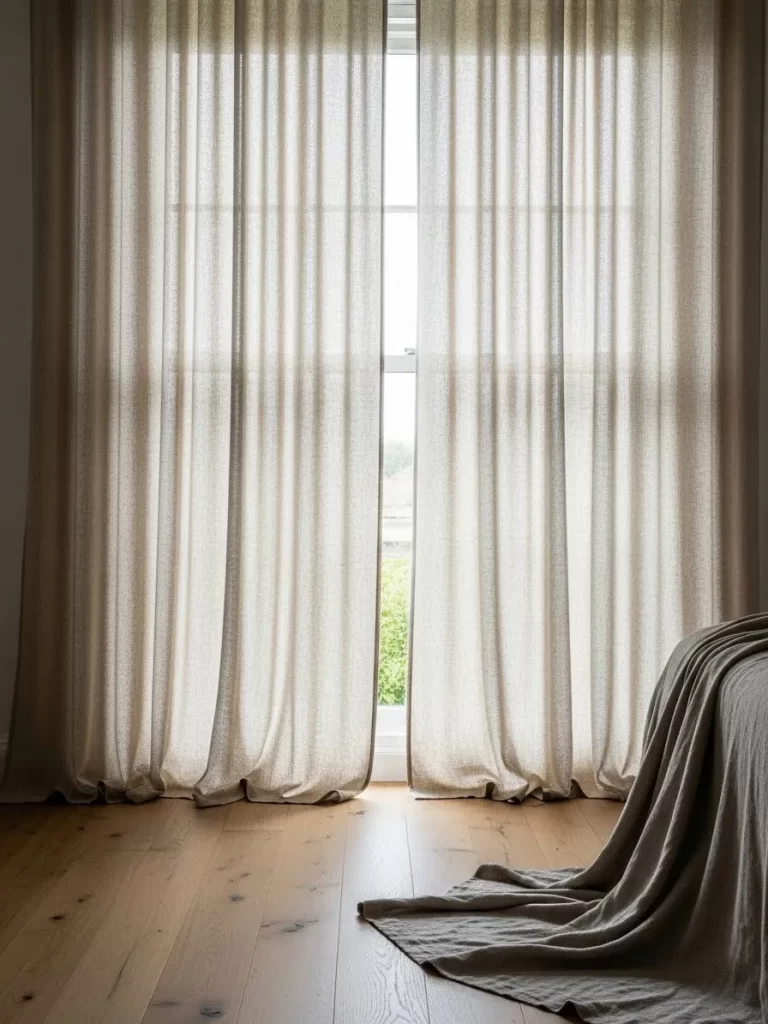
Natural light is the best way to make a modern home feel warm and open. These sheer beige linen drapes let in a soft glow while providing some privacy. The fabric pools slightly on the wood floor for a relaxed look.
The vertical lines of the drapes make the ceiling look higher and the room feel larger. This setup is all about simplicity and the beauty of natural materials. It creates a calm and peaceful atmosphere for a romantic evening.
Material Required List
- Two sheer beige linen curtain panels
- One black metal curtain rod
- Curtain rings or clips
- Light wood flooring
Equipment Required List
- Power drill
- Screwdriver
- Steamer
DIY Instruction Step by Step
- Measure the width of your window and install the curtain rod brackets.
- Place the black metal rod into the brackets and check the height.
- Slide the linen panels onto the rod using clips or rings.
- Ensure the curtains are wide enough to cover the whole window.
- Let the bottom of the fabric rest naturally on the floor.
- Use a handheld steamer to remove any heavy wrinkles from the linen.
- Pull the drapes to the sides during the day to let in the most light.
- Close them in the evening to create a soft and private space.
31 Vintage Brass Olive Pitcher
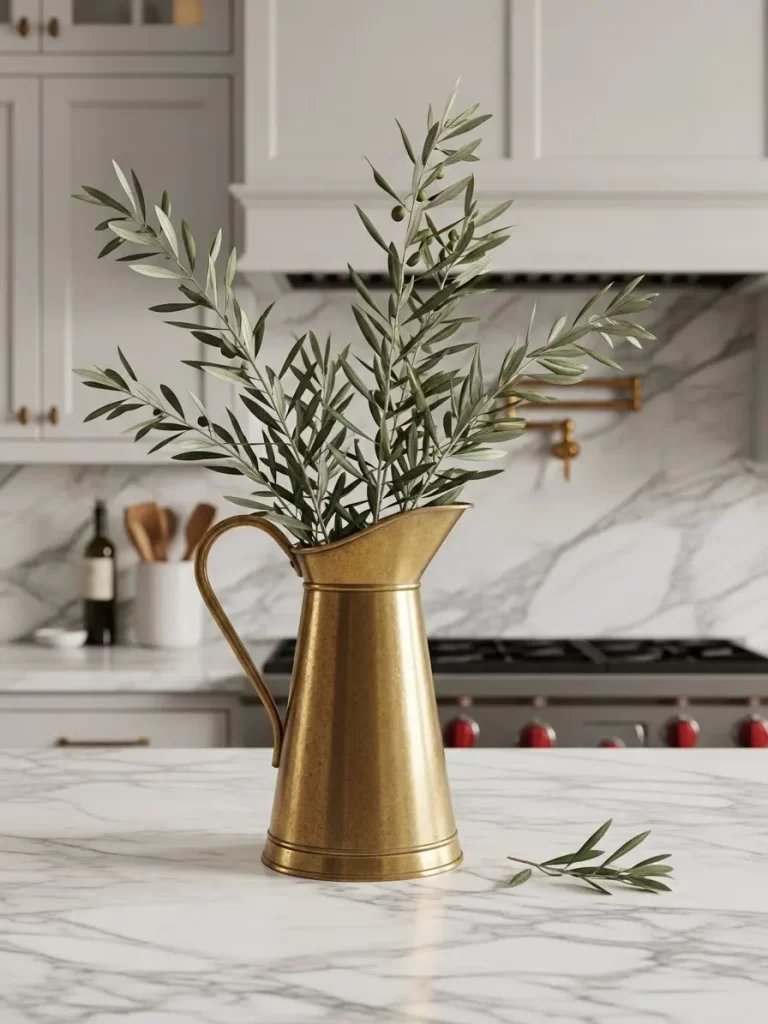
Bringing greenery into a kitchen adds life and a natural touch to the space. This setup uses a tall brass pitcher filled with fresh olive branches to create a Mediterranean feel.
The golden hue of the metal shines under kitchen lights and looks great against marble counters. It is a simple way to add height and color to your cooking area without clutter. This look works in both traditional and modern homes.
Material Required List
- One tall brass pitcher or jug
- Three fresh olive branches with leaves
- Fresh water
Equipment Required List
- Pruning shears
- Metal polish
- Soft cloth
DIY Instruction Step by Step
- Use a soft cloth and metal polish to make your brass pitcher shine.
- Fill the pitcher halfway with clean cool water.
- Use pruning shears to trim the olive branches to about twice the height of the jug.
- Remove any leaves from the bottom three inches of each branch.
- Place the branches into the pitcher so they lean out in different directions.
- Set the arrangement in the center of your kitchen island or counter.
- Change the water every three days to keep the leaves looking green.
- Wipe away any water spots from the brass surface immediately to prevent tarnishing.
32 Duo Texture Serving Boards
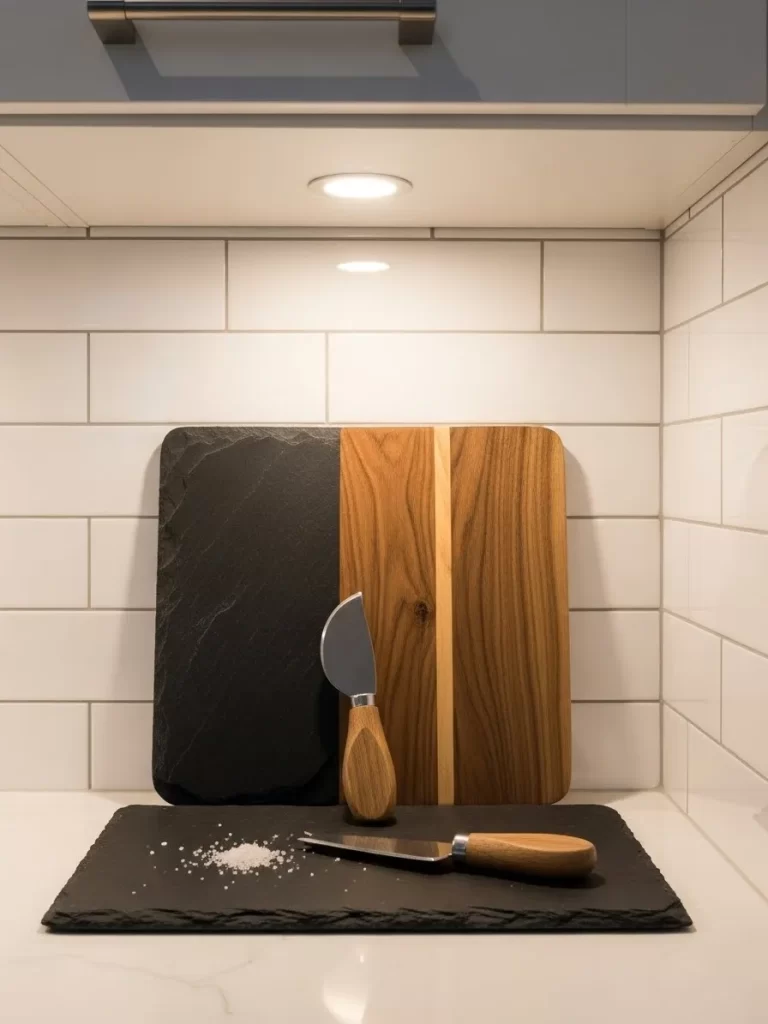
Modern kitchens value materials that are both functional and beautiful. This display features a slate board and a wood board leaning together under a warm light. The dark stone contrasts perfectly with the warm wood grain.
Setting a small cheese knife on the slate adds a sense of readiness for a romantic snack. It looks professional and organized while taking up very little space. This setup turns everyday kitchen tools into a piece of intentional decor.
Material Required List
- One rectangular slate serving board
- One rectangular walnut or oak wood board
- One small metal cheese knife with a wooden handle
- Coarse sea salt for styling
Equipment Required List
- Under cabinet LED light
- Microfiber cloth
DIY Instruction Step by Step
- Clean your boards thoroughly and wipe them dry with a microfiber cloth.
- Position your slate board flat against the kitchen backsplash tiles.
- Lean the wood board directly in front of the slate at a slight angle.
- Place a second slate board flat on the counter in front of the leaning duo.
- Sprinkle a small pinch of coarse sea salt onto the flat slate board.
- Set the cheese knife next to the salt with the blade facing away from the edge.
- Turn on the under cabinet light to highlight the different textures of stone and wood.
- Keep the surrounding area clear of other items to maintain the minimalist look.
33 Organic Shaped Pebble Mirror
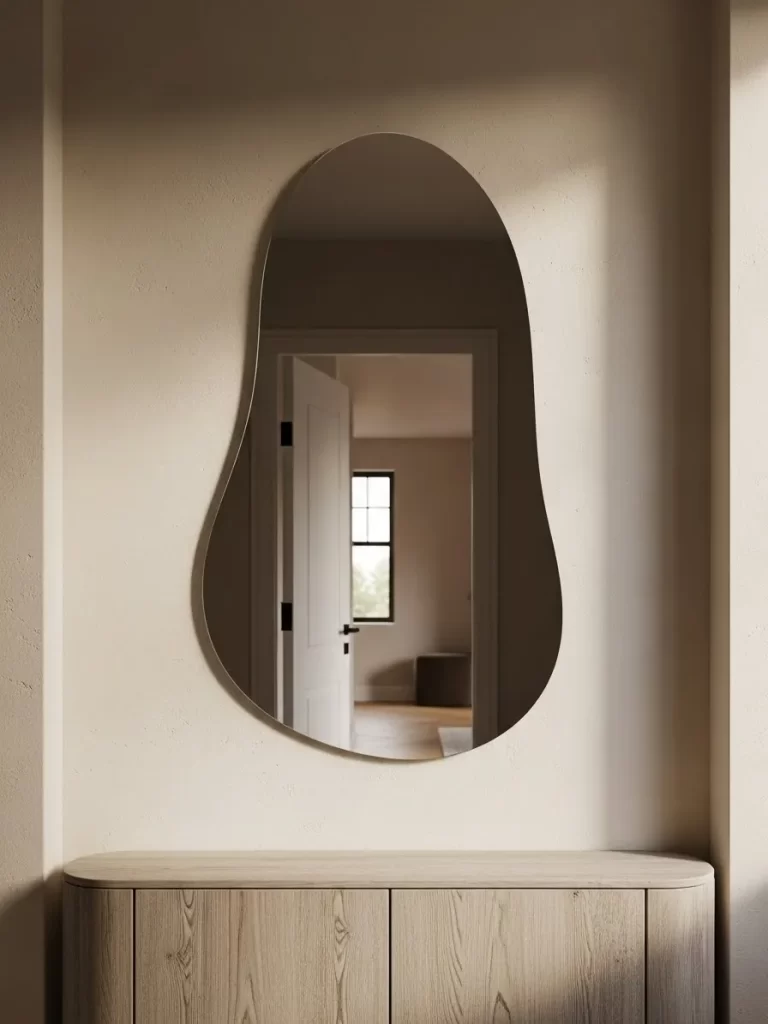
Traditional round or square mirrors can sometimes feel too stiff for a modern home. This organic shaped mirror mimics the curves of a smooth pebble found in nature. It adds a soft and artistic touch to a wood console table.
The frameless design makes it look light and airy against the neutral wall. It reflects the light from across the room to make the entryway feel much larger. This is a subtle way to bring modern art into your daily routine.
Material Required List
- One large organic or pebble shaped frameless mirror
- One light oak wood console table
- Heavy duty wall anchors
Equipment Required List
- Power drill
- Measuring tape
- Glass cleaner
- Spirit level
DIY Instruction Step by Step
- Measure the center of your console table and mark the wall at eye level.
- Use a spirit level to ensure your marks for the mirror brackets are even.
- Drill holes into the wall and tap the heavy duty anchors into place.
- Screw the mounting brackets into the anchors until they are tight.
- Lift the mirror carefully and hook the back onto the wall brackets.
- Clean the glass surface with spray until it is perfectly streak free.
- Center the console table directly underneath the hung mirror.
- Add a single small bowl or key tray to the table to finish the entry look.
34 Dried Hydrangea Cloud Arrangement
Dried flowers offer a timeless beauty that lasts much longer than fresh bouquets. This massive arrangement of dried hydrangeas looks like a soft brown cloud in a stone vase.
The neutral color palette fits easily into a modern dining room with long white hallways. It provides a large amount of visual weight without feeling heavy or dark. This setup is a great way to fill a large table with organic texture.
Material Required List
- Fifteen large dried hydrangea stems in beige or brown
- One large round concrete or stone vase
- Floral wire or tape
Equipment Required List
- Heavy duty scissors
- Hairdryer (for dusting)
DIY Instruction Step by Step
- Clean your concrete vase and ensure the inside is dry and free of debris.
- Group three hydrangea stems together and wrap the base with floral wire.
- Place the first group in the center of the vase to act as the highest point.
- Add more stems around the center group to build a rounded dome shape.
- Use scissors to trim any stems that stick out too far from the main group.
- Shake the vase gently to settle the flowers into a natural cloud like look.
- Use a hairdryer on a cool low setting to blow away any dust from the petals.
- Place the vase in the center of a long dining table for maximum impact.
35 Leather Strap Hanging Shelf
Custom shelving adds a high end feel to a room while staying very functional. These shelves use thick brown leather straps to hold a light wood board against a white wall.
The brass hardware adds a tiny touch of gold that feels special for the holiday. It is a great way to show off your favorite ceramic mugs or small bowls. This design brings a masculine and modern touch to a kitchen or office.
Material Required List
- One light oak shelf board (two feet long)
- Two thick brown leather straps with pre punched holes
- Four brass decorative wall screws
- One ceramic coffee mug
Equipment Required List
- Power drill
- Spirit level
- Screwdriver
DIY Instruction Step by Step
- Mark two vertical lines on your wall about eighteen inches apart.
- Hold a leather strap against the wall and mark the top and bottom hole spots.
- Drill holes at your marks and install wall anchors if necessary.
- Screw the leather straps to the wall using the brass decorative screws.
- Slide the wood board through the loops created by the leather straps.
- Use a spirit level to make sure the board is perfectly horizontal.
- Adjust the leather until the shelf sits flat and feels secure.
- Place a ceramic mug on the shelf to test the weight and balance.
36 Minimalist Sand Toned Sofa Setup
A living room should feel like a place where you can truly breathe and rest. This setup uses a long sand colored sofa against a matching neutral wall for a calm look.
Textured pillows and a thick knit throw blanket add layers of comfort without using bright colors. The vertical lines of the long curtains make the ceiling feel very high and grand. It is a sophisticated way to create a cozy nest for a Valentine’s movie night.
Material Required List
- One long beige fabric sofa
- Three square sand colored throw pillows
- One rectangular textured knit pillow
- One light grey wool throw blanket
- Large beige area rug
Equipment Required List
- Vacuum cleaner
- Fabric brush
DIY Instruction Step by Step
- Vacuum your large area rug and place it in the center of the room.
- Position your sofa so it sits entirely on the rug or at least the front legs.
- Smooth out the fabric on the seat cushions to remove any wrinkles.
- Place the three square pillows in the corners of the sofa.
- Put the rectangular textured pillow in the very center of the seat back.
- Fold the wool blanket in half and drape it over one arm of the sofa.
- Pull the bottom of the blanket so it falls naturally toward the rug.
- Fluff the pillows by hand to make the seating look full and inviting.
37 Wooden Knot Sculpture
Small art objects can make a coffee table look like it was styled by a professional. This hand carved wooden knot sits on top of a stack of neutral books.
The light wood grain and smooth curves add a soft and organic touch to the room. It acts as a conversation piece that guests will want to touch and move. This look is about quiet luxury and the beauty of simple shapes.
Material Required List
- One hand carved wooden knot sculpture
- Two thick hardback books with white or grey covers
- One dark wood coffee table
Equipment Required List
- Microfiber cloth
DIY Instruction Step by Step
- Wipe your coffee table with a microfiber cloth to remove all dust.
- Choose two books that have clean spines and similar sizes.
- Stack the books in the center of the table with the spines facing the sofa.
- Ensure the books are perfectly aligned for a neat and modern look.
- Place the wooden knot sculpture in the center of the top book.
- Turn the knot until the most interesting curves face the main seat.
- Leave the area around the books empty to keep the focus on the art.
- Check the balance of the room to see if the table needs anything else.
38 Miniature Moss Terracotta Pots
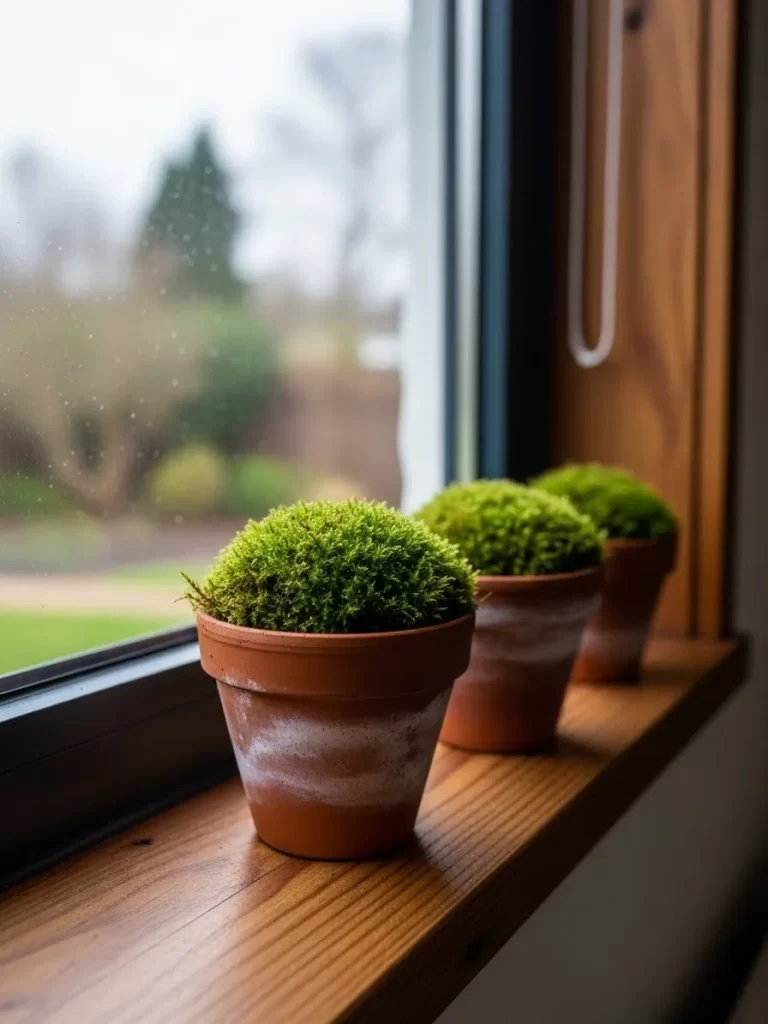
Bringing a bit of the garden indoors adds a fresh and lively feeling to a windowsill. These three small terracotta pots are filled with bright green mounds of moss.
The weathered look of the pots adds a sense of history and age to a modern window. It is a very low maintenance way to enjoy greenery throughout the winter months. This group of three looks much more intentional than a single plant alone.
Material Required List
- Three small terracotta plant pots (three inch diameter)
- Three clumps of live or preserved cushion moss
- Small amount of potting soil or floral foam
- White chalk paint for aging
Equipment Required List
- Small sponge
- Spray bottle for water
DIY Instruction Step by Step
- Dab a damp sponge into white chalk paint and lightly rub it on the pots to age them.
- Fill the bottom half of each pot with soil or a piece of floral foam.
- Press a clump of green moss into the top of each pot so it forms a dome.
- Ensure the moss sits slightly above the rim of the terracotta for a full look.
- Wipe away any stray soil from the outside of the pots with a dry cloth.
- Line up the three pots on a wooden windowsill with about two inches between them.
- Use a spray bottle to give live moss a light misting of water every few days.
- Enjoy the bright pop of green against the view of the outdoors.
Designing a romantic home does not require following every holiday trend. Choosing timeless pieces and rich textures allows you to celebrate in a way that feels authentic. You now have the tools to create a space that looks curated and high end.
Small changes like switching your candle colors or adding a velvet throw make a big difference. These projects are easy enough for anyone to try at home. Your space will feel warm and inviting throughout the entire season.
We hope these ideas inspire you to look at holiday styling through a modern lens. Enjoy the process of crafting a beautiful and sophisticated retreat. Happy decorating.
Key Takeaways
- Focus on rich textures like velvet and natural stone instead of plastic items.
- Use moody colors such as black and emerald to create a mature atmosphere.
- Simple DIY tasks can provide a high end look while staying on a small budget.
- Minimalism helps keep your home feeling fresh and uncluttered during holidays.
- Lighting plays a massive role in setting a romantic and calm mood.