
Valentine’s Day is a special time to show love and appreciation for your partner. Most people focus on gifts or dinner but forget how important lighting is for the mood. Harsh overhead lights often kill the romantic feeling you want to create.

Fairy lights offer a soft and warm glow that changes any room instantly. They are affordable and very easy to set up with basic tools. You can turn your home into a magical sanctuary without spending a fortune on new furniture.
We have gathered thirty five creative ways to use these tiny bulbs. Each idea includes simple instructions that anyone can follow at home. Prepare to see your living space in a whole new light this February.
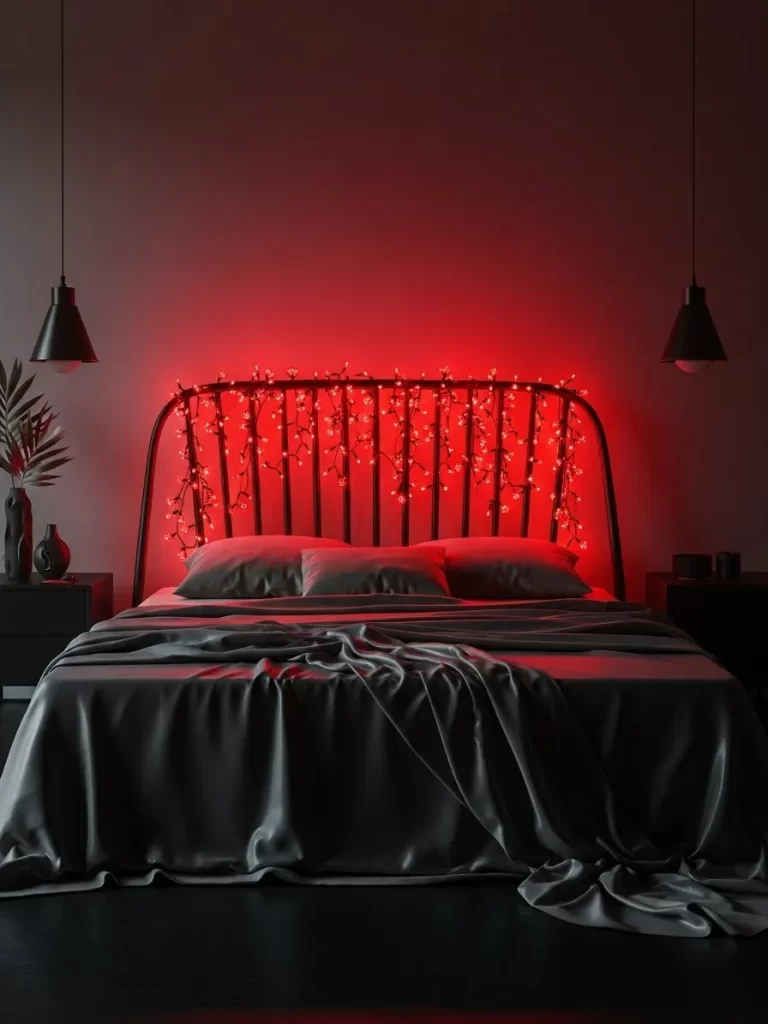
1 Romantic Waterfall Light Wall
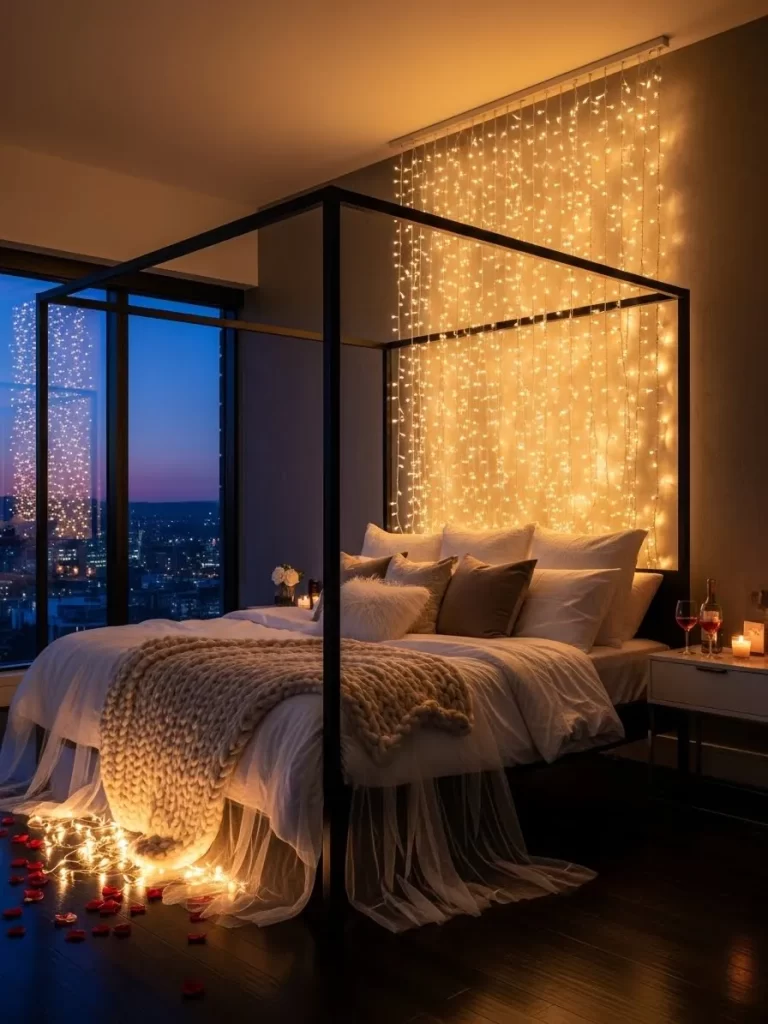
Transform your bedroom into a cozy retreat with a shimmering wall of light. This simple addition brings a soft warmth that brightens the entire space instantly. It creates a romantic atmosphere without requiring major renovations or expensive furniture changes.
The delicate strands hang behind your bed to mimic a glowing waterfall. They cast a gentle hum of light that makes the room feel peaceful. Adding red rose petals near the base completes the look for a sweet surprise.
You will love how the golden hues bounce off the walls and bedding. This setup provides enough light to read by while keeping the mood intimate. It is a wonderful way to celebrate love in your own private sanctuary.
Materials Required
- LED curtain fairy lights
- Clear adhesive wall hooks
- Red silk rose petals
- Power extension cord
Equipment Required
- Sturdy step ladder
- Measuring tape
- Pencil for marking
DIY Instructions
- Begin by clearing any clutter away from the wall behind your headboard.
- Use your measuring tape to find the center of the wall space above the bed.
- Mark small spots with a pencil every six inches along the top of the wall near the ceiling.
- Stick the adhesive hooks onto each pencil mark and press them firmly for thirty seconds.
- Drape the main horizontal cord of the fairy lights across the hooks carefully.
- Untangle each vertical strand one by one so they fall straight down toward the floor.
- Place your silk rose petals in small piles or a heart shape at the foot of the bed.
- Connect the lights to the nearest power outlet using an extension cord if the wire is too short.
- Step back to ensure the lights hang evenly and adjust any tangled strands.
2 Glowing Message in a Bottle Trio

Recycle glass bottles to create a stunning centerpiece for your dinner table. These clear containers hold fine copper wires that twinkle like captured fireflies. Mixing different bottle shapes adds a touch of vintage character to the display.
A handwritten note tucked inside one bottle adds a personal touch. This simple detail turns your lighting into a conversation piece. Green leaves and red petals scattered at the base soften the wood surface.
The soft glow is bright enough to see your partner but low enough to feel cozy. You can create this look in minutes using items from your pantry. It is a wonderful way to repurpose glass while setting a romantic mood.
Materials Required
- Three assorted empty glass bottles
- Three strands of battery operated copper wire fairy lights
- Fresh eucalyptus stems
- Loose red rose petals
- One small piece of paper
- Thin ribbon
Equipment Required
- Glass cleaner
- Small towel
DIY Instructions
- Wash the bottles with soap and water to remove any dust or sticky residue.
- Dry the glass thoroughly with a clean towel to ensure it sparkles under the lights.
- Place one strand of copper wire lights inside each bottle carefully.
- Push the wire down so it coils naturally at the bottom and middle sections.
- Hide the small battery pack behind the bottle or inside the neck if it fits.
- Write a short love letter on your piece of paper for a surprise.
- Roll the paper into a tight tube and tie it with a ribbon.
- Slide the note into the clearest bottle so it remains visible to your guest.
- Arrange the bottles in the center of your table on a dark runner.
- Surround the glass bases with green leaves and red petals for a finished look.
3 Radiant Heart Vanity Mirror
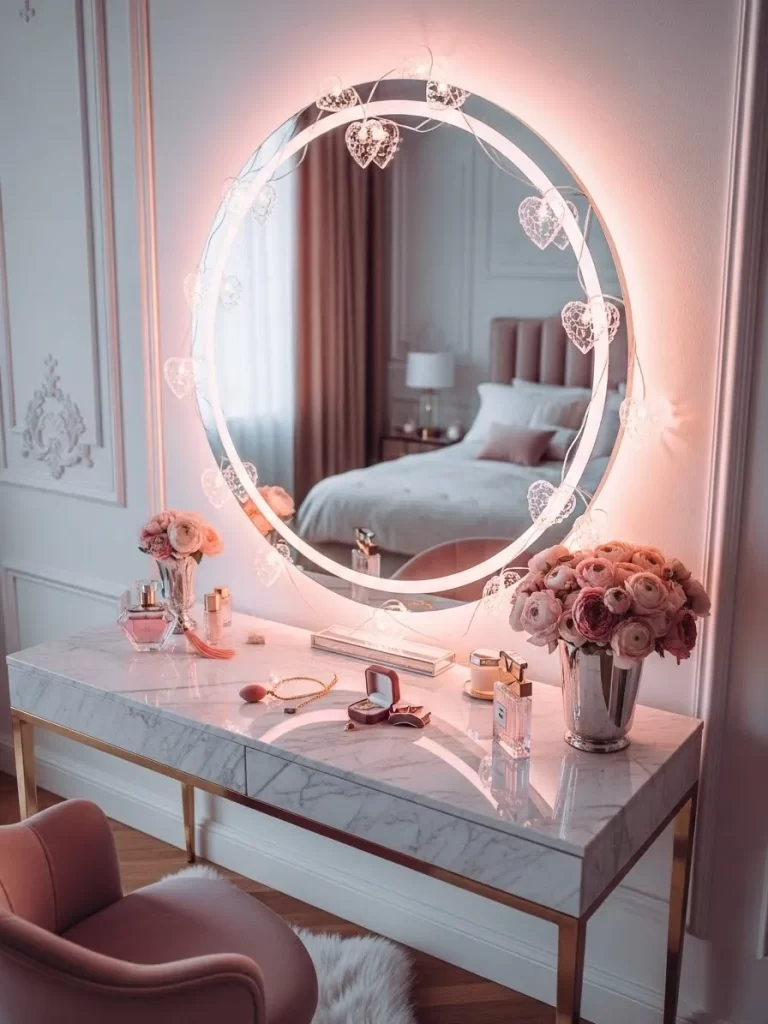
Add a touch of whimsy to your bedroom with heart shaped string lights. These pink glowing ornaments frame your mirror with a soft and flattering radiance. This setup makes the simple act of getting ready feel like a luxury experience.
The warm light reflects off the glass to double the brightness of the room. It coordinates with fresh flowers and gold accents on your tabletop. Every morning will feel more cheerful in this illuminated space.
Setup is very easy and works on any size of mirror. The hearts cast a gentle pink hue that is very soothing at night. It is a lovely way to celebrate the season of love every day.
Materials Required
- One strand of heart shaped fairy lights
- Clear adhesive cord clips
- Pink roses in a silver vase
- Gold jewelry tray
Equipment Required
- Rubbing alcohol
- Cotton cloth
DIY Instructions
- Clean the outer edge of your mirror frame with rubbing alcohol and a cloth.
- Let the surface dry for one minute so the adhesive sticks well to the frame.
- Remove the backing from your clear cord clips and press them onto the frame.
- Space the clips every five inches around the entire circumference of the mirror.
- Wait thirty minutes for the adhesive to bond strongly to the frame surface.
- Snap the wire of your heart lights into the clips starting from the bottom.
- Ensure each heart bulb faces forward to maximize the glow for your reflection.
- Plug the lights into the nearest outlet and hide the cord behind your vanity.
- Place your roses and jewelry tray on the table to complete the scene.
4 Twinkling Star Heart Photo Wall
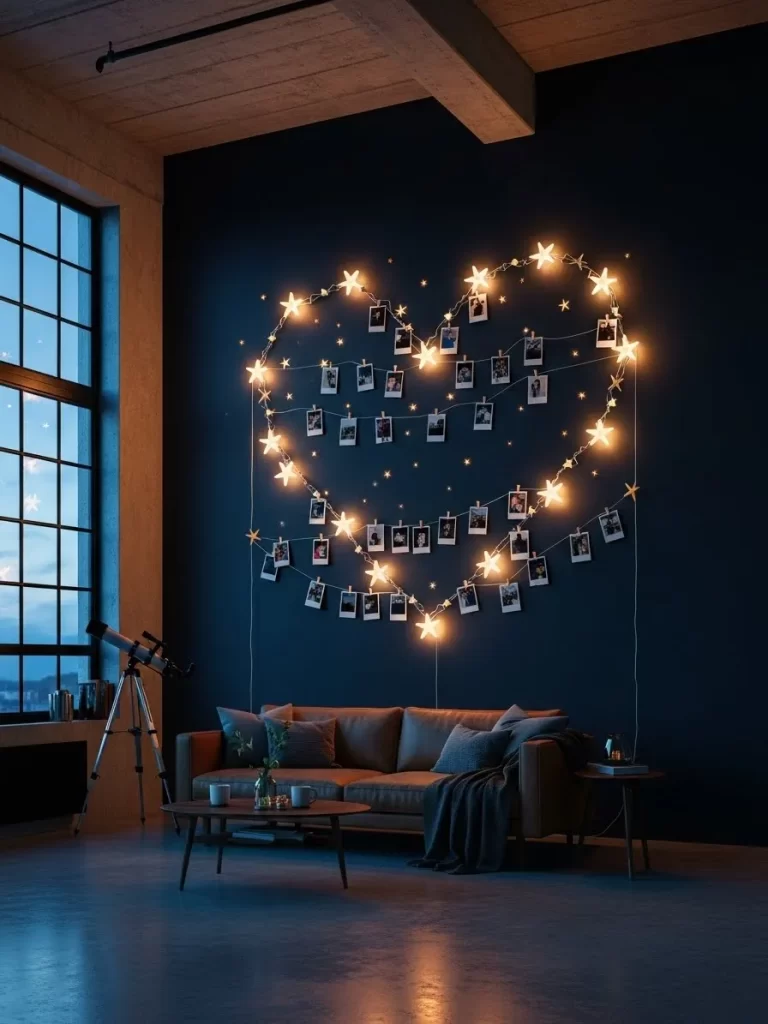
Transform a blank wall into a gallery of your favorite memories. Shaping string lights into a large heart creates a meaningful focal point in your living room. Small star clips hold your photos securely while adding a magical twinkle.
The dark wall color makes the warm white bulbs pop with intense contrast. This display reminds you of happy moments every time you walk by. It provides a soft ambient light that is excellent for watching movies or relaxing.
You can customize the size of the heart to fit any space. This project is a great way to use printed photos that usually stay in a drawer. Your home will feel much more personal and cozy with this addition.
Materials Required
- Two strands of star clip fairy lights
- Twenty printed polaroid photos
- Small clear wall hooks
- Pencil
Equipment Required
- Measuring tape
- Step stool
DIY Instructions
- Choose a large wall area that is clear of other decorations for the best effect.
- Use your pencil to draw a very faint heart shape on the wall.
- Measure the width to ensure the heart is centered above your furniture properly.
- Stick the wall hooks along the pencil line at six inch intervals.
- Press each hook firmly for thirty seconds to make sure it stays in place.
- Loop the string lights over the hooks following your pencil guide carefully.
- Plug in the lights to check if the heart shape looks symmetrical and even.
- Use the star shaped clips to attach your photos to the wire strands.
- Space the pictures evenly so the light can shine between them clearly.
- Erase any visible pencil marks with a soft eraser once you finish.
5 Cozy Rain Day Reading Nook
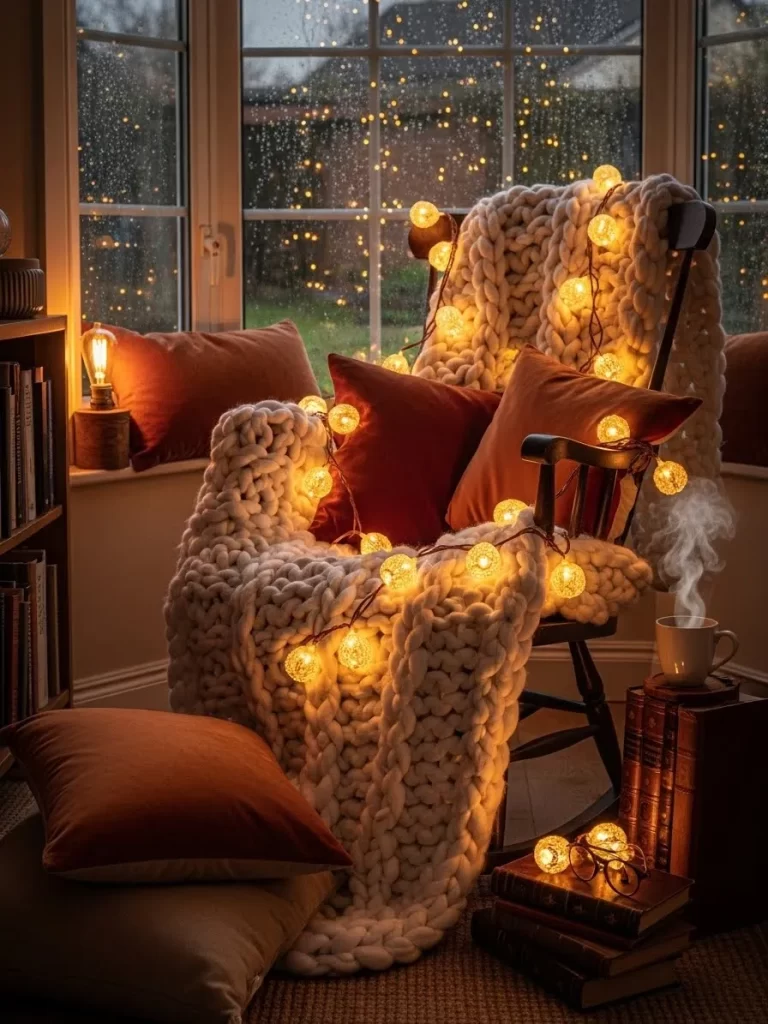
Design a private retreat for those cold winter evenings. Draping large globe lights over a textured blanket creates a very inviting atmosphere. The oversized bulbs offer a soft and diffused glow that feels relaxing.
A comfortable rocking chair becomes the best seat in the house with this setup. The light catches the rain on the window for a beautiful visual effect. This corner is excellent for sipping tea and getting lost in a book.
The warm colors of the pillows and blankets enhance the cozy feeling. You can move these lights easily to different rooms whenever you need a change. It is a quick way to add style and warmth to any dark corner.
Materials Required
- One strand of large globe fairy lights
- Chunky knit throw blanket
- Two velvet cushions
- Stack of hardback books
Equipment Required
- Extension cord
DIY Instructions
- Place your favorite armchair in a corner near a window for a nice view.
- Toss the chunky knit blanket over the back of the chair artistically.
- Let the fabric drape naturally over one arm and down to the floor.
- Arrange your velvet cushions to create a comfortable and supportive seat.
- Lay the globe lights over the blanket starting from the top section.
- Weave the wire through the folds of the fabric to keep it in place.
- Plug the lights into an outlet using an extension cord if necessary.
- Stack your books on a small table or on the floor nearby.
- Turn off the main room lights to enjoy the gentle radiance of the bulbs.
6 Magical Moonlit Balcony Garden
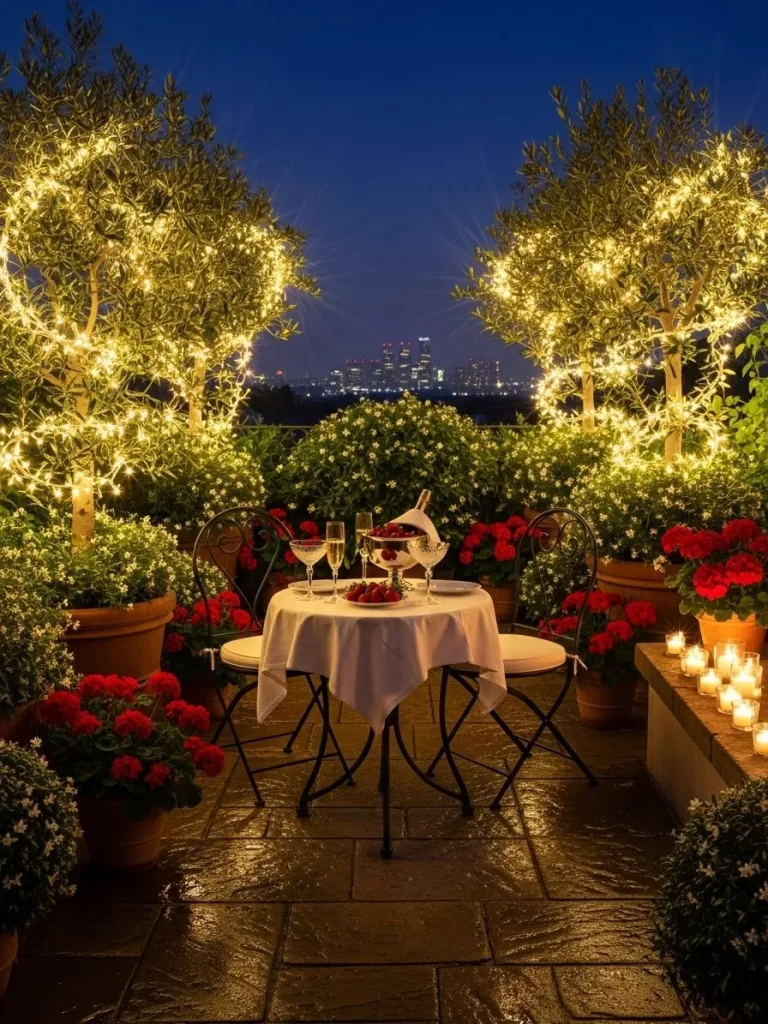
Create a secret garden on your own balcony for a romantic meal. Wrapping your outdoor trees with hundreds of tiny lights creates a brilliant display. This setup brings a sense of wonder to any outdoor area.
The trees act as glowing pillars that frame your dining table. Red flowers and flickering candles on the table add layers of warmth and color. You can enjoy the city view while sitting in your own private oasis.
This lighting is durable enough for outdoor use throughout the year. It makes the space feel larger and much more sophisticated. Your partner will feel like they have been transported to a high end restaurant.
Materials Required
- Four strands of outdoor rated fairy lights
- White tablecloth
- Two chairs with cushions
- Potted red geraniums
- Glass candle holders
Equipment Required
- Step ladder
- Outdoor extension cord
DIY Instructions
- Clear your balcony of any unnecessary items to make room for the table.
- Place your two potted trees on opposite sides of the intended dining area.
- Start at the bottom of the tree trunk and wrap the lights tightly.
- Work your way up into the branches to cover the entire tree evenly.
- Secure the end of the wire by tucking it under a sturdy branch.
- Cover your table with the white cloth and set out your dinnerware.
- Place the red flowers in the center to provide a pop of color.
- Arrange the candle holders around the flowers for extra ambient light.
- Connect all the tree lights to an outdoor power source safely.
- Hide the wires along the base of the balcony wall for a neat look.
7 Dreamy Cotton Cloud Ceiling
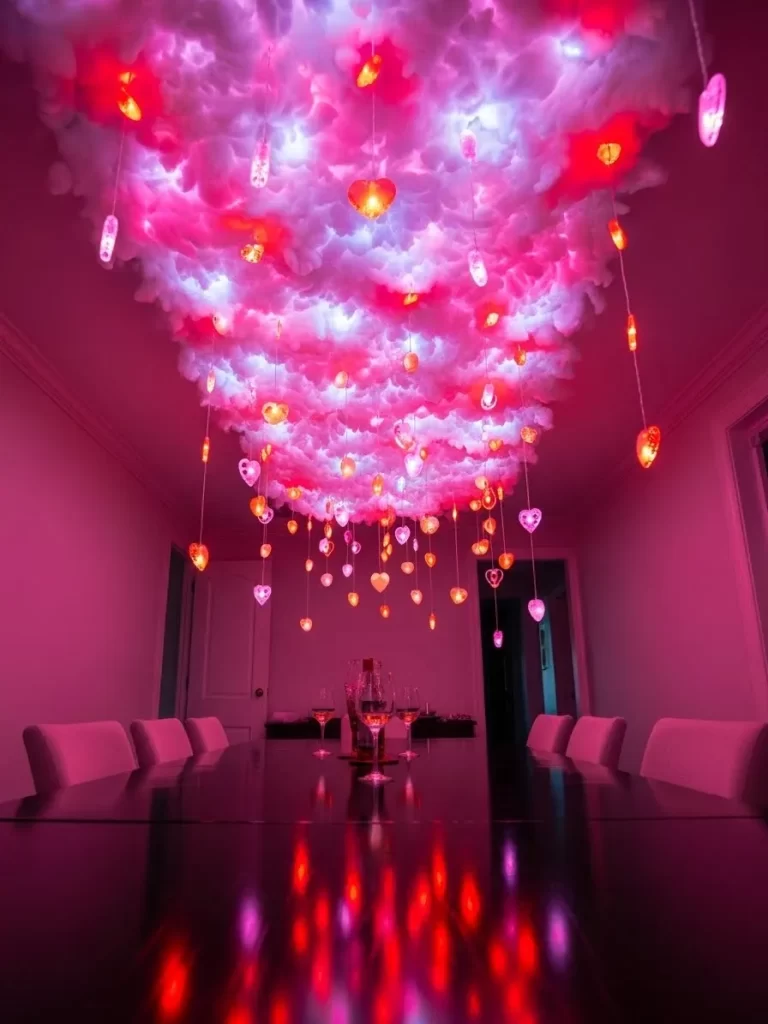
Turn your dining room into a whimsical dreamscape with a cloud installation. This fluffy ceiling feature uses lights to glow in shades of pink and purple. Hanging heart ornaments appear to float through the air like falling love notes.
The vibrant colors create a bold and modern look for a Valentine dinner. It changes the entire mood of the room without any permanent changes. This display is sure to impress anyone who enters the house.
You can adjust the colors using a remote to match your table setting. The soft texture of the cloud makes the space feel intimate and magical. It is a creative way to use vertical space for decoration.
Materials Required
- Large box of polyester fiberfill
- LED light strips with color control
- Heart shaped battery lights
- Clear fishing line
- Wire mesh panel
Equipment Required
- Hot glue gun
- Ceiling hooks
- Step ladder
DIY Instructions
- Cut the wire mesh into a long rectangular shape with wire cutters.
- Attach the LED strips to the mesh using the adhesive backing provided.
- Apply hot glue to the mesh in small sections carefully.
- Press large clumps of fiberfill onto the glue until the mesh is hidden.
- Continue adding fiberfill until the structure looks like a thick cloud.
- Screw two hooks into your ceiling joists above the dining table.
- Use the fishing line to hang the cloud from the hooks securely.
- Tie the heart lights to the mesh so they hang down at different heights.
- Turn on the LED strips and select a pink or purple setting.
- Enjoy the colorful glow reflecting off your dining table surface.
8 Romantic Rose Petal Hallway Path
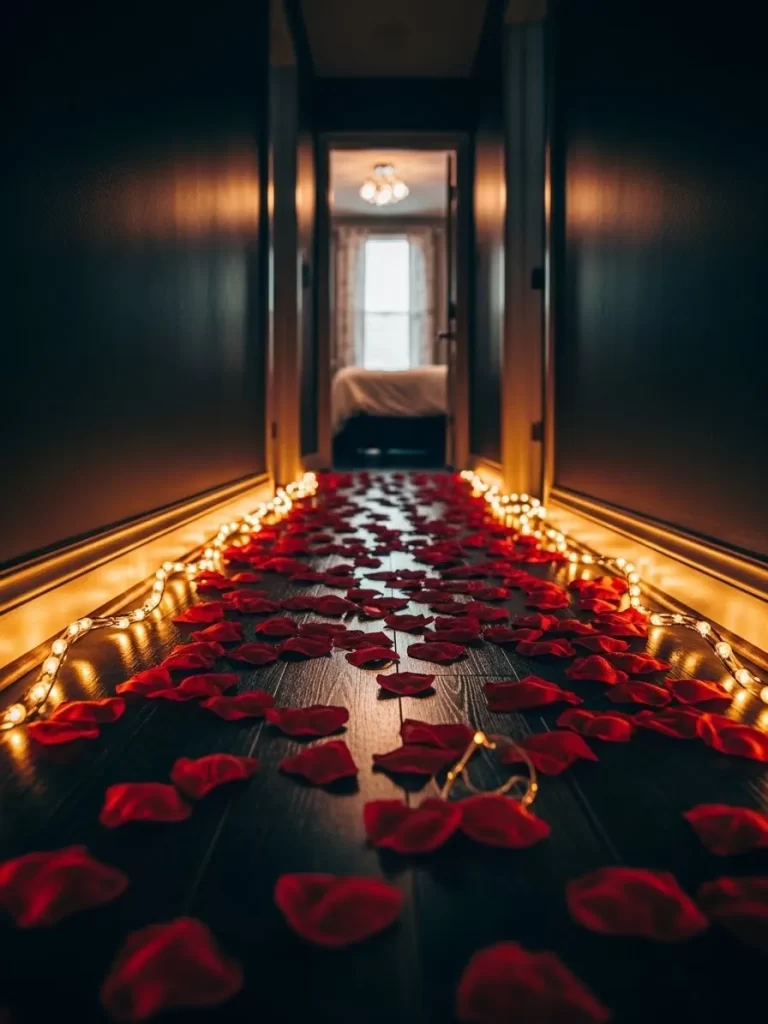
Lead the way to a special surprise with a glowing floor path. Lining your hallway with fairy lights creates a sense of excitement and mystery. The deep red petals scattered on the floor provide a rich and romantic texture.
The contrast between the dark floor and the bright lights is very dramatic. This simple gesture makes a huge impact as soon as someone enters the home. It is a classic way to show your affection on a special night.
The path defines the walk and builds anticipation for what is at the end. You can set this up in just a few minutes with minimal effort. It turns a normal hallway into a beautiful and memorable experience.
Materials Required
- Two twenty foot strands of battery fairy lights
- One large bag of silk red rose petals
- Extra batteries
Equipment Required
- Broom
- Painter tape
DIY Instructions
- Sweep the floor to remove any dust so the path looks clean.
- Lay one strand of lights along the left side of the hallway.
- Use small pieces of painter tape to keep the wire straight against the wall.
- Lay the second strand of lights along the right side of the hallway.
- Check that both strands are parallel to create a clear walkway.
- Pour the rose petals into the center space between the two light lines.
- Spread the petals out so they cover the floor thickly and evenly.
- Ensure there is enough space to walk without stepping on the lights.
- Turn on the lights just before your guest arrives for the best effect.
9 Submerged Copper Light Vases

These water filled vases provide a sophisticated glow for any surface. Submerging copper lights in water creates a shimmering effect that is very elegant. A single white flower floating on top adds a touch of natural beauty.
Clear beads at the bottom hide the wires and diffuse the light beautifully. This setup is excellent for a spa bathroom or a romantic dinner table. The glass cylinders reflect the light to create a bright and clean look.
You can use different heights of glass to create visual interest. This decoration looks very expensive but uses very basic materials. It brings a peaceful and calming energy to your home environment.
Materials Required
- Three glass cylinder vases in different sizes
- Three sets of waterproof copper fairy lights
- One jar of clear water beads
- Three fresh white flowers
- Distilled water
Equipment Required
- Large bowl
- Paper towels
DIY Instructions
- Soak the water beads in a bowl of water for four hours until they grow.
- Drain the excess water from the beads once they are full size.
- Place the battery pack of the waterproof lights at the bottom of the vase.
- Fill the bottom third of the vase with the clear beads to hide the pack.
- Loop the copper wire upwards through the center of the vase.
- Pour distilled water into the vase until it is nearly full.
- Use a paper towel to wipe any water drops off the outside of the glass.
- Cut the stem off your white flower so only the bloom remains.
- Place the flower gently on the surface of the water.
- Turn on the lights to see the water and glass shimmer in the room.
10 Multi Layered Memory Gallery Wall
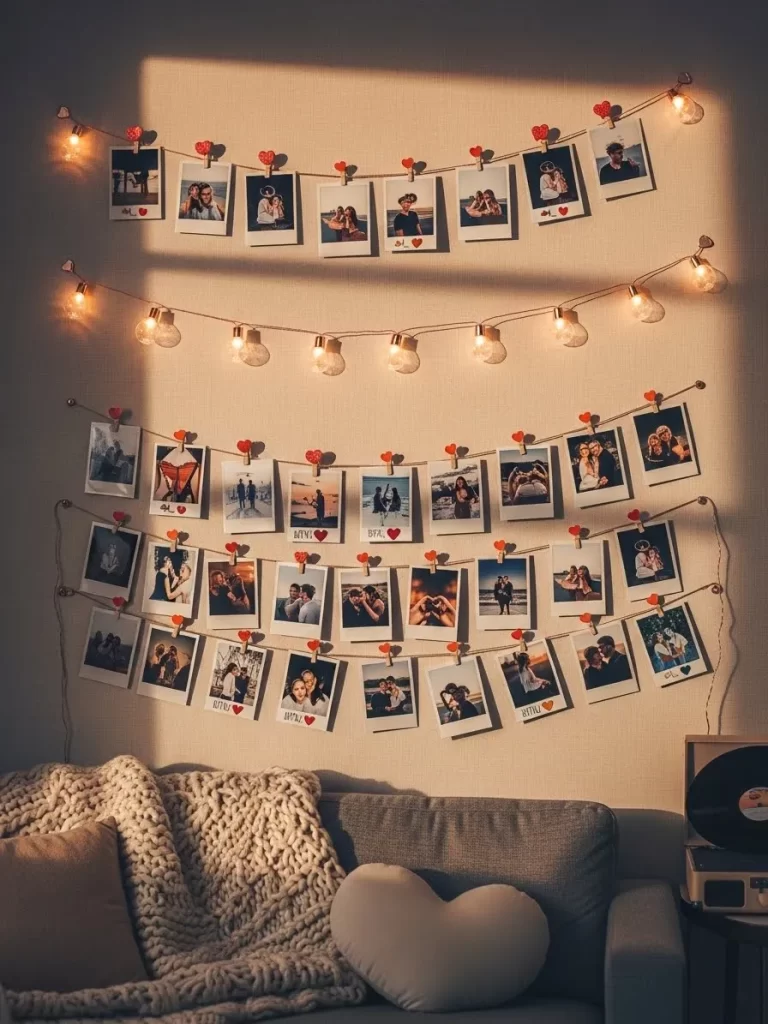
Display your life together with this warm and inviting photo wall. Mixing large bulbs with tiny fairy lights adds a lot of character to the room. The heart clips provide a sweet detail that holds your photos in place.
The lights create a golden glow that makes the room feel very comfortable. This setup is a wonderful way to tell a story through your favorite pictures. It serves as a great backdrop for a cozy night on the sofa.
The layers of light provide different levels of brightness for the space. You can easily add new photos as you make more memories together. This is a meaningful decoration that you can enjoy every single day.
Materials Required
- One strand of large bulb string lights
- Two strands of copper wire fairy lights
- Twenty red heart wooden clips
- Twenty printed photos
- Small wall nails
Equipment Required
- Hammer
- Pencil
DIY Instructions
- Mark three horizontal lines on your wall with a pencil for guidance.
- Space the lines about twelve inches apart from each other vertically.
- Tap small nails into the wall at the ends of each pencil line.
- String the large bulbs across the middle line for a bold look.
- Drape the fairy lights across the top and bottom lines for contrast.
- Use the heart clips to hang ten photos on the top strand of wire.
- Hang the remaining ten photos on the bottom strand of wire.
- Ensure the photos are level and do not overlap each other.
- Plug in all the light strands to a power strip for easy control.
- Adjust the wires if they sag too much to keep the look neat.
11 Moroccan Lantern Collection

Grouped lanterns create a charming and rustic look for your living room. Filling different styles of lanterns with warm lights adds a lot of depth. The white faux fur rug underneath makes the whole setup feel very soft.
The light reflects off the glass and metal to brighten up the floor area. This arrangement is an excellent alternative to a traditional fire in the fireplace. It provides a safe and beautiful glow that lasts all evening.
You can mix and match different lantern colors like black and white. This creates a timeless look that works well with any interior design style. It is a very simple way to make your hearth feel warm and welcoming.
Materials Required
- Four metal lanterns of various sizes
- Four long strands of battery fairy lights
- One white faux fur rug
- Small pine cones for decoration
Equipment Required
- Glass cleaner
- Microfiber cloth
DIY Instructions
- Clean the glass panels of each lantern to remove any fingerprints.
- Open the lantern door and place a bunched up strand of lights inside.
- Ensure the lights are spread out so they fill the entire glass area.
- Close the door and hide the battery pack at the very bottom.
- Place the faux fur rug on the floor in front of your fireplace.
- Arrange the lanterns on the rug in a cluster from tallest to shortest.
- Scatter a few pine cones around the base of the lanterns.
- Turn on each set of lights and adjust their position for an even glow.
- Step back to make sure the cluster looks balanced and natural.
12 Crimson Headboard Glow
Make a bold statement in your bedroom with vibrant red lighting. Wrapping red branch lights around a black metal headboard creates a modern look. This setup provides a deep and moody atmosphere that is very romantic.
The dark bedding and pillows make the red glow stand out even more. It is a very stylish way to change the energy of your sleeping space. This lighting is excellent for a late night chat or relaxing before sleep.
The branch shapes add an organic and artistic touch to the room. You can easily remove them if you want to change the color for another holiday. It is a unique design that looks like a piece of glowing art.
Materials Required
- Three strands of red LED branch fairy lights
- Black silk or cotton duvet cover
- Dark grey throw pillows
- Small black zip ties
Equipment Required
- Scissors
DIY Instructions
- Clear the pillows away from your headboard to have a clean workspace.
- Start at the left side of the metal headboard frame.
- Wrap one branch of lights around the vertical bars of the bed.
- Use a small zip tie to secure the wire to the frame at the top.
- Continue wrapping across the top and down the right side of the bed.
- Overlap the branches slightly to ensure there are no dark spots.
- Trim the excess ends of the zip ties with your scissors.
- Hide the power cords behind the mattress and plug them in.
- Arrange your dark bedding and pillows to complete the look.
13 Frosty Window Icicle Lights
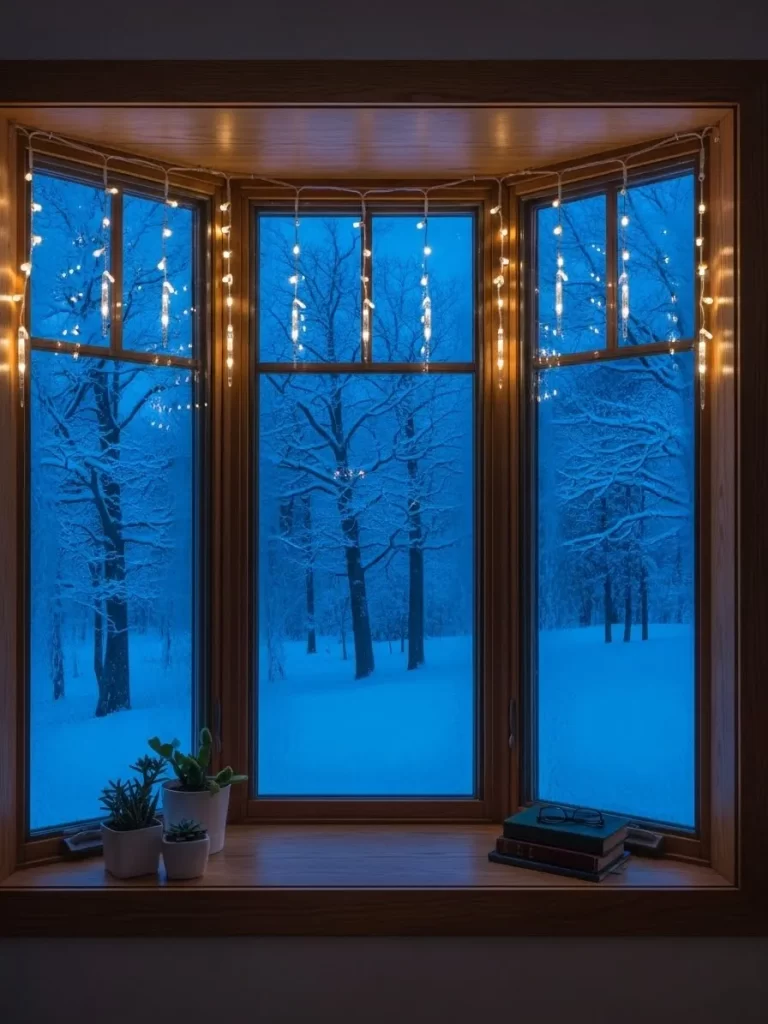
Bring the magic of a winter landscape inside your home. Hanging icicle style lights in a large bay window creates a stunning frame. The warm glow contrasts with the blue light of the snowy trees outside.
This setup makes your windows look like they are dripping with light. It is a beautiful view both from inside the house and from the street. The lights provide a cozy feeling while you watch the snow fall.
Adding small plants and books to the window sill completes the scene. This decoration is very peaceful and helps brighten up short winter days. It is a classic holiday look that feels very fresh and clean.
Materials Required
- Two strands of warm white icicle fairy lights
- Clear adhesive window hooks
- Three small potted succulents
- Stack of green books
Equipment Required
- Window cleaner
- Step stool
DIY Instructions
- Clean the inside of your window glass and the wooden frame.
- Stick the adhesive hooks along the top edge of the window frame.
- Space the hooks about eight inches apart for a secure hold.
- Press the hooks firmly and wait one hour before hanging the lights.
- Drape the main horizontal wire of the icicle lights across the hooks.
- Let the vertical strands hang down naturally at different lengths.
- Untangle any wires that are caught on each other so they hang straight.
- Place your small plants and books on the window sill below.
- Plug in the lights and enjoy the view of the glowing garden outside.
14 Botanical Table Runner Radiance
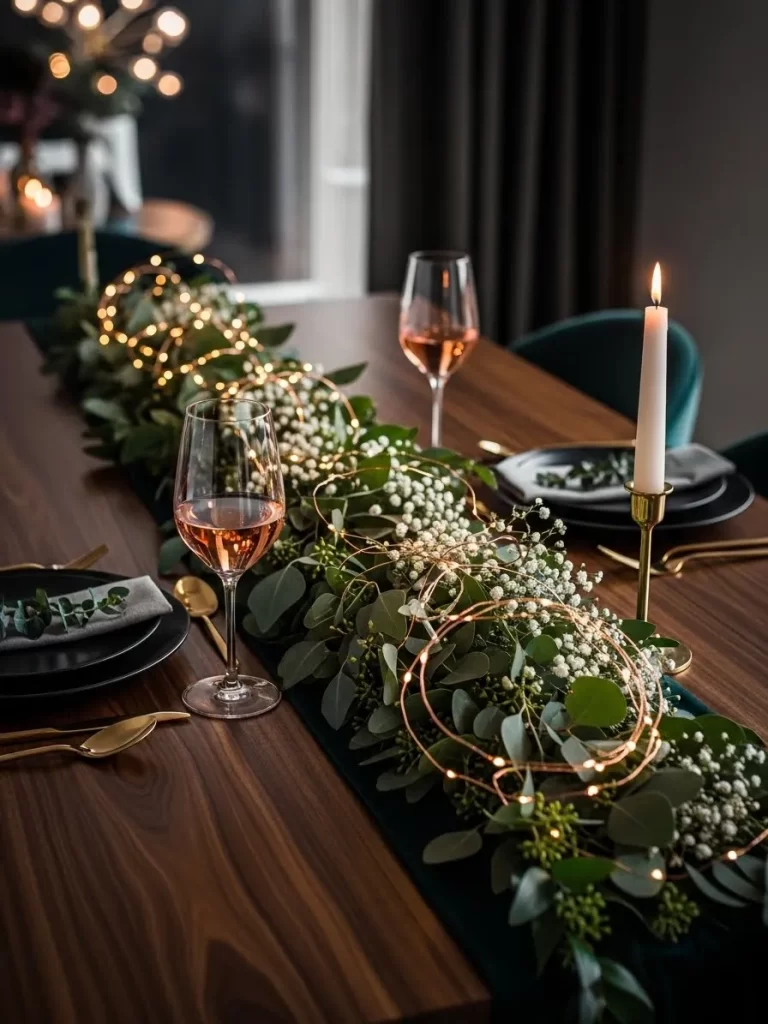
Dress up your dining table with a lush and glowing centerpiece. Weaving thin copper lights through fresh greenery creates a very organic look. The tiny bulbs look like morning dew catching the sunlight.
The mix of eucalyptus and white flowers provides a fresh and natural scent. This runner is much more interesting than a standard fabric cloth. It sets a very high end tone for a romantic dinner or a small party.
The copper wire is almost invisible among the leaves and stems. This allows the light to appear as if it is floating within the plants. It is a sophisticated way to bring nature into your home decor.
Materials Required
- Three long branches of fresh eucalyptus
- Two bunches of white baby breath flowers
- Two strands of copper wire fairy lights
- Tall white taper candles and gold holders
Equipment Required
- Garden shears
DIY Instructions
- Clean your dining table surface thoroughly before you begin.
- Lay the eucalyptus branches down the center of the table in a long line.
- Overlap the ends of the branches to hide any bare wood or stems.
- Tuck small sprigs of baby breath into the gaps between the leaves.
- Unroll your copper wire lights and lay them on top of the greenery.
- Weave the wire under some leaves so the bulbs are peeking through.
- Place the gold candle holders at each end of the botanical runner.
- Insert the white taper candles and ensure they are standing straight.
- Hide the battery packs at the ends of the table under the leaves.
- Light the candles and turn on the wires just before serving dinner.
15 Boho Macrame Light Wall
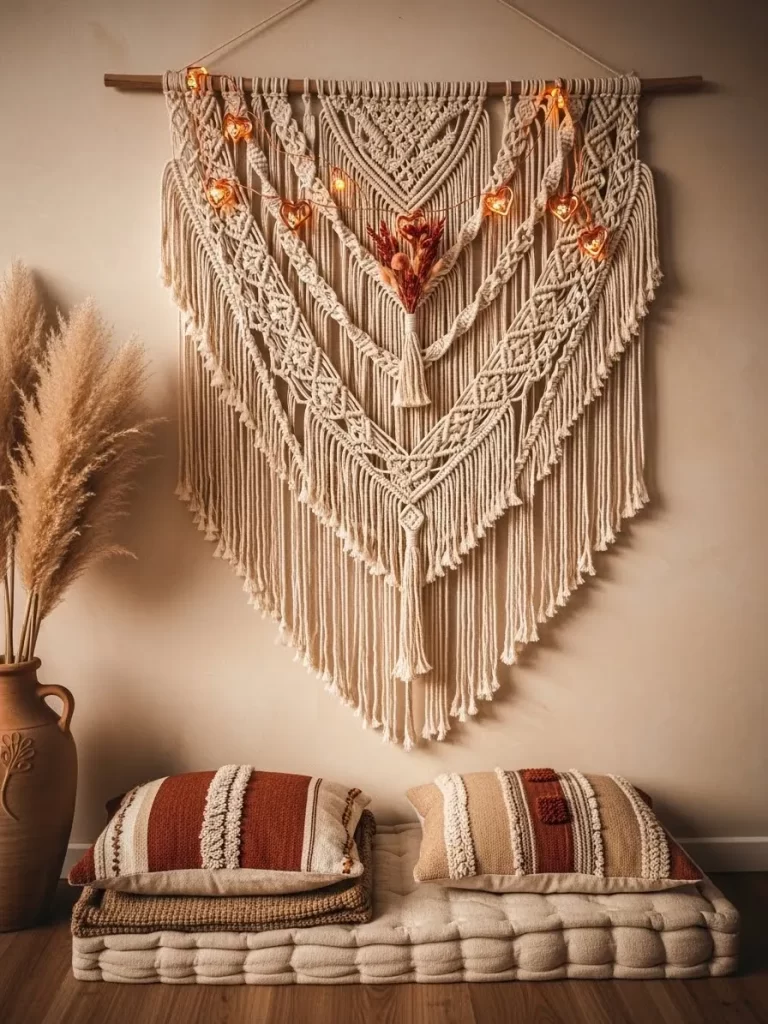
Combine soft textures and warm lights for a bohemian bedroom vibe. Adding heart shaped lights to a large macrame piece adds a layer of magic. The woven patterns of the rope create interesting shadows on the wall.
The neutral tones of the macrame and pillows make the space feel calm. This decoration is excellent for creating a relaxed and artistic environment. It brings a lot of personality to the wall above your bed or sofa.
The lights highlight the beautiful details of the handmade knots. This project is a great way to update a piece of art you already own. It makes your room feel more inviting and full of love.
Materials Required
- One large cream macrame wall hanging
- One strand of heart shaped wire fairy lights
- Two patterned throw pillows
- Wooden dowel for hanging
Equipment Required
- Level
- Small nails and hammer
DIY Instructions
- Hang your macrame piece on the wall using the wooden dowel and nails.
- Use a level to make sure the dowel is perfectly straight.
- Plug in your heart lights to see where the bulbs are located.
- Start at the top corner of the macrame and weave the wire through.
- Drape the lights in a gentle curve across the center of the piece.
- Secure the wire by tucking it behind some of the thicker rope knots.
- Let the extra length of wire hang down or hide it behind the fabric.
- Arrange your patterned pillows on the furniture below the hanging.
- Turn on the lights to see the woven patterns glow in the dark.
16 Floral Chandelier Masterpiece
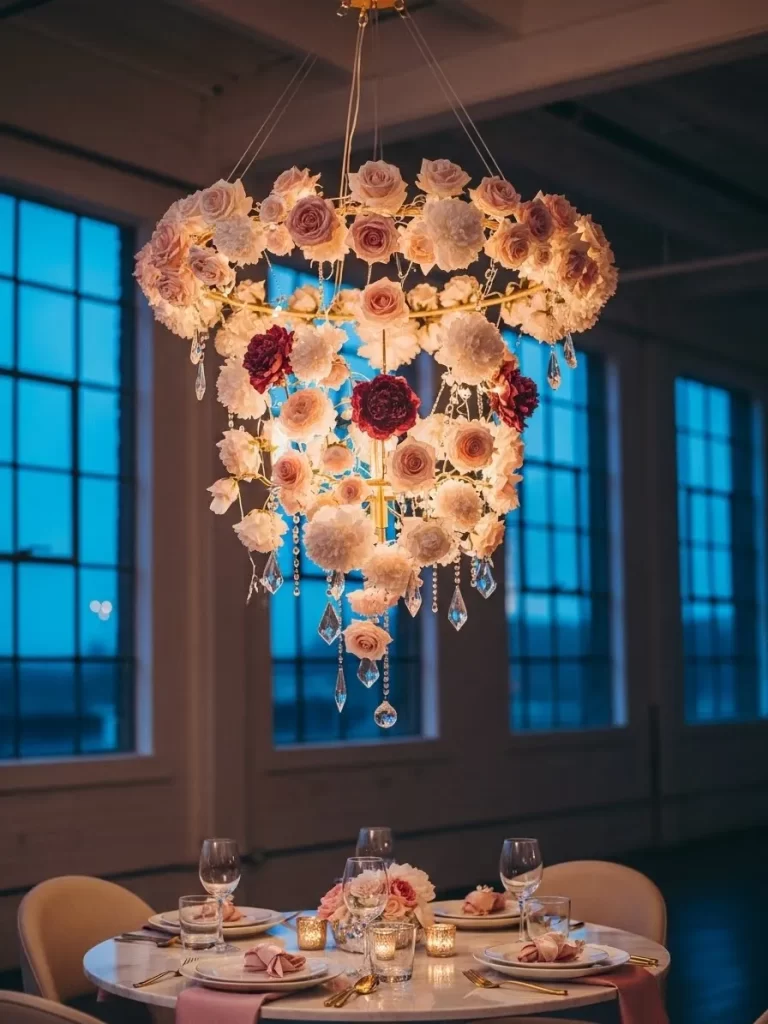
Create a breathtaking focal point above your table with a flower chandelier. This hanging fixture uses roses and peonies to hide a core of bright lights. It brings a sense of grand elegance to any dining or living area.
The soft pink and white flowers create a very feminine and romantic look. Crystal drops hanging from the bottom catch the light for extra sparkle. This is a very dramatic piece that will be the center of attention.
The light shines through the petals to create a soft and warm radiance. It is much more beautiful than a standard light bulb or modern lamp. This decoration turns a simple dinner into a very special occasion.
Materials Required
- One wire wreath frame
- Large bag of silk roses and peonies
- Two strands of battery fairy lights
- Five crystal chandelier drops
- Pink velvet ribbons
Equipment Required
- Hot glue gun
- Wire cutters
DIY Instructions
- Wrap the fairy lights around the wire wreath frame multiple times.
- Ensure the bulbs are spread evenly around the entire circle.
- Use the hot glue gun to attach the largest flowers to the frame.
- Fill in all the gaps with smaller flowers and green leaves.
- Continue adding layers until the wire frame is completely hidden.
- Attach the crystal drops to the bottom of the frame using thin wire.
- Tie four long pink ribbons to the top of the frame for hanging.
- Gather the ribbons at the top and tie them into a strong knot.
- Hang the chandelier from a ceiling hook above your dining table.
- Turn on the lights to see the flowers glow from the inside out.
17 Faux Fireplace Log Glow
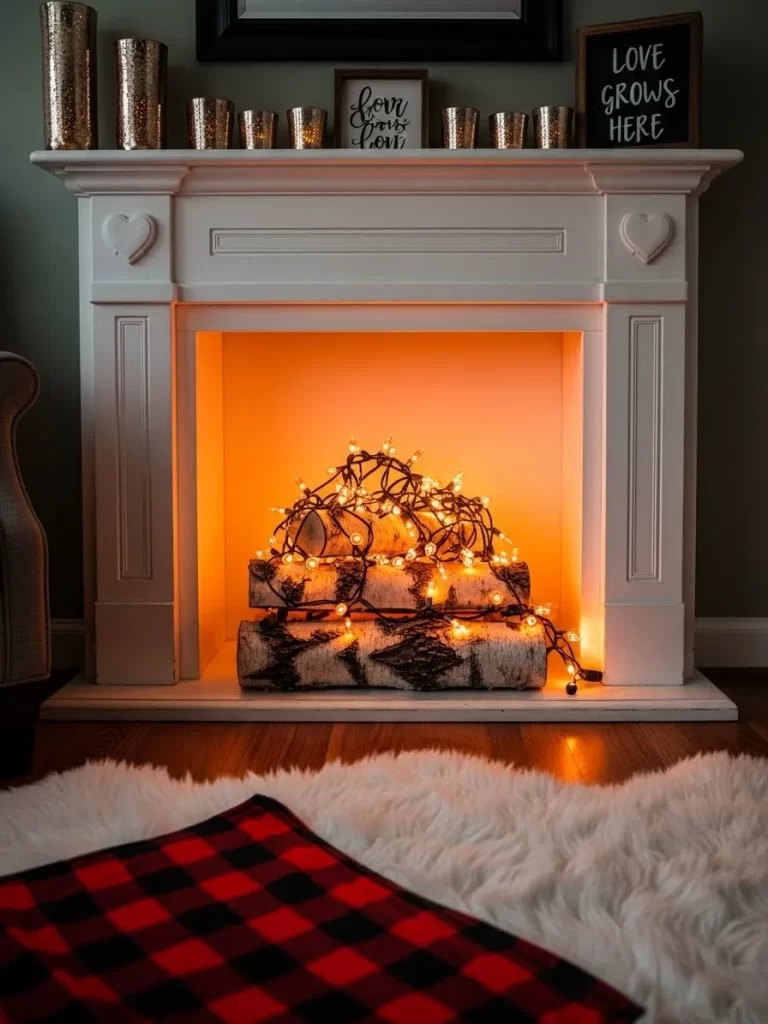
Enjoy the warmth of a fire without any smoke or real wood. Filling a faux fireplace with birch logs and fairy lights creates a cozy hearth. This setup provides a beautiful orange glow that mimics a real flame.
The white bark of the birch logs reflects the light for a bright effect. This is an excellent solution for homes without a working chimney. It makes your living room feel very warm and welcoming during the winter.
The lights provide a constant and safe source of illumination for the room. You can leave this on all night without any safety concerns. It is a very stylish way to use an empty fireplace space.
Materials Required
- Five white birch logs
- Two strands of orange or warm white fairy lights
- One white faux fur rug
- Plaid throw blanket
Equipment Required
- Dust cloth
DIY Instructions
- Clean the inside of your faux fireplace to remove any dust.
- Stack three logs at the bottom of the fireplace in a row.
- Place the remaining two logs on top to create a small pile.
- Wrap the fairy lights around the logs in a messy and natural way.
- Tuck the ends of the wires behind the logs to hide them.
- Lay the white faux fur rug on the floor in front of the logs.
- Toss the plaid blanket over a nearby chair to add more color.
- Turn on the lights and adjust the logs so the glow looks even.
- Enjoy the peaceful atmosphere of your new glowing hearth.
18 Vintage Birdcage Fairy Lamp
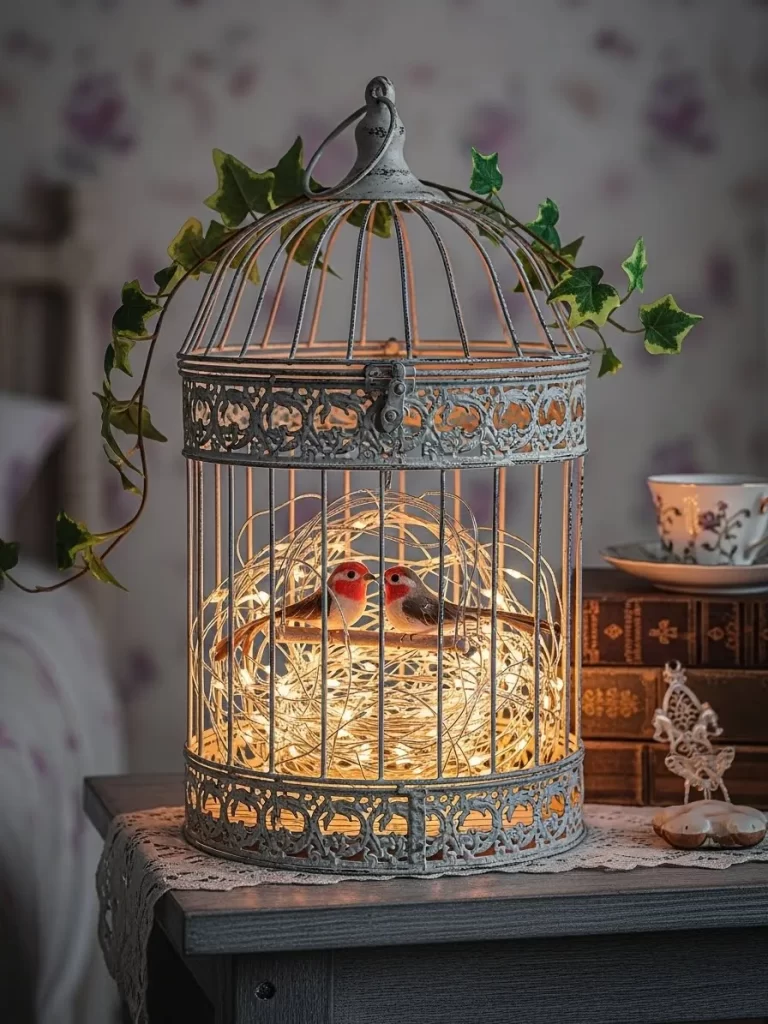
Transform a rustic birdcage into a whimsical lamp for your bedside table. Filling the cage with a tangle of lights creates a bright nest of energy. The weathered metal adds a touch of vintage charm to your bedroom.
Two small bird figures perched inside make the scene look like a fairy tale. The light shines through the metal bars to create beautiful patterns on the walls. This is a very creative way to repurpose an old decorative item.
The warm glow is excellent for use as a nightlight or reading lamp. It fits perfectly on top of a stack of old books or a lace cloth. This setup brings a sense of history and romance to your space.
Materials Required
- One vintage metal birdcage
- Two strands of copper wire fairy lights
- Two small decorative bird figures
- One lace doily
Equipment Required
- Wire brush
DIY Instructions
- Use the wire brush to remove any loose rust from the birdcage.
- Wipe the metal clean with a damp cloth and let it dry.
- Place the lace doily on your bedside table or dresser.
- Set the birdcage on top of the doily in the center.
- Open the cage door and place the fairy lights inside in a pile.
- Arrange the birds so they are sitting on the wire nest of lights.
- Close the cage door and secure the latch.
- Pull the power cord through the bars at the back of the cage.
- Plug in the lights and enjoy the antique glowing display.
19 Illuminated Love Bookshelf
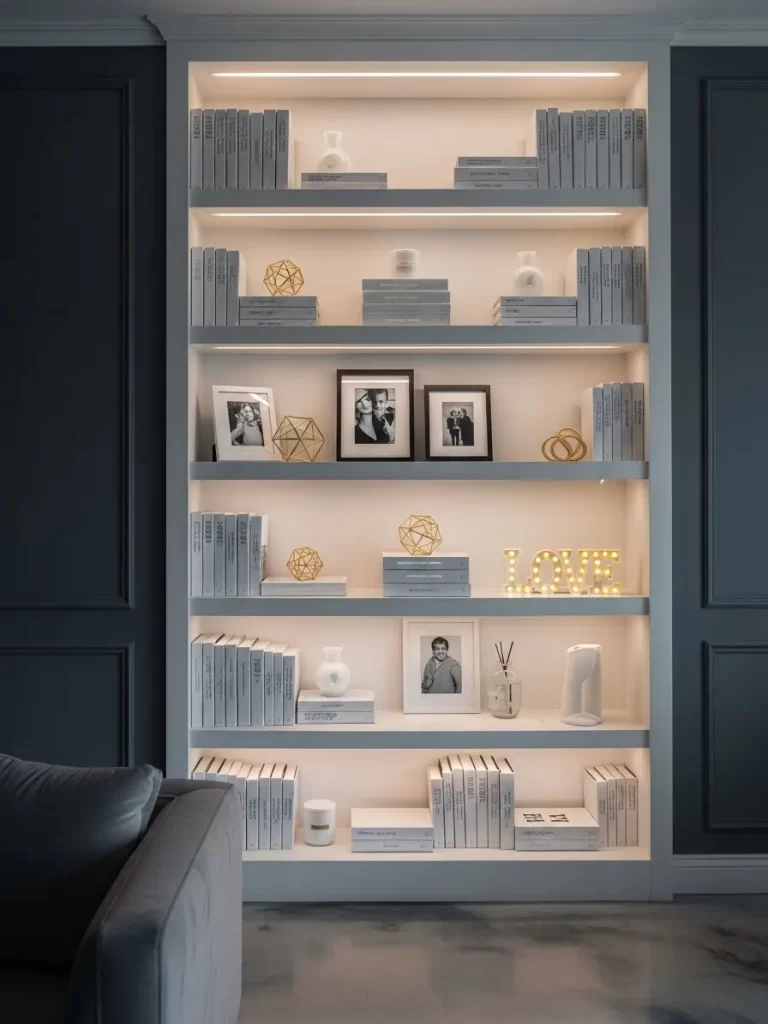
Light up your bookshelf to showcase your favorite items and photos. Using integrated light strips under the shelves creates a very clean and modern look. The golden LOVE sign adds a bright and meaningful detail to the display.
The even lighting makes it easy to see all your books and decorations. It turns a standard piece of furniture into a professional looking gallery. This setup is excellent for creating a sophisticated mood in your living area.
The warm light reflecting off white books and gold objects is very elegant. You can use this to highlight your shared history through framed photos. It makes the whole room feel more organized and high end.
Materials Required
- LED adhesive light strips
- Large lit LOVE marquee sign
- Gold geometric ornaments
- Framed black and white photos
- Matching white book covers
Equipment Required
- Scissors
- Rubbing alcohol
DIY Instructions
- Clean the underside of each bookshelf with rubbing alcohol.
- Measure the width of your shelves and cut the LED strips to fit.
- Peel off the backing and press the strips firmly under each shelf.
- Connect the power cables along the side of the bookshelf unit.
- Cover your books in white paper to create a uniform look.
- Arrange the books and gold ornaments on the different levels.
- Place the framed photos in the center of the middle shelves.
- Put the large LOVE sign on a lower shelf as a focal point.
- Turn on all the lights to see your library glow with warmth.
20 Heartfelt Bedrunner Arrangement
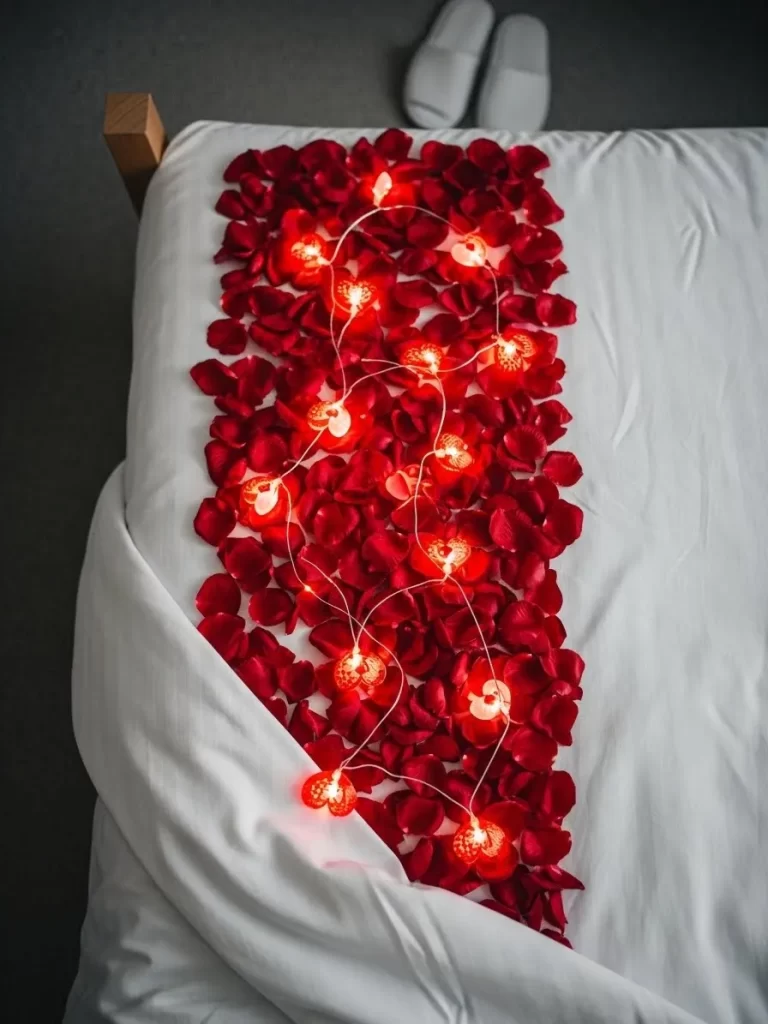
Surround yourself with love by decorating your bed with lights and petals. Creating a wide path of red rose petals across white bedding is very striking. Weaving heart shaped lights through the petals adds a magical glow to the scene.
The bright red color represents passion and stands out against the white fabric. This setup is a wonderful surprise for a Valentine evening at home. It makes the entire bedroom feel like a romantic hotel suite.
The soft light from the hearts provides a warm and intimate ambiance. You can set this up quickly to create a memorable and beautiful moment. It is a very thoughtful way to celebrate your partner.
Materials Required
- One large bag of silk red rose petals
- Two strands of heart shaped battery lights
- White duvet cover and sheets
- White bedroom slippers
Equipment Required
- None
DIY Instructions
- Make your bed with clean white sheets and a smooth white duvet.
- Fold the top of the duvet back to create a neat and open space.
- Pour the red rose petals in a wide band down the center of the bed.
- Spread the petals so they look like a thick carpet of red.
- Lay the heart string lights on top of the rose petals in a zigzag.
- Hide the battery packs under the edge of the duvet or a pillow.
- Place the white slippers on the floor at the foot of the bed.
- Dim the main room lights and turn on the heart shaped wires.
- Step back and admire the romantic transformation of your bedroom.
21 Neon Heart and Arrow Sign
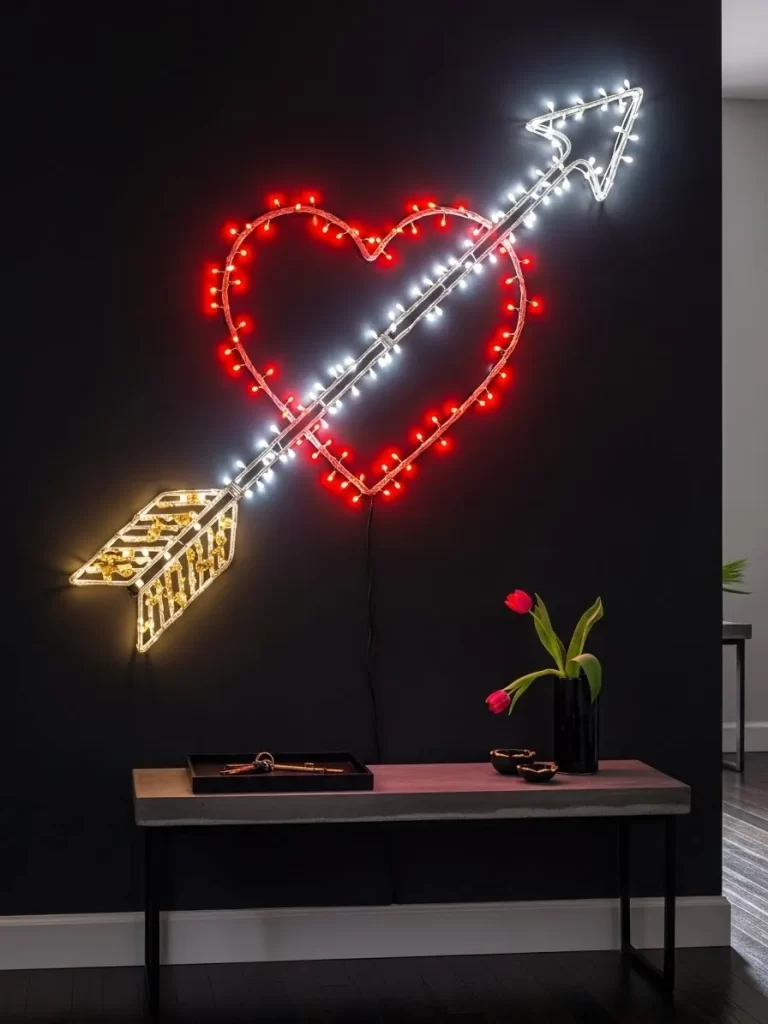
Create a modern and edgy look for your entryway with a neon style sign. This large glowing heart and arrow design makes an immediate impact on a dark wall. It combines classic romantic symbols with contemporary lighting technology.
The vibrant red and white lights reflect off a sleek console table below. It serves as a stylish beacon for guests entering your home. This setup is excellent for those who prefer bold design over traditional decorations.
You can use this as a permanent piece of art or a festive holiday accent. The contrast between the bright sign and the dark background is very dramatic. It brings a pop of energy and love to any room.
Materials Required
- Large LED heart and arrow neon sign
- Minimalist console table
- Fresh red tulips in a black vase
- Black tray for keys
Equipment Required
- Power drill
- Wall anchors and screws
- Level
DIY Instructions
- Choose a prominent dark wall space in your hallway or living room.
- Use the level to mark the correct hanging spots for the sign.
- Drill holes and insert wall anchors to support the weight of the sign.
- Secure the sign to the wall using the provided screws.
- Plug the sign into a nearby outlet and hide the wire along the baseboard.
- Place the console table directly underneath the glowing sign.
- Add the black vase with fresh red tulips for a touch of natural color.
- Set the key tray on the table to keep the space organized.
22 Pom Pom Mirror Frame
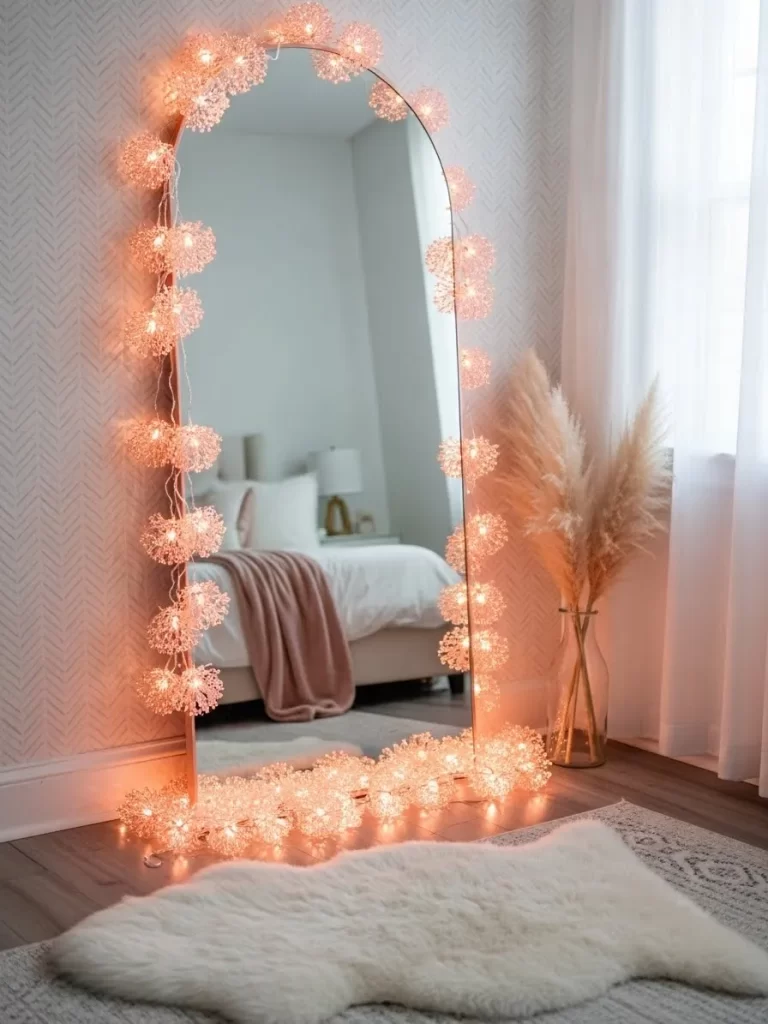
Upgrade a simple floor mirror with a soft and playful light border. Wrapping a strand of pom pom fairy lights around the frame adds texture and charm. The warm peach glow creates a cozy atmosphere for your bedroom or dressing area.
The fuzzy textures of the lights and the nearby rug make the space feel very inviting. It is a wonderful way to soften the look of a large piece of glass. This decoration is excellent for creating a feminine and relaxed vibe.
The light provides a gentle radiance that is perfect for trying on outfits. It coordinates beautifully with neutral colors like cream and light wood. Your mirror will become a favorite feature of your room.
Materials Required
- Large arched floor mirror
- Two strands of peach pom pom fairy lights
- White faux fur rug
- Large glass vase with pampas grass
Equipment Required
- Clear adhesive clips
DIY Instructions
- Clean the outer frame of your arched mirror thoroughly.
- Stick the clear adhesive clips along the back edge of the mirror frame.
- Space the clips every six inches to ensure the lights hang evenly.
- Snap the wire of the pom pom lights into the clips starting from the base.
- Wrap the lights all the way around the curve of the arch.
- Let the remaining length of lights pool at the bottom on the floor.
- Place the white faux fur rug on the floor in front of the mirror.
- Set the vase of pampas grass nearby to add height and texture.
23 Wisteria Garden Portal
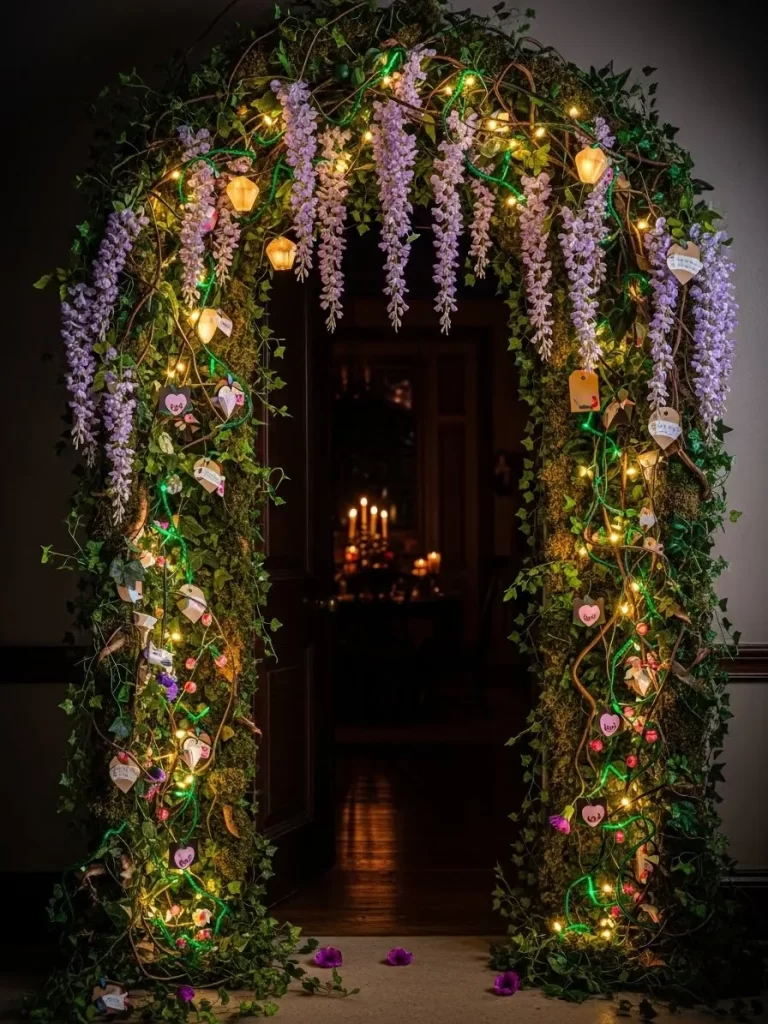
Transform your doorway into a magical entrance with a lush floral arch. Weaving purple wisteria vines and warm lights together creates a fairytale look. This setup is excellent for a romantic dinner party or a backyard wedding.
The hanging flowers add movement and a sense of luxury to the space. Soft lighting peeking through the green leaves makes the arch glow from within. It invites your guests into a world of romance and beauty.
This decoration looks stunning in both indoor and outdoor settings. It provides a beautiful backdrop for photos and special moments. You will feel like you are entering an enchanted forest every time you walk through.
Materials Required
- Strong wire or wooden garden arch
- Six long strands of artificial wisteria vines
- Four strands of warm white fairy lights
- Assorted green ivy and moss
- Small paper heart tags
Equipment Required
- Green floral wire
- Wire cutters
- Step ladder
DIY Instructions
- Secure your arch firmly in the doorway or garden path.
- Wrap the ivy and moss around the base of the arch to hide the frame.
- Use floral wire to attach the wisteria vines so they hang down from the top.
- Weave the fairy lights throughout the flowers and leaves evenly.
- Ensure the bulbs are distributed to highlight the purple petals.
- Tie the small paper heart tags to the vines for a personal touch.
- Place a few fallen petals on the ground below the arch.
- Turn on the lights and adjust any hanging vines to ensure a clear path.
24 Sweetheart Kitchen Counter
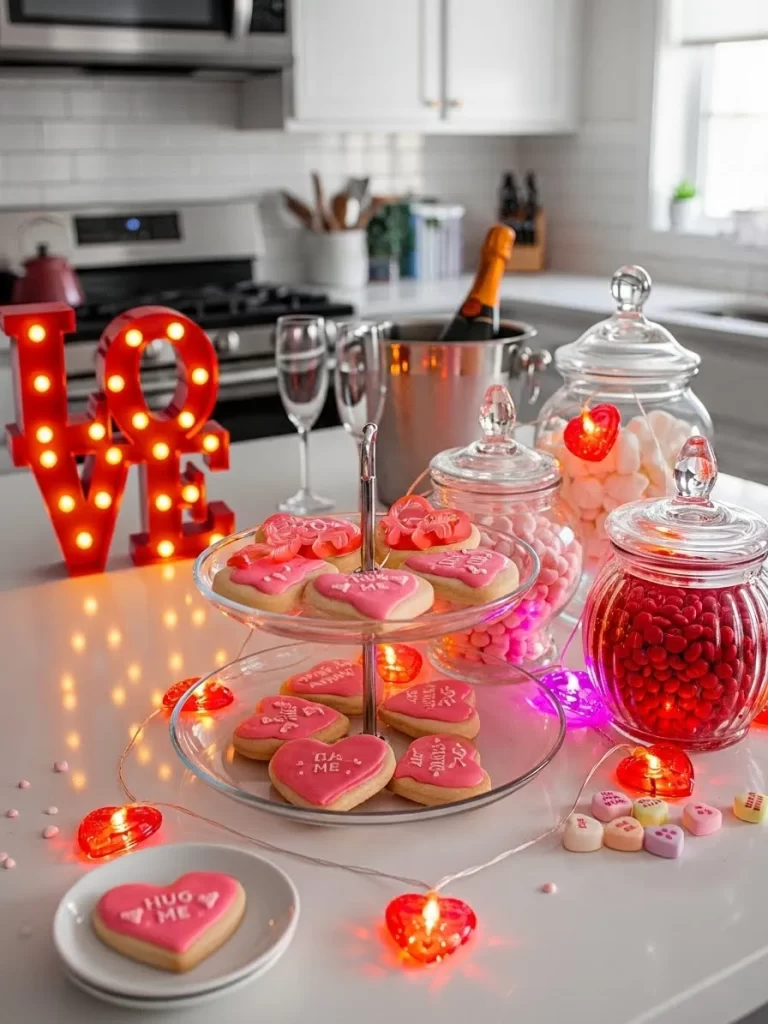
Bring the Valentine spirit into the heart of your home with a festive kitchen display. Arranging heart shaped cookies and candy on a tiered tray creates a sweet focal point. Red heart fairy lights draped across the counter add a warm and playful glow.
The lit LOVE sign in the background ties the whole theme together beautifully. It makes the act of baking or sharing snacks feel very special. This setup is excellent for a family celebration or a quiet morning coffee.
The bright colors of the sweets contrast nicely with a clean white kitchen. It is a simple way to add cheer to a space you use every day. Your family will love the festive and delicious transformation.
Materials Required
- Two tiered glass serving tray
- Heart shaped sugar cookies with pink icing
- Assorted jars filled with red and pink candies
- Red heart shaped string lights
- Small lit LOVE marquee sign
Equipment Required
- Cookie sheets and cooling racks
- Rolling pin
DIY Instructions
- Bake or buy heart shaped cookies and decorate them with pink icing.
- Fill your glass jars with various red and pink sweets like chocolates or mints.
- Arrange the cookies on the two tiered tray in an attractive pattern.
- Place the tray in the center of your kitchen island or counter.
- Position the LOVE sign nearby so it is visible from the front.
- Drape the red heart lights around the jars and trays loosely.
- Scatter a few small candy hearts on the counter for extra detail.
- Plug in the lights and enjoy a sweet treats station.
25 Midnight Floor Picnic Circle
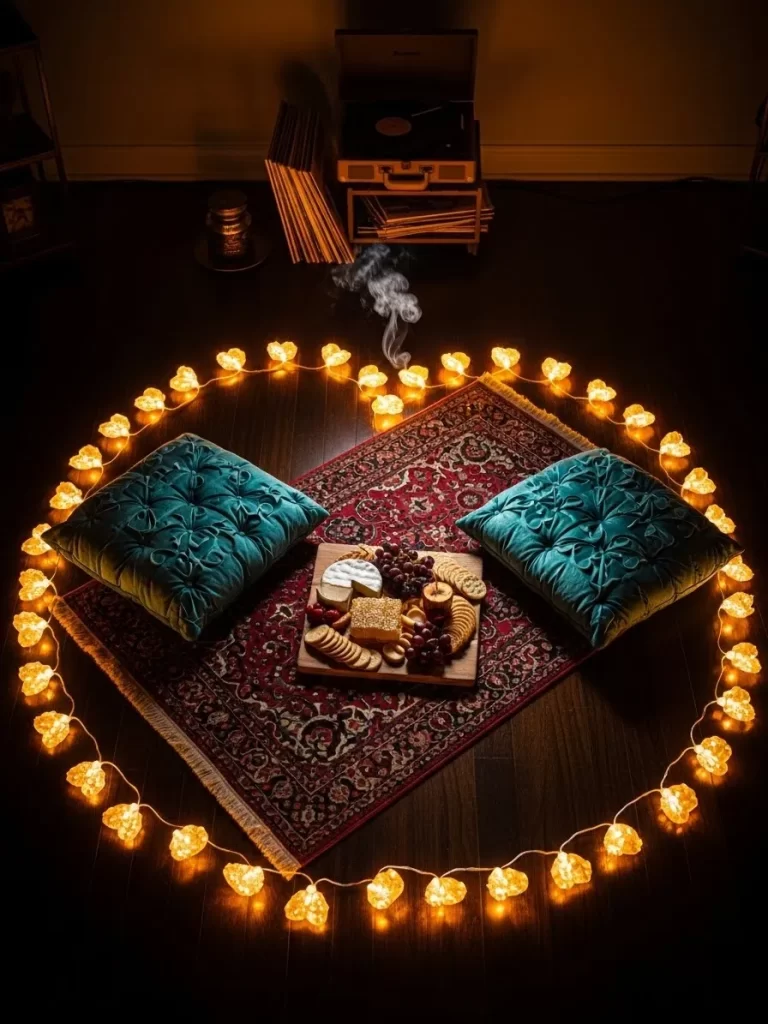
Set the scene for an intimate and cozy evening with a floor picnic. Creating a circle of heart shaped lights on a dark floor defines your private space. The rich colors of the rug and pillows add warmth and comfort to the setup.
A board filled with cheese, grapes, and crackers makes for a delicious and easy meal. The soft lighting from the floor and a nearby record player sets a relaxed mood. This is a wonderful alternative to a traditional dinner at the table.
The glowing circle creates a sense of safety and romance in a dark room. It is a very creative and low cost way to surprise your partner. You can spend hours talking and eating in your own little island of light.
Materials Required
- One long strand of heart shaped fairy lights
- One ornate red area rug
- Two teal velvet floor cushions
- Wooden charcuterie board
- Assorted cheeses, fruits, and crackers
Equipment Required
- Record player and favorite albums
- Incense or scented candles
DIY Instructions
- Clear a large area of floor space in your living room.
- Lay the red area rug flat in the center of the cleared space.
- Place the teal velvet cushions on opposite sides of the rug.
- Prepare your food board with a variety of snacks and place it in the middle.
- Arrange the heart lights in a wide circle around the rug on the floor.
- Start the record player with some soft music to set the tone.
- Light a stick of incense to add a pleasant fragrance to the air.
- Turn off the main lights and enjoy your private picnic within the glowing heart circle.
26 Skyline Umbrella Lights
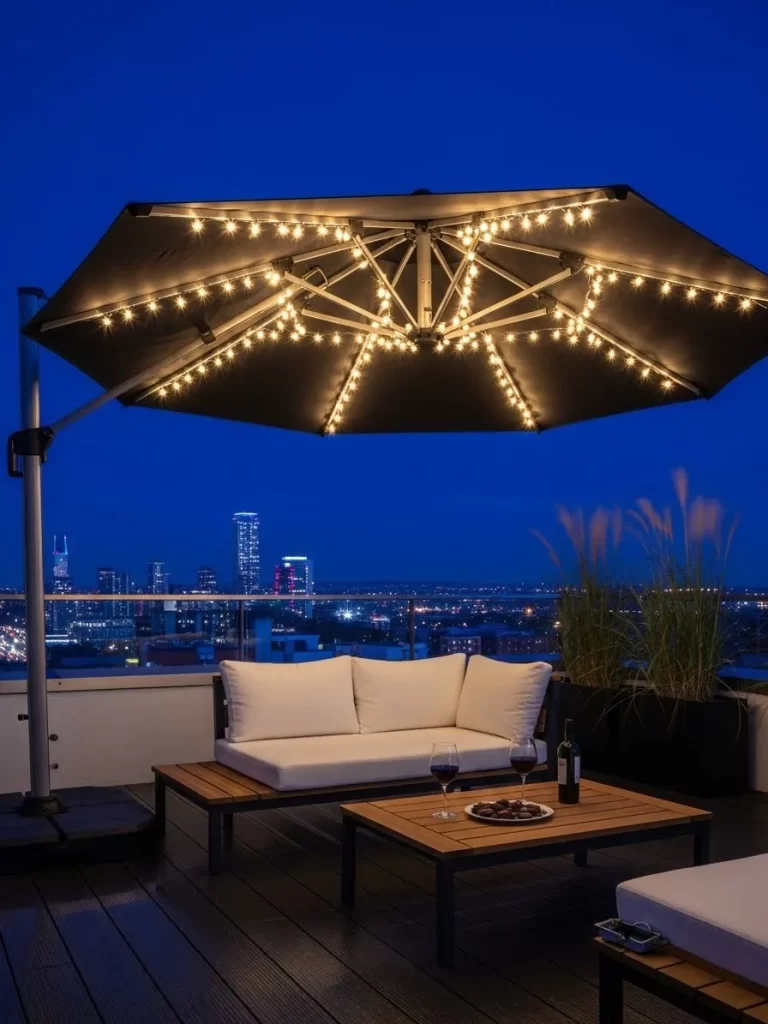
Turn your rooftop or patio into a glamorous lounge for a night under the stars. Attaching fairy lights to the underside of a large patio umbrella creates a stunning canopy. The light reflects off the dark fabric to cast a warm glow over the seating area.
The distant city skyline provides a breathtaking backdrop for your romantic evening. Soft white cushions and a wooden table make the space feel like a high end hotel. It is an excellent way to enjoy the fresh air in total comfort.
This setup is wonderful for a quiet dinner or drinks with a view. The lighting is bright enough for conversation but dim enough to see the stars. You will feel like you are on top of the world in this private oasis.
Materials Required
- Large cantilever patio umbrella
- Four strands of warm white string lights
- Outdoor sofa with white cushions
- Wooden coffee table
- Bottle of wine and glasses
Equipment Required
- Clear zip ties
- Outdoor extension cord
- Ladder
DIY Instructions
- Open your patio umbrella fully and ensure it is stable.
- Use the ladder to reach the ribs on the underside of the umbrella.
- Use zip ties to secure the string lights along each rib, starting from the center.
- Connect all the light strands together at the central pole.
- Run the power cord down the pole and connect it to an outdoor outlet.
- Arrange the outdoor sofa and table directly underneath the umbrella.
- Set out the wine and glasses for a relaxing evening.
- Turn on the lights as the sun sets to see the canopy glow.
27 Bathtub Rainfall Sparkle
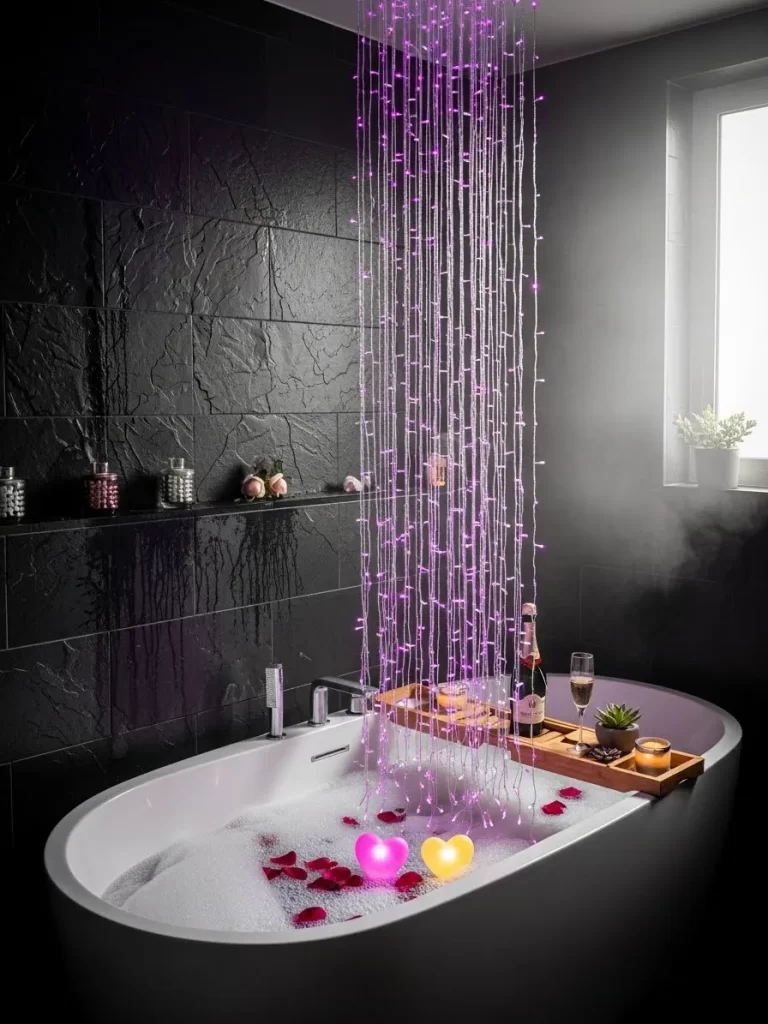
Transform your bathroom into a luxurious spa with a waterfall of lights. Hanging purple fairy lights from the ceiling above the tub creates a magical effect. The light strands look like glowing rain falling into the bubbles below.
The dark tiles make the purple glow feel very rich and mysterious. Adding red rose petals and floating heart candles to the water enhances the romantic mood. This is the ultimate way to relax and celebrate a special occasion.
The soft lighting is much more soothing than harsh bathroom bulbs. It creates a peaceful sanctuary where you can wash away the stress of the day. Your partner will be amazed by this creative and beautiful surprise.
Materials Required
- Four strands of purple curtain fairy lights
- Wooden bathtub tray
- Champagne and glasses
- Floating heart shaped candles
- Fresh red rose petals
Equipment Required
- Clear adhesive ceiling hooks
- Step stool
DIY Instructions
- Clean the ceiling area above the bathtub to ensure hooks will stick.
- Use the stool to place the hooks in a straight line along the ceiling.
- Hang the main wire of the purple lights across the hooks.
- Let the vertical strands fall straight down toward the edge of the tub.
- Fill the bathtub with warm water and plenty of bubble bath.
- Scatter the rose petals and floating candles on the surface of the water.
- Place the wooden tray across the tub with the champagne and glasses.
- Dim the main lights and turn on the purple rainfall for a magical soak.
28 Grand Staircase Red Garland
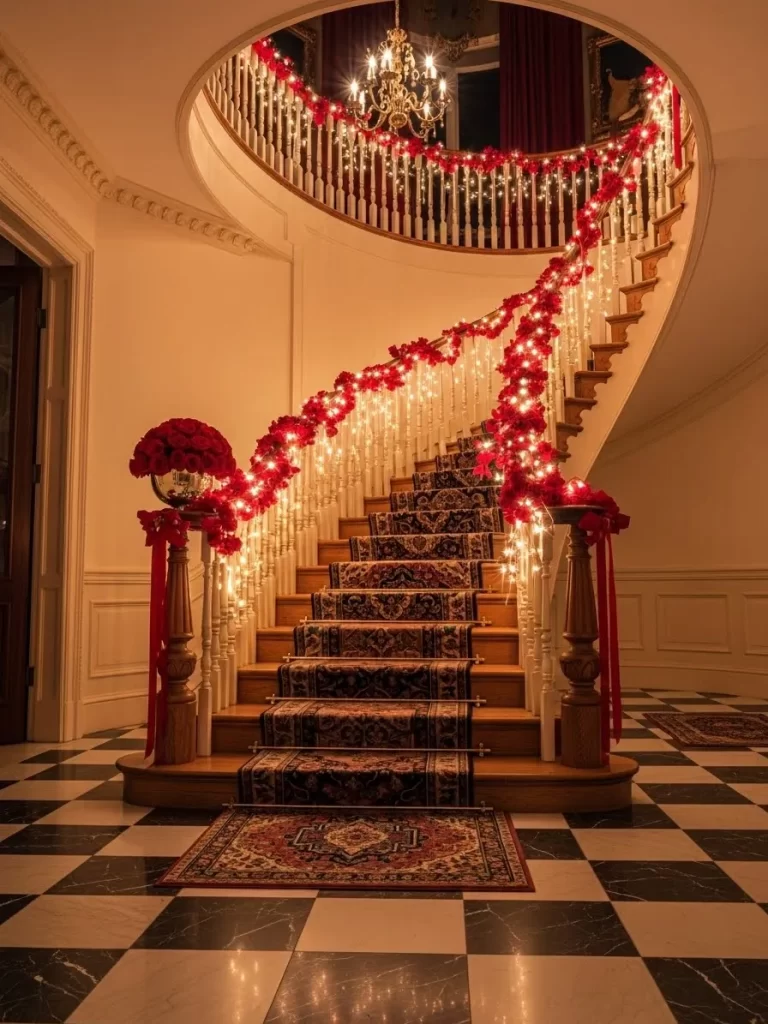
Make a grand entrance with a dramatic staircase display for your Valentine party. Wrapping a thick garland of red roses and warm lights around the banister is very elegant. The glowing strands drape down like a waterfall of flowers and light.
The ornate rugs and dark wood of the stairs provide a classic and luxurious setting. It creates a warm and welcoming atmosphere for your guests as they arrive. This setup is excellent for large homes with traditional architecture.
The combination of deep red and golden light is timeless and romantic. It turns a functional part of the house into a stunning piece of art. You will feel like royalty walking down these illuminated steps.
Materials Required
- Twenty feet of thick artificial red rose garland
- Four long strands of warm white fairy lights
- Large crystal chandelier
- Ornate area rugs for the landing
- Large vase filled with red roses
Equipment Required
- Clear floral wire
- Step ladder
DIY Instructions
- Start at the top of the staircase and drape the rose garland over the banister.
- Use floral wire to secure the garland every two feet so it does not slip.
- Weave the fairy lights throughout the roses, ensuring even coverage.
- Let some of the light strands hang down between the spindles for a waterfall effect.
- Place the large vase of roses on a pedestal at the base of the stairs.
- Ensure the area rugs are straight and the landing is clear of clutter.
- Turn on the lights and the chandelier to illuminate the entire hallway.
- Adjust the flowers to hide any visible wires or ties.
29 Tulle Dream Wall Backlit

Create a soft and ethereal backdrop for your bedroom with layers of pink fabric. Hanging tiered tulle ruffles behind your bed adds a sense of luxury and romance. Backlighting the fabric with globe lights creates a gentle and diffused glow.
The white bedding and faux fur throw make the space feel like a fluffy cloud. It is a wonderful way to add texture and color to a plain white room. This setup is excellent for creating a peaceful and feminine environment.
The warm lights peeking through the pink tulle are very flattering and cozy. You will love how the whole wall seems to shimmer in the evening. It is a creative alternative to a traditional headboard or wallpaper.
Materials Required
- Ten yards of pink tulle fabric
- Three strands of large globe fairy lights
- White upholstered bed frame
- Faux fur white throw blanket
- Lit LOVE neon sign
Equipment Required
- Tension rod or curtain track
- Safety pins
DIY Instructions
- Install a curtain track or tension rod along the wall behind your bed.
- Cut the tulle into long strips and bunch them to create a ruffled look.
- Secure the tulle to the rod in overlapping layers from top to bottom.
- Use safety pins to create the tiered ruffle effect if needed.
- Hang the globe lights behind the tulle so the wires are hidden.
- Place your bed against the wall and add the white bedding and throw.
- Put the LOVE sign on the pillows to add a modern focal point.
- Turn on the lights to see the pink fabric glow from within.
30 Heart Silhouette Lantern Box
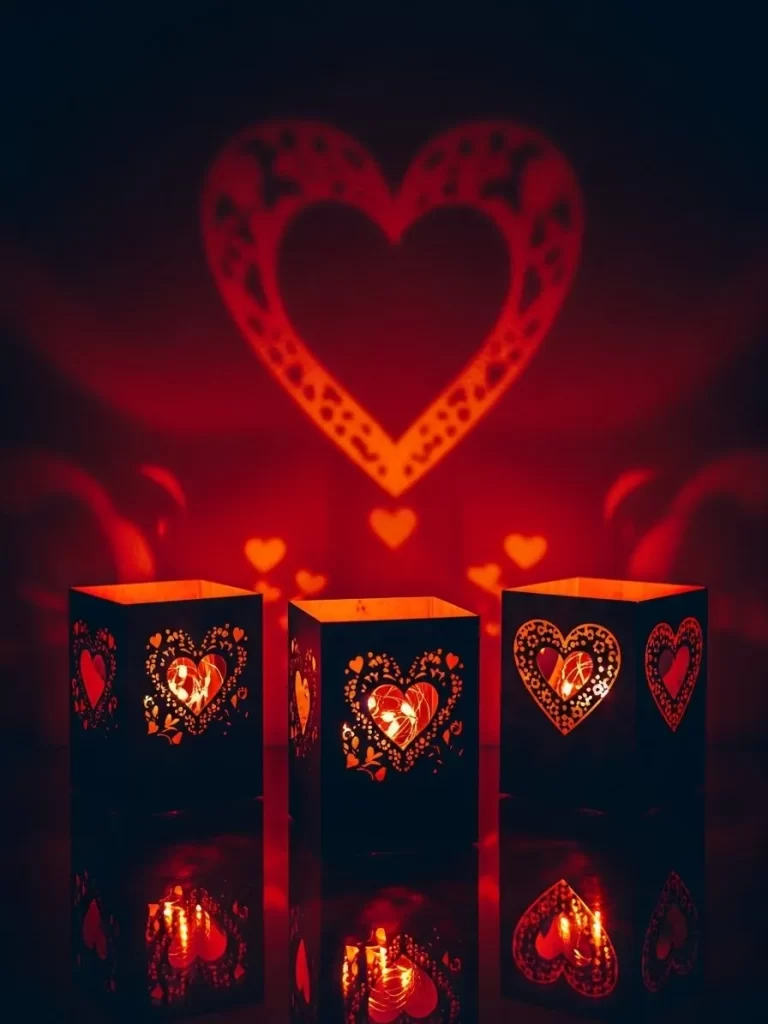
Add a touch of mystery and romance to your decor with shadow lanterns. These dark boxes feature intricate heart cutouts that project beautiful patterns onto the walls. The internal fairy lights create a flickering and warm glow from within.
The reflection of the hearts on a polished surface doubles the visual impact. This setup is excellent for a coffee table or a dark corner that needs some life. It brings a sense of wonder and warmth to any room in your home.
The contrast between the black boxes and the red light is very striking. You can easily make these boxes to match your personal style. They are a wonderful way to play with light and shadow for a romantic evening.
Materials Required
- Three black cardstock or metal square boxes
- Three strands of battery operated red fairy lights
- Red tissue paper
- Black tray for display
Equipment Required
- Craft knife or laser cutter
- Glue stick
DIY Instructions
- Draw or print heart patterns on the sides of your black boxes.
- Carefully cut out the heart shapes using a craft knife.
- Glue a piece of red tissue paper over the inside of each cutout.
- Place a bunched up strand of red fairy lights inside each box.
- Close the tops of the boxes and hide the battery packs at the bottom.
- Arrange the lanterns in a row on a black tray or polished table.
- Turn off the room lights to see the heart shadows project onto the wall.
- Adjust the distance from the wall to change the size of the shadows.
31 Blanket Ladder Festive Twinkle
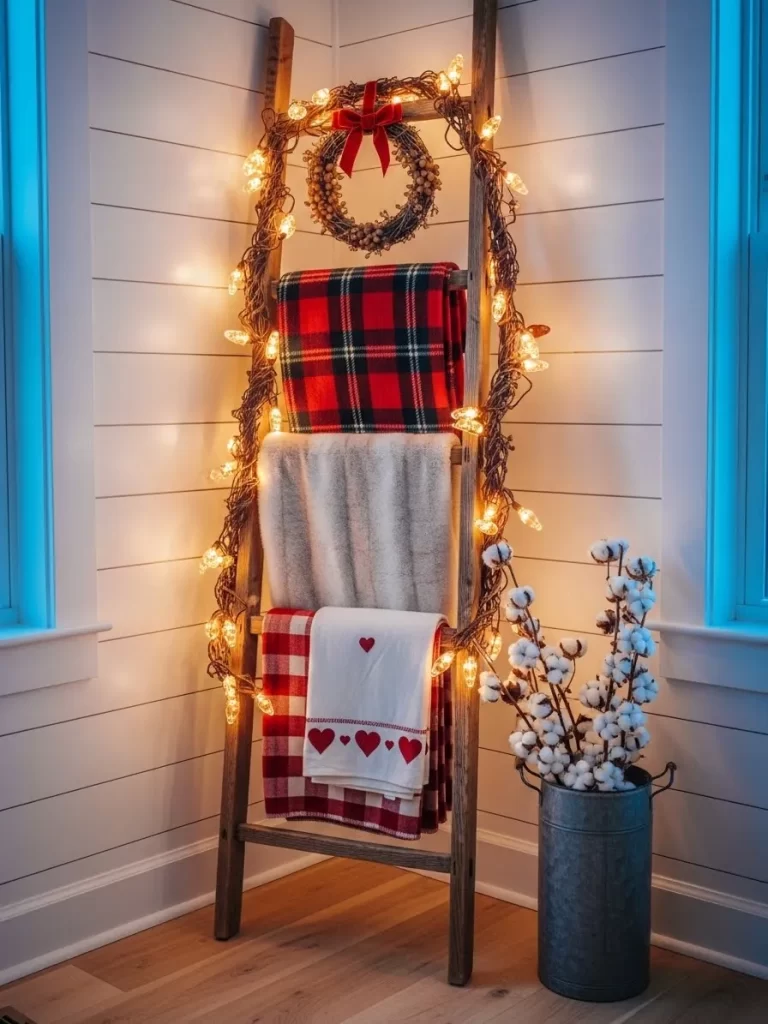
Bring a rustic and cozy touch to your living room with a decorated blanket ladder. Wrapping a wooden ladder with thick vine lights and a berry wreath is very charming. The warm glow highlights the soft textures of your favorite holiday blankets.
The red and white plaid patterns coordinate with a classic Valentine or Christmas theme. It is a wonderful way to keep your cozy essentials organized while adding a festive accent. This setup is excellent for a farmhouse or traditional style home.
The cotton branches in a metal tin add a touch of natural beauty to the corner. This decoration makes your living space feel much more welcoming and lived in. You can easily swap the blankets as the seasons change.
Materials Required
- Five foot wooden blanket ladder
- Three strands of thick vine style fairy lights
- Red berry wreath with a bow
- Assorted red and white plaid blankets
- Metal bucket with cotton branches
Equipment Required
- None
DIY Instructions
- Lean the wooden ladder securely against a corner wall.
- Hang the berry wreath on the top rung of the ladder using the bow.
- Wrap the vine lights around the side rails and rungs of the ladder.
- Ensure the lights are distributed evenly from top to bottom.
- Fold your blankets neatly and hang them over the lower rungs.
- Place the metal bucket with cotton branches on the floor next to the ladder.
- Adjust the lights so they peak through the folds of the blankets.
- Plug in the lights to create a warm and cozy focal point.
32 Floral Mantelpiece Garland
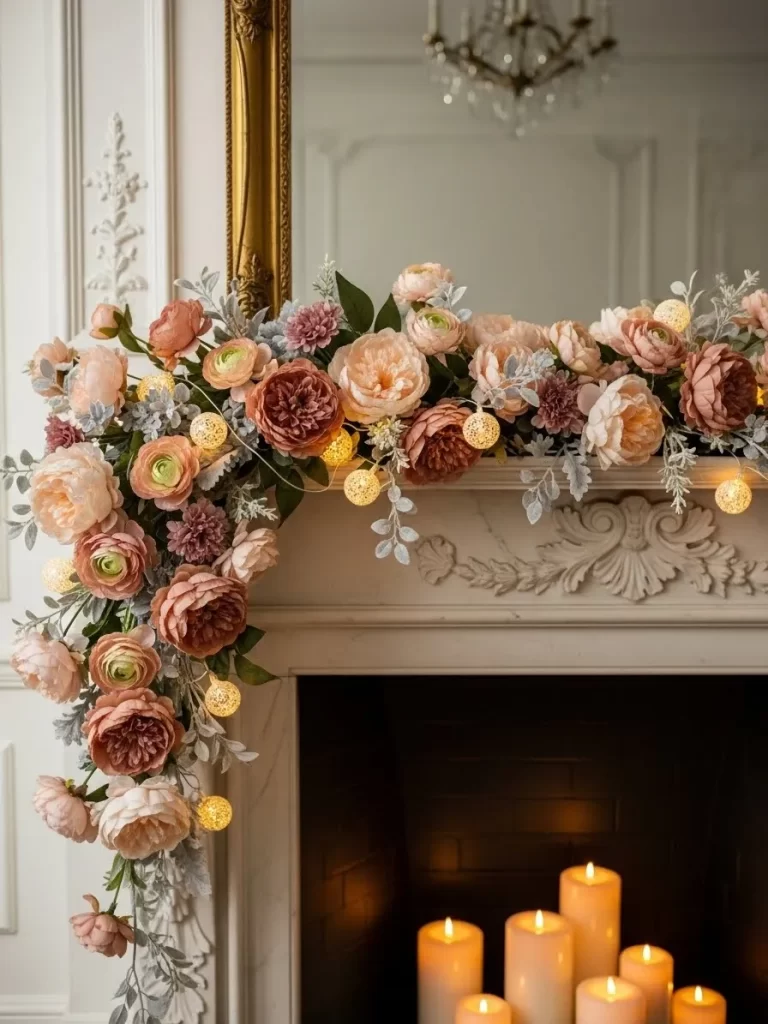
Transform your fireplace into a stunning spring garden with a lush floral garland. Mixing large roses, peonies, and dusty miller leaves creates a very rich and romantic look. The small globe lights woven throughout the flowers add a magical sparkle.
The soft pink and peach colors coordinate beautifully with a white ornate mantel. Adding tall white candles in the hearth provides extra layers of warm light. This setup is excellent for a romantic dinner or a spring celebration.
The garland drapes elegantly down one side of the fireplace for a modern and artistic look. It turns a traditional architectural feature into a beautiful piece of decor. Your living room will feel much more fresh and full of life.
Materials Required
- Six foot artificial floral garland (roses and peonies)
- One strand of small globe fairy lights
- Six tall white pillar candles
- Large gold framed mirror for the wall
Equipment Required
- Clear adhesive mantel hooks
- Step stool
DIY Instructions
- Clean the top of your mantel to ensure the hooks will stick.
- Place the adhesive hooks along the front edge of the mantel.
- Drape the floral garland across the top, letting it hang down one side.
- Weave the globe lights into the flowers, hiding the wire as much as possible.
- Place the tall white candles in the center of the empty fireplace.
- Ensure the large mirror is centered on the wall above the mantel.
- Turn on the lights and light the candles for a multi layered glow.
- Adjust the flowers to ensure the garland looks full and balanced.
33 Celestial Star Ceiling
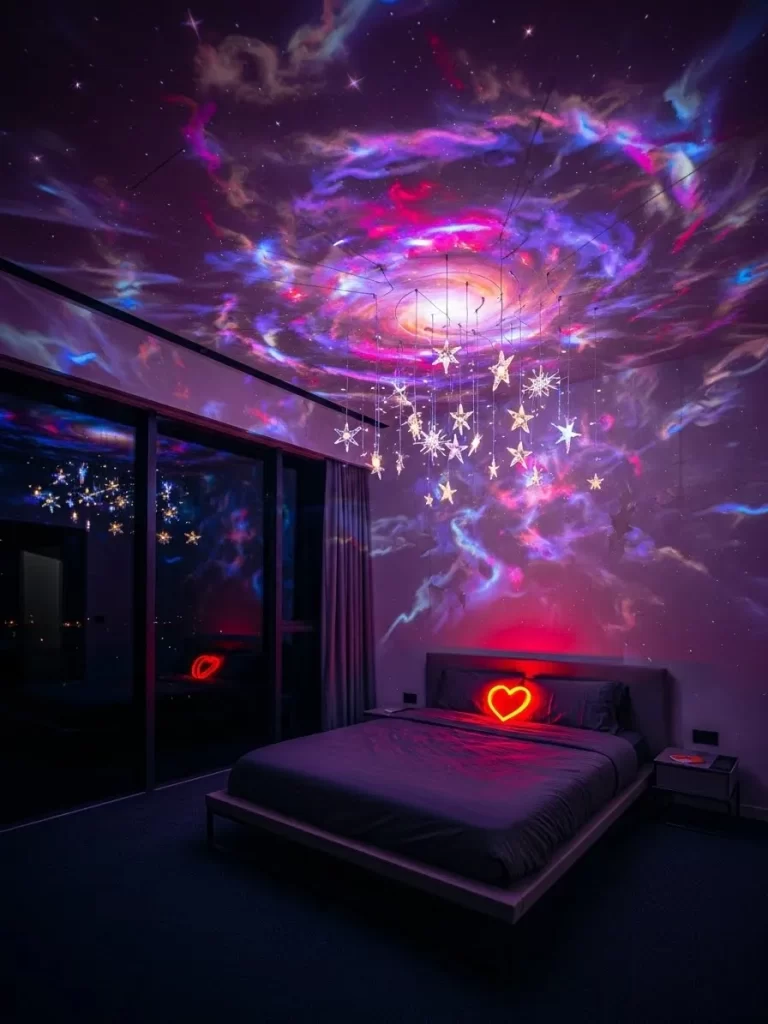
Turn your bedroom into a breathtaking view of the galaxy with a star installation. Hanging hundreds of star shaped lights from the ceiling creates a truly magical experience. The vibrant purple and pink light reflects off the walls like a swirling nebula.
The neon heart on the bed adds a modern and romantic touch to the room. It feels like you are sleeping in a private observatory under the night sky. This setup is excellent for those who want a bold and unforgettable bedroom design.
The dynamic colors and patterns provide a soothing and beautiful atmosphere. You can spend hours staring up at your own private star field. It is a creative way to make a small room feel much larger and more special.
Materials Required
- Large star shaped ceiling projector
- Fifty individual battery operated star fairy lights
- Neon red heart shaped table lamp
- Dark grey or black bedding
Equipment Required
- Clear fishing line
- Small ceiling hooks
- Step ladder
DIY Instructions
- Set up the star projector on a nightstand to cover the ceiling in light.
- Use the ladder to install small hooks across the entire ceiling.
- Tie the individual star lights to lengths of fishing line of various heights.
- Hang the stars from the hooks so they appear to float at different levels.
- Place the neon heart lamp on the bed or a nearby table.
- Ensure all wires are hidden or tucked away for a clean look.
- Dim the main lights and turn on the projector and star lights.
- Enjoy your private view of the cosmos from the comfort of your bed.
34 Hanging Window Heart Glow
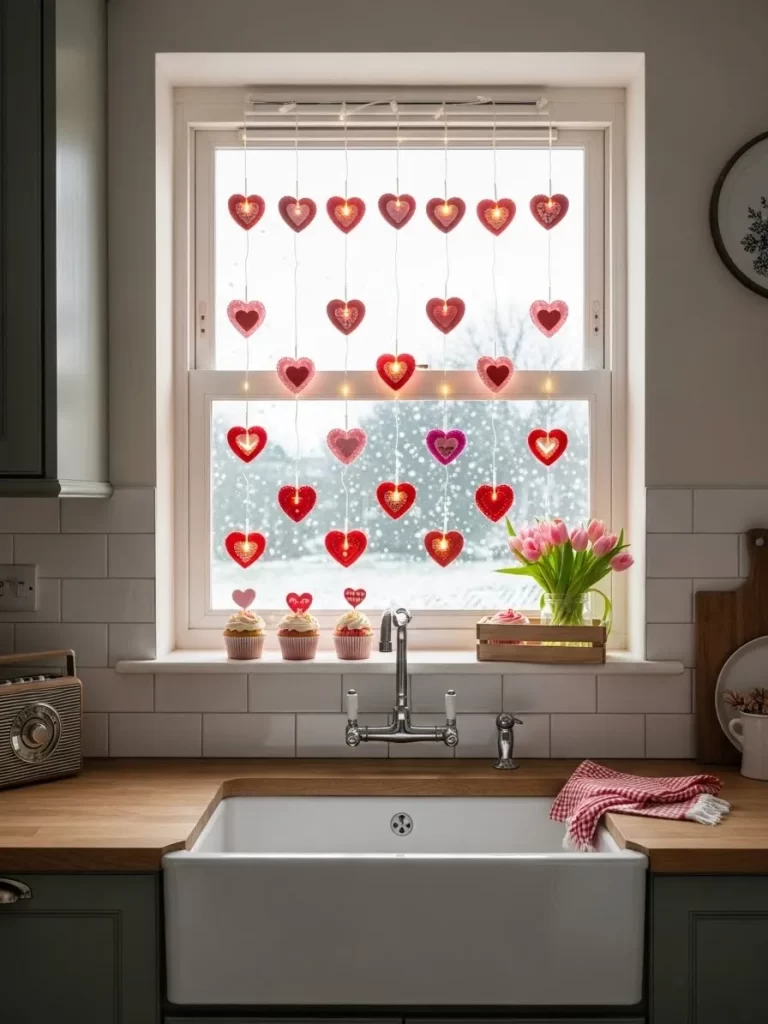
Decorate your kitchen window with a sweet and simple heart display. Hanging individual heart shaped ornaments from a curtain rod is very charming. The internal lights make each heart glow against the snowy view outside.
The bright red and pink colors add a pop of cheer to your cooking space. Fresh tulips in a vase and heart topped cupcakes complete the festive look. This setup is excellent for adding a touch of love to your daily routine.
The soft lighting is very welcoming on dark and cold winter mornings. It makes the kitchen feel like the warmest and happiest room in the house. Your family will love this playful and easy holiday transformation.
Materials Required
- Twelve heart shaped hanging light ornaments
- White curtain rod and clips
- Fresh pink tulips in a glass jar
- Cupcakes with heart shaped toppers
Equipment Required
- Level
- Screwdriver
DIY Instructions
- Install a white curtain rod across the top of your kitchen window.
- Use the clips to hang the heart ornaments at different heights.
- Ensure the cords are tucked behind the window frame or rod.
- Plug in the hearts and check that they are all glowing evenly.
- Place the vase of pink tulips on the window sill below.
- Arrange your festive cupcakes on a wooden board nearby.
- Use the window light to highlight the bright red and pink colors.
- Enjoy the festive view while you prepare your Valentine treats.
35 Winter Wonderland Lit Tree

Create a breathtaking outdoor display with a giant illuminated tree. Wrapping every branch of a large leafless tree with thousands of lights is a stunning achievement. The warm golden glow contrasts beautifully with the deep blue night sky.
The snowy ground reflects the light to make the whole yard feel magical. This setup is excellent for creating a winter wonderland that can be seen from far away. It brings a sense of awe and beauty to the cold winter landscape.
The light provides a warm and welcoming beacon for your home. You will feel like you are in a holiday movie every time you look out the window. It is a grand and beautiful way to celebrate the season.
Materials Required
- Twenty strands of commercial grade outdoor fairy lights
- Sturdy wooden garden bench
- Outdoor rated extension cords and timers
Equipment Required
- Professional grade ladder or cherry picker
- Outdoor light clips
- Warm winter clothing
DIY Instructions
- Choose a large, healthy tree in your yard that is close to a power source.
- Use a ladder to reach the main trunk and begin wrapping the lights.
- Work your way up the trunk and out along each major branch.
- Wrap the lights tightly to ensure they stay in place during wind or snow.
- Use outdoor clips to secure the lights to the ends of the smaller branches.
- Place a wooden bench underneath the tree to create a viewing spot.
- Connect all the strands to a timer so they turn on automatically at dusk.
- Step back and admire the incredible transformation of your winter garden.
Romantic settings are within your reach this year. These lighting designs help you express your love through creativity. Your partner will appreciate the time and care you put into the home.
Turn off the bright lamps and let the fairy lights do the work. You can create a memory that lasts much longer than a box of chocolates. Start your transformation now and feel the magic.
Key Takeaways
- Warm lighting is the most effective way to set a romantic mood.
- Most of these projects use simple items you already own.
- You do not need to be an expert to follow these DIY steps.
- Personal touches like photos make the lighting more meaningful.