
Walking into a child’s bedroom should feel like stepping into a world of joy. Most parents struggle with spaces that look flat or uninspired after the holiday season ends. You can easily fix a dull atmosphere by adding a few festive touches for Valentine’s Day.

Love is the theme of the month and your kids deserve to feel it in their own space. Switching out plain sheets for heart prints makes a huge difference. Small changes like wall art or cozy pillows bring a splash of color without costing a fortune.
This guide offers thirty nine creative ways to brighten up their room. Each idea comes with easy instructions so you can build them yourself. Get ready to transform their sleeping area into a cheerful sanctuary they will love.
1 Felt Heart Wall Garland

Adding a string of soft hearts above the bed instantly changes the mood of a room. These hanging decorations bring a sense of handmade charm that store bought items often lack. Red and pink tones pop against a neutral wall to create a cheerful focal point. Your child will feel the warmth of the holiday every time they walk into their bedroom.
Felt material provides a tactile experience that kids find comforting and cozy. This setup stays safe and light while offering a festive look for the season. It serves as a great way to celebrate love without cluttering the floor or furniture. You can customize the colors to match any existing bedding or wall paint to fix a dull space.
Material required list
- Red felt fabric
- Pink felt fabric
- White felt fabric
- Thin yarn or string
- Soft stuffing material
Equipment required list
- Sharp fabric scissors
- Hand sewing needle
- Marking pencil
- Stiff cardboard for templates
DIY instruction step by step
- Sketch a heart shape on a piece of cardboard to use as a sturdy guide.
- Cut the cardboard heart out with your scissors.
- Place the template on your felt and trace the shape with a pencil.
- Repeat this until you have two felt hearts for every one you want to hang.
- Hold two identical pieces together so the edges line up.
- Thread your needle and tie a knot at the end of the string.
- Stitch slowly around the border of the two pieces.
- Leave a small gap about the size of your thumb at the top.
- Push small clumps of stuffing into the heart through that hole.
- Finish sewing the gap shut once the heart feels soft and full.
- Take a very long piece of yarn to act as your main hanging line.
- Run the yarn through the top of each heart to connect them all.
- Space the hearts out so they do not bunch up in one spot.
- Secure the ends of the line to your wall with small tacks.
2 Sweet Conversation Hearts Bedding
Bright pastel colors make this bed look like a bowl of candy. Kids love the familiar shapes of conversation hearts spread across their blankets. Each heart features a different friendly message to boost their mood. This style works well for rooms that need a soft touch of color without being too dark.
Choosing light blue and pink tones helps the space feel airy and open. Your child can enjoy a whimsical theme that feels both modern and nostalgic. The large heart shaped pillow serves as a cozy centerpiece for reading or relaxing. It turns a boring sleep area into a cheerful spot for play.
Material required list
- White cotton duvet cover
- Fabric paint in pastel pink yellow and mint
- Large heart stencil
- Cardboard sheet
Equipment required list
- Foam paint roller
- Small paint brush
- Painter tape
- Iron for setting paint
DIY instruction step by step
- Lay your white duvet cover flat on a clean floor.
- Slide a piece of cardboard inside the cover to stop paint from bleeding through.
- Tape your heart stencil onto the top corner of the fabric.
- Pour pink fabric paint into a tray and dip your roller.
- Roll the paint over the stencil until the heart is fully colored.
- Lift the stencil carefully to reveal the shape.
- Clean the stencil and move it to a new spot on the blanket.
- Repeat this process with yellow and mint colors until the surface is covered.
- Use a small brush to write short words like HUG ME inside each heart.
- Let the paint dry for twenty four hours in a room with good air flow.
- Press the fabric with a warm iron to make the design permanent.
- Put the cover on the bed to enjoy your new creation.
3 Out Of This World Celestial Hearts
Space lovers will adore this navy blue theme with a romantic twist. Small hearts act as stars in the constellations across the duvet. A glowing moon pillow adds a magical touch to the dark background. This look is great for children who prefer a more mysterious or nighttime aesthetic.
The deep colors provide a calming atmosphere that helps kids settle down for bed. Shimmery silver lines connect the heart stars to create patterns in the sky. It offers a unique way to celebrate the holiday without using traditional bright reds. This design makes the room feel like a private planetarium.
Material required list
- Navy blue bedding set
- Silver fabric marker
- Iridescent fabric scrap
- Soft pillow stuffing
Equipment required list
- Fabric scissors
- Sewing machine or needle
- Ruler
- Tailor chalk
DIY instruction step by step
- Spread the navy blue blanket out on a large table.
- Mark small dots where you want your heart constellations to go using chalk.
- Use the silver fabric marker to draw tiny hearts over each dot.
- Connect the hearts with thin silver lines to form star patterns.
- Use a ruler to keep your lines straight and clean.
- Cut two large crescent moon shapes from your iridescent fabric.
- Place the two moon pieces on top of each other with the shiny sides touching.
- Sew around the edge but leave a three inch opening at the bottom.
- Turn the fabric right side out through that small hole.
- Stuff the moon with soft filling until it looks plump.
- Stitch the opening closed by hand using a hidden seam.
- Place the moon pillow and the blanket on the bed.
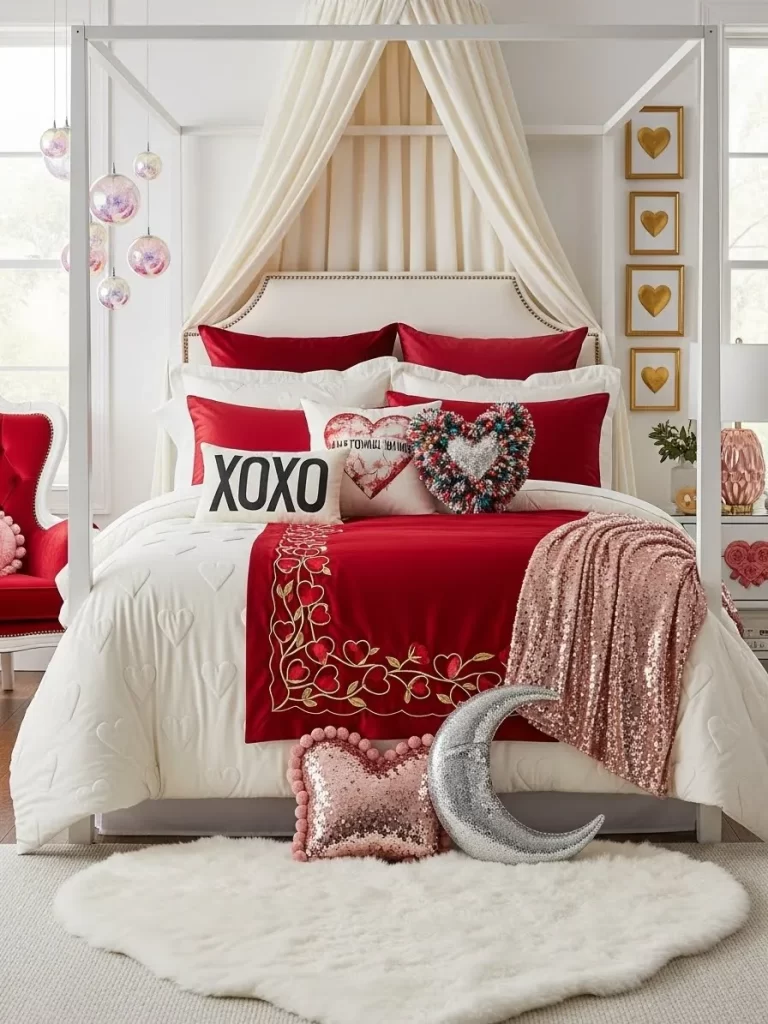
4 Bold XOXO Graphic Bedding
Large red letters create a high energy look that feels very fresh. The black and white stripes on the bed skirt add a sharp contrast to the bright red text. This style is excellent for older kids who want a more mature or graphic design. It makes a strong statement the moment you enter the room.
The simple color palette keeps the decor from looking messy or cluttered. Using typography is a smart way to fill up a dull white wall or bed. This bedding pairs well with a neon sign to create a trendy glow. Your child will love the bold and modern vibes of this setup.
Material required list
- Plain white duvet
- Red felt fabric
- Black and white striped fabric
- Heavy duty fabric glue
Equipment required list
- Large letter templates
- Measuring tape
- Sharp scissors
- Weights to hold fabric
DIY instruction step by step
- Print out large templates for the letters X and O on paper.
- Place these templates on your red felt fabric.
- Trace around each letter with a pencil very carefully.
- Cut out the felt letters using your sharpest scissors.
- Arrange the letters on the center of your white duvet.
- Use a measuring tape to make sure the letters are centered.
- Apply a thick layer of fabric glue to the back of the first letter.
- Press the letter down firmly onto the duvet fabric.
- Put a heavy book on top of the letter while the glue dries.
- Repeat this for all the letters until the word is complete.
- Cut a long strip of striped fabric to fit around the bottom of the bed.
- Glue or sew the striped fabric to the edge of the mattress base.
5 Playful Puppy Love Prints
Puppies wearing heart shaped sunglasses bring a sense of humor to the bedroom. This blue bedding is filled with different dog breeds for animal lovers. A large plush dog holding a red heart makes the bed feel extra inviting. It is a sweet way to show love through a fun animal theme.
Kids will enjoy spotting their favorite dogs across the fabric pattern. The navy blue background allows the red and white details to stand out clearly. This theme is easy to put together with a few key pieces of decor. It creates a warm and friendly environment for any child.
Material required list
- Blue sheet set
- Dog themed fabric stickers
- Large stuffed dog toy
- Red felt for a small heart
Equipment required list
- Fabric glue
- Scissors
- Needle and thread
- Chalk
DIY instruction step by step
- Pick out a plain blue sheet or duvet cover for the base.
- Peel the backing off your dog fabric stickers.
- Place the stickers in a random pattern all over the top of the sheet.
- Press down hard on each sticker to make sure it stays in place.
- Cut a medium heart shape out of your red felt fabric.
- Use chalk to write the word WOOF in the middle of the heart.
- Stitch the heart onto the paws of your large stuffed dog toy.
- Make sure the stitches are tight so the heart does not fall off.
- Set the stuffed dog in the center of the pillows on the bed.
- Toss a red and white striped blanket over the foot of the bed.
- Smooth out any wrinkles in the blue sheets.
- Step back to see how the puppy theme brightens the room.
6 Love Letter Gingham Set
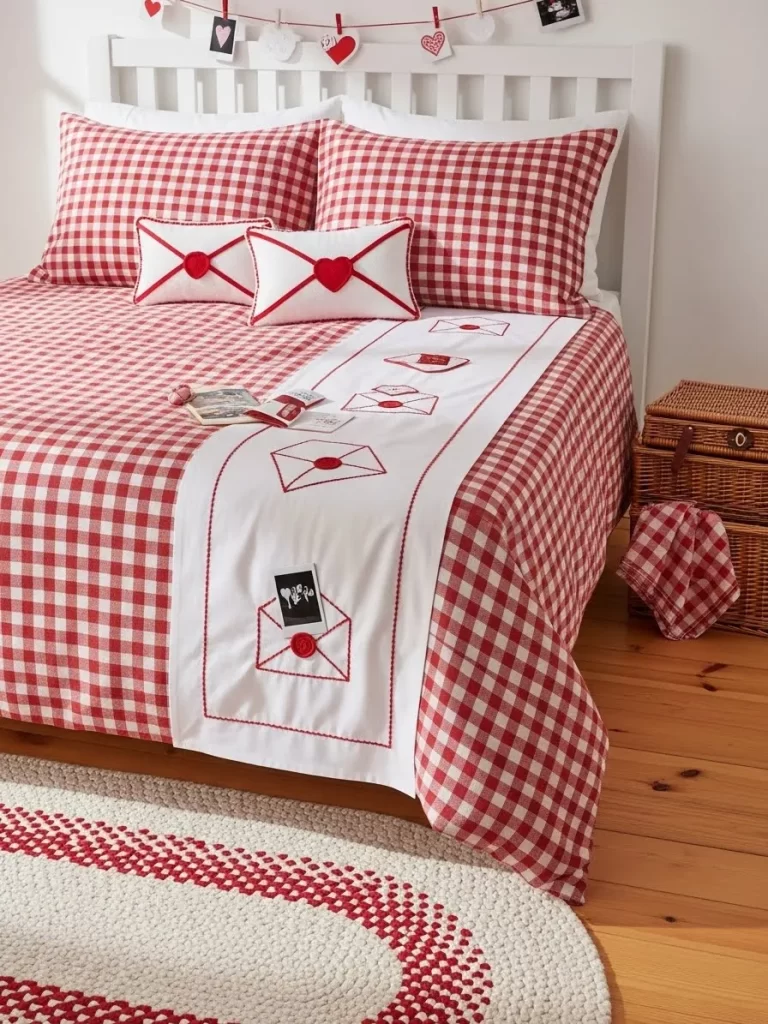
Red and white checkered patterns offer a classic look for a cozy bedroom. This set features unique pillows that look like sealed envelopes. A white runner with embroidered letters adds a touch of storytelling to the bed. It feels like a collection of secret notes from a best friend.
Gingham fabric is timeless and coordinates easily with other red accents. The envelope pillows use red heart buttons to act as wax seals. This theme encourages kids to write their own letters or notes. It turns the bed into a place for imagination and warmth.
Material required list
- Red and white gingham duvet
- White fabric for envelope pillows
- Red heart shaped buttons
- Red embroidery thread
Equipment required list
- Sewing machine
- Fabric shears
- Hand needle
- Iron
DIY instruction step by step
- Cut a long rectangle of white fabric for the pillow cover.
- Fold the fabric into three sections so it overlaps in the middle.
- Sew the side edges shut to create a simple pouch.
- Flip the top flap over so it looks like the back of an envelope.
- Use red thread to sew a decorative border around the flap.
- Sew a red heart button in the center of the flap to seal it.
- Insert a pillow into the white cover you just made.
- Lay a white fabric runner across the bottom of the gingham bed.
- Draw a small envelope shape on the runner with a pencil.
- Trace over the pencil lines with red embroidery thread.
- Iron the fabric to remove any creases from the sewing process.
- Arrange the envelope pillows against the headboard for a cute finish.
7 Textured Pompom Heart Throw

Soft pompom hearts add a three dimensional feel to a plain peach blanket. This project is excellent for kids who love textures and tactile decor. The bright yellow and teal hearts create a rainbow of love across the bed. It is a great way to update a simple blanket without buying a new one.
Each heart is made of fluffy yarn that feels soft to the touch. The variety of colors makes the bedding look vibrant and full of life. This handmade touch makes the room feel special and unique for the holiday. Your child will enjoy the cozy and bumpy texture of the hearts.
Material required list
- Peach or pink fleece blanket
- Thick yarn in yellow red and teal
- Strong fabric glue
- Cardboard scraps
Equipment required list
- Scissors
- Fork for small pompoms
- Marker
- Ruler
DIY instruction step by step
- Cut a small heart shape out of cardboard to use as a base.
- Wrap your yarn around a fork thirty times to make a small pompom.
- Tie a tight string around the middle of the yarn on the fork.
- Slide the yarn off and cut the loops to create a fuzzy ball.
- Trim the yarn ball until it is round and even.
- Repeat this until you have enough pompoms to cover your cardboard heart.
- Apply glue to the cardboard heart and stick the pompoms onto it.
- Let the heart dry until the pompoms are firmly attached.
- Place your blanket flat on a table or the floor.
- Mark the spots where you want each heart to go with a ruler.
- Glue the back of the pompom heart to the fleece blanket.
- Allow the glue to dry for a full day before using the throw.
8 Watercolor Splatter Heart Art
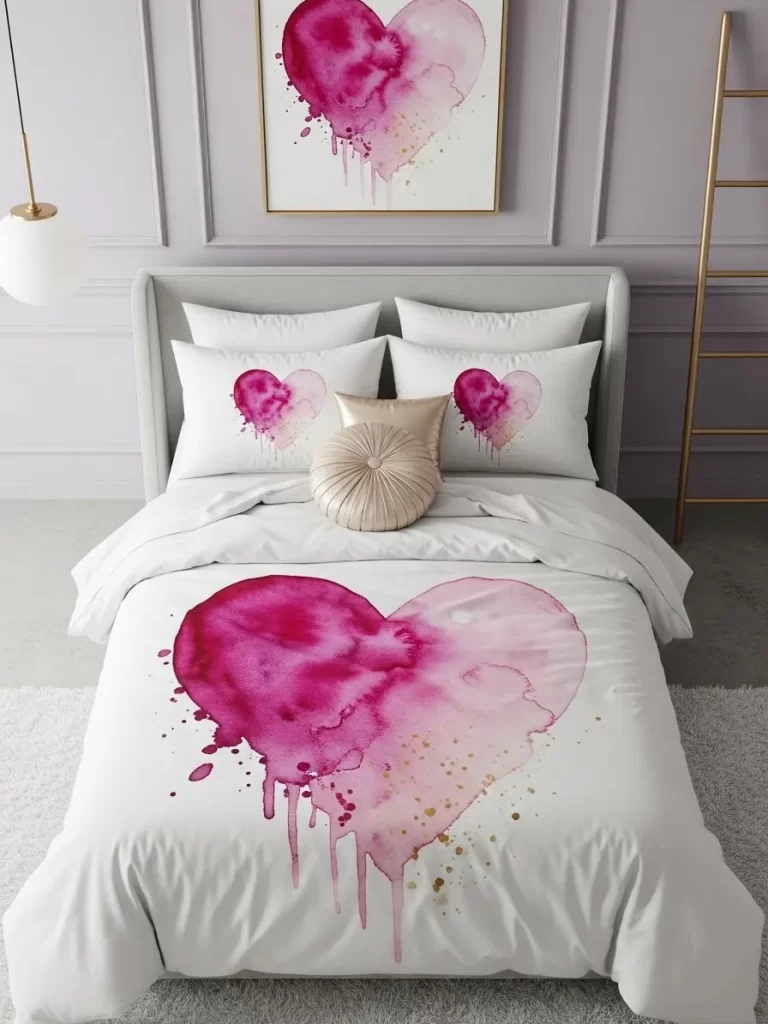
Artistic splashes of pink and purple create a dreamy heart design. This style looks like a painting come to life on the bed sheets. It brings a creative and sophisticated feel to a dull white room. The messy edges of the heart add a modern and cool vibe.
Soft watercolor tones blend together to create a relaxing visual effect. You can match this with a gold pillow for a touch of luxury. This design is suitable for children who love art and bright colors. It makes the bed look like a masterpiece in a gallery.
Material required list
- White cotton bedding
- Pink and purple fabric paints
- Water for thinning paint
- Large plastic sheet
Equipment required list
- Spray bottle
- Large paint brush
- Dropper
- Hair dryer
DIY instruction step by step
- Cover your work area with a large plastic sheet to prevent mess.
- Lay the white duvet cover flat on top of the plastic.
- Mix your fabric paint with a little water in a small cup.
- Dip a large brush into the pink paint and hold it over the fabric.
- Tap the brush handle to let paint drops splatter onto the center.
- Use a spray bottle of water to mist the paint so it spreads out.
- Guide the paint with your brush to form a rough heart shape.
- Add purple paint drops near the edges for a blended look.
- Use a dropper to add smaller splashes around the main heart.
- Let the paint bleed and run to create a watercolor effect.
- Use a hair dryer on a cool setting to speed up the drying.
- Iron the back of the fabric to set the colors permanently.
9 Green Garden Valentine Decor
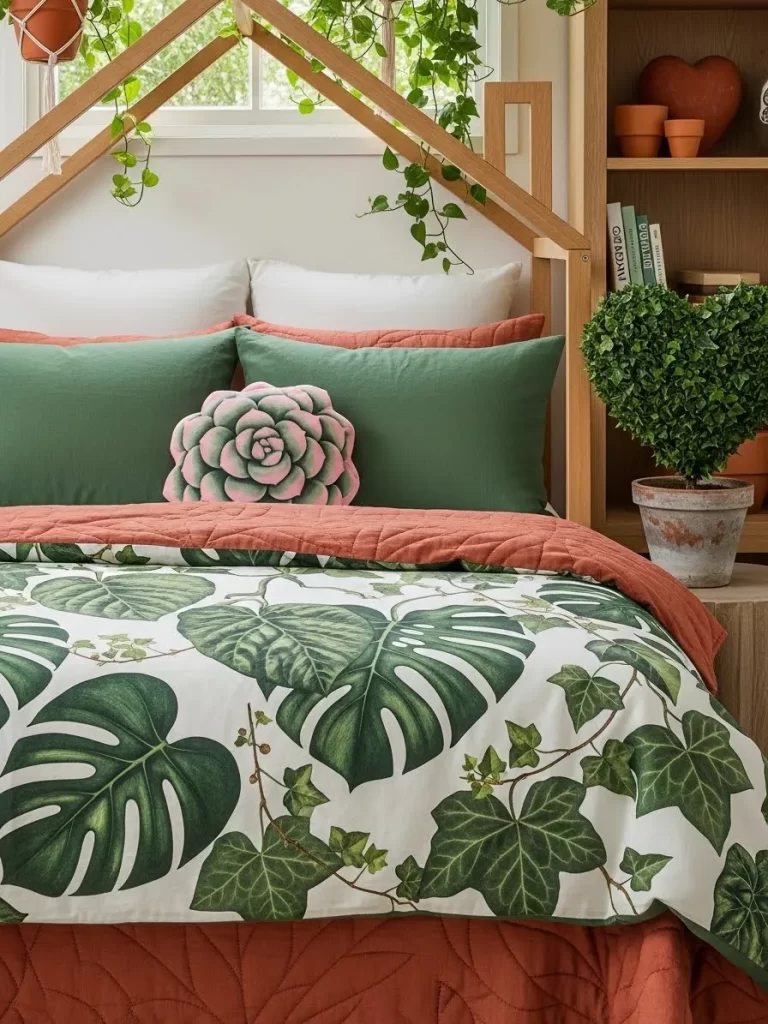
Monstera leaves and ivy vines bring a fresh garden feel to the room. This theme uses green as the main color with pops of terracotta and pink. A 3D succulent pillow adds a soft and natural touch to the botanical prints. It is a wonderful choice for kids who enjoy nature and plants.
The combination of leaves and hearts creates a unique jungle of love. Using a wooden bed frame enhances the earthy and warm atmosphere. This decor breathes life into a room that feels cold or empty. Your child will feel like they are sleeping in a cozy forest.
Material required list
- Leaf print duvet cover
- Pink and green felt
- Wooden bed frame
- Artificial ivy vines
Equipment required list
- Glue gun
- Scissors
- Pins
- Sewing needle
DIY instruction step by step
- Place your leaf print duvet on the bed as the base.
- Cut several leaf shapes out of green felt fabric.
- Cut smaller pink petals out of the pink felt.
- Layer the pink petals in a circle to look like a succulent.
- Glue the petals together at the base using a hot glue gun.
- Attach the felt succulent to the center of a green pillow.
- Drape artificial ivy vines over the top of the bed frame.
- Use small clips to keep the vines from falling down.
- Arrange terracotta colored pillows behind the green ones.
- Put a small heart shaped topiary on the nightstand nearby.
- Ensure the vines are tucked away from where the child sleeps.
- Smooth the blanket to show off the large leaf patterns.
10 Minimalist Modern Heart Duvet

A single giant red heart makes a powerful statement on a crisp white bed. This minimalist look is clean and very easy to achieve. The vertical neon sign adds a trendy glow that lights up the entire space. It removes all the clutter while still celebrating the spirit of the holiday.
Striped rugs and simple pillows keep the focus on the central heart. This design is great for small rooms that need to look bigger and brighter. The contrast between red and white is sharp and very pleasing to the eye. It is a timeless style that grows with your child.
Material required list
- White duvet cover
- Large red fabric scrap
- Heat bond adhesive paper
- Black and white striped rug
Equipment required list
- Iron
- Large scissors
- Chalk
- Measuring tape
DIY instruction step by step
- Wash and dry your white duvet cover before you start.
- Draw a very large heart on the back of your red fabric with chalk.
- Cut the heart out following your chalk lines carefully.
- Apply heat bond adhesive paper to the back of the red heart.
- Use a warm iron to stick the paper to the fabric.
- Peel the paper backing off to reveal the sticky surface.
- Find the exact center of the white duvet with your measuring tape.
- Place the red heart onto the center of the duvet.
- Press the heart with the iron for thirty seconds to bond it.
- Move the iron slowly to make sure the edges are flat.
- Lay a striped rug on the floor next to the bed.
- Plug in a neon LOVE sign on the wall to finish the look.
11 Rainbow Heart Path Bedding
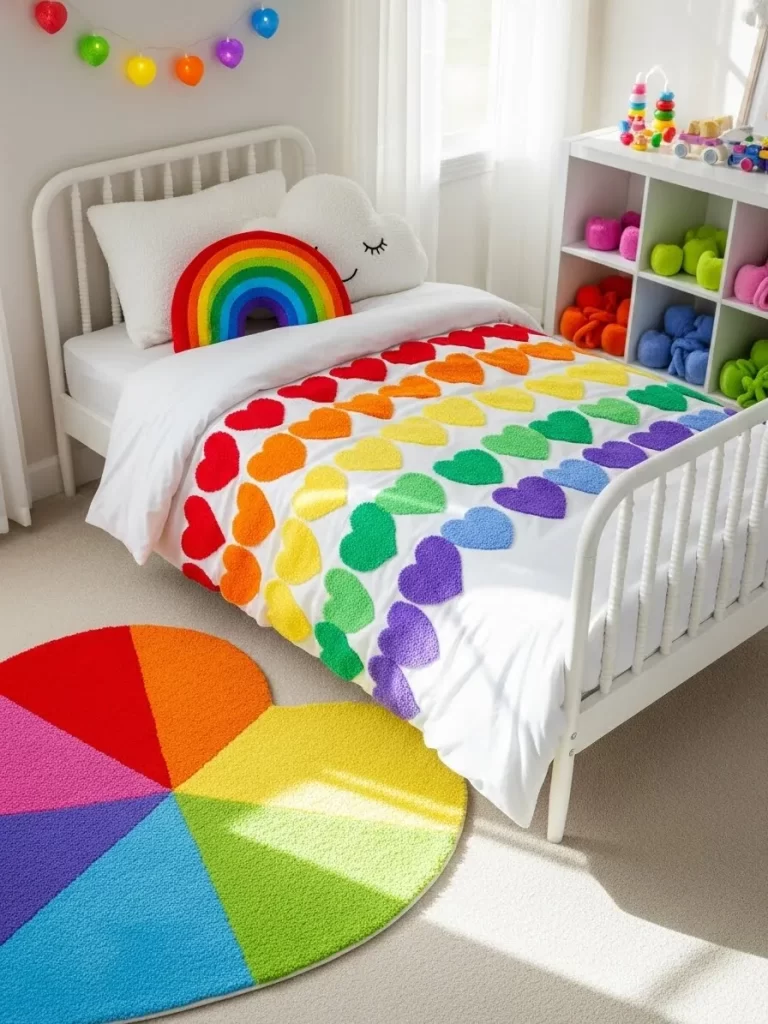
Bright hearts in every color of the rainbow create a cheerful path across the duvet. This design brings a joyful energy that can liven up any dull bedroom. Soft fuzzy textures on each heart invite kids to sit and play on the bed.
Matching accessories like a rainbow heart rug tie the whole look together. Vibrant shades of red orange and blue pop against the white fabric. You can easily pair this with colorful storage bins to keep the room organized and fun.
Material required list
- White duvet cover
- Fabric scraps in rainbow colors
- Fabric glue
- Measuring tape
Equipment required list
- Heart template
- Scissors
- Pencil
- Weights
DIY instruction step by step
- Trace the heart template onto the colorful fabric scraps.
- Cut out several hearts in each color of the rainbow.
- Lay the white duvet flat on a clean surface.
- Arrange the hearts in diagonal rows starting from red to purple.
- Use a measuring tape to keep the spacing even between hearts.
- Apply a thin layer of fabric glue to the back of a red heart.
- Press the heart down firmly onto the duvet.
- Put a weight on the heart for ten minutes to secure it.
- Repeat this process for every color in the rainbow sequence.
- Let the glue dry completely for a full day.
12 Cozy Cabin Buffalo Plaid Hearts
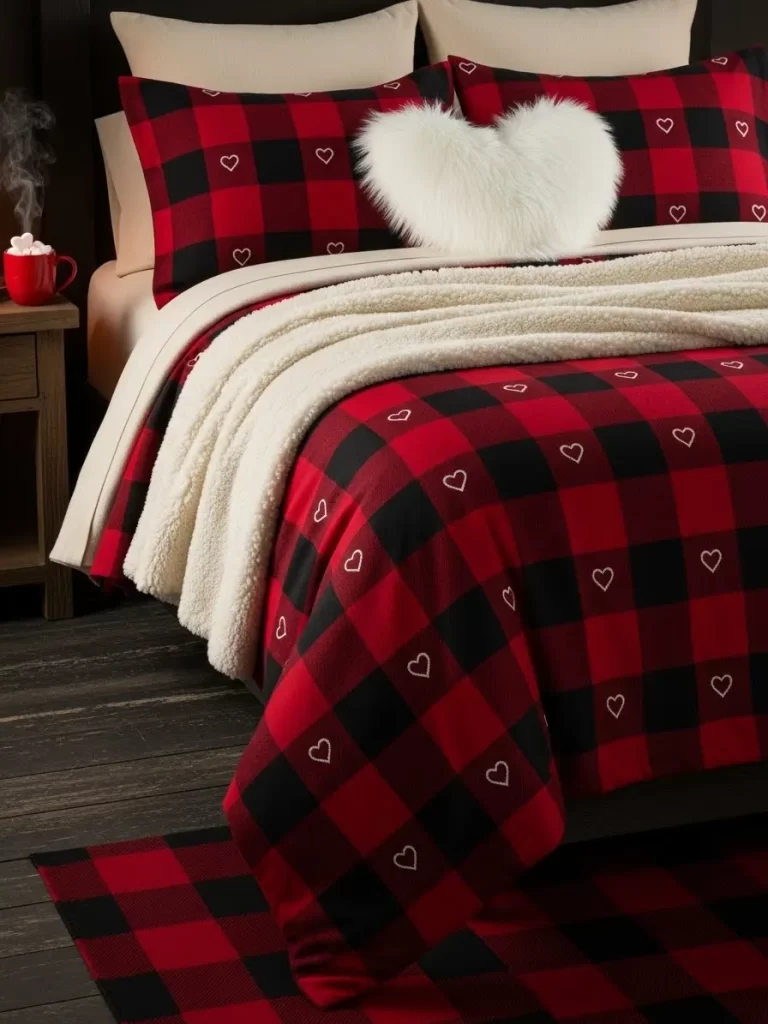
Deep red and black checkers give the room a warm cabin feel for the winter season. Tiny white hearts are scattered across the plaid pattern to add a sweet touch. A large white fuzzy heart pillow acts as a soft centerpiece for the bed.
Placing a thick cream colored blanket at the foot of the bed adds extra comfort. This style works well with dark wood furniture and warm lighting. Your child will love the snug and rustic atmosphere of this holiday theme.
Material required list
- Buffalo plaid duvet set
- White fabric paint
- White faux fur fabric
- Pillow stuffing
Equipment required list
- Small heart stamp
- Paint tray
- Sewing kit
- Scissors
DIY instruction step by step
- Pour a small amount of white fabric paint into your tray.
- Dip your heart stamp into the paint and tap off the extra.
- Press the stamp onto the red squares of the plaid duvet.
- Space the hearts out randomly for a natural look.
- Cut two large heart shapes out of the white faux fur fabric.
- Place the fluffy sides together and sew around the border.
- Leave a small opening at the bottom of the heart.
- Turn the fabric inside out so the fuzzy side is now on the outside.
- Fill the heart with soft stuffing until it is very plump.
- Sew the remaining gap shut with a hidden stitch.
13 Purple Galactic Heart Glow
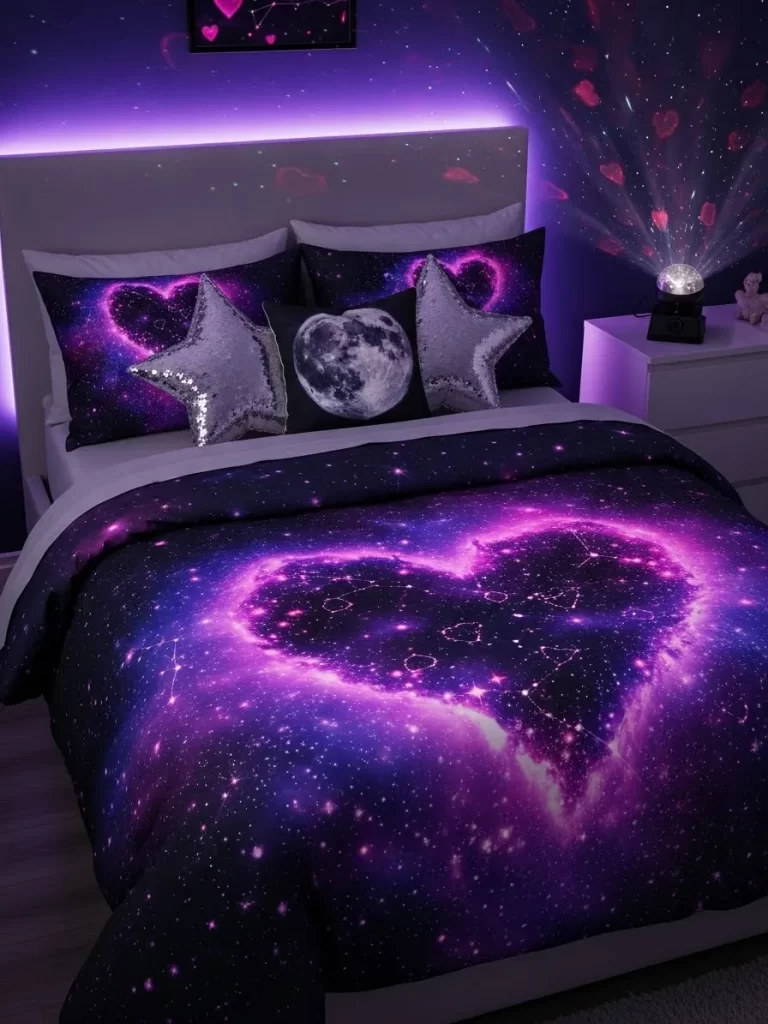
Magical purple nebula clouds and stars fill the duvet with cosmic wonder. A large glowing heart sits in the center of the bed to act as a focal point. Using sequin star pillows adds a touch of shine that reflects the wall lights.
Star projectors can cast heart shapes onto the walls to expand the theme. This design is great for children who enjoy science and space exploration. Bright neon lights behind the headboard create a futuristic and cool vibe.
Material required list
- Galaxy print duvet cover
- Silver sequin fabric
- LED light strip
- Heart shaped pillow
Equipment required list
- Sewing machine
- Scissors
- Sticky tape
- Marker
DIY instruction step by step
- Cut two star shapes from the silver sequin fabric.
- Sew the star pieces together and fill them with stuffing.
- Place the galaxy duvet on the bed and smooth it out.
- Attach the LED light strip to the back of the headboard with tape.
- Plug in the lights to see a purple glow around the bed.
- Set the star pillows on top of the galaxy blanket.
- Use a heart shaped projector on the nightstand to light the ceiling.
- Choose purple or pink settings on the projector to match the bedding.
14 Royal Princess Carriage Bedding
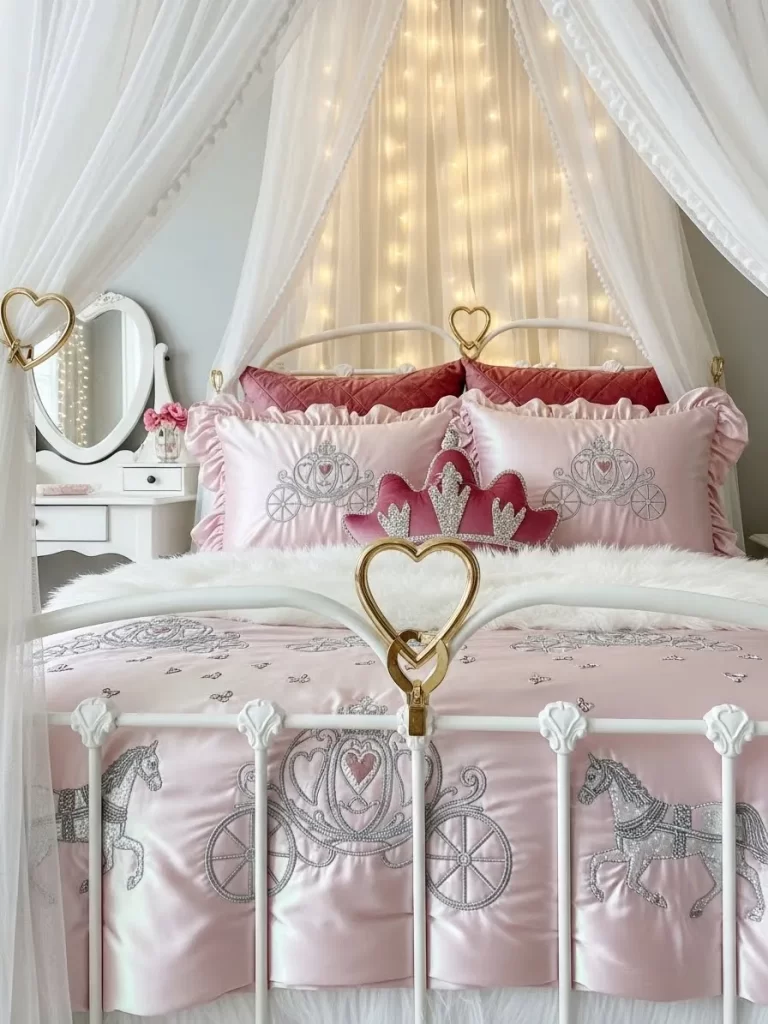
Elegant pink satin bedding features beautiful silver carriage embroidery for a regal look. Soft ruffles along the edges of the pillows add a delicate and fancy touch. A crown shaped pillow in deep rose velvet sits proudly in the center.
White mesh curtains drape around the bed to create a private and magical space. Gold heart accents on the bed frame help to tie the whole royal theme together. Every little detail makes the room feel like a palace for a young queen.
Material required list
- Pink satin duvet cover
- Silver embroidery thread
- White mesh fabric
- Gold heart charms
Equipment required list
- Sewing needle
- Scissors
- Tension rod
- Pencil
DIY instruction step by step
- Draw a simple carriage shape on the duvet using a light pencil.
- Use the silver thread to stitch over your pencil lines.
- Attach the white mesh fabric to a tension rod above the bed.
- Let the mesh hang down on both sides of the headboard.
- Tie the mesh back with pink ribbons to keep it tidy.
- Glue or sew gold heart charms onto the top corners of the bed.
- Place a rose colored velvet pillow against the white pillows.
- Add a faux fur rug next to the bed for a soft landing.
15 Bold Polka Dot Heart Set
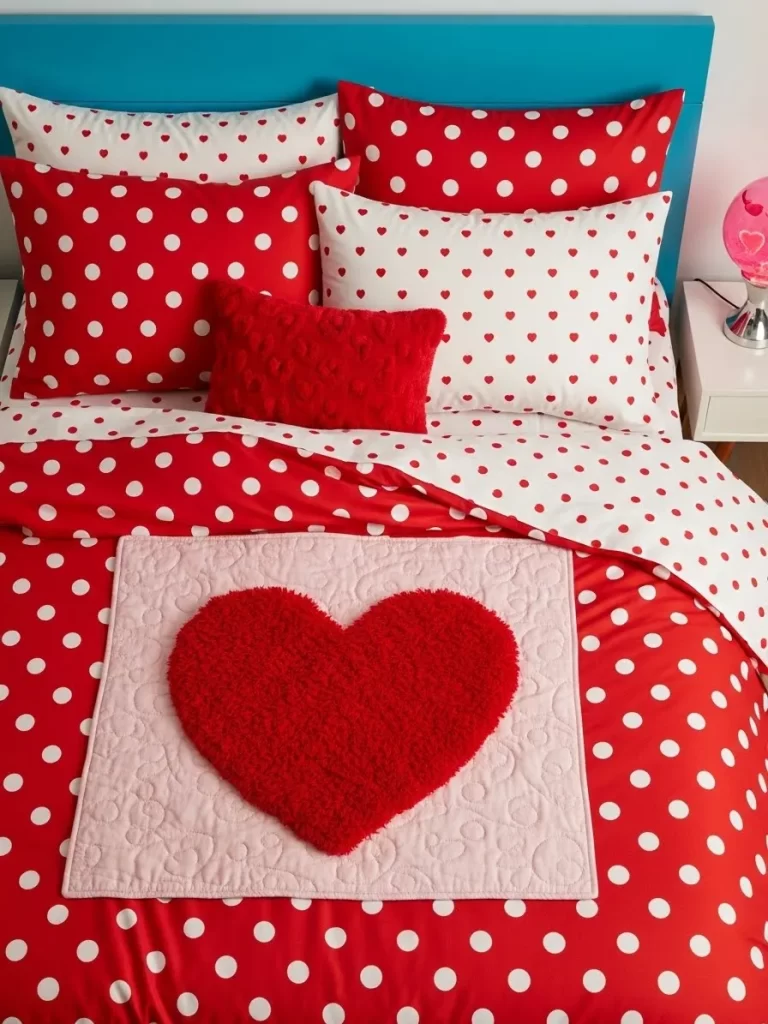
Punchy red and white polka dots bring a high energy vibe to any dull room. A large red fuzzy heart sits on a pink quilted square for a fun contrast. Small hearts on the pillows add a secondary layer of holiday spirit.
Blue headboards provide a sharp pop of color that makes the red stand out even more. Adding a heart shaped lamp on the bedside table enhances the festive mood. This style is wonderful for kids who love bright and graphic patterns.
Material required list
- Red polka dot duvet
- Pink quilted fabric
- Red fluffy fabric
- Fabric glue
Equipment required list
- Large scissors
- Measuring tape
- Chalk
- Iron
DIY instruction step by step
- Cut a square of pink quilted fabric that is twenty inches wide.
- Iron the pink square to make it flat and smooth.
- Draw a large heart on the back of the red fluffy fabric.
- Cut the heart out very carefully with your scissors.
- Center the red heart on top of the pink quilted square.
- Glue the heart to the pink fabric using strong fabric glue.
- Place the whole pink square in the middle of the polka dot duvet.
- Sew the edges of the pink square onto the duvet cover.
- Add matching polka dot pillowcases to the top of the bed.
16 Teddy Bear Hugs Bedding
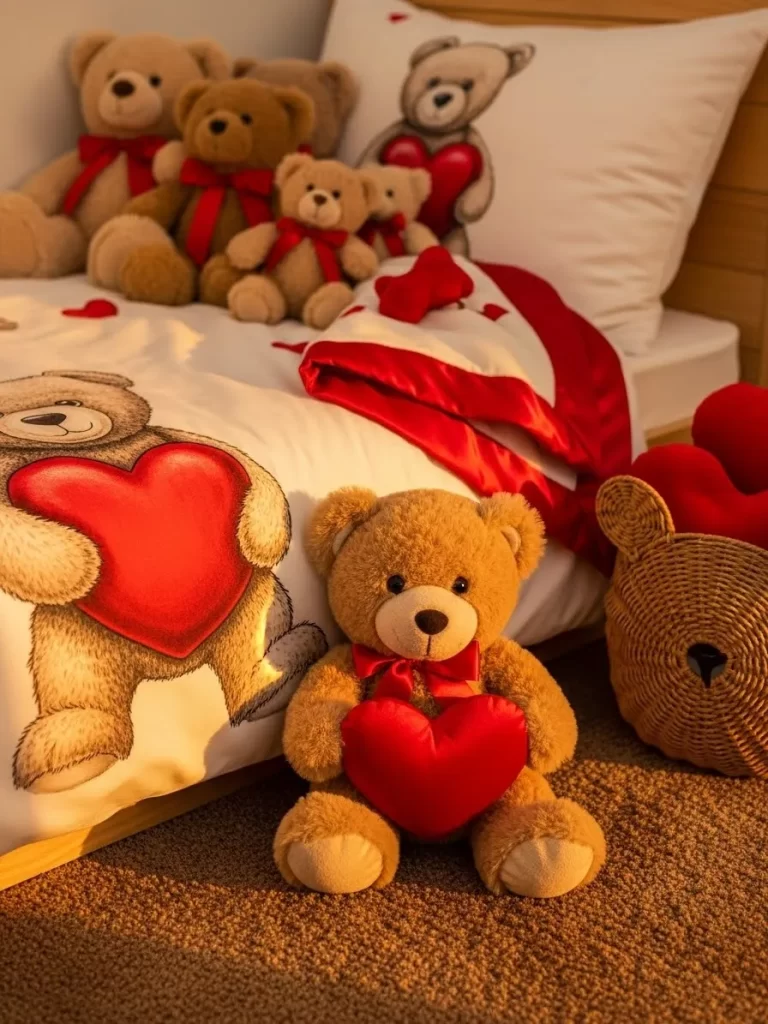
Friendly brown bears holding red hearts create a warm and comforting theme for sleep. Multiple plush teddy bears are gathered together to make the bed feel like a soft nest. Wooden headboards and golden lighting add to the cozy cottage atmosphere.
Your child will love waking up next to their favorite fuzzy friends every morning. Soft red borders on the white duvet give the design a clean and finished look. Placing a woven basket nearby provides a cute home for extra stuffed animals.
Material required list
- White duvet cover
- Iron on bear transfers
- Red satin ribbon
- Brown wicker basket
Equipment required list
- Iron
- Scissors
- Measuring tape
- Sewing kit
DIY instruction step by step
- Place the iron on bear transfers across the bottom of the duvet.
- Use a hot iron to press each transfer firmly onto the fabric.
- Cut long strips of red satin ribbon for the edges of the duvet.
- Sew the ribbon along the borders to create a red frame.
- Arrange several brown teddy bears on top of the white pillows.
- Tie small red bows around the necks of the stuffed bears.
- Put the wicker basket at the foot of the bed for toy storage.
- Toss a red heart shaped pillow into the basket for extra detail.
17 Boho Macrame Heart Wall Art
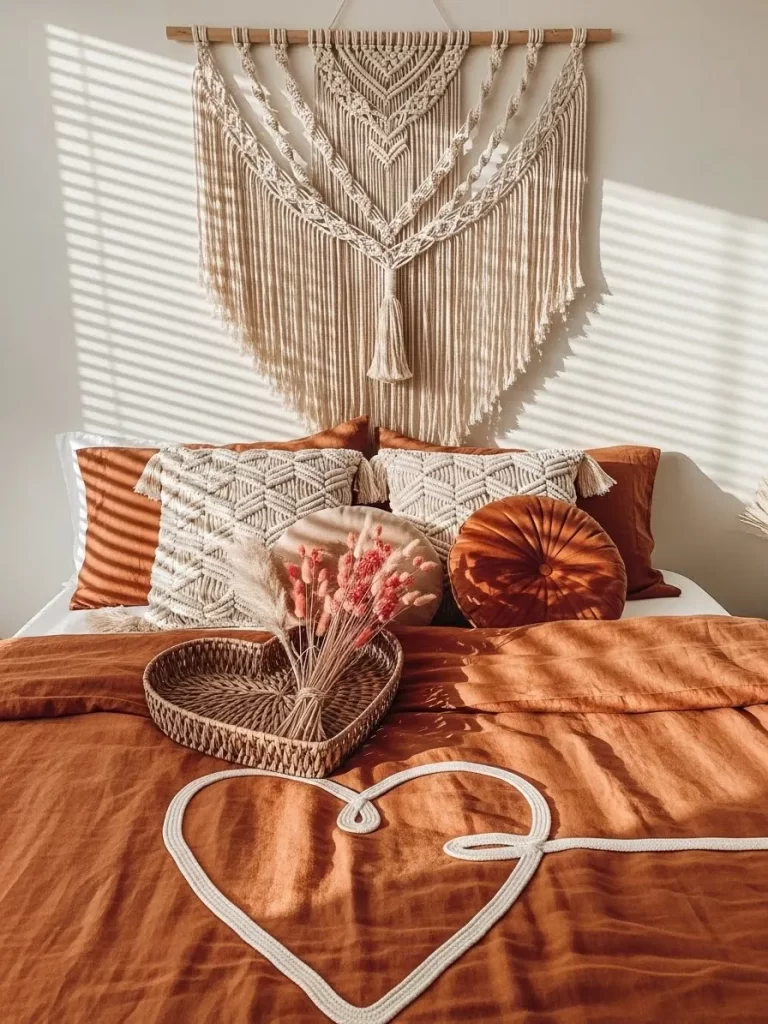
Natural cream tones and woven textures bring a calm and peaceful vibe to the room. A giant macrame wall hanging features a central heart shape made of intricate knots. Earthy terracotta bedding provides a warm base that feels very grounded and cozy.
Matching woven pillows and a wicker heart tray complete the bohemian look. Soft light through the window creates gentle shadows across the beautiful fabric patterns. Bringing nature indoors with dried flowers adds a lovely finishing touch to the space.
Material required list
- Cotton macrame cord
- Wooden dowel
- Terracotta duvet cover
- Wicker heart tray
Equipment required list
- Scissors
- Measuring tape
- Wall hook
- Comb
DIY instruction step by step
- Cut twenty pieces of cotton cord to the same length.
- Loop each cord onto the wooden dowel using a simple knot.
- Tie the cords together in a pattern to form a large heart.
- Use a comb to brush out the ends of the cord for a soft fringe.
- Hang the wooden dowel on a wall hook above the headboard.
- Put the terracotta duvet cover on the bed and smooth it out.
- Place the wicker heart tray in the center of the blanket.
- Fill the tray with a small bunch of dried pink flowers.
18 Metallic Disco Glam Room
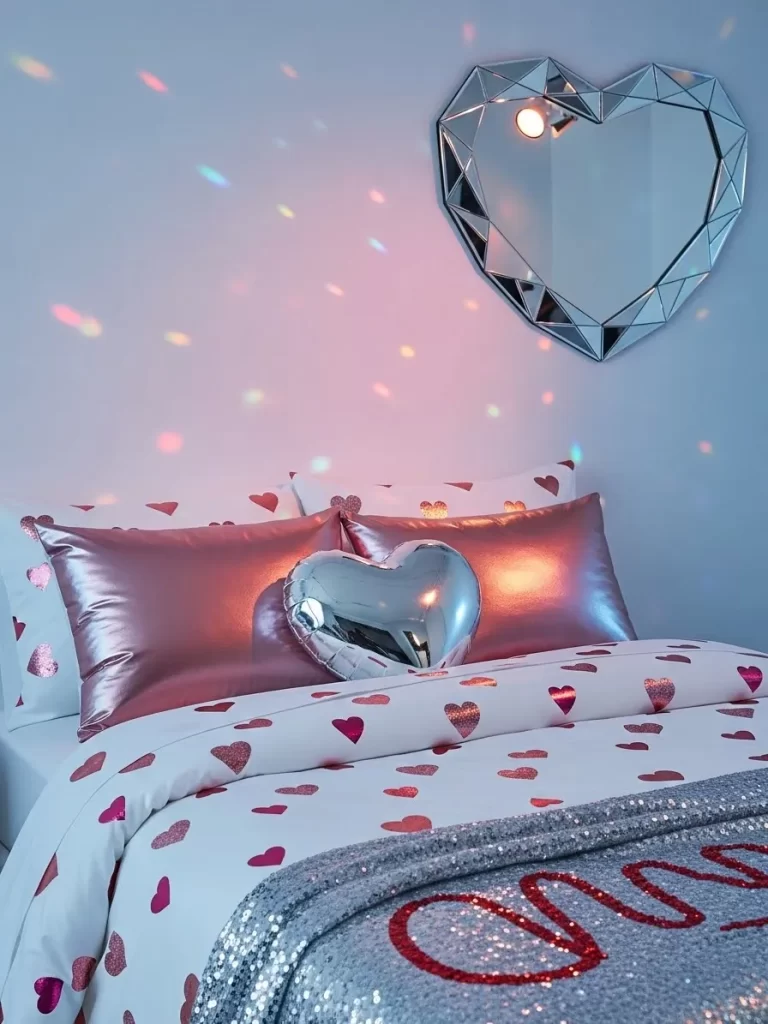
Shimmering pink satin pillows and a silver heart balloon add a touch of sparkle. Light reflects off a faceted heart mirror on the wall to create a dance party feel. Glossy white bedding keeps the space looking bright and very modern.
Sparkly silver blankets at the foot of the bed provide a luxurious and fun texture. Silver glitter hearts are scattered across the fabric to catch the morning sun. Transform a dull corner into a glamorous retreat for a child who loves to shine.
Material required list
- White duvet cover
- Silver glitter fabric paint
- Pink satin pillowcases
- Heart shaped mirror
Equipment required list
- Heart stencil
- Foam brush
- Wall adhesive
- Iron
DIY instruction step by step
- Lay the white duvet cover flat on a clean table or floor.
- Tape the heart stencil onto the bottom half of the duvet.
- Dab silver glitter paint over the stencil with a foam brush.
- Move the stencil to new spots and repeat the painting.
- Let the glitter paint dry for a full day before using the bed.
- Place the heart mirror on the wall using strong adhesive.
- Put the pink satin pillowcases on the bed pillows.
- Inflate a silver heart balloon and tie it to the headboard.
19 Superhero Heart Action Bedding

Brave superheroes flying through heart shaped clouds bring excitement to the bedroom. Comic book style speech bubbles like POW add a fun and energetic touch to the duvet. A large red satin cape with a white heart acts as a heroic bed runner.
Vibrant blue and red colors make the bed stand out in a white room. Bright yellow pillows with shield logos help your child feel powerful and loved. Make the space an adventure zone where love is the greatest superpower of all.
Material required list
- Blue duvet cover
- Red satin fabric
- White felt fabric
- Yellow pillowcases
Equipment required list
- Scissors
- Fabric glue
- Chalk
- Ruler
DIY instruction step by step
- Cut a large rectangle from the red satin fabric for the cape.
- Use white felt to cut out a large heart shape.
- Glue the white heart to the center of the red satin cape.
- Drape the cape over the foot of the blue bed.
- Cut shield shapes from the remaining red fabric.
- Glue the red shields onto the yellow pillowcases.
- Use chalk to draw comic book clouds on the blue duvet.
- Trace over the chalk lines with white fabric paint.
20 Mailbox Love Letter Nook
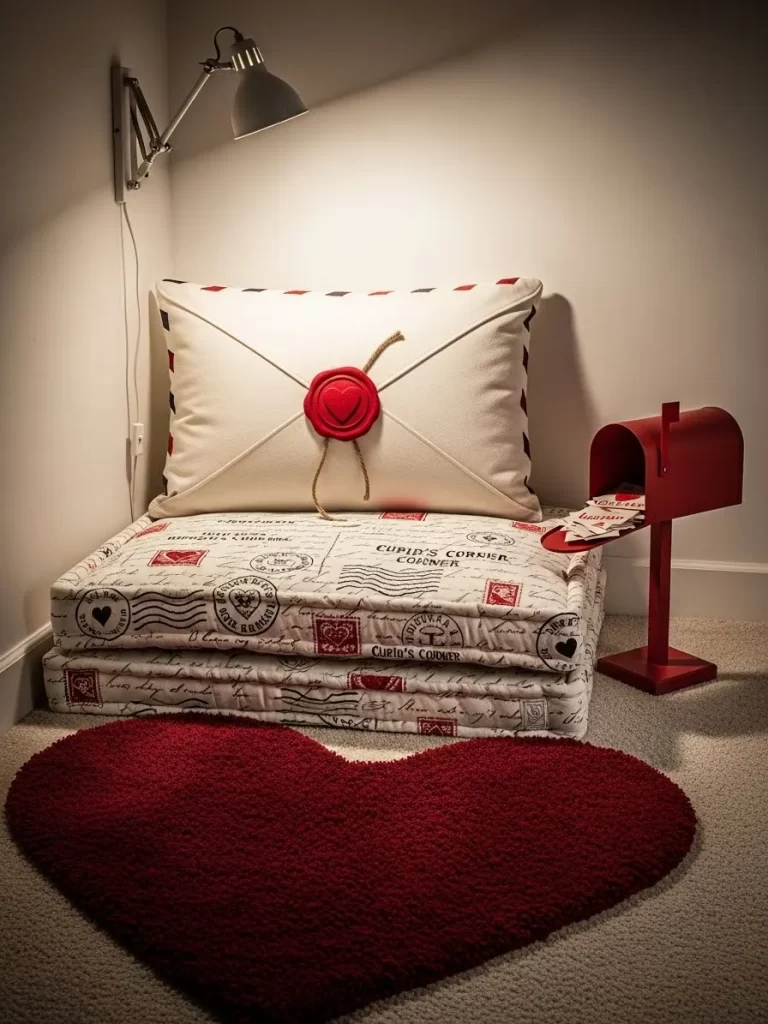
Whimsical letter prints on a soft floor cushion create the best spot for reading. A giant envelope pillow with a red wax seal adds a touch of secret mystery. Cozy red heart rugs on the floor provide a warm place to sit and relax.
Red mailboxes nearby are ready to hold cards and notes from friends or family. Soft light from a bedside lamp makes this corner feel very inviting and warm. Set up this special nook to encourage your child to write and read more.
Material required list
- White floor cushion
- Black fabric marker
- Red felt for the seal
- Small toy mailbox
Equipment required list
- Ruler
- Scissors
- Fabric glue
- Pencil
DIY instruction step by step
- Use a ruler and black marker to draw stamp lines on the cushion.
- Write small words like LOVE or HELLO in the corners.
- Cut two large rectangles from white fabric for an envelope pillow.
- Sew three sides shut and fill the pillow with soft stuffing.
- Fold the top flap over and sew it down to look like an envelope.
- Cut a round circle from red felt to act as a wax seal.
- Glue the red felt circle to the center of the envelope flap.
- Place the toy mailbox on a small table next to the floor cushion.
21 Shimmering Sequin Heart Bedding
Rich burgundy velvet textures bring a sense of luxury to this cozy sleep space. A centerpiece pillow features reversible sequins that change color when you swipe your hand across them. This interactive element keeps kids entertained while adding a trendy glittery glow to the room. The deep wine tones provide a sophisticated backdrop for the bright pink accents.
Large quilted patterns on the duvet create a heavy and warm feel for cold February nights. Your child will love the tactile sensation of the soft velvet against their skin. It transforms a standard bedroom into a glamorous retreat fit for a star. Soft lighting reflects off the silver sequins to make the whole bed shine.
Material required list
- Burgundy velvet duvet cover
- Reversible silver and pink sequin fabric
- Pink velvet pillowcases
- Soft cotton pillow inserts
Equipment required list
- Sewing machine
- Fabric scissors
- Measuring tape
- Sewing pins
DIY instruction step by step
- Lay your pink velvet pillowcase flat on a hard work surface.
- Cut a large square of reversible sequin fabric using your scissors.
- Place the sequin square in the very center of the pillowcase front.
- Pin the edges of the sequin fabric down so it does not move.
- Sew around the four sides of the square with a slow stitch.
- Ensure the sequins are facing the right way before finishing the seam.
- Slide the pillow insert into the case through the side opening.
- Place the finished pillow in the middle of your burgundy duvet.
- Brush the sequins up or down to create different heart patterns.
22 Nautical Sea of Love Set
Navy blue fabric decorated with white anchors and red hearts creates a classic maritime theme. This look is excellent for kids who love the ocean and sailing adventures. A life ring pillow with the words SEA OF LOVE adds a playful touch to the pillows. Red piping along the edges of the sheets provides a sharp and clean finish.
Wooden oars mounted on the wall help reinforce the sailor vibe in the space. Small heart garlands made of rope tie the nautical elements together with the holiday theme. This design feels sturdy and adventurous while still being very sweet. It is a great choice for refreshing a dull room with a bold color palette.
Material required list
- Navy blue duvet cover
- White and red fabric paint
- Round white pillow
- Red fabric scraps
Equipment required list
- Anchor stencil
- Heart stencil
- Foam paint brushes
- Fabric glue
DIY instruction step by step
- Spread the navy duvet cover out on the floor or a large table.
- Place your anchor stencil on the fabric in a repeating pattern.
- Apply white fabric paint over the anchor stencil with a foam brush.
- Move the stencil across the duvet until the whole surface is covered.
- Use a heart stencil to add small red hearts between the white anchors.
- Let the paint dry for at least twelve hours before moving the fabric.
- Cut four red strips of fabric to act as straps for the life ring.
- Glue the red strips onto your round white pillow at equal distances.
- Paint the words SEA OF LOVE in the center of the white pillow.
- Toss the finished life ring pillow onto the head of the bed.
23 Folk Art Bird Heart Pattern

Intricate folk designs featuring symmetrical birds and flowers bring a traditional charm to the bedding. These red and blue patterns look like hand stamped art on the white cotton fabric. A small rectangular pillow with a wooden button adds a rustic and handmade feel. This style is wonderful for creating a calm and artistic atmosphere for children.
Each heart contains a mirror image of two birds to symbolize friendship and love. The vibrant colors stand out beautifully against a light wood bed frame. Using a striped red and white sheet underneath adds a fun layer of pattern. It turns the bedroom into a cozy space filled with stories and heritage.
Material required list
- White cotton duvet cover
- Red and blue fabric markers
- Small white linen pillow
- Large wooden button
Equipment required list
- Folk art paper template
- Pencil
- Needle and thread
- Iron
DIY instruction step by step
- Print out a folk art heart template that features birds and flowers.
- Slide the paper template inside the white duvet cover to see the lines.
- Trace the design onto the fabric using a light pencil mark.
- Color in the birds with your blue fabric marker very carefully.
- Use the red marker to fill in the hearts and flower petals.
- Repeat this design in three large sections across the duvet top.
- Iron the fabric on a medium setting to set the ink for washing.
- Sew a large wooden button to the center of your small linen pillow.
- Place the decorated pillow on top of the folk art duvet.
24 Prehistoric Dinosaur Love Prints
Green dinosaurs wearing heart shaped balloons make this bedding a hit for young explorers. The dark forest green background allows the lime green and red colors to pop. A pterodactyl plush toy holding a heart says RAW R MEANS I LOVE YOU for a funny touch. It is a creative way to mix a love for reptiles with the Valentine season.
Bone patterns shaped into hearts add a quirky and clever detail to the sheets. This theme is high energy and full of personality for a child who loves animals. Matching green rugs shaped like dinosaur footprints complete the look on the floor. Your little one will enjoy a room that feels like a prehistoric party.
Material required list
- Dark green duvet cover
- Dinosaur fabric patches
- Orange felt fabric
- White fabric paint
Equipment required list
- Hot glue gun
- Small paint brush
- Scissors
- Chalk
DIY instruction step by step
- Lay your dark green duvet cover flat on a clean surface.
- Arrange your dinosaur patches across the duvet in different spots.
- Use a hot glue gun to attach each patch firmly to the fabric.
- Cut out small heart shapes from the orange felt fabric.
- Glue one orange heart above the head of each dinosaur patch.
- Use a small brush to paint thin white lines connecting hearts to dinos.
- Draw small bone shapes with chalk on the pillowcases first.
- Paint over the chalk bones with white fabric paint to form hearts.
- Let all the glue and paint dry completely before making the bed.
25 Radiant Red Ombre Heart Drift
Bright red colors fade slowly into a soft white at the top of this modern bedding. Small heart outlines seem to float and drift upward like bubbles in the air. A glowing neon heart on the nightstand creates a warm and magical light in the evening. This minimalist design is very clean and offers a high contrast look.
Using a pink floor and walls enhances the soft and romantic feel of the theme. The smooth satin finish of the fabric makes the bed look expensive and sleek. It is a fantastic choice for a room that needs a bold splash of color. Your child will love the transition of shades from dark to light.
Material required list
- White satin duvet cover
- Red fabric dye
- Heart shaped sponge
- Red fabric paint
Equipment required list
- Large plastic tub
- Measuring cup
- Rubber gloves
- Hair dryer
DIY instruction step by step
- Fill a large plastic tub with warm water and red fabric dye.
- Dip only the bottom half of your white duvet into the red water.
- Hold the fabric in the dye for ten minutes to get a deep color.
- Pull the fabric out slowly to create a fading ombre effect.
- Rinse the duvet in cold water until the water runs clear.
- Dry the duvet completely in a machine or out in the sun.
- Dip your heart shaped sponge into a tray of red fabric paint.
- Stamp hearts onto the white section of the duvet in a random pattern.
- Use a hair dryer to set the paint so it stays on the satin.
26 Magical Butterfly Flutter Decor
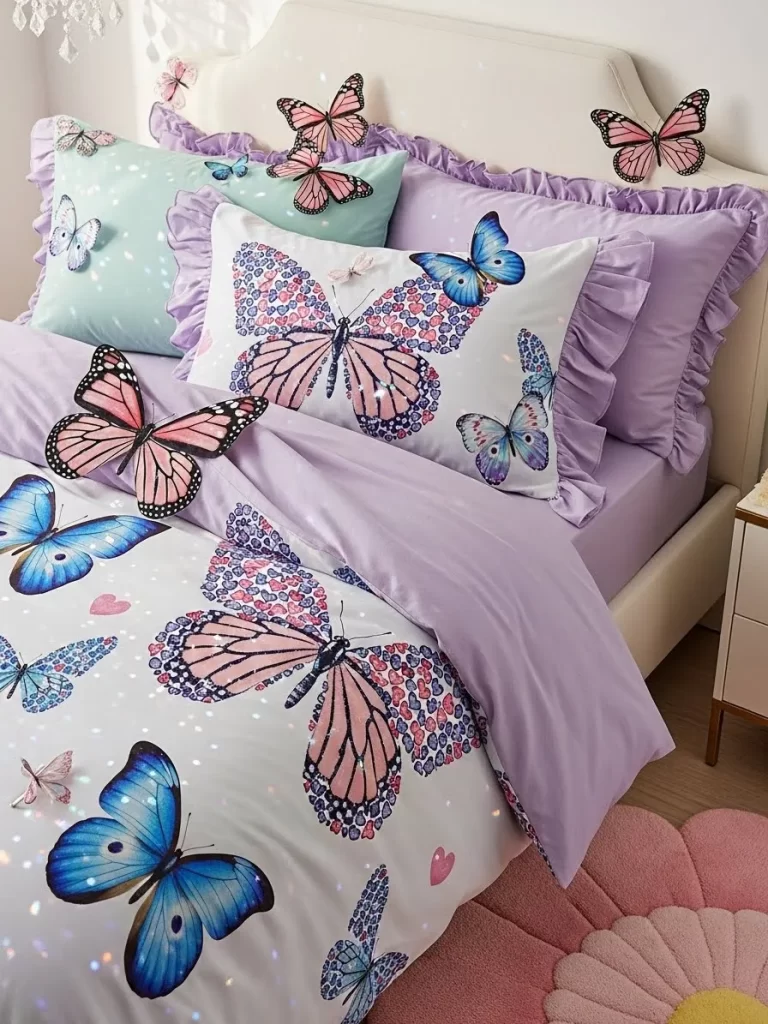
Purple ruffles and colorful butterflies transform this bed into a spring garden. Large 3D butterflies are attached to the pillows and walls to create a sense of movement. The lavender tones provide a soothing environment that is very relaxing for sleep. Each butterfly wing features tiny heart patterns to stay on theme for the holiday.
Sparkling lights hidden in the fabric make the butterflies look like they are glowing. This whimsical style is great for kids who love nature and fairy tales. Combining mint green accents with purple creates a fresh and unique color palette. It makes a dull white room feel like a scene from a storybook.
Material required list
- Purple ruffled duvet cover
- Butterfly wall decals
- Mesh fabric in pink and blue
- Thin wire
Equipment required list
- Wire cutters
- Needle and thread
- Scissors
- Safety pins
DIY instruction step by step
- Cut a piece of thin wire into a figure eight shape for wings.
- Wrap your mesh fabric tightly around the wire frames.
- Tie the center of the wire with a small piece of blue fabric.
- Bend the wire slightly to make the butterfly look like it is flying.
- Stitch the mesh butterfly onto the corner of your purple pillowcase.
- Repeat this to make five more butterflies in different colors.
- Pin some of the mesh butterflies onto the surface of the duvet.
- Stick the butterfly decals on the wall above the headboard.
- Fluff the purple ruffles to give the bed more volume and shape.
27 Sweet Treat Dessert Theme
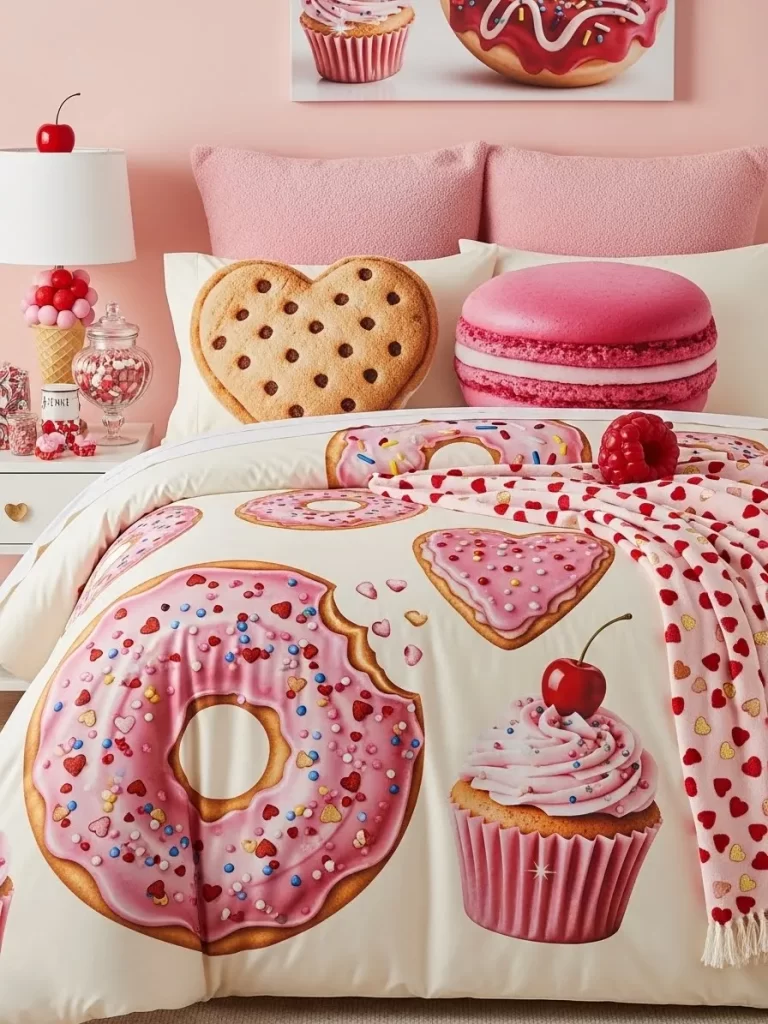
Delicious prints of donuts and cupcakes make the bedding look like a bakery display. A giant macaron shaped pillow provides a soft and round cushion for lounging. The warm cream background keeps the room looking bright and very appetizing. This fun theme is excellent for children who have a big sweet tooth.
Small heart sprinkles are scattered over the frosting of every illustrated treat. A pink heart blanket with tassels adds an extra layer of warmth to the foot of the bed. This design brings a cheerful and playful energy to the space. It turns every bedtime into a sweet and cozy experience.
Material required list
- Cream colored duvet cover
- Fabric markers in pink brown and red
- Round pink fabric
- Stuffing material
Equipment required list
- Circular template
- Sewing machine
- Scissors
- Pencil
DIY instruction step by step
- Draw large circles on your cream duvet using a pencil and template.
- Use brown markers to color the circles like donuts and cupcakes.
- Add pink frosting shapes on top of the brown circles with markers.
- Draw tiny red hearts over the frosting to look like sweet sprinkles.
- Cut two large circles from your pink fabric to make a macaron.
- Sew the two pink circles together but leave a gap for stuffing.
- Push the stuffing into the pink circle until it is thick and round.
- Sew the gap closed to finish your macaron pillow.
- Place the treat themed bedding on the bed and add the pillow.
28 Heritage Quilted Patchwork Heart

Traditional red and white squares are stitched together to create a classic quilt look. Each white square contains a different heart design made from floral or striped fabric. A vintage rag doll sitting on the pillows adds a sense of nostalgia to the room. This theme is very warm and feels like a handmade gift from a grandparent.
Small red stitches around the border of each patch show the detail of the work. The mix of patterns keeps the eyes busy and makes the bed the star of the room. This style is great for creating a cottage or farmhouse vibe in a dull space. It offers a timeless beauty that never goes out of fashion.
Material required list
- Plain white quilt
- Fabric scraps with flowers and stripes
- Red embroidery floss
- Large red pillowcases
Equipment required list
- Heart template
- Fabric scissors
- Embroidery needle
- Pins
DIY instruction step by step
- Cut twenty heart shapes from your various fabric scraps.
- Arrange the hearts in a grid pattern on top of your white quilt.
- Pin each heart into the center of a square section on the quilt.
- Use red embroidery floss to sew a running stitch around each heart.
- Make the stitches visible to give it a rustic and handmade look.
- Ensure the thread is knotted tightly on the back of the quilt.
- Remove the pins once all the hearts are securely attached.
- Use the same red floss to stitch a heart on your red pillowcases.
- Lay the finished quilt over the bed for a cozy heritage look.
29 Safari Wild About You Decor

Tall giraffes crossing their necks to form a heart bring a wild spirit to the room. The earthy tan and olive green colors create a natural safari atmosphere. A wooden sign above the bed says WILD ABOUT YOU to tie the animal theme together. This decor is wonderful for kids who love wildlife and outdoor adventures.
Leafy garlands draped over the bamboo bed frame add a touch of the jungle. A grey elephant plush holding a red flower makes the pillow area look very friendly. This style is calm yet exciting and fills the room with warmth. It is a smart way to use neutral tones with a few pops of festive red.
Material required list
- Tan colored duvet cover
- Brown fabric paint
- Artificial green leaves
- Small wooden board
Equipment required list
- Giraffe stencil
- Paint brush
- Glue gun
- Black permanent marker
DIY instruction step by step
- Place your tan duvet cover flat on a large work table.
- Tape two giraffe stencils so their heads lean toward each other.
- Paint the giraffe shapes with brown fabric paint using a brush.
- Remove the stencils to see the heart shape formed by the necks.
- Let the paint dry for twenty four hours before touching the fabric.
- Write the words WILD ABOUT YOU on the wooden board with a marker.
- Use a glue gun to attach artificial leaves around the edge of the board.
- Hang the finished sign on the wall behind the center of the bed.
- Wrap extra green leaf vines around the posts of the bed frame.
30 Golden Gallery Heart Art
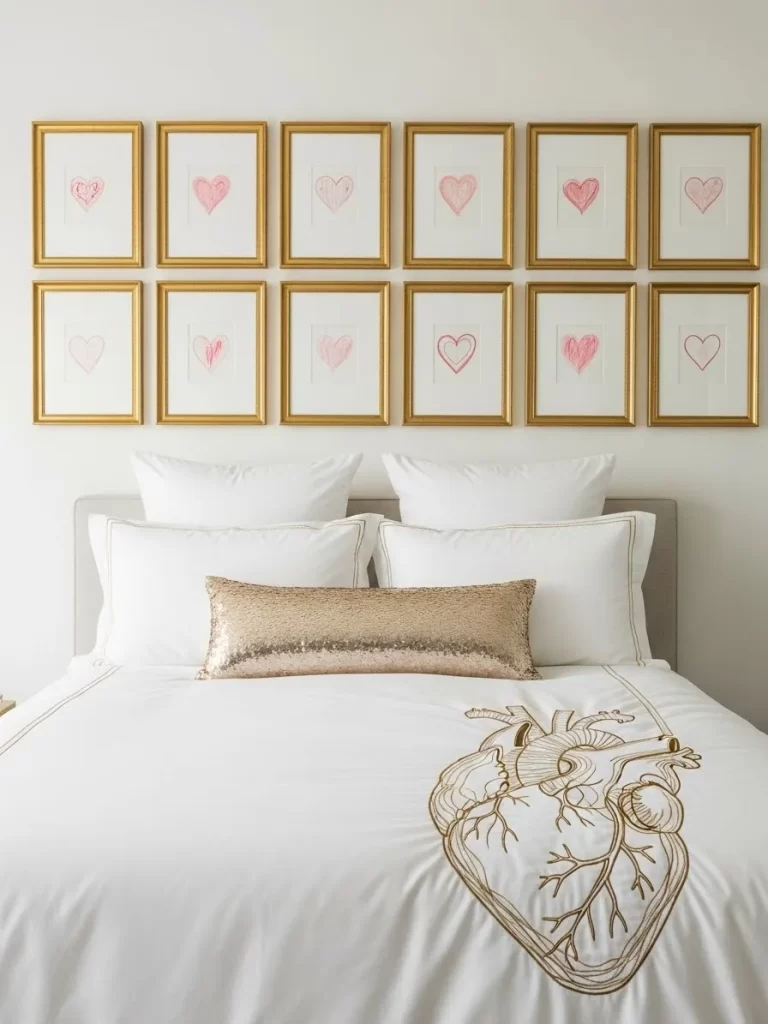
A sophisticated white duvet features a large golden anatomical heart for a modern look. The wall above the bed is covered in twelve matching gold frames with heart sketches. This design is very clean and feels like a professional art gallery. It is a great choice for older kids who want a more mature and stylish bedroom.
Glittery gold pillows add a touch of sparkle to the simple white bedding. The combination of gold and white makes the room feel very bright and expensive. Using simple line art keeps the space from feeling cluttered or messy. Your child will enjoy a room that looks both creative and very polished.
Material required list
- Plain white bedding set
- Gold fabric paint
- Twelve small gold picture frames
- White paper
Equipment required list
- Fine tip paint brush
- Pink crayons
- Hammer and nails
- Measuring tape
DIY instruction step by step
- Lay the white duvet cover flat on a clean and hard floor.
- Use a fine brush to paint a large anatomical heart in the bottom corner.
- Use gold fabric paint to make the lines look shiny and bold.
- Let the gold paint dry completely for at least one full day.
- Draw a small simple heart on twelve separate pieces of white paper.
- Color each heart with a pink crayon using light and soft strokes.
- Place each drawing into one of the twelve gold picture frames.
- Use a measuring tape to mark twelve even spots on the wall.
- Hang the frames in three rows of four to create a heart gallery.
31 Heart Express Train Set
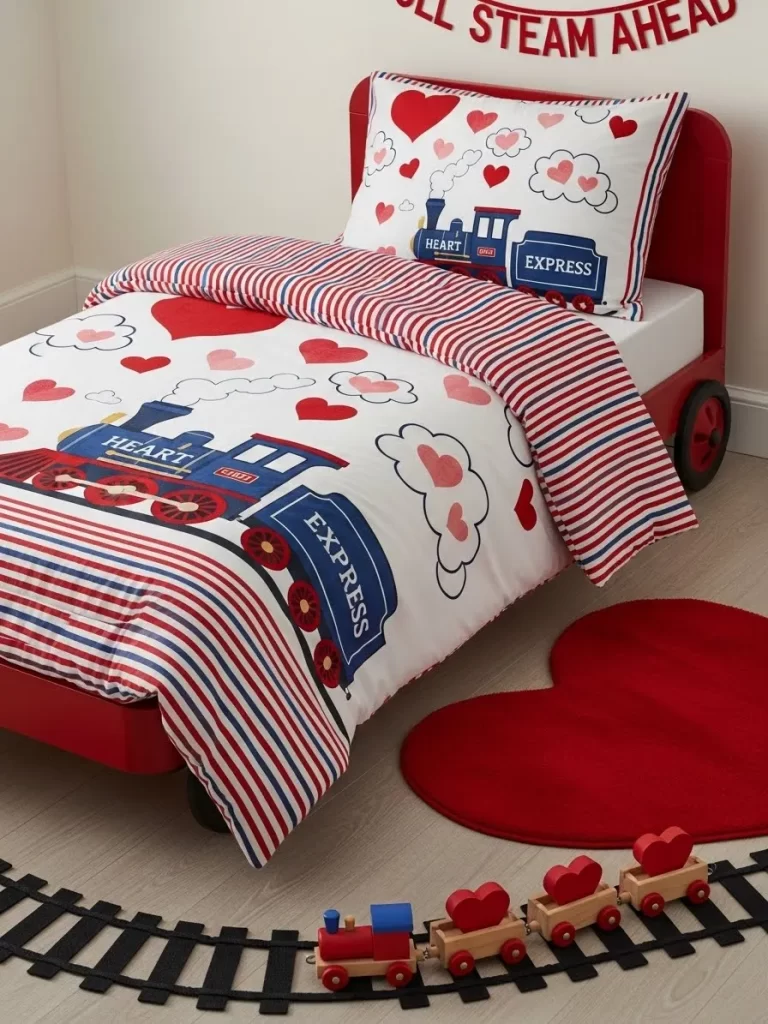
Small trains puff out heart shaped steam across this bright white duvet. The red bed frame with round wheels makes your child feel like they are riding on the love express. Red and white stripes on the pillow add a classic touch to the playful theme. It brings a lot of movement to a quiet corner of the room.
Matching heart rugs lead the way like a cozy track for the little train. Your child will enjoy the bright colors and the friendly train illustrations. This setup works for toddlers who love vehicles and bright primary colors. It makes the sleeping area feel like a destination for fun.
Material required list
- Blue fabric marker
- Red felt sheets
- Large cardboard boxes
- Black paint
Equipment required list
- Sharp scissors
- Paint brush
- Pencil
- Tape measure
DIY instruction step by step
- Collect several large cardboard boxes and flatten them out on the floor.
- Draw two long parallel lines to create a train track path using a pencil.
- Cut the tracks out with your sharp scissors.
- Paint the cardboard tracks black and let them dry for one hour.
- Place the tracks in a circle around the base of the bed.
- Cut small heart shapes out of the red felt sheets.
- Glue the felt hearts onto the sides of the bed frame wheels.
- Draw small steam clouds on the white pillow with your blue marker.
- Use the tape measure to ensure the track pieces line up evenly.
32 Secret Rose Garden Gate

Deep emerald green fabric features a beautiful iron gate and climbing rose pattern. Glowing heart shaped lights drape over the headboard like magic vines in the night. This look is excellent for kids who love mysteries and secret garden stories. The dark background helps the pink roses stand out vividly.
Adding a textured green throw blanket creates a feeling of sitting on soft grass. The room stays dark and cozy while the warm lights provide a gentle comfort. It is a sophisticated way to use nature themes for the holiday. Your child will feel safe in their own private forest hideaway.
Material required list
- Emerald green duvet cover
- Artificial rose vines
- Heart shaped string lights
- Green fleece blanket
Equipment required list
- Clear plastic clips
- Extension cord
- Step ladder
- Scissors
DIY instruction step by step
- Place the emerald green duvet on the bed and smooth the surface.
- Stand on a step ladder to reach the top of the bed frame.
- Attach clear plastic clips along the top rail of the headboard.
- String the heart shaped lights across the clips so they hang down.
- Wrap the artificial rose vines around the string of lights.
- Secure the vines with small pieces of green wire or string.
- Plug the lights into an extension cord behind the nightstand.
- Lay the green fleece blanket across the bottom of the bed.
- Adjust the rose petals so they face forward toward the room.
33 Vintage Library Book Hearts
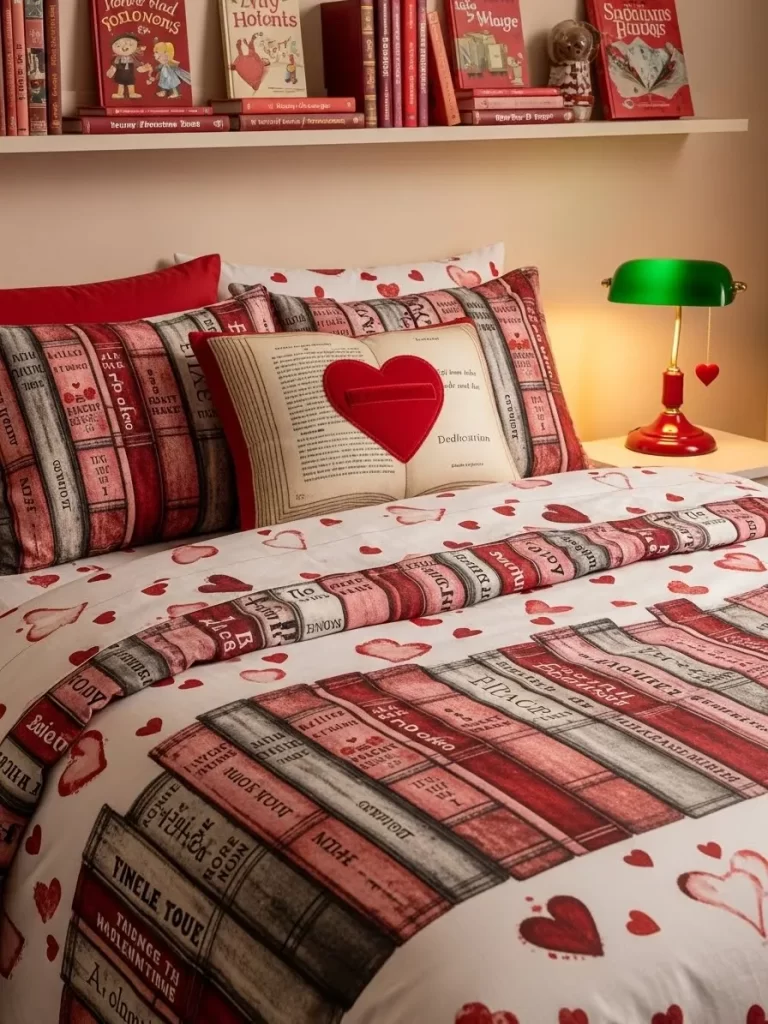
Rows of vintage books line this duvet to create a smart and cozy atmosphere. A central pillow looks like an open book with a big red heart in the middle. This theme is wonderful for young readers who love to get lost in a good story. The warm lighting from the green desk lamp adds a studious vibe.
Red and brown tones keep the space feeling grounded and very warm. You can pair this with a bookshelf full of real heart themed stories nearby. It transforms a boring bed into a library of love and imagination. Your child will feel encouraged to pick up a book before falling asleep.
Material required list
- Book print duvet cover
- Cream colored fabric
- Red fabric scrap
- Soft pillow stuffing
Equipment required list
- Sewing needle
- Red thread
- Scissors
- Fabric glue
DIY instruction step by step
- Cut two large rectangles out of the cream colored fabric.
- Sew three sides together to make a pillow case that looks like pages.
- Turn the fabric inside out so the seams are hidden.
- Stuff the pillow with soft filling until it is firm.
- Sew the fourth side shut using a tiny needle and thread.
- Cut a medium heart shape out of your red fabric scrap.
- Glue the red heart to the center of the cream pillow.
- Draw thin black lines on the edges of the pillow to look like paper.
- Place the finished book pillow in the center of the book print bedding.
34 Rock Star Guitar Glow

A neon guitar with wings takes center stage on this edgy black bedding. The pillow shaped like a guitar pick says YOU ROCK in bright red letters. This style is for the child who wants a cool and modern room for the holiday. Red neon hearts on the wall create a bold and rhythmic glow.
Shaggy red rugs on the floor add a bit of rock star texture to the hard floor. The black fabric makes the red and white text pop like a concert poster. It is a splendid way to celebrate Valentine’s Day without using too many soft details. Your kid will feel like a superstar in this high energy space.
Material required list
- Black duvet cover
- Red neon light sign
- Red shaggy rug
- Red and white fabric paint
Equipment required list
- Paint brush
- Chalk
- Wall hooks
- Power strip
DIY instruction step by step
- Lay the black duvet cover out on a flat surface.
- Use chalk to sketch a large guitar shape in the center.
- Paint over the chalk lines with bright red and white fabric paint.
- Let the paint dry for twenty four hours in a cool place.
- Mount the red neon heart sign on the wall above the bed.
- Use wall hooks to keep the power cord tucked against the wall.
- Plug the sign into a power strip near the floor.
- Place the red shaggy rug right next to the bed.
- Add a guitar pick shaped pillow to the top of the bed.
35 Pink Ballerina Tutu Ruffles
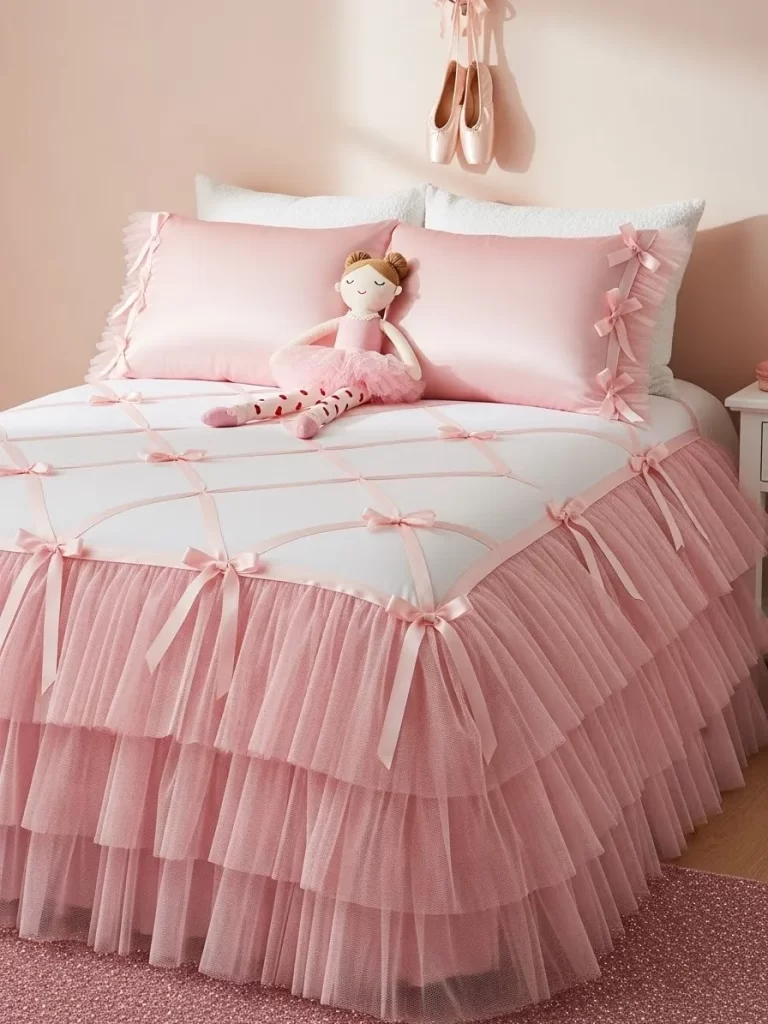
Layers of soft pink tulle create a bed skirt that looks like a giant ballerina tutu. Satin ribbons are tied into bows across the top of the quilted white duvet. This design is for the child who dreams of dancing on a big stage one day. The light pink tones make the room feel airy and very calm.
Matching satin ballet slippers hang on the wall to act as beautiful decor pieces. A small ballerina doll sits on the bed to welcome your child at night. The whole space feels like a delicate dream of pink and white. It is a wonderful choice for a child who loves ruffles and soft textures.
Material required list
- White quilted duvet
- Pink tulle fabric
- Pink satin ribbon
- Small ballerina doll
Equipment required list
- Safety pins
- Scissors
- Measuring tape
- Iron
DIY instruction step by step
- Measure the length from the top of the mattress to the floor.
- Cut long strips of pink tulle that are twice that length.
- Tie the tulle strips onto a long piece of ribbon.
- Bunch the tulle together to create a full and fluffy skirt.
- Use safety pins to attach the tulle skirt to the bed frame.
- Cut several pieces of pink satin ribbon into twelve inch lengths.
- Tie the ribbons into pretty bows with long tails.
- Pin a bow onto each corner of the white quilted duvet.
- Place the ballerina doll on the pillows to finish the look.
36 Gamer Level Up Pixels
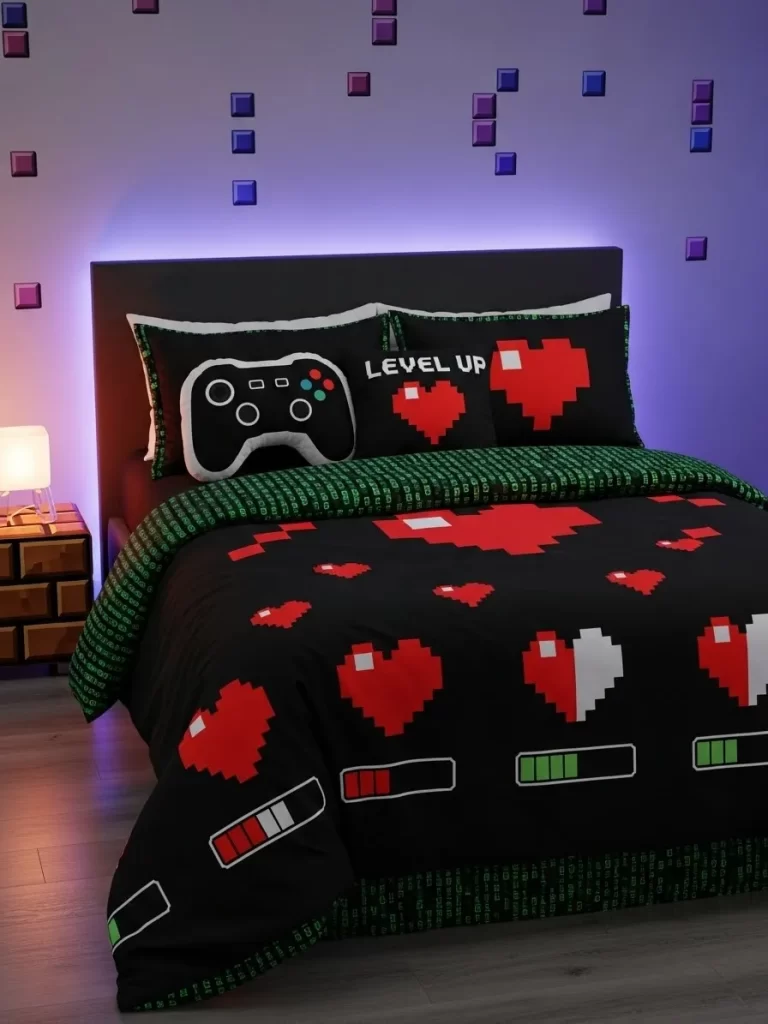
Pixelated hearts and health bars bring a video game world to the bedroom. The controller shaped pillow makes the bed the center of the gaming universe. This theme uses black and green colors to create a digital and tech style look. It is a fun and unique way to use hearts for a gamer child.
Glowing purple lights behind the headboard make the pixel art look like a screen. Your kid will love seeing the level up messages on their own pillows. This design proves that Valentine’s Day can be cool and modern for everyone. It makes the room feel like an interactive zone for play and rest.
Material required list
- Black bedding set
- Felt sheets in red and white
- Purple LED strip lights
- Green fabric markers
Equipment required list
- Ruler
- Scissors
- Fabric glue
- Sticky tape
DIY instruction step by step
- Use a ruler to draw small squares on the red felt sheets.
- Cut the red squares out to make pixel pieces for a heart.
- Arrange the red squares into a heart shape on the black duvet.
- Glue each square down so the edges touch but stay square.
- Use white felt squares to add a shine effect to the pixel heart.
- Draw a green health bar at the bottom of the duvet with markers.
- Tape the purple LED lights to the back of the bed frame.
- Turn the lights on to create a digital glow against the wall.
- Put the controller shaped pillow at the head of the bed.
37 Sky High Heart Balloons
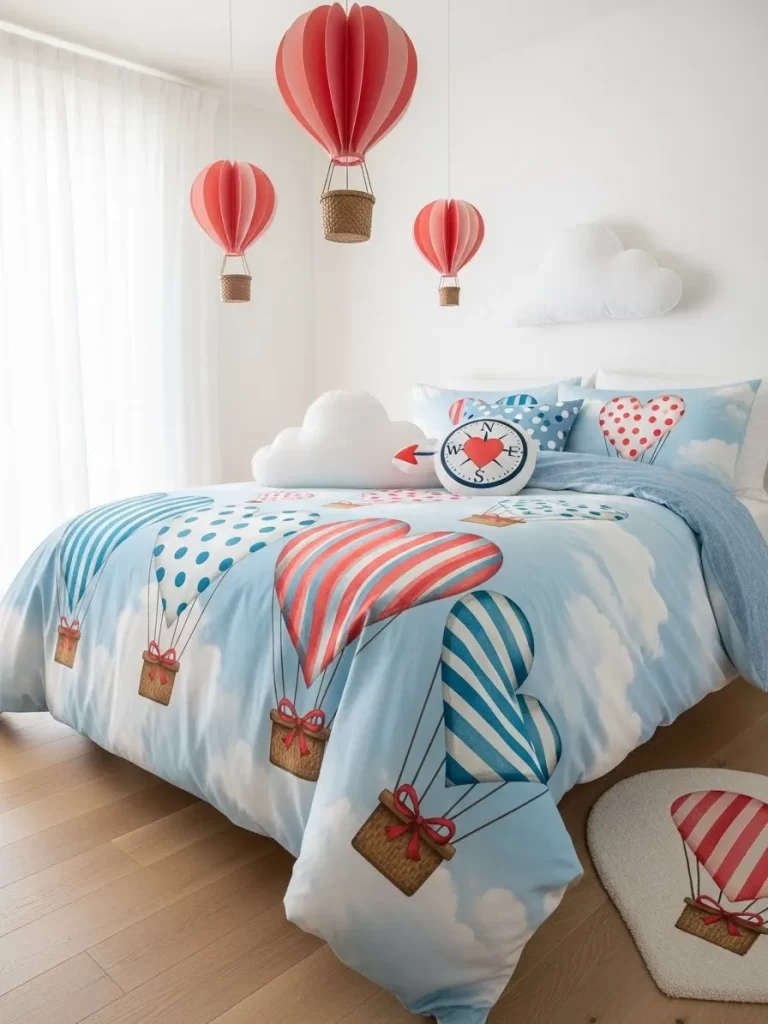
Blue skies and white clouds fill the bedding with a sense of freedom and wonder. Heart shaped hot air balloons float across the duvet in red and white stripes. Small baskets hang from the balloons to hold little treats or friendly notes. This theme is for the child who loves to look up at the stars and dream.
Hanging paper balloons from the ceiling adds a three dimensional feel to the air. The room feels wide and open even in a small and narrow space. It is a sweet way to lift the mood of a dull room during the holiday. Your child will feel like they are floating away on a happy journey.
Material required list
- Blue sky duvet cover
- Red and white paper lanterns
- Small wicker baskets
- Fishing line
Equipment required list
- Ceiling hooks
- Scissors
- Glue
- Pencil
DIY instruction step by step
- Assemble the red and white paper lanterns so they are round.
- Cut four pieces of fishing line for each balloon.
- Tie the lines to the bottom wire of the paper lantern.
- Attach the other ends of the lines to the corners of a small basket.
- Put a small heart shaped note inside each wicker basket.
- Screw a hook into the ceiling above the bed area.
- Hang the lantern from the ceiling hook using more fishing line.
- Space the balloons out so they look like they are drifting.
- Arrange the blue sky bedding to match the balloons in the air.
38 Glitter Sprinkle Heart Party
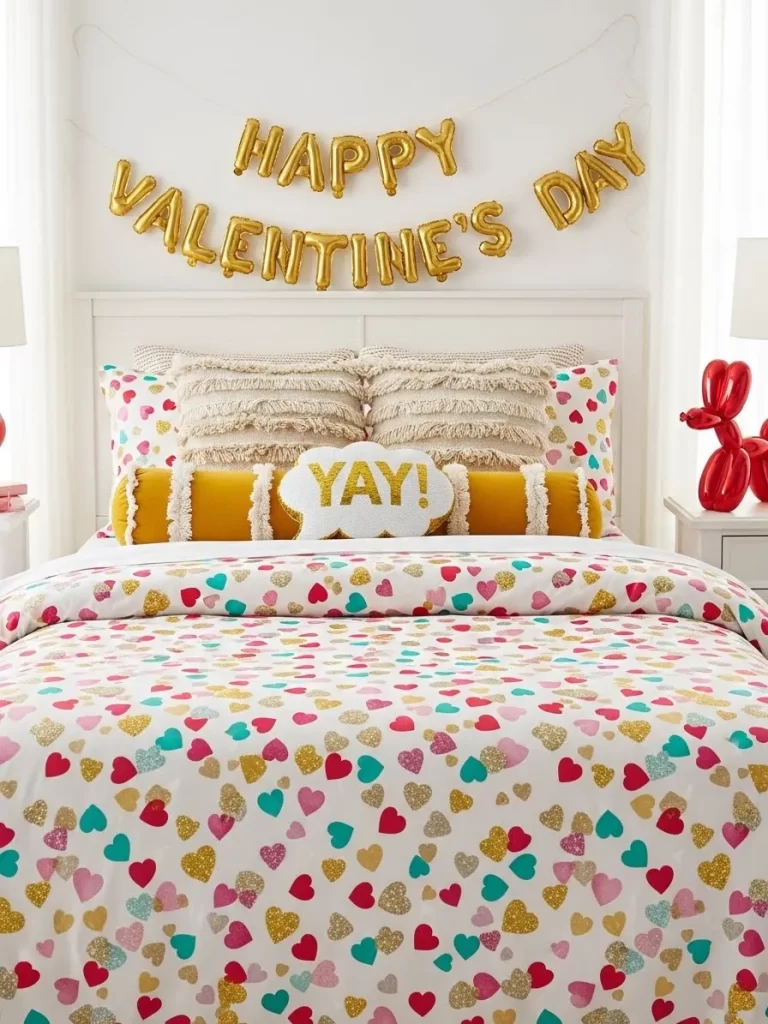
Glittery hearts in every color of the rainbow are sprinkled across the white fabric. A large cloud pillow features the word YAY in bold golden letters. This bedding is high energy and very festive for a holiday morning. It looks like a giant bowl of candy has been spread across the bed.
Red balloon animals on the nightstands add a quirky and fun touch to the space. The multi colored hearts make it easy to match any other decor in the room. This design is for the child who loves a big party atmosphere every day. It brings a loud and happy energy to a quiet bedroom.
Material required list
- White duvet cover
- Glitter fabric glue in many colors
- Red long balloons
- Golden fabric markers
Equipment required list
- Heart stencil
- Balloon pump
- Chalk
- Cardboard
DIY instruction step by step
- Slide a piece of cardboard inside the white duvet cover.
- Place the heart stencil on the top left corner of the fabric.
- Fill the stencil with a thick layer of pink glitter glue.
- Move the stencil and repeat with blue gold and green glitter glue.
- Fill the entire surface with small glittery hearts of different colors.
- Let the glitter glue dry for twelve hours until it is hard.
- Use golden markers to write the word YAY on a white pillow.
- Use the pump to blow up red balloons and twist them into dogs.
- Place the balloon animals on the nightstand next to the bed.
39 Grand Royal XOXO Canopy
A grand white canopy with sheer curtains turns the bed into a royal throne. A deep red velvet runner features golden embroidery for a very fancy look. The sequin heart pillows and gold framed art add layers of luxury to the space. It is the ultimate design for a child who wants to feel very special.
Soft white fur rugs on the floor provide a warm spot for bare feet in the morning. The tall white bed posts make the room feel very high and grand. This style uses red and gold to create a very classic and rich holiday theme. Your child will feel like a prince or princess in this elegant room.
Material required list
- White canopy bed frame
- Sheer white curtains
- Red velvet fabric
- Gold fringe trim
Equipment required list
- Fabric glue
- Measuring tape
- Scissors
- Iron
DIY instruction step by step
- Measure the width of your bed to determine the size of the runner.
- Cut a long rectangle of red velvet fabric to fit across the bed.
- Iron the edges of the velvet so they are flat and crisp.
- Apply a line of fabric glue along the border of the red velvet.
- Press the gold fringe trim onto the glue and let it set.
- Drape the sheer white curtains over the top rails of the bed.
- Tie the curtains to the posts with small gold cords or ribbons.
- Place the red velvet runner across the bottom of the white duvet.
- Add a few gold heart shaped pillows to the head of the bed.
Key Takeaways
1 Small decor changes create a big impact on the overall mood of a bedroom.
2 DIY projects allow you to customize the room to match your child’s specific interests.
3 Color variety helps remove the boredom of a plain white or grey room.
4 Involving your kids in the decorating process makes the holiday more exciting.
5 Themed bedding serves as the easiest way to refresh a space quickly.
Creating a special space for your child does not require a massive renovation. These thirty nine swaps prove that a little creativity goes a long way. You have seen everything from space themes to puppy prints to fit any personality.
Every project in this list aims to make their room feel more personal and warm. Your children will appreciate the effort you put into their holiday surprise. These memories of a cozy and festive home stay with them forever.
Start with one or two swaps today to see how the energy shifts. A brighter room leads to happier play and better rest for everyone. Enjoy the process of making their world a bit more colorful this Valentine’s Day.