Valentine’s Day often sneaks up on us, leaving little time to plan a lavish, detailed table setting. You might be staring at your current tabletop, wondering why it looks less like a scene from a romantic movie and more like Monday night dinner. This feeling of an “uninspired table” is common, but it is certainly not a difficult problem to solve.

The beauty of a truly elegant centerpiece lies in its ability to transform a mood quickly, often using items you already have. Forget the stress of rushed ordering or elaborate DIY projects that take days. We’re focusing on speed, impact, and sophisticated aesthetics right now.
This comprehensive guide brings you 40 inventive and beautiful centerpiece ideas, all achievable at the last minute. Whether you have a stash of copper vases, a few citrus fruits, or just a bouquet of supermarket flowers, you can create a stunning focal point. Let’s elevate your intimate dinner from ordinary to extraordinary, securing that romantic ambiance your evening deserves.
1. Antique Bottle & Ruby Rose Cluster
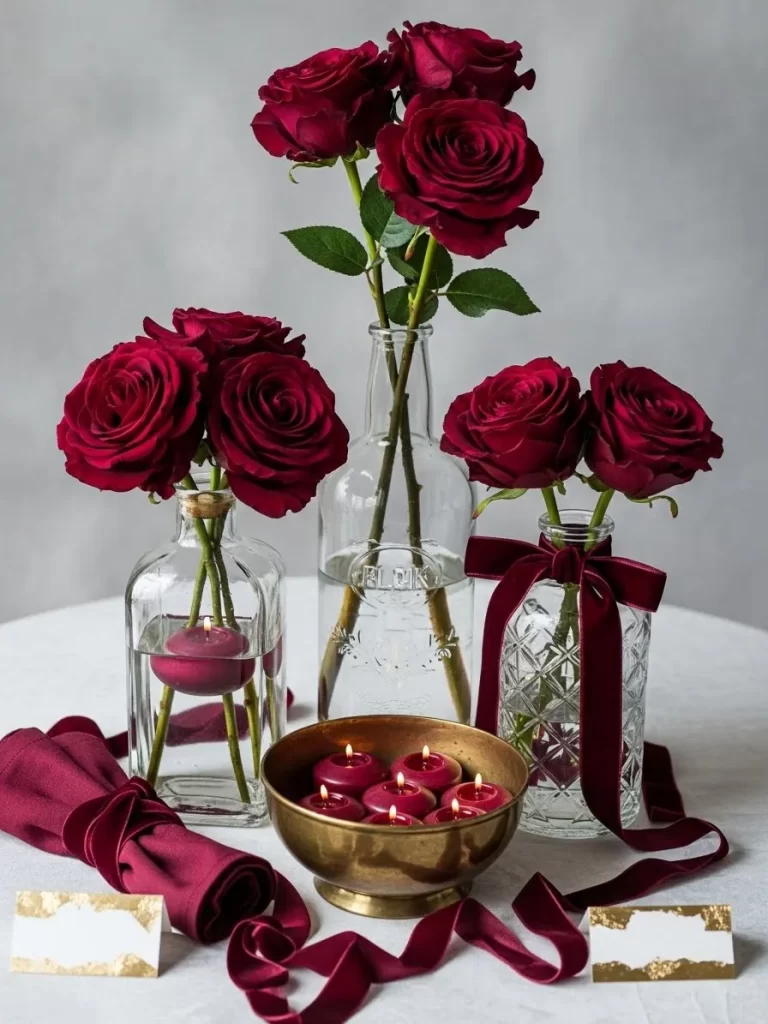
This stunning setup showcases the simple elegance of deep red roses arranged in an asymmetrical grouping. Using mismatched clear glass bottles creates visual interest and texture, moving away from formal symmetry. Notice how the velvety burgundy ribbon draped across the table and tied around one neck anchors the whole scene, giving the arrangement a cohesive, romantic flow.
The inclusion of floating candles adds a soft, ambient glow to the display, providing warmth crucial for a cozy Valentine’s evening. Placing the smaller votives in a rustic brass bowl heightens the dramatic contrast between the metallic finish and the rich, waxy red. These small elements work together, proving that you don’t need a massive bouquet to create a truly luxurious tablescape.
Overall, this centerpiece feels deeply personal and thoughtfully curated. It successfully blends casual, found items like the bottles with traditional romantic elements like the roses and rich velvet, resulting in a display that is both approachable and undeniably elegant for a spontaneous dinner gathering.
Material Required
- Six to nine long stem deep red roses
- Three clear glass bottles (different shapes and sizes work well)
- Small, shallow brass or gold colored bowl
- Five to seven red floating candles
- One yard of burgundy or deep red velvet ribbon
- Water
Equipment Required
- Sharp utility knife or floral shears
- Lighter or long matchsticks
- Small funnel (optional, for filling narrow bottle necks)
DIY Instructions
- Prepare the Vessels: Thoroughly clean and dry all three glass bottles and the small bowl. Fill each of the three bottles with clean water, leaving about an inch of space at the top. The varying shapes will lend a charming, rustic aesthetic to the final piece.
- Trim and Arrange the Roses: Take the deep red roses and use your shears to trim the stems. For the tallest bottle, keep two or three stems long so the blossoms sit well above the neck. For the medium sized bottle, trim three stems shorter. For the smallest bottle, shorten the remaining stems significantly so the flower heads sit just above the water line.
- Create the Floating Votive: Gently place one or two of the red floating candles into the smallest bottle; they should sit directly on the water’s surface. Next, carefully place the remaining four to six floating candles into the small brass bowl. Ensure the bowl is deep enough that the candles float freely.
- Add the Velvet Accent: Take the burgundy velvet ribbon and loosely wrap a section around the neck of one of the glass bottles, tying it with a simple knot or bow. Allow the remaining length of the ribbon to trail elegantly across the tabletop, connecting the bottles and the brass bowl visually.
- Assemble the Centerpiece: Place the brass bowl containing the candles in the center of your table. Arrange the three rose filled bottles around the bowl in a slight cluster. Be sure they are placed at different heights and angles for an engaging look. Light the wicks of all the floating candles just before your guests arrive to set the warm, romantic atmosphere.
2. Low Bowl of Plush White Blooms
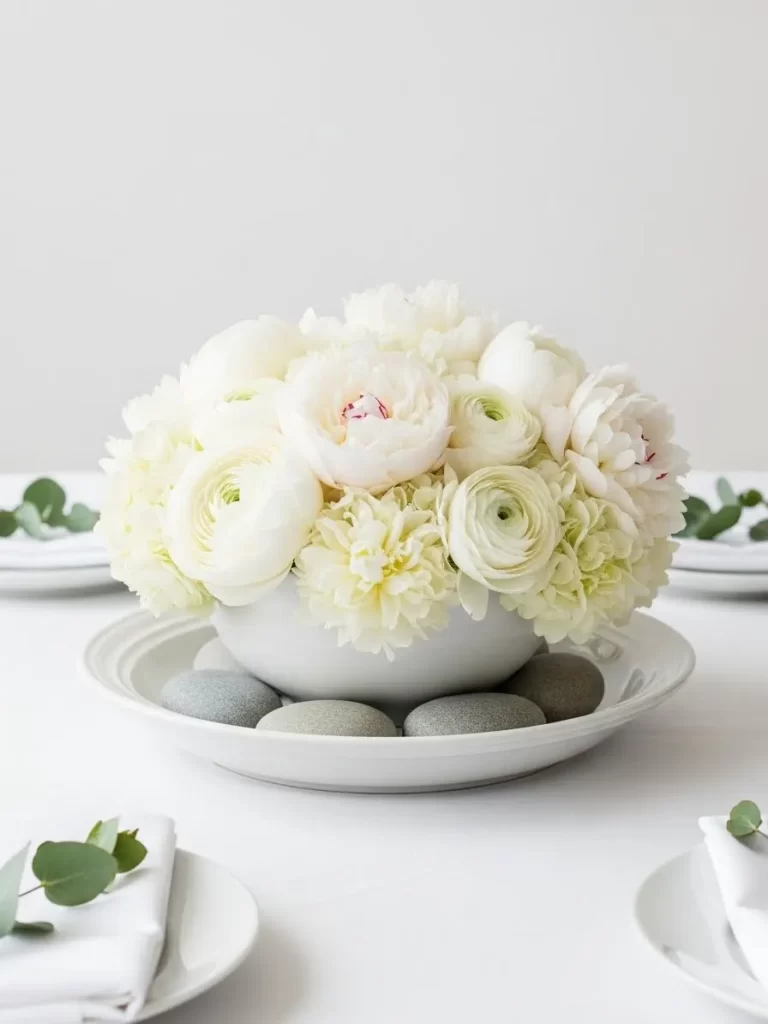
This centerpiece is a beautiful study in simplicity and soft texture, focusing entirely on a lush mass of white flowers. The arrangement uses dense ranunculus and peonies, creating a visually rich dome shape that spills over the edges of a crisp white bowl. This low profile keeps sightlines clear, encouraging easy conversation across the table.
Underneath the bowl, smooth gray river stones are placed on a clean white serving platter, grounding the arrangement with a subtle, earthy contrast. The stones add a tactile, natural element that complements the delicate, cultivated blooms. Simple sprigs of eucalyptus tucked near the place settings introduce a light touch of green, connecting the entire table setup.
The overall feeling is one of fresh, modern elegance, relying on volume and pure color rather than complicated details. This sophisticated look is easily achievable, making a huge impact with minimal fuss, showcasing the beauty of monochrome and natural elements.
Material Required
- Twelve to fifteen white ranunculus stems
- Six to eight white peony stems (or large white garden roses)
- One wide, shallow white ceramic bowl (approximately 6 to 8 inches wide)
- One large white serving platter or dinner plate (approximately 12 inches wide)
- Six to eight smooth, medium-sized gray river stones
- Water
- Small sprigs of eucalyptus (optional, for place settings)
Equipment Required
- Sharp floral shears
DIY Instructions
- Prepare the Flowers: Remove all excess foliage from the ranunculus and peony stems. Cut the stems relatively short, aiming for a length that allows the flower heads to sit just above the rim of your white bowl.
- Fill the Vessel: Fill the white ceramic bowl about halfway with fresh water. Since this is a low, dense arrangement, you will not need any foam or wire grid to hold the flowers in place.
- Build the Dome: Start placing the peony or garden rose heads into the bowl first, distributing them evenly to establish the main structure. Next, fill in all the gaps using the smaller ranunculus blooms. Push the stems close together so the flower heads create a tight, luxurious, domed mass with no visible water or stems.
- Assemble the Base: Place the large white serving platter onto your table. Arrange the smooth gray river stones in a circle on the platter, spaced evenly, creating a nest for the flower bowl.
- Final Placement: Carefully set the white bowl filled with flowers directly onto the river stones in the center of the platter. If using eucalyptus, simply lay a small sprig diagonally across the napkin at each place setting to tie the whole design together.
3. Terracotta Vase with Boho Feathers
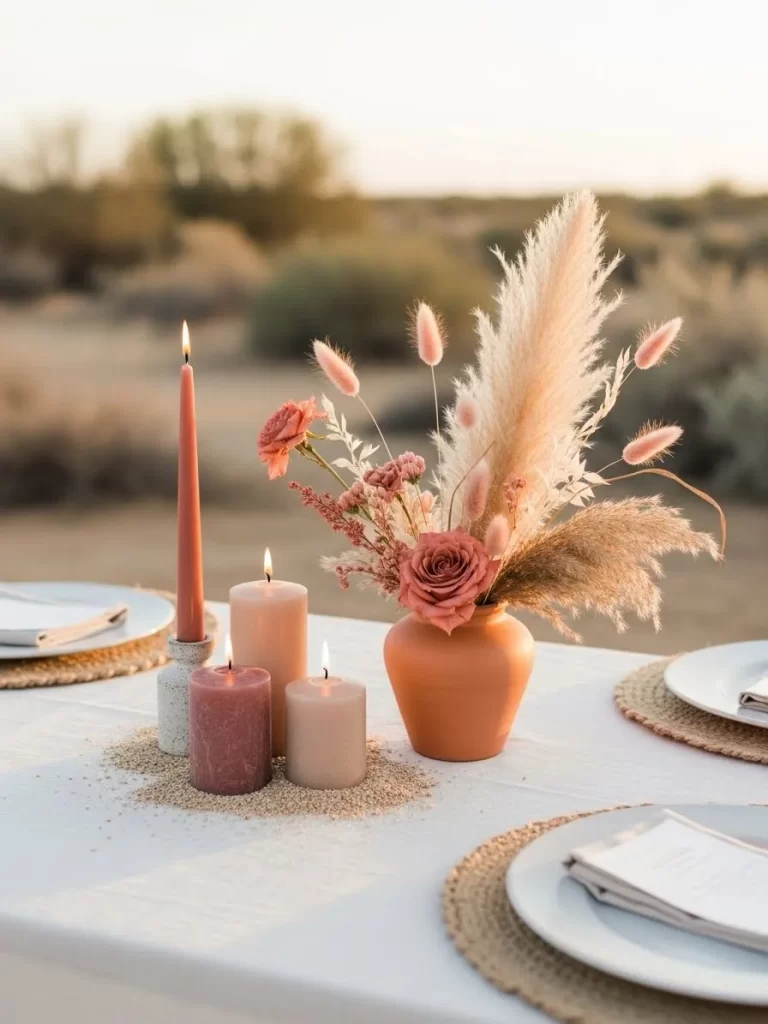
This gorgeous centerpiece uses a warm terracotta vase as its anchor, immediately establishing a relaxed, earthy aesthetic. The arrangement is built around fluffy, sun bleached pampas grass and smaller bunny tail plumes, giving it a soft, textural height that draws the eye upward. A few stems of muted, dusty rose colored flowers, possibly garden roses or spray roses, introduce a touch of classic romance.
The muted, warm tones of the flowers and grasses perfectly complement the simple, unglazed vase. This display is effortlessly modern yet incredibly romantic, moving beyond traditional roses. The surrounding candles use similar dusty rose, nude, and terracotta hues, providing a cohesive color palette that speaks to a subtle, desert inspired style.
A sprinkle of small, light colored grains or seeds around the base of the candles adds a little sparkle and dimension. The entire arrangement, set against the rustic outdoor backdrop, feels organic and entirely welcoming, showcasing how varied textures can create profound visual depth.
Material Required
- One mid-sized terracotta or clay vase
- Four to six stems of pampas grass plumes
- Eight to ten stems of bunny tail grass (or similar small, fluffy dried grass)
- Three to five fresh or dried roses in a dusty rose or nude color
- Three pillar candles (various heights, in shades of blush, mauve, and nude)
- One tall taper candle in a rose color
- One small stone or marble taper candle holder
- About 1/2 cup of decorative grains or small gold sprinkles (e.g., quinoa, millet, or gold glitter dust)
Equipment Required
- Sharp scissors or floral shears
DIY Instructions
- Prepare the Vase and Flowers: Ensure the terracotta vase is clean. If using fresh roses, fill the vase with a small amount of water. If using dried roses, no water is needed.
- Build the Tall Structure: Begin by placing the pampas grass plumes into the vase, positioning them to stand tall and fan out slightly, creating the main height and fluffy backdrop.
- Insert the Textural Elements: Next, add the smaller bunny tail plumes, arranging them to fill the space around the pampas grass. Aim for a balanced, airy look, allowing the stems to cross naturally.
- Add the Focal Blooms: Tuck the dusty rose roses among the dried grasses. Position them lower in the vase so they provide a visual focal point and a soft pop of color against the neutral plumes.
- Create the Candle Cluster: Place the tall taper candle into its holder. Arrange the three pillar candles of varying sizes next to the taper candle holder. They should sit in a loose, attractive cluster near the vase.
- Apply the Grains: Take the decorative grains or sprinkles and scatter them lightly around the base of the candle cluster. This detail acts as a textural runner, connecting the candles to the overall tablescape.
- Light and Enjoy: Light the candles just before dinner to provide a warm, inviting glow to your romantic, boho inspired table.
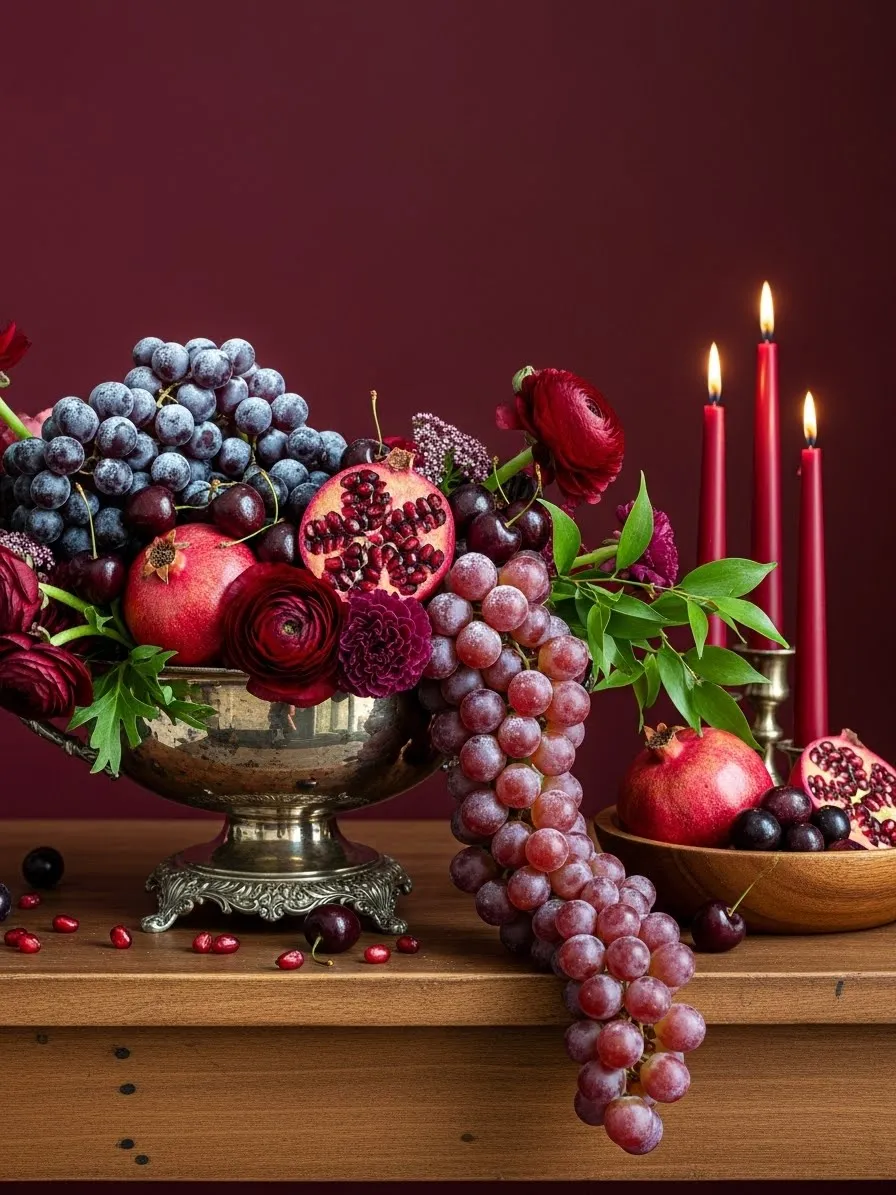
4. Rich Fruit & Floral Cornucopia

This centerpiece is a magnificent display of opulence, relying on deep, saturated colors to create a sense of dramatic romance. The arrangement features an overflowing bounty of dark grapes, halved pomegranates, and ripe cherries, all centered in a classic silver pedestal bowl. The rich, edible elements instantly feel luxurious and inviting.
Clusters of deep red ranunculus flowers and other burgundy blooms are tucked in among the fruit, providing texture and complementing the jewel tones of the produce. A dramatic cascade of red grapes spills artfully from the bowl onto the table, giving the arrangement an old world, painterly quality.
The addition of tall, striking red taper candles in antique brass holders reinforces the passionate, moody color scheme. This stunning arrangement proves that you can achieve incredible elegance by blending flowers and fresh fruit, especially when sticking to a cohesive, intense color palette like ruby and crimson.
Material Required
- One antique silver or pewter pedestal bowl (or a similar ornate container)
- Three clusters of dark purple or red grapes
- Two pomegranates (one whole, one cut in half)
- One cup of cherries
- Four to six stems of deep red ranunculus or similarly colored flowers
- Assortment of fresh leaves or greenery (optional)
- Four tall red taper candles
- Two or three brass or silver candle holders (various heights are appealing)
Equipment Required
- Sharp knife (for halving the pomegranates)
DIY Instructions
- Prepare the Candles: Place the four tall red taper candles securely into the brass or silver candle holders. Set them aside for final placement.
- Create the Floral Base: If your bowl has a deep base, you can place a small amount of greenery or leaves inside first to help position the flowers. Arrange the deep red ranunculus flowers on one side of the pedestal bowl, allowing them to cluster and provide a rich, dark backdrop.
- Layer the Fruit: Begin filling the bowl, starting with the largest fruit. Place the whole pomegranate inside, followed by one of the halves cut side up, to showcase the beautiful seeds.
- Add the Grapes: Tuck one cluster of grapes into the bowl, allowing the berries to peek out. Take the largest or longest cluster of grapes and drape it dramatically over the edge of the pedestal bowl, ensuring a long vine hangs down gracefully onto the table surface.
- Final Touches: Scatter the cherries and loose pomegranates seeds around the base of the bowl and on the tabletop for a feeling of decadent abundance. Finally, place the candleholders in a tight grouping next to the overflowing bowl. Light the candles to complete this magnificent tableau.
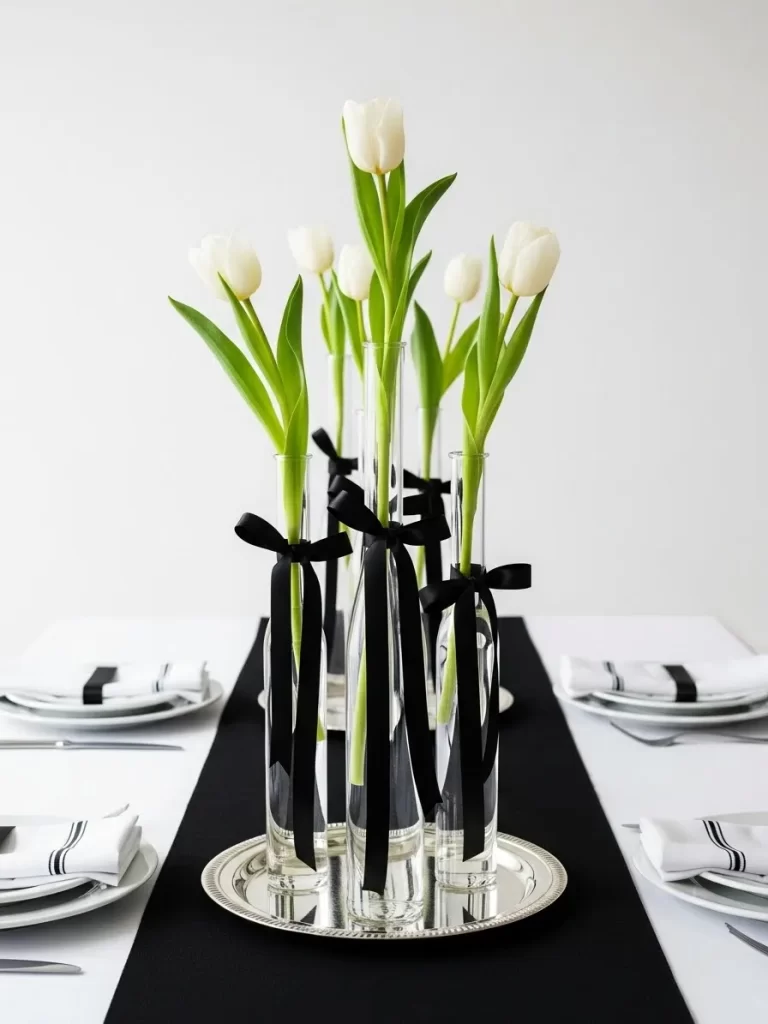
5. Chic Black and White Anemones
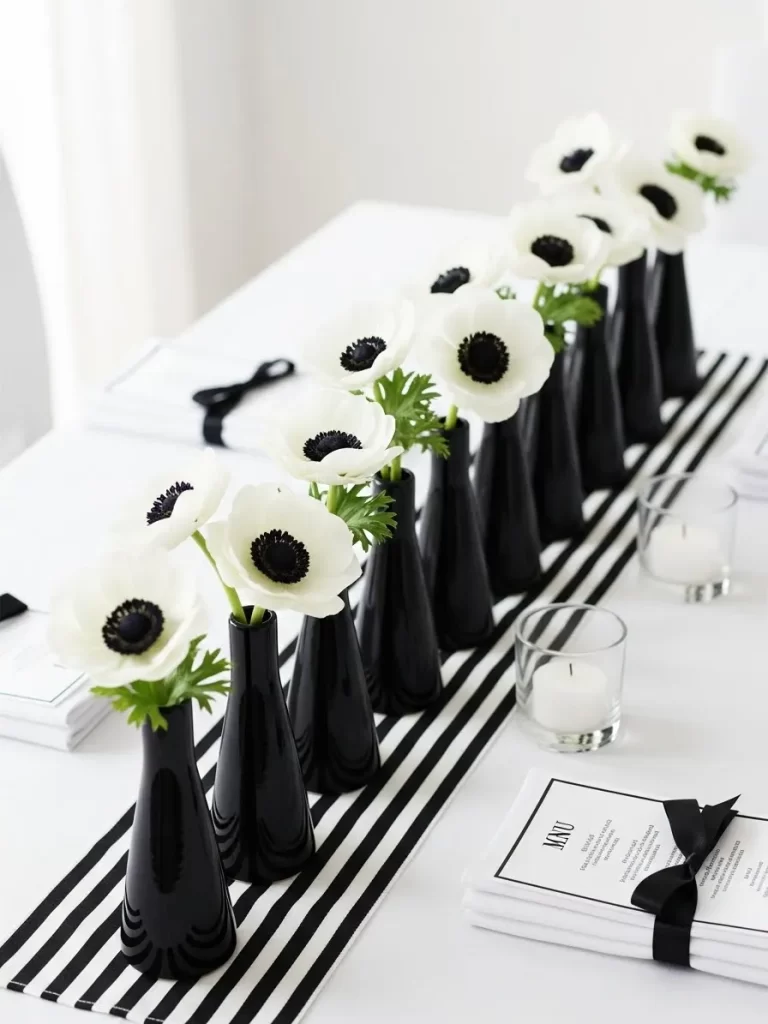
This minimalist centerpiece is a striking example of modern, high contrast design, proving that simple colors can create maximum impact. A row of sleek, black bud vases holds single stems of crisp white anemone flowers, instantly drawing the eye with their strong visual contrast. The black centers of the anemones echo the color of the vases and the runner, providing pleasing consistency.
The centerpiece uses repetition and a linear arrangement to create a dramatic, graphic statement down the length of the table. A bold black and white striped runner anchors the entire display, reinforcing the sharp, contemporary theme. Small, clear glass votive candles are placed along the side, adding a gentle, warm light that softens the graphic edge.
This look is sophisticated and easy to assemble, relying on the impactful beauty of the anemone flower itself. The result is an elegant, uncluttered tablescape that feels effortlessly chic and perfectly tailored for a modern, fashion forward dinner.
Material Required
- Eight to ten small, sleek black bud vases (identical size and shape is important)
- Eight to ten stems of white anemones (one for each vase)
- One black and white striped table runner
- Four to six small glass votive candles
- Water
Equipment Required
- Sharp floral shears
DIY Instructions
- Prepare the Vases: Clean all the black bud vases thoroughly. Fill each vase with a small amount of water.
- Trim the Flowers: Take the white anemones and use your shears to trim the stems so that each flower head sits about three to four inches above the neck of the vase. The uniform height is essential for this linear look.
- Assemble the Runner: Lay the black and white striped runner neatly down the center of your table.
- Create the Line: Place the first bud vase at the center point of the runner. Arrange the remaining vases in a single, perfectly straight line on the runner, spacing them evenly apart down the length of the table. Insert one trimmed anemone into each vase.
- Add the Candles: Place the small glass votive candles in a parallel line next to the row of vases. The candles should be placed slightly off the striped runner to provide a visual break and soften the lines. Light the candles just before your guests arrive for a gentle, romantic sparkle.
6. Enchanted Forest Woodland Tray
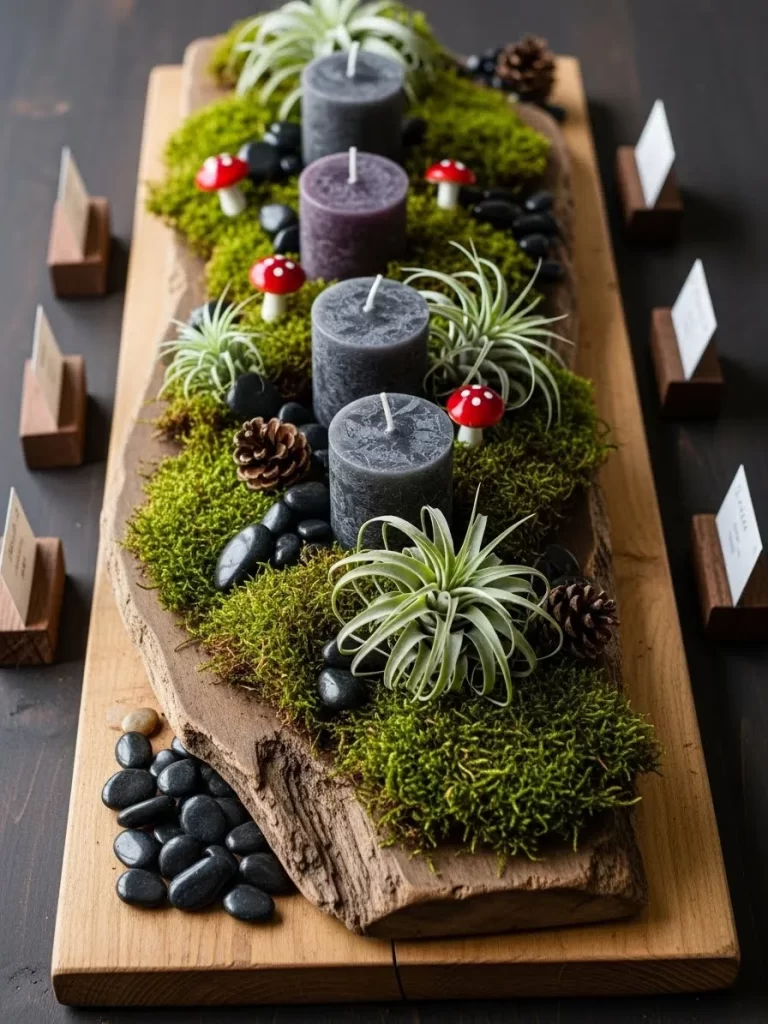
This centerpiece brings the magic of a mossy woodland indoors, creating a beautiful, organic miniature landscape. The entire scene is built upon a gorgeous live edge wooden slab, providing a rugged, natural foundation that contrasts with the refined table setting. Lush, bright green moss covers the wood, establishing the vibrant, forest floor texture.
Three dark gray pillar candles are clustered together, their muted color lending a sophisticated, moody contrast to the bright green. They are surrounded by small, striking air plants, which require no soil and add an interesting, spiky texture to the soft moss. Small details like miniature red toadstool decorations and natural pinecones enhance the whimsical, fairytale quality.
Scattered polished black river stones complete the scene, adding weight and depth, making the moss appear even more vibrant. This centerpiece is a highly creative, conversation starting display that beautifully blends natural elements with deep, atmospheric tones for a unique dinner setting.
Material Required
- One live edge wood slab or a rectangular wooden serving board
- One large sheet of preserved or fresh sheet moss (enough to cover the board)
- Three thick pillar candles in charcoal gray or dark purple
- Four to six small air plants (Tillandsia)
- A handful of polished black river stones
- Two to four small decorative items (e.g., miniature red ceramic mushrooms, natural pinecones)
Equipment Required
- Hot glue gun (optional, for securing moss)
DIY Instructions
- Prepare the Base: Place the live edge wood slab in the center of your table. If you want a more permanent setup, use a small dab of hot glue to secure the moss to the top of the wood. Otherwise, simply lay the sheet moss neatly across the entire surface of the board.
- Place the Candles: Arrange the three dark gray pillar candles in a tight, attractive cluster at the center of the mossy board.
- Add the Air Plants: Strategically tuck the air plants into the moss around the candles. Ensure the plants are resting securely on the surface, allowing their spiky leaves to contrast with the soft moss.
- Scatter the Stones: Distribute the polished black river stones artfully around the candles and the air plants. Group some of them tightly and let a few trail off the edges of the board for a natural effect.
- Introduce the Whimsy: Nestle the decorative elements, such as the miniature mushrooms and pinecones, into the moss. They should look like they grew there naturally, adding small points of interest across the surface. Light the candles to complete this enchanted scene to life.
7. Geometric Rose Gold Terrariums
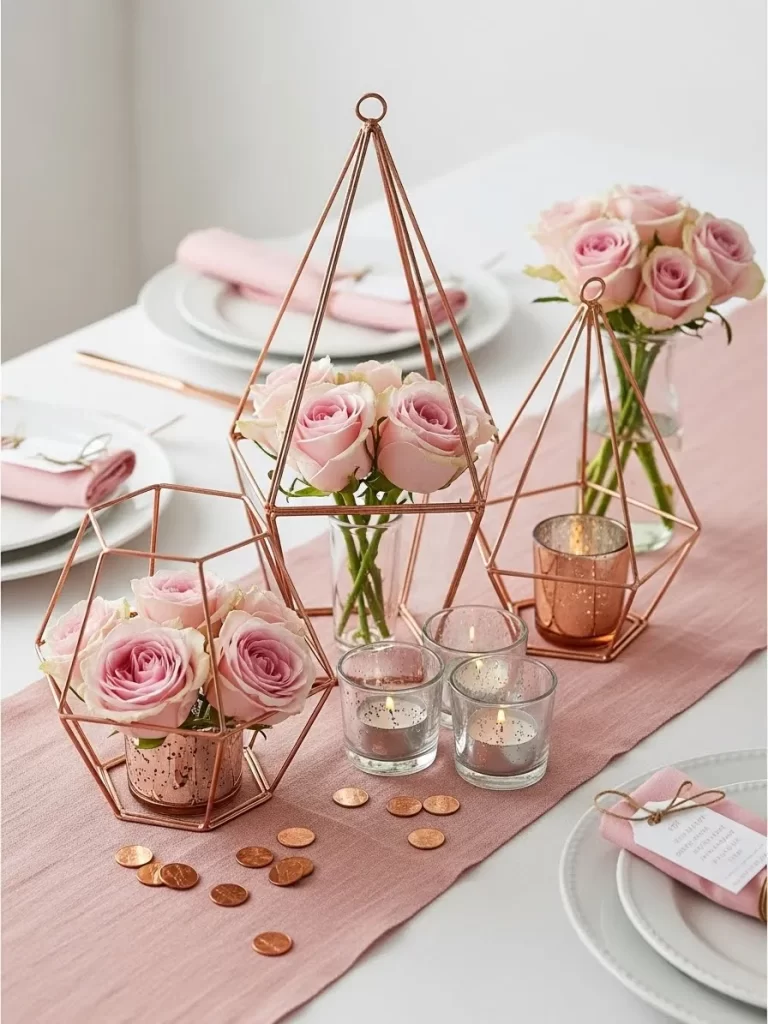
This striking centerpiece is a celebration of modern geometry and soft, feminine color. Three rose gold colored, open wire frames in varying sizes and shapes act as terrarium bases. The metallic finish adds warmth and a contemporary shine to the table setting.
Within the geometric containers, clusters of delicate, light pink roses are arranged, creating a beautiful contrast between the structured metal and the natural, rounded petals. This arrangement cleverly blends industrial style with soft romance. One of the frames holds a small mercury glass votive, which catches the light beautifully, enhancing the metallic theme.
A row of simple glass votives sits at the base of the terrariums, and a scattering of copper pennies across the dusty rose table runner reinforces the metallic hue. This setup is incredibly stylish and uses height and material contrast effectively, resulting in a display that is glamorous yet understated.
Material Required
- Three rose gold or copper colored geometric open wire frames (various heights and shapes)
- Ten to twelve light pink roses
- Two small glass vases or containers that fit inside the frames
- One mercury glass votive holder (rose gold colored)
- Six small glass votive candles
- Water
- Small handful of copper pennies (optional, for decoration)
- One dusty rose or light pink table runner
Equipment Required
- Sharp floral shears
DIY Instructions
- Prepare the Flowers: Remove all excess foliage and thorns from the rose stems. Trim the stems short enough so that the clusters of roses sit neatly inside the small glass vases you plan to place inside the geometric frames.
- Arrange the Roses: Fill the two small glass vases with water. Arrange the light pink roses tightly in the vases to create two compact, lush bouquets.
- Assemble the Frames: Place the dusty rose table runner down the center of your table. Arrange the three geometric frames in a tight grouping on the runner. Place one of the small rose bouquets inside two of the frames. In the third frame (or next to it), place the rose gold mercury glass votive holder.
- Add the Candle Cluster: Arrange the six small glass votive candles in a loose cluster in front of the geometric frames. Scatter the copper pennies casually around the base of the votives and on the runner to catch the light.
- Final Light: Light all the candles, including the one in the mercury glass holder, to make the metallic frames glow beautifully against the soft pink background.
8. Sunny Citrus and Moss Runner
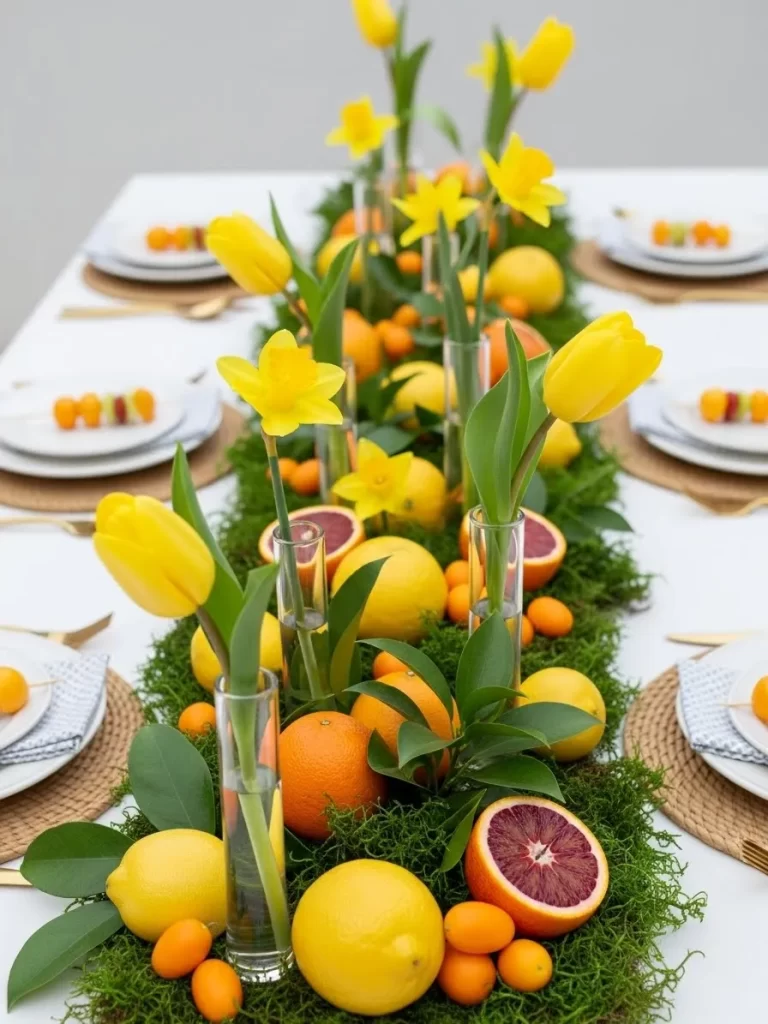
This vibrant centerpiece is a refreshing burst of color and fragrance, utilizing fresh fruit and bright blooms for a joyful, edible display. The foundation is a lush, textured runner of vibrant green preserved moss laid directly down the center of the table. This green carpet provides a wonderful natural contrast to the bright yellow and orange tones.
Clusters of whole lemons, oranges, and halved blood oranges are nestled into the moss, mixing the citrus colors and shapes. Small, bright yellow tulips and daffodils are placed into individual, sleek glass test tube vases, creating a line of cheerful height that runs the length of the table.
The inclusion of small kumquats and dark green citrus leaves adds variation in size and texture. This long, sprawling arrangement is utterly unique, showcasing that garden and pantry items can create an incredibly festive and appealing tablescape for a unique Valentine’s celebration.
Material Required
- One long sheet of vibrant preserved moss (or sheet moss)
- Six to eight whole lemons
- Three to five whole oranges
- Two blood oranges (halved)
- A small handful of kumquats
- Six to eight yellow tulips
- Four to six yellow daffodils
- Ten to twelve small glass test tube vases (or tiny bud vases)
- Six to eight fresh dark green citrus leaves (optional)
- Water
Equipment Required
- Sharp knife (for halving the blood oranges)
- Sharp floral shears
DIY Instructions
- Establish the Runner: Unroll the preserved moss and lay it straight down the center of your table, allowing it to act as a wide, natural table runner.
- Trim the Flowers: Trim the stems of the tulips and daffodils to various heights so they stand upright in the test tube vases, but ensure none are too tall to obstruct views across the table. Fill all the test tube vases with water.
- Set the Flower Line: Start at the center of the moss and push the bases of the test tube vases gently into the moss so they stand upright and appear to be growing out of the green bed. Arrange the vases in a staggered line down the length of the runner.
- Nestle the Citrus: Begin placing the whole lemons and oranges directly onto the moss, scattering them organically around the flower vases. Tuck the halved blood oranges face up to show off the interior color.
- Add Accents: Scatter the small kumquats in tight clusters around the larger fruits. Finally, tuck the dark green citrus leaves here and there to add further color depth and freshness, completing this sunny, unique tablescape.
9. Literary Luminosity Lamp & Books
This centerpiece offers a sophisticated, intellectual take on table decoration, replacing a traditional vase with stacked books and a modern lamp. A cluster of antique books with rich, burgundy colored covers creates a textured, elevated platform in the center of the table. The deep color of the book spines anchors the dark, elegant table runner.
A sleek, cordless table lamp with a dark metal finish is placed atop the stack, providing a warm, focused vertical light source that feels incredibly intimate. This is an excellent way to introduce atmospheric lighting without relying solely on traditional candles.
Next to the lamp, a small glass jar holds a simple, wild arrangement of deep purple and magenta colored flowers, possibly hellebores and statice. This combination of natural blooms, antique paper, and modern light results in an interesting, multi textural, and highly personal centerpiece that suggests shared interests and quiet conversation.
Material Required
- Four to six antique or hardcover books with richly colored spines (burgundy, maroon, or deep purple)
- One small, battery operated or cordless table lamp with a sleek design
- One small, clear glass jar or mason jar
- A handful of deep purple and magenta colored flowers (e.g., hellebores, statice, lavender sprigs)
- Water
Equipment Required
- None (or sharp scissors for trimming flowers)
DIY Instructions
- Stack the Base: Choose the largest books and lay them flat on your table runner to create a solid base. Place the remaining books on top, varying the sizes and turning them slightly to create an attractive, sturdy stack.
- Position the Light: Place the cordless table lamp directly on the top book of the stack. Ensure the base is centered and stable. Turn the lamp on to test the illumination.
- Prepare the Flowers: Fill the small clear glass jar with water. Trim the stems of the purple and magenta flowers to a length that allows the bouquet to sit just slightly higher than the top of the lamp base.
- Create the Arrangement: Arrange the flowers loosely in the jar, allowing them to fall naturally for an organic, wild look. Place the jar right next to the book stack. You may allow a few sprigs of the longer flowers, like lavender, to trail down the side of the books.
- Final View: The finished piece should feel balanced, with the light and the flowers complementing the scholarly texture of the books.
10. Floating Rose Garden Canopy
While technically a ceiling treatment, this lush installation creates an incredible overhead centerpiece, bringing a spectacular, cloud like display of romance above the table. A dense, hanging arrangement of blush pink cherry blossoms and soft, feathery pampas grass plumes creates a dramatic floral canopy. The mix of delicate blossoms and rustic grass offers beautiful textural contrast.
The arrangement is draped with soft, sheer pink fabric, giving the entire setting a dreamy, ethereal feel. The volume of the natural elements ensures a maximum impact of color and texture. Hanging from the arrangement are various light pink paper lanterns and small pom poms, adding a playful, decorative element.
Placed directly on the table below are three simple white candles on a clear acrylic tray. This choice keeps the tabletop extremely clean and minimal, ensuring that all focus remains on the breathtaking, elevated floral display. This is a stunning, high drama look for a grand Valentine’s celebration.
Material Required
- Two to three large branches of faux or real pink cherry blossoms
- Five to seven large plumes of pampas grass
- Four large paper lanterns (two light pink, two slightly darker pink)
- Two small pink honeycomb paper decorations or pom poms
- Three yards of sheer light pink tulle or chiffon fabric
- Three small white pillar candles
- One clear acrylic tray or low platform
- Thin clear fishing line or floral wire
Equipment Required
- Ladder or sturdy step stool
- Ceiling hooks or an existing fixture (must be sturdy enough to hold the weight)
- Scissors
DIY Instructions
- Establish the Base: Secure two or more sturdy ceiling hooks directly above the center of your table. This will be the anchor for the hanging arrangement.
- Drape the Fabric: Gently drape the sheer pink fabric between the two anchors, allowing it to hang down in soft, romantic folds to frame the space above the table.
- Create the Floral Cloud: Using floral wire or thick fishing line, secure the bases of the cherry blossom branches and the pampas grass plumes. Cluster them tightly together to create a dense, cloud like hanging bouquet directly beneath the fabric. The blossoms should be facing downwards.
- Hang the Lanterns: Use clear fishing line to hang the paper lanterns and pom poms from the bottom of the floral cloud. Vary the lengths so they hang at different heights for a dynamic effect.
- Set the Tabletop: Place the clear acrylic tray in the exact center of the table beneath the hanging structure. Place the three small white pillar candles onto the tray in a tight line or cluster.
- The Final View: This arrangement requires a sturdy overhead fixture but delivers a truly unforgettable and deeply romantic atmosphere with its beautiful height and soft, lush texture.
11. Minimalist Ocean Glass Cluster
This captivating centerpiece creates a serene, aquatic feel using varying heights of clear glass bottles filled with vibrant blue colored water. The tall white calla lilies and snapdragons rise elegantly from the vessels, their stark white petals providing a beautiful contrast to the deep aqua marine liquid. The asymmetrical arrangement of the bottles keeps the eye moving across the display.
A small, mirrored square base reflects the light and the colors, enhancing the centerpiece’s bright, fresh mood. Inside some bottles, teal and white sea glass pieces are layered with the water, adding beautiful texture and mimicking the ocean floor. Small glass jars filled with white sand further emphasize the coastal theme.
This display is striking because of its simplicity and the unexpected use of colored water. It feels modern, clean, and entirely refreshing, offering an alternative to traditional reds and pinks for a romantic occasion.
Material Required
- Five clear glass bottles or vases (various heights and widths)
- Three to four white calla lily stems
- One or two stems of white snapdragons (or similar tall, spiky white flower)
- Blue food coloring
- Small jar of white craft sand
- Small bag of teal/aqua marine colored sea glass chips
- One square mirror or light blue acrylic tray (as a base)
- Water
Equipment Required
- Funnel (optional, for filling bottles)
- Floral shears
DIY Instructions
- Prepare the Base: Lay the mirror or acrylic tray flat in the center of your table.
- Color the Water: Fill three of the five bottles with water. Add a few drops of blue food coloring to the water in these three bottles until you achieve a bright, consistent aqua marine color.
- Add Sea Glass and Sand: Fill the bottom of the remaining two clear bottles with a small handful of the teal sea glass chips in one and a small amount of white sand in the other, then fill these two bottles with clear water. Fill the small jar halfway with white sand and place it on the mirrored tray.
- Arrange the Flowers: Trim the calla lily stems so they stand tall in the two tallest bottles, including one with blue water. Trim the snapdragons so they stand tall in one of the medium sized bottles. Place the remaining flowers in the clear bottles with the sand and sea glass.
- Assemble the Cluster: Place the bottles and the sand jar onto the mirrored base, arranging them in a visually pleasing, staggered cluster. The variety of heights and colors creates a dynamic, light reflective waterscape.
12. Spiced Candlelit Wood Tray
This centerpiece is a feast for the senses, rich in warm autumnal colors, spices, and comforting fragrances. A rustic wooden serving tray is filled with dark coffee beans, anise stars, cinnamon sticks, and whole walnuts, creating a dense, textural base. The dark spices provide a beautiful background for the brighter elements.
Three thick, glowing pillar candles in a deep gold or burnt orange color provide soft, inviting light. Tucked among the spices are dried orange slices, their translucent color adding a cheerful brightness and visual contrast to the deep brown elements. The arrangement features a small cluster of rust colored chrysanthemums in a glass jar, adding an unexpected floral touch.
Overall, this display feels incredibly cozy and abundant, suggesting warmth and comfort. The natural elements and the deep, cohesive color palette make this a stunning, highly aromatic choice for a romantic winter or fall dinner.
Material Required
- One wooden serving tray or shallow box (approximately 18 to 24 inches long)
- Three pillar candles in burnt orange or gold (various heights are appealing)
- Two cups of whole coffee beans or small dark pebbles
- Half a cup of star anise and cinnamon sticks
- One cup of whole walnuts or hazelnuts
- Five to six dried orange slices
- Small bouquet of bronze or rust colored chrysanthemums
- One small, clear mason jar
- Water
- Small red or burgundy flower petals (optional)
Equipment Required
- None
DIY Instructions
- Lay the Foundation: Place the wooden tray in the center of your table. Pour the coffee beans or dark pebbles into the tray, spreading them out to create an even, dark, aromatic base.
- Add the Candles: Nestle the three pillar candles into the bed of beans, pushing them down slightly so they stand securely. Group them in a loose cluster.
- Arrange the Spices: Scatter the cinnamon sticks and star anise across the tray, distributing them around the candles and filling the empty space. Add the whole walnuts throughout the display.
- Brighten with Citrus: Place the dried orange slices onto the arrangement, ensuring their bright color is prominently displayed.
- Insert the Flowers: Fill the small mason jar halfway with water. Trim the chrysanthemum stems and arrange them tightly in the jar. Carefully nestle the jar into the beans on one end of the tray. Add a few loose petals around the base of the jar if you wish.
- Light and Enjoy: Light the candles to release the beautiful, warm scent of the spices, creating an immediate, cozy ambiance.
13. Elevated Magenta & Stone Stacks
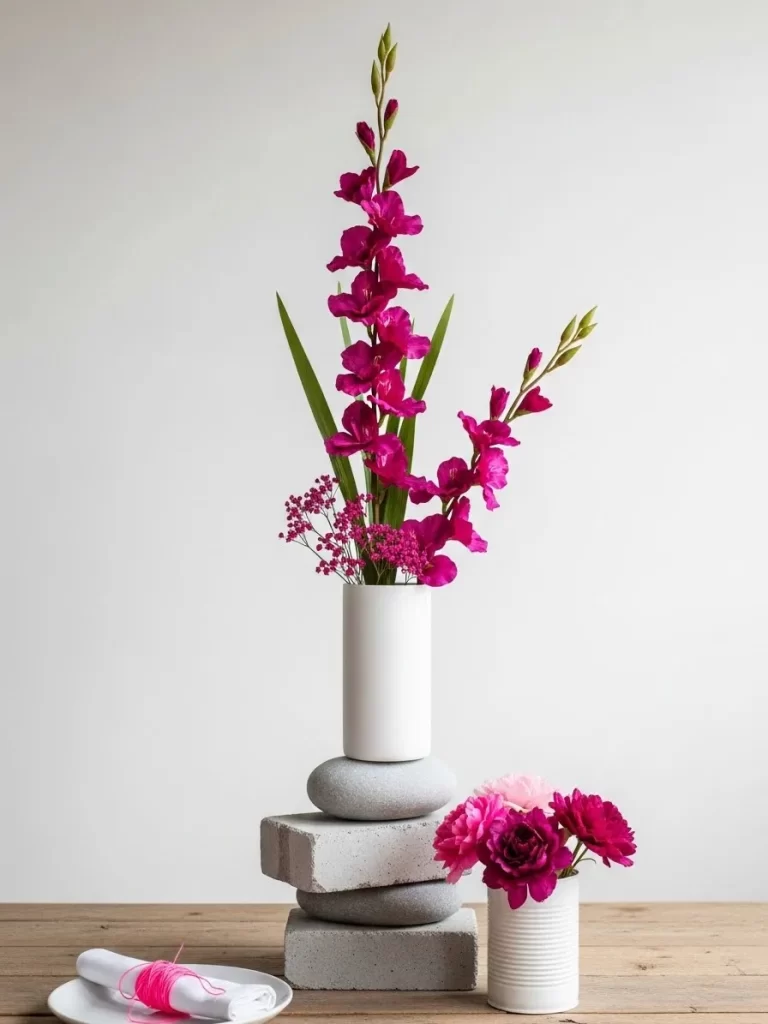
This vertically dynamic centerpiece uses stacked blocks and stones to lift a modern vase, creating an impressive focal point. The base consists of varying shades of gray pavers and smooth river stones, giving the display an architectural, contemporary foundation. This deliberate stacking provides necessary visual height.
A sleek white cylindrical vase sits atop the structure, holding tall spikes of bright magenta gladiolus flowers. The boldness of the flower color is intensified by the clean white vase and the neutral gray base. A small cluster of darker pink blooms is placed in a tiny white can next to the stone stack, anchoring the color at the base.
The contrasting textures of the rough concrete blocks, the smooth stones, and the delicate flowers make this arrangement visually captivating. It is a stunning, easy DIY option that uses structure and intense color to make a lasting statement.
Material Required
- Two or three small, gray concrete pavers or decorative building blocks
- Two smooth, medium sized gray river stones
- One tall, cylindrical white ceramic vase (approximately 8 to 10 inches tall)
- Three to five stems of bright magenta gladiolus flowers (or similar tall, spiky flower)
- Small sprigs of contrasting filler flower (e.g., magenta wax flower or baby’s breath)
- Small white can or mug
- Two to three dark pink garden roses or spray roses
- Water
Equipment Required
- Sharp floral shears
DIY Instructions
- Build the Foundation: Place the concrete pavers in a small, stable stack on your table. Place the two smooth river stones on top of the concrete blocks, ensuring the stack is centered and completely stable.
- Arrange the Tall Blooms: Fill the tall white vase with water. Trim the gladiolus stems so the flower heads extend a good distance above the vase rim. Insert the tall flowers into the vase. Add the small magenta filler flowers to provide a soft cloud of color around the base of the gladiolus spikes.
- Place the Vase: Carefully set the bottom of the tall white vase directly onto the top stone of the stack.
- Create the Base Accent: Fill the small white can or mug with a small amount of water. Trim the dark pink roses and arrange them in the small can to create a tight, compact cluster. Place this accent vase right next to the base of the stone stack.
- Final Look: The height and the vibrant pink color create an engaging centerpiece that utilizes simple building materials for a sophisticated look.
14. Sweet Bud Vase Messages
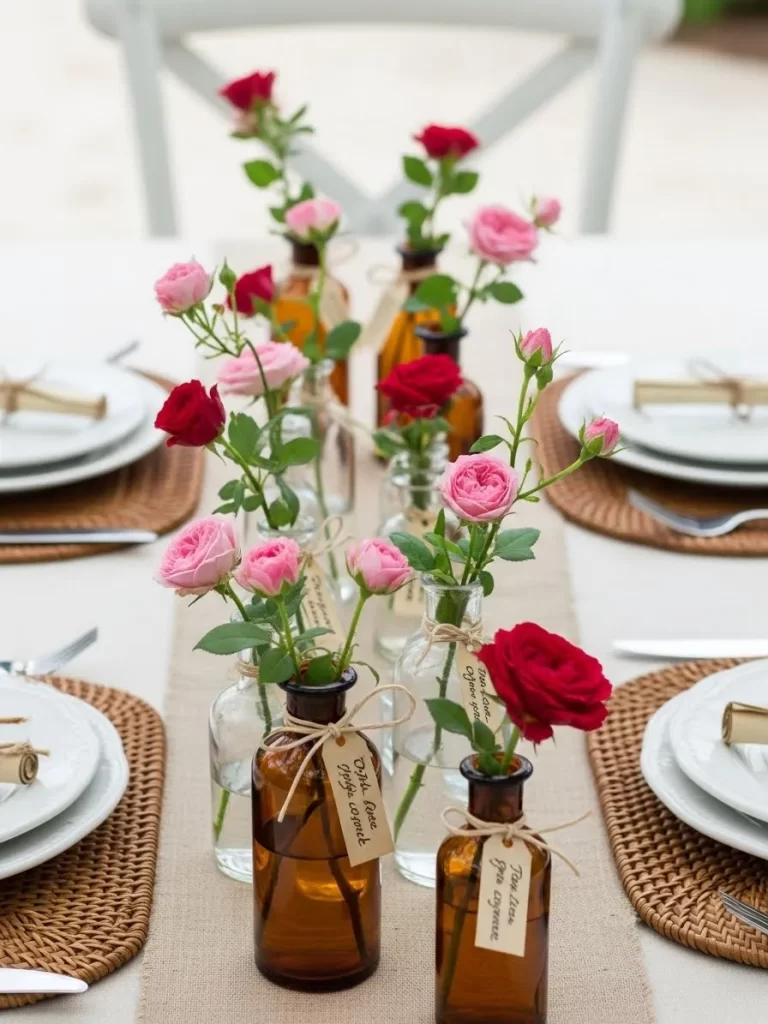
This charming centerpiece creates an intimate and rustic atmosphere using a collection of small glass bottles and simple garden roses. A variety of miniature amber and clear glass apothecary bottles are lined up along a neutral linen or burlap table runner. The mix of brown and clear glass adds a lovely vintage feel.
Each bottle holds just one or two small garden roses, varying in shades from deep red to soft blush pink. This technique allows the individual beauty of each bloom to be appreciated. A small, handwritten tag tied with twine to the neck of each bottle adds a personal, heartfelt touch.
The overall arrangement is sprawling and delicate, with the individual bottles creating a linear path down the table. This is a wonderfully approachable and heartfelt decoration, feeling nostalgic and genuinely romantic without being overly formal.
Material Required
- Twelve to fifteen small glass apothecary or bud vases (a mix of amber and clear)
- Twelve to fifteen small spray roses or miniature garden roses (mixed shades of red and pink)
- Burlap or neutral linen table runner
- Twine
- Small tags or cardstock (enough for each bottle)
- Fine tipped pen
- Water
Equipment Required
- Sharp scissors
- Hole punch (for the tags)
DIY Instructions
- Prepare the Runner and Vases: Lay the table runner down the center of your table. Clean and fill all the small glass bottles with water.
- Write the Messages: Using the fine tipped pen, write a short, simple romantic note or a single word (e.g., “Love,” “Us,” “Forever”) on each small tag. Punch a hole in each tag.
- Attach the Tags: Cut small lengths of twine. Loop the twine through the hole in the tag and tie the tag neatly around the neck of each glass bottle with a simple bow or knot.
- Arrange the Roses: Trim the rose stems so they stand at varying, graceful heights in the small bottles. Place one to two roses in each bottle.
- Assemble the Display: Arrange the bottles in a loose, sprawling line down the center of the runner. Alternate the clear and amber bottles, ensuring the colors and heights of the roses are mixed attractively. The finished result should look like a scattered, tiny garden.
15. Dark Wood Driftwood & Floating Orchid

This striking centerpiece showcases natural elements and dramatic contrast, resulting in a display that is minimal yet powerful. A beautifully curved piece of light colored driftwood dominates the scene, acting as a sculptural focal point that spans the length of the arrangement. Its weathered texture contrasts wonderfully with the smooth elements.
The driftwood is positioned over a wide, shallow charcoal gray bowl filled with water, where a single, delicate white orchid blossom floats serenely. The single flower provides a soft, organic spot of color against the dark bowl and the rough wood.
Three tall, slender black taper candles in a subtle gray holder reinforce the elegant, moody color scheme. A small piece of tree bark or a wooden coaster lifts one end of the driftwood, adding another layer of texture. This sophisticated arrangement is reminiscent of Japanese zen gardens and is deeply calming.
Material Required
- One visually interesting piece of light colored driftwood (approx. 18 to 24 inches long)
- One wide, shallow bowl in charcoal gray or black (approximately 8 to 10 inches wide)
- One single white orchid blossom (or white gardenia)
- Three tall, slender black taper candles
- One sturdy candle holder for the three tapers (gray or neutral color)
- One small, thick slice of tree bark or wood coaster
- Water
Equipment Required
- None
DIY Instructions
- Set the Water Base: Place the shallow gray bowl in the center of your table. Fill it nearly to the top with fresh water.
- Place the Orchid: Gently float the single white orchid blossom on the water’s surface in the bowl.
- Position the Candles: Place the black taper candles securely into the candle holder. Arrange the holder to one side of the bowl. Light the wicks.
- Lift the Driftwood: Place the small slice of tree bark or wood coaster next to the bowl, on the opposite side of the candles.
- Place the Sculpture: Carefully position the driftwood so that it spans horizontally across the arrangement. One end should rest lightly on the rim of the gray bowl, and the other end should rest on the small wood slice, creating a gentle, elevated curve over the floating flower.
16. Regal Purple Velvet & Artichoke Display

This luxurious centerpiece combines deep, rich color with unusual textural elements for a truly dramatic effect. The arrangement is built around shades of royal and eggplant purple, anchored by a cascade of opulent purple velvet fabric draped over the centerpiece stand. The velvet immediately establishes a feeling of romance and grandeur.
The main arrangement features a polished silver ice bucket filled with a dense mass of purple hydrangeas, chrysanthemums, and stock flowers. Unexpectedly, large purple artichoke heads are tucked into the flowers, providing a stunning contrast in texture and shape.
Two smaller, coordinated arrangements, one in a purple ceramic pot and one in a smaller silver container, flank the main piece, adding visual width. The cohesive, monochromatic purple palette, combined with the polished silver, creates a sophisticated, almost theatrical table setting.
Material Required
- One large, highly polished silver ice bucket or punch bowl
- Three large purple artichoke heads
- Four to six stems of purple hydrangeas (or similar voluminous flower)
- Five to seven stems of purple stock flower and mums
- Three yards of deep purple velvet fabric
- One smaller purple ceramic pot
- One medium silver container (e.g., small champagne bucket)
- Floral foam (optional, for structure)
- Water
Equipment Required
- Sharp floral shears
- Large, sturdy pedestal or box (to elevate the main bucket)
DIY Instructions
- Establish the Elevation: Place the pedestal or box in the center of your table. Carefully drape the purple velvet fabric over the pedestal, ensuring the fabric spills attractively onto the table surface.
- Prepare the Main Arrangement: If using foam, soak it in water and place it securely inside the large silver ice bucket. If not using foam, fill the bucket with water. Begin arranging the flowers, using the voluminous hydrangeas to create a rounded shape.
- Insert the Artichokes: Tuck the three purple artichoke heads deep into the center of the flowers, positioning them to sit slightly above the blooms for visual dominance. Fill the remaining space with the purple stock and chrysanthemum flowers.
- Create the Side Accents: Fill the smaller purple pot and the medium silver container with water. Create two smaller, denser arrangements using the remaining purple flowers and one half of a purple artichoke head in each.
- Assemble the Display: Carefully set the main silver bucket onto the velvet draped pedestal. Place the two smaller, complementary arrangements on the table surface on either side of the elevated centerpiece. The result is a lush, three tiered arrangement of rich color and unusual shape.
17. Edible Artichoke Candle Wreath
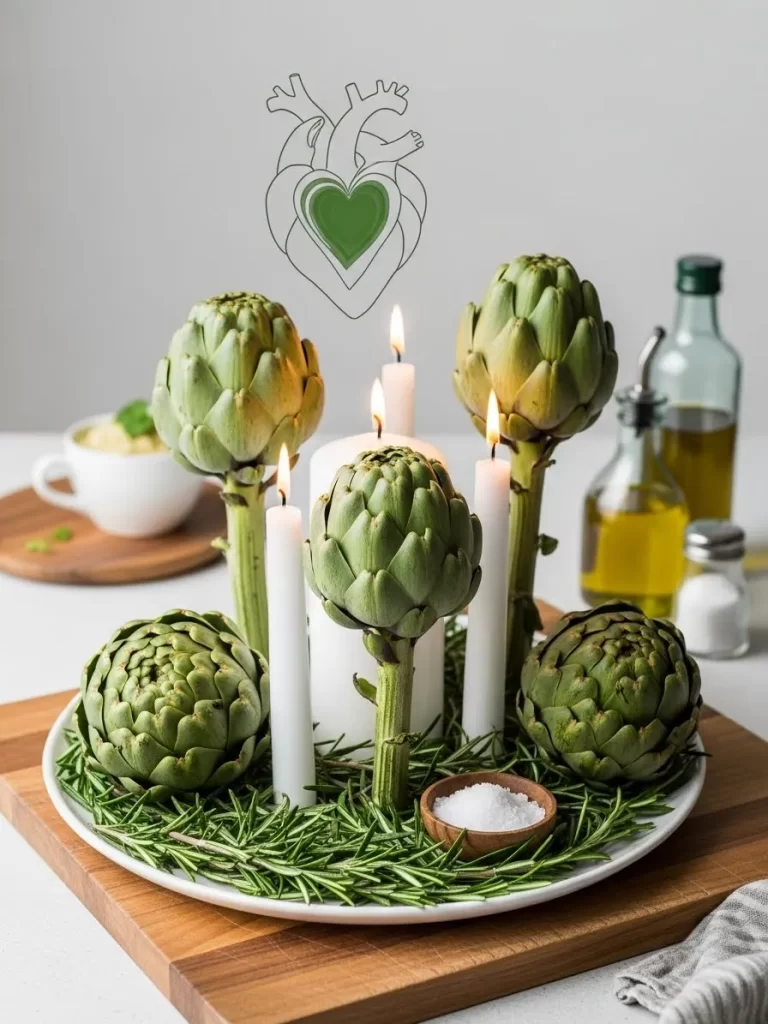
This extremely creative centerpiece uses fresh vegetables to form a striking, organic decoration with a unique texture. Five fresh, pale green artichokes are used as the main elements, each carefully balanced atop a tall white pillar candle. This simple pairing creates an immediate, striking vertical design.
The entire arrangement is set on a white serving platter, which is covered with a generous, fragrant layer of fresh rosemary sprigs. The deep green needles of the rosemary form a beautiful, natural wreath around the base of the candles.
The inclusion of a tiny wooden bowl holding sea salt reinforces the culinary theme, suggesting the artichokes are ready to be dipped and enjoyed. This centerpiece is entirely unexpected, relying on natural shapes and clean colors to create a fresh, sophisticated, and very memorable table display.
Material Required
- Five fresh, medium sized artichokes
- Five tall, slender white pillar candles (same height is best)
- One large round white serving platter (approximately 12 inches wide)
- One large bunch of fresh rosemary sprigs (enough to cover the platter)
- One tiny wooden bowl or ceramic ramekin
- Coarse sea salt
Equipment Required
- Thin, sharp wooden skewers or thick needles
DIY Instructions
- Prepare the Base: Lay the white serving platter in the center of your table. Spread the fresh rosemary sprigs evenly across the platter to create a dense, fragrant bed, leaving only the rim visible.
- Insert the Candles: Arrange the five white pillar candles upright on the rosemary, positioning one in the exact center and the remaining four around it in a tight, attractive circle.
- Attach the Artichokes: Gently take a thick needle or sharp skewer and insert it a short way into the bottom base of one artichoke. Then, press the artichoke down onto the top of a candle, using the small hole as a guide to secure it in place. Repeat this process for the remaining four artichokes and candles.
- Add the Salt: Fill the tiny wooden bowl with coarse sea salt. Nestle the bowl into the rosemary at the base of the candle circle.
- Light and Display: Light the wicks of the candles, allowing the soft white light to filter through the spiky green rosemary and contrast with the vegetable texture.
18. Modern Ikebana with Red Blooms
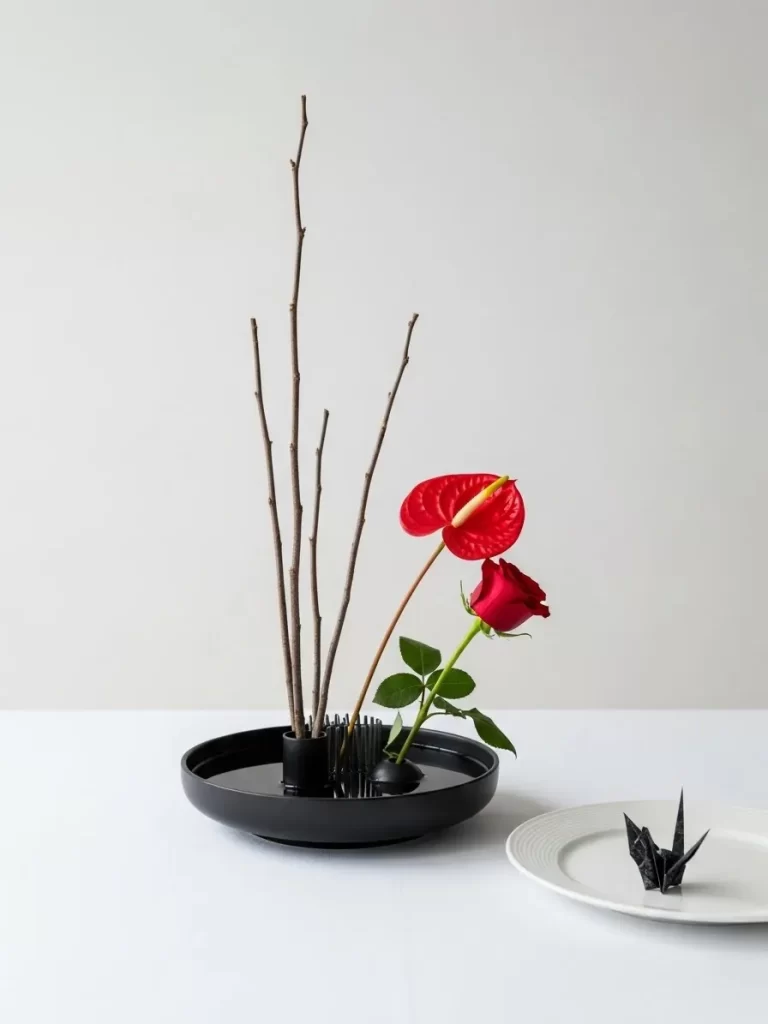
This centerpiece is a beautiful example of minimalist Japanese floral art, or Ikebana, focusing on line, color, and negative space. A sleek, low black dish holds a small cluster of metallic gray flower frogs, or kengyan, which anchor the stems. The arrangement uses only three key elements: smooth, bare wooden branches, a single vibrant red Anthurium, and one deep red rose.
The tall, thin branches provide vertical structure, creating a sense of height and asymmetry. The two red flowers are placed low and tight to the bowl, contrasting their bold color and rounded shapes with the straight lines of the branches. The Anthurium’s unusual shape and glossy texture are highlighted by this simple presentation.
A final, thoughtful touch is the presence of a small, crisp black origami crane placed on a nearby white plate. This small detail reinforces the artistic and Eastern aesthetic, making the entire composition sophisticated, spare, and deeply intentional.
Material Required
- One low, wide black ceramic dish or bowl
- One black metal flower frog (kengyan)
- Five to seven smooth, straight, thin bare tree branches (approximately 12 to 18 inches tall)
- One single stem of red Anthurium flower
- One single deep red rose stem
- Small square of black origami paper (optional)
- Water
Equipment Required
- Small wire snips (optional, for branch trimming)
DIY Instructions
- Prepare the Base: Place the black dish in the center of your table. Place the black metal flower frog securely in the center of the dish. Fill the dish with a small amount of water, ensuring the frog is partially submerged.
- Set the Structure: Insert the five to seven bare tree branches into the needles of the flower frog. Arrange them to stand tall and fan out, creating an asymmetrical, linear backdrop. They should lean slightly to one side.
- Place the Focal Flowers: Trim the stems of the red Anthurium and the red rose so they sit low and close to the flower frog, contrasting the height of the branches. Insert the rose and the Anthurium into the frog’s needles, positioning them to create a tight, vibrant cluster.
- Fold the Crane (Optional): Fold a small black origami crane. Place it neatly on a nearby empty white side plate.
- The Finished Art: The result is a centerpiece that uses empty space as much as the elements themselves, offering a stunning and contemplative aesthetic for a romantic evening.
19. Rose Champagne Tower with Baby’s Breath
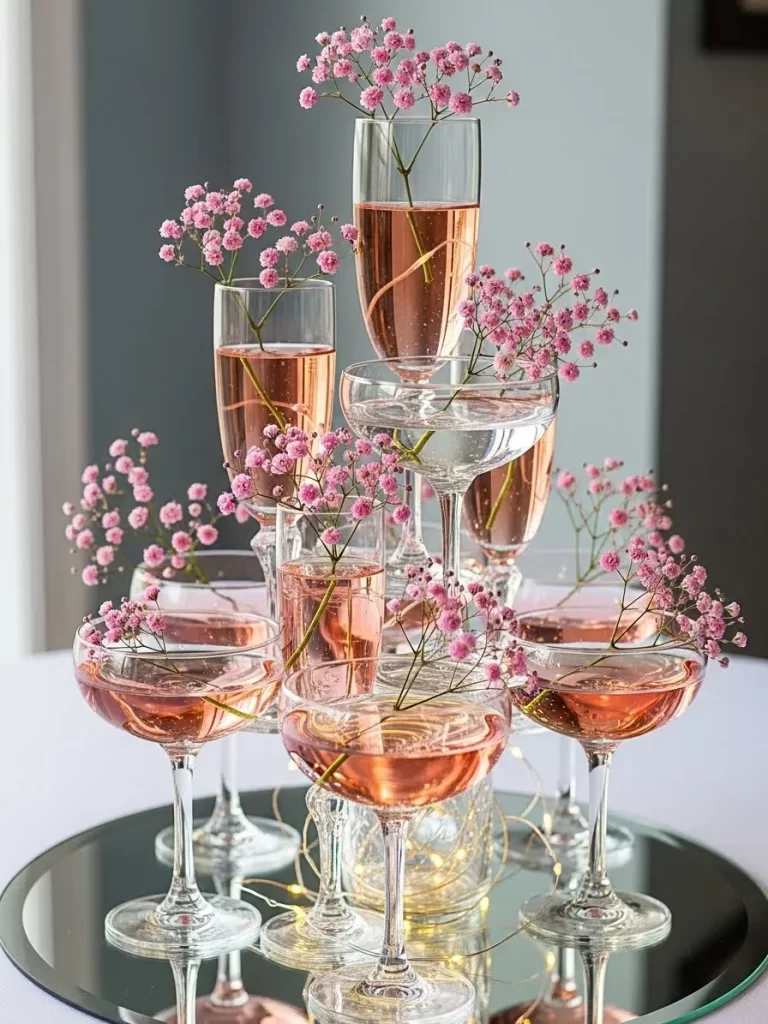
This dazzling centerpiece takes the classic champagne tower and transforms it into a romantic floral display. A collection of vintage coup and modern flute glasses are stacked to create a pyramid shape, elevated by a mirrored base. The clear glassware reflects the light beautifully, enhancing the sparkle.
Each glass is partially filled with a pale pink, rosé colored liquid, possibly sparkling wine or tinted water, which gives the tower a cohesive, warm blush color. Tucked into the liquid in each glass are small sprigs of pink baby’s breath, giving the arrangement a cloud like, feminine texture.
The mirrored tray and a few strands of hidden fairy lights add extra glamour and sparkle to the base. This arrangement is playful, celebratory, and visually stunning, making it a wonderful, dramatic focal point for a special Valentine’s toast.
Material Required
- One round mirrored serving tray or large mirror tile (as a base)
- Three to four coup glasses
- Four to five champagne flutes (various styles and heights are appealing)
- Rosé sparkling wine or water tinted with pink food coloring
- Small bunch of pink baby’s breath (Gypsophila)
- One string of battery operated fairy lights (optional)
Equipment Required
- None
DIY Instructions
- Prepare the Base: Place the mirrored serving tray securely in the center of your table. If using fairy lights, arrange them in a loose coil in the center of the tray.
- Build the Tower: Start by placing the largest coup glasses on the mirrored tray to form the base circle. Carefully stack the next row of glasses (flutes or coups) on top, ensuring the base of each upper glass rests securely on the rims of the glasses below it. Continue until you achieve a sturdy, attractive pyramid.
- Fill the Glasses: Gently pour the rosé liquid into each glass until they are about halfway full. Be very careful not to disturb the tower structure.
- Add the Flowers: Trim the pink baby’s breath into small sprigs, about two to three inches long. Gently place one or two small sprigs into the liquid in each glass. The bubbles or liquid will help hold the sprigs in place.
- Final Sparkle: Turn on the fairy lights just before your guests arrive. The mirrored base and the pink liquid create a shimmering, celebratory effect.
20. Rustic Lavender and Oatmeal Display
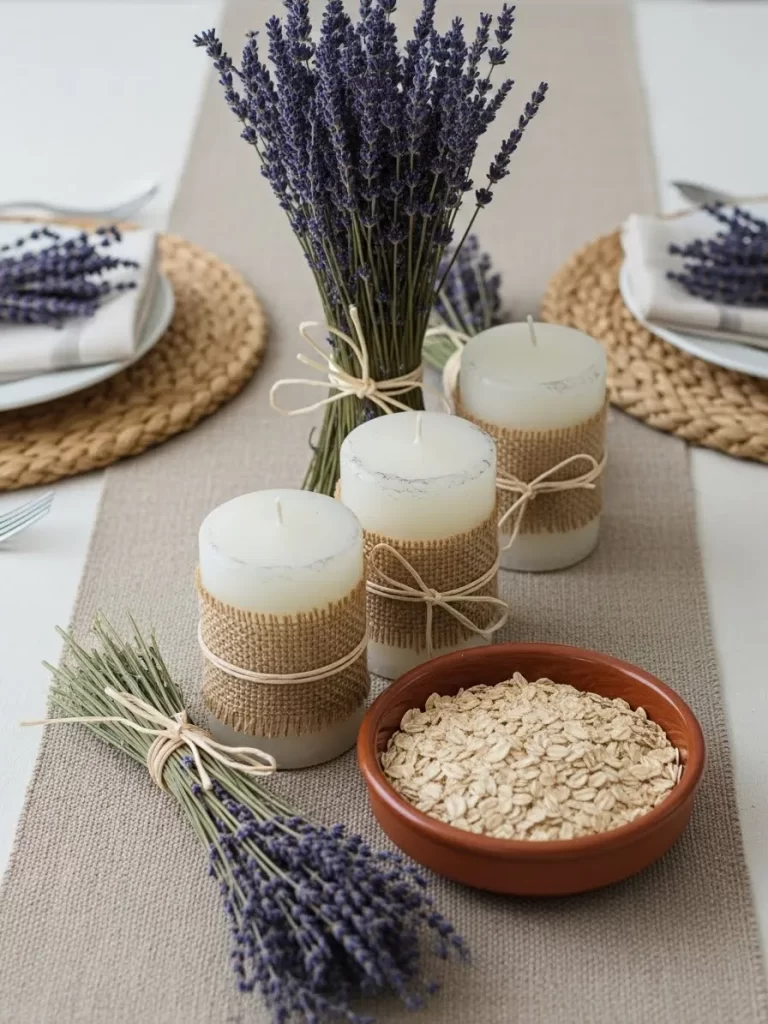
This charming, rustic centerpiece combines the soothing color of dried lavender with the comforting texture of raw oats. A narrow, natural colored linen runner anchors the display on a woven placemat background. The vertical element is a tall, tightly bound bouquet of dried purple lavender, its fragrance adding a calming, natural scent to the air.
Three thick white pillar candles are dressed simply with bands of burlap and tied with natural twine, giving them a lovely farmhouse chic look. The neutral tones of the candles and the burlap perfectly complement the soft purple of the lavender.
A simple terracotta bowl is filled with raw rolled oats, their pale, flakey texture adding an unexpected, textural element that enhances the natural, homespun aesthetic. This arrangement is understated, elegant, and uses everyday materials to create a wonderfully calm and inviting atmosphere.
Material Required
- One narrow, neutral linen or burlap table runner
- One large bunch of dried lavender (enough for a thick bouquet)
- Three white pillar candles (various heights are appealing)
- Burlap ribbon or strips
- Natural twine
- One small terracotta or ceramic bowl
- Two cups of raw rolled oats
- Small bunch of dried lavender for place settings (optional)
Equipment Required
- Scissors
DIY Instructions
- Set the Runner: Lay the linen runner down the center of your table.
- Dress the Candles: Cut strips of burlap to fit snugly around the middle of each white pillar candle. Secure the burlap with a small piece of tape if needed. Cut small lengths of natural twine and tie a neat bow around the burlap band on each candle.
- Prepare the Lavender: Gather the large bunch of dried lavender stems tightly together to form an upright bouquet. Tie the stems securely with twine near the base.
- Place the Oats: Fill the terracotta bowl with raw rolled oats, mounding them slightly in the center.
- Assemble the Display: Place the tall lavender bouquet at the center back of the runner. Arrange the three decorated pillar candles in a staggered cluster in front of the lavender. Place the bowl of oats attractively next to the candles. If you have extra lavender, lay a small sprig across the napkin at each place setting to tie the theme together.
- Final Touch: Light the candles for a soft glow and enjoy the subtle, calming fragrance of the lavender.
21. Bold Paper Bloom & Black Stone Base
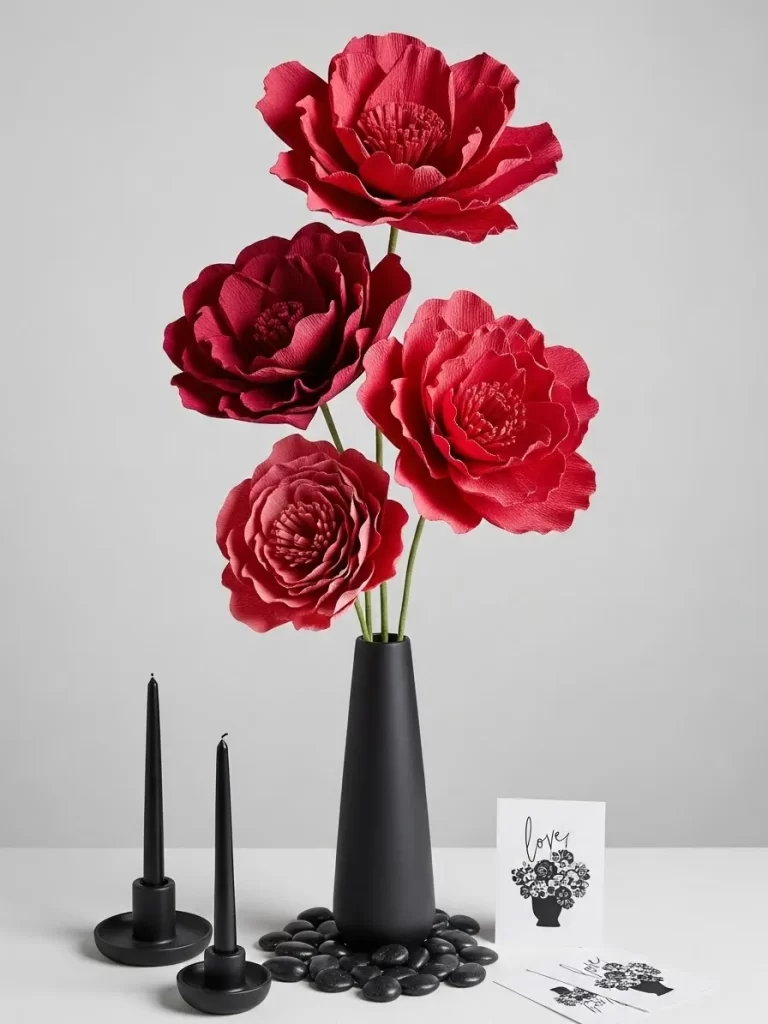
This striking centerpiece uses exaggerated scale and high contrast for a dramatic, modern look. Four large, intricately crafted paper flowers in deep shades of crimson and scarlet stand tall, making a sculptural statement. Their creased texture and rich, non traditional height immediately draw attention.
The giant blooms are held in a sleek, minimalist black vase with a tapered neck, which anchors the bold color. At the base of the vase, a small cluster of smooth, polished black river stones adds a grounding, organic texture that contrasts with the manufactured paper.
Flanking the vase are two slender black taper candles in simple black holders, reinforcing the stark, graphic aesthetic. A small black and white note card rests nearby, tying the sharp, monochrome base elements together with the fiery color of the oversized flowers.
Material Required
- Four large, handmade paper flowers (crepe paper or cardstock) in deep red or crimson
- One tall, matte black ceramic vase (cylindrical or slightly tapered)
- Two black taper candles
- Two small, simple black candle holders (or painted wood coasters)
- One cup of smooth, polished black river stones or pebbles
- One small black and white note card (optional)
Equipment Required
- None
DIY Instructions
- Prepare the Vase: Ensure the black vase is clean. Since the flowers are paper, you will not need water. If the vase feels light, place a few heavier stones or sand in the bottom for stability.
- Arrange the Blooms: Gently place the four large paper flowers into the vase. Arrange them to stand at varying, intentional heights, allowing their large heads to fan out dramatically.
- Create the Candle Cluster: Place the two black taper candles securely into their holders. Set them on the table near the vase, keeping them close together.
- Add the Stone Texture: Scatter the smooth black river stones artfully around the base of the black vase and the candle holders. The stones should connect the three black elements visually.
- Final Accent: Place the black and white note card next to the stones, leaning it against the base of one of the candle holders to complete the bold composition.
22. Coastal Shell and Sand Path
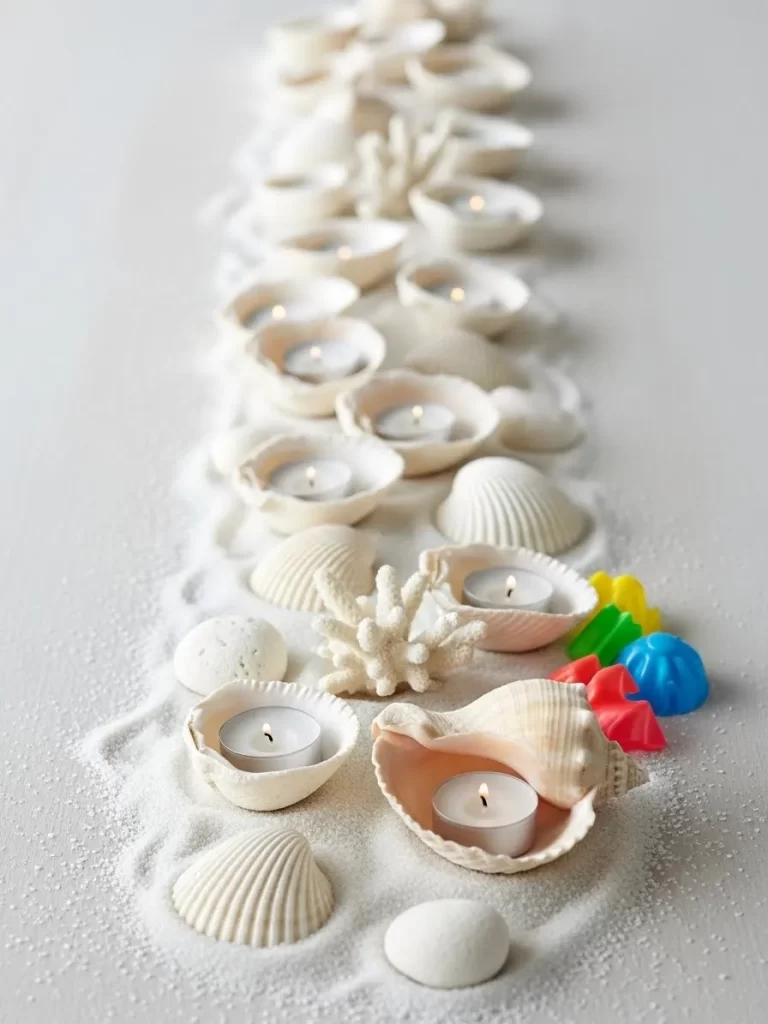
This serene centerpiece creates a long, luminous path of light and texture down the table, evoking the tranquil feeling of a beach at twilight. The base is a generous, flowing trail of fine white sand, creating a soft, natural runner. Various types of white and cream colored seashells are nestled into the sand.
Small tea lights are placed inside large, naturally curved clam shells and conch shells, transforming them into delicate, glowing votive holders. The row of tiny flames creates a beautiful, flickering line of warm light that contrasts with the cool white of the sand and shells.
The simple addition of bleached white coral pieces and smooth white pebbles provides sculptural elements and variation in texture. A subtle inclusion of bright, small plastic toys or sand buckets adds a playful, unexpected touch of vibrant color to the otherwise monochromatic scene.
Material Required
- Fine white craft sand (enough to create a runner down the table)
- Ten to fifteen assorted white and cream colored seashells (including large clam shells and conch shells)
- Ten to fifteen small white tea light candles
- Two to three pieces of bleached white decorative coral
- Smooth white pebbles or polished stones
- Small plastic items (e.g., tiny colorful sand toys, optional)
Equipment Required
- Lighter or long matchsticks
- Small spoon or scooper (for spreading sand)
DIY Instructions
- Lay the Sand Path: Carefully pour the white craft sand directly down the center of your table. Use the scooper or a spoon to gently spread it into a smooth, even path or runner, about six to eight inches wide.
- Prepare the Votives: Gently place one tea light candle inside the cup of each of the large clam shells or conch shells.
- Create the Line of Light: Arrange the shell votives along the center line of the sand path. Ensure they are spaced evenly, forming a cohesive row.
- Add Natural Texture: Nestle the remaining smooth seashells and white pebbles into the sand around the votives. Place the pieces of white coral between the candles to add height and a structural element.
- Final Whimsy (Optional): Tuck the small colorful plastic items near the end of the runner for a bright pop of color and unexpected playfulness. Light the candles just before guests arrive to illuminate the entire coastal scene.
23. Decadent Chocolate & Berry Spread
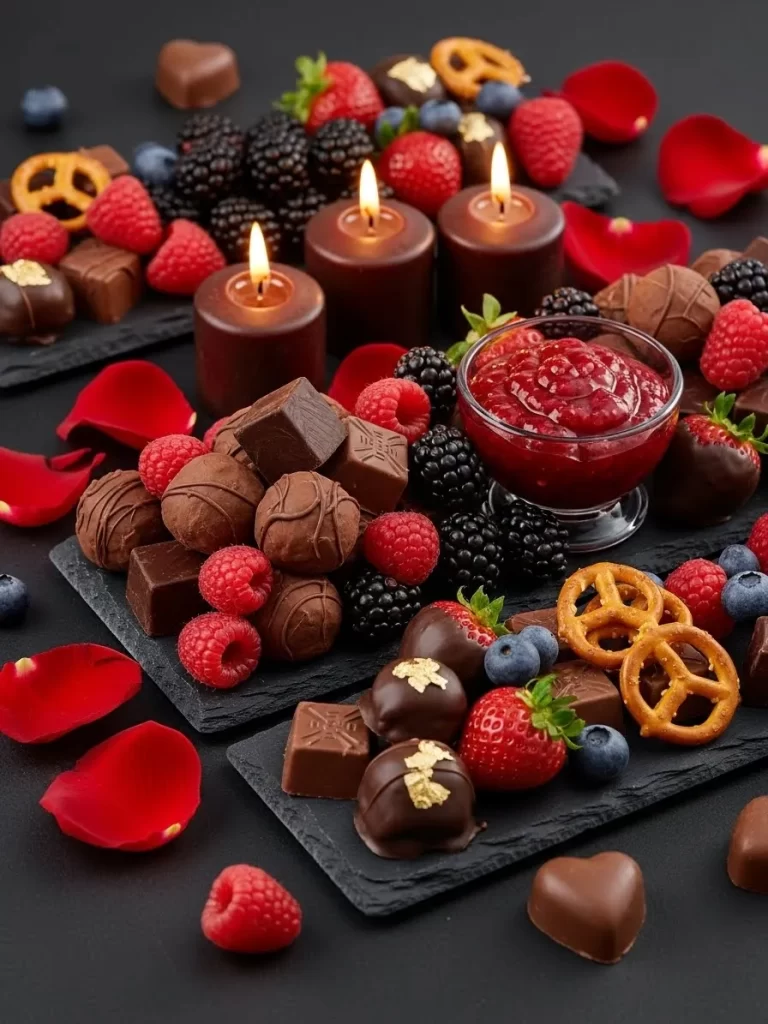
This dramatic centerpiece is entirely edible, focusing on rich colors and luxurious textures for a truly indulgent experience. Two dark, slate gray serving platters hold mounds of deep chocolate truffles, squares, and heart shaped confections. The dark color of the slate and chocolate provides a strong, moody contrast.
Vibrant red and purple berries—raspberries, blackberries, and blueberries—are scattered profusely across the platters, adding fresh color and brightness. Dipped strawberries, some flecked with gold leaf, introduce an extra layer of elegance. Two brown pillar candles are placed among the treats, adding a warm, intimate glow to the display.
A small glass bowl of bright red dipping sauce or jam is the focal point, its color intensified by the surrounding dark background. Small, salty pretzels are included, offering a surprising textural counterpoint to the smooth chocolate and soft fruit. This arrangement is the essence of Valentine’s decadence.
Material Required
- Assortment of dark chocolate truffles, squares, and heart shaped chocolates
- One cup of fresh raspberries
- One cup of fresh blackberries and blueberries
- Six to eight fresh strawberries (some dipped in chocolate and decorated with gold leaf)
- Two small slate gray serving platters
- Two small, brown pillar candles
- One small glass bowl of red jam or dipping sauce
- A handful of small, salted pretzels
- Loose red rose petals (optional, for table scattering)
Equipment Required
- None
DIY Instructions
- Prepare the Bases: Place the two small slate gray serving platters side by side or slightly staggered on your table.
- Arrange the Candles: Place the two small brown pillar candles near the center of the display, one on each platter, or clustered tightly together. Light the wicks.
- Build the Chocolate Piles: Begin arranging the various dark chocolates onto the platters, creating attractive, bountiful piles. Place the dipped strawberries strategically to highlight their appearance.
- Add the Berries: Scatter the fresh raspberries, blackberries, and blueberries liberally across the chocolate mounds and around the edges of the platters, ensuring the bright colors pop against the dark slate.
- Place the Dip: Set the small glass bowl of red jam or dipping sauce centrally between the two platters.
- The Final Indulgence: Tuck the small salted pretzels into the arrangement, providing an unexpected shape and texture. Scatter a few loose red rose petals around the base of the platters to enhance the romantic mood.
24. Sleek Slate and Potted Bulbs
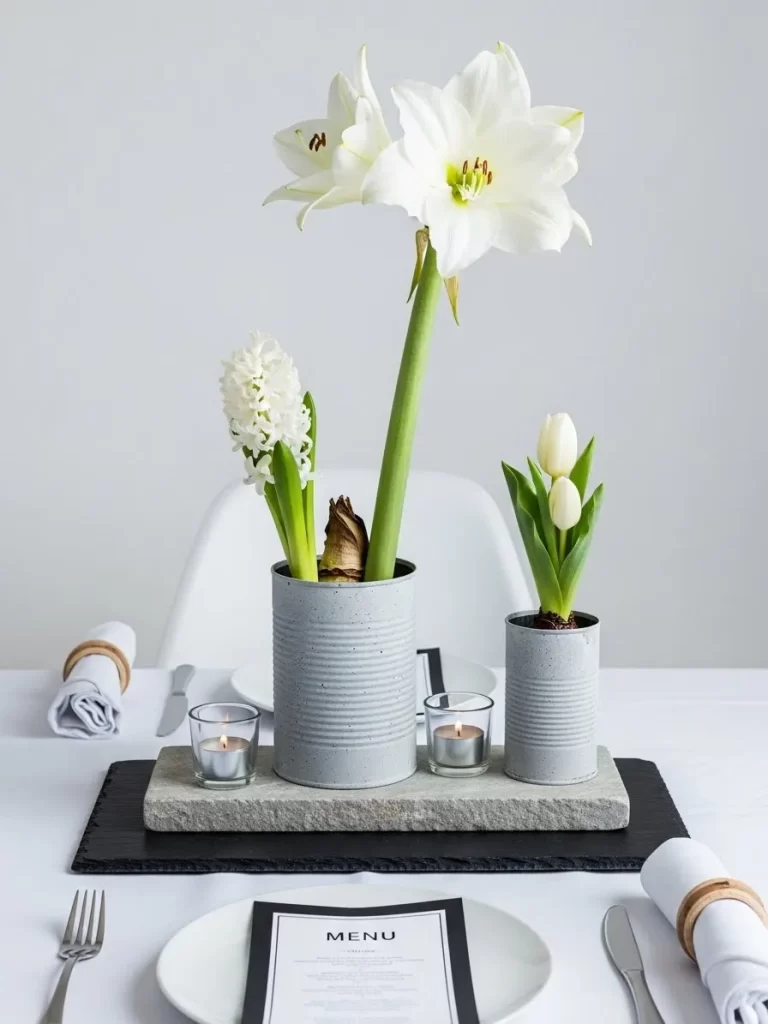
This minimalist centerpiece is a study in texture and natural growth, grounded in a striking black and white color scheme. A rough edged black slate tile provides a dramatic base, contrasting sharply with the white tabletop. Layered on top is a smooth, light gray stone paver.
Two galvanized metal cans, their ribbed sides adding subtle texture, are painted or coated in a light gray concrete finish. They hold potted white bulbs—a tall amaryllis and a shorter hyacinth—and a small white tulip, showing off their growth stages. This is a celebration of spring growth with a modern twist.
Small glass votive candles are placed on the gray paver, providing a tiny, intimate light. The entire arrangement is a beautiful blend of organic life and industrial materials, offering a refreshing, clean aesthetic that feels highly sophisticated.
Material Required
- One rectangular black slate tile
- One rectangular light gray stone paver or concrete slab
- Two small galvanized metal cans (with ridges)
- One white amaryllis bulb/flower (potted or cut stem)
- One white hyacinth bulb/flower (potted)
- One white tulip bulb/flower (potted)
- Two small glass votive candles
- Potting soil or small pebbles (if using cut flowers/bulbs)
- Water (if using cut stems)
Equipment Required
- None
DIY Instructions
- Set the Base: Place the black slate tile in the center of your table. Center the light gray paver on top of the black slate.
- Prepare the Cans: Ensure the metal cans are clean and have a decorative gray finish. Place the potted hyacinth and the potted tulip into the shorter can, allowing the soil and growth to be visible. Place the potted amaryllis bulb into the taller can.
- Assemble the Display: Place the two decorative cans onto the light gray paver, ensuring they are positioned at different heights for visual interest.
- Add the Light: Place the two small glass votive candles directly onto the gray paver, clustering them near the bases of the cans. Light the wicks.
- The Modern Garden: This centerpiece elegantly showcases the beauty of the growing bulbs against the sharp contrast of the slate and concrete materials.
25. Romantic Lace & Pearl Jars
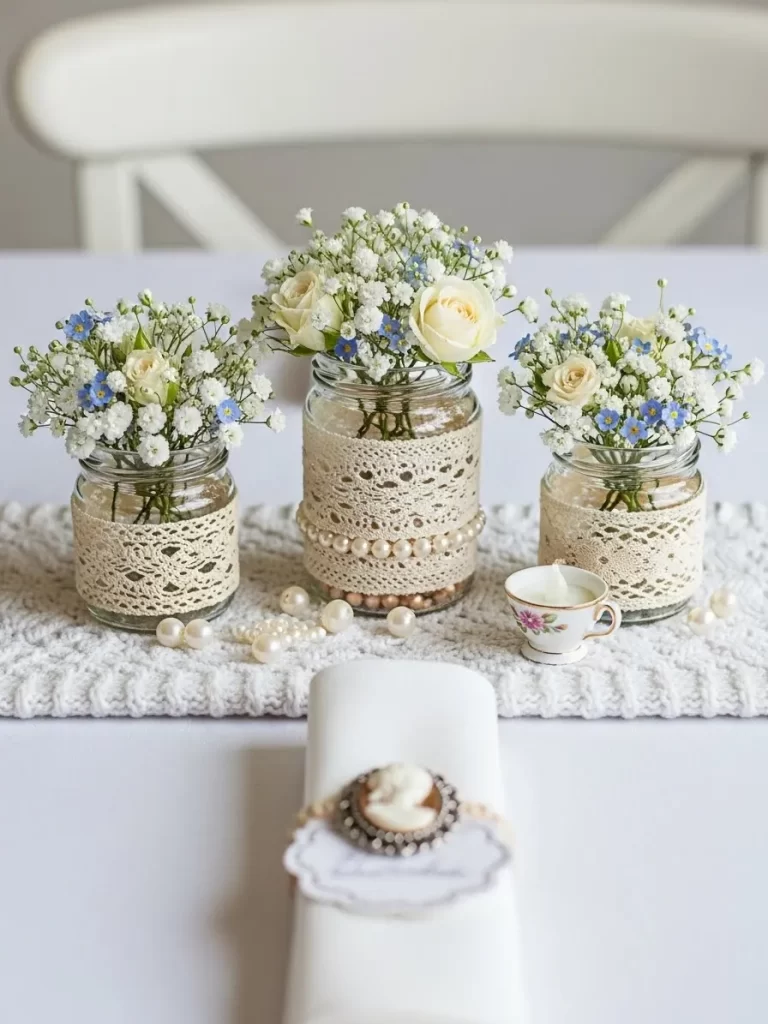
This vintage inspired centerpiece features a charming arrangement of lace covered mason jars holding sweet, delicate flowers. Three glass jars are wrapped in textured, crocheted lace trim, giving them a homespun, antique charm. Strands of white and cream colored faux pearls are draped around the center jar, adding a layer of subtle luxury.
Each jar holds a soft, airy bouquet of white baby’s breath, small blue forget me nots, and one or two pale cream colored miniature roses. The arrangement is simple but highly textural, creating a feeling of gentle romance.
The jars are set on a soft, cable knit or crocheted runner, which enhances the cozy, handmade aesthetic. Loose pearls are scattered across the runner, completing the delicate, old world tableau.
Material Required
- Three small to medium sized glass mason jars or standard jam jars
- White and cream colored crocheted lace trim or ribbon
- One bunch of white baby’s breath (Gypsophila)
- Small sprigs of blue forget me nots (or similar small blue flower)
- Three to five pale cream or white miniature roses
- One strand of faux pearls
- One small crocheted or cable knit table runner
- Water
- Small decorative items (e.g., miniature teacup, loose faux pearls)
Equipment Required
- Hot glue gun or strong craft glue
- Scissors
DIY Instructions
- Decorate the Jars: Cut the lace trim to fit around the body of each glass jar. Secure the lace with craft glue or a hot glue gun, making sure the seam is tidy.
- Add the Pearls: Wrap the strand of faux pearls once or twice around the center jar, securing it with a dot of glue if necessary. Scatter a handful of loose pearls across the table runner.
- Prepare the Flowers: Fill all three jars with water. Trim the stems of the roses, baby’s breath, and blue flowers to a short length, creating small, tight bouquets that sit just above the rim of the jars.
- Assemble the Bouquets: Create a small, balanced bouquet for each jar, ensuring the pale rose is the central focus, surrounded by the white and blue filler flowers.
- Set the Scene: Lay the crocheted runner down the center of your table. Place the three decorated jars in a close grouping on the runner. Nestle the miniature teacup nearby for an added vintage touch.
26. Aromatic Herb & Flower Box
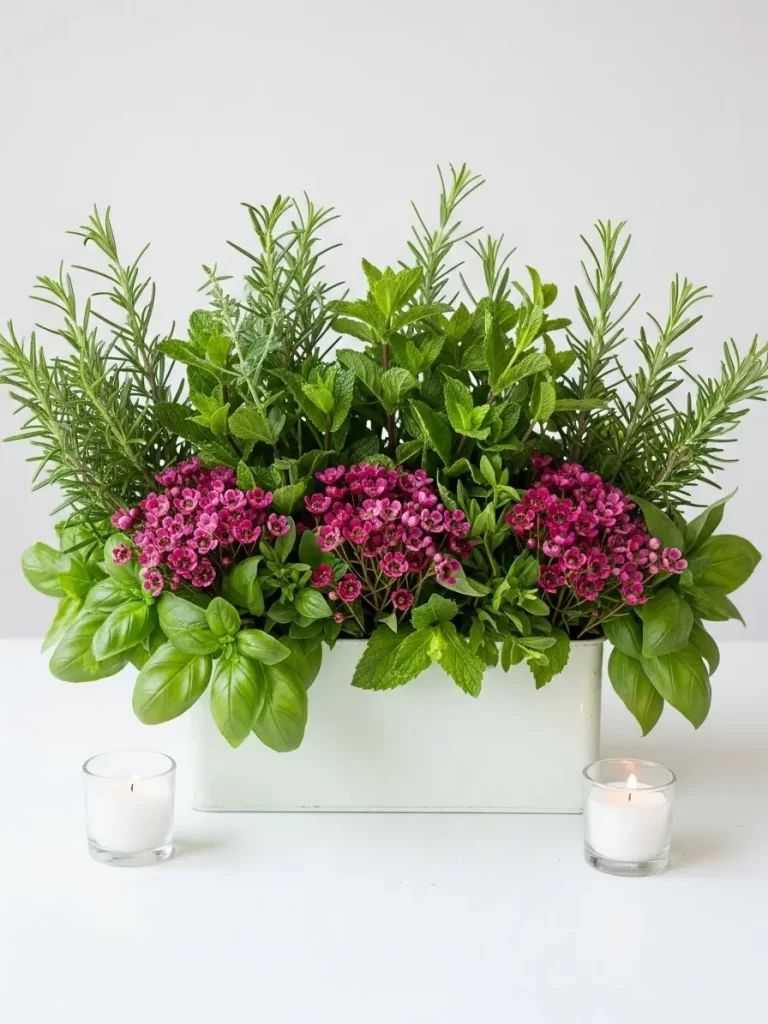
This sophisticated centerpiece is an aromatic indoor garden, combining culinary herbs with a vibrant pop of color. The arrangement is contained within a clean, rectangular white planter box, which provides a modern, crisp border.
The box is densely planted with a beautiful mix of fresh herbs: rosemary, with its upright, spiky texture, and lush, rounded mint and basil leaves. The fresh greenery is interrupted by a stunning band of bright magenta or deep pink wax flowers, which are nestled low into the basil and mint.
The overall arrangement is layered, with the tall rosemary framing the colorful center band and the low basil forming the rich green border. Two simple glass votive candles sit at the base, their light adding a subtle, warm glow to this entirely natural and wonderfully fragrant display.
Material Required
- One rectangular white planter box (approximately 12 to 18 inches long)
- Small rosemary plant or several large cuttings
- Small mint plant or several large cuttings
- Small basil plant or several large cuttings
- One small bunch of magenta or deep pink wax flowers (or similar dense, small bloom)
- Potting soil (if using potted plants)
- Water
- Two simple glass votive candles
Equipment Required
- Small trowel (if planting)
- Scissors or floral shears (if using cuttings)
DIY Instructions
- Prepare the Planter: Line the bottom of the white planter box with a thin layer of pebbles for drainage, then fill it with potting soil. If using cuttings, you can skip the soil and simply arrange the stems in a hidden water filled container inside the box.
- Plant the Herbs: Plant or insert the rosemary cuttings along the back and sides of the box to create the tall, upright border. Plant the mint in the middle layer, creating volume. Plant the basil along the front edge, allowing its large leaves to spill over the box rim.
- Insert the Flowers: Tuck the magenta wax flowers into the mint layer, placing them low so they form a horizontal band of color across the middle of the box. Ensure the herbs slightly cover the lower stems.
- Add the Light: Place the two simple glass votive candles directly on the table surface, one at each end of the planter box. Light the candles to complete the fresh, aromatic scene.
27. Black Ribbon Tulip Lineup
This graphic, high contrast centerpiece creates a feeling of sophisticated modern romance. A row of tall, cylindrical clear glass vases is centered on a deep black table runner, creating a striking linear display. Each vase holds a single, crisp white tulip, their vibrant green stems and leaves extending dramatically upward.
The bold black runner provides a sharp backdrop for the purity of the white flowers. The height of the vases ensures the sightline remains clear, while the repetition of the elements creates a strong, minimalist statement.
A simple black satin ribbon is tied around the neck of each vase, the tails cascading down to the table surface, adding a flowing, romantic contrast to the sharp lines. The entire arrangement rests on a round, silver serving tray, whose reflective surface enhances the dramatic black and white palette.
Material Required
- Six to eight tall, cylindrical clear glass vases (all the same height)
- Six to eight crisp white tulip stems (one for each vase)
- Deep black table runner
- Roll of thin black satin ribbon
- One round, silver serving tray (or mirrored tray)
- Water
Equipment Required
- Sharp floral shears
- Scissors (for ribbon)
DIY Instructions
- Set the Base: Lay the black table runner straight down the center of your table. Place the round silver tray centrally on the runner.
- Prepare the Vases: Fill all the glass vases halfway with water. Trim the tulip stems so the flower heads stand several inches above the rim of the vases. Insert one tulip into each vase.
- Add the Ribbon: Cut a length of black satin ribbon for each vase. Tie the ribbon neatly around the neck of the vase in a simple knot or bow, allowing the long tails to hang down gracefully.
- Create the Line: Arrange the vases in a single, straight line down the center of the silver tray. Ensure the spacing between them is even to maintain the clean, repetitive aesthetic.
- Final Look: The dramatic simplicity of the black and white, enhanced by the reflective tray and the repetition of the flowers, results in a highly contemporary and elegant display.
28. Terra Cotta & Carnation Bloom
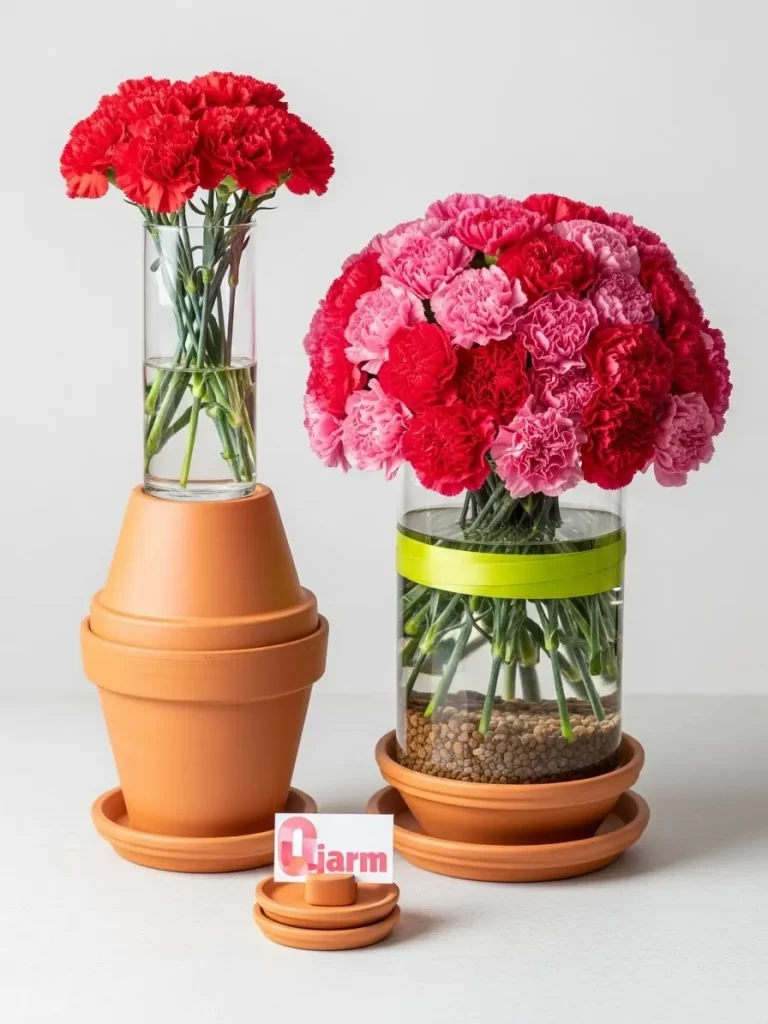
This charming centerpiece uses stacked terra cotta pots to create unexpected height for a fun, spring inspired arrangement. Two different stacks of terra cotta pots and their corresponding saucers form the base, instantly giving the arrangement a sunny, garden ready feel.
The vessels holding the flowers are tall, simple glass cylinders, providing a clean contrast to the rustic pots. One vase holds a dense, rounded mound of mixed red and pink carnations, while the other holds a simpler cluster of red carnations. The volume of the flowers adds cheerful color and texture.
The vase with the large mixed bouquet features a visible layer of small pebbles and a wide, bright green ribbon wrapped around the center, which helps the whole structure pop. This is a delightful, accessible design that uses inexpensive materials to achieve a striking, colorful result.
Material Required
- Five to six terra cotta pots and three matching saucers (various sizes for stacking)
- Two tall, cylindrical clear glass vases
- One large bunch of pink carnations
- One medium bunch of red carnations
- Small bag of brown or gray pebbles/gravel
- Wide, bright green satin or grosgrain ribbon
- Water
- Small decorative card (optional)
Equipment Required
- Scissors
DIY Instructions
- Build the Pedestals: Create the first pedestal by stacking three terra cotta pots upside down, placing a saucer at the top. Create the second, shorter pedestal by stacking two pots and a saucer.
- Prepare the Vases: Fill the two glass cylindrical vases with water. Pour a thin layer of decorative pebbles into the bottom of the larger vase.
- Dress the Carnations: Trim the stems of the red and pink carnations short. In the larger vase, create a very dense, round bouquet using the mixed colors. Tie a length of the bright green ribbon securely around the center of this vase. Create a smaller, looser bouquet of only red carnations in the second vase.
- Assemble the Display: Place the vase with the smaller red bouquet on the taller, stacked pedestal. Place the vase with the large mixed bouquet on the shorter stack. The differing heights and flower volumes create an engaging, cheerful display.
29. Sparkling Mercury Glass Runner
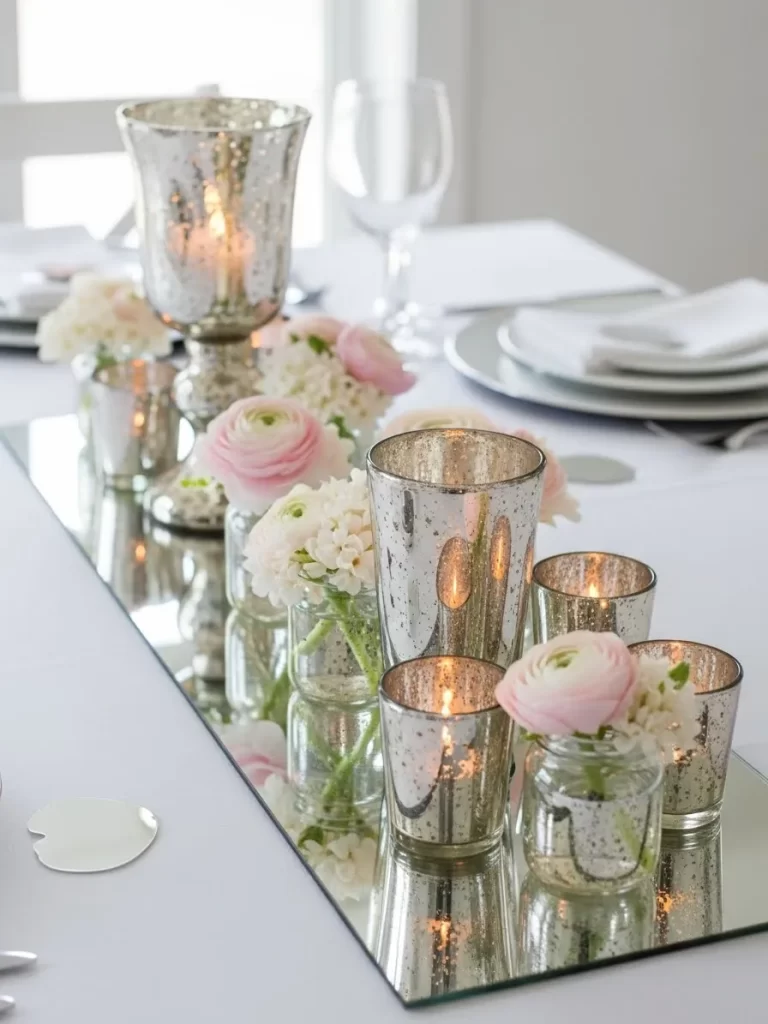
This luxurious centerpiece uses reflection and soft candlelight to create a glamorous, antique mood. A long, rectangular mirror acts as the table runner, dramatically reflecting every element and amplifying the light.
Clustered along the mirror are various mercury glass votives and candle holders. Their speckled silver finish adds a vintage, shimmering texture. The varying heights of the mercury glass, from small votives to a tall stemmed glass, create visual interest and depth.
Small glass jars hold petite arrangements of pale pink ranunculus and tiny white hydrangeas, their soft colors contrasting beautifully with the bright silver and warm candlelight. The overall effect is incredibly luminous and elegant, giving the table an almost magical, ethereal glow.
Material Required
- One long, rectangular mirror (at least 24 inches long)
- Three small mercury glass votive holders
- Two tall mercury glass pillar holders or stemmed glasses
- One tall, stemmed silver or mercury glass candle holder
- Small clear glass jars or mason jars (approximately three to five)
- Six to eight white tea light candles
- Small bunch of light pink ranunculus
- Small bunch of tiny white hydrangeas or similar filler flower
- Water
Equipment Required
- Floral shears
- Lighter
DIY Instructions
- Set the Base: Lay the long, rectangular mirror flat down the center of your table, ensuring it is secure and stable.
- Prepare the Flowers: Fill the small clear glass jars with water. Trim the stems of the pink ranunculus and white flowers very short and arrange them in the small jars to create sweet, low bouquets.
- Place the Candles: Place one tea light candle inside each of the mercury glass votives and the taller holders.
- Create the Luminous Cluster: Arrange the flower jars and the mercury glass candle holders onto the mirror in a long, dense cluster. Ensure that the various heights are mixed attractively and that the flowers are interspersed with the candles.
- Final Glow: Light all the tea lights. The reflection on the mirror and the speckled silver of the mercury glass will create an extraordinary amount of soft, romantic light.
30. Classic Floating Rose Bowl

This arrangement is a beautiful, timeless display of romance, relying on simplicity and rich color. A wide, low clear glass bowl serves as the central vessel, its clear sides showing off the floating elements within.
The water surface is covered in rich, deep red and soft ivory colored rose petals, which create a dense, colorful carpet. Three white floating candles are nestled among the petals, their small flames providing intimate, warm illumination that makes the colors glow.
The bowl itself contains clear glass gems at the bottom, which provide a textured, refractive base, catching the light as it passes through the water. A few loose red and ivory petals and flat glass gems are scattered around the base of the bowl on the white tabletop, tying the centerpiece to the larger setting. This is a wonderfully elegant and simple last minute decoration.
Material Required
- One large, clear glass bowl (wide and shallow is appealing)
- Two cups of deep red rose petals (fresh or high quality silk)
- Half a cup of ivory or cream colored rose petals
- Three white floating candles
- One cup of clear or light colored glass gems/beads
- Water
Equipment Required
- Lighter or long matchsticks
DIY Instructions
- Prepare the Base: Place the clear glass bowl in the center of your table. Pour the clear glass gems into the bottom of the bowl to create a decorative layer.
- Fill with Water: Carefully fill the glass bowl with water, leaving about half an inch of space at the top.
- Float the Petals: Gently scatter the red and ivory rose petals onto the water’s surface. Allow them to spread naturally, creating an even, dense layer of color that covers most of the water.
- Add the Candles: Carefully place the three white floating candles onto the water, ensuring they are positioned evenly among the petals.
- Final Scatter: Scatter a few of the loose red and ivory rose petals and a handful of the glass gems around the base of the bowl on the tabletop. Light the candles just before dinner to complete the classic, luminous romantic scene.
31. Rustic Grapevine Heart Tree
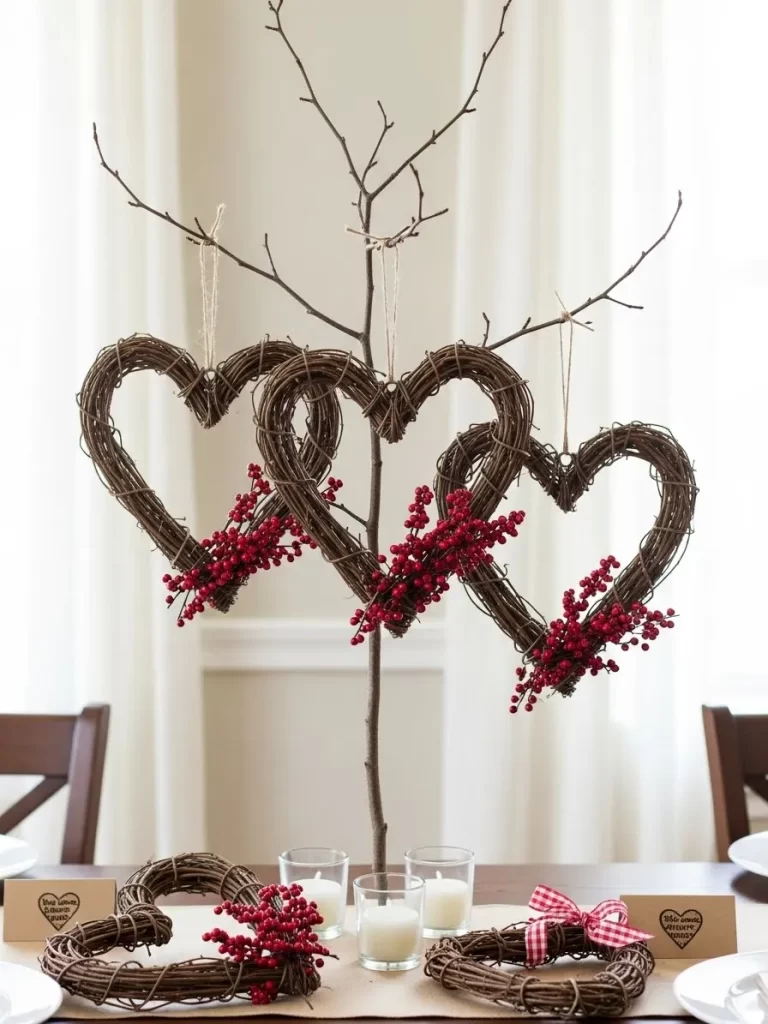
This charming, homespun centerpiece features a vertical branch serving as a central “tree” from which rustic grapevine heart wreaths are suspended. The branch is visually anchored by a simple base, allowing the focus to remain on the beautiful, intertwined wood of the hearts. Small clusters of vibrant red berries are woven into the corner of each heart, adding a bright pop of holiday color.
Beneath the heart tree, small grapevine hearts lie on the table, flanking three simple white votive candles. The entire display is set on a light colored linen runner, which complements the natural textures. One of the small hearts includes a checked ribbon, adding a country chic touch, while another heart has a tiny written tag, offering a sweet, personal message.
The overall arrangement is incredibly warm and evocative of simple, deep affection. It successfully uses height and repeating natural shapes to create a memorable and heartfelt romantic display.
Material Required
- One sturdy, decorative bare branch (approximately 18 to 24 inches tall)
- Three medium sized grapevine heart wreaths (all similar size)
- Two small grapevine heart wreaths
- Small clusters of faux red berries (enough for five hearts)
- Natural twine or rustic string
- Three small white glass votive candles
- One sturdy vase or pot (to hold the branch)
- Small amount of plaster of Paris, sand, or stones (to stabilize the branch)
- Small decorative tag and fine tipped pen (optional)
- Small piece of red checked ribbon (optional)
Equipment Required
- Hot glue gun (for securing berries)
- Scissors
DIY Instructions
- Anchor the Branch: Place the sturdy branch into your selected vase or pot. Fill the container with sand or small stones, pressing the base of the branch down firmly to ensure it stands completely straight and stable. If needed, use plaster of Paris to set it firmly.
- Decorate the Hearts: Use a hot glue gun to secure a small cluster of the faux red berries to the bottom curve of each of the five grapevine hearts. For one of the small hearts, tie the red checked ribbon in a bow on the side. For another, write a short word on the small tag and tie it to the heart with twine.
- Hang the Hearts: Cut three lengths of natural twine. Tie one end of the twine to the top center of each of the three medium hearts. Tie the other end of the twine to the upper branches of the main centerpiece tree, ensuring the hearts hang at slightly different, attractive heights.
- Assemble the Base: Place the branch base in the center of your table. Arrange the three white votive candles in front of the base. Place the two small, decorated hearts near the candles to complete the cozy, rustic arrangement.
32. Sleek Copper & White Anemone Vases
This centerpiece is a stunning exercise in contemporary glamour, achieved through the use of highly reflective metallic surfaces and sharp floral contrast. A tall, slender vase, plated in shimmering copper or rose gold, commands attention. Copper wire is loosely coiled around the neck, adding an unexpected, textural detail.
The tall vase holds three to four stems of crisp white anemone flowers, their striking black centers providing a dramatic focal point. The tall, linear stems contrast beautifully with the vase’s smooth, reflective form.
Flanking the tall vase are two smaller, rounded copper vases, one with a subtle hammered texture, each holding a compact cluster of anemones. The varying shapes and textures of the copper containers create visual interest. Two single white taper candles in matching copper holders complete the elegant, monochrome and metallic tableau.
Material Required
- One tall, slender copper or rose gold cylindrical vase
- Two small, rounded copper or rose gold vases (varying textures are appealing)
- Five to seven stems of white anemones (or high quality faux anemones)
- One small spool of copper wire (thin gauge)
- Two white taper candles
- Two copper or rose gold taper candle holders
- Water
Equipment Required
- Wire cutters or scissors (for copper wire)
- Sharp floral shears
DIY Instructions
- Decorate the Tall Vase: If using real copper wire, unspool a section and gently wrap it several times around the upper neck of the tall copper vase, letting it look loose and organic.
- Arrange the Tall Blooms: Fill the tall vase with water. Trim three or four of the anemone stems to a length that allows the flowers to stand dramatically above the wire coil. Insert the stems into the vase.
- Prepare the Small Arrangements: Fill the two small rounded copper vases with water. Trim the remaining anemone stems short to create two dense, low bouquets that sit just above the rims. Place the bouquets in their respective vases.
- Add the Candles: Place the two white taper candles securely into the matching copper holders.
- Assemble the Cluster: Set the tall copper vase in the center of your table. Arrange the two shorter, rounded vases on either side, positioning the two candle holders in the spaces between the flowers to create a cohesive, sparkling metallic landscape.
33. Playful Cinema Popcorn Tubs

This fun, highly themed centerpiece is a departure from traditional romance, celebrating a cozy movie night in. A tiered collection of striped red and white popcorn tubs forms the main structure, immediately setting a festive, retro tone. The tubs are overflowing with fluffy white popcorn, creating a voluminous, cloud like visual texture.
Bright red gerbera daisies are tucked into the popcorn mounds, providing vibrant pops of saturated color that contrast beautifully with the white. Interspersed among the tubs are round, black message boards displaying romantic and cinematic words like “CINEMA” and “ROMNTS,” adding a cute, personalized element.
Small bags of candy and bottles of classic cola flank the display, reinforcing the sweet, casual theme. This is an entirely delightful, accessible, and playful decoration that requires minimal fuss for maximum impact.
Material Required
- Four to five striped red and white popcorn tubs (various sizes)
- Large amount of freshly popped white popcorn (ensure it’s salted/flavored minimally for presentation)
- Eight to ten bright red gerbera daisies (with stems trimmed short)
- Three small, round black chalkboard signs or letter boards
- Two small bags of red wrapped candy
- Two glass bottles of classic cola
- Two round coaster bases (to elevate the cola bottles)
- Floral wire or wooden picks (optional, for securing flowers)
Equipment Required
- None (unless popping popcorn)
DIY Instructions
- Fill the Tubs: Start by filling all the red and white striped popcorn tubs completely with popcorn, ensuring the popcorn mounds proudly above the rim.
- Place the Flowers: Gently tuck the trimmed red gerbera daisies into the popcorn mounds. Position them so the bright flower heads sit just above the popcorn, distributing them evenly among the various tubs. If using fresh flowers, you can put the stems in small, hidden plastic vials of water.
- Write the Messages: Write the chosen romantic or movie related words onto the three small black message boards.
- Assemble the Display: Arrange the largest popcorn tub in the center, positioning the others around it to create a tiered, bountiful cluster. Place the three message boards attractively in the spaces between the tubs.
- Add the Accents: Place one bottle of cola on a coaster on each side of the main cluster. Arrange the small bags of red wrapped candy in the foreground to complete this cheerful, cinematic tableau.
34. Modern Gold Swirl Marble Runner
This minimalist yet striking centerpiece uses bold graphic lines and luxurious materials to create an entirely modern aesthetic. A runner of matte dark gray or black paper provides a sophisticated, somber background. A hand painted, organic, wavy line of bright gold paint runs down the entire length of the runner.
The linear gold design leads the eye to a square of white marble with a rough, natural edge. This marble piece features a large, hand painted gold spiral, creating a stunning abstract focal point. This fusion of industrial color, natural stone, and metallic line is highly artistic.
Three small, clear glass bud vases are placed along the gold line, each holding a single delicate pink anemone or daisy. The simplicity of the flowers contrasts beautifully with the strong, graphic design, resulting in a cohesive, luxurious, and understated romantic setting.
Material Required
- Roll of thick, matte dark gray or black paper (for the runner)
- Gold craft paint or gold leaf pen
- One square white marble tile (with a natural edge)
- Three small, clear glass bud vases or bottles
- Three pink anemones or small pink daisy stems (one for each vase)
- Water
Equipment Required
- Fine tipped paintbrush (if using paint)
- Ruler and pencil (optional, for marking the line)
- Sharp floral shears
DIY Instructions
- Create the Runner: Lay the dark paper down the center of your table. Use the gold paint or pen to draw a continuous, flowing, organic wavy line down the entire length of the paper. Allow the paint to dry completely.
- Decorate the Marble: Place the marble tile at one end of the runner. Paint a large, attractive gold spiral design onto the surface of the marble tile. Let this dry completely as well.
- Prepare the Flowers: Fill the three small bud vases with water. Trim the pink flower stems short and insert one bloom into each vase.
- Assemble the Art: Place the decorated marble tile on the runner, ensuring the wavy line connects seamlessly with the spiral design. Place the three bud vases at different points along the gold line, spreading them out attractively. The finished piece should look like a flowing, painted work of art.
35. Festive Berry and Snow Hurricane Lamps
This centerpiece creates a winter wonderland effect using clear glass and vibrant red berries. Four large, tall glass hurricane vases, standing at varying heights, form the main structure. Each vase contains a generous base of sparkling white craft snow or salt.
Tucked into the white base are bright red faux berry sprigs, their vibrant color providing a striking contrast to the snow and the clear glass. Tall white taper candles are securely placed in the center of the snow and berries, ready to illuminate the beautiful scene.
The entire arrangement is set upon a bed of fluffy white faux fur, which instantly enhances the cozy, snowy atmosphere. Two low, wide glass bowls filled with water and floating candles, surrounded by loose red berries, anchor the display at the table level.
Material Required
- Four tall, clear glass hurricane vases (various heights)
- Four large white taper candles
- Large bag of white craft snow or coarse white salt
- Eight to ten sprigs of faux red berries (winter berries or hypericum berries)
- Two wide, shallow glass bowls
- Two white floating candles
- One piece of white faux fur or fluffy white blanket (to use as a runner)
- Small amount of white pebbles or glass beads (for the bottom of the vases)
- Water
Equipment Required
- Lighter
DIY Instructions
- Set the Base: Lay the white faux fur runner or blanket down the center of your table.
- Fill the Vases: Place a thin layer of white pebbles or beads in the bottom of each hurricane vase. Fill each vase about one third to halfway with the white craft snow or salt.
- Place Candles and Berries: Securely press one white taper candle into the center of the snow in each vase. Tuck two or three sprigs of the red berries into the snow around the base of the candle in each vase.
- Prepare Floating Bowls: Fill the two shallow glass bowls with water. Gently float the two white candles on the surface of the water in each bowl. Scatter a small handful of loose red berries onto the water around the candles.
- Assemble the Cluster: Arrange the four tall hurricane vases in a tight, staggered cluster on the faux fur. Place the two low floating bowls in front of the tall vases to complete the snowy, festive arrangement. Light all candles just before serving.
36. Warm Wood Block & Citrus Runner
This centerpiece is a stunning blend of masculine, earthy textures and bright, cheerful citrus elements. The main decorative element is a flowing, serpentine path of natural, unfinished wooden blocks and thick, short wood sticks. This warm, linear structure runs down the center of the table.
Clustered at both ends of the wood path are low, dark brown bowls filled with a vibrant mix of whole oranges, halved pink grapefruits, and bright green limes. Fresh bay leaves or similar dark green foliage are tucked around the fruit, providing deep color contrast and an herbal fragrance.
Three thick, low yellow pillar candles are nestled directly into the wooden blocks in the center of the arrangement, providing a warm, contrasting color and soft light. This design uses simple shapes and colors to create an organic, textural, and sophisticated tableau.
Material Required
- Assortment of unfinished wooden blocks and thick sticks (small enough to cluster)
- Two small, low dark brown ceramic bowls
- Four whole oranges
- Two pink grapefruits (halved)
- Two to three whole limes
- Two to three sprigs of fresh bay leaves or similar dark green foliage
- Three thick, short yellow pillar candles (uniform height is appealing)
- Small decorative wooden rounds (optional, for coasters)
Equipment Required
- Sharp knife (for halving the grapefruit)
DIY Instructions
- Build the Wood Path: Lay the wooden blocks and thick sticks directly down the center of your table, arranging them to create a dense, flowing path about six inches wide.
- Set the Candle Focal Point: Nestle the three yellow pillar candles directly into the wooden blocks in the center of the path, ensuring they stand securely upright.
- Prepare the Citrus Bowls: Place the two dark brown ceramic bowls, one at each end of the wood path. Arrange the whole oranges, one halved grapefruit, and the whole limes into each bowl. Tuck the fresh bay leaves around the fruit to fill the space and provide deep color.
- Connect the Elements: Scatter a few extra wooden sticks and blocks outside the bowls to visually connect the fruit displays to the central candle section. Light the candles to complete this warm, aromatic, and rustic design.
37. Cascading Ribbon and Lily Tower
This dramatic centerpiece focuses on height and flowing color, creating a striking focal point for a round table. A tall, slender glass vase holds a beautiful, simple bouquet of pink and white oriental lilies, their elegant heads standing well above the vase rim.
The most captivating element is the volume of ribbon cascading from the vase’s neck. Long, wide ribbons in shades of burgundy, wine, rose, and cream hang down to the tabletop, creating a flowing, colorful skirt that contrasts with the white table. The ribbons are spread out to form paths across the table surface.
Small glass bowls filled with pink candy coated chocolates are placed at the base of the ribbons, their spherical shape providing a soft contrast to the linear ribbons. The color repetition from the lilies to the ribbons to the candy creates a sophisticated, cohesive, and incredibly lush aesthetic.
Material Required
- One tall, slender glass cylindrical vase (approximately 14 to 18 inches tall)
- Three to five stems of pink and white oriental lilies
- Several yards of wide ribbon (in shades of burgundy, wine, rose, and cream)
- Three small, clear glass bowls
- One cup of pink candy coated chocolates (or similar round pink candy)
- Water
- Floral tape or elastic band
Equipment Required
- Sharp scissors
DIY Instructions
- Prepare the Lilies: Fill the tall vase with water. Trim the lily stems to a length that allows the flower heads to stand prominently at the top of the vase.
- Attach the Ribbons: Cut the various colors of ribbon into very long strips (long enough to reach the table). Gather the strips and tie them securely together with floral tape or an elastic band around the neck of the vase.
- Arrange the Cascade: Insert the lilies into the vase. Carefully arrange the ribbon strips, allowing them to hang down and spread out evenly across the table surface, forming distinct color bands radiating from the center.
- Add the Candy Accents: Place the three small glass bowls onto the table where the ribbons spread out. Fill each bowl with the pink candy coated chocolates. Scatter a few loose candies onto the ribbons to enhance the playful color.
- Final Look: The dramatic height of the lilies and the flowing, multi colored ribbon cascade make this a truly unique and luxurious table display.
38. Global Spice and Lentil Jars

This highly textural centerpiece uses a linear arrangement of spice filled jars, creating an unexpected, vibrant runner. A mix of small glass mason jars are lined up along a dark runner, which is set upon a natural burlap mat.
Each jar is filled with a different colored dry food, such as split green peas, various lentils, coffee beans, and bright pink peppercorns. This simple technique provides a striking visual palette of earthy colors and varied textures. The layers of pulses and beans act as a beautiful, natural base.
Small dried orange slices and tiny, bright red chrysanthemum blooms are tucked into the tops of the jars, providing fragrant accents and contrasting pops of color. The entire arrangement is grounded on a warm, round wooden tray, adding another layer of organic texture.
Material Required
- Ten to twelve small glass mason jars or spice jars (various heights are appealing)
- Assortment of dry goods (e.g., green split peas, brown lentils, red lentils, pink peppercorns, chickpeas, etc.)
- Three to five small, bright red chrysanthemum blooms or similar flowers
- Three to four small dried orange slices
- One small round wooden tray
- Dark colored table runner
- Burlap or linen runner (optional, to layer)
Equipment Required
- Small funnel (optional, for filling jars)
- Scissors or floral shears
DIY Instructions
- Set the Base: Lay the runners down the center of your table, placing the wooden tray at the center point.
- Fill the Jars: Using the funnel, carefully fill each glass jar with a different dry ingredient. Ensure the layers are visually attractive.
- Add the Accents: Trim the flower stems very short. Gently insert the trimmed red flowers into the tops of the filled jars, using the dry ingredients to hold the stem upright. Position the dried orange slices artfully on the rim of a couple of jars.
- Assemble the Display: Arrange the filled jars onto the wooden tray in a tight, attractive cluster. Place the remaining jars directly onto the dark runner, creating a cohesive, linear display that flows outward from the wooden tray.
39. Winter White Trough Garden
This minimalist centerpiece is a striking modern landscape, using height and texture in a highly controlled manner. A long, shallow black wooden trough is filled with a textured, sculpted white material, possibly plaster or clay, that is molded to look like a thick layer of snow or whipped cream.
Standing tall in the white base are five to seven vertical stalks of white tuberoses or similar spiky white flowers, interspersed with shorter, clustered white stock flowers. The arrangement creates a rhythmic, linear display of white and pale green against the stark black base.
The arrangement uses repetition of material for dramatic effect. Small black plates placed nearby contain matching white sculptures or decorative meringue like pieces, mimicking the textured white material in the trough. This design is clean, graphic, and strikingly contemporary.
Material Required
- One long, shallow rectangular black wooden trough or planter box
- White plaster of Paris, spackle, or thick textured craft paste
- Five to seven stalks of white tuberoses or similar spiky white flowers
- Three to five clusters of white stock flowers (or similar filler flower)
- Three small black serving plates
- Small white sculpted pieces (or thick cut white clay/plaster, for plate decor)
- Water (if using fresh flowers)
Equipment Required
- Small trowel or spreading tool (for sculpting the white base)
- Floral wire or small plastic vials (to hold water for fresh flowers)
- Sharp floral shears
DIY Instructions
- Prepare the Base: Place the black trough in the center of your table. Fill the trough with the white textured material. Use a spreading tool to sculpt the material into a thick, wavy, or ridged texture, making it appear like snow or frosting. Let the material dry if required.
- Insert the Flowers: If using fresh flowers, you will need to place small, water filled plastic vials or floral picks hidden within the white base to hold the stems. Insert the tall tuberoses into the white base, spacing them evenly. Insert the shorter white stock flower clusters into the spaces between the tall stalks.
- Decorate the Plates: Place one small white sculpted piece onto each of the three small black serving plates.
- Assemble the Scene: Arrange the three black plates along the side of the trough, ensuring the white sculpture on the plates visually connects to the white texture in the trough. The contrast between the black and white creates a stunning, highly artistic modern display.
40. Pink Grapefruit & Gerbera Salt Bed
This bright, cheerful centerpiece uses a textural bed of pink Himalayan salt and vibrant citrus fruit for a refreshing, high energy look. A large, rectangular white platter holds a thick, luminous layer of pink Himalayan sea salt, creating a stunning, colorful base.
Halved pink grapefruits are placed prominently on the salt bed, their bright flesh contrasting wonderfully with the pale pink salt. Bright pink gerbera daisies, known for their bold color and graphic shape, are placed in small, low glass votives and nestled into the salt.
Small, clustered bouquets of pale green and pink hydrangeas are tucked into the arrangement, adding variation in shape. Small silver Hershey Kiss chocolates are scattered throughout, adding a playful, glittering touch. This is a wonderfully energetic, accessible, and brightly colored display.
Material Required
- One large rectangular white serving platter
- Two cups of pink Himalayan sea salt (coarse grain)
- Two whole pink grapefruits (halved)
- Four bright pink gerbera daisies
- Two small clusters of pale green or light pink hydrangeas (or similar filler flower)
- Four to six small, low clear glass votive holders or small jars
- Small handful of silver foil wrapped chocolates (e.g., Hershey Kisses)
- Water
Equipment Required
- Sharp knife (for halving the grapefruits)
- Sharp floral shears
DIY Instructions
- Create the Salt Bed: Place the large white platter in the center of your table. Pour the pink Himalayan sea salt onto the platter and gently spread it to create a thick, even layer that covers the entire surface.
- Prepare the Flowers: Fill the four to six small glass votives or jars with water. Trim the stems of the pink gerbera daisies very short and insert one bloom into each of the small glass jars.
- Place the Fruit and Flowers: Nestle the four halved grapefruits, cut side up, into the salt bed, placing them at the four corners of the platter. Place the small jars of gerbera daisies into the salt bed among the fruit.
- Add the Fillers: Gently tuck the small clusters of hydrangeas into the remaining open spaces in the salt bed.
- Scatter the Chocolate: Scatter the silver foil wrapped chocolates randomly across the salt bed. The reflective foil adds a playful sparkle against the pink salt. This centerpiece is bright, fragrant, and visually exciting.
We’ve explored a wide spectrum of creative centerpiece ideas, proving that a lack of time does not have to mean a lack of elegance or visual impact. From the moody drama of deep red roses and fruit to the clean, architectural look of wood blocks and citrus, every design offers a unique way to celebrate romance.
Remember that the most successful tablescapes blend texture, height, and cohesive color. Do not be afraid to mix natural elements like stones and moss with luxurious fabrics like velvet or high gloss metals. This contrast adds immediate depth and sophistication to any hurried setup.
The key takeaway here is simply to begin with what you have on hand. Whether you choose a minimalist grouping of black vases or an overflowing bowl of spice and candles, these ideas provide the fast track to a stunning Valentine’s dinner. Enjoy the process of creating a beautiful, personalized space for your special night.
Key Takeaways
Simplicity Drives Elegance
Focusing on one or two strong elements, like floating candles in water or single stems in bud vases, often results in the most chic and timeless displays. Less clutter makes the remaining items look more intentional and luxurious.
Texture is Transformation
Combine varied materials for instant depth. Pair rough elements (driftwood, moss, river stones) with smooth finishes (polished glass, silver, metal). This interplay between surfaces is what makes the arrangement feel curated, not rushed.
Light is Atmosphere
Ambient, flickering light is essential for romance. Use groupings of votive candles, or integrate lamps and lanterns into your design. The soft light instantly elevates the mood and highlights the colors and textures you have arranged.