Is your bedroom feeling more “storage closet” than “sensual retreat”? You are certainly not alone. Many of us overlook the bedroom when decorating, leaving it feeling cold, cluttered, or simply uninspiring. This space, however, deserves to be a haven for relaxation and intimacy, especially as we approach Valentine’s Day.

Fortunately, you do not need a full renovation to transform the mood. Simple swaps in color, lighting, and texture can dramatically change the atmosphere in just an afternoon. Focusing on rich reds and soft pinks allows you to convey passion and sweetness while keeping the look chic and sophisticated.
We have compiled 39 easy, high-impact decor swaps, complete with step by step DIY guides. These tips will help you banish boredom and inject genuine romance into your sleeping quarters, proving that a loving atmosphere is just a few beautiful accessories away.
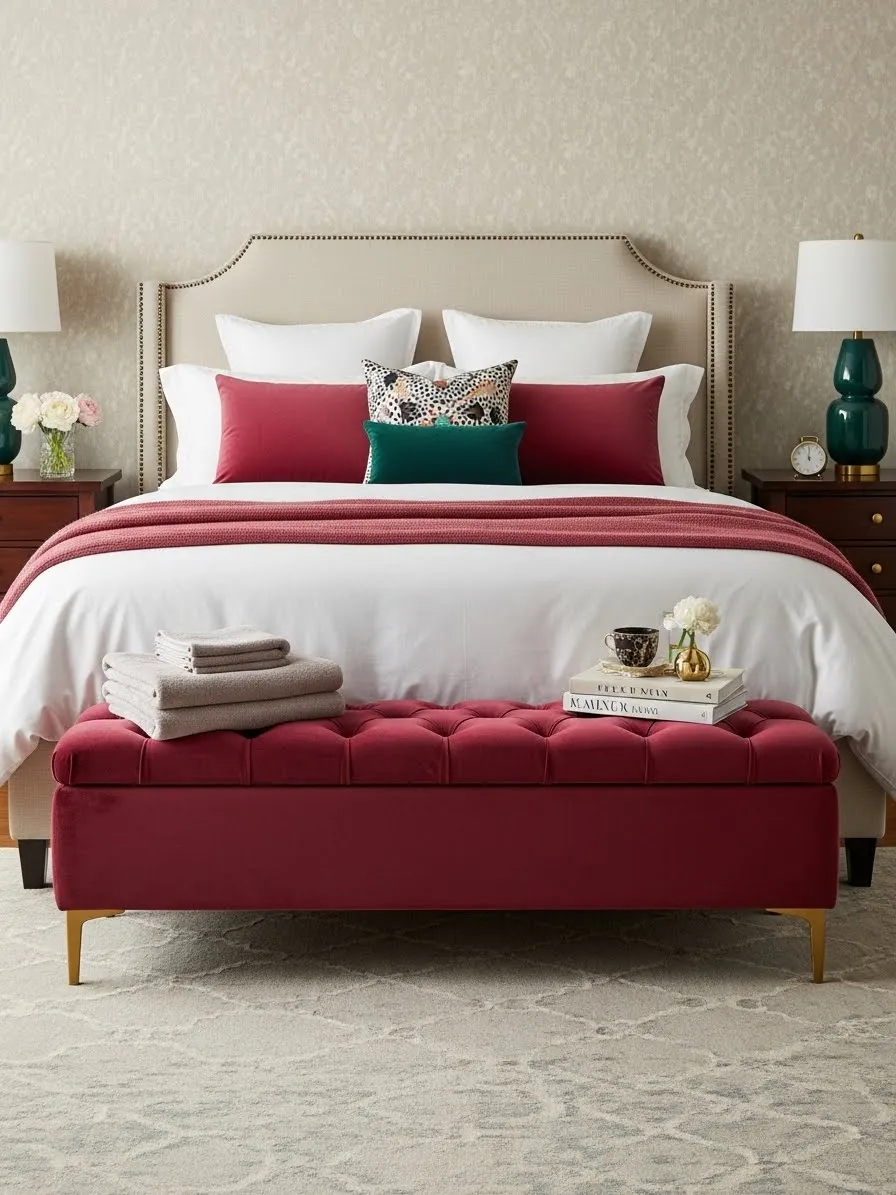
1. Blush Velvet Bedding Collection
Item Name: Rose Petal Dreamscape Pillow Set
Transforming your sleeping space into a romantic haven starts right here with layering various shades of pink and rose. Notice how the combination of soft blush sheets and rich mauve velvet cushions creates immediate texture and depth. The crushed velvet Euro shams add a sophisticated shimmer, contrasting beautifully with the smooth, matte finish of the standard pillowcases. This thoughtful layering instantly elevates a mundane bed into a luxurious, inviting retreat perfect for celebrating love.
The centerpiece bolster pillow, upholstered in a deep, dusty rose velvet, provides excellent lumbar support and a crucial pop of color to anchor the arrangement. Using varied tones, from almost white to a deep berry pink, keeps the look from feeling flat or childish. Consider this palette a foundation for adding subtle metallic accents, like the displayed copper tray, which enhance the warmth and intimacy of the setting.
Materials Required
- One standard-sized bolster pillow insert (about 6 inches by 18 inches).
- 1.5 yards of crushed or smooth velvet fabric in a dusty rose or mauve color.
- One matching zipper, 14 inches long (or slightly shorter than your insert).
- Coordinating thread.
Equipment Required
- Sewing machine.
- Fabric scissors.
- Measuring tape or ruler.
- Straight pins.
- Iron and ironing board.
DIY Instructions: Simple Bolster Pillow Cover
- Measure and Cut the Fabric: Measure the circumference of your bolster pillow insert. Add 1 inch for seam allowances. Measure the length of the insert and add 1.5 inches for seam allowances. Cut a rectangle from your velvet fabric using these measurements. Example: If your insert is 18 inches long and 20 inches around, cut a piece 21.5 inches long by 21 inches wide.
- Prepare the Zipper Opening: Lay your fabric rectangle flat, face down. Fold the rectangle in half lengthwise, right sides together, aligning the long edges. Pin the edges together. Now, find the center of this long seam. Mark where the zipper should go (centered, leaving about 2 inches of seam at each end).
- Baste the Zipper Area: Sew the long seam using a normal stitch length, except for the section where the zipper will be. Sew this zipper section with a temporary basting stitch (a long stitch length). Sew the remaining ends of the seam with a regular stitch length. Press the entire seam open flat using a warm iron.
- Insert the Zipper: Place your zipper face down over the basted seam opening on the wrong side of the fabric. Pin it in place, making sure the teeth are centered over the seam line. Using your sewing machine and a zipper foot, carefully stitch the zipper to the fabric, sewing down one side, across the bottom, and up the other side.
- Finish the Zipper: Turn the fabric to the wrong side. Use a seam ripper to carefully remove the temporary basting stitches, revealing the zipper underneath. This is how you open and close the cover.
- Sew the Ends: Turn the cover inside out, so the right sides are facing. Fold one short end over about half an inch and press, then fold it over again half an inch and press to create a neat finished edge for the ends of the cover. Repeat on the other short end. Sew these short ends closed to create the cylindrical shape.
- Insert the Pillow: Turn the cover right side out and insert your bolster pillow form. Zip it closed, and place your romantic new pillow on the bed.
2. Low-Lit Red Table Lamps
Item Name: Ruby Glow Bedside Sconces
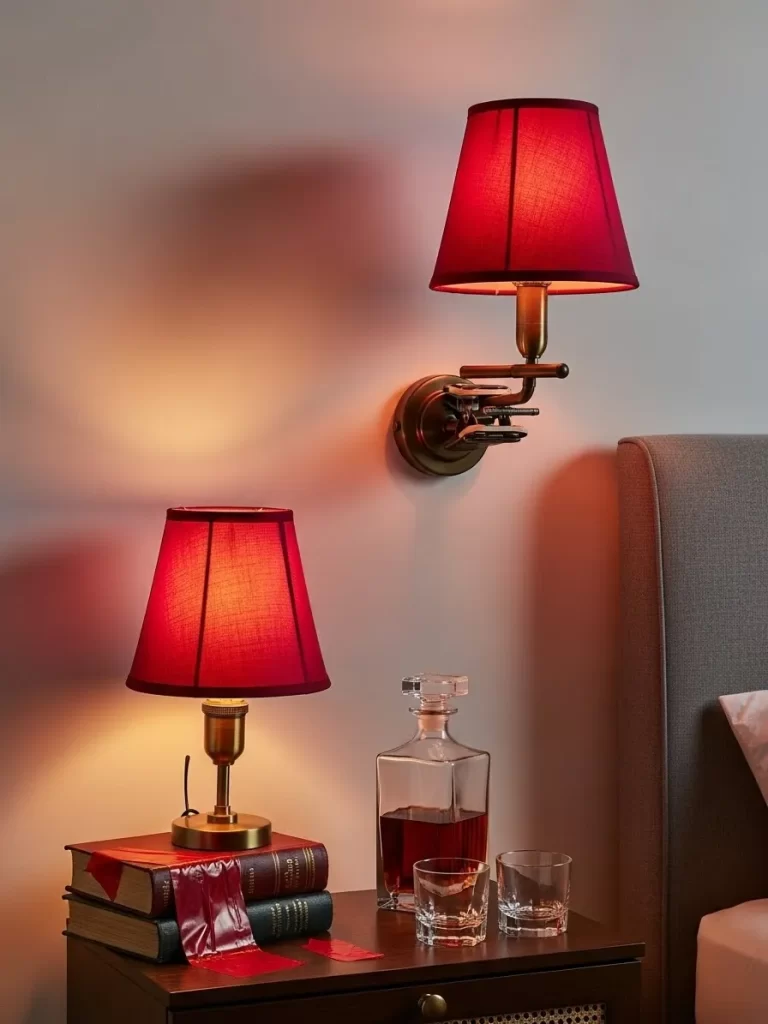
The power of lighting to set an amorous tone cannot be overstated; harsh overhead fixtures are certainly a mood killer. These twin bedside lamps, featuring deep ruby red shades, cast a wonderfully warm and flattering glow across the room. The subtle, diffused light creates shadows and highlights that make the entire space feel immediately cozier and much more intimate.
Notice the clever placement of the two different light styles: a small table lamp anchored by a stack of vintage books and a swing-arm sconce mounted directly to the wall. This combination offers layered light sources, preventing any dark corners and allowing you to adjust the intensity as needed. Changing out your current white or beige lamp shades for a rich red hue is perhaps the fastest way to inject romance into the environment.
Materials Required
- Two small lamps or sconces with detachable shades (can be existing fixtures).
- 1/2 yard of deep red semi-sheer fabric (like linen or thick organza).
- Fabric glue or hot glue gun and glue sticks.
- Spray adhesive (optional, for a smoother finish).
- A small piece of red ribbon or trim (optional).
Equipment Required
- Scissors.
- Measuring tape.
- Iron and ironing board.
- Safety glasses (if using spray adhesive).
DIY Instructions: Custom Red Lampshade Cover
- Measure the Existing Shade: Carefully measure the height of your current lampshade. Next, measure the circumference (distance around) the top and bottom edges. Many shades taper, so be sure to get both measurements.
- Cut the Fabric: Using the measurements from Step 1, cut a piece of your red fabric. It should be slightly taller than the shade (add about 1 inch to the height for wrapping) and a few inches longer than the bottom circumference measurement. This overlap allows you to secure the ends neatly. Note: If your shade is highly tapered, you might need to trace the shade onto the fabric to get the correct shape.
- Prepare the Fabric: Lay the fabric face down and press it lightly with an iron to remove any wrinkles. This ensures a clean application.
- Attach the Fabric (Glue Method): Starting at the back seam of the lampshade, apply a thin, even line of fabric glue along the edge of the shade’s frame. Line up the edge of your red fabric and press it firmly into the glue.
- Wrap and Secure: Slowly roll the lampshade along the fabric, applying a thin layer of glue (or spray adhesive) to the shade surface as you go, keeping the fabric taut and straight. When you reach the beginning edge, fold the raw end of the fabric under by about half an inch to create a clean seam, then glue this folded edge down over the starting point.
- Finish the Edges: Trim the excess fabric at the top and bottom, leaving just enough (about half an inch) to tuck inside the shade’s rim. Use glue to fold and secure this fabric against the inner frame of the shade. If desired, glue a piece of decorative red ribbon around the top and bottom outer edges for a polished look.
3. Coral Fluffy Throw and Texture
Item Name: Fireside Snuggle Throw
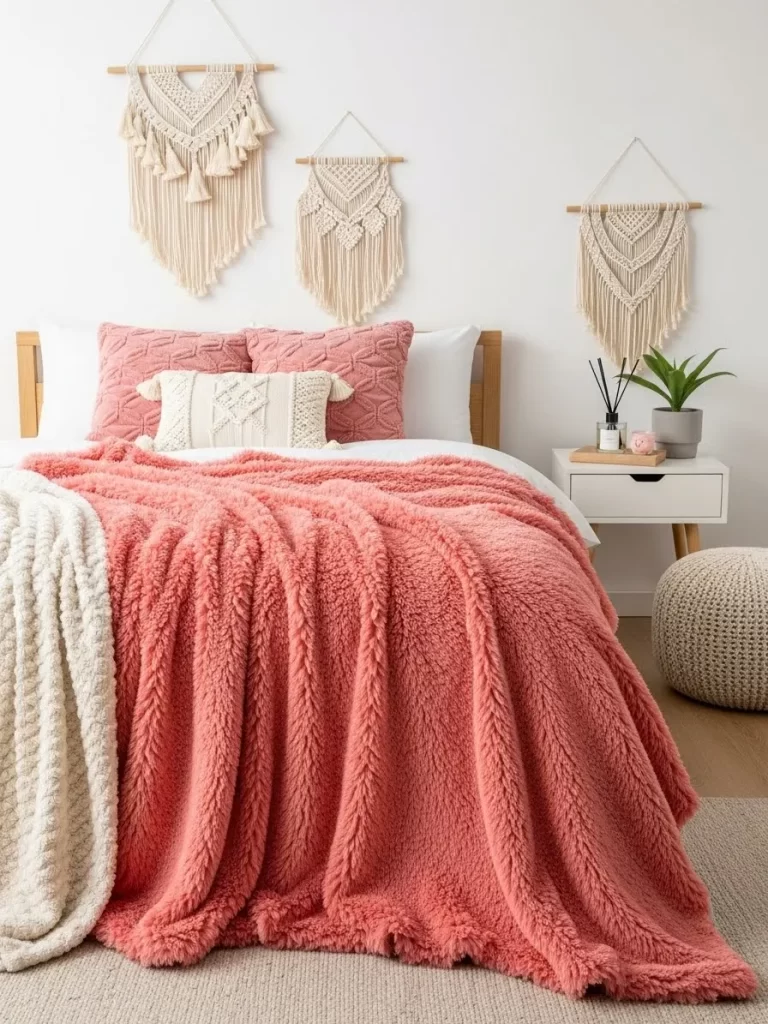
Texture plays a key role in making a bedroom feel utterly irresistible and inviting. This sumptuous, deep coral throw blanket draped across the bed provides an immediate focal point and tactile warmth. The plush, shaggy texture instantly makes you want to curl up underneath it, replacing a boring, flat comforter with something wonderfully cozy.
The layering of textures continues with the matching square pillows, which feature an intriguing, tufted geometric pattern. Combining this soft, modern shag with the more structured macrame wall hangings prevents the room from feeling one dimensional. The combination of coral, cream, and white provides a vibrant but balanced color scheme, perfect for a cheerful and passionate celebration.
Materials Required
- 3 yards of long-pile, shaggy, or sherpa fleece fabric in a coral or red tone.
- Scissors.
- Sewing machine or needle and thread (if you choose to hem).
Equipment Required
- Measuring tape.
DIY Instructions: Simple No-Sew Shaggy Throw
- Prepare the Fabric: Lay your three yards of fabric out on a large, clean surface, ensuring the shaggy side is facing down (the wrong side is facing up). Smooth out any wrinkles or folds.
- Square the Edges: Using your measuring tape, check that all four corners are perfectly square. If the edges are slightly uneven from the store cut, gently trim them straight using sharp scissors. The goal is a perfect rectangle.
- Round the Corners (Optional): For a softer look, you can slightly round the corners. Place a small plate or cup at one corner and trace the curve. Cut along this curved line, and use the trimmed piece as a template for the other three corners.
- Finish the Edges (No-Sew): Since shaggy fleece does not typically fray, you can choose to leave the edges raw for a clean, simple, modern finish. The natural texture will hide the cut edge well.
- Finish the Edges (Simple Hem): If you prefer a hem, fold the raw edge over about half an inch all the way around, and press lightly. Then, fold it over again half an inch and pin it in place. Use a sewing machine or hand needle to sew a straight line along the inner folded edge. This creates a neat, finished look that frames the blanket.
- Toss and Display: Drape the throw casually across the foot of the bed or over a chair to immediately boost the room’s texture and color profile.
4. Heart Wall Decals and Love Light
Item Name: Floating Hearts Accent Wall
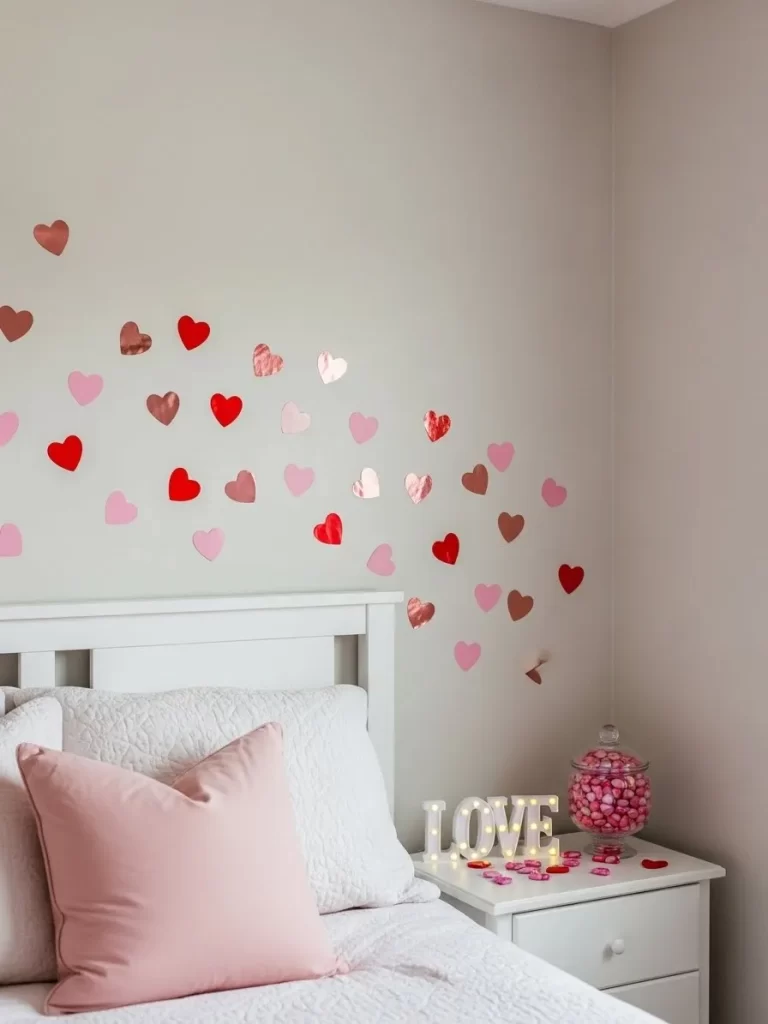
A quick, high-impact swap is essential for temporary holiday decorating, and these vinyl heart decals fit the bill perfectly. Spreading the hearts in a constellation-like pattern above the headboard draws the eye upward, making the room feel festive and lively without being overwhelming. The mix of deep red, pale pink, and metallic rose gold adds a sophisticated glimmer when catching the light.
This decorating technique is especially appealing because it uses easily removable materials, leaving no damage to the walls once Valentine’s Day passes. The luminous “LOVE” sign on the bedside table provides a warm, concentrated glow that acts as a secondary light source and a charming message. Finishing the scene with a jar of pink candies ensures the theme is carried through with playful charm.
Materials Required
- Self-adhesive vinyl in red, light pink, and metallic rose gold (or pre-cut heart decals).
- Silhouette or Cricut machine (if cutting your own decals) or a simple craft punch in a heart shape.
- Transfer tape (optional, but helpful for precise placement).
- Rubbing alcohol and a clean cloth.
Equipment Required
- Ruler or measuring tape.
- Level (optional, for straight placement).
- Plastic credit card or squeegee (for smoothing decals).
DIY Instructions: Scattered Heart Wall Decals
- Prepare the Surface: Ensure the wall area is clean and dust-free. Lightly wipe the area above the bed with rubbing alcohol on a clean cloth. Allow the wall to dry completely; this ensures the adhesive sticks properly.
- Cut the Decals: If you are cutting your own, use your cutting machine or craft punch to create various sizes of hearts from your three colors of vinyl. Aim for a variety of sizes for a dynamic, scattered look.
- Plan the Layout: Before peeling the backing, lightly position the decals on the wall with painter’s tape or take a quick photo of the arrangement you want. Start placing the largest hearts first, focusing on the area directly above the headboard. The pattern should gently taper off as it moves outwards.
- Apply the Decals: Peel the backing from a heart. Place it gently onto the desired spot on the wall. Use a plastic card or squeegee to firmly rub over the decal, pressing out any air bubbles, starting from the center and moving outwards.
- Remove the Transfer Tape (If Used): If you used transfer tape, carefully peel it away at a sharp angle, leaving the vinyl heart stuck firmly to the wall.
- Create the Scattered Effect: Continue placing the hearts, ensuring you mix the colors and sizes randomly to create an organic, floating effect, rather than a rigid pattern. Stand back frequently to assess the overall balance of the arrangement.
5. Rich Red Satin Sheet Set
Item Name: Crimson Silk Sensations Bedding

Nothing says luxury and romance quite like the deep sheen of satin, and this crimson red set instantly transforms a basic bed into a showstopper. The rich color creates a sophisticated, passionate backdrop, contrasting sharply yet beautifully with the crisp white sheets underneath. This layering effect allows the deep red to truly stand out, making a powerful statement.
The fluidity of the material naturally drapes and catches the light, giving the entire bed a dynamic and expensive appearance. Notice how the matching pillowcases frame the headboard, pulling the whole look together. The combination of black, white, and this stunning, sensual red proves that a romantic space can still be strikingly modern and elegant.
Materials Required
- 6 to 8 yards of charmeuse satin or similar fabric in a rich red color (quantity depends on bed size and desired drop).
- Measuring tape.
- Coordinating thread.
Equipment Required
- Sewing machine.
- Iron and ironing board.
- Fabric scissors.
DIY Instructions: Simple Flat Sheet Overlay
- Measure the Bed: Measure the width and length of your mattress. Add about 20 inches to the width and 10 inches to the length for a generous drape and hemming. This will serve as a decorative overlay. Example: For a queen bed (60×80 inches), cut a piece roughly 80×90 inches.
- Cut the Fabric: Carefully lay out your satin fabric, smoothing any wrinkles. Satin can be slippery, so cutting slowly and precisely is important. Cut the measured rectangle.
- Prepare the Hem: Satin tends to fray, so a clean hem is necessary. Along all four edges, fold the raw edge over about 1/4 inch and press gently with a low-heat iron (always test on a scrap first, as satin can melt).
- Create a Double Hem: Fold the edge over another 1/4 inch, creating a double fold that fully encloses the raw edge. Pin this hem securely all the way around the perimeter.
- Stitch the Hem: Using your sewing machine, sew a straight line close to the inner folded edge of the hem. Remove all pins as you sew. Take your time to keep the stitches even and straight.
- Display the Overlay: Place the finished satin sheet directly over your existing comforter or duvet cover, centering it on the bed. Allow the beautiful material to pool and drape dramatically down the sides, instantly creating a romantic, luxurious texture.
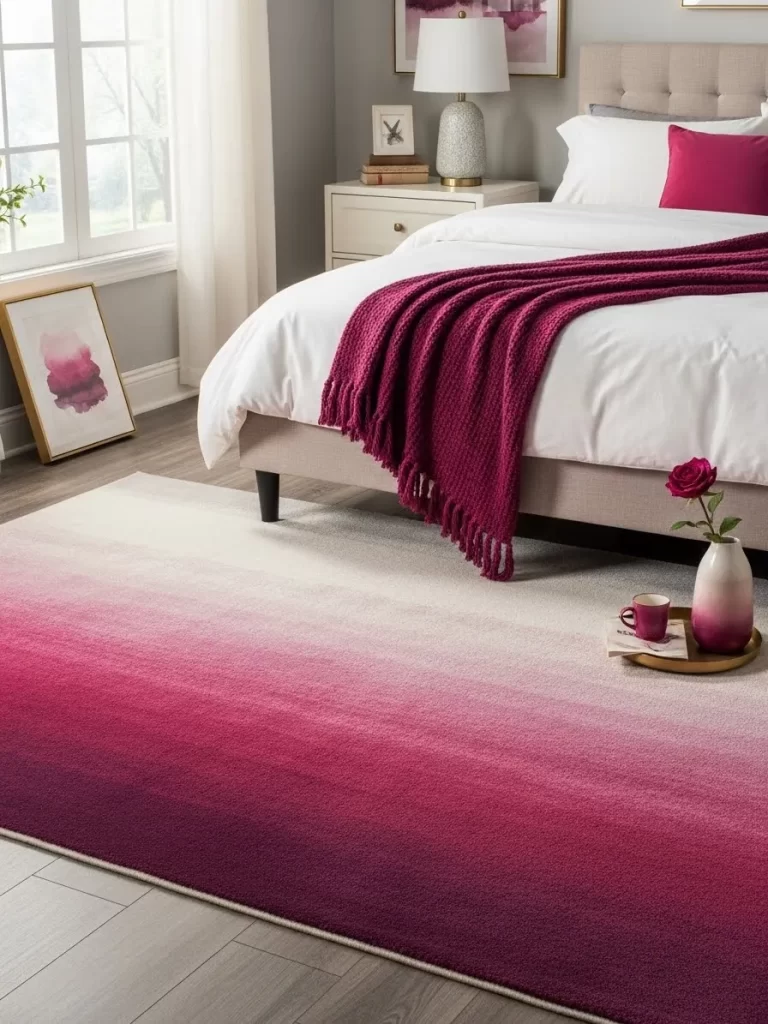
6. Blush Pink Round Rugs
Item Name: Soft Step Bedside Shags
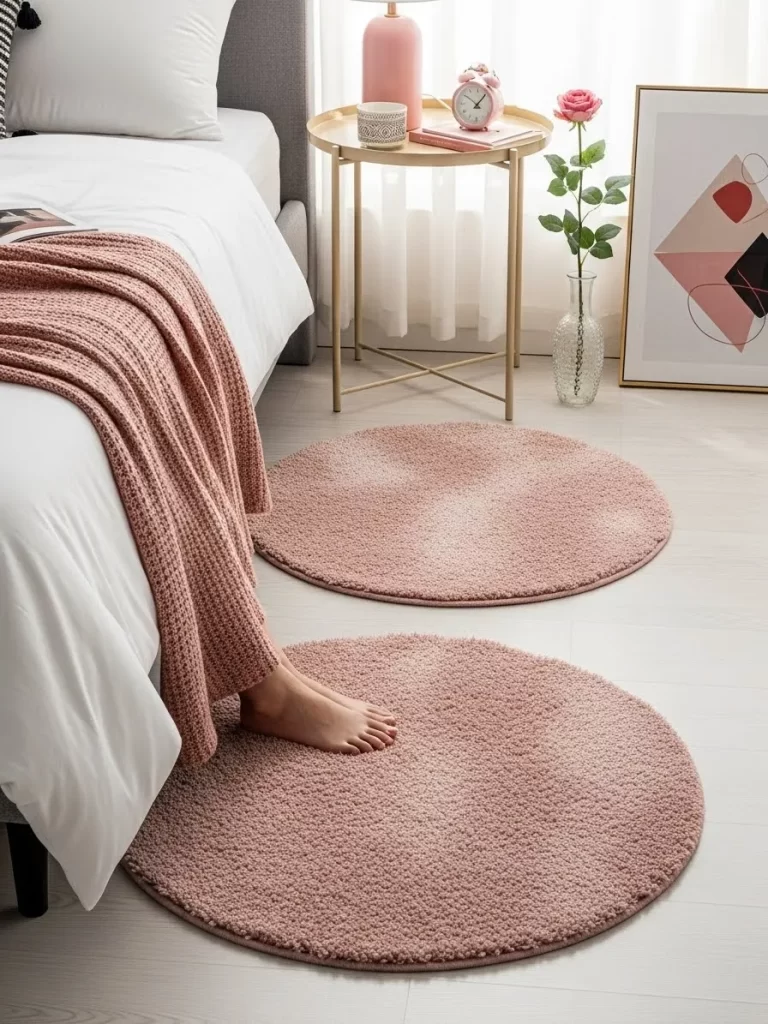
The sensation of stepping onto a cold, hard floor first thing in the morning can quickly ruin a mood. Introducing soft, shaggy rugs beside the bed is an often overlooked way to boost comfort and create intimacy. These blush pink, round rugs provide a velvety, cozy landing spot that feels soothing beneath your bare feet.
The circular shape softens the room’s overall geometry, which is typically dominated by straight lines from the bed frame and walls. Placing two smaller rugs—one on each side—instead of a single large area rug defines the personal spaces on either side of the bed. This subtle addition of color and texture makes the journey from bed to floor a gentle transition.
Materials Required
- 1.5 to 2 yards of thick, long-pile shag rug material (available by the yard at fabric stores).
- Non-slip rug backing material (e.g., rubberized shelf liner).
- Hot glue gun and glue sticks or heavy-duty fabric adhesive.
Equipment Required
- Large paper or poster board for creating a template.
- Fabric scissors or utility knife.
- Marker or chalk.
DIY Instructions: Cozy Round Shag Rugs
- Create the Template: Decide on the size of your round rugs (e.g., 30 inches in diameter). Fold your large paper or poster board in half, then in half again to create a square. Place the corner with the two folds at the center point. Measure out half the diameter (the radius, e.g., 15 inches) from the center fold and mark it. Use a string tied to a marker to draw a perfect quarter-circle arc. Cut along this line and unfold the paper to reveal a round template.
- Cut the Rug Material: Lay the shag material wrong side up. Pin or trace your paper template onto the material using a marker or chalk. Carefully cut out the circle using sharp scissors or a utility knife. Repeat this step for the second rug.
- Cut the Non-Slip Backing: Place the finished shag circle on top of the non-slip material and trace around it. Cut the backing out slightly smaller than the shag circle (about 1 inch smaller all around). This keeps the backing hidden.
- Attach the Backing: Apply a generous amount of hot glue or heavy-duty adhesive to the perimeter and center of the wrong side of the shag rug. Immediately press the non-slip backing material firmly onto the glue.
- Cure Time: Allow the adhesive to cure completely, following the manufacturer’s instructions. This ensures the backing is firmly attached and the rug is safe to walk on.
- Place the Rugs: Position one finished rug on each side of the bed, right where your feet naturally land when getting up.
7. Light Pink Canopy with Fairy Lights
Item Name: Romantic Sheer Ceiling Drape
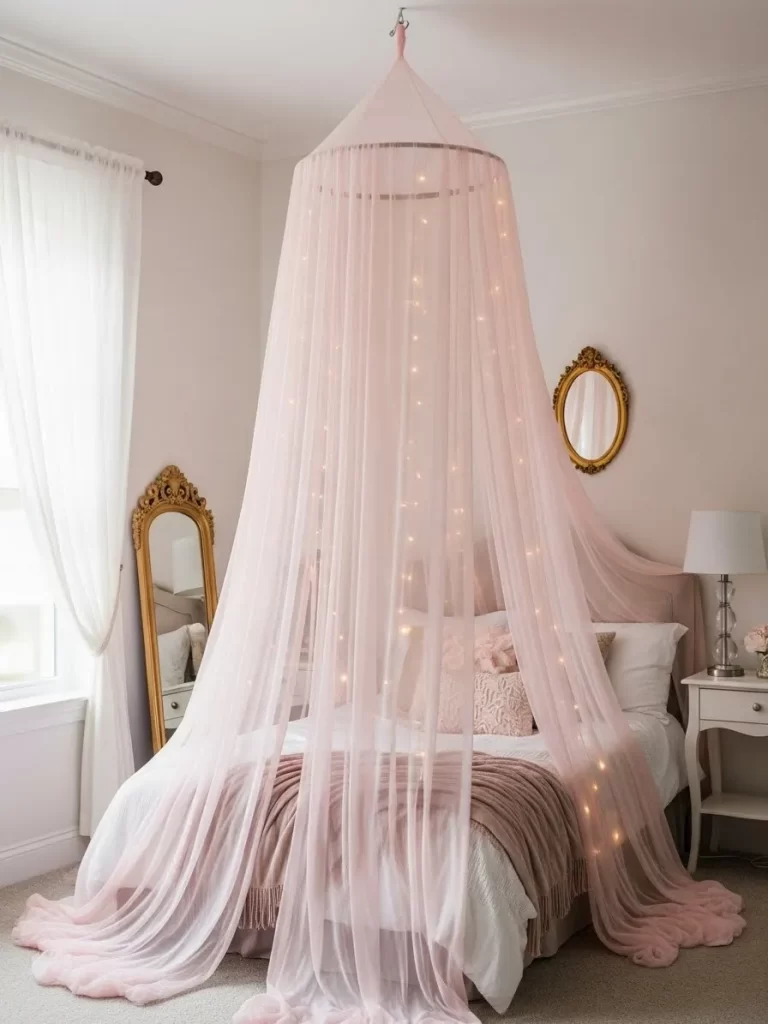
For an undeniable touch of storybook romance, suspending a light, sheer canopy over the bed is the ultimate transformation. The pale blush netting softens the entire space, creating an instant sense of enclosure and intimacy within the room. It feels like a beautiful, private world made just for two.
The integration of tiny, warm-toned fairy lights within the fabric adds a magical, ethereal sparkle. When switched on, the lights cast a gentle, scattered glow that is flattering and dreamy, far more captivating than standard lamps. The way the sheer fabric puddles gently on the floor contributes to the overall feeling of luxurious, cloud-like comfort and elegance.
Materials Required
- 6 to 8 yards of very lightweight, sheer fabric (tulle, organza, or sheer curtain material) in light pink or white.
- One circular embroidery hoop (about 20 inches in diameter).
- A string of battery-operated LED fairy lights (warm white recommended, 10-15 feet).
- One ceiling hook and anchor (ensure it can hold a few pounds).
Equipment Required
- Needle and thread or sewing machine.
- Scissors.
- Ladder or sturdy step stool.
- Drill (for ceiling hook installation).
DIY Instructions: Fairy Light Bed Canopy
- Prepare the Fabric: Cut the sheer fabric into two or three long panels, depending on the width of your fabric. The length should be measured from your ceiling hook point down to the floor, plus about 2 feet for draping and puddling.
- Create the Hoop Frame: Separate the inner and outer rings of the embroidery hoop. Gather the top edge of one fabric panel and sew a running stitch around the edge to gather it slightly. Repeat for the other panels.
- Attach Fabric to Hoop: Place the gathered fabric ends over the inner hoop ring. Push the outer ring over the inner ring, clamping the fabric securely in place. Adjust the gathers so the fabric is evenly distributed around the hoop.
- Install the Hook: Choose a point directly above the center of your bed. Drill a small pilot hole, insert the ceiling anchor, and screw in the hook until it is securely fastened to the ceiling.
- Drape the Lights: Wrap the string of battery-operated fairy lights loosely around the outer ring of the hoop. Allow the string of lights to gently cascade down through the sheer fabric, weaving them in and out of the material for a scattered, integrated look. Secure the battery pack to the top of the hoop.
- Hang the Canopy: Loop a piece of sturdy string or ribbon through the top of the hoop and hang it from the newly installed ceiling hook. Allow the fabric to fall gently around the bed, creating your intimate, glowing enclosure.
8. Bold Geometric Red and White Bedding
Item Name: Pop Art Passion Duvet Set

For couples who favor a more energetic and modern aesthetic, injecting graphic patterns in vibrant red is a fantastic approach. This duvet cover and pillowcase set utilizes a striking geometric pattern—bold white squares on a red background—creating an eye-catching, invigorating centerpiece for the room. It delivers intense passion without relying on traditional lace or flowers.
The contrasting art pieces on the wall reinforce this contemporary vibe, featuring a zigzag chevron and a cubist print. The use of repeating patterns adds a sense of rhythm and fun to the space, showing that romantic decor can be lively and playful. This look keeps the mood lighthearted while still embracing the traditional colors of love.
Materials Required
- An existing plain white or light-colored duvet cover and two pillowcases.
- 1/2 yard of heavy-duty fabric paint (red or coral).
- Painters tape (1 inch wide).
- Cardboard sheet (must fit inside the duvet cover).
Equipment Required
- Paintbrush or foam roller.
- Iron and ironing board (to heat set the paint).
DIY Instructions: Geometric Pattern Duvet Cover
- Prepare the Duvet: Wash and thoroughly dry your duvet cover and pillowcases. Lay the duvet cover flat on a large surface. Insert the cardboard sheet inside the cover to prevent the paint from bleeding through to the back layer.
- Create the Pattern Grid: Use the painter’s tape to mark out your geometric design. For the featured square grid, place long vertical strips of tape spaced evenly across the duvet. Then, place horizontal strips of tape, ensuring they intersect the vertical strips to form squares. The parts covered by the tape will remain white.
- Secure the Tape: Press down firmly on all the tape edges, especially where they intersect, to ensure no paint can seep underneath.
- Paint the Fabric: Using your foam roller or paintbrush, apply an even coat of the red fabric paint over the entire taped area. Apply a second coat if necessary for full coverage, allowing the first coat to dry slightly according to the paint instructions.
- Remove the Tape: Crucially, remove the painter’s tape while the paint is still slightly damp. Pull the tape off slowly and carefully to reveal the crisp, white geometric lines underneath. Let the paint dry completely.
- Heat Set the Paint: Once fully dry, follow the fabric paint manufacturer’s instructions to heat set the design with an iron. This step makes the design permanent and washable. Repeat the process for the pillowcases, adjusting the grid size as needed.
9. Pink Glass Carafe and Drinkware
Item Name: Rose Water Bedside Set
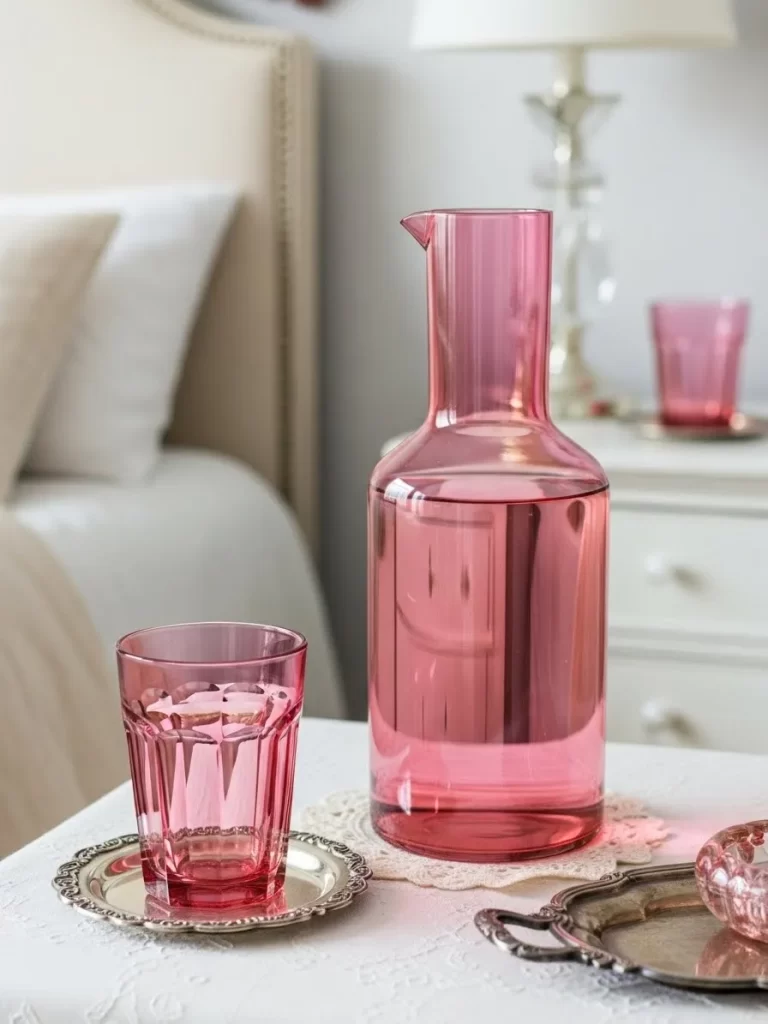
Adding a touch of thoughtfulness to your bedside table through elegant drinkware immediately upgrades the space from functional to romantic. This tall, translucent pink carafe and matching glass provide a sophisticated pop of color and a helpful feature for late-night hydration. The glassware’s pink hue adds a subtle, delicate warmth to the area.
Presenting the glass on a small, decorative silver coaster or tray, as shown, elevates the simple act of having water nearby into a moment of intentional luxury. The slightly textured surface of the glass enhances the light, making the liquid inside appear vibrant. Paying attention to these small, practical accessories contributes significantly to the overall feeling of well being and attentiveness.
Materials Required
- One plain glass carafe and one tumbler (clear glass).
- Glass painting medium or glass paint thinner.
- Pink acrylic craft paint (semi-transparent or satin finish).
- Small glass of water (for cleaning brushes).
Equipment Required
- Soft-bristle paintbrush (flat or rounded).
- Oven (for curing the paint).
- Rubbing alcohol and cotton swabs.
DIY Instructions: Frosted Pink Glassware
- Prepare the Glass: Thoroughly wash the carafe and tumbler with soap and water, then dry completely. Wipe the outer surfaces with rubbing alcohol to remove all fingerprints and oils, which ensures the paint adheres cleanly.
- Mix the Paint: In a small, disposable container, mix the pink acrylic craft paint with the glass painting medium or paint thinner according to the manufacturer’s instructions. You want a consistency that is thin enough to be translucent but thick enough to cover the glass evenly. Test on a scrap piece of glass first.
- Apply the Paint: Using a soft-bristle brush, apply a thin, even layer of the pink mixture to the exterior of the carafe and tumbler. Use long, smooth vertical strokes to minimize brush marks and create a consistent frosted look. Do not paint the inside or the lip of the glass where lips will touch.
- Let it Dry: Allow the first coat to dry completely, which may take several hours. If the color is too light, apply a second thin coat.
- Cure the Paint: Once the paint is fully dried and you are satisfied with the coverage, follow the glass paint manufacturer’s instructions for curing. This usually involves baking the glassware in a cool oven, letting it heat up to a certain temperature, baking for a specified time, and then allowing it to cool completely inside the oven. This step makes the paint durable and washable.
- Display: Place your beautiful, romantic drinkware on the bedside table, ready for a cool drink.
10. Classic Red Duvet with Cozy Throw
Item Name: Scarlet Simplicity Bedding
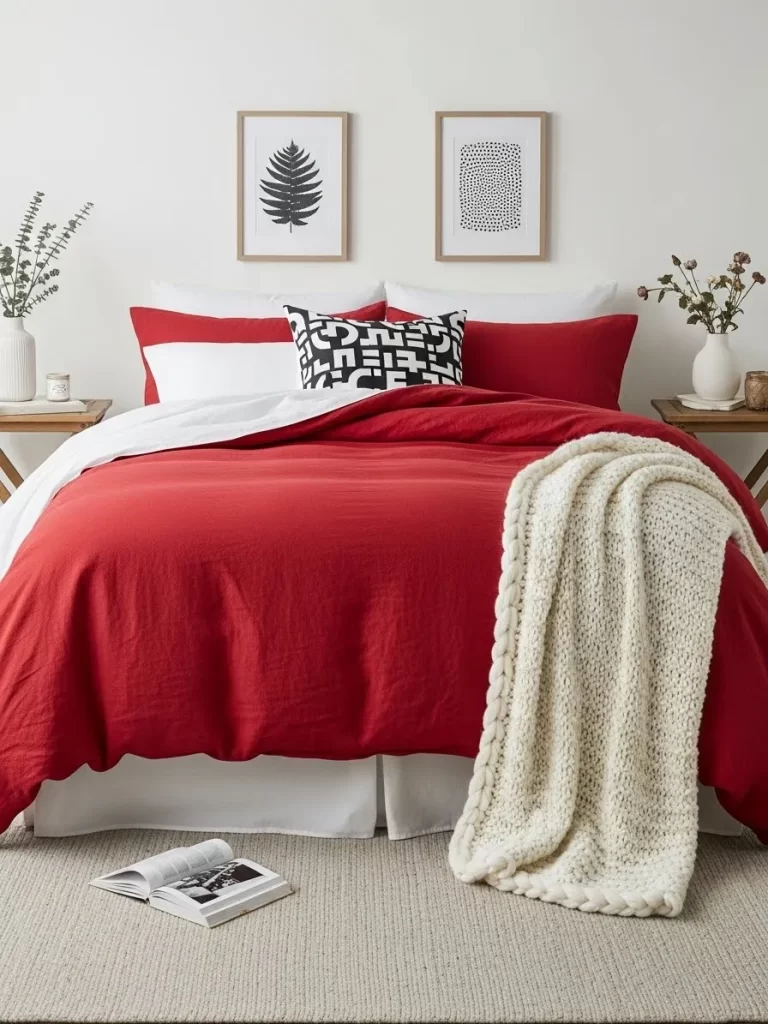
This arrangement proves that simplicity is often the key to elegance, especially when working with a powerful color like true red. The single, unpatterned red linen duvet cover acts as a massive, rich block of color that conveys passion and warmth without any busy elements. The linen fabric provides a lovely, relaxed texture that keeps the look grounded and approachable.
Draping a heavy, creamy white chunky knit throw across the foot of the bed introduces a fantastic counter-texture and breaks up the red field. This layering is vital for visual comfort, adding a feeling of inviting softness. The overall look is balanced, passionate, and beautifully suited for a mature, modern bedroom update.
Materials Required
- 3 to 4 skeins of chunky, unspun roving yarn in white or cream color (wool or acrylic blend).
- Large gauge knitting needles (size 50 or larger, or use your arms for arm knitting).
Equipment Required
- Scissors.
- Measuring tape.
DIY Instructions: Simple Chunky Knit Throw (Arm Knitting)
- Prepare the Yarn: Pull out a few yards of yarn from the first skein to act as your tail. Make a slipknot near the end of the tail and place it onto your right forearm—this is your first “stitch.”
- Cast On: Using the working yarn (the yarn attached to the skein), hold it in your left hand. Loop it over your left thumb and index finger. Bring the working yarn up through the loop on your wrist/arm. Drop the loop from your fingers and pull the working yarn to tighten the new loop onto your right forearm. This is your second stitch. Continue casting on until you have about 15 to 20 stitches (or desired width).
- Knit Row 1: Transfer the tail yarn to your right hand. Take the first stitch from your right arm and move it to your left arm. Insert your right hand under the working yarn (the long strand attached to the skein). Pull the working yarn through the loop you just took off your right arm. Transfer the new loop to your right arm. Repeat this process until all stitches have been transferred from your left arm to your right arm. This completes the first row.
- Knit Row 2 (and subsequent rows): Repeat the knitting action (Step 3), transferring the stitches back to your left arm. Continue knitting back and forth until the blanket reaches your desired length or you run out of yarn.
- Cast Off (Bind Off): Knit the first two stitches of the final row. When the second stitch is on your left arm, lift the first stitch over the second stitch and off your arm. You now have one stitch left on your left arm. Knit the next stitch (the third one), and again lift the previous stitch over the newly knitted one and off your arm. Continue until only one stitch remains.
- Finish: Cut the yarn, leaving a 12-inch tail. Pull this tail completely through the last remaining loop and pull to tighten the knot. Weave the tails back into the blanket to secure them. Drape your cozy new throw over the red duvet.
11. Pink Faux Fur Bench and Neon Light
Item Name: Fluffy Hot Pink Footrest

This piece introduces a fun, bold, and luxurious texture that immediately communicates extravagance and playful romance. The hot pink faux fur bench, set upon sleek gold hairpin legs, serves as a lavish centerpiece at the foot of the bed. It provides a spot for reading or conversation, instantly replacing a generic storage ottoman with something soft and stylish.
The daring color choice is balanced by the clean, white bedding and the neutral rug, ensuring the pink doesn’t overpower the entire room. Notice the innovative use of under-bench accent lighting. The neon pink glow creates a moody, contemporary atmosphere, bathing the surrounding floor in a vibrant, passionate hue.
Materials Required
- One wooden bench frame or pre-cut plywood top (minimum 36 x 14 inches).
- Four hairpin legs (about 14-16 inches tall) and coordinating screws.
- 1.5 yards of long-pile, quality faux fur fabric in hot pink or bright blush.
- 1-inch thick foam padding, cut to the size of the bench top.
- Batting/wadding (optional, for extra cushioning).
Equipment Required
- Staple gun and heavy-duty staples.
- Drill and screwdriver.
- Fabric scissors.
- Measuring tape.
- Safety glasses.
DIY Instructions: Faux Fur Ottoman/Bench
- Prepare the Top: Lay the foam padding on the wooden bench top. If using batting, wrap it over the foam for a smoother shape.
- Cut the Fabric: Lay the faux fur fabric (fur side down) on a clean floor. Center the foam-covered bench top onto the fabric. Cut the fabric, leaving at least 4 to 6 inches of excess all around the edges to pull and staple underneath.
- Upholster the Top: Starting on one long side, pull the fabric firmly over the edge of the wood and use the staple gun to secure it to the underside, placing staples every 2 to 3 inches. Move to the opposite long side, pull the fabric tightly, and staple. Repeat for the short sides, ensuring the fabric remains taut and smooth on the top surface.
- Fold the Corners: At the corners, neatly fold the fabric like wrapping a present. Pull the folds tight and staple them securely. The fur’s thickness helps hide any minor imperfections here.
- Attach the Legs: Turn the upholstered bench over. Position the hairpin legs about 1 inch inward from each corner. Mark the screw holes. Drill pilot holes if necessary, then securely attach the legs to the underside of the wood frame using the screws.
- Add Lighting (Optional): If desired, affix battery-operated LED light strips (like the neon pink style shown) using their adhesive backing to the underside of the bench frame, ensuring the light faces downward to create the beautiful, ambient glow.
12. Rose Gold Photo Frames
Item Name: Cherished Memories Gallery
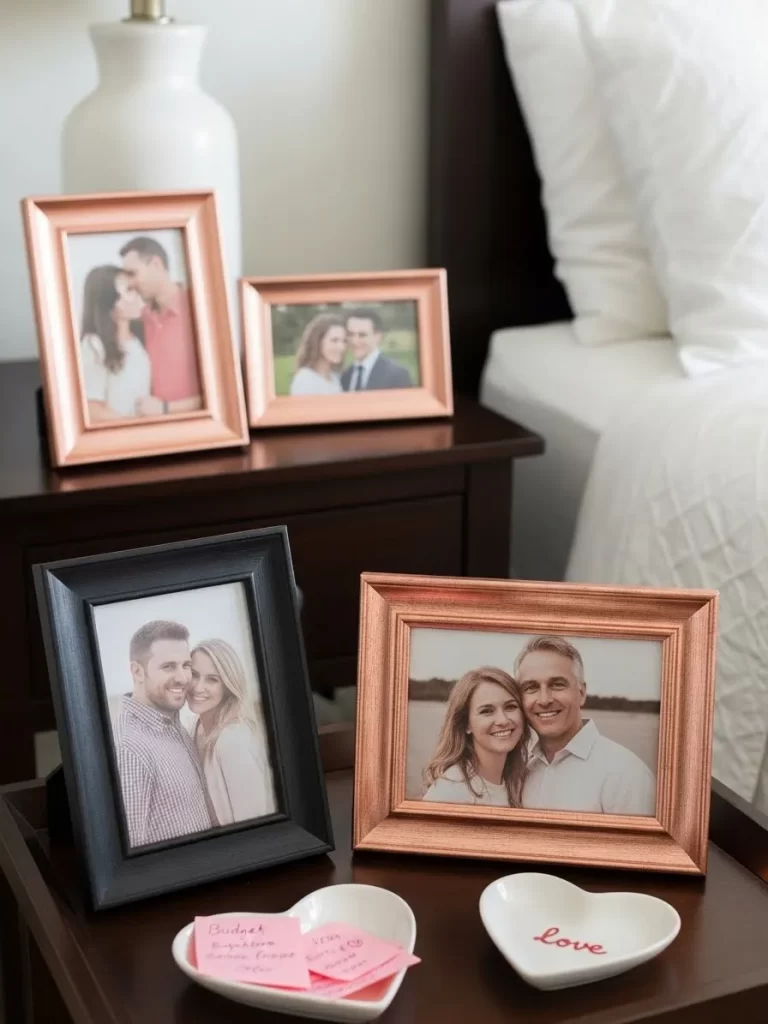
Personal touches are essential for creating genuine romance, and displaying photographs of yourselves instantly makes the bedroom feel more personal and intimate. Swapping out standard dark frames for light, metallic rose gold frames provides a warm, modern shimmer that complements both red and pink decor beautifully.
The mixed metals and finishes create visual interest: note the dark black frame contrasting with the copper-toned ones. This variance keeps the arrangement sophisticated and prevents it from looking too uniform. Arranging the frames on a bedside table ensures these loving memories are the first and last thing you see each day.
Materials Required
- Four inexpensive photo frames in varying sizes (e.g., 4×6, 5×7).
- Metallic rose gold spray paint (fast-drying).
- Newspaper or drop cloth.
- Painter’s tape.
Equipment Required
- Screwdriver or flat tool (for disassembling frames).
- Face mask (for spray painting).
- Gloves (optional).
DIY Instructions: Metallic Rose Gold Frames
- Disassemble the Frames: Carefully remove the backing, photo matting, and glass from all four frames. Set the glass and photos aside in a safe place. You only want to paint the wooden or plastic frame edges.
- Prepare for Painting: Lay the frames flat on a protected surface outdoors or in a well-ventilated area lined with newspaper or a drop cloth.
- Apply Paint: Following the spray paint manufacturer’s instructions, hold the can about 8 to 10 inches away from the frames. Apply a thin, even coat of the rose gold paint to the visible surfaces of the frames. Use smooth, sweeping motions.
- Dry and Recoat: Allow the first coat to dry completely (this usually takes 15 to 30 minutes). Apply a second thin coat if the coverage needs to be richer or more opaque.
- Cure Time: Let the frames dry and cure completely—this may take several hours or overnight—before handling them or putting them back together.
- Reassemble: Once fully cured, carefully reinsert the glass, your favorite photographs, and the backing pieces. Arrange your newly glamorous, personalized frames on your bedside table or dresser.
13. Layered Velvet and Sheer Curtains
Item Name: Dramatic Ruby Window Drapes
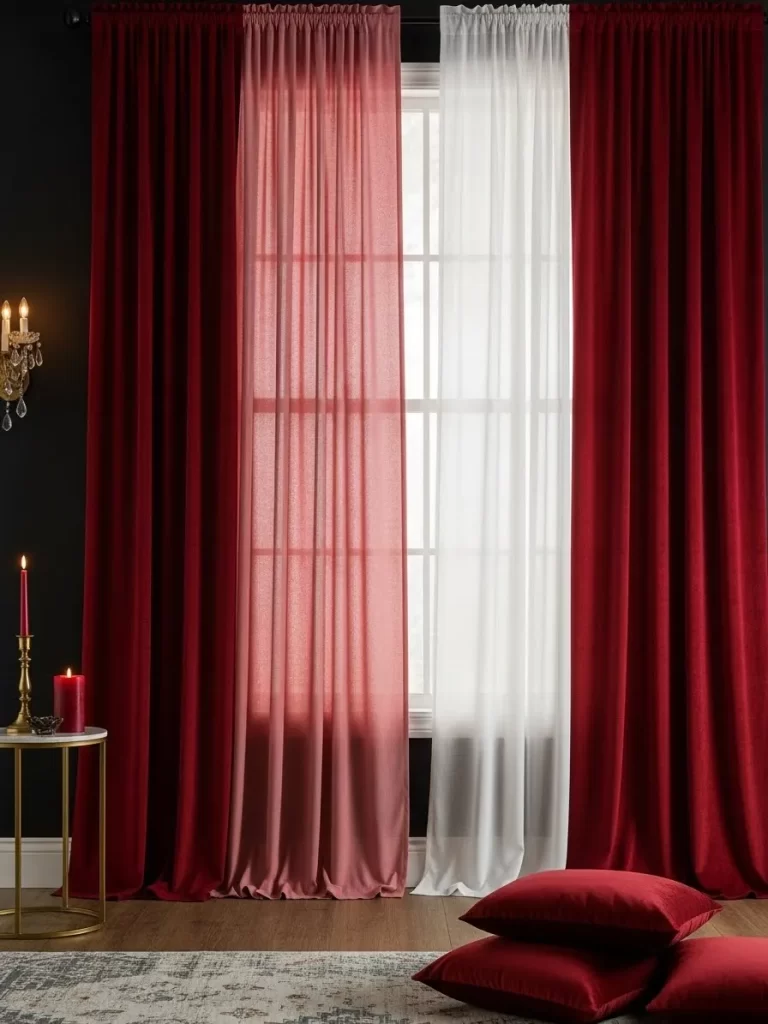
Window treatments are a critical element in controlling mood and light, and layering curtains provides drama and versatility. Installing floor-length, deep ruby velvet curtains offers luxurious texture and blackout capabilities for ultimate privacy. The velvet’s heavy weight instantly conveys opulence and deep, passionate color.
Layering sheer, blush pink curtains underneath the velvet panels softens the incoming daylight when the heavy drapes are open, filtering the light into a romantic glow. The white sheer panel in the center provides necessary contrast and allows plenty of light while still maintaining a gentle, veiled look. This technique allows you to customize the light and intimacy level at any time.
Materials Required
- Two sets of curtains: one pair of sheer, light pink curtains and one pair of velvet or heavy red curtains.
- Double curtain rod hardware (two brackets, two rods).
Equipment Required
- Drill and screwdriver.
- Measuring tape.
- Ladder or sturdy step stool.
- Pencil (for marking the wall).
DIY Instructions: Layered Curtain Installation
- Measure and Mark: Decide where you want your brackets to be placed. The rod should be mounted higher and wider than the window itself to make the window appear larger. Mark the position for the two outer brackets (one for each end).
- Install the Brackets: Use the drill to install the anchors and screw the double curtain rod brackets securely into the wall at your marked positions. A double bracket allows you to hang two separate rods.
- Thread the Curtains: Slide the sheer, light pink curtains onto the rod that will hang closest to the window glass (the back rod). Slide the heavy, red velvet curtains onto the rod that will hang furthest from the window (the front rod).
- Mount the Rods: Place the back rod (with the sheers) onto the rear holders of the brackets. Place the front rod (with the velvet) onto the front holders of the brackets. Secure the rods in place.
- Style the Drapes: Draw the velvet curtains open during the day, allowing the sheer pink layer to filter the light. At night, close the heavy velvet drapes for maximum privacy and a beautiful backdrop against the dark walls.
14. Pink Aroma Diffuser and Reed Diffuser
Item Name: Calming Rose Water Fragrance Set
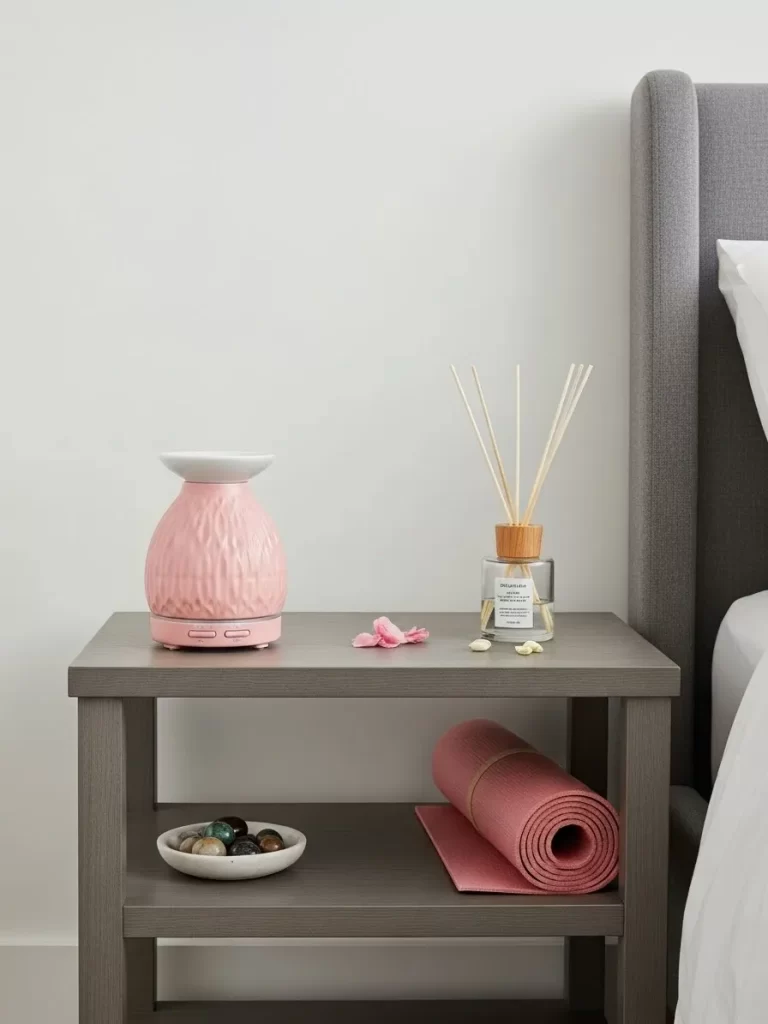
Scent is one of the most powerful senses for triggering emotion, and choosing an appropriate aroma is vital for romance. This bedside setup features both an electric aroma diffuser in a sweet blush pink ceramic finish and a coordinating reed diffuser. The reed diffuser provides a constant, gentle background fragrance, while the electric model offers bursts of stronger scent and ambient light.
The textured pink ceramic housing adds a feminine, stylish touch to the bedside table. Including natural elements like rose petals and crystals creates a calming, mindful atmosphere that encourages relaxation and connection. Opting for essential oils like ylang-ylang, rose, or sandalwood can further enhance the intimate mood.
Materials Required
- A plain ceramic or glass essential oil diffuser (unscented).
- Pink acrylic craft paint (semi-transparent or satin finish).
- Clear-coat sealant spray (optional).
- Painter’s tape (optional, for masking parts).
Equipment Required
- Small craft paintbrush.
- Rubbing alcohol and cotton swabs.
- Newspaper or drop cloth.
DIY Instructions: Custom Pink Diffuser Base
- Prepare the Surface: Ensure the base of your essential oil diffuser is clean and dry. Gently wipe the exterior ceramic or glass with rubbing alcohol to remove any oils. Use painter’s tape to mask off the top part where the water/oil reservoir is, or any control buttons, so you only paint the base.
- Mix and Apply Paint: Use a thin coat of pink acrylic paint. You may need to thin it slightly with water or a flow-aid medium for a smooth finish. Apply the paint to the exterior base, avoiding the electrical components.
- Create Texture (Optional): While the paint is still wet, you can lightly tap the brush to create a subtle, textured finish, mimicking the look in the image.
- Dry and Recoat: Allow the first coat to dry completely. Apply a second coat if needed.
- Seal (Optional): Once the paint is fully cured (let it sit for 24-48 hours), you can apply a clear-coat sealant spray for durability, ensuring you do this outside or in a well-ventilated area.
- Use: Once dry, place the base back on your bedside table. Fill the reservoir with water and a few drops of a romantic essential oil (like rose or lavender) and turn it on to infuse the room with a beautiful scent.
15. Tufted Mauve Headboard Panel
Item Name: Velvet Comfort Backrest Cushions
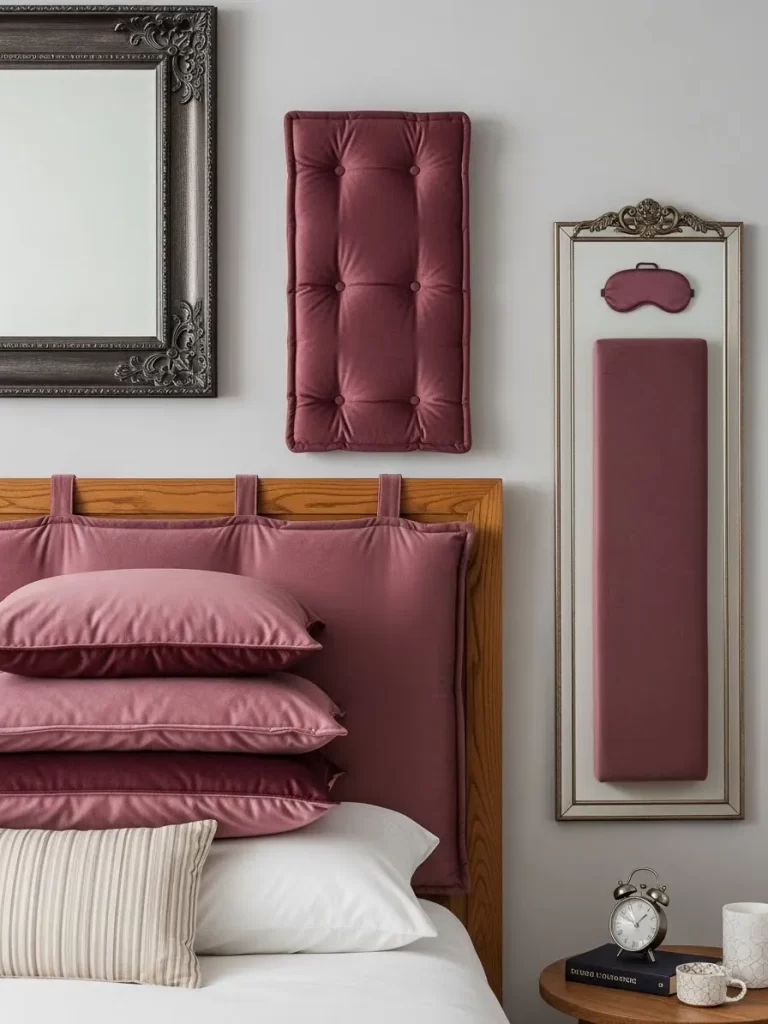
Replacing a cold, hard headboard with soft, upholstered panels instantly upgrades the comfort and visual appeal of the bed. These individual mauve velvet panels, button-tufted for added dimension, provide a plush, luxurious backrest. The deep, rosy shade is rich and inviting, pairing beautifully with crisp white bedding.
Mounting these vertical panels provides a contemporary accent to the space. The long, slender mirror placed beside the bed reflects light and enhances the verticality of the design, making the ceiling seem higher. This look introduces rich texture and depth without requiring a huge furniture investment.
Materials Required
- Two pieces of plywood or thick foam core board (desired size for panels, e.g., one 24×18 inches and one 48×12 inches).
- 1-inch thick foam padding, cut to match the board sizes.
- 1.5 yards of mauve or dusty rose velvet fabric.
- Upholstery thread and needle, or long upholstery buttons.
- Strong adhesive or staple gun.
Equipment Required
- Fabric scissors.
- Measuring tape.
- Drill (for wall mounting).
- Level.
DIY Instructions: Button-Tufted Wall Panel
- Prep the Board: Cut your foam padding to match the plywood or foam core board. Attach the foam to the board using strong adhesive.
- Cut and Lay the Fabric: Cut the velvet fabric, allowing 3 to 4 inches of excess all around the edges of the board. Lay the fabric face down on the floor.
- Upholster: Center the foam-covered board onto the fabric. Pull the fabric edges firmly around the back of the board and secure them using a staple gun. Keep the fabric very taut across the front.
- Mark Tufting Points: On the front of the panel, mark where you want your tufting buttons to go (e.g., in a grid pattern).
- Add Tufting: Thread a long upholstery needle with strong thread (doubled). From the back of the board, push the needle through the foam to the front at the first marked point. Thread an upholstery button onto the needle, and push the needle back through the same spot to the back of the board. Pull the thread very tightly to create the tuft indentation, and secure the thread at the back with a knot or a staple. Repeat for all tufting points.
- Mount: Use strong wall-hanging hardware (like picture wire or flush-mount brackets) attached to the back of the board to mount your finished panel securely to the wall above the bed.
16. Heart-Themed Storage Baskets
Item Name: Love Struck Laundry Hampers
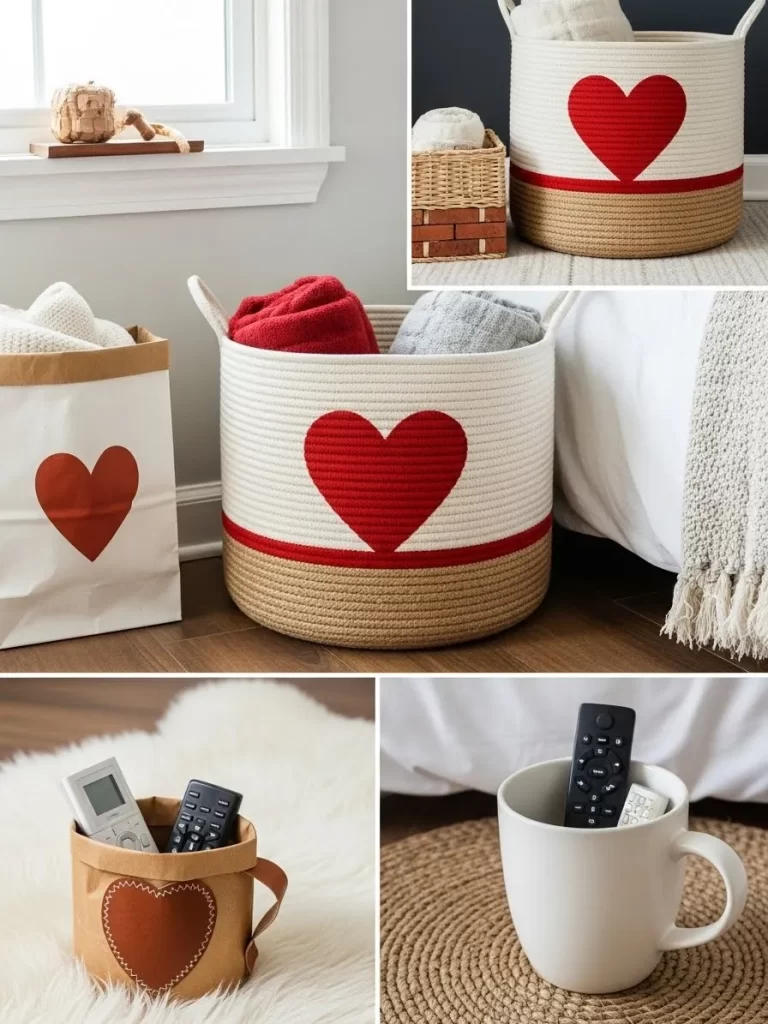
Clutter is the enemy of romance, so stylish storage solutions are a must. These rope storage baskets, personalized with large, vibrant red heart appliqués, keep throws, laundry, or remote controls neatly tucked away while contributing directly to the Valentine’s Day theme. The natural woven rope texture adds an organic, grounded element to the decor.
The collection of different sizes—from a large floor basket to a small leather desktop caddy—shows how the heart motif can be repeated cohesively throughout the room. Using practical items like these to carry the theme ensures the decor is both functional and fun. The bright red hearts provide a powerful visual pop against the neutral backgrounds.
Materials Required
- One plain, woven rope storage basket (any size).
- Felt fabric in deep red (1/4 yard).
- Fabric glue or hot glue gun and glue sticks.
- Scissors.
Equipment Required
- Large sheet of paper or template material.
- Marker.
DIY Instructions: Heart Appliqué Storage Basket
- Create the Heart Template: Draw a large, symmetrical heart shape on your paper template. The size should be appropriate for the basket (e.g., about 1/3 of the basket’s height). Cut out the paper heart.
- Cut the Felt Heart: Pin the paper template onto the red felt fabric. Using sharp scissors, carefully cut out the heart shape. Felt is an excellent material because its edges will not fray.
- Position the Heart: Hold the felt heart up to the basket to determine the best placement. Typically, centered on the front is the most visually striking location.
- Attach the Appliqué: Apply a generous but even amount of fabric glue or hot glue to the back of the felt heart. Start gluing from the center and work your way outwards.
- Secure to Basket: Press the heart firmly onto the rope basket, holding it in place for a few moments to allow the glue to bond with the rope fibers. Ensure all edges are securely flattened against the basket.
- Cure Time: Allow the glue to dry completely according to the adhesive instructions before using or moving the basket. Fill it with cozy blankets or pillows to instantly upgrade your room’s romantic storage.
17. Word Art Throw Blanket
Item Name: Bold Love Message Throw

Words of affection can become a beautiful, tangible piece of decor, as seen with this striking knitted blanket featuring large, graphic typography. The white background provides a clean canvas, making the red and pink text stand out clearly. This throw is a straightforward way to communicate your feelings without using traditional symbols.
Draping it casually over an armchair or the foot of the bed immediately draws attention and sets a declarative romantic mood. Styling it with framed handwritten notes and a classic red book enhances the literary and thoughtful theme. This piece is a powerful visual and textural addition to the sitting area of the bedroom.
Materials Required
- A plain, large, light-colored fleece or knit throw blanket (white or cream).
- Red and pink heat transfer vinyl (HTV) sheets.
- Cutting machine (Cricut/Silhouette) or large stencils and craft knife.
- Iron or heat press.
Equipment Required
- Weeding tool (for removing excess vinyl).
- Scissors.
- Measuring tape.
- Ironing board or heat press mat.
DIY Instructions: Graphic Lettered Throw Blanket
- Design and Cut: Create your romantic text design on your computer and load the colors of heat transfer vinyl (HTV) into your cutting machine. Remember to mirror the image before cutting, as HTV is applied backward. Weed the excess vinyl from around the lettering using a weeding tool.
- Position the Design: Lay your throw blanket flat on a protected surface (ironing board or heat press mat). Position the weeded vinyl (shiny, clear plastic side up) onto the center of the blanket, ensuring the placement is straight and centered.
- Apply Heat: Follow the specific temperature and time instructions for your HTV brand and blanket material. Typically, you press the iron or heat press down firmly over the clear plastic sheet for about 15 to 30 seconds. Lift and press the next section, overlapping slightly, until the entire design has been heated.
- Peel the Backing: Once the vinyl has been heated, carefully peel back the clear plastic sheet. If the vinyl lifts, place the sheet back down and apply more heat.
- Cure Time: Allow the blanket to cool completely. The heat sets the adhesive, creating a washable, bold graphic design that is ready to express your message of love.
18. Pale Pink Sheer Window Panels
Item Name: Blushing Dawn Window Treatment
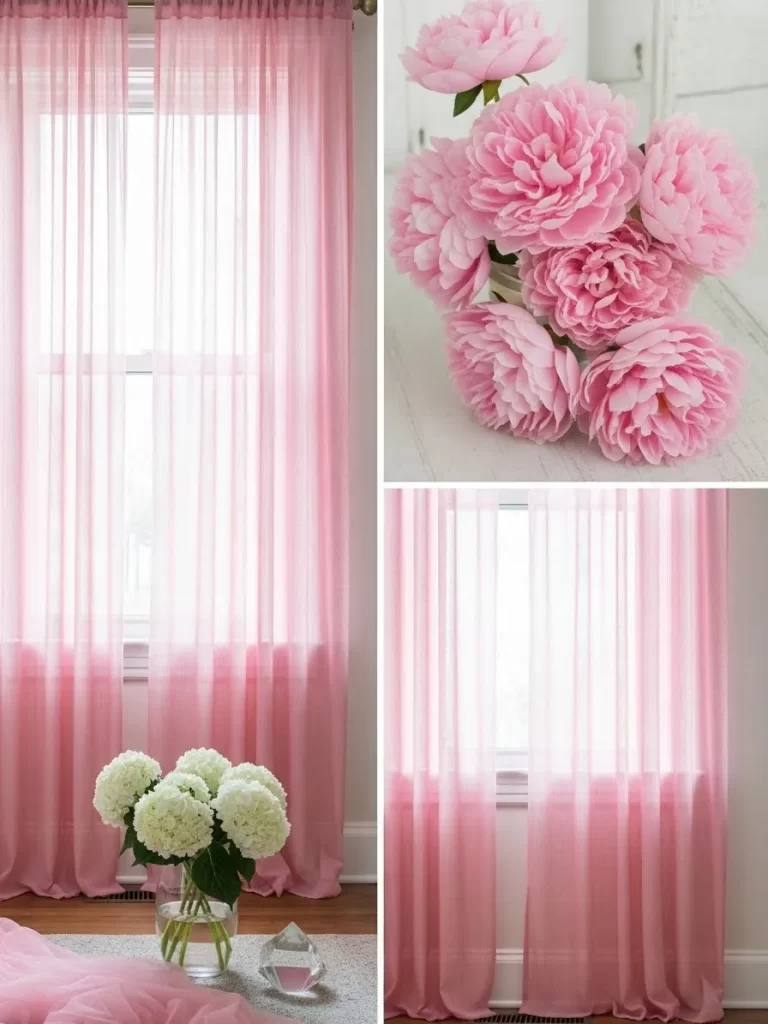
Light and airiness contribute greatly to a romantic atmosphere, and heavy blinds can quickly ruin the mood. These pale pink, floor-length sheer curtains filter the harsh outdoor light into a gentle, flattering glow, bathing the room in soft, delicate color. The vertical lines of the material also help to visually elongate the walls.
The light pink hue is soft and feminine, complementing almost any wall color without overwhelming the space. Pairing the sheer panels with simple, clear glass vases holding white or pink flowers reinforces the airy, natural elegance of the setup. This simple swap allows maximum natural light while maintaining privacy.
Materials Required
- Plain sheer curtains (white or cream).
- Fabric dye in pale pink (liquid form is easiest).
- Salt (helps set the color).
- Large bucket or clean bathtub.
Equipment Required
- Rubber gloves.
- Stirring stick.
- Measuring cups.
DIY Instructions: Ombré Dip-Dyed Curtains (Pink)
- Prepare the Curtains: Wash and dry the sheer curtains to ensure they are clean and damp before dyeing. Damp fabric accepts the dye more evenly.
- Mix the Dye Bath: Fill a large bucket or bathtub with enough very hot water to submerge the bottom half of the curtains. Add the liquid pink fabric dye according to the instructions, starting with less dye for a lighter, paler shade. Add a cup of salt to help the color absorb into the sheer fabric. Stir well.
- Dip Dye: Lower the curtains slowly into the dye bath, starting with the very bottom hem. Keep the top 3/4 of the curtain out of the water. This will create the lightest concentration of color at the bottom.
- Create the Gradient: For an ombré or gradient effect, slowly dip a little more of the curtain into the bath every 5 to 10 minutes. The sections that stay in the longest will become the darkest pink, creating a gradual fade towards the top. Do not fully submerge the top portion.
- Rinse and Dry: Once the desired shade is achieved, carefully remove the curtains. Rinse them under cool water until the water runs clear, which removes excess dye. Hang the curtains to dry according to the dye instructions, or place them in a low-heat dryer.
- Re-hang: Reinstall the finished curtains on the rod. The gradient pink will now cast a soft, blushing light over the entire room.
19. Deep Berry Ottoman and Accents
Item Name: Velvet Storage Comfort Bench

Placing a beautifully upholstered bench at the foot of the bed is a classic way to complete a refined bedroom look. This deep berry or wine-colored velvet ottoman not only offers a rich, luxurious color pop but also provides valuable hidden storage. The tufting adds a sophisticated, tailored detail, enhanced by the slim, mid-century modern style gold legs.
The plush velvet material, a sophisticated alternative to bright red, adds immediate depth and tactile appeal. Layering the bedding with rich burgundy Euro shams and a coordinating throw ties the color story back to the centerpiece ottoman. The result is a balanced, elegant, and deeply sensual bedroom arrangement.
Materials Required
- A plain wooden storage bench or ottoman (existing furniture works well).
- 2-3 yards of rich berry or burgundy velvet fabric.
- Batting/wadding (optional, for a softer tufted look).
- Upholstery nails or decorative brass tacks (optional, for trim).
Equipment Required
- Staple gun and staples.
- Fabric scissors.
- Screwdriver (for removing old fabric/hardware).
- Measuring tape.
DIY Instructions: Velvet Upholstered Ottoman
- Prepare the Ottoman: Remove the existing fabric or cushion from the ottoman base. Ensure the wooden base is clean and free of staples. If you are starting with a plain bench, ensure the top is lightly padded.
- Cut the Fabric: Cut the velvet fabric, allowing enough excess (4 to 6 inches on all sides) to pull tightly and staple underneath the bench or ottoman lid.
- Upholster the Top: Lay the velvet fabric face down. Center the padded top on the fabric. Pull the fabric edges firmly over the edges and staple it to the underside of the lid, starting in the center of each side and working outwards. Keep the fabric taut to prevent wrinkles on the top. Neatly fold and staple the corners.
- Reattach the Top: If the ottoman top was removable, reattach it to the base using the existing hardware.
- Add Trim (Optional): If you want to add decorative flair, measure and mark a line just under the lid’s edge. Use decorative brass tacks or upholstery nails to create a clean, elegant border along the base of the lid or around the bottom edge of the ottoman.
- Style: Place the finished ottoman at the foot of the bed, using the top for decorative books, a tray, or folded blankets.
20. Bold Abstract Floral Wall Art
Item Name: Passion Bloom Framed Prints
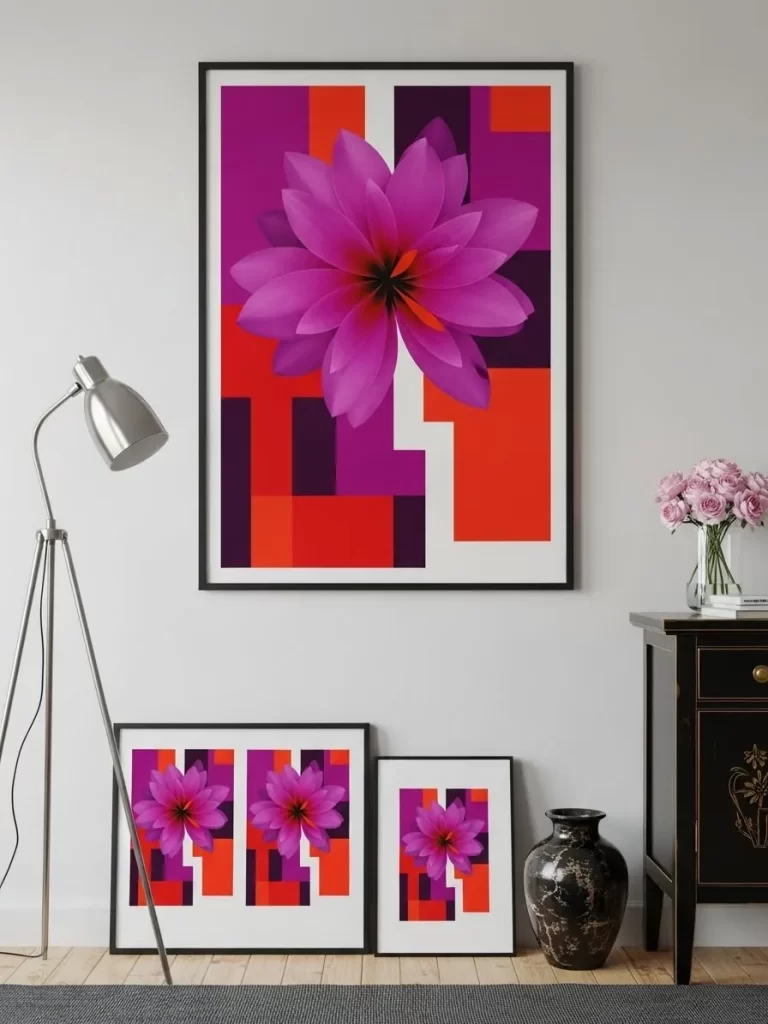
Wall art offers a powerful way to infuse romance and color into a room without touching the bedding. These large-scale abstract prints feature vibrant magenta, deep purple, and fiery orange-red blocks, modernized by the crisp white lines. The dramatic, floating floral element provides a strong focal point.
Grouping several prints in descending size creates a dynamic, intentional gallery wall that emphasizes the room’s height. The bold, graphic nature of the prints keeps the look energetic and sophisticated, proving that romantic art doesn’t have to be delicate. This maximalist approach to color is visually invigorating and passionate.
Materials Required
- Digital image files of your chosen abstract prints (or your own design).
- Photo paper or poster board for printing.
- Four matching black picture frames in various sizes (e.g., one large, two medium, one small).
Equipment Required
- Access to a high-quality printer or a print shop.
- Scissors or utility knife.
- Measuring tape and level.
- Hammer and nails or wall hanging strips.
DIY Instructions: DIY Abstract Gallery Wall
- Select and Print: Finalize your artwork, ensuring the colors are vibrant (magenta, red, purple, orange). Have the prints professionally printed in the required sizes to fit your frames.
- Frame the Prints: Carefully place the printed artwork into the corresponding frames, ensuring the art is centered and secured behind the glass.
- Plan the Layout: On the wall above your dresser or near a bedside table, use paper cutouts of your frame sizes to test various arrangements. The key is to balance the large print with the smaller ones, typically aligning the vertical center of the grouping.
- Mark and Hang: Once you have the arrangement you like, mark the top hanging point for each frame. Use a level to ensure the prints are straight. Install your hanging hardware (nails or adhesive strips).
- Display: Hang the largest print first, as it anchors the design. Then, place the smaller supporting prints around it to create a cohesive, vibrant gallery display. Step back to admire the powerful, artistic injection of color.
21. Rose Quartz and Copper Tray Display
Item Name: Crystal Love Bedside Tray
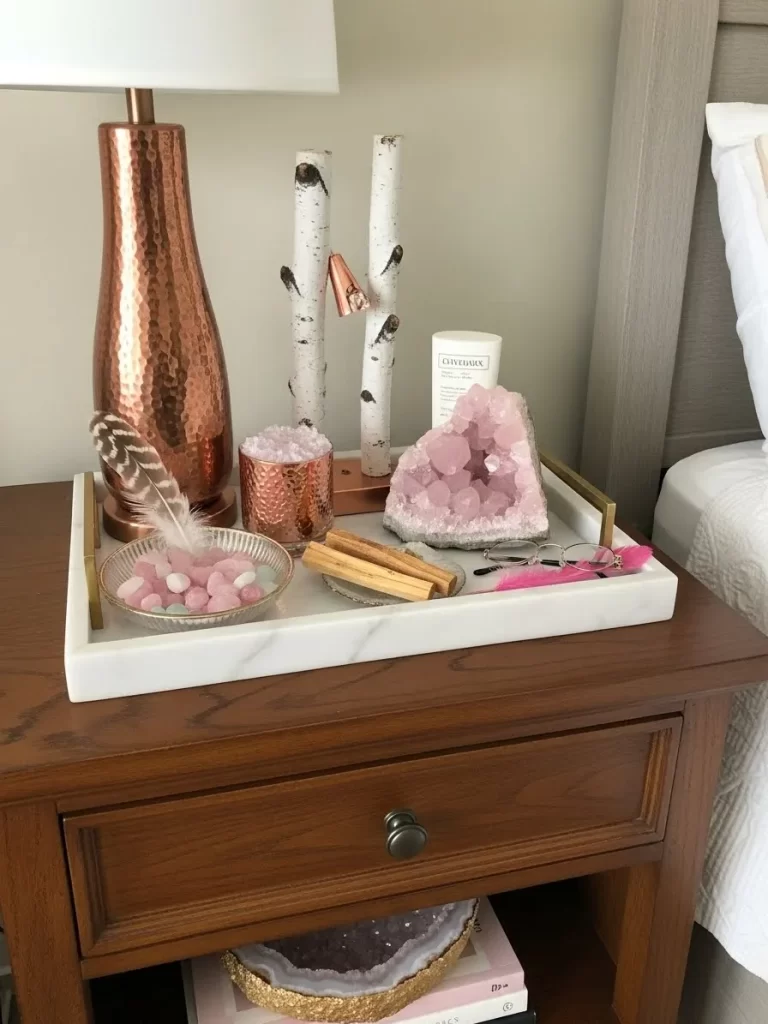
Creating a beautiful collection of personal, thoughtful items on a bedside table instantly makes the space feel more serene and unique. This marble tray arrangement brings together rich, textured copper, natural wood, and blush-colored crystals for a sophisticated, calming display. The hammered copper lamp base provides a wonderful contrast to the cool, white marble surface.
The centerpiece is the stunning rose quartz cluster, a crystal often associated with love and emotional healing, infusing the area with tranquil energy. Adding natural elements like a feather and bundles of palo santo sticks (for scent) elevates the entire presentation. This thoughtful display focuses on well being and subtle, romantic intention.
Materials Required
- One wooden serving tray (can be painted or marble print, like the image).
- Gold or copper metallic spray paint (if your tray handles are not already metal).
- Various sizes of rose quartz stones and clusters.
- Optional: Small white birch branch pieces or decorative natural sticks.
Equipment Required
- Rubbing alcohol and a cloth (for cleaning metal).
- Newspaper or drop cloth.
- Drill (if attaching branches to a base).
- Strong adhesive (like E6000).
DIY Instructions: Personalized Crystal Display Tray
- Prepare the Tray: If your tray has wooden or plastic handles, remove them if possible. Clean the handles thoroughly with rubbing alcohol. Lay the tray on a protected surface.
- Paint the Handles: Spray the handles with the metallic copper or gold spray paint, ensuring a thin, even coat. Allow the first coat to dry, then apply a second coat if necessary. Reattach the handles once fully cured.
- Arrange the Crystals: Place the largest rose quartz cluster (or your largest decorative element) near the back center of the tray to serve as the anchor.
- Layer Smaller Elements: Scatter smaller, tumbled rose quartz stones into a decorative bowl or dish. Arrange other elements like the birch branches or scented sticks around the main crystal cluster. Tip: You can lightly glue the birch branches to a small wooden base for stability.
- Add Function: Incorporate necessary items, such as the lamp or a piece of moisturizing cream, to ensure the display remains practical. The goal is beauty and functionality working together.
- Place and Enjoy: Set the finished tray on your bedside table. The reflective surfaces and soft pink crystals will beautifully catch the light and add a warm, romantic glow to the area.
22. Zebra Print Rug in Coral
Item Name: Wildheart Accent Hide
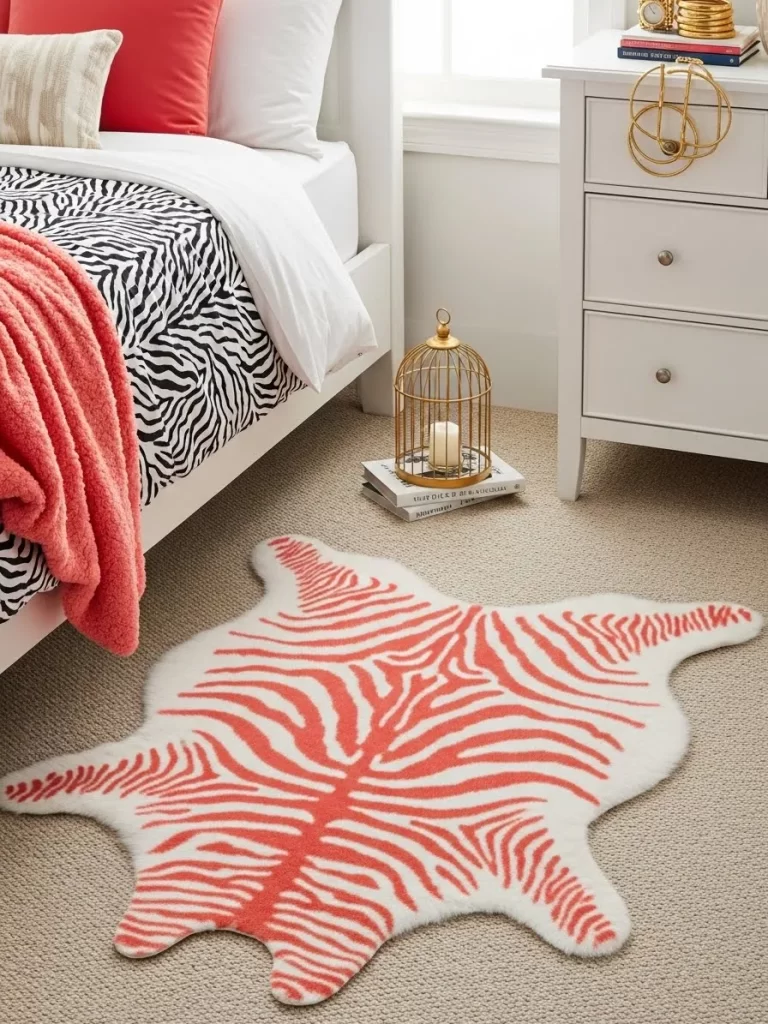
For those who love bold design and playful color, this coral and white zebra print accent rug is an exciting substitute for traditional, drab floor coverings. The unusual shade of coral-red mixed with white instantly infuses the room with fun and energy. The irregular hide shape adds a dynamic, artistic element underfoot.
Placed beside the bed, this rug offers a soft landing spot in a shocking, modern pattern that instantly catches the eye. It works surprisingly well with the black and white animal print bedding, showing how mixing patterns can create a sophisticated yet lively aesthetic. The piece adds warmth and texture while keeping the romantic theme feeling contemporary.
Materials Required
- White faux fur or high-pile white rug material (large enough for your hide shape).
- Coral or warm red fabric paint or heavy-duty acrylic paint mixed with a fabric medium.
- Large paper or cardboard for a stencil/template.
Equipment Required
- Utility knife or sharp fabric scissors.
- Ruler or measuring tape.
- Wide paintbrush or foam roller.
- Marker or chalk.
DIY Instructions: Animal Print Accent Rug
- Create the Shape: Lay your white rug material upside down. Draw the rough, organic shape of an animal hide onto the backing (or trace the shape from a template). Cut carefully along the line using a utility knife or sharp scissors.
- Create the Stencil: Sketch the flowing, irregular lines of a zebra stripe pattern onto large paper, ensuring the stripes are varying widths. Cut out the stripe shapes to create a negative space stencil.
- Mix the Paint: Mix your coral paint with fabric medium according to instructions, or use a dedicated fabric paint.
- Apply the Pattern: Lay the finished white hide shape flat. Place your stencil over the rug and secure it slightly. Using the paintbrush or foam roller, lightly dab or roll the coral paint into the stencil cutouts. Lift the stencil and reposition it to continue the pattern across the entire rug surface.
- Dry and Cure: Allow the paint to dry thoroughly, following the manufacturer’s instructions. This may take 24 to 48 hours. If using fabric paint, you may need to heat-set the design with an iron (place a thin cloth over the rug before ironing).
- Display: Place your vibrant, unique rug next to the bed to add immediate energy and bold color to your romantic space.
23. Decadent Chocolate Accents
Item Name: Decadence and Devotion Pillow Set
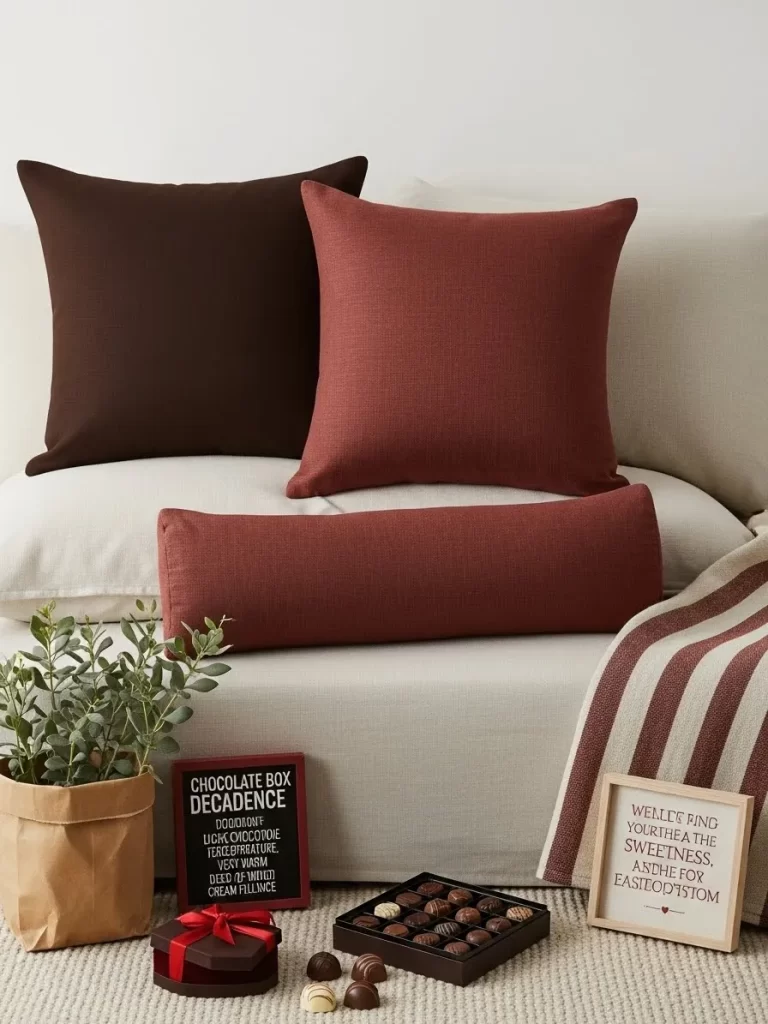
Creating a truly romantic setting often involves touches beyond just color and fabric. Here, deep reds and chocolate browns mimic the colors of rich, decadent treats. The pillows—one square in a reddish-brown and one dark brown—contrast beautifully with the creamy white bedding, creating a warm, earthy palette.
The focus here is entirely on experience and indulgence. Placing a box of fine chocolates and small, charming framed signage on the bed suggests a delightful treat is waiting. The combination of textures—the linen pillows, the striped throw, and the natural paper bag—adds depth, making the entire display feel inviting and richly curated.
Materials Required
- Two small decorative picture frames (one for a quote, one for a menu).
- Red cardstock or construction paper.
- White paint pen or white adhesive vinyl letters.
- Digital print of a love quote or poem.
- A favorite boxed chocolate assortment.
Equipment Required
- Printer.
- Scissors.
DIY Instructions: Romantic Treat Display Frames
- Design the Quote: Find a short, romantic poem or quote. Print it out onto white paper, sized to fit one of your picture frames. Place it in the frame.
- Create the Decadence Sign: Take the second picture frame and replace the picture with a piece of red cardstock. On the glass or clear plastic front, use a white paint pen or vinyl letters to write a playful “menu” or description, such as “CHOCOLATE BOX DECADENCE: Dark, Smooth, Rich.”
- Assemble the Scene: Place the finished frames and a beautifully packaged box of chocolates near the foot or side of the bed, perhaps on a low table or directly on the duvet.
- Add Sensory Details: Place a cozy throw blanket and a plant wrapped in a kraft paper bag nearby to enhance the rustic, cozy charm of the display.
- The Reveal: Presenting these elements signals an intention for relaxation and shared enjoyment, making the space instantly feel thoughtful and intimate.
24. Pink Pom-Pom and Tassel Garland
Item Name: Flirtatious Fringe Mirror Garland
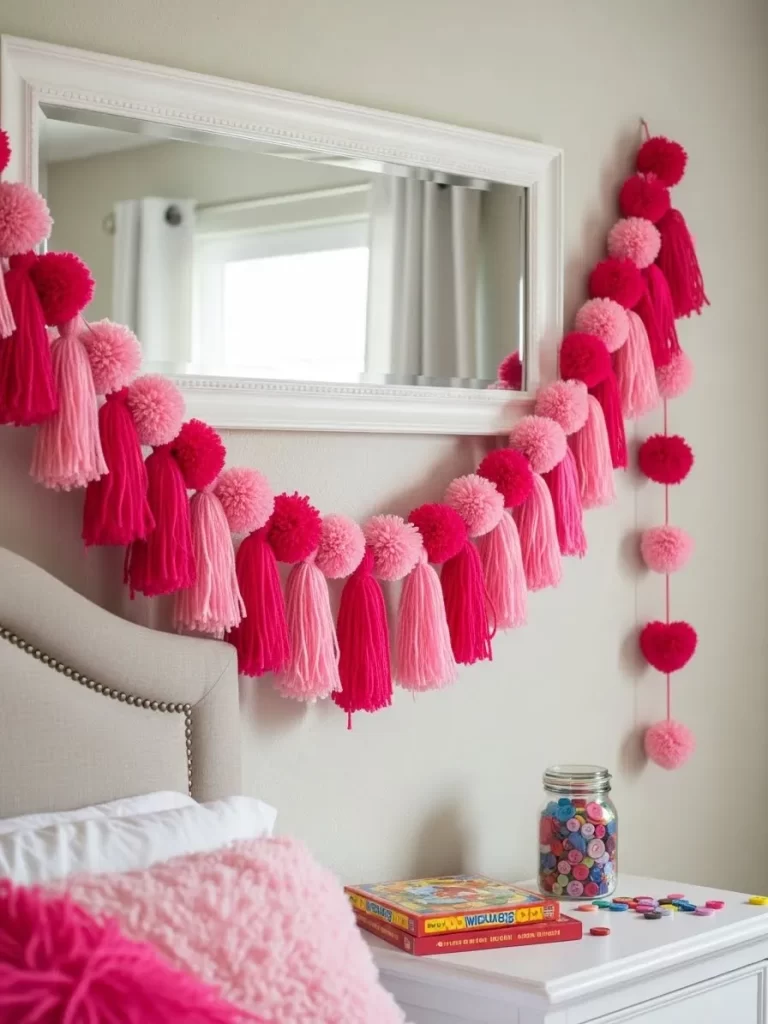
Garlands are an effortless, temporary way to introduce intense color and texture to a wall, mirror, or headboard. This vibrant garland, featuring chunky yarn pom-poms alternating with lush, long tassels in varying shades of hot pink and light blush, provides incredible texture and movement. It adds a youthful, playful kind of romance.
Draping the garland around a large framed mirror creates a stunning festive accent wall. The reflective quality of the mirror helps multiply the light and the color, making the pink hues even more impactful. The repetition of the pink theme through the bedside items creates a cohesive, joyful expression of love.
Materials Required
- Skeins of yarn in three shades of pink (hot pink, medium pink, light blush).
- Scissors.
- Cardboard pieces (for making pom-poms and tassels).
- Long, sturdy piece of twine or rope (for the main garland line).
Equipment Required
- Ruler.
DIY Instructions: Yarn Pom-Pom and Tassel Garland
- Make the Tassels: Cut two pieces of cardboard about 6 inches long. Wrap the yarn tightly around the cardboard about 100 times. Slide the yarn off the cardboard. Tie a piece of yarn tightly around one end (the top of the tassel). Tie another piece of yarn about 1 inch below the top knot to create a “head.” Cut the loops at the bottom. Repeat this process, alternating the three shades of pink until you have 10-12 tassels.
- Make the Pom-Poms: Use a pom-pom maker or cut two C-shaped pieces of cardboard. Wrap the yarn around them until very thick. Cut the yarn through the center gap, and tie a separate piece of yarn tightly around the middle to secure the pom-pom. Fluff and trim until round. Create 10-12 pom-poms, alternating colors.
- Assemble the Garland: Lay out your main twine line. Determine your desired spacing (e.g., 2 inches apart).
- Attach Elements: Tie a pom-pom securely to the twine, followed by a tassel, then another pom-pom, alternating the elements and colors along the length of the twine. Adjust the knots until the arrangement hangs evenly.
- Hang: Hang the finished garland draped gracefully over a mirror, headboard, or along a mantle to instantly introduce exuberant pink texture and romance.
25. Curated Red Bookcase Display
Item Name: Passionate Library Wall Shelves

Decorating with books is a subtle yet powerful way to inject color and personality into a room, particularly if you’re not ready for bright red walls. This striking visual relies on grouping books by spine color—all shades of red, from cranberry to scarlet. The contrast against the black floating shelves is dramatically sophisticated.
Interspersing the books with small, sculptural red vases and black or white bookends breaks up the line of books, adding artistic interest. This intentional arrangement turns a functional storage space into a bold, graphic display that conveys confidence and passion. The small globe adds a touch of thoughtful, worldly charm.
Materials Required
- A collection of hardcover books (gather red, maroon, and crimson spines).
- Two to three sculptural red vases or decorative accents.
- Black or contrasting bookends.
- Floating shelves (if not already installed).
Equipment Required
- Drill and level (for shelf installation).
DIY Instructions: Monochromatic Bookcase Styling
- Gather the Reds: Gather all books you own with red, maroon, or crimson spines. If you have any books whose dust jackets aren’t red, you can remove the jacket to reveal a color underneath, or wrap them in red construction paper.
- Install Shelves (If Needed): If you are installing new floating shelves, use a drill and a level to ensure they are securely fastened and perfectly straight on the wall.
- Group and Arrange: Arrange the books by grouping similar colors together, or alternating heights for variety. Place some books vertically, and stack small piles of books horizontally to create different levels.
- Introduce Accents: Use the sculptural red vases and black bookends to break up the lines of the books. Place a vase on the end of one shelf, a pair of bookends on another, and the horizontal book stacks on a third.
- Add a Personal Touch: Place a small object of interest, like a framed photo or a vintage globe, on one of the shelves to personalize the look. The final arrangement provides a sophisticated, non-traditional burst of passionate color.
26. Rose Gold Mercury Glass Lamp
Item Name: Cracked Rose Glimmer Lamp

Lighting accessories that shimmer and reflect light add tremendous romance and luxury to a bedside table. This lamp features a stunning, oversized base made of rose gold mercury glass, treated with a cracked or distressed finish. The metallic sheen throws a beautiful, warm glow across the entire table surface.
The large, glossy base is anchored by a sharp, contemporary gold square footing, providing a rich, mixed-metal aesthetic. The crackle finish ensures the light diffusion is soft and ambient, contrasting the crisp white lampshade. Pairing it with reflective crystal coasters and small metallic accents emphasizes the glamorous, celebratory nature of the decor.
Materials Required
- One plain glass lamp base (clear or frosted).
- Metallic rose gold mirror-effect spray paint.
- Spray bottle filled with a 1:1 solution of water and white vinegar.
- Newspaper or drop cloth.
Equipment Required
- Rubber gloves and face mask (for spraying).
- Funnel (optional).
DIY Instructions: Cracked Mercury Glass Lamp Base
- Prepare the Base: Ensure the glass base is clean and dry. Remove any hardware you do not want painted. The painting is done on the inside of the glass base.
- First Spray: Working in a well-ventilated area, spray a light, even coat of the rose gold mirror-effect paint inside the base. Turn the base slightly as you spray to coat all inner surfaces.
- Apply Vinegar Solution (The Crackle Effect): Immediately after the paint is applied and while it is still wet, use the spray bottle to lightly mist the inside of the base with the water/vinegar solution. This solution reacts with the paint, causing it to bead and separate, creating the “cracked” or distressed effect.
- Dry and Repeat: Allow the paint to dry completely. The distressed pattern will become more noticeable. Apply a second, lighter coat of the metallic paint and mist again with the vinegar solution for a richer, more textured finish.
- Cure: Allow the base to fully cure according to the paint instructions (this may take 24-48 hours). Reattach any hardware.
- Style: Place the finished lamp on your bedside table next to a celebratory champagne flute. The rose gold glow will instantly elevate the intimate atmosphere.
27. Ombré Shag Area Rug
Item Name: Raspberry Sunset Floor Carpet
A dramatic area rug can anchor the entire romantic color scheme, and this ombré design is a striking example of blending pinks and reds seamlessly. The rug transitions dramatically from creamy white at the top to a rich, deep raspberry or magenta at the bottom, mimicking a beautiful sunset. The gradient effect adds depth and visual movement to the floor.
The rug draws the eye down and pairs beautifully with the berry-toned throw blanket and accent pillows on the bed. The softness of the rug texture provides necessary comfort and warmth underfoot, ensuring that the room feels physically inviting. This contemporary design avoids traditional patterns while still embracing passionate color.
Materials Required
- A large, plain white or cream-colored area rug (low to medium pile works best).
- Liquid fabric dye in deep magenta or raspberry (multiple bottles).
- Salt and dish soap.
- Large plastic tub or buckets (enough to hold and soak the dye).
Equipment Required
- Rubber gloves.
- Long stirring stick.
- Hose or shower for rinsing.
DIY Instructions: Ombré Dip-Dyed Area Rug
- Protect the Area: Perform this DIY outdoors or in a space like a garage, as dyeing can be messy. Lay down a large tarp or plastic sheeting.
- Prepare the Dye: Mix the magenta dye with very hot water in a large tub or bucket, according to the manufacturer’s directions. Add a cup of salt and a squirt of dish soap to help the dye absorb and spread evenly.
- Dip the Rug: Decide how much of the rug you want to be the darkest color (the bottom section). Slowly dip that portion of the rug into the dye bath.
- Create the Gradient: To achieve the ombré fade, use a smaller bucket of diluted dye (less dye, more water) and slowly apply it to the section just above the darkest dip. You can also use a sponge or spray bottle to feather the dye upward onto the white section, creating a gradual transition from deep color to pale white.
- Soak and Cure: Let the darkest section soak for the maximum recommended time for the deepest color. Rinse the rug thoroughly with a hose or in a shower until the water runs clear.
- Dry: Hang the rug or lay it flat on a protected surface to dry completely. Once dry, place it under your bed, allowing the beautiful color gradient to set the room’s passionate tone.
28. Blush Pink Textured Throw
Item Name: Cozy Blush Bobble Throw
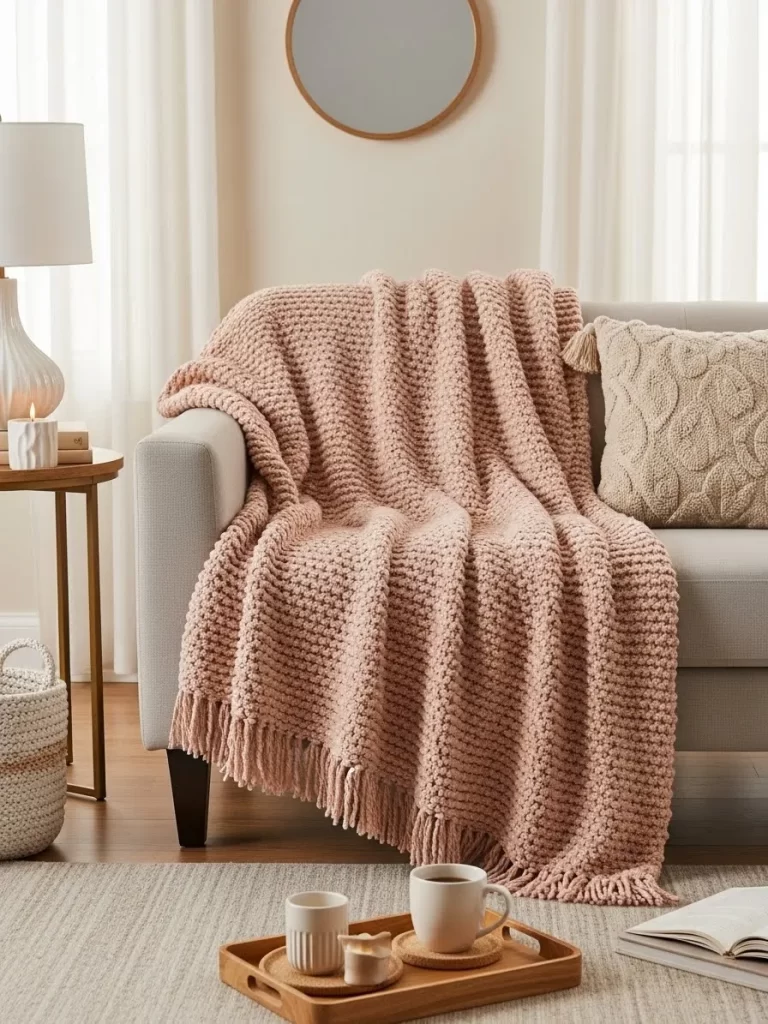
This heavy, textured throw blanket in a gentle blush pink is a wonderful addition for anyone seeking coziness and subtle color. The beautiful bobble or moss stitch creates a soft, tactile surface that adds incredible dimension to a flat sofa or bed. The addition of fringe along the edges enhances the handmade, comfortable feeling.
Draping the throw over the arm of a chair or across the foot of the bed immediately softens the furniture’s hard lines. The soft color harmonizes effortlessly with other neutrals and whites in the room, proving that romantic décor does not always require bright red. This piece is all about inviting relaxation and quiet intimacy.
Materials Required
- 4 to 5 skeins of soft, light pink yarn (medium to bulky weight).
- Knitting needles (size 10 or 11, depending on yarn weight).
Equipment Required
- Scissors.
- Crochet hook (for adding fringe).
DIY Instructions: Simple Knit Textured Throw
- Cast On: Decide on your desired width (a standard throw is about 50 inches wide). Cast on the appropriate number of stitches for your chosen stitch and yarn gauge. A stitch count of 100 to 120 is usually suitable for a throw.
- Choose a Textured Stitch: A seed stitch (alternating knit and purl every stitch) or a simple basketweave provides lovely texture. For a very simple version, try a garter stitch (knitting every row).
- Knit the Body: Continue knitting in your chosen stitch pattern until the blanket reaches your desired length (about 60 inches).
- Bind Off: Cast off the stitches on the final row loosely to ensure the edge does not pull tight.
- Add Fringe (Optional): Cut 8-inch lengths of yarn. Take two to three strands of the cut yarn, fold them in half, and use a crochet hook to pull the folded loop through a stitch on the short edge of the blanket. Pull the tails through the loop to create a knot. Repeat this process every few stitches along both short edges for a decorative fringe.
- Style: Fold or drape the finished throw over a chair to invite snuggling and infuse the area with soft texture and color.
29. Heart-Shaped Wall Mirror Duo
Item Name: Double Heart Reflector Pair
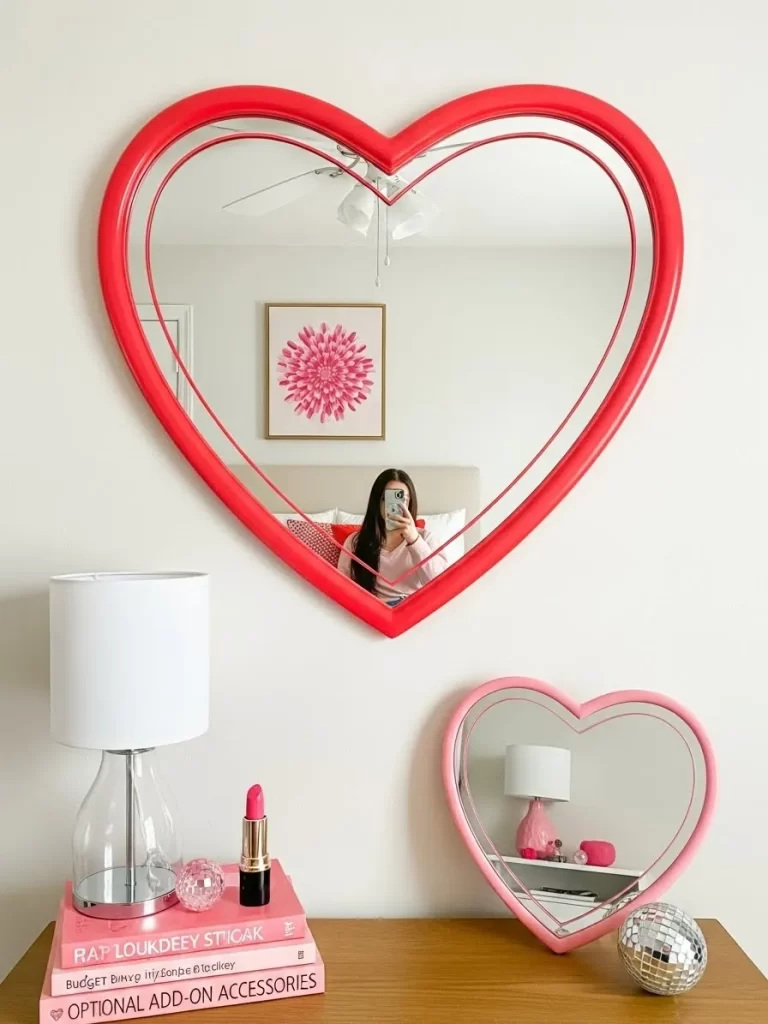
Mirrors are excellent for amplifying light and making a space feel larger and more open, while this pair immediately reinforces the theme of love. The large, dominant mirror with its vivid red heart frame serves as a bold statement piece over the headboard or a dresser. The second, smaller pink heart mirror creates a charming, layered effect.
Placing the mirror above the bed beautifully reflects the light and the surrounding décor, including the floral art in the background. The small size of the pink mirror on the table is perfectly scaled for vanity use, while also reflecting the light from the nearby lamp. These pieces combine function, romance, and playful, vibrant color.
Materials Required
- One existing mirror (any shape) to serve as a base, or pre-cut mirror glass.
- Large piece of wood (MDF or plywood) for the backer/frame shape.
- Red paint (glossy finish recommended).
- Jigsaw (or ask a hardware store to cut the shape).
- Wall hanging hardware.
Equipment Required
- Sandpaper.
- Drill.
- Strong adhesive (like construction adhesive).
DIY Instructions: Custom Heart-Shaped Mirror Frame
- Cut the Frame Shape: Decide on the size of your large heart frame. Draw the heart shape onto the wood and carefully cut it out using a jigsaw. You will cut two heart shapes: one outer shape and one inner shape (to hold the mirror glass).
- Smooth and Paint: Lightly sand the edges of the cut wood to ensure they are smooth. Paint the wood frame pieces with your bright red, glossy paint. Apply two or three coats for a deep, saturated color, allowing ample drying time between coats.
- Attach the Mirror: Carefully apply strong adhesive to the back of the painted wood frame. Center and press the pre-cut mirror glass onto the adhesive. If you are using an existing, standard mirror, you can cut the heart shape out of the wood and mount the mirror over the frame.
- Install Hanging Hardware: Once the adhesive is completely cured, attach heavy-duty wall hanging hardware to the back of the wood frame, ensuring it is rated to hold the weight of the mirror and the wood.
- Mount: Using a drill and level, securely mount the large heart mirror on the wall above your dresser or bed. Place a smaller, store-bought pink heart mirror on the table below to complete the themed duo.
30. Red and Gold Traditional Tapestry
Item Name: Royal Damask Wall Hanging
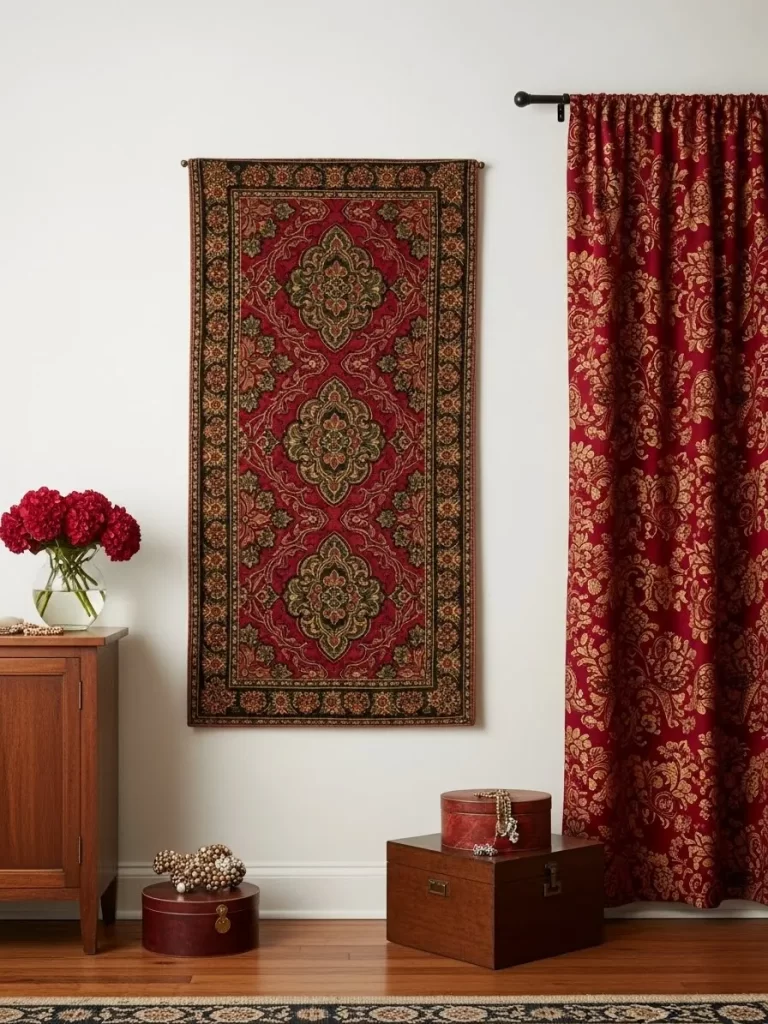
For a bedroom aiming for rich, timeless elegance rather than modern simplicity, incorporating a wall tapestry is an excellent idea. This piece, with its deep crimson background and intricate gold and moss green damask pattern, introduces a dense, luxurious texture and an old-world feeling of romance.
Hanging the tapestry vertically acts as a compelling accent that draws the eye upward. It is beautifully complemented by the matching heavy, red and gold damask curtain panel, which offers dramatic texture and light control. The use of rich woods and classic, dark-toned furniture completes this sophisticated, deeply layered romantic aesthetic.
Materials Required
- A rectangular piece of fabric (velvet or heavy linen) with a traditional damask or medallion pattern (about 20 x 48 inches).
- One wooden dowel (slightly wider than the fabric).
- Decorative cord or thin rope.
- Fabric glue or sewing machine.
Equipment Required
- Needle and thread (optional).
- Measuring tape.
- Wall hanging hardware (tacks or hooks).
DIY Instructions: Decorative Fabric Wall Tapestry
- Prepare the Fabric: Ensure the tapestry fabric edges are neat and straight. Turn over the side edges about half an inch and press, then fold again and sew a neat hem down the sides.
- Create the Dowel Pocket: Along the top edge, fold the fabric over 1.5 inches to the back (wrong side). Sew a straight line across the bottom of this fold to create a pocket or sleeve wide enough for the dowel to slide through easily.
- Insert the Dowel: Slide the wooden dowel through the newly created sleeve at the top of the fabric.
- Attach Hanging Cord: Cut a piece of decorative cord or rope (about 18 inches long). Tie each end of the cord securely around the dowel, positioned a few inches in from each end. This forms the loop for hanging.
- Hang and Style: Install two small wall tacks or hooks on the wall. Hang the cord loop over the hooks, allowing the tapestry to hang vertically. Drape the corded ends of the dowel with some decorative beaded necklaces or jewelry boxes on the furniture below to finish the opulent look.
31. Earthy Red Floor Seating and Macrame
Item Name: Terracotta Retreat Modular Chairs
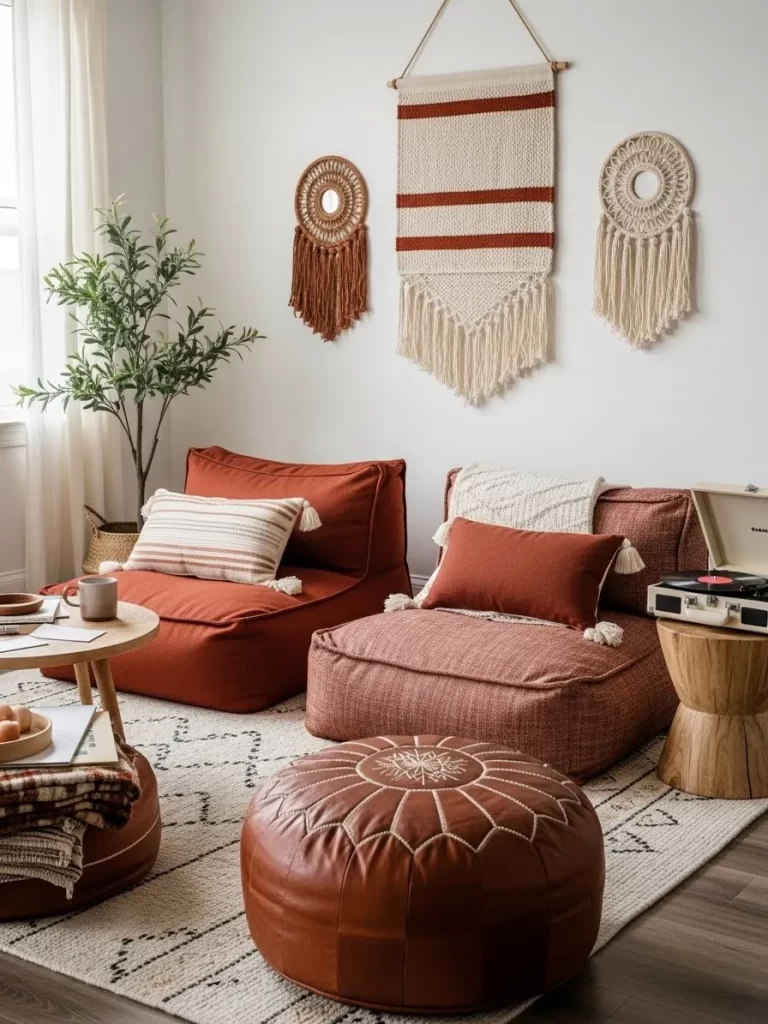
For a truly relaxed and intimate setting, adding unconventional, modular floor seating transforms a corner of the bedroom into a cozy lounge. These large, floor-level modular chairs are upholstered in a textured, warm terracotta or earthy red fabric, providing an enveloping softness far removed from rigid armchairs. This setting encourages casual, close conversation.
The rustic, textured wall hangings—macrame and woven tapestries in cream and rust—reinforce the bohemian, natural vibe. A leather pouf and a small wooden side table complete the look, tying into the organic, tactile aesthetic. This inviting space serves as an easy, stylish spot for sharing music or reading together.
Materials Required
- Four large, inexpensive square cushions (floor or patio cushions).
- 4 yards of heavy, textured cotton or linen fabric in terracotta or rust red.
- Coordinating heavy-duty thread.
- Zipper (optional, if you want removable covers).
Equipment Required
- Sewing machine.
- Measuring tape and ruler.
- Fabric scissors.
- Straight pins.
DIY Instructions: Simple Modular Floor Seating Covers
- Measure the Cushions: Measure the length, width, and depth (thickness) of your square floor cushions. Add 1 inch to the length and width for seam allowances.
- Cut the Fabric: For each cushion, you will need five pieces of fabric (two sides, one top/bottom, and the front/back pieces which will include the zipper or envelope closure). The simplest method is cutting one long rectangle that wraps around the entire cushion plus enough material for the zipper or overlap.
- Sew the Case: Pin the fabric pieces together, wrong sides out. Sew the seams, leaving one side open for inserting the cushion. If adding a zipper, sew the zipper into that open side. If using an envelope closure, create an overlap of 6 inches and hem the edges before sewing the final side seam.
- Finish the Seams: Clip the corners close to the seam, then turn the cover right side out.
- Insert the Cushion: Insert the floor cushion into the newly sewn cover. If you used a zipper, zip it closed.
- Arrange the Seating: Stack or arrange the finished cushions together on a rug to create your low, intimate modular seating area. Add small lumbar pillows for back support and extra texture.
32. Rose Water Linen Spray
Item Name: Scented Sheets Mist
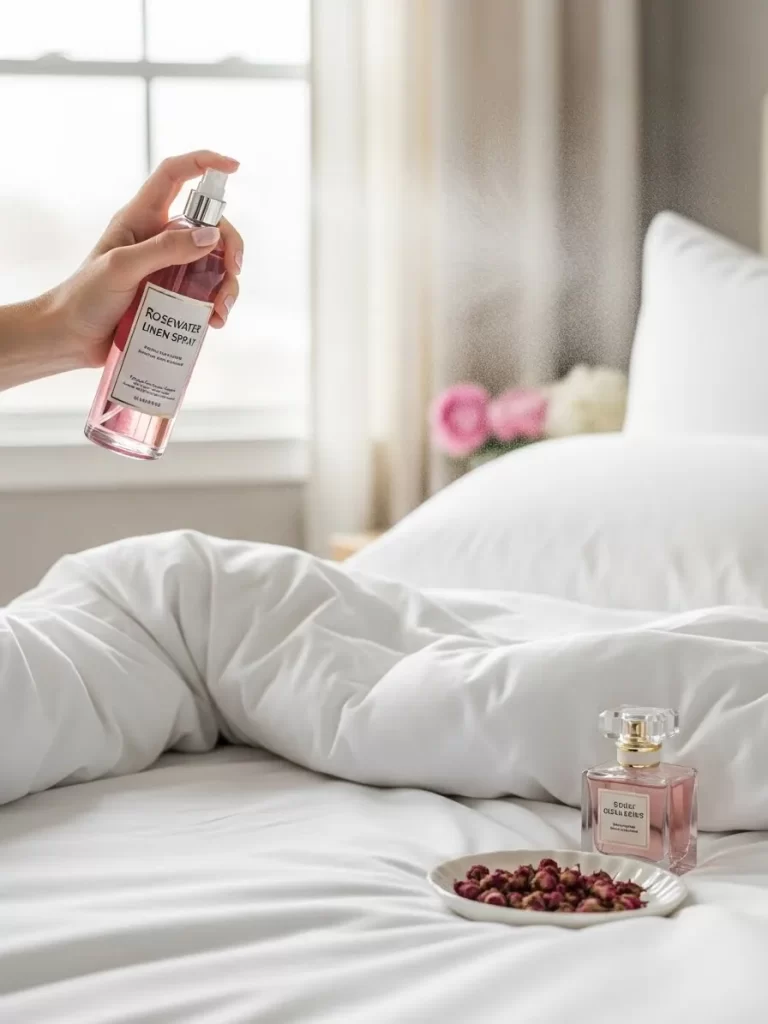
Scent plays a crucial, often forgotten role in setting a romantic mood. This beautiful bottle of rose water linen spray offers an instant fix for a refreshing, delicate floral scent right before bed. A subtle mist of a familiar, lovely scent on the bedding and pillows enhances the feeling of luxury and cleanliness.
The pink liquid and clear glass bottle add a small, pretty pop of color to the nightstand. The spray is styled alongside a coordinating perfume bottle and a dish of dried rosebuds, emphasizing the cohesive, fragrant theme. This simple gesture of freshening the sheets transforms a necessary chore into an act of sensory self-care and attention.
Materials Required
- One clear glass spray bottle (4-8 ounces).
- 1/2 cup distilled water.
- 1/2 cup vodka or witch hazel (acts as an emulsifier and preservative).
- 20-30 drops of Rose essential oil (or a romantic blend like ylang-ylang and sandalwood).
- Optional: A few drops of pink food coloring for color.
- Funnel (optional).
Equipment Required
- Measuring cup.
DIY Instructions: Romantic Rose Water Linen Mist
- Sanitize the Bottle: Thoroughly clean and dry the glass spray bottle to ensure no previous scents or contaminants remain.
- Mix the Base: Using the funnel (if needed), pour the distilled water and the vodka or witch hazel into the glass bottle. The vodka helps the oil and water blend and also helps the scent dissipate quickly without leaving damp spots.
- Add the Scent: Add 20 to 30 drops of the rose essential oil. Start with fewer drops; you can always add more. If desired, add one or two drops of pink food coloring for visual appeal.
- Shake Well: Screw the lid on tightly and shake the mixture vigorously for about 30 seconds to combine the ingredients.
- Test and Adjust: Spray a small mist onto a scrap piece of fabric to test the strength of the scent. Add more water for a lighter mist or more essential oil for a stronger fragrance.
- Use: Mist the sheets and pillows lightly a few minutes before entering the bedroom. Store the bottle away from direct sunlight and shake gently before each use.
33. Heart-Shaped Window String Lights
Item Name: Glowing Heart Garland
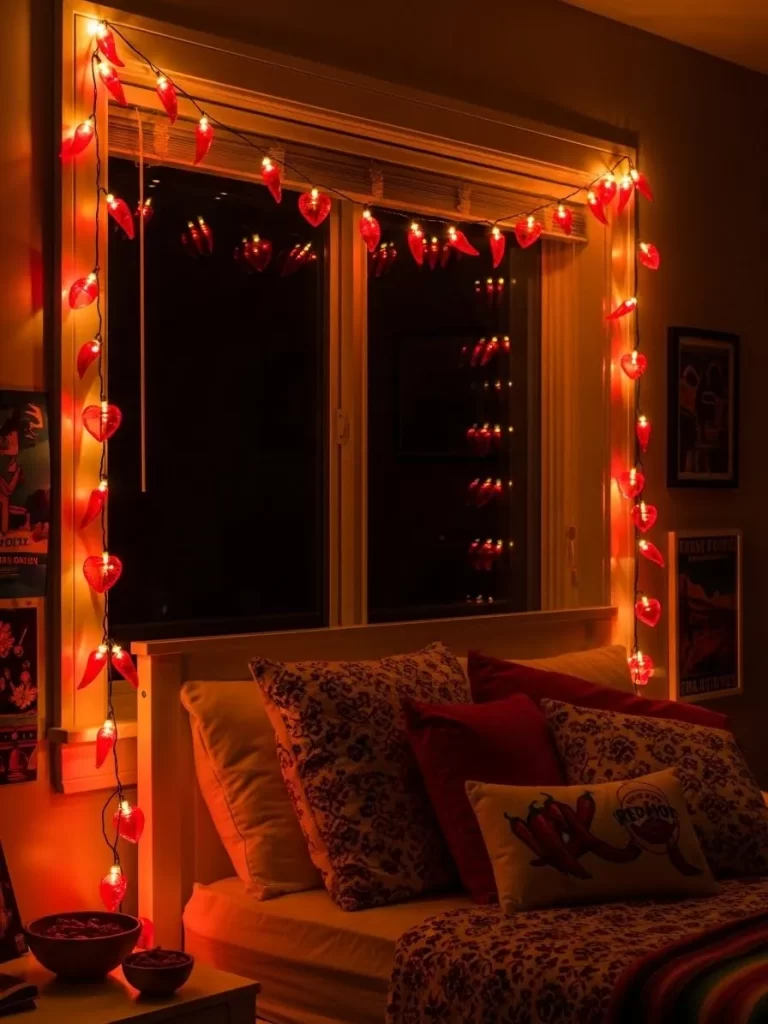
Lighting is the ultimate mood setter, and these whimsical, red heart-shaped string lights create a warm, intense glow perfect for an evening of romance. Draping them around the frame of the window instantly draws the eye and makes the space feel festive, magical, and incredibly cozy. The deep red light casts a flattering, sensual shade across the bed and pillows.
The warm glow contrasts beautifully with the dark night outside, creating a contained, intimate atmosphere within the room. The playful, casual draping of the lights over the headboard and window frame prevents the look from feeling too stiff. The red accents on the pillows reinforce the theme, pulling the eye from the window to the bed.
Materials Required
- 2 to 3 strings of battery-operated LED heart or chili pepper shaped string lights (red or warm white).
- Small, clear adhesive hooks (removable kind recommended).
Equipment Required
- Step stool or ladder.
- Measuring tape.
DIY Instructions: Romantic Window Frame Lights
- Plan the Layout: Determine the path you want the lights to take around the window frame. A simple drape across the top and down the sides is usually the most effective and easiest to achieve.
- Install the Hooks: Following the adhesive hook instructions, place the small, clear adhesive hooks along the top inside edge of your window frame and down the sides. Place them strategically where the lights need to change direction or need support.
- Drape the Lights: Starting at one top corner, secure the beginning of the light string to a hook. Gently wrap the lights around the window frame, securing the cord to the hooks as you go. Allow the cord to dip slightly between the hooks to create a graceful, relaxed drape, rather than pulling the lights taut.
- Connect and Conceal: If you are using multiple strings, connect them seamlessly at a discreet spot, perhaps behind a curtain or near the base of the frame. Conceal the battery pack (if applicable) behind a curtain or on the windowsill.
- Test the Mood: Turn the lights on to check the coverage and glow. The warm red light should reflect beautifully off the window glass, enhancing the room’s intimate ambiance.
34. Ruffled Tiered Bed Skirt
Item Name: Velvet Cascade Bed Skirt

For a deeply luxurious, dramatic, and overtly romantic presentation, a tiered velvet bed skirt is an outstanding choice. This heavy, ruby red skirt uses multiple gathered ruffles to create incredible volume and a cascading, voluminous effect that completely obscures the bed frame. The rich red velvet material conveys opulence and deep passion.
The height and volume created by the bed skirt ground the entire bed, making it feel like a majestic centerpiece. The look is balanced by the crisp white and black pillows on top, preventing the red from becoming overwhelming. Mirroring the bedside table and showcasing a velvet jewelry box below emphasizes the luxurious, celebratory nature of the scene.
Materials Required
- 6 to 8 yards of heavy red velvet fabric (the amount depends heavily on your bed size).
- Matching thread.
- Large piece of non-slip cotton or muslin fabric (sized to fit your box spring top).
Equipment Required
- Sewing machine.
- Measuring tape.
- Iron and ironing board.
DIY Instructions: Tiered Ruffle Bed Skirt
- Measure and Cut: Measure the length and width of your box spring. Cut the muslin/cotton fabric to fit the top of the box spring. Measure the distance from the top of the box spring to the floor (the ‘drop’) for the length of your ruffles, adding 1 inch for the top seam.
- Cut Ruffle Strips: Cut the velvet fabric into long, continuous strips that are 2 to 3 times the width of the box spring side you are covering. (More fabric equals more ruffle volume.)
- Gather the Ruffles: Use your sewing machine to create gathered ruffles by sewing a basting stitch (long stitch length) along one edge of the velvet strip. Gently pull one thread end to gather the fabric until the ruffled strip matches the length of the box spring side.
- Attach Ruffles to Skirt Panel: Sew the gathered velvet ruffle strips to the main muslin top piece. To create the tiered look, sew the lowest tier first, then sew the next tier overlapping the top seam of the previous tier. Repeat until you have 2 or 3 layers of ruffles down the sides.
- Finish Edges: Hem the bottom edge of the lowest ruffle strip.
- Installation: Place the finished skirt over your box spring like a fitted sheet. The heavy velvet ruffles will pool luxuriously at the floor, completing your dramatic bedroom look.
35. Assorted Red Vases and Fresh Flowers
Item Name: Crimson Clay Floral Collection

Fresh flowers are a timeless symbol of romance, but their presentation can be modernized using bold, colorful vases. This collection of sleek, glossy red vases in various shapes and heights creates a dynamic, architectural display. The uniform color allows the different shapes—from tall bottles to squat, organic vessels—to become the focal point.
The contrast between the sharp, modern red ceramic and the delicate white and pink flowers is visually stunning and contemporary. Grouping the vases tightly together on a surface, rather than scattering them, creates a powerful, intentional statement piece. This is a wonderfully vibrant way to introduce color and life.
Materials Required
- A collection of plain vases (glass, ceramic, or metal) in varying shapes.
- High-gloss, vibrant red spray paint (specifically for ceramic/metal, or a universal gloss paint).
- Newspaper or drop cloth.
- Sandpaper (fine grit, 220 or higher).
Equipment Required
- Face mask and gloves (for spray painting).
- Rubbing alcohol and a cloth.
DIY Instructions: Glossy Red Vase Collection
- Prepare the Vases: Thoroughly wash and dry all the vases. If the surfaces are glossy or very smooth, lightly scuff them with fine-grit sandpaper to help the paint adhere. Wipe them clean with rubbing alcohol.
- Protect the Area: Set up your spraying area outdoors or in a well-ventilated space, covering the surface with a drop cloth or newspaper.
- Apply Paint: Following the spray paint instructions, apply a light, even coat of the red glossy spray paint. Ensure you spray smoothly to avoid drips. Apply a second, thin coat after the first has dried to achieve a deep, saturated color and a brilliant, uniform shine. Do not paint the inside lip where water will touch.
- Cure Time: Allow the vases to dry and cure completely—this may take 24 to 48 hours—before adding water or flowers.
- Arrange the Display: Fill the finished red vases with white and pink roses, carnations, or snapdragons. Group the vases together on a table or dresser, alternating the height and flower types to create a striking, modern floral arrangement.
36. Dip-Dyed Hot Pink Floor Cushion
Item Name: Magenta Flow Lounge Pillow
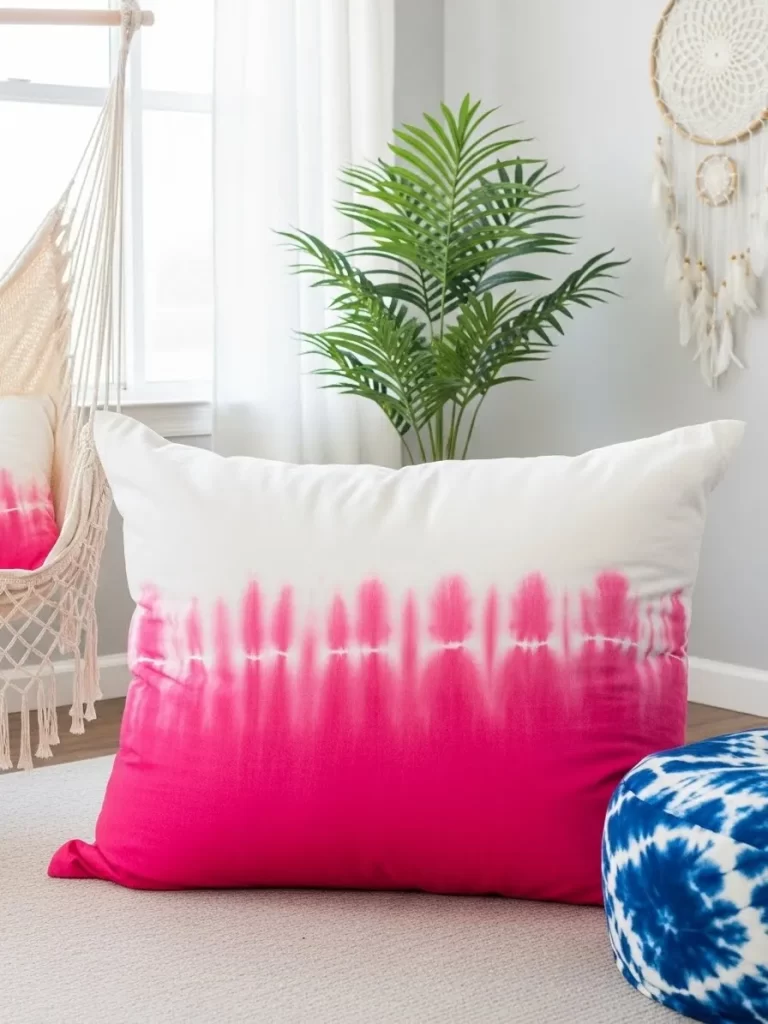
Floor cushions are the ultimate romantic accessory, encouraging comfortable, casual lounging on the floor, perfect for board games or reading together. This oversized pillow features a striking ombré tie-dye effect, fading dramatically from hot magenta pink up to crisp white. The technique adds a modern, artistic flair that instantly catches the eye.
The intense pop of color is beautifully set off by the simple white rug and the natural textures of the nearby hanging chair and plant. This piece invites relaxation and warmth, making an unused corner of the room functional and incredibly inviting. The size and brightness ensure it becomes a fun, lively statement piece.
Materials Required
- One large, plain white cotton or canvas floor pillow cover.
- Hot magenta or fuchsia liquid fabric dye.
- Salt and dish soap.
- Large bucket or clean tub.
- Rubber bands or string (optional, for specific tie-dye patterns).
Equipment Required
- Rubber gloves.
- Measuring cup.
- Stirring stick.
DIY Instructions: Ombré Dip-Dyed Floor Cushion
- Prepare the Cover: Wash and dry the pillow cover. It should be damp before dyeing for the best results.
- Mix the Dye Bath: Fill the large bucket or tub with enough very hot water to submerge half the pillow cover. Add the magenta fabric dye, salt, and a squirt of dish soap, stirring well.
- Dip the Cover: Dip the bottom half of the pillow cover into the dye bath. For the most dramatic gradient, start by dipping the bottom 1/4 of the cover for the longest time (about 20 minutes). Then, slowly dip the next 1/4 section for a shorter time (10 minutes).
- Create the Ombré: To get the sharp fade shown, you can pull the pillow cover out quickly after the desired soak time is complete for each section, or you can use a spray bottle with heavily diluted dye on the mid-section to help feather the line between the white and magenta. The goal is a gradual fade from the deepest color to white.
- Rinse and Dry: Once the color is rich enough, rinse the cover under cool water until the water runs completely clear. Wash the cover separately in cold water with mild detergent.
- Finish: Insert the cushion and place the finished, vibrant pillow on the floor to introduce color, comfort, and an artistic touch to your romantic space.
37. Velvet Stacked Storage Boxes
Item Name: Treasure Chest Velvet Containers
Clutter severely detracts from a romantic atmosphere, but these deep red velvet storage boxes offer a luxurious solution. The rich velvet texture and deep, sophisticated color instantly upgrade the functional pieces. Stacking the boxes of varying sizes, each accented with a pale pink stripe, creates a beautiful, dimensional display.
The boxes are designed with internal compartments, making them especially useful for organizing remotes, jewelry, or private keepsakes. They are styled with vintage keys and a magnifying glass, suggesting hidden treasures and secrets. This is a wonderfully elegant and non-traditional way to introduce strong red color and necessary organization.
Materials Required
- Plain cardboard or wooden boxes with lids (various sizes).
- 1 to 2 yards of deep red velvet fabric.
- 1/4 yard of pale pink velvet fabric (for the stripe).
- Heavy-duty spray adhesive or strong fabric glue.
- Scissors.
Equipment Required
- Ruler or measuring tape.
- Utility knife (optional, for neat corners).
DIY Instructions: Velvet Covered Storage Boxes
- Cut the Fabric: Cut the red velvet into strips large enough to wrap around the sides of each box, plus enough material to cover the lid and the inside. Cut the pink fabric into strips for the decorative horizontal stripe.
- Wrap the Sides: Spray the outside of one box side with adhesive. Lay the red velvet strip over the adhesive, smoothing out any bubbles. Overlap the edges neatly at a corner. Repeat for all sides.
- Add the Stripe (Optional): Measure and cut the pink velvet stripe to wrap around the center of the box sides. Glue the pink strip neatly over the main red velvet layer.
- Cover the Lid and Inside: Cover the lid top with a piece of red velvet. Use a small piece of velvet to line the interior bottom of the box for a softer finish. Optional: Use thin cardboard covered in velvet to create interior dividers.
- Finish the Edges: Carefully cut and fold the velvet at the corners and along the box edges for a neat, tailored look, gluing down all raw edges.
- Stack and Style: Stack the finished boxes on a dresser or shelf. Use them to organize remote controls, love letters, or small pieces of jewelry, keeping the room tidy and beautiful.
38. Red Neon and LED Strip Lighting
Item Name: Valentine’s Glow Mood Lighting
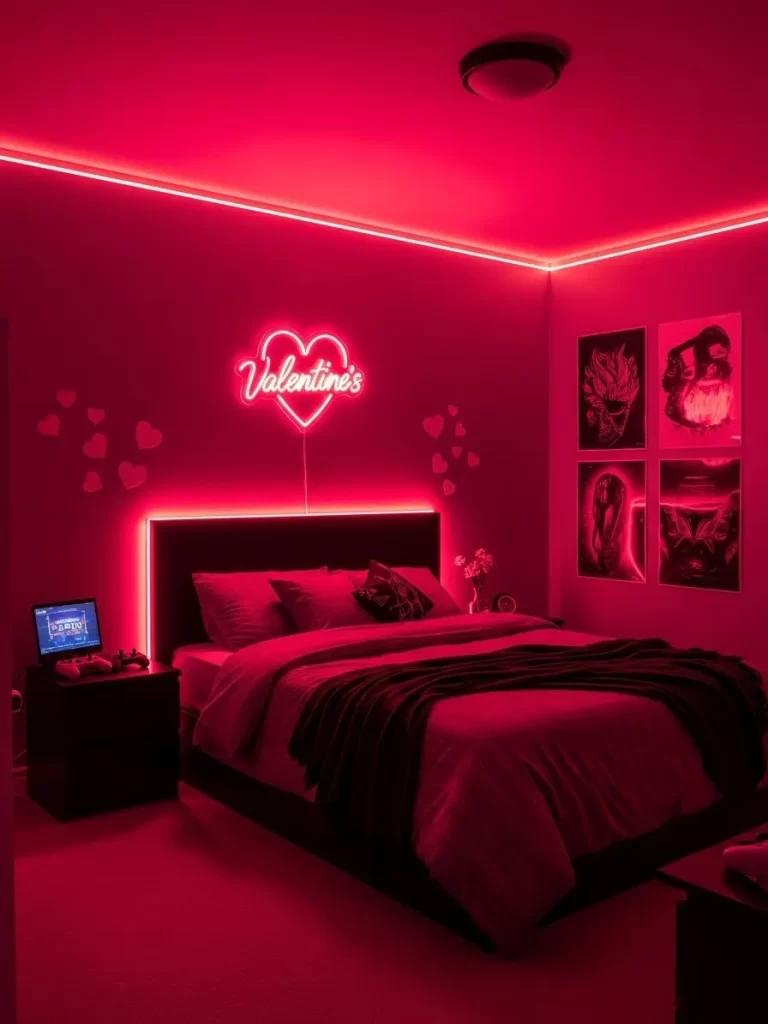
For a modern, high-impact romantic transformation, embracing custom neon and LED strip lighting is a dynamic choice. The overhead LED strip lighting, installed around the ceiling perimeter, casts a powerful, saturated red glow over the entire room, instantly changing the mood. The custom “Valentine’s” neon sign provides a fun, focused centerpiece over the headboard.
The red light makes the dark bedding and walls look dramatic and sensual, enveloping the space in passionate color. This approach to lighting is fully adjustable and highly effective for creating a temporary, immersive party or intimate vibe. The scattered heart decals on the wall reinforce the energetic, playful theme.
Materials Required
- One roll of color-changing LED strip lights (red preferred).
- Mounting clips or adhesive backing (should come with the lights).
- Optional: One small, pre-made red neon sign (heart or word art).
Equipment Required
- Ladder or sturdy step stool.
- Measuring tape.
- Scissors (to cut LED strip lights to length at designated cut marks).
DIY Instructions: Ambient LED Strip Installation
- Measure and Clean: Measure the perimeter of your ceiling (or the length you wish to cover). Wipe the ceiling or wall area where the lights will be placed with rubbing alcohol to ensure the adhesive sticks.
- Cut the Strips: If necessary, cut the LED light strips to the required length, only cutting at the designated marked points on the strip.
- Install the Strips: Starting in an inconspicuous corner, peel the protective backing from the strip lights and carefully press them firmly onto the ceiling/wall junction. Work your way around the room, keeping the strip straight and flush with the corner. Use mounting clips for added security, especially around corners.
- Connect Power: Connect the strip lights to the power supply or controller and position the adapter near an outlet.
- Install Neon Sign (Optional): Mount the neon sign securely to the wall above the bed using appropriate anchors, ensuring the cord is neatly plugged into an outlet or concealed.
- Set the Scene: Turn on the lights and set them to the deep red setting. The reflective light and high-impact color will immediately transform your room into a dramatically romantic haven.
39. Hot Pink Accent Wall and Chair
Item Name: Flamingo Paradise Reading Corner
For the boldest romantic statement, transforming one wall with vibrant hot pink wallpaper creates an energetic and maximalist aesthetic. The detailed pattern of the wallpaper is offset by clean, white trim, preventing the color from feeling too juvenile. This is an all-in approach to passionate, joyful color.
A plush, curvy velvet accent chair in a matching hot pink, set upon delicate gold legs, anchors the corner. Adding a gold bar cart dressed with beautiful flowers and glassware turns the space into an elegant conversation or cocktail nook. The flamingo art reinforces the fun, stylish, and highly visual approach to romantic décor.
Materials Required
- 1 to 2 rolls of peel-and-stick hot pink patterned wallpaper.
- Small, rounded wood chair frame (thrifted or inexpensive find).
- 1 yard of plush hot pink velvet fabric.
- Foam padding (for seat cushion).
Equipment Required
- Exacto knife or utility knife.
- Smoothing tool/squeegee (for wallpaper).
- Staple gun (for upholstering the chair).
DIY Instructions: Accent Wall and Upholstered Chair
- Prep the Wall: Ensure the accent wall is clean, smooth, and dry.
- Apply Wallpaper: Starting from the top of the wall, peel the backing from the wallpaper and apply the first strip vertically, smoothing out bubbles with a squeegee as you go. Carefully align the pattern before applying the next strip, trimming the edges with a utility knife.
- Prepare the Chair Seat: Remove the existing seat cushion from the chair frame. If the frame is wood, you may want to paint it. Cut a piece of foam padding to fit the seat.
- Upholster the Seat: Center the foam on the underside of the velvet fabric. Place the seat cushion on the foam. Pull the fabric tightly up and around the edges of the cushion and staple it securely to the underside of the wood base using a staple gun. Neatly fold and staple the corners.
- Reassemble and Style: Attach the upholstered seat back onto the chair frame. Place the chair in front of the new accent wall. Accessorize the area with a bar cart, fresh flowers, and reflective art to create a glamorous, passion-filled corner.
We hope these 39 swaps have shown you how effortless it is to transform a plain bedroom into a beautiful, romantic haven. Focusing on textural richness—from cozy velvet to soft shag rugs—combined with warm, intentional lighting creates an atmosphere of deep intimacy and comfort.
Remember, the goal is not merely decorating for a holiday, but designing a space that makes you feel loved and relaxed year round. Whether you tackle a major project like a tiered bed skirt or simply update your bedside glassware, each small change contributes to your overall feeling of well being. Enjoy the process of crafting your stunning, new romantic retreat!
Key Takeaways
Layering is Key
Achieve an expensive, luxurious look by combining multiple fabrics like smooth satin, crushed velvet, and chunky knit throws. This layering of materials immediately adds visual depth and tactile warmth to the bed.
Lighting Sets the Mood
Banish harsh overhead fixtures and rely on ambient, diffused light. Use ruby red lampshades, fairy lights, or custom neon signs to cast a warm, flattering glow that makes the room feel cozy and intimate.
Focus on Function and Love
Incorporate romantic themes into functional pieces. Use bold heart decals on storage baskets, personalized photo frames, or elegant glassware. This keeps the décor playful and intentional, rather than just clutter.