Struggling with a messy laundry room is a common frustration for many homeowners. Mountains of clothes and scattered bottles make simple chores feel impossible. You can turn this chaotic space into a functional hub with the right plan.

Organization changes the way you handle daily tasks. Saving time becomes much easier when every item has a specific home. This collection of thirty eight hacks will help you reclaim your utility area.
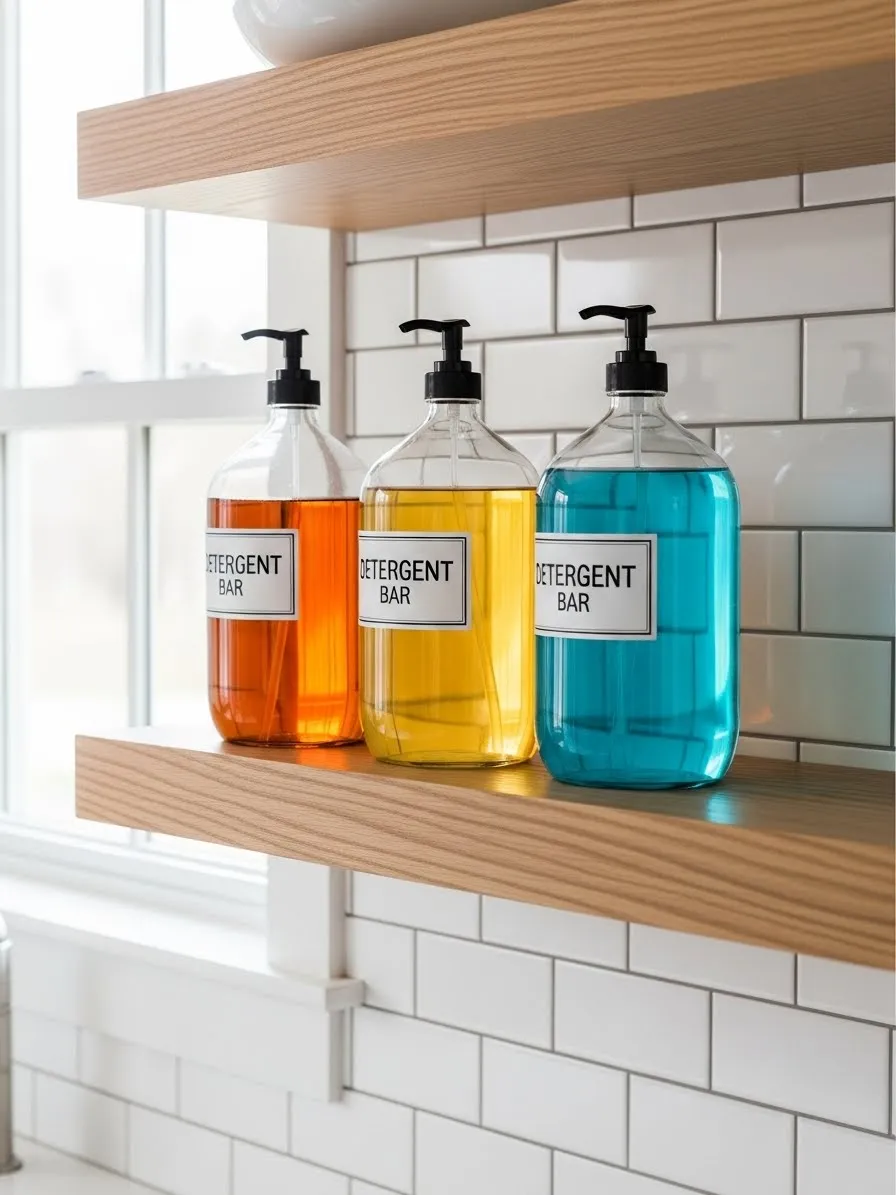
1 Glass Pump Dispensers

Transforming your laundry area starts with swapping out clunky plastic containers for these sleek glass bottles. Clear glass allows you to monitor soap levels instantly while adding a splash of vibrant color to the room. These dispensers sit beautifully on open wooden shelving against a clean tile backdrop. Every pump provides a measured amount of liquid which reduces product waste.
Uniform labels create a cohesive look that calms the visual chaos of various brand designs. Pumping detergent directly into the machine saves time and prevents messy spills on your surfaces. Visitors will notice how organized your space feels with such a simple and effective upgrade. Using these containers makes a routine chore feel like a high end experience every single day.
Material Required List
- Clear glass bottles with pumps
- Waterproof labels
- Liquid laundry detergent
Equipment Required List
- Small funnel
- Damp cloth
- Measuring cup
DIY Instructions
- Clean the outside of each glass bottle with a damp cloth to remove dust.
- Let the glass surface dry completely so the labels stick well.
- Peel the backing off your waterproof labels carefully.
- Center the label on the front of the bottle and press it down.
- Smooth out any air bubbles with your thumb starting from the middle.
- Place a small funnel into the mouth of the bottle.
- Pour your detergent into the bottle until it is nearly full.
- Screw the pump lid on tightly to prevent any leaks.
- Press the pump several times to get the liquid flowing.
2 Slim Rolling Storage Cart

Small gaps between your machines often go to waste. This rolling cart turns that empty sliver into a storage powerhouse for soaps and pods. Every shelf offers easy access to your most used supplies.
Wheels make it simple to glide the unit out for a quick refill. Sturdy plastic construction stands up to humidity without rusting or staining. Tiny rooms feel much larger when floor clutter moves into these hidden spots.
Material Required List
- Multi tier rolling cart
- Laundry pods
- Cleaning bottles
Equipment Required List
- Measuring tape
- Cleaning cloth
DIY Instructions
- Measure the width of the gap between your appliances first.
- Unpack the cart pieces and lay them on a flat floor.
- Push the caster wheels into the bottom base until they click.
- Connect the plastic support rods to the first tray.
- Place the second tray on top of the rods and press down.
- Continue this process for all remaining shelves.
- Tighten any connectors to ensure the cart is stable.
- Load your heavy detergent bottles on the bottom shelf for balance.
- Slide the finished cart into the narrow space.
3 Accordion Wall Drying Rack

Hanging wet clothes usually requires a bulky floor rack. This wooden accordion design mounts directly to your wall to save precious square footage. It expands when you have a load of delicates and folds flat when empty.
Natural wood tones provide a warm look to your utility space. Air flows freely through the open bars to dry garments quickly. Using wall space keeps your floor clear for walking and sorting.
Material Required List
- Wooden accordion rack
- Wall screws
- Plastic anchors
Equipment Required List
- Power drill
- Pencil
- Bubble level
DIY Instructions
- Hold the rack against the wall at your desired height.
- Use a bubble level to make sure the unit is straight.
- Mark the mounting holes on the wall with your pencil.
- Drill holes into the marks using a bit that matches your anchors.
- Push the plastic anchors into the holes until they are flush.
- Align the rack with the anchors and insert the screws.
- Tighten the screws until the rack feels very solid.
- Pull the rack open to ensure it moves without hitting anything.
4 Butcher Block Folding Station

Front loading machines offer a great opportunity for extra workspace. A solid wood countertop placed over the units creates a smooth area for folding. This setup prevents small items like socks from falling into the dark gaps.
White towels look beautiful against the deep grain of the wood. Adding a woven basket nearby keeps smaller essentials within arm reach. You will find that laundry day goes faster when you have a dedicated surface.
Material Required List
- Butcher block wood slab
- Wood sealer
- Woven basket
Equipment Required List
- Circular saw
- Sandpaper
- Paint brush
DIY Instructions
- Measure the top surface of your washer and dryer together.
- Cut your wood slab so it extends slightly past the edges.
- Sand the top and sides until the wood feels soft.
- Apply a layer of wood sealer to protect against water.
- Wait for the surface to dry for at least twenty four hours.
- Place the slab carefully over the top of the machines.
- Set a woven basket on the corner to hold your items.
- Use this new space to stack your clean laundry immediately.
5 Lost Socks Sign
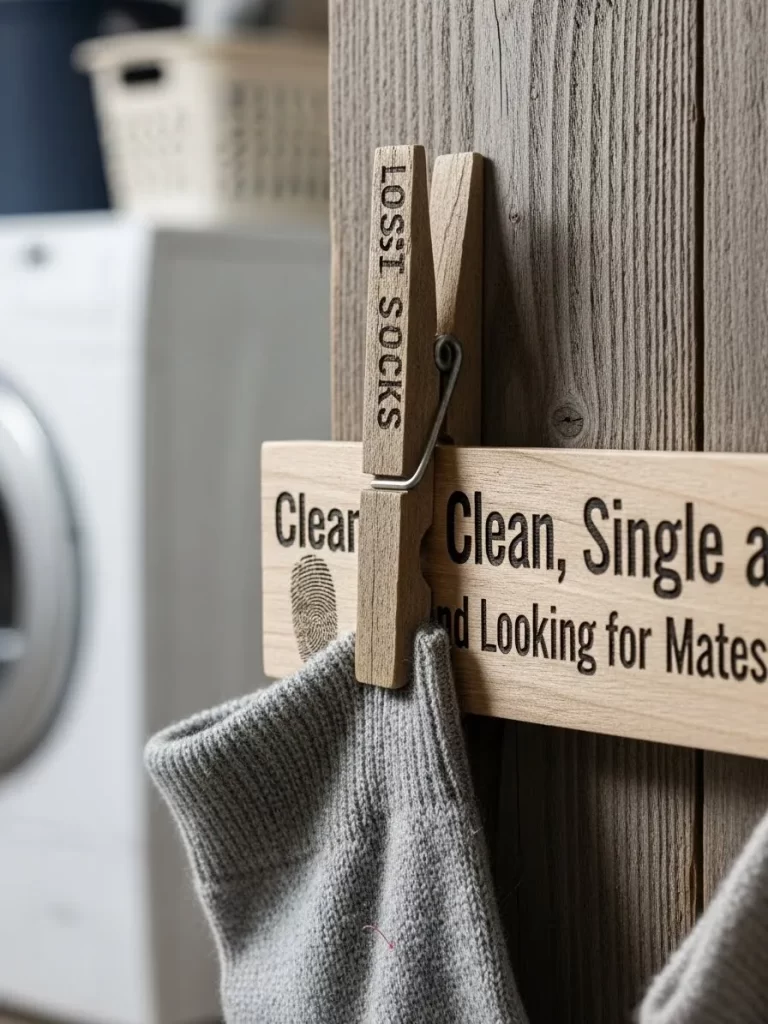
Missing socks are a frustrating part of every laundry routine. This wooden board features a funny message and clips to hold single items. Hanging them in a visible spot helps you find matches as they appear.
Natural wood and black text fit into any decor style. Clothespins provide a simple way to attach and remove socks quickly. You can turn a common annoyance into a charming piece of wall art.
Material Required List
- Flat wooden board
- Wooden clothespins
- Wood glue
Equipment Required List
- Paint marker
- Ruler
- Small saw
DIY Instructions
- Cut a small piece of wood into a rectangular shape.
- Write a message about missing socks using your paint marker.
- Use a ruler to space out your clothespins evenly.
- Put a small dot of glue on the back of each pin.
- Press the pins onto the board and let them set.
- Wait two hours for the glue to dry completely.
- Attach a hanging wire to the back of the wood.
- Mount the sign on the wall near your dryer machine.
6 Door Mounted Cleaning Center
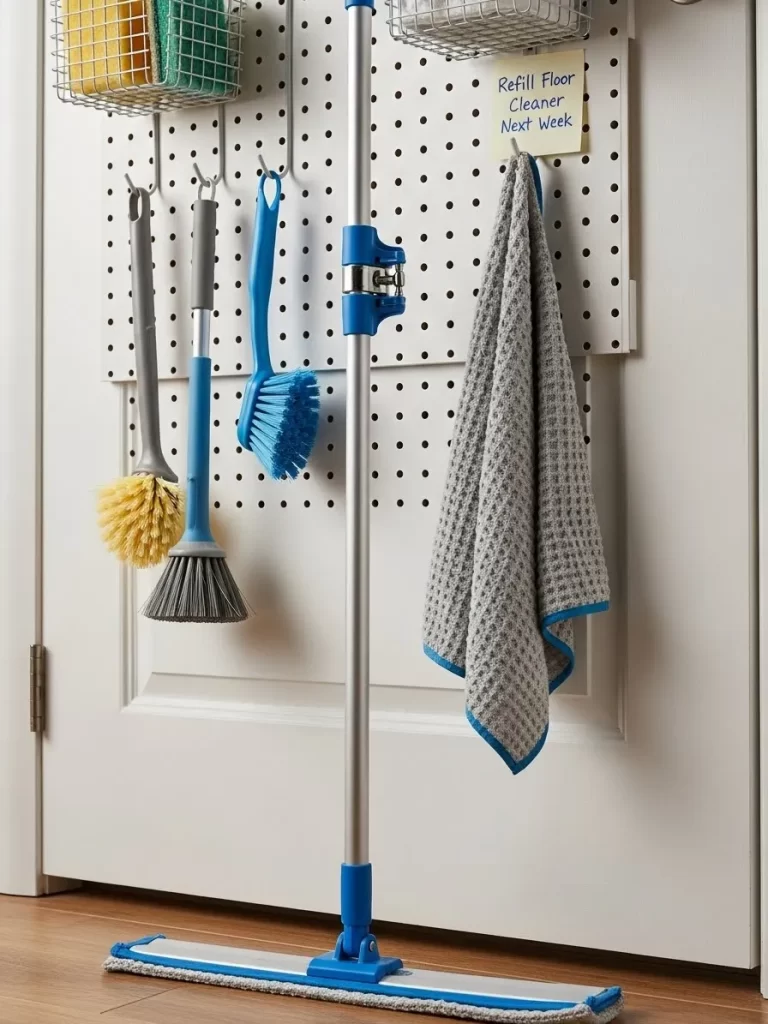
Backs of doors provide excellent storage for tall items like mops. A white pegboard allows you to customize the layout of your hooks. Keeping brushes and towels off the floor makes the room look much tidier.
Small baskets can hang on the board to hold sponges or scrubbers. Seeing all your tools at once helps you stay on top of chores. This system utilizes wasted space and keeps your floors completely clear.
Material Required List
- Pegboard panel
- Assorted metal hooks
- Wire baskets
Equipment Required List
- Screwdriver
- Mounting hardware
- Level
DIY Instructions
- Position the pegboard in the center of the door back.
- Ensure the board is level so your tools hang straight.
- Screw the mounting hardware into the door corners.
- Press the pegboard onto the mounts until it clicks.
- Insert your hooks into the holes in various positions.
- Hang your mop and brushes on the long hooks.
- Place sponges into the wire baskets for easy access.
- Check that the door still opens and closes easily.
7 Magnetic Lint Trash Bin
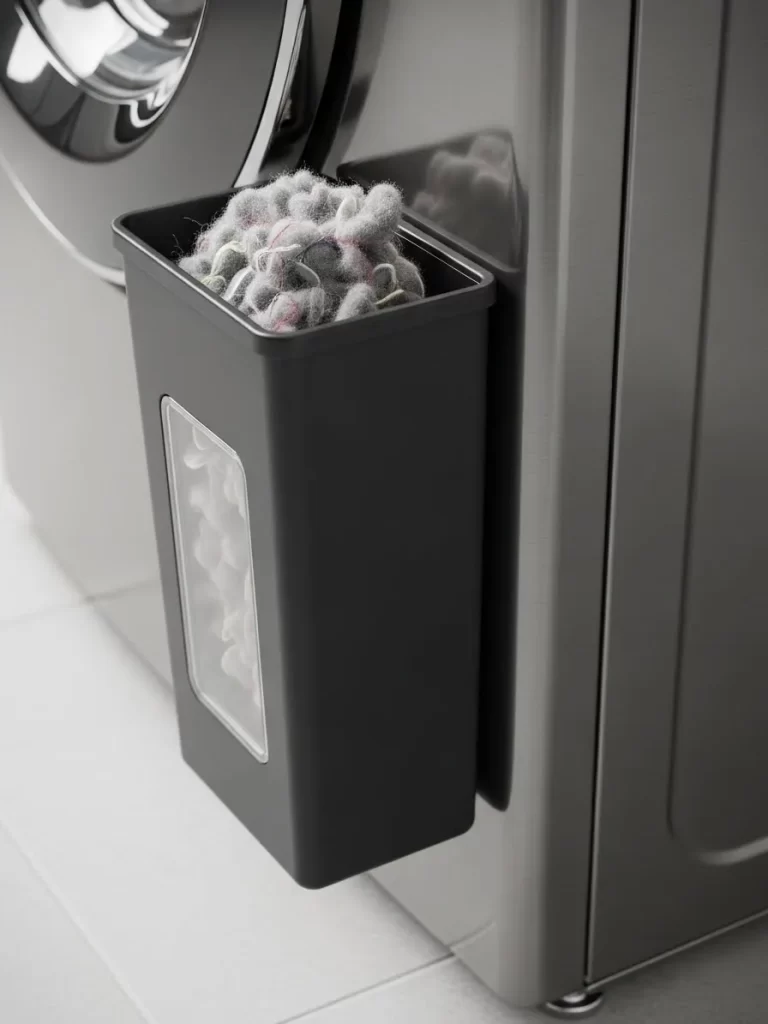
Lint from the dryer trap needs a place to go immediately. This slim black bin attaches to the side of your machine with magnets. A clear window on the front shows you when it is full.
Durable plastic keeps the bin looking new for a long time. Having the trash right next to the machine encourages frequent cleaning. You will reduce the risk of fire by keeping your lint trap clear.
Material Required List
- Magnetic lint bin
- Small trash bags
- Cleaning spray
Equipment Required List
- Microfiber cloth
- Rubbing alcohol
DIY Instructions
- Wipe the side of your dryer with rubbing alcohol.
- Clean the magnets on the back of the bin as well.
- Stick the bin onto the metal side of the dryer.
- Adjust the height so you can reach it easily.
- Place a small bag inside if you want easier emptying.
- Drop your lint into the top opening after every dry cycle.
- Look through the window to see the current fill level.
- Remove the bin and dump the lint into the main trash.
8 Triple Bag Laundry Sorter
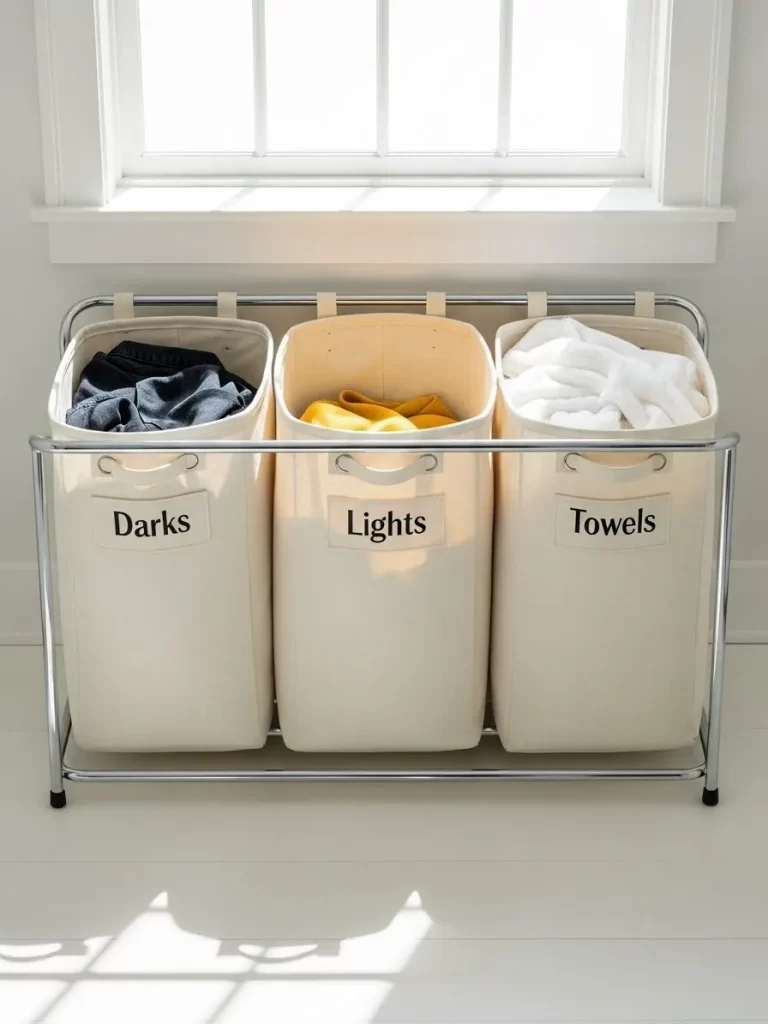
Sorting clothes as you go saves a lot of time on wash day. This metal frame holds three separate canvas bags for different categories. Labels for darks and lights help everyone in the house participate.
Wheels on the bottom allow you to move the unit to the washer. Sturdy canvas material is breathable and holds a large amount of weight. Organizing your loads early prevents accidental color bleeding in the wash.
Material Required List
- Laundry sorter frame kit
- Three canvas bags
- Fabric labels
Equipment Required List
- Wrench
- Screwdriver
DIY Instructions
- Lay the metal frame pieces on a flat floor surface.
- Bolt the side pieces to the bottom bars using your wrench.
- Attach the wheels to the four corners of the base.
- Slide the horizontal bars through the loops on the bags.
- Hook the bars into the notches on the top of the frame.
- Ensure the labels for darks and lights are facing forward.
- Push the sorter into its spot under a window or counter.
- Roll it over to the machine when a bag is full.
9 Hidden Cabinet Ironing Board
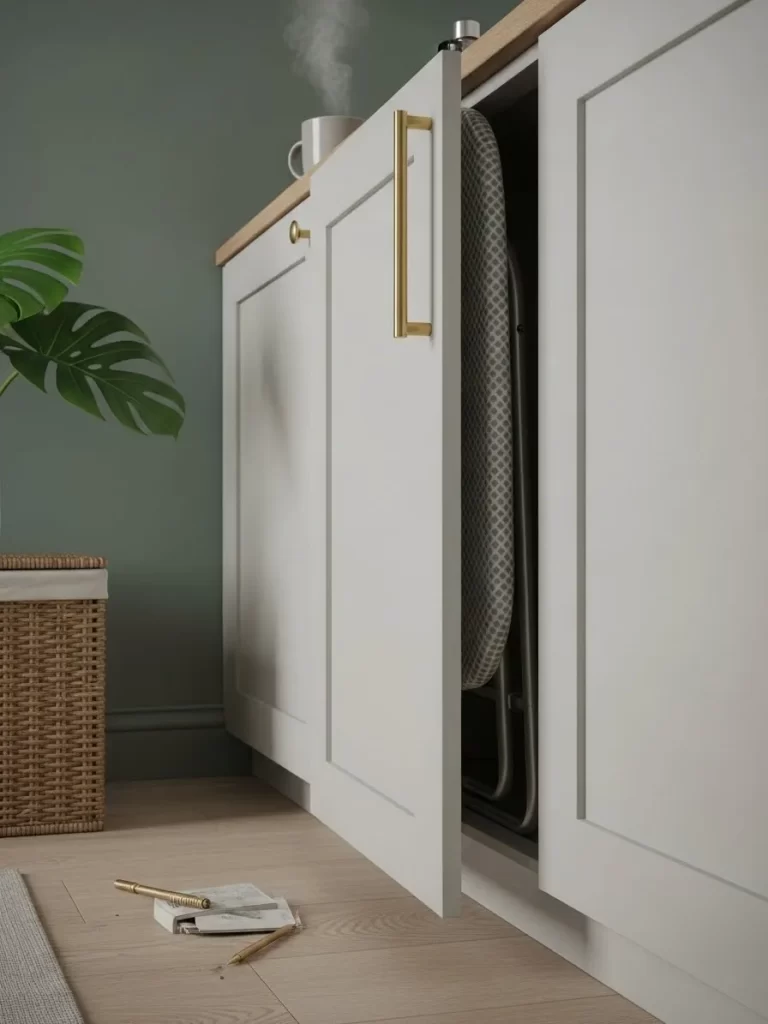
Traditional ironing boards are often bulky and hard to store. This design hides the board inside a slim cabinet when not in use. Opening the door reveals a full sized surface that is ready for work.
Grey patterned covers add a modern touch to the utility room. Placing the board near a power outlet makes the task much simpler. You can keep your laundry room looking sleek by tucking this away.
Material Required List
- Wall mount ironing board cabinet
- Heat resistant board cover
- Wood screws
Equipment Required List
- Stud finder
- Drill
- Level
DIY Instructions
- Find the wooden studs in your wall using a stud finder.
- Hold the cabinet against the wall at your waist height.
- Check that the unit is level before you start drilling.
- Screw the cabinet into the wall studs for safety.
- Attach the ironing board to the internal hinges.
- Slide the heat resistant cover over the padded board.
- Fold the board up and close the cabinet door.
- Use the handle to pull the board down whenever needed.
10 Vintage Ladder Drying Rack
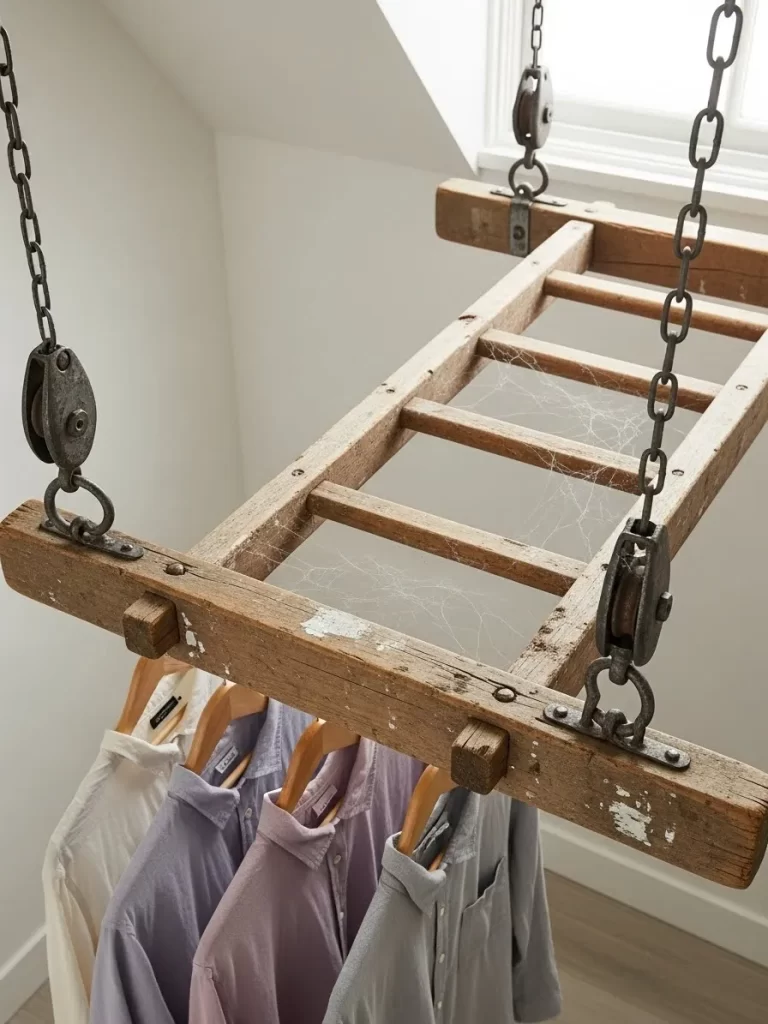
Old wooden ladders can find a new life as a hanging rack. Suspending the ladder from the ceiling provides a lot of room for hangers. This rustic look adds personality to a functional storage space.
Metal chains and pulleys allow you to adjust the hanging height. Air circulates around the clothes to dry them faster than a flat rack. You will love how this unique piece changes the feel of the room.
Material Required List
- Old wooden ladder
- Heavy duty metal chains
- Ceiling hooks
Equipment Required List
- Power drill
- Pliers
- Ladder for reaching the ceiling
DIY Instructions
- Clean the old ladder with soap and water to remove dust.
- Sand any rough edges so your clothes do not snag.
- Drill four holes into the ends of the ladder rails.
- Insert large eye bolts into these holes and tighten them.
- Install heavy duty hooks into the ceiling joists above.
- Attach the metal chains to the hooks and the ladder.
- Use pliers to secure the chain links around the bolts.
- Hang your shirts on hangers along the rungs of the ladder.
11 Labeled Cleaning Bins
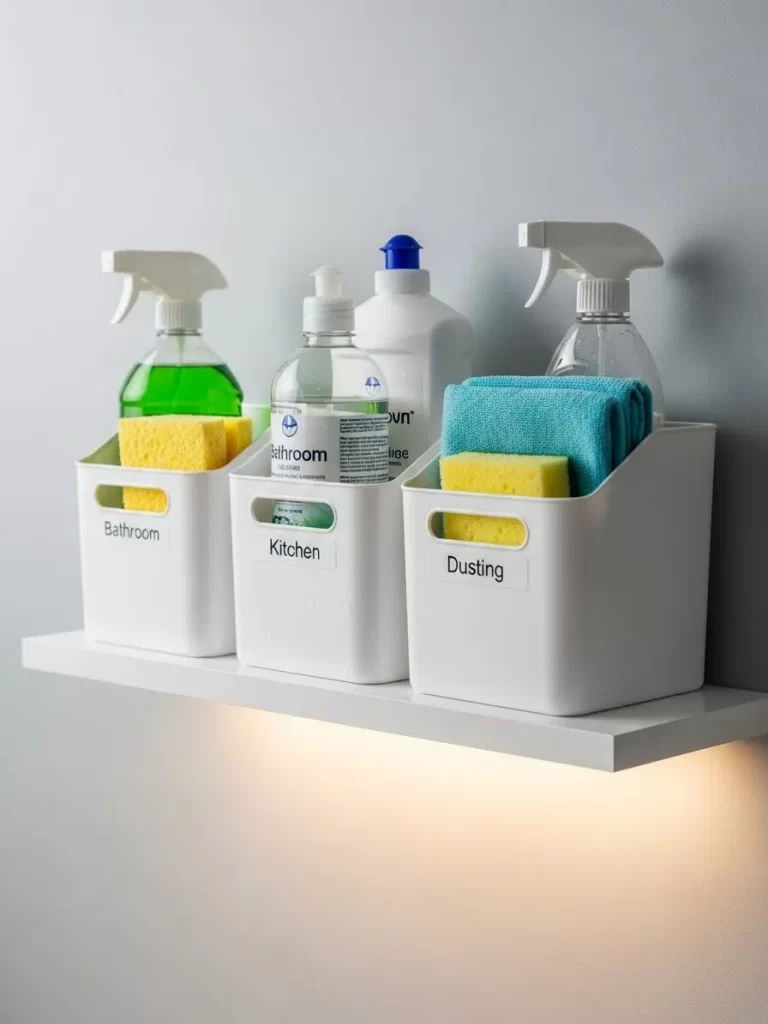
Floating shelves provide a great spot for frequently used cleaning sprays. White plastic bins keep your bottles organized by their specific purpose. Labels for the kitchen or bathroom make finding supplies very fast.
Sponges and cloths stay tidy inside these matched containers. Keeping everything on a high shelf protects children from reaching chemicals. This clean layout makes your utility room look like a professional space.
Material Required List
- White plastic storage bins
- Adhesive labels
- Floating shelf
Equipment Required List
- Label maker
- Cleaning cloth
DIY Instructions
- Wipe the front of each plastic bin to remove oils.
- Print labels for different rooms like Kitchen and Dusting.
- Stick the labels onto the center of each bin front.
- Place your cleaning sprays and sponges into the bins.
- Group similar items together so you know what is in stock.
- Arrange the bins neatly on your floating wall shelf.
- Put the most used items in the bin on the far right.
- Slide a bin out whenever you need to clean a specific room.
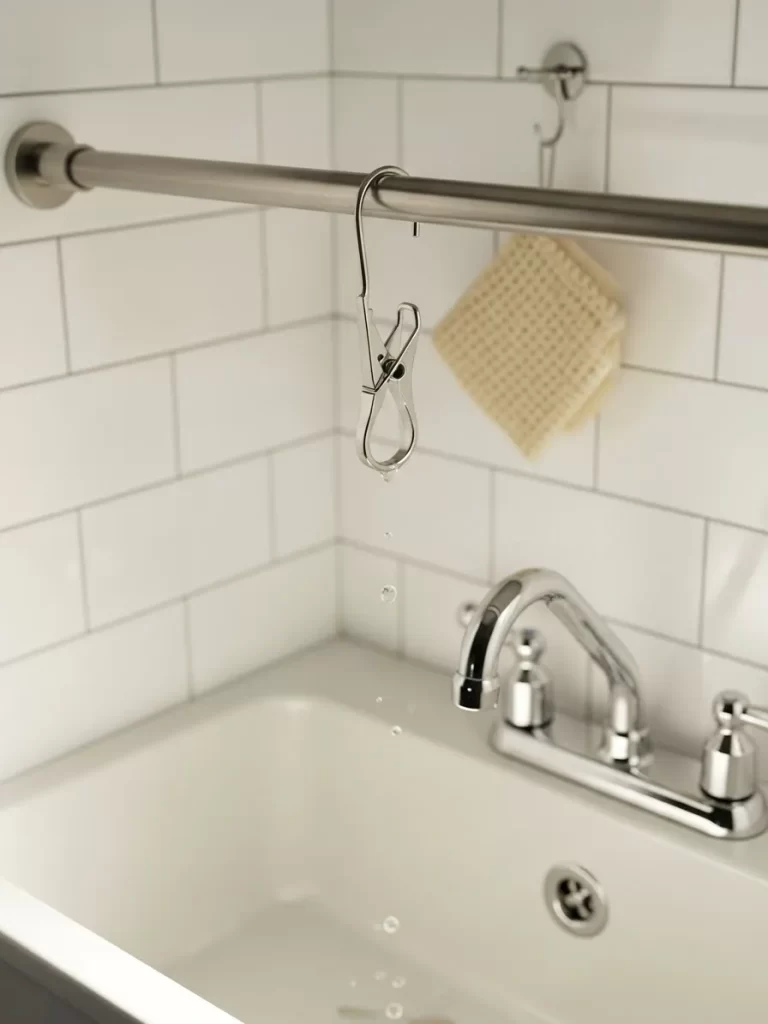
12 Retractable Wall Clothesline
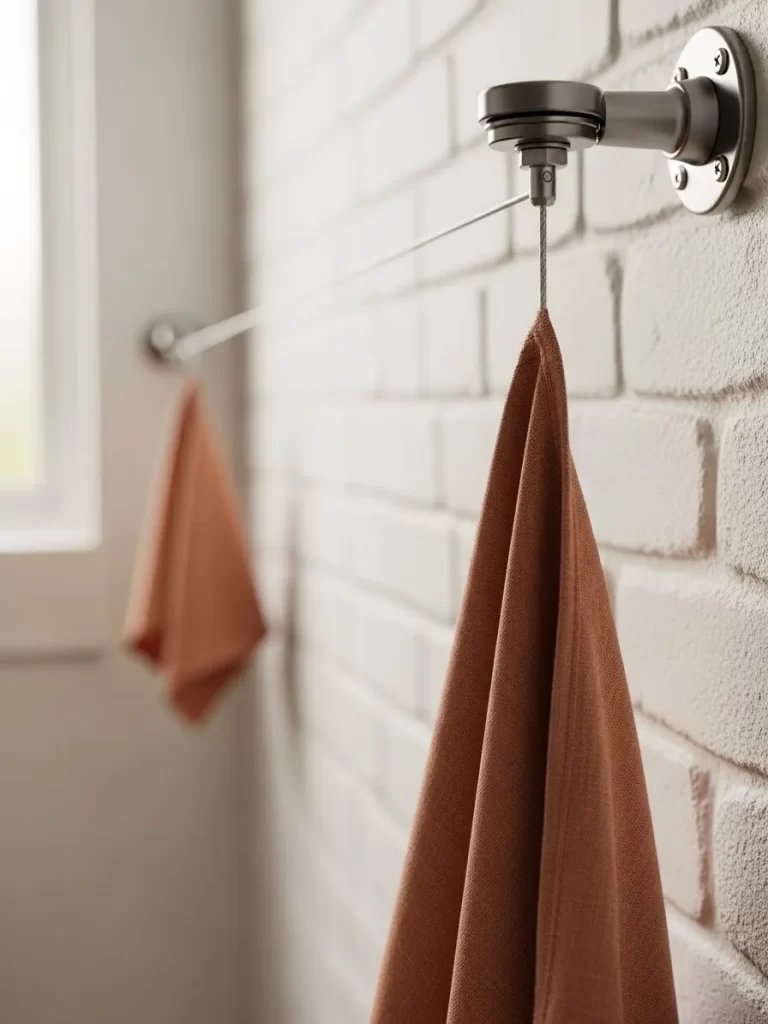
Small spaces require smart solutions for air drying wet items. This retractable line pulls out when needed and hides away afterward. A sleek metal housing looks professional on a white brick or tiled wall.
Sturdy cables hold the weight of heavy towels without sagging. You can mount this in a shower or over a laundry sink. Removing the line when it is dry keeps the room looking open.
Material Required List
- Retractable clothesline kit
- Wall anchors
- Stainless steel screws
Equipment Required List
- Drill
- Pencil
- Measuring tape
DIY Instructions
- Decide where you want the line to stretch across the room.
- Mark the mounting holes for the main housing on the wall.
- Drill the holes and insert your plastic wall anchors.
- Screw the housing onto the wall until it is tight.
- Install the receiving hook on the opposite wall at the same height.
- Pull the line out to make sure it reaches the hook.
- Hang a wet towel to test the tension of the cable.
- Push the line back into the housing after your laundry is dry.
13 Magnetic Manual Holder
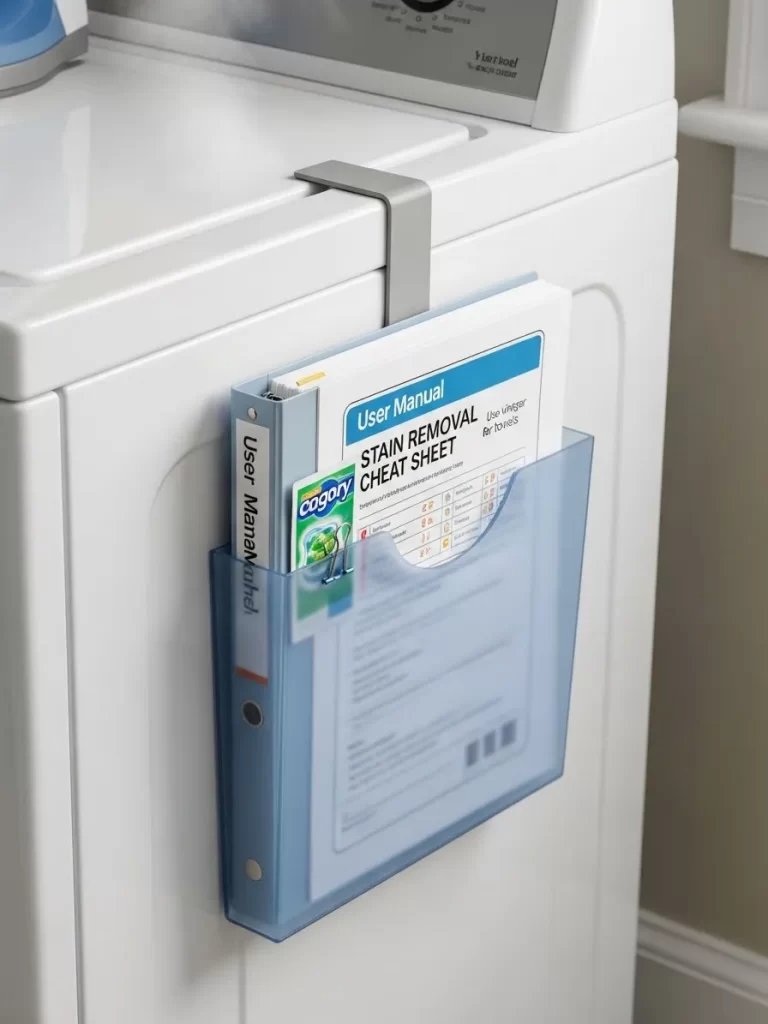
Keeping track of appliance manuals can be a difficult task. This blue plastic holder sticks to the side of your washer with magnets. It provides a safe spot for your stain removal charts and user guides.
Clear windows allow you to see the contents without opening the bin. Keeping documents near the machines ensures you can find help quickly. You will never lose an important instruction book again with this system.
Material Required List
- Magnetic file pocket
- Appliance manuals
- Stain removal cheat sheet
Equipment Required List
- Cleaning spray
- Paper clips
DIY Instructions
- Clear a spot on the side of your metal washing machine.
- Wipe the surface to ensure the magnets grip the metal.
- Place your user manuals inside the plastic file pocket.
- Add a cheat sheet for removing common laundry stains.
- Snap the magnetic holder onto the side of the machine.
- Check that the pocket is straight and does not slide down.
- Keep a pen inside so you can take notes on your wash.
- Pull the guides out whenever you have a technical question.
14 Glass Hardware Jars
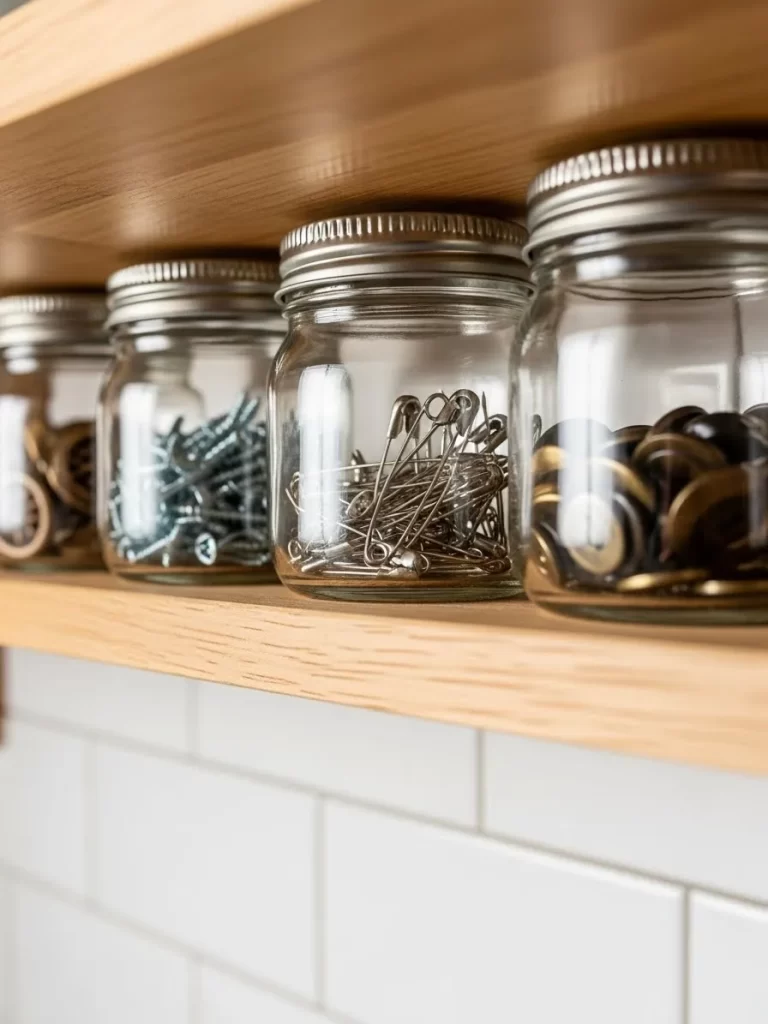
Small items like screws and safety pins often get lost in drawers. Clear glass jars with metal lids keep these bits visible and organized. Lining them up on a wooden shelf creates a very neat appearance.
Using jars of the same size makes the storage look uniform. Metal lids keep dust and moisture away from your metal hardware. You can easily find the exact screw you need through the clear glass.
Material Required List
- Small glass jars
- Metal screw lids
- Safety pins and screws
Equipment Required List
- Cleaning rag
- Shelf space
DIY Instructions
- Wash your glass jars thoroughly and let them dry completely.
- Sort your hardware into groups like pins and nails.
- Fill each jar with one type of item for better organization.
- Twist the metal lids on tightly to seal the jars.
- Arrange the jars in a row on your laundry room shelf.
- Place the jars you use most often at the front of the line.
- Use these containers to hold buttons or extra curtain hooks.
- Look through the glass to find what you need in seconds.
15 Washer Lid Reminders
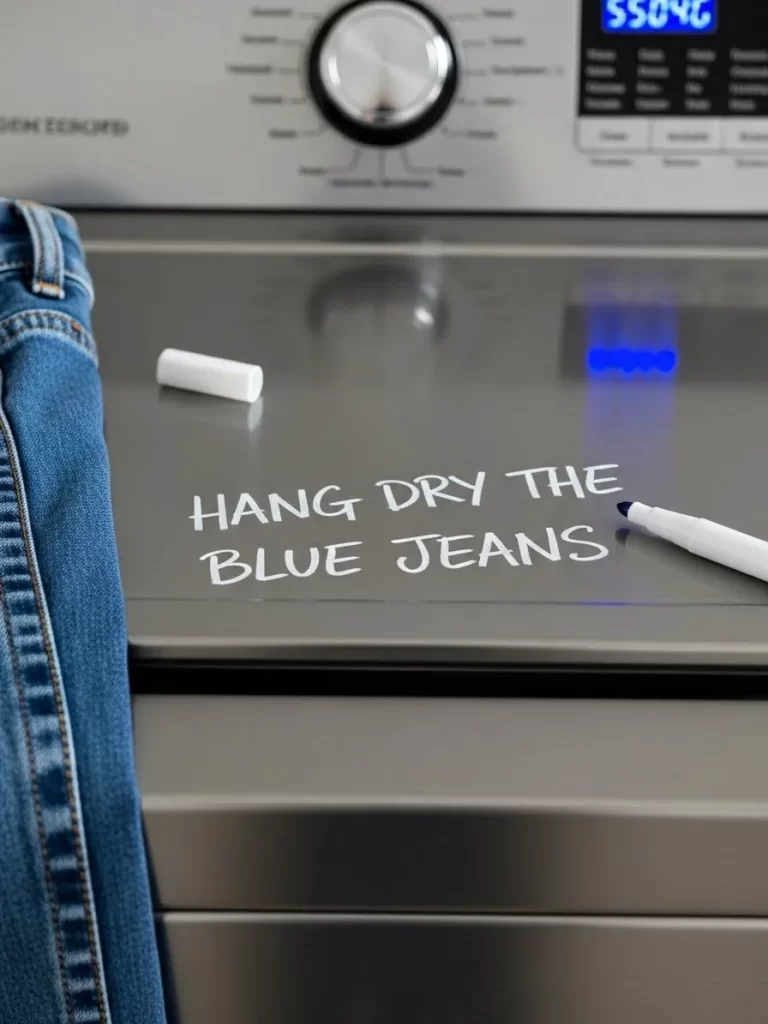
Forgetting to hang dry specific items can ruin your favorite clothes. Using a white chalk marker on the dryer lid creates a temporary note. This simple trick ensures that everyone knows how to handle the load.
Wiping the text away is easy once the task is finished. Writing directly on the machine saves you from using paper sticky notes. You will love this quick way to communicate with your family members.
Material Required List
- White chalk marker
- Microfiber cloth
- Water
Equipment Required List
- Your washing machine
- Damp sponge
DIY Instructions
- Shake the chalk marker well before you start writing.
- Press the tip down on a scrap piece of paper to start the ink.
- Write a clear note on the top of your dryer or washer.
- Include specific instructions like hang dry the blue jeans.
- Leave the marker nearby so others can add their own notes.
- Wait for the laundry cycle to finish and follow the note.
- Wipe the message away with a damp cloth when done.
- Dry the surface with a microfiber towel to prevent streaks.
16 Hanger Stacking Stand
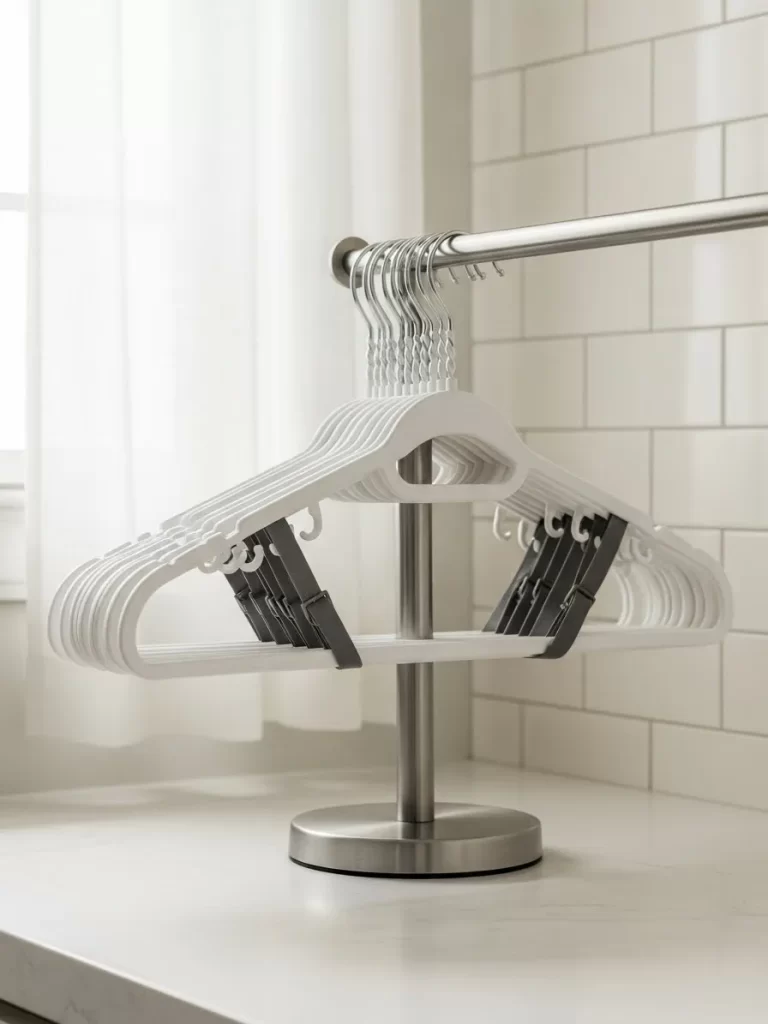
Empty hangers usually get tangled in a messy pile on the counter. This metal stand keeps them stacked neatly and ready for use. A vertical pole holds the hangers in a uniform shape.
Shiny chrome finishes look great in a modern utility room. Moving the whole stack at once is much easier than carrying loose hangers. You will save a lot of frustration by keeping your hangers organized.
Material Required List
- Metal hanger stacker base
- Vertical support pole
- Plastic or wire hangers
Equipment Required List
- Allen wrench
- Soft cloth
DIY Instructions
- Set the heavy metal base on your laundry room counter.
- Insert the vertical pole into the center hole of the base.
- Tighten the screw underneath using an Allen wrench.
- Wipe the metal surfaces with a soft cloth to remove fingerprints.
- Slide your empty hangers over the top of the pole.
- Let the hangers rest on the base in a neat stack.
- Take one hanger off the top whenever you need to hang a shirt.
- Keep the stand near your drying rack for maximum efficiency.
17 Color Coded Mesh Bags

Delicate items need extra protection during the wash cycle. Hanging mesh bags on wall hooks keeps them organized by color or person. Bright pink and green bags add a fun pop of color to the room.
Zippers keep your items secure so they do not get lost in the machine. Using hooks on the wall saves space in your laundry baskets. You can easily grab a bag and toss it straight into the wash.
Material Required List
- Multi colored mesh laundry bags
- Wall mounted hooks
- Fabric softener
Equipment Required List
- Drill
- Screws
- Level
DIY Instructions
- Install a row of hooks on a wall near your washing machine.
- Space the hooks at least six inches apart for easy access.
- Give each family member a different colored mesh bag.
- Instruct everyone to put their delicates inside their own bag.
- Hang the bags on the hooks by their small fabric loops.
- Zip the bags closed before you put them in the machine.
- Wash the items on a gentle cycle to prevent any damage.
- Return the empty bags to the hooks once they are dry.
18 Under Machine Storage Drawer
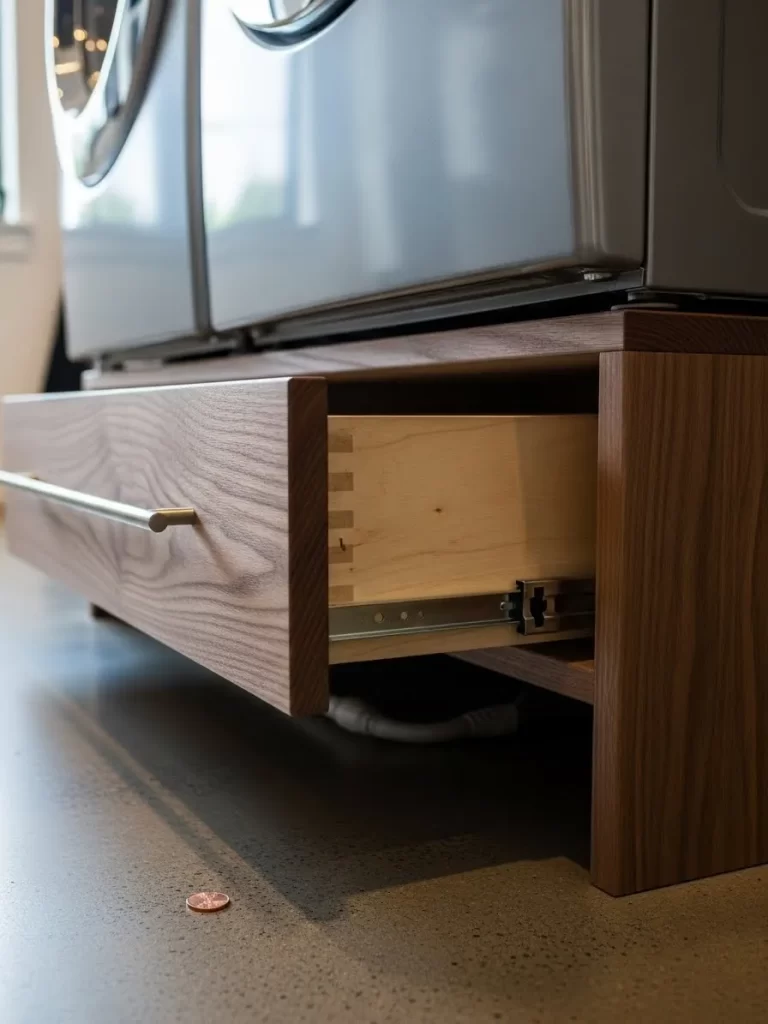
Raising your washer and dryer makes loading and unloading much easier. This wooden pedestal includes a large drawer for extra storage space. You can hide bulky items like detergent boxes or spare towels inside.
Natural wood grains bring a high end look to your utility area. Metal handles allow you to pull the heavy drawer open with ease. This project adds both function and style to a typically boring space.
Material Required List
- Heavy duty wood boards
- Metal drawer slides
- Long drawer handle
Equipment Required List
- Power drill
- Wood glue
- Clamps
DIY Instructions
- Build a strong wooden box that can hold the weight of a machine.
- Reinforce the corners with glue and long screws for safety.
- Install metal sliding tracks on the inside of the wooden box.
- Construct a smaller drawer that fits perfectly inside the tracks.
- Attach a large metal handle to the front of the drawer face.
- Place the pedestal on the floor and check that it is level.
- Lift your washing machine onto the top of the wooden base.
- Fill the drawer with your extra cleaning supplies and towels.
19 Under Cabinet Puck Light
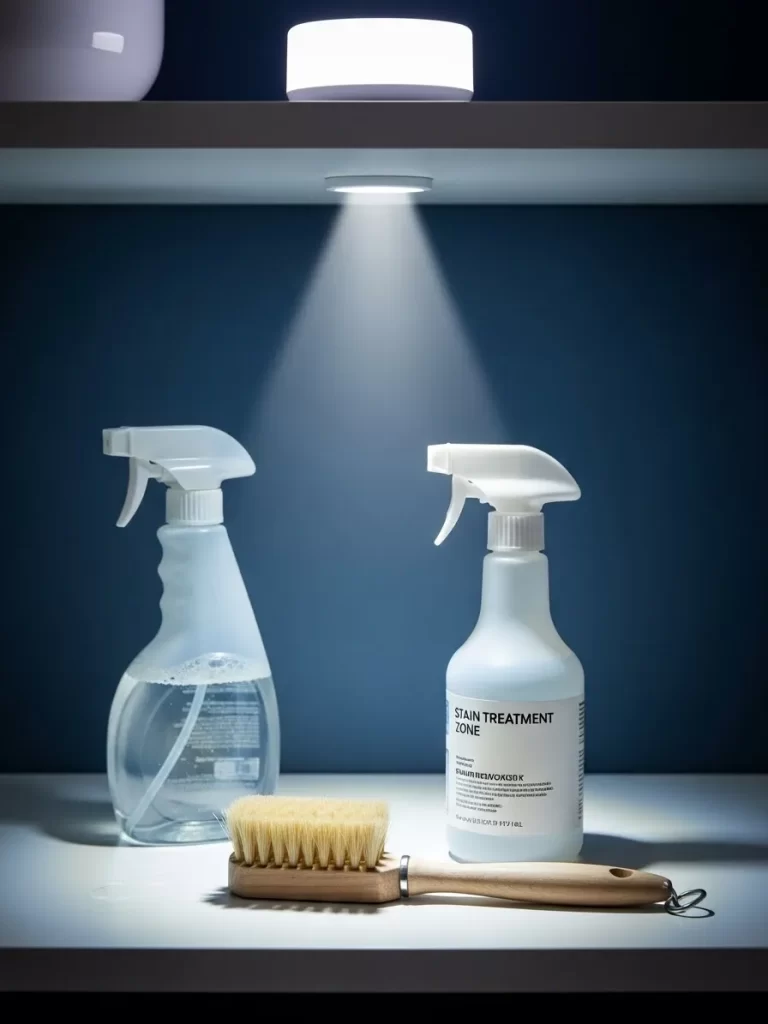
Dark corners in a utility room make it hard to spot stains. A small battery powered light under the shelf brightens your workspace. This focused beam helps you treat fabric with precision.
Stick on lights require no wiring and can be moved anywhere. Tapping the center of the light turns it on and off instantly. You will find that a well lit room feels much more organized and clean.
Material Required List
- Battery powered puck light
- Double sided adhesive tape
- AAA batteries
Equipment Required List
- Cleaning alcohol
- Paper towel
DIY Instructions
- Open the back of the puck light and insert the batteries.
- Clean the underside of your cabinet with rubbing alcohol.
- Peel the paper off one side of the adhesive tape.
- Press the tape firmly onto the back of the light.
- Remove the remaining paper and stick the light to the cabinet.
- Hold the light in place for thirty seconds to ensure a bond.
- Tap the plastic lens to test the brightness of the bulb.
- Use this light whenever you are pre treating laundry stains.
20 Wool Dryer Ball Tray

Using wool dryer balls reduces drying time and softens fabrics naturally. These eco friendly spheres bounce around to separate your clothes for better airflow. Adding a few drops of oil gives your laundry a fresh scent without chemicals.
Marble trays keep your supplies looking neat on top of the machine. Glass jars protect scented beads from losing their aroma over time. Switching to this method saves money on dryer sheets and helps the environment.
Material Required List
- Wool dryer balls
- Lavender essential oil
- Marble display tray
Equipment Required List
- Glass jar with lid
- Small dropper
DIY Instructions
- Buy high quality wool balls that are free of synthetic fibers.
- Place the marble tray on a flat surface near your dryer.
- Pour your scented beads into a clear glass jar.
- Close the lid tightly to keep the moisture out.
- Put two or three drops of oil onto each wool ball.
- Let the oil dry for ten minutes before using the balls.
- Toss the balls into the dryer with your wet clothes.
- Store everything back on the tray once the cycle ends.
21 Hanging Spray Bottle Rod
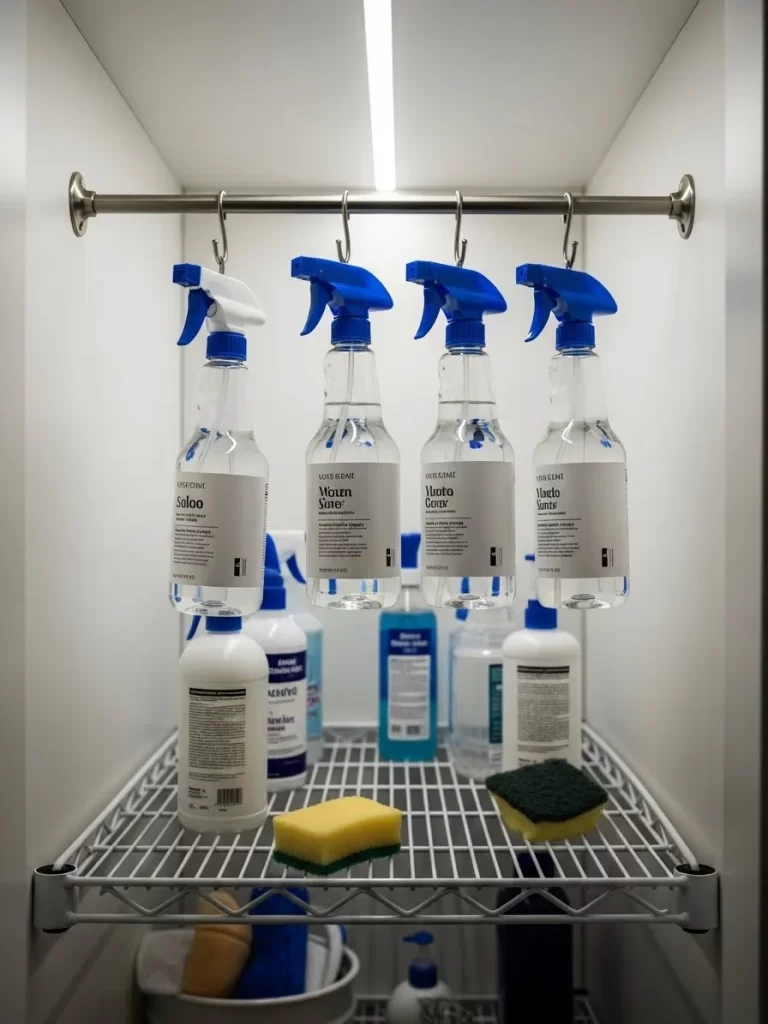
Hanging cleaning bottles by their triggers clears up your shelf space instantly. A simple tension rod fits inside almost any cabinet or closet. This trick keeps your sprays visible and very easy to grab.
Organizing items vertically makes your utility room feel much more professional. You can group your glass cleaners or wood polishes in one specific section. Clear bottles look very tidy when they hang in a straight line.
Material Required List
- Adjustable tension rod
- Variety of spray bottles
- Cleaning solutions
Equipment Required List
- Measuring tape
- Cleaning cloth
- Rubbing alcohol
DIY Instructions
- Measure the width of the inside of your cabinet or closet.
- Wipe the side walls with rubbing alcohol to ensure a good grip.
- Twist the tension rod to extend it slightly longer than the cabinet width.
- Position the rod near the top of the cabinet space.
- Push the ends of the rod against the walls until it stays firm.
- Check the strength of the rod by pulling down on it gently.
- Hook the triggers of your spray bottles over the metal rod.
- Arrange the bottles by usage for a better look.
22 Rotating Corner Turntable
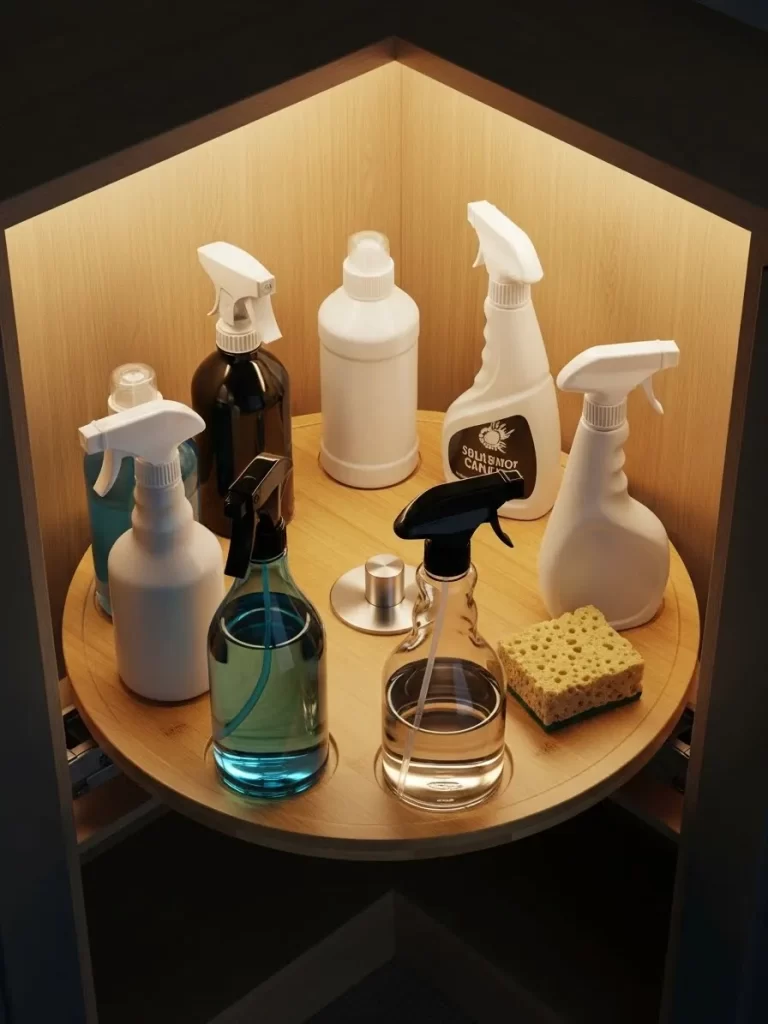
Deep corner cabinets often become a dark hole for forgotten cleaning supplies. Installing a lazy Susan allows you to reach every bottle with a simple spin. Everything stays right at the front where you can see it clearly.
Natural wood trays add a warm touch to your white cabinetry. This setup prevents you from knocking over bottles while searching for the one in the back. Keeping your most used sprays on a rotating base saves time every single day.
Material Required List
- Wooden lazy Susan turntable
- Cleaning spray bottles
- Large sponges
Equipment Required List
- Damp cloth
- Wood polish
DIY Instructions
- Clear out the corner cabinet and wipe the shelf clean.
- Apply a small amount of wood polish to the turntable surface.
- Place the lazy Susan in the center of the corner space.
- Spin the tray to make sure it does not hit the cabinet walls.
- Set your tallest spray bottles in the middle of the tray.
- Arrange smaller items like sponges around the outer edge.
- Group similar products together to make finding them faster.
- Rotate the tray whenever you need to reach a specific bottle.
23 Vertical Bag Roll Dispenser
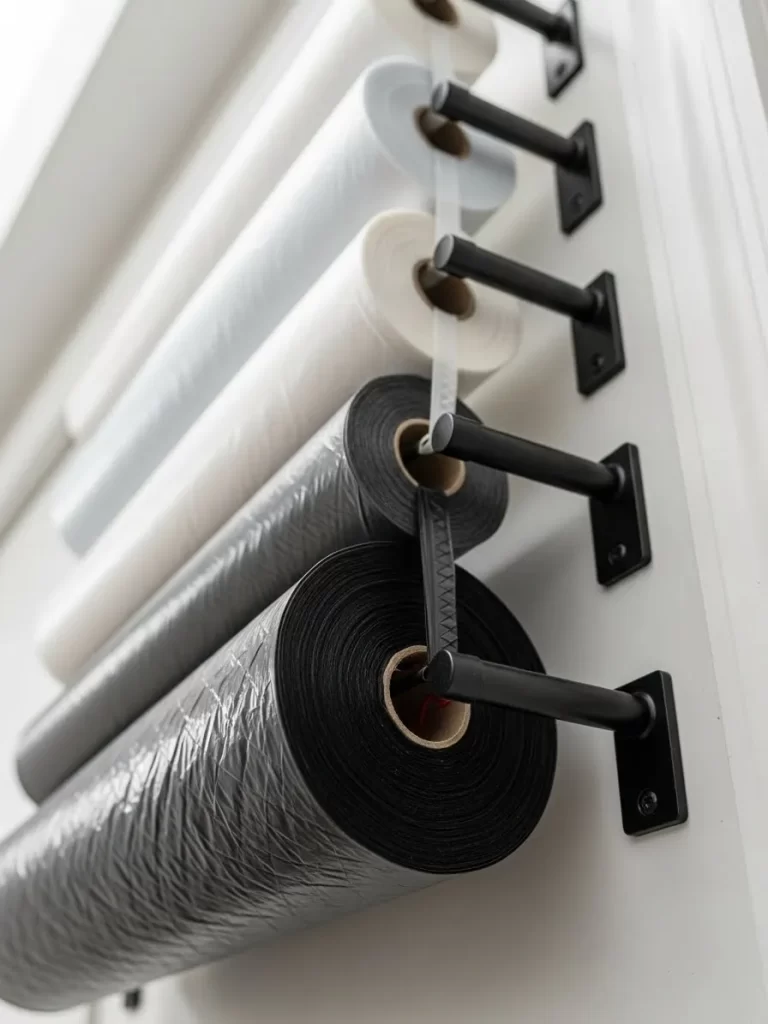
Bulky boxes of trash bags often take up too much drawer space. Mounting the rolls directly to the wall creates a streamlined and efficient dispensing station. This method allows you to pull a new bag without searching through a cluttered cupboard.
Black metal rods provide a modern and industrial look to your utility area. Different colors of bags can be stored together for quick access during chores. You will love how this simple change clears your surfaces and drawers.
Material Required List
- Wall mounted paper towel holders
- Rolls of trash bags
- Wall screws
Equipment Required List
- Power drill
- Pencil
- Level
DIY Instructions
- Choose a vertical strip of wall space near your trash area.
- Hold the first bracket against the wall and mark the holes.
- Use a level to ensure the brackets stay in a straight line.
- Drill pilot holes into the wall at your pencil marks.
- Screw the metal brackets into the wall until they are secure.
- Slide the trash bag roll onto the removable center rod.
- Snap the rod back into the wall brackets firmly.
- Pull the end of the bag to make sure it rolls smoothly.
24 Finders Keepers Change Jar
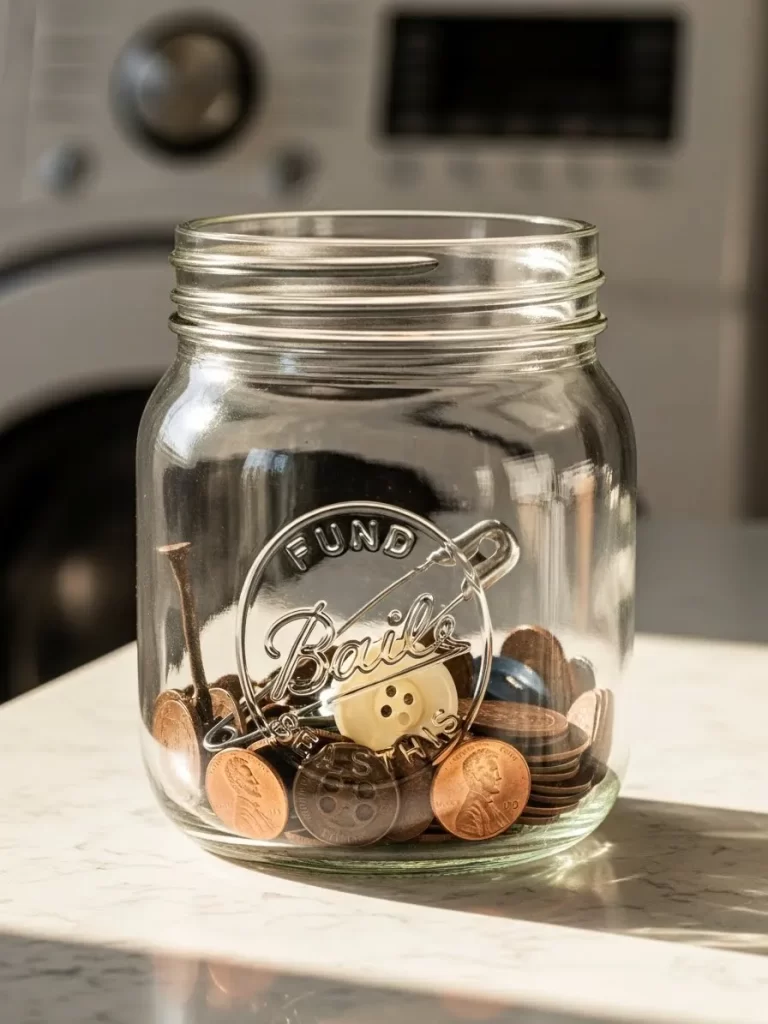
Pocket clutter like coins and buttons needs a dedicated home in the laundry room. A clear glass jar acts as a central spot for all the treasures you find while sorting. This prevents small items from clanking around inside your washing machine.
Setting a jar on your folding counter makes the sorting process much more organized. You can easily spot a missing button or a loose penny through the transparent glass. Guests will find this quirky touch both useful and charming.
Material Required List
- Large glass mason jar
- Loose change and buttons
- Decorative label
Equipment Required List
- Glass cleaner
- Microfiber towel
DIY Instructions
- Clean the glass jar inside and out with a soft towel.
- Remove any old sticky residue from the glass surface.
- Apply a label that says Finders Keepers to the front.
- Place the jar on your laundry room counter or shelf.
- Check all pockets for coins before you start a wash load.
- Drop any items you find into the open jar immediately.
- Sort through the jar once a month to find matches.
- Use the collected coins for a fun family treat.
25 Industrial Tool Wall
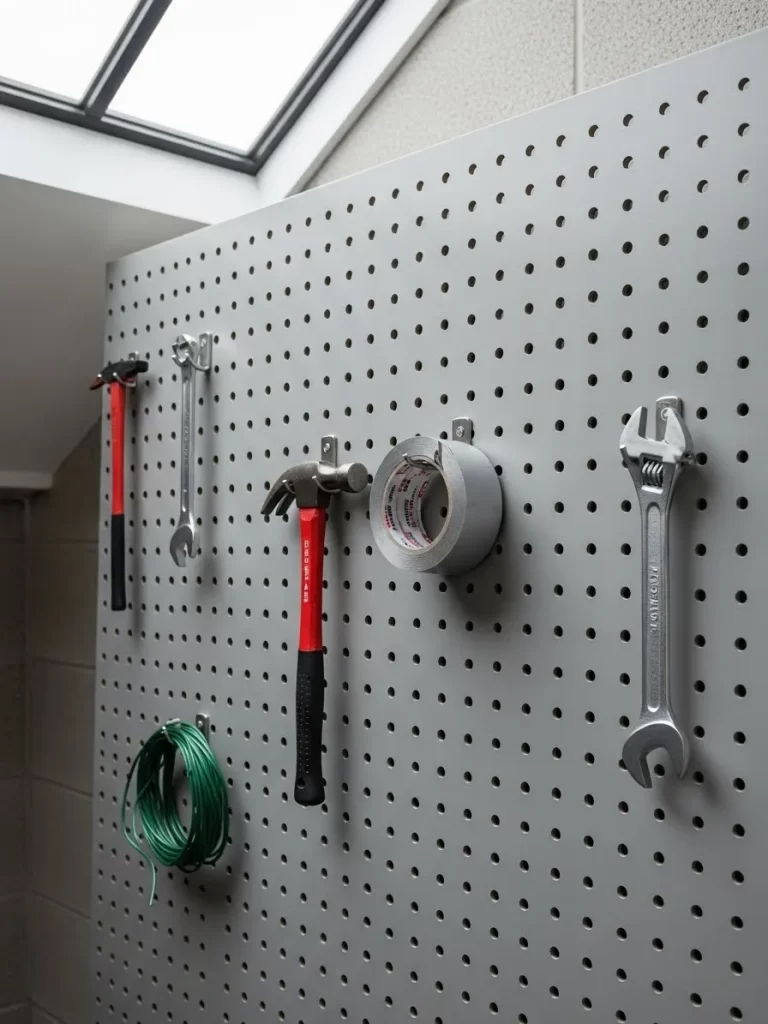
Keeping your repair tools near the utility area helps you fix household issues fast. A metal pegboard holds hammers and wrenches in a very tidy and accessible layout. This prevents your heavy tools from getting buried in a deep junk drawer.
Grey panels create a clean and modern backdrop for your shining metal equipment. Every item has a specific hook so you always know where to return it. Your workspace will feel much larger when the floor is clear of toolboxes.
Material Required List
- Metal pegboard panel
- Assorted heavy duty hooks
- Wall mounting kit
Equipment Required List
- Power drill
- Screwdriver
- Tape measure
DIY Instructions
- Locate a large empty wall space in your utility room.
- Measure the panel to ensure it fits the area correctly.
- Hold the pegboard up and mark the mounting points.
- Drill holes into the wall and insert the plastic anchors.
- Screw the pegboard into the wall using the provided kit.
- Arrange your heaviest tools like hammers on the bottom hooks.
- Place smaller items like wrenches and tape on the top.
- Adjust the hooks until everything hangs straight and secure.
26 S Hook Broom Bar
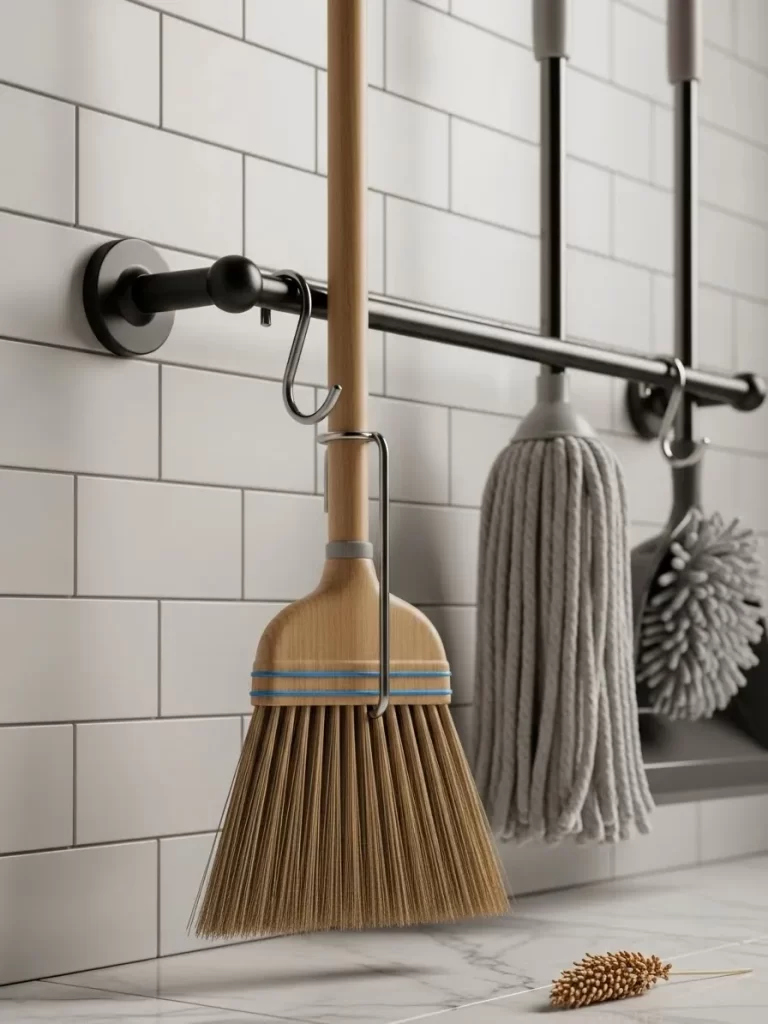
Leaning brooms against the wall often results in them falling over or creating a mess. A sturdy towel bar paired with metal S hooks provides a secure hanging solution. This setup keeps your cleaning heads off the floor which protects the bristles.
Black hardware looks striking against white subway tiles in a modern laundry room. Getting your mops in the air helps them dry much faster after every use. You will enjoy a much cleaner floor without brooms cluttering the corners.
Material Required List
- Wall mounted towel bar
- Large metal S hooks
- Brooms and mops
Equipment Required List
- Power drill
- Pencil
- Level
DIY Instructions
- Find a wall space that is tall enough for your longest broom.
- Mark the placement of the towel bar with a pencil.
- Use your level to ensure the bar is not tilted.
- Drill the necessary holes for the mounting hardware.
- Screw the towel bar into the wall until it is firm.
- Slide your metal S hooks onto the horizontal bar.
- Hang your brooms by the holes in their handles.
- Space the items out so they do not bump into each other.
27 Slanted Basket Tower

Sorting laundry is much easier when you can see into every basket at once. A slanted wooden rack holds your containers at an angle for better visibility. This design allows you to toss clothes into the correct bin without moving anything.
White plastic baskets look organized and fresh inside a light colored wood frame. Using vertical space helps you manage multiple loads in a very small footprint. Your family will find it much simpler to keep their darks and lights separate.
Material Required List
- Wooden shelving unit
- White plastic laundry baskets
- Wood screws
Equipment Required List
- Screwdriver
- Measuring tape
- Sandpaper
DIY Instructions
- Measure the width of your laundry baskets before building.
- Cut your wooden supports to the correct height for your room.
- Attach horizontal rails at a slight downward angle.
- Sand the wood until it is smooth to prevent snags.
- Screw the rails into the side supports of the tower.
- Place the plastic baskets onto the slanted rails.
- Test the stability by filling the baskets with some clothes.
- Label each basket for darks and lights and colors.
28 Clear Pocket Door Storage
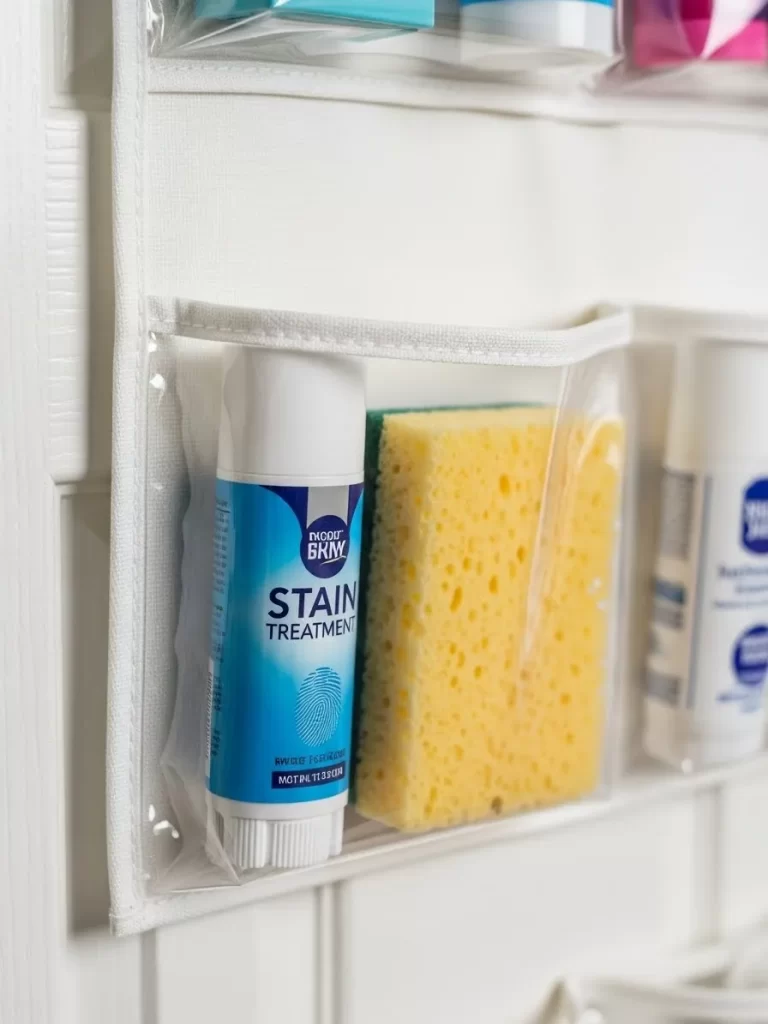
Small items like stain sticks and sponges often get lost in big cabinets. An over the door organizer with clear pockets keeps every tiny tool in plain sight. This uses the empty space on the back of your door very effectively.
Transparent plastic allows you to find what you need without digging through drawers. You can organize your pockets by task like shoe care or stain removal. This system keeps your essential supplies within reach at all times.
Material Required List
- Over the door pocket organizer
- Cleaning brushes and sponges
- Stain treatment pens
Equipment Required List
- Scissors
- Door hooks
DIY Instructions
- Open the organizer and lay it flat on the floor first.
- Slide the metal hooks into the holes at the top of the fabric.
- Hang the hooks over the top edge of your utility room door.
- Ensure the pockets are facing outward toward the room.
- Fill the top pockets with items you use most frequently.
- Put heavier bottles in the bottom pockets for better balance.
- Group similar cleaning tools together in the same row.
- Check that the door still closes smoothly with the organizer.
29 Natural Stone Boot Tray
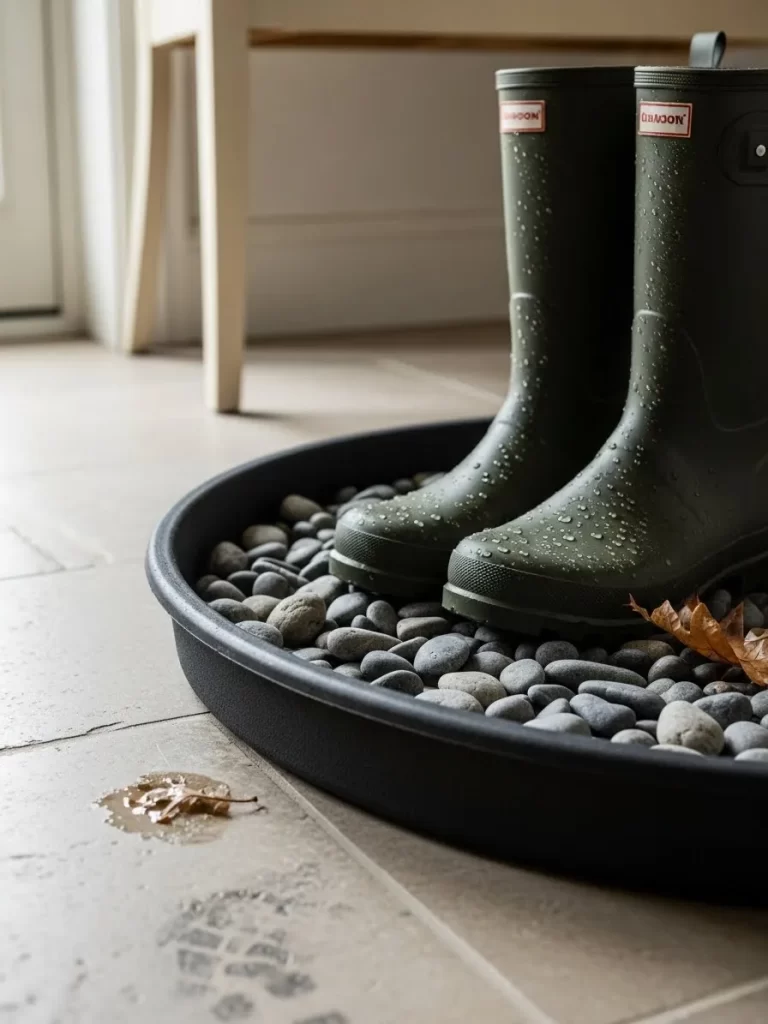
Muddy shoes can quickly ruin the clean floor of your utility room. A shallow tray filled with river stones provides a drainage spot for wet boots. The rocks allow air to circulate so your footwear dries more quickly.
Dark pebbles add a beautiful and natural element to your home decor. Water drips into the bottom of the tray while the shoes sit high and dry. You will appreciate how this prevents puddles from forming on your tiles.
Material Required List
- Large plastic or metal tray
- Bag of smooth river stones
- Rubber boots
Equipment Required List
- Cleaning brush
- Water bucket
DIY Instructions
- Wash the river stones in a bucket to remove any dust.
- Dry the stones completely before putting them in the tray.
- Place the empty tray on the floor near your door.
- Pour the stones into the tray until the bottom is covered.
- Spread the rocks out evenly with your hands.
- Set your wet or muddy boots on top of the stones.
- Empty the water from the bottom of the tray once a week.
- Rinse the stones occasionally to keep them looking fresh.
30 Cold Wash Machine Decal
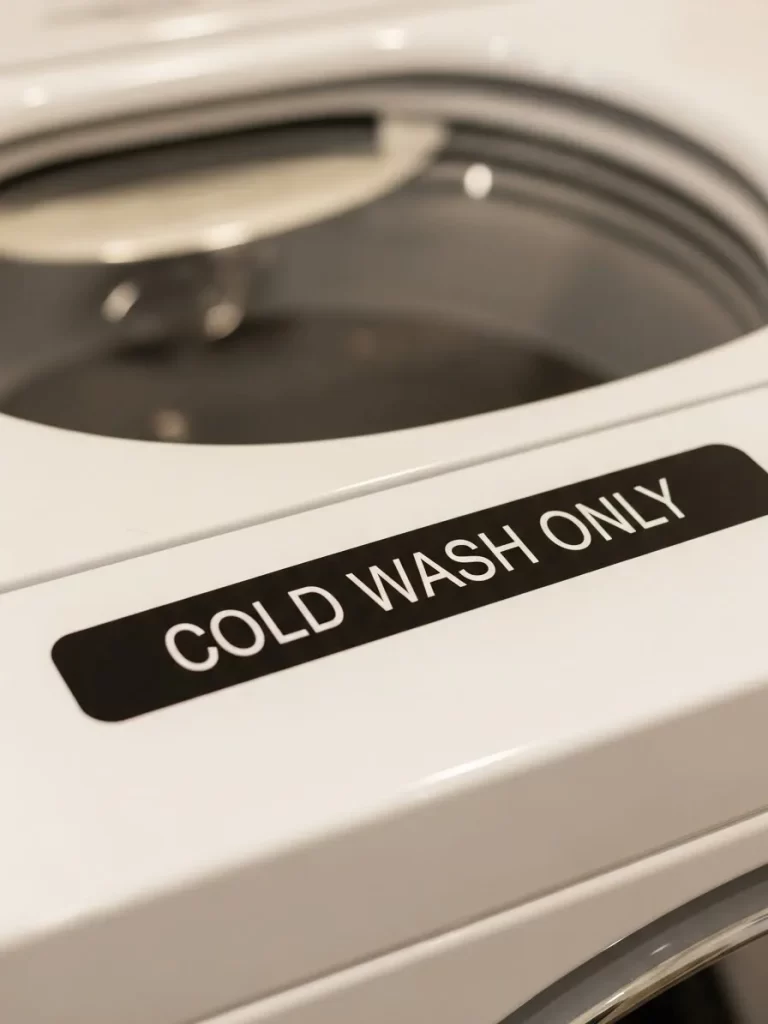
Reminder stickers on your appliance help prevent accidental laundry mishaps. A clear black label for cold wash cycles ensures everyone uses the right temperature. This protects your delicate fabrics from shrinking or fading in hot water.
Placing the decal near the power button makes it impossible to miss. These labels look professional and much better than messy handwritten notes. You will extend the life of your wardrobe by following this simple instruction.
Material Required List
- Vinyl letter stickers
- Transfer tape
- Masking tape
Equipment Required List
- Credit card or squeegee
- Rubbing alcohol
- Cleaning rag
DIY Instructions
- Clean the surface of your machine with rubbing alcohol.
- Wait for the area to dry completely before you proceed.
- Peel the backing off the vinyl sticker very slowly.
- Align the sticker on the machine using a piece of masking tape.
- Press the decal onto the surface starting from the center.
- Rub the letters firmly with a credit card to remove bubbles.
- Peel away the clear transfer tape at a sharp angle.
- Press down on the edges of the letters to ensure a bond.
31 Slim Step Ladder Storage

High shelves are hard to reach without a little extra height. This slim silver ladder folds down to a very narrow profile. You can slide it into the tiny gap between your washing machine and the cabinet.
Metal frames provide a safe and sturdy platform for your feet. Black rubber feet prevent the ladder from sliding on your smooth tile floor. Keeping a ladder nearby makes it easy to grab extra supplies from the top cabinets.
Material Required List
- Slim folding step ladder
- Cleaning wipes
- Non slip floor mat
Equipment Required List
- Measuring tape
- Cleaning cloth
DIY Instructions
- Measure the width of the narrow gap next to your machine.
- Purchase a ladder that is thinner than that empty space.
- Wipe the metal rungs of the ladder to remove any grease.
- Practice opening and closing the hinge mechanism several times.
- Ensure the safety lock clicks into place when the ladder is open.
- Stand on the bottom step to test the stability of the feet.
- Fold the ladder flat by pulling the release lever.
- Slide the unit into the narrow gap for easy storage.
32 Drawer Ironing Board
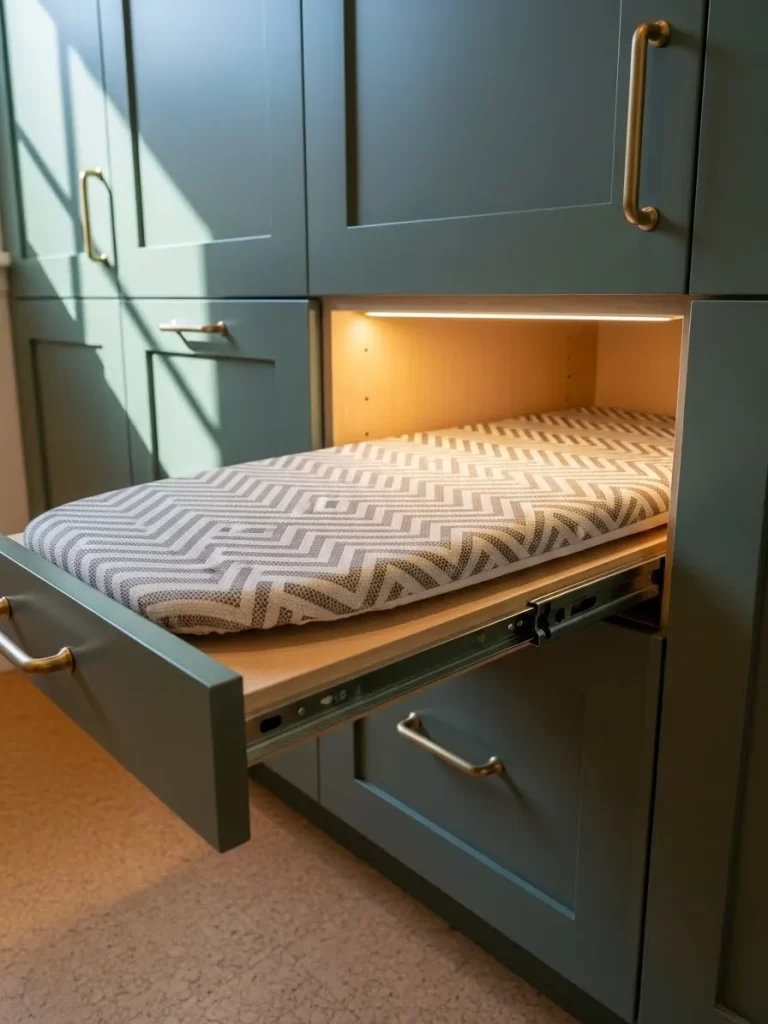
Traditional ironing boards take up a lot of floor space in a small room. This built in version pulls out of a standard kitchen drawer. A grey patterned cover looks modern and sleek against dark green cabinets.
Metal sliding tracks allow the board to move smoothly and quietly. You can press a shirt and hide the board away in just seconds. This clever design keeps your utility room looking organized and uncluttered.
Material Required List
- Pull out ironing board hardware kit
- Heat resistant board cover
- Wood screws
Equipment Required List
- Power drill
- Screwdriver
- Level
DIY Instructions
- Choose a cabinet drawer that is at the correct height for ironing.
- Remove the existing drawer box from the cabinet tracks.
- Install the metal sliding rails onto the inside walls of the cabinet.
- Use a level to make sure the rails are perfectly straight.
- Fasten the ironing board mechanism to the new rails.
- Attach the original drawer front to the folding mechanism.
- Stretch the heat resistant cover over the padded board.
- Pull the drawer open to ensure the board unfolds correctly.
33 Magnetic Vacuum Tool Bar
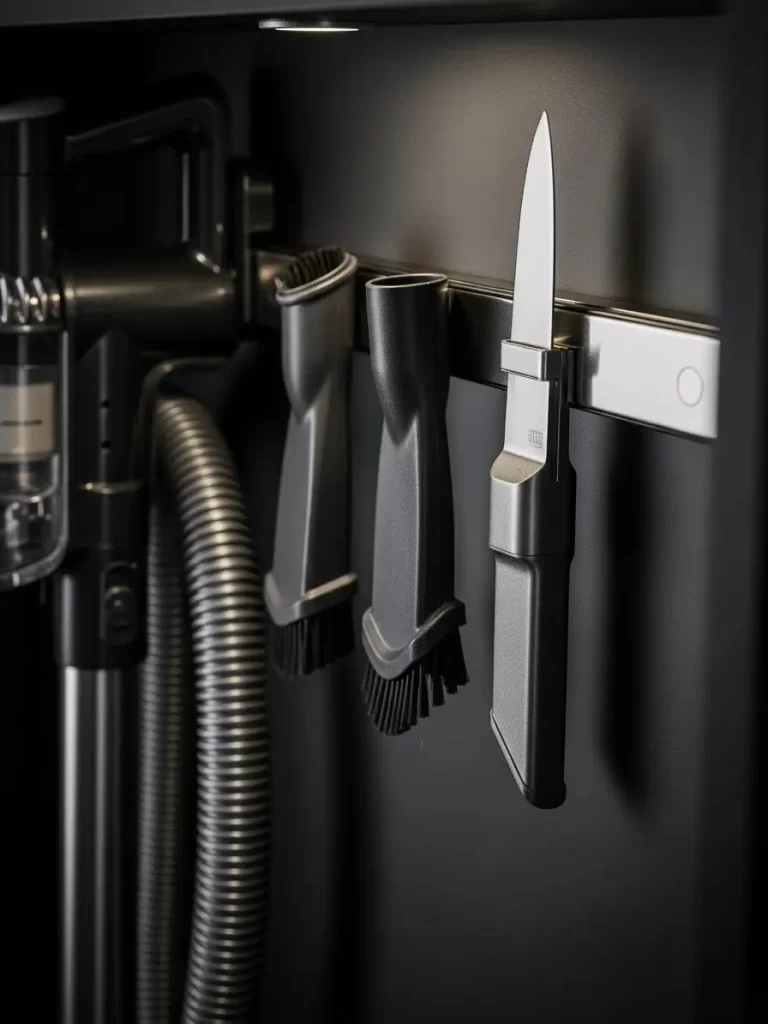
Vacuum attachments often get lost at the bottom of a dark closet. This metal bar uses strong magnets to hold your plastic nozzles and brushes. Every tool stays in plain sight and is ready for a quick cleaning job.
Mounting the bar inside a utility cabinet keeps the room looking tidy. Seeing your tools displayed helps you choose the right one for the task. You will love how this simple addition organizes your cleaning supplies.
Material Required List
- Heavy duty magnetic strip
- Metal mounting brackets
- Vacuum attachments
Equipment Required List
- Power drill
- Screws
- Pencil
DIY Instructions
- Find a flat surface on the wall or inside your cabinet.
- Hold the magnetic bar up and mark the holes with a pencil.
- Drill small pilot holes into your pencil marks.
- Screw the mounting brackets into the surface until they are firm.
- Snap the magnetic bar into the metal brackets.
- Wipe your vacuum tools to remove any dust or hair.
- Place the metal parts of your tools against the magnet.
- Arrange the brushes and nozzles from largest to smallest.
34 Mesh Basket Liner
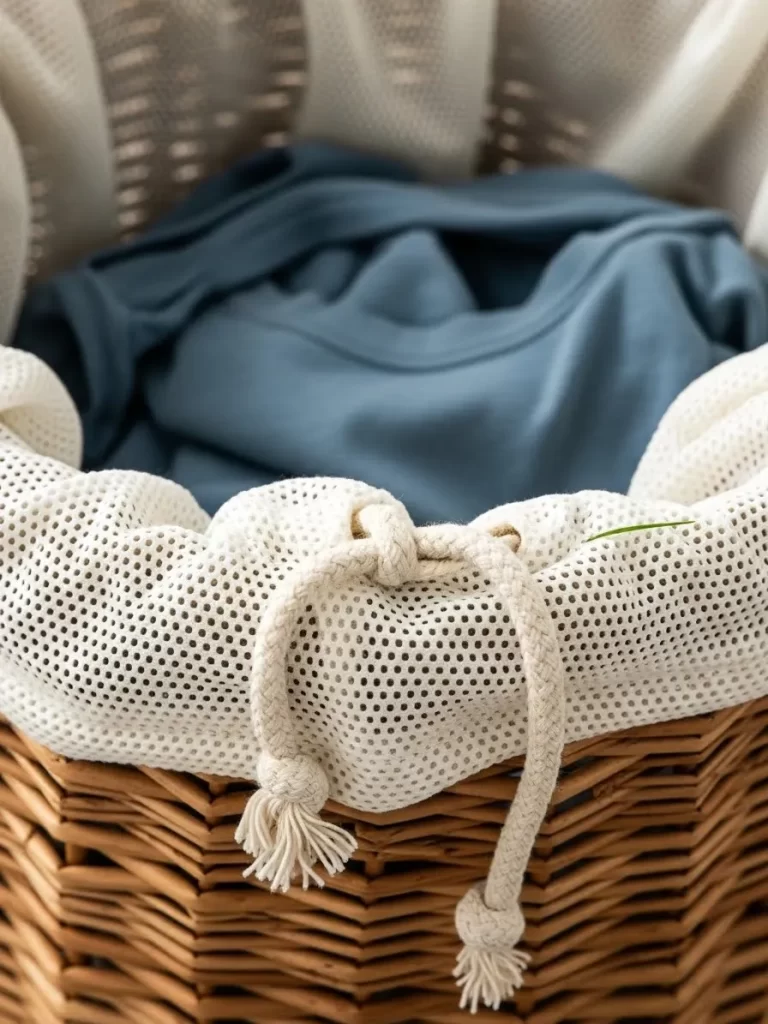
Woven laundry baskets can sometimes snag delicate lace or silk fabrics. A soft mesh liner provides a protective barrier for your favorite clothes. The drawstring top keeps your laundry secure while you carry it to the machine.
Natural wicker looks beautiful but needs a bit of care. Using a liner allows you to wash the bag whenever it gets dirty. You will find that your baskets stay fresh and clean for a much longer time.
Material Required List
- Woven wicker laundry basket
- Large mesh laundry bag
- Cotton drawstring cord
Equipment Required List
- Scissors
- Large needle
DIY Instructions
- Select a mesh bag that is larger than your wicker basket.
- Place the bag inside the basket and fold the edges over.
- Ensure the mesh reaches all the way to the bottom corners.
- Thread a drawstring cord through the top edge of the mesh.
- Tie the ends of the cord into a secure knot.
- Pull the drawstring tight to fit the liner to the basket rim.
- Toss your dirty clothes into the lined basket every day.
- Remove the liner and wash it with your clothes once a week.
35 Metal Label Bins
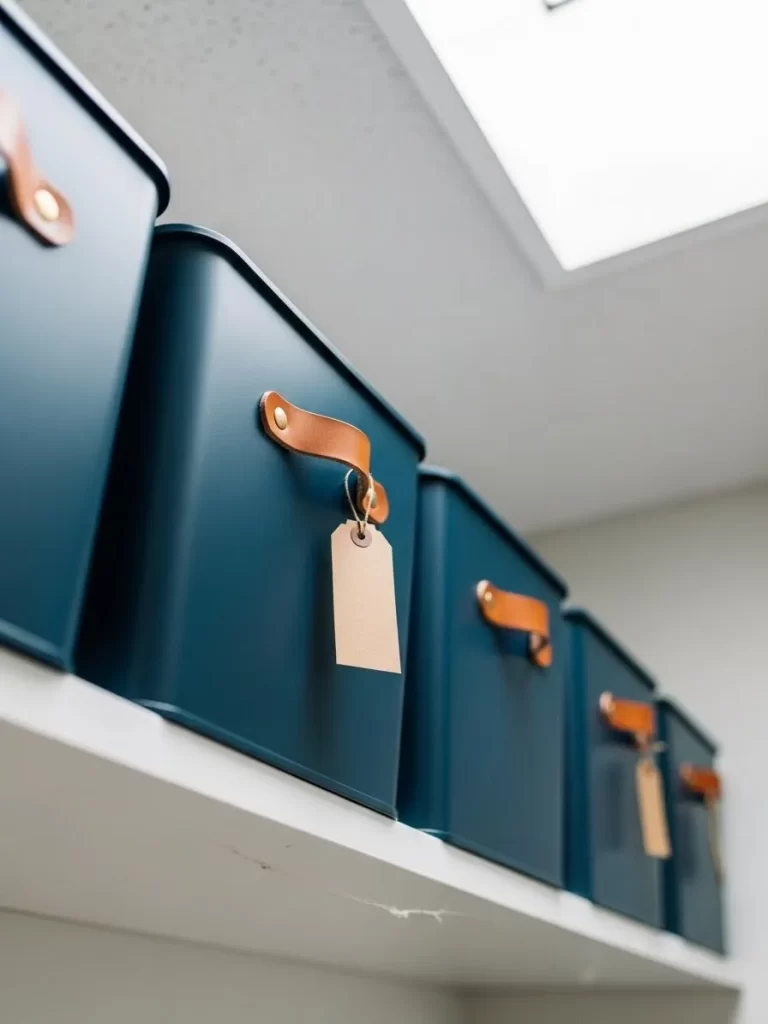
Dark teal bins add a sophisticated touch of color to your white shelves. Leather handles allow you to pull the heavy containers down with ease. Every bin features a paper tag so you know exactly what is stored inside.
Uniform containers hide the visual clutter of various cleaning products. Stacking these bins vertically uses your shelf space very efficiently. Your storage room will look like a professionally styled home in no time.
Material Required List
- Teal metal storage bins
- Leather strips for handles
- Cardstock for labels
Equipment Required List
- Hole punch
- Brass rivets
- Hammer
DIY Instructions
- Punch two holes into the front of each metal bin.
- Cut the leather strips into short lengths for the handles.
- Align the leather holes with the holes in the metal bin.
- Push a brass rivet through the leather and the metal.
- Hammer the back of the rivet until it is flat and secure.
- Write the name of your supplies on a small piece of cardstock.
- Tie the label to the leather handle using a piece of twine.
- Fill the bins with your towels or cleaning supplies.
36 S Hook Sink Clip
Drying small items over the sink prevents water from dripping on the floor. This metal S hook features a clip that holds wet sponges or cloths. Hanging items vertically allows them to drip dry into the basin quickly.
Stainless steel material will not rust even when it gets wet every day. You can slide the hook along a tension rod to make more room. This simple tool keeps your utility sink area looking clean and organized.
Material Required List
- Stainless steel S hooks with clips
- Metal tension rod
- Wet sponges or cloths
Equipment Required List
- Measuring tape
- Cleaning cloth
DIY Instructions
- Install a small metal rod above your utility room sink.
- Slide the top curve of the S hook over the metal rod.
- Squeeze the metal clip to open the small jaws.
- Insert the edge of a wet cloth or sponge into the clip.
- Release the clip to hold the item securely in place.
- Position the hook so the water drips directly into the drain.
- Move the hooks around until they are spaced evenly.
- Remove the dry items and fold them away when finished.
37 Battery and Bulb Organizer
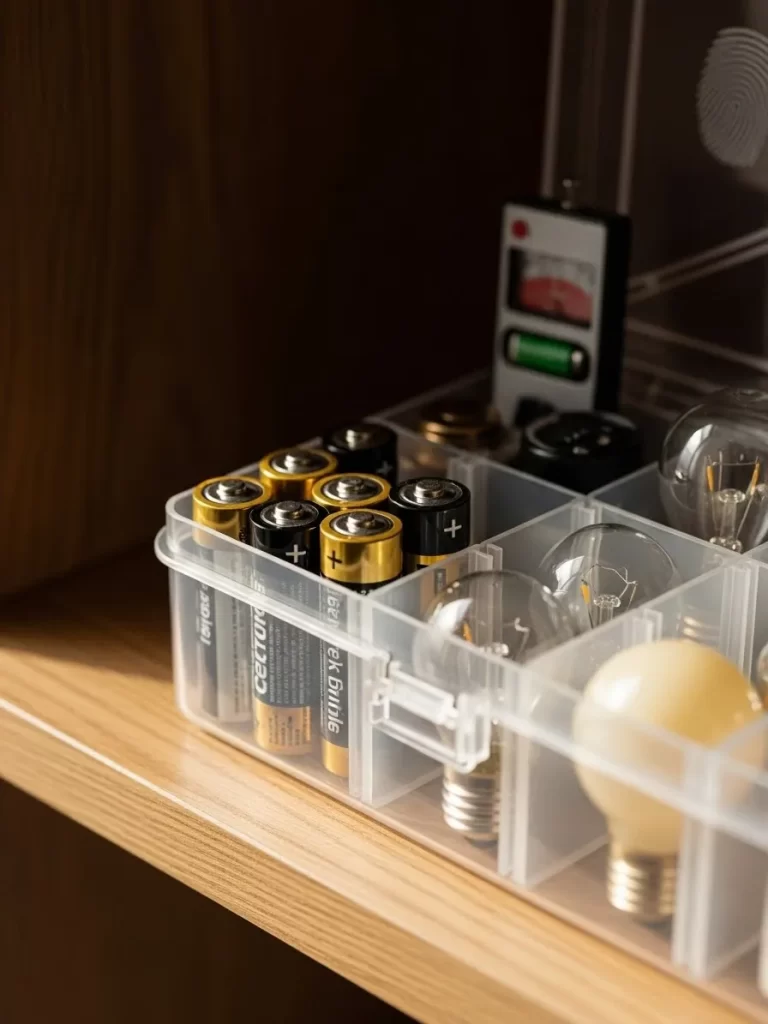
Loose batteries and light bulbs are difficult to store without a proper case. This clear plastic organizer features many small compartments for different sizes. Seeing your inventory clearly helps you know when to buy more supplies.
Transparent lids protect your delicate bulbs from getting crushed or broken. Keeping all your electrical supplies in one spot saves a lot of time. You will never have to hunt through a junk drawer for a battery again.
Material Required List
- Clear plastic compartment box
- Assorted batteries
- Spare light bulbs
Equipment Required List
- Label maker
- Cleaning rag
DIY Instructions
- Wipe the inside of the plastic box to remove any dust.
- Group your batteries by size like AA and AAA and 9V.
- Place each group into a separate plastic compartment.
- Arrange your light bulbs in the larger sections of the box.
- Ensure the glass bulbs do not touch each other too much.
- Print labels for each section using your label maker.
- Stick the labels onto the dividers or the clear lid.
- Close the lid and store the box on a cool dry shelf.
38 Framed Folding Cheat Sheet
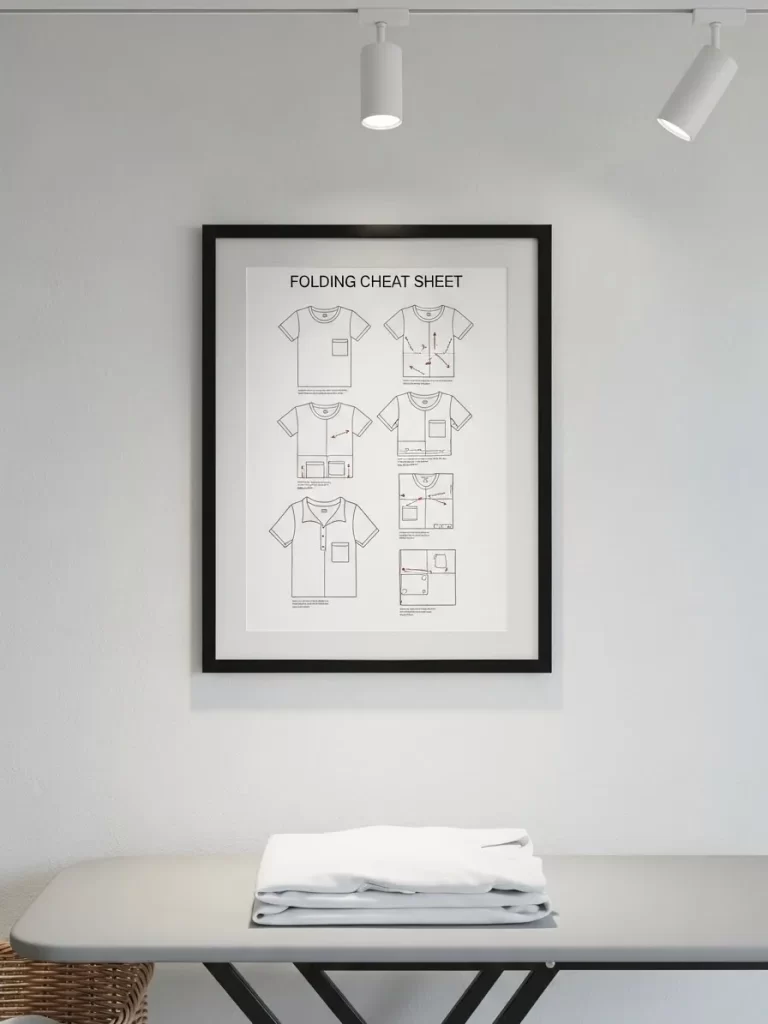
Folding different types of shirts can be a confusing task for some. This framed chart shows you the exact steps for every kind of garment. Hanging the guide at eye level makes it a very useful tool for your laundry room.
Black frames look classic on a clean white wall over your folding table. This art piece is both functional and beautiful at the same time. You will find that everyone in the house starts folding clothes more neatly.
Material Required List
- Printed folding instruction sheet
- Black picture frame
- Wall hanging kit
Equipment Required List
- Hammer
- Level
- Pencil
DIY Instructions
- Find a clear diagram of how to fold various types of clothing.
- Print the diagram on a high quality piece of white paper.
- Open the back of the black frame and insert the paper.
- Secure the frame backing and check for any dust on the glass.
- Choose a spot on the wall directly above your folding station.
- Mark the top center of the frame on the wall with a pencil.
- Hammer a picture nail into the wall at your mark.
- Hang the frame and use a level to make sure it is straight.
Key Takeaways
Vertical space is your best friend in small rooms. Hanging items on walls or doors keeps your floor clear for walking.
Using clear jars lets you see exactly what you have in stock. Monitoring your supplies prevents you from running out of detergent at the wrong time.
Labels ensure that everyone knows where to put things back. Consistency helps maintain the order you worked so hard to create.
Creating an orderly utility room brings a sense of peace to your home life. Chores go faster when you are not fighting against the clutter.
Pick a few of these projects to begin your journey toward a better space. Consistency will turn your laundry nightmare into a dream of efficiency.
Enjoy the feeling of a room that finally works for your needs. Every small step toward organization makes a huge difference in your daily routine.