
Your home should tell a story that belongs only to you. Many houses feel empty or bland even when they are full of furniture. You might look at your walls and wonder why they feel so cold.

Adding character does not mean you need a large budget. Small and unique finds can shift the mood of a room instantly. These pieces catch the eye and make guests feel welcome.
We collected forty one creative items to help you express your style. Every decoration comes with a guide so you can build it at home. You have the power to turn a simple room into a sanctuary.
1. Amber Glass Mushroom Table Lamp
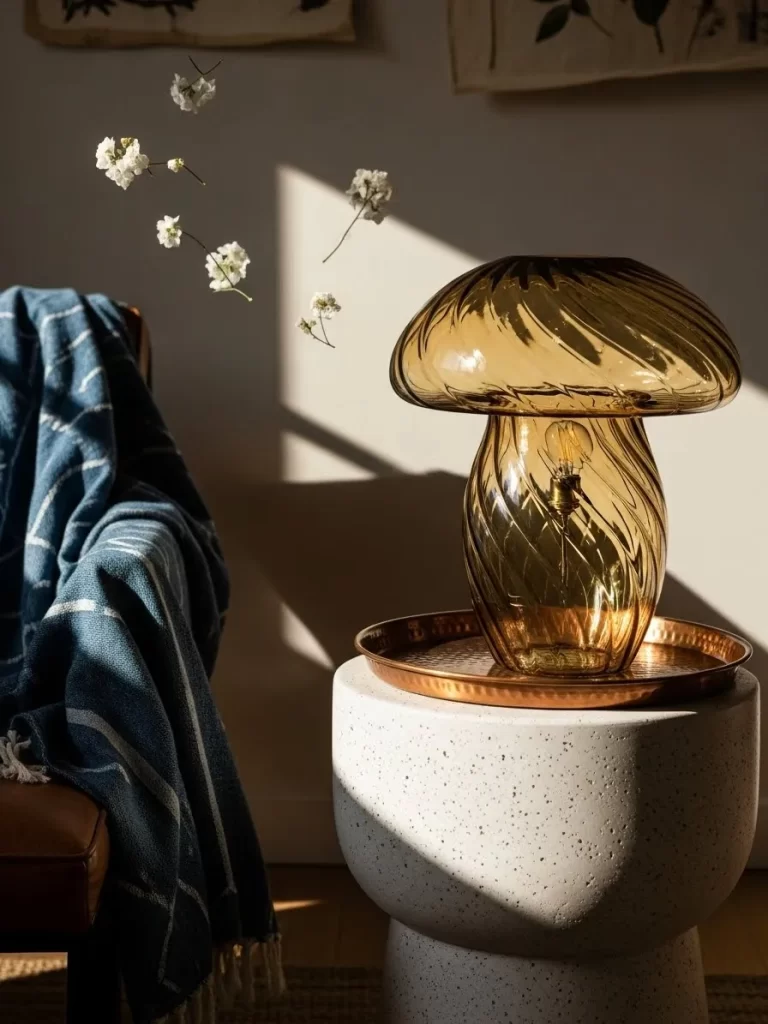
This vintage style lamp brings a warm and inviting glow to any corner of your house. Its unique mushroom shape captures attention and creates an instant conversation piece. The amber tint of the glass softens the light, making your living space feel cozy and lived in.
Swirl patterns on the glass add a touch of texture and movement to your decor. You can place it on a side table or a bookshelf to break up straight lines. It works well with many different styles, from modern to retro. This piece helps you express your personality without saying a word.
Materials Required List
- One large amber glass bowl for the mushroom cap
- One amber glass vase for the mushroom base
- Clear glass adhesive or strong epoxy
- LED light bulb
- Battery operated puck light or a corded lamp kit
Equipment Required List
- Safety goggles
- Protective gloves
- Glass drill bit
- Power drill
- Microfiber cloth
DIY Instructions Step by Step
- Start by cleaning both the glass bowl and the vase with soap and water to remove any dust or oily fingerprints.
- Dry the glass pieces completely with a microfiber cloth so the glue sticks properly later.
- Wear your safety goggles and gloves before you start any drilling to protect yourself from glass shards.
- Use a power drill with a glass bit to slowly make a small hole at the bottom of the vase if you want a corded lamp.
- Pour a little water on the glass while you drill to prevent the glass from cracking or getting too hot.
- Pull the lamp cord through the hole and secure the light socket at the top of the vase with a small amount of glue.
- Skip the drilling steps if you prefer to use a battery operated puck light inside the vase instead.
- Apply a thin layer of clear glass adhesive to the top rim of the vase once your light source is ready.
- Center the glass bowl on top of the vase carefully and press down firmly to create the mushroom shape.
- Allow the glue to dry for twenty four hours without moving the lamp so the bond stays strong.
- Put your LED bulb inside the lamp and enjoy the soft light in your room.
2. Terracotta Face Planter
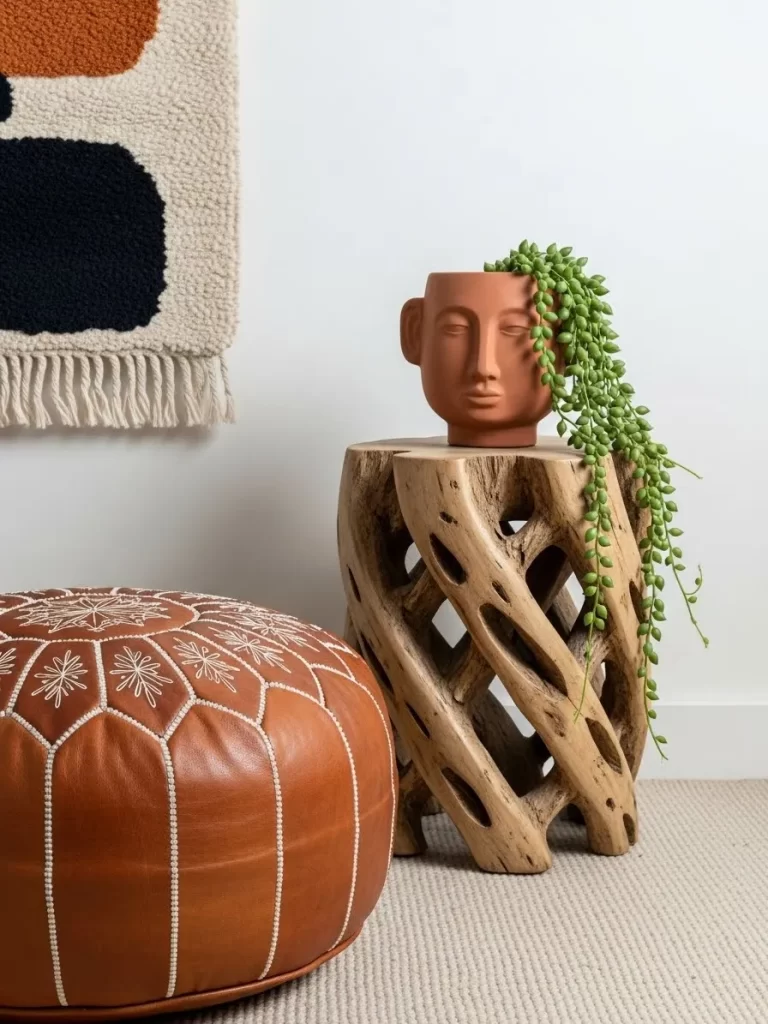
Add a touch of human connection to your greenery with this artistic face planter. It turns a simple trailing plant into a head of lush hair. The earthy terracotta tones blend well with any room and provide a warm feel to your shelf.
This sculptural piece stands out because it looks like a work of art. Guests will notice the calm expression immediately. It works well on a wooden stool or a side table to bring life into a quiet corner.
Materials Required List
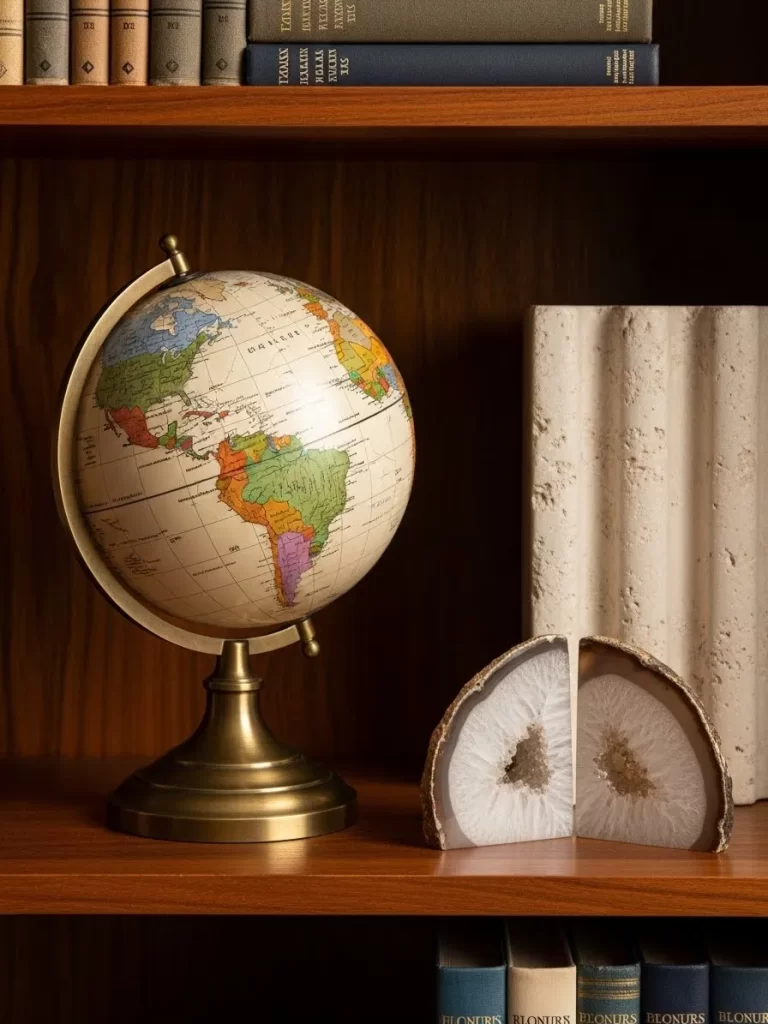
- Air dry clay or terracotta clay
- Small plastic pot for the inner lining
- Water
- Acrylic sealer
- A small plant like a string of pearls
Equipment Required List
- Clay sculpting tools or a butter knife
- Smooth work surface
- Small sponge
- Sandpaper
- Paintbrush
DIY Instructions Step by Step
- Roll out your clay on a flat surface until it is about half an inch thick.
- Wrap the clay around your plastic pot to get the basic cylinder shape.
- Pinch the edges together and use a little water to smooth the seam with your fingers.
- Roll small bits of clay to create a nose and ears for the face.
- Press these features onto the front of the pot and blend the edges into the main body.
- Use a sculpting tool to lightly carve out the eyes and a mouth.
- Smooth the entire surface with a damp sponge to remove any bumps or fingerprints.
- Let the clay dry completely for two days in a cool spot.
- Sand any rough edges with fine sandpaper once the planter is hard.
- Apply a coat of acrylic sealer to the inside and outside to make it waterproof.
- Place your plant inside the pot and watch the green hair grow.
3. Wrought Iron Candelabra

Bring old world charm to your fireplace with a forged metal candle holder. This black iron piece features elegant curves that contrast beautifully against a rustic wooden mantle. It holds three tapered candles to provide a dramatic and flickering light source.
Moody lighting transforms the atmosphere of a room instantly. You can use this piece to create a focal point in your dining area or living space. It feels sturdy and timeless, making it a great choice for those who love vintage aesthetics.
Materials Required List
- Three sturdy PVC pipes cut to different lengths
- Thick gauge copper wire or flexible aluminum wire
- Three plastic candle cups
- Black textured spray paint
- Strong adhesive glue
Equipment Required List
- Hacksaw
- Wire cutters
- Sandpaper
- Disposable gloves
- Drop cloth
DIY Instructions Step by Step
- Cut your PVC pipes into three different heights using a hacksaw to create a tiered look.
- Sand the ends of the pipes so they are flat and smooth.
- Bend your thick wire into decorative swirls to mimic the look of forged iron.
- Glue the wire swirls to the main PVC pipes to form the body of the candelabra.
- Attach the plastic candle cups to the top of each pipe using strong glue.
- Connect the three pipes at the base with more wire and glue to keep them stable.
- Lay down a drop cloth in a well ventilated area to protect your floor.
- Put on your gloves and spray the entire piece with black textured paint.
- Apply a second coat after the first one dries to ensure full coverage.
- Check that the paint has completely hardened before moving the piece.
- Place your favorite tapered candles into the cups and set the holder on your mantle.
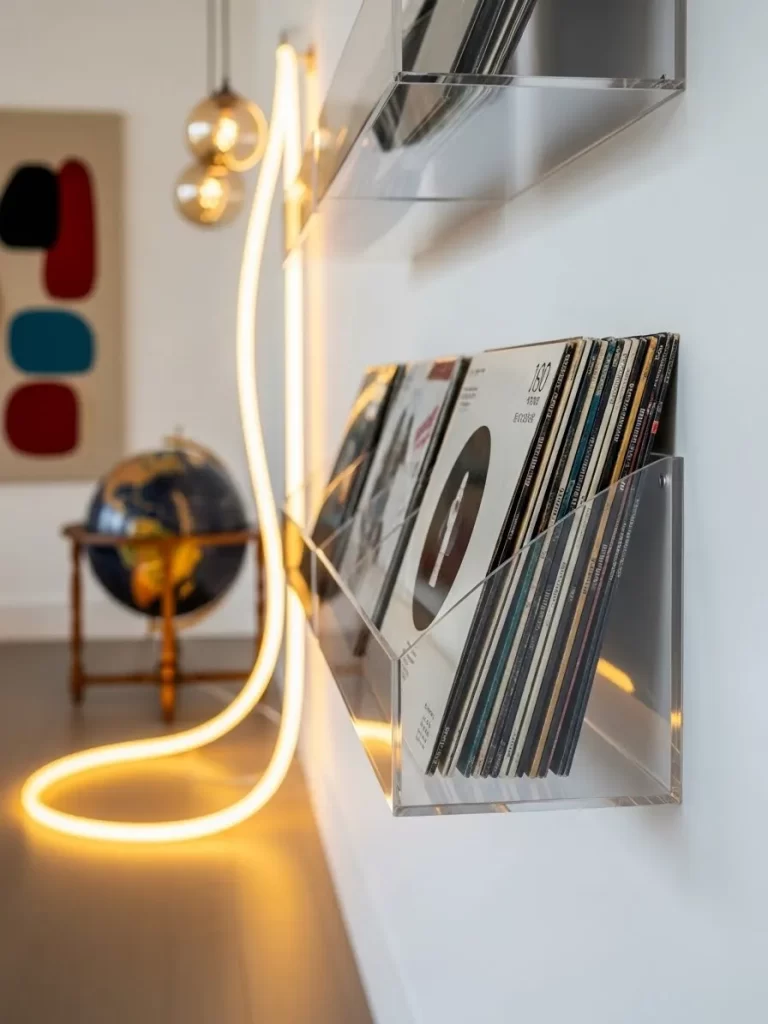
4. Floating Acrylic Record Shelves

Show off your favorite vinyl collection with these clear floating shelves. They make your records look like they are hovering on the wall. This setup keeps your music accessible while turning album art into a gallery display.
Adding a neon light strip underneath creates a modern and vibrant energy. The transparency of the acrylic ensures the focus remains on the colorful record covers. It is an excellent way to personalize a music room or a lounge area.
Materials Required List
- Clear acrylic sheets cut into long strips
- Heavy duty mounting tape or small wall brackets
- Rubbing alcohol
- LED neon light strip
- Vinyl records for display
Equipment Required List
- Measuring tape
- Spirit level
- Microfiber cloth
- Pencil
- Drill if using brackets
DIY Instructions Step by Step
- Clean the wall surface with rubbing alcohol to remove any dust or grease.
- Measure the width of your record covers to decide how long your shelves should be.
- Use a spirit level and a pencil to mark a straight line on the wall where the shelf will go.
- Peel the backing off the heavy duty mounting tape and apply it to the back of the acrylic strip.
- Press the acrylic shelf firmly against the wall along your pencil line.
- Hold the shelf in place for thirty seconds to make sure the bond is tight.
- Repeat this process for as many shelves as you want to display.
- Stick the LED neon light strip along the bottom edge of the shelves.
- Hide the power cord behind a piece of furniture or use a cord cover.
- Slide your favorite vinyl records onto the shelves so they lean slightly back.
- Turn on the neon lights to highlight your collection at night.
5. Pressed Fern Glass Coasters
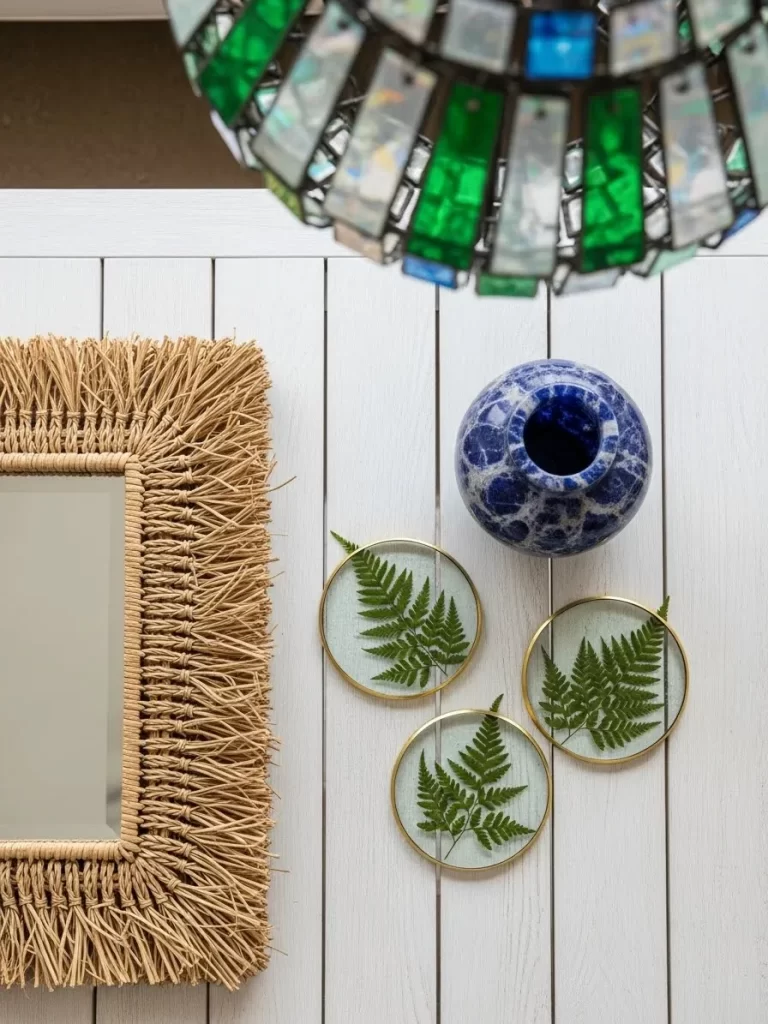
Preserve a piece of nature on your coffee table with these delicate glass coasters. Each one holds a real green fern leaf between two layers of glass. The thin gold rim adds a sophisticated touch that protects your surfaces from water rings.
These small details bring a botanical theme into your home without much effort. They look wonderful sitting next to a colorful vase or a textured mirror. This project is a great way to remember a walk in the woods or a special garden.
Materials Required List
- Fresh fern leaves
- Circular glass pieces in pairs
- Copper or gold foil tape
- Clear glass glue
- Small rubber feet for the bottom
Equipment Required List
- Heavy books or a flower press
- Paper towels
- Scissors
- Tweezers
- Glass cleaner
DIY Instructions Step by Step
- Place your fresh fern leaves between two paper towels and tuck them inside a heavy book.
- Wait about one week for the leaves to dry out completely and become flat.
- Clean your glass circles with glass cleaner to make sure there are no streaks.
- Use tweezers to place a single dried fern leaf in the center of one glass circle.
- Apply a tiny dot of clear glue to the back of the leaf to keep it from sliding.
- Lay the second glass circle directly on top of the leaf to sandwich it.
- Wrap the copper or gold foil tape around the edges of the two glass pieces.
- Press the tape down firmly with your thumb to create a smooth metal rim.
- Trim the ends of the tape with scissors so they meet perfectly without overlapping.
- Stick four small rubber feet to the bottom of the coaster to prevent it from slipping.
- Set your drink down and enjoy the natural beauty of your new coasters.
6. Corinthian Column Plant Stand
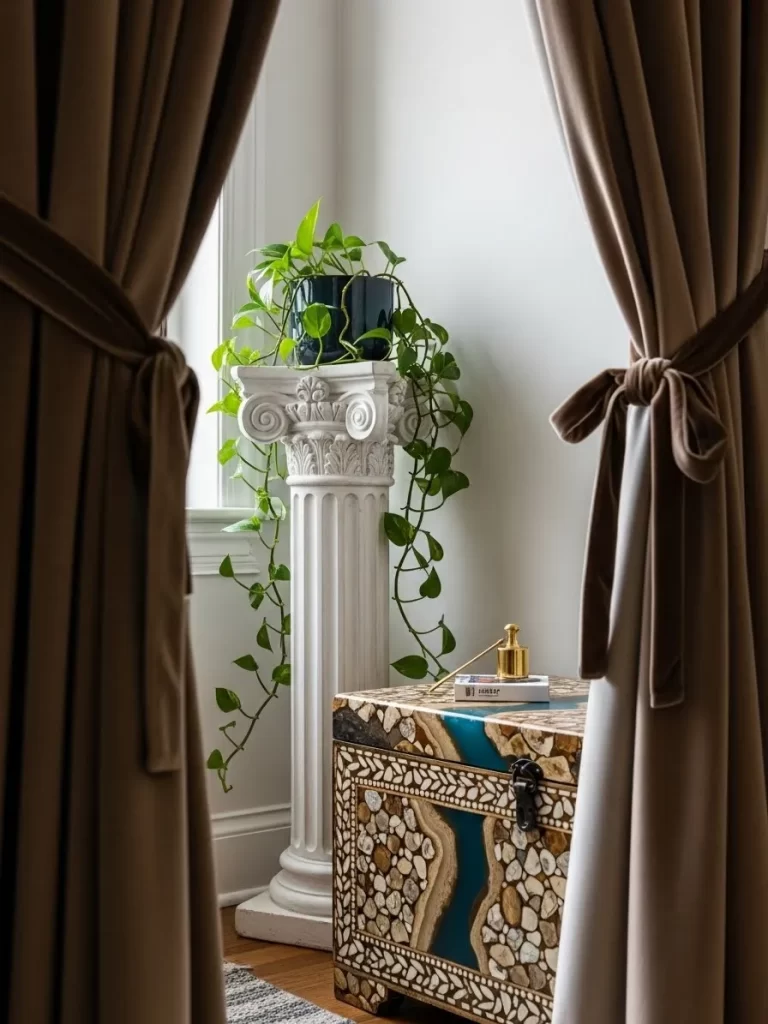
Elevate your plants with a classic Greek style pedestal. This white column adds height and a sense of history to your indoor garden. It allows trailing vines to spill down gracefully, creating a striking visual contrast against the white walls.
Placing this stand near a window makes the most of natural light and shadows. It serves as a strong architectural element that balances softer furniture pieces. Your pothos or ivy will look like a living sculpture when displayed this way.
Materials Required List
- Large cardboard shipping tube
- Square wooden boards for the top and base
- Decorative foam molding or trim
- White chalk paint
- Wood glue
Equipment Required List
- Saw to cut the tube
- Paintbrush
- Measuring tape
- Sandpaper
- Clamps
DIY Instructions Step by Step
- Cut the cardboard shipping tube to the height you want for your plant stand.
- Sand the edges of your square wooden boards until they are very smooth.
- Apply wood glue to the top and bottom rims of the cardboard tube.
- Center the wooden boards on the tube and use clamps to hold them while the glue dries.
- Cut pieces of foam molding to fit around the top and bottom of the column.
- Glue the molding in place to create the classic decorative ridges.
- Let the glue set for several hours until the structure feels very sturdy.
- Paint the entire column with white chalk paint using a large brush.
- Apply a second coat of paint to hide any brown cardboard or wood grain.
- Use a small brush to get into the cracks and details of the molding.
- Place a potted plant on top once the paint is dry to the touch.
7. Natural Agate Geode Bookends
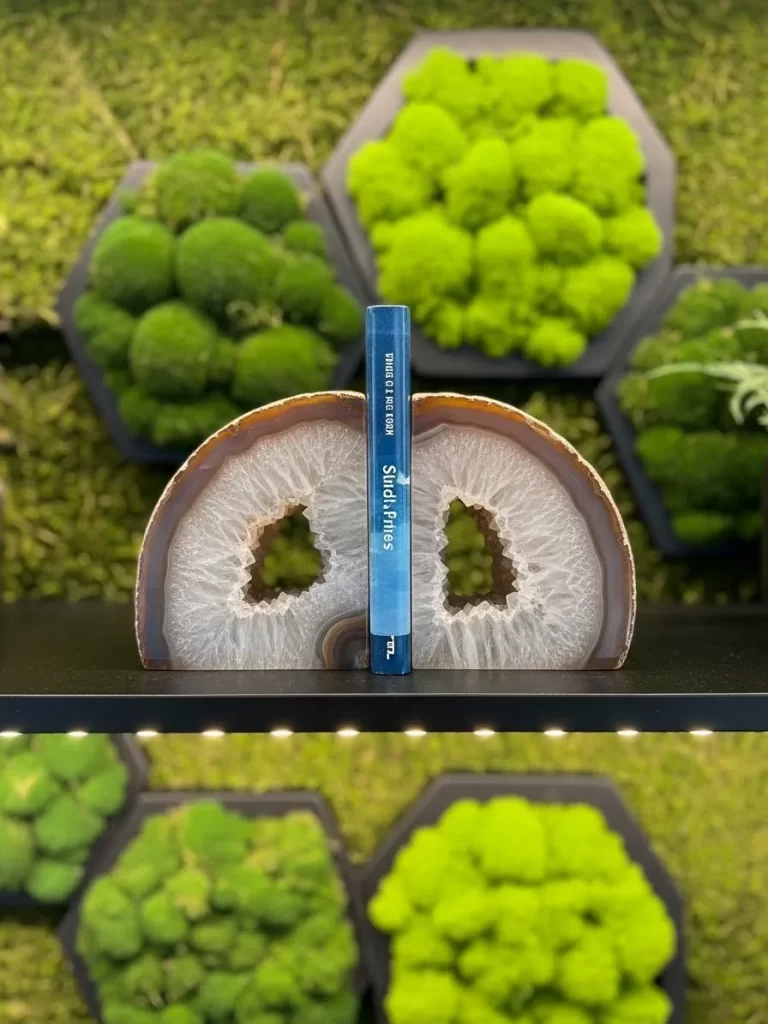
Keep your books upright with the help of stunning natural minerals. These agate bookends feature a crystalline center that sparkles when the light hits it. The brown and white rings show the many layers formed over millions of years.
These pieces add weight and texture to any bookshelf or desk. They serve a functional purpose while acting as a beautiful geological display. You can pair them with moss wall art to complete a nature inspired look in your office.
Materials Required List
- Large round stones or concrete blocks
- Metallic gold paint
- Various shades of blue and white acrylic paint
- Clear glossy resin
- Felt pads for the bottom
Equipment Required List
- Paintbrushes
- Mixing cups for resin
- Stir sticks
- Disposable gloves
- Level surface
DIY Instructions Step by Step
- Clean your stones or concrete blocks to remove any loose dirt or dust.
- Paint the outer edge of the stone with metallic gold paint to look like a gold rim.
- Mix different shades of blue and white paint to create rings in the center of the stone.
- Start with a dark color on the outside and get lighter as you move toward the middle.
- Use a small brush to add tiny white dots in the center to mimic crystals.
- Mix your clear resin according to the package instructions while wearing gloves.
- Pour a thick layer of resin over the painted area to give it a glass like finish.
- Pop any air bubbles that rise to the surface with a toothpick or a straw.
- Let the resin cure for twenty four hours on a completely level surface.
- Stick felt pads to the bottom of the stones so they do not scratch your shelves.
- Place a row of books between the two stones to keep them neat and tidy.
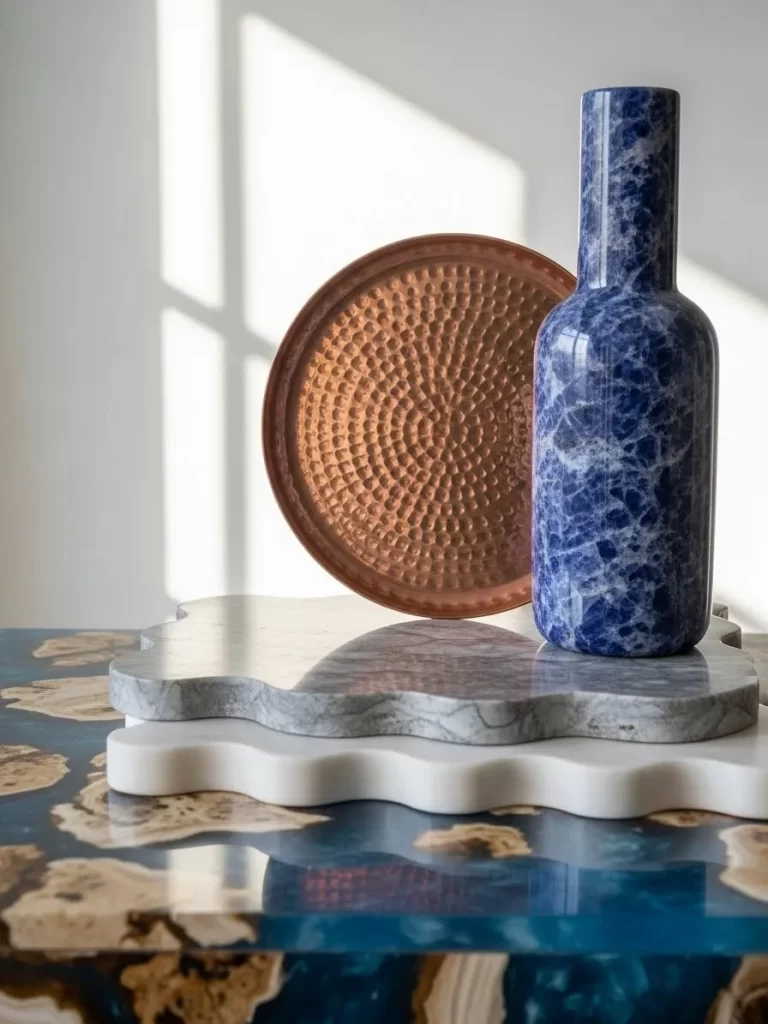
8. Hammered Copper Decorative Tray
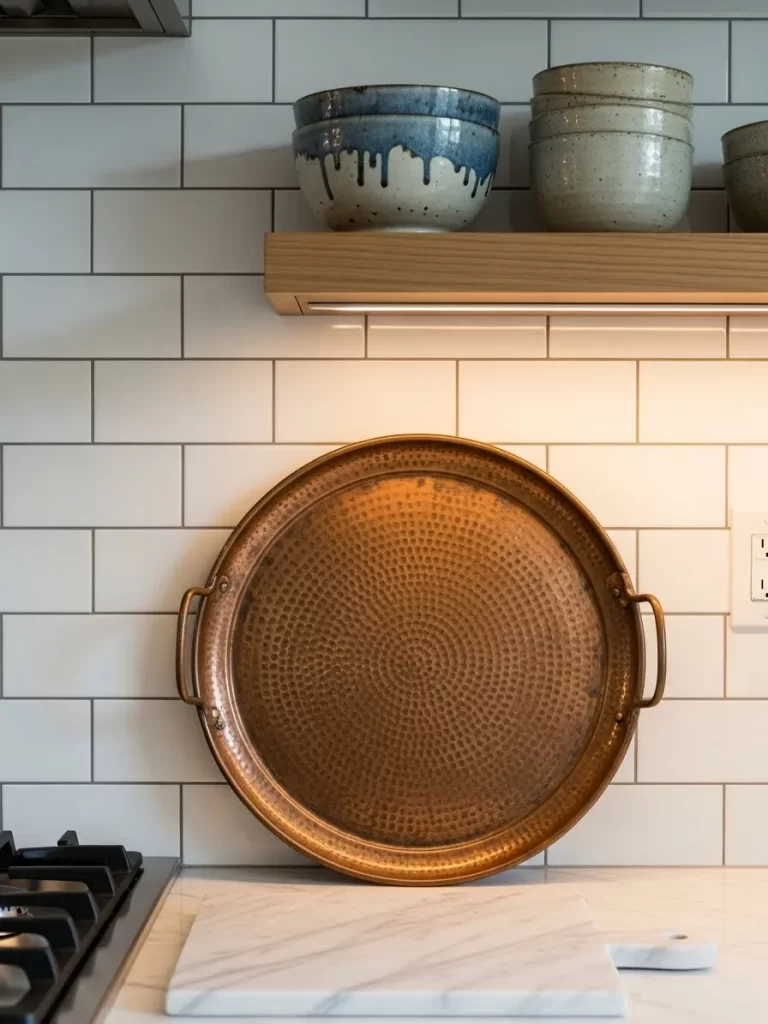
A large copper tray adds warmth and shine to your kitchen or dining space. The hammered texture creates a unique surface that reflects light in different directions. You can lean it against a wall as a backdrop or use it to serve drinks to your guests.
Metallic accents like this one provide a high end feel to even the simplest rooms. It pairs wonderfully with white subway tiles and wooden shelves. This versatile item is both a practical tool and a bold piece of wall art.
Materials Required List
- Flat metal pizza pan or round tray
- Copper metallic spray paint
- Clear protective top coat
- Two metal cabinet handles
- Small bolts and nuts
Equipment Required List
- Ball peen hammer
- Power drill
- Metal drill bit
- Screwdriver
- Sandpaper
DIY Instructions Step by Step
- Use a ball peen hammer to strike the surface of the metal pan repeatedly.
- Keep the hits close together to create a consistent hammered pattern.
- Sand any sharp edges on the rim of the pan until they are smooth.
- Mark two spots on opposite sides of the tray where the handles will go.
- Drill holes through these marks using a power drill and a metal bit.
- Spray the entire tray with copper metallic paint in light and even strokes.
- Let the paint dry completely before turning the tray over to paint the back.
- Apply a clear top coat to protect the copper finish from scratches or fading.
- Attach the cabinet handles by threading the bolts through the holes and tightening the nuts.
- Check that the handles are secure and do not wiggle when you lift the tray.
- Display the tray on your counter or use it to organize your favorite mugs.
9. Embroidered Leather Moroccan Pouf
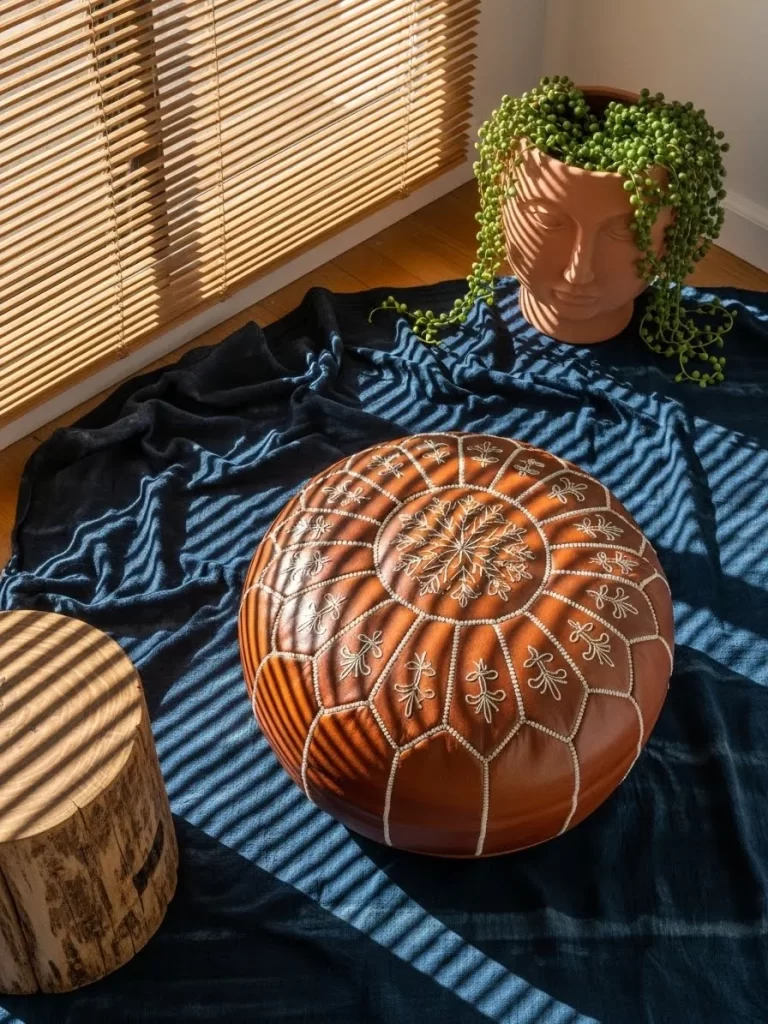
Sit back and relax on a hand stitched leather floor cushion. This tan pouf features intricate white embroidery that showcases traditional craftsmanship. It provides extra seating without taking up too much space in your living room.
The circular shape and soft texture break up the sharp corners of modern furniture. You can use it as a footrest or a low table for a small tray. Its earthy color brings a grounded and comfortable vibe to any seating area.
Materials Required List
- Faux leather or heavy canvas fabric
- Strong upholstery thread
- Embroidery floss in a contrasting color
- Large bag of polyester fiberfill or old blankets
- Long upholstery needle
Equipment Required List
- Fabric scissors
- Chalk or fabric marker
- Sewing machine
- Pins
- Measuring tape
DIY Instructions Step by Step
- Cut out two large circles of fabric for the top and bottom of the pouf.
- Cut a long rectangular strip of fabric that will act as the side panel.
- Use your fabric marker to draw a star or floral design on the top circle.
- Stitch over your drawing with the embroidery floss to create the decorative pattern.
- Pin the side panel to the edge of the top circle with the right sides facing each other.
- Sew along the pinned edge using a sewing machine for a strong seam.
- Attach the bottom circle to the other side of the rectangular strip in the same way.
- Leave a six inch opening in the seam so you can turn the pouf right side out.
- Turn the fabric through the opening and flatten the seams with your fingers.
- Stuff the pouf tightly with fiberfill or old blankets until it feels firm.
- Close the opening by hand using a hidden stitch and the upholstery needle.
10. Wicker Hot Air Balloon Lantern

Let your imagination take flight with this whimsical wicker light fixture. The balloon shape adds a playful touch to a nursery or a creative workspace. It casts beautiful shadows on the ceiling due to the open weave of the rattan.
Natural materials like wicker make a space feel light and airy. This hanging piece works well alongside other geometric glass pendants to create a layered lighting look. It is a simple way to add height and interest to your room.
Materials Required List
- Large round wicker basket or paper lantern
- Small square wicker basket for the passenger car
- Thick twine or jute rope
- Light socket kit with a long cord
- Small decorative sandbags or fabric scraps
Equipment Required List
- Scissors
- Hot glue gun
- Wire cutters
- Measuring tape
- Ceiling hook
DIY Instructions Step by Step
- Cut out the bottom center of the large wicker basket using wire cutters.
- Slide your light socket through this hole so the bulb will sit inside the basket.
- Glue the socket in place to make sure it does not slide out.
- Cut four equal lengths of twine to connect the large basket to the small one.
- Tie the top of each piece of twine to the rim of the large balloon basket.
- Attach the other end of the twine to the corners of the small basket.
- Adjust the lengths so the small basket hangs perfectly level below the balloon.
- Glue small fabric scraps to the sides of the little basket to look like sandbags.
- Screw an LED bulb into the socket to prevent the wicker from getting too hot.
- Install a hook in your ceiling and hang the cord so the balloon floats in the air.
- Plug in the lantern and enjoy the warm glow of your handmade balloon.
11. Miniature Corinthian Column Stand
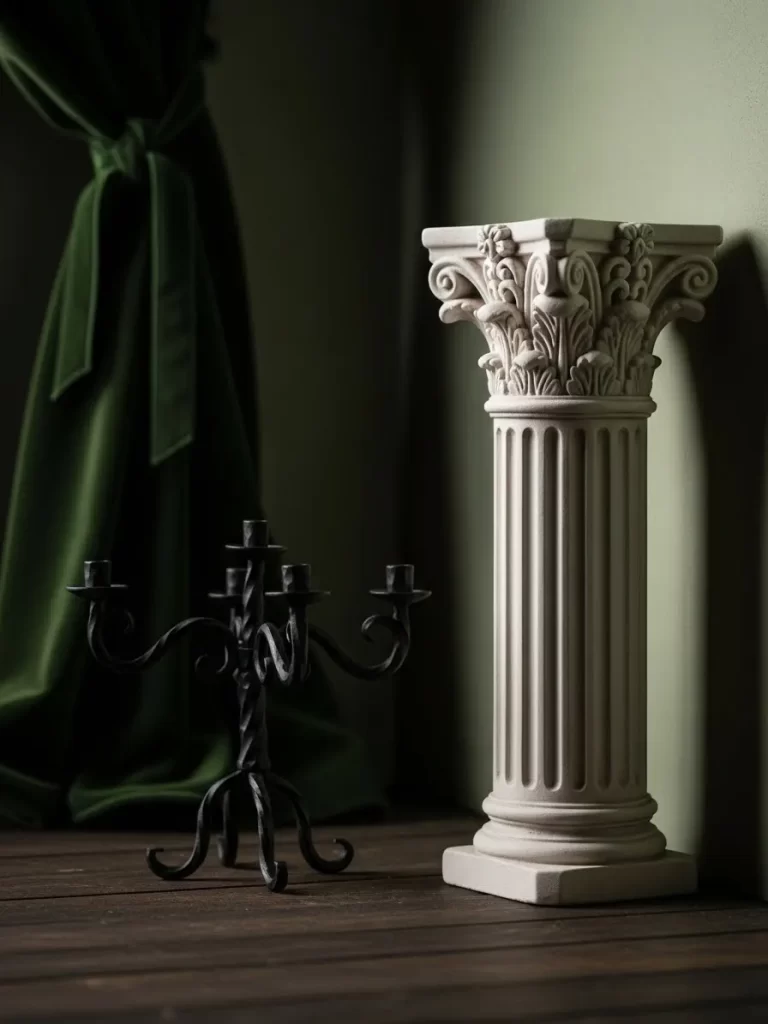
This small white pedestal brings a touch of classical beauty to your indoor space. It sits low to the ground and provides a solid base for your favorite objects. Detailed carvings at the top create a sense of history and elegance.
You can pair it with a dark metal candelabra to create a moody and sophisticated corner. The contrast between the bright white stone and deep green walls looks very striking. It works well in a study or a cozy library.
Materials Required List
- Plaster of Paris
- Large plastic cup for a mold
- Cardboard scraps for detail
- White acrylic paint
- Clear water
Equipment Required List
- Mixing bowl
- Wooden spoon
- Utility knife
- Fine sandpaper
- Paintbrush
DIY Instructions Step by Step
- Mix the plaster with water in a bowl until it looks like thick cream.
- Pour the mixture into your plastic cup mold slowly to avoid spills.
- Tap the sides of the cup to get rid of any air bubbles in the plaster.
- Let the plaster sit for two hours until it feels warm and hard.
- Peel the plastic cup away carefully to reveal the column shape.
- Cut small vertical ridges into the sides using a utility knife for detail.
- Glue cardboard circles to the top and bottom to create a wider base.
- Paint the entire piece white to look like real polished stone.
- Use sandpaper to scuff the edges for an aged vintage look.
- Place a small candle or a tiny plant on top of your new pedestal.
12. Crystal Geode Display Bottles

Transform a simple dresser into a luxury display with these crystal topped bottles. Each bottle features a raw geode or crystal cluster as a stopper. The natural shapes of the stones contrast with the smooth glass and marble surfaces.
Blue and white marble vases nearby add to the sophisticated atmosphere. These pieces catch the light and add a touch of sparkle to your morning routine. You can use them to store perfume or decorative oils in your bedroom.
Materials Required List
- Small glass bottles with flat lids
- Raw crystal clusters or geodes
- Strong clear adhesive
- Gold spray paint
- Rubbing alcohol
Equipment Required List
- Microfiber cloth
- Disposable gloves
- Toothpicks
- Large drop cloth
- Sandpaper
DIY Instructions Step by Step
- Clean the lids of your bottles with rubbing alcohol to remove any oils.
- Sand the bottom of your crystals lightly so they have a rough surface for glue.
- Spray the bottle lids with gold paint and let them dry completely.
- Apply a generous amount of strong adhesive to the center of the lid.
- Press the raw crystal cluster onto the glue and hold it for one minute.
- Use a toothpick to wipe away any extra glue that oozes out from the sides.
- Let the glue cure for twenty four hours without moving the bottles.
- Fill the glass bottles with your favorite colored water or perfume.
- Place the crystal stoppers on top and arrange them on a decorative tray.
- Set the tray on your vanity to enjoy the elegant and natural look.
13. Wire Mesh Human Bust Sculpture
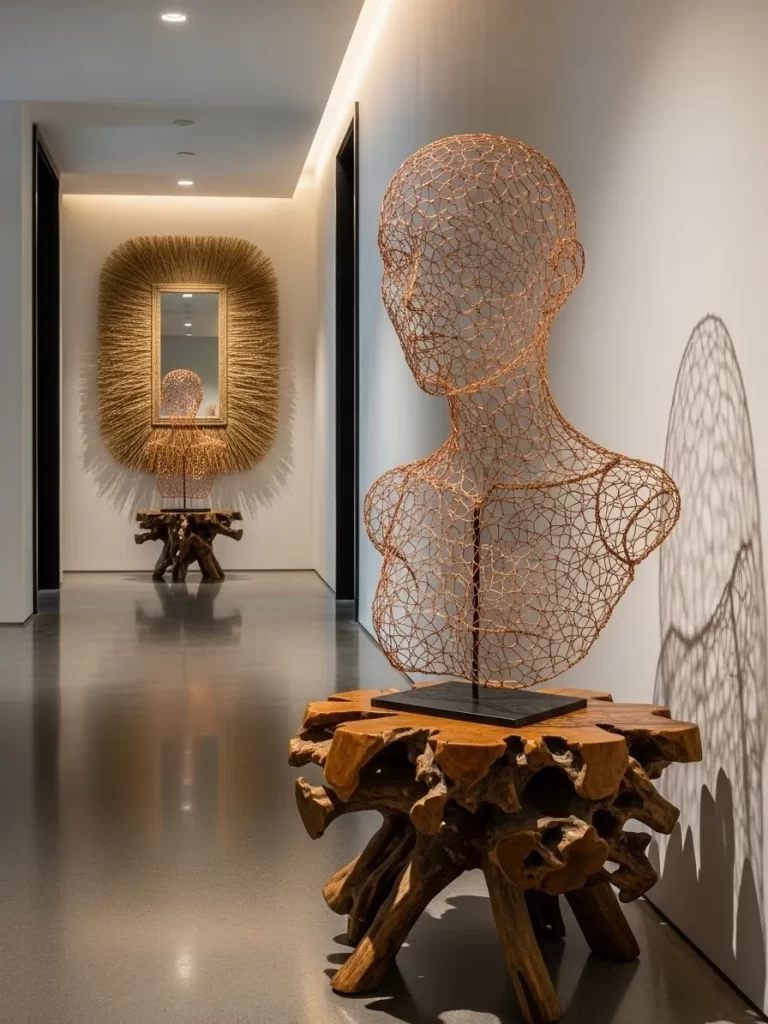
Add a modern and artistic touch to your hallway with a wire mesh bust. This sculpture uses thin copper wire to create the shape of a human head and shoulders. It looks light and airy while still being a strong visual statement.
The sculpture sits on a rough wood pedestal which adds an earthy contrast to the metal. Shadows from the wire create interesting patterns on the white walls as you walk by. It is a great way to introduce fine art into a minimalist home.
Materials Required List
- Flexible copper or aluminum wire
- Wooden block for the base
- Small metal rod
- Strong wood glue
- Clear spray sealant
Equipment Required List
- Wire cutters
- Needle nose pliers
- Power drill
- Wood drill bit
- Safety glasses
DIY Instructions Step by Step
- Drill a small hole into the center of your wooden block base.
- Insert the metal rod into the hole and secure it with a drop of wood glue.
- Create a loop of wire at the top of the rod to start the head shape.
- Wrap more wire around the loop to build out the volume of the face and skull.
- Use needle nose pliers to pinch the wire into the shape of a nose and chin.
- Build the neck and shoulders by wrapping longer pieces of wire around the rod.
- Connect the different layers of wire by twisting the ends together tightly.
- Continue adding wire until the bust looks solid but still has open spaces.
- Spray the entire sculpture with a clear sealant to prevent the metal from tarnishing.
- Place the finished art piece on a console table to greet your guests.
14. Flexible Neon Rope Light
Brighten up your wall with a custom neon rope light that flows like a drawing. This flexible light source allows you to create curved shapes and loops that look like modern art. It adds a vibrant and energetic glow to a music room or bedroom.
The light reflects off smooth surfaces and highlights your favorite wall decor. You can snake it around furniture or let it hang in a loose and organic pattern. This simple addition makes any room feel like a trendy lounge.
Materials Required List
- Flexible LED neon rope light
- Clear mounting clips
- Small screws
- Power adapter
- Long extension cord
Equipment Required List
- Measuring tape
- Pencil
- Manual screwdriver
- Level tool
- Step ladder
DIY Instructions Step by Step
- Decide on the shape or pattern you want to create on your wall.
- Use a pencil to lightly mark the path of the light on the surface.
- Hold the mounting clips along the pencil line every six inches.
- Screw the clips into the wall using a screwdriver to keep them secure.
- Start at the power outlet and snap the neon rope into the first clip.
- Continue snapping the light into the clips as you follow your pencil drawing.
- Create loops or waves by spacing the clips further apart in those areas.
- Check that the rope is held firmly and does not sag between the clips.
- Connect the end of the rope light to the power adapter and plug it in.
- Turn off the main room lights to see your new neon art glow.
15. Amethyst Specimen on Concrete Base
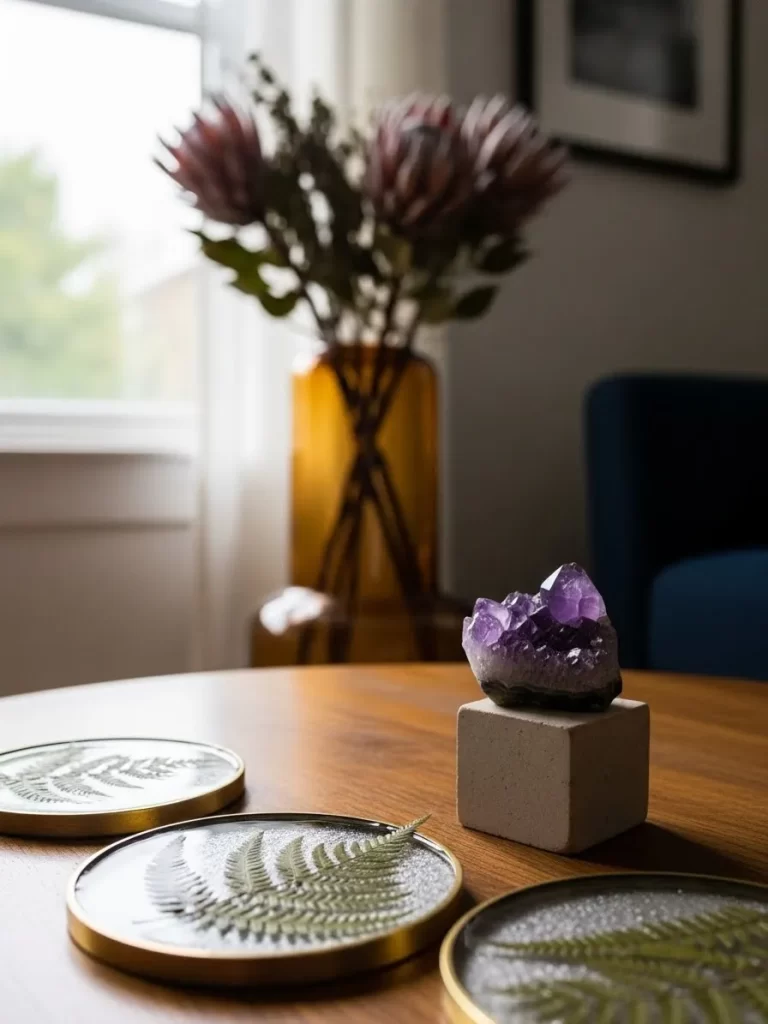
Bring the energy of natural crystals into your home with an amethyst display. This deep purple stone sits on a simple gray concrete cube for a modern look. It serves as a beautiful accent piece for a coffee table or a desk.
The rough texture of the crystal contrasts with the smooth and industrial feel of the concrete. It provides a pop of color that stands out against neutral wood tones. This piece helps ground your decor and connects you to the natural world.
Materials Required List
- Raw amethyst crystal cluster
- Pre mixed concrete or cement
- Small square plastic container
- Strong clear adhesive
- Fine sandpaper
Equipment Required List
- Mixing bowl
- Metal spoon
- Non stick cooking spray
- Disposable gloves
- Level surface
DIY Instructions Step by Step
- Spray the inside of your plastic container with cooking spray for easy removal.
- Mix the concrete with water until it has the consistency of peanut butter.
- Pour the concrete into the container until it is two inches deep.
- Tap the sides to level the surface and remove any trapped air bubbles.
- Let the concrete dry for forty eight hours on a level surface.
- Pull the concrete block out of the mold and sand the edges until smooth.
- Clean the bottom of your amethyst crystal with a damp cloth and let it dry.
- Apply a large drop of strong glue to the top center of the concrete block.
- Press the crystal firmly onto the glue and hold it in place for a minute.
- Allow the glue to set for a full day before displaying your new crystal stand.
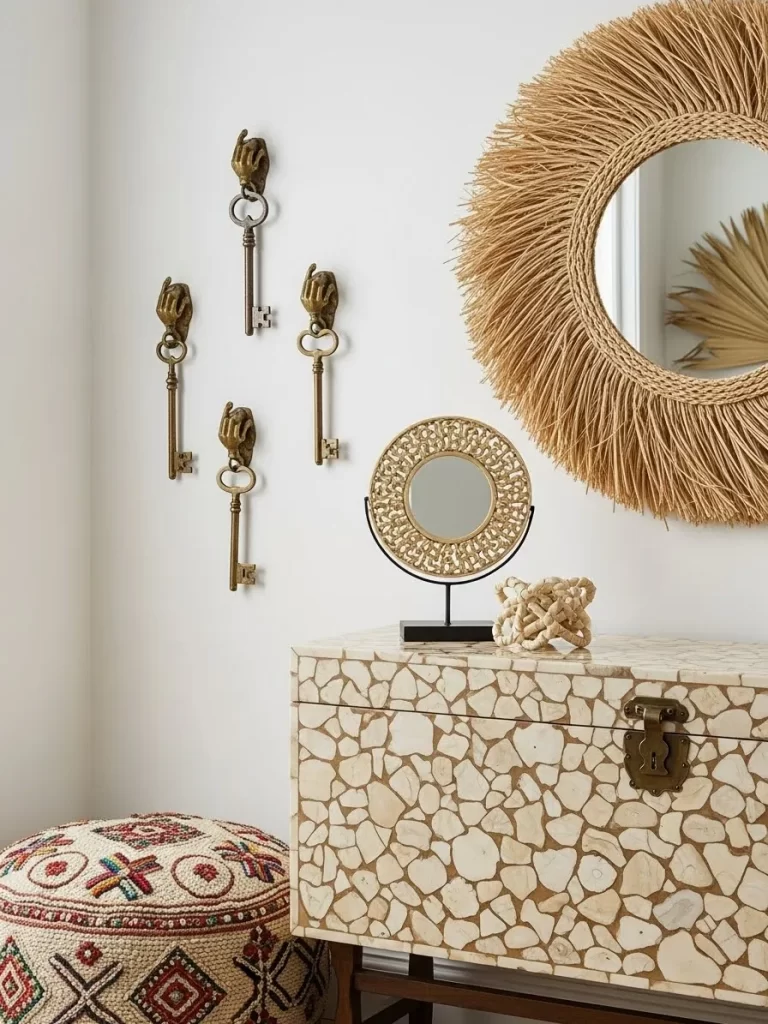
16. Brass Hand Shaped Wall Hooks
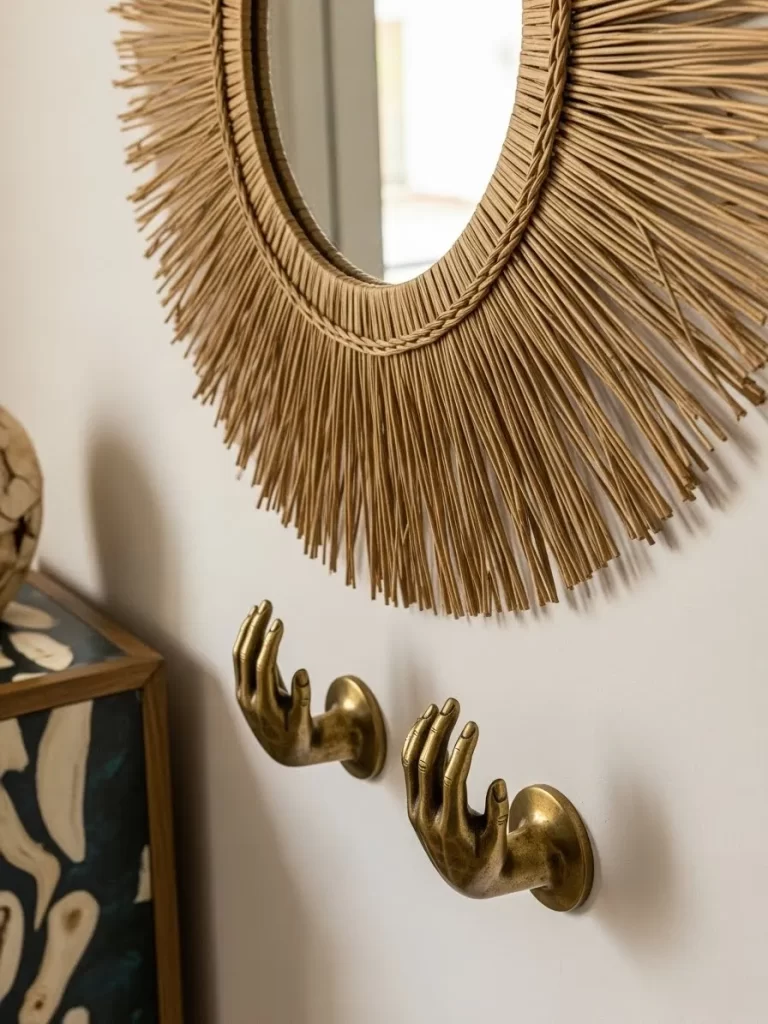
Organize your entryway with a touch of surrealism using these brass hand hooks. They look like hands emerging from the wall to hold your keys or light jackets. The warm gold tone adds a sense of luxury and fun to a plain wall.
These hooks sit perfectly under a sunburst mirror to create a unique wall gallery. They are both functional and act as a conversation piece for anyone who visits. You can use them to display jewelry or small bags in a bedroom too.
Materials Required List
- Hand shaped decorative hardware
- Heavy duty wall anchors
- Matching brass screws
- Level tool
- Pencil
Equipment Required List
- Power drill
- Drill bits
- Manual screwdriver
- Measuring tape
- Small hammer
DIY Instructions Step by Step
- Choose a spot on the wall where you want your hooks to live.
- Hold the hand hook against the wall and mark the screw holes with a pencil.
- Use a measuring tape to make sure the second hook is level with the first.
- Drill holes into the wall at your pencil marks using the correct drill bit.
- Tap the plastic wall anchors into the holes gently with a hammer.
- Place the hand hook over the anchors and line up the screw holes.
- Drive the brass screws through the hook and into the anchors with a screwdriver.
- Tighten the screws until the hook does not wiggle or move on the wall.
- Repeat these steps for the second hand hook to create a matching pair.
- Hang your keys or a light scarf on the open palms of the brass hands.
17. Stacked Concrete Candle Holders
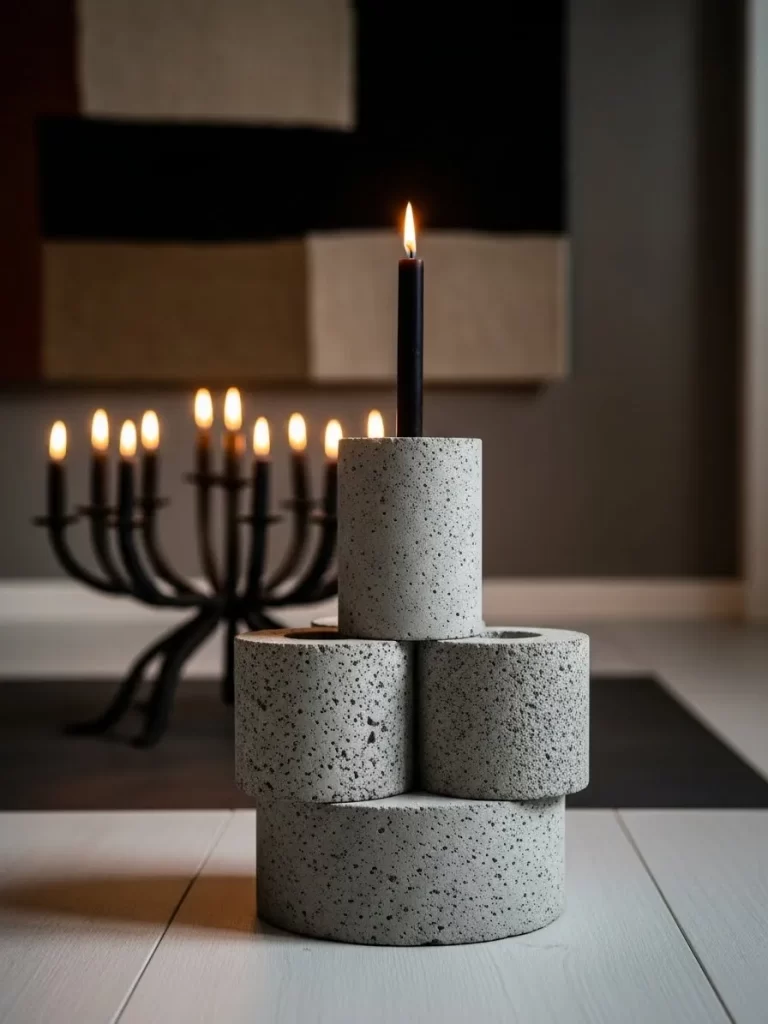
Create a bold industrial look with these stacked concrete cylinder candle holders. They feature a speckled texture that adds a gritty and modern feel to your table. The simple gray tones allow the black tapered candles to stand out.
You can stack them in different heights to create a tiered centerpiece for a dinner party. They work well in minimalist rooms that use a lot of black and white. These holders are heavy and stable and keep your candles secure.
Materials Required List
- Empty cardboard juice or milk cartons
- Concrete mix
- Small plastic pipe pieces
- Clean water
- Vegetable oil
Equipment Required List
- Mixing bucket
- Large stir stick
- Utility knife
- Fine sandpaper
- Measuring cup
DIY Instructions Step by Step
- Cut the tops off your cardboard cartons to create open box molds.
- Coat the inside of the cartons and the outside of the pipes with vegetable oil.
- Mix the concrete with water until it is smooth and thick like wet sand.
- Pour the concrete into the cartons at different heights for variety.
- Press a piece of plastic pipe into the center of each concrete block.
- Make sure the pipe goes down about one inch to create a hole for the candle.
- Tape the pipes in place so they stay centered while the concrete hardens.
- Let the concrete dry for three days in a cool and shaded spot.
- Tear away the cardboard and pull out the plastic pipes with pliers.
- Sand the rough surfaces and top edges until they feel smooth and look neat.
18. Celestial Sun Embroidered Blanket
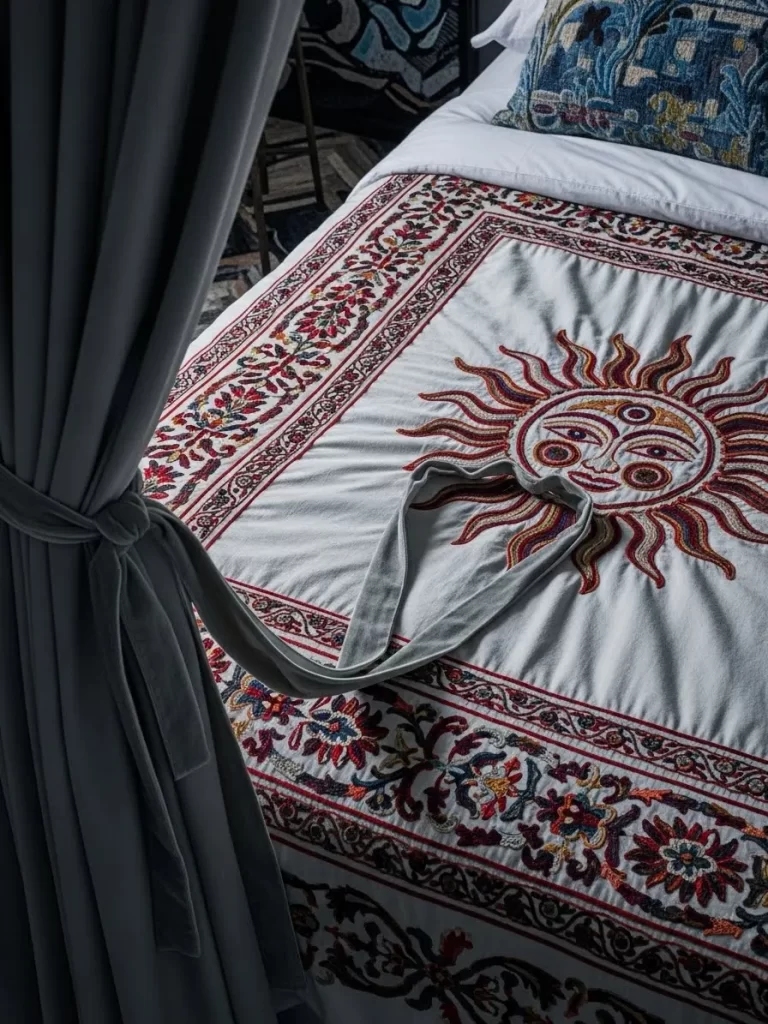
Add a layer of warmth and art to your bedroom with a sun embroidered throw. This white blanket features a large smiling sun in the center with rays of light stretching outward. The colorful stitching brings a bright and happy energy to your sleep space.
Floral borders around the edges give the piece a traditional and handmade feel. It works well at the foot of a bed or draped over a cozy reading chair. This blanket is an easy way to introduce patterns without overwhelming the room.
Materials Required List
- Plain white cotton or linen blanket
- Colorful embroidery floss
- Large embroidery hoop
- Transfer paper
- Water soluble fabric pen
Equipment Required List
- Embroidery needles
- Fabric scissors
- Iron
- Large table
- Bright lamp
DIY Instructions Step by Step
- Wash and iron your blanket so it is clean and free of any wrinkles.
- Draw a large sun design on a piece of paper or find a pattern you love.
- Use transfer paper to trace the sun design onto the center of the blanket.
- Tighten a section of the blanket into your embroidery hoop to keep it flat.
- Choose a bright yellow or orange thread to start stitching the sun rays.
- Use a simple backstitch to follow the lines of your sun drawing.
- Move the hoop to a new section as you complete each part of the design.
- Add smaller details like eyes or a mouth using a darker thread color.
- Stitch a floral pattern along the edges of the blanket to match the center.
- Rinse the blanket in cool water to remove the marks from the fabric pen.
19. Blue Sodalite Stone Vases
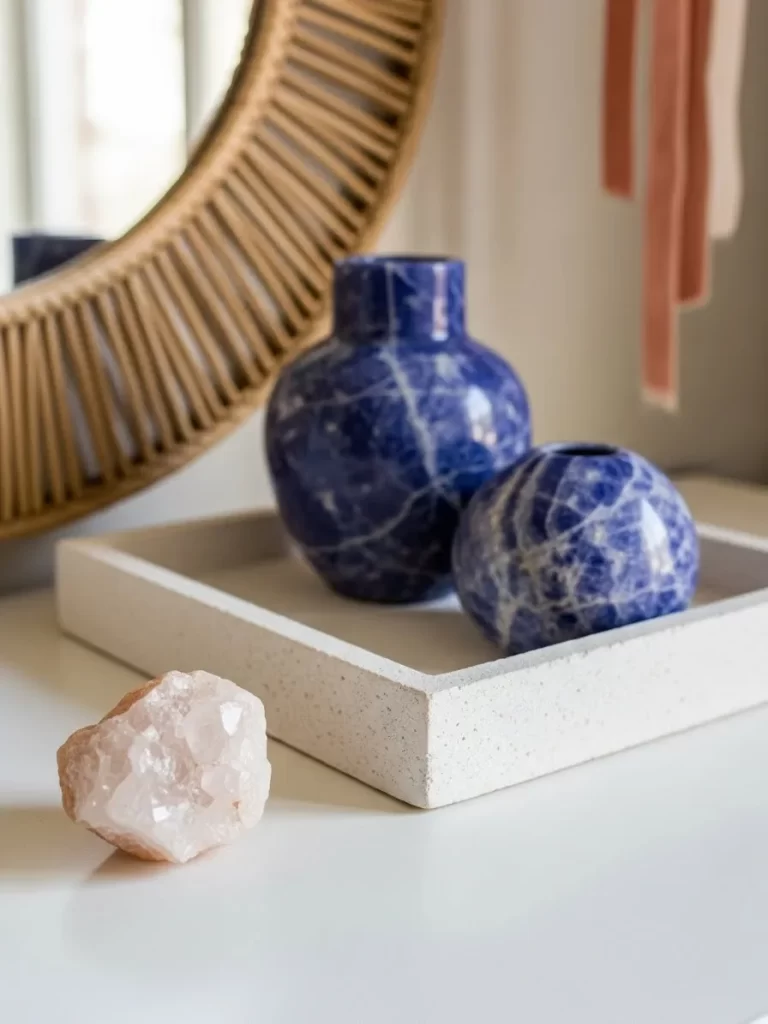
Introduce a deep and rich blue color to your decor with sodalite stone vases. These polished vessels feature white veins that look like clouds in a midnight sky. They bring a sense of luxury and nature to a white shelf or a marble counter.
The spherical and cylindrical shapes create a nice visual balance when placed together. You can leave them empty as sculptures or add a single green leaf for a minimalist look. These vases feel heavy and premium and elevate any space they occupy.
Materials Required List
- Natural blue stone or marble blocks
- Diamond core drill bit
- Water for cooling
- Stone polishing pads
- Clear stone sealer
Equipment Required List
- Drill press or steady power drill
- Sturdy clamps
- Safety goggles
- Waterproof work area
- Microfiber cloth
DIY Instructions Step by Step
- Secure your blue stone block to a work table using sturdy clamps.
- Put on your safety goggles to protect your eyes from stone dust.
- Mark the center of the stone where you want the opening of the vase to be.
- Use a diamond core drill bit to start drilling a hole into the stone.
- Pour water onto the stone constantly while you drill to keep it cool.
- Drill down slowly until the hole is about four inches deep.
- Stop drilling and clean out the stone dust with a damp microfiber cloth.
- Use polishing pads to smooth the inside and top rim of the new vase.
- Apply a coat of stone sealer to the entire piece to make the blue color pop.
- Let the sealer dry for twelve hours before placing the vase on your shelf.
20. Hexagonal Moss Wall Record Display
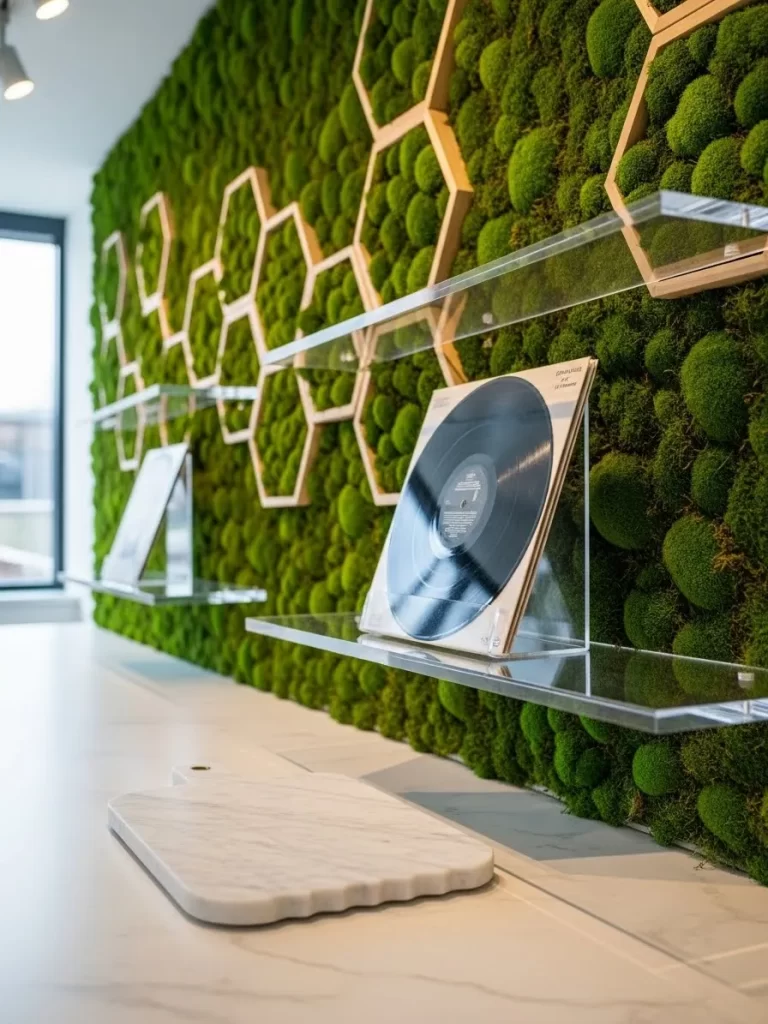
Combine music and nature with a hexagonal moss wall display for your records. This setup uses clear acrylic shelves mounted over a backdrop of lush green moss. It creates a vibrant living gallery that brings the outdoors into your home.
The geometric shapes of the moss panels add a modern and organized feel to the wall. This design is great for filling a large empty space with color and life. It protects your records while making them the center of attention in any room.
Materials Required List
- Hexagonal wooden frames
- Preserved reindeer or sheet moss
- Clear acrylic floating shelves
- Strong wood glue
- Mounting hardware
Equipment Required List
- Hot glue gun
- Spirit level
- Pencil
- Power drill
- Manual screwdriver
DIY Instructions Step by Step
- Arrange your hexagonal frames on the floor to find a pattern you like.
- Apply a layer of wood glue to the back of the frames and press them together.
- Let the glue dry so the frames form a single large honeycomb structure.
- Use a hot glue gun to fill the inside of the frames with preserved moss.
- Press the moss down firmly so there are no gaps or empty wooden spots.
- Mark the wall with a pencil where you want the moss display to hang.
- Drill holes and install the mounting hardware to secure the frames to the wall.
- Mount the clear acrylic shelves directly onto the moss panels or the wall nearby.
- Use a spirit level to make sure the shelves are perfectly straight.
- Place your favorite vinyl records on the shelves and enjoy your living music wall.
21. Entryway Brass Hand Hooks
Elevate your organization game with these unique hand shaped hooks near your door. They turn your keys and accessories into a sculptural display against a neutral wall. The antique brass finish matches well with woven mirrors and textured chests.
These hooks keep your daily essentials in plain sight while adding character to your hallway. You can mount them at different heights to create a dynamic and interesting look. It is a practical way to show off your style the moment you walk inside.
Materials Required List
- Brass hand shaped hardware
- Heavy duty wall anchors
- Brass screws
- Level tool
- Masking tape
Equipment Required List
- Power drill
- Drill bits
- Manual screwdriver
- Measuring tape
- Pencil
DIY Instructions Step by Step
- Pick a clear section of wall near your front door for the hooks.
- Use masking tape to mark the heights where you want each hand to sit.
- Hold the first brass hand against the tape and mark the screw holes with a pencil.
- Check with a level tool to ensure the marks are perfectly vertical.
- Drill holes through the marks using a bit that matches your wall anchors.
- Push the anchors into the holes until they are flush with the wall surface.
- Place the hook over the anchors and drive the brass screws in with a screwdriver.
- Tighten each screw until the hand feels very secure and does not move.
- Repeat these steps for the other three hands to create a staggered row.
- Hang your most used keys or a small lanyard on the fingers of the brass hands.
22. Teal Glass Fern Coasters
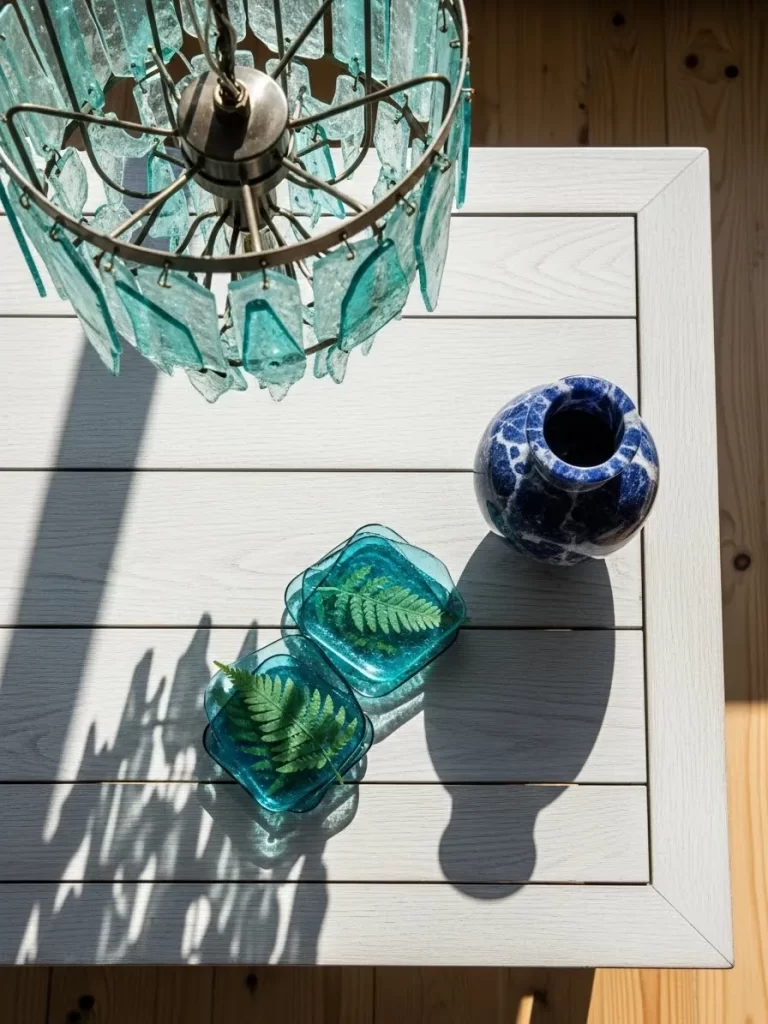
Protect your white coffee table with these stunning teal glass coasters. Each piece features a real pressed fern leaf trapped inside a translucent blue layer. The color reminds you of the ocean and adds a cool tone to your room.
These coasters catch the sunlight and cast beautiful blue shadows on your furniture. They look especially nice next to dark stone vases or brass accents. It is a simple project that brings a fresh botanical feel to your morning coffee.
Materials Required List
- Teal glass circles in pairs
- Dried and pressed fern leaves
- Clear glass adhesive
- Gold decorative foil tape
- Small felt pads
Equipment Required List
- Heavy books for pressing
- Tweezers
- Glass cleaner
- Soft cloth
- Scissors
DIY Instructions Step by Step
- Flatten your fern leaves inside a heavy book for a week until they are dry.
- Clean both sides of the teal glass circles with glass cleaner and a soft cloth.
- Use tweezers to carefully place a fern leaf on the center of one glass circle.
- Apply a tiny drop of clear glue to the stem of the leaf to hold it.
- Place the second teal glass circle on top to create a sandwich.
- Wrap the gold foil tape around the edge of the two glass pieces to seal them.
- Smooth the tape down with your thumb to remove any air bubbles or wrinkles.
- Trim the ends of the tape with scissors so they meet perfectly.
- Stick four small felt pads to the bottom of the coaster to prevent scratches.
- Place the finished coaster on your table and set a glass of water on top.
23. Raw Quartz Drawer Knobs

Update your furniture with these custom raw quartz knobs on a dark wooden dresser. The milky white stone sparkles under soft lighting and adds a luxurious touch. It turns a standard piece of furniture into a one of a kind treasure.
The natural shape of the quartz provides a comfortable grip when opening drawers. These knobs pair beautifully with concrete candle holders and warm wooden textures. It is an easy way to bring a high end look to an office or bedroom.
Materials Required List
- Raw quartz crystal points or clusters
- Standard metal knob bases
- Heavy duty epoxy glue
- Long mounting screws
- Rubbing alcohol
Equipment Required List
- Manual screwdriver
- Fine sandpaper
- Toothpicks
- Disposable gloves
- Level surface
DIY Instructions Step by Step
- Unscrew the old knobs from your dresser and clean the area with a damp cloth.
- Wipe the metal knob bases and the bottom of the quartz with rubbing alcohol.
- Scuff the metal surface with sandpaper to help the glue stick better.
- Mix a small amount of heavy duty epoxy according to the package directions.
- Apply the epoxy to the top of the metal base using a toothpick.
- Press the quartz crystal onto the glue and hold it firmly for two minutes.
- Let the glue dry for twenty four hours on a flat and level surface.
- Check that the crystal is firmly attached and does not wiggle on the base.
- Insert the mounting screw through the drawer hole and into the new knob.
- Tighten the screw with a manual screwdriver until the knob is snug.
24. Classic Ionic Column Pedestal
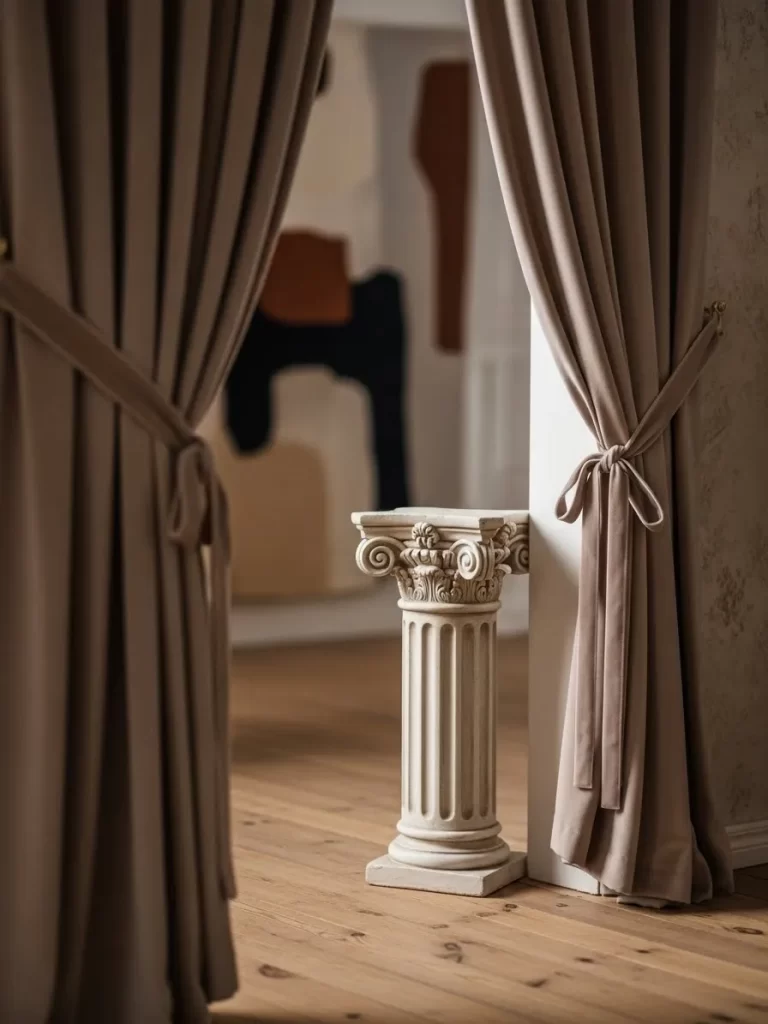
Frame your doorway with a sense of grandeur using a tall Ionic column pedestal. This white architectural piece adds height and a formal feel to your living room. It acts as a beautiful stand for trailing plants or a small brass lamp.
The fluted design and scroll details at the top catch the light and create soft shadows. It works well when tucked behind neutral curtains to add a layer of sophistication. This pedestal is a bold way to introduce classical art into your modern home.
Materials Required List
- Large heavy duty cardboard tube
- Square wooden blocks for top and bottom
- Decorative plaster molding strips
- White chalk paint
- Industrial strength glue
Equipment Required List
- Hand saw
- Large paintbrush
- Measuring tape
- Fine sandpaper
- Clamps
DIY Instructions Step by Step
- Cut your cardboard tube to the desired height using a hand saw.
- Sand the edges of the square wooden blocks until they are perfectly smooth.
- Apply industrial glue to the rims of the tube and press the blocks on.
- Use clamps to hold the blocks in place until the glue dries completely.
- Glue the decorative plaster molding around the top rim to create the scrolls.
- Add vertical fluted strips along the length of the tube for a classic look.
- Let all the glue set for at least twelve hours in a dry room.
- Paint the entire column with a thick layer of white chalk paint.
- Apply a second coat to ensure the surface looks like solid stone.
- Place the pedestal near your doorway and top it with a lush green plant.
25. Twisted Metal Candelabra
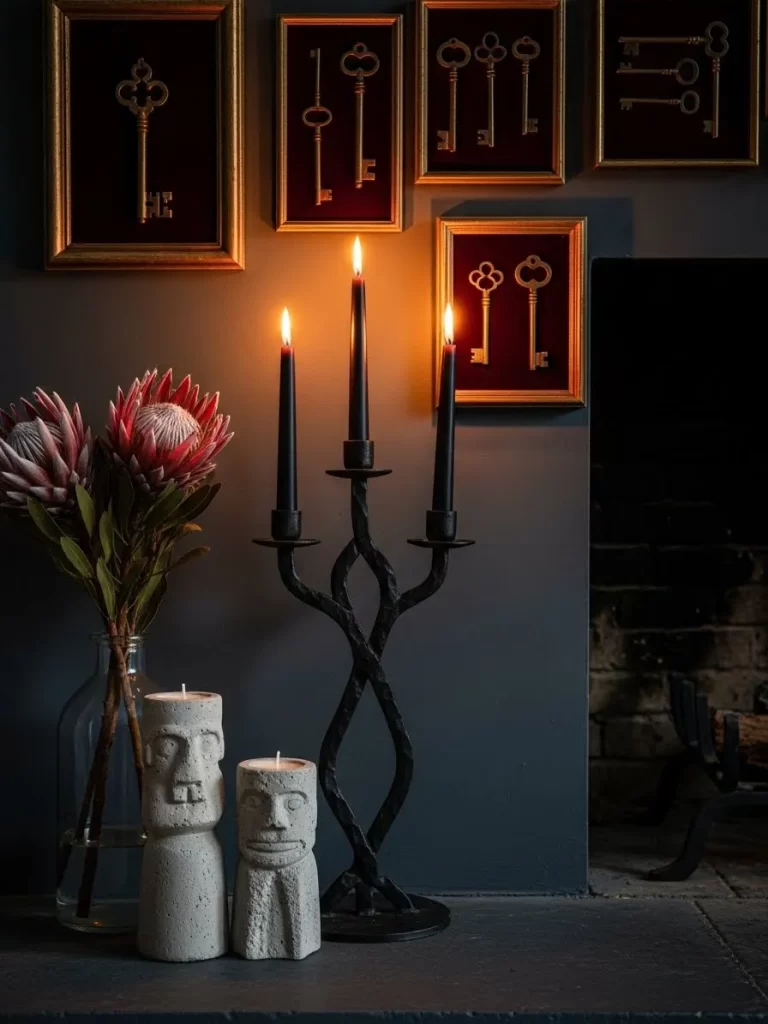
This black wrought iron candelabra features a unique twisted frame that adds a gothic touch. It sits elegantly on a dark mantle next to framed vintage keys and concrete statues. The flickering black candles create a moody and mysterious atmosphere.
The height of the holder allows it to stand out against dark gray walls. It provides a focal point that is both functional and artistic for your dining area. This piece is a great choice for those who love a sophisticated and dark aesthetic.
Materials Required List
- Sturdy black metal rods
- Three metal candle cups
- Black binding wire
- Matte black spray paint
- Black tapered candles
Equipment Required List
- Pliers for twisting
- Metal file
- Drop cloth for painting
- Disposable gloves
- Measuring tape
DIY Instructions Step by Step
- Cut your metal rods into three equal lengths using a file or saw.
- Use pliers to twist the rods together in the center to create a braid.
- Spread the bottom of the rods outward to form a stable tripod base.
- Bend the top of the rods away from each other to hold the candles.
- Attach the metal cups to the top of each rod using the binding wire.
- Tighten the wire with pliers so the cups do not tilt or wobble.
- Sand any sharp metal edges with a file to make them safe to touch.
- Spray the entire structure with matte black paint on a drop cloth.
- Allow the paint to dry for two hours before adding a second coat.
- Place your black tapered candles into the cups and set them on your fireplace.
26. Sodalite Blue Column Vase
Bring a splash of vibrant blue to your kitchen counter with a sodalite column vase. This tall vessel features deep blue tones and white crystalline veins that look like a night sky. It stands beautifully next to hammered copper trays and marble cutting boards.
The cylindrical shape is simple and clean and allows the natural stone patterns to shine. You can use it to hold tall flowering branches or leave it empty as a sculpture. This piece adds a high end and natural element to your cooking space.
Materials Required List
- Natural sodalite or blue marble cylinder
- Diamond core drill bit
- Clear stone sealer
- Water for cooling
- Microfiber cloth
Equipment Required List
- Power drill with a steady stand
- Sturdy clamps
- Safety goggles
- Waterproof workspace
- Sandpaper
DIY Instructions Step by Step
- Clamp your stone cylinder firmly to a waterproof work table.
- Wear your safety glasses to protect your eyes from any flying stone bits.
- Mark the exact center of the top of the stone with a pencil.
- Use the diamond core drill bit to start a shallow hole in the center.
- Keep a constant stream of water flowing over the stone while you drill.
- Drill down slowly until you reach a depth of five or six inches.
- Remove the stone core from the hole and wipe the vase clean with a cloth.
- Sand the top rim of the vase until it feels smooth and looks polished.
- Apply a coat of clear stone sealer to the entire surface for protection.
- Let the vase dry for twenty four hours before placing it on your marble counter.
27. Rattan Fringe Sunburst Mirror
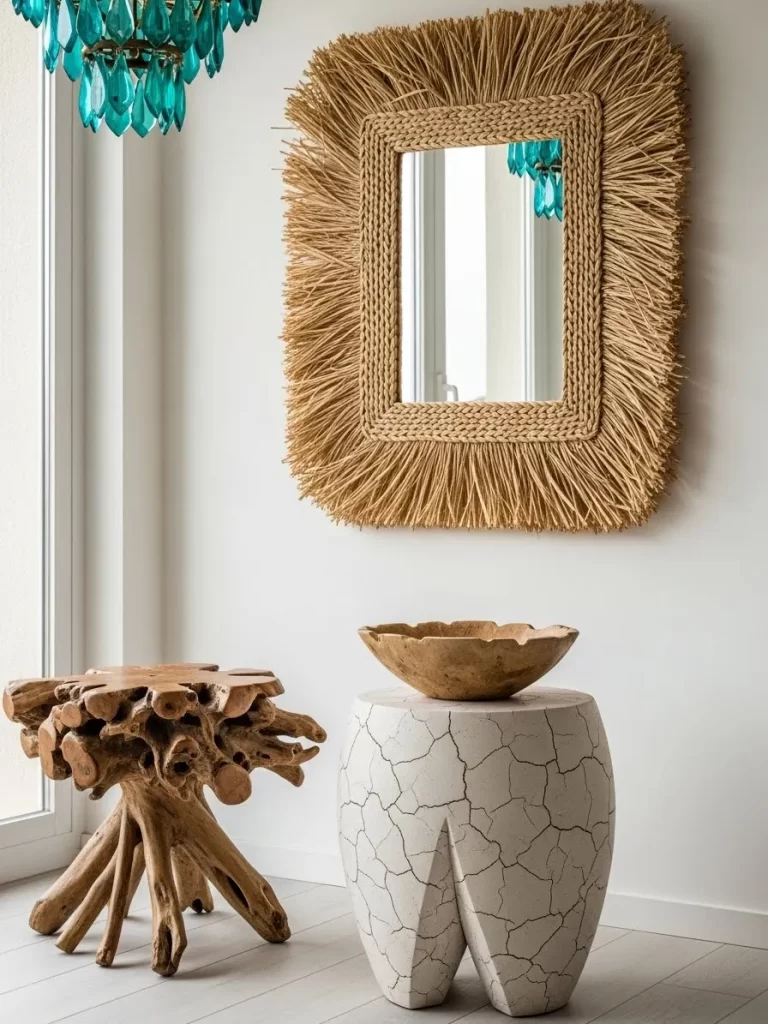
Add a beachy and bohemian vibe to your wall with a fringed sunburst mirror. This piece features a square mirror framed by long and textured rattan fibers. It brings a sense of warmth and movement to a bright and airy living room.
The mirror sits above a white concrete stool and a rough wooden side table. This combination of textures makes your home feel cozy and lived in. It is a great way to reflect light and make a small space feel much larger.
Materials Required List
- Square frameless mirror
- Thick plywood backing
- Long rattan or raffia fibers
- Industrial strength glue
- Wall mounting kit
Equipment Required List
- Hot glue gun
- Scissors
- Measuring tape
- Level tool
- Pencil
DIY Instructions Step by Step
- Cut your plywood backing to be four inches wider than your square mirror.
- Glue the mirror to the center of the plywood using industrial adhesive.
- Let the glue dry for twelve hours on a flat surface without moving it.
- Cut your rattan fibers into lengths of about six inches using scissors.
- Apply a line of hot glue along the edge of the mirror on the plywood.
- Press the rattan fibers into the glue so they fan out like a sunburst.
- Continue adding layers of rattan until the entire plywood frame is covered.
- Trim the ends of the fibers so they create a neat and even fringe.
- Attach the wall mounting kit to the back of the plywood carefully.
- Hang the mirror on your wall and use a level tool to make it straight.
28. Swirl Amber Glass Lamp
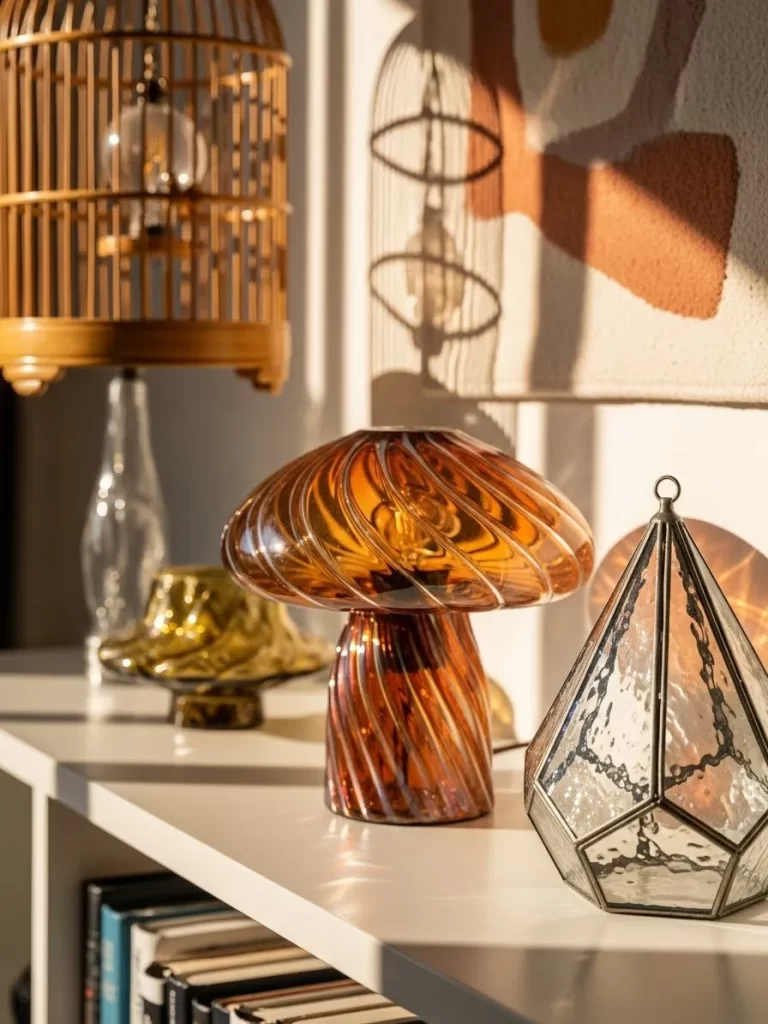
This mushroom shaped amber lamp creates a warm and nostalgic glow on your shelf. The swirl patterns in the glass add texture and catch the light in a beautiful way. It looks elegant next to a geometric wire lantern and abstract wall art.
The soft orange hue of the lamp makes your room feel cozy during the evening hours. You can place it on a white console table to make the color pop. This piece is a great way to introduce vintage style into a modern home.
Materials Required List
- Large amber glass bowl for the top
- Amber glass vase for the base
- LED lamp kit with cord
- Clear glass epoxy
- Rubber grommet
Equipment Required List
- Power drill
- Glass drill bit
- Microfiber cloth
- Safety glasses
- Masking tape
DIY Instructions Step by Step
- Clean your glass bowl and vase with a soft cloth to remove any dust.
- Apply masking tape to the spot on the vase where you will drill the hole.
- Drill a small hole through the tape using a glass bit while wearing goggles.
- Insert a rubber grommet into the hole to protect the lamp cord from sharp edges.
- Thread the lamp cord through the hole and secure the socket at the top of the vase.
- Apply a thin line of clear epoxy to the rim of the amber vase.
- Place the glass bowl on top and center it carefully over the socket.
- Hold the bowl in place for a few minutes while the glue starts to set.
- Let the entire lamp dry for twenty four hours so the bond is strong.
- Screw in a warm LED bulb and turn on your new vintage style lamp.
29. Cast Iron Rabbit Knobs
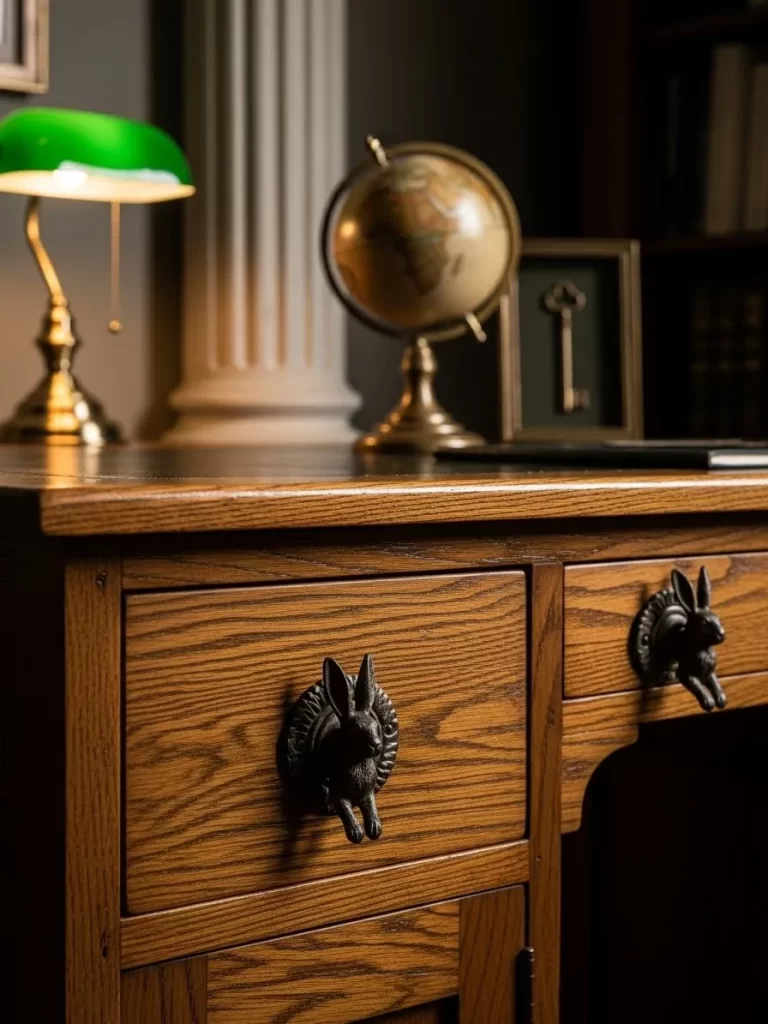
Give your desk a whimsical and classic update with these cast iron rabbit drawer knobs. They feature a detailed bunny shape with a dark antique finish that looks great on wood. These small details show off your personality in a subtle and fun way.
The knobs pair well with a green library lamp and a brass globe for a traditional office look. They are easy to install and provide a unique grip for your drawers. It is a simple way to bring a touch of nature and charm to your workspace.
Materials Required List
- Rabbit shaped metal drawer pulls
- Mounting bolts and washers
- Dark metal paint for touch ups
- Rubbing alcohol
- Soft cloth
Equipment Required List
- Manual screwdriver
- Measuring tape
- Pencil
- Power drill if making new holes
- Pliers
DIY Instructions Step by Step
- Remove the existing knobs from your desk drawers using a screwdriver.
- Clean the area around the hole with a soft cloth and rubbing alcohol.
- Measure the distance between the screw holes on your new rabbit knobs.
- Mark the center of the drawer with a pencil if you need to drill new holes.
- Drill a hole through the pencil mark using a bit that matches your bolts.
- Place the rabbit knob on the front of the drawer and line it up.
- Insert the bolt through the inside of the drawer and into the knob.
- Use a screwdriver to tighten the bolt until the knob is held firmly.
- Use pliers to snap off any extra bolt length on the inside of the drawer.
- Repeat these steps for the second drawer to complete the matching set.
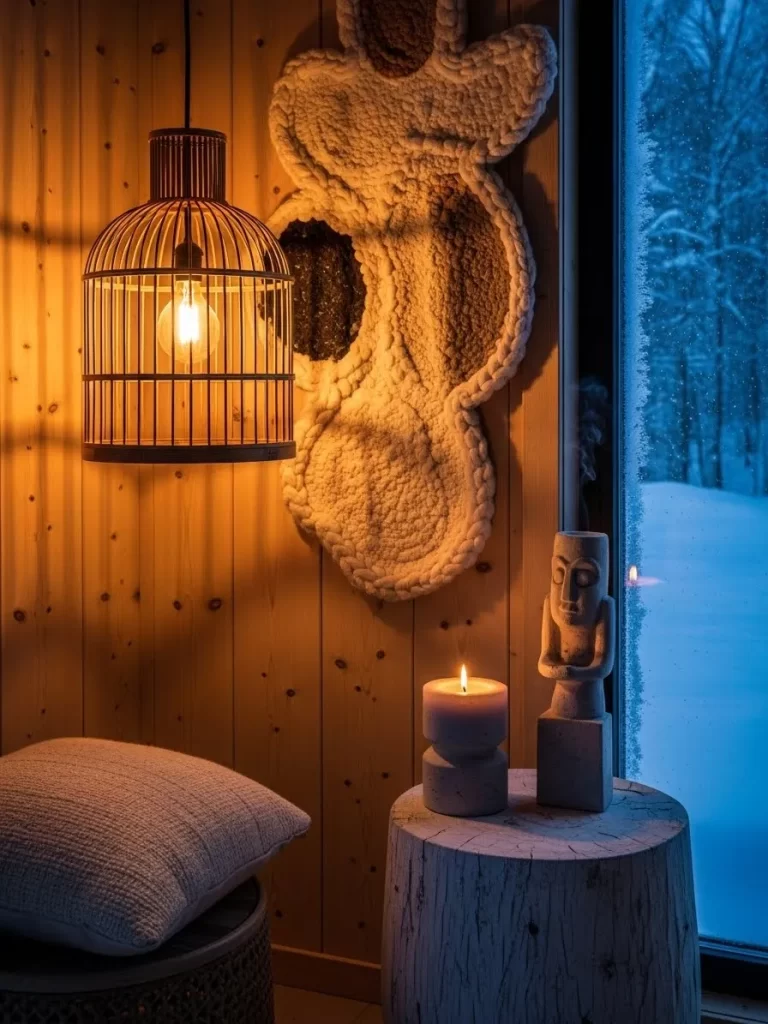
30. Bamboo Birdcage Pendant Light
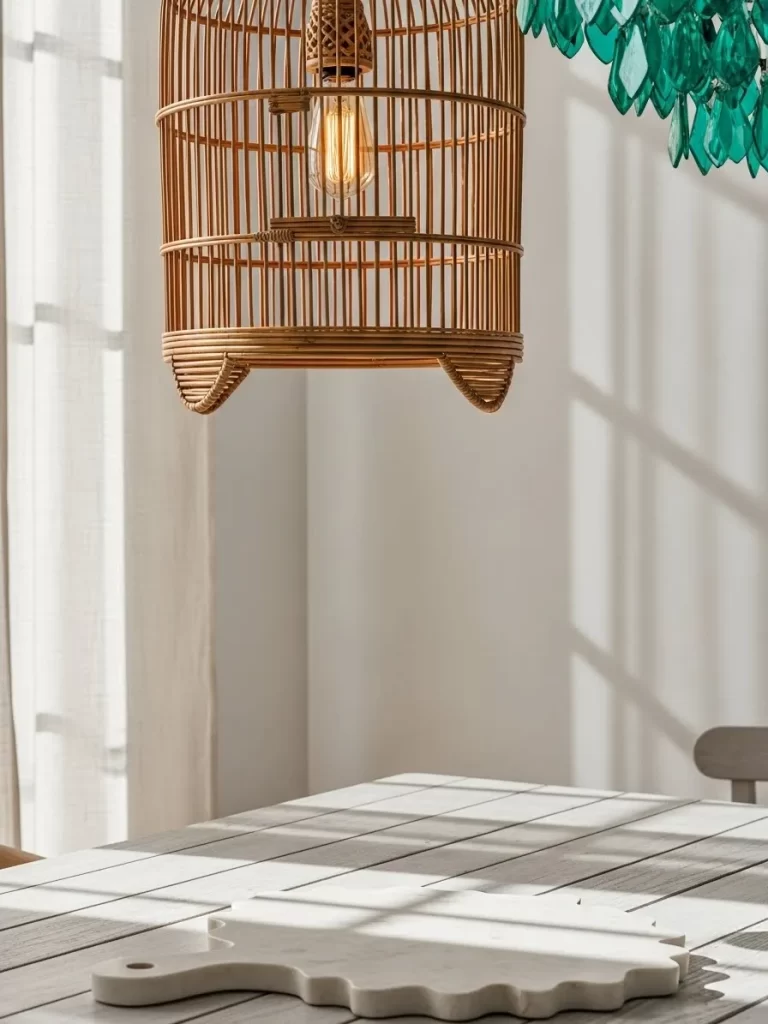
Hang a touch of tropical charm in your dining room with a bamboo birdcage light. This lantern features thin wooden ribs that allow the light to shine through in patterns. It creates a light and airy feel that matches well with white walls and wooden tables.
The open weave of the bamboo allows the vintage style bulb to be the star of the show. You can pair it with a teal glass chandelier for a layered and colorful lighting look. This piece is a great way to bring natural materials into your interior design.
Materials Required List
- Large bamboo or wicker birdcage
- Corded pendant light kit
- Small decorative wooden beads
- Strong jute twine
- LED Edison bulb
Equipment Required List
- Wire cutters
- Hot glue gun
- Measuring tape
- Ceiling hook
- Scissors
DIY Instructions Step by Step
- Use wire cutters to remove the bottom door or base of the birdcage.
- Cut a small opening in the center of the top ribs for the light cord.
- Slide the pendant light cord through the hole and secure the socket inside.
- Glue wooden beads around the cord entry point for a decorative touch.
- Tie lengths of jute twine to the top of the cage to hide the electrical cord.
- Ensure the socket hangs straight in the center of the birdcage frame.
- Screw an LED Edison bulb into the socket to complete the vintage look.
- Install a sturdy hook in the ceiling where you want the light to hang.
- Loop the cord over the hook and adjust the height to fit your table.
- Plug in the light and enjoy the warm and textured glow of your new lantern.
31. Ethnic Patterned Mirror Frame
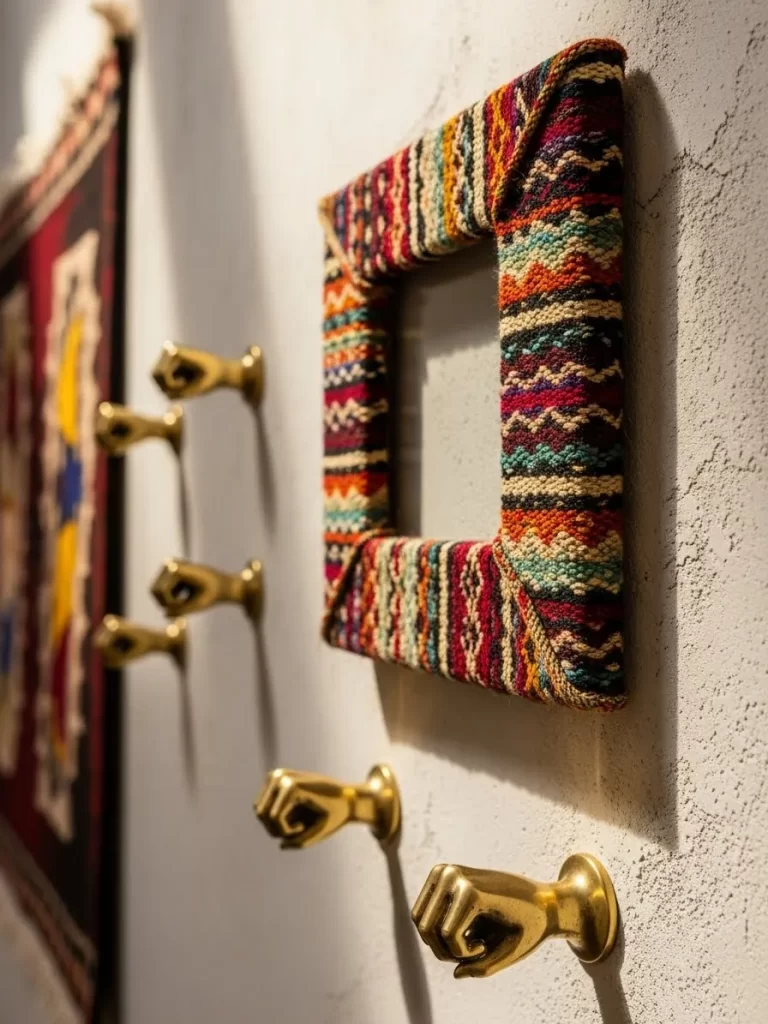
Vibrant colors and bold shapes make this mirror frame a standout piece in any hallway. The fabric wrap adds a soft texture that you do not usually see on a wall. It sits next to brass hand hooks to create a curated and global atmosphere.
This design brings life to a plain white wall without the need for paint. You can choose patterns that match your rugs or pillows to tie the whole room together. The rich weave of the textile reflects your love for handmade crafts.
Materials Required List
- Plain square mirror
- Thick cardboard or plywood backing
- Strips of patterned ethnic fabric
- Strong fabric glue
- Picture hanging wire
Equipment Required List
- Sharp fabric scissors
- Measuring tape
- Hot glue gun
- Pencil
- Heavy books for pressing
DIY Instructions Step by Step
- Measure the size of your mirror and cut a cardboard backing that is four inches wider on all sides.
- Mark the center of the cardboard where the mirror will sit using your pencil.
- Glue the mirror firmly to the cardboard and let it dry for one hour.
- Cut your ethnic fabric into long strips that are wide enough to wrap around the cardboard edges.
- Apply fabric glue to the cardboard frame area outside the mirror.
- Press the fabric strips onto the glue and smooth out any lumps with your fingers.
- Wrap the excess fabric around the back of the cardboard and secure it with hot glue.
- Make sure the corners are folded neatly like you are wrapping a gift box.
- Flip the mirror over and place heavy books on the fabric edges to help the glue bond.
- Attach the hanging wire to the back of the cardboard once everything is dry.
32. Macrame Face Planter Hanger
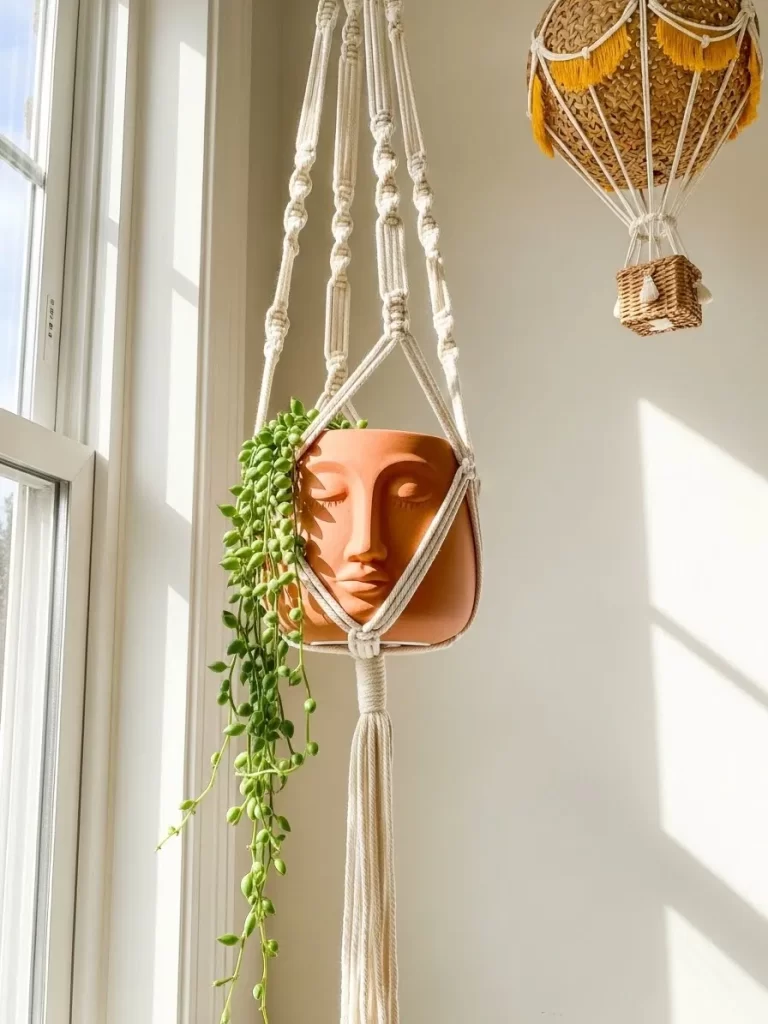
Combine classic macrame knots with a modern face planter to add height to your window display. The cotton rope creates a soft cradle for the terracotta pot. This setup allows your plants to catch the best sunlight while keeping your tables clear.
A string of pearls plant looks like green hair flowing over the edges of the pot. The warm sun highlights the facial features and creates long shadows on the wall. This piece makes your indoor garden feel organized and artistic.
Materials Required List
- Cotton macrame cord
- Wooden ring for hanging
- Terracotta face planter
- Trailing indoor plant
- Small decorative beads
Equipment Required List
- Scissors
- Measuring tape
- Ceiling hook
- Power drill
- S hook
DIY Instructions Step by Step
- Cut eight long pieces of macrame cord to the same length.
- Pull the cords through the wooden ring and fold them in half so you have sixteen strands.
- Tie a large knot right below the ring to keep the cords together.
- Separate the cords into four groups of four strands each.
- Tie a series of square knots in each group about six inches down from the top.
- Join two strands from one group with two strands from the next group.
- Tie another set of knots to create a diamond pattern in the rope.
- Place your empty face planter in the center of the cords to check the size.
- Tie all the cords together in one large knot at the bottom of the pot.
- Trim the ends of the rope to create a decorative tassel.
- Slide the face planter into the rope cradle and hang it from a ceiling hook.
33. Vintage Map Serving Tray
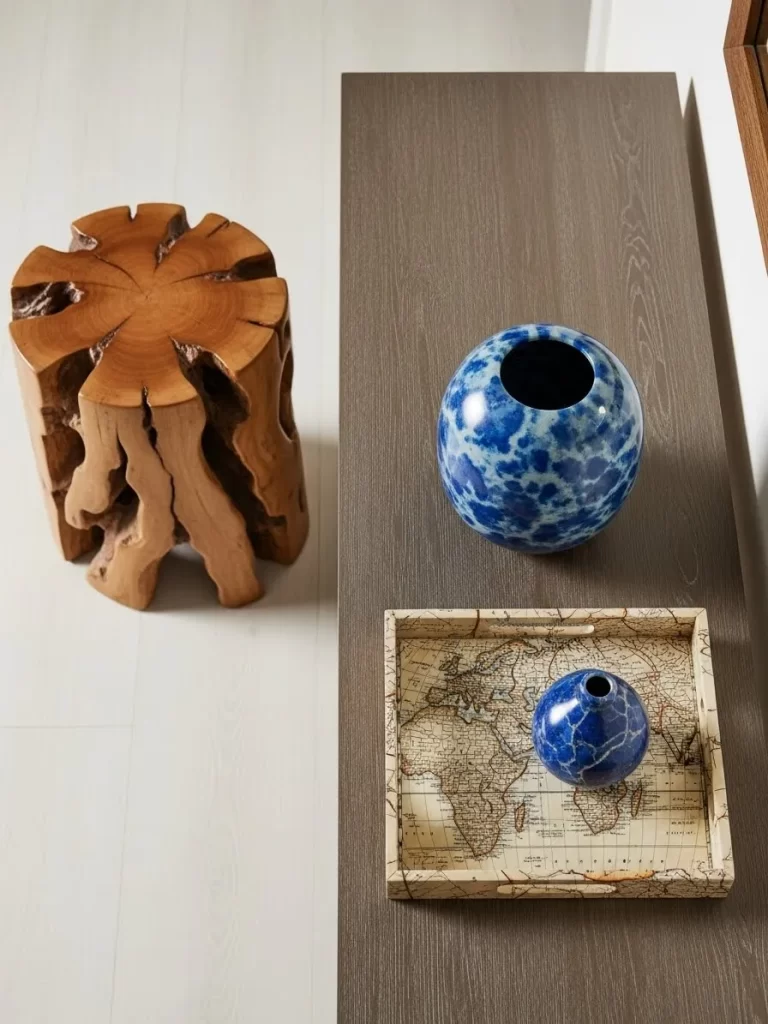
Turn a simple wooden tray into a piece of history using old maps. This tray serves as a beautiful base for your blue stone vases and crystal specimens. The sepia tones of the map add a sophisticated and worldly touch to your coffee table.
Using travel maps makes the piece feel personal and full of memories. It organizes your small decor items while acting as a protector for your furniture surfaces. This project is a great way to recycle paper into something useful and chic.
Materials Required List
- Plain wooden serving tray
- Vintage paper map
- Mod Podge or clear decoupage glue
- Clear acrylic sealer
- Sandpaper
Equipment Required List
- Foam paintbrush
- Utility knife
- Ruler
- Soft cloth
- Pencil
DIY Instructions Step by Step
- Sand the surface of the wooden tray to remove any old polish or rough spots.
- Wipe away the dust with a soft cloth so the glue stays clean.
- Place the tray on top of your map and trace the bottom shape with a pencil.
- Cut out the map piece carefully using a utility knife and a ruler.
- Apply a thin and even layer of Mod Podge to the bottom of the tray.
- Press the map into the tray and smooth out any air bubbles from the center to the edges.
- Wait thirty minutes for the glue to dry completely.
- Brush another layer of Mod Podge over the top of the map to seal the paper.
- Let the tray dry for two hours before adding a second coat of glue.
- Spray the entire tray with a clear acrylic sealer to make it water resistant.
34. Brass Globe and Agate Display
A classic desktop globe brings a sense of old world discovery to your bookshelf. It looks stunning next to white fluted columns and natural agate bookends. The brass stand reflects the warm tones of the wooden shelves and creates a cozy library vibe.
This collection of items tells a story of travel and nature. The various heights of the objects keep the display interesting to the eye. You can use these pieces to fill empty gaps in your office or living room.
Materials Required List
- Standard desktop globe
- Metallic brass spray paint
- Pair of agate geode slices
- Small felt pads
- Clear glue
Equipment Required List
- Screwdriver
- Sandpaper
- Drop cloth
- Microfiber cloth
- Painter’s tape
DIY Instructions Step by Step
- Take the globe apart by using a screwdriver to remove the map ball from the stand.
- Sand the metal stand lightly to help the new paint stick to the surface.
- Wrap the top of the stand with painter’s tape to protect the areas that hold the globe.
- Spray the stand with metallic brass paint on a drop cloth in a ventilated area.
- Let the paint dry for two hours before applying a second light coat.
- Clean your agate slices with a microfiber cloth to make the crystals shine.
- Stick small felt pads to the bottom of the agate slices to prevent shelf scratches.
- Glue the agate pieces to heavy metal bookend bases if the stones are too light.
- Remove the tape and put the globe ball back into the brass stand.
- Arrange the globe and the agate bookends on your shelf next to your favorite books.
35. Neon Silver Record Gallery
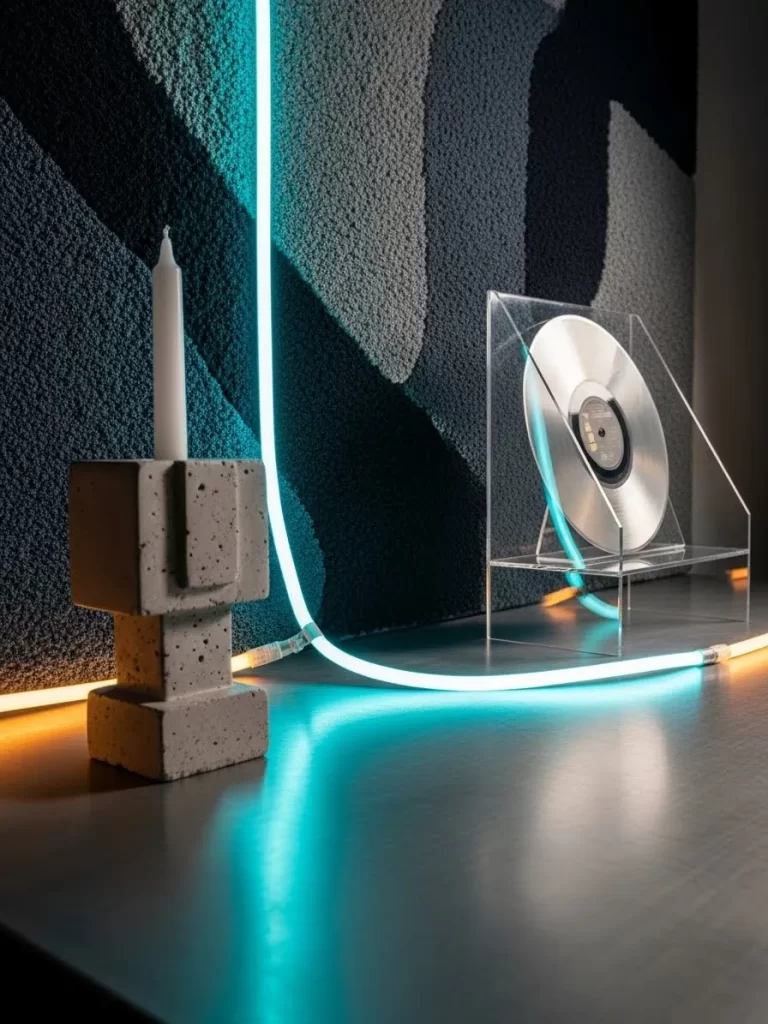
Make your music collection glow with a futuristic neon wall display. This setup uses a clear acrylic stand to hold a silver vinyl record in front of a textured wall. A snaking neon tube light adds a vibrant cyan energy that changes the mood of the room.
The reflection of the light on the silver disc creates a stunning visual effect. It turns a simple album into a piece of modern art that guests will love. This project works well in a media room or a creative workspace.
Materials Required List
- Silver or colored vinyl record
- Clear acrylic display stand
- Flexible LED neon rope light
- Clear wall clips
- Power adapter
Equipment Required List
- Measuring tape
- Pencil
- Screwdriver
- Spirit level
- Small screws
DIY Instructions Step by Step
- Pick a spot on your wall that is near a power outlet for the light.
- Mark the position for the acrylic stand using a pencil and a spirit level.
- Screw the stand into the wall or place it on a sturdy shelf.
- Slide your silver record into the stand so it stays upright.
- Decide on a flowing path for the neon rope light around the record.
- Mark the path on the wall with your pencil.
- Screw the clear wall clips along the pencil line every five inches.
- Snap the flexible neon rope into the clips to form a wavy line.
- Hide any extra cord behind the record stand or furniture.
- Plug in the adapter and turn on the light to see the silver glow.
36. Pyramid Terrarium and Face Planter

Create a calm and balanced workspace with a mix of geometric and organic shapes. The glass pyramid terrarium adds a sharp modern touch next to a soft face planter. A green moss wall in the background brings the freshness of a forest indoors.
The light wood table provides a warm base for these natural elements. This setup is great for reducing stress while you work. It makes a quiet corner feel like a tiny living sanctuary.
Materials Required List
- Small glass pyramid frame
- Terracotta face planter
- Preserved moss or small succulents
- Decorative white pebbles
- Potting soil
Equipment Required List
- Tweezers
- Small spoon
- Spray bottle
- Soft cloth
- Measuring cup
DIY Instructions Step by Step
- Clean the glass of the pyramid terrarium with a soft cloth for a clear view.
- Pour a thin layer of white pebbles into the bottom of the glass frame.
- Use a small spoon to add potting soil over the pebbles if using live plants.
- Place your succulents into the soil and press them down gently.
- Add more pebbles around the plants to hide the dirt and keep things neat.
- Fill your face planter with soil and a trailing plant like ivy.
- Set the face planter next to the pyramid on your wooden desk.
- Use a spray bottle to lightly mist the plants once a week.
- Adjust the moss wall panels in the background to frame your new display.
- Enjoy the peaceful view while you sit at your desk or table.
37. Blue Stone Specimen Gallery
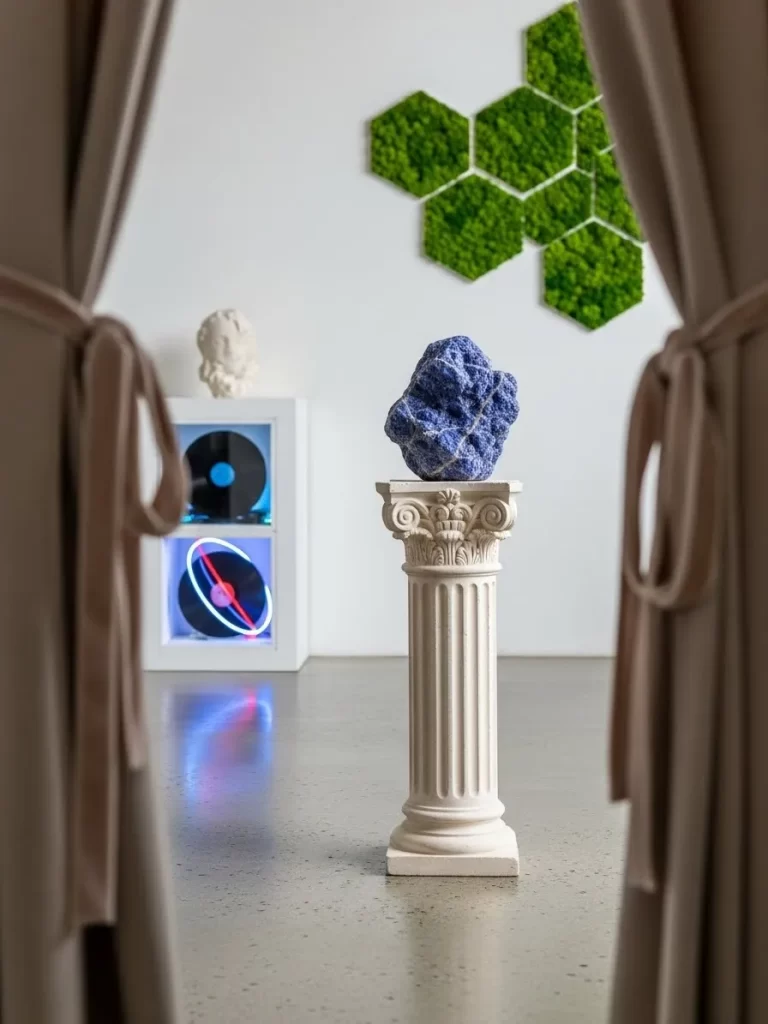
Display a raw blue mineral on a white column to create a museum look in your home. The bright blue color of the stone contrasts beautifully with the clean white pedestal. This piece serves as a bold focal point in a minimalist room.
The moss hexagons on the wall add a pop of green that mimics a natural landscape. This design shows off your love for geology and high end art. It is a simple way to make a large room feel more expensive and curated.
Materials Required List
- Large blue raw stone or crystal
- Small white Corinthian column
- Clear museum wax
- Moss wall panels
- Mounting tape
Equipment Required List
- Microfiber cloth
- Level tool
- Measuring tape
- Pencil
- Step ladder
DIY Instructions Step by Step
- Wipe the white column with a microfiber cloth to remove any dust.
- Place the column on a level spot on the floor or a large table.
- Apply a small pea sized amount of museum wax to the top center of the column.
- Press the blue stone firmly onto the wax to keep it from sliding off.
- Measure the wall behind the column to plan your moss panel layout.
- Use mounting tape to stick the moss hexagons to the wall in a group.
- Check with a level tool to make sure the panels are straight.
- Adjust the lighting in the room to highlight the texture of the blue stone.
- Step back and ensure the display is centered against the wall art.
- Dust the stone occasionally with a soft brush to keep the color bright.
38. Face Mug Planter on Wood Slice

Start your day with a smile by using a face mug as a tiny succulent pot. This small terracotta piece looks great sitting on a marble slab and a rustic wood slice. It brings a playful and grounded energy to your kitchen or breakfast nook.
The wicker lamp in the background casts a warm glow that makes the wood textures look rich. This setup is an easy way to use small items to add big personality. It feels very cozy and helps you enjoy your quiet morning coffee.
Materials Required List
- Terracotta face mug or small cup
- Round wooden slice
- Marble coaster or small slab
- Tiny succulent or air plant
- Decorative sand
Equipment Required List
- Small spoon
- Soft brush
- Watering can
- Measuring tape
- Microfiber cloth
DIY Instructions Step by Step
- Place your round wood slice in the center of your table or counter.
- Set the marble slab on top of the wood to create a layered base.
- Fill the face mug with a small amount of decorative sand or soil.
- Tuck your succulent into the mug and press the sand down around it.
- Use a soft brush to remove any sand from the face of the mug.
- Set the mug in the center of the marble slab.
- Position a wicker lamp nearby to highlight the wood and stone textures.
- Check that the mug is stable and will not tip over.
- Add a few drops of water to the succulent every two weeks.
- Enjoy your new charming and natural table centerpiece.
39. Golden Sunburst Wall Mirror
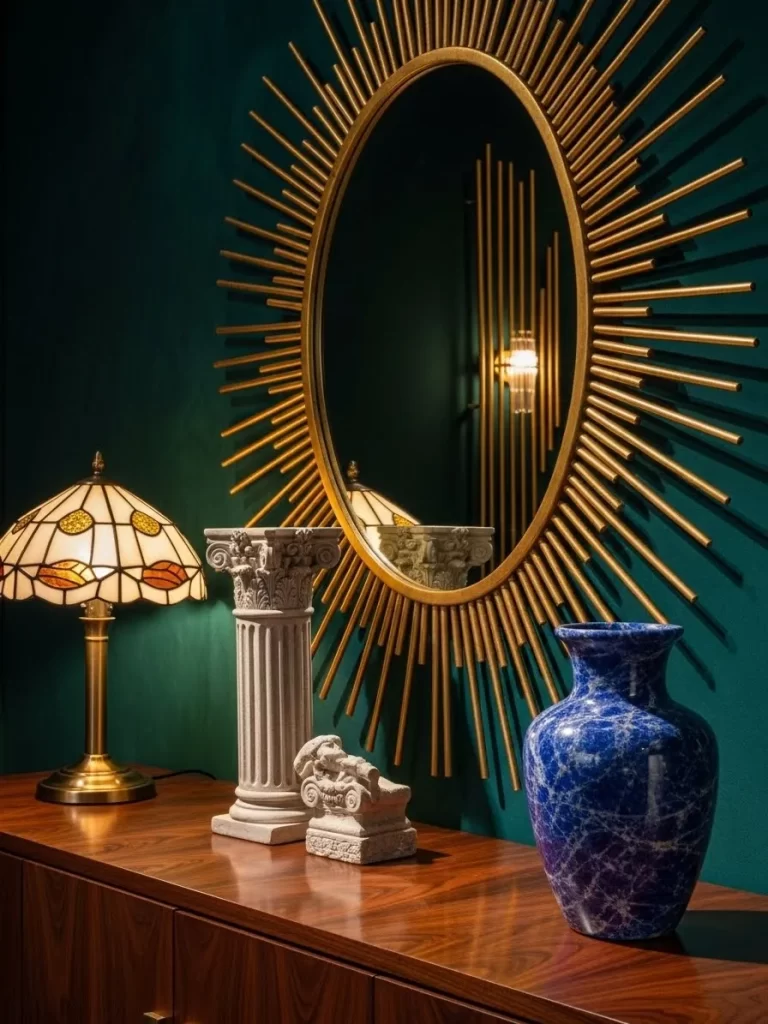
Expand your room with a large sunburst mirror that reflects light and adds a royal feel. The golden rays reach out to fill an empty wall with energy and movement. It acts as a stunning backdrop for your collection of vases and columns.
This mirror makes a dark room feel much brighter and more open. It pairs well with deep green walls and dark wood furniture for a classic look. The size of the piece makes it the star of your living room or bedroom.
Materials Required List
- Large circular mirror
- Wooden dowels in various lengths
- Large wooden disk for the base
- Gold metallic spray paint
- Heavy duty wall mounting kit
Equipment Required List
- Hot glue gun
- Measuring tape
- Spirit level
- Pencil
- Power drill
DIY Instructions Step by Step
- Lay the wooden disk on a flat surface and mark the center.
- Glue the circular mirror to the middle of the wooden disk and let it dry.
- Arrange the wooden dowels around the edge of the disk like sun rays.
- Use a mix of long and short dowels to create a dynamic pattern.
- Glue each dowel firmly to the wood and let the structure set for one hour.
- Cover the mirror glass with paper and tape to protect it from paint.
- Spray the entire frame and the dowels with gold metallic paint.
- Apply three light coats of paint to get a smooth and shiny finish.
- Remove the paper from the mirror once the paint is completely dry.
- Install the mounting kit and hang the mirror using a spirit level.
40. Bamboo Birdcage Cabin Light
Bring a warm and rustic glow to your timber cabin with a bamboo birdcage lamp. This light fixture casts long striped shadows that make the wood walls look extra cozy. It provides a soft light that is perfect for snowy winter evenings.
The natural material of the lamp matches the forest theme of a wooden home. It hangs simply from the ceiling and adds height to the room. This piece makes your interior feel welcoming and very comfortable.
Materials Required List
- Large bamboo birdcage
- Pendant light cord kit
- LED light bulb
- Jute twine
- Ceiling hook
Equipment Required List
- Wire cutters
- Measuring tape
- Power drill
- Step ladder
- Screwdriver
DIY Instructions Step by Step
- Remove the bottom tray of the birdcage using wire cutters.
- Cut a small hole in the top center of the bamboo frame for the cord.
- Thread the pendant light cord through the hole and secure the socket.
- Wrap a bit of jute twine around the cord where it meets the cage for detail.
- Drill a hole in your ceiling beam and screw in a sturdy hook.
- Loop the light cord over the hook to decide on the best hanging height.
- Tighten the screws on the cord kit to hold the lamp in place.
- Screw a warm LED bulb into the socket inside the cage.
- Ensure the birdcage hangs level and does not touch the walls.
- Plug in the light and relax in the warm glow of your cabin lantern.
41. Grand Desert Living Room Decor
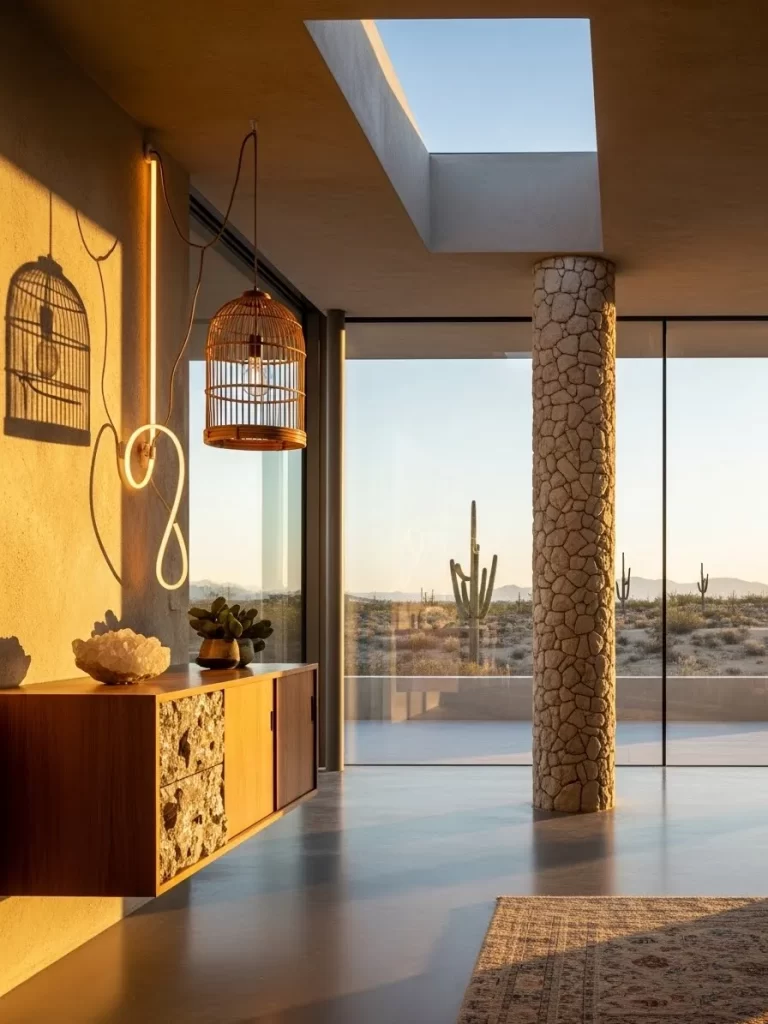
Open spaces and natural light fill this desert living room with a sense of peace. Tall stone columns and large glass walls bring the beauty of the outdoors inside. Bamboo birdcage lamps hang from the ceiling to add a soft and organic touch.
The warm desert sun highlights the textures of the stone and wooden furniture. You can sit on a large rug and enjoy the view of the cacti outside. This design creates a luxury home that feels connected to the natural world.
Materials Required List
- Tall stone columns
- Bamboo birdcage lamps
- Wooden console table
- Large woven rug
- Raw crystal specimens
Equipment Required List
- Power drill
- Level tool
- Measuring tape
- Step ladder
- Heavy duty glass cleaner
DIY Instructions Step by Step
- Clean the large glass walls with cleaner to ensure a clear desert view.
- Place the tall stone columns near the glass to frame the landscape.
- Set the large woven rug in the center of the room to add warmth.
- Arrange the wooden console table against a solid wall near the window.
- Install the bamboo birdcage lamps at different heights from the ceiling.
- Use a level tool to make sure the console table is perfectly straight.
- Place the raw crystal specimens on top of the table to catch the light.
- Add a few green plants in terracotta pots to match the desert theme.
- Adjust the furniture so there is a clear path to walk through the room.
- Turn on the birdcage lights in the evening to create a soft and warm glow.
Key Takeaways
Use various textures like raw stone and warm wood to build visual depth.
Lighting plays a major role in setting a cozy or energetic atmosphere.
DIY projects allow you to own rare pieces without spending too much money.
Small details like unique drawer knobs or custom coasters make a big impact.
Building a home with personality takes time and patience. You should not rush to fill every corner in a single day. Choose items that truly resonate with your own spirit and hobbies.
Your living space will gradually transform into a place that feels real. These projects and finds provide a foundation for your creative journey. Enjoy the thrill of seeing your vision come to life in every room.