
Do you ever walk into your home and feel like something is missing? Your furniture is tasteful, the colors are neutral, yet the room lacks that spark, that character that makes a space truly memorable. That missing piece is often not a major remodel but the absence of unique, conversational objects.

Many modern homes fall into the trap of purchasing mass produced decor designed to be inoffensive rather than inspiring. These “filler” pieces leave a room feeling generic, stripped of personality, and undeniably basic. Moving beyond this requires a shift in mindset: seeing every accessory as an opportunity to showcase your passions, history, or love of craft.
We believe that your home should tell a story. This guide is your cheat sheet to finding those distinct accents that instantly add depth, texture, and unexpected elegance to every room. From handcrafted bowls that mimic volcanic rock to sculptural bookends, we are exploring 40 non standard finds that transform a basic apartment into a curated sanctuary.
You will find that character is built piece by piece, focusing on items that possess strong texture, unique form, and genuine narrative. Get ready to banish the basic and start building a home that is truly your own.
1. Handcrafted Volcanic Texture Bowl
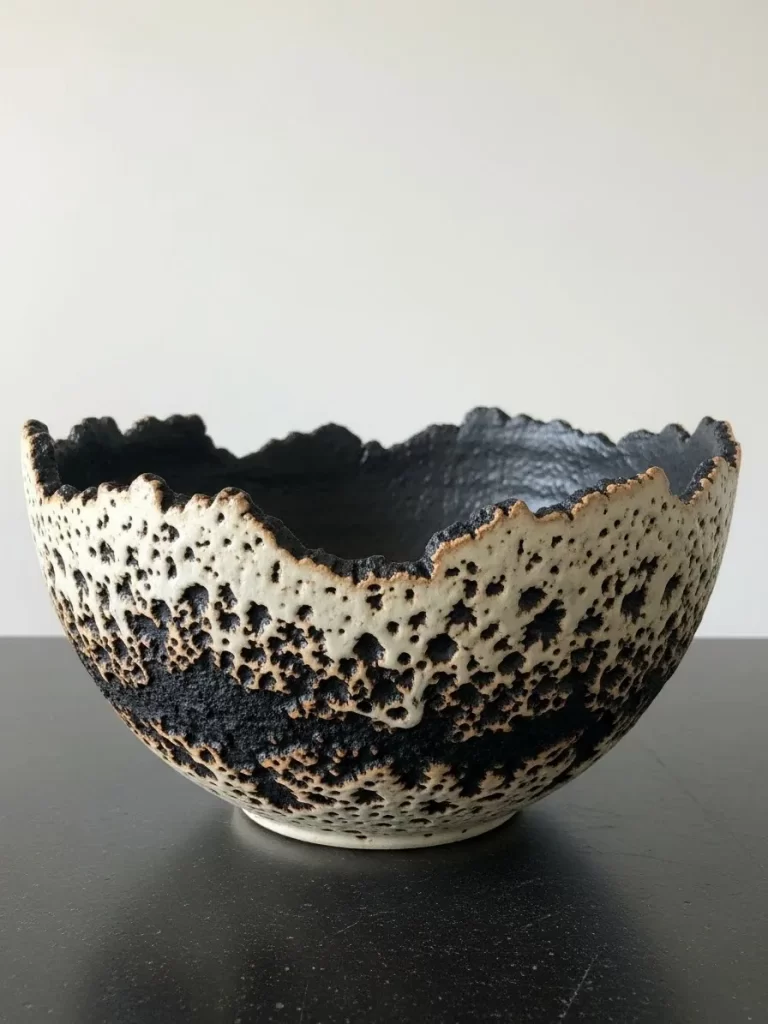
Tired of commonplace mass produced decorative pieces? This striking bowl instantly elevates any surface it graces. Its unique, heavily textured exterior, resembling cooled lava or coral, provides a captivating contrast against the smooth, dark interior. This is far more than just a vessel; it is a conversation starter and a piece of organic sculpture.
The dramatic interplay between the deep black and creamy off white glaze captures attention immediately. Display it solo on a coffee table or use it as an unconventional centerpiece on your dining table. The raw, earthy feel brings a sophisticated, globally inspired touch to modern and minimalist spaces alike, making your room feel instantly more curated.
You will find that adding elements with tactile interest like this is the secret to moving beyond basic decor. This bowl adds a necessary layer of depth and visual intrigue, transforming a simple room into one filled with character and artistry. It is an accent piece that truly speaks volumes.
???? DIY Instruction: Create Your Own Textured Decor Bowl
While replicating the exact look of high fired ceramic is challenging, you can achieve a similar organic, volcanic texture using readily available materials.
Material Required List
- Air dry clay (white or terra cotta color)
- Course salt or sand
- Black and cream colored acrylic or craft paint
- Matte clear sealant spray or varnish
Equipment Required List
- Mixing bowl
- Spoon or mixing stick
- Crafting knife or sculpting tools
- Paint brushes (small detail and larger flat brush)
- Disposable gloves
- Baking sheet or piece of cardboard (for drying)
DIY Instruction Step by Step
- Prepare the Clay Base: Take a generous amount of air dry clay. Gently form it into a basic bowl shape, roughly the size you want your final piece to be. Remember, the edges do not need to be smooth; uneven, organic edges look more natural.
- Incorporate Texture: Put on your gloves. In a mixing bowl, combine a small portion of clay with a handful of course salt or sand. Mix thoroughly until the texture is evenly distributed. This mixture will be used for the exterior of the bowl.
- Apply Textured Layer: Carefully take the salt enriched clay mixture and press it onto the entire outer surface of your smooth clay bowl base. Use your fingers to press, pinch, and sculpt the clay, creating deep crevices and bumps that mimic the volcanic, pocked surface of the inspiration photo.
- Create the Uneven Rim: Use your sculpting tool or crafting knife to make the top edge look jagged and irregular. Avoid making it look machine made; aim for a rough, natural break.
- Dry Thoroughly: Place the textured bowl on a baking sheet or cardboard and let it dry completely according to the air dry clay manufacturer’s instructions. This might take 24 to 72 hours, depending on humidity and size. Do not rush this step, as trapped moisture can cause cracking later.
- Paint the Interior: Once fully dry, paint the entire inside surface of the bowl with the black acrylic paint. Apply two coats if necessary to achieve a deep, opaque finish.
- Paint the Exterior (Layer One): Paint the entire textured exterior with the black acrylic paint, ensuring the paint gets into all the small crevices. Let this coat dry completely.
- Paint the Exterior (Layer Two): Using the cream colored paint, dry brush over the raised parts of the exterior texture. To dry brush, dip your brush lightly into the paint, wipe most of it off onto a paper towel, and then lightly sweep the brush across the texture. This technique allows the black paint to show through the depressions, highlighting the unique structure.
- Seal for Longevity: Once all paint is dry, take your bowl to a well ventilated area and apply a clear matte sealant spray or varnish to protect your finished piece. This will prevent chipping and give the bowl a professional, lasting finish.
2. Kintsugi Style Catchall Dish

Look closely at this small dish; it tells a fascinating story of repair and beauty. Inspired by the Japanese art of Kintsugi, where broken pottery is mended with lacquer dusted or mixed with powdered gold, this piece celebrates imperfection. Instead of hiding the cracks, the gleaming gold lines highlight them, suggesting that an object is more beautiful for having been broken.
This small, elegant accent piece works wonderfully on a bedside table, entryway console, or dresser. Use it to hold keys, jewelry, or simply display it as a standalone work of art. The gentle, organic shape coupled with the stark contrast of the white porcelain and rich metallic veins adds an unexpected element of thoughtful design to any basic surface.
Incorporating items with meaning like this instantly adds a layer of depth to your home decor. It reminds us that character often comes from embracing history and flaws. This subtle yet powerful find effortlessly elevates a room’s aesthetic.
???? DIY Instruction: Kintsugi Inspired Dish
You can mimic the elegant, repaired look of Kintsugi on an existing ceramic item using specialized kits or craft materials.
Material Required List
- Small ceramic or porcelain dish (plain white works well)
- Two part epoxy glue
- Gold mica powder or fine gold glitter
- Rubbing alcohol and cotton swabs
- Mixing sticks and disposable surface (wax paper or cardboard)
Equipment Required List
- Small, fine tipped paintbrush (or toothpick for very fine lines)
- Mixing tray or small disposable cup
- Safety gloves (optional, but recommended for epoxy)
DIY Instruction Step by Step
- Prepare the Surface: Ensure your dish is perfectly clean and dry. Use a cotton swab dampened with rubbing alcohol to wipe down the surface where you plan to apply the “cracks.” This removes any oils or dust.
- Plan the “Cracks”: Decide where you want your gold lines to run. You can either intentionally break a ceramic piece and glue it back together (the traditional method) or simply draw abstract crack patterns onto the existing surface, which is safer and easier.
- Mix the Adhesive: Follow the instructions for your two part epoxy glue precisely. Mix the resin and hardener together thoroughly on your disposable surface using a mixing stick.
- Add the Gold: Immediately sprinkle a generous amount of gold mica powder or fine glitter into the mixed epoxy. Stir until the epoxy takes on a rich, metallic gold color and texture. Work quickly, as epoxy sets fast.
- Apply the Gold Lines: Dip your fine tipped paintbrush or toothpick into the gold epoxy mixture. Carefully trace the planned crack lines onto the ceramic dish. Apply the mixture thickly enough so that the gold stands proud of the surface slightly, mimicking the traditional lacquer filling.
- Cure and Clean: Allow the gold epoxy to cure completely, which may take 24 hours, depending on the product. Once dry, use a cotton swab lightly dipped in rubbing alcohol to gently clean up any stray epoxy or gold powder around the edges of your new metallic veins. Your unique catchall dish is now ready for display.
3. Stacked Terracotta Geometric Sculpture
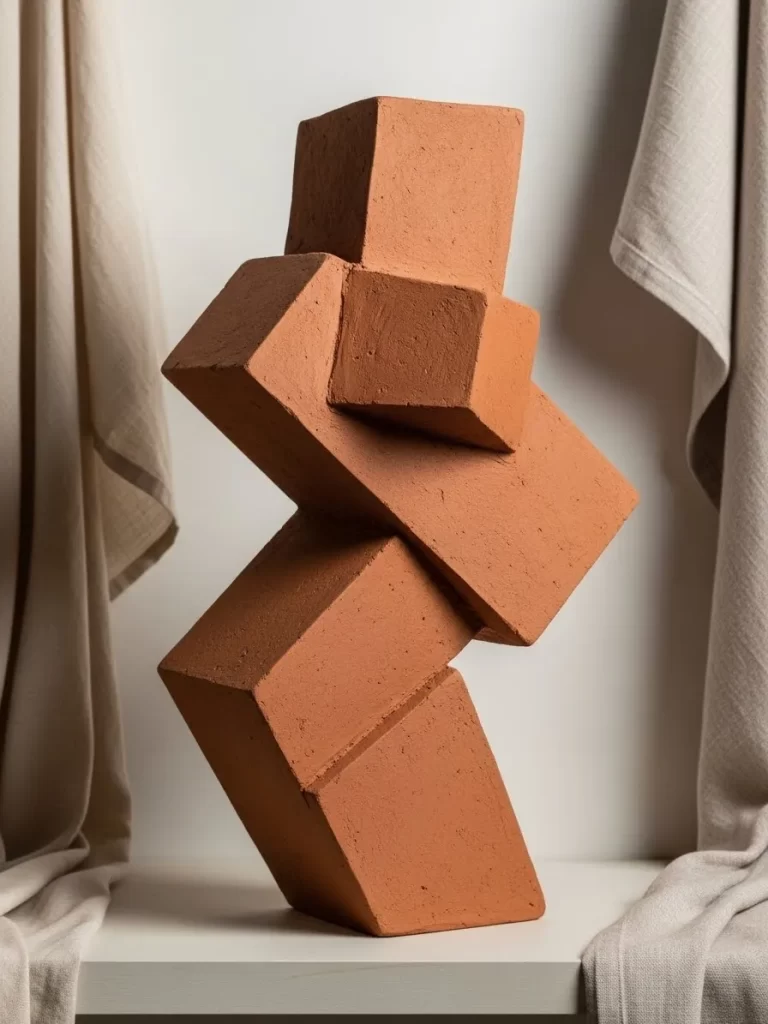
Achieve visual impact immediately with this bold, architectural piece. Constructed from geometric blocks of warm terracotta, the sculpture is intentionally unbalanced, creating a dynamic, forward leaning posture that seems to defy gravity. Its coarse, matte finish highlights the earthiness of the material, offering a beautiful, organic texture.
This piece stands out because it combines natural material with a thoroughly modern, abstract form. The simplicity of the reddish brown clay makes it versatile, contrasting beautifully against white walls or nestled among greenery. Position it where its strong vertical lines can draw the eye upward and add dimension to a lower shelf or tabletop.
Adding a substantial, unique sculpture like this is an excellent strategy to anchor a vignette and showcase your personal style. It speaks volumes about an appreciation for modern art and raw, honest materials, instantly making your room feel sophisticated and thoughtfully designed.
???? DIY Instruction: Terracotta Geometric Sculpture
You can create a similar stacked sculpture effect using terracotta pots, wood blocks, or air dry clay, focusing on achieving that uneven, cantilevered structure.
Material Required List
- Medium density fiberboard (MDF) or untreated wood blocks in various sizes (e.g., small, medium, large cubes and rectangles)
- Strong wood glue or construction adhesive
- Terracotta colored acrylic or chalk paint
- Fine grit sandpaper (around 120 220)
Equipment Required List
- Hand saw or access to a cutting service (if blocks are not pre cut)
- Clamps (optional, but helpful for drying)
- Paint brushes (large flat brush)
- Drop cloth or protective surface
DIY Instruction Step by Step
- Cut the Blocks: If your blocks are not pre cut, carefully cut your MDF or wood into the desired geometric shapes (cubes or rectangular prisms). Ensure the ends are square for stable stacking.
- Plan the Stacking: Arrange the blocks on a flat surface until you achieve the desired abstract, unbalanced composition, similar to the image. Take a photo of the final arrangement so you remember the exact angles and order.
- Glue the First Stack: Apply a generous layer of strong wood glue to the surfaces where the first two blocks connect. Press them together firmly and wipe away any excess glue that squeezes out. If possible, secure them with clamps and let them dry for the time recommended by the glue manufacturer.
- Continue Stacking: Repeat the gluing and stacking process for each subsequent block, working your way up. For sections that involve a dramatic overhang, hold the blocks in place or use temporary supports until the glue has fully set. Patience is crucial here to ensure a stable structure.
- Sand the Surface: Once the entire sculpture is dry and stable, lightly sand all the exterior surfaces. This step helps smooth any rough edges and prepares the wood for painting, giving it a uniform, textural finish.
- Paint the Terracotta Color: Apply an even coat of terracotta colored paint over the entire sculpture. Use a large brush and work quickly to avoid harsh brush strokes. Apply a second coat if needed, ensuring the color is rich and matte to mimic the raw clay look. Allow to dry completely before placing it on display.
4. Brass Articulated Hand Bookend

This is an item guaranteed to stop guests in their tracks. Function meets theatrical flair in this striking bookend shaped like an articulated brass hand. The rich, warm patina of the metal instantly conveys a sense of history and gravitas, contrasting sharply with the clean, modern joints visible on the fingers.
It holds your volumes with a touch of surreal elegance, making even the most mundane shelf display feel like an installation. The intricate detailing on the knuckles and wrist gives the piece a slightly vintage, mechanical feel that is incredibly compelling. Use it to keep your treasured antique books neatly displayed, adding an intellectual and mysterious edge to your living room or office.
Introducing a sculptural, functional piece like this eliminates basic shelf styling immediately. It acts as both a necessary utility and a statement piece, reflecting a truly creative approach to decorating that transcends common accessories.
???? DIY Instruction: Robotic Hand Inspired Bookend
You can achieve a similar metallic, sculptural bookend look using foam board or thick cardboard and metallic gold spray paint.
Material Required List
- Thick cardboard or foam core board (around 1/4 inch thickness)
- Strong adhesive (hot glue gun or strong craft glue)
- Metallic gold spray paint
- Heavy material for the base (sand, small rocks, or metal plate)
- Clear glossy sealant spray
Equipment Required List
- Utility knife or craft knife
- Ruler and cutting mat
- Pencil and paper (for templates)
- Safety mask and gloves (for spray painting)
DIY Instruction Step by Step
- Create Hand Templates: Sketch the separate parts of an articulated hand onto paper: the palm/wrist piece, and the segments for each finger and thumb. The segments should be simple rectangles to mimic the mechanical joints. Remember to draw two sides for the hand to give it dimension.
- Cut the Pieces: Carefully cut all the hand segments out of the cardboard or foam core using a utility knife and a ruler for straight edges. You will need many small pieces to build up the thickness and create the illusion of solid brass.
- Assemble the Hand: Glue the pieces together to create the three dimensional hand shape. Start with the wrist base and gradually add the finger segments, aiming for a slightly curled position suitable for holding a book. Use small dots of glue to attach the finger segments, leaving small gaps to represent the joints.
- Create the Heavy Base: Cut a small, sturdy base piece. Glue the finished hand structure securely onto the base. To make it a functional bookend, you must add weight. Cut a cavity into the bottom of the base and fill it with sand, small rocks, or glue a flat metal plate to the underside. Seal the cavity with another piece of cardboard.
- Prime and Paint: In a well ventilated area, apply a light coat of primer if you are using cardboard. Once dry, apply several thin, even coats of metallic gold spray paint over the entire bookend, ensuring you cover all edges and crevices.
- Seal and Finish: After the gold paint is dry, apply a coat of clear glossy sealant spray. This adds shine and protects the paint, giving it the look of polished, expensive brass.
5. Decorative Hardwood Chain Links
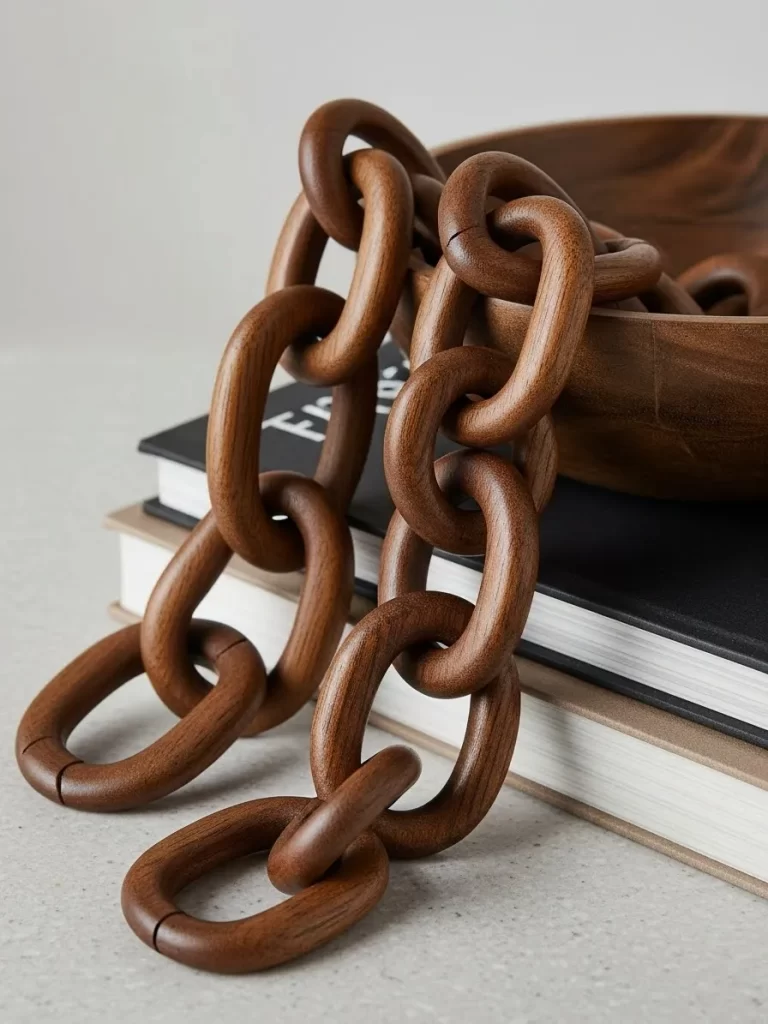
This is minimalist decor with a tactile twist. These oversized, interlocking wooden chain links are a stylish way to add warmth and a sculptural element to a table or shelf. Made from a richly stained hardwood, the grain of the material is visible through the smooth, curved surface of each link.
The simple, unadorned structure showcases the inherent beauty of the wood itself. Draped casually over a stack of books, nestled in a decorative bowl, or spread out on a console, the chain breaks up flat surfaces and introduces dynamic movement. The object feels grounded and organic, providing a soothing balance to otherwise streamlined, modern furnishings.
Accents that prioritize material and form over flashy color are essential for building a sophisticated home. This wooden chain offers just the right amount of visual weight and texture to elevate a vignette without overwhelming it, proving that sometimes, the simplest shapes make the biggest statement.
???? DIY Instruction: Wooden Chain Links
Making a decorative wooden chain requires some patience, but results in a beautiful, natural accent.
Material Required List
- Wood dowels (about 1 inch in diameter) or salvaged hardwood pieces
- Wood stain (medium to dark tone)
- Wood glue
- Fine grit sandpaper (220)
Equipment Required List
- Hand saw or miter box (for precise cuts)
- Drill and appropriate sized drill bit
- Clamp
- Measuring tape and pencil
DIY Instruction Step by Step
- Cut the Links: Determine the desired size for your links. For each link, you will need two pieces: the main curved piece (which will be bent) and two small connecting pieces. Since you are not steaming the wood, the easiest method is to create C shapes that can be joined. Cut your wood into segments that can be shaped into the desired oval link size. You will be making half links.
- Hollow the Center (Easier Method): Drill a hole in the center of the segment. Use a coping saw or a router to remove the center wood, creating a solid wooden ring shape. Repeat for all desired links.
- Cut and Sand the Rings: Once you have the solid rings, use your hand saw to carefully cut a straight, clean gap in one section of each ring. This is how you will interlock them.
- Interlock and Glue: Pass one ring through the gap of the next ring before gluing the gap shut. Apply wood glue generously to the cut edges and press them firmly together, clamping if necessary. Wipe off any excess glue immediately.
- Sand for Smoothness: After the glue is completely dry, thoroughly sand the entire chain, paying extra attention to the glued seams to make the joint invisible. Start with medium grit and finish with fine grit sandpaper until the surface is exceptionally smooth.
- Stain and Finish: Apply your wood stain according to the product instructions. Allow it to penetrate and dry completely. For a protective finish and a beautiful sheen, apply a clear wood varnish or oil.
6. Iridescent Opal Glass Knot Sculpture
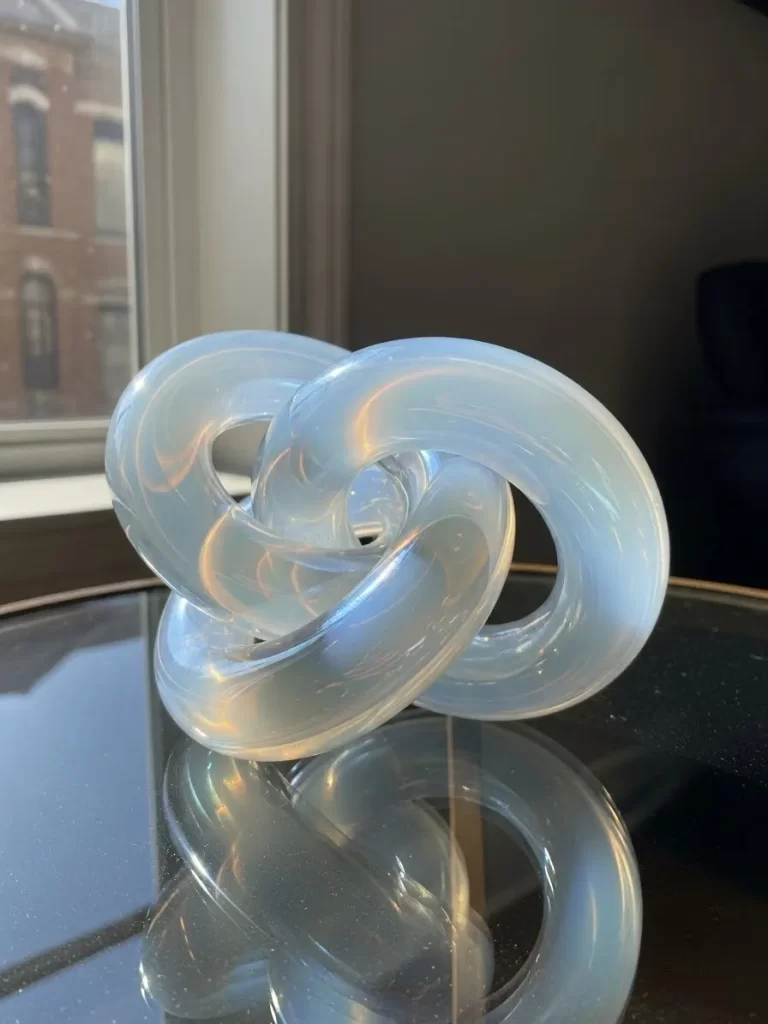
Light plays across the surface of this object in mesmerizing ways. This interlocked knot sculpture is crafted from opalescent glass, giving it a soft, milky white base with shimmers of pale pink, yellow, and blue when viewed from different angles. It is a stunning display of captured light and fluid motion.
The smooth, continuous lines of the knot create a sense of infinite movement and connection, offering a sophisticated counterpoint to angular furniture. Because the color subtly shifts with the surrounding light, this piece looks different throughout the day, constantly providing new visual interest. Set it on a glossy surface to double the effect with a crisp reflection.
Using translucent, highly refractive materials like this instantly adds an element of ethereal charm and luxury. It is a striking alternative to standard clear glass or metallic decor, injecting a fresh, luminous energy into any room without adding clutter or harsh color.
???? DIY Instruction: Opalescent Resin Knot Sculpture
Replicating this look at home involves working with resin and special pigments to achieve that iridescent glow.
Material Required List
- Two part clear casting epoxy resin
- Iridescent or color shifting mica powder (white or pale blue)
- Silicone mold in a complex knot or chain link shape (or multiple small molds)
- Mixing cups and stir sticks (disposable)
Equipment Required List
- Safety gloves and respirator mask (essential when working with resin)
- Heat gun or long reach lighter (for removing bubbles)
- Digital scale (for accurate resin mixing)
DIY Instruction Step by Step
- Prepare the Work Area: Resin requires a well ventilated, level, and dust free workspace. Put on your gloves and respirator mask. Place your silicone mold on a perfectly flat surface.
- Measure and Mix Resin: Use your digital scale to measure the two parts of the epoxy resin (Part A and Part B) exactly according to the manufacturer’s ratio. Mix them thoroughly for the specified time, scraping the sides and bottom of the cup.
- Add Color Pigment: Add a very small amount of the iridescent mica powder to the mixed resin. Stir gently until the powder is fully incorporated and the resin has a milky, shimmery look. Be careful not to introduce too many bubbles.
- Pour the Resin: Slowly and carefully pour the colored resin into the silicone knot mold. Pouring slowly reduces the chance of trapping air bubbles. Fill the mold right up to the top edge.
- Remove Bubbles: Immediately after pouring, use a heat gun passed quickly over the surface, or a long reach lighter, to pop any rising air bubbles. Hold the heat source a few inches away and only pass it over for a second or two at a time.
- Cure: Cover the mold loosely to protect it from dust and allow the resin to cure completely, following the time specifications on your product (often 24 to 72 hours). Do not demold before the cure time is up.
- Demold and Finish: Once fully cured, gently remove the sculpture from the silicone mold. The surface should be smooth and glossy. If any edges are slightly sharp, you can very gently sand them down, but be aware that sanding dulls the shine.
7. Woven Natural Fiber Rainbow Basket

Storage does not have to be dull. This large, handwoven basket brings a riot of color and global texture into your functional decor. The primary material is a sturdy, natural grass or fiber, beautifully accented with bold, diagonal stripes of rich, dyed yarn in a full spectrum of colors—red, blue, green, and yellow.
The combination of the neutral base and the energetic rainbow pattern makes this piece remarkably versatile. It works wonderfully as stylish storage for blankets, toys, or laundry, or simply as an eye catching planter cover. The woven handles make it easily portable, and the slightly slouched, organic form prevents it from feeling too rigid.
Embracing texture and global patterns like this is an easy way to move away from anonymous, basic rooms. This basket is a celebration of handmade craft, adding character, warmth, and a cheerful pop of color that instantly revitalizes a space.
???? DIY Instruction: Colorful Woven Storage Basket
This DIY mimics the look of a colorful coiled basket using rope and colorful yarn or string.
Material Required List
- Thick cotton clothesline or manila rope (several yards)
- Hot glue gun and plenty of glue sticks
- Assortment of brightly colored yarns or sturdy string (red, blue, yellow, green)
- Large sewing needle (or tapestry needle) and thread (optional, for extra reinforcement)
Equipment Required List
- Scissors
- Large table or protected work surface
DIY Instruction Step by Step
- Start the Base Coil: Tightly coil the end of your rope into a small, flat spiral, forming the center of the basket base. Secure this starting coil heavily with hot glue.
- Coil and Glue the Base: Continue spiraling the rope around the center piece, gluing the adjacent coils together as you go. Apply pressure to keep the base flat and tight. Continue until the base reaches the desired diameter.
- Start the Sides: Once the base is large enough, begin coiling the rope upward instead of outward. This forms the sides of the basket. Continue gluing the rope coils together, ensuring the angle is consistent for an even wall.
- Introduce the Color Stripes: When you reach the point where you want your first color band, stop the natural rope and begin wrapping a section of your colored yarn tightly around the next few inches of the rope coil. The wrapping should be close and opaque.
- Create the Diagonal Pattern: As you build up the wall, choose different points to start and stop wrapping each color band with the yarn, staggering them diagonally up the side of the basket to create the striped effect seen in the image. You can either glue the yarn in place or sew it securely to the underlying rope coil for extra durability.
- Finish the Rim and Handles: Continue coiling and gluing until the basket is the desired height. To create the handles, leave two sections of rope on opposite sides unattached to the coil below, allowing them to loop out and back in to be securely glued to the rope coil below the rim. Glue the final end of the rope coil securely to complete the rim.
8. Glazed Volcanic Texture Mini Vases

Grouping small, highly textural items together is a brilliant way to add character. This collection of small vases is extraordinary, featuring a two tone design of deep black and taupe, both covered in an aggressively porous, volcanic texture. This gives the surface a gritty, organic, and truly unique feel.
A smooth, sky blue glaze drips casually from the mouth of each vase, creating a striking contrast against the earthy, rough body. This glossy, cool color draws the eye to the neck of the bottle, adding an element of polished refinement to the raw aesthetic. Display a handful of these together on a mantle or bookshelf for maximum impact.
These little vessels prove that even miniature decor can command attention when the texture is this bold. They are a wonderful way to introduce an artistic, handmade feel to an otherwise unremarkable shelf, offering depth and visual interest far beyond standard smooth glass or ceramic.
???? DIY Instruction: Textured Mini Vases
You can easily transform small glass bottles or existing vases into these textural wonders using paint and a common household ingredient.
Material Required List
- Small glass or ceramic bottles (e.g., sample sized bottles or spice jars)
- Black and taupe (or light brown) acrylic paint
- Baking soda or fine sand
- Glossy blue or gray acrylic paint
- Clear matte sealant spray
Equipment Required List
- Small mixing bowls and stir sticks
- Paint brushes (small detail and larger flat brush)
- Drop cloth or protected surface
DIY Instruction Step by Step
- Prepare the Texture Mixture: In separate mixing bowls, combine the black paint with a generous amount of baking soda or sand until the mixture is thick, pasty, and highly textured, like a stucco. Repeat this step for the taupe paint.
- Paint the Base Layer: Paint the bottom half of each bottle with the black texture paint mixture. Apply it thickly and unevenly to enhance the porous, volcanic appearance. Let this dry completely.
- Paint the Top Layer: Paint the top half of each bottle (leaving the very neck unpainted) with the taupe texture paint mixture. Try to blend the border between the two colors slightly for a natural transition. Let this layer dry fully.
- Apply the Glaze Effect: Dip your small detail brush into the glossy blue or gray acrylic paint. Apply a thick ring of this glossy paint around the very neck and rim of the bottle. Let the excess paint drip naturally down the sides, mimicking the look of an applied glaze running down the textured surface. Do not try to smooth the drips; the uneven run is part of the effect.
- Seal the Finish: Once all the paint, especially the glossy drip, is completely dry, spray the entire bottle with a clear matte sealant. This protects the finish and ensures the raw, textured look is preserved. The combination of matte texture and glossy drip is highly effective.
9. Modern Abstract Marble Bust
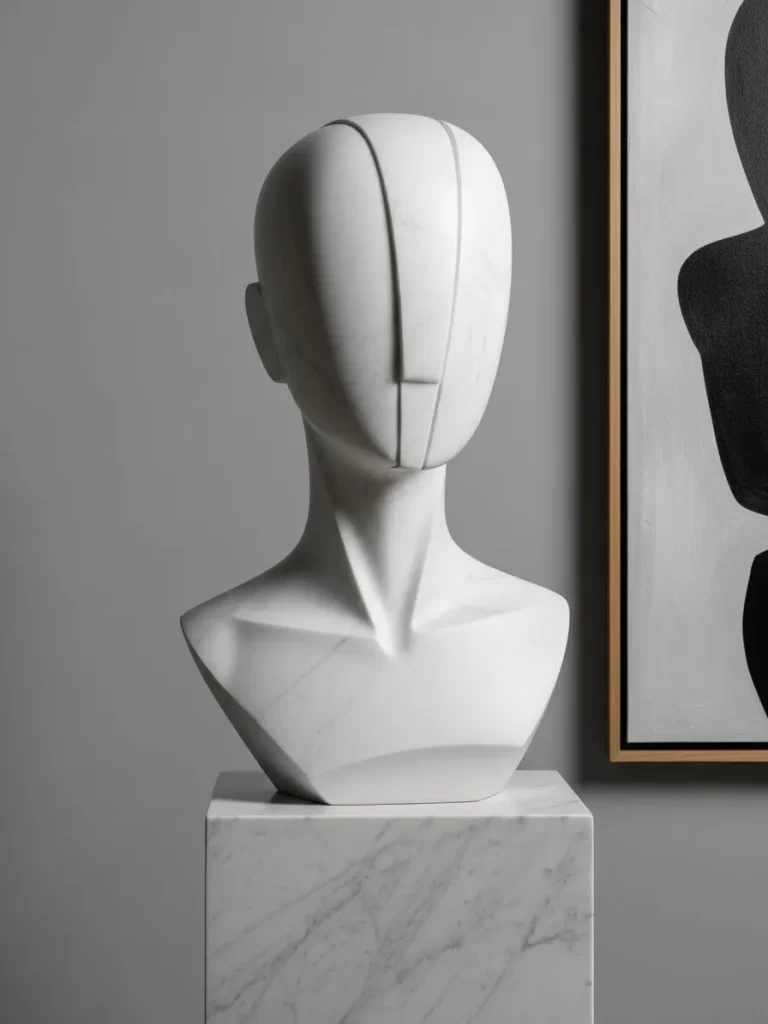
Minimalist yet powerful, this sculpted head elevates the traditional bust form into something utterly contemporary. Crafted from pristine white marble, the smooth surface is broken only by severe, clean lines that delineate abstract facial features and a subtle part down the middle. This piece is less about realism and more about geometric form and quiet contemplation.
The smooth, cool material and faceless quality lend an air of timeless sophistication and mystery to any space. Placed upon its own matching marble plinth, it creates a striking focal point, perfect for anchoring a hallway table or adding architectural strength to a living area. The lack of detailed features allows the viewer to project their own interpretation onto the piece.
Adding a substantial, quality sculpture like this is the definitive way to move beyond basic filler decor. It transforms a room into a gallery, showcasing an appreciation for modern art and clean, impactful design. The stark white color ensures it integrates seamlessly into almost any palette.
???? DIY Instruction: Faux Marble Geometric Bust
You can achieve a high end, geometric bust effect using inexpensive foam or plaster and a clever painting technique.
Material Required List
- Foam mannequin head (or simple plaster cast bust)
- Lightweight spackling paste or joint compound
- White chalk paint or matte spray paint
- Gray acrylic paint (very light shade)
- Fine black acrylic paint (for veins)
Equipment Required List
- Sandpaper (medium and fine grit)
- Utility knife
- Putty knife or sculpting tool
- Feather or small, fine tipped brush
DIY Instruction Step by Step
- Shape the Form: Use the utility knife to cut or score the existing foam or plaster bust to create the modern, geometric lines seen in the image (e.g., the line down the center of the head, the sharp lines defining the neck). Use the sculpting tool or putty knife to apply spackling paste to fill in any unwanted features or to sharpen edges, smoothing out the surface as much as possible.
- Sand Smooth: Once the spackling paste is completely dry, sand the entire surface until it is extremely smooth and the new geometric lines are sharp and clean. Wipe away all dust.
- Apply Base Coat: Apply two coats of white chalk paint or matte white spray paint to the entire bust and its base. This creates a smooth, opaque foundation for the marble effect. Let it dry completely.
- Create the Veining: Mix a tiny amount of the black acrylic paint with water to make a very thin wash. Using a feather or a fine brush, lightly drag very thin, wispy lines across the surface of the bust, mimicking natural marble veins.
- Soften the Veins: Immediately after applying the black line, lightly dab and blend the area with a damp cloth or sponge to soften the vein, making it look like it is under the surface of the stone rather than sitting on top. Repeat this process until you are happy with the marbling effect.
- Finalize: Once the paint is dry, the matte chalk paint finish should look convincingly like unpolished marble. For added protection, you can use a matte sealant, but be careful not to introduce too much shine, which would lessen the marble illusion.
10. Speckled Mercury Glass Reed Diffuser
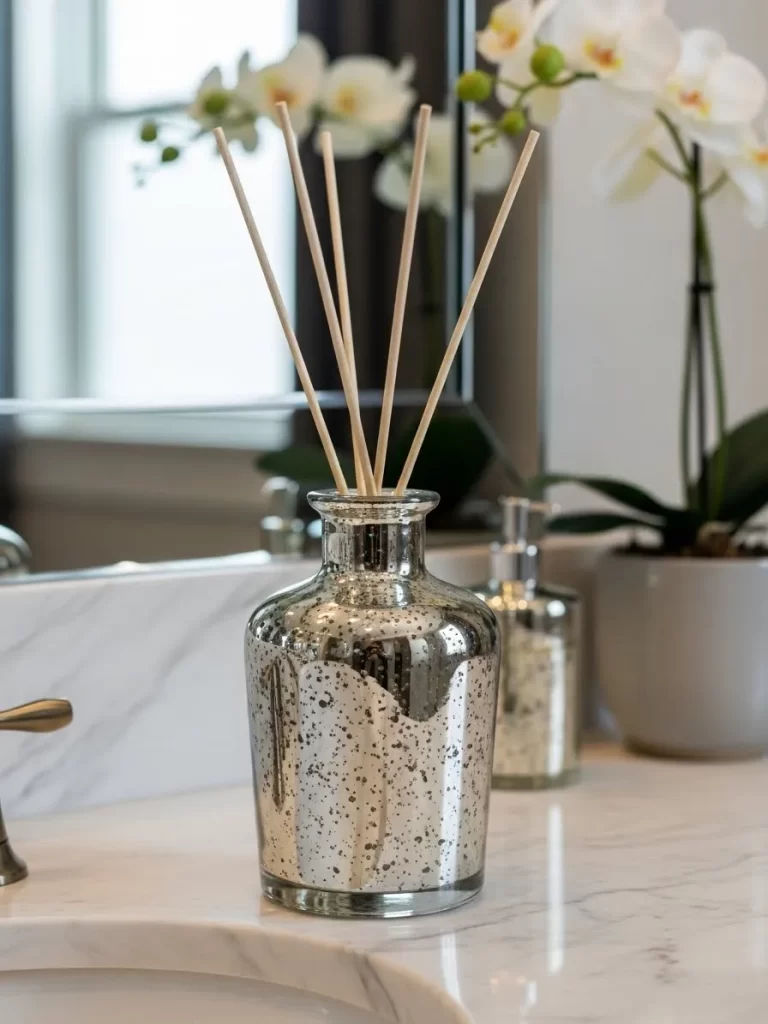
Even functional items can be extraordinary. This reed diffuser bottle is crafted from mercury glass, featuring a beautifully mottled, speckled silver finish that catches the light and adds vintage glamour to any bathroom or powder room counter. The reflective surface introduces a subtle sparkle and a feeling of old world luxury.
The delicate finish of the glass looks rich and textured, contrasting perfectly with the simple, natural reed sticks. It is a lovely way to add a sophisticated metallic touch without using a harsh, solid color. The reflective quality helps brighten the space and makes the whole area feel more deliberate and styled.
Upgrading everyday basics with unique finishes is the simplest trick to elevating a basic home. Swap out the standard drugstore diffuser for something like this, and your room instantly gains a layer of thoughtful, high end detail that delights the eye.
???? DIY Instruction: Faux Mercury Glass Diffuser Bottle
You can recreate the antique, speckled mercury glass effect on the inside of a clear glass bottle.
Material Required List
- Clear glass bottle with a narrow neck (an old syrup or specialty drink bottle works well)
- Mirror effect spray paint (must be designed for glass)
- Water and a spray bottle
- Clear vinegar
- Paper towels
Equipment Required List
- Protected work area (cardboard box or drop cloth)
- Safety mask and gloves (essential for spray painting)
DIY Instruction Step by Step
- Clean the Bottle: Thoroughly clean the inside of your glass bottle with soap and water. Ensure it is completely dry afterward.
- Prepare the Spray: Mix a solution of 50% water and 50% white vinegar in your small spray bottle. The vinegar helps the water droplets cling to the glass, creating the necessary uneven pattern.
- Spray Water Mixture: Holding the bottle upside down, spray a few light mists of the water and vinegar solution into the inside of the bottle, allowing tiny droplets to form on the interior walls. Do not soak it; you want small beads of water.
- Apply Mirror Paint (Quickly): Working quickly in a well ventilated area, immediately spray a light, quick coat of the mirror effect paint into the inside of the bottle, ensuring you coat the entire interior surface. The paint will react with the water droplets.
- Blot and Repeat: Allow the paint to sit for a few seconds. Then, using a paper towel wrapped around a stick or long tongs, gently dab the interior surface to blot the excess water and paint, which helps enhance the speckled look.
- Cure and Finish: Let the first coat dry. Repeat steps 3 through 5 two or three more times until you achieve the desired depth and richness of the speckled silver effect. Once finished and fully dry, the bottle is ready to be filled with your favorite reed diffuser oil.
11. Framed Vintage Botanical Print
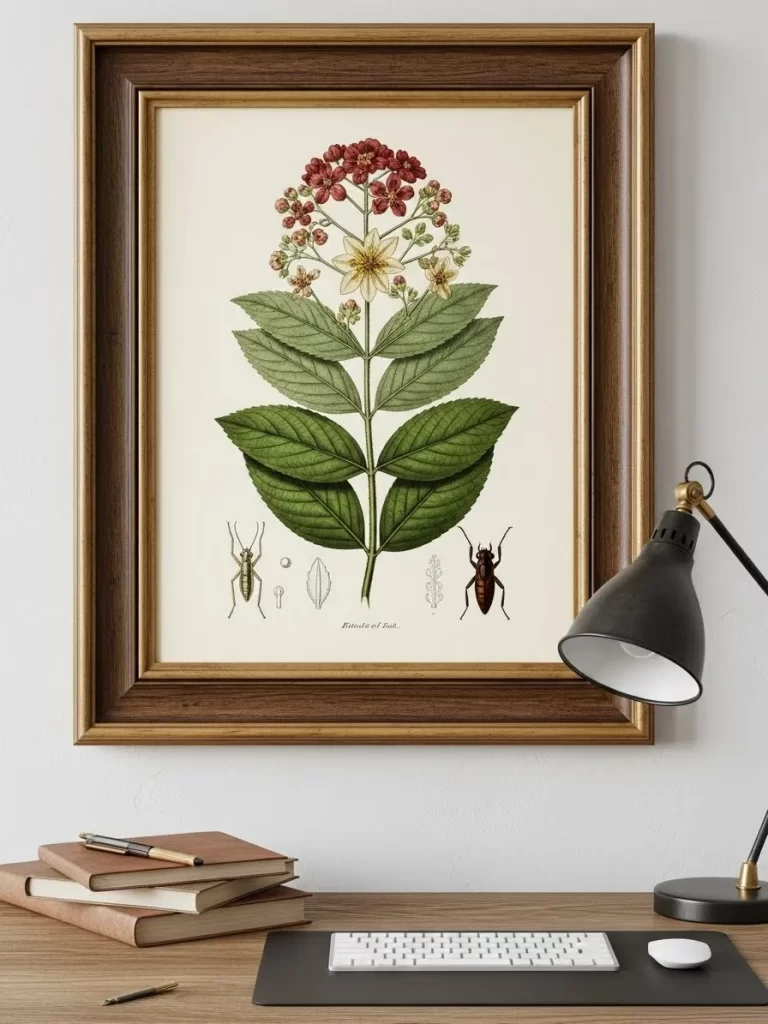
Elevate your wall decor beyond ordinary posters with a detailed botanical print. This piece captures a vibrant, meticulously rendered image of a flowering plant and small insects, reminiscent of 19th century scientific illustrations. The rich green foliage and deep red blossoms are set against a creamy, aged background, suggesting historical significance.
Framed in a substantial, warm wooden frame, this print adds a cultivated, natural history feel to any room. It works beautifully above a desk or paired with other classic prints in a gallery wall arrangement. The blend of artistry and scientific observation offers a refreshing alternative to abstract geometric art.
Introducing classic, richly detailed pieces like this is key to building a home with genuine character. It provides a focal point that is both visually restful and intellectually engaging, instantly making your space feel layered and deeply personal.
???? DIY Instruction: Aged Botanical Wall Art
You can turn any modern botanical illustration into a convincing vintage style framed print using simple aging techniques.
Material Required List
- Printed botanical illustration (on matte paper)
- Instant coffee grounds or strong tea bags
- Water
- Small spray bottle
- Cotton swabs
- Large wooden frame with glass front
- Foam core backing (or heavy cardboard)
Equipment Required List
- Large, shallow pan or baking sheet
- Oven (optional, for quick drying)
- Iron (optional, for flattening)
DIY Instruction Step by Step
- Prepare the Aging Solution: Brew a very strong cup of coffee or dark tea. Let it cool completely. Pour the liquid into a shallow pan or tray large enough to hold your print. Alternatively, use a mix of warm water and instant coffee grounds to make a dark wash.
- Age the Paper: Carefully submerge your printed illustration into the liquid. Let it soak for just 30 to 60 seconds. The longer it soaks, the darker the aged effect.
- Create Imperfections: Remove the print gently and place it on a clean towel. Before it dries, use a cotton swab dipped in pure coffee grounds or tea leaves to dab subtle dark spots and watermarks onto the paper, mimicking true age spots.
- Dry and Flatten: Allow the print to air dry completely, or speed up the process by placing it in a very low temperature oven (around 170°F) for a few minutes. If the paper buckles after drying, carefully iron it on a low setting without steam between two sheets of parchment paper.
- Assemble the Frame: Clean the glass of your frame thoroughly. Place the aged print inside the wooden frame. Use a piece of foam core or heavy cardboard to back the print, ensuring it sits flat and wrinkle free. Secure the backing and hang your historically inspired art.
12. Kantha Stitch Reversible Throw Blanket
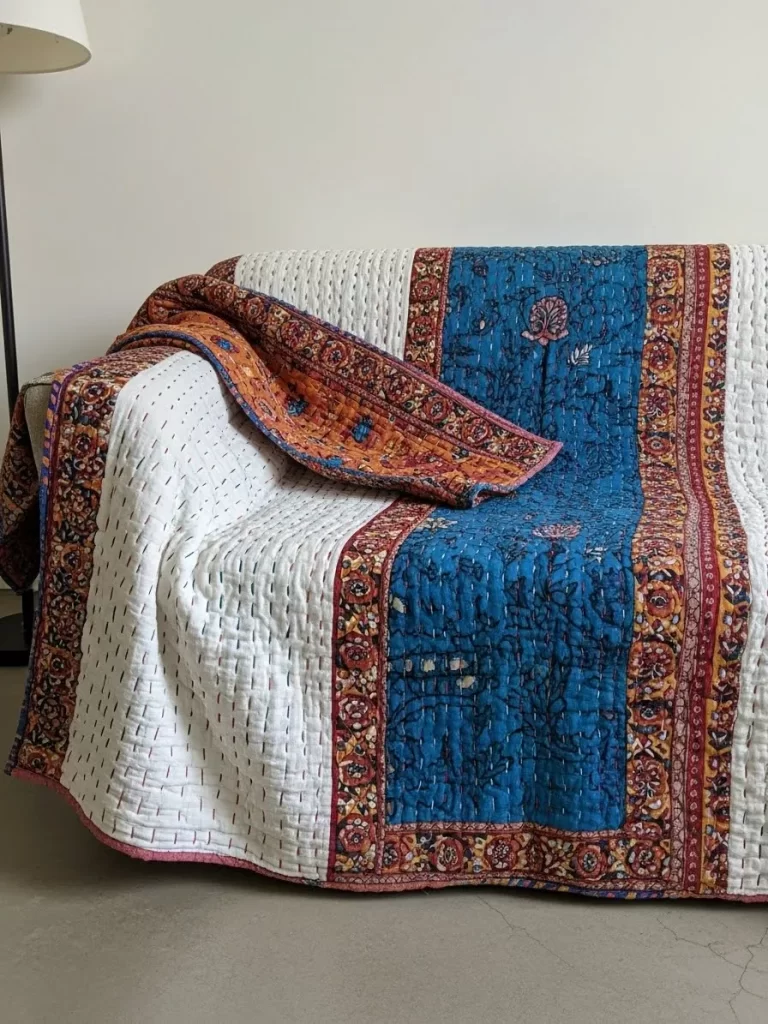
This throw is a textile masterpiece, bringing color, pattern, and warmth to a neutral sofa. Featuring the distinctive Kantha stitching technique from India, the fabric is characterized by thousands of small, straight, running stitches that quilt the layers together. This stitching adds subtle texture and stability to the piece.
One side bursts with rich indigo and fiery orange patterns, defined by intricate floral borders. The reverse side offers a contrasting clean white backdrop, punctuated only by the subtle texture of the bright stitching that passes through the fabric. Draped over the back of a couch, it introduces a necessary, lively dose of bohemian global style.
Textiles are one of the fastest ways to inject personality into a basic room. This hand stitched blanket adds not only visual interest but also a feeling of handmade quality and history, making your lounging area immediately feel cozy and authentically collected.
???? DIY Instruction: Kantha Style Quilted Throw
You can replicate the look of a Kantha throw by layering fabrics and applying the signature running stitch by hand.
Material Required List
- Two large pieces of cotton fabric (one vibrant print, one solid or patterned for the reverse)
- Thin cotton batting or a muslin sheet (for the interior layer)
- Embroidery floss or yarn in a contrasting color (e.g., pink or red)
- Safety pins (or fabric adhesive spray)
Equipment Required List
- Long hand sewing needle (doll making needle works well)
- Ruler or measuring tape
- Scissors
DIY Instruction Step by Step
- Layer the Fabrics: Lay your large backing fabric (solid color) flat on the floor or a large table, smooth side up. Place the thin batting or muslin layer on top of that. Finally, center your patterned top fabric. Smooth out all layers to eliminate any wrinkles.
- Baste the Layers: Secure the three layers together. You can use fabric adhesive spray between the layers, or more traditionally, use many safety pins spaced every six inches across the entire surface of the blanket to prevent shifting while you stitch.
- Mark Stitching Lines (Optional): Kantha stitches are often done freehand, but for uniformity, you can lightly mark parallel lines across the blanket using a removable fabric marker. These lines should be spaced about 1/2 to 1 inch apart.
- Perform the Running Stitch: Thread your long needle with the contrasting embroidery floss or yarn. Start at one end and begin making small, even, straight running stitches along your marked lines or freehand. The stitches should be visible and uniform, passing through all three layers of fabric.
- Continue Stitching: Work across the entire blanket, row by row, until the entire surface is covered with the distinctive, textured stitching. The repetition of the running stitch is what defines the Kantha look.
- Finish the Edges: Once all stitching is complete, remove the safety pins. Trim the edges of the blanket neatly. Turn the edges over twice to hide the raw edges, and stitch the hem down to create a clean, finished border.
13. Textured Monochromatic Tile Art
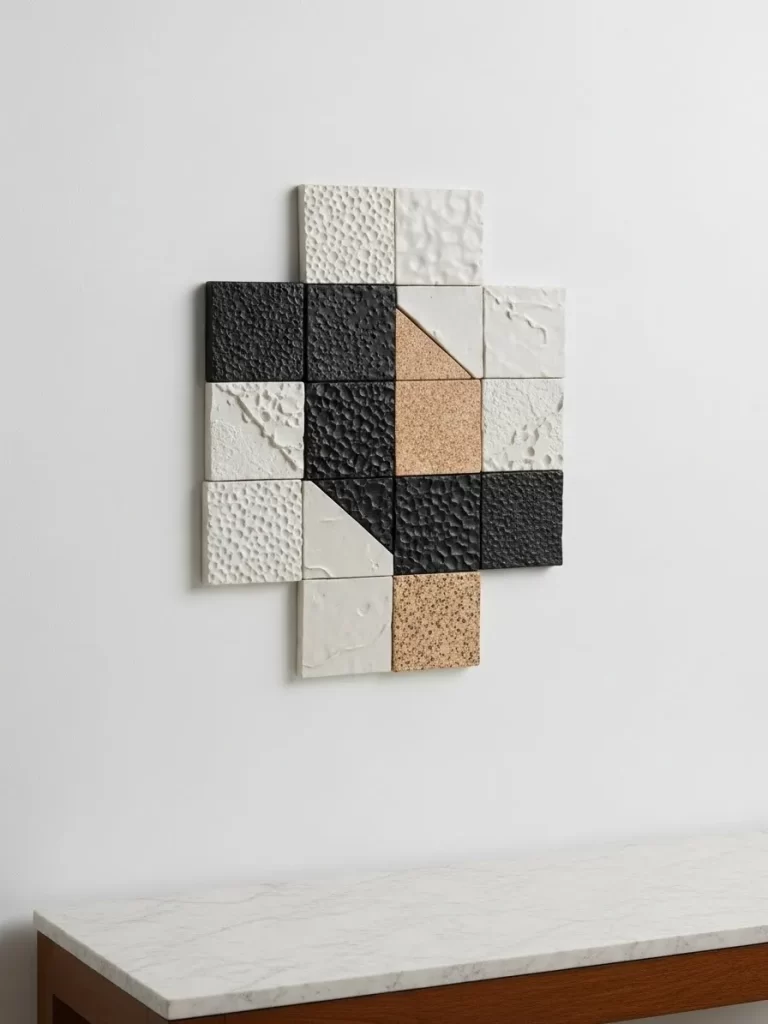
This geometric wall piece is a minimalist study in texture and contrast. Composed of square ceramic tiles, the arrangement uses a sophisticated palette of black, white, and natural terracotta. The tiles are intentionally finished with a variety of textures—some are smooth and glossy, others have a bumpy, porous surface, and some feature abstract patterns.
The strong, simple cross shape of the arrangement draws the eye immediately, providing an impactful alternative to flat paintings. The play of light and shadow across the different surfaces—from the speckled terracotta to the matte black to the pitted white—adds extraordinary depth and visual interest to a plain white wall.
By focusing on textural variation within a limited color scheme, this piece delivers maximum impact without clashing with existing furnishings. It is a stunning, architectural way to incorporate a bespoke, gallery worthy feel into a contemporary living space.
???? DIY Instruction: Textured Tile Wall Art
You can create a similar textural wall installation using plain ceramic tiles and various compounds to create the surface differences.
Material Required List
- Plain ceramic tiles (approx. 4×4 inches or 6×6 inches)
- Black, white, and terracotta colored acrylic or spray paint
- Texture creating materials (e.g., modeling paste, fine sand, coarse salt, joint compound)
- Strong construction adhesive or heavy duty mounting tape
Equipment Required List
- Putty knife and plastic wrap
- Small stencil brush or sponge
- Plastic cups and stir sticks
- Drop cloth
DIY Instruction Step by Step
- Plan the Layout: Lay your tiles out in the desired cross pattern on a flat surface. Take a photo of the arrangement to remember where each finish will go.
- Create the Textures (White Tiles): For the white bumpy texture, mix white paint with a coarse material like sand or small amounts of styrofoam beads. For the pitted texture, apply a layer of thick joint compound and press plastic wrap lightly onto it, peeling it off just as the compound begins to set to leave an uneven surface. For the smooth tiles, just use plain white paint.
- Create the Textures (Black Tiles): For the matte black texture, mix black paint with fine sand or crushed salt until highly gritty. For the smooth black areas, use plain matte black paint.
- Create the Accent Tiles: Paint the natural colored tiles with a terracotta or speckled sandy color. If you have any angular pieces, simply use masking tape to block off sections before painting to get clean geometric lines.
- Paint and Dry: Once the textures are applied and shaped with the putty knife or sponge, let all the tiles dry completely. You may need a second coat of paint on some areas.
- Mount the Tiles: Once fully cured, flip the tiles over. Apply heavy duty mounting tape or construction adhesive to the back of each tile. Carefully place the tiles onto the wall one by one, using your reference photo to maintain the exact pattern and spacing. Press each tile firmly for secure attachment.
14. Shadowbox of Found Vintage Keys
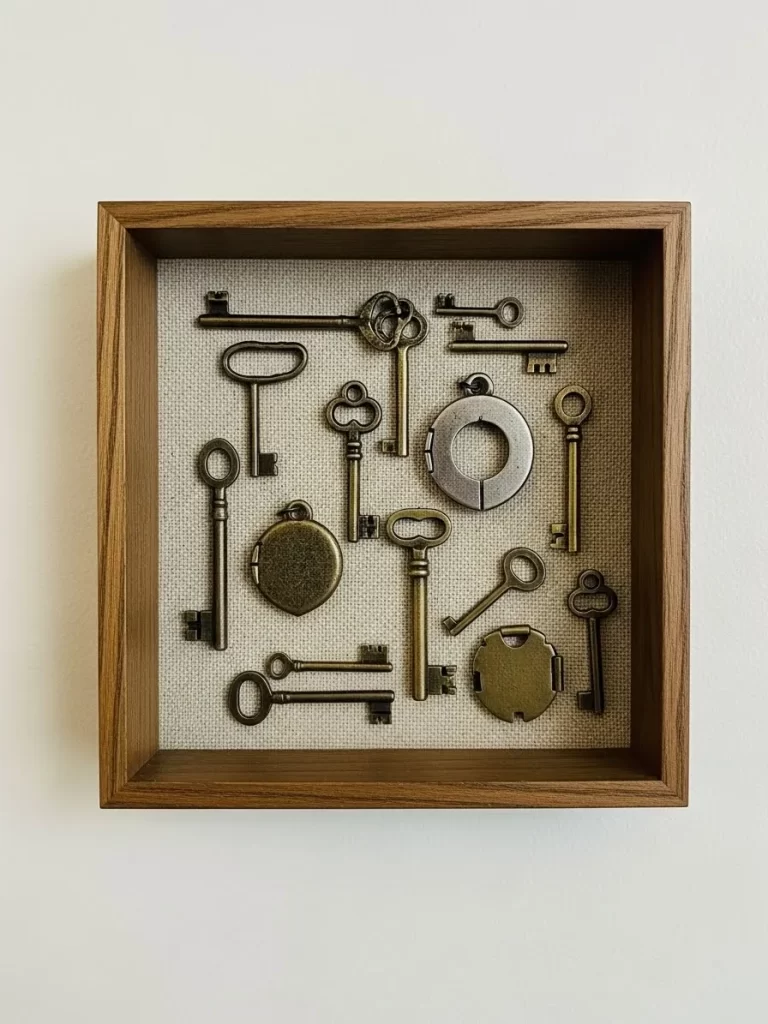
This framed collection is pure curiosity captured under glass. This shallow wooden shadowbox contains an artful arrangement of vintage skeleton keys, old lock mechanisms, and small heart shaped lockets, all finished in a muted, antique bronze or brass tone. It instantly evokes a sense of history and untold secrets.
The collection is mounted against a neutral, textural linen fabric, which allows the intricate shapes and varying sizes of the keys to stand out dramatically. Displayed on a wall, it functions as unique, narrative wall art that encourages closer inspection and speculation about what secrets these keys once held.
Curating and displaying genuine found objects is one of the best ways to move away from generic decor. This piece offers a sophisticated, tailored way to showcase a passion for history and collecting, transforming simple wall space into a compelling focal point.
???? DIY Instruction: Antique Keys Shadowbox
Creating this look is straightforward, focusing mainly on the arrangement and mounting of the items within the box.
Material Required List
- Deep wooden shadowbox frame
- Assorted metal skeleton keys, old lock parts, or small bronze trinkets
- Neutral colored fabric (linen, burlap, or cotton)
- Spray adhesive or craft glue
- Hot glue gun and glue sticks
Equipment Required List
- Scissors and ruler
- Pencil
DIY Instruction Step by Step
- Prepare the Backing: Disassemble your shadowbox. Take the backing board and measure the fabric to fit perfectly over the surface, wrapping it tightly around the edges. Secure the fabric to the back of the board using spray adhesive or craft glue, ensuring there are no wrinkles.
- Arrange the Keys: Lay the fabric covered board flat. Arrange your collection of keys and metal objects onto the surface until you find a pleasing, balanced composition. Mix sizes, shapes, and angles for a dynamic display, similar to the image.
- Secure the Keys: Once satisfied with the arrangement, pick up one key at a time. Apply a generous dot of hot glue to the back of the key and press it firmly back into its position on the fabric covered board. Repeat this for every object, ensuring they are securely fastened.
- Reassemble the Frame: Once the glue is completely dry and all pieces are secured, place the finished backing board back into the wooden shadowbox frame. Fasten the backing securely and close the box, making sure the keys are not touching the glass.
- Hang: Your new, history inspired wall art is ready to be hung and appreciated.
15. Layered Fiber Macrame Wall Hanging
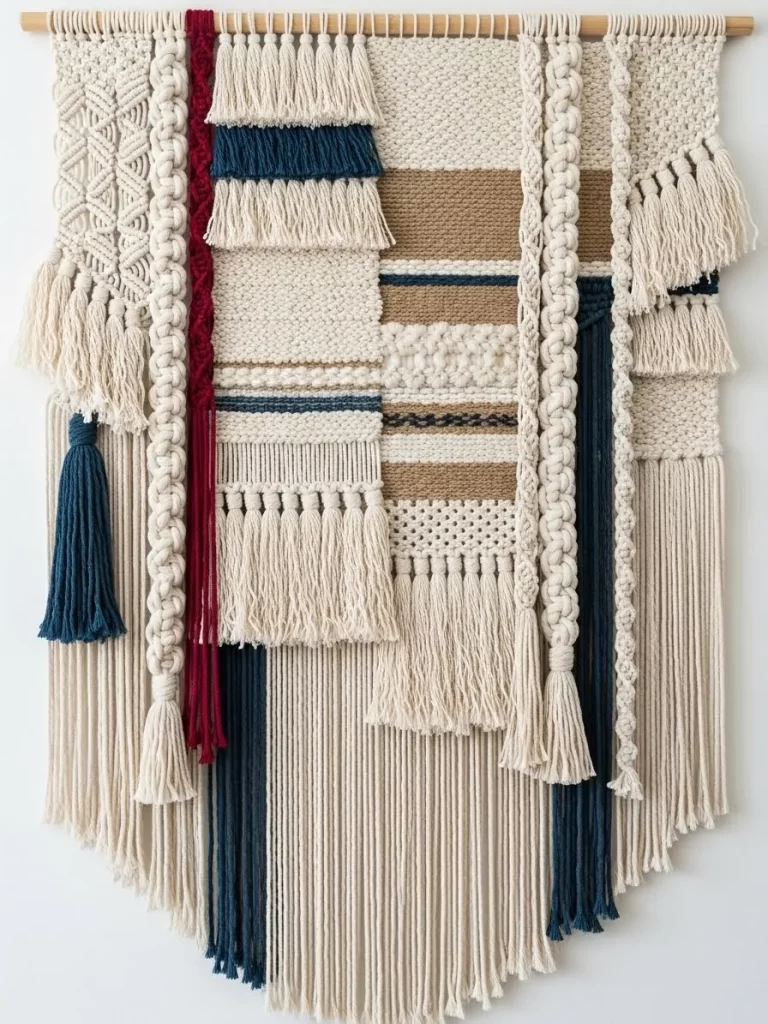
Texture reigns supreme in this magnificent, large scale wall hanging. It combines multiple textile techniques—thick braiding, knotting (macrame), weaving, and fringing—to create a complex, cascading design. The neutral cream and white fibers are punctuated by bold blocks of deep indigo blue, rich burgundy, and natural taupe.
The sheer variety of textures—from the chunky twisted cords to the dense bobbles to the straight, hanging fringe—makes this piece incredibly dynamic. The layering creates a three dimensional effect, adding a soft, bohemian warmth and sound dampening quality to a large wall. It is a stunning focal point for a living room or bedroom.
Opting for a handmade, large scale textile like this instantly transforms a room, moving the decor far beyond simple prints or posters. This piece is a celebration of fiber art and craft, lending an authentic, artisan character to your home.
???? DIY Instruction: Multi Textured Wall Hanging
Creating this piece involves basic macrame and weaving techniques, focusing on combining different types of fibers and colors.
Material Required List
- Wooden dowel or stick (for the top)
- Thick cotton macrame rope (natural color)
- Chunky wool yarn (taupe, white, indigo, burgundy)
- Thin weaving yarn (matching colors)
- Scissors
Equipment Required List
- Weaving needle or tapestry needle
- Measuring tape
- Comb (for creating fringe)
DIY Instruction Step by Step
- Prepare the Dowel: Cut several long strands of macrame rope and use a simple Lark’s Head knot to attach them evenly across the wooden dowel. These will serve as your base strands.
- Create Macrame Sections: On the left side, use the base ropes to create intricate macrame knot patterns (like square knots or double half hitch knots) to build dense, decorative blocks of texture.
- Weave the Center Section: In the middle area, use the weaving yarn to weave between the vertical strands attached to the dowel, creating blocks of solid color and texture (taupe, indigo, burgundy). You can use the chunky wool yarn to create thick horizontal rows or loops for a bobble effect.
- Create Braids and Tassels: Using the chunky cotton rope, braid several long, thick sections that will hang vertically down the sides. Create large, fluffy tassels with the colored yarn and attach them to the hanging strings on the left.
- Assemble the Layers: Cut long, straight sections of the macrame rope to hang below the woven and knotted sections. Layer the different elements—the braids, the tassels, the woven blocks, and the straight fringe—to overlap each other, achieving a multi dimensional look.
- Finish the Fringe: Use a comb to gently separate and straighten the bottom edges of the long hanging strands and the fringe sections to give them a clean, flowing appearance.
16. Monochromatic Abstract Hand Sculptures
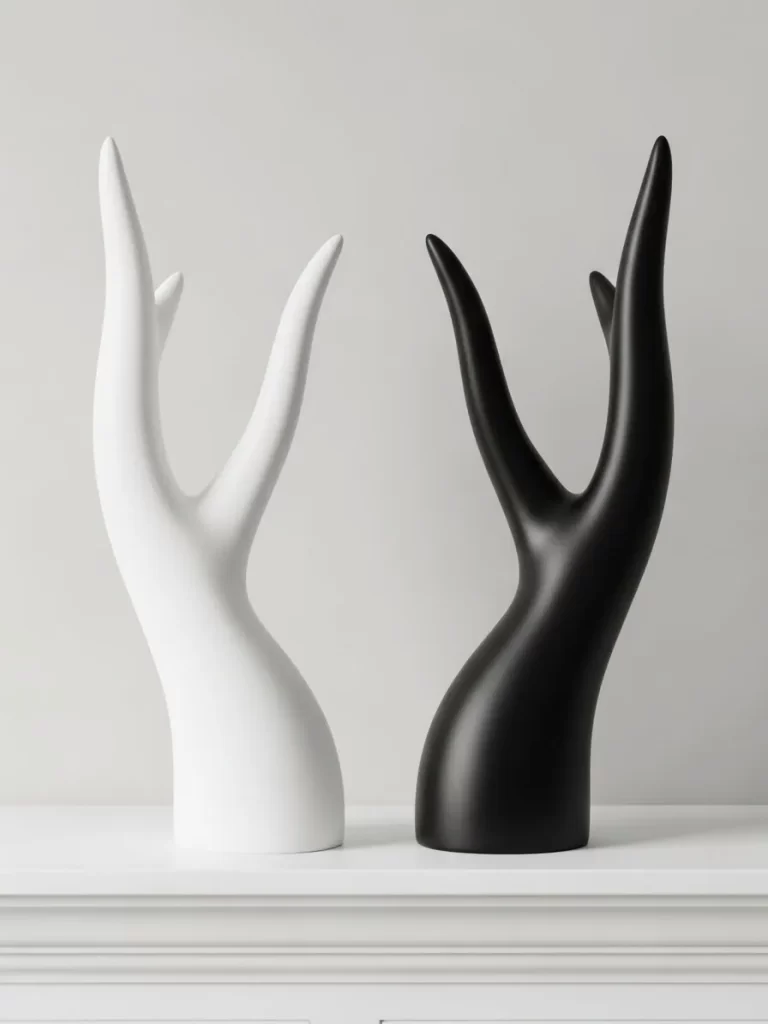
These twin sculptures make a powerful contemporary statement through stark contrast and elegant form. Crafted to resemble stylized, upward reaching hands, the pieces are simplified into abstract, smooth, and flowing shapes. One is finished in a matte, clean white, and the other in a deep, velvety matte black.
The pairing is a classic study in duality and balance. The graceful, elongated form captures a sense of reaching or offering, lending a thoughtful, artistic touch to any console or shelf. When displayed side by side, their silhouettes play off one another beautifully, adding height and sculptural interest without introducing busy detail.
These pieces are the definition of non basic, modern decor. They deliver sophistication through purity of form and color, proving that abstract art pieces can be approachable and incredibly effective in anchoring a space with quiet drama.
???? DIY Instruction: Abstract Hand Sculptures
You can create a similar abstract, elongated hand shape using wire armature and air dry clay, followed by a matte paint finish.
Material Required List
- Thick gauge wire (for armature)
- Air dry clay (or sculpting plaster)
- Matte black and matte white spray paint
- Wooden base (optional)
- Clear matte sealant spray
Equipment Required List
- Wire cutters and pliers
- Crafting knife or sculpting tool
- Sandpaper (medium and fine grit)
- Safety mask and gloves
DIY Instruction Step by Step
- Build the Armature: Using the wire, bend and shape the internal skeleton for the abstract hand, focusing on the elongated wrist and the upward curve of the two main fingers/points. The wire needs to be strong enough to hold the clay’s weight.
- Apply the Clay: Begin covering the wire armature with the air dry clay, building up the volume to create the smooth, curving body of the hand and wrist. Focus on blending and smoothing the clay to eliminate seams and maintain a fluid, continuous line. Leave the bottom flat so it can stand easily.
- Dry and Refine: Let the clay dry completely according to the manufacturer’s instructions. Once dry, use a crafting knife to carve away any imperfections and sand the entire surface with fine grit sandpaper until it is exceptionally smooth, replicating the refined ceramic finish.
- Paint the Sculptures: Divide your finished sculptures into the black and white pairing. In a ventilated area, apply two to three thin, even coats of matte black spray paint to one sculpture and matte white spray paint to the other. Ensure the finish is opaque and flat, avoiding any drips or glossy patches.
- Seal the Finish: Once the paint is fully cured, apply a light mist of clear matte sealant spray to protect the surface and preserve the sophisticated, non glossy finish.
17. Kilim Style Fringed Accent Pillow

Immediately introduce warmth and global texture with this rich, patterned throw pillow. It is crafted from a vintage style Kilm rug material, featuring traditional geometric motifs in a striking palette of brick red, cobalt blue, cream, and black. The woven squares are pieced together, giving the pillow a handmade, layered feel.
Adding to its unique character, the edges where the patterns meet are adorned with vertical strips of pale, feathery fringe. This unexpected detail softens the strong geometric patterns and adds a delightful textural element. The blend of coarse woven textile and soft fringe makes this accessory highly tactile.
Accent pillows are low commitment items that have a huge impact on basic furniture. This piece is far from ordinary, offering both the durability of a rug and the cozy appeal of a cushion, instantly making a basic sofa feel worldly and thoughtfully decorated.
???? DIY Instruction: Kilim Inspired Patchwork Pillow
You can mimic the look of a woven Kilm pillow using patterned fabric scraps and adding your own decorative fringe.
Material Required List
- Fabric scraps in geometric patterns (red, blue, cream, black) or Kilm patterned fabric
- Solid backing fabric (heavy cotton or canvas)
- Faux fur trim or thick yarn (for the fringe effect)
- Pillow insert
- Matching thread
Equipment Required List
- Sewing machine (or needle for hand sewing)
- Fabric scissors
- Pins
- Measuring tape
DIY Instruction Step by Step
- Cut the Patches: Cut your patterned fabric scraps into squares or rectangles of equal size. You need enough patches to create one side of the pillow cover (e.g., a 2×2 or 3×3 grid).
- Stitch the Patches: Pin the fabric patches together in the desired Kilm style arrangement. Sew them together with a straight stitch, using a 1/2 inch seam allowance, until you have created the full pillow front panel. Press the seams flat.
- Prepare the Fringe: Cut the faux fur trim or lengths of thick yarn to the length needed for the decorative vertical strips (where the patches meet). If using yarn, glue or stitch the lengths close together onto a thin strip of fabric to create a flat fringe trim.
- Attach the Fringe: Pin and sew the prepared fringe trim over the vertical seams where the fabric patches meet, as seen in the inspiration image. Sew it down carefully to secure the trim.
- Assemble the Pillow Cover: Cut the backing fabric to the same size as your finished front panel. With the right sides facing together, pin the front and back panels. Place the fringe inside the seam allowance, so it flips out when the pillow is turned right side out.
- Sew and Insert: Sew around three sides and part of the fourth side, leaving a large enough opening to insert the pillow form. Turn the cover right side out, stuff the pillow insert firmly inside, and hand stitch the opening closed with a slip stitch.
18. Ornate Convex Round Mirror
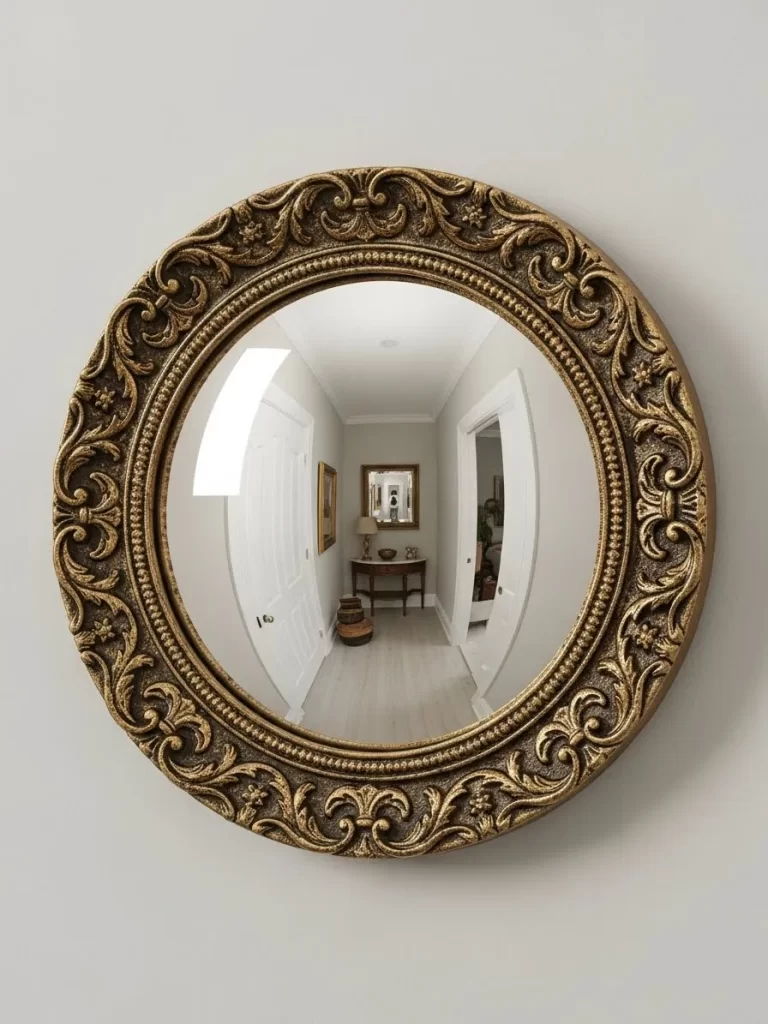
Mirrors are essential, but they do not have to be flat. This stunning piece features a heavily sculpted, antique gold frame surrounding a convex, or fish eye, mirror. The frame is a masterpiece of detail, covered in intricate scrolls, vines, and floral motifs that immediately lend a regal, Baroque elegance.
The unusual curved glass surface distorts the reflection, transforming the space into an artful, wide angle panorama. This quality makes it a fantastic tool for brightening a hallway or adding visual intrigue, as it reflects the entire room in a dramatic, spherical way.
Hanging a mirror with such a rich, textural frame and an unexpected curve is an instant way to break up a flat wall and introduce a sense of vintage luxury. It serves as both a dazzling piece of dimensional wall art and a functional tool for creating the illusion of more space.
???? DIY Instruction: Gilded Ornate Mirror
You can achieve a similar antique, ornate gold mirror look by repurposing a thrift store mirror and applying texture medium and gold paint.
Material Required List
- Plain round mirror (thrifted or new)
- Lightweight joint compound or texture paste
- Matte dark brown or black spray paint (base coat)
- Metallic gold spray paint or gold leaf kit
- Small detail brushes and artist sponges
- Clear sealant spray
Equipment Required List
- Protective sheeting (to cover the glass)
- Palette knife or sculpting tool
- Safety gloves and mask
DIY Instruction Step by Step
- Protect the Glass: Carefully cover the mirror glass with masking tape and paper, ensuring the frame is fully exposed.
- Build the Texture: Using a palette knife or sculpting tool, apply a layer of thick joint compound or texture paste directly to the plain mirror frame. While wet, use tools, fingers, or a heavy textured stamp (like a lace doily or carved block) to press intricate, swirling, and floral patterns into the compound, mimicking the ornate detailing. Let the compound dry completely.
- Apply Base Color: In a well ventilated area, apply a coat of matte black or dark brown spray paint over the entire textured frame. This base color will create the dark shadows necessary for the antique look.
- Apply the Gold Finish: Once the base coat is dry, use your gold spray paint or gold leaf. For the antique effect, use the gold sparingly. If spraying, use very short bursts, allowing the dark color to show through the depressions. If using gold leaf, apply small, imperfect patches. For a highly realistic effect, use a dry sponge dipped in gold acrylic paint and dab it only onto the raised areas.
- Finish: Once the gold is dry, apply a clear sealant to protect the finish. If you want to simulate the convex glass, you will need to find a specialized mirror, as that aspect cannot be DIYed with flat glass.
19. Architectural Engraving Wall Art

For those who appreciate history and meticulous detail, this print is a strong choice. It features a detailed, black and white engraving of an ornate architectural column capital and a decorative door hinge. The image is printed on paper with an aged, sepia tone, lending it a sense of historical artifact.
Framed simply with a clean black edge, the large scale of the print commands attention. It works wonderfully in an office or a library, introducing a feeling of scholastic interest and masculine elegance. The focus on a usually overlooked structural element—the capital and hinge—makes it a truly non standard piece of art.
Art that showcases technical detail and historical structure adds sophistication that simple abstracts cannot match. This print is a thoughtful choice for anchoring a workspace, proving that character often lies in the fine points of design and engineering.
???? DIY Instruction: Faux Architectural Engraving
You can create a high quality, large scale print that mimics the look of a vintage architectural drawing.
Material Required List
- High resolution digital image of a technical drawing, engraving, or architectural blueprint (available online)
- Large format printing service (using matte or watercolor paper)
- Tea or coffee wash (for aging, see DIY #11)
- Simple black frame (ready made)
Equipment Required List
- Sponge or large, soft brush
- Large protected surface
- Iron (optional)
DIY Instruction Step by Step
- Source the Image: Find a black and white image of an architectural detail (a column, a gear, a cross section) that has a high contrast, line based appearance like an engraving. Have it printed at your desired large size onto a quality matte paper.
- Age the Print: Follow the aging steps outlined in DIY #11 (Framed Vintage Botanical Print) using a light tea or coffee wash. Instead of fully soaking it, you can use a large, soft brush or sponge to gently paint the sepia wash over the entire surface, paying special attention to darkening the edges slightly.
- Crease for Realism (Optional): Once the wash is on and slightly damp, you can gently fold the paper once or twice and then immediately flatten it. This creates soft creases, mimicking how old papers were stored. Iron the print on a very low setting after it is fully dry to flatten it completely.
- Frame the Art: Place the aged, sepia toned print into the simple black frame. The dark frame provides a striking modern contrast to the vintage appearance of the print, making the whole piece look custom and highly curated.
20. Marbled Textile Wall Hanging
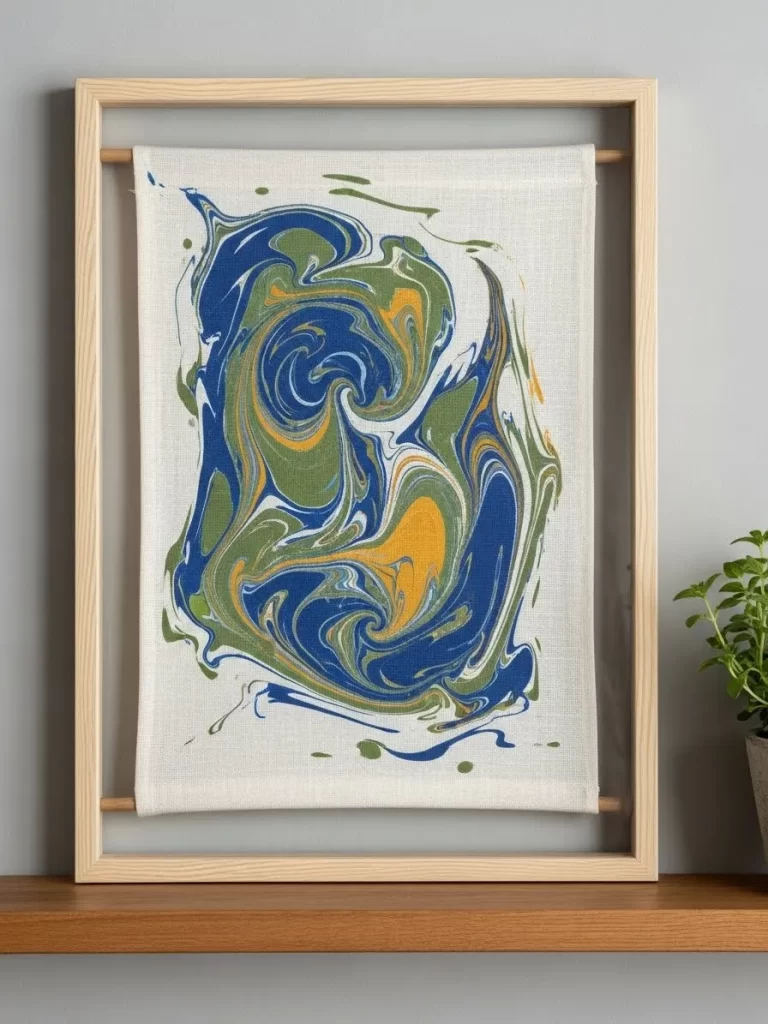
This wall hanging introduces a bold splash of flowing color and artistic movement. Instead of being flat and crisp, the fabric piece features a striking, non repeating pattern created through the art of paint marbling. Swirls of deep indigo, emerald green, and ochre yellow blend and flow across the natural linen background.
The textile itself is hung simply, draped between two wooden dowels, which gives it a soft, non rigid form unlike a canvas. The marbling technique ensures that no two pieces are exactly alike, providing a genuine one of a kind element that transforms a blank wall into a space of fluid, organic color.
Choosing unexpected materials, like a marbled textile, for wall decor is a surefire way to avoid basic design. It adds an artistic, handcrafted feel and a sense of dynamic movement that instantly lifts the energy of a room.
???? DIY Instruction: Marbled Textile Wall Art
You can create this stunning, fluid pattern using a traditional marbling technique on a piece of linen or cotton fabric.
Material Required List
- Piece of linen or cotton fabric (pre washed)
- Marbling paint kit (includes paints, thickener/size, and alum powder)
- Wooden dowels (two)
- Strong twine or yarn
Equipment Required List
- Large, shallow tray (must be larger than your fabric)
- Rake or stylus (for manipulating paint)
- Clothes pins or clips
DIY Instruction Step by Step
- Prepare the Fabric: Soak your fabric piece in a solution of water and alum powder (included in marbling kits) according to the kit instructions. This helps the paint adhere. Let it dry completely.
- Prepare the Size: Mix the powdered thickener (often called “size”) with water in the large, shallow tray according to the kit instructions. This creates the thick liquid foundation that the paint floats on. Let the size cure.
- Drop the Paint: Gently drip your chosen colors (blue, green, yellow, white) onto the surface of the size. The paint will float on top. Use the rake or stylus to gently pull and swirl the colors into the desired flowing, organic pattern.
- Lay the Fabric: Carefully and smoothly lay your treated fabric piece onto the surface of the marbled paint. Let it sit for just a few seconds to absorb the pattern.
- Rinse and Dry: Gently lift the fabric from the tray. Immediately rinse the fabric under running water to wash away the sticky size, leaving only the permanent paint design. Hang the textile up to dry completely using clothes pins.
- Assemble the Hanging: Once dry, fold the top and bottom edges of the fabric over the wooden dowels and stitch them securely in place. Tie a piece of twine or yarn to the top dowel for hanging.
21. Industrial Articulated Task Lamp
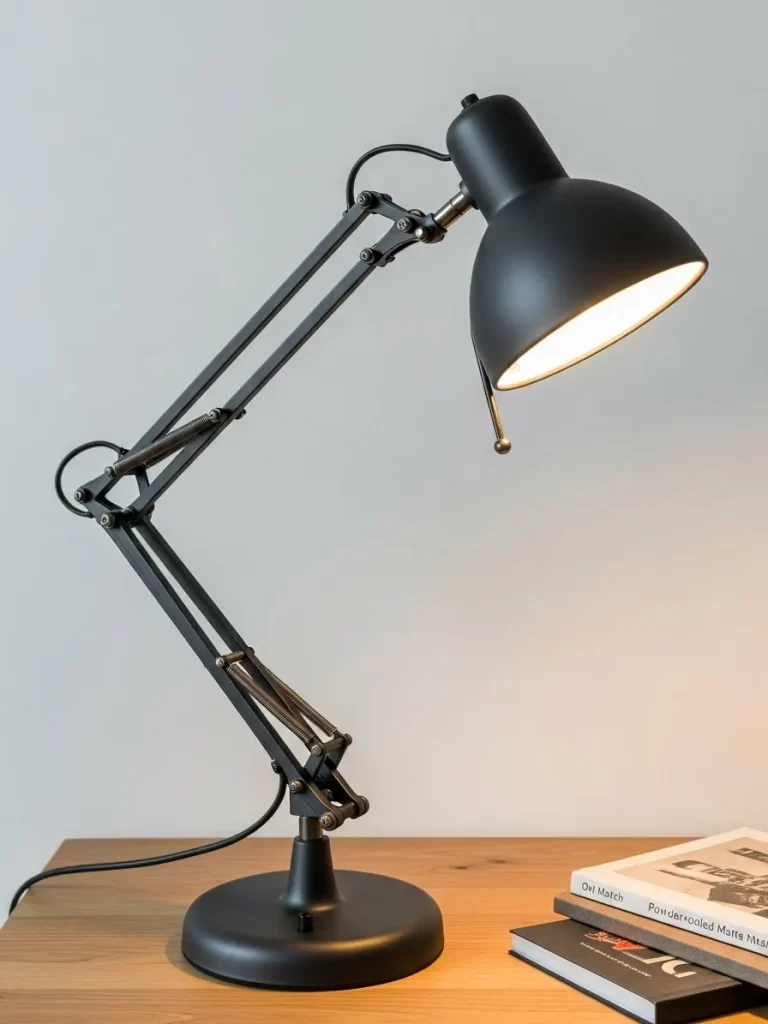
Illuminate your workspace with a sense of purposeful engineering. This classic task lamp features an all matte black finish and a highly articulated, spring balanced arm system. The exposed springs and joint mechanisms give it an undeniably utilitarian and slightly retro industrial aesthetic.
The wide, domed shade casts a concentrated pool of light, making it exceptionally functional for reading or detailed work. Positioned on a desk or bedside table, its striking, angular silhouette adds a strong vertical and horizontal element to the room. This is a lighting choice that prioritizes form and function equally, moving far beyond basic lamp design.
Choosing statement lighting is a key strategy for elevating basic rooms. This lamp acts as a piece of sculpture even when switched off, bringing character and a timeless, draftsman inspired appeal to your functional areas.
???? DIY Instruction: Black Industrial Style Lamp Makeover
You can revitalize an existing cheap or basic desk lamp to achieve this sleek, industrial look with a matte finish.
Material Required List
- Old metal desk lamp (must have a spring/articulated arm)
- Matte black spray paint (ensure it adheres well to metal)
- Sandpaper (fine grit, 220)
- Primer spray paint (for metal)
- Light bulb (warm tone recommended)
Equipment Required List
- Screwdriver or wrench (for disassembly)
- Protective sheeting and painter’s tape
- Safety mask and gloves
DIY Instruction Step by Step
- Disassemble the Lamp: Carefully take apart the lamp, removing the shade, base, and any plastic or electrical parts that should not be painted. Unplug and separate the electrical cord entirely if possible, or wrap the cord and socket with painter’s tape very securely.
- Prepare the Surface: Use fine grit sandpaper to lightly scuff all the metal surfaces of the arm, springs, and shade. This crucial step helps the new paint adhere. Wipe down all parts thoroughly to remove any dust and grease.
- Apply Primer: In a well ventilated area, apply one light, even coat of metal primer spray to all the parts. Let the primer dry completely.
- Apply Matte Black Paint: Apply several thin, even coats of the matte black spray paint, following the can’s instructions for drying time between coats. Rotating the pieces allows you to cover every angle and joint thoroughly. Ensure the paint is completely flat and matte.
- Cure and Reassemble: Let the painted pieces cure for at least 24 hours. Carefully remove all tape and reassemble the lamp. Use a warm toned light bulb to create a cozy, focused glow that contrasts with the stark black finish.
22. Fluted Olive Glass Match Jar
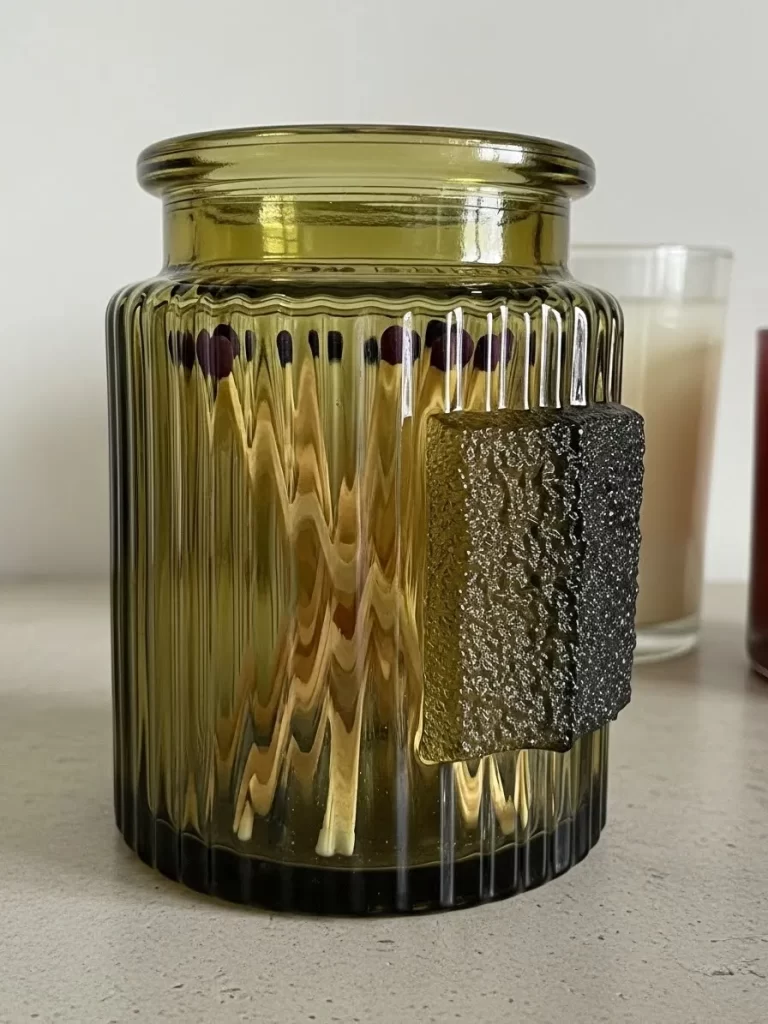
Functional everyday items should possess beauty, and this match jar is a prime example. Made from heavy, olive toned glass with a delicate fluted texture, it is both practical and stylish. The deep green color gives it a vintage apothecary feel, setting it apart from standard storage.
A crucial detail is the small, textured striking pad securely affixed to the side of the jar. This allows the user to store long safety matches elegantly while keeping the striker readily accessible. The glass itself captures and refracts light beautifully, making the wooden matches visible inside.
Upgrading small accessories like this is a subtle yet effective strategy to add character to a mantle or coffee table. It provides a tactile, well designed accessory that looks sophisticated and thoughtful, transforming a basic necessity into a decorative element.
???? DIY Instruction: Textured Match Striker Jar
You can easily add a match striker pad to a fluted glass jar to create a sophisticated, functional piece.
Material Required List
- Fluted or textured glass jar with a lid (olive green or amber glass works well)
- Long wooden safety matches
- Match striker paper or coarse sandpaper (fine grit will not work)
- Strong, clear adhesive (like E6000 or strong epoxy)
Equipment Required List
- Scissors and ruler
- Rubbing alcohol and cotton swab
DIY Instruction Step by Step
- Clean the Surface: Clean the outside of the glass jar thoroughly with a cotton swab and rubbing alcohol where you plan to attach the striker pad. This removes any oils and ensures maximum adhesion.
- Cut the Striker Pad: Measure and cut a small square or rectangle piece of match striker paper (or very coarse sandpaper) to the desired size. You want it substantial enough to strike a match easily.
- Attach the Striker Pad: Apply a generous but neat layer of the strong clear adhesive to the back of the striker paper. Carefully position the striker pad onto the clean glass surface of the jar. Press it firmly for about 30 seconds.
- Cure: Allow the adhesive to cure completely, which may take 24 to 72 hours depending on the product. Do not attempt to strike a match until the glue is fully set.
- Fill and Use: Once the adhesive is cured, fill the jar with your long wooden matches. Display the jar near your candles or fireplace for a charming, accessible, and non basic way to store matches.
23. Heavy Timber Abstract Bookends

These substantial bookends anchor your shelf display with raw, masculine character. They are carved from thick, rich toned timber, giving them a rustic yet modern feel. One side features deeply carved, circular and square protrusions, creating an abstract, mechanical relief pattern.
The wood sits on a contrasting, dark metal base, adding visual weight and stability. This interplay between the warm, natural wood and the cool, heavy metal is incredibly compelling. Used to flank a set of classic books, they transform a simple shelf into a curated, sculptural moment.
Using found or handmade items with this level of visual weight and textural contrast is a smart move to overcome basic shelf styling. These bookends function as miniature pieces of industrial folk art, reflecting a sophisticated taste in materials and form.
???? DIY Instruction: Sculpted Timber Bookends
You can create a similarly rugged, sculptural bookend using thick wood blocks and metal hardware for the industrial detail.
Material Required List
- Two solid, thick wood blocks (pre cut to size, or cut from a beam)
- Dark wood stain or dark wax
- Assorted metal washers, screws, or heavy cabinet knobs (for the relief pattern)
- Strong construction adhesive
- Thin flat metal or dark painted wood pieces (for the base)
Equipment Required List
- Orbital sander or sandpaper (medium and fine grit)
- Drill
- Screwdriver
DIY Instruction Step by Step
- Prepare the Wood: Sand the wood blocks thoroughly to ensure a smooth, stable surface. Apply a dark wood stain or wood wax to mimic the deep, aged tone of the inspiration image. Allow the stain/wax to dry fully.
- Plan the Relief Pattern: Decide which side of the wood blocks will face outward. Arrange your metal hardware (washers, screws, knobs) into an abstract geometric pattern, similar to the image, on one face of each block.
- Attach the Hardware: Drill pilot holes where necessary for the screws or knobs. Attach the hardware, recessing some pieces slightly for an aged, industrial look. For pieces that cannot be screwed, use a strong construction adhesive to secure them firmly to the wood.
- Create the Base: Cut or source two thin, flat pieces of metal or wood that are slightly larger than the bottom of your wood blocks. Paint these base pieces a deep, dark brown or black to contrast with the stained wood.
- Assemble the Bookends: Apply a strong construction adhesive to the bottom of the wood blocks and secure them firmly to the center of the prepared base pieces. Ensure the bookends stand perfectly upright and let the adhesive cure completely before using them to support heavy books.
24. Copper Spiral Incense Holder
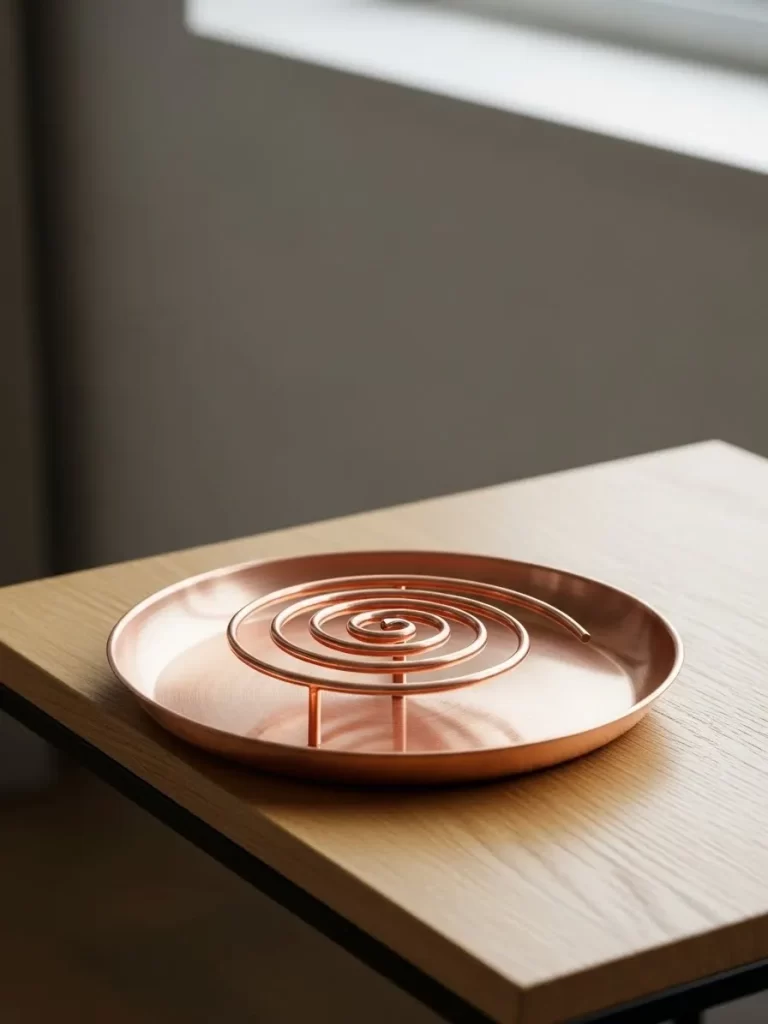
This piece transforms the simple act of burning incense into a moment of elegant ritual. Crafted entirely from polished copper, the holder consists of a shallow, wide tray with a delicate, continuous spiral of copper wire suspended above the surface. The entire piece has a warm, rosy metallic sheen.
The spiral wire is designed to hold incense in its coil, allowing the ash to drop cleanly onto the tray below. The minimal, continuous form of the spiral is deeply satisfying and instantly elevates it to a piece of kinetic sculpture. Displayed on a simple wooden surface, the warm copper tones stand out beautifully.
Incorporating elements of ritual and ceremony into your decor adds immediate character. This holder is far superior to standard wooden boxes, introducing a note of sophisticated modern design and a luxurious metallic accent to your contemplative spaces.
???? DIY Instruction: Spiral Metal Incense Holder
Creating this sculptural piece involves carefully shaping metal wire and securing it to a simple base plate.
Material Required List
- Thin gauge copper wire (easy to bend, but rigid enough to hold its shape)
- Flat, shallow copper or copper colored metal plate (for the base)
- Strong metal adhesive or quick setting epoxy
- Clear glossy sealant spray
Equipment Required List
- Pliers (needle nose for tight bends)
- Metal cutters
- Ruler
- Small metal standoffs or screws (optional, for height)
DIY Instruction Step by Step
- Create the Spiral: Measure out a long section of copper wire. Using needle nose pliers, carefully begin coiling the wire tightly from the center outward to form a neat, flat spiral. The coils should be evenly spaced and large enough to hold the incense stick.
- Shape the Center Support: Cut a short, straight piece of copper wire to act as the central support that elevates the spiral above the plate. Use pliers to bend a small, flat loop or base at the bottom of this support wire.
- Attach the Spiral: Securely glue the center of the finished copper spiral to the top of the short support wire using metal adhesive. Allow this joint to set completely.
- Prepare the Plate: Ensure your base plate is clean and free of dust. If using metal standoffs, attach them to the plate first to create tiny feet.
- Mount the Spiral: Apply a generous amount of metal adhesive or epoxy to the bottom loop/base of the center support wire. Carefully position the support wire in the center of the copper base plate and hold it firmly until the adhesive sets enough to hold the weight.
- Seal and Finish: Once the structure is completely stable, spray the entire holder (spiral and plate) with a clear glossy sealant to protect the copper color and provide a professional shine.
25. Distressed Galvanized Herb Trough
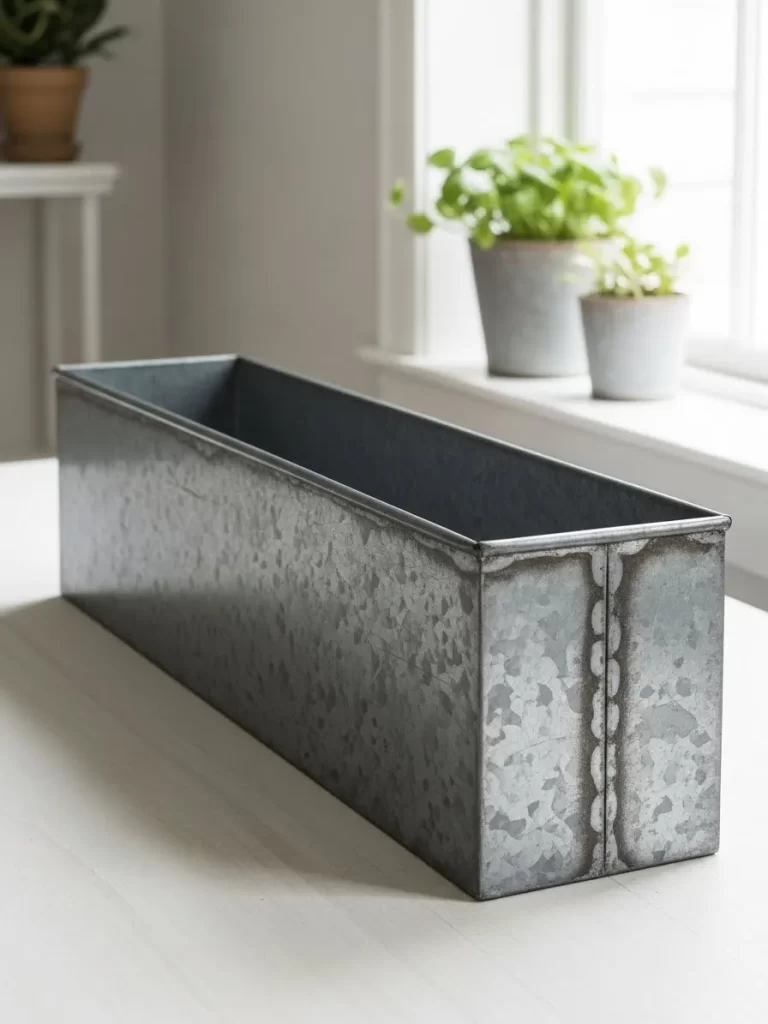
For a dose of rustic industrial charm, functional containers like this are essential. This planter is a long, narrow trough crafted from galvanized metal, featuring a subtly distressed, speckled finish. The riveted or visible seam lines on the sides add an authentic, vintage agricultural or industrial feel.
The long, rectangular shape is particularly versatile, fitting perfectly on a window ledge, a narrow console table, or as a centerpiece on an outdoor table. It provides a striking, textured container for herbs, succulents, or colorful floral arrangements, contrasting beautifully with the softness of the plants.
Bringing materials with genuine patina and utility into your decor instantly adds depth and history. This trough moves beyond basic ceramic planters, providing a touch of farmhouse or loft apartment character that is both rugged and stylish.
???? DIY Instruction: Faux Galvanized Metal Planter
You can turn a basic wood or plastic container into a realistic looking, distressed galvanized metal planter using paint effects.
Material Required List
- Long, narrow wooden trough (or plastic planter)
- Gray spray paint (matte or satin finish)
- Black and white acrylic paint
- Small natural sponge or sea sponge
- Fine grit sandpaper
- Clear acrylic sealant (matte or satin)
Equipment Required List
- Protective sheeting
- Paint brushes (small detail brush)
- Ruler and pencil
DIY Instruction Step by Step
- Prep the Planter: If using wood, ensure the seams are smooth. Apply a base coat of the plain gray spray paint to the entire exterior surface. Let it dry completely.
- Add Distressing and Texture: Lightly dab a small amount of white acrylic paint onto the natural sponge. Gently blot the sponge randomly across the gray surface. This creates the white speckled, mottled effect of aging galvanized metal. Clean the sponge and repeat the process using a tiny amount of black paint to create dark pitting and shadowing.
- Simulate Seams/Rivets: Use a small detail brush and a slightly darker gray or black paint to draw thin, straight vertical lines down the corners of the planter, mimicking visible seams. Add tiny dots along these lines to resemble rivets.
- Age the Edges: Once the paint is dry, use fine grit sandpaper to very lightly sand the edges and corners of the trough. This reveals the darker base color (or the original material) underneath, simulating natural wear and rusting.
- Seal for Protection: In a ventilated area, apply a final coat of clear acrylic sealant (matte or satin) to protect the finish, especially since it will be used for plants.
26. Banded Multi Stone Onyx Bowl

Nature’s artistry is fully on display in this stunning catchall dish. Carved from a single piece of banded onyx, the bowl showcases an extraordinary, non repeating pattern of organic color. Swirls of deep forest green, rusty orange, cream, and brown flow through the stone.
The simple, gently curved form of the dish ensures the focus remains entirely on the mesmerizing geological patterns of the material. Set on a dark surface, the stone’s translucent quality catches the light, giving it a subtle internal glow. This piece is far too beautiful to hide; use it to hold keys or simply display it empty.
Choosing decor carved from natural, geological materials instantly elevates a room’s character. This onyx bowl is not just an accessory; it is a piece of earth history, bringing rich texture and sophisticated color to your entryway or dresser.
???? DIY Instruction: Faux Banded Onyx Bowl
You can replicate the banded, translucent look of onyx using polymer clay and a careful kneading technique.
Material Required List
- Polymer clay in several colors (forest green, white, cream, rust/orange, dark brown)
- Clear glossy sealant spray (or resin for a truly polished look)
- Small ceramic or glass bowl (for molding the shape)
Equipment Required List
- Clay conditioning machine or rolling pin
- Crafting knife or wire cutter
- Rubber gloves
DIY Instruction Step by Step
- Prepare the Clay Segments: Condition each color of polymer clay until soft. Form each color into long, thin ropes.
- Create the Banding: Place the different colored clay ropes next to each other in a cluster (green, white, orange, brown). Gently twist and roll the cluster of ropes together, but do not over mix. The goal is to create long, distinct, parallel bands of color, not a muddy blend.
- Slice the Clay: Use a crafting knife or wire cutter to slice the long, banded clay log into thin, flat sheets. These slices will now display the intricate, swirling lines that mimic the onyx banding.
- Mold the Bowl: Carefully press the sliced clay sheets onto the outside surface of a small, smooth ceramic or glass bowl. Overlap the edges slightly and use your fingers to smooth and blend the joins. You are creating a thin shell over the real bowl. Trim the top edge neatly.
- Bake the Clay: Gently peel the clay shell off the glass bowl. Place the clay shell onto a baking sheet and bake it according to the polymer clay manufacturer’s instructions.
- Seal and Finish: Once baked and cooled, the clay bowl should be hard. To replicate the translucent, high gloss look of polished onyx, apply several coats of a clear glossy sealant spray or coat it with a layer of clear casting resin.
27. Folk Art Terracotta Goat Bust
This piece is pure, joyful character. A folk art style bust of a goat head, it is rendered in a rough, textural terracotta that is then brightly painted in saturated, non realistic colors—vivid blue, grass green, sunny yellow, and sunset orange. The horns curve dramatically, adding height and dimension.
The placement inside a bookshelf niche highlights its sculptural form and introduces a wonderful element of the unexpected. It functions as a bold, eccentric accent that reflects a love for global craft and whimsical, non serious art. It is a stunning visual break among the straight lines of the books.
Choosing unique, colorful sculptural pieces that defy categorization is an instant way to move beyond basic decor. This goat bust acts as a vibrant centerpiece for a personal collection, showcasing humor and a cultured aesthetic.
???? DIY Instruction: Colorful Folk Art Bust
You can transform a basic animal bust (or create one using papier mâché) into a colorful folk art piece with bright paint and a texture base.
Material Required List
- Animal bust form (goat, deer, or ram) made of papier mâché, resin, or plaster
- Gesso or thick primer
- Bright acrylic paints (blue, green, yellow, orange, red)
- Clear matte varnish or sealant
- Fine sand or grit (optional, for added texture)
Equipment Required List
- Paint brushes (various sizes)
- Mixing cups
- Protective sheeting
DIY Instruction Step by Step
- Prepare the Form: Ensure the bust is clean. Apply a coat of gesso or a heavy duty primer to the entire surface. If you want added texture, mix a small amount of fine sand or grit into the gesso before applying it. Let this layer dry completely.
- Apply Base Colors: Using the bright acrylic paints, block out the main colors on the bust, similar to the image (e.g., blue for the forehead, yellow for the cheeks, orange/red for the neck). Do not worry about perfection; folk art is charmingly uneven.
- Add Details and Blending: Use a smaller brush to add details like eyes, nose, and any patterns on the horns. Where the colors meet, use a dry brush technique to gently blend the edge, creating a soft, colorful transition without harsh lines. Apply additional thin coats until the colors are rich and vibrant.
- Paint the Horns: Paint the horns in a natural bone color or a contrasting dark brown/black, adding texture with small brush strokes.
- Seal the Finish: Once all the paint is completely dry, apply several coats of clear matte varnish or sealant. This protects the bright colors and gives the piece a professional, lasting finish while preserving the non glossy folk art look.
28. Oversized Demi John Bottle Lamp

Scale is everything in design, and this lamp proves it. Featuring an extraordinarily large, rounded base made from subtly green tinted glass, it immediately commands attention. The glass shape is reminiscent of an old world demi john or fermentation carboy.
The massive, transparent base allows light to pass through, creating a soft, diffused glow that brightens the surrounding area. The lamp is topped with a simple, oversized cream colored fabric shade, balancing the substantial size of the base. Its sheer size and simple, organic form make it an unmissable anchor for a living room corner or side table.
Using unexpected scale with classic shapes is a non basic design technique that pays off. This lamp functions not just as a light source but as a stunning, transparent floor sculpture, adding dramatic height and a lovely touch of colored glass to your space.
???? DIY Instruction: Giant Glass Bottle Lamp Conversion
You can convert a large glass jug or carboy into a lamp base using a specialized lamp making kit.
Material Required List
- Very large glass jug, carboy, or demi john bottle (clear or tinted glass)
- Lamp wiring kit (includes cord, socket, plug, and a threaded pipe/nipple)
- Lamp harp (the frame that holds the shade) and finial
- Oversized drum or barrel lamp shade
- Cork or rubber stopper with a pre drilled center hole (to fit the bottle neck)
Equipment Required List
- Screwdriver
- Wire strippers and pliers
- Drill (with glass bit, only if drilling a hole for the cord)
DIY Instruction Step by Step
- Prepare the Bottle: Your lamp kit will require the cord to exit the bottle. You either need a specialized cork with a groove for the cord, or you must drill a hole near the base of the bottle using a glass drill bit and water. Using the cork is much easier and safer.
- Assemble the Lamp Kit: Feed the electrical cord through the pre drilled hole in the cork stopper. Thread the hollow, threaded metal pipe (nipple) that came with the lamp kit through the center hole of the stopper.
- Secure the Socket: Wire the lamp socket to the cord according to the kit instructions. Screw the socket assembly onto the top end of the metal pipe/nipple.
- Insert the Assembly: Gently press the cork stopper firmly into the neck of the glass bottle. The pipe and socket should be held rigidly in place.
- Attach Harp and Shade: Screw the lamp harp securely onto the socket base. Place your oversized lamp shade onto the harp and secure it with the finial (the decorative screw at the top).
- Test and Display: Plug in the lamp and ensure it works correctly. The large scale creates a stunning and unique lighting feature.
29. Velvet Damask Accent Pillow
This pillow is a luxurious exercise in textural layering and rich color. Made from deep sapphire blue velvet, the fabric itself suggests opulence. The surface is then overlaid with a subtly raised, cut velvet pattern of classic damask motifs in emerald green, peacock blue, and brick red.
The dimensional quality of the cut velvet adds incredible tactile and visual depth. The monochromatic blue base is broken up by the rich, jewel toned pattern, ensuring that the piece feels grand yet cohesive. It is a striking contrast against plain linen or cotton upholstery, instantly elevating the perceived quality of a sofa or armchair.
Introducing rich, dimensional fabrics like cut velvet is a foolproof way to inject character and luxury into basic seating. This pillow is a substantial, color saturated piece that transforms a simple sitting area into a welcoming, refined lounge.
???? DIY Instruction: Stenciled Velvet Pillow
While cutting velvet is complex, you can mimic the raised damask pattern effect using fabric stencil paint on an existing velvet cover.
Material Required List
- Plain velvet pillow cover (deep blue or jewel tone)
- Fabric stencil paint (in jewel tones: red, green, metallic blue)
- Damask pattern stencil (must be strong and washable)
- Freezer paper or thin cardboard
- Fabric glue (optional, for extra texture)
Equipment Required List
- Stencil brushes or small foam rollers
- Iron
- Protective sheeting
DIY Instruction Step by Step
- Prepare the Pillow: Insert a piece of freezer paper or thin cardboard into the pillow cover to keep the paint from bleeding through to the back. Lay the cover flat and smooth.
- Position the Stencil: Place your damask stencil over the velvet cover. Use painter’s tape to secure the stencil firmly in place around the edges.
- Mix the Paint (Optional Texture): For a slightly raised effect similar to cut velvet, you can mix a small amount of fabric glue or dimensional medium into your fabric stencil paints.
- Apply the Paint: Dip your stencil brush or roller into the mixed fabric paint. Blot off the excess paint onto a paper towel. Gently and evenly pounce or roll the paint over the stencil. Use different colors on different sections of the stencil to create the patchwork colored effect seen in the image.
- Lift and Repeat: Carefully lift the stencil straight up while the paint is still wet. Reposition the stencil to continue the repeating damask pattern across the entire pillow surface. Clean the stencil immediately between uses to keep the lines crisp.
- Set the Paint: Allow the paint to dry completely. Follow the fabric paint manufacturer’s instructions for heat setting the paint (usually done by ironing the back of the fabric) to ensure the design is permanent and washable.
30. Framed Stamp and Pressed Flower Collage
This framed shadowbox is a wonderfully rich tapestry of delicate, collected elements. It features a collage of vintage postage stamps, pressed dried flowers (like violets, ferns, and small yellow blossoms), handwritten notes, and other small natural objects. The pieces are all meticulously pinned against a neutral backing.
The arrangement is a study in texture, color, and history, combining the graphic design of old stamps with the organic beauty of nature. Displayed large scale, it immediately draws the eye and invites close, prolonged inspection. It is a stunning, deeply personal alternative to conventional wall art.
Creating a piece that showcases a personal collection or a love for ephemera is the highest form of character driven decor. This shadowbox transforms simple mementos into a sophisticated, museum worthy display, giving your room a profound sense of history and curation.
???? DIY Instruction: Ephemera and Flower Shadowbox
You can create a beautiful, layered collage using collected paper goods and pressed flowers inside a large frame.
Material Required List
- Deep shadowbox frame with glass front
- Large sheet of neutral colored foam core or thick cardstock (for the backing)
- Collection of ephemera (vintage stamps, old letters, labels, postcards)
- Pressed dried flowers and small natural finds (acorns, tiny shells)
- Fine, long insect pins or small mounting glue dots
- Tweezers
Equipment Required List
- Ruler and scissors
- Glue stick (for flat papers)
DIY Instruction Step by Step
- Prepare the Backing: Cut the foam core to fit snugly inside the shadowbox frame. This will be the surface onto which everything is pinned.
- Plan the Layout: Lay the foam core flat. Arrange all your stamps, papers, and flowers onto the surface. Start by gluing down the largest, flattest pieces (like background paper scraps) using a glue stick. Then, layer the stamps and flowers, arranging them randomly but ensuring visual balance across the frame.
- Mount the Elements: Once the flat pieces are glued, use your long pins or glue dots to secure the three dimensional elements. Use pins for the pressed flowers and papers to give them a natural, collected look, pushing the pins deep into the foam core. Use glue dots for small, heavy objects like acorns or shells.
- Finalize the Arrangement: Use tweezers to gently adjust the delicate elements. Ensure all the pinned items are securely fixed and will not shift if the frame is hung vertically.
- Assemble the Frame: Carefully place the finished foam core collage into the shadowbox frame. Secure the backing and hang your unique, curated work of art.
31. Polished Petrified Wood Coasters
These coasters are far more than just surface protection; they are millions of years of natural history captured in slices. Crafted from polished petrified wood, each piece features a striking cross section that reveals the original tree rings, now replaced by colorful minerals. The distinct red, black, and gray banding makes every coaster a one of a kind geological artwork.
The rough, natural bark edge provides a rugged contrast to the highly polished, glossy surface. Displayed beneath a coffee cup, they elevate a simple beverage into a stylish moment. Their durability and incredible visual texture make them a sophisticated alternative to basic stone or cork coasters.
Incorporating natural materials with such dramatic patterns is an effortless way to add character and conversational appeal to your home. These coasters serve as miniature, functional pieces of art that bring the raw beauty of the earth right to your tabletop.
???? DIY Instruction: Faux Petrified Wood Coasters
You can mimic the polished, wood grain effect of petrified wood using slices of wood and careful paint layering, sealed with resin for a deep shine.
Material Required List
- Wood slices (4 or more, about 1/2 inch thick, with bark edge retained)
- Black, gray, rust red, and white acrylic paint
- Clear casting epoxy resin kit (two part)
- Stir sticks and disposable cups
- Sandpaper (medium and fine grit)
Equipment Required List
- Paint brushes (small detail and larger flat brush)
- Heat gun or lighter (for resin bubbles)
- Protective tape (painter’s tape)
DIY Instruction Step by Step
- Prepare the Wood: Lightly sand the top surface of the wood slices to make them smooth for painting. Wipe away all dust.
- Paint the Rings: Use black and dark gray paint to paint the innermost rings and dark core of the wood slice. Build outward using concentric rings of gray and white paint to mimic the growth rings.
- Add the Color: Use the rust red paint to carefully paint bands or patches of color along the outside of the core, blending the edges softly into the gray. The key is to keep the pattern organic, letting the colors flow but maintaining the look of distinct layers. Let the paint dry completely.
- Seal the Bark: Apply painter’s tape around the outer bark edge of the coaster to protect it from the resin.
- Apply the Resin Coating: Mix the two part epoxy resin according to the kit instructions, ensuring you scrape the sides of the mixing cup. Carefully pour a layer of the mixed resin over the painted surface of each coaster, allowing the resin to flow just to the edge of the painter’s tape.
- Remove Bubbles and Cure: Use a heat gun or long reach lighter to quickly sweep over the resin surface and pop any air bubbles. Let the resin cure completely (usually 24 to 72 hours) in a dust free, level area. Once cured, remove the painter’s tape, and your high gloss, faux petrified wood coasters are ready.
32. Patinated Ornate Remote Box
Even the most mundane household clutter can be disguised with style. This rectangular box, designed to hold remotes or other small items, is crafted from metal with heavily detailed, ornate embossing on the sides and lid. Scrolls and framed panels lend it an antique, jewel box quality.
The box is finished with a stunning, aged patina, combining brass tones with deep greenish blue verdigris, which instantly conveys a sense of age and discovery. Placed on a coffee table, it serves as a luxurious yet functional hideaway, adding elegance to your living space while keeping surfaces tidy.
Choosing storage items with rich texture and history is crucial for moving beyond basic organizational bins. This piece introduces an air of vintage luxury and intriguing texture, showcasing that utilitarian objects can still be highly decorative.
???? DIY Instruction: Faux Patina Remote Box
You can give a plain wood or metal box a convincing aged brass and verdigris patina using a simple base and layered painting technique.
Material Required List
- Plain wooden box or metal tin with a lid
- Sculpting clay or modeling paste (for relief detail)
- Dark brown or black paint (for base)
- Metallic brass or copper acrylic paint
- Blue green and teal acrylic paint (for verdigris)
- Fine grit sandpaper
- Clear matte sealant
Equipment Required List
- Small stencil or detailed stamp (optional, for the relief pattern)
- Small artist brushes
- Sea sponge or dense natural sponge
DIY Instruction Step by Step
- Create the Ornate Relief (Optional): If your box is plain, use a stencil or stamp to press a decorative relief pattern into thin layers of modeling paste. Apply the paste to the lid and sides of the box and let it dry completely.
- Apply the Base: Paint the entire box with the dark brown or black base paint. Ensure this coat dries fully, as it will act as the “shadow” layer.
- Apply Metallic Layer: Using a dry brush technique, lightly brush the metallic brass or copper paint over the entire box, focusing only on the raised areas of the texture and edges. Do not fully cover the dark base coat.
- Create the Patina: Dip a small, damp sea sponge into a mix of blue green and teal paint. Dab the sponge onto a paper towel to remove most of the moisture. Lightly and randomly blot the damp, diluted blue green paint into the crevices and areas where real copper or brass would naturally oxidize.
- Distress and Highlight: Once the patina paint is dry, use fine grit sandpaper to very lightly sand the highest raised areas and sharp corners, allowing more of the shiny metallic paint to show through. This highlights the detail.
- Seal the Finish: Apply a coat of clear matte sealant to protect the layered paint effects and give the box an aged yet durable finish.
33. Sculptural Timber and Glass Hourglass
Timekeeping becomes an art form with this large, striking hourglass. The classic bulbous glass chambers are dramatically elongated and held in place by four thick, smoothly tapered wooden uprights. The natural light wood contrasts beautifully with the dark, granular sand inside.
The use of exposed metal fittings at the joints adds a refined, modern touch to the otherwise organic materials. Far too substantial to be merely a timer, this hourglass functions as a centerpiece, lending an intellectual, thoughtful feel to a desk or shelf. It embodies both functional design and sculptural elegance.
Choosing elevated forms of classic items, like this hourglass, is an excellent way to add character. It introduces a sense of contemplation and dramatic height, transforming a basic surface into a statement about time and design.
???? DIY Instruction: Modern Sculptural Hourglass
Replicating this piece focuses on finding the right glass shape and creating the minimalist wooden structure to hold it.
Material Required List
- Two identical, clear, tear drop shaped glass vases or containers
- Fine, dark colored sand or fine grain coffee grounds
- Four sturdy, round wooden dowels (about 1 inch thick)
- Small metal rings or collars (to fit around the glass neck)
- Strong, clear glass adhesive or epoxy
- Wooden base pieces (for top and bottom connection points)
Equipment Required List
- Drill and appropriate sized drill bits
- Wood stain or varnish (optional)
- Measuring tape and level
DIY Instruction Step by Step
- Prepare the Glass Chambers: Carefully glue the rims of the two glass containers together to form the hourglass shape. You need to ensure a small opening remains between them so the sand can flow. You may need to create a small collar insert if the openings are too large. Let the adhesive cure fully.
- Prepare the Sand: Ensure your sand or coffee grounds are completely dry. Fill one chamber of the sealed glass hourglass with the sand.
- Prepare the Wooden Supports: Stain or varnish the four wooden dowels if desired. Mark the dowels so they are exactly the same length. Drill a small, shallow hole into the ends of two small wooden base pieces, matching the placement of the four dowels.
- Assemble the Frame: Place the base of the hourglass on the bottom wooden base piece. Carefully position the four wooden dowels vertically around the hourglass, securing the bottoms into the drilled holes of the bottom base piece with strong glue.
- Secure the Top: Place the second wooden base piece onto the top of the dowels, securing them with glue. Use the small metal rings or collars to decorate and reinforce the areas where the dowels meet the glass at the narrowest point. Use a level to ensure the entire structure is plumb and stable.
34. Cast Iron Trivet with Raised Texture

This piece elevates a humble kitchen necessity into a work of industrial art. This sturdy trivet, designed to protect surfaces from hot pots, is made from heavy cast iron. The surface features an open, geometric lattice design, allowing heat to escape.
Crucially, the short legs supporting the trivet are finished with a heavily hammered or pebbled texture, contrasting sharply with the smooth, cutout pattern on top. The matte black finish adds to its powerful, grounded aesthetic. Display it propped on a kitchen shelf or used as a non slip base for a small potted plant.
Choosing functional pieces with this level of textural detail and material quality is a simple way to add character to your kitchen or dining area. This trivet is heavy, honest, and sculptural, far surpassing flimsy wire alternatives.
???? DIY Instruction: Faux Textured Iron Trivet/Stand
You can create a similar textural, industrial stand using a thick square of wood and paint effects.
Material Required List
- Thick, square wood block (or pre cut small wooden stool)
- Modeling paste or wood putty
- Flat black spray paint (or matte acrylic paint)
- Fine grit sandpaper
- Strong wood glue
Equipment Required List
- Wood saw (if cutting your own legs)
- Drill and router (optional, for the grid top)
- Textured sponge or metal brush
DIY Instruction Step by Step
- Form the Shape: If starting with a block, cut four short, thick legs and glue them securely to the corners of the top square piece. Allow the glue to dry.
- Create the Texture: Apply a generous layer of modeling paste or wood putty to the outside surfaces of the four short legs. While the paste is still wet, use a crumpled piece of aluminum foil, a textured sponge, or a metal brush to press a dense, irregular pitted pattern into the paste, mimicking hammered iron. Let the texture dry completely.
- Create the Top Grid (Optional): If you want an open grid top, use a router to carefully cut a square lattice pattern into the top surface of the wood block. If you do not have a router, you can skip this step or paint the grid design on later.
- Sand and Prime: Lightly sand the entire piece, focusing on smoothing the paste edges while preserving the rough texture. Apply a coat of black primer.
- Apply Matte Black Finish: Apply several thin, even coats of flat black spray paint over the entire piece, ensuring the paint gets into all the crevices of the textured legs. The key is a deep, uniform, non shiny black finish.
- Cure: Allow the piece to cure fully. The heavy texture combined with the deep matte black paint creates a surprisingly realistic faux cast iron look.
35. Sculptural Faux Brain Coral

This piece is a stunning natural form translated into enduring art. It is a large, perfectly round specimen resembling brain coral, finished in a matte, clean white. The surface features an incredibly intricate, repeating geometric honeycomb pattern, showcasing organic complexity.
The stark white color emphasizes the remarkable texture, allowing light and shadow to play across the deep crevices. Displayed on a dark surface or inside a glass cabinet, it instantly brings an element of seaside curiosity and natural wonder to a contemporary room. It is a striking, large scale object that requires zero maintenance.
Introducing complex, textural objects derived from nature is a great way to add character and depth. This sculptural coral piece provides a stunning, high contrast accent that suggests a well traveled and cultured aesthetic.
???? DIY Instruction: Sculpted Faux Coral Decor
Replicating the dense, symmetrical honeycomb texture of brain coral is challenging, but you can achieve a convincing textural cluster using foam and texture paste.
Material Required List
- Large, round piece of foam (craft foam or floral foam)
- Lightweight spackling paste or joint compound
- Matte white acrylic or spray paint
- Hot glue gun and glue sticks
- Clear matte sealant spray
Equipment Required List
- Utility knife (for shaping)
- Small, rounded sculpting tool (or the end of a thin dowel)
- Small brush
DIY Instruction Step by Step
- Shape the Base: Use the utility knife to carve the foam into the basic, slightly irregular round shape of brain coral.
- Apply the Texture Base: Apply a thin layer of hot glue to a small section of the foam. While the glue is still slightly warm, use a small, rounded tool (like the back of a thin pen) to gently press repeating, small, circular or hexagonal depressions into the glue and foam. This creates the basic honeycomb structure. Repeat this process over the entire surface, working in small sections.
- Refine the Texture: Once the glue is dry, use a small brush to cover the entire surface with a thick layer of spackling paste or joint compound. This fills the spaces between the depressions and gives the piece a uniform, porous texture.
- Dry and Sand: Let the paste dry completely. Lightly sand the high points, but be careful not to lose the recessed pattern.
- Paint and Finish: Apply two to three coats of matte white acrylic or spray paint, ensuring the paint gets deep into all the crevices. The matte finish helps the light and shadow play across the intricate surface.
- Seal: Finish with a light coat of clear matte sealant spray to protect the fragile texture.
36. Antique Style Embossed Desk Globe

This sophisticated accessory is a call back to the age of exploration and detailed cartography. This desk globe features a beautiful, richly colored map embossed with texture, highlighting mountain ranges and geographic features. The map colors are dark, earthy browns and blacks, giving it a vintage, subdued aesthetic.
The globe is held in a substantial, detailed silver colored metal meridian ring and mounted on an equally ornate metal stand. This intricate metalwork, likely pewter or oxidized silver, lends the piece an antique, scholarly feel. Displayed with books or a spyglass, it transforms a desk into a curated study.
Incorporating objects with intellectual curiosity and historical texture is a simple way to elevate basic decor. This globe acts as an instant centerpiece, adding gravitas and a tactile, non glossy element that speaks to a love for history and travel.
???? DIY Instruction: Embossed Antique Globe Makeover
You can take a basic, modern globe and give it a rich, antique, textured finish using paint and specialized materials.
Material Required List
- Basic modern globe (can be plastic or metal)
- Relief paint or puffy paint (for mountains)
- Matte black and dark brown acrylic paint
- Metallic silver or pewter spray paint (for the stand)
- Fine grit sandpaper
- Clear satin or matte sealant spray
Equipment Required List
- Small detail brush
- Large flat brush
- Masking tape
- Safety mask and gloves
DIY Instruction Step by Step
- Disassemble and Prep: Carefully separate the globe sphere from the stand and meridian ring. Use fine grit sandpaper to rough up the surface of the stand and meridian ring. Clean the entire sphere.
- Emboss the Map: Using relief paint or puffy paint, carefully trace over the main mountain ranges and significant topographical features on the globe’s surface. Allow the relief paint to dry and harden completely.
- Paint the Globe: Once the relief is dry, paint the entire globe sphere (continents and oceans) with a mix of matte black and dark brown paint. Apply the paint thickly, allowing it to settle around the edges of the raised relief, emphasizing the texture. Let this coat dry fully.
- Highlight the Texture: Use a very dry brush dipped in a lighter brown or bronze paint to lightly brush over the raised mountain relief. This highlights the features and simulates wear.
- Refinish the Stand: In a ventilated area, spray the stand and meridian ring with the metallic silver or pewter spray paint. Apply multiple light coats for a solid, antique metal finish.
- Reassemble: Once all pieces are fully dry, reassemble the globe. The contrast between the dark, textured sphere and the cool metal stand creates the sophisticated, antique effect.
37. Collection of Cut Glass Decanters
A coordinated collection of glassware instantly elevates a bar cart or console. This grouping features four stunning decanters, all crafted from heavy, clear cut glass. Each piece showcases a unique, complex diamond or starburst pattern etched deeply into the glass body.
The varying heights and distinctive, multifaceted stoppers create a dynamic, glamorous display. When light catches the cut surfaces, the glass refracts and sparkles dramatically, adding a touch of classic, crystal luxury. The clear material ensures they integrate seamlessly into any color scheme, focusing the character purely on texture and form.
Displaying functional items like this in a cohesive group is a foolproof styling trick to move past basic decor. These decanters introduce timeless elegance and incredible light play, creating a sophisticated visual focal point.
???? DIY Instruction: Etched Glass Decanters
You can etch or stencil a decorative pattern onto basic glass decanters or wine bottles to achieve a similar textured, antique look.
Material Required List
- Clear glass decanters or large wine/liquor bottles
- Glass etching cream (specialized product)
- Vinyl stencil or contact paper (for creating the pattern)
- Protective gloves and safety glasses
- Sponge brush or popsicle stick
Equipment Required List
- Craft cutter machine (optional, for intricate stencils)
- Craft knife
- Rubbing alcohol
DIY Instruction Step by Step
- Clean and Prep: Clean the glass bottles thoroughly with rubbing alcohol to remove any oils or dust. Ensure the surface is perfectly dry.
- Apply the Stencil: Cut your intricate diamond or starburst pattern out of vinyl or contact paper. Carefully apply the stencil to the body of the glass bottle, pressing down firmly to ensure the edges are completely sealed. Only the area you want to be etched should be exposed.
- Apply Etching Cream: Put on your protective gloves and safety glasses. Using a sponge brush or popsicle stick, apply a thick, even layer of the glass etching cream over all the exposed glass within the stencil area. Do not thin the cream.
- Wait and Rinse: Follow the product instructions precisely for the required waiting time (usually 5 to 15 minutes). Once the time is up, rinse the cream off the bottle completely under running water while still wearing gloves. Remove the stencil.
- Finish: The exposed glass areas should now have a frosted, permanently etched finish, mimicking the antique cut glass pattern. Repeat the process to create a variety of patterns across your collection of bottles.
38. Minimalist Carved Decorative Pipe
This is an object of quiet, artisan character that begs to be picked up. This small, decorative wooden pipe is carved from light, unstained wood, highlighting the natural grain. The long, slender body is adorned with simple, etched linear and zigzag patterns near the tip and bowl.
The minimalist design simplifies the traditional pipe form into a sculptural, elegant accent. Placed casually on a stack of art books, it introduces a subtle, handcrafted element that suggests a history of craftsmanship and intellectual pursuits. It is a stunning, non basic piece of personal history or folk art.
Choosing small, handcrafted objects with meaningful history or narrative immediately elevates a space. This piece adds a unique, bespoke touch and warm wood texture to an otherwise simple surface.
???? DIY Instruction: Etched Wooden Decor Pipe
You can use a simple wooden dowel and wood burning tool to create a similar lightweight, decorative wooden object with etched patterns.
Material Required List
- Wood dowel (about 1 inch in diameter)
- Small piece of hardwood (for the bowl)
- Wood stain or oil (light color)
- Wood glue
- Fine grit sandpaper
Equipment Required List
- Coping saw or hand saw
- Drill with a large bit (for the bowl)
- Wood burning tool with fine tips
DIY Instruction Step by Step
- Cut and Shape: Cut the dowel to the desired length for the stem. Cut the small hardwood piece and drill a shallow, wide hole into it to form the bowl shape. Use the saw to taper the ends of the stem and bowl into the sleek shapes seen in the image.
- Glue the Pieces: Securely glue the bowl piece to the stem piece, ensuring the glue creates a strong, clean joint. Allow the wood glue to dry completely.
- Sand Smooth: Sand the entire piece with fine grit sandpaper until the wood is extremely smooth and the joint is invisible.
- Apply Etched Patterns: Plug in your wood burning tool. Using the fine tips, carefully etch the simple linear bands and zigzag patterns onto the wood surface, following the design of the inspiration image. Practice the pattern first on a scrap piece of wood.
- Finish the Wood: Wipe away any burning residue. Apply a coat of light wood stain or oil to the entire piece. This enhances the natural grain and seals the etching without introducing a distracting color.
39. Jar of Tumbled Sea Glass
Simplicity meets natural beauty in this stunning decorative container. A clear, vintage style glass jar is filled to the brim with a collection of tumbled sea glass in soft, ocean inspired hues—seafoam green, aquamarine, soft brown, and milky white.
The light filtering through the glass and the frosted texture of the glass fragments creates a stunning visual effect, turning a simple window ledge into an illuminated display. Each unique shard tells a story of the ocean and time, making this far more than just random filler.
Incorporating natural elements with historical provenance, like genuine sea glass, is a straightforward way to add authentic character. This jar provides a beautiful, colorful, and non fussy accent that captures the serenity of the beach and brightens any space.
???? DIY Instruction: Faux Tumbled Sea Glass Jar
You can create realistic looking sea glass using glass pieces and specialized materials to achieve the frosted, tumbled appearance.
Material Required List
- Clear glass jar or bottle
- Glass pieces or smooth decorative glass pebbles
- Glass frosting spray or specialized sea glass medium (matte finish)
- Blue, green, and brown food coloring or glass paint (optional, for color)
Equipment Required List
- Mixing bowl
- Rubber gloves
- Protective sheeting and paper towels
DIY Instruction Step by Step
- Color the Glass (Optional): If your glass pieces are clear, you can add color. In a mixing bowl, combine a few drops of glass paint or food coloring with a teaspoon of clear craft glue. Add the glass pieces and toss them gently until they are lightly and unevenly coated with color. Spread the pieces on wax paper to dry completely.
- Apply the Frosted Finish: Once the pieces are dry, take them to a well ventilated area. Spread them out on a protected surface. Apply several thin, even coats of the glass frosting spray or sea glass medium. You want an opaque, matte finish that replicates the “tumbled” look of real sea glass.
- Cure: Allow the pieces to dry and cure completely according to the product instructions.
- Fill the Jar: Once the faux sea glass is ready, carefully fill the clear glass jar. Display it where light can pass through the frosted pieces to maximize the soft, colorful effect.
40. Kinetic Wooden Desk Cube
This is the ultimate accent for the intellectually curious. This compact wooden cube is not a simple block, but a kinetic desk toy or sculpture, featuring visible mechanical components like bearings and moving wooden slides. It is crafted from beautifully finished light oak wood.
The exposed metal ball bearing on the front and the various circular cutouts hint at the hidden mechanical action within. This is a functional curiosity, providing a tactile, engaging object for fidgeting or contemplation. It introduces a subtle, sophisticated element of engineering and playfulness to a workspace.
Choosing an item that is interactive and displays its inner workings is a highly effective way to add character to a desk. This kinetic cube is a non standard accent that moves far beyond basic office supplies, lending a refined, thoughtful, and slightly technical feel to the environment.
???? DIY Instruction: Wooden Fidget Cube Shell
Replicating the entire kinetic mechanism is complex, but you can create a decorative wooden shell that showcases a real bearing for a similar industrial, sculptural effect.
Material Required List
- Small wooden box or cube (pre cut or built from thin wooden boards)
- Large metal ball bearing (check size against your box)
- Wooden dowels (small diameter)
- Clear wood varnish or oil
- Strong wood glue
Equipment Required List
- Drill with hole saw attachment (for circular cutouts)
- Coping saw (for the linear cutout)
- Sandpaper (various grits)
DIY Instruction Step by Step
- Build or Source the Box: Start with a square wooden box. Sand it lightly and apply a coat of varnish or oil to achieve the light oak finish.
- Create the Bearing Cutout: Determine the size and location for the main bearing display (as seen on the front of the image). Use the hole saw attachment on the drill to carefully cut a circular opening large enough to partially recess the ball bearing.
- Mount the Bearing: Apply a strong wood glue or construction adhesive to the edges of the bearing and firmly press it into the circular cutout so that the metal is visible and flush with the wood surface.
- Create the Linear Cutout: Use a coping saw to cut the narrow, linear opening at the top of the box. Insert small wooden dowels through pre drilled holes on the sides to mimic the sliding mechanism, gluing them in place.
- Create the Side Detail: Use the hole saw or drill to create the circular cutout on the side of the box. Glue a decorative wooden disk or small knob into this cutout to simulate a turning mechanism.
- Secure the Base: Glue the finished cube structure onto a slightly larger, ornamental wooden base. This gives it a more finished, substantial look for display.
We have explored forty non standard objects, proving that moving beyond basic decor is achievable by prioritizing character, texture, and story. The secret to a captivating interior lies in choosing pieces that feel collected over time, not bought in a single afternoon. Look for materials with inherent history, like petrified wood or aged brass, and embrace forms that are abstract or inspired by global folk art.
You now possess the strategies and the DIY know how to transform those dull corners into intriguing focal points. Start small, perhaps with a sculptural vase or a unique textile, and watch how quickly a room gains depth. Remember, every item you choose is a chance to express your unique aesthetic.
Ultimately, your home’s character comes from authenticity. Stop striving for magazine showroom and start collecting objects that genuinely delight you and invite conversation. The days of basic decor are officially over; your newly curated home awaits.
Key Takeaways
- Prioritize Texture and Form: Focus on materials like raw terracotta, heavily textured ceramic, or natural fibers. These elements add depth even in a neutral color palette.
- Embrace Functional Sculpture: Upgrade everyday items like match jars (fluted glass) and remote boxes (patinated metal) into art objects that serve a practical purpose.
- Look to History and Craft: Incorporate items that suggest a narrative, such as Kintsugi inspired dishes, vintage botanical prints, or Kantha stitched textiles. These pieces make a room feel well traveled.
- Play with Scale and Contrast: Use oversized elements, like a giant glass demi john lamp, to disrupt predictability. Pair matte textures with high gloss finishes for visual excitement.
- DIY is Key to Customization: Use the provided instructions to tailor inexpensive items, like wood blocks and thrifted mirrors, into high end, unique decorative accents.