It is a common frustration: you clean the house today, only to find the clutter creeping back tomorrow. That cycle of mess and frantic cleaning is exhausting, leaving you feeling defeated before you even start. The real issue is usually not effort, but an outdated or nonexistent organizational system.

Most people struggle because they focus on temporary fixes, like tidying a pile, instead of establishing robust habits that prevent the mess entirely. This article is your guide to permanently solving the clutter problem, moving beyond quick fixes into lasting functionality.
We have compiled 45 tested, actionable hacks designed to optimize every room in your house, from the notorious junk drawer to the overflowing entryway. These ideas focus on small, consistent behavioral changes and smart storage solutions that minimize daily effort. Get ready to transform your space, reclaim your time, and finally enjoy a truly tidy home in 2026.
1. The Supercharged Entryway Command Center

This image features a highly effective Entryway Organization Hub designed to eliminate clutter right where you walk in the door.
Stop the paper pileup and the frantic key search every morning. A well designed drop zone like this transforms a busy transition area into an orderly space. The key rail mounted beneath a slender shelf keeps small important items exactly where they belong. The shelf above is the spot for sunglasses, wallets, or a small decorative plant, giving the area a touch of welcoming style.
Vertical wall pockets are a smart way to manage incoming mail and important documents that need attention. Labeling these slots makes sorting quick and easy, ensuring bills are paid on time and school notices are seen. A small, attractive bowl is also included at the bottom, providing a catchall for loose change, car fobs, or other tiny pieces that might otherwise scatter. Implementing a system this focused means you can say goodbye to those annoying entryway messes immediately.
DIY Hack: Create Your Own Entryway Shelf and Hook Rail
This hack focuses on installing the basic shelf and hook system shown in the image, providing an essential foundation for any entryway.
Materials Required
- One length of pine or MDF wood for the shelf (suggested dimensions: 24 to 36 inches long, 5 to 6 inches deep)
- One flat backing board for the coat hooks (suggested dimensions: slightly shorter than the shelf, 3 to 4 inches tall)
- Primer and paint in your chosen color (semi gloss or satin finish is recommended for durability)
- Four to six decorative wall hooks
- Two small, decorative shelf brackets or concealed shelf supports
- Screws appropriate for mounting into wall studs or heavy duty wall anchors
Equipment Required
- Power drill and various sized drill bits
- Stud finder
- Level (a long one is best)
- Measuring tape
- Pencil
- Screwdriver (or screwdriver bit for the drill)
- Sandpaper (medium and fine grit)
- Safety glasses
DIY Instruction Step by Step
- Prepare the Wood: Begin by sanding all the wood pieces until they are completely smooth to the touch. Pay extra attention to the edges. Apply one coat of primer to all surfaces of both the shelf and the hook backing board. Once dry, apply two coats of your chosen paint color, allowing adequate drying time between each coat.
- Locate Wall Studs: Use the stud finder to locate the structural studs inside your wall where you plan to hang the unit. Mark the center of these studs with a pencil. Aim to center the unit near the door, keeping it easily reachable. If studs are not available where you want the shelf, plan to use heavy duty wall anchors.
- Install the Hook Rail: Hold the painted backing board up to the wall, using the level to make certain it is perfectly horizontal. Mark the spots where the mounting screws will go, ensuring these line up with your marked wall studs or anchor locations. Pre drill small pilot holes through the board and into the wall. Attach the hook rail to the wall firmly using long screws appropriate for the material you hit (stud or anchor).
- Attach the Hooks: Now that the rail is securely on the wall, measure and mark even spaces for your decorative hooks. Pre drill small holes for the hook screws. Fasten all the hooks onto the painted backing board.
- Mount the Shelf Supports: The shelf should sit a few inches directly above the hook rail. Hold the shelf brackets or supports against the wall, using the level again to ensure they are straight. Mark the drill spots. Screw the brackets securely into the wall studs or anchors. If using concealed supports, follow the specific instructions that came with them for drilling holes into the wall and the back of the shelf.
- Secure the Shelf: Place the painted shelf onto the mounted supports. If your supports require the shelf to be screwed down for stability, gently drive screws up through the supports into the bottom of the shelf. Make sure the shelf rests flat and is completely stable before placing anything on it. Your command center foundation is now ready for use.
2. Transforming Awkward Corners into Wellness Stations

This beautiful scene showcases a highly organized Integrated Vanity and Storage Area, turning what might have been wasted counter space into a productive spot.
Maintaining a tidy bathroom or vanity area is often difficult because of the sheer volume of personal care items. This design effectively utilizes vertical space, which is the secret to keeping counters clean. Shallow floating shelves hold frequently used products, preventing them from sprawling across the desk. Notice how the items are grouped by type or size, which aids visual clarity and makes morning routines much faster.
A versatile pegboard system is mounted to the right, offering flexible storage that can be customized over time. Little cups and hooks attached to the pegboard keep tools like scissors, brushes, and hair ties organized and tangle free. The narrow spice rack style shelves mounted near the sink demonstrate a clever way to store smaller bottles or jars, keeping them accessible but contained. This system proves that even compact areas can support a clutter free, multifunctional space for getting ready or managing wellness supplies.
DIY Hack: Installing a Customizable Pegboard Organization System
This hack focuses on building the customizable pegboard shown on the right side of the image, offering maximum flexibility for small items.
Materials Required
- One sheet of pre cut pegboard (suggested size: 24 inches by 36 inches, thickness varies)
- Four narrow wood strips (called spacers or furring strips) slightly shorter than the pegboard edges
- Primer and paint (optional, if you want a color other than white)
- Pegboard accessories kit (includes plastic hooks, small cups, and shelves designed to fit the peg holes)
- Screws appropriate for mounting into wall studs or heavy duty wall anchors
Equipment Required
- Power drill and drill bits
- Level
- Measuring tape
- Pencil
- Stud finder
- Safety glasses
DIY Instruction Step by Step
- Prepare the Pegboard and Spacers: If you choose to paint your pegboard or wood spacers, do so now and let them dry completely. The key to a functional pegboard is creating space behind it so the hooks can slide in. The four spacer strips will be mounted between the wall and the pegboard itself.
- Mark the Wall: Hold the pegboard up to the desired location on your wall. Use the level to ensure it is straight. Lightly trace the four corners with a pencil. Use the stud finder to locate any studs within that area and mark them. Ideally, you want to screw the spacers into studs for the strongest hold.
- Attach the Spacers: Lay the pegboard face down. Line up the wood spacer strips along the four edges. The spacers must sit inside the boundaries of the pegboard. Drill pilot holes through the pegboard and into the spacers. Now, line up the spacers on the wall. Mount the spacers to the wall using your appropriate screws or wall anchors, ensuring they are straight and level.
- Mount the Pegboard: Hold the pegboard up to the wall so it rests directly on top of the mounted spacers. The pegboard edges should align perfectly with the spacers underneath. Screw the pegboard into the spacer strips using small screws. Do this near the corners and along the edges, ensuring the screws go only into the wood strips, not directly into the wall behind the strips.
- Customize with Accessories: Once the board is firmly attached, begin adding your organizational accessories. Insert the cups, small shelves, and various hooks into the holes based on the items you need to store (scissors, brushes, cords, etc.). Since the board is spaced away from the wall, the hooks should clip in easily. Adjust the placement whenever your storage needs change.
3. The Power of “Like With Like” Storage

This illustration highlights the powerful organizing principle of Grouped Category Storage using simple fabric or canvas bags.
Mess often happens when similar items are scattered across multiple drawers, bins, and rooms. Getting organized starts with a retrieval step: gathering everything related to a single category together. Here, you see a collection of kitchen utensils, small tools, and hardware all consolidated into three durable drawstring bags. This method immediately creates order from visual chaos.
The bags themselves are an excellent storage solution, particularly for items that are infrequently used or that are awkward shapes. Using soft bags prevents scratching other surfaces and allows the containers to compress slightly when placed in a tight storage space, such as a closet shelf or the back of a cupboard. Rather than tossing things into a junk drawer, commit to storing items by type, labeling the bag if needed, and keeping them neatly contained until the next time you need them.
DIY Hack: Sewing Simple Drawstring Utility Bags
This hack provides instructions for sewing the basic utility bags shown in the image, an inexpensive way to organize loose items.
Materials Required
- Durable fabric, such as canvas, heavy cotton duck, or denim (about 1 yard per medium bag)
- Matching thread
- Cord or thick ribbon for the drawstring (about 1.5 times the width of your bag opening per bag)
Equipment Required
- Sewing machine
- Iron and ironing board
- Scissors or rotary cutter and mat
- Measuring tape
- Safety pin or bodkin (for threading the drawstring)
- Straight pins
DIY Instruction Step by Step
- Cut the Fabric: Decide on the size you want for your bag. For a medium sized bag, cut one rectangular piece of fabric that measures 18 inches wide by 30 inches long. (This includes seam allowance).
- Prepare the Drawstring Casing: At one of the 18 inch edges, fold the edge over about half an inch and press it flat with the iron. Fold it over again, this time about 1.5 inches, and press it flat. This creates the channel (casing) for the drawstring. Pin this fold in place.
- Sew the Casing: Sew along the bottom edge of the 1.5 inch fold you just created, keeping your stitching straight and leaving the narrow ends of the casing open. This is where the drawstring will go. Repeat steps 2 and 3 on the opposite 18 inch edge.
- Create the Bag Shape: Fold the fabric in half widthwise so the two long 30 inch sides meet. Make sure the drawstring casings align at the top. Pin the two side edges together.
- Sew the Sides and Bottom: Starting just below the drawstring casing, sew a straight seam down the side, across the bottom, and up the second side, stopping again just below the casing. Use about a half inch seam allowance.
- Turn and Thread: Turn the bag right side out and push the corners out gently. The bag should stand up on its own. Cut your drawstring cord to the length you need. Attach a safety pin to one end of the cord and use it to thread the cord all the way through one casing, across the open space, and back out through the other casing opening. Tie the two ends of the cord together in a secure knot. To close the bag, simply pull on the cord.
4. Time Blocking for Tidiness

This image clearly illustrates the concept of Focused Cleaning with Timers, a straightforward yet powerful technique for tackling messes.
Sometimes, the sheer thought of cleaning feels overwhelming, making it easy to postpone. This hack tackles that mental hurdle by breaking down big tasks into manageable, short bursts. The presence of both an analog and a digital timer suggests flexibility in how you approach these timed cleaning sessions. Setting a timer for just 10 or 15 minutes makes cleaning feel less like a chore and more like a quick, achievable goal.
Beside the timers, a collection of cleaning supplies in a mesh caddy emphasizes readiness. Having all your essentials gathered in one portable container means you are not wasting precious timed minutes searching for a sponge or a spray bottle. This “ready to go” caddy paired with a timer transforms cleaning from a daunting activity into a series of swift, concentrated efforts. Even short bursts of focused work add up, significantly reducing overall mess without feeling like a massive undertaking.
DIY Hack: Assembling a Portable Cleaning Caddy
This hack focuses on creating a convenient, portable cleaning caddy like the one shown, so you are always ready for a timed cleaning session.
Materials Required
- One sturdy mesh or plastic caddy with a handle
- All purpose cleaner spray bottle
- Glass cleaner spray bottle
- Scrub brush
- Microfiber cloths (a few)
- Small dustpan and brush set (optional)
- Lint roller (optional)
- Dish soap or concentrated cleaner
Equipment Required
- None needed for assembly, but a timer is essential for the use of the caddy (digital or analog clock)
DIY Instruction Step by Step
- Gather Your Supplies: Collect all the cleaning products and tools you use most often for quick tidying. Think about what you typically grab when you spot a small mess in the kitchen, bathroom, or living area.
- Select Your Caddy: Choose a caddy that is strong enough to hold all the liquids and tools without tipping over. A caddy with separate compartments can be helpful for organization, but a single open caddy works just as well. Mesh versions allow visibility and drainage.
- Arrange Contents Logically: Place the taller spray bottles in first, ensuring they stand upright and do not leak. Fill in the remaining spaces with cloths, brushes, and smaller bottles. Try to arrange them so everything is visible and easy to grab without having to pull everything else out.
- Keep it Stocked: As you use up products, make a habit of replacing them in the caddy immediately. This ensures your portable cleaning station is always fully equipped for the next timed cleaning burst. Store the caddy in an easily accessible location, like under the sink or in a laundry room cabinet, so it is always ready to go.
- Set Your Timer: When you are ready to tackle a messy spot, grab your caddy and set your timer for 10 or 15 minutes. Focus intensely on one small area during that time. When the timer goes off, you are done, regardless of whether the area is “perfect.” This consistency creates lasting tidiness.
5. The Organized Drawer System

This image illustrates a highly effective Layered Drawer Organization system, making the most of both horizontal and vertical space within a single drawer.
Drawers can quickly become chaotic catchalls for various items. This system demonstrates how to combat that tendency with clever dividers and containers. The main drawer is sectioned into multiple compartments using sleek, simple dividers. This creates specific homes for smaller items like pens, scissors, sticky notes, and cards, preventing them from mixing together into a messy jumble.
Above these divided sections, clear lidded containers are strategically placed, holding things like charging cables and small electronics. This layering technique doubles the storage capacity of the drawer while keeping contents visible and protected. The contrasting decorative boxes and a woven basket on the countertop also hint at external storage solutions, showing how aesthetics and function can combine. Implementing such a system means every item has a designated spot, making it easy to find what you need and return it after use, maintaining a beautifully organized space.
DIY Hack: Custom Drawer Dividers for Clutter Control
This hack focuses on creating simple, custom fit drawer dividers to bring order to chaotic drawers, just like the image.
Materials Required
- Thin wood (like craft plywood or balsa wood), plastic sheets, or stiff cardboard (if for light duty items)
- Wood glue (for wood dividers) or strong craft glue (for plastic/cardboard)
- Sandpaper (if using wood)
- Paint or contact paper (optional, for decorative finish)
Equipment Required
- Measuring tape or ruler
- Pencil
- Utility knife or saw (depending on material)
- Cutting mat (for utility knife)
- Clamps or heavy books (for gluing wood)
DIY Instruction Step by Step
- Measure Your Drawer: Begin by fully emptying the drawer you want to organize. Use your measuring tape to measure the internal length, width, and depth of the drawer. Write these measurements down accurately.
- Plan Your Layout: Think about what items will go into this drawer. Sketch out a simple diagram of how you want to divide the space. Consider making some sections longer for pens, wider for notebooks, or square for small tools. You will need to cut strips of your chosen material to create these sections.
- Cut the Main Dividers: Cut two strips of your material that match the full length of the drawer. These will be your main lengthwise dividers. The height of these strips should be slightly less than the drawer’s depth, so the drawer can still close easily. If using wood, sand the edges smooth.
- Cut the Cross Dividers: Now, cut shorter strips that will fit across the drawer, perpendicular to your main dividers, to create smaller compartments. Again, the height should be appropriate for the drawer. You will need to determine how many cross dividers based on your layout plan.
- Assemble and Glue (Wood/Plastic): For wood or plastic, apply wood glue or strong craft glue along the edges of the cross dividers. Press them firmly into place against the main lengthwise dividers, creating a grid. You can also glue them directly to the drawer bottom for extra stability. Use clamps or heavy books to hold the pieces together while the glue dries completely, often several hours.
- Assemble (Cardboard): For cardboard, you might use notches or slotting techniques. Cut small slits halfway through the height of your dividers at the points where they intersect. Slide the notched pieces together to form a grid. You can add a small dot of glue at each intersection for stability.
- Optional Finishing: If you desire, you can paint your finished wood dividers or cover them with decorative contact paper once the glue has dried. Allow any paint to dry fully before returning to the drawer.
- Place in Drawer: Carefully insert your completed divider system into the drawer. Begin placing your items into their new, designated compartments. Enjoy the immediate sense of order and ease of finding what you need.
6. The Vertical Mail and Document Sorter

This inviting image presents a streamlined Vertical Mail Management System combined with smart storage solutions for an organized entryway or office nook.
Paper clutter is a notorious culprit for messy homes, but this setup offers a clear solution. The wall mounted mail sorter immediately grabs incoming papers, stopping them from piling up on flat surfaces. Each slot acts as a temporary holding area, preventing bills, letters, and other documents from becoming scattered. The dark, sleek design also adds a modern touch while being highly functional.
Below the mail organizer, additional storage options keep other items off the floor. A sturdy woven basket provides a home for rolled up blueprints, wrapping paper, or umbrellas, blending natural textures with practical use. Next to it, a multi level shelving unit with clear fronts offers visible yet contained storage for books, magazines, or smaller decorative items. And, critically, a paper shredder stands ready to dispose of sensitive documents, completing a comprehensive system that tackles paper clutter from arrival to disposal, keeping your space clean and functional.
DIY Hack: Installing a Wall Mounted Mail Organizer
This hack focuses on installing a functional wall mounted mail organizer like the one in the image, to keep paper clutter off your surfaces.
Materials Required
- One wall mounted mail organizer (metal, plastic, or wood)
- Screws and wall anchors appropriate for your organizer and wall type
Equipment Required
- Power drill with drill bits
- Level
- Measuring tape
- Pencil
- Stud finder
- Safety glasses
DIY Instruction Step by Step
- Choose Your Location: Select a wall in your entryway, kitchen, or home office where mail tends to accumulate. Ensure the spot is convenient and at an easy to reach height.
- Determine Mounting Points: Hold the mail organizer against the wall at the desired height. Use a pencil to mark through the pre drilled mounting holes on the organizer onto the wall.
- Check for Studs (Optional but Recommended): Use your stud finder to see if any of your marked mounting points align with wall studs. Mounting directly into a stud provides the most secure hold. If no studs are available, you will need to use wall anchors.
- Drill Pilot Holes: For each marked point, use your power drill to create a pilot hole. If you are drilling into a stud, use a smaller drill bit than your screw. If you are using wall anchors, drill a hole the size recommended by the anchor manufacturer.
- Insert Wall Anchors (If Needed): If you are using wall anchors, push or gently tap them into the pilot holes until they are flush with the wall surface. Ensure they are fully seated.
- Mount the Organizer: Line up the holes on your mail organizer with the drilled holes (and anchors, if used) on the wall. Insert the screws and begin to tighten them. Use your level one last time before the screws are fully tightened to ensure the organizer is perfectly straight.
- Secure Firmly: Finish tightening all screws until the mail organizer is securely fastened to the wall and does not wobble. Avoid overtightening, which could strip the screw or damage the wall. Your new paper management system is ready to help you conquer mail clutter.
7. Maximizing Under Sink Space with Magnets

This collage of images showcases intelligent techniques for Hidden Vertical Storage within cabinets, primarily using magnetic strips and caddies.
Under sink cabinets often become dark, crowded spaces where supplies are hidden and quickly forgotten. This hack brings immediate order and accessibility to that awkward area. Installing a simple metal magnetic strip to the upper inside wall of the cabinet is a brilliant trick. This strip can hold small metal tools like scissors, screwdrivers, or grooming items vertically, clearing floor space entirely.
The bulkier items, like spray bottles and sponges, are contained neatly in small, attractive perforated baskets. Using baskets ensures that if a product leaks, the mess is contained and the bottles are easy to pull out when cleaning. The magnetic strips also keep those sharp items, like kitchen shears, safely out of reach of small children while remaining quickly available to an adult. These small, targeted organizational changes drastically improve the functionality of hidden storage spots in the bathroom or kitchen.
DIY Hack: Installing a Magnetic Strip for Tool Storage
This hack focuses on installing the magnetic strip shown in the image to utilize unused vertical space inside a cabinet or closet.
Materials Required
- One metal magnetic strip (sold as knife racks or utility holders)
- Screws and/or adhesive strips (depending on the product you buy)
Equipment Required
- Power drill with appropriate drill bits (if screwing the strip in)
- Level
- Measuring tape
- Pencil
- Safety glasses
DIY Instruction Step by Step
- Select Placement: Open the cabinet door where you want to install the strip. Measure the area to ensure the strip fits the width of the cabinet interior. Typically, the best placement is near the top of the cabinet box, leaving maximum space below for caddies and tall bottles.
- Mark Mounting Points: Hold the magnetic strip against the inside wall of the cabinet. Use your level to ensure it is perfectly horizontal. Mark the screw hole locations with a pencil.
- Prepare for Installation: If your strip uses strong adhesive backing, simply peel the backing off. If your strip requires screws, use your drill to create small pilot holes at the marked points.
- Install the Strip: If using adhesive, press the strip firmly against the cabinet wall for at least 30 seconds. If using screws, hold the strip in place and drive the screws through the holes and into the cabinet wall, securing it tightly. Ensure the strip is secure before trusting it to hold weight.
- Organize Your Tools: Begin placing metal items onto the strip. This is great for scissors, small screwdrivers, safety pins, tweezers, or other small metal tools that often clutter the cabinet floor. This immediately frees up the bottom of the cabinet for your cleaning caddies.
8. Mobile Utility Carts for Flexibility

This collage highlights the versatility of Wheeled Storage Carts, demonstrating how they can manage laundry, cleaning supplies, and craft materials.
A significant cause of home mess is the lack of portability; items are stored far from where they are used. Mobile carts solve this issue by bringing organization directly to the task. The top left image shows a rolling hamper, which moves easily from the bedroom to the laundry room, eliminating clothing piles on the floor.
The tiered metal and plastic carts offer multipurpose storage. In the bottom left, one cart is loaded with cleaning products, buckets, and sponges, making it a “cleaning station on wheels” that can be rolled between the kitchen and bathrooms. The cart on the right handles art and craft supplies, allowing a creative person to bring their materials to the table or desk and then roll them out of sight when work is finished. Choosing containers and carts with wheels drastically reduces the effort required to clean up, encouraging consistent tidiness.
DIY Hack: Setting Up a Rolling Craft or Cleaning Station
This hack focuses on organizing a three tier utility cart to create a dedicated, portable station for a specific recurring task (cleaning, crafting, or homework).
Materials Required
- One three tier metal or plastic utility cart (must have wheels)
- Various small bins, cups, and containers that fit within the cart’s shelves
- Supplies for your chosen task (e.g., cleaning products, art supplies, toolkits)
Equipment Required
- Assembly tools provided with the cart (often a small wrench)
DIY Instruction Step by Step
- Assemble the Cart: Follow the manufacturer’s instructions to assemble the three tiered cart. Ensure the wheels are correctly installed and lock when necessary. This step is usually straightforward, involving screwing the vertical supports into the horizontal shelves.
- Determine Task and Loadout: Decide if this cart will be your cleaning, craft, or office supply station. Group all the supplies for that task together.
- Strategic Tier Loading: Assign a function to each of the three tiers:
- Top Tier (Active/Most Used): Place your smallest, most frequently used items here, such as pens, brushes, sponges, and small spray bottles. Use small containers or cups to keep these items upright and separate.
- Middle Tier (Medium Use/Heavy Items): Store bulkier items here, like larger bottles of cleaner, towels, buckets, or medium sized craft paper stacks. This shelf is often easiest to reach when standing.
- Bottom Tier (Bulk/Reserve): Store heavy items, like gallons of distilled water, large storage bins of reserve supplies, or items used least often. Keeping heavier items lower prevents the cart from tipping and makes it more stable when rolling.
- Insert Secondary Containers: Place your smaller bins and cups inside the tiers before adding the supplies. This keeps the items from rolling around when the cart is moved. Once the containers are placed, fill them neatly with your supplies.
- Test Mobility: Give the cart a gentle push to ensure it rolls smoothly and that no items fall off. Store the cart in a dedicated location (like a closet or corner) when not in use, ready to be rolled out whenever the activity begins.
9. The Habit of Clearing Surfaces Daily

This image, showing a beautifully set and clutter free dining and kitchen area, emphasizes the importance of Creating and Maintaining Clear Surfaces.
The key to a visually tidy home is having few items resting on horizontal spaces, like countertops, tables, and floors. This dining area illustrates the outcome of this practice: a relaxed, open, and stylish room. The dining table is set with a simple centerpiece and is completely clear of mail, homework, or random gadgets. The kitchen island surface is also free of unnecessary clutter, displaying only a small decorative tray and an analog clock.
By making it a daily habit to clear all kitchen counters and dining tables before bed, you wake up to a welcoming, organized space. A clear table encourages family meals, and clear counters make cooking and cleaning easier. The few items that remain, like the clock and small decor, are intentionally chosen accents, not scattered clutter. This habit prevents the gradual accumulation of mess that makes a home feel perpetually disorganized.
DIY Hack: The 10 Minute “Surface Sweep” Routine
This is a procedural hack focused on changing daily behavior rather than building a physical item. It requires only commitment.
Materials Required
- Small basket or designated “Sweep Bin”
- Timer (use the clock or a digital phone timer)
Equipment Required
- None
DIY Instruction Step by Step
- Designate a Time: Choose a consistent time of day for your surface sweep. Right after dinner or just before getting ready for bed are highly effective times, as the main areas (kitchen, dining) are often the messiest.
- Gather the Tool: Grab your designated Sweep Bin. This is a temporary holding basket for items that do not belong in the room you are cleaning.
- Set the Timer: Set a timer for 10 minutes. This provides focus and prevents the task from becoming endless.
- Execute the Sweep: Move quickly through the room (starting with the kitchen counters or dining table). Pick up every item that does not belong there (keys, mail, toys, chargers, cups, etc.). Put items that belong in the room (e.g., the salt shaker back in the cabinet) immediately away. Toss items that belong in other rooms into the Sweep Bin.
- The Delivery Run: Once the 10 minutes are up, or when the Sweep Bin is full, carry the bin around the house, depositing its contents back to their correct homes (keys to the hook, mail to the organizer, toys to the kids’ room).
- Consistency is Key: Repeat this 10 minute surface sweep every single day. The consistency prevents clutter from ever taking root on your main surfaces, ensuring you wake up to a clear home every morning.
10. Conquering Digital Clutter

This image, showing a computer screen focused on an email management tool, highlights the critical organization hack of Managing the Digital Mess.
Mess in the physical world is often matched by chaos in the digital realm, which also contributes to stress and disorganization. The computer screen showing the Unroll.me service suggests a focus on taking control of the email inbox. Thousands of unread emails and dozens of unwanted newsletter subscriptions can be mentally draining.
Taking the time to unsubscribe from irrelevant emails and consolidating necessary subscriptions into one digest folder drastically reduces digital noise. Beyond the inbox, the physical presence of a phone and loose photos suggests the importance of organizing images and files as well. Backing up photos and organizing computer files into clearly labeled folders reduces the anxiety associated with digital hoarding. Conquering digital clutter streamlines your mental space, freeing up energy to focus on tidying your physical environment.
DIY Hack: The Digital Subscription Detox
This is a process focused on clearing out your email inbox, reducing the daily influx of digital clutter.
Materials Required
- Access to your primary email account
- A tool like Unroll.me or a similar email filtering service (optional, but highly recommended)
Equipment Required
- Computer or smartphone
DIY Instruction Step by Step
- Choose Your Battleground: Log into the email account that receives the most promotional emails, newsletters, and spam.
- Use an Automation Tool (Recommended): If you use a service like Unroll.me, connect your account and let the tool scan your inbox. It will automatically categorize all your subscriptions into three lists: Keep Subscribed, Unsubscribe, and Rollup.
- Execute the Unsubscribe Mission: Go through the list of subscriptions the tool finds (or manually scroll through your last two months of emails). Be ruthless. For any email you rarely read or find unimportant, immediately click the unsubscribe link at the bottom of the email or use the tool’s unsubscribe function.
- Create the Rollup (Digest): For subscriptions you do want to keep (like daily news digests or shopping alerts), choose the “Rollup” or “Digest” option. This combines all those separate emails into a single, daily email summary, drastically reducing the number of new messages you see throughout the day.
- Manual Tidy Up: Now that the flood of new mail is reduced, sort your remaining inbox. Quickly archive any older, unnecessary emails. Create a maximum of five simple folders (e.g., Receipts, Financial, To Do) for the few emails you absolutely must save.
- Maintain the Clean State: Dedicate the last 5 minutes of your workday to clearing your inbox. If you see a new subscription, unsubscribe immediately. By stopping the inflow, your inbox stays clean permanently.
11. Clear Containers for Instant Visibility

This image powerfully demonstrates the benefit of using Transparent Stackable Bins and Drawer Inserts for both pantry and utility storage.
Finding what you need instantly is the hallmark of a truly organized space. This setup uses clear acrylic bins inside the cabinet, making snacks, spices, and bottles visible without needing to move anything. Stacking the bins vertically maximizes the height of the shelf, turning unused air space into crucial storage. This technique is especially useful for quickly identifying smaller items like bags of chips or single serving containers.
Below the cabinet, the drawer uses custom wood dividers and labeled compartments for incredibly small, often messy items. The drawer holds everything from folded socks and gloves to writing instruments and miscellaneous small toys (like batteries and small blocks). Notice the specific section dedicated just to “AA Batteries.” Labeling these micro divisions removes any guesswork about where an item belongs. Clear containment and labeling together make putting things away as fast as taking them out.
DIY Hack: Creating Labeled Drawer Sections with Wood
This hack focuses on installing the labeled wooden dividers shown in the image to bring order to drawers containing small, varied items.
Materials Required
- Thin strips of wood (e.g., craft wood, basswood, or thin pine) matching the drawer depth
- Wood glue
- Small decorative labels or label maker materials
- Small cups or square containers (optional, for holding tiny items like buttons or batteries)
Equipment Required
- Measuring tape or ruler
- Utility knife or small hand saw
- Pencil
- Sandpaper (medium grit)
DIY Instruction Step by Step
- Empty and Measure: Fully empty and clean the drawer. Measure the internal length and width precisely. Determine the depth of your drawer; your wooden strips should be cut slightly less than this depth to ensure the drawer opens and closes without catching.
- Sketch the Layout: Think about what items will go into this drawer. Sketch out a rough plan of your drawer, focusing on long dividers running front to back, and shorter cross dividers creating the individual sections. Ensure the size of each section matches the size of the items it will hold (socks need longer space than pens).
- Cut and Sand the Strips: Cut the wood strips according to your measurements. Use sandpaper to smooth all edges, removing splinters and making them safe to handle.
- Assemble the Grid: In a large, flat workspace, assemble your dividers according to your plan. Apply wood glue to the ends and sides where the strips intersect. You can also glue them directly to the drawer bottom for extra stability. Use clamps or heavy books to hold the pieces together while the glue dries completely, often several hours.
- Dry and Label: Allow the wood glue to dry completely overnight. Once stable, apply your small, clearly printed labels (like “Pens” or “AA Batteries”) to the front edge of each new wooden compartment.
- Organize and Use: Sort your items and place them into their new labeled homes. The custom fit and clear labels ensure that finding and returning the items is now intuitive and quick.
12. The Power of Intentional Pauses

This tranquil image shows a person sitting calmly amidst a tidy living space, emphasizing the Mindful Organizing Approach over frantic cleaning.
Organizational fatigue happens when you try to tidy up everything all at once. This image encourages taking a necessary pause before tackling a mess. Sitting quietly and observing the space allows you to identify the true source of the clutter, rather than just shifting things around. The neat arrangement of furniture, the soft natural light, and the simple plant all demonstrate the peace that comes from an intentional, clutter free environment.
The boxes sitting near the person also suggest that the next step might be a thoughtful decluttering session, not a cleaning spree. This hack is about mental preparation: before you organize, take five minutes to breathe, choose one small area to focus on, and approach the task with calm energy. A tidy mind leads directly to a tidy home.
DIY Hack: Implementing the “Clutter Audit” Meditation
This is a mental and procedural hack that requires no materials, focusing entirely on a shift in mindset before beginning an organizing session.
Materials Required
- None
Equipment Required
- Comfortable chair or seat
DIY Instruction Step by Step
- Choose Your Seat: Find a comfortable spot in the room that feels the most overwhelming. Sit down and allow yourself to relax fully. Do not bring any tools, bins, or supplies with you.
- Set an Observation Timer: Close your eyes or soften your gaze. Set a timer for three minutes. Spend this time simply breathing deeply and clearing your thoughts.
- Perform the Audit: Once the timer goes off, open your eyes and look slowly around the room. Do not touch anything. Ask yourself two simple questions:
- Where does the most stress sit in this room? (Is it the pile of mail, the shelf of mismatched items, or the floor?)
- What is the absolute smallest thing I could fix right now that would make the biggest difference? (A single stack of books, the dirty dishes, the scattered shoes?)
- Select a Single Task: Based on your audit, select only one small task. This might be “clear the coffee table” or “empty the action basket.”
- Start and Stop: Stand up, complete only that single, focused task with intention, and then decide if you have the energy for another small task. By tackling the mess in small, intentional bites, you avoid burnout and achieve immediate, stress reducing results.
13. Utilizing Vertical Door Space

This image illustrates an excellent way to use an often ignored storage location: the back of the door, featuring a Multi Hook Over the Door Rack.
The back of any door—in a bedroom, bathroom, or closet—is valuable storage real estate that helps keep floor space clear. This simple metal rack uses hooks that fit right over the top of the door, requiring zero tools for installation. Hanging bathrobes, towels, or even clothes you plan to wear the next day on these hooks immediately stops them from ending up draped over chairs or lying on the bed.
The interior of the closet also shows a well organized system, including neatly folded towels on shelves and clothes hanging properly. The door rack complements this system by handling those temporary use items that are not quite dirty but are not ready to be put fully away. This hack is especially useful in small bedrooms or bathrooms where wall space is scarce, ensuring robes and towels are always hung up and easily accessible.
DIY Hack: Installing an Over the Door Hook Rack
This hack focuses on the simple installation and effective use of a multi hook rack for vertical storage on a door.
Materials Required
- One multi hook over the door rack (usually metal or heavy plastic)
- Small pieces of felt or rubber bumpers (optional, to prevent door rattle)
Equipment Required
- None (unless using the felt/bumpers, which may require scissors)
DIY Instruction Step by Step
- Check Door Fit: Unbox the over the door rack. Ensure the hooks that go over the top of the door are thin enough to allow your door to close properly when the rack is in place.
- Place the Rack: Simply hang the rack over the top edge of the door, ensuring it is centered. Gently close the door to verify it shuts without catching or scraping the frame.
- Apply Buffers (Optional): If the rack moves or rattles every time the door is opened or closed, apply small felt furniture pads or clear rubber bumpers to the back of the rack where it touches the door panel. This stabilizes the rack and protects the door finish.
- Assign Designated Hooks: To maximize this hack, assign a specific item to each hook. For example, Hook 1 is for your bathrobe, Hook 2 is for your travel bag, Hook 3 is for the next day’s outfit. Clear assignments prevent the hooks from becoming a messy pileup.
- Use Immediately: Train yourself and your family to immediately hang up robes and towels after use. Since the rack is visible and easy to access, this habit becomes simple to maintain.
14. Creating a “Decision Required” Zone

This close up image focuses on a fabric storage box topped with neatly folded laundry, emphasizing the step of Deciding the Fate of Decluttered Items.
The visual text overlay “Donate/Fix/Sell” and “Optional Upgrade” identifies the necessary step after you have decluttered. It is not enough to just put things in a pile. This gray storage box acts as a temporary holding zone for items you have removed but have not yet processed. Folding the laundry on top also suggests that this box could be a simple, attractive container for items like sheets, blankets, or clothes that need to be put away neatly.
The presence of the notebook and pen reinforces the idea that processing these items requires thought. You need to write down what needs to be fixed, what needs to be photographed for selling, and what is ready to drop off at the donation center. Using a stylish, lidded box makes the inevitable pile of stuff look neat while you wait to process it, preventing the “pending” pile from turning into new, unsightly clutter.
DIY Hack: Setting up the Processing Center
This is a procedural hack for managing the items removed during a decluttering session, ensuring they leave the house quickly.
Materials Required
- One attractive, lidded storage box or durable tote bag (the Processing Center)
- Large, clearly labeled trash bags (one for donation, one for trash)
- Notebook and pen
Equipment Required
- None
DIY Instruction Step by Step
- Establish the Center: Select a tidy, lidded box or tote bag to be your Processing Center. Place this box in a low traffic area where it is easily accessible but not highly visible, like a spare closet floor or utility room corner.
- The Sorting Phase: During any decluttering session, every item you remove that is not immediately trash should go into the Processing Center box. Do not try to sort it right away.
- The Decision Hour: Once the box is full, set aside 30 minutes for a Decision Hour. Empty the box and use your notebook to quickly categorize each item:
- DONATE: Items in good condition you no longer need. Place these directly into the labeled donation bag.
- SELL: High value items you want to list online. Write the item name and selling platform (e.g., “Sweater Vest eBay”) in your notebook.
- FIX: Items that require simple repair before use or donation. Write the item and the required repair (e.g., “Shirt sew button”).
- Execute the Exit Plan:
- Immediately place the full DONATE bag in your car trunk or near the front door to leave the house within 48 hours.
- Set a deadline (e.g., one week) to address the SELL and FIX lists. If you miss the deadline, the item automatically moves to the donation bag. This prevents the lists from becoming new clutter.
15. The Clear Paper Processing System

This close up image focuses on a fabric storage box topped with neatly folded laundry, emphasizing the step of Deciding the Fate of Decluttered Items.
The visual text overlay “Donate/Fix/Sell” and “Optional Upgrade” identifies the necessary step after you have decluttered. It is not enough to just put things in a pile. This gray storage box acts as a temporary holding zone for items you have removed but have not yet processed. Folding the laundry on top also suggests that this box could be a simple, attractive container for items like sheets, blankets, or clothes that need to be put away neatly.
The presence of the notebook and pen reinforces the idea that processing these items requires thought. You need to write down what needs to be fixed, what needs to be photographed for selling, and what is ready to drop off at the donation center. Using a stylish, lidded box makes the inevitable pile of stuff look neat while you wait to process it, preventing the “pending” pile from turning into new, unsightly clutter.
DIY Hack: Setting up the Processing Center
This is a procedural hack for managing the items removed during a decluttering session, ensuring they leave the house quickly.
Materials Required
- One attractive, lidded storage box or durable tote bag (the Processing Center)
- Large, clearly labeled trash bags (one for donation, one for trash)
- Notebook and pen
Equipment Required
- None
DIY Instruction Step by Step
- Establish the Center: Select a tidy, lidded box or tote bag to be your Processing Center. Place this box in a low traffic area where it is easily accessible but not highly visible, like a spare closet floor or utility room corner.
- The Sorting Phase: During any decluttering session, every item you remove that is not immediately trash should go into the Processing Center box. Do not try to sort it right away.
- The Decision Hour: Once the box is full, set aside 30 minutes for a Decision Hour. Empty the box and use your notebook to quickly categorize each item:
- DONATE: Items in good condition you no longer need. Place these directly into the labeled donation bag.
- SELL: High value items you want to list online. Write the item name and selling platform (e.g., “Sweater Vest eBay”) in your notebook.
- FIX: Items that require simple repair before use or donation. Write the item and the required repair (e.g., “Shirt sew button”).
- Execute the Exit Plan:
- Immediately place the full DONATE bag in your car trunk or near the front door to leave the house within 48 hours.
- Set a deadline (e.g., one week) to address the SELL and FIX lists. If you miss the deadline, the item automatically moves to the donation bag. This prevents the lists from becoming new clutter.
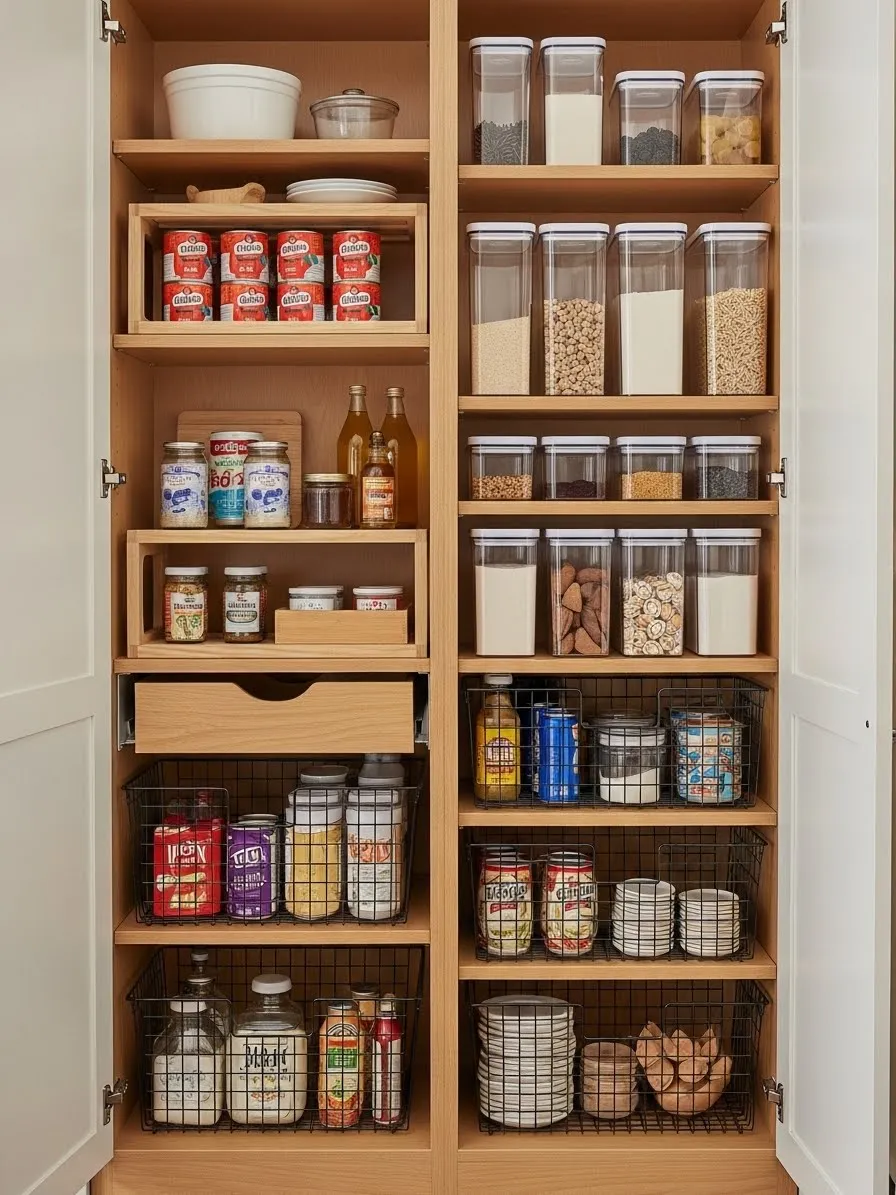
16. The Uniform Pantry Look

This image features a beautifully organized pantry demonstrating the effectiveness of Airtight, Matching Storage Containers for dry goods and liquids.
Maintaining a tidy food or utility closet is easy when containers look and function the same. Using a uniform set of clear, square containers maximizes space on the shelves because there are no wasted gaps between round edges. The clear material makes the contents instantly identifiable, while the bright white labels eliminate guesswork, ensuring you always grab rice instead of flour.
This system is not limited to food, as the bottom shelf shows containers holding laundry detergent, softener, and other utility items. Decanting liquids from large, oddly shaped original bottles into smaller, uniform containers creates a cohesive and visually pleasing look. Importantly, the airtight seals on these types of containers also help keep pantry pests out and keep food fresher for longer. The result is a system that promotes both efficiency and cleanliness.
DIY Hack: Decanting and Labeling Your Pantry Staples
This hack focuses on transitioning from original food packaging to uniform, labeled containers for superior pantry organization.
Materials Required
- Matching set of airtight, clear storage containers (various sizes)
- Printable labels or label maker materials (white labels on clear containers are stylish)
- Dry goods (pasta, rice, flour, beans) and utility items you wish to decant
Equipment Required
- None (unless using a label maker)
- Small funnel (optional, for pouring fine powders)
DIY Instruction Step by Step
- Empty and Clean: Start with one shelf or section of your pantry. Remove all items and thoroughly wipe down the shelf, removing any crumbs or dust.
- Select Containers and Decant: Choose a container size appropriate for each item. For example, use tall, slender containers for spaghetti and larger, square bins for flour or sugar. Carefully pour the contents of the original packaging into the new container. Use a funnel if necessary to prevent spills, especially with fine powders.
- Transfer Information: Do not toss the original packaging immediately. Cut out or write down any important information, such as cooking instructions, expiration dates, or allergy warnings. Place this small note inside the container, hidden beneath the contents, or tape it to the back.
- Create and Apply Labels: Use your label maker to create clear, simple labels (e.g., “All Purpose Flour,” “White Rice,” “Penne Pasta”). Apply one label squarely to the front of each container. Keeping the label placement consistent enhances the uniform look.
- Place on Shelves: Return the newly decanted, labeled containers to the shelves, grouping similar items together (all baking supplies on one shelf, all grains on another). Place items you use most often on the most accessible shelves.
17. Anchor Habits for Sustained Tidiness

This diagram illustrates the concept of Habit Stacking and Reset Routines for maintaining order through small, regular efforts.
The greatest challenge in organization is not the initial tidy up, but keeping the home that way. This hack encourages linking new, positive tidying behaviors to existing activities, known as “anchor habits.” For instance, you decide that immediately after you finish your morning coffee (the anchor habit), you will spend 15 minutes clearing the kitchen counter (the new desired behavior).
This method bypasses reliance on willpower; instead, it uses momentum to get things done. The mention of a “family meeting” and setting a timer suggests the routine should be collaborative and time bound. Establishing a 10 or 15 minute “reset” window every day, focused on a specific, assigned messy zone (like the living room or kitchen), prevents minor clutter from evolving into major chaos. Consistent, short bursts of effort anchored to daily routines are the foundation of a permanently tidy home.
DIY Hack: Setting up a 15 Minute “Anchor Habit” Reset
This is a procedural hack focused on anchoring a short tidying session to an existing daily habit to ensure consistency.
Materials Required
- Timer (phone or kitchen timer)
- Small notebook and pen (optional, for planning)
Equipment Required
- None
DIY Instruction Step by Step
- Identify the Anchor: List three things you do every single day without fail (e.g., “Drink morning coffee,” “Brush teeth,” “Walk the dog”). Select the one that occurs at the most convenient time for a short clean up. This is your Anchor Habit.
- Define the New Routine: Choose one small, specific area in your home that often gets messy (e.g., “Wipe down bathroom counter,” “Clear the kitchen table,” “Put away all shoes by the door”). This will be your 15 minute Reset Routine.
- Stack the Habits: Write down your new habit stack clearly: “After I [Anchor Habit], I will spend 15 minutes [Reset Routine].” For example: “After I finish my morning coffee, I will spend 15 minutes clearing the kitchen counter.”
- Execute and Time: The next time you perform your Anchor Habit, immediately set your timer for 15 minutes and begin the Reset Routine. Focus only on that area for the full time, putting things away, wiping surfaces, or processing clutter.
- Review and Adjust: Review your routine after one week. If 15 minutes is too long, reduce it to 10. If the routine is too broad, make it more specific. The goal is to make the combination so simple that the tidying session feels like an automatic continuation of the anchor.
18. Under Bed Storage Solutions

This image illustrates an excellent use of under the bed space with Low Profile Mesh Storage Bins, a smart way to store seasonal or occasional items.
Under the bed is often wasted space, but it offers a vast, out of sight area perfect for items you do not need daily access to. Using specialized, low profile bins allows you to store a significant volume of items while keeping them protected from dust. The mesh construction of these bins provides good air circulation, which is essential when storing textiles like blankets or seasonal clothing.
The clear, simple labeling on the front of the bins (“Formal Wear” and “Seasonal Albums”) prevents this area from becoming a black hole of forgotten items. The label “Off Site” visible on the bed frame suggests that even items stored here might eventually need to move to longer term storage if they are not used periodically. This storage method is a powerful solution for reducing closet overflow without resorting to unsightly stacks of plastic bins.
DIY Hack: Utilizing Under Bed Storage with Mesh Bins
This hack focuses on preparing and using low profile storage bins to tidy away seasonal or seldom used items beneath the bed.
Materials Required
- Two to four low profile, sturdy storage bins (mesh or canvas with hard sides are best)
- Labels and marker or label maker
- Items you wish to store (e.g., blankets, photo albums, seasonal clothing)
Equipment Required
- None
DIY Instruction Step by Step
- Clear the Area: Use a vacuum cleaner to thoroughly clean the floor space directly beneath your bed, paying attention to the corners and dust bunnies.
- Select Items for Storage: Gather the items that clutter your drawers or closet but are not needed every day. Good examples include heavy winter blankets, formal shoes, or old photo albums.
- Load the Bins Strategically: Place the items neatly inside the bins. Be careful not to overstuff them, as this can damage the items and prevent the bins from sliding easily. Group similar items in the same bin (e.g., all holiday decorations in one, all winter hats in another).
- Label Clearly: Use large, easy to read labels that clearly state the contents, like “Winter Sweaters” or “Archived Documents.” Apply the label to the side of the bin that will face out when stored under the bed.
- Slide and Store: Gently slide the labeled bins under the bed. Make sure the labels are visible so you do not have to pull out every bin to find what you are looking for. This frees up prime closet and drawer space immediately.
19. The Laundry Sorting System

This image displays an efficient and space saving laundry solution featuring a Three Section Rolling Hamper and Hanging Organizers.
Dirty laundry is a massive contributor to floor clutter, but a structured sorting system eliminates the piles. This rolling three section hamper allows clothing to be sorted immediately upon removal, before it even hits the floor. The clear labels “Lights,” “Darks,” and “Delicates/Dry Cleaning” make the sorting process simple for everyone in the household. Because the hamper is on wheels, it rolls easily to the washing machine, saving time and effort.
Above the hamper, a hanging organizer system provides organized storage for clean, folded clothes awaiting transport or immediate use. The individual cloth cubbies prevent clean laundry from becoming a messy heap. This combination of pre sorting the dirty clothes and organizing the clean clothes creates a powerful, full cycle system that keeps the entire laundry area—and the rest of the bedroom—tidy and functioning smoothly.
DIY Hack: Setting up a Rolling Pre Sorted Laundry System
This hack focuses on installing and labeling a multi section hamper to handle dirty clothes before they become a problem.
Materials Required
- One three section rolling hamper unit (often canvas or mesh bags on a metal frame)
- Permanent marker or printed labels for the three sections
- Fabric laundry bags or inserts (if not included with the frame)
Equipment Required
- Assembly tools provided with the hamper (usually an Allen wrench)
DIY Instruction Step by Step
- Assemble the Frame: Follow the manufacturer’s instructions to assemble the metal frame of the rolling hamper. Ensure the wheels are attached securely and lock in place if they are designed to do so.
- Attach the Bags: Install the three separate laundry bags onto the frame. They should hang securely so they do not collapse when filled with clothes.
- Label the Sections: Use a permanent marker directly on the fabric bags or attach clear labels to the front of the frame or bags. Label them “Lights,” “Darks,” and “Delicates/Dry Cleaning.” Ensure the labels are clear and visible.
- Place and Communicate: Position the rolling hamper in the laundry room or a shared bedroom/closet space. Clearly communicate the new sorting rules to everyone who lives in the house, instructing them to place clothes directly into the correct, labeled section.
- Simplified Washing: When laundry day arrives, simply roll the hamper directly to the machine. You can remove the bags one at a time, and the sorting is already complete, making the washing process faster and reducing the chances of colors bleeding.
20. The Micro Organization Drawer

This detailed close up of a drawer highlights the effectiveness of Modular Container Systems for Small Items and miscellaneous tools.
Drawers are often neglected, becoming home to random junk, but this system transforms chaos into accessible order. Using small, square, clear modular containers allows the user to customize the layout of the drawer completely. The containers fit together like puzzle pieces, maximizing the use of the entire horizontal space.
Each container is dedicated to one specific category, clearly marked with a label like “Batteries,” “Allen Keys,” or “Small Screws/Nails.” Even unusual items, such as the small blue tool and scissors, have a designated spot in a long, shallow tray at the back. This level of micro organization ensures that every tiny tool and supply is accounted for, eliminating the frustrating search for a specific battery size or small wrench. This system is adaptable and can be instantly rearranged if the contents of the drawer change.
DIY Hack: Creating a Modular Tool Drawer System
This hack focuses on using small, interlocking containers to bring order to a utility or junk drawer filled with small, miscellaneous items.
Materials Required
- A set of small, interlocking or modular clear plastic containers (various sizes, preferably square or rectangular)
- Label maker or small paper labels and clear tape
- Small items you are organizing (batteries, hardware, keys, rubber bands)
Equipment Required
- None
DIY Instruction Step by Step
- Empty and Clean: Remove everything from the drawer. Thoroughly vacuum or wipe out the inside.
- Assess and Categorize: Sort the items you removed into small, distinct categories (e.g., all batteries together, all screws together, all glue sticks together). Discard any true trash or broken items.
- Select Containers: Choose a container size for each category that allows the item to fit snugly without too much wasted space. For example, use a small, deep container for buttons and a longer, shallow one for rulers.
- Lay out the Grid: Begin placing the empty containers into the drawer, starting at one corner. Arrange them to fit the entire space without gaps. Since they are modular, you should be able to create a custom grid that maximizes every square inch.
- Label and Fill: Once the grid is set, apply a clear, simple label to the front of each container (e.g., “AA Batteries,” “Small Screws”). Then, carefully place the corresponding items into their new labeled containers.
- Maintain the Order: By dedicating a container and label to every small item, you make it easy for yourself (and others) to return the item to its exact home immediately after use, preventing the drawer from ever reverting to a messy state.
21. Utilizing Shelves for Simple Style

This image highlights a simple yet effective organization strategy: Minimalist and Intentional Shelf Styling for a clutter free look.
Sometimes, the best way to organize a space is to simply use less of it. This image features a closet or built in shelving unit that is intentionally sparse, maximizing negative space for a calm, tidy aesthetic. Instead of filling every shelf, the user has chosen only a few essential items to display: books, a small framed print, and simple potted plants.
Books are stacked vertically and horizontally in small groupings, acting as decoration rather than just storage overflow. The simple framed art and small succulents provide visual texture without introducing clutter. A cluttered shelf can make an entire room feel disorganized, but a minimalist approach makes the area feel curated, calm, and spacious. This hack is about prioritizing quality over quantity in what you choose to keep visible.
DIY Hack: The “Less Is More” Shelf Styling
This is a creative and organizational hack focused on removing clutter from shelves and styling the remaining items for maximum visual peace.
Materials Required
- Existing books, small framed artwork, and simple decorative items (like small plants)
- Storage bins or boxes (to hold the items you remove)
Equipment Required
- Dust cloth
DIY Instruction Step by Step
- Empty the Shelves: Completely remove every single item from the shelves you want to style. Give the shelves a thorough cleaning to remove dust.
- Filter the Contents: Examine the items you removed. Sort them into three piles: “Must Stay” (books you reference frequently, essential decor), “Store Away” (items you want to keep but do not need visible), and “Discard/Donate.” Place the “Store Away” items neatly into labeled bins and relocate them to a closet or basement.
- Group and Arrange (Books): Begin with your books. On one shelf, arrange a small stack of books horizontally (laying flat) to serve as a visual anchor. On another shelf, place a small group of books vertically, using a decorative object (like a plant or small statue) as a bookend. Avoid stacking books across the entire length of the shelf.
- Add Decoration Sparingly: On the remaining empty shelves, add only one or two simple decorative items. A small piece of framed art or a simple faux succulent works well. The goal is to leave significant open space (white space) on every shelf.
- Step Back and Evaluate: After styling, step back and look at the unit from across the room. The shelves should feel balanced and calm. If any shelf looks too busy, remove an item. This intentional reduction of visible items creates a tidy, restful visual environment.
22. The “One Wear” and Repair Closet Zones

This image introduces a vital system for wardrobe management: Designated Zones for Items Needing Action.
Clothing clutter often stems from items that are not quite clean, need minor repair, or are out of rotation. This hack addresses those pending garments directly. A small basket labeled “1 Wear Items” provides a clean, temporary home for clothes that have been worn once but are not yet ready for the laundry pile. This prevents the “chair clutter” epidemic where semi clean clothes pile up.
The hanging garments illustrate the “Out List,” which is clothing ready to be donated, and the “Repair Tag” system for items needing mending or professional cleaning. Tagging a garment with a “Dry Clean/Mend” label when you take it off makes sure it is not accidentally worn again. By dedicating a small area of your closet to these three categories—one wear, out list, and repair—you ensure that clothes are either properly stored or moved swiftly toward their next step.
DIY Hack: Setting Up the Wardrobe Processing Center
This hack focuses on creating the three specific zones in your closet to manage clothes that are in limbo.
Materials Required
- One small, sturdy basket or plastic bin
- Permanent marker or label maker materials
- Simple tags (paper or cardstock) and safety pins or small pieces of twine
- One dedicated hanger (for the “Out List”)
Equipment Required
- None
DIY Instruction Step by Step
- Establish the 1 Wear Zone: Select a small basket or bin. Label it clearly as “1 Wear Items.” Place this basket on a low shelf in your closet or on a chair near the closet door. Explain to yourself that only clean, wrinkle free items worn for less than four hours are allowed here.
- Create the Repair/Dry Clean Tags: Prepare several tags. On one side, write “DRY CLEAN,” and on the other, write “MEND.” Attach a piece of twine or a safety pin to each tag. Keep these tags stored in a small dish inside the closet.
- Define the Out List: Select one distinctively colored or labeled hanger (like the red one in the image). Label it “THE OUT LIST.” This hanger is for clothes that are ready to be donated or sold. As soon as you decide you do not want an item, move it to this hanger.
- Implement the Action Steps:
- When you take off a shirt and notice a stain or missing button, immediately attach a “MEND” tag and hang it separately.
- When the “Out List” hanger has more than three items, it is time for a trip to the donation center.
- When the “1 Wear Items” bin gets full, the clothes either go back in the drawer or straight to the washing machine.
23. The 3 For 1 Rule (The Purchasing Filter)

This screen capture highlights a powerful organizing mindset known as the “Remove 3 Items for 1 Purchased” Rule, designed to combat accumulation.
Homes become messy not just because of poor habits, but because we constantly bring in more than we remove. This rule provides a strong purchasing filter right at the moment of acquisition. The principle is simple: for every non consumable item you purchase (like a new shirt, a gadget, or a book), you must remove three similar existing items from your home.
This strategy forces intentionality. Instead of asking if you like the new item, you must ask what three existing items you are willing to let go of to make room. This naturally slows down consumption and ensures that the total volume of your belongings consistently shrinks over time. Applying this rule is the ultimate “pre decluttering” step because it stops clutter before it ever crosses your threshold.
DIY Hack: Implementing the 3 For 1 Buying Rule
This is a mental and procedural hack designed to curb overaccumulation directly at the source—the moment of purchase.
Materials Required
- None, just mental commitment
Equipment Required
- None
DIY Instruction Step by Step
- Identify Non Consumables: Define what constitutes a “non consumable item” for this rule (clothing, shoes, books, tools, décor, toys). Items like food or toilet paper are naturally excluded.
- Establish the Checkpoint: Create a mental checkpoint that activates every time you are about to purchase a non consumable item. Pause for a moment before completing the transaction.
- The Mental Inventory: Ask yourself: “If I buy this new item, what three existing items of the same type will I remove from my home today?” If you are buying a new sweater, you must identify three old sweaters to donate. If you cannot immediately identify the three items you are willing to remove, you should not purchase the new item.
- Execute the Removal: Once the new item is home, immediately locate the three corresponding items you decided to remove. Place them directly into a “Donate” or “Sell” bag. Do not allow them to linger.
- Track and Maintain: Use this rule consistently across all purchasing categories. Over time, you will find you become much more thoughtful about what you bring into your home, resulting in less clutter to manage.
24. The 5 Minute Living Room Reset

This image captures a moment of tidiness and relaxation, emphasizing the benefit of the Quick Living Room Reset before sitting down.
The living room is the hub of the home, and its appearance heavily influences your perception of overall tidiness. This woman tidying a pillow and the neat appearance of the sofa suggest that a quick reset makes the space inviting. Notice the woven basket containing remotes and magazines on the floor. This basket acts as a simple, attractive container for items that frequently clutter the coffee table.
Keeping a handheld vacuum nearby, as shown on the rug, emphasizes the importance of addressing small messes immediately, rather than waiting for a full cleaning day. Before settling down to relax, spend five minutes fluffing pillows, folding throws, clearing the coffee table, and collecting scattered items into a designated remote basket. This small habit transforms a messy space into a ready to use sanctuary, proving that consistency matters more than duration.
DIY Hack: Creating a Remote Control Catchall
This simple hack focuses on using a decorative basket to eliminate the most common coffee table clutter: remotes and electronics.
Materials Required
- One small, decorative basket (woven, wood, or metal)
- All remote controls, gaming controllers, and electronic accessories (e.g., stylus pens) that float around the room
Equipment Required
- None
DIY Instruction Step by Step
- Select the Basket: Choose a basket whose style matches your living room décor and is large enough to hold all the remotes and controllers upright. A woven basket adds nice texture.
- Gather the Clutter: Collect all the remotes and controllers from the sofa cushions, side tables, and floor.
- Establish the Home: Place the basket on a convenient surface, such as the bottom shelf of the coffee table, a side table, or the floor near the sofa. Ensure it is very easy to reach from your main seating area.
- Fill and Commit: Place all the gathered remotes and controllers into the basket. The rule is now simple: every time you finish using a remote or controller, it must be returned to the basket.
- The Quick Reset: As part of your living room reset, take a moment to ensure all pillows are fluffed, throws are folded, and every remote control is back in the basket. This makes the space look instantly much tidier.
25. Centralizing Instruction Manuals

This image highlights the need to organize Digital and Physical Product Manuals, which are frequent sources of paper clutter.
When we buy new electronics or appliances, they come with bulky paper manuals that often get tossed into a drawer, forgotten, and later cause confusion. This hack suggests two solutions: consolidating and digitizing. The multiple manual booklets in the image remind us that we keep too many. The phone next to the manual is a prompt to search for and save the digital PDF version of the manual instead of the paper one.
To manage the manuals you absolutely must keep (like warranties or complex instructions), consolidate them into one dedicated binder or file box labeled “Manuals.” Getting rid of the bulky paper copies for most items and placing the remaining essential ones in a single, accessible location prevents paper overflow. This eliminates the frantic search for instructions when a device malfunctions, restoring order to your utility drawers.
DIY Hack: Creating a Digital and Physical Manual Archive
This hack establishes a central, simple system for managing all appliance and electronics documentation.
Materials Required
- One three ring binder or accordion file folder
- Clear sheet protectors (optional)
- Labeled tabs for the binder (e.g., “Kitchen,” “Electronics,” “Appliances”)
- Your paper manuals and warranties
Equipment Required
- Smartphone or computer with scanning capability
DIY Instruction Step by Step
- Gather and Sort: Collect all the instruction manuals and warranties scattered throughout your home (junk drawers, cabinets, etc.).
- Digitize the Unnecessary: For manuals that are readily available online (most small electronics), simply search for the PDF version and save it to a designated folder on your computer (e.g., “Product Manuals”). Once saved, recycle the paper copy.
- Archive the Essentials: For complex appliances, warranties, or manuals that are hard to find online, organize the remaining paper copies into your binder or accordion folder. Use the tabs to separate them by category (e.g., “Washer,” “Stove,” “TV”). Place the original purchase receipt with the manual inside a sheet protector if possible.
- Establish the Drop Zone: Store the completed Manuals Binder in one central, accessible location (like a filing cabinet or a high shelf in the laundry room).
- Maintain the Flow: When you purchase a new item, immediately process the manual using the system: digitize or file it. This stops new manuals from ever entering the junk drawer.
26. Sorting Toys by Category

This image demonstrates a simple, highly effective organizational principle for children’s items: Labeled Baskets for Category Sorting.
Toy clutter is notoriously difficult to manage because of the sheer volume and variety of small parts. This hack solves that problem by using matching, sturdy baskets to group toys by type, not just by room. The attractive woven baskets add a natural texture to the room, and the clear labels “Blocks/Construct,” “Dolls/Figures,” and “Art/Puzzles” make clean up simple and intuitive.
By having a designated home for each category, children know exactly where to put items away, which encourages independence and simplifies the tidying process for parents. If a basket becomes too full, it acts as a visual cue that it is time for a decluttering session within that specific category. This system is visually calming, functional, and reduces the time spent searching for matching toy pieces.
DIY Hack: Creating a Category Based Toy Sorting System
This hack focuses on implementing the labeled basket system to bring order to children’s play areas.
Materials Required
- A set of matching baskets or bins (three to six is a good starting number)
- Permanent marker or label maker materials
Equipment Required
- None
DIY Instruction Step by Step
- Gather and Declutter: Empty all toys from the floor, shelves, and containers in the play area. Sort them all into one massive pile, then immediately remove any broken toys or toys the children have outgrown (the discard/donate pile).
- Define Categories: Look at the remaining toys and decide on three to six broad categories that make sense for your child (e.g., “Building,” “Vehicles,” “Art Supplies,” “Pretend Play,” “Dolls”).
- Label the Baskets: Clearly label each empty basket with one of the defined categories (e.g., “Vehicles,” “Building Blocks”).
- Sort the Toys: Have the children help you place the toys into the correct, labeled basket. This reinforces the system and teaches them where things belong.
- Establish the Routine: Make it a simple, non negotiable rule that when playtime ends, all toys must be sorted back into their corresponding labeled basket. Since the system is so clear, the cleanup process takes far less time than before.
27. Maximizing Cabinet Door Storage

This image illustrates an excellent way to gain crucial storage space by utilizing the back of a cabinet door with a Tiered Hanging Organizer.
The space behind cabinet doors is often overlooked, yet it is a highly effective place to store slender, frequently used items. This tiered wire rack is hung directly on the back of the door, providing several levels of storage without consuming valuable shelf space. Notice how items like aluminum foil, plastic wrap boxes, and even small cleaning products fit neatly into the vertical pockets.
The added whiteboard and marker, also hung on the door, provide a convenient place to quickly jot down a shopping list when you notice an item running low. In the spice cabinet, using the door for wraps and small essentials frees up the shelves for bulkier containers, like the spice baskets and measuring cups shown inside. This hack is about bringing small, functional items out of the clutter and making them instantly accessible.
DIY Hack: Installing a Cabinet Door Hanging Rack
This hack focuses on installing a wire or plastic rack on the inside of a cabinet door to maximize storage for small items.
Materials Required
- One tiered wire or plastic over the door storage rack (designed for pantries or utility closets)
- Screws or adhesive strips (depending on the rack type)
- Small items to store (foil, plastic wrap, snack bags)
Equipment Required
- Power drill and drill bits (if using screws)
- Level
- Measuring tape
- Pencil
- Safety glasses
DIY Instruction Step by Step
- Check Depth and Clearance: Before installation, make sure the rack will not be too deep. Close the door to ensure the rack and its contents clear the shelves inside the cabinet when the door is shut. Adjust the shelf positions inside the cabinet if needed.
- Mark and Level: Hold the rack against the inside of the cabinet door at the desired height. Use the level to make certain the rack is straight. Use a pencil to mark the screw hole locations on the door panel.
- Pre Drill Holes (If Screwing): Use a drill bit that is slightly smaller than your screw diameter to carefully drill pilot holes through the door panel at the marked locations. This prevents the wood from splitting.
- Attach the Rack: Hold the rack in place and drive the screws through the rack’s mounting holes and into the door. Secure it tightly, but avoid overtightening, which can damage the door panel.
- Load the Items: Begin placing your items into the tiers. Store the heaviest items (like large boxes of plastic wrap) in the lower tiers for safety and stability. Place smaller, lighter items (like chip clips or small spice bottles) in the top tiers.
28. Organizing Craft and Gift Supplies

This lovely image showcases a clutter free way to store occasional items like gift wrap and greeting cards using Decorative Lidded Boxes.
Items like gift wrap, ribbons, and greeting cards are often stored in a chaotic jumble, making them unusable when you actually need them. This hack demonstrates how to store these sporadic items in a visually appealing and highly functional way. Sturdy, matching colored boxes, some with decorative bows and lids, sit neatly on a shelf, containing the clutter.
The open pink box on the bottom right clearly shows a collection of greeting cards and envelopes standing upright, a much better solution than having them scattered in a drawer. The stack of blue boxes with white ribbons provides attractive closed storage for things like tissue paper or small party favors. Using pretty storage containers encourages you to keep these often neglected supplies organized, ensuring you are always ready for a celebration without creating an accompanying mess.
DIY Hack: Creating a Gift Wrap and Card Station
This hack focuses on using decorative boxes to consolidate all gift related supplies into one attractive, easy to access station.
Materials Required
- Three to five decorative, sturdy storage boxes (various sizes, some lidded, some open)
- Greeting cards, envelopes, tissue paper, ribbons, and gift tags
- Small pieces of foam core or cardboard (for card dividers)
Equipment Required
- Label maker or permanent marker
DIY Instruction Step by Step
- Gather and Sort: Collect all your greeting cards, gift tags, ribbons, tissue paper, and small boxes scattered throughout the house. Discard any torn wrap or cards that are too old to use.
- Define the Box Functions: Assign a function to each box:
- Box 1 (Tall, Lidded): For storing rolled up flat sheet tissue paper, small ribbons, and gift bags.
- Box 2 (Open, Medium): The Greeting Card Station.
- Box 3 (Lidded, Medium): For storing gift tags, cello bags, and small birthday candles.
- Organize the Greeting Card Station: For the open box (Box 2), use pieces of cardboard or foam core to create simple dividers. Label these dividers by occasion (e.g., “Birthday,” “Thank You,” “Blank,” “Holiday”). Stand your cards up in the appropriate sections for easy browsing.
- Fill the Lidded Boxes: Neatly fold tissue paper and place it inside the Lidded Box 1. Coil ribbons neatly and place them in the appropriate spot.
- Place and Maintain: Stack the lidded boxes attractively on a shelf or inside a closet. Place the open card station where it is easy to grab when needed. When you buy a new pack of cards or ribbon, it must immediately be placed into the correct box.
29. Appliance Organization by Frequency

This clean kitchen cabinet illustrates the concept of Storing Appliances by Usage Frequency, which optimizes counter space and accessibility.
Kitchen counters quickly become cluttered with bulky appliances if they do not have a designated home. This system uses cabinet space to store large and small appliances based on how often they are used. The heavy duty shelving holds mixers, slow cookers, and toasters neatly, reducing visual noise on the countertop while keeping them readily available.
Notice that the appliances used daily, like the coffee maker and toaster, are likely sitting on the countertop area shown between the upper and lower cabinets. The upper shelves are reserved for less frequent items like the rice cooker or specialty mixers, which are heavy but still need easy access. The lower cabinets use large, labeled bins to store accompanying accessories and smaller gadgets. Organizing by frequency means your everyday cooking flow is streamlined, and the counter surfaces remain clear and clean.
DIY Hack: Decluttering and Storing Kitchen Appliances
This hack focuses on applying the frequency principle to both large and small appliances to free up counter space.
Materials Required
- Large, sturdy, labeled bins or totes (for lower cabinet storage)
- Non slip shelf liner (optional, to protect shelves)
- Label maker or permanent marker
Equipment Required
- None
DIY Instruction Step by Step
- Assess Usage Frequency: Make a list of every appliance you own. Categorize them into three groups:
- Daily/Weekly Use (Coffee maker, toaster, microwave). These can stay on the counter.
- Monthly Use (Stand mixer, slow cooker, food processor). These need cabinet space.
- Annual Use/Special Occasion (Waffle iron, turkey fryer, bread maker). These should be stored in deep storage (garage, high shelf).
- Clear the Counters: Remove all appliances from your countertops except the Daily/Weekly items. Find an appropriate, clean cabinet to house the Monthly Use appliances.
- Place Monthly Use Appliances: Arrange the monthly use items on the shelves. Place the heaviest items (like the stand mixer) on the lowest, most accessible shelf, and lighter, less used items on upper shelves. Avoid stacking them, if possible, to prevent damage.
- Organize Accessories: Use your labeled bins for the lower cabinets. Gather all the small attachments, cords, and manuals that belong to the stored appliances. Label the bins by the appliance they serve (e.g., “Mixer Attachments,” “Food Processor Parts”). Place these bins in the low cabinets for easy reach.
30. The Portable Supply Caddy

This image features a highly functional Multifunction Portable Supply Caddy, designed to centralize and transport various small office or craft materials.
Scattered pens, pencils, glue sticks, and scissors are a common source of clutter on desks and kitchen tables. This molded plastic caddy provides an immediate solution by gathering all these necessary items into one portable unit. The caddy is divided into sections, ensuring pens stay separate from scissors, promoting visual order and making items easy to grab.
Having a single caddy means you can quickly carry your supplies from the office to the kitchen table for homework, or to the living room for crafting. The convenience of portability encourages immediate clean up; when you are finished working, the entire container can be picked up by the handle and put away. This eliminates the tedious task of gathering individual pens and pencils after every activity.
DIY Hack: Setting Up a Portable Activity Caddy
This hack focuses on organizing a multi compartment caddy to keep supplies ready and mobile for any work surface.
Materials Required
- One sturdy, plastic multi compartment supply caddy with a handle
- Pens, pencils, markers, glue sticks, small scissors, calculator, etc.
Equipment Required
- None
DIY Instruction Step by Step
- Source the Caddy: Purchase a durable caddy that has internal divisions. Ensure it has a strong, comfortable handle, as you will be moving it frequently.
- Sort and Declutter Supplies: Gather all the small office, homework, or craft supplies you want to keep together. Immediately throw away dried out pens, broken pencils, and any unnecessary duplicates.
- Assign Compartments: Assign a specific category to each section of the caddy:
- Tall Sections: Markers and colored pens (stored point down for easy access).
- Medium Sections: Pencils and glue sticks.
- Shallow Sections: Scissors, small calculator, thumbtacks, or a small sharpener.
- Load and Test: Fill the caddy, ensuring that no item sticks up too high that it would prevent the caddy from fitting under a shelf or cabinet. The goal is to maximize storage while keeping the caddy easy to carry.
- Establish the Home: Assign a clear home for the caddy when it is not in use (e.g., a specific shelf in a closet or a utility drawer). After every use, the rule is to put the entire caddy back in its assigned place, instantly clearing the work surface.
31. The Non Negotiable Daily Tidy List

This image displays a highly effective organizational tool: a Visible Daily Non Negotiable Tidy Checklist.
Inconsistent effort is the primary reason homes return to a messy state. This checklist, clearly displayed on a refrigerator, mandates a few simple tasks that must be completed every day. Tasks like “Clear Kitchen Sink,” “5 Minute Room Sweep,” and establishing “No Pile Zones” are small, achievable goals that prevent catastrophic build up.
Making this list visible, laminate it, and using a marker to check off completed tasks provides motivation and accountability. It removes the decision making process; you simply follow the list. The emphasis on “Anchor Habits” and “Very Easy” difficulty reinforces that these routines should be linked to existing behaviors and require minimal energy. A committed daily effort of only 15 minutes prevents you from needing to spend an entire weekend catching up on chores.
DIY Hack: Creating and Implementing the Daily Tidy Checklist
This is a procedural hack focused on creating a simple, visible, and highly accountable daily routine.
Materials Required
- One piece of paper or printable template
- Marker (for creating the list)
- Laminating sheet or clear plastic sleeve (to make it reusable)
- Dry erase marker and eraser
Equipment Required
- Laminating machine (optional) or magnets (to hang it on the fridge)
DIY Instruction Step by Step
- Draft the Non Negotiables: Decide on three to five simple, high impact tidying tasks that, if ignored, cause the most mess in your home. These must be achievable in five minutes or less. Examples:
- Clear all dishes from the sink and counters.
- Spend 5 minutes on a “Room Sweep” (putting away obvious items in the main living area).
- Make the bed.
- Clear the entryway drop zone.
- Create the Visible List: Write these tasks clearly on the paper, leaving space for a checkmark next to each one. Laminate the sheet or place it inside a protective clear plastic sleeve.
- Post the List: Hang the list in a highly visible area, such as the refrigerator door, the back of the pantry door, or the command center. Place the dry erase marker right next to it.
- Implement and Check Off: Establish a time (e.g., right before dinner or before relaxing in the evening) when these items must be completed. As soon as you finish a task, immediately use the dry erase marker to check it off. The visual satisfaction of the checkmark provides positive reinforcement.
- Wipe and Repeat: Wipe the checks clean before bed or first thing the next morning, ready to start the routine fresh. Consistency is the goal.
32. Color Coding the Closet

This image showcases the powerful impact of Organizing Clothes by Color and Type within a wardrobe.
A messy closet makes getting ready stressful and often leads to duplicate purchases because you cannot find what you own. Organizing shirts by color creates a neat, aesthetically pleasing view that immediately helps you locate items. All plaid shirts are grouped, all blue shirts are together, and the pops of color, like the red shirts, provide visual breaks.
Consistency in the hangers also adds to the streamlined, tidy appearance, reducing visual clutter. Beyond color, clothes are implicitly organized by type (all button downs together), which is the first step toward a functional wardrobe. When clothes are easy to see and access, you wear more of what you own and spend less time searching, creating a calmer start to your day.
DIY Hack: Color Coding Your Wardrobe
This hack focuses on the simple, visual task of rearranging your hanging clothes for maximum efficiency and aesthetic appeal.
Materials Required
- Matching hangers (optional, but highly recommended for visual unity)
- Your clothes
Equipment Required
- None
DIY Instruction Step by Step
- Remove Everything and Declutter: Empty all hanging items from the closet. This is the moment to remove any clothes you have not worn in over a year.
- Hang by Type: Start by organizing the remaining clothes into broad categories: all pants together, all dresses, all short sleeve shirts, all long sleeve shirts.
- Color Code Within Types: Now, work within each category. Take the long sleeve shirts, for example, and hang them side by side according to color. Use a consistent rainbow or lightness scale: start with whites, then beige/yellows, pinks, reds, oranges, greens, blues, greys, and finally blacks.
- Standardize Hangers (Optional Upgrade): If you can, invest in matching hangers (like the white plastic ones shown or slim velvet hangers). Mixing wire, plastic, and wood hangers creates a visually distracting mess; uniform hangers immediately make the closet look professionally organized.
- Maintain the Order: When you put laundry away, take the extra five seconds to place the item in the correct spot next to its color neighbor. This prevents the closet from devolving back into chaos.
33. Mastering the Cable Clutter

This image provides a step by step guide to conquering the infamous Junk Drawer Cable Mess using small organizers and bags.
The jumble of cords, chargers, and power bricks is a universal source of stress. This hack provides a contained, categorized solution. The drawer is organized using soft, fabric dividers and rigid plastic bins. Loose cables are neatly wrapped and secured with small labels indicating their function (“Cable Ties,” “Velcro Wraps,” “Cable”).
Crucially, spare cables and chargers are stored inside small, clear, labeled zipper bags. This prevents them from unraveling and tangling with others. Labeling the bags with their function (“Spare Backlos”) makes the exact item instantly visible. By keeping cables wrapped, labeled, and grouped in small containers, you eliminate the time spent untangling a massive mess, ensuring the right cord is found every time.
DIY Hack: Creating the Cable Command Center Drawer
This hack focuses on using small containers and ties to organize all your electronic cables and chargers into one clean drawer.
Materials Required
- Drawer divider system (felt bins, plastic trays, or cardboard pieces)
- Small clear zipper bags or sandwich bags
- Velcro straps, small ties, or rubber bands
- Label maker or small paper labels and clear tape
- All your loose cables and chargers
Equipment Required
- None
DIY Instruction Step by Step
- Gather and Purge: Collect every single loose cable and charger in your house. Immediately discard any that belong to devices you no longer own or are clearly broken.
- Wrap the Cables: Neatly coil each remaining cable individually. Secure the coil using a Velcro strap, cable tie, or even a rubber band. This prevents tangling.
- Categorize and Bag: Group similar cables and chargers together. Place spare cables (like extra phone cords or chargers) into the clear zipper bags.
- Label Everything: Label the wrapped cables (e.g., “Camera Cord,” “USB C,” “Power Strip”). Label the plastic bags clearly (e.g., “Spare Phone Cables,” “Monitor Cords”).
- Load the Drawer: Use your divider system to create compartments within the drawer. Place the power strips and multi outlet plugs in one large compartment. Arrange the individually bagged and wrapped cables neatly into the remaining compartments. By having a specific, labeled home, you eliminate cable sprawl.
34. The Clear Sink Zone

This bright image showcases a simple hack for a consistently tidy kitchen: The Clear Sink and Counter Zone.
The sink area is the most used space in the kitchen, and it is also the place where mess is most visible. This hack focuses on ensuring the sink, faucet, and surrounding counter space remain totally clear. The only items allowed on the counter are the essentials: a dish rack, a clean drying towel, and a few small potted herbs on the windowsill.
Having a dedicated space for air drying (the dish rack) prevents wet dishes from sprawling across the counter. The absence of clutter around the sink makes the entire kitchen look cleaner and more inviting. This system requires an immediate action rule: as soon as a dish is clean, it goes into the rack or is put away. By minimizing the items on the countertop, you maintain a sense of calm and hygiene.
DIY Hack: Implementing the “Clear Sink Before Sleep” Rule
This is a behavioral hack focused on making the sink area the focus of the daily kitchen clean up.
Materials Required
- Dish soap, sponge/brush
- Dish drying rack
- Clean kitchen towel
Equipment Required
- Timer (optional)
DIY Instruction Step by Step
- Establish the Rule: Set a clear rule that every night, before going to bed, the kitchen sink and the counter area immediately surrounding it must be completely clear of dirty dishes, stray sponges, and food debris.
- Designate a Drying Area: If you hand wash dishes, designate a specific, clean drying rack area on the counter, as shown in the image. Ensure the rack is the only item allowed to hold wet dishes. If you use a dishwasher, dishes must be put into the machine and run nightly.
- The Final Sweep: After washing up, quickly wipe down the sink basin and the faucet. Hang the drying towel neatly, and put away any soap bottles or stray brushes that are not essential. The only items allowed out are those actively drying in the rack.
- Enjoy the Payoff: Waking up to a clear, clean sink is one of the quickest ways to feel organized and calm in the morning. This small step sets a positive tone for the entire day.
35. Time and Task Consolidation

This image emphasizes the role of time management in organization, featuring a clock and various supplies, representing Consolidating Tasks and Tools.
Disorganization is often a failure of time management as much as a failure of storage. The clock next to the organized tools suggests that organizing supplies efficiently is done to save time. By gathering all writing utensils, markers, and office supplies into small, clear, compartmentalized containers, you are creating a workspace where everything is reachable and visible.
The core idea here is centralizing resources. Instead of having pens in three different drawers, they are all here, next to a clock that reminds you to use your time wisely. Using a stylish cup for highlighters and an acrylic container for pens ensures that even the process of organizing looks tidy. This hack combines the visual clarity of categorization with the efficiency of time management, ensuring you spend less time searching and more time doing.
DIY Hack: Creating a Centralized Office Supply Tower
This hack focuses on consolidating all small office supplies into a single, tiered organization system.
Materials Required
- Various containers (small cups, short square bins, divided trays)
- All pens, pencils, scissors, highlighters, tape, etc.
Equipment Required
- None
DIY Instruction Step by Step
- Gather and Cull: Collect all the small office supplies from around the house. Immediately discard anything broken or unusable. Keep only one pair of scissors, one stapler, etc., removing all unnecessary duplicates.
- Group Supplies: Sort the remaining supplies into categories (e.g., all pens together, all highlighters together, all scissors/tape together).
- Build the Tower: Begin arranging your containers on a small tray or stand. Place the tallest containers (for markers and pens) toward the back. Use the small, divided bins for tiny items like paperclips, rubber bands, and staples.
- Load the Tower: Place the supplies into their designated containers, standing them upright for easy access. The goal is to make the entire collection visible at a glance.
- Assign the Home: Place the assembled supply tower on your desk or on a shelf nearby. When an item is taken out, it must be returned to the tower immediately, ensuring all your work tools are always available in one spot.
36. Tiered Pantry Organization

This fully stocked pantry cabinet is a master class in Deep and Vertical Pantry Storage, utilizing different container types for maximum efficiency.
A disorganized pantry can lead to food waste and frantic meal prep. This system uses a combination of square, airtight containers (upper shelves) and wire baskets and tiered racks (lower shelves) to make every item visible. The wood risers and tiered shelving are essential, lifting canned goods so that every can’s label is visible, eliminating the need to dig.
The use of wire baskets on the bottom shelves is smart for storing heavier items like drinks, bottles, and irregularly shaped items like bags of potatoes or small onions. The open wire allows you to see the contents while keeping the shelves clean. By utilizing every inch, from the deep back of the shelf to the front, and employing different storage solutions tailored to different food types, this pantry remains tidy, accessible, and prevents food items from getting lost.
DIY Hack: Installing Tiered Risers for Canned Goods
This hack focuses on installing inexpensive tiered risers to bring order and visibility to your canned and jarred items.
Materials Required
- Two or more tiered shelving units (metal or plastic steps)
- Non slip shelf liner (optional)
- All your canned and jarred goods
Equipment Required
- None
DIY Instruction Step by Step
- Empty and Clean: Remove all the canned and jarred items from your pantry shelves. Wipe down the shelf thoroughly.
- Install the Risers: Place your tiered shelving units side by side on the shelf. If they are plastic, you can secure them lightly to the shelf using double sided tape or non slip liner to prevent sliding.
- Group and Load: Group your canned goods by category (e.g., all vegetables together, all tomatoes together, all beans together).
- Place on Tiers: Start loading the cans onto the risers. Place the tallest items (like large jars or juice cans) on the back, highest tier. Place the shortest cans on the front, lowest tier. The goal is for the label of every single can to be visible without having to move the can in front of it.
- Maintain Consistency: When you buy a new can, practice the “FIFO” rule (First In, First Out). Place the new can at the back of the group, and move the older can to the front. This simple habit prevents food from expiring in the back of your pantry.
37. Visual Cues for Consistent Storage

This image illustrates a clever organization hack: Using Visual Templates or Guides to ensure items are returned to their designated home consistently.
The problem with most storage systems is that people forget where things belong or do not return them neatly. This method solves that with fun, clear graphics. By drawing or printing outlines of where items should sit—a stack of shirts, a spice bottle, a roll of paper towels—it creates a visual command. There is no guesswork involved; you simply match the item to its designated spot.
This technique is extremely useful for maintaining tidiness in shared spaces like linen closets, supply shelves, or even clothing drawers. The outline acts as a reminder that the shelf should never be cluttered with something that does not fit the template. If a template is empty, it acts as a signal to the whole household that the item is running low and needs to be restocked.
DIY Hack: Creating Visual Templates for Drawer and Shelf Organization
This hack focuses on creating the visual outlines shown in the image to encourage consistent placement of items.
Materials Required
- Large sheets of heavy white paper or thin cardstock (or non adhesive shelf liner)
- Permanent black marker
- Scissors
- Items you are outlining (e.g., folded shirts, spice jars, paper towel rolls)
Equipment Required
- None
DIY Instruction Step by Step
- Prepare the Surface: Empty the shelf or drawer you wish to organize and wipe it clean. Cut the paper or cardstock to perfectly fit the bottom of the drawer or shelf.
- Arrange the Items: Place the items you want to outline neatly in their final storage configuration. For example, stack the folded shirts neatly where they will live, and place the paper towel roll next to them.
- Trace the Outlines: Using the black marker, carefully trace around the base of each item. For stacks of clothes or towels, trace the base of the stack to create a landing zone. If the item is in a drawer, make sure the outline allows the drawer to close fully.
- Remove and Refine: Once traced, remove the items. Use your marker to fill in any lines or to add a small text label if necessary.
- Install and Use: Place the finished template back on the shelf or in the drawer. Place the actual items onto the outlines. The clear visual guides now serve as a non verbal reminder to keep the space organized, as any deviation is immediately obvious.
38. The Digital Inventory Reminder

This image shows a closed cabinet door revealing a smartphone with an organization app, highlighting the Digital Inventory and Stock Check hack.
A messy home often includes duplicated items—five bottles of shampoo or three cans of black beans—because we forget what we already own. This hack prevents duplicates by linking physical storage to a digital inventory. The phone screen shows a list manager, suggesting that before shopping, you check the digital list to ensure you do not buy unnecessary items.
The rule embedded in this system is that when you put an item away, you immediately check the stock location and update the inventory digitally. The whiteboard on the inside of the cabinet door acts as an “Optional Upgrade,” a quick place to jot down items when you notice they are running low. By maintaining a clean inventory, you save money, reduce clutter, and ensure your home stays efficiently stocked.
DIY Hack: Setting up a Shared Stock Reminder List
This hack focuses on implementing a digital system to track low stock items and prevent duplicate purchases.
Materials Required
- Smartphone or tablet
- A simple list app that can be shared (e.g., Google Keep, Notes, Todoist)
- Small whiteboard or magnet notepad (optional)
Equipment Required
- None
DIY Instruction Step by Step
- Choose the App and Share: Select a simple, accessible list application on your phone. Create a list labeled “Home Stock Needed.” Share this list with everyone in the household who shops.
- Define Stock Locations: Define the main storage areas you need to track (e.g., “Bathroom Closet,” “Pantry,” “Cleaning Supplies”).
- The Immediate Action Rule: Establish a non negotiable rule: whenever someone takes the last or second to last of any essential item (like toothpaste, toilet paper, or coffee), they must stop and immediately add the item to the digital “Home Stock Needed” list.
- Install the Optional Upgrade: If using a physical whiteboard, mount it on the inside of a supply cabinet door (like the one shown). When someone notices an item is low, they write it on the board. Before going shopping, the shopper quickly checks the physical board and transfers the items to the digital list.
- The Shopping Filter: When at the store, the shopper refers only to the digital list. The commitment to the list ensures you buy only what you need, stopping the inflow of unnecessary stock and reducing storage clutter.
39. Hiding Visual Chaos Behind Curtains

This image shows a clever and attractive technique for organizing a utility or storage nook: Using Tension Rod Curtains to Hide Clutter.
Not all storage spaces can look as pristine as a magazine cover, especially if they house bulkier, less attractive items like cleaning buckets or microwaves. This hack uses simple, pretty fabric curtains hung on tension rods to conceal the “working” side of the storage area. The curtains provide a soft, decorative element that instantly cleans up the visual line of the room.
To the left, open shelving holds meticulously organized items like magazines in matching file boxes and tools in woven baskets. This separation is key: the organized items are visible, while the necessary, but messier, functional items (like the microwave and appliance accessories) are tucked neatly behind the curtains. This is a brilliant strategy for achieving a tidy appearance quickly without having to completely renovate the space.
DIY Hack: Installing a Decorative Curtain to Hide Storage
This hack focuses on installing a simple curtain system to hide messy utility shelves or appliance cubbies.
Materials Required
- Two tension rods (one for the top, one for the bottom of the opening)
- Fabric curtains or panels that match your décor (enough length to cover the opening)
- Small drapery clips or rings (if the curtains do not have a rod pocket)
Equipment Required
- Measuring tape
- Stepladder or stool
DIY Instruction Step by Step
- Measure the Opening: Accurately measure the height and width of the cabinet opening or nook you want to hide. Purchase a curtain rod that adjusts to this width and a curtain long enough to cover the entire height, plus some extra for gathering.
- Install the Tension Rods: Adjust the top tension rod to be slightly wider than the opening and install it firmly inside the frame near the top. If using a second curtain (as shown), install the second rod at the midpoint of the opening. The tension should be tight enough to hold the weight of the fabric.
- Attach the Curtain: Slide the curtain panel onto the tension rod(s). If your curtain does not have a rod pocket, use clip rings to attach the fabric to the rod.
- Smooth and Arrange: Gently pull the curtain across the opening, ensuring the fabric hangs evenly. Adjust the pleats for a soft, gathered look that fully conceals the shelves behind it.
- Enjoy the Visual Tidy: The curtains immediately provide a clean, cohesive appearance to the area, hiding the functional mess without requiring you to reorganize the space behind them.
40. The Linen Closet Sanctuary

This image shows a beautifully organized linen closet demonstrating Extreme Folding Consistency and Categorization.
A linen closet is one of the easiest spaces to organize because the contents are uniform, but it often becomes a messy, overcrowded tangle. This hack achieves maximum visual order by implementing a standard folding method for all towels and bedding. The uniform look of the all white linens is calming, and the neat stacks are easier to maintain.
Small labels placed directly on the shelves (e.g., “Towels,” “Bedding”) ensure that items are always placed back on the correct shelf, preventing a messy mix. The bottom shelf also incorporates a “Donation” bag, reminding you to process linens that are old or unused, which prevents overstuffing the shelves. A tidy linen closet is not just about looks; it makes finding and swapping out sheets and towels simple and stress free.
DIY Hack: Implementing the Uniform Folding Method (Linen)
This is a procedural hack focused entirely on standardizing the way you fold and stack all linens for maximum visual appeal and stability.
Materials Required
- All your linens (sheets, towels, pillowcases)
- Small label maker or tape and marker
Equipment Required
- None
DIY Instruction Step by Step
- Empty and Assign: Remove everything from the closet and wipe the shelves clean. Assign a clear shelf or section to each category: “Bath Towels,” “Hand Towels,” “Sheet Sets,” and “Bedding.” Apply clear labels to the front of the shelves.
- Learn the Fold: Choose one standard method for folding. For towels, a neat hotel style tri fold works well. For sheets, learn the “fitted sheet fold” to make them manageable squares.
- Fold Everything: Systematically fold every towel and sheet set using your chosen method. To make sheets easily accessible, store the entire matching set (fitted sheet, flat sheet, and one pillowcase) inside the second pillowcase.
- Stack Consistently: Place the folded items back onto their designated, labeled shelves. Stack the items so the folds face the front, creating a clean, uniform spine. Never stack items so high that they risk toppling over or prevent the shelf above from being used.
- Maintain the Look: Whenever you take a clean towel or sheet from the laundry, commit to folding it neatly using the standard fold before putting it away. This prevents the closet from quickly reverting to a messy state.
41. Entryway Recycling Station

This image features a dedicated Entryway Sorting and Recycling Station, stopping junk mail and packaging from moving further into the home.
The entry point of the home is where most clutter originates, particularly paper and packaging. This hack solves that by putting the necessary disposal tools right where they are needed. A wall mounted mail sorter organizes important mail (the mail you must keep), but below it, two small, dedicated recycling bins (labeled with the recycle symbol) handle the immediate disposal of junk mail, plastic wrapping, and cardboard packaging.
The presence of the larger trash bins nearby ensures all types of waste are dealt with immediately. By establishing this dedicated zone, you stop the flow of potential clutter—junk mail and broken down shipping boxes—from ever reaching the kitchen counter or living room table. This is organization at the source, preventing mess before it even begins.
DIY Hack: Setting up the Entryway Recycling and Trash Hub
This hack focuses on installing the visible containers needed to manage waste immediately upon entering the home.
Materials Required
- Two small, clearly marked bins or buckets (for recycling)
- One small vertical mail sorter (wall mounted)
- Small trash can (if you do not already have one nearby)
- Screws and wall anchors (if mounting the mail sorter)
Equipment Required
- Drill and drill bits (if mounting)
- Level
DIY Instruction Step by Step
- Mount the Mail Sorter: Install the mail sorter on the wall near the door using screws and anchors, ensuring it is level and at a comfortable height. This is your “KEEP” zone.
- Place the Recycling Hub: Mount the two small recycling bins (the “DISPOSE” zone) directly below the mail sorter, or place them on a small shoe rack near the door. Label one for paper/cardboard and one for plastic/mixed materials.
- Place the Trash Bin: Place the main trash bin nearby to handle non recyclable items.
- Implement the 5 Second Rule: Create a new household rule: when you enter the home, you have five seconds to process all paper and packaging in your hands. Mail goes into the sorter; junk mail and packaging go straight into the labeled recycling or trash bins.
- Empty Frequently: Because these bins are small, they will need to be emptied into the main recycling/trash containers daily or every few days. This frequent emptying keeps the entryway hub from becoming an overflow mess.
42. The Decluttering Power Hour

This image of three full trash bags and large markers emphasizes the concept of The Focused Decluttering Session with a time constraint.
Getting rid of unwanted things is the most crucial step in organization, yet it is often the most intimidating. The visual of the full bags and the marker stating “Thour Required” encourages tackling this task with a focused, time bound commitment. Dedicating just one “Power Hour” to aggressive decluttering, rather than trying to clean all weekend, makes the task feel manageable.
The markers pointing to “Donation Bin” and “Overa Uegenx” (Likely “Storage/Keep”) highlight the importance of deciding the fate of items quickly. When you dedicate an hour to this task, you are mentally prepared to make swift decisions about what leaves the house. These concentrated efforts, resulting in full bags ready to exit, are the fastest way to create lasting space and order.
DIY Hack: Implementing the 60 Minute Declutter Power Hour
This is a behavioral hack focused on conducting a short, aggressive decluttering session for maximum impact.
Materials Required
- Large, sturdy trash bags (for trash and donation)
- Timer
- Labels/marker (optional)
Equipment Required
- None
DIY Instruction Step by Step
- Select a Micro Zone: Do not try to clean the whole house. Choose one very specific, small area that you know is cluttered, like “the linen closet shelf,” “the magazine basket,” or “the top three shirts in the dresser.”
- Prepare the Tools: Place a donation bag and a trash bag right next to your chosen zone. Grab your timer.
- Set the Time and Commit: Set the timer for 60 minutes. The only rule is that for the entire 60 minutes, you are to do nothing but make decisions about the items in that zone. You are not allowed to tidy or clean; you only decide: Keep, Trash, or Donate.
- Process Aggressively: When the timer starts, pick up every item in the zone. If you do not love it or use it regularly, it goes into the Trash or Donation bag immediately. Do not move items to another room; make the decision now.
- Immediate Exit: When the timer goes off, stop immediately. Take the full trash bag to the outdoor bin and place the full donation bag in your car or near the front door. Seeing those bags leave the house provides an enormous sense of accomplishment and immediate space.
43. The “Next Day Prep” Routine

This multi frame image highlights the importance of the Preemptive Tidy and Next Day Preparation routine for a stress free morning.
Starting the day off mess free and ready to go is the secret to maintaining a tidy home and a calm mind. The top frames show a person brushing their teeth and smiling, and a garment bag holding clean jeans. These images emphasize anchoring a tidying task (like clearing the bathroom counter) to a natural anchor habit (like brushing teeth). The prepared garment bag signals that putting away laundry or packing the next day’s outfit is done the night before.
The bottom frames show a trench coat and a packed gym bag placed neatly near the door. Laying out your full outfit, packing your work bag, and putting your shoes by the door the night before eliminates morning chaos. This simple routine prevents clothing from piling up on chairs and ensures you never frantically empty a closet looking for a specific item just before leaving.
DIY Hack: Implementing the 10 Minute Nightly Prep
This is a procedural hack focused on establishing a short, high impact routine before bed to ensure morning peace.
Materials Required
- A designated spot (a hook, a chair, or a hanger) for the next day’s outfit
- Your briefcase, backpack, or gym bag
Equipment Required
- Timer
DIY Instruction Step by Step
- Set the Timer: Set a timer for 10 minutes right after dinner or before you start your evening relaxation time.
- Prep the Outfit: Select every piece of clothing and accessories you plan to wear the next day (including shoes). Hang the clothes neatly on their designated hanger or chair near the closet, completely ready to put on.
- Prep the Bags: Fully pack any bag you need for the next day (work, school, gym). Put in your laptop, wallet, keys, and any necessary files or lunch. Ensure the bags are zipped up and ready to go.
- Clear the Exit Zone: Place your prepared outfit and fully packed bags right by the main exit door, along with your keys and any other crucial items.
- The Quick Clean: Spend the last minute of the timer performing a quick cleanup of the bathroom counter (wiping toothpaste residue, putting away hair tools). This ensures you wake up to a clear space.
44. Room Specific Relocation Bins

This quadrant of images demonstrates the highly effective method of using Temporary Relocation Baskets labeled by room.
One of the biggest obstacles to tidiness is items that belong in a room far away from where they are found. These fabric bins solve the problem by creating temporary holding zones for items that need to be moved. Instead of immediately running an item to the bedroom, you toss it into the basket labeled “Bedroom.”
The basket labeled “Exit Strategy” is particularly helpful, acting as a reminder for items that need to leave the house, such as library books, returns, or gifts. By having one centralized basket for each room (e.g., “Bedroom,” “Bathroom”), you can gather items all day and then do one quick “Delivery Run” at the end of the day, making the process of returning items fast and efficient.
DIY Hack: Creating and Using Relocation Bins
This hack focuses on setting up and using labeled bins to manage item relocation between different rooms.
Materials Required
- Three or four small, sturdy bins or baskets (matching is attractive)
- Label maker or permanent marker
- Items that are frequently out of place
Equipment Required
- None
DIY Instruction Step by Step
- Define and Label: Decide on the three most common relocation destinations in your home (e.g., “Bedroom,” “Office,” “Kids’ Room”). Label one bin for each destination, plus a fourth bin labeled “EXIT STRATEGY” (for returns, dry cleaning, library books).
- Place the Hub: Place all the labeled bins together in one central, low traffic area, such as at the foot of the stairs, in a hallway, or near the main office desk. This is your Relocation Hub.
- The Quick Toss: When you find an item that is out of place and belongs in the Office, simply toss it into the “Office” bin. This stops you from taking a detour and getting distracted.
- The Daily Delivery Run: Once a day (perhaps during your nightly tidy routine), grab the Relocation Hub. Carry the bins from room to room, quickly emptying the contents into their correct homes. This one concentrated effort replaces multiple, distracting micro trips throughout the day.
45. The Bulk Reserve Supply Closet

This image features a fully stocked utility closet demonstrating the concept of Categorized, Labeled Reserve Stock storage.
Homes become cluttered when bulk items, like toilet paper and cleaning supplies, are stored randomly or in original packaging. This system uses matching clear bins and large, white labels to organize reserve items. Each bin holds a specific category, ensuring visibility (“Reserve Stock,” “Visibility,” “Time Requires,” etc., which represent stock items).
Using clear, stackable containers is crucial here because they allow you to see the contents and maximize the vertical space on the shelves. Importantly, by moving bulky items out of their messy original packaging and into these neat containers, you reduce the overall visual chaos of the closet. This systematic storage of reserve items ensures you always know what you have and where to find it.
DIY Hack: Organizing Bulk Items into Reserve Bins
This hack focuses on using large, clear bins to manage bulk purchases and reserve supplies in a closet.
Materials Required
- Large, clear, sturdy, lidded bins (various sizes)
- Label maker or permanent marker
- Bulk supplies (toilet paper, paper towels, cleaning products, toothpaste)
Equipment Required
- None
DIY Instruction Step by Step
- Empty and Assess: Remove all reserve supplies from the closet. Group them by category (e.g., all dental supplies together, all paper goods together).
- Select and Fill Bins: Choose a bin size appropriate for the category. Place paper products (like toilet paper rolls) neatly into one bin. Place small bottles and tubes (like toothpaste and mouthwash) into another. Using clear bins ensures you can see how full they are.
- Label Precisely: Label the bins clearly on the front handle. Use descriptive labels like “Reserve Stock,” “Paper Goods,” “Dental,” or “Bathroom Cleaners.”
- Stack and Store: Return the bins to the closet shelves, stacking them where appropriate to save space. Place the heaviest items (like large cleaning jugs) on the lowest shelves for safety and stability.
- Implement the Restock Rule: When the active supply of an item runs out (e.g., the last roll of toilet paper), it is a visual reminder to immediately grab one item from the reserve bin. This constant check keeps the reserve stock top of mind and ensures you never run out unexpectedly.
Achieving a tidy home in 2026 really comes down to mastering those tiny, consistent moments. We understand that tackling 45 hacks at once feels overwhelming, but remember that organization is a journey, not a destination. Start small by picking just one high impact change—maybe the 10 Minute Surface Sweep or installing an Entryway Command Center. Focus on turning that single action into an “anchor habit.”
When you use systems like clear labeling, vertical storage, and immediate waste processing, you take the heavy mental load out of maintaining order. These hacks are tools for intentional living. They are designed to streamline your daily flow, allowing you to spend less time managing stuff and more time enjoying your space. Choose consistency over speed, and you will find lasting peace in your home.
Key Takeaways
- Behavioral Change is Key: Lasting tidiness relies on small, daily “anchor habits” like the 15 Minute Reset, not massive weekend cleaning sprees.
- Stop Clutter at the Source: Use purchasing filters (the 3 For 1 Rule) and immediate processing zones (Entryway Recycling Hubs) to prevent new items and paper from piling up.
- Vertical Space is Valuable: Maximize every hidden corner, from the back of the cabinet door to under the bed, using stackable, clear containers and vertical organizers.
- Label Everything: Clear, simple labels in drawers, closets, and pantries remove all guesswork, ensuring items are put away correctly every single time.
- Relocation Strategy: Use room specific relocation bins to quickly gather out of place items, preventing them from scattering across the home.