Do you ever look around your home and feel frustrated? You clean, you tidy, but the mess always seems to return. It feels like a constant battle against clutter.
This is a common problem. A messy home often happens when items do not have a clear, logical “home.” It happens when systems are too complex to maintain.

You are not failing at organization. You just need a better set of tools. This guide is here to help.
We have gathered 45 ultimate organization hacks. These are not about buying expensive containers. They are about creating smart, simple systems that work for your life. Get ready to reclaim your space and enjoy a truly tidy home in 2026.
1. Create the “Landing Strip”
Item Name: The Minimalist Entry Shelf

Clutter often starts at the front door. Keys, mail, and pocket contents get dropped on the nearest surface. This small shelf acts as a gatekeeper. It stops that daily pile-up before it spreads.
This setup gives everything an immediate home. Your wallet, phone, and sunglasses rest here. The wall-mounted file holder catches mail. Hooks are ready for your coat and bag. It’s a simple system. It keeps your entryway clear and your mornings calm.
DIY Instructions: Installing Your Entry Shelf
- Gather Your Tools: You will need a floating shelf kit (which includes the shelf and a hidden bracket), a level, a pencil, a tape measure, a stud finder, and a drill with bits.
- Pick Your Spot: Decide on the height for your shelf. A common height is 36-40 inches from the floor. Make sure it’s comfortable to use and doesn’t block the door.
- Find the Studs: Use the stud finder to locate the wall studs. These are the strong wooden beams inside your wall. Mark their centers lightly with your pencil. Attaching to studs is the most secure method.
- Mark Your Holes: Hold the shelf’s metal bracket against the wall. Place the level on top of it. Adjust until the bubble is centered. Align the bracket’s holes with your stud marks. Mark the drill holes with your pencil.
- Drill Pilot Holes: If you are drilling into studs, use a drill bit slightly smaller than your screws. Drill shallow “pilot holes” on your marks. This prevents the wood from splitting.
- Use Wall Anchors (If No Studs): If you cannot line up with studs, you must use wall anchors. Drill holes for the anchors (check the anchor packaging for the right drill bit size). Gently tap the anchors into the holes with a hammer until they are flush with the wall.
- Attach the Bracket: Line the bracket up with your holes. Use your drill to drive the screws firmly into the studs or the anchors. Wiggle the bracket to ensure it is tight against the wall.
- Slide on the Shelf: Most floating shelves are hollow. Simply slide the shelf onto the bracket’s poles. Secure it with the small set screws, which are usually located on the underside of the shelf.
2. Use Seasonal Bins
Item Name: The Seasonal Shift Bins

Your mudroom should not hold winter boots in July. This system uses labeled bins for seasonal items. It forces you to store what you are not using.
Coats, hats, and umbrellas have a home on the hooks. But the bins below store gear for other seasons. “Rain Gear” and “Winter Gear” are tucked away. This keeps your active space clear. It only holds what you need today.
DIY Instructions: The Seasonal Bin Swap
- Gather Your Tools: You will need 3-4 sturdy, identical bins. Fabric or plastic bins work well. You also need a label maker or stencil letters.
- Identify Your “Seasons”: Think about your climate. You might need bins for “Summer” (sunscreen, swim goggles), “Rain” (umbrellas, ponchos), and “Winter” (gloves, hats, scarves).
- Create Clear Labels: Use your label maker to create large, clear labels. Stick one on the front of each bin.
- Sort Your Gear: Gather all your out-of-season items. Put them in the correct bins.
- Designate a “Swap” Spot: Store the bins for the current season in your mudroom. Store the off-season bins in a closet or garage.
- Set a Calendar Reminder: Set a reminder on your phone for the change of seasons (e.g., “October 1: Swap Bins”). When the day comes, simply swap the bins out.
3. Vertical Shoe Storage
Item Name: The “Off-the-Floor” Shoe Wall

Shoes are a primary source of entry-way clutter. They create a “shoe puddle” by the door. This hack uses vertical space to get every pair off the floor.
This system uses two methods. Wall-mounted shelves hold your most-used pairs. An over-the-door hanger holds the rest. This clears your walkway. It also makes finding a matching pair simple. No more digging through a pile.
DIY Instructions: Installing Wall Shelves
- Gather Your Tools: You will need simple, shallow shelves (often sold as “picture ledges”), a level, a pencil, a stud finder, a drill, and wall anchors/screws.
- Plan Your Layout: Decide how many rows of shelves you need. Use a tape measure to space them out. Leave enough vertical room for your tallest heels or boots.
- Find Studs: Use the stud finder to locate studs. Mark them with your pencil.
- Mark Your First Shelf: Hold the first shelf against the wall. Place the level on top. Adjust until it is straight. Mark the drill holes. Try to hit at least one stud.
- Drill and Secure:
- In a Stud: Drill a pilot hole, then drive your screw in.
- In Drywall: Drill a hole for a wall anchor. Tap the anchor in. Then, screw the shelf into the anchor.
- Repeat for Other Shelves: Use your tape measure to position the next shelf. Repeat the process until all shelves are securely mounted.
- Add Door Hanger: For your less-used shoes, hang an over-the-door shoe organizer on the back of your closet door.
4. Designate Family “Drop Zones”
Item Name: The “Everyone-Has-a-Bin” Hall Tree

Clutter is often about family. Backpacks, gym bags, and mail get left for someone else to handle. This system gives every person and purpose a home.
This hall tree creates specific zones. Hooks for coats. Baskets on top for less-used items. The bench bins are key. They are labeled for specific needs: “Gym,” “I forgot,” and “Parents.” This creates accountability. Everyone knows where their own items go.
DIY Instructions: Creating Labeled Bins
- Gather Your Tools: You will need sturdy baskets or bins that fit your shelf. You also need tags (wood, plastic, or cardstock) and a marker.
- Define Your “Zones”: Look at what piles up. Do kids forget homework? Create an “I Forgot” bin. Do parents have papers? Create a “Parents” bin. “Gym,” “Pets,” or “Returns” are other good options.
- Label the Tags: Write one category on each tag. Make the writing large and easy to read.
- Attach the Tags: Use string or a zip-tie to attach the tag to the handle of each basket.
- Teach the System: This is the most important step. Walk your family through it. The “I Forgot” bin is for items that need to go back to school. The “Parents” bin is for mail and forms.
- Maintain It: Once a week, go through the bins. Empty the “Parents” bin. Make sure the “I Forgot” bin is ready for Monday.
5. Decant Your Pantry
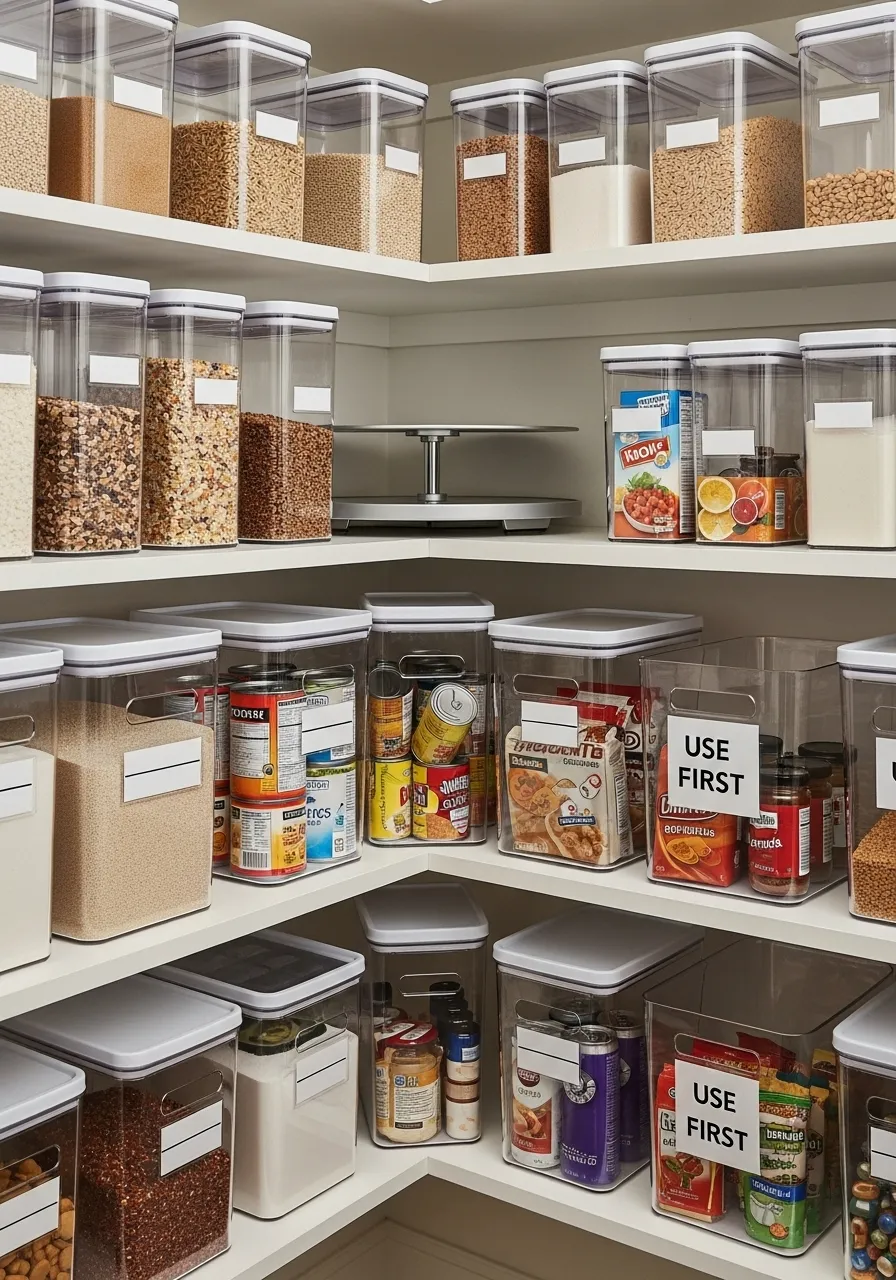
Item Name: The “See-Everything” Pantry System

A pantry becomes messy when you cannot see what you have. Half-empty boxes hide behind each other. This hack uses clear, airtight containers.
You “decant” items like cereal, pasta, and grains. They move from ugly boxes into uniform containers. This has two benefits. First, it looks clean. Second, you can see at-a-glance what you have. You know exactly when you are low on rice.
DIY Instructions: How to Decant Your Pantry
- Gather Your Tools: You will need a set of clear, airtight containers. You also need a label maker and a funnel (for grains).
- Empty One Shelf: Start small. Empty one shelf of your pantry.
- Wipe and Group: Clean the shelf. Group your bagged and boxed items (pasta, rice, cereal).
- Decant: Open a bag of pasta. Use a funnel to pour it into a clear container. Seal the lid.
- Label Immediately: This is critical. Use your label maker to create a label (“Spaghetti,” “Oats”). Stick it on the container.
- Add Expiration Date: On the bottom of the container, use a small piece of tape to write the expiration date from the original box.
- Organize Bins: For items you cannot decant (like cans or packets), use clear bins. Label one “USE FIRST” for items nearing their expiration date.
6. Zone Your Utensil Drawers
Item Name: The “Ergonomic” Kitchen Drawer

Kitchen drawers are often a jumble of tools. You search for the spatula while food is cooking. This hack creates zones based on how you cook.
This kitchen has two zoned drawers. The top drawer, “Stove Tools,” holds items used while cooking. Whisks, spatulas, and ladles are here. The bottom drawer holds duplicates, baking tools, and secondary items. Everything is separated by bamboo dividers.
DIY Instructions: Zoning Your Drawers
- Gather Your Tools: You will need expandable bamboo drawer dividers and a non-slip drawer liner.
- Empty and Clean: Take everything out of your utensil drawers. Wipe them clean.
- Add Liner: Cut the non-slip liner to size. Lay it flat in the bottom of the drawer. This stops items from sliding.
- Sort Your Tools: Make piles based on use.
- Pile 1 (Stove Tools): Spatulas, whisks, ladles, tongs.
- Pile 2 (Baking): Measuring cups, spoons, specialty spatulas.
- Pile 3 (Prep): Peelers, can openers, small tools.
- Install Dividers: Place the spring-loaded dividers in your drawer. Create “channels” for each category.
- Load by Zone: Put your “Stove Tools” (Pile 1) in the drawer closest to your stove. Put other piles in secondary drawers. You should be able to grab a spatula without searching.
7. Corral Your Cooking Oils
Item Name: The Countertop Cooking Caddy

Oils, vinegars, and spices can stain your counter. They spread out and look messy. This hack groups all your “high-use” cooking items into one caddy.
This caddy holds your most-used oils, vinegars, and salt and pepper. It sits on a bamboo tray. This tray protects your counter from drips. It also groups everything into one visual “home.” When you need to cook, you have one station.
DIY Instructions: Making a Cooking Caddy
- Gather Your Tools: You need a simple tray (bamboo, metal, or ceramic). You also need a utensil holder (for spatulas) and smaller shakers (for salt/pepper).
- Choose Your “All-Stars”: Look at your counter. What do you grab for every meal? This is usually:
- Olive Oil
- Vegetable Oil
- One type of vinegar
- Salt
- Pepper
- 2-3 main spatulas/spoons
- Assemble the Caddy:
- Place the tray on your counter near the stove.
- Put your oils and vinegars directly on the tray.
- Put your salt and pepper shakers on the tray.
- Place the utensil holder on the tray. Put your spatulas inside it.
- Store the Rest: Move all other oils and spices into your pantry. Your counter is now clear.
8. Maximize Under-Sink Space
Item Name: The “Awkward-Space” Cabinet Kit

The cabinet under the sink is a challenge. Pipes get in the way. It becomes a deep, dark mess of bottles. This hack uses tools designed for that space.
A spinning turntable (Lazy Susan) gives access to bottles. A two-tier sliding shelf doubles your storage. Over-the-door caddies hold sponges and trash bags. Stick-on lights help you see. This system uses every inch.
DIY Instructions: Organizing Under the Sink
- Gather Your Tools: You will need a Lazy Susan, a 2-tier sliding organizer, and over-the-door caddies. A tape measure is essential.
- Empty and Clean: Take everything out. Wipe down the entire cabinet.
- Measure Carefully: Measure the usable space. Note the width, height, and depth, avoiding the pipes.
- Install Organizers:
- Side 1: Place the 2-tier sliding organizer. Put tall, heavy bottles (like bleach) on the bottom. Put sponges and smaller items on top.
- Side 2: Place the Lazy Susan. Arrange your most-used spray bottles on it. You can spin it to grab what is in the back.
- Use the Doors: Hang the caddies on the cabinet doors. Use them for sponges, trash bags, or dish tabs.
- Add Lights: Stick battery-powered “puck lights” to the top of the cabinet. Tap them on to see.
9. Create a Recycling Hub
Item Name: The “All-in-One” Sorting Station

Recycling can create clutter. You end up with piles of paper and boxes. This hack builds a dedicated sorting station inside a cabinet.
This system uses labeled, stacking bins. “Glass,” “Paper,” “Plastic,” and “Compost” each have a bin. A recycling guide is taped to the door. This removes all guesswork. It makes sorting a simple, clean habit.
DIY Instructions: Building a Recycling Station
- Gather Your Tools: You need a set of stacking bins. You also need a label maker or stencils.
- Check Your Local Rules: Go to your city’s waste management website. Find out what you can recycle. “Paper,” “Glass,” “Cans,” “Plastic #1-5,” etc.
- Label Your Bins: Create clear labels for your bins based on your city’s rules. Add simple icon stickers (a bottle for glass) to make it fast.
- Create a “Guide”: Type up the recycling rules. Print it out. Tape this “Recycling Guide” to the inside of the cabinet door.
- Stack and Sort: Stack your bins inside a kitchen or utility cabinet.
- Add a “Utility” Hook: Add a small basket or hook on the door. Use it to hold items like bamboo brushes, a box cutter, or fresh towels.
10. Use a Smart Shopping List
Item Name: The “Never-Forget” Digital List

Clutter happens when we buy things we do not need. Or, we forget essentials and have to make extra trips. This hack uses a central, digital list.
This home uses a smart assistant. “Hey Google, add ‘oat milk’ to my shopping list.” This list syncs to your phone. The whole family can add to it. You buy only what you need. It organizes your shopping before you even go to the store.
DIY Instructions: Setting Up a Smart List
- Gather Your Tools: You need a smart speaker (like a Google Home or Amazon Echo) and a smartphone.
- Set Up Your “Home”: In your Google Home or Alexa app, make sure your speaker is set up.
- Find the “List” Feature:
- Google: In the Google Home app, go to Settings > Notes & Lists. Select “Google Tasks” or another list app.
- Amazon: In the Alexa app, go to More > Lists & Notes.
- Train Your Family: Teach everyone the command. “Alexa, add eggs to the shopping list.”
- Use It in the Wild: When you are at the store, open your app (Google Tasks or the Alexa app). Your list is there. Check items off as you buy them.
- Link Other Apps: You can connect your smart list to other apps (like Google Keep) so it is always visible.
11. Install an “Appliance Garage”
Item Name: The Hideaway Appliance Station

Small appliances are the biggest source of counter clutter. Toasters, blenders, and mixers create visual chaos. An “appliance garage” hides them.
This is a cabinet that sits on your counter. It has a lift-up door. Inside, a power strip provides electricity. A second cabinet below has a pull-out shelf. This holds heavy items like your mixer. The counter stays clear.
DIY Instructions: Creating a “Low-Tech” Appliance Garage
- Gather Your Tools: You will need a sturdy, deep-drawer cabinet, a heavy-duty pull-out shelf kit, and a drill.
- Measure Your Appliance: Find the height and footprint of your heaviest appliance (like a KitchenAid mixer).
- Choose Your Cabinet: Select a base cabinet.
- Install the Pull-Out Shelf: Follow the kit instructions. You will install two drawer-slide tracks on the bottom of the cabinet.
- Secure the Shelf: Attach the shelf to the tracks. Place your mixer or blender on the shelf.
- Manage Cords: Drill a 2-inch hole in the back of the cabinet. Feed the appliance cords through this hole. Plug them into a nearby outlet.
- Store and Use: Now, you can simply slide the heavy mixer out when you need it. Slide it back in when you are done. Your counter is free.
12. Use Your Pantry Door
Item Name: The “Hidden-Space” Spice Rack

Pantry shelves are deep. Small items like spices get lost. This hack uses the back of your pantry door. It turns unused air-space into a massive storage center.
This over-the-door rack has dozens of clear shelves. It holds your entire spice collection. It also holds oils and other small jars. Everything is visible. Nothing gets lost in the back of a deep shelf.
DIY Instructions: Installing an Over-the-Door Rack
- Gather Your Tools: You will need an over-the-door rack kit. You also need a tape measure.
- Measure Your Door: Measure the width and height of your door. Make sure you measure the inside (flat) part of the door.
- Buy the Right Kit:
- Hook-On: The easiest type. These kits come with metal hooks that just hang over the top of the door.
- Wall-Mounted: These are more secure. They require you to screw the rack directly into the door.
- Assemble the Rack: Follow the kit’s instructions to build the rack.
- Install It:
- Hook-On: Simply hang the hooks over the door.
- Wall-Mounted: Hold the rack against the door. Use a level to make sure it is straight. Mark your drill holes. Drill shallow pilot holes. Screw the rack into the door.
- Load It Up: Start placing your spices. Put heavier items on the bottom shelves.
13. Tame Your Media Cables
Item Name: The “Digital-Spaghetti” Solution

The tangle of cables behind your TV is a mess. It collects dust and looks chaotic. This hack uses simple tools to bundle and hide them.
This media cabinet shows a clean setup. All extra-long cables are bundled with hook-and-loop straps. They are tucked neatly on a shelf. The router and other electronics are given space to breathe. This small effort makes a big visual impact.
DIY Instructions: Bundling Your Cables
- Gather Your Tools: You will need a set of hook-and-loop cable straps (like Velcro strips).
- Unplug Everything: This is the easiest way. Unplug all your media devices from the power strip.
- Trace and Detangle: Untangle the “spaghetti.” Group the cables by device.
- Coil the Slack: Take the excess length of one cable. Coil it into a neat, 6-inch loop.
- Strap It: Use a hook-and-loop strap to secure the coil.
- Repeat: Do this for every single cable.
- Plug Back In: Plug everything back into the power strip.
- Tuck and Hide: Tuck the neat coils behind your media cabinet or onto a shelf.
14. Define Your “Work-From-Home” Zone
Item Name: The “Corner-Office” Nook

Working from home can make your house feel messy. Your work papers spread to the dining table. This hack carves out a dedicated, organized zone just for work.
This small corner is clearly defined. A simple desk holds the laptop. A shelving unit holds work-related books and supplies. A rug visually separates the “office” from the living room. When work is done, you leave this zone.
DIY Instructions: Creating a “Work Zone”
- Gather Your Tools: You need a desk, a chair, and a shelving unit.
- Find Your Corner: Look for an unused corner in your home. It could be in a living room, bedroom, or hallway.
- Define with Furniture: Place the desk in the corner. Place the shelving unit next to it.
- Use Vertical Storage: The shelving unit is key. Use it to store all your work items. Use baskets or bins on the shelves for small supplies (pens, staplers).
- Add a “Border”: Place a small rug under the desk and chair. This creates a visual “border.” It signals to your brain that this small area is for work.
- Keep it Clean: The rule is simple: only work items live in this zone. At the end of the day, put everything back on the shelves.
15. Use a “Containment Tray”
Item Name: The Coffee Table “Catch-All”

Coffee tables and ottomans attract clutter. Remotes, coasters, and books spread out. This hack uses a simple tray to “contain” the mess.
This wooden tray groups all the daily-use items. It holds the remotes, coasters, a candle, and a book. It turns a pile of clutter into a neat arrangement. It also makes it easy to move everything at once when you need to clean.
DIY Instructions: Setting Up Your Containment Tray
- Gather Your Tools: You need one large, attractive tray. Wood, metal, or lacquer trays all work well.
- Clear Your Table: Remove everything from your coffee table or ottoman.
- Identify “The Essentials”: Decide what needs to live on this surface.
- TV Remotes
- Coasters
- A decorative item (like a small plant or candle)
- The book you are currently reading.
- Place the Tray: Put the empty tray in the center of your coffee table.
- Arrange the Items: Place your “essentials” inside the tray.
- Maintain the “Rule”: The new rule is: items on the coffee table must live inside the tray. If it does not fit, it belongs somewhere else.
16. Create Smart “Scenes”
Item Name: The “One-Tap” Tidy

Visual clutter is not just about things. It is also about lighting. A room with one harsh overhead light can feel chaotic. This hack uses smart lighting to create “scenes.”
This smart-home app shows different scenes. “Focus” is for bright, cool light. “Relax” is for warm, dim light. “Dinner” is for a specific mood. This organizes your home’s atmosphere. You can change your whole room with one tap.
DIY Instructions: Setting Up a Smart Scene
- Gather Your Tools: You will need smart bulbs (like Philips Hue or Wyze) and their matching app. A smart speaker is optional but helpful.
- Install Bulbs: Replace your regular bulbs with smart bulbs.
- Connect to App: Follow the app’s instructions to connect each bulb. Group them by room (e.g., “Living Room”).
- Create Your First “Scene”:
- Go to the “Scenes” section of your app.
- Create a new scene. Call it “Relax.”
- Set the “Living Room” lights to a warm yellow color.
- Set the brightness to 30%.
- Save the scene.
- Create More Scenes: Make a “Focus” scene (bright, white light) and a “Movie” scene (very dim, blue light).
- Use Your Voice: Connect the app to your smart speaker. Now you can say, “Hey Google, set the ‘Relax’ scene.”
17. Build an Indoor Greenhouse
Item Name: The Living-Art Cabinet

Houseplants can add clutter. You end up with small, mismatched pots on every surface. This hack turns your plant collection into a single, organized feature.
This glass cabinet is retrofitted with grow lights and fans. It becomes an indoor greenhouse. It groups all your plants into one “living-art” piece. This stops pot-clutter. It also keeps your plants healthy and contained.
DIY Instructions: Making a Cabinet Greenhouse
- Gather Your Tools: You need a glass-door cabinet (like the IKEA Milsbo). You also need LED strip grow lights, small USB fans, and a power strip.
- Assemble the Cabinet: Build your cabinet.
- Add Lights: Stick the LED grow light strips to the underside of each shelf.
- Add Airflow: Place the small USB fans in the corners. Aim them so they circulate air.
- Manage Cords: Run all the light and fan cords neatly to the back. Feed them through any cabinet holes. Plug them all into a power strip.
- Add Plants: Arrange your plants inside the cabinet.
- Use a Timer: Plug the power strip into a simple outlet timer. Set it to turn the lights and fans on for 12 hours a day.
18. Automate Your “End-of-Day”
Item Name: The “Digital Shutdown” Routine

A messy desktop (physical or digital) can feel overwhelming. This hack uses automation to clean up for you.
This computer uses a “Siri Shortcut” script. At the end of the day, one click runs the “End of day” routine. This script closes all apps. It archives files. It even sets a “fresh digital desktop” for the next morning. This is a digital-organization hack.
DIY Instructions: Setting Up a Simple “End-of-Day”
- Gather Your Tools: You need a computer. We will use a simple automation app (like “Shortcuts” on Mac or “Power Automate” on Windows).
- Define Your “Shutdown”: What needs to happen at 5 PM?
- Close all work apps (Slack, Outlook, Teams).
- Archive today’s “desktop” files.
- Open a “relaxing” app (like Spotify).
- Build the Automation:
- Open your “Shortcuts” or “Power Automate” app.
- Create a new automation.
- Drag and drop actions: “Find all files on Desktop.”
- Add action: “Move files to ‘Desktop Archive’ folder.”
- Add action: “Quit App [Slack].”
- Add action: “Quit App [Outlook].”
- Run It: Save your script. Run it at the end of your next workday.
- Level Up: You can set these automations to run on a schedule, so your computer cleans itself up at 5 PM every day.
19. Create an “Action Station”
Item Name: The “To-Do” File Sorter

Paper clutter is a big problem. Bills, mail, and forms pile up. This hack creates a simple “action station” on your desk.
This wire file sorter organizes paper by action. It is not just a pile. One slot is for “To-Do.” Another is for “To-File.” This system stops paper from becoming a “doom pile.” You know exactly what needs your attention.
DIY Instructions: Setting Up Your Action Station
- Gather Your Tools: You need a simple, desktop file sorter (wire or plastic) and some file folders.
- Define Your “Actions”: What kind of paper do you get? You only need a few categories.
- INBOX: All new mail and papers go here first.
- TO-DO: Items that need an action (Pay a bill, sign a form).
- TO-FILE: Items you need to keep, but do not need to act on.
- Label Your Folders: Create one file folder for each of your “action” categories.
- Load the Sorter: Place the folders in your file sorter. Put “INBOX” at the front.
- Set a Schedule: Once a week (e.g., Sunday night), go through your station. Empty the “INBOX” into the other folders. Pay the bills in “TO-DO.” File the papers in “TO-FILE.”
20. Use “Visual” Decluttering
Item Name: The Calming Plant Corner

Sometimes a room feels “messy” even when it is tidy. This is “visual clutter.” Too many small objects or harsh colors can overwhelm your brain.
This hack uses simple, large-scale items to create calm. A single, large plant in a simple basket. A simple, neutral-colored sofa. One piece of abstract art. This is “decluttering” by removing visual noise. It creates a space that feels restful.
DIY Instructions: How to Visually Declutter
- Gather Your Tools: You need a few empty boxes.
- Clear All Surfaces: Take everything off your shelves, tables, and mantle.
- Evaluate: Look at your empty room. It already feels calmer.
- Re-introduce Items (The “Rule of 3”):
- Start putting items back. But follow a new rule.
- Group items in threes. (e.g., A tall vase, a medium book, a small bowl).
- Do not put back everything. Only put back what you love.
- Use “Calm” Containers: Put small, “noisy” items (like remotes) in a simple box or tray.
- Add a “Hero” Plant: Buy one large floor plant. Put it in a simple basket. This one large item will anchor the room, making all the small items feel less important.
21. Use a Fold-Down Desk
Item Name: The “Now-You-See-It” Wall Desk

Small spaces need smart furniture. A bulky desk can eat up an entire room. This solution disappears when you are finished. It is a wall-mounted desk that folds flat.
This gives you a solid workspace when you need one. When work is over, you fold it up. The surface becomes a slim shelf. This hack is great for guest rooms or studio apartments. It reclaims your floor space instantly.
DIY Instructions: Installing a Wall-Mounted Desk
- Gather Your Tools: You will need a folding wall desk kit, a stud finder, a level, a drill, and a pencil.
- Choose Your Wall: Find a clear section of wall. Use the stud finder to locate the wooden studs. Mark their centers. Attaching to studs is essential for a desk.
- Position the Desk: Unfold the desk. Hold the main bracket or mounting strip against the wall. Decide on the height (standard desk height is 29-30 inches from the floor).
- Level and Mark: Place your level on top of the desk’s mounting bracket. Adjust until it is straight. Use your pencil to mark the drill holes. Make sure at least two holes line up with your marked studs.
- Drill Pilot Holes: Drill small pilot holes into the studs on your marks. This makes it easier to drive the screws.
- Secure the Bracket: Hold the bracket in place. Use your drill to drive the long screws from your kit through the bracket and deep into the wall studs.
- Test It: Wiggle the bracket to ensure it is secure. Carefully fold the desk up and down a few times.
22. Create a “Focus Kit”
Item Name: The “Do Not Disturb” Box

Focus is a valuable resource. A cluttered desk or digital pings can break your concentration. This hack creates a physical kit for deep work.
It is a simple box that holds everything you need to focus. This includes headphones, a “focus” notebook, a timer, and a “Do Not Disturb” sign. When you open this box, it signals to your brain that it is time to work. It keeps your tools together.
DIY Instructions: Assembling Your Focus Kit
- Gather Your Tools: You will need a simple, attractive box. A bamboo desk organizer or a nice shoebox works well.
- Select Your “Focus” Tools: Gather the analog items that help you work. This could be:
- Noise-canceling headphones.
- A dedicated notebook and pen (only for this task).
- A physical timer (to avoid using your phone).
- A small card that says “Do Not Disturb.”
- Arrange the Box: Place your items neatly in the box.
- Create the Ritual: Place the box on a clean shelf. When it is time for deep work, clear your desk. Take only this box to your workspace.
- Put it Away: When your timer goes off, your work session is done. Put all the items back in the box. Place the box back on its shelf. This closes the “loop” on your work session.
23. Organize Your Digital Legacy
Item Name: The Digital “In-Case-of-Emergency” Plan

We have messy digital lives. Passwords, accounts, and files are scattered. This organization hack is about peace of mind. It is a plan for your most important digital information.
Using a secure app or a master note, you list your key accounts. This includes password managers and hard drive locations. You name a “Legacy Contact.” This person can manage your digital assets if you cannot. It is a “weekend project” that organizes your entire digital life.
DIY Instructions: Starting Your Legacy Plan
- Get a Password Manager: This is step one. Use a service like 1Password or Bitwarden. Put all your passwords into it.
- Designate a Legacy Contact: Most password managers have a “Legacy” or “Emergency Access” feature. Follow the app’s steps to invite a trusted person. They will not get access until you approve it or in an emergency.
- Create a “Master Note”: Inside your password manager, create a secure note.
- List Key Info in the Note: Do not write passwords here. Write the locations of key information. For example:
- “Main bank is [Bank Name].”
- “Hard drive backups are in the [Closet Safe].”
- “List of subscriptions to cancel is in [Google Drive Folder].”
- Tell Your Contact: Have a conversation with your legacy contact. Let them know what the plan is and why you have set it up.
24. Zone Your Closet by Context
Item Name: The Contextual Closet System

A messy closet makes getting dressed hard. Most people organize by item type (all shirts together). This hack organizes by context.
Your closet is split into zones for your life. “WFH” (Work From Home) holds your comfy lounge clothes. “Active” holds gym gear. “Going Out” holds your nicer shirts. This way, you only look in the section you need. Labeled hangers or dividers make the zones clear.
DIY Instructions: How to Zone Your Closet
- Gather Your Tools: You will need closet rod dividers or simple hanging tags. A label maker is also helpful.
- Empty and Sort: Take all your clothes out. Create piles on your bed based on when you wear them. Make a “Work” pile, a “Lounge” pile, an “Active” pile, a “Social” pile, etc.
- Create Your Zones: Look at your closet rods. Assign a physical section for each of your piles.
- Label the Zones:
- Hanging Tags: Use cardstock tags. Write the zone name (“ACTIVE”) and hang it from the first hanger in that section.
- Rod Dividers: Use plastic closet dividers (like they have in stores). Put a label on the divider and place it between your zones.
- Load the Closet: Hang your clothes back up, but put them in their new “context” zones.
- Label Drawers: Use the same logic for your drawers. One drawer can be “Lounge,” another “Active.”
25. Tame Your Nightstand Drawer
Item Name: The Bedside Drawer Kit

The nightstand drawer often becomes a junk drawer. It fills with old receipts, loose change, and tangled cords. This hack uses dividers to give every item a home.
Small, modular bins create a custom fit. There is a spot for your charging cable. A tray holds lotions or lip balm. Another holds your glasses. Now, when you reach into the drawer in the dark, you can find exactly what you need.
DIY Instructions: Organizing Your Nightstand Drawer
- Gather Your Tools: You will need a set of small, shallow drawer organizers or bins.
- Empty the Drawer: Dump everything out of the drawer.
- Clean and Purge: Wipe the drawer clean. Throw away trash, old papers, and anything that does not belong.
- Identify Essentials: Decide what must live in this drawer. This is usually:
- Charging cable
- Lip balm / hand lotion
- Medication
- A small notebook and pen
- Reading glasses
- Arrange the Bins: Place your empty bins in the drawer. Treat it like a puzzle. Find a layout that fits the space.
- Fill the Bins: Put your items back. Give each category its own bin. Coil your charging cable and place it in its own small tray.
26. Create Purposeful Mini-Zones
Item Name: The “Catch-All” Basket and “Library” Shelf

Clutter happens when items have no “home.” This hack uses small pieces of furniture to create specific mini-zones.
A small, empty basket by the door becomes the “shoe zone.” It stops shoes from scattering. A low bookshelf becomes a “reading zone” or “media zone.” It collects books and magazines. These small zones act as magnets for your items.
DIY Instructions: Setting Up a Mini-Zone
- Identify a “Clutter Spot”: Find a place where things always pile up (like by the door).
- Choose a “Container”:
- For shoes/bags: Get a large, sturdy basket.
- For books/magazines: Get a small, low bookshelf.
- For mail/keys: Get a small tray (see Hack 15).
- Place the Container: Put your chosen container right in the clutter spot. Put the basket where shoes are dropped. Put the bookshelf in the corner where books pile up.
- Load it (Once): Gather all the items that belong there. Put the shoes in the basket. Put the books on the shelf.
- Build the Habit: The container is now the only home for those items. The new rule is “shoes live in the basket.”
27. Digitize Your “Cold” Storage
Item Name: The QR-Code Inventory System

“Cold storage” holds items you rarely use. This includes holiday decorations, seasonal clothes, or “gift wrap.” The problem? You forget what is in each box.
This hack uses QR codes to create a digital inventory. You stick a code on a bin. You use an app to list everything inside that bin. Need the gift wrap? Scan the codes with your phone until you find the right box. No more opening five bins.
DIY Instructions: Using QR Storage Labels
- Gather Your Tools: You will need storage bins, printable QR code labels (or a label kit like “Sortly”), and a smartphone.
- Download an App: Find an inventory app (like Sortly, or even a simple notes app).
- Number Your Bins: Start with one bin. Put a label on it.
- Create a Digital List: In your app, create a new entry. Title it “Bin 01.”
- List the Contents: Open the bin. List everything inside. Be specific. “Red/Green wrapping paper,” “Gift bags,” “Bows.”
- Generate a QR Code:
- In-App: Apps like Sortly will generate a unique QR code for your “Bin 01” entry.
- Manual: You can go to a free QR code generator website. Paste your list into it. Generate a code.
- Print and Stick: Print your QR code and stick it on the bin.
- Repeat: Do this for all your storage bins. Now, you can scan the code to see what is inside without opening it.
28. Use Under-Bed Storage Drawers
Item Name: The Captain’s Storage Bed

The space under your bed is large. But it is often a “dust bunny” graveyard. A bed with built-in drawers turns this wasted area into a massive, organized dresser.
This is much cleaner than sliding shallow plastic bins. The deep drawers can hold your entire collection of sweaters. They are also great for extra linens, blankets, and towels. It is a piece of furniture that does two jobs.
DIY Instructions: How to Use a Storage Bed
- Find the Right Bed: This hack is about choosing the right furniture. Look for a “storage bed” or “captain’s bed” with large, deep drawers.
- Assign a Category: Dedicate these drawers to a single category of items. This is not for random junk.
- Use for “Off-Season”: This is a great place for your “cold storage.” In summer, fill these drawers with all your winter sweaters, heavy socks, and flannels.
- Use for “Bulky”: This is also a good spot for bulky items that clog your main closet. This includes extra bed sheets, guest towels, and comforters.
- Use Dividers: The drawers are large. Use simple cardboard or spring-loaded dividers inside. This stops your clothes from becoming one big pile.
29. Build an Accessory Station
Item Name: The Closet Accessory Nook

Jewelry, sunglasses, and scarves are small and hard to organize. They end up in a tangled box. This hack creates a small, visual station for all your accessories.
It uses a shelf in your closet. Simple trays hold rings and bracelets. A framed piece of mesh becomes an earring holder. Wall-mounted knobs hold long necklaces. Acrylic drawers store sunglasses. Everything is visible and easy to grab.
DIY Instructions: Making a Framed Earring Holder
- Gather Your Tools: You will need a simple picture frame, a piece of wire mesh or plastic canvas (from a craft store), and a staple gun.
- Prepare the Frame: Remove the glass and the backing from the picture frame. You will only use the empty frame.
- Cut the Mesh: Lay the frame on your mesh. Use scissors to cut the mesh. It should be just slightly larger than the opening.
- Staple the Mesh: Place the mesh over the back of the frame. Pull it tight. Use the staple gun to staple the mesh to the back of the wooden frame. Add staples every few inches.
- Trim Excess: Trim any extra mesh that sticks out.
- Hang and Use: You can now lean this frame against the wall or hang it. Hook your earrings directly onto the mesh.
30. Make a Mobile Mending Cart
Item Name: The Rolling Hobby Station

Hobbies create clutter. A sewing machine, threads, or craft supplies can take over a table. This hack uses a rolling cart to create a mobile station.
This cart holds everything for a specific task: mending clothes. Labeled bins hold items “To-Mend.” A pegboard on the side holds scissors and thread. When it is time to work, you roll the cart out. When you are done, it rolls back into a closet.
DIY Instructions: Building a Mending Cart
- Gather Your Tools: You will need a 3-tier rolling utility cart, a small wire grid (pegboard), and some small bins or drawers that fit on the cart’s shelves.
- Assemble the Cart: Build the rolling cart according to its instructions.
- Attach the Grid: Use zip ties to attach the wire grid or pegboard to one side of the cart. This is now your “tool wall.”
- Add Hooks: Add small hooks to the grid to hold scissors, thread spools, and other tools.
- Organize Shelves:
- Top Shelf: Place your most-used items here. This could be a pincushion, a measuring tape, and a small sewing kit.
- Middle Shelf: Add a bin labeled “TO-MEND.” When you find a shirt with a missing button, put it here.
- Bottom Shelf: Use this for larger items or textile recycling.
- Park It: Store the cart in a closet or a laundry room corner. Roll it out when you have time to mend.
31. Use “Backstock” Bins
Item Name: The Bathroom Backstock Bin

A tidy bathroom relies on managing supplies. Those extra shampoos, soaps, and deodorants can quickly create clutter under the sink. This hack uses a clear, labeled bin for your backstock.
The bin clearly holds your spare bathroom products. It keeps them contained and visible. A separate small bin can hold a “Needs Repurchase” list. You just add items to this list as you use the last one. No more chaotic hunting for replacements.
DIY Instructions: Setting Up Your Backstock Bin
- Gather Your Tools: You will need a clear, lidded storage bin (with handles is a plus), a label maker, and a small, shallow tray for your “Needs Repurchase” list.
- Empty Under the Sink: Take everything out from under your bathroom sink.
- Clean and Purge: Wipe the cabinet clean. Throw away empty bottles and expired items.
- Gather Backstock: Collect all your extra, unopened bathroom products.
- Load the Bin: Place these backstock items neatly into the clear bin.
- Label Clearly: Use your label maker to create a bold label: “BATHROOM BACKSTOCK.” Place it on the side of the bin.
- Create Repurchase List: On a small piece of paper, write “NEEDS REPURCHASE.” Put this in the small tray.
- Place and Maintain: Put the backstock bin and the repurchase tray back under the sink. When you finish a product, take a new one from the backstock and add the used item to your repurchase list.
32. Organize by Routine
Item Name: The AM/PM Skincare Trays

Bathroom counters become a jumble of bottles. You use some products in the morning and different ones at night. This hack organizes your products by your daily routine.
Two simple trays keep your skincare separate. One tray is labeled “AM.” It holds your morning moisturizers and SPF. The other is labeled “PM.” It holds your night creams and treatments. This stops clutter. It also streamlines your routine.
DIY Instructions: Creating AM/PM Trays
- Gather Your Tools: You will need two identical, shallow trays (ceramic, plastic, or bamboo). A label maker is also helpful.
- Clear Your Counter: Take all your skincare products off the bathroom counter.
- Clean and Purge: Wipe the counter clean. Throw away any expired or unused products.
- Sort by Time: Separate your products into two piles: “AM” (morning) and “PM” (night). Some items might be used both times; choose the tray where it gets used most.
- Label the Trays:
- Label Maker: Print “AM” and “PM” and stick them to the front edge of each tray.
- Marker: Use a permanent marker to write directly on the tray.
- Load the Trays: Arrange your products neatly on their respective trays. Use small cups for brushes.
- Place and Maintain: Put the trays back on the counter. Only the products for that time of day are within easy reach.
33. Build a “Grab-and-Go” Medicine Caddy
Item Name: The Portable Medicine Station

Finding a Band-Aid in an emergency is stressful. Medicine cabinets often get messy. This hack creates a organized, portable system for first aid and medicine.
Two caddies separate “First Aid” from “Medicine.” Each caddy has internal dividers. This keeps bandages, creams, and pills separate. Everything is clearly labeled. These caddies can be carried anywhere in the house when needed.
DIY Instructions: Assembling a Medicine Caddy
- Gather Your Tools: You will need two plastic caddies with handles and internal dividers, and a label maker.
- Empty Your Medicine Cabinet: Take everything out.
- Clean and Purge: Throw away expired medications (check local disposal guidelines). Discard empty boxes.
- Sort by Type: Create two main piles: “FIRST AID” (bandages, antiseptic, wraps) and “MEDICINE” (pain relievers, cold/flu, allergy pills).
- Label the Caddies: Use your label maker to create large labels for “FIRST AID” and “MEDICINE.” Stick these to the front of each caddy.
- Label Internal Sections: Use smaller labels for the dividers: “Cuts & Scrapes,” “Sprains,” “Cold & Flu,” “Pain & Stomach,” “Allergies.”
- Load the Caddies: Place the items into their correct labeled sections.
- Store: Place the caddies on a high shelf, away from children.
34. Prepare a Guest Welcome Basket
Item Name: The Thoughtful Guest Kit

Having guests can feel chaotic. You rush to gather towels and toiletries. This hack organizes everything into one “welcome” basket.
This basket contains fresh towels, bottled water, travel-sized toiletries, and even Wi-Fi information. It makes your guests feel at home. It also frees you from last-minute scrambling. The basket is ready to go whenever someone stays over.
DIY Instructions: Creating Your Guest Basket
- Gather Your Tools: You will need one attractive, sturdy basket (wicker or fabric works well).
- Select Your “Kit” Items: Think like a guest. What would they need?
- Two fresh, clean hand towels.
- A small bar of soap or travel-sized body wash, shampoo, and conditioner.
- A small toothbrush and toothpaste.
- Two small bottles of water.
- A small snack (like a granola bar).
- A card with your Wi-Fi network name and password clearly written.
- Wash and Fold: Wash all the towels. Fold them neatly.
- Arrange the Basket: Place the towels at the bottom. Arrange the toiletries, water bottles, and snacks on top. Put the Wi-Fi card in a prominent spot.
- Place and Maintain: Store the basket in your guest room closet or on an accessible shelf. Check it periodically. Replace used items or refresh the snacks if they expire.
35. Use Vertical Dividers
Item Name: The Linen Closet Organizer

Linen closets can quickly become unruly. Sheets, blankets, and towels become a tumbling mess. This hack uses vertical dividers to keep stacks upright and orderly.
These dividers create individual “slots” for each set of sheets or towels. They stop piles from falling over. This maximizes your shelf space. It also makes it easy to pull out one item without disturbing the rest.
DIY Instructions: Installing Shelf Dividers
- Gather Your Tools: You will need a set of clear plastic or metal shelf dividers.
- Empty One Shelf: Take all the linens off one shelf in your closet.
- Clean the Shelf: Wipe the shelf clean.
- Fold Your Linens: Fold your sheets and towels neatly into consistent sizes. It helps to fold duvet covers with their matching pillowcases inside.
- Install Dividers: Shelf dividers usually slide onto the existing shelf. Place your first divider at one end of the shelf.
- Create Sections: Place another divider to create a section just wide enough for your folded linens.
- Fill and Repeat: Place one stack of linens into the first section. Continue adding dividers and filling sections across the shelf.
- Test: Try pulling one stack out. The dividers should keep the other stacks upright.
36. Sort Toys by “Type”
Item Name: The Labeled Toy Station

Children’s toys can quickly overwhelm a room. You step on small bricks. Art supplies get mixed with action figures. This hack organizes toys into labeled bins by type.
This shelving unit uses clear bins. Each bin is labeled: “Bricks,” “Flats,” “Windows,” “Bits.” This makes cleanup easier. Children know where everything belongs. It teaches them basic sorting skills.
DIY Instructions: Creating a Toy Sorting System
- Gather Your Tools: You will need a low shelving unit with cubbies, clear plastic bins that fit the cubbies, and a label maker.
- Empty All Toys: Take every toy out of the room.
- Sort into Piles: Create piles of similar toys. All building bricks go together. All small figures go together. All cars go together.
- Choose Categories: Decide on 5-8 main categories that make sense for your child’s toys. Make them specific: “Small Bricks,” “Large Blocks,” “Art Supplies,” “Cars,” “Dolls.”
- Label the Bins: Use your label maker to create clear, large labels for each category. Add a simple picture if your child is very young.
- Load the Bins: Place the sorted toys into their correct bins.
- Place the Bins: Put the bins into the shelving unit. Place the most-used bins on lower shelves for easy access.
- Teach and Maintain: Show your child the new system. Make cleanup a game.
37. Color-Code for Kids
Item Name: The Rainbow Closet Kit

Children’s closets can be chaotic. Finding specific clothes or knowing where things go back is hard. This hack uses color-coded bins to simplify organization for kids.
Brightly colored bins are labeled for different types of items or days of the week. “Red” for shirts, “Blue” for pants, or even “Monday” “Tuesday.” This makes it visual and fun for kids. It also helps them learn responsibility.
DIY Instructions: Setting Up a Color-Coded Closet
- Gather Your Tools: You will need brightly colored bins, a label maker, and clothes hangers.
- Empty and Purge: Clear out your child’s closet. Remove clothes that are too small or worn.
- Decide on Categories: How do you want to organize?
- By Clothing Type: Red bin for shirts, Green for pants, Blue for PJs.
- By Day of the Week: Red for Monday’s outfit, Green for Tuesday’s, etc.
- By Season: Red for summer, Blue for winter.
- Label the Bins: Use your label maker to create clear, bold labels.
- Load the Bins: Place the clothes into their correct, color-coded bins. You can also hang everyday clothes on the rod.
- Install Pull-Out Drawers (Optional): If you have space, a pull-out wire basket system (as seen in the image) works well for smaller toys or accessories.
- Make it a Habit: Encourage your child to put clothes back in the right colored bin.
38. Digitize Children’s Art
Item Name: The Digital Art Archiver

Children’s artwork is precious, but it piles up. You feel guilty throwing it away. This hack helps you keep the memories without the clutter. It is a system to curate and digitize art.
You display a few favorites. Monthly, you select one or two more favorites. You then take a clear photo of them. These photos are stored in a digital album. The rest of the paper art can then be recycled.
DIY Instructions: Digitizing Art
- Gather Your Tools: You will need a smartphone, a good camera app, a simple clothesline or magnetic display for current art, and a digital photo storage solution (like Google Photos or a dedicated art app).
- Display Current Favorites: Hang a string across a wall. Use clothespins to display a few pieces of art. Let your child choose these.
- Monthly Culling: Once a month, gather all the new artwork. Sit with your child. Pick 1-2 favorites to keep for longer.
- Photograph the Rest: Lay the other pieces flat in good light. Take clear, well-lit photos with your smartphone. You want a clear image of just the art.
- Upload and Archive: Upload these photos to a dedicated album in your chosen photo app (e.g., “Kids Art 2026”).
- Recycle: Once the photos are safely stored, you can recycle the physical artwork. You keep the memory without the paper pile.
39. Create a “Go-Bag” Station
Item Name: The Emergency & Everyday Bag Rack

Bags can accumulate. Gym bags, beach bags, and emergency kits often sit in a heap. This hack uses a wall-mounted system to keep all your “go-bags” organized and ready.
A pegboard and hooks create a functional wall display. Emergency kits, gym bags, and reusable shopping bags each have their own hook. A shelf above holds batteries and tools. This makes it easy to grab the right bag for any situation.
DIY Instructions: Installing a Pegboard Bag Rack
- Gather Your Tools: You will need a pegboard sheet, wooden strips (furring strips), screws, a drill, a stud finder, and a level. You also need heavy-duty hooks for the pegboard.
- Measure and Cut: Decide on the size of your pegboard. You can buy pre-cut sheets.
- Prepare Wall: Use the stud finder to locate wall studs. Mark them.
- Install Furring Strips: Pegboard needs space behind it for the hooks. Cut wooden strips. Screw these strips horizontally into the wall studs.
- Mount Pegboard: Hold the pegboard against the furring strips. Use screws to attach the pegboard to the strips. This holds it securely, away from the wall.
- Install Hooks: Place your heavy-duty hooks into the pegboard holes. Dedicate one hook for each specific bag (“Emergency Kit,” “Gym Bag,” “Reusable Bags”).
- Add a Shelf: Install a simple floating shelf above the pegboard to hold smaller items or charging baskets.
40. Maximize Garage Vertical Space
Item Name: The Sports Gear Wall Organizer

Garages quickly become chaotic. Balls roll around. Bats lean against walls. This hack uses vertical wall space to organize all your sports equipment.
Tall wire baskets store balls by type. Helmets hang on hooks. Bats and rackets clip into special holders. Mesh bags hold smaller items like frisbees. This system gets everything off the floor. It prevents tripping hazards. It also makes finding gear a breeze.
DIY Instructions: Installing a Wall Storage System
- Gather Your Tools: You will need a wall-mounted track system (often metal rails), various hooks, baskets, and mesh bags that attach to the system, a stud finder, a level, a drill, and screws.
- Clear the Wall: Choose a section of your garage wall. Clear it completely.
- Find Studs: Use the stud finder to locate and mark the wall studs. This is crucial for heavy sports equipment.
- Install Tracks: Hold the metal track (or rails) against the wall. Use the level to make sure it is straight. Mark your drill holes, ensuring they align with the studs.
- Drill and Secure: Drill pilot holes. Screw the tracks firmly into the wall studs. You may need long, heavy-duty screws.
- Attach Organizers: Slide or clip the various baskets, hooks, and mesh bags onto the tracks.
- Sort and Store: Gather all your sports equipment. Place balls in the tall baskets. Hang helmets and bats. Put smaller items in the mesh bags.
- Position for Access: Place frequently used items at an easy-to-reach height.
41. Create a Predictive Household Inventory
Item Name: The Smart Inventory Scanner

Household supplies disappear into cabinets and get forgotten. You buy duplicates or run out at the worst moment. This hack uses a digital inventory to track your supplies.
You apply QR codes to items like air filters or batteries. Scan the code with an app on your phone. The app shows you how many you have left. It can even remind you when to reorder. This stops waste and keeps your home running smoothly.
DIY Instructions: Setting Up a Household Inventory
- Gather Your Tools: You will need a smartphone, an inventory app (like Sortly or another with QR code capabilities), and printable QR code labels.
- Identify Key Consumables: Walk through your home. List items you regularly repurchase: air filters, light bulbs, batteries, cleaning supplies, water softener salt.
- Designate a Storage Spot: Group all these “backstock” items into one cabinet or storage area.
- Create a Digital Entry: In your app, create a new entry for “Air Filter (Size X).” Set the “Quantity” to how many you have.
- Generate QR Code: The app will likely generate a unique QR code for that item. Print it.
- Label and Stick: Stick the printed QR code onto one of your air filter boxes.
- Repeat: Do this for all your key consumables.
- Scan to Update: When you use an item, scan its QR code. Update the quantity in the app. When the quantity gets low, the app reminds you to reorder.
42. Create a Donation “Holding Zone”
Item Name: The Ready-to-Donate Basket

Deciding to declutter is one thing. Actually getting items to a donation center is another. This hack creates a dedicated “holding zone” for items leaving your home.
A basket or bin in a convenient spot acts as a collection point. As you declutter, put clothes, books, or small household items into it. Once it is full, it is a clear signal to make a donation run. This stops items from sitting in piles.
DIY Instructions: Setting Up Your Donation Zone
- Gather Your Tools: You will need one large, attractive basket or a clearly labeled bin.
- Choose a Strategic Spot: Place the basket in a low-traffic area that is still easy to access. This could be in your laundry room, a spare closet, or even the corner of a bedroom.
- Introduce the Concept: When you come across an item you no longer need, do not put it back. Instead, immediately place it in the donation basket.
- Make a “Donation List”: Keep a running list on your phone or a small notebook. Jot down the items in the basket. This helps for tax purposes later.
- Set a “Full” Trigger: Decide what “full” means. Is it when the basket overflows? Or when you have 10 items?
- Schedule the Drop-Off: Once the basket hits its “full” trigger, immediately schedule a time to drop off the donations. Put it on your calendar.
43. Try the “Micro-Decluttering” Method
Item Name: The 10-Minute Tidy Timer

Overwhelm stops many people from organizing. A whole room seems too big a task. The “micro-decluttering” method breaks it down.
You set a timer for 10-15 minutes. Focus on one small area. Clean one drawer. Sort one shelf. This method is about consistency, not speed. Over time, these small actions add up to a tidy home. It is a manageable approach.
DIY Instructions: Using the Micro-Decluttering Method
- Gather Your Tools: You will need a timer (a physical alarm clock works well to avoid phone distractions), and three empty bins labeled “TOSS,” “DONATION,” and “KEEP.”
- Choose a “Micro-Spot”: Do not pick a whole room. Pick one small area: one kitchen drawer, one shelf in the pantry, the top of one dresser.
- Set the Timer: Set your timer for 10-15 minutes.
- Work Quickly: Go through every item in that small spot. Ask yourself for each item:
- TOSS: Is it trash? Broken? Expired? Put it in the “TOSS” bin.
- DONATION: Do I use this? Is it still good? Could someone else use it? Put it in the “DONATION” bin.
- KEEP: Do I love this? Do I use this often? Does it have a home? Put it in the “KEEP” bin.
- Stop When Timer Rings: When the timer goes off, stop.
- Take Action: Immediately take the “TOSS” bin to the trash. Put the “DONATION” bin with your other donations (see Hack 42). Put the “KEEP” items back, but now they are organized.
44. Create a “No-Buy” List
Item Name: The Conscious Consumption List

Sometimes, the best organization hack is to stop bringing new things into the house. Impulse buys quickly lead to clutter. This hack uses a “no-buy” list to curb overspending on certain categories.
You decide on categories you are not allowed to purchase for a set time (e.g., three months). For example, “no mugs, no water bottles, no journals.” This list helps you be more intentional. It encourages you to use what you already own.
DIY Instructions: Making Your No-Buy List
- Gather Your Tools: You will need a pen and a small notebook or a notes app on your phone.
- Identify “Clutter Categories”: Look around your home. What types of items do you have too many of? What do you buy on impulse? (e.g., T-shirts, candles, decorative plates, art supplies).
- Choose 3-5 Items: Select 3-5 categories that you will not buy for the next 1-3 months.
- Write It Down: Clearly write “NO-BUY LIST” at the top of your paper. List the chosen categories below.
- Keep it Visible: Keep this list in your wallet, or take a picture of it and set it as your phone background. This acts as a reminder when you are shopping.
- Revisit and Adjust: After your chosen time period, review your list. Did it help? You can extend it, change categories, or celebrate your success.
45. Digitize Your Wardrobe
Item Name: The Virtual Closet App

Even a perfectly organized closet can feel overwhelming if you do not know what you own. This hack creates a digital record of your clothes.
You take pictures of your garments. These photos are uploaded to a wardrobe app. You can then see your entire collection on your phone. This helps you build outfits. It also stops you from buying clothes you already have or do not need.
DIY Instructions: Digitizing Your Wardrobe
- Gather Your Tools: You will need a smartphone and a wardrobe app (like Cladwell, Stylebook, or a simple photo album app).
- Declutter First: Before you start, apply other hacks (like the “Contextual Closet” Hack 24). Only digitize clothes you actually love and wear.
- Take Pictures: Hang each garment on a plain wall or door. Take a clear, well-lit photo of each item. Try to use consistent lighting and angles.
- Upload to App: Upload the photos to your chosen wardrobe app.
- Add Details (Optional but Helpful): Many apps allow you to add details like brand, color, size, and even how often you wear it.
- Categorize: Group your items by type (shirts, pants, dresses) or color.
- Browse and Plan: Now you can scroll through your digital wardrobe. Plan outfits for the week. This makes getting dressed easier and stops impulse clothing buys.
Achieving a tidy home is a process. It is not a one-time event. The goal is to build habits that stop clutter before it starts.
These 45 hacks are your new toolbox. You do not need to do them all at once. That would be overwhelming.
Start small. Pick one hack this weekend. Maybe it is creating a “landing strip” by your door. Or maybe it is just clearing your nightstand drawer.
Each small change builds momentum. A calm, organized home is within your reach. The journey to a tidy 2026 begins with a single, simple step.
Key Takeaways
Here are the main ideas to remember from this guide:
- Give Everything a Home: Clutter is often just “homeless” items. A tray, a basket, or a hook creates a designated spot.
- Zone Your Spaces: Group items by their purpose. Create a “work” zone, a “relax” zone, or a “coffee” station.
- Go Vertical: Use your wall space. Shelves, hooks, and over-the-door racks get items off the floor and counters.
- Make It Visible: Use clear containers and labels. You cannot organize what you cannot see.
- Automate and Digitize: Use smart tools to manage lists, files, and even your home’s lighting. This reduces mental clutter.
- Start Small: Do not try to organize your whole house in one day. A 10-minute “micro-decluttering” session is a great start.