
Walking into a room that feels flat can be quite frustrating for any homeowner. You might have the right furniture but still feel like something is missing from the overall design. Often the problem is a lack of physical depth and tactile variety across your surfaces.

Rooms come alive when you mix different materials that play with light and shadow. Swapping smooth finishes for organic grains or woven fabrics adds an instant layer of character. You do not need a massive budget to transform a boring space into a high end sanctuary.
This guide offers thirty eight specific ways to introduce luxury through texture. Every item focuses on moving away from factory finishes toward more intentional and hand crafted elements. You will learn how to make your home feel solid and very well designed.
1 Earthy Venetian Plaster Walls
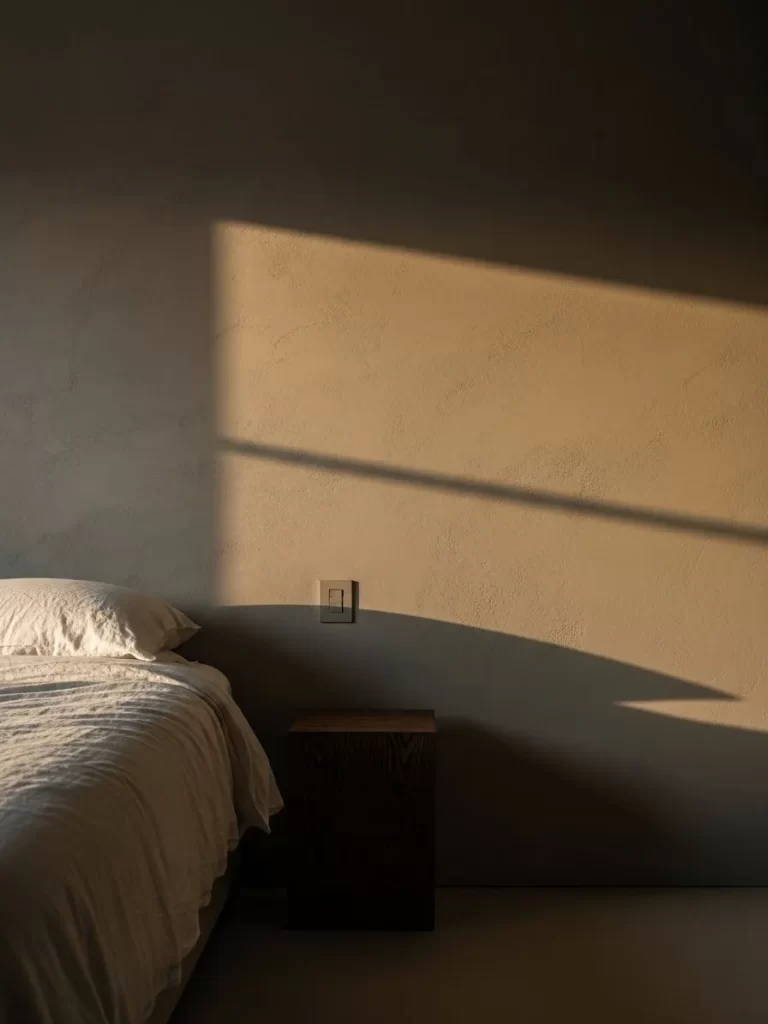
Flat paint often leaves a room feeling cold and unfinished. This textured wall finish adds immediate depth by mimicking the natural variation of stone or aged clay. It catches the light beautifully, creating soft shadows that make a bedroom feel grounded and expensive.
Warm tones transform a basic sleeping area into a high end sanctuary. Using a tactile finish like this eliminates the need for heavy decor because the wall itself becomes a work of art. You will find that even simple sunlight looks better when it bounces off a hand applied surface.
Materials Required
- Venetian plaster or high quality joint compound
- Mineral pigments for custom coloring
- High grit sandpaper
- Water based matte sealer
- Masking tape
Equipment Required
- Stainless steel trowel
- Putty knife
- Large mixing bucket
- Clean rags
- Drop cloths
DIY Instructions
- Clear the area and lay down drop cloths to protect your flooring.
- Clean the wall surface thoroughly to remove any dust or grease.
- Apply masking tape to the ceiling and baseboards for clean edges.
- Mix your plaster or joint compound until it reaches a smooth peanut butter consistency.
- Scoop a small amount of material onto your trowel.
- Press the trowel against the wall at a low angle and swipe in random arcs.
- Keep the layers thin and allow some of the bottom wall color to peek through slightly.
- Let the first coat dry completely for at least four hours.
- Apply a second thin coat using smaller strokes to fill in gaps and create more texture.
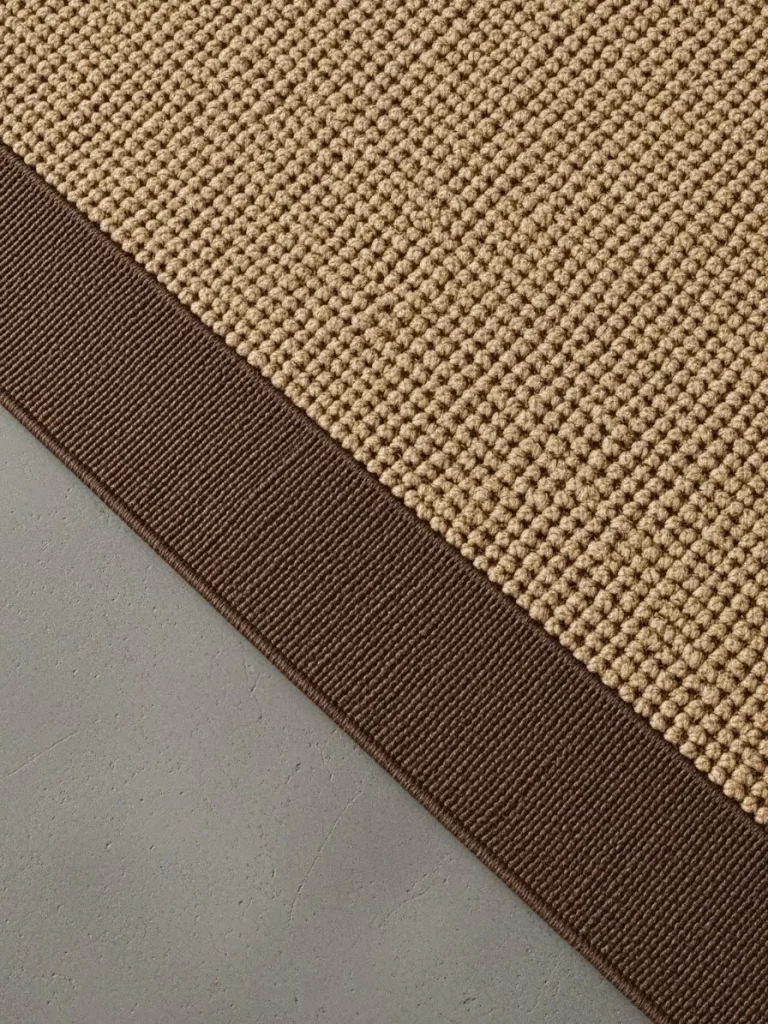
- Sand the surface lightly once dry to remove any sharp peaks or edges.
- Wipe away dust with a damp rag before applying the matte sealer.
- Buff the wall with a clean cloth to achieve a soft natural glow.
2 Handcrafted Zellige Kitchen Backsplash
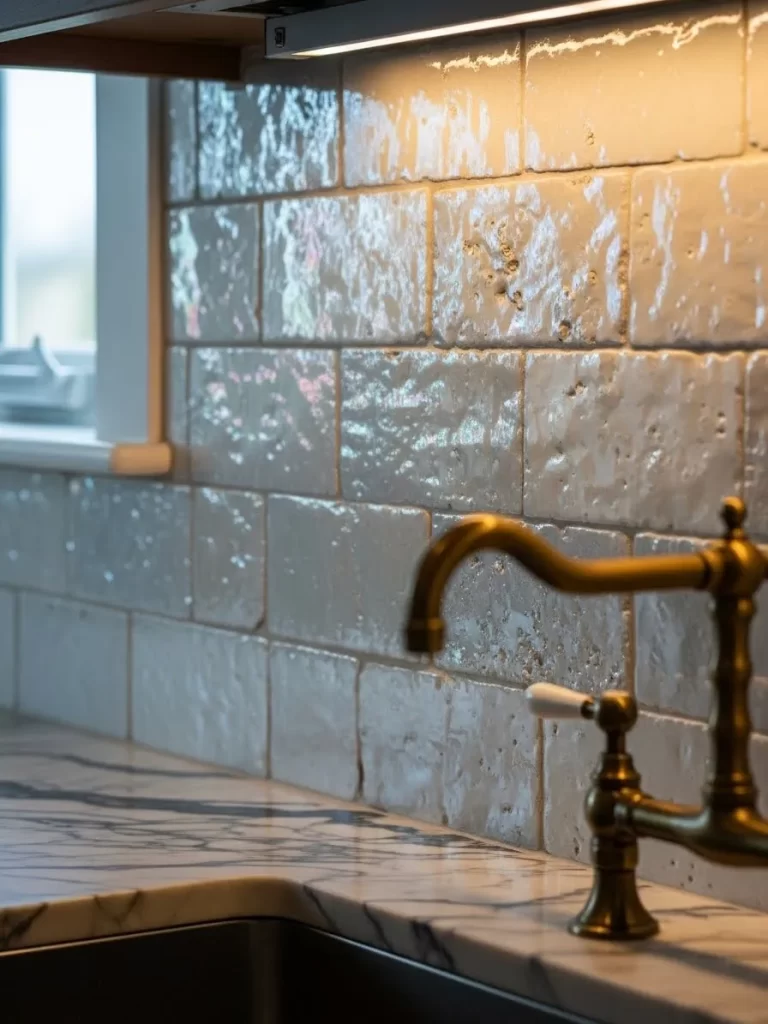
Standard subway tiles often feel sterile and very industrial in a modern home. These hand glazed ceramic pieces offer a rippled surface that reflects light in many different directions. You get a sense of history and craftsmanship that basic factory ceramic simply cannot provide for your kitchen.
Choosing a backsplash with varying heights and tones adds an organic look to your cooking space. Light catches the edges of each block to create a shimmering effect. Shadows dance across the walls when you turn on your under cabinet lighting. This simple swap brings a rich soul to a room that usually feels cold.
Materials Required
- Zellige or handmade tiles
- Thin set mortar
- Pre mixed grout
- Tile spacers
- Painters tape
- Warm water
Equipment Required
- Notched trowel
- Rubber grout float
- Manual tile cutter or wet saw
- Large sponge
- Level
- Plastic buckets
DIY Instructions
- Clean your wall surface to remove grease and old paint before you start.
- Mark a straight center line on the wall using your level to keep rows even.
- Apply a layer of thin set mortar to a small section of the wall using the notched trowel.
- Press each tile into the mortar firmly and leave a very small gap between them.
- Check each row with your level to ensure the backsplash remains straight as you move up.
- Use the tile cutter to trim pieces for the edges or around electrical outlets.
- Allow the mortar to dry for twenty four hours before you think about grouting.
- Push grout into the gaps using the rubber float at a forty five degree angle.
- Wipe away excess grout from the tile faces using a damp sponge.
- Rinse your sponge often to avoid leaving a cloudy film on the glossy surface.
- Let the grout sit for another day to harden completely.
- Buff the tiles with a dry microfiber cloth to make them shine.
3 Luminous Alabaster Stone Lighting
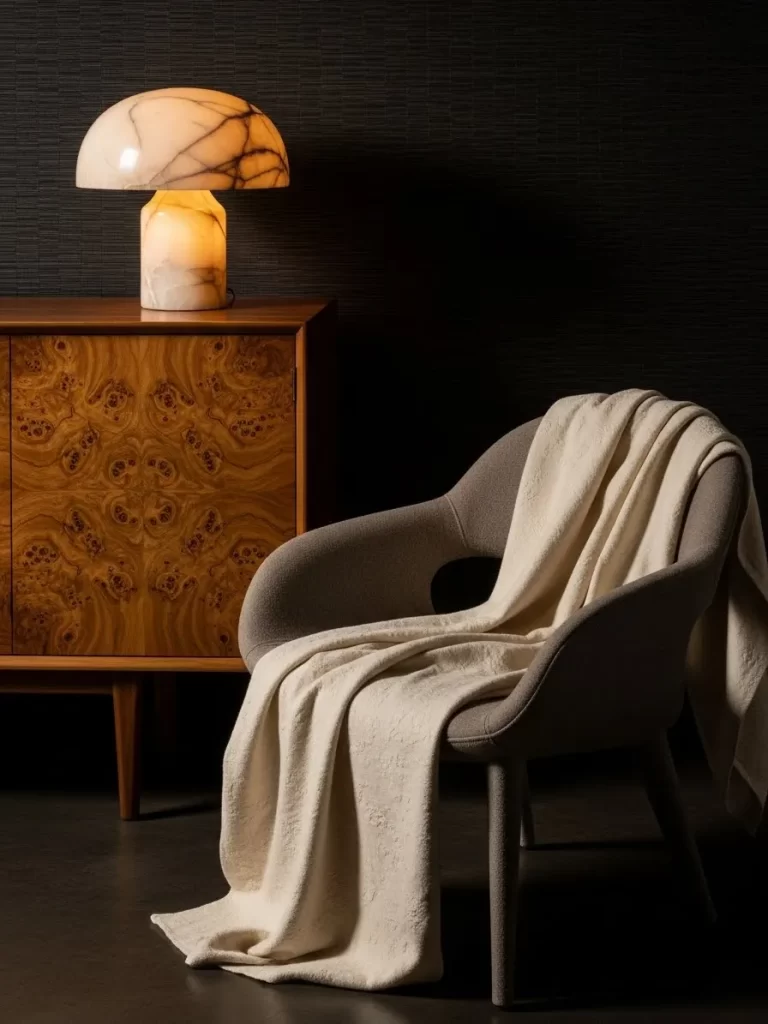
Standard plastic or metal lamps lack the physical weight and presence of natural stone. Alabaster provides a soft glow that reveals beautiful mineral veining inside the material. It acts as both a functional light source and a heavy sculpture for your side table or cabinet.
Natural materials connect your indoor room to the beauty of the outdoors. This stone feels cool to the touch and very solid in your hands. You will find that it elevates a dark corner into a bright focal point. Using a lamp like this adds a layer of quiet luxury to your evening atmosphere.
Materials Required
- Alabaster lamp base
- LED bulb with warm color temperature
- Soft felt pads for the base
- Stone sealer spray
Equipment Required
- Microfiber cleaning cloth
- Screwdriver if assembly is needed
DIY Instructions
- Unbox your stone lamp carefully because real alabaster can chip if dropped.
- Wipe the entire surface with a dry microfiber cloth to remove any packing dust.
- Apply a thin coat of stone sealer if the material feels very porous or chalky.
- Let the sealer dry for one hour in a well ventilated room.
- Attach the felt pads to the bottom of the base to protect your wooden furniture.
- Thread the electrical cord through the center pipe if the lamp is not pre assembled.
- Screw the light socket onto the top of the stone base using your hands.
- Install a warm LED bulb to prevent the stone from getting too hot during use.
- Place the shade over the bulb and secure it with the top finial nut.
- Position the lamp in a spot where it can be seen from across the room.
- Plug it in and enjoy the natural patterns revealed by the light.
4 Sculptural Coffered Entryway Ceiling
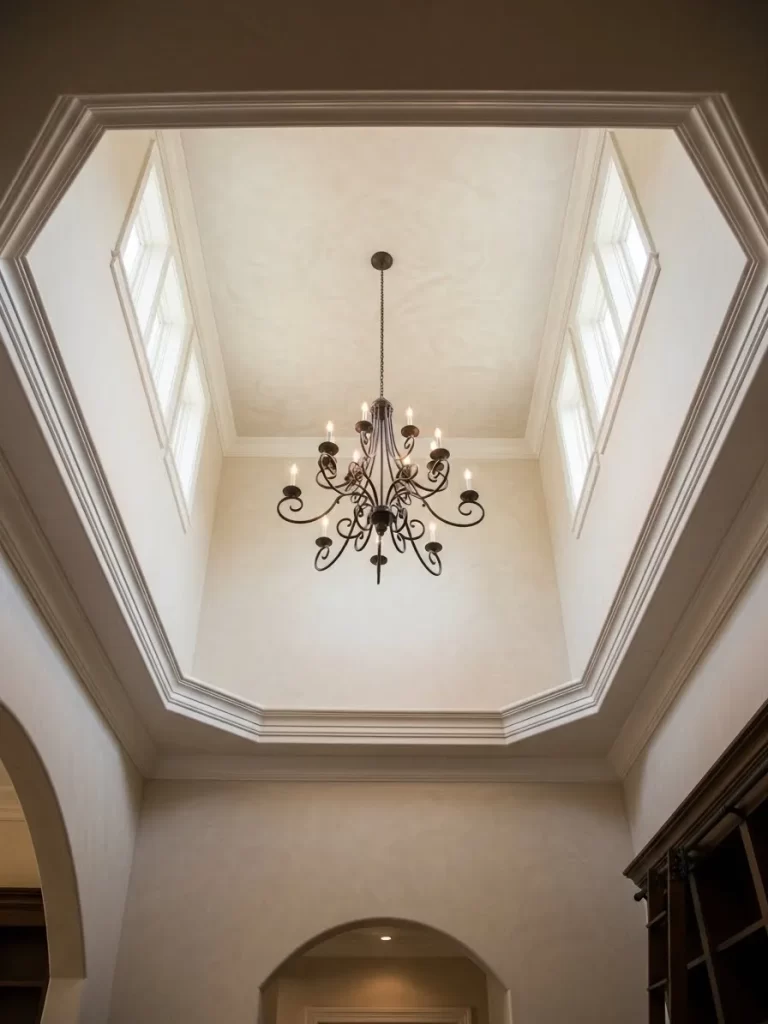
Flat white ceilings are a missed opportunity for adding architectural interest to your home. Adding layers of thick molding creates height and drama in a grand entryway or a long hallway. This structural change draws the eye upward and adds a sense of immense luxury to the first floor.
Shadows settle into the deep grooves of the custom woodwork. You gain a feeling of old world elegance without changing the actual floor plan of the house. It defines the room with structural grace and makes the space feel more intentional. Visitors will notice the detail the moment they walk through your front door.
Materials Required
- Lightweight crown molding
- Wood glue
- Finish nails
- Sandable wood filler
- Interior ceiling paint
- Caulk
Equipment Required
- Miter saw
- Cordless nail gun
- Measuring tape
- Ladder
- Caulking gun
- Paint brushes
DIY Instructions
- Measure the length and width of your ceiling to plan the grid pattern.
- Draw the grid onto the ceiling using a pencil and a long straight edge.
- Cut your main beams from wood or foam molding using the miter saw.
- Apply wood glue to the back of the first beam and press it against your pencil line.
- Secure the beam into the ceiling joists using the cordless nail gun.
- Install the shorter cross beams to complete the box shapes of the grid.
- Fit small pieces of crown molding inside each box for a more decorative look.
- Fill all nail holes with a small amount of wood filler and let it dry.
- Sand the filler until the surface feels completely smooth to your touch.
- Apply caulk to all the seams where the wood meets the ceiling.
- Paint the entire structure with a fresh coat of matte white paint.
- Remove any paint drips immediately to keep the edges looking sharp.
5 Ribbed Grasscloth Wall Covering

Smooth painted walls can look boring and flat in a home office or a library. Grasscloth adds a vertical line that makes your ceiling feel much higher than it really is. The natural fibers introduce warmth and a slight sheen that changes as you walk past the wall.
Hanging framed art becomes more impactful when placed against a textured and organic backdrop. You will notice how the fabric absorbs sound and creates a very quiet and peaceful atmosphere. This choice adds a layer of high end sophistication to your vertical surfaces. It creates a cozy feeling that paint cannot replicate.
Materials Required
- Rolls of grasscloth wallpaper
- Clear wallpaper adhesive
- Seam roller
- Sharp utility blades
Equipment Required
- Smoothing brush
- Large level
- Paint roller and tray
- Tape measure
- Straight edge tool
DIY Instructions
- Remove all outlet covers and switch plates from the wall before you begin.
- Use your level to draw a perfectly straight vertical line for the first panel.
- Cut a strip of wallpaper that is four inches longer than the height of your wall.
- Apply the clear adhesive to the back of the paper using the paint roller.
- Fold the paper loosely and let it sit for five minutes to activate the glue.
- Align the edge of the paper with your vertical pencil line on the wall.
- Smooth the paper from the center outward using the smoothing brush.
- Trim the excess material at the ceiling and floor with a sharp utility blade.
- Apply the next panel so the edges touch but do not overlap at all.
- Press the seams down firmly using the small seam roller tool.
- Wipe away any excess glue with a damp sponge right away.
- Allow the room to dry for a full day before replacing the outlet covers.
6 Puddled Linen Sheer Curtains
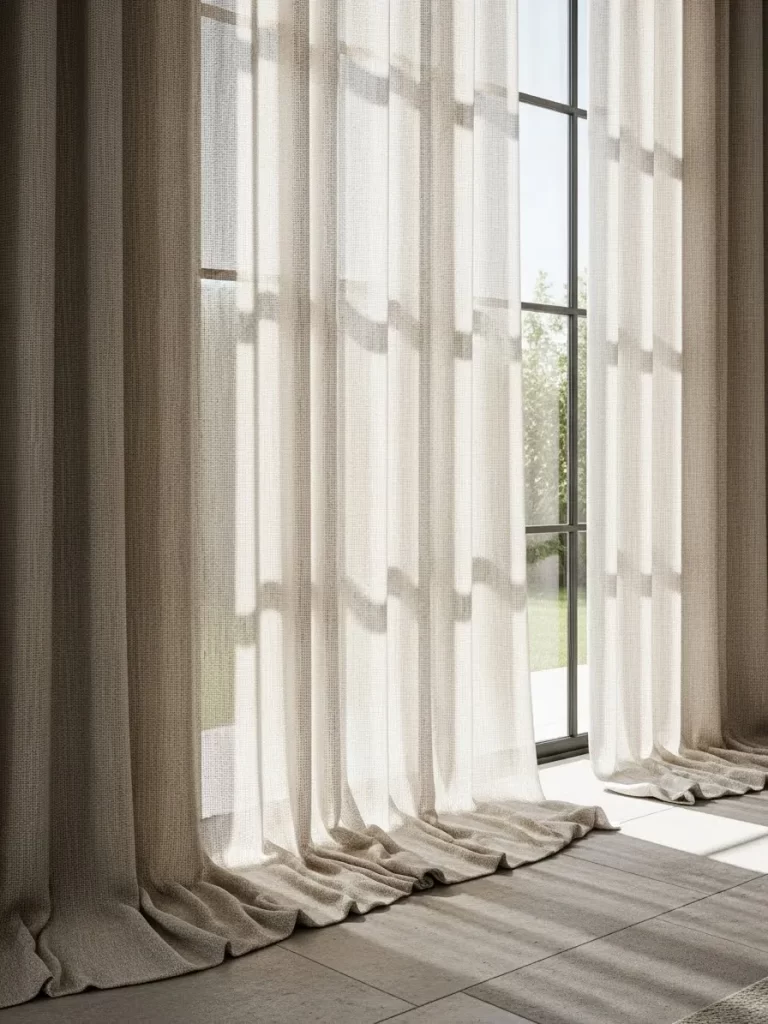
Heavy drapes sometimes block too much life and natural air from entering a room. Sheer linen allows soft light to filter through while still maintaining your privacy from the street. The fabric has a natural slub and texture that adds visual interest to a large window area.
Letting the extra fabric pool on the floor creates a relaxed and very expensive vibe. Breezes catch the lightweight material to create gentle and calming movement in the space. You achieve a high end hotel look with very little physical effort or high cost. These curtains make any window feel much larger and more grand.
Materials Required
- Linen sheer curtain panels
- Curtain rod
- Wall anchors
- Screws
Equipment Required
- Power drill
- Screwdriver
- Stepladder
- Measuring tape
- Handheld steamer
DIY Instructions
- Measure the width of your window and add ten inches to each side for the rod.
- Mark the height for your rod brackets at least six inches above the window frame.
- Drill holes into the wall and insert the plastic anchors for extra support.
- Screw the brackets into the anchors using your power drill or a screwdriver.
- Slide the curtain panels onto the rod before you lift it up.
- Place the rod onto the brackets and tighten the small locking screws.
- Arrange the fabric so it hangs evenly across the entire width of the rod.
- Pull the bottom of the curtains out so they puddle gracefully on the floor.
- Use the handheld steamer to remove any deep wrinkles from the shipping box.
- Shake the panels gently to help the linen fibers relax and hang straight.
- Adjust the folds by hand to create a uniform look from top to bottom.
- Step back and check that the curtains cover the window edges completely.
7 Nubby Boucle Statement Sofa
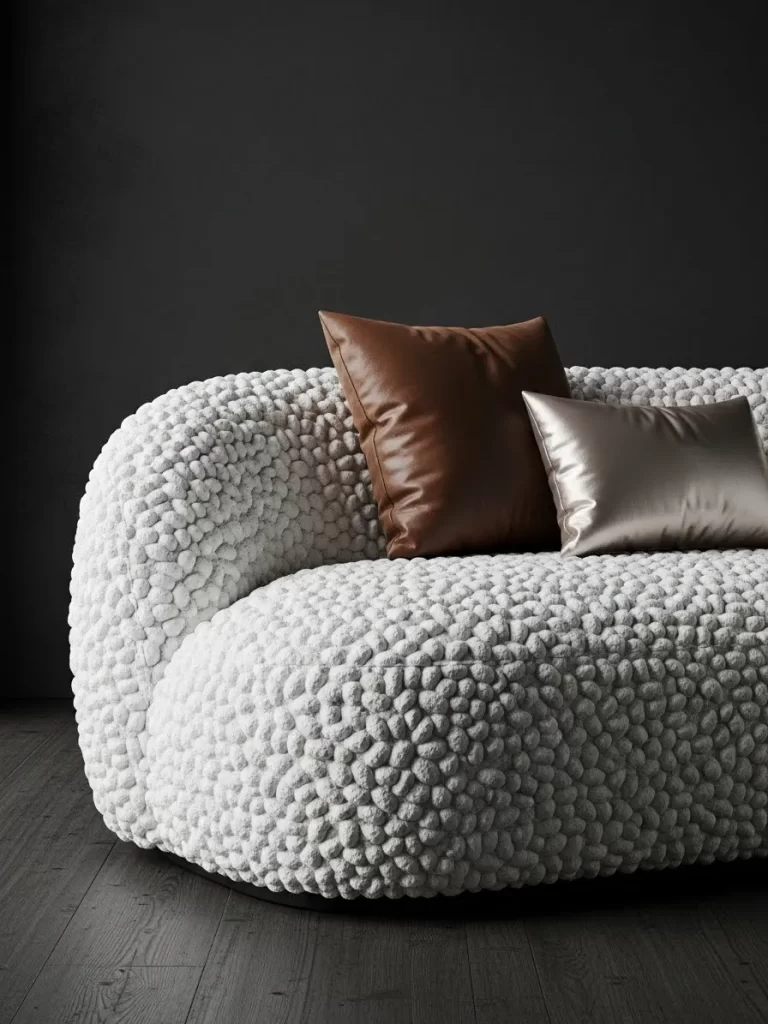
Flat polyester fabrics often look cheap and thin under bright interior lights. Boucle features small loops of yarn that create a cloud like appearance across the entire piece. This material feels incredibly cozy and looks very modern when placed in a dark or moody room.
Pairing this soft fabric with smooth leather pillows creates a beautiful contrast of different textures. The rounded shapes of the furniture invite you to sit down and relax for a while. You get a piece of furniture that is as much a sculpture as it is a chair. It becomes the main talking point of your living room.
Materials Required
- Boucle upholstery fabric
- Heavy duty staples
- Replacement foam padding
- Fabric protector spray
Equipment Required
- Staple gun
- Fabric scissors
- Pliers for removing old staples
- Measuring tape
DIY Instructions
- Pick a simple chair or ottoman for your first upholstery project to learn.
- Remove the old fabric carefully using your pliers to pull out every staple.
- Measure the size of each panel and add three inches to every side.
- Cut your new boucle fabric using sharp scissors to avoid fraying the loops.
- Replace the old foam if it feels flat or looks yellow and brittle.
- Center the fabric over the top of the furniture piece.
- Pull the material tight and place one staple in the center of each side.
- Work your way toward the corners while keeping the tension very even.
- Fold the corners neatly like a gift box and secure them with extra staples.
- Trim away any excess fabric from the underside so it looks clean.
- Spray the entire piece with fabric protector to prevent stains from sinking in.
- Place the furniture in your room and fluff the surface with your hand.
8 Carved Travertine Entry Table
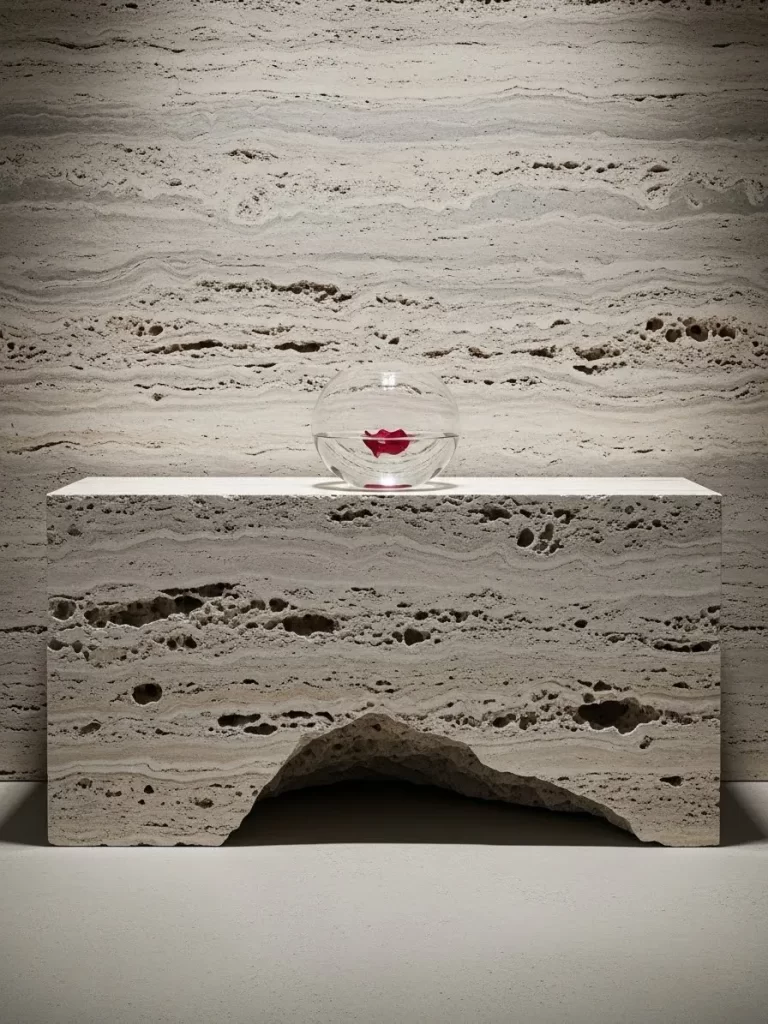
Sleek glass or polished metal tables can often feel cold and very sharp in a home. Travertine stone has natural pits and small holes that tell a story of geological time. This table uses raw edges and a matte finish to bring a rugged beauty indoors.
Neutral colors allow the unique texture of the stone to be the true star of the show. It provides a solid and heavy base for a simple glass bowl or a single red flower. Your guests will immediately notice the earthy weight and the luxury of this natural piece. It anchors the entryway with a sense of permanence.
Materials Required
- Travertine stone slabs or a pre made base
- Stone adhesive
- Clear stone wax
- Sandpaper for stone
Equipment Required
- Heavy duty gloves
- Level
- Soft cloths
- Paint brush
DIY Instructions
- Wear heavy gloves to protect your hands from the rough edges of the stone.
- Clean the surfaces of the stone slabs to remove any dust or loose pebbles.
- Apply a thick bead of stone adhesive to the top of the table base.
- Lift the heavy stone top with a partner and set it onto the base carefully.
- Use your level to make sure the top is sitting perfectly flat and straight.
- Let the adhesive dry for forty eight hours without moving the table at all.
- Sand any very sharp or jagged corners using the specialized stone sandpaper.
- Wipe away the sanding dust with a damp cloth and let it dry.
- Apply a thin layer of clear stone wax using a clean paint brush.
- Let the wax sit for twenty minutes before you start the buffing process.
- Buff the stone with a soft cloth to create a very subtle and natural glow.
- Place the table against a wall to ensure it stays stable and secure.
9 Two Tone Textured Area Rug
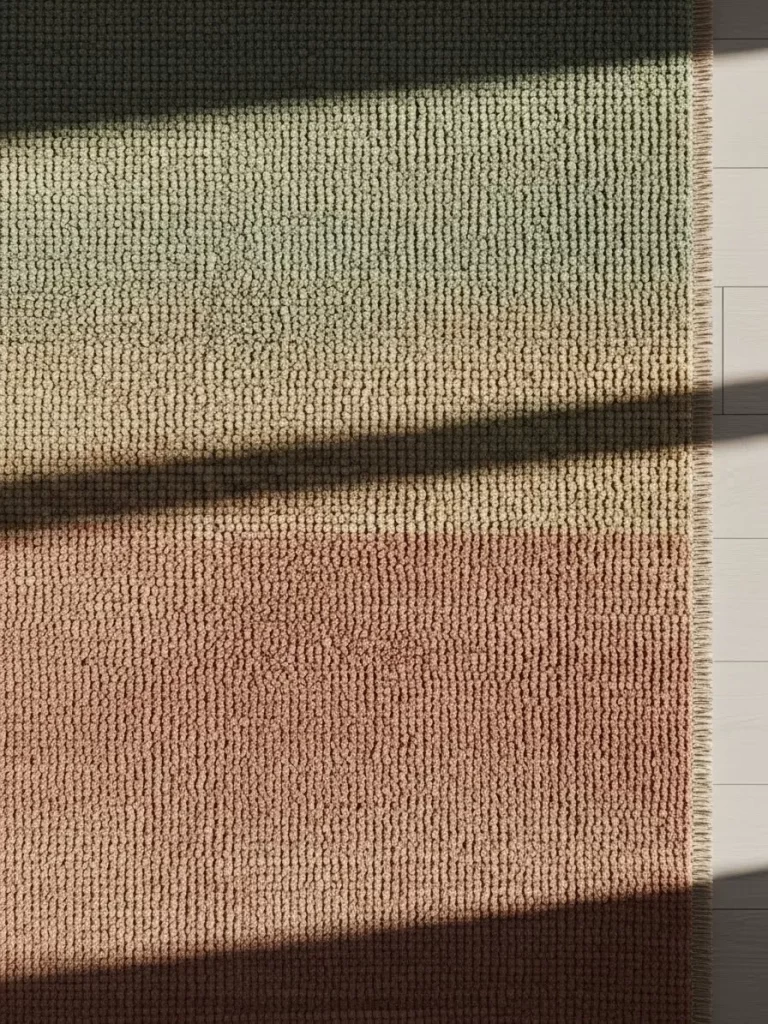
Hardwood or tile floors need a soft layer to feel complete and comfortable. This woven rug uses a thick pile to create a grid like pattern that looks very modern. The split color design adds a contemporary touch to a classic floor without being too loud.
Walking barefoot on this soft surface feels like a gentle foot massage every day. It anchors your furniture and defines different zones in an open plan living room. You add a pop of subtle color without overwhelming the rest of your home decor. The texture helps to hide small bits of dust between cleanings.
Materials Required
- Large area rug
- Non slip rug pad
- Double sided rug tape
Equipment Required
- Heavy duty scissors
- Vacuum
- Measuring tape
DIY Instructions
- Move all of your furniture out of the area where the rug will go.
- Sweep and vacuum the floor thoroughly to remove any hidden grit or dirt.
- Measure the rug pad and cut it two inches smaller than the rug itself.
- Lay the rug pad on the floor and make sure it is centered in the space.
- Apply pieces of double sided tape to the corners of the rug pad for grip.
- Roll the rug out over the pad slowly to avoid creating any large lumps.
- Pull the edges of the rug to flatten any ripples or waves in the fabric.
- Walk over the entire surface to press the rug into the non slip pad.
- Place the front legs of your sofa and chairs on top of the rug edges.
- Vacuum the rug on a high setting to lift the fibers and remove loose lint.
- Trim any long or loose threads with your scissors very carefully.
- Enjoy the extra warmth and sound dampening this new layer provides.
10 Aged Brass Cabinet Pulls
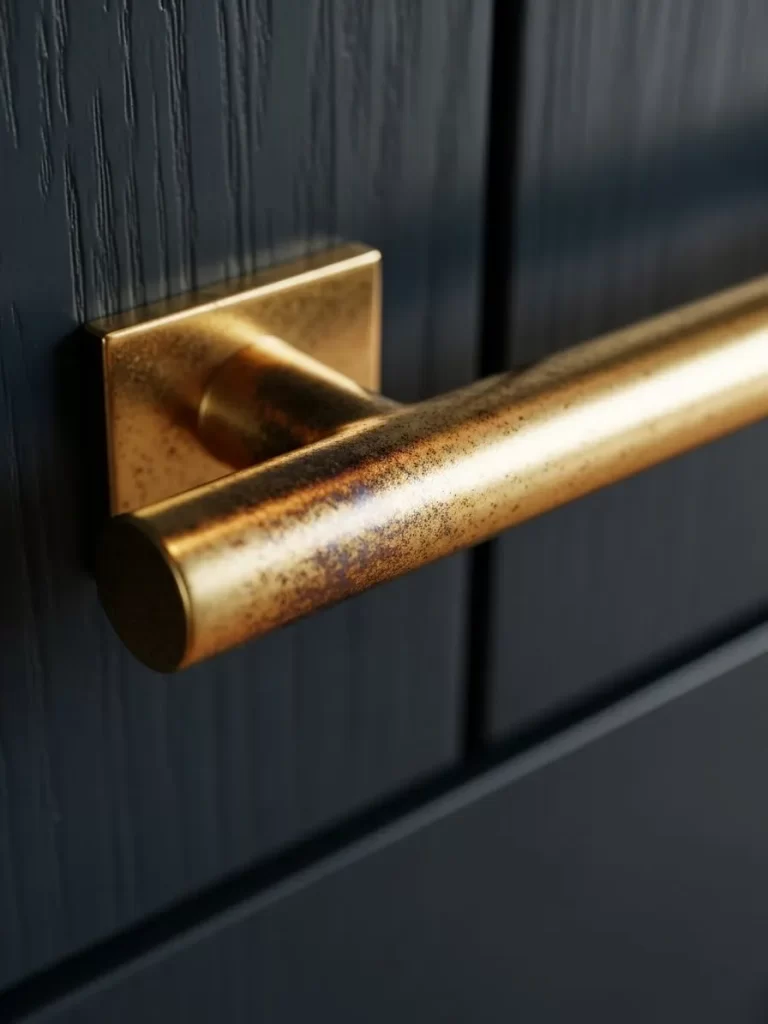
Shiny chrome or plain black hardware can often feel generic and mass produced. Antiqued brass has a warm patina that looks better as it gets older and is used more. It adds a touch of golden jewelry to your dark kitchen or bathroom cabinets.
The brushed finish hides fingerprints and adds a vintage charm to a modern room. Touching a heavy metal handle gives a sense of quality every time you open a drawer. This small swap makes a massive impact on the overall design of your cabinetry. It is the easiest way to make a basic kitchen look custom.
Materials Required
- Brass cabinet handles
- Matching screws
- Painter’s tape
Equipment Required
- Power drill
- Drill bit for wood
- Screwdriver
- Measuring template
- Pencil
DIY Instructions
- Remove your old cabinet hardware using a standard screwdriver.
- Clean the cabinet surface to remove any old oil or dirt from the holes.
- Fill any old holes with wood putty if your new handles are a different size.
- Place a piece of painter’s tape over the area where you need to drill.
- Mark the exact spot for the new holes using your pencil and the template.
- Drill through the tape and the wood slowly to prevent the cabinet from splintering.
- Peel away the tape to reveal the clean holes you just created.
- Push the new screws through the back of the cabinet door or drawer.
- Align the brass handle with the screws on the front of the door.
- Tighten the screws with your screwdriver until the handle feels very solid.
- Check that the handle is level and straight before you move to the next one.
- Wipe the brass with a clean cloth to remove any natural oils from your hands.
11 Translucent Alabaster Wall Sconce
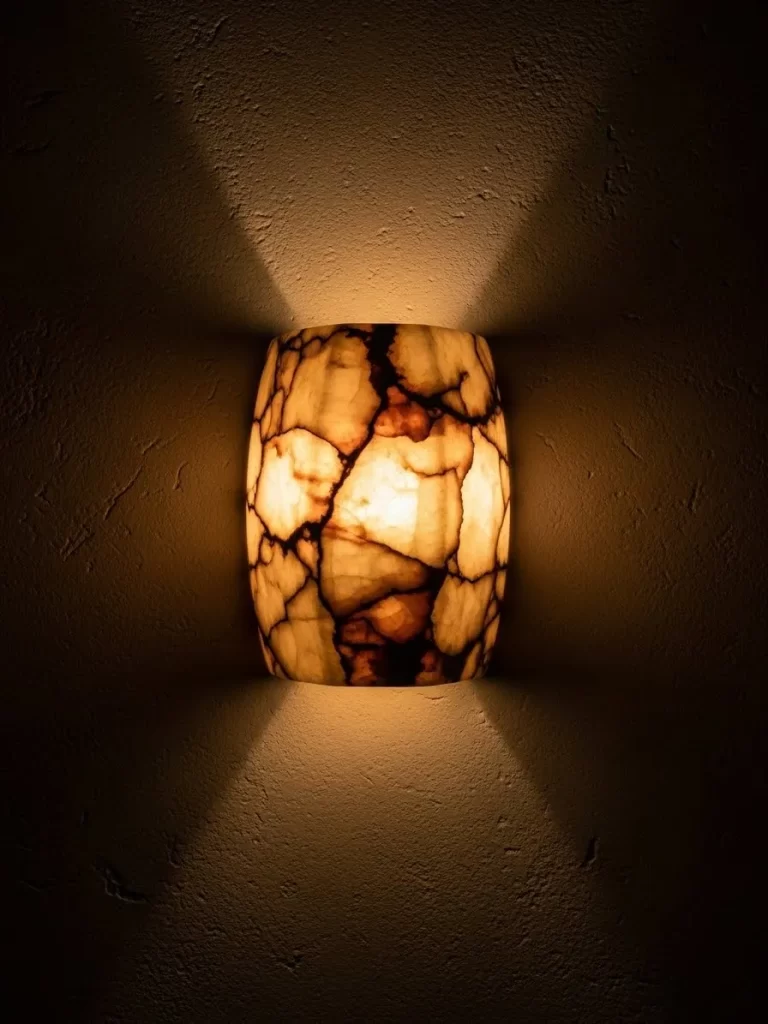
Empty walls often feel like a missed chance for soft and layered lighting. This stone sconce glows with a rich honey color when the light shines through its mineral layers. It creates a warm and inviting path down a hallway or provides a soft light for a dark corner.
Stone textures bring a heavy and very grounded feeling to your vertical spaces. Every piece of alabaster is unique, so your lighting will always look like a custom commission. You will appreciate how the light emphasizes the natural cracks and veins within the stone. This fixture provides a high end look that glass cannot match.
Materials Required
- Alabaster wall sconce fixture
- Warm LED light bulb
- Plastic wall anchors
- Electrical wire connectors
Equipment Required
- Voltage tester
- Wire strippers
- Screwdriver set
- Power drill
- Level
DIY Instructions
- Turn off the power to the light fixture at the main circuit breaker panel.
- Use your voltage tester to confirm that the wires are dead before you touch them.
- Hold the mounting bracket against the wall and mark the holes with a pencil.
- Drill the holes and insert the plastic anchors for a very secure hold.
- Screw the mounting bracket into the wall anchors using your screwdriver.
- Strip a small amount of insulation off the ends of the wall wires.
- Connect the house wires to the fixture wires using the twist on connectors.
- Tuck the wires neatly into the electrical box to keep the area clean.
- Mount the sconce base to the bracket and tighten the small side screws.
- Screw in the warm LED bulb and make sure it is tight.
- Slide the alabaster cover over the base and secure it with the hardware.
- Turn the power back on and enjoy the soft mineral glow on your wall.
12 Deep Grain Oak Flooring

Smooth laminate or vinyl floors can feel thin and very flat under your feet. These real wood planks feature a deep and visible grain that you can actually feel. The dark brown color adds a sense of history and warmth to a large and open room.
Natural wood patterns bring an organic energy to your home flooring. Light reflects off the ridges of the wood to show off its rugged and expensive character. You create a solid foundation that supports the rest of your luxurious furniture pieces. These floors provide a tactile experience that enhances every single step you take.
Materials Required
- Deep grain oak floor planks
- Floor underlayment
- Wood floor glue or flooring nails
- Wood transition strips
Equipment Required
- Miter saw
- Flooring nailer or mallet
- Measuring tape
- Chalk line
- Tapping block
DIY Instructions
- Ensure your subfloor is completely level and free of any debris or dust.
- Roll out the underlayment and tape the seams to create a moisture barrier.
- Snap a chalk line across the room to guide your very first row of wood.
- Lay the first plank with the groove side facing the wall for stability.
- Use small spacers to leave a tiny gap for the wood to expand naturally.
- Nail the planks into the floor through the tongue using the flooring nailer.
- Tap each new plank into the previous one using the tapping block.
- Stagger the end joints of each row by at least six inches for a natural look.
- Measure and cut the final planks to fit against the opposite wall.
- Install the transition strips at doorways to cover any visible gaps.
- Remove the spacers and install your baseboards over the expansion gaps.
- Sweep the new floor to remove any wood dust from the installation process.
13 Reeded Glass Cabinet Doors

Solid cabinet doors can make a kitchen or bar area feel closed off and heavy. This vertical ribbed glass hides the mess inside while still letting light pass through. It adds a sophisticated texture that looks great in both modern and traditional homes.
Glass panels allow you to show off the shapes of your glassware without revealing every detail. The thin lines create a shimmering effect when the sun hits the cabinet from an angle. You will notice how the room feels more open and airy with these translucent surfaces. It provides a layer of visual mystery that plain glass lacks.
Materials Required
- Reeded glass panels
- Clear silicone adhesive
- Decorative wood trim
- Small finishing nails
Equipment Required
- Glass cutter or pre cut panels
- Caulk gun
- Hammer
- Measuring tape
- Clamps
DIY Instructions
- Measure the openings of your cabinet doors very accurately before ordering glass.
- Remove the existing door panels or the center section of your frame.
- Clean the inside edges of the wood frame to remove old glue or dust.
- Apply a thin bead of clear silicone along the inner lip of the frame.
- Press the reeded glass panel into the frame with the ribs facing outward.
- Use clamps to hold the glass in place while the silicone begins to set.
- Cut small pieces of decorative wood trim to fit behind the glass.
- Secure the trim with tiny finishing nails to hold the glass permanently.
- Wipe away any excess silicone that squeezed out from the edges.
- Let the adhesive cure for a full twenty four hours before moving the door.
- Reattach the cabinet doors to the hinges and adjust them for a level look.
- Clean the glass with a soft cloth to remove fingerprints and smudges.
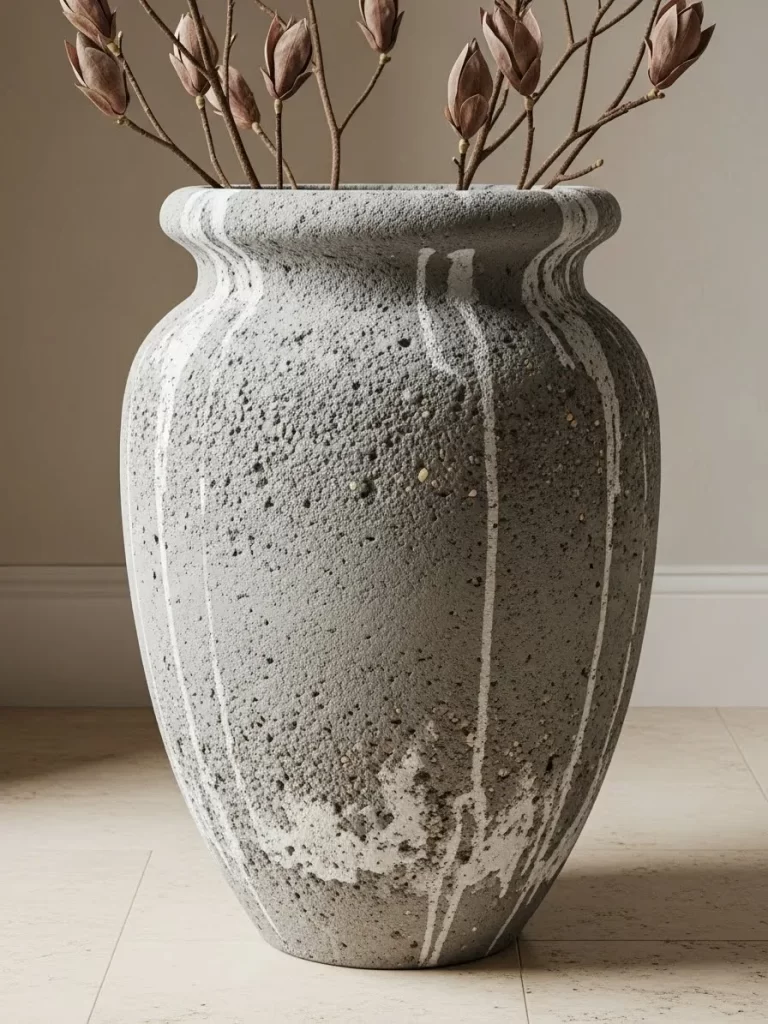
14 Cratered Lava Rock Vase
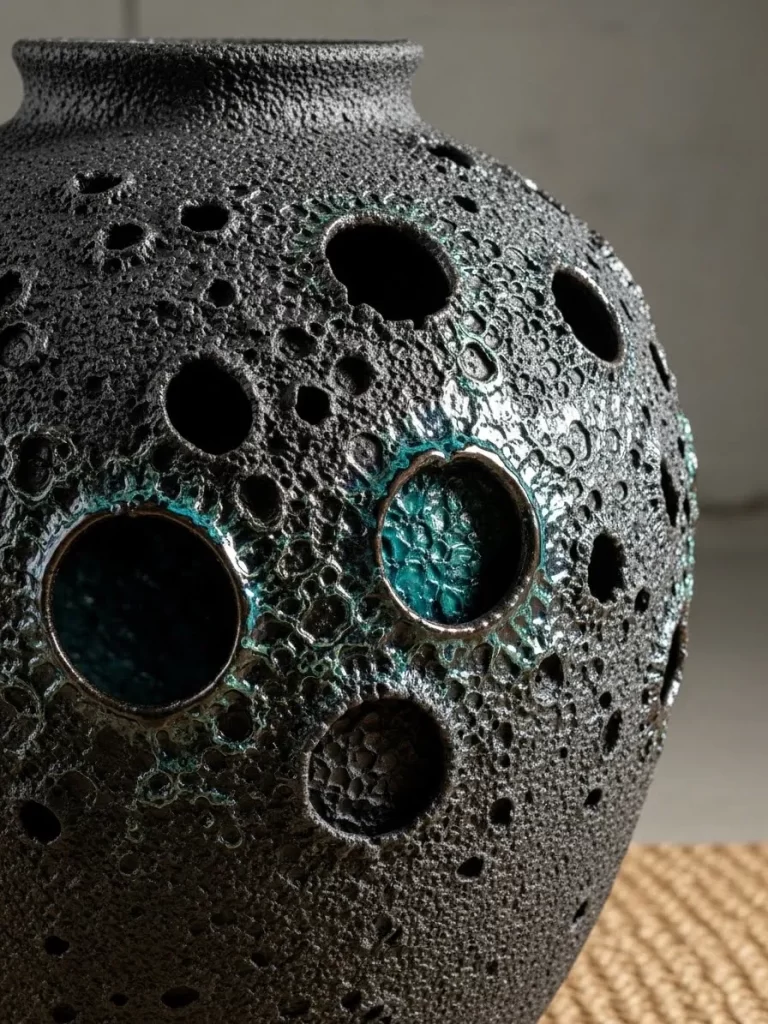
Polished ceramic often looks too clean and lacks a sense of personality or grit. This dark vase features a rough and porous surface that looks like it came from a volcano. The deep holes and jagged edges provide a sharp contrast to a smooth table or shelf.
Vases with heavy textures act as bold sculptures even without any flowers inside. The dark charcoal color adds a moody and very sophisticated element to your shelf styling. You will love how the light creates deep shadows within the tiny craters of the stone. It brings a raw and natural energy to your indoor decor.
Materials Required
- Raw ceramic vase or lava rock piece
- Matte black stone paint
- Coarse sand or texture additive
- Clear matte spray sealer
Equipment Required
- Paint brushes
- Mixing bowl
- Plastic drop cloth
- Small sponge
DIY Instructions
- Find a basic ceramic vase with a shape that you really like.
- Mix your matte black paint with a handful of coarse sand for grit.
- Apply the thick paint mixture to the vase using a rough dabbing motion.
- Use a sponge to create uneven peaks and valleys in the wet paint.
- Let the first thick coat dry for at least six hours in a dry room.
- Add a second coat of paint only to specific areas to build up the texture.
- Use a small tool to poke tiny holes into the thick paint for a cratered look.
- Allow the entire vase to dry for a full day until it feels very hard.
- Spray a light coat of matte sealer over the surface to protect the paint.
- Wipe the rim of the vase with a damp cloth to keep it looking clean.
- Place the vase on a tray to protect your furniture from the rough base.
- Style it with a single dried branch to emphasize the rugged stone look.
15 Supple Pebbled Leather Armchair

Thin fabric chairs often lose their shape and look worn out after only a few months. This thick leather features a visible pebble grain that adds a rugged and expensive feel. It is soft to the touch but strong enough to last for many decades in a busy home.
Leather naturally gains a beautiful patina as it ages and is used every day. The rich tan color works with almost any palette and provides a warm and organic glow. You get a piece of furniture that feels solid and very intentional in your living room layout. It offers a classic look that never goes out of style.
Materials Required
- High quality leather hides
- Upholstery thread
- Spray on leather conditioner
- Replacement cushion foam
Equipment Required
- Heavy duty sewing machine
- Leather needles
- Sharp fabric shears
- Upholstery staple gun
DIY Instructions
- Strip the old fabric off your armchair and save the pieces for patterns.
- Lay the leather hides flat and trace your patterns onto the back side.
- Cut the leather carefully using very sharp shears to get a clean edge.
- Install a leather needle and heavy thread into your sewing machine.
- Sew the panels together with the grain sides facing each other for hidden seams.
- Turn the leather covers right side out and check the strength of the joints.
- Replace the old seat foam with a high density version for better support.
- Pull the leather cover over the chair frame and center it perfectly.
- Staple the edges of the leather to the underside of the wooden frame.
- Use a heat gun gently to smooth out any small wrinkles in the leather.
- Apply a thin layer of leather conditioner to keep the material soft and flexible.
- Buff the surface with a clean cloth to achieve a soft and natural shine.
16 Woven Paper Cord Dining Chair

Plastic or metal chairs can feel cold and very uncomfortable during a long dinner. This hand woven seat provides a natural spring and a beautiful geometric pattern for your dining room. The light wood frame paired with the tan cord looks very airy and modern.
Natural fibers bring a sense of warmth and manual craft to your table setting. You will find that the woven surface is breathable and stays cool during the summer months. The texture adds a layer of visual interest to an area that is usually very flat. These chairs offer a timeless look that feels both casual and very high end.
Materials Required
- Unfinished wooden chair frame
- Rolls of Danish paper cord
- Wood finish or oil
- Cardboard L nails
Equipment Required
- Hammer
- Scissors
- Wood clamps
- Measuring tape
- Sandpaper
DIY Instructions
- Sand the wooden chair frame until it feels smooth and free of splinters.
- Apply a coat of clear wood oil to protect the timber and let it dry.
- Tap the L nails into the inside of the seat rails to hold your cord.
- Tie the end of the paper cord to the first nail in the corner.
- Wrap the cord around the front and back rails to create the base layer.
- Keep the tension very tight as you move across the width of the seat.
- Start the cross weave by going over and under the vertical cord lines.
- Push the cords together often to ensure the weave is dense and solid.
- Tie off the end of the cord on a hidden nail under the seat rail.
- Hammer the nails flat so they do not snag your clothes later.
- Check that the pattern is straight and even across the entire surface.
- Wipe the frame one last time to remove any dust from the weaving process.
17 Fluted Oak Kitchen Island
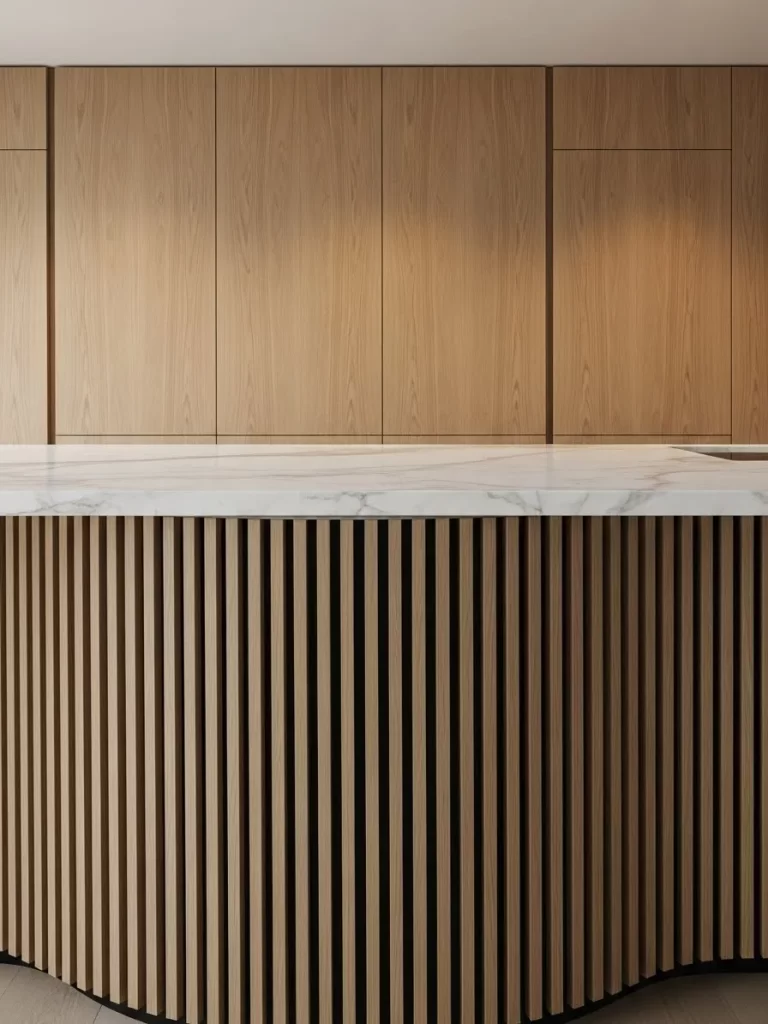
Plain drywall or flat wood panels can make a large island look like a big boring box. These thin vertical slats add a rhythmic pattern that draws the eye and creates soft shadows. The light wood grain looks beautiful against a white marble or dark stone countertop.
Adding vertical lines helps to break up the heavy horizontal surfaces of a large kitchen. You gain a custom architectural look without the high cost of a full kitchen remodel. The texture is durable and stands up well to the bumps of daily life at the island. It makes the center of your home feel more like a piece of high end furniture.
Materials Required
- Fluted wood panels or individual slats
- Construction adhesive
- Finish nails
- Wood stain or clear sealer
Equipment Required
- Table saw or miter saw
- Level
- Caulking gun
- Brad nailer
- Measuring tape
DIY Instructions
- Measure the height and width of your kitchen island panels very carefully.
- Cut your fluted wood sheets to match the height of the island base.
- Sand the edges of the wood to remove any rough spots from the saw.
- Apply a generous amount of construction adhesive to the back of the panel.
- Press the wood panel against the island and check it with your level.
- Secure the panel with a few small finish nails along the top and bottom.
- Repeat the process for the sides of the island until the box is covered.
- Fill any small nail holes with wood putty that matches your wood color.
- Sand the putty flat once it is dry so the surface is perfectly smooth.
- Apply a clear matte sealer to protect the wood from kitchen spills and dirt.
- Use a small brush to get the sealer into the deep grooves of the fluting.
- Buff the wood with a soft cloth to give it a clean and finished appearance.
18 Rustic Jute Rope Lamp
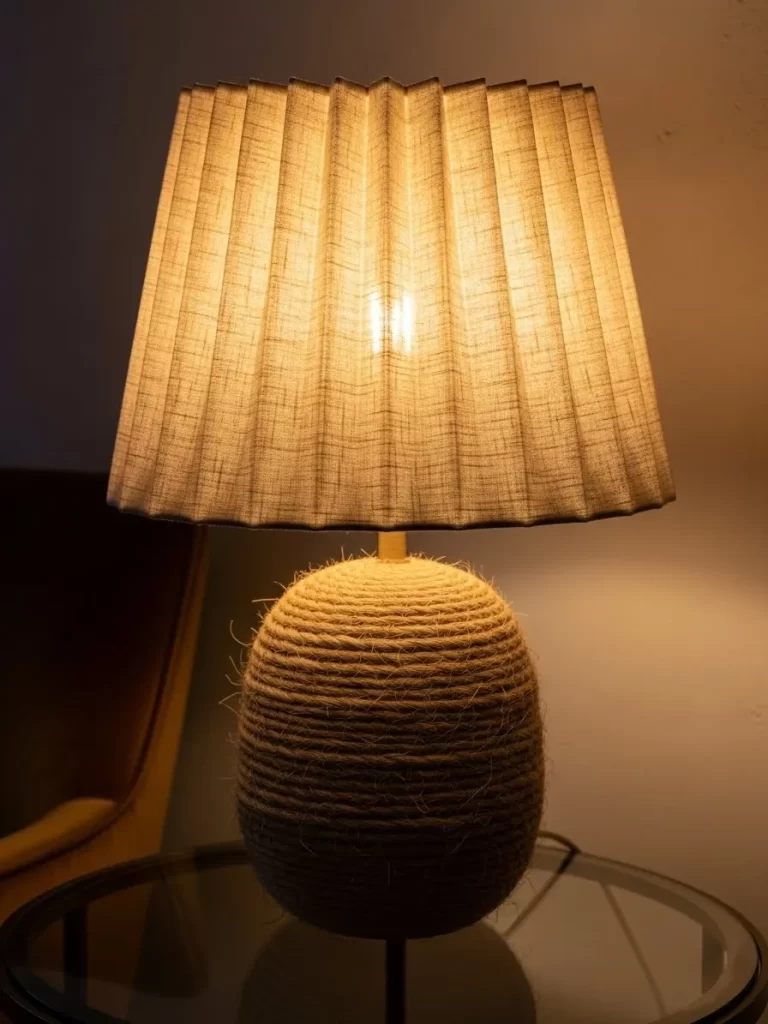
Sleek ceramic lamps can sometimes feel a bit too formal or delicate for a cozy room. This base is wrapped in thick natural rope to create a rugged and very tactile surface. The pleated fabric shade adds another layer of texture that softens the light beautifully.
Natural materials like jute bring an earthy and very relaxed vibe to your bedside table. You will notice how the rough rope catches the light to show off its twisted fibers. It provides a heavy and stable base that feels very high quality in your hands. This lamp acts as a small piece of organic art for your living space.
Materials Required
- Simple lamp base with a smooth surface
- Roll of thick jute or sisal rope
- Hot glue sticks
- Pleated fabric lampshade
Equipment Required
- Hot glue gun
- Sharp utility knife
- Scissors
- Measuring tape
DIY Instructions
- Unplug your lamp and remove the shade and the light bulb first.
- Clean the surface of the lamp base to ensure the glue sticks well.
- Apply a small bead of hot glue to the very bottom edge of the base.
- Press the end of the rope into the glue and hold it until it sets.
- Wrap the rope tightly around the base in a slow upward spiral.
- Add a small drop of glue every few inches to keep the rope from slipping.
- Push the layers of rope down firmly so no gaps are visible between them.
- Cut the rope with a utility knife when you reach the top of the base.
- Glue the end of the rope down and tuck it behind a previous layer.
- Screw the light bulb back into the socket and attach the pleated shade.
- Place the lamp on a side table where the texture can be easily seen.
- Enjoy the warm and rustic atmosphere this simple project creates.
19 Distressed Antique Mirror Panels

Large clear mirrors can often look very cold and stark in a formal dining room. These panels feature a hand aged finish with dark spots and soft golden clouds. They provide a sense of history and depth that a brand new mirror simply cannot offer.
Using foxed or antiqued glass softens the reflection and makes a room feel much cozier. The dark patterns act like a subtle piece of abstract art across your entire wall. You will find that these mirrors add a layer of old world mystery and luxury to your home. They reflect light in a very soft and flattering way for your guests.
Materials Required
- Clear glass mirror panels
- Muriatic acid or mirror aging solution
- Gold and black spray paint
- Paint stripper
Equipment Required
- Protective goggles and gloves
- Plastic spray bottle
- Funnel
- Soft rags
- Large plastic tub
DIY Instructions
- Wear your safety gear and work in a very well ventilated outdoor area.
- Remove the plastic backing from the mirror using a chemical paint stripper.
- Wipe away the dissolved backing until the silver layer is fully exposed.
- Spray the aging solution onto the silver in a random and light mist.
- Watch the silver layer begin to dissolve and create small dark holes.
- Stop the process with a mixture of water and baking soda once you like the look.
- Dry the back of the glass completely with a soft and clean cloth.
- Spray light patches of gold and black paint over the dissolved areas.
- Apply a final solid coat of gray paint to protect the new antique finish.
- Let the paint dry for a full day before you handle the glass panels.
- Mount the mirrors to your wall using heavy duty mirror clips or adhesive.
- Clean the front of the glass to see your new vintage masterpiece.
20 Smoked Glass Mirrored Coffee Table

Standard wooden coffee tables can feel very heavy and dark in the middle of a room. This table uses smoked mirror surfaces to reflect your rug and furniture while looking very light. The dark tint adds a layer of mystery and modern luxury to your seating area.
Reflective surfaces help to double the visual space and make a small room feel much bigger. You get a piece of furniture that changes its look depending on where you stand in the room. The sharp edges and smooth glass provide a clean and very polished focal point. It brings a high end gallery vibe to your personal living space.
Materials Required
- Simple square coffee table frame
- Smoked glass or mirrored panels
- Heavy duty glass adhesive
- Soft felt bumpers
Equipment Required
- Measuring tape
- Level
- Glass cleaner
- Microfiber cloth
- Clamps
DIY Instructions
- Measure the top and sides of your table frame to get the glass sizes.
- Order your smoked mirror panels with polished edges for a very safe finish.
- Clean the table frame thoroughly to remove any grease or old dust.
- Apply a thin layer of glass adhesive to the top of the table frame.
- Place the top mirror panel onto the frame and center it very carefully.
- Apply adhesive to the side rails and press the side mirrors into place.
- Use clamps with soft pads to hold the mirrors while the glue dries.
- Check that all the corners meet perfectly and the table is level.
- Let the adhesive cure for at least forty eight hours without moving it.
- Attach small felt bumpers to the bottom of the table to protect your rug.
- Clean the entire table with a high quality glass cleaner and a soft cloth.
- Position the table in front of your sofa and enjoy the new reflections.
21 Marble Skirting and Terrazzo Flooring
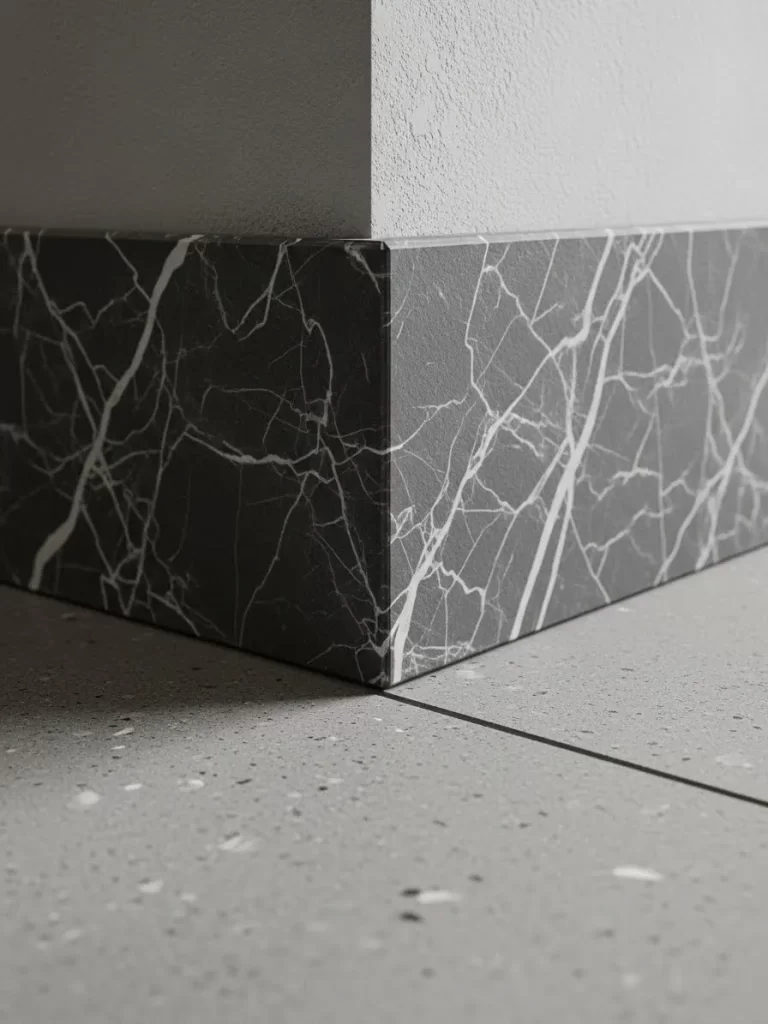
Standard wooden baseboards can often feel like an afterthought in a high end room. Using a thin slab of marble instead creates a seamless transition from the wall to a beautiful terrazzo floor. This material choice adds a heavy sense of permanence and luxury to the edges of your space.
Light reflects off the polished stone surface to brighten up dark corners. You will find that the natural white veins contrast beautifully against the dark flecks in the flooring. This combination is durable and resists moisture much better than any painted timber. It provides a clean and architectural look that feels very intentional.
Materials Required
- Marble baseboard strips
- Terrazzo floor tiles
- Thin set mortar
- Stone sealer
- Tile grout
Equipment Required
- Wet saw with a diamond blade
- Notched trowel
- Rubber mallet
- Level
- Tile spacers
DIY Instructions
- Level your subfloor completely before you begin laying the terrazzo tiles.
- Spread a layer of mortar on the floor using the notched trowel.
- Press each tile into the mortar and use spacers to keep the gaps even.
- Check each tile with your level to ensure the floor is perfectly flat.
- Cut the tiles for the edges of the room using the wet saw.
- Let the floor dry for twenty four hours before you apply the grout.
- Apply mortar to the back of the marble skirting strips.
- Press the marble against the wall and align the bottom edge with the floor.
- Use the rubber mallet to tap the marble gently until it is flush.
- Fill the gaps between the marble and the floor with matching grout.
- Wipe away any excess material with a damp sponge right away.
- Apply stone sealer to the entire surface to protect it from stains.
22 Textured Limestone Patio Flooring
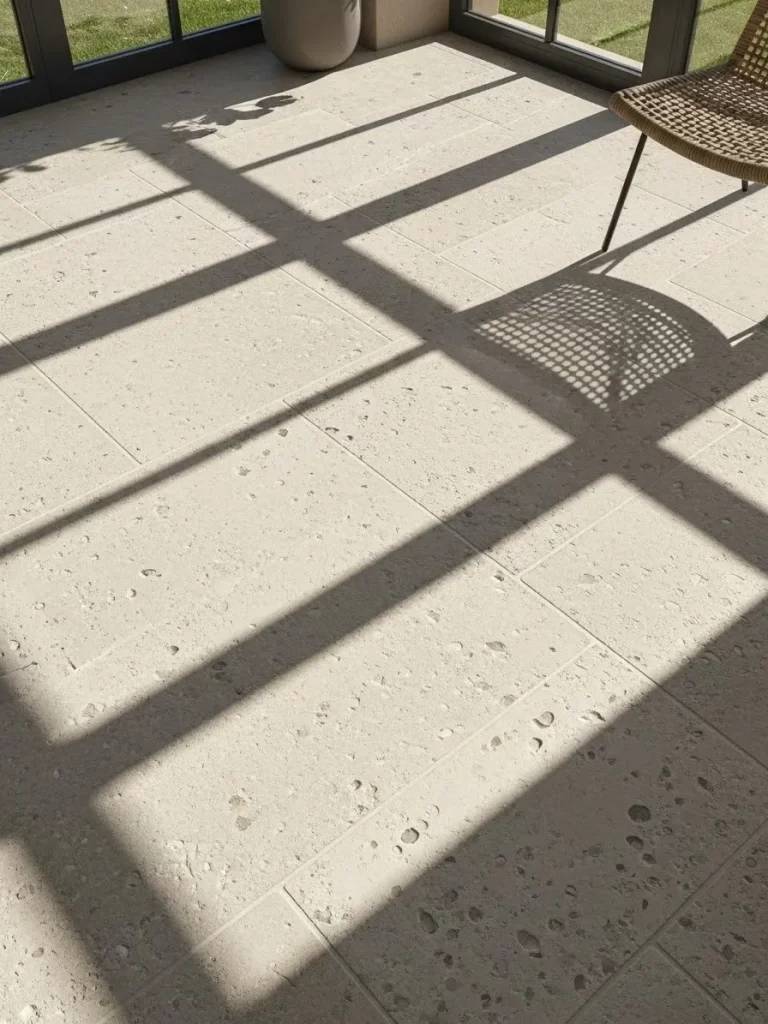
Flat concrete slabs often look industrial and lack the warmth of natural stone. Limestone tiles offer a porous and rugged texture that feels incredible under your feet. The varying shades of beige and cream create a soft backdrop for your outdoor seating area.
Sunlight emphasizes the tiny craters and fossil marks within each stone. You get a space that feels like a Mediterranean retreat right in your own backyard. The natural material stays cool to the touch even during the hottest summer days. It adds a layer of organic luxury to your home exterior.
Materials Required
- Natural limestone pavers
- Crushed stone base
- Polymeric sand
- Stone sealer
Equipment Required
- Plate compactor
- Shovel
- Rake
- Large level
- Rubber mallet
DIY Instructions
- Dig out the area to a depth of six inches to prepare the base.
- Fill the hole with four inches of crushed stone and rake it level.
- Use the plate compactor to press the stone into a solid foundation.
- Add a one inch layer of bedding sand over the crushed stone base.
- Lay your first limestone paver in a corner and tap it with the mallet.
- Check the level often to ensure water will drain away from your house.
- Place the remaining pavers with small gaps between each stone.
- Spread polymeric sand over the entire patio and brush it into the gaps.
- Use a leaf blower to remove any excess sand from the stone faces.
- Mist the sand lightly with water to activate the hardening agent.
- Let the sand cure for at least twenty four hours before walking on it.
- Apply a breathable stone sealer to prevent mold and algae growth.
23 Hand Forged Black Iron Hardware
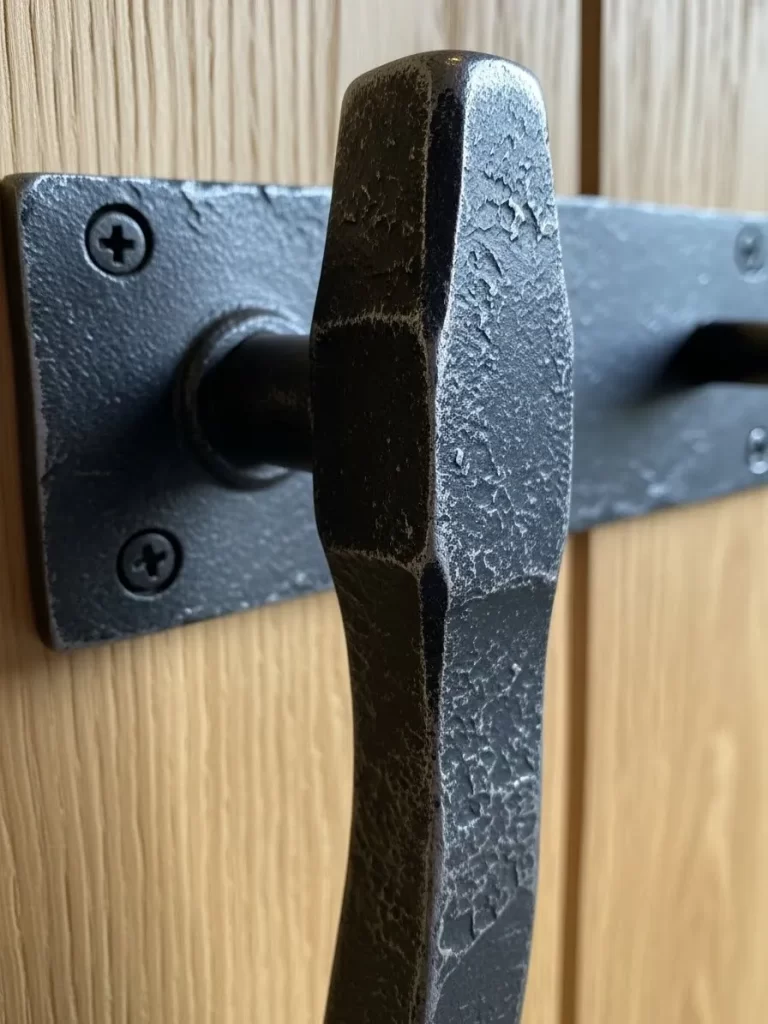
Mass produced metal handles often feel thin and lack a sense of character. Forged iron provides a heavy and hammered texture that you can feel every time you open a door. The deep black finish looks beautiful against natural wood or light painted surfaces.
Small details like this bring a sense of history and craft into a modern home. You will appreciate the slight variations and unique marks left by the blacksmith. This hardware acts as a strong visual anchor for your interior doors or cabinets. It adds a layer of rugged sophistication that feels very high quality.
Materials Required
- Forged iron door handles
- Heavy duty mounting screws
- Metal polish
Equipment Required
- Power drill
- Drill bit set
- Screwdriver
- Measuring tape
- Pencil
DIY Instructions
- Measure the thickness of your door to ensure the screws are the right length.
- Mark the centers for the handle holes using a pencil and a template.
- Drill pilot holes through the door to prevent the wood from splitting.
- Align the iron handle over the holes on the front of the door.
- Insert the mounting screws from the back side and tighten them slightly.
- Check that the handle is perfectly vertical using your measuring tape.
- Tighten all the screws until the handle feels solid and does not move.
- Install the latch mechanism into the side of the door frame.
- Test the handle to make sure the latch moves smoothly without sticking.
- Wipe the iron with a clean cloth to remove any dust from the drill.
- Apply a small amount of metal polish if the finish looks a bit dull.
- Enjoy the heavy and satisfying click of your new high end hardware.
24 Oversized Concrete Drip Vessel
Thin glass vases often look fragile and lack the visual weight needed for a large room. This thick concrete vessel features a rough stone texture with unique white drip patterns. It acts as a massive sculptural piece that grounds your entryway or living room corner.
Natural gray tones provide a neutral base that lets your greenery really stand out. You will love the contrast between the organic leaves and the heavy industrial stone. The vessel feels incredibly solid and adds a sense of permanence to your shelf styling. It brings a raw and very modern energy to any indoor space.
Materials Required
- Large plastic bucket for a mold
- High strength concrete mix
- White acrylic paint
- Water based sealer
Equipment Required
- Mixing paddle
- Large tub
- Sandpaper
- Paint brush
- Cooking spray
DIY Instructions
- Coat the inside of your large plastic bucket with cooking spray for easy release.
- Mix your concrete with water until it looks like thick pancake batter.
- Pour the concrete into the bucket until it is three quarters full.
- Tap the sides of the bucket firmly to remove any trapped air bubbles.
- Place a smaller weighted bucket inside the center to create the hole.
- Let the concrete cure for forty eight hours in a cool and shady spot.
- Pull the vessel out of the mold carefully once it feels very hard.
- Sand the top rim and the outer surface to remove any sharp edges.
- Thin your white paint with a little water to create a runny liquid.
- Pour the paint over the rim and let it drip down the sides naturally.
- Allow the paint to dry completely before you move the heavy vessel.
- Apply a clear sealer to the inside if you plan to hold real water.
25 Impasto Textured Palette Knife Art
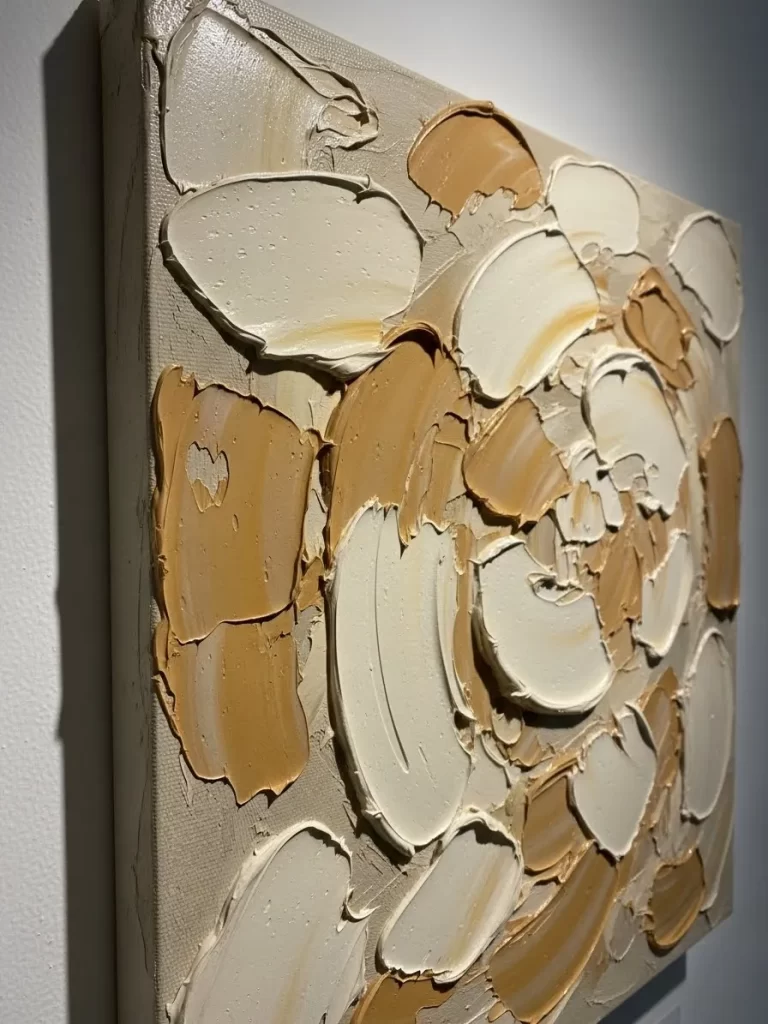
Flat prints and posters often lack the energy of a hand painted canvas. Impasto art uses thick layers of paint to create a three dimensional surface that catches the light. You can see the physical strokes and the movement of the artist across the entire piece.
Neutral shades of tan and white add a sophisticated texture to your gallery wall. The shadows within the thick paint change as you walk through the room. You gain a focal point that feels expensive and very unique to your home. It brings a tactile and very personal touch to your interior design.
Materials Required
- Large stretched canvas
- Heavy body acrylic paint
- Modeling paste
- Palette knives
Equipment Required
- Easel or flat table
- Clean rags
- Mixing plates
DIY Instructions
- Lay your canvas flat on a table to prevent the thick paint from sliding.
- Mix equal parts of modeling paste and acrylic paint for extra volume.
- Scoop a large amount of the mixture onto your widest palette knife.
- Press the knife onto the canvas and swipe in a quick curving motion.
- Layer the paint heavily in some areas to create deep peaks and valleys.
- Use the edge of the knife to scratch fine lines into the wet surface.
- Allow the paint to dry for at least twenty four hours between layers.
- Add a few highlights of a lighter color to the tops of the dried peaks.
- Keep the composition simple to let the texture be the main focus.
- Check the piece from different angles to ensure the light catches the strokes.
- Let the entire canvas cure for a full week until it feels very firm.
- Hang the art in a spot where side lighting will emphasize the texture.
26 Mohair Throw on Pebbled Leather
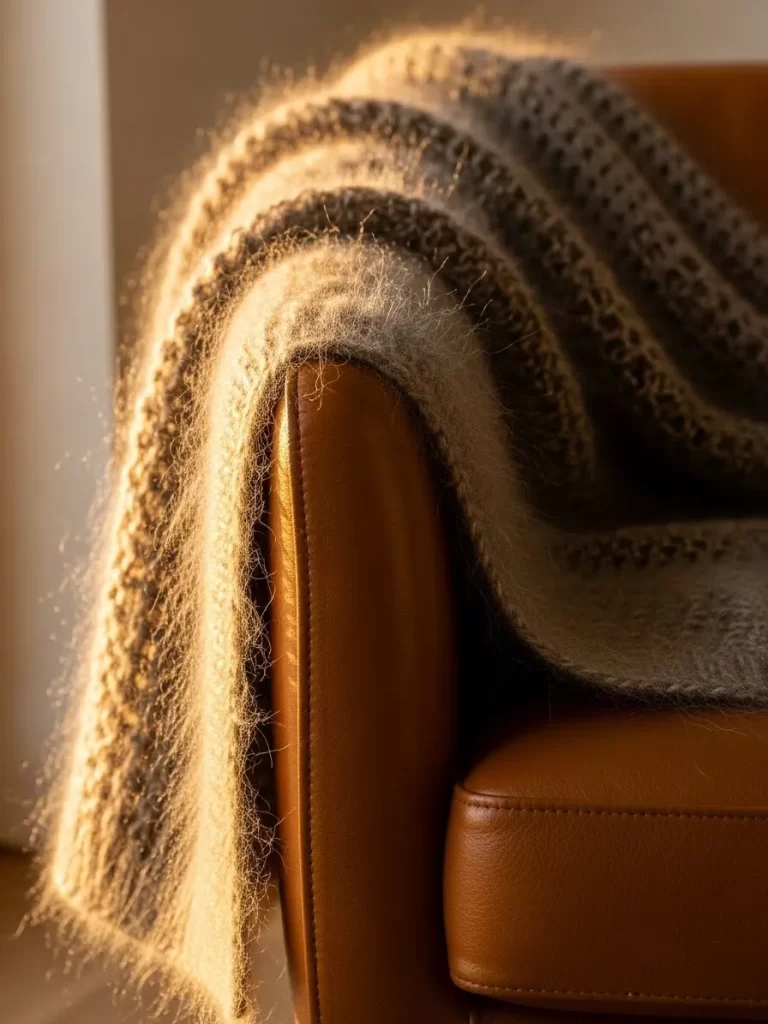
Smooth leather chairs can sometimes feel a bit cold and slippery during the winter. Adding a long fiber mohair throw creates an immediate sense of warmth and coziness. The fuzzy texture of the wool provides a beautiful contrast to the grain of the leather.
Light catches the fine hairs of the throw to create a soft and inviting glow. You will find that this simple layer makes a modern room feel much more lived in. It offers a luxurious tactile experience every time you sit down to read. This combination brings a rich and very balanced look to your seating area.
Materials Required
- High quality mohair or alpaca wool throw
- Leather conditioner
- Soft bristle brush
Equipment Required
- Clean microfiber cloth
- Handheld steamer
DIY Instructions
- Wipe your leather chair with a damp cloth to remove any hidden dust.
- Apply a thin layer of leather conditioner to keep the surface supple.
- Buff the leather with a dry cloth until it has a soft natural shine.
- Unfold your mohair throw and shake it out to lift the fine fibers.
- Drape the throw over one arm of the chair for a relaxed appearance.
- Let the fabric pool slightly on the seat to create a cozy feeling.
- Use the steamer on a low setting to remove any deep shipping folds.
- Avoid pressing the steamer directly against the wool to prevent matting.
- Brush the mohair gently with a soft bristle brush to keep it fluffy.
- Arrange the throw so it looks effortless and not too stiff or formal.
- Pair it with a smooth velvet pillow for even more texture variety.
- Enjoy the extra comfort this high end material provides for your skin.
27 Natural Black Slate Floor Tiles
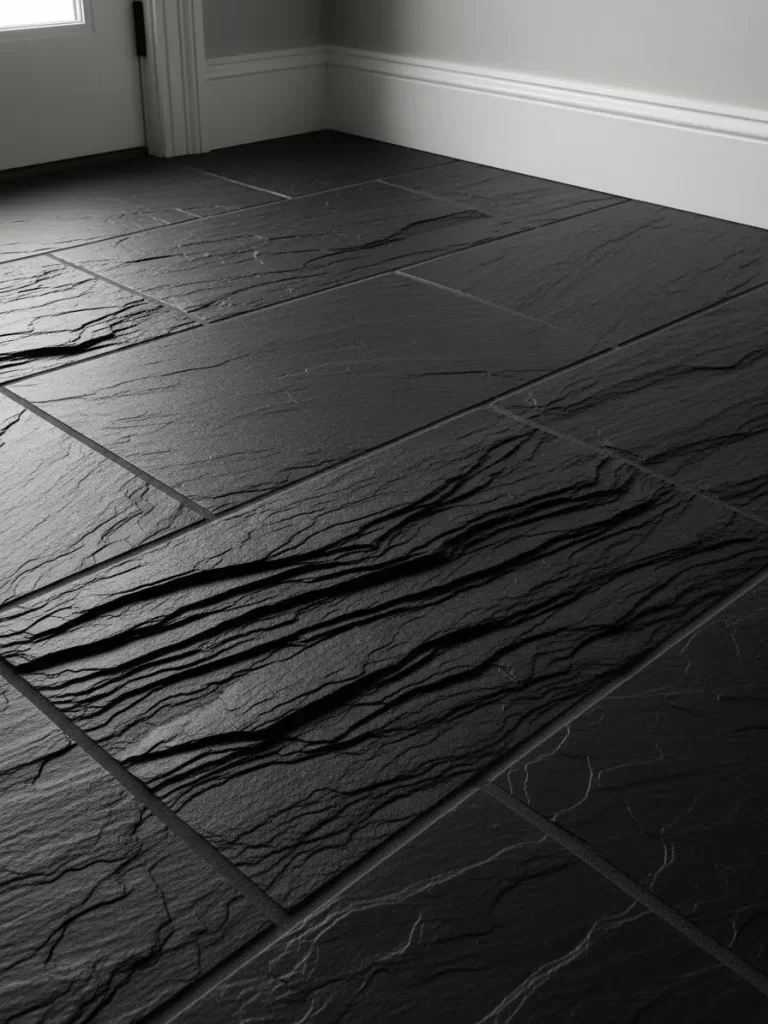
Standard gray tiles often look flat and lack the character of real earth materials. Natural slate features a split face texture that shows off the layered history of the stone. The deep black color provides a dramatic and very sophisticated base for your room.
Walking on these tiles gives you a connected and very grounded feeling. The rugged surface is naturally non slip and hides dirt exceptionally well in busy areas. You gain a floor that looks better as it ages and develops a soft natural sheen. It brings a powerful and very timeless luxury to your home.
Materials Required
- Natural black slate tiles
- Dark gray tile grout
- Penetrating stone sealer
- Mortar
Equipment Required
- Wet saw
- Notched trowel
- Grout float
- Large sponge
- Level
DIY Instructions
- Clean your subfloor thoroughly and ensure it is dry before you begin.
- Mix your mortar until it reaches a thick and creamy consistency.
- Spread the mortar in a small area using the notched trowel.
- Lay the slate tiles in a random pattern to show off the natural variations.
- Press each tile down firmly and check it with your level for flatness.
- Use a wet saw to cut the slate for the edges and around obstacles.
- Let the mortar set for twenty four hours before you start the grouting.
- Apply the dark grout into the gaps using a rubber grout float.
- Wipe the tile faces with a damp sponge to remove the excess grout.
- Rinse your sponge often to keep the slate surfaces looking clean.
- Allow the grout to dry completely before you apply the stone sealer.
- Buff the floor with a clean cloth to achieve a rich and deep finish.
28 Sisal Rug with Dark Border
Plain carpet can often look generic and lacks the structural interest of woven fibers. Sisal rugs offer a tight and ribbed texture that adds a natural energy to your floor. The dark brown border provides a clean frame that grounds the light tan center.
Natural fibers are incredibly durable and stand up well to heavy foot traffic. You will notice how the rug adds a layer of quiet and calm to a busy room. The organic material brings an earthy and very sophisticated look to your dining area. It creates a solid foundation that complements almost any furniture style.
Materials Required
- Woven sisal or jute area rug
- Non slip rug pad
- Fabric protector spray
Equipment Required
- Measuring tape
- Heavy duty scissors
- Vacuum with a brush attachment
DIY Instructions
- Measure your floor space to ensure the rug fits under your furniture legs.
- Lay the non slip pad down first to keep the rug from sliding around.
- Trim the pad so it is two inches shorter than the rug on all sides.
- Roll out the sisal rug over the pad and center it in the room.
- Pull the corners tight to remove any ripples from the shipping roll.
- Vacuum the rug on a low setting to lift the fibers and remove lint.
- Spray the entire surface with fabric protector to prevent deep stains.
- Place your heavy furniture on the rug to help it lay flat and stay still.
- Use a pair of scissors to trim any small stray fibers that might pop up.
- Avoid using water to clean the rug as it can shrink the natural fibers.
- Blot any spills immediately with a dry cloth and a little club soda.
- Enjoy the natural and very high end look of your new floor covering.
29 Knurled Brass Dimmer Switch
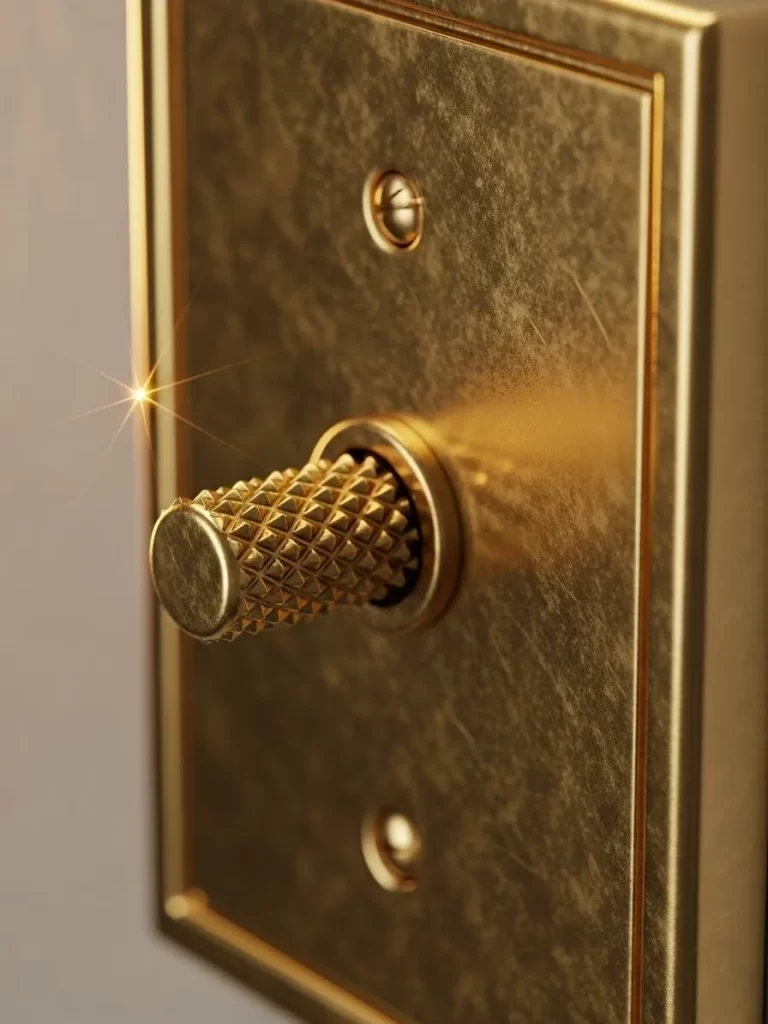
Standard plastic light switches often feel cheap and look very dated in a luxury home. This heavy brass plate features a knurled dial that provides a satisfying grip for your fingers. The antiqued finish adds a touch of golden jewelry to your walls.
Touching a solid metal switch gives a sense of quality every single time you enter a room. You will appreciate the way the dimming function allows you to control the mood. This small detail makes your interior design feel much more custom and expensive. It transforms a basic utility into a beautiful and very tactile feature.
Materials Required
- Knurled brass dimmer switch plate
- Electrical wire nuts
- Matching brass screws
Equipment Required
- Flat head screwdriver
- Phillips head screwdriver
- Voltage tester
- Needle nose pliers
DIY Instructions
- Turn off the power to the lighting circuit at your main breaker box.
- Use the voltage tester to double check that no electricity is flowing.
- Remove the old plastic switch plate using a small screwdriver.
- Unscrew the switch from the wall box and pull it out carefully.
- Disconnect the house wires from the old switch one at a time.
- Straighten the ends of the wires using your needle nose pliers.
- Connect the black house wire to the black wire on the new dimmer.
- Connect the remaining wires to the matching leads on the brass switch.
- Secure all the connections tightly using the plastic wire nuts.
- Push the wires back into the box and screw the dimmer into place.
- Attach the brass cover plate using the matching golden screws.
- Turn the power back on and test the smooth dimming motion of the dial.
30 Washed Linen Bedding
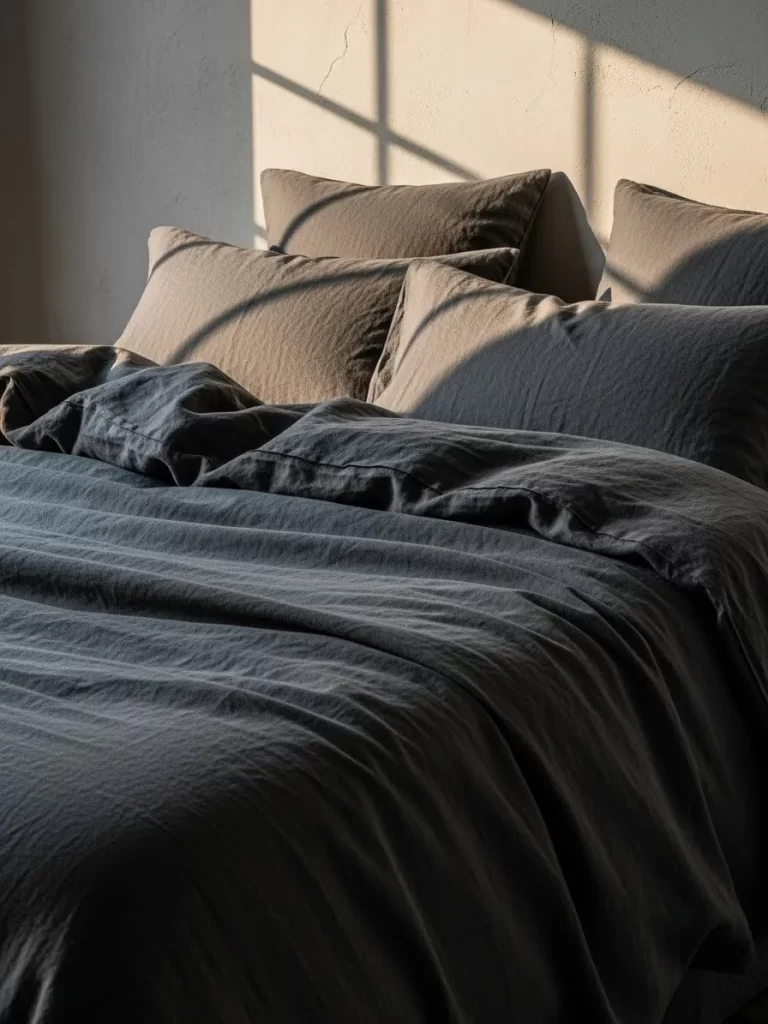
Polished cotton sheets can often feel stiff and lack the relaxed beauty of natural fabric. Washed linen offers a rumpled and very soft texture that invites you to crawl into bed. The deep charcoal color looks sophisticated and hides wrinkles naturally.
Linen is highly breathable and keeps you cool during the warmest summer nights. You will love the way the fabric gets even softer every time you wash it. It provides a lived in and very high end look to your sleeping sanctuary. This material choice brings a layer of quiet luxury to your daily rest.
Materials Required
- Washed linen duvet cover and pillowcases
- Gentle liquid detergent
- Wool dryer balls
Equipment Required
- Washing machine
- Tumble dryer
- Handheld steamer
DIY Instructions
- Wash your new linen bedding in cold water before you use it.
- Use a very small amount of gentle detergent to protect the fibers.
- Avoid using fabric softeners as they can coat and damage the linen.
- Tumble dry the bedding on a low heat setting with the wool balls.
- Remove the linen from the dryer while it is still slightly damp.
- Shake the fabric out firmly to help the natural wrinkles look intentional.
- Stuff your pillows into the cases and smooth them out with your hands.
- Place the duvet cover over your comforter and secure the bottom buttons.
- Drape the top of the duvet over the pillows for a relaxed style.
- Use a handheld steamer for a few seconds if the edges look too messy.
- Layer a textured wool throw over the foot of the bed for extra depth.
- Step back and enjoy the soft and very organic atmosphere of your room.
31 Cloth Bound Books on Shelving

Plain plastic e readers or shiny paperbacks often lack the visual warmth of a real library. These fabric bound spines provide a tactile and colorful layer to your built in shelving. You will notice how the matte finish of the cloth absorbs light and creates a cozy academic atmosphere.
Small books with gold foil lettering add a touch of vintage charm to any modern room. They act as small sculptures when stacked horizontally or lined up by color. This choice brings a sense of history and intellectual depth to your home office. It creates a focal point that feels expensive and very unique.
Materials Required
- Selection of cloth bound books
- Brass bookends
- Soft felt pads
Equipment Required
- Microfiber duster
- Level
- Tape measure
DIY Instructions
- Dust your shelves thoroughly with a microfiber cloth before you begin.
- Group your books by color or size to create a clean visual pattern.
- Place your largest books at the ends of the shelves for stability.
- Alternate between vertical and horizontal stacks to add visual interest.
- Align the spines with the front edge of the shelf for a tidy appearance.
- Use brass bookends to keep vertical stacks standing perfectly straight.
- Attach small felt pads to the bottom of bookends to protect the wood.
- Leave some open space between groups to avoid a cluttered look.
- Place a small decorative object on top of horizontal stacks for height.
- Check that the shelves are level and not bowing under the weight.
- Rotate the books occasionally to prevent light fading on the spines.
- Step back and adjust the placement until the arrangement feels balanced.
32 Gilded Framed Wall Art
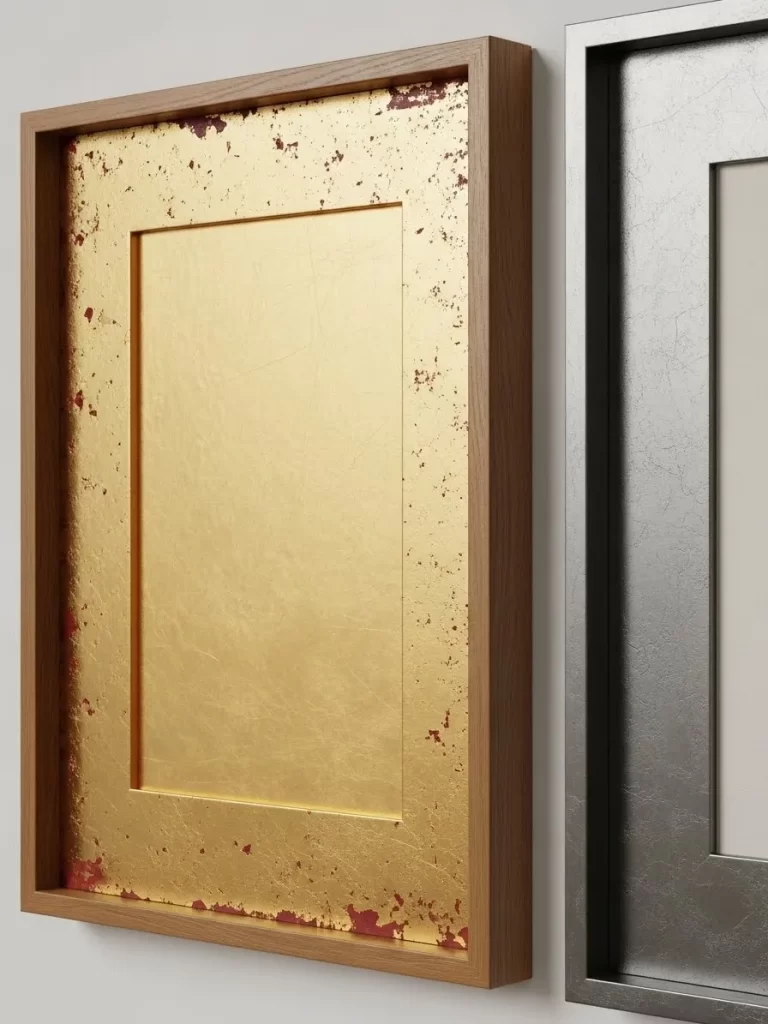
Cheap plastic frames make even the most beautiful art look temporary and low quality. A thick wood frame with gold leaf adds a sense of importance and permanence to your gallery wall. You will see how the metallic surface catches the morning sun and glows in the evening lamp light.
Intricate carvings on the frame edges provide a beautiful contrast to smooth white walls. This material swap elevates a simple print into a museum quality focal point. It anchors the room with a traditional and very expensive aesthetic. You get a piece of decor that looks like a rare find from an antique shop.
Materials Required
- Wood frame
- Gold leaf kit with adhesive size
- Red clay bolus or primer
- Protective sealer
Equipment Required
- Soft gilding brushes
- Fine sandpaper
- Burnishing tool
- Masking tape
DIY Instructions
- Sand the wood frame until it is completely smooth to your touch.
- Wipe away all dust with a damp cloth and let it dry.
- Apply a coat of red primer to give the gold a rich and warm undertone.
- Brush a thin layer of adhesive size over the entire frame surface.
- Wait for the adhesive to become tacky but not completely wet.
- Lift a sheet of gold leaf carefully using a soft dry brush.
- Press the leaf onto the frame and smooth it down with light strokes.
- Overlap the edges of the sheets slightly to ensure full coverage.
- Use the burnishing tool to rub the gold and create a high shine.
- Gently brush away any loose flakes of gold once the frame is covered.
- Apply a clear sealer to protect the delicate gold leaf from air.
- Insert your art and hang the frame in a prominent spot on your wall.
33 Textured Metallic Wall Panels
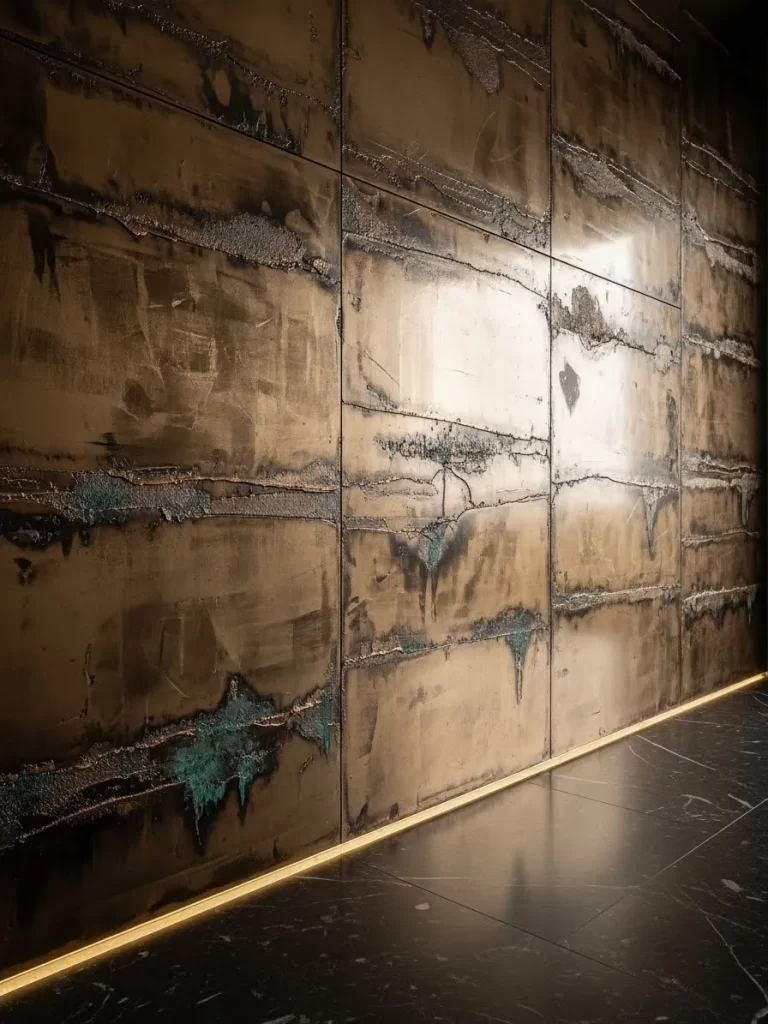
Flat painted accent walls are becoming common and often feel a bit dated or simple. These hand finished metal sheets feature heavy oxidation and layered patinas that look like industrial art. You gain a vertical surface that feels raw and incredibly modern in a dark living space.
Copper and brass tones bring a warm metallic energy to an otherwise neutral room. Light bounces off the raised textures to create a constantly changing visual experience throughout the day. This bold choice adds a layer of architectural grit and high end style. It makes your walls feel solid and very intentional.
Materials Required
- Thin metal sheets or copper panels
- Patina aging solution
- Construction adhesive
- Clear lacquer spray
Equipment Required
- Metal snips
- Protective gloves and goggles
- Notched spreader
- Clean spray bottle
DIY Instructions
- Measure your wall area to determine how many panels you need.
- Wear protective gloves and goggles before you handle the metal sheets.
- Clean the panels with a degreaser to remove any factory oils.
- Spray the patina solution onto the panels in a random mist pattern.
- Let the chemicals react with the metal for several hours to age.
- Rinse the panels with water to stop the oxidation once you like the color.
- Apply a coat of clear lacquer to lock in the patina and prevent rust.
- Spread construction adhesive on the back of the panel using a spreader.
- Press the panel firmly against the wall and hold it for one minute.
- Use metal snips to trim panels around corners or electrical outlets.
- Wipe away any excess glue from the edges with a damp cloth.
- Ensure all panels are level and flush against each other on the wall.
34 Brass Wire Mesh Cabinet Doors
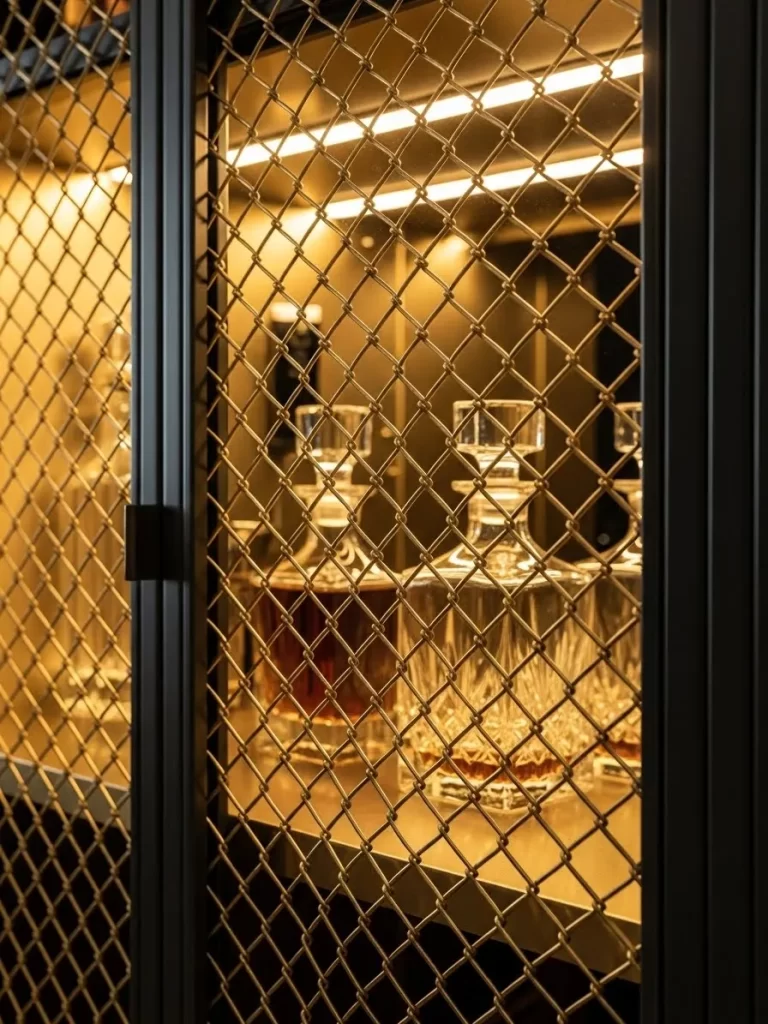
Solid wood doors or plain glass often hide the beautiful shapes of your crystal collection. This woven metal mesh adds a shimmering geometric layer that feels both vintage and very fresh. You get a glimpse of what is inside while maintaining a clean and organized exterior.
Golden wire catches the interior lighting to make your bar cabinet glow from within. It introduces a thin and delicate texture that balances out heavy wooden furniture pieces. This small detail transforms a basic pantry into a bespoke piece of high end craftsmanship. You achieve a look that feels custom and very sophisticated.
Materials Required
- Decorative brass wire mesh
- Wood splines or finishing trim
- Small brass nails
- Clear furniture wax
Equipment Required
- Heavy duty wire cutters
- Staple gun
- Hammer
- Measuring tape
- Clips
DIY Instructions
- Remove the center panel of your cabinet door using a router or saw.
- Measure the opening and add one inch to all sides for the mesh.
- Cut the brass mesh using wire cutters and wear gloves for safety.
- Lay the door face down on a soft towel to protect the finish.
- Center the mesh over the opening and hold it tight with clips.
- Use a staple gun to secure the edges of the mesh to the wood frame.
- Trim away any sharp wires that hang over the edge of the frame.
- Place wood splines over the staples to create a clean and finished look.
- Nail the splines into place using small brass nails and a hammer.
- Apply a thin layer of wax to the brass to prevent it from tarnishing.
- Buff the wood frame with a cloth to remove any fingerprints.
- Reattach the door to the cabinet and check for a smooth swing.
35 Slotted Teak Bath Mat
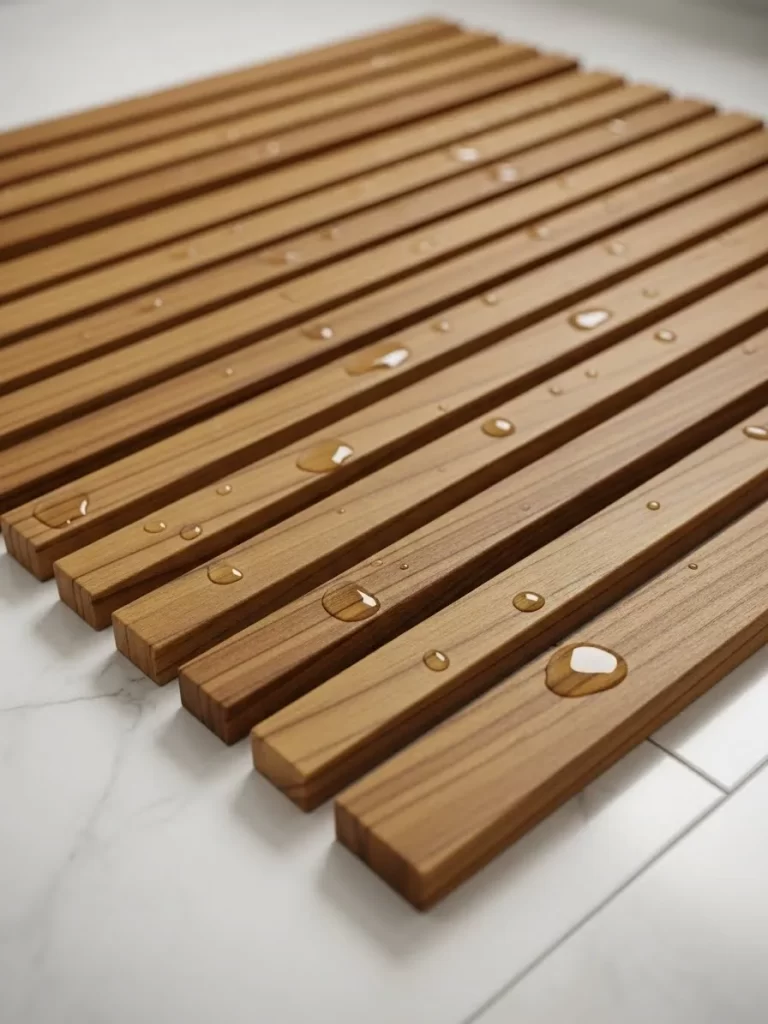
Soggy fabric mats can feel a bit messy and harbor moisture in a humid bathroom. A solid wood mat made from teak offers a spa like experience that is both clean and very durable. You will love the warm feeling of the natural wood under your feet after a hot shower.
Natural oils in the timber resist water and create a beautiful matte finish that lasts for many years. The slotted design allows air to flow freely and prevents water from pooling on the floor. It brings an organic and very calm energy to your morning routine. This small swap makes your bathroom feel like a high end hotel.
Materials Required
- Teak wood slats
- Stainless steel screws
- Waterproof wood glue
- Rubber feet
Equipment Required
- Table saw or miter saw
- Power drill
- Orbital sander
- Measuring tape
- Clamps
DIY Instructions
- Cut your teak wood into equal lengths to create a square or rectangle mat.
- Sand the edges of every slat until they feel smooth and rounded.
- Lay two long slats down as the base support for your bath mat.
- Apply waterproof glue to the spots where the top slats will sit.
- Place the top slats across the base with a half inch gap between them.
- Use a spacer block to ensure every gap is the exact same width.
- Clamp the slats together while you prepare to drill your pilot holes.
- Drill small holes through the top slats into the base to prevent splitting.
- Drive stainless steel screws into the holes to hold the structure together.
- Sand the entire mat one last time to remove any dried glue or marks.
- Attach rubber feet to the bottom of the base to prevent the mat from sliding.
- Place the mat outside your shower and enjoy the natural wood texture.
36 Hand Hewn Timber Ceiling Beams

Smooth drywall ceilings often feel vast and a bit empty in a large open room. Adding thick reclaimed wood beams provides an immediate sense of structure and rustic history. You can see the physical marks of the axe and the saw across the entire surface.
Heavy timber draws the eye upward and makes a high ceiling feel more intimate and warm. The natural wood grain contrasts beautifully with white plaster for a classic farmhouse look. This architectural swap anchors the room with a feeling of strength and quality. It adds a layer of character that new wood cannot mimic.
Materials Required
- Reclaimed wood beams or hollow box beams
- Heavy duty toggle bolts
- Wood stain or wax
- Shims
Equipment Required
- Circular saw
- Impact driver
- Scaffolding or tall ladder
- Stud finder
- Chalk line
DIY Instructions
- Use a stud finder to locate the ceiling joists and mark them with a pencil.
- Snap a chalk line across the ceiling to guide the placement of the beams.
- Measure and cut your beams to fit tightly between the walls of the room.
- Sand the beams lightly to remove any loose splinters or dirt from the wood.
- Apply a coat of stain or wax to enhance the color of the old timber.
- Screw wooden mounting blocks into the ceiling joists along your chalk line.
- Lift the hollow box beam over the mounting blocks with a partner.
- Use shims to level the beam if your ceiling is a bit uneven or slanted.
- Drive screws through the sides of the beam into the mounting blocks.
- Fill the screw holes with matching wood putty to hide the hardware.
- Check that the beam is solid and does not move when you touch it.
- Remove your ladder and enjoy the new architectural depth of your ceiling.
37 Fluted Glass Door Knobs

Plain round handles often feel generic and lack the sparkle of high end hardware. These clear glass knobs feature vertical ribs that catch the light like a small diamond. You gain a vintage and very elegant touch every time you open a bedroom or closet door.
Golden brass bases provide a warm foundation for the translucent glass top. This material combination feels heavy in your hand and signals a high level of attention to detail. It is a quick way to add a layer of classic glamour to a standard hallway. You will love how they transform a basic door into a design feature.
Materials Required
- Fluted glass door knobs
- Latch mechanism
- Matching strike plate
- Spindle
Equipment Required
- Screwdriver set
- Measuring tape
- Pencil
- Clean cloth
DIY Instructions
- Remove the old door handle and the latch from the side of the door.
- Clean the area around the holes to remove any old paint or dust.
- Slide the new latch mechanism into the hole on the edge of the door.
- Screw the latch plate into the door using the provided hardware.
- Insert the square spindle through the hole in the center of the latch.
- Slide one glass knob onto the spindle and press it against the door.
- Align the second knob on the opposite side and push them together.
- Tighten the screws on the base of the knobs until they feel solid.
- Check that the knobs turn easily and the latch moves in and out.
- Install the new strike plate on the door frame to match the latch.
- Wipe the glass knobs with a soft cloth to remove any fingerprints.
- Test the door several times to make sure it latches and opens smoothly.
38 Shagreen Textured Side Table
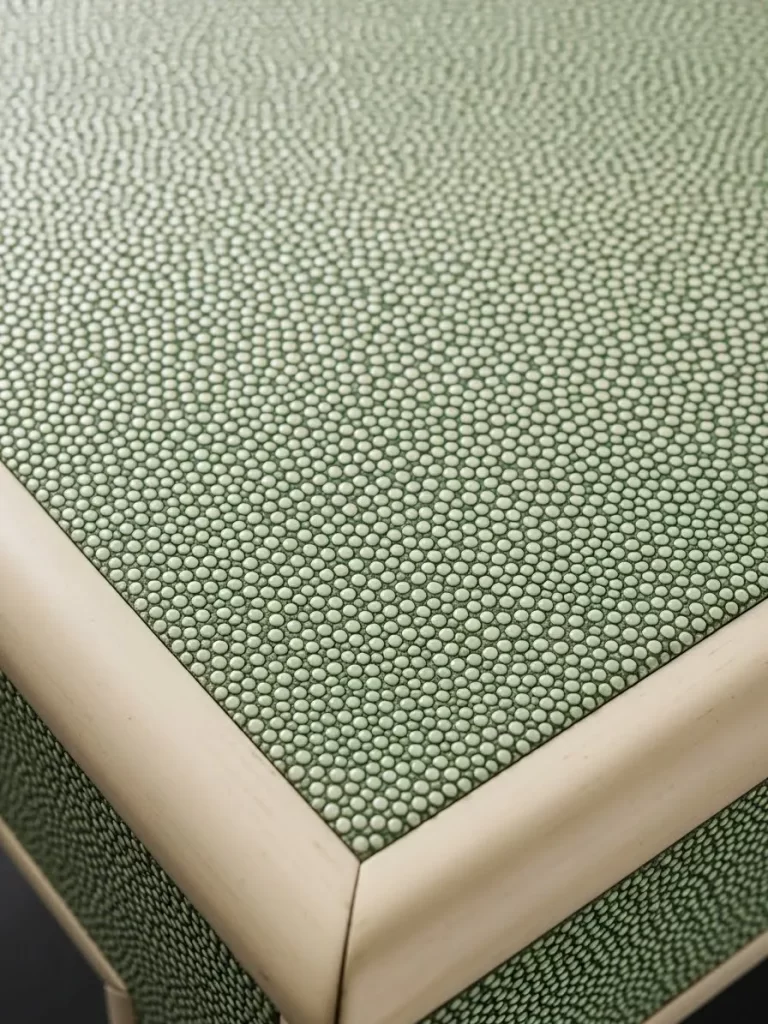
Polished wood or metal tables can sometimes look a bit flat and uninteresting in a living room. Shagreen features a tiny beaded pattern that mimics the skin of a stingray for a very exotic look. You get a tactile surface that feels sophisticated and incredibly unique in your seating area.
Soft green and gray tones allow the rich texture to be the true star of the furniture piece. This material adds a layer of quiet luxury that works well in both modern and classic homes. It becomes a subtle conversation starter for anyone who sits nearby. You achieve a high end look with a very interesting physical feel.
Materials Required
- Simple wood table frame
- Faux shagreen fabric or textured vinyl
- High strength spray adhesive
- Clear top coat sealer
Equipment Required
- Utility knife
- Straight edge tool
- Brayer roller
- Soft cloth
- Sandpaper
DIY Instructions
- Sand the wood table frame until it is flat and free of any old finish.
- Wipe the surface with a cloth to remove all dust and loose particles.
- Measure the top and sides of the table very carefully before you cut.
- Cut the shagreen fabric to size and leave extra material for the corners.
- Apply a layer of spray adhesive to the top surface of the table.
- Place the fabric onto the glue and use a brayer roller to remove bubbles.
- Press from the center outward to ensure the texture stays flat and even.
- Fold the fabric over the edges and glue them to the underside of the frame.
- Trim the corners with a sharp utility knife for a clean and professional fit.
- Apply adhesive to the side panels and repeat the smoothing process.
- Let the glue dry for a full day before you touch the table again.
- Spray a thin clear sealer over the fabric to protect it from drinks or dust.
Key Takeaways
Contrast is the secret to a high end home design. Mixing rough stone with soft wool creates a visual tension that looks very expensive. You should always aim to balance hard and soft surfaces in every single room.
Natural materials bring an organic soul to your living space. Items like alabaster or jute tell a story of the earth and look better as they age. Choosing these over plastic or mass produced metal makes a significant difference.
Small hardware changes provide a massive impact for a low cost. Switching your cabinet pulls or light switches to heavy brass adds a touch of jewelry to your walls. You will appreciate the quality of these tactile details every day.
Transforming a flat room into a luxurious retreat is a journey of small and thoughtful choices. You now have thirty eight different ways to bring depth and life to your vertical and horizontal surfaces. Every material swap moves you closer to a home that feels curated rather than just decorated.
Start with one or two projects that speak to your personal style. You might choose to update a single lamp or commit to a full textured wall finish. Notice how the light in your room changes as you introduce these new layers.
A beautiful home is one that feels as good as it looks. Focus on the physical touch and the visual weight of every piece you bring indoors. You will find that a textured house is a warm and very welcoming place to live.