Clutter often sneaks into our homes when we least expect it. Finding a place for every small item makes your living space feel much more peaceful. You do not need expensive renovations to achieve a tidy look. Simple containers like woven baskets and plastic bins can transform any messy corner into a curated display.

Natural textures bring warmth to your rooms while serving a very practical purpose. These versatile tools work in every area from the pantry to the porch. Choosing the right vessel allows you to hide the chaos and highlight your personal style. You will find that an organized home leads to a much clearer mind.
This guide explores forty creative methods to reclaim your space with ease. We focus on smart solutions that look beautiful and stay within your budget. Every suggestion includes a simple project you can complete in one afternoon. Get ready to turn your household storage into a decorative feature that you will love.
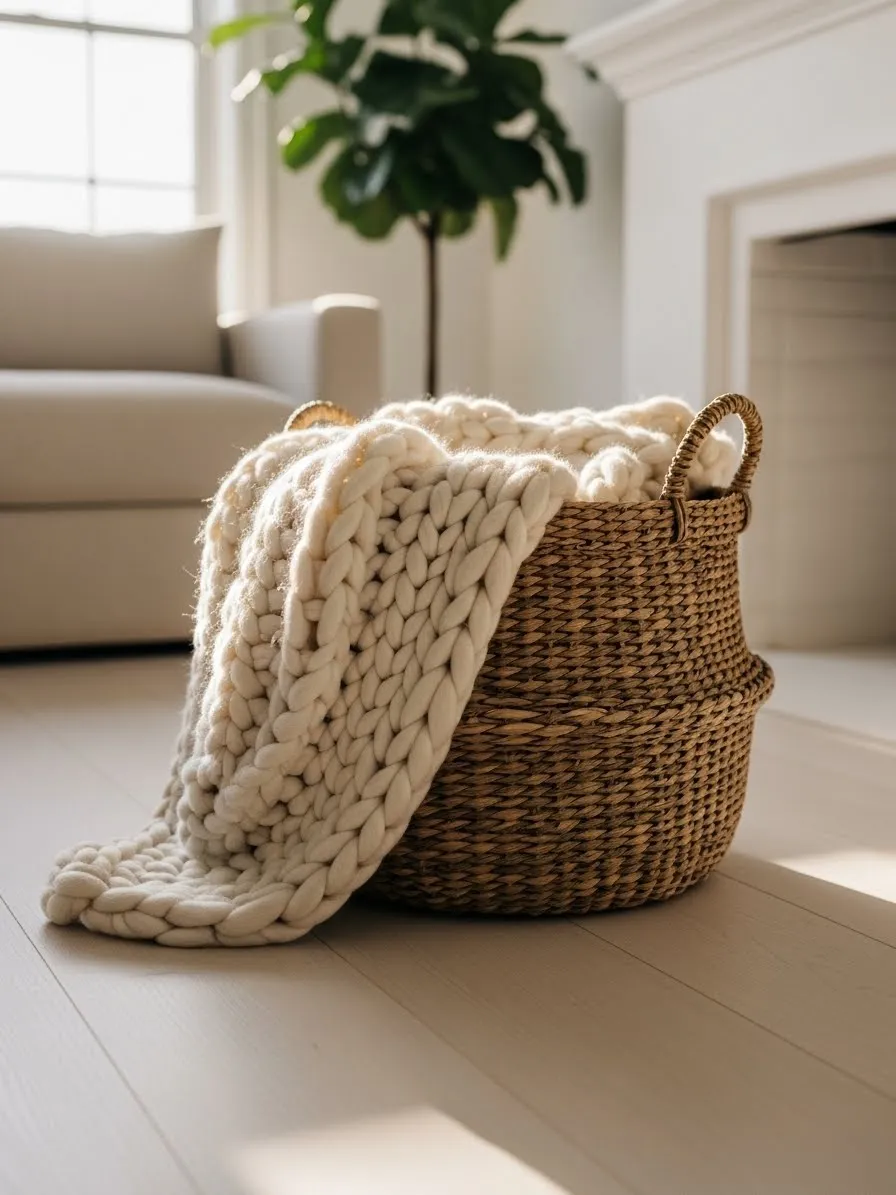
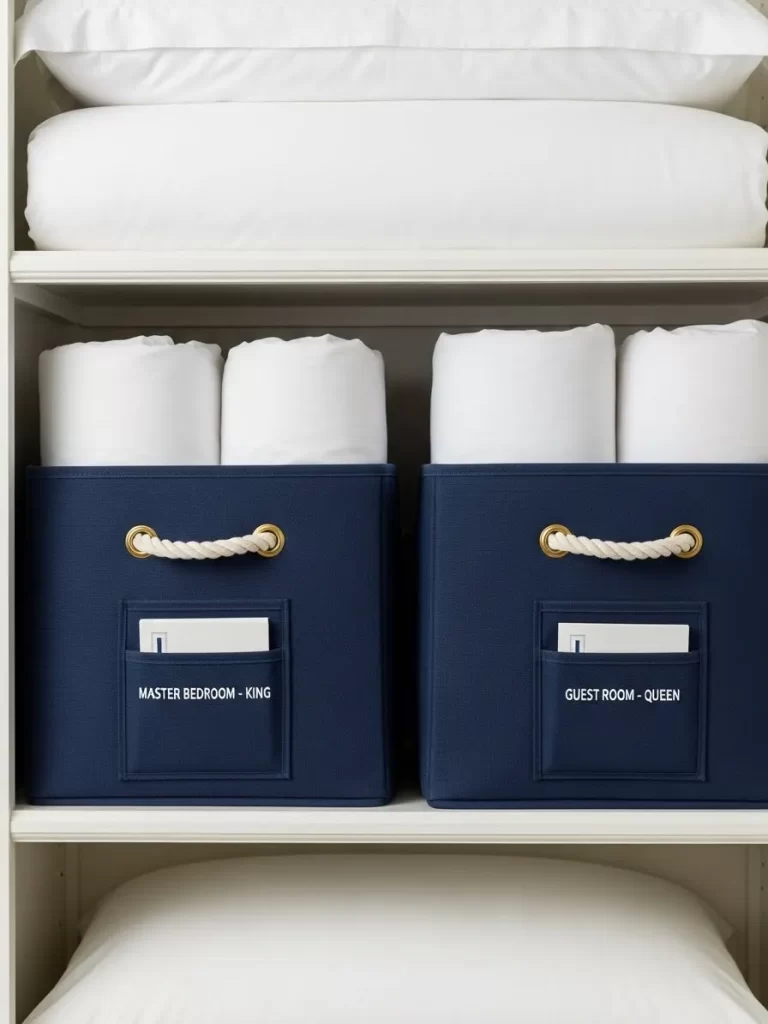
1 Chunky Knit Blanket Seagrass Basket

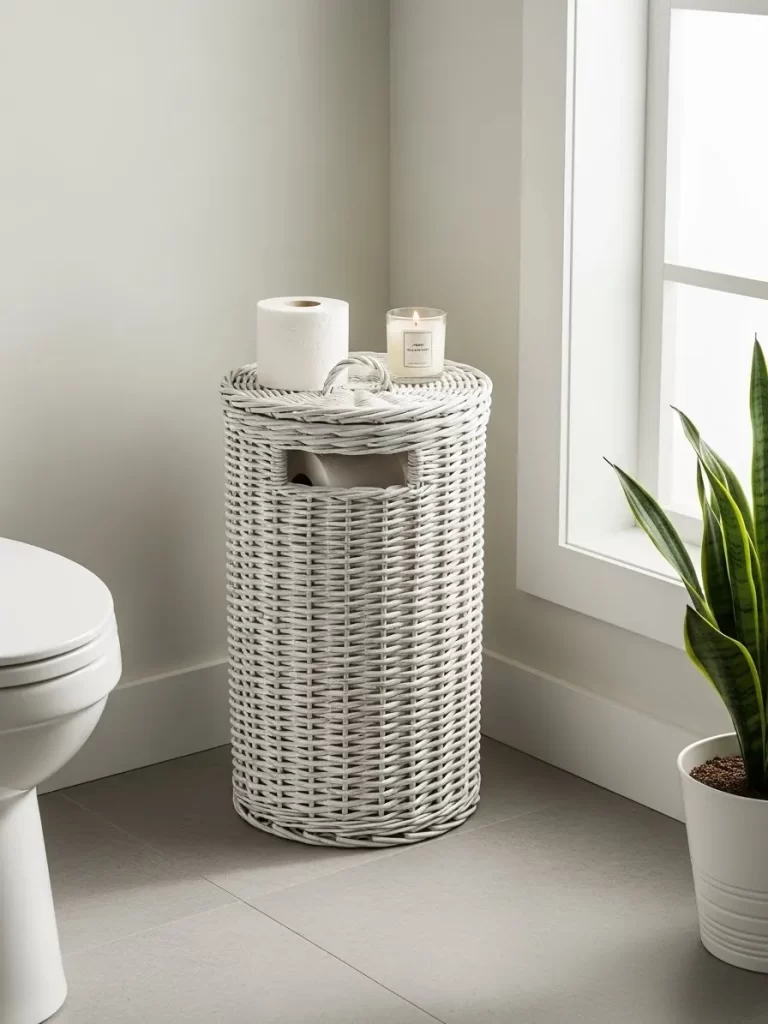
Woven seagrass baskets offer a wonderful way to tidy up your living room while adding natural textures. This large round container holds a heavy cream colored blanket that spills over the side. Using such a vessel keeps your floor clear and makes your space feel cozy.
Natural fibers bring warmth to any modern home design. These sturdy handles allow you to move your linens easily from the sofa to the fireplace. You can tuck away extra pillows or toys inside to maintain a clean environment quickly.
Small details like the textured weave create a focal point in a minimalist room. Placing this near a chair provides easy access to warmth on chilly evenings. It serves as a functional piece of art that hides clutter effectively.
Material Required List
- Natural seagrass or wicker basket with handles
- Cotton chunky knit yarn or a ready made thick blanket
- Measuring tape
- Clear protective spray for wood or grass
Equipment Required List
- Soft cloth for cleaning
- Scissors if you are making your own blanket
- Large crochet hook for DIY knitting
DIY Instruction Step by Step
- Select a basket that features a wide base and reinforced handles to support the weight of heavy textiles.
- Wipe the interior and exterior of the seagrass with a dry soft cloth to remove any loose dust or debris.
- Apply a light coat of clear protective spray to the bottom of the basket to prevent floor scratches.
- Allow the spray to dry completely in a ventilated area before placing it on your rug or hardwood.
- Fold your chunky knit blanket in half lengthwise to create a long rectangular shape.
- Roll the blanket loosely and place it vertically into the basket so the top edges remain visible.
- Drape one corner of the knit fabric over the edge of the basket to achieve a relaxed and inviting look.
- Position the container next to a sofa or an armchair where you frequently relax.
2 Rattan Luggage Entryway Trunk
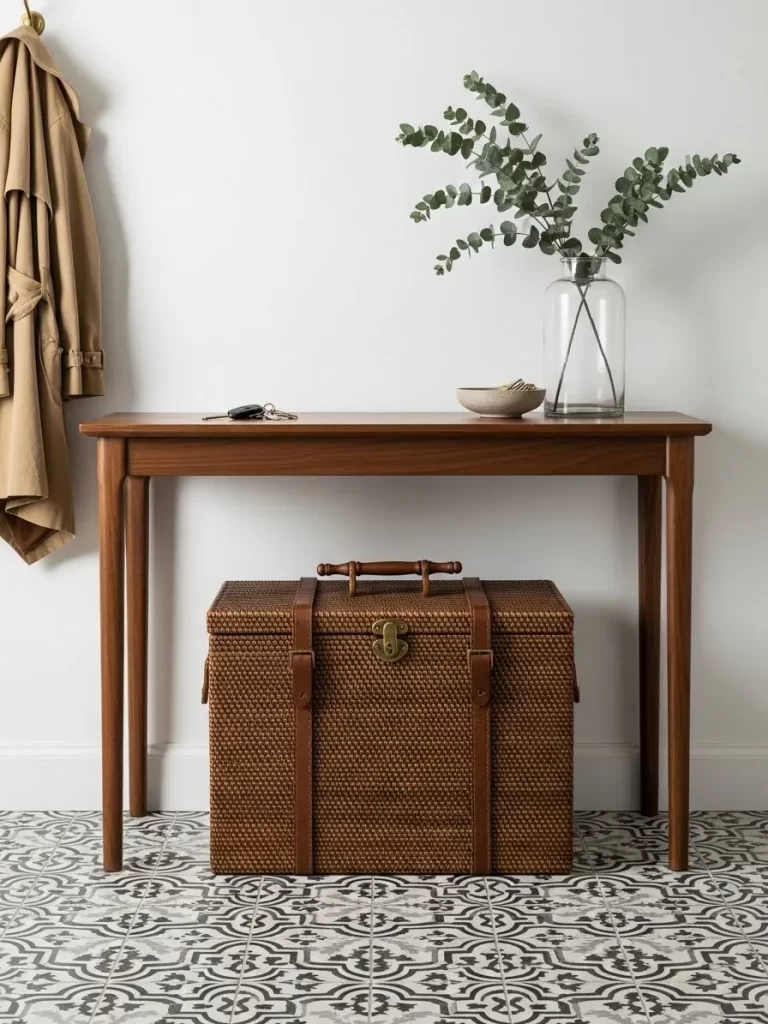
Classic rattan trunks provide a sophisticated way to hide seasonal items right in your foyer. This rich brown box sits neatly under a wooden entryway table. It blends with the tile floor and simple decor. Natural materials offer a sense of timeless elegance to a busy mudroom.
Leather straps and metal hardware give this piece a vintage travel vibe. You can use it to store winter boots or extra bags out of sight. It keeps your hallway looking sharp while providing hidden room for bulky belongings. This choice keeps your home orderly without sacrificing any style.
Guests will notice the clean lines and organized atmosphere of your entrance. Tucking away shoes inside prevents a messy pileup near the front door. Every item finds a home inside this durable and attractive storage solution. It is a smart addition to a functional home.
Material Required List
- Rectangular rattan trunk with lid
- Leather conditioner
- Small adhesive felt pads
- Cedar blocks or sachets
Equipment Required List
- Soft buffing cloth
- Measuring tape
DIY Instruction Step by Step
- Measure the height of the space beneath your console table to ensure the trunk fits.
- Clean the rattan surfaces with a soft cloth to remove any dust from the gaps.
- Apply a small amount of leather conditioner to the straps to keep them flexible and shiny.
- Stick felt pads to the bottom four corners of the trunk to protect your tile or wood floors.
- Place a few cedar blocks inside the trunk to keep the stored items smelling fresh.
- Fill the container with items like scarves, umbrellas, or out of season footwear.
- Close the lid and secure the buckles to maintain a tidy appearance.
- Slide the trunk under your table so it is centered for a balanced look.
3 Black Wire Pantry Snack Bins

Wire bins create a streamlined look for your kitchen pantry shelves. These dark metal containers hold snacks like pretzels and protein bars in neat rows. Labeling each section helps family members find what they need without searching. Organizing food by type keeps your cupboards from becoming a source of stress.
The open grid design allows you to see when supplies run low. You can stack similar items together to maximize vertical shelf space. This method turns a cluttered cupboard into a boutique style snack station. It encourages better habits by making healthy choices visible and easy to reach.
Using metal storage on wooden shelves adds a modern industrial touch to your kitchen. These containers are easy to wipe clean if crumbs occur inside. Keeping your snacks sorted ensures you never buy duplicates of what you already own. It is a clever way to manage your groceries.
Material Required List
- Set of black wire pantry baskets
- Pre printed or handwritten labels
- Small metal label clips
- Non slip shelf liner
Equipment Required List
- Scissors
- Microfiber cleaning cloth
DIY Instruction Step by Step
- Clear your pantry shelf and wipe it down with a damp cloth to remove crumbs.
- Cut your shelf liner to size and lay it flat to keep the baskets from sliding.
- Sort your snacks into categories such as salty treats, sweets, or breakfast bars.
- Insert your labels into the metal clips and attach one to the front of each basket.
- Stand tall packages at the back of the basket and shorter items at the front.
- Align the boxes on the shelf with even spacing to create a professional look.
- Group the most frequently used items at eye level for easy grabbing.
- Review your inventory weekly to see what needs restocking through the wire mesh.
4 Minimalist Wire Bathroom Towel Bins
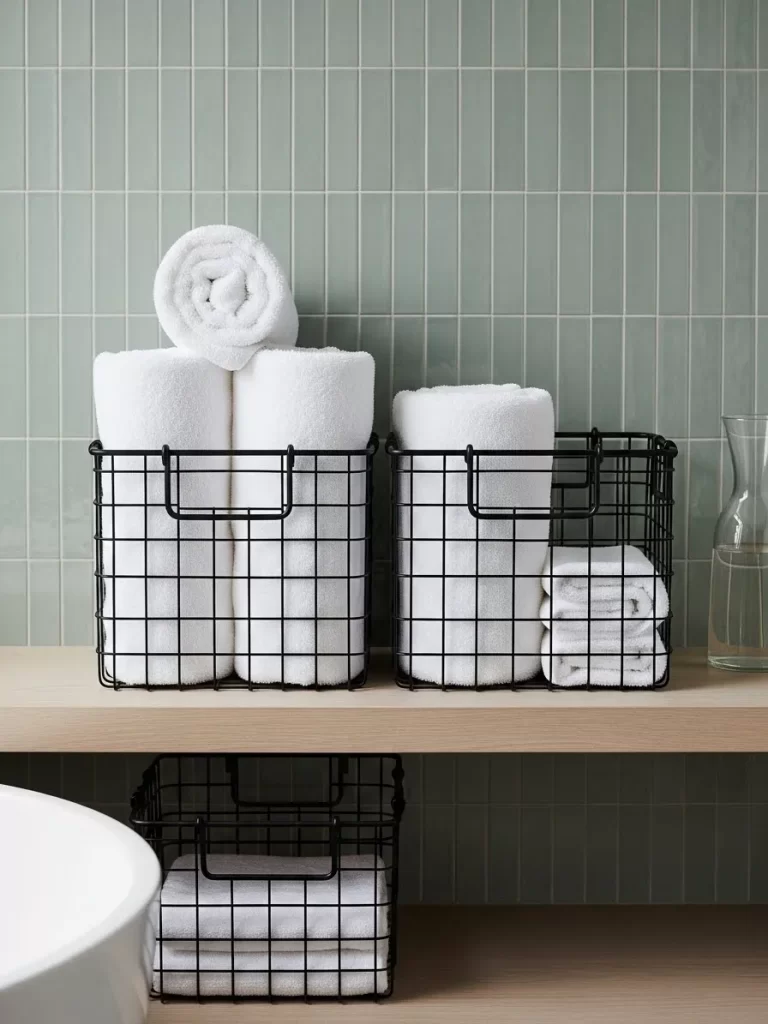
Sleek black metal baskets bring order to a modern bathroom or linen closet. These square containers hold rolled white towels against a soft green tiled wall. The contrast between the dark metal and light fabric creates a clean aesthetic. Using vertical storage helps you save room on narrow shelves.
Rolling towels instead of folding them saves significant space for other essentials. You can easily grab a fresh cloth without toppling the entire stack of linens. This setup keeps your daily needs within reach while looking like a high end spa. It makes the morning routine feel much more calm.
Grid style containers allow air to circulate around the fabric to keep it fresh. You can also see exactly how many clean items you have left at a glance. Metal bins are durable and handle the moisture of a bathroom environment very well. They are a great choice for home organization.
Material Required List
- Square black wire storage baskets
- Matching set of cotton towels
- Mild cleaning spray
Equipment Required List
- Large flat surface for rolling
- Soft cloth
DIY Instruction Step by Step
- Clean the bathroom shelf thoroughly and ensure it is completely dry.
- Wipe the wire baskets to remove any manufacturing residue that might stain towels.
- Lay your first towel flat on a table and fold it in half lengthwise.
- Roll the towel tightly from one end to the other to form a neat cylinder.
- Place the rolled towels into the basket vertically so the top circles are visible.
- Pack them closely enough so they stay upright but can be removed easily.
- Arrange the baskets on your shelf according to towel size or frequency of use.
- Keep a small stack of washcloths in a separate basket to maintain the pattern.
5 Under Bed Fabric Sweater Bag
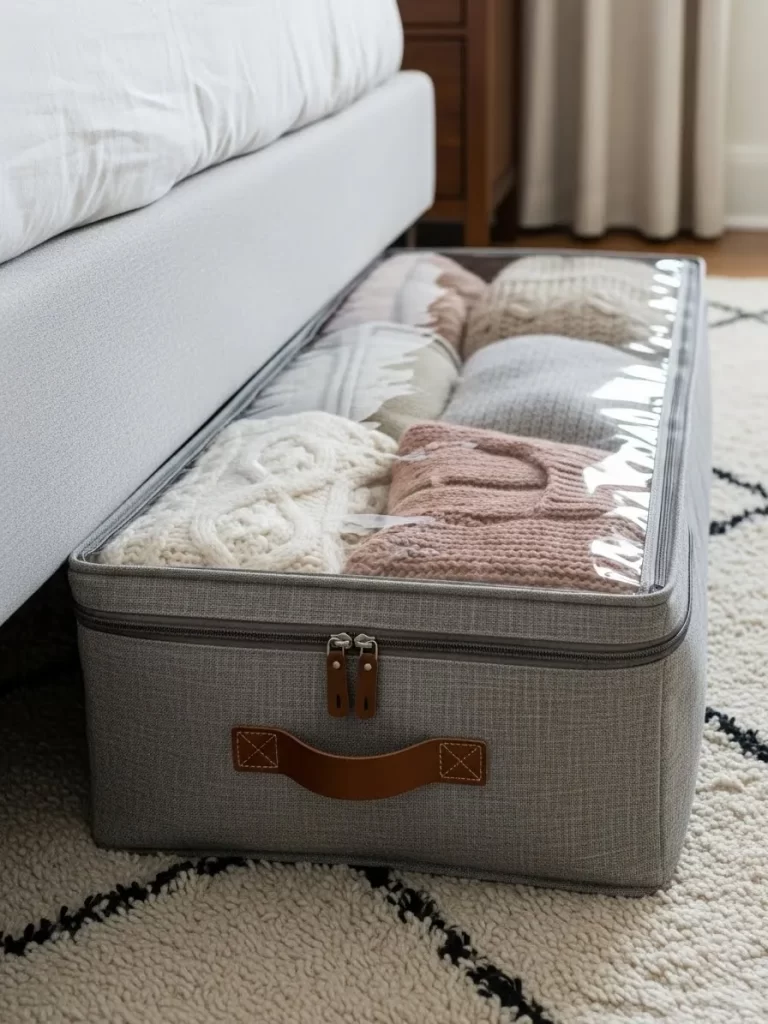
Long fabric bins utilize the often wasted space beneath your bed frame. This grey container features a clear plastic lid so you can view your knits instantly. Sturdy leather handles make it easy to slide the bag out from the rug. It is a clever way to keep your room clutter free.
Protecting your wool sweaters from dust and moths is essential for long term care. The zipper closure keeps everything secure and organized during the off season. It is a smart solution for small bedrooms with limited closet capacity. You will appreciate the extra floor space once your bulky items are hidden.
Soft fabric walls allow the container to fit into tight spots more easily than plastic boxes. The neutral color matches many bedroom rugs and decor styles. Storing items under the bed keeps them out of your daily sight line. This creates a peaceful environment that helps you relax at night.
Material Required List
- Fabric under bed storage container with clear lid
- Acid free tissue paper
- Lavender or cedar sachets
- Fabric freshener spray
Equipment Required List
- Vacuum cleaner
- Measuring tape
DIY Instruction Step by Step
- Measure the clearance under your bed to ensure the bag will slide in and out.
- Vacuum the area under the bed to remove any hidden dust bunnies.
- Spray the interior of the fabric bag with freshener and let it air dry.
- Fold your sweaters into uniform squares to prevent wrinkles and maximize space.
- Place a sheet of tissue paper between each sweater for extra protection.
- Tuck a scented sachet into the corner to keep fabrics smelling fresh for months.
- Zip the clear lid shut and ensure the fabric is not caught in the teeth.
- Use the leather handle to push the bag under the bed until it is out of sight.
6 Walnut Coffee Pod Countertop Bin

A solid wood box organizes your morning routine on the kitchen counter. This walnut container holds colorful coffee capsules and ceramic jars for stirrers. Brass feet lift the base slightly to protect your marble surface from spills. It adds a touch of sophistication to your daily coffee habit.
Keeping all your brewing supplies in one spot saves time during busy mornings. The natural grain of the wood adds a layer of luxury to your kitchen nook. It transforms a scattered mess of pods into a tidy and professional display. You can see all your flavor options in one quick look.
Small ceramic containers inside the box keep sugar packets and spoons separated. The low profile of the wood bin fits under most upper cabinets. It is a durable piece that will last for years with simple care. This setup makes your kitchen feel like a high quality cafe.
Material Required List
- Wooden storage box with low sides
- Two small ceramic jars or cups
- Food safe wood oil
- Assorted coffee capsules
Equipment Required List
- Soft application cloth
- Level surface
DIY Instruction Step by Step
- Apply a small amount of wood oil to the box to enhance the grain and protect it.
- Place the wooden bin on a stable part of your counter near the coffee machine.
- Set your two ceramic jars at the back of the box to hold wooden stirrers.
- Fill the front section of the box with your coffee pods.
- Organize the capsules by color to create a visually appealing and easy to read display.
- Place sugar packets or small spoons in the remaining ceramic jar.
- Wipe down any coffee splashes immediately to keep the wood in top condition.
- Restock the pods weekly so you never run out of your favorite morning flavors.
7 Woven Cotton Rope Nursery Caddy
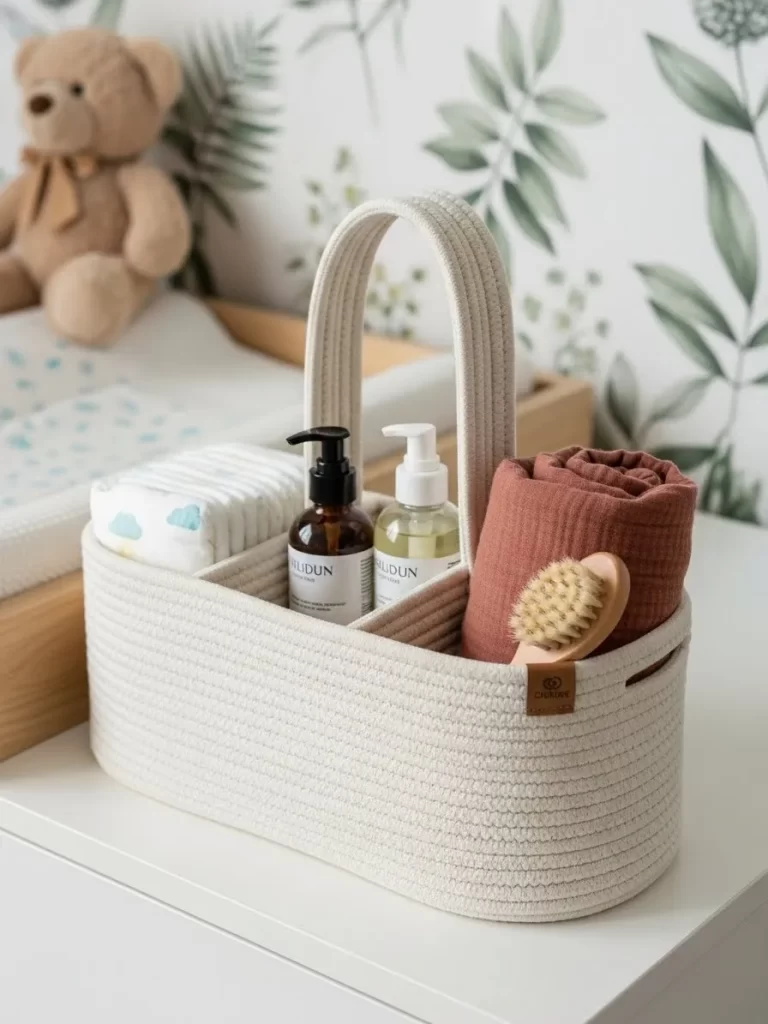
Soft cotton rope baskets are a gentle choice for baby changing stations. This cream colored caddy features a sturdy handle for carrying supplies from room to room. It neatly holds diapers, wipes, and lotions in divided sections. Natural fibers are safe and soft for a nursery environment.
The neutral tones match many nursery themes or wallpaper designs. You can keep this on a dresser to ensure everything stays within arm reach. It provides a safe and quiet way to organize essentials for your little one. Carrying the whole bin makes middle of the night changes much faster.
Using a portable caddy means you are always ready for a diaper change anywhere. The flexible walls of the rope bin can hold many bulky items together. It is a practical gift for new parents who value both style and function. This organizer helps keep the nursery looking calm and clean.
Material Required List
- Divided cotton rope diaper caddy
- Small bottle of fabric protector
- Diapers, wipes, and baby lotions
- Small soft brush
Equipment Required List
- Ventilated area for spraying
- Cleaning cloth
DIY Instruction Step by Step
- Spray the outside of the cotton caddy with fabric protector to prevent stains.
- Let the basket dry completely in a well ventilated room before adding baby items.
- Place a stack of clean diapers in the largest compartment for quick access.
- Set a pack of baby wipes into the secondary slot so they stand upright.
- Arrange small bottles of lotion and diaper cream in the smaller side pockets.
- Tuck a soft hairbrush or thermometer into the mesh side pockets if available.
- Place the handle in the center and test the balance by lifting the caddy.
- Keep the caddy on your main changing table but grab it whenever you change rooms.
8 Navy Fabric Cord Management Box
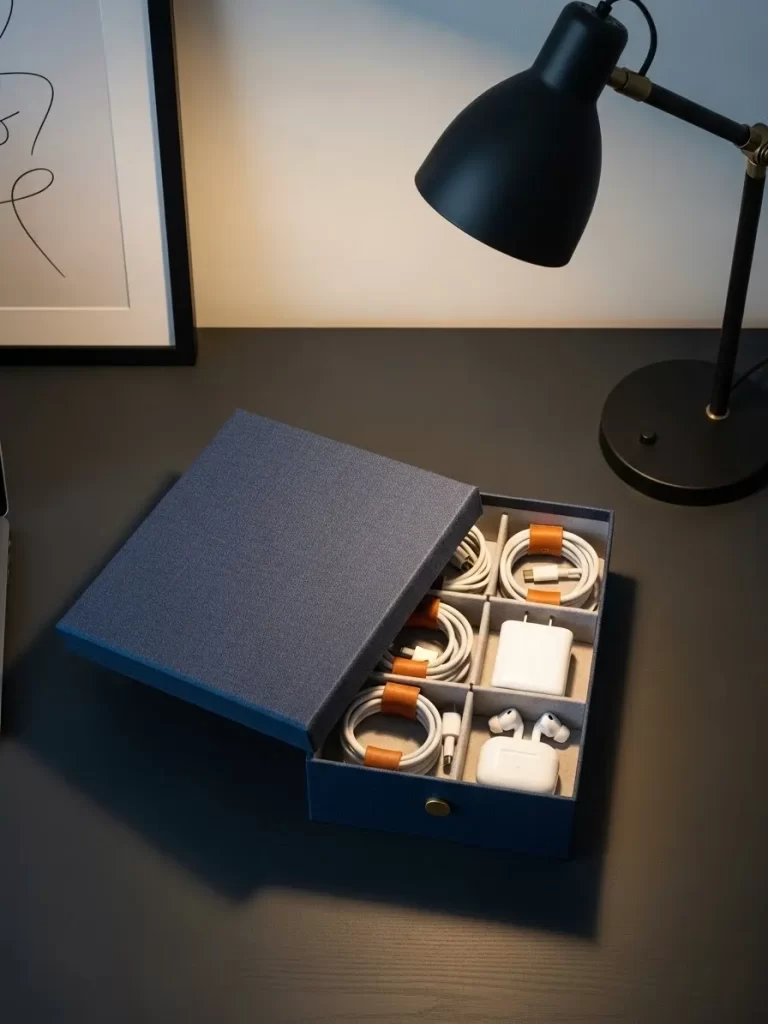
A partitioned fabric box ends the frustration of tangled electronic cables. This deep blue container uses small squares to keep each cord separate and easy to find. The matching lid hides the visual clutter of white wires and power blocks. It is a great way to tidy a desk.
Storing chargers and earbuds this way prevents damage to delicate internal components. You can place the box on a desk or inside a drawer for a tidy workspace. It is a simple tool for maintaining a high tech life without the mess. Labeling each slot would make finding things even faster.
The fabric finish feels much nicer than plastic alternatives in a home office. Small leather loops keep the cords from unrolling while they are in the box. This system ensures you never lose your most important charging accessories. It makes managing your devices a very simple task every day.
Material Required List
- Navy fabric box with internal grid dividers
- Velcro or leather cable ties
- Label stickers
- Small electronics and cables
Equipment Required List
- Pen or marker
- Dusting cloth
DIY Instruction Step by Step
- Gather all loose charging cables, adapters, and earbuds from around your office.
- Wipe down each cable to remove dust before placing it into the clean box.
- Wrap each cord into a neat loop and secure it with a velcro tie.
- Place one wrapped cable into each square compartment of the fabric grid.
- Set larger power bricks in the bigger sections to keep them from crushing wires.
- Write the name of the device on a sticker and place it on the edge of the divider.
- Close the lid to protect your electronics from dust and sunlight.
- Store the box on your bookshelf or in a deep drawer to clear your desktop space.
9 Wall Mounted Pet Supply Baskets
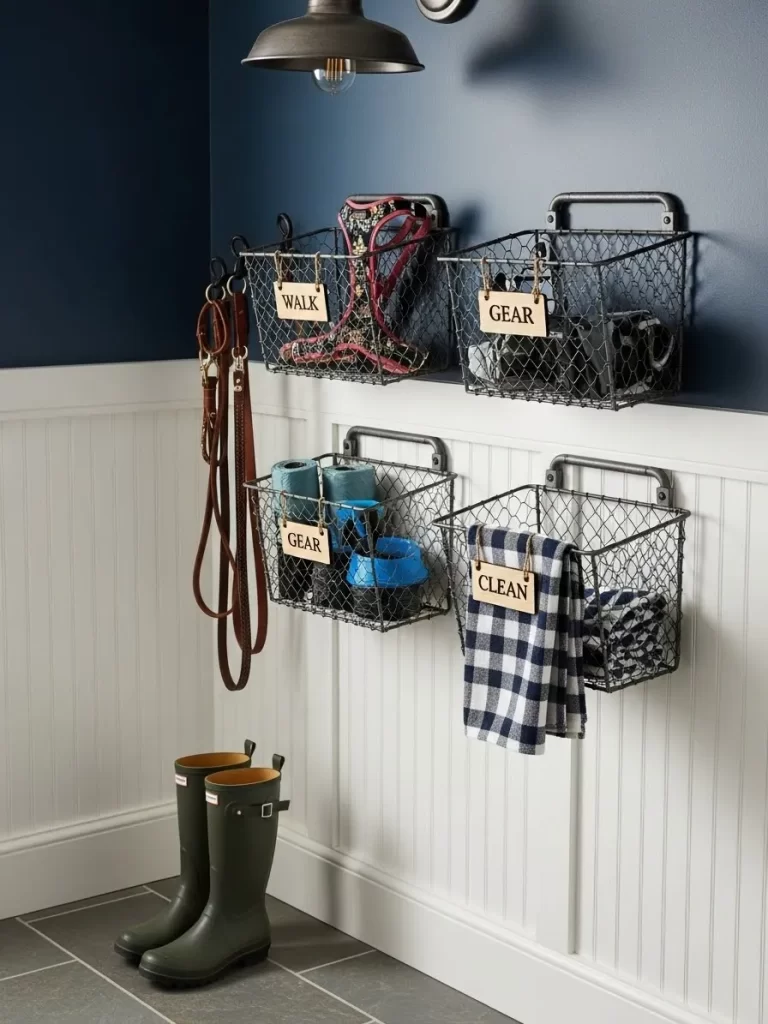
Hanging wire baskets turn a blank wall into a functional pet station. These dark metal bins hold leashes, harnesses, and grooming towels right by the door. Wooden labels clearly identify where each item belongs for every family member. It is a smart way to use vertical space in a hallway.
Lifting gear off the floor prevents tripping and keeps your entryway clear. You can hang damp leashes on the side hooks to dry properly after a walk. This vertical system uses wall space to manage all your animal care needs. It makes getting ready for a walk much more efficient.
Wire construction allows you to see the contents of each basket from below. The industrial style looks great against dark navy walls and white trim. You can easily switch out the items as the seasons change or as you get new pets. This setup keeps your pet gear organized and accessible.
Material Required List
- Set of wire wall baskets with mounting hardware
- Small wooden tags
- Jute twine
- Pet leashes, harnesses, and treats
Equipment Required List
- Power drill and bits
- Level and pencil
- Screwdriver
DIY Instruction Step by Step
- Find a wall space near the exit that has enough room for several small bins.
- Hold the first basket against the wall and use a level to ensure it is straight.
- Mark the screw holes with a pencil so you know exactly where to drill.
- Drill the holes and insert wall anchors to provide a strong base for the weight.
- Screw the baskets into the anchors until they are firm and do not wiggle.
- Label your wooden tags with names like Walk or Gear and tie them with twine.
- Hang your pet leashes on the bottom hooks and place folded towels in the bins.
- Tuck some treats or waste bags into the top basket for a complete walk station.
10 Open Weave Rattan Magazine Basket
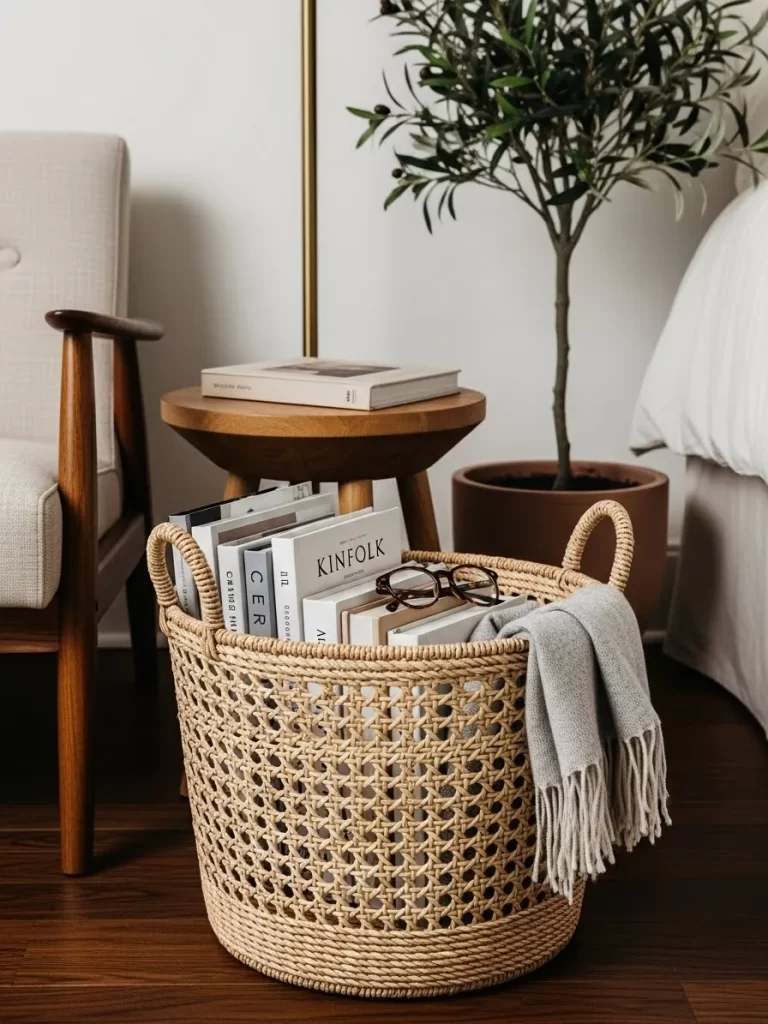
An airy rattan basket offers a light and stylish place for your favorite books. This round vessel features a woven pattern that lets you see the contents easily. A soft grey throw hangs over the edge to invite relaxation. It is a lovely addition to a cozy reading spot.
Placing this container next to a comfortable chair creates a cozy reading nook. The sturdy base keeps tall magazines upright and prevents them from curling. It adds a touch of organic texture to your living room or bedroom corner. Natural wicker brings a relaxed beach vibe to the space.
Large handles on the sides make it easy to move your reading material around. You can store extra pillows or knitting supplies inside when the books are elsewhere. This piece is both functional and decorative for a minimalist home. It keeps your floor clear while keeping your hobbies close by.
Material Required List
- Round open weave rattan basket with handles
- Cotton or wool throw blanket
- Current magazines and hardback books
- Clear furniture bumpers
Equipment Required List
- Soft brush for dusting
- Measuring tape
DIY Instruction Step by Step
- Use a soft brush to clean between the woven rattan fibers to remove any debris.
- Attach small clear bumpers to the bottom rim to protect your wood floors.
- Fold your throw blanket into a long rectangle and drape it over the handle.
- Allow half of the blanket to hang inside the basket and the other half outside.
- Stand your magazines and books vertically inside the basket with the spines facing up.
- Arrange them by height so the smaller books do not get lost at the bottom.
- Place the basket next to a floor lamp or a comfortable armchair.
- Rotate your reading material monthly to keep the display fresh and interesting.
11 Airtight Clear Kitchen Flour Bin
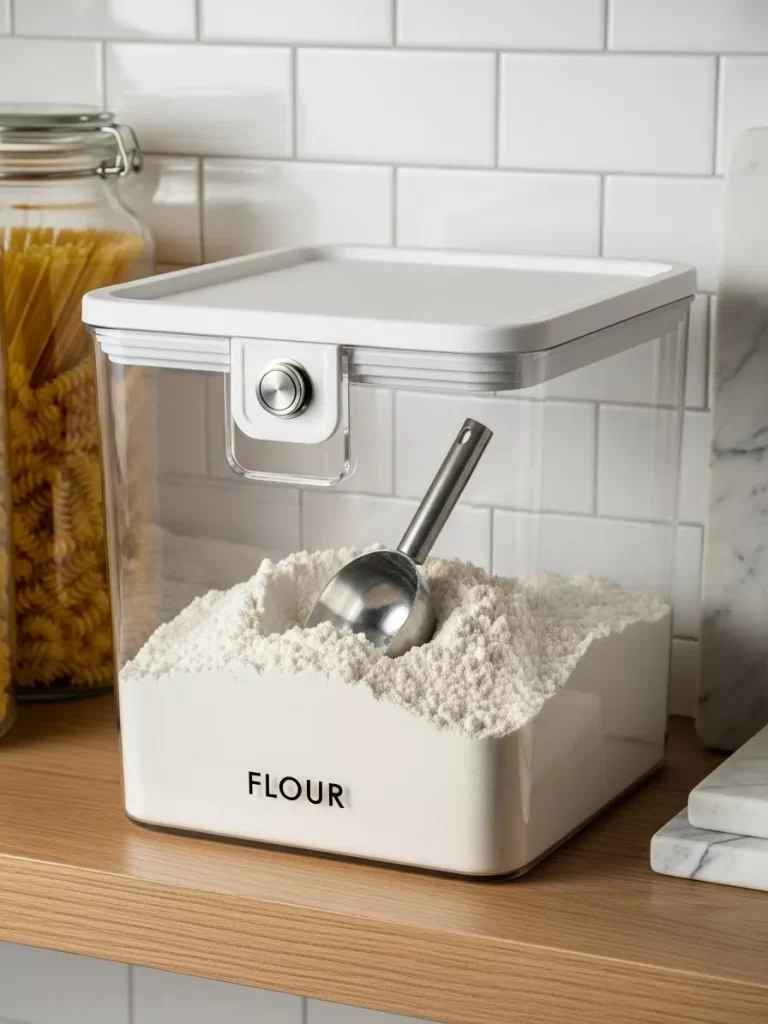
Large clear containers keep your baking staples fresh and visible in a modern kitchen. This square bin features an airtight lid with a silver locking button to seal out moisture. A metal scoop rests right in the flour for easy measuring during busy recipes. It looks clean against a white subway tile backsplash.
Storing flour in its original paper bag can lead to messes and pests in the pantry. Transferring it to a plastic bin keeps your counters spotless and your food safe. You can quickly see how much supply is left before you start a new cake. This system brings a professional feel to your home cooking space.
The square shape of the container helps it sit flush against other bins to save space. Labeling the front with a simple font makes finding ingredients a fast task. These bins are durable and very easy to wash between refills. It is a functional upgrade for any active kitchen.
Material Required List
- Large airtight plastic or glass container
- Stainless steel flour scoop
- Vinyl label stickers
- Fresh bag of all purpose flour
Equipment Required List
- Warm soapy water and sponge
- Dry towel
DIY Instruction Step by Step
- Wash the new container and lid with warm soapy water to remove any dust.
- Dry every surface completely with a towel to ensure no moisture ruins the flour.
- Apply your label to the front center of the bin while it is still empty.
- Pour your bag of flour slowly into the bin to avoid creating a dust cloud.
- Tuck the metal scoop into the flour so the handle remains accessible at the top.
- Wipe any excess powder from the rim of the bin before closing the lid.
- Press the locking button firmly to create an airtight seal that keeps flour fresh.
- Place the container on your counter or pantry shelf for a neat baking station.
12 Grey Felt Toy Storage Bins
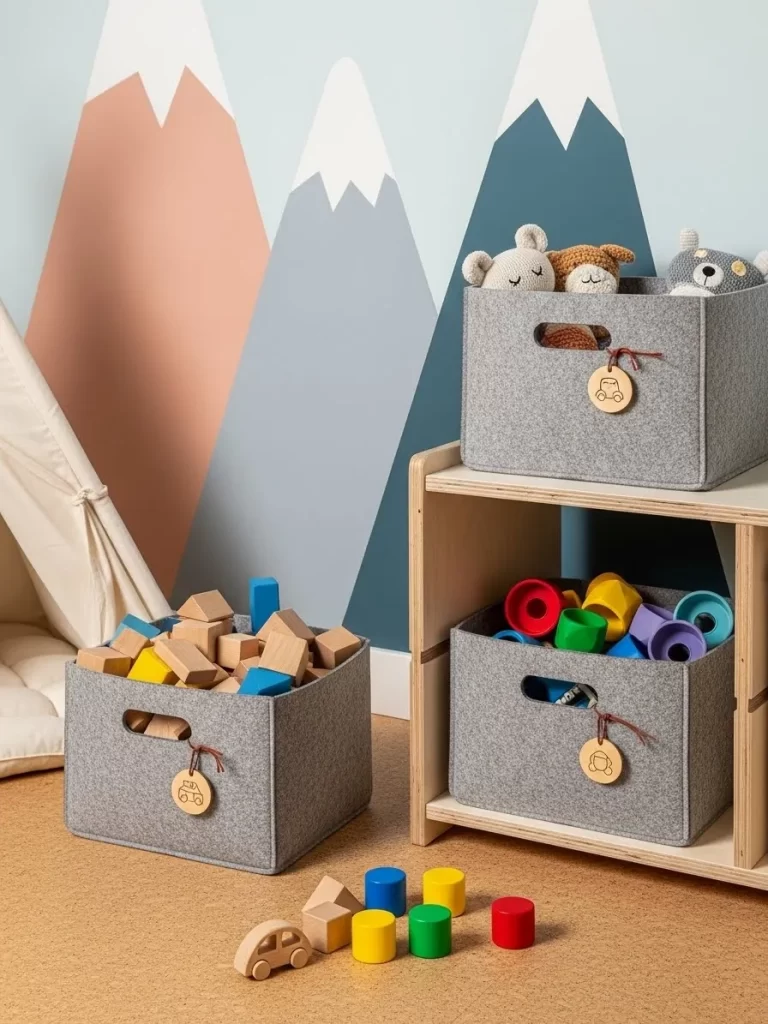
Soft felt bins provide a safe and quiet way to organize a child play area. These grey square containers sit on a wooden shelf and hold colorful building blocks and toys. Small wooden tags help children learn where to put their things after playtime. The neutral color balances out the bright colors of the nursery.
Felt is a great material because it has no sharp edges and does not make noise. You can easily pull these bins out by the die cut handles to move toys to the rug. They are durable enough to hold heavy wooden pieces without losing their shape. This setup keeps the bedroom looking tidy and intentional.
Using uniform bins creates a calm visual environment for kids to relax. You can group toys by type like cars in one bin and dolls in another. The soft texture adds a cozy feel to the room decor. It is a wonderful way to teach organization skills from a young age.
Material Required List
- Set of square grey felt storage bins
- Round wooden labels
- Leather cord or thick string
- Assorted children toys
Equipment Required List
- Fabric lint roller
- Scissors
DIY Instruction Step by Step
- Use a lint roller on the felt surfaces to remove any loose fibers or dust.
- Clear your storage unit and wipe the shelves to prepare for the new bins.
- Write or draw a simple icon of the toy type on each wooden label.
- Thread the leather cord through the label hole and tie it to the bin handle.
- Sort the toys into groups such as blocks, plushies, or art supplies.
- Fill each felt bin with the appropriate group of items to keep them separate.
- Slide the bins onto the shelf with the handles and labels facing forward.
- Encourage your child to match the toy to the label during every cleanup.
13 Marble Bathroom Vanity Tray
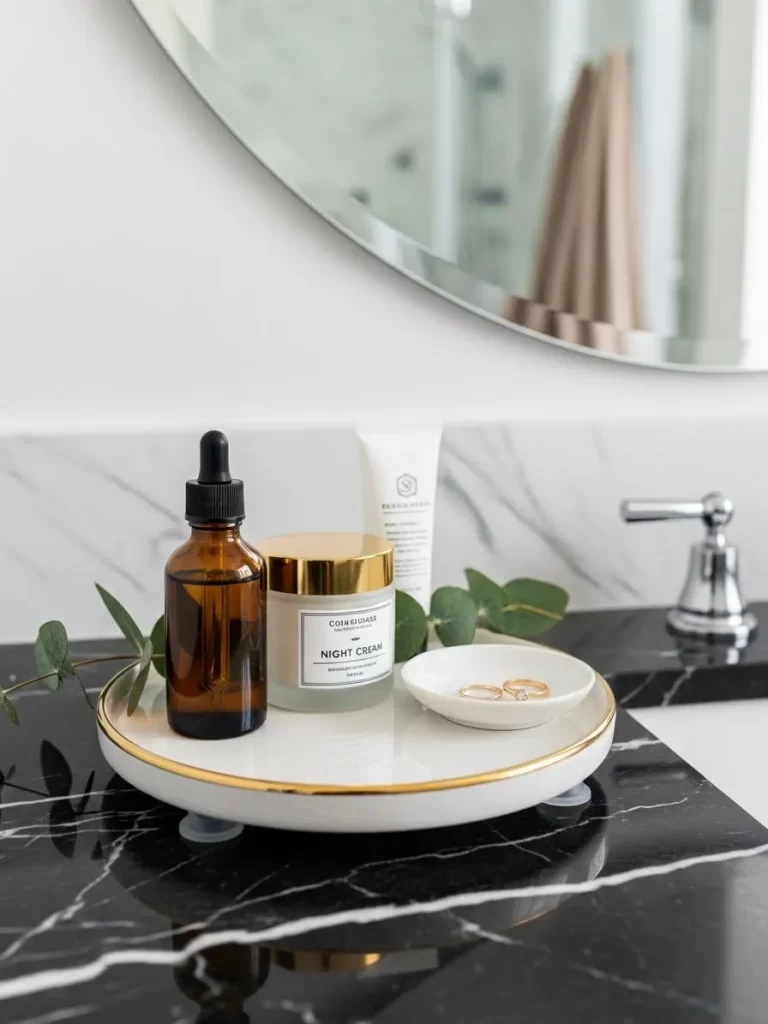
A white marble tray with a gold rim organizes your daily skincare products beautifully. This round riser holds glass bottles and jars on a black marble countertop. Small rubber feet lift the tray to prevent water from sitting underneath. It turns a scattered bathroom vanity into a luxury display.
Grouping your morning essentials in one spot keeps the counter looking clear. You can easily wipe around the tray instead of moving every individual bottle. The gold detail adds a touch of glam to your bathroom decor. It provides a dedicated home for delicate jewelry or rings while you wash.
Natural stone handles the damp bathroom air well and feels very sturdy. You can add a small green leaf or flower to the tray for a fresh look. This simple addition makes getting ready feel like a special ritual. It is a smart way to manage small items in a shared space.
Material Required List
- Round marble or ceramic vanity tray
- Small porcelain ring dish
- Suction cup feet or rubber bumpers
- Daily skincare bottles and jars
Equipment Required List
- Microfiber cloth
- Glass cleaner
DIY Instruction Step by Step
- Clean the marble tray with a damp cloth to remove any stone dust.
- Attach the rubber bumpers to the bottom of the tray to lift it off the counter.
- Place the tray on your vanity near the sink where you use your products most.
- Set your tallest bottle in the center and arrange smaller jars around the edge.
- Put the small ring dish on one side of the tray for safe storage of jewelry.
- Add a decorative element like a small plant or a candle to fill any gaps.
- Wipe the marble surface weekly to prevent soap scum from building up.
- Arrange the bottles so the labels face the front for a tidy and clean appearance.
14 Labeled Canvas Laundry Sorting Bins
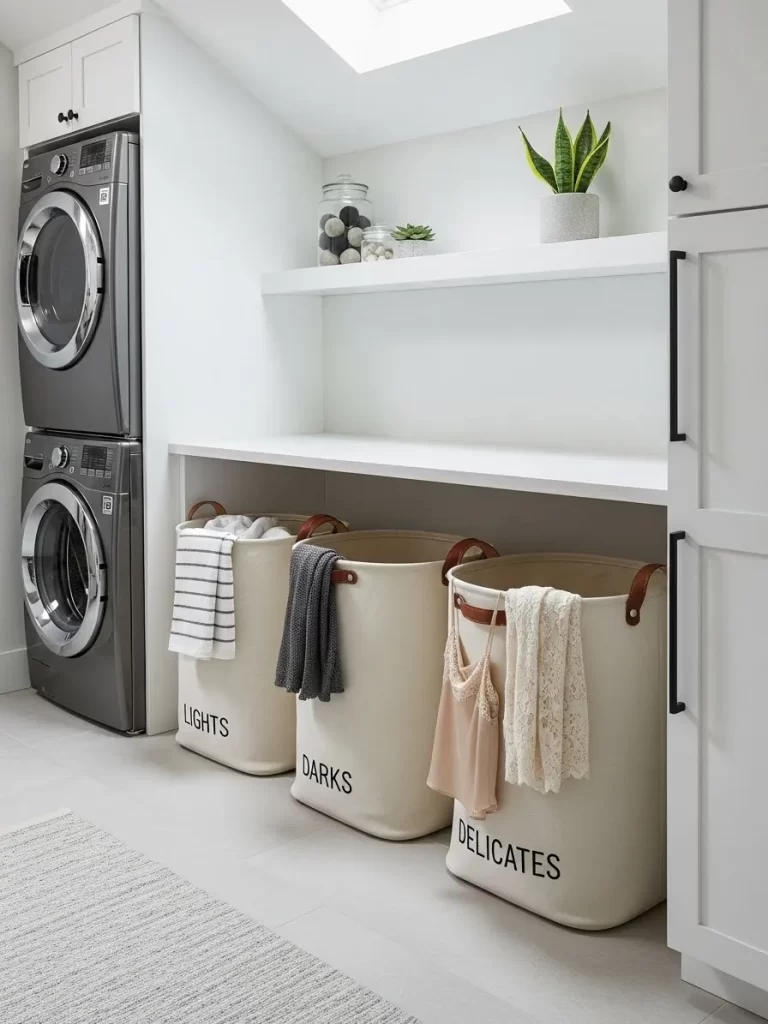
Large canvas bins make laundry day much easier by pre sorting your clothes. These three tall bags are labeled for lights, darks, and delicates in bold black letters. Sturdy leather handles allow you to carry a full load to the washer without trouble. They fit perfectly under a white folding counter in a laundry room.
Using separate bins prevents colors from bleeding into your white fabrics later. You can see at a glance when you have enough items for a full load. This system keeps dirty laundry off the floor and out of sight. It creates an efficient workflow in a small utility space.
Canvas is a breathable material that prevents odors from building up in the fabric. The cream color looks fresh and matches a clean white laundry room design. You can also use these bins to store clean linens or extra towels. It is a practical solution for a busy household.
Material Required List
- Three tall canvas laundry bags
- Iron on vinyl labels or fabric markers
- Leather handle replacement kit if needed
- Small laundry room rug
Equipment Required List
- Measuring tape
- Iron for labels
DIY Instruction Step by Step
- Measure the height and width of the space under your laundry counter.
- Apply the iron on labels to the front of each bag while the fabric is flat.
- Ensure the labels for Lights, Darks, and Delicates are centered and straight.
- Attach the leather handles to the top rim of the bags using the provided hardware.
- Place a small rug on the floor to provide a soft surface for the bins to sit on.
- Slide the three bags side by side under the folding table for a neat look.
- Toss your clothing into the correct bin as soon as you take it off.
- Pull the specific bag out when it is full and dump the contents into the washer.
15 Sparkling Gemstone Remote Box
A shimmering box covered in small gems hides your gaming controllers and remotes. This square container sits on a wooden coffee table in front of a warm fireplace. The lid stays partially open to show a soft velvet interior and organized electronics. It adds a touch of sparkle to your living room entertainment area.
Keeping remotes inside a box prevents them from getting lost between sofa cushions. It also protects the buttons from dust and accidental spills during movie night. The decorative exterior turns a boring plastic device into a part of your home decor. You can even rest a drink on a coaster on top of the closed lid.
The divided interior keeps the game controller from bumping into the TV remotes. Using a fancy box makes the room feel more intentional and less cluttered with tech. It is a great way to blend modern electronics with a cozy traditional home. This piece is both a storage tool and a conversation starter.
Material Required List
- Wooden or cardboard storage box with lid
- Self adhesive rhinestone sheets
- Velvet fabric for the interior lining
- Small pieces of foam for dividers
Equipment Required List
- Fabric glue
- Sharp craft knife
DIY Instruction Step by Step
- Measure the inside of your box and cut the velvet fabric to fit the floor and walls.
- Glue the velvet into place and let it dry completely to create a soft lining.
- Cut small foam blocks and wrap them in velvet to act as dividers for the remotes.
- Wipe the exterior of the box to ensure it is clean and free of oils.
- Peel the backing from the rhinestone sheets and press them firmly onto the box lid.
- Continue applying the gems to the sides of the box until the whole surface is covered.
- Place your gaming controllers and remotes into the designated velvet slots.
- Set the box on your coffee table and enjoy a clutter free viewing experience.
16 Tailored Drawer Organization Grid
Divided tray inserts bring order to a messy dresser drawer full of accessories. These light grey fabric bins keep watches, belts, and ties in their own neat spots. Built in lighting along the edges of the drawer makes finding items very easy. This system turns your closet into a high end dressing room.
Rolling your ties and belts prevents them from developing permanent creases over time. You can group watches on soft pillows to keep the glass faces from scratching. Every item has a dedicated home which makes getting dressed in the morning faster. It encourages you to put things back where they belong every day.
The modular design allows you to move the boxes around to fit your specific collection. Neutral colors keep the focus on your beautiful leather goods and metal watches. This storage method uses every inch of drawer space efficiently. It is a smart way to care for your most valuable personal items.
Material Required List
- Set of various sized fabric drawer dividers
- Small watch pillows
- LED adhesive light strips
- Double sided mounting tape
Equipment Required List
- Measuring tape
- Scissors
DIY Instruction Step by Step
- Empty your dresser drawer completely and wipe the interior with a cloth.
- Measure the width and depth of the drawer to plan your layout of the bins.
- Place the LED light strips along the top edges of the drawer for better visibility.
- Set the larger fabric bins into the drawer first to hold bulky items like belts.
- Fill in the remaining gaps with smaller square bins for cufflinks or rings.
- Roll your ties and belts tightly and place them vertically into the slots.
- Put your watches onto the small pillows and set them into the designated bins.
- Use small pieces of mounting tape to keep the bins from sliding when the drawer opens.
17 Wall Mounted Office Paper Sort
Black metal bins with woven rattan fronts offer a stylish way to manage your mail. These three vertical pockets hang on the wall near an entryway or home office desk. Brass label holders identify categories like action, file, and shred for quick sorting. It prevents piles of paper from taking over your countertops.
Lifting your paperwork off the desk creates a clearer mental space for working. You can see your magazines and letters at a glance without digging through a stack. The combination of black metal and natural cane adds a modern boho touch. This setup ensures you never miss an important bill or invitation.
The slim profile of these bins works well in narrow hallways or small corners. They are sturdy enough to hold heavy catalogs and multiple folders at once. Keeping your mail sorted daily makes the weekend chore of filing much easier. It is a functional and beautiful addition to any organized home.
Material Required List
- Three wall mounted metal file pockets with cane fronts
- Brass label clips
- Printed paper labels
- Wall screws and anchors
Equipment Required List
- Power drill
- Level tool
- Pencil
DIY Instruction Step by Step
- Decide on the best height for the bins so they are easy to reach while standing.
- Use a level and pencil to mark a straight horizontal line on your wall.
- Hold the first bin up to the marks and indicate where the screw holes should go.
- Drill into the marks and tap the plastic anchors into the wall surface.
- Secure each of the three bins with screws until they are flush against the wall.
- Insert your labels into the brass holders and clip them to the front of each pocket.
- Place your incoming mail into the first bin and move it through the system as needed.
- Clear out the shred and file bins once a week to maintain an empty and tidy wall.
18 Heavy Duty Wire Firewood Basket
A thick black wire basket provides a rugged and practical home for your fireplace logs. This round container holds several large birch logs next to a stone hearth. The sturdy metal handles allow you to carry a fresh load from the outside wood pile. It keeps bark and debris from scattering across your clean floor.
The open wire design lets air flow around the wood to keep it dry for burning. You can see exactly how many logs you have left before you need a refill. This industrial style piece looks wonderful against traditional brick or stone fireplaces. It adds a functional and rustic charm to your winter living room.
Using a dedicated basket prevents wood from toppling over and creating a mess. The dark metal finish is durable and hides soot or dirt very well. It is a long lasting solution for anyone who enjoys a real wood fire. This container makes tending to the hearth a much cleaner and simpler task.
Material Required List
- Large heavy gauge wire basket with handles
- Assorted dry birch or oak firewood
- Clear spray sealant for metal
- Thick felt or rubber base ring
Equipment Required List
- Heavy duty gloves
- Soft cleaning brush
DIY Instruction Step by Step
- Spray the metal basket with clear sealant to prevent rust from moisture on the wood.
- Let the coating dry for several hours before bringing the basket inside the house.
- Attach a felt ring or small pads to the bottom rim to protect your tile or wood floors.
- Wipe the stone hearth area to remove any old ash before placing the new basket.
- Wear gloves to stack your firewood vertically inside the wire container.
- Pack the logs tightly so they do not shift when you move the basket.
- Place the filled basket on one side of the fireplace for easy access to fuel.
- Sweep up any loose bark that falls through the wire mesh during the initial filling.
19 Long Woven Table Centerpiece Tray
A low profile woven tray serves as a beautiful base for a dining table display. This long rectangular container holds green moss balls and white pillar candles on a wooden surface. The natural texture of the tray adds warmth to a modern dining room setting. It allows you to move the entire decor piece easily when it is time to eat.
Using a tray for a centerpiece keeps the table looking intentional and organized. You can change the items inside for different seasons or holidays very quickly. The narrow shape leaves plenty of room for plates and glasses on either side. It provides a focal point that does not block the view of guests across the table.
The neutral brown color of the weave matches almost any wood or glass table. You can add small stones or succulents for a more organic and fresh look. This setup is great for dinner parties because it stays tidy throughout the meal. It is a simple way to bring nature indoors.
Material Required List
- Long and narrow woven seagrass or rattan tray
- Four white pillar candles of varying heights
- Three decorative green moss balls
- Small heat resistant glass coasters
Equipment Required List
- Measuring tape
- Cleaning cloth
DIY Instruction Step by Step
- Measure your dining table to ensure the tray leaves enough room for place settings.
- Wipe the woven tray with a dry cloth to remove any dust or loose fibers.
- Place the tray in the exact center of the table for a balanced look.
- Set your glass coasters inside the tray to provide a safe base for the candles.
- Arrange the white candles on the coasters with the tallest one in the middle.
- Nestle the green moss balls in the spaces between the candles for a pop of color.
- Check that all items are secure and will not roll when the table is bumped.
- Light the candles during dinner to create a warm and inviting atmosphere.
20 Woven Window Herb Garden Box

A long woven basket turns a sunny windowsill into a productive kitchen herb garden. This narrow container holds pots of fresh basil, mint, and parsley on a bed of black stones. The texture of the weave looks great against the bright light of a large window. It keeps your cooking greens within reach while you prepare meals.
The black pebbles at the bottom help catch excess water and keep the pots stable. You can easily lift the entire basket to clean the counter or move the plants. Fresh herbs add a wonderful scent and a splash of life to your kitchen decor. This system prevents water from dripping onto your window frame or sill.
Using a single basket for several plants creates a more cohesive and tidy look. You can swap out herbs as you use them or as the seasons change. The sturdy construction of the basket handles the weight of the soil and stones easily. It is a smart way to bring a garden into a small indoor space.
Material Required List
- Long rectangular woven basket with a plastic liner
- Potted herbs like basil, mint, and cilantro
- Small black river stones or pebbles
- Brass herb scissors
Equipment Required List
- Small watering can
- Potting trowel
DIY Instruction Step by Step
- Ensure your woven basket has a waterproof plastic liner to protect the fibers.
- Pour a two inch layer of black river stones into the bottom of the basket.
- Place your potted herbs on top of the stones to see how they fit.
- Space the plants evenly so they have room to grow and receive sunlight.
- Fill in the gaps between the pots with more black stones for a clean finish.
- Set the basket on a sunny windowsill where it will get at least six hours of light.
- Water the plants carefully and ensure the water drains into the stone layer.
- Rest the brass scissors on the stones so you are always ready to harvest fresh leaves.
21 Tall Woven Fitness Gear Basket
A large open weave basket provides a dedicated home for your yoga mats and workout tools. This tall cylindrical container keeps rolling items upright and organized near a window. Two sturdy handles allow you to carry your gear to a different room for a session. It adds an organic feel to your home gym or living room corner.
Lifting your exercise mats off the floor prevents them from unrolling and creating a trip hazard. You can tuck foam rollers and jump ropes into the side gaps for a complete fitness station. This setup turns bulky equipment into a tidy and attractive display. It makes starting your daily workout much more pleasant.
The light wood color of the weave matches many modern interior styles. Using a breathable basket helps your mats stay fresh after a tough workout session. You can quickly see which mat you want to use through the decorative weave. It is a smart way to manage your health and wellness supplies.
Material Required List
- Tall open weave rattan or wicker basket
- Non slip mat for the basket bottom
- Various yoga mats and foam rollers
- Fabric sanitizing spray
Equipment Required List
- Vacuum with brush attachment
- Measuring tape
DIY Instruction Step by Step
- Measure the length of your rolled yoga mats to ensure the basket is tall enough to support them.
- Vacuum the inside of the basket to remove any loose debris that might stick to your mats.
- Place a non slip mat at the bottom of the basket to prevent items from shifting.
- Wipe your yoga mats with a damp cloth and let them dry completely.
- Roll your mats tightly and secure them with a strap if they tend to unwrap.
- Stand the mats vertically in the basket so the edges are aligned.
- Tuck smaller items like jump ropes or resistance bands into the remaining spaces.
- Set the basket in a corner with good airflow to keep your gear smelling fresh.
22 Gold Wire Gift Wrap Station
A tall cylindrical wire bin keeps your rolls of wrapping paper neat and accessible. This gold metal container sits on a white table next to ribbons and gift boxes. The thin grid design allows the colorful patterns of the paper to show through. It turns a messy craft corner into a professional looking gift station.
Storing paper vertically prevents the ends from getting crushed or torn in a closet. You can easily slide a roll out when you need to wrap a birthday present. This system keeps your long rolls from falling over and taking up too much room. It makes preparing for holidays a much faster and more organized task.
The gold finish adds a touch of elegance to your office or hobby room. You can hang large scissors on the side of the wire mesh for convenience. This container is light enough to move to the living room during big wrapping sessions. It is a stylish solution for any creative home.
Material Required List
- Tall gold wire mesh wastebasket or bin
- Marble or heavy base plate
- Selection of wrapping paper rolls
- Decorative ribbons and bows
Equipment Required List
- Microfiber cloth
- Adhesive foam pads
DIY Instruction Step by Step
- Wipe the gold wire bin with a microfiber cloth to remove any fingerprints.
- Attach a heavy marble plate to the bottom of the bin to keep it from tipping over.
- Stick foam pads to the bottom of the base to protect your table surface.
- Place your longest rolls of wrapping paper into the center of the bin.
- Surround the long rolls with shorter pieces and specialty foil papers.
- Hook your gold scissors onto the top rim of the wire for easy access.
- Stack rolls of ribbon on a nearby shelf or hang them from the wire mesh.
- Position the station on a sturdy table with plenty of flat surface for cutting paper.
23 Frosted Bin Bathroom Cabinet Sort

Frosted plastic bins with gold labels bring a high end look to your under sink storage. These four square containers hold skincare, hair care, and dental supplies on a white shelf. The translucent walls hide the bright colors of bottles while letting you see silhouettes. It creates a calm and uniform appearance inside a busy cabinet.
Grouping bathroom items by category prevents you from hunting for a bottle every morning. You can pull out the entire bin to find what you need on the back of the shelf. This method protects your wood cabinets from leaks and sticky spills. It makes cleaning the bathroom much faster because you only move four bins.
Built in lighting makes the gold labels sparkle and helps you see the labels clearly. The uniform size of the boxes uses every inch of shelf space efficiently. This setup transforms a dark messy cabinet into a tidy boutique experience. It is a simple way to upgrade your daily grooming routine.
Material Required List
- Four frosted plastic bins with handles
- Gold adhesive label holders
- Printed cardstock labels
- Battery operated LED light strips
Equipment Required List
- Measuring tape
- Cleaning sponge
DIY Instruction Step by Step
- Remove everything from your cabinet and wipe the shelves with a damp sponge.
- Measure the shelf depth to ensure the bins will allow the cabinet door to close.
- Apply the LED light strips to the underside of the shelf above for better visibility.
- Peel and stick the gold label holders to the front center of each frosted bin.
- Sort your products into groups such as Dental, Skincare, and Hair Care.
- Insert the printed labels into the gold holders so they are clearly visible.
- Place your items into the bins with the most used bottles at the front.
- Slide the bins onto the shelf in a neat row for a clean and organized look.
24 Tiered Wood Crate Produce Cart
A vertical rolling cart with wooden crates keeps your kitchen staples fresh and organized. This three level stand holds onions, garlic, and potatoes in separate rustic bins. The open slat design allows air to flow around the vegetables to prevent rotting. It is a wonderful way to use a narrow space next to a counter.
Storing produce this way keeps your countertops clear for food preparation. You can move the entire cart easily when you need to sweep the floor. This rustic look adds a cozy farmhouse feel to a modern kitchen design. It ensures you always know when it is time to buy more groceries.
Using separate levels prevents the gas from onions from spoiling your potatoes. The dark wood finish is durable and hides dirt from the garden or store. You can also use the top shelf for jars of beans or grains. It is a smart and mobile solution for a busy home cook.
Material Required List
- Tiered metal frame cart with wheels
- Three matching wooden slat crates
- Natural burlap liners
- Chalkboard label paint
Equipment Required List
- Small paint brush
- Chalk or white paint pen
DIY Instruction Step by Step
- Assemble the metal frame of the cart according to the provided instructions.
- Paint a small rectangle on the front of each wooden crate with chalkboard paint.
- Let the paint dry for several hours before writing the names of the produce.
- Place a burlap liner inside each crate to catch loose skins and dirt.
- Set the crates into the levels of the cart frame and ensure they are secure.
- Fill the top crate with garlic and the middle one with various types of onions.
- Place the heavy potatoes in the bottom crate to keep the cart stable.
- Roll the cart into a cool and dark spot in your kitchen or pantry area.
25 Woven Guest Welcome Basket
A cozy wicker basket with a green fabric liner makes guests feel at home instantly. This rectangular container sits on a fresh white bed with towels and travel supplies. A small framed card provides the wifi password for an easy stay. It adds a thoughtful and luxury touch to your guest room decor.
Providing essentials like water and snacks saves your visitors from asking for help. You can include small bottles of soap and a fresh flower for a spa feel. This setup keeps the room looking tidy while offering everything a person might need. It shows your friends and family that you care about their comfort.
The natural wood of the basket looks lovely against a grey textured blanket. You can easily move the bin to a nightstand once the guest arrives. This system ensures your guest room is always ready for a last minute visitor. It is a simple way to be a wonderful and organized host.
Material Required List
- Woven wicker basket with handles
- Sage green fabric liner or napkin
- Two white cotton bath towels
- Small picture frame and cardstock
Equipment Required List
- Computer and printer for the wifi card
- Scissors
DIY Instruction Step by Step
- Wash and fluff your guest towels before rolling them into neat cylinders.
- Place the green fabric liner into the basket so the edges hang over the sides.
- Print your home wifi name and password on a small piece of decorative cardstock.
- Insert the card into the frame and place it at the front of the basket.
- Set the rolled towels at the back of the container to act as a soft backdrop.
- Fill the remaining space with a bottle of water and small travel toiletries.
- Add a single white hydrangea or a sprig of lavender for a fresh scent.
- Place the completed welcome basket in the center of the guest bed.
26 Under Sink Cleaning Supply Caddy
A frosted plastic caddy with a grey handle keeps your cleaning sprays organized under the sink. This divided bin holds bottles of degreaser and all purpose spray alongside brushes. A grey textured mat protects the cabinet floor from leaks and water damage. It turns a messy utility area into a functional workspace.
Keeping all your supplies in a portable caddy allows you to carry them to any room. You can see through the frosted walls to find the right sponge or cloth quickly. This system prevents bottles from tipping over and creating a chemical mess. It makes the chore of cleaning much more efficient and less stressful.
The low profile of the bin fits easily around plumbing pipes and drains. You can store rolled microfiber cloths in the side section to keep them dry. This setup encourages you to stay on top of your household tasks. It is a durable and practical choice for a busy family home.
Material Required List
- Frosted plastic cleaning caddy with handle
- Grey silicone under sink mat
- Uniform spray bottles with labels
- Wooden scrubbing brushes
Equipment Required List
- Measuring tape
- Utility knife
DIY Instruction Step by Step
- Clear out the space under your sink and wipe the floor with a damp cloth.
- Measure the cabinet floor and cut the silicone mat to fit around the pipes.
- Lay the mat down to provide a waterproof and non slip surface for your caddy.
- Transfer your cleaning liquids into matching bottles for a more organized look.
- Apply clear labels to the front of each bottle so you know what is inside.
- Place the bottles into the larger sections of the plastic caddy.
- Set your brushes and sponges in the smaller compartments near the handle.
- Slide the caddy onto the mat where it is easy to reach but out of the way.
27 Navy Rope Bookcase Bins
Dark navy rope baskets provide a sophisticated way to hide small items on a wooden bookshelf. These two square containers sit on a rich walnut shelf next to books and art. The textured weave adds a layer of visual interest to a minimalist room design. It is a great way to manage clutter in a home office or living area.
Storing loose papers or electronics inside these bins keeps your shelves looking sharp. You can easily pull them out by the integrated handles to find what you need. This choice keeps your home orderly without sacrificing a single bit of style. It creates a peaceful environment that helps you focus on your work.
The deep blue color matches many modern decor themes and adds a pop of color. Using uniform baskets creates a sense of balance and calm in a busy room. These containers are sturdy and hold their shape even when filled with heavy items. It is a smart addition to any functional home library.
Material Required List
- Two square navy blue cotton rope baskets
- Walnut wood bookshelf
- Selection of hardback books
- Small decorative objects like geodes
Equipment Required List
- Measuring tape
- Microfiber cloth
DIY Instruction Step by Step
- Measure the height and width of your bookshelf openings to choose the right bin size.
- Dust the wooden shelves with a microfiber cloth before placing the new baskets.
- Arrange your books on the top shelf with some standing and others lying flat.
- Place the navy rope baskets on the middle shelf with even spacing between them.
- Fill the baskets with items you want to keep hidden like chargers or notebooks.
- Ensure the handles face the front so you can pull the bins out easily.
- Add a small plant or a decorative stone on the shelf above for a finished look.
- Keep the baskets aligned with the front edge of the shelf for a tidy appearance.
28 Ochre Dipped Entryway Basket
A large cotton rope basket with an ochre yellow base adds a warm splash of color to your foyer. This round container sits on a wooden bench and holds winter hats, gloves, and a scarf. The two tone design brings a modern and cheerful feel to a neutral entryway. It provides a dedicated spot for family members to drop their outdoor gear.
Tossing your winter accessories into a soft bin prevents them from getting lost around the house. You can easily grab your favorite hat on the way out the door in the morning. This system keeps your hallway clear of small piles of fabric and clutter. It makes getting ready for cold weather a much simpler task for everyone.
The sturdy rope construction handles the weight of heavy coats and blankets easily. You can also use this basket in a living room to store extra throw pillows. It is a functional piece of art that hides messes effectively in any busy room. This choice keeps your home looking inviting and very organized.
Material Required List
- Large cotton rope basket with yellow dipped bottom
- Wooden entryway bench
- Assorted winter hats and mittens
- Long knit scarf
Equipment Required List
- Fabric lint roller
- Measuring tape
DIY Instruction Step by Step
- Use a lint roller on your winter gear to remove any fuzz before storing them.
- Place the wooden bench in your entryway where people usually take off their coats.
- Set the ochre rope basket on one end of the bench to keep the seat clear.
- Fold your long scarf and drape it over the edge of the basket for a cozy look.
- Toss your clean hats and gloves into the center of the bin for easy access.
- Ensure the basket handles are accessible if you need to move the gear.
- Teach your family to put their items in the basket as soon as they come inside.
- Shake out the basket once a month to remove any loose dirt or salt from the winter.
29 Clear Acrylic Fabric Square Bin

A clear plastic bin organizes your colorful fabric scraps and sewing supplies perfectly. This square container allows the bright patterns of the cloth to act as a decorative element. A matching lid protects the delicate fabric from dust and sunlight in your craft room. It turns a messy collection into a beautiful rainbow of creative possibilities.
Storing your fabric vertically helps you see every piece you own at a single glance. You can pull out one specific square without disturbing the rest of the stack. This system prevents you from buying duplicate materials for your next quilting project. It makes the process of choosing colors for a design much more fun.
The transparent walls make the room feel open and light compared to solid boxes. You can stack these bins to save space on your sewing table or shelf. This durable container is easy to wipe clean if thread or lint builds up inside. It is a smart way to manage a large hobby collection.
Material Required List
- Square clear acrylic bin with lid
- Selection of colorful fabric squares
- Small sewing notions like pins and tape
- Green cutting mat for the table
Equipment Required List
- Rotary cutter or fabric scissors
- Ruler
DIY Instruction Step by Step
- Clean the acrylic bin with a soft cloth to ensure the plastic is clear and shiny.
- Iron your fabric scraps so they are flat and easy to fold into uniform sizes.
- Cut your fabric into squares or rectangles that match the width of the bin.
- Fold each piece of fabric so the most colorful part is visible from the side.
- Stack the fabric vertically in the bin according to the colors of the rainbow.
- Place small items like bobbins or pins in a tiny tray at the very top.
- Set the lid on the bin and place it on your green cutting mat or a shelf.
- Organize your thread on the wall above the bin for a complete sewing station.
30 Tall White Wicker Toilet Paper Tower
A slim white wicker basket provides a discreet and stylish way to store extra toilet paper. This cylindrical container sits in the corner of a bathroom with a lid and a small window. A candle and a roll of paper rest on the flat top for easy access by guests. It adds a touch of classic texture to a clean and modern bathroom.
Hiding extra rolls inside a basket prevents the room from looking like a storage closet. The narrow design fits into small spaces between the toilet and the wall easily. This system ensures you never run out of supplies at an inconvenient time. It keeps your bathroom looking tidy and well prepared for any situation.
The white finish matches many bathroom fixtures and creates a fresh and airy feel. Woven wicker is durable and handles the humid environment of a bathroom very well. You can quickly see through the side opening when it is time to buy more paper. It is a practical and attractive addition to any home.
Material Required List
- Tall cylindrical white wicker basket with lid
- Several rolls of white toilet paper
- Scented candle in a glass jar
- Small decorative tray for the top
Equipment Required List
- Soft brush for cleaning
- Measuring tape
DIY Instruction Step by Step
- Measure the space in your bathroom corner to ensure the tower will fit comfortably.
- Use a soft brush to remove any dust from the wicker weave before bringing it inside.
- Stack your extra rolls of toilet paper vertically inside the basket.
- Ensure the bottom roll is visible through the side window so you can track supplies.
- Place the wicker lid on top of the stack and press it down firmly.
- Set a small tray on the lid to provide a flat and stable surface for decor.
- Place a fresh roll of paper and a scented candle on the tray for your guests.
- Position the tower within arm reach of the toilet for the most convenience.
31 Large Woven Outdoor Cushion Trunk
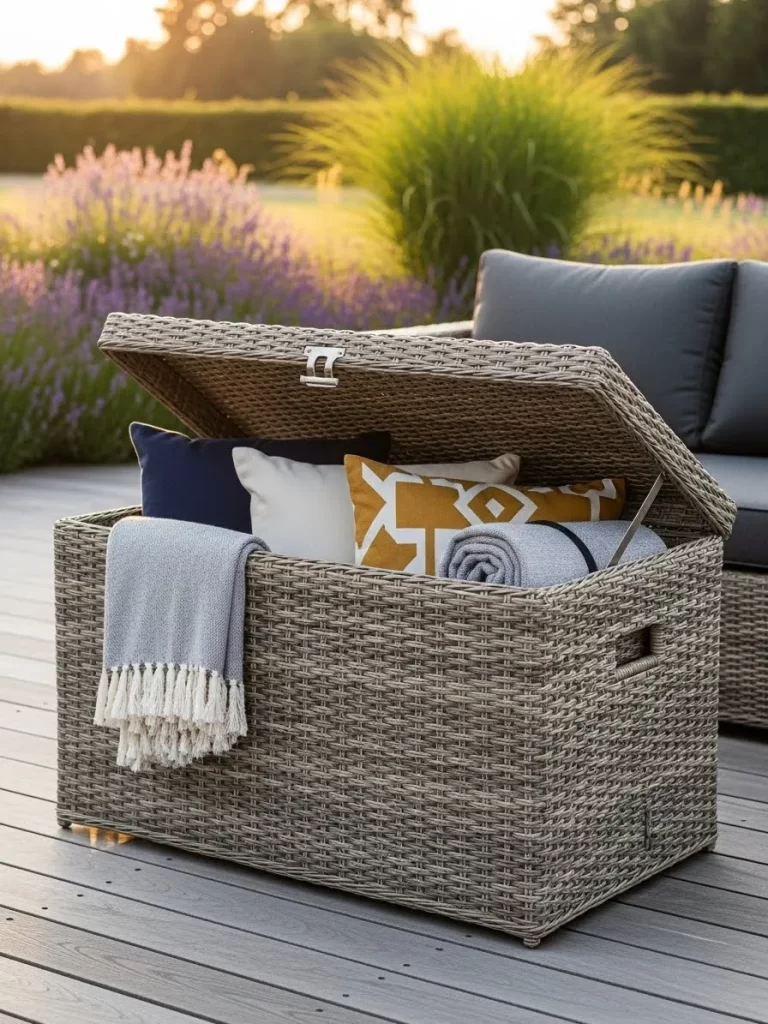
Weather resistant resin wicker makes this large trunk a smart choice for your patio or deck. The neutral grey tones blend with natural outdoor surroundings and modern furniture. A sturdy lid protects soft blue and patterned pillows from evening dew or light rain. It keeps your backyard lounging area tidy and ready for guests at any moment.
Handles on the side allow you to reposition the trunk as needed for your gathering. The interior provides ample room for bulky items like rolled pool towels or thick garden blankets. Air flows through the weave to keep fabrics smelling fresh during the summer months. This piece serves as both a storage unit and a convenient side table for drinks.
Choosing high quality materials ensures your outdoor space remains organized for years. This trunk eliminates the need to carry heavy cushions back and forth from the house. It maintains a clean look on your patio while keeping comfort within reach. Every backyard can benefit from such a functional and stylish addition.
Material Required List
- Large resin wicker outdoor trunk with lid
- Outdoor fabric protectant spray
- Mild dish soap
- Warm water
Equipment Required List
- Soft bristle brush
- Garden hose with spray nozzle
- Measuring tape
DIY Instruction Step by Step
- Measure your patio area to find a level spot that does not block paths or doorways.
- Mix a small amount of dish soap with warm water in a bucket for cleaning.
- Scrub the wicker surfaces with a soft brush to remove any dirt or dust from the gaps.
- Rinse the entire trunk with a garden hose and let it dry completely in the sun.
- Apply a light coat of outdoor protectant spray to the lid to help shed rainwater.
- Line the bottom with a thin plastic sheet if you plan to store items through the winter.
- Stack your cushions and blankets neatly inside to maximize the available space.
- Close the lid firmly and place the trunk next to your outdoor sofa or lounge chairs.
32 Walnut Desk Stationery Organizer

A solid walnut wood box brings a sense of history and order to your writing desk. This rich brown container features internal brass dividers to separate envelopes from fine pens. A vintage style wax seal and ink nibs rest in the smaller front compartments. It adds a layer of sophistication to your personal correspondence and daily tasks.
Natural wood grains provide a warm contrast to green leather desk mats and brass lamps. The low profile design ensures your workspace feels open rather than cluttered. You can find your stamps and airmail stickers instantly without digging through messy drawers. This organizer turns a simple desk into a dedicated station for creative thought.
Finely crafted joinery on the corners shows off the quality of the material. It is a durable piece that ages beautifully over time with very little maintenance. Keeping your tools visible encourages the habit of handwritten letters. This storage solution is as beautiful as it is helpful for staying productive.
Material Required List
- Walnut wood desk organizer with brass inserts
- Food safe wood conditioner or wax
- Fine grit sandpaper
- Soft lint free cloth
Equipment Required List
- Small level
- Handheld duster
DIY Instruction Step by Step
- Lightly sand any rough edges on the wooden box using fine grit sandpaper for a smooth finish.
- Wipe away all sanding dust with a clean duster or a damp cloth.
- Apply a small amount of wood conditioner to a cloth and rub it into the grain.
- Buff the wood until it has a soft and healthy shine across all visible surfaces.
- Slide the brass dividers into the pre cut slots to create custom sections for your mail.
- Place your envelopes in the tallest back section so they stand upright and organized.
- Arrange your fountain pens and ink nibs in the front slots for easy access.
- Position the organizer on the corner of your desk where it will not interfere with your typing.
33 Galvanized Metal Art Supply Caddy

A sturdy galvanized metal bin provides a rugged home for a large collection of art supplies. This divided container holds dozens of colorful markers, pencils, and crayons in separate slots. A smooth wooden handle makes it easy for children to move their projects to the kitchen table. It keeps a creative mess contained and simple to clean up after playtime.
Metal construction is durable and wipes clean easily if paint or ink spills occur. The industrial look fits well in a modern playroom or a home school corner. You can see all your colors at once which helps inspire new artistic ideas. This caddy ensures that every marker has a home and avoids lost caps.
Using a portable bin allows the whole family to share supplies in different rooms. It is heavy enough to stay upright even when filled with tall brushes and tools. The zinc finish adds a rustic touch to a bright and cheerful craft area. This is a smart way to manage the needs of a busy household.
Material Required List
- Galvanized metal caddy with wood handle
- Adhesive felt circles
- Clear multi purpose sealant
- Art supplies like markers and pencils
Equipment Required List
- Microfiber cloth
- Dish soap
DIY Instruction Step by Step
- Wash the metal caddy with mild soap and water to remove any factory residue.
- Dry the metal thoroughly with a microfiber cloth to prevent water spots.
- Apply a thin coat of clear sealant to the interior corners to prevent moisture from causing rust.
- Stick adhesive felt circles to the bottom corners to protect your table from scratches.
- Sort your markers and pencils by color or type before placing them in the caddy.
- Fill each of the six sections with specific tools like crayons in one and glue in another.
- Check that the wooden handle is secure and comfortable for small hands to carry.
- Place the caddy in the center of your craft table for a tidy and inviting workspace.
34 Gold Net Fruit Bowl on Marble

A delicate gold wire bowl serves as a stunning focal point for a modern bar or kitchen. This mesh container rests on a solid white marble base for a high end aesthetic. It holds bright lemons and limes that add a splash of natural color to your decor. The open weave allows air to circulate which helps keep your citrus fresh for longer.
Using metal and stone together creates a balanced and luxurious look in any room. This bowl is small enough to fit on a glass bar cart next to crystal decanters. It provides a dedicated spot for garnishes that are used for evening drinks. This setup makes your entertaining area feel professional and well organized.
The golden finish reflects light beautifully in a dim room or under bright kitchen lamps. It turns simple grocery items into a decorative display that catches the eye. The marble base provides weight and stability so the bowl does not tip. This is a simple way to elevate your home hosting style.
Material Required List
- Gold wire mesh bowl
- Round white marble coaster or base
- Clear silicone adhesive
- Fresh lemons and limes
Equipment Required List
- Glass cleaner
- Soft cloth
DIY Instruction Step by Step
- Clean the marble base with glass cleaner to ensure a clear and bright surface.
- Wipe the gold wire bowl to remove any dust or fingerprints from the metal.
- Apply three small dots of clear silicone adhesive to the bottom of the wire bowl.
- Press the bowl onto the center of the marble base and hold it for one minute.
- Allow the adhesive to cure for at least four hours before adding any weight.
- Wash your fruit and dry it completely to prevent water from sitting on the gold finish.
- Arrange the lemons and limes inside the bowl to create a full and colorful look.
- Place the finished piece on your bar cart or kitchen island for a sophisticated touch.
35 Braided Grey Cotton Slipper Basket

A soft braided cotton basket offers a cozy place to store your favorite indoor footwear. This round grey container sits on a plush rug near the edge of a bed. It holds warm slippers with sheepskin lining for easy access on cold mornings. The thick weave adds a layer of comfort and texture to a modern bedroom.
Keeping your slippers in a basket prevents them from being kicked under the bed or lost. You can easily slide the bin out when you are ready to relax after a long day. The neutral grey color matches almost any bedding or curtain style. This simple habit keeps your bedroom floor clear and organized.
Cotton rope is a gentle material that will not scratch your furniture or snag your socks. It is flexible enough to squeeze into small corners or under a low nightstand. The integrated handles make it simple to carry the basket to the laundry room if needed. This is a wonderful way to bring a spa feel into your home.
Material Required List
- Round braided cotton rope basket in grey
- Fabric stiffener spray
- Cozy slippers or house shoes
- Scented dryer sheet
Equipment Required List
- Handheld steamer
- Fabric brush
DIY Instruction Step by Step
- Use a handheld steamer on the basket to remove any creases from shipping or storage.
- Shape the walls of the basket with your hands while the cotton is still warm and damp.
- Apply a light layer of fabric stiffener to the interior if you want the sides to stay upright.
- Let the basket air dry completely in a sunny spot for several hours.
- Place a scented dryer sheet at the bottom of the bin to keep your slippers smelling fresh.
- Tuck your slippers into the basket with the heels facing down for a neat appearance.
- Set the container on the rug next to your bed where your feet land in the morning.
- Brush the exterior of the cotton rope occasionally to remove any lint or dust.
36 Under Desk White Cable Tray
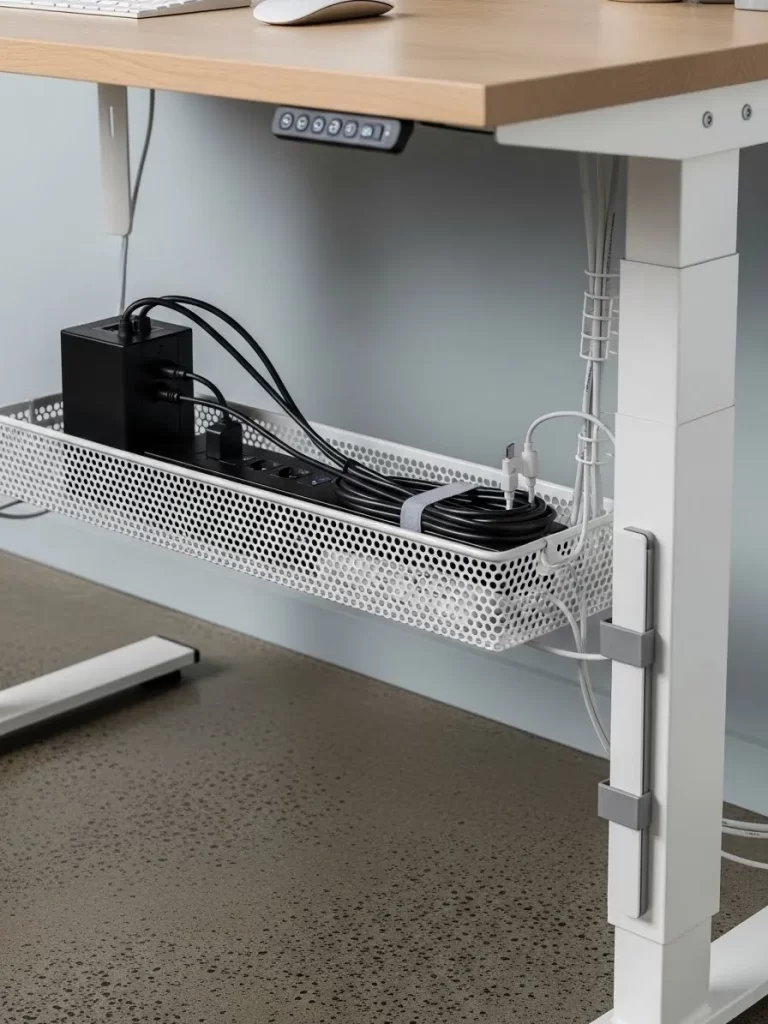
A perforated metal tray provides a hidden and efficient way to manage messy computer cords. This long white bin hangs under a modern standing desk to keep power strips off the floor. It organizes black cables and white chargers into a neat line out of sight. This setup creates a clean and professional look for your home office.
Lifting wires off the ground prevents dust from building up and makes vacuuming much easier. You can use simple ties to bundle long cords so they do not tangle inside the tray. This system protects your electronics from being accidentally unplugged by feet or pets. It makes your workspace feel much more organized and peaceful.
The white finish matches the legs of a modern desk for a seamless appearance. Holes in the metal allow for plenty of air to flow around hot power adapters. You can easily reach under the desk to swap out a charger whenever you need to. This is a smart solution for anyone with a high tech setup.
Material Required List
- White perforated metal cable management tray
- Velcro cable ties
- Under desk mounting screws
- Power strip with surge protection
Equipment Required List
- Power drill and bits
- Screwdriver
- Pencil
DIY Instruction Step by Step
- Clear your desk surface and turn the desk over or crawl underneath to reach the bottom.
- Hold the cable tray against the underside of the desk near the back edge.
- Mark the screw holes with a pencil while keeping the tray centered and straight.
- Drill small pilot holes into the marks to prevent the wood from splitting.
- Secure the tray to the desk using the provided screws and a screwdriver.
- Place your power strip inside the tray and plug it into the nearest wall outlet.
- Use velcro ties to bundle your computer and monitor cords into neat groups.
- Thread the bundles through the tray and plug them into the power strip for a tidy finish.
37 Clear Tiered Pantry Spice Rack
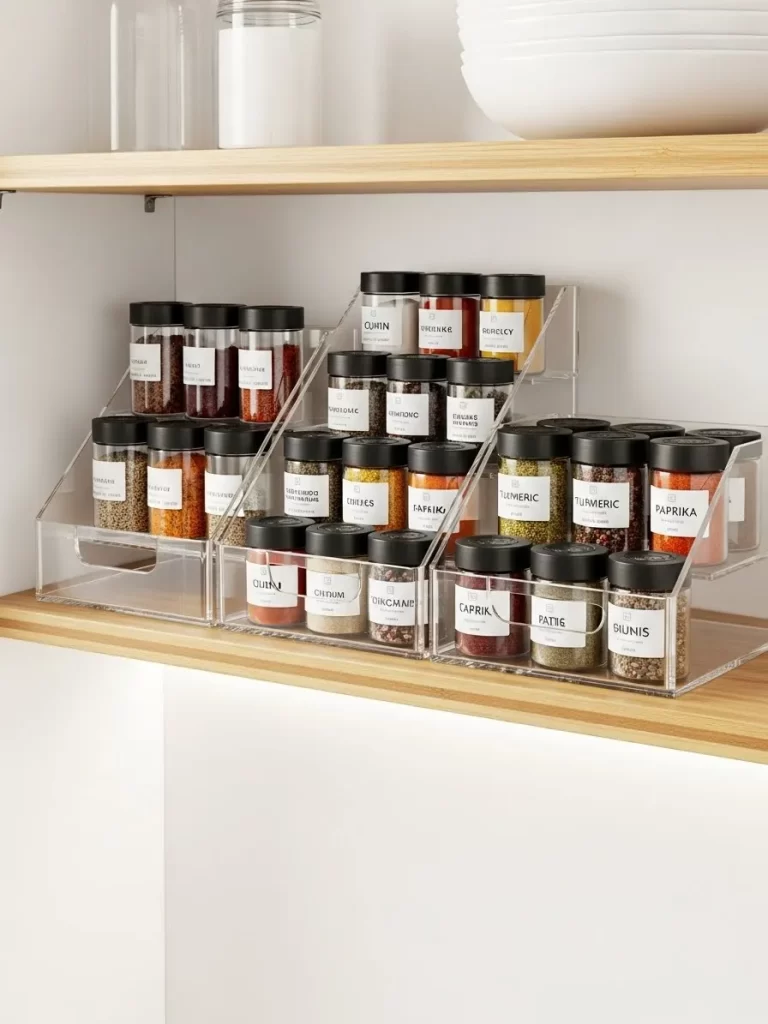
Acrylic risers turn a cluttered spice shelf into an organized display where everything is visible. These three level stairs hold glass jars of paprika, turmeric, and cumin in neat rows. A clear bin at the front holds smaller packets or frequently used seasonings. It makes finding the right flavor for your dinner a fast and simple task.
Storing spices on different levels prevents taller jars from hiding the smaller ones in the back. You can quickly check your inventory before going to the grocery store. This system works well on wooden shelves and keeps the kitchen looking clean. It encourages you to experiment with new recipes when your ingredients are easy to see.
Uniform labels on the lids or sides of the jars add a professional touch to your pantry. These clear plastic stands are durable and very easy to wipe clean if a spill occurs. You can move the entire rack to a different shelf as your collection grows. This is a smart upgrade for any home cook who values efficiency.
Material Required List
- Three tier clear acrylic spice riser
- Matching glass jars with black lids
- Waterproof spice labels
- Mild acrylic cleaner
Equipment Required List
- Microfiber cloth
- Measuring tape
DIY Instruction Step by Step
- Empty your spice shelf and measure the width to ensure the riser will fit.
- Clean the acrylic stand with a soft cloth and mild cleaner to remove any smudges.
- Transfer your bulk spices into matching glass jars for a uniform and tidy look.
- Apply a waterproof label to the front of each jar at the same height.
- Set the acrylic riser on your pantry shelf against the back wall.
- Place the spices you use least often on the top tier of the rack.
- Fill the middle and bottom tiers with your most popular seasonings and herbs.
- Keep a small clear bin next to the riser for salt, pepper, and large grinders.
38 Navy Fabric Linen Closet Bins
Large navy blue bins bring a sense of order and luxury to a white linen closet. These square containers hold folded white sheets and pillowcases in neat stacks. Gold rimmed handles and label pockets help you identify the contents for different bedrooms. This system turns a messy pile of fabric into a tidy and functional storage space.
Grouping your linens by size or room prevents confusion when making the bed. You can easily pull out the Guest Room bin without disturbing the rest of the shelf. This method protects your clean sheets from dust and keeps them smelling fresh longer. It makes the chore of putting away laundry much more organized.
The deep blue fabric provides a beautiful contrast to bright white towels and shelves. These bins are sturdy enough to hold heavy duvet covers without bulging. You can fold your items to fit perfectly inside the square dimensions. This is a smart way to maximize every inch of your storage closet.
Material Required List
- Two navy blue fabric bins with gold handles
- Printed room labels
- Cedar wood rings
- Linen water spray
Equipment Required List
- Iron and ironing board
- Measuring tape
DIY Instruction Step by Step
- Wash and iron your bed sheets so they are crisp and easy to fold neatly.
- Fold the sheets into rectangles that match the width and depth of the navy bins.
- Spray each set lightly with linen water for a fresh and clean scent.
- Place the folded sheets into the bins with the spine of the fold facing upward.
- Slide a cedar ring between the layers of fabric to protect against pests.
- Write the bedroom name on a small card and slide it into the gold label holder.
- Place the bins on your closet shelf with the handles facing the front.
- Group similar items like king size sheets in one bin and queen in another for clarity.
39 Grey Wicker Entryway Umbrella Stand
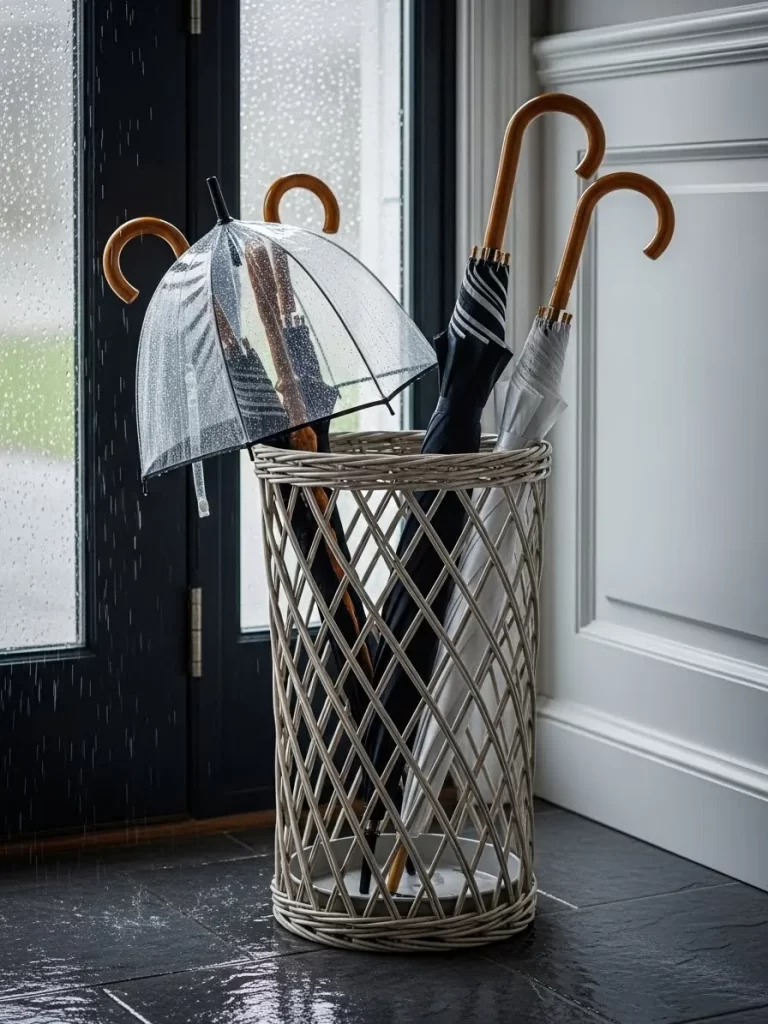
A tall and slim wicker basket offers a stylish way to store umbrellas near your front door. This round container features a wide weave that allows wet items to dry quickly. It stands on a dark tile floor next to a glass door to catch drips before they reach your rug. This piece adds a touch of rustic charm to an organized and modern foyer.
Storing umbrellas vertically ensures they stay in good shape and are easy to grab on rainy days. You can fit several large umbrellas and a few smaller ones inside the same bin. This system keeps your entryway from looking cluttered with leaning sticks and wet fabric. It provides a dedicated home for an item that often gets misplaced.
The grey finish of the wicker matches many entryway colors and decor styles. A small drip tray at the bottom prevents water from puddling on your floor. This container is light enough to move to a closet during the dry summer months. It is a practical and attractive addition to any home entrance.
Material Required List
- Tall cylindrical grey wicker basket
- Small plastic or metal drip tray
- Clear waterproof sealant
- Selection of umbrellas
Equipment Required List
- Soft brush for dusting
- Measuring tape
DIY Instruction Step by Step
- Dust the wicker basket thoroughly with a soft brush to remove any loose fibers.
- Apply a thin layer of clear waterproof sealant to the bottom of the basket.
- Place a small drip tray inside the bottom of the bin to collect rainwater.
- Set the basket in a corner of your foyer where it will not be knocked over.
- Check that the stand is stable on your tile or wood flooring.
- Place your umbrellas inside the basket with the handles facing up for easy reach.
- Hang small foldable umbrellas on the top rim of the weave if they are too short.
- Empty the drip tray after a storm to keep the area clean and prevent odors.
40 Grey Fabric Trunk Cargo Organizer

A large grey fabric bin keeps your car trunk tidy and prevents groceries from rolling around. This multi section container holds bags of fresh vegetables and rolled blankets securely. Mesh side pockets provide extra room for tools, water bottles, and a first aid kit. It turns a messy cargo area into a perfectly organized storage system for travel.
Using an organizer ensures your belongings stay in place during quick stops or sharp turns. You can easily lift the entire bin out of the car when you need to use the full trunk space. This durable fabric is easy to clean and stands up to daily wear and tear. It makes grocery shopping and road trips much more efficient and less stressful.
The neutral grey color looks clean and matches the interior of most modern vehicles. Sturdy handles allow you to carry a full load of items into the house in one trip. This system protects your car carpet from spills and dirt from outdoor gear. It is a smart investment for anyone who spends a lot of time on the road.
Material Required List
- Folding fabric trunk organizer with dividers
- Velcro strips for the base
- Reflective emergency tape
- Basic car supplies like a flashlight and map
Equipment Required List
- Vacuum cleaner
- Scissors
DIY Instruction Step by Step
- Vacuum your car trunk thoroughly to remove any dirt or debris before adding the bin.
- Unfold the fabric organizer and snap the internal dividers into place.
- Apply velcro strips to the bottom of the bin to keep it from sliding on the carpet.
- Stick a piece of reflective tape to the side for better visibility during night use.
- Place your heavy items like tools and water bottles in the center compartments.
- Tuck small necessities into the mesh exterior pockets for quick access.
- Roll your emergency blankets and place them in the side sections to save space.
- Position the organizer against the back seat to keep the rest of the trunk open for bags.
Creating an orderly home is a journey that starts with one small container. You have seen how simple bins and baskets can tackle even the toughest clutter problems. These solutions prove that function and fashion go hand in hand. Your rooms will feel larger and much more inviting once everything has a proper home.
Maintenance is the secret to keeping your spaces looking sharp over time. Try to review your storage systems every few months to ensure they still work for your needs. You can easily swap items out as seasons change or as your family grows. Small efforts today lead to a much more relaxing environment tomorrow.
Thank you for following along with these forty organization ideas. We hope you feel inspired to start your own tidying project this weekend. Enjoy the calm and beauty that comes with a well managed home. Your space is now a true reflection of your organized lifestyle.
Key Takeaways
Natural materials like rattan and seagrass add warmth and hidden storage to living areas. Using these fibers helps you maintain a cozy atmosphere while tucking away blankets or toys. It is a simple way to bring nature indoors.
Vertical wall space offers a clever way to organize pet supplies and office paperwork. Lifting items off the floor prevents tripping hazards and keeps your surfaces clear. This method works especially well in small hallways.
Rolling linens and towels saves significant space while keeping closets looking like a high end spa. This technique allows you to see every item you own at a glance. It makes your morning routine feel much more calm.
Transparent bins in the kitchen and bathroom allow you to track your supplies instantly. You will always know when it is time to buy more groceries or skincare. This prevents the stress of running out of essentials.
Portable caddies make daily chores and baby care much more efficient for busy families. Carrying your tools from room to room saves time and energy during the day. It ensures you are always prepared for any task.