Clutter accumulation affects everyone, turning useful space into chaos quickly. Achieving a home that feels both organized and stylish requires smart strategies, not just buying more containers. The key lies in utilizing functional storage pieces that seamlessly blend into your existing decor.

Baskets and bins offer some of the most versatile solutions available. They provide the perfect mix of texture, containment, and visual appeal, working in nearly every room. From concealed items in a pantry to displayed blankets in the living room, these humble containers solve countless storage dilemmas.
This comprehensive guide explores 40 clever and attractive ways to employ baskets and bins throughout your home. Prepare to transform messy zones into beautifully neat spaces using woven fibers, sturdy wire, and transparent acrylic. Get ready to organize your home with style and efficiency.
1. Two-Tone Cotton Rope Entryway Organizers

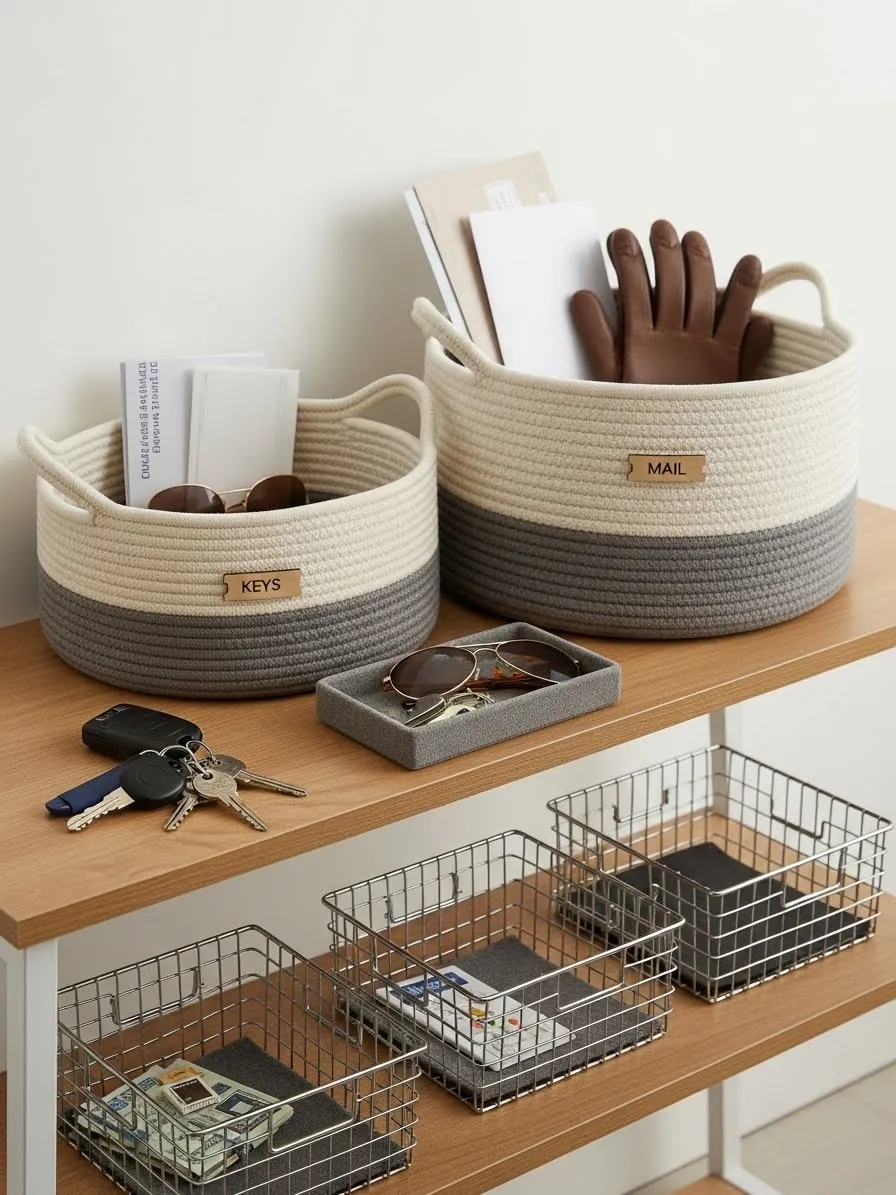
These beautiful cotton rope baskets provide a welcoming, structured way to manage everyday items right near your front door. The lovely two-tone design, featuring natural cream rope paired with a grounding gray lower section, adds softness and texture to a minimalist wooden console. Notice the sturdy rope handles, which make them simple to grab and move, streamlining cleanup even during busy mornings.
Each basket is clearly labeled with a small leather patch, ensuring everyone knows precisely where to drop their essentials upon arriving home. One holds “KEYS,” while the other is ready for incoming “MAIL.” This simple identification trick eliminates the frantic searching for important items before heading out.
Adding to the organization on the shelf, a small gray felt tray holds sunglasses and loose change, keeping the surface looking clean. Beneath the rope storage, three sleek, square wire bins introduce a different texture, providing ventilated space for other accessories like wallets or small electronics. This combination of soft rope and structured metal delivers both practicality and appealing design.
???? Material Required
- Thick cotton rope (approximately 1/2 inch to 3/4 inch diameter)
- Contrasting colored cotton rope or yarn (for the bottom section)
- Fabric glue or hot glue gun and glue sticks
- Heavy-duty sewing thread (matching the rope color)
- Piece of leather or faux leather (for the labels)
- Permanent marker or label maker
✂️ Equipment Required
- Sewing needle (large eye, curved upholstery needle works best)
- Sharp scissors
- Measuring tape
- Clamps (optional, to hold coils in place)
???? DIY Instruction Step-by-Step: Two-Tone Rope Basket
This instruction focuses on creating one of the cotton rope baskets using a coiling technique.
- Prepare the Base Coil: Take the end of your colored (gray) rope. Use a generous amount of fabric glue or hot glue to tightly coil the first few inches of rope into a flat spiral. This creates the very center of the basket’s base. Hold it securely until the glue sets.
- Expand the Base: Continue spiraling the colored rope outward, adding glue between the adjacent rope coils every inch or so to ensure they hold together. As you work, occasionally stitch the coils together using the heavy-duty needle and thread. These stitches provide strength that glue alone cannot offer. Keep the base completely flat.
- Determine the Size: Use your measuring tape to check the diameter. Stop adding coils when the base reaches your desired size (e.g., 10 or 12 inches across). Secure the end of the colored rope with extra glue and a few firm stitches.
- Introduce the Second Color: Take the end of your natural-colored (cream) rope. Place its end right next to the finished end of the colored rope. Glue and stitch the cream rope firmly to the final coil of the colored base.
- Start the Sides: To begin forming the sides, instead of keeping the new coil flat, slightly push the next coil of natural rope up and against the edge of the finished base. This slight change in angle will make the basket walls rise.
- Build the Walls: Continue coiling the natural rope, ensuring each new layer sits directly on top of the one below it. Keep stitching and gluing as you move up. Maintain even tension to keep the sides straight and symmetrical.
- Create the Handles: When the basket reaches your desired height (stop about two inches from the top), you will form the handles. Coil the rope for about three inches, then leave a six-inch loop of rope suspended without attaching it to the layer below. Then, resume coiling and attaching the rope for the rest of the perimeter. Repeat the handle gap on the opposite side.
- Finish the Rim: Once you have made one full coil above the handles, cut the rope, leaving about a one-inch tail. Tightly secure this tail to the final coil with glue and several strong stitches, tucking the end neatly inward.
- Add the Label: Cut a small rectangle from your leather or faux leather. Use a permanent marker to neatly write “KEYS” or “MAIL.” Glue or stitch this label securely onto the side of the basket, positioning it centered between the two handles.
2. Oversized Woven Texture Accent Hamper

This substantial floor basket brings a lovely natural texture to any living space, offering an attractive solution for storing throw blankets and pillows. The robust, tightly woven material, likely water hyacinth or a similar natural fiber, provides long-lasting durability while softening the look of the room. Its tall, cylindrical shape is capable of holding a sizable collection of cozy items.
Easy-to-grip curved handles are seamlessly integrated into the rim, making it simple to move the basket from the sofa area to a closet or laundry room. The natural texture contrasts beautifully with the soft, fringed gray throw blanket draped over the edge, alongside the accompanying decorative pillow.
The basket sits on a light-colored rug next to a smaller, modern rope basket, creating a pleasing mix of organic and contemporary styles. This kind of piece moves beyond basic utility; it functions as an attractive accessory that keeps your living area tidy and comfortable.
???? Material Required
- Large, cylindrical woven basket (the base item)
- Natural fiber yarn (e.g., jute, cotton, or raffia) for tassel embellishments
- Small metal rings or wooden beads (optional, for decorative detail)
✂️ Equipment Required
- Hot glue gun and glue sticks (high-temp)
- Sharp scissors
- Measuring tape or ruler
- Large, blunt needle (if attaching by hand sewing)
???? DIY Instruction Step-by-Step: Tassel and Fringed Accent
This instruction details how to add decorative fringe or tassels to a similar plain woven basket for a customized look.
- Prepare the Tassels: Decide on the length and thickness of your tassels. Wrap the yarn tightly around a piece of cardboard (the width of the cardboard should equal the desired length of the tassel). Wrap the yarn many times to create a full tassel.
- Secure and Cut: Carefully slide the wrapped yarn off the cardboard. Tie a separate piece of yarn very tightly around the bundle about a half-inch from one end, creating the tassel “head.” Snip the loops at the opposite end with sharp scissors. Repeat this process until you have enough tassels to wrap around the entire basket rim.
- Create the Connecting Strand: Measure the circumference of your basket’s top rim. Cut a piece of yarn or thin rope slightly longer than this measurement. This strand will be the base for attaching the tassels.
- Attach Tassels to the Strand: Fold the top loop of each tassel over the connecting strand. Use a piece of thin, strong thread to secure the tassel head to the connecting strand, ensuring they are evenly spaced. Use a ruler to maintain consistency in spacing.
- Affix the Fringe to the Basket: Once the entire fringe strip is assembled, carefully position it around the outer top edge of the basket. Use the hot glue gun to apply small, strong dots of glue directly beneath the connecting strand and press it firmly onto the woven material of the basket. Work in small sections so the glue does not cool too quickly.
- Secure the Ends: Overlap the ends of the fringe strip slightly at the back of the basket, gluing them down neatly. Allow the glue to fully set before handling or adding items to the basket.
3. Industrial Wire Bins for Pantry Produce

These robust metal wire bins offer an excellent, airy way to store root vegetables like onions and potatoes in a pantry or kitchen cabinet. The open-grid design promotes air circulation, which is crucial for keeping produce fresh longer and delaying sprouting. Storing vegetables outside of humid environments like the refrigerator helps them maintain quality.
The heavy-duty construction of the wire racks means they can handle the weight of numerous vegetables without bending or warping. A clever feature of these bins is their stacking capability, allowing you to maximize vertical storage space within tall shelves. The top of the bin nests securely into the bottom of the one placed above it.
Each bin is clearly labeled with a small, black chalkboard-style tag, simplifying organization at a glance. Seeing the contents through the wire helps the cook quickly identify what is needed. This system creates a tidy, functional, and easily restocked food storage area.
???? Material Required
- Stackable wire baskets (4 or more)
- Small chalkboard tags with clips or hooks
- Chalk or liquid chalk marker
- Small, heavy-duty zip ties (optional, for extra stability when stacking)
✂️ Equipment Required
- None
???? DIY Instruction Step-by-Step: Labeling and Stacking Prep
This instruction details how to label and prepare the wire bins for optimized pantry storage.
- Determine Contents: Decide which type of produce or item will be placed in each basket (e.g., onions, potatoes, garlic, canned goods). Plan your arrangement, considering heavier items should be placed on lower shelves for safety and easier access.
- Prepare Labels: Use the chalk or liquid chalk marker to clearly and neatly write the item name on each chalkboard tag. Ensure the writing is large enough to be easily read from a distance.
- Attach the Labels: Fasten the labeled tags securely to the front lip of the appropriate wire basket using the attached clip or hook. Make sure the tag is centered and faces outward for maximum visibility.
- Load the Bins: Gently place the produce into the respective baskets. Avoid overfilling the bins; leave a small gap at the top to make stacking safer and prevent crushing the vegetables.
- Stack for Height (Optional): If you need to maximize vertical space, place the second bin directly on top of the filled first bin. The feet or base of the upper basket should fit securely into the rim of the lower one.
- Secure the Stacks (Advanced): If the baskets seem wobbly or if you live in an area prone to movement, use small zip ties to connect the top wire of the bottom basket to the bottom wire of the basket resting on top of it. Trim the excess zip tie length after tightening.
4. Clear Modular Trays for Drawer Organization

This image showcases how shallow, clear acrylic bins can transform a bathroom vanity drawer into a model of neatness. By using modular square containers, you can create customized compartments for small items that often end up jumbled together. The transparent material allows you to view the contents instantly, preventing the purchase of duplicate items.
These trays are placed side-by-side, creating a clean grid pattern that maximizes the usable space inside the drawer. Specific items, such as hair ties, dental picks, and small bottles, are separated into their own dedicated homes. This arrangement ensures that every item is visible and easily accessible when the drawer is opened.
The use of clear containers against the white drawer interior produces a crisp, contemporary aesthetic. The lower section of the drawer features non-clear bins in soft gray and beige tones, adding a subtle contrast while still maintaining the organized structure. This strategy ensures even tiny essentials have an allocated spot, bringing welcome order to the routine.
???? Material Required
- Clear acrylic square or rectangular storage trays (various sizes to fit the drawer)
- Non-slip grip liners or adhesive mounting putty (optional, to prevent sliding)
✂️ Equipment Required
- Measuring tape or ruler
- Calculator or graph paper (for planning the layout)
???? DIY Instruction Step-by-Step: Configuring Drawer Dividers
This instruction details how to plan and implement a modular drawer organization system.
- Measure the Drawer: Use the measuring tape to precisely measure the inside dimensions of your drawer: width, length (front to back), and depth. Write these dimensions down.
- Plan the Layout: Based on your measurements, sketch a simple diagram of the drawer. Use the dimensions of the acrylic trays you plan to use to map out how they will fit together. The goal is to leave as little wasted space as possible. Consider the height of the trays to ensure the drawer can still close easily.
- Empty and Clean: Remove everything from the drawer. Vacuum up any debris and wipe the inside surfaces thoroughly with a mild cleaner and dry cloth. A clean base is essential for a tidy look.
- Place the Trays: Begin by placing the largest trays into the drawer, starting at the front or back, and then fill in the gaps with the smaller trays, matching your planned layout. Ensure the trays are flush against each other.
- Secure Trays (Optional): If the trays shift when opening or closing the drawer, cut and place non-slip grip liner material underneath them. Alternatively, place a small dot of mounting putty under the corners of each tray to hold them firmly in place.
- Load the Contents: Place specific categories of items into each designated tray. For example, all hair ties go into one, dental supplies in another, and so on. Keep taller items in the back trays if possible for better visibility. Close the drawer to confirm that no item is too tall to interfere with the closing mechanism.
5. Under-Bed Wheeled Storage Bins

These specialized bins maximize unused space beneath the bed, providing substantial storage for linens, extra clothing, or seasonal items. The durable fabric material and dark charcoal color blend discreetly with the bedroom decor, offering a sophisticated storage solution. The design features a sturdy, structured frame, ensuring the bins maintain their rectangular shape even when full.
A standout feature is the small wheels or casters mounted to the bottom of the containers. This rolling capability makes accessing the contents effortless; you can smoothly pull the bins out from under the bed and push them back without straining your back or scratching the floor.
The leather-look pull handles add a touch of warmth and provide a convenient grip point. One bin is closed with a zippered lid, keeping items dust-free, while the adjacent bin is open, ready to hold pillows or large soft goods. This system turns wasted under-bed space into highly functional real estate.
???? Material Required
- Plain fabric storage box (must have a rigid base or frame)
- Small caster wheels (four per box)
- Strong adhesive (suitable for bonding metal/plastic to fabric/wood)
- Replacement pull handle (faux leather or metal, if desired)
✂️ Equipment Required
- Screwdriver or power drill (if wheels require screwing)
- Measuring tape
- Marker or pencil
- Safety goggles (if drilling)
???? DIY Instruction Step-by-Step: Adding Wheels to Under-Bed Bins
This instruction details how to convert a standard fabric storage box into a rolling under-bed bin.
- Check Clearance: Before starting, measure the height from the floor to the bottom of your bed frame. Ensure the height of your bin plus the height of the wheels will still fit underneath comfortably.
- Mark Wheel Placement: Turn the empty storage box upside down. Use a marker or pencil to lightly mark the spots for the four wheels, placing them approximately one inch in from each corner of the base. Ensure the placement is symmetrical and even.
- Attach the Wheels: Depending on your wheel type, either use adhesive or screws.
- Adhesive: Apply a strong bond adhesive generously to the flat surface of the wheel mounting plate and press it firmly onto the marked spots on the bottom of the bin. Allow the glue to cure completely according to the manufacturer’s directions (usually 24 hours).
- Screwing: If the bin has a solid wood or plastic base, pre-drill small pilot holes at the marked spots. Then, use a screwdriver or power drill to secure the wheels firmly to the base.
- Install/Replace Handle: If you are upgrading the handle, remove the existing one. Attach the new leather-look handle using screws or strong rivets, making sure it is centered and secure for pulling the loaded bin.
- Test the Bin: Once the wheels are attached and secure, turn the bin upright. Gently push and pull it to test the rolling mechanism and confirm it moves smoothly and clears the bed frame opening.
6. Sleek Black Wire Desk Organizers

These black, powder-coated wire baskets bring a clean, modern, and slightly industrial feel to an office desk or shelf. The low-profile design of the bottom baskets makes them particularly good for containing everyday desktop items without dominating the workspace. Their open construction means you can easily see what supplies are inside, like pens, notebooks, and folders.
The baskets are available in various shapes, allowing for flexible configuration. One taller basket is used vertically to file notebooks and papers, while the wide, lower baskets contain smaller materials. This setup helps separate incoming mail from supplies and reference files.
A rectangular label holder is affixed to the front of each organizer, utilizing a small, writable tag to specify the contents, which keeps the system organized. This style offers a great alternative to solid filing cabinets, adding depth and contrast against the warm tone of the wooden shelf and desktop.
???? Material Required
- Standard black wire baskets (various sizes)
- Writable white or cardstock labels
- Small metal label holders (with clips or wires)
- Fine-tip permanent marker or chalkboard pen
- Magnetic strips with adhesive backing (optional, for securing baskets to metal surfaces)
✂️ Equipment Required
- Scissors
- Ruler
???? DIY Instruction Step-by-Step: Labeling and Arranging Wire Organizers
This instruction focuses on creating and affixing the custom labels for a neat presentation.
- Prepare the Labels: Cut your white or cardstock material into neat rectangles to fit inside the metal label holders. Use the fine-tip marker to clearly write the intended contents for each basket (e.g., “Invoices,” “Notebooks,” “Supplies”). Use a neat, consistent handwriting style.
- Insert Labels: Slide the finished labels into the designated slot on the metal label holders.
- Attach to Baskets: Clip the label holders onto the top wire rim of the corresponding basket. Position them in the center of the basket’s front side for maximum visibility and a uniform look.
- Group and Categorize: Sort your desk supplies into the pre-labeled categories. Place tall items, like notepads or binders, into the taller baskets, and smaller accessories into the lower or divided containers.
- Arrange the Baskets: Position the baskets on your shelf or desk. Grouping similar categories together or placing the most-used baskets closest to your chair makes for an efficient workflow.
- Secure (Optional): If your desk is metal, you can apply small adhesive magnetic strips to the bottom of the baskets to prevent them from sliding out of place when pulled or pushed.
7. Two-Tone Rope Baskets with Dividers for Toys

These chunky cotton rope baskets are a colorful and soft option for toy storage in a child’s room or family area. Their substantial size and sturdy handles make cleanup straightforward, even for little hands. The two-tone design, featuring a neutral upper section and a contrasting beige bottom, gives them a grounded, stylish look that works with modern decor.
What truly elevates these baskets is the addition of felt or plastic sectional dividers, which are inserted inside. These dividers create small compartments, turning a simple hamper into a categorized organizer for LEGO bricks, small figurines, craft supplies, and blocks. This stops small parts from getting lost at the bottom.
In the background, bright plastic bins in teal and yellow provide additional, open storage for larger, bulkier toys. The blend of the soft rope baskets with the structured dividers and plastic tubs shows how different container types can work together to manage the diverse needs of a toy collection.
???? Material Required
- Large cotton rope basket
- Felt or thin plastic sheets (in a contrasting color like light blue or grey)
- Strong fabric glue or hot glue gun and sticks
- Ruler or yardstick
- Fabric pencil or marker
✂️ Equipment Required
- Sharp scissors or utility knife
- Sewing clips or clamps (optional)
???? DIY Instruction Step-by-Step: Adding Custom Internal Dividers
This instruction details how to create and install the sectional dividers seen in the image.
- Measure the Basket Interior: Measure the inside diameter (width) of the basket and its inside depth (height). This will determine the dimensions of your divider pieces.
- Plan the Grid: Decide on the number of compartments you need. For a simple four-section grid, you will need two pieces that cross in the middle. For a nine-section grid, you’ll need two sets of cross-pieces.
- Cut the Dividers: Using the felt or plastic, cut long strips equal to the basket’s depth. The length should match the interior diameter. Cut one piece for the horizontal divider and one for the vertical divider.
- Create the Interlocking Slits: In the exact center of one piece (the vertical divider), cut a slit that starts from the top edge and goes halfway down the depth of the material. In the exact center of the second piece (the horizontal divider), cut a corresponding slit that starts from the bottom edge and goes halfway up the depth.
- Test the Interlock: Slide the two pieces together by matching the slits. They should form a tight, standing “X” shape.
- Install and Secure: Place the completed divider grid inside the basket. Use a few dots of strong fabric glue along the bottom edge where the divider meets the basket base to prevent it from spinning or shifting when toys are added. Allow the glue to fully dry before handling or adding items to the basket.
8. Stackable Fabric Storage Boxes for Linens

These uniformly sized, light-colored fabric boxes are placed neatly in shelving units, offering sophisticated containment for bedroom linens. The boxes have a tailored, textured fabric finish that gives a clean, upscale appearance, helping to maintain a serene atmosphere in a linen closet or wardrobe.
The top row features closed boxes with lids, which is beneficial for keeping seasonal items or less frequently used bedding dust-free. The lower boxes are open-top, allowing for quick access to everyday essentials like folded sheets or extra towels.
Each box is equipped with a sturdy fabric handle centered on the front, making it simple to pull them forward and retrieve contents. A small, subtle label slot is integrated just above the handle, providing a spot for identification without cluttering the aesthetic. The organized stacking of towels and a plump pillow demonstrates the ample capacity of this storage system.
???? Material Required
- Structured fabric storage boxes (with or without lids)
- White cardstock or sturdy paper for labels
- Label maker or fine-tip black pen
✂️ Equipment Required
- Scissors
- Ruler
???? DIY Instruction Step-by-Step: Creating and Inserting Labels
This instruction focuses on creating neat, standardized labels for the integrated label slots.
- Measure the Label Slot: Use a ruler to precisely measure the height and width of the small label window on the front of the fabric box. This ensures your labels fit perfectly.
- Design the Labels: Cut the cardstock to the size you measured. Decide on the content for the labels (e.g., “Queen Sheets,” “Bath Towels,” “Winter Blankets”).
- Create the Text: Use a label maker for a professional look, or print the text on the cardstock using a simple, clean font. If writing by hand, use the fine-tip pen and practice to maintain consistent size and neatness across all labels.
- Insert the Labels: Gently slide the completed label into the clear plastic slot or holder on the front of the corresponding box. Ensure it is centered and sitting flat.
- Stock the Boxes: Fold the linens neatly before placing them inside. Rolling towels (as shown in the image) maximizes space and looks attractive. Place heavier items on the bottom shelf and lighter items on top.
- Maintain Consistency: When restocking, ensure all items are placed back into their designated, labeled boxes to maintain the long-term integrity of the organization system.
9. Layered Acrylic and Mirror Beauty Organizers

This sophisticated setup demonstrates how clear acrylic containers can create luxurious and highly functional storage inside a vanity or cupboard. The tiered design of the acrylic trays allows for bottles and jars of varying heights to be displayed efficiently. This prevents products from being lost behind one another, making morning routines much faster.
The use of clear materials maximizes light within the cabinet and gives the display a clean, contemporary feel. The mirrored tray beneath the acrylic risers adds a layer of glamour, reflecting the products and creating a polished presentation. This keeps the cabinet shelf itself protected from spills or drips.
Alongside the clear containers, a pair of square bins with a faux marble finish introduces a touch of classic luxury and opacity, balancing the clear organizers. These opaque boxes are useful for concealing smaller, less aesthetically pleasing items, like cotton balls or cosmetic samples, keeping the overall look neat and curated.
???? Material Required
- Clear acrylic tiered risers or modular storage trays
- Mirrored tray or acrylic shelf liner
- Marble-patterned contact paper or vinyl (if making your own marble box accent)
✂️ Equipment Required
- Utility knife or sharp scissors
- Measuring tape or ruler
- Smooth plastic squeegee (for applying contact paper)
???? DIY Instruction Step-by-Step: Configuring Tiered Vanity Storage
This instruction details how to plan and implement a tiered acrylic organization system.
- Measure the Shelf: Precisely measure the width, depth, and height of the cabinet shelf. Ensure the tallest bottles on the risers will clear the shelf above them.
- Install Mirrored Base: Place the mirrored tray or shelf liner securely on the cabinet shelf. This provides the attractive reflective base for the containers.
- Position the Risers: Place the acrylic tiered risers onto the mirrored surface. If you are using multiple risers, ensure they are spaced logically to hold all your products.
- Arrange Products: Place your tallest products (e.g., pump bottles of lotion or cleanser) on the back, highest tier of the riser. Place medium-sized items (serums, toners) on the middle tiers. Dedicate the front, lowest sections to small jars of cream and miniature bottles.
- Add Opaque Containers: Position any opaque containers, like the faux marble boxes, on the shelf next to the acrylic risers. Use these to store visually unappealing items like cotton pads or travel samples.
- Close the Cabinet: Open and close the cabinet door to confirm that no bottle or jar interferes with the door or hinge mechanism.
10. Bohemian Tasseled Woven Pet Toy Baskets

This trio of hand-woven wicker baskets creates a playful, bohemian look while providing dedicated storage for pet toys. Made from natural fibers like rattan or wicker, these baskets offer a warm texture that contrasts nicely with the neutral rugs and bright door light. The varying sizes allow for different toy capacities, keeping large rope chews separate from smaller balls.
The charming cream-colored tassel fringe running along the rim adds a whimsical, decorative touch, making these containers feel less utilitarian and more like stylish decor pieces. The baskets feature sturdy, curved loop handles that make them simple to carry, allowing you to quickly move them from the living area to the patio.
A custom-stenciled wooden crate sits beside the baskets, clearly labeled with the pet’s name, adding a personal, rustic element to the pet station. The combination of natural textures and custom details ensures the pet’s belongings are managed attractively near an access point like a back door.
???? Material Required
- Woven wicker or rattan baskets (three varying sizes)
- Pre-made fringe or tassel trim (cream or white cotton)
- Strong adhesive (clear craft glue or hot glue gun and sticks)
✂️ Equipment Required
- Measuring tape
- Sharp scissors
- Clips or pins (optional, for temporarily holding the trim)
???? DIY Instruction Step-by-Step: Attaching Tassel Trim to Baskets
This instruction details the simple process of adding a pre-made tassel trim to the woven basket.
- Measure the Circumference: Use the measuring tape to measure the outer circumference of the basket’s rim where you want the trim to sit. If the trim is going around the belly of the basket, measure that specific area.
- Cut the Trim: Cut the tassel trim to the required length, adding about two inches of overlap to allow for a clean joining of the ends.
- Plan the Placement: Decide exactly how high or low on the basket the fringe will sit. Place a few pins or clips to temporarily mark the line, ensuring it is level all the way around.
- Apply the Glue: Starting at the back of the basket (to hide the seam), apply a thin, continuous bead of strong adhesive or hot glue along the line where the top edge of the trim will rest. Work in small sections, about six inches at a time, so the glue doesn’t dry before you place the trim.
- Attach the Trim: Press the trim firmly into the glue, following the basket’s shape. Continue around the circumference, applying glue and pressing the trim down securely.
- Join the Ends: When you reach the starting point, cut the excess trim so that the ends meet neatly, perhaps overlapping one tassel slightly over the other. Secure this final joint with extra glue. Allow the glue to fully set before filling the baskets with pet toys.
11. Tall Woven Rattan Closet Stacking Boxes

These beautiful, tall rattan storage boxes bring warmth and texture to an organized closet system. Stacked three high, they maximize vertical space within the shelving unit, making them exceptionally useful for storing smaller items like socks, scarves, or seasonal accessories. The rich, natural woven material offers an attractive aesthetic that elevates the look of the entire closet.
Each box is secured with a fitted lid and features a cut-out handle on the front for easy access when pulling the unit off the shelf. A small metal label holder is affixed above the handle, allowing for clear identification of the contents, which is essential when stacking. The top box in the right stack is enhanced with a delicate, soft ribbon tied around it, adding a touch of personalized charm.
Sitting adjacent to a clear shoe storage system, these boxes show how mixing different types of containers can create a comprehensive and stylish storage solution. Their uniform size contributes to a clean, custom built-in look within the white shelving.
???? Material Required
- Tall, rectangular woven rattan or wicker storage boxes with lids
- Metal label holders (riveted or glued onto the box)
- Cardstock or white paper for labels
- Fine satin or grosgrain ribbon (optional, for decorative accents)
✂️ Equipment Required
- Ruler and scissors
- Hole punch (if using ribbon)
- Label maker or fine-tip pen
???? DIY Instruction Step-by-Step: Stacking and Labeling for Closets
This instruction details how to label and customize the rattan boxes for vertical closet organization.
- Prepare the Labels: Measure the size of the metal label holder on the front of the boxes. Cut your cardstock to fit and use a label maker or neat handwriting to clearly print the contents (e.g., “Scarves,” “Belts,” “Socks”). Slide the finished labels into the holder on each box.
- Determine Stacking Order: Decide which items will go in the top, middle, and bottom boxes. Place heavier or less-used items in the bottom boxes for stability and easier access to the items you grab often.
- Load and Place: Place the corresponding items into the labeled boxes. Ensure the contents do not bulge or prevent the lid from closing flat. Stack the boxes securely on the shelf, ensuring they are flush against the back wall.
- Add Ribbon Accent (Optional): Take a length of ribbon long enough to wrap around the top box with enough left over for a bow. Center the ribbon horizontally around the box, just under the lid. Overlap the ribbon at the front and tie a neat, symmetrical bow.
- Secure the Stack: If the boxes slide or wobble, you can place a small square of non-slip shelf liner or a bit of mounting putty between the lid of the lower box and the base of the upper box to ensure the stack remains stable.
12. Galvanized Wire Baskets for Craft Supplies

These open-top, galvanized metal wire baskets provide excellent, easily viewable storage for craft and hobby materials. Their sturdy, industrial aesthetic adds a strong visual element to the shelving unit, while the open wire structure allows light to pass through, keeping the storage area bright.
The baskets hold various glass jars filled with small crafting components like beads, buttons, and decorative accents. Using clear jars within the wire containers makes it effortless to see the color and quantity of the contents without opening anything. This pairing of metal and glass delivers a functional and visually interesting display.
Each basket features a small chalkboard hanging tag clipped onto the front wire rim. These tags are useful for quick labeling, indicating categories like “Group 1” or “Beads,” and they can be wiped clean and rewritten when the contents change. Beneath the wire shelves, structured fabric drawers offer concealed storage for bulkier items.
???? Material Required
- Galvanized wire baskets (various sizes)
- Small chalkboard tags with clips or string
- Chalk or liquid chalk marker
- Assorted clear glass jars with lids (for small supplies)
✂️ Equipment Required
- None
???? DIY Instruction Step-by-Step: Organizing Small Craft Items
This instruction focuses on using the combined system of jars and baskets for efficient craft organization.
- Categorize Supplies: Sort all your small craft items (beads, glitter, buttons, findings) into logical groups. Decide which supplies are visually appealing enough for clear jars and which need opaque storage.
- Fill the Jars: Place the small items into the clear glass jars. Avoid mixing unrelated items in the same jar. Seal the lids tightly.
- Load the Baskets: Arrange the filled jars neatly inside the wire baskets. Place taller jars toward the back and shorter jars or containers toward the front for better visibility.
- Prepare and Label the Chalkboards: Use the chalk marker to clearly write the category or contents of the basket onto the chalkboard tags. Keep the text concise and easy to read.
- Attach the Tags: Clip or tie the labeled chalkboard tags securely to the front wire rim of the corresponding basket. Ensure the tags are centered and hang straight for a tidy presentation.
- Position on Shelves: Place the baskets onto the shelving unit. Arrange them so frequently used items are easily reachable, usually on the lower or front shelves.
13. Woven Laundry Hampers with Canvas Liners

This set of matching, tall woven hampers offers a stylish and organized way to sort laundry before wash day. Constructed from a natural material like water hyacinth or seagrass, the baskets introduce a lovely, textured element to the laundry room or bedroom. They are lined with thick, removable white canvas, which protects the woven material and is simple to wipe clean.
The round openings and sturdy rope loop handles make it easy to toss clothes inside and move the hamper when full. The matching sizing and uniform look give the grouping a neat, intentional appearance, unlike scattered, mismatched bins.
Custom wooden placards are securely attached to the front of each basket using twine, boldly stenciled with “WHITES” and “DARKS.” This clear labeling system streamlines the sorting process, making laundry management efficient for everyone using the space.
???? Material Required
- Tall, woven hampers with removable canvas liners
- Thin wooden tags or flat rectangular pieces of wood
- Black stencil paint or permanent paint marker
- Stencils for letters (“WHITES,” “DARKS”)
- Natural twine or jute rope
✂️ Equipment Required
- Small paintbrush or sponge (for stenciling)
- Ruler
- Power drill with a small drill bit (for the wooden tags)
???? DIY Instruction Step-by-Step: Stenciling and Attaching Wooden Laundry Labels
This instruction details how to create and affix the customized laundry sorting labels.
- Prepare the Wooden Tags: Drill two small holes, one on the top left and one on the top right of each wooden tag. Ensure the tags are clean and dry before painting.
- Stencil the Labels: Place the letter stencils onto the center of a wooden tag. Hold the stencil down firmly or secure it with painter’s tape. Use a small amount of stencil paint on your brush or sponge and lightly dab the paint over the stencils. Apply two thin coats if needed.
- Dry and Remove Stencil: Carefully lift the stencil immediately after painting. Allow the paint to dry completely. Repeat the stenciling process for all tags (“WHITES,” “DARKS,” etc.).
- Cut the Twine: Cut two pieces of twine for each basket, about 10 inches long each. These will be used to attach the tag to the basket.
- Attach the Tag: Thread one piece of twine through each hole on the wooden tag. Find a sturdy, low-profile woven spot on the front of the corresponding hamper. Wrap the twine ends around the woven material and tie them in a tight, double knot, ensuring the tag hangs straight and flat against the basket. Trim any long excess twine.
- Secure the Liner: Ensure the canvas liner is pulled up and wrapped neatly over the rim of the hamper, keeping the shape tidy.
14. Woven Rattan Media Console Bins

These dark-toned, rectangular rattan baskets fit perfectly into the cubbies of a media console, offering beautiful concealment for electronics, controllers, and cables. The tightly woven material hides clutter while still allowing for some airflow, which is helpful when storing media equipment. The natural texture softens the look of the wood shelving unit.
Each bin features a rectangular cut-out on the front, acting as an easy grip handle, allowing the baskets to be pulled out smoothly when you need to access items. A small leather-look strap handle is affixed just above the cutout, secured by metal rivets, providing an additional layer of style and utility.
Inside the upper bins, various remote controls and small chargers are neatly stored, keeping the top of the console clear. The lower bins contain bulkier items like tangled cables, gaming accessories, and small media players. This organizational solution keeps the living space tidy without compromising the functional needs of an entertainment center.
???? Material Required
- Rectangular woven rattan or seagrass storage boxes
- Faux leather strap material (approximately 1 inch wide)
- Small metal rivets or brass thumb tacks
- Strong adhesive (optional, for extra security)
✂️ Equipment Required
- Hole punch (for the leather strap)
- Ruler and scissors
- Hammer (if using rivets)
- Screwdriver (if using screw-in hardware)
???? DIY Instruction Step-by-Step: Adding Custom Faux Leather Handles
This instruction details how to add the decorative and functional faux leather pull handles.
- Measure and Cut the Straps: Determine the length you want for your handle loop. Cut the faux leather strap into strips of equal length (e.g., 6 to 8 inches each).
- Punch the Holes: On both ends of each strap, punch a small hole for the rivet or attachment hardware. Ensure the holes are positioned evenly and symmetrically.
- Position the Handle: Center the strap vertically on the front of the basket, directly above the existing cut-out handle. Mark the two attachment points on the woven material with a pencil.
- Attach the Hardware: Fold the strap into a loop.
- Using Rivets: Push the rivet post through the hole in the strap and through the basket material at the marked point. Place the cap on the other side and use a hammer to securely fasten the rivet, locking the strap in place.
- Using Adhesive/Tacks: Apply a small amount of strong adhesive to the underside of the strap ends, then press the strap firmly onto the basket. For extra flair, use a decorative brass thumb tack or small screw-in piece of hardware at each end of the strap loop.
- Repeat and Finish: Repeat the process for all baskets, ensuring the handle placement is uniform. Allow any adhesive used to fully cure before pulling on the handles.
15. Chrome Wire Pull-Out Refrigerator Bins

These polished chrome wire baskets are specifically designed for organization within deep shelving units, such as a pantry, freezer, or refrigerator. The open wire construction provides excellent visibility and airflow, which is particularly beneficial for food storage. The durable metal ensures they can handle heavy contents.
The bins feature an integrated rail system or small wheels, allowing them to function like pull-out drawers. This is especially useful in deep spaces, eliminating the need to reach far into the back of the shelf to access items. Pulling the bin forward brings the contents instantly into view.
A simple white label is attached to the front of each basket, clearly identifying the contents. The labels use block letters for easy reading. These containers help categorize stored items, keeping different types of food or supplies separate and making inventory quick and simple.
???? Material Required
- Wire baskets (sized for refrigeration/pantry use)
- Rolling casters or drawer-slide hardware (if customizing)
- Vinyl or laminated labels (designed to withstand cold/moisture)
- Permanent marker or label maker
✂️ Equipment Required
- None (if using pre-made rolling baskets)
- Screwdriver or power drill (if installing drawer slides)
???? DIY Instruction Step-by-Step: Labeling and Implementing Wire Fridge Storage
This instruction focuses on effective labeling and setup for a cold environment.
- Measure the Space: Precisely measure the width, depth, and height of the shelf space where the baskets will be placed. This prevents purchasing baskets that are too large or tall.
- Categorize Items: Decide what specific items will be grouped into each basket (e.g., “Snacks,” “Dairy,” “Frozen Vegetables”).
- Create Moisture-Resistant Labels: Use a label maker with waterproof tape, or create labels on paper and then laminate them. Write the category name clearly using a clean font. Paper labels in a cold environment will quickly become damp and illegible.
- Attach the Labels: Affix the waterproof labels to the designated metal label holder on the front of each basket. Ensure they adhere well to the metal surface.
- Load the Baskets: Place the categorized items into the wire baskets. Load heavier items on the bottom of the basket for stability.
- Test the Movement: Slide the filled baskets into the refrigerator or pantry. Pull each basket forward and push it back several times to ensure the rolling or sliding mechanism works smoothly when loaded.
16. Two-Tone Rope Organizer Caddy for Baby Supplies

This compact, two-tone cotton rope caddy is a charming and practical way to keep baby essentials organized on a changing table or dresser. The white and gray rope design matches the nursery’s serene, neutral aesthetic. The small size makes it portable, allowing the caddy to be moved easily to where it is needed most.
The caddy features a built-in divider down the center, which helps separate different types of supplies, such as clean diapers, folded washcloths, and various baby care products. The soft rope construction is gentle and won’t scratch furniture surfaces.
A woven rope handle spans the top opening of the caddy, making it simple to lift and carry with one hand. A decorative ribbon wraps around the center, adding a sweet detail, and a small, oval-shaped tag is attached to the ribbon, offering a spot for a name or category label. This keeps all necessary items conveniently grouped and accessible.
???? Material Required
- Small cotton rope caddy with an integrated divider and lid
- Decorative ribbon (satin or grosgrain)
- Small oval wooden or faux leather tag
- Fine-tip pen or vinyl letters
- Fabric glue or sewing needle and thread
✂️ Equipment Required
- Scissors
- Ruler
???? DIY Instruction Step-by-Step: Customizing a Rope Caddy with Ribbon and Tag
This instruction details how to add the decorative ribbon and identification tag to the caddy.
- Measure and Cut the Ribbon: Measure the full circumference of the caddy. Cut the ribbon to this length, adding a generous overlap (about 6 inches) for securing the ends.
- Secure the Ribbon: Apply a thin line of fabric glue around the center of the caddy, along the color change line. Carefully wrap the ribbon around the circumference, pressing it gently into the glue. Overlap the ends neatly at the back and secure the final piece with a strong dot of glue.
- Prepare the Tag: Write the label (e.g., “Diapers,” “Wipes,” or the baby’s name) neatly onto the small tag using a fine-tip pen or apply pre-cut vinyl letters.
- Attach the Tag: Decide on the placement for the tag, typically centered on the front. Use a small amount of fabric glue to attach the tag directly onto the ribbon, ensuring it is straight and secure. Alternatively, you can sew the tag onto the ribbon for a more durable attachment.
- Load the Caddy: Place bottles and creams in one section and folded items like wipes and washcloths in the other. Keep the most frequently used items facing the direction you usually approach the changing table.
- Use the Lid: Close the caddy lid to keep the contents dust-free and maintain a tidy appearance on the dresser or changing station.
17. Industrial Galvanized Garden Tool Storage

This collection of galvanized metal baskets provides rugged, weatherproof storage for gardening tools and supplies. The combination of a solid metal body encased in a wire grid gives the large basket exceptional durability and a classic farmhouse or industrial aesthetic. This top basket is clearly labeled with a large wooden “SEEDS” tag.
The wide, sturdy metal handle on the top bin allows for easy portability, making it simple to carry tools out to the garden bed. The basket is deep enough to hold a variety of items, including hand trowels, cultivators, and work gloves.
Below the main bin, two smaller, open wire baskets sit on small metal feet, providing stable, elevated storage. One holds a terra cotta pot containing additional tools, and the other is sized perfectly to file packets of seeds, keeping them upright and organized for browsing.
???? Material Required
- Galvanized metal basket (square or rectangular)
- Rustic wooden placard (for the label)
- Black stencil paint or permanent paint marker
- Natural twine or jute rope
- Heavy-duty spray sealer (optional, to protect the wood from moisture)
✂️ Equipment Required
- Hole punch or drill (for the wooden tag)
- Small paintbrush or sponge (for stenciling)
- Scissors
???? DIY Instruction Step-by-Step: Creating a Rustic Garden Tool Label
This instruction details how to create and affix the large, rustic wooden “SEEDS” label.
- Prepare the Wooden Tags: If the wooden tag is plain, you may wish to lightly sand it or distress it for a rustic look. Drill a small hole on the left and right side of the tag’s top edge.
- Stencil or Write the Word: Using a stencil or confident freehand, paint the word “SEEDS” (or “TOOLS,” “GLOVES”) clearly on the wooden tag with black stencil paint. Allow the paint to dry fully. If desired, spray the tag with a clear sealer to protect it from outdoor moisture.
- Cut the Twine: Cut a generous length of twine (e.g., 24 inches).
- Attach the Tag: Thread the twine through the two holes in the wooden tag. Tie the twine around a visible, sturdy section of the galvanized wire grid on the front of the main basket. Ensure the knots are tight and positioned discreetly behind the tag, allowing the label to hang slightly suspended and straight.
- Load the Baskets: Sort tools by type. Place large, sturdy tools in the main galvanized bin. Use the smaller wire baskets for items that need to be kept dry and upright, like seed packets, or use them to contain small terra cotta pots holding hand tools.
18. Divided Woven Caddy for Toilet-Top Storage

This decorative, segmented woven basket is designed for convenient and aesthetically pleasing storage right on the back of the toilet tank. The tightly woven natural fibers, featuring a striking chevron pattern of natural tan and dark blue, add a beautiful global texture to the bathroom space.
The oval-shaped caddy has a removable, hinged lid, which helps conceal some contents while still keeping them easily accessible. Inside, the caddy is divided into sections, which is highly useful for separating various bathroom essentials like a fresh roll of toilet paper, neatly rolled hand towels, and small amenities like mouthwash and soaps.
Its design makes it a thoughtful way to organize guest bathroom supplies or simply keep everyday items within easy reach. Small bottles of lotion and bamboo toothbrushes are lined up in the central compartment, showing how even small items can be contained stylishly.
???? Material Required
- Woven basket with a segmented interior and lid (the base item)
- Small glass bottles with caps (for lotions or mouthwash)
- Small white cotton washcloths or towels
- Guest-sized toiletries (bamboo toothbrushes, travel toothpaste)
✂️ Equipment Required
- None
???? DIY Instruction Step-by-Step: Curating a Stylish Toilet-Top Amenity Caddy
This instruction details how to arrange the contents of the caddy for maximum function and style.
- Clean the Basket: Wipe the inside of the basket clean to remove any dust or debris.
- Categorize the Segments: Assign a category to each of the basket’s sections. For example, one side for linens, the center for personal care items, and the remaining space for toilet paper.
- Roll the Towels: Take the small white washcloths or hand towels and roll them tightly and neatly. Place these rolls standing upright in the designated linen section of the caddy. Rolling them conserves space and provides a polished look.
- Arrange Personal Items: Line up items like bamboo toothbrushes, tubes of toothpaste, and cotton swabs in the center compartment. Use the small bottles to decant mouthwash or lotions, ensuring they are tightly capped to prevent spills.
- Position the Essentials: Place the fresh roll of toilet paper in its assigned section. If you are adding other items like linen sprays or air fresheners, position them neatly.
- Place and Enjoy: Carefully set the filled caddy on the back of the toilet tank, centered and stable.
19. Light Gray Cube Storage Bins for Wardrobes

These soft, light-gray fabric storage cubes are stacked neatly within a white wardrobe shelving unit, demonstrating a clean and minimalist approach to storage. The uniform color and size of the bins create a wall of organized texture, which is calming and attractive.
The cubes feature a lid that closes over the top, keeping the contents completely protected from dust and out of sight. The structural framing ensures the boxes hold their square shape even when not completely full.
A contrasting dark leather-look pull handle is centered on the front of each box, secured with metal hardware, offering a strong grip point for pulling the bin forward. Above the main rows of gray cubes, a row of natural woven wicker baskets adds a complementary layer of texture, preventing the closet from looking too monotone or sterile.
???? Material Required
- Structured fabric storage cubes with lids
- Decorative pull handles (faux leather or fabric webbing)
- Small metal hardware (screws or rivets, if changing handles)
✂️ Equipment Required
- Ruler
- Screwdriver or rivet setting tool (if replacing/installing hardware)
- Scissors
???? DIY Instruction Step-by-Step: Maximizing Cube Bin Shelf Space
This instruction focuses on ensuring the bins fit and function correctly within the shelf unit.
- Measure the Cubby: Measure the height and width of the shelf cubby to confirm the boxes fit exactly. If the boxes are too tight, they will be difficult to pull out. If they are too small, there will be wasted space.
- Determine Contents: Assign categories to the bins (e.g., “Sweaters,” “T-Shirts,” “Off-Season Items”). Place heavier items on lower shelves and lighter items on top.
- Fold Uniformly: Ensure all clothing or items placed inside the bins are folded consistently using a method like the file fold. This prevents items from sliding out when the bin is pulled forward and maximizes the internal volume.
- Load Evenly: Fill the bins evenly. Avoid overpacking, which can distort the box shape and make it difficult to secure the lid properly.
- Placement: Push the filled and closed boxes all the way back into the cubbies so they are flush with the front edge of the shelf. This creates the neat, continuous look seen in the image.
- Maintain: Regularly check the bins for items that need refolding or are in the wrong place to maintain the system’s long-term organization.
20. Clear Modular Trays for Desk Drawer Supplies

This image displays the effectiveness of using small, clear acrylic trays to organize an office drawer. The various rectangular shapes and sizes are fitted together to create custom-sized compartments for different types of small office supplies. This system is set within a drawer framed with a beautiful, warm wooden trim, adding a natural contrast.
The transparent material allows for instant identification of the contents, which include large silver binder clips and smaller blue paper clips. Separating these small items into their own bins prevents them from mixing together in a messy pile, saving time when working.
The modular nature means the arrangement can be easily changed if the contents of the drawer shift. The empty clear space behind the filled trays provides flexibility, allowing for a longer item or another container to be placed there later. This technique is an excellent way to maintain order in a busy workspace.
???? Material Required
- Clear acrylic drawer organizer trays (various small sizes)
- Non-slip grip liner (optional, to prevent trays from moving)
✂️ Equipment Required
- Measuring tape or ruler
- Calculator or graph paper (for planning)
???? DIY Instruction Step-by-Step: Organizing Small Desk Drawer Items
This instruction focuses on measuring and implementing the clear, modular drawer system.
- Measure the Drawer Space: Carefully measure the interior width, depth, and height of the drawer. Note the dimensions of the wooden frame or any fixed hardware to ensure the trays do not interfere.
- Plan the Arrangement: Using your measurements, determine the required sizes of the clear trays. Sketch a layout on paper, or arrange the empty trays within the drawer to find the most efficient pattern that leaves minimal gaps.
- Place Non-Slip Liner (Optional): If the trays slide around when the drawer is opened, cut a piece of non-slip grip material to fit the bottom of the drawer and lay it flat.
- Install the Trays: Place the largest trays first, followed by the smaller ones, fitting them snugly against each other according to your planned configuration.
- Load the Supplies: Sort your small office supplies. Place paper clips in one bin, binder clips in another, thumb tacks in a third, and so on. Fill the bins to a level that allows the drawer to close without snagging the contents.
- Test and Refine: Close and open the drawer a few times to ensure the trays do not shift. Adjust the contents or tray placement if any movement or jamming occurs.
21. Slim Wire Baskets for Vertical Packet Storage

These slender, chrome-finished wire baskets are expertly utilized for vertical storage of dry mixes and spice packets in a pantry. Their narrow shape is exactly right for filing items like taco seasoning and gravy mixes, preventing them from ending up in a messy pile on a shelf. The open wire structure allows you to quickly see the quantity of remaining packets.
The packages are stood upright, maximizing the vertical space and keeping the labels visible for easy access. They are contained within separate baskets, which prevents cross-contamination of scents and simplifies categorization.
A classic, framed label holder is affixed to the front of each basket, clearly identifying the contents. The basket on the left holds yellow “Taco Seasoning” packets, while the right basket contains “Yeast” and gravy mixes. This system keeps small, flimsy packets tidy and accessible alongside other pantry containers.
???? Material Required
- Slim wire baskets (approximately 4 to 6 inches wide)
- Metal label holders (riveted or with clips)
- Cardstock or white paper for labels
- Fine-tip permanent marker or label maker
✂️ Equipment Required
- Scissors and ruler
???? DIY Instruction Step-by-Step: Organizing Packets and Mixes
This instruction details how to use the wire baskets to contain and categorize dry mix packets.
- Categorize the Packets: Group all your small seasoning, gravy, yeast, and spice packets by function or type. Assign a category to each basket (e.g., “Baking,” “Dinner Mixes,” “Taco”).
- Cut and Insert Labels: Measure the label holders. Cut the cardstock to size and use your label maker or neat writing to clearly print the category name for each basket. Insert the finished labels into the holders.
- Place the Baskets: Position the empty, labeled baskets on the pantry shelf.
- Load the Packets: Place the packets into their assigned baskets vertically, facing forward. If the packets are all the same size, line them up neatly. If they are different heights, place the tallest ones in the back. The goal is for the packets to stand up straight.
- Use Dividers (Optional): If the baskets are too wide for the packets, you can insert a small piece of stiff cardboard or acrylic sheet vertically inside the basket to act as a spacer, keeping the packets packed tightly together.
- Maintain the System: When grocery shopping, place new packets directly into their labeled basket. Check the front label to ensure the correct contents are inside before putting them on the shelf.
22. Tall Woven Hamper for Fitness Gear

This generously sized, tall woven hamper serves as a convenient and attractive vessel for storing home fitness equipment. Made from a natural, sturdy woven material, it introduces a beautiful organic texture to the corner of a room, preventing exercise equipment from looking messy.
The cylindrical shape and substantial height are exactly right for containing awkwardly shaped items like yoga mats and foam rollers, which are often difficult to store neatly. The dark gray and black of the equipment contrast subtly with the light, natural weave of the basket.
Integrated cut-out handles at the top of the basket allow for simple relocation. Small accessories, such as bright blue hand weights and a textured massage roller, are placed at the top, making them easy to grab for an impromptu workout. This solution keeps workout essentials together yet visually concealed.
???? Material Required
- Tall, deep woven basket or hamper
- Foam roller and yoga mat
- Resistance bands or small hand weights
✂️ Equipment Required
- None
???? DIY Instruction Step-by-Step: Organizing Vertical Fitness Equipment
This instruction focuses on efficiently loading tall equipment into a hamper for corner storage.
- Roll the Mats: Roll the yoga or exercise mats as tightly as possible. Use a strap or large elastic band to keep them secured in a compact cylinder shape.
- Place Tall Items First: Position the rolled mats and any tall foam rollers vertically into the center of the basket. Placing them first provides a stable base and utilizes the full height of the container.
- Add Medium Items: If you have resistance bands, fold or roll them neatly and place them around the base of the taller items. If you have a small towel, roll it and place it along the side.
- Top with Small Weights: Place small hand weights or ankle weights gently around the top rim of the basket. Positioning them near the top makes them quickly accessible for use.
- Test the Lift: Use the handle cutouts to lift the basket slightly. Ensure the contents are balanced and do not shift or cause the basket to tip over. If the basket is wobbly, place heavier items lower down inside.
23. Covered Wicker Bins for Hair Tools

These two round, lidded wicker bins offer a charming and safe solution for storing hot hair styling tools beneath a bathroom vanity. The tight, natural weave of the bins, coupled with the light canvas liner peeking over the rim, gives them a coastal, appealing appearance.
The lids are essential here, as they conceal the less attractive bulk of blow dryer cords and curling irons. Keeping the tools contained and covered helps prevent dust accumulation in the cabinet. One lid is clearly visible on the lower shelf, featuring a decorative rope tie.
Above the wicker bins, a clear acrylic box holds a hair dryer and brush, showcasing how mixing clear containers with opaque woven baskets creates a versatile storage plan. This system is functional for keeping the tools readily available while keeping the counter clear of clutter.
???? Material Required
- Round woven wicker baskets with lids and liners
- Heat-resistant silicone or rubber mat
- Ribbon or rope for lid accent
✂️ Equipment Required
- None
???? DIY Instruction Step-by-Step: Safe Storage for Hair Tools
This instruction details how to safely use the covered baskets for hair styling tools.
- Pre-Heat Safety: Before storing any heat-generating tool (curling iron, straightener), allow it to cool completely. Never store a warm tool in a woven or fabric basket; this poses a safety risk.
- Cord Management: Gently coil the cords of the hair tools. Use a small velcro strap or twist tie to secure the coils, preventing the cords from tangling with other items inside the basket.
- Place the Mat: Place a heat-resistant silicone or rubber mat on the bottom of one of the wicker baskets. This provides a protective barrier, even when you are certain the tool is cool.
- Load the Tools: Place one or two of your cooled styling tools into the basket with the protective mat. Use the second basket for smaller items like brushes, hairspray, or extra accessories.
- Secure the Lid: Place the lid firmly on the basket. If desired, use a small piece of ribbon or rope to tie a simple decorative knot on the lid handle, adding a finishing touch.
- Maintain the Spot: Keep the heat-resistant mat handy on the counter when using the tools, then let the tools cool on the mat before returning them to the basket.
24. Black Wire Bins for Under-Sink Cleaning Supplies

These sturdy black wire baskets are cleverly used beneath the kitchen or laundry sink to organize cleaning supplies and utility linens. The dark, powder-coated finish gives the area a modern, slightly industrial feel. The wire grid structure is advantageous under a sink, as it allows for ventilation and makes spills easy to spot.
The baskets feature large, open handles integrated into the frame, making them simple to pull out from the depths of the cabinet to access the supplies. The right-hand basket is filled with stacks of neatly folded gray cleaning towels, while the left basket holds a variety of spray bottles and large containers of cleaner.
The varying heights of the bottles are accommodated by the open-top design. By grouping tall bottles and soft linens into separate bins, the system prevents items from toppling over, creating a much tidier and safer under-sink storage zone.
???? Material Required
- Black powder-coated wire baskets (two or more, with handles)
- Cleaning products and utility linens
✂️ Equipment Required
- None
???? DIY Instruction Step-by-Step: Under-Sink Cleaning Caddy Setup
This instruction details how to arrange cleaning supplies for accessibility beneath the sink.
- Clear and Clean: Empty the under-sink area completely. Wipe the floor and walls of the cabinet with a cleaning solution to ensure a fresh, clean start.
- Categorize Supplies: Sort your cleaning supplies into functional groups: chemicals/sprays, scrub brushes/sponges, and linens/rags.
- Assign Bins: Assign one basket for bottles and liquids and another for folded linens and rags. If you have many small tools, a third basket may be required.
- Load the Bottle Bin: Place the tallest bottles toward the back of the wire bin, preventing them from interfering with the sink pipe. Place smaller bottles toward the front. Ensure all bottle caps are securely tightened before placing them in the basket.
- Load the Linen Bin: Fold all cleaning rags and towels into uniform rectangles. Stand them vertically inside the basket (like file folding) so you can pull out one towel without disturbing the stack.
- Position the Bins: Slide the filled baskets into the cabinet. Keep the most frequently used items (like daily counter spray) in the bin that is easiest to access, usually positioned toward the front opening.
25. Soft Rope Baskets for Children’s Books

These generous, creamy-white cotton rope baskets are used as stylish containers for children’s books on open shelving. The soft, textured material is tactile and child-friendly, providing a safe and inviting way to organize a library. The neutral color complements the white shelving unit beautifully.
The books are stored vertically, facing outward, which helps small children browse and select titles independently. Storing books this way, rather than stacking them flat, also prevents bending or damaging the covers.
A built-in handle cutout on the front of each basket makes it simple to slide the container out when necessary. The baskets on the lower shelf are filled with a mix of colorful books, providing vibrant visual interest. One basket on the upper right even appears to have a small cardboard divider inserted to help keep different categories of books separated.
???? Material Required
- Large, sturdy cotton rope baskets with cut-out handles
- Stiff cardboard or acrylic sheet (for internal divider, optional)
- Colorful children’s books
✂️ Equipment Required
- Ruler and scissors (if creating dividers)
???? DIY Instruction Step-by-Step: Organizing Books for Children
This instruction details how to use the rope baskets to create an accessible, front-facing book display.
- Assess the Collection: Group books by size, reading level, or genre. Aim for one category per basket to prevent the baskets from getting overcrowded.
- Load Vertically: Place the books vertically inside the basket with the spine facing toward the top of the basket and the cover facing outward toward the room. This “browsing” method encourages kids to select books based on their cover art.
- Use Dividers (Optional): If a basket is quite long, you can insert a piece of stiff cardboard or thin acrylic to create two smaller sections. This is particularly helpful for separating very small board books from taller picture books.
- Place the Baskets: Position the heaviest or most frequently used books on the lowest shelves, making them easiest for small children to reach safely.
- Maintain Tightness: Try to keep the basket filled somewhat snugly. If the basket is too empty, the books will lean and fall over, defeating the purpose of the organization. If necessary, place a small, heavy item like a wood block at the back to help prop the books up.
26. Woven Basket with Yarn Port for Knitting

This beautifully rounded, tightly woven basket is specifically set up for yarn and knitting or crochet projects. Its substantial size can easily hold several skeins of yarn and a partially completed project. The natural fiber material adds a welcoming, cozy texture to a living room corner.
A clever feature is the small, reinforced circular opening or “yarn port” visible on the side of the basket. This opening allows the yarn strand to feed through easily while the ball remains securely inside, preventing the yarn from rolling away across the floor during use.
The decorative element is further enhanced by an attached string of wooden beads and matching yarn tassels, adding a lovely handcrafted touch. The basket is shown full of soft, gray and cream-colored yarn and knitting needles, making it an attractive yet fully functional storage piece.
???? Material Required
- Round woven basket
- Small wooden beads and yarn (for tassels)
- Drill and appropriately sized drill bit (if adding a yarn port)
- Strong glue or sewing thread (if adding tassels)
✂️ Equipment Required
- Scissors
- Ruler
- Power drill with a wood/plastic bit
???? DIY Instruction Step-by-Step: Adding a Yarn Port and Decorative Tassels
This instruction details how to customize a woven basket for knitting or crochet.
- Create the Yarn Port: Choose a spot on the side of the basket, about halfway down. If the basket is woven over a rigid frame, use a small drill bit to create a perfectly sized, smooth hole. If it is only woven fiber, carefully cut a small circle, reinforcing the edges with a strong, clear glue to prevent the fibers from unraveling. The hole should be large enough for the yarn to pass through easily.
- Make the Tassels: Wrap yarn repeatedly around a piece of cardboard to the desired length. Tie a thread tightly around one end, and cut the loop at the other end. Create two tassels.
- String the Beads: Take a length of thin twine or strong thread. Tie one tassel to one end. Thread three to five wooden beads onto the twine. Tie the second tassel to the other end of the twine.
- Attach the Decoration: Tie the unattached section of the bead strand securely to a loop or handle near the rim of the basket. Ensure it is placed where it won’t interfere with the yarn feeding through the port.
- Load the Project: Place the yarn balls inside. Feed the working end of the yarn strand through the yarn port before you begin knitting or crocheting.
27. Rattan Baskets for Linen Cabinet Organization

This linen cabinet is expertly organized using warm, tightly woven rattan baskets, providing an elegant solution for concealed storage. The rich, golden-brown color of the rattan introduces a beautiful, natural warmth against the dark-gray interior of the cabinet.
The rectangular boxes are sized to fit the cabinet shelves perfectly, maximizing the available space. Two open-top bins are used on the bottom shelf, holding stacks of neatly folded napkins and washcloths. Above them, two lidded boxes are used to keep less frequently used linens, such as doilies or specialized cloths, protected from dust.
Each basket is labeled with a small, dark metal label holder secured to the front, clearly identifying the contents. The metal holders contrast sharply with the rattan material, ensuring labels are visible. The top shelf displays neat stacks of plates and cups, demonstrating how the baskets integrate seamlessly with dishware storage.
???? Material Required
- Rectangular rattan storage boxes (some with lids, some without)
- Small, dark-colored metal label holders
- White cardstock for labels
- Label maker or fine-tip pen
✂️ Equipment Required
- Scissors and ruler
???? DIY Instruction Step-by-Step: Integrating Rattan into Cabinetry
This instruction focuses on efficiently using both lidded and open rattan bins within a cabinet.
- Measure and Fit: Confirm the rattan boxes fit precisely within the cabinet depth and width. Ensure the doors can close smoothly, particularly if using boxes with lids on shelves near the door hinge.
- Assign Functions: Designate the lidded boxes for long-term or dust-sensitive storage (e.g., seasonal linens, heirloom items). Reserve the open-top boxes for everyday essentials (e.g., daily napkins, hand towels).
- Prepare the Labels: Measure the metal holders. Create crisp, professional labels using a label maker with text like “Daily Napkins,” “Guest Towels,” or “Seasonal.” Insert the labels into the metal holders and secure the holders to the front of the corresponding basket.
- Fold and Load: Fold all linens into consistent, uniform rectangles or squares. Stand folded items vertically in the open-top bins for a cleaner look and easier access, as seen in the image. Load the lidded boxes and ensure the lids close fully.
- Position the Baskets: Place the boxes on the cabinet shelves. Positioning the open-top bins lower makes daily access simpler, while placing the lidded bins higher maximizes dust protection.
28. Heavy-Duty Labeled Bins for Car Trunk Safety

These sturdy, square fabric bins are specially designed to organize essential items in the trunk of a car. Made from thick, durable fabric, the dark color provides discreet storage, blending well with the car’s interior. The structured design ensures they maintain their shape even when partially filled.
These bins are placed on top of a gray plastic storage crate, which helps elevate them and provides an additional layer of ventilated storage underneath. The use of both a soft bin and a hard crate maximizes utility for different types of equipment.
Crucially, the bins are clearly labeled in bold, white block letters. One box holds “FIRST AID” supplies, and the other is marked for “STREET TIPS” (presumably tools or roadside equipment). The heavy-duty carrying handles on the sides make them simple to lift out when needed for roadside emergencies.
???? Material Required
- Structured, dark-colored fabric storage bins
- White iron-on vinyl or permanent white paint markers
- Stencils (for large block letters)
- Small plastic or wire crate (for the base)
✂️ Equipment Required
- Iron or heat press (for iron-on vinyl)
- Ruler and scissors
- Small paintbrush or stencil sponge
???? DIY Instruction Step-by-Step: Customizing Fabric Bins for the Trunk
This instruction details how to add the custom, durable labels to the fabric bins.
- Prepare the Surface: Ensure the fabric bins are clean and free of dust. Place a piece of stiff cardboard inside the bin while applying the labels to prevent the fabric from stretching or the material from bleeding through.
- Apply Stencil/Vinyl: Decide on the exact centered placement of the label.
- Using Stencils and Paint: Secure the letter stencils onto the fabric using painter’s tape. Use a very small amount of white paint on a sponge and dab straight up and down to apply the paint, preventing bleeding under the stencil. Allow paint to dry.
- Using Iron-On Vinyl: Cut the letters from iron-on vinyl. Place the vinyl letters on the fabric and carefully use an iron or heat press according to the vinyl manufacturer’s directions to adhere the labels firmly.
- Load the Safety Items: Fill the “FIRST AID” box with bandages, antiseptic wipes, emergency contact lists, and any essential medications. Fill the “STREET TIPS” box with jumper cables, a flashlight, spare fluids, and basic hand tools.
- Position in the Trunk: Place the plastic crate down first, then place the filled fabric bins securely on top of the crate. If your trunk floor is carpeted, you may wish to use velcro strips on the bottom of the crates to keep them from sliding around.
29. Clear Acrylic Bins for Closet Handbag Display

This sophisticated closet arrangement uses clear, structured acrylic bins to store and showcase handbags, folded sweaters, and other accessories within custom wardrobe cubbies. The clear material offers dust protection while keeping the beautiful accessories fully visible.
The bins are uniformly sized and fit precisely into the cubby openings, maximizing the visual flow of the display. The transparent bins on the bottom row hold handbags upright, ensuring they keep their shape and preventing them from getting crushed by other items.
On the upper shelves, the cubbies are used without bins to display folded sweaters and smaller handbags. The mix of clear bins and open shelves shows how various organizational tools can combine to achieve a high-end, boutique-style wardrobe look. This system turns storage into an attractive exhibit.
???? Material Required
- Clear rectangular acrylic storage bins
- Cardboard inserts or stiff felt (for shaping the handbags)
✂️ Equipment Required
- None
???? DIY Instruction Step-by-Step: Storing Handbags in Clear Bins
This instruction details how to use the clear bins to protect and display handbags.
- Prep the Handbags: Empty all items from the handbags. To prevent them from collapsing and losing shape over time, fill them lightly with tissue paper, a small pillow, or custom-cut stiff cardboard inserts.
- Assign Bins: Determine which bags will fit best into the clear acrylic bins. Due to their rigid shape, acrylic bins work best for structured bags (like clutches or crossbodies) that can stand upright.
- Load the Bins: Place the handbags into the clear bins so they are standing upright, facing outward, with their hardware and main features clearly visible. Ensure the bin is not overcrowded; the bag should slide in and out easily.
- Consider Handles: If the bag has a long strap, coil it neatly inside the bag or around the base. Short, structured handles can be left out, as shown in the image.
- Placement: Slide the bins into the closet cubbies. Position the most frequently used or favorite handbags in the cubbies at eye level. Use the upper cubbies for neatly folded sweaters or out-of-season items.
30. Divided Woven Caddy for Outdoor Entertaining
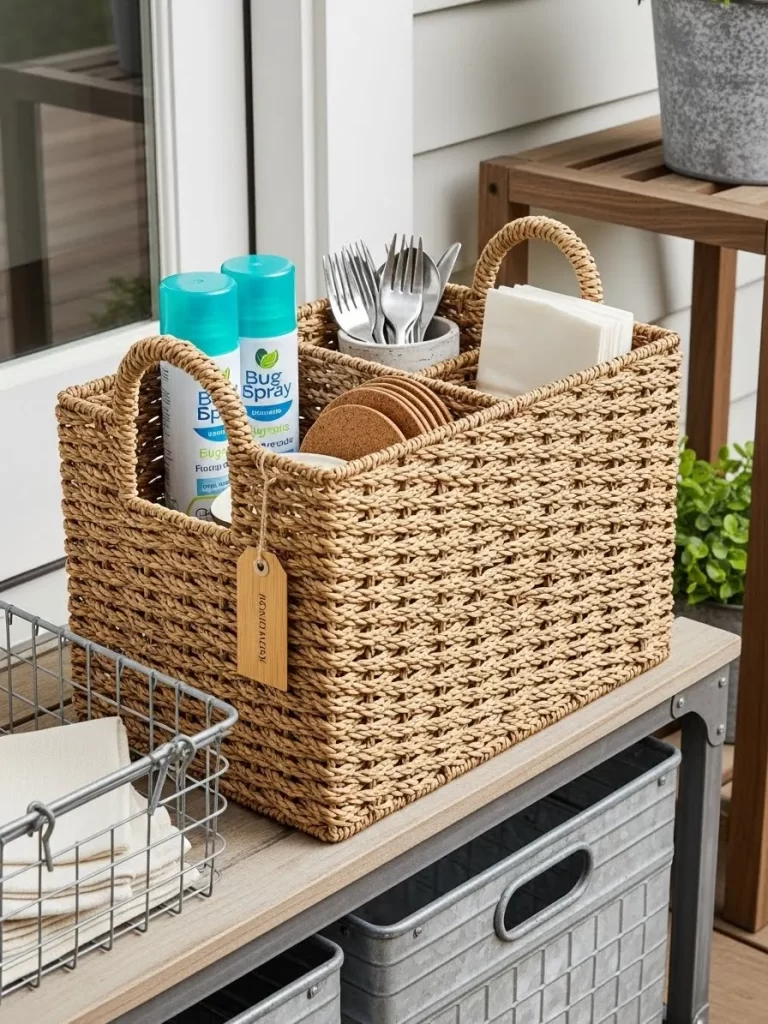
This attractive, segmented woven basket is designed for highly portable outdoor entertaining. The sturdy, tight weave of the natural fibers and the robust, curved side handles make it simple to carry from the kitchen to the patio or deck.
The rectangular caddy features an integrated divider, creating distinct compartments for various items needed during an outdoor meal. It is shown holding two cans of bug spray in one section, a stack of small cork coasters in the middle, and a set of silverware in a small stone container in the final section. Neatly folded napkins are also tucked alongside the silverware.
A small wooden tag hangs from the side handle, providing a spot for a handwritten label or personalized message. This type of caddy eliminates multiple trips and keeps all necessary dining and amenity supplies grouped together.
???? Material Required
- Divided woven basket or caddy with handles
- Small wooden tag and twine
- Permanent marker or stencil
- Small ceramic or stone container (for silverware)
✂️ Equipment Required
- None
???? DIY Instruction Step-by-Step: Setting Up an Outdoor Caddy
This instruction details how to arrange the compartments of the caddy for entertaining ease.
- Assign Compartments: Decide what items will go in each section. Grouping similar items makes the caddy intuitive to use (e.g., drinks/amenities, flatware, napkins/plates).
- Load Amenities: Place tall items like bug spray or sunscreen into the first section. If using smaller bottles, place them inside a secondary container to keep them upright.
- Contain Flatware: Place the silverware (forks, spoons, knives) into a small, attractive container (like a ceramic jar or stone cup) before placing the container into its designated section. This keeps the silverware tidy and clean.
- Fold Linens: Fold napkins into neat squares or rectangles. Place them standing upright in the remaining section alongside the coasters.
- Add the Tag (Optional): Tie the wooden tag onto one of the side handles using twine. Use a permanent marker to write a clear label like “Picnic,” “Patio,” or “BBQ Supplies.”
- Test the Carry: Lift the caddy fully loaded using the side handles. Ensure the weight is evenly distributed so the items do not shift or fall out during transport from the house to the outdoor dining area.
31. Personalized Rope Baskets for Living Room Essentials

These extra-large, cream-colored cotton rope baskets introduce a soft, homey texture to the living area, acting as stylish catch-alls next to a cozy armchair. Their substantial size is useful for consolidating throw blankets, remote controls, or magazines, reducing clutter around seating.
The baskets feature large, simple canvas patches on the front, customized with a single bold letter (“O” and “Ou” are visible), providing a subtle yet personal touch. This labeling system simplifies identification when storing items like knitting projects, reading materials, or electronics accessories.
The baskets are staggered, with one resting on a small, light wooden stool for easy access, and the other sitting directly on the carpeted floor. This combination of soft rope texture and natural wood adds a warm, inviting feel to a comfortable reading nook.
???? Material Required
- Large, cream-colored cotton rope baskets
- Stiff canvas or heavy cotton fabric (for labels)
- Black fabric paint or iron-on vinyl letters
- Heavy-duty needle and thread (matching rope or contrasting)
✂️ Equipment Required
- Scissors and ruler
- Iron or heat press (if using vinyl)
- Small paintbrush (if using paint)
???? DIY Instruction Step-by-Step: Personalizing Rope Baskets with Initial Patches
This instruction details how to create and affix the initial patches for a customized look.
- Cut the Patches: Cut the canvas or heavy fabric into neat squares or rectangles. Ensure the size is appropriate for the basket front.
- Add the Initial: Use black fabric paint and a stencil, or cut and iron on vinyl letters to apply the desired initial (e.g., “O,” “K,” “L”) to the center of the canvas patch. Allow the paint or vinyl to set completely.
- Pin the Patch: Center the finished canvas patch onto the side of the rope basket. Use straight pins or safety pins to hold the patch firmly in place.
- Sew the Patch: Using the heavy-duty needle and thread, hand-stitch the patch securely around all four edges onto the rope material. Use tight, even stitches for a clean, finished appearance.
- Load and Arrange: Place one basket on a small side table or stool to hold small, frequently used items like remotes and glasses. Use the larger basket on the floor for bulkier items like blankets or magazines.
32. Rolling Wire Bins for Wrapping Supplies

These tall, narrow wire baskets are an outstanding vertical storage solution for rolls of wrapping paper and related supplies in a closet or corner. The open wire design allows you to easily view the different patterns and colors of paper, making selection quick and simple.
The most practical feature is the small caster wheels attached to the base of each unit. This rolling capability means the baskets can be smoothly pulled out from a tight corner for use and pushed back for storage, avoiding corner clutter.
Metal label holders are clipped to the front of the bins, clearly separating the contents. The tall back basket is dedicated to “Ribbons,” while the front basket is marked “Paper Rolls” and includes small racks or coils of ribbon stored horizontally inside. This system makes all gift-wrapping essentials highly organized.
???? Material Required
- Tall, narrow wire baskets with integrated wheels
- Metal label holders with clips
- White cardstock for labels
- Label maker or fine-tip pen
✂️ Equipment Required
- Scissors and ruler
???? DIY Instruction Step-by-Step: Vertical Wrapping Paper Organization
This instruction focuses on organizing the tall, bulky rolls of paper and accessories.
- Group and Measure: Gather all your wrapping paper rolls and ribbons. Group them by category (paper or ribbon). Measure the inside height of the wire baskets to confirm the paper rolls will fit vertically without sticking out too far.
- Load the Paper: Stand the wrapping paper rolls vertically inside their assigned wire basket. Place the rolls facing different directions (some front-facing, some side-facing) to maximize the number of rolls that fit.
- Organize Ribbon/Accessories: Use the second basket for ribbon spools, scissors, and tape. Place ribbon spools on a horizontal dowel or simply pile them neatly inside, as shown, with scissors and tape toward the top.
- Label the Baskets: Create neat labels for “Wrapping Paper” and “Ribbons/Accessories.” Clip the labels securely to the metal label holder on the front of the corresponding basket.
- Position the Baskets: Slide the baskets into their corner storage spot. The wheels allow them to be nested closely together without the frustration of lifting them when needed.
33. Under-Stairs Cube Storage with Mixed Bins

This image showcases how the awkward space beneath a staircase can be maximized using uniform cube shelving and a mix of storage container styles. The structure is built right into the stair slope, creating custom-sized cubbies for different needs.
The majority of the cubbies are filled with structured fabric storage boxes in a sophisticated dark gray. These boxes have lids and faux leather pull handles, providing dust-free, concealed containment for miscellaneous items. Their uniform appearance creates a visually clean aesthetic.
The bottom row introduces textural variety with three different natural woven baskets. Two feature a dark, high-contrast pattern, while the third is a lighter, creamy color. This combination of concealed uniformity on top and open texture on the bottom adds visual interest while providing flexibility for storing different kinds of goods.
???? Material Required
- Structured cube shelving unit
- Dark gray fabric storage cubes with lids and handles
- Assorted patterned woven baskets (two dark, one light)
- Labeling materials (optional)
✂️ Equipment Required
- Level and measuring tape
- Basic tools for assembling the shelving unit
???? DIY Instruction Step-by-Step: Setting Up Under-Stairs Cube Storage
This instruction details the process of organizing the under-stairs storage using mixed bin types.
- Assemble and Install Shelving: Assemble the cube shelving unit and position it in the under-stairs space. Use a level to ensure the unit is sitting straight, even if the floor or walls are not perfectly level.
- Load Concealed Storage: Place all the gray fabric cubes into the upper cubbies. Use these for items you want completely hidden or protected, such as seasonal clothes, taxes, or electronics. Ensure the lids are fully closed and the handles are aligned.
- Load Textured Storage: Place the patterned woven baskets into the bottom row. Use these for items that are frequently accessed or have an attractive texture, such as throw blankets, magazines, or larger children’s toys.
- Balance the Look: If you have an odd number of cubes, try to alternate the pattern and color of the woven baskets on the bottom row to create an intentional, balanced design. Place the patterned bins flanking the plain one, for instance.
- Utilize Remaining Space: If there are any shelves remaining uncovered, use them for decorative items or neatly folded linens to complete the curated look.
34. Stacked Clear Bins for Bulk Reserve Items

These large, clear acrylic storage bins are used to consolidate bulk reserve items in a closet or pantry. The transparent, sturdy construction makes it simple to view the contents instantly, allowing you to easily track inventory of essential supplies. The bins are stackable, maximizing the vertical shelf space.
The top bin is filled with several rolls of toilet paper, neatly stacked both vertically and horizontally. A small, dry-erase label sticker on the front helps categorize this reserve supply.
The bottom bin is used for different categories of reserve goods: tall white plastic bottles are stored next to a neat stack of boxed medications or toiletries. The large, integrated handles on the ends of the bins make them easy to slide in and out when accessing the items. This system creates an organized, dust-free holding spot for essential overflow.
???? Material Required
- Large, clear stackable acrylic storage bins
- Chalkboard or dry-erase vinyl labels
- Chalk marker or dry-erase pen
✂️ Equipment Required
- None
???? DIY Instruction Step-by-Step: Stacking and Labeling Reserve Supplies
This instruction details how to use these clear bins for bulk overflow items.
- Sort Supplies: Gather all your bulk or overflow items (e.g., paper goods, toiletries, cleaning pods). Group them into categories that will fit logically into the bins.
- Apply Labels: Apply the dry-erase or chalkboard label stickers firmly to the front, center of each clear bin. Use the chalk marker to clearly write the category (e.g., “Toilet Paper,” “Soap Reserve,” “First Aid Refills”).
- Load the Bins: Load the contents. For paper goods, stack them tightly to prevent them from rolling. For boxed goods, stand them upright. Ensure no item is too tall to prevent the lid of the lower bin from closing or the upper bin from sitting flat.
- Stack the Bins: Carefully stack the filled bins. Place the heaviest bin on the bottom for stability. Use the integrated handles to lift and position the top bin securely onto the bottom one.
- Maintain Inventory: When you take the last item from a bin, use the dry-erase marker to write a reminder on the front label, prompting you to restock that particular reserve item.
35. Two-Tone Rope Caddy for Coffee Station

This two-tone cotton rope basket is used as a stylish, portable caddy to organize coffee and tea essentials on a countertop. The woven texture and soft colors (natural cream and gray) introduce a homey element that works well in a kitchen or office breakroom.
The rectangular basket is equipped with two sturdy rope handles, making it simple to lift and carry the entire station from the counter to a table. Inside, multiple small white ceramic cups are used as internal dividers, neatly containing items like coffee pods, sugar packets, wooden stir sticks, and tea bags.
A separate, six-compartment galvanized metal tray sits below the rope caddy. This piece is specifically used to separate various flavors of tea bags, providing a complete and organized beverage service station. The combination of soft rope, matte ceramic, and industrial metal adds a compelling mix of textures.
???? Material Required
- Two-tone cotton rope caddy with handles
- Small ceramic cups (for dividing the interior)
- Galvanized metal partitioned tray (for tea)
- Coffee pods, sugar packets, stir sticks, and tea bags
✂️ Equipment Required
- None
???? DIY Instruction Step-by-Step: Creating a Portable Beverage Station
This instruction details how to use the caddy and cups to build a functional coffee station.
- Plan the Layout: Place the small ceramic cups inside the rope caddy. Arrange them to create compartments that will fit your supplies. You may need three cups in a line, or four if arranged in a square pattern.
- Assign Contents: Dedicate each ceramic cup to a specific item (e.g., sugar packets, stir sticks, or a type of coffee pod). Use the remaining space in the basket for the larger items like mugs or napkins.
- Fill the Caddy: Fill the cups and the surrounding basket space with the designated beverage supplies.
- Organize Tea: If using the galvanized tray, file the tea bags vertically into the separate compartments, grouping them by flavor or type.
- Position the Station: Place the rope caddy next to the coffee maker and the tea tray in front of it. The separation of the pods and tea ensures everything is easy to find without rummaging.
36. Oversized Natural Basket for Laundry or Seasonal Items

This large, round woven basket provides generous floor storage with a distinct bohemian flair, useful for laundry, blankets, or bulky seasonal accessories. The thick, natural woven fiber of the hamper features a decorative row of creamy pom-poms or tassels around the center, adding a playful accent.
The tall, open shape makes it easy to toss items inside, and the large woven handles provide a secure grip for moving the basket. Surrounding the natural hamper are two bright, structured plastic bins in bold red and yellow, offering high-contrast options for sorting or containing other items.
The top of the basket is accessorized with brightly colored scarves and a black straw hat, suggesting its use as a stylish catch-all for garments and accessories near a changing area or closet. This mix of materials—soft woven, colorful plastic, and delicate fabrics—creates a dynamic storage setup.
???? Material Required
- Large, natural woven hamper with handles
- Pom-pom or tassel trim (optional, if adding a custom border)
- Strong adhesive (if attaching trim)
- Large, colorful plastic bins (red and yellow)
✂️ Equipment Required
- Scissors (if customizing trim)
???? DIY Instruction Step-by-Step: Creating a Textured Floor Storage Display
This instruction details how to enhance and utilize the large basket alongside plastic bins for organized floor storage.
- Enhance the Basket (Optional): If your basket is plain, attach a pre-made pom-pom or tassel trim band around the center using a strong craft glue. Ensure the trim is level and securely fastened.
- Assign the Hampers: Designate the large woven hamper for aesthetically pleasing items or those requiring ventilation, such as throw blankets, scarves, or dry-clean-only garments. Assign the plastic bins to categories that may be damp or require a quick wipe-down, such as gym clothes or items for a specific trip.
- Load the Woven Basket: Place large, soft items in the bottom. Drape decorative accessories, like scarves and hats, over the rim for a stylish, accessible display.
- Load the Plastic Bins: Place the contents into the plastic bins. Because plastic bins lack handles, position them at the front of the storage area for easy access.
- Arrangement: Place the large woven basket in the corner, with the two colorful plastic bins arranged diagonally in front of it to create a dynamic, layered look.
37. Stacked Black Wire Drawers for Hardware

This compact, four-tier set of black wire drawers provides excellent, visible organization for small hardware and garage supplies. The industrial black finish contrasts sharply with the light wood workbench surface. The open mesh construction allows for instant viewing of contents, preventing repeated searching for small parts.
Each drawer is designed to slide out, making access to the contents effortless without having to unstack the units. The top three drawers hold an assortment of metal washers, nuts, bolts, and hooks, all separated for organization.
A small metal label holder is affixed to the front of each drawer, allowing for clear identification of the contents, which is crucial when storing small hardware. This stacking system is far tidier than using multiple mismatched tins or containers and keeps all necessary components visible and contained.
???? Material Required
- Stackable black wire drawers (4-tier unit)
- Small metal label holders with clips
- White cardstock for labels
- Fine-tip pen or label maker
- Small baggies or cups (for grouping tiny items inside the drawers)
✂️ Equipment Required
- Ruler and scissors
???? DIY Instruction Step-by-Step: Organizing Small Hardware Drawers
This instruction details how to efficiently sort and label the contents of the wire drawers.
- Categorize Hardware: Sort all your screws, nails, washers, and bolts by type and size. Assign one type of hardware to each of the four drawers (e.g., “Screws,” “Nails,” “Washers,” “Bolts”).
- Create Labels: Measure the label holders. Create clear, concise labels for each category using block lettering or a label maker. Clip the finished labels onto the front of the corresponding wire drawer.
- Load the Drawers: Place the smallest items (like washers or tiny nails) into small plastic cups or heavy-duty zip-top baggies before placing them in the drawer. This prevents them from slipping through the wire mesh. Place larger items directly into the drawers.
- Maintain Separation: Even though the drawers are separated, try to keep the hardware grouped loosely inside to prevent smaller items from rattling and mixing together when the drawer is opened or closed.
- Position the Unit: Place the stacked drawer unit prominently on the workbench or shelf. The easily visible labels and contents make finding small parts efficient during projects.
38. Rattan Baskets with Linen Liners for Bathroom Shelving

These three rectangular rattan baskets are beautifully arranged on open shelving, providing stylish, covered storage for bathroom linens. The warm, natural rattan weave is complemented by a soft, light-colored fabric liner that is visible along the rim, adding a gentle texture.
The upper two baskets feature removable lids with a square cut-out handle and a decorative white ribbon tied in a neat bow on the front, offering protected, discreet containment. The large basket on the lower shelf uses a similar liner as a dust cover or flap, holding neatly folded towels underneath.
A tight pyramid of rolled white towels sits adjacent to the large basket, showcasing the mix of rolled and concealed storage. This setup balances the functional need for accessible items with the desire for a clean, visually uncluttered bathroom space.
???? Material Required
- Rattan storage baskets (rectangular, with and without lids)
- Fabric liners (stitched into the basket or removable)
- Thin white or cream satin ribbon
- White towels (for rolling)
✂️ Equipment Required
- Scissors and ruler
???? DIY Instruction Step-by-Step: Customizing Rattan Baskets with Ribbon
This instruction focuses on adding the decorative ribbon accent to the lidded baskets.
- Measure the Ribbon: Cut a length of ribbon for each lidded basket (about 12 to 15 inches).
- Locate the Attachment Point: Find a small gap or loop in the rattan weave on the center-front of the basket, directly below the lid or near the handle.
- Tie the Bow: Thread the center of the ribbon through the weave gap or loop. Tie the ribbon into a small, neat bow, ensuring the loops are symmetrical and the ends are trimmed on a sharp diagonal.
- Load the Linens: Fold or roll the towels and linens neatly. For the lidded boxes, stack the items flat. For the open basket, roll towels tightly and stack them horizontally.
- Create the Towel Pyramid: To replicate the look on the lower shelf, tightly roll five to six towels. Place three rolls on the bottom row, two on the second row, and one on the top, forming a stable pyramid shape. Place this alongside the large basket.
- Position the Baskets: Arrange the baskets on the shelves, balancing the lidded, uniform look on the top shelf with the visual interest of the rolled towels and large open basket on the bottom shelf.
39. Large Woven Hamper for Living Room Blankets

This substantial, rectangular woven basket provides a warm, natural centerpiece for organizing extra pillows and cozy blankets in a living room. The thick, textured weave offers an earthy look that contrasts beautifully with the soft, white upholstered furniture and window seating.
The basket’s large, rectangular opening makes it simple to toss in or retrieve bulky items like throw pillows and folded quilts. A sturdy, circular, woven handle is integrated into the rim on the side, making the basket easy to move next to the sofa or chair where extra comfort is needed.
A small burlap-style tag is tied to the handle, adding a rustic accent and providing space for a handwritten label if the basket’s contents ever change. The mix of white textured pillows, a folded white knit blanket, and the rich natural weave creates a welcoming and organized seating area.
???? Material Required
- Large, rectangular woven basket with handles
- Burlap or jute fabric tag
- Natural twine
- Permanent marker
✂️ Equipment Required
- Scissors
???? DIY Instruction Step-by-Step: Labeling and Loading a Blanket Basket
This instruction focuses on styling the basket for easy access and a decorative look.
- Prepare the Tag: Cut a simple rectangular or oval shape from the burlap/jute fabric. Use the permanent marker to write a simple, stylized word like “Cozy” or “Blankets.”
- Tie the Tag: Loop a piece of natural twine through the tag. Tie the twine securely around the base of the integrated handle on the side of the basket, allowing the tag to hang naturally.
- Load the Heaviest Items: Place the heaviest or largest folded items (like thick quilts or spare blankets) on the bottom of the basket for stability.
- Layer the Texture: Add a folded knit or textured throw blanket next. Arrange it so some of the material drapes slightly over the edge of the basket, showcasing the texture.
- Top with Pillows: Place decorative throw pillows on top of the blankets. Angle them slightly to create a casual, inviting look. Placing them on top ensures they are easy to grab quickly.
- Position: Place the full basket close to the sofa or window seat, ensuring the handle side is easily accessible.
40. Extra-Large Rope Bin for Sports Equipment

This extra-large, rectangular cotton rope bin is a fantastic floor-level storage solution for bulky items like sports equipment or backpacks. The sturdy, thick cream-colored rope provides a soft yet durable container, making it a safe choice for a child’s play area or entryway.
The substantial size is perfectly suited for corralling items that otherwise tend to clutter a hallway, such as basketballs, soccer balls, and school backpacks. The low profile allows items to be tossed in easily while still keeping the contents contained.
Adding a playful, personal touch are three small tags adorned with fabric patterns and block letters (“G,” “C,” and “W”). These tags are tied to the rim, which could signify family initials or the contents of smaller bins stored inside. Two smaller, matching rope bins are visible on the shelving unit behind it, showing how the rope style can be used throughout a room.
???? Material Required
- Extra-large rectangular cotton rope bin
- Small fabric scraps (three different patterns)
- Stiff interfacing or cardboard (for tag stability)
- Small metal rings or eyelets
- Black permanent marker or paint pen
✂️ Equipment Required
- Scissors
- Hole punch or small tool for setting eyelets
- Sewing needle and thread or fabric glue
???? DIY Instruction Step-by-Step: Creating Personalized Initial Tags
This instruction details how to create and attach the fabric initial tags for the extra-large basket.
- Cut the Tags: Cut three identical tag shapes from the stiff interfacing or cardboard. Cut matching shapes from the patterned fabric scraps, adding a small allowance for wrapping around the edges.
- Assemble the Tags: Use fabric glue or thread to wrap and secure the fabric neatly around the cardboard tags. Ensure the tag is flat and rigid.
- Add the Initial: Use a stencil and a paint pen or a permanent marker to draw a large, clear initial (“G,” “C,” etc.) onto the center of each fabric tag.
- Punch and Reinforce: Punch a single hole at the top center of each finished tag. Reinforce the hole with a small metal eyelet if you have the tool, or use thread and a needle to stitch around the edge of the hole for durability.
- Attach to Basket: Thread a piece of matching ribbon or thin rope through the hole of each tag. Tie the tags securely to the top rope rim of the large basket, spacing them evenly across the front for a decorative effect.
- Load the Bin: Place large, soft items like balls and backpacks into the bin. Use the handle cut-outs on the sides to easily slide the basket in and out of its storage location near the door.
We have journeyed through 40 unique and actionable ways to utilize baskets and bins, proving that organization does not have to sacrifice style. Whether corralling remote controls in a cozy rope caddy or sorting bulk supplies in clear, stackable bins, every solution focuses on practical containment and beautiful design.
The real power of these flexible containers lies in their ability to adapt to any room’s aesthetic. Natural rattan brings warmth and texture, while industrial wire adds a modern, structured feel. By grouping similar items and assigning dedicated homes within these pieces, you create a sense of calm and order that lasts.
Starting small is the most important step. Choose one problem area today, implement one of these smart bin solutions, and experience the immediate relief of a tidier, more welcoming space. Your organized and stylish home is waiting.
Key Takeaways
- Prioritize Vertical Space: Use stackable bins (like pantry wire baskets or tall rattan boxes) to maximize storage capacity on shelves and floors.
- Balance Aesthetics and Function: Combine soft, opaque materials (rope or fabric) to hide clutter with clear or wire containers to keep necessary items easily visible.
- Implement Effective Labeling: Use clear, consistent labels (chalkboard tags, stenciled wood, or printed vinyl) on all closed and wire containers for instant identification.
- Choose Material by Location: Select durable, ventilated materials (wire or galvanized metal) for utility areas, and choose soft, textured materials (cotton rope or wicker) for living spaces and bedrooms.
- Create Customized Compartments: Use small, internal dividers or small nested cups/mugs within larger baskets to keep small items (like remotes or coffee pods) separate and easy to find.