Winter finally fades into the background. We often feel a natural urge to open our windows and clear out the heavy dust. This season represents a fresh start for every room in your house. You do not need a massive bank account to make a big change.

Small details often create the most significant shift in your daily mood. We gathered dozens of ways to bring energy back into your living space. These concepts will help you move away from tired trends. Your home deserves a vibrant update that mirrors the beauty of nature.
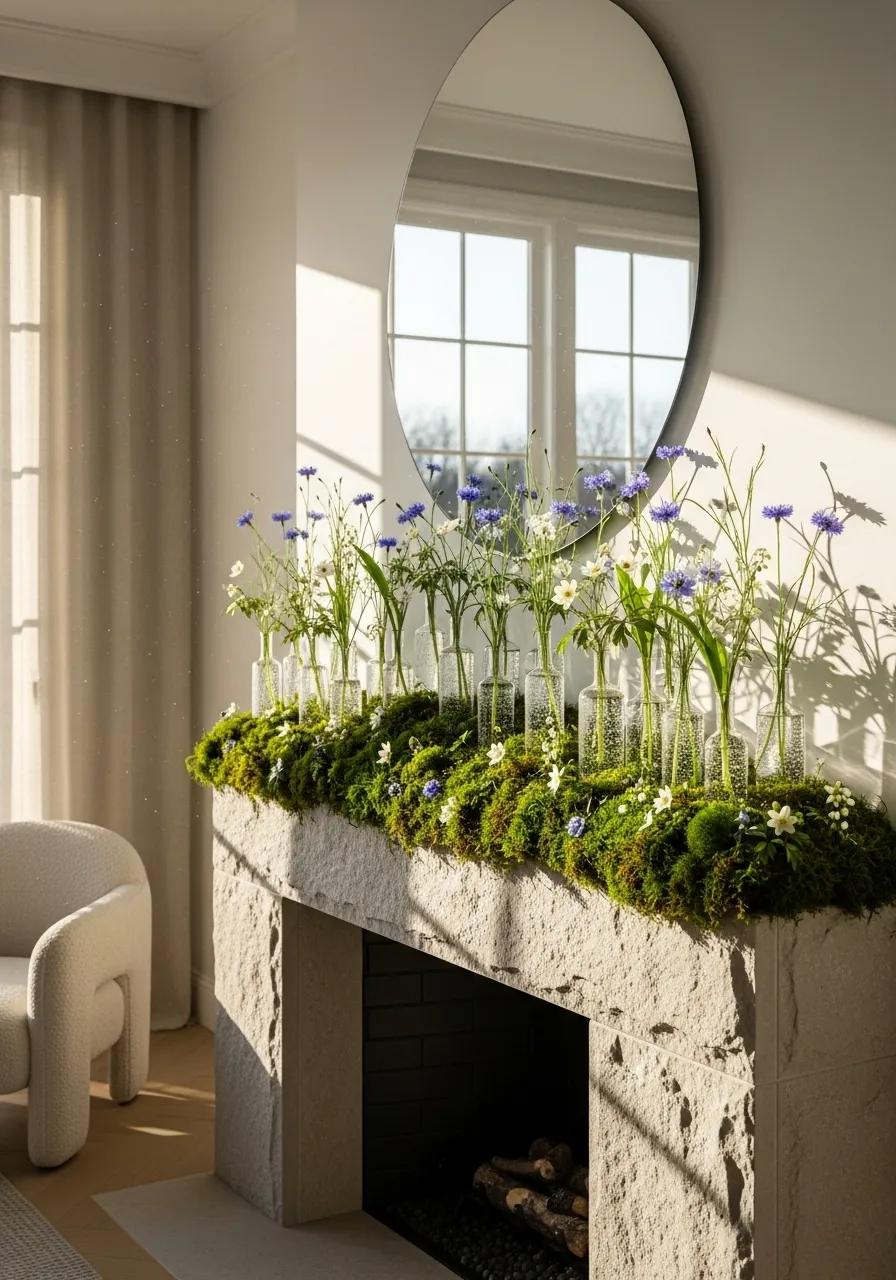
1 Wildflower Moss Mantle Display
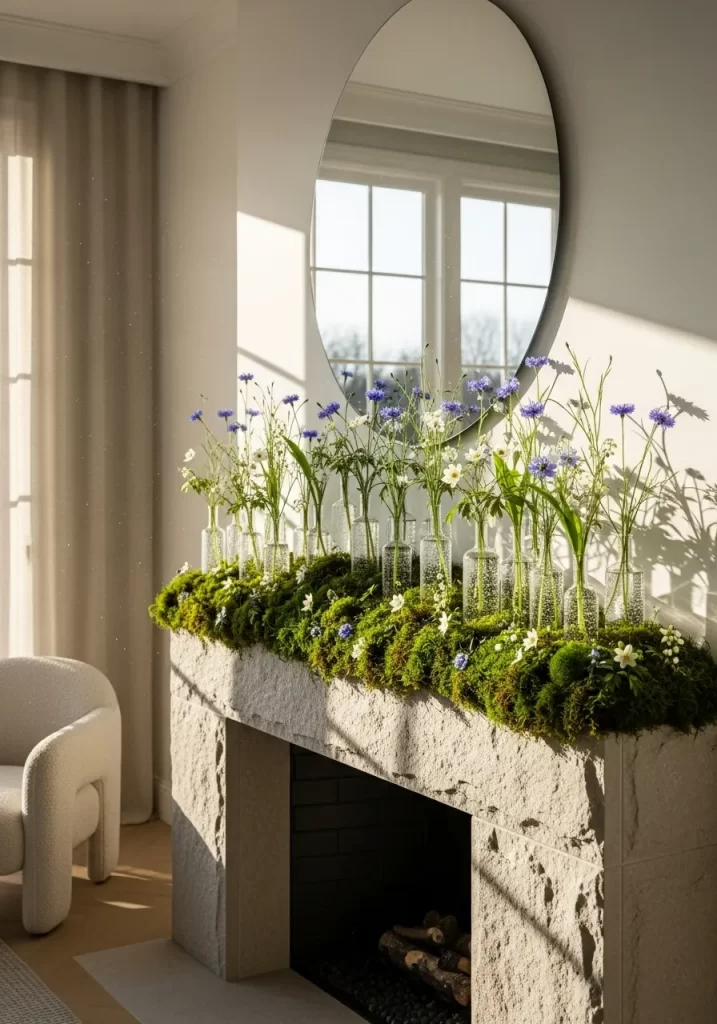
Lush green textures meet delicate blossoms in this breathtaking fireplace transformation. This setup moves away from traditional heavy decor by using a natural moss base to anchor slender glass bud vases. Each vase holds a single stem, creating an airy and whimsical meadow right inside your living room. The vibrant blue and white petals pop beautifully against the earthy greenery, while the glass bottles catch the afternoon sunlight.
Integrating organic elements brings an immediate sense of renewal to a space. It feels like a fresh garden path has been lifted and placed gently on your mantle. This design works well because it uses height and negative space to maintain a light, breezy atmosphere. You can easily adapt this look for any seasonal shift by simply swapping the flower varieties.
Material Required List
- Fresh or preserved sheet moss
- Assorted wildflowers or slender blooms
- Small clear glass bud vases or recycled glass bottles
- Floral foam blocks
- Water for the vases
Equipment Required List
- Floral shears or sharp scissors
- Measuring cup
- Soft cloth for cleaning glass
DIY Instruction Step by Step
- Clean the top of your mantle thoroughly to ensure the surface is dry and free of dust.
- Arrange your glass vases in a long, slightly staggered line across the entire length of the fireplace.
- Fill each glass container about halfway with room temperature water using your measuring cup.
- Lay the sheet moss around the bases of the bottles, tucking the edges in to hide the bottoms of the glass completely.
- Create a hilly effect with the moss by bunching it up in some areas and flattening it in others for a natural look.
- Trim your flower stems at an angle so they sit at varying heights when placed in the vases.
- Insert one or two stems into each bottle, allowing some to lean naturally for a wild appearance.
- Scatter a few tiny loose blossoms directly onto the moss surface to tie the whole garden scene together.
2 Monochrome Petal Tablescape
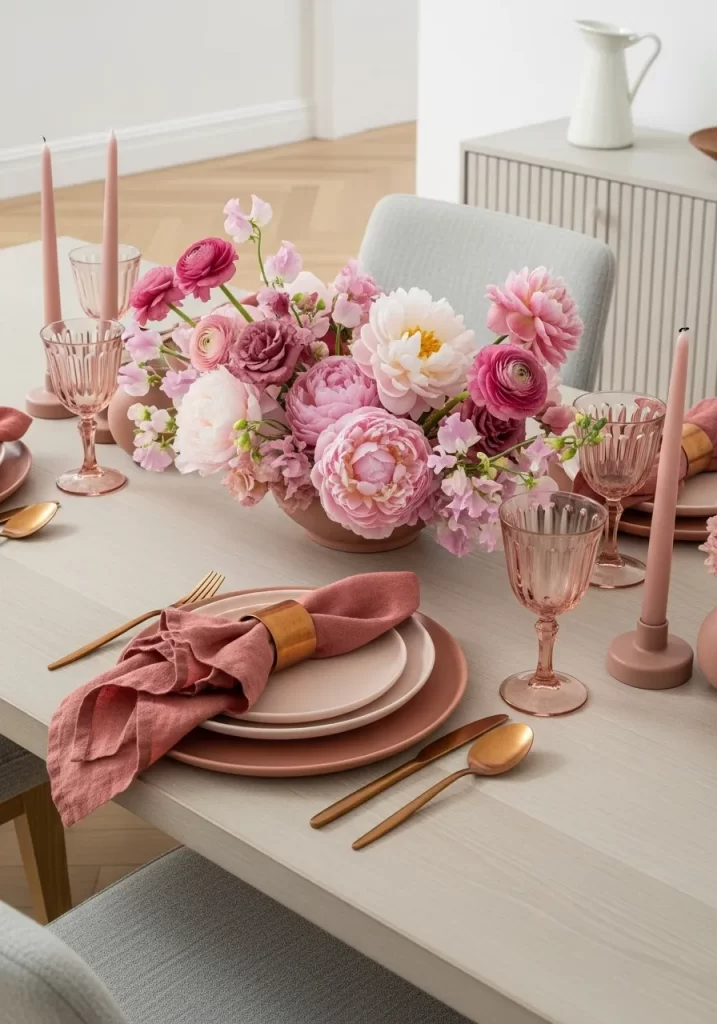
Soft blush tones and deep mauves create a sophisticated dining experience that feels modern and warm. This tablescape ditches high contrast colors for a cohesive palette of pinks. Matte clay plates stacked in varying shades add depth without cluttering the visual field. Elegant rose tinted glassware catches the light, while slender taper candles provide a vertical element to the arrangement.
Using a single color family allows the natural beauty of the textures to shine. The gold cutlery adds a tiny hint of luxury that complements the warm undertones of the floral centerpieces. This design proves that spring decor can be both lush and minimalist at the same time. It creates an inviting atmosphere for long afternoon brunches or intimate dinners.
Material Required List
- Assorted pink flowers like peonies and roses
- Low wide ceramic bowl
- Rose colored taper candles and matching holders
- Pink or mauve linen napkins
- Gold toned cutlery set
- Pink tinted wine or water glasses
Equipment Required List
- Floral shears
- Napkin rings
- Chicken wire or floral frog
DIY Instruction Step by Step
- Place a crumpled piece of chicken wire or a floral frog inside your low ceramic bowl to hold stems in place.
- Fill the bowl with cool water until it is nearly full.
- Start with your largest blooms, like peonies, placing them low and toward the center of the bowl.
- Add medium sized flowers around the edges to build out the round shape.
- Tuck in delicate greenery to create a sense of movement and height.
- Set your table with the largest plate on the bottom and smaller salad plates on top.
- Slide your linen napkin through a ring and place it across the top plate.
- Arrange your tinted glassware and gold cutlery around each setting.
- Finish by placing the taper candles and holders symmetrically around the center floral bowl.
3 Oversized Flowering Branch Installation
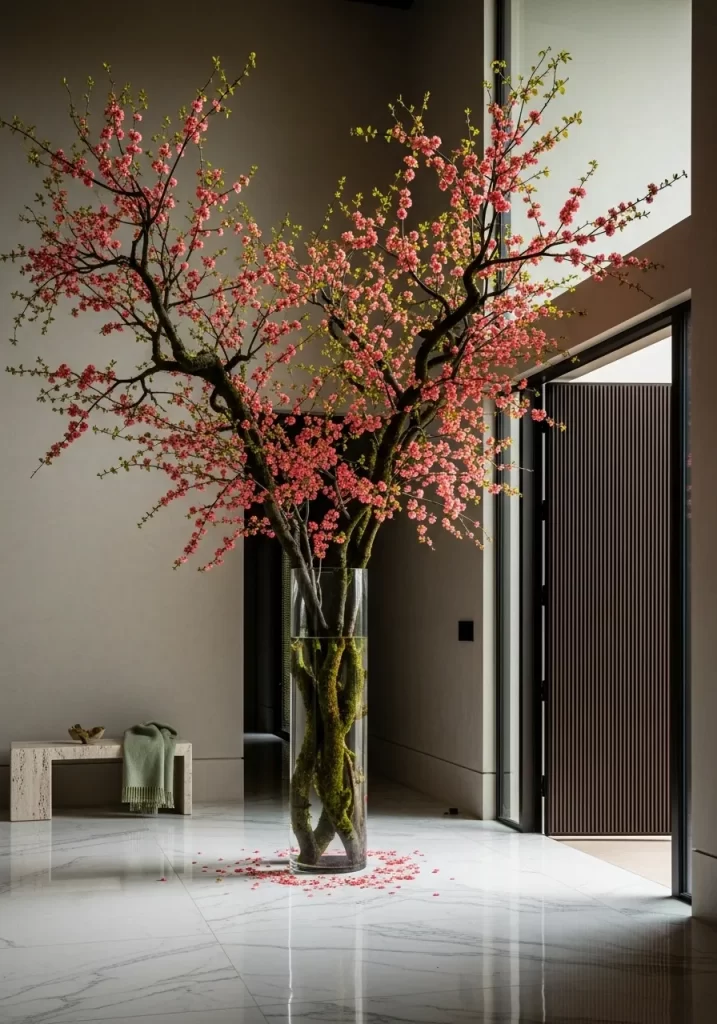
Bring the grandeur of the outdoors inside with a dramatic display of towering flowering branches. A tall, clear glass cylinder vase acts as a sturdy base for thick, moss covered limbs heavy with pink blossoms. This installation mimics the look of a blooming tree growing directly from your floor. The reflection on the polished marble surface doubles the impact of the flowers, making the entire room feel like a high end garden gallery.
Scale is the secret to making this look work. Choosing branches that reach nearly to the ceiling creates a focal point that requires very little other decor. The natural curve of the wood provides an organic silhouette that softens the hard lines of modern architecture. It is a bold statement that celebrates the peak of the spring season with minimal effort.
Material Required List
- Tall, thick flowering branches
- Large, heavy duty clear glass cylinder vase
- Large river stones or heavy glass marbles
- Fresh water
Equipment Required List
- Heavy duty loppers or a small hand saw
- Sturdy step ladder
DIY Instruction Step by Step
- Wash your large glass vase thoroughly to ensure the water stays clear for as long as possible.
- Place a layer of heavy river stones at the bottom of the vase to provide weight and prevent tipping.
- Fill the vase about three quarters full with fresh, cool water.
- Use your loppers to cut the base of each branch at a sharp angle to help them drink water effectively.
- Carefully lean the tallest branch into the vase, letting it find its natural balance point.
- Add shorter branches around the main one to fill out the center and create a full look.
- Step back frequently to check the balance and ensure the arrangement looks good from all angles.
- Clear away any fallen petals from the floor but leave a few scattered for a natural effect.
4 Glowing Speckled Egg Lantern
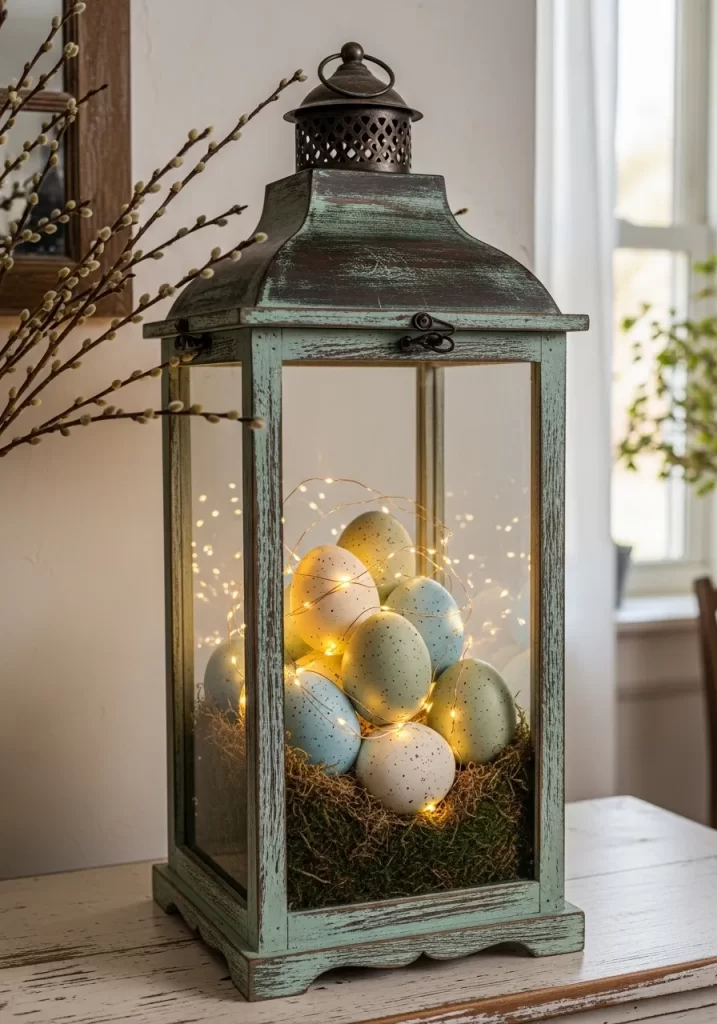
Transform a rustic garden lantern into a magical indoor light source using simple seasonal elements. This design features a bed of dried forest moss at the base of a weathered teal metal lantern. A cluster of speckled eggs in soft pastel shades sits nestled in the greenery. Thin copper fairy lights wrap around the eggs, casting a soft glow that highlights the delicate patterns on the shells.
This piece works beautifully as a nightlight on a hallway table or a centerpiece for a cozy breakfast nook. The combination of the distressed metal and the warm lights creates a vintage feel that still looks fresh for the new season. It is an easy way to add a touch of whimsy without over the top color.
Material Required List
- Large glass paneled lantern with a metal frame
- Dried or preserved sheet moss
- Decorative speckled eggs in pastel colors
- Battery operated LED fairy lights
Equipment Required List
- Small scissors for trimming moss
- Clean cloth
DIY Instruction Step by Step
- Open the door of your lantern and wipe the glass panes with a clean cloth.
- Gently pull apart your moss and layer it on the floor of the lantern until it is about two inches thick.
- Unroll your fairy lights and place the battery pack toward the back of the lantern, hiding it under a bit of moss.
- Begin stacking your speckled eggs in a small pyramid in the center of the moss.
- Weave the thin wire of the fairy lights over and under the eggs as you stack them.
- Make sure some lights are tucked deep into the moss to create a glowing base.
- Close the lantern door and adjust any eggs that may have shifted.
- Turn on the lights in the evening to create a soft, inviting ambiance.
5 Bunny Ear Floral Crown Vase
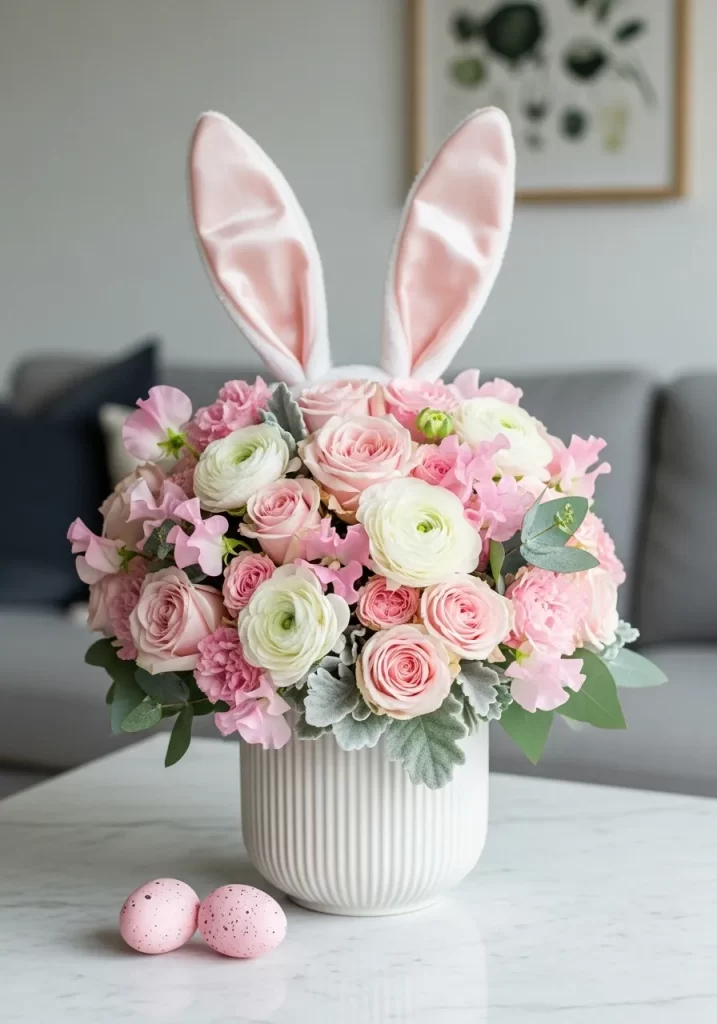
Inject a playful and charming spirit into your coffee table decor with this unique floral arrangement. A simple white fluted ceramic vase holds a dense, round bouquet of classic spring roses and ranunculus. The surprise element is a pair of soft, satin lined bunny ears peaking out from behind the flowers. Two small speckled eggs placed on the table nearby tie the theme together.
This arrangement is a fun conversation starter that guests will enjoy. The soft pink and white tones keep the look elegant despite the whimsical theme. By using a tight cluster of flowers, the bunny ears look like they are part of a crown worn by the bouquet. It is a simple way to celebrate the holiday while maintaining a high style aesthetic.
Material Required List
- White fluted ceramic vase
- Pink roses and white ranunculus
- Plush bunny ear headband
- Floral tape
- Water
Equipment Required List
- Floral scissors
- Clear tape
DIY Instruction Step by Step
- Fill your white vase with water and a bit of flower food.
- Use floral tape to create a grid across the top of the vase to help hold the flower stems upright.
- Cut your roses and ranunculus so the heads sit just above the rim of the vase.
- Fill the entire vase with flowers until you have a tight, dome like shape.
- Tuck dusty miller leaves around the bottom edge of the flowers to act as a frame.
- If using a headband, carefully tuck the band behind the flowers so only the ears are visible.
- If the ears feel loose, use a bit of clear tape to secure them to the back of the vase.
- Place two matching speckled eggs on the table next to the vase to finish the scene.
6 Rainbow Egg Front Door Wreath
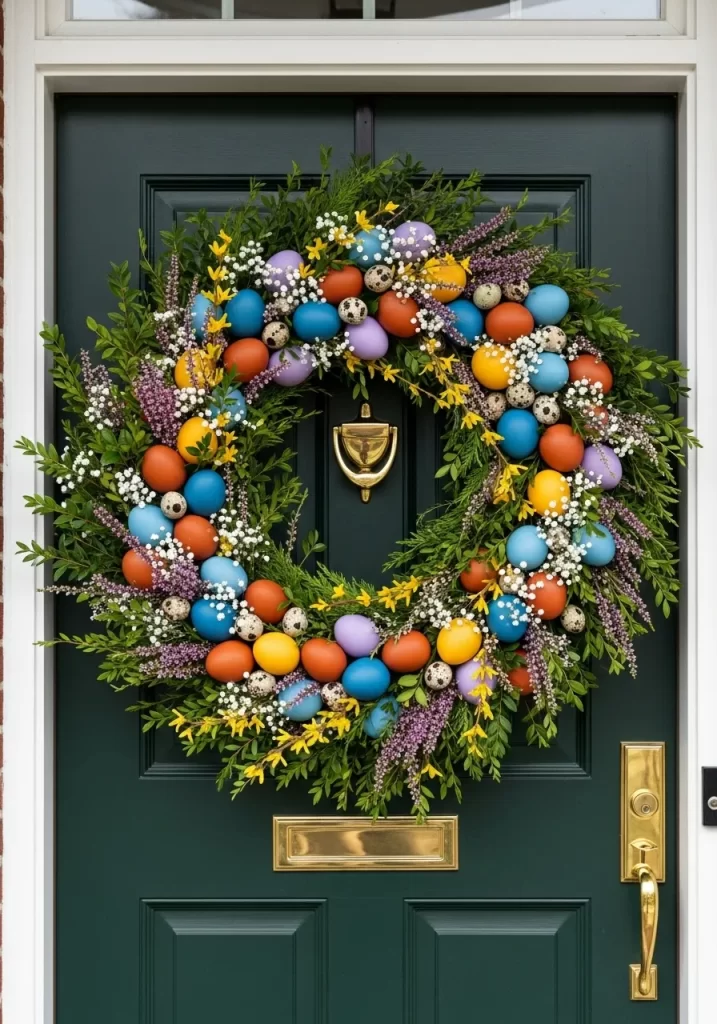
Make a bold first impression with a front door wreath that celebrates every color of the spring season. This lush green base is densely packed with dyed eggs in shades of burnt orange, deep blue, yellow, and lavender. Tiny white baby’s breath flowers and sprigs of purple heather are woven throughout to soften the look. The dark green door provides the perfect backdrop to make these vibrant colors pop.
This wreath moves away from the usual pale pastels and embraces a more saturated, earthy palette. It feels sophisticated and handmade, offering a warm welcome to any guest. The mix of natural textures and smooth eggshells creates a visual interest that draws the eye from the street.
Material Required List
- 18 inch boxwood or evergreen wreath base
- Plastic or blown out eggs in various colors
- Small speckled quail eggs
- Dried baby’s breath and heather sprigs
- Hot glue sticks
Equipment Required List
- Hot glue gun
- Floral wire or a wreath hanger
DIY Instruction Step by Step
- Lay your green wreath base flat on a table to plan your layout.
- Use your glue gun to attach the largest colored eggs first, spacing them evenly around the entire circle.
- Fill in the gaps between the large eggs with the smaller speckled quail eggs.
- Cut small bundles of baby’s breath and heather into three inch sections.
- Tuck the stems of the flowers into the greenery, securing them with a tiny drop of glue if needed.
- Ensure the flowers are distributed evenly so the wreath looks balanced.
- Let the glue dry completely for at least one hour before moving the wreath.
- Use a sturdy hook or floral wire to hang your creation securely on your front door.
7 Fabric Carrot Kitchen Bunting
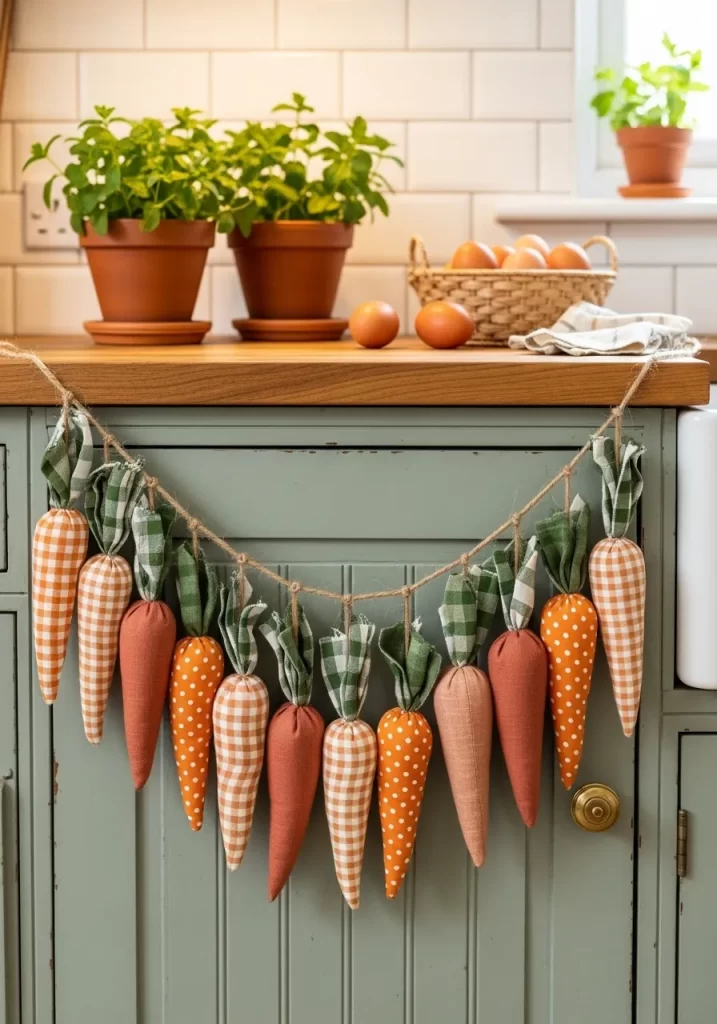
Add a cozy, farmhouse touch to your kitchen by hanging a whimsical carrot garland across your cabinets. These handmade fabric carrots feature a mix of orange checkered, polka dot, and solid patterns for a playful look. Green gingham fabric strips mimic the leafy tops, and the whole set is strung on a rustic jute twine. This decor piece brings a bit of garden charm to the heart of the home.
Garlands are a fantastic way to decorate without using up valuable counter space. This specific design works well against sage green or white cabinetry, adding a pop of warm color. It is a lighthearted way to acknowledge the season while keeping the kitchen feeling functional and tidy.
Material Required List
- Scraps of orange and green cotton fabric
- Polyester fiberfill or cotton stuffing
- Jute twine or thick string
- Orange and green thread
Equipment Required List
- Sewing machine or needle and thread
- Fabric scissors
- Large blunt needle for threading
DIY Instruction Step by Step
- Cut out long, thin triangular shapes from your orange fabric to serve as the carrot bodies.
- Sew the two long sides of the triangle together with the patterned side facing in, then flip it right side out.
- Stuff the carrot firmly with fiberfill until it takes on a rounded shape.
- Cut strips of green fabric and bunch them together to create the carrot greens.
- Insert the green strips into the top of the orange carrot and sew the top shut, securing the greens in place.
- Repeat this process until you have about ten to twelve carrots.
- Use a large needle to thread the jute twine through the top of each carrot, just below the greens.
- Space the carrots out evenly along the string and tie loops at each end for easy hanging.
8 Vintage Ladder Flower Display
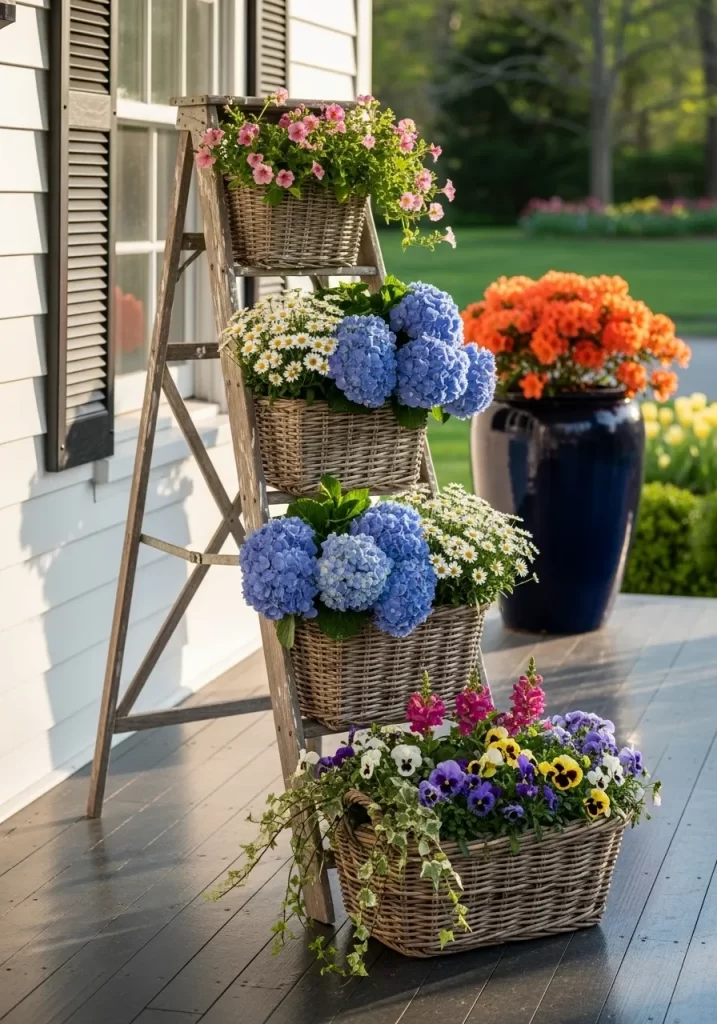
Repurpose an old wooden step ladder into a stunning vertical garden for your porch or patio. This display uses tiered steps to hold woven baskets overflowing with colorful spring blooms. Vibrant blue hydrangeas, pink petunias, and white daisies create a waterfall of color that draws the eye upward. The weathered wood of the ladder adds a rustic, soulful element that balances the fresh brightness of the flowers.
Vertical displays are a smart solution for small outdoor spaces or entryways. By stacking the baskets, you maximize your floral impact without taking up much floor area. This setup is easy to update as different flowers come into season, ensuring your porch stays beautiful all year long.
Material Required List
- Old wooden step ladder
- Five or six sturdy woven baskets with handles
- Potted spring flowers like hydrangeas, pansies, and daisies
- Plastic liners for the baskets
- Heavy duty zip ties or wire
Equipment Required List
- Hand trowel
- Watering can
DIY Instruction Step by Step
- Open your ladder and make sure it is sitting level on your porch or deck.
- Line each woven basket with a plastic liner or a thick trash bag to prevent water from rotting the wood.
- Place your potted flowers into the baskets, adding a little extra potting soil if needed to fill them out.
- Set the heaviest baskets on the bottom steps of the ladder for stability.
- Use zip ties or hidden floral wire to secure the handles of the baskets to the ladder steps so they do not tip over.
- Arrange trailing plants like ivy or petunias in the higher baskets so they can spill over the sides.
- Place a large potted plant on the ground next to the ladder to ground the entire display.
- Water the plants regularly, ensuring the liners allow for just enough drainage to keep the roots healthy.
9 Grand Hydrangea Entrance Urns
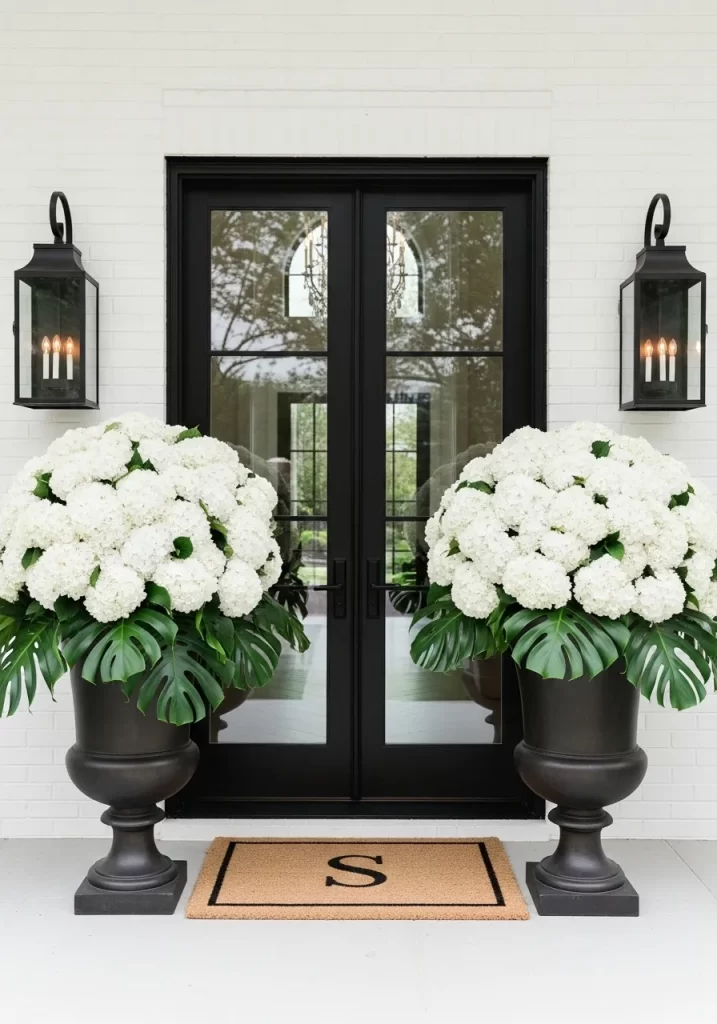
Create a classic and symmetrical entrance with two oversized matte black urns filled with massive white hydrangea blooms. These show stopping arrangements are framed by large, waxy monstera leaves at the base. The contrast between the crisp white petals and the deep green foliage creates a look that is both timeless and fresh. Set against a white brick wall and black framed doors, this display offers high end curb appeal.
Symmetry is a powerful tool in home design, as it immediately creates a sense of order and calm. Using one type of flower in a large quantity makes a much bigger statement than a mix of smaller plants. These urns are a great way to mark the transition from winter to spring with a clean, sophisticated aesthetic.
Material Required List
- Two large black garden urns or pedestals
- High quality faux or fresh white hydrangeas (about 20 per urn)
- Large real or silk monstera leaves
- Large blocks of floral foam
- Heavy stones for weight
Equipment Required List
- Serrated knife to cut foam
- Gardening gloves
DIY Instruction Step by Step
- Place several heavy stones in the bottom of each urn to prevent them from blowing over in the wind.
- Cut your floral foam to fit snugly into the top opening of the urn.
- If using fresh flowers, soak the foam in water first; if using faux, leave it dry.
- Push your monstera leaves into the foam around the outer edge so they drape over the rim of the urn.
- Begin inserting the hydrangea stems into the center of the foam, starting from the middle and working out.
- Keep the flower heads close together to create one giant, seamless ball of white blossoms.
- Adjust the height of the stems so the arrangement looks like a smooth dome.
- Repeat the exact same steps for the second urn to ensure they are identical mirrors of each other.
10 Golden Bunny Mantle Scape

Elevate your fireplace mantle with a luxurious mix of metallic accents and soft greenery. Two polished gold bunny figurines act as the centerpieces of this elegant scene. They are surrounded by a lush garland of eucalyptus and silver dollar greenery, which provides a muted, dusty base. Speckled eggs in soft taupe, sage, and pink tones are tucked into the leaves, some featuring beautiful gold leaf accents.
This design proves that seasonal decor can be chic and sophisticated. The gold elements catch the light beautifully, especially when paired with the tiny fairy lights hidden in the foliage. It is a grown up take on spring themes that feels expensive and curated.
Material Required List
- Two gold finished ceramic or metal bunny statues
- Fresh or high quality faux eucalyptus garland
- Large decorative eggs with some solid and some with gold flecks
- Warm white LED fairy lights on a thin wire
Equipment Required List
- Command hooks or floral wire
- Microfiber cloth for polishing
DIY Instruction Step by Step
- Clear your mantle and polish the surface to ensure the gold bunnies reflect clearly.
- Lay your eucalyptus garland across the length of the mantle, letting some ends hang off the sides.
- Use small clear hooks or wire to secure the garland so it stays in place.
- Position your gold bunnies in the center, perhaps slightly offset from each other for a natural look.
- Weave the fairy lights through the eucalyptus leaves, hiding the battery pack at one end.
- Nestle the large decorative eggs into the curves of the greenery.
- Place the eggs with gold flecks near the bunnies to tie the metallic theme together.
- Turn on the lights to see how the gold surfaces of the bunnies and eggs glow against the green leaves.
11 Glass Orb Blossom Trio
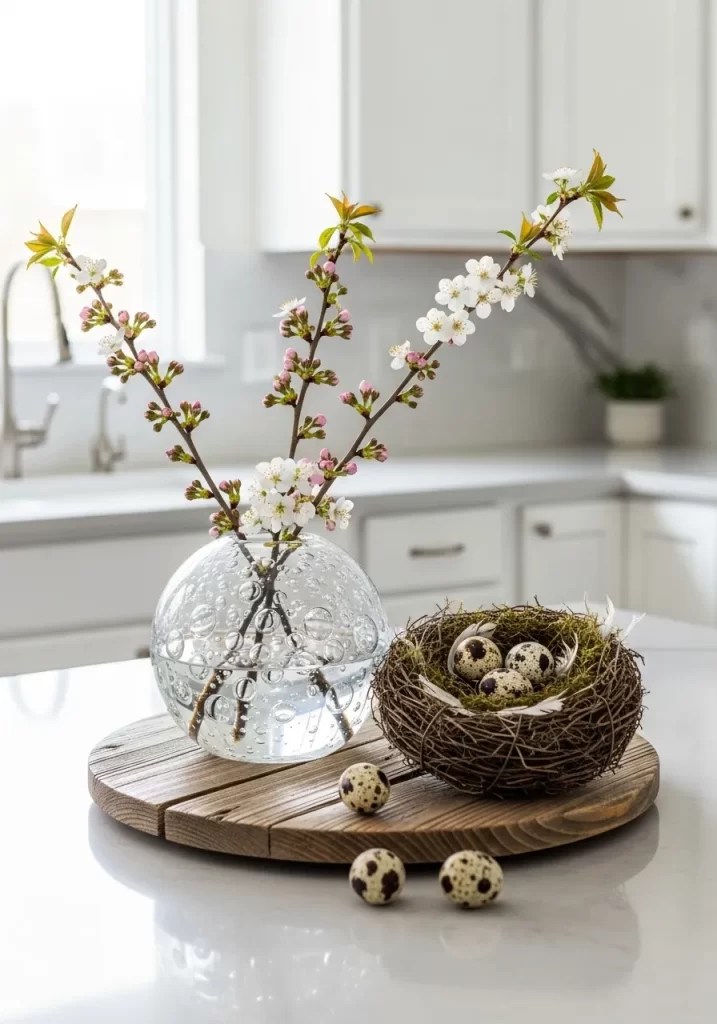
Minimalism meets nature in this clean kitchen island display. A clear glass bubble vase with textured surface details holds three slender cherry blossom branches. Next to it, a rustic wooden pedestal supports a dense, woven bird nest filled with speckled quail eggs. The contrast between the fragile glass and the rough, weathered wood creates a balanced look that feels organic yet polished.
Using a round vase helps break up the straight lines often found in modern kitchens. Small green leaves budding on the branches signal the very start of the season. This arrangement stays low enough to allow for easy conversation across the counter. It is a quiet way to bring a touch of the orchard inside your home.
Material Required List
- Clear glass bubble or orb vase
- Three fresh flowering cherry or plum branches
- Small round wooden tray or pedestal
- Woven decorative bird nest
- Four or five speckled quail eggs
- Fresh water
Equipment Required List
- Floral shears
- Glass cleaner
- Soft cloth
DIY Instruction Step by Step
- Polish your glass orb vase until it is completely streak free.
- Fill the vase about halfway with clean, room temperature water.
- Trim the bottom of your flowering branches at a steep angle.
- Place the branches into the vase, letting them fan out naturally in different directions.
- Position the wooden pedestal on your counter or table next to the vase.
- Set the woven nest onto the wooden base.
- Arrange three quail eggs inside the nest and place two more on the wooden tray for a casual look.
- Wipe away any water droplets from the counter to keep the presentation neat.
12 Sage and Floral Layered Bedding
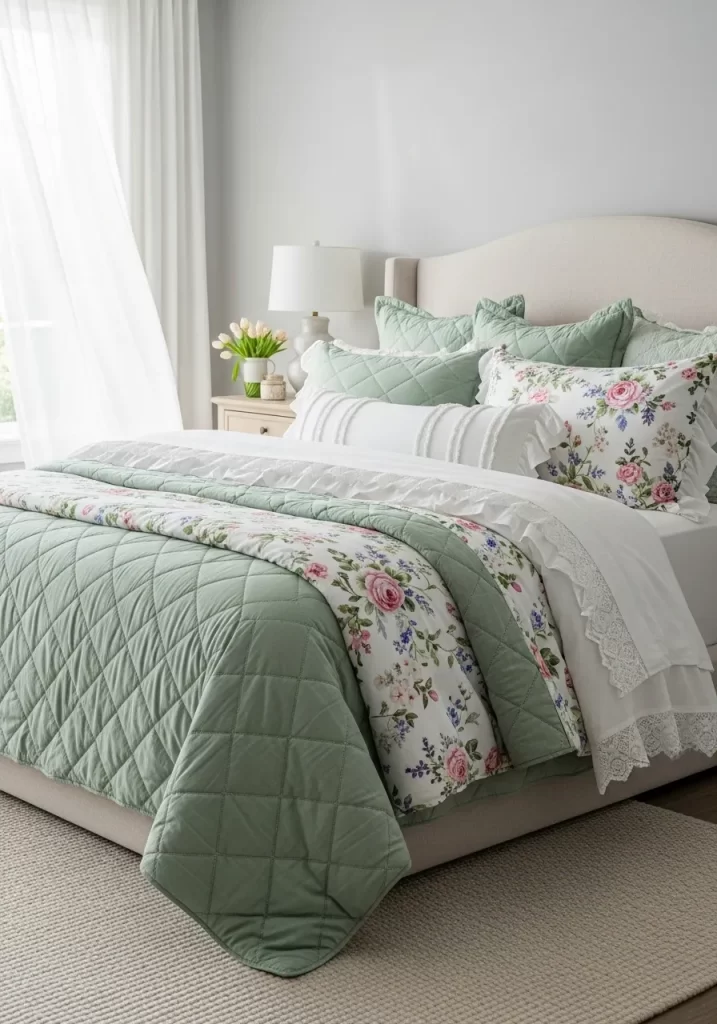
Refresh your sanctuary with a mix of soothing sage green and romantic floral prints. This bedding setup uses a heavy quilted sage coverlet as a solid base for a floral duvet folded at the foot of the bed. Crisp white sheets with lace edges add a touch of vintage charm and breathable comfort. Matching sage pillows and floral shams create a tiered look that makes the bed feel extra plush and inviting.
Layering different patterns and textures is the key to a professional looking bedroom. The cool green tones reflect the new growth of spring without being overwhelming. This color palette works beautifully with light wood furniture and soft, natural light. It transforms the room into a calm retreat for rest.
Material Required List
- Sage green quilted coverlet or bedspread
- Floral print duvet cover and insert
- White lace trimmed flat and fitted sheets
- Two sage green quilted pillow shams
- Two floral print pillow shams
Equipment Required List
- Iron or handheld steamer
- Measuring tape
DIY Instruction Step by Step
- Place your white fitted sheet over the mattress and pull it tight at all four corners.
- Lay the lace trimmed flat sheet on top, ensuring it hangs evenly on both sides of the bed.
- Spread the sage green quilted coverlet over the bed, pulling it all the way to the headboard.
- Fold the top of the coverlet and the flat sheet down about twelve inches to show off the lace.
- Place the floral duvet at the foot of the bed, folding it into thirds for a thick, luxurious look.
- Prop up the sage quilted shams against the headboard first.
- Lean the floral shams against the green ones to create a layered effect.
- Finish the look by placing a small pitcher of white tulips on your bedside table.
13 Farmhouse Tray Tulip Display
Gather your favorite seasonal elements onto a single wooden tray for an instant coffee table focal point. A tall white ceramic pitcher filled with fringed pink tulips serves as the height element. Nearby, a large glass apothecary jar is packed with soft orange and cream speckled eggs. A small velvet covered bunny and a luxury scented candle sit on a stack of books to complete the cozy scene.
This arrangement is easy to move whenever you need more space on the table. The white and wood tones keep the look neutral enough for any living room style. Using a tray helps contain smaller items so the decor looks intentional rather than cluttered. It is a simple way to tell a seasonal story in one small area.
Material Required List
- Round white washed wooden tray
- White ceramic pitcher or jug
- Fifteen to twenty fringed pink tulips
- Large glass apothecary jar with lid
- Bag of decorative speckled eggs in earth tones
- Small peach velvet bunny figurine
- Scented candle with a wooden lid
- Two or three hardcover coffee table books
Equipment Required List
- Scissors
- Dusting cloth
DIY Instruction Step by Step
- Set your wooden tray in the center of your coffee table.
- Place a stack of two or three books on one side of the tray.
- Fill your white pitcher with water and arrange the tulips inside so they look full and lush.
- Position the pitcher in the back corner of the tray.
- Carefully fill the glass jar with the speckled eggs and place it next to the pitcher.
- Set your scented candle on top of the stack of books.
- Nestle the velvet bunny next to the candle so it looks like it is guarding the display.
- Turn the books so the titles are readable from the front of the table.
14 Embroidered Lavender Window Valance
Soft linen and delicate embroidery bring a touch of the French countryside to your kitchen window. This light cream valance features tall stalks of lavender and wild herbs stitched along the bottom edge. The fabric is hung with simple bronze rings on a thin rod, allowing plenty of natural light to filter through. This look replaces heavy winter curtains with something airy and bright for the warmer months.
Adding herbs on the windowsill further connects the indoor space to the garden outside. The purple and green threads in the fabric tie in perfectly with real potted plants. It is a functional piece of decor that provides a bit of privacy without blocking the view. This style is excellent for making a small kitchen feel much larger.
Material Required List
- Cream linen fabric with lavender embroidery
- Thin bronze or gold curtain rod
- Matching clip on curtain rings
- Three small terracotta pots
- Fresh herbs like basil, rosemary, and thyme
Equipment Required List
- Screwdriver for the rod brackets
- Level
- Small watering can
DIY Instruction Step by Step
- Install your curtain rod brackets about two inches above the window frame using a level.
- Slide your bronze rings onto the curtain rod before placing the rod into the brackets.
- Clip the top edge of your linen valance onto the rings, spacing them about four inches apart.
- Adjust the fabric so it hangs in soft, even waves across the window.
- Place your three terracotta pots on the windowsill directly below the curtain.
- Transplant your fresh herbs into the pots using a bit of organic soil.
- Arrange the pots in a neat row, placing the tallest herb in the center.
- Use a small brass watering can to keep the herbs hydrated and add a decorative touch to the sill.
15 Potted Herb Dining Centerpiece
Ditch the traditional floral centerpiece for a living, fragrant herb garden on your dining table. This design features four aged terracotta pots lined up on a long, natural wood plank. Each pot holds a different lush herb, including basil, rosemary, and curly parsley. Bits of fresh moss are scattered around the base of the pots to hide the soil and add a forest like feel.
This centerpiece is as practical as it is beautiful since guests can pluck fresh leaves for their meals. The rustic finish on the pots gives them a vintage look that pairs well with modern glassware. Using a wooden board as a base protects your table from moisture and dirt. It is a fresh take on greenery that lasts much longer than cut flowers.
Material Required List
- Long wooden serving board or reclaimed wood plank
- Four medium terracotta pots with a white washed finish
- Fresh herb plants
- Bag of fresh or preserved green moss
- Potting soil
Equipment Required List
- Hand trowel
- Garden snips
- Small pitcher
DIY Instruction Step by Step
- Lay your wooden board down the center of your dining table.
- Fill each terracotta pot about halfway with fresh potting soil.
- Remove the herb plants from their plastic containers and place them into the pots.
- Add more soil around the sides of each plant and press down gently to secure them.
- Place the four pots in a straight line on top of the wooden board.
- Tuck small handfuls of moss around the base of the plants to cover all the brown soil.
- Scatter a few extra bits of moss directly on the wooden board between the pots for a natural look.
- Place a pair of vintage garden snips on the board so guests can harvest herbs during dinner.
16 Color Coordinated Spring Bookshelf
Turn your library into a work of art by organizing your books in soft, seasonal shades. This bookshelf features stacks of volumes in varying tones of mint green, seafoam, and pale blue. Ceramic bird figurines and air plants under glass cloches are tucked between the stacks to add life and texture. A warm picture light at the top illuminates the display, making the colors glow against the dark navy background.
Organizing by color creates a calm and cohesive look that is very pleasing to the eye. The mix of vertical and horizontal stacks adds architectural interest to the shelves. Adding a few speckled eggs or seasonal objects makes the display feel current. It is a clever way to decorate using items you already own.
Material Required List
- Books with green, blue, and cream spines
- Two white ceramic bird figurines
- Glass cloche with a wooden base
- One large air plant or succulent
- Decorative speckled eggs
- Battery operated picture light
Equipment Required List
- Level
- Microfiber duster
DIY Instruction Step by Step
- Remove everything from your shelves and wipe them down with a soft cloth.
- Sort your books by color, gathering all the greens and blues into separate piles.
- Create a horizontal stack of four or five books on the middle shelf to act as a pedestal.
- Place a ceramic bird figurine on top of this horizontal stack.
- Stand a row of books vertically on the other side of the shelf, using a heavy object as a bookend.
- Place your air plant inside the glass cloche and set it on a different shelf level.
- Scatter a few decorative eggs in the empty spaces to tie in the spring theme.
- Mount the picture light at the very top of the bookshelf to highlight your new arrangement.
17 Bright and Sunny Mudroom Entry

Bring a cheerful energy to your entryway with pops of high contrast yellow. This mudroom features a clean white bench with beadboard backing and black hooks for organization. A bright yellow raincoat and matching rain boots stand ready for spring showers. A large woven basket holds several light blue and striped umbrellas, making them easy to grab on the way out the door.
Functional items can serve as decor when they are chosen in a specific color theme. The natural jute rug and wooden stool add warmth to the primarily white space. A simple glass vase with yellow flowering Forsythia branches ties the whole look together. This entryway feels organized, fresh, and ready for the changing weather.
Material Required List
- Bright yellow rain boots
- Yellow hooded raincoat
- Large round woven storage basket
- Three or four umbrellas in blue or pastel tones
- Clear glass vase
- Fresh Forsythia branches
- Jute area rug
Equipment Required List
- Wall hooks
- Level
DIY Instruction Step by Step
- Lay your jute rug down in the center of the entryway to define the space.
- Hang your yellow raincoat on one of the wall hooks to add a vertical splash of color.
- Place your yellow rain boots neatly on the floor next to the white bench.
- Set the large woven basket on the floor on the opposite side of the bench.
- Insert your umbrellas into the basket so the handles are sticking out for easy access.
- Fill your glass vase with water and place the yellow Forsythia branches inside.
- Set the vase on a small wooden stool or the corner of the bench.
- Ensure all items are spaced out so the mudroom looks tidy and inviting.
18 Floating Gold Botanical Gallery
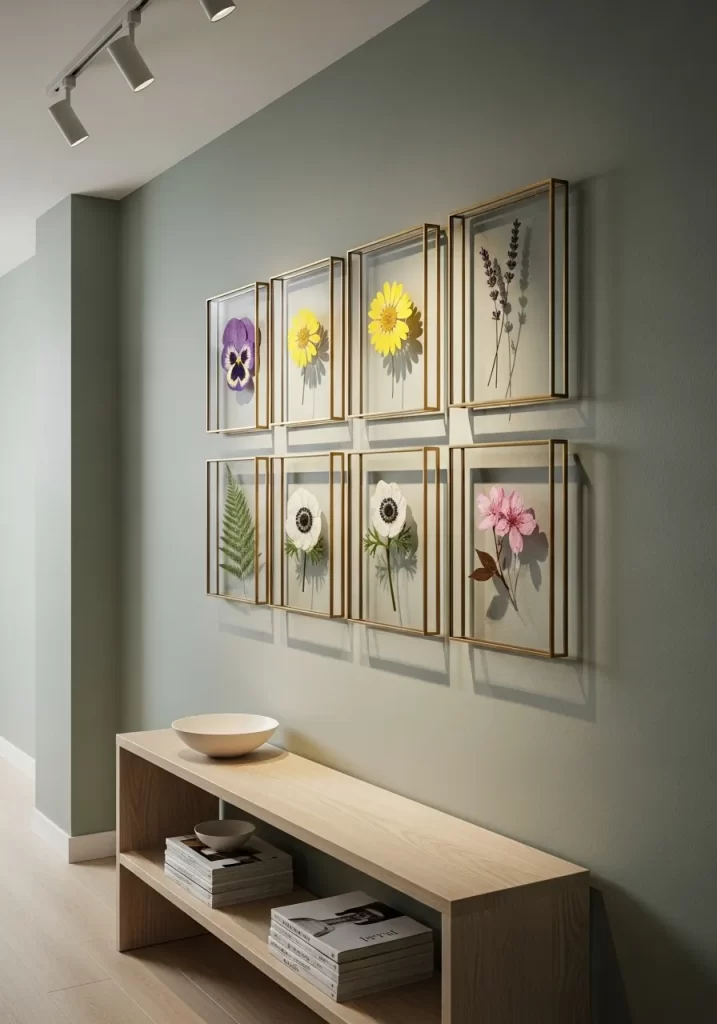
Create a sophisticated wall display using pressed flowers in modern gold frames. This gallery features eight matching thin profile frames arranged in a perfect grid. Each frame holds a single botanical specimen, like a purple pansy or a green fern leaf, pressed between two sheets of glass. The floating effect allows the wall color to show through, making the art feel light and airy.
This type of decor is a beautiful way to preserve the first blooms of the season. The gold frames add a touch of glamour that elevates the simple natural elements. Keeping the frames identical in size and spacing makes the arrangement look like a high end art installation. It works perfectly above a long console table in a hallway or living room.
Material Required List
- Eight gold floating picture frames
- Assorted fresh flowers and leaves for pressing
- Heavy books
- Parchment paper
- Clear adhesive dots
Equipment Required List
- Measuring tape
- Level
- Hammer and small nails
DIY Instruction Step by Step
- Place your fresh flowers between sheets of parchment paper and tuck them inside a heavy book for two weeks.
- Once the flowers are flat and dry, carefully open your floating frames.
- Position one pressed flower in the center of the glass, using a tiny adhesive dot to keep it from sliding.
- Close the frame and wipe the glass to remove any fingerprints.
- Use your measuring tape and level to mark eight spots on the wall in a grid pattern.
- Space the marks about three inches apart horizontally and vertically.
- Drive a small nail into each pencil mark.
- Hang your frames and use the level one last time to make sure every row is perfectly straight.
19 Velvet Ribbon Chair Accents

Add a touch of softness to your dining room by tying long, luxurious velvet bows to the back of your chairs. This design uses deep olive green velvet ribbons that drape all the way to the floor. The rich texture of the velvet contrasts beautifully with the clean white lines of the bentwood chairs. A matching peach colored ribbon is tied around a large mercury glass vase on the floor, unifying the entire room.
Ribbons are one of the most affordable ways to change the look of a space for a new season. The long tails of the bows add a sense of movement and elegance to the dining area. This detail works especially well for a spring brunch or a holiday gathering. You can easily switch the colors as the seasons change to keep the look fresh.
Material Required List
- 10 yards of 2 inch wide olive green velvet ribbon
- 2 yards of 2 inch wide peach velvet ribbon
- Large mercury glass vase
- Fresh white tulips
- Four white dining chairs
Equipment Required List
- Sharp fabric scissors
- Measuring tape
DIY Instruction Step by Step
- Measure and cut the green ribbon into four equal lengths of about two and a half yards each.
- Loop one ribbon around the top rail of a chair, ensuring the ends are even.
- Tie a large, floppy bow in the center of the chair back.
- Pull the loops and tails until the bow looks full and the tails reach the floor.
- Repeat this for the remaining three chairs.
- Fill your large mercury glass vase with water and a big bunch of white tulips.
- Wrap the peach ribbon around the neck of the vase and tie a matching bow.
- Place the vase on the floor near the table to act as a secondary focal point.
20 Giant Apothecary Egg Jar
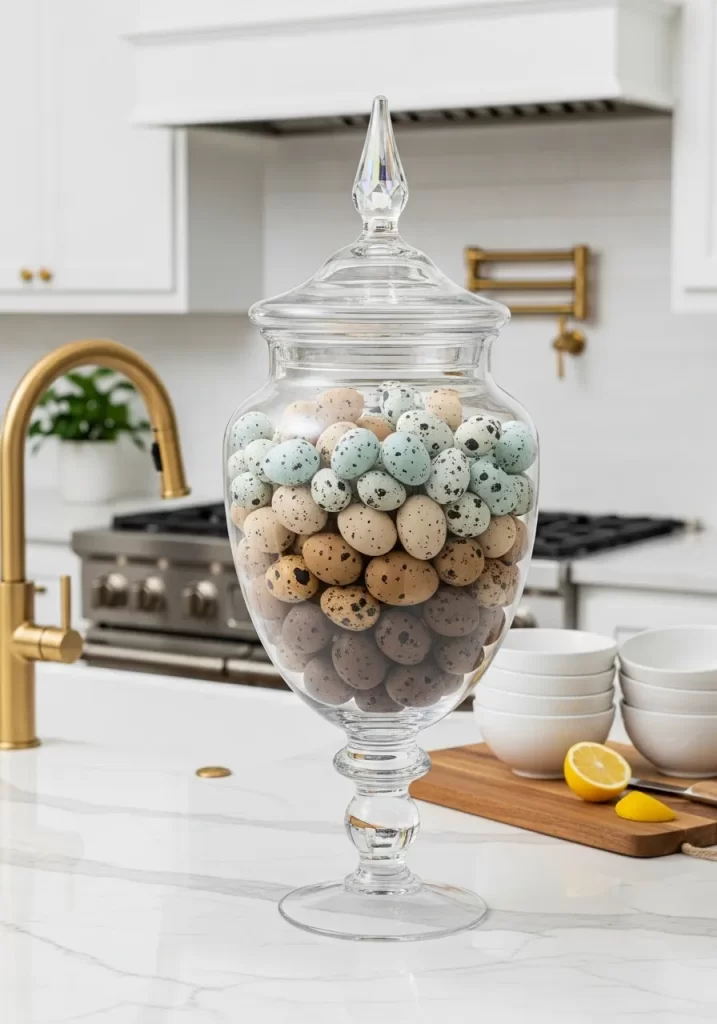
Make a simple yet high impact statement in your kitchen with a massive glass apothecary jar filled with eggs. This oversized vessel features a decorative pointed lid and a pedestal base. It is packed to the top with small speckled eggs in natural shades of cream, tan, and soft blue. This display takes a common spring motif and scales it up for a look that is both modern and dramatic.
The neutral colors of the eggs look beautiful against white marble countertops and gold kitchen fixtures. Using a single, large item creates a cleaner look than many small decorations scattered around. It is a sophisticated way to acknowledge the season in a high traffic area. The glass reflects the light, making the kitchen feel brighter and more open.
Material Required List
- Extra large glass apothecary jar with a lid
- 100 to 150 small decorative speckled eggs
- Soft cloth
Equipment Required List
- Glass cleaner
- Step stool
DIY Instruction Step by Step
- Wash and dry your glass jar thoroughly to make sure there is no dust on the inside.
- Place the empty jar in its final location on your kitchen counter or island.
- Begin pouring your speckled eggs into the jar, doing so gently to avoid cracking any shells.
- Gently shake the jar as you fill it so the eggs settle into all the gaps.
- Fill the jar all the way to the neck, leaving just enough room for the lid to sit properly.
- Place the lid on top and ensure it is level.
- Wipe the outside of the glass with a bit of cleaner to remove any fingerprints from the filling process.
- Place a wooden cutting board with a few fresh lemons nearby to add a pop of color and complete the look.
21 Twinkling Rooftop Garden
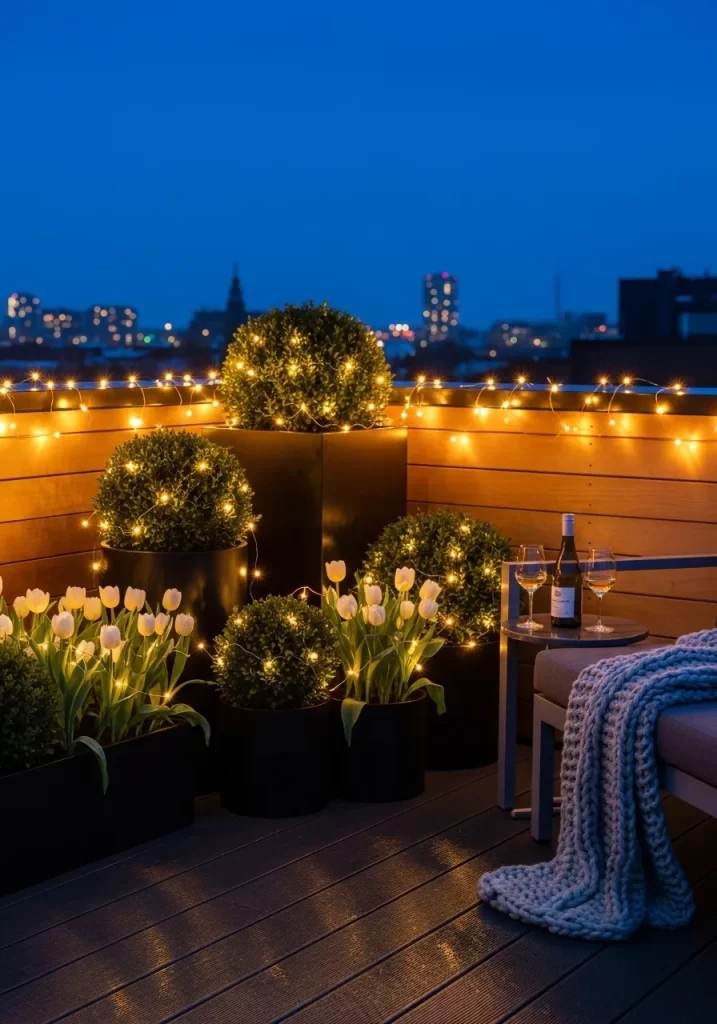
Illuminate your outdoor space after sunset with a sea of golden fairy lights. This rooftop patio uses various sizes of square and cylindrical black planters to house lush, green boxwood globes and white tulips. Thin strings of warm LED lights wrap around each shrub and the perimeter of the terrace, creating a magical glow. A heavy, chunky knit throw blanket on a modern lounge chair ensures the space stays cozy on cool spring evenings.
Lighting transforms a standard garden into a luxury retreat. The contrast between the dark night sky and the warm lights makes the urban environment feel peaceful and secluded. Placing plants at different heights adds depth and architectural interest to the small space. It is the best place to unwind as the city lights shimmer in the distance.
Material Required List
- Assorted black garden planters
- Boxwood globes or shrubs
- White tulip plants
- Multiple strings of warm white LED fairy lights
- Chunky knit grey throw blanket
- Modern outdoor lounge chair
Equipment Required List
- Extension cords
- Outdoor power strip
- Scissors
DIY Instruction Step by Step
- Clean your rooftop surface and arrange your black planters in clusters of three or four.
- Place the tallest shrubs in the back and the shorter tulip pots in the front for a layered look.
- Start at the base of each shrub and wrap the fairy lights around the branches, working your way to the top.
- Tuck the wires deep into the foliage so only the glowing bulbs are visible.
- String a long line of lights along the top edge of your wooden fence or railing.
- Connect all the light strings to a central outdoor power strip hidden behind a large planter.
- Drape your chunky knit blanket over the back of the lounge chair.
- Set a small side table next to the chair for drinks and snacks.
22 Lilac and Rain Fragrance Station
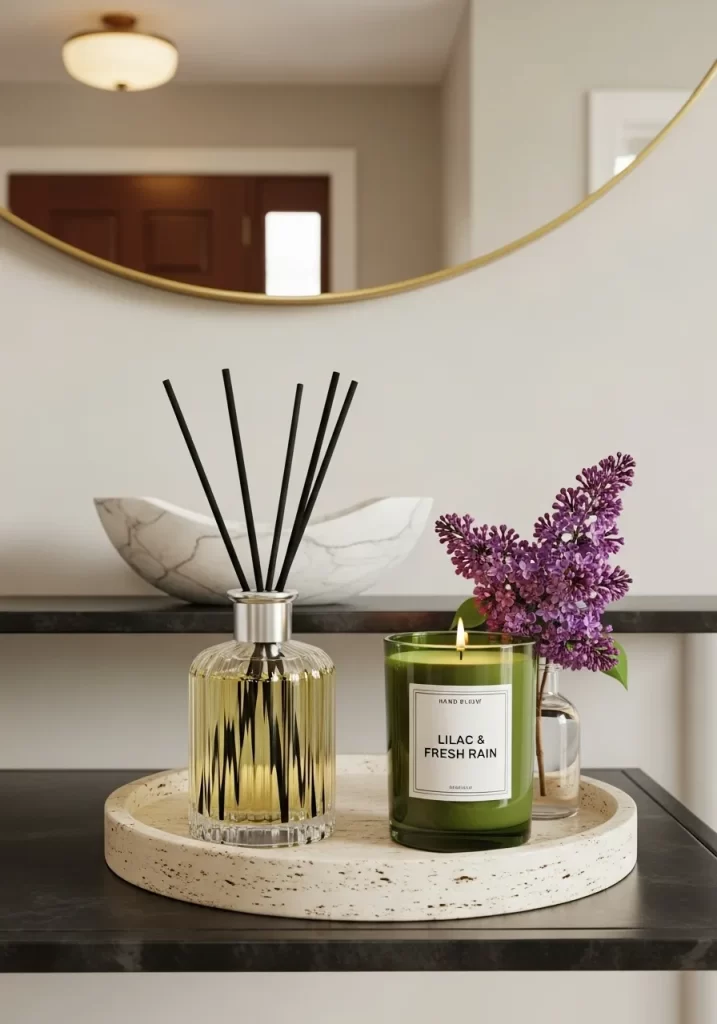
Scent is a powerful way to signal a change in seasons throughout your home. This fragrance station features a large green glass candle labeled Lilac and Fresh Rain and a matching reed diffuser. A small clear glass vase holds a single cutting of fresh purple lilac, reinforcing the floral scent profile. All three items sit on a textured cream stone tray, creating a tidy and elegant vignette.
Scented decor adds another layer of luxury to a room without any visual clutter. The soft purple and green tones look beautiful against a dark wood console or a neutral hallway table. This setup works well in an entryway to greet guests with a fresh, garden inspired aroma. It is a quiet reminder of the blooming world just outside your front door.
Material Required List
- Large green glass scented candle
- Glass reed diffuser with black reeds
- Small clear glass bud vase
- One fresh lilac stem
- Round textured stone or ceramic tray
Equipment Required List
- Long reach lighter or matches
- Floral snips
DIY Instruction Step by Step
- Place your stone tray in a central location where air flows freely, like a hallway or living room.
- Set the green candle and the reed diffuser on opposite sides of the tray.
- Open the diffuser oil and insert the black reeds, flipping them once to start the scent flow.
- Fill the small bud vase with water and place the fresh lilac stem inside.
- Position the vase between the candle and the diffuser to tie the elements together.
- Trim the wick of your candle to a quarter inch before lighting it for the first time.
- Replace the water in the bud vase every two days to keep the lilac fresh.
- Dust the tray once a week to maintain the clean, polished look.
23 Coastal Blue Ottoman Tray
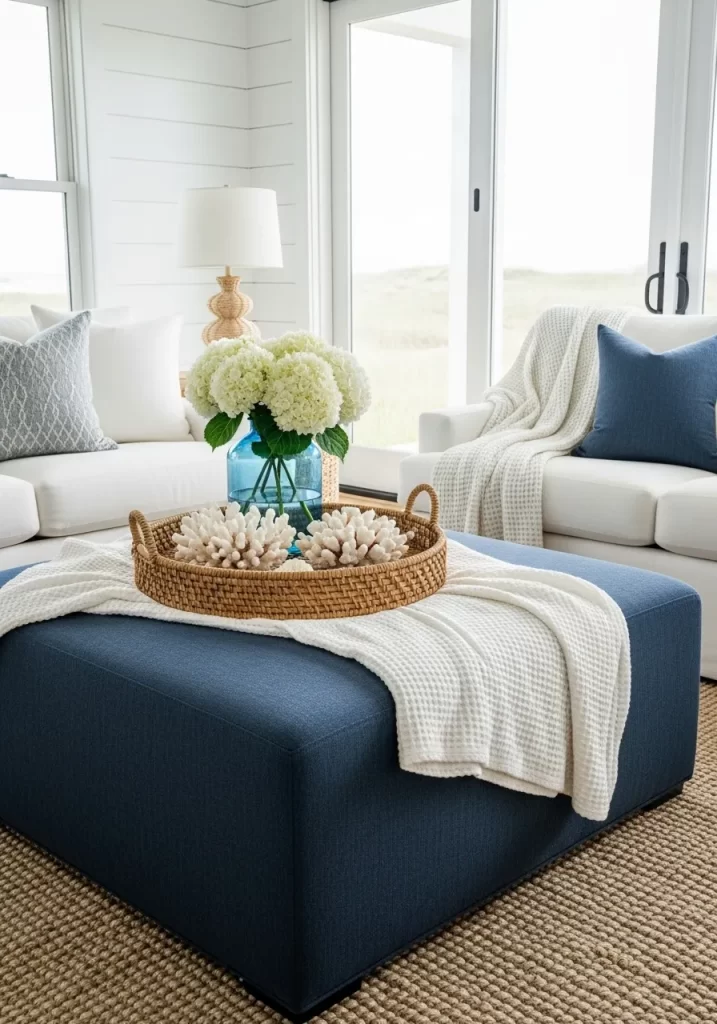
Bring a breezy, seaside feeling to your living room with a mix of deep blues and natural textures. A large navy blue upholstered ottoman serves as a soft coffee table. A round woven rattan tray sits in the center, holding two large pieces of white decorative coral. A translucent blue glass vase filled with white hydrangeas provides a tall, soft element that balances the hard coral.
The combination of navy blue and crisp white is a classic spring theme that never goes out of style. Adding a white waffle knit throw blanket draped casually over the ottoman increases the comfort level. The rattan tray adds a rustic touch that prevents the blue from feeling too formal. This setup is great for a beach house or any home that wants a relaxed, airy vibe.
Material Required List
- Large round woven rattan tray
- Two white resin or natural coral pieces
- Medium blue glass vase
- One large bunch of white hydrangeas
- White waffle knit throw blanket
- Large navy blue ottoman
Equipment Required List
- Floral scissors
- Water pitcher
DIY Instruction Step by Step
- Fold your white throw blanket lengthwise and drape it across one corner of the navy ottoman.
- Place the round rattan tray directly on top of the blanket or on the center of the ottoman.
- Fill the blue glass vase with cool water and trim your hydrangeas so they sit low and full.
- Place the vase toward the back of the tray.
- Set the two pieces of white coral in front of the vase, overlapping them slightly for a natural look.
- Ensure the tray is stable and will not tip when someone sits on the ottoman.
- Smooth out any wrinkles in the blanket to keep the look clean and intentional.
- Add a small stack of blue covered books if you have extra space on the tray.
24 Watercolor Landscape Pillow Stack
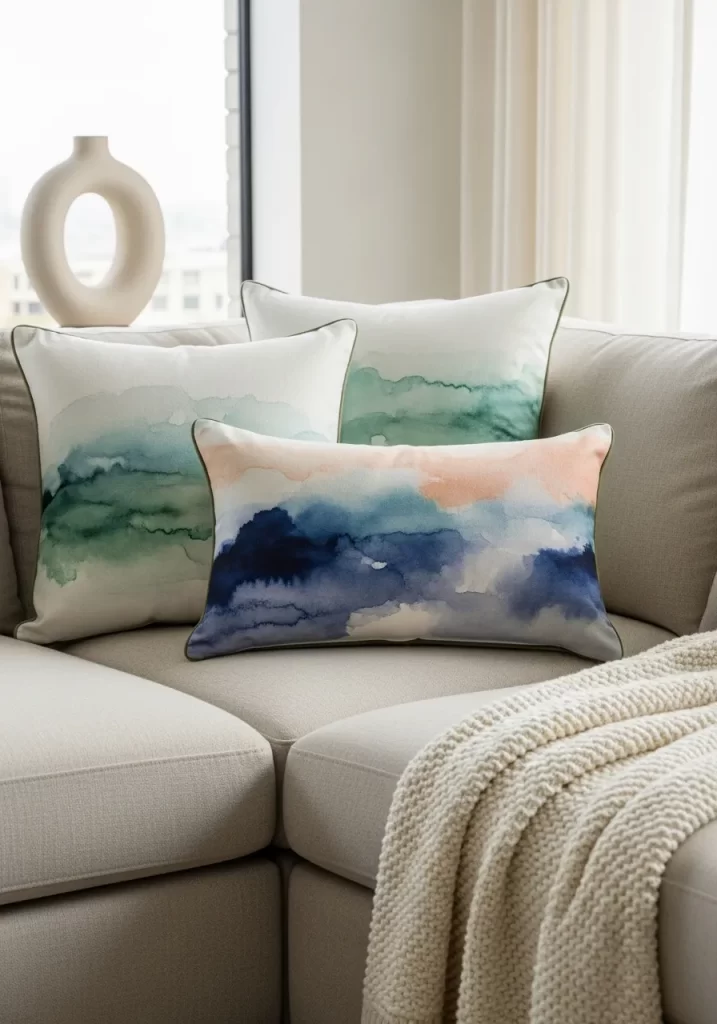
Refresh your sofa instantly by swapping heavy winter fabrics for light, artistic prints. This trio of pillows features soft watercolor designs in shades of forest green, misty blue, and pale peach. The abstract mountain and cloud patterns evoke the feeling of a spring morning in the countryside. They are arranged on a neutral beige sectional next to a chunky cream knit throw, making the space look cozy and curated.
Abstract prints are a great way to introduce multiple colors into a room without a single pattern dominating the space. The soft edges of the watercolor designs keep the look relaxed and modern. Choosing a mix of square and rectangular shapes adds visual interest to the arrangement. This simple change can make an old sofa feel entirely new for the season.
Material Required List
- Two square watercolor print pillow covers
- One rectangular watercolor print pillow cover
- Three high quality pillow inserts
- Cream knit throw blanket
- Neutral colored sectional or sofa
Equipment Required List
- Handheld steamer
DIY Instruction Step by Step
- Remove your old pillow covers and replace them with the new watercolor designs.
- Give each pillow a good shake to ensure the inserts are fluffy and fill the corners.
- Place the two square pillows in the corner of the sofa, overlapping them slightly.
- Lean the smaller rectangular pillow in front of the square ones to create a tiered look.
- Drape the cream knit throw over the arm of the sofa next to the pillows.
- Use a steamer to remove any fold lines from the new pillow covers.
- Adjust the pillows so the most colorful parts of the pattern are facing forward.
- Chop the top of the pillows with your hand to give them a professional, finished look.
25 Golden Arched Garden Mirror
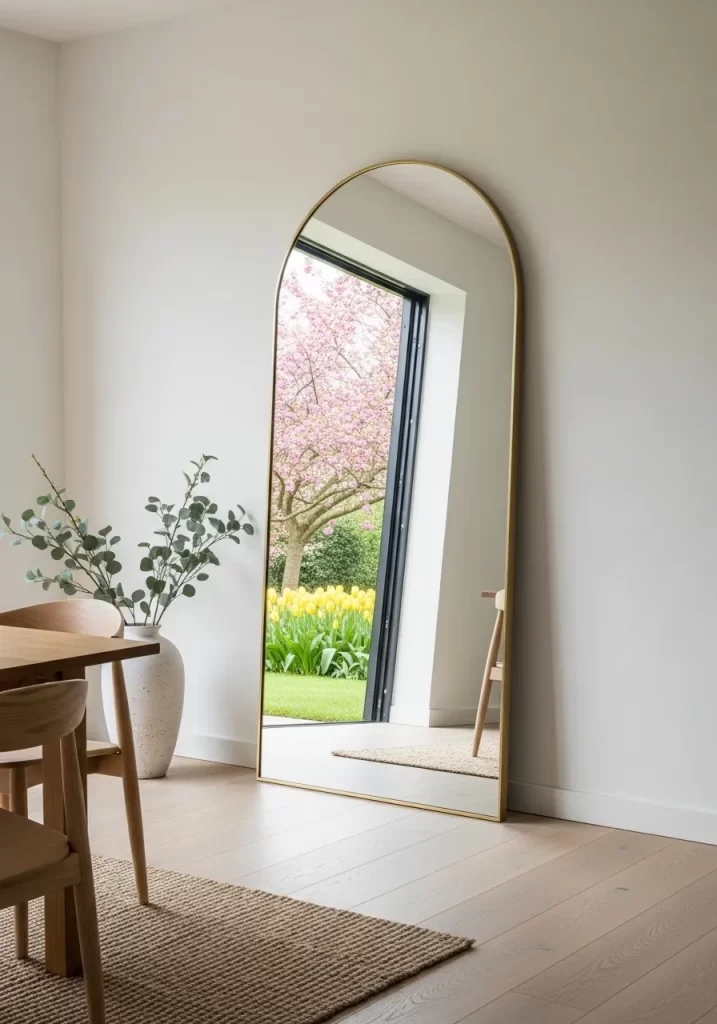
Create the illusion of an extra window by placing a large arched mirror opposite a glass door or window. This oversized floor mirror features a thin gold frame that looks elegant and disappears into the background. It perfectly reflects the blooming cherry trees and yellow tulips in the garden outside. The reflection doubles the amount of natural light in the room, making it feel twice as large and much brighter.
Mirrors are a classic designer trick for opening up a space and bringing the outdoors in. Placing a simple white vase with green branches next to the mirror connects the indoor decor with the reflected garden. This setup works exceptionally well in a dining room or a dark hallway. It creates a dynamic piece of living art that changes as the garden grows through the season.
Material Required List
- Large arched floor mirror with a gold frame
- Tall white textured ceramic vase
- Three or four fresh green leaf branches
- Jute area rug
- Wooden dining chair
Equipment Required List
- Glass cleaner
- Soft cloth
- Wall anchor or safety strap
DIY Instruction Step by Step
- Lay down your jute rug to protect the floor and define the area for the mirror.
- Carefully lean the arched mirror against the wall, ensuring it is at a slight angle.
- Secure the mirror to the wall using a safety strap to prevent it from tipping forward.
- Clean the glass thoroughly with a soft cloth to ensure a clear reflection of the garden.
- Place the tall white vase on the floor next to the mirror.
- Fill the vase with water and insert the green branches, letting them lean toward the glass.
- Position a wooden chair nearby to create a cozy reading or viewing nook.
- Check the reflection from several points in the room to make sure you are capturing the best part of the garden.
26 Mint Green Interior Doors

Give your hallway a fresh and unexpected makeover by painting your interior doors a soft mint green. These classic four panel doors look stunning with their new pastel hue and modern silver hardware. The pale grey walls and white baseboards provide a clean, neutral backdrop that makes the green pop without being loud. A small niche at the end of the hall holds a simple white vase of flowers, tying the whole look together.
Changing the color of your doors is a bold move that pays off by adding a high end, custom feel to your home. Mint green is a great choice because it feels clean, calm, and perfectly suited for the new season. This update is relatively easy to do over a weekend and completely changes the energy of a boring hallway. It makes the transition from room to room feel like a walk through a spring garden.
Material Required List
- One gallon of high quality interior paint in mint green
- High quality primer
- Silver or brushed nickel door handles and hinges
- Painter’s tape
- Drop cloths
Equipment Required List
- 2 inch angled paintbrush
- Small foam roller
- Screwdriver
- Sandpaper
DIY Instruction Step by Step
- Remove the door handles and hinges using a screwdriver and set them aside.
- Lay the door flat on sawhorses or leave it on the hinges if you are careful.
- Lightly sand the entire surface of the door to help the new paint stick.
- Wipe away all dust with a damp cloth and let the door dry completely.
- Use painter’s tape to protect the white trim around the door frame.
- Apply one coat of primer and let it dry according to the instructions on the can.
- Use the angled brush to paint the recessed panels first, then use the foam roller for the flat surfaces.
- Apply two thin coats of the mint green paint, allowing for full drying time between coats.
- Reattach your silver hardware once the paint is no longer tacky.
27 Illuminated Orchid Cloche
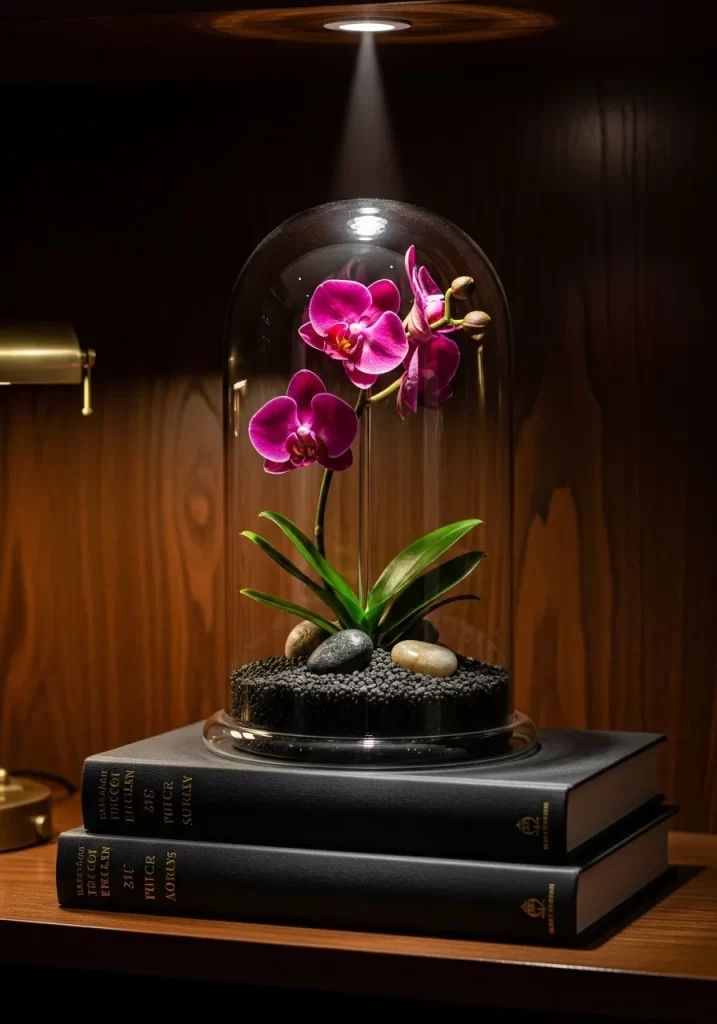
Highlight the delicate beauty of a rare orchid by placing it under a clear glass cloche. This display features a vibrant magenta orchid with dark green leaves, sitting on a bed of black pebbles and smooth river stones. The entire arrangement is placed on a stack of black hardcover books, elevating it to eye level. A small spotlight from above casts a dramatic beam of light, making the orchid glow against the dark wood background.
Using a cloche protects delicate flowers and creates a museum like atmosphere for your plants. The contrast between the bright purple petals and the dark, moody setting feels sophisticated and modern. This is a great piece for a home office or a library where you want a touch of life without a large footprint. It is a quiet, elegant statement that celebrates the unique forms of nature.
Material Required List
- Large glass cloche with a matching base
- One potted mini orchid in magenta or deep purple
- Small bag of black decorative pebbles
- Three or four smooth river stones
- Two large black hardcover books
- Battery operated puck light or small spotlight
Equipment Required List
- Tongs for placing stones
- Soft cloth
DIY Instruction Step by Step
- Place your two black books in a stack on your shelf or desk.
- Set the base of the cloche on top of the books.
- Carefully place your potted orchid in the center of the base.
- Pour the black pebbles around the base of the orchid until the plastic pot is completely hidden.
- Place the larger river stones on top of the pebbles for a more natural, layered look.
- Wipe the inside and outside of the glass cloche to remove any dust or smears.
- Lower the glass over the orchid, being careful not to catch any leaves or petals.
- Mount the small light directly above the cloche to highlight the flower shape.
28 Lavender Bathroom Refresh
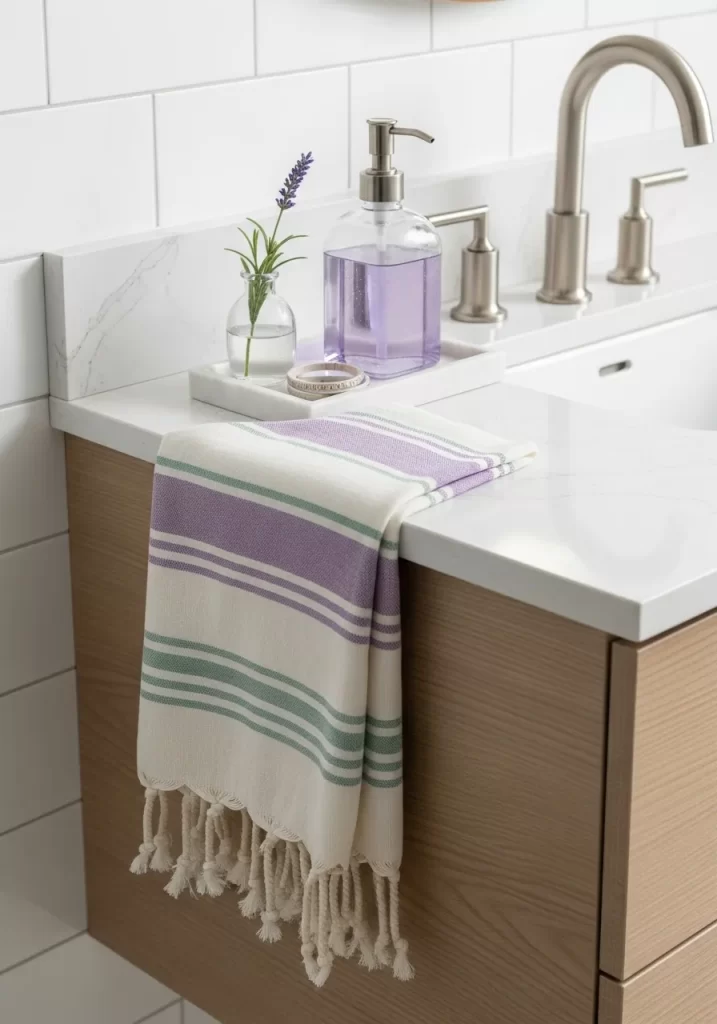
Turn your guest bathroom into a spa like retreat with a few simple purple accents. This clean white vanity features a sleek nickel faucet and a matching soap dispenser filled with lavender colored soap. A small glass vase with a single sprig of lavender adds a natural scent and a pop of color. A soft white towel with purple and green stripes hangs over the edge of the counter, tying the theme together.
The scent of lavender is naturally calming, making it a great choice for a bathroom. The mix of white marble and light wood creates a bright, clean look that feels very fresh for spring. This update is incredibly easy to do and makes a big difference in how the room feels to guests. It is a small way to bring a bit of luxury to a functional space.
Material Required List
- Clear glass soap dispenser
- Lavender scented liquid soap
- Small clear glass bud vase
- One fresh or dried lavender sprig
- White hand towel with purple and green stripes
- Small white marble tray
Equipment Required List
- None
DIY Instruction Step by Step
- Clear everything off your bathroom counter and wipe the surface down.
- Place the small marble tray next to the sink to hold your items.
- Fill the soap dispenser with the purple lavender soap and place it on the tray.
- Fill the bud vase with water and insert the lavender sprig.
- Position the vase next to the soap dispenser on the marble tray.
- Fold the striped hand towel neatly and drape it over the front edge of the vanity.
- Ensure the stripes are aligned and the towel hangs evenly.
- Add a small lavender scented candle if you have extra space on the counter.
29 Single Parrot Tulip Nightstand
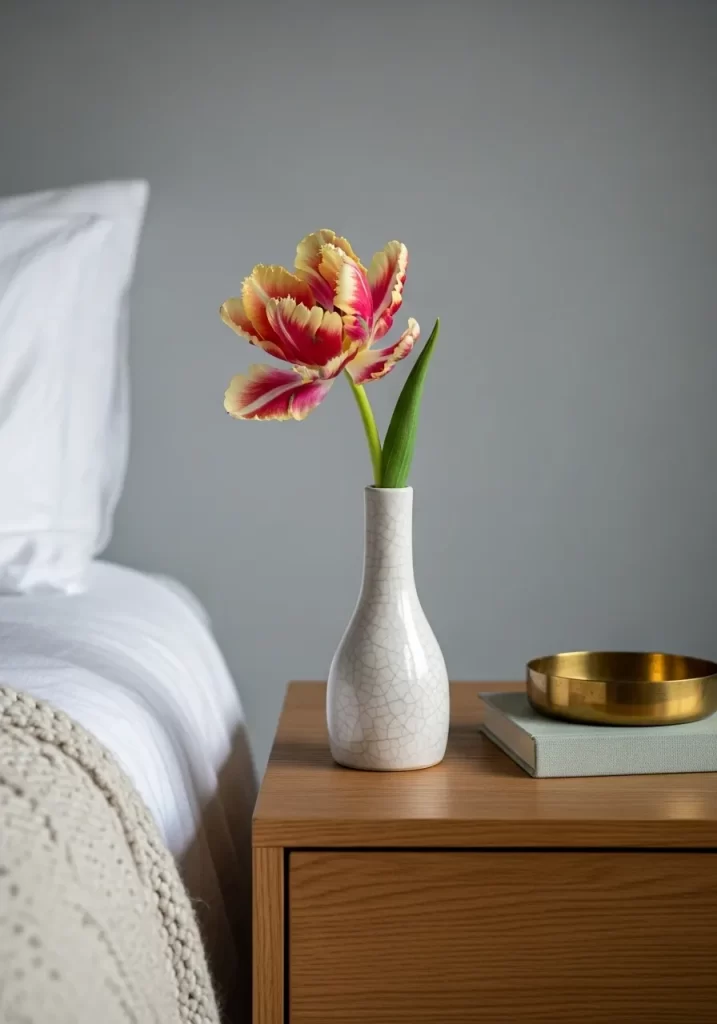
Embrace the beauty of a single, dramatic flower to brighten up your bedroom. This nightstand features a white crackle glaze vase holding a spectacular parrot tulip with ruffled red and yellow petals. A small gold tray and a green covered book sit nearby, creating a simple and high end look. The neutral grey walls and white bedding make the vibrant colors of the tulip the undisputed star of the room.
Parrot tulips are known for their unique shapes and bold colors, making them perfect for a minimalist display. Using just one flower allows you to appreciate every detail of the petals and the stem. This setup is very easy to maintain and brings an immediate sense of life to your sleeping area. It is a cheerful sight to wake up to every morning.
Material Required List
- Small white ceramic vase with a crackle finish
- One large parrot tulip
- Small round gold decorative tray
- One book with a light green spine
- Light wood nightstand
Equipment Required List
- Floral shears
- Water pitcher
DIY Instruction Step by Step
- Clear your nightstand and dust the surface.
- Place the green covered book on one side of the table.
- Set the small gold tray on top of the book to hold jewelry or a watch.
- Fill the white vase with cool water and a tiny bit of flower food.
- Trim the tulip stem at an angle so it sits about four inches above the rim of the vase.
- Place the vase in the center of the nightstand.
- Position the flower so it leans slightly toward the bed.
- Change the water every day to keep the tulip upright and vibrant for as long as possible.
30 Hanging Moss Kokedama Forest
Bring a modern, sculptural element to your home with a group of hanging moss balls, also known as Kokedama. These four green spheres are covered in lush moss and held together with thin tan string. Long, delicate ferns grow out of the tops, creating a floating forest effect in front of a large window. The natural green of the moss looks beautiful against the white brick walls and black window frames.
Kokedama is a Japanese botanical art form that eliminates the need for a traditional pot. Hanging them at different heights creates a dynamic and interesting display that uses vertical space. This setup is perfect for a bright kitchen or a sunroom where plants can thrive in natural light. It is a unique and artistic way to bring a lot of greenery into a room without taking up any floor or counter space.
Material Required List
- Four small indoor plants
- Bag of bonsai soil and peat moss
- Fresh green sheet moss
- Thin tan jute twine or fishing line
- Water
Equipment Required List
- Large mixing bowl
- Scissors
- Ceiling hooks
DIY Instruction Step by Step
- Remove the plants from their pots and gently shake off the extra soil from the roots.
- In a large bowl, mix the bonsai soil and peat moss with a little water until it forms a thick clay like mud.
- Mold a ball of the soil mixture around the roots of each plant until it is about the size of an orange.
- Wrap a layer of fresh sheet moss around the soil ball, covering it completely.
- Wind the jute twine around the moss ball in various directions to secure the moss and the soil.
- Tie a long piece of twine to the wrapping to act as a hanger.
- Install four hooks into your ceiling near a bright window, spacing them out evenly.
- Hang the Kokedama at different heights by adjusting the length of the twine.
- To water, simply take them down once a week and soak the moss balls in a bowl of water for ten minutes.
31 Copper and Marble Kitchen Vignette
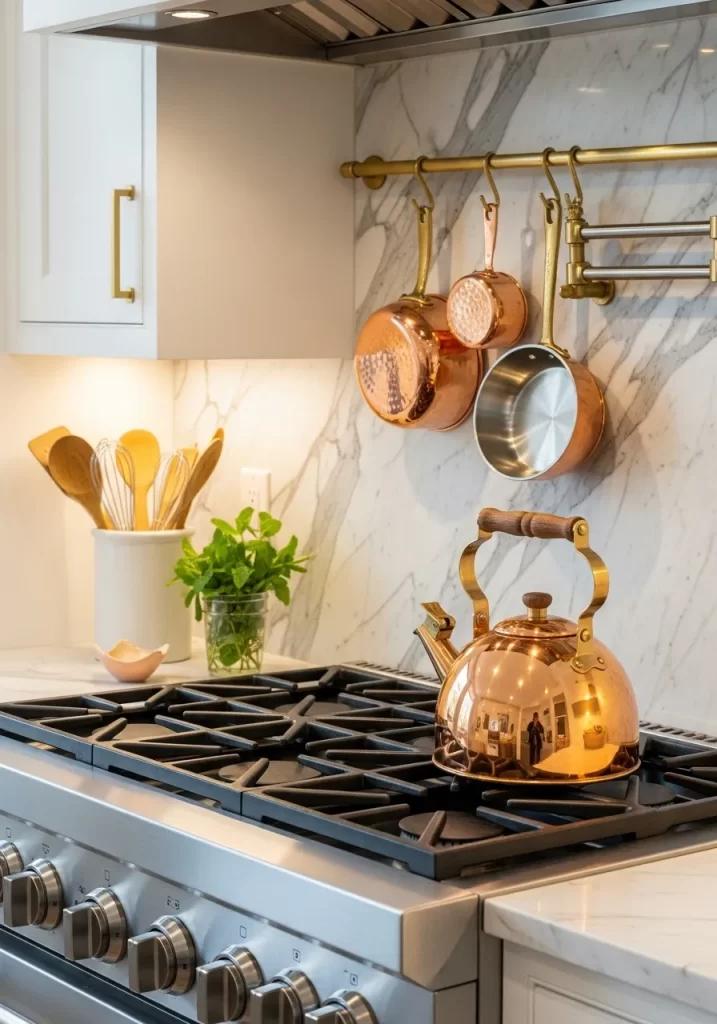
Warm metallic tones meet the timeless elegance of white marble in this stunning kitchen corner. A polished copper tea kettle sits prominently on a professional grade range, reflecting the clean light of the room. Behind it, matching copper pots hang from a brass rail, creating a functional yet beautiful wall display. A simple glass jar of fresh mint adds a burst of organic green that softens the hard surfaces of the stone and metal.
Choosing high quality metals like copper and brass adds an immediate sense of luxury to the heart of the home. These materials develop a beautiful patina over time, making your kitchen feel lived in and soulful. This setup works well because it keeps essential tools within reach while maintaining a curated, high end look. It proves that everyday utility can be elevated into a work of art.
Material Required List
- Polished copper tea kettle
- Assorted copper saucepans and pots
- Brass or gold finished pot rail with hooks
- Large white ceramic utensil crock
- Fresh mint or basil in a glass jar
- Wooden spoons and whisks
Equipment Required List
- Drill and wall anchors
- Screwdriver
- Level
- Microfiber cloth for polishing metal
DIY Instruction Step by Step
- Measure the space on your backsplash where you want to hang the pot rail.
- Use a level and pencil to mark the drill holes, ensuring the rail will be perfectly straight.
- Drill the holes and insert wall anchors if you are not drilling directly into a stud.
- Screw the brass rail brackets into the wall and slide the rail into place.
- Slide the hooks onto the rail and space them out evenly.
- Hang your copper pots by their handles, placing the largest ones toward the ends for balance.
- Set your copper kettle on the stove and polish it with a microfiber cloth until it shines.
- Place a small jar of fresh water and mint on the counter to bring a fresh, aromatic element to the scene.
32 Organic Cleaning and Utility Shelf
Transform your laundry or utility room into a serene space by using natural textures and uniform containers. This light wood floating shelf holds a row of amber and clear glass spray bottles with minimalist labels. A large glass carboy of linen spray serves as a focal point, while a woven seagrass basket keeps fresh white towels organized. A small pot of lavender nearby ensures the room always smells like a field in bloom.
Uniformity is the secret to making a utility area feel organized and calm. By decanting cleaning supplies into beautiful glass bottles, you remove visual clutter and plastic waste. The mix of wood, glass, and woven fibers creates a tactile, earthy vibe that makes chores feel a little less like work. It is a practical upgrade that significantly improves the aesthetic of a functional space.
Material Required List
- Light oak or pine floating shelf
- Four amber glass spray bottles
- One large clear glass jug or carboy
- Woven seagrass basket with a white fabric liner
- Rolled white cotton hand towels
- Wooden handled scrub brush
- Potted lavender plant
Equipment Required List
- Floating shelf hardware
- Drill and level
- Funnel for decanting liquids
DIY Instruction Step by Step
- Install your floating shelf at eye level, ensuring it is secured to wall studs for weight support.
- Fill your glass spray bottles with your favorite eco friendly cleaners or DIY mixtures.
- Apply clean, waterproof labels to the front of each bottle at the exact same height for a professional look.
- Line the spray bottles in a neat row on the left side of the shelf.
- Fill the large glass carboy with linen water and place it in the center.
- Roll your white towels tightly and stand them upright inside the woven basket.
- Place the basket and the wooden scrub brush on the right side of the shelf.
- Set the potted lavender on the counter below or at the end of the shelf to add a natural fragrance to the area.
33 Geometric Woven Basket Wall Gallery
Make a bold architectural statement by turning traditional woven baskets into a large scale wall installation. This gallery features nearly twenty baskets of varying sizes and patterns arranged in a fluid, cloud like shape. The intricate black, brown, and tan geometric weaves add depth and texture to the plain white wall. Below, a mid century modern teak sideboard provides a warm, grounded base for the airy display.
Wall baskets are a fantastic way to add personality and warmth to a high ceilinged room. The circular shapes break up the hard lines of furniture and windows, creating a more inviting atmosphere. Because these items are lightweight, they are easy to hang and rearrange until the composition feels just right. This design bridges the gap between traditional craftsmanship and modern interior styling.
Material Required List
- 15 to 20 woven wall baskets in various sizes
- Mid century modern wooden sideboard
- Black ceramic table lamp
- Small white orchid in a pot
- Two or three art books
Equipment Required List
- Small finishing nails
- Hammer
- Pencil
- Measuring tape
DIY Instruction Step by Step
- Lay all your baskets out on the floor in front of the wall to test your arrangement.
- Start with the largest basket as your anchor and place it slightly off center on the wall.
- Use a small finishing nail driven at an angle to hang the basket through the weave.
- Build outward from the center, tucking smaller baskets under the edges of larger ones to create layers.
- Vary the patterns and colors so no two similar baskets are right next to each other.
- Step back frequently to check the overall shape and ensure the cloud feels balanced.
- Place your teak sideboard underneath the finished gallery to frame the display.
- Decorate the sideboard with a black lamp on one end and the orchid and books in the middle for a clean finish.
34 Minimalist Acrylic and Citrus Table
Brighten a neutral living room with a clear acrylic coffee table that lets your rug and sunlight take center stage. This modern piece is styled with a simple stack of white Coffee Table books and a bowl of vibrant yellow lemons. Two long stemmed yellow ranunculus in a white square vase provide height and a delicate floral touch. The transparency of the table makes the small room feel much more open and spacious.
Using citrus as decor is an affordable way to add high impact color and a fresh scent to your home. The yellow tones pop beautifully against the teal and terracotta patterns of the traditional rug below. This setup is perfect for those who love a clean, less is more aesthetic but still want a home to feel cheerful. The acrylic material also reflects the afternoon sun, making the whole corner glow.
Material Required List
- Clear acrylic waterfall coffee table
- Large clear glass bowl
- Six to eight fresh lemons
- Two white hardcover books
- Small white square ceramic vase
- Three yellow ranunculus or poppies
Equipment Required List
- Glass cleaner
- Microfiber cloth
DIY Instruction Step by Step
- Clean the acrylic table thoroughly with a specialized cleaner to ensure it is crystal clear.
- Place your patterned rug in the center of the seating area and set the table on top.
- Create a stack of two white books on the left side of the table.
- Set the clear glass bowl on top of the books and fill it with fresh lemons.
- Place the white square vase on the right side of the table.
- Fill the vase with water and trim your yellow ranunculus so they stand at different heights.
- Add two more lemons directly on the table surface next to the vase for a casual look.
- Position the table so it catches the light from the nearest window to maximize the floating effect.
35 Dramatic Green Apple Pyramid
Create a striking and edible centerpiece by stacking vibrant green apples in a large white ceramic bowl. This display uses color and repetition to create a high contrast focal point against a dark, moody dining room background. The smooth, matte finish of the white bowl perfectly complements the waxy sheen of the Granny Smith apples. One lone apple placed on the table nearby adds a touch of artistic imperfection.
The secret to this look is the monochromatic color scheme. By using only one type of fruit, the arrangement feels like a modern sculpture rather than a simple snack bowl. This is a great way to add living color to a dark kitchen or dining area without the maintenance of flowers. It feels fresh, crisp, and sophisticated, making it an excellent choice for a minimalist home.
Material Required List
- Large wide mouth white ceramic bowl
- 25 to 30 large Granny Smith apples
- Dark wood or black dining table
Equipment Required List
- Mild fruit wash
- Lint free towel for polishing
DIY Instruction Step by Step
- Wash all the apples and dry them completely with a lint free towel to make them shine.
- Place your white bowl in the center of your dark dining table.
- Create a sturdy base layer of apples by lining the bottom of the bowl until it is full.
- Start the second layer by nesting apples in the gaps created by the first layer.
- Continue building upward in a pyramid shape, tapering the number of apples as you go.
- Place the final apple at the very peak to complete the point.
- Check the stability of the stack to ensure it will not collapse if the table is bumped.
- Set one extra apple on the table surface about six inches away from the bowl for a professional styling touch.
36 Ethereal Paper Lantern Bedroom Canopy
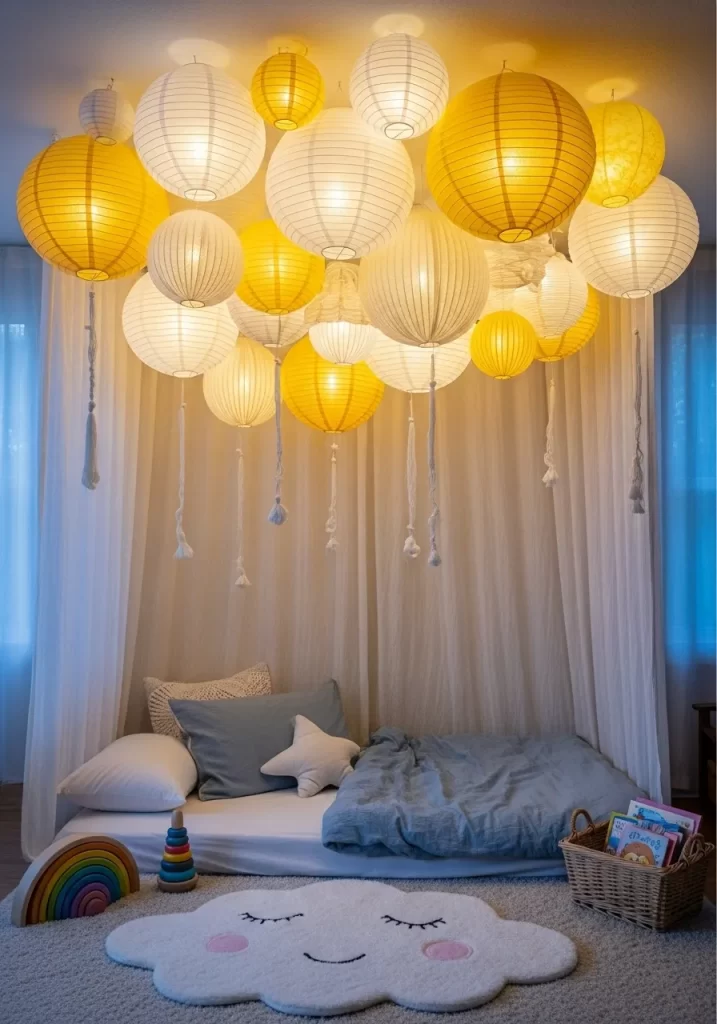
Transform a simple floor bed into a dreamlike sanctuary with a massive installation of white and yellow paper lanterns. This design features dozens of lanterns in various sizes suspended from the ceiling to create a glowing cloud above the sleeping area. The mix of soft white and warm yellow light filters through the paper, casting a gentle, flattering glow over the room. Below, a cloud shaped rug and rainbow toys add to the whimsical, cozy atmosphere.
This setup is a fantastic alternative to a traditional headboard or canopy. It adds a huge amount of visual interest and soft light without requiring a large budget. Using battery operated LED lights inside the lanterns makes the installation safe and easy to manage. It is a perfect way to make a child room or a guest nook feel like a magical retreat from the world.
Material Required List
- 30 to 40 white and yellow paper lanterns in mixed sizes
- Battery operated LED lantern lights with a remote
- Clear fishing line or white string
- White cloud shaped area rug
- Floor mattress with blue and white bedding
Equipment Required List
- Ceiling hooks or a tension rod
- Scissors
- Step ladder
DIY Instruction Step by Step
- Assemble all your paper lanterns and insert the battery operated LED lights into each one.
- Map out a large rectangle on your ceiling directly above the bed.
- Install ceiling hooks or a grid of thin wire to act as your hanging points.
- Cut varying lengths of fishing line and tie them to the top of each lantern.
- Start hanging the largest lanterns first, placing them toward the center of the cloud.
- Fill in the gaps with smaller lanterns, adjusting the heights so they overlap and hide the strings.
- Keep the lowest lanterns at least four feet above the mattress for safety and comfort.
- Turn on the lights using the remote in the evening to enjoy your glowing indoor sky.
37 Sculptural Bookshelf with Bird Motifs
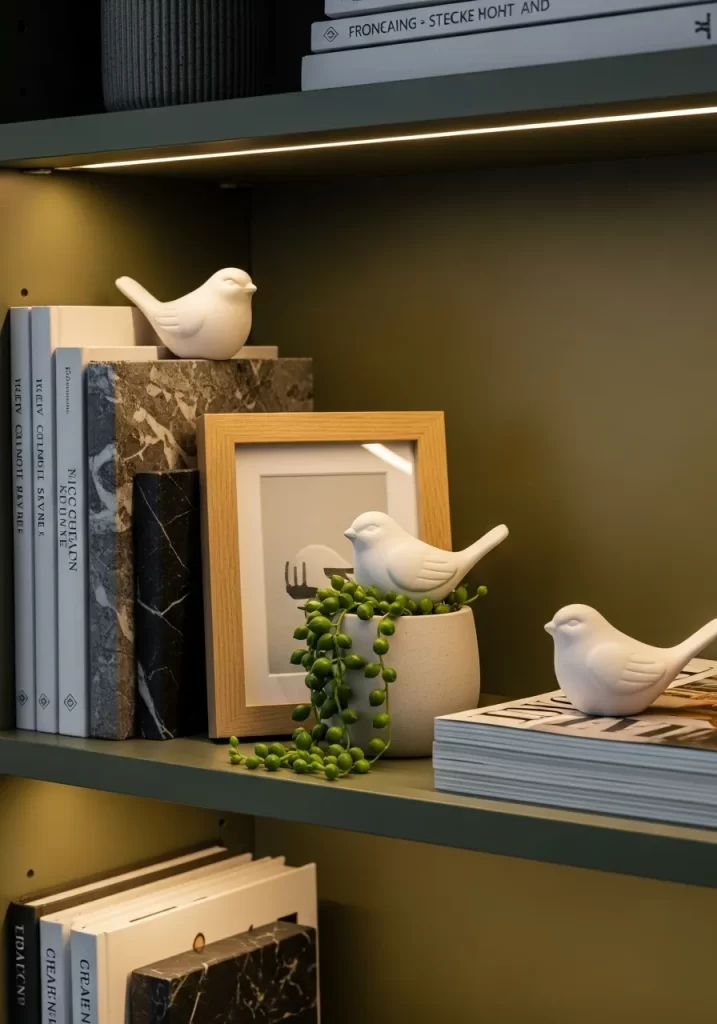
Bring a sense of peace and movement to your library with a collection of matte white bird figurines. This shelf display uses olive green and dark grey backgrounds to make the white ceramic birds stand out. They are perched on stacks of books and even on the edge of a small potted String of Pearls plant. The warm LED strip lighting under each shelf highlights the smooth curves of the birds and the texture of the marble patterned books.
Incorporating animal motifs into a bookshelf makes the display feel more dynamic and less like a static storage unit. The birds look as if they are hopping from shelf to shelf, leading the eye through your collection. By keeping the color of the figurines consistent, the look remains sophisticated and adult. This is a great way to add a layer of storytelling to your home decor.
Material Required List
- Three or four matte white ceramic bird figurines
- Small String of Pearls succulent in a concrete pot
- Light wood picture frame
- Assorted books with green, black, and white spines
- Marble print book covers
Equipment Required List
- LED adhesive light strips
- Microfiber duster
DIY Instruction Step by Step
- Clean your shelves and install LED light strips under the front edge of each level.
- Group your books by color and create several horizontal stacks of three to four books.
- Place your picture frame on one shelf, leaning it slightly to add a vertical element.
- Set the String of Pearls plant in front of a book stack so the leaves can drape over the edge.
- Place one bird figurine on top of a horizontal book stack.
- Position another bird so it looks like it is peering into the plant pot.
- Place a third bird at the very end of a shelf for a balanced look.
- Turn on the shelf lights to see how the white birds glow against the dark green background.
38 Grand Olive Tree Corner Statement

Add a touch of Mediterranean elegance to a bright room with a tall, bushy indoor olive tree. This stunning specimen sits in a large, modern concrete cylinder pot, creating a bold vertical element in an empty corner. The silvery green leaves catch the light from the surrounding windows, bringing an organic, airy feel to the space. A simple black floor lamp and a neutral sofa nearby keep the focus entirely on the tree natural beauty.
Olive trees are a favorite for designers because they add height without feeling heavy or dark. The thin, delicate branches allow light to pass through, which keeps the room feeling open. Placing the tree in a concrete pot adds a modern, industrial touch that contrasts beautifully with the soft foliage. It is a timeless piece of living decor that only gets better as it grows.
Material Required List
- Large potted olive tree
- Oversized concrete cylinder planter
- Potting soil specifically for Mediterranean plants
- Large decorative river stones
- Modern black floor lamp
Equipment Required List
- Hand trowel
- Watering can with a long spout
DIY Instruction Step by Step
- Choose the brightest corner in your room, preferably one with two windows for maximum light.
- Place your large concrete planter in the corner and add a layer of stones at the bottom for drainage.
- Carefully transplant your olive tree into the new pot, filling the sides with fresh soil.
- Press the soil down firmly to ensure the tree stands perfectly straight.
- Cover the top of the soil with a layer of smooth river stones for a clean, professional finish.
- Position your black floor lamp next to the tree to provide evening light and architectural interest.
- Water the tree immediately after planting and then only when the top two inches of soil feel dry.
- Wipe the dust off the leaves once a month to keep the tree healthy and looking vibrant.
Refreshing your surroundings for the new season is a great way to boost your spirits. You now have a complete list of ways to make your rooms feel modern. Each project offers a simple chance to show off your unique style.
Focus on the specific textures and colors that make you feel happy. Spring is the best time to play with organic materials and bright light. We hope these creative suggestions inspire your next home project. Begin with one small area and watch your entire environment transform.
Key Takeaways
1 Incorporating organic materials like moss and wood adds warmth to any room.
2 Organizing your items by color creates a sense of balance and calm.
3 Strategic lighting projects change the atmosphere of your home after sunset.
4 Giving new life to old objects saves money while adding plenty of character.