Spring is almost here. You can feel the change in the breeze. The long nights of winter are finally over. Now is the best time to refresh your living space.

Many people think a home makeover costs a lot of money. This is not true. You can create a bright atmosphere with simple items. Small swaps lead to big results.
This guide offers forty one ways to welcome the sun. We focus on light and natural textures. Your home will feel new in no time. Let us begin this journey toward a fresher house.
1 Velvet Earth Tone Throw Pillows
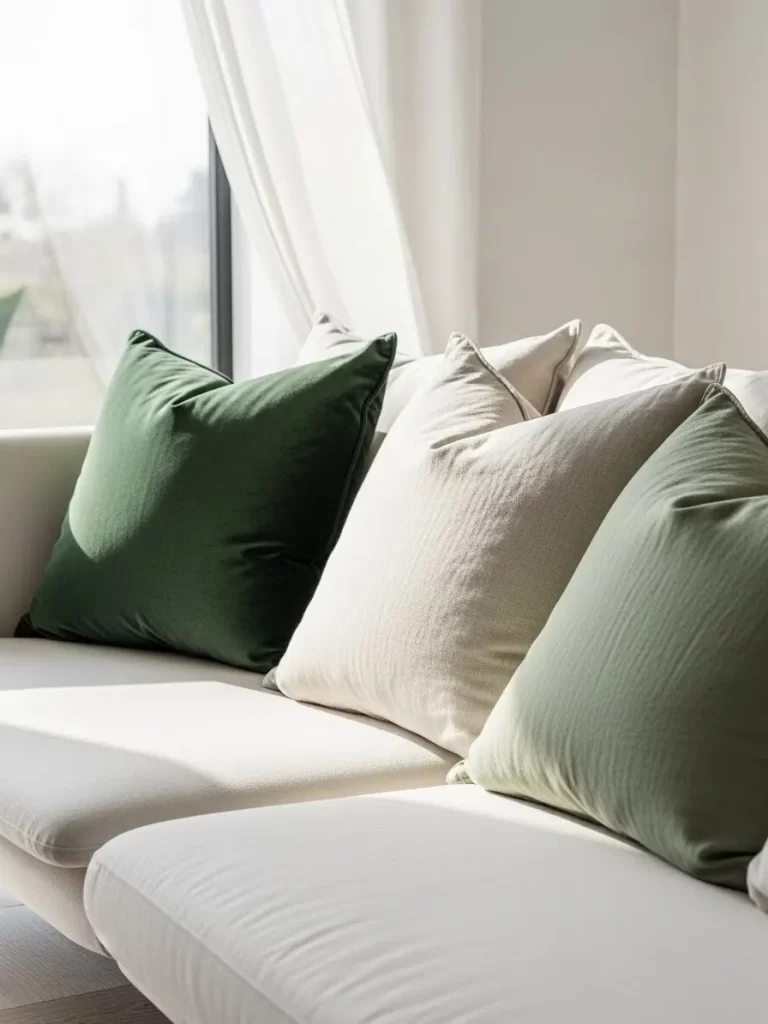
Refreshing your living room starts with the textures you touch every day. These velvet cushions bring a sophisticated botanical feel to any neutral sofa. The deep forest green acts as a grounded anchor against lighter cream fabrics.
Natural light bounces beautifully off the soft pile of the fabric. Mixing different shades creates a layered look that mimics the colors of a budding garden. It is a simple way to transition your home from winter coziness to spring brightness without replacing large furniture pieces.
Soft textiles make a space feel welcoming and lived in. Choosing high quality covers allows you to swap styles easily as seasons change. These specific tones work well to bridge the gap between indoor comfort and the greenery growing just outside your window.
Materials Required
- 20 inch by 20 inch velvet pillow covers in forest green and sage
- High quality down or down alternative pillow inserts
- Fabric measuring tape
- Lint roller
Equipment Required
- None (Hand assembly)
DIY Instructions
- Select your pillow inserts first. Choose an insert that is 2 inches larger than your cover to ensure the pillow looks plump and full.
- Unzip the velvet cover completely to avoid snagging the fabric on the teeth of the zipper.
- Fold your pillow insert in half. This makes it much easier to slide into the narrow opening of the cover without straining the seams.
- Push the folded insert all the way to the bottom corners of the cover.
- Release the insert so it expands inside the fabric. Reach into the corners with your hand to make sure the stuffing reaches every edge.
- Pull the zipper shut slowly while tucking the fabric inward.
- Give the pillow a firm chop in the center with the side of your hand. This creates that designer look seen in professional home staging.
- Arrange them on your couch by placing the darkest green color at the ends and the lighter shades toward the middle.
2 Waffle Weave Cotton Throw Blanket

Lighten the mood of your favorite reading chair by trading heavy wool for breathable cotton. A waffle weave texture provides enough warmth for chilly mornings while remaining light enough for sunny afternoons. The warm terracotta or honey hues mimic the glow of the sun as it stays out longer each day.
Draping this fabric over a plush faux fur base creates a beautiful contrast between winter remnants and spring arrivals. It is a tactile way to signal a change in seasons. The frayed tassel edges add a touch of relaxed charm that fits any casual living space.
Layering your seating area makes it feel curated rather than cluttered. This simple swap encourages you to linger over your morning coffee. Since cotton is easy to wash, you can keep your home looking and smelling crisp all season long.
Materials Required
- One lightweight waffle weave cotton throw blanket
- Faux fur rug or chair drape
- Mild laundry detergent
Equipment Required
- Washing machine
DIY Instructions
- Remove any heavy, dark winter blankets from your furniture and store them in vacuum sealed bags for next year.
- Wash your new cotton throw on a gentle cycle to soften the fibers and remove any warehouse dust.
- Dry the blanket on low heat or hang it outside to give it a genuine outdoor scent.
- Lay a white faux fur rug over the seat and back of your armchair to provide a soft base.
- Pinch the cotton blanket by its center point and let the corners hang naturally.
- Toss the blanket over one arm of the chair so it cascades down toward the floor in a loose, effortless triangle shape.
- Smooth out the top layer but leave the tassels slightly messy for a modern, lived in appearance.
3 Citrus and Spice Natural Candles
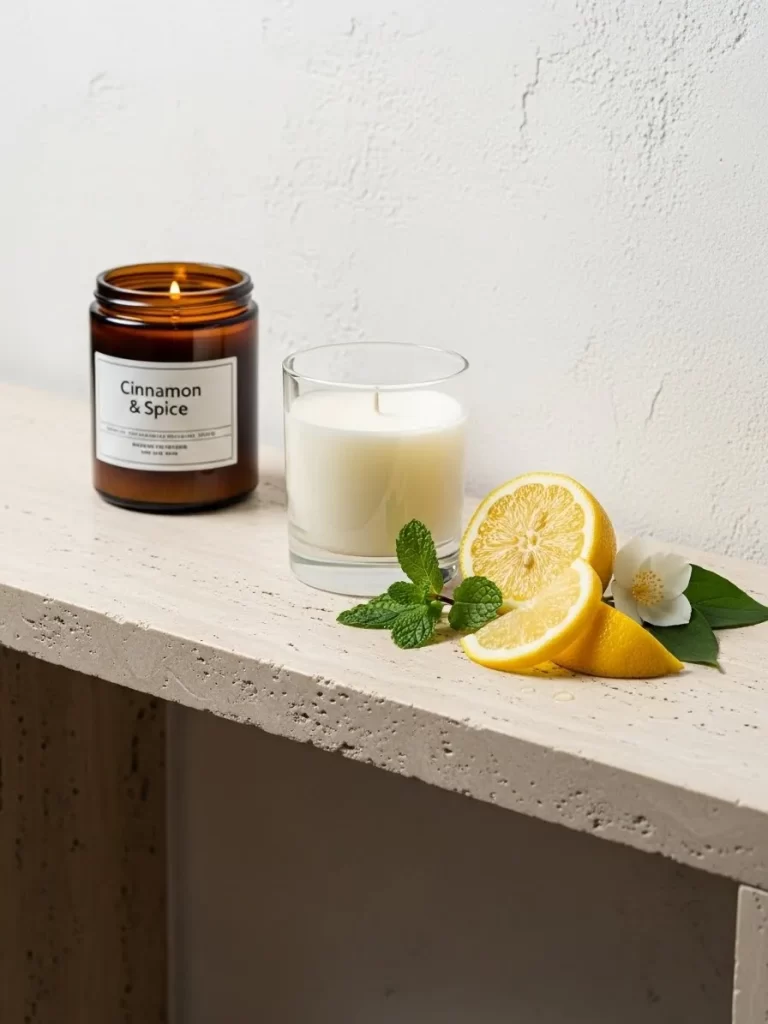
Scent is the fastest way to change the atmosphere of a room. Swapping heavy musk or pine aromas for bright lemon and mint instantly clears the mental fog of winter. These amber and clear glass jars look beautiful on any stone or wooden shelf.
Freshly sliced citrus fruits placed nearby enhance the visual experience of the fragrance. The flicker of a small flame adds a sense of life to quiet corners of your home. Using natural soy or beeswax ensures the air remains clean and free of harsh chemicals.
Setting a scent ritual helps you transition into a spring mindset. Lighting these after a morning cleaning session makes the whole house feel renewed. It is a small luxury that provides daily joy.
Materials Required
- 1 Amber glass jar candle in Cinnamon or Spice
- 1 Clear glass jar candle in Lemon or Citrus
- 1 Fresh lemon
- 1 Sprig of fresh mint
- Small white flower
Equipment Required
- Sharp kitchen knife
- Matches or a long neck lighter
DIY Instructions
- Wipe down your shelf or mantle with a damp cloth to remove any dust.
- Place the amber jar on the left side to provide a sturdy visual base.
- Position the clear glass candle slightly in front and to the right of the first jar.
- Slice a fresh lemon into thick rounds and one small wedge.
- Arrange the lemon slices and the mint sprig directly on the shelf next to the candles.
- Place a small white blossom among the greens for a pop of brightness.
- Trim the candle wicks to a quarter inch to prevent black smoke from staining your walls.
- Light the candles and enjoy how the citrus scent blends with the warmth of the spice.
4 Minimalist Fluted Glass Door Knobs

Small hardware changes offer a huge impact with very little effort. Replacing standard metal handles with fluted glass or crystal knobs catches the returning spring sunlight. These accents act like jewelry for your doors, reflecting rainbows across your hallway.
Choose between matte black for a modern contrast or brushed gold for a warm, classic glow. The ribbed texture feels high end and provides a better grip. It is a subtle upgrade that makes your daily movements feel more intentional.
Updating your doors refreshes the entire transition between rooms. This project takes only minutes but elevates the look of the whole house. It is a great way to experiment with mixed metals and vintage inspired styles.
Materials Required
- New fluted glass door knobs with matching backplates
- Screws
- Soft cloth
Equipment Required
- Phillips head screwdriver
- Flat head screwdriver
DIY Instructions
- Prop the door open with a heavy object so it does not move while you work.
- Use your screwdriver to remove the two screws holding the old handle plate in place.
- Pull the old handles out from both sides of the door simultaneously.
- Slide the new latch mechanism into the hole on the side of the door if you are replacing the internal parts too.
- Insert the new glass knob through the hole, ensuring the spindle lines up with the opposite handle.
- Hold both handles firmly against the door and tighten the new screws by hand first.
- Finish tightening with the screwdriver until the handle is snug but not impossible to turn.
- Polish the glass with a soft cloth to remove any fingerprints left behind during the installation.
5 Sheer White and Navy Layered Curtains
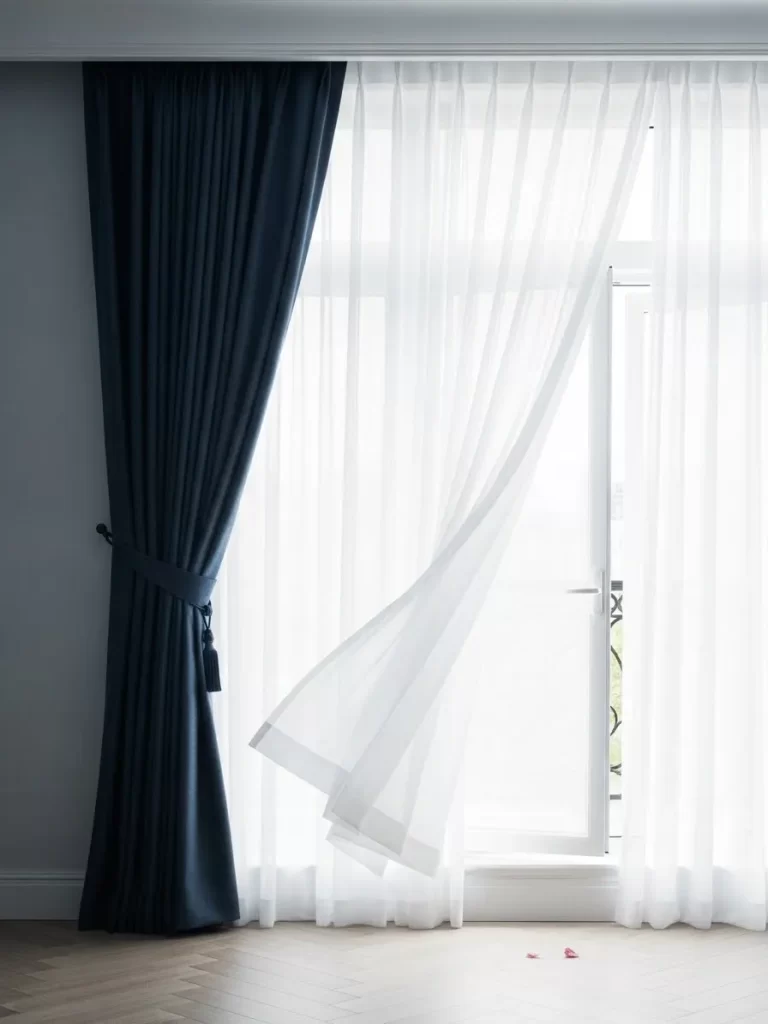
Changing your window treatments is a fast way to invite more light inside. Heavy winter drapes often block the sun even when they are open. Replacing them with airy, sheer white panels allows natural light to filter through while maintaining your privacy.
Adding a single navy blue panel on the side creates a sophisticated frame for your view. This dark contrast makes the white fabric appear even brighter and crisper. The movement of light fabric in a spring breeze adds a sense of life to any room.
Hanging your rod higher than the window frame makes your ceilings feel much taller. This simple trick opens up the entire space. It creates a breezy, coastal atmosphere that feels fresh for the new season.
Materials Required
- 2 Sheer white curtain panels
- 1 Navy blue blackout or heavy cotton panel
- 1 Decorative tassel tie back
- Iron on hem tape
Equipment Required
- Step ladder
- Handheld steamer or iron
- Measuring tape
DIY Instructions
- Remove your existing heavy winter curtains and the rod from the wall brackets.
- Measure your window height to ensure the new sheer panels will just barely touch the floor.
- Use a steamer or iron to remove all packing creases from the new white and navy fabric.
- Slide the sheer white panels onto the curtain rod first so they sit in the middle of the window.
- Add the navy panel to the far left or right side of the rod to act as a decorative accent.
- Place the rod back onto the wall brackets and spread the white sheers evenly across the glass.
- Gather the navy panel at the midpoint of the window height.
- Wrap the tassel tie back around the navy fabric and hook it to the wall to create a graceful curve.
6 Textured Jute and Charcoal Rug Layering
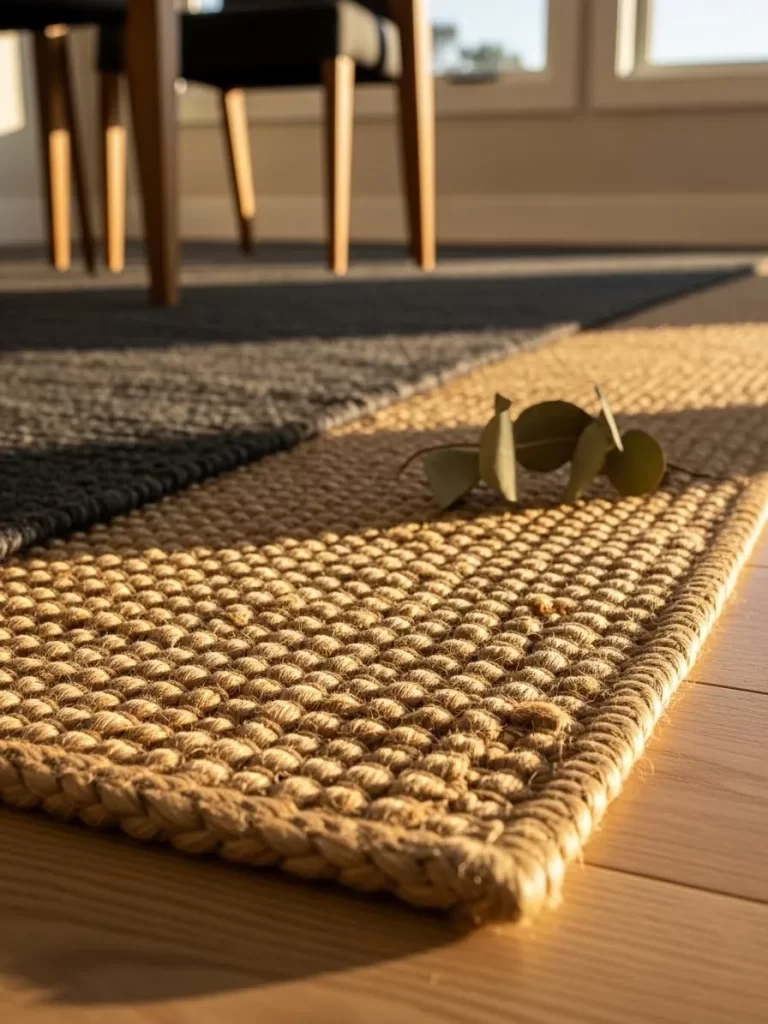
Natural fibers bring an organic, earthy feel to your entryway or dining room. A chunky jute rug provides a durable base that can handle the transition from muddy boots to spring rain. The golden tan tones reflect the warmth of the sun on your floors.
Layering a darker, charcoal colored rug underneath creates a modern, tiered look. This technique defines the space and adds a professional design touch. The mix of rough jute and soft woven fabric creates a pleasing sensory experience underfoot.
Keeping your floors light and textured prevents the room from feeling weighed down. Jute is sustainable and easy to clean with a quick vacuum. This setup works well in high traffic areas where you want style without high maintenance.
Materials Required
- 1 Large charcoal or dark gray low pile rug
- 1 Smaller chunky jute or sisal rug
- Non slip rug pad
- Double sided rug tape
Equipment Required
- Vacuum cleaner
- Measuring tape
DIY Instructions
- Clear all furniture out of the area and vacuum the bare floor thoroughly.
- Lay down a non slip rug pad that is slightly smaller than your largest rug to prevent sliding.
- Roll out the charcoal rug and center it in the room or under your main furniture pieces.
- Smooth out any ripples by pulling the corners tight and letting the rug settle for an hour.
- Place the smaller jute rug directly on top of the charcoal rug.
- Center the jute rug so that a consistent border of the dark rug shows on all sides.
- Apply small strips of rug tape to the underside of the jute rug corners to keep it from shifting.
- Walk over the surface to press the layers together and ensure the transition is flat and safe.
7 Botanical Watercolor Wall Art Trio
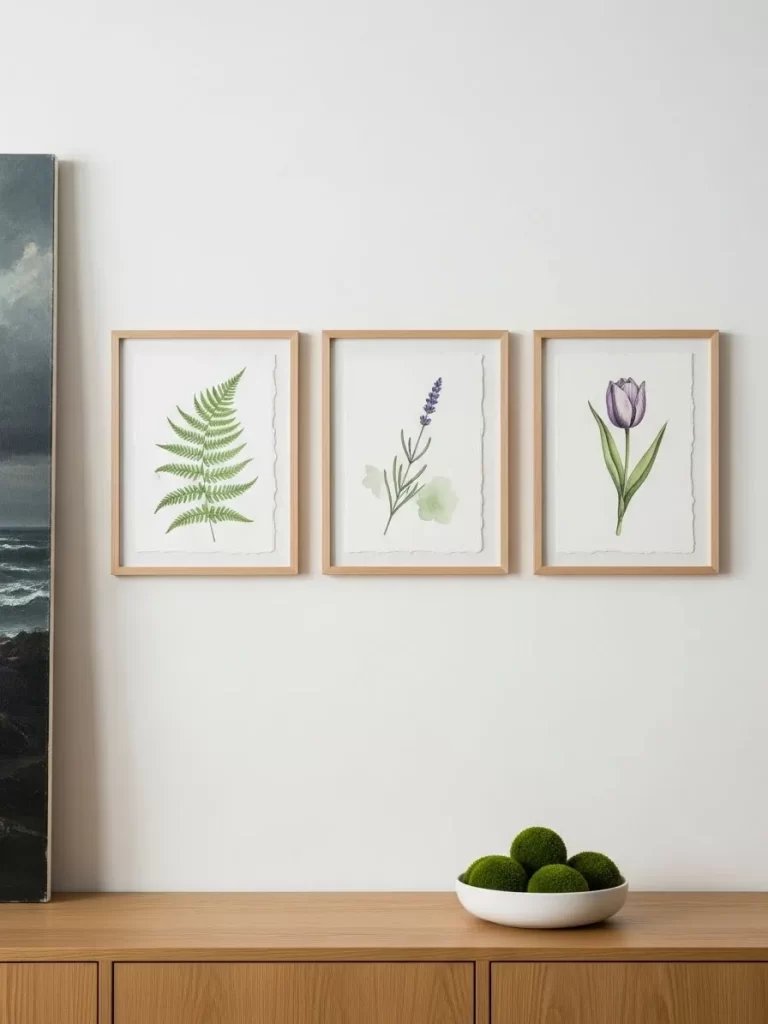
Bringing the garden indoors does not always require a green thumb. A trio of watercolor prints featuring ferns, lavender, and tulips adds a soft pop of color to white walls. These delicate images celebrate the first blooms of the season in a permanent way.
Framing these prints in light wood or oak keeps the look Scandinavian and airy. Hanging them in a horizontal row creates a sense of order and calm in a hallway or above a sideboard. The white matting around the art makes the colors stand out without overwhelming the room.
Small accents like moss balls in a white bowl nearby complete the natural theme. This gallery style arrangement is easy to update whenever you want a new look. It is a sophisticated way to fill empty wall space with seasonal joy.
Materials Required
- 3 Botanical watercolor prints
- 3 Matching light oak frames with white mats
- Small white ceramic bowl
- 4 Decorative moss balls
Equipment Required
- Hammer
- Small nails or picture hangers
- Level
- Pencil
DIY Instructions
- Insert your botanical prints into the frames, making sure they are centered within the white mats.
- Measure the width of your wall and mark the center point with a light pencil at eye level.
- Place the first frame in the center of your mark.
- Measure 3 inches to the left and 3 inches to the right of the center frame for your outer frames.
- Use a level to ensure all three marks are perfectly straight across the wall.
- Tap your nails into the marks and hang the frames securely.
- Wipe the glass with a microfiber cloth to remove fingerprints.
- Place the white bowl on the furniture below the art and fill it with the moss balls for a 3D natural element.
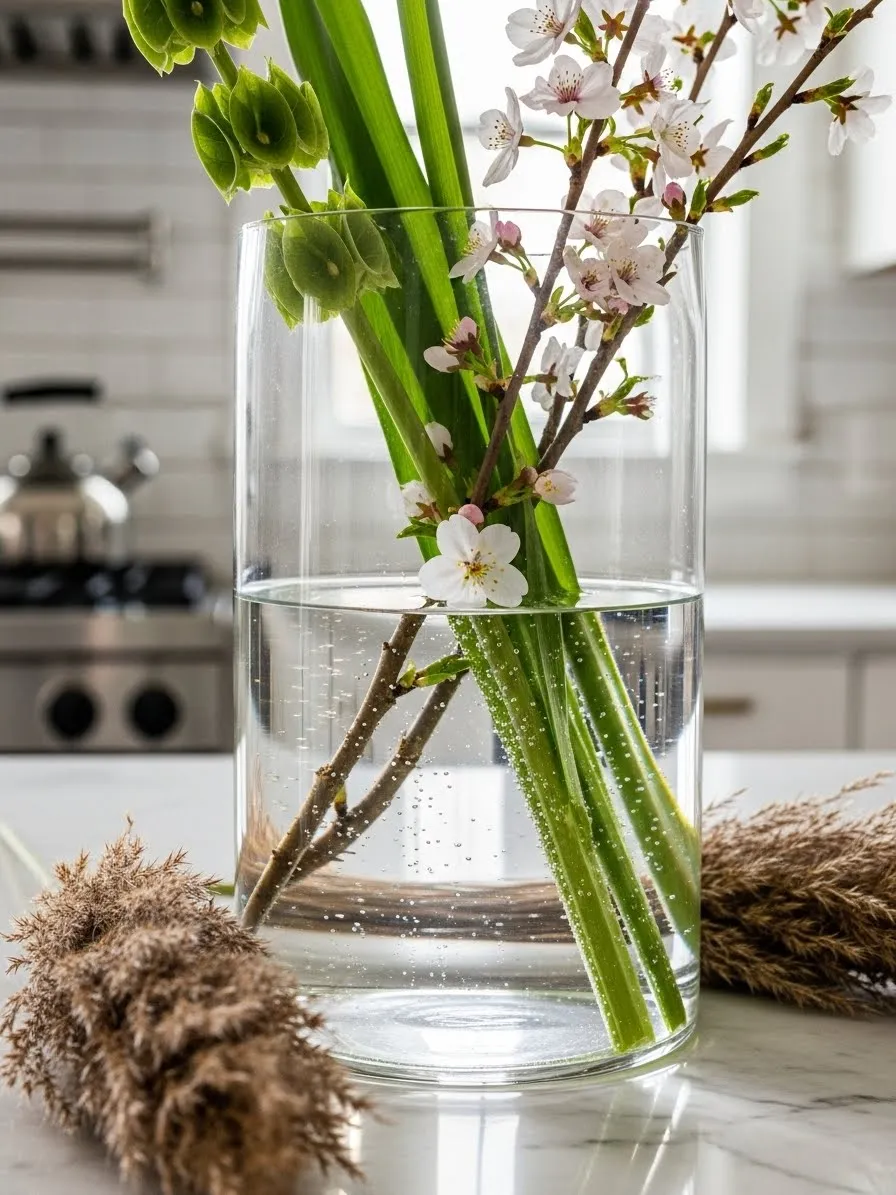
8 Cherry Blossom and Greenery Glass Arrangement

Fresh branches are the ultimate symbol of spring arrival. Placing a mix of flowering cherry blossoms and tall green stems in a clear cylinder vase creates an instant focal point. The water and glass together look clean and refreshing on a kitchen island.
Using a transparent vase allows you to see the stems, which adds to the natural, just picked aesthetic. The height of the branches draws the eye upward, making the room feel more spacious. This arrangement lasts much longer than a standard bouquet of cut flowers.
Scatter a few dried wheat stalks or pampas grass nearby for added texture. This contrast between fresh blooms and dried elements feels very current. It is a low cost way to make a big impact in your home.
Materials Required
- 1 Tall glass cylinder vase
- 3 Fresh cherry blossom branches
- 4 Long green leafy stems
- Fresh cool water
- Flower food
Equipment Required
- Garden shears or sharp scissors
DIY Instructions
- Fill your glass vase halfway with cool water and stir in a packet of flower food.
- Trim the bottom of each branch at a 45 degree angle. This helps the branch drink more water.
- Remove any leaves or small twigs that would sit below the water line to prevent bacteria growth.
- Place the tallest green stems in the center of the vase to create a vertical spine.
- Criss cross the flowering cherry blossom branches around the green stems.
- Lean some branches toward the edges of the vase so they fan out naturally.
- Check the water daily and top it off, as branches drink a lot of water in the first few days.
- Place the vase in a spot that gets indirect sunlight to keep the blossoms from wilting too quickly.
9 Hotel-Style Crisp White Bedding Refresh

Nothing feels as fresh as a bed made with clean, white linens. Swapping dark winter duvets for bright white covers instantly transforms your bedroom into a serene sanctuary. Layering a light gray quilt on top adds depth without losing the bright feeling.
Adding a thin, pale yellow runner at the foot of the bed provides a sunny hint of spring color. This look mimics a high end spa or a luxury hotel suite. It encourages better sleep by creating a visual environment that is calm and clutter free.
Natural textures like a cane or wicker headboard complement the white fabric perfectly. This combination of wood and white is a timeless spring staple. It makes the whole room feel like it has been professionally staged.
Materials Required
- White cotton or linen duvet cover and shams
- Light gray coverlet or thin quilt
- Pale yellow decorative bed runner
- Freshly laundered white sheets
Equipment Required
- Iron or fabric spray
DIY Instructions
- Strip your bed of all heavy winter blankets and dark pillowcases.
- Put on your fresh white sheets, pulling them tight and tucking the corners flat under the mattress.
- Stuff your duvet into the white cover and shake it out until the corners meet.
- Lay the duvet over the bed and fold the top 12 inches down to show the pillows.
- Place the gray coverlet over the bottom half of the bed for a layered texture.
- Smooth the yellow runner across the very foot of the bed to add a horizontal line of color.
- Stand at the head of the bed and fluff your pillows, leaning them against the headboard.
- Use a light mist of water or fabric spray to release any wrinkles for a perfectly smooth finish.
10 Minimalist Acrylic Tray Styling

Clear acrylic trays are secret weapons for organizing spring surfaces. They provide a designated spot for your items without adding visual weight to your tables. Placing white books and gold accents inside the tray keeps everything looking tidy and intentional.
Using a tray on a marble surface protects the stone while creating a room within a room effect. A small bowl of green grapes or limes adds a pop of edible color that feels vibrant. This setup is perfect for coffee tables or nightstands where you want to reduce clutter.
The transparent material allows the beauty of your furniture to show through. It is a modern way to display your favorite spring reads and candles. This small change makes any surface look organized and expensive.
Materials Required
- 1 Large clear acrylic tray with handles
- 3 Small white covered books or journals
- 1 Gold candle snuffer or decorative brass object
- Small glass bowl
- Fresh green grapes or citrus fruit
Equipment Required
- Microfiber cloth
- Glass cleaner
DIY Instructions
- Clean your acrylic tray with a microfiber cloth to remove dust and static.
- Stack your three white books in the center of the tray, starting with the largest on the bottom.
- Place your gold decorative object or candle snuffer on top of the book stack at a slight angle.
- Fill a small glass bowl with fresh green grapes and place it in a corner of the tray.
- Ensure there is some white space in the tray so it does not look overfilled.
- Position the tray in the center of your marble table or slightly to one side.
- Align the tray handles so they are parallel to the edge of the table.
- Check the fruit daily to ensure it stays fresh and vibrant for the best visual effect.
11 Floral Patterned Entryway Doormat
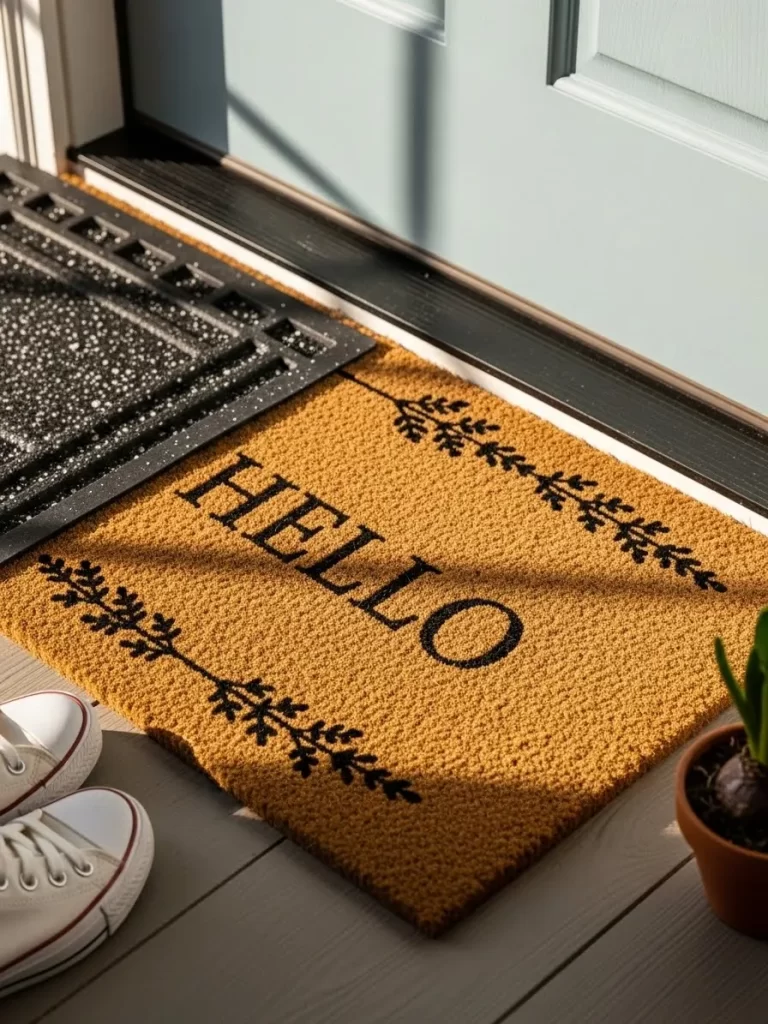
Welcome guests with a burst of color before they even step through the door. A natural coir mat featuring black botanical outlines feels modern yet welcoming. The word Hello centered in the design sets a friendly tone for your spring gatherings.
Coir mats are practical because they scrape away mud and debris from seasonal rain showers. Pairing the mat with white sneakers nearby makes the entry look active and ready for outdoor adventures. Small terracotta pots with early spring bulbs complete this porch vignette.
Natural brown fibers ground the space while the black ink adds a crisp graphic touch. It is an affordable update that boosts your home curb appeal instantly. Every arrival feels a little brighter with this simple change.
Materials Required
- 1 Natural coir Hello doormat with botanical print
- 1 Small terracotta pot
- 1 Spring bulb
- Potting soil
Equipment Required
- None (Hand assembly)
DIY Instructions
- Sweep your entryway porch to remove old winter leaves and cobwebs.
- Place the new coir mat directly in front of the door, aligning it with the threshold.
- Fill your terracotta pot halfway with fresh potting soil.
- Plant your spring bulb in the center and cover it with more soil until only the tip shows.
- Water the bulb lightly and place the pot in the corner of your step near the mat.
- Align your most used spring shoes neatly to one side of the mat to keep the pathway clear.
- Shake the mat outside once a week to keep the Hello text visible and clean.
12 Spring Botanical Shelf Backdrop

Transform dark bookshelves into a bright spring display with temporary wallpaper backings. A cream colored paper with delicate white blossoms and green leaves softens the look of dark wood. It provides a beautiful stage for white ceramic birds and trailing vines.
Adding small white bird figurines on top of book stacks brings a whimsical garden element indoors. A lush ivy plant cascading over the edge of the shelf adds movement and real life. This layered approach makes a massive library feel light and curated.
Lighting the shelves from within highlights the botanical patterns. It creates a warm glow that makes the room feel cozy even on rainy spring nights. This project uses vertical space to celebrate the change in seasons.
Materials Required
- Peel and stick botanical wallpaper
- White ceramic bird figurines
- 1 Potted trailing ivy plant
- White decorative books
Equipment Required
- Measuring tape
- Utility knife or scissors
- Plastic smoothing tool
DIY Instructions
- Remove all items from your bookshelf and wipe the back panels clean.
- Measure the height and width of each individual shelf section.
- Cut your wallpaper or cardstock to match these measurements exactly.
- Peel back a small section of the adhesive backing and align the paper with the top corner of the shelf back.
- Slowly press the paper down, using a smoothing tool to push out any air bubbles.
- Place your white books in small stacks, alternating between vertical and horizontal placements.
- Set the white ceramic birds on top of the horizontal book stacks so they appear to be perching.
- Position the ivy plant on the right side of a shelf so its vines hang down over the rows below.
13 Glass Vase Trio with Yellow Blooms

Clustering different glass vases creates a sophisticated laboratory feel that honors the science of spring growth. Use a mix of round, tall, and fluted clear glass to hold single stems of bright yellow forsythia. The varying heights add visual rhythm to a windowsill.
Adding a solid black ceramic jar nearby provides a heavy visual anchor to the transparent glass. White tulips in the tallest vase offer a soft, romantic contrast to the jagged yellow branches. This arrangement captures the feeling of a wild meadow.
Natural light passing through the water and glass makes the room feel larger and cleaner. It is a minimalist way to use color without painting walls. Simple stems are often more striking than a crowded bouquet.
Materials Required
- 1 Tall fluted glass vase
- 1 Round teardrop glass vase
- 1 Solid black ceramic jar
- 3 Forsythia branches
- 2 White tulips
- Fresh water
Equipment Required
- Garden shears
DIY Instructions
- Clean all your vases with warm soapy water so the glass is crystal clear.
- Fill the glass vases three quarters full with fresh water.
- Place one tall forsythia branch in the teardrop vase so it leans toward the window.
- Put the white tulips in the fluted vase, making sure the stems are long enough to stand tall.
- Place a shorter forsythia stem in the black jar to add a pop of color to the dark surface.
- Arrange the three containers on your ledge, placing the tallest one in the back.
- Overlap the edges of the vases slightly so they look like one cohesive group.
- Refresh the water every two days to keep the yellow blossoms from dropping early.
14 Double Wreath Front Door Display
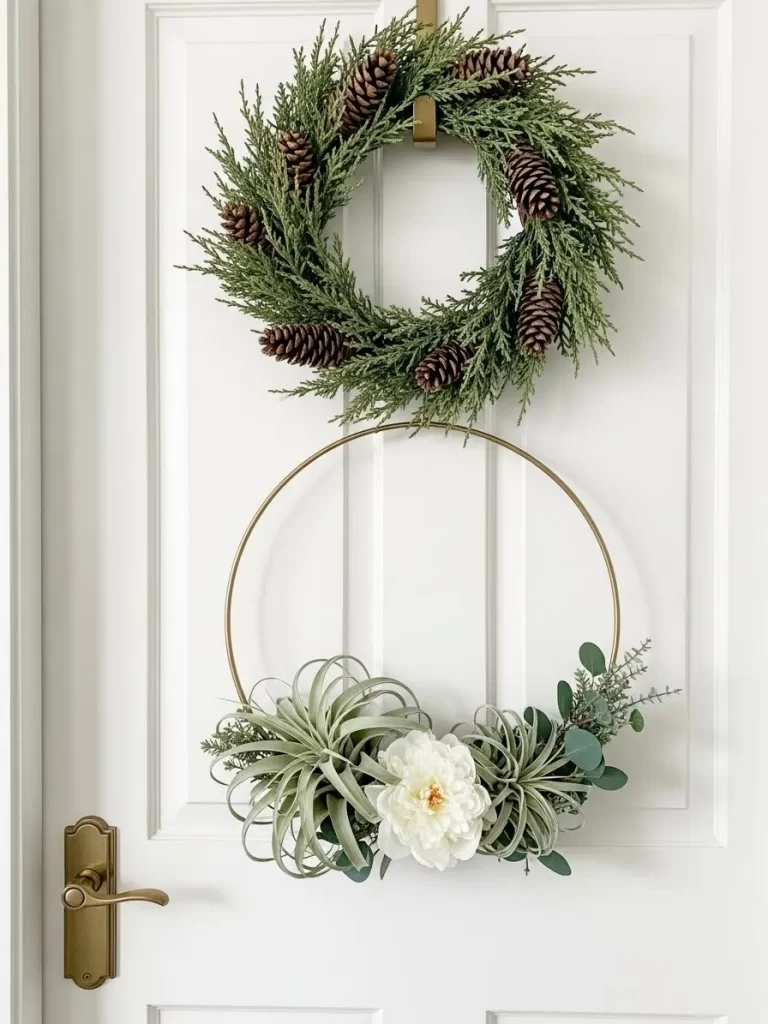
One wreath is classic, but stacking two different styles is a modern design statement. Hang a traditional evergreen and pinecone wreath at the top to transition from winter. Below it, add a minimalist gold hoop wreath decorated with white peonies and air plants.
The contrast between the dense green needles and the light gold ring is stunning against a white door. This over under look fills the vertical space of a tall entryway. The white peony adds a soft, bridal touch that screams spring.
Using a gold wreath hanger keeps the look elegant and unified. This setup allows you to keep some winter elements while slowly introducing spring textures. It is an unexpected way to decorate your first point of contact for guests.
Materials Required
- 1 Traditional evergreen wreath
- 1 Gold metal hoop wreath
- 1 Large faux white peony
- 3 Faux air plants or succulents
- Green floral wire
Equipment Required
- 1 Over the door double wreath hanger
- Wire cutters
DIY Instructions
- Place your double wreath hanger over the top of your front door.
- Hang the heavy evergreen wreath on the top hook.
- Secure the faux white peony to the bottom center of the gold hoop using floral wire.
- Attach the air plants on either side of the peony to create a crescent shape of greenery.
- Hang the finished gold hoop wreath on the bottom hook of the hanger.
- Adjust the wreaths so the gold hoop sits about 4 to 6 inches below the evergreen wreath.
- Fluff the needles of the top wreath so they frame the top of the gold hoop.
- Ensure the door closes easily and the wreaths do not jiggle when the handle is turned.
15 Frosted Seafoam Glass Soap Dispenser

Upgrade your bathroom or kitchen sink with colors inspired by the ocean. A frosted seafoam green glass bottle adds a soft, cool tone to white marble counters. Pairing it with a dark amber glass bottle creates a vintage apothecary look.
The brushed nickel pump offers a sleek, modern finish that resists fingerprints. Small details like a lemon scented bar of soap in a white ceramic dish enhance the fresh theme. It turns a boring daily chore into a spa like experience.
The texture of frosted glass hides soap residue better than clear glass. It feels smooth and expensive to the touch. This small swap is a great way to introduce color into a strictly neutral room.
Materials Required
- 1 Frosted seafoam glass soap dispenser bottle
- 1 Amber glass pump bottle
- 1 White ceramic soap dish
- 1 Bar of citrus soap
- Clear liquid hand soap
Equipment Required
- None (Hand assembly)
DIY Instructions
- Wash your new glass bottles thoroughly before filling them.
- Fill the seafoam bottle with clear liquid hand soap.
- Fill the amber bottle with your favorite lightweight hand lotion.
- Screw the pumps on tightly and wipe away any drips from the glass.
- Place the seafoam bottle in the center of your sink area.
- Set the amber bottle slightly behind it to create a layered effect.
- Put the fresh bar of lemon soap in the ceramic dish and place it to the right of the bottles.
- Prime the pumps by pressing them a few times until the liquid flows smoothly.
16 Dipped Woven Storage Baskets
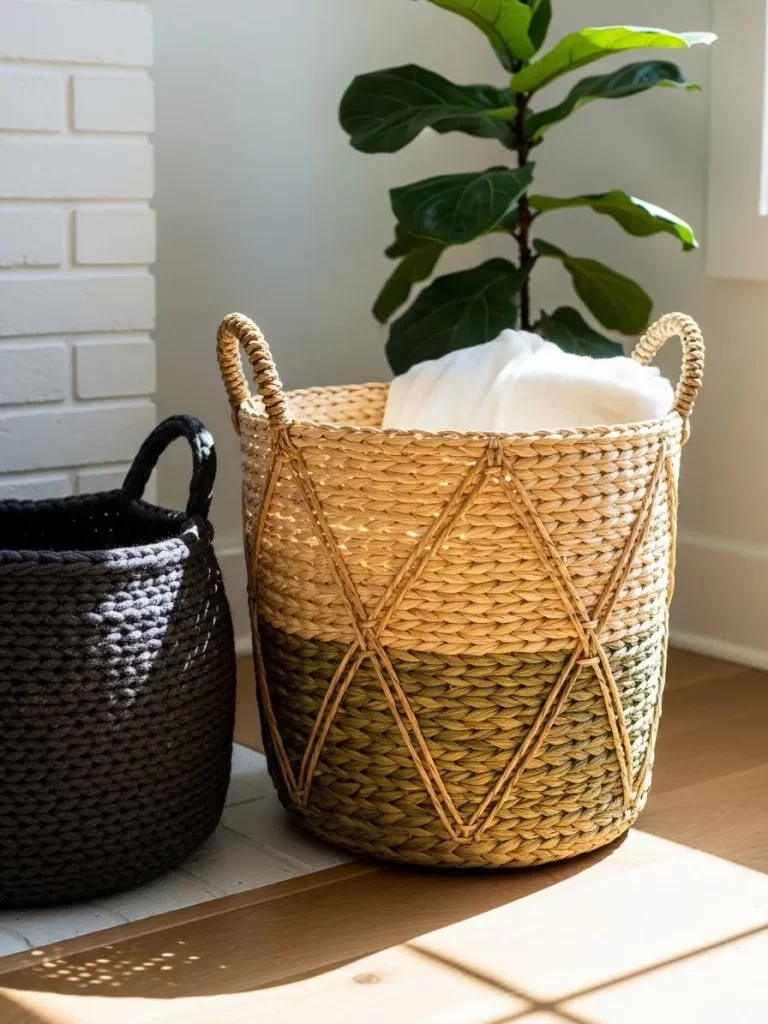
Organize your spring cleaning supplies or extra blankets in textured grass baskets. A two tone design with a natural top and a sage green dipped bottom adds a modern pop of color to floor corners. The diamond pattern woven into the sides provides extra structural strength.
Using baskets keeps your floors clear of clutter while adding organic warmth to the room. Pairing a green basket with a solid charcoal woven one creates a balanced, masculine feminine mix. Placing a large fiddle leaf fig plant nearby makes the green tones really stand out.
These baskets are perfect for holding white cotton throws that you might need on cooler spring nights. The handles make them easy to move from the living room to the bedroom. It is a stylish way to hide the mess of daily life.
Materials Required
- 1 Large seagrass basket with sage green bottom
- 1 Medium charcoal cotton rope basket
- 1 Large white cotton throw blanket
- 1 Tall indoor plant
Equipment Required
- None (Hand assembly)
DIY Instructions
- Find an empty corner in your living room that gets decent natural light.
- Place the large sage green basket on the floor first.
- Fold your white cotton blanket neatly and tuck it into the basket, letting a small corner drape over the edge.
- Position the charcoal basket slightly in front and to the left of the first one.
- Place your potted plant behind the baskets to act as a tall green backdrop.
- Use the smaller basket to hold remote controls or magazines to keep the coffee table clear.
- Rotate the baskets so the handles face outward for easy grabbing.
17 Fluted Ceramic Bedside Lamp
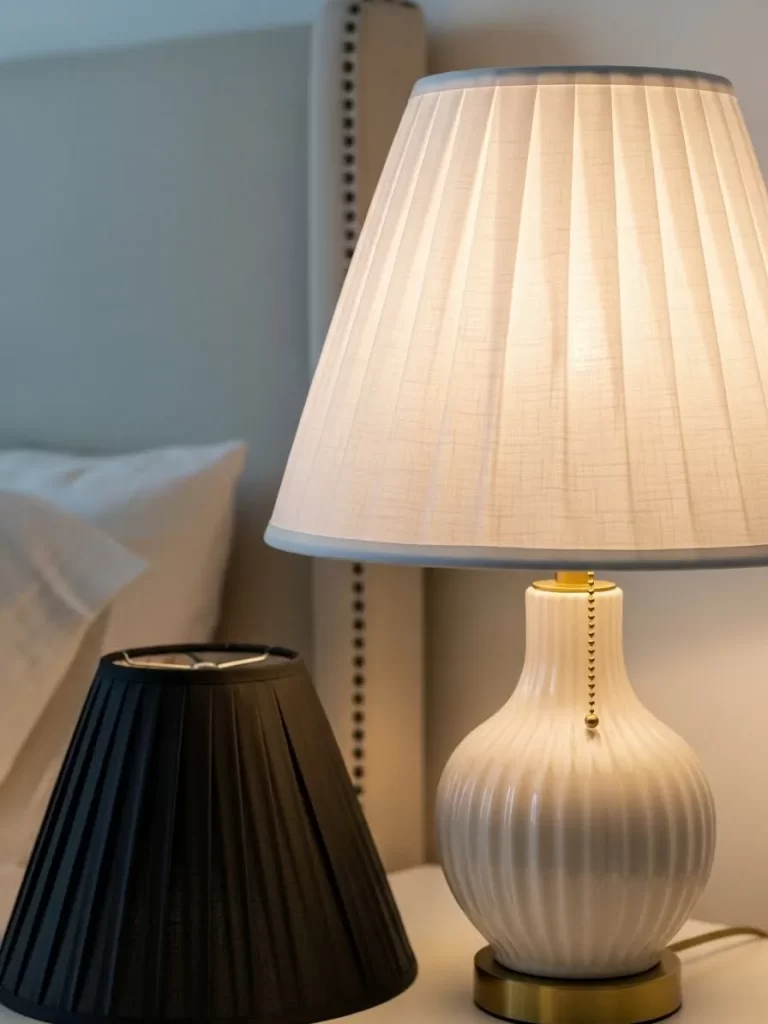
Lighting should be as beautiful as the furniture it sits on. A white ceramic lamp with a vertical fluted base adds subtle texture to your nightstand. The cream colored pleated shade softens the bulb glow, creating a relaxing environment for sleep.
Contrast the bright white lamp with a matte black pleated shade on a secondary light source. This creates a high contrast, modern look that feels very balanced. The gold pull chain adds a tiny sparkle of luxury every time you turn it on.
The ribbed surface of the ceramic catches the shadows, adding depth to the piece. It is a timeless design that works with any spring color palette. Placing it against a neutral padded headboard makes the room feel like a designer hotel room.
Materials Required
- 1 White fluted ceramic lamp base
- 1 Cream pleated fabric lampshade
- 1 Black pleated fabric lampshade
- 1 LED soft white light bulb
Equipment Required
- None (Hand assembly)
DIY Instructions
- Remove all plastic packaging from the lamp base and shades.
- Screw the light bulb into the socket firmly.
- Attach the metal harp to the lamp base.
- Place the cream shade over the harp and screw on the decorative top piece to hold it steady.
- Set the lamp on your bedside table about 6 inches away from the wall.
- Plug the cord into the nearest outlet and tuck the excess wire behind the furniture.
- Pull the gold chain to test the light and ensure the shade is level.
- Use the black shade on a desk lamp in the same room to tie the contrasting theme together.
18 Macrame and Burgundy Table Runners
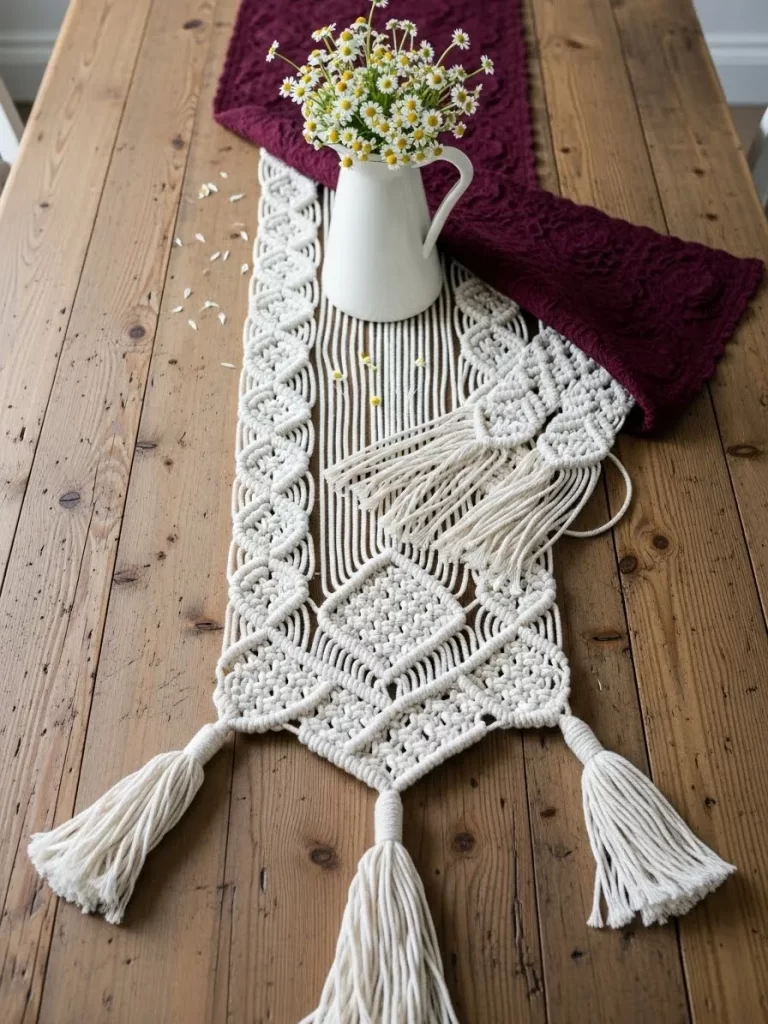
Dress your dining table for a spring brunch by layering different textures. A white macrame runner with long tassels provides a bohemian, airy base. Laying a deep burgundy or plum colored knit runner across it adds a rich, unexpected pop of color.
Natural wood tables look beautiful when partially covered by these soft fibers. A small white pitcher filled with tiny daisies makes the center of the table feel like a fresh meadow. This look is perfect for casual weekend gatherings with friends.
The intricate knots of the macrame catch the light and add visual interest to the flat surface. It is a great way to protect your table while showing off your style. Mixing a dark winter color like burgundy with bright white keeps the look grounded.
Materials Required
- 1 Long white cotton macrame table runner
- 1 Shorter burgundy knit table runner
- 1 Small white ceramic pitcher
- 1 Bunch of fresh daisies
Equipment Required
- None (Hand assembly)
DIY Instructions
- Clear your wooden table and wipe it down with a damp cloth.
- Lay the white macrame runner down the center of the table, letting the tassels hang off each end.
- Place the burgundy runner over the macrame, but position it horizontally across the middle of the table.
- Fill the white pitcher with cool water and trim your daisies so they sit just above the rim.
- Set the pitcher directly in the center where the two runners cross.
- Spread the macrame tassels out so they look full and even.
- Smooth out any wrinkles in the knit fabric with your hands.
19 Rattan and Leather Coaster Set

Protect your surfaces with materials that feel like a tropical getaway. A flower shaped woven rattan coaster adds a fun, organic shape to your white coffee table. Pairing it with a set of dark chocolate leather coasters provides a sophisticated contrast.
Rattan is great for spring because it is lightweight and breathable. The leather adds a touch of library style class to the mix. Placing these near a wicker magazine rack creates a cohesive, textured look in your seating area.
The natural tan of the rattan looks beautiful under the bright spring sun. It prevents water rings while acting as a tiny piece of art on your table. It is a small detail that makes your home feel finished and thoughtful.
Materials Required
- 4 Flower shaped woven rattan coasters
- 4 Round dark brown leather coasters
- 1 Wicker magazine rack
Equipment Required
- None (Hand assembly)
DIY Instructions
- Clean your white coffee table or side table to provide a bright background.
- Stack the leather coasters in a neat pile toward the back of the table.
- Place one rattan coaster in the center of the table where you usually sit.
- Arrange the remaining rattan coasters in a small fan shape nearby.
- Set your wicker magazine rack on the floor next to the table to match the rattan texture.
- Ensure the coasters are within easy reach of any guest sitting on the sofa.
- Wipe the leather coasters with a dry cloth once a week to maintain their shine.
20 Colorful Coffee Table Book Stack

Books are not just for reading; they are powerful decor tools. Stack books with bright spines like yellow, teal, and pink to create a rainbow on your marble table. The bold titles and colors act as an instant conversation starter for visitors.
Placing a clear glass bowl of limes on top of the stack adds a zesty, edible element to the display. The green of the fruit pulls out the natural themes of spring. It is a high energy look that makes a room feel vibrant and modern.
The reflection of the colorful books on a polished marble surface doubles the visual impact. It is an easy way to show off your interests while decorating. This setup works best in a living room that needs a quick burst of personality.
Materials Required
- 4 Large hardback books with colorful spines
- 1 Small clear glass bowl
- 3-4 Fresh limes
Equipment Required
- None (Hand assembly)
DIY Instructions
- Choose four books that are roughly the same size but have different colored spines.
- Stack them from largest to smallest, placing the black book on the bottom and the yellow one on top.
- Align the spines so they are perfectly flush and facing the entrance of the room.
- Place the clear glass bowl in the center of the top book.
- Fill the bowl with fresh limes, making sure they are clean and shiny.
- Position the stack on a marble or white table to allow the colors to reflect on the surface.
- Swap the fruit every few days to keep the display looking fresh and appetizing.
21 Minimalist Fine Line Wall Art
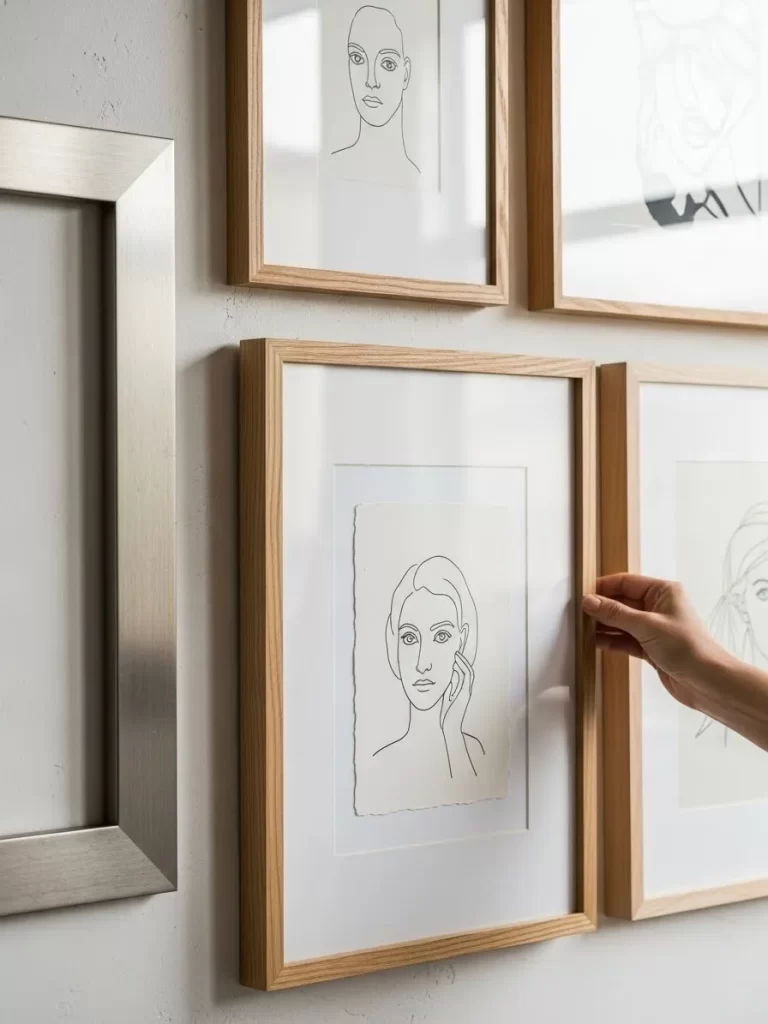
Refreshing your walls does not require bold colors or heavy frames. These fine line drawings of female silhouettes offer a sophisticated and airy feel to a hallway or bedroom. The simple black ink on off white paper keeps the space feeling calm and uncluttered as the days grow longer.
Natural oak frames provide a warm, organic touch that complements the minimalist aesthetic. You can arrange them in a tight grid for a structured look or stagger them for a more relaxed gallery feel. The white matting allows the artwork to breathe and draws the eye to the delicate details.
Swapping out heavy winter paintings for these light illustrations instantly brightens a room. They act as a quiet backdrop to your seasonal changes. This style of art is timeless and works with almost any existing furniture.
Materials Required
- 3 or 4 fine line botanical or silhouette prints
- Matching light oak frames with white mats
- Small nails or adhesive hanging strips
Equipment Required
- Hammer
- Level
- Pencil
DIY Instructions
- Choose a series of prints that share a similar theme.
- Open your oak frames and clean the glass thoroughly to remove any dust or fingerprints.
- Place your prints inside the mats, ensuring they are perfectly straight.
- Measure the wall space where you want to hang the art and find the eye level center point.
- Mark the top center of each frame on the wall using a pencil and a level.
- Hammer in your nails or apply adhesive strips according to your marks.
- Hang the frames and step back to check the spacing between each piece.
- Adjust slightly until the gap between frames is uniform, around two to three inches.
22 Floral Sheer and Navy Layered Curtains

Windows are the best way to invite spring into your home. Layering a navy blue sheer panel with a delicate yellow floral pattern creates a beautiful play of light and shadow. The dark blue grounds the window while the floral pattern celebrates the coming blooms.
Natural sunlight filters through the thin fabric, casting soft patterns across your floor. This combination provides a bit of privacy without blocking the view of your budding garden. It is a soft, romantic look that feels much lighter than heavy velvet drapes.
Using a wooden curtain rod adds to the natural, earthy theme of the room. This simple textile swap changes the entire mood of a living area or dining room. It encourages you to keep the windows open to catch the fresh spring breeze.
Materials Required
- 2 Navy blue sheer curtain panels
- 2 Yellow floral sheer panels
- Wooden curtain rod and brackets
Equipment Required
- Step ladder
- Screwdriver
- Measuring tape
DIY Instructions
- Remove your old, heavy winter curtains and the hardware.
- Install your wooden brackets about four inches above and six inches wider than the window frame.
- Slide one navy panel onto the rod, followed by two floral panels, and finish with the second navy panel.
- Lift the rod and secure it into the brackets, ensuring the fabric hangs evenly.
- Spread the floral panels across the center of the window to catch the most light.
- Pull the navy panels to the outer edges to act as a frame for the floral pattern.
- Use a handheld steamer to remove any packaging folds while the curtains are hanging.
23 Textured Gray and White Bath Mats

Bathrooms often feel cold, but new textiles can add instant warmth. A plush, charcoal gray popcorn textured mat paired with a crisp white waffle weave rug creates a spa like atmosphere. These layers feel incredible underfoot on a chilly spring morning.
The white waffle weave rug provides a clean, hygienic base that reflects light off the bathroom tiles. Placing the smaller, textured gray mat on top adds a sophisticated contrast in both color and feel. This simple addition makes the room feel intentional and cared for.
Hexagonal floor tiles look even better when framed by soft, high quality cotton. Choosing neutral tones allows you to change your towels and accessories without clashing. It is a small luxury that improves your daily morning routine.
Materials Required
- 1 Large white waffle weave bath mat
- 1 Small charcoal gray textured rug
- Non slip rug grippers
Equipment Required
- Washing machine
DIY Instructions
- Scrub your bathroom floor and grout to ensure a clean surface.
- Wash both new mats in warm water to fluff the fibers.
- Dry them on a low heat setting to maintain the softness of the cotton.
- Place the white waffle weave mat in front of your vanity or shower.
- Layer the smaller gray textured mat directly in the center of the white one.
- Ensure the mats are straight and aligned with the lines of your floor tiles.
- Add non slip grippers to the corners if the mats slide easily on the wet floor.
24 Marble and Wire Fruit Bowl Display
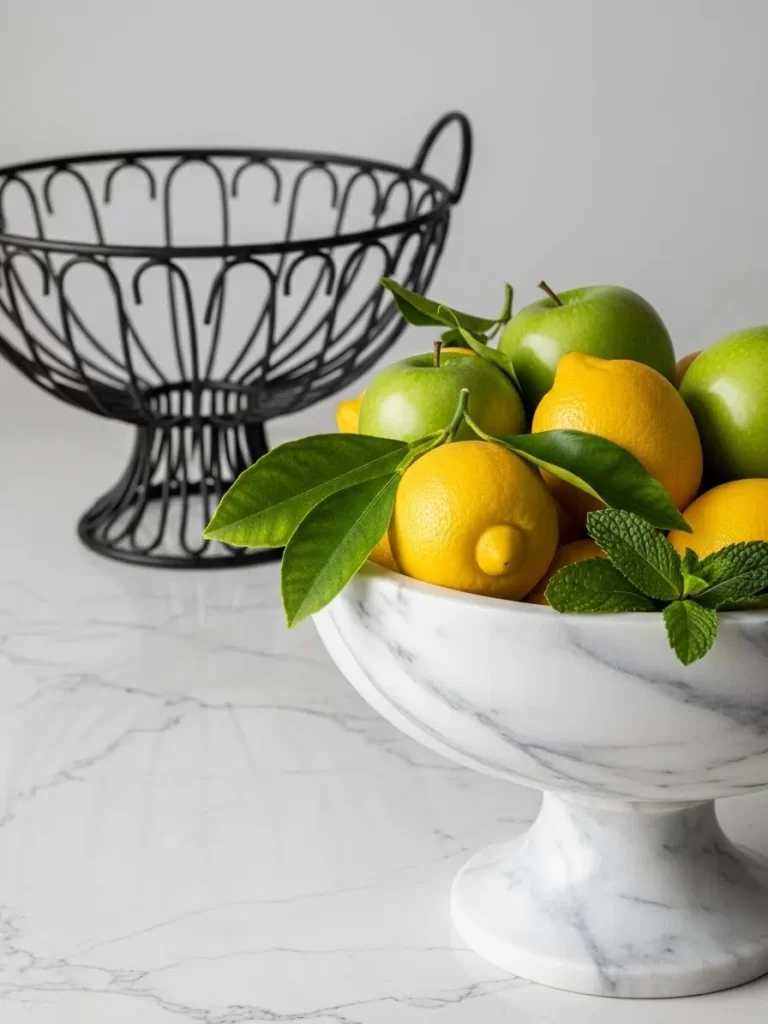
Kitchen counters look much fresher when decorated with natural elements. A white marble pedestal bowl filled with bright lemons and green apples adds a vibrant splash of color. This edible centerpiece feels much more alive than a cluttered counter of appliances.
Pairing the heavy marble with a minimalist black wire basket creates a modern, balanced look. The contrast between the solid stone and the open wire design is visually interesting. Using fresh mint leaves as a garnish adds a wonderful scent to your kitchen air.
Keeping fruit in sight encourages healthy snacking while acting as a seasonal decoration. The bright yellows and greens mimic the colors of a spring meadow. It is a functional and beautiful way to organize your grocery items.
Materials Required
- 1 White marble pedestal bowl
- 1 Black wire fruit basket
- 5 Fresh lemons
- 4 Green apples
- Fresh mint sprigs
Equipment Required
- None
DIY Instructions
- Clear a prominent spot on your kitchen island or dining table.
- Wipe the marble bowl with a damp cloth to ensure the stone is shining.
- Place the black wire basket behind the marble bowl to create depth.
- Fill the marble bowl with the lemons first, stacking them toward the center.
- Tuck the green apples into the spaces around the lemons for a mix of color.
- Place a few sprigs of fresh mint among the fruit to add a pop of dark green.
- Leave the wire basket empty or use it to hold lighter items like bananas.
- Rotate the fruit every few days to keep the arrangement looking fresh.
25 Modern Chandelier and Warm Lighting
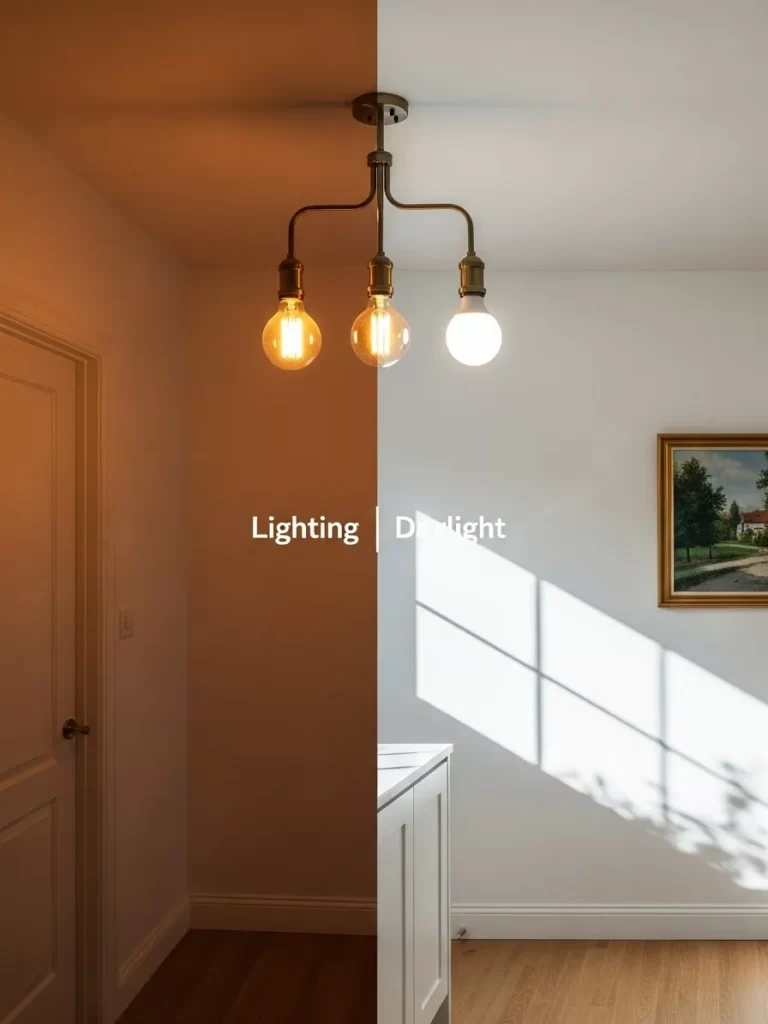
Lighting is the most important element for creating a spring atmosphere. A modern brass chandelier with three arms provides a clean, architectural look above a doorway. Choosing the right bulbs can change the entire feel of your hallway.
Compare a warm, amber toned bulb with a bright daylight bulb to see the difference. Warm light feels cozy and inviting for evening relaxing. Daylight bulbs are better for tasks and making a small space feel much larger during the day.
Shadows cast by natural light from a nearby window can create beautiful patterns on your walls. A simple light fixture upgrade makes an old space feel brand new. It is an investment that pays off every time you flip the switch.
Materials Required
- 1 Three arm brass chandelier
- 3 LED bulbs
- Wire nuts and electrical tape
Equipment Required
- Voltage tester
- Screwdriver
- Wire strippers
- Step ladder
DIY Instructions
- Turn off the power at the main breaker box before touching any wires.
- Use a voltage tester on the old fixture to make sure no electricity is running to it.
- Remove the old light fixture and disconnect the wires.
- Attach the mounting bracket for the new brass chandelier to the ceiling box.
- Match the house wires to the light wires: black to black, white to white, and green to the ground screw.
- Twist the wires together and secure them with wire nuts.
- Tuck the wires into the ceiling box and screw the chandelier canopy into the bracket.
- Install your chosen bulbs and turn the power back on.
26 Mixed Material Coaster Collection

Protecting your furniture can be an opportunity for a small style statement. Mixing different materials like dark slate, teal agate, and colorful terrazzo creates a curated look. These small items add texture and color to a wooden coffee table or desk.
Natural agate slices with gold edges look like jewelry for your home. The deep teal tones represent the cooling spring rains. Pairing them with speckled terrazzo coasters adds a playful, modern touch that feels very current.
Keeping a variety of coasters allows guests to choose their favorite style. It prevents water rings while adding a layer of personality to your surfaces. These small objects are easy to swap out as your mood changes.
Materials Required
- 4 Dark slate square coasters
- 2 Teal agate slices
- 2 Round terrazzo patterned coasters
- Small felt pads
Equipment Required
- None
DIY Instructions
- Clear your coffee table and wipe away any dust.
- Stack the dark slate coasters in a neat pile to act as a neutral base.
- Place the two agate slices side by side in the center of the table.
- Set the terrazzo coasters on top of the slate stack for a pop of pattern.
- Add small felt pads to the bottom of any coasters that might scratch your furniture.
- Position the coasters within easy reach of each seating spot.
27 Pastel Taper Candles and Brass Holders
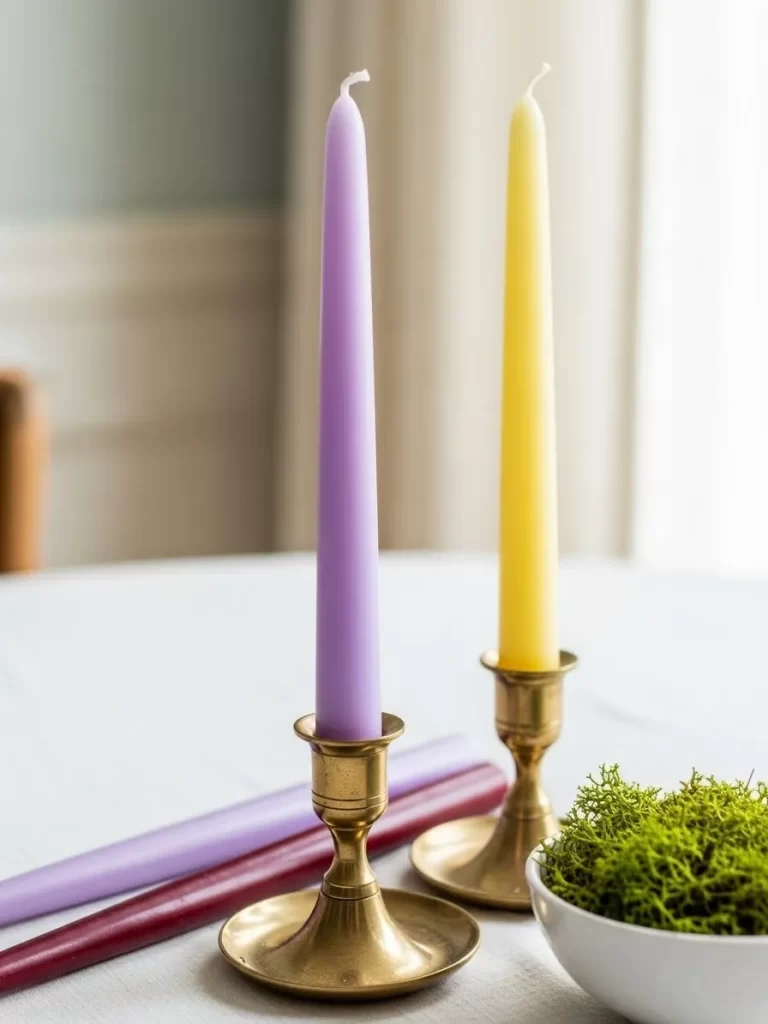
Light up your dining area with a soft palette that mirrors a spring sunrise. Transitioning away from dark, heavy tapers to shades of lavender and pale yellow instantly lifts the energy of a room. These slender candles add height and elegance to a tabletop without creating a visual barrier.
Polished brass holders provide a warm, metallic glow that feels timeless and sophisticated. Placing a small bowl of preserved green moss nearby adds a grounded, organic texture. This combination of vintage metal and soft wax colors creates a beautiful centerpiece.
Mixing different heights of holders adds a rhythmic flow to your decor. Choosing unscented tapers ensures that the delicate aroma of your spring meals remains the star of the show. It is a simple way to make an ordinary night dinner feel like a special occasion.
Materials Required
- 2 Solid brass taper candle holders
- 1 Lavender taper candle
- 1 Pale yellow taper candle
- Small white ceramic bowl
- Preserved green reindeer moss
Equipment Required
- Matches or a lighter
DIY Instructions
- Buff your brass holders with a soft cloth to remove fingerprints.
- Ensure the base of each candle fits snugly into the holder.
- Trim the bottom of the wax with a knife if the candle is too wide.
- Place the taller brass holder toward the back of your display area.
- Position the shorter holder slightly to the side and forward.
- Fill your small white bowl with the preserved green moss.
- Set the moss bowl at the base of the brass holders to hide the hard lines.
- Light the candles just before guests arrive to create a welcoming atmosphere.
28 Trio of Potted Succulents and Evergreens

Bring the longevity of the desert and the forest to your desk with a curated greenery grouping. A small, burlap wrapped faux pine tree provides a sturdy vertical element that bridges the seasons. Pairing it with a variety of succulents in white ceramic pots keeps the look fresh.
Trailing plants like a string of pearls add a sense of movement. The contrast between the spiky zebra cactus and the smooth leaves of the echeveria creates a miniature landscape. This low maintenance setup is perfect for those who want a garden feel without the daily upkeep.
Using a bright desk lamp helps highlight the different shades of green in your plants. This arrangement works beautifully in a home office or on a sunny windowsill. It provides a natural focus point that helps reduce stress during a busy workday.
Materials Required
- 1 Small faux pine tree in a burlap base
- 2 Small white ceramic planters
- 1 Zebra cactus
- 1 String of pearls plant
- White decorative pebbles
Equipment Required
- Small watering can
DIY Instructions
- Place your burlap wrapped tree on the left side to act as the tallest anchor.
- Fill your white ceramic planters with a well draining succulent soil mix.
- Plant the zebra cactus in one pot and the string of pearls in the other.
- Cover the top of the soil with white decorative pebbles for a clean look.
- Position the succulent pots close together in front of the pine tree.
- Let the vines of the string of pearls drape naturally toward the front of your desk.
- Point a desk lamp toward the grouping to make the colors pop.
- Water the succulents sparingly, only when the soil is completely dry.
29 Minimalist Dual Clock Display

Keep track of your time with a clean, functional wall arrangement that doubles as art. A large, black metal skeletal clock offers a bold statement on a white wall. Pairing it with a smaller, light wood framed clock creates a pleasing contrast in scale.
The open design of the larger clock allows your wall color to show through, keeping the room feeling airy. The natural grain of the smaller wooden clock adds a touch of warmth. This display is perfect for a home office or a kitchen.
Mounting clocks at different levels adds visual interest to an empty corner. It is a practical way to decorate that stays true to a less is more philosophy. This simple hardware update makes your home feel more organized and modern.
Materials Required
- 1 Large black metal wall clock
- 1 Medium round clock with a light wood frame
- 2 Heavy duty wall anchors and screws
Equipment Required
- Power drill
- Level
- Hammer
- Pencil
DIY Instructions
- Choose a prominent wall that is currently empty and clear of other decorations.
- Hold the large black clock against the wall and mark the hanging point with a pencil.
- Use a drill to create a hole for the wall anchor, then tap the anchor in with a hammer.
- Drive the screw into the anchor, leaving about a quarter inch of the head exposed.
- Hang the large clock and use a level to ensure the twelve o clock position is vertical.
- Repeat the process for the wooden clock on the adjacent wall or at a different height.
- Ensure the two clocks are close enough to feel like a pair.
- Set both clocks to the exact same time to maintain order.
30 Woven Rattan Ottoman and Blue POUF

Create a relaxed seating area by mixing natural textures with soft, cool tones. A round, woven rattan ottoman brings a coastal, breezy feel to your living room. Pairing it with a structured navy blue fabric pouf adds a layer of comfort and a sophisticated color contrast.
The open weave of the rattan allows air to circulate, making it a great choice for warmer spring days. A simple wooden tray on top of the ottoman turns it into a functional coffee table for your tea. This setup encourages a laid back lifestyle.
Soft sunlight hitting the natural fibers creates beautiful shadows on your rug. This combination of materials feels organic yet polished. It is an easy way to add extra seating for guests without overcrowding your space.
Materials Required
- 1 Round woven rattan ottoman
- 1 Square navy blue fabric pouf
- 1 Small round wooden tray
- 1 Linen napkin
Equipment Required
- None
DIY Instructions
- Position your navy blue pouf next to your main sofa to act as a footrest.
- Place the rattan ottoman in the center of the seating area to serve as a low table.
- Set the wooden tray directly on top of the rattan surface.
- Drape a neutral linen napkin over the edge of the tray for softness.
- Place a glass of tea on the tray to complete the relaxing scene.
- Arrange the furniture so there is space to walk between the pieces.
- Use the rattan ottoman to hold books when not in use for drinks.
31 Embroidered Floral Hand Towels
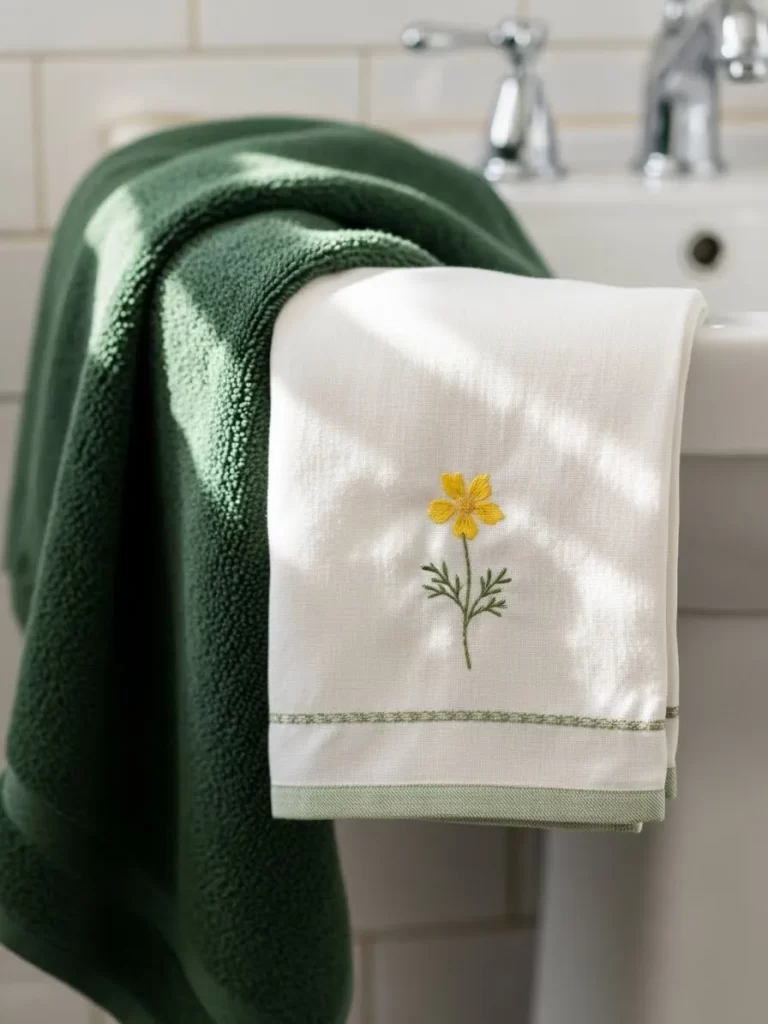
Small textile updates can make a big impact in high traffic areas like the bathroom or kitchen. Trade your heavy, dark winter towels for crisp white linens featuring delicate embroidered blossoms. A single yellow flower with green leaves adds a cheerful touch.
Pairing these with a deep forest green bath towel creates a sophisticated, nature inspired contrast. The sunlight catching the soft cotton fibers emphasizes the clean and fresh atmosphere of the room. It is a simple way to transition your home into the new season.
Lightweight linens dry faster and look much brighter against white ceramic sinks. Choosing high quality embroidery ensures the design stays vibrant after many washes. This tiny detail makes your daily routine feel a bit more special.
Materials Required
- 1 White linen hand towel with yellow floral embroidery
- 1 Plush forest green bath towel
- Mild fabric softener
Equipment Required
- None (Hand assembly)
DIY Instructions
- Remove any thick, dark winter towels from your bathroom racks.
- Give your new embroidered towels a quick wash on a gentle cycle to soften the linen.
- Use a small amount of fabric softener to ensure the cotton remains fluffy.
- Drape the forest green bath towel over the towel bar first.
- Place the white embroidered hand towel directly over the green one.
- Smooth out any wrinkles with your hands to make the embroidery lay flat.
- Align the edges of both towels so they look neat and professionally styled.
32 Large Seagrass Fern Planter
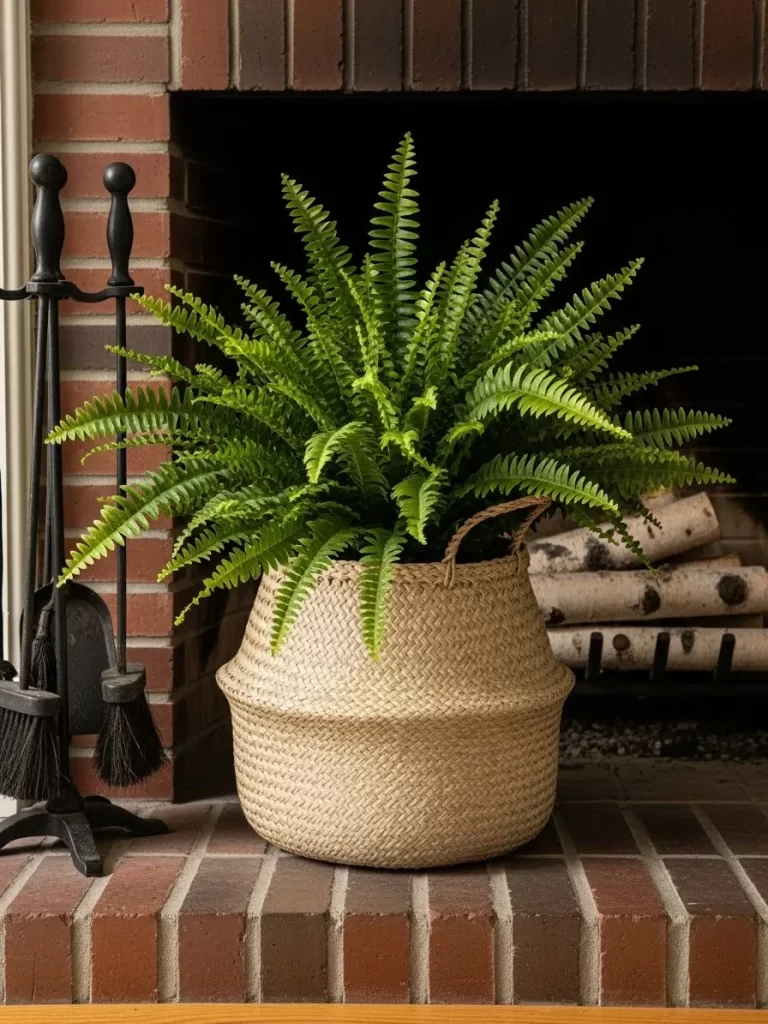
Plants are the ultimate way to signal that spring has arrived in your home. Placing a lush Boston fern inside a natural seagrass basket brings an organic, earthy texture to your fireplace hearth. The vibrant green fronds contrast beautifully with the warm tones of red brick.
Seagrass baskets are lightweight and breathable, making them excellent for housing indoor plants. The woven texture hides plastic nursery pots while adding a hand crafted feel to your living space. This setup works well in corners that need a boost of life.
Adding a few birch logs nearby enhances the woodland aesthetic. The mix of rough brick, woven grass, and soft leaves creates a rich sensory experience. It is a low effort way to make a large visual statement in your main gathering room.
Materials Required
- 1 Large healthy Boston fern
- 1 Round woven seagrass basket
- Plastic saucer
- 3-4 Birch wood logs
Equipment Required
- None (Hand assembly)
DIY Instructions
- Measure the diameter of your fern nursery pot to ensure the basket is slightly larger.
- Place a plastic saucer at the very bottom of the basket to prevent water leaks.
- Lower the fern into the basket, making sure it sits level on top of the saucer.
- Fluff the green fronds so they spill over the edges of the basket naturally.
- Place the basket on one side of your fireplace hearth.
- Arrange the birch logs in a small stack next to the basket.
- Mist the fern leaves with water occasionally to keep them looking bright.
33 Marble and Amethyst Bookends
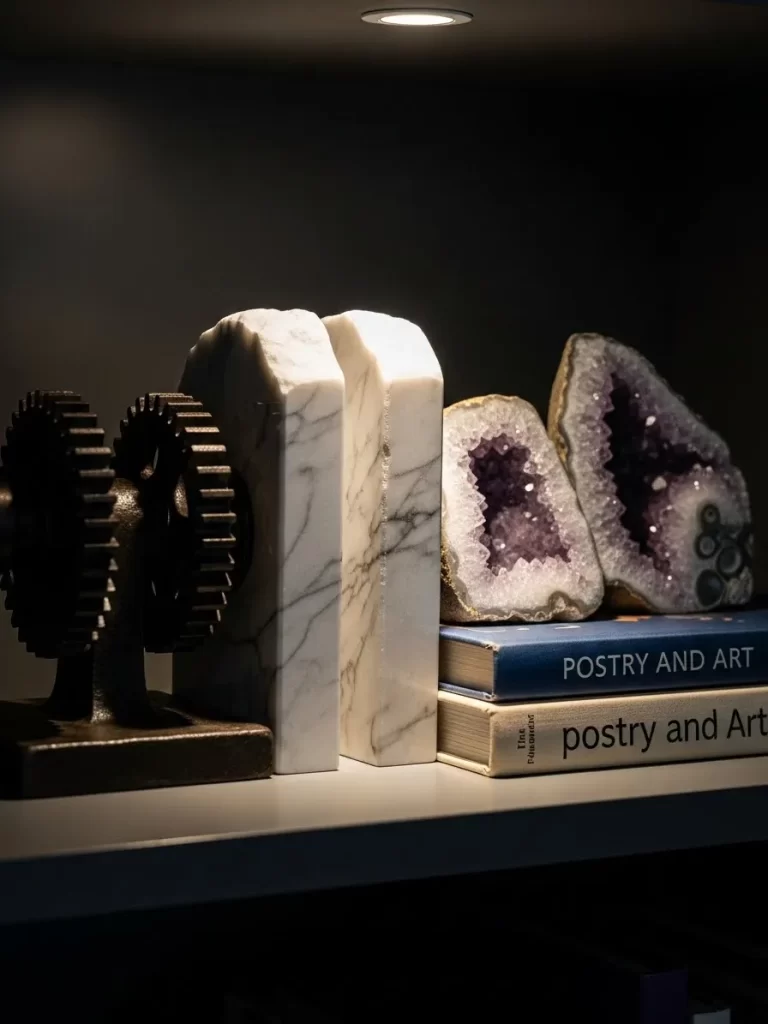
Elevate your bookshelf with a mix of heavy stone and glittering crystals. Using solid marble bookends provides a sturdy, classic anchor for your favorite poetry and art books. Placing raw amethyst geodes next to them adds a touch of natural mystery.
A small spotlight or shelf light above the arrangement makes the crystal facets sparkle. This high contrast look between the smooth white marble and the jagged purple geode feels modern and sophisticated. It turns a simple storage space into a curated display.
Metal gear style accents can be added for a bit of industrial flair. This combination of textures tells a story of both nature and human design. It is a great way to bring the beauty of the earth into your home office or library.
Materials Required
- 2 Solid white marble bookends
- 2 Raw amethyst geode clusters
- 1 Industrial metal gear decorative piece
- 2-3 Hardcover books
Equipment Required
- Small LED shelf light
DIY Instructions
- Clear a section of your shelf and wipe it down to remove any dust.
- Place your books in the center, ensuring the spines face outward.
- Push one marble bookend firmly against the left side of the book stack.
- Set an amethyst geode directly in front of the marble piece.
- Place the second marble bookend and geode on the right side of the stack.
- Position the metal gear piece on the far left to add an industrial element.
- Adjust the books so they are perfectly vertical and secure.
- Turn on a shelf light to highlight the purple crystals and the marble.
34 Patchwork Star Quilt Layering
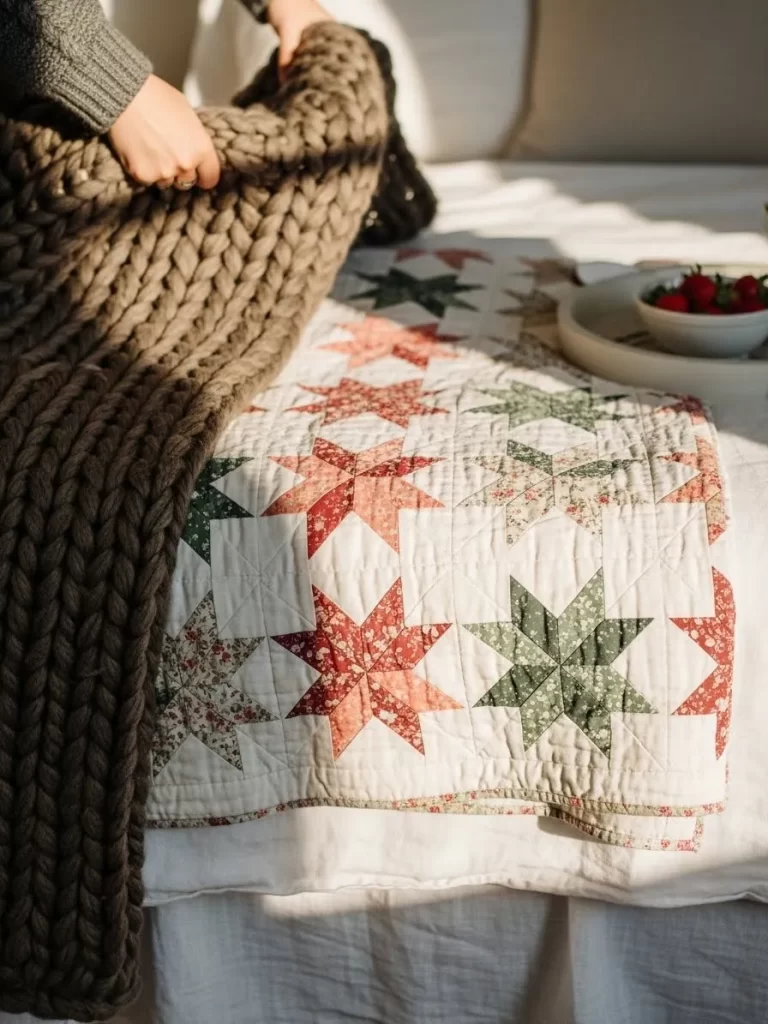
Trade your heavy winter duvets for a lightweight patchwork quilt. A classic star pattern in shades of dusty rose and sage green feels nostalgic and fresh. Layering this over a chunky knit blanket adds depth and texture to your bed for chilly nights.
Natural sunlight emphasizes the intricate stitching and floral patterns. This look is cozy without being heavy, making it perfect for the transition into warmer weather. A bowl of fresh strawberries nearby adds a sweet, seasonal touch to your morning routine.
Keeping your base linens white allows the colors of the quilt to stand out. This traditional style brings a sense of comfort and hand crafted charm. It encourages you to linger in bed with the windows open to catch the morning breeze.
Materials Required
- 1 Cotton patchwork quilt
- 1 Dark gray chunky knit throw blanket
- White cotton sheets and pillowcases
- Small bowl of fresh strawberries
Equipment Required
- None (Hand assembly)
DIY Instructions
- Remove your heavy winter comforter and replace it with clean, white cotton sheets.
- Lay the patchwork quilt over the bed, making sure it hangs evenly.
- Fold the top 12 inches of the quilt down to reveal the white sheets and pillows.
- Drape the chunky knit blanket across the foot of the bed in a loose, casual way.
- Tuck the corners of the knit blanket slightly to create a layered look.
- Place a small bowl of strawberries on a tray at the edge of the bed for color.
- Smooth out the quilt to showcase the floral star patterns.
35 Clear Glass Pantry Organization
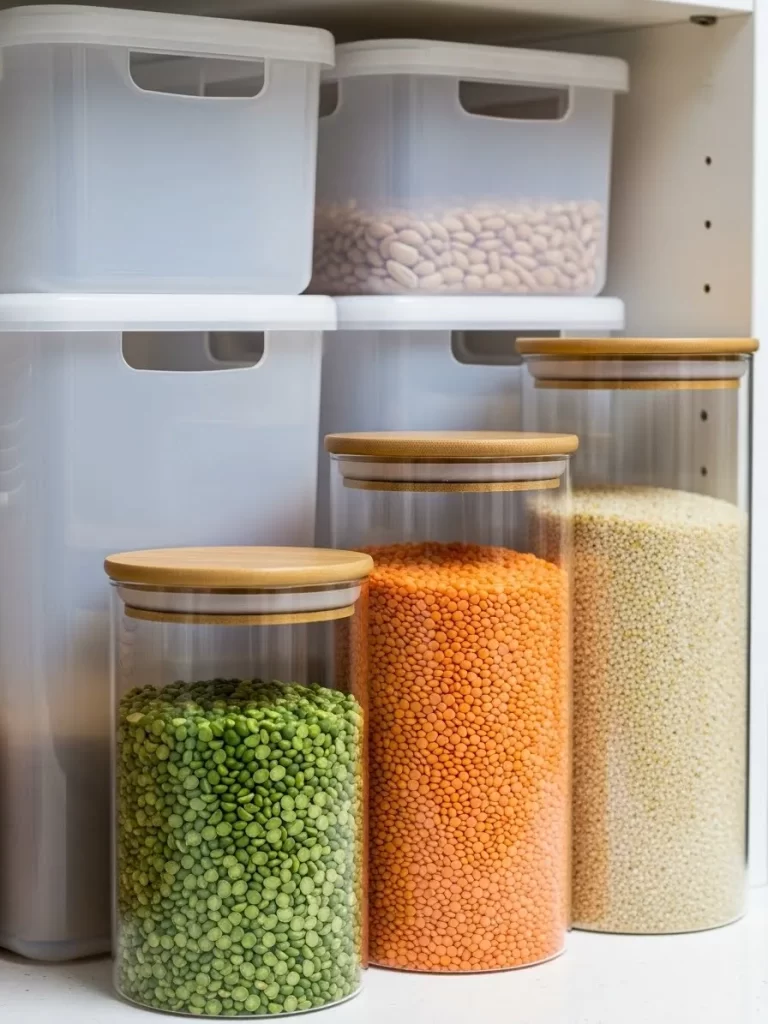
Spring cleaning is the best time to organize your kitchen staples into beautiful clear containers. Using tall glass jars with bamboo lids makes ingredients look like art. The different colors and textures of the food create a vibrant, rainbow effect in your cabinet.
Transparent storage allows you to see exactly what you have at a glance, reducing food waste. Bamboo lids provide a natural, airtight seal that keeps your dry goods fresh. This system turns a cluttered pantry into a clean and functional space.
Stacking smaller plastic bins behind the glass jars helps utilize deep shelf space. This tiered approach ensures nothing gets lost in the back of the cupboard. It is a satisfying project that makes cooking feel more organized and enjoyable.
Materials Required
- 4-5 Tall glass jars with bamboo lids
- Dry staples like peas, lentils, and quinoa
- Large white plastic storage bins
Equipment Required
- Funnel
- Damp cloth
DIY Instructions
- Empty your pantry shelves and wipe them down with a damp cloth.
- Wash and dry your new glass jars to ensure they are streak free.
- Fill each jar with a different dry ingredient, using a funnel to avoid spills.
- Press the bamboo lids down firmly to create an airtight seal.
- Group your jars together on the front of the shelf by color.
- Place larger white plastic bins behind the jars to hold bagged items.
- Align all the jars so the lids are at the same level for a neat look.
36 Round Gold and Grid Mirror Duo
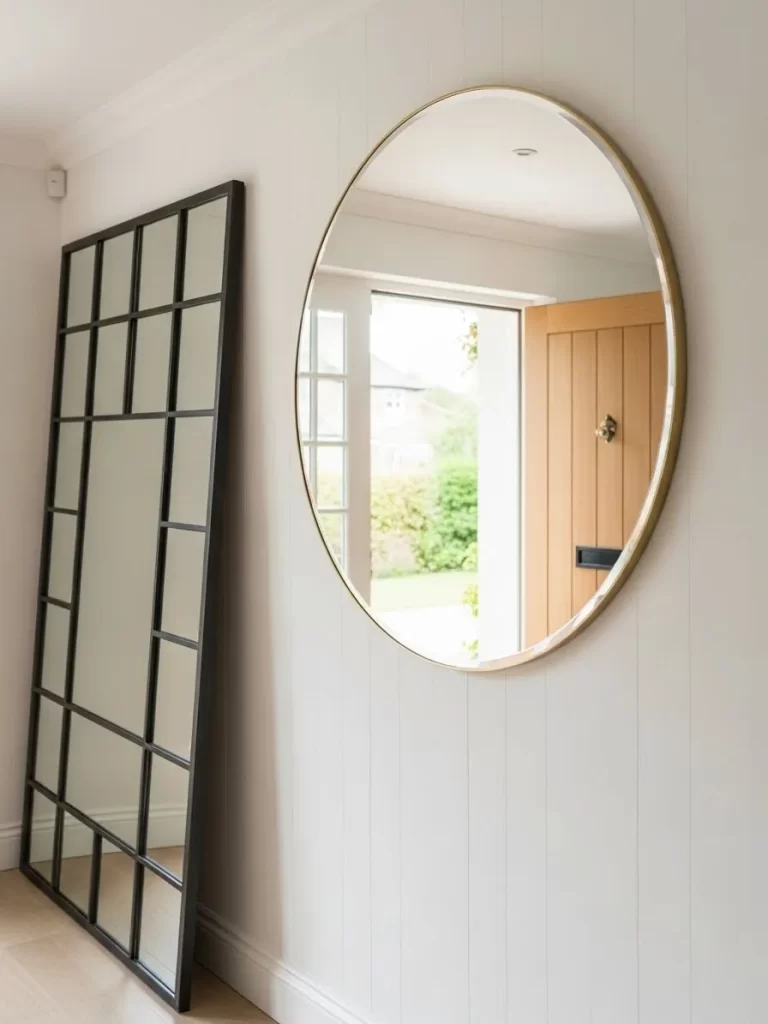
Mirrors are essential for bouncing spring light into dark hallways and entryways. A large round mirror with a thin gold frame offers a soft, modern silhouette that opens up the space. Pairing it with a tall, black framed grid mirror creates a dynamic window effect.
Placing mirrors near your front door reflects the outdoors, making the interior feel more connected to nature. The gold finish adds a touch of warmth that complements light wood doors. This combination makes a small entryway feel much more grand.
The grid mirror adds an architectural element that mimics a classic windowpane. This is a great trick for windowless halls to make them feel less enclosed. It is a high impact way to improve both the light and style of your home transition areas.
Materials Required
- 1 Large round mirror with a gold frame
- 1 Tall rectangular mirror with a black grid frame
- Heavy duty wall anchors and screws
Equipment Required
- Power drill
- Level
- Pencil
- Glass cleaner
DIY Instructions
- Identify a wall in your entryway that lacks natural light.
- Lean the tall grid mirror against the wall first to determine placement.
- Mark the center point on the wall for the round mirror at eye level.
- Use a drill and level to install the wall anchor for the round mirror.
- Hang the gold mirror securely and check that it is level.
- Position the grid mirror slightly to the side of the round mirror.
- Ensure both mirrors are clean and free of streaks using glass cleaner.
- Stand back to see how the light reflects off both surfaces.
37 Crochet Raffia Placemats and Navy Napkins

Set a fresh table for your first outdoor inspired lunch with natural woven textures. A round crochet raffia placemat with a scalloped edge brings a coastal, handcrafted feel to your dining area. Pairing this with a deep navy blue fabric napkin creates a bold look.
The neutral tan of the raffia looks beautiful under the bright spring sun. A clean white ceramic plate makes the colors of your meal pop against the dark napkin. Adding a glass of water with fresh mint leaves nearby completes the refreshing theme.
Gold or bronze cutlery adds a final touch of elegance to this casual setup. This mix of materials is perfect for weekend brunches with friends. It is an easy way to make a simple meal feel like a special event.
Materials Required
- 4 Round crochet raffia placemats
- 4 Navy blue cotton napkins
- 4 White ceramic dinner plates
- Gold cutlery
- Fresh mint leaves
Equipment Required
- None (Hand assembly)
DIY Instructions
- Lay your raffia placemats on a wooden tabletop, spacing them evenly.
- Place a white dinner plate in the center of each placemat.
- Fold a navy napkin in half and drape it over the left side of the plate.
- Position your gold fork on the left and the knife on the right.
- Set a glass of water with a sprig of mint at the top right of each setting.
- Smooth out the placemat edges so the scalloped design is visible.
- Ensure the napkin hangs slightly off the table for a relaxed look.
38 Rainbow Privacy Window Film
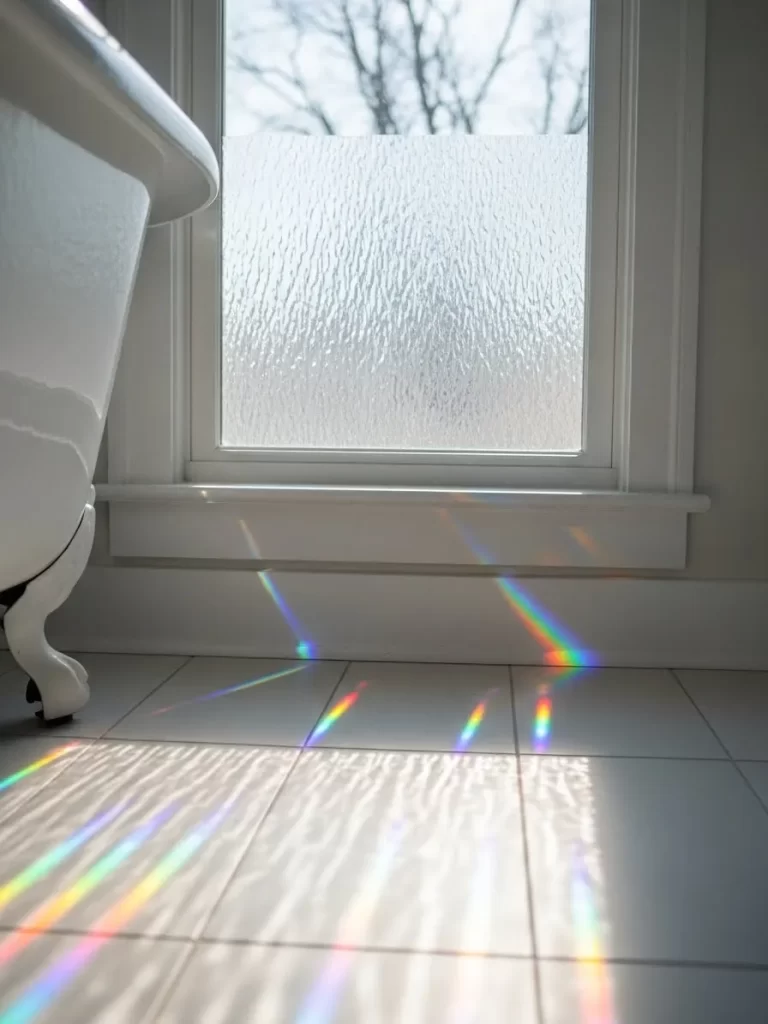
Turn your bathroom windows into a source of colorful light without sacrificing privacy. Applying a textured, frosted window film allows sunlight to pass through while creating beautiful rainbows on your floor. This simple update is a great alternative to heavy blinds.
The frosted texture mimics the look of expensive rain glass but is much more affordable. Sunlight hitting the film at different angles during the day will shift the colors across your tiles. It is a magical way to start your morning routine in a room filled with light.
Privacy film is easy to install and can be removed without leaving a residue. It allows you to keep the top of the window clear for a view of the sky while shielding the bottom. This is a functional and artistic solution for street level windows.
Materials Required
- 1 Roll of frosted privacy window film
- Spray bottle with water and a drop of dish soap
- Microfiber cloth
Equipment Required
- Utility knife
- Squeegee
- Measuring tape
DIY Instructions
- Measure the width and height of your window pane and cut the film larger.
- Clean the glass thoroughly with a microfiber cloth.
- Spray the window pane generously with the soapy water solution.
- Peel the backing off the film and apply it to the wet glass.
- Use a squeegee to push out all the water and air bubbles from the center.
- Trim the excess film along the edges using a sharp utility knife.
- Wipe away any excess water with a dry cloth.
- Enjoy the shifting rainbow patterns as the sun moves.
39 Wicker Peacock Chair and Yellow Boots
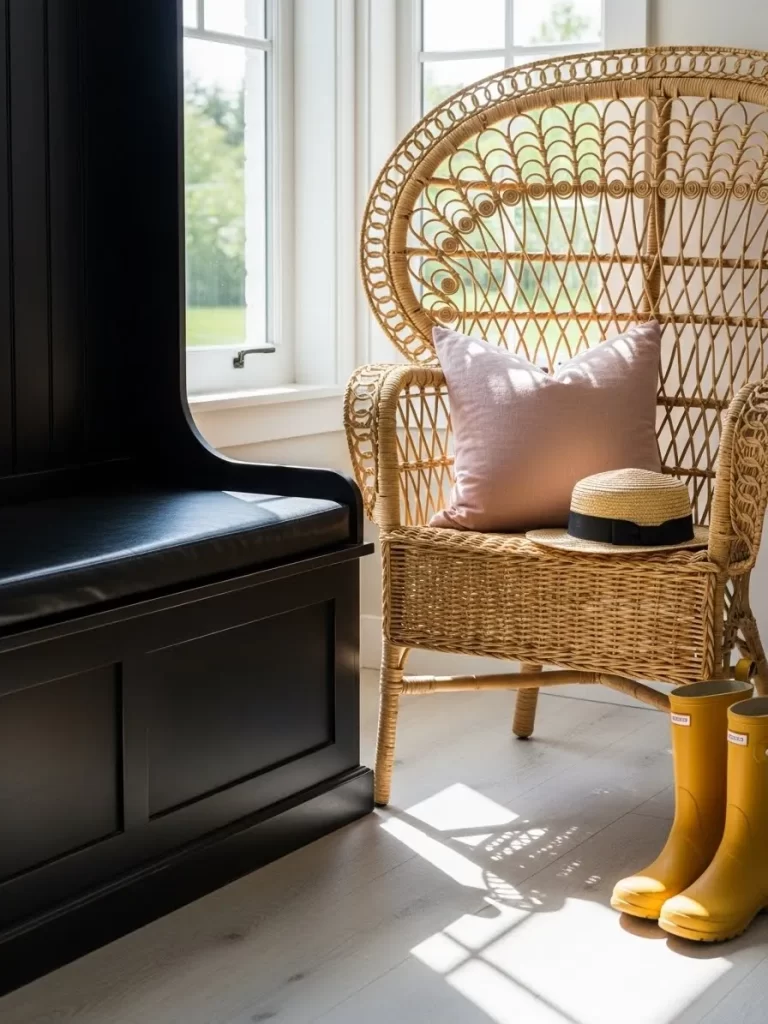
Create a whimsical, garden inspired entryway with a vintage style wicker peacock chair. The intricate woven backrest adds a dramatic and airy focal point to a sunlit corner. A soft, dusty rose cushion makes the chair inviting for a quick rest.
Pairing the natural wicker with bright yellow rain boots adds a fun, seasonal pop of color. A straw hat placed on the seat suggests a day spent gardening or walking in the sun. This vignette captures the playful and energetic spirit of spring.
A black wooden bench nearby provides a sturdy contrast to the light wicker. This setup is both practical for changing shoes and beautiful for welcoming guests. It is a great way to show off your personality right at the front door.
Materials Required
- 1 Wicker peacock chair
- 1 Dusty rose seat cushion
- 1 Pair of bright yellow rain boots
- 1 Straw sun hat
Equipment Required
- None (Hand assembly)
DIY Instructions
- Place your peacock chair in a bright spot near a window.
- Set the rose colored cushion on the seat and fluff it.
- Position the yellow rain boots neatly on the floor next to the chair.
- Rest the straw hat on the edge of the seat at a slight angle.
- If you have a dark bench nearby, align the chair so it creates a balanced grouping.
- Ensure there is enough space around the chair for the wide backrest to be visible.
- Keep the boots clean and shiny to maintain the cheerful look.
40 Botanical Framed Art Pair
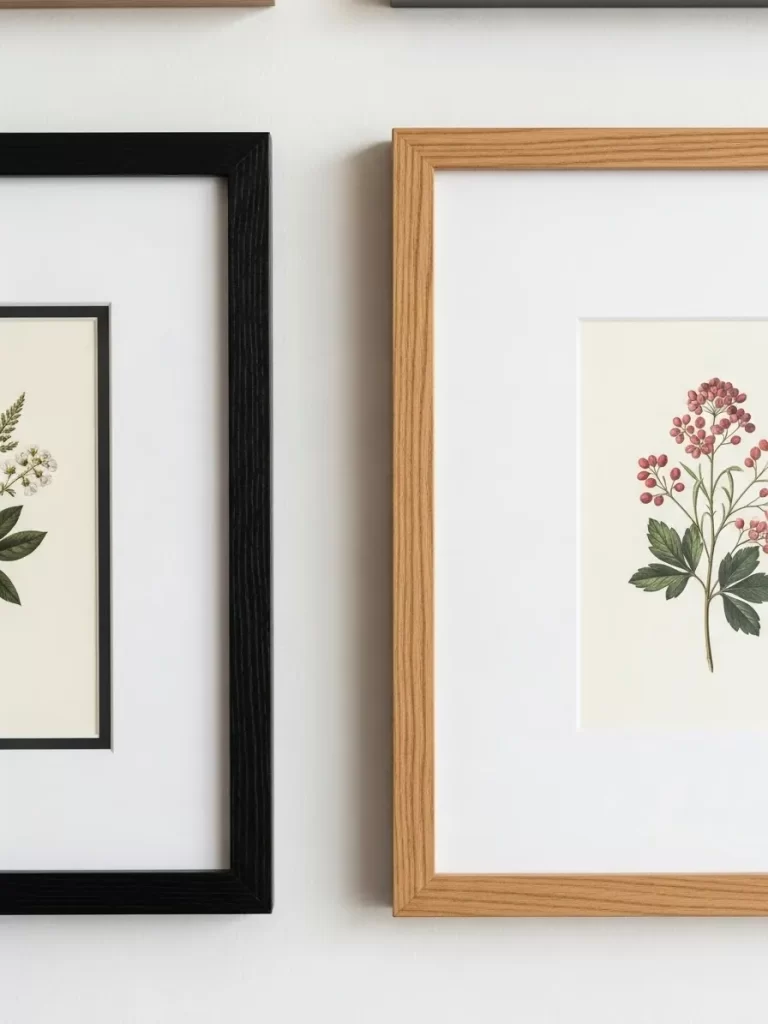
Fill your empty wall space with a pair of classic botanical prints that celebrate seasonal growth. A mix of different frame styles, like matte black and natural oak, adds a modern and collected feel to your art. These delicate illustrations bring a timeless garden aesthetic into any room.
White matting around the prints makes the colors appear more vibrant and professional. Hanging two different sizes next to each other creates a relaxed and interesting gallery style display. This look works perfectly in a dining room or above a bedroom dresser.
Using natural themed art helps bridge the gap between your indoor decor and the budding trees outside. It is an affordable way to add a layer of sophistication to your walls. These prints are easy to swap out if you want to update your look.
Materials Required
- 2 Botanical prints
- 1 Matte black frame with a white mat
- 1 Natural oak frame with a white mat
Equipment Required
- Hammer
- Small nails or picture hangers
- Level
- Pencil
DIY Instructions
- Choose two botanical prints that share a similar vintage illustration style.
- Insert one print into the black frame and the other into the oak frame.
- Decide on the placement on your wall, keeping the frames about 3-4 inches apart.
- Mark the hanging points with a pencil, using a level to ensure they are straight.
- Hammer in your nails at the marked spots.
- Hang the frames and adjust them until they are level.
- Wipe the glass with a microfiber cloth to remove any smudges.
- Enjoy how the different frames add character to your display.
41 Tropical Leaf Indoor-Outdoor Rug
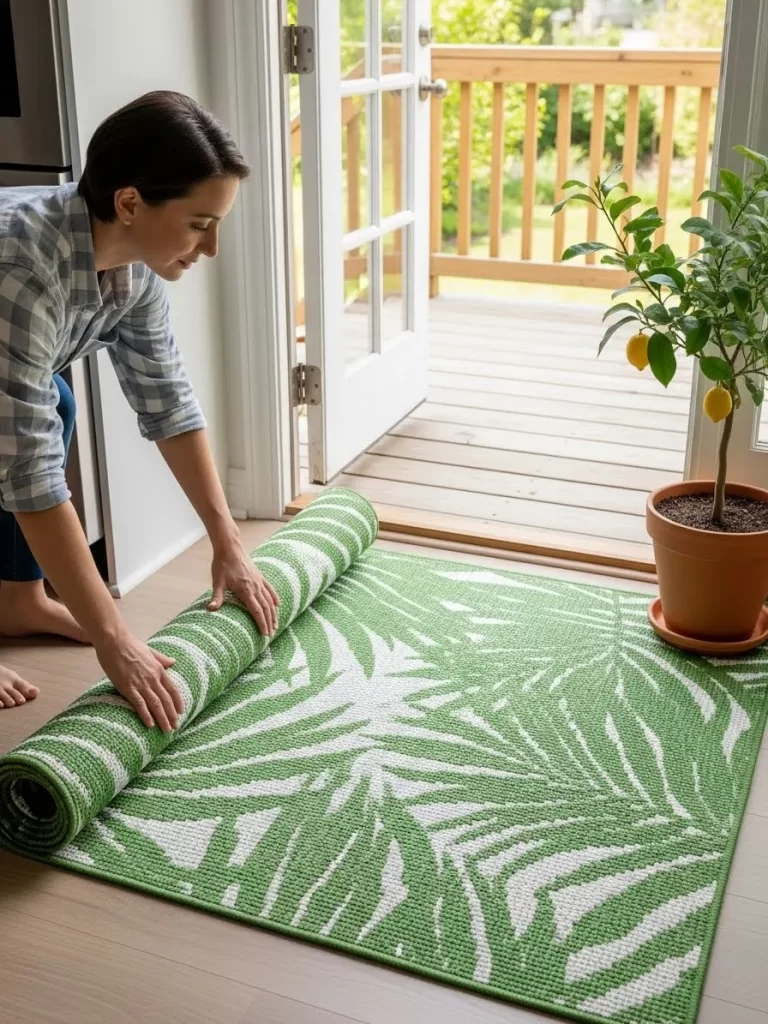
Bring the feeling of a lush garden into your living space with a vibrant botanical rug. This green and white palm leaf pattern instantly wakes up a neutral room with a punch of natural color. The durable woven material handles high traffic areas like entryways with ease.
Rolling out a fresh floor covering is one of the quickest ways to redefine a space for spring. Natural light from an open doorway makes the crisp white patterns on the rug appear even brighter. It creates a seamless transition between your indoor comfort and the outdoors.
Indoor outdoor rugs are practical because they are easy to hose down or vacuum. They provide a soft surface for bare feet while standing up to seasonal rain. This simple swap makes your home feel like a vacation retreat every single day.
Materials Required
- 1 Green and white tropical leaf pattern indoor outdoor rug
- 1 Large indoor plant
- Non slip rug pad
Equipment Required
- Vacuum cleaner
- Damp cloth
DIY Instructions
- Clear the floor area near your deck and sweep away any loose dust.
- Unroll your non slip rug pad and trim it so it is two inches smaller than your rug.
- Place the rug pad on the floor and align it with the doorway.
- Unroll your new tropical leaf rug directly over the pad, ensuring it is centered.
- Smooth out any ripples by walking over the surface.
- Position a large indoor plant in the corner of the rug to enhance the botanical theme.
- Wipe the floor around the rug with a damp cloth to ensure the entire entry looks polished.
Refreshing your home for spring is a rewarding process. You have seen how small items change a room. These forty one swaps provide a clear path to a brighter space.
Take your time with each project. You do not have to do everything at once. Start with a single pillow or a new scent. You will notice the difference immediately.
Enjoy the process of clearing out the old. Embrace the light and life of the new season. Your home is now a sanctuary of freshness.
Key Takeaways
- Focus on natural light to open up small spaces.
- Add greenery to bring instant life to any room.
- Use light fabrics to replace heavy winter materials.
- Small hardware changes offer a quick modern look.
- Scent plays a huge role in how you feel in your space.
- Layered textures create depth without adding clutter.
- Bright colors reflect the energy of the outside world.