
Is your once-loved couch starting to look more like a dull, forgotten piece of furniture? You do not have to spend a fortune on a brand-new sofa just to revitalize your living room. A tired couch can completely drag down the energy of your home, but the solution is much simpler and cheaper than you think.

Refreshing an old sofa comes down to smart styling, clever accessories, and a few easy DIY tricks. You can hide wear and tear, inject bold new colors, or simply improve the comfort level using these affordable ideas. We have compiled 41 instant fixes that tackle everything from sagging cushions to outdated fabrics.
Get ready to transform your drab seating into the cozy, show-stopping centerpiece it was meant to be. These projects require minimal time and effort, proving that high style does not require a high budget.
1 Chunky Wool Arm Knit Throw
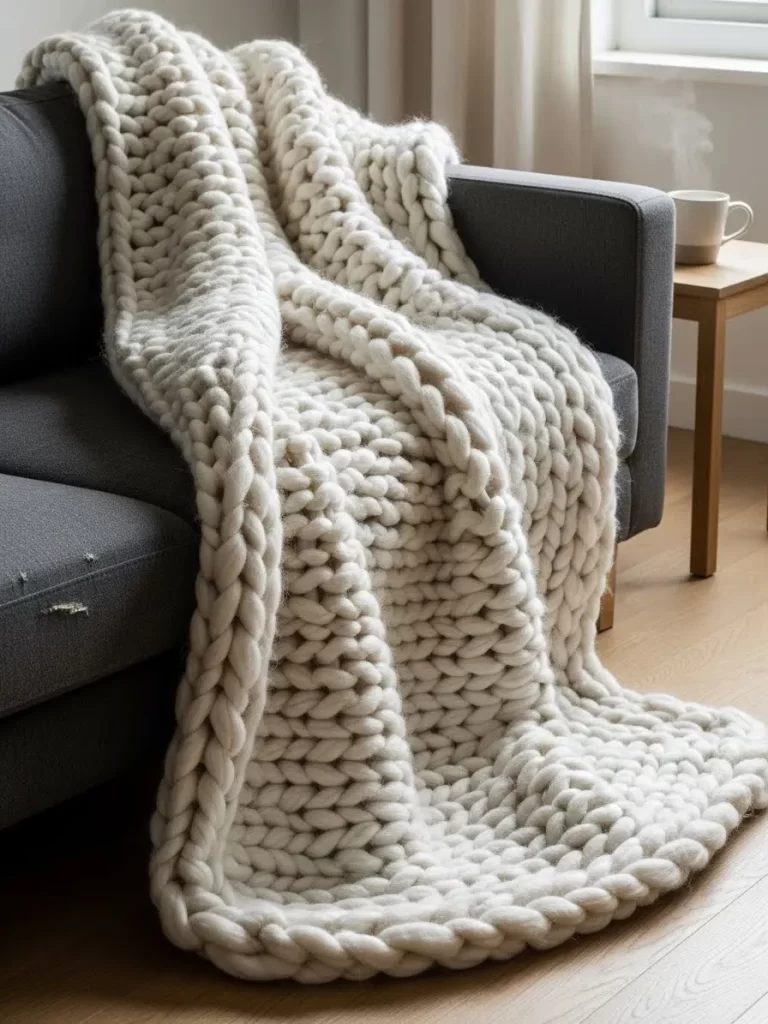
Transforming a tired sofa is easy when you use texture to your advantage. This oversized cream knit blanket brings a sense of luxury and warmth to any living space. It drapes elegantly over the arm of a dark grey couch, creating a striking visual contrast that catches the eye.
The heavy loops of the wool provide a cozy feel that invites you to relax. Small imperfections on an old sofa disappear behind these thick strands of yarn. You can instantly hide stains or fabric tears while adding a sophisticated layer to your room.
Thick blankets like this offer more than just looks. They provide physical comfort during chilly evenings and make a house feel like a home. Selecting a neutral color ensures the piece fits with your existing decor without clashing.
Material Required
- 6 to 8 pounds of unspun wool roving or jumbo chenille yarn
- Clear packing tape
Equipment Required
- Your arms
- Large flat surface like a table or floor
- Scissors
DIY Instruction Step by Step
- Start by pulling a long tail of yarn from your wool bundle and create a slip knot large enough to fit over your hand.
- Slide the loop onto your right arm and keep it snug but comfortable against your wrist.
- Use your left hand to create a new loop from the working yarn and pull it through the first knot.
- Place this second loop onto your right arm next to the first one.
- Repeat this process until you have about 15 to 20 loops lined up on your arm to set the width of the blanket.
- Move the loops from your right arm to your left arm by pulling the working yarn through each stitch one by one.
- Continue knitting back and forth between your arms to build the length of the throw.
- Ensure each stitch stays loose so the blanket remains soft and flexible.
- Finish the project by casting off the last row and tucking the remaining tail into the weave.
2 Twist-in Upholstery Spiral Pins
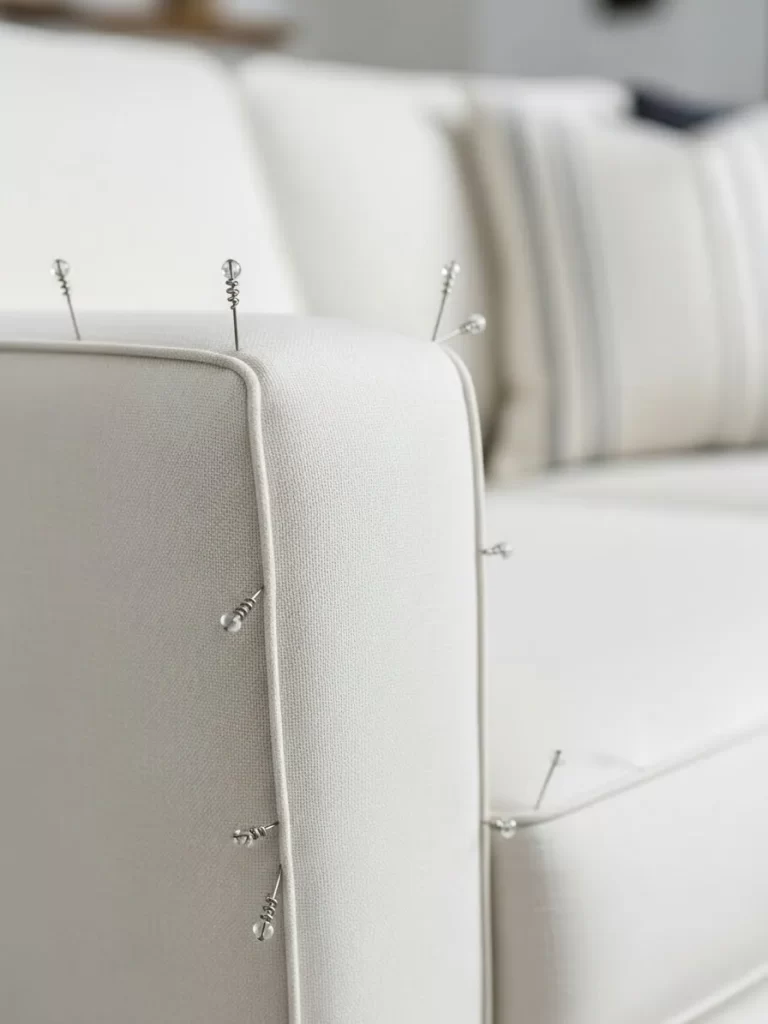
Sagging fabric or loose covers can make even the most expensive furniture look messy. These clever spiral pins offer a quick fix for keeping armrest covers and slipcovers firmly in place. They feature a clear, inconspicuous head that blends into almost any fabric pattern or color without standing out.
Using these pins allows you to tighten loose upholstery around corners and edges where wear and tear are most visible. Simply twisting them into the frame secures the textile so it stays taut through daily use. It provides a tailored, professional finish to an old couch with very little effort or cost.
Material Required
- Pack of clear-headed spiral upholstery pins
- Replacement fabric or armrest covers
Equipment Required
- Your hands (no tools needed)
DIY Instruction Step by Step
- Identify the areas on your sofa where the fabric is sagging or where a cover keeps slipping off.
- Smooth out the fabric with your hand to ensure there are no bunches or wrinkles in the target area.
- Position the sharp tip of the spiral pin against the fabric and the underlying sofa frame.
- Apply gentle pressure and rotate the pin clockwise, just like you would with a screw.
- Continue twisting until the clear plastic head sits flush against the surface of the material.
- Space the pins evenly along the seam or edge to create a uniform and secure hold.
- Check that the pins have grabbed into the padding or wood frame to prevent them from popping back out.
3 Modern Metallic Furniture Leg Caps
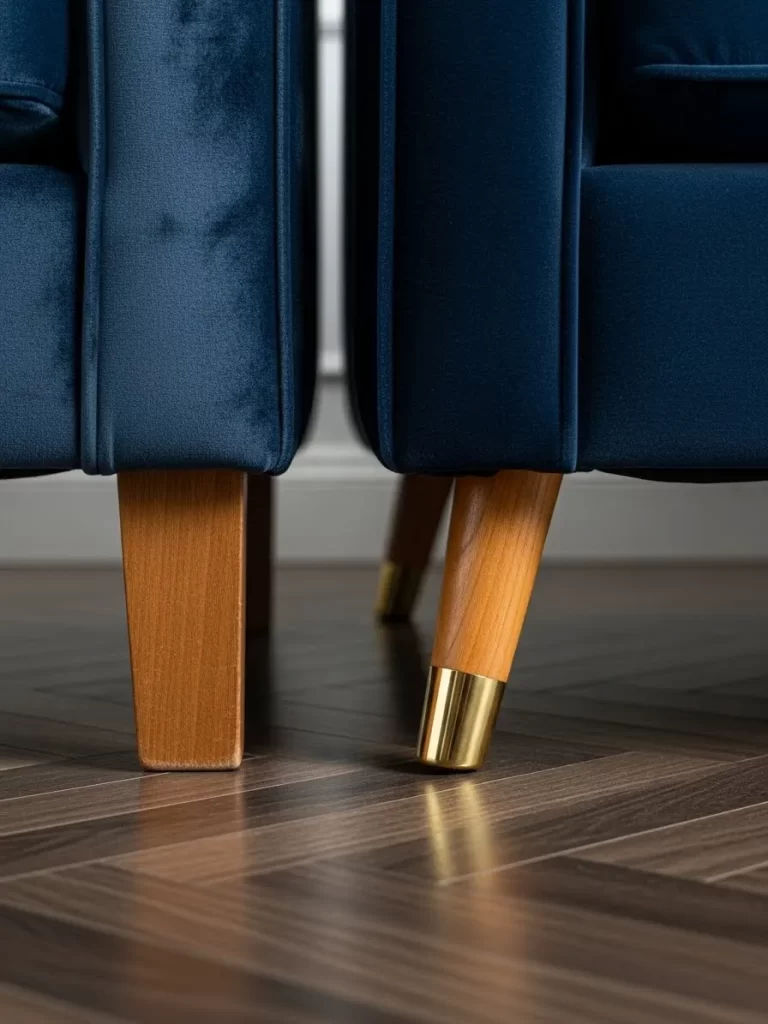
Give your sofa a high-end furniture showroom look by upgrading the feet with sleek metallic accents. These gold-toned caps slide over standard wooden legs to add a touch of modern flair. This small detail draws the eye downward and makes the entire piece feel intentionally designed rather than dated.
Contrast is key when refreshing a room, and the bright metal against a deep navy velvet creates a rich aesthetic. You can hide scuff marks or chips on old wooden legs easily with this method. It is a brilliant way to bridge the gap between vintage charm and contemporary style.
Material Required
- Set of 4 brass or gold furniture leg ferrules (caps)
- Clear adhesive or mounting putty
Equipment Required
- Measuring tape
- Soft cloth
- Fine-grit sandpaper
DIY Instruction Step by Step
- Measure the diameter of your sofa legs at the very bottom to ensure you buy the correct cap size.
- Clean the bottom of each wooden leg with a soft cloth to remove dust and floor wax buildup.
- Use fine-grit sandpaper to lightly smooth any rough edges or splinters on the bottom of the legs.
- Test fit the metallic cap by sliding it onto the leg to see if it stays on by itself.
- Apply a small amount of clear adhesive or mounting putty inside the cap if the fit is a bit loose.
- Press the cap firmly onto the leg and hold it for a few seconds to set the bond.
- Repeat this for all four corners, ensuring each cap is pushed up to the same height for a level look.
4 Emerald Velvet Oversized Lumbar Pillow
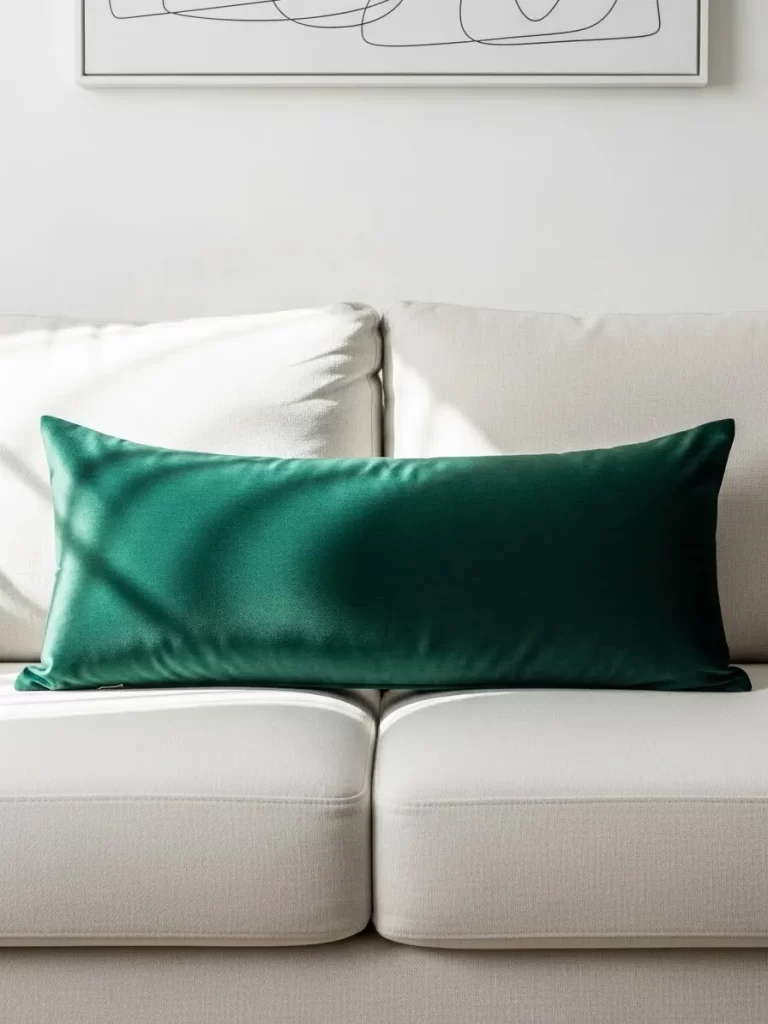
A single bold accessory can shift the entire mood of a neutral living room. This long, forest green velvet pillow provides a pop of jewel-toned color against a crisp white sofa. The rich texture adds a layer of sophistication while the elongated shape offers better support for your back.
Velvet has a natural sheen that catches the light, making the couch look more expensive and inviting. Using an oversized lumbar cushion also helps to fill the visual gap between the seat and the backrest. It is a simple trick to cover up worn-back cushions that have lost their original fluff.
Material Required
- Large lumbar pillow insert
- Emerald green velvet pillow cover
- Fabric protector spray
Equipment Required
- Your hands
DIY Instruction Step by Step
- Select an insert that is two inches larger than your pillow cover to ensure a plump, high-end appearance.
- Fold the pillow insert in half like a taco to make it easier to slide into the narrow opening of the cover.
- Push the folded insert all the way to the corners of the velvet cover.
- Release the insert and reach inside to smooth out the filling so it reaches every edge.
- Close the zipper carefully, making sure the velvet fabric does not get caught in the teeth.
- Give the pillow a firm “chop” in the center with your hand to create a stylish indentation.
- Place the pillow centered on the sofa to create a focal point that ties the room together.
5 Decorative Button Tufting Repair

Lost or loose buttons on a tufted sofa make the piece look neglected and old. Reattaching a button or adding new ones can restore that classic, structured look to your furniture. This technique pulls the fabric tight into the foam, creating those beautiful diamond patterns that define traditional styles.
Working with a long upholstery needle allows you to reach through the back of the frame for a secure hold. You can choose matching fabric buttons for a seamless look or contrasting ones for a bit of personality. This small repair project significantly improves the overall silhouette of your couch cushions.
Material Required
- Heavy-duty upholstery thread or twine
- Replacement shank buttons
- Scrap fabric (to use as a backer)
Equipment Required
- Long upholstery needle (at least 6 inches)
- Scissors
- Pliers (optional, for pulling the needle through)
DIY Instruction Step by Step
- Thread your long upholstery needle with a double strand of heavy-duty twine for extra strength.
- Push the needle through the existing hole in the foam from the back of the sofa toward the front.
- Slide the replacement button onto the needle through the shank on its back.
- Pass the needle back through the same hole, going from the front of the sofa to the back.
- Pull the thread tight until the button sinks into the cushion to the desired depth.
- Place a small scrap of fabric on the back side of the couch and tie the thread around it to prevent the knot from pulling through the foam.
- Tie a secure square knot and trim the excess thread, hiding the ends behind the sofa frame.
6 Faux Fur Texture Overlay
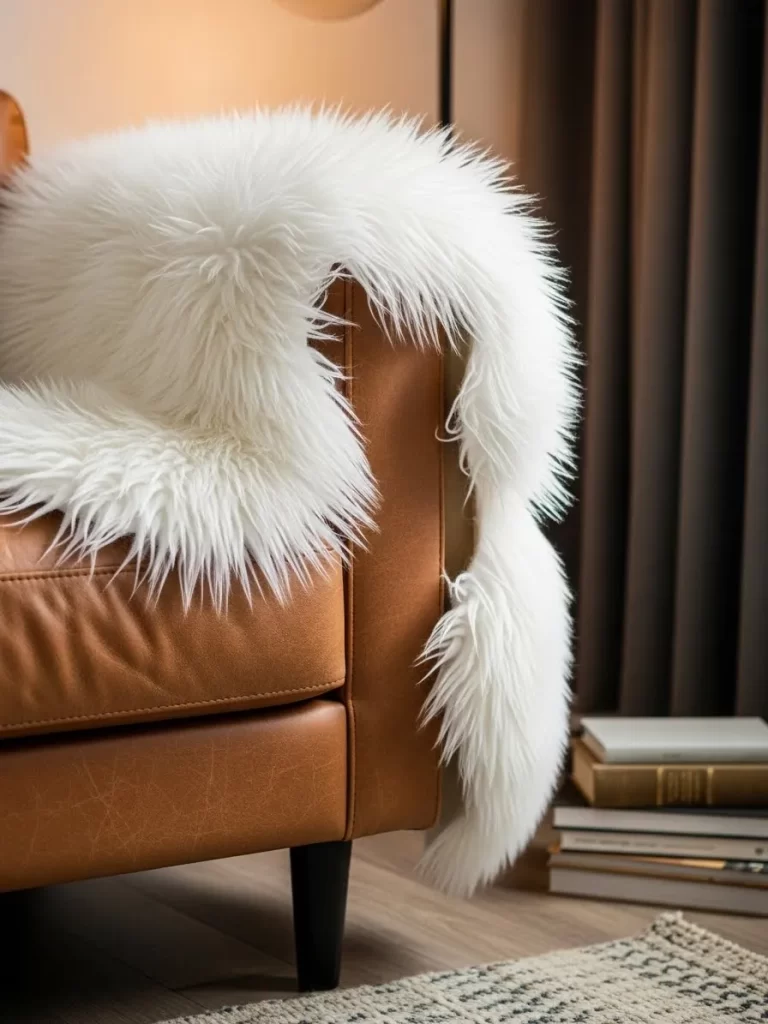
Nothing says comfort quite like the plush feel of a white faux fur rug draped over a leather sofa. This combination adds an instant “Scandi-chic” vibe to your home while protecting the leather from scratches. The long fibers create a beautiful messy-cool look that makes the sofa look incredibly inviting.
Faux fur is a great tool for hiding cracked leather or worn-out armrests on an older chair. It adds a high-contrast element that feels soft to the touch and looks great in photos. You can easily move it around to change the look of the room whenever you feel like a change.
Material Required
- High-quality faux fur sheepskin rug or throw
- Non-slip rug pad (optional)
Equipment Required
- Wide-tooth comb or pet brush
DIY Instruction Step by Step
- Shake the faux fur rug vigorously outside to fluff up the fibers before placing it on the furniture.
- Drape the fur over the armrest or the corner of the sofa, letting it fall naturally toward the floor.
- Adjust the placement so the widest part of the fur covers the area of the couch you want to hide.
- Use a non-slip rug pad underneath the fur if you find it sliding off slippery leather surfaces.
- Use a wide-tooth comb or pet brush to gently brush the fibers if they become matted over time.
- Tuck the edge of the fur into the crease between the seat cushion and the armrest for a more secure fit.
- Step back and check the balance of the room, ensuring the white fur provides a nice contrast to the floor and sofa.
7 Fabric Spray Paint Transformation
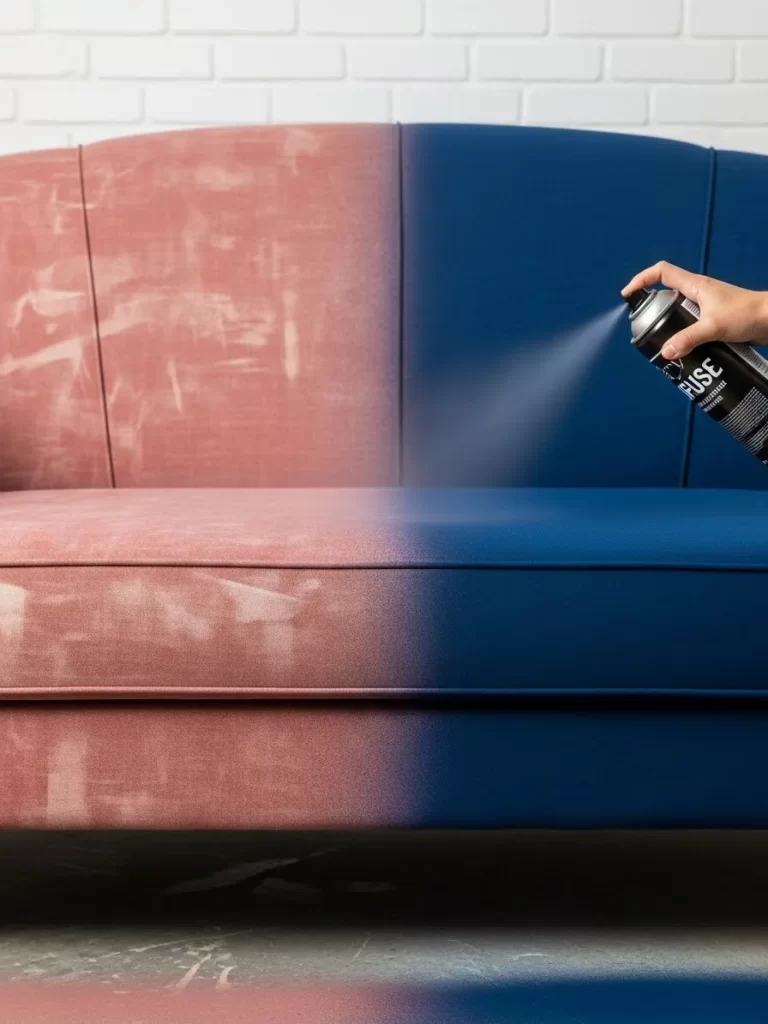
If you hate the color of your sofa, you can actually change it without the cost of professional reupholstery. Fabric spray paint is a specialized product that soaks into the fibers rather than sitting on top like traditional paint. This allows the material to remain soft and flexible while looking like a brand-new piece of furniture.
In this example, a dusty rose sofa is being transformed into a deep, sophisticated navy blue. The process covers up permanent stains and fading from sunlight. It is a bold way to breathe new life into a piece that you were ready to throw away.
Material Required
- Several cans of fabric-specific spray paint (upholstery paint)
- Drop cloths or old sheets
- Painter’s tape
Equipment Required
- Scrub brush
- Spray bottle with water
- Face mask or respirator
DIY Instruction Step by Step
- Clean the sofa thoroughly with a vacuum and a scrub brush to remove any dust or oils from the fabric.
- Move the sofa to a well-ventilated area, like a garage or a driveway, and cover the floor with drop cloths.
- Use painter’s tape to cover any parts of the sofa you do not want to paint, such as the legs or wooden trim.
- Lightly mist the fabric with water from a spray bottle to help the paint soak in evenly.
- Shake the paint can well and apply a very thin, even coat over one section of the sofa.
- Use a brush to work the wet paint into the fibers while it is still damp.
- Allow the first coat to dry completely before applying a second or third layer to achieve full color coverage.
8 Tribal Print Sofa Runner
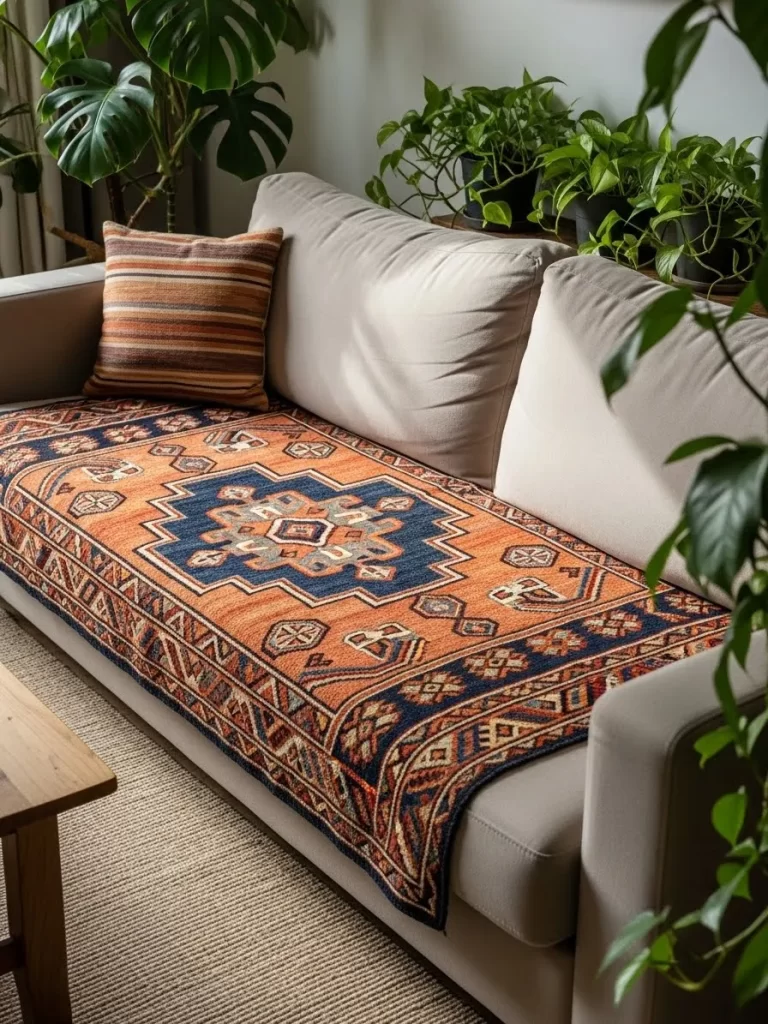
A runner is a fantastic way to introduce pattern to a plain sofa without committing to a full slipcover. This orange and blue tribal print rug sits perfectly across the seat cushions, protecting the high-traffic area. It adds a bohemian touch that feels warm and curated.
The heavy weave of a rug or runner prevents it from shifting when people sit down. This is an excellent solution for homes with pets or children where the middle of the couch gets dirty quickly. You can easily swap the runner out for different seasons to keep the look fresh.
Material Required
- Small accent rug or specialized sofa runner
- Double-sided upholstery tape
Equipment Required
- Measuring tape
- Scissors
DIY Instruction Step by Step
- Measure the length of your sofa seating area to find a runner that fits within the armrests.
- Lay the runner flat across the seat cushions, ensuring it is centered from left to right.
- Fold the front edge of the rug over the front of the cushions for a clean, finished look.
- Apply small strips of double-sided upholstery tape to the underside of the rug if it tends to slide.
- Press the rug firmly onto the sofa fabric to secure the tape bond.
- Smooth out any lumps or bumps in the rug so it sits flush against the cushions.
- Add a matching throw pillow on one side to pull the colors from the runner into the rest of the sofa.
9 Bold Black and White Bolster Trio

Geometric shapes can give a standard sofa a futuristic or high-design edge. These long bolster pillows with black and white stripes break up the horizontal lines of a grey couch. They offer unique lumbar support and can even serve as makeshift armrests for deeper furniture.
Stripes are a timeless pattern that works well with almost any color palette. Placing three bolsters in a row creates a rhythmic visual that feels organized and intentional. This look is perfect for minimalist homes that need a bit of visual interest without clutter.
Material Required
- Three bolster pillow inserts
- Striped fabric or pre-made striped bolster covers
Equipment Required
- Your hands
DIY Instruction Step by Step
- Measure the width of your sofa to see how many bolsters will fit across the back or seat.
- Stuff your bolster inserts into the striped covers, ensuring the ends are filled out completely.
- Rotate the covers so the stripes line up perfectly on all three pillows for a professional look.
- Place one long bolster against the back cushions to act as a lower back support.
- Position the two shorter bolsters against the armrests to create a cozy, “boxed-in” feeling.
- Adjust the pillows so the stripes run in the same direction to keep the pattern consistent.
- Use these bolsters to hide any gaps or sagging areas where the seat meets the backrest.
10 Multi-Layer Foam Cushion Refresh

Comfort is just as important as appearance when it comes to a sofa refresh. If your cushions feel flat and “bottomed out,” adding new foam layers can make them feel like new. This image shows a cushion being rebuilt with a firm base and a soft, plush top layer for the best of both worlds.
Wrapping the foam in batting before putting the cover back on gives the cushion a rounded, professional shape. It fills out the fabric cover tightly, removing wrinkles and making the sofa look brand new. You will notice the difference the second you sit down.
Material Required
- High-density upholstery foam (firm base)
- Memory foam or soft foam topper
- Polyester batting (dacron)
- Spray adhesive
Equipment Required
- Electric carving knife or heavy-duty bread knife
- Measuring tape
- Marker
DIY Instruction Step by Step
- Unzip your old cushion cover and remove the worn-out internal padding.
- Measure the inside of the cover to determine the exact size of the new foam you need.
- Mark your foam sheets with a marker and use an electric carving knife to cut them to size.
- Apply a thin layer of spray adhesive between the firm base foam and the softer topper foam.
- Press the two layers together and let them dry for a few minutes.
- Wrap the entire foam block in polyester batting to soften the edges and add extra volume.
- Stuff the newly padded foam back into the original cover, being careful to align the corners.
11 Contrast Piping with Fabric Markers
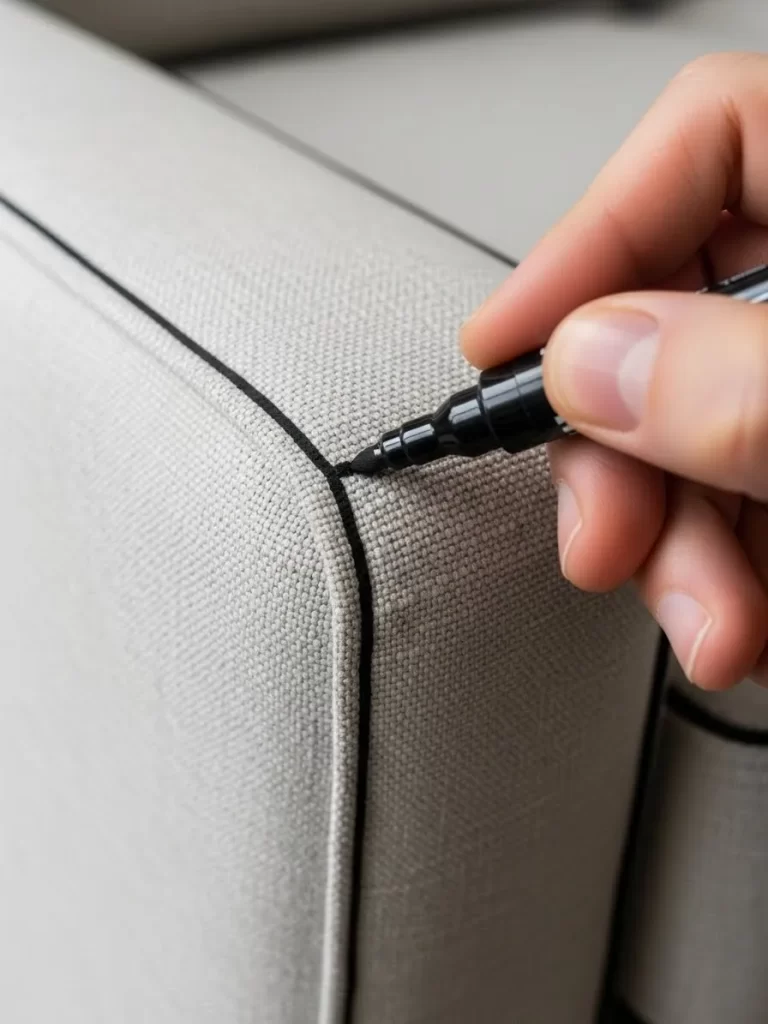
Detailing the seams of your sofa can highlight its silhouette and add a custom-tailored feel. Using a fabric marker to darken the piping is a surprisingly effective trick for light-colored furniture. It creates a “sketch-like” or high-contrast border that makes the couch pop against a plain wall.
This method is incredibly low-cost and requires no sewing skills at all. It is a great way to hide minor fraying or discoloration along the edges of the cushions. The result is a sharp, modern look that looks like a designer piece.
Material Required
- Permanent fabric markers (in a dark color like black or navy)
- Scrap fabric for testing
Equipment Required
- Steady hand
- Ruler (optional)
DIY Instruction Step by Step
- Choose a high-quality fabric marker that is specifically designed not to bleed into the surrounding material.
- Test the marker on a hidden spot of the sofa, like the underside of a cushion, to check the color.
- Start at the back corner of the sofa and slowly trace along the raised piping of the seam.
- Use short, controlled strokes to ensure the ink stays only on the corded edge.
- Let the ink dry for several hours before sitting on the sofa to prevent smearing.
- Go over the lines a second time if you want a deeper, more solid color.
- Use a ruler on straight sections if you are worried about keeping a steady hand while drawing.
12 Pom-Pom Trim Edge Detail
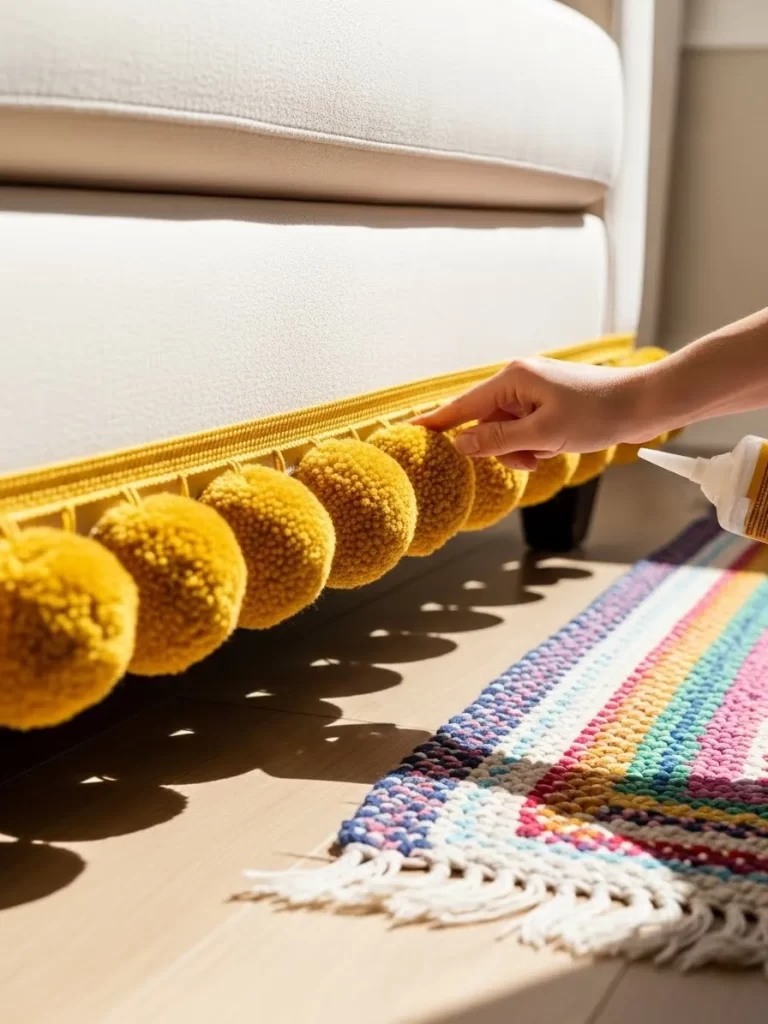
Adding a whimsical border to the base of your sofa can hide unsightly gaps or plain legs. These oversized yellow pom-poms create a playful and textured fringe that moves when you walk by. It is a simple way to introduce a second color to your furniture without using paint.
Glueing the trim along the bottom edge provides a clean and uniform line. This look works particularly well in nurseries, eclectic living rooms, or any space that needs a bit of personality. You can easily remove or change the trim later if you want a more serious look.
Material Required
- Several yards of pom-pom fringe trim
- High-strength fabric glue or hot glue sticks
Equipment Required
- Measuring tape
- Fabric scissors
- Glue gun (if using hot glue)
DIY Instruction Step by Step
- Measure the perimeter of your sofa base to determine how many yards of trim you need to purchase.
- Start at one of the back corners of the sofa so the seam of the trim is hidden from view.
- Apply a thin, steady line of fabric glue along the bottom edge of the sofa fabric.
- Press the flat ribbon part of the pom-pom trim firmly into the glue.
- Work in small sections, about 12 inches at a time, to prevent the glue from drying before you attach the trim.
- Ensure the pom-poms hang freely just above the floor level for the best visual effect.
- Cut the trim at the end and overlap the edges slightly, securing them with an extra drop of glue.
13 Integrated Corner Media Tray
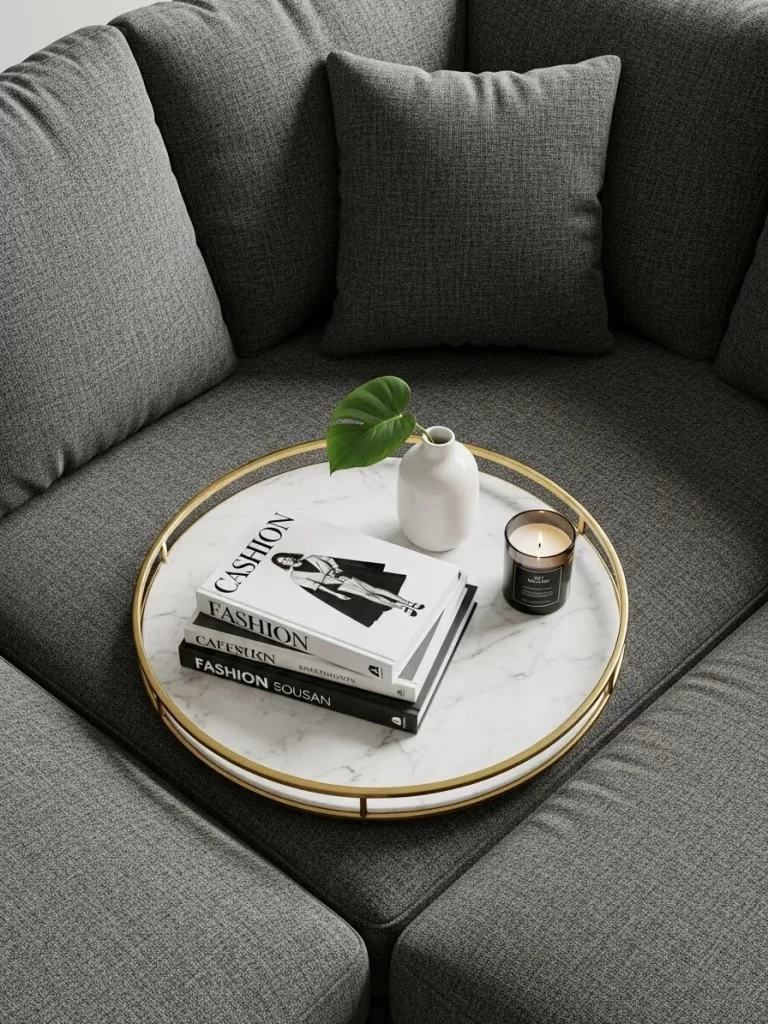
Sectional sofas often have awkward corners that become “dead zones” for decor. Placing a circular marble and gold tray in this space creates a functional surface for candles, books, and coffee. It keeps your essentials within reach without needing a separate side table.
The tray provides a stable, flat surface on top of soft cushions, preventing spills. Selecting materials like marble and brass adds a touch of elegance that elevates the look of the grey fabric. This setup makes the corner feel cozy and useful rather than just empty space.
Material Required
- Large circular decorative tray (marble, wood, or metal)
- Decorative items (candle, small vase, coffee table books)
Equipment Required
- Your hands
DIY Instruction Step by Step
- Clean the corner area of your sectional sofa to remove any crumbs or dust.
- Place the tray directly into the corner where the two seat cushions meet.
- Press down slightly to ensure the tray feels stable and does not wobble on the padding.
- Stack two or three thin books in the center of the tray to create varying heights.
- Add a scented candle and a small vase with a green leaf to bring a natural element to the space.
- Arrange the items so the tallest piece is toward the back and the shortest is at the front.
- Check the stability one last time to make sure the tray stays level even when someone sits nearby.
14 Brass Nailhead Trim Upgrade
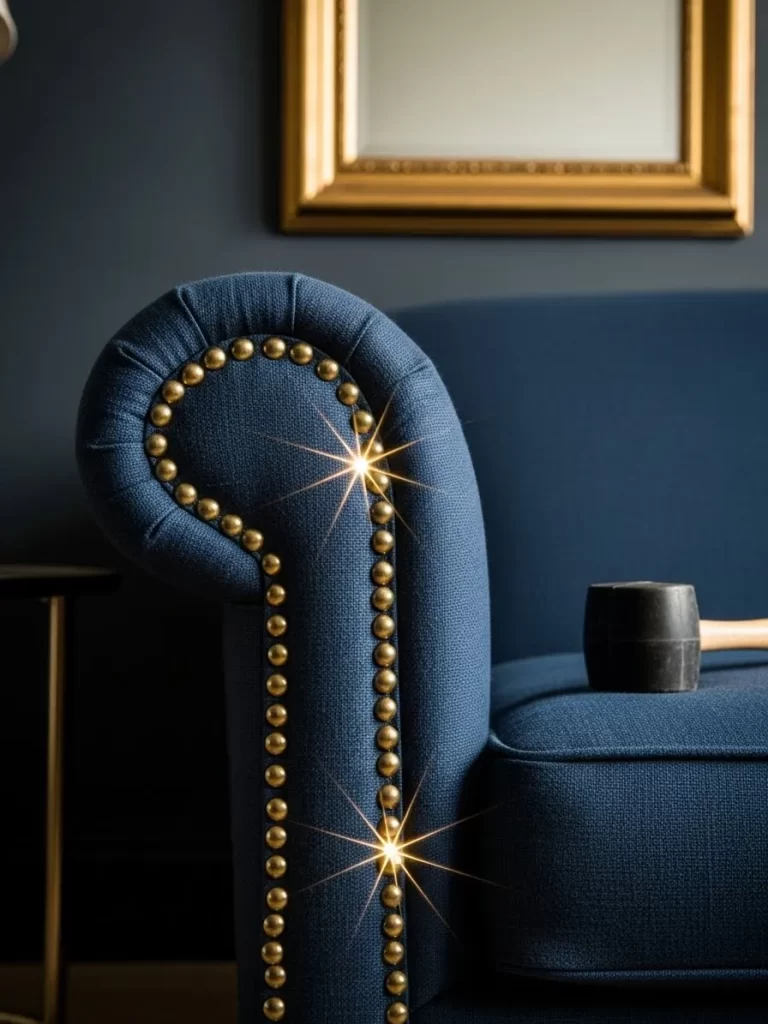
Adding a row of brass nailheads can give a plain upholstered armrest an instant antique or high-end look. These individual metal studs create a beautiful, shimmering border that defines the shape of the sofa. It is a classic design choice that works perfectly with deep blue or dark-colored fabrics.
This project is very satisfying because the change is visible with every single nail you tap in. You can follow the natural curve of the armrest to highlight the furniture’s silhouette. It makes a mass-produced couch look like a custom-made heirloom.
Material Required
- Box of decorative upholstery nailheads (brass, silver, or bronze)
- Chalk or fabric pencil
Equipment Required
- Rubber mallet (to avoid scratching the metal)
- Needle-nose pliers
- Spacer tool (optional, for even gaps)
DIY Instruction Step by Step
- Use a piece of chalk to mark a light line where you want the row of nailheads to sit.
- Hold the first nailhead with needle-nose pliers to protect your fingers from the mallet.
- Position the sharp point on your chalk line and tap it gently into the wooden frame with the rubber mallet.
- Drive the nail in until the decorative head is flush with the fabric surface.
- Place the next nailhead about half an inch away, using a spacer tool to keep the distance consistent.
- Follow the curve of the armrest slowly, ensuring the line remains straight and even.
- Wipe away any remaining chalk marks once you have finished the entire row.
15 Layered Throw Blanket Texture
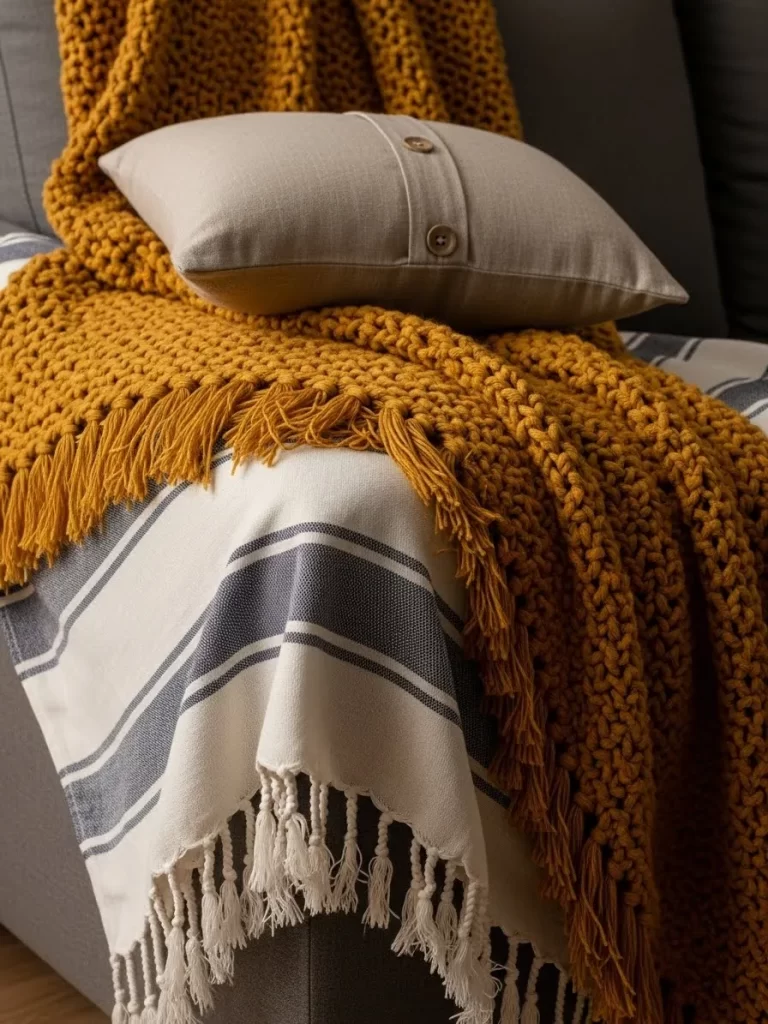
Mixing different weights and textures of blankets can make a sofa look professionally styled. This image shows a thick, mustard-colored knit throw layered over a lighter, fringed cotton blanket. The combination adds depth and a sense of effortless comfort to the room.
Layering allows you to play with colors and patterns without overwhelming the space. The fringed edges add a bohemian touch, while the heavy knit provides warmth for cold nights. It is a great way to cover a large portion of an old sofa while making it the coziest spot in the house.
Material Required
- One heavy knit throw blanket
- One lightweight fringed cotton throw
- One textured button-down pillow
Equipment Required
- Your hands
DIY Instruction Step by Step
- Drape the lightweight cotton blanket over the back of the sofa, letting the fringe hang down the front.
- Angle the blanket slightly so it doesn’t look too stiff or formal.
- Fold the heavier knit blanket in thirds and place it directly on top of the first layer.
- Offset the top blanket so you can still see the fringe and pattern of the bottom layer.
- Smooth out any large wrinkles, but keep the look slightly relaxed and “lived-in.”
- Place a textured pillow in front of the layered blankets to tie the whole look together.
- Adjust the drape until the colors and textures feel balanced across the sofa arm.
16 Bold Fabric Dye Refresh

If your cushion covers are faded but still in good shape, a simple dye bath can restore their vibrancy. This image shows covers that have been dyed a bright, energetic coral color to replace a dull grey. It is an inexpensive way to completely change the color palette of your room.
Dyeing works best on natural fibers like cotton or linen, soaking deep into the fabric for long-lasting color. You can choose a shade that matches your new decor perfectly. It gives you the freedom to experiment with bold trends without buying all new furniture.
Material Required
- Liquid or powder fabric dye
- Salt or vinegar (to set the dye)
- Large plastic tub or stainless steel sink
Equipment Required
- Rubber gloves
- Long stirring stick or tongs
- Washing machine
DIY Instruction Step by Step
- Remove the covers from your cushions and wash them thoroughly to remove any dirt or oils.
- Fill a large tub with very hot water and add the fabric dye according to the package instructions.
- Stir in salt (for cotton) or vinegar (for silk/wool) to help the color bond to the fibers.
- Submerge the damp covers into the dye bath and stir constantly for the first ten minutes.
- Leave the covers in the dye for up to an hour, stirring occasionally to ensure an even color.
- Rinse the fabric in cold water until the water runs clear.
- Wash the covers in the washing machine with a mild detergent and dry them away from direct sunlight.
17 Sleek Wooden Armrest Wrap
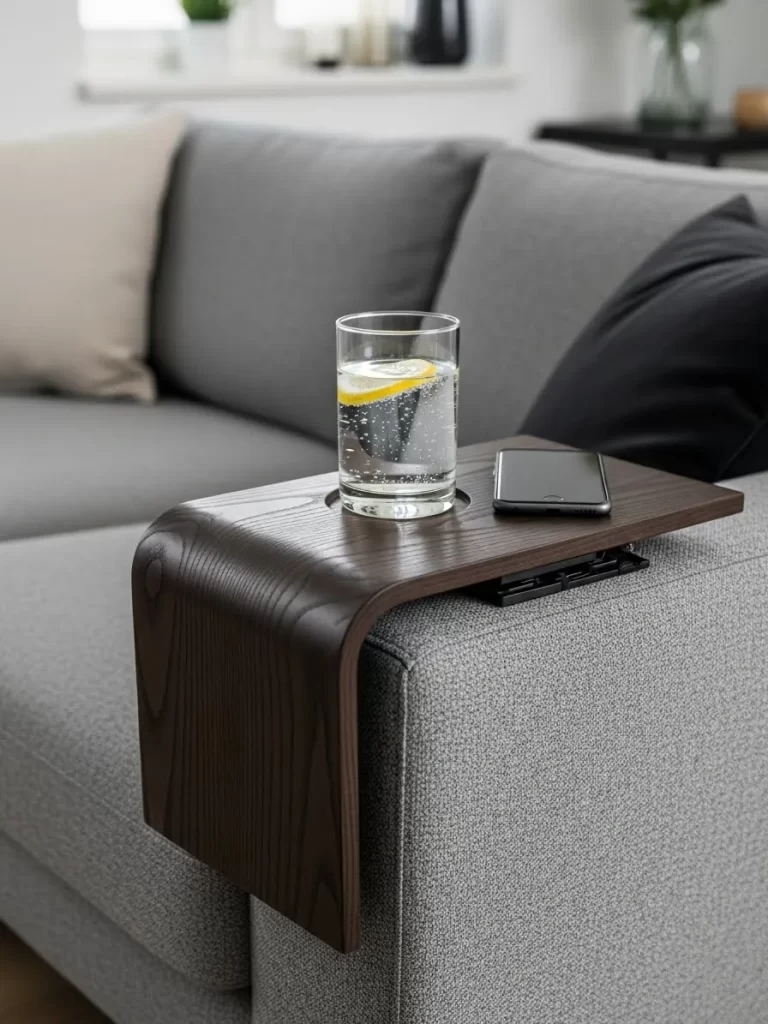
Protect your sofa and create a modern look with a flexible wooden armrest wrap. This dark wood accessory fits over the square arm of a couch, providing a flat surface for drinks and phones. It eliminates the need for coasters and adds a sophisticated architectural element.
The wrap is made of thin wooden slats that can bend to fit different arm widths. It looks especially good on minimalist, grey sofas, adding a warm natural texture. This is a must-have for small apartments where there isn’t enough room for a coffee table.
Material Required
- Flexible wooden sofa armrest wrap
- Non-slip backing (usually included)
Equipment Required
- Your hands
DIY Instruction Step by Step
- Measure the width of your sofa arm to ensure the wrap will fit securely over the top.
- Clean the surface of the sofa arm with a lint roller to remove any dust or hair.
- Drape the wooden wrap over the center of the armrest, letting the slats hang down on both sides.
- Press down on the top surface to make sure the non-slip backing is gripping the fabric.
- Adjust the position until the wrap is perfectly centered and stable.
- Place your glass or phone in the designated areas to test the stability.
- If the wrap feels loose, you can add a small piece of shelf liner underneath for extra grip.
18 Bohemian Floor Pouf Duo

Adding floor seating near your sofa can make the living area feel more social and relaxed. These large, square poufs in cream and burnt orange provide extra spots for guests to sit. The textured patterns and tufted details add a rich, bohemian vibe that complements a simple couch.
Poufs are also great for using as oversized footstools when you want to stretch out. They fill up the empty floor space in front of the sofa, making the room feel more complete. You can easily tuck them away when you need more walking room.
Material Required
- Two large square pouf covers
- High-density bean bag filler or old towels/blankets for stuffing
Equipment Required
- Your hands
DIY Instruction Step by Step
- Choose pouf covers that have different but complementary colors and textures.
- Fill the covers tightly with your choice of stuffing; using old blankets makes them heavier and more stable.
- Ensure the corners are completely packed so the pouf keeps its square shape over time.
- Zip the covers closed and give them a few firm pats to even out the filling.
- Place the poufs side-by-side on a textured rug near the front corner of your sofa.
- Add a small wooden tray on top of one pouf if you want to use it as an extra side table.
- Rotate the poufs occasionally to prevent one side from becoming flatter than the others.
19 High-Contrast Accent Pillow Swap
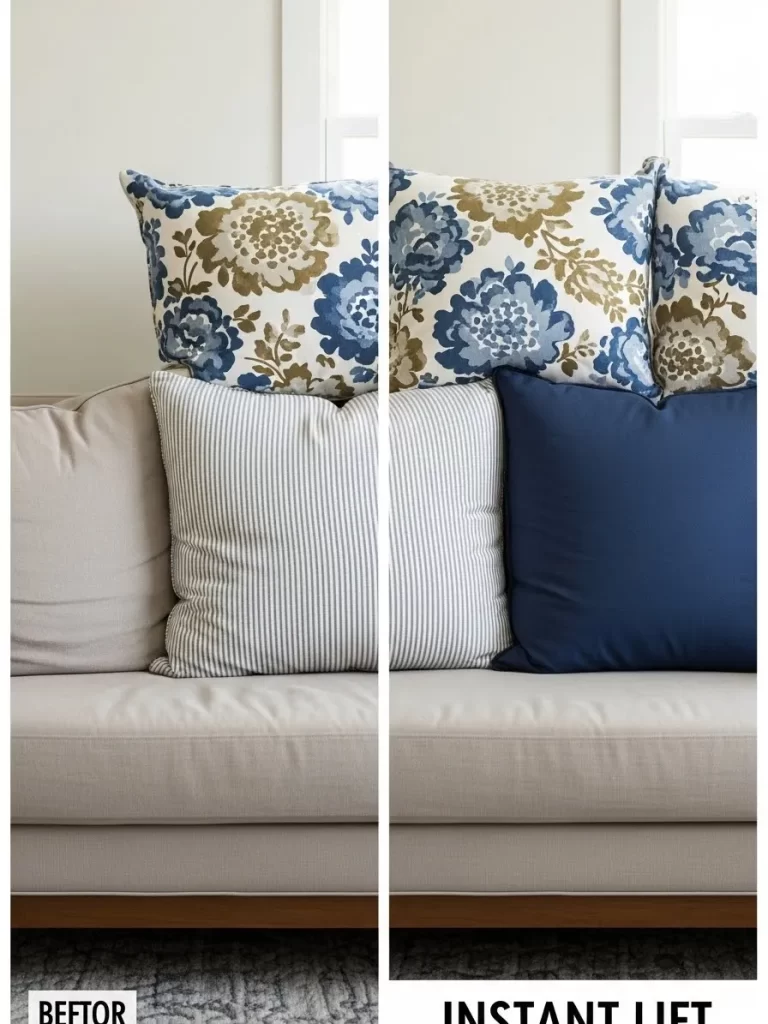
Swapping out your old pillows for new ones is the fastest way to get an “instant lift” for your sofa. This comparison shows how replacing a busy floral pattern with a solid navy blue pillow creates a cleaner look. The dark blue provides a strong anchor that makes the other patterned pillows pop.
Mixing solids with patterns helps to balance the visual energy of the room. It makes the sofa look more modern and less cluttered. You don’t need to buy new pillows; just changing the covers can make the whole couch feel like a different piece of furniture.
Material Required
- Set of high-contrast solid color pillow covers
- Existing pillow inserts
Equipment Required
- Your hands
DIY Instruction Step by Step
- Look at your existing sofa color and choose a contrasting solid color for your new covers.
- Remove the old, patterned covers from your throw pillows.
- Stuff the inserts into the new solid-colored covers, making sure to fill the corners.
- Place the new solid pillows at the ends of the sofa to act as a “frame.”
- Layer one or two of your favorite patterned pillows in front of the solids for a professional look.
- Use a mix of different sizes, such as a large square pillow behind a smaller rectangular one.
- Give each pillow a quick fluff and a “karate chop” in the middle for a designer touch.
20 Iron-On Decorative Fabric Patch
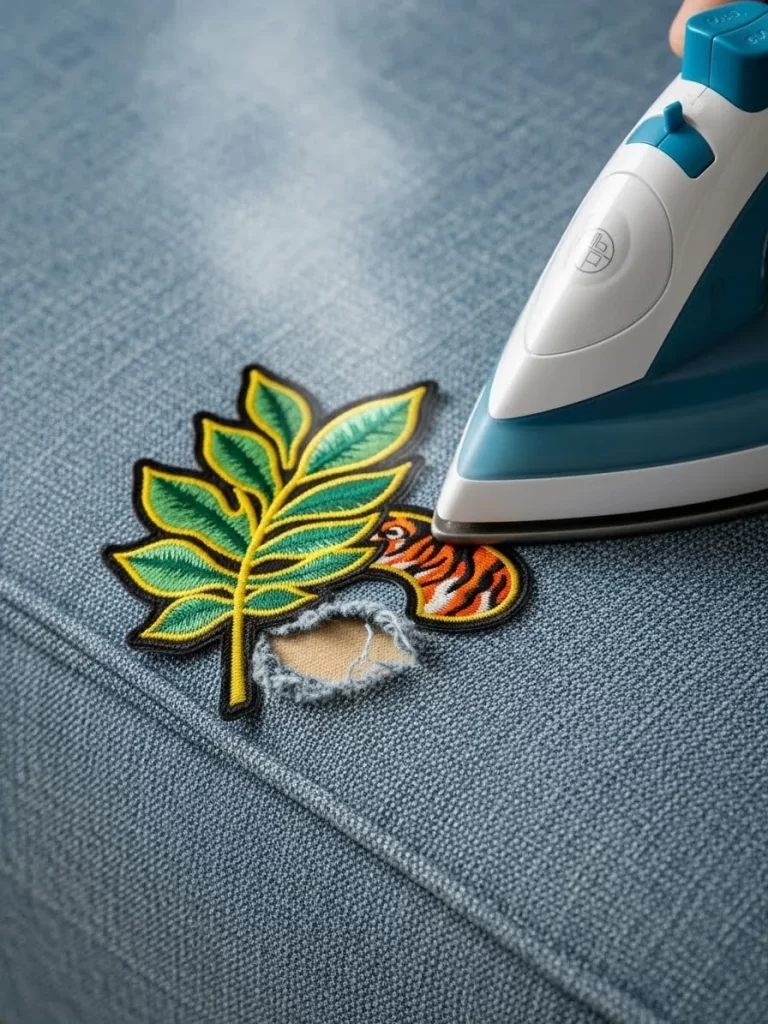
Hiding a tear or a stubborn stain is easy with a stylish iron-on patch. This image shows a colorful botanical patch being applied to a light blue sofa to cover a hole. It turns a flaw into a unique decorative feature that adds a bit of handcrafted charm.
Patches come in thousands of designs, allowing you to personalize your furniture. The heat-activated adhesive creates a strong bond that stays in place through regular use. It is a much faster and more creative solution than trying to sew a hidden repair.
Material Required
- Iron-on decorative fabric patch
- Thin cotton cloth (like a pillowcase)
Equipment Required
- Clothes iron
- Flat, hard surface
DIY Instruction Step by Step
- Trim any loose threads from the hole or stain on your sofa to make a smooth surface.
- Position the decorative patch exactly where you want it to stay.
- Heat your iron to the setting recommended on the patch packaging (usually the “cotton” setting).
- Place a thin cotton cloth over the patch to protect the sofa fabric from direct heat.
- Press the iron firmly onto the cloth-covered patch and hold it still for about 30 to 45 seconds.
- Lift the iron and let the area cool completely before checking if the edges are secure.
- If the patch isn’t fully bonded, repeat the heating process for another 20 seconds.
21 Large Statement Indoor Plant

Sometimes the best way to refresh a sofa is to change what is around it. Placing a massive Fiddle Leaf Fig behind the couch adds a burst of life and color to the entire room. The giant green leaves create a natural canopy that makes the seating area feel like a private oasis.
Plants soften the sharp lines of furniture and add a sense of calm to your living space. The height of a large plant draws the eye upward, making your ceilings feel taller. It is a simple way to distract from an older sofa by creating a stunning focal point nearby.
Material Required
- Large indoor plant (like a Fiddle Leaf Fig or Monstera)
- Decorative ceramic pot
- Potting soil
Equipment Required
- Your hands
- Watering can
DIY Instruction Step by Step
- Choose a plant that is at least four to five feet tall to make a real impact.
- Pick a decorative pot that is slightly larger than the plant’s current plastic container.
- Place a layer of soil at the bottom of the new pot and center your plant inside.
- Fill the remaining space with soil and press down gently to remove air pockets.
- Position the plant in a corner behind the sofa where it will get plenty of indirect sunlight.
- Angle the leaves so they drape slightly over the back of the couch for a lush look.
- Water the plant regularly and wipe the leaves with a damp cloth to keep them shiny and healthy.
22 Custom Slipcover Tailoring with Elastic
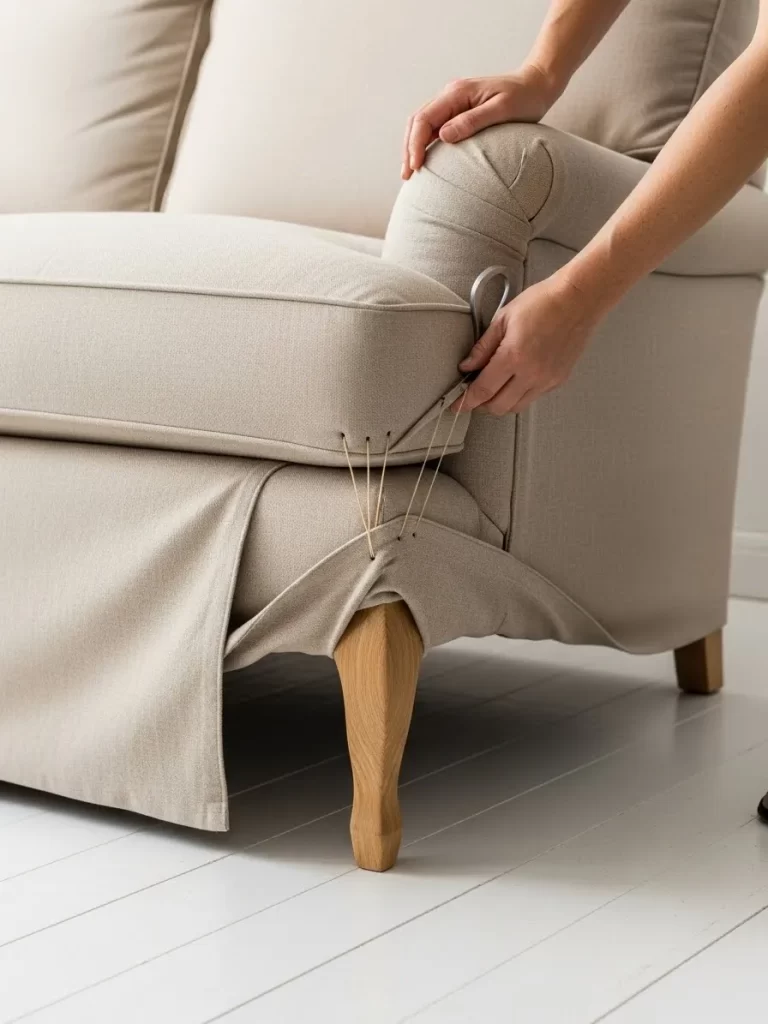
Standard slipcovers often look baggy and cheap, but you can tailor them for a custom fit. Using elastic cords and clips underneath the sofa allows you to pull the fabric tight against the frame. This image shows how to secure the corners so the cover follows the exact lines of your furniture.
Tucking the excess fabric deep into the crevices of the sofa creates those sharp, defined edges. It prevents the cover from shifting every time someone sits down. This technique makes a budget-friendly cover look like a professionally upholstered piece.
Material Required
- Stretchable sofa slipcover
- Set of upholstery elastic clips (sheet straps)
- Foam tucking grips
Equipment Required
- Your hands
- Scissors
DIY Instruction Step by Step
- Drape the slipcover over your sofa, ensuring the seams align with the arms and backrest.
- Tuck the excess fabric into the deep creases between the cushions and the frame.
- Insert foam tucking grips into the creases to hold the fabric firmly in place.
- Tip the sofa forward or have someone lift it to access the underside of the frame.
- Attach the elastic clips to the edges of the fabric and stretch them across the bottom.
- Clip the elastic to the opposite side of the fabric to create a tight, drum-like tension.
- Pull the corners tight and secure them with extra clips to remove any remaining wrinkles.
23 Silk Scarf Pillow Embellishment
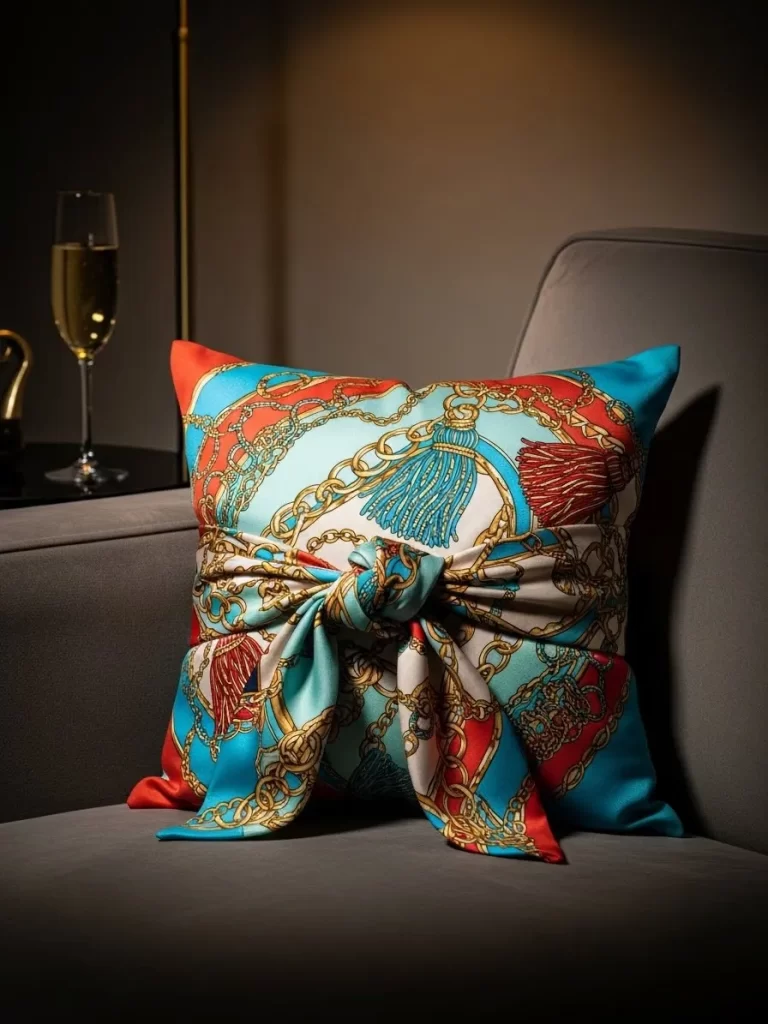
Dress up a plain throw pillow by wrapping it in a vibrant silk scarf. This image shows a grey pillow transformed with a luxury-patterned scarf tied in a large, elegant bow. It adds a sophisticated layer of high-end fashion to your sofa without the cost of designer accessories.
The sheen of the silk creates a beautiful contrast against the matte fabric of the couch. You can use scarves you already own to change the look of your living room in seconds. It is a creative way to repurpose items and add a personal, artistic touch to your decor.
Material Required
- Large square or rectangular throw pillow
- Large silk or satin scarf with a bold pattern
Equipment Required
- Your hands
DIY Instruction Step by Step
- Lay the silk scarf flat on a clean table with the patterned side facing down.
- Place your throw pillow in the center of the scarf at a diagonal angle.
- Fold two opposite corners of the scarf over the pillow so they overlap in the middle.
- Grab the remaining two corners and pull them toward the center of the pillow face.
- Tie these two corners into a tight double knot to secure the scarf around the pillow.
- Fluff the ends of the scarf to create a decorative bow or a sleek, flat fold.
- Place the embellished pillow on your sofa as a focal point among other plain cushions.
24 Aromatherapy Fabric Refresh Mist
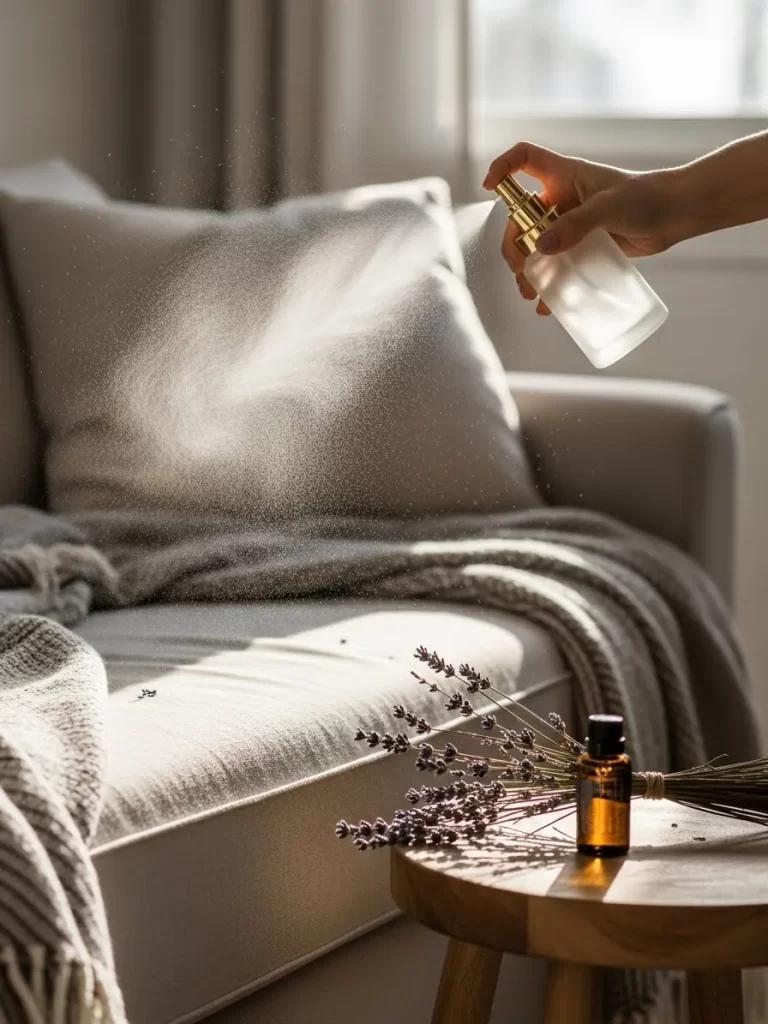
A sofa refresh is not just about looks; it is also about how the piece makes you feel. Spritzing your upholstery with a homemade lavender and essential oil mist removes stale odors and creates a spa-like atmosphere. This simple sensory update makes the whole room feel cleaner and more inviting instantly.
Using natural oils ensures that your home stays free of harsh chemicals and artificial fragrances. The fine mist dries quickly and leaves a subtle, calming scent on the fabric. It is the final touch for any deep-cleaning or decorating project.
Material Required
- Distilled water
- Witch hazel or rubbing alcohol
- Lavender essential oil (or your favorite scent)
- Small dried lavender sprigs (optional)
Equipment Required
- Small glass spray bottle
- Funnel
DIY Instruction Step by Step
- Use a funnel to fill your glass spray bottle about three-quarters full with distilled water.
- Add one tablespoon of witch hazel or rubbing alcohol to help the oils mix with the water.
- Drop 15 to 20 drops of lavender essential oil into the bottle.
- Place a few dried lavender sprigs inside the bottle for a beautiful visual touch.
- Secure the spray nozzle and shake the bottle vigorously to combine the ingredients.
- Lightly mist your sofa cushions from about 12 inches away, avoiding any wooden parts.
- Allow the fabric to air dry for a few minutes before sitting down to enjoy the fresh scent.
25 Velvet Ribbon Back Detailing
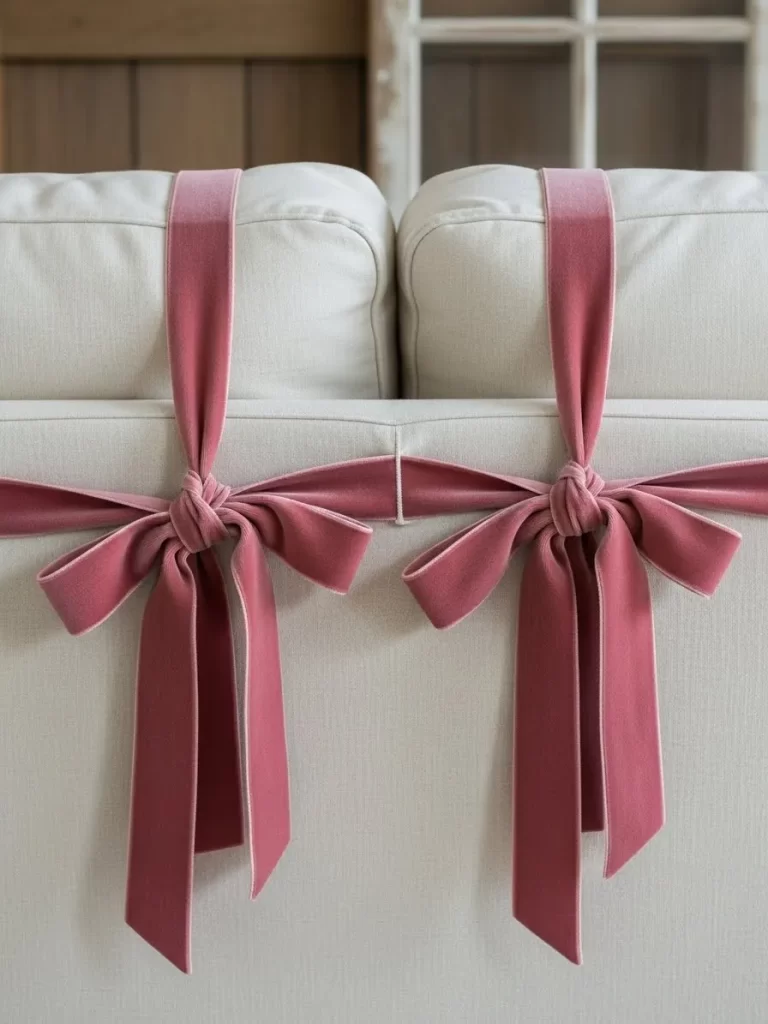
Add a touch of Victorian elegance to your sofa by tying velvet ribbons around the back cushions. This image shows two large pink velvet bows cinching the cushions of a white couch. It creates a “gift-wrapped” look that is both playful and incredibly sophisticated.
This detail works best on sofas where the back is visible, such as in the middle of a room. The ribbons add a soft vertical line and a pop of color that breaks up a large expanse of fabric. It is a unique way to personalize your furniture for special occasions or seasonal updates.
Material Required
- Several yards of wide velvet ribbon (2 to 3 inches wide)
- Fabric scissors
Equipment Required
- Your hands
- Measuring tape
DIY Instruction Step by Step
- Measure the circumference of your back cushions to determine how much ribbon you need for each.
- Cut a length of ribbon that is long enough to wrap around the cushion with extra for a bow.
- Wrap the ribbon vertically around the center of the cushion, pulling it slightly to create a cinch.
- Tie a simple knot at the top or front of the cushion to hold it in place.
- Create a large, floppy bow with the remaining ribbon ends, ensuring the loops are even.
- Trim the ends of the ribbon at an angle or into a “V” shape for a professional finish.
- Repeat the process for the other cushions, keeping the height and bow size consistent.
26 Bohemian Tapestry Drape
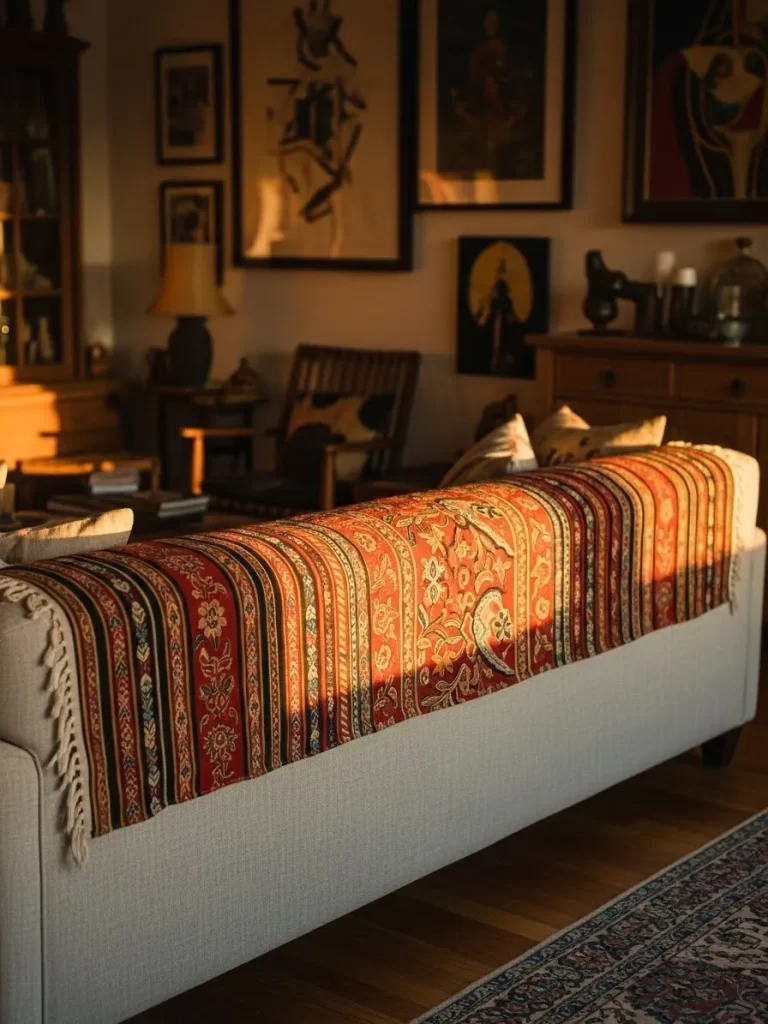
Covering the back of a sofa with a rich, patterned tapestry is a classic bohemian move. This image shows a red and gold woven fabric draped over the length of a white couch. It adds instant warmth and protects the top edge of the sofa from dust and hair.
Tapestries are usually lightweight and easy to clean, making them a practical choice for busy homes. The intricate patterns provide a cultural flair that makes the furniture look curated and traveled. It is a bold way to introduce a completely new color story to your living space.
Material Required
- Large woven tapestry or patterned textile
- Small upholstery tacks (optional)
Equipment Required
- Your hands
- Step stool (if needed)
DIY Instruction Step by Step
- Choose a tapestry that is wide enough to cover at least two-thirds of the sofa’s width.
- Fold the top edge of the tapestry over the back of the sofa, letting it hang down the rear.
- Center the fabric so the pattern is symmetrical and the drape is even on both sides.
- Tuck the bottom edge of the fabric into the crease where the back cushions meet the seat.
- Smooth out any wrinkles with your hands, moving from the center toward the outer edges.
- Use a few hidden upholstery tacks to secure the fabric if it tends to slide down.
- Place a few solid-colored pillows in front of the tapestry to anchor the busy pattern.
27 Large-Scale Windowpane Grid Detailing
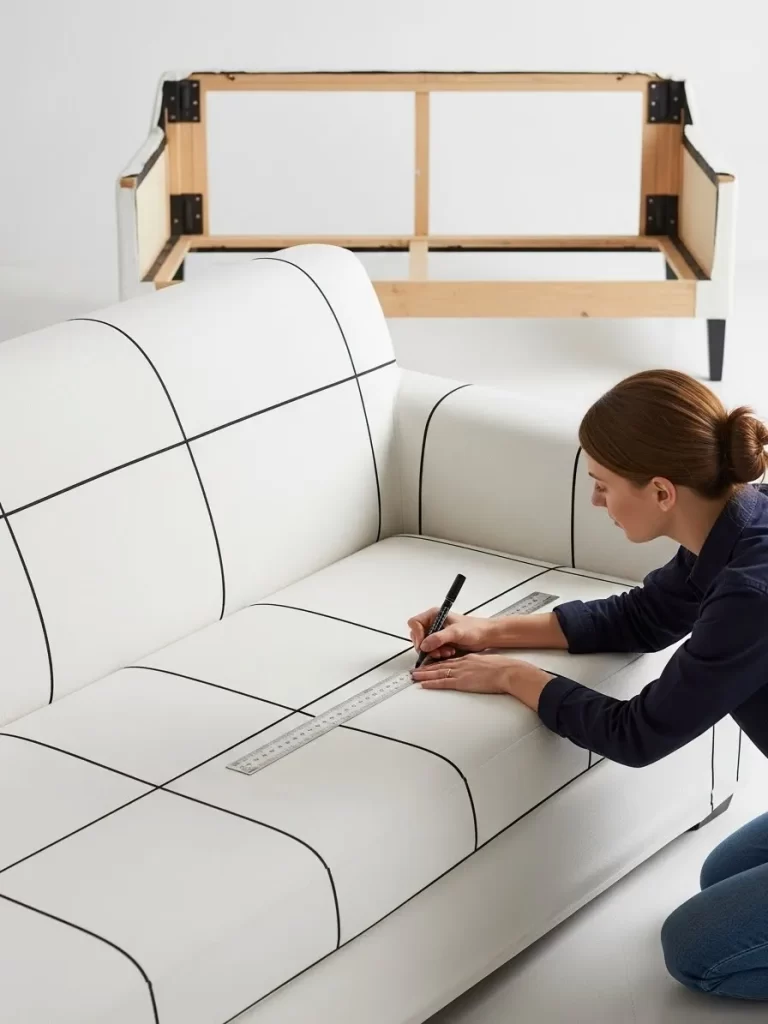
If you want a modern, architectural look, try adding a windowpane grid pattern to a plain sofa. This image shows a person using a ruler and a fabric marker to draw clean black lines on a white couch. It transforms a generic piece into a high-fashion statement that looks like it belongs in an art gallery.
The grid pattern creates a sense of order and scales up the visual impact of the furniture. It is a brave DIY project that pays off by making your sofa the undeniable center of the room. This look works best on furniture with flat, straight surfaces and minimal tufting.
Material Required
- Black permanent fabric marker (fine tip)
- White or light-colored sofa
Equipment Required
- Long metal ruler or yardstick
- Measuring tape
- Pencil (for light drafting)
DIY Instruction Step by Step
- Measure the height and width of your sofa cushions to plan the size of your grid squares.
- Use a pencil to mark light dots every 10 or 12 inches along the edges of the fabric.
- Align your long ruler between the dots to create a straight path for your marker.
- Draw the vertical lines first, working from one side of the sofa to the other.
- Use the ruler to draw horizontal lines across the vertical ones to complete the grid.
- Step back frequently to ensure the lines are straight and the squares are even in size.
- Let the ink dry for 24 hours before sitting on the sofa to avoid any smudging or transfer.
28 Pleated Skirt with Safety Pin Accents
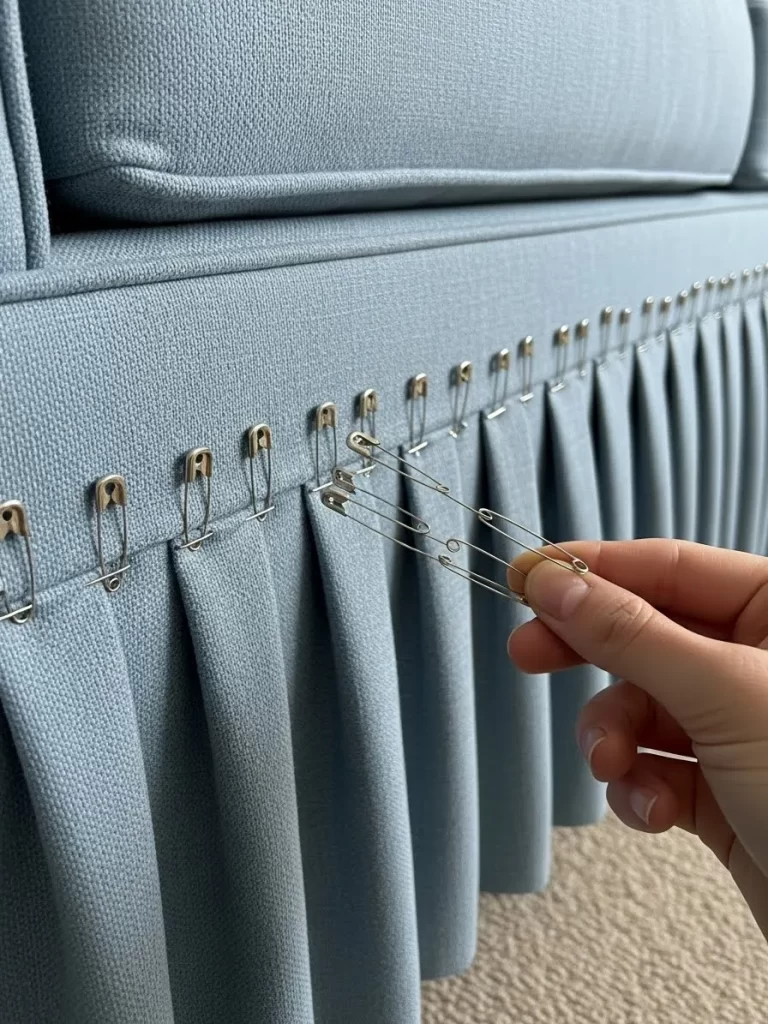
Give your sofa a tailored, traditional look by adding a pleated skirt to the base. This image shows a person using large safety pins to create uniform pleats in a blue fabric wrap. It hides the legs of the sofa and adds a soft, feminine touch to the room’s silhouette.
Using safety pins allows you to adjust the pleats until they are perfectly even before committing to a permanent hold. It is a clever “no-sew” trick that provides a professional result with very little cost. The pins themselves can even be a decorative feature if you choose stylish ones.
Material Required
- Large piece of fabric (matching or contrasting with your sofa)
- Box of large, sturdy safety pins or decorative kilt pins
Equipment Required
- Measuring tape
- Iron and ironing board
DIY Instruction Step by Step
- Measure the height from the bottom of your sofa frame to the floor.
- Cut your fabric into long strips that are two inches taller than your measurement.
- Hem the bottom edge of the fabric with an iron and hem tape for a clean finish.
- Fold the fabric into three-inch pleats, using your iron to press each fold flat.
- Wrap the pleated fabric around the base of the sofa, starting at a back corner.
- Use safety pins to attach the top edge of the pleats to the sofa’s existing upholstery.
- Space the pins evenly and hide them under the overhanging seat cushions for a seamless look.
29 Minimalist Waterfall Throw Style
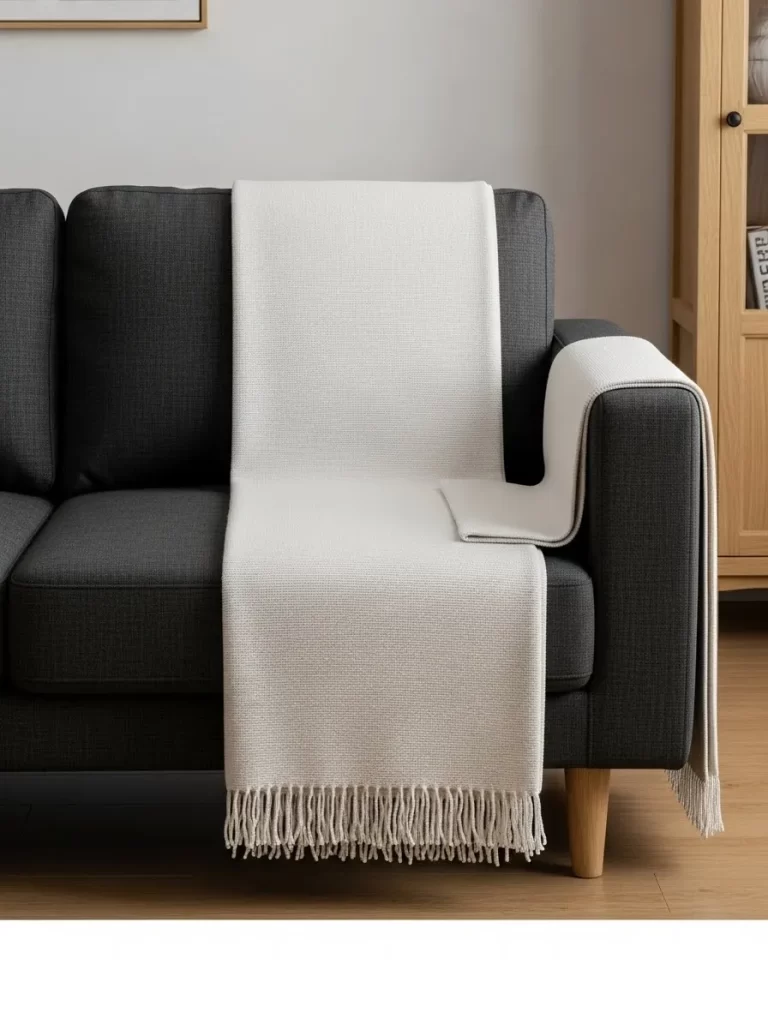
Sometimes the simplest refresh is just a matter of how you fold your blankets. This image shows a white throw draped in a “waterfall” style over a dark grey sofa. The blanket starts at the top of the backrest and flows straight down to the floor, creating a clean vertical line.
This styling choice makes the sofa look taller and more organized than a messy drape. It highlights the contrast between light and dark fabrics, giving the room a sophisticated, modern feel. It is a great way to protect the middle of the sofa where people sit most often.
Material Required
- Long rectangular throw blanket with fringe
Equipment Required
- Your hands
DIY Instruction Step by Step
- Fold your throw blanket into a long, narrow rectangle that is about 18 inches wide.
- Hold the blanket by one end and place it over the top edge of the backrest.
- Let the blanket fall naturally down the front of the back cushion and across the seat.
- Ensure the bottom edge of the blanket reaches the floor or the base of the sofa.
- Smooth out any folds so the blanket looks like a flat, intentional “runner.”
- Tuck a small portion of the blanket into the crease between the back and seat cushions.
- Repeat the fold on the armrest if you want a matching “mini-waterfall” on the side.
30 Atmospheric Arch Lamp Lighting
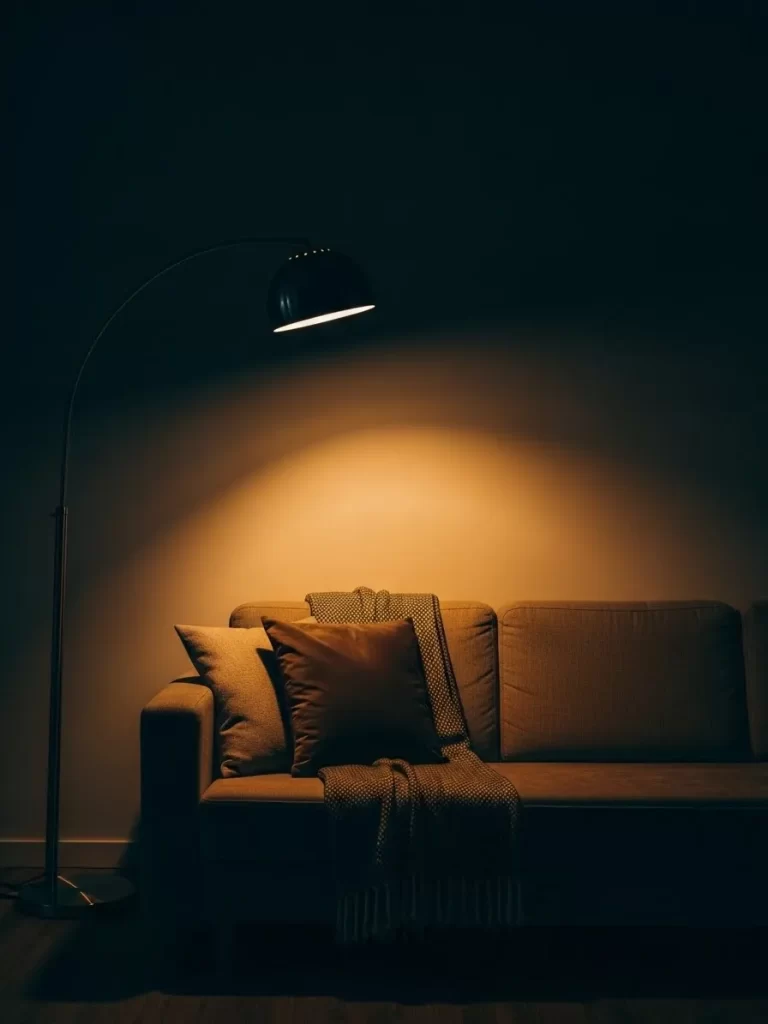
Your sofa might not be the problem; it could just be the lighting in your room. This image shows a sleek black arch lamp leaning over a beige couch, casting a warm glow on the cushions. This dramatic lighting creates deep shadows and cozy highlights that make an old sofa look expensive and inviting.
A floor lamp provides functional light for reading while acting as a large-scale piece of decor. The curve of the lamp softens the room and adds a modern, architectural element. It turns the sofa area into a dedicated “zone” for relaxation that feels separate from the rest of the house.
Material Required
- Large arched floor lamp with a heavy base
- Warm-toned LED bulb
Equipment Required
- Your hands
DIY Instruction Step by Step
- Assemble your arched lamp according to the manufacturer’s instructions, ensuring the base is secure.
- Place the heavy base of the lamp behind one of the back corners of your sofa.
- Adjust the height and the reach of the arch so the light bulb hangs over the center of the seating area.
- Angle the lampshade so the light points downward and doesn’t shine directly into your eyes.
- Install a warm-toned bulb to create a cozy, golden atmosphere in the evenings.
- Hide the power cord along the baseboard or under the sofa to keep the floor looking clean.
- Use the lamp in place of harsh overhead lights to completely change the mood of your living room.
31 Two-Tone Painted Sofa Legs

Create a custom, high-fashion look by painting your sofa legs in two different colors. This image shows emerald green velvet furniture with legs that are painted gold at the bottom and black at the top. This “dipped” effect adds a touch of modern art to your furniture and ties in different metal finishes from your room.
Changing the color of the legs can make a bulky sofa feel lighter or more grounded. It is a very small project that makes a massive impact on the overall design of the piece. You can match the colors to your favorite accessories for a truly curated home.
Material Required
- Painter’s tape
- Small cans of gold and black furniture paint (satin finish)
- Clear protective topcoat
Equipment Required
- Small paintbrush
- Sandpaper (medium grit)
- Drop cloth
DIY Instruction Step by Step
- Remove the legs from your sofa if possible; if not, flip the sofa over onto a drop cloth.
- Lightly sand the wooden legs to remove any old varnish and help the new paint stick.
- Wipe away the dust with a damp cloth and let the wood dry completely.
- Paint the entire leg with your base color (the black paint) and let it dry.
- Wrap painter’s tape around the leg about three inches from the bottom to create a straight line.
- Paint the bottom section with the gold paint, applying two coats for full coverage.
- Remove the tape while the paint is still slightly tacky, then add a clear topcoat once fully dry.
32 Natural Wood Replacement Buttons
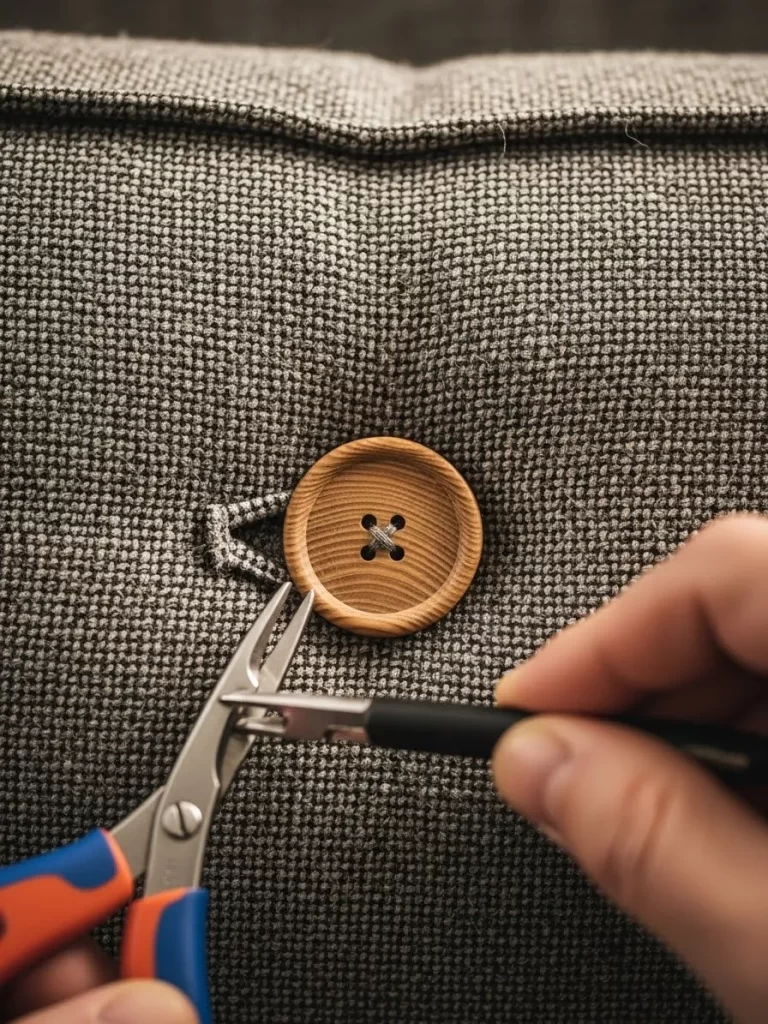
Replacing standard fabric buttons with natural wood alternatives can give your sofa a rustic or organic feel. This image shows a close-up of a large, four-hole wooden button being sewn into a grey textured fabric using needle-nose pliers for precision. It is a subtle change that adds a handcrafted, artisanal quality to any tufted furniture piece.
The warm grain of the wood stands out beautifully against cool-toned upholstery, creating a nice focal point. This simple swap can make a mass-produced couch look like a custom piece of furniture from a boutique shop. It is an affordable way to add a touch of nature to your indoor living space.
Material Required
- Set of large four-hole wooden buttons
- Heavy-duty upholstery thread
Equipment Required
- Long upholstery needle
- Needle-nose pliers
- Scissors
DIY Instruction Step by Step
- Remove the old buttons from your sofa by carefully snipping the thread from the back or front.
- Thread your long upholstery needle with a double strand of high-strength twine.
- Push the needle through the sofa from the back to the front through the original tufting hole.
- Slide the needle through two holes of the wooden button and then back through the other two holes.
- Push the needle back through the same hole in the sofa toward the rear of the frame.
- Use needle-nose pliers to pull the thread tight until the button sinks into the cushion.
- Tie a secure knot at the back of the sofa, using a small scrap of fabric as a anchor to prevent the knot from slipping through.
33 Geometric Jute Sofa Runner
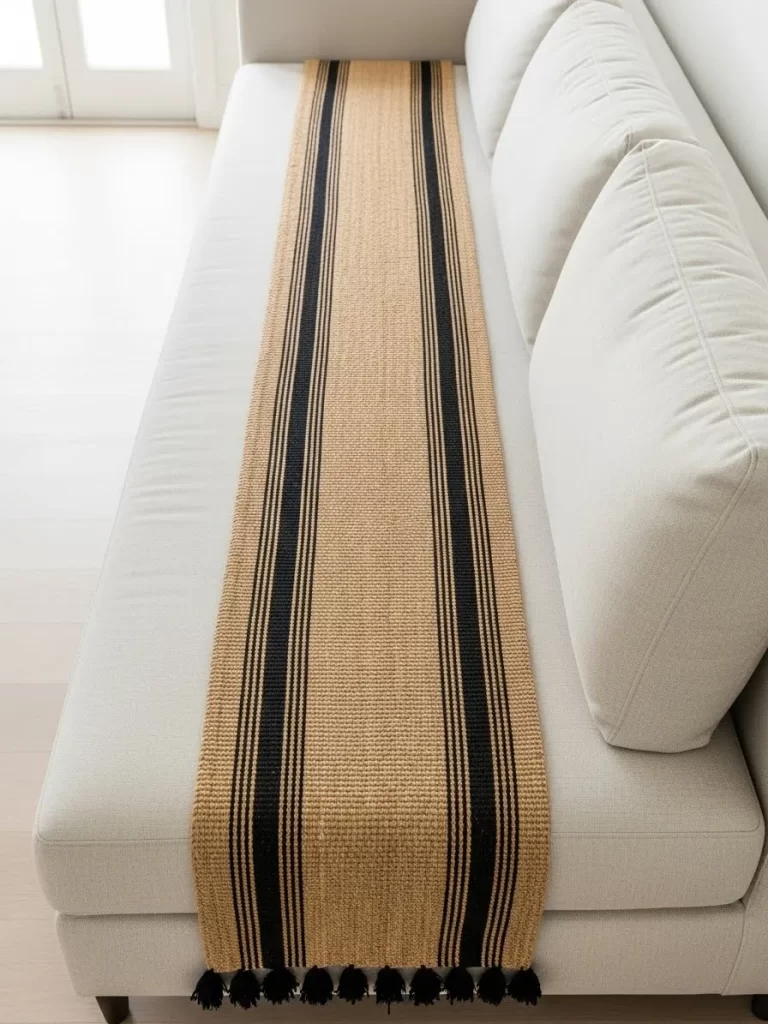
Protecting your seat cushions does not have to look boring or cheap. This long jute runner features bold black vertical stripes that add a modern, linear look to a light-colored sofa. The natural texture of the jute provides a rugged contrast to soft upholstery, making the seating area feel more grounded.
This accessory is perfect for homes with a minimalist or coastal aesthetic. It stays in place better than thin blankets because of its weight and coarse texture. You can instantly hide stains on the seat cushions while adding a sophisticated layer of design to your room.
Material Required
- Long jute or woven rug runner
Equipment Required
- Your hands
DIY Instruction Step by Step
- Measure the total length of your sofa seat to ensure the runner covers the entire area.
- Lay the jute runner flat across the cushions, aligning the black stripes so they are perfectly centered.
- Let the ends of the runner drape slightly over the edges of the sofa or tuck them in for a cleaner look.
- Smooth out any ripples in the rug to ensure a flat, comfortable surface for sitting.
- Check that the runner is straight by looking at it from across the room.
- Tuck the back edge of the runner into the crease where the seat meets the backrest to prevent sliding.
- Add a few neutral-colored pillows on top to blend the runner into the rest of the sofa design.
34 Vintage Patchwork Quilt Drape
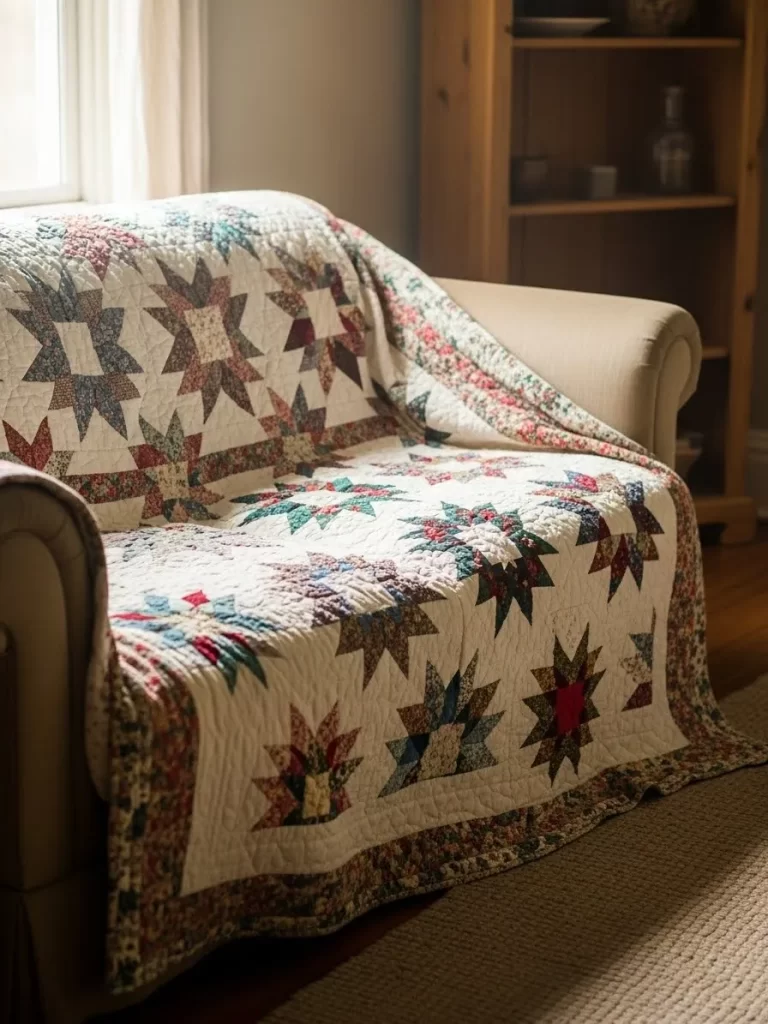
Bringing a sense of history to your living room is easy with a classic patchwork quilt. This image shows a colorful star-patterned quilt draped over the entire back and seat of a tan sofa. The intricate stitching and varied fabrics create a cozy, lived-in feel that invites you to curl up and relax.
Using a quilt is a great way to cover up extensive wear or a color you no longer like. It adds a layer of warmth for cold nights and is easily machine washable. This look works best in traditional, farmhouse, or eclectic homes that value comfort and heritage.
Material Required
- Large vintage or handmade patchwork quilt
Equipment Required
- Your hands
DIY Instruction Step by Step
- Shake out the quilt to remove any dust and ensure it is clean before placing it on the furniture.
- Spread the quilt evenly over the backrest of the sofa, letting it fall naturally over the cushions.
- Adjust the placement so the most vibrant or interesting patterns are visible in the center.
- Tuck the fabric into the deep creases between the back and seat to keep it from shifting.
- Drape the excess fabric over the armrests to create a soft, rounded appearance.
- Smooth the quilt over the seat area, making sure the edges reach the floor or the baseboard.
- Pair the quilt with solid-colored pillows to prevent the patterns from feeling too overwhelming.
35 Plywood Cushion Support Board

If your sofa is sagging and uncomfortable, the problem might be the springs underneath. Adding a custom-cut piece of plywood beneath the cushions can restore the firm, supportive feel of a new couch. This image shows a before and after comparison of a seat that went from sunken and messy to flat and tailored.
This is a functional refresh that improves your posture and the lifespan of your furniture. It is hidden completely from view once the cushions are put back in place. You will feel an immediate difference in comfort the next time you sit down to watch a movie.
Material Required
- 1/2 inch or 3/4 inch thick plywood sheet
Equipment Required
- Measuring tape
- Hand saw or circular saw
- Sandpaper
DIY Instruction Step by Step
- Remove all seat cushions from the sofa to expose the spring or webbing base.
- Measure the internal width and depth of the sofa frame where the cushions sit.
- Subtract one inch from each measurement to ensure the board fits easily without scratching the frame.
- Mark your plywood and cut it to size using a saw.
- Sand the edges of the plywood thoroughly to prevent any splinters from snagging the sofa fabric.
- Place the plywood board directly on top of the springs, ensuring it sits flat and stable.
- Replace the cushions on top of the board and enjoy the restored firmness.
36 Protective Armrest Cap
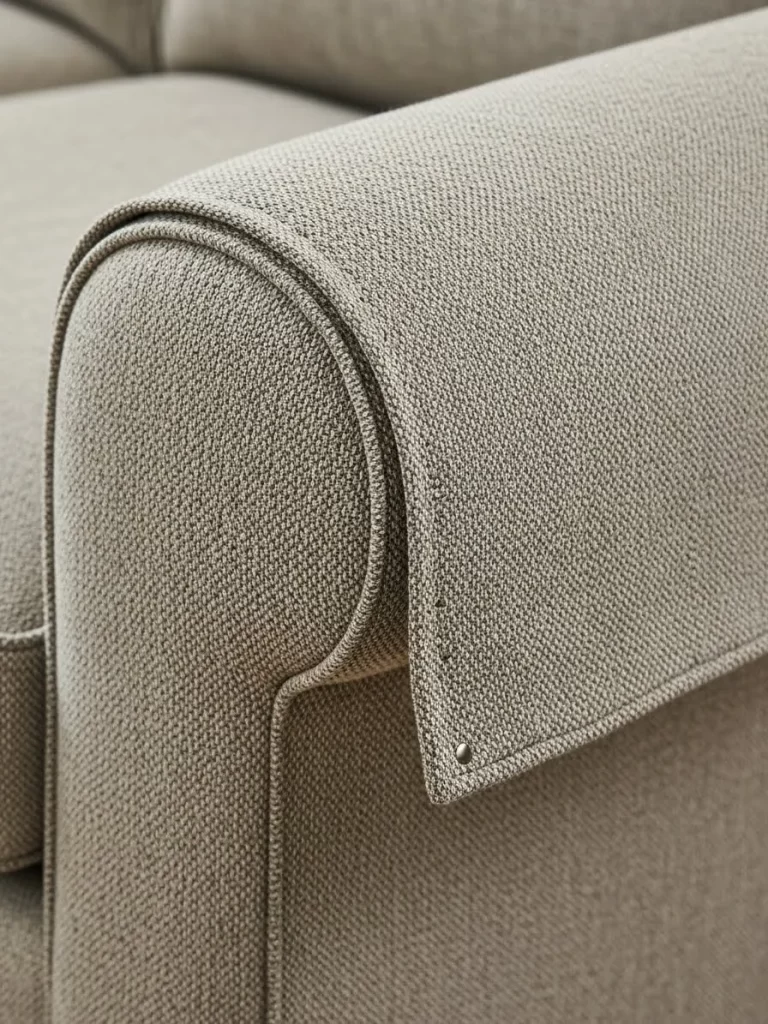
The armrests are often the first part of a sofa to show dirt, oil, and wear. Adding a custom-fit fabric cap protects the material while adding a subtle layer of texture. This image shows a grey woven cap that matches the sofa perfectly, secured with a small, discrete metal pin.
This solution is much sleeker than draping a large towel or blanket over the side. It stays in place during use and can be removed easily for washing. It is a smart way to keep a new sofa looking fresh or to hide existing damage on an old one.
Material Required
- Fabric that matches or complements your sofa
- Small upholstery twist pins or nails
Equipment Required
- Measuring tape
- Fabric scissors
- Sewing machine or hem tape
DIY Instruction Step by Step
- Measure the width and length of your sofa armrest, including the parts that drape down.
- Cut a piece of fabric that is two inches larger than your measurements on all sides.
- Hem the edges of the fabric using a sewing machine or iron-on hem tape for a clean finish.
- Drape the fabric over the armrest and adjust it until it sits evenly.
- Fold the front corners neatly to follow the curve of the sofa arm.
- Use small upholstery pins to secure the fabric to the underside or the back of the armrest.
- Ensure the pins are pushed in completely so they are not visible and do not snag clothing.
37 Tonal Striped Pillow Trio
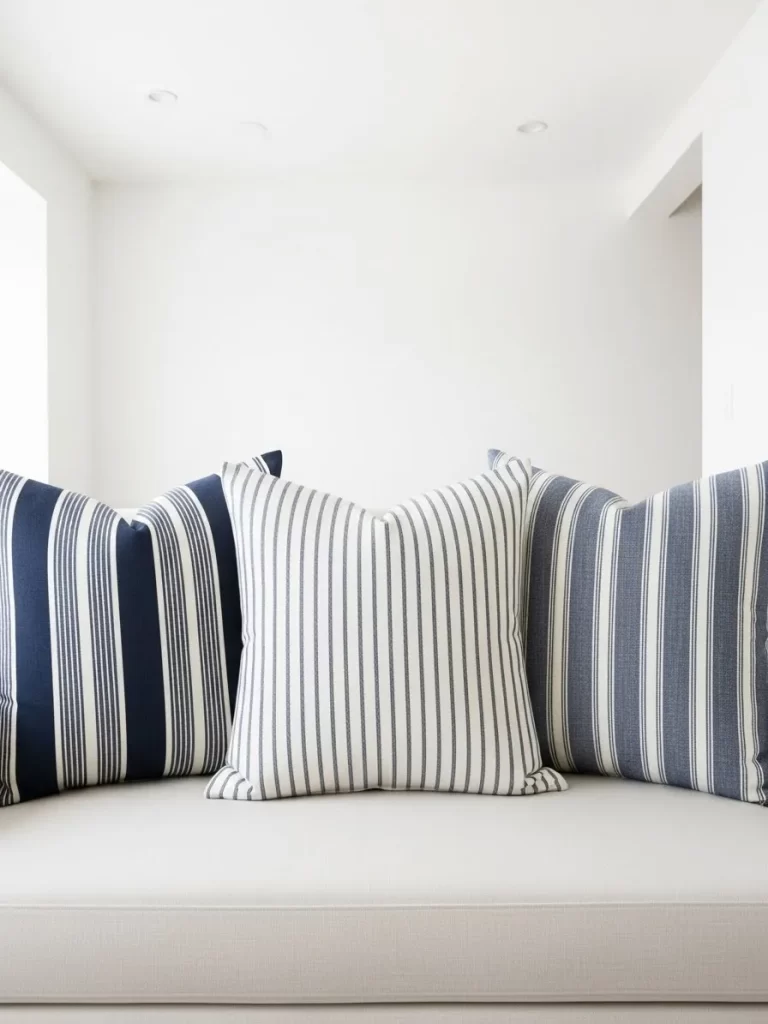
Using pillows with the same pattern in different colors or scales can create a professional, layered look. This image shows three large square pillows with navy and white stripes arranged neatly on a light-colored sofa. The variation in stripe width adds visual interest without looking cluttered or disorganized.
Stripes are a timeless choice that works well in modern, traditional, or nautical-themed rooms. Placing them in a row creates a sense of symmetry and order on your couch. This is an easy way to refresh a neutral sofa by introducing a classic color palette.
Material Required
- Three throw pillows with varying stripe patterns
Equipment Required
- Your hands
DIY Instruction Step by Step
- Choose three pillows that share a common color, like navy blue, but have different stripe designs.
- Place the pillow with the boldest or widest stripes in the center of the sofa.
- Position the two other pillows on either side to create a balanced arrangement.
- Ensure the pillows are standing upright against the back cushions for a tidy appearance.
- Adjust the spacing so there is a small gap between each pillow.
- Give each pillow a quick fluff to make them look full and inviting.
- Mix in a solid-colored throw blanket to pull the whole look together.
38 Quilted Sofa Seat Topper
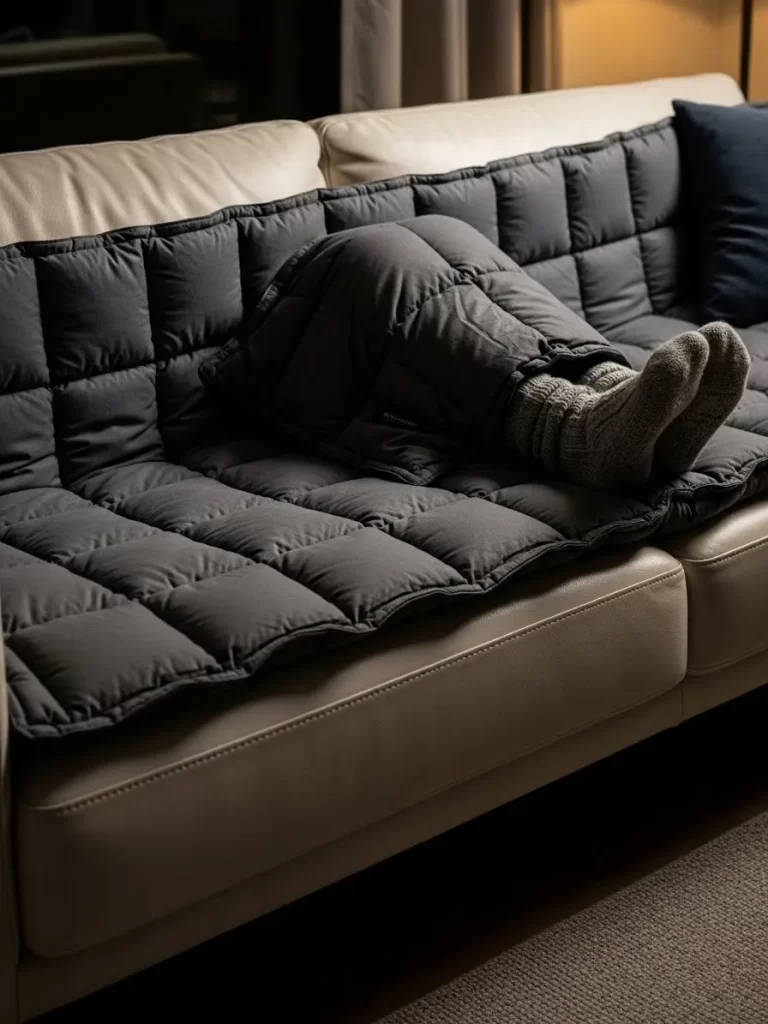
For ultimate comfort, consider adding a quilted topper to your sofa seat. This image shows a dark grey, puffer-style quilted mat that covers the entire seating area, providing extra padding and warmth. It is perfect for those who spend a lot of time lounging or for homes with cold leather furniture.
The quilted squares create a modern, textured look that feels very cozy. This topper also acts as a protective barrier against spills and pet hair. You can easily roll it up and store it away when you want a more formal look for guests.
Material Required
- Quilted sofa topper or small down alternative comforter
Equipment Required
- Your hands
DIY Instruction Step by Step
- Find a quilted topper that matches the width of your sofa seating area.
- Lay the topper flat across the seat cushions, starting from one armrest and moving to the other.
- Tuck the back edge of the topper into the crease behind the cushions to keep it secure.
- Smooth out the quilted sections so they look even and plump.
- Let the front edge hang slightly over the seat for a relaxed, comfortable look.
- Test the topper by sitting on it to make sure it does not slide around too much.
- Add a pair of thick wool socks or a matching pillow to complete the cozy lounge vibe.
39 Deep Steam Clean Extraction

Sometimes a sofa does not need new accessories; it just needs a professional-grade cleaning. This image shows a clear extraction tool pulling dark, dirty water out of a striped fabric couch. You can see the immediate difference as the fabric returns to its original, bright color.
Steam cleaning removes deep-seated dust, allergens, and odors that vacuuming alone cannot reach. It is the best way to sanitize your furniture and make it feel truly fresh and new again. This process can extend the life of your upholstery by removing abrasive dirt particles.
Material Required
- Upholstery cleaning solution
- Clean water
Equipment Required
- Portable steam cleaner or carpet extractor with upholstery tool
- Vacuum cleaner
DIY Instruction Step by Step
- Vacuum the entire sofa thoroughly, including under the cushions and in the crevices.
- Pre-treat any visible stains with a specialized upholstery cleaner and let it sit for a few minutes.
- Fill your steam cleaner with the recommended mix of hot water and cleaning solution.
- Start at the top of the backrest and pull the extraction tool slowly downward in straight lines.
- Apply steady pressure to ensure the machine pulls as much water and dirt out of the fabric as possible.
- Repeat the process on the seat cushions and armrests until the extraction water runs clear.
- Let the sofa air dry completely for at least 12 to 24 hours before sitting on it or replacing pillows.
40 Minimalist Zen Styling
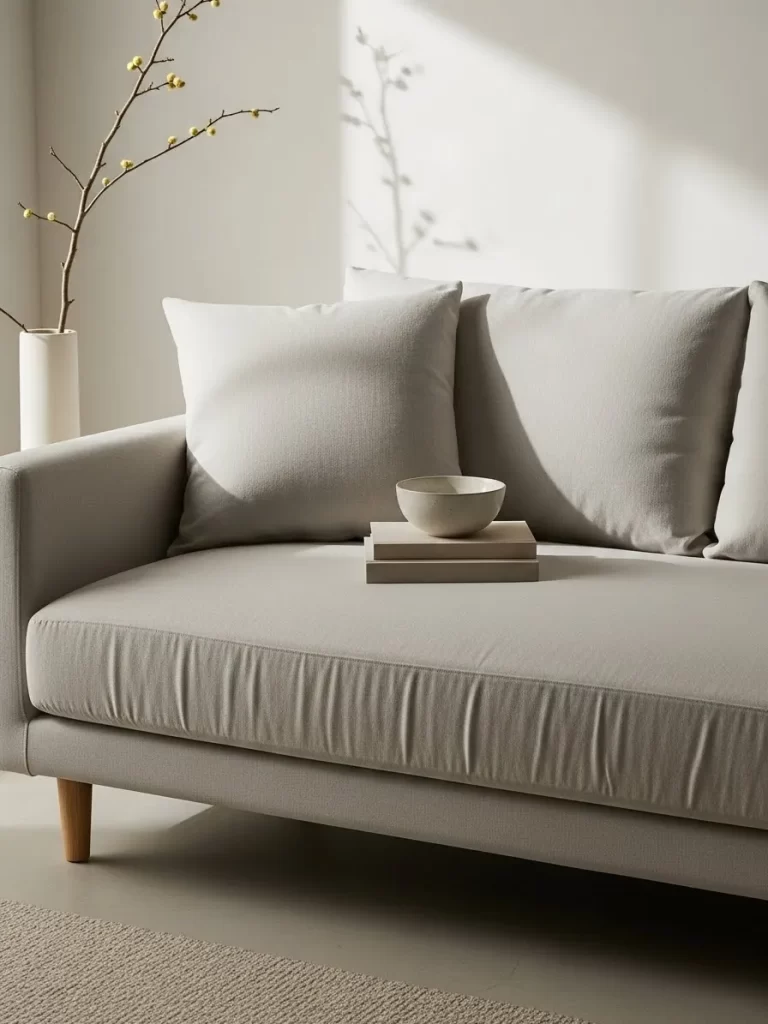
A refresh can also mean simplifying your space for a calmer atmosphere. This image shows a light grey sofa styled with only one large matching pillow and a stack of books with a ceramic bowl. The clean lines and neutral colors create a peaceful, Zen-like environment that feels very modern.
Removing clutter allows the beauty of the furniture and the natural light in the room to stand out. This approach is perfect for small spaces where too many accessories can feel overwhelming. It creates a sophisticated look that is both functional and aesthetically pleasing.
Material Required
- One oversized matching throw pillow
- Two or three neutral-colored books
- Small ceramic bowl or vase
Equipment Required
- Your hands
DIY Instruction Step by Step
- Clear everything off your sofa and the surrounding area to start with a blank slate.
- Place one large, plump pillow in the corner of the sofa to provide a soft backrest.
- Stack two or three books on the seat cushion next to the pillow, aligning them neatly.
- Set a small ceramic bowl or a single branch in a vase on top of the books for a touch of art.
- Ensure all items follow a similar color palette, like beige, white, or light grey.
- Step back and check that the arrangement looks balanced but not crowded.
- Keep the rest of the room tidy to maintain the minimalist, peaceful feeling of the space.
41 Leather Buckle Strap Detailing
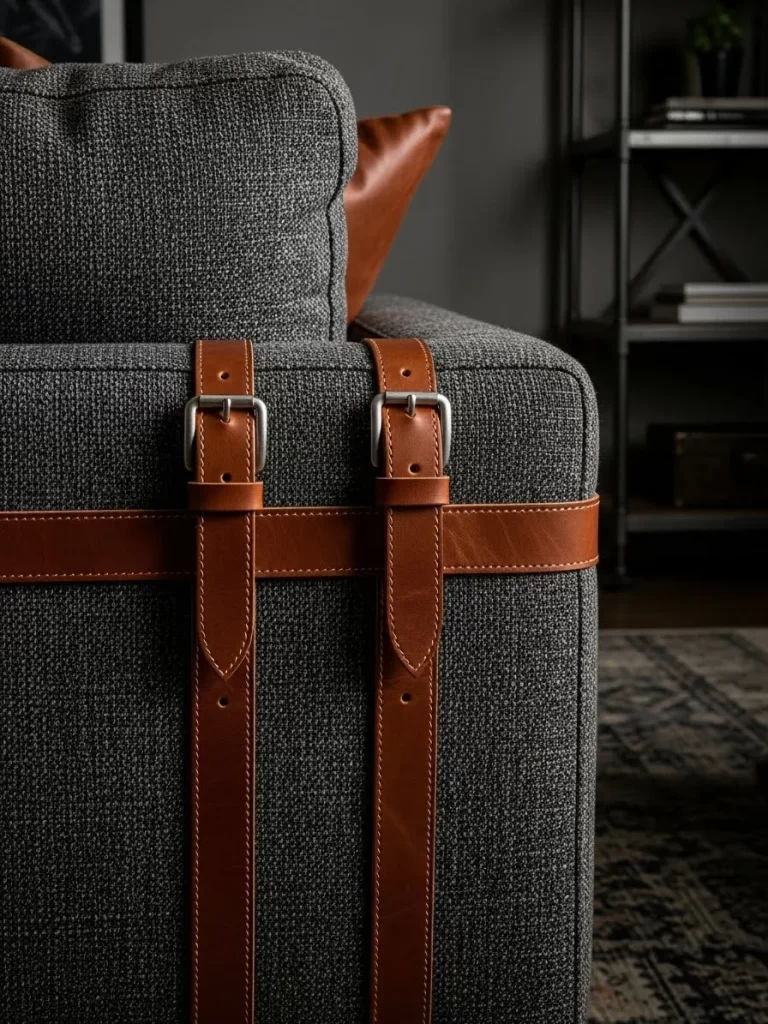
Add an industrial or equestrian touch to your sofa with decorative leather straps. This image shows two dark brown leather straps with silver buckles wrapped around the back corner of a grey textured couch. It is a unique architectural detail that makes your furniture look like a high-end designer piece.
These straps can also serve a functional purpose by holding back cushions in place or securing a throw blanket. The contrast between the rugged leather and the soft fabric adds a layer of sophistication. It is a bold way to personalize your sofa and make it a conversation starter.
Material Required
- Two long leather belts or upholstery straps with buckles
Equipment Required
- Measuring tape
- Your hands
DIY Instruction Step by Step
- Measure the height of your sofa backrest to ensure your leather straps are long enough to wrap around it.
- Position the first strap about six inches from the edge of the sofa.
- Wrap the strap vertically around the backrest, ensuring it is straight and tight.
- Buckle the strap at the front or top, depending on where you want the decorative metal to show.
- Repeat the process with the second strap, spacing it evenly from the first one.
- Adjust the tension so the straps stay in place but do not squeeze the cushions too tightly.
- Tuck the excess tail of the leather into the buckle loops for a clean, finished look.
Say goodbye to your weary, worn-out couch. With just a few affordable materials and a little bit of creative effort, you have successfully transformed your living room centerpiece. We have explored 41 simple changes, proving that sometimes the best refresh is simply a matter of smart accessories and minor repair work.
The goal is to personalize your space and highlight the best features of your existing furniture. Whether you added a sleek wooden armrest wrap or restored firmness with a plywood board, your sofa is now cozier and more stylish than before. Feel proud of the budget-friendly transformation you achieved.
Remember that furniture should reflect your personal style, not break the bank. Keep experimenting with new pillows and throws as the seasons change to keep your living room feeling constantly fresh and inspired.
Key Takeaways
Texture is Your Best Tool: Layering throws, from chunky knits to faux fur, instantly hides wear and adds luxurious depth without reupholstering.
Do Not Ignore the Details: Small changes like swapping out boring furniture legs for metallic caps or adding decorative nailhead trim create a custom, high-end look.
Pillows are a Necessity: Using oversized lumbar pillows or a high-contrast trio instantly makes a sofa look plump and professionally styled.
Comfort Can Be DIY: Fixing a saggy couch is simple by adding a support board under the cushions or rebuilding padding with new foam layers.
Personalize with Flair: Simple items like silk scarves tied around pillows or velvet ribbons on back cushions add unique, fashionable touches for almost zero cost.