Living in a small space can feel challenging. You see clutter pile up quickly. Walls seem to close in. You might even think your home looks cramped or unattractive. This feeling gets stronger when you want a fresh start for the New Year.
You do not need to move or buy a bigger house. Your space is not the problem. The way you use it is.

We have gathered 42 brilliant hacks to change how you see your home. These are not complicated projects. They are smart, simple ways to reclaim your space.
This guide will show you how to maximize every single inch. You can make your home feel bigger, brighter, and more organized. Get ready to transform your small space for the New Year.
1. Cozy Corner Reading Nook with Built-in Shelves
Item Name: Illuminated Attic Library

A small, awkwardly shaped space does not have to be wasted; you can turn it into the most charming part of your home. Building shelves directly into the wall maximizes storage, using every available inch from floor to ceiling. This strategy is essential for tiny rooms, especially those with sloped ceilings or difficult corners. Notice how the custom shelves embrace the ceiling line, creating a deep, moody, and highly functional library wall.
We need proper lighting to make these spaces usable and inviting. Integrating subtle LED strip lights along the shelf edges adds depth and warmth, drawing your eye to the decor and books. The warm caramel tone of the comfy chair contrasts beautifully with the dark blue shelving, creating a sophisticated retreat. This setup provides storage, seating, and a dedicated zone for relaxation, all within a footprint you might have considered unusable.
DIY Instructions: Installing LED Strip Lighting in Built-in Shelves
This project gives standard shelving a designer upgrade and makes a small corner feel special.
What You Will Need:
- LED strip lighting kit (look for a warm white color and adhesive backing)
- Scissors (for cutting the LED strip, only on designated lines)
- Measuring tape
- Cleaning cloths and rubbing alcohol
- Cable management clips or tape (optional, for securing wires)
Step-by-Step Instructions:
- Plan the Placement and Measure: First, determine where you want the light to shine. Typically, this is along the front lip or the inner top edge of each shelf to wash the back wall. Measure the exact length of each shelf you plan to illuminate.
- Clean the Surface: Wipe down the chosen shelf surfaces with a cleaning cloth dipped in rubbing alcohol. You must remove all dust and grime; this step ensures the adhesive on the LED strip sticks permanently. Wait a few minutes for the surface to dry fully.
- Cut the LED Strips: Unroll the LED strip and locate the small copper contacts marked with a scissors icon. Carefully cut the strip to your measured length only at these designated cutting points. Never cut through the middle of the strip, or it may stop working.
- Attach the Lighting: Peel off the protective backing from a section of the LED strip, about a foot or two at a time. Press the exposed adhesive side firmly onto the cleaned shelf surface, starting at the back corner where the strip will plug in. Apply consistent pressure as you go, ensuring a straight line.
- Connect and Conceal the Wires: Once all strips are installed, connect them using the included connectors or jump wires in your kit. Run any visible wires vertically along the inside corner of the bookshelf frame. Use small cable clips to secure the wires neatly, hiding them behind the books and objects on the shelf.
- Test the Lights: Finally, plug the power supply into an outlet and switch on the lights. If the strips are working correctly, you can now enjoy your beautifully lit, cozy reading nook!
2. Full Wall Mirror Panel for Amplified Space
Item Name: Seamless Reflection Wall

Mirrors are truly magical when it comes to decorating a tiny apartment. Placing a large, custom mirror panel across an entire wall is one of the most effective ways to double the visual square footage. This trick not only makes the room look substantially larger but also bounces available light deep into the space, brightening even the gloomiest corners. Looking at this design, you can appreciate how the mirrored wall reflects the elegant chandelier and the opposing furniture, turning a small room into a sprawling, formal sitting area.
You should always consider using a frameless design when aiming for this amplified effect. The clean edges of these panels make the reflection feel continuous, almost like an open doorway. A statement mirror like this also enhances the existing decor, adding visual interest without introducing physical clutter.
DIY Instructions: Creating the Illusion of a Full Wall Mirror
Achieving this impressive look involves combining frameless mirrors to create a seamless surface.
What You Will Need:
- Three to five frameless wall mirrors of the same size and shape (rectangles work best)
- Heavy duty mirror adhesive (check manufacturer’s instruction for safety)
- Level, tape measure, and painter’s tape
- Protective gloves and safety glasses
- Stud finder
Step-by-Step Instructions:
- Mark the Centerline: Measure the width of your wall and find the precise center point. Draw a light vertical pencil line from floor to ceiling. This line will guide the placement of your first mirror, ensuring symmetry.
- Apply Adhesive to the First Mirror: Put on your protective gear. Lay the first mirror face down on a protected flat surface. Apply the mirror adhesive to the back in a serpentine or zig zag pattern. Keep the adhesive about two inches away from the edges.
- Install the Center Mirror: Carefully lift the first mirror and align its side edge precisely with the center line you marked. Press the mirror firmly against the wall. Use painter’s tape to hold the mirror in place temporarily while the adhesive begins to set. Check its alignment with the level.
- Install Adjacent Mirrors: Apply adhesive to the next mirror and carefully butt its edge right up against the edge of the installed center mirror. You must ensure there is no gap between the two glass panels. Repeat this process until all mirrors cover the desired wall area.
- Secure and Cure: Use more painter’s tape along all the seams and edges for extra security. Allow the adhesive to cure completely, which might take 24 to 72 hours depending on the product, before removing the tape. Now you can enjoy your dramatically enlarged room!
3. Custom Floating Desk with Wall Cabinets
Item Name: Integrated Minimalist Workspace

Maximizing vertical space is absolutely crucial in a limited square footage environment. Here, a brilliant custom built unit combines a wide floating desk with extensive cabinetry mounted high on the wall. This dual function design provides a spacious work area for two people without taking up any floor space, making the room feel open and airy. The mixture of crisp white and warm wood tones keeps the whole look light and contemporary.
Think about the importance of hiding clutter; the upper cabinets are essential for stowing away documents, supplies, and anything else that makes a desk look messy. Under cabinet lighting, like the strip shown here, provides crucial task light directly on the working surface. A floating drawer unit keeps essentials close at hand while maintaining a clean line along the bottom. This clever setup proves that even a cramped room can handle a dual workstation.
DIY Instructions: Adding Under Cabinet Task Lighting
Adding lighting below your cabinets is an easy way to improve usability and reduce eye strain in a work area.
What You WillNeed:
- Plug and play LED strip light kit or LED light pucks
- Extension cord (if the desk is far from an outlet)
- Cable ties or wire concealers
- Measuring tape and cleaning supplies
Step-by-Step Instructions:
- Determine Lighting Type and Length: Decide whether you will use an LED strip (for continuous light) or LED pucks (for focused light). Measure the length underneath the cabinet where the desk is located. If using a strip, ensure the kit length is appropriate.
- Clean the Cabinet Underside: Clean the bottom surface of the cabinet thoroughly using rubbing alcohol to ensure good adhesion. The surface must be completely dry before proceeding.
- Install the Lights: For LED strips, peel the backing off and press the strip firmly to the underside of the cabinet, keeping it close to the wall for better concealment. For puck lights, attach them evenly spaced using the included adhesive or small screws.
- Manage and Conceal Wires: Route the wire from the light source back to the power supply. Use tiny wire concealers that stick to the wall or cabinet to run the wire discreetly. If using an extension cord, try to hide it behind the desk or along the baseboard.
- Power Up and Adjust: Plug the unit into the outlet and test the light. Adjust the position slightly if needed to eliminate any unwanted glare on your screen or desktop.
4. Ceiling Suspended Open Shelving Room Divider
Item Name: Industrial Loft Partition

Utilizing the vertical space all the way up to the ceiling is an advanced technique for dividing an open concept room without blocking light. This industrial style shelving unit, constructed from metal pipes and wood planks, functions as an airy, decorative room divider. It clearly separates the living room area from the bedroom area in a studio apartment. This partition method keeps the space feeling expansive while giving the separate zones their own definition.
It is important to note how this structure draws the eye upward, making the ceiling seem higher. The open shelves provide ample storage and display space for books and decorative objects. Since the shelves are not solid, light easily passes through, preventing the space from feeling dark or heavy. The hanging design, secured to the ceiling, ensures stability without cluttering the floor with unnecessary supports.
DIY Instructions: Styling an Open Room Divider Shelf
When you use open shelving as a room divider, styling it correctly is essential to make it look balanced and visually appealing from both sides.
What You Will Need:
- Books and neutral boxes for storage
- Plants or ceramic vases
- Trays and baskets
- Small pieces of art or framed photos
Step-by-Step Instructions:
- Start with the Anchors: Place your heaviest, largest items on the bottom and middle shelves. This should include stacks of books (some standing, some lying flat) and the largest storage baskets. This grounds the structure visually.
- Add Vertical Contrast: Introduce tall, slender objects like elegant vases, sculptural pieces, or indoor plants on the upper shelves. Varying the height prevents the shelves from looking monotonous.
- Create Small Vignettes: Group objects in odd numbers (threes or fives) on each shelf. For example, a small stack of books, a framed picture, and a candle on a simple tray make a nice arrangement.
- Maintain Airiness: Resist the urge to fill every shelf to capacity. Leave about one third of the shelf space empty. This allows light to pass through the unit, reinforcing its function as an open divider.
- View from Both Sides: Step back and look at the unit from both the living room and the bedroom side. Ensure that the back of any object (like bookends or picture frames) is also visually appealing, as both sides will be seen.
5. Velvet Track Curtains for Flexible Privacy
Item Name: Sliding Fabric Room Separator

Curtains offer a soft, elegant, and highly flexible solution for sectioning off a sleeping area in a studio apartment. Installing floor to ceiling velvet drapes on a ceiling track allows you to completely open or close off the bedroom from the living space instantly. This approach is much less permanent than a wall, giving you the ability to change your layout needs day to day. During the day, they remain neatly stacked to maximize light and space.
Think about using a heavy, luxurious fabric like velvet, as shown here; it adds a touch of sophistication and also helps to dampen sound between the two zones. The rich color scheme creates a cozy and defined lounge area separate from the restful bedroom. Because they run on a smooth track, they operate with ease, making the transition between public and private spaces effortless.
DIY Instructions: Setting Up a Ceiling Track Curtain Divider
Installing a ceiling track is straightforward and provides a fluid way to partition a room without complicated construction.
What You Will Need:
- Curtain track system designed for ceiling mounting (includes track, carriers, and end caps)
- Heavy duty drapes with header hooks
- Power drill, screws, and measuring tape
- Stud finder and pencil
- Stepladder and safety glasses
Step-by-Step Instructions:
- Mark the Track Position: Decide where the curtain needs to hang to fully enclose the space. Use the stud finder to locate ceiling joists, if possible, as these provide the most secure attachment. Mark the drilling points lightly with a pencil, keeping the track perfectly straight using the measuring tape.
- Drill Pilot Holes: Wearing safety glasses, use the power drill to create small pilot holes at the marked locations. If you miss a joist, you will need to use appropriate heavy duty drywall anchors.
- Attach the Track: Hold the track in place against the ceiling and use the drill to screw the mounting brackets or the track itself into the ceiling. Ensure the track is firmly secured and level across its entire length.
- Insert Carriers and Hang Curtains: Slide the curtain carriers (the little wheeled hooks) into the track slot. Once the track is mounted, attach the curtain hooks to the carriers. Insert the end caps on the track to prevent the carriers from sliding out.
- Test the Movement: Gently slide the curtain back and forth along the track. Check that it moves smoothly without snagging. Fully close and open the curtains a few times to ensure they hang correctly and provide the privacy you want.
6. Low Profile Storage Platform Bed
Item Name: Integrated Lighted Tatami Platform

A custom platform bed is an excellent investment for tiny bedrooms, maximizing every inch underneath the mattress for hidden storage. This Japanese style, low profile design keeps the room feeling grounded and spacious by avoiding a bulky frame. The seamless wood surface not only provides support but also features discreet drawers or lift top compartments all the way around. This clever hidden storage eliminates the need for large dressers.
This minimalist design creates a serene atmosphere, prioritizing rest and relaxation. The beautiful ambient glow from the LED lighting strip installed along the base is a stylish touch, making the bed appear to float. That soft light is also practical, providing a low level pathway light if you get up in the middle of the night. Choosing a platform like this is a smart way to get the most utility and elegance from a small sleeping area.
DIY Instructions: Installing Undermount LED Platform Lighting
Adding a soft glow under a platform bed is a quick, inexpensive way to elevate the design and add functional lighting.
What You Will Need:
- Flexible LED strip light kit with a remote or motion sensor (about 16 feet should cover three sides of a Queen bed)
- Extension cord (if needed)
- Cleaning cloths and rubbing alcohol
- Cable management clips
Step-by-Step Instructions:
- Clean the Mounting Surface: Wipe down the underside edge of the bed platform where the LED strip will stick. You must ensure the surface is free of dust and debris so the adhesive holds fast. Let it dry completely.
- Plan the Run: Determine where the power cord will plug in. Start applying the LED strip at that point, ensuring the run will cover three visible sides of the bed, or the entire perimeter. You want the light to be consistent.
- Attach the Strip: Peel off a short section of the adhesive backing at a time and press the strip firmly along the inside edge of the bed platform, facing the light towards the floor. Applying consistent pressure ensures a secure bond.
- Secure and Conceal the Wiring: Once the strip is fully attached, use small cable management clips to secure the power cord neatly along the underside of the frame and down to the outlet. Ensure the cord is completely out of sight.
- Test the System: Plug in the power supply. If your kit has a remote, test all the settings and dimmer functions. If it has a motion sensor, test the activation to ensure it works properly.
7. Light and Airy Living Room Palette
Item Name: Cozy Cloud Seating Arrangement

The illusion of space often comes down to color and texture, especially in living areas. Relying on a monochromatic palette of light grays, creams, and whites instantly opens up a small room. The soft colors reflect light beautifully, making the walls feel distant and the entire space feel much larger than it actually is. Texture is what prevents this neutral look from feeling bland.
Observe the rich variety in the textiles: a chunky knit throw, smooth linen pillows, and a shaggy sheepskin rug. These layers add tactile comfort and visual interest without adding heavy bulk. The simple, light wood side table and framed white art pieces complete the minimal, sophisticated aesthetic. This strategy is an accessible way to make a constrained room feel expansive and incredibly comfortable.
DIY Instructions: Crafting a Textured Throw Pillow
Adding custom, textured pillows is a simple way to elevate a neutral space. This quick project uses inexpensive materials.
What You Will Need:
- Plain canvas or linen pillow cover (18 x 18 inches)
- Thick, chunky yarn (like merino or roving yarn)
- Scissors
- Hot glue gun and glue sticks
Step-by-Step Instructions:
- Prepare the Yarn Loops: Cut the chunky yarn into short pieces, approximately four inches long. You will need many pieces. The more you cut, the denser your textured pillow will be.
- Mark the Center: Place the pillow cover flat. Use a pencil to lightly mark the center area where you want the texture to be densest, or map out a simple design (like a wide stripe).
- Attach the Loops: Take one yarn piece, fold it in half to create a loop, and apply a small dot of hot glue to the folded end. Press the glued end firmly onto the pillow cover. Hold it until the glue sets.
- Repeat and Build Density: Continue gluing the yarn loops in tight rows across your marked area. Try to stagger the loops slightly so the canvas backing is completely covered. Work slowly to create a consistent, shaggy surface.
- Dry and Display: Let the pillow cover lie flat for several hours to ensure all the glue has cured. Insert the pillow insert and place your new, textured accent pillow on your couch to add softness and depth.
8. Glass Panel Dividers for Open Flow
Item Name: Minimalist Framed Glass Wall

For rooms that need separation but cannot spare the light or visual space, full glass partitions are an excellent modern solution. This structure divides one functional zone, likely a bedroom or closet, from the main living area. Because the glass is transparent, the view extends completely through to the windows on the other side. This trick maintains an open, loftlike feeling while still providing distinct, separated rooms.
You can truly appreciate how the subtle silver grid pattern adds architectural definition without feeling bulky or heavy. The clear, light refracting surfaces even make the room brighter by distributing daylight more effectively. Paired with clear acrylic chairs and thin metal furniture, the whole space maintains an incredibly light and airy contemporary aesthetic. This hack is key to designing a home where every section feels connected and spacious.
DIY Instructions: Cleaning Glass Partitions for Maximum Clarity
A clean glass divider is essential for maximizing light and maintaining the open feeling. This method ensures a streak free shine.
What You Will Need:
- Microfiber cloths (two or three)
- Water and white vinegar solution (equal parts) in a spray bottle
- Squeegee (optional, for very large panes)
Step-by-Step Instructions:
- Prepare the Solution: Mix equal parts warm water and white vinegar in your spray bottle. Vinegar is a gentle, natural cleaner that effectively cuts through grime without leaving streaks.
- Wipe Down the Surface: Before spraying, quickly wipe the glass with a dry microfiber cloth to remove any loose dust, which can create streaks when wet.
- Spray and Section: Spray a section of the glass, starting at the top. Do not soak the entire wall at once, as the solution may dry too quickly.
- Wipe in a Pattern: Immediately wipe the sprayed area using a clean, dry microfiber cloth. Use a systematic motion, such as a large “S” shape or horizontal lines, working from top to bottom. This systematic approach ensures no spot is missed.
- Buff the Edges: Check the corners and edges, which often accumulate dirt. Use your third, completely dry microfiber cloth to buff away any remaining dampness or streaks along the frames and corners. Repeat on the opposite side of the glass.
9. Layered Textures and Earthy Tones
Item Name: Jute and Terracotta Accent Wall

A bold accent wall and carefully chosen textures can create depth in a narrow room, drawing attention away from its size. The striking combination of terracotta red, sage green, and light wood slats provides instant visual warmth and a bohemian flair. The large jute rug layered on the floor defines the seating area and adds a grounding, natural texture.
Large mirrors placed on the floor, rather than hung, create the illusion of extended space by reflecting the beautiful colors and textures of the wall. Using natural elements like rattan lighting and woven baskets enhances the feeling of spaciousness and relaxation. This design shows that small spaces can embrace rich color and bold patterns as long as they maintain clean lines and natural light.
DIY Instructions: Simple Floor Standing Mirror Hack
Using a full length mirror on the floor is a stylish hack that makes a room feel taller and instantly adds light.
What You Will Need:
- A full length mirror with a sturdy frame
- Two rubber furniture stoppers or felt pads
- Measuring tape and level
- Wall anchor or picture wire (for safety)
Step-by-Step Instructions:
- Choose the Location: Place the mirror where it can reflect light and interesting objects, like an accent wall or a window. The floor placement makes the ceiling look much higher.
- Ensure Stability: The mirror must lean securely against the wall. Place the rubber stoppers or felt pads on the bottom corners where the mirror meets the wall. These will prevent it from sliding on smooth floors.
- Safety First (Crucial): Even though it is leaning on the floor, you must secure the top edge to the wall for safety. Use a wall anchor or a simple picture wire attached to the top of the mirror frame and secured to a stud or a secure anchor in the wall. This prevents it from tipping over.
- Check the Angle: Use the level to ensure the mirror is leaning back at a safe and appropriate angle. The slight tilt should give you a full length view while adding to the depth of the room.
10. Floating Storage Boxes with Backlighting
Item Name: Illuminated Box Shelving Display

Floating, boxed shelves are a spectacular way to create storage and display space without the clutter of a full bookcase. These dark, deep units mounted on the wall use no floor space whatsoever, which is the ultimate small space win. The recessed design creates a visually appealing grid pattern that becomes a focal point for the entire room.
Notice the clever use of contrasting wood veneer backing inside each box; this simple detail makes the shelves pop. Integrating small spotlights or LED puck lights inside each box highlights the displayed objects, turning simple sculptures into works of art. The long, low floating cabinet underneath provides essential closed storage to hide away general items, maintaining the minimalist, sleek aesthetic. This wall is proof that you can have both storage and style in a tight area.
DIY Instructions: Mounting Simple Box Shelves
Floating box shelves are easy to install and immediately add functional style to a blank wall.
What You Will Need:
- Pre assembled box shelves (three to four)
- Power drill and appropriate screws or toggle bolts (for drywall)
- Stud finder, level, and pencil
- Measuring tape
Step-by-Step Instructions:
- Plan the Layout: Decide on the arrangement you want. For a contemporary look, space the boxes unevenly, or arrange them in a neat line for a more symmetrical feel. Use the measuring tape to determine the exact distance between each box.
- Mark the Mounting Points: Use the level to draw a light horizontal line on the wall where the bottom of the lowest row of shelves will sit. Mark the drill points for the first shelf’s mounting hardware using the pencil.
- Drill and Anchor: Use the drill to create pilot holes at your marked points. If you hit a stud, use a wood screw. If it is drywall, you must use a heavy duty toggle bolt or anchor that can support the shelf’s weight plus the weight of your items.
- Mount the First Shelf: Secure the first shelf firmly to the wall. Double check that it is level. A straight first shelf is crucial, as all subsequent shelves will be referenced against it.
- Install Remaining Shelves: Once the first shelf is secure, measure the distance up or over to the next position. Mark, drill, and mount the remaining shelves, checking each one with the level before moving on.
- Style: Once the shelves are all secure, gently place your chosen objects inside, ensuring not to overload them.
11. Multiuse Modular Cube Storage
Item Name: Versatile Vertical Storage Bench

Embracing bright colors and flexible furniture instantly makes a small space feel organized and fun. This clever system uses stacked storage cubes to create multiple functional zones in one corner. Vertical stacking maximizes wall space for shelving, while horizontal placement forms a cushioned seating bench below. Having a mix of open cubes and closed boxes keeps clutter hidden but allows you to showcase favorite decor items.
This setup is great for a kid’s room, craft area, or entryway, as it serves as storage, display, and a comfortable seat for putting on shoes. The clean lines of the boxes and the vivid color blocking add a lively, contemporary feel. Remember, every piece of furniture in a small room should work at least twice as hard as its cost suggests.
DIY Instructions: Creating a Simple Seating Pad for Cube Storage
Turning a storage unit into a bench requires a comfortable cushion pad you can make yourself.
What You Will Need:
- Foam cushion or dense batting cut to the size of the top cube area
- Upholstery fabric (enough to cover the foam and wrap underneath)
- Staple gun and staples
- Scissors and measuring tape
- Optional: nonslip rug pad material
Step-by-Step Instructions:
- Measure and Cut the Foam: Measure the exact length and depth of the cube unit’s top surface. Cut the foam or batting to these dimensions using sharp scissors. The foam should sit perfectly flush with the edges.
- Cut the Fabric: Lay your fabric face down on a clean surface. Place the foam centered on the fabric. Cut the fabric so you have four to six inches of excess on all four sides. This allows you to wrap it neatly under the foam.
- Wrap and Staple: Start with the longest sides. Pull the fabric taut across the foam and fold the excess neatly underneath the foam pad. Use the staple gun to secure the fabric to the underside of the foam, placing staples every two inches.
- Fold the Corners: For the corners, fold the fabric like wrapping a present: pull the material taut, smooth out the excess into a neat pleat, and staple the pleat underneath the pad. Ensure the fabric surface is smooth and wrinkle free.
- Secure the Pad: Place a small piece of nonslip rug pad material on top of the cube unit. Position the finished cushion pad on top. The rug pad material keeps the cushion from sliding when someone sits down.
12. Transforming Wall Mounted Foldout Desk
Item Name: Hidden Floating Workspace

Small homes benefit greatly from furniture that disappears when the day is done. This brilliant wall mounted cabinet transforms into a full sized desk with a simple fold down motion. When closed, it is just a streamlined piece of cabinetry, saving significant floor space in a kitchen, living room, or studio. The folding chair and table legs can also be stored discreetly nearby, ensuring the room remains completely clutter free.
Notice how the cabinet section above the desk offers valuable, permanent storage for books, mail, and decorative elements. The clever use of light wood tones prevents the piece from feeling heavy or intrusive on the wall. Hanging a simple pendant light directly over the workspace ensures that when the desk is open, you have ample, focused light for your tasks.
DIY Instructions: Styling Permanent Shelves for Utility
The shelves of a foldout desk are always visible, so organizing them effectively is important for both looks and function.
What You Will Need:
- Matching small storage containers or baskets
- Bookends
- Small potted plant or sculptural object
- Items you use daily (pens, notebooks, clock)
Step-by-Step Instructions:
- Sort Necessary Items: Gather all the items you need near the desk: stationery, chargers, reference books, and mail. Group similar items together into piles.
- Use Containers for Clutter: Place all the small, messy items, like charging cables and pens, into matching storage boxes or baskets. This provides immediate visual order.
- Create Visual Balance: Place the taller items, such as a stack of books or a decorative clock, on one side of a shelf to create vertical balance. Use a bookend to keep things tidy.
- Introduce Natural Elements: Place one small, easy to care for potted plant, like a succulent, on the top shelf. This adds a refreshing, lively touch to the workspace.
- Keep It Sparse: Resist the urge to overfill the permanent shelves. Leave at least half the shelf space empty. This allows the items you choose to display to breathe and keeps the whole unit looking neat.
13. Mobile Kitchen Island and Prep Station
Item Name: Rolling Butcher Block Cart

Kitchens are often the most difficult area to organize in a small apartment due to a serious lack of counter space. A robust, stainless steel cart with a butcher block top provides flexible, instantly movable extra prep area. This unit can be rolled anywhere needed: into the living room for entertaining, or right next to the stove for cooking. The wheels are a true game changer for efficiency and floor flow.
The open shelving below is excellent for storing frequently used kitchen essentials, such as heavy pots, pans, and mixing bowls. Towel bars on the side keep dishtowels handy without taking up cabinet space. This furniture piece effectively creates a functional kitchen island even when the room is too narrow for a built in unit. This smart addition instantly enhances cooking and serving capability.
DIY Instructions: Organizing Kitchen Shelves for Maximum Space
Keeping open shelves organized can be challenging, but using smart stacking methods is key to maximizing capacity.
What You Will Need:
- Pot and pan organizing racks (U shaped wire racks)
- Stackable containers for dry goods and accessories
- Shelf liners (optional, to protect the metal)
Step-by-Step Instructions:
- Empty and Assess: Remove all items from the shelves and wipe the metal clean. Take stock of what you own and declutter any unused pots or gadgets.
- Prioritize the Bottom Shelf: Place the heaviest items, like large dutch ovens and stockpots, on the bottom shelf. Use a pot and pan rack to store lids vertically, which saves a huge amount of space and makes them easy to grab.
- Organize the Middle Shelf: Place smaller, frequently used items here, such as mixing bowls and serving dishes. Use stackable containers to hold small gadgets or cooking supplies.
- Style the Top: Reserve the butcher block surface for immediate use, food prep, or display. Place plants, bottles, or a cutting board here to maintain a clean appearance.
- Use the Bars: Hang your most frequently used towels and maybe even a few lightweight utensils from the side bars. Ensure all items are easily accessible without having to shift things around.
14. Sectional Sofa with Integrated Drawers
Item Name: Hidden Storage Seating Unit

Using dual function furniture is the golden rule of small space design. This comfortable, U shaped sectional sofa provides generous seating while secretly housing deep storage drawers beneath every section. Instead of a bulky separate storage cabinet, you have valuable, easily accessible space for blankets, games, magazines, and seasonal pillows right where you sit. The dark wood base contrasts beautifully with the olive green upholstery, giving the piece a rich, tailored feel.
This clever design also includes open shelving built into the end of one chaise, offering quick access for items like binders, decorative boxes, and reference books. The combination of seating, drawers, and shelving makes this a total living room command center. Investing in furniture that works this hard is the best way to keep your floor clear and your room tidy.
DIY Instructions: Organizing Sofa Drawers with Dividers
Deep storage drawers can quickly become disorganized; using simple dividers will keep the contents neat and easily searchable.
What You Will Need:
- Cardboard pieces or thin plywood scraps
- Fabric or contact paper (optional, for aesthetics)
- Hot glue or wood glue
- Measuring tape and box cutter
Step-by-Step Instructions:
- Measure the Drawer: Fully pull out one of the sofa drawers. Measure the interior depth, height, and length of the space. Decide how many sections you want (for example, three equal sections).
- Cut Divider Pieces: Cut your cardboard or plywood pieces to the correct height and depth of the drawer. You will need one piece for each section you want to create (e.g., two pieces for three sections).
- Cover the Material (Optional): If you want a cleaner look, cover the cardboard or wood with fabric or contact paper. This is purely aesthetic and helps protect the contents.
- Install the Dividers: Use hot glue or wood glue along the edges of the cut divider pieces. Press them firmly into the drawer interior at your preplanned intervals. Hold them in place for a few minutes until the glue sets.
- Allow Time to Cure: Let the glue dry completely before loading the drawer with your blankets, media, or other stored items. Now you can easily organize categories of items without them shifting.
15. Sleek Sliding Panel Hidden Vanity
Item Name: Track Mounted Concealed Rooms

Creating flexibility in a limited space is simple with oversized barn style sliding doors. This design uses the hardware not just as a doorway but as a dynamic wall that conceals or reveals a functional area, such as a compact vanity or dressing room. The smooth motion of the panels allows you to hide clutter instantly when guests arrive or to close off a private zone for use. The overall effect is clean and highly modern.
The high contrast between the dark wood frame and the crisp white sliding panels adds a sophisticated, architectural detail to the room. Look at how the sliding panels overlap; this ensures total privacy when needed. Using sleek floor level lighting along the rug enhances the sense of luxury and space in the room. This solution is far more elegant than simple curtains or folding screens.
DIY Instructions: Cleaning and Maintaining Exposed Track Hardware
Exposed track hardware needs occasional cleaning to ensure the smooth, quiet operation of the sliding panels.
What You Will Need:
- Small, stiff bristled brush or old toothbrush
- Microfiber cloth
- Can of compressed air
- Silicone lubricant spray (optional)
Step-by-Step Instructions:
- Clear Debris: Use the can of compressed air to blow out any loose dust, dirt, or pet hair that has settled on top of the exposed metal track and around the wheel mechanisms.
- Brush the Track: Use the small, stiff bristled brush to gently scrub the surface of the track. Concentrate on the ridges and grooves where the wheels roll. This helps dislodge any sticky residue or grime.
- Wipe Down: Dampen a microfiber cloth slightly (do not use harsh chemicals) and wipe the entire surface of the track and the visible wheel components. This removes the fine dust that the brushing loosened.
- Lubricate (If Needed): If the door is squeaky or starts to stick, apply a very small amount of silicone lubricant spray directly onto the track’s surface. Wipe away any excess immediately.
- Test the Slide: Gently slide the door back and forth several times to distribute the lubricant and confirm that the motion is silent and smooth.
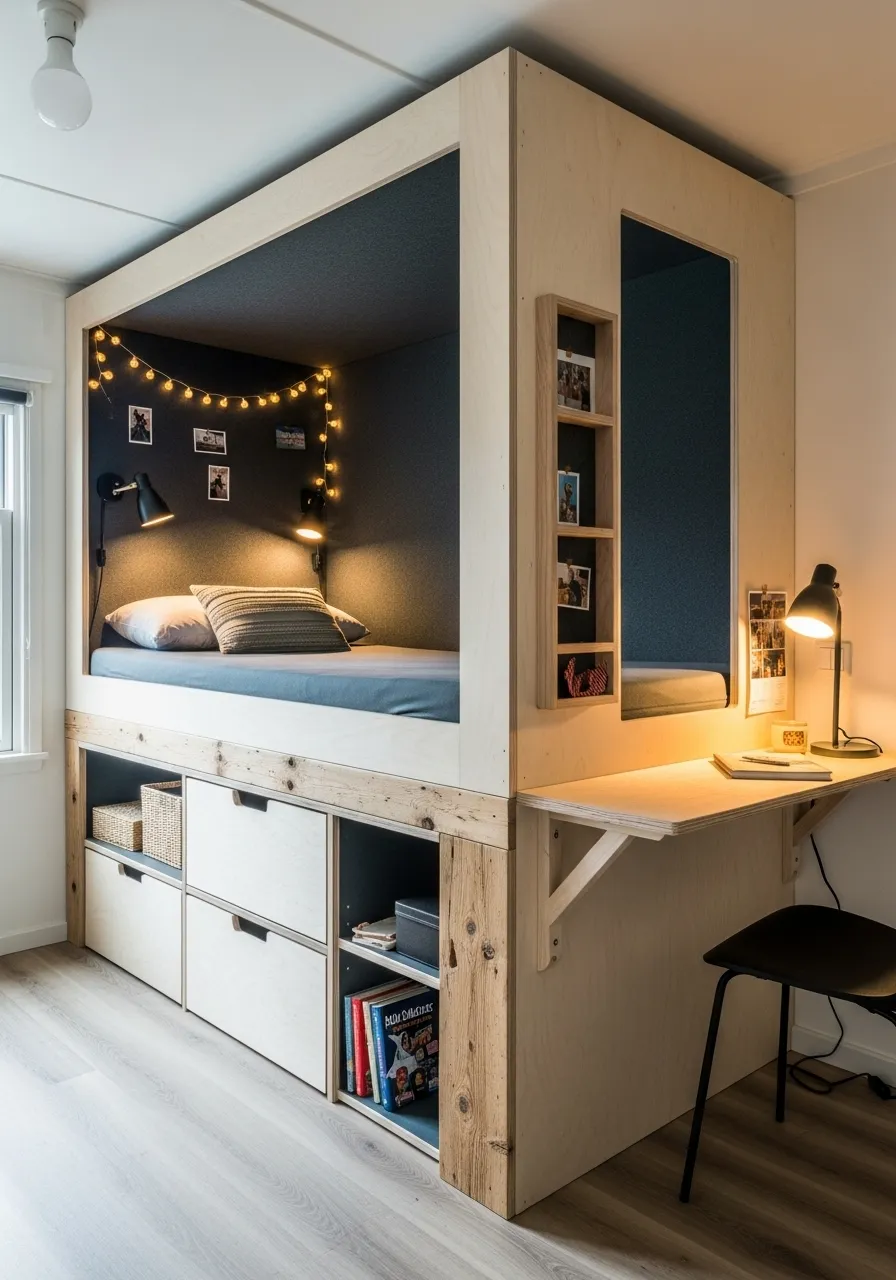
16. All in One Loft Sleep and Work Zone
Item Name: Custom Vertical Living Pod

Making use of height is the ultimate small space solution, especially in rooms with high ceilings. This incredible custom unit combines a cozy, embedded sleeping area with extensive storage and a dedicated desk underneath. Building upward effectively stacks two rooms into the footprint of one, creating a multipurpose living pod. The dark blue felt lining inside the sleeping nook makes it feel secure, private, and exceptionally restful.
Look at the sheer amount of storage packed into the base: multiple pullout drawers, open shelving for books, and a neat workspace. The drop down desk maintains the clean profile of the unit and allows the area below to remain usable. Small details, like the string lights in the bed nook, add a playful, welcoming touch to this highly efficient, architectural solution.
DIY Instructions: Adding String Lights to a Bed Nook
String lights add warmth and a custom, cozy ambiance to any enclosed sleeping area.
What You Will Need:
- Battery powered LED string lights (look for a warm white or soft yellow)
- Small removable adhesive hooks or clear tape
- Measuring tape
Step-by-Step Instructions:
- Plan the Pattern: Decide on the look you want. A simple drape along the top edge of the bed nook is easiest, or you can create a zig zag pattern across the back wall for more light.
- Measure and Test: Hold the string of lights up and measure how much length you need. Turn the lights on briefly to ensure they are working and to check the color and brightness.
- Install the Hooks: Place small removable adhesive hooks along your planned path. If you are draping them across the top, place hooks every 12 to 18 inches. Press the hooks firmly onto the wall or frame.
- Hang the Lights: Start at the end where the battery pack or power source is located. Carefully drape the string lights onto the hooks, leaving a slight, gentle curve between each one. Conceal the battery pack behind a pillow or on a hidden shelf.
- Adjust and Secure: Stand back and check the pattern. Tighten or loosen the string until the desired effect is achieved. Press the lights firmly into the hooks or secure with small pieces of clear tape where necessary.
17. Multipurpose Built-in Window Bench
Item Name: Cozy Reading Nook with Cabinet Storage

Transforming an unused window bay into a functional piece of furniture is a fantastic way to add charm and storage. This custom bench provides deep, comfortable seating and beautiful, integrated closed storage below. Instead of cluttering the room with a freestanding couch, this unit uses the natural alcove to create a designated relaxation zone. The paneled cabinetry below is spacious enough for seasonal items, toys, or blankets.
Bright accent colors, like the bold blue pillows shown here, contrast wonderfully with the light wood paneling, drawing the eye to the cozy nook. Sconce lighting mounted on the wall above the bench provides focused reading light without needing a bulky floor lamp. This feature adds architectural value and maximizes floor space simultaneously.
DIY Instructions: Making a Simple Upholstered Window Seat Cushion
Creating a comfortable, custom cushion is the final step in turning a bench into a cozy retreat.
What You Will Need:
- Foam cushion cut to the exact size of the bench seat
- Non stretch, durable upholstery fabric
- Heavy duty thread and a large sewing needle or a sewing machine
- Scissors and straight pins
Step-by-Step Instructions:
- Cut the Fabric Panels: Measure the foam cushion’s length, width, and thickness. Cut two large rectangles of fabric for the top and bottom (length plus width) and four smaller strips for the side boxing (length or width by thickness). Add one inch seam allowance to all cuts.
- Sew the Side Panels: Pin and sew the four side strips together into a continuous loop that matches the perimeter of the cushion. Use a straight stitch one inch from the edge. This creates the “box” for the cushion thickness.
- Attach Top and Bottom: Pin the top fabric rectangle to the top edge of the side box loop. Leave one long side unpinned. Sew the three pinned sides together. Repeat this process for the bottom rectangle, leaving an opening of about 15 inches on the unsewn side.
- Insert the Foam: Turn the cushion cover right side out through the opening. Carefully slide the foam into the newly sewn cover. The cover should be snug and smooth.
- Close the Opening: Hand sew the open section shut using a slip stitch, hiding the thread for a professional finish. Place the finished cushion on the bench and add your pillows.
18. Massive Adjustable Pegboard Organizer
Item Name: Flexible Wall Utility System

Wall storage is the cornerstone of tiny space living, and a full wall pegboard is the ultimate flexible organizer. This large sheet of material, covered in evenly spaced holes, allows you to change your storage setup whenever you need to. Shelves, hooks, and baskets can be moved up, down, or sideways in seconds. Using the pegboard for a variety of objects, from tools to jars, keeps every item visible and off the limited counter space.
The natural wood tone is a warm update to the traditional utility style, making this system suitable for a kitchen, craft room, or home office. By customizing the placement of the accessories, you maximize every square inch of vertical storage. This is a hack that truly empowers you to keep your organizational system adaptive and tidy.
DIY Instructions: Creating Custom Wooden Pegboard Shelves
You can make your own simple wooden shelves that fit perfectly onto your pegboard.
What You Will Need:
- One to two small wooden planks (four to six inches deep)
- Wooden dowels (same diameter as the pegboard holes)
- Wood glue and clamps
- Hand saw or electric saw
Step-by-Step Instructions:
- Cut the Shelves: Decide how long you want your shelf to be and cut the wooden plank to that length. Sand all the edges to ensure they are smooth and splinter free.
- Cut the Dowel Supports: Measure and cut the wooden dowels. You will need two supports per shelf. The dowels should be long enough to go through the shelf thickness and still extend about three to four inches below it.
- Drill the Shelf Holes: Measure two spots near the back edge of the shelf where the dowels will insert. Drill holes that are just slightly smaller than the dowel diameter. You want the dowel to fit snugly.
- Attach the Dowels: Place a small amount of wood glue into the holes you drilled. Tap the dowels gently into the holes so they are flush with the top surface of the shelf. Clamp the dowels in place and let the glue dry completely.
- Install on Pegboard: Once dry, simply insert the protruding dowels into the holes on the pegboard at the height you desire. Place your items on the shelf.
19. Solid Wood Bed with Deep Storage Drawers
Item Name: Dresser Integrated Bed Frame

Eliminating the need for a separate dresser is a brilliant space saving move in any small bedroom. This sturdy wood bed frame features deep, smooth sliding drawers built directly into the base on all sides. These drawers offer substantial storage capacity for clothes, linens, and shoes. This dual function unit is arguably one of the most effective solutions for freeing up floor space.
The natural wood construction adds a cozy, lasting quality to the room, creating a strong focal point. Notice the soft underglow lighting integrated just above the drawers; it adds a subtle layer of atmosphere and is practical for navigating the room at night. Choosing a bed like this is a smart strategic move that combines two essential pieces of furniture into one neat footprint.
DIY Instructions: Adding Interior Drawer Lighting
Installing a small light inside deep drawers helps you find items easily without turning on the main room light.
What You Will Need:
- Small, battery powered LED push lights or strip lights (one for each drawer)
- Double sided adhesive pads or strong adhesive tape
- Measuring tape and cleaning supplies
Step-by-Step Instructions:
- Clean the Interior: Open the drawer fully and clean the inside surface (the top underside of the drawer opening) with a damp cloth. The surface must be clean and dry for the adhesive to stick.
- Select the Placement: Choose a spot on the interior wall of the bed frame, just above the drawer opening. This location allows the light to shine down into the drawer when it is opened.
- Attach the Light: Peel the backing off the double sided adhesive pad and stick it firmly to the back of the LED push light or strip. Press the light firmly onto the cleaned interior surface. Hold for 30 seconds to ensure a secure bond.
- Test Activation: Some lights are motion activated, and some are push lights. Test the light by opening and closing the drawer. The goal is for the light to activate only when the drawer is open, illuminating the contents.
20. Over the Door Storage Center
Item Name: Vertical Organizer for Closet or Pantry

The space behind any door, whether a closet, bedroom, or pantry door, is often completely wasted. Installing an over the door organizer is an immediate way to create vertical storage without touching a single tool. This versatile design combines wire baskets with canvas pouches, allowing you to store a wide variety of items from spices and cleaning supplies to toiletries and small towels.
This system puts nonfunctional wall space to work, utilizing the entire height of the door. The mix of materials offers a clean, versatile look that suits multiple rooms in the house. Look at how the different compartments are sized to hold both tall bottles and folded textiles. This is a very easy and affordable hack that provides massive returns on organizational space.
DIY Instructions: Securing an Over the Door Organizer for Stability
Over the door organizers can sometimes rattle or swing; securing the bottom ensures quiet, safe use.
What You Will Need:
- Double sided foam tape or thin furniture bumper pads
- Small, flat head screws or tiny nails (optional, for renters, use removable adhesive hooks)
- Pencil
Step-by-Step Instructions:
- Hang the Organizer: First, hang the organizer over the door using its existing hooks. Load it with your items so it has its full weight.
- Mark the Bottom Edge: Close the door and check where the bottom of the organizer meets the door panel. Use a light pencil mark to identify the two lower corners.
- Secure the Base (No Drill): Peel the backing off two furniture bumper pads or pieces of double sided foam tape. Apply one to the back of the organizer at each of your marked lower corners. Press the organizer firmly against the door for a few seconds. This cushioning keeps the organizer from banging against the door when it is opened or closed.
- Secure the Base (Optional Drill): If you desire more security and are permitted to drill, use a tiny, flat head screw or nail to gently secure the bottom wire frame or wooden panel of the organizer directly to the door at the lower corners. Be careful not to drill through the entire door.
- Test the Door: Gently open and close the door several times to ensure the unit stays in place and does not swing or rattle against the frame.
21. Fireplace Nook Media Center
Item Name: Integrated Fireplace Entertainment Hub

Even a nonfunctional fireplace can become a valuable storage and display area in a tiny living room. Instead of leaving the hearth empty, this design cleverly converts the recess into a media center. A simple floating shelf within the firebox holds electronics like a gaming console or streaming device. This smart repurposing saves space by tucking away unsightly components into a built in niche.
Consider the aesthetic appeal; the dark painted interior of the fireplace contrasts beautifully with the classic white mantel, highlighting the functional upgrades. Small string lights arranged like glowing embers add a charming, cozy touch without the heat of a real fire. The mirror above reflects light and extends the visual space, balancing the practicality below.
DIY Instructions: Organizing Wires in a Media Nook
Neatly managing cables is essential for a clean looking media center. This hack keeps wires out of sight.
What You Will Need:
- Cable ties or Velcro cable wraps
- Adhesive backed cable clips
- Small power strip (optional)
Step-by-Step Instructions:
- Unplug and Detangle: First, unplug all electronic devices. Carefully untangle any existing wire messes. Lay each cable out straight.
- Group Similar Wires: Gather the wires from individual devices together. For example, group the power cord and HDMI cable for one console. Use a cable tie or Velcro wrap to bundle them.
- Secure to the Shelf/Wall: Use adhesive backed cable clips to secure the bundled wires along the underside of the shelf or discreetly along the back wall of the niche. This prevents them from dangling.
- Power Strip Integration (Optional): If you are using a power strip, place it as far back in the niche as possible. Plug all device power cords into the strip, then use one main cable tie to bundle the power strip’s cord.
- Test and Refine: Plug everything back in and test that all devices work. Adjust the cable clips or ties as needed to ensure all wires are tucked away and out of view.
22. Corner Banquette with Storage and Shelving
Item Name: Custom Dining Nook with Concealed Storage

Using every corner efficiently is a hallmark of excellent small space design. This custom built corner banquette creates a cozy dining area that also doubles as extensive storage. The cushioned benches lift up to reveal generous hidden compartments underneath, perfect for stowing away linens, seasonal decor, or extra dishes. The built in shelving along the outer edges also provides display space for frequently used items.
This setup maximizes seating in a compact footprint, allowing more people to gather comfortably than traditional chairs might allow. The patterned cushions add a cheerful pop of color, making the eating area feel inviting. Notice the angular open shelves on the ends, offering a creative spot for small decor items or even cookbooks. This is a brilliant, multi functional piece for any small dining area.
DIY Instructions: Making a Lift Top Storage Bench Cushion
A lift top bench needs a cushion that is easy to remove or securely attached to the lid.
What You Will Need:
- Foam cushion cut to the size of the bench lid
- Durable upholstery fabric (with a little stretch is helpful)
- Heavy duty staples and staple gun
- Scissors and measuring tape
- Optional: hinge fasteners or Velcro strips
Step-by-Step Instructions:
- Cut the Fabric: Measure the foam cushion. Cut your fabric with at least three to four inches of overlap on all sides. This allows you to wrap and staple the fabric neatly underneath the foam.
- Wrap the Foam: Lay the fabric face down. Center the foam on top. Start wrapping the fabric tightly around the foam, pulling firmly to avoid wrinkles.
- Staple the Fabric: Use the staple gun to secure the fabric to the underside of the foam, starting from the center of each side and working outwards. Fold the corners neatly, similar to wrapping a gift, and staple them down.
- Attach to Lid (Optional): If you want the cushion to lift with the bench lid, apply adhesive Velcro strips to the underside of the finished cushion and matching strips to the top of the bench lid. Press firmly.
- Test the Lift: Carefully open and close the bench lid to ensure the cushion remains secure and that the lid still functions smoothly. The cushion should not snag or impede the opening.
23. Functional Headboard with Built-in Storage
Item Name: Smart Storage Headboard

Making the most of the space around your bed is essential in a small bedroom. This custom headboard unit extends beyond the width of the mattress, creating integrated nightstands, shelves, and even pullout drawers. You have a space for books, charging electronics, and personal items right within arm’s reach. This eliminates the need for separate nightstands, freeing up valuable floor space.
Notice the clever details: adjustable wall sconces provide task lighting for reading, while power outlets and USB charging ports are built directly into the side. The pullout drawer is perfect for keeping small items like glasses or phones handy but out of sight. Above the bed, there is also hidden overhead cabinetry for even more storage. This sleek, blue unit is a total bedroom command center.
DIY Instructions: Adding Charging Ports to a Headboard Nook
Integrating a charging station makes a headboard significantly more useful. This involves a simple installation.
What You Will Need:
- Recessed power outlet with USB charging ports (check your local electrical codes)
- Jigsaw or drill with hole saw attachment
- Wire strippers and screwdriver
- Electrical box and wiring (if wiring directly to the house)
- Or: a simple power strip with USB ports and cable clips (for easier, nonpermanent solution)
Step-by-Step Instructions (Nonpermanent Solution):
- Choose a Power Strip: Select a compact power strip that includes both standard outlets and USB ports. Ensure the cord length is enough to reach a wall outlet.
- Position the Strip: Decide where on the headboard shelf or in a drawer you want the power strip to sit. It should be easily accessible but also as hidden as possible.
- Secure the Power Strip: Use strong double sided adhesive tape or small cable ties to secure the power strip to the back of the shelf or inside a drawer. This prevents it from sliding around.
- Manage Cables: Run the power strip’s main cord discreetly down the back of the headboard, securing it with cable clips along the way. Plug it into an available wall outlet.
- Organize Charging Wires: Use small cable clips or Velcro ties to keep your phone chargers and other device cables neatly bundled near the new ports. This prevents a tangled mess on your nightstand.
24. Floor to Ceiling Library Wall with Rolling Ladder
Item Name: Grand Vertical Bookshelf

For serious book lovers in a smaller home, building a floor to ceiling library wall is a dramatic and space efficient solution. This impressive design turns an entire wall into a functional and aesthetically striking feature. The tall shelves allow for thousands of books, ensuring that every literary treasure has its place. A rolling ladder makes accessing the highest shelves easy and adds a touch of classic library charm.
The rich wood tones bring warmth and sophistication to the room, contrasting beautifully with the light green walls. This vertical storage system eliminates the need for multiple smaller bookcases, creating a unified and grand impression. Notice the subtle accent lights above each shelf section, highlighting the spine titles and making the room feel inviting. This hack turns clutter into a curated display.
DIY Instructions: Maintaining a Rolling Library Ladder
A rolling ladder should be kept clean and smooth for safe, effortless use.
What You Will Need:
- Soft cloth and all purpose cleaner
- Silicone spray lubricant
- Small vacuum cleaner with a brush attachment
Step-by-Step Instructions:
- Clean the Track: Begin by vacuuming the top rail where the ladder wheels run. Use the brush attachment to remove any dust or debris that might be trapped in the groove.
- Wipe Down the Track: Dampen a soft cloth with all purpose cleaner and wipe down the entire length of the metal track. This removes any sticky residue or grime.
- Lubricate the Wheels: Spray a small amount of silicone lubricant directly onto each wheel mechanism. You want to ensure the lubricant gets into the moving parts. Do not over spray.
- Wipe the Ladder: Clean the wooden or metal rungs and sides of the ladder with a damp cloth. This keeps it looking fresh and prevents dirt from transferring to the track.
- Test the Glide: Gently roll the ladder back and forth along the track several times. It should move smoothly and silently. If any sticking occurs, reapply a small amount of lubricant.
25. Pocket Door Pantry/Closet with Mirror
Item Name: Hidden Walk in Wardrobe

Even a tight hallway can accommodate serious storage with the smart use of a pocket door. This clever design slides entirely into the wall, completely disappearing when open. This means you do not lose any floor space to a swinging door. Here, a deep niche behind the door functions as a compact walk in wardrobe or pantry. The bright purple interior adds a lively burst of unexpected color.
Installing a full length mirror on the inside of the door or on the back wall of the closet serves a dual purpose: it is practical for dressing and also bounces light around, making the small space feel larger. The built in shelving and hanging rods maximize every available inch, creating storage for clothes, accessories, and hats. This setup keeps daily essentials organized but hidden from view.
DIY Instructions: Styling a Compact Closet Niche
Making a tiny closet functional and attractive involves strategic organization and smart display.
What You Will Need:
- Matching hangers and storage boxes
- Small decorative tray for accessories
- Hooks for hats or scarves
Step-by-Step Instructions:
- Declutter First: Remove everything from the closet. Sort through clothes, shoes, and accessories. Donate or discard anything you no longer use or wear.
- Utilize Vertical Space: Hang your clothes on rods using matching slimline hangers. Place frequently used hats on hooks or stack them neatly on upper shelves. Use clear plastic shoe boxes to store shoes neatly at the bottom.
- Categorize and Contain: Use stylish fabric storage boxes for smaller items like scarves, belts, or socks. Label the boxes if you like. This keeps contents tidy and makes them easy to find.
- Create a Display: On a small shelf or vanity surface within the closet, place a decorative tray. Arrange jewelry, a small vase of flowers, or a favorite perfume bottle here. This adds a personal touch.
- Regular Maintenance: Make a habit of tidying the closet regularly. Avoid letting things pile up, which can quickly make the small space feel overwhelming.
26. Under Stair Laundry and Storage Nook
Item Name: Integrated Utility Alcove

The awkward space underneath a staircase is often overlooked, but it is actually a goldmine for hidden utility. This brilliant design transforms the unused void into a compact laundry station and an organized storage nook. Stacking the washer and dryer vertically is a common small space trick, allowing both appliances to fit into a minimal footprint. This creates a dedicated laundry area without sacrificing a separate room.
Observe the sliding shelves and pullout baskets that maximize every irregular corner and depth. A pullout countertop provides a temporary surface for folding clothes or sorting items. Built in shelves store laundry detergents and other cleaning supplies neatly. This is a highly efficient, custom solution that brings major convenience to a small home.
DIY Instructions: Creating a Pullout Folding Shelf
Adding a pullout shelf under stairs or in a cabinet provides a handy surface that disappears when not in use.
What You Will Need:
- A sturdy wooden shelf board (cut to fit the cabinet width and desired depth)
- Heavy duty full extension drawer slides (two, appropriate length for shelf)
- Screwdriver and screws
- Level and measuring tape
- Wood glue (optional, for extra strength)
Step-by-Step Instructions:
- Measure and Cut Shelf: Measure the width of your under stair cabinet. Decide how deep you want your pullout shelf to be when fully extended. Cut your wooden board to these dimensions.
- Install Drawer Slides: Attach one part of the drawer slide to the sides of your wooden shelf, ensuring it is flush with the bottom edge. Use the included screws.
- Mount Remaining Slides: Next, attach the other part of the drawer slides to the inside walls of the under stair cabinet. Use the level to ensure they are perfectly parallel and straight. This is very important for smooth operation.
- Slide in the Shelf: Carefully align the shelf with the mounted slides in the cabinet. Gently push the shelf into place until the slides click or lock into position.
- Test and Adjust: Pull the shelf in and out several times to test its smoothness. If it sticks, check the alignment of the slides with the level. This movable surface is now ready for folding or prepping.
27. Floating Entryway Console with Key Organizer
Item Name: Wall Mounted Drop Zone

The entryway is the first impression of your home, and it often becomes a clutter magnet. This stylish, wall mounted console is a genius hack for small entryways because it uses zero floor space. The floating shelf provides a surface for mail or decor, while the integrated hook rail below keeps keys, coats, and bags neatly organized and off the floor.
The dark wood finish adds a sophisticated touch, making this functional piece feel substantial without being bulky. Notice the clever wall mounted letter holder; this is a tidy solution for incoming mail that often piles up on horizontal surfaces. By keeping everything off the ground, this setup ensures a clean, welcoming transition into your home, no matter how small your foyer.
DIY Instructions: Installing Wall Mounted Mail and Key Holder
Adding a designated spot for mail and keys keeps your entryway tidy and prevents losing important items.
What You Will Need:
- Wall mounted mail and key organizer unit
- Power drill, appropriate screws, and wall anchors (if not drilling into a stud)
- Level and pencil
- Measuring tape
Step-by-Step Instructions:
- Choose the Spot: Decide on the best location in your entryway. It should be easily accessible as you come and go, but not obstruct a doorway. Place it at a comfortable height for everyone.
- Mark Drill Points: Hold the organizer against the wall and use a level to ensure it is straight. Use a pencil to mark the exact spots where the mounting screws will go.
- Drill Pilot Holes: Using the power drill, create pilot holes at your marked spots. If you are drilling into drywall, insert the appropriate wall anchors now. If you are drilling into a stud, screws alone will be sufficient.
- Secure the Organizer: Hold the organizer back up to the wall, aligning the screw holes with your pilot holes. Insert the screws and tighten them until the organizer is firmly attached to the wall. Do not overtighten, as this could damage the wall.
- Load and Organize: Place your mail, keys, and other entryway essentials into the organizer. Enjoy your instantly tidier and more functional entryway.
28. Wall Mounted Fold Down Vanity
Item Name: Hidden Illuminated Makeup Station

Every inch counts in a small bathroom or bedroom, and this wall mounted fold down vanity is a fantastic space saver. When closed, it is a sleek, compact cabinet, taking up no floor space. When open, it transforms into a fully functional makeup station complete with a mirror and Hollywood style lights. This piece effectively provides a dedicated getting ready area without needing a permanent bulky dresser.
The vibrant orange interior of the cabinet creates a playful, energetic contrast, turning a mundane item into a design statement. Built in lighting around the mirror ensures you always have ample, shadow free illumination for applying makeup or styling hair. The small fold down shelf inside provides space for cosmetics while you work. This is an innovative solution that hides away all your beauty essentials.
DIY Instructions: Wiring Vanity Strip Lighting
Adding a strip of lights around a mirror significantly improves visibility for grooming tasks.
What You Will Need:
- LED strip light kit (look for bright, neutral white, and self adhesive)
- Small removable adhesive clips or clear tape
- Scissors (to cut LED strip at marked intervals)
- Measuring tape
- Cleaning cloths and rubbing alcohol
Step-by-Step Instructions:
- Clean the Mirror Frame: Wipe the frame or edge around the mirror with rubbing alcohol to ensure it is clean and dry. This helps the adhesive stick properly.
- Measure and Plan: Measure the perimeter of your mirror where you want the lights to go. Unroll the LED strip and find the cutting points. Cut the strip to the correct length.
- Attach the Strip: Peel off the adhesive backing from the LED strip. Carefully press the strip onto the mirror frame, starting from a discreet corner or edge. Apply firm, consistent pressure.
- Conceal Wires: Route any excess wiring neatly along the back of the vanity or along the wall. Use small adhesive clips to secure the wires and keep them out of sight.
- Connect Power and Test: Plug the power adapter into a nearby wall outlet. Turn on the lights and check for even illumination. Adjust the placement slightly if needed to eliminate any harsh shadows.
29. Bathroom Niche with Glass Shelving
Item Name: Over Toilet Vertical Storage

The space above the toilet is one of the most underutilized areas in a small bathroom. Creating a deep, tiled niche with glass shelves is a stylish way to add significant storage without any extra footprint. The shelves are recessed directly into the wall, maintaining a seamless, clean look. This provides a dedicated spot for towels, toiletries, and decorative items.
The clear glass shelves allow light to pass through, keeping the small space feeling open and airy. Subway tiles on the wall add texture and a timeless aesthetic. Notice the clever use of woven baskets for organizing smaller items, which keeps the display tidy. This thoughtful design proves that functionality can be integrated beautifully into any bathroom size.
DIY Instructions: Organizing Bathroom Shelves with Baskets
Baskets are essential for keeping bathroom shelves tidy and making small items easy to find.
What You Will Need:
- Woven baskets or clear acrylic bins (various sizes)
- Labels (optional)
- Items to organize (toiletries, towels, extra toilet paper)
Step-by-Step Instructions:
- Declutter and Sort: Remove all items from the shelves. Discard expired products or anything you no longer use. Group similar items together (e.g., skin care, hair products, extra soaps).
- Measure Basket Sizes: Measure the depth, width, and height of your shelves. Select baskets that fit well within these dimensions. You want them to be snug but not too tight.
- Allocate Items to Baskets: Place items into baskets based on their category. For instance, put all your facial products in one small basket and hair accessories in another. This prevents tiny items from getting lost.
- Arrange on Shelves: Place the largest baskets on the lower shelves. Arrange them so they are easily accessible. Stack folded towels neatly next to the baskets.
- Label (Optional): If you have multiple family members or many different items, consider labeling the front of each basket. This helps everyone keep things organized and find what they need quickly.
30. Living Plant Room Divider with Grow Lights
Item Name: Vertical Indoor Garden Partition

Bring the outdoors in, even in a small apartment, with a stunning vertical garden that also functions as a room divider. This tall, freestanding unit features multiple tiers of potted herbs and plants, illuminated by integrated grow lights. This creates a vibrant, living screen that naturally separates open concept areas like a living room and dining space, without blocking the flow of air or light.
The black metal frame is sleek and modern, providing sturdy support for the plants. The grow lights ensure the plants thrive, even in less sunny spots. Notice how the small terracotta pots add a touch of rustic charm. This hack is not just about division; it is about purifying the air, adding natural beauty, and creating a calming green oasis in your home.
DIY Instructions: Maintaining a Vertical Herb Garden
Keeping your indoor herb garden thriving requires consistent care for watering and light.
What You Will Need:
- Small watering can
- Pruning shears or sharp scissors
- Plant mister (for humidity)
- Timer for grow lights
Step-by-Step Instructions:
- Set Grow Light Schedule: Set your grow lights on a timer to provide 12 to 16 hours of light daily. This consistent schedule is crucial for herb growth. Adjust the height of the lights as the plants grow.
- Water Consistently: Check the soil moisture daily. Stick your finger about an inch into the soil. If it feels dry, it is time to water. Use a small watering can to water slowly until water drains from the bottom of the pot.
- Mist for Humidity: Many herbs enjoy higher humidity. Mist the plant leaves lightly with a plant mister every few days, especially if your home air is dry.
- Prune Regularly: Use pruning shears or sharp scissors to snip off any yellowing leaves or stems. Harvest herbs from the top of the plant to encourage bushier growth. Never remove more than one third of the plant at once.
- Rotate Pots: Rotate each pot by a quarter turn every week. This ensures all sides of the plants receive even light from the grow lights, promoting balanced growth.
31. Backlit Wall Mounted TV
Item Name: Illuminated Smart Display

In a small living space, a wall mounted television is the ultimate space saver, as it frees up the floor from bulky entertainment units. This large, sleek screen is mounted perfectly at eye level above a minimalist console, creating a clean focal point. The brilliant touch here is the backlighting around the TV, which not only looks modern but also reduces eye strain by creating ambient light behind the screen.
The low profile console beneath provides discreet storage for media accessories and keeps the room looking uncluttered. The light gray walls and white console contribute to an airy, contemporary aesthetic. This setup demonstrates how to achieve a high impact entertainment zone that enhances the room without overwhelming it.
DIY Instructions: Installing LED Backlighting for Your TV
Adding LED backlighting is a simple way to elevate your TV setup and improve viewing comfort.
What You Will Need:
- USB powered LED strip light kit (designed for TVs, usually with adhesive backing)
- Measuring tape and scissors
- Cleaning cloth and rubbing alcohol
Step-by-Step Instructions:
- Clean the TV Back: Unplug your TV. Thoroughly clean the back of the TV around the perimeter where you plan to attach the LED strip. Use rubbing alcohol to remove any dust or grease, ensuring the adhesive sticks well. Let it dry completely.
- Measure and Cut (If Necessary): Measure the perimeter of your TV’s back. Unroll the LED strip and cut it to the appropriate length at the designated cutting points (usually marked with a scissors icon). Avoid cutting anywhere else, or the strip may not work.
- Attach the LED Strip: Peel off a small section of the adhesive backing from the LED strip. Starting from a corner near a USB port, carefully press the strip onto the back of your TV, about 2-3 inches in from the edge. Apply firm, consistent pressure as you work your way around the perimeter.
- Connect to Power: Once the strip is fully adhered, plug the USB connector into an available USB port on your TV. If your TV does not have one, you might need a small USB wall adapter.
- Test and Enjoy: Plug your TV back in and turn it on. Test the LED lights. Most kits come with a remote to adjust colors and brightness. The ambient glow should now make your viewing experience more immersive and comfortable.
32. Home Theater with Projector Screen
Item Name: Cinematic Wall Projection

Transforming a wall into a home theater is a dream for many, and a ceiling mounted projector with a retractable screen makes it a reality even in a small living room. This setup provides a massive cinematic experience without a permanent, bulky television taking up space. When not in use, the screen rolls up, completely disappearing and allowing the room to return to its everyday function.
The deep red wall color creates a cozy, immersive environment, typical of a movie theater. A low slung media console provides essential storage for media devices, keeping them tidy. Tall, industrial style floor lamps with exposed bulbs add mood lighting and a touch of modern design. This is an excellent solution for maximizing entertainment value in a limited space.
DIY Instructions: Optimizing Your Projector Screen Area
To get the best picture quality from your projector, you need a clear, flat surface and proper light control.
What You Will Need:
- Cleaning cloth and mild cleaner (for screen)
- Dark colored drapes or blinds (if not already installed)
- A spirit level
Step-by-Step Instructions:
- Clean the Screen: Carefully lower your retractable screen. Use a soft, damp microfiber cloth (with only water or a very mild, non abrasive cleaner recommended by the manufacturer) to gently wipe the screen surface. Dust and smudges can degrade picture quality. Allow it to air dry fully.
- Check for Flatness: Ensure your screen is hanging perfectly flat. If it has adjustable tension, make small adjustments. A ripple free surface is essential for undistorted images. Use a spirit level to check the horizontal alignment.
- Control Ambient Light: For optimal viewing, the room should be as dark as possible. If you have windows, ensure they are covered with thick, dark drapes or blackout blinds to prevent external light from washing out the image.
- Calibrate Projector: Most projectors have settings for brightness, contrast, and color. Refer to your projector’s manual for instructions on how to calibrate it to match your screen and room lighting conditions.
- Speaker Placement: Position your speakers to the sides of the screen, or beneath it, for an immersive audio experience. Ensure they do not block the projection path.
33. Integrated Laundry and Cleaning Cabinet
Item Name: Hidden Vertical Utility Center

When space is at a premium, a full height built in cabinet can become a powerhouse of utility. This sleek unit ingeniously conceals a stacked washer and dryer, along with pullout shelving for laundry and cleaning supplies. The clean, modern cabinetry blends seamlessly into the room, making a usually functional space feel like an intentional part of the home’s design.
Notice the clever details: the pullout shelves above the washer and dryer keep detergents and softeners organized and within easy reach. Below the lower machine, a deeper pullout provides space for large bottles or laundry baskets. The integrated lighting inside the cabinet is a practical touch, illuminating the contents when the doors are open. This is a complete, hidden laundry solution that works hard in minimal square footage.
DIY Instructions: Cleaning Your Stacked Washer and Dryer
Regular cleaning keeps your machines running efficiently and prevents odors, especially in a compact space.
What You Will Need:
- White vinegar and baking soda
- Microfiber cloths
- Old toothbrush or small brush
- All purpose cleaner
Step-by-Step Instructions:
- Wash Cycle (Washer): Set your washing machine to its hottest cycle. Add two cups of white vinegar directly into the detergent dispenser. Run an empty cycle. For an extra clean, sprinkle half a cup of baking soda into the drum before a second empty hot cycle.
- Wipe Down (Washer): After the cycle, wipe down the inside of the drum, the detergent dispenser, and the rubber gasket around the door with a damp microfiber cloth. Use an old toothbrush for hard to reach areas of the gasket, where mold can build up. Leave the door ajar to air dry.
- Clean Lint Trap (Dryer): Remove the lint trap from your dryer. Use your fingers or a small vacuum attachment to remove all accumulated lint. Wash the lint trap in warm, soapy water with an old toothbrush every few months to remove any fabric softener residue.
- Wipe Down (Dryer): Wipe down the inside of the dryer drum with a damp cloth. Also, clean the outside of both machines with an all purpose cleaner, paying attention to buttons and control panels.
- Ventilation: Always leave the washer door slightly ajar after use to prevent mildew and odors from forming in the drum, especially in a small, enclosed space.
34. Compact Fold Down Wall Desk with Storage
Item Name: Streamlined Concealed Office

A truly adaptable workspace is essential in a small home, and this wall mounted cabinet that transforms into a desk is a genius solution. When folded up, it is a sleek, unassuming cabinet, freeing up floor space for other activities. When lowered, it provides a stable desk surface, complete with an organized interior. This is perfect for a studio apartment where distinct zones are hard to create.
The corkboard on the back wall of the cabinet is a clever touch, offering a spot for notes, reminders, or inspirational images without cluttering the main living area. Organized compartments for mail and supplies keep everything tidy. The integrated light ensures ample task lighting, turning a nook into a functional office. A folding chair completes the temporary workspace without taking up permanent floor space.
DIY Instructions: Customizing a Fold Down Desk Interior
Making the inside of your fold down desk organized and inspiring will make you more productive.
What You WillNeed:
- Adhesive cork roll or small cork tiles
- Small storage bins or pen holders
- Decorative pushpins or magnets
- Whiteboard markers (if using a whiteboard section)
Step-by-Step Instructions:
- Install Corkboard: Measure the interior back panel of your fold down desk. Cut the adhesive cork roll to size and carefully apply it. If using cork tiles, arrange and adhere them securely. This creates a versatile surface for notes.
- Add Storage Compartments: Use small, coordinating storage bins or pen holders to organize stationery, paper clips, and other desk essentials. Adhere them with double sided tape if they tend to slide around.
- Personalize the Space: Use decorative pushpins to attach important reminders, inspiring quotes, or small photos to the corkboard. This makes the space feel personalized and inviting.
- Consider a Mini Whiteboard: If you prefer, you can replace a section of the corkboard with a small, adhesive whiteboard sheet for quick notes and brainstorming. Keep a small whiteboard marker and eraser handy.
- Keep It Clutter Free: Regularly clear the desk surface and the internal compartments. The beauty of a fold down desk is its ability to hide clutter, but it works best when the hidden space is also organized.
35. Cane Panel Room Divider with Hidden Lighting
Item Name: Boho Chic Lighted Screen

A stylish room divider can be a game changer in an open concept studio apartment, and this cane panel screen is both beautiful and functional. It creates a subtle separation between the sleeping area and the living space without making the room feel enclosed or dark. The natural cane material allows light to filter through, maintaining an airy, open ambiance.
The clever addition of ambient lighting from behind the screen creates a soft, inviting glow, enhancing the cozy atmosphere of the bedroom. The warm wood tones and natural textures contribute to a serene, bohemian aesthetic. When paired with simple, light colored linens, the screen becomes a focal point that defines zones while adding visual texture and warmth.
DIY Instructions: Adding Backlighting to a Room Divider
Backlighting a room divider adds ambiance and helps define areas in a soft, indirect way.
What You Will Need:
- Warm white LED strip light (battery operated or plug in with a long cord)
- Small adhesive backed cable clips or clear tape
- Command strips or small L-brackets (if securing the light unit)
Step-by-Step Instructions:
- Choose Light Placement: Decide whether you want the light to come from the top, bottom, or sides of the divider. For a soft glow, place the strip on the floor behind the divider, or attach it to the top edge facing downwards.
- Secure the Light Source: If using a battery powered strip, secure the battery pack discreetly behind the divider using Command strips. If plug in, ensure the cord can reach an outlet and is hidden.
- Attach the LED Strip: Peel the adhesive backing from the LED strip. Carefully attach it to the back edge of the room divider, facing the light towards the wall or floor. This creates an indirect glow rather than direct light.
- Conceal Wires: Use small adhesive cable clips or clear tape to run any visible wires neatly along the frame of the divider or along the baseboard, keeping them out of sight.
- Test and Adjust: Turn on the lights and check the effect. Adjust the position of the strip slightly if needed to achieve the desired ambiance. This soft glow will highlight the texture of the divider and add warmth to your space.
36. Wall Mounted Peg Rail and Shelf
Item Name: Farmhouse Entryway Organizer

In a small entryway or hallway, a long, wall mounted peg rail with a shelf is a timeless and highly functional solution for organizing everyday items. This classic farmhouse style piece provides numerous pegs for hanging coats, bags, hats, and scarves, keeping them off the floor and easily accessible. The integrated shelf above is perfect for displaying small decor items or holding mail.
The light wood finish and clean lines contribute to a simple, uncluttered aesthetic, which is essential in compact spaces. Notice how sconce lighting is strategically placed above the shelf, adding task lighting and highlighting the items displayed. This system utilizes vertical space efficiently, transforming a blank wall into a hardworking command center for your comings and goings.
DIY Instructions: Installing a Wall Mounted Peg Rail
A peg rail is a straightforward installation that provides instant organization and charm.
What You Will Need:
- Pre made wooden peg rail with shelf
- Power drill, appropriate screws, and wall anchors (if not drilling into studs)
- Level and pencil
- Stud finder (optional, but recommended)
- Measuring tape
Step-by-Step Instructions:
- Choose Height and Location: Decide on a comfortable hanging height for coats and bags. Use a stud finder to locate wall studs if possible, as these provide the most secure mounting points.
- Mark Drill Points: Hold the peg rail against the wall. Use a level to ensure it is perfectly horizontal. Mark the drill points for the mounting screws with a pencil.
- Drill Pilot Holes: Use the power drill to create pilot holes at your marked locations. If you are not drilling into a stud, insert wall anchors into the pilot holes now, following the anchor manufacturer’s instructions.
- Secure the Peg Rail: Align the peg rail with the pilot holes. Insert the screws and tighten them until the rail is firmly attached to the wall. Do not overtighten.
- Style and Use: Once secured, hang your coats, hats, and bags on the pegs. Use the top shelf for small decorative items, a bowl for keys, or to display framed art.
37. Vertical Indoor Plant Shelf
Item Name: Tiered Planter Display

Bringing greenery into a small apartment can be a challenge without taking up valuable floor space. This tall, narrow plant shelf is the perfect solution, allowing you to create a lush indoor garden vertically. Multiple tiers of shelves provide ample room for various potted plants, making a statement without consuming much horizontal area.
The sleek black metal frame with glass shelves offers a modern, airy look, allowing light to reach all plants. A clip on grow light ensures that even plants on lower shelves receive adequate illumination, allowing them to thrive. This vertical garden brightens a corner, purifies the air, and adds a refreshing touch of nature to any small room, making it feel more vibrant and alive.
DIY Instructions: Caring for Potted Plants on Shelves
Keeping multiple plants thriving on a shelf requires a consistent watering and light routine.
What You Will Need:
- Small watering can with a long spout
- Plant mister
- Fertilize (appropriate for your plants)
- Soft cloth for cleaning leaves
Step-by-Step Instructions:
- Watering Routine: Check the soil of each plant every few days. Use the “finger test”: stick your finger an inch or two into the soil. If it feels dry, water thoroughly until water drains from the bottom. Avoid overwatering.
- Light Management: Ensure your grow light is positioned to cover as many plants as possible. Rotate your plants weekly so all sides receive adequate light. If some plants need more light, place them on higher shelves closer to the grow light.
- Humidity Control: Many indoor plants appreciate humidity. Use a plant mister to lightly spray the leaves every few days, especially if your indoor air is dry.
- Dusting Leaves: Periodically wipe the leaves of your plants with a soft, damp cloth. Dust can block light absorption and hinder growth.
- Fertilize (Seasonally): During the growing season (spring and summer), fertilize your plants according to the product’s instructions. Reduce or stop fertilizing in fall and winter.
38. Multipurpose Coffee Table with Storage
Item Name: Lift Top Game and Storage Table

A coffee table that does more than just hold drinks is a true hero in a small living room. This generously sized coffee table features hidden compartments and open shelving, providing a discreet solution for storing everything from board games and books to blankets and remotes. The dark wood finish adds a touch of classic elegance.
The ingenious design includes a lift top section, which can transform into a comfortable workspace or dining surface when extended. This dual function allows for eating, working, or playing games without the need for a separate table. By centralizing storage in one piece of furniture, this table helps keep the surrounding floor clear, making the small room feel more expansive and organized.
DIY Instructions: Organizing a Storage Coffee Table
Keeping the interior of a storage coffee table tidy ensures you can easily find what you need.
What You Will Need:
- Small organizing bins or trays
- Bookends (for open shelves)
- Labels (optional)
Step-by-Step Instructions:
- Categorize Contents: Empty the coffee table. Group similar items together, such as remote controls, magazines, board games, or small craft supplies.
- Use Bins for Small Items: For smaller items like remotes, coasters, or pens, use small organizing bins or decorative trays within the compartments. This prevents them from rolling around or getting lost.
- Stack and Divide Books/Magazines: On open shelves, stack magazines or larger books neatly. Use bookends to keep vertical stacks upright and orderly.
- Position for Access: Place frequently used items in the most accessible spots. For example, remote controls should be in an easy-to-grab bin on the top shelf, while board games can go in deeper compartments.
- Regular Tidying: Make it a habit to put things back immediately after use. A quick tidy up each evening will keep the coffee table functional and neat, enhancing the overall tidiness of your living room.
39. Vertical Kitchen Tray Divider
Item Name: Integrated Sheet Pan Organizer

Optimizing cabinet space, especially for awkward items like baking sheets and cutting boards, is a challenge in any kitchen. This brilliant hack uses vertical dividers to create designated slots for flat items within a standard base cabinet. Instead of stacking everything horizontally (which makes items hard to access), this system keeps them upright and easily retrievable.
The bright LED lighting strip installed along the top of the cabinet illuminates the contents, making it simple to find what you need without rummaging. The custom built wooden dividers provide a sturdy and attractive solution, blending seamlessly with the modern white cabinetry. This is a must have for maximizing functionality and efficiency in a small kitchen.
DIY Instructions: Installing Vertical Dividers in a Cabinet
Adding vertical dividers is a simple way to organize trays, cutting boards, and baking sheets.
What You Will Need:
- Thin plywood or MDF boards (cut to cabinet height and depth)
- Wood glue and small nails/screws (or strong adhesive tape for temporary)
- Measuring tape, pencil, and a level
- Clamp (optional)
Step-by-Step Instructions:
- Measure Cabinet Interior: Measure the interior height, depth, and desired width of your cabinet section. Decide how many dividers you want and the spacing between them (e.g., 3-4 inches apart for baking sheets).
- Cut Divider Boards: Cut your plywood or MDF boards to the measured height and depth. Ensure the edges are smooth.
- Mark Placement: Use a pencil and measuring tape to mark the exact locations for your dividers on the bottom and top interior surfaces of the cabinet. Use a level to ensure the marks are aligned.
- Attach Dividers: Apply wood glue along the bottom edge of one divider. Place it firmly onto the marked spot on the cabinet base. For added security, you can use small nails or screws through the bottom into the divider, or use adhesive tape to hold it while the glue dries.
- Secure Top (Optional): If your cabinet has a top panel, you can also secure the top edge of the divider with glue and small nails for extra stability. If not, the glue at the base will be sufficient for light items. Repeat for all dividers.
- Allow to Cure: Let the glue dry completely (check the glue manufacturer’s instructions) before placing your trays and cutting boards into their new, organized slots.
40. Ottoman with Shoe Storage
Item Name: Entryway Storage Bench

A versatile ottoman is a small space superstar, especially when it cleverly doubles as hidden storage. This stylish upholstered bench provides a comfortable spot to sit in an entryway or living room, but its main hack lies beneath the lid. The top lifts to reveal specialized compartments for shoe storage, neatly organizing several pairs and keeping them out of sight.
The neutral linen upholstery and simple design allow it to blend seamlessly into various decor styles. The separate lid on one end of the ottoman offers a flat surface for a tray, making it a functional side table as well. This dual function piece is perfect for keeping an entryway tidy, or adding extra storage to a bedroom or living room without bringing in more furniture.
DIY Instructions: Assembling an Ottoman Shoe Rack Insert
Many ottomans have open storage; an insert helps organize shoes more effectively.
What You Will Need:
- Fabric shoe organizer insert (designed for ottomans or closets)
- Measuring tape
- Scissors (if trimming needed)
Step-by-Step Instructions:
- Measure Ottoman Interior: Open your ottoman’s lid and measure the interior length, width, and depth of the storage compartment.
- Select Organizer: Purchase a fabric shoe organizer insert that closely matches the dimensions of your ottoman. Many are designed to be flexible and fit various sizes.
- Assemble (If Needed): If the organizer comes flat packed, assemble it according to the manufacturer’s instructions. This usually involves inserting cardboard panels to create the individual shoe slots.
- Place in Ottoman: Carefully lower the assembled shoe organizer into the ottoman. It should fit snugly or almost fill the space, preventing it from shifting around.
- Load Shoes: Place one pair of shoes in each slot. This keeps them separated, protected, and easily accessible. The remaining open space in the ottoman can be used for blankets or other items.
41. Portable Bar Cart for Entertaining
Item Name: Glam Gold Rolling Bar

A bar cart is an ideal piece for small homes, providing flexible entertaining space that can be easily moved or tucked away. This sleek gold finished cart, with its three mirrored shelves, adds a touch of glamour while serving as a fully functional mobile bar. It neatly stores bottles, glassware, and mixing tools, keeping everything organized and ready for guests.
The top surface is styled with fresh flowers, adding a pop of color and making it a decorative focal point even when not in use for drinks. The compact footprint allows it to roll into any room, making it easy to serve guests in the living area or move it aside when more floor space is needed. This piece is perfect for maximizing entertaining potential in a tight layout.
DIY Instructions: Styling a Bar Cart for Small Spaces
An organized and attractively styled bar cart is both functional and a decorative asset.
What You Will Need:
- Selection of 3-5 liquor bottles (varied heights)
- 2-3 types of glassware (cocktail, wine, or tumblers)
- Small ice bucket and tongs
- Cocktail shaker and basic bar tools
- Decorative element (e.g., small vase of flowers, bowl of lemons)
- Tray or small dish for garnishes
Step-by-Step Instructions:
- Top Shelf – Function & Beauty: Place your most frequently used liquor bottles and a few decorative items here. A small vase of fresh flowers adds life, and an ice bucket with tongs keeps things practical. Arrange 2-4 key glasses for easy access. This shelf is your primary serving area.
- Middle Shelf – Storage & Variety: Store less frequently used bottles, additional glassware, or a cocktail recipe book on this shelf. You can also place a small tray here with garnishes like limes or olives when entertaining. Keep this shelf neat but functional.
- Bottom Shelf – Heavier & Less Used Items: This is the ideal spot for heavier bottles, less attractive items, or extra napkins and coasters. A stack of art books can also be used to add weight and style, as seen in the image.
- Balance & Symmetry: Arrange items with varying heights to create visual interest. Aim for balance across the shelves, but don’t overfill. Leave some open space to prevent it from looking cluttered, which is especially important in a small room.
- Keep it Mobile: Ensure all items are stable so they don’t shift when the cart is rolled. This allows you to easily move the bar cart wherever it’s needed, maximizing your entertaining space.
42. Fluted Wood Accent Column with Backlighting
Item Name: Illuminated Vertical Feature

Architectural details can make a small room feel grander, and this fluted wood column with integrated backlighting is a striking example. Positioned in a corner, it creates a strong vertical element that draws the eye upward, making the ceiling appear higher. The linear texture of the fluted wood adds sophisticated detail and a touch of organic warmth to the space.
The concealed LED strip lighting running along the sides of the column casts a soft, ambient glow onto the walls, enhancing the room’s mood and making the corner feel more inviting. The rich terracotta and sage green walls provide a beautiful backdrop, highlighting the natural wood tones. This feature cleverly uses an often-overlooked corner to add both style and a sense of expanded space.
DIY Instructions: Adding Corner Backlighting to Accent Walls
Creating a gentle glow behind a corner feature or along a wall adds depth and mood to a small room.
What You Will Need:
- LED strip lighting kit (warm white or tunable white recommended, with adhesive backing)
- Measuring tape
- Cleaning cloths and rubbing alcohol
- Cable management clips or clear adhesive tape
- Power drill and small screws (if mounting an LED channel)
Step-by-Step Instructions:
- Plan the Placement: Decide if you want the light to run vertically up the corner, or horizontally along the baseboards/ceiling. For an accent column, running it vertically along the edges facing the wall is ideal. Measure the exact length needed.
- Clean the Surface: Thoroughly clean the wall surface where the LED strip will be applied using rubbing alcohol. This ensures the adhesive sticks securely. Let the surface dry completely.
- Attach the LED Strip: Carefully peel off the protective backing from the LED strip. Starting from the bottom (or top) of your chosen edge, press the strip firmly onto the wall, ensuring it’s straight. Apply consistent pressure as you go. For a column, you’d apply it to the side edges facing the adjacent walls.
- Conceal Wires: Route any excess wiring neatly along the baseboard or behind the column. Use small cable management clips or clear adhesive tape to secure the wires and keep them out of sight.
- Connect to Power and Test: Plug the LED strip’s power adapter into an outlet. Turn on the lights and check the effect. Adjust the placement slightly if needed to achieve the desired ambient glow and ensure no harsh shadows are cast. If your kit has a dimmer, experiment with different brightness levels.
A small home does not have to be an “ugly” home. It is a canvas for smart solutions and creative design. Your space limitation is actually an opportunity to be more intentional.
You have seen 42 ways to prove that size is not a barrier to good style. From furniture that works twice as hard to walls that store your life, every hack shows a new possibility. You can build, hang, or organize your way to a home that feels open and personal.
Do not try to do everything at once. Choose one hack that excites you. Start there.
Build that window bench. Hang that floating desk. Organize that cabinet. This New Year, you can make the home you have the home you truly love.
Key Takeaways
- Go Vertical: Use your walls. Floor to ceiling shelves, pegboards, and wall mounted desks free up valuable floor space.
- Embrace Dual Function: Every piece of furniture should earn its keep. Choose storage beds, lift top coffee tables, and benches that hide clutter.
- Create Illusions: Light and reflection are your best tools. Use mirrors, light colors, and glass partitions to make any room feel larger.
- Hide the Clutter: A tidy space looks bigger. Use built in cabinets, over door organizers, and storage baskets to give everything a home.
- DIY Makes it Yours: A custom solution solves a specific problem. Simple DIY projects for lighting, shelving, or dividers can transform a useless corner into a favorite spot.