Small kitchens often present a big design challenge, making us feel cramped and struggling to find space for essentials. However, limited square footage should never mean limited style or functionality. With thoughtful planning and creative execution, your compact culinary area can be transformed into an efficient, visually expansive, and enjoyable space.

This detailed guide provides you with 39 smart layout and design ideas specifically tailored to combat the feeling of being closed in. We focus on maximizing vertical storage, integrating reflective surfaces, and choosing streamlined layouts that prioritize function without sacrificing aesthetic appeal. Say goodbye to clutter and hello to clever, beautiful kitchen design.
You are about to discover powerful techniques, from installing custom pull-outs to utilizing integrated lighting, that trick the eye into seeing a much larger room. Prepare to unlock the full potential of your kitchen and turn its small size into a design advantage.
1. Efficient U-Shaped Galley Kitchen Design

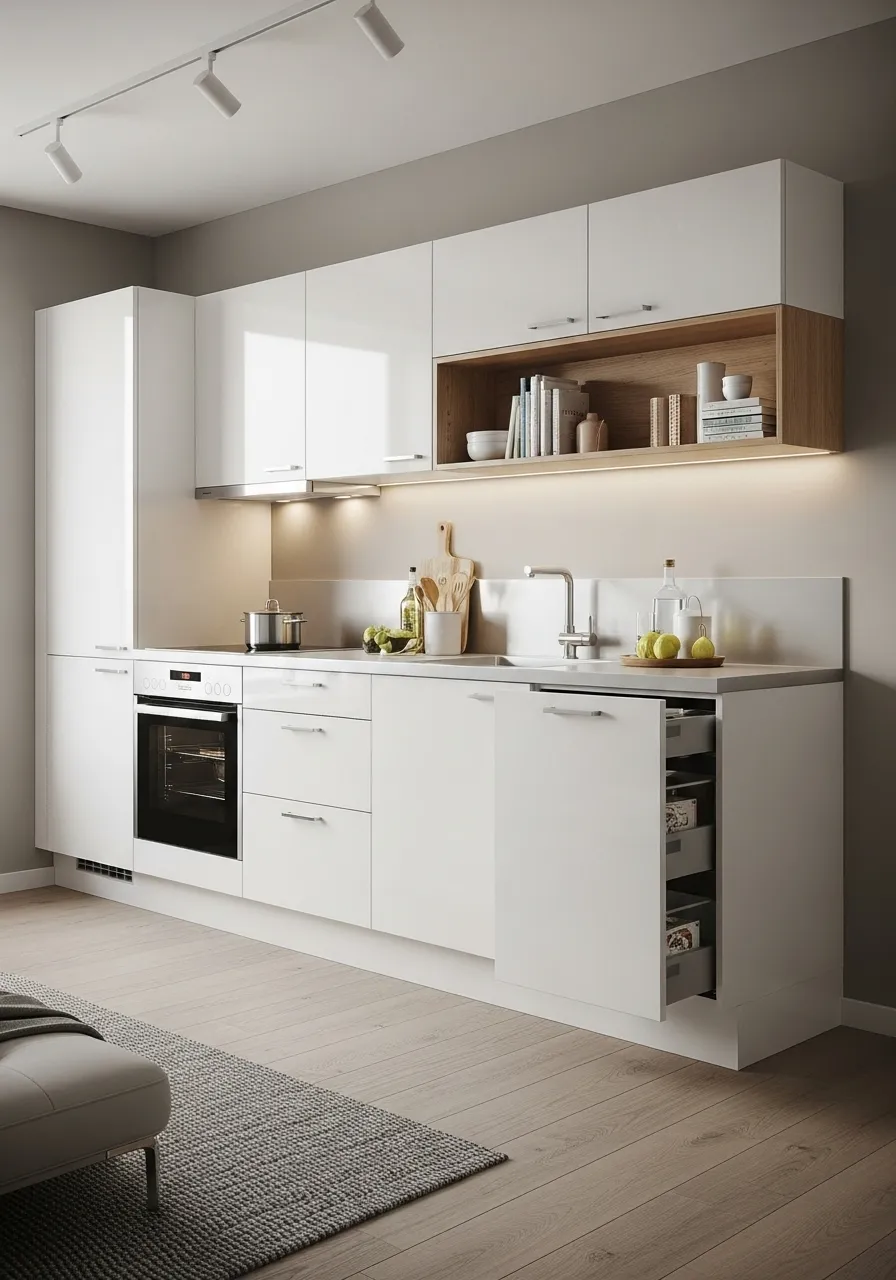
This clever U-shaped galley layout maximizes every bit of available floor space, proving that small kitchens can feel airy and stylish. Light neutral tones, specifically the combination of pale wood lower cabinets and smooth, matte gray upper cabinetry, create a tranquil and cohesive look. Utilizing tall storage up to the ceiling helps capture valuable space often overlooked, with woven baskets neatly stowing away items on top.
Under cabinet lighting is a brilliant addition. This feature not only brightens the countertop work areas but also visually lifts the upper cabinets, preventing the space from feeling cramped. The recessed window at the end draws the eye and floods the room with natural light, a crucial component for making a confined area seem much larger. Built-in appliances and open shelving on the end cap contribute both function and a personalized touch.
????️ DIY Project: Installing Under Cabinet Strip Lighting
Adding subtle, warm lighting underneath your upper cabinets is a cost-effective way to enhance both the function and perceived size of your kitchen. This project focuses on installing easy-to-use LED strip lights.
Material Required List
- LED strip lights (flexible, warm white, cuttable type)
- Power supply/transformer (appropriate for the length of your LED strips)
- Self-adhesive wire clips or cable staples
- Extension wires (if needed to connect strips around corners)
- Double-sided mounting tape (optional, if the strip’s adhesive is weak)
- Rubbing alcohol and a clean cloth
Equipment Required List
- Tape measure
- Scissors (or utility knife)
- Wire cutters (if cutting and splicing wires)
- Safety glasses
- Drill (if routing wires through cabinets)
Step-by-Step DIY Instructions
- Measure and Clean the Area: Carefully measure the length of the underside of your cabinets where you want the light to shine. This measurement tells you how much LED strip you need. Clean the cabinet undersurface thoroughly with rubbing alcohol and the clean cloth. Removing any grease or dust ensures the adhesive sticks properly.
- Plan the Power Connection: Decide where your power outlet is and how the main power cord will reach the LED strip. You may need to route the cord discreetly behind a cabinet or through a small hole drilled near the back wall, keeping it hidden from view.
- Cut the LED Strips to Size: LED strips have specific points where you can safely cut them, usually marked with a copper line and a scissor icon. Cut your strips to match the measured lengths of your cabinet sections. If you are connecting multiple sections, use the included connectors or extension wires to bridge the gaps above your appliances or sink.
- Peel and Stick the Strips: Remove the protective backing from the strip’s adhesive. Starting at the corner closest to your power source, firmly press the LED strip onto the clean underside of the cabinet. Apply steady pressure along the entire length to ensure a strong bond.
- Connect the Power Supply: Plug the end of your LED strip (or the connector attached to the strip) into the transformer or power supply. If your system requires wiring, follow the manufacturer’s instructions carefully, ensuring all connections are secure.
- Manage and Hide the Wires: Use the self-adhesive wire clips or cable staples to secure the power cord and any visible connection wires neatly along the back or top of the cabinet. The goal is to make the lighting appear wireless.
- Test the Lights: Plug the transformer into the outlet. Check to make sure all sections of the strip light up evenly. Enjoy the enhanced, brightened workspace!
2. Integrated Tall Storage and Glossy White Cabinets

A seamless, monochromatic design immediately gives this space a larger, cleaner appearance. High-gloss white cabinetry reflects available light brilliantly, a key technique for expanding visual boundaries in a narrow room. The thoughtful inclusion of a tall, full-height unit integrates the oven and offers deep storage without breaking the clean line of the counter.
The deliberate break in the upper run of cabinets features natural wood open shelving. This touch of warmth prevents the all-white kitchen from feeling sterile and provides easy access for cookbooks or frequently used bowls. Notice how the appliances, including the oven and induction hob, are built directly into the cabinetry for a flush, contemporary look. Excellent use of drawers instead of standard cabinets below the counter further enhances organizational efficiency.
????️ DIY Project: Adding Natural Wood Open Shelving
Introducing a focal point like this wood open shelf can add character and a sense of depth to an otherwise flat wall of cabinets, breaking up the monotony of the white.
Material Required List
- Natural wood shelving material (e.g., solid oak or pine board)
- Heavy-duty concealed floating shelf brackets
- Wood stain or clear polyurethane finish (optional)
- Fine-grit sandpaper (120-220 grit)
- Measuring tape and level
- Wood screws (appropriate length for shelf thickness)
Equipment Required List
- Power drill/driver
- Stud finder
- Safety glasses
- Miter saw or handsaw (for cutting shelf to length)
- Paintbrush or rag (for applying stain/finish)
Step-by-Step DIY Instructions
- Prepare and Finish the Wood: If your wood is raw, sand all surfaces smooth using sandpaper. Wipe away all the dust. If you want a specific tone, apply your wood stain following the product directions, then seal it with polyurethane for protection. Allow it to dry completely.
- Determine Shelf Placement: Carefully measure the width of the gap where the shelf will sit between the upper cabinets. Cut the finished wood to this exact length. Use your tape measure and level to mark the precise spot on the wall where the shelf will sit, ensuring it is perfectly horizontal.
- Install the Floating Brackets: Use a stud finder to locate the wall studs within your marked area. Mark the location of the studs. Floating shelves are heavy, so it is important to screw at least one of the brackets directly into a stud for maximum support. If studs aren’t present where needed, use heavy-duty wall anchors.
- Mount the Brackets: Hold the mounting plate of the bracket up to your pencil marks and pre-drill pilot holes. Use the drill/driver to firmly screw the brackets into the wall. Ensure the brackets are level with each other.
- Drill Holes in the Shelf: Measure the placement of the bracket rods sticking out from the wall. Transfer these measurements precisely to the back edge of your wood shelf. Using a drill bit slightly larger than the diameter of the bracket rods, carefully drill holes into the back of the shelf to match the rod placements. The depth should allow the shelf to slide snugly onto the rods.
- Secure the Shelf: Gently slide the finished shelf onto the bracket rods. It should fit tightly against the wall. If necessary, you can use a small amount of wood glue inside the drilled holes before sliding the shelf on for extra security, but the rods themselves usually provide a strong friction fit.
3. Banquette Seating with Hidden Storage

This charming kitchen corner skillfully incorporates a cozy dining area without sacrificing valuable storage. Banquette seating, built directly into the wall, replaces bulky chairs and saves significant floor area, a masterstroke in smaller homes. The light greige color palette, complemented by the subway tile backsplash, keeps the area feeling open and warm.
The seating base is not just for comfort; it conceals deep drawers below, making it an excellent spot to store seasonal items or seldom-used appliances. Above the bench, glass-front cabinets visually lighten the storage while letting you display dinnerware. The small, pull-out storage rack next to the bench showcases another brilliant way to utilize every centimeter of space for spices or drinks, proving functionality can be stylish.
????️ DIY Project: Building a Simple Storage Bench Base
Creating a custom storage bench provides seating and crucial hidden space for kitchen overflow. This project focuses on the basic structure (you would add cushions later).
Material Required List
- Plywood sheets (3/4-inch thickness, for bench sides and top)
- 2×4 lumber (for internal framing/support)
- Wood screws (1 1/4 inch and 2 1/2 inch)
- Wood glue
- Piano hinge (for a lift-up top, or drawer slides/hardware for drawers)
- Primer and paint (to match the kitchen cabinetry)
Equipment Required List
- Miter saw or circular saw
- Power drill/driver
- Level and tape measure
- Clamps
- Sandpaper (medium grit)
- Stud finder
Step-by-Step DIY Instructions
- Measure and Cut the Frame: Determine the exact length, height, and depth your bench needs to be. Cut the 2×4 lumber to create a rectangular frame for the base and a corresponding frame for the top lip. The height should be comfortable for seating (around 18-20 inches, including the cushion).
- Assemble the Base Frame: Use wood glue and 2 1/2-inch screws to assemble the 2×4 frames. Make sure the corners are square. This sturdy frame will support the weight. Screw the base frame directly into the wall studs for maximum stability, ensuring it is level.
- Attach Plywood Sides: Cut the plywood to form the front and side walls of the bench base. Apply wood glue to the 2×4 frame edges and attach the plywood panels using the 1 1/4-inch screws. For a cleaner look, counter-sink the screws and fill the holes with wood putty later.
- Create the Storage Access: You can choose a lift-up top or drawer fronts.
- For a Lift-Up Top: Cut a plywood piece to be the bench seat. Attach a piano hinge to the back edge of the top piece and the back 2×4 frame, allowing the top to open easily toward the kitchen.
- For Drawers: Install drawer slides on the inside of the frame and attach the finished drawer boxes and fronts (this is a more complex step requiring precise measurements).
- Finish the Bench: Fill all visible screw holes and seams with wood putty. Sand the entire structure smooth once dry. Apply a coat of primer, followed by two coats of the kitchen cabinet paint, allowing ample drying time between coats.
4. Compact Corner Kitchen with Peninsula Bar

Blending the cooking zone with a casual dining area is a smart solution for open-plan living. This kitchen utilizes a corner layout with a small peninsula extending into the main living space. The peninsula serves two important roles: it provides a comfortable breakfast bar for seating and extends the available preparation surface, a huge plus in a confined area.
The contrasting two-tone cabinetry—natural wood for the base units and light beige for the wall units—adds visual interest without overwhelming the room. Overhead pendant lights are kept simple and minimalist, drawing attention to the peninsula without blocking the sightlines. Furthermore, the base of the peninsula features open shelving, creating a convenient spot for frequently grabbed items and helping the structure feel less imposing than solid cabinetry.
????️ DIY Project: Installing Decorative Pendant Lights
Swapping out existing lighting for stylish pendants over an island or peninsula can define the space and add a designer touch without undergoing a full renovation. Note: Always turn off the power at the circuit breaker before starting any electrical work.
Material Required List
- Two or three decorative pendant light fixtures
- Electrical wire nuts
- Electrical tape
- Ceiling mounting hardware (usually included with the fixture)
- Wire strippers
Equipment Required List
- Ladder
- Non-contact voltage tester
- Power drill/screwdriver
- Safety glasses
Step-by-Step DIY Instructions
- Shut Off Power: Locate your main circuit breaker panel and switch off the power to the circuit feeding the existing light fixture. Crucially, use a non-contact voltage tester to confirm that the power is completely off at the ceiling box.
- Remove the Existing Fixture: Carefully unscrew the canopy or base of the old light fixture from the ceiling junction box. Gently lower the fixture. Loosen the wire nuts connecting the old light’s wires (black, white, and ground) to the house wiring. Remove the old fixture completely.
- Prepare the New Pendants: Follow the manufacturer’s instructions for the new pendant lights. You may need to adjust the cord length of each pendant. Measure and cut the cords so the lights hang at the desired height over the bar. For a bar, hang them approximately 30-36 inches above the counter surface.
- Connect the Wiring: This step must be done carefully. Connect the wires of the first pendant to the house wires: black wire (hot) to the house’s black wire, white wire (neutral) to the house’s white wire, and the bare copper or green wire (ground) to the house’s ground wire. Twist the appropriate wire nuts tightly over the paired wires. Repeat this process for the remaining pendants, connecting their corresponding wires to the same house wires inside the junction box.
- Mount the Canopy: Gently tuck the connected wires into the junction box. Attach the new fixture’s mounting plate or canopy to the ceiling junction box using the screws provided with the fixture.
- Restore Power and Test: Turn the power back on at the circuit breaker. Switch on the light to verify that all the new pendants are working correctly.
5. Dark Drama with Mirrored Splashback

This bold kitchen proves that you do not need to restrict yourself to white to make a small space engaging. The matte dark gray cabinetry creates a sophisticated, grounded feeling. The genius move here is the use of a distressed mirrored splashback and surrounding upper cabinets. This reflective surface dramatically doubles the visual width of the kitchen, bouncing light and creating an illusion of much greater depth.
The design relies heavily on strong lines and hidden hardware for a streamlined, minimalist appearance. Recessed pull-out drawers for pots and pans illustrate excellent internal organization, maximizing hard-to-reach corner space. Slim floating shelves flanking the mirrored area offer a spot for decorative essentials while keeping the wall visually uncluttered, contributing to the open, contemporary style.
????️ DIY Project: Installing Floating Shelves for Display
Floating shelves are a great alternative to bulky upper cabinets, helping to open up wall space and providing easy access to frequently used items.
Material Required List
- Finished wood shelf boards (1-inch or 1 1/2-inch thickness)
- Floating shelf hardware kit (rods or concealed bracket system)
- Heavy-duty wall anchors (if not mounting into studs)
- Level and tape measure
- Pencil
Equipment Required List
- Power drill/driver
- Stud finder
- Safety glasses
- Miter saw or handsaw (if cutting the boards)
Step-by-Step DIY Instructions
- Decide on Placement and Mark: Choose the exact location for your shelves, keeping a comfortable height above the countertop. Use your level and tape measure to draw a straight, horizontal line on the wall where the bottom of the shelf will sit.
- Locate Support Points: Use the stud finder to locate any wooden studs behind the drywall. Mark these spots. Attaching to studs is always the most secure method. If the location of the studs doesn’t align with your desired shelf spot, you will need to rely on the heavy-duty wall anchors supplied with your floating shelf kit.
- Mount the Bracket Hardware: Line up the bracket or mounting plate from your hardware kit along your marked horizontal line. Mark the screw hole positions. Pre-drill pilot holes. Use the drill/driver to firmly screw the mounting plate or bracket rods into the wall. Ensure the entire bracket is perfectly level before tightening the final screws.
- Prepare the Shelf for Mounting: If your bracket uses rods, you must drill corresponding holes into the back edge of your wood shelf. Measure the distance between the rods on the wall and transfer these measurements precisely to the shelf board. Drill holes deep enough for the shelf to slide fully onto the rods, making sure the board remains flush with the wall.
- Slide and Secure the Shelf: Gently slide the wood shelf onto the mounted brackets. It should fit snugly. For added security, some systems use a small screw that goes through the underside of the shelf into the bracket. If your system requires this, secure the final screw.
6. High-Contrast Monochromatic Kitchen

A powerful combination of matte black base cabinets and crisp white upper units defines this striking kitchen. This two-tone approach is excellent for small spaces because the bright upper cabinets visually recede, making the walls feel farther away and the ceiling higher. The bold, geometric black and white tile backsplash acts as a dramatic focal point, adding personality and visual depth.
Functional design is prioritized with floor-to-ceiling storage on the left, integrating a spice rack pull-out that neatly hides away smaller items. Open shelving continues the black and white theme on the far right, providing valuable display space while maintaining an open feel. The brass hardware provides a subtle, warm accent against the stark color palette.
????️ DIY Project: Installing a Custom Tile Backsplash
A vibrant backsplash is a relatively small area that can make a huge impact on a kitchen’s style and visual size. This guide covers a simple, straight-set (non-diagonal) tile pattern.
Material Required List
- Ceramic or porcelain tiles (plus 10% extra for cuts)
- Tile adhesive (pre-mixed mastic is easier for beginners)
- Grout (sanded for wider gaps, non-sanded for narrow gaps)
- Tile spacers (consistent size for even gaps)
- Sealer (if using unglazed tile or natural stone)
Equipment Required List
- Notched trowel (for spreading adhesive)
- Tile cutter or wet saw (a wet saw is recommended for complex cuts)
- Grout float (for spreading grout)
- Large sponges
- Buckets (for water and mixing)
- Level and straightedge
- Safety glasses
Step-by-Step DIY Instructions
- Prepare the Surface: Ensure the wall behind the counter is clean, dry, and smooth. Mark a center line on the wall both horizontally and vertically. Starting your pattern from the center ensures the cuts are balanced on both ends.
- Spread the Adhesive: Use the notched trowel to apply a manageable layer of adhesive to a small section of the wall (about 2×2 feet). Hold the trowel at a 45-degree angle to create even, consistent ridges.
- Set the Tiles: Begin laying the tiles at the intersection of your center lines. Press each tile firmly into the adhesive with a slight twisting motion. Insert tile spacers between each tile and along the bottom (where it meets the counter) to ensure uniform grout lines.
- Make Cuts and Continue: As you reach the edges, use your tile cutter or wet saw to make precise cuts. Remember to measure twice and cut once. Continuously check your work with a level to ensure the rows are straight. Allow the adhesive to cure completely (typically 24 hours).
- Apply the Grout: Remove all the spacers. Mix the grout according to the manufacturer’s directions. Use the grout float to spread the grout diagonally across the tiles, pressing it firmly into the spaces. Wipe away excess grout immediately with the float.
- Clean and Cure: After 15–30 minutes (when the grout haze begins to form), use a damp sponge to wipe away the remaining haze from the tile surfaces. Rinse your sponge often in clean water. Allow the grout to cure completely, then apply sealer if needed.
7. Urban Industrial Corner Kitchen

This inviting corner kitchen combines durable, utilitarian materials with a classic color scheme. The deep charcoal base cabinets and clean white wall units provide a pleasing contrast, while the simple white subway tile backsplash maintains a bright background. This arrangement maximizes the corner space for cooking and preparation.
The key feature is the industrial-style shelving unit on the left, constructed from black metal and wood. This open structure replaces a closed cabinet, dramatically reducing visual weight while offering extensive storage for dishes and glassware. Additional storage is created by a metal rod with S-hooks beneath the upper cabinets, providing a home for pots and cooking tools, a practical way to keep the counter free of clutter.
????️ DIY Project: Installing a Rail and S-Hook System
Adding a simple rail system is an easy and affordable way to free up drawer space and keep essential cooking tools within immediate reach, reducing counter clutter.
Material Required List
- Kitchen rail/bar system kit (metal rod and mounting hardware)
- S-hooks (enough for your tools)
- Wall anchors (if not attaching to studs)
- Level and tape measure
- Pencil
Equipment Required List
- Power drill/driver
- Stud finder
- Safety glasses
Step-by-Step DIY Instructions
- Determine Rail Location: Choose a spot directly under your upper cabinets or on an open stretch of wall where your tools will be most convenient. Use your level and tape measure to mark a perfectly straight line for the rail. Ensure the height allows tools to hang without touching the counter.
- Mark and Drill: Hold the rail’s mounting brackets up to the wall, lining them up with your pencil mark. Mark the exact spot for the screw holes. Use the stud finder to locate studs if possible; otherwise, use the appropriate wall anchors for drywall. Pre-drill the pilot holes.
- Attach the Brackets: Secure the mounting brackets to the wall using the drill/driver. Make sure they are fastened firmly and are still level with each other.
- Mount the Rail: Slide the metal rod through the openings on the brackets. Most systems have a small screw or set pin to secure the rod inside the bracket, preventing it from sliding or rotating. Tighten these locking screws.
- Add the Hooks and Tools: Slide your S-hooks onto the newly installed rail. Hang your pots, pans, measuring cups, and cooking utensils from the hooks. Enjoy your newly organized and clutter-free counter space.
8. Integrated Appliance and Pull-Out Pantry

The cool, dusty blue color of this cabinetry offers a refreshing, contemporary look while maintaining a calm atmosphere. The smooth, slab-style doors without traditional handles give the entire wall a seamless, furniture-like appearance, a huge benefit for maximizing visual flow in a small area. The countertop area itself is kept neat and focused, using under-cabinet lighting to define the work zone.
The true space-saving innovation here is the hidden storage. The dishwasher is completely paneled to match the rest of the cabinetry. Most impressively, the full-height pull-out pantry features chrome racks that glide out completely, allowing easy access to every spice bottle and ingredient. This pantry design uses the often-awkward depth of a cabinet to its fullest potential.
????️ DIY Project: Installing a Cabinet Pull-Out Basket System
Transforming a deep, conventional cabinet into a sliding basket or rack system drastically improves access and organization, eliminating wasted space in the back of the cabinet.
Material Required List
- Complete pull-out basket/drawer system kit (including baskets, runners, and mounting hardware)
- Pencil
- Tape measure
- Level
Equipment Required List
- Power drill/driver
- Safety glasses
Step-by-Step DIY Instructions
- Empty and Prepare the Cabinet: Remove everything from the cabinet. Wipe down the interior, especially the base, ensuring it is clean and dry.
- Determine Runner Placement: Consult the instructions that came with your specific pull-out system. The runners (slides) usually need to be mounted perfectly parallel to each other on the base of the cabinet or attached to the side walls. Measure the depth of the cabinet to confirm the slides will fit.
- Install the Base Runners: Place one runner on the cabinet floor near the side. Use your tape measure to ensure it is the correct distance from the cabinet front edge (as specified by the kit). Mark the screw holes with a pencil. Repeat this for the second runner on the opposite side. Pre-drill the holes and use the drill/driver to firmly secure the runners to the cabinet base. Use the level to ensure they are straight.
- Assemble the Basket Unit: Attach the sliding basket frame to the runners according to the kit’s directions. This usually involves snapping the frame onto the runners or screwing them together.
- Test the Movement: Gently slide the empty basket unit in and out a few times to ensure it glides smoothly and doesn’t rub against the cabinet frame or door.
- Add the Baskets/Racks: Place the baskets or wire racks onto the frame. Load your items into the new pull-out system. This simple addition has greatly improved your storage accessibility.
9. Corner Cabinet Storage Maximization

This classic, shaker-style kitchen features a bright, welcoming atmosphere with light wood lower cabinets and white upper units. The soft teal subway tile splashback adds a beautiful layer of color without being overpowering, making the space feel personalized and cheerful. A crucial challenge in any kitchen, especially a smaller one, is utilizing the corner base cabinet.
Here, the corner is conquered with specialized, tiered pull-out drawers and a corner caddy that glides out. This eliminates the need to reach deep inside a dark cabinet, bringing pots, pans, and serving dishes directly to the user. Above the counter, glass-front corner cabinets offer an opportunity to display lovely glassware and dinnerware, making the cabinet itself appear less heavy than a solid wood door.
????️ DIY Project: Installing a Corner Cabinet Pull-Out Caddy
Corner cabinets are notorious for becoming cluttered black holes. A rotating or pull-out system instantly makes that space usable and organized. This guide assumes installation of a “Kidney-Shaped” or “Lazy Susan” style caddy system.
Material Required List
- Corner pull-out caddy system kit (includes shelves, hardware, and pivot poles)
- Measuring tape and pencil
- Screws and bolts (as supplied with the kit)
Equipment Required List
- Power drill/driver
- Level
- Safety glasses
Step-by-Step DIY Instructions
- Clear and Prep the Cabinet: Empty out the existing contents and clean the interior of the corner base cabinet thoroughly.
- Determine Pole Placement: The system relies on a central pivot pole. The kit instructions will specify where to install the top and bottom pivot brackets. The bottom bracket is usually screwed directly to the cabinet floor, and the top bracket secures to the underside of the countertop or a permanent shelf above.
- Install the Pivot Brackets: Use the measuring tape to ensure the top and bottom brackets are perfectly aligned vertically. Mark the screw holes. Pre-drill pilot holes and use the drill/driver to secure the brackets firmly to the top and bottom of the cabinet interior.
- Assemble the Pole and Shelves: Assemble the pivot pole according to the kit’s instructions, often involving clipping the pole sections together. Slide the caddy shelves onto the pole. Adjust the height of each shelf to accommodate the items you plan to store, securing them with the provided locking clips.
- Mount the System: Carefully insert the assembled pole and shelf unit between the installed pivot brackets. The system should sit securely between the two points, allowing the shelves to rotate or swing out smoothly.
- Test and Adjust: Test the rotation or swing action of the caddy. If it rubs or catches, you may need to adjust the height of the shelves or the alignment of the pivot pole slightly.
10. Large Drawer Storage and Reflective Splashback

This contemporary kitchen maximizes function through specialized storage methods. Instead of numerous small cabinets, the design incorporates wide, deep drawers in the base units. These deep drawers are far superior for organizing and accessing heavy items like pots, pans, and bulk ingredients, allowing for a more efficient workflow. The sleek, handle-less fronts contribute to the minimalist aesthetic.
The most dramatic element is the full-length mirrored splashback. This feature is a powerful visual trick, reflecting the light from the window and the surrounding room. This creates an immediate impression of a much deeper, more expansive space, solving the challenge of feeling closed in. The continuous, clean lines of the white countertop and upper cabinets further enhance the feeling of calm and order.
????️ DIY Project: Converting Cabinet to Deep Pull-Out Drawers
Converting standard cabinet doors into deep drawers makes items easier to see and reach, utilizing the full depth of the unit. This project focuses on installing full-extension drawer slides and boxes behind an existing door (if you prefer not to change the door front).
Material Required List
- Pre-assembled drawer boxes or materials to build custom boxes (wood)
- Full-extension drawer slides (heavy-duty, appropriate length)
- Wood screws (1/2 inch and 5/8 inch)
- Wood glue
- Measuring tape and pencil
Equipment Required List
- Power drill/driver
- Level
- Square (carpenter’s square)
- Clamps
Step-by-Step DIY Instructions
- Prepare the Opening: Remove the cabinet door and any existing shelves inside the cabinet. Clean the interior. If you are keeping the original door, it must be re-hung using 170-degree hinges so it can open fully out of the way.
- Install the Cabinet Slides: The drawer slides come in two parts: one attaches to the cabinet frame, and one attaches to the drawer box. Refer to the slide instructions for precise placement. Usually, the slides are mounted flush with the cabinet opening. Use a level and square to mark the position for the first set of slides (top drawer). Pre-drill and secure the slides to the cabinet interior walls. Repeat for the lower drawer set, ensuring the vertical spacing is adequate.
- Assemble the Drawers (if not pre-made): If building your own, assemble the drawer boxes using wood glue and screws, ensuring they are perfectly square.
- Attach Drawer Slides: Attach the other half of the slides to the side of each drawer box. The position must align exactly with the slides mounted in the cabinet.
- Insert and Test the Drawers: Carefully slide the drawers onto the runners. The full-extension slides should click into place. Test each drawer by pulling it out all the way. It should glide smoothly and not wobble.
- Adjust and Load: Make any final adjustments to the slide positions if the drawers are catching. Load the drawers with your heavy kitchen items for greatly improved accessibility.
11. Minimalist Corner Kitchen with Rolling Cart

This L-shaped kitchen maximizes utility in a very tight area using a clean, light gray palette. The flat-fronted, handle-less cabinets contribute to a sleek, uninterrupted look, which is essential for making a small space feel organized. Leather pull tabs on the cabinets add a subtle touch of textural warmth against the otherwise cool, modern surfaces.
A smart division is created by the black-framed glass partition. This structural element separates the kitchen visually without blocking precious light or sightlines, a wonderful way to define zones in an open-plan apartment. Most notably, the inclusion of a slim, multi-tiered rolling cart provides flexible storage that can be moved out of the way when necessary, a truly functional piece for a compact home.
????️ DIY Project: Creating a Custom Leather Cabinet Pull
Instead of bulky handles that project into the small workspace, try replacing hardware with simple, soft leather pull tabs for a modern, minimalist look.
Material Required List
- Leather strips (vegetable-tanned leather, about 1/8 inch thick, 1 inch wide)
- Heavy-duty leather hole punch
- Rotary cutter or sharp utility knife
- Ruler and cutting mat
- Cabinet screws (shorter than the existing ones, as they will go through the thin leather)
- Metal washers (optional, for reinforcement)
Equipment Required List
- Power drill/driver
- Pencil
Step-by-Step DIY Instructions
- Measure and Cut the Leather: Determine the length of the leather tab you desire when folded. A length of 6 inches is a good starting point for a folded loop. Use the rotary cutter and ruler on a cutting mat to cut your leather strips to the exact desired length and width.
- Mark the Screw Holes: Take one leather strip and fold it in half neatly. Mark the position for the screw hole(s). If you are using one screw, mark a hole near the cut end, ensuring the screw will pass through both layers of the leather when folded. If you are using two screws, mark the positions on the flat strip before folding.
- Punch the Holes: Place the leather strip on a protected surface and use the heavy-duty hole punch to create clean, smooth holes at your marked spots. Make sure the holes are large enough for your cabinet screws.
- Attach the Pull: Align the folded leather strip onto the existing cabinet hole(s). Insert the new, slightly shorter screw through the leather and into the cabinet door. If using a washer, place it between the screw head and the leather for durability.
- Tighten Securely: Use the power drill/driver to tighten the screw gently, securing the leather pull to the cabinet door. Ensure it is firm but do not over-tighten, which could damage the leather. Repeat for all cabinets and drawers.
12. Generous Pull-Out Pantry with Light Palette

The calm gray shaker-style cabinetry and large farmhouse sink give this kitchen a timeless, elegant feel. The white subway tile backsplash and marble-look countertop reflect light well, contributing to the bright atmosphere. This design smartly handles appliance storage by building them into the wall units, maintaining a continuous sightline at the counter level.
Maximizing vertical space is achieved through the use of a tall, full-height pantry unit. When opened, this unit reveals custom-built tiered shelving, complete with interior lighting, which showcases every item clearly. A lower pull-out unit near the counter offers quick access to cleaning supplies and sponges, proving that even tricky sink base cabinets can be highly organized.
????️ DIY Project: Adding Lighting Inside a Pantry Cabinet
Illuminating the interior of a deep pantry makes finding ingredients simpler and adds a sophisticated touch. This project uses battery-operated, motion-sensor LED puck lights for easy installation.
Material Required List
- Battery-operated LED puck lights (motion-sensor type recommended)
- Double-sided mounting tape or screws (usually included with lights)
- Rubbing alcohol and a clean cloth
- Measuring tape
Equipment Required List
- Power drill/driver (if using screws)
- Safety glasses
Step-by-Step DIY Instructions
- Clean the Surfaces: Empty the pantry. Determine the best mounting location for your lights. The top center of the cabinet interior or beneath each shelf lip are common spots. Clean the chosen surface areas thoroughly with rubbing alcohol to ensure the mounting tape adheres properly.
- Determine Light Spacing: If using multiple puck lights, plan for even spacing across the top of the cabinet or under the shelves to eliminate shadows. Use your measuring tape to mark the center point for each light.
- Mount the Lights: Remove the protective backing from the double-sided mounting tape on the back of the puck light base (or use the provided screws and drill/driver to secure the base). Press the light base firmly onto the marked spot for at least thirty seconds. Repeat this process for all lights.
- Insert Batteries and Test: Insert the batteries into each LED light unit. If they are motion-sensor lights, close the cabinet door, wait a moment, and then open it. The lights should immediately switch on, illuminating the contents of the pantry. If they don’t, check the battery orientation and the sensor sensitivity settings.
13. Peninsula Counter and Hidden Pull-Out Storage

This light-filled kitchen cleverly uses a half-wall or peninsula to separate the dining area while creating an efficient U-shaped layout. The combination of dark blue base cabinets and white wall units provides a sharp, sophisticated contrast. Notice the rich wood countertop which extends gracefully into a small, attached dining table, saving space typically required for a freestanding table.
A pull-out cabinet is integrated right into the end of the peninsula. This narrow, deep storage unit is specially designed for bottles, condiments, and cleaning supplies, offering easy access from both the counter and the dining side. This efficient use of the peninsula’s shallow depth demonstrates outstanding space utilization, transforming an overlooked area into highly functional storage.
????️ DIY Project: Customizing an Existing End Cabinet for Shallow Pull-Out Storage
If you have a shallow cabinet or the end of a peninsula, you can install a narrow pull-out system for bottles and cans, making the most of tight spaces.
Material Required List
- Narrow pull-out basket system kit (specifically designed for shallow cabinets)
- Plywood (for backing or securing runners, if needed)
- Wood screws (appropriate length for the kit and cabinet material)
- Measuring tape and pencil
Equipment Required List
- Power drill/driver
- Level
- Safety glasses
Step-by-Step DIY Instructions
- Measure the Opening: Accurately measure the height, depth, and—most importantly—the width of the cabinet opening where the pull-out will be installed. Purchase a pull-out kit that fits these exact dimensions.
- Mount the Runners: Most shallow pull-out systems require runners to be mounted on the floor and/or the side walls. If the side walls are thin, you might need to screw the runners into a plywood backing piece first, then attach the plywood to the wall for extra support. Use the level to ensure both sides are perfectly parallel and straight.
- Attach Runners to the Door (if applicable): If your system is door-mounted, attach the mounting brackets to the inside of the cabinet door. This step requires precision so that the door aligns properly when closed.
- Assemble and Install the Rack: Assemble the bottle rack frame and baskets according to the kit instructions. Slide the assembled frame onto the mounted runners inside the cabinet. If the door is separate, attach the pull-out frame to the door’s mounting brackets.
- Test the Movement: Open and close the pull-out several times. It should glide effortlessly. Load it with bottles, placing the heaviest items on the bottom, and check the movement again to ensure stability.
14. Cozy Niche Kitchen with Curved Counters

Framed by an elegant arched doorway, this tiny U-shaped kitchen nook feels intimate and efficiently planned. The use of all-white cabinetry and white subway tile backsplash creates a seamless, bright backdrop that instantly makes the area appear larger than its actual footprint. The warm wood countertop adds a beautiful natural element and grounds the space.
Corner cabinets are designed with gentle curves at the end, replacing sharp edges with soft lines. This small modification improves traffic flow through the opening and adds a unique design touch. Crucially, the corner base unit features open shelving, eliminating dead space and providing accessible storage for frequently used pots and plates. This maximizes both function and aesthetic appeal.
????️ DIY Project: Installing a Decorative Corbel Shelf
Adding decorative corbel shelves above the countertop or flanking a window can provide small, stylish storage niches without the bulk of a full cabinet.
Material Required List
- Two wooden corbels (decorative brackets)
- One small shelf board (finished to match countertops or trim)
- Wood screws (2 1/2 inch)
- Wood filler or putty
- Paint (to match wall or trim color)
Equipment Required List
- Power drill/driver
- Stud finder
- Level and tape measure
- Safety glasses
Step-by-Step DIY Instructions
- Mark the Shelf Location: Choose the height and location for your small shelf. Use the level and tape measure to draw a light, horizontal line on the wall where the bottom of the shelf will sit. The shelf should be high enough not to interfere with countertop use.
- Mount the Corbels: Use the stud finder to locate studs behind the wall. The corbels should ideally be secured directly into studs for maximum support. If studs aren’t available, use heavy-duty anchors. Hold the first corbel in place, mark the screw holes, pre-drill, and secure it firmly. Ensure the corbel is plumb (straight up and down).
- Mount the Second Corbel: Measure the exact distance needed to support your shelf board and repeat the mounting process for the second corbel, ensuring it is level with the first one.
- Attach the Shelf: Place the shelf board on top of the mounted corbels. The corbels should support the shelf evenly. Secure the shelf to the top of the corbels by driving short screws up through the corbel and into the underside of the shelf board.
- Finish the Shelf: Fill any visible screw holes and gaps with wood filler. Once dry, sand lightly. Prime and paint the corbels and shelf edges to blend seamlessly with your trim or wall color.
15. Modern Galley Kitchen with Designer Cabinetry

This spectacular galley kitchen showcases how dark colors can work wonderfully in a narrow space when combined with reflective materials. The midnight blue base cabinets create a rich foundation. The upper cabinets are truly striking, featuring dark-framed glass doors with fluted or reeded texture and integrated internal lighting. This design choice lights up the displayed glassware beautifully.
The lighting behind the glass not only showcases the items but also casts a gentle, ambient glow that visually expands the height of the room. Furthermore, the base units feature smart corner solutions, including metal pull-out shelves and swing-out caddies for pots, ensuring that not a single inch of storage is wasted. The clean white counter and white splashback balance the dark tones perfectly.
????️ DIY Project: Installing Internal Cabinet Lighting for Glass Doors
Adding LED lighting inside cabinets with glass fronts highlights contents and creates dramatic, expansive lighting effects in a small kitchen.
Material Required List
- LED strip lighting (low-profile, flexible type)
- Power supply/transformer (appropriate for the strip length)
- Corner aluminum channels (for a cleaner look and better light diffusion)
- Connecting wires and wire connectors
- Rubbing alcohol and a clean cloth
Equipment Required List
- Measuring tape
- Scissors/Utility knife
- Power drill (for routing wires)
- Safety glasses
Step-by-Step DIY Instructions
- Plan Wire Routing: Determine where your power source will be. Wires must be routed as discreetly as possible, often through a small hole drilled into the back or top of the cabinet box. Plan to run the strip along the inside front edge of the cabinet box, just behind the door frame.
- Measure and Cut Strips: Measure the length of the cabinet interior where the strip will be placed (along the top, bottom, or sides). Cut the LED strips to the appropriate lengths at the designated cutting points.
- Install Aluminum Channels (Optional but Recommended): Place the aluminum channels in the inner corners of the cabinet where the light will sit. These channels provide a clean housing for the strip and help to diffuse the light evenly. Secure them with small screws or adhesive.
- Mount the LED Strips: Clean the inside surface of the channel or cabinet with rubbing alcohol. Peel the adhesive backing and press the LED strip firmly into the channel or directly onto the cabinet interior.
- Connect the Power: Connect the strips to the power supply using the connecting wires. Route the power cord out of the cabinet through the pre-drilled hole to the transformer/power outlet.
- Test the Lights: Plug in the transformer and test the lighting. Ensure the placement maximizes the illumination of the shelves and glassware without creating harsh glare.
16. Classic Cabinetry with Highlighted Interior Storage

This warm, inviting kitchen features lovely sage green, shaker-style cabinets paired with natural wood butcher block counters. The classic farmhouse sink and brass hardware enhance the traditional, cozy atmosphere. The design smartly uses the vertical space with a full-height pantry unit seamlessly integrated into the wall.
The special visual element is the open wall cabinet, which is painted a contrasting, rich ochre yellow inside. This pop of color draws the eye immediately, transforming a simple storage unit into a display feature for glassware and dishes. This unexpected, colorful detail adds great depth and personality, preventing the small room from feeling monochromatic or dull.
????️ DIY Project: Painting the Interior of a Cabinet for Contrast
Adding a bright, contrasting color inside a wall cabinet is a simple, cost-effective way to create a decorative feature and showcase your dinnerware.
Material Required List
- Primer (bonding primer recommended)
- Interior cabinet paint (high-quality, satin or semi-gloss finish)
- Painter’s tape (high-quality, low-tack)
- Drop cloth
- Fine-grit sandpaper (220 grit)
- Small foam rollers and small paintbrush
Equipment Required List
- Screwdriver (for removing the door and shelves)
- Safety glasses
Step-by-Step DIY Instructions
- Remove and Prepare: Remove the cabinet door, hinges, and any adjustable shelves. Lay the door and shelves aside in a safe spot. Lightly scuff the interior surfaces of the cabinet box with fine-grit sandpaper. This helps the new paint adhere. Wipe away all sanding dust completely.
- Tape the Edges: Carefully apply painter’s tape along the inside of the cabinet face frame, ensuring that the tape line is straight and precisely where the interior meets the exterior frame. Also tape any necessary areas inside the cabinet box that should not be painted.
- Apply Primer: Apply a thin, even coat of bonding primer to the entire interior surface you plan to paint. Primer helps the color coat look true and stick well. Allow the primer to dry completely according to the manufacturer’s instructions.
- Apply Color Coat: Using the small foam roller, apply the first coat of your chosen contrasting color (e.g., the ochre yellow). Use the paintbrush for the corners and tight spots. Foam rollers leave the smoothest finish.
- Second Coat and Dry: After the first coat is dry, apply a second coat for full opacity and depth of color. Let the second coat cure for the recommended time (often 24 hours or more).
- Reassemble: Carefully remove the painter’s tape while the paint is still slightly soft (this helps ensure a crisp line). Reinstall the dry shelves and reattach the door.
17. Light Gray U-Shaped Kitchen with Smart Storage

This highly functional U-shaped layout uses a calming palette of light gray cabinetry with a clean white countertop and white subway tile backsplash. The design is meticulously planned for storage efficiency. The area above the countertop benefits from subtle under-cabinet lighting that brightly illuminates the work surfaces.
Numerous storage innovations are present, including a wide, convenient pull-out drawer next to the oven, which is stocked with oils and spices. Furthermore, a narrow pull-out pantry is tucked between the refrigerator and the counter. This design uses light colors to expand the space while incorporating specialized, pull-out fittings to maximize access and organization in every corner of the small footprint.
????️ DIY Project: Creating a Custom Knife Block Drawer Insert
Keeping knives in a drawer is safer and saves counter space. A custom insert ensures knives stay organized and protected within a standard kitchen drawer.
Material Required List
- Thin plywood or hardwood strips (1/4 inch or 1/2 inch thickness)
- Wood glue
- Small nails or brads (optional)
- Measuring tape and pencil
Equipment Required List
- Table saw or miter box and handsaw (for precise cuts)
- Clamps
- Sandpaper (medium grit)
- Safety glasses
Step-by-Step DIY Instructions
- Measure the Drawer: Carefully measure the internal width, length, and depth of the drawer you want to convert. This is the maximum size for your insert.
- Cut the Side Pieces: Cut the wood strips to the length of the drawer. These strips will form the rows that hold the knives. You will need pairs of strips (a top strip and a bottom strip for each row of knives). The width of the strips should be less than half the height of the drawer, ensuring the knife handle does not prevent the drawer from closing.
- Determine Slot Spacing: Lay out your knives. Measure the space needed between the front and back of the blade for each knife. This spacing determines where you will stop the top strip short of the drawer’s back. The top strip needs to hold the blade straight, and the bottom strip provides the foundation.
- Assemble the Insert Base: Cut the top and bottom strips for each row. Apply wood glue and use small nails/brads to secure the top strip to the bottom strip, leaving a gap at the back equal to the length of the knife blade. Repeat this for all the knife slots you need.
- Install the Insert: Once the glue is dry, place the finished strip units inside the drawer, spacing them correctly for the thickness of each knife. You can glue or nail the units to the drawer bottom, or just let them sit loose if they fit snugly. Place your knives into the slots (blades down) to test the fit.
18. Open-Plan Kitchen with Multipurpose Island

Integrating the kitchen into the main living space requires careful definition, which is brilliantly achieved here with a central island. This island features a dark countertop contrasting with the light gray wood-grain cabinetry. It serves multiple functions: sink area, food preparation surface, and a dining counter due to the raised wood bar top.
The design utilizes every inch of the island’s structure for storage. One side features a dedicated wine rack and pull-out storage for bottles, while the other side incorporates a tall, swing-out caddy for cleaning products, often needed near the sink. Visible dustbins are placed neatly under the elevated bar top, indicating a full commitment to maximizing both form and function.
????️ DIY Project: Building a Simple Custom Wine Nook into Cabinetry
Adding a small, custom wine rack nook to an existing cabinet provides attractive, specific storage for bottles without requiring a massive renovation.
Material Required List
- Thin, strong wood strips (1/2 inch thickness)
- Wood glue
- Small nails or brads
- Cabinet paint (to match the existing cabinet)
- Measuring tape and pencil
Equipment Required List
- Table saw or miter saw
- Clamps
- Sandpaper (220 grit)
- Safety glasses
Step-by-Step DIY Instructions
- Choose and Measure the Space: Select an existing cabinet or a section of a cabinet, ideally next to an upper cabinet door, to dedicate to the wine nook. Measure the internal height, depth, and width of this section.
- Calculate Racking: Wine bottles typically require about 4 inches of space to sit comfortably. Divide your cabinet width by 4 inches to determine how many vertical dividers you need.
- Cut the Dividers: Cut the wood strips to create horizontal shelves and vertical dividers. The horizontal pieces should be the depth of the cabinet. The vertical dividers should be the height of one bottle, minus the thickness of the horizontal wood strips.
- Assemble the Grid: Mark the positions for the vertical dividers on your horizontal shelf pieces. Apply wood glue and use small nails/brads to assemble the grid structure (a series of ‘X’ or ‘H’ shapes, or simple squares). Clamps help hold the pieces while the glue sets.
- Finish the Rack: Sand the entire rack lightly and paint it to match the rest of your cabinet interior or exterior. Let it dry completely.
- Install the Rack: Slide the finished rack into the designated cabinet section. You can secure it with small screws through the back of the cabinet box, ensuring the rack cannot slide out when bottles are placed inside.
19. Two-Tone Kitchen with Farmhouse Sink

This kitchen blends rustic elements, like the large farmhouse sink and light wood cabinetry, with clean, modern lines. The light gray upper cabinets and darker gray base cabinets create a pleasant visual contrast, anchoring the lower portion of the room. A practical white subway tile backsplash brightens the entire countertop area.
The design emphasizes vertical organization. The tall, built-in cabinet houses a combination oven and microwave, keeping the countertop completely free for preparation. Next to the oven, a narrow pull-out cabinet provides convenient, accessible storage for cleaning products and supplies, an excellent way to use the otherwise limited space next to an appliance.
????️ DIY Project: Installing a Farmhouse Sink Front Apron Panel
While installing the actual sink is complex plumbing work, creating a removable access panel beneath a farmhouse sink (often called an apron front) is a great DIY storage solution.
Material Required List
- Plywood or MDF panel (to match cabinet finish)
- Simple hidden cabinet hinges (non-drilled cup style, surface mount)
- Magnetic cabinet latches (or push-to-open latches)
- Screws
Equipment Required List
- Power drill/driver
- Measuring tape and level
- Router (optional, for decorative edge)
- Safety glasses
Step-by-Step DIY Instructions
- Measure the Opening: Measure the exact height and width of the apron opening beneath your farmhouse sink. Cut the plywood or MDF panel to fit this opening precisely. Finish the panel with paint or veneer to match the surrounding cabinetry.
- Mount the Hinges: Attach the simple surface-mount hinges to the inside edge of the cabinet box on one side of the opening. Attach the corresponding hinge plates to the inside of your new panel. The hinges allow the panel to swing open.
- Install the Panel: Carefully fit the panel into the opening and secure the hinges. The panel should swing open smoothly.
- Install the Magnetic Latches: Install one or two magnetic latches (or push-to-open latches) on the inside of the cabinet box opposite the hinges. Install the strike plate onto the inside of the panel so that when the panel is closed, it holds securely shut.
- Test the Panel: Open and close the panel. When shut, it should look seamless with the surrounding cabinet fronts. When open, it provides easy access to the area directly beneath the sink for storage or plumbing maintenance.
20. Galley Kitchen with Bold Copper Ceiling

This stylish galley kitchen addresses the feeling of confinement through sophisticated visual tricks, particularly above. The walls are lined with floor-to-ceiling cabinets on one side and a run of base cabinets and open shelving on the other, ensuring maximum storage. The light, neutral shaker cabinetry and white marble countertops keep the entire space bright.
The ceiling is the most striking feature, clad in a sleek, glossy copper panel surrounded by recessed ribbon lighting. This shiny, reflective surface draws the eye upward and visually expands the height of the room. The under-shelf lighting adds a final layer of illumination, giving the long, narrow kitchen a welcoming, luxurious glow.
????️ DIY Project: Installing Under-Shelf LED Strip Lighting
Lighting open shelving not only highlights display items but also visually lifts the shelves, making the wall feel less flat and more spacious.
Material Required List
- LED strip lighting (low-voltage, peel-and-stick)
- Power supply/transformer
- Discreet wire clips or channels
- Rubbing alcohol and a clean cloth
- Measuring tape
Equipment Required List
- Scissors or utility knife
- Power drill (if routing wires)
- Safety glasses
Step-by-Step DIY Instructions
- Measure the Shelves: Determine the length of the LED strip needed for the underside of each open shelf. If your shelves are thick, you might run the strip along the back underside to hide it completely from view.
- Clean the Surface: Thoroughly clean the underside of the shelf where the strip will be applied using rubbing alcohol. This guarantees the adhesive will bond securely.
- Plan Wire Routing: The wires must be hidden. If the shelves meet the wall, you can run the tiny wires along the wall behind the shelf, using discreet wire clips, or route them up through a small hole drilled through the shelf and the wall (if you have wall access).
- Apply the LED Strips: Cut the strips to size at the designated cut points. Peel off the backing and firmly press the strip onto the underside of the shelf.
- Connect and Conceal: Connect the strips to the power supply. Run the power wire to the nearest outlet. Use wire channels or clips to secure all wiring neatly, ensuring no wires are dangling or visible.
- Test the Lights: Plug in the power supply. The downward-cast light will instantly add warmth and definition to the items on the countertop below and highlight the items on the shelf itself.
21. Hidden Appliance Station with Tambour Door

This bright kitchen integrates smart solutions to keep the counter clear while still offering full functionality. The light gray cabinets and natural wood accents create a serene and welcoming atmosphere. The most noteworthy feature is the appliance garage, cleverly concealed behind a rolling tambour door. This keeps everyday items like a coffee machine or toaster out of sight when not in use.
Beneath the counter, specific compartments are designed to house a small beverage fridge and a toaster oven. This strategic placement ensures that every appliance has a designated home, eliminating clutter. The open shelving on the right, filled with glassware, provides a neat display while offering convenient access, and under-shelf lighting brightens the workspace beautifully.
????️ DIY Project: Building a Simple Tambour Door Appliance Garage
A tambour door rolls up and out of the way, making it a sleek way to hide appliances and keep your countertops clean. This project focuses on a basic, non-powered version.
Material Required List
- Tambour door kit (includes slats, track, and handle)
- Plywood (1/2 inch thickness for side panels and top/bottom of garage)
- Wood glue
- Small nails or screws
- Finishing materials (paint or veneer to match cabinets)
- Measuring tape and pencil
Equipment Required List
- Circular saw or table saw
- Router (optional, for recessing tracks)
- Power drill/driver
- Safety glasses
- Clamps
Step-by-Step DIY Instructions
- Determine Garage Dimensions: Measure the area where you want your appliance garage. Decide on the height, width, and depth needed to comfortably house your appliances. Cut the plywood panels for the sides, top, and bottom of the garage according to these measurements.
- Assemble the Garage Box: Use wood glue and small screws or nails to assemble the plywood into a simple box shape. Ensure it is square and sturdy. If you want to recess the tracks, use a router to cut shallow grooves along the inside edges of the side panels where the tambour door tracks will sit.
- Install the Tambour Tracks: Follow the instructions provided with your tambour door kit. The tracks typically fit into grooves or are surface-mounted along the inside edges of the garage’s side panels and curve around to the top. Secure the tracks firmly.
- Attach the Tambour Door: Carefully slide the tambour door slats into the installed tracks. The door should glide smoothly up and down. Attach the handle to the bottom slat of the tambour door.
- Finish the Garage: Fill any visible screw holes with wood putty and sand smooth. Paint or veneer the exterior of the appliance garage to match your existing kitchen cabinetry.
- Place and Load: Place your new appliance garage in its designated spot on the countertop. Load your appliances inside. Now, you can simply roll the door down to hide them, maintaining a clutter-free kitchen.
22. Reflective Mirrored Wall in a Dark Kitchen

This contemporary kitchen makes a bold statement with its dark, almost black, flat-front cabinetry. The color choice, while unconventional for small spaces, is expertly counteracted by highly reflective surfaces. A floor-to-ceiling mirrored wall on the right dramatically expands the perceived size of the kitchen, reflecting the light and the adjacent living area.
Above the sink, a mirrored splashback extends to meet the upper cabinets, further enhancing the illusion of depth. A continuous LED strip light runs along the base of the upper cabinets, providing functional task lighting while adding a striking line of illumination. The large, full-height pull-out pantry next to the refrigerator demonstrates an advanced level of interior organization, keeping everything neatly out of sight.
????️ DIY Project: Installing a Mirrored Backsplash Section
A mirrored backsplash is an excellent way to visually expand a small kitchen and bounce light around. This project covers installing pre-cut mirror tiles or a single mirror panel section.
Material Required List
- Mirror tiles or a single mirror panel (cut to size)
- Strong mirror adhesive (ensure it is suitable for mirrors, as some adhesives can damage the silver backing)
- Painter’s tape
- Rubbing alcohol and a clean cloth
- Drop cloth
- Spacers (if using mirror tiles for small gaps)
Equipment Required List
- Caulk gun (for adhesive)
- Level
- Measuring tape
- Safety glasses and gloves
Step-by-Step DIY Instructions
- Prepare the Surface: Ensure the wall where the mirror will be installed is clean, dry, and free of grease. Clean the back of the mirror pieces as well. Lay down a drop cloth to protect your counters.
- Plan the Layout: If using mirror tiles, lay them out on a table first to plan your pattern and cuts. Mark the center of your wall section to start tiling for a balanced look. For a single panel, mark its precise position on the wall.
- Apply Adhesive: Apply the mirror adhesive to the back of the first mirror tile or panel. Follow the manufacturer’s instructions for application pattern (e.g., zig-zag or dots). Do not apply adhesive too close to the edges to avoid squeeze-out.
- Install the Mirror: Carefully place the mirror piece onto the wall, aligning it with your marks. Press firmly and evenly. If using tiles, use spacers to ensure consistent gaps. Use painter’s tape to hold the mirror pieces in place while the adhesive cures, especially for larger panels. Support large panels with temporary shims or props from below if needed.
- Clean and Cure: Immediately wipe away any excess adhesive that squeezes out with a damp cloth or appropriate cleaner. Allow the adhesive to cure completely, which can take 24-72 hours, before removing the painter’s tape.
23. Open Shelving with Integrated Lighting and Storage Drawers

This lively kitchen embraces warm wood tones and open shelving to create a welcoming and highly functional space. The lower cabinets feature a mix of textured wood fronts and integrated wooden crate-style drawers, which add a rustic, organic touch. These drawers are particularly useful for storing vegetables or frequently accessed items.
Above the counter, sturdy open shelves are bathed in integrated LED lighting. This lighting illuminates the colorful dishes and potted plants, making them feel like decorative elements rather than clutter. The track lighting on the ceiling further brightens the entire room, emphasizing the high ceilings. A track system with movable spotlights ensures no corner of the work area remains in shadow.
????️ DIY Project: Installing Simple Open Shelves with Under-Shelf Lighting
Combine the visual lightness of open shelves with the practicality of integrated lighting for a modern, functional look.
Material Required List
- Pre-finished wood shelves (or wood to cut and finish)
- Floating shelf brackets (concealed type for a clean look)
- Low-profile LED strip lights with adhesive backing
- Power supply/transformer for LED lights
- Discreet wire clips
- Rubbing alcohol and clean cloth
- Wood screws (for brackets)
Equipment Required List
- Power drill/driver
- Stud finder
- Level and tape measure
- Scissors (for LED strip)
- Safety glasses
Step-by-Step DIY Instructions
- Install Floating Shelf Brackets: Choose your shelf locations. Use a stud finder to locate wall studs. Mark a horizontal line for the bottom of your shelves using a level. Install the floating shelf brackets, ensuring they are perfectly level and securely screwed into studs or heavy-duty wall anchors.
- Prepare Shelves for Lighting: If your shelves have a slight lip or groove on the underside, clean this area thoroughly with rubbing alcohol. If not, plan to run the LED strip directly along the back underside edge of the shelf where it meets the wall.
- Attach LED Strips to Shelves: Measure the length of each shelf. Cut the LED strip lights to the appropriate length at the marked cutting points. Peel off the adhesive backing and firmly press the LED strip onto the clean underside of each shelf.
- Route and Connect Wiring: This is the most crucial step for a clean look. The tiny wires from each LED strip need to be run discreetly to the power supply. You might need to drill small holes through the back of the shelves and into the wall (if you have wall access) or run the wires along the top or back edges of the shelves, securing them with discreet wire clips. Connect all the strips to the power supply.
- Mount the Shelves: Carefully slide your finished shelves onto the mounted brackets. Ensure they are secure and flush against the wall.
- Test the Lighting: Plug in the power supply and test your new illuminated shelves.
24. U-Shaped Kitchen with Deep Berry Cabinets

This U-shaped kitchen features a striking and unexpected deep berry color for the base cabinets, which provides a rich, luxurious feel. The white upper cabinets and subway tile splashback balance the bold color, keeping the overall impression bright and open. White marble-look countertops complete the elegant look.
The design makes excellent use of specialized internal fittings. On both sides of the sink, there are deep pull-out drawers with internal dividers, perfect for organizing dishes, bowls, and even mugs. The upper cabinets feature glass fronts and internal lighting, allowing for the attractive display of glassware while adding an extra layer of ambient illumination that enhances the sense of space.
????️ DIY Project: Installing Wire Basket Pull-Out Drawers
Convert a standard cabinet into an organized storage system with easy-to-access wire basket pull-out drawers. These are especially useful for produce or items needing air circulation.
Material Required List
- Wire basket pull-out system kit (includes baskets, runners, mounting hardware)
- Measuring tape and pencil
- Wood screws (appropriate length for the kit)
Equipment Required List
- Power drill/driver
- Level
- Safety glasses
Step-by-Step DIY Instructions
- Clear and Clean the Cabinet: Remove everything from the cabinet and wipe down the interior, particularly the base and side walls.
- Install the Runners: The kit will include runners (slides) that attach to the inside walls of the cabinet. Following the manufacturer’s instructions, position the first set of runners at the desired height. Use the tape measure to ensure they are the correct distance from the cabinet front edge. Mark the screw holes with a pencil.
- Secure the Runners: Pre-drill pilot holes and use the drill/driver to firmly attach the runners to the cabinet walls. Use a level to ensure both runners are perfectly parallel and straight. Repeat this process for any additional sets of runners for multiple baskets.
- Attach Baskets to Runners: Slide the wire baskets onto the installed runners. Most systems click into place. Test the movement of each basket to ensure it glides smoothly and does not catch on the cabinet frame.
- Adjust and Load: Make any minor adjustments to the runners if necessary. Load the baskets with your kitchen items. The open wire design helps you see everything at a glance.
25. Multipurpose Island with Integrated Beverage Fridge

This light, airy kitchen features neutral beige cabinets and white countertops, creating a serene and spacious feel. A central island serves as a versatile hub, incorporating a sink, an extended counter for prep, and a cozy seating area. The soft, sculptural pendant lights above the island add a touch of modern elegance and visual interest without being visually heavy.
A key feature for both convenience and space-saving is the integrated beverage fridge built into the island. This keeps drinks readily accessible without taking up valuable refrigerator space or counter area. One end of the island also includes open shelving, providing a handy spot for cookbooks, small appliances, or decorative items, further enhancing its multifunctionality.
????️ DIY Project: Installing a Small Integrated Beverage Fridge in an Island
Adding a beverage fridge to your kitchen island enhances convenience and creates a dedicated “refreshment station” without cluttering your main refrigerator. This assumes you are installing in a new or modified cabinet opening.
Material Required List
- Compact beverage fridge (appropriate size for cabinet opening)
- Plywood or MDF (for building a custom enclosure if needed)
- Wood screws
- Measuring tape and pencil
- Electrical outlet (properly wired and located within the island)
Equipment Required List
- Power drill/driver
- Jigsaw or circular saw
- Level
- Safety glasses
Step-by-Step DIY Instructions
- Measure and Prepare the Opening: Carefully measure the dimensions of your beverage fridge (height, width, depth). Ensure your island has an existing cabinet opening that is slightly larger than these dimensions to allow for air circulation. If not, you may need to modify an existing cabinet or build a new enclosure from plywood.
- Ensure Proper Ventilation: Beverage fridges require adequate ventilation. Make sure there is space for air to circulate around the back and sides of the unit, and that the front grille is unobstructed. If building an enclosure, incorporate vents as recommended by the fridge manufacturer.
- Install Electrical Outlet: Confirm there is a dedicated electrical outlet inside the island cabinet where the fridge will sit. If not, this is a job for a qualified electrician to install one safely. Do not proceed without a proper electrical connection.
- Slide in the Fridge: Carefully slide the beverage fridge into the prepared opening in the island. Ensure it is level and centered.
- Secure the Fridge (Optional): Some integrated fridges have brackets or screws to secure them to the cabinet frame to prevent tipping. If your model includes this, follow the manufacturer’s instructions to secure it.
- Test the Fridge: Plug in the fridge and turn it on. Allow it to cool down for several hours before loading beverages.
26. Deep Green Base Cabinets with White Uppers

This inviting kitchen beautifully balances color and light. The deep forest green base cabinets create a rich, grounding effect, while the crisp white upper cabinets and matching white countertop brighten the room, making it feel open and contemporary. The classic subway tile splashback adds a clean, timeless texture.
A clever corner solution is evident with a multi-tiered pull-out system for pots and pans. This design allows for complete access to items typically lost in the back of deep corner cabinets. The brass hardware on both the green and white cabinets adds a sophisticated, warm metallic accent, enhancing the kitchen’s refined aesthetic.
????️ DIY Project: Refreshing Cabinet Hardware with New Pulls
Changing out cabinet hardware is a quick and impactful way to update the look of your kitchen and can tie together different elements like your two-toned cabinetry.
Material Required List
- New cabinet pulls or handles
- Screws (often included with new hardware; ensure they are the correct length)
- Painter’s tape (optional, for measuring)
- Wood putty (if changing hole spacing)
- Sandpaper (if filling holes)
- Paint or touch-up pen (if filling holes)
Equipment Required List
- Screwdriver (manual or drill/driver)
- Measuring tape
- Level (if drilling new holes)
- Drill (if drilling new holes)
Step-by-Step DIY Instructions
- Remove Old Hardware: Use a screwdriver to carefully remove the screws from the inside of your cabinet doors and drawers, detaching the old pulls or handles.
- Assess New Hardware: Compare your new pulls to the old ones.
- If the new pulls use the same screw holes: This is the easiest scenario. Simply proceed to step 5.
- If the new pulls require different hole spacing or only one hole: You will need to fill the old holes.
- Fill Old Holes (if needed): If you are changing the hole spacing, fill the old holes on the cabinet fronts with wood putty. Allow it to dry completely. Sand the patched area smooth and touch up with matching paint or a cabinet touch-up pen.
- Mark New Holes (if needed): If drilling new holes, use your measuring tape and a level to precisely mark the new screw hole positions on each cabinet door and drawer. For pulls, ensure the spacing between the holes is accurate. Drill pilot holes from the front, taking care not to drill all the way through the cabinet interior into yourself!
- Install New Hardware: Insert the screws from the inside of the cabinet door or drawer through the pre-drilled holes. Align the new pull or handle on the outside and gently tighten the screws with a screwdriver. Do not over-tighten, as this can strip the screws or damage the cabinet.
- Enjoy the New Look: Step back and admire your updated kitchen hardware.
27. Ultra-Sleek Galley Kitchen with Full-Extension Drawers

This minimalist galley kitchen embodies modern efficiency with its entirely white, flat-front cabinetry and integrated appliances. The seamless design creates a calm and expansive feeling, visually extending the narrow space. Recessed ceiling lights and a continuous strip of under-cabinet lighting ensure the work surfaces are brightly illuminated, further enhancing the spacious perception.
The true hero of this design is the extensive use of full-extension, deep drawers in the base units. These drawers pull out completely, offering full visibility and easy access to pots, pans, and dishes, eliminating any wasted storage space at the back of the cabinets. This thoughtful organization is paramount for a compact kitchen where every item needs a designated, accessible spot.
????️ DIY Project: Installing Drawer Organizers for Utensils and Dishes
Even with full-extension drawers, internal organizers are crucial for maintaining order and maximizing space within the drawer.
Material Required List
- Drawer organizer inserts (bamboo, plastic, or adjustable wood dividers)
- Non-slip drawer liners (optional)
- Measuring tape and pencil
- Wood glue and small nails (if building custom dividers)
Equipment Required List
- Utility knife (for cutting liners)
- Saw (if cutting custom dividers)
- Safety glasses
Step-by-Step DIY Instructions
- Measure the Drawer Interior: Measure the internal length, width, and depth of your kitchen drawers. This helps you select pre-made organizers or plan for custom ones.
- Add Drawer Liners (Optional): If using, cut the non-slip drawer liner to fit the bottom of each drawer precisely. Place it in the drawer; this prevents items from sliding around.
- Choose Your Organizer Type:
- Pre-made Inserts: Purchase pre-made utensil trays, spice rack inserts, or dish peg systems that fit your drawer dimensions. Simply place them in the drawer.
- Adjustable Dividers: Buy adjustable dividers that expand to fit the drawer width or length. Position them to create compartments that suit your items.
- Custom Wood Dividers: Cut thin wood strips to create custom compartments. Use wood glue and small nails to secure them to the drawer bottom or to each other.
- Arrange and Optimize: Arrange your chosen organizers and dividers to best fit your kitchen tools, cutlery, and dishes. Experiment with different configurations until you achieve the most efficient and accessible layout.
- Load the Drawer: Place your utensils, plates, and other items into their new, organized homes. Enjoy the clarity and ease of finding what you need!
28. Tall Pantry Pull-Out in a Galley Kitchen

This sleek galley kitchen employs a classic black and white color scheme for a sophisticated, expansive feel. Dark base cabinets provide a strong foundation, while the white upper cabinets and subway tile splashback keep the room bright. The contrasting dark, textured wall on the left adds depth without overwhelming the space.
A standout feature is the full-height, multi-tiered pull-out pantry. This unit maximizes vertical storage in a narrow footprint, allowing for the organized storage of countless canned goods, spices, and cleaning supplies. The pull-out mechanism ensures every item is visible and accessible, transforming a potentially awkward tall cabinet into a highly functional storage solution.
????️ DIY Project: Installing a Full-Height Pull-Out Pantry System
A tall pull-out pantry is a game-changer for maximizing storage in a narrow cabinet, bringing all items into full view and reach.
Material Required List
- Full-height pantry pull-out system kit (includes frame, shelves/baskets, and heavy-duty slides)
- Measuring tape and pencil
- Wood screws (appropriate for the kit and cabinet material)
Equipment Required List
- Power drill/driver
- Level
- Safety glasses
Step-by-Step DIY Instructions
- Empty and Prepare the Cabinet: Remove everything from the cabinet. Ensure the cabinet floor and side walls are clean and sturdy.
- Install the Bottom and Top Slides: The system typically has a heavy-duty slide mechanism that attaches to the cabinet floor and another smaller guide that attaches to the top of the cabinet interior (or underside of the countertop). Carefully follow the kit’s instructions for precise placement. Use a level to ensure both mounting points are perfectly aligned.
- Mount the Slides: Mark the screw holes for the bottom slide. Pre-drill and secure the bottom slide to the cabinet floor. Repeat for the top guide or slide.
- Assemble the Pantry Frame: Assemble the main frame of the pull-out pantry, including any shelves or baskets, according to the kit’s instructions. This frame will attach to the slides.
- Install the Pantry Unit: Attach the assembled pantry frame to the installed slides. This often involves a simple clip or screw mechanism. Gently slide the unit in and out to test its movement. It should glide smoothly and not wobble.
- Load and Adjust: Once installed, load your pantry items, distributing weight evenly. Make any final adjustments to the shelves or frame to ensure optimal functionality.
29. Roll-Out Prep Station with Butcher Block

This compact kitchen prioritizes functionality and flow with light wood, flat-front cabinetry and a dark countertop. The white subway tile backsplash brightens the area, creating a neat and inviting atmosphere. Under-cabinet lighting ensures the work surfaces are always well-illuminated.
The most innovative feature is the roll-out work station. This unit comprises a butcher block countertop on a sliding mechanism, which can be pulled out to extend the preparation area when needed. Below the butcher block, open shelving provides accessible storage for frequently used small appliances or ingredients, keeping them off the main counter yet within reach. This flexible design is a smart solution for maximizing limited counter space.
????️ DIY Project: Building a Simple Roll-Out Prep Station
A pull-out cutting board or small prep station expands your workspace in a compact kitchen without needing a full island.
Material Required List
- Butcher block or sturdy wood panel (for the top surface)
- Heavy-duty full-extension drawer slides (rated for the weight of your top and any items stored below)
- Plywood (1/2 inch thickness for the frame)
- Wood glue
- Wood screws
- Casters/wheels (optional, if making it truly freestanding/rolling)
- Measuring tape and pencil
Equipment Required List
- Circular saw or table saw
- Power drill/driver
- Level and square
- Clamps
- Sandpaper (medium grit)
- Safety glasses
Step-by-Step DIY Instructions
- Measure and Design: Choose an existing cabinet opening or a dedicated space where the roll-out will reside. Measure the width, height, and depth. Design your roll-out unit to fit precisely, ensuring clearance for the slides. Decide if it will be a simple pull-out board or a small cart with shelves.
- Build the Frame (if a cart): If creating a cart with shelves, cut plywood to form the base and side panels. Assemble with wood glue and screws, ensuring it is square and sturdy. Attach casters to the bottom if it will be a movable unit.
- Install Drawer Slides: Attach one half of the heavy-duty full-extension slides to the inside of the cabinet opening. Ensure they are level and parallel to each other. Attach the other half of the slides to the sides of your butcher block top or the top of your rolling cart.
- Attach Butcher Block: Secure the butcher block top to the sliding mechanism. If it’s a simple pull-out board, it will attach directly to the slides. If it’s a cart, the slides will attach to the top of the cart frame.
- Slide and Test: Carefully slide the assembled prep station into its cabinet opening. Test the movement. It should glide smoothly and fully extend without catching.
- Finish (Optional): You can paint or veneer the visible parts of the roll-out station to match your existing cabinetry.
30. Glossy Gray Kitchen with Integrated Spice Pull-Out

This modern kitchen exudes sophistication with its high-gloss gray cabinetry, which reflects light beautifully and helps to visually expand the room. The clean, handle-less design of the cabinets contributes to a seamless, contemporary aesthetic. A continuous strip of under-cabinet lighting illuminates the crisp white countertop and splashback, creating a bright and inviting workspace.
A key organizational feature is the narrow, full-height pull-out spice rack located next to the sink. This slim unit is specifically designed to store numerous spice jars and bottles, keeping them organized and easily accessible without cluttering shelves or drawers. The use of open shelving for a few decorative items above the sink adds a personal touch without sacrificing the streamlined look.
????️ DIY Project: Installing a Narrow Spice Pull-Out Rack
A narrow pull-out spice rack is an efficient way to use those awkward small spaces next to appliances or sinks, keeping spices organized and within reach.
Material Required List
- Narrow spice pull-out rack kit (includes racks, frame, and slides)
- Measuring tape and pencil
- Wood screws (appropriate for the kit and cabinet material)
Equipment Required List
- Power drill/driver
- Level
- Safety glasses
Step-by-Step DIY Instructions
- Measure the Opening: Accurately measure the height, depth, and narrow width of the cabinet opening where the pull-out will be installed. Purchase a pull-out kit that is specifically designed for these slim dimensions.
- Mount the Runners: Most narrow pull-out systems require runners (slides) to be mounted on the cabinet floor and/or the side walls. Following the kit’s instructions, position the runners. Use the tape measure to ensure they are the correct distance from the cabinet front edge. Mark the screw holes with a pencil.
- Secure the Runners: Pre-drill pilot holes and use the drill/driver to firmly attach the runners to the cabinet. It is crucial for both runners to be perfectly parallel and level for smooth operation.
- Assemble and Install the Rack: Assemble the spice rack frame and shelves/baskets according to the kit’s instructions. Slide the assembled frame onto the mounted runners inside the cabinet. If the cabinet door is integrated with the pull-out (door-mounted system), attach the door to the pull-out frame as directed by the kit.
- Test the Movement: Open and close the pull-out several times. It should glide effortlessly. Load it with your spice jars, placing heavier items at the bottom, and check the movement again to ensure stability.
31. Slatted Wood Feature Wall with Hidden Storage

This kitchen makes a striking visual statement with its extensive use of vertical wooden slats. This design element, seen on both the tall cabinet on the left and the upper cabinets spanning the wall, adds rich texture and warmth. The dark gray base cabinets create a modern contrast, while the pristine white countertop and backsplash ensure the work area remains bright and clean.
Hidden within the slatted panels are a full-height pantry and upper cabinets, maintaining a seamless appearance. Below the counter, a slim pull-out drawer beside the sink offers discrete storage for sponges or small utensils, keeping the countertop free of clutter. The open shelf above the sink, illuminated by under-cabinet lighting, provides a handy spot for frequently used spices and dishes.
????️ DIY Project: Installing a Decorative Slatted Wall Panel
Adding a slatted wood panel feature wall or cabinet front can introduce texture, warmth, and a modern aesthetic to a flat kitchen surface.
Material Required List
- Wood slats (thin, uniform strips of wood, e.g., pine or MDF with veneer)
- Plywood backing board (thin, to mount slats onto)
- Wood glue
- Small finishing nails or brads
- Measuring tape and pencil
- Level
- Wood stain or paint (optional, for finishing slats)
Equipment Required List
- Miter saw or circular saw (for cutting slats precisely)
- Nail gun (for brads) or hammer
- Clamps
- Sandpaper (fine grit)
- Safety glasses
Step-by-Step DIY Instructions
- Prepare the Backing Board: Measure the area where you want the slatted panel. Cut a piece of thin plywood to this exact size. If painting or staining the slats, finish them now before installation.
- Cut the Slats: Carefully measure the vertical height of your backing board. Cut all your wood slats to this precise length. Ensuring uniformity is crucial for a clean look.
- Attach First Slat: Apply a line of wood glue to the back of your first slat. Align it perfectly with one edge of the plywood backing board. Use small finishing nails or brads to secure it, making sure it is perfectly straight using a level.
- Space and Attach Subsequent Slats: Decide on the spacing between your slats. This could be a small gap for visual interest or placed flush for a more solid look. Use a spacer block of the desired width to maintain consistent gaps. Apply glue and secure each subsequent slat, ensuring even spacing and alignment.
- Allow to Cure and Mount: Once all slats are attached and the glue is dry, the panel is ready. You can then mount this entire slatted panel onto your wall or cabinet front using screws (from the back if possible, or through hidden spots between slats) or strong adhesive, ensuring it’s level and secure.
32. Soft Mint Green Kitchen with Pet Food Station

This delightful kitchen features a soothing palette of soft mint green, high-gloss cabinetry paired with crisp white countertops. The clean lines and reflective surfaces contribute to a bright, open feeling. The layout efficiently utilizes corner space with a built-in oven and dishwasher integrated seamlessly into the design.
A thoughtful addition for pet owners is the custom-built pet feeding station, which features a pull-out drawer housing two stainless steel bowls. This keeps the bowls neatly out of the way when not in use, preventing tripping hazards and maintaining a tidy floor. The corner pull-out basket system next to the sink further enhances organization, making often-reached items easily accessible.
????️ DIY Project: Building a Custom Pet Food Drawer
Creating a dedicated pull-out drawer for pet food bowls keeps the kitchen floor clear and bowls safely out of the way when not needed.
Material Required List
- Plywood (1/2 or 3/4 inch thickness) for drawer box and front
- Drawer slides (full-extension, sturdy)
- Stainless steel pet bowls (sized to fit the drawer)
- Wood glue
- Wood screws
- Jigsaw or hole saw (for cutting bowl holes)
- Primer and paint (to match cabinets)
- Sandpaper (medium grit)
Equipment Required List
- Power drill/driver
- Measuring tape and pencil
- Level and square
- Clamps
- Safety glasses
Step-by-Step DIY Instructions
- Measure and Design the Drawer: Measure the width, depth, and height of the cabinet opening where the pet food drawer will go. Design a simple drawer box to fit these dimensions, ensuring enough clearance for the pet bowls and their rim. The drawer front should match your existing cabinetry.
- Build the Drawer Box: Cut the plywood pieces for the drawer sides, front (internal), and bottom. Assemble them using wood glue and screws, making sure the box is perfectly square.
- Cut Bowl Openings: Place your pet bowls upside down on the top surface of the drawer box (where the bowls will sit). Trace around the rim of each bowl. Use a jigsaw or hole saw to carefully cut out these circular openings. Sand the edges smooth.
- Attach Drawer Front: Attach your finished cabinet door (which will serve as the drawer front) to the front of your newly built drawer box. Ensure it aligns with your existing cabinetry.
- Install Drawer Slides: Attach the drawer slides to the inside of the cabinet opening, ensuring they are level and parallel. Attach the other half of the slides to the sides of your pet food drawer box.
- Insert and Test: Carefully slide the pet food drawer into the cabinet. Test its movement; it should slide smoothly. Insert the pet bowls into their cutouts. Now, your furry friend’s bowls have a neat, hidden home!
33. All-Black Galley Kitchen with Mirror Accents

This striking galley kitchen embraces a bold, monochromatic design with matte black cabinetry throughout. This daring choice for a smaller space works because of strategic elements that prevent it from feeling too dark. A continuous white countertop and backsplash provide stark contrast, reflecting the under-cabinet lighting.
The upper cabinet on the far left features a clever pull-down shelf system, making the contents of the highest shelves easily accessible. Integrated mirrors as a backsplash behind the cooktop visually extend the space, bouncing light and reflecting the room. A rail system with hooks for utensils and a small potted plant adds functional and decorative elements, breaking up the dark surfaces.
????️ DIY Project: Installing a Pull-Down Shelf System in an Upper Cabinet
A pull-down shelf system brings high-up items within easy reach, making upper cabinets far more user-friendly, especially in a compact kitchen.
Material Required List
- Pull-down shelf system kit (includes frame, shelves, and hydraulic mechanism)
- Measuring tape and pencil
- Wood screws (appropriate for the kit and cabinet material)
Equipment Required List
- Power drill/driver
- Level
- Safety glasses
Step-by-Step DIY Instructions
- Clear and Measure Cabinet: Empty the upper cabinet where the system will be installed. Measure the internal height, width, and depth to ensure your chosen kit will fit.
- Install Side Mounting Plates: The pull-down system typically mounts to the inside side walls of the cabinet. Following the manufacturer’s instructions, position the side mounting plates. Use the measuring tape to ensure they are the correct distance from the cabinet front and perfectly level. Mark the screw holes.
- Secure Mounting Plates: Pre-drill pilot holes and use the drill/driver to firmly attach the mounting plates to the cabinet side walls.
- Assemble and Install the Frame: Assemble the main frame of the pull-down unit, including the shelves, according to the kit’s instructions. This frame then attaches to the installed side mounting plates.
- Attach Hydraulic Mechanism: Connect the hydraulic or spring-loaded mechanism (which allows the shelves to pull down and push back up smoothly) to the frame and the cabinet, as per the kit’s instructions.
- Test and Load: Test the pull-down action several times. It should operate smoothly and securely. Load the shelves with your items, distributing the weight evenly. This greatly improves accessibility to high storage!
34. Natural Wood Corner Kitchen with Open Shelving

This charming kitchen uses natural wood for all its cabinetry, creating a warm, inviting, and consistent aesthetic. The pale wood is balanced by light countertops and a white backsplash, ensuring the space feels bright and not overwhelmed by the wood tones. A tall, open shelving unit on the far left offers visual lightness and a place for spices and jars.
Crucial to its function is the specialized corner storage. The base unit features an “L-shaped” pull-out system that extends fully, revealing all contents, including larger items. A full-height pull-out pantry with internal lighting provides extensive storage for groceries, showing that even smaller kitchens can accommodate serious bulk storage when designed with clever fittings.
????️ DIY Project: Installing a Corner “L-Shaped” Pull-Out System
An “L-shaped” or “magic corner” pull-out system is a sophisticated way to utilize the deep, often wasted space in a corner base cabinet, making items fully accessible.
Material Required List
- “L-shaped” pull-out system kit (includes shelves, frame, and complex slides)
- Measuring tape and pencil
- Wood screws (appropriate for the kit and cabinet material)
Equipment Required List
- Power drill/driver
- Level
- Square (carpenter’s square)
- Safety glasses
Step-by-Step DIY Instructions
- Clear and Prepare the Cabinet: Remove everything from the corner base cabinet. Clean the interior thoroughly. Measure the internal dimensions of the cabinet to ensure your chosen “L-shaped” system will fit.
- Install the Main Frame and Slides: This system is more complex than simple drawers. The main frame usually attaches to the floor and/or side wall of the cabinet. The slides that allow the “L” section to pull out and pivot are integrated into this frame. Follow the kit’s instructions meticulously for precise placement of all mounting points. Use a level and square to ensure everything is perfectly aligned.
- Secure Mounting Hardware: Mark all screw holes, pre-drill, and then use the drill/driver to firmly secure all parts of the main frame and slides to the cabinet.
- Assemble and Attach Shelves: Assemble the “L-shaped” shelves or baskets onto the pull-out frame according to the kit’s directions.
- Attach to Cabinet Door (if applicable): If your system integrates with the cabinet door (meaning the door pulls the shelves out), attach the door to the pull-out mechanism as per the kit’s instructions. This often requires careful alignment.
- Test and Adjust: Gently pull out and push back the “L-shaped” system several times. It should glide smoothly, pivot, and retract without catching. Make any necessary adjustments to the mounting screws or frame. Load your pots, pans, and other items for easy access.
35. All-White Galley Kitchen with Beadboard Cabinets

This bright, all-white galley kitchen creates an expansive and airy atmosphere through its monochromatic color scheme and strategic use of texture. The beadboard cabinet fronts add a charming, subtle detail, preventing the white from feeling flat. Recessed ceiling lighting and under-cabinet lighting ensure the entire workspace is brilliantly illuminated.
The design is highly functional, featuring a deep pull-out drawer system next to the oven for easy access to dishes and cooking utensils. The built-in microwave and oven are neatly stacked, saving counter space. This kitchen beautifully demonstrates how consistent color, varied textures, and smart storage solutions can transform a narrow galley into an inviting and efficient hub.
????️ DIY Project: Installing Beadboard Wallpaper on Cabinet Panels
For a quick and budget-friendly way to add texture like beadboard to flat cabinet doors, consider using beadboard wallpaper or thin beadboard panels.
Material Required List
- Beadboard wallpaper or thin beadboard paneling
- Strong adhesive (for wallpaper, or wood glue for panels)
- Utility knife or scissors (for wallpaper) / Circular saw (for panels)
- Roller or smoother (for wallpaper)
- Primer and paint (to match cabinets)
- Sandpaper (fine grit)
- Measuring tape and pencil
Equipment Required List
- Screwdriver (for removing cabinet doors)
- Safety glasses
Step-by-Step DIY Instructions
- Remove and Prepare Doors: Carefully remove all cabinet doors and drawer fronts. Take off hinges and hardware. Clean the surfaces thoroughly. Lightly sand the flat center panel of each door to create a good surface for adhesion.
- Measure and Cut: Measure the inside dimensions of the flat panel on each cabinet door. Cut your beadboard wallpaper or paneling to these exact dimensions. For paneling, ensure cuts are clean and straight.
- Apply Adhesive:
- For Wallpaper: Apply wallpaper paste evenly to the back of the beadboard wallpaper piece or directly to the cabinet panel, following product instructions.
- For Paneling: Apply a thin, even layer of wood glue to the back of the beadboard panel.
- Attach to Door: Carefully align the beadboard piece with the inside panel of the cabinet door. Press it firmly into place. For wallpaper, use a roller or smoother to remove any air bubbles. For paneling, use clamps to hold it while the glue dries, or small finishing nails to secure it.
- Finish and Reinstall: Once the adhesive is completely dry, prime and paint the beadboard (and the entire door if needed) to match your existing cabinet color. Allow it to cure fully. Reattach hinges and hardware, then rehang the doors.
36. Industrial Corner Kitchen with Glass Shelving

This sophisticated corner kitchen masterfully blends industrial aesthetics with warm, natural touches. The base cabinets feature a light, almost whitewashed wood, creating a clean and modern foundation. The striking element is the black metal framework that defines the upper cabinetry and open shelving, giving the kitchen a structured, architectural feel.
The upper units feature reeded glass doors with internal lighting, which beautifully illuminates displayed dishes and glassware. This design visually lightens the top half of the kitchen while still offering enclosed storage. Below, a smart corner pull-out system for bottles and jars maximizes storage in an often-underutilized space, providing easy access to condiments and cooking essentials.
????️ DIY Project: Adding a Metal Rail and S-Hook System for Utensils
A simple yet effective way to free up counter and drawer space is to install a rail system with S-hooks for hanging frequently used utensils and small pots.
Material Required List
- Metal rail/bar system (kitchen-specific, includes mounting hardware)
- S-hooks (metal, various sizes)
- Measuring tape and pencil
- Level
- Wall anchors (if not mounting into studs)
Equipment Required List
- Power drill/driver
- Stud finder
- Safety glasses
Step-by-Step DIY Instructions
- Determine Placement: Choose a wall section, preferably under upper cabinets or near the stove, where your rail will be most useful. Use your tape measure and pencil to mark the desired height, ensuring tools will hang freely without hitting the countertop. Use a level to draw a straight, horizontal line.
- Locate Studs and Mark Holes: Use a stud finder to locate any wall studs behind your marked line. Mark these spots. Ideally, mount the rail brackets directly into studs for the strongest hold. If studs are not available at your chosen points, use heavy-duty wall anchors appropriate for your wall type (e.g., drywall anchors).
- Install Mounting Brackets: Hold the rail’s mounting brackets up to your marks. Mark the screw hole positions. Pre-drill pilot holes. Use the drill/driver to firmly screw the brackets into the wall. Ensure they are level with each other.
- Attach the Rail: Slide the metal rail through the openings on the mounted brackets. Most systems have small set screws on the underside of the brackets to secure the rail in place. Tighten these screws to prevent the rail from spinning or sliding.
- Add S-Hooks and Organize: Slide your S-hooks onto the newly installed rail. Hang your spatulas, ladles, measuring cups, and even small pots. This immediately clears up counter space and keeps essentials within arm’s reach.
37. Warm Wood Galley Kitchen with Integrated Cart

This inviting galley kitchen features warm, natural wood cabinetry throughout, creating a cohesive and cozy atmosphere. The light countertops and subtle backsplash ensure the space remains bright and functional. Overhead, a large skylight floods the room with natural light, a crucial element for making a narrow kitchen feel more open.
A standout feature is the integrated rolling cart with open shelving. This flexible unit can be pulled out from beneath the counter to serve as an additional prep area or a mobile serving station. When pushed in, it neatly tucks away, maintaining the kitchen’s streamlined look. The combination of under-cabinet lighting and wall sconces ensures ample illumination for all tasks.
????️ DIY Project: Building an Integrated Rolling Storage Cart
A custom-fit rolling cart that slides under the counter provides flexible storage and extra workspace that can be moved as needed.
Material Required List
- Plywood (3/4 inch thickness for cart frame and shelves)
- Butcher block or sturdy wood panel (for cart top)
- Heavy-duty locking casters (4)
- Wood glue
- Wood screws
- Sandpaper (medium grit)
- Primer and paint/stain (to match kitchen)
- Drawer pull or handle (for the front of the cart)
- Measuring tape and pencil
Equipment Required List
- Circular saw or table saw
- Power drill/driver
- Level and square
- Clamps
- Safety glasses
Step-by-Step DIY Instructions
- Measure and Design: Measure the width, height, and depth of the cabinet opening or designated space where the cart will reside. Ensure there’s sufficient clearance for the casters and for the cart to slide in and out freely. Design a simple box frame with internal shelves, making sure the top fits the desired butcher block.
- Cut Plywood Pieces: Cut all plywood pieces for the cart’s sides, top, bottom, and any internal shelves.
- Assemble the Cart Frame: Use wood glue and screws to assemble the main frame of the cart. Ensure it is perfectly square and sturdy. If you plan to have internal shelves, attach them now.
- Attach Casters: Flip the cart frame upside down. Attach the four heavy-duty locking casters to the corners of the base, using screws. Ensure they are securely fastened.
- Attach Butcher Block Top: Flip the cart right side up. Position the butcher block top evenly on the cart frame. Secure it from underneath with screws driven up through the frame into the butcher block.
- Add Drawer Pull and Finish: Attach a drawer pull or handle to the front of the cart to make it easy to pull out. Sand any rough edges on the cart. Prime and paint or stain the cart to match your kitchen cabinetry.
- Test and Use: Once dry, test the casters and the locking mechanism. Roll the cart into its designated spot. It’s now ready to provide extra prep space or mobile storage!
38. Olive Green Kitchen with Patina Mirrors

This elegant kitchen showcases a refined color palette of muted olive green cabinetry, paired with dark marble countertops. The choice of hardware, a sleek brass finish, complements the green beautifully, adding a touch of understated luxury. The strategic use of a distressed mirrored splashback above the counter creates an antique patina effect that expands the visual depth of the room.
The mirrored surface extends upwards to cover the entire wall above the counter, reflecting ambient light and the gold accents. Under-cabinet lighting further illuminates this reflective feature, enhancing the sense of spaciousness. A slender console table with a brass frame and marble top stands in front, providing an additional surface for display or serving without visually blocking the kitchen.
????️ DIY Project: Creating a “Faux” Patina Mirror Effect
Achieve a distressed, antiqued mirror look on a new mirror using simple techniques to add character and visual depth to your backsplash.
Material Required List
- Mirror (can be pre-cut to splashback size or mirror tiles)
- Spray bottle with a mixture of 1 part bleach to 1 part water (wear gloves!)
- Spray bottle with clear vinegar
- Rubber gloves and safety glasses
- Heavy-duty mirror adhesive
- Painter’s tape
- Soft rags or paper towels
- Drop cloth
Equipment Required List
- Utility knife or scraping tool (optional, for distressing)
Step-by-Step DIY Instructions
- Prepare the Mirror (Backside): Lay the mirror face-down on a protected surface (drop cloth). Using a utility knife or scraping tool, carefully scrape away sections of the protective paint backing from the mirror. This exposes the silver reflective layer underneath. The more you scrape, the more distressed the final look.
- Apply Bleach Solution: Wearing gloves and safety glasses, spray the scraped areas of the mirror’s backing with the bleach/water solution. Let it sit for a few minutes. The bleach will begin to react with the silver, creating dark, mottled, and oxidized patterns. Watch carefully; you control the level of “patina.”
- Neutralize with Vinegar: Once you achieve the desired patina, immediately spray the entire area with clear vinegar. This neutralizes the bleach and stops the chemical reaction. Gently dab with a soft rag or paper towel to dry.
- Seal the Backing: Once completely dry, you can spray a clear protective sealant or a coat of black paint over the distressed backing. This protects the newly created patina from further damage and provides a solid background for the reflective front.
- Install the Mirror: Install the mirror onto your backsplash area using heavy-duty mirror adhesive (ensure it’s safe for mirrors). Apply adhesive to the back of the mirror and press it firmly onto the wall. Use painter’s tape to hold it in place while the adhesive cures.
39. U-Shaped Kitchen with Herringbone Floor and Pull-Outs

This bright U-shaped kitchen combines classic white cabinetry with a dynamic black-and-white herringbone tile floor and backsplash. The contrasting patterns add significant visual interest and depth, drawing the eye and making the space feel energetic and larger. Under-cabinet lighting highlights the workspace, ensuring functionality.
The design excels in smart storage solutions. An “L-shaped” pull-out system in the corner base cabinet provides full access to dishes and pots, eliminating deep, inaccessible areas. Next to the oven, a narrow pull-out drawer system offers convenient storage for spices or cleaning supplies, further demonstrating a commitment to maximizing every inch for organization and efficiency.
????️ DIY Project: Installing a Decorative Herringbone Tile Backsplash
A herringbone pattern adds a sophisticated and dynamic look to a tile backsplash, making even a small kitchen feel custom and stylish.
Material Required List
- Ceramic or porcelain subway tiles (plus 15% extra for cuts)
- Tile adhesive (pre-mixed mastic for beginners)
- Grout (non-sanded for narrow gaps)
- Tile spacers (small, consistent size)
- Sealer (if using porous grout)
Equipment Required List
- Wet saw (essential for precise angled cuts)
- Notched trowel
- Grout float
- Large sponges and buckets
- Level and straightedge
- Safety glasses
Step-by-Step DIY Instructions
- Prepare the Surface: Ensure your wall is clean, dry, and smooth. Mark a precise center point on your wall, both horizontally and vertically. This will be your starting point for the herringbone pattern.
- Determine Herringbone Angle: For a classic herringbone, tiles are laid at a 45-degree angle. Use your wet saw to cut the ends of some tiles at a 45-degree angle. These will be your starting and ending pieces.
- Spread Adhesive: Using a notched trowel, apply a thin, even layer of tile adhesive to a small section of the wall (about 2×2 feet), starting at your center mark.
- Lay the First Tiles: Begin by laying two tiles to form the first “V” of your herringbone pattern, using your center marks as a guide. Ensure the point of the “V” is sharp and the tiles meet cleanly. Insert tile spacers.
- Continue the Pattern: Work outward from your starting point, interlocking the tiles in the herringbone pattern. Each tile should be placed so its end meets the side of another tile at a 45-degree angle. Consistently use spacers to maintain uniform grout lines.
- Make Edge Cuts: As you reach the edges and corners, you will need to make precise 45-degree cuts with your wet saw to create clean, straight lines.
- Grout and Clean: Once all tiles are laid and the adhesive is fully cured (at least 24 hours), remove all spacers. Mix and apply the grout with a grout float, pressing it firmly into the joints. Wipe away excess grout diagonally with the float. After 15-30 minutes, clean the tile surface with a damp sponge, rinsing often, until all haze is removed. Let the grout cure, then apply sealer if needed.
Transforming a small kitchen truly is a rewarding process that relies on careful planning and innovative use of space. By implementing the smart layout and design ideas we have explored—from specialized corner storage to reflective backsplashes—you can create a kitchen that feels open, organized, and remarkably functional.
Remember that every single inch matters. Focusing on verticality, choosing light and contrasting color palettes, and prioritizing customized, accessible storage will dramatically enhance your kitchen’s usability and visual appeal. Take inspiration from these 39 strategies and personalize them to fit your unique cooking style and home aesthetic.
Embrace the challenge of your small space! You now have the knowledge and the step-by-step DIY instructions to turn your kitchen from cramped to captivating. Enjoy your bright, efficient, and beautifully designed new culinary hub.
Key Takeaways
- Maximize Vertical Space: Utilize floor-to-ceiling cabinets and tall pull-out pantry units to exploit overlooked vertical storage areas.
- Embrace Reflective Surfaces: Install mirrored backsplashes, high-gloss cabinetry, or glass-front doors to visually expand the room’s depth and reflect light.
- Invest in Specialized Storage: Corner pull-out systems, deep full-extension drawers, and integrated spice racks eliminate “dead space” and make contents fully accessible.
- Prioritize Lighting: Under-cabinet lighting, internal cabinet lighting, and pendant fixtures brighten work areas and visually lift upper cabinets, enhancing the spacious feel.
- Choose Streamlined Design: Opt for integrated appliances, handle-less cabinets, and continuous lines to maintain a clean, uncluttered, and contemporary appearance.