A small kitchen can feel like a daily challenge. The counters fill up too quickly. Finding the right pot or pan becomes a noisy treasure hunt. You might feel like you are always working in a cramped and cluttered space.

But a small kitchen is not a roadblock. It is an opportunity for clever design. With the right layout and smart storage, even the tiniest kitchen can feel open and work beautifully. It is about making every inch count.
This guide is here to help you solve that puzzle. We have gathered 38 smart ideas that will transform your kitchen. You will find simple swaps, clever DIY projects, and layout tricks that create more room than you thought possible. Get ready to make your small kitchen feel spacious and organized.
1. Go Sleek with a U-Shaped Layout

A U-shaped kitchen layout makes the most of a small area. It gives you three walls for counters and cabinets. This design keeps everything within easy reach, so you spend less time walking around and more time cooking. The continuous countertop provides ample room for meal prep.
This kitchen uses dark, handleless cabinets to create a clean, unbroken line. This visual trick can make a compact room feel more spacious and less cluttered. Warm under-cabinet lighting brightens the workspace, making the counters feel more open. A magnetic knife strip on the wall is a clever move, freeing up valuable drawer and counter space.
DIY Instructions: Easy Magnetic Knife Strip
Things You’ll Need:
- A magnetic knife bar (you can buy this at a home store)
- A pencil
- A level (it looks like a ruler with a bubble in it)
- A drill (ask a grown-up for help with this!)
- A screwdriver
- The screws that came with your knife bar
Step-by-Step Guide:
- Find the Right Spot: First, decide where you want to hang your knives. Pick an empty wall space near where you prepare food. Make sure it’s high enough so little kids can’t reach it.
- Make Your Marks: Hold the knife bar against the wall. Place the level on top of it. Wiggle it until the bubble is exactly in the middle. Now, use your pencil to mark the wall through the screw holes on the bar.
- Time for the Grown-Up: Ask an adult to use the drill to make small pilot holes where you made your pencil marks. This makes it much easier to put the screws in.
- Attach the Bar: Hold the knife bar over the holes again. Use the screwdriver to put the screws in and attach the bar tightly to the wall.
- Add Your Knives: Carefully place your knives on the magnetic strip one by one. The magnet is strong and will hold them safely in place. Now your knives are organized and easy to grab!
2. Embrace Open Corner Shelving

This kitchen feels warm and inviting. Natural wood shelves in the corner turn an often-awkward space into a beautiful display. They hold everyday dishes, making them easy to grab. A lazy susan in the corner cabinet is a great solution for accessing pots and pans.
The layout includes a cozy breakfast nook right by the window. This adds a dining spot without taking up much floor space. A small rolling cart provides extra counter space when needed and can be moved out of the way. The light colors and wood tones make the room feel bright.
DIY Instructions: Simple Wooden Corner Shelves
Things You’ll Need:
- Wooden boards (cut to fit your corner)
- Shelf brackets
- A pencil
- A tape measure
- A level
- A drill and screwdriver (with adult help)
- Sandpaper
Step-by-Step Guide:
- Plan Your Shelves: Decide how many shelves you want and how far apart they should be. Use the tape measure and pencil to mark on the wall where each shelf will go.
- Smooth the Wood: Take your wooden boards and lightly rub them with sandpaper until they are smooth. Wipe off any dust with a cloth.
- Mark for Brackets: Use your level to draw a straight line where the bottom of your first shelf will be. Hold a bracket under the line and mark the screw holes with your pencil. Do this for both sides of the corner.
- Get an Adult’s Help: Ask a grown-up to drill pilot holes and then screw the brackets into the wall.
- Place the Shelf: Set your wooden board on top of the brackets. You can ask the adult to help you screw the shelf onto the brackets from underneath so it’s secure. Repeat for all your shelves!
3. Adopt an Industrial Loft Vibe

An industrial style works well in tight quarters. Exposed brick walls add texture without closing in the room. Open metal and wood shelving keeps the space from feeling heavy and puts everything on display. This encourages you to keep your dishes tidy.
A freestanding stainless steel island on wheels is a versatile addition. It serves as a prep area, a serving station, or even a small dining table. Hanging pots and pans on a wall-mounted grid saves a tremendous amount of cabinet space and adds to the professional kitchen look.
DIY Instructions: Industrial Pipe Shelves
Things You’ll Need:
- Wooden boards
- Black iron pipes and fittings (flanges, pipes, and caps – from a hardware store)
- A drill and screwdriver (and a grown-up)
- A pencil and a level
- Screws
Step-by-Step Guide:
- Build the Brackets: Twist the pipe pieces together. You’ll screw a short pipe into a flange (the flat, round part). This flange will attach to the wall. At the other end of the pipe, you can add another fitting and a cap. Make two of these for each shelf.
- Position on the Wall: Decide where you want your shelf. Hold one pipe bracket against the wall and use a level to make sure it’s straight up and down. Mark the screw holes inside the flange with a pencil.
- Drill and Attach: Have an adult drill pilot holes on your marks. Then, they can screw the flange securely to the wall. Do the same for the second bracket, making sure it’s level with the first one.
- Add the Shelf: Place your wooden board on top of the two pipe brackets.
- Secure the Wood: You can use small pipe straps or clips to screw the board to the pipes from underneath. This will stop it from wiggling.
4. Integrate Smart Technology

This modern kitchen uses technology to maximize convenience. Hidden appliance garages and pop-up outlets keep countertops clear and uncluttered. Drawers are fitted with custom organizers for utensils and pans, ensuring everything has its place. The clean, white, handleless cabinets reflect light, making the space feel larger.
Smart features, like a digital screen on the fridge or a tablet stand, help with recipes and grocery lists. Under-cabinet and in-cabinet lighting is not just for looks; it makes it easier to see what you have. This reduces the time spent searching for items in dark corners.
DIY Instructions: Stick-On LED Under-Cabinet Lights
Things You’ll Need:
- A roll of LED light tape (battery-powered or plug-in)
- Scissors
- A clean, dry cloth
- A tape measure
Step-by-Step Guide:
- Clean the Surface: Wipe the underside of your cabinets with the cloth to make sure they are clean and dry. This helps the lights stick better.
- Measure and Cut: Use your tape measure to see how long your cabinet is. Roll out the LED tape and cut it to the right length. There are usually little scissor marks on the tape showing you where it’s safe to cut.
- Peel and Stick: The back of the LED tape is like a sticker. Carefully peel off the paper backing.
- Apply the Lights: Press the sticky side of the tape firmly onto the bottom of the cabinet. It’s best to place it near the front edge so the light shines down on your counter.
- Power It Up: If your lights are battery-powered, put the batteries in the pack and stick the pack in a hidden spot. If they plug in, run the cord neatly to the nearest outlet. Now you have fancy kitchen lights!
5. Use Creative Storage Organizers

This kitchen is full of clever storage ideas. A pegboard on the wall is a flexible way to hang pots, pans, and utensils. Wall-mounted racks keep spices visible and within reach. Hanging fruit baskets free up counter space while keeping produce fresh.
A rolling cart acts as a mobile island, providing extra storage and a cutting surface. Inside the cabinets, pull-out racks for baking sheets and cutting boards prevent messy stacks. Giving cabinet doors a fresh look with floral wallpaper adds a personal touch without a big renovation.
DIY Instructions: Cabinet Door Makeover
Things You’ll Need:
- Peel-and-stick wallpaper or contact paper
- A ruler or tape measure
- A pencil
- Scissors or a craft knife
- A smoother tool (or a plastic card, like a gift card)
- A cleaning spray and cloth
Step-by-Step Guide:
- Clean the Doors: First, clean the front of your cabinet doors really well. Let them dry completely.
- Measure Your Door: Use the ruler to measure the height and width of the flat part of your cabinet door that you want to cover.
- Cut the Paper: Roll out your wallpaper and use your measurements to draw the shape on the back. Cut it out carefully with scissors.
- Stick It On: Peel off a small corner of the paper backing. Line it up with the corner of your cabinet door and press it down.
- Smooth It Out: Slowly peel off the rest of the backing while you use the smoother tool to press the wallpaper onto the door. This pushes out any air bubbles. Go slowly! If you mess up, you can usually pull it off and try again.
6. Choose a Light and Airy Color Palette

A soft, light color scheme can make any small kitchen feel bigger and brighter. The mint green cabinets in this room add a touch of color without being overwhelming. Glass-front cabinets display pretty dishes and prevent the upper cabinets from looking like a solid, heavy block.
A small island provides extra seating and a prep surface. Open shelving below the counter is a good spot for woven baskets, adding texture and storage. Windows are kept clear to let in as much natural light as possible, which always helps to open up a room.
DIY Instructions: Windowsill Herb Garden
Things You’ll Need:
- Small pots (terracotta or any kind with a hole in the bottom)
- A tray or dish to put under the pots
- Potting soil
- Small herb plants (like basil, mint, or parsley) or seeds
- A small watering can or cup
Step-by-Step Guide:
- Prepare Your Pots: Place your pots on the tray. The tray will catch any extra water so you don’t make a mess.
- Add the Soil: Fill each pot about halfway with potting soil.
- Plant Your Herbs: If you have small plants, gently take one out of its container and place it in your pot. Add more soil around it until the pot is almost full. If you are using seeds, follow the directions on the seed packet.
- Give Them a Drink: Water your newly planted herbs. Don’t give them too much, just enough to make the soil damp.
- Find a Sunny Spot: Place your tray of herbs on a windowsill that gets lots of sunlight. Water them a little bit every few days when the soil feels dry.
7. Add a Touch of Luxury

A small space can still feel luxurious. This kitchen uses a rich, dark green for the cabinets, which creates a cozy and sophisticated mood. A marble backsplash and countertop add a touch of elegance and bounce light around the room. Brass hardware and fixtures provide warm, metallic accents.
Mirrored or glass-front upper cabinets are a great choice. They reflect light and give a glimpse of what’s inside, making the walls feel less solid. A built-in wine fridge is a compact luxury that saves space elsewhere. Smart use of sconce lighting adds a soft glow.
DIY Instructions: Tiered Spice Organizer
Things You’ll Need:
- Small, stackable shelves or a pre-made tiered spice rack
- Your spice jars
- Labels and a pen (optional)
Step-by-Step Guide:
- Clear the Cabinet: Take everything out of the kitchen cabinet where you keep your spices. Give the inside a good wipe with a clean cloth.
- Assemble the Rack: If your tiered rack needs to be put together, follow the instructions that came with it. It’s usually very simple.
- Place It Inside: Put the empty rack inside your cabinet.
- Organize Your Spices: Start placing your spice jars on the shelves. Put the tallest jars in the back row and the shortest ones in the front. This way, you can see all the labels.
- Label Everything: If your jars aren’t labeled, now is a good time to write the name of each spice on a small label and stick it on the front or the lid. Now you can find your cinnamon in a snap!
8. Hide It All Away with a Kitchen Armoire

For a truly minimal look in a studio or open-plan living space, consider a kitchen armoire. This is a complete, compact kitchen hidden behind closet doors. When not in use, everything is concealed, which helps the living area feel tidy and uncluttered.
Inside, every inch is used efficiently. There are shelves for dishes, a small sink, a cooktop, and even a mini-fridge. The inside of the doors can be used for extra storage, like a spice rack. This solution is great for people who don’t cook elaborate meals every day but still want the essentials.
DIY Instructions: Simple Door-Mounted Spice Rack
Things You’ll Need:
- Small, lightweight spice racks (the kind made for walls or doors)
- A pencil
- A screwdriver
- Short screws (make sure they aren’t longer than your cabinet door is thick!)
Step-by-Step Guide:
- Check Your Space: Open your cabinet door. Make sure a rack will fit on the inside without bumping into the shelves when you close the door.
- Hold and Mark: Hold the empty spice rack against the inside of the door where you want it to go. Use a pencil to mark the wall through the screw holes.
- Screw It In: This is the most important part. Choose screws that are shorter than the thickness of your cabinet door. You don’t want them to poke through the front! Carefully screw the rack onto the inside of the door using your marks.
- Load It Up: Once the rack is secure, you can fill it with your smaller spice jars. Close the door slowly the first time to make sure it doesn’t hit anything.
9. Go Natural with Rustic Wood Shelves

This kitchen has a warm, earthy feel. Thick, rustic wood shelves provide plenty of open storage. Storing dry goods like pasta, beans, and flour in clear glass jars looks neat and lets you see what you have at a glance. It turns your ingredients into part of the decor.
A dedicated recycling center with pull-out bins makes sorting waste easy and keeps it out of sight. A window herb garden brings fresh greenery into the room and puts fresh flavors right at your fingertips. The natural materials, like wood and stone, create a calming atmosphere.
DIY Instructions: Labeled Pantry Jars
Things You’ll Need:
- Clear glass jars with lids
- Your dry foods (flour, sugar, pasta, beans, etc.)
- Labels (you can use chalkboard labels, sticker labels, or tie-on tags)
- A pen or chalk marker
Step-by-Step Guide:
- Wash and Dry: Make sure your glass jars are completely clean and dry on the inside. Any water could spoil the food.
- Fill Them Up: Carefully pour your dry foods into the jars. A funnel can help you do this without making a mess. Put the lids on tightly.
- Write Your Labels: Using your pen or marker, write the name of the food on each label. You could write “Flour,” “Sugar,” “Spaghetti,” and so on.
- Stick Them On: Peel the backing off your sticker labels and place them on the front of the jars. If you have chalkboard labels, you can write on them with a chalk marker. If you have tags, tie them around the neck of the jar with a piece of string.
- Arrange Your Shelves: Place your beautiful new jars on your open shelves. It looks so organized!
10. Create a Retro Vibe with a Banquette

This kitchen is bursting with personality. A bold, geometric tile backsplash adds a fun pop of color and pattern. Mid-century modern style cabinets with clean lines and warm wood tones are a good fit for smaller spaces. Sputnik-style light fixtures add to the retro charm without taking up much visual space.
A built-in bench, or banquette, against the wall creates a cozy dining nook. It saves space compared to a traditional table and chairs. The slim pedestal table is easy to move around. The result is a functional and stylish eat-in kitchen that feels cheerful and unique.
DIY Instructions: No-Sew Bench Cushion
Things You’ll Need:
- A piece of plywood cut to the size of your bench top
- A piece of foam, the same size as the plywood
- A piece of fabric, larger than the plywood
- A staple gun (ask a grown-up for help)
Step-by-Step Guide:
- Make a Sandwich: Lay your fabric on the floor, pattern-side down. Place the foam on top of it, in the middle. Then, place the plywood on top of the foam. You should have a wood-foam-fabric sandwich.
- Fold and Staple: Start on one of the long sides. Pull the edge of the fabric up and over the edge of the plywood. Ask an adult to use the staple gun to place a few staples in the middle to hold it.
- Pull It Tight: Go to the opposite side. Pull the fabric tight, and have the adult put a few staples in the middle of that side. Do the same for the two shorter sides, always pulling the fabric snug.
- Finish the Sides: Now, go back and fill in the staples all along the four sides, leaving the corners for last.
- Fold the Corners: For the corners, fold the fabric like you are wrapping a birthday present. Fold it neatly and tightly, and use the staple gun to secure the folds. Place your new cushion on your bench!
11. Channel Parisian Charm

This kitchen has a timeless, elegant feel, like a small Parisian cafe. The classic black-and-white checkered floor is a bold design choice that makes the room feel special. A small bistro table and chairs provide a charming spot for coffee.
An overhead pot rack, decorated with shiny copper pans, is a beautiful and practical storage solution. It frees up cabinet space and keeps cookware within arm’s reach. Open shelves display pretty dishes, while a vintage-style hutch adds even more storage and character to the space.
DIY Instructions: How to Create an Antique-Look Mirror
Things You’ll Need:
- A mirror
- A spray bottle with water
- Paper towels
- A spray can of “looking glass” or mirror-effect spray paint
- A spray can of black or dark gray spray paint
Step-by-Step Guide:
- Work Outside: This project is best done outdoors or in a well-ventilated area. Put down some newspaper to protect the ground.
- Clean the Mirror: Make sure your mirror is very clean on the glass side.
- Mist with Water: Lightly spritz the surface of the mirror with water. You want little droplets, not big puddles.
- Apply Mirror Spray: From about a foot away, spray a light, even coat of the mirror-effect spray paint over the water droplets. Let it dry for a few minutes.
- Blot the Water: Gently blot the water droplets with a paper towel. This will lift off a little of the paint and create the aged look.
- Add the Dark Paint: Once it’s completely dry, flip the mirror over and spray a light coat of the black or gray paint on the back of the mirror. This will show through the spots you blotted. Let it dry, and you have a vintage-looking mirror!
12. Play with Bold Graphics

Don’t be afraid of bold patterns in a small kitchen. This space uses high-contrast, black-and-white geometric tiles on both the floor and the backsplash. This creates a stunning visual effect and makes the kitchen feel dynamic and full of energy.
To keep the look balanced, the cabinets are split between black and white. This two-tone approach is very modern. The clean, flat-front cabinets and simple black hardware don’t compete with the busy tile, creating a cohesive and stylish room.
DIY Instructions: Easy Peel-and-Stick Tile Backsplash
Things You’ll Need:
- Peel-and-stick tile sheets
- A tape measure or ruler
- A pencil
- A utility knife or strong scissors
- A clean cloth and cleaning spray
Step-by-Step Guide:
- Prep Your Wall: Clean the wall where you want to put your backsplash. Make sure it’s completely dry before you start.
- Measure and Plan: Measure the area. It’s a good idea to lay out your tiles on the floor first to see how they will fit.
- The First Tile: Start in a corner. Peel the backing off your first tile sheet. Carefully press it onto the wall, making sure it’s straight. Smooth it down with your hands.
- Line Them Up: Take your next tile sheet. Most have an overlapping edge. Line it up with the first sheet and press it down firmly. Keep going until you cover the whole area.
- Make Cuts: When you get to an edge or an outlet, measure the space and draw the shape you need on the back of a tile sheet. Carefully cut it with the utility knife or scissors (ask an adult for help with the knife). Peel and stick the cut piece.
13. Float Your Cabinets for an Airy Feel

Mounting cabinets to the wall so they don’t touch the floor is a fantastic trick for small kitchens. These “floating” cabinets create an unbroken line of flooring underneath, which makes the room feel much larger and more open. It also makes cleaning the floor a breeze.
This kitchen takes it a step further with open floating shelves below the main counter. This provides easy-to-access storage for everyday dishes. The lift-up upper cabinet doors are also a great space-saver, as they don’t swing out into the room.
DIY Instructions: Create a “Floating” Shelf Illusion
Things You’ll Need:
- A floating shelf kit from a hardware store (this includes the shelf and a hidden metal bracket)
- A pencil
- A level
- A drill (with a grown-up’s help)
- A screwdriver
Step-by-Step Guide:
- Find the Spot: Decide where you want your shelf to hang.
- Mark the Bracket: Hold the metal bracket against the wall. Use your level to make sure it’s perfectly straight. Use a pencil to mark the screw holes.
- Drill and Attach: Ask an adult to drill pilot holes on your marks. Then, have them screw the bracket tightly to the wall. It needs to be very secure.
- Slide on the Shelf: The wooden shelf is hollow on one side. Find that side and simply slide it over the metal bracket. It should fit snugly.
- Secure It: Most kits have a couple of small screw holes on the bottom of the shelf. Use these to screw the shelf to the bracket from underneath so it can’t slide off. Now it looks like it’s floating on the wall!
14. Layer Textures for a Bohemian Look

A bohemian kitchen is warm, personal, and full of life. This one uses a mix of patterns and textures to create a cozy feel. A patterned tile backsplash, a colorful rug, and wooden countertops all work together. Open shelves are filled with a mix of colorful, mismatched dishes.
Plants are key to this style. Hanging macrame planters bring greenery in without using any counter space. Little personal touches, like framed pictures, unique mugs, and pretty tea towels, make the kitchen feel like the heart of the home.
DIY Instructions: Simple Macrame Plant Hanger
Things You’ll Need:
- Macrame cord or thick yarn
- Scissors
- A metal or wooden ring
- A small potted plant
Step-by-Step Guide:
- Cut Your Cords: Cut four long pieces of cord. A good starting length is about twice as long as you want your hanger to be.
- Attach to the Ring: Take all four pieces of cord and fold them in half. Push the folded loop through your ring. Then, pull the loose ends of the cord through the loop and pull tight. You now have eight strands hanging down.
- Make the First Knots: Separate the eight strands into four pairs. About halfway down, tie a simple knot in each pair. Try to make all four knots at the same level.
- Make the Second Knots: Now, take one strand from one pair and one strand from the pair next to it. Tie them together in a knot a few inches below your first set of knots. Do this all the way around. You are creating a net.
- The Final Knot: Gather all eight strands together at the bottom. Tie one big, strong knot a few inches below your second set of knots. This creates the base for your pot to sit on. Trim the ends so they are even. Pop your plant in!
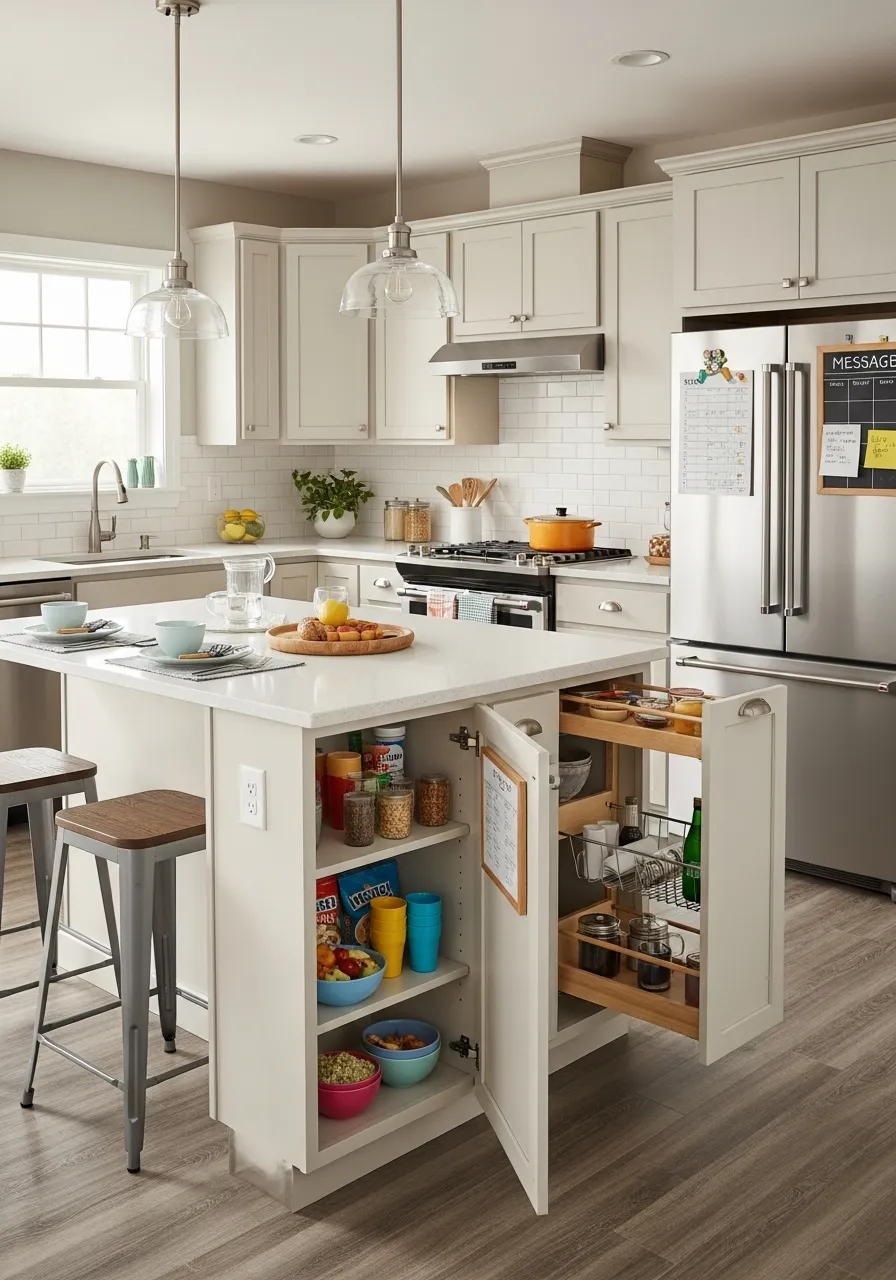
15. Make Your Island a Storage Powerhouse

A kitchen island isn’t just for extra counter space; it can be a storage hero. This island features open shelves for cookbooks and cereal boxes on one side. On the other side, a pull-out rack keeps bottles and spices organized and easy to find.
The inside of the cabinet doors can be used, too. A small corkboard is a great spot for reminders and shopping lists. This approach ensures that every single bit of the island is working hard, helping to keep the rest of the kitchen free of clutter.
DIY Instructions: Corkboard Cabinet Door Organizer
Things You’ll Need:
- A thin corkboard tile
- Strong double-sided tape or command strips
- Scissors
- A tape measure
- Push pins
Step-by-Step Guide:
- Measure Your Door: Measure the flat, inside panel of your cabinet door.
- Cut the Cork: If your cork tile is too big, use the tape measure to mark the right size on it. Ask an adult to help you carefully cut it with a utility knife.
- Apply the Tape: Stick several pieces of strong double-sided tape or command strips to the back of the corkboard. Make sure to put some in the corners and in the middle.
- Stick It On: Peel the backing off the tape. Carefully press the corkboard onto the inside of your cabinet door. Press firmly all over for about 30 seconds.
- Get Organized: Let the tape set for about an hour. Then you can use push pins to hang up your notes, recipes, or a small calendar.
16. Get Cozy with Country Farmhouse Style

Country farmhouse kitchens feel warm and welcoming. A deep apron-front sink, also known as a farmhouse sink, is a key feature. This kitchen uses a soft, sage green color on the cabinets and wall paneling, which feels calm and natural. Butcher block countertops add to the rustic charm.
An overhead pot rack keeps bulky pots and pans out of the cabinets. Open shelves and a plate rack make it easy to grab everyday dishes. A simple fabric skirt under the sink hides plumbing and adds a soft touch of pattern.
DIY Instructions: How to Make a Simple Fabric Sink Skirt
Things You’ll Need:
- A piece of fabric (measure the width and height of the area you want to cover)
- A tension rod (like a small curtain rod)
- Iron-on hem tape
- An iron (with a grown-up’s help)
- Scissors
Step-by-Step Guide:
- Measure and Cut: Measure the width of the space under your sink. Cut your fabric so it’s about one-and-a-half times this width. This will make it look nice and gathered. Add a few inches to the height for the hems.
- Hem the Edges: With an adult’s help, use the iron and hem tape to finish the bottom and side edges of your fabric. You just fold the edge over, place the tape inside, and iron it.
- Make a Pocket for the Rod: On the top edge, fold down about two inches of fabric to make a pocket. Use the iron-on hem tape to secure it, but leave the ends open!
- Hang Your Skirt: Slide the tension rod through the pocket you just made.
- Install It: Squeeze the tension rod so it’s a little shorter, place it under your sink, and let it expand until it’s holding itself up tightly. Adjust the gathers in your fabric so it looks even.
17. Streamline with a Galley Layout

A galley kitchen consists of two parallel walls of cabinets and countertops, creating a central walkway. This is a very efficient layout for small spaces because it minimizes the distance between the sink, stove, and fridge.
This kitchen uses a minimalist design to enhance the sense of space. Flat-panel wood grain cabinets without handles create a seamless look. The countertops and backsplash are made from the same white marble-look material, which unifies the space. Keeping the color palette simple and consistent prevents the narrow room from feeling busy.
DIY Instructions: Organize Drawers with DIY Dividers
Things You’ll Need:
- Thin pieces of hobby wood or sturdy craft foam board
- A ruler
- A pencil
- A craft knife or small saw (with adult help)
- Strong wood glue or hot glue
Step-by-Step Guide:
- Measure Your Drawer: Measure the inside width and depth of your kitchen drawer. Also, measure the height.
- Cut Your Main Divider: Cut a piece of wood or foam board that matches the depth of the drawer. Make sure its height is just under the drawer height so it doesn’t jam.
- Cut the Small Dividers: Decide how you want to divide the drawer. Cut smaller pieces of wood that will run from your main divider to the side of the drawer.
- Make Notches: On your main divider, mark where you want the smaller dividers to connect. With adult help, cut a small notch halfway through the wood at each mark. Do the same on one end of each small divider.
- Fit Them Together: The notches should slide into each other like puzzle pieces. Add a small dot of glue where they connect to make them strong. Let it dry, then place your new organizer in the drawer!
18. Opt for a Multi-Functional Kitchenette

This is the ultimate space-saver for a tiny apartment or guest suite. It’s a compact kitchenette that packs a lot of function into one small corner. It includes a microwave, a small cooktop, a sink, and cabinet space.
The cleverest part is the pull-out and fold-down features. A pull-out cutting board is stored right above the trash can, making cleanup easy. A section of the counter folds down to create a small table for eating or working. Even the folding chairs have their own hanging spot on the side.
DIY Instructions: Create a Fold-Down Wall Desk/Table
Things You’ll Need:
- A rectangular piece of sturdy wood (this will be your tabletop)
- Two strong hinges
- Two folding shelf brackets
- A pencil, a level, and a drill (with a grown-up)
- Screws
Step-by-Step Guide:
- Attach Hinges to the Wall: Decide how high you want your table. Use a level to draw a straight line on the wall. Ask an adult to screw one side of each hinge to the wall along this line.
- Attach the Tabletop: Place your wooden board on top of the open hinges. Screw the other side of the hinges to the edge of the board. Now it should be able to fold down against the wall.
- Position the Folding Brackets: With the tabletop folded up, open one of the folding shelf brackets and place it on the wall under the table. Mark its screw holes. Do the same for the other bracket.
- Attach the Brackets: Fold the table down so it’s out of the way. Ask the adult to screw the folding brackets to the wall where you made the marks.
- Test It Out: Fold the tabletop up and click the brackets into place to support it. To fold it down, you just release the latch on the brackets.
19. Reflect Light with Glossy Surfaces

In a narrow kitchen without much natural light, shiny surfaces are your best friend. This kitchen uses high-gloss white cabinets that reflect light all around the room, making it feel brighter and wider than it really is.
A mirrored backsplash doubles the effect, reflecting the entire space and creating an illusion of depth. The frosted glass panels on the upper cabinets are a nice touch, as they hide clutter while still feeling lighter than solid doors. The bright, reflective floor also contributes to the spacious feel.
DIY Instructions: Apply a Frosted Glass Film to Cabinets
Things You’ll Need:
- A roll of frosted glass window film
- A spray bottle with water and a tiny drop of dish soap
- A ruler and a craft knife
- A squeegee or a plastic card
- A clean cloth
Step-by-Step Guide:
- Clean Your Glass: Clean the glass on your cabinet doors thoroughly.
- Measure and Cut: Measure the glass panel. Cut a piece of the window film that is about an inch bigger on all sides.
- Wet the Glass: Spray the soapy water solution generously all over the glass. Your fingers should be wet, too.
- Peel and Apply: The film has a clear backing. Peel it off. Carefully place the sticky side of the film onto the wet glass. The water lets you slide it around to get it in the right spot.
- Squeegee It: Once it’s positioned correctly, use the squeegee to smooth it out. Start from the center and push all the water and air bubbles out to the edges.
- Trim the Edges: With an adult’s help, use the craft knife and ruler to carefully trim the extra film from the edges of the glass. Squeegee the edges one last time.
20. Use Freestanding Furniture

Instead of all built-in cabinets, try using individual pieces of furniture. This creates a more relaxed, “unfitted” look that can feel less bulky in a small room. This kitchen uses a freestanding butcher block on wheels as an island and a separate wooden table for extra prep space.
A vintage glass-front hutch acts as the pantry, displaying dishes and glassware. Even the farmhouse sink is on a simple stand instead of being built into a cabinet. This approach gives you the flexibility to move things around and makes the kitchen feel more like a living space.
DIY Instructions: Give Furniture a Distressed Paint Finish
Things You’ll Need:
- A small wooden table or chair
- Two colors of latex paint (a dark base color and a lighter top color)
- A candle or wax block
- Sandpaper
- Paintbrushes
- A clean cloth
Step-by-Step Guide:
- Paint the Base Coat: Paint your entire piece of furniture with the darker color. Let it dry completely.
- Add Some Wax: Take your candle and rub the wax on the edges and corners where furniture would naturally get worn and chipped over time.
- Paint the Top Coat: Paint the entire piece with your lighter top color, right over the wax spots. Let it dry completely.
- Time to Distress: Take a piece of sandpaper and gently rub it over the areas where you put the wax. The top layer of paint will come off easily in those spots, revealing the darker color underneath.
- Wipe It Down: Use a clean, damp cloth to wipe away all the paint dust. Now your furniture has a cool, aged look!
21. Build Upwards with a Loft

When you can’t build out, build up. This kitchen brilliantly uses vertical space by adding a storage loft above the main kitchen area. This is a great place to store seasonal items or appliances you don’t use every day. A sturdy ladder provides access.
The kitchen itself is compact and efficient, with a stainless steel countertop that is durable and easy to clean. A pull-out pantry next to the fridge makes great use of a narrow space. This design is a smart solution for apartments with high ceilings.
DIY Instructions: Easy Ladder-Style Pot Rack
Things You’ll Need:
- Two long, narrow wooden boards (for the sides)
- Three or four shorter wooden dowels (for the rungs)
- A drill (and a grown-up)
- Wood glue
- Sandpaper
- Strong hooks to hang the ladder
- “S” hooks for your pots
Step-by-Step Guide:
- Drill the Holes: Lay the two long boards side-by-side. Measure and mark spots for your dowel rungs, making sure they are evenly spaced on both boards. Ask an adult to help you drill holes at your marks, but don’t drill all the way through!
- Sand Everything: Lightly sand all the wood pieces to make them smooth.
- Assemble the Ladder: Put a little bit of wood glue in each hole on one of the long boards. Push the ends of the dowels into the holes. Now, put glue in the holes of the second board and fit it onto the other ends of the dowels.
- Let it Dry: Wipe away any extra glue. Let your ladder dry for a few hours.
- Hang it Up: Ask an adult to screw two strong hooks into the wall or ceiling. Hang your ladder from the hooks. Now you can use “S” hooks to hang your pots and pans from the rungs.
22. Maximize Cabinet Insides

The secret to a tidy kitchen is often hidden behind closed doors. This kitchen is a masterclass in interior cabinet organization. Instead of deep, dark shelves, it uses pull-out drawers, tiered racks, and custom dividers.
Drawers within drawers keep cutlery and utensils neatly separated. A narrow pull-out caddy next to the stove is a convenient spot for oils and spices. These solutions mean you never have to get on your hands and knees to find something at the back of a cabinet again.
DIY Instructions: Vertical Plate Rack for a Deep Drawer
Things You’ll Need:
- A piece of pegboard, cut to fit the bottom of your drawer
- Wooden dowels (about 1/2 inch thick)
- A small saw (with adult help)
- A tape measure
Step-by-Step Guide:
- Fit the Pegboard: Place the pegboard in the bottom of your deep drawer. It should fit snugly.
- Measure and Cut Dowels: Decide how high you want your dowels to be. They should be tall enough to hold your plates upright, but short enough for the drawer to close. Ask an adult to help you cut the dowels into equal-sized pieces.
- Place Your Plates: Arrange your plates in the drawer on top of the pegboard to see where you want them to go.
- Insert the Dowels: Take the plates out. Now, stick the cut dowels into the holes in the pegboard to create little corrals for your plates.
- Stack Your Plates: Store your plates vertically between the dowels. They are now easy to grab, and they won’t slide around and get chipped when you open and close the drawer.
23. Create a Hidden Appliance Garage

Countertop clutter can make a small kitchen feel tiny. An “appliance garage” is a cabinet that sits on the countertop, designed to hide things like your toaster, blender, and stand mixer. This one has a clever lift-up door that tucks away, keeping it open while you cook.
Inside, pull-out shelves make it easy to access heavy appliances without having to lift them. Having outlets inside the garage is also a great feature. It keeps everything plugged in and ready to go, but completely out of sight when not in use.
DIY Instructions: Simple Countertop Charging Station
Things You’ll Need:
- A decorative box or a wire basket
- A small power strip
- Your device chargers
- A few binder clips
Step-by-Step Guide:
- Find a Spot: Choose a corner of your counter where you’d like to charge your phone or tablet.
- Set Up the Power: Place the power strip inside the box or basket. Run the main cord out the back to a nearby wall outlet.
- Plug In: Plug all of your chargers into the power strip inside the box.
- Organize the Cords: This is the fun part. Clip a binder clip onto the edge of the box. You can then thread your charging cable through the metal loop of the clip. This keeps the end of the cord from falling back into the box.
- Charge It Up: When you need to charge your device, you can just pull the cord out a little. When you’re done, the end stays neatly held by the binder clip.
24. Invest in Smart Corner Storage

Corners are often the most difficult part of a kitchen to use well. This futuristic kitchen solves the problem with amazing pull-out and swing-out shelves. These systems bring the contents of the corner cabinet right out to you, so you don’t have to reach into a deep, dark space.
The curved design of the cabinets and countertop is another smart feature. Soft, rounded edges are safer in a tight space and can help improve the flow of traffic through the kitchen. The seamless white countertop and wood cabinets create a clean, modern look.
DIY Instructions: Make a Simple Cabinet Lazy Susan
Things You’ll Need:
- Two round pieces of wood of the same size
- A “lazy susan bearing” from the hardware store (it looks like a flat metal square)
- A screwdriver
- A pencil
Step-by-Step Guide:
- Find the Center: Take one of your wooden circles. Use a ruler to find the exact center and mark it with a pencil.
- Attach the Bearing: Place the lazy susan bearing on the wood, centered over your mark. Use your screwdriver to attach one side of the bearing to the wooden circle with the screws that came with it.
- Find the Other Center: Now, find the center of your second wooden circle.
- Attach the Top: Place the second circle on top of the bearing. Carefully line up the center marks. Turn the whole thing over so you can see the other side of the bearing and the bottom of the top circle.
- Screw It Together: Screw the other side of the bearing to the second circle. Now you have a spinning platform! Place it in your cabinet to easily reach spices or cans.
25. Design a Multi-Level Island

This large, open-plan kitchen uses a multi-level island to define different zones. The lower level has the sink and main prep area. The higher level acts as a bar or casual dining spot, separating the cooking area from the dining space.
This island is packed with features, including a built-in wine fridge and a dishwasher. This concentration of appliances in one place makes the workflow very efficient. The industrial-style lighting above highlights the island as the centerpiece of the room.
DIY Instructions: Create a Cookbook or Tablet Stand
Things You’ll Need:
- A small, decorative cutting board
- A small piece of wood for the ledge (about 1 inch by 1 inch)
- A triangular piece of wood for the stand
- Strong wood glue
- Sandpaper
Step-by-Step Guide:
- Sand the Pieces: Make sure all your wood pieces are smooth by rubbing them with sandpaper.
- Attach the Ledge: Take the small piece of wood for the ledge. Put a line of wood glue along one of its long sides. Press it firmly onto the bottom front of the cutting board. This is what your book will rest on.
- Attach the Stand: Take the triangular piece of wood. Put glue along its longest edge. Press it onto the back of the cutting board, near the bottom. This will make the cutting board lean back like a picture frame.
- Let it Dry: Use a damp cloth to wipe away any extra glue. Let the stand dry completely for a few hours.
- Use It! Once it’s dry and strong, you can prop up your cookbook or tablet on it while you cook.
26. Grow Your Own with an Indoor Garden

Bring the garden inside with a dedicated hydroponic unit. This is a brilliant way to have fresh herbs and greens available year-round, even in a small apartment with no outdoor space. The built-in grow lights mean you don’t even need a sunny window.
This kitchen integrates the garden unit seamlessly at the end of a cabinet run. The fresh green plants add a beautiful splash of color and life to the room. The rest of the kitchen uses natural materials like wood countertops and woven baskets to complement the garden.
DIY Instructions: Mason Jar Herb Garden
Things You’ll Need:
- A few clean glass mason jars
- Small rocks or pebbles
- Potting soil
- Herb seeds (like basil or mint) or small starter plants
- Water
Step-by-Step Guide:
- Add Rocks for Drainage: Put a layer of small rocks, about an inch or two deep, in the bottom of each mason jar. This helps keep the plant’s roots from getting too wet.
- Add Soil: Fill the jars about two-thirds full with potting soil.
- Plant Your Herbs: If you have starter plants, gently place one in each jar and add more soil around it. If you are using seeds, poke a small hole in the soil with your finger, drop in a few seeds, and cover them lightly with soil.
- Just a Little Water: Give your herbs a small drink of water.
- Find a Sunny Home: Place your mason jar garden on a sunny windowsill. Water them whenever the soil looks dry. You’ll have fresh herbs in no time!
27. Go Modular and Mobile

For ultimate flexibility, consider a modular kitchen made of freestanding pieces. This professional-style setup uses stainless steel tables and racks that can be moved and rearranged as needed. This is a great option for renters or for spaces that might need to be used for different purposes.
Wheels on the main cooking island and prep cart make them easy to move around for cleaning or to create more space. Open shelving on the bottom of the units and on the tall baker’s rack provides plenty of storage that is easy to see and access.
DIY Instructions: Add Wheels to a Small Shelf
Things You’ll Need:
- A small, sturdy wooden bookshelf or table
- Four caster wheels (the kind that screw on)
- A pencil
- A screwdriver
- A grown-up to help
Step-by-Step Guide:
- Flip It Over: Carefully turn your bookshelf or table upside down so the legs are pointing up.
- Position the Wheels: Place one wheel on the bottom of each leg, in the corner. Make sure it doesn’t stick out over the edge.
- Mark the Holes: Use your pencil to mark where the screws need to go through the holes in the wheel’s base. Do this for all four wheels.
- Screw Them On: Ask an adult to help you. It’s best if they drill a small pilot hole first. Then, use the screwdriver to attach each wheel firmly to the bottom of each leg.
- Time to Roll: Flip your furniture back over. Now you have a rolling cart that you can move around your kitchen!
28. Dedicate a Wall as a Pantry

If you have a closet or a nook near your kitchen, you can turn it into a super-organized pantry. This walk-in pantry uses floor-to-ceiling shelving to make the most of the space. Everything is visible and easy to find, which helps with meal planning and grocery shopping.
This pantry is more than just shelves. It has a countertop for small appliances like a microwave and coffee maker, freeing up space in the main kitchen. Pull-out carts and drawers provide specialized storage for smaller items, ensuring that no space is wasted.
DIY Instructions: Canned Food Dispenser Rack
Things You’ll Need:
- Sturdy cardboard (from a big box)
- A ruler
- A pencil
- A box cutter or strong scissors (with adult help)
- Hot glue gun or strong tape
Step-by-Step Guide:
- Measure Your Cans: Take a standard soup can and measure its height and width.
- Design the Ramp: You are going to build a small ramp. The back of the ramp needs to be taller than one can, and the front needs to be shorter. It should be just a little wider than a can.
- Cut Your Pieces: With an adult’s help, cut out the pieces from the cardboard: a long bottom piece, a tall back piece, a short front piece, and two side pieces that are angled like a ramp.
- Glue It Together: Use the hot glue or tape to assemble your dispenser. It should look like a little slide for your cans. Make sure it’s strong.
- Load It Up: Place the dispenser on your pantry shelf. Load your cans from the back. They will roll to the front. When you take one, the next one rolls into its place!
29. Turn a Nook into a Glam Bar

Even a tiny, unused nook can become a stunning feature. This space has been transformed into a glamorous Art Deco-style wet bar. The dramatic fan-shaped tile, gold fixtures, and hammered gold sink create a huge impact in a small footprint.
Glass shelves are a great choice here. They provide storage for glassware without looking heavy and allow the beautiful tile to show through. Under-shelf lighting adds to the moody, sophisticated atmosphere. It shows that you don’t need a lot of space to add a lot of style.
DIY Instructions: Gilded-Edge Glassware
Things You’ll Need:
- Some plain drinking glasses
- Gold liquid leaf or a gold paint pen (make sure it’s non-toxic and food-safe if it’s near the rim)
- A small, thin paintbrush
- Painter’s tape
Step-by-Step Guide:
- Clean Your Glasses: Wash and dry your glasses so they are perfectly clean.
- Tape a Straight Line: Wrap a piece of painter’s tape around the glass to create a crisp, straight line. You could do this near the rim or near the bottom.
- Time to Paint: If you are using liquid leaf, dip your small brush in and carefully paint a band of gold around the glass, right up to the edge of the tape. If you are using a paint pen, just color it in.
- Let it Dry (A Little): Wait for the paint to be almost dry, but still a little tacky.
- Peel the Tape: Carefully and slowly peel off the painter’s tape to reveal your perfect gold line. Let the glasses dry completely according to the instructions on the paint. Now you have fancy, custom glassware!
30. Unify with a Waterfall Countertop

This kitchen demonstrates the power of minimalism. A “waterfall” countertop is one where the counter material continues down the side of the cabinet to the floor. Here, the concrete-look material is used for the counter, the sides, and the backsplash, creating one seamless, unified surface.
This technique is very effective in small spaces because it simplifies the look and reduces visual clutter. The warm wood grain of the handleless cabinets provides a beautiful contrast to the cool gray of the concrete. The result is a calm, clean, and highly modern kitchen.
DIY Instructions: Faux Concrete Coasters
Things You’ll Need:
- A few plain ceramic tiles (4×4 inches is a good size)
- Concrete-look peel-and-stick contact paper
- A pencil
- Scissors or a craft knife
- Small felt pads
Step-by-Step Guide:
- Clean Your Tiles: Make sure your ceramic tiles are clean and dry.
- Trace and Cut: Place a tile face down on the back of the contact paper. Trace around it with a pencil. Cut out the square. Do this for each tile.
- Apply the Paper: Carefully peel the backing off one of your contact paper squares. Line it up with the corners of a tile and smooth it down. Use your fingers or a plastic card to push out any air bubbles.
- Fold the Edges: If your contact paper is a little bigger than your tile, you can fold the extra neatly over the edges.
- Add Feet: Stick four small felt pads on the bottom of each tile, one in each corner. This will protect your furniture. Now you have stylish, modern coasters that look like concrete!
31. Carve Out a Kitchen Office

In today’s world, the kitchen often doubles as a home office. This design cleverly incorporates a dedicated workspace right into the kitchen cabinetry. A small desk area provides a spot for a laptop, with open shelving above for books and supplies.
The real genius is in the details. A built-in charging station keeps all your devices powered up and organized. Deep drawers are designed to hold files and tablets, keeping work clutter hidden away. This creates a functional home office without sacrificing kitchen space.
DIY Instructions: Simple Desk Drawer Organizer
Things You’ll Need:
- A shallow cardboard box that fits inside your desk drawer
- Smaller cardboard boxes (like from tea or granola bars)
- Scissors
- Wrapping paper or paint (optional)
- Glue or double-sided tape
Step-by-Step Guide:
- Create Your Layout: Place the large box inside your drawer. Arrange the smaller boxes inside it to create compartments for pens, paper clips, sticky notes, and other supplies.
- Decorate (Optional): If you want to make it look nice, take the boxes out and cover them with wrapping paper or give them a coat of paint. Let them dry.
- Secure the Boxes: Place the decorated boxes back inside the larger box. Use a little bit of glue or double-sided tape on the bottom of the small boxes to keep them from sliding around.
- Fill It Up: Place your new custom organizer in your desk drawer and fill it with your office supplies. Everything now has its own spot!
32. Use Color Blocking for a Playful Look

A small kitchen is a great place to experiment with bold color. This one uses a technique called “color blocking,” with large sections of solid, vibrant color. The bright yellow fridge and the primary red and blue cabinet fronts create a fun, energetic, and modern look, inspired by the art of Piet Mondrian.
To keep the space from feeling chaotic, the walls, countertop, and floor are all kept a simple, clean white. This makes the bright colors pop and become the focus of the room. The simple, handleless design of the cabinets also contributes to the clean, graphic feel.
DIY Instructions: Paint-Dipped Kitchen Utensils
Things You’ll Need:
- Wooden spoons and spatulas
- Acrylic craft paint in your favorite colors
- A paintbrush
- Painter’s tape
- A clear, food-safe sealant (optional)
Step-by-Step Guide:
- Tape Your Line: Wrap a piece of painter’s tape around the handle of each wooden utensil. Make sure the tape is straight and pressed down firmly so paint can’t sneak underneath.
- Start Painting: Paint the handle of the spoon from the tape down to the bottom. You might need to do two coats to get a nice, solid color.
- Let Them Dry: Find a way to let the utensils dry without smudging the paint. You could stand them up in a jar or lay them on a piece of wax paper.
- Peel the Tape: When the paint is completely dry, carefully peel off the painter’s tape. You should have a crisp, clean line.
- Seal Them (Optional): If you want to protect the paint, you can have an adult help you apply a coat of clear, food-safe sealant to the painted part.
33. Embrace Wabi-Sabi Warmth

This kitchen has a beautiful, calming, and natural feel. The style is inspired by “wabi-sabi,” a Japanese idea that finds beauty in imperfection. It uses natural, rustic materials like rough-hewn wood for the cabinets and open shelves, and slate for the floor and countertops.
The storage is a mix of open and closed. Open niches in the cabinetry are used to display handmade pottery bowls. A vintage-style chest of drawers is repurposed for storage, adding character. The overall effect is earthy, authentic, and deeply personal.
DIY Instructions: Twig-Handled Serving Tray
Things You’ll Need:
- A simple wooden tray
- Two interesting-looking twigs or small branches
- A small handsaw (with a grown-up)
- Strong glue (like E6000 or wood glue)
- Sandpaper
Step-by-Step Guide:
- Find Your Twigs: Go on a nature walk and find two sturdy twigs that are comfortable to hold.
- Prep the Twigs: An adult should help you saw the twigs so they are the right length to be handles for your tray. Use sandpaper to smooth any rough ends.
- Position the Handles: Lay the twigs on the top edges of the tray to see where you want them to go.
- Glue Them Down: Apply a generous line of strong glue to the bottom of one of the twigs. Press it firmly onto the tray. Do the same for the second twig.
- Let It Cure: Let the glue dry completely, which might take a full day. Once it’s secure, you have a unique, nature-inspired tray for carrying drinks or snacks.
34. Tuck a Kitchen Under the Stairs

The awkward, slanted space under a staircase is often wasted. This design brilliantly turns that nook into a fully functional kitchenette. Custom-built cabinets and shelves are designed to fit the angle of the stairs perfectly, ensuring no space is lost.
This compact kitchen has everything you need: a fridge, a sink, a cooktop, and clever storage. A pull-out pantry on the side of the fridge uses a narrow space. A rolling cart with a built-in cutting board can be pulled out for extra prep space. LED strip lighting ensures the small space is bright and usable.
DIY Instructions: Rolling Under-Cabinet Storage Cart
Things You’ll Need:
- A wooden crate
- Four caster wheels
- A screwdriver and pencil
- A grown-up to help
- Sandpaper (optional)
Step-by-Step Guide:
- Smooth the Crate (Optional): If your wooden crate has any splinters, use sandpaper to smooth the edges.
- Flip It Over: Turn the crate upside down.
- Position and Mark: Place one wheel on each of the four corners on the bottom of the crate. Use a pencil to mark the screw holes.
- Attach the Wheels: Ask a grown-up to help you screw the wheels firmly onto the bottom of the crate.
- Roll It Out: Turn your crate back over. You now have a rolling bin! You can use it to store pots and pans, root vegetables like potatoes and onions, or even recycling. It’s easy to roll out when you need something and tuck away when you’re done.
35. Go Seamless with Integrated Appliances

For the ultimate clean and minimalist look, hide your appliances. This kitchen uses integrated appliances, which are covered with cabinet panels to match the rest of the kitchen. This makes the fridge, dishwasher, and other machines disappear, creating a beautiful, unbroken wall of wood grain.
The lack of handles, known as a “handleless” design, adds to the seamless effect. Cove lighting, which is hidden along the top of the cabinets, casts a soft, warm glow down the walls. A marble waterfall island and backsplash add a touch of natural pattern and luxury to the simple design.
DIY Instructions: Create a Faux Marble Tray
Things You’ll Need:
- A simple, flat wooden or plastic tray
- Marble-patterned peel-and-stick contact paper
- Scissors or a craft knife
- A ruler
- A smoother tool or plastic card
Step-by-Step Guide:
- Clean Your Tray: Make sure the tray is clean and completely dry.
- Measure and Cut: Measure the inside bottom of your tray. Cut a piece of the marble contact paper to that exact size.
- Stick It Down: Carefully peel the backing off the contact paper. Starting at one end, slowly press it onto the bottom of the tray. Use the smoother tool to push out any air bubbles as you go.
- Cover the Sides (Optional): If you want to cover the inside walls of the tray, measure and cut strips of contact paper and apply them in the same way.
- Let it Set: Let the tray sit for a little while to make sure the adhesive is secure. Now you have a stylish tray that looks like it’s made of expensive marble!
36. Create a Portable Outdoor Kitchen

Your kitchen doesn’t have to be indoors. This clever unit is a portable outdoor kitchen station, great for a balcony, patio, or deck. It provides a countertop for prep, a small sink, and storage for all your grilling essentials.
The unit is on wheels, so it can be easily moved. It includes a mini-fridge to keep drinks cold, a spot for a grill or griddle, and hooks on the door for tools. This is a fantastic way to extend your living space and enjoy cooking outdoors, even if you have a small home.
DIY Instructions: Simple Outdoor Utensil Caddy
Things You’ll Need:
- A few clean, empty tin cans
- A small piece of wood
- A drill (with a grown-up)
- Screws and washers
- Spray paint (optional)
Step-by-Step Guide:
- Prep Your Cans: Make sure your cans are clean and that there are no sharp edges at the top. If you want, you can spray paint them a fun color. Let them dry.
- Drill Holes in Cans: Ask an adult to help you drill a small hole in the side of each can, near the top.
- Drill Holes in Wood: Hold a can against the piece of wood and mark where the hole is. Drill a hole in the wood at that spot. Do this for all your cans.
- Attach the Cans: Place a washer on a screw. From the inside of the can, push the screw through the hole. Screw it into the hole in the wood. The washer will stop the screw head from pulling through.
- Fill It Up: Attach all your cans to the wood. Now you can hang your caddy on a wall or fence and use it to hold forks, knives, and spoons for your outdoor meals.
37. See Everything with Ribbed Glass

If you like the idea of glass cabinets but want to hide clutter a little, ribbed or fluted glass is a great option. The texture of the glass blurs the contents of the cabinets, so you get a sense of what’s inside without having to keep everything perfectly tidy.
This kitchen uses tall, black-framed glass cabinets for both upper and lower storage. This creates a look that is light and open, but also sophisticated. The uniform stacks of white dishes inside become part of the design, adding a graphic, organized element to the room.
DIY Instructions: Ribbed Glass-Effect Vase
Things You’ll Need:
- A plain, clear glass cylinder vase
- A hot glue gun
- A grown-up to help with the hot glue
Step-by-Step Guide:
- Clean the Vase: Make sure your glass vase is clean and dry.
- Heat Up the Glue Gun: With a grown-up’s help, plug in the hot glue gun and let it get hot.
- Make Your Lines: This is the fun part! The adult should carefully run a straight line of hot glue from the top rim of the vase all the way down to the bottom.
- Repeat, Repeat, Repeat: Keep making straight glue lines all the way around the vase. Try to keep them evenly spaced.
- Let It Cool: Let the glue cool down and harden completely. When you look through the vase, the glue lines will bend the light and create a cool, ribbed effect, similar to fluted glass.
38. Go Wild with a Steampunk Theme

Your kitchen is a chance to show off your personality. This incredible kitchen is fully committed to a steampunk theme. It’s filled with copper, brass, gears, gauges, and pipes. The custom copper range hood and sink are amazing focal points.
This style is all about intricate details. An old card catalog is used for storing small items. The lighting fixtures look like they came from an old factory or a submarine. Even the stove has a big red wheel for a handle. It’s a reminder that a kitchen can be a work of art.
DIY Instructions: Steampunk-Inspired Gear Coasters
Things You’ll Need:
- Round cork coasters
- Metallic craft paint (gold, copper, and bronze)
- A paintbrush
- A hot glue gun (with an adult’s help)
- Some old nuts, bolts, and small plastic gears from a craft store
Step-by-Step Guide:
- Paint the Coasters: Paint your cork coasters with one of the metallic paints. Let them dry. You could even dry-brush a little of a second color on top to make them look aged.
- Paint Your Bits: Paint the nuts, bolts, and plastic gears with the different metallic colors. It’s okay if they look a little messy and old.
- Arrange Your Design: Plan out how you want to arrange the gears and bolts on your coasters.
- Glue Everything Down: Ask an adult to help you use the hot glue gun to stick the metal and plastic bits onto the coasters. Don’t put them too close to the edge.
- Let Them Dry: Let the glue cool completely. You now have unique steampunk coasters that look like they came from a mad inventor’s workshop.
Having a small kitchen does not mean you have to settle for less. It just means you get to be more creative. As we’ve seen, the right choices in layout, lighting, and storage can completely change how your kitchen feels and functions. You can turn a cramped room into a charming and efficient workspace.
The journey to a better kitchen starts with a single good idea. Whether you decide to build upwards, install a clever corner unit, or simply organize your drawers, each small change adds up. Your kitchen has the potential to be a space you love to cook in, no matter its size.
Key Takeaways
- Think Vertically: Use the space above your counters with tall cabinets, open shelving, or even a storage loft.
- Smart Storage is Essential: Install pull-out drawers, lazy susans, and wall-mounted racks to make every cabinet more accessible.
- Light and Reflection Create Space: Use light colors, glossy surfaces, and mirrors to make the room feel bigger and brighter.
- Multi-Functional is Key: Choose islands that offer storage and seating, or opt for furniture that can be moved or folded away.
- DIY Can Make a Difference: Simple projects like a magnetic knife strip or drawer dividers can solve major storage problems on a budget.