

Stepping into your home should feel like a sigh of relief, not a trip hazard. If your entryway currently serves as a chaotic dumping ground for shoes, coats, and mail, it may be sending the wrong message to you and your guests. A small foyer is a huge organizational challenge, often becoming a bottleneck that impacts your entire day.
Fortunately, even the most cramped landing strip can be transformed into a welcoming and highly efficient zone. The key lies in ditching bulky furniture and embracing creative vertical solutions. Thinking smart about storage ensures every inch is utilized to its full potential.
We have compiled 36 innovative layout solutions designed specifically for tight spaces. From hidden charging stations to glamorous gallery walls, these ideas will help you conquer clutter. Get ready to turn that unwelcoming mess into a beautifully organized welcome home.
1 Minimalist Floating Console and Round Mirror Set
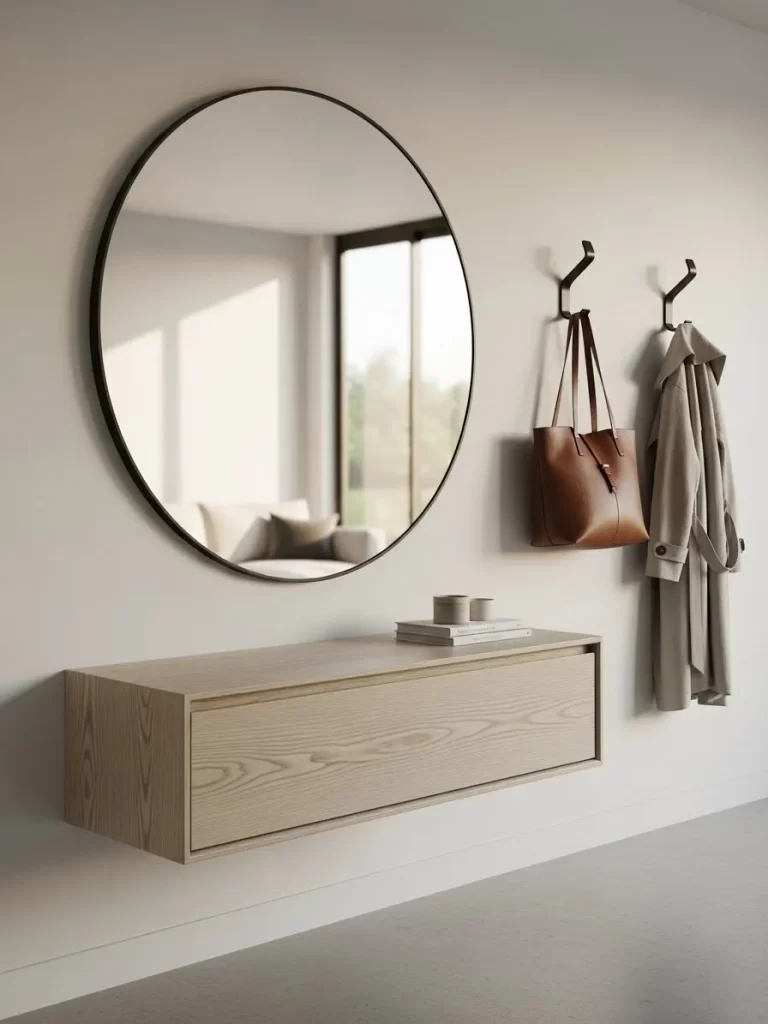
Small entryways often feel cramped because of bulky furniture legs. This floating wooden console solves that problem by keeping the floor clear. It provides a slim drawer to hide away keys, mail, and daily clutter without taking up precious walking space.
The large circular mirror acts as a focal point while reflecting light to make the foyer feel much larger. Simple black wall hooks nearby offer a dedicated spot for coats and bags. This layout keeps your essentials organized and within reach as you head out the door.
Neutral tones and clean lines create a calm atmosphere the moment you walk inside. Using vertical space effectively ensures that even the smallest landing strip remains functional. This design proves that you do not need a massive hallway to make a strong first impression.
Material Required List
- One floating wooden console unit
- One large round wall mirror with a thin black frame
- Two heavy duty metal wall hooks
- Wall anchors and screws suitable for your wall type
- Painter’s tape
Equipment Required List
- Power drill and drill bits
- Bubble level
- Measuring tape
- Pencil
- Stud finder
- Screwdriver
DIY Instruction Step by Step
- Use a stud finder to locate the wooden studs behind your wall and mark them with a pencil.
- Measure the height where you want the top of the console to sit and hold the mounting bracket against the wall.
- Place a bubble level on top of the bracket to ensure it is straight before marking the screw holes.
- Drill pilot holes into the marked spots and insert wall anchors if you are not hitting a stud.
- Secure the mounting bracket or the console backboard to the wall using a power drill and long screws.
- Slide the console unit onto the bracket and check that it is firm and level.
- Locate the center point above the console for your mirror and mark the hanging spot.
- Install the mirror hardware into the wall and carefully hang the circular mirror.
- Space the two wall hooks about 6 to 8 inches apart on the side and mount them at shoulder height.
- Test the weight capacity of the hooks and console drawer before placing your bags or heavy books.
2 Ultra-Slim Floating Marble Console and Oversized Mirror
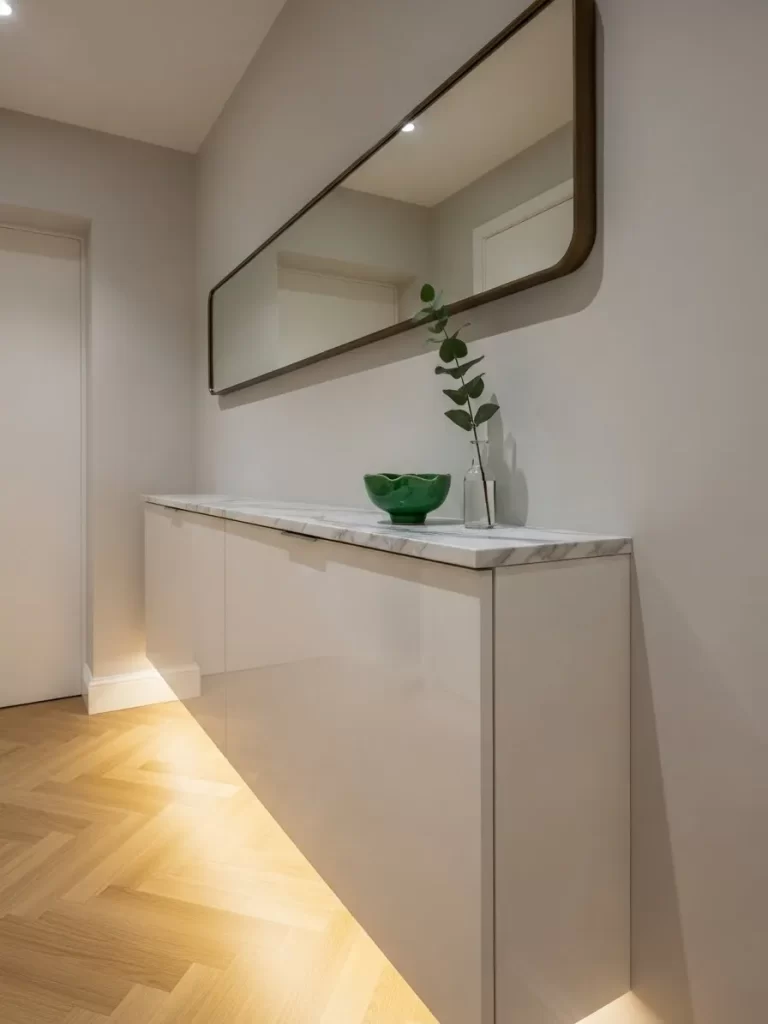
Long, narrow hallways often suffer from a lack of light and functional storage. This ultra-slim floating console features a white high-gloss finish that blends seamlessly into the wall. A luxurious marble top adds a touch of elegance while providing a surface for small decor and a catch-all bowl.
The elongated, rounded mirror stretches across the wall to create the illusion of a wider passage. Integrated under-cabinet lighting casts a warm glow on the floor, making the path feel safe and welcoming. This setup maximizes floor space while offering a high-end look that is easy to maintain.
Maintaining a clear walkway is vital in tight corridors. By mounting everything to the wall, you remove the visual weight of traditional furniture legs. This layout keeps your entryway feeling airy and organized without sacrificing style.
Material Required List
- One slim floating cabinet unit with a high-gloss finish
- One custom-cut marble or quartz remnant top
- One large horizontal pill-shaped mirror
- LED light strip with an adhesive back
- Heavy-duty mounting brackets and anchors
- Construction adhesive
Equipment Required List
- Power drill with masonry or wood bits
- Long bubble level
- Measuring tape and pencil
- Caulk gun
- Stud finder
- Screwdriver
DIY Instruction Step by Step
- Map out the height of your console on the wall using a pencil and a long bubble level to ensure a straight line.
- Find the wall studs with your stud finder and mark their locations clearly within the cabinet area.
- Attach the heavy-duty mounting brackets to the studs using long screws for a secure hold.
- Lift the floating cabinet onto the brackets and screw it firmly into place from the interior.
- Apply beads of construction adhesive to the top of the cabinet and carefully set the marble slab on top.
- Clean away any excess adhesive immediately and let the stone sit for twenty-four hours to bond.
- Mark the center point of the wall above the cabinet and install the hanging hardware for the large mirror.
- Lift the mirror with a partner and hook it onto the wall mounts, ensuring it stays level.
- Peel the backing off the LED light strip and press it firmly along the bottom edge of the cabinet.
- Hide the power cord behind the cabinet or plug it into a low-profile outlet to finish the glow effect.
3 Navy Blue Corner Mudroom Cubby with Built-in Seating
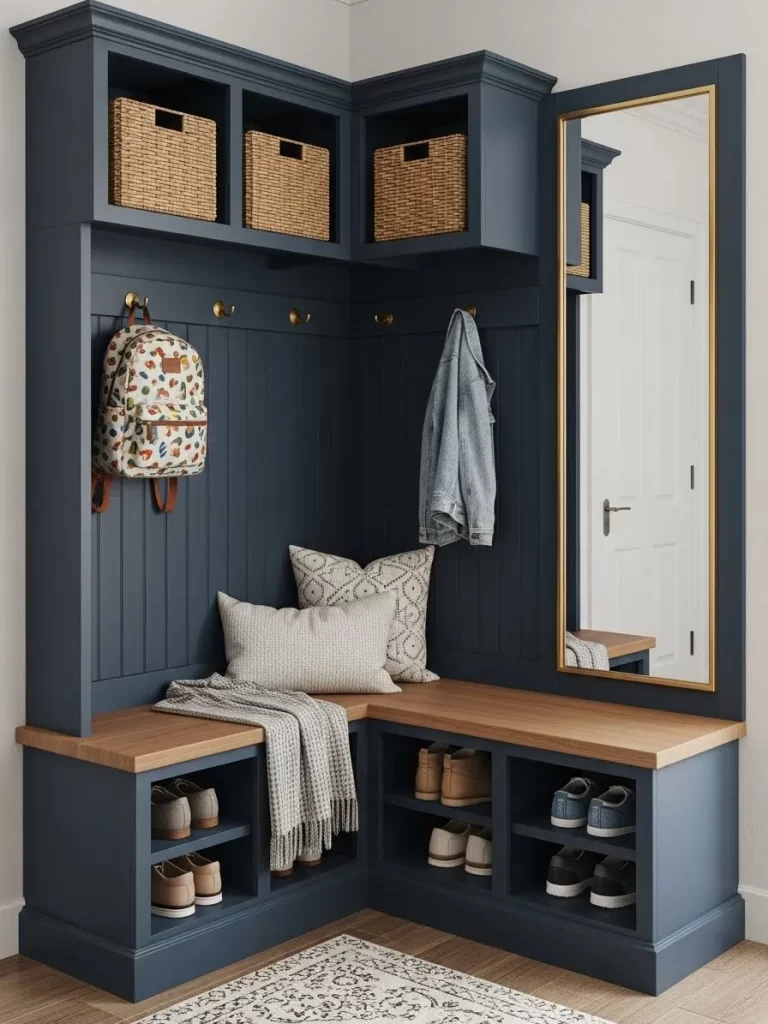
Transforming a dead corner into a functional zone is a smart move for busy households. This custom-built mudroom features a deep navy blue finish that hides scuffs and adds sophisticated color. The L-shaped bench offers plenty of room to sit down and put on shoes comfortably.
Upper cubbies house woven baskets to hide seasonal gear like hats and gloves. Below the seat, open shelving allows for quick access to footwear, keeping the floor free of piles. Gold-toned hooks provide a stylish place to hang backpacks and coats at various heights.
A tall mirror is integrated into the side panel to allow for a quick outfit check before leaving. This all-in-one station centralizes your morning routine into a single compact area. The contrast between the dark paint and the light wood seating brings a modern farmhouse feel to the foyer.
Material Required List
- Pre-cut plywood sheets (3/4 inch thickness)
- Solid wood planks for the bench top
- Three woven storage baskets
- Five gold-finished metal coat hooks
- One frameless mirror panel
- Navy blue furniture paint and primer
- Wood glue and finish nails
Equipment Required List
- Circular saw or table saw
- Cordless nail gun or hammer
- Power drill and driver bits
- Paint rollers and high-quality brushes
- Sandpaper (120 and 220 grit)
- Measuring tape
DIY Instruction Step by Step
- Measure your corner space and build two separate rectangular base frames for the bench.
- Attach the plywood sides and dividers to create the lower shoe cubbies using wood glue and nails.
- Construct the upper shelf unit with square openings that match the size of your woven baskets.
- Install vertical wall panels between the bench and the upper shelves for a finished look.
- Secure the base frames and upper shelves to the wall studs using long cabinet screws.
- Sand the solid wood bench planks until smooth and attach them to the base frames with glue and nails.
- Prime the entire unit and apply two coats of navy blue furniture paint, allowing time to dry between coats.
- Measure the side panel and adhere the mirror using specialized mirror mastic or clips.
- Measure and mark even spacing for the gold hooks and screw them into the back panel.
- Slide your baskets into the top cubbies and add a few throw pillows to the bench for a cozy touch.
4 Oversized Gold Gilded Mirror with Emerald Velvet Stool
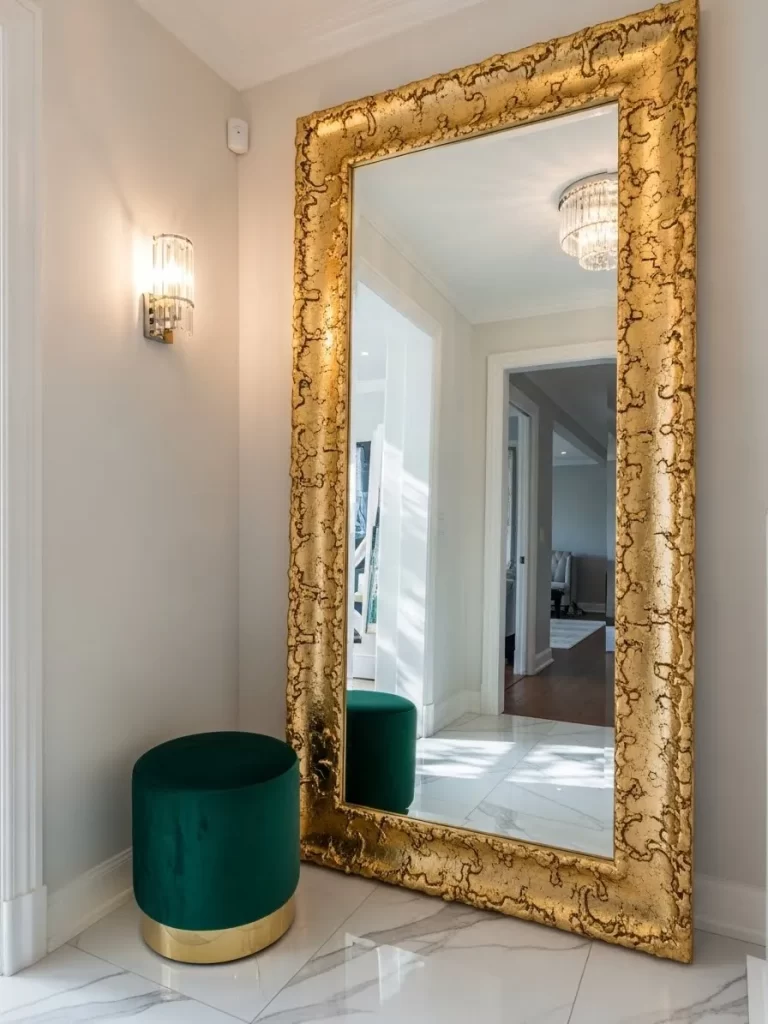
Small entryways can benefit from a bold approach to decor. A massive floor-to-ceiling mirror with a textured gold frame serves as the ultimate statement piece. It bounces light across the room and creates a grand feeling in even the tiniest hall.
Tucked neatly beside the mirror is a compact emerald green velvet stool. This provides a soft place to sit while taking up very little physical or visual space. The combination of gold and jewel tones makes the foyer feel like a luxury boutique.
The marble tile floor complements the metallic accents for a high-end finish. This layout is for those who want a glamorous entryway but lack the room for large consoles. It keeps the area functional for quick checks without the clutter.
Material Required List
- One oversized floor mirror with a wide decorative frame
- One round velvet ottoman with a metallic base
- Wall-mounted crystal or glass sconce
- Mirror safety anchors (Anti-tip kit)
- Clear silicone bumpers
Equipment Required List
- Power drill
- Screwdriver
- Bubble level
- Measuring tape
- Cleaning cloth and glass cleaner
DIY Instruction Step by Step
- Clean the wall area thoroughly and move the mirror into the general position to test the angle.
- Place clear silicone bumpers on the bottom corners of the mirror frame to prevent it from slipping.
- Lean the mirror against the wall and use a level to ensure it is not tilting to one side.
- Locate the studs behind the top of the mirror to install the anti-tip safety anchors.
- Attach the safety wire or bracket to the back of the mirror frame and the wall stud.
- Position the emerald stool slightly to the side of the mirror so it does not block the reflection.
- Measure the height for your wall sconce about eye level and install the mounting plate.
- Connect the wiring for the light fixture or use a battery-operated bulb for an easy setup.
- Polish the mirror surface with glass cleaner to remove fingerprints from the installation process.
- Ensure the stool is far enough from the door swing to avoid any collisions.
5 Industrial Metal Pipe Rack with Dark Wood Shelving
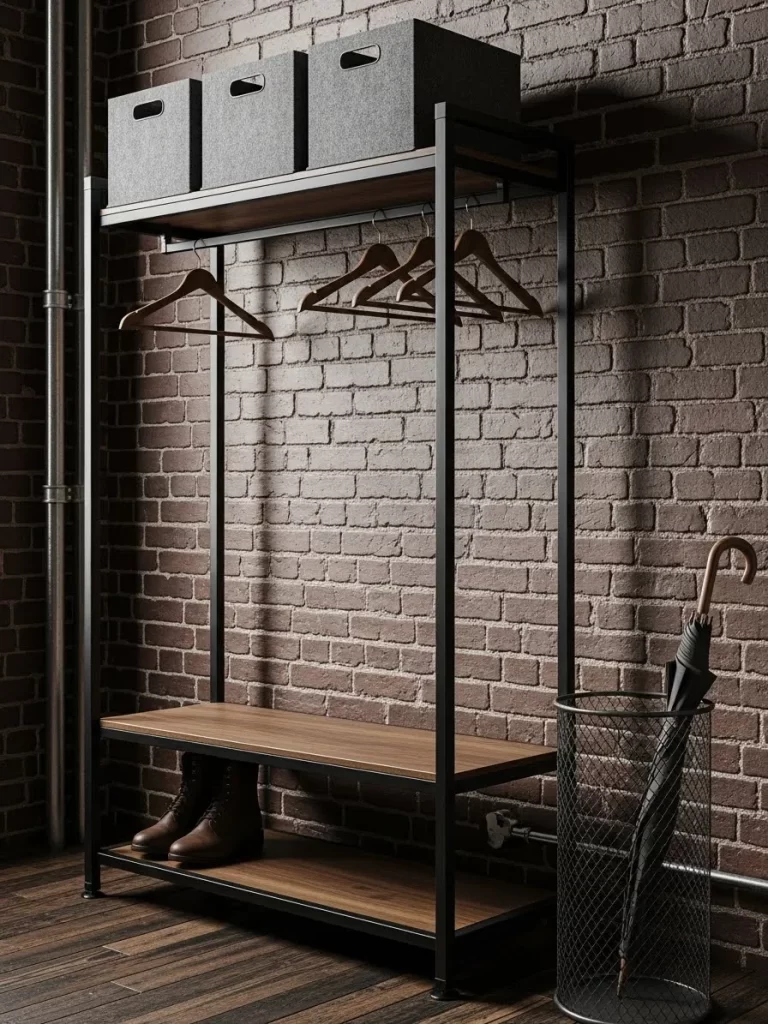
A brick-walled entryway demands a rugged and durable organization system. This industrial-style rack combines a black metal frame with rich, dark wood shelves for a balanced look. The open design allows the texture of the brick to show through.
The top shelf holds felt storage bins for items you want to keep out of sight. A sturdy hanging rod provides space for multiple coats on wooden hangers. The bottom shelves serve as a dedicated zone for boots and everyday footwear.
A mesh umbrella stand sits nearby to catch dripping rain gear. This setup is highly functional for urban apartments or mudrooms with a loft aesthetic. It offers plenty of storage capacity while maintaining a slim footprint against the wall.
Material Required List
- One freestanding industrial garment rack or black iron pipes
- Three dark wood boards cut to width
- Three charcoal gray felt storage boxes
- Set of matching wooden coat hangers
- One metal mesh umbrella holder
- Floor protectors (felt pads)
Equipment Required List
- Allen wrench (usually included with kits)
- Phillips head screwdriver
- Level
- Small step ladder
- Measuring tape
DIY Instruction Step by Step
- Assemble the base of the metal frame first, ensuring the feet are level on your floor.
- Attach the vertical support poles and tighten the screws firmly to prevent the rack from wobbling.
- Slide the lower wooden shelves onto the support brackets and secure them from underneath.
- Install the top shelf and the horizontal hanging bar at the highest point of the frame.
- Place felt pads on the bottom of the metal feet to protect your wood or tile floors.
- Arrange the felt storage bins on the top shelf for hats, scarves, and extra accessories.
- Place the wooden hangers on the rod with even spacing to maintain a clean look.
- Position the umbrella stand on the right or left side of the rack based on your door swing.
- Wipe down the metal pipes with a damp cloth to remove any factory oils.
- Load your heaviest boots on the very bottom shelf to give the unit more stability.
6 White Storage Bench with Woven Baskets and Botanical Gallery
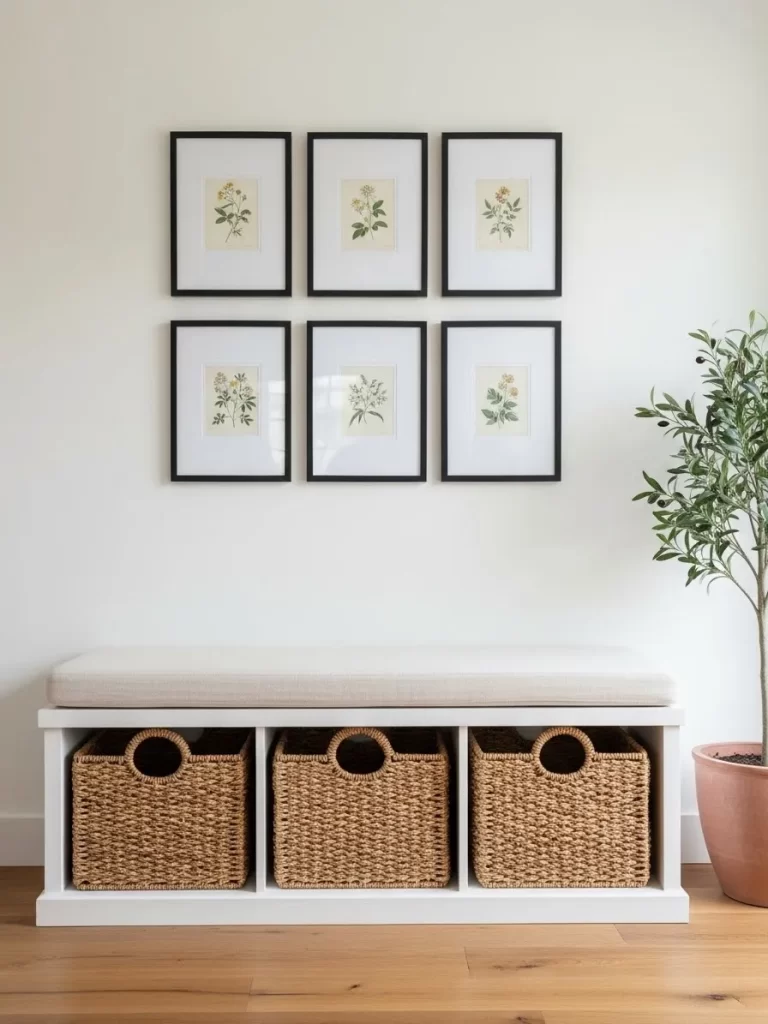
This bright and airy layout focuses on symmetry and natural textures. A low-profile white bench offers a comfortable spot to sit, while three large seagrass baskets underneath hide shoe clutter. This design is excellent for families who need easy-to-reach storage.
Above the bench, a gallery of six botanical prints in black frames creates a sophisticated grid. The repetitive pattern draws the eye upward, making the ceiling feel higher. A potted olive tree in the corner adds a touch of greenery to the neutral palette.
The combination of white furniture and natural wood floors feels timeless and fresh. Keeping the colors light prevents the furniture from overwhelming a small foyer. It is a simple way to bring order to a high-traffic area.
Material Required List
- One 3-cubby storage bench in white
- Three matching seagrass or wicker baskets with handles
- One cream-colored upholstered bench cushion
- Six identical black picture frames (8×10 or 11×14)
- Six botanical art prints
- One large floor planter and an artificial olive tree
Equipment Required List
- Hammer or nail gun
- Measuring tape
- Laser level or bubble level
- Painter’s tape
- Pencil
DIY Instruction Step by Step
- Place the storage bench against your main wall and ensure it is centered.
- Lay the upholstered cushion on top and slide the three woven baskets into the open cubbies.
- Measure the width of the bench and mark the center point on the wall above it.
- Lay your six picture frames on the floor to decide the spacing for your grid.
- Use painter’s tape to mark the outer corners of your gallery wall to visualize the final size.
- Start with the bottom center frame, using a level to make sure it is straight.
- Install the remaining five frames around the first one, maintaining the exact spacing.
- Place the olive tree in its planter and set it at the end of the bench.
- Fill the baskets with shoes, pet leashes, or outdoor toys to keep the floor clear.
- Take a step back to ensure the botanical prints are aligned and adjust as needed.
7 Giant Plywood Pegboard Organization Wall

A pegboard wall is a flexible solution for a busy household with changing needs. This floor-to-ceiling installation uses large wooden pegs that you can move whenever you like. It allows you to hang heavy bags, helmets, and coats at any height.
The light birch plywood adds a warm, modern feel to the entryway. Small clip-on shelves provide a place for tiny plants or a bowl for your keys. A hanging fabric pocket is a clever addition for sorting mail or holding important documents.
This layout turns an entire wall into a giant organization station. Because it is flat against the wall, it takes up almost no floor space. It is a great way to use a long empty hallway that would otherwise go to waste.
Material Required List
- Four large sheets of 3/4 inch birch plywood
- Assorted 1-inch diameter wooden dowels
- One small plywood shelf with peg attachments
- One fabric wall organizer with metal hooks
- Wood screws and heavy-duty wall anchors
- 1×2 inch wood furring strips
Equipment Required List
- Power drill and 1-inch spade bit
- Circular saw
- Orbital sander
- Level
- Stud finder
- Measuring tape
DIY Instruction Step by Step
- Cut your plywood sheets to fit the height and width of your foyer wall.
- Use a ruler and pencil to mark a grid of dots every 4 to 6 inches.
- Drill holes at every mark using a 1-inch bit while keeping the drill vertical.
- Sand the surface and the inside of every hole until they are smooth.
- Screw 1×2 furring strips into the wall studs to create a frame.
- Lift the plywood sheets and screw them into the furring strips.
- Cut your wooden dowels into pegs and sand the ends.
- Push the pegs into the holes to hold your bags and coats.
- Slide your small plywood shelves onto pairs of pegs for display.
- Hook the fabric mail sorter onto lower pegs for easy access.
8 Dark Wood Built-in Bookshelf and Shoe Niche
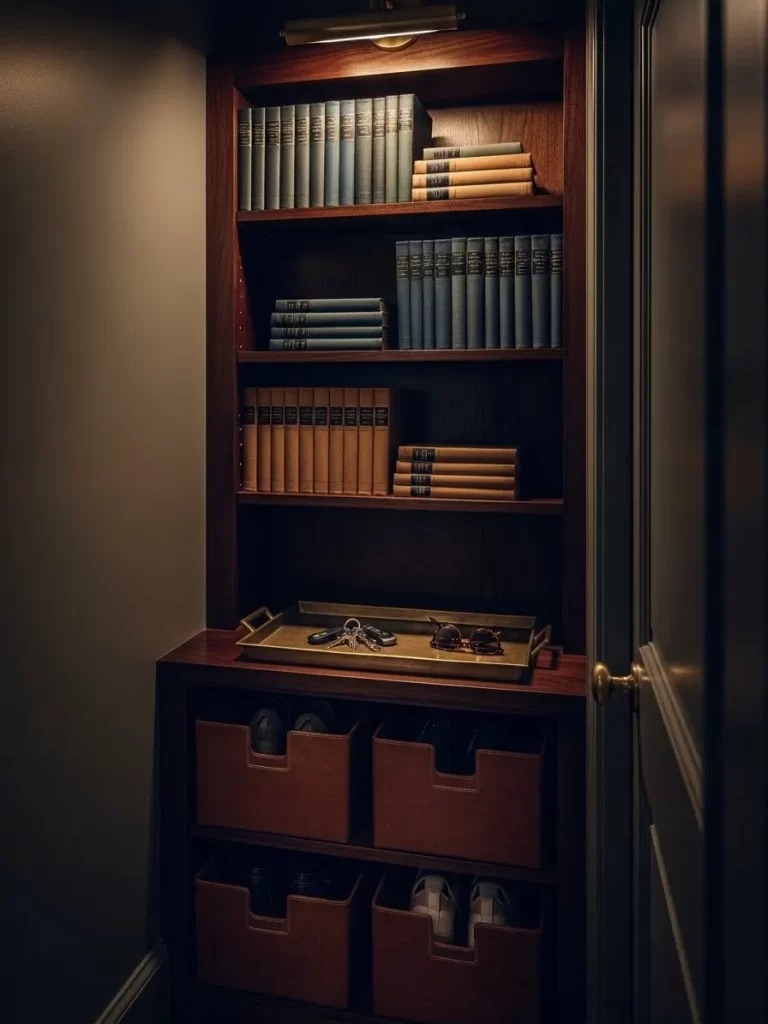
A recessed wall niche is a goldmine for organization in a small home. This built-in unit features rich dark wood tones that create a cozy, library-like feel. The upper shelves are filled with books to show your personality.
The middle section serves as a landing strip with a brass tray for keys. Below, custom leather bins provide a hidden spot for shoes and unsightly items. An integrated picture light at the top ensures the contents are easy to see.
Using a dark stain makes the niche recede, making the hallway feel less cluttered. This design is for those who want a formal look that provides high-end utility. It maximizes the vertical space of a wall area beautifully.
Material Required List
- Pre-built bookshelf unit or custom-cut oak boards
- Dark walnut wood stain and sealer
- Four leather or faux-leather storage bins
- One decorative brass valet tray
- One battery-operated LED picture light
- Wood glue and trim molding
Equipment Required List
- Hammer and finishing nails
- Paintbrush or staining rag
- Measuring tape
- Screwdriver
- Sandpaper (220 grit)
DIY Instruction Step by Step
- Measure the depth and width of your wall niche carefully.
- Sand all wood surfaces and apply the dark walnut stain.
- Install the vertical side supports by nailing them into the side walls.
- Add the horizontal shelves at heights that fit your books and bins.
- Use small pieces of trim molding under each shelf for extra support.
- Place the leather bins on the bottom two shelves for shoes.
- Set the brass tray on the counter-height shelf as a drop zone.
- Arrange your books on the upper shelves by color or size.
- Center the picture light at the very top of the niche.
- Turn on the light and adjust the angle to highlight the tray.
9 Minimalist White Recessed Shelves with Black Stool
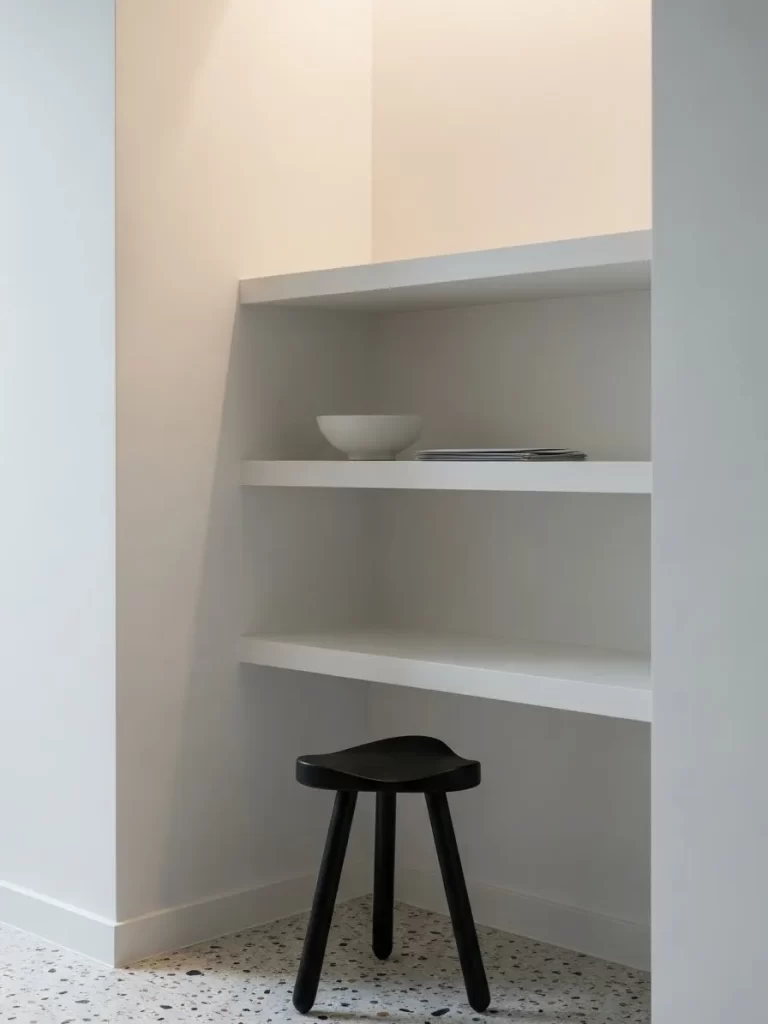
Simplicity is often the best answer for a tiny foyer. These deep white recessed shelves disappear into the wall for a clean and modern look. The wide spacing between shelves prevents the area from looking crowded.
A single white bowl on the middle shelf provides a spot for keys. A small black three-legged stool sits underneath to offer a sharp contrast to the white environment. This piece is small enough to be moved easily but sturdy enough for daily use.
Terrazzo flooring adds a subtle pattern to the space without being overwhelming. This layout works well in modern apartments where every inch of floor space is valuable. It is a quiet design that keeps your entryway functional.
Material Required List
- Thick white laminate or painted wood shelves
- Hidden shelf floating brackets
- One small black wooden stool
- One minimalist ceramic key bowl
- White caulk and touch-up paint
Equipment Required List
- Power drill
- Long bubble level
- Stud finder
- Measuring tape
- Caulk gun
DIY Instruction Step by Step
- Determine the number of shelves you want and mark their heights.
- Locate the wall studs and install the hidden floating shelf brackets.
- Slide the thick white shelves onto the brackets until they are flush.
- Apply a thin bead of white caulk where the shelf meets the wall.
- Place the ceramic bowl on the center shelf for a key spot.
- Position the black stool on the floor directly under the bottom shelf.
- Ensure the terrazzo floor is clean to allow the stool to stand out.
- Keep the top shelf clear to maintain the minimalist feel.
- Wipe the shelves with a microfiber cloth to keep them crisp.
- Check the weight limits of your brackets before placing heavy mail.
10 Marble Pedestal and Abstract Art Statement
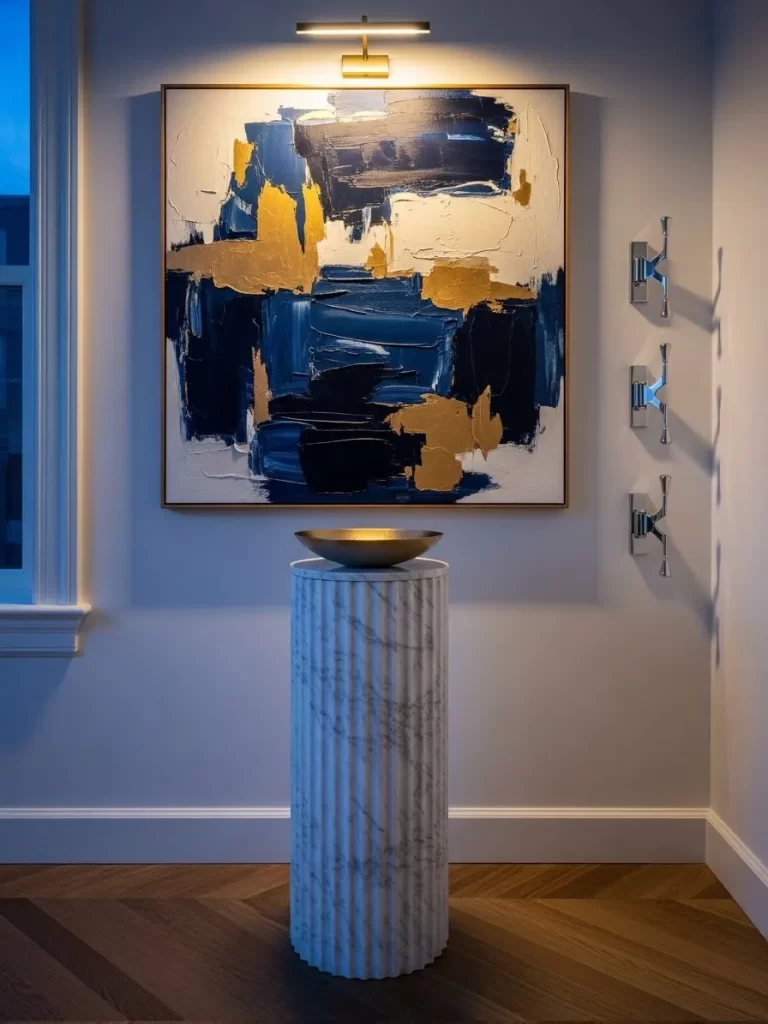
If you prefer a gallery look over a traditional mudroom, this layout is for you. A fluted marble pedestal takes center stage to hold a simple gold bowl for essentials. It provides a luxurious feel while occupying a very small footprint.
Above the pedestal, a large abstract painting adds drama and color. A dedicated art light brings the piece to life to make the foyer feel curated. Chrome wall hooks on the side offer a sleek place for guest coats.
The herringbone wood floors add warmth and movement to the hall. This setup is about quality over quantity, focusing on a few high-impact pieces. It is a choice for homeowners who want an entryway that feels expensive.
Material Required List
- One fluted marble pedestal column
- One gold or brass shallow key bowl
- One large framed abstract canvas painting
- One slim LED art light
- Three modern chrome wall hooks
- Heavy-duty wall anchors
Equipment Required List
- Power drill
- Screwdriver
- Bubble level
- Measuring tape
- Pencil
DIY Instruction Step by Step
- Place the marble pedestal in the center of your entryway wall.
- Center the gold bowl on top of the pedestal for a functional touch.
- Measure the height for the artwork so the center is at eye level.
- Install two heavy-duty wall anchors to hang the painting securely.
- Mount the art light directly above the frame in the center.
- Mark three vertical spots on the side wall for your hooks.
- Drill pilot holes and screw the hooks into the wall anchors.
- Arrange the hooks in a straight vertical line for symmetry.
- Turn on the art light to create a warm, inviting glow.
- Ensure the pedestal is stable and heavy enough to not tip.
11 Modern White Mudroom Unit with Walnut Bench
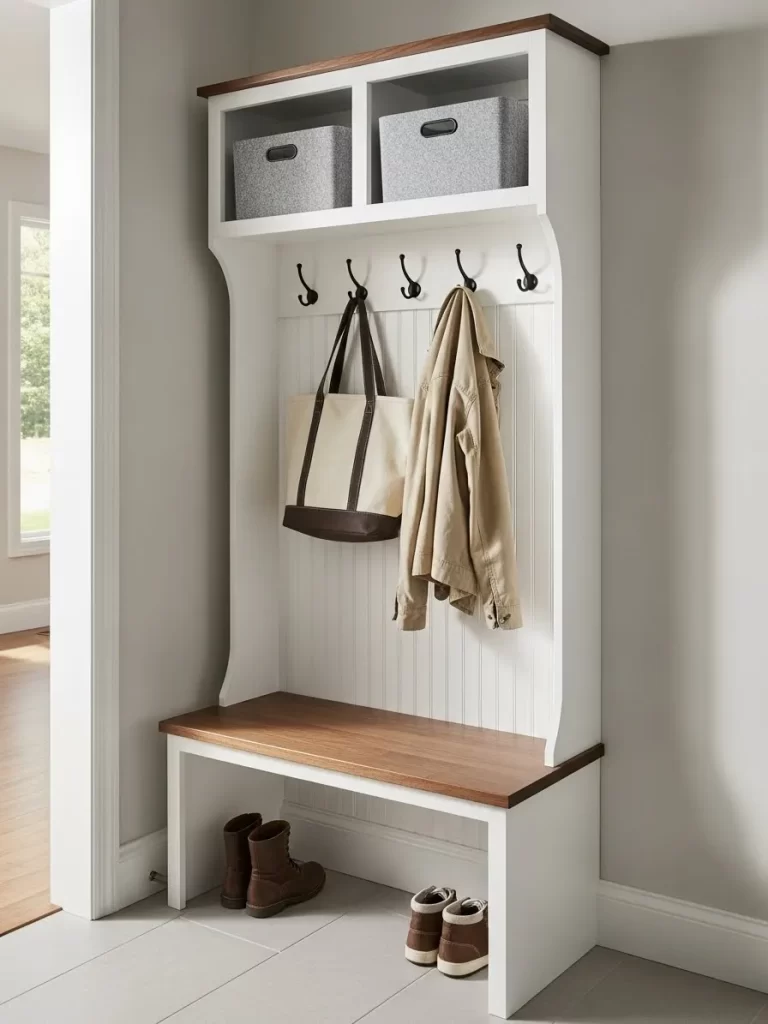
This unit combines the practicality of a mudroom with a furniture feel. The crisp white frame features a tongue-and-groove back panel for texture. Two top cubbies provide a home for gray felt bins to hide seasonal clutter.
A warm walnut wood bench top provides a sturdy place to sit and offers contrast. Black metal hooks are mounted at a convenient height for hanging bags and jackets. The open space beneath the bench allows for easy shoe storage on the floor.
Clean lines and vertical orientation help this piece fit into narrow entryways. It provides multiple levels of organization without blocking the flow of the house. This layout is excellent for those who want a built-in look with a freestanding piece.
Material Required List
- One white hall tree unit with a wood bench top
- Two gray felt storage bins
- Four black dual-prong metal hooks
- Furniture anti-tip safety kit
- White wood filler
Equipment Required List
- Phillips head screwdriver
- Power drill
- Bubble level
- Measuring tape
- Hammer
DIY Instruction Step by Step
- Unbox all components of the hall tree on a soft surface.
- Assemble the base frame and the bench seat according to instructions.
- Attach the vertical side panels and the backboard to the base.
- Install the upper shelf unit and secure it with the provided hardware.
- Place the walnut bench top onto the frame and screw it in.
- Mark the positions for the four black hooks on the back panel.
- Use white wood filler to hide any visible screw holes.
- Move the completed unit against the wall and check the level.
- Install the anti-tip safety kit by securing the bracket to a stud.
- Place the felt bins in the top cubbies for immediate use.
12 Tiered Walnut Floating Shelves for Narrow Entries
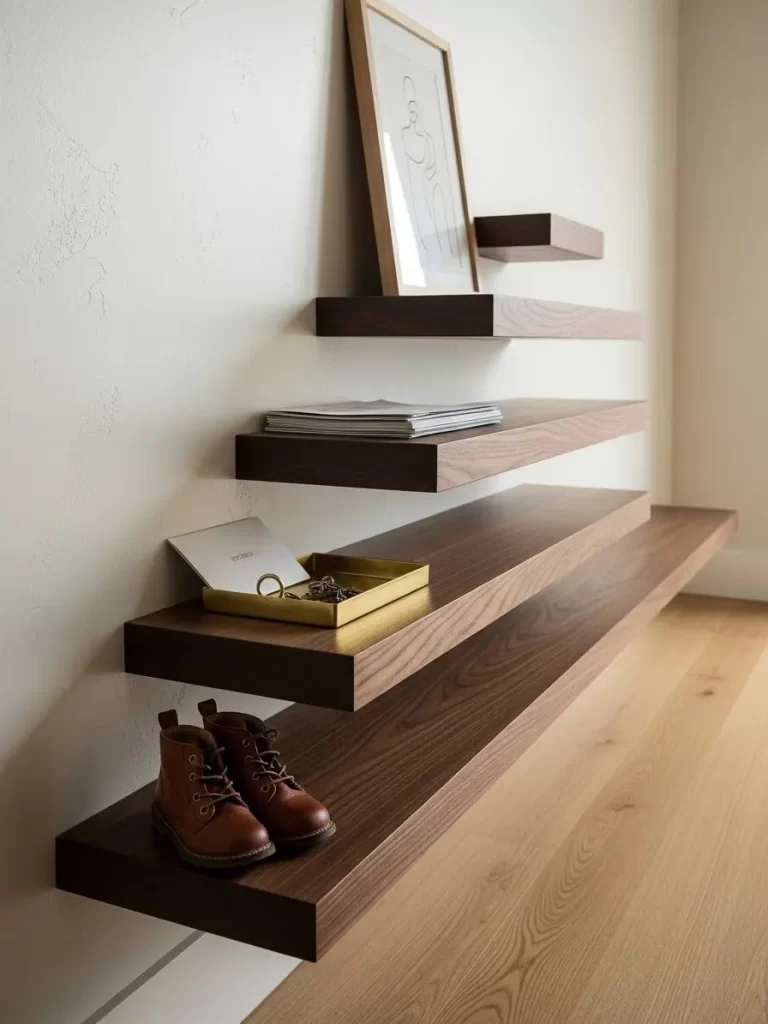
When floor space is at zero, these tiered walnut shelves provide a sophisticated storage solution. The varying lengths create a dynamic visual effect on a plain wall. The rich wood grain adds warmth and depth to a light foyer.
The bottom shelf is deep enough to hold a pair of children’s shoes. Middle shelves act as a landing zone for mail, keys, and daily documents. The top shelf provides a display area for artwork to keep it away from busy hands.
This layout utilizes the entire height of the wall without adding physical bulk. It is an excellent way to organize a foyer that is actually a hallway. The floating design keeps the floor visible to make the space look larger.
Material Required List
- Three walnut floating shelves in staggered lengths
- One brass valet tray
- One thin wooden picture frame
- Heavy-duty floating shelf mounting hardware
- Sandpaper (220 grit)
Equipment Required List
- Power drill and long drill bits
- Long bubble level
- Stud finder
- Measuring tape
- Pencil
DIY Instruction Step by Step
- Use a stud finder to locate every stud along the wall.
- Mark the height for the longest bottom shelf first with a level.
- Screw the first mounting bracket into at least two wall studs.
- Slide the longest walnut shelf onto the bracket until it is firm.
- Measure up 12 inches for the position of the second shelf.
- Offset the second bracket to the left to create a staggered look.
- Repeat the installation process for the third and shortest shelf.
- Place your brass tray on the middle shelf for your keys.
- Lean your framed artwork on the top shelf for decoration.
- Ensure the bottom shelf is high enough to clean the floor easily.
13 Parisian Style Marble Bistro Table for Two

A small foyer can sometimes double as a cozy breakfast nook or waiting area. This classic marble-topped bistro table with a black iron base adds immediate character. It provides a solid surface for keys while remaining very stylish.
Two bistro chairs with woven cane seats tuck neatly under the table. The circular shape allows for easy movement around the table in tight corners. Sunlight filtering through a window highlights the marble veins and the wood floor.
This layout is for those who enjoy a slower pace and want multi-functional furniture. It serves as a drop zone during the day and a coffee spot in the morning. The combination of black and white creates a timeless aesthetic.
Material Required List
- One 24-inch round marble-topped bistro table
- Two black wood chairs with natural cane seating
- One small ceramic saucer for keys
- Felt pads for the table and chair legs
- Marble sealer
Equipment Required List
- Wrench or socket set
- Soft microfiber cloth
- Level
- Measuring tape
DIY Instruction Step by Step
- Assemble the cast iron table base and tighten all bolts.
- Apply a coat of marble sealer to the tabletop for protection.
- Attach the marble top to the base frame using the hardware.
- Place the table in the corner and use a level to check it.
- Apply felt pads to the bottom of the table and chair legs.
- Arrange the two chairs so they do not block walking paths.
- Place the ceramic saucer in the center of the table for keys.
- Lay a folded newspaper on the table to enhance the feel.
- Ensure there is enough space to pull out the chairs comfortably.
- Wipe the marble top weekly with a damp cloth to maintain shine.
14 Terracotta Wall with Woven Basket Gallery
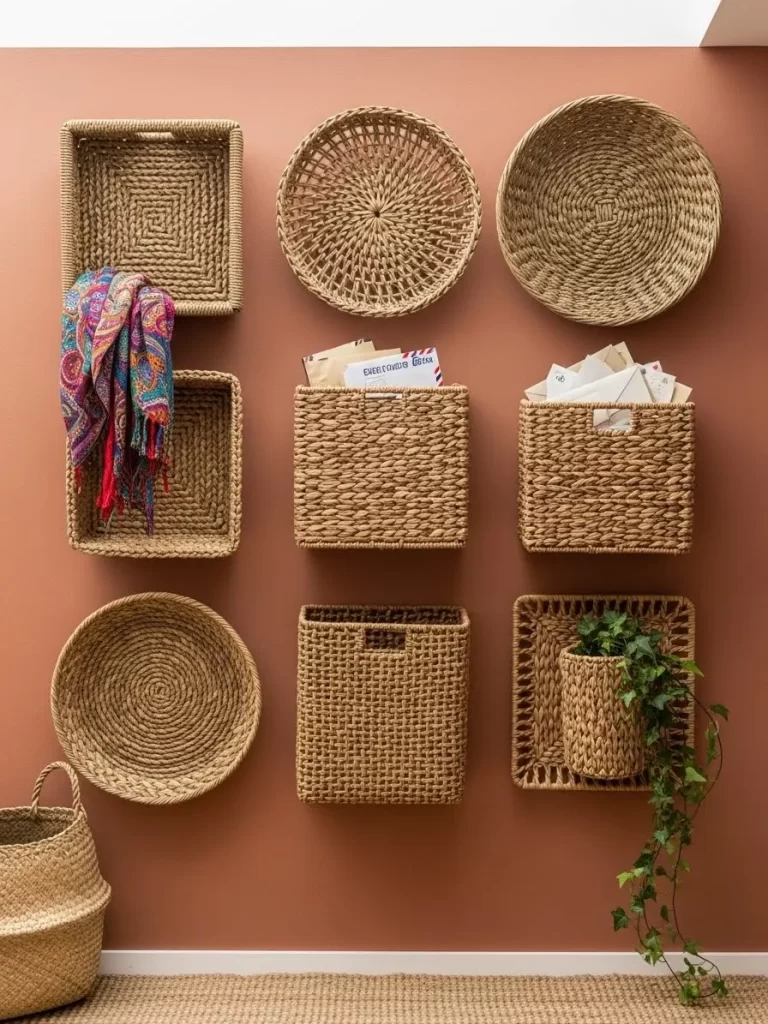
Injecting warmth into a small foyer can be achieved with a bold paint color. This terracotta-toned wall serves as a vibrant backdrop for a collection of woven baskets. Each basket varies in shape and size to create a rich texture.
Functional baskets are mounted within reach to hold outgoing mail and light accessories. Circular flat baskets act as decorative elements to fill gaps and add interest. A cascading green plant brings a fresh element to the vertical display.
This layout is a budget-friendly way to organize a wall without expensive furniture. It turns basic storage items into a large-scale art installation. The earthy tones create a welcoming atmosphere as soon as you step inside.
Material Required List
- One gallon of terracotta interior paint
- Seven to nine assorted woven baskets
- Small finishing nails or clear adhesive hooks
- One small lightweight potted ivy plant
- Paint roller and tray
Equipment Required List
- Hammer
- Measuring tape
- Level
- Painter’s tape
- Pencil
DIY Instruction Step by Step
- Clear the wall and apply two coats of terracotta paint.
- Lay all your baskets on the floor to plan the arrangement.
- Start with the largest baskets in the center of your design.
- Use a pencil to mark the top center point for each basket.
- Drive a finishing nail into the wall at your mark angled up.
- Hang the deeper baskets first and ensure they are sturdy.
- Layer the flatter baskets around the deeper ones for a full look.
- Place your small potted plant inside a basket at a lower height.
- Adjust the spacing between baskets so the gallery feels balanced.
- Stand back and check the view from the front door.
15 Hidden Mirror Cabinet with Integrated Charging Station
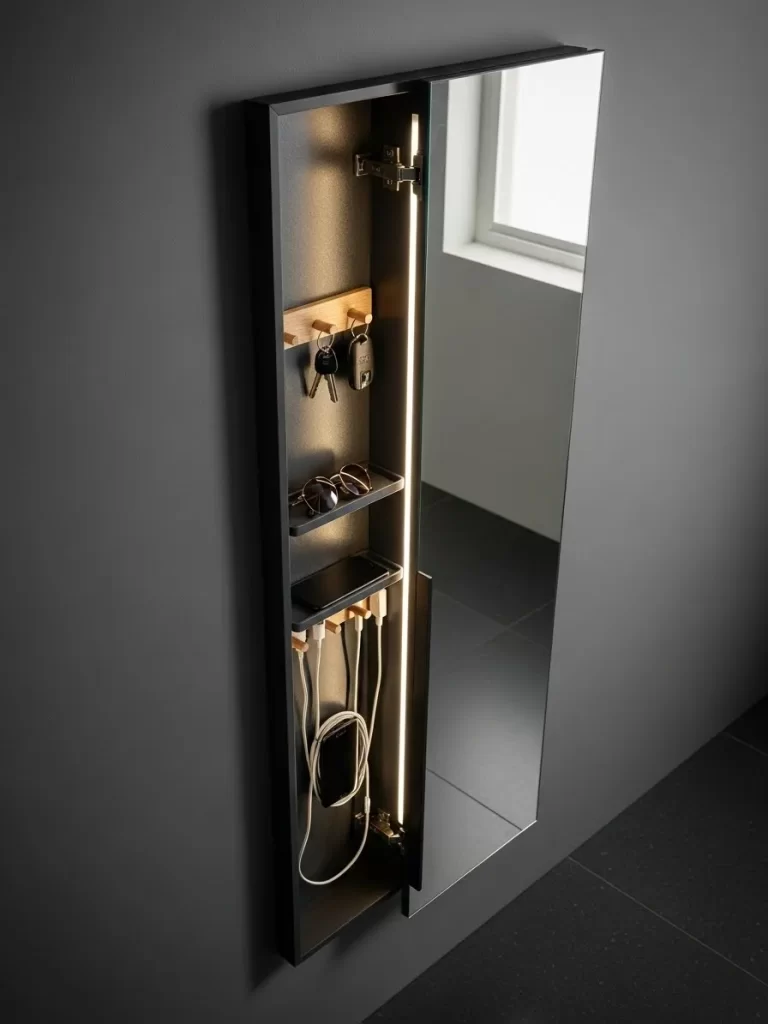
Modern entryways need to manage technology as well as coats and bags. This slim, wall-mounted mirror hides a secret storage compartment inside its frame. It opens to reveal a charging station for phones and dedicated hooks for keys.
The minimalist exterior looks like a high-end full-length mirror to keep the foyer clean. Inside, a built-in LED light strip illuminates your items so you never lose your glasses. This design is the ultimate solution for those who hate messy cords.
A dark gray wall helps the mirror frame blend in for a sleek vibe. This layout is for the tech-savvy homeowner who values organization and privacy. It keeps all your daily essentials behind a beautiful reflective surface.
Material Required List
- One wall-mounted mirror cabinet
- Multi-port USB charging hub
- Short charging cables for various devices
- Adhesive cable management clips
- Heavy-duty wall mounting anchors
Equipment Required List
- Power drill
- Bubble level
- Stud finder
- Measuring tape
- Screwdriver
DIY Instruction Step by Step
- Open the mirror cabinet and plan the layout for your hub.
- Use adhesive clips to route the charging wires along the edges.
- Find the wall studs and mark the mounting points for brackets.
- Drill pilot holes and secure the brackets to the wall level.
- Lift the cabinet onto the brackets and screw safety locks in.
- Plug the charging hub into a nearby outlet behind the frame.
- Arrange your keys on the internal hooks for easy grabbing.
- Test the mirror hinge to ensure it opens without hitting walls.
- Wipe the mirror surface with a microfiber cloth for clarity.
- Organize your phones in the dock so they are ready daily.
16 Ornate Radiator Cover with Tall Arched Mirror
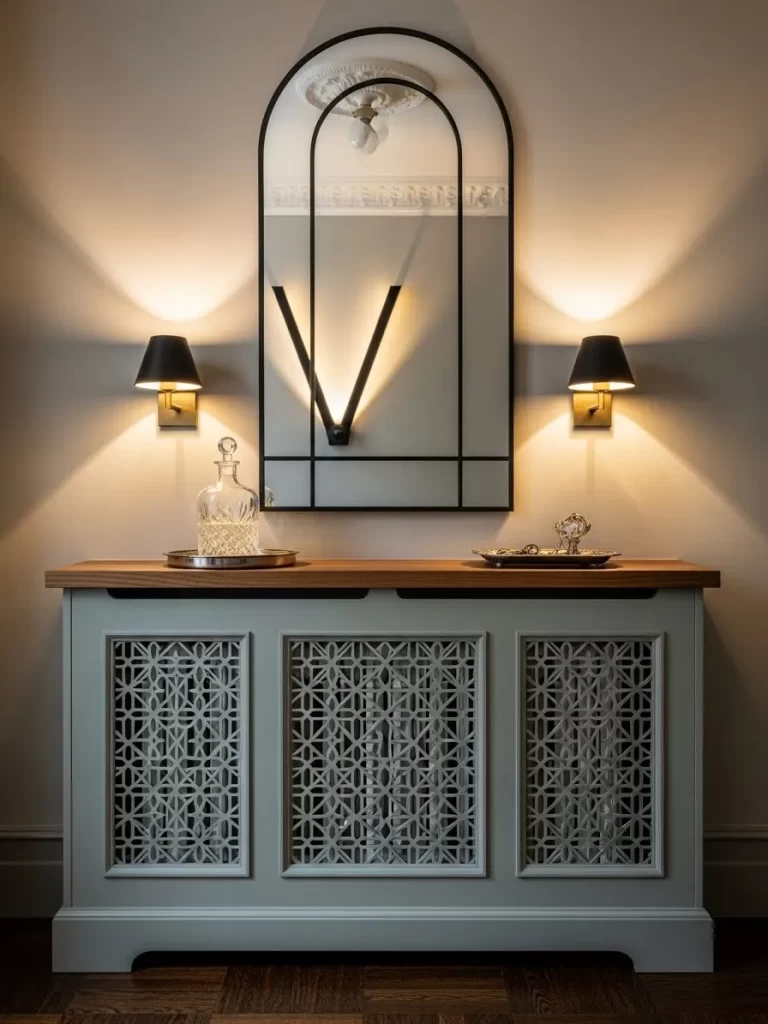
Many older homes have unsightly radiators right in the entryway of the house. This custom-built cover turns a heating element into a beautiful console table. The intricate laser-cut pattern allows heat to circulate while hiding the metal unit.
A tall arched mirror sits above the cover to add height to the room. Symmetrical wall sconces on either side provide a soft, balanced glow in the evening. A wooden top offers a safe place for a glass decanter or keys.
This layout is a masterclass in making the best of a difficult space. It combines architectural details with modern styling for a formal foyer feel. It is a smart way to gain a furniture surface without moving plumbing.
Material Required List
- One radiator cover with a decorative grille
- One tall black arched wall mirror
- Two modern black wall sconces
- One solid wood board for the top surface
- Wood glue and finish nails
Equipment Required List
- Measuring tape
- Level
- Power drill
- Hammer
- Stud finder
DIY Instruction Step by Step
- Measure your radiator carefully and add clearance for airflow.
- Assemble the radiator cover frame and attach the grille panels.
- Place the cover over the radiator and check that it is flush.
- Apply wood glue to the frame and secure the wood top.
- Sand the edges of the wood top and apply a clear coat.
- Center the tall arched mirror above the cover and mark it.
- Install the mirror hardware into the wall and hang it.
- Mark the spots for your sconces on either side of the mirror.
- Install the sconces using battery bulbs if you have no wiring.
- Place a small tray on the wood top to protect the finish.
17 Industrial Wire Grid Wall for Urban Foyer Storage
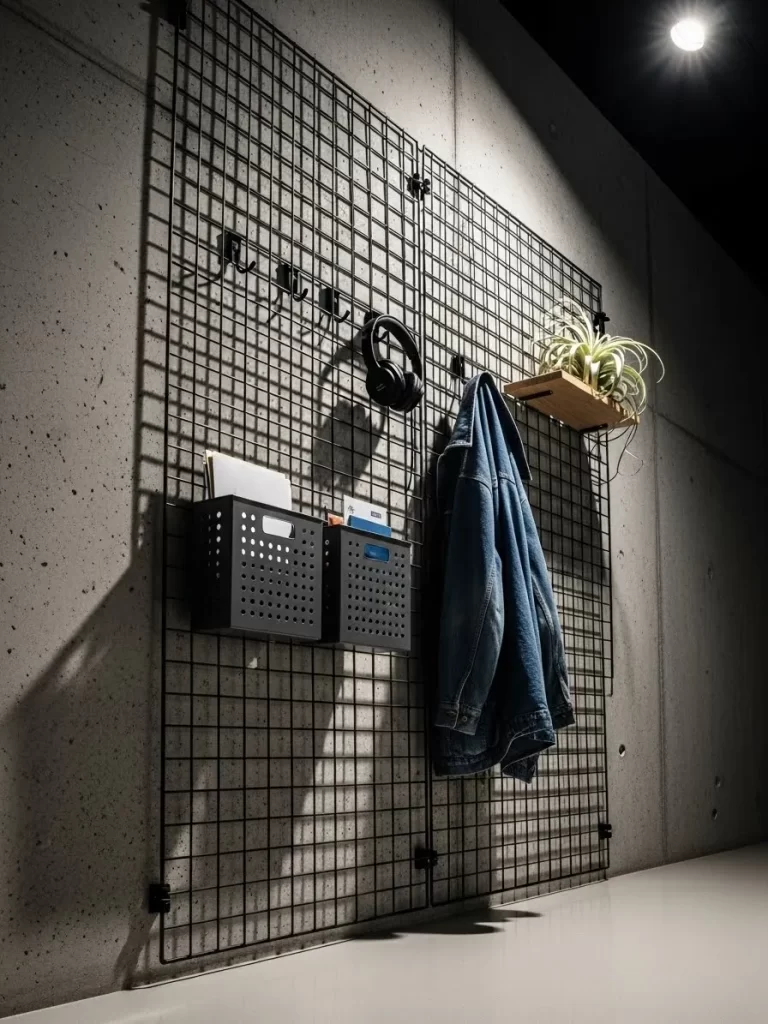
A wire grid system offers a rugged and customizable way to organize your gear. This black metal grid mounts directly to a concrete wall for an industrial look. It allows you to clip on baskets, hooks, and small wooden shelves.
A denim jacket hangs from an S-hook while headphones sit on a dedicated mount. Small metal bins hold mail and notebooks to keep them vertical and easy to grab. A tiny shelf provides a home for an air plant to soften the metal.
The shadows cast by the grid add a layer of texture when lit from above. This layout is excellent for renters because it requires very few holes in the wall. It is a smart choice for a flexible “command center” in a tight space.
Material Required List
- Two large black metal wire wall grids
- Assorted grid accessories like hooks and baskets
- Four wall mounting clips per grid
- One small air plant or succulent
- Metal S-hooks
Equipment Required List
- Power drill
- Bubble level
- Measuring tape
- Pencil
- Screwdriver
DIY Instruction Step by Step
- Hold the first wire grid against the wall and use a level.
- Mark the four corner points where the mounting clips will go.
- Drill pilot holes and insert anchors to ensure it holds weight.
- Screw the mounting clips into the wall and snap the grid in.
- Repeat the process for the second grid right next to the first.
- Clip your metal storage bins onto the grid at waist height.
- Slide S-hooks onto the wire to create hanging spots for coats.
- Install the small wooden shelf by hooking it into the grid.
- Arrange your gear using specialized hooks.
- Double-check that all clips are secure before hanging heavy bags.
18 Multi-Tiered Plant Stand and Woven Shoe Basket
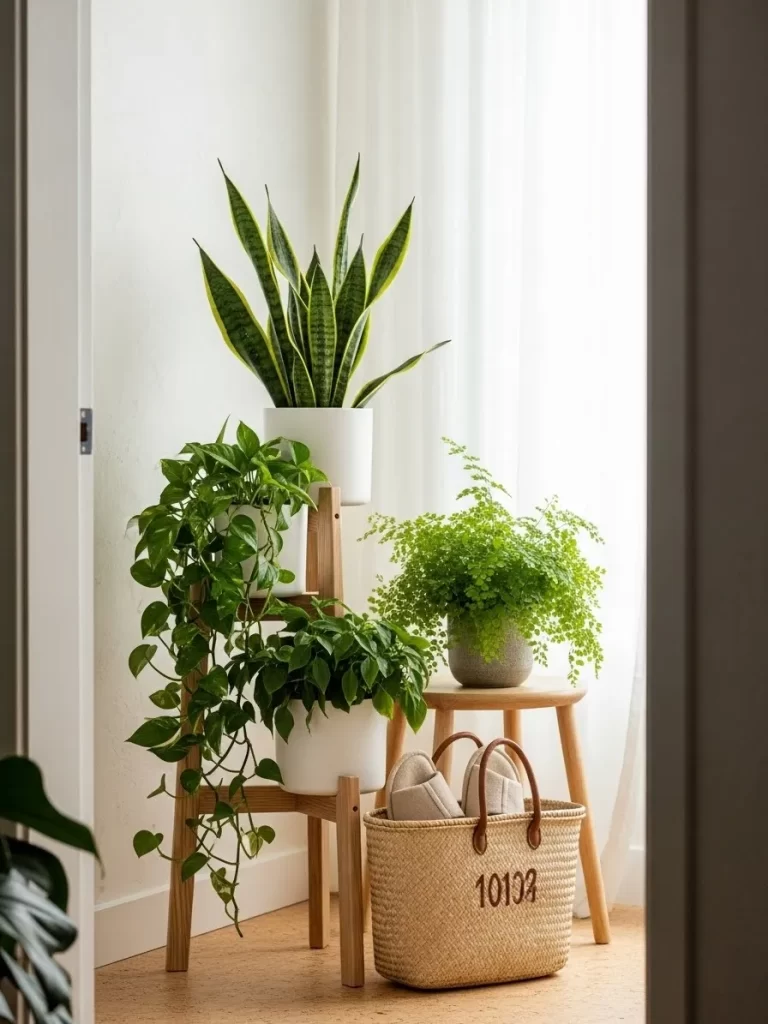
Bringing the outdoors in can make a small entryway feel much more inviting. This three-tiered wooden plant stand holds a variety of greenery from tall to trailing. The vertical arrangement adds height and life without taking up much floor area.
A large woven basket sits at the base of the stand to hold soft shoes. This keeps your most-used footwear hidden but accessible as soon as you enter. A small wooden stool provides an extra surface for a fern or a bag.
The combination of light wood and green leaves feels very fresh and clean. This layout is for those who want a living foyer that prioritizes air quality. It is a simple way to fill a corner that might look empty.
Material Required List
- One tiered wooden plant stand
- One large seagrass basket with leather handles
- Three to four assorted indoor plants
- Matching white or gray ceramic plant pots
- One small round wooden stool
Equipment Required List
- Small watering can
- Potting soil
- Measuring tape
- Microfiber cloth
DIY Instruction Step by Step
- Assemble the tiered plant stand and ensure all joints are tight.
- Place the stand in a corner that receives some natural light.
- Pot your plants into matching ceramic containers for a unified look.
- Position the tallest plant on the highest tier of the stand.
- Place trailing plants on the lower tiers so they spill over.
- Set the large woven basket on the floor next to the stand.
- Fill the basket with your indoor slippers or light sneakers.
- Position the small wooden stool on the other side for balance.
- Wipe the leaves of your plants with a damp cloth to clean them.
- Ensure the basket is not in the direct path of the door.
19 Triple Blue Locker Set for Family Organization
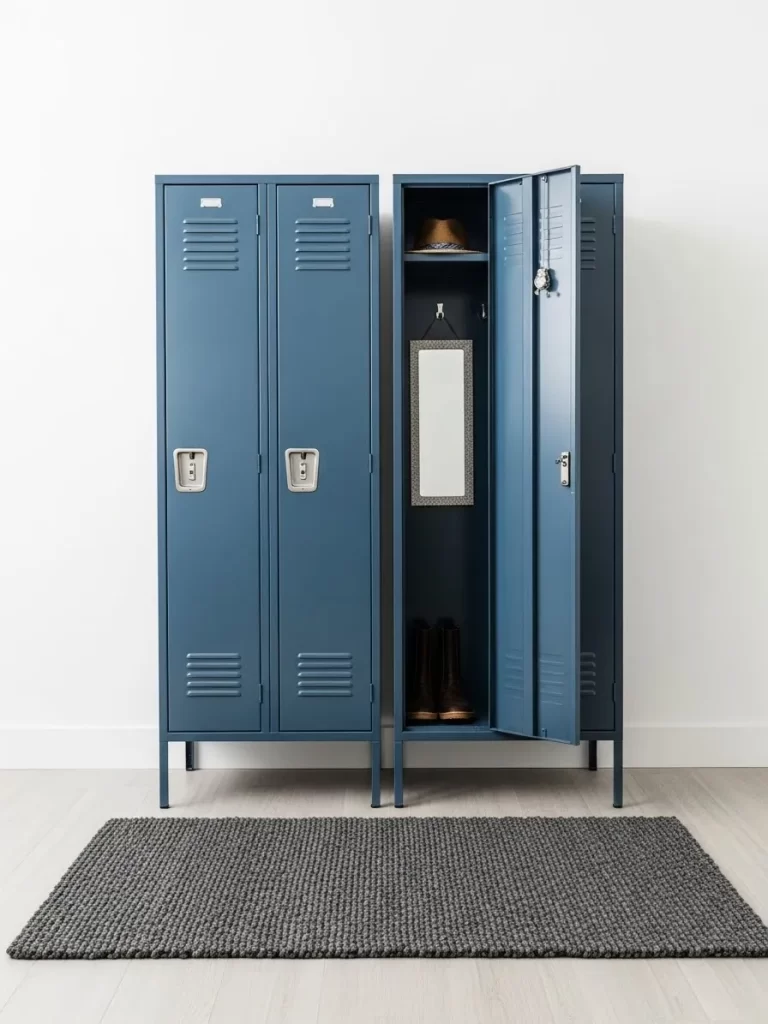
Standard lockers provide a nostalgic and highly organized solution for busy families. This set of three metal lockers is painted in a muted blue to add color. Each family member can have their own dedicated space for school gear.
Inside, the lockers feature a top shelf for hats and a middle hook for bags. A small mirror is mounted on the door for last-minute checks. The bottom area is for boots to keep dirty soles away from the house.
A gray textured rug in front of the lockers helps define the zone. This layout is incredibly durable and easy to wipe clean after a rainy day. It is the best choice for a “no-excuses” system for keeping tidy.
Material Required List
- One set of three slim metal storage lockers
- Muted blue metal spray paint
- Three small locker mirrors with adhesive backing
- Six internal locker hooks
- One gray woven area rug
Equipment Required List
- Level
- Screwdriver
- Measuring tape
- Cleaning supplies
DIY Instruction Step by Step
- Move the locker unit into your entryway and center it.
- Use a level to check the floor and adjust the feet if needed.
- Bolt the lockers together if they are separate units for stability.
- Secure the entire unit to the wall studs using an anti-tip kit.
- Peel the backing off the mirrors and stick them inside doors.
- Install internal hooks at shoulder height for easy hanging.
- Place the gray rug on the floor directly in front of lockers.
- Assign one locker to each family member for their own gear.
- Store heavy boots at the bottom to keep the unit stable.
- Wipe down the metal exterior with a damp cloth to keep it blue.
20 Minimalist Workspace and Entryway Landing Strip
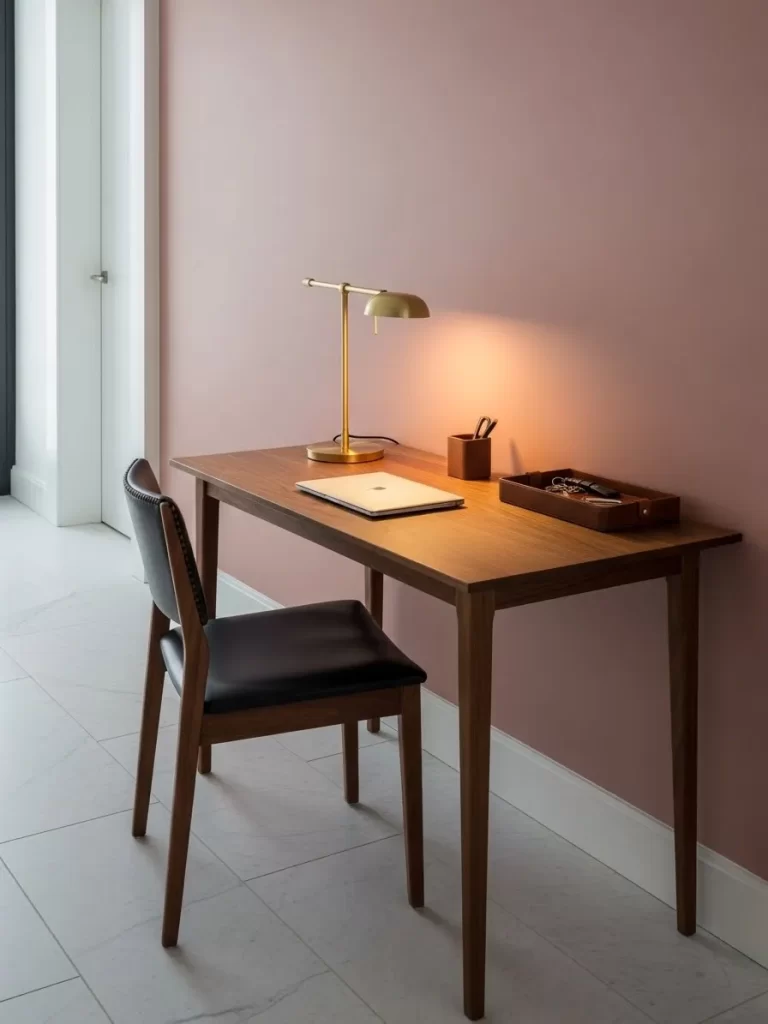
In very small homes, the entryway often has to work as a home office. This simple wooden desk features slim legs that keep the floor looking open. A single black leather chair provides a comfortable spot to work or put on shoes.
The desk surface acts as a landing strip with a brass lamp for light. A leather tray holds keys and small items while a pen holder keeps things tidy. The soft pink wall adds a touch of warmth and personality to the zone.
Keeping the desk clear of large computers helps it feel like entryway furniture. This layout is excellent for students who live in studio apartments. It maximizes every square foot of the home by combining two rooms into one.
Material Required List
- One slim wooden writing desk
- One black leather-backed chair with wood legs
- One brass task lamp with a vintage bulb
- One leather valet tray and matching pen cup
- Soft pink or mauve interior paint
Equipment Required List
- Paint roller and tray
- Screwdriver for desk assembly
- Measuring tape
- Level
DIY Instruction Step by Step
- Paint your entryway wall in a soft pink tone and let it dry.
- Assemble the wooden desk and place it firmly against the wall.
- Check that the desk is level and adjust the leg glides if needed.
- Position the black leather chair so it can be tucked under.
- Place the brass task lamp on the side of the desk surface.
- Set the leather tray in the center to act as your catch-all.
- Organize your pens and mail in the matching cup for neatness.
- Ensure there is a power outlet nearby for the lamp and laptop.
- Use a cable clip to hide the lamp cord along the back leg.
- Keep the area under the desk free of clutter for a clean look.
21 Vintage Leather Trunk and World Map Decor
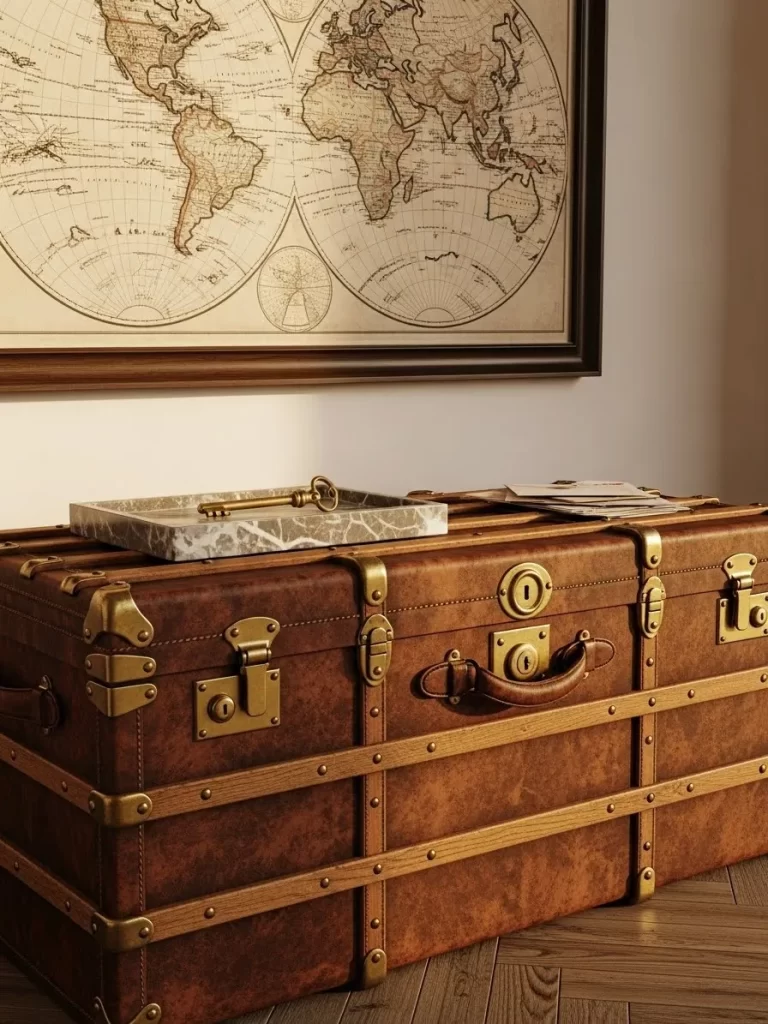
A vintage leather trunk provides a large amount of storage and character. It sits at the base of the wall to hold bulky items like blankets or shoes. The aged leather and brass hardware create a warm, global traveler aesthetic.
Above the trunk, a large framed world map reinforces the theme of adventure. A marble tray sits on top of the trunk to hold keys and daily mail. This setup turns a simple storage piece into a primary focal point for the room.
The rich brown tones of the trunk complement dark wood floors beautifully. This layout is for those who love antiques and want a foyer with a story. It offers deep storage while serving as a sturdy surface for decorative items.
Material Required List
- One vintage style leather or wood steamer trunk
- One large framed world map or historical chart
- One square marble valet tray
- Brass wall hangers for the map
- Leather conditioner
Equipment Required List
- Hammer
- Measuring tape
- Level
- Microfiber cloth
- Drill for wall anchors
DIY Instruction Step by Step
- Clean the leather trunk with conditioner to restore its shine.
- Position the trunk against the center of your entryway wall.
- Measure the width of the trunk and mark the center point above it.
- Hold the framed map against the wall to determine the best height.
- Install heavy-duty wall hangers into the studs to support the map.
- Use a level to ensure the map is straight before finishing the hang.
- Place the marble tray on one side of the trunk top for your keys.
- Store seasonal items or extra shoes inside the trunk to hide clutter.
- Ensure there is enough room around the trunk for people to walk.
- Wipe down the brass hardware on the trunk with a dry cloth.
22 Zen Minimalist Floating Shelf and Wooden Shoe Platform
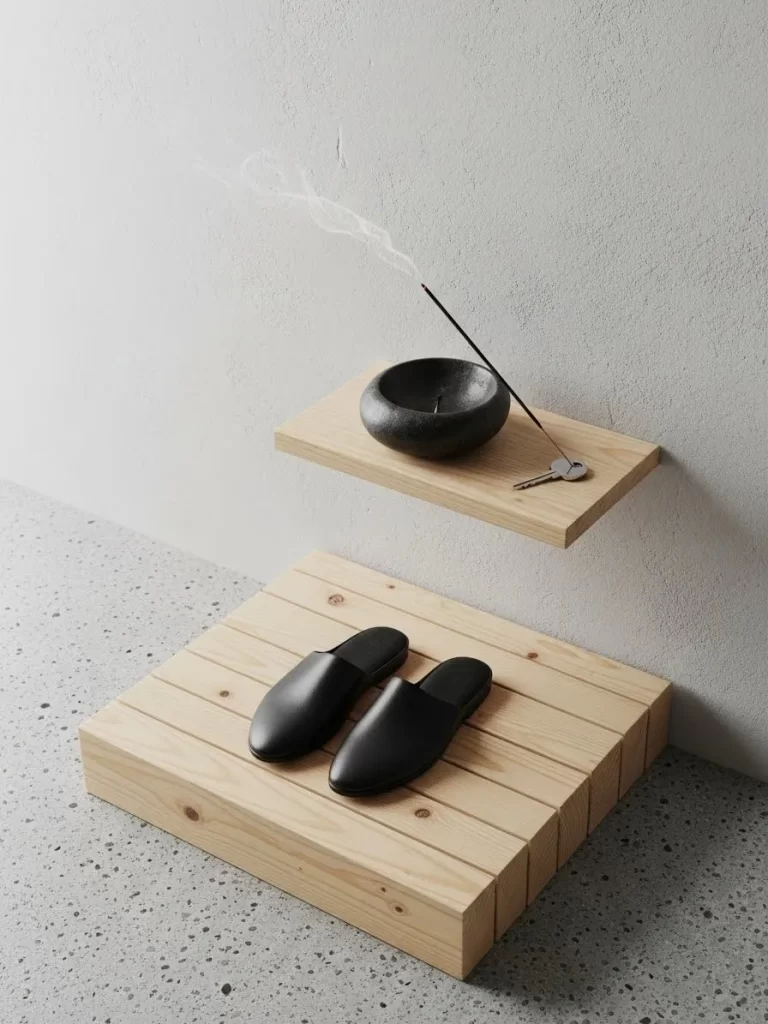
A peaceful entryway can set a calm tone for the rest of your home. This layout features a single light wood floating shelf for a key bowl and incense. Below it, a low wooden platform made of vertical slats keeps shoes off the floor.
The raw wood textures and neutral gray walls create a spa-like atmosphere. A black stone bowl on the shelf holds incense to greet you with a pleasant scent. Simple black slippers sit ready on the platform for you to change into.
This design is for those who want to leave the stress of the world at the door. It prioritizes open space and natural materials for a clean, meditative look. The floating elements make the small foyer feel much larger.
Material Required List
- One 24-inch light wood floating shelf
- One DIY wooden slat shoe platform (pine or cedar)
- One black stone or ceramic bowl
- Incense sticks and a holder
- Gray matte interior paint
Equipment Required List
- Power drill
- Bubble level
- Measuring tape
- Sandpaper
- Paint roller
DIY Instruction Step by Step
- Paint your wall in a soft matte gray to create a neutral backdrop.
- Build the shoe platform by nailing wood slats onto base boards.
- Sand the platform until it is perfectly smooth to avoid splinters.
- Mark the position for your floating shelf at waist height.
- Install the hidden mounting bracket into the wall studs for strength.
- Slide the wood shelf onto the bracket and check that it is level.
- Place the shoe platform on the floor directly under the floating shelf.
- Set the black bowl on the shelf and add your incense holder.
- Place your favorite indoor slippers on the platform for easy use.
- Keep the area around the shelf clear of any other decorations.
23 Classic White Wainscoting and Wooden Peg Rail
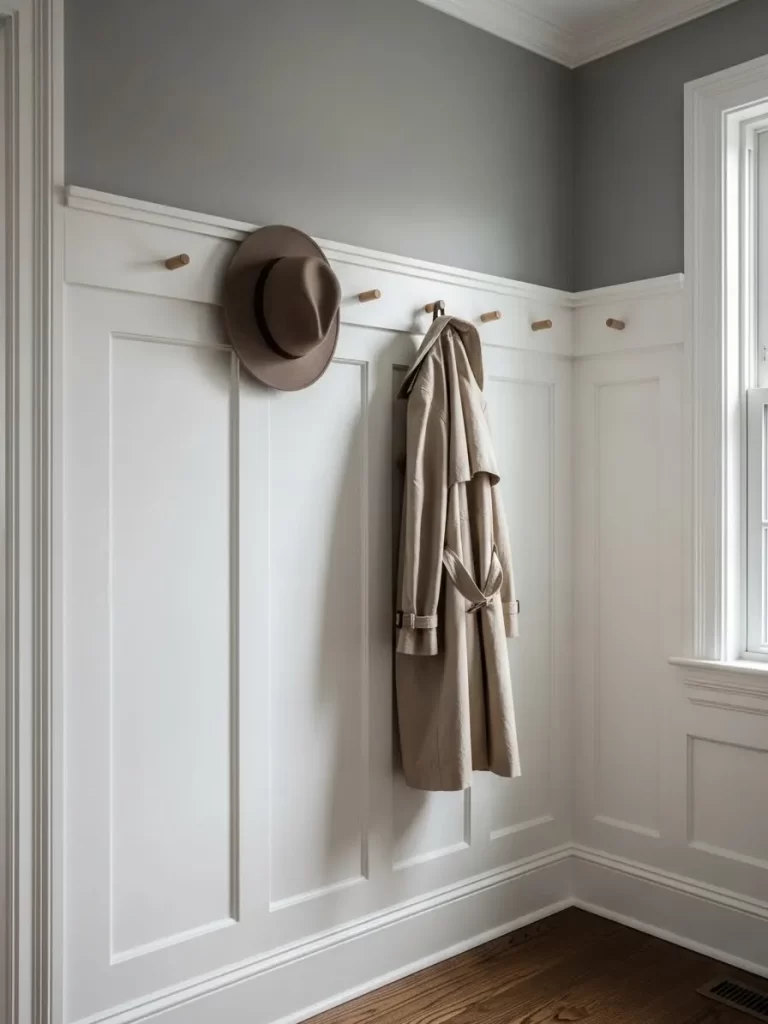
Wainscoting adds architectural detail and protection to your entryway walls. This traditional setup features white wood panels topped with a continuous peg rail. It offers a classic look that is also highly functional for a busy family.
The wooden pegs are spaced evenly to hold hats, long coats, and umbrellas. The contrast between the white panels and the gray upper wall feels very sophisticated. This design is durable enough to handle daily wear from kids and pets.
A dark wood floor anchors the light walls for a balanced and warm feel. This layout is for those who love timeless home design and simple organization. It provides plenty of hanging space without the need for bulky furniture.
Material Required List
- Pre-cut wainscoting panels or beadboard
- One long 1×4 inch wood board for the peg rail
- Shaker style wooden pegs
- White semi-gloss paint
- Wood glue and finish nails
Equipment Required List
- Hammer or nail gun
- Power drill with spade bit
- Level
- Measuring tape
- Paintbrush
DIY Instruction Step by Step
- Measure the height of your wainscoting (usually 36 to 42 inches).
- Install the panels along the bottom of the wall using glue and nails.
- Drill holes every 6 inches into your 1×4 wood board for the pegs.
- Apply wood glue to the ends of the pegs and tap them into the holes.
- Paint the wainscoting and the peg rail in a crisp white color.
- Install the peg rail along the top edge of the wainscoting panels.
- Use a level to ensure the rail is straight across the entire wall.
- Nail the rail into the wall studs for a secure and strong hold.
- Caulk any gaps between the panels and the rail for a finished look.
- Hang your hats and coats on the pegs once the paint is fully dry.
24 Asymmetrical Oak Cube Shelves on Navy Wall
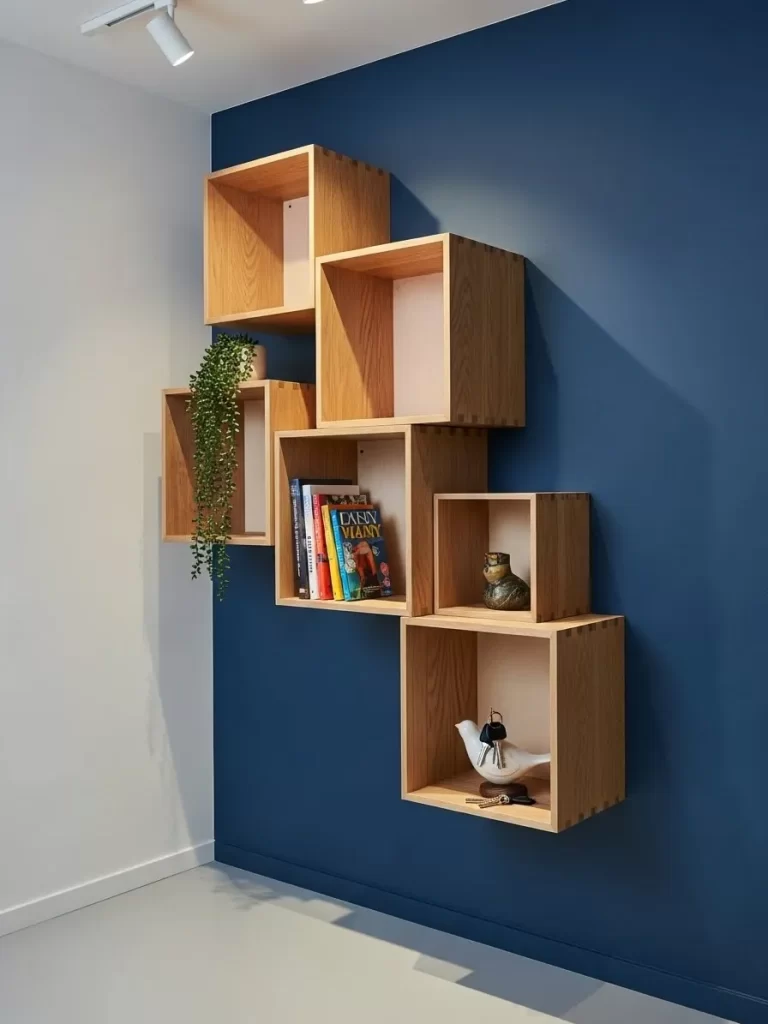
Asymmetrical shelving adds a modern and artistic touch to a foyer. These oak cube shelves are mounted in a staggered pattern on a deep navy wall. The open cubes provide a place for books, decorative items, and essentials.
The warm oak wood pops against the dark blue paint for a high-contrast look. A trailing plant adds a soft, natural element to the geometric wood shapes. This layout allows you to customize your storage based on daily items.
A light gray floor keeps the space from feeling too dark. This design is for those who want an entryway that feels like modern art. It provides functional storage while acting as a creative focal point for guests.
Material Required List
- Five assorted oak wood cube shelves (varying sizes)
- Deep navy blue interior paint
- One small decorative bird figurine for keys
- One small trailing plant in a neutral pot
- Wall anchors and screws
Equipment Required List
- Power drill
- Bubble level
- Measuring tape
- Pencil
- Paint roller and tray
DIY Instruction Step by Step
- Paint your accent wall in navy blue and let it dry.
- Lay your oak cubes on the floor to find a staggered arrangement.
- Mark the mounting holes for the highest cube on the wall.
- Drill pilot holes and install anchors before screwing the cube in.
- Use a level to ensure the first cube is straight.
- Mount the remaining cubes in a staggered pattern below the first.
- Place your trailing plant in the highest cube so it can hang down.
- Set the decorative bird on a lower cube to hold your daily keys.
- Fill the other cubes with books or small art pieces.
- Ensure the cubes are high enough to not be bumped.
25 Rustic Wooden Ladder and Woven Shoe Basket
A rustic ladder is a slim and stylish way to store blankets or scarves. It leans against a white brick wall to add height and texture to the space. The light wood finish coordinates well with a natural woven basket on the floor.
The basket holds your shoes to keep them organized and out of the walkway. This layout is very easy to set up and can be moved whenever you need to clean. It is a great choice for a farmhouse or boho aesthetic.
Simple white brick walls provide a clean and bright backdrop for the wood. This setup is for those who want a casual and inviting entryway with minimal effort. It uses vertical space effectively without taking much floor area.
Material Required List
- One 5-foot wooden decorative ladder
- One large round woven seagrass basket
- One cozy gray knit throw or blanket
- One pair of sunglasses or a scarf
- Felt pads for the ladder feet
Equipment Required List
- Measuring tape
- Microfiber cloth
- No tools required for assembly
DIY Instruction Step by Step
- Clean your wooden ladder with a cloth to remove dust.
- Apply felt pads to the bottom of the ladder legs to protect the floor.
- Lean the ladder against your entryway wall for stability.
- Drape your knit throw over a rung of the ladder.
- Hang your sunglasses or a scarf on a higher rung.
- Place the woven basket on the floor next to the base of the ladder.
- Put your daily shoes or slippers inside the basket to hide them.
- Ensure the ladder is leaning securely and will not slip.
- Adjust the throw blanket so it looks casual and inviting.
- Keep the area around the base clear to prevent tripping.
26 Clear Acrylic Console Table for Invisible Storage
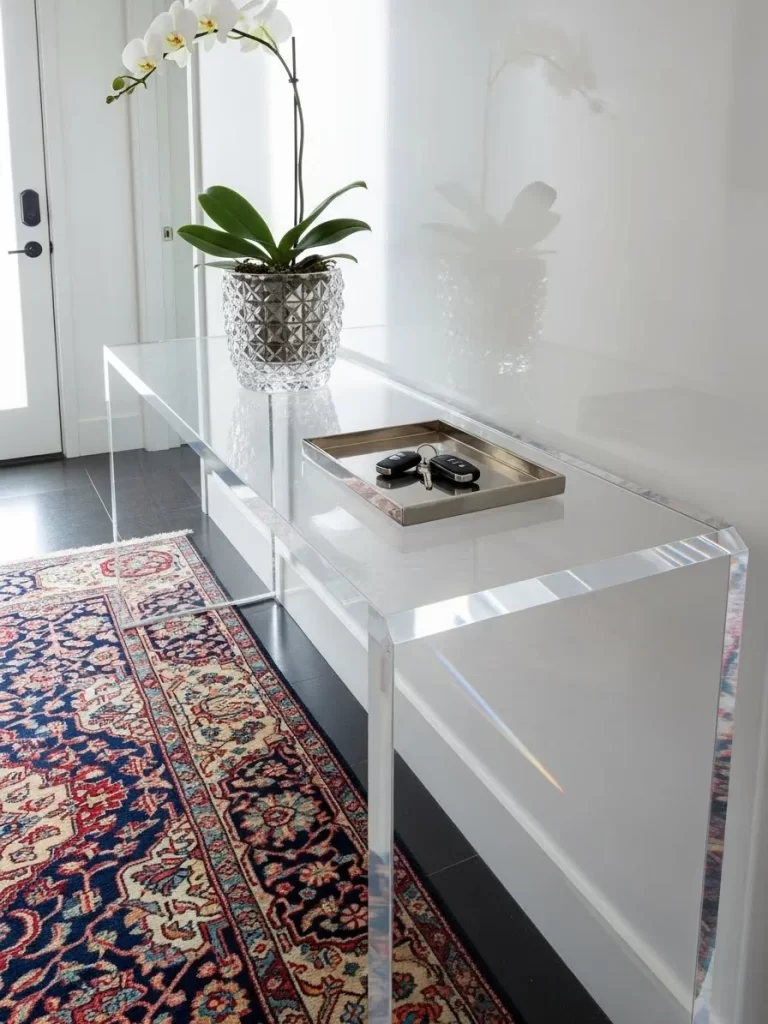
An acrylic console table is a solution for making a small foyer look huge. Because it is transparent, it provides a surface without any visual weight. It allows your beautiful rug and wall decor to take center stage.
A glass vase with a white orchid adds elegance to the clear surface. A silver tray holds keys and daily mail to keep them organized in one spot. The table sits over a vibrant patterned rug that adds color and warmth.
This layout is for those who want a modern, high-gloss look that is very clean. It is excellent for narrow entryways where a traditional table would feel bulky. The clear material reflects light to make the entire foyer feel bright.
Material Required List
- One clear acrylic or ghost console table
- One silver or polished nickel valet tray
- One glass vase with a white silk orchid
- One vibrant patterned area rug
- Acrylic cleaner and a soft cloth
Equipment Required List
- Measuring tape
- Level
- No tools required for setup
DIY Instruction Step by Step
- Clean your acrylic table with a specialized cleaner.
- Lay your vibrant patterned rug on the floor for the table.
- Position the clear console table over the rug against your wall.
- Check that the table is level and stable on the rug surface.
- Place the silver tray in the center of the table for your keys.
- Set the orchid vase on one side of the table for height.
- Ensure the table is pushed flush against the wall.
- Keep the space under the table clear to maintain the effect.
- Wipe the table surface daily to remove any fingerprints.
- Arrange your mail on the tray to keep the clear top tidy.
27 Half-Moon Console Table and Double Ring Mirror

A half-moon or demilune table is designed specifically for tight foyer spaces. Its curved front has no sharp corners to bump into as you walk by. The taupe finish adds a subtle color that coordinates with neutral walls.
Above the table, a unique double ring mirror adds a modern geometric element. A large woven basket sits underneath the table to provide hidden storage for shoes. This layout balances curves with clean lines for a very polished look.
The light wood floor adds warmth to the neutral color palette. This design is for those who want a classic foyer setup with a modern twist. It provides a surface, mirror, and storage in a small footprint.
Material Required List
- One taupe half-moon console table with slim legs
- One large round double-ring wall mirror in gold
- One large woven floor basket for shoes
- One small stone bowl for keys
- Wall anchors and screws
Equipment Required List
- Power drill
- Bubble level
- Measuring tape
- Pencil
- Screwdriver
DIY Instruction Step by Step
- Place the half-moon table against the wall and center it.
- Use a level to ensure the table surface is straight and stable.
- Mark the wall at eye level for the center of your mirror.
- Install a heavy-duty wall anchor to support the mirror.
- Hang the mirror and check that it is level above the table.
- Place the woven basket on the floor centered under the table legs.
- Set the stone bowl on the table surface for your daily keys.
- Fill the basket with shoes or umbrellas to keep the floor clear.
- Adjust the table position so it is flush against the baseboard.
- Wipe the mirror and table surface for a clean finish.
28 Vertical Spine Bookshelf and Integrated Key Shelf
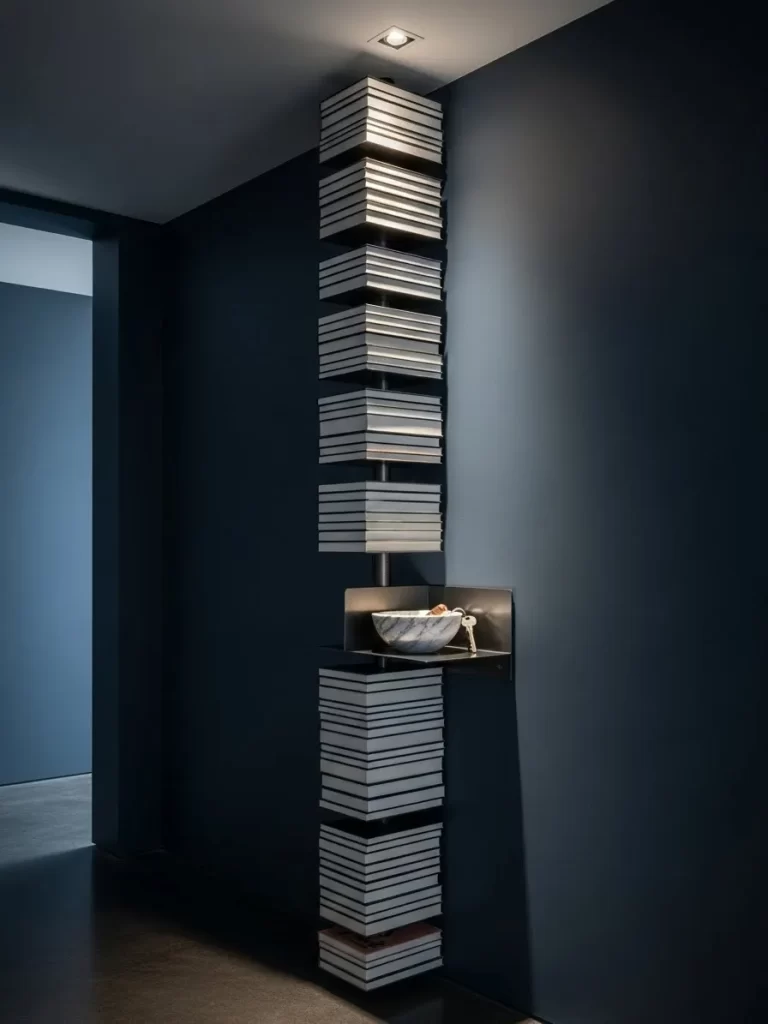
If you have a narrow wall, a vertical spine bookshelf is a smart way to store books. This tall, slim unit holds a stack of books that appear to float. A small integrated metal shelf halfway up provides a spot for keys.
The deep blue-gray wall creates a moody backdrop for the books. A recessed ceiling light shines directly down on the stack to highlight textures. This layout turns a corner into a library and landing zone.
This design is for those who have a book collection but little floor space. It uses vertical height while keeping the foyer organized. The metal and paper combination adds an intellectual feel to the home.
Material Required List
- One metal spine style vertical bookshelf
- One small clip-on metal shelf for keys
- One marble or stone bowl
- Deep blue-gray interior paint
- Recessed LED ceiling light
Equipment Required List
- Power drill
- Level
- Stud finder
- Measuring tape
- Screwdriver
DIY Instruction Step by Step
- Paint your narrow wall in a deep blue-gray matte finish.
- Use a stud finder to locate the center stud for mounting the spine.
- Install the metal spine into the wall studs with long screws.
- Ensure the spine is perfectly vertical using a bubble level.
- Attach the small metal shelf at waist height for your key bowl.
- Stack your books on the spine shelves for stability.
- Place your marble bowl on the key shelf for daily essentials.
- Install a recessed light in the ceiling above the stack.
- Adjust the books so they are centered and look neat.
- Ensure the bookshelf is secured at the top to prevent tipping.
29 Vibrant Orange Arched Niche with Minimalist Floating Bench
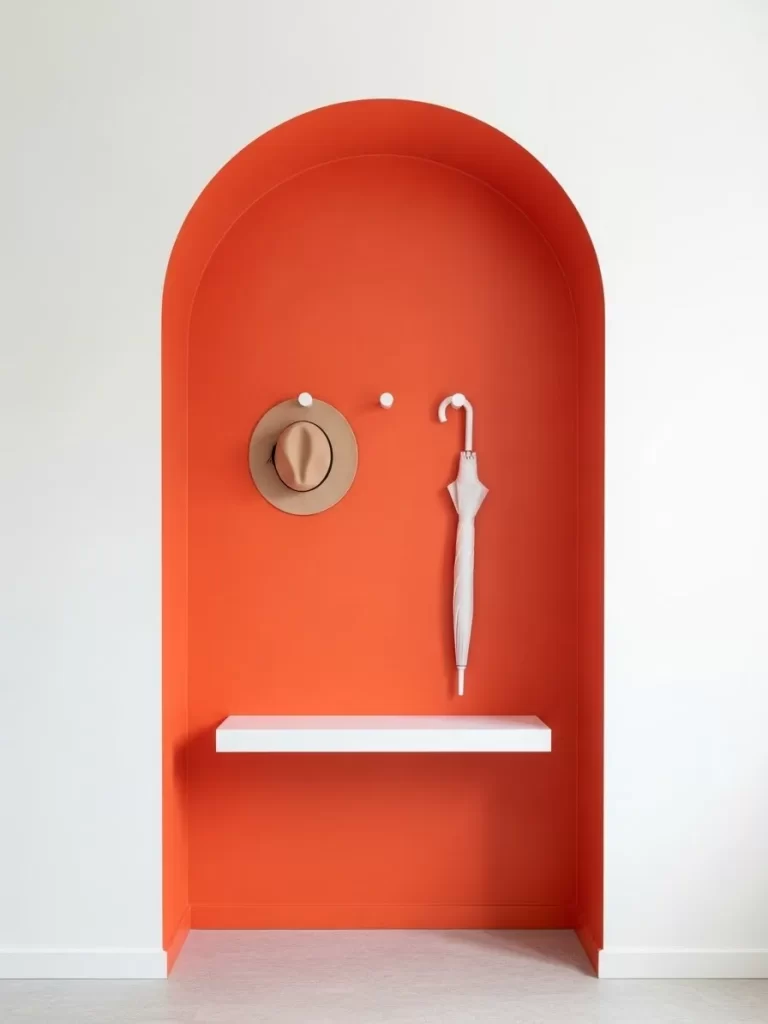
A bright pop of color can turn a foyer into a memorable experience. This layout features a recessed arched niche painted in vibrant orange. A single white floating bench provides a clean horizontal line across the curve.
Simple white pegs hold a hat and a white umbrella to keep them off the floor. The contrast between orange and white is very bold and modern. This design is for those who want a high-impact foyer with vibrant color.
The minimalist approach keeps the focus on the architecture and hue. It provides just enough storage for essentials without any extra clutter. This layout is a way to use an architectural feature like a wall niche.
Material Required List
- One gallon of vibrant orange interior paint
- One thick white floating bench or shelf
- Three white minimalist wall pegs
- Heavy-duty floating bench brackets
- White caulk for the edges
Equipment Required List
- Power drill
- Bubble level
- Measuring tape
- Paint roller and small brush
- Stud finder
DIY Instruction Step by Step
- Paint the inside of your wall niche with vibrant orange.
- Mark the height for your floating bench at standard height.
- Locate the studs inside the niche and install the brackets.
- Slide the white bench onto the brackets and ensure it is level.
- Apply white caulk around the bench for a built-in look.
- Mark three spots for your pegs inside the orange arch.
- Drill pilot holes and screw the white pegs into anchors.
- Hang your favorite hat and a white umbrella on the new pegs.
- Keep the floor under the bench completely clear.
- Ensure the orange paint is fully dry before hanging items.
30 Symmetrical Foyer with Twin Dressers and Tall Mirrors
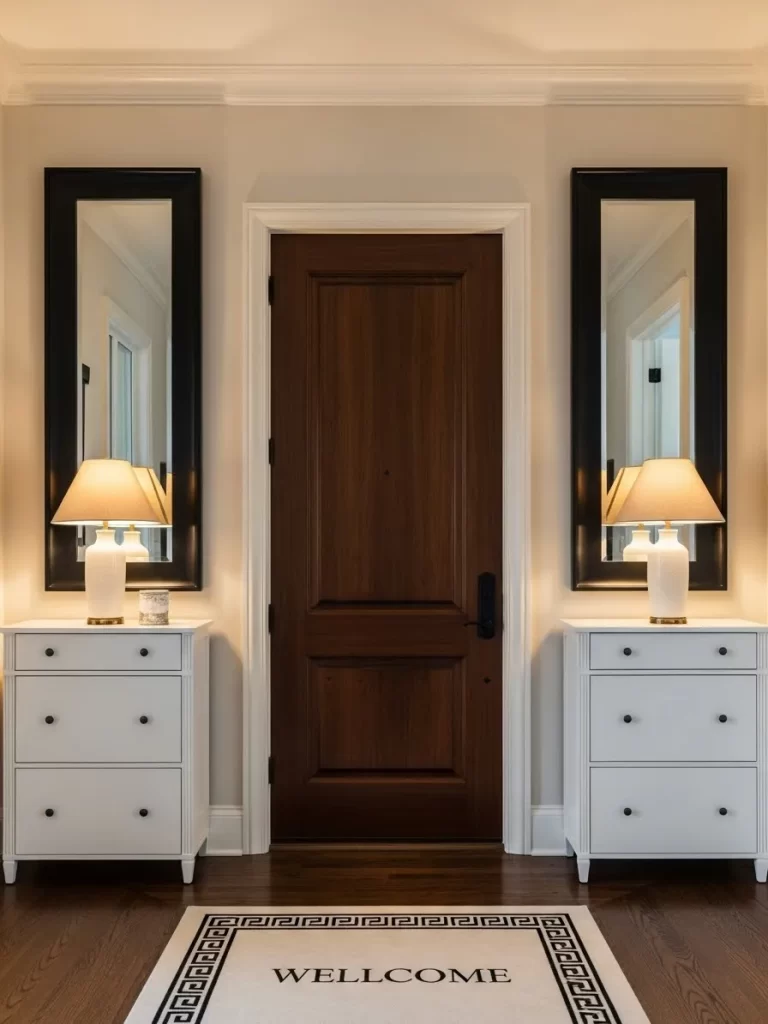
Symmetry creates a sense of order and formality as you walk into a home. This layout features a dark wood door flanked by two identical white dressers. Above each dresser, a tall black-framed mirror reflects the opposite side.
Matching white lamps provide a warm, even glow for the entryway. A “Wellcome” rug in the center ties the two sides together and greets guests. This design is excellent for wider foyers that need to feel balanced.
The contrast between the dark door and white furniture is very classic. This layout provides storage for mail, keys, and seasonal accessories. It turns a large entryway into a formal room that feels like part of the house.
Material Required List
- Two identical white three-drawer dressers
- Two tall rectangular mirrors with black frames
- Two matching white table lamps with beige shades
- One “Wellcome” patterned entryway rug
- Two small decorative candles or jars
Equipment Required List
- Measuring tape
- Level
- Power drill for mirror hanging
- Screwdriver
- Stud finder
DIY Instruction Step by Step
- Center your “Wellcome” rug in front of the main entry door.
- Position the two dressers on either side of the door.
- Use a level to ensure both dressers are standing straight.
- Mark the wall above each dresser for the tall mirrors.
- Install heavy-duty anchors to hang the mirrors securely.
- Check that both mirrors are at the same height for symmetry.
- Place the matching lamps on the outer edges of each dresser top.
- Plug the lamps into outlets and hide the cords.
- Set a small candle next to each lamp for a final touch.
- Use the dresser drawers to organize your keys and mail.
31 Chalkboard Command Center and Backpack Hooks
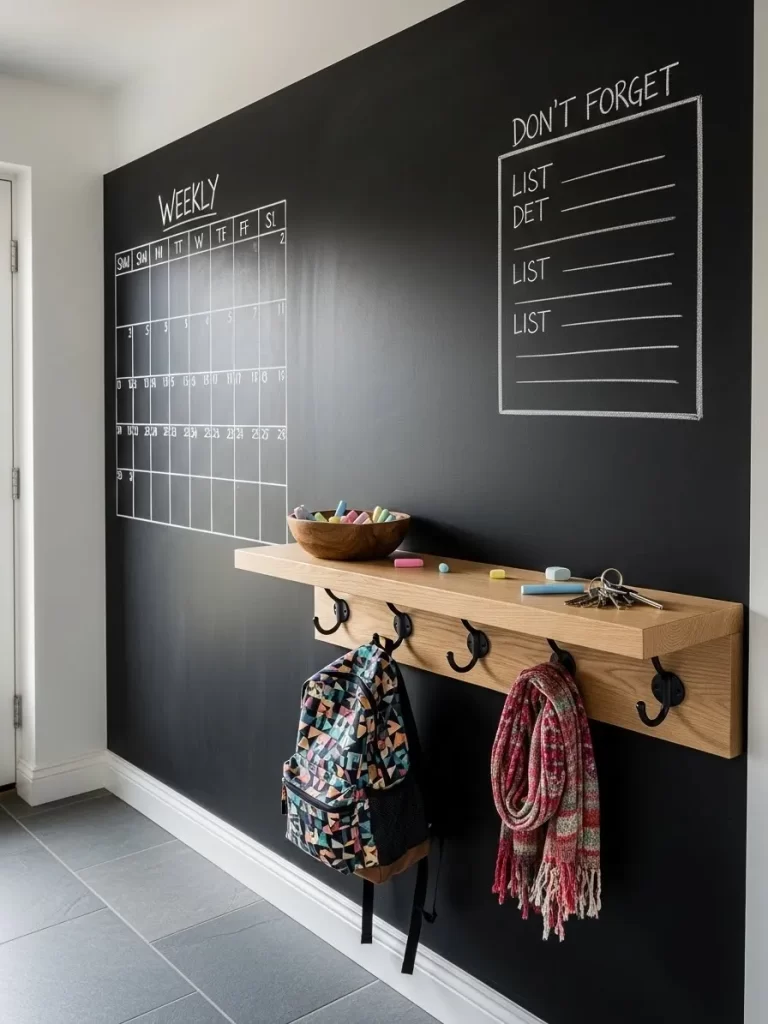
A chalkboard wall turns your foyer into a central command station for the family. This large black surface allows you to write weekly schedules and important reminders. A light wood shelf provides a landing spot for your daily keys.
Sturdy black hooks are mounted below the shelf for heavy backpacks and scarves. The white chalk drawings against the black wall create a playful and organized look. This layout is for busy parents who need to manage multiple school schedules.
The slate gray tile floor is durable enough for high-traffic footwear. This setup keeps the hallway clear while ensuring no one forgets a gym bag. It is a functional and creative way to use a blank wall in the foyer.
Material Required List
- One gallon of black chalkboard paint
- One thick oak floating shelf with a back panel
- Four heavy-duty black metal backpack hooks
- Assorted white and colored chalk
- One small wooden bowl for chalk
Equipment Required List
- Paint roller and painter’s tape
- Power drill and drill bits
- Level and pencil
- Measuring tape
- Stud finder
DIY Instruction Step by Step
- Clean the wall and tape off the rectangular area for your board.
- Apply two coats of chalkboard paint and let it dry for three days.
- Locate the wall studs inside the chalkboard area with your finder.
- Mount the wood shelf at chest height using long screws into the studs.
- Check that the shelf is level before you tighten all the fasteners.
- Mark the spots for your four hooks beneath the shelf 8 inches apart.
- Drill pilot holes and screw the hooks firmly into the back panel or wall.
- Rub the flat side of a piece of chalk over the entire board to season it.
- Wipe the board clean with a dry cloth to prepare it for writing.
- Place the wooden bowl on the shelf and fill it with your chalk.
32 Navy Tribal Rug and Giant Button Wall Hooks
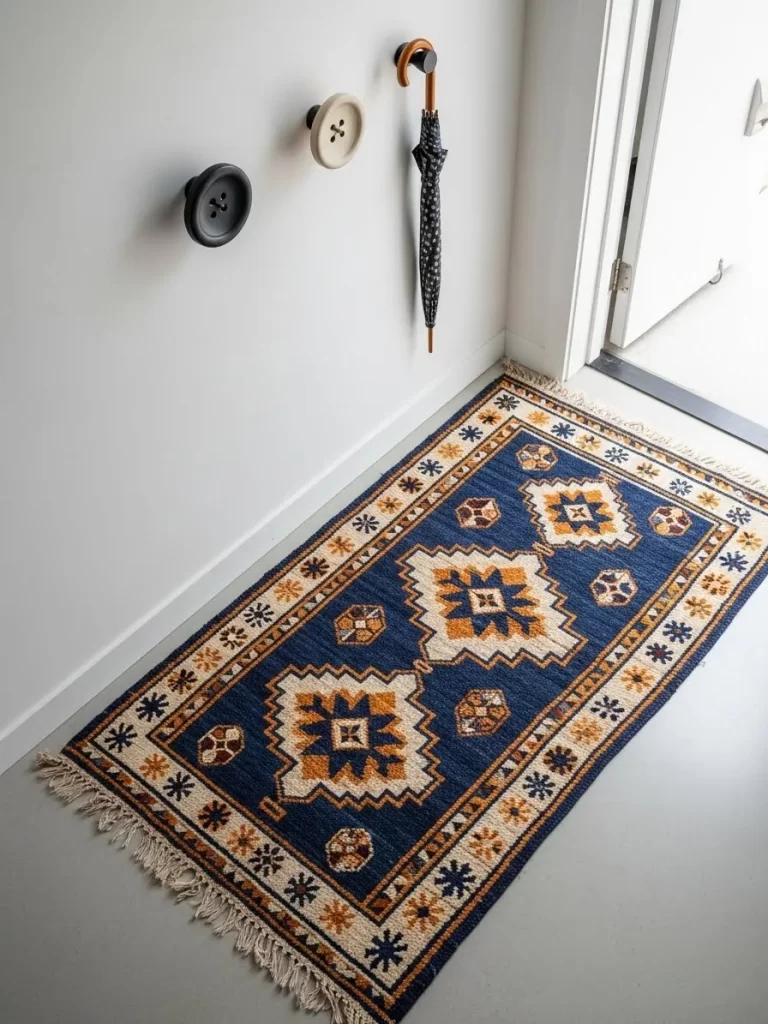
A vibrant navy blue tribal rug adds immediate warmth and pattern to a white foyer. The geometric design in gold and cream acts as a soft foundation for the entrance. On the wall, oversized decorative hooks shaped like buttons add a whimsical touch.
A tall black umbrella stand sits neatly in the corner to catch wet gear. The playful scale of the button hooks makes them a functional conversation piece. This layout is for those who want an entryway that feels young and energetic.
The combination of white walls and bold textiles makes the space feel very bright. It provides a dedicated spot for accessories without any heavy furniture at all. This design is a way to make a big impact in a small foyer.
Material Required List
- One 3×5 navy blue tribal patterned area rug
- Three oversized button wall hooks (black, tan, and gray)
- One tall slim black umbrella holder
- Heavy-duty wall anchors and screws
- One polka-dot pattern umbrella
Equipment Required List
- Power drill and drill bits
- Measuring tape
- Level
- Pencil
- Hammer
DIY Instruction Step by Step
- Lay your navy tribal rug on the floor so it is centered with the door.
- Determine the best heights for your button hooks on the entryway wall.
- Mark three staggered spots for the hooks with your pencil and level.
- Drill pilot holes at your marks and tap in the wall anchors with a hammer.
- Screw the button hooks into the anchors until they are flush with the wall.
- Ensure each hook is tight enough to hold the weight of a heavy winter coat.
- Place the umbrella stand in the corner nearest to the door hinges.
- Set your polka-dot umbrella in the stand for a quick grab on rainy days.
- Vacuum the rug to remove any dust from the drilling process.
- Hang a hat or a light bag on the hooks to complete the energetic look.
33 Grey Wood Sliding Barn Doors with Mirrored Panel
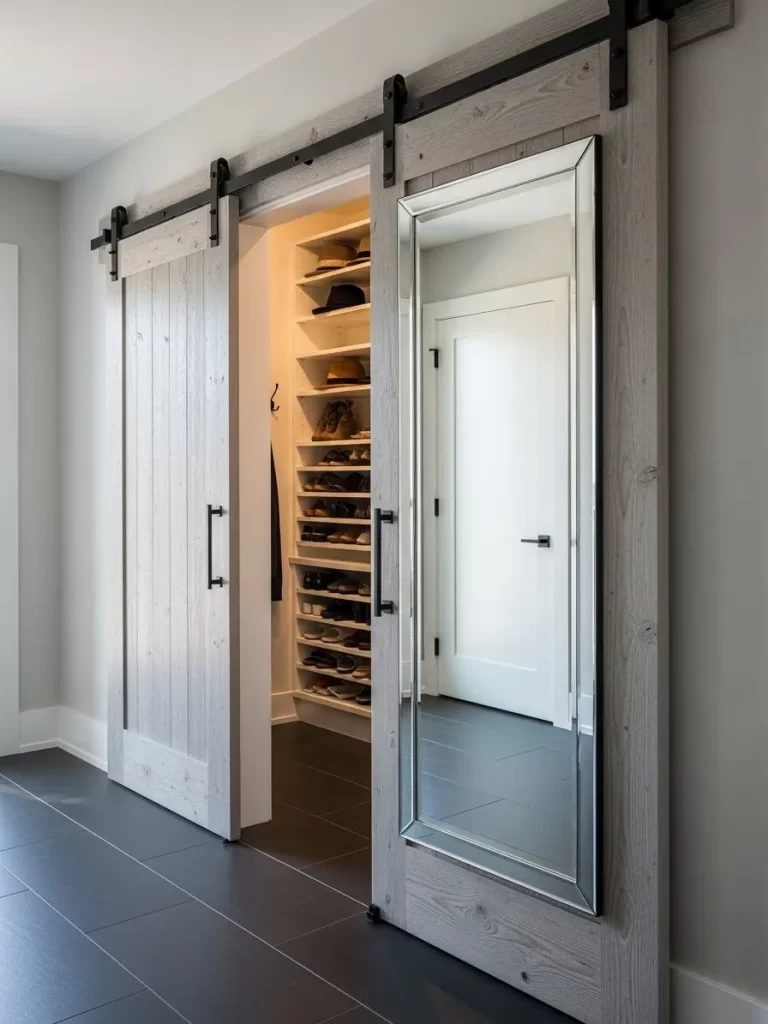
Sliding barn doors are a smart way to hide a messy entryway closet. This set features a rustic gray wood finish that adds texture to the foyer. A full-length mirror is built into one of the panels for last-minute checks.
The black metal track allows the doors to slide without taking up floor space. Inside the closet, white shelving holds hats, boots, and everyday sneakers in order. This layout turns a storage area into a beautiful architectural feature for guests.
The dark gray floor tiles complement the wood tones for a modern aesthetic. This setup is for those who want to hide clutter behind a stylish facade. It maximizes the utility of a standard closet while adding a lot of character.
Material Required List
- Two gray wood barn door panels
- One full-length mirror insert for a door panel
- Black metal barn door hardware and track kit
- One set of white wood closet shelving
- Two heavy-duty black door handles
Equipment Required List
- Power drill and driver bits
- Long level and measuring tape
- Stud finder and pencil
- Wrench and socket set
- Step ladder
DIY Instruction Step by Step
- Measure your door opening to ensure the barn doors will cover it fully.
- Locate the wall studs above the door opening and mark their positions.
- Install a 1×6 header board into the studs to support the heavy track.
- Mount the black metal track to the header board using the provided bolts.
- Use your long level to make sure the track is perfectly straight.
- Attach the rollers and black handles to the top and front of the doors.
- Glue the mirror panel into the recessed area of one door if needed.
- Lift the doors onto the track and install the safety anti-jump disks.
- Install the floor guides to keep the doors from swinging in or out.
- Organize your closet shelving behind the doors to complete the storage zone.
34 Built-in Pet Station with Bowl Niche and Basket

Pet lovers can keep their foyers organized with a dedicated feeding station. This built-in unit features a raised niche for stainless steel water and food bowls. A warm wood counter provides a surface for sorting mail or pet gear.
A large woven basket sits in the adjacent cubby to hold leashes and toys. Wall-mounted hooks above the bench provide a spot for dog leads and bags. This layout ensures that your pet’s needs are met without creating a mess.
The white cabinetry and light wood floors create a clean and bright look. It turns an unused corner of the entryway into a high-utility pet zone. This design is a way to make your foyer functional for every member of the family.
Material Required List
- One custom-built white plywood base cabinet with niches
- Two stainless steel pet feeding bowls
- One thick oak board for the counter top
- One large square wicker storage basket
- Three black metal dog leash hooks
Equipment Required List
- Power drill and screwdriver
- Measuring tape and level
- Jigsaw to cut bowl holes in the base
- Caulk and wood glue
- Sandpaper (120 grit)
DIY Instruction Step by Step
- Measure your pet’s height to determine the best level for the bowls.
- Build the cabinet base with two open niches for the bowls and the basket.
- Cut two circular holes in the top of the bowl niche using your jigsaw.
- Sand the edges of the holes until they are smooth for your pet.
- Drop the stainless steel bowls into the holes to check for a snug fit.
- Install the oak counter top onto the base cabinet using wood glue.
- Secure the counter from underneath with short screws into the cabinet frame.
- Mount the leash hooks on the wall above the cabinet at shoulder height.
- Slide the wicker basket into the open cubby for toy and leash storage.
- Fill the water bowl and organize your pet gear to finish the station.
35 Deep Blue Velvet Curtains for Hidden Entryway Storage
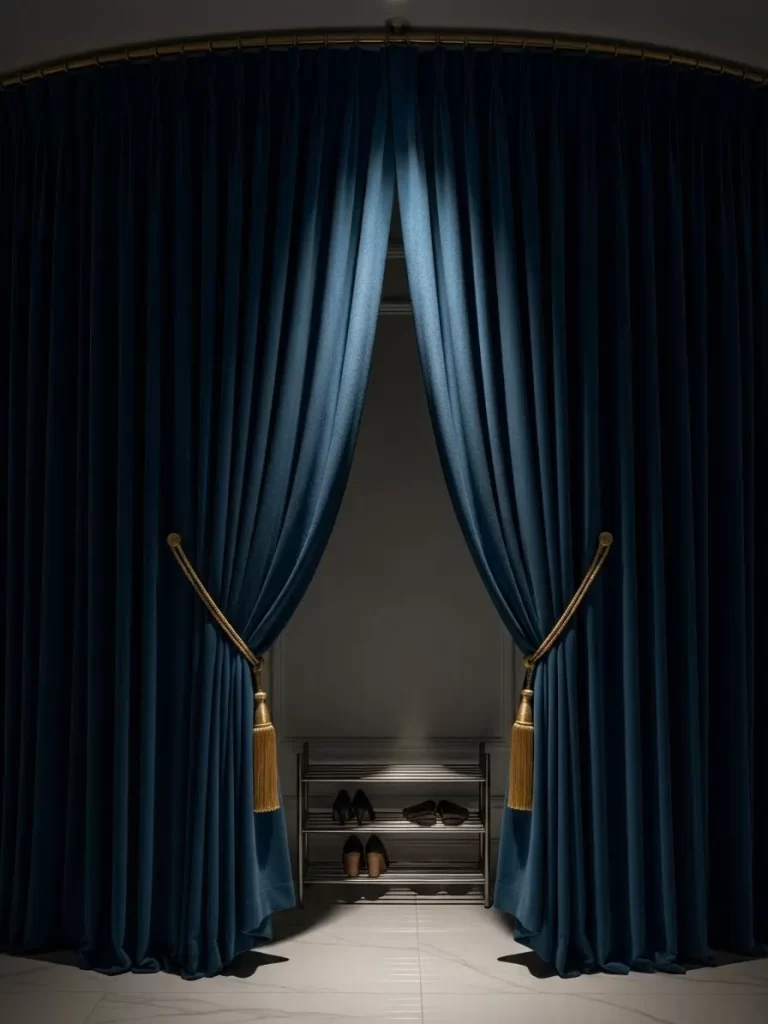
Curtains are a soft and elegant way to divide a foyer from a storage room. This pair of deep blue velvet drapes adds a dramatic touch of luxury. They hide a metal shoe rack and coat storage when you have guests.
Large gold tassels act as tie-backs to hold the curtains open during the day. The heavy fabric helps dampen noise and block drafts from the front door. This layout is for those who want a formal and cozy entryway experience.
The combination of dark blue and gold accents feels very sophisticated. It allows you to have a massive storage area that disappears in a second. This design is a way to manage organization without permanent construction.
Material Required List
- One pair of floor-to-ceiling deep blue velvet curtains
- One heavy-duty curved gold curtain rod
- Two large gold tassel curtain tie-backs
- One metal 3-tier shoe storage rack
- Heavy-duty wall anchors and mounting brackets
Equipment Required List
- Power drill and drill bits
- Long level and measuring tape
- Pencil and step ladder
- Iron or steamer for the velvet
- Screwdriver
DIY Instruction Step by Step
- Measure the height from your ceiling to the floor for the curtain length.
- Mark the spots for your curtain rod brackets 4 inches below the ceiling.
- Drill pilot holes and install the wall anchors at your marks.
- Screw the brackets into the wall and ensure they are perfectly level.
- Steam the velvet curtains to remove any wrinkles before you hang them.
- Slide the curtains onto the gold rod and lift it onto the brackets.
- Position your metal shoe rack against the wall behind the new curtains.
- Install the gold tie-back hooks on the side walls at waist height.
- Loop the gold tassels around the curtains to hold them open during the day.
- Check that the curtains slide easily to hide your storage area quickly.
36 Smart Tech Console with LED Clock Mirror
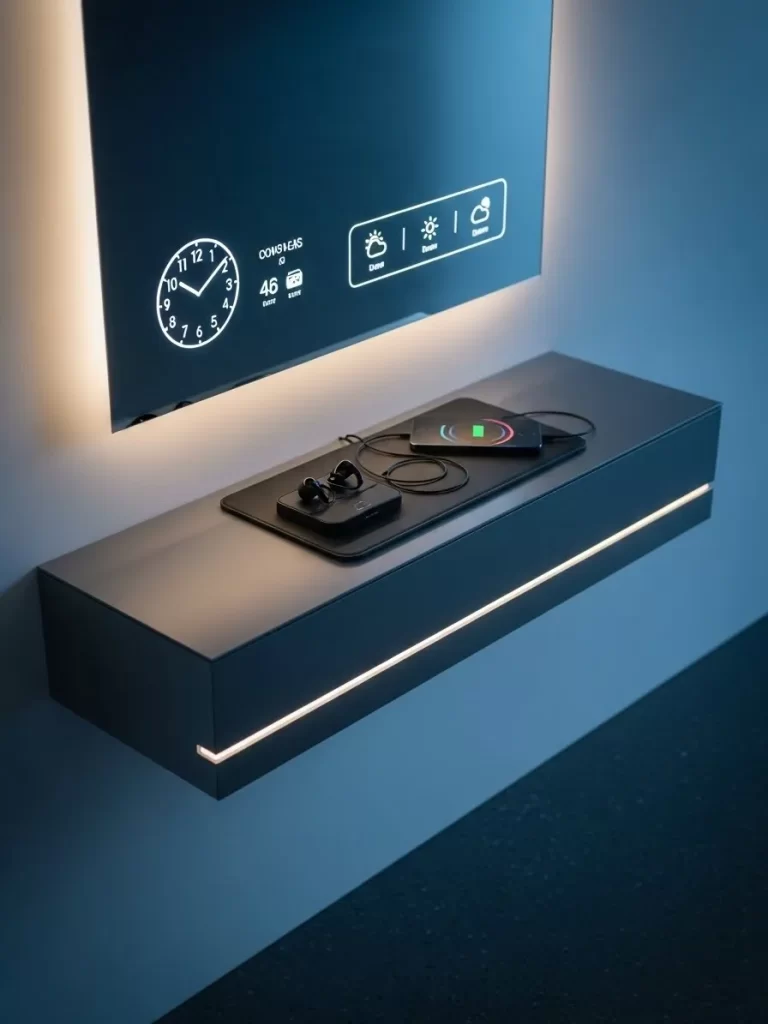
Modern entryways can embrace the future with integrated smart technology. This layout features a gray floating console with a built-in charging pad. A smart mirror above displays the time, weather, and your daily calendar.
LED lighting strips along the console and mirror create a futuristic glow. A leather mat on the desk surface provides a safe spot for your headphones. This setup is for the tech enthusiast who wants an entryway that works hard.
The dark gray wall helps the digital displays pop and remain very readable. It eliminates the need for separate clocks and messy charging cables for phones. This design keeps your foyer functional and very clean in a high-tech way.
Material Required List
- One gray floating smart console with integrated USB ports
- One smart LED mirror with time and weather display
- One black leather desk mat for technology
- Adhesive LED light strips with remote control
- Heavy-duty wall mounting brackets
Equipment Required List
- Power drill and driver bits
- Long level and measuring tape
- Stud finder and pencil
- Wire strippers or nearby power outlet
- Screwdriver
DIY Instruction Step by Step
- Map out the height of your tech console using your level and pencil.
- Locate the wall studs and install the heavy-duty mounting brackets.
- Lift the console onto the brackets and secure it from the inside.
- Mark the center point above the console for your smart LED mirror.
- Install the mirror hardware into the wall anchors for a secure hold.
- Connect the mirror and console to your home power and Wi-Fi network.
- Apply the LED light strips to the bottom edge of the console unit.
- Place the leather mat on the desk surface to organize your daily gear.
- Hide any visible power cords using a slim cable management channel.
- Test the touch screen and charging ports to ensure everything is ready.
We have explored 36 innovative ways to organize and elevate even the smallest entryway. The overarching lesson is that maximizing organization does not require a large home. It simply demands clever use of vertical space and a commitment to keeping the floor clear.
By implementing one of these smart layouts, you can ensure your foyer is both beautiful and functional. Choose systems that truly match your daily routine, whether that involves hiding pet gear or managing high-tech essentials. Your entryway sets the tone for your home, so make it count.
These designs prove that a small space can deliver a massive welcome. Take these strategies and tailor them to your personal style. Transform your entrance from a cluttered hurdle into a calm, organized transition space.
Key Takeaways
Optimize Vertical Space
Look upward when planning your organization. Use tall, slim systems like spine bookshelves or layered pegboards. Floating shelves and mirrors draw the eye up, making the entire area feel taller and more open.
Prioritize Hidden Storage
Use furniture that serves multiple purposes. Closed storage is your greatest ally for hiding clutter, such as floating cabinets, storage benches, or decorative trunks. Hide shoes and mail away to maintain a serene atmosphere.
Embrace Reflective Surfaces
Mirrors are essential in small foyers. They not only provide a final look before leaving but also reflect light. This reflection instantly creates the illusion of a larger, brighter space, which is always welcoming.
Choose Multi-Functional Pieces
Every item in a small entryway must earn its place. Use benches that double as shoe storage or radiator covers that act as console tables. Focus on pieces that offer both utility and surface area.