Living in a small space does not mean sacrificing style or comfort. Tight quarters often feel frustrating when you try to fit everything in. It is time to stop feeling cramped and start seeing the potential in every inch of your room.

We have gathered 42 clever layout solutions designed to reclaim your floor space. These smart tricks use vertical storage, light, and visual illusion to transform your bedroom.
Get ready to turn your tiny sleeping area into an organized, restful, and open sanctuary.
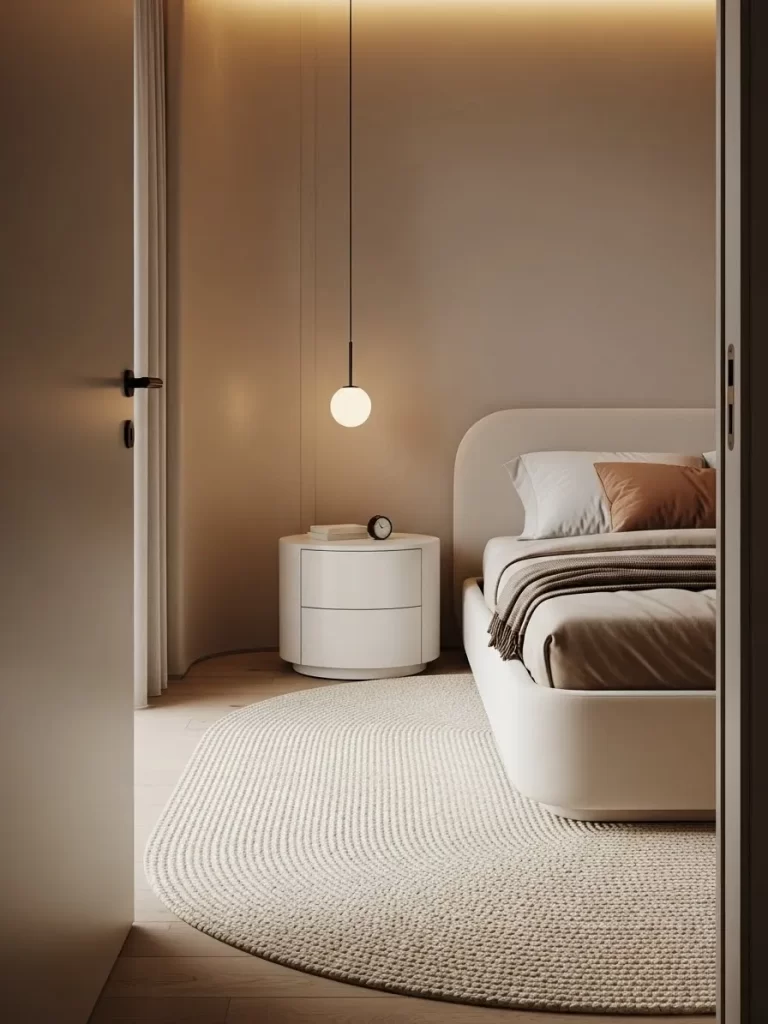
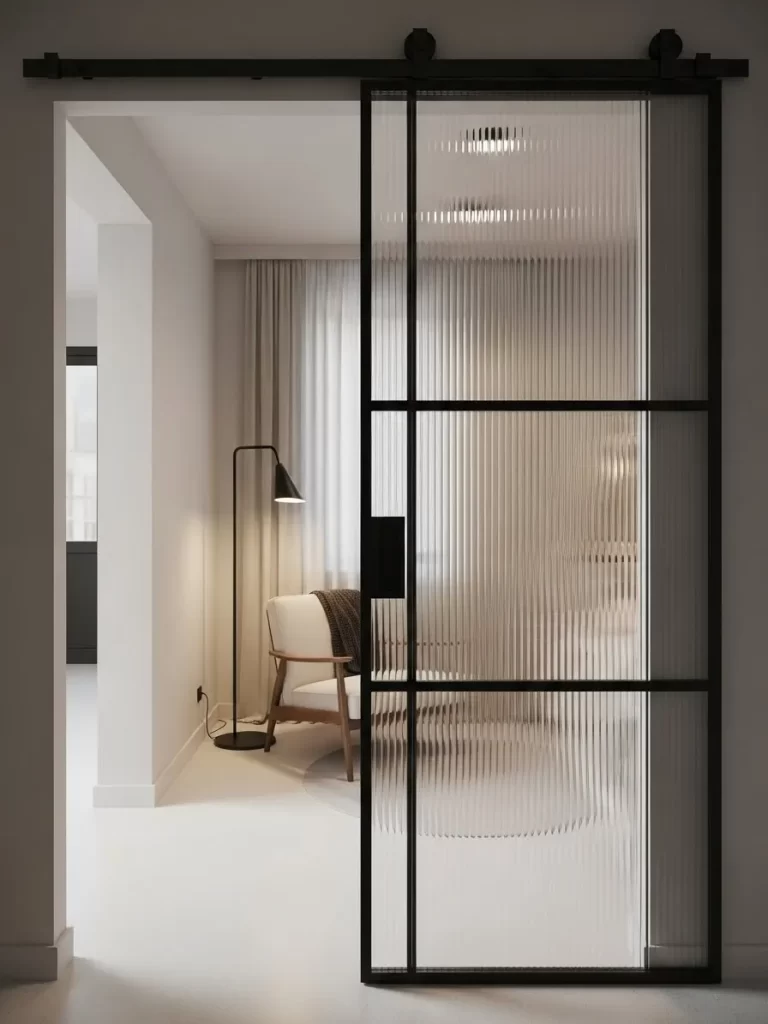
1 Floor to Ceiling Sheer Curtains
Vertical lines do wonders for a cramped room. These sheer curtains hang from the very top of the wall and brush against the floor. This trick draws your eyes upward and creates an illusion of a much higher ceiling.
Light still pours through the fabric even when you close them. This keeps the space bright while hiding the window frame edges. Using a neutral color that matches the walls helps the fabric blend in so the room feels wider.
Soft ripples in the fabric add a touch of texture without feeling heavy. You can easily push them to one side to let the full sun in. It is a simple way to make a tiny bedroom feel airy and open.
Material Required List
- Two sheer fabric panels
- Extra long curtain rod
- Mounting brackets
- Screws
- Wall anchors
Equipment Required List
- Measuring tape
- Pencil
- Power drill
- Screwdriver
- Step ladder
- Level tool
DIY Instruction Step by Step
- Measure the total height from your ceiling down to the floor to decide where to place the rod.
- Use your measuring tape to mark spots at least 4 to 6 inches above the window frame or directly under the ceiling.
- Hold the mounting brackets against the wall at these marks and use a pencil to dot the screw holes.
- Check your marks with a level tool to ensure the rod will sit straight.
- Drill holes into the marks and push plastic wall anchors into the holes for a firm grip.
- Align the brackets with the anchors and tighten the screws using your screwdriver.
- Slide your sheer fabric panels onto the curtain rod.
- Lift the rod and set it securely onto the brackets.
- Adjust the folds of the fabric so they hang evenly across the window.
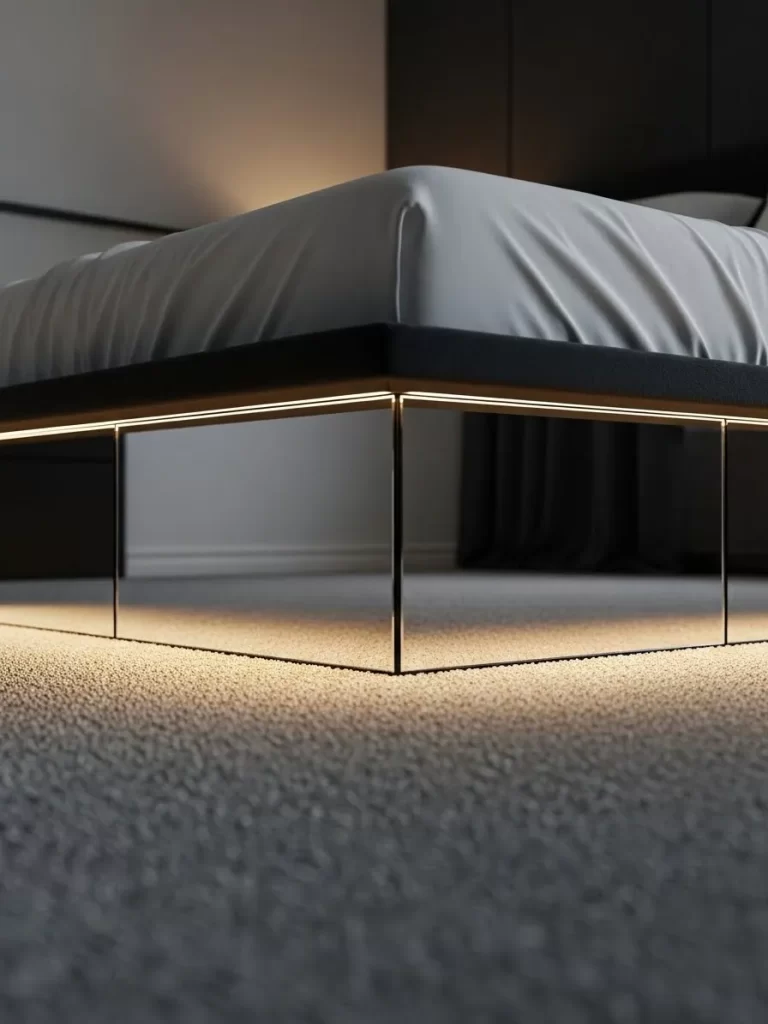
2 Floating Console and Under-bed Lighting
Small rooms often feel heavy when furniture sits flat on the floor. This layout uses a floating media console and a bed frame with hidden LED strips. Lifting these pieces off the ground exposes more floor tiles, which tricks your brain into seeing a larger area.
The warm glow from underneath the furniture blurs the hard edges of the room. It creates a soft, ambient light that makes the heavy wooden bed look like it is weightless. This design choice provides a sleek, modern look while keeping the walkways clear of bulky legs and clutter.
Choosing a monochrome grey palette for the walls and cabinets adds to the spacious feel. The long, horizontal lines of the floating shelves guide the eye along the length of the room. It is a smart way to add storage without eating up precious walking space.
Material Required List
- Floating console unit
- LED light strips with adhesive backing
- Power adapter
- Wall mounting hardware
- Cable management clips
Equipment Required List
- Electric drill
- Level tool
- Measuring tape
- Pencil
- Stud finder
- Scissors
DIY Instruction Step by Step
- Use a stud finder to locate the wooden beams behind your wall for a secure hold.
- Mark the desired height of your console with a pencil, ensuring it is at least 10 inches off the floor.
- Hold the mounting bracket against the wall and use your level tool to make sure it is perfectly flat.
- Drill pilot holes into the wall studs and screw the bracket into place firmly.
- Lift the console and slide it onto the bracket until it clicks or locks.
- Clean the underside of your bed frame and console with a dry cloth to remove dust.
- Peel the backing off the LED light strips and press them firmly along the bottom edges of the furniture.
- Cut the light strip at the designated marks if it is too long for the furniture piece.
- Plug the lights into a nearby outlet and hide the wires using small plastic cable clips.
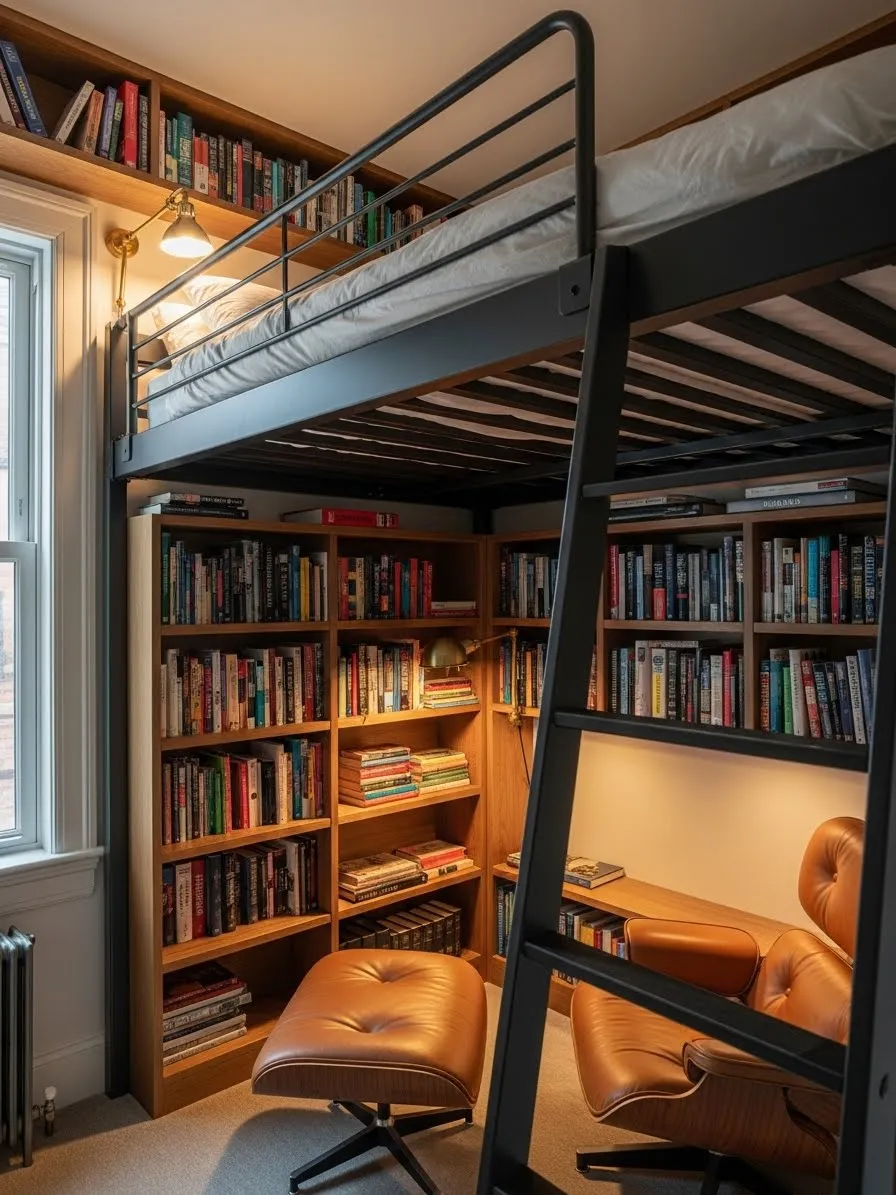
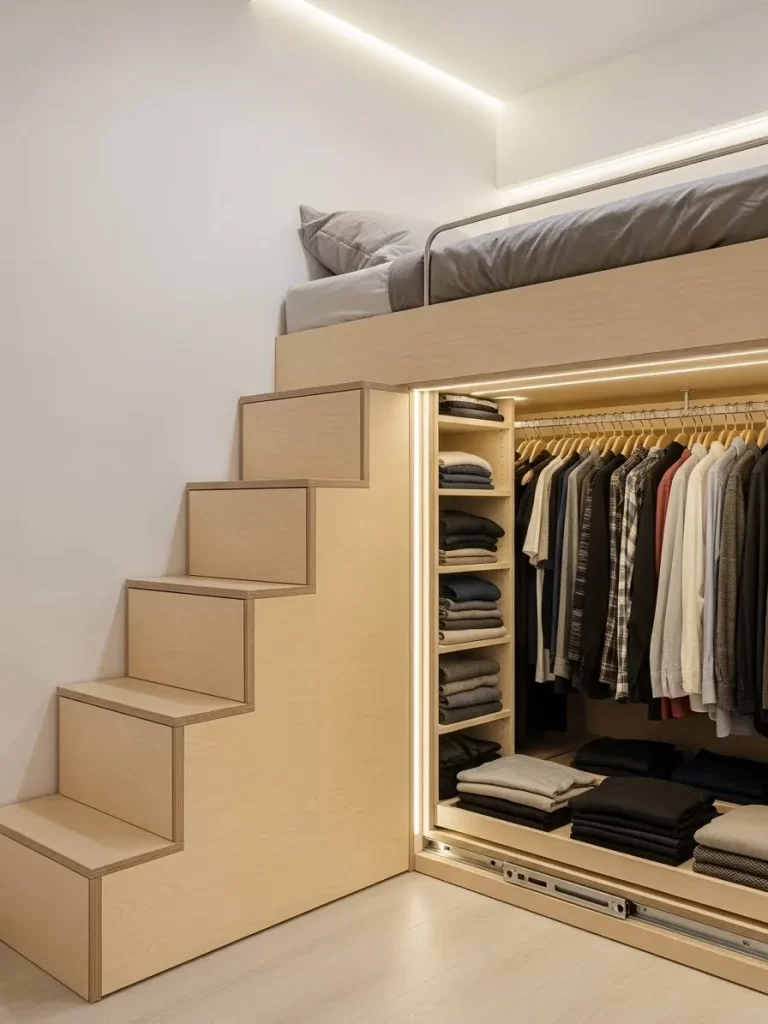
3 High Loft Bed with Library Nook

Going vertical is the best solution when you lack square footage. This sturdy black metal loft bed lifts the sleeping area toward the ceiling to free up the floor. Below the mattress, a cozy reading nook features floor to ceiling bookshelves and a comfortable lounge chair.
The dark metal frame provides a strong industrial look without blocking the light from the window. Rich wood tones in the shelving add warmth and a sense of luxury to the corner. This setup turns a single sleeping spot into a multi functional living area that feels like a private suite.
Built in lighting inside the shelves ensures the lower nook stays bright and inviting. Placing an ottoman with the chair makes the space feel like a full living room. It maximizes every inch of the corner for both rest and relaxation.
Material Required List
- Loft bed frame kit
- Wooden bookshelf units
- Warm LED puck lights
- Comfortable lounge chair and ottoman
- Area rug
Equipment Required List
- Allen wrench set
- Screwdriver
- Step ladder
- Rubber mallet
- Measuring tape
DIY Instruction Step by Step
- Clear the corner of your room and lay out all the parts of the loft bed frame.
- Assemble the side ladders and support beams following the kit manual carefully.
- Tighten every bolt with an Allen wrench to ensure the structure does not wobble.
- Secure the bed frame to the wall studs using safety brackets to prevent tipping.
- Slide the wooden bookshelves into the space beneath the bed frame.
- Peel and stick the LED puck lights to the underside of the bed slats to light up the books.
- Place a small rug on the floor to define the boundaries of your new reading area.
- Position your lounge chair and ottoman in the center of the nook.
- Organize your books by color or size to keep the small space looking tidy and decorative.
4 Mirrored Feature Wall Behind Bed

Mirrors are a classic secret for doubling the visual size of a room. This design uses a grid of mirrored panels that cover the entire wall behind the headboard. It creates a deep reflection that makes the bedroom look like it goes on forever.
The tall white cabinets on either side frame the mirrors and provide massive amounts of storage. By using white doors, the furniture blends with the ceiling and keeps the room feeling light. This layout turns a cramped back wall into a stunning focal point that adds glamor and depth.
Crystal pendant lights hanging in front of the mirrors catch the light and bounce it around. This setup is excellent for rooms with limited natural light sources. It creates a bright, high end atmosphere that feels anything but small.
Material Required List
- Large mirrored glass panels
- Heavy duty mirror adhesive
- Two tall wardrobe cabinets
- Leveling shims
- Crystal pendant lights
Equipment Required List
- Caulking gun
- Level tool
- Measuring tape
- Suction cup glass lifter
- Pencil
DIY Instruction Step by Step
- Measure your back wall to determine how many mirrored panels you need to fill the gap between cabinets.
- Assemble and install the two tall wardrobe cabinets on the far left and right sides of the wall.
- Clean the wall surface thoroughly to ensure the adhesive sticks properly.
- Apply several large beads of mirror adhesive to the back of the first glass panel.
- Use a suction cup lifter to press the panel against the wall, starting from the bottom center.
- Check the panel with a level tool before the glue sets to ensure it is straight.
- Repeat this process for the remaining panels, keeping the gaps between them very tight.
- Allow the adhesive to dry for 24 hours before hanging any lights or moving the bed.
- Polish the glass with a microfiber cloth to remove any fingerprints or glue residue.
5 Window Bench with Integrated Storage
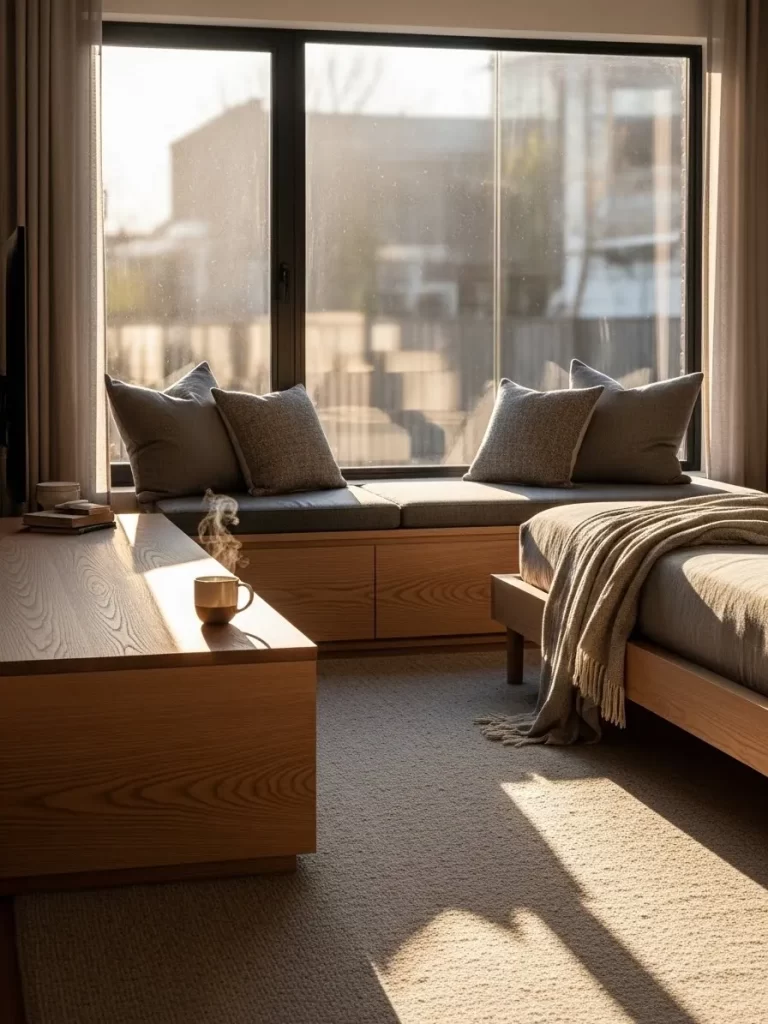
Windows are often underutilized in small rooms, but this layout turns the ledge into a functional seat. A custom wooden bench sits flush against the glass, offering a peaceful spot to sit and watch the world. Below the seating cushion, large drawers provide hidden space for extra blankets or shoes.
The natural wood grain brings a sense of calm and nature into the bedroom. Using a low profile bed frame next to the bench keeps the sightlines open across the floor. This arrangement makes the room feel like a cozy cabin retreat rather than a tight box.
Neutral tones on the rug and bedding keep the vibe cohesive and soft. The sunlight hitting the wood adds a golden glow that makes the space feel warm. It is a smart way to gain both a sofa and a closet without taking up extra wall space.
Material Required List
- Plywood sheets or pre-made bench cabinets
- Foam seat cushions
- Fabric for upholstery
- Drawer pulls
- Wood stain or sealant
Equipment Required List
- Circular saw
- Power drill
- Staple gun
- Measuring tape
- Sandpaper
DIY Instruction Step by Step
- Measure the width of your window and the height from the floor to the bottom of the sill.
- Build or buy a wooden box frame that fits perfectly into that window gap.
- Cut a piece of plywood for the bench top and sand the edges until they are smooth.
- Apply a wood stain that matches your bed frame and let it dry completely.
- Install drawer slides inside the frame and attach the drawer boxes for storage.
- Wrap the foam cushion in your chosen fabric and secure it to a thin board using a staple gun.
- Place the upholstered cushion on top of the bench.
- Screw the bench into the wall studs so it does not move when you sit down.
- Add a few throw pillows to make the nook look inviting and comfortable.
6 Hidden Workspace Inside Wardrobe
Many people need a home office but lack a separate room for a desk. This clever layout hides a full workspace behind a sleek cabinet door. When the door is closed, the room looks like a clean, minimalist bedroom with plenty of storage.
Opening the top panel reveals a warm wood interior with a built-in lamp and space for a laptop. The desk surface folds down to provide a sturdy place to work without the need for a permanent table. This keeps the floor clear during the day and hides messy paperwork at night.
The white exterior of the cabinets reflects light and makes the walls feel further away. Using a different wood texture inside the desk area creates a nice mental shift from sleep mode to work mode. It is a professional and tidy solution for tiny living.
Material Required List
- Custom wardrobe unit with a flip-down door
- Heavy duty folding hinges
- Internal wooden cladding
- Small desk lamp
- Magnetic latches
Equipment Required List
- Power drill
- Screwdriver
- Level tool
- Wire cutters
- Measuring tape
DIY Instruction Step by Step
- Select a section of your wardrobe that is at a comfortable sitting height.
- Remove any existing shelves from that middle section to create an open cavity.
- Line the back and sides of the inner cabinet with thin wood planks for a premium look.
- Attach heavy duty folding hinges to the bottom edge of your desk panel and the cabinet frame.
- Install a support chain or a hydraulic arm to hold the desk level when it is open.
- Drill a small hole in the back of the cabinet to run a power cord for your lamp and laptop.
- Mount a small LED lamp to the top of the inner cabinet for focused task lighting.
- Add magnetic latches to the top corners so the door stays shut when you are finished working.
- Slide your chair into the space or use a folding chair that can be tucked away easily.
7 Minimalist Elevated Platform Bed
Traditional bed frames often feel bulky and consume too much visual space in a tiny room. This Japanese inspired layout uses a wide wooden platform to elevate the sleeping area. A low profile mattress sits on top of tatami mats to keep the room feeling open and airy.
The natural light wood tones create a sense of calm and order. Using different levels for the floor helps define the sleeping zone without using solid walls. This design allows the sunlight from the window to reach every corner of the bedroom.
A small bonsai tree and a simple tea set add a peaceful touch to the platform. Keeping the furniture close to the floor makes the ceiling feel much higher than it actually is. It is a smart way to embrace minimalism while maximizing the floor area.
Material Required List
- Structural timber beams
- Plywood sheets
- Tatami mats
- Low profile mattress
- Wood finish or clear sealant
Equipment Required List
- Power saw
- Power drill and wood screws
- Sanding block
- Measuring tape
- Level tool
DIY Instruction Step by Step
- Measure the width of your room to ensure the platform fits snugly from wall to wall.
- Build a rectangular base frame using structural timber beams for maximum support.
- Install cross beams every 16 inches within the frame to prevent the plywood from sagging.
- Secure the frame to the floor or wall studs to keep it from shifting.
- Cut plywood sheets to fit the top of your frame and screw them down firmly.
- Sand all the edges and surfaces until they are perfectly smooth to the touch.
- Apply a clear sealant or light wood stain to protect the wood from moisture.
- Lay the tatami mats over the wooden platform to create a soft and breathable base.
- Place your mattress in the center and enjoy the extra walking space around the edges.
8 Corner Gaming Station with LED Accents
Corners are frequently wasted, but this layout turns a small nook into a high tech gaming hub. An L shaped floating desk fits perfectly into the corner to provide a large workspace. Under-desk LED lighting creates a deep blue glow that adds a sense of depth to the walls.
Floating shelves above the monitors hold small plants and collectibles without taking up floor space. The white finish of the desk and shelves helps bounce light around the room. This setup proves that you can have a full office and a comfortable bed in a very tight area.
The sleek ergonomic chair can tuck completely under the desk when you are not using it. This keeps the walkway clear and makes the room look organized. It is a great way to balance a hobby space with a restful sleeping environment.
Material Required List
- L shaped floating desk kit
- Wall mounted floating shelves
- RGB LED light strips
- Heavy duty wall brackets
- Cable management sleeves
Equipment Required List
- Stud finder
- Power drill
- Level tool
- Measuring tape
- Pencil
DIY Instruction Step by Step
- Use a stud finder to locate the strongest points in your walls for mounting the desk.
- Mark the height for your desk, making sure it aligns with the height of your chair arms.
- Screw the heavy duty brackets into the wall studs using long wood screws.
- Place the L shaped desk surface onto the brackets and secure it from underneath.
- Mount the floating shelves at least 20 inches above the desk to allow room for monitors.
- Clean the bottom of the desk and shelves with a damp cloth and let them dry.
- Peel and stick the LED strips along the back edge of the desk for a halo effect.
- Connect the lights to a power source and use cable sleeves to hide all the messy wires.
- Position your dual monitors and gaming gear to complete the tech focused look.
9 Seamless Closet and Room Divider
Large closets can make a bedroom feel crowded, but this design uses the wardrobe as a architectural feature. A fabric-covered headboard stands in the center of the room to act as a divider. Behind this wall, a glowing walk in closet organizes clothes without cluttering the main sleep area.
Warm LED strips illuminate the closet interior so you can see every item clearly. The fabric panels on the divider soften the acoustics of the room and add a luxury hotel feel. This layout creates a private dressing area while keeping the bed as the main focal point.
Symmetry plays a big role in making this small space feel balanced. Identical pendant lights hang on both sides of the bed to provide soft, even lighting. It is a sophisticated way to manage storage in a room with limited wall space.
Material Required List
- Large wardrobe system
- Plywood panels for the divider
- Fabric batting and upholstery fabric
- Brass or gold trim strips
- LED closet lighting kit
Equipment Required List
- Staple gun
- Hammer and finishing nails
- Power drill
- Level tool
- Fabric shears
DIY Instruction Step by Step
- Position your wardrobe units against the back wall and secure them together.
- Build a free standing wall frame using timber to act as your headboard divider.
- Cover the front of the frame with plywood panels.
- Wrap the panels in soft batting and then your chosen upholstery fabric.
- Secure the fabric to the back of the panels using a staple gun.
- Attach brass trim strips between the fabric panels for a modern, high end look.
- Install the LED lighting kit inside the wardrobe to ensure the closet is bright.
- Place the bed directly against the new fabric wall.
- Hang pendant lights from the ceiling on either side to save space on your nightstands.
10 Fluted Glass Sliding Room Partition
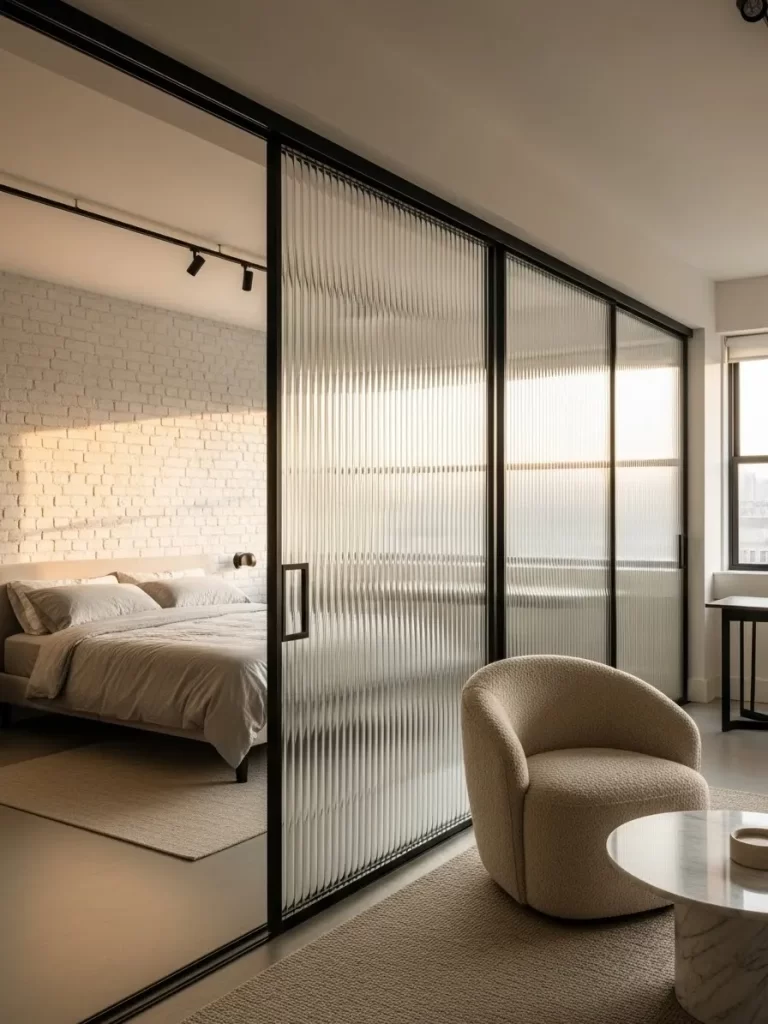
Solid walls can make a small apartment feel like a series of tiny boxes. This layout uses fluted glass sliding doors to separate the bedroom from the living area. The textured glass allows light to pass through while still providing enough privacy for sleeping.
The black metal frames add a sharp, modern edge to the soft interior colors. Sliding doors are a massive space saver because they do not need a swing radius to open. This keeps the floor area clear for furniture like a cozy bouclé armchair.
A white brick feature wall behind the bed adds texture without making the room feel dark. The tracks for the doors are mounted to the ceiling to keep the floor transition smooth and seamless. It is a stylish solution for open plan living that needs a bit of structure.
Material Required List
- Fluted glass panels
- Sliding door track kit
- Metal door frames
- Ceiling anchors
- Recessed lighting track
Equipment Required List
- Heavy duty drill
- Level tool
- Measuring tape
- Allen wrench
- Screwdriver
DIY Instruction Step by Step
- Measure the height from your floor to the ceiling to ensure the doors fit the gap.
- Mark a straight line across the ceiling where the track will be installed.
- Drill holes into the ceiling joists and secure the sliding track with heavy duty anchors.
- Assemble the metal frames around the fluted glass panels carefully.
- Lift the panels and hook the rollers into the ceiling track.
- Install a floor guide to keep the glass from swinging back and forth when moved.
- Adjust the rollers using an Allen wrench so the doors hang level.
- Wipe down the glass panels with a specialized cleaner to remove any smudges.
- Mount a track lighting system on the bedroom side to highlight the brick wall texture.
11 Wrap Around Floating Cabinets
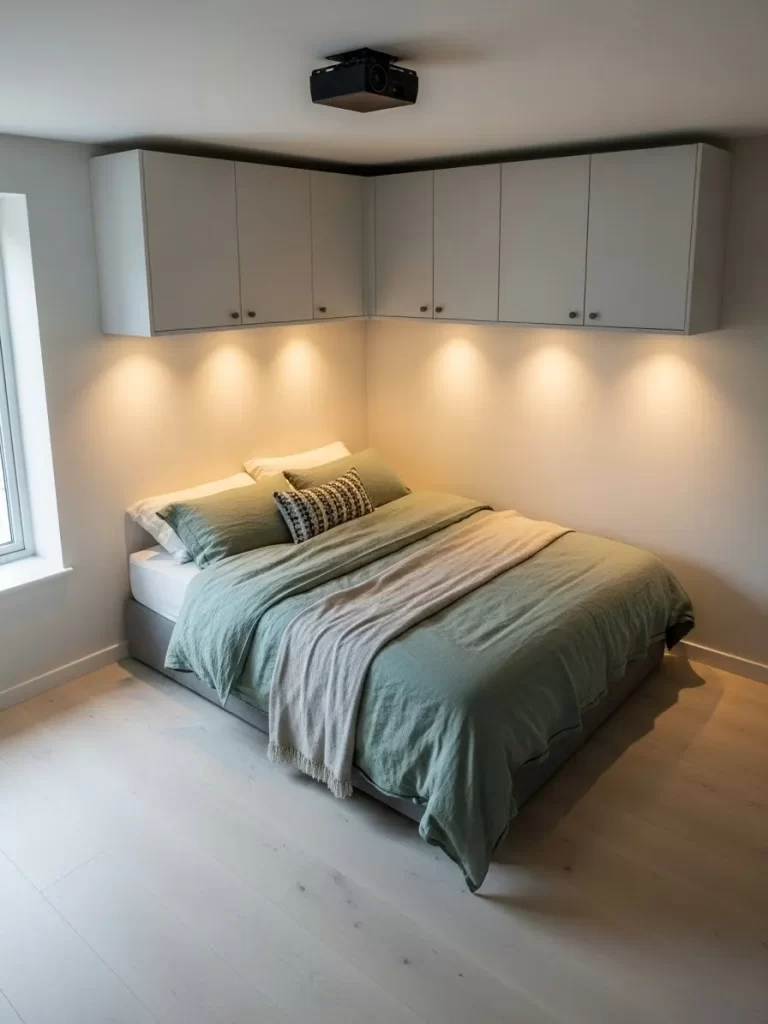
Wall corners often go to waste in standard bedroom designs. This layout solves that problem by installing a continuous line of floating cabinets that wrap around the upper corner. It provides massive storage for bulky items while keeping the floor completely open.
Recessed spotlights under the cabinets point directly onto the bed. This provides a warm glow for reading without the need for bulky lamps on the floor. The light grey finish of the cabinets helps them blend into the wall so they do not feel heavy or intrusive.
Keeping the bed centered under the cabinets creates a cozy, cocoon like feeling. The lack of floor clutter makes the room feel much larger than its actual dimensions. It is a brilliant way to use the empty air space near the ceiling.
Material Required List
- Upper storage cabinets
- Long wall mounting rails
- LED puck lights
- Cabinet hardware handles
- Finishing trim
Equipment Required List
- Power drill
- Stud finder
- Level tool
- Measuring tape
- Clamps
DIY Instruction Step by Step
- Measure the two walls in your corner to determine how many cabinet units you need.
- Use a stud finder to mark every wooden stud along the upper part of the wall.
- Screw the heavy duty mounting rails into the studs at your desired height.
- Lift the first cabinet into place and hook it onto the rail.
- Use clamps to hold the second cabinet flush against the first one while you screw them together.
- Repeat this until the entire corner is covered with the cabinet units.
- Drill small holes in the bottom of the cabinets to run wires for your lights.
- Install the LED puck lights and hide the wiring inside the lower cabinet shelf.
- Attach your handles and adjust the door hinges so everything looks aligned.
12 Strategic Single Statement Plant
Decorating a small room with too many objects can make it feel cluttered. This layout focuses on one large fiddle leaf fig tree placed in a corner. The vertical growth of the plant draws the eye upward and adds a burst of life to the neutral grey walls.
A pleated floor lamp stands behind the plant to create soft shadows at night. This layer of lighting adds depth and makes the corner feel much deeper than it is. Using a dark wood floor with light walls creates a high contrast look that feels modern and expensive.
Keeping the bedding simple with a dark grey throw keeps the room looking organized. The natural light from the window hits the leaves and brings a fresh energy to the space. It is a simple way to decorate without losing any floor area.
Material Required List
- Large potted plant
- Decorative ceramic pot
- Pleated floor lamp
- Smart light bulb
- Potting soil
Equipment Required List
- Level tool
- Measuring tape
- Microfiber cloth
DIY Instruction Step by Step
- Choose a corner of the room that receives bright, indirect sunlight from the window.
- Place your decorative pot in the corner and add a layer of drainage stones at the bottom.
- Carefully move your large plant into the pot and fill the gaps with fresh potting soil.
- Position the pleated floor lamp slightly behind the plant so the leaves catch the light.
- Wipe the leaves with a damp microfiber cloth to ensure they look glossy and healthy.
- Set your smart bulb to a warm temperature to mimic the evening sun.
- Ensure the plant pot is not blocking any walking paths or the door swing.
- Water the plant sparingly to avoid spills on your hardwood floors.
- Rotate the pot once a week so the plant grows evenly toward the light source.
13 Live Edge Window Desk
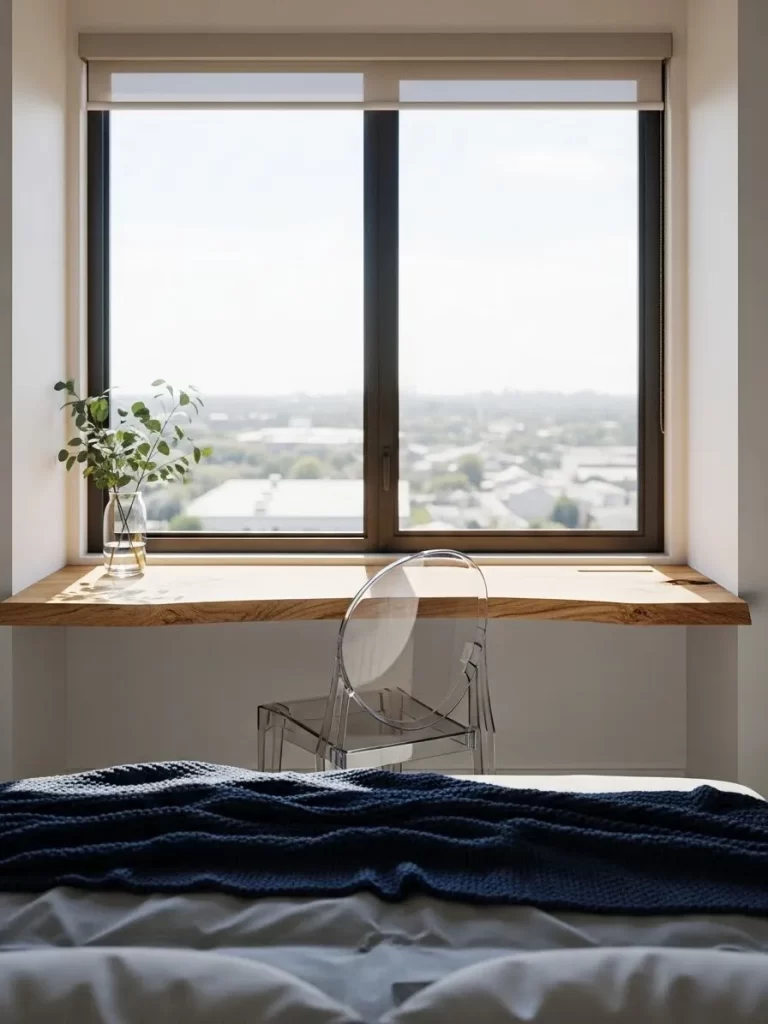
A bulky desk can easily ruin the flow of a small bedroom. This layout replaces a traditional table with a live edge wood slab mounted directly into the window nook. The organic shape of the wood provides a natural touch that contrasts with the clean white walls.
Using a clear acrylic chair makes the seating almost invisible. This allows the eye to travel straight to the view outside, making the room feel connected to the outdoors. It is a spot for a laptop or a morning coffee without taking up central floor space.
The slab is mounted at a height that allows you to look out the window while working. Small plants on the desk bring the greenery from outside into the room. It is a functional and beautiful way to utilize a deep window sill.
Material Required List
- Live edge wood slab
- Heavy duty steel L brackets
- Wood sealant
- Clear acrylic chair
- Wall anchors and screws
Equipment Required List
- Power drill
- Level tool
- Orbital sander
- Measuring tape
- Paintbrush
DIY Instruction Step by Step
- Measure the width of your window opening and order a wood slab that is 1 inch shorter.
- Sand the surface and the natural edges of the slab until they are smooth.
- Apply two coats of wood sealant to protect the surface from sun damage and stains.
- Mark the height for your desk on the walls within the window nook.
- Use a level tool to ensure your bracket marks are even on both sides.
- Drill holes into the wall and secure the heavy duty steel brackets with anchors.
- Lay the wood slab onto the brackets and screw it in from underneath.
- Check that the desk is stable and does not wobble when you apply weight.
- Slide your clear chair into the space to complete your minimalist home office.
14 Recessed Bed Within Storage Wall

Building your bed into a wall of cabinets is the ultimate space saving move. This layout features a bed tucked into a central niche surrounded by floor to ceiling storage. It creates a protected, snug sleeping area while providing a home for every single item you own.
Vertical wood slats behind the headboard add a high end architectural detail. Built in brass reading lamps provide focused light without taking up space on a nightstand. The light beige color of the cabinets keeps the massive furniture piece from feeling overwhelming.
Large drawers at the top can hold seasonal items like winter coats or extra pillows. This design completely eliminates the need for separate dressers or closets in the room. It leaves the rest of the floor area totally open for movement.
Material Required List
- Modular tall wardrobe units
- Wood slats for the feature wall
- Two brass wall sconces
- Plywood for the bed niche frame
- Wood glue and finish nails
Equipment Required List
- Power drill
- Miter saw
- Level tool
- Measuring tape
- Hammer
DIY Instruction Step by Step
- Measure your entire back wall and sketch out the placement of the wardrobes and the bed gap.
- Assemble and install the tall wardrobe units on both the left and right sides of the room.
- Build a bridge cabinet across the top to connect the two side units.
- Secure every cabinet to the wall studs to prevent any movement.
- Cut your wood slats to the height of the central niche and sand the edges.
- Apply wood glue to the back of the slats and nail them into the wall in a vertical pattern.
- Drill holes through the slats to mount your brass wall sconces.
- Wire the lamps into the wall or use battery operated bulbs for an easier setup.
- Slide your bed frame into the central gap and enjoy your built-in sanctuary.
15 Transparent Furniture and Neon Outlines
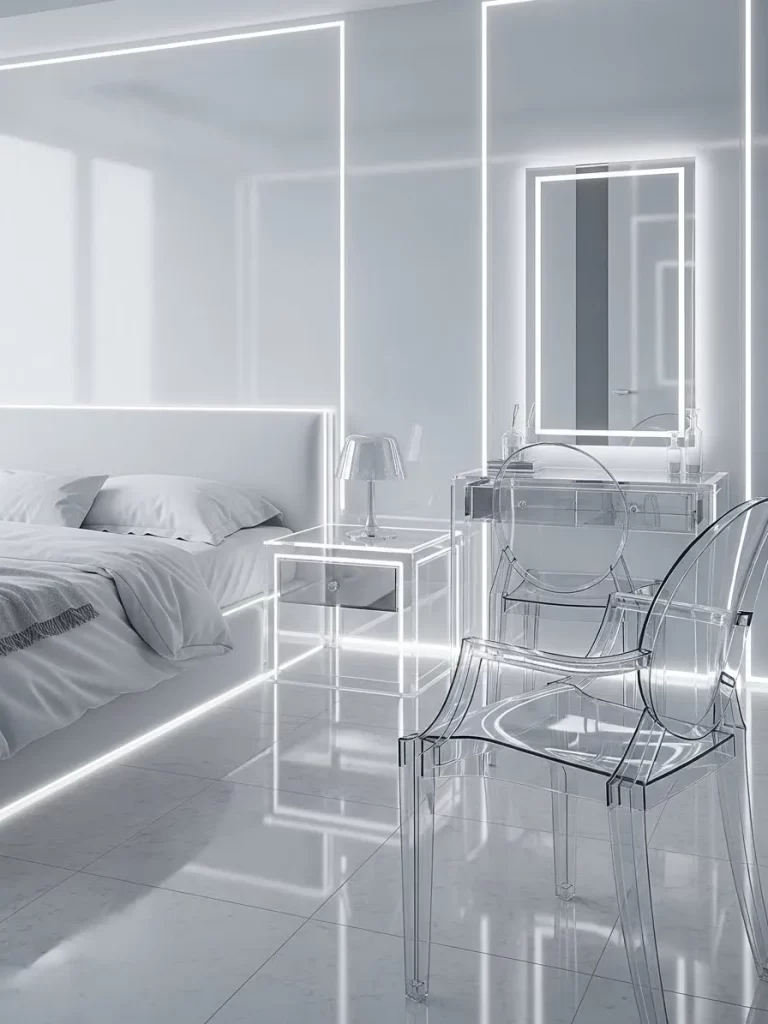
Heavy furniture can make a small room feel like it is closing in on you. This layout uses transparent acrylic chairs and bedside tables to maintain clear sightlines across the floor. Integrated neon LED strips along the wall molding add a futuristic and spacious vibe.
The glowing lines define the architectural shape of the room without adding physical bulk. Using a white and silver color palette reflects the neon light to keep the space bright. This design is for someone who wants a modern, high tech look in a tight apartment.
Ghost chairs are very easy to move around when you need more space. The light passes right through them, which makes the floor area look much larger than it is. It is a creative way to add style and seating without the visual weight.
Material Required List
- Clear acrylic ghost chairs
- Acrylic nightstands
- Neon LED flex strips
- Adhesive mounting clips
- White bedding set
Equipment Required List
- Measuring tape
- Level tool
- Scissors
- Clean cloth
DIY Instruction Step by Step
- Clean the walls and floor thoroughly to remove any dust that might show through clear furniture.
- Use a level tool to mark out the rectangular patterns on your walls for the neon strips.
- Peel the backing off the neon flex strips and press them firmly along your marks.
- Use small adhesive clips at the corners to ensure the strips stay straight.
- Place your acrylic nightstands on either side of the bed.
- Position the ghost chairs in the corners or at a small vanity desk.
- Use a microfiber cloth and a gentle cleaner to keep the acrylic furniture sparkling.
- Hide the power cords for the LED strips behind the bed frame or under the rug.
- Dim the main lights to let the neon outlines expand the visual borders of the room.
16 Wall Mounted Fold Down Desk
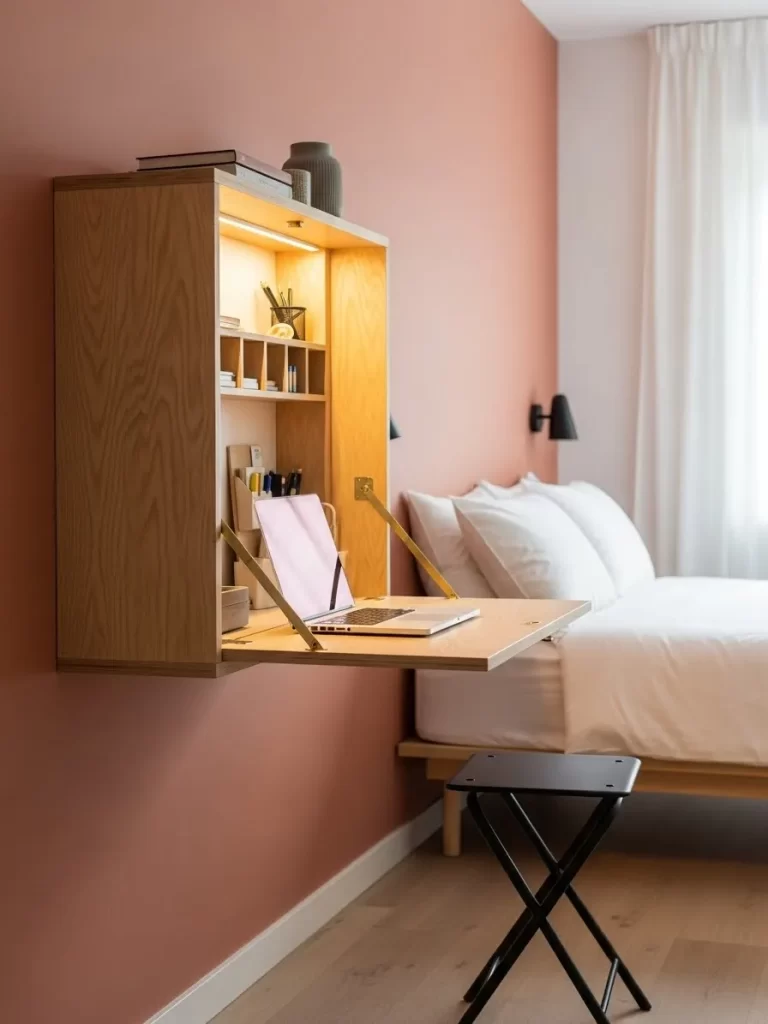
When floor space is at a premium, a desk that disappears is your best friend. This layout uses a wooden wall cabinet that opens up into a sturdy workspace. When you are finished, you simply fold it back up to regain your walking path.
Small cubbies inside the cabinet hold pens, notebooks, and a laptop. A built in LED light ensures you have plenty of brightness for late night tasks. The warm wood tone against a terracotta wall creates a cozy and inviting atmosphere.
A small folding stool can be tucked under the bed when the desk is closed. This setup allows you to have a productive office during the day and a relaxing bedroom at night. It is a smart solution for multi functional living in a tiny studio.
Material Required List
- Fold down desk cabinet kit
- Heavy duty wall anchors
- Small LED strip light
- Wood finish or paint
- Magnetic door catch
Equipment Required List
- Power drill
- Level tool
- Screwdriver
- Measuring tape
- Pencil
DIY Instruction Step by Step
- Find a clear section of wall that has enough space for the desk to fold down completely.
- Use a pencil to mark the height of the desk, typically around 30 inches from the floor.
- Locate the wall studs and mark them for a secure mounting point.
- Hold the cabinet against the wall and use your level tool to ensure it is straight.
- Drill pilot holes into the studs and screw the cabinet firmly into place.
- Attach the internal LED strip light to the top shelf of the cabinet.
- Check the folding mechanism to ensure the desk stays level when it is open.
- Add a magnetic catch at the top so the desk does not fall open unexpectedly.
- Organize your supplies in the small cubbies and enjoy your hidden office.
17 Low Profile Bed with Symmetrical Wall Sconces
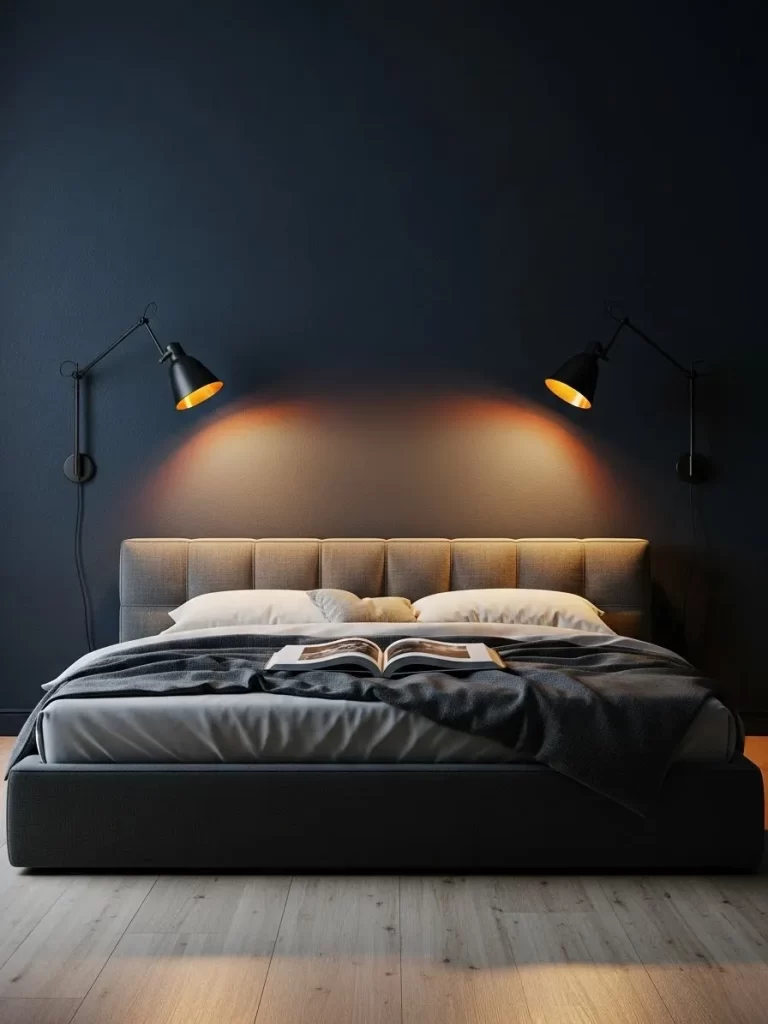
Keeping your furniture low to the ground is a simple way to make a room feel bigger. This layout uses a platform bed with a soft grey headboard that sits quite low. Two long arm black sconces are mounted to the wall to replace bulky bedside lamps.
The dark navy wall creates a deep background that makes the bed look like it is floating. Symmetrical lighting provides a sense of balance and order, which is very calming in a small space. The warm light from the brass lined shades creates a cozy glow for reading.
By mounting the lights on the wall, you free up the surface of your nightstands for books or plants. This keeps the bedside area looking clean and uncluttered. It is a timeless design that works in almost any small bedroom.
Material Required List
- Two long arm wall sconces
- Low profile bed frame
- Dark navy wall paint
- Bedside tables
- Lightbulbs
Equipment Required List
- Paint roller and tray
- Power drill
- Level tool
- Measuring tape
- Screwdriver
DIY Instruction Step by Step
- Paint your feature wall a deep navy color and let it dry for at least 24 hours.
- Position your bed in the center of the wall to determine where the lights should go.
- Mark two spots on the wall, about 18 inches above the mattress and 10 inches from the headboard.
- Ensure both marks are at the exact same height using your level tool.
- Drill holes and install the mounting brackets for the sconces.
- Connect the wiring if they are hardwired, or simply plug them into the nearest outlet.
- Secure the sconces to the brackets and tighten the screws.
- Adjust the long arms so the light points toward the center of the bed.
- Place your low nightstands under the lights to finish the balanced look.
18 Hydraulic Lift Storage Bed
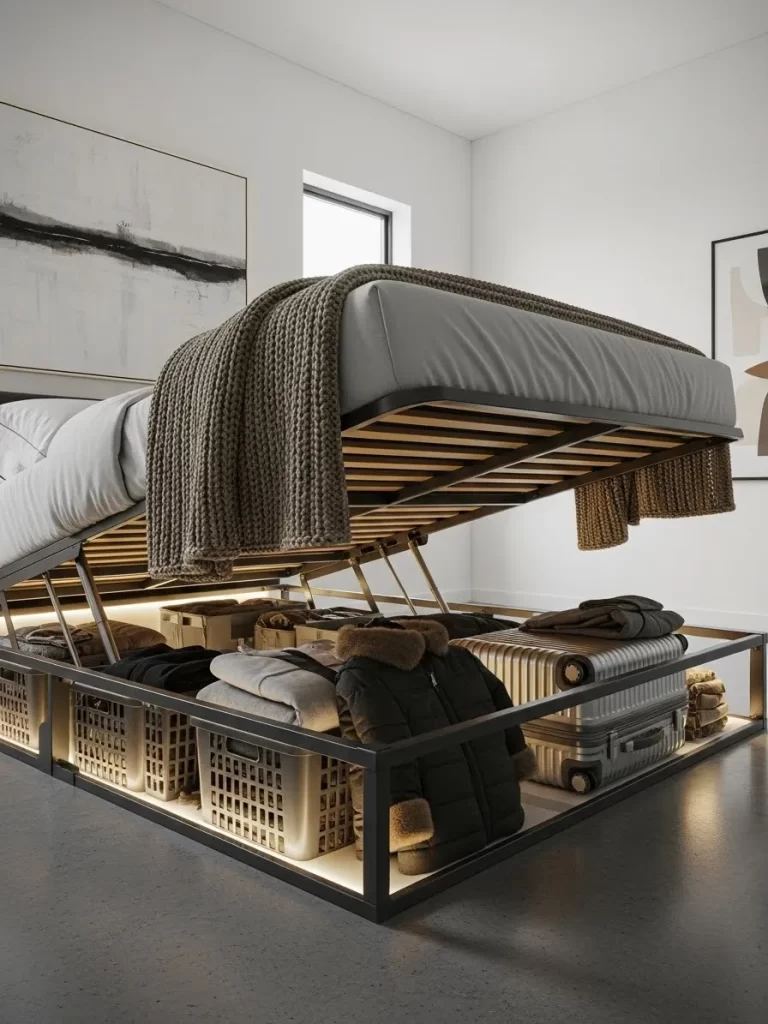
If you have a lot of large items like suitcases or winter blankets, a lift bed is the best solution. This layout features a bed frame with a hydraulic mechanism that lifts the entire mattress. It reveals a massive hidden compartment that covers the entire footprint of the bed.
The base of the bed is built with a sturdy metal frame and integrated LED lighting. This light makes it easy to find things in the dark and adds a modern touch to the floor. It is like having a horizontal closet right under where you sleep.
Large plastic bins can be used inside the storage area to keep things organized. This setup allows you to remove large dressers from the room entirely. It is the most efficient way to use every square inch of floor space.
Material Required List
- Hydraulic bed lift kit
- Metal bed frame base
- Plywood for the storage floor
- LED light strips
- Heavy duty mattress
Equipment Required List
- Socket wrench set
- Power drill
- Screwdriver
- Level tool
- Safety gloves
DIY Instruction Step by Step
- Clear the entire bedroom floor and lay out the pieces of the metal bed frame.
- Bolt the main frame together using a socket wrench according to the manual.
- Attach the hydraulic pistons to the side rails and the lifting top frame.
- Test the lift mechanism a few times to ensure it moves smoothly and stays open.
- Screw the plywood sheets into the bottom of the frame to create a solid floor.
- Install the LED light strips around the inner perimeter of the base.
- Place the mattress on top of the lifting frame.
- Lift the bed and place your suitcases, bins, and extra bedding inside.
- Close the bed and enjoy a room that looks clean and feels organized.
19 Floating Corner Vanity with Trifold Mirror
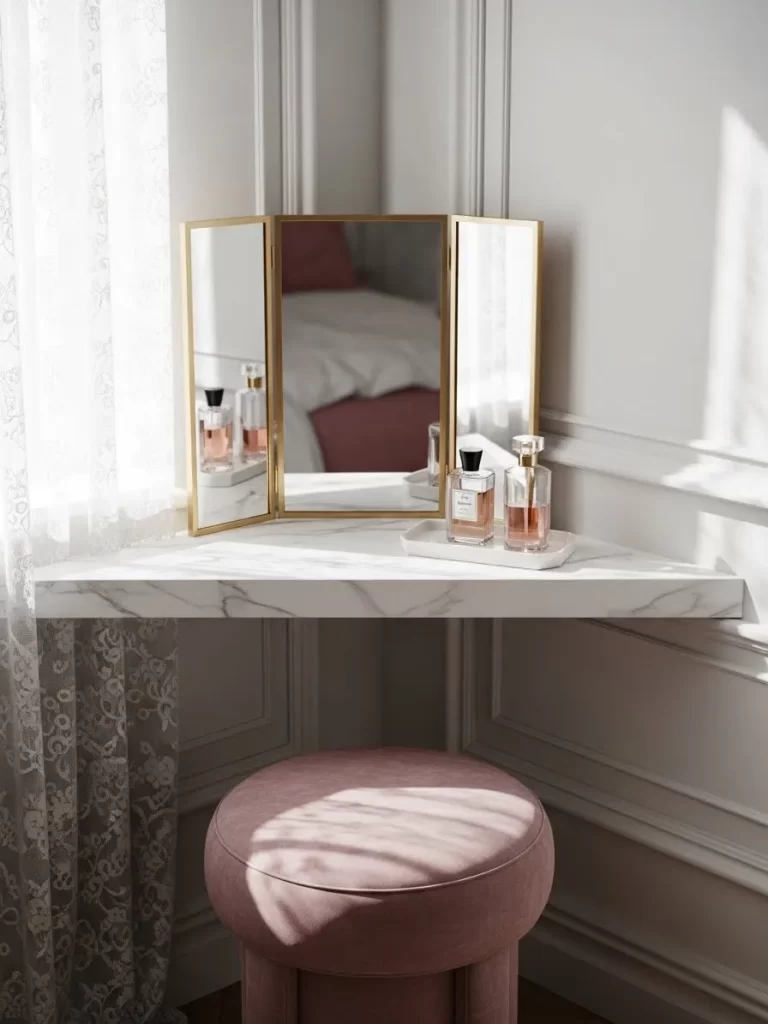
Every corner in a small room is an opportunity for a functional zone. This layout uses a triangular marble shelf mounted in a corner to create a compact vanity. A gold trifold mirror sits on top to reflect light and make the corner look deeper.
A soft pink velvet stool can be tucked completely under the shelf when you are not using it. This keeps the walkway open and adds a touch of glamor to the bedroom. The marble texture and gold accents make the small space feel like a high end boutique.
Placing the vanity near a window ensures you have the best natural light for getting ready. It is a way to have a dedicated beauty spot without taking up a whole wall. This design turns an awkward corner into a stylish focal point.
Material Required List
- Triangular marble shelf
- Trifold vanity mirror
- Heavy duty corner brackets
- Velvet vanity stool
- Wall anchors and screws
Equipment Required List
- Power drill
- Level tool
- Measuring tape
- Pencil
- Screwdriver
DIY Instruction Step by Step
- Measure the corner to determine the size of the triangular shelf you need.
- Mark the height for the shelf, usually around 30 inches from the floor.
- Use your level tool to ensure the marks on both walls are even.
- Drill holes into the walls and secure the heavy duty brackets with anchors.
- Place the triangular shelf on the brackets and screw it in place from underneath.
- Set your trifold mirror in the center of the shelf.
- Adjust the side panels of the mirror to catch the most light from the window.
- Slide your velvet stool under the shelf to check the legroom.
- Add a tray for your perfumes and brushes to keep the surface tidy.
20 Giant Pegboard Organization Wall
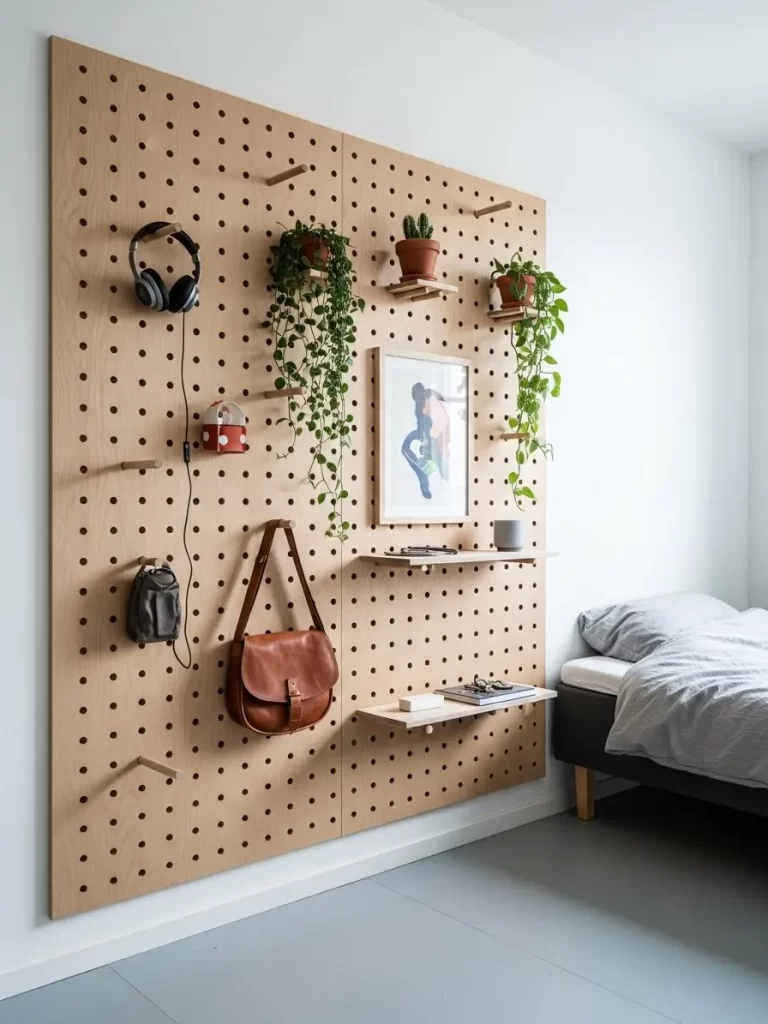
When you cannot expand the floor, you must expand the walls. This layout features a massive wooden pegboard that covers almost an entire wall next to the bed. It uses movable pegs and small shelves to hold everything from headphones to potted plants.
The light wood texture adds warmth and a modern Scandinavian feel to the room. You can change the layout of the shelves whenever you want without drilling new holes. This makes it a storage system for a small, ever changing bedroom.
A leather bag and framed art can hang directly on the pegs to act as decor. This setup keeps all your daily items off the floor and within easy reach. It is a fun and functional way to display your favorite things while staying organized.
Material Required List
- Large plywood pegboard panels
- Wooden pegs
- Small matching wooden shelves
- Wall mounting spacers
- Heavy duty screws
Equipment Required List
- Power drill
- Level tool
- Stud finder
- Measuring tape
- Pencil
DIY Instruction Step by Step
- Choose a wall that is clear of furniture and measure the area for the pegboard.
- Use a stud finder to locate the beams in the wall for the strongest mount.
- Mark the corners of where the pegboard panels will sit.
- Install wall spacers behind the board so there is room for the pegs to go through.
- Screw the pegboard panels into the wall studs using heavy duty screws.
- Use your level tool to make sure the board is not tilted.
- Push the wooden pegs into the holes in any pattern that you like.
- Rest the small wooden shelves on top of two or more pegs to create platforms.
- Hang your bags, hats, and plants to clear up your floor and desk space.
21 Oversized Leaner Mirror
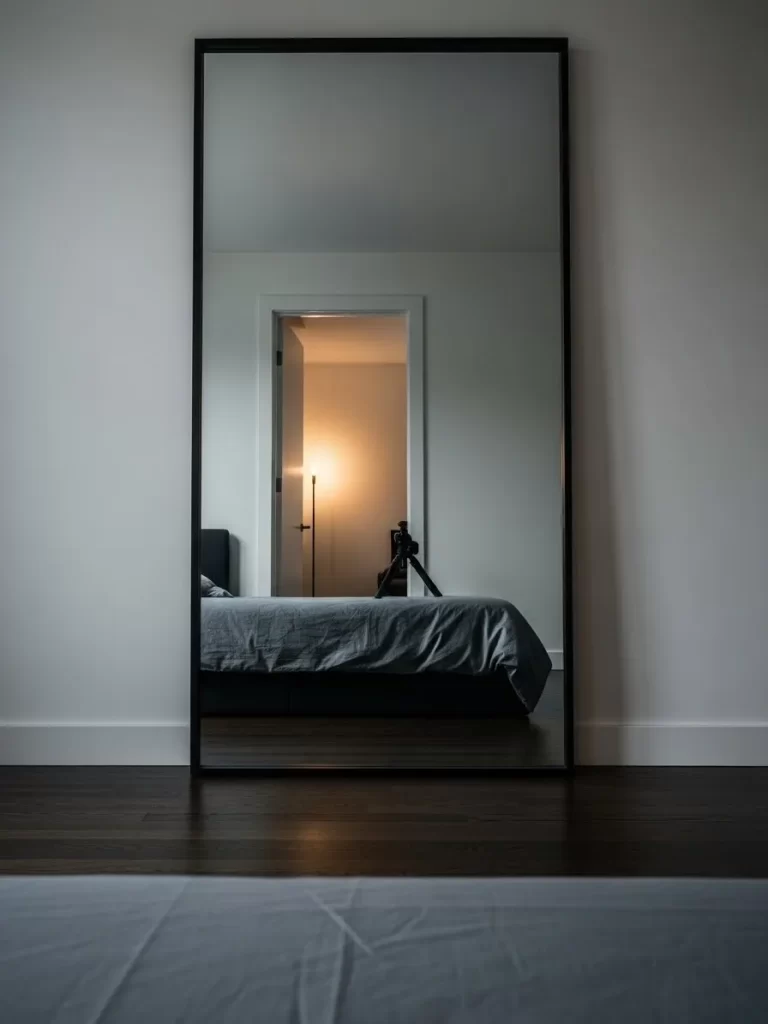
Floor space is limited, but a large mirror can make a room feel twice as deep. This layout uses a massive rectangular mirror with a thin black frame that leans against the wall. It reflects the entire bed and doorway, creating a sense of infinite space.
The reflection of light from the hallway makes the dark hardwood floors look brighter. Placing the mirror directly across from a light source helps distribute brightness into every corner. It is a simple piece of decor that acts as an extra window for the room.
The minimalist frame ensures the mirror does not feel heavy or intrusive. It provides a spot to check your outfit while keeping the walls clean of multiple small frames. This trick is a favorite for designers working in narrow urban bedrooms.
Material Required List
- Large floor mirror (at least 6 feet tall)
- Anti skid floor pads
- Wall safety tether kit
- Glass cleaner
Equipment Required List
- Power drill
- Measuring tape
- Level tool
- Screwdriver
DIY Instruction Step by Step
- Choose a wall that faces a doorway or a window to maximize the reflection.
- Clean the floor area to remove any grit that might scratch the mirror frame.
- Attach anti skid rubber pads to the bottom of the mirror frame.
- Lean the mirror against the wall at a slight angle for stability.
- Use a level tool to ensure the mirror is not tilted to one side.
- Locate a wall stud behind the top center of the mirror.
- Install the wall safety tether according to the kit instructions to prevent tipping.
- Wipe the glass surface with a specialized cleaner and a soft cloth.
- Ensure the mirror is not blocking the path of the door as it opens.
22 Reflective High Gloss Ceiling
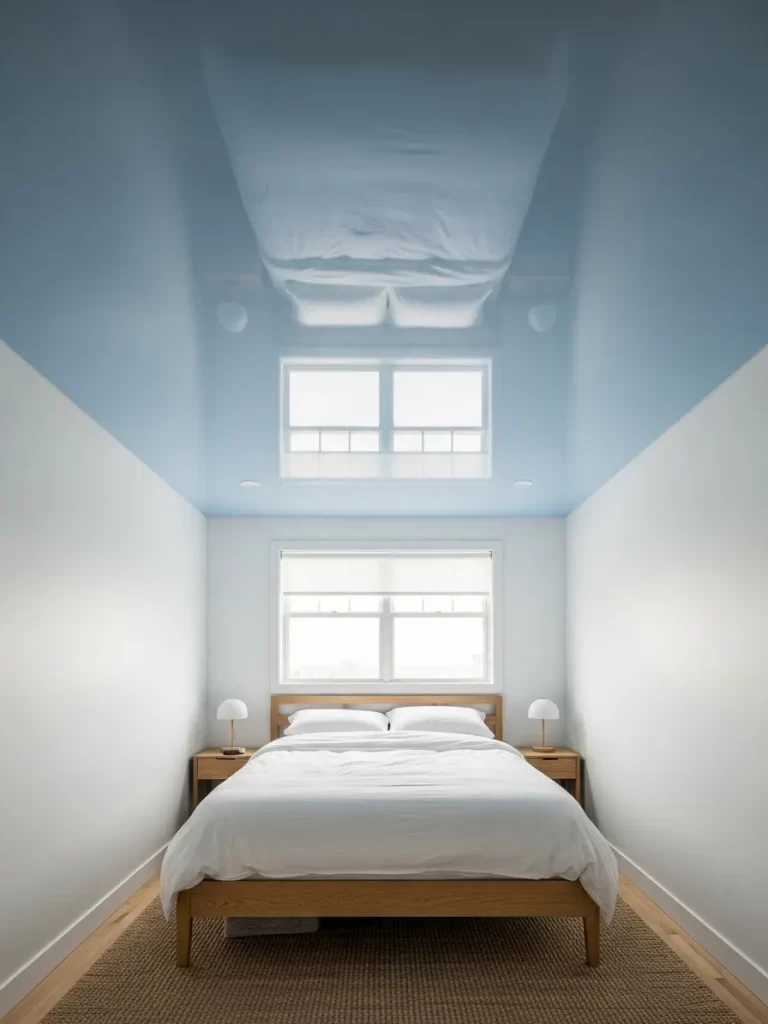
Ceilings are often the forgotten fifth wall in a bedroom. This layout features a high gloss blue finish on the ceiling that reflects the room like a quiet lake. It makes the ceiling appear much higher and adds a cool, calming energy to the space.
The white walls and light wood furniture keep the focus on the overhead color. This design allows natural light from the window to bounce down onto the bed, keeping things bright. It is a bold choice that makes a standard boxy room feel like a custom designed suite.
Small bedside lamps provide a warm glow that reflects beautifully off the glossy surface at night. This setup creates a soft ambient light that is very relaxing for sleep. It is an effective way to add character without taking up an inch of floor space.
Material Required List
- High gloss ceiling paint or stretch ceiling film
- Painter’s tape
- Plastic drop cloths
- Fine grit sandpaper
- Ceiling primer
Equipment Required List
- Paint roller with an extension pole
- Step ladder
- Paint tray
- Sandpaper block
- Dust mask
DIY Instruction Step by Step
- Remove all furniture from the room or cover it completely with plastic drop cloths.
- Sand the ceiling surface to remove any bumps or old texture.
- Wipe away the dust with a damp cloth and let the surface dry.
- Apply a high quality primer to ensure the gloss paint sticks evenly.
- Use painter’s tape to protect the tops of the white walls.
- Mix the high gloss paint thoroughly before pouring it into the tray.
- Roll the paint onto the ceiling in long, steady strokes to avoid visible lines.
- Apply a second coat after the first one has dried completely for a deep shine.
- Remove the tape carefully while the paint is still slightly tacky for a clean edge.
23 Built-in Halo Nightlight Nook
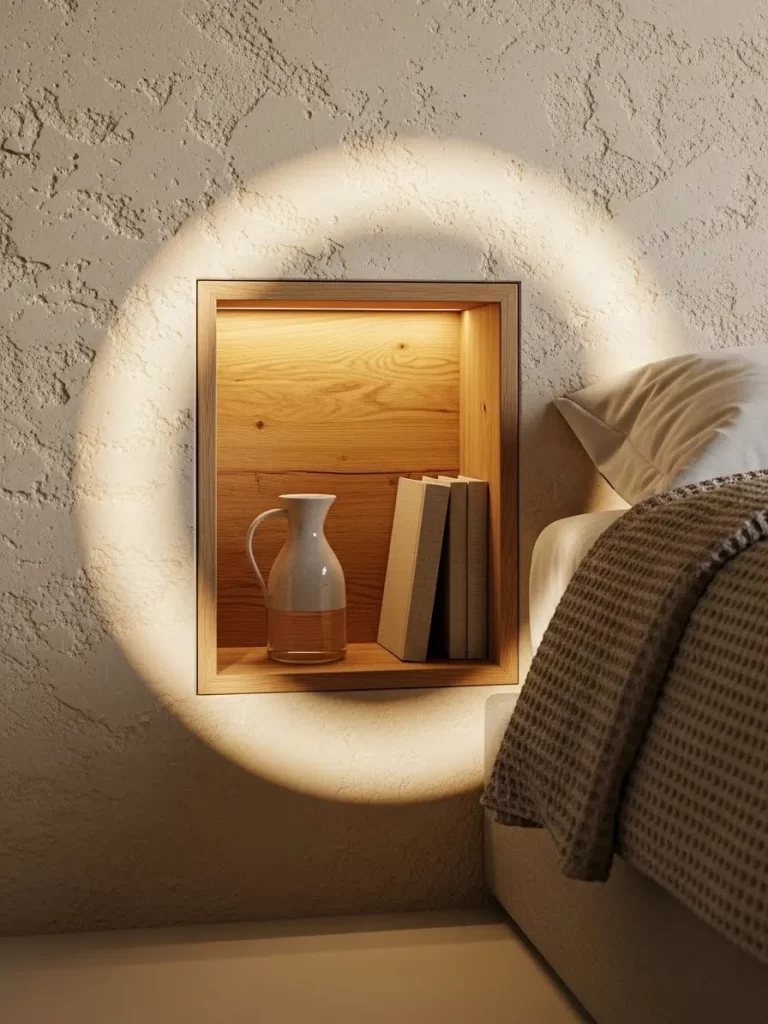
Lamps can clutter a nightstand, but this layout builds the light directly into the wall. A small square niche is carved into the plaster and lined with warm wood. A hidden LED strip inside creates a soft halo effect that glows onto the textured wall.
This nook is for a glass of water, a phone, or a few favorite books. It keeps the area around the bed completely clear of cords and bulky furniture. The warm light makes the rough texture of the wall look cozy and inviting.
Using a recessed light prevents glare when you are trying to sleep. It provides just enough brightness to find your way without waking up a partner. This design turns a functional light source into a beautiful piece of architectural art.
Material Required List
- Wooden niche box insert
- Battery operated LED light strip
- Adhesive for the wood insert
- Texture paint or plaster
- Small decor items
Equipment Required List
- Drywall saw
- Level tool
- Measuring tape
- Pencil
- Caulking gun
DIY Instruction Step by Step
- Mark a square on the wall at the height of your mattress using a pencil and level.
- Cut a hole into the drywall carefully using a drywall saw.
- Check for any wires or pipes inside the wall before proceeding.
- Apply adhesive to the outside of the wooden niche box insert.
- Push the box into the hole until it is flush with the wall surface.
- Apply a small bead of caulk around the edges to seal any gaps.
- Stick the LED light strip to the inner top edge of the wooden box.
- Touch up the surrounding wall with texture paint to match the rest of the room.
- Place your water carafe or books inside the new glowing nook.
24 Cantilevered Marble Bedside Shelf
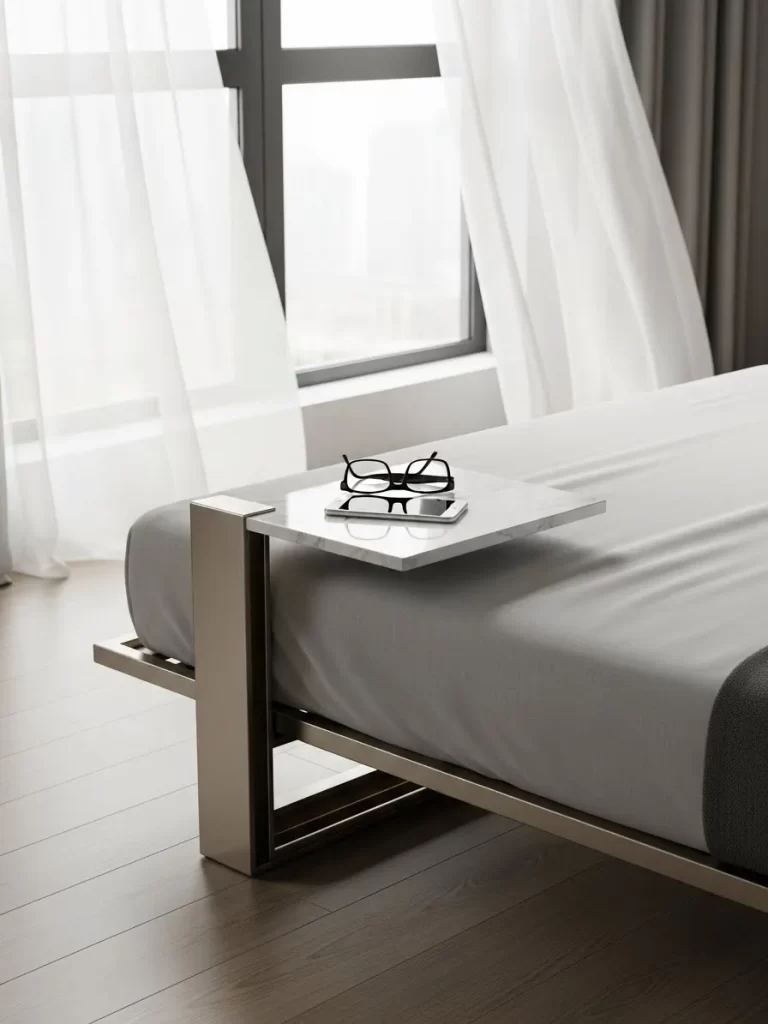
Heavy nightstands can make a narrow bedroom feel like a hallway. This layout uses a cantilevered marble slab that attaches directly to the metal bed frame. It provides a sturdy surface for glasses and a phone while staying completely off the floor.
The marble adds a touch of luxury and weight without the visual bulk of a cabinet. This allows the flooring to run all the way to the wall, making the room look wider. The thin metal frame of the bed keeps the overall look minimalist and modern.
White sheer curtains in the background let in soft light that makes the marble shine. It is a smart way to add a premium material to a small space without it being overwhelming. This design is excellent for those who love clean lines and high end finishes.
Material Required List
- Small marble slab (pre-cut)
- Metal L brackets (matching bed frame color)
- Epoxy adhesive
- Industrial strength screws
- Clear bumpers
Equipment Required List
- Power drill
- Measuring tape
- Screwdriver
- Level tool
- Clamps
DIY Instruction Step by Step
- Measure the height of your bed frame to decide where the shelf should sit.
- Clean the bottom of the marble slab to ensure the glue sticks well.
- Attach the metal brackets to the side of the bed frame using industrial screws.
- Apply a thick layer of epoxy adhesive to the top of the brackets.
- Place the marble slab onto the brackets and use clamps to hold it in place.
- Wait for the epoxy to cure fully based on the package instructions.
- Check that the shelf is level and does not move when weight is applied.
- Add small clear bumpers to the corners of the marble to prevent any scratches.
- Use the shelf for your morning coffee or essential nighttime items.
25 Integrated Bed and Wardrobe Nook
Placing a bed against a window can be tricky, but this layout makes it look intentional. A tall, floor to ceiling wardrobe sits right next to the bed, creating a cozy corner. The dark grey color scheme makes the storage unit blend into the shadows, so it does not feel large.
A small wall mounted lamp provides light for reading without taking up any space on the radiator cover. The vertical lines of the wardrobe door draw the eye up, emphasizing the height of the room. This arrangement leaves the center of the floor open for moving around easily.
The light from the window hits the bed directly, making it a bright spot for lounging during the day. Using a monochrome palette for the bedding and curtains keeps the small space looking tidy and unified. It is a professional way to fit a lot of function into a very tight area.
Material Required List
- Tall slim wardrobe unit
- Wall mounted swing arm lamp
- Deep grey paint
- Curtain rod and hardware
- Radiator cover shelf
Equipment Required List
- Power drill
- Level tool
- Paint roller
- Screwdriver
- Stud finder
DIY Instruction Step by Step
- Paint the wardrobe and the surrounding walls the same shade of deep grey.
- Assemble the wardrobe unit and slide it into the corner next to the window.
- Secure the wardrobe to the wall studs to ensure it never tips over.
- Install the swing arm lamp on the wall at a comfortable height above the pillows.
- Mount a slim radiator cover over the heater to create an extra ledge for decor.
- Hang a dark curtain rod close to the ceiling to match the room’s color.
- Place the bed frame directly against the radiator cover and wardrobe side.
- Organize your clothes inside the wardrobe to clear away any external racks.
- Add a soft throw blanket to the bed to make the dark nook feel warm and inviting.
26 Natural Wood Blanket Ladder

Throw blankets can quickly become a messy pile in a small room. This layout uses a simple leaning ladder made of light oak to display blankets and plants. It takes up very little floor space while adding a decorative, vertical element to a plain wall.
Small white vases and an ivy plant sit on the top rungs to add a touch of life. The natural wood grain matches the bed frame, creating a cohesive and calm atmosphere. It is a piece of furniture that you can move around whenever you need a change.
The ladder keeps your blankets within reach but off the bed when they are not in use. This makes it easier to keep the room looking tidy and organized. It is an affordable and stylish way to add texture to a minimalist bedroom.
Material Required List
- Two long oak poles (6 feet)
- Four short oak rungs (18 inches)
- Wood glue
- Wood screws
- Clear wax finish
Equipment Required List
- Power drill
- Measuring tape
- Sandpaper
- Level tool
- Paintbrush
DIY Instruction Step by Step
- Sand all the oak pieces until they are smooth and free of splinters.
- Mark four even spots along both long poles for the rungs to be attached.
- Drill pilot holes into the poles and the ends of each rung.
- Apply a small amount of wood glue to the ends of the rungs.
- Screw the rungs into the poles to create the ladder shape.
- Ensure the ladder is level so it does not wobble when leaning.
- Apply a clear wax finish to protect the wood and let it dry.
- Lean the ladder against a clear section of wall near your bed.
- Drape your favorite blankets over the lower rungs and place a small plant on top.
27 Textured Bouclé Bed Bench
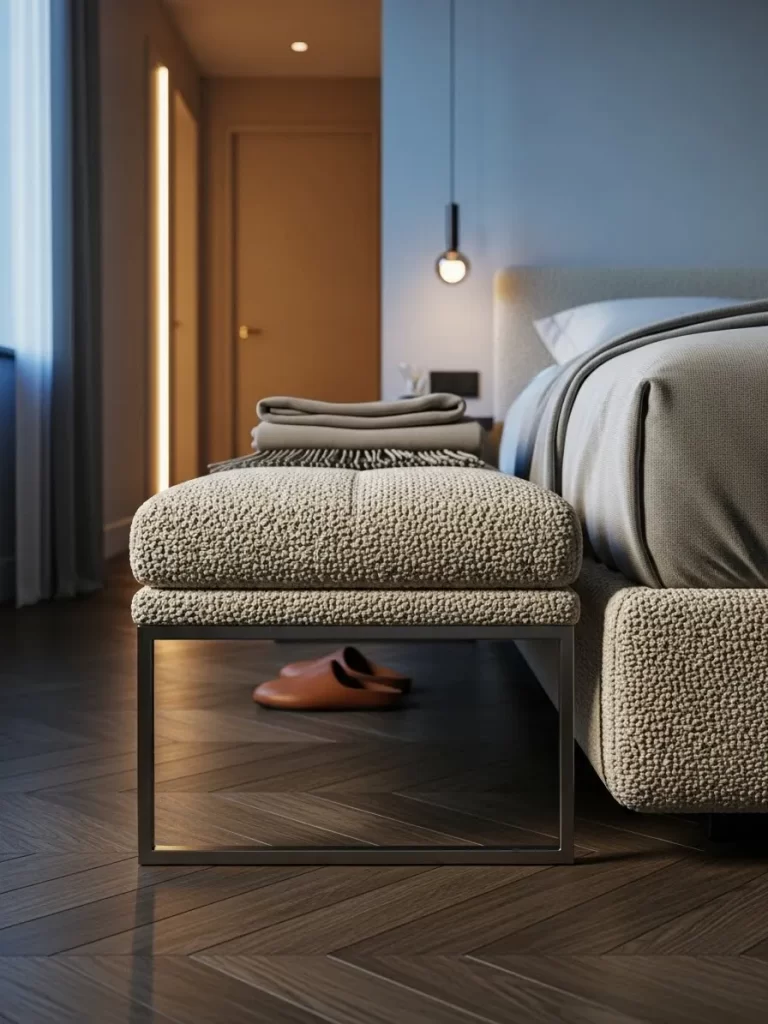
Adding a bench to the end of a bed provides a spot for shoes and bags without cluttering the floor. This layout features a slim metal frame bench with a soft, textured bouclé cushion. The low profile design ensures it does not block the view of the room or the bed.
The thin legs of the bench allow you to see the floor underneath, which maintains a sense of openness. It matches the neutral tones of the bedding and walls for a clean, professional look. Using a bench helps define the “sleeping zone” and keeps daily items organized.
Warm lighting from a pendant lamp reflects off the floor, making the texture of the fabric pop. This piece adds a layer of comfort and style that makes a small room feel like a luxury hotel. It is a functional addition that provides extra seating when needed.
Material Required List
- Metal bench frame
- Bouclé fabric
- High density foam
- Plywood base
- Staples
Equipment Required List
- Staple gun
- Measuring tape
- Scissors
- Screwdriver
- Hammer
DIY Instruction Step by Step
- Measure the width of your bed to ensure the bench frame is slightly narrower.
- Cut a piece of plywood to fit the top of the metal frame exactly.
- Place the foam on the plywood and wrap the bouclé fabric over the top.
- Pull the fabric tight and staple it to the underside of the plywood.
- Hammer down any staples that are not flush with the wood.
- Screw the upholstered top onto the metal bench frame.
- Check that all the legs are even and the bench does not wobble.
- Place the bench at the foot of your bed, leaving enough room to walk past.
- Use it to hold extra pillows or your morning robe for easy access.
28 Industrial Wall Mounted Bike Rack
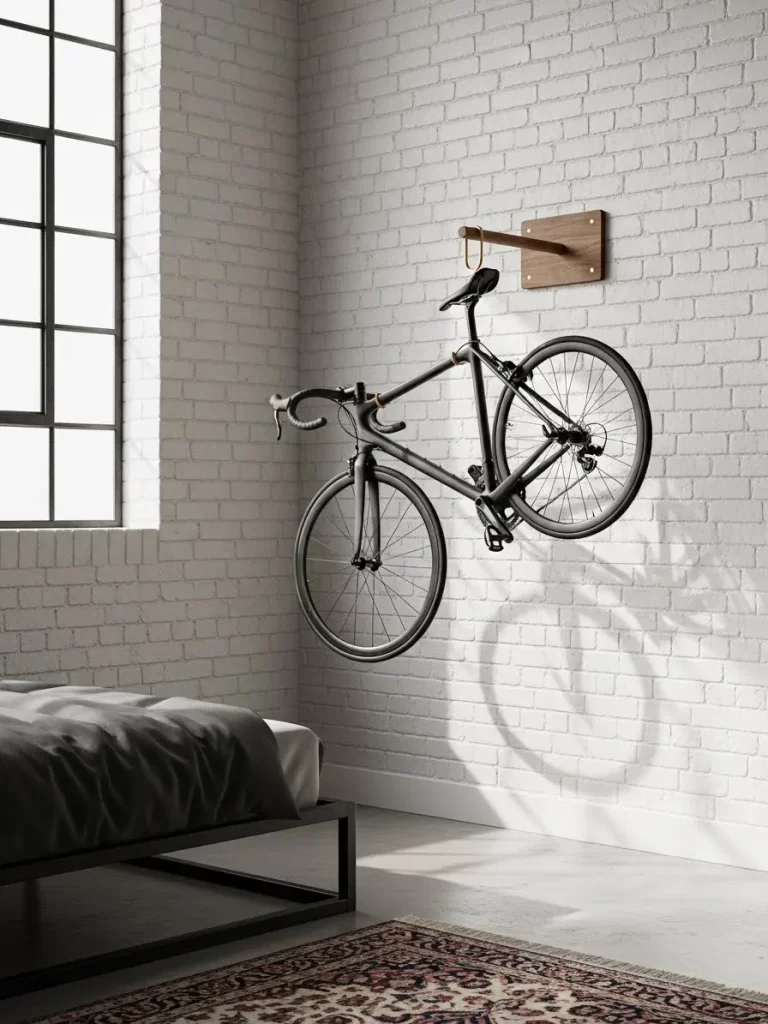
A bicycle can be the biggest obstacle in a small urban bedroom. This layout turns a bike into a piece of wall art by hanging it on a minimalist wooden peg. It keeps the wheels off the ground and frees up an entire corner of floor space.
The white brick wall provides a clean, industrial backdrop for the black bike. This setup is perfect for active people who need to store their gear indoors but want to maintain a tidy room. The rack is simple and sturdy, making it easy to grab your bike and go.
Placing a rug underneath the bike catches any dust or debris from the wheels. It is a creative way to solve a storage problem while adding a personal touch to your decor. This design proves that even a large item can fit into a tiny space if you think vertically.
Material Required List
- Heavy duty wooden bike peg
- Extra long wall screws
- Heavy duty wall anchors
- A piece of scrap rug or rubber mat
- Clear sealant for the wood
Equipment Required List
- Power drill
- Stud finder
- Level tool
- Measuring tape
- Pencil
DIY Instruction Step by Step
- Measure the height and length of your bike to find the best spot on the wall.
- Use a stud finder to locate a solid beam behind the white brick or drywall.
- Mark the height for the peg, ensuring there is enough room for the tires above the floor.
- Drill a deep pilot hole into the wall stud.
- Screw the wooden bike peg into the hole until it is completely firm.
- Use a level to make sure the peg is straight so the bike does not slip.
- Lift your bike and hook the frame onto the peg.
- Place a small rug on the floor directly under where the wheels hang.
- Ensure the bike is not blocking any walkways or hitting the bed.
29 Triple Tier Floating Photo Ledge
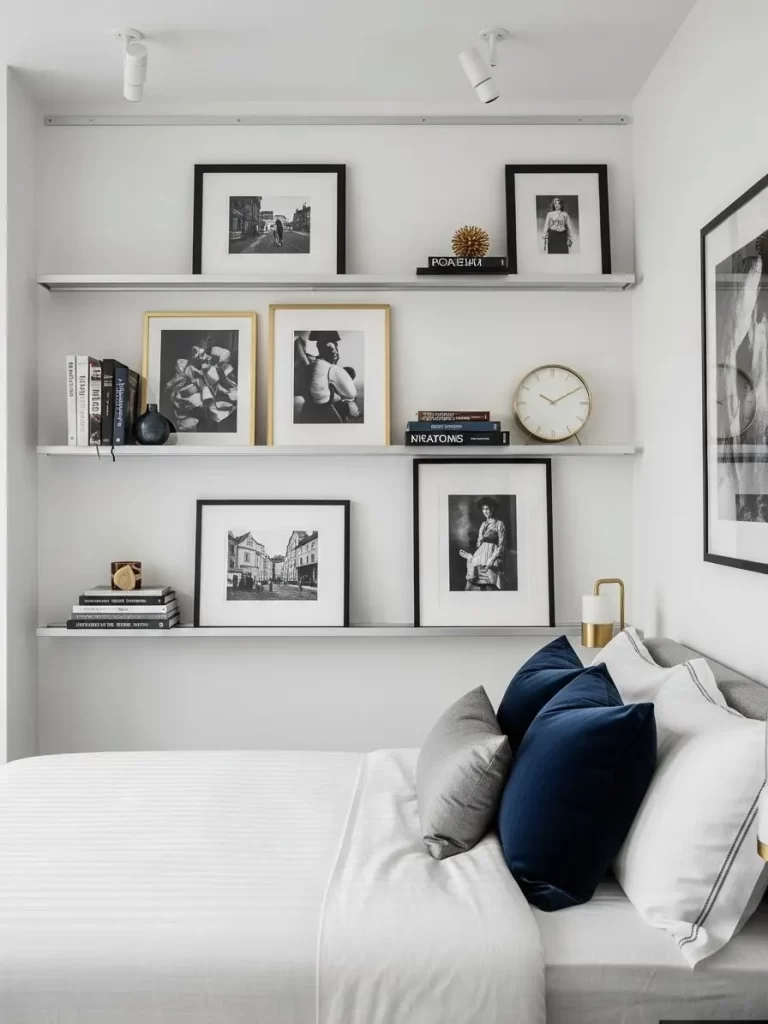
Standard picture frames can feel cluttered on a small bedside table. This layout uses three long, white floating ledges to display art and books above the headboard. It creates a gallery wall that you can change and rearrange without making new holes.
The mix of black and gold frames adds a sophisticated touch to the white walls. Small objects like a gold clock and books provide extra height and variety to the display. This design draws the eye upward and makes the wall feel more dynamic and interesting.
Using white shelves on a white wall makes the ledges almost invisible. This allows the artwork to stand out and feel like it is floating in the air. It is an easy way to personalize your room while keeping the floor and tables clear.
Material Required List
- Three white floating shelves (3 feet each)
- Wall mounting screws
- Selection of framed photos
- Small decorative clock
- Books
Equipment Required List
- Power drill
- Level tool
- Measuring tape
- Pencil
- Screwdriver
DIY Instruction Step by Step
- Decide on the spacing between the shelves, usually about 12 to 15 inches apart.
- Mark the position for the bottom shelf using a pencil and level.
- Drill holes into the wall and install the mounting brackets for the first shelf.
- Slide the white shelf onto the brackets and check that it is level.
- Repeat this process for the middle and top shelves, keeping them perfectly aligned.
- Lean your largest framed photos against the back of the ledges.
- Layer smaller frames in front of the larger ones for a professional look.
- Add your clock and a few books to fill in the gaps.
- Step back and adjust the spacing of the items until the wall looks balanced.
30 Full Wall Perimeter Curtains
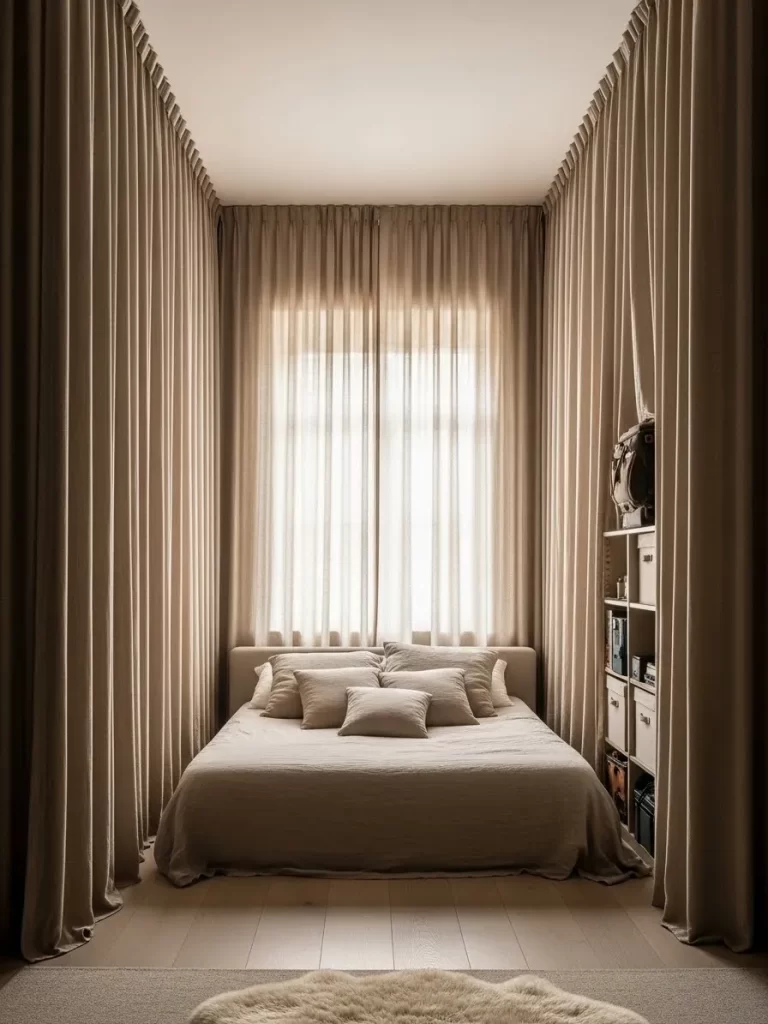
Small rooms often have uneven walls or awkward windows that make the space feel chopped up. This layout uses soft, neutral curtains to cover almost the entire wall perimeter. It creates a smooth, continuous backdrop that makes the room feel like a soft and cozy cocoon.
The vertical folds of the fabric add height to the room while hiding any storage or messy corners. This design is excellent for creating a peaceful and quiet environment for sleeping. Light still filters through the window, but the edges are softened by the fabric.
A small sheepskin rug on the floor adds another layer of comfort and warmth. This setup turns a plain room into a high end sanctuary that feels much larger and more unified. It is a simple fabric trick that completely transforms the atmosphere.
Material Required List
- Multiple sheer or linen curtain panels
- Wall to wall ceiling track
- Ceiling mounting screws
- Curtain hooks
- Sheepskin rug
Equipment Required List
- Power drill
- Step ladder
- Measuring tape
- Level tool
- Screwdriver
DIY Instruction Step by Step
- Measure the total length of the walls you want to cover with curtains.
- Install a curtain track directly into the ceiling, following the edge of the walls.
- Ensure the track is secure by using ceiling anchors if you are not hitting joists.
- Attach the hooks to the top of your fabric panels at even intervals.
- Slide the hooks into the ceiling track and pull the curtains across the wall.
- Adjust the panels so the fabric gathers evenly and looks like a solid wall.
- Tuck any storage bins or bookshelves behind the fabric to hide them from view.
- Place a soft rug at the foot of the bed to complete the cozy look.
- Enjoy the quiet and soft feeling of your new fabric lined bedroom.
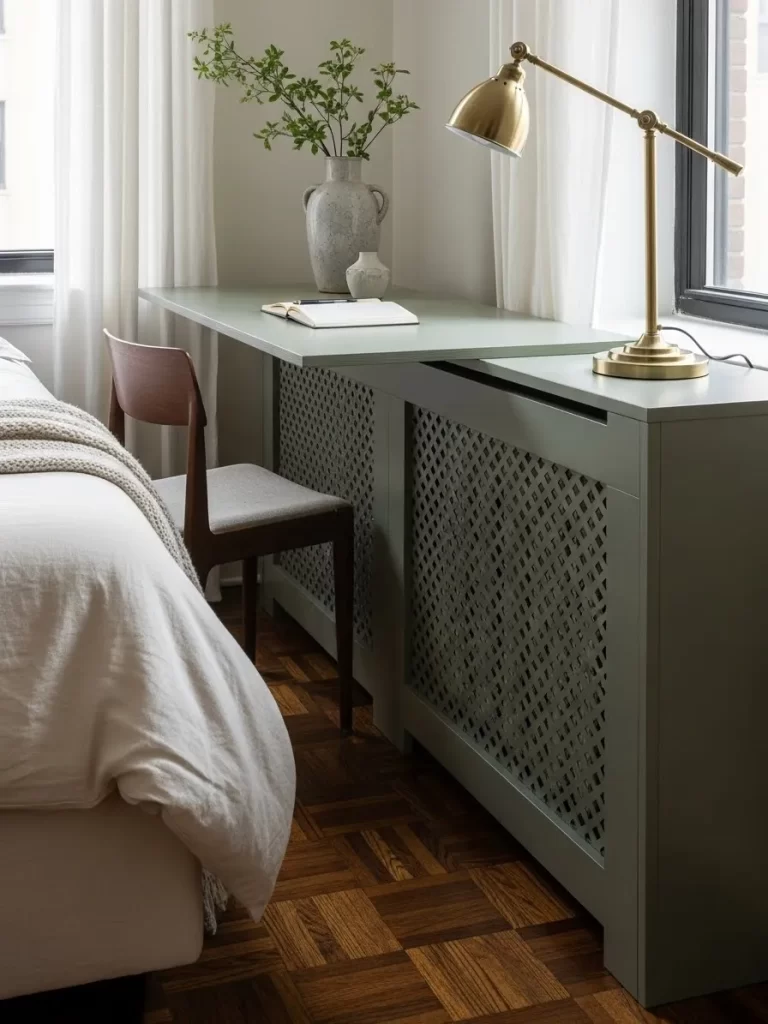
31 Sliding Desk Over Radiator
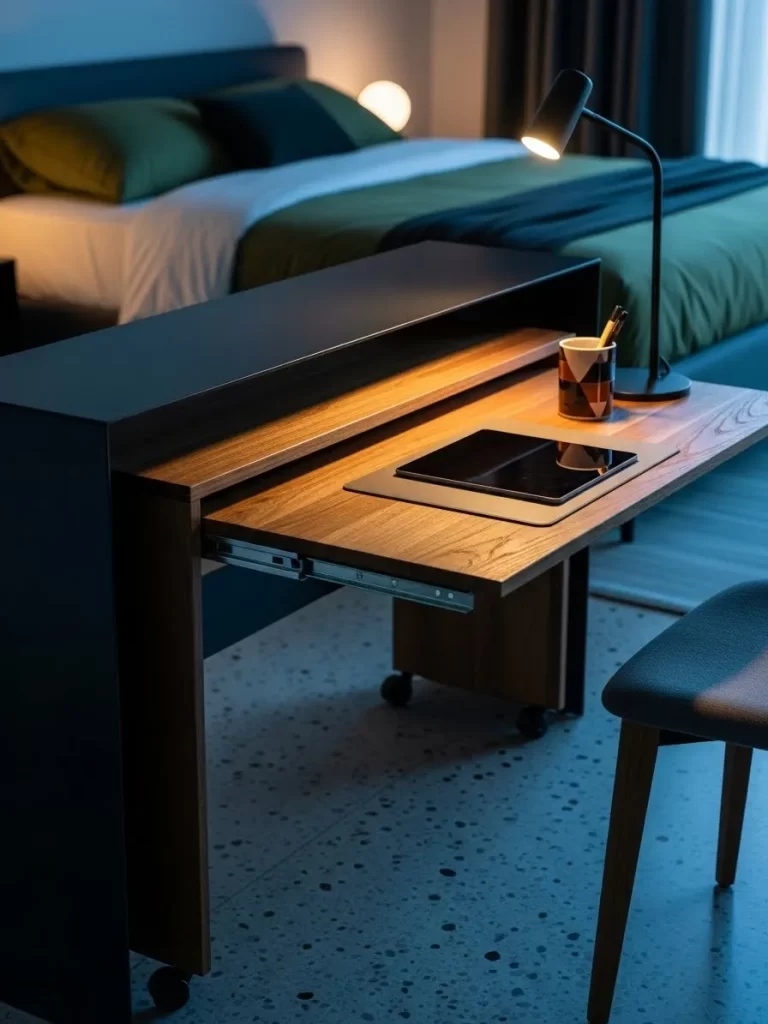
Awkward radiator placement often leaves gaps in small bedrooms that are hard to fill. This layout solves that problem by installing a custom sliding desk that glides over the heater. When you need to work, you simply pull the surface toward you to create a deep and stable workspace.
The desk is finished in a soft sage green that matches the radiator cover for a seamless look. Using a lattice pattern on the heater cover allows warmth to circulate while providing a clean and professional appearance. This design turns a heating fixture into a dual purpose piece of furniture.
A vintage style brass lamp and a simple wooden chair add a touch of warmth and character. This setup keeps the desk surface flush with the wall when not in use, which maintains a clear path around the bed. It is a smart way to add an office without taking up any permanent floor area.
Material Required List
- Custom wooden desk top
- Radiator cover with lattice front
- Heavy duty drawer slides
- Sage green wood paint
- Brass desk lamp
Equipment Required List
- Power drill
- Level tool
- Measuring tape
- Screwdriver
- Paintbrush
DIY Instruction Step by Step
- Measure the height and width of your radiator to ensure the cover will fit with enough clearance.
- Build or buy a radiator cover and paint it in your chosen sage green shade.
- Install the radiator cover over the heater and secure it to the wall using small brackets.
- Attach one side of the heavy duty drawer slides to the top edges of the radiator cover.
- Mount the matching side of the slides to the underside of your wooden desk top.
- Slide the desk top onto the cover rails and check that it moves smoothly without catching.
- Paint the desk top the same sage green to create a unified and built-in appearance.
- Place your brass lamp and a notebook on the surface to complete the workspace.
- Ensure the sliding mechanism is locked or stable when fully extended for a safe work experience.
32 Vintage Mid-Century Dresser

Floating storage is great, but a classic piece of furniture can add a lot of soul to a small room. This layout uses a mid-century modern wooden dresser placed right next to the bed. The warm cherry wood tones provide a beautiful contrast against the crisp white linens.
The tapered legs of the dresser create a sense of lightness by showing more of the hardwood floor. This prevents the furniture from looking like a heavy block in a cramped corner. Using brass knobs adds a touch of shine that catches the natural morning light.
A yellow accent pillow on the bed ties in with the golden tones of the wood grain. This setup provides plenty of drawer space for clothes while doubling as a large and sturdy nightstand. It is a timeless choice that combines essential storage with high end style.
Material Required List
- Mid-century wooden dresser
- Brass drawer knobs
- Wood polish
- Yellow accent pillow
- White waffle knit bedding
Equipment Required List
- Measuring tape
- Screwdriver
- Microfiber cloth
DIY Instruction Step by Step
- Measure the space between your bed and the wall to ensure the dresser fits comfortably.
- Clean the wooden surface of the dresser with a soft cloth to remove any dust.
- Apply a high quality wood polish to enhance the natural grain and protect the finish.
- Replace any old or broken hardware with modern brass knobs for a fresh look.
- Position the dresser next to the bed, leaving enough room for the drawers to open fully.
- Ensure the dresser is level on the floor by adjusting the feet or using small shims.
- Organize your folded clothes in the drawers to keep the rest of the room tidy.
- Place a small lamp or a book on top to make the dresser feel integrated into the sleep area.
- Add a bright yellow pillow to the bed to draw the eye and balance the warm wood tones.
33 Curvature and Soft Ambient Glow
Hard angles can make a small room feel restrictive and boxy. This layout uses a curved wall and a round nightstand to soften the flow of the bedroom. A low profile bed with rounded edges matches the architecture, making the whole space feel more organic.
Hidden LED strips along the top of the curved wall provide a soft, warm glow that bounces off the ceiling. This indirect lighting creates a peaceful atmosphere and eliminates the need for harsh overhead fixtures. A single orb pendant light hangs over the nightstand to provide focused light for reading.
The neutral beige and cream palette keeps the room looking bright and spacious. Using different textures, like a thick woven rug and smooth matte walls, adds depth without visual clutter. It is a sophisticated design that prioritizes calm and comfort.
Material Required List
- Low profile rounded bed frame
- Circular two drawer nightstand
- Orb pendant light
- LED flex strips
- Large oval woven rug
Equipment Required List
- Power drill
- Level tool
- Measuring tape
- Wire strippers
DIY Instruction Step by Step
- Paint your walls in a matte cream or beige finish to create a soft and neutral backdrop.
- Install the LED flex strips along the top edge of your wall or inside a recessed ceiling channel.
- Center the rounded bed frame against the main wall to maximize the walking space on both sides.
- Mark the position for your orb pendant light so it hangs directly over the center of the nightstand.
- Secure the pendant light mounting bracket to the ceiling joist for a safe and stable hold.
- Place the circular nightstand next to the bed and organize your nighttime essentials inside.
- Lay down the large oval rug to define the sleeping area and add a layer of soft texture.
- Adjust the height of the pendant light so it sits about 20 inches above the nightstand surface.
- Use a warm temperature bulb in all fixtures to maintain the soft and inviting ambient glow.
34 Lofted Bed with Hidden Sliding Wardrobe
When square footage is extremely limited, building a “room within a room” is a game changer. This layout features a high lofted bed built on a custom wooden platform. Below the sleeping area, a massive sliding wardrobe organizes an entire collection of clothes.
The wardrobe is mounted on heavy duty tracks and pulls out completely to show every hanging item and shelf. Integrated LED strips inside the closet ensure you can see everything clearly even in a dark corner. Wooden stairs with built in drawers lead up to the bed, providing even more storage.
The light natural wood finish keeps the large structure from feeling too heavy in a small space. This design effectively doubles the usable area of the room by stacking sleep and storage vertically. It is the ultimate solution for anyone living in a tiny studio or urban apartment.
Material Required List
- Custom loft bed platform
- Heavy duty sliding wardrobe track
- Internal wardrobe shelving units
- LED closet lighting kit
- Wooden drawer slides for stairs
Equipment Required List
- Power saw
- Power drill
- Level tool
- Measuring tape
- Clamps
DIY Instruction Step by Step
- Design a structural frame for the loft platform that can safely support the weight of a bed and person.
- Secure the main support beams to the wall studs using heavy duty lag bolts.
- Install the sliding track system on the floor and the underside of the bed platform.
- Build the wardrobe unit with a mix of hanging rods and adjustable shelves for maximum flexibility.
- Mount the wardrobe onto the tracks and test that it slides out smoothly and locks in place.
- Assemble the wooden stairs and install large drawers within each step for extra storage.
- Stick the LED lighting strips inside the wardrobe and connect them to a motion sensor switch.
- Add a safety rail to the loft bed area to prevent any accidental falls during the night.
- Finish all wood surfaces with a light sealant to maintain the bright and airy Scandinavian look.
35 Industrial Floating Clothes Rail
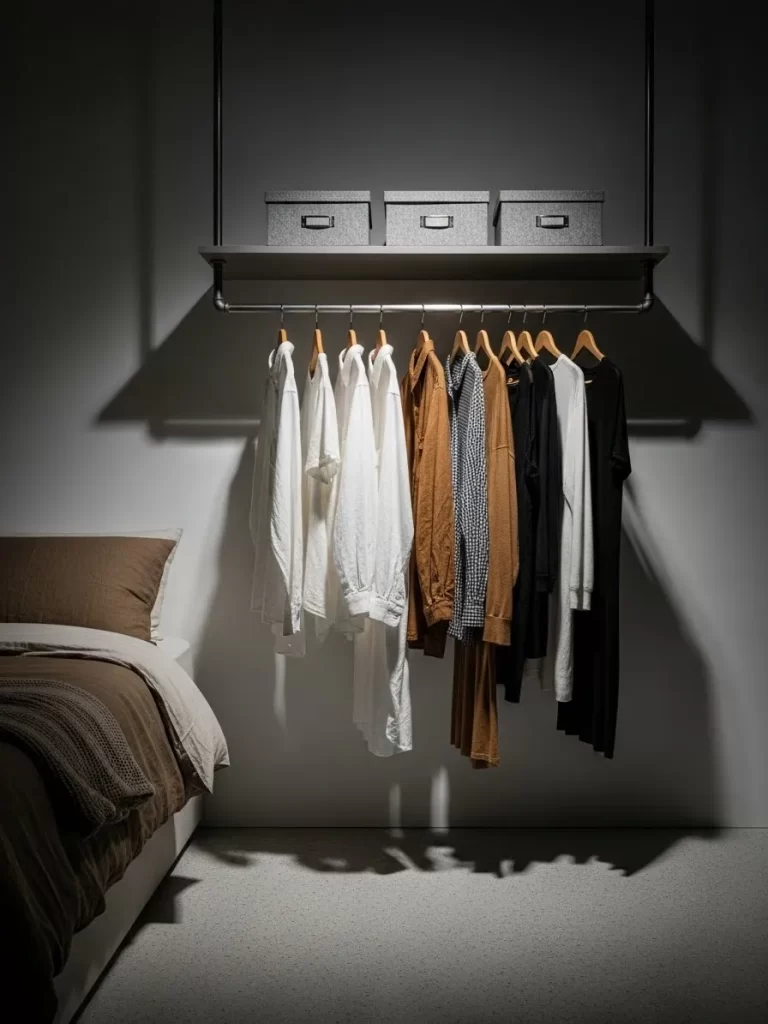
Traditional closets can take up a lot of visual and physical space. This layout replaces a bulky wardrobe with a minimalist floating rail made of black industrial piping. A single grey shelf above the rail provides a spot for storage bins and seasonal items.
This open concept storage keeps your clothes within reach while making the room feel more open. By lifting the rail off the floor, you create space for a laundry basket or shoes underneath. The dark metal and grey tones add a cool, modern edge to a simple white bedroom.
The light from the bedside lamp creates dramatic shadows that emphasize the clean lines of the design. This setup is perfect for someone with a curated wardrobe who wants to showcase their favorite pieces. It is a cost effective and stylish way to manage storage in a tight space.
Material Required List
- Black industrial steel pipes
- Pipe flanges and elbows
- Grey laminated wood shelf
- Heavy duty wall anchors
- Storage bins
Equipment Required List
- Power drill
- Level tool
- Pipe wrench
- Measuring tape
- Pencil
DIY Instruction Step by Step
- Mark the height for your floating rail on the wall, ensuring there is enough room for long coats.
- Assemble the industrial pipes and elbows into a U-shape and tighten them with a pipe wrench.
- Hold the flanges against the wall and mark the screw holes using a pencil.
- Drill holes into the marks and push in heavy duty wall anchors for a secure hold.
- Screw the pipe rail into the wall anchors and check that it is level.
- Install small brackets about 12 inches above the rail to support your storage shelf.
- Secure the grey shelf to the brackets and place your storage bins on top.
- Hang your clothes on matching wooden hangers to keep the open closet looking organized.
- Wipe down the metal pipes with a damp cloth to remove any grease or residue from assembly.
36 Mirror Base Floating Bed
Standard bed legs can be a visual distraction in a small, minimalist room. This layout uses a bed frame with a recessed mirror base that creates a stunning “floating” illusion. At night, integrated LED strips under the frame glow against the carpet for a futuristic look.
The reflection from the mirror base makes the floor look like it extends right under the bed. This trick expands the visual boundary of the room and adds a layer of mystery and style. The clean white sheets and dark walls create a high contrast environment that feels modern and expensive.
Warm light from the floor creates a soft ambient glow that is perfect for a relaxing evening. This design is excellent for anyone who wants a unique focal point that also serves a functional purpose. It is a creative way to use mirrors to change the perception of a tiny space.
Material Required List
- Recessed bed frame
- Custom cut mirror panels
- Heavy duty mirror adhesive
- RGB LED light strips
- Soft plush carpet
Equipment Required List
- Measuring tape
- Level tool
- Caulking gun
- Suction cup glass lifter
DIY Instruction Step by Step
- Build or buy a bed frame that has a set-back or recessed base at least 6 inches from the edge.
- Measure each side of the recessed base and order custom mirrored glass panels to fit perfectly.
- Apply thick beads of mirror adhesive to the wooden base of the bed frame.
- Use a suction cup lifter to press the mirror panels onto the base and hold them for a few minutes.
- Check that the mirrors are straight and flush with the floor using a level tool.
- Stick the LED lighting strips along the bottom outer edge of the main bed frame, not the base.
- Wire the lights to a nearby outlet and hide any messy cables inside the bed frame.
- Place your mattress and white linens on the frame and turn on the under-bed lighting.
- Clean the mirror panels with a microfiber cloth to ensure the reflection is clear and effective.
37 Slim Vertical Bedside Tower
Bulky nightstands are the first thing to go in a narrow bedroom layout. This layout replaces a table with a slim black vertical tower that stands right against the bed. It features multiple small shelves for a phone, books, and even a small potted plant.
This tower uses height instead of width to provide storage, which keeps the walkway clear. An integrated wireless charging pad on one of the middle shelves eliminates messy cords. The matte black finish and thin metal frame add a sleek and modern touch next to the bed.
A trailing plant on the top shelf adds a burst of green and life to the room. This setup is perfect for anyone who only needs a few essential items within reach at night. It is a smart and stylish way to maximize the vertical space next to your bed.
Material Required List
- Slim metal storage tower
- Wireless charging pad
- Small indoor trailing plant
- Adhesive cable clips
- Selection of books
Equipment Required List
- Measuring tape
- Level tool
- Screwdriver
- Pencil
DIY Instruction Step by Step
- Assemble the vertical metal tower according to the manufacturer’s specific instructions.
- Position the tower in the narrow gap between your bed and the adjacent wall.
- Use a level tool to ensure the tower stands perfectly straight and does not wobble.
- Stick the wireless charging pad to one of the middle shelves using a strong adhesive.
- Run the power cord down the back of the tower and secure it with adhesive cable clips.
- Place your favorite books on the lower shelves to add weight and stability to the base.
- Set a small trailing plant on the top shelf and let the leaves drape down the sides naturally.
- Place your phone on the charging pad and check that the connection is solid and working.
- Adjust the exact position of the tower so it is easy to reach from a lying position.
38 Immersive Misty Forest Mural
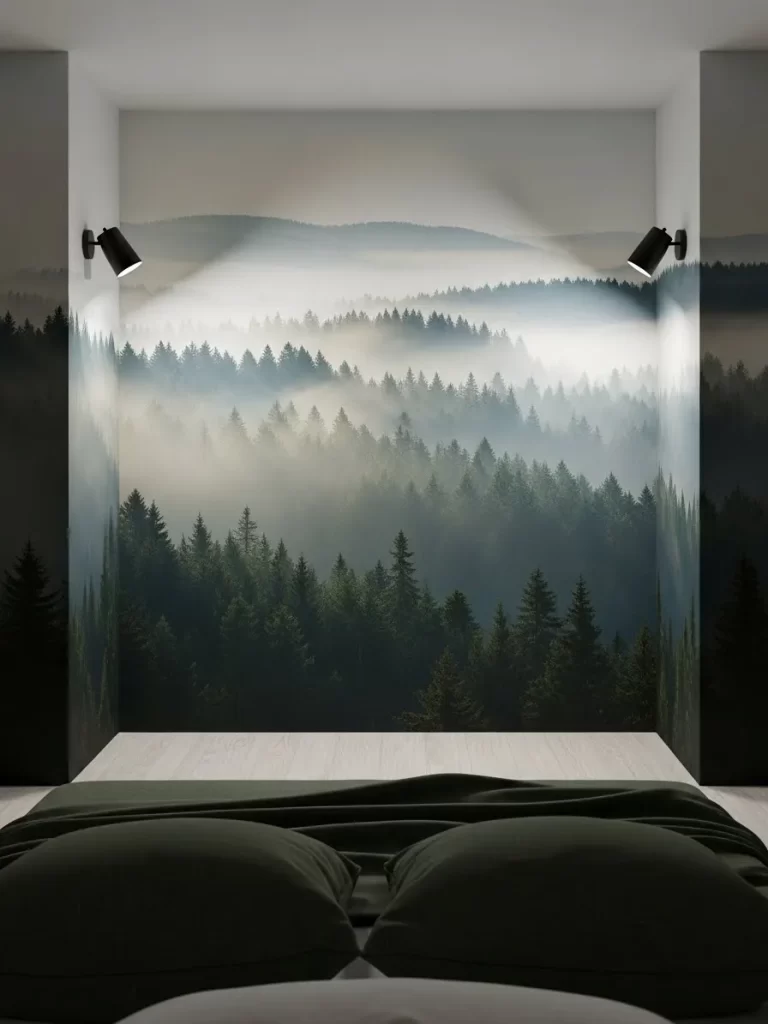
When a room feels small and enclosed, a mural can break the walls and add a sense of infinite distance. This layout features a full wall mural of a misty evergreen forest that surrounds the headboard. It creates a deep, atmospheric backdrop that makes the bedroom feel like a peaceful clearing.
Two black wall sconces point light onto the mural, creating a dramatic and layered effect. The dark green bedding ties in with the forest theme, making the whole room feel like a cohesive sanctuary. Covering the side walls as well creates a fully immersive experience that distracts from the room’s small size.
The light wood floor provides a bright and clean contrast to the dark and moody walls. This design is for anyone who wants to escape the city and feel connected to nature. It is a bold and beautiful way to add character and depth to a tiny space.
Material Required List
- Custom forest wall mural
- Wallpaper paste
- Two matte black wall sconces
- Deep green duvet set
- Seam roller
Equipment Required List
- Wallpaper smoother
- Utility knife
- Level tool
- Measuring tape
- Power drill
DIY Instruction Step by Step
- Measure your back wall and the return sections of the side walls to determine the exact mural size needed.
- Clean the wall surfaces thoroughly and remove any old nails, bumps, or loose paint.
- Apply wallpaper paste to the first section of the wall using a wide brush or roller.
- Carefully hang the first mural panel, starting from the top corner and working your way down.
- Use a wallpaper smoother to push out any air bubbles from the center toward the edges.
- Match the pattern of the second panel perfectly with the first and roll the seams together firmly.
- Trim any excess paper at the ceiling and floor lines using a sharp utility knife.
- Drill holes and install the black wall sconces over the mural once the paste is dried completely.
- Layer your bed with deep green linens to complete the immersive forest look.
39 Immersive Misty Forest Mural
When a room feels small and enclosed, a mural can break the walls and add a sense of infinite distance. This layout features a full wall mural of a misty evergreen forest that surrounds the headboard. It creates a deep, atmospheric backdrop that makes the bedroom feel like a peaceful clearing.
Two black wall sconces point light onto the mural, creating a dramatic and layered effect. The dark green bedding ties in with the forest theme, making the whole room feel like a cohesive sanctuary. Covering the side walls as well creates a fully immersive experience that distracts from the room’s small size.
The light wood floor provides a bright and clean contrast to the dark and moody walls. This design is for anyone who wants to escape the city and feel connected to nature. It is a bold and beautiful way to add character and depth to a tiny space.
Material Required List
- Custom forest wall mural
- Wallpaper paste
- Two matte black wall sconces
- Deep green duvet set
- Seam roller
Equipment Required List
- Wallpaper smoother
- Utility knife
- Level tool
- Measuring tape
- Power drill
DIY Instruction Step by Step
- Measure your back wall and the return sections of the side walls to determine the exact mural size needed.
- Clean the wall surfaces thoroughly and remove any old nails, bumps, or loose paint.
- Apply wallpaper paste to the first section of the wall using a wide brush or roller.
- Carefully hang the first mural panel, starting from the top corner and working your way down.
- Use a wallpaper smoother to push out any air bubbles from the center toward the edges.
- Match the pattern of the second panel perfectly with the first and roll the seams together firmly.
- Trim any excess paper at the ceiling and floor lines using a sharp utility knife.
- Drill holes and install the black wall sconces over the mural once the paste is dried completely.
- Layer your bed with deep green linens to complete the immersive forest look.
40 Slim Vertical Bedside Tower

Bulky nightstands are the first thing to go in a narrow bedroom layout. This layout replaces a table with a slim black vertical tower that stands right against the bed. It features multiple small shelves for a phone, books, and even a small potted plant.
This tower uses height instead of width to provide storage, which keeps the walkway clear. An integrated wireless charging pad on one of the middle shelves eliminates messy cords. The matte black finish and thin metal frame add a sleek and modern touch next to the bed.
A trailing plant on the top shelf adds a burst of green and life to the room. This setup is perfect for anyone who only needs a few essential items within reach at night. It is a smart and stylish way to maximize the vertical space next to your bed.
Material Required List
- Slim metal storage tower
- Wireless charging pad
- Small indoor trailing plant
- Adhesive cable clips
- Selection of books
Equipment Required List
- Measuring tape
- Level tool
- Screwdriver
- Pencil
DIY Instruction Step by Step
- Assemble the vertical metal tower according to the manufacturer’s specific instructions.
- Position the tower in the narrow gap between your bed and the adjacent wall.
- Use a level tool to ensure the tower stands perfectly straight and does not wobble.
- Stick the wireless charging pad to one of the middle shelves using a strong adhesive.
- Run the power cord down the back of the tower and secure it with adhesive cable clips.
- Place your favorite books on the lower shelves to add weight and stability to the base.
- Set a small trailing plant on the top shelf and let the leaves drape down the sides naturally.
- Place your phone on the charging pad and check that the connection is solid and working.
- Adjust the exact position of the tower so it is easy to reach from a lying position.
41 Floor to Ceiling Tension Shelf
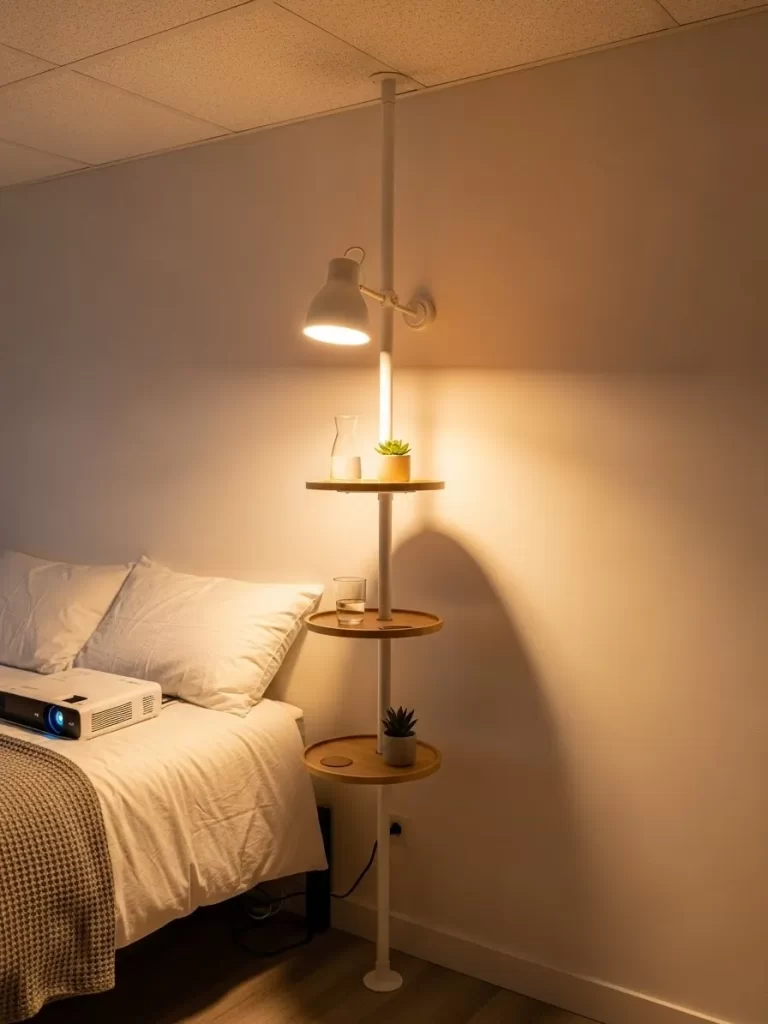
When you cannot drill into the walls, a tension rod system is the best storage solution. This layout features a white floor to ceiling pole with adjustable circular wooden shelves. It provides a spot for a lamp, water, and plants without requiring a permanent nightstand.
A matching white lamp is mounted directly to the pole to save even more space. The circular shelves can be rotated or moved up and down to fit your specific needs. This setup is excellent for renters because it leaves no holes in the walls or ceiling.
The minimalist design blends into the wall, keeping the room feeling light and airy. Using a projector on the bed instead of a TV keeps the floor area completely clear. It is a functional and flexible way to add utility to a tiny corner.
Material Required List
- Tension pole shelf kit
- Adjustable wooden circular shelves
- Clip-on or pole-mounted lamp
- Small potted succulents
- Glass water carafe
Equipment Required List
- Measuring tape
- Level tool
- Step ladder
DIY Instruction Step by Step
- Measure the height of your ceiling to ensure the tension pole will fit the vertical gap.
- Place the bottom base of the pole on the floor in your chosen corner.
- Extend the top of the pole until it firmly reaches the ceiling.
- Tighten the tension mechanism until the pole is completely stable and does not move.
- Slide the circular wooden shelves onto the pole and set them at your desired heights.
- Use a level tool to make sure each individual shelf is perfectly horizontal.
- Attach the lamp to the upper part of the pole and point it toward the bed.
- Arrange your water glass and small plants on the shelves to add function and color.
- Periodically check the tension of the pole to ensure it remains tight and safe over time.
42 Minimalist Clear Acrylic Bed Frame
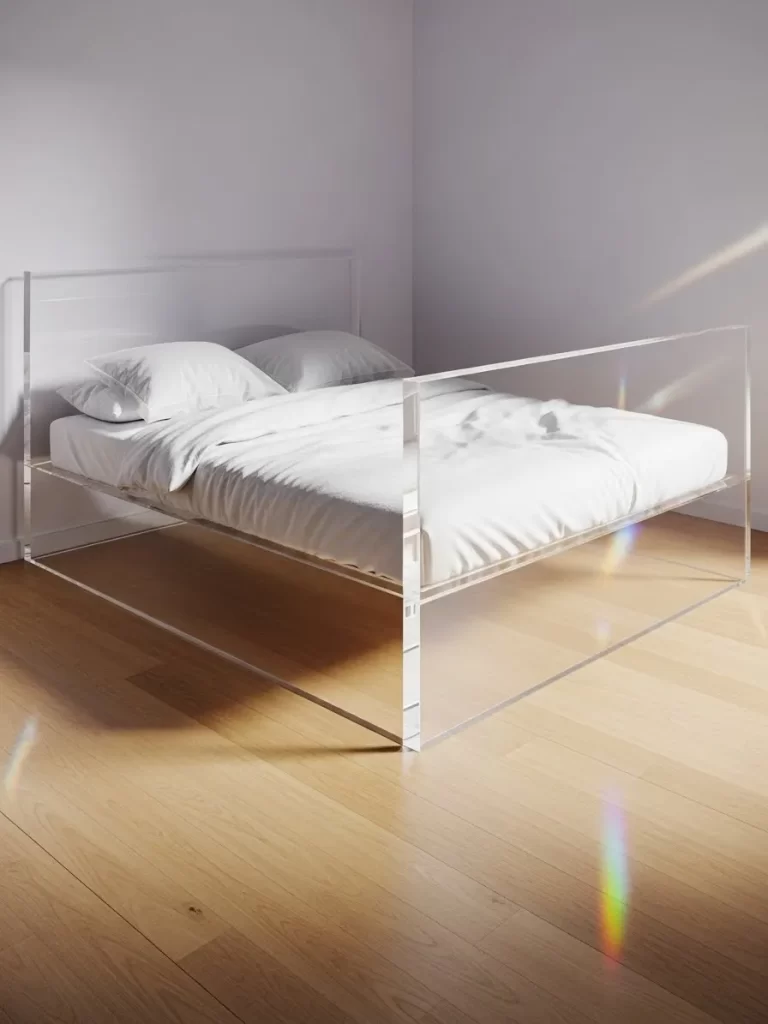
Heavy furniture can often make a small room feel crowded and dark. This layout uses a bed frame made entirely of clear acrylic to create a floating effect. Light passes straight through the frame, which makes the floor space look much larger than it is.
The transparent headboard and footboard maintain clear sightlines across the entire bedroom. Using simple white linens keeps the focus on the modern and airy design. This setup is perfect for someone who loves a clean, futuristic, and high end look.
Natural light from the window catches the edges of the acrylic, creating beautiful rainbow reflections. The light wood floor underneath remains fully visible, adding to the sense of openness. It is a creative way to fit a large bed into a tiny space without the visual weight.
Material Required List
- Clear acrylic bed frame panels
- Specialized acrylic adhesive or fasteners
- Support slats for the mattress
- Anti-scratch floor protectors
- Microfiber cleaning cloth
Equipment Required List
- Allen wrench set
- Measuring tape
- Level tool
- Rubber mallet
DIY Instruction Step by Step
- Lay out all the clear acrylic panels on a soft rug to prevent any surface scratches.
- Connect the side rails to the headboard using the specialized fasteners provided.
- Attach the footboard to the side rails to complete the rectangular outer frame.
- Use a rubber mallet to gently tap the joints together if they are a tight fit.
- Install the support slats across the middle of the frame to hold the mattress.
- Check that the entire frame is level and square using your measuring tape and level.
- Place anti-scratch protectors on the bottom of the acrylic legs to save your wood floors.
- Wipe down all the acrylic surfaces with a microfiber cloth to remove any fingerprints.
- Position the bed in the center of the room to let the light flow through the frame.
You have seen that maximizing a small bedroom is about clever geometry and visual trickery. Utilizing vertical walls for storage, embracing floating furniture, and integrating lighting are all powerful tools.
Each of these 42 ideas helps you expand the room without tearing down walls. Stop letting limited square footage limit your decorating dreams.
Choose the solutions that fit your lifestyle and enjoy a bedroom that feels airy, organized, and custom designed just for you.
Key Takeaways
- Go Vertical: Always look upward to add storage, lighting, and curtains near the ceiling.
- Embrace Illusion: Mirrors and transparent furniture dramatically increase the perceived size of the room.
- Float Everything: Mount desks, consoles, and shelves on the wall to expose the maximum amount of floor.
- Double Duty: Invest in lift beds, window benches, and fold down furniture that serves two functions.