
Many homeowners look at their tiny bathrooms and feel stuck. You might wonder if there is any hope for such a cramped area. The truth is that even the smallest room can become a beautiful sanctuary. You just need the right plan and a bit of creativity.

Designers often say that small spaces offer the biggest opportunities. A narrow floor plan forces you to think about every single inch. This article shows you how to turn those tight corners into stylish features. You will find forty unique ideas to make your bathroom look large and modern.
We focus on layouts that blend beauty with daily use. These projects are simple to follow and do not require professional help. You can upgrade your home while keeping your budget in check. Let us look at these smart ways to change your view of small bathrooms forever.
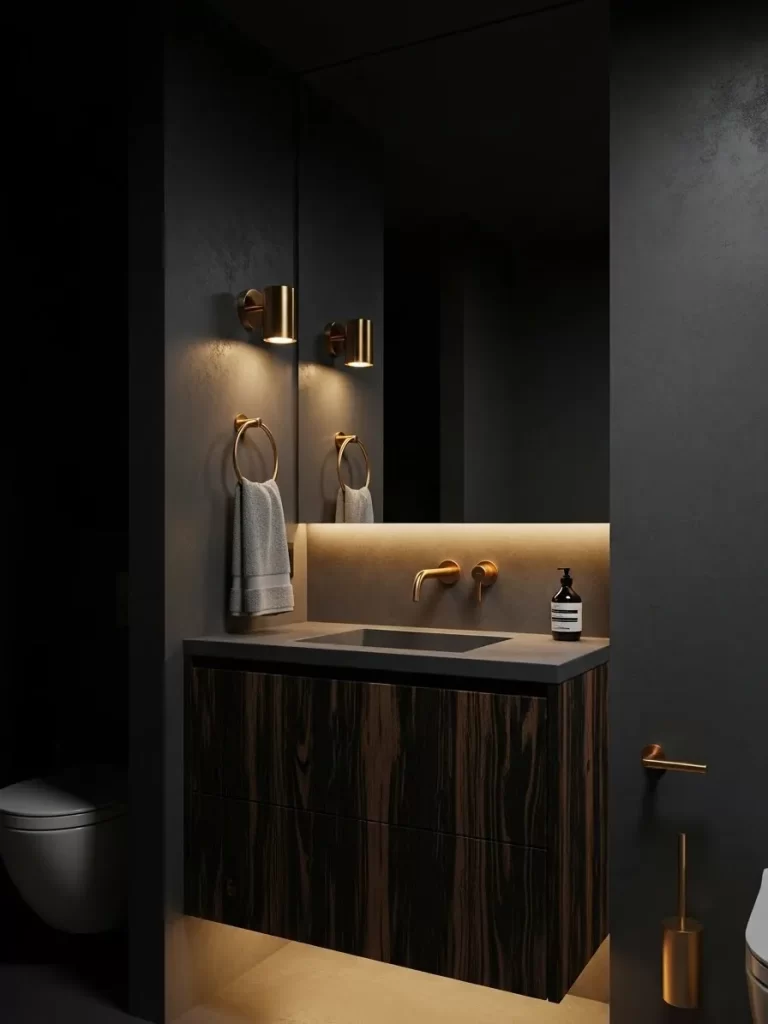
1 Floating Oak Vanity with Under-Cabinet Lighting

Small bathrooms often feel cramped because of bulky floor cabinets. This design solves that problem by lifting the vanity off the ground. The warm wood texture adds a natural touch to the clean white walls.
Strategic lighting placed underneath the cabinet creates a soft glow. This makes the floor area look wider and brighter. A wall mounted faucet keeps the counter clear and organized.
Materials Required
- Floating wood vanity unit
- LED light strip with adhesive backing
- High quality wood sealant
- Wall mounting brackets and heavy duty screws
- Vessel sink and wall mounted faucet kit
Equipment Required
- Power drill and specialized drill bits
- Leveling tool
- Measuring tape
- Stud finder
- Caulk gun
DIY Instructions
- Find the wall studs using your stud finder to ensure the vanity has strong support. Mark these spots clearly with a pencil.
- Measure the height where you want the sink to sit and draw a level horizontal line across the wall.
- Align your mounting brackets with the pencil marks and drill pilot holes into the studs.
- Secure the brackets firmly to the wall using heavy duty screws and check that they are completely level.
- Lift the vanity onto the brackets and screw it into place from the inside of the cabinet.
- Clean the bottom surface of the vanity with a dry cloth to remove any dust.
- Peel the backing off your LED light strip and press it firmly along the underside of the cabinet near the back edge.
- Connect the light strip to a power source or a battery pack hidden inside the drawer.
- Install the vessel sink on top and apply a bead of clear silicone caulk around the base to prevent water leaks.
- Attach your wall mounted faucet according to the manufacturer instructions to finish the look.
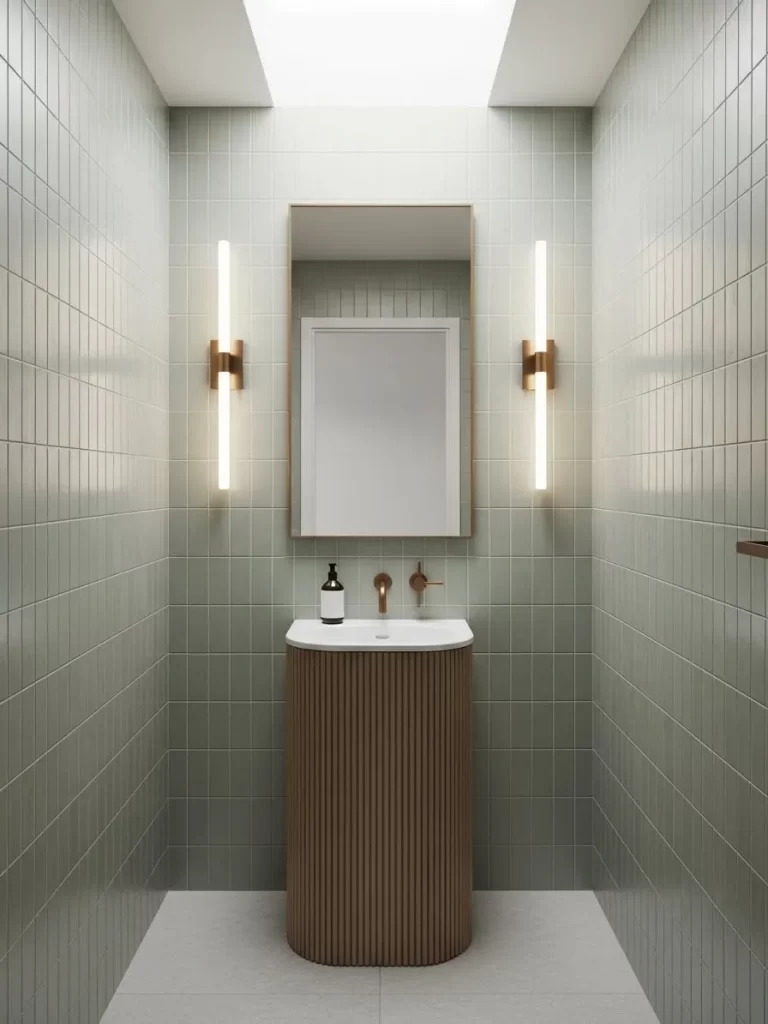
2 Seamless Sage Green Wet Room
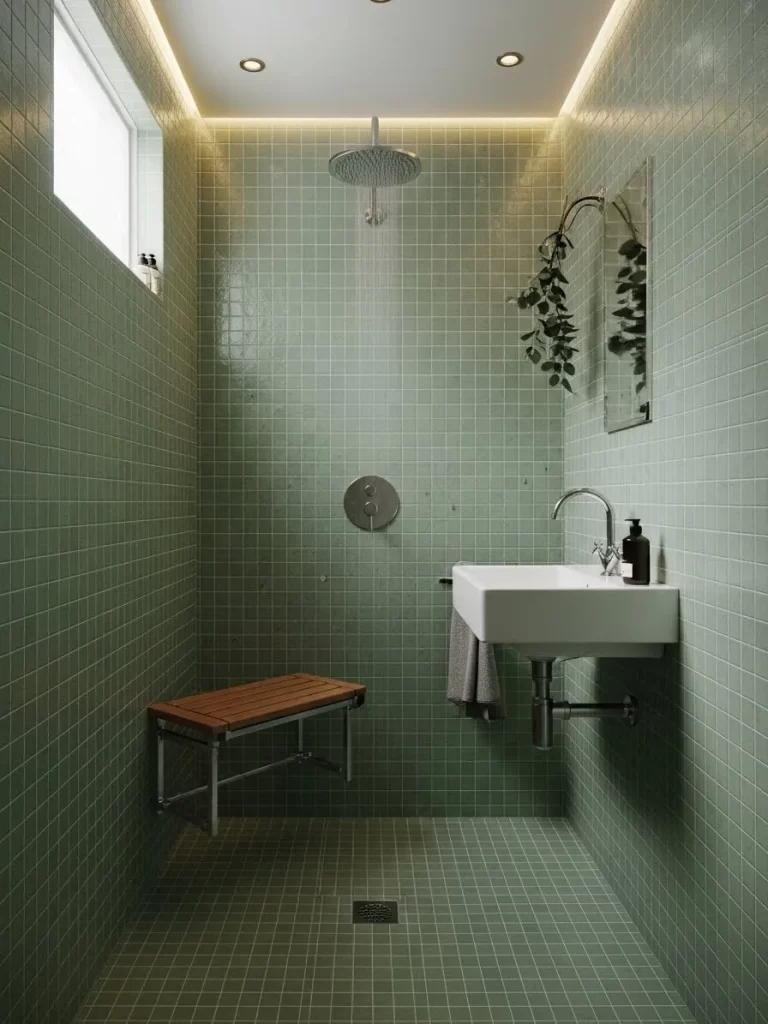
Small bathrooms often feel chopped up by different flooring and wall materials. This layout uses a single sage green tile for every surface to create a unified look. The consistent color stretches the visual boundaries of the room.
A wall hung sink and a simple wooden bench maximize the available floor space. This open floor plan makes cleaning much easier while providing a spa like atmosphere. The natural wood adds warmth to the cool green tones of the tile.
Materials Required
- Square ceramic tiles in sage green
- Waterproof tile grout and sealer
- Wall mounted white ceramic sink
- Floating wooden shower bench
- Chrome drain cover
Equipment Required
- Tile saw or manual tile cutter
- Notched trowel
- Rubber grout float
- Power drill with masonry bits
- Laser level
DIY Instructions
- Prepare the walls and floor by applying a high quality waterproofing membrane to prevent future leaks.
- Use a laser level to mark a straight starting line for your tiles at the bottom of the wall.
- Apply thin set mortar to a small section of the wall using your notched trowel.
- Press the green tiles into the mortar, using spacers to keep the lines straight and even.
- Cut tiles to fit around the drain and the wall mounted plumbing pipes using a tile saw.
- Let the mortar dry for at least twenty four hours before removing the spacers.
- Spread grout over the tiles with a rubber float, pushing it deep into the gaps.
- Wipe away the excess grout with a damp sponge after it begins to set.
- Drill holes into the wall studs to mount the sink and the wooden bench securely.
- Apply a clear silicone sealant around the sink and along the floor edges to keep everything watertight.
3 Curvy Corner Glass Shower Enclosure
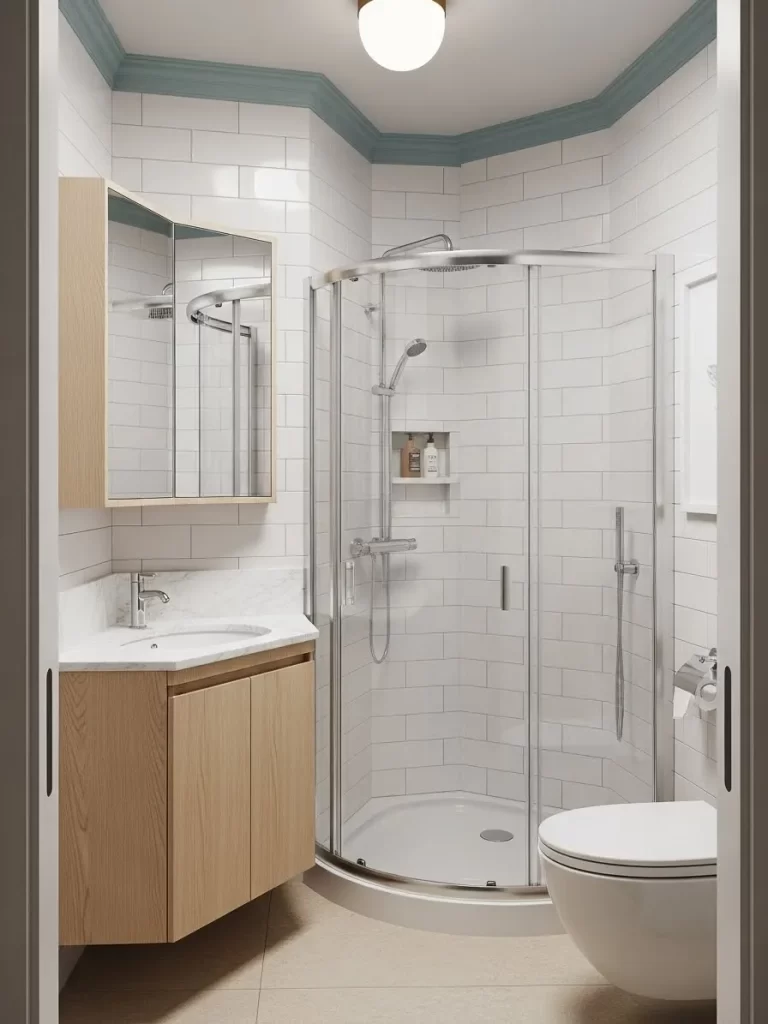
Corner layouts are excellent for reclaiming wasted space in tight bathrooms. This design features a rounded glass shower that fits snugly into a corner without blocking the view. The curved glass helps the traffic flow better than sharp corners.
Classic white subway tiles on the walls reflect light to keep the area bright. A light wood vanity provides storage while looking lightweight and modern. The blue crown molding at the top adds a unique pop of color that draws the eye upward.
Materials Required
- Curved glass shower kit with base
- White subway tiles
- Light oak vanity with marble top
- Mirrored medicine cabinet
- Blue paint for trim accents
Equipment Required
- Screwdriver set
- Adjustable wrench
- Caulking gun
- Level
- Tile adhesive spreader
DIY Instructions
- Clean the corner walls thoroughly and ensure they are straight and plumb.
- Install the shower base first, making sure it sits completely level on the floor.
- Apply tile adhesive to the walls and lay your subway tiles in a classic brick pattern.
- Grout the tiles and let them dry before you start installing the shower frame.
- Screw the metal shower tracks into the wall using the anchors provided in your kit.
- Slide the glass panels into the tracks and secure them according to the manual.
- Attach the door handles and check that the sliding mechanism moves smoothly.
- Assemble the oak vanity and position it next to the shower, leaving enough room for the door to open.
- Mount the mirrored cabinet on the wall at eye level above the vanity.
- Seal all edges where the shower and vanity meet the wall with waterproof caulk.
4 Bold Patterned Accent Wall and Black Vanity
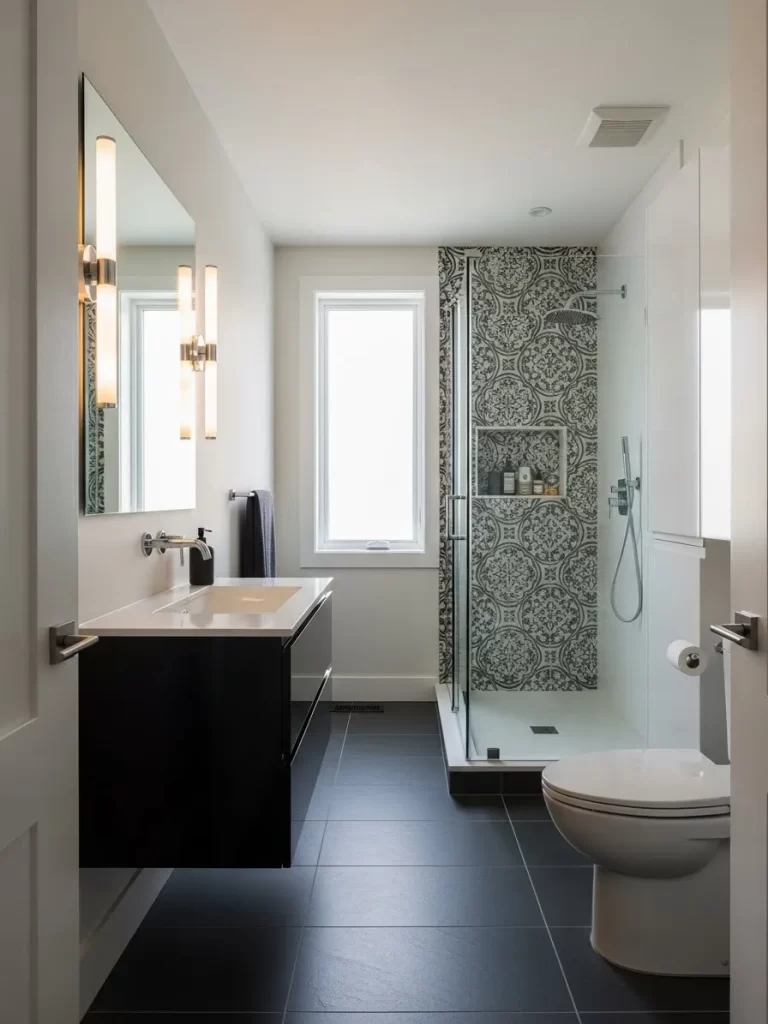
High contrast colors can make a small bathroom feel incredibly stylish and deep. This room uses a patterned tile wall in the shower to create a strong focal point. The black floating vanity provides a sharp, modern look against the white walls.
The dark floor tiles ground the space and make the white fixtures pop. A large mirror reflects the light from the window, which helps open up the narrow floor plan. Two sleek wall sconces provide even lighting for the face without taking up counter space.
Materials Required
- Patterned ceramic tiles for the shower wall
- Matte black floating vanity unit
- Large frameless wall mirror
- Modern vertical wall sconces
- Dark grey floor tiles
Equipment Required
- Power drill
- Measuring tape
- Leveling tool
- Thin set mortar and grout
- Electrical wire strippers
DIY Instructions
- Layout your patterned tiles on the floor first to ensure the design aligns correctly before sticking them to the wall.
- Apply mortar to the back shower wall and install the patterned tiles from the center outward.
- Install the dark floor tiles across the entire bathroom to create a solid base.
- Use a stud finder to locate the best spot for the floating vanity on the side wall.
- Drill pilot holes and bolt the vanity frame to the wall studs at your height.
- Place the vanity top on the frame and connect the sink plumbing.
- Mark the positions for the wall sconces on either side of where the mirror will go.
- Carefully mount the light fixtures and ensure the wiring is safe.
- Glue the large mirror to the wall using mirror safe adhesive.
- Apply a dark grout to the floor and shower tiles to match the color scheme.
5 Modern Retro Pink Tile and Wood Layout
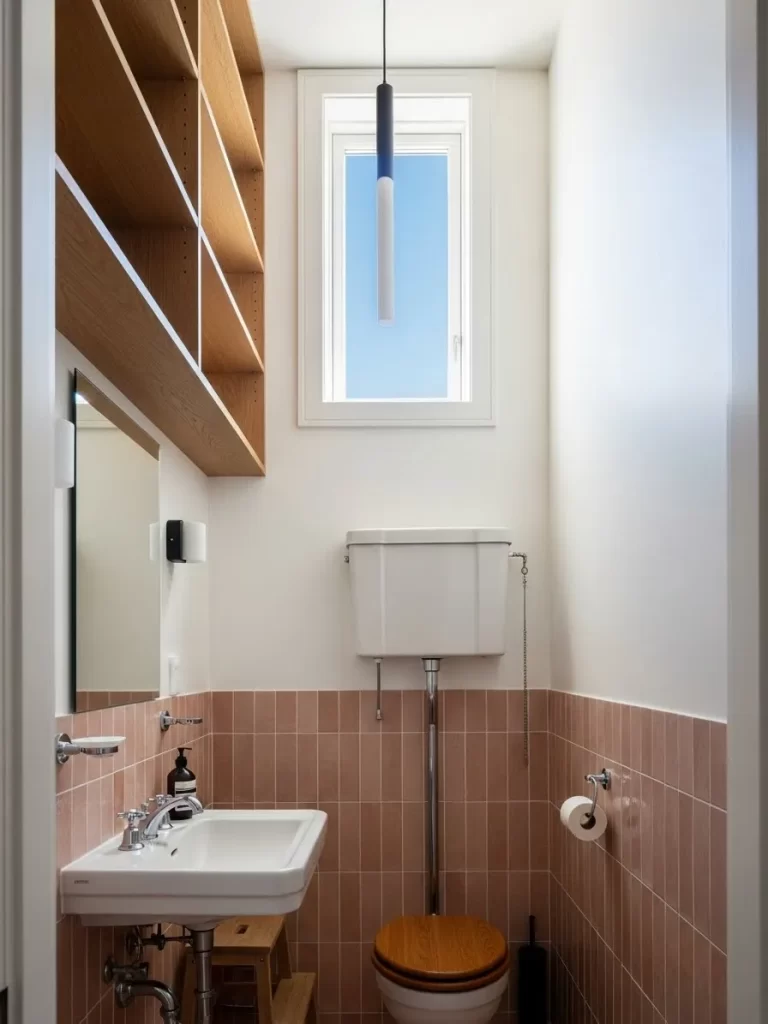
Small spaces can handle color when you use it with intention. This bathroom features vertical pink tiles that add height to the room. The exposed white plumbing and high tank toilet provide a vintage feel that saves floor space.
Wooden shelving units above the vanity offer plenty of storage for toiletries and decor. A natural wood toilet seat and step stool add warmth to the cool tile surfaces. The long pendant light provides focused illumination without taking up wall area.
Materials Required
- Vertical pink subway tiles
- White high tank toilet system
- Reclaimed wood for shelving
- Wall mounted white sink
- Wooden toilet seat
Equipment Required
- Tile cutter
- Power drill
- Measuring tape
- Level
- Wrench set
DIY Instructions
- Install the pink tiles vertically on the lower half of the wall to create height.
- Mount the high tank for the toilet near the ceiling using heavy duty wall anchors.
- Connect the long chrome flush pipe from the tank to the toilet bowl.
- Fix the wall mounted sink at a comfortable height using a sturdy steel bracket.
- Cut wood planks to the width of the wall for the overhead storage.
- Screw the wooden shelves into the wall studs for weight support.
- Install the wooden toilet seat onto the white bowl using the provided hardware.
- Hang the pendant light from the ceiling so it centers over the vanity area.
- Apply a clear sealant to the wood shelves to protect them from moisture.
- Caulk the gap between the sink and the tiled wall to prevent damage.
6 Dark Slat Wall and Marble Floating Sink
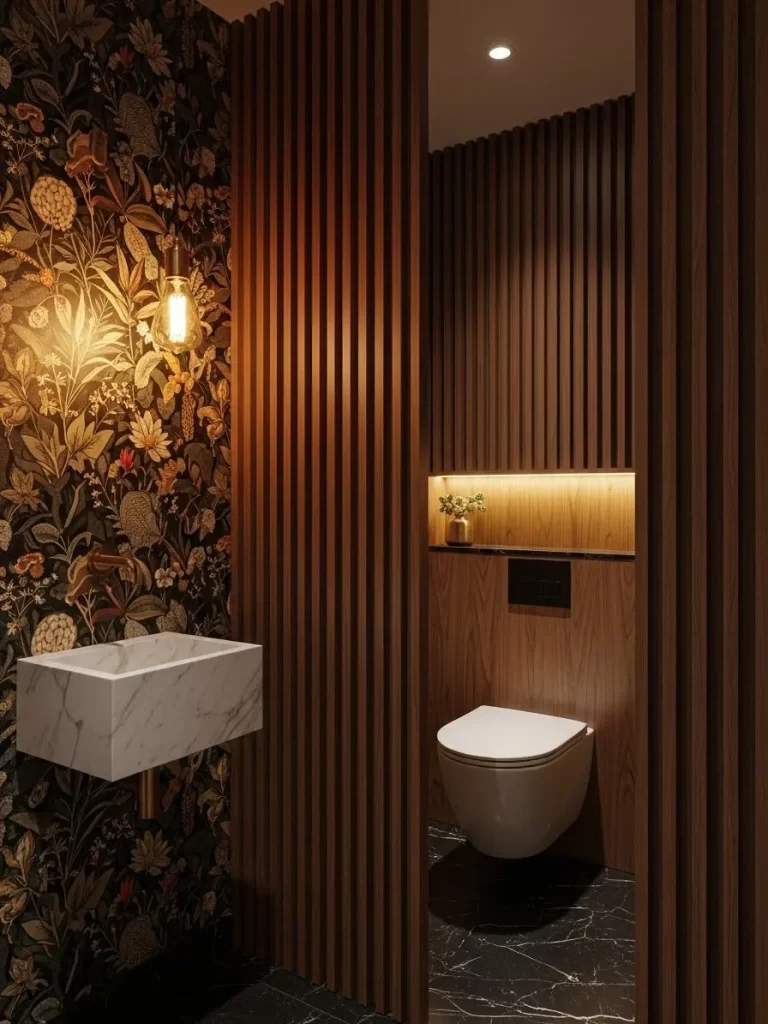
This design uses deep vertical wood slats to create a moody and sophisticated atmosphere. The dark tones provide a sense of depth that makes the wall seem further away. A white marble floating sink breaks up the dark colors with a touch of luxury.
Floral wallpaper on the adjacent wall adds a vintage contrast to the modern wood lines. A single hanging bulb provides warm, focused light that highlights the stone texture. This layout proves that dark colors can make a small room feel like a high end lounge.
Materials Required
- Dark wood wall slats
- Marble block floating sink
- Floral patterned waterproof wallpaper
- Brass pendant light fixture
- Construction adhesive
Equipment Required
- Circular saw
- Level
- Stud finder
- Caulk gun
- Power drill
DIY Instructions
- Prepare the accent wall by removing any old paint or debris and ensuring the surface is dry.
- Use a stud finder to locate the wall supports and mark them for mounting the heavy marble sink.
- Install the floral wallpaper on the side wall first to ensure clean edges.
- Cut your wood slats to the exact height of the room using a circular saw.
- Apply construction adhesive to the back of the slats and press them firmly against the wall.
- Use a level to ensure every slat is perfectly vertical.
- Mount the marble sink bracket into the studs and slide the sink into place.
- Connect the brass plumbing fixtures to the wall mounted pipes behind the slats.
- Hang the pendant light from the ceiling so it sits just above the sink.
- Apply a dark sealant to any gaps between the slats and the floor.
7 Pebble Floor Shower with LED Accents
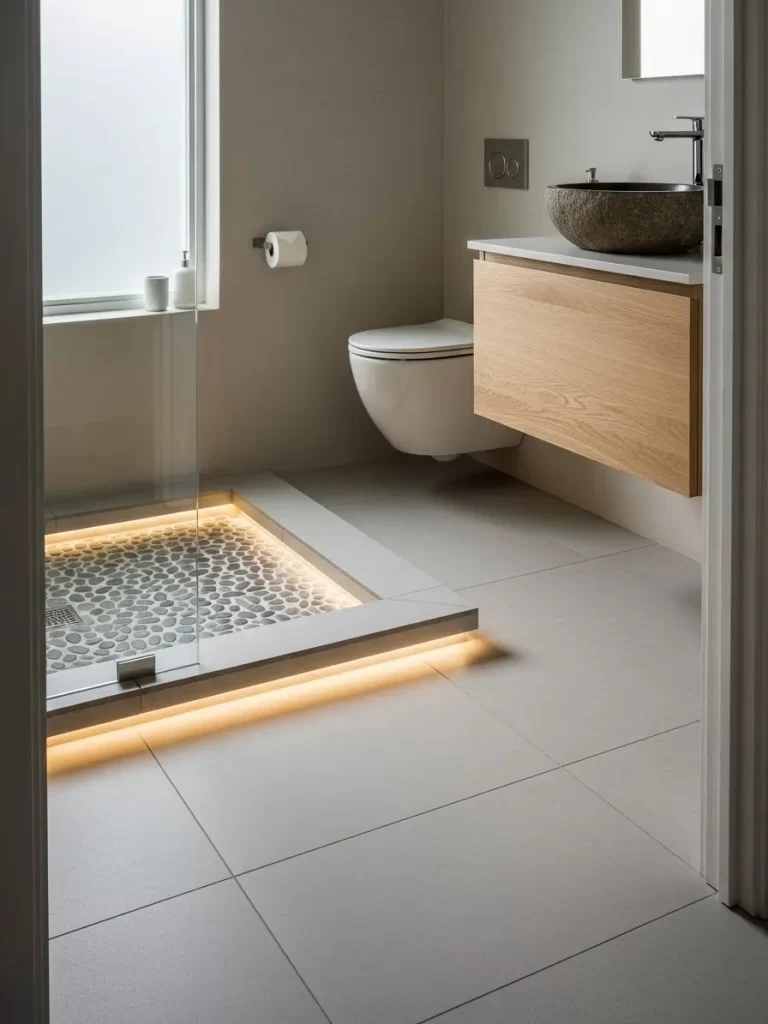
Natural elements bring a calming, outdoor feel to a compact bathroom. This layout features a shower floor made of smooth river pebbles that massage the feet. The raised border keeps water contained while housing a hidden light strip.
The warm glow from the floor reflects off the large grey floor tiles to brighten the lower half of the room. A floating wood vanity keeps the floor space open and easy to clean. Large windows allow natural light to wash over the neutral tones.
Materials Required
- Natural river pebble tile sheets
- Large format grey porcelain tiles
- Waterproof LED light strip
- Floating wood vanity
- Epoxy grout
Equipment Required
- Tile saw
- Notched trowel
- Grout float
- Measuring tape
- Silicone caulk gun
DIY Instructions
- Install a waterproof pan for the shower area and ensure the drain is centered.
- Lay the grey floor tiles across the main bathroom area first to set your height.
- Create a raised curb for the shower using waterproof backer board and tile it.
- Apply thin set mortar to the shower floor and press the pebble sheets into place.
- Fill the gaps between the pebbles with epoxy grout for a durable surface.
- Install a hidden channel along the bottom of the shower curb for the LED strip.
- Slide the LED light strip into the channel and connect it to a power source.
- Mount the floating vanity to the wall studs at a height that allows light to pass underneath.
- Attach the stone vessel sink to the vanity and connect the plumbing.
- Seal the edges of the pebble floor and the vanity with clear silicone.
8 Expansive Mirrored Wall and Glass Sink
Mirrors are the most effective tool for making a tiny bathroom feel huge. This design covers the entire back wall with mirror panels. The reflection doubles the visual space and bounces light into every dark corner.
A floating white counter with a clear glass vessel sink maintains the airy feel of the room. Using transparent materials ensures that nothing blocks the line of sight. It creates a sleek look that is suitable for very narrow spaces.
Materials Required
- Large custom cut mirror panels
- Mirror safe mastic adhesive
- Floating white vanity countertop
- Clear glass vessel sink
- Chrome wall mounted faucet
Equipment Required
- Suction cup glass lifters
- Level
- Caulking gun
- Measuring tape
- Power drill
DIY Instructions
- Clean the back wall thoroughly to ensure the adhesive bonds with the surface.
- Mark a level line where the vanity countertop will be installed before placing the mirrors.
- Apply mirror mastic to the back of the glass panels in large, even circles.
- Use suction cup lifters to press the mirror panels onto the wall, starting from the floor.
- Secure the edges with small mirror clips to hold the weight while the glue dries.
- Drill holes through the mirror carefully for the wall mounted faucet and supports.
- Install the heavy duty brackets for the floating countertop into the wall studs.
- Place the white countertop on the brackets and secure it from underneath.
- Set the glass vessel sink on top and connect the chrome drain pipe.
- Wipe down all glass surfaces with a microfiber cloth to remove smudges.
9 Warm Wood and Hexagon Patterned Bathroom
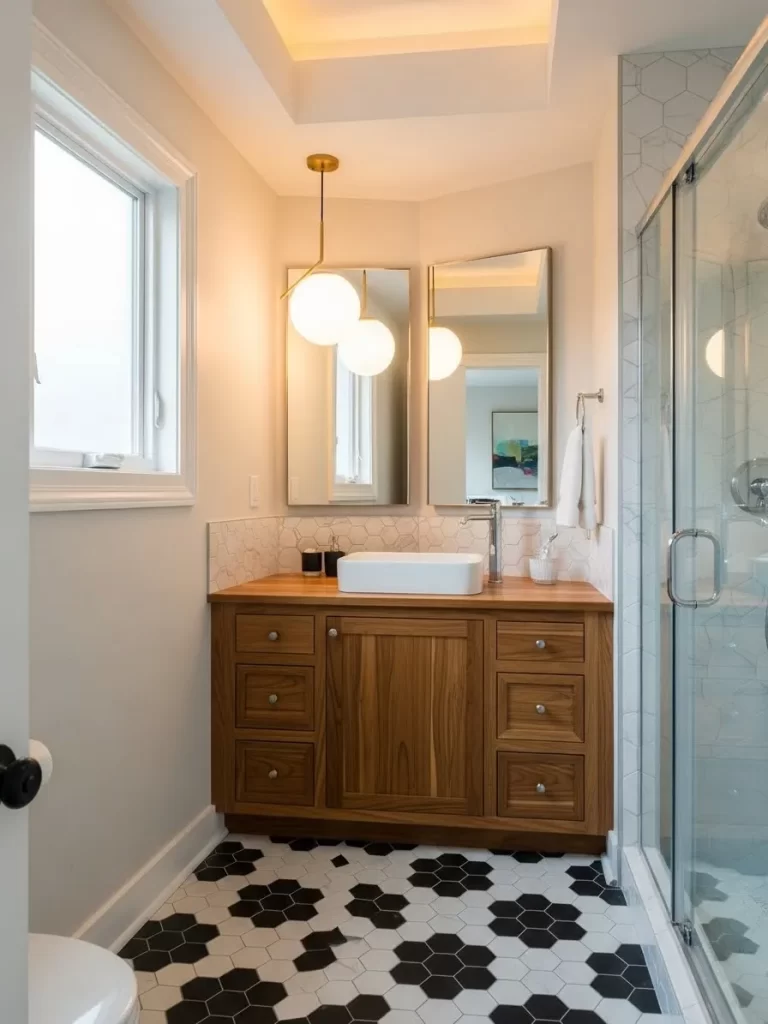
Mixing different textures creates a cozy and interesting environment. This room uses a rich wood vanity with many drawers to maximize storage. The black and white hexagon floor adds a playful, modern pattern that hides dirt well.
Two globe pendant lights hang at different heights to add visual interest near the window. The white vessel sink sits on a wood countertop, providing a clean and bright focal point. This layout balances traditional cabinetry with contemporary tile work.
Materials Required
- Custom wood vanity unit
- Black and white hexagon porcelain tiles
- White ceramic vessel sink
- Brass globe pendant lights
- White marble backsplash tiles
Equipment Required
- Tile saw
- Grout float
- Power drill
- Measuring tape
- Level
DIY Instructions
- Lay out the hexagon tiles on the floor to create the desired floral or geometric pattern.
- Apply mortar to the floor and set the tiles, using spacers for even grout lines.
- Install the wood vanity against the wall and secure it to the studs.
- Place the marble backsplash tiles behind the vanity area and grout them with white.
- Mount the white vessel sink onto the wood top and seal the base with silicone.
- Install the faucet through the pre drilled hole in the vanity.
- Hire an electrician to drop the pendant light wires from the ceiling.
- Attach the globe fixtures to the wiring and test the light levels.
- Grout the floor tiles with a dark grey color to make the hexagon shapes stand out.
- Apply a water resistant finish to the wood vanity to protect it from splashes.
10 Frosted Glass Barn Door
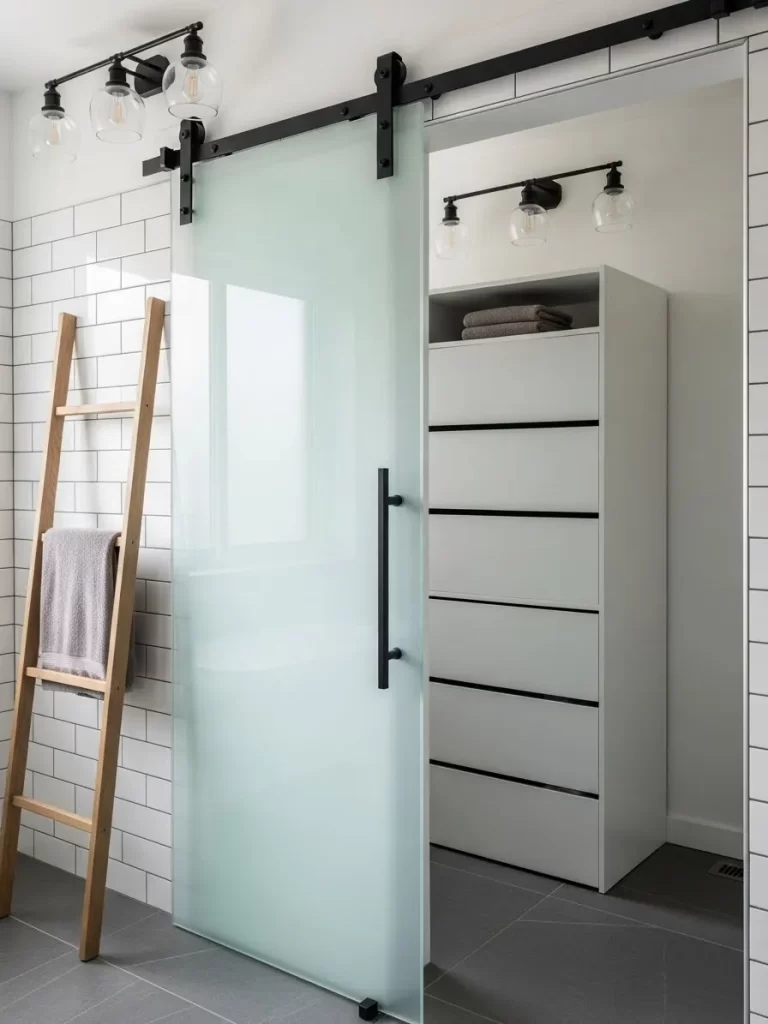
Traditional doors swing into the room and waste a lot of floor space. A sliding barn door made of frosted glass stays flat against the wall and allows light to pass through. It provides privacy while making the entry feel more open.
The black metal hardware adds an industrial touch to the clean white tile walls. A wooden towel ladder leaning against the wall provides easy access to linens without taking up floor area. This setup is excellent for bathrooms that open into narrow hallways.
Materials Required
- Frosted glass door panel
- Sliding barn door hardware kit
- Wooden towel ladder
- Wall anchors and screws
- Floor guide for the door
Equipment Required
- Power drill
- Level
- Stud finder
- Wrench set
- Measuring tape
DIY Instructions
- Measure the door opening and ensure you have enough wall space on one side for the door to slide.
- Use a stud finder to locate the header above the door frame for the metal track.
- Mark the holes for the track using a level to ensure the door slides smoothly.
- Drill pilot holes and bolt the black metal track into the wall studs.
- Attach the roller wheels to the top of the frosted glass door panel.
- Carefully lift the door and hang the rollers onto the wall track.
- Install the floor guide to keep the bottom of the glass from swinging outward.
- Attach the door stoppers to the ends of the track to prevent the door from sliding off.
- Place the wooden ladder against a nearby wall to hold your towels.
- Test the door several times to make sure it moves quietly.
11 Traditional Pedestal Sink with Blue Accents

A pedestal sink is a classic choice for tight quarters because it occupies very little visual real estate. This layout pairs a white ceramic sink with elegant chrome legs for a touch of shine. The lower half of the wall features white beadboard paneling to protect against moisture.
Soft blue paint on the upper walls adds a calming pop of color without overwhelming the small area. A crystal chandelier hangs from the ceiling to provide a sense of luxury. The black and white mosaic tile floor keeps the design grounded and timeless.
Materials Required
- Porcelain pedestal sink with chrome support legs
- White beadboard wall panels
- Light blue interior paint
- Small crystal chandelier
- Black and white mosaic floor tiles
Equipment Required
- Power drill
- Adjustable wrench
- Level
- Paint roller and brushes
- Caulking gun
DIY Instructions
- Install the mosaic floor tiles across the entire room and let the grout dry for a full day.
- Cut the beadboard panels to waist height and glue them to the lower section of the walls.
- Apply a coat of light blue paint to the top half of the walls using a clean roller.
- Position the pedestal base and the sink basin to mark the mounting holes on the wall.
- Drill into the wall studs and secure the sink using heavy duty bolts.
- Connect the chrome support legs to the front of the sink for added stability.
- Hook up the faucet and drain pipes according to the plumbing kit instructions.
- Mount the crystal chandelier to the ceiling electrical box to brighten the space.
- Attach white baseboard trim along the bottom of the beadboard to hide the tile edges.
- Apply a thin line of white caulk where the sink meets the wall to keep water out.
12 Concrete Trough Sink with Floating Shelf
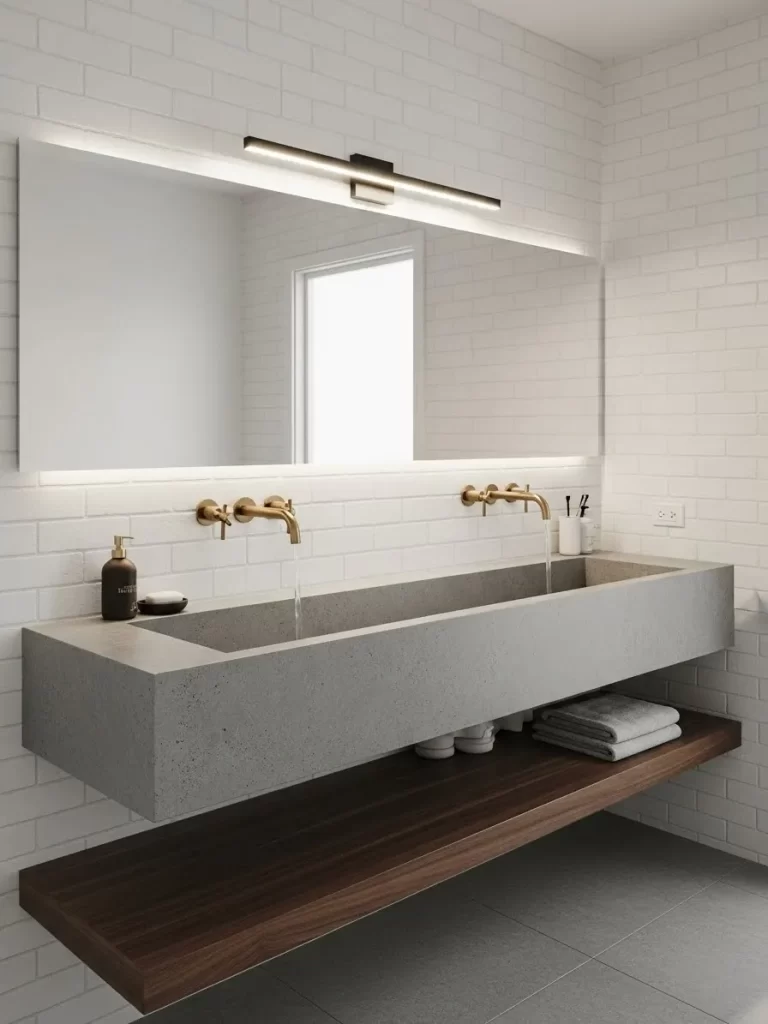
This industrial design uses a long concrete trough sink to provide plenty of washing space for two people. Lifting the sink off the floor keeps the layout feeling open and modern. A dark wood floating shelf underneath provides a dedicated spot for fresh towels.
White subway tiles cover the wall to keep the room bright and reflect the light from the long LED bar. Brass wall mounted faucets add a warm metallic touch to the cool grey concrete. This setup is great for narrow bathrooms that need to accommodate multiple users.
Materials Required
- Custom concrete trough sink
- Dark wood thick floating shelf
- White subway tiles
- Brass wall mounted faucets
- Linear LED mirror light
Equipment Required
- Heavy duty wall brackets
- Power drill
- Laser level
- Masonry bits
- Caulk gun
DIY Instructions
- Tile the entire back wall with white subway tiles before installing the heavy fixtures.
- Measure and mark the wall studs to find the strongest points for the sink brackets.
- Bolt the heavy duty steel brackets into the studs at a comfortable height.
- Carefully lift the concrete trough sink onto the brackets with a partner.
- Install the brass faucets into the wall pipes above the sink basins.
- Mount the dark wood shelf about twelve inches below the sink using hidden brackets.
- Hang the large mirror and install the linear LED light bar directly above it.
- Connect the sink drains to the main waste pipe using matching brass or chrome traps.
- Seal the top edge of the sink against the tiles with clear silicone.
- Place folded grey towels on the wooden shelf to complete the industrial look.
13 Sky High Shower with Living Moss Wal
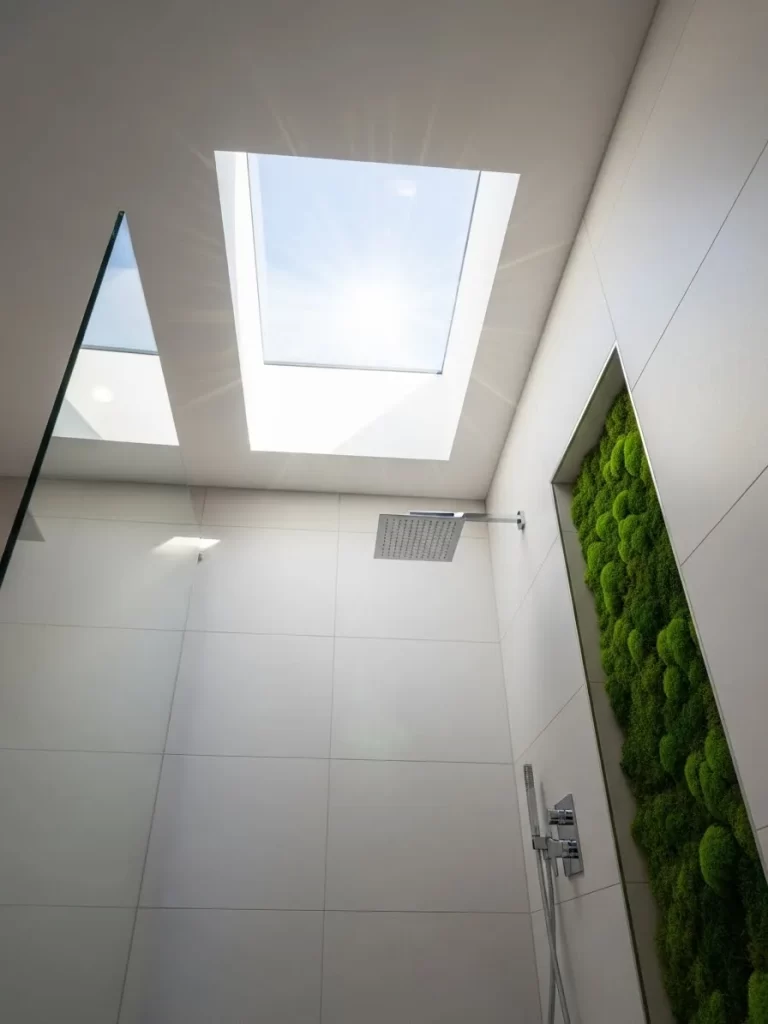
Bringing nature inside can turn a cramped shower into a refreshing sanctuary. This layout features a large skylight that floods the shower with natural sunlight from above. A recessed wall niche is filled with vibrant green moss to create a living art piece.
Large white wall tiles minimize grout lines and make the shower stall feel much wider. A sleek rainfall showerhead provides a spa experience without taking up wall space. The combination of bright light and greenery makes the room feel like an outdoor garden.
Materials Required
- Large format white ceramic tiles
- Preserved or living moss panels
- Rainfall showerhead kit
- Waterproofing membrane
- Glass shower partition
Equipment Required
- Tile saw
- Notched trowel
- Grout float
- Measuring tape
- Utility knife
DIY Instructions
- Frame out a large rectangular niche in the shower wall before you start tiling.
- Apply a waterproofing membrane to every inch of the shower walls and the niche interior.
- Install the large white tiles on the walls, leaving the niche area open.
- Mount the rainfall showerhead into the ceiling or high on the wall.
- Cut the moss panels to fit completely inside the recessed wall niche.
- Use a waterproof adhesive to stick the moss panels to the back of the niche.
- Install the glass partition to keep water away from the rest of the bathroom.
- Grout the wall tiles with a matching white color to create a seamless look.
- Seal the edges of the moss niche with clear silicone to protect the wall structure.
- Clean the glass and tiles thoroughly to allow the natural light to reflect.
14 Monochromatic Terracotta Minimalist Design
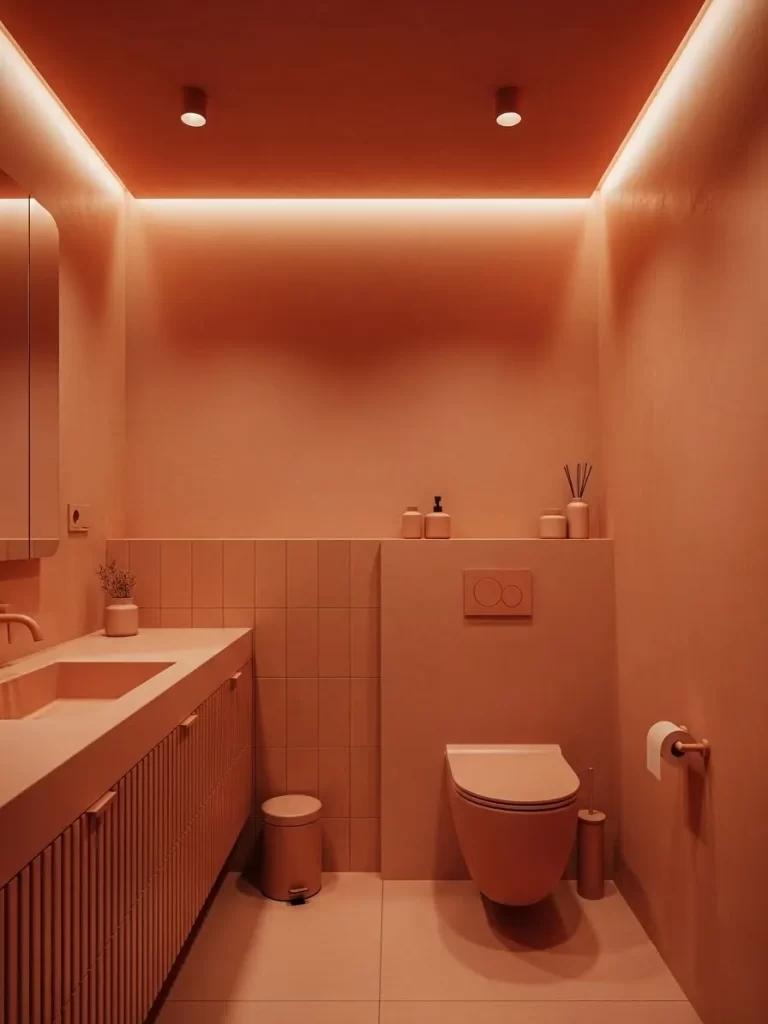
Using a single color for the walls, floor, and fixtures creates a striking and modern look. This bathroom is finished in a warm terracotta tone that feels cozy and sophisticated. The consistent color palette removes visual clutter and makes the room feel unified.
The vanity features a slatted wood front that adds subtle texture without breaking the color theme. Hidden LED strips along the ceiling edges provide a soft glow that eliminates harsh shadows. This layout is excellent for those who want a bold yet calm environment.
Materials Required
- Terracotta colored waterproof wall plaster or paint
- Matching terracotta floor tiles
- Slatted wood vanity unit
- Terracotta colored toilet and sink
- LED light strips
Equipment Required
- Paint roller
- Trowel (for plaster)
- Tile cutter
- Level
- Caulking gun
DIY Instructions
- Apply the terracotta plaster or paint to the walls for a smooth, matte finish.
- Install the matching floor tiles and use a grout color that blends in completely.
- Mount the slatted wood vanity to the wall and install the matching sink on top.
- Secure the terracotta toilet to the floor and connect the plumbing.
- Install a hidden track for the LED strips along the top edge of the walls.
- Press the LED lights into the track to create a wash of light down the walls.
- Use a matching terracotta caulk to seal the gaps around the sink and toilet.
- Install minimalist chrome or black faucets to provide a slight contrast.
- Hang a frameless mirror to keep the focus on the beautiful wall color.
- Keep accessories to a minimum to maintain the clean and modern aesthetic.
15 Extended Countertop Over the Toilet
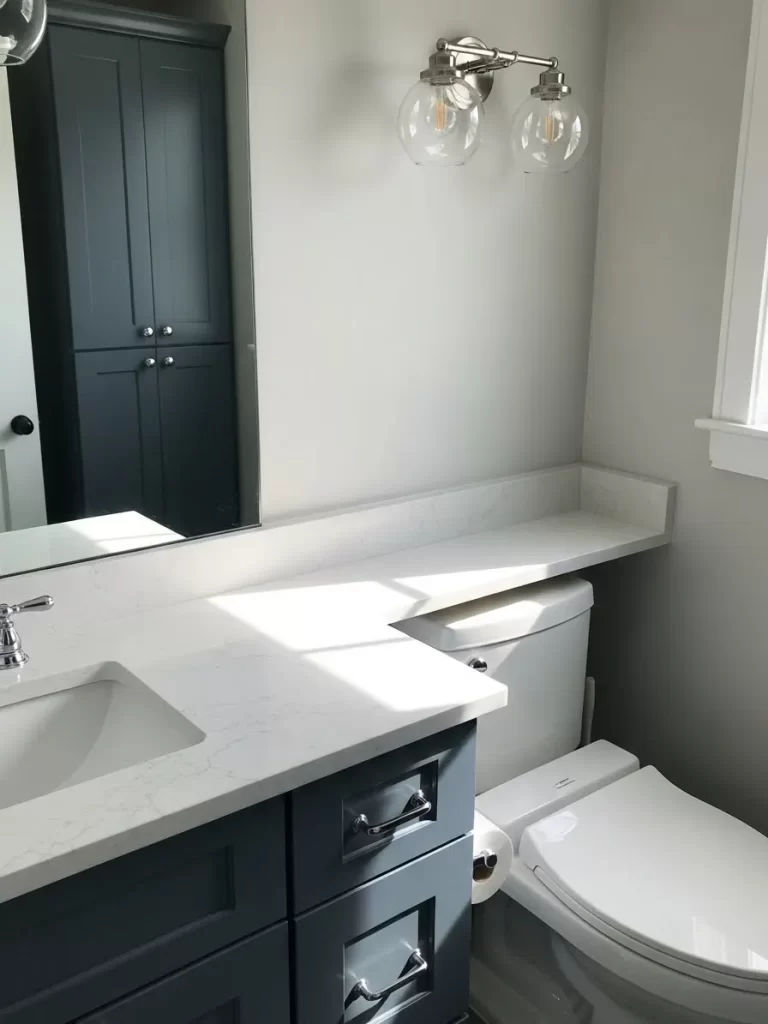
In very small bathrooms, every inch of flat surface is valuable. This layout extends the vanity countertop directly over the toilet tank to create a long, continuous shelf. It provides an excellent spot for decor, candles, or extra soap without adding bulk.
Dark grey cabinets provide a sharp contrast against the light marble top and white walls. A large mirror and bright vanity lights ensure the room stays well lit. This simple design trick significantly increases the usable area in a narrow floor plan.
Materials Required
- Custom length marble or quartz countertop
- Dark grey vanity cabinet
- Large wall mirror
- Modern globe vanity lights
- White ceramic sink
Equipment Required
- Power drill
- Level
- Jigsaw (to cut sink hole)
- Measuring tape
- Wrench set
DIY Instructions
- Measure the total length of your wall from the corner to the end of the toilet area.
- Order a custom countertop that matches this length with a notch for the toilet tank.
- Install the vanity cabinet first and ensure it is level and secure.
- Place the countertop over the vanity and the toilet tank, checking for a flawless fit.
- Use a jigsaw to cut the opening for the sink if the countertop is not pre cut.
- Secure the countertop to the vanity with adhesive and small screws from below.
- Mount the sink into the opening and connect the faucet and drain lines.
- Hang the large mirror so it spans the width of the vanity and the toilet.
- Install the globe lights above the mirror to provide even illumination.
- Apply a bead of clear silicone along the back edge of the counter to prevent leaks.
16 Fluted Glass Partition for Privacy

Clear glass is great for space, but sometimes you want a bit of privacy in the shower. Fluted or ribbed glass provides a blurred effect while still letting light pass through. This layout uses a floor to ceiling fluted glass panel to separate the wet and dry areas.
Light wood floors and a matching vanity add a warm, organic feel to the room. A large window provides a view while the fluted glass keeps the shower area feeling secluded. This design balances the open look of glass with the comfort of a private enclosure.
Materials Required
- Fluted glass shower panel
- Metal floor and wall tracks
- Floating wood vanity
- Wood look waterproof flooring
- Minimalist chrome shower fixtures
Equipment Required
- Power drill
- Level
- Measuring tape
- Glass suction cups
- Silicone sealant
DIY Instructions
- Install the wood look waterproof flooring across the entire bathroom area.
- Secure the metal tracks to the floor and wall where the glass will sit.
- Use a level to ensure the tracks are perfectly straight so the glass does not lean.
- Carefully slide the fluted glass panel into the tracks with the help of a friend.
- Tighten the set screws in the tracks to hold the glass firmly in place.
- Mount the floating wood vanity to the wall studs next to the glass partition.
- Install the sink and faucet, ensuring there is enough room to move around.
- Hook up the shower fixtures on the wall inside the glass enclosure.
- Apply a clear silicone sealant along the edges of the metal tracks to keep water in.
- Wipe down the fluted glass with a soft cloth to keep the texture looking sharp.
17 Vintage Blue Patterned Tile Floor
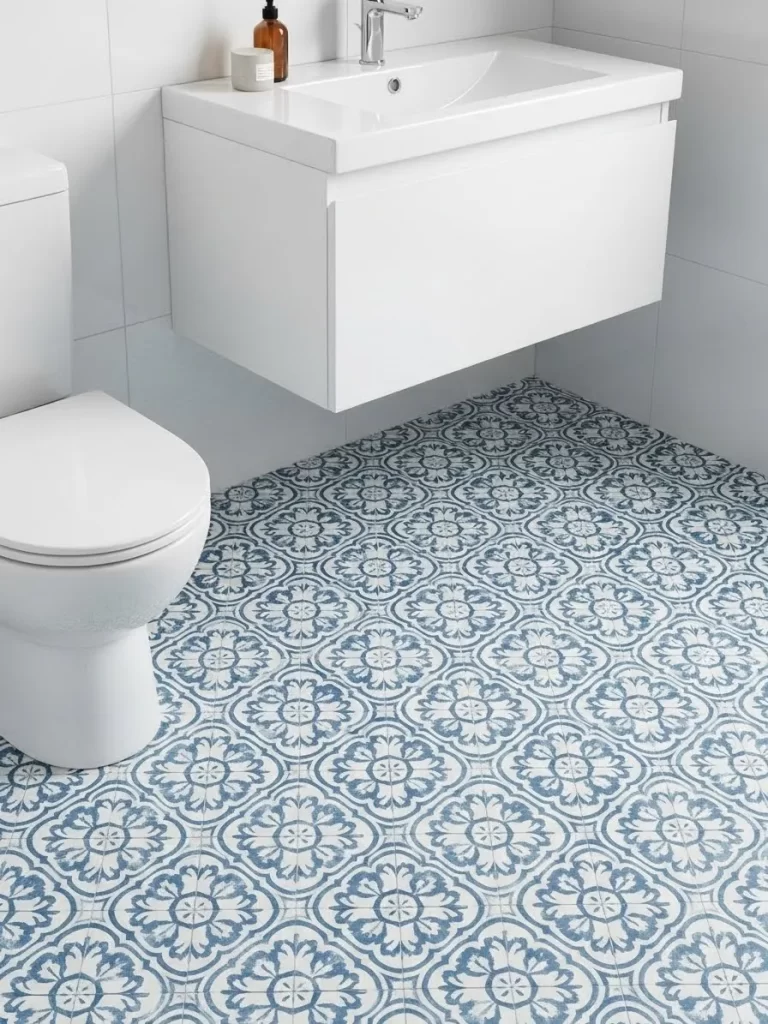
A busy floor pattern can actually make a small bathroom feel more intentional and designed. This room features blue and white patterned tiles that draw the eye downward and add character. The rest of the room stays simple with white walls and a floating white vanity.
The clean lines of the white fixtures allow the floor to be the main star of the show. A wall mounted toilet saves floor space and makes the pattern look more continuous. This layout is a great way to add a splash of personality without cluttering the walls.
Materials Required
- Patterned blue and white porcelain tiles
- Floating white vanity unit
- Wall mounted white toilet
- White wall tiles or paint
- Chrome bathroom fixtures
Equipment Required
- Tile cutter
- Notched trowel
- Grout float
- Power drill
- Level
DIY Instructions
- Start by laying the patterned tiles in the center of the room and work outward.
- Use spacers to keep the pattern aligned and the grout lines even.
- Install the wall mounted toilet tank behind the wall or use a compact model.
- Secure the white floating vanity to the wall studs at a comfortable height.
- Mount the sink onto the vanity and connect the chrome faucet.
- Paint the walls a crisp white or install large white subway tiles.
- Grout the floor tiles with a light grey color to complement the blue pattern.
- Install the toilet bowl onto the wall bolts and check that it is level.
- Add a simple mirror above the vanity to reflect the bright walls.
- Seal the floor with a high quality tile sealer to protect the blue pattern.
18 Grey Scale Mosaic and Floating Vanity
Mosaic tiles create a textured, high end look that works beautifully in small showers. This design uses tiny grey and white tiles to cover the back wall and floor. A dark wood floating vanity with under cabinet lighting adds a modern touch.
The wall mounted toilet keeps the floor area clear, making the room feel more spacious. Strategic recessed lights in the ceiling provide a bright and even wash over the mosaic surfaces. This layout uses fine details to create a sense of luxury in a compact footprint.
Materials Required
- Grey and white mosaic tile sheets
- Dark wood floating vanity
- Wall mounted white toilet
- LED under cabinet light strip
- Recessed ceiling lights
Equipment Required
- Notched trowel
- Rubber grout float
- Power drill
- Level
- Wire strippers
DIY Instructions
- Apply thin set mortar to the shower wall and press the mosaic sheets into place.
- Use a grout float to push light grey grout into all the small joints.
- Install the mosaic tiles on the floor to create a seamless transition into the shower.
- Mount the floating vanity to the wall studs and ensure it is completely level.
- Attach the LED light strip to the bottom of the vanity for a soft floor glow.
- Secure the wall mounted toilet to the hidden frame inside the wall.
- Install the recessed lights in the ceiling to provide bright, overhead illumination.
- Connect the plumbing for the sink and the wall mounted shower head.
- Wipe the mosaic tiles with a damp sponge to remove any grout haze.
- Apply a clear sealant to the wood vanity to protect it from shower steam.
19 Hidden Pocket Door and Dark Textured Walls
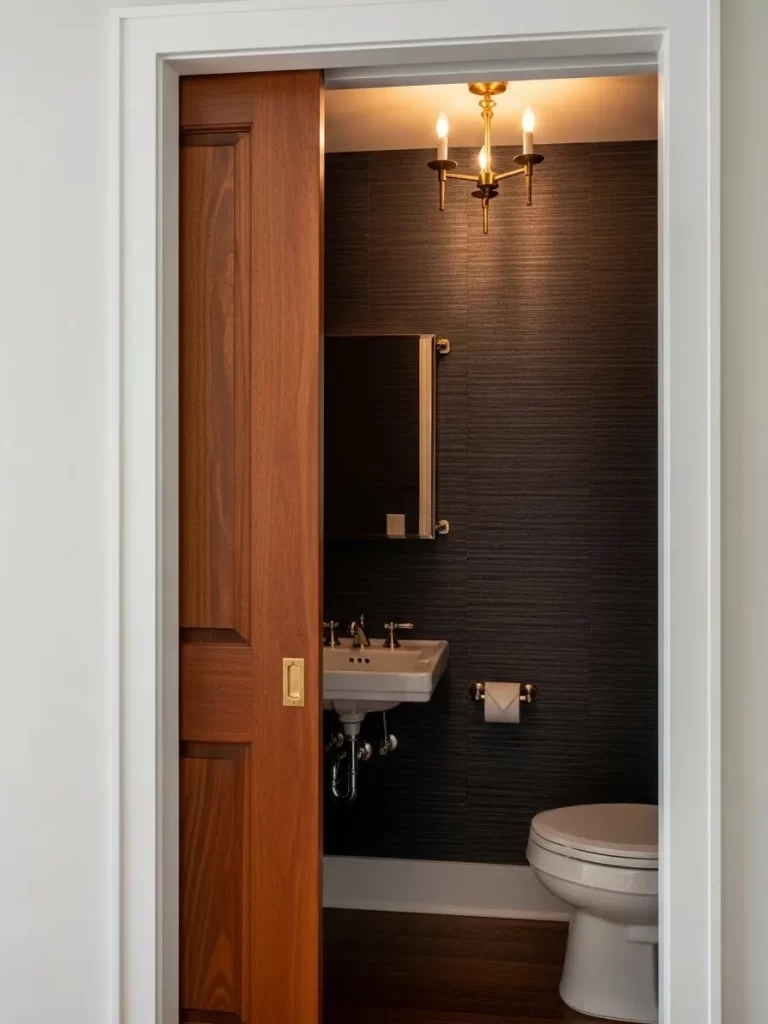
Pocket doors are the ultimate space savers because they disappear entirely into the wall. This layout features a rich wood pocket door that opens to a moody, dark grey bathroom. The dark horizontal texture on the walls adds a sense of width to the narrow room.
A small wall mounted sink and toilet keep the floor open and easy to navigate. A vintage brass chandelier provides a warm and inviting light that contrasts with the dark walls. This design is excellent for creating a hidden, spa like powder room.
Materials Required
- Pocket door frame kit and wood door
- Dark grey textured wallpaper or plaster
- Wall mounted white sink
- Brass vintage chandelier
- Brass plumbing fixtures
Equipment Required
- Reciprocating saw
- Power drill
- Level
- Wallpaper paste and brush
- Screwdriver set
DIY Instructions
- Open the wall between two rooms and install the pocket door frame kit.
- Hang the wood door on the track and ensure it slides smoothly into the wall.
- Close the wall with drywall and apply the dark textured wallpaper or plaster.
- Mount the small white sink to the wall using heavy duty anchors.
- Install the brass faucet and exposed trap for a stylish, vintage look.
- Secure the toilet to the floor or wall, depending on your model.
- Hang the brass chandelier from the center of the ceiling.
- Install a small, framed mirror above the sink to reflect the warm light.
- Add brass towel hooks and a toilet paper holder to match the theme.
- Test the pocket door one last time to make sure it clears all the new fixtures.
20 Luxury Spa Bath with Slat Wall and Stones
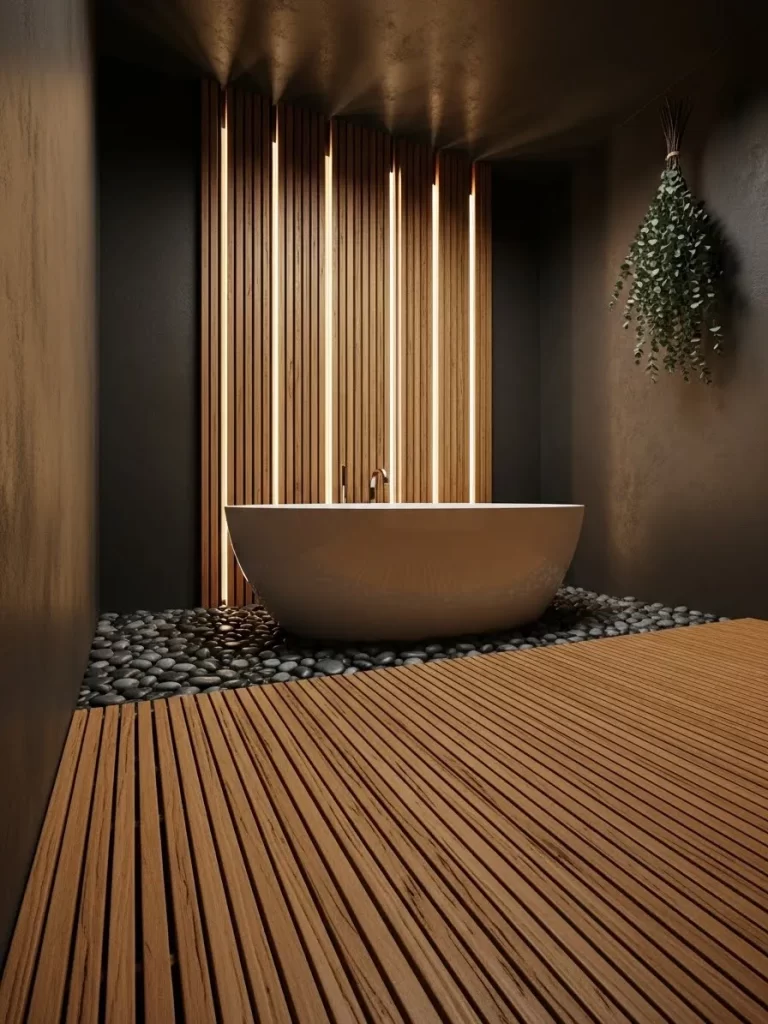
You do not need a large room to have a luxury soaking tub. This layout features a freestanding white tub set against a wall of vertical wood slats. Smooth black river stones surround the base of the tub to create a natural, spa like feel.
Hidden lights behind the wood slats create a dramatic and relaxing atmosphere. A wooden slat floor in the foreground provides a warm place to step after a bath. This design focuses on texture and mood to make a small bathroom feel like a high end retreat.
Materials Required
- Freestanding white soaking tub
- Vertical wood slats
- Black river stones
- LED light strips
- Wooden slat floor panels
Equipment Required
- Level
- Power drill
- Measuring tape
- Construction adhesive
- Caulk gun
DIY Instructions
- Install the vertical wood slats on the back wall, leaving small gaps for the light to shine through.
- Place the LED light strips behind the slats before you secure them to the wall.
- Position the freestanding tub in front of the slat wall and connect the plumbing.
- Pour the black river stones around the base of the tub to hide the drain pipes.
- Lay the wooden slat floor panels in the area leading up to the tub.
- Install a floor mounted tub filler faucet for a clean and modern look.
- Use construction adhesive to keep the wall slats from moving or warping.
- Apply a waterproof sealant to all the wood surfaces to prevent mold.
- Hang a bunch of dried eucalyptus on the wall to add a fresh scent.
- Dim the lights and check that the LED glow is even and relaxing.
21 Minimalist White Bathroom with Recessed Niches
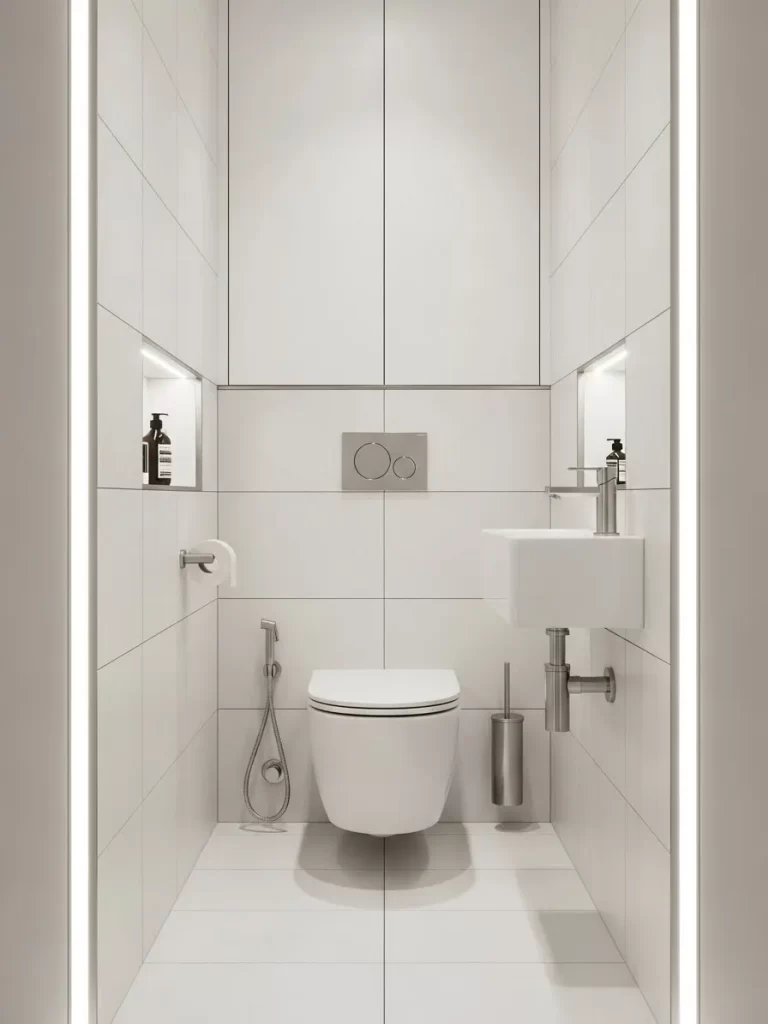
A purely white color palette is the ultimate trick for making a narrow space feel infinite. This layout features large white wall tiles that are completely aligned for a clean, grid like appearance. Two recessed wall niches on opposite sides provide balanced storage while maintaining a flat wall surface.
Strategic LED lighting inside the niches and along the wall edges adds depth without taking up space. A compact wall mounted sink and toilet keep the floor area completely clear and easy to clean. The monochromatic look is broken only by sleek chrome plumbing fixtures for a high tech finish.
Materials Required
- Large white square porcelain tiles
- Pre fabricated recessed wall niche boxes
- LED strip lighting with waterproof housing
- Compact wall mounted ceramic sink
- Matching wall mounted toilet
Equipment Required
- Tile saw
- Laser level
- Power drill with masonry bits
- Notched trowel
- Caulking gun
DIY Instructions
- Plan the placement of your wall mounted toilet and sink to ensure they align with existing plumbing lines.
- Cut openings into the wall between studs to install the pre fabricated recessed niche boxes.
- Apply a thorough layer of waterproofing membrane to the entire wall and inside the niches.
- Install the large white tiles from the center of the wall outward to ensure a symmetrical pattern.
- Carefully tile inside the niches, ensuring the corners are sharp and the grout lines match the main wall.
- Mount the LED light strips along the top edges of the niches and vertically along the main wall corners.
- Secure the wall mounted sink and toilet using heavy duty bolts anchored directly into the wall framing.
- Apply white grout to all tile joints and wipe away the excess with a damp sponge.
- Install the chrome faucet and toilet flush plate to match the minimalist theme.
- Seal the edges around the sink and toilet with white silicone to create a seamless finish.
22 Library Style Powder Room with Dark Blue Walls
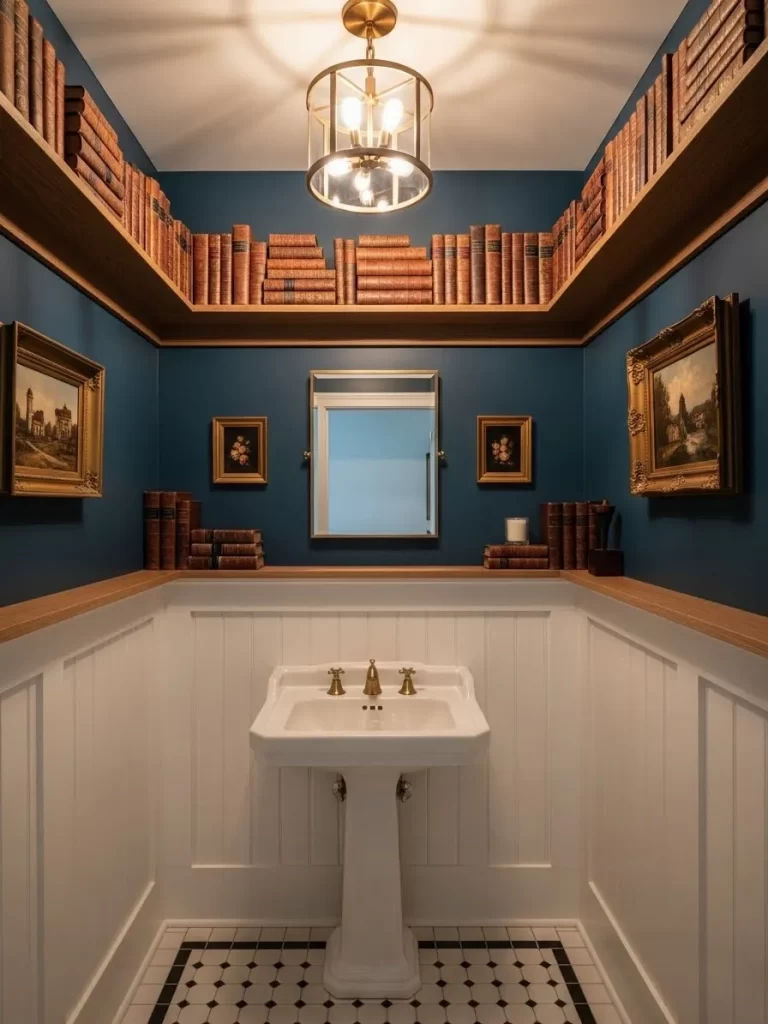
Who says a small bathroom cannot be a sanctuary for book lovers? This creative layout uses high reaching wooden shelves to hold a collection of books. The deep blue walls provide a dramatic backdrop that makes the white beadboard paneling pop.
Vintage style framed artwork on the walls adds a touch of classic sophistication. A pedestal sink with brass fixtures maintains a traditional look while saving valuable floor space. The black and white mosaic floor adds a final layer of texture that ties the entire room together.
Materials Required
- Deep navy blue interior paint
- White beadboard wall paneling
- Custom built wooden shelving units
- Traditional pedestal sink with brass faucet
- Black and white octagon mosaic tiles
Equipment Required
- Miter saw
- Power drill
- Paint roller and brushes
- Level
- Brad nailer
DIY Instructions
- Install the mosaic floor tiles and finish with white grout to establish a classic base.
- Attach the white beadboard paneling to the lower half of the walls using a brad nailer and adhesive.
- Apply two coats of deep navy blue paint to the upper half of the walls and the ceiling.
- Build wooden U shaped shelves that wrap around the top of the room to hold your book collection.
- Secure the shelves into the wall studs using heavy duty brackets for maximum safety.
- Mount the pedestal sink to the floor and wall, ensuring all brass plumbing is neatly connected.
- Install a classic lantern style pendant light in the center of the ceiling.
- Hang framed artwork on the blue walls, using a level to keep them completely straight.
- Apply a protective wood sealant to the library shelves to prevent warping from humidity.
- Finish by arranging your books and a few small decorative items on the high shelves.
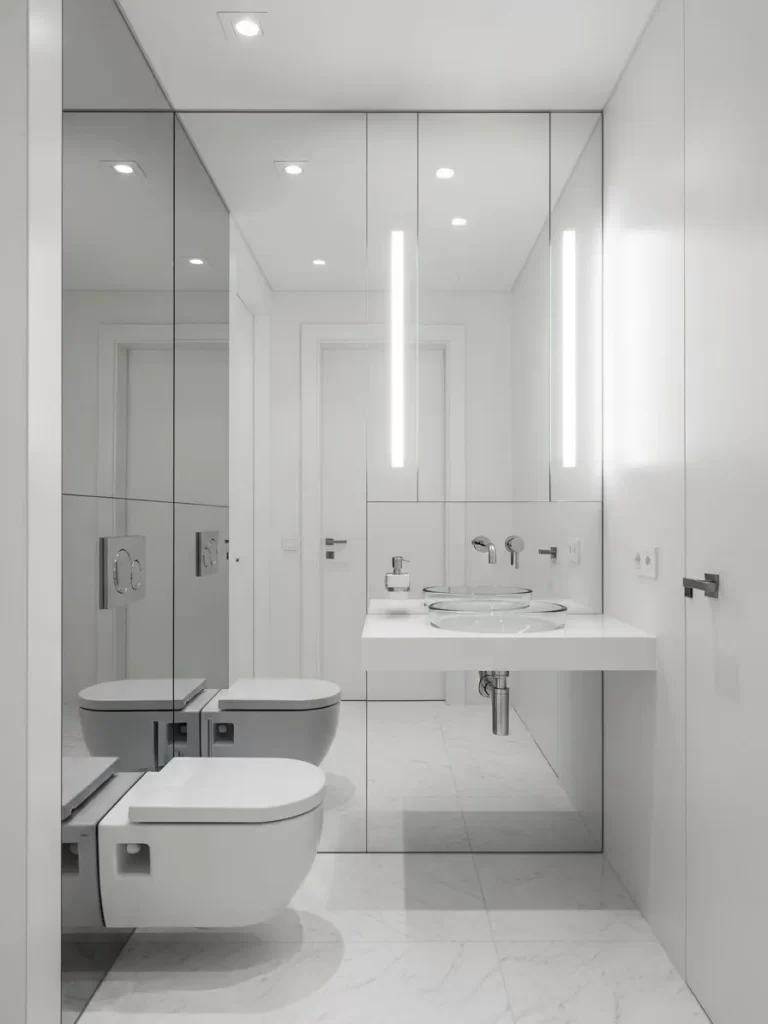
23 Futuristic All Mirror Infinite Vanity
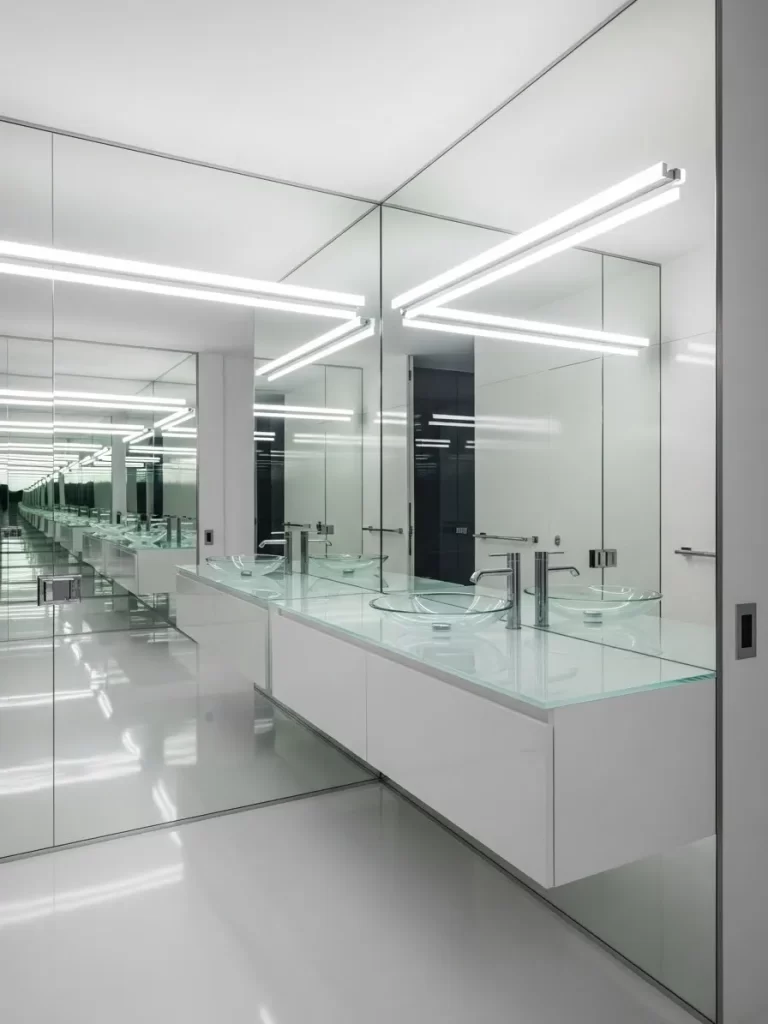
If you want to completely erase the boundaries of a small room, this all mirror design is the answer. Every wall surface is covered in high quality mirror panels that reflect each other to create an infinite visual loop. The long floating vanity features a glass top and transparent vessel sinks to maintain the invisible look.
Continuous linear LED lights run along the ceiling and walls, providing a bright, shadow free environment. This layout is excellent for ultra modern homes where a bold, high tech aesthetic is desired. It makes even the narrowest vanity area feel like a vast, open gallery.
Materials Required
- Custom sized floor to ceiling mirror panels
- Mirror safe mastic adhesive
- Floating vanity unit with glass top
- Transparent glass vessel sinks
- Long linear LED light bars
Equipment Required
- Glass suction cup lifters
- Laser level
- Caulking gun
- Power drill with glass bits
- Measuring tape
DIY Instructions
- Prepare the walls by ensuring they are completely flat and clean for maximum mirror adhesion.
- Install a support ledge along the bottom of the wall to hold the weight of the large mirror panels.
- Apply mirror mastic to the back of the first panel and use suction cups to press it into place.
- Repeat the process for all walls, ensuring the seams between mirrors are as tight as possible.
- Carefully drill through the mirrors using specialized diamond bits to mount the vanity and plumbing.
- Secure the floating vanity frame to the wall studs behind the mirrors using long bolts.
- Place the glass vanity top and the transparent sinks into position and connect the faucets.
- Mount the linear LED light bars along the ceiling corners to create long lines of light.
- Use a clear, mirror safe silicone to seal any gaps between the vanity and the glass walls.
- Polish every surface with a high quality glass cleaner to achieve the flawless infinite reflection.
24 Moody Dark Wood and Brass Powder Room
Dark colors can create a sense of extreme luxury and intimacy in a small powder room. This design features rich, dark stained wood for the vanity and textured charcoal walls. Brass wall sconces and matching plumbing fixtures provide a warm, golden glow against the dark surfaces.
A large frameless mirror with hidden backlighting adds a layer of depth and soft illumination. The floating vanity keeps the floor space open, making the room feel more breathable despite the dark tones. This layout is a masterclass in using high end materials to make a small space feel intentional.
Materials Required
- Dark stained wood vanity cabinet
- Charcoal grey textured wall plaster or paint
- Brass wall mounted sconces
- Brass faucet and towel ring
- Large frameless mirror with LED backlight
Equipment Required
- Trowel
- Power drill
- Level
- Measuring tape
- Electrical wire strippers
DIY Instructions
- Apply the charcoal textured plaster to the walls, using a trowel to create a natural finish.
- Mount the dark wood floating vanity to the wall studs at a height that is comfortable for users.
- Install the integrated sink and connect the brass wall mounted faucet.
- Mark the positions for the brass sconces on either side of the vanity area and install the wiring.
- Secure the sconces to the wall and choose warm toned bulbs to enhance the brass finish.
- Mount the large frameless mirror directly above the vanity using a heavy duty bracket.
- Connect the LED backlight behind the mirror to a wall switch for a dramatic effect.
- Add a brass towel ring and toilet paper holder to match the rest of the fixtures.
- Use a dark colored sealant around the sink and vanity to blend in with the charcoal walls.
- Place a small bottle of soap on the vanity to complete the luxury hotel feel.
25 Mid Century Modern Wood and Terrazzo Layout
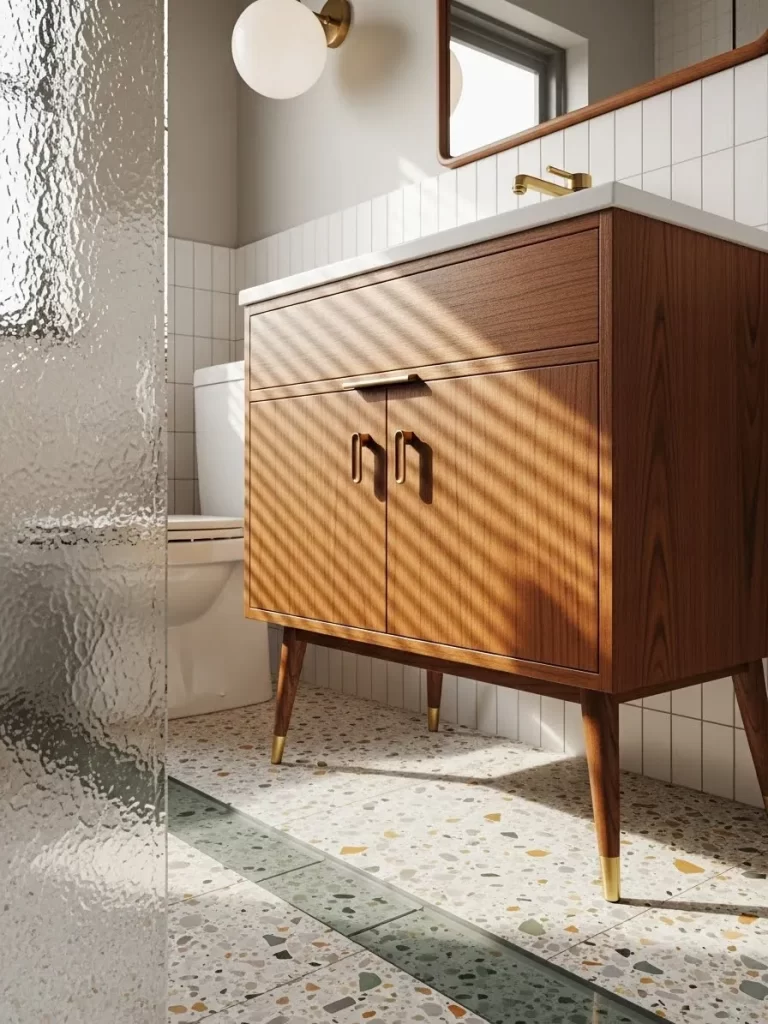
Warm wood tones and playful patterns can make a small bathroom feel incredibly inviting. This layout features a mid century style wood vanity with tapered legs that keep the floor visible. The floor is finished in a vibrant terrazzo tile that adds a splash of color and retro charm.
Vertical white wall tiles provide a clean and bright backdrop that helps the wood grain stand out. A globe style wall light and brass faucet add a touch of vintage elegance to the modern setup. The frosted glass shower partition provides privacy while still allowing natural light to flow through.
Materials Required
- Mid century style wood vanity with tapered legs
- Terrazzo patterned floor tiles
- Vertical white subway tiles
- Globe wall sconce with brass base
- Brass faucet and hardware
Equipment Required
- Tile cutter
- Power drill
- Level
- Notched trowel
- Measuring tape
DIY Instructions
- Install the terrazzo floor tiles using a neutral grout color to let the pattern be the star.
- Apply mortar to the walls and install the white subway tiles in a vertical stack pattern.
- Assemble the wood vanity and position it in the center of the wall space.
- Secure the vanity to the wall for extra stability, even though it has legs.
- Install the white sink and the brass faucet, ensuring all connections are tight.
- Mount the globe wall light directly above the mirror for a focused and warm glow.
- Hang a thin framed wood or brass mirror to match the mid century theme.
- Grout the wall tiles with a crisp white color to maintain a bright and airy feel.
- Install a frosted glass panel for the shower area using minimalist metal tracks.
- Seal all joints between the vanity, floor, and wall with a high quality clear silicone.
26 Dramatic Marble Slabs and Minimalist Shower

When you use large scale patterns in a small room, it creates a sense of grand design. This shower is lined with massive white marble slabs that feature bold, dramatic grey veining. A single sheet of clear glass separates the shower, allowing the beautiful stone to be seen.
Sleek matte black fixtures provide a modern contrast to the traditional marble look. The floor uses matching marble tiles to create a seamless transition that stretches the room. This layout is excellent for anyone who wants a high end, luxury spa feeling in their own home.
Materials Required
- Large format marble look porcelain slabs
- Matching marble floor tiles
- Frameless clear glass shower panel
- Matte black rainfall showerhead and controls
- High strength tile adhesive
Equipment Required
- Large scale tile cutter
- Heavy duty suction cups
- Level
- Notched trowel
- Caulking gun
DIY Instructions
- Prepare the shower walls by applying a thick layer of professional waterproofing membrane.
- Measure your wall space and carefully cut the large marble slabs to fit the height of the ceiling.
- Apply a generous amount of high strength adhesive to the wall and the back of each slab.
- Use heavy duty suction cups to lift and press the slabs into place, ensuring the patterns align.
- Install the matching marble floor tiles, making sure they slope correctly toward the drain.
- Mount the matte black showerhead and controls through the pre drilled holes in the marble.
- Secure the clear glass partition to the wall and floor using small minimalist black clips.
- Apply a color matched grout to the few seams between the slabs for a seamless look.
- Use a black or clear silicone to seal the edges where the glass meets the marble walls.
- Buff the marble surfaces with a dry cloth to remove any installation fingerprints or dust.
27 Sage Green Herringbone Shower with Classic Vanity
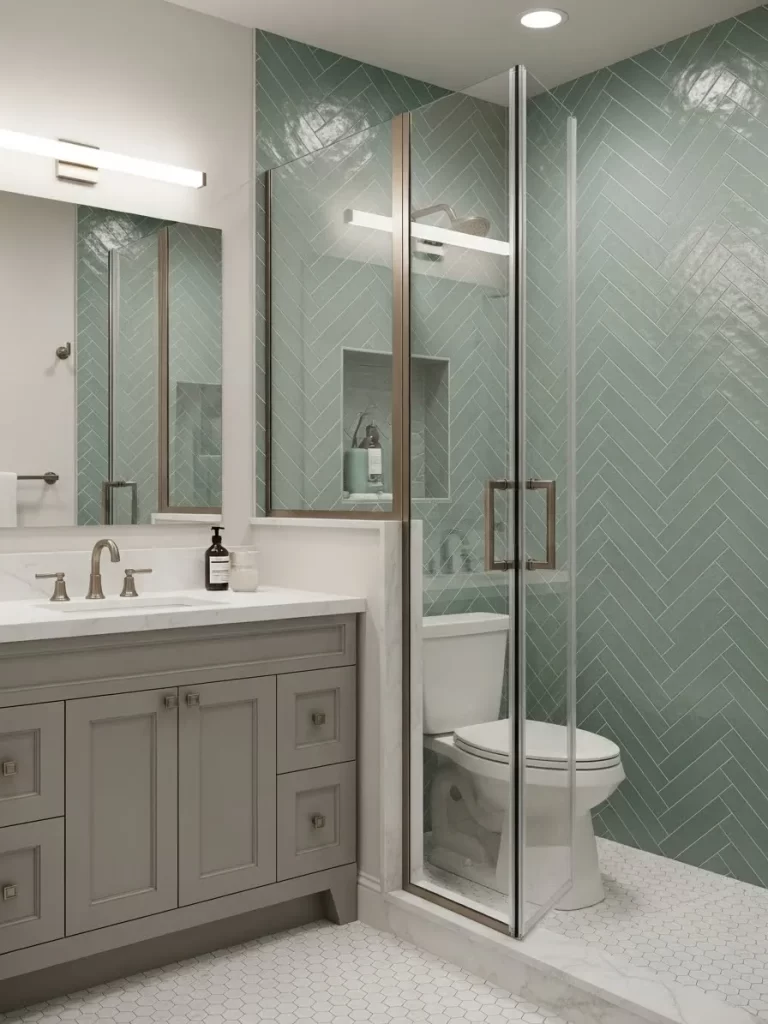
Herringbone tile patterns are excellent for adding visual interest and a sense of movement to small spaces. This shower features sage green tiles in a classic V shape pattern that draws the eye upward. The rest of the room stays neutral with a traditional grey vanity and a marble top.
A glass shower door with black framing adds a modern touch to the otherwise classic design. The white hexagon floor tiles provide a subtle texture that does not compete with the herringbone walls. This layout is a suitable blend of modern color and timeless tile techniques.
Materials Required
- Sage green subway tiles
- White small hexagon floor tiles
- Traditional grey vanity with marble top
- Black framed glass shower door
- Modern brass faucet and hardware
Equipment Required
- Tile saw with angle guide
- Laser level
- Notched trowel
- Rubber grout float
- Power drill
DIY Instructions
- Establish a level starting line at the bottom of the shower wall to ensure the pattern stays straight.
- Apply mortar and set the sage green tiles at a 45 degree angle to create the herringbone look.
- Use a tile saw to carefully cut the edge tiles where they meet the corners and the ceiling.
- Install the small white hexagon tiles on the floor, using spacers to keep the pattern consistent.
- Assemble and secure the grey vanity to the wall studs next to the shower area.
- Mount the marble countertop and the sink, then install the brass faucet for a warm contrast.
- Secure the black framed glass shower door to the tiled wall using the provided metal tracks.
- Grout the sage green tiles with a light grey or white color to make the pattern stand out.
- Apply a waterproof sealant to the marble vanity top to prevent future staining.
- Seal the base of the shower and the vanity edges with clear silicone to keep water contained.
28 Sculptural Arched Vanity Niche
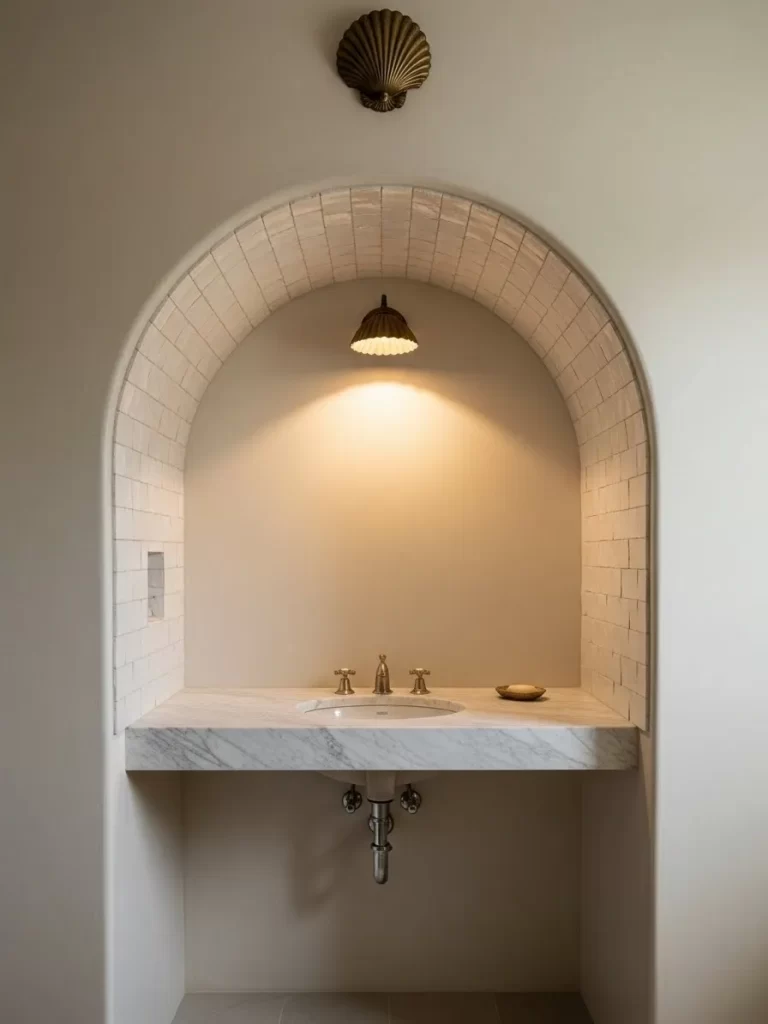
An arched wall niche can turn a simple vanity into a beautiful architectural focal point. This design features a deep arch lined with small white tiles that add texture and soft reflections. The thick marble floating vanity provides a solid and luxurious place for the integrated sink.
A single vintage style shell sconce is mounted inside the arch to provide focused lighting. The clean white walls around the arch keep the space feeling open and airy. This layout is a fantastic way to add character and custom craftsmanship to a small bathroom.
Materials Required
- Thick marble slab for floating vanity
- Small white square ceramic tiles
- Pre formed arch framing kit
- Vintage brass shell style wall sconce
- High quality white interior paint
Equipment Required
- Power drill with masonry bits
- Heavy duty steel wall brackets
- Level
- Notched trowel
- Electrical wire strippers
DIY Instructions
- Install the pre formed arch framing kit into your wall studs to create the curved shape.
- Apply drywall over the framing and finish the seams to create a smooth surface for tiling.
- Apply mortar to the inside of the arch and press the small white tiles into place, following the curve.
- Measure and mark the height for your thick marble vanity inside the arched niche.
- Bolt the heavy duty steel brackets into the wall studs and slide the marble slab onto them.
- Install the sink and the brass faucet, ensuring all plumbing is hidden behind the marble.
- Mount the brass shell sconce to the center of the arch ceiling to provide a soft glow.
- Paint the surrounding walls with a high quality white paint to make the arch stand out.
- Apply white grout to the tiles inside the arch and wipe away the excess for a clean finish.
- Seal the marble vanity top with a protective coating to keep it looking brand new.
29 Minimalist Sage Green Vertical Tile Bathroom
Vertical tiles are a smart design choice for making a room with a low ceiling feel much taller. This layout features sage green tiles stacked vertically from floor to ceiling for a clean and modern look. A narrow fluted wood vanity adds a touch of organic texture and saves space.
Two long linear wall lights provide even illumination and emphasize the vertical lines of the tile. The large skylight overhead floods the room with natural light, making the green tones look vibrant. This design focuses on simple shapes and soft colors to create a peaceful environment.
Materials Required
- Vertical format sage green subway tiles
- Narrow fluted wood vanity unit
- Two long linear LED wall sconces
- White ceramic vessel sink
- Copper or brass faucet fixtures
Equipment Required
- Tile saw
- Laser level
- Power drill
- Notched trowel
- Measuring tape
DIY Instructions
- Use a laser level to mark a completely vertical starting line on the back wall.
- Apply mortar and install the sage green tiles in a vertical stack pattern to create height.
- Continue the tiling across all three walls of the vanity area for a consistent look.
- Mount the narrow fluted wood vanity to the wall studs, keeping it centered under the skylight.
- Install the white vessel sink on top and connect the copper faucet to the wall pipes.
- Position the two linear wall lights on either side of where the mirror will be placed.
- Secure the lights to the wall and choose bulbs that provide a soft daylight glow.
- Grout the tiles with a matching green or light grey color to make the vertical lines subtle.
- Hang a simple frameless mirror at eye level to reflect the light from the skylight.
- Seal the edges of the vanity and the tile corners with a high quality clear silicone.
30 Spa Like Laundry and Bath with Wicker Baskets
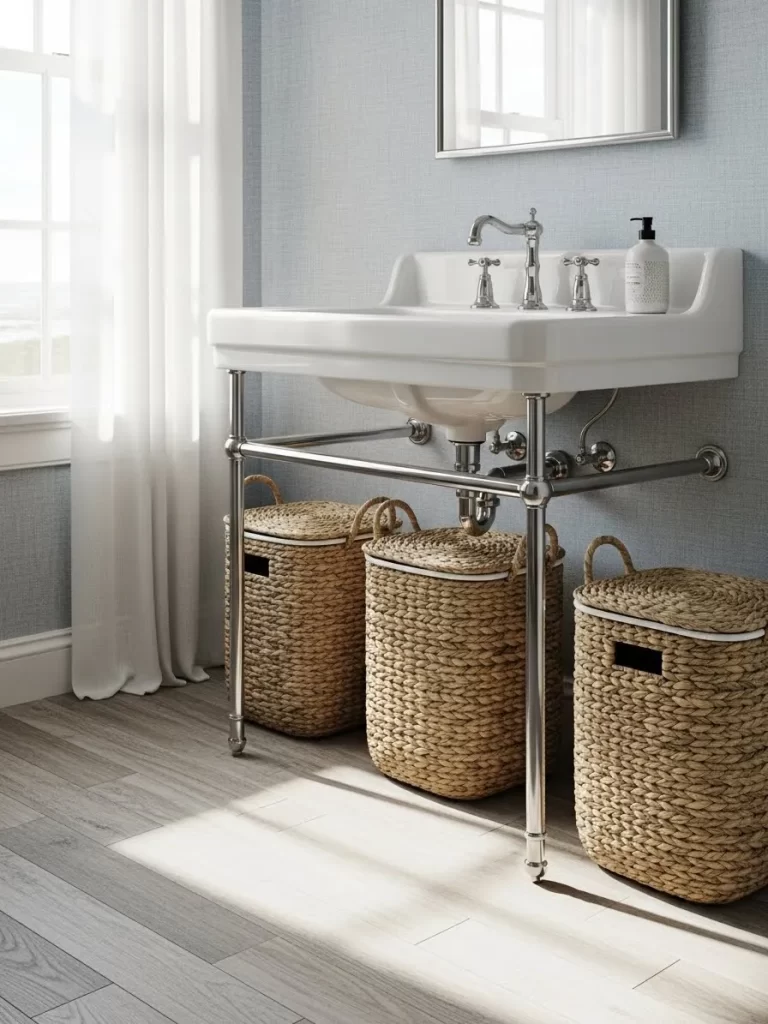
Combining storage and style is essential for keeping a small bathroom functional. This layout uses a traditional pedestal sink with chrome legs to keep the floor area looking open. Three large matching wicker baskets are placed underneath to provide hidden storage for laundry.
The soft blue grey textured wallpaper adds a layer of warmth and sophistication to the walls. Large windows allow plenty of natural light to reach every corner of the room. This setup proves that you can have plenty of storage without the need for bulky cabinets.
Materials Required
- Traditional wide top pedestal sink with chrome legs
- Three large matching wicker baskets with lids
- Blue grey textured waterproof wallpaper
- Chrome faucet and wall mounted plumbing traps
- Wood look waterproof floor tiles
Equipment Required
- Wallpaper paste and brush
- Power drill
- Level
- Wrench set
- Measuring tape
DIY Instructions
- Install the wood look floor tiles across the room to create a warm and durable base.
- Apply the textured blue grey wallpaper to the main wall, ensuring there are no air bubbles.
- Position the pedestal sink and mark the mounting points for the chrome support legs.
- Drill into the floor and wall to secure the sink and legs firmly in place.
- Connect the chrome faucet and the stylish exposed drain pipe under the sink.
- Measure the open space under the sink to ensure your wicker baskets will fit comfortably.
- Place the three wicker baskets side by side on the floor to fill the empty space.
- Add fabric liners to the inside of the baskets to protect your linens from the wicker.
- Hang a simple silver framed mirror above the sink to match the chrome fixtures.
- Finish the room with long white curtains to provide privacy while still letting in light.
31 Navy Vanity with Marble and Mirror Accents
Dark cabinetry brings an air of sophistication to even the smallest bathroom settings. This floating navy vanity features elegant gold pulls that catch the light beautifully. The marble backsplash provides a luxurious texture that lightens the overall mood of the room.
Polished mirror strips at the base create a unique floating illusion. This clever trick adds depth and reflects the clean floor tiling. It is a smart way to mix high end materials while maintaining a clean and modern silhouette.
Materials Required
- Navy blue floating vanity cabinet
- Polished gold cabinet handles
- Marble look porcelain tiles
- Mirror trim adhesive strips
- High strength wall anchors
Equipment Required
- Power drill
- Measuring tape
- Leveling tool
- Caulk gun
- Soft microfiber cloth
DIY Instructions
- Find the wall studs to ensure your floating vanity has a strong foundation.
- Measure your preferred sink height and mark a level line across the wall area.
- Drill pilot holes into the studs and secure the heavy duty mounting brackets firmly.
- Lift the navy vanity onto the brackets and screw it into place from the inside.
- Attach the gold handles to the drawer fronts using a screwdriver for a snug fit.
- Clean the wall area above the vanity and apply the marble tiles using thin set mortar.
- Grout the marble tiles with a matching white shade to create a seamless backsplash.
- Peel the backing off the mirror trim strips and apply them to the base of the cabinet.
- Press the mirror strips firmly for one minute to ensure the adhesive bonds well.
- Wipe down the mirror and gold hardware to remove any fingerprints or dust.
32 Scalloped Tile Backsplash and Patterned Wallpaper
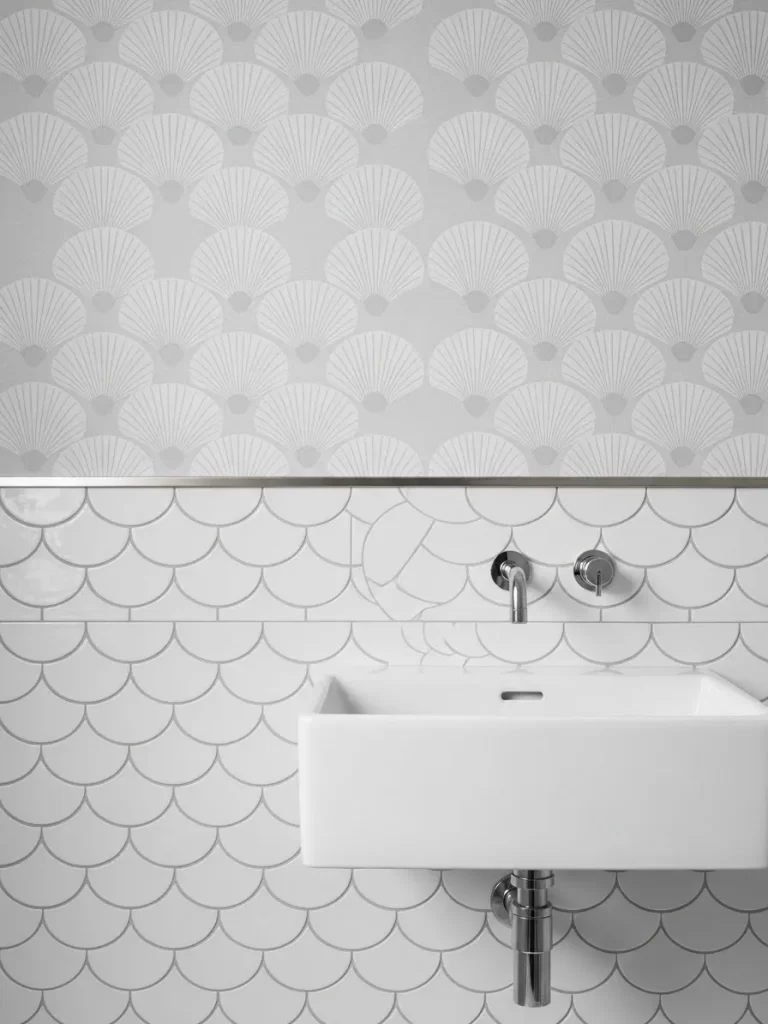
Textures can work together to create a playful and inviting atmosphere in tight spaces. This design pairs white scalloped tiles with a subtle shell patterned wallpaper. The combination adds visual height and character without feeling too busy or crowded.
A wall mounted square sink keeps the floor area open and easy to maintain. Small chrome fixtures provide a modern touch that complements the cool white tones. This layout is a wonderful example of using simple shapes to build a custom look.
Materials Required
- White scalloped ceramic tiles
- Shell patterned waterproof wallpaper
- Wall mounted ceramic basin
- Chrome faucet and drain kit
- Waterproof wallpaper adhesive
Equipment Required
- Notched trowel
- Grout float
- Utility knife
- Level
- Paint roller
DIY Instructions
- Measure the wall area above the sink to determine how much wallpaper you need.
- Apply the waterproof adhesive to the top half of the wall using a paint roller.
- Smooth the shell wallpaper onto the wall, removing any air bubbles with a flat tool.
- Install a metal trim piece horizontally to create a clean border for the tiles.
- Apply tile mortar to the lower wall and set the scalloped tiles in rows.
- Use a level to check that your tile rows are completely straight as you work.
- Let the tiles set for a day before applying a crisp white grout.
- Wipe the tile surfaces with a damp sponge to remove any hazy residue.
- Mount the sink brackets into the wall studs and secure the ceramic basin.
- Connect the chrome faucet and seal the gap behind the sink with white silicone.
33 High Gloss Green Ceiling and Checkered Floor

Bold colors can transform a small powder room into a high fashion statement piece. This layout features a stunning high gloss emerald green ceiling that reflects a crystal chandelier. The classic black and white checkered floor provides a timeless foundation.
Floor to ceiling mirrors on the side walls make the narrow hallway feel like a grand gallery. The white pedestal sink keeps the focus on the surrounding patterns and rich colors. It is a daring design that uses reflection to hide the actual size of the room.
Materials Required
- High gloss emerald green interior paint
- Black and white marble floor tiles
- Traditional white pedestal sink
- Multi tier crystal chandelier
- Large frameless mirror panels
Equipment Required
- Paint sprayer or high quality roller
- Tile saw
- Laser level
- Power drill
- Suction cup lifters
DIY Instructions
- Sand the ceiling until it is completely smooth to prepare for the high gloss finish.
- Apply a primer and two coats of emerald green paint using a sprayer for a glass like look.
- Lay the black and white floor tiles in a diagonal diamond pattern to stretch the room.
- Grout the floor with a dark charcoal shade to keep the checkered lines sharp.
- Measure the side walls and order custom cut mirror panels to fit exactly.
- Apply mirror mastic to the walls and press the large glass panels into place.
- Install the electrical box in the center of the ceiling for the new chandelier.
- Assemble the crystal fixture and hang it securely, ensuring it is at a safe height.
- Mount the pedestal sink to the floor and wall using the provided hardware.
- Clean the mirrors and the gloss ceiling with a specialized cleaner for maximum shine.
34 Minimalist Vanity with Fluted Pendant Light

Simplicity is key when you want to create a calm and functional bathroom environment. This design features a dark wood vanity topped with a thick white integrated sink. A fluted glass pendant light with brass accents provides a soft and elegant glow.
The wall mounted brass faucet keeps the counter space clear for a clean and tidy look. Neutral white walls allow the textures of the wood and glass to take center stage. This layout proves that a few high quality pieces are better than a lot of clutter.
Materials Required
- Dark wood floating vanity
- Thick white resin integrated sink
- Fluted glass pendant light with brass rod
- Wall mounted brass faucet kit
- Modern round vanity mirror
Equipment Required
- Power drill
- Level
- Wire strippers
- Caulking gun
- Measuring tape
DIY Instructions
- Mark the wall studs and mount the floating vanity at your desired comfort height.
- Secure the thick resin sink onto the vanity base using a strong adhesive.
- Measure the distance from the ceiling for the pendant light to hang beside the mirror.
- Turn off the power and connect the fluted glass light fixture to the ceiling wires.
- Install the brass faucet into the wall mounted pipes, ensuring all seals are watertight.
- Hang the round mirror at eye level, centering it over the white sink basin.
- Apply a thin bead of clear silicone where the sink meets the wall surface.
- Place a few simple accessories like a glass soap dispenser on the counter.
- Clean the brass hardware with a soft cloth to keep the metallic shine bright.
- Test the light and faucet to ensure your minimalist retreat is ready for use.
35 Multi Tier Chrome Towel Rack and Navy Tile
Maximizing storage in a small bathroom often requires thinking about the vertical space. This design uses a large chrome hotel style towel rack to keep clean linens organized and dry. The deep navy subway tiles on the lower wall add a sense of luxury and depth.
Two globe wall sconces provide bright and even lighting on either side of the towel rack. The white upper walls and white toilet keep the room feeling balanced and airy. It is a practical layout that brings the feel of a high end hotel into your home.
Materials Required
- Multi tier chrome towel rack with hooks
- Navy blue subway wall tiles
- Two globe style wall sconces
- White ceramic wall mounted toilet
- White tile trim pieces
Equipment Required
- Power drill with tile bits
- Level
- Measuring tape
- Screwdriver
- Grout float
DIY Instructions
- Install the navy subway tiles on the lower third of the wall using a brick pattern.
- Add a white tile trim along the top edge of the navy section for a clean finish.
- Mark the mounting holes for the towel rack on the white upper wall section.
- Use a level to ensure the rack will be straight before you start drilling.
- Secure the chrome towel rack into the wall studs using the included heavy duty screws.
- Position the globe sconces on either side of the rack and connect the wiring.
- Mount the white toilet to the wall or floor and ensure the plumbing is tight.
- Apply a dark blue grout to the navy tiles to create a seamless color block.
- Hang fresh white towels on the different tiers of the chrome rack.
- Wipe down all chrome surfaces to remove any dust or fingerprints from the install.
36 Geometric 3D Tile Wall and Hidden Storage
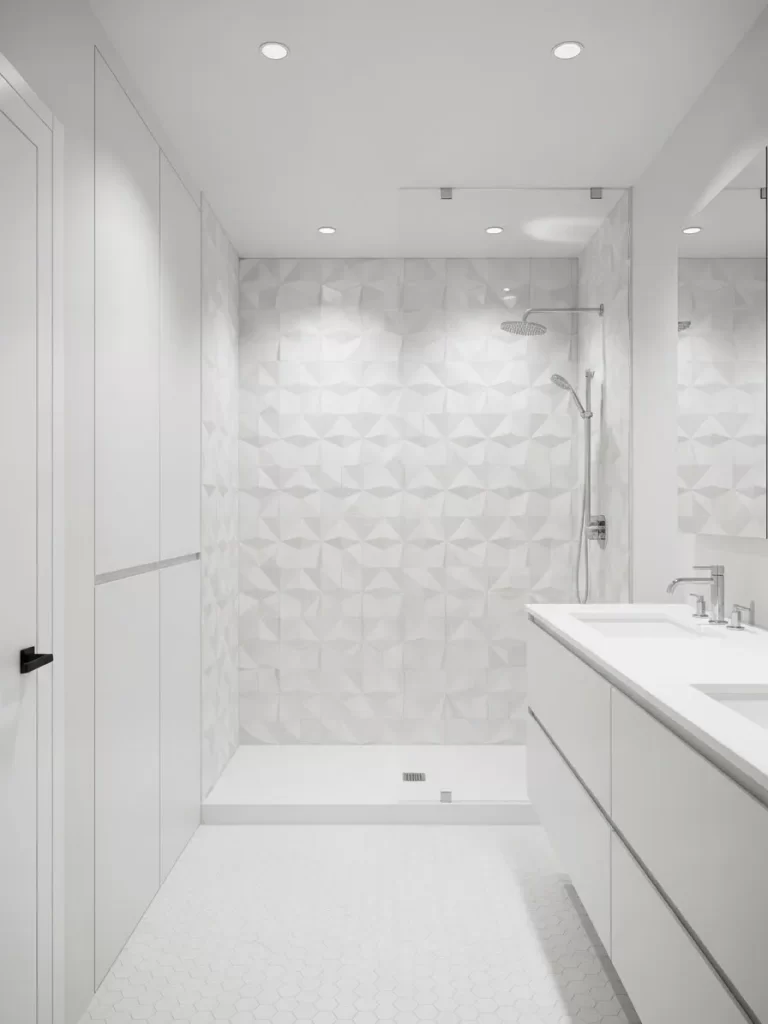
Adding texture to a white bathroom prevents it from looking cold or flat. This layout features a shower wall covered in 3D geometric tiles that catch the light at different angles. Large white floor to ceiling cabinets provide hidden storage for a clutter free look.
A frameless glass partition separates the shower while keeping the floor plan open. The small white hexagon floor tiles add a subtle pattern that feels soft underfoot. This design is all about using light and shadow to create a modern and spacious feel.
Materials Required
- 3D geometric white wall tiles
- Small white hexagon floor tiles
- Custom floor to ceiling white cabinets
- Frameless glass shower panel
- Matte silver shower fixtures
Equipment Required
- Tile saw
- Notched trowel
- Grout float
- Level
- Power drill
DIY Instructions
- Build or install the large white cabinets against the main wall to maximize storage.
- Apply the 3D geometric tiles to the back shower wall, checking for a level fit.
- Lay the white hexagon tiles on the floor, working from the shower drain outward.
- Grout the wall and floor tiles with a bright white shade for a clean look.
- Secure the frameless glass panel to the wall and floor using hidden metal clips.
- Mount the shower head and handle into the pre drilled holes in the 3D wall.
- Install the silver sink faucet and connect the vanity plumbing carefully.
- Apply a clear silicone sealant to all corners to prevent water from escaping.
- Polish the 3D tiles with a dry cloth to highlight the geometric shapes.
- Organize your toiletries inside the large cabinets to keep the counters empty.
37 Waffle Weave Shower Curtain and Gold Accents
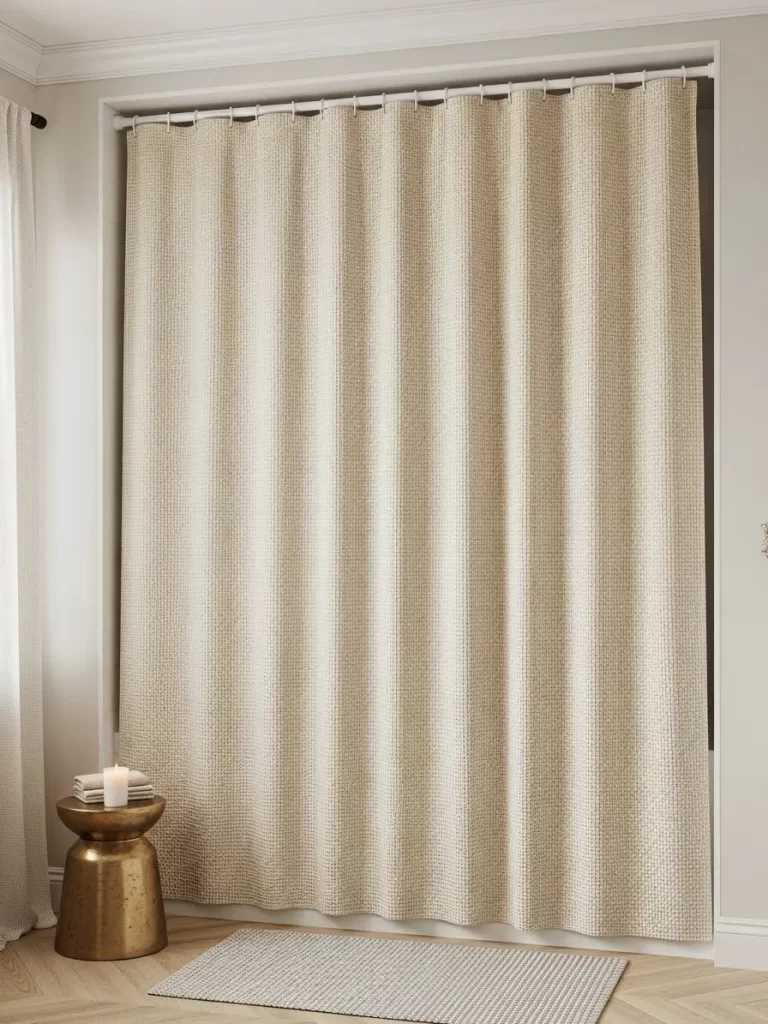
A simple fabric change can soften the hard lines of a tiled bathroom. This design uses a floor to ceiling waffle weave shower curtain to hide the tub and add cozy texture. A small gold stool serves as a stylish side table for candles or towels.
Neutral beige walls and light wood floors keep the atmosphere warm and relaxing. This layout is very easy to achieve and works well for renters who want to upgrade their space. It focuses on comfort and small luxury touches to create a spa like environment.
Materials Required
- Extra long white waffle weave shower curtain
- Tension shower rod or ceiling track
- Small gold metallic stool or side table
- Light beige interior paint
- Textured white floor rug
Equipment Required
- Paint roller
- Measuring tape
- Level (for the shower rod)
- Stepladder
- Steam iron
DIY Instructions
- Apply two coats of light beige paint to the walls for a warm and neutral base.
- Measure the height from the ceiling to the floor to find the right curtain length.
- Install a tension rod or a ceiling mounted track across the shower opening.
- Iron the waffle weave curtain to remove wrinkles before hanging it up.
- Slide the curtain rings onto the rod and hang the fabric so it just touches the floor.
- Place the gold stool next to the shower area for easy access to your items.
- Lay the textured white rug in front of the sink to add more comfort underfoot.
- Use a gold toned soap dispenser to match the stool and add a cohesive look.
- Light a candle on the gold stool to enhance the relaxing spa atmosphere.
- Adjust the curtain folds so they hang evenly and cover the entire shower area.
38 Golden Mosaic Shower Niche with LED Lighting

A well lit niche can turn basic shower storage into a stunning focal point. This design features a long recessed shelf lined with sparkling golden mosaic tiles. A hidden LED strip at the top of the niche makes the tiles shimmer and provides soft ambient light.
Dark grey textured wall tiles provide a moody contrast that makes the gold pop even more. This setup keeps your shampoo bottles organized and off the floor for a cleaner look. It is a high end detail that adds a lot of style to a small shower.
Materials Required
- Gold toned glass mosaic tile sheets
- Large format dark grey wall tiles
- Waterproof LED light strip
- Pre built shower niche box
- Epoxy grout in a gold or neutral shade
Equipment Required
- Reciprocating saw
- Notched trowel
- Grout float
- Silicone caulk gun
- Level
DIY Instructions
- Cut an opening in the shower wall between the studs to fit the niche box.
- Secure the niche box and apply a thick layer of waterproofing membrane to the seams.
- Install the large dark grey tiles on the surrounding walls, cutting them to fit the opening.
- Apply the gold mosaic sheets to the back and sides of the inside niche area.
- Grout the gold tiles with epoxy grout to ensure a long lasting and waterproof finish.
- Install a small channel at the top of the niche to hide the LED light strip.
- Connect the waterproof LED strip to a safe power source outside the shower zone.
- Seal the edges where the niche meets the wall tiles with a dark grey silicone.
- Wipe the gold mosaics with a soft cloth to remove any grout film and add shine.
- Arrange your favorite glass bottles in the niche to catch the light from the LED.
39 Rough Stone Sink in a Textured Dark Niche

Natural textures can bring a rugged beauty to a modern bathroom. This layout features a hand carved stone vessel sink set inside a deep wall niche. The back of the niche is lined with dark fluted stone that adds a strong vertical texture.
Two vertical LED light bars on the sides highlight the rough edges of the stone sink. The surrounding walls are finished in a smooth light grey plaster for a minimalist contrast. This design feels like a piece of art and is suitable for a unique powder room.
Materials Required
- Rough cut stone vessel sink
- Dark grey fluted stone wall panels
- Two vertical LED light bars
- Light grey waterproof wall plaster
- Minimalist wall mounted faucet
Equipment Required
- Heavy duty wall brackets
- Power drill with masonry bits
- Level
- Trowel
- Construction adhesive
DIY Instructions
- Build a deep recessed niche into the wall and line it with the fluted stone panels.
- Apply the light grey plaster to the rest of the walls for a smooth and clean finish.
- Install heavy duty brackets inside the niche to support the weight of the stone sink.
- Place the stone vessel sink onto the brackets and secure it with construction adhesive.
- Install the minimalist faucet into the wall pipes directly above the center of the sink.
- Mount the two vertical LED bars on the inner side walls of the niche.
- Connect the lighting to a wall switch and check for even illumination on the stone.
- Seal the drain hole in the stone sink with a high quality plumbing putty.
- Apply a stone sealer to the sink to prevent water stains and keep the natural color.
- Keep the niche area clear of clutter to allow the sculptural sink to be the focus.
40 Swivel LED Mirror and Vertical White Tiles
Modern technology can make a small bathroom much more functional for daily routines. This design features a round LED lit mirror on a swivel arm that can be moved to the suitable angle. The walls are covered in tall white tiles that make the ceiling feel much higher.
Sleek matte black plumbing fixtures provide a sharp and clean contrast against the white tiles. The built in wall shelf keeps essentials within reach without taking up counter space. This layout is efficient, bright, and excellent for a master bathroom with limited room.
Materials Required
- Swivel arm LED vanity mirror
- Vertical white subway tiles
- Matte black wall mounted faucet
- Recessed wall shelf unit
- White grout and sealer
Equipment Required
- Power drill
- Level
- Tile saw
- Measuring tape
- Screwdriver
DIY Instructions
- Install the white subway tiles vertically from the floor to the ceiling across the wall.
- Grout the tiles with white grout to create a seamless and bright surface.
- Mark the height for the swivel mirror so it is at eye level for the primary user.
- Drill into the wall studs and secure the swivel arm mirror using the provided bolts.
- Connect the LED mirror to the electrical box or plug it into a nearby outlet.
- Install the matte black faucet into the wall pipes above the sink area.
- Set the recessed shelf into the tiled wall to hold your soap and toothbrushes.
- Apply a bead of white silicone around the faucet and the shelf edges.
- Test the swivel arm to ensure the mirror moves freely without hitting the wall.
- Clean the mirror and the matte black fixtures with a soft cloth for a polished finish.
Key Takeaways
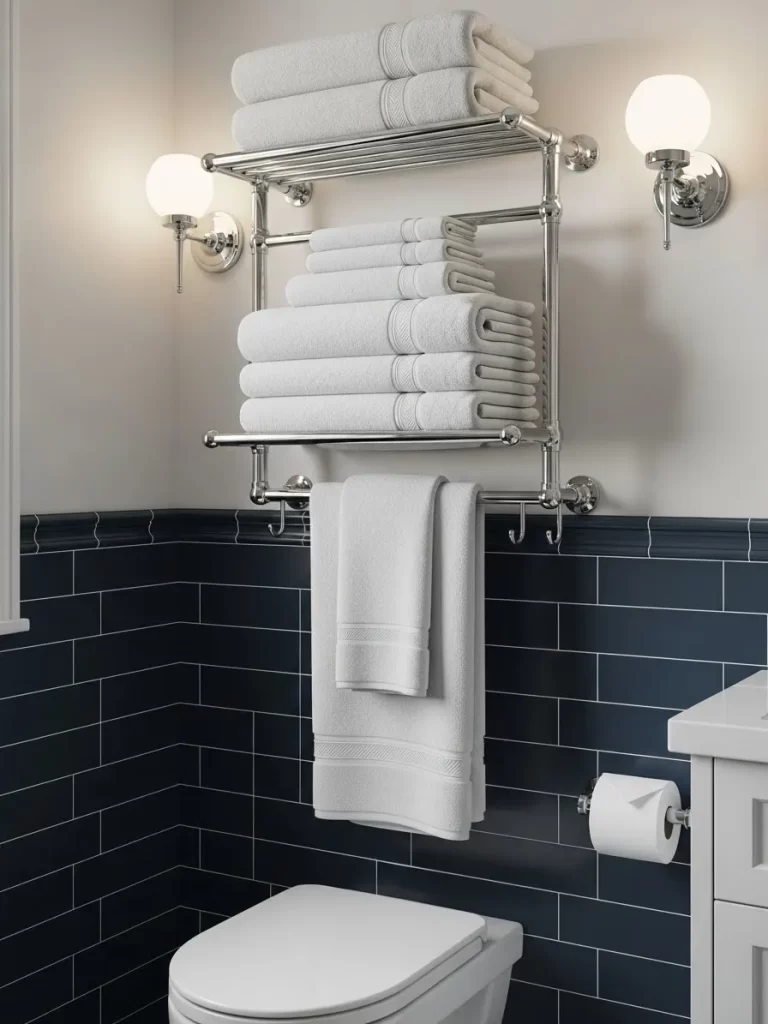
Vertical storage is your best friend in narrow rooms. Always look for empty wall space above the toilet or sink to add shelves or racks.
Lighter colors reflect more light and make walls feel distant. Use whites or soft pastels to open up the environment and prevent a closed in feeling.
Mirrors are a powerful tool for doubling your visual space. Consider a floor to ceiling mirror for the biggest impact on a cramped floor plan.
Floating vanities keep the floor visible and create an airy look. This simple change makes any small bathroom feel much wider and easier to clean.
Natural materials like wood and stone add warmth to hard tile surfaces. These textures prevent a small room from feeling cold or clinical.
Changing a small bathroom does not have to be a stressful task. You have seen forty different ways to bring light and style into your home. Each layout proves that size is just a number. Your choice of color and texture makes the real difference.
Try starting with one small project this weekend. You might change a faucet or add a floating shelf. These minor updates build confidence for larger changes later. Your home deserves to look its best no matter the square footage.
Take a moment to imagine how much better your morning routine will feel. A clean and organized space reduces stress every single day. We hope these designs give you the spark to start your own transformation. You have the tools and the steps to succeed.