This time of year, the days grow shorter and the air grows colder. In the Nordic countries, this turning of the season is met with a special kind of warmth. It is a season of light, nature, and deep, simple comfort. This is the heart of a Scandinavian Christmas.

Forget the clutter and the noise. This style is about creating a peaceful haven. It finds its beauty in natural materials like fresh pine, warm wood, and soft wool. It is about the gentle flicker of a candle and the joy of a handmade ornament. It is about creating a feeling of “hygge,” a deep sense of coziness and contentment.
Here, you will find 39 simple ideas to bring this calm and natural spirit into your own home. Each one comes with easy-to-follow instructions, showing you how to craft a meaningful and beautiful holiday space. Let’s begin.
1. Natural Evergreen Fireplace Garland

Bring the outdoors in with a beautiful, draping evergreen garland. This design celebrates the simple beauty of nature. Fresh fir branches mixed with the soft, silvery-green leaves of eucalyptus create a stunning texture. Pinecones and dried lotus pods add visual interest.
The garland’s asymmetrical drape over the mantelpiece feels organic and effortless. It’s a classic Scandinavian approach. The focus is on natural materials and a clean, uncluttered look. This decoration fills the room with the fresh scent of pine, truly setting a festive mood.
DIY Asymmetrical Evergreen Garland
You can make your own beautiful garland to hang over a fireplace or a doorway. Let’s do it step-by-step.
What You’ll Need:
- A long piece of thick rope, a little longer than your mantelpiece
- Green floral wire
- Many small branches of fresh greenery (like fir, pine, and eucalyptus)
- Some interesting extras like pinecones or dried seed pods
- Small, removable hooks to hang your garland
Step-by-Step Guide:
- Prepare Your Greenery: Cut your large branches into smaller, more manageable pieces, about 8-10 inches long.
- Make Small Bunches: Take a few pieces of your different greenery and arrange them into a small bouquet or bunch.
- Attach to the Rope: Place your first bunch onto the rope. Use the floral wire to wrap tightly around the stems and the rope, securing it in place. Don’t cut the wire.
- Layer the Next Bunch: Make another small bunch. Lay it over the stems of the first one, so the pretty leaves cover up the mechanics. Keep wrapping the same floral wire around these new stems and the rope.
- Keep Going: Continue this process—making a bunch, layering it, and wrapping it—until your rope is covered and looks full and lush.
- Add the Extras: Use small pieces of wire to attach your pinecones and seed pods in any empty spots.
- Hang It Up: Ask a grown-up to place the removable hooks on your mantel. Carefully drape your beautiful new garland for everyone to enjoy.
2. Whimsical Paper Star Window Display

Let your windows shine with a galaxy of paper stars. This is a beloved tradition in Sweden and other Nordic countries, where lighted stars, or “Julstjärna,” are hung in windows to brighten the long winter nights. The intricate folds and patterns of the paper create beautiful shadows and a soft, welcoming light.
Using stars of different sizes, patterns, and colors adds depth to the display. Grouping them together in a window creates a magical focal point. It’s a simple, elegant decoration that brings a sense of wonder and enchantment to your home, both inside and out.
DIY Simple 3D Paper Star
Making these folded stars is a fun project for a cozy afternoon.
What You’ll Need:
- Square pieces of paper (patterned scrapbook paper or even old book pages work well)
- Scissors
- A glue stick or clear tape
Step-by-Step Guide:
- Fold the Paper: Take one square piece of paper. Fold it in half to make a triangle. Unfold it. Then fold it in half the other way to make another triangle. Unfold it. You should have an “X” crease.
- Fold Again: Now, fold the paper in half to make a rectangle. Unfold it. Fold it in half the other way to make another rectangle. Unfold it. You should now have a star-shaped set of creases on your paper.
- Make the Cuts: Look at the creases that make a “plus” sign. Cut along each of these four lines, stopping about halfway to the center of the paper.
- Create the Points: Take one of the cuts you just made. You will see two flaps of paper. Fold one flap over to the center crease line to make a point. Do the same with the other flap. It should look like a kite shape.
- Glue the Points: Put a little glue on one of the flaps you just folded and press the other one on top of it. This creates one 3D point of your star. Do this for the other three cuts. You’ll have a star with four points.
- Make Another One: Do steps 1-5 again with another piece of square paper to make an identical four-pointed star.
- Combine Them: Put glue on the flat center of one star and place the other star on top, but twisted so all eight points are showing. Let it dry, and you have a beautiful 3D star!
3. Warm & Golden Beeswax Candles

Create a cozy and inviting atmosphere with the warm glow of beeswax candles. Their natural, honey-like scent and beautiful golden color are much warmer than regular white candles. In Scandinavian homes, candles are essential for creating “hygge,” a feeling of contentment and well-being.
Arranging candles of different heights and thicknesses adds visual interest. Grouping them on natural materials like rustic wood blocks and birch logs creates a beautiful, rustic centerpiece. The soft, flickering light makes any room feel instantly more calm and peaceful during the dark winter months.
DIY Rolled Beeswax Candles
You can make your own beautiful candles without melting any hot wax. It’s safe and fun!
What You’ll Need:
- Sheets of beeswax with a honeycomb pattern (you can find these at a craft store)
- Candle wicks, a few inches longer than the height of your beeswax sheet
- A hairdryer (optional)
Step-by-Step Guide:
- Warm the Wax: If your beeswax sheet is very stiff, you can gently warm it with a hairdryer for a few seconds to make it soft and easy to roll.
- Place the Wick: Lay your beeswax sheet flat. Take a piece of wick and lay it along one edge of the sheet. The wick should hang over the top and bottom a little bit.
- Start Rolling: Very carefully and tightly, press the edge of the beeswax sheet over the wick. You want the wick to be right in the center.
- Keep It Straight: Continue to roll the sheet up as straight and evenly as you can. Use your fingertips to press gently as you roll to make sure it’s nice and compact.
- Seal the Edge: When you get to the end of the sheet, gently press the final edge down so it sticks to the candle. The warmth from your hands should be enough to seal it.
- Trim the Wick: Use scissors to trim the wick at the top of your candle, leaving about a half-inch sticking out. Your beautiful, handmade candle is ready to be lit by a grown-up!
4. Fragrant Dried Citrus & Spice Garland

Fill your home with the classic scents of Christmas using a beautiful, all-natural garland. This decoration is a feast for the senses. Thinly sliced oranges and grapefruits are dried in the oven until they look like stained glass. The vibrant colors are stunning when they catch the light.
Stringing the citrus wheels with cinnamon sticks and star anise adds a warm, spicy fragrance. This type of simple, handcrafted ornament is very common in Scandinavian tradition. It’s a wonderful way to use natural materials to create something that looks, feels, and smells like the holiday season.
DIY Dried Orange Garland
Let’s make a garland that looks beautiful and makes your house smell amazing.
What You’ll Need:
- 2-3 oranges or other citrus fruits
- A sharp knife (a job for a grown-up)
- Paper towels
- A baking sheet with a wire rack
- Twine or string and a large needle
- Cinnamon sticks and star anise (optional)
Step-by-Step Guide:
- Slice the Fruit: Ask a grown-up to slice the oranges into thin, even rounds, about 1/4 inch thick.
- Dry the Slices: Pat the orange slices with a paper towel to get rid of as much juice as you can. This helps them dry faster.
- Bake Them Low and Slow: Place the slices on a wire rack on a baking sheet. Bake them in the oven at a very low temperature (around 200°F or 100°C) for 2-3 hours. A grown-up should flip them over every 30 minutes. They are ready when they are dry and no longer sticky.
- Let Them Cool: Let the orange slices cool down completely.
- String Them Up: Thread your needle with a long piece of twine. Carefully push the needle through the fleshy part of an orange slice. Then, you can thread on a cinnamon stick or a star anise. Keep making a pattern of orange, spice, orange, spice until your garland is the length you want.
- Hang and Enjoy: Hang your fragrant new garland in a window or on your Christmas tree.
5. Simple Clay & Salt Dough Ornaments

Embrace the beauty of handmade simplicity with charming clay ornaments. A key part of Scandinavian design is the appreciation for things that are crafted with care. These ornaments, made from simple air-dry clay or traditional salt dough, have a lovely, rustic feel.
Using cookie cutters in festive shapes is an easy way to start. You can also add texture by pressing stamps or natural elements like evergreen sprigs into the clay before it dries. Hung on a tree with simple twine, these ornaments are a testament to the idea that you don’t need glitter and gloss to make something beautiful.
DIY Salt Dough Ornaments
This is a classic craft that uses ingredients you already have in your kitchen. It’s like baking, but for decorating!
What You’ll Need:
- 4 cups of all-purpose flour
- 1 cup of table salt
- 1.5 cups of warm water
- A rolling pin
- Christmas cookie cutters
- A straw
- String or ribbon for hanging
Step-by-Step Guide:
- Mix the Dough: In a big bowl, mix the flour and salt together. Slowly stir in the warm water until a thick dough forms.
- Knead the Dough: Turn the dough out onto a floured surface and knead it with your hands for about 10 minutes, until it’s smooth and soft.
- Roll and Cut: Use your rolling pin to roll the dough out until it’s about 1/4 inch thick. Use your favorite cookie cutters to cut out different shapes.
- Don’t Forget the Hole: Use the end of a straw to poke a hole in the top of each ornament. This is where the string will go.
- Bake Your Ornaments: Place your shapes on a baking sheet. Ask a grown-up to bake them in the oven at 250°F or 120°C for about 2 hours, or until they are hard and completely dry.
- Cool and Decorate: Let the ornaments cool down completely. You can leave them plain for a natural look, or you can paint them.
- Add the String: Thread a piece of string or ribbon through the hole and tie a loop. Now they are ready to hang on your tree!
6. Serene All-White Winter Scene

Create a feeling of pure tranquility with an all-white decorating scheme. This look is inspired by the quiet beauty of a landscape covered in fresh snow. The key is to use different textures to keep the monochromatic palette interesting. A fluffy sheepskin rug, a chunky knit blanket, and delicate paper ornaments all add their own unique feel.
A bare-branch tree painted white is a striking alternative to a traditional green one. A simple wreath and little ceramic houses on the windowsill complete the peaceful scene. This serene and minimalist style turns your room into a calm winter sanctuary.
DIY White Branch Tree
Let’s make a beautiful, snowy-looking tree out of a fallen branch.
What You’ll Need:
- A large, interesting-looking tree branch that has fallen on the ground
- A bucket or large flower pot
- Some rocks or sand
- A can of white spray paint (or a bottle of white craft paint and a brush)
Step-by-Step Guide:
- Find the Right Branch: Go on a hunt in your backyard or a park for a cool branch that has lots of smaller twigs coming off it, like a mini tree.
- Clean It Up: Make sure your branch is clean and dry. Brush off any dirt or loose bark.
- Give It a Stand: Place the bottom of your branch into the bucket. Fill the bucket with rocks or sand, packing them in tightly all around the branch so it stands up straight and doesn’t wobble.
- Paint It White: In a well-ventilated area or outside, paint your entire branch white. If you are using spray paint, a grown-up should help. Make sure to get all the little twigs. Let it dry completely.
- Bring It Inside: Once it’s dry, you can bring your beautiful white tree inside. You can leave it bare for a very simple look, or you can hang a few lightweight, white ornaments on its branches.
7. Minimalist Bare Branch “Tree”

Challenge the traditional notion of a Christmas tree with this beautifully stark and simple alternative. A single, sculptural branch placed in a modern vase becomes a minimalist’s holiday centerpiece. This idea embodies the Scandinavian design principle of “less is more.”
The beauty of this decoration lies in the interesting, organic shape of the branch itself. A few carefully placed glass ornaments are all that’s needed to add a touch of festive sparkle. This is a sophisticated and artistic way to bring a touch of nature indoors, proving that holiday decor can be both simple and stunning.
DIY Minimalist Branch Tree
This is the simplest tree of all, and it’s very stylish.
What You’ll Need:
- One beautiful, interesting branch (look for one with a nice shape)
- A sturdy vase that is heavy enough so it won’t tip over
- A few lightweight Christmas ornaments
Step-by-Step Guide:
- Go on a Branch Hunt: The most important part is finding the branch. Look for one that has a pleasing shape. It could be twisty or have lots of little twigs.
- Clean Your Branch: Wipe your branch with a damp cloth to remove any dirt. Let it dry.
- Arrange It in the Vase: Place your branch in your vase. You might need to turn it a few times to find the angle that looks best.
- Add a Few Ornaments: This look is all about being simple. Choose just a few of your favorite ornaments—maybe 5 to 7—and hang them carefully on the branches. Space them out so the tree doesn’t look too crowded.
- Find the Perfect Spot: Place your beautiful, simple tree on a side table or in a corner where it can be admired. It’s a piece of natural art!
8. Modern Geometric Holiday Mobile

Add a touch of playful sophistication to your holiday decor with a modern mobile. This is a fresh and unexpected alternative to more traditional decorations. Inspired by the famous mobiles of Danish artists, this piece is all about balance, shape, and movement.
Simple geometric shapes—circles, diamonds, and stars—are cut from paper in a classic holiday palette of green, white, and gold. Hung from thin metal rods, the shapes gently spin and float in the air. It’s a captivating and artistic decoration that adds a light, airy, and modern feel to any room.
DIY Simple Paper Mobile
Let’s make a cool hanging decoration that moves.
What You’ll Need:
- A few sheets of colored cardstock paper (like green, white, and gold)
- A pencil and scissors
- A hole punch
- Thin string or thread
- One or two thin sticks, twigs, or metal rods
Step-by-Step Guide:
- Cut Your Shapes: On your paper, draw and cut out lots of different shapes. Make circles, stars, triangles, and diamonds. Make them in different sizes.
- Punch the Holes: Punch a small hole at the top of each paper shape.
- Tie on the Strings: Cut pieces of string in different lengths. Tie one end of a string to each paper shape.
- Create the Top Bar: Take your main stick. Tie a long piece of string to the very center of it. This is what you will use to hang your mobile.
- Attach Your Shapes: Take one of your shapes on a string and tie the other end to the stick. Tie another one on the other side of the stick.
- Find the Balance: This is the tricky, fun part. As you add shapes, the stick might start to tilt. You need to add another shape or slide one along the stick to make it balance and hang straight again.
- Add Another Level (Optional): You can tie another, smaller stick to a string hanging from your main stick to create a second level of hanging shapes.
- Hang and Watch: Hang your mobile near a window or vent where it can catch a little breeze and gently spin.
9. Minimalist Hoop Wreath with Greenery

Embrace a modern, airy take on the classic Christmas wreath. This minimalist design uses a simple metal or wooden hoop as its base. Instead of covering the entire ring, a beautiful spray of fresh greenery is attached to just one side.
The mix of textures, from feathery pine to smooth eucalyptus, creates a lovely, natural arrangement. The exposed part of the hoop adds a clean, graphic element to the design. A simple leather or ribbon loop for hanging completes the look. It’s a chic and understated piece that is both festive and stylish.
DIY Minimalist Hoop Wreath
Let’s make a modern wreath that looks very elegant and is easy to put together.
What You’ll Need:
- A metal or wooden embroidery hoop
- Green floral wire
- A few sprigs of your favorite greenery (eucalyptus, pine, and rosemary all look great)
- A piece of ribbon or leather cord for hanging
Step-by-Step Guide:
- Make a Small Bouquet: Take your sprigs of greenery and arrange them into a small, handsome bunch. Place your longest pieces in the back and shorter ones in the front.
- Attach to the Hoop: Lay your little bouquet against the side of the hoop.
- Wrap It Up: Take your floral wire and start wrapping it tightly around the stems of your greenery and the hoop. Go around 5 or 6 times until it feels very secure.
- Tuck and Secure: If any stems are sticking out, you can wrap them with more wire to keep them neat.
- Add the Hanger: Take your piece of ribbon. Loop it around the top of the hoop and tie a knot or a bow.
- Hang Your Wreath: Your beautiful, modern wreath is all done. You can hang it on a door, a wall, or in a window.
10. Moody & Monochromatic Black Table Setting

For a dramatic and daring holiday look, try a monochromatic black table setting. While it might seem unconventional, this style is incredibly chic and sophisticated. It creates a cozy, intimate atmosphere that makes candles and metallic accents truly stand out.
Black dishes, black glassware, and a black tablecloth create a deep, moody canvas. Gold or brass cutlery and candle holders add a necessary touch of warmth and shine. A small, simple evergreen tree in a dark vase serves as a centerpiece, its green needles a welcome touch of nature. This bold look is for those who love modern design and a bit of holiday drama.
DIY A Moody, Dark Table Setting
This is less of a craft and more about putting things together to create a dramatic look.
What You’ll Need:
- A dark tablecloth (black, charcoal gray, or dark navy)
- Dark-colored dishes and napkins
- Gold or brass-colored forks, spoons, and knives
- Lots of candles in dark or metallic holders
- A simple glass vase and a few pine branches
Step-by-Step Guide:
- Start with the Base: Cover your table with the dark tablecloth. This sets the moody tone.
- Set Each Place: At each seat, place your dark plates. You can fold a dark napkin and put it on top.
- Add Some Shine: Place your gold or brass-colored cutlery next to the plates. The metallic shine looks amazing against the dark colors.
- Create a Centerpiece: This should be simple. Place your pine branches in the vase and set it in the middle of the table.
- Bring in the Light: This is the most important part. Arrange lots of candles down the center of the table. Use candle holders of different heights to make it more interesting.
- Light the Candles: Just before your guests arrive, light all the candles. The room will be filled with a warm, flickering glow, and your dark, dramatic table will look incredibly cozy and inviting.
11. Whimsical Christmas Gnomes (Tomte)
")
Invite a little bit of Scandinavian folklore into your home with charming Christmas gnomes. In legend, these little figures, called “Tomte” or “Nisse,” are household spirits who protect the family. They bring a sense of playfulness and magic to your holiday decor.
Their tall, pointy red hats and fluffy white beards are their most famous features. Arranging them on natural elements like birch logs and moss makes them look right at home. These little guardians add a touch of whimsy and tradition to any shelf or tabletop display.
DIY Sock Gnome Instructions
You can make your very own gnome friend out of a sock. It’s easy and so much fun!
What You’ll Need:
- One clean sock (a fuzzy one is great)
- A small bag of uncooked rice or beans for filling
- A rubber band or a piece of string
- A small piece of faux fur for the beard
- A piece of felt for the hat
- A small wooden bead or pom-pom for the nose
- A hot glue gun (ask a grown-up to help with this)
Step-by-Step Guide:
- Fill the Body: Pour rice into the sock until it’s about two-thirds full. This will be the gnome’s body.
- Tie It Off: Squeeze the top of the sock to pack the rice down. Secure it tightly with a rubber band or string, right above the rice. You can trim off the extra sock fabric above the tie.
- Make the Beard: Cut a triangle shape out of the faux fur. The fur should point down, like a real beard. Use the hot glue gun to attach the beard to the front of the gnome’s body.
- Add the Nose: Glue the little wooden bead right on top of the beard, where a nose would be. It should look like the nose is peeking out from under the hat.
- Create the Hat: Take your piece of felt, roll it into a cone shape that fits on top of the gnome’s head, and glue the seam to hold it.
- Put on the Hat: Place the felt hat on your gnome, pulling it down so it just covers the top of the nose. A little dot of glue will keep it in place. Your gnome is ready to guard your house for Christmas!
12. Traditional Straw Yule Ornaments

Connect with age-old traditions using beautiful ornaments made of straw. For centuries, Scandinavian families have crafted decorations from the last harvest’s wheat or rye straw. These golden figures celebrate the end of the harvest and the hope for a good year to come.
The most famous of these is the Yule Goat, or “Julbock,” a symbol of the holidays. These intricate, woven ornaments look stunning against the dark wood of a wall or the green of a Christmas tree. They bring a deep sense of history and rustic charm to your celebrations.
DIY Simple Straw Star
Let’s make a classic straw ornament. It’s like weaving with sunshine.
What You’ll Need:
- A handful of natural drinking straws (paper ones can work too, but natural is best)
- A bowl of warm water
- Strong thread (red or white is traditional)
- Scissors
Step-by-Step Guide:
- Soak the Straws: Place your straws in the warm water for about 20-30 minutes. This makes them soft and flexible so they won’t break when you work with them.
- Cut Your Pieces: Take the straws out of the water and pat them dry. Cut 12 pieces that are all the exact same length. A good size to start with is 4 inches long.
- Make Two Squares: Lay out four straw pieces to make a square shape. Tie a tight knot with your thread at each corner to hold it together. Make a second square just like the first one.
- Join Them Together: Place one square directly on top of the other, but twisted so the points of the bottom square stick out between the sides of the top square. It should look like an 8-pointed star.
- Secure the Star: Use your thread to tightly wrap and tie the two squares together where they cross.
- Add a Hanger: Tie a loop of thread to one of the points of your star so you can hang it up. You’ve made a beautiful, traditional ornament!
13. Abundant Berry Wreath Centerpiece

Create a stunning and classic holiday table with a vibrant berry wreath. A large, simple wreath made entirely of bright red lingonberries (or cranberries) makes a powerful statement. The bold pop of color is festive and cheerful, especially on a crisp white tablecloth.
Placing tall, slim candles in the center of the wreath adds height and a warm, flickering light. The combination of the natural berries and the elegant glow of candlelight feels both rustic and refined. This centerpiece is a timeless way to bring the beauty of winter’s colors to your holiday feast.
DIY Simple Berry Wreath
Making a bright red wreath is a great way to add color to your table.
What You’ll Need:
- A wire wreath frame (you can find these at a craft store)
- Green floral wire
- Lots of faux berry branches (cranberries or holly berries work well)
- Wire cutters (ask a grown-up for help)
Step-by-Step Guide:
- Prepare Your Branches: Use the wire cutters to snip your large berry branches into smaller, more manageable clusters. Each piece should be about 5-6 inches long.
- Attach the First Bunch: Take one small cluster of berries and lay it on top of the wire frame. Use a piece of floral wire to wrap tightly around the stems and the frame, securing it in place.
- Cover the Stems: Take a second cluster of berries and place it just below the first one, making sure the berries cover the stems of the bunch before it. Secure this one with wire too.
- Keep Going: Continue this process, layering the berry clusters and wrapping them with wire. Keep all the branches pointing in the same direction as you go around the frame.
- Fluff and Fill: Once the whole frame is covered, look for any empty spots. You can tuck in extra small berry pieces to make it look full and round.
- Set the Table: Carefully place your finished wreath in the center of your table. You can place a few pillar candles in the middle to complete the look.
14. Edible Gingerbread Garland

Fill your kitchen with the warm, spicy scent of Christmas. A garland made of gingerbread cookies is a charming and delicious way to decorate. The simple, familiar shape of gingerbread men, strung together with twine, adds a playful and homemade feel to the room.
The detailed white icing brings the little figures to life. Hung against a clean, tiled wall, this edible art is a treat for all the senses. It’s a wonderful tradition that combines the joy of baking with the fun of decorating, making your kitchen the true heart of the holiday home.
DIY Gingerbread Garland
Let’s bake our decorations! This is so much fun, and your house will smell amazing.
What You’ll Need:
- Your favorite gingerbread cookie dough (store-bought or from a recipe)
- A gingerbread man cookie cutter
- A rolling pin
- A straw
- Baking sheets
- White icing in a piping bag with a small tip
- Twine or ribbon
Step-by-Step Guide:
- Roll and Cut: On a floured surface, roll out your gingerbread dough until it’s about 1/4 inch thick. Use your cookie cutter to cut out as many gingerbread men as you can.
- Make the Holes: Before you bake them, use a straw to poke a hole in each cookie. You can make one hole in a hand to hang them individually, or one in each hand to string them together.
- Bake Your Cookies: Place the cookies on a baking sheet and bake them according to your recipe. Let them cool completely.
- Time to Decorate: Once the cookies are cool, use your white icing to draw faces, buttons, and squiggles on their arms and legs. Let the icing dry and harden completely.
- String Them Up: Cut a long piece of twine. Carefully thread it through the holes in your cookies. You can tie a little knot after each cookie to keep them spaced apart if you like.
- Hang and Admire: Hang your delicious garland in the kitchen. Just try not to eat it all at once!
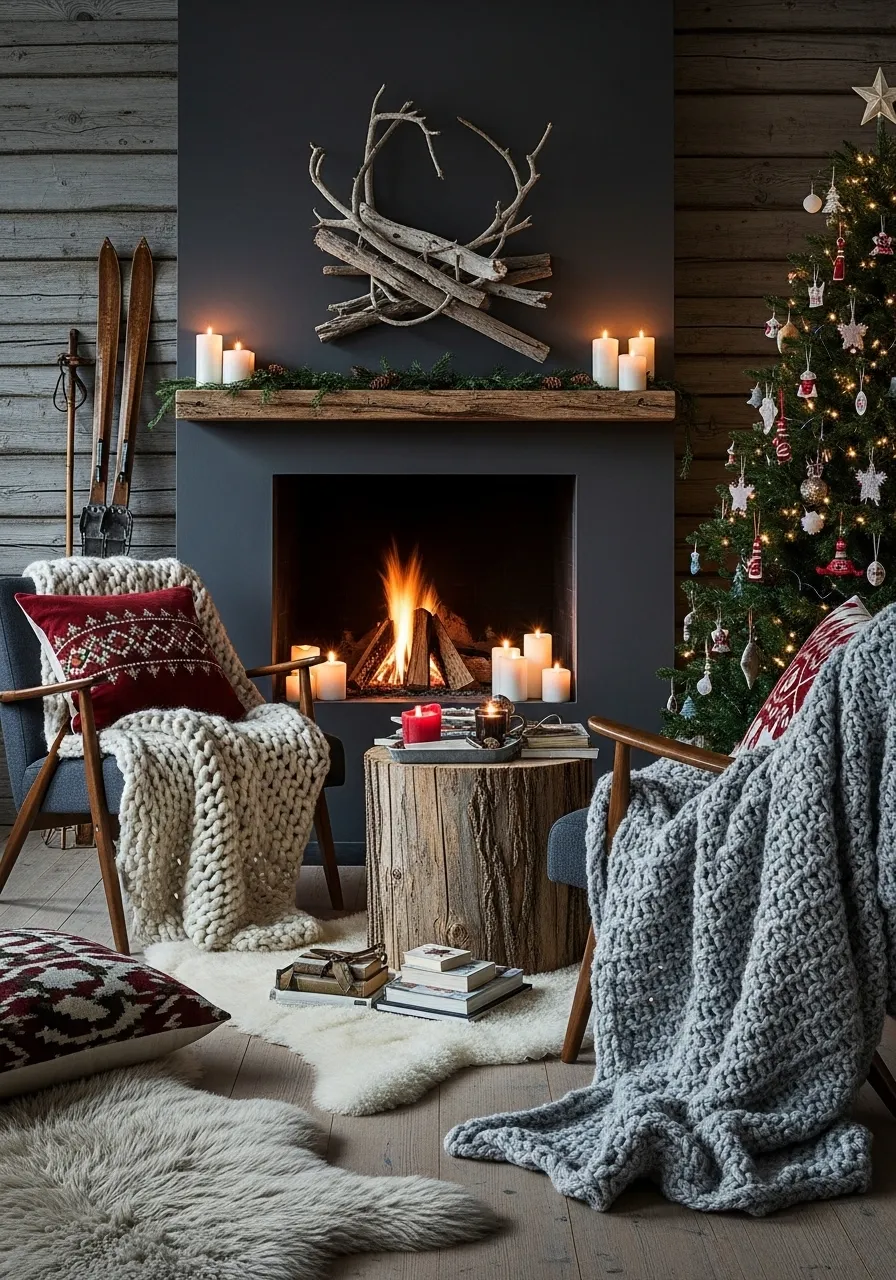
15. Cozy Cabin Fireplace Setting

Create the ultimate feeling of “hygge,” the Danish word for a mood of coziness and comfortable contentment. This look is all about texture, warmth, and natural materials. A roaring fire in a simple, modern fireplace is the heart of the scene.
Surround it with comfortable chairs piled high with chunky knit blankets and soft pillows. A sheepskin rug on the floor invites you to sit close to the warmth. Natural wood elements, like a tree stump side table and rustic wall art, complete the cozy cabin atmosphere. It’s a space that encourages you to slow down and savor the season.
DIY Driftwood Wall Art
Let’s make some rustic art for the wall, inspired by wood found on a beach.
What You’ll Need:
- A collection of small, dry sticks or driftwood pieces
- A hot glue gun (get a grown-up’s help)
- A piece of cardboard to protect your table
Step-by-Step Guide:
- Gather Your Sticks: Go on a walk and collect a bunch of small, interesting-looking sticks. They should all be dry. Try to find different thicknesses.
- Create a Base: Pick two of your thickest, straightest sticks. Lay them down parallel to each other, about a foot apart. This is the foundation of your sculpture.
- Start Building: Take another stick and put a dot of hot glue on each end. Place it across your two base sticks and hold it for a few seconds until the glue sets.
- Make a Pile: Keep adding more sticks, gluing them on top of each other in a crisscross pattern. It’s like building with Lincoln Logs! You want it to look like a messy, natural pile of wood.
- Add Antlers (Optional): The art in the picture has antler shapes. You can try to make these by finding Y-shaped sticks and gluing them so they point outwards from the main pile.
- Let It Dry: Once you are happy with the shape and size of your wood art, let the glue dry completely.
- Hang It Up: Ask a grown-up to help you hang your new rustic creation on the wall, perhaps over a doorway or mantel.
16. Minimalist Advent Candle Holder

Mark the peaceful passage of time leading up to Christmas with a modern Advent candle holder. The tradition involves lighting one candle on each of the four Sundays of Advent, creating a growing pool of light as the holiday approaches. This simple, linear design is a beautiful, understated way to honor that tradition.
Made of stone or ceramic in a neutral gray, the holder feels calm and grounded. It fits perfectly with a minimalist table setting of linen tablecloths and simple dishware. It is a quiet reminder to pause and reflect during a busy season, bringing a sense of peace to your home.
DIY Air-Dry Clay Advent Holder
You can make your own modern candle holder out of clay. No oven needed!
What You’ll Need:
- A block of air-dry clay (gray or white looks great)
- A rolling pin or a smooth bottle
- A ruler and a butter knife
- Four tall, thin taper candles
Step-by-Step Guide:
- Shape the Base: Take a good-sized chunk of clay and knead it until it’s soft. Roll it out into a long, rectangular block. You can use your ruler and butter knife to trim the sides and make them straight.
- Make the Candle Holes: Take one of your candles and gently but firmly press the bottom end into the clay where you want your first candle to go. Give it a little twist as you pull it out. This will make a hole that is the right size.
- Space Them Out: Make three more holes, spacing them out evenly along your clay block. Use your ruler to make sure they are in a nice, straight line.
- Let It Dry: This is the easy part. Just let your clay holder sit for a day or two until it is completely hard and dry. The package will tell you how long it takes.
- Add the Candles: Once it’s dry, you can place your four candles into the holes. Your beautiful, modern Advent holder is ready for the first Sunday of Advent.
17. A Simple ‘Fika’ Holiday Corner

Embrace the Swedish tradition of “fika” – taking a moment to slow down and enjoy a coffee and a treat. You can create a special holiday fika corner to make these moments even cozier. It doesn’t require grand decorations, just a few simple, thoughtful touches.
A wooden tray helps organize the space. Add a favorite festive mug, a jar of homemade gingerbread cookies, and a lit candle for warmth. A small vase with a single evergreen sprig brings in a touch of nature and the scent of pine. This little nook becomes a personal retreat for savoring the simple joys of the season.
DIY Your Fika Moment
This DIY isn’t about making one thing, but about putting things together to create a feeling. Let’s build a cozy corner.
What You’ll Need:
- A nice tray (wood or ceramic is lovely)
- Your favorite holiday mug
- A plate with a delicious Christmas treat (like a cookie or a pastry)
- A candle in a small holder
- A small jar or vase
- A little sprig of greenery from outside (like pine or fir)
Step-by-Step Guide:
- Find Your Spot: Choose a quiet corner in your kitchen or living room. This will be your special fika spot.
- Start with the Tray: Place your tray down. This is the base for your cozy scene.
- The Main Event: Brew your favorite warm drink and pour it into your special mug. Place the mug on the tray. Put your tasty treat on its plate right next to it.
- Add Some Green: Fill your small vase with a little water and place the evergreen sprig inside. Put it on the tray. It adds life and a fresh scent.
- Light a Candle: Carefully light your candle and place it on the tray. The gentle flame makes everything feel warmer and cozier.
- Time to Relax: Now, sit down and enjoy your fika. Take a deep breath, sip your drink, and savor your treat. You’ve created a small, peaceful holiday moment just for you.
18. Tabletop Evergreen Spiral

Create a simple yet captivating centerpiece with a spiral of fresh greenery. This design is beautifully minimalist and draws inspiration from the shapes of nature. A single, long branch of pine or fir is gently coiled on a dark tabletop, creating an elegant spiral.
The form naturally draws your eye towards the center, where a single beeswax candle stands. The candle’s warm, golden flame provides a focal point and a soft glow. This decoration is all about appreciating the simple beauty of a single branch and a single flame, making it a peaceful and meditative addition to your table.
DIY Evergreen Spiral Centerpiece
Let’s make a cool, swirly centerpiece for a table. It’s very easy!
What You’ll Need:
- A long, flexible piece of evergreen garland (real or fake will work)
- A small, sturdy candle holder with a candle
- Wire cutters (if you need to trim your garland)
Step-by-Step Guide:
- Clear Your Space: Start with a clean, empty table where you want to build your centerpiece.
- Place the Candle: Put your candle holder and candle right in the center of the space. This is the middle of your spiral.
- Start Coiling: Take one end of your evergreen garland. Place it near the candle holder.
- Wrap It Around: Begin to gently coil the garland around the candle holder. Keep the coil flat against the table.
- Keep Going: Continue to loop the garland around itself, making the spiral bigger and bigger with each loop. You can make the loops tight or loose, whatever you think looks best.
- Tuck the End: When you get to the end of your garland, simply tuck the tip underneath the coil next to it to hide it.
- Final Touches: Adjust the spiral so it looks nice and even. When you light the candle, its glow will light up your beautiful, natural creation.
19. Natural Wooden Bead Garland

Add a touch of simple, rustic texture to your home with a wooden bead garland. In Scandinavian design, natural materials are always celebrated. This garland, made of plain, unfinished wood beads, has a warm and organic feel. It is wonderfully versatile.
You can drape it over the arm of a sofa, loop it through the branches of your Christmas tree, or arrange it on a mantelpiece. The soft tassels at each end add a gentle, handcrafted touch. It is a subtle decoration that adds texture and interest without overwhelming the space.
DIY Wooden Bead Garland with Tassels
This is a fun and easy stringing project, and you can make the tassels yourself!
What You’ll Need:
- A package of round wooden beads (you can use all one size or mix them up)
- A long piece of twine or string
- Yarn for the tassels
- A small piece of cardboard (about 4 inches wide)
- A pair of scissors
Step-by-Step Guide:
- Make the First Tassel: Take your yarn and wrap it around the piece of cardboard about 20 times. Carefully slide the loop of yarn off the cardboard.
- Tie the Tassel: Cut a separate, small piece of yarn and tie it tightly around the top of the loop. Cut another piece of yarn and wrap it around the loop about an inch from the top to create the tassel’s “neck.” Snip the bottom loops of yarn to create the fringe.
- Start Stringing: Tie your first tassel to one end of your long piece of twine.
- Add the Beads: Start threading the wooden beads onto the twine, one by one. You can create a pattern with different sizes or just add them randomly.
- Keep Going: Continue adding beads until your garland is the length you want it to be.
- Add the Final Tassel: Make a second tassel just like the first one. Tie it securely to the other end of the twine, right after the last bead.
- Hang It Up: Your beautiful, natural garland is ready to be draped anywhere in your home.
20. Sculptural Wooden Candelabra

Light up your home with a piece that is both a candle holder and a work of art. This modern wooden candelabra brings a sculptural element to holiday decorating. Its smooth, curved lines and multi-level design are a fresh take on the traditional candelabra, or “ljusstake.”
It creates a beautiful display of light, especially in a simple, uncluttered space like a hallway. Placed on the floor, it adds an unexpected and dramatic touch. Paired with a large hanging paper star, it makes a simple entryway feel magical and bright, welcoming guests with a warm and stylish glow.
DIY Clay Candelabra
A real wooden candelabra like this is hard to make, but we can make a cool, curvy one out of clay!
What You’ll Need:
- A large block of air-dry clay
- A little bit of water in a cup
- Seven taper candles
- Your hands!
Step-by-Step Guide:
- Warm Up the Clay: Take a big chunk of clay and knead it on your table until it feels soft and easy to work with.
- Make a Base: Roll the clay into a thick, long snake shape. Then, stand it up and gently press the bottom onto the table to make a flat, stable base so it won’t fall over.
- Create the Arms: Gently start to bend and shape your clay snake. You can make it curve like an “S” or make wavy arms that branch off. Use your fingers and a little water to smooth out any cracks.
- Add Candle Spots: Decide where you want your candles to go. At the top and on the curves of your sculpture are good places.
- Make the Holes: Just like we did for the Advent holder, take the bottom of a candle and press it firmly into the clay to make a hole. Make seven holes in different spots on your candelabra.
- Let It Dry: Now, let your sculpture dry completely. This might take a few days because it’s a big piece. Be patient!
- Place the Candles: Once it’s totally hard, you can put your candles in. Ask a grown-up to help you light them and enjoy your amazing piece of art.
21. Frosted Winter Wonderland Tablescape

Create a table setting that looks like it was touched by frost. This magical, monochromatic look uses shades of white, silver, and clear glass to evoke a glistening winter morning. Frosted branches adorned with tiny white berries and delicate glass ornaments create a stunning centerpiece.
The soft glow from mercury glass candle holders adds warmth and a gentle sparkle to the scene. Everything, from the dishes to the vases, has a cool, icy finish. This elegant and ethereal tablescape transforms a holiday meal into a truly enchanting experience, capturing the quiet beauty of a world covered in ice.
DIY Frosted Branches
You can make any branch look like it’s covered in beautiful ice crystals. It’s like magic winter paint!
What You’ll Need:
- Some bare branches or twigs from your yard
- A can of white or silver spray paint
- A can of spray adhesive
- Epsom salt or clear glitter
- A large, shallow box or tray
- Newspaper to protect your workspace
Step-by-Step Guide:
- Set Up Your Space: Lay down lots of newspaper outside or in a well-ventilated area. This project can get a little messy.
- Paint the Branches: Place your branches on the newspaper. Ask a grown-up to help you spray paint them white or silver. Make sure to get all the little twigs. Let them dry completely.
- Get the Frost Ready: Pour a good amount of Epsom salt or glitter into your shallow box. This is your “frost.”
- Add the Glue: Take one dry, painted branch. In your protected area, spray it all over with the spray adhesive. It will get sticky fast!
- Make It Sparkle: Immediately lay the sticky branch in the box of Epsom salt. Roll it around and sprinkle the salt all over it until it’s completely covered in frosty crystals.
- Let It Dry: Carefully pick up your frosted branch and set it somewhere to dry completely. Once it’s dry, you can arrange it in a vase to create a beautiful, icy centerpiece.
22. Enchanted Forest Table Runner

Bring the magic of a forest floor to your holiday table. This creative centerpiece is a living landscape that runs down the center of the table. A lush bed of real moss creates the base, with lichen-covered branches and little mushrooms popping up along the way.
Small bowls of pinecones and nuts are nestled into the greenery. The main feature is a small glass terrarium holding a tiny woodland scene with deer figurines. This tablescape is a celebration of nature’s textures and details. It invites guests to lean in and discover the small wonders within the enchanting forest scene.
DIY Enchanted Mossy Table Runner
Let’s build a magical forest right on your dinner table!
What You’ll Need:
- A long, narrow tray or a piece of wood to be your base
- Several bags of preserved moss (you can find this at a craft store)
- A hot glue gun (with a grown-up’s help)
- Small branches, pinecones, and acorns
- Optional: a small glass bowl and tiny animal figures for a terrarium
Step-by-Step Guide:
- Lay the Foundation: Place your long tray or board in the center of your table. This will protect your table and hold your forest together.
- Glue the Moss: With a grown-up’s help, use the hot glue gun to add dabs of glue to the tray. Press down chunks of moss onto the glue to create a green, mossy carpet. Cover the whole tray.
- Add Branches and Pinecones: Arrange your branches and pinecones on top of the moss. You can glue them down or just nestle them in place. Create a winding path with them down the center of your runner.
- Make a Mini Terrarium (Optional): If you have a small glass bowl, fill the bottom with tiny pebbles. Add a layer of moss on top. Place your little animal figures inside to create a tiny scene.
- Place the Terrarium: Set your finished terrarium in the middle of your mossy runner. It will be the star of your enchanted forest. Your magical table is ready for a feast!
23. Coastal Driftwood Wall Tree

Capture the raw, windswept beauty of a winter coast with a driftwood wall tree. This is a striking and space-saving alternative to a traditional Christmas tree. A collection of weathered driftwood branches are arranged on the wall in the shape of a pine tree, from longest at the bottom to shortest at the top.
The natural, silvery-gray tones of the wood pair beautifully with the cool blues and grays of the room. A few simple ornaments in white and blue hang from the branches. This minimalist tree is a tribute to the power and beauty of nature, bringing a sense of calm, coastal serenity into your home.
DIY Branch Wall Tree
Let’s build a Christmas tree right on the wall using sticks! It’s great if you don’t have a lot of floor space.
What You’ll Need:
- A collection of 5-7 straight sticks or branches in different sizes
- A pair of garden clippers or a small saw (for a grown-up to use)
- Twine or string
- A few small, removable wall hooks or nails
- A few lightweight ornaments
Step-by-Step Guide:
- Find Your Branches: Go on a nature walk and collect some fallen sticks. You’ll need one long one for the bottom, then a slightly shorter one, and so on, until you have a very short one for the top.
- Lay Out Your Tree: Arrange your sticks on the floor in the shape of a Christmas tree. Make sure there is a few inches of space between each branch.
- Tie It Together: Cut a very long piece of twine. Start at your top, shortest branch. Tie the twine securely around one end of the branch.
- Create the Sides: Bring the twine down to the branch below it and wrap it around the end of that branch. Keep going all the way down to the bottom branch, connecting all the branches on one side.
- Do the Other Side: Cut another long piece of twine and do the exact same thing on the other side of the branches. When you’re done, you should be able to pick the whole thing up like a ladder.
- Hang and Decorate: Ask a grown-up to put a hook or nail on the wall. Hang your tree from the top of the twine. Now you can add your lightweight ornaments to the branches.
24. Hand-Carved Woodland Creatures

Add timeless charm to your holiday decor with simple, hand-carved wooden figures. Scandinavian design has a long history of woodworking, celebrating the skill and artistry of the craft. These small sculptures of woodland animals like foxes, bears, and owls have a simple, honest beauty.
The smooth, faceted cuts in the wood show the hand of the artist and give the figures character. Left in their natural wood tones or with just a touch of paint, they feel warm and authentic. Grouped together on a table or shelf, they create a quiet little forest scene that can be cherished for years.
DIY Clay Woodland Animals
Carving wood is tricky, but we can make similar beautiful animals using clay!
What You’ll Need:
- Air-dry clay (white or terracotta color)
- A small cup of water
- A plastic butter knife or a modeling tool
- A toothpick
Step-by-Step Guide:
- Choose Your Animal: Let’s start with a simple bear. Take a chunk of clay and roll it into a thick, egg shape for the body.
- Form the Head: Roll a smaller ball of clay for the head. Use your fingers to pinch out two small, rounded ears on top and a little snout in the front.
- Attach the Head: Gently press the head onto the wider end of the body. You can use your finger dipped in a tiny bit of water to smooth the seam where they connect.
- Add Legs: Roll four small, thick sausage shapes for the legs. Stick them to the bottom of the body. Make sure your bear can stand up on its own.
- Carve the Details: This is the fun part! Use your butter knife to gently press flat spots, or “facets,” onto the clay, just like the carved wood. This will make it look more realistic.
- Add a Face: Use a toothpick to poke two little dots for eyes and a tiny dot for the nose.
- Let It Dry: Let your clay animal dry completely. You can make a whole forest of friends!
25. Woven Danish Heart Ornaments

Weave a little love into your Christmas decorations with traditional Danish paper hearts. These “Julehjerter” are a classic craft, and many families in Denmark spend a cozy evening making them together. They are created by weaving two different colors of paper together to form a little heart-shaped basket.
The simple, graphic pattern is cheerful and iconic. Traditionally made in red and white, you can use any colors you like. You can hang them on the tree, string them into a garland, or even fill them with tiny treats. They are a heartfelt, handmade symbol of the holiday season.
DIY Woven Paper Hearts
Let’s make a classic Danish heart basket. It looks tricky, but it’s just a few simple steps.
What You’ll Need:
- Two pieces of paper or felt in different colors (like red and white)
- A pencil and a ruler
- Scissors
Step-by-Step Guide:
- Cut Your Pieces: From each color of paper, cut a rectangle that is 3 inches wide and 8 inches long.
- Fold in Half: Fold each rectangle in half so you have two pieces that are 3 inches wide and 4 inches long.
- Round the Top: Take one folded piece. On the end opposite the fold, use your scissors to round the corners, so it looks like an arch. Do the same for the other piece.
- Make the Cuts: Now, on the same rounded end, make two long cuts from the edge towards the fold. Stop about an inch from the fold. This will give you three flaps on each piece.
- Get Ready to Weave: Hold the two pieces at a right angle to each other, with the flaps overlapping. Let’s say you have the red one in your left hand and the white one in your right.
- Start Weaving: Take the top red flap and weave it through the inside of the top white flap. Then, take that same red flap and weave it around the outside of the middle white flap, and then through the inside of the bottom white flap.
- Weave the Next Row: Now take the middle red flap. Do the opposite pattern: weave it around the outside of the top white flap, then through the middle white flap, and then around the outside of the bottom white flap.
- Finish It: Weave the bottom red flap just like you did the top one. Gently push all the strips together. When you open it up, you should have a woven heart basket! You can add a little paper handle if you like.
26. Modern Brass Advent Candelabra

Count down the Sundays of Advent with clean, modern style. This minimalist candelabra puts a contemporary spin on a cherished tradition. The simple, elegant frame is crafted from brushed brass, giving it a warm, metallic glow.
Four taper candles stand in a neat row, ready to be lit each week. Simple, round tags numbered one through four hang from each candle, adding a graphic detail. This piece is all about understated elegance. It doesn’t shout for attention but provides a beautiful, quiet focal point as you mark the growing light and anticipation of the season.
DIY Numbered Advent Tags
Let’s make the little numbered tags that make an Advent candle holder special.
What You’ll Need:
- A piece of white or cream-colored cardstock paper
- A circle punch, or a small cup to trace and scissors
- Number stamps or a nice pen
- A hole punch
- Thin string or twine
Step-by-Step Guide:
- Make the Circles: Use your circle punch to punch out four circles from the cardstock. If you don’t have a punch, trace a small bottle cap four times and carefully cut out the circles.
- Number Them Up: Use your number stamps to stamp the numbers 1, 2, 3, and 4 in the center of each circle. If you are using a pen, write the numbers neatly.
- Punch the Holes: Use your hole punch to make a small hole at the top of each numbered tag.
- Add the String: Cut four small pieces of string, each about 5 inches long. Thread one piece of string through the hole in each tag and tie a simple knot to make a loop.
- Hang on Your Candles: You can now hang these tags on any candle holder that holds four candles. Just loop the string over each candle. It’s a simple way to turn any candelabra into a special Advent display.
27. Natural & Simple Gift Wrapping

Extend your minimalist Scandinavian aesthetic to the presents under the tree. This style of gift wrapping celebrates simplicity and natural materials. Using plain brown kraft paper as a base creates a clean, uniform look. It is a humble material that feels warm and unpretentious.
Instead of flashy bows, the gifts are tied with natural jute twine or simple cotton ribbon. A small sprig of fresh greenery, like pine or fir, is tucked into the knot. This small detail adds a touch of life, color, and festive scent. The result is beautiful, thoughtful, and kind to the environment.
DIY Natural Gift Wrapping
Let’s wrap presents in a way that looks beautiful and is good for the Earth.
What You’ll Need:
- A roll of brown kraft paper
- Scissors and clear tape
- Natural twine or cotton ribbon
- Small sprigs of greenery (you can snip a tiny piece from your Christmas tree or a bush outside)
Step-by-Step Guide:
- Wrap the Box: First, wrap your present neatly in the brown paper, just like you would with any other wrapping paper. Make sure your corners are crisp and your tape is hidden.
- Tie the Twine: Cut a long piece of twine. Lay it over the top of the box, then wrap it around the back and cross the ends. Bring the ends back up to the front and pull them tight.
- Add the Greenery: Before you tie the final knot or bow, take your little sprig of greenery. Lay it on top of the box, right where the twine crosses.
- Tie the Knot: Now, tie your knot or bow right over the stem of the greenery. This will hold it securely in place.
- Finish It Up: Trim the ends of your twine. You now have a beautifully wrapped gift that looks simple, natural, and very thoughtful. You can do this for all your presents to make them look like a lovely collection.
28. Minimalist Berry Wreath Place Setting

Elevate a simple holiday table with a thoughtful and festive touch at each seat. A crisp white linen cloth and simple white plates create a clean and bright foundation. The star of this setting is the small, personal wreath made of vibrant red berries.
Placing a mini-wreath on each plate adds a powerful burst of color and a touch of nature. It serves as both decoration and a warm welcome for your guests. Paired with a single candle and a small vase of matching berries, this look is uncluttered and elegant. It shows that even small details can make a big impact.
DIY Mini Berry Wreath for Plates
Let’s make tiny wreaths to put on everyone’s plate. It makes the table feel extra special.
What You’ll Need:
- Bendy, thin grapevine wire (from a craft store)
- Green floral tape
- A few sprigs of faux berries with leaves
- Wire cutters (ask a grown-up for help)
Step-by-Step Guide:
- Form the Ring: Cut a piece of the grapevine wire about 10 inches long. Gently bend it into a circle, overlapping the ends by about an inch. Twist the ends around each other to secure the circle. This is your mini wreath base.
- Wrap the Base: Take your floral tape and start wrapping it around the wire circle. Overlap the tape as you go. This will cover the wire and give your berries something to stick to.
- Prepare the Berries: Use your wire cutters to snip small clusters of berries and leaves from the larger branch. Each piece should be about 2 inches long.
- Attach the Berries: Take your first little berry sprig and lay its stem flat against the wrapped wreath. Use a small piece of floral tape to wrap the stem tightly to the wreath.
- Keep Adding More: Take another berry sprig and lay it so its berries cover the taped stem of the first one. Tape this one on. Continue this pattern all the way around the little wreath.
- Set the Table: Once your wreath is covered in berries, place one on each plate at your holiday table. Your guests will love this beautiful little detail!
29. Layered Papercut Winter Scene

Tell a story with light and shadow using the delicate art of papercutting. This traditional craft, known as “Scherenschnitte” in German-speaking regions, is popular across Europe. It involves cutting intricate designs into a single sheet of paper. This piece takes it a step further by layering several cutouts to create a sense of depth.
The white paper scene of a winter forest with cozy cabins stands out against a deep blue background, evoking a starry winter night. Placed in a simple wood frame, the artwork is both intricate and serene. It is a beautiful way to capture the quiet magic of a snowy landscape.
DIY Layered Paper Scene
Let’s make a 3D picture out of paper. It looks really impressive!
What You’ll Need:
- 3-4 sheets of white cardstock
- 1 sheet of dark blue cardstock for the background
- A pencil
- A craft knife and cutting mat (this is a grown-up’s tool!)
- Small foam adhesive squares (from a craft store)
- A picture frame
Step-by-Step Guide:
- Plan Your Scene: You are going to create a foreground, a middle ground, and a background. The foreground has the biggest objects, and they get smaller as they go back.
- Draw the Foreground: On your first sheet of white paper, draw two large trees, one on each side. The bottoms of the trees should connect at the bottom of the paper. This is Layer 1.
- Draw the Middle Ground: On your second sheet, draw some smaller hills and maybe a little cabin on one side. This is Layer 2. On your third sheet, draw some even smaller, pointy pine trees for the background. This is Layer 3.
- Time for Cutting: This is the most important part! Ask a grown-up to use the craft knife to very carefully cut out your designs. They need to cut away all the blank space, leaving just the trees and hills.
- Start Assembling: Take your picture frame and place the dark blue paper inside as the background.
- Add the Layers: Take your background trees (Layer 3). Put a few of the foam adhesive squares on the back and stick it onto the blue paper. The foam makes it pop out.
- Keep Building: Now take your middle ground with the cabin (Layer 2). Add foam squares to the back and stick it on top of the first layer. Finally, add your foreground trees (Layer 1) on top of that.
- Frame Your Art: Put the glass and back on your frame. You’ve created a beautiful, deep winter scene!
30. Simple Olive Branch Banister Garland

Grace your staircase with a garland of understated elegance. While pine and fir are traditional, using olive branches offers a unique and softer look. The silvery-green leaves provide a gentle color that feels both festive and peaceful. The branches have a beautiful, natural drape as they curve along the handrail.
Instead of elaborate decorations, the garland is simply accented with a few rich, velvet ribbons tied in simple bows. The warm, rusty color of the ribbon is a lovely complement to the cool green of the leaves. This simple decoration enhances the beauty of the staircase without overwhelming it, proving that less can truly be more.
DIY Simple Banister Garland
Let’s decorate the railing of a staircase to make it look festive and elegant.
What You’ll Need:
- A long garland of faux greenery (olive branches or eucalyptus look lovely)
- Several pre-made velvet bows, or a spool of velvet ribbon and scissors
- Thin, green floral wire
Step-by-Step Guide:
- Start at the Top or Bottom: Decide if you want to start at the top or bottom of your staircase. Hold the end of the garland against the handrail.
- Attach the End: Use a 6-inch piece of floral wire to securely attach the end of the garland to the railing. Wrap the wire tightly and twist the ends together. You can hide the twisted part under the leaves.
- Drape and Attach: Let the garland hang down in a gentle curve, or “swag.” Then, attach it to the railing again about two or three feet down. Keep making these swoops and attaching the garland all the way down your staircase.
- Add the Bows: Now, find the spots where you attached the garland to the railing with wire.
- Cover the Wire: Take one of your velvet bows and use its wire or a new piece of floral wire to attach it right on top of the spot where you can see the first piece of wire. The bow will hide your work and add a beautiful pop of color and texture.
- Place All Bows: Add a bow to each point where the garland is attached to the railing. Step back and admire your beautifully decorated staircase!
31. Glowing Windowsill Christmas Village

Create a magical little world right on your windowsill. A collection of miniature ceramic houses, with tiny lights glowing from within, brings a sense of warmth and wonder to a cold winter’s day. The clean, simple shapes of the houses are a hallmark of Scandinavian design.
Mixed with miniature bottle brush trees and a dusting of fake snow, the scene becomes a tiny, peaceful village. It’s a delightful decoration that looks beautiful from both inside and outside your home, adding a cheerful and welcoming glow for all to see.
DIY Glowing Windowsill Village
Let’s build a tiny, snowy town that lights up at night.
What You’ll Need:
- A few small ceramic or cardboard houses (from a craft store)
- A variety of small bottle brush trees
- A bag of fake snow or cotton batting
- A string of battery-powered micro LED fairy lights
Step-by-Step Guide:
- Clear Your Sill: Start with a clean, empty windowsill. This is the foundation for your village.
- Lay the Snow: Spread a layer of fake snow or gently pulled-apart cotton batting across the entire windowsill to create a snowy ground.
- Place the Houses: Arrange your little houses on top of the snow. Stagger them, putting some closer to the window and some further back to create a sense of depth.
- Add the Forest: Place your bottle brush trees in between the houses. Mix up the sizes to make it look like a real forest.
- Time to Light It Up: This is the magic part. Take your string of fairy lights and carefully weave it in and around your village. Tuck some lights behind the houses and in between the trees.
- Hide the Pack: Hide the battery pack at one end of the windowsill, perhaps behind a larger house or a cluster of trees.
- Turn It On: When it gets dark, switch on the lights. Your tiny village will come to life with a warm, cozy glow.
32. A Haven of Amber Candlelight

Fill your living room with an incredibly warm and inviting glow using amber-colored glass. This deep, honey-toned glass creates a soft and soothing light that is the very essence of “hygge.” The effect is even more magical when many candles are lit at once.
A collection of different textured and shaped glass candle holders and vases adds depth and visual interest. Arranged on coffee tables and side tables, they turn the entire room into a sanctuary of warmth. Paired with a few simple evergreen sprigs, this look is all about creating a cozy, intimate atmosphere for relaxing on long winter nights.
DIY Amber Glass Candle Display
Let’s create a super cozy feeling in a room using lots of warm, glowing light.
What You’ll Need:
- A collection of clear glass vases, jars, and candle holders in different shapes and sizes (you can find these at a thrift store)
- Amber or orange-colored glass paint (from a craft store)
- A paintbrush
- Tea light and votive candles
- A few small evergreen sprigs
Step-by-Step Guide:
- Clean Your Glass: Make sure all your glass jars and holders are clean and dry.
- Paint It Amber: Paint the inside of each glass container with the amber glass paint. A thin coat will give a lighter color, while a thicker coat will be darker. Let it dry completely according to the paint’s instructions.
- Arrange Your Collection: Find a few spots in your room, like a coffee table and a shelf. Group your newly amber-colored holders together. Mix up the tall ones and the short ones.
- Add the Candles: Place a tea light or a votive candle inside each holder.
- Add a Touch of Green: Place a few small evergreen sprigs in one or two of the taller vases.
- Light Up the Room: Carefully light all the candles. Step back and see how the amber glass turns the candlelight into a beautiful, warm, and super cozy glow that fills the whole room.
33. The Unadorned Christmas Tree

Sometimes, the most beautiful statement is the simplest one. This approach to Christmas decorating celebrates the natural beauty of the evergreen tree itself. A full, healthy pine or fir tree, with its rich green color and classic shape, is a beautiful object on its own.
Instead of covering it in ornaments, the tree is left nearly bare, with only a delicate string of warm white lights woven through its branches. A simple burlap or linen tree skirt covers the base. This minimalist style is calm and peaceful, reminding us that the beauty of nature often needs no embellishment.
DIY A Simple & Natural Tree Look
This is the easiest decorating style of all! It’s all about showing off how pretty the tree is by itself.
What You’ll Need:
- A beautiful Christmas tree
- One or two strings of small, warm white fairy lights (lights with a thin wire look best)
- A tree skirt made of a natural fabric, like burlap or linen
Step-by-Step Guide:
- Choose the Right Tree: The most important step is to pick a tree that you love the shape of. Look for one that is full and has nice, even branches.
- Set It Up: Place your tree in its stand and make sure it’s standing up straight.
- Wrap the Tree Skirt: Lay your burlap or linen tree skirt around the base of the tree, covering the metal or plastic stand.
- Add the Lights: Start at the bottom of the tree. Gently wrap the string of lights around the branches, working your way up to the top. Try to tuck the wire deep into the branches so you see more of the little lights than the wire itself.
- Step Back and Admire: Plug in the lights. That’s it! You don’t need to add any ornaments. Just enjoy the simple, beautiful shape of your tree and the warm, twinkling lights. It’s a very calm and peaceful look.
34. Soft & Modern Felt Ball Garland

Add a touch of soft texture and gentle color to your holiday decor with a felt ball garland. This simple and playful decoration is a modern favorite in Scandinavian homes. The round, woolly balls have a cozy, handmade feel that adds warmth to any space.
Strung in a simple color palette of greens, grays, and warm mustard, the garland can be draped over a mantelpiece, wrapped around a tree, or hung on a wall. It is a cheerful and understated way to add a bit of color and texture to your minimalist holiday scheme.
DIY Felt Ball Garland
Let’s make a soft and colorful garland. It’s as easy as stringing beads!
What You’ll Need:
- A bag of wool felt balls in your favorite colors
- A long, sharp needle with a large eye
- Strong thread or thin twine (white or a neutral color works well)
Step-by-Step Guide:
- Plan Your Pattern: Before you start, lay your felt balls out on a table in the order you want them on your garland. You can make a repeating pattern, or just make it random and colorful.
- Thread Your Needle: Cut a very long piece of thread (longer than you think you’ll need) and thread it through your needle. Don’t tie a knot in the end yet.
- Push It Through: Take your first felt ball. Firmly and carefully, push the needle straight through the center of the ball. It might be a little tough, so be careful with your fingers!
- Slide It Down: Pull the ball all the way down the thread, leaving about 6 inches of extra thread at the end. The ball should stay in place on its own, but if it’s sliding, you can tie a small knot on either side of it.
- Keep Going: Continue stringing your felt balls, following your pattern. You can push them right up against each other or leave a little space between each one.
- Finish It Off: Once all your balls are on the string, cut the thread from the needle, leaving another 6 inches of extra thread at that end. You can tie loops at both ends for easy hanging.
35. A Welcoming Lantern-Lit Pathway

Create a truly magical and welcoming entrance to your home on a dark winter’s night. A pathway lined with glowing lanterns is a classic and beautiful tradition in Nordic countries. The lanterns cast a warm, flickering light onto the snow, guiding guests to your door.
Using simple, black-framed lanterns in a classic design keeps the look clean and modern. Inside, safe, battery-operated pillar candles provide a steady and worry-free glow. This simple gesture transforms your entryway, making your home look like a warm and inviting haven from the winter cold.
DIY Lantern Pathway
Let’s make the walkway to your house look magical and super welcoming.
What You’ll Need:
- Several lanterns (at least 4 or 6)
- Battery-operated LED candles that flicker (one for each lantern)
Step-by-Step Guide:
- Choose Your Candles: Make sure the LED candles you choose are the right size to fit inside your lanterns. Ones that have a gentle flicker look the most realistic.
- Put Candles Inside: Open the door on each lantern and place one LED candle inside. Make sure it’s sitting flat and in the center.
- Turn Them On: Switch on each of the candles before you close the lantern doors.
- Plan Your Path: Stand at your front door and look down your walkway. Decide where you want to place your lanterns. You want to space them out so they light up the whole path.
- Place the Lanterns: Take your lit lanterns outside. Place them on the ground along the edges of your walkway. Stagger them, putting one on the left side, then a few feet down on the right side, and so on.
- Enjoy the Glow: When it gets dark, your path will be lit by a beautiful, warm, and flickering light, welcoming everyone to your home.
36. Personalized Clay Gift & Name Tags

Add a thoughtful, handmade detail to your gifts or holiday table with personalized clay tags. These simple, white and terracotta-colored ornaments feel both rustic and modern. Using letter stamps to press initials into the clay makes each one unique.
You can also use natural elements, like a single autumn leaf, to create a beautiful fossil-like impression in the clay. With a simple hole punched at the top, they can be tied to a present, used as a name card at a dinner party, or hung on the Christmas tree. They are a small detail that shows great care.
DIY Personalized Clay Tags
Let’s make special tags out of clay that you can use for presents or for your friends at the dinner table.
What You’ll Need:
- Air-dry clay
- A rolling pin
- A round cookie cutter (or a cup to trace)
- Letter stamps (like the kind for cookies or crafts)
- A straw
- A small, pretty leaf (optional)
- Twine
Step-by-Step Guide:
- Roll the Clay: Take a piece of clay and roll it out flat until it’s about 1/4 inch thick.
- Cut Your Shapes: Use your cookie cutter to cut out as many round tags as you need.
- Personalize It: This is the fun part. Take your letter stamps and press the first initial of a friend or family member into the center of a clay circle.
- Or, Use a Leaf: If you want to make a nature print, take your little leaf and lay it on a clay circle. Gently press it down with your rolling pin. Then, carefully peel the leaf off. It will leave a beautiful pattern behind!
- Don’t Forget the Hole: Use your straw to poke a hole in the top of each tag.
- Let Them Dry: Place your finished tags on a flat surface and let them dry completely. This might take a day or two.
- Add the String: Once they are hard, cut a piece of twine, thread it through the hole, and tie a loop. Your beautiful, personal tags are ready to use!
37. A Miniature Snowy Tree Forest

Create a charming, miniature winter landscape on a shelf or console table. A collection of bottle brush trees and simple wooden trees in various shades of green and white creates a sense of a dense, snowy forest. The different shapes, sizes, and textures make the scene feel dynamic and alive.
A blanket of fake snow covers the base, creating soft, rolling hills. Tucking in a few tiny woodland animal figures, like deer or foxes, adds a touch of life and story to the scene. This delightful display captures the magic of a forest in winter and can be a fun decoration to build with the whole family.
DIY Miniature Forest Display
Let’s build a whole snowy forest that you can put on a table.
What You’ll Need:
- A collection of bottle brush trees and small wooden trees in different sizes and shades of green
- A shallow tray or a piece of white foam board for your base
- A bag of fake snow
- Optional: tiny animal figurines
Step-by-Step Guide:
- Create Your Landscape: If you are using a foam board, you can carve it a little or stack pieces to make hills. If you’re using a tray, you can create hills by bunching up some paper towels before you add the snow.
- Add the Snow: Cover your entire base with a thick, fluffy layer of fake snow.
- Plant the Trees: Start planting your trees in the snow. Push the bases down firmly so they stand up straight.
- Make It Look Real: Don’t just line them up. Cluster some trees together to make a thick part of the forest. Put taller trees in the back and shorter ones in the front to create a sense of depth. Mix the bottle brush trees with the wooden ones.
- Add Some Life (Optional): If you have tiny animal figures, tuck them into your scene. Maybe a little fox is peeking out from behind a tree, or a deer is standing in a clearing.
- Find the Perfect Spot: Place your finished winter wonderland on a shelf, mantel, or table where everyone can enjoy looking at all the little details.
38. Bring the Northern Lights Indoors

Capture one of the most breathtaking natural wonders of the Nordic regions without leaving your home. The Aurora Borealis, or Northern Lights, are a magical display of color in the night sky. You can bring this incredible experience indoors with a special light projector.
In an otherwise dark room, the projector casts swirling waves of green, purple, and blue light across your ceiling and walls. It creates an immersive and truly magical atmosphere. This is a modern and unique way to decorate for the holidays, using light itself to create a sense of wonder and awe.
DIY A Magical Light Experience
This DIY is all about setting a mood with light, not making an object. It’s a bit of holiday magic.
What You’ll Need:
- An aurora or galaxy light projector (you can find many different kinds online or in stores)
- A dark room
- Optional: quiet, calm music
Step-by-Step Guide:
- Find the Right Spot: Choose a room where you can make it really dark. A bedroom or a living room with the curtains closed is a good choice.
- Place Your Projector: Set up your projector on a small table or a shelf. You might need to try a few different spots to see where it creates the best effect on your ceiling or a large, blank wall.
- Turn Off the Lights: Turn off all the lamps and overhead lights in the room. The darker it is, the more brilliant the projected lights will be.
- Turn On the Magic: Switch on your aurora projector. Watch as the amazing, colorful lights begin to dance and swirl across the room.
- Add Some Music (Optional): For an even more relaxing and magical experience, you can play some soft, instrumental music.
- Sit Back and Enjoy: This decoration is an experience. Cuddle up on the couch with a cozy blanket and just watch the beautiful light show. It’s a peaceful and wonderful way to spend a dark winter evening.
39. Lush & Natural Evergreen Wreath

Return to a timeless classic with a full, lush wreath made of fresh evergreens. Sometimes, the most traditional decorations are the most beautiful. This wreath is packed with fragrant fir branches, creating a rich texture and a deep green color.
A few sprigs of silvery-blue eucalyptus are tucked in, adding a subtle touch of color variation and a fresh scent. Hung with a simple, wide velvet ribbon, the wreath is elegant and welcoming. It is a celebration of the season’s natural abundance and a beautiful, classic way to greet guests at your door.
DIY A Full & Lush Evergreen Wreath
Let’s make a big, beautiful wreath like the ones you see in magazines. It’s easier than it looks!
What You’ll Need:
- A wire wreath frame (12 or 14 inches is a good size)
- A paddle of green floral wire
- Lots of fresh evergreen branches (like fir, pine, or cedar)
- A few sprigs of something different, like eucalyptus
- Garden clippers
- A nice ribbon for hanging
Step-by-Step Guide:
- Prepare Your Greenery: Use your clippers to cut your large branches into small pieces, about 6-8 inches long.
- Make a Mini Bouquet: Take 3 or 4 of your small evergreen pieces and arrange them into a little bunch. You can add a sprig of eucalyptus in there too.
- Attach the First Bunch: Hold your little bouquet against the wire frame. Take your paddle of floral wire and wrap it tightly around the stems and the frame 3 or 4 times. Do not cut the wire!
- Layer the Next Bunch: Make another little bouquet. Place it on the frame just below the first one, so the leafy part covers the stems of the first bunch.
- Wrap and Repeat: Holding the second bunch in place, just continue wrapping the same wire from the paddle around its stems and the frame. Continue this process: make a bunch, layer it, and wrap it.
- Finish the Circle: Keep going all the way around the frame. When you get back to the start, tuck the stems of your last bunch underneath the leaves of your very first bunch and wrap it tightly. Now you can cut the wire and twist the end to secure it.
- Add a Hanger: Loop your ribbon around the top of your wreath and tie a bow. Your gorgeous, professional-looking wreath is ready to hang on your door!
As we’ve seen, a Scandinavian-style Christmas is not about having more. It is about having things that mean more. It’s a return to simplicity, a celebration of nature, and an invitation to slow down and savor the quiet moments of the season.
By bringing natural elements indoors and focusing on the warm glow of candlelight, you create a space that feels both festive and deeply peaceful. These ideas are more than just decorations; they are small ways to build a warm and personal atmosphere for you and your loved ones to enjoy.
Key Takeaways for a Scandinavian Christmas:
- Embrace the Outdoors: Use fresh greenery, bare branches, pinecones, and wood to create a connection with nature.
- Let There Be Light: Candles are essential. Use them generously to create a warm, inviting glow that pushes back the winter darkness.
- Simplicity is Key: Choose a few high-quality, meaningful decorations over clutter. A clean, uncluttered space is a calm space.
- Handmade From the Heart: DIY projects add a personal touch that cannot be bought. A handmade ornament or garland tells a story.
- Texture Creates Coziness: Create that “hygge” feeling with soft textures like chunky knit blankets, wool, linen, and sheepskin rugs.