Autumn brings a chance to transform our homes into a warm and welcoming retreat. This Halloween, move away from the overly spooky and embrace a style that feels both cozy and charming. Rustic decor is a great choice because it uses natural elements like wood, hay, and pumpkins to create a sense of comfort.

You can combine farm-fresh textures with classic Halloween fun to make a space that is inviting for everyone. This collection of ideas shows how you can use simple items to create a festive mood. Whether you are looking for a big project or a small touch of decor, you can find a way to make your home feel ready for the season.
1. Whimsical Ghostly Friends

Welcome guests to your home with a touch of spooky whimsy. This display, filled with friendly hanging ghosts and carved pumpkins, makes a statement without being too scary. The rustic, simple design uses natural elements like tree branches to create a cozy and inviting scene.
White pumpkins on the table and mantelpiece add to the ghostly theme. The entire arrangement shows a nice balance of spooky and sweet, which is a great way to celebrate the holiday with a warm, welcoming feeling. The large, hanging ghosts sway gently, giving the space a playful, ethereal quality.
DIY Whimsical Ghostly Friends
Creating these friendly ghosts is a fun activity for anyone! Here is how you can make your own.
Materials you will need:
- Cheesecloth or white fabric
- Styrofoam balls
- Black felt or marker
- String or fishing line
- Tree branches or a metal chandelier frame
Step 1: Get your ghosts ready. First, take a styrofoam ball and set it on a flat surface. This will be the ghost’s head.
Step 2: Give your ghost a body. Now, drape a piece of white fabric or cheesecloth over the styrofoam ball. Make sure it hangs down evenly on all sides. You can use a bit of glue to hold the fabric to the top of the ball.
Step 3: Make the ghost’s face. Once the fabric is in place, you can draw on the ghost’s eyes with a black marker. If you want to get fancy, you can cut small circles from black felt and glue them on instead.
Step 4: Get your ghosts ready to hang. Carefully tie a piece of string or fishing line around the neck of the ghost, just below the styrofoam ball. Tie the other end to your tree branch or chandelier frame.
Step 5: Place your ghosts for a spooky effect. Hang your ghost decorations in a fun place, like in a window, or from a branch you have placed inside a vase on a table. When a breeze comes through, they will sway and dance in the air.
2. The Cozy Gingham Farmhouse

This delightful collection of Halloween decor combines classic farmhouse style with a spooky flair. The bold black and white buffalo check pattern on the blanket and signs creates a warm, rustic backdrop. The look is grounded in a simple color palette, using black pumpkins and a pop of bright orange. Small flying bats and a simple ghost figure perched on a hay bale bring a playful Halloween spirit to the scene. This design proves that Halloween decor can be both chic and charming, bringing a touch of cozy style to your space.
DIY Gingham Farmhouse Signs
Making your own signs is a simple way to personalize your decor. Here’s how you can make a spooky sign for your home.
Materials you will need:
- A wooden sign or piece of wood
- Black and white paint
- A stencil or vinyl letters
- Paintbrush
- Tape
Step 1: Get your sign painted. First, paint your entire wooden sign with a coat of white paint. Let it dry completely so the next layer of paint will stick.
Step 2: Create a guide for your letters. Use a pencil to lightly sketch out the spooky words you want to write on the sign. You can use a stencil or simply draw them freehand.
Step 3: Paint your letters. Carefully paint inside your letters with the black paint. You can go over it a few times to get a bold, clean look. Make sure to let the paint dry before you move or touch the sign.
Step 4: Make your words spooky. Once the paint is dry, you can outline the letters with a small, thin brush to make them look cleaner. Your sign is now ready to add to your decor.
3. The Enchanted Forest Centerpiece

Bring a sense of magic to your table with this whimsical centerpiece. This enchanting arrangement uses gnarled branches to form a miniature spooky tree, while small lanterns with flickering lights hang from its limbs. The base of the display is covered in soft green moss, making it feel like a tiny forest floor. Adorable little ghosts and red-capped mushrooms are tucked among the branches and acorns, giving the scene a playful, fairy-tale vibe. This centerpiece is a delightful way to add a bit of rustic charm and spooky fun to any meal.
DIY Enchanted Forest Centerpiece
Creating this centerpiece is a great project that uses things you can find outside. Follow these steps to make your own.
Materials you will need:
- A log or a vase
- Tree branches
- Small battery-powered lanterns or fairy lights
- White fabric or cheesecloth
- Small red and white mushrooms (can be store-bought)
- Moss, pinecones, acorns, and leaves
Step 1: Set up your base. Place a thick log piece or a vase on the middle of your table. If you use a vase, fill it with a bit of sand or rocks to help the branches stand up straight.
Step 2: Add your branches. Put your tree branches into the log or vase. Spread them out so they look like a small tree.
Step 3: Light up your tree. Carefully hang the small lanterns or wrap the fairy lights around the branches. Make sure the battery packs are hidden.
Step 4: Make your tiny ghosts. Cut small squares of white fabric. Put a tiny bit of glue on a small ball of paper or cotton, and wrap the fabric around it to make a ghost. Draw on little eyes with a black marker.
Step 5: Decorate the base. Spread moss around the bottom of the log or vase. Tuck in your tiny ghosts, mushrooms, pinecones, and acorns to make it look like a little forest.
4. The Mysterious Apothecary Nook

A sense of old-world charm and mystery fills this space. This decor setup combines vintage-style elements to create a witchy apothecary vibe. A collection of old books with worn covers is stacked high, while a brass scale and various glass bottles are arranged on a dark shelf. The different sizes and colors of the bottles give the display a sense of being a real potion-making station. The warm glow of the candles adds to the moody and secretive feel, and botanical prints on the wall tie the whole look together with a touch of nature.
DIY Mysterious Potion Bottles
You can easily transform old bottles into spooky potion containers. Here is how you can do it.
Materials you will need:
- Old glass bottles (any shape or size)
- Water
- Food coloring
- Glitter (optional)
- Paper and marker or a printer for labels
- Scissors
- Tape or glue
Step 1: Get your bottles ready. First, clean and dry your glass bottles. Remove any old labels.
Step 2: Create your spooky liquid. Pour some water into a cup. Add a few drops of food coloring to make it a spooky color, like green or purple. If you want, you can mix in a tiny bit of glitter to make it shimmer.
Step 3: Fill your bottles. Carefully pour the colored water into each bottle. Fill them up to the top.
Step 4: Make the labels. Write or print out fun, spooky names for your potions, like “Witch’s Brew,” “Spider Venom,” or “Bat Blood.” Cut out the labels.
Step 5: Add the labels to your bottles. Use tape or glue to stick your new labels onto the front of your bottles. Now you have your very own set of spooky potions!
5. The Bountiful Porch Harvest Display

This abundant porch display celebrates the best parts of autumn. It uses a cozy assortment of hay bales, corn stalks, and a wide variety of pumpkins to create a rich, inviting scene. The pumpkins are different sizes, colors, and textures, which makes the arrangement visually exciting. Baskets of apples and gourds are placed throughout the display, adding to the feeling of a generous harvest. A jack-o’-lantern with a happy glow shows off a classic spooky side, inviting trick-o’-treaters to come and have fun. The entire setup is very welcoming and full of fall cheer.
DIY Bountiful Porch Display
Making a big porch display is easier than it looks. You just need to arrange everything in layers.
Materials you will need:
- Hay bales
- Pumpkins and gourds (different sizes and colors)
- Corn stalks
- A carved jack-o’-lantern
- Baskets or crates
Step 1: Set up the base. First, place your hay bales on the porch to create a sturdy, flat base. You can make a stack of two bales to create a higher area for your pumpkins.
Step 2: Add your big pumpkins. Place your largest pumpkins on the hay bales and on the ground around the bales. Put them in different spots to make it look interesting.
Step 3: Bring in the details. Now, tuck the smaller pumpkins and gourds into the empty spaces. You can also put them inside baskets or on crates to add height and texture.
Step 4: Add the corn stalks. Stand up your corn stalks next to the hay bales or at the corners of your porch. They will make the display look taller and more full.
Step 5: Light up the night. Finally, place your carved jack-o’-lantern in a special spot and light it up when it gets dark. It will be the star of your spooky porch.
6. The Gothic Victorian Table Setting

This table setting is full of dark, romantic style. Layers of black lace cascade over the table, giving it a rich and sophisticated look. Towering black candles in ornate candelabras create a dramatic, flickering light. Old portraits and silver pumpkins are placed among the decor, which adds to the mysterious feel. The plates and glasses are also in dark tones, which keeps the look consistent and spooky. This decor is a strong way to add a bit of spooky elegance to a Halloween dinner party or gathering.
DIY Spooky Victorian Portraits
Turn a simple frame into a spooky vintage portrait to scare and delight your friends.
Materials you will need:
- Old picture frames (or new ones that you can paint)
- Black spray paint or acrylic paint
- Old or vintage-looking portraits (you can print these from a computer)
- Scissors or a paper cutter
- Glue
Step 1: Get your frames ready. If you have new frames, paint them with black paint and let them dry completely. This will give them a spooky, aged look.
Step 2: Find a spooky picture. Search online for old portraits, or maybe even pictures of ghosts or vampires. Print them out to fit your frames.
Step 3: Place the picture in the frame. Carefully cut out your printed picture so it fits inside the frame. Put it inside the frame just like you would with any other photo.
Step 4: Display your spooky art. Your portraits are now ready to be hung on a wall or placed on a table to add a spooky feel to your decor.
7. The Rustic Kitchen Cauldron

A cozy, rustic feel fills this kitchen corner. The centerpiece is a large, black cast iron pot that looks like a witch’s cauldron. It is overflowing with a collection of pumpkins, gourds, and dried floral arrangements. The different textures and colors of the gourds create a full and lively display. Hanging above the pot are bunches of dried herbs, which adds to the charming, natural style. This simple yet beautiful decoration makes the kitchen feel ready for autumn, with a touch of magic for Halloween.
DIY Kitchen Cauldron Centerpiece
Making this centerpiece is a fun way to use pumpkins and other items you find outside.
Materials you will need:
- A large black pot or bowl
- Pumpkins and gourds (different sizes, shapes, and colors)
- Dried flowers or leaves
- Dried herbs (optional)
- Twine or string (optional)
Step 1: Get your cauldron ready. Place a large black pot or bowl in the center of your kitchen island or table. This will be your cauldron.
Step 2: Fill your cauldron. Start by placing the largest pumpkins in the pot first. Then, tuck the smaller pumpkins and gourds in to fill the empty spaces.
Step 3: Add some flowers. Tuck dried flowers or colorful leaves into the spaces between the pumpkins. This will make your centerpiece look even more full and pretty.
Step 4: Hang your herbs. If you want, you can tie bunches of dried herbs with twine and hang them from a hook or a rack in your kitchen. This will give the whole room a fun, spooky feel.
8. Modern Minimalist Halloween

This setup is a clean, modern take on rustic Halloween style. The decor uses a simple color palette of black, white, and natural wood, creating a sleek and sophisticated look. Wooden pumpkins with carved faces add a touch of handcrafted charm. A black lantern with a glowing candle provides soft, warm light. The display also includes a spooky ghost and bat garland, which makes it feel ready for the holiday. This simple style is a great way to celebrate Halloween while keeping your space looking clean and modern.
DIY Minimalist Wooden Pumpkins
Making these pumpkins is a fun and easy project that you can use year after year.
Materials you will need:
- Pieces of wood (or pre-cut wooden pumpkins from a craft store)
- Black paint
- A pencil
- A small paintbrush
- Saw (ask a grown-up for help!)
Step 1: Get your wood ready. If you have a piece of wood, use a pencil to draw a pumpkin shape on it. A grown-up can help you cut out the shape with a saw. You can also buy pre-cut wooden pumpkins.
Step 2: Paint your pumpkin. Paint your wooden pumpkin black. You may need to do a couple of coats to get a nice, solid color. Let it dry all the way.
Step 3: Make a spooky face. Once the paint is dry, use a pencil to draw a simple spooky face on the pumpkin. Keep the shapes simple.
Step 4: Paint the face white. Use a small paintbrush and white paint to fill in the face you drew. Take your time to stay inside the lines. Now you have a spooky wooden pumpkin!
9. The Cozy Scarecrow Family

These three friendly scarecrows bring a warm and happy feeling to the table. They are dressed in classic plaid and denim, with straw sticking out from their hands and feet. A little scarecrow family sitting together creates a playful, welcoming mood. The centerpiece in front of them is made of Indian corn, pumpkins, and gourds, all in rich autumn colors. This decor is a wonderful way to celebrate the harvest season with a touch of fun and personality.
DIY Simple Scarecrow Dolls
You can make your own cute scarecrow dolls in just a few steps.
Materials you will need:
- Straw or hay
- A small burlap sack
- Fabric scraps (plaid, denim, etc.)
- Twine or string
- Black marker
- Glue
Step 1: Make the head. Fill a small burlap sack with straw or hay until it forms a round shape for the head. Tie it off with some twine or string.
Step 2: Give your scarecrow a body. Roll up a piece of fabric for the body and glue it to the head. You can also glue on other small pieces of fabric for a shirt and pants.
Step 3: Make the arms and legs. Gather small bunches of straw for the arms and legs. Tie them with string to the body of the scarecrow.
Step 4: Make the face and hair. Draw a happy face on the burlap head with a black marker. You can also glue some extra straw on top for hair and a hat.
10. The Autumn Porch Welcome

This charming porch is a beautiful tribute to the fall season. A variety of pumpkins and gourds in different shapes and shades of orange, white, and green are arranged in a large display. They are piled on hay bales and placed in baskets to create a full, rich look. The corn stalks and mums add a nice pop of color and texture. A chunky knit blanket on the couch offers a feeling of cozy comfort, inviting you to sit and enjoy the autumn air. It is a fantastic way to welcome visitors with a feeling of warmth and cheer.
DIY Autumn Porch Welcome Display
This display is all about arranging your items to look full and inviting. Here is a simple way to create it.
Materials you will need:
- Hay bales
- Pumpkins and gourds of different sizes
- Fall plants like mums
- Baskets or crates
- Corn stalks
- A cozy blanket
Step 1: Get your hay bales ready. Place your hay bales on your porch to create a sturdy, flat base. You can stack them or arrange them in a line, depending on how big you want your display to be.
Step 2: Place your pumpkins. Start by placing your largest pumpkins on the hay bales and on the ground in front of them. Then, fill in the spaces with the smaller pumpkins and gourds.
Step 3: Add the flowers and baskets. Place your fall flowers in pots or baskets and tuck them into the display. You can also add more baskets with pumpkins inside them to create more visual interest.
Step 4: Use the corn stalks. Stand up your corn stalks next to the hay bales or at the corners of your porch. They will make the display look taller and more full.
Step 5: Add a cozy touch. If you have a chair or couch on your porch, fold a cozy blanket and place it on top. This will make your porch feel even more welcoming.
11. The Spooky Carnival Porch

Step right up to this playful and eerie carnival-themed display. The rustic porch is transformed into a classic funhouse entrance with aged signs and vintage-looking dolls. Striped pumpkins in black and white give a circus-tent feel, while old lanterns provide a flickering glow. A large wooden wagon wheel and draped cobwebs on the window add to the charmingly old-fashioned, spooky vibe. This decor is a creative way to mix a bit of nostalgic fun with a touch of Halloween fright.
DIY Spooky Carnival Pumpkins
These striped pumpkins are a fun way to add a playful look to your decor.
Materials you will need:
- Pumpkins (real or fake)
- Black and white paint
- A paintbrush
- Tape
Step 1: Get your pumpkins ready. First, make sure your pumpkins are clean and dry. You can use fake pumpkins so you can use them again next year.
Step 2: Make your stripes. Use a pencil to lightly draw a few lines from the top of the pumpkin to the bottom. Try to make them as straight as you can.
Step 3: Tape your stripes. Place a small piece of tape along one side of each pencil line. This will help you paint a straight line later.
Step 4: Paint the stripes. Use your black paint to carefully paint inside the lines you made with the tape. Let the paint dry, and then take off the tape.
Step 5: Finish your pumpkins. Now you can paint any other parts of the pumpkins you want, like the top or bottom. You can also use a small brush to touch up any wobbly lines.
12. Witchy Herb Garden

This delightful indoor garden brings a touch of magic to any room. It features a variety of plants in small terracotta pots, which give the display a warm, earthy feel. Each pot has a small wooden sign with a witchy name, such as “Belladonna” or “Sage.” The plants are arranged on a rustic tray and add a natural look to the scene. Bunches of dried herbs hang from a rack above, giving the space a feeling of being a real witch’s workshop.
DIY Witchy Herb Garden Signs
Make your own herb signs to label all your spooky plants.
Materials you will need:
- Small pieces of wood or craft sticks
- A black marker or wood-burning tool
- A pencil
- Glue
Step 1: Get your wood ready. First, if you have craft sticks, you can use those. If you have a small piece of wood, you can ask a grown-up to help you cut it into smaller pieces.
Step 2: Write your names. Use a pencil to lightly write the spooky names on each piece of wood. Some good names are “Moonwart,” “Wolfsbane,” or “Belladonna.”
Step 3: Trace your letters. Once you have the names written, you can go over the pencil lines with a black marker to make them darker. If you have a wood-burning tool, you can use it to burn the letters into the wood for an aged look. Make sure to be very careful with the tool.
Step 4: Place the signs. Now you can push the signs into the soil of your potted plants. They will look great and give your garden a fun, spooky feel.
13. The Haunted Tavern

Get ready to serve some spooky drinks with this fun and rustic bar setup. This display has a relaxed, old-timey feel, with a collection of metal tankards and pitchers on a dark wooden table. A large dispenser filled with a glowing orange drink is a great focal point. Small blackboards with fun Halloween-themed drink names add to the bar-like mood. A decorated pumpkin with a beer foam top and scattered almonds complete the look.
DIY Haunted Tavern Sign
Make your own sign to let people know what spooky drinks you have.
Materials you will need:
- A small blackboard or piece of wood painted with blackboard paint
- White or colored chalk
- A pencil
Step 1: Get your sign ready. Make sure your blackboard is clean and ready to write on.
Step 2: Sketch out your words. Use a pencil to lightly draw the words you want to write, like “Witches Brew” or “The Haunted Tavern.” This helps you get the letters spaced out correctly.
Step 3: Write your spooky message. Now, use the chalk to trace over your pencil lines. You can make the letters thicker by going over them a few times.
Step 4: Draw some spooky pictures. You can also draw small pictures on your sign with the chalk, like ghosts, bats, or pumpkins. This will make your sign look more interesting.
14. The Creeping Web Hallway

This simple yet scary display is a classic way to decorate for Halloween. The main part of the scene is the large, beautiful mirror covered in stretchy, fake cobwebs. The webs are draped over the whole table and down to the floor, making it look like a spooky spider has taken over. A variety of black spiders are crawling all over the webs, and a few are also on the pumpkins below. This is a quick and easy way to create a big impact in your entryway.
DIY Spooky Spiderwebs
Creating a spooky web is a very simple way to decorate for Halloween.
Materials you will need:
- A bag of fake spiderwebs
- Fake spiders
Step 1: Get your webs ready. Take the fake spiderwebs out of the bag. They will be in a tight ball.
Step 2: Stretch the webs. Start to pull and stretch the webs apart. Pull gently so you don’t break them into small pieces. The more you stretch them, the more they will look like real spiderwebs.
Step 3: Put the webs in a spooky place. Drape the webs over a mirror, a table, or even a bush outside. You can also stretch them over a door or a window.
Step 4: Add the spiders. Now, place your fake spiders on the webs. You can put them in different spots to make it look like they are crawling all over.
15. Sweet Harvest Display

A porch full of harvest happiness welcomes everyone with a cheerful mood. This display uses classic autumn elements, including a stepped pyramid of hay bales and corn stalks. The pumpkins are placed all over the bales, some carved with funny faces. Baskets are filled with bright yellow mums and a big pile of candy corn. The pumpkins are a mix of sizes and colors, which makes the whole scene feel full and inviting.
DIY Candy Corn Welcome Mat
You can create a fun welcome mat with candy corn to show everyone you are ready for Halloween.
Materials you will need:
- An outdoor space where you can pour out a lot of candy corn
- A broom and dustpan
- A few bags of candy corn
Step 1: Get a clean area ready. First, make sure the area where you want to make your design is clean. You can use a broom to sweep away any leaves or dirt.
Step 2: Draw your design. Use a stick to lightly draw a shape in the dirt or on the ground. You can make a circle, a big pumpkin, or even a star.
Step 3: Pour the candy corn. Carefully pour the candy corn into the shape you drew. Try to keep them inside the lines. You can use your hands to spread them out and fill in the spaces.
Step 4: Finish your design. Make sure the candy corn is placed in a way that looks nice and full. Now you have a fun welcome mat for all your friends to see!
16. The Bubbling Cauldron

This magical display creates a real feeling of a witch’s lair. A large, green punch bowl sits on a wooden base and appears to be bubbling and smoking, which gives it a spooky and mysterious look. It’s surrounded by small jars filled with herbs, spices, and dried flowers that are labeled with clever names. Wooden spoons are ready to stir the brew, and a small black witch’s hat is a fun addition. This is a very creative and cool way to serve drinks at a Halloween party.
DIY Bubbling Potion Punch
Making a spooky, bubbling punch for your party is easy with a grown-up’s help.
Materials you will need:
- A large, clear punch bowl
- A punch bowl with a spigot is a good choice.
- A green-colored drink, like lime soda or Hawaiian Punch
- A block of dry ice (ask a grown-up to get this)
- A pair of gloves and tongs (to hold the dry ice)
Step 1: Get your punch ready. First, pour your green drink into the punch bowl.
Step 2: Add the bubbles. Ask a grown-up to help you with this step. Use a pair of tongs and gloves to carefully place a small piece of dry ice into the punch bowl.
Step 3: Watch it bubble! The dry ice will make the punch bowl bubble and smoke. It will look like a real spooky potion. Just remember not to touch the dry ice with your hands.
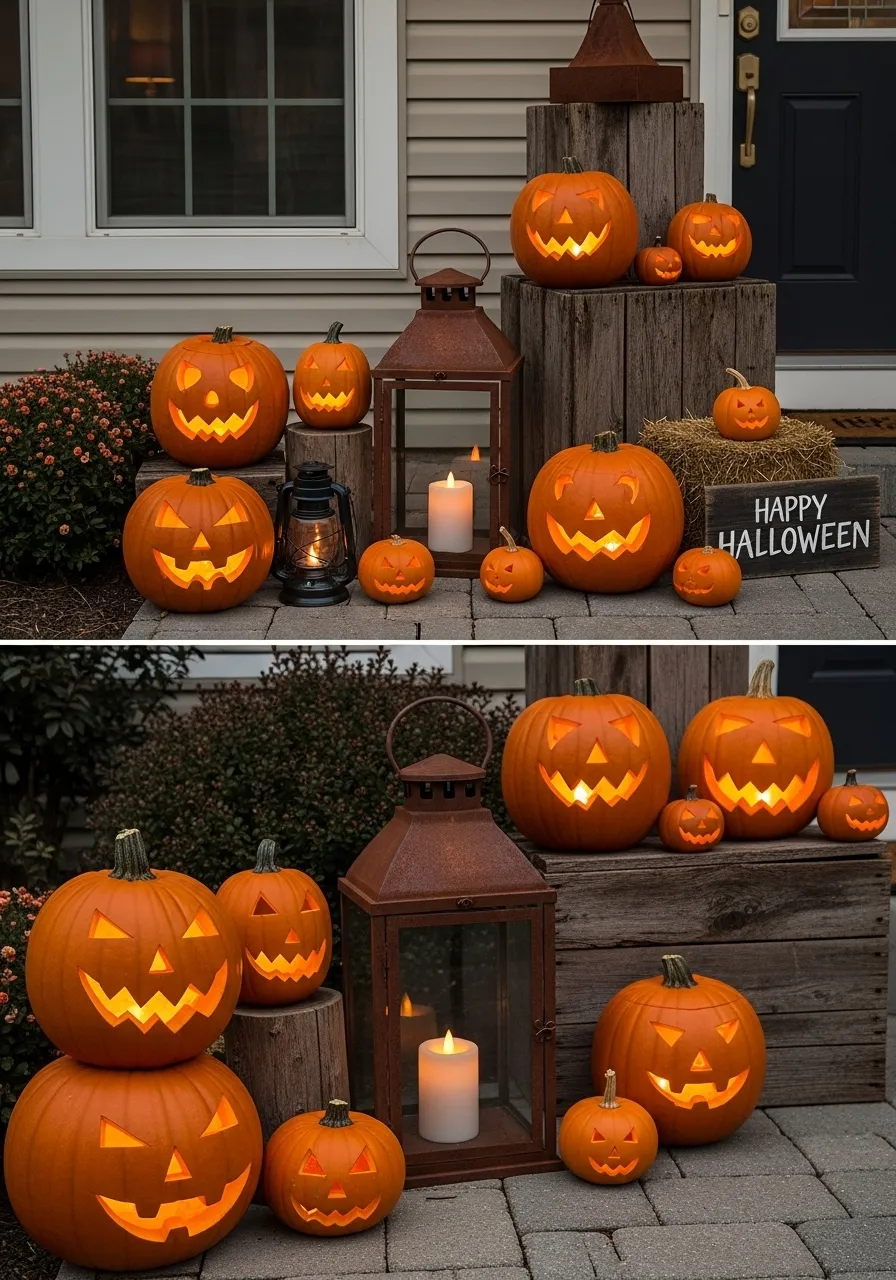
17. Glowing Jack-o’-lantern Staircase

This warm and inviting entryway is a classic Halloween sight. The porch stairs are lined with different sizes of glowing jack-o’-lanterns, which create a cheerful and welcoming glow. The carved faces are all different and have fun, spooky smiles. A few old lanterns are also placed among the pumpkins, which gives the scene an antique, rustic feel. A “Happy Halloween” sign adds a final friendly message, and the whole display feels ready for a night of trick-o’-treating.
DIY Jack-o’-lantern Staircase
This is a fun way to decorate your stairs with your pumpkins.
Materials you will need:
- Pumpkins of different sizes
- A pumpkin carving kit (ask a grown-up for help)
- Lights for your pumpkins (battery-powered candles are safest)
Step 1: Pick your pumpkins. First, go to a pumpkin patch or a store to pick out your pumpkins. You will need a few different sizes to make a good display.
Step 2: Carve your pumpkins. Ask a grown-up to help you with this part. Use a carving kit to carve a fun face into each of your pumpkins.
Step 3: Light them up. Once your pumpkins are carved, put a battery-powered light inside each one. This is much safer than using real candles.
Step 4: Arrange them on the stairs. Carefully place your glowing pumpkins on your stairs. Put the biggest ones on the bottom and the smallest ones on the top. Make sure they are placed far back so no one trips on them.
18. The Boho Ghostly Wall

This cozy and creative room is filled with handmade touches. The wall is decorated with macrame hangings, which have a beautiful woven pattern. A few of the hangings have small, ghostly faces on them, which adds a spooky surprise. The room also has many pillows and blankets that add to the relaxed, bohemian feel. On the floor, a collection of white pumpkins with simple black ghost faces is placed among woven baskets and warm textures.
DIY Ghostly Macrame
You can easily make your macrame hangings a bit spooky.
Materials you will need:
- A macrame wall hanging
- Black felt or marker
- Scissors
- Glue
Step 1: Get your macrame ready. First, make sure your macrame is hanging in a good spot on the wall.
Step 2: Make the ghost’s face. Cut two small, black felt circles for the eyes and a slightly larger oval for the mouth. Or you can simply draw them on with a black marker.
Step 3: Add the face to the macrame. Carefully glue the felt circles and oval onto the macrame where you want the ghost’s face to be. Now your macrame is a little bit spooky!
19. The Pantry of Preserved Spells

This pantry looks like it belongs to a witch with a flair for organization. Shelves are filled with various jars of preserved goods, which are tied with twine and burlap. The different sizes and contents of the jars give the display a rustic and full look. A few jars have spiders glued onto them, and a grinning jack-o’-lantern adds to the Halloween vibe. A small basket of cinnamon sticks and other spices at the bottom gives the feeling of a cozy, witchy kitchen.
DIY Spooky Spider Jars
Making your own spooky spider jars is a fun and easy project.
Materials you will need:
- Empty glass jars with lids
- Twine
- Small fake spiders
- Glue
Step 1: Get your jars ready. First, make sure your glass jars are clean and dry. You can fill them with anything you want, like candies, dried leaves, or spices.
Step 2: Tie the twine. Wrap a piece of twine around the lid of the jar a few times and tie a knot.
Step 3: Add the spider. Use a small bit of glue to stick a fake spider onto the twine you just tied.
Step 4: Place your jars. Now you can place your spooky jars on a shelf or a table to add a touch of Halloween magic to your home.
20. The Spooky Scarecrow Field

This outdoor display is a spooky and simple way to decorate your yard. Two large scarecrows stand guard on either side of a path, which leads to a dark cornfield. They are dressed in plaid shirts and have pumpkin heads with happy, but also a bit scary, faces. A few carved pumpkins and lanterns with flickering candles are placed at their feet, which makes the scene glow with an eerie light. This decor is a great way to welcome trick-o’-treaters to your home with a fun and spooky display.
DIY Spooky Scarecrow Field
You can make your own spooky scarecrow family for your yard.
Materials you will need:
- Old clothes (a plaid shirt and jeans work well)
- Hay or straw
- Twine or string
- Pumpkins
- A pumpkin carving kit (ask a grown-up for help)
- A wooden pole or stake
Step 1: Get your clothes ready. Lay out your old shirt and jeans on the ground.
Step 2: Stuff the clothes. Fill the shirt and jeans with hay or straw until they look full and solid. You can use twine to tie off the cuffs of the sleeves and legs so the straw doesn’t fall out.
Step 3: Make the head. Carefully carve a face into a pumpkin. Ask a grown-up for help with this step.
Step 4: Put your scarecrow together. Place a wooden pole through the middle of the shirt and jeans. Push the pole into the ground to make your scarecrow stand up. Then, place the carved pumpkin on top of the pole for the head.
Step 5: Add more decorations. Place your extra pumpkins and lanterns around the base of the scarecrow to make it look even spookier. Just make sure the lanterns are a good distance from the hay so they don’t catch fire.
21. The Cozy Hearth

This inviting living room scene has a warm, cozy mood. The fireplace is filled with a bright, crackling fire. Large pumpkins in different sizes and shades of orange are placed on the hearth, which adds a natural touch. A soft, chunky blanket is draped over the couch, and a basket of firewood stands by, ready for use. The whole scene feels like a comfortable autumn evening, with a mix of light, textures, and fall colors.
DIY Cozy Hearth Display
Making a cozy fireplace display is a great way to make your home feel ready for autumn.
Materials you will need:
- A few pumpkins of different sizes and colors
- Lanterns or flameless candles
- A cozy blanket or throw
- A basket or crate to hold firewood
Step 1: Place your pumpkins. First, put your pumpkins on the hearth in front of the fireplace. You can arrange them in a line or in a small group.
Step 2: Add your lanterns. Place a few lanterns or flameless candles among the pumpkins. This will make the display glow when it gets dark.
Step 3: Bring in the cozy. Fold a cozy blanket and place it over the arm of a chair or on a nearby couch. This will make the space feel even more comfortable.
Step 4: Add the firewood. Fill a basket or crate with firewood and place it next to the fireplace. This will add to the rustic, cozy look.
22. The Pumpkin Carving Table

This bright and lively table is all set up for a fun day of pumpkin carving. The table is covered with pumpkins of different sizes, shapes, and colors, which are ready to be carved. Tools and small bowls are on the table to hold the pumpkin guts and seeds. A burlap table runner gives the display a simple, rustic feel. This is a great way to show that Halloween is about more than just a spooky night, but a fun activity for all ages.
DIY Pumpkin Carving Station
Setting up a pumpkin carving station is a fun way to get ready for Halloween.
Materials you will need:
- Pumpkins
- Pumpkin carving tools (ask a grown-up for help)
- Bowls for seeds
- A burlap table runner
- A newspaper or an old sheet to cover the table
Step 1: Cover your table. First, cover your table with newspaper or an old sheet. This will make cleaning up much easier.
Step 2: Place your pumpkins. Put a few pumpkins on the table, one for each person who will be carving.
Step 3: Set out the tools. Place the carving tools on the table. Make sure a grown-up is ready to help you use the tools safely.
Step 4: Get your bowls ready. Put out a few bowls for everyone to use. You can use these to hold the seeds and pumpkin guts.
Step 5: Start carving! Now you are ready to start carving your pumpkins. This is a great way to get creative and have fun.
23. The Scarecrow Guard

This spooky and rustic yard scene creates an eerie mood. A lonely scarecrow stands in a field of dry corn, which has a tattered cloth outfit and a burlap sack head. A few crows are perched on pumpkins and a wooden fence, watching over the scene. Pumpkins with spooky faces are placed around the scarecrow, and a barrel adds to the farm feel. The dark sky and flying birds make the whole scene feel even spookier.
DIY Spooky Scarecrow
You can make your scarecrow look even spookier with a few simple steps.
Materials you will need:
- Old clothes
- Burlap sacks
- Hay or straw
- Twine
- A wooden pole or stake
- A needle and thread (optional)
Step 1: Stuff the clothes. Fill an old shirt and jeans with hay or straw. You can use a needle and thread to sew a few spots so the hay doesn’t fall out.
Step 2: Make the head. Fill a burlap sack with straw and tie it off with twine to create a round head shape. You can draw a spooky face on it with a black marker.
Step 3: Put it all together. Place the clothes and head on a wooden pole and push the pole into the ground.
Step 4: Add the details. You can fray the edges of the clothes or make a few tears to make the scarecrow look even older and spookier.
24. Ethereal Ghostly Dining

This elegant dining room is transformed into a peaceful, haunted space. White pumpkins of all sizes are arranged on the buffet and dining table, which creates a clean, consistent theme. The real stars are the white, hanging ghosts that float down from the ceiling. A bare, painted branch is suspended above the table, which gives the scene a natural, spooky touch. This decor is a refined and beautiful way to celebrate Halloween with a ghostly feel.
DIY Ethereal Ghostly Hangings
Making these ghosts is a fun and easy way to add a bit of spooky elegance to your home.
Materials you will need:
- Cheesecloth or white fabric
- White styrofoam balls
- Black felt or marker
- Fishing line or clear string
- A white painted branch
Step 1: Get your ghosts ready. First, take a styrofoam ball and place it on a flat surface. This will be the ghost’s head.
Step 2: Give your ghost a body. Now, drape a piece of white fabric over the styrofoam ball. The fabric should hang down to look like a ghostly body. You can use a tiny bit of glue to hold it in place.
Step 3: Make the ghost’s face. Cut small circles from black felt and glue them on for the eyes, or draw them on with a marker.
Step 4: Get your branch ready. Take a tree branch and paint it white. Once the paint is dry, you can hang it from the ceiling with strong wire or rope.
Step 5: Hang your ghosts. Use fishing line to tie your ghosts to the branch. The clear line will make the ghosts look like they are floating in the air.
25. The Haunted House Welcome

This rustic and spooky porch display is the perfect way to welcome trick-o’-treaters. The entryway is decorated with black pumpkins that have spooky faces carved into them. The real highlight is the vintage-looking “Haunted House” sign that stands tall and proud. The rusty lanterns with flickering lights give the scene a warm but also eerie glow. Draped webs and a ghostly figure add to the haunting feel.
DIY Haunted House Sign
Making a spooky sign is a great way to personalize your Halloween decor.
Materials you will need:
- A piece of wood
- White and black paint
- A paintbrush
- A pencil
- A wooden stake or post
Step 1: Get your wood ready. First, paint your piece of wood with white paint. Let it dry completely.
Step 2: Draw your letters. Use a pencil to lightly draw the words “Haunted House” on the sign. You can make the letters look old and spooky by making them a bit wobbly.
Step 3: Paint the letters. Carefully paint inside your letters with the black paint. You can go over it a few times to get a bold, clean look.
Step 4: Make it look old. Once the paint is dry, you can use some sandpaper to rub away some of the white paint on the edges and corners. This will make the sign look old and rustic.
Step 5: Set up your sign. Attach your sign to a wooden stake and place it in your yard or by your front door.
26. The Spooky Forest Centerpiece

This tabletop display is both elegant and haunting. A gnarled, dark tree stands in a wooden log base covered in moss. The branches of the tree reach up and out, which gives it a mysterious look. Small, black pumpkins and stones are placed around the base, and tiny fairy lights give the scene a warm, flickering glow. This centerpiece is a simple yet effective way to bring a touch of the spooky woods to your dining table.
DIY Spooky Forest Centerpiece
Creating this centerpiece is a fun project that uses things you can find outside.
Materials you will need:
- A log or wooden planter
- Moss
- A few bare branches
- Tiny battery-powered fairy lights
- Black pumpkins or gourds
- Small rocks or stones
Step 1: Set up your base. First, place a log or a wooden planter on the middle of your table. Fill it with a bit of dirt or sand to hold the branches.
Step 2: Add your tree. Place the bare branches into the planter. Spread them out so they look like a small, spooky tree.
Step 3: Decorate the base. Spread moss around the base of the branches. You can use a bit of glue to hold it in place.
Step 4: Light it up. Carefully wrap the fairy lights around the base of the branches. You can also place some small black pumpkins or stones around the base to finish the look.
27. The Pumpkin Patch Farmstand

This charming porch display has a happy and rustic farm feel. It uses a variety of hay bales, pumpkins, and gourds, all in different colors and textures. A few baskets are filled to the top with gourds and pumpkins, which gives the scene a feeling of abundance. Signs with “Pumpkin Patch” and “Farmstand” add to the welcoming mood. This decor is a great way to show off a bountiful harvest and celebrate the season.
DIY Pumpkin Patch Farmstand Display
Making this display is all about arranging your items to look full and inviting.
Materials you will need:
- Hay bales
- Pumpkins and gourds (different sizes and colors)
- Baskets
- A small wooden bench or crate
- Two small wooden signs
Step 1: Set up your base. First, place a few hay bales on the porch to create a sturdy base. You can place a small wooden bench or crate on top of the bales to add height.
Step 2: Add the pumpkins. Place your pumpkins and gourds on the hay bales and on the ground. Fill your baskets with a mix of gourds and pumpkins.
Step 3: Add the signs. Place one of the signs on the wooden bench or crate. You can also place another sign nearby to add to the fun.
Step 4: Finish the display. Tuck in a few corn stalks and mums to make the display look even more full. Your pumpkin patch is now open!
28. The Haunted Library

This cozy and spooky scene has a literary and mysterious feel. The room is filled with tall bookshelves and old books, which gives it a feeling of history and magic. A large mirror is placed on a dark wooden table, which is surrounded by old books and flickering candles. A small human skull is placed among the books, which adds a spooky touch. A sign that says “The Haunted Library” completes the look, and the whole scene feels like a fun, mysterious place to read a spooky story.
DIY Haunted Library Sign
Making a spooky sign is a great way to add a bit of fun to your decor.
Materials you will need:
- A piece of wood
- Black and white paint
- A paintbrush
- A pencil
- Twine or string
Step 1: Get your wood ready. First, paint your piece of wood with white paint. Let it dry completely.
Step 2: Draw your letters. Use a pencil to lightly draw the words “The Haunted Library” on the sign. You can make the letters a bit wobbly to make them look spooky.
Step 3: Paint the letters. Carefully paint inside your letters with the black paint. You can go over it a few times to get a bold, clean look.
Step 4: Make it look old. Once the paint is dry, you can use some sandpaper to rub away some of the paint on the edges and corners. This will make the sign look old and rustic.
Step 5: Set up your sign. Now you can place your sign on a table or on the floor to welcome guests to your haunted library.
29. The Rustic Harvest Table

This beautiful dining table is set for a cozy autumn feast. It is filled with a bounty of pumpkins and gourds in a variety of sizes and colors. A burlap table runner gives the table a simple, rustic feel. The large orange pumpkins are placed at the center, which makes them the star of the show. Small gourds, candles, and fake grapes are tucked in between the pumpkins, which gives the table a full, rich look.
DIY Rustic Harvest Table Setting
Setting a beautiful harvest table is a fun way to get ready for a party.
Materials you will need:
- A burlap or natural fabric table runner
- Pumpkins and gourds of different sizes and colors
- Small fake grapes or acorns
- Small candles
Step 1: Set your table. First, place your table runner down the middle of your dining table.
Step 2: Arrange your pumpkins. Place your largest pumpkins in the center of the runner. Then, tuck the smaller pumpkins and gourds in around them.
Step 3: Add the details. Place small candles along the runner. You can also tuck in some fake grapes, acorns, or other small items to fill in the spaces.
Step 4: Set the table. Now you can set your plates, glasses, and silverware on the table. Your harvest table is ready for a feast!
30. Witch’s Garden

This inviting garden is a fun and simple way to decorate your porch. It features a collection of potted plants with small wooden signs that have witchy names on them. The terracotta pots give the display a warm, earthy feel. White and orange pumpkins with friendly faces are placed on the ground, and a small wooden sign with “Witch’s Garden” on it completes the look. This decor is a great way to welcome visitors with a bit of spooky fun.
DIY Witch’s Garden Display
Making a witch’s garden is a fun way to use plants to decorate your porch.
Materials you will need:
- Potted plants
- Small wooden signs
- A black marker or paint
- Pumpkins
- A small crate or stool
Step 1: Arrange your plants. First, arrange your potted plants on your porch. You can place some on the ground and some on a small crate or stool to add different levels.
Step 2: Make the signs. Use a black marker or paint to write spooky names on the wooden signs. You can make up your own names, like “Eye of Newt” or “Dragon’s Breath.”
Step 3: Place the signs. Push the small signs into the soil of the plants.
Step 4: Add the pumpkins. Place a few pumpkins in front of the plants. You can also add a small sign with the words “Witch’s Garden” on it.
31. The Hay Bale Feast

This is a fun and comfortable way to have a party outside. The space is filled with hay bales that are used as seating and tables. A long table made from a few hay bales is covered with a red and black tablecloth, which makes a cozy spot for a meal. Carved jack-o’-lanterns and corn stalks are placed around the space, which adds to the harvest feel. The string lights hanging above make the whole area feel warm and magical.
DIY Hay Bale Party Setup
Making this outdoor party area is a great way to get everyone together.
Materials you will need:
- Hay bales
- Tablecloths (flannel or plaid is a good choice)
- Pumpkins and gourds
- Battery-powered lanterns or string lights
Step 1: Set up the seating. First, place the hay bales around your yard to create a fun, outdoor seating area. You can put them in rows or in small groups.
Step 2: Make your table. Stack two hay bales on top of each other and cover them with a tablecloth to create a tall table.
Step 3: Decorate your space. Place a few pumpkins and gourds around the hay bales and on the table. This will make the space look festive.
Step 4: Add some light. Hang string lights from the trees or the porch to make the area feel warm and inviting at night.
32. The Haunted Cabin Porch

This rustic porch is transformed into a spooky cabin scene. A large, wooden sign that says “Haunted Cabin” hangs above the door. The decor uses a simple color palette of black and white, with pops of orange from the pumpkins. The spooky lanterns with flickering lights give the porch an eerie glow. Draped lace and cobwebs on the railing add to the ghostly feel. A small ghost figure stands at the bottom of the stairs, ready to greet visitors.
DIY Haunted Cabin Sign
Making a spooky sign is a great way to personalize your Halloween decor.
Materials you will need:
- A piece of wood
- White and black paint
- A paintbrush
- A pencil
- A wooden stake or post
Step 1: Get your wood ready. First, paint your piece of wood with black or brown paint. Let it dry completely.
Step 2: Draw your letters. Use a pencil to lightly draw the words “Haunted Cabin” on the sign. You can make the letters look old and spooky by making them a bit wobbly.
Step 3: Paint the letters. Carefully paint inside your letters with the white paint. You can go over it a few times to get a bold, clean look.
Step 4: Make it look old. Once the paint is dry, you can use some sandpaper to rub away some of the paint on the edges and corners. This will make the sign look old and rustic.
Step 5: Set up your sign. Attach your sign to a wooden stake and place it in your yard or by your front door.
33. The Dark Forest Centerpiece

This tabletop display is both haunting and elegant. A large, gnarled tree stands in a base covered in a dark green moss. The bare branches of the tree reach up and out, which gives it a mysterious look. Small, black pumpkins and smooth, dark stones are placed around the base, and tiny fairy lights are wrapped around the centerpiece. This is a very simple yet effective way to bring a touch of the spooky woods to your dining table.
DIY Dark Forest Centerpiece
Creating this centerpiece is a fun project that uses things you can find outside.
Materials you will need:
- A log or wooden planter
- Moss
- A few bare branches
- Tiny battery-powered fairy lights
- Black pumpkins or gourds
- Small rocks or stones
Step 1: Set up your base. First, place a log or a wooden planter on the middle of your table. Fill it with a bit of dirt or sand to hold the branches.
Step 2: Add your tree. Place the bare branches into the planter. Spread them out so they look like a small, spooky tree.
Step 3: Decorate the base. Spread moss around the base of the branches. You can use a bit of glue to hold it in place.
Step 4: Light it up. Carefully wrap the fairy lights around the base of the branches. You can also place some small black pumpkins or stones around the base to finish the look.
34. The Witches’ Tavern

This playful and rustic candy bar is a fun way to serve treats at a party. The table is filled with glass jars of different sizes and shapes, which are filled with colorful candies. A large sign with “The Witches’ Tavern” on it hangs above the table. A drink dispenser is filled with a bright orange drink, and paper bats are strung across the table. This is a creative and fun way to serve candy and drinks at a Halloween party.
DIY Witches’ Tavern Candy Bar
Making a candy bar is a fun way to show off your sweets.
Materials you will need:
- A rustic table or sideboard
- A few glass jars of different sizes
- Your favorite candies
- A drink dispenser
- A sign that says “The Witches’ Tavern”
- A few pumpkins and gourds
Step 1: Set up your table. First, place a rustic table in a good spot. Place a few wooden crates on the floor to add height.
Step 2: Fill your jars. Fill your glass jars with all of your favorite candies. You can use different colors and types to make the jars look full and fun.
Step 3: Add your drinks. Place a drink dispenser on the table and fill it with a fun, colored drink.
Step 4: Decorate the space. Place a sign above the table and put a few pumpkins and gourds on the table and on the crates below.
35. The Spooky Carnival Hut

This is a creative and unique take on Halloween decor. It features a small, rustic wooden hut that looks like a carnival ticket booth or game stand. It is decorated with striped pumpkins in red and white and small, eerie-looking dolls. Old lanterns provide a flickering glow. The rustic look is finished with draped fabric and an old wagon wheel, which adds to the charmingly old-fashioned, spooky vibe.
DIY Spooky Carnival Pumpkins
These striped pumpkins are a fun way to add a playful look to your decor.
Materials you will need:
- Pumpkins (real or fake)
- Red and white paint
- A paintbrush
- Tape
Step 1: Get your pumpkins ready. First, make sure your pumpkins are clean and dry. You can use fake pumpkins so you can use them again next year.
Step 2: Make your stripes. Use a pencil to lightly draw a few lines from the top of the pumpkin to the bottom. Try to make them as straight as you can.
Step 3: Tape your stripes. Place a small piece of tape along one side of each pencil line. This will help you paint a straight line later.
Step 4: Paint the stripes. Use your red paint to carefully paint inside the lines you made with the tape. Let the paint dry, and then take off the tape.
Step 5: Finish your pumpkins. Now you can paint any other parts of the pumpkins you want, like the top or bottom. You can also use a small brush to touch up any wobbly lines.
36. The Cozy Witch’s Hearth

This fireplace display is all about creating a spooky and cozy mood. A large, black cauldron sits in the fireplace, which has a warm, glowing fire inside. The mantle is decorated with bunches of dried herbs that are tied with twine. A few pumpkins with spooky faces and a witch’s broom are placed on the hearth. The whole scene feels magical and inviting, with a touch of a witch’s home.
DIY Cozy Witch’s Hearth
Making a spooky fireplace display is a great way to make your home feel ready for autumn.
Materials you will need:
- A large black pot or cauldron
- Pumpkins with spooky faces
- A witch’s broom
- Dried herbs
- A few jars or cans for decor
Step 1: Set up your cauldron. First, place a large black pot or cauldron in the fireplace.
Step 2: Add your pumpkins. Place a few pumpkins with spooky faces on the hearth in front of the fireplace.
Step 3: Add the details. Tie bunches of dried herbs with twine and hang them from the mantle. You can also place a few jars or cans with fun labels on the hearth.
Step 4: Place the broom. Stand a witch’s broom next to the fireplace to finish the look.
37. The Spooky Tree Chandelier

This dining room is transformed into a peaceful, haunted space. The main part of the scene is the large, bare, dark branch that is hanging from the ceiling. A few small, white ghosts are hanging from the branches, which gives the scene an ethereal feel. The room also has a buffet table with white pumpkins and candles that glow with a warm light. The whole decor is a refined and beautiful way to celebrate Halloween with a ghostly feel.
DIY Spooky Tree Chandelier
Making this spooky chandelier is a fun and easy way to add a bit of spooky elegance to your home.
Materials you will need:
- A bare tree branch
- White cheesecloth or fabric
- White styrofoam balls
- Black felt or marker
- Fishing line or clear string
Step 1: Get your ghosts ready. First, take a styrofoam ball and place it on a flat surface. This will be the ghost’s head.
Step 2: Give your ghost a body. Now, drape a piece of white fabric over the styrofoam ball. The fabric should hang down to look like a ghostly body. You can use a tiny bit of glue to hold it in place.
Step 3: Make the ghost’s face. Cut small circles from black felt and glue them on for the eyes, or draw them on with a marker.
Step 4: Hang your branch. Take your tree branch and hang it from the ceiling with strong wire or rope.
Step 5: Hang your ghosts. Use fishing line to tie your ghosts to the branch. The clear line will make the ghosts look like they are floating in the air.
38. Glowing Pumpkins Display

This welcoming entryway is filled with the warm, cheerful glow of jack-o’-lanterns. A large collection of pumpkins in different sizes and shapes is placed on the porch and stairs. The carved faces all have a glowing light inside. The pumpkins are arranged on hay bales and wooden crates, which gives the display a cozy, rustic feel. A large, rusty lantern with a candle inside adds to the warm, inviting mood.
DIY Glowing Pumpkins Display
Making a glowing pumpkin display is a fun way to decorate your porch.
Materials you will need:
- A variety of pumpkins (different sizes and shapes)
- A pumpkin carving kit (ask a grown-up for help)
- Lights for your pumpkins (battery-powered candles are safest)
- Hay bales or wooden crates
Step 1: Carve your pumpkins. Ask a grown-up to help you with this part. Use a carving kit to carve a fun face into each of your pumpkins.
Step 2: Light them up. Once your pumpkins are carved, put a battery-powered light inside each one. This is much safer than using real candles.
Step 3: Arrange them on the porch. Carefully place your glowing pumpkins on your stairs and on the ground. You can use hay bales or wooden crates to create different levels and make the display look more full.
Step 4: Add the finishing touches. You can add some other items, like a spooky lantern or a sign, to finish the look.
39. The Bat Cave Mantle

This elegant fireplace mantle has a simple but effective Halloween theme. It is decorated with a collection of black pumpkins that have spooky faces carved into them. The pumpkins glow with a warm light. The real highlight is the flock of paper bats that are flying above the mantle. They are hanging from a bare, dark branch and add a spooky and fun touch to the scene. The whole decor is a great way to celebrate Halloween with a simple and modern look.
DIY Flying Bat Mantle
Making a flying bat display is a fun and easy way to decorate for Halloween.
Materials you will need:
- Black craft paper
- Scissors
- Tape or string
- A bare branch or a piece of wood
Step 1: Make your bats. First, draw a bat shape on a piece of black paper. It should look like a bat with its wings spread out. Cut out the shape. You can also print out a bat shape from a computer.
Step 2: Make more bats. Trace the bat shape onto the rest of your black paper and cut out as many bats as you want.
Step 3: Hang your bats. Use a small piece of tape to stick the bats to the wall above your mantle. You can also hang them from a bare branch with string.
Step 4: Add some pumpkins. Place a few glowing pumpkins on the mantle to finish the look.
40. The Wise Old Owls Display

This charming and unique display is filled with a love for the autumn woods. It features a collection of owls of different sizes, which are placed on a rustic wooden table. One of the owls is sitting on a tree stump, while another is on a stack of old books. A pumpkin is decorated with a painted owl face, and small, glowing lanterns are placed on the table. This is a very creative way to celebrate Halloween with a love for nature and the wisdom of the forest.
DIY Wise Old Owl Pumpkins
Making a spooky owl pumpkin is a fun way to decorate for Halloween.
Materials you will need:
- A pumpkin
- A black marker or black paint
- A pencil
- A paintbrush (optional)
Step 1: Get your pumpkin ready. First, make sure your pumpkin is clean and dry.
Step 2: Draw your owl. Use a pencil to lightly draw an owl’s face on the pumpkin. You can make the eyes big and round and give the owl a pointy beak.
Step 3: Paint the owl’s face. Carefully paint inside the lines you drew with a black marker or black paint. You can also use a small brush to add details like feathers.
Step 4: Finish your pumpkin. Once the paint is dry, you can add a few extra touches, like a small piece of twine around the stem.
Creating a cozy and rustic Halloween home is a great way to celebrate the holiday with a sense of warmth. By using natural materials and embracing a mix of textures, you can design a space that feels personal and inviting. The simple projects in this article show how you can bring a bit of charm to any part of your home, from the front porch to the dining table.
Each idea offers a chance to get creative and celebrate the season in your own special way. From glowing pumpkins to spooky ghost decorations, every project adds to a warm and welcoming atmosphere. Now is the time to gather your materials and enjoy the process of making your space feel like a comfortable autumn haven.
Key Takeaways
- Embrace a Cozy Palette: Focus on earthy colors like warm orange, deep browns, and simple blacks and whites for a calming, rustic look.
- Use Natural Textures: Incorporate materials like hay, burlap, wood, and dried corn to add a touch of the outdoors.
- DIY Your Decor: Simple, handmade projects like painted signs, ghostly hangings, and glowing pumpkins are easy to create and add a personal touch.
- Mix Styles: Combine traditional Halloween elements with a modern or farmhouse aesthetic for a look that is both unique and timeless.
- Create a Welcoming Mood: Use warm lighting from lanterns and candles to make your space feel inviting for guests and family.