Ribbon is for more than just wrapping presents. This simple, colorful craft supply holds immense potential to change the look and feel of your home. It can add softness to a sharp corner, a splash of color to a neutral room, or a touch of personal charm to an everyday object.

Forget expensive renovations or complicated projects. The ideas that follow are about small, creative touches that make a big difference. From your front door to your bedroom windows, a simple bow or a well-placed length of ribbon can bring new life and personality into your space.
This collection of 41 ideas will show you how to weave, tie, and wrap your way to a brighter home. Each project is straightforward, affordable, and a wonderful way to express your own unique style.
1. Ribbon Curtain Tie-Back

Add a touch of softness and elegance to your window treatments with a custom curtain tie-back. This design uses layers of sheer and satin ribbons in warm, gentle colors like peach, pink, and gold.
The large, airy bow creates a beautiful focal point. Tucked into the center are small, charming details like a single pearl and a sprig of green leaves.
For a bit of magic, a thin wire of fairy lights is woven through the flowing ribbon tails. This creates a gentle glow when the sun goes down, adding a dreamy atmosphere to the room.
DIY Instructions: How to Make a Light-Up Curtain Tie-Back
What You’ll Need:
- Several types of ribbon (sheer, satin, different widths and colors)
- A thin wire of battery-powered fairy lights
- A small bit of fake greenery
- A large craft pearl or bead
- A pipe cleaner or floral wire
- Scissors
- Hot glue gun
Step-by-Step Guide:
- Cut Your Ribbons: Cut several long pieces of your different ribbons. To make the big bow, you’ll need a few pieces that are about 2 feet long. For the long tails, cut pieces that are about 3 feet long.
- Make the Bow: Take your 2-foot ribbon pieces. Make a loop with one, then another loop on the other side, like you’re tying a shoelace. Do this with a few ribbons layered on top of each other.
- Secure the Bow: Pinch the middle of your ribbon loops together. Tightly wrap your pipe cleaner or floral wire around the center to hold it all in place.
- Add the Tails and Lights: Take your 3-foot ribbon pieces and the fairy light string. Fold them in half and attach them to the back of your bow with the pipe cleaner.
- Add Decorations: Use your hot glue gun to carefully glue the pearl and the greenery right in the center of the bow, hiding the pipe cleaner.
- Tie It On: Wrap the finished tie-back around your curtain and use the long tails to tie a simple knot or bow to hold it in place.
2. Farmhouse Wreath Bow

Give your front door a warm and welcoming feel with a layered, rustic bow. This wreath decoration combines different textures and patterns to create a classic farmhouse look.
The base of the bow is a wide, natural-colored burlap ribbon. Layered on top are two different styles of gingham ribbon, one in a brown and beige check and the other in a traditional black and white.
A sprig of dried cotton and a hint of lavender add a soft, natural touch. For a personal element, a small wooden disc with a monogram is tucked into the ribbon tails.
DIY Instructions: How to Make a Layered Farmhouse Bow
What You’ll Need:
- A wreath
- Three types of wide, wired ribbon (burlap, brown gingham, black gingham)
- Floral wire or a pipe cleaner
- A sprig of fake cotton and lavender
- A small wooden circle and a marker for the monogram (optional)
- Hot glue gun
- Scissors
Step-by-Step Guide:
- Create Ribbon Loops: Start with your widest ribbon (the burlap). Make a loop, then pinch the end. Make another loop on the other side, creating a figure-8 shape. Make two or three loops on each side.
- Layer the Next Ribbon: Do the same thing with the brown gingham ribbon, making the loops just a little bit smaller than the burlap ones. Place this on top of your burlap loops.
- Add the Top Layer: Repeat the process one more time with the black and white gingham ribbon, making these loops the smallest. Place this on the very top.
- Secure the Center: Tightly wrap a piece of floral wire around the center of all your ribbon layers. Twist it in the back to hold everything together.
- Add the Tails: Cut long pieces of each of your ribbons for the tails. Fold them in half and attach them to the back of the bow with the floral wire. You can cut a “V” shape at the ends of the tails to make them look nice.
- Add the Details: Use your hot glue gun to tuck the cotton and lavender into the center of the bow. If you made a monogram, glue it onto one of the tails. Finally, use the wire to attach your finished bow to your wreath.
3. Velvet Bow Plant Hangers

Elevate your indoor garden with these stylish and sophisticated plant hangers. This project combines the natural, bohemian look of macrame with the rich texture of velvet ribbon.
The hangers are made using traditional macrame knotting techniques, but with a colorful cord that matches the ribbon. This creates a sleek and cohesive design.
Instead of a simple loop, the hangers are topped with a large, luxurious velvet bow. The bow is tied directly to the metal wall hook, adding a soft, elegant touch that beautifully frames the green leaves of the plant.
DIY Instructions: How to Make a Velvet Bow Plant Hanger
What You’ll Need:
- A potted plant
- Macrame cord (in a color like green or blue)
- A roll of wide velvet ribbon that matches your cord
- A wall hook for hanging
- Scissors
- A measuring tape
- Optional: decorative beads or charms
Step-by-Step Guide:
- Cut Your Cords: Cut four long pieces of your macrame cord. A good starting length is about twice your height.
- Start the Hanger: Fold all four cords in half. Tie a single big knot at the folded end, leaving a small loop.
- Knot the Cords: Separate your eight dangling cords into four pairs. About halfway down, tie a simple knot in each pair.
- Create the Basket: Now, take one cord from one pair and one cord from the pair next to it. A few inches down from your first set of knots, tie these two cords together. Do this all the way around. This will create a diamond pattern that will hold your pot.
- Finish the Bottom: Place your pot inside the netting to see where the bottom should be. Gather all eight cords together under the pot and tie them all into one big, secure knot. Trim the ends to create a tassel.
- Add the Bow: Hang your finished macrame hanger from the wall hook using the loop at the top. Take your velvet ribbon and tie a large, beautiful bow around the base of the hook, covering the top loop of your hanger.
4. Charming Bow Drawer Pulls

Give a plain piece of furniture a quick and charming makeover. This simple idea replaces standard drawer knobs with soft, pretty ribbon bows, adding a touch of sweetness and personality.
The bows are made from a sturdy, ribbed grosgrain ribbon, which holds its shape well. Using a variety of soft colors like gray, pink, and navy blue adds a gentle, custom look to a dresser or cabinet.
A small, antique-style key charm dangles from the center of each bow, adding a whimsical and vintage feel. This is an easy, no-tools-required update for any room.
DIY Instructions: How to Make Bow Drawer Pulls
What You’ll Need:
- A dresser or cabinet with single-hole knobs
- Grosgrain ribbon
- Small charms (like keys)
- Scissors
- A screwdriver
Step-by-Step Guide:
- Remove the Old Knobs: Use your screwdriver to unscrew the existing knobs from your drawers. Keep the screws!
- Cut Your Ribbon: Cut a piece of ribbon about 6-8 inches long.
- Make a Loop: Fold the ribbon in half to make a loop.
- Attach to the Drawer: From the inside of the drawer, push the screw through the drawer front’s hole. From the outside, place the two ends of your ribbon loop over the screw’s tip. Screw the knob back on just enough to hold the ribbon in place.
- Tie the Bow: Take another piece of ribbon and tie it into a neat bow around the ribbon loop you just made.
- Add the Charm: Before you pull the bow’s knot tight, slide your key charm onto the ribbon so it hangs in the center. Now pull the knot tight and trim the tails. Repeat for all your drawers.
5. Boho Ribbon Wall Tapestry

Create a piece of beautiful, textured wall art with this bohemian-inspired tapestry. This project combines different ribbons, cords, and natural elements to make a stunning, free-flowing wall hanging.
The base is a simple, rustic piece of driftwood. Hanging from it are dozens of long strands of ribbon and macrame cord in an earthy color palette of rust, mustard yellow, olive green, and cream.
The textures are varied and interesting, with some strands braided, some knotted, and some left to hang straight. Wooden beads and soft feathers are threaded throughout, adding to the natural, handcrafted feel.
DIY Instructions: How to Make a Ribbon Wall Tapestry
What You’ll Need:
- A piece of driftwood or a wooden dowel
- A variety of ribbons, yarns, and cords in different textures and colors
- Wooden beads and feathers
- A piece of string for hanging
- Scissors
Step-by-Step Guide:
- Prepare Your Hanger: Tie your piece of string securely to both ends of your driftwood. This is how you will hang your art when it’s finished.
- Cut Your Ribbons: Start cutting long pieces of your different ribbons and cords. They should be more than twice the length you want your final tapestry to be.
- Attach the First Ribbon: Take one piece of ribbon. Fold it in half to make a loop. Place the loop over the top of the driftwood, then pull the two tails through the loop. This is called a lark’s head knot. Pull it tight.
- Fill the Branch: Continue adding more and more ribbons and cords until the driftwood is full and you are happy with the mix of colors and textures.
- Add Details: You can braid some of the strands together. You can thread wooden beads onto some of the cords. You can tie feathers onto the ends of others. Get creative!
- Trim the Bottom: Once you are done adding details, use your scissors to trim the bottom. You can cut it straight across, at an angle, or into a “V” shape.
6. Colorful Ribbon Book Bundles

Style your bookshelves with a pop of color and a touch of modern design. This simple idea uses brightly colored ribbons to wrap and organize books, turning them into decorative objects.
The books and boxes are grouped by color, creating a visually pleasing arrangement. Sturdy, wide grosgrain ribbon is wrapped around the items, almost like a belt, holding them together in a neat bundle.
The use of bold, contrasting colors like turquoise, orange, and lime green adds a playful and graphic element to the shelf. It is a creative way to bring order and style to your book collection.
DIY Instructions: How to Style Books with Ribbon
What You’ll Need:
- Books or decorative boxes
- Several rolls of wide, sturdy ribbon in bold colors
- Scissors
- Double-sided tape (optional)
Step-by-Step Guide:
- Group Your Items: First, decide which books or boxes you want to bundle together. You can group them by size, color, or topic.
- Measure Your Ribbon: Take your roll of ribbon. Wrap it around your group of books to see how much you will need. You want the ends to overlap by about an inch on the back or bottom of the bundle. Cut the ribbon.
- Wrap the Bundle: Carefully wrap the ribbon around your books. Make sure it’s straight and pulled tight so it holds the books together securely.
- Secure the End: Where the ribbon ends overlap, you can either tuck the end under, or for a very clean look, use a small piece of double-sided tape to stick it down.
- Create a Display: Make several different bundles using different colored ribbons. Arrange them on your bookshelf for a modern and organized look. You can wrap some bundles vertically and some horizontally.
7. Enchanted Ribbon Chandelier

Transform a basic light fixture into a whimsical, enchanted chandelier. This project is perfect for adding a touch of magic to a bedroom, a party, or a reading nook.
The base is a simple metal chandelier frame, perhaps an old one you want to update. It is entwined with faux ivy vines to give it an overgrown, fairytale look.
Hanging down from the frame are long, torn strips of fabric and ribbon in a dreamy color palette of teal, lavender, and sage green. Interspersed with the ribbons are delicate strands of pearls and small, metal leaf and butterfly charms, adding to the magical woodland feel.
DIY Instructions: How to Make a Ribbon Chandelier
What You’ll Need:
- A chandelier frame or a large metal hoop
- Strips of torn fabric and ribbons in various colors
- Faux ivy vines
- Strands of craft pearls and small charms
- Floral wire or thin string
- Scissors
Step-by-Step Guide:
- Prepare the Frame: First, wrap your faux ivy vines all around the metal frame of the chandelier, covering the metal. Use small pieces of floral wire to hold it in place if needed.
- Cut Your Ribbons: Cut many long pieces of your different ribbons and fabric strips. They can be different lengths to create a more natural look.
- Tie on the Ribbons: Start tying your ribbons onto the chandelier frame. You can use a simple knot. Space them out and mix up the colors as you go.
- Add the Pearls and Charms: Cut long pieces of your thin string. Tie your charms along the length of the string, spacing them out. Drape and tie these strings and your strands of pearls onto the frame, letting them hang down among the ribbons.
- Fill It Up: Keep adding more ribbons and decorations until your chandelier looks as full and magical as you want it to.
- Hang It Up: Carefully hang your finished chandelier. Make sure that the ribbons and decorations are not touching the light bulbs if you are using it with a real light. For safety, this project is also great with non-working, purely decorative chandeliers.
8. Layered Ribbon Table Runner

Create a custom table runner that is bursting with color and pattern. This no-sew project is a fantastic way to decorate your table for a party or a special occasion, and it can be completely customized to your theme.
The runner is made by simply laying long strips of different ribbons next to each other. The mix of patterns—like Greek keys, mosaic tiles, lemons, and stripes—creates a vibrant and eclectic look.
To complete the place setting, small bundles of matching ribbon are tied with twine and accented with a fresh sprig of rosemary. It is a creative and flexible way to add a lot of visual interest to your tablescape.
DIY Instructions: How to Make a Ribbon Table Runner
What You’ll Need:
- Several rolls of wide ribbon in different but coordinating patterns and colors
- Scissors
- A measuring tape
- Double-sided tape or hem tape (optional)
Step-by-Step Guide:
- Measure Your Table: First, measure the length of your table. Decide how long you want your runner to be. It should be at least the length of the table, plus about a foot of overhang on each end.
- Cut Your Ribbons: Cut one long piece from each of your different ribbon rolls. They should all be cut to the exact same length that you decided on in step one.
- Lay Out Your Design: On the table, start laying your cut ribbons down side-by-side. Arrange them in an order that you think looks beautiful. Make sure the edges are straight and just barely touching.
- Secure the Runner (Optional): If you want your runner to be a single piece that you can use again, you have two choices. You can either run long strips of double-sided tape down the back to hold the ribbons together, or you can use iron-on hem tape to connect the edges of the ribbons.
- Set the Table: If you don’t want to connect them, you can simply lay the ribbons on the table. The weight of your plates and decorations will hold them in place for your meal.
9. Rustic Nature-Wrapped Vase

Give a simple glass vase a rustic and natural makeover. This easy project wraps the vase in textured fabric and finishes it with a beautiful, nature-inspired bow.
The main wrap is a piece of wide, neutral-colored linen or burlap, which adds a lovely, earthy texture. A second, slightly narrower ribbon in a complementary color is layered on top.
The bow is tied around the center, and tucked into the knot is a small, smooth stone and a curvy piece of twig. It’s a design that brings the simple beauty of the outdoors inside.
DIY Instructions: How to Decorate a Vase
What You’ll Need:
- A plain glass vase
- A wide piece of fabric like linen or burlap
- A roll of sturdy ribbon
- A small, interesting stone and a twig
- A hot glue gun
- Scissors
Step-by-Step Guide:
- Cut Your Fabric: Cut your piece of linen or burlap so that it is tall enough to cover most of your vase, and long enough to wrap all the way around with a little overlap.
- Glue the Fabric: Put a line of hot glue down the side of your vase. Press one end of the fabric onto the glue. Wrap the fabric tightly around the vase, and then put another line of glue on the fabric to secure the other end.
- Add the Ribbon: Take your roll of ribbon. Wrap it around the center of the fabric-covered vase.
- Prepare Your Nature Items: Use a generous dot of hot glue to attach your twig to the front of your small stone.
- Tie the Bow: Place your stone-and-twig piece in the center of the ribbon. Tie the ribbon into a neat bow right over the top of it, which will help hold it in place.
- Final Touches: Add a little more hot glue under the stone if you need to secure it more firmly. Trim the tails of your bow, and your vase is ready for flowers.
10. Sweet Ribbon-Trimmed Lampshade

Add a custom, handcrafted touch to a simple lampshade. This project uses different types of ribbon and trim to create a sweet and charming design.
The shade is decorated with two horizontal bands of ribbon. The top band is a simple yellow velvet ribbon, while the bottom features a layer of aqua velvet ribbon topped with a delicate crisscross pattern of thin twine.
The focal point is a lovely little bow made from aqua velvet ribbon and finished with a classic white button in the center. It’s a simple project that can tie a whole room’s color scheme together.
DIY Instructions: How to Decorate a Lampshade
What You’ll Need:
- A plain lampshade
- A few types of ribbon and trim (like velvet ribbon and thin twine)
- A decorative button
- A hot glue gun or fabric glue
- Scissors
Step-by-Step Guide:
- Add the Top Band: Take your first ribbon. Carefully wrap it around the top edge of the lampshade. Pull it snug and secure the end with a small dot of glue.
- Add the Bottom Band: Do the same thing with your main ribbon for the bottom of the shade. Wrap it around the bottom edge and glue it securely in place.
- Add the Detail Trim: If you want to add another layer, like the crisscross twine, do that now. Carefully glue your trim on top of the bottom ribbon band. This is a good time to be patient and make sure your spacing is even.
- Make the Bow: Take a piece of your ribbon and tie it into a small, neat bow.
- Add the Button: Use a dot of glue to attach your button right in the center of the bow’s knot.
- Attach the Bow: Decide where you want your bow to go on the lampshade. The top band is a great spot. Use one final dot of glue to attach your finished bow to the lampshade.
11. Modern Ribbon Memory Board

Display your favorite photos, notes, and mementos on this stylish and modern memory board. This DIY project uses a simple cork board and a grid of colorful ribbons to create a functional and beautiful piece of wall decor.
The ribbons are stretched tightly across the board, creating a clean, graphic grid pattern. The mix of colors—black, navy, gray, and white—gives it a sophisticated and contemporary feel.
Small wooden clothespins are used to clip photos and cards to thin pieces of twine that are strung between the ribbons. It is a flexible system that makes it easy to change out your display whenever you want.
DIY Instructions: How to Make a Ribbon Memory Board
What You’ll Need:
- A cork bulletin board
- Several rolls of sturdy ribbon in different colors
- A staple gun or strong thumbtacks
- Scissors
- A ruler
- Twine and small clothespins
Step-by-Step Guide:
- Plan Your Grid: Lay your ribbons on top of your cork board to decide on the spacing and order of the colors for your grid. Use your ruler to make sure everything will be even.
- Attach the Vertical Ribbons: Start with the ribbons that will go up and down. Cut a piece of your first color that is a few inches longer than the height of your board. Pull it tight and staple or tack the ends securely to the back of the board. Continue with all your vertical ribbons.
- Weave the Horizontal Ribbons: Now, do the same thing with your horizontal ribbons. As you place each one, weave it over and under the vertical ribbons. This will make your grid strong. Pull each one tight and secure the ends on the back.
- Add the Twine: Cut a few pieces of twine. Stretch them across your board and tuck the ends behind the ribbons to hold them in place.
- Hang and Decorate: Hang your finished board on the wall. Use the small clothespins to clip your favorite photos and notes to the twine.
12. Elegant Gothic Mantel Scarf

Decorate your fireplace mantel for a special occasion or holiday with this dramatic and elegant ribbon scarf. This design uses a rich color palette and luxurious textures to create a stunning, gothic-inspired look.
The scarf is made from long, flowing pieces of satin ribbon in deep burgundy, black, and shimmering silver. They are draped gracefully across the mantel, creating beautiful swags.
At each point where the ribbon is gathered, there is a large, elaborate pom-pom bow made from the same ribbons. Dangling from the bows are vintage-style keys and sparkling black crystal beads, adding to the romantic and mysterious feel.
DIY Instructions: How to Make a Ribbon Mantel Scarf
What You’ll Need:
- Several rolls of wide satin ribbon in your chosen colors
- Removable adhesive hooks
- Decorative charms like keys and beads
- Floral wire
- Scissors
Step-by-Step Guide:
- Place Your Hooks: Place your removable hooks on top of your mantel where you want the ribbon to be gathered. One on each end and one or two in the middle is a good start.
- Make the Bows: For each hook, you will make a large pom-pom bow. Make many loops of your different colored ribbons, holding them all together in the middle. Secure the center tightly with floral wire.
- Add Charms: Before you attach the bows, cut long pieces of ribbon. Thread your beads and tie your keys onto the ends. Attach these dangling ribbons to the back of your bows with the floral wire.
- Hang the Bows: Hang your finished bows from the hooks on your mantel.
- Create the Swags: Take long pieces of your main ribbons. Start at one end of the mantel. Tuck the ends behind the first bow. Let the ribbon drape down in a gentle curve (a swag), then bring it up and tuck it behind the next bow.
- Finish the Draping: Continue draping the ribbons across the entire mantel. Step back, fluff your bows, and arrange the ribbon tails so they hang beautifully.
13. Coastal Napkin Rings

Bring a touch of the beach to your dining table with these charming, coastal-inspired napkin rings. This easy craft combines natural textures and materials to create a relaxed and beautiful table setting.
The base of each ring is a simple, rolled cloth napkin. The decoration starts with a wrap of natural jute twine, which gives it a rustic, nautical feel.
A simple bow made from a textured, linen-like ribbon is the main feature. Tucked into the center of the bow is a piece of smooth sea glass and a small, delicate seashell, completing the seaside theme.
DIY Instructions: How to Make Coastal Napkin Rings
What You’ll Need:
- Cloth napkins
- Jute twine
- A roll of ribbon (linen or burlap works well)
- Small pieces of sea glass and tiny seashells
- A hot glue gun
- Scissors
Step-by-Step Guide:
- Roll Your Napkin: Neatly roll up one of your cloth napkins.
- Wrap with Twine: Take your jute twine. Put a small dot of hot glue on the back of the napkin to hold the end of the twine in place. Wrap the twine around the center of the napkin several times to create a wide band. Cut the twine and secure the other end with another dot of glue.
- Tie the Ribbon: Cut a piece of your ribbon. Tie it in a simple knot or a small bow around the center of the twine band.
- Prepare Your Charms: Use your hot glue gun to attach a small seashell to your piece of sea glass.
- Add the Coastal Touch: Put a generous dot of hot glue on the back of your sea glass and press it firmly onto the center of the ribbon knot.
- Repeat for Your Set: Do the same for all your other napkins to create a beautiful, matching set for your table.
14. Art Deco Ribbon Mirror Frame

Turn a plain, boring mirror into a stunning piece of Art Deco-inspired art. This intricate project uses ribbon to create a bold, geometric frame full of glamour and style.
The design is built on a simple square mirror with a plain black frame. The magic comes from the ribbon, which is folded, wrapped, and layered to create sharp, repeating patterns reminiscent of the 1920s.
The color scheme of gold, silver, and black is classic Art Deco. The textured, metallic ribbon catches the light beautifully, and small black beads are used at the corners to add a final, polished detail.
DIY Instructions: How to Make a Ribbon Mirror Frame
(This is an advanced project that requires patience!)
What You’ll Need:
- A mirror with a flat, wide frame
- Ribbon in at least three colors (like black, gold, and silver)
- A hot glue gun or strong craft glue
- Scissors
- A ruler
- Decorative beads (optional)
Step-by-Step Guide:
- Plan Your Design: Look up some Art Deco patterns for inspiration. Use a pencil to lightly sketch your design onto the mirror frame. Think in straight lines, angles, and repeating shapes.
- Cut Your Base Pieces: Cut and glue down the main, background pieces of your design first. For this mirror, that would be the black triangular shapes at the corners.
- Create the Wrapped “Rods”: To get the textured, striped look, cut small pieces of cardboard or thin dowels. Tightly wrap your metallic ribbon around these pieces, securing the ends with glue.
- Assemble the Pattern: Carefully glue your ribbon-wrapped rods onto the frame, following your sketched design. You will need to cut them at angles to make them fit perfectly. This is the most time-consuming part!
- Layer and Build: Continue cutting, wrapping, and gluing your ribbon pieces to build up your geometric pattern.
- Add Final Details: Glue your decorative beads onto the corners or other key points in your design to add a finished touch.
15. Whimsical Rainbow Ribbon Canopy

Create a magical and dreamy space in a child’s room with this enchanting rainbow canopy. This project hangs from the ceiling to create a colorful, cascading waterfall of ribbons.
The top of the canopy is a simple hoop, from which dozens of long satin ribbons in every color of the rainbow are tied. They hang down to the floor, creating a whimsical tent-like space.
To add to the magic, a string of fairy lights is woven through the ribbons. Small, soft, felt stars and clouds are attached to the strands, making it a truly dreamy hideaway for reading and playing.
DIY Instructions: How to Make a Rainbow Canopy
What You’ll Need:
- A large embroidery hoop or a hula hoop
- Many rolls of satin ribbon in all the colors of the rainbow
- A string of battery-powered fairy lights
- White felt, stuffing, and glue to make clouds (optional)
- A ceiling hook and string for hanging
- Scissors
Step-by-Step Guide:
- Prepare the Hoop: If you’re using an embroidery hoop, you only need the solid inner ring. You can wrap it in white ribbon to make it look nice.
- Cut Your Ribbons: This is the big job! Cut many, many long pieces of your rainbow ribbons. They all need to be the same length, and long enough to reach from your ceiling to the floor, with a little extra.
- Tie on the Ribbons: Start tying your ribbons onto the hoop. Use a simple lark’s head knot (fold a ribbon in half, loop it over the hoop, and pull the tails through). Work your way around the hoop, following the order of the rainbow: red, orange, yellow, green, blue, indigo, violet.
- Add the Lights: Once all the ribbons are on, weave your string of fairy lights in and among the hanging ribbons.
- Add Clouds (Optional): Cut cloud shapes out of your white felt. Glue two pieces together, leaving a small opening. Stuff it with a little bit of stuffing, then glue it shut. Attach your clouds to some of the ribbons.
- Hang Your Canopy: Tie three or four long pieces of string to your hoop, spacing them out evenly. Bring them all together in the middle and tie a single big knot. Hang this from a secure hook in the ceiling.
16. Stylish Woven Cord Organizer

Tidy up that messy tangle of computer cords or workshop cables with this clever and stylish organizer. This project uses a woven technique with sturdy webbing or ribbon to create a functional and attractive cable wrap.
The wrap is made from two different colors of a very strong, canvas-like ribbon. It is woven into a neat, tight pattern that keeps all the individual wires bundled together.
A simple leather strap or an elastic band is used to hold the woven wrap closed. It’s a handsome solution that turns a messy eyesore into an organized, design-conscious detail.
DIY Instructions: How to Make a Woven Cord Organizer
What You’ll Need:
- Your bundle of cords
- Two colors of very strong, wide ribbon or webbing
- An elastic band or a thin leather strap with a snap
- Scissors
- A hot glue gun or fabric glue
Step-by-Step Guide:
- Cut Your Weaving Strips: Cut several pieces of your two ribbon colors. They should be long enough to wrap around your bundle of cords with some overlap.
- Create the “Loom”: Lay down one of your ribbon pieces. This is your base.
- Start Weaving: Take a ribbon of the other color. Weave it over and under your base ribbon. Then take another piece of the first color and weave it next to the first one, but in the opposite pattern (under and over).
- Build Your Mat: Continue weaving your ribbon strips together to create a small, flat “mat” that is wide enough to hold your cords and long enough to wrap around them.
- Secure the Edges: Once your mat is the right size, use fabric glue along all the edges to stop it from unraveling. Let it dry completely.
- Wrap Your Cords: Place your bundle of cords in the middle of your woven mat. Wrap the mat around the cords. Secure the whole thing by stretching your elastic band or snapping your leather strap around the outside.
17. Festive Holiday Chair Sashes

Make your dining room extra festive for a holiday meal with these beautiful and elaborate chair decorations. This project uses large, custom bows to turn every chair at the table into a statement piece.
The bows are made from multiple types of wide, wired ribbon, which helps them hold their grand shape. A mix of glittery gold, festive plaid, and rich red and green ribbons creates a classic Christmas look.
Tucked into the center of each bow is a collection of holiday accents. You can find glittery star picks, holly leaves, red berries, and even cinnamon sticks tied together with twine. The long, flowing tails of the ribbon complete the dramatic effect.
DIY Instructions: How to Make a Holiday Chair Bow
What You’ll Need:
- Wide, wired ribbon in several holiday patterns
- Holiday “picks” (like glittery stars, faux berries, and greenery)
- A few cinnamon sticks (optional)
- Floral wire
- Scissors
Step-by-Step Guide:
- Make the Bow Loops: Using your widest ribbon, make several large loops, pinching them in the center. Use a piece of floral wire to hold them together.
- Layer More Loops: Do the same thing with your other ribbons, making each layer’s loops slightly smaller than the last. Add these new layers on top of your base and secure them all together with the floral wire.
- Add the Tails: Cut very long pieces of your different ribbons for the tails. Attach them to the back of your bow with the wire.
- Create an Accent Bundle: Take your holiday picks—the stars, berries, and greenery—and arrange them into a small bunch. If you’re using cinnamon sticks, tie them together with twine first. Add this bundle to your picks.
- Attach the Accents: Use floral wire to attach your accent bundle securely to the front of the bow, right in the center.
- Tie to the Chair: Use the long wire ends on the back of your bow to tie it firmly to the top of your dining chair. Fluff the loops and arrange the tails to make it look perfect.
18. Woven Ribbon Headboard

Create a custom, one-of-a-kind headboard with this creative and textural weaving project. This is a fantastic way to update an old bed frame or add a soft, cozy touch to a bedroom.
The project uses a simple metal or wooden headboard frame as a loom. Long strips of thick, sturdy, and slightly stretchy fabric or ribbon are then woven horizontally and vertically through the frame.
Using a mix of neutral colors like gray, beige, white, and brown creates a calming and sophisticated look. A single, patterned ribbon is added as an accent, providing a pop of color and interest to the design.
DIY Instructions: How to Weave a Headboard
What You’ll Need:
- A headboard frame with open bars (like a simple metal frame)
- Several yards of very thick, sturdy ribbon or fabric strips in various colors
- Scissors
- A hot glue gun or safety pins
Step-by-Step Guide:
- Prepare the Vertical Wraps (Warp): Start by wrapping your main color ribbon vertically around the top and bottom bars of the frame. Pull it tight. Secure the end on the back with hot glue or a safety pin. Continue until the whole frame is covered with these tight, vertical strands.
- Start Weaving (Weft): Take your first horizontal ribbon. Start at one side and weave it over and under the vertical strands, all the way to the other side.
- Secure the Ends: Pull the horizontal ribbon tight. Wrap the end around the side of the frame and secure it on the back with glue or a pin.
- Continue Weaving: Take your next horizontal ribbon. This time, weave it in the opposite pattern. If you went “over, under” the first time, go “under, over” this time.
- Fill the Headboard: Keep weaving new rows, pushing them down tightly against the previous row. You can switch colors whenever you want to create a striped pattern.
- Finish It Off: When you get to the top, make sure your last row is pulled tight and securely fastened on the back.
19. Bohemian Ribbon Tassel Charm

Add a touch of bohemian flair to a drawer pull, a handbag, or a doorknob with this beautiful, multi-textured tassel charm. This is a wonderful project for using up small, leftover scraps of your favorite ribbons and trims.
The tassel is a free-flowing collection of many different types of ribbon, cord, and even fine chain. The mix of velvet, satin, and braided trims in a soft, dusty color palette creates a rich and varied texture.
The tassel is held together at the top with a neat velvet bow. A small, metal leaf charm and a tiny seashell are added for a final, nature-inspired touch.
DIY Instructions: How to Make a Ribbon Tassel
What You’ll Need:
- Lots of small pieces of different ribbons, yarns, and thin chains
- A key ring or a large jump ring
- A piece of ribbon for the top bow
- A small charm
- Scissors
Step-by-Step Guide:
- Cut Your Strands: Go through your scrap bag and cut lots of pieces of ribbon and yarn. They should all be about the same length, maybe 8-10 inches long.
- Attach to the Ring: Take one piece of ribbon. Fold it in half to make a loop. Put the loop through your key ring, then pull the two tails through the loop (a lark’s head knot).
- Fill the Ring: Keep adding more and more of your different ribbons and chains to the key ring until it is nice and full.
- Tie the Bow: Take your special piece of ribbon that you saved for the top bow. Tie it in a neat bow right onto the key ring, on top of all the other ribbon knots.
- Add the Charm: Before you pull the bow’s knot completely tight, slide your charm onto the ribbon. Now, pull the knot tight so the charm hangs in the center.
- Trim the Tassel: Let all your strands hang down. Use your scissors to give the bottom of the tassel a little trim to make it even, or leave it shaggy for a more rustic look.
20. Dainty Bow Lantern Garland

Add a soft, romantic glow to any room with this sweet and simple lantern garland. This is an easy project that can be customized to match any color scheme, making it great for parties, nurseries, or holiday decor.
The garland is made from a string of small, round paper lanterns that have lights inside. The magic comes from the simple, delicate bows that are tied to each lantern.
The bows are made from sheer, organza ribbon in pretty colors like burgundy and white. They are tied directly onto the wire frame of each lantern, adding a soft, decorative touch that looks beautiful when the lanterns are lit up.
DIY Instructions: How to Make a Bow Lantern Garland
What You’ll Need:
- A string of paper lantern lights
- Rolls of sheer ribbon in one or two colors
- Scissors
Step-by-Step Guide:
- Assemble Your Lanterns: First, put your lanterns together. Usually, this means carefully expanding the paper part and inserting the wire frame that holds the light bulb.
- Cut Your Ribbon: Cut many small pieces of your ribbon. A length of about 8-10 inches should be enough to tie a small, dainty bow. You will need one piece of ribbon for each lantern.
- Find the Spot: Look at your lantern. The best place to tie your bow is on the wire frame at the very top of the lantern, where it attaches to the main light string.
- Tie the Bow: Take one piece of your cut ribbon and tie it in a simple, neat bow around that spot on the wire frame.
- Trim the Tails: After you tie the bow, you might want to trim the tails at an angle with your scissors to make them look finished.
- Decorate All the Lanterns: Repeat this process, tying one beautiful bow on each lantern all the way down the string. Hang your garland and enjoy the soft glow!
21. Wrapped Basket Handle Accent

Give a simple woven basket a personalized and polished look. This project focuses on the handle, turning it from a plain part of the basket into a colorful focal point. The handle is tightly wrapped with fabric-like ribbon in earthy colors like green and brown.
The color blocking adds a modern touch to the rustic basket. A small, crisp bow made from a contrasting striped ribbon is tied on as a charming detail.
To complete the woodland theme, a small wooden bead and a tiny acorn charm hang from the base of the handle. It is a simple update that adds a lot of character.
DIY Instructions: How to Wrap a Basket Handle
What You’ll Need:
- A basket with a handle
- Two colors of wide, sturdy ribbon
- A short piece of a third, patterned ribbon for a bow
- A wooden bead and a small charm
- A thin piece of cord or string
- Hot glue gun or fabric glue
- Scissors
Step-by-Step Guide:
- Start Wrapping: Pick a spot to start, like the base of the handle. Put a small dot of glue on the handle and press the end of your first colored ribbon onto it.
- Wrap Tightly: Begin wrapping the ribbon tightly around the handle, making sure each new wrap slightly overlaps the last one. Keep it neat and smooth.
- Change Colors: When you get to the middle of the handle, trim the first ribbon and glue the end down securely. Now, start your second color right where the first one ended. Continue wrapping until you reach the other side of the handle.
- Finish the Wrap: Glue the end of the second ribbon down securely at the base of the handle.
- Add the Bow: Take your patterned ribbon and tie it into a small, neat bow. Use a dot of glue to attach it to the handle where the two colors meet.
- Add the Charm: Thread your wooden bead and acorn charm onto the thin piece of cord. Tie the cord in a secure knot around the base of the handle, letting the charms dangle. Trim any extra cord.
22. Starry Night Ceiling Canopy

Create a dramatic and magical effect for a party or a special room. This ceiling decoration uses long crepe paper or fabric streamers to create a stunning canopy. The streamers all radiate from a central point, like a circus tent.
Using a simple color scheme of navy blue and shimmering silver gives the room an elegant, celestial feel. The streamers draw the eye up, making the room feel taller and more grand.
Small, glowing stars are stuck to the streamers, adding a touch of twinkle and wonder. It’s a high-impact decoration that can transform the entire atmosphere of a space.
DIY Instructions: Create a Streamer Ceiling Canopy
What You’ll Need:
- Several rolls of wide streamers in two colors (like navy and silver)
- A small hoop or ring (like the inside of an embroidery hoop)
- Removable adhesive hooks or a strong thumbtack
- Glow-in-the-dark star stickers
- Scissors
- A step stool or ladder (ask a grown-up for help!)
Step-by-Step Guide:
- Find the Center: Decide where you want the center of your canopy to be on the ceiling. Ask a grown-up to help you attach your small hoop to the ceiling with a hook or thumbtack.
- Attach the First Streamer: Cut a very long piece of your first color streamer. It needs to reach from the center of the ceiling to the wall, with a little extra. Tie one end of the streamer securely to the hoop.
- Stretch to the Wall: Gently stretch the streamer to the spot on the wall where you want it to end. Use another removable hook or a piece of clear tape to attach it to the wall, right where it meets the ceiling.
- Continue Adding Streamers: Keep adding more streamers, alternating your two colors. Attach one end to the center hoop and the other to the wall, spacing them out evenly all the way around the room.
- Trim the Ends: Once all your streamers are up, you can trim any extra length at the wall end.
- Add the Stars: Carefully place your glow-in-the-dark star stickers onto the streamers. Scatter them around for a magical, starry night effect.
23. Lush Floral Staircase Garland

Turn your staircase into a beautiful, flowing garden. This stunning garland combines ribbons, flowers, and greenery to create a romantic and celebratory decoration for a banister.
Large, multi-layered bows act as the anchor points for the design. They are made with a mix of ribbons, including plaid, floral, and solid colors like lavender and sage green.
Tucked into and around the bows are silk flowers like peonies and roses, along with sprigs of lavender and fall leaves. The long, curly tails of the ribbon cascade down, leading the eye up the stairs.
DIY Instructions: Decorate a Staircase Banister
What You’ll Need:
- Several types of wide, wired ribbon
- A variety of silk flowers and greenery
- Floral wire or pipe cleaners
- Scissors
Step-by-Step Guide:
- Make the Bows: Start by making two or three large, fluffy bows. Use a mix of your different ribbons to make them look full and interesting. Secure the center of each bow tightly with floral wire, leaving long wire tails.
- Attach Bows to the Banister: Decide where you want your bows to go, like at the top, bottom, and middle of the staircase. Use the wire tails to attach the bows securely to the banister.
- Create Flower Bundles: Take a few of your silk flowers and some greenery. Arrange them into a small bunch, or mini-bouquet. Wrap the stems together with floral wire. Make several of these bundles.
- Add the Flowers: Tuck the flower bundles into and around your large bows. Use the floral wire on the bundles to attach them to the banister.
- Connect with Ribbon: Take long pieces of your ribbons. Loosely drape and wrap them around the banister, connecting one bow to the next. This makes it look like one continuous garland.
- Fluff and Finish: Step back and look at your work. Fluff the bow loops, curl the ribbon tails (wired ribbon is great for this), and make sure all your flowers are facing forward.
24. Colorful Canister Labels

Organize your pantry with a cheerful and charming touch. This idea uses simple ribbons and tags to label kitchen canisters, making them both easy to identify and beautiful to look at.
A crisp ribbon is tied in a neat bow around the neck of each white ceramic jar. Using different colors and patterns, like yellow grosgrain or blue gingham, adds a splash of color to the kitchen counter.
Simple brown paper tags with handwritten labels hang from the center of each bow. It is a practical and pretty way to keep your spices and ingredients in order.
DIY Instructions: Make Your Own Canister Labels
What You’ll Need:
- Kitchen canisters or jars
- Different colors of ribbon
- Paper tags (you can buy these or make them from cardstock)
- A hole punch
- A pen or marker
- Scissors
Step-by-Step Guide:
- Write on Your Tags: Using your nice pen or marker, write the name of the ingredient (like “Flour,” “Sugar,” or “Tea”) on each paper tag.
- Punch a Hole: If your tags don’t already have a hole, use the hole punch to make one at the top of each tag.
- Cut Your Ribbon: Cut a piece of ribbon for your first canister. It should be long enough to wrap around the jar and tie a nice bow.
- Thread the Tag: Take that piece of ribbon and thread one end through the hole in the correct tag. Slide the tag to the middle of the ribbon.
- Tie It On: Wrap the ribbon around the neck of the canister, making sure the tag is in the front. Tie a tight, neat bow. The tag should hang right below the bow’s knot.
- Repeat for All Canisters: Do the same thing for all your other canisters, using different colored ribbons for a fun, mix-and-match look.
25. Banded Ribbon Throw Pillow

Give a plain pillow a quick and sophisticated update. This no-sew project uses a variety of beautiful ribbons to create a colorful, textured band around a simple throw pillow.
The ribbons are layered in a mix of widths, colors, and textures. Rich velvet, shiny satin, and patterned jacquard ribbons in a warm color palette of reds and oranges create a luxurious feel. Thin gold ribbon adds a touch of sparkle.
The ribbons are wrapped both vertically and horizontally, crossing over each other to create a pattern like a beautifully wrapped gift. It is an easy way to customize your decor.
DIY Instructions: Create a Ribbon-Wrapped Pillow
What You’ll Need:
- A plain throw pillow
- A collection of ribbons in different widths and textures that look good together
- Scissors
- Fabric glue or a hot glue gun
- A measuring tape
Step-by-Step Guide:
- Plan Your Design: Lay your ribbons across your pillow to decide on the order and spacing. A symmetrical design often looks best.
- Measure and Cut: Start with the ribbons that will go all the way around the pillow. Measure around the pillow with your measuring tape, then add an inch for overlap. Cut your ribbons to this length.
- Glue the First Ribbons: Take your first ribbon. Wrap it around the pillow where you want it to go. Pull it snug. On the back of the pillow, overlap the ends and secure them with a line of fabric glue.
- Add More Layers: Continue adding your main ribbons, gluing them on the back of the pillow until you have created your striped band.
- Add the Cross-Ribbons: Now, measure and cut the ribbons that will go in the other direction. These will be shorter.
- Secure the Final Ribbons: Glue these shorter ribbons in place, making sure their ends are tucked neatly under the main ribbon band on the back of the pillow. Let all the glue dry completely.
26. Woven Ribbon Geometric Wall Art

Create a stunning piece of three-dimensional art for your walls. This unique artwork is made by folding and weaving ribbons over square canvases to create a textured, geometric pattern.
The use of different shades of the same color, from light teal to deep navy, creates a beautiful ombre effect. The woven technique results in a repeating starburst or pinwheel pattern that has a lot of depth and shadow.
Small, colorful pyramid shapes made from the same folded ribbon technique extend from the sides, adding a playful and unexpected touch. It is a creative and modern way to display color and texture.
DIY Instructions: Make Geometric Ribbon Art
(This is an advanced project!)
What You’ll Need:
- Several small, square canvases (all the same size)
- Wide ribbon in several shades of one color
- A staple gun and staples
- Scissors
- A ruler
Step-by-Step Guide:
- Cover a Canvas: Tightly wrap one of your canvases in a base layer of ribbon, stapling it neatly on the back.
- Cut Four Strips: Cut four pieces of ribbon, each one a couple of inches longer than your canvas is wide.
- Fold the Ends: Take one strip. Fold both ends into a point, like the tip of an arrow. You can iron it to make the crease sharp.
- Create the “X”: Place two of your folded strips on the canvas to form an “X” shape, with the points meeting in the middle. Staple the ends securely to the back of the canvas.
- Create the “+”: Place the other two folded strips on top to form a “+” shape. The points should meet in the middle, covering the center of the “X”. Staple the ends to the back. This completes one square.
- Make More Squares: Repeat this process for all your canvases, using your different shades of ribbon.
- Assemble Your Art: Arrange your finished squares on a table to create the ombre pattern you like. You can glue them together or mount them on a larger board to hang on the wall.
27. Glittering Wine Glass Charms

Help guests keep track of their drinks with these stylish and sparkly wine glass charms. This simple craft uses glittery ribbon to add a touch of glamour to your glassware.
Small, crisp bows are tied from thin, glittery ribbon in various colors like silver, gold, black, and red. This allows each guest to have their own unique color, so there are no mix-ups.
A small metal monogram charm is attached to the center of each bow, making them even more personal. The bows are then tied or glued to a thin ring of wire that can be easily opened and closed around the stem of a wine glass.
DIY Instructions: Make Your Own Wine Glass Charms
What You’ll Need:
- Thin, glittery ribbon in several colors
- Small initial charms
- Wine glass charm rings (you can find these at a craft store)
- Scissors
- Strong craft glue (optional)
Step-by-Step Guide:
- Cut Your Ribbon: For each charm, cut a small piece of ribbon, about 4-5 inches long.
- Tie the Bow: Carefully tie the ribbon into a small, neat bow.
- Add the Charm: Before you pull the knot completely tight, slide the loop of your initial charm onto the ribbon. Now, pull the knot tight. The charm should hang just below the center of the bow.
- Attach to the Ring: Take one of your wine glass charm rings. Open it up.
- Tie It On: Use the tails of your ribbon bow to tie a secure double-knot around the ring. Trim any long, leftover ends of the ribbon.
- Glue for Security (Optional): For extra hold, you can add a tiny dot of strong craft glue where you tied the ribbon onto the ring.
- Make a Set: Create a whole set of charms using different colors of ribbon so your guests can easily tell their drinks apart.
28. Nature-Inspired Gift Topper

Make your presents look as thoughtful on the outside as they are on the inside. This gift wrapping idea uses layers of beautiful ribbon and natural elements to create a stunning presentation.
A simple, plainly wrapped gift is the canvas. A wide, patterned ribbon with a delicate design is wrapped around the package first. A narrower, solid-colored ribbon is layered on top, and both are tied in a crisp bow.
Tucked into the knot of the bow is a small pinecone and a fresh sprig of pine, bringing an organic, rustic touch. This kind of thoughtful wrapping makes any gift feel extra special.
DIY Instructions: Create a Beautiful Gift Topper
What You’ll Need:
- A wrapped gift
- Two different ribbons that look nice together (one wider, one narrower)
- A small pinecone and a little sprig of greenery (like pine or rosemary)
- Scissors
- A piece of thin floral wire or a dot of hot glue
Step-by-Step Guide:
- Wrap with Wide Ribbon: Take your wider ribbon. Wrap it around your gift box and tie a simple knot on top. Don’t make the bow yet.
- Add the Narrow Ribbon: Take your narrower ribbon and place it right on top of the wider one. Tie a knot right over the first knot.
- Prepare Your Nature Items: If your pinecone and greenery are separate, use a small piece of floral wire or a dot of hot glue to attach them together into a tiny bundle.
- Tuck and Tie: Gently tuck your little nature bundle right into the center of your ribbon knots.
- Tie the Bow: Now, take the tails of both ribbons together and tie them into one beautiful, layered bow right on top of the bundle. This will help hold it in place.
- Fluff and Trim: Adjust the loops of your bow to make it look full. Trim the tails of the ribbon at an angle to give them a finished look.
29. Colorful Beaded Fan Pulls

Replace your boring fan pulls with a vibrant, handmade tassel. This is a fun and easy way to add a pop of color and personality to a ceiling fan or a lamp.
The tassel is made from a collection of brightly colored satin ribbons in shades of pink, blue, orange, and green. At the top of the tassel, a stack of colorful wooden beads adds to the playful look.
The entire piece hangs from a loop of ribbon, making it easy to attach to the fan’s chain. It is a small detail that can brighten up a whole room.
DIY Instructions: Make a Ribbon Tassel Fan Pull
What You’ll Need:
- Several rolls of thin satin ribbon in bright colors
- A few colorful wooden beads with large holes
- A slightly wider, sturdier ribbon for the loop
- Scissors
Step-by-Step Guide:
- Cut Your Ribbons: Cut many pieces of your colorful ribbons, all to the same length. A good length is about 12 inches. The more you cut, the thicker your tassel will be.
- Make the Loop: Cut a 6-inch piece of your sturdier ribbon. Fold it in half to make a loop and tie a knot at the end.
- Assemble the Tassel: Lay your loop down. Take all your cut ribbon pieces and lay them on top of the loop’s knot, so the knot is right in the middle of the bundle.
- Tie the Tassel: Take another piece of ribbon. Tightly wrap it around the middle of the ribbon bundle, right over the knot from your loop. Tie a very secure double knot.
- Fold and Secure: Fold all the ribbon strands down to form the tassel shape. Take one more piece of ribbon and wrap it tightly around the “neck” of the tassel, about an inch down from the top fold. Tie a secure knot.
- Add the Beads: Thread your colorful wooden beads onto the top loop. Push them down so they sit on top of the tassel.
- Trim: Hold up your tassel and trim the bottom ends with your scissors to make them all even. Now it’s ready to hang!
30. Personalized Quilt Ties

Keep your folded quilts and blankets neatly stored with these charming, personalized ties. Instead of just folding them, securing them with a custom ribbon adds a thoughtful and organized touch.
Simple grosgrain ribbons in neutral colors like beige or classic black are used. The ends of the ribbons are monogrammed with initials, making them a wonderful personalized gift or a way to label blankets for different family members.
The ribbons are tied in simple, classic bows, keeping the focus on the beautiful quilt and the custom initials. This is a lovely way to store heirloom blankets or prepare linens in a guest room.
DIY Instructions: Make Your Own Quilt Ties
What You’ll Need:
- A quilt or blanket
- Grosgrain ribbon
- Fabric markers or an embroidery kit (or you can order custom ribbon)
- Scissors
Step-by-Step Guide:
- Fold Your Quilt: Neatly fold or roll your quilt into the size you want for storage.
- Measure Your Ribbon: Drape your ribbon around the folded quilt to see how much you need. It should be long enough to wrap around and tie a generous bow. Cut two pieces of this length.
- Personalize the Ribbon: This is the fun part! Use your fabric markers or embroidery skills to add initials to the ends of the ribbon tails. If you are ordering custom ribbon, you can skip this step.
- Let It Dry: If you used fabric markers, make sure they are completely dry and heat-set according to the package directions before you tie them.
- Tie Them On: Take your two personalized ribbons. Wrap them around your folded quilt, spacing them out evenly.
- Make Your Bows: Tie each ribbon into a simple, beautiful bow. Your quilt is now neatly bundled and has a wonderful, personal touch.
31. Elegant Ribbon Bookmarks

Never lose your page again with these beautiful, handmade bookmarks. This project uses elegant satin ribbons as the base, turning a simple placeholder into a piece of jewelry for your book. They are long enough to drape gracefully from the spine.
Each bookmark is finished with a charming, personal touch. A small, delicate bow is tied at one end, while the other features a decorative charm like a vintage key or a custom wax seal.
These bookmarks are a wonderful way to add a bit of luxury to your reading experience. They also make very thoughtful and personal gifts for any book lover in your life.
DIY Instructions: How to Make a Ribbon Bookmark
What You’ll Need:
- A roll of beautiful satin ribbon
- A decorative charm (like a key, a locket, or a monogram)
- A jump ring (a small metal circle from a craft store)
- Pliers (to open the jump ring)
- Scissors
Step-by-Step Guide:
- Measure Your Ribbon: Take your book and your ribbon. You want the ribbon to be a few inches taller than the book so it hangs out from the top and bottom. Cut the ribbon to that length.
- Attach the Charm: Use the pliers to gently twist open the jump ring. Don’t pull it apart, just open it sideways.
- Secure the Charm: Slip your charm onto the open jump ring. Then, push one end of your ribbon through the jump ring and fold about half an inch of the ribbon back on itself.
- Close the Ring: Squeeze the jump ring closed with the pliers, making sure it goes through the ribbon to hold it securely.
- Tie a Small Bow: On the other end of the ribbon, tie a very small and neat bow. This will hang out of the top of your book.
- Trim the Ends: Use your scissors to trim the tails of the bow at an angle to make them look nice and prevent fraying. Your elegant bookmark is now ready to use!
32. No-Sew Ribbon Tab Curtains

Hang a lightweight curtain without ever touching a sewing machine. This clever method uses a tension wire and loops of sturdy ribbon to create a modern, industrial-style window treatment.
The wide, durable ribbons are looped over the wire, and the ends are held together with strong metal clips. These same clips then hold the top of the curtain fabric, creating the look of curtain tabs.
This approach is simple to install and easily adjustable. Using different colored ribbons or clips allows you to customize the look to perfectly match your room’s decor. It is a stylish solution for renters or anyone who wants a quick window update.
DIY Instructions: Hang a No-Sew Curtain
What You’ll Need:
- A lightweight curtain panel
- A curtain wire kit with hooks
- Sturdy, wide ribbon
- Strong metal clips (like bulldog clips)
- Wooden clothespins
- Scissors
- A measuring tape
Step-by-Step Guide:
- Install the Wire: Following the instructions in your kit, install the curtain wire across your window. Screw the hooks into the wall or window frame and make sure the wire is pulled very tight.
- Cut Your Ribbon Loops: Decide how low you want your curtain to hang from the wire. Cut several pieces of ribbon to the same length—enough to create one loop for every 6 inches of your curtain’s width.
- Create the Loops: Take one piece of ribbon and fold it in half to make a loop.
- Attach to the Wire: Drape the ribbon loop over the curtain wire. Attach one of your strong metal clips to the two ends of the ribbon, holding them together. Repeat this for all your ribbon pieces, spacing them out along the wire.
- Hang the Curtain: Use the wooden clothespins to clip the top edge of your curtain fabric to the bottom of the metal clips.
- Adjust as Needed: Step back and make sure your curtain is hanging straight. You can easily adjust the clothespins to get it just right.
33. Rustic Harvest Wine Bottle Gift Tie

Elevate a bottle of wine from a simple gift to a beautifully presented offering. This rustic decoration is a thoughtful way to dress up a bottle for a dinner party or a holiday gift, especially in the autumn.
Two different kinds of textured ribbon, one a solid burnt orange and the other a multi-toned green and beige, are layered together. They are tied in a simple, crisp knot around the neck of the bottle.
Tucked securely into the knot are sprigs of natural elements. A fresh piece of rosemary and a dried stalk of wheat add a lovely, fragrant touch that celebrates the harvest season.
DIY Instructions: Decorate a Wine Bottle
What You’ll Need:
- A bottle of wine
- Two different types of textured ribbon
- A fresh sprig of rosemary
- A dried stalk of wheat
- Scissors
Step-by-Step Guide:
- Cut Your Ribbons: Cut a piece from each of your two ribbons. A length of about 15 inches should be plenty to work with.
- Layer the Ribbons: Place the two ribbons on top of each other.
- Position on the Bottle: Find the spot on the neck of the wine bottle where you want to tie your decoration. Wrap the layered ribbons around the neck from the front, crossing them in the back and bringing the ends back to the front.
- Add the Greenery: Lay your rosemary sprig and your stalk of wheat right in the center, on top of where the ribbons cross.
- Tie a Knot: Carefully tie a single, tight knot with your ribbons, making sure to trap the stems of the rosemary and wheat inside the knot.
- Trim the Ends: Pull the knot tight and adjust the greenery so it looks nice. Use your scissors to trim the four ribbon tails at a sharp angle to give them a clean, finished look.
34. Modern Beaded Ribbon Wall Hanging

Create a simple yet beautiful piece of modern art for your wall. This hanging uses a clean wooden frame and a palette of muted, sophisticated colors to create a calming and stylish decoration.
Long, vertical drapes of high-quality ribbon hang between two simple wooden dowels. The colors are arranged thoughtfully, creating a pleasing and balanced look.
Two of the ribbon strands are threaded with smooth, round wooden beads. This adds a natural, textural element to the piece and provides a focal point, breaking up the clean lines of the other ribbons.
DIY Instructions: Make a Modern Wall Hanging
What You’ll Need:
- Two wooden dowels of the same length
- Several rolls of wide ribbon in different, complementary colors
- Large wooden beads with holes big enough for your ribbon
- A staple gun or a hot glue gun
- String for hanging
- Scissors
Step-by-Step Guide:
- Cut Your Ribbons: Decide how long you want your wall hanging to be. Cut your ribbons so they are a few inches longer than this measurement.
- Attach Ribbons to the Top Dowel: Lay your top dowel on a flat surface. Arrange your ribbons in the order you like. One by one, wrap the end of each ribbon around the dowel and secure it on the back with a staple or a line of hot glue.
- String the Beads: Choose one or two of your hanging ribbons. Carefully thread your wooden beads onto them. You can fill the whole length or just part of it.
- Attach the Bottom Dowel: Once all your ribbons and beads are in place, take your second dowel. Attach the bottom ends of the ribbons to the back of this dowel, pulling them tight and securing them with staples or glue.
- Add the Hanger: Cut a piece of string. Tie the ends securely to each side of the top dowel. Your modern wall hanging is now ready to be put on display.
35. Velvet Ribbon Picture Hangers

Display your favorite pictures with a touch of old-world elegance. This method of hanging frames is a beautiful alternative to traditional hooks and wire, adding color, texture, and a sense of drama to your gallery wall.
Long, luxurious velvet ribbons are used to suspend the frames. The deep, rich colors of the ribbon, like emerald green and ruby red, provide a beautiful contrast against the wall and the metallic frames.
Small bows are often tied where the ribbon meets the frame or at the very top where it hangs. It is a sophisticated look that works wonderfully with vintage frames and artwork.
DIY Instructions: Hang Pictures with Ribbon
What You’ll Need:
- Picture frames with art
- Long velvet ribbon
- Decorative wall hooks or nails
- A small screw eye hook for each frame
- Scissors
- A ruler
Step-by-Step Guide:
- Prepare the Frame: Turn your picture frame over. Exactly in the center of the top edge of the frame, carefully screw in your small screw eye hook.
- Measure Your Ribbon: Decide how low you want your picture to hang from the decorative wall hook. Double that measurement, then add about a foot for tying bows. Cut your ribbon to this length.
- Thread the Ribbon: Thread your cut piece of ribbon through the screw eye hook on the back of the frame. Pull the ribbon through so the frame is hanging in the middle.
- Tie a Bow (Optional): If you want a small bow right above your picture, you can tie one now where the ribbon meets the screw eye hook.
- Hang the Picture: Put your decorative hook or nail in the wall. Take the two ends of the ribbon, bring them together, and hang the loop over the hook.
- Tie the Top Bow: Tie the two ends of the ribbon into a beautiful, neat bow right under the wall hook. Let the tails hang down. Adjust the picture so it hangs straight.
36. Vibrant Bohemian Curtain Tie-Back

Hold back your curtains with a burst of joyful color and texture. This is no ordinary tie-back; it’s a piece of fiber art that brings a vibrant, bohemian spirit to any window.
The main tie is made from a thick, multi-colored braid of different fabrics and ribbons. From this hangs an elaborate tassel, full of exciting details.
The tassel features ribbons with gold trim, strings of colorful beads, tiny mirrors, and small cowrie shells. At the very bottom, a cluster of little brass bells adds a gentle jingle. This is a statement piece that celebrates color and craftsmanship.
DIY Instructions: Craft a Bohemian Tie-Back
(This is a creative project, so feel free to change the details!)
What You’ll Need:
- Many different colorful ribbons, yarns, and strips of fabric
- Colorful beads, small shells, and tiny bells
- Strong thread
- Scissors
- A hot glue gun
Step-by-Step Guide:
- Make the Braid: Take three long, thick bundles of different ribbons and fabrics. Tie a knot at one end. Braid them together tightly to create the main tie-back piece. Tie another knot at the other end.
- Create the Tassel: Cut many, many pieces of different ribbons and yarns, about 1-2 feet long. This will be your tassel.
- Form the Tassel Head: Make a small, decorated ball shape out of fabric, beads, and glue. This will be the top of your tassel.
- Assemble the Tassel: Tie your bundle of tassel ribbons tightly in the middle. Attach this bundle to the bottom of your decorated tassel head.
- Add Details: Use strong thread to sew or tie on your beads, shells, and bells, letting them hang down within the tassel.
- Attach Tassel to Braid: Securely tie your finished tassel to the middle of the long braid you made in the first step.
- Use It: Wrap the braid around your curtain and loop one end through the other to hold it in place.
37. Farmhouse Plaid Bow Accent

Add a touch of rustic charm to your home decor with a simple, well-placed bow. This farmhouse-style decoration proves that a small detail can make a big impact on a tiered tray or centerpiece.
A crisp, black-and-white buffalo plaid ribbon is tied into a classic bow. The ribbon itself is special, with the word “HOME” printed along its length, adding to the cozy feel.
Hanging from the center of the bow by a piece of twine is a small wooden tag. The tag is engraved with welcoming words like “gather” and “blessed,” completing the warm, rustic aesthetic.
DIY Instructions: Make a Farmhouse Bow Accent
What You’ll Need:
- A roll of plaid ribbon
- A small, blank wooden tag
- A fine-tipped permanent marker or letter stamps
- A piece of twine
- Scissors
Step-by-Step Guide:
- Personalize Your Tag: Use your permanent marker or letter stamps to write a nice word like “gather,” “blessed,” or “family” on your wooden tag.
- Cut Your Ribbon: Cut a piece of your plaid ribbon long enough to make a nice-sized bow with some tails. About 15 inches is a good start.
- Tie the Bow: Tie the ribbon into a simple, pretty bow. Before you pull the knot all the way tight, pause for the next step.
- Add the Twine and Tag: Cut a short piece of twine and thread it through the hole in your wooden tag. Tie the ends of the twine in a small knot.
- Secure the Tag: Place the loop of the twine right in the center of your bow’s knot. Now, pull the bow’s knot tight, which will hold the twine in place.
- Attach to Your Decor: You can either tie the bow directly onto an object, or add another piece of twine to the back of the bow so you can hang it from something.
38. Simple Holiday Chair Streamers

Decorate your dining room for a festive meal in minutes. This incredibly simple idea adds a touch of color and cheer to your chairs without a lot of fuss.
Long, beautiful satin ribbons in holiday colors like teal, red, and white are used. One of each color is tied in a simple knot around one of the vertical slats on the back of a chair.
The ribbons are left to hang like long, graceful streamers. As a final touch, a single shiny jingle bell is tied to the end of one of the ribbons, adding a bit of sparkle and a happy, festive sound whenever the chair is moved.
DIY Instructions: Make Quick Chair Streamers
What You’ll Need:
- Rolls of satin ribbon in 2 or 3 different colors
- One jingle bell for each chair
- Scissors
Step-by-Step Guide:
- Cut Your Ribbons: For each chair, cut one long piece from each of your colored ribbons. They should all be the same length. A good length is about 3 feet, or long enough to almost touch the floor when tied on.
- Gather the Ribbons: Take one piece of each color and hold them together as a single bunch.
- Tie Them On: Find a spot on the back of your chair, like a top corner or a central slat. Tie the bunch of ribbons in a single, simple knot around that spot.
- Adjust the Knot: Scoot the knot up or down until you like where it sits. Pull it tight.
- Add the Jingle Bell: Choose one of the ribbon tails hanging down. Tie your jingle bell securely to the very bottom of that ribbon with a small, tight double-knot.
- Trim the Ends: Let the ribbons hang freely. If you like, you can trim the ends at an angle with your scissors to make them look neat. Repeat for every chair at your table!
39. Steampunk Gear & Leather Bow

Create a decoration that is truly a work of art with this imaginative, steampunk-inspired bow. This piece is perfect for topping a special gift box, decorating a hat, or as a unique home accent.
The bow itself has multiple layers, combining strips of brown faux leather with a textured canvas ribbon. This creates a rustic and industrial base.
The real magic is in the details. The bow is covered in an assortment of metal gears, tiny clock faces, and coiled wires. A miniature pocket watch serves as a fantastic centerpiece. It is a creative project that combines crafting with mechanical fantasy.
DIY Instructions: Create a Steampunk Bow
What You’ll Need:
- Strips of faux leather and sturdy fabric ribbon
- A collection of small, decorative metal gears, clock parts, and charms (you can find these at craft stores)
- A small decorative pocket watch or compass
- Thin, bendable copper wire
- A hot glue gun and a strong craft glue (like E6000)
Step-by-Step Guide:
- Make the Base Bow: Create a simple bow shape by making two loops with your faux leather strip and gluing it in the center. Make a slightly smaller bow from your fabric ribbon and glue it on top.
- Wrap the Center: Wrap a small strip of leather or ribbon around the center of your layered bow to hide the glued parts. Secure it in the back with glue.
- Plan Your Gears: Arrange your gears, clocks, and other metal pieces on top of the bow to decide where you want everything to go.
- Glue on the Big Pieces: Use a strong craft glue (ask a grown-up for help) to attach your larger pieces, like the pocket watch and the biggest gears. This glue is strong but takes a while to dry.
- Add Smaller Details: Use the hot glue gun to add the smaller gears and charms. You can layer them on top of each other to create depth.
- Add Wire Accents: Take your thin copper wire and wrap it around a pencil to make it curly. Tuck and glue these wire curls in and around your gears to add a final, industrial touch.
40. Seaside Dreams Decorative Cloche

Turn a simple glass dome, or cloche, into a beautiful seaside-inspired centerpiece. This project uses a large, airy bow to add color and charm to the display.
Inside the cloche, a small bird’s nest filled with sea glass creates a tiny, protected beach scene. A vintage measuring tape wrapped around the nest adds a touch of rustic character.
The cloche is topped with a generous, multi-layered bow made from sheer, wired ribbons in shades of seafoam green, blue, and white. Hanging from the center of the bow, right inside the dome, is a single, delicate seashell.
DIY Instructions: Decorate a Glass Cloche
What You’ll Need:
- A glass cloche with a knob on top
- A small bird’s nest and some sea glass
- A roll of sheer, wired ribbon in coastal colors
- A small seashell
- A needle and thin thread
- Scissors
Step-by-Step Guide:
- Prepare Your Shell: Carefully use the needle to poke a small hole in the top of your seashell. (If this is too hard, you can use a dot of hot glue in a later step).
- Thread the Shell: Cut a piece of your thin thread. Push it through the hole in the shell and tie the ends in a knot to create a loop.
- Arrange Your Scene: Place your bird’s nest on the base of the cloche. Fill the nest with your pretty pieces of sea glass. Carefully place the glass dome over the top.
- Make a Large Bow: Take your sheer, wired ribbon and create a large, fluffy, multi-loop bow. Before you tighten the center knot, slip the thread loop holding your seashell into the middle.
- Tie the Bow On: Pull the bow’s knot tight, securing the shell’s thread. Now, use the tails of the bow to tie it securely around the knob at the very top of the glass cloche.
- Arrange the Bow: Because your ribbon is wired, you can fluff the loops and curl the tails to make them look full and beautiful. Make sure the seashell is hanging nicely in the center of the dome.
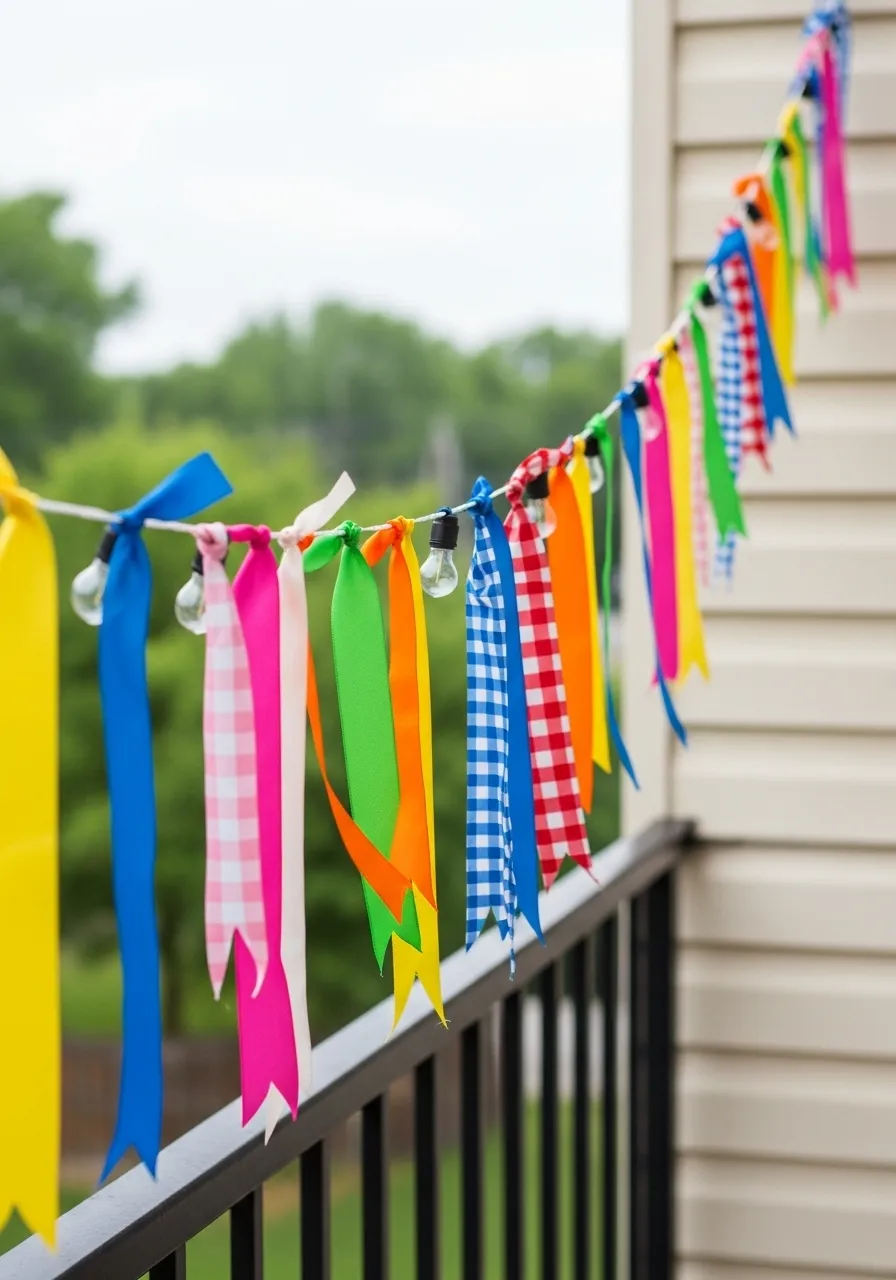
41. Colorful Ribbon Party Garland

Instantly brighten any balcony, patio, or party room with this incredibly cheerful garland. This decoration is all about fun and color, using a simple string of outdoor lights as its base.
Short pieces of different ribbons are tied directly onto the light string between each bulb. The mix of solid, bright colors and classic gingham patterns creates a festive, playful look that moves beautifully in a breeze.
This is a simple and budget-friendly way to add a big splash of personality to a space for a birthday, a barbecue, or just for everyday cheer. It’s easy to customize with any color or pattern you like.
DIY Instructions: How to Make a Ribbon Garland
What You’ll Need:
- A string of outdoor lights (cafe lights)
- Several rolls of ribbon in various colors and patterns
- Scissors
Step-by-Step Guide:
- Hang Your Lights: First, hang up your string of lights exactly where you want your garland to be. It’s much easier to add the ribbons when the lights are already in place.
- Cut Lots of Ribbon: Cut your ribbons into many pieces, all about the same length. A good length to start with is 1 foot (12 inches) for each piece.
- Find Your Spot: Look at your light string. Find a spot on the wire between two of the light bulbs.
- Tie a Simple Knot: Take one piece of your cut ribbon and tie it onto the wire with a single, simple knot. Let the two tails hang down.
- Keep Going: Take another piece of ribbon (maybe a different color or pattern) and tie it on right next to the first one. Continue doing this, filling the space between the light bulbs.
- Fill the Whole String: Keep tying on ribbons until you have decorated the entire length of your light string. You can mix up the colors and patterns randomly for a fun look. Your festive garland is now ready to enjoy!
As we have seen, a simple roll of ribbon is a powerhouse of creative potential. It can be elegant, rustic, modern, or whimsical. It can organize your shelves, soften your lighting, and turn a plain piece of furniture into something special. The possibilities are truly endless.
The beauty of these projects lies in their simplicity. You do not need to be an expert crafter or have a large budget to bring more color and texture into your home. All you need is a bit of inspiration and a willingness to try something new.
We hope these 41 ideas have sparked your imagination. Choose a project that speaks to you, make it your own with your favorite colors and patterns, and see how easily you can brighten your home, one bow at a time.
Key Takeaways
- Look Beyond Gift Wrap: Ribbons are a versatile and affordable material for all kinds of home decor, from wall art to furniture updates.
- Texture is Key: Mixing different types of ribbons like velvet, satin, and burlap adds depth and visual interest to any project.
- Personalize Anything: Use ribbons with charms, monograms, or specific color palettes to easily add a personal touch to your belongings.
- No-Sew Solutions: Ribbons offer many creative ways to hang curtains, create pillow covers, and update decor without needing a sewing machine.
- Small Changes, Big Impact: You don’t need a major overhaul to refresh a room. A well-placed bow or a colorful ribbon accent can change the entire feel of a space.