When the air turns crisp and the days grow shorter, nature offers its own beautiful decorations. Pinecones and berries, with their rich textures and deep colors, are classic symbols of the season. They bring a touch of the outdoors inside, making our homes feel warm and welcoming.

While a wreath on the front door is a lovely tradition, these humble natural treasures can do so much more. Their versatility is surprising, fitting into styles from rustic farmhouse to modern minimalist. They can be elegant, playful, cozy, or sophisticated.
This collection of ideas explores the many creative ways you can use pinecones and berries to bring beauty to every corner of your home. Get ready to be inspired by 36 genius projects, complete with simple step-by-step instructions perfect for any skill level.
1. Glowing Pinecone & Berry Lanterns

A simple glass hurricane vase becomes a warm and inviting centerpiece. This design is easy to assemble and creates a cozy atmosphere. The soft candlelight reflects off the glass, highlighting the natural textures inside.
The arrangement starts with a base of green moss. A white pillar candle sits in the center, surrounded by pinecones with frosted tips. Sprigs of bright red berries and fresh cedar add a touch of festive color. A delicate string of copper fairy lights is woven throughout, adding a magical twinkle to the scene.
DIY Instructions
What You’ll Need:
- A large glass hurricane vase or a similar clear glass container
- A white or cream-colored pillar candle
- Preserved moss (from a craft store)
- Pinecones
- Sprigs of faux red berries
- A few small sprigs of fresh cedar or other evergreen
- A short string of battery-operated copper wire fairy lights
Step-by-Step Guide:
- Create a Mossy Base: Place a layer of the preserved moss at the bottom of your glass vase. Make it thick enough to create a nice, soft bed.
- Place the Candle: Gently set your pillar candle in the very center of the moss.
- Arrange the Pinecones: Tuck your pinecones into the moss around the candle. Vary their angles to make it look natural.
- Add a Pop of Color: Add the sprigs of red berries and cedar. Place them in the gaps between the pinecones.
- Weave in the Lights: Carefully arrange the string of fairy lights. Tuck the small battery pack into the moss at the back so it is hidden.
- Light it Up: Turn on the fairy lights and light the candle to enjoy your glowing creation.
2. Gilded Pinecone & Berry Tablescape

This table runner creates a luxurious and abundant feel for a dinner party. The mix of colors and textures is rich and inviting. It’s a design that feels both elegant and close to nature.
A dark velvet runner provides a dramatic base for the arrangement. Pinecones painted in gold, silver, and a dusty blue are clustered down the center of the table. Deep purple and black berries, along with fresh figs and pomegranates, are tucked in between the pinecones. The scene is illuminated by the warm light of mercury glass votive candles.
DIY Instructions
What You’ll Need:
- A table runner (velvet or a dark color works well)
- Pinecones of various sizes
- Metallic spray paint (gold and silver) and craft paint (dusty blue)
- Faux berries in dark colors (purple, black)
- Fresh elements like pomegranates and figs (optional)
- Votive candles in metallic holders
- A few sprigs of greenery like eucalyptus
Step-by-Step Guide:
- Paint Your Pinecones: In a well-ventilated area, spray paint some pinecones gold and some silver. For the others, use a small brush to dry-brush the dusty blue paint onto the tips of the scales. Let them all dry completely.
- Lay the Foundation: Place your runner down the center of your table. Scatter a few sprigs of eucalyptus to create a light, airy base.
- Arrange the Pinecones: Create a dense cluster of your painted pinecones along the middle of the runner. Mix the colors and sizes.
- Add Fruits and Berries: Tuck the berries, figs, and pomegranates into the gaps between the pinecones.
- Place the Candles: Nestle the votive candle holders throughout your arrangement. Make sure they are stable and not too close to anything flammable.
- Light and Enjoy: Light the candles just before your guests arrive to create a warm, shimmering centerpiece.
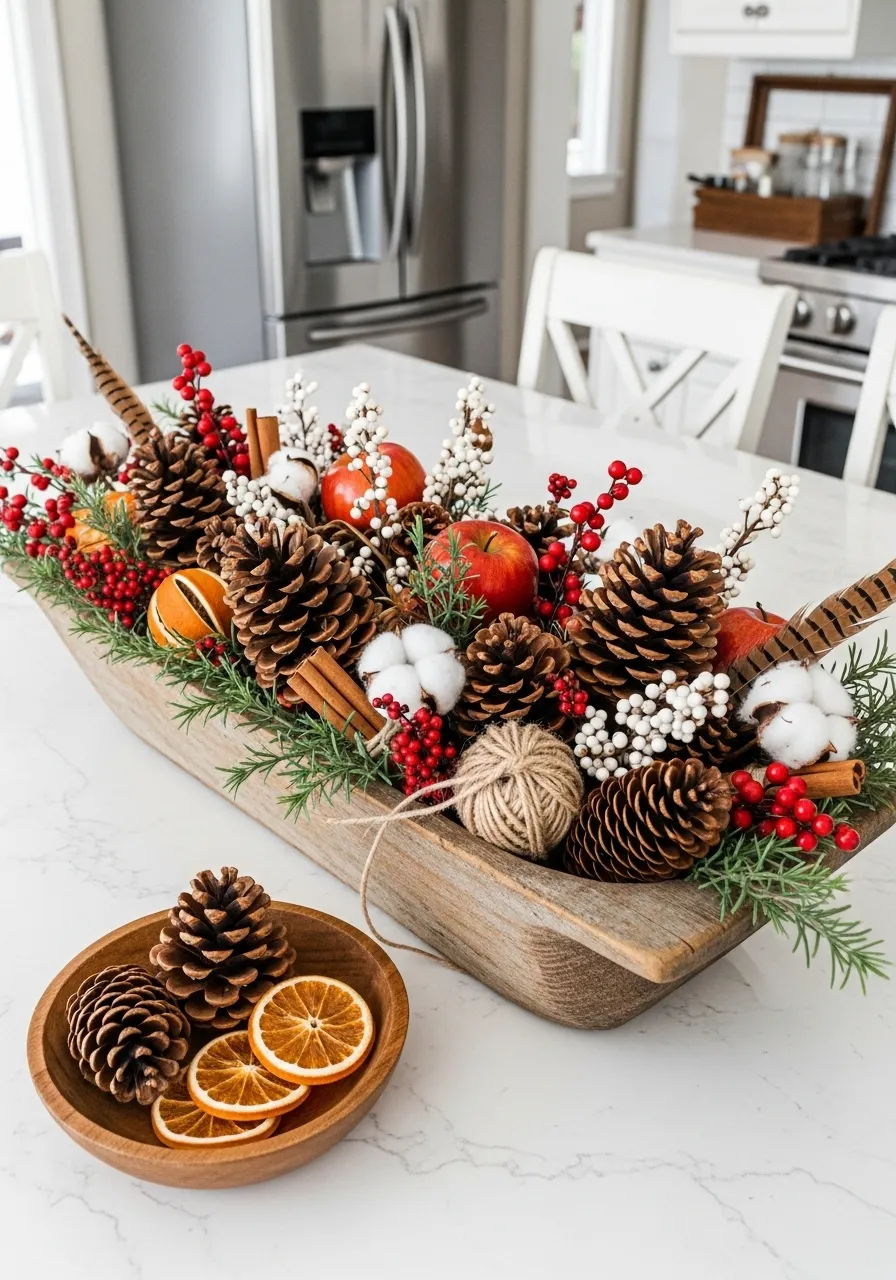
3. Rustic Dough Bowl Centerpiece

A wooden dough bowl provides a charming, rustic container for a full and festive centerpiece. This arrangement is bursting with texture and classic holiday elements. It’s a wonderful statement piece for a kitchen island or dining table.
Large pinecones form the foundation of the display. Tucked among them are bright red apples, sprigs of red and white berries, and soft tufts of cotton. Cinnamon sticks, dried orange slices, and pheasant feathers add interesting details and a lovely scent. The arrangement is finished with fresh rosemary sprigs for a touch of green.
DIY Instructions
What You’ll Need:
- A wooden dough bowl or a similar long, shallow container
- Large pinecones
- Faux apples
- Faux berries in red and white
- Faux cotton stems
- Cinnamon sticks
- Dried orange slices
- Natural accents like feathers or a ball of twine
- Sprigs of greenery (rosemary or fir)
Step-by-Step Guide:
- Create a Base: Fill the bottom of your dough bowl with a few sprigs of greenery.
- Place Large Items: Arrange the large pinecones and the apples in the bowl first. These are your main anchor pieces.
- Fill in with Berries and Cotton: Tuck the stems of the red and white berries and the cotton tufts into the gaps. Make sure the color is distributed evenly.
- Add Textural Details: Place the cinnamon sticks and dried orange slices throughout the arrangement.
- Add Final Touches: Add any extra elements you have, like the feathers or a small ball of twine, to fill any remaining holes.
- Step Back and Adjust: Look at your centerpiece from all sides and adjust any pieces until it looks full and balanced.
4. Whimsical Woodland Mobile

This hanging mobile is a piece of flowing, natural art. It brings a sense of playful movement and woodland charm to a room. It would look lovely hanging over a dining table or in the corner of a living room.
A sturdy, interesting branch serves as the hanging rod. From it, various objects are suspended by thin string at different lengths. Snow-tipped pinecones, bright red berries, and natural feathers turn gently in the air. Wooden and metal hoops add a modern, geometric touch to the rustic elements.
DIY Instructions
What You’ll Need:
- A nice-looking, sturdy branch
- Twine or string for hanging the mobile
- Thin, clear fishing line or neutral-colored thread
- Pinecones
- White craft paint
- Faux red berries
- Feathers
- Embroidery hoops or metal rings
- A hot glue gun
Step-by-Step Guide:
- Prepare the Hanger: Tie a long piece of twine to both ends of your branch so you can hang it.
- Tip the Pinecones: Dip the tips of your pinecones in a little bit of white paint to give them a snowy look. Let them dry.
- Cut Your Strings: Cut many pieces of your thin thread at different lengths.
- Attach Your Items: Tie or glue the end of a piece of thread to each item: a pinecone, a feather, a small cluster of berries. For the hoops, just tie the thread on.
- Hang Everything from the Branch: Tie the other end of each thread to the branch. Space your hanging items out along the branch.
- Create a Balanced Look: Arrange the items so that you have a good mix of textures and shapes. Make sure the mobile hangs straight and isn’t too heavy on one side. Hang it up and watch it gently spin.
5. Snowy White Mantel Display

This mantel arrangement creates a serene and elegant winter scene. The all-white and neutral color palette is calm and sophisticated. It’s a clean and modern take on winter decorating.
A collection of white and off-white vases in various shapes and sizes are arranged on a simple white shelf. Some vases hold branches of white, glittery berries. Snow-covered pinecones are placed in between the vases and on small dishes. The scene is made cozy by the soft glow of several white candles in simple glass and silver holders.
DIY Instructions
What You’ll Need:
- A collection of white or cream-colored vases
- Faux branches with white berries
- Pinecones
- White craft paint and a brush
- White or silver candle holders and white candles
- A white shelf or mantelpiece
Step-by-Step Guide:
- Create Snowy Pinecones: Use a paintbrush to apply white paint to the tips of your pinecones. You can make the coating thick for a heavy snow look. Let them dry.
- Arrange Your Vases: Place your collection of vases on the mantel. Cluster them in groups and vary the heights.
- Add the Berry Branches: Put the white berry branches in a few of the taller vases.
- Place Your Pinecones: Arrange your painted pinecones on the shelf. Place some directly on the surface and maybe one or two on a small plate or shallow bowl.
- Add the Candles: Position your candle holders in between the vases. The candlelight will create a beautiful glow against all the white.
- Check for Balance: Step back and make sure your arrangement looks balanced and not too crowded. The empty space is just as important as the decorated space in this minimal look.
6. Vintage Library Vignette

This decoration has a rich, studious, and old-fashioned charm. It looks like a scene from a classic novel or a professor’s study. It’s a great way to decorate a bookshelf or a side table.
A stack of antique-looking books with dark green and red spines forms the base of the scene. On top of the books, a teacup filled with pinecones, red berries, and a rolled-up scroll of sheet music sits on its saucer. Brass candlesticks, a magnifying glass, and a small globe add to the vintage, scholarly feel.
DIY Instructions
What You’ll Need:
- A stack of old, decorative books
- A vintage-style teacup and saucer
- Small pinecones
- Faux red berries
- A piece of paper with sheet music (or any nice pattern)
- Ribbon or twine
- Other vintage-style accessories (candlesticks, a small globe, etc.)
Step-by-Step Guide:
- Create Your Base: Stack the books on your shelf or table. Arrange them in a way that is pleasing to the eye.
- Prepare the Scroll: Roll up your piece of sheet music and tie it with a small piece of ribbon to keep it rolled.
- Fill the Teacup: Place the teacup on its saucer. Fill the cup with a few small pinecones and a sprig of red berries. Tuck your little scroll in so it sticks out.
- Assemble the Scene: Place the filled teacup on top of the stack of books.
- Add Accessories: Arrange your other vintage items, like the candlesticks and magnifying glass, around the books to complete the look.
7. Spiced Orange & Clove Pomander Bowl

This centerpiece is a feast for the senses, especially the sense of smell. The combination of citrus, spice, and pine is the classic scent of the holidays. It’s a beautiful and fragrant addition to a kitchen counter or dining table.
A decorative bowl with a plaid ribbon is filled to the brim with natural elements. The main features are bright oranges studded with cloves in pretty patterns. Large pinecones, cinnamon sticks, vanilla beans, and star anise are tucked in around the oranges. Sprigs of fresh pine and red berries complete the full and fragrant arrangement.
DIY Instructions
What You’ll Need:
- A nice bowl
- A festive ribbon
- Oranges
- Whole cloves
- Pinecones
- Cinnamon sticks and other whole spices
- Sprigs of pine and faux red berries
Step-by-Step Guide:
- Decorate the Bowl: Tie a beautiful plaid ribbon around your bowl.
- Make the Pomanders: Take an orange and press the sharp end of the whole cloves into the peel. You can make lines, swirls, or any pattern you like. Do this with several oranges.
- Fill the Bowl: Place your finished orange pomanders in the bowl.
- Add the Pinecones and Spices: Fill in the gaps around the oranges with pinecones, cinnamon sticks, and star anise.
- Add Greenery and Berries: Tuck in the sprigs of fresh pine and red berries to fill any remaining holes and add color.
- Enjoy the Scent: Place your finished bowl in a room where you can enjoy its wonderful holiday fragrance.
8. Frosted Winter Window Box

This window box arrangement brings a touch of frosty, wintery beauty indoors. The cool color palette of silver, white, and blue is elegant and peaceful. It’s a great way to decorate a console table or a space in front of a window.
A long, galvanized metal planter holds the arrangement. Frosted pinecones and shiny silver ornaments are nestled among sprigs of faux pine. Stems of white berries and glittery silver branches add height and a touch of sparkle. A string of cool white or blue fairy lights is woven throughout, giving the whole display a chilly, magical glow.
DIY Instructions
What You’ll Need:
- A long planter box (metal or wood painted silver/white)
- Floral foam to fit inside the planter
- Frosted or snow-tipped pinecones
- Silver ball ornaments
- Faux pine or fir sprigs
- Faux branches with white berries
- Glittery silver decorative branches
- A string of fairy lights (cool white or blue)
Step-by-Step Guide:
- Set Up Your Base: Place the floral foam inside your planter box.
- Create a Green Foundation: Stick the stems of the faux pine sprigs into the foam to create a full, green base.
- Add Height: Insert the taller white berry stems and the glittery silver branches into the foam, mostly in the back and center of the arrangement.
- Place Your Pinecones and Ornaments: Nestle the frosted pinecones and silver ornaments in among the greenery. You can use a bit of wire or hot glue to secure them if needed.
- Weave in the Lights: Weave your string of fairy lights throughout the entire arrangement. Tuck the battery pack into the back or hide it under the greenery.
- Place by the Window: Set your finished window box on a table to catch the natural light and enjoy the frosty sparkle.
9. Mason Jar Herb & Berry Gifts

These charming mason jars are a thoughtful and beautiful handmade gift or party favor. They can also be used as simple, rustic decorations on a shelf. The layers of natural materials inside the jar are lovely to look at.
Several mason jars are filled with different arrangements. Some are filled with small pinecones, while others have fragrant herbs like sage and rosemary. Each jar is topped with fresh greenery and bright red berries. A red and white baker’s twine is tied around the rim, holding a simple kraft paper tag for a name or a message.
DIY Instructions
What You’ll Need:
- Mason jars with lids removed
- Small pinecones
- Fresh herbs like rosemary, sage, and thyme
- Sprigs of faux red berries
- Red and white baker’s twine
- Kraft paper tags and a pen
Step-by-Step Guide:
- Fill Your Jars: Decide what you want to put in each jar. You can fill one just with pinecones, and others with a mix of herbs.
- Add the Toppings: Once your jar is filled, stick a few sprigs of fresh greenery (like rosemary) and a sprig of red berries into the top.
- Add the Twine: Cut a long piece of baker’s twine and wrap it around the neck of the jar several times.
- Write Your Tag: Write a name or a short message on your kraft paper tag.
- Attach the Tag: Thread the tag onto one of the ends of the twine, and then tie a neat bow to secure it.
- Arrange or Give as Gifts: You can line your finished jars up on a shelf for a pretty display, or give them to friends and family.
10. Simple Bedside Bud Vase

This tiny arrangement is a perfect example of how a small touch of nature can brighten a space. It’s simple, delicate, and brings a bit of seasonal color to a nightstand or a small side table. The beauty is in its simplicity.
A small, white ceramic bud vase holds a minimalist bouquet. It contains just a few stems: a sprig of eucalyptus, a bit of dried lavender, and a small branch of red berries. Two tiny pinecones are nestled at the base of the stems, adding a rustic touch. A simple lavender-colored ribbon is tied in a bow around the neck of the vase.
DIY Instructions
What You’ll Need:
- A small bud vase
- A couple of very small pinecones
- A sprig of faux red berries
- A few other dried or faux stems (eucalyptus, lavender, etc.)
- A thin ribbon
- A hot glue gun
Step-by-Step Guide:
- Create Your Bouquet: Take your berry sprig and your other stems and arrange them in your hand. Trim the bottoms so they are the right height for your vase.
- Add the Pinecones: Use a small dot of hot glue to attach the two tiny pinecones to the stems, near the bottom of where the bouquet will be visible above the vase.
- Place in Vase: Carefully place your finished little bouquet into the bud vase.
- Tie a Bow: Tie the thin ribbon in a simple bow around the neck of the vase.
- Find the Perfect Spot: Place your delicate arrangement on a bedside table or any small spot that needs a little bit of cheer.
11. Festive Hot Cocoa Station Tray

A tiered tray becomes a cheerful hub for holiday treats. This display is a fun and practical way to organize a hot cocoa bar. It brings a cozy, café-like feeling to your kitchen counter.
The galvanized metal stand is filled with everything needed for a warm drink. Mugs, marshmallows, and peppermint sticks are ready for guests. The scene is decorated with pinecones, bright red berries, and miniature bottle brush trees. A happy gingerbread man and a plaid napkin add to the festive charm.
DIY Instructions
What You’ll Need:
- A two or three-tiered tray
- Mugs for hot cocoa
- Hot cocoa supplies (marshmallows, peppermint sticks, etc.)
- A few pinecones
- Sprigs of faux red berries
- Small bottle brush trees
- A small festive sign or tag
- A gingerbread cookie (optional)
- A small plaid cloth napkin
Step-by-Step Guide:
- Set Up Your Tray: Place your tiered tray on the counter where you plan to serve hot cocoa.
- Place the Large Items: Arrange the mugs on the different levels of the tray first.
- Add the Treats: Fill a small jar or bowl with marshmallows and place it on the tray. Add the peppermint sticks to one of the mugs.
- Decorate with Nature: Tuck pinecones and red berry sprigs into the gaps around the mugs.
- Create a Tiny Forest: Place the bottle brush trees on both tiers to add height and color.
- Add Final Touches: Lean a small sign against one of the mugs. Drape the plaid napkin on the bottom tier and set a gingerbread man on top.
12. Secret Woodland Drawer Diorama

An open drawer reveals a tiny, magical world. This display is a delightful surprise, turning a simple piece of furniture into a storytelling scene. It is a creative and unexpected touch of nature.
The drawer is lined with a carpet of green moss, creating a forest floor. On this bed of green rests a collection of woodland treasures. A small bird’s nest, pinecones, and tiny mushrooms are scattered about. A single feather, a vintage postcard, and a flameless candle add to the mystery and charm of this miniature landscape.
DIY Instructions
What You’ll Need:
- A drawer you can leave partially open for display
- A sheet of preserved moss (from a craft store)
- Scissors
- Small pinecones
- A small decorative bird’s nest
- Faux red berries
- A single feather
- Other small woodland items (like tiny faux mushrooms)
- A battery-operated tea light candle
Step-by-Step Guide:
- Line the Drawer: Measure the inside of your drawer and cut the sheet of preserved moss to fit. Lay it inside to create the grassy base.
- Place the Main Items: Set the bird’s nest in the moss, slightly off-center. Place the flameless tea light candle nearby.
- Scatter the Pinecones: Arrange the pinecones around the mossy floor. Cluster some together and let others stand alone.
- Add Berries and Details: Tuck the sprigs of red berries into the scene. Carefully place the feather and any other small items you have.
- Create Your Scene: Adjust all the pieces until you are happy with your secret woodland world. Pull the drawer open just enough to let people peek inside.
13. Cozy Fire Pit Accents

These simple decorations add a natural touch to an outdoor gathering space. They are easy to create and bring a bit of festive color to a patio or fire pit area. The pieces are sturdy enough to withstand a cool evening outdoors.
A large pinecone stands as the centerpiece for each accent. It is surrounded by a small ring of deep red and dusty blue berries. The decorations rest on rustic wood slices and dark slate coasters, which complement the natural stone of the fire pit. They are a simple way to make an outdoor space feel more intentional and styled.
DIY Instructions
What You’ll Need:
- Large, open pinecones
- Faux berry garland or several berry sprigs on flexible wire
- Wire cutters
- Hot glue gun and glue sticks
- Flat bases (slate coasters, wood slices, or small tiles)
Step-by-Step Guide:
- Create the Berry Ring: Cut a piece of the berry garland or wire. Bend it into a circle that is just a little bit wider than the base of your pinecone. Twist the ends together to secure the ring.
- Secure the Pinecone: Place a generous dot of hot glue on the center of your coaster or wood slice. Firmly press the bottom of the pinecone into the glue and hold it for a moment until it sets.
- Add the Berries: Place another ring of hot glue on the coaster, around the base of the pinecone.
- Attach the Ring: Press the berry ring you made into the hot glue. This will secure it to the base and snug it up against the pinecone.
- Let it Cool: Allow the glue to cool completely. You can then arrange your new decorations around your fire pit.
14. Birch Log Candle Centerpiece

This centerpiece brings the rustic beauty of a birch forest to your table. The varying heights of the logs create an interesting and dynamic display. It’s a substantial piece that works well for an outdoor table or a rustic indoor setting.
Logs of white birch wood are grouped together to serve as natural candle holders. Each log has a hole drilled in the top to hold a small flameless candle. The base of the arrangement is a metal tray filled with a ring of evergreen branches, pinecones, and bright red berries, completing the woodland look.
DIY Instructions
What You’ll Need:
- A round metal tray or platter
- 4-5 birch logs, cut to different heights (from a craft store or sustainably sourced)
- A drill with a spade bit (the same size as your candles)
- Flameless tea light or votive candles
- A faux evergreen wreath or several evergreen sprigs
- Pinecones
- Sprigs of faux red berries
Step-by-Step Guide:
- Prepare the Logs: (An adult should do this part!) Carefully drill a shallow hole in the center of the top of each birch log. Make it just deep enough for the candle to sit securely inside.
- Arrange the Greenery: Place the evergreen wreath or sprigs in a circle on your metal tray.
- Place the Logs: Stand your birch logs in the center of the wreath. Group them closely together, with the tallest ones in the middle and shorter ones around them.
- Add the Candles: Place one flameless candle into the hole on top of each log.
- Fill in with Details: Tuck the pinecones and red berry sprigs into the evergreen wreath at the base of the logs. Fill any empty spots until the base looks full and festive.
15. Enchanting Winter Ice Lanterns

These glowing ice bowls are a magical way to light an outdoor path or porch on a cold night. The flame of the candle is encased in ice, creating a beautiful, frosty glow. They capture the fleeting beauty of winter.
Natural elements are frozen right into the ice. Bright red cranberries, pinecones, evergreen sprigs, and slices of orange are suspended in the frozen walls of the bowls. A single candle placed in the center makes all the beautiful colors and textures shine. They are a truly unique and temporary decoration.
DIY Instructions
What You’ll Need:
- Two bowls for each lantern, one larger and one smaller that fits inside with space around it
- Water
- Tape
- Rocks or something heavy to weigh down the inner bowl
- Decorative items: fresh cranberries, small pinecones, evergreen clippings, thin orange slices
- Small candles or tea lights
Step-by-Step Guide:
- Set Up Your Mold: Place the smaller bowl inside the larger bowl.
- Add Your Decorations: Fill the space between the two bowls with your cranberries, pinecones, and orange slices.
- Add Water: Slowly pour water into the space between the bowls, until it comes almost to the top. The decorations will float around.
- Secure the Inner Bowl: Place rocks or a weight inside the small bowl to keep it from floating up. Use a few pieces of tape across the top of the bowls to keep the inner bowl centered.
- Freeze It: Carefully place the bowls in your freezer (or outside if it’s freezing!). Let it freeze solid, which may take several hours or overnight.
- Release the Lantern: Once frozen, take it out. Pour a little warm water into the inner bowl to loosen it, then pull it out. Turn the large bowl upside down and run some warm water over it until your ice lantern slides out.
- Light It Up: Place your candle inside and set it outside to glow.
16. Simple Pinecone Place Card Holders

These place card holders are a simple and elegant way to guide guests to their seats. They bring a small, personal touch of nature to each place setting. This is a very easy project that makes a big impact on a holiday table.
The concept is straightforward and beautiful. A single pinecone, with its flat bottom, serves as a sturdy base. A small name card is tucked securely into the top scales of the pinecone. A few tiny red berries placed nearby add a hint of color to the otherwise minimal design.
DIY Instructions
What You’ll Need:
- Pinecones that have a flat bottom and can stand up on their own
- Small cards for the names (cardstock works best)
- A pen with nice ink
- Hot glue gun and glue sticks (optional)
- Tiny faux red berries (optional)
Step-by-Step Guide:
- Find Good Pinecones: Choose pinecones that sit flat and don’t wobble. Make sure they are clean and dry.
- Write the Names: Neatly write each guest’s name on a place card.
- Insert the Card: Find a good spot among the top scales of the pinecone. Gently slide the bottom edge of the name card in between two scales. The scales should hold it in place. If it’s a little loose, you can add a tiny, hidden dot of hot glue.
- Add a Touch of Color: For an extra detail, use a hot glue gun to attach one or two tiny red berries to the base of the pinecone, near the front.
- Set the Table: Place one finished place card holder at the top of each plate at your dining table.
17. Serene Floating Candle Bowl

This centerpiece creates a peaceful and elegant mood. The combination of water, light, and natural elements is calming and beautiful. It works well as a centerpiece on a coffee table or dining table.
A wide, shallow glass bowl is filled with clear water. Floating on the surface are flower-shaped candles, their flames adding a warm glow. Sprigs of cedar and bright red cranberries drift among the candles. Below the surface, small pinecones rest at the bottom of the bowl, adding depth to the watery scene.
DIY Instructions
What You’ll Need:
- A large, shallow glass bowl
- Water
- Small pinecones
- Fresh cranberries
- A few sprigs of fresh cedar or other evergreen
- Floating candles (flower shapes are pretty, but any kind will work)
Step-by-Step Guide:
- Create the Base: Place a handful of small pinecones at the bottom of the glass bowl. Spread them out evenly.
- Add Water: Gently fill the bowl with water. Pour it in slowly so you don’t disturb the pinecones too much.
- Add the Greenery: Snip your cedar into smaller pieces. Let them float on the surface of the water.
- Scatter the Cranberries: Sprinkle the fresh cranberries into the water. They will float on top and add a beautiful red color.
- Place the Candles: Gently set your floating candles on the surface of the water. Space them out so they have room to float.
- Light and Enjoy: Light the candles just before you are ready to enjoy the display.
18. Natural Beaded Pinecone Garland

This garland adds a touch of modern bohemian style to your decor. The mix of natural wood, pinecones, and soft tassels creates a lovely textural piece. It looks beautiful draped over a mirror, a mantel, or a doorway.
Large wooden beads in natural and white tones are strung together to form the main part of the garland. Pinecones of various sizes are interspersed between the beads, adding a rustic element. Sprigs of red berries provide a festive pop of color. The garland is finished on both ends with thick, handcrafted jute tassels.
DIY Instructions
What You’ll Need:
- Thick jute twine or string
- Large wooden beads (a mix of natural wood and white painted beads)
- Pinecones
- An eye hook screw for each pinecone
- Jute or twine to make tassels
- A hot glue gun and glue sticks
- Faux red berry sprigs
Step-by-Step Guide:
- Prepare the Pinecones: Screw one small eye hook into the bottom (the flat end) of each pinecone. This will give you a loop to thread the string through.
- Make the Tassels: Wrap jute around your hand or a piece of cardboard many times. Tie a piece of string tightly around the top of the loop. Cut the bottom loops to create the tassel fringe. Make two.
- String the Garland: Cut a long piece of your main twine. Tie a tassel securely to one end. Start stringing your beads and pinecones, threading the twine through the eye hooks. Create a pattern you like.
- Add Berries: Every so often, use a dab of hot glue to attach a small sprig of red berries where a bead and pinecone meet.
- Finish the Garland: Once your garland is the length you want, string on the last few beads and tie the second tassel securely to the end. Snip off any excess twine.
19. Classic Pinecone Topiary Trees

These topiaries are a structured and elegant way to display natural elements. They have a classic, formal feel that works well for an entryway, mantel, or sideboard. They bring a touch of polished, garden-inspired style indoors.
A styrofoam ball is completely covered in small, tightly packed pinecones, forming the topiary sphere. Tiny red berries and bits of green moss are tucked into the crevices, adding color and texture. The sphere is set on a simple wooden dowel stem and placed in a decorative urn or pot filled with moss.
DIY Instructions
What You’ll Need:
- A styrofoam ball (size of your choice)
- Many small pinecones
- A hot glue gun and a lot of glue sticks
- A wooden dowel for the stem
- A decorative pot or urn
- A block of floral foam
- Preserved moss
- Tiny faux red berries
- A ribbon (optional)
Step-by-Step Guide:
- Cover the Ball: Start gluing pinecones to the styrofoam ball. Begin at the top and work your way down and around. Place them very close together to completely hide the foam.
- Insert the Stem: Once the ball is covered and the glue is dry, carefully push one end of the wooden dowel into the bottom of the styrofoam ball. Add some hot glue to secure it.
- Pot the Topiary: Place the floral foam block into your pot (you may need to cut it to fit). Push the other end of the dowel deep into the center of the foam.
- Add Moss: Cover the floral foam in the pot with a layer of preserved green moss.
- Add the Berries: Go back to your pinecone ball and tuck tiny red berries into the small gaps between the pinecones. A little dab of hot glue will hold them in place.
- Add a Bow: If you like, tie a simple ribbon bow around the dowel, just beneath the pinecone sphere.
20. Dressed-Up Chandelier

Decorating a light fixture is an easy way to draw the eye upward and make a room feel festive from top to bottom. This adds a delicate and elegant touch to a dining room or entryway. It brings the holiday decorations to a new level.
The arms of the chandelier are lightly draped with a faux evergreen garland. From the arms hang long, flowing ribbons in contrasting colors like deep red and soft white. At the end of each ribbon, a single snow-dusted pinecone is tied, accented with a tiny sprig of berries and holly.
DIY Instructions
What You’ll Need:
- A thin, flexible faux evergreen garland
- Pinecones
- White craft paint
- Ribbon in two colors (e.g., satin red and cream)
- Scissors
- Hot glue gun and glue sticks
- Tiny faux red berries and holly leaves
Step-by-Step Guide:
- Tip the Pinecones: Lightly dab the edges of your pinecones with white paint to give them a snowy look. Let them dry completely.
- Prepare the Hangers: Cut pieces of ribbon, all the same length. For each pinecone, you’ll need one ribbon.
- Attach Pinecones to Ribbons: Tie a ribbon securely around the top of a pinecone, or use a dot of hot glue to attach it to the stem end.
- Add Details: Glue a tiny sprig with a holly leaf and a few red berries to the spot where the ribbon meets the pinecone. Do this for all your pinecone hangers.
- Drape the Chandelier: (Make sure the light is turned off and cool!) Gently wrap the evergreen garland around the arms of your chandelier.
- Hang the Ornaments: Tie your finished pinecone ribbons to the chandelier arms. Let them hang down at equal lengths for a uniform look.
21. Winter Wonderland Terrarium

This geometric terrarium holds a tiny, snow-covered world. It’s like a little snow globe, capturing a quiet moment from a winter forest. The glass and metal frame gives the natural scene a modern edge.
Inside, a layer of soft white snow creates the ground for this miniature landscape. Pinecones and a piece of driftwood stand in for trees and fallen logs. A small deer figurine pauses in the clearing, while bright red berries add a pop of color. A delicate string of fairy lights is woven through the scene, making the whole world glow.
DIY Instructions
What You’ll Need:
- A glass terrarium with a metal frame
- Faux snow or white sand
- A few small pinecones
- A small, interesting piece of driftwood or a twig
- Sprigs of faux red berries
- A tiny deer figurine
- A short string of copper wire fairy lights
Step-by-Step Guide:
- Create a Snowy Base: Carefully pour a layer of the faux snow into the bottom of your terrarium. Make it about an inch deep and spread it out evenly.
- Place Your “Trees”: Stand your pinecones up in the snow. Arrange them so they look like a small cluster of trees.
- Add Other Natural Elements: Place the piece of driftwood in the scene.
- Introduce a Friend: Gently set your little deer figurine in the snow. Position it so it looks like it’s walking through the tiny forest.
- Add Color: Tuck the sprigs of red berries in around the pinecones.
- Make It Sparkle: Weave the string of fairy lights through your scene, hiding the small battery pack in the back or under the snow. Turn it on to see your winter wonderland light up.
22. Cozy Fireside Basket

This soft basket is filled with all the essentials for a cozy evening. It is both a beautiful decoration and a practical collection of comforts. Placed by a fireplace or a favorite chair, it invites you to relax and stay warm.
A chunky knit blanket spills out of a woven basket. Nestled inside are birch logs, ready for the fire, and several large pinecones. Bright red berry branches stick out, adding a festive touch to the neutral colors of the blankets and wood. A string of wooden beads drapes over the side, completing the comfortable, rustic look.
DIY Instructions
What You’ll Need:
- A large, soft basket (a woven or knit one is nice)
- One or two cozy blankets
- Two or three small birch logs
- Several large pinecones
- A few large sprigs of faux red berries
- A string of decorative wooden beads
Step-by-Step Guide:
- Start with the Blankets: Place one blanket in the basket, letting it fill the bottom and bunch up a bit. Drape the second blanket so it spills nicely over the edge of the basket.
- Add the Logs: Stand the birch logs up inside the basket. Tuck them in amongst the blankets so they are secure and visible.
- Place the Pinecones: Arrange the large pinecones in the basket. Let them peek out from the folds of the blankets.
- Add a Pop of Color: Stick the long stems of the red berry branches deep into the basket so they stand up tall.
- Add the Final Touch: Drape the string of wooden beads over the side of the basket, letting it hang down.
23. Scented Pinecone Fire Starters

This bucket holds a useful and fragrant collection. These pinecone fire starters make lighting a fire on a cold night a simple and pleasant task. They are a clever craft that is both practical and decorative.
A galvanized metal bucket is filled with pinecones. Some pinecones have been dipped in melted wax and sit on sticks, resembling little lollipops. These are the fire starters. Tall branches of red berries add height and color to the arrangement. A bundle of kindling tied with twine sits nearby, ready for use.
DIY Instructions
What You’ll Need:
- Pinecones
- Candle wax flakes (soy wax works well)
- An old pot or double boiler for melting wax
- Wicks or cotton string
- Wooden skewers or sticks
- A bucket or container to display them
Step-by-Step Guide:
- Prepare Your Pinecones: Tie a short piece of wick or string around the middle of each pinecone you want to turn into a fire starter.
- Melt the Wax: (An adult should do this part!) Melt the wax flakes in a double boiler or an old pot over low heat. You can add a few drops of cinnamon or pine essential oil for scent.
- Dip the Pinecones: Holding the wick, carefully dip a pinecone into the melted wax. Turn it to coat it all over. Lift it out and let the extra wax drip off.
- Let Them Cool: Place the wax-covered pinecones on a sheet of wax paper to cool and harden. You can dip them a second time for a thicker coat.
- Add Sticks (Optional): While the wax is still a little soft, you can push a wooden skewer into the bottom to create a handle.
- Arrange Your Display: Fill your bucket with plain pinecones and your finished fire starters. To use one, simply light the wick and place it under your logs in the fireplace.
24. Framed Botanical Collection

This gallery wall turns natural finds into beautiful art. It is a sophisticated and organized way to display the simple beauty of leaves, berries, and pinecones. The collection brings a touch of a natural history museum to your home.
Each dark wood frame holds a carefully arranged specimen against a textured, neutral background. Pressed ferns, clusters of dried berries, and interesting leaves are displayed with simple labels. A few frames hold single pinecones, treating them as sculptures. The variety of shapes and sizes in the frames makes the whole wall feel dynamic.
DIY Instructions
What You’ll Need:
- Shadow box frames in various sizes
- Burlap or linen fabric to use as a background
- Scissors
- Hot glue gun and glue sticks
- Pressed leaves and ferns (you can press your own in a heavy book)
- Dried berry sprigs
- Small pinecones
- Small paper labels and a pen (optional)
Step-by-Step Guide:
- Prepare the Frames: Open up your shadow box frames. Cut a piece of your fabric to fit the backboard of each frame. Use a little bit of glue to secure the fabric.
- Plan Your Layout: Decide what you want to put in each frame. Lay your leaves, berries, and pinecones out on the fabric backboards before you glue them.
- Glue Your Items: Once you are happy with the arrangement, carefully lift each item and put a few small dots of hot glue on the back. Gently press it onto the fabric. Use only a little glue so it doesn’t show.
- Add Labels: If you like, write the name of the plant on a tiny paper label and glue it underneath your specimen.
- Assemble and Hang: Put your frames back together. Arrange your finished botanical art on the wall in a group.
25. Rustic Napkin Rings

These simple napkin rings add a special, handmade touch to a table setting. They are a small detail that shows care and thought. Wrapping a simple cloth napkin with these makes it ready for a festive meal.
A plain linen napkin is rolled and tied with natural jute twine. The twine is wrapped several times to create a wide band. Tucked into the twine is a small, charming bundle of nature: two tiny pinecones, a sprig of fresh rosemary, and a few bright red berries. The bow is tied on top to hold everything in place.
DIY Instructions
What You’ll Need:
- Natural jute twine
- Scissors
- Small pinecones
- Small sprigs of faux red berries
- Small sprigs of fresh rosemary (or faux greenery)
- A hot glue gun and glue sticks
- Cloth napkins
Step-by-Step Guide:
- Create a Mini-Bouquet: Take two small pinecones, a sprig of berries, and a sprig of rosemary. Arrange them in a tiny bundle that you find pleasing. Use a small dot of hot glue between them to hold them together.
- Cut Your Twine: Cut a long piece of twine, about 2 feet long, for each napkin.
- Roll Your Napkin: Neatly roll or fold one of your cloth napkins.
- Wrap It Up: Find the middle of your piece of twine and lay it over the center of the napkin. Wrap both ends of the twine around the napkin until you have a wide band.
- Attach the Decoration: Before you tie the final knot, lay your mini-bouquet on top of the twine band.
- Tie a Bow: Tie the ends of the twine into a secure bow right on top of your little bouquet. This will hold it in place. Repeat for all your napkins.
26. Elegant Staircase Swags

Decorating a staircase banister adds a grand and festive feeling to a home. These individual swags offer a classic and polished look. The repeating design leads the eye up the stairs.
A main garland of faux pine is wrapped around the handrail, woven with warm fairy lights. At each post, a beautiful bunch of decorations is tied. Each bunch features a large pinecone, fresh evergreen sprigs, and a full cluster of red berries. A long, luxurious velvet or plaid ribbon ties it all to the banister, the tails hanging down elegantly.
DIY Instructions
What You’ll Need:
- A long faux evergreen garland
- A string of fairy lights
- Floral wire
- Large pinecones
- Sprigs of faux greenery (like cedar or fir)
- Large sprigs of faux red berries
- Wide ribbon in various colors or patterns (velvet, plaid, etc.)
- Scissors
Step-by-Step Guide:
- Wrap the Banister: First, wrap the evergreen garland up your staircase handrail. Then, wrap the string of fairy lights around the garland.
- Make Your Bunches: For each swag, create a small bouquet. Start with a sprig of greenery, add a large sprig of berries, and place a large pinecone in front.
- Wire it Together: Use a piece of floral wire to wrap tightly around the stems of your little bouquet to hold all the pieces together. Leave some extra wire to use for attaching.
- Cut Your Ribbons: Cut a long piece of ribbon for each bunch you made.
- Attach to the Stairs: Using the extra floral wire, attach one bunch to each post or spindle of your staircase.
- Add the Bow: Tie a ribbon over the floral wire to hide it. You can make a simple knot and let the tails hang long, or you can tie a big, beautiful bow.
27. Winter Wonderland Cloche

A glass cloche or dome turns a simple arrangement into a precious display. It protects the items inside and makes them feel special. This decoration works beautifully as a centerpiece on a kitchen island or a side table.
The scene is built on a wooden cake stand, which gives it height. A bed of green moss forms the base. Inside the dome, a tall pinecone stands like a Christmas tree, surrounded by smaller pinecones, silver and white ornaments, and delicate cream-colored flowers. Bright red berries add a festive touch to this captured winter moment.
DIY Instructions
What You’ll Need:
- A cake stand or decorative pedestal
- A glass cloche (bell jar) that fits on the stand
- Preserved green moss
- Pinecones of various sizes
- Small Christmas ornaments (silver and white look nice)
- A few faux flowers (like small hydrangeas or mums)
- Sprigs of faux red berries
Step-by-Step Guide:
- Create Your Base: Place your cake stand on a flat surface. Arrange a generous layer of the green moss on top of it.
- Add the Tallest Item: Place your largest pinecone in the center of the moss. This will be the focal point of your scene.
- Arrange the Other Items: Start tucking the smaller pinecones, ornaments, and flowers into the moss around the central pinecone. Create a full and balanced arrangement.
- Add a Pop of Color: Place the red berry sprigs in any remaining gaps.
- Check Your Work: Before you put the dome on, make sure everything is inside the footprint of where the glass will sit.
- Cover Your Scene: Carefully place the glass cloche over your arrangement. Now your winter scene is complete and beautifully displayed.
28. Nature’s Bounty Tray

This tray is a beautiful and organized display of nature’s textures and colors. It serves as a kind of deconstructed centerpiece or a palette of natural art supplies. It is a simple, modern way to appreciate the details of each natural element.
A simple gray tray is neatly filled with rows of different natural materials. There are rows of pinecones, walnuts, and dried berries in various shades of red and black. Spices like cinnamon sticks and star anise add another layer of texture and scent. Slices of dried orange give a bright pop of color, making the whole tray a feast for the eyes.
DIY Instructions
What You’ll Need:
- A long, shallow tray with a simple design
- A collection of natural items with interesting textures. Good choices include:
- Pinecones of different sizes
- Nuts in their shells (like walnuts)
- Dried berries or cranberries
- Cinnamon sticks
- Star anise
- Dried orange slices
- Vanilla beans
Step-by-Step Guide:
- Clean Your Tray: Make sure your tray is clean and dry.
- Plan Your Rows: Decide which order you want your items to be in. Think about arranging them by color, size, or texture.
- Create the First Row: Carefully place your first material in a neat row at one end of the tray. For example, start with a row of pinecones.
- Continue Making Rows: Add your next material in a new row right next to the first one. Keep the lines between the different materials as neat as you can.
- Fill the Tray: Continue adding rows of your different natural items until the entire tray is full.
- Display It: Place your finished tray on a coffee table or console table as a beautiful, modern piece of natural art.
29. Festive Drink Stirrers

These charming stir sticks add a festive and personal touch to any holiday beverage. They are a simple craft that can make party drinks feel more special. They also double as clever drink markers so guests don’t mix up their glasses.
A simple bamboo skewer is topped with a miniature decoration. A tiny pinecone is attached to the top, crowned with a single bright red berry. They are a small but impactful detail. Displayed in a glass, they are ready for guests to add to their cocktails or sparkling cider.
DIY Instructions
What You’ll Need:
- Long bamboo skewers or thin wooden sticks
- Very small pinecones (sometimes called hemlock cones)
- Tiny faux red berries
- A hot glue gun and glue sticks
- Wire cutters or strong scissors (to snip the berries)
Step-by-Step Guide:
- Prepare Your Berries: Snip single red berries off of their larger stems. Leave a tiny bit of the stem on the back to make it easier to glue.
- Attach the Pinecone: Place a small dot of hot glue on the top end of a bamboo skewer. Firmly press the bottom of a tiny pinecone onto the glue and hold it for a moment.
- Add the Berry: Put another, even smaller dot of glue on the very top center of the pinecone.
- Place the Topper: Gently press a single red berry onto the glue. Now your pinecone has a little red crown.
- Let it Dry: Set the finished stirrer aside to let the glue cool completely.
- Repeat: Make as many drink stirrers as you need for your party.
30. Minimalist Wall Branch Hanging

This wall hanging is a simple and modern way to bring a touch of the outdoors in. It celebrates the natural shape of the branch itself. The decoration is sparse and intentional, making it a calming piece of art.
A single, beautiful birch branch is suspended from a nail on the wall. The decoration is kept minimal. A few small clusters of red berries are attached where smaller twigs meet the main branch. Several pinecones hang from clear fishing line, making them appear to float beneath the branch. A delicate string of copper lights adds a subtle, warm glow.
DIY Instructions
What You’ll Need:
- An interesting branch (birch is nice, but any type will work)
- A nail or hook for the wall
- Clear fishing line or thin string
- Scissors
- Small pinecones
- Small sprigs of faux red berries
- A hot glue gun and glue sticks
- A short string of fairy lights (optional)
Step-by-Step Guide:
- Hang Your Branch: Find the balance point of your branch and hang it on a nail on your wall.
- Add the Berries: Decide where you want to add a little color. Put a small dot of hot glue on the branch and press a sprig of red berries onto it. Add a few more clusters along the branch.
- Prepare the Pinecones: Cut several pieces of fishing line at different lengths. Tie one end of each piece securely to the top of a pinecone.
- Hang the Pinecones: Tie the other end of the fishing line to the underside of the branch. Let the pinecones hang down at different heights.
- Add Lights: If you are using them, loosely wrap the string of fairy lights around the branch.
- Adjust and Admire: Step back and look at your creation. Move the hanging pinecones around until you are happy with the simple, modern look.
31. Festive Ice Bucket Chiller

This stunning ice bucket is more than just a way to chill a bottle; it’s a centerpiece for a celebration. It turns a functional item into a piece of decorative art. The layers of natural elements frozen in the ice create a beautiful, frosty effect.
Bright red cranberries, fresh rosemary sprigs, and small pinecones are suspended in the thick ice walls of the bucket. As the ice slowly melts, it creates a lovely, glistening effect. It’s a spectacular way to present a bottle of champagne or sparkling wine at a party, making the moment feel even more special.
DIY Instructions
What You’ll Need:
- Two buckets, one large and one smaller that fits inside with about a 1-2 inch gap all around.
- Distilled water (using distilled water makes the ice clearer)
- Fresh cranberries
- Small pinecones
- Sprigs of fresh rosemary
- Rocks or a heavy object to weigh down the inner bucket
- Tape
Step-by-Step Guide:
- Set Up the Mold: Place the smaller bucket inside the larger bucket.
- Add a Base Layer: Pour about two inches of water into the gap between the buckets and drop in some cranberries and pinecones. Place this in the freezer until it is frozen solid. This creates a stable base.
- Add Your Decorations: Once the base is frozen, remove the buckets from the freezer. Fill the rest of the gap with your cranberries, rosemary sprigs, and pinecones.
- Fill with Water: Slowly pour distilled water into the gap until it’s almost full.
- Secure the Inner Bucket: Place rocks inside the smaller bucket to weigh it down and keep it from floating. Use tape across the top to keep it centered.
- Freeze Solid: Carefully place the entire setup back in the freezer. Let it freeze completely, which can take 8 hours or overnight.
- Release the Chiller: To remove the ice bucket, take it from the freezer and let it sit for a few minutes. Pour some warm water into the inner bucket to loosen it, then pull it out. Turn the large bucket upside down to slide the finished ice chiller out. Place it on a tray and put your bottle inside.
32. Natural Gift Wrapping

Thoughtful gift wrapping can be just as meaningful as the gift inside. This style uses simple, natural materials to create a beautiful and personal presentation. It’s an earthy and elegant alternative to shiny wrapping paper.
Plain kraft paper provides a simple canvas for the decoration. A gift can be wrapped with a band of rich velvet ribbon or simply tied with jute twine. The finishing touch is a small, hand-assembled bouquet of fresh cedar, a couple of tiny pinecones, and a pop of red from a few berries. A wooden name tag adds the final rustic detail.
DIY Instructions
What You’ll Need:
- Brown kraft wrapping paper
- Ribbon (velvet or satin) and/or natural jute twine
- Small pinecones
- Small sprigs of fresh cedar or other evergreen
- Small sprigs of faux red berries
- A hot glue gun and glue sticks
- Scissors
- Wooden or paper name tags
Step-by-Step Guide:
- Wrap Your Gift: Neatly wrap your present in the kraft paper.
- Add a Ribbon: Wrap a piece of velvet ribbon around the center of the box and secure it at the back.
- Tie with Twine: Wrap a piece of jute twine around the box in the other direction, and tie a simple bow on top.
- Create a Mini-Bouquet: Take a small sprig of cedar, one or two tiny pinecones, and a small cluster of berries. Arrange them in a pleasing way. Use a tiny dot of hot glue to hold the pieces together.
- Attach the Topper: Put a small dot of hot glue on the back of your mini-bouquet and press it firmly onto the center of the bow.
- Add a Name Tag: Write the recipient’s name on a tag and tuck it under the twine bow.
33. Hanging Herb & Pinecone Bundles

This idea turns a practical kitchen pot rack into a stunning, fragrant display. It brings the charm of an old-world apothecary or a country garden right into your kitchen. The hanging bundles are both beautiful and aromatic.
From the hooks of the pot rack hang numerous small bouquets. There are bundles of dried herbs like rosemary, thyme, and bay leaves, tied with simple twine. Interspersed with the herbs are hanging pinecones and sprigs of red berries. Slices of dried orange add another layer of color and scent, making the whole arrangement a feast for the senses.
DIY Instructions
What You’ll Need:
- A pot rack or a ceiling rack with hooks
- Fresh herbs that dry well (rosemary, thyme, sage, bay leaves)
- Small pinecones
- Sprigs of faux berries
- Jute twine
- Scissors
- Floral wire (optional)
Step-by-Step Guide:
- Create Your Bundles: Take a few sprigs of one or two types of herbs and arrange them in a small bundle.
- Add Other Elements: Add a sprig of berries or a dried orange slice to your herb bundle.
- Tie Them Up: Cut a long piece of twine. Wrap it tightly around the stems of your bundle several times. Leave a long tail on the twine and tie a loop for hanging.
- Prepare the Pinecones: For the pinecones, tie a piece of twine securely around the top section of the cone, then make a loop for hanging. You can also screw a small eye hook into the top of the pinecone.
- Hang Your Decorations: Hang your finished herb bundles and pinecones from the hooks on your pot rack.
- Arrange Your Display: Mix the different types of bundles so you have a variety of textures and colors all around the rack.
34. Bedroom Canopy Garland

This simple garland adds a touch of romance and festivity to a bedroom. Draping it over a headboard or a mirror creates a soft, elegant focal point. It’s a subtle way to bring seasonal cheer into a personal space.
A delicate, thin garland made of wired red berries and tiny pinecones is the main feature. It is gracefully draped over the top of a gold metal bed frame. A string of warm white fairy lights is intertwined with the garland, casting a soft and dreamy glow. The look is minimal, yet very effective.
DIY Instructions
What You’ll Need:
- A thin, flexible garland of faux berries and pinecones
- A string of battery-operated fairy lights with a thin wire (copper or silver)
- Small pieces of floral wire or twist ties to secure it
Step-by-Step Guide:
- Combine Garland and Lights: Lay your garland out on the floor. Take your string of fairy lights and loosely wrap it around the garland from one end to the other.
- Find the Center: Find the middle point of your combined garland and light string.
- Drape the Garland: Place the center point of the garland at the center of your headboard, mirror, or canopy frame. Let the ends drape down gracefully on both sides.
- Secure It in Place: Use small, discreet pieces of floral wire or twist ties to attach the garland to the frame in a few key spots. This will keep it from slipping. Make sure to hide the wire.
- Hide the Battery Pack: Tuck the small battery pack for the lights out of sight behind the bed, a pillow, or tape it to the back of the mirror.
- Turn it On: Switch on the lights to enjoy the warm, sparkling effect.
35. Welcoming Entryway Vignette

This simple arrangement creates a warm and inviting welcome for anyone who steps through the door. It gathers cozy elements together in a small space, like an entryway bench. It sets a comfortable and classic tone for the whole house.
A simple wooden tray provides a base for the display. In it, a glass hurricane vase holds a lit candle, casting a welcoming glow. A clear vase is filled with tall branches of red berries, adding height and vibrant color. Large pinecones are arranged around the candles and vase, filling out the tray. A plaid blanket and a cozy pillow on the bench complete the scene.
DIY Instructions
What You’ll Need:
- A small bench or table in your entryway
- A wooden or metal tray
- A glass hurricane vase and a pillar candle
- A second, taller vase
- Several sprigs of faux red berries
- 3-4 large pinecones
- A cozy plaid blanket or throw
- A decorative pillow
Step-by-Step Guide:
- Set the Scene: Place your bench by the door. Fold the plaid blanket and drape it over one side of the bench. Place the pillow next to it.
- Position the Tray: Set your tray on the other side of the bench.
- Place the Tallest Items: Put the hurricane candle and the taller vase with berries on the tray first. Place them slightly off-center for a more natural look.
- Arrange the Pinecones: Place the large pinecones on the tray around the base of the candle and vase. Let them fill the empty space.
- Light the Candle: For a truly welcoming feel, light the candle (or use a flameless one) when you are expecting guests.
- Final Check: Make sure the arrangement looks balanced and inviting from the angle someone would see it when they first walk in.
36. Scented Botanical Wax Sachets

These solid wax sachets are beautiful, fragrant ornaments. They can be hung in a closet, placed in a drawer, or used as unique holiday decorations. They capture the scents and sights of the season in a small, elegant tablet.
A smooth, cream-colored bar of soy wax serves as the canvas. Pressed into the surface of the wax is a carefully arranged collection of natural treasures. Tiny pinecones, star anise, dried orange slices, and red berries are artfully placed. A simple ribbon is looped through a hole at the top, making it ready to hang and release its gentle fragrance.
DIY Instructions
What You’ll Need:
- Soy wax flakes
- A heat-proof pouring pot or double boiler
- Essential oils for scent (like orange, cinnamon, or pine)
- A rectangular silicone mold (or other shapes)
- A skewer or straw for making a hole
- Dried decorative items: tiny pinecones, star anise, dried orange slices, red berries, evergreen sprigs.
- Ribbon for hanging
Step-by-Step Guide:
- Melt the Wax: (An adult should do this part!) Melt the soy wax flakes gently in your double boiler. Once melted, remove it from the heat and let it cool slightly for a minute or two.
- Add Scent: Stir in a generous amount of your chosen essential oils.
- Pour into Molds: Carefully pour the melted wax into your silicone molds. Fill them about half an inch deep.
- Let it Set Slightly: Wait for 5-10 minutes. You want the wax to start getting a little firm on top but still be soft enough to press things into.
- Decorate the Top: Gently press your dried botanicals into the surface of the wax. Arrange them in a beautiful pattern.
- Make the Hole: Before the wax is completely hard, use a skewer or straw to poke a hole near the top of the sachet where the ribbon will go.
- Cool Completely: Let the sachets cool and harden completely for several hours.
- De-mold and Finish: Once they are solid, gently pop the sachets out of the molds. Thread a piece of ribbon through the hole and tie a loop for hanging.
From a simple bedside vase to an elaborate tablescape, it’s clear that pinecones and berries are some of nature’s most adaptable crafting materials. They can be painted, scented, hung, or frozen to create decorations that are uniquely yours.
Bringing these natural elements into your home is a wonderful way to celebrate the changing seasons. The simple act of creating something beautiful with your hands can make your home feel even more personal and inviting.
We hope these 36 ideas have sparked your imagination. Now it’s your turn to gather some supplies, put on some music, and create something wonderful that brings the beauty of the outdoors inside.
Key Takeaways
- Versatility is Key: Pinecones and berries can be adapted to fit any decor style, from rustic and natural to modern and glamorous.
- Go Beyond the Wreath: Think about using these natural elements on tablescapes, mantels, chandeliers, and even in your kitchen or bedroom.
- Simple DIY, Big Impact: Many of these beautiful projects require only basic supplies and a little creativity, but they can dramatically transform a space.
- Engage the Senses: You can add elements like citrus, spices, and scented wax to your pinecone and berry crafts to make them appeal to the sense of smell as well as sight.