
Walking into a cluttered kitchen feels stressful and overwhelming. Most people find it hard to keep their food storage tidy for long. You might spend too much time searching for a single jar of spices. Chaos often leads to food waste and extra grocery costs at the store.

This guide offers forty five smart ways to fix your shelving. Each solution helps you regain control over your daily routine. Your kitchen will transform into a peaceful space for cooking. Simple habits make a huge difference in how you feel at home.
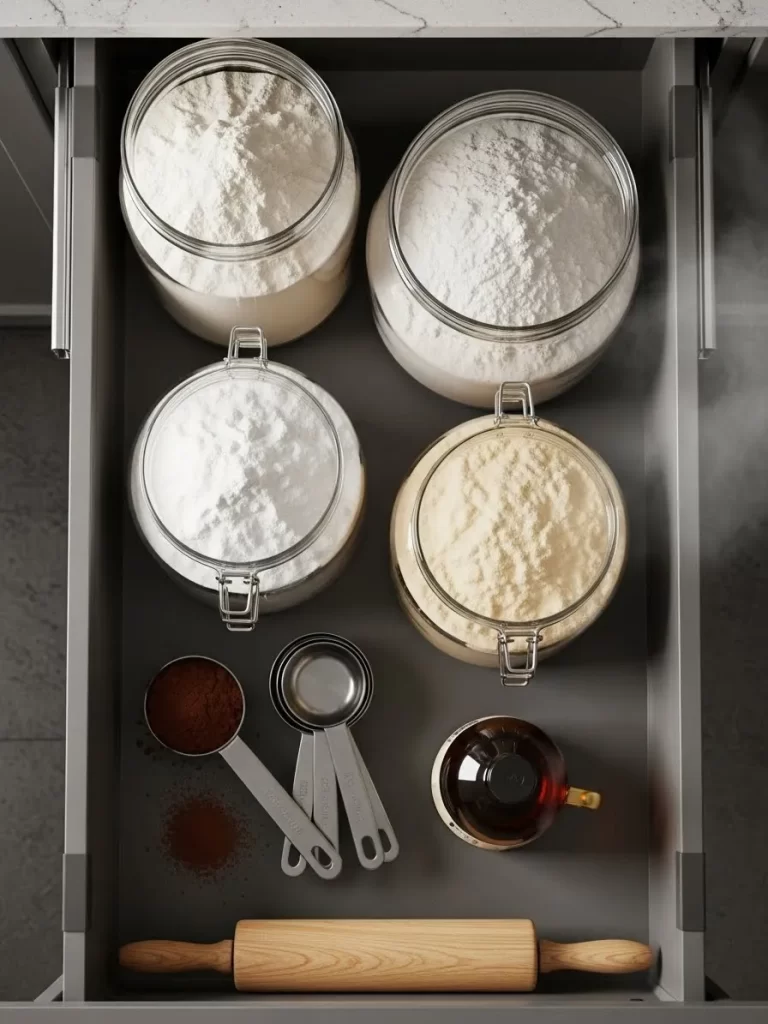
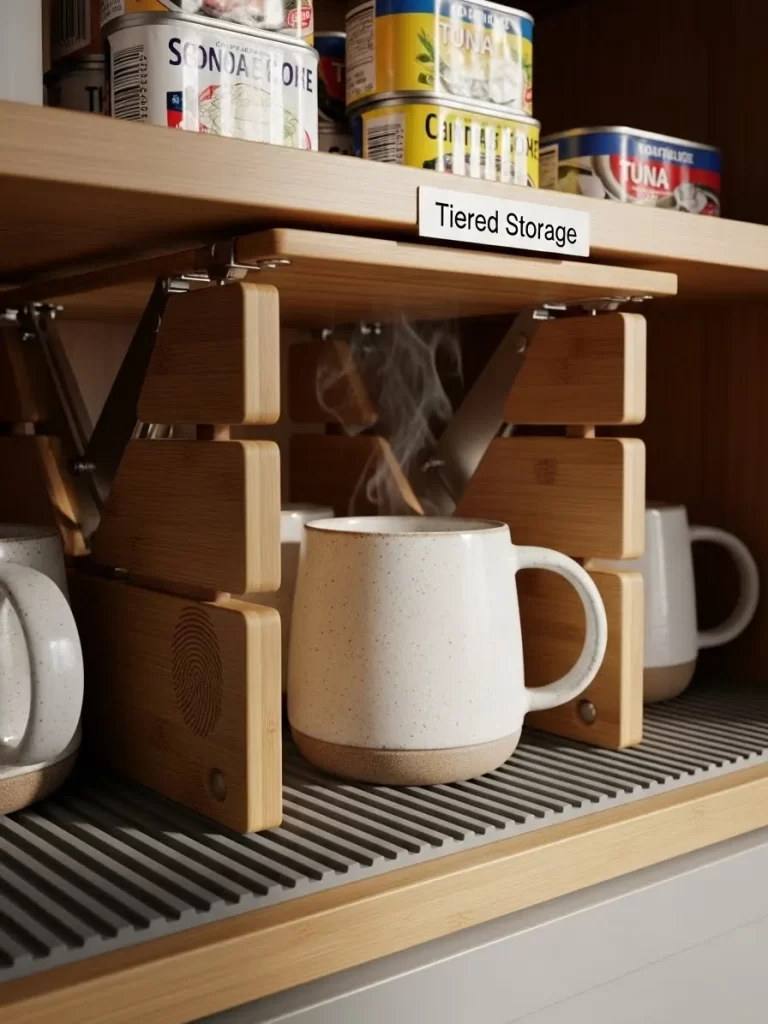
1 Uniform Glass Jars with Bamboo Lids
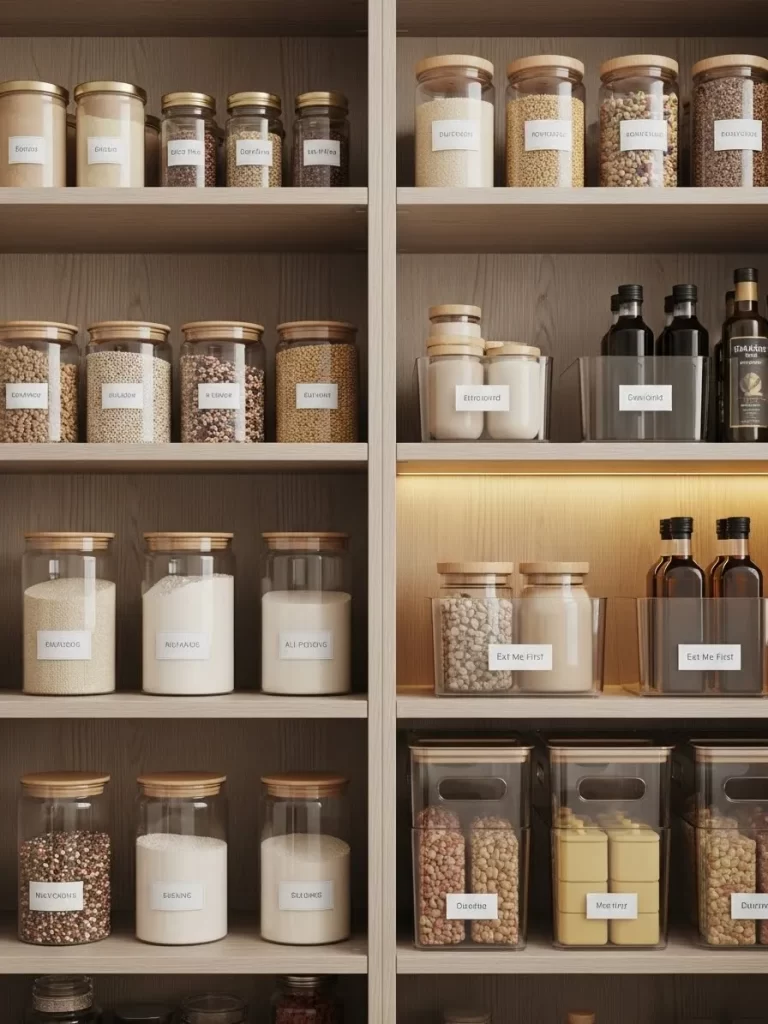
Transform your messy shelves into a serene kitchen sanctuary by switching to matching glass jars. These clear containers allow you to see exactly how much flour or pasta remains at a glance. You will notice how the uniform look immediately reduces visual noise in your pantry.
Choosing bamboo lids adds a warm and natural touch to the space. Using consistent sizes creates a rhythmic pattern that feels calm and tidy. Your ingredients stay fresh while your kitchen looks like a professional designer curated it.
Labels play a crucial role in maintaining this system over time. Plain white stickers with clear text help every family member find what they need without searching. Organizing your dry goods this way makes cooking faster and more enjoyable every single day.
Material Required List
- Glass jars in various sizes
- Bamboo lids with silicone seals
- Adhesive white labels
- Fine tip marker
Equipment Required List
- Warm water
- Dish soap
- Dry microfiber towel
- Measuring cups or a funnel
DIY Instructions Step by Step
- Clean all the glass jars with warm soapy water before you start.
- Wipe the jars dry with a soft towel so no water spots remain.
- Sort your food items into groups like grains or snacks.
- Fill the jars with your dry ingredients carefully using a funnel or cups.
- Write the name of each food item on a white label clearly.
- Press the label firmly onto the front of the glass jar at the same height.
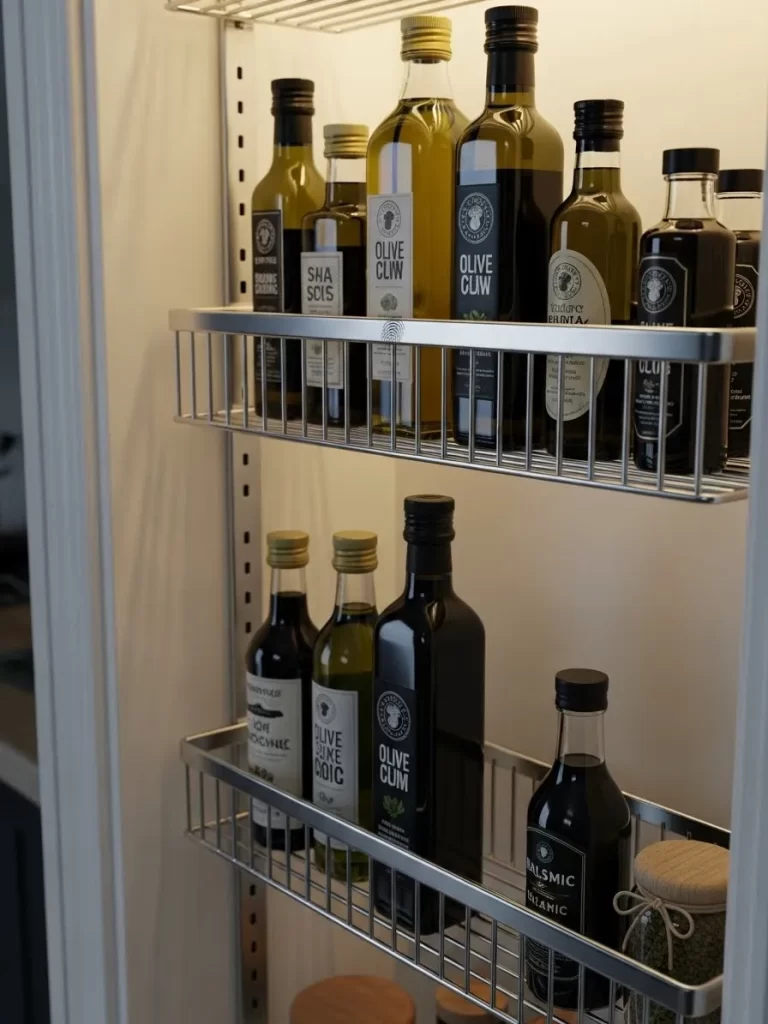
- Arrange the jars on your pantry shelves by size or frequency of use.
2 Airtight Flip Top Containers
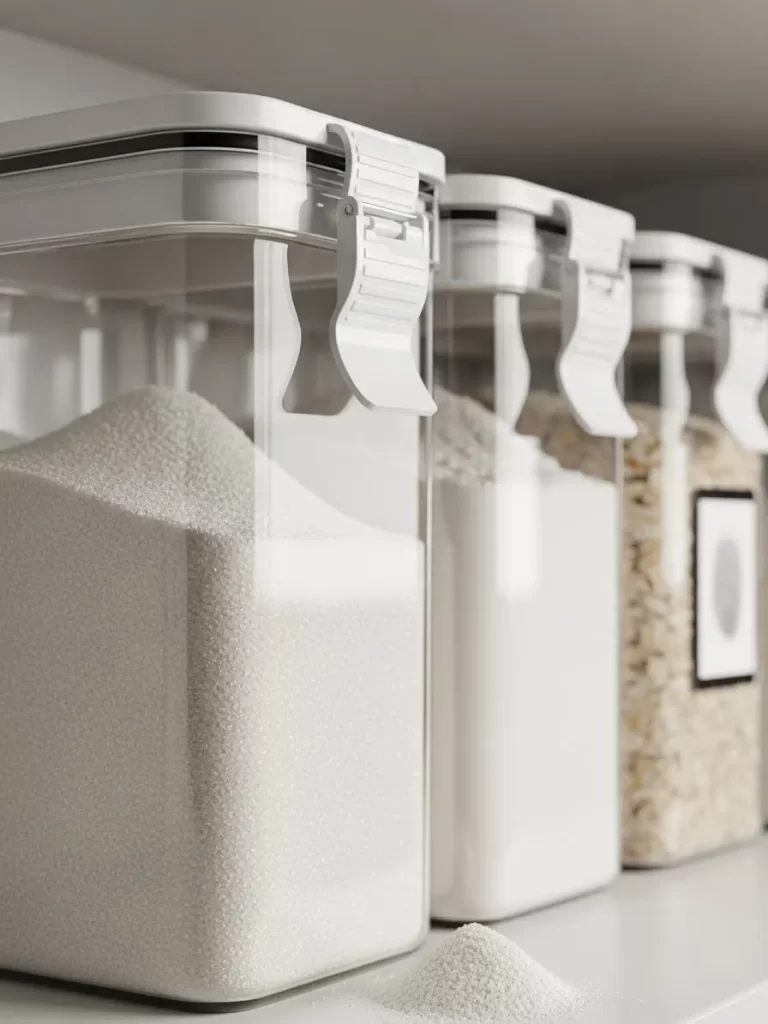
Keeping food fresh is easy when you use airtight storage. These clear bins let you see your supply levels without opening a single lid. You will avoid buying extra flour or sugar by mistake.
Flipping the top seal creates a vacuum that locks out moisture. This design works wonders for baking staples that clump easily. Stacking them saves precious vertical space on your shelves.
Modern kitchens benefit from such sleek and functional tools. Every container keeps pests away from your dry goods. Your pantry will look orderly and remain clean for a long time.
Material Required List
- Clear plastic bins with flip lids
- Silicone gaskets
- Water resistant labels
- Permanent ink pen
Equipment Required List
- Soft sponge
- Mild detergent
- Kitchen scale
- Measuring scoop
DIY Instructions Step by Step
- Wash the plastic containers using warm water and mild detergent.
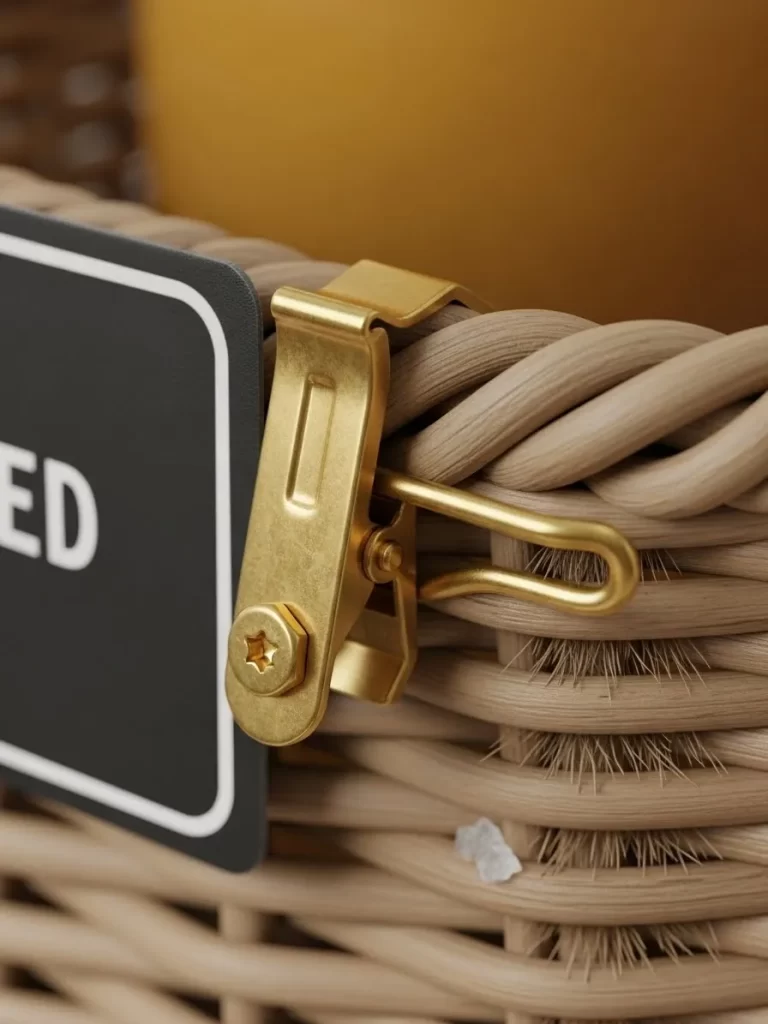
- Rinse the silicone gaskets thoroughly to remove any factory residue.
- Air dry every part completely to prevent mold growth inside.
- Weigh your bulk food items to ensure they fit the container volume.
- Pour the ingredients slowly into the bin to avoid dust clouds.
- Position the lid on top and press the lever down to seal it.
- Stick a label on the lower front area for easy identification.
3 Pull Out Tiered Spice Rack

Narrow gaps in your cabinetry often go to waste. A pull out rack turns those slim spots into a high capacity spice station. Everything stays hidden but remains within reach during a busy cooking session.
Glass jars with black caps provide a sleek and modern look. Adding uniform labels ensures you never grab cumin when you need cinnamon. Bright LED lighting under the shelf makes every label easy to read.
This setup maximizes every inch of your available kitchen real estate. Metal rails keep the bottles from falling when you move the rack. You will feel like a professional chef with such an organized system.
Material Required List
- Metal sliding rack system
- Mounting screws
- Glass spice jars
- Preprinted black labels
Equipment Required List
- Power drill
- Screwdriver
- Measuring tape
- Pencil for marking
DIY Instructions Step by Step
- Measure the width of your cabinet gap to ensure the rack fits.
- Clear out the bottom shelf where the tracks will be placed.
- Mark the screw holes on the cabinet floor using a pencil.
- Drill small pilot holes to make the screws go in easier.
- Fasten the metal tracks securely using the provided mounting screws.
- Slide the tiered rack into the tracks to check for smooth movement.
- Fill your jars with spices and place them on the different levels.
4 Two Tier Wood Lazy Susan
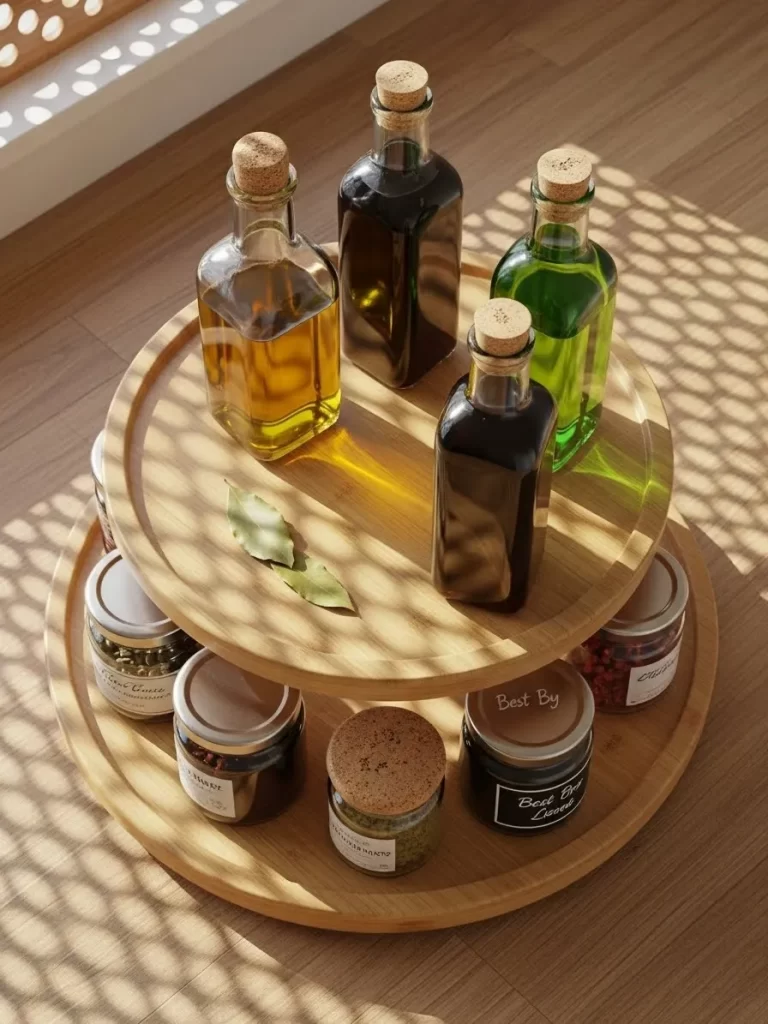
Corners are notorious for swallowing small oil bottles and jars. This rotating wooden tray brings those hidden items directly to your fingertips. Just a simple spin reveals whatever you need for your dinner recipe.
Using two tiers doubles your storage capacity without taking up extra counter space. Natural wood grain adds a touch of warmth to your kitchen aesthetic. Cork stoppers on the glass bottles keep your liquid ingredients safe and spill free.
Stability is a key feature of this heavy wooden base. You can store heavy vinegar bottles on the bottom without any wobbling. This tool makes finding ingredients a fun and quick task.
Material Required List
- Two circular wooden trays
- Center support post
- Ball bearing swivel base
- Wood glue
Equipment Required List
- Hand screwdriver
- Level tool
- Sandpaper
- Soft cloth
DIY Instructions Step by Step
- Sand the wooden surfaces to remove any rough or sharp edges.
- Attach the ball bearing swivel to the bottom of the largest tray.
- Apply wood glue to the base of the center support post.
- Screw the support post into the middle of the bottom tray.
- Place the second tray on top of the support post carefully.
- Check that the trays are level so bottles do not slide off.
- Wipe the wood with a cloth to remove any dust.
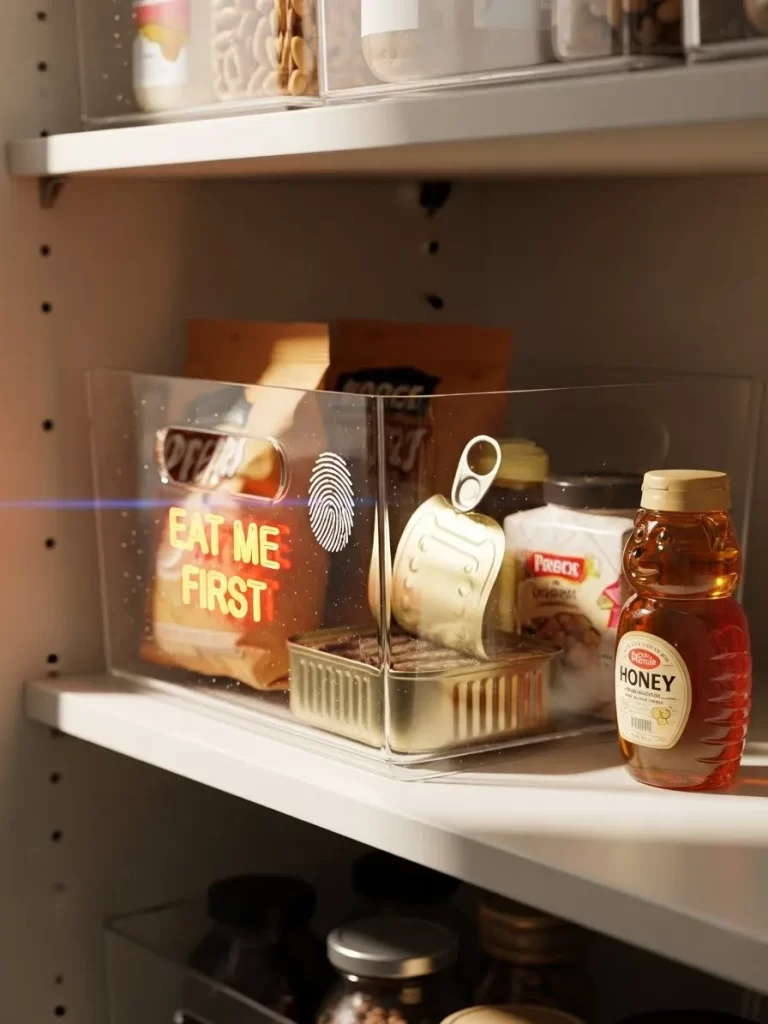
5 Clear Eat Me First Bin
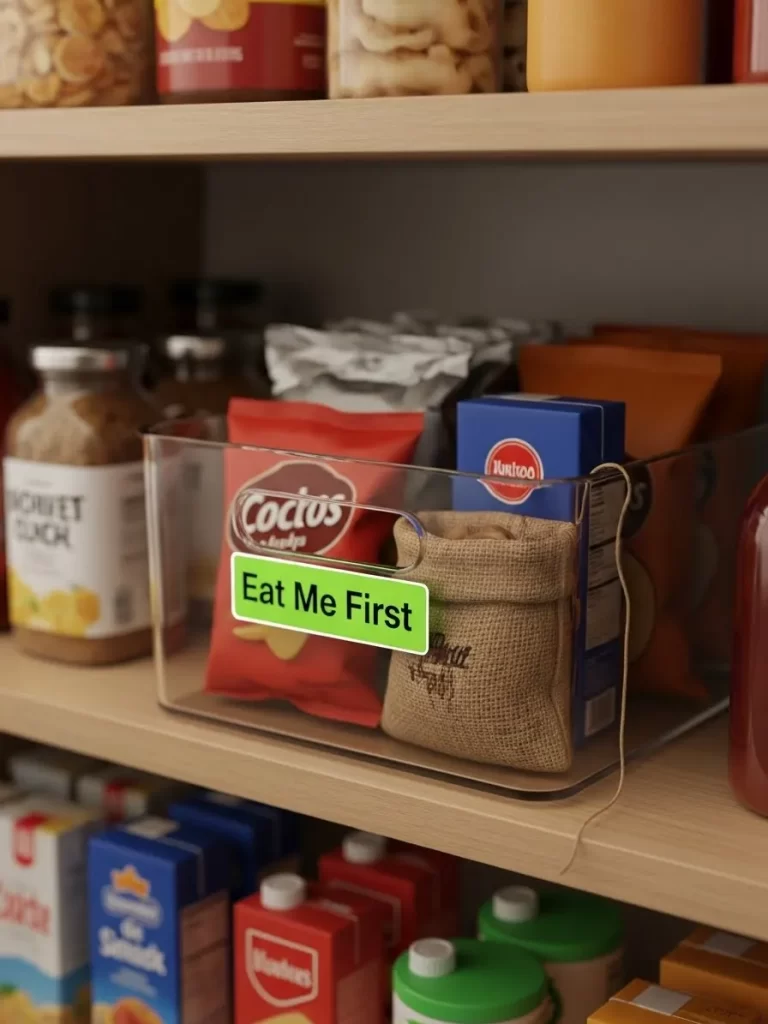
Food waste often happens because snacks get pushed to the back. This clear bin creates a dedicated zone for items that need to be consumed soon. You can reduce grocery costs by focusing on what you already own.
Putting the label in a bright color catches the eye immediately. Kids will know exactly which bag of chips or box of raisins to grab first. It serves as a helpful reminder for the whole family to eat responsibly.
Transparent walls help you see through the packaging of different snacks. You will spend less time rummaging through the pantry for a quick bite. This simple habit keeps your food supply fresh and rotated.
Material Required List
- Large clear acrylic bin
- Green adhesive vinyl
- Small burlap bags
- Clip on bin handle
Equipment Required List
- Scissors
- Ruler
- Glass cleaner
- Paper towel
DIY Instructions Step by Step
- Clean the outside of the acrylic bin with glass cleaner.
- Cut a rectangle out of the green vinyl for your label.
- Write the phrase Eat Me First on the vinyl using a dark pen.
- Peel the backing off and center the label on the bin front.
- Place small burlap sacks inside for loose items like nuts.
- Group all your snacks that expire soon into this container.
- Slide the bin onto a shelf that is at eye level.
6 Mesh Root Vegetable Baskets
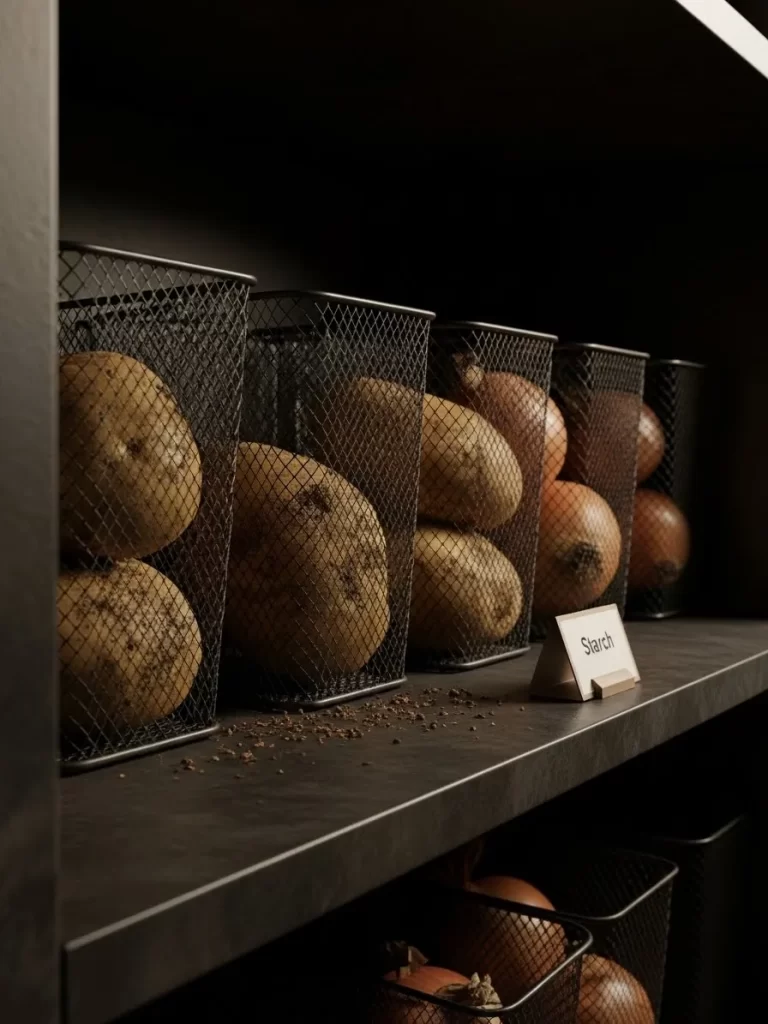
Potatoes and onions require good airflow to stay fresh for weeks. These black wire mesh bins allow air to circulate freely around your root vegetables. Darker colors hide small amounts of dirt that might fall off the skins.
Placing a small sign nearby helps you keep track of your categories. Sturdy mesh prevents your produce from rolling around on the dark shelf. You will enjoy a much cleaner and more organized pantry floor or cabinet.
Keeping these items in a cool and dark place is vital. Wire baskets make it easy to see when you are running low on supplies. This storage method prevents premature rotting and saves you money.
Material Required List
- Black wire mesh baskets
- Small wooden sign holders
- Cardstock paper
- Rubber feet for the base
Equipment Required List
- Printer or marker
- Small brush
- Vacuum cleaner
- Scissors
DIY Instructions Step by Step
- Brush any loose dirt out of your pantry cabinet first.
- Attach rubber feet to the bottom of the wire baskets to protect shelves.
- Cut small rectangles out of cardstock to fit the sign holders.
- Write the word Starch or Onions on the cardstock clearly.
- Insert the paper into the wooden holders and place them by the bins.
- Fill each basket with only one type of vegetable to prevent gas buildup.
- Line the baskets up in a row for a tidy appearance.
7 Gravity Feed Can Rack
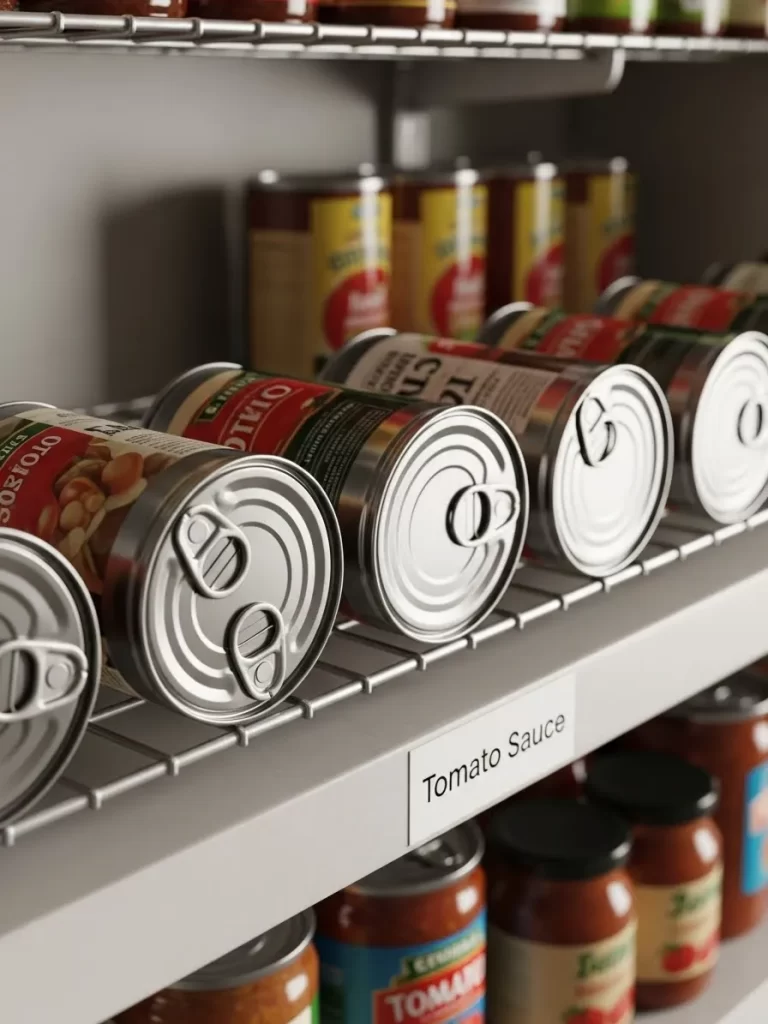
Tinned goods often pile up in messy stacks that tumble over. A gravity feed rack keeps your tomato sauce and soup cans in a neat line. Each time you remove one item, the next one rolls forward automatically.
Seeing the labels clearly helps you plan your meals with speed. Wire construction ensures the rack is strong enough to hold heavy metal cans. This system prevents old cans from hiding behind newer purchases at the back.
Adjusting the dividers allows you to store different sizes of cans. You will appreciate the extra space this rack creates on your shelves. Your inventory management becomes a simple task with this smart tool.
Material Required List
- Metal wire can organizer
- Plastic shelf liners
- Label stickers
- Zip ties
Equipment Required List
- Wire cutters
- Measuring tape
- Level
- Marking pen
DIY Instructions Step by Step
- Measure your shelf depth to ensure the rack fits inside.
- Assemble the metal frame according to the package directions.
- Place plastic liners on each level to help the cans slide.
- Insert the wire dividers to match the width of your cans.
- Tighten any loose joints with zip ties for extra stability.
- Load the cans from the back so the oldest items are in front.
- Label the front of each row with the name of the food.
8 Vertical Tray Dividers
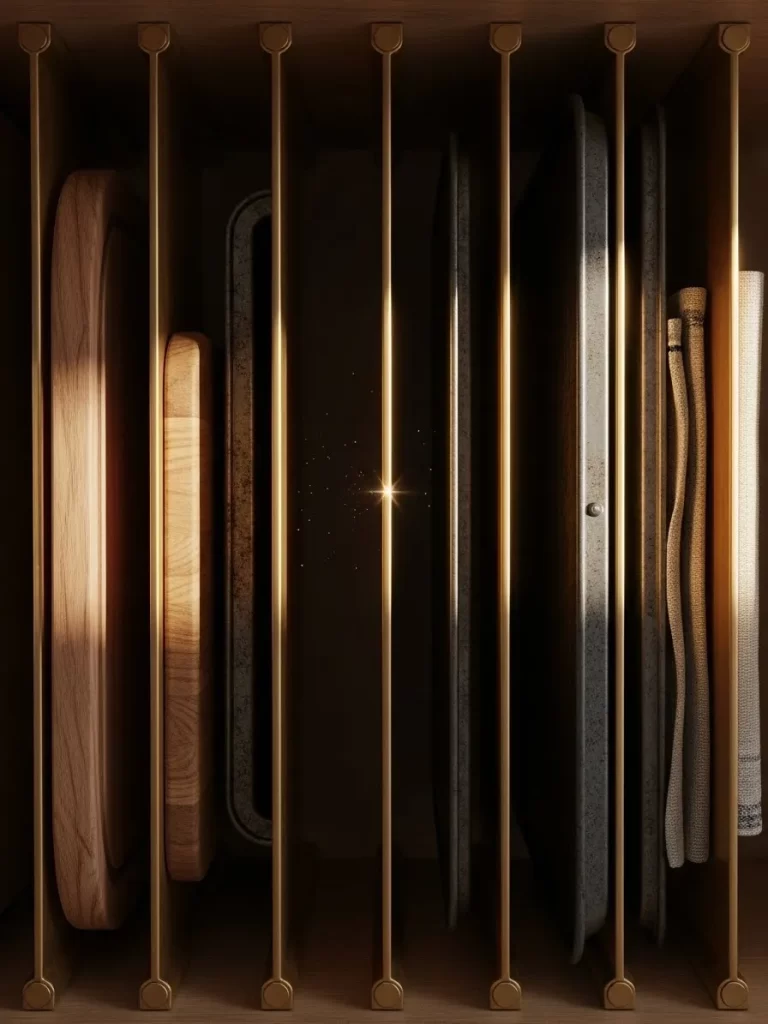
Stacking baking sheets and cutting boards creates a loud mess whenever you need the bottom one. Vertical dividers allow you to store these flat items upright. You can slide out a single cookie sheet without disturbing the rest of the pile.
Gold or brass finishes add a luxurious feel to your internal cabinetry. Deep slots accommodate various sizes of boards and heavy pans. Your kitchen will feel much more professional with this simple hardware upgrade.
Organizing by height makes it easy to find specific tools. You will no longer hear the clatter of falling metal in your kitchen. This arrangement protects your expensive pans from getting scratched.
Material Required List
- Metal vertical divider inserts
- Small wood screws
- Non slip matting
- Polishing cloth
Equipment Required List
- Power screwdriver
- Pencil
- Ruler
- Hand vacuum
DIY Instructions Step by Step
- Clear the cabinet and vacuum out any crumbs or debris.
- Lay down a piece of non slip matting to protect the wood.
- Arrange the dividers with enough space for thick cutting boards.
- Mark the placement of the base holes with your pencil.
- Screw the dividers into the bottom of the cabinet shelf.
- Polish the metal rails with a cloth to make them shine.
- Slide your trays and boards into the slots starting with the tallest.
9 Under Shelf Wire Basket
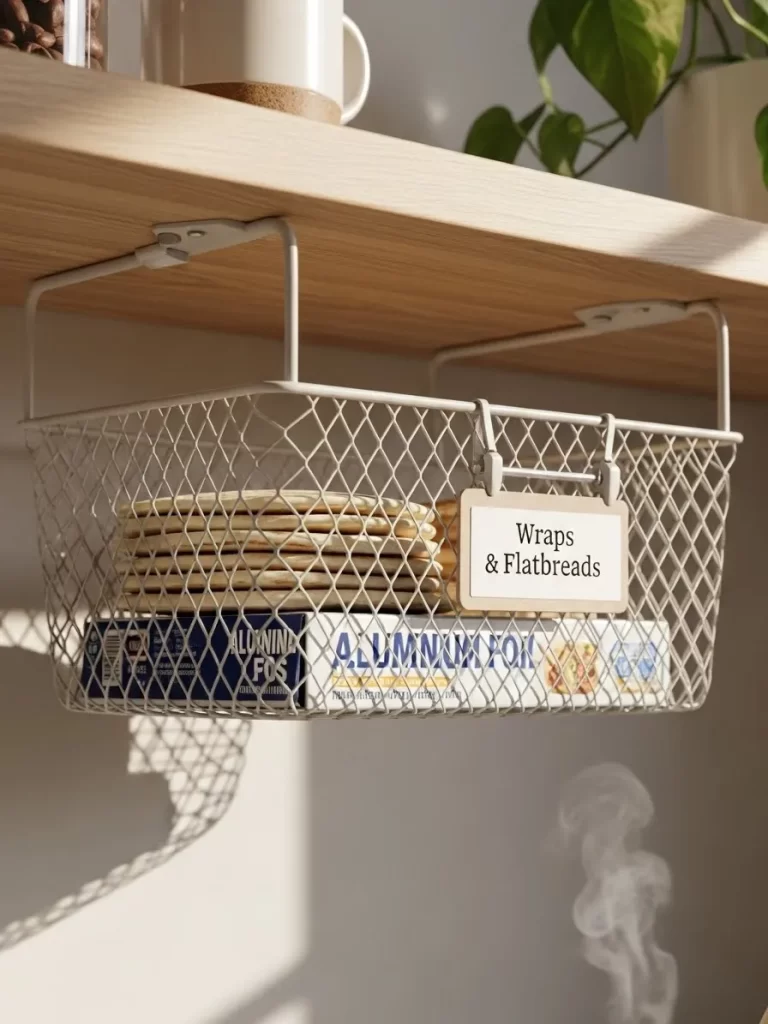
Empty space beneath your shelves is often overlooked. An under shelf basket slides onto your existing rack to provide extra room for light items. It is a great place to keep wraps or flatbreads within easy reach.
White wire matches most pantry interiors for a clean appearance. Adding a small clip on label identifies exactly what lives inside the basket. You gain valuable storage without needing to drill any holes or use glue.
Lightweight snacks or boxes of aluminum foil fit here perfectly. You can remove the basket at any time to clean the shelf below. This versatile solution works in almost any kitchen or pantry setup.
Material Required List
- Under shelf wire basket
- Clip on label holder
- White cardstock
- Protective tape
Equipment Required List
- Scissors
- Pen
- Ruler
- Cleaning rag
DIY Instructions Step by Step
- Wipe down the underside of your pantry shelf with a rag.
- Apply small pieces of protective tape to the basket arms.
- Slide the basket arms onto the shelf until they are snug.
- Ensure the basket is level and does not hit the items below.
- Write the contents on a small piece of white cardstock.
- Clip the label holder onto the front wire of the basket.
- Fill the basket with light items like wraps or napkins.
10 Door Mounted Spice Organizer
Door organizers utilize the most underused real estate in your kitchen. These chrome baskets hold a variety of oil bottles and vinegar jars securely. You clear up your main shelves for larger boxes and appliances.
Slim rails prevent tall bottles from tipping over when you open the door. Seeing your entire collection at once helps you stay inspired while you cook. It creates a boutique feel that makes your pantry look incredibly organized.
Sturdy mounting hardware ensures the rack stays in place. You will find that cooking becomes much more efficient with spices at eye level. This upgrade adds significant value to a small kitchen space.
Material Required List
- Door mounting rail system
- Multiple wire baskets
- Heavy duty screws
- Leveling shims
Equipment Required List
- Power drill
- Spirit level
- Pencil
- Screwdriver bit
DIY Instructions Step by Step
- Hold the vertical rails against the back of the pantry door.
- Use a spirit level to make sure the rails are straight.
- Mark the mounting holes on the door with your pencil.
- Drill shallow pilot holes without going through the door front.
- Attach the rails firmly using the heavy duty screws provided.
- Hook the wire baskets onto the rails at your preferred heights.
- Place your heaviest bottles in the bottom baskets for better balance.
11 Dedicated Smoothie Station Bins
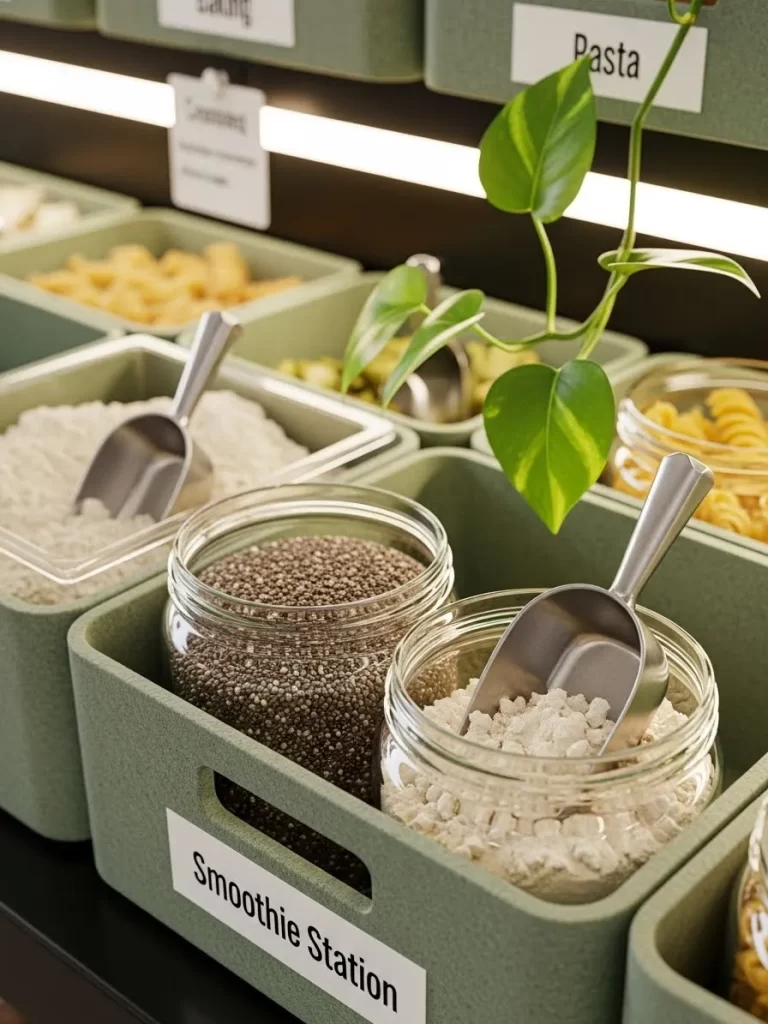
Creating a specific zone for your morning routine saves valuable time during the early rush. These matte green bins keep all your superfood powders and seeds in one tidy spot. You will find that having everything ready to grab makes healthy choices much easier to maintain.
Small metal scoops inside each jar prevent a mess on your counter. Using clear glass containers inside the bin lets you see when supplies are low. This setup turns a cluttered shelf into a functional wellness center that looks great too.
Labels on the front help you identify different ingredients like chia seeds or protein powder instantly. Fresh greenery nearby adds a pleasant and organic touch to the area. Every morning will feel more organized with this setup.
Material Required List
- Large matte green plastic bins
- Glass jars with airtight lids
- Small metal measuring scoops
- White adhesive labels
- Small potted plant
Equipment Required List
- Mild dish soap
- Soft sponge
- Microfiber cloth
- Permanent marker
DIY Instructions Step by Step
- Clear a dedicated shelf in your pantry for the smoothie station.
- Wash the green bins and glass jars with warm soapy water.
- Dry every item completely using a microfiber cloth to avoid moisture.
- Fill the glass jars with your favorite smoothie ingredients.
- Place one metal scoop inside each jar for easy portioning.
- Write the name of the ingredient on a label and stick it to the bin front.
- Arrange the jars inside the green bins and place a plant nearby.
12 Motion Activated Pantry Lighting
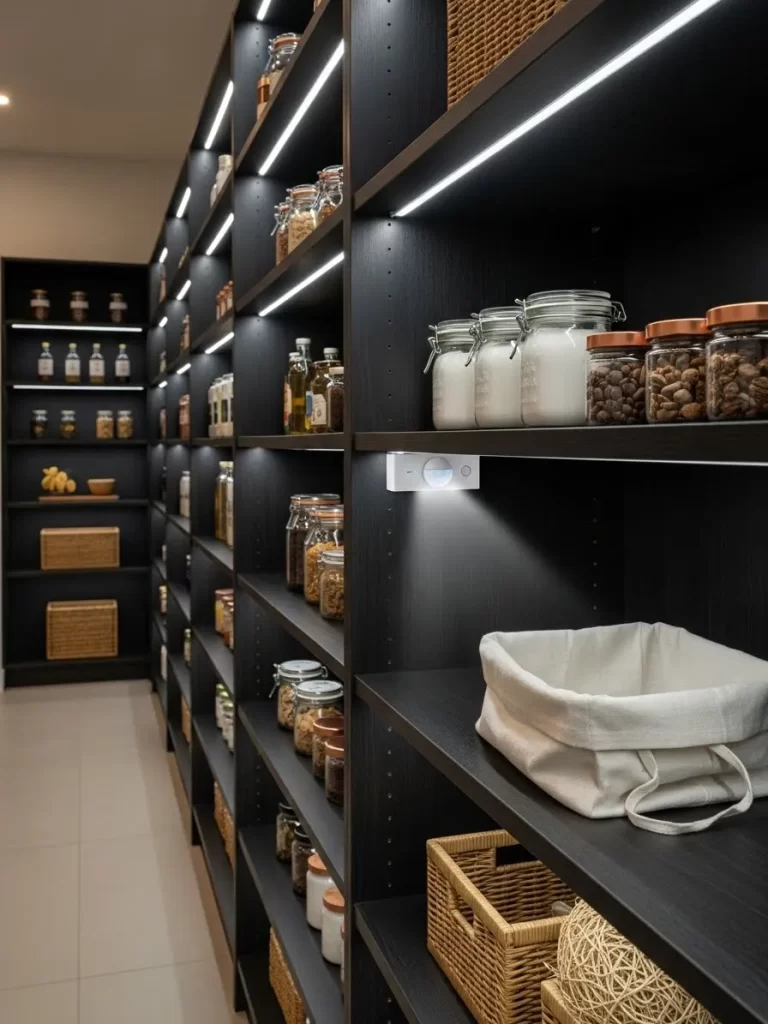
Dark corners often hide expired food and duplicate purchases. Installing slim light strips ensures every shelf remains visible as soon as you open the door. These bright LEDs illuminate even the deepest parts of your storage space without flicking a switch.
Energy efficient sensors turn the power on only when they detect movement. You can finally see the labels on the very top shelf without using a flashlight. This simple addition makes your kitchen feel modern and much more expensive.
Better visibility helps you keep your inventory accurate and your shelves much cleaner. No more rummaging through the shadows for a single jar of honey. You will enjoy the instant brightness every time you reach for a snack.
Material Required List
- Battery powered LED light strips
- Motion sensor unit
- Adhesive mounting tape
- Fresh batteries
Equipment Required List
- Rubbing alcohol
- Paper towels
- Measuring tape
- Small screwdriver
DIY Instructions Step by Step
- Measure the length of each shelf to determine where the lights should go.
- Wipe the underside of the shelves with rubbing alcohol to remove dust.
- Let the surface dry for a few minutes so the tape sticks well.
- Peel the backing off the adhesive tape on the back of the LED strips.
- Press the light strips firmly onto the underside of each pantry shelf.
- Insert the batteries into the motion sensor unit and the light controllers.
- Mount the motion sensor near the door frame where it can see you enter.
13 Taco Night Meal Kit Crate
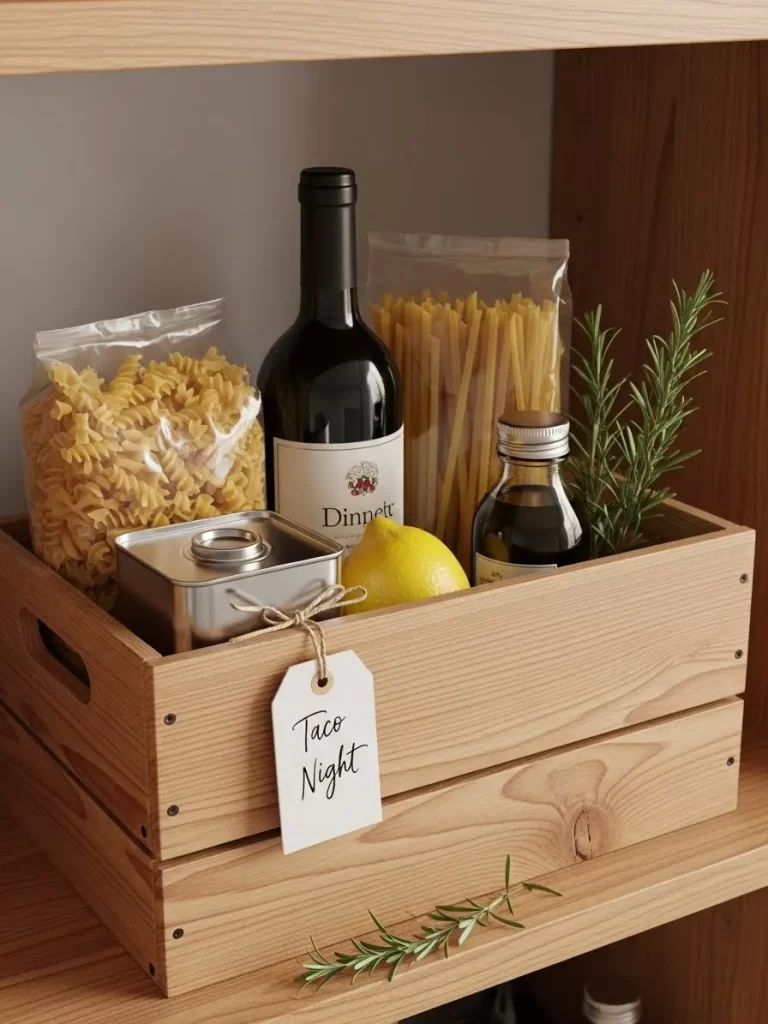
Preparing for family dinner becomes effortless with themed meal crates. This wooden box holds your pasta, oil, and seasonings together for a specific menu. You can just grab the whole kit and start cooking without searching through multiple shelves.
Decorative tags help you identify the purpose of each container quickly. Natural wood adds a rustic charm to your pantry interior and looks very tidy. This method is a fantastic way to plan your weekly meals.
It prevents small sauce bottles from getting lost behind larger cereal boxes. Keeping everything for one recipe in a single crate saves minutes during the evening rush. Your family will appreciate the structured approach to dinner time.
Material Required List
- Wooden storage crate with handles
- Cardstock gift tag
- Natural twine
- Small metal tin for spices
Equipment Required List
- Sandpaper
- Scissors
- Calligraphy pen
- Hole punch
DIY Instructions Step by Step
- Sand any rough edges on the wooden crate to prevent splinters.
- Group all ingredients for a specific meal like tacos or pasta night.
- Place the larger bottles and bags at the back of the crate.
- Put smaller spice tins and fresh produce in the front section.
- Write the name of the meal on a cardstock tag clearly.
- Punch a hole in the tag and thread a piece of twine through it.
- Tie the tag to the handle of the crate and place it on your shelf.
14 Rolling Bulk Storage Bin
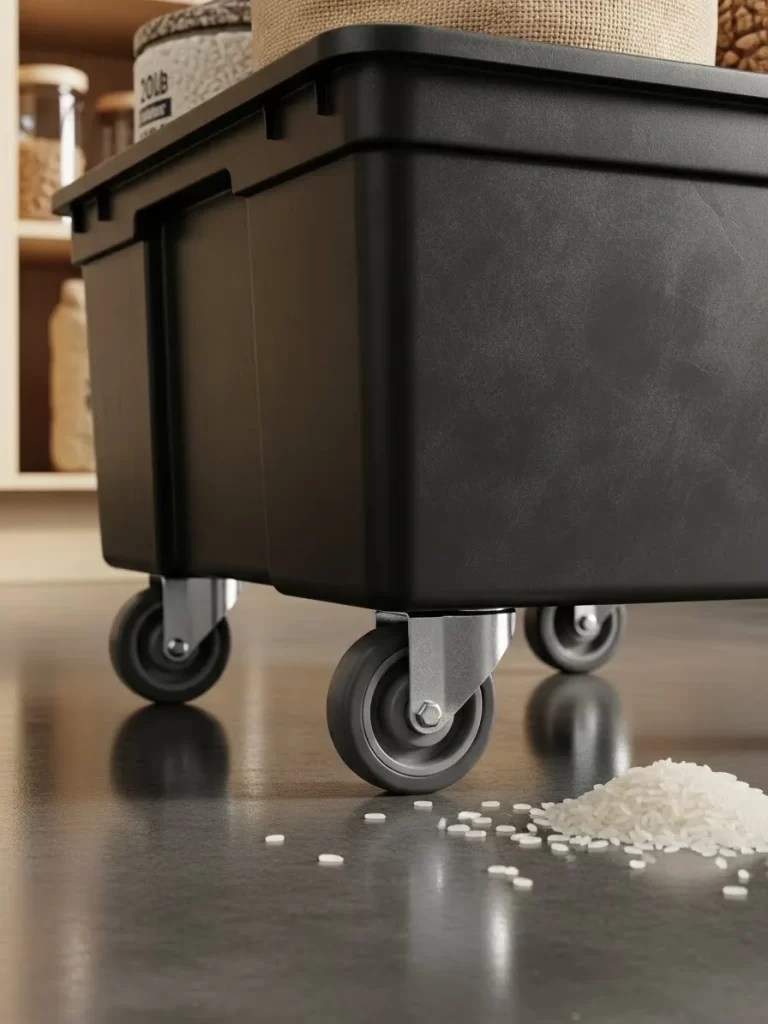
Moving heavy bags of rice or flour is often hard on your back. A sturdy black bin on casters allows you to glide bulk supplies across the floor with ease. This solution is excellent for bottom shelves or floor spaces.
Wheels make cleaning under your storage area a quick and simple task. The large capacity holds enough grain or pet food for many months of cooking. You will love how much more accessible your heaviest pantry items become.
The dark color hides scuffs and maintains a clean look over time. Sturdy construction ensures the bin can handle significant weight without cracking. This mobile unit adds a layer of industrial efficiency to your home kitchen.
Material Required List
- Large heavy duty plastic bin
- Set of four swivel caster wheels
- Industrial strength adhesive or bolts
- Burlap sack for lining
Equipment Required List
- Power drill
- Measuring ruler
- Marker
- Wrench set
DIY Instructions Step by Step
- Turn the empty plastic bin upside down on a flat surface.
- Mark four spots near the corners of the base for the wheels.
- Drill holes through the plastic if you are using bolts for mounting.
- Secure the caster wheels tightly to the bottom of the bin.
- Flip the bin back over and test that it rolls smoothly on your floor.
- Place a burlap sack inside to hold loose bags of rice or flour.
- Push the bin into the gap under your lowest pantry shelf.
15 Labeled Overstock Grain Shelf
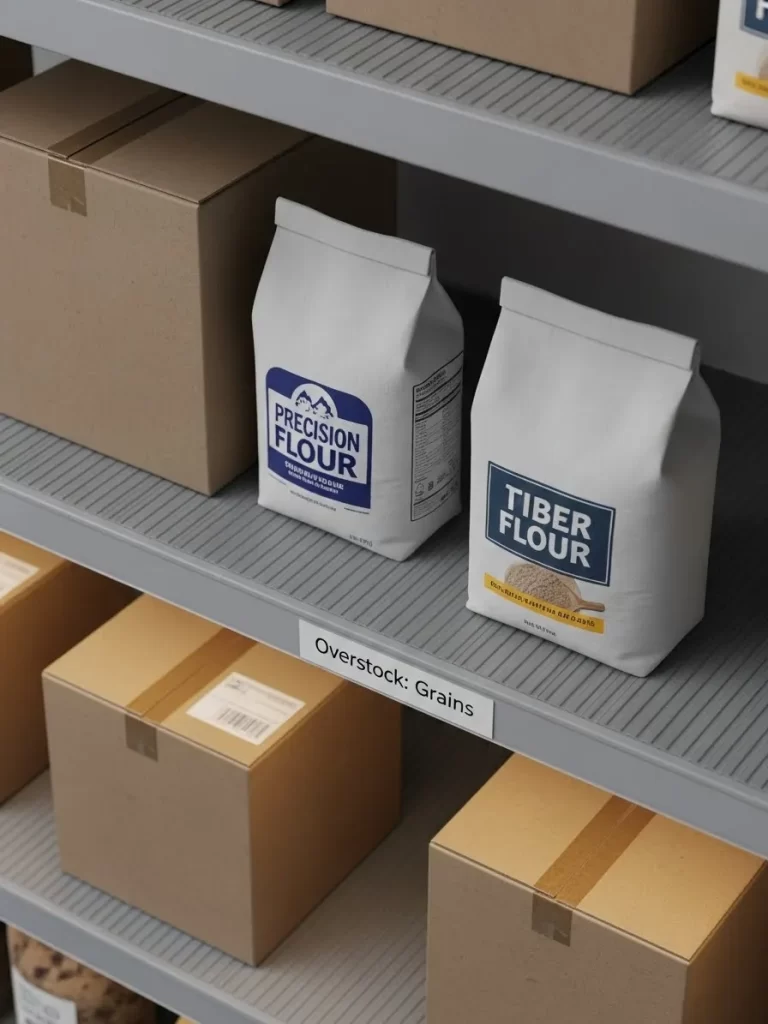
Keeping extra supplies in a separate zone prevents your main shelves from becoming overcrowded. These gray racks provide a stable home for backup bags of flour and grain. Clearly marked labels on the shelf edge tell you exactly what is waiting.
Organizing by category ensures you never buy a third bag of sugar by mistake. Flat surfaces make it easy to slide boxes in and out without any snagging. This strategy keeps your daily use area clean and manageable.
You will feel much more prepared for large baking projects or unexpected guests. Modern labeling looks professional and keeps the whole family on the same page. Every bag of flour has a designated spot for long term storage.
Material Required List
- Industrial style gray shelving
- Large cardboard boxes for bulk items
- Magnetic label holders
- White paper inserts
Equipment Required List
- Level tool
- Rubber mallet
- Label printer
- Box cutter
DIY Instructions Step by Step
- Assemble your shelving unit according to the manufacturer guide.
- Use a level to ensure the shelves are straight so items do not slide.
- Sort your extra groceries into categories like grains or canned goods.
- Place the heaviest boxes on the bottom shelf for better stability.
- Write the word Overstock followed by the category on your paper inserts.
- Slide the labels into the holders and attach them to the shelf front.
- Stack your extra bags of flour and rice neatly behind the labels.
16 Wall Mounted Digital Inventory Tablet
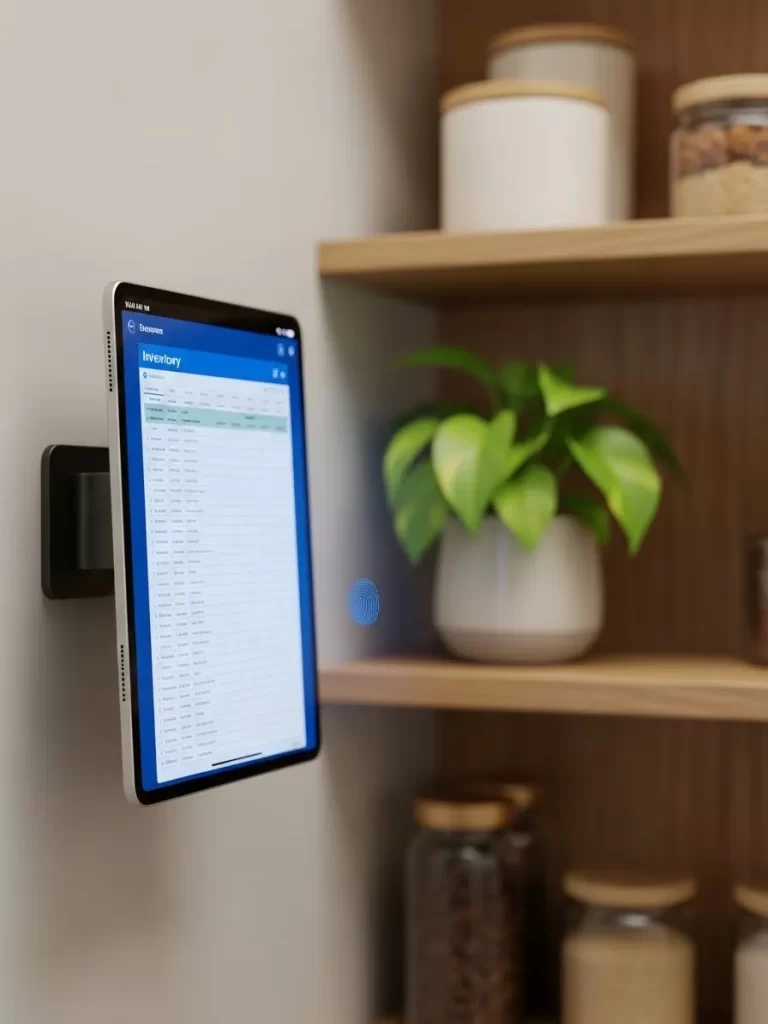
Technology brings your kitchen organization into the modern age with style. Mounting a slim tablet on the wall allows you to track your groceries in real time. You can view your shopping list or check expiration dates with a tap.
Having a digital hub keeps paper clutter away from your food storage area. This system links directly to your phone for easy updates while you are at the store. Managing a large household becomes a much simpler process.
It also works as a great place to view digital recipes while you prep meals. The sleek mount keeps the device safe from spills and countertop mess. Your kitchen will feel like a high tech command center for healthy living.
Material Required List
- Tablet computer
- Wall mount bracket
- Long charging cable
- Cable clips
Equipment Required List
- Power drill
- Level
- Screwdriver
- Pencil
DIY Instructions Step by Step
- Choose a spot on the wall at eye level near your pantry entrance.
- Hold the mounting bracket against the wall and check it with a level.
- Mark the screw holes with a pencil and drill into the wall.
- Fasten the bracket securely using the provided screws and anchors.
- Snap your tablet into the mount and ensure it is held firmly.
- Run the charging cable along the wall using clips to keep it tidy.
- Install an inventory app and start logging your pantry items.
17 Healthy Snack Sorting Bins
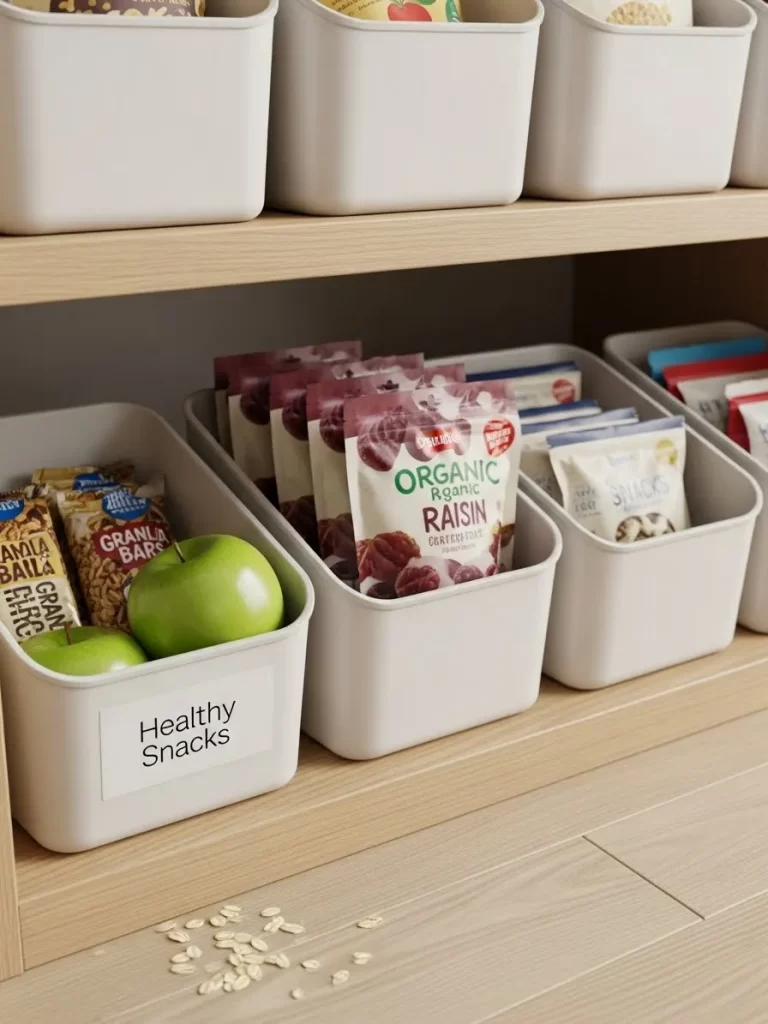
Quick bites often end up in a jumble that makes finding a snack frustrating. These clean white bins separate your granola bars from your fruit for better visibility. Kids can easily reach their favorite treats without digging.
Plain text labels provide a clear guide for everyone in the house to follow. The low front design lets you see the contents at a glance from across the room. You will find that keeping snacks organized leads to less waste.
Everything stays fresh and easy to find during a busy afternoon. Stacking these bins can save even more shelf space if needed. Your healthy lifestyle becomes easier to maintain when the right choices are front and center.
Material Required List
- Set of white plastic storage bins
- Printed adhesive labels
- Fresh fruit
- Individually wrapped snacks
Equipment Required List
- Cleaning wipes
- Ruler
- Scissors
- Dry erase marker
DIY Instructions Step by Step
- Empty your current snack shelf and wipe it down with a cloth.
- Sort your snacks into groups such as bars or fruit and nuts.
- Place the white bins in a row along the pantry shelf.
- Stick a label that says Healthy Snacks on the front of the first bin.
- Fill the bins with your sorted items making sure the labels face out.
- Put items with the shortest shelf life at the very front.
- Teach your family members to return items to the correct bin.
18 Baking Station Drawer
Pull out drawers offer a top down view of your most used baking ingredients. Large glass jars keep your flour and sugar fresh and free from clumps. You can fit your rolling pin and measuring spoons right next to the containers.
Metal latches on the jars ensure an airtight seal every time you close them. This arrangement makes baking a much faster and cleaner experience for any cook. You will appreciate having all your supplies in one spot.
It turns a deep cabinet into a highly functional workspace. Seeing your flour levels from above helps you plan for the next batch of cookies. Your baking projects will feel more organized and far less stressful.
Material Required List
- Large glass flip top jars
- Wooden rolling pin
- Set of stainless steel measuring spoons
- Non slip drawer liner
Equipment Required List
- Measuring tape
- Scissors
- Hand vacuum
- Damp cloth
DIY Instructions Step by Step
- Measure the inside of your deep drawer to buy the right size jars.
- Clear out the drawer and use a vacuum to remove any old debris.
- Cut the non slip liner to fit the bottom of the drawer exactly.
- Wash and dry the glass jars thoroughly before you fill them.
- Pour your baking staples into the jars and snap the lids shut.
- Place the jars in the back of the drawer to keep the weight balanced.
- Lay your rolling pin and measuring tools in the front for access.
19 Glowing Priority Bin
Visual cues help you remember to use ingredients before they go bad. This clear bin features a glowing label that highlights items needing immediate attention. It serves as a constant reminder for your family to check here.
Transparency allows you to identify contents without moving the container at all. The sleek design fits seamlessly onto any standard pantry shelf in your kitchen. You will save a significant amount of money by reducing food waste.
This bin makes inventory rotation an automatic part of your daily routine. Seeing the bright text helps you prioritize ingredients for dinner tonight. Your kitchen management skills will improve with this simple but effective light up tool.
Material Required List
- Clear acrylic bin with handles
- Battery operated LED label
- Small canned goods
- Open snack bags
Equipment Required List
- Glass cleaner
- Lint free cloth
- Small screwdriver
- Fresh batteries
DIY Instructions Step by Step
- Clean the acrylic bin with glass cleaner until it is sparkling.
- Install the batteries into the LED label unit carefully.
- Peel the backing off the label and press it onto the front.
- Search your pantry for items that will expire within the week.
- Place these items inside the bin so they are clearly visible.
- Turn on the light feature to draw attention to the priority food.
- Position the bin at eye level so it is the first thing people see.
20 Hanging Onion Mesh Bags
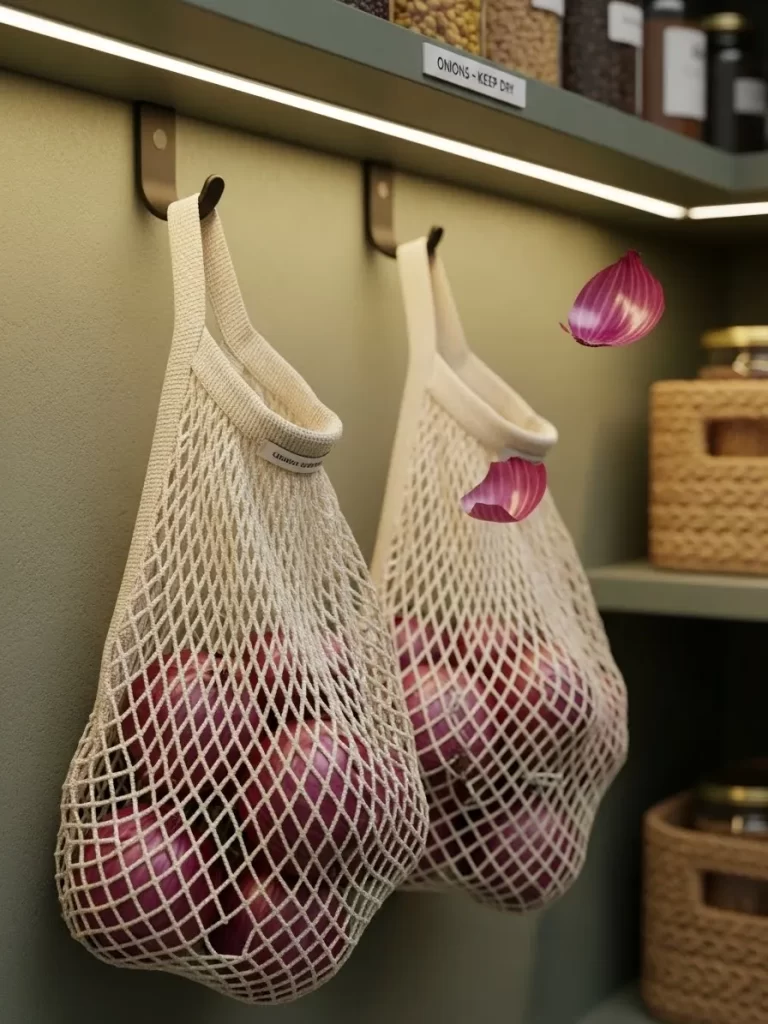
Onions stay fresh much longer when they have plenty of room to breathe. These woven mesh bags hang from simple hooks to provide maximum air circulation. You save valuable shelf space by moving your produce to the walls.
Natural materials give your kitchen a cozy and organic feeling that is very inviting. The open weave makes it easy to see how many onions remain. This storage method is a smart way to utilize vertical space.
It prevents onions from rolling around and making a mess on your shelves. Keeping your root vegetables elevated keeps them away from pests and moisture. Your pantry will look more curated and feel much more spacious with this solution.
Material Required List
- Cotton mesh produce bags
- Heavy duty wall hooks
- Wall anchors
- Large onions
Equipment Required List
- Power drill
- Hammer
- Pencil
- Measuring tape
DIY Instructions Step by Step
- Find an empty wall space in your pantry that stays cool.
- Mark the height for your hooks using a pencil and tape.
- Drill a hole for the wall anchor and tap it in with a hammer.
- Screw the hook into the anchor until it is flush with the wall.
- Place your onions inside the cotton mesh bags gently.
- Loop the handle of the bag over the hook and let it hang.
- Check the bags once a week to remove any softening produce.
21 Coffee Station and Mug Collection
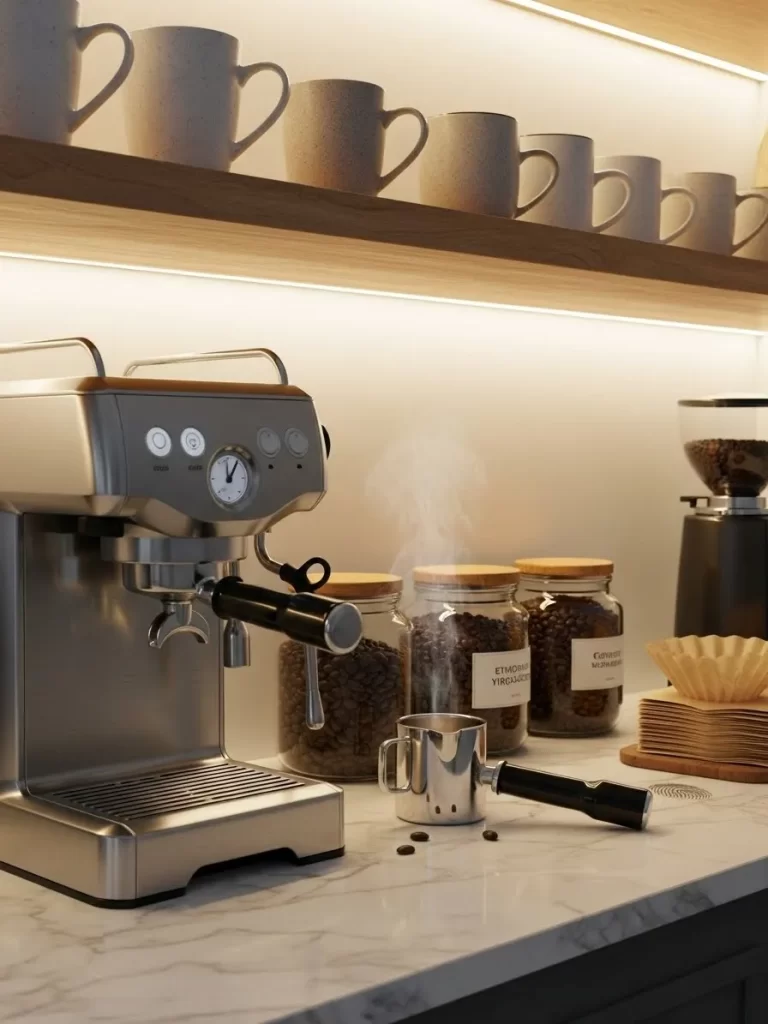
Morning routines feel much smoother when your caffeine fix is easy to find. This setup keeps your espresso machine and mugs in a single designated zone. You will enjoy the ease of grabbing a warm cup without searching.
Clear glass jars store your beans while keeping them visible for quick inventory checks. Using a marble countertop adds a clean and sophisticated feel to the kitchen. Your space stays tidy because everything has a fixed home.
Having your favorite mugs lined up on a shelf makes the area feel like a cozy cafe. You can prep your drink quickly while the rest of the house is still asleep. This station turns a functional corner into a beautiful focal point.
Material Required List
- Espresso machine
- Ceramic mugs
- Glass jars with wood lids
- Marble counter protector
Equipment Required List
- Level tool
- Cleaning spray
- Soft cloth
- Measuring tape
DIY Instructions Step by Step
- Measure your counter space to ensure the machine fits comfortably.
- Clean the surface with a marble safe spray and a cloth.
- Place your espresso machine on the left side of the station.
- Arrange your mugs in a neat row on the shelf above.
- Fill the glass jars with different coffee bean varieties.
- Set the portafilter and milk pitcher next to the machine.
- Plug in the unit and organize the power cord out of sight.
22 Sage Green Bread Box
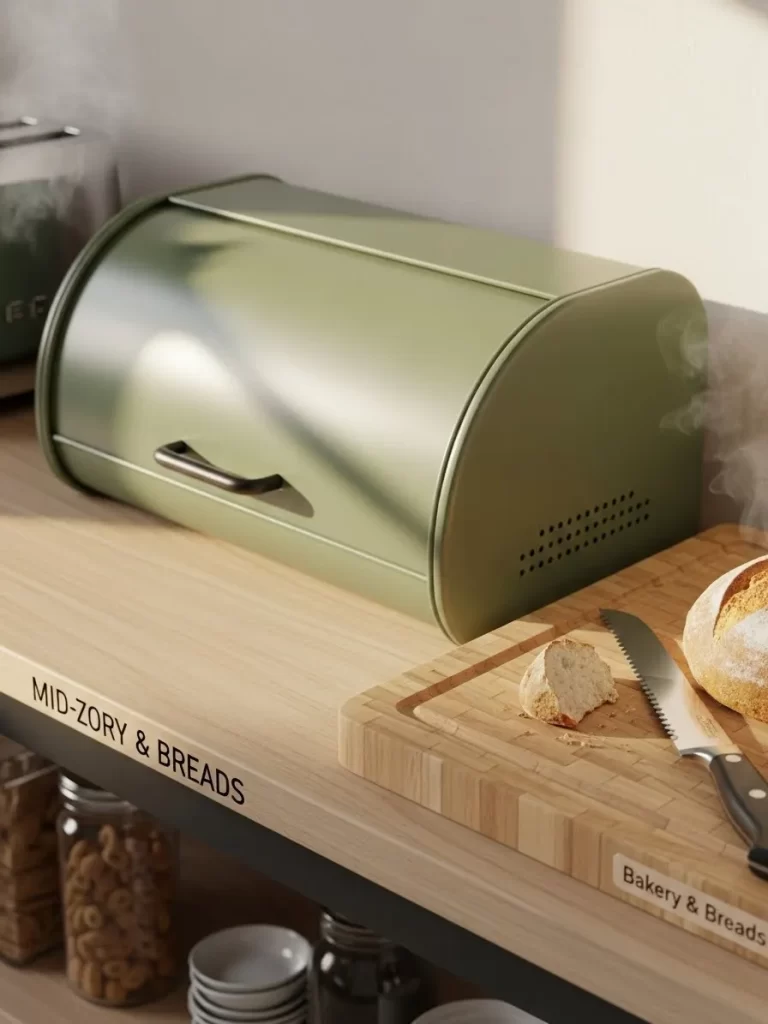
Keeping your loaves fresh involves protecting them from air and light. A metal bread box offers a classic solution that looks beautiful on any counter. The sage green finish brings a soft pop of color to a neutral room.
Matching your storage to your cutting board creates a cohesive design. Air vents in the back ensure the bread stays at the right moisture level. You will find that your kitchen feels much more organized when bags are hidden.
This container prevents crumbs from spreading across your workspace. Natural wood accents on the surrounding tools complement the green color beautifully. Your morning toast routine will feel more elegant with such a stylish storage piece.
Material Required List
- Metal bread box
- Wooden cutting board
- Bread knife
- Fresh loaves
Equipment Required List
- Damp sponge
- Dish towel
- Cutting board oil
DIY Instructions Step by Step
- Wipe down the interior of the metal box with a damp sponge.
- Dry the box completely so no moisture remains inside.
- Apply food safe oil to your wooden cutting board once a month.
- Place the cutting board next to the bread box for convenience.
- Set the bread knife on the board or in a nearby drawer.
- Slide your unwrapped bread into the container and close the lid.
- Position the setup away from the heat of the stove.
23 Specialty Vinegar and Oil Display
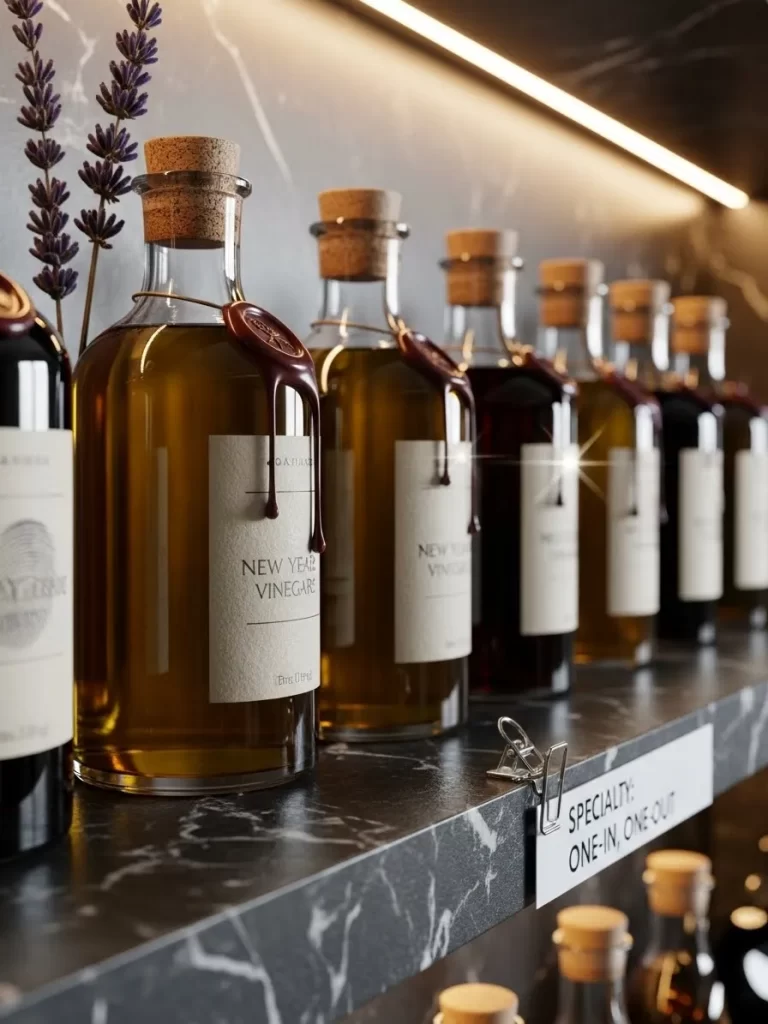
Artisan liquids deserve a display that reflects their high quality. These glass bottles feature wax seals that add an old world charm to your pantry. You can easily distinguish between your balsamic and olive oils with labels.
Using a one in one out system keeps your stock fresh and manageable. Dark shelves highlight the rich colors of the liquids inside the bottles. This arrangement makes your pantry look like a professional tasting room.
Keeping these bottles in a row prevents them from getting sticky and cluttered. The wax seals protect the corks and add a hand crafted feel to your kitchen. You will enjoy using these beautiful ingredients every time you cook dinner.
Material Required List
- Glass bottles with corks
- Sealing wax
- Specialty labels
- Small metal clips
Equipment Required List
- Wax melting pot
- Heat source
- Cleaning brush
- Funnel
DIY Instructions Step by Step
- Transfer your specialty oils into clean glass bottles using a funnel.
- Melt the sealing wax in a small pot over low heat.
- Dip the top of the corked bottle into the wax once.
- Let the wax drip down the side for a decorative effect.
- Press a seal stamp into the wax before it hardens.
- Attach your labels to the front of each bottle at the same level.
- Place the bottles in a row on a sturdy eye level shelf.
24 Soft Lined Flat Storage Drawer
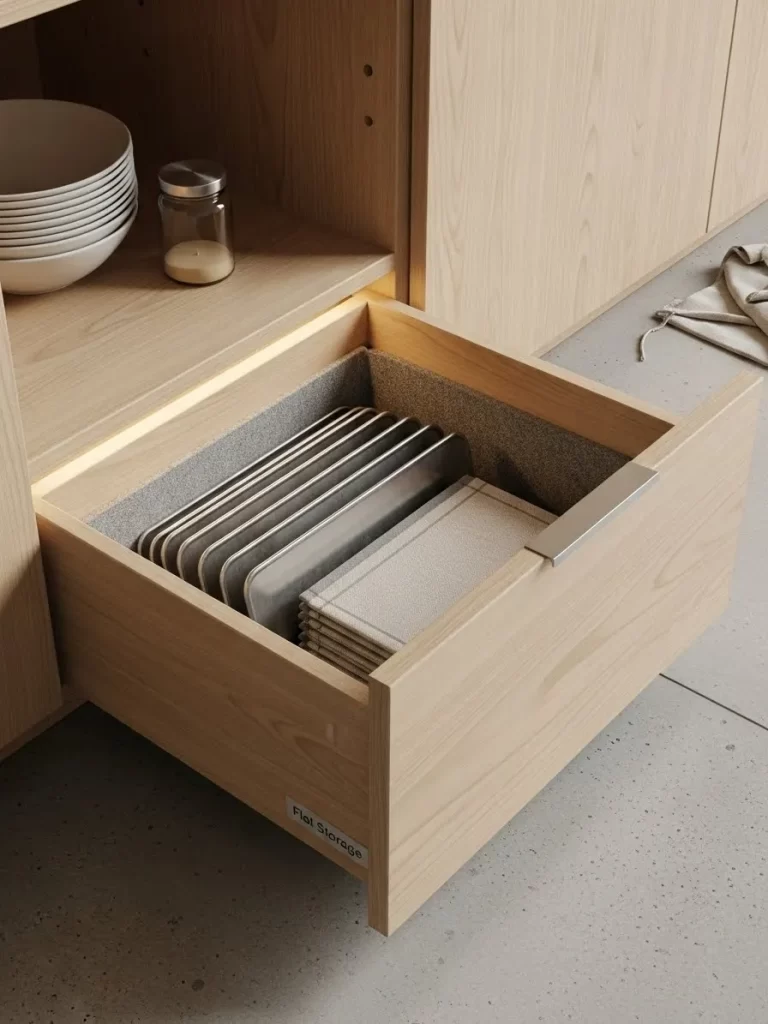
Deep drawers provide the best home for heavy plates and linens. Adding a felt or fabric liner prevents your dishes from sliding when you open it. This simple layer also protects the wood from scratches and heavy impact.
Storing items flat makes it easy to grab the bottom plate without a struggle. A dedicated spot for napkins keeps your dining essentials organized and clean. You will notice how much quieter your kitchen feels with soft surfaces.
Customizing the drawer interior ensures every piece of dishware fits securely. Neutral colors for the lining keep the aesthetic clean and modern. Your expensive ceramics will stay in excellent condition for many years with this protection.
Material Required List
- Adhesive felt liner
- Stack of ceramic plates
- Fabric napkins
- Drawer dividers
Equipment Required List
- Sharp scissors
- Measuring tape
- Cleaning cloth
- Pencil
DIY Instructions Step by Step
- Measure the bottom of your drawer with a tape measure.
- Cut the felt liner to fit the space exactly using scissors.
- Peel the backing off the felt and press it into the drawer floor.
- Smooth out any bubbles or folds with your hand firmly.
- Place your ceramic plates in a neat pile on the left side.
- Fold your fabric napkins into small squares and stack them.
- Slide the drawer slowly to check that nothing moves around.
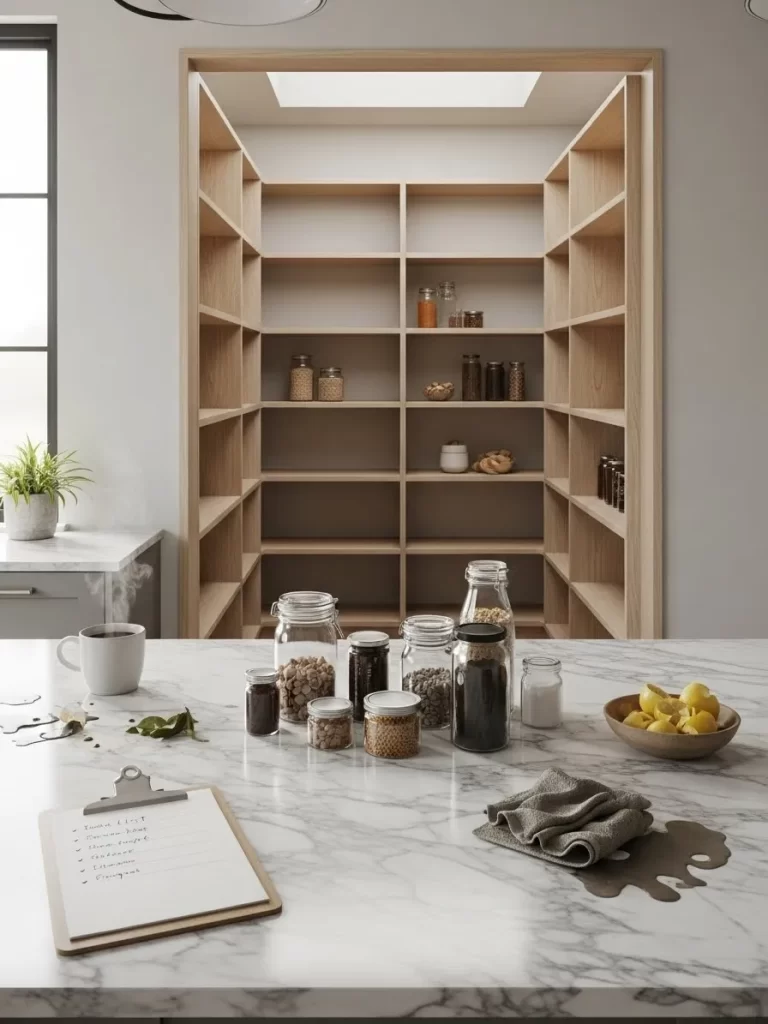
25 Master Pantry with Integrated Clock
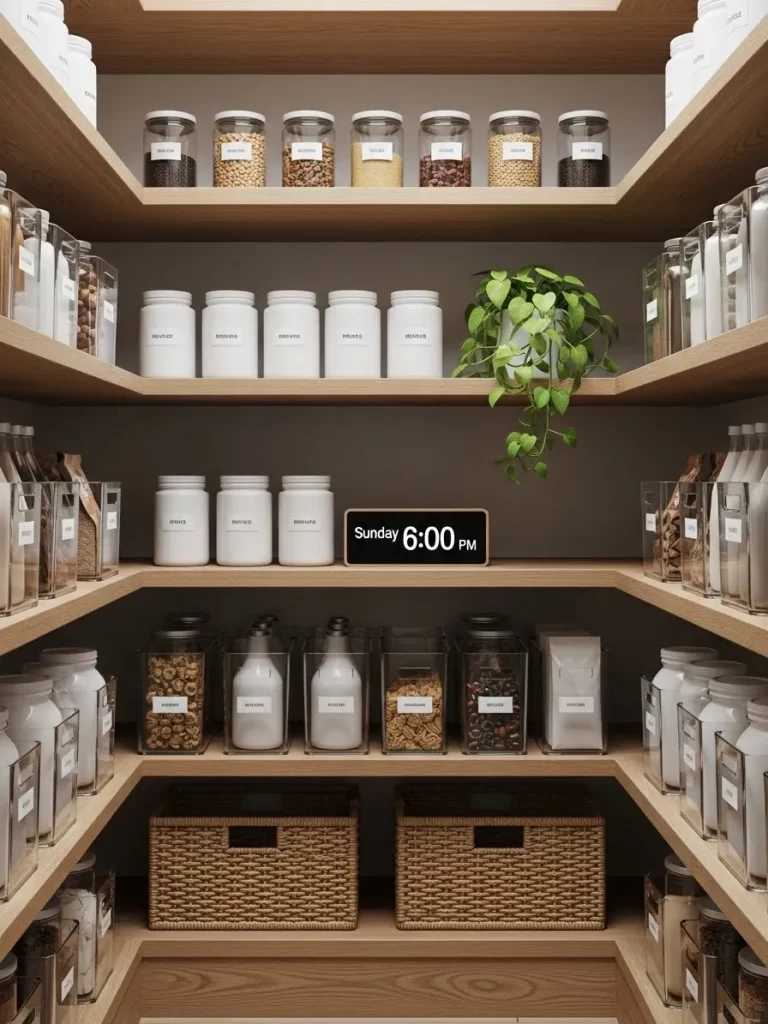
A large walk in pantry acts as the brain of your entire kitchen. Using open shelving allows you to see every ingredient at a single glance. Adding a digital clock helps you keep track of cooking times while you prep.
Incorporate a live plant to keep the air fresh and the space inviting. Woven baskets on the floor hold heavy items like bags of flour or pet food. Your inventory management becomes a breeze when every item has its own shelf.
Consistent labeling across all containers creates a unified and calm appearance. Having a central hub for food storage makes meal planning much simpler for you. Your kitchen efficiency will increase significantly with such a well designed walk in area.
Material Required List
- Floating wooden shelves
- Digital desk clock
- Potted ivy plant
- Large wicker baskets
Equipment Required List
- Power drill
- Wall anchors
- Spirit level
- Step stool
DIY Instructions Step by Step
- Install wooden floating shelves at equal heights along your walls.
- Verify that each shelf is level before you tighten the screws.
- Position your digital clock in the center for high visibility.
- Place a potted plant on a middle shelf to add some color.
- Store your smaller white jars in rows on the upper levels.
- Set the heavy wicker baskets on the bottom shelf for bulky goods.
- Organize your inventory by category like grains or snacks.
26 Custom Embossed Shelf Labels
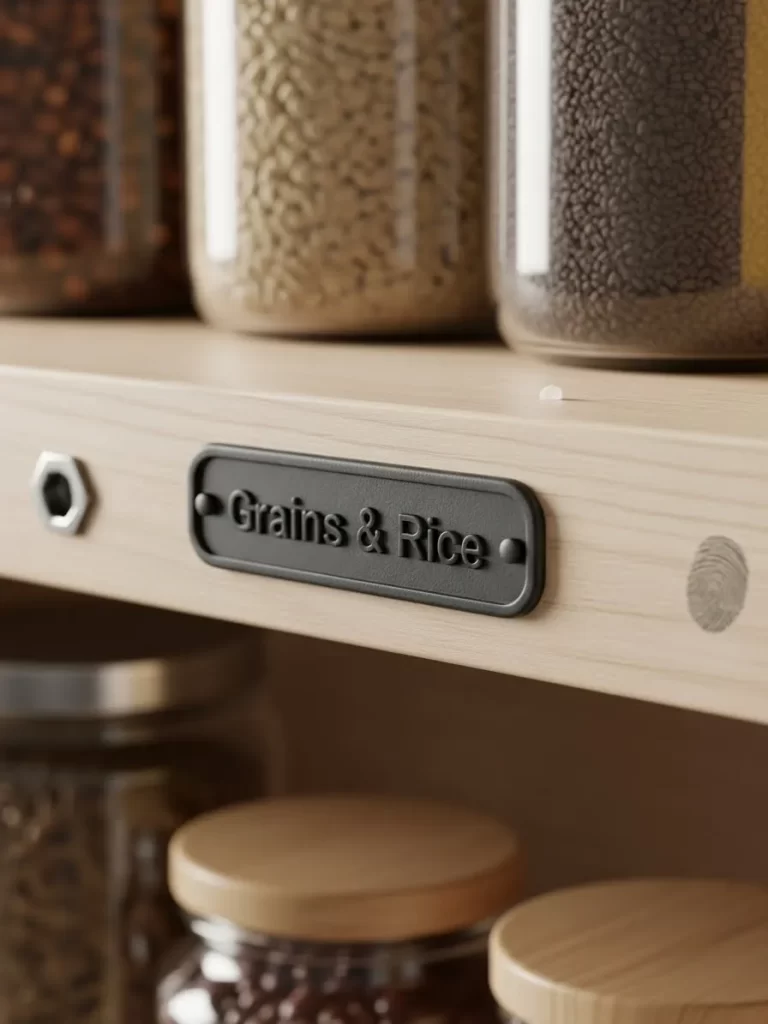
Clear identification is the secret to a long term organizational system. Metal labels attached to the shelf edge look sophisticated and permanent. These tags tell every visitor exactly where the rice or pasta belongs in the pantry.
Wood shelves provide a warm background for these dark industrial accents. Using screws to mount the labels ensures they never fall off or peel away. Your pantry will look like a high end boutique with this small detail.
Embossed letters are easy to read and add a tactile quality to your storage. You will never have to guess which jar contains which grain ever again. This small investment makes a huge difference in the overall tidiness of your home.
Material Required List
- Metal label plates
- Small mounting screws
- Wood shelf boards
- Glass storage jars
Equipment Required List
- Screwdriver
- Pencil for marking
- Ruler
- Drill with tiny bit
DIY Instructions Step by Step
- Choose the center point of each shelf for your new label.
- Hold the metal plate against the wood and mark the holes.
- Drill very shallow pilot holes so the wood does not crack.
- Fasten the label plate to the shelf using the small screws.
- Tighten the screws until the metal is flush with the surface.
- Fill your glass jars with the corresponding dry ingredients.
- Line up the jars behind the correct labels for a tidy finish.
27 Wide Aperture Pantry Entrance
Modern home design often features a large and open pantry space. A clean marble island provides a place to set groceries while you unload them. Looking into an organized space brings a sense of calm to your daily life.
Bright lighting is essential for finding items in deep corner cabinets. Keeping the counters clear of clutter makes the room feel much larger. You will enjoy your kitchen more when your storage looks this inviting and clean.
Tall shelves maximize the height of the room for seasonal items. Using white containers on the upper shelves keeps the space feeling light and airy. Every inch of this pantry is designed for both beauty and high functionality.
Material Required List
- Marble countertop island
- Tall wooden shelving units
- Glass jars with lids
- White ceramic bowls
Equipment Required List
- Floor mop
- Glass cleaner
- Dusting cloth
- Step ladder
DIY Instructions Step by Step
- Clean your marble island with a specific stone cleaner and cloth.
- Sweep the pantry floor to remove any dust or debris.
- Wipe down the empty shelves to prepare for new organization.
- Group your glass jars on the island to sort them by size.
- Place the most used items at eye level on the shelves.
- Put decorative ceramic bowls on the lower shelves for storage.
- Ensure the walkway is clear so you can move around easily.
28 Tiered Acrylic Can Stadium

Tinned goods stay visible when you stack them on different levels. An acrylic can rack allows you to see the labels of the back rows. This prevents you from buying duplicates of items you already have on hand.
The transparent material blends into any shelf color for a clean look. Sturdy plastic holds the weight of many metal cans without bending or cracking. You can sort your beans and soups into logical groups with ease.
A non slip mat underneath keeps the rack from sliding when you reach for a can. Organizing your canned goods by size helps maintain a sense of order. You will appreciate how much faster you can find ingredients for a quick soup.
Material Required List
- Tiered acrylic shelf organizer
- Rubber shelf mat
- Assorted food cans
- Small label holder
Equipment Required List
- Cleaning wipe
- Measuring tape
- Permanent marker
- Ruler
DIY Instructions Step by Step
- Measure the depth of your shelf to choose the right organizer.
- Place a rubber mat on the shelf to prevent the acrylic from sliding.
- Set the tiered rack on top of the mat and press it down.
- Clean each food can to remove any dust or sticky residue.
- Arranging the cans on the tiers with the labels facing forward.
- Place the tallest cans on the back row for better visibility.
- Attach a small label to the shelf edge for the category.
29 Dual Zone Inventory Divider
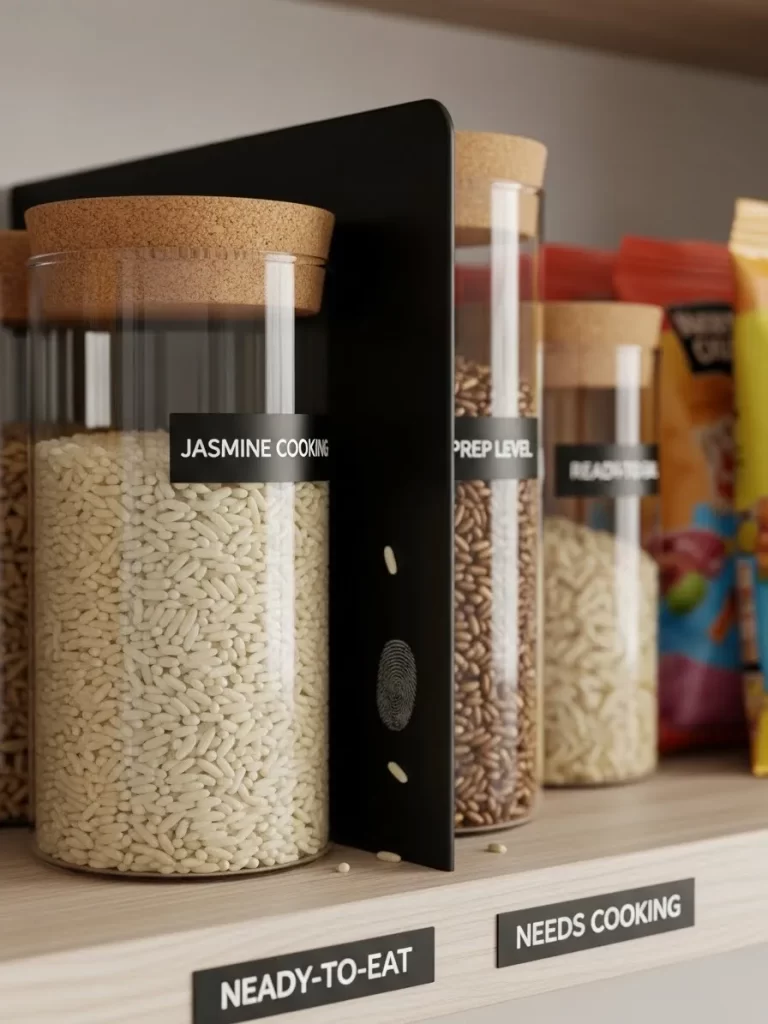
Sorting food based on preparation time is a clever kitchen hack. A simple black divider separates ready to eat snacks from items that need cooking. This system helps you make quick decisions when you are in a rush.
Cork lids on glass jars keep your grains and rice perfectly fresh. Using bold labels on the shelf makes the categories easy for kids to read. Your cooking process becomes much more efficient with this simple physical boundary.
Having a dedicated prep level ensures you always have ingredients ready for dinner. The sleek black divider adds a modern touch to your wooden pantry shelves. You will love how this simple change streamlines your grocery shopping and meal prep.
Material Required List
- Metal shelf divider
- Glass jars with cork tops
- Black adhesive labels
- White paint pen
Equipment Required List
- Measuring tape
- Glass cleaner
- Level tool
- Soft cloth
DIY Instructions Step by Step
- Mark the center of your pantry shelf with a small pencil dot.
- Slide the metal divider onto the shelf until it is secure.
- Clean your glass jars and fill them with rice or pasta.
- Write the names of the grains on the jar labels clearly.
- Place the ready to eat snacks on the left side of the divider.
- Put your cooking staples on the right side of the metal wall.
- Apply the category labels to the shelf front for extra clarity.
30 Categorized Seasoning Packet Bin
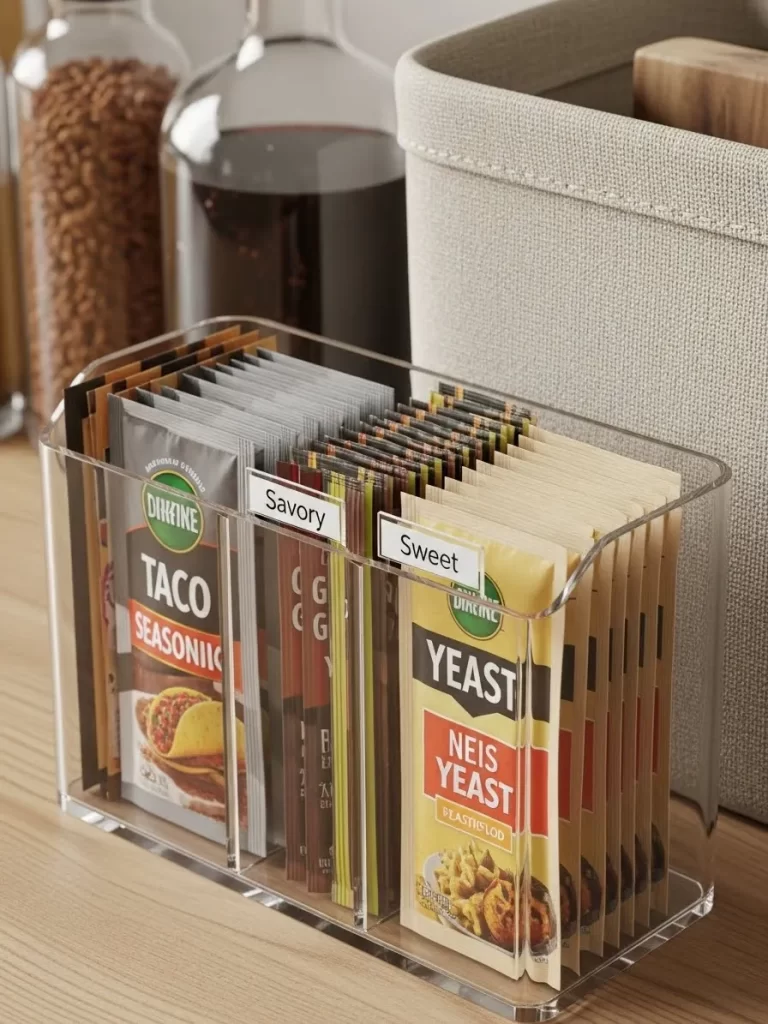
Small packets of taco seasoning or yeast often create a messy pile. A clear acrylic bin with dividers keeps these flat items standing upright. You can flip through your collection like a filing cabinet to find the right spice.
Separate labels for savory and sweet items prevent confusion during baking. The compact design fits into narrow gaps on your pantry shelves easily. You will save money by knowing exactly how many packets you have left.
Clear walls allow you to see the colorful packaging of each mix. Grouping them by flavor profile makes planning themed dinner nights a lot easier. This small organizer brings a surprising amount of order to a chaotic shelf.
Material Required List
- Acrylic bin with internal dividers
- Printed plastic labels
- Assorted spice packets
- Small fabric bin
Equipment Required List
- Cleaning spray
- Paper towel
- Scissors
- Tweezers
DIY Instructions Step by Step
- Wash the acrylic organizer and dry it with a paper towel.
- Sort your packets into savory items and baking supplies.
- Use tweezers to place small labels on the divider tabs.
- Slide the packets into the corresponding slots in the bin.
- Group similar flavors together so they are easy to find.
- Place the organizer on a shelf near your main cooking zone.
- Check the bin before your next grocery trip to restock.
31 Bamboo Tiered Mug Cupboard
Utilizing the space under your cans provides a unique spot for coffee mugs. A bamboo tiered organizer creates a beautiful and earthy home for your ceramic collection. You can keep your morning cups hidden but easily accessible behind a door.
Steam from a fresh cup of coffee adds a cozy atmosphere to this storage zone. Ribbed gray shelf liners protect the wood and keep the mugs from sliding. This arrangement is a smart way to squeeze more functionality into a small cabinet.
Organizing your mugs by color or size creates a visually pleasing display. The natural wood grain of the bamboo looks fantastic against neutral kitchen colors. You will enjoy the organized feel of your morning routine with this setup.
Material Required List
- Tiered bamboo mug rack
- Ribbed gray shelf liner
- Ceramic coffee mugs
- Small adhesive hooks
Equipment Required List
- Damp cloth
- Scissors
- Measuring tape
- Handheld vacuum
DIY Instructions Step by Step
- Empty the bottom section of your cabinet and vacuum any dust.
- Measure the shelf and cut the gray liner to fit perfectly.
- Place the liner down and smooth it out with a damp cloth.
- Set the bamboo tiered rack on top of the liner carefully.
- Arrange your mugs on the tiers starting with the largest in back.
- Ensure there is enough vertical clearance for the shelf above.
- Wipe down each mug before placing it in its new home.
32 Wall Mounted Utility Pegboard
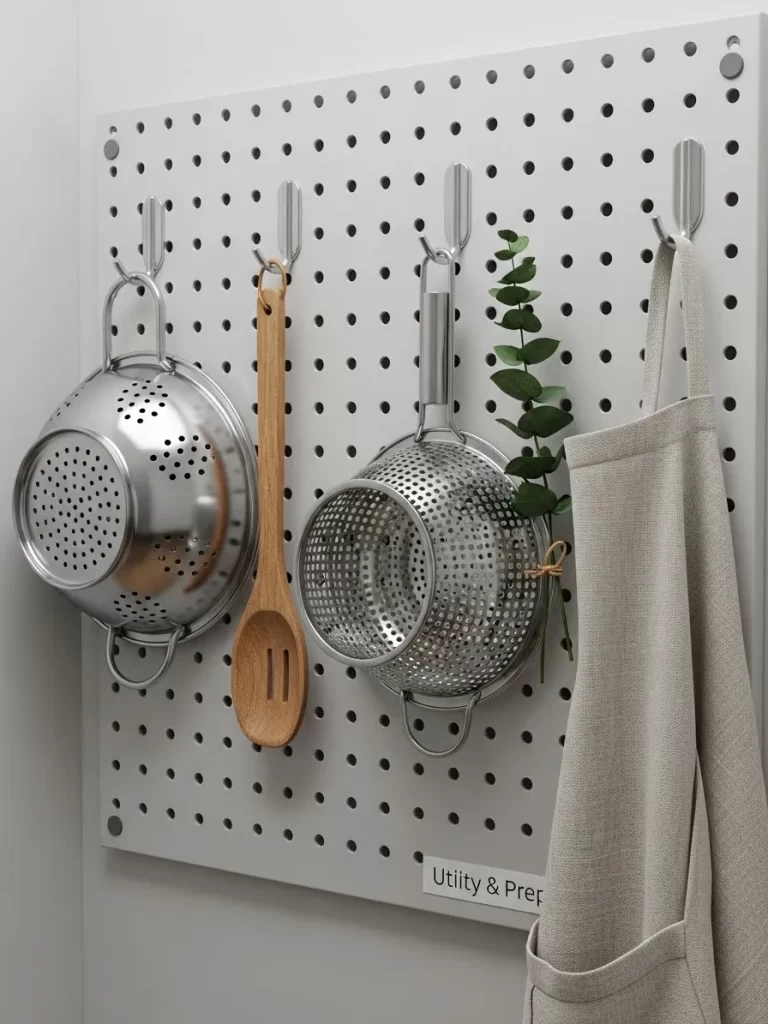
Moving your heavy colanders and aprons to the wall frees up deep drawer space. A white metal pegboard offers a versatile and adjustable storage solution for any kitchen corner. You can move the hooks around as your collection of tools grows.
Natural wood accents like spoons look great against the clean white board. Adding a small sprig of greenery makes this functional area feel like part of your decor. You will find that having your prep tools at eye level saves a lot of time.
Sturdy metal construction ensures the board can hold heavy stainless steel items. Each tool has its own designated hook for a very tidy appearance. Your kitchen will look like a professional workshop for delicious home cooked meals.
Material Required List
- Metal pegboard panels
- Assorted metal hooks
- Mounting hardware
- Fresh eucalyptus sprig
Equipment Required List
- Power drill
- Spirit level
- Screwdriver
- Pencil
DIY Instructions Step by Step
- Hold the pegboard against the wall and check it with a level.
- Mark the mounting holes on the wall using your pencil.
- Drill holes into the wall and insert the plastic anchors.
- Screw the board into the wall until it is firmly attached.
- Insert the metal hooks into the holes in a logical pattern.
- Hang your colanders and aprons on the hooks starting with heavy items.
- Add a small wooden spoon or plant for a decorative touch.
33 Seasonal Flour and Sugar Jars
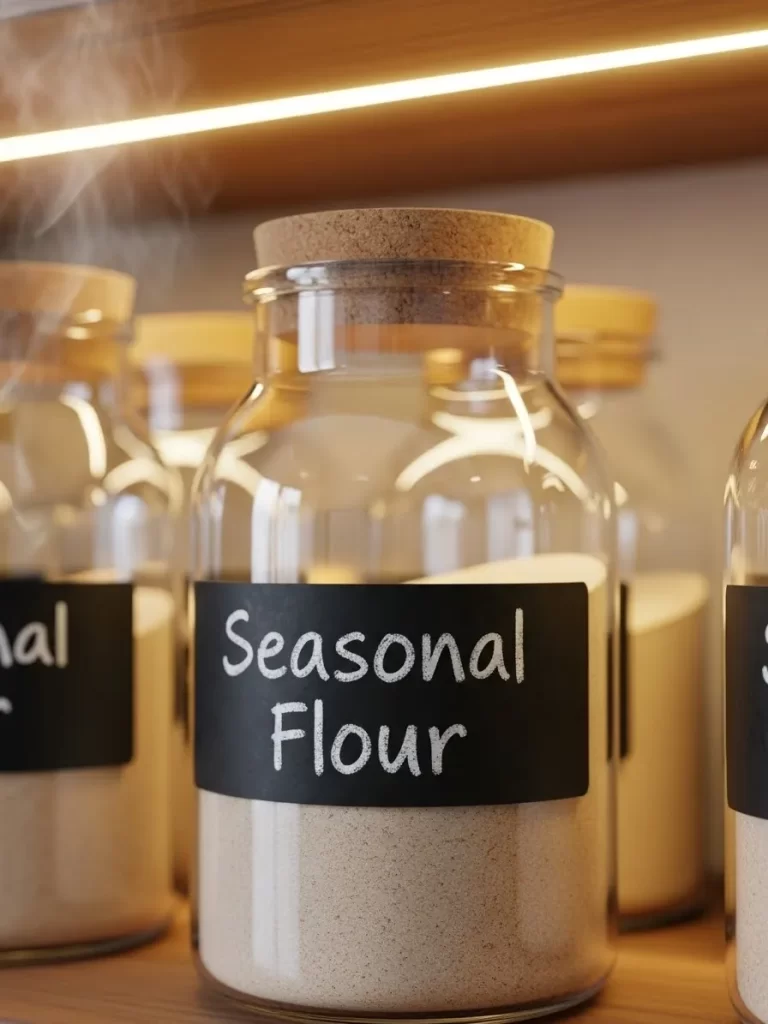
Baking during the holidays requires larger quantities of specific ingredients. These glass jars with chalkboard labels are a great way to store seasonal flour varieties. You can easily wipe away the names and rewrite them for different projects.
Natural cork stoppers keep your dry goods fresh and free from pantry pests. Seeing the fine texture of the flour through the glass helps you identify what you need. This setup adds a charming and rustic feel to your kitchen counter or shelf.
Grouping these jars together creates a dedicated baking station for your home. The black labels provide a high contrast look that is very easy to read. You will love how simple it is to switch labels as you move through different seasons.
Material Required List
- Large glass jars with cork lids
- Self adhesive chalkboard labels
- Chalk or liquid chalk marker
- Bulk bags of specialty flour
Equipment Required List
- Glass cleaner
- Funnel
- Microfiber cloth
- Ruler
DIY Instructions Step by Step
- Clean the glass jars thoroughly and dry them with a cloth.
- Peel the chalkboard labels and press them onto the jar fronts.
- Use a ruler to ensure all labels are at the same height.
- Write the names of your flours on the labels using chalk.
- Fill each jar with flour using a funnel to avoid making a mess.
- Press the cork lids down firmly to create a good seal.
- Arrange the jars in a row under your pantry lighting.
34 Digital Kitchen Inventory Scale
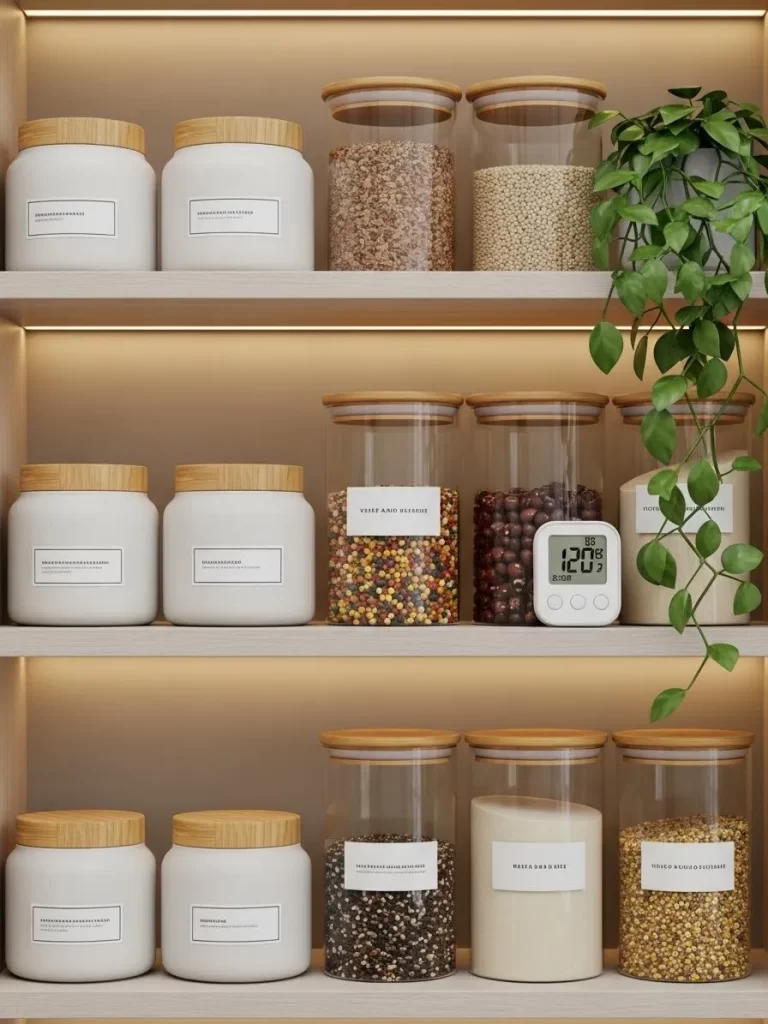
Accurate measurements are the foundation of any successful baking recipe. Keeping a digital scale right on your pantry shelf makes portioning ingredients a fast task. This modern tool features a clear display that is easy to read under cabinet lights.
Jars of different seeds and grains stay organized behind the scale for quick access. Using a consistent white color for your storage jars keeps the area looking calm. You will find that weighing your food leads to much better results in the kitchen.
The compact size of the scale means it does not take up much shelf real estate. Having technology integrated into your storage area helps you track your supplies more effectively. Your pantry will feel like a professional laboratory for culinary creativity.
Material Required List
- Digital kitchen scale
- Uniform white ceramic jars
- Glass jars with bamboo lids
- Potted climbing plant
Equipment Required List
- Cleaning wipe
- Batteries for scale
- Measuring tape
- Soft dusting cloth
DIY Instructions Step by Step
- Wipe down your pantry shelf to remove any dust or crumbs.
- Install fresh batteries into your digital kitchen scale.
- Place the scale in a central spot where you have room to work.
- Line up your white ceramic jars on the shelf behind the scale.
- Organize your glass jars by the height of the ingredients inside.
- Add a small plant to the side to soften the look of the shelf.
- Test the scale by weighing a few common items like flour or nuts.
35 Clear vs. Labeled Jar Comparison
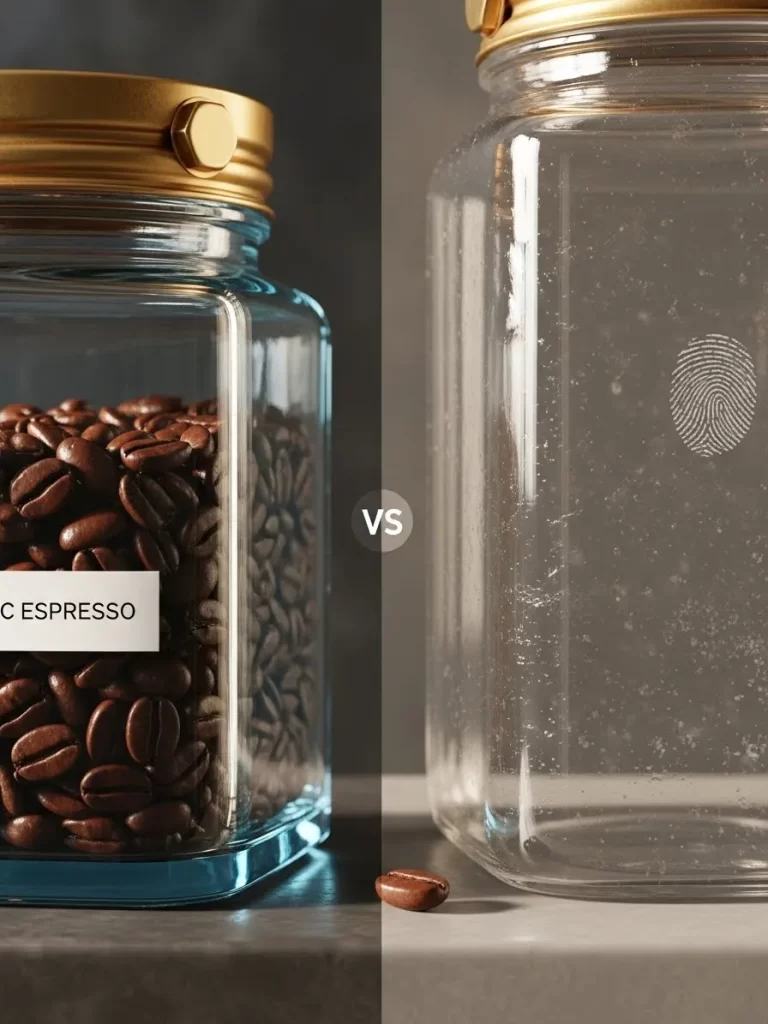
Visual clarity is important but labels add a necessary level of detail to your pantry. Comparing a plain glass jar to one with a crisp label shows the value of organization. You can see the texture of the coffee beans while knowing the exact variety.
Metal lids with hexagonal nuts add an industrial and unique style to your storage. Clear glass lets the natural beauty of your ingredients shine through at all times. You will appreciate the extra information that a label provides during a busy morning.
Keeping your jars clean is easy when they have smooth glass surfaces. Fingerprints on the glass show that a quick wipe with a cloth is needed once a week. This comparison helps you decide which labeling style works best for your home.
Material Required List
- Square glass jars
- Brass and metal lids
- Printed white labels
- Fresh coffee beans
Equipment Required List
- Glass cleaner
- Lint free cloth
- Label applicator or tweezers
- Small scoop
DIY Instructions Step by Step
- Clean two identical square glass jars until they are sparkling.
- Fill one jar with coffee beans and leave the other one empty.
- Apply a printed white label to the front of the filled jar.
- Ensure the label is straight by aligning it with the jar edges.
- Screw the brass lids on tightly to keep the beans fresh.
- Place the jars side by side to see the difference in clarity.
- Wipe away any fingerprints with a lint free cloth immediately.
36 Ribbed Silicone Shelf Liner

Spills and sticky drips can ruin your beautiful wooden pantry shelves. A ribbed gray silicone mat provides a protective barrier that is easy to clean. You can simply wipe away honey or oil with a damp cloth without staining the wood.
The textured surface prevents jars and bottles from sliding around when you reach for them. Using a neutral gray color keeps your pantry looking modern and sophisticated. You will find that cleaning your shelves takes much less time with these liners.
Silicone is a durable material that will last for many years in your kitchen. These mats are especially helpful under liquid ingredients like oils and vinegars. Your pantry will stay in top condition with this simple and effective protection.
Material Required List
- Roll of ribbed silicone matting
- Microfiber cleaning cloth
- Warm soapy water
- Adhesive strips
Equipment Required List
- Measuring tape
- Sharp scissors
- Pen for marking
- Straight edge or ruler
DIY Instructions Step by Step
- Measure the width and depth of your pantry shelves accurately.
- Unroll the silicone mat on a flat surface like a table.
- Mark the cutting lines on the back of the mat using a pen.
- Cut the mat to size using sharp scissors for a clean edge.
- Wipe the shelf clean to remove any existing dust or grit.
- Lay the silicone mat down and press it into the corners.
- Use adhesive strips if needed to keep the mat from moving.
37 Matte Black and White Labels
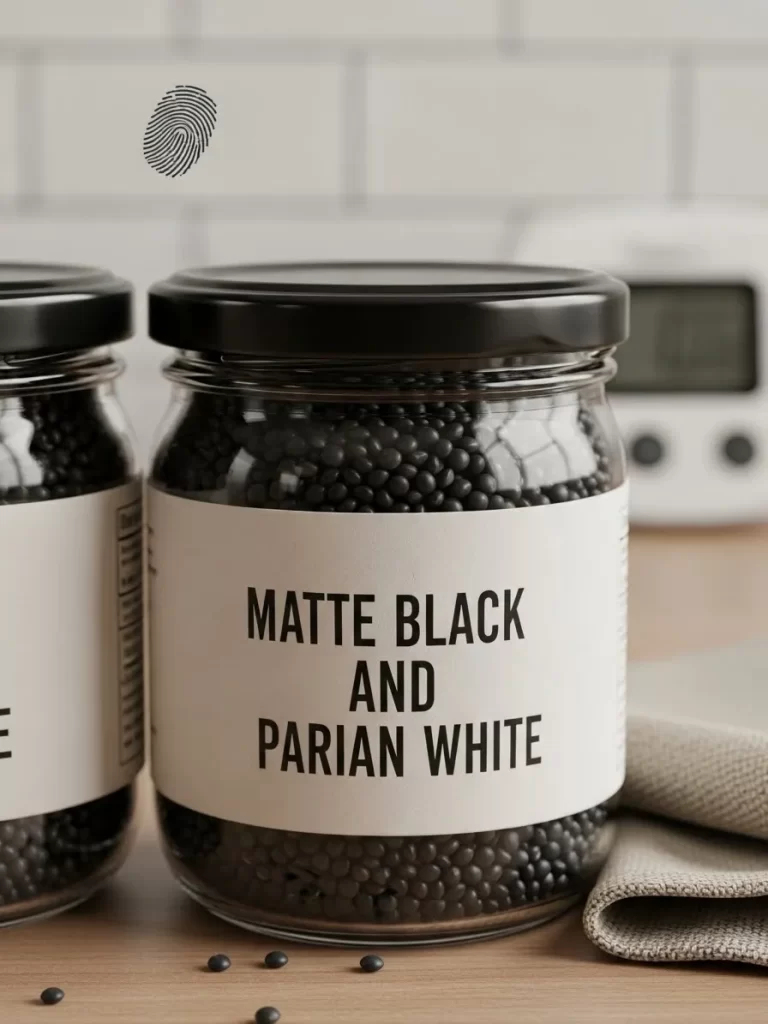
Minimalist design can make your food storage look like a piece of art. These jars feature bold matte black and white labels that are very easy to read. You can identify your black beans or white rice from across the entire kitchen.
Using a consistent font across all your jars creates a very high end appearance. The black lids complement the labels for a cohesive and modern aesthetic. You will feel a sense of pride every time you open your pantry door.
These labels are often water resistant and can handle being wiped down. The contrast between the dark beans and the white paper is visually striking. Your pantry organization will reach a new level of style with this simple change.
Material Required List
- Clear glass jars with black lids
- Matte finish adhesive labels
- Digital timer or clock
- Black beans or dark grains
Equipment Required List
- Cleaning spray
- Paper towel
- Tweezers for labels
- Ruler
DIY Instructions Step by Step
- Wash your glass jars in the sink and dry them completely.
- Choose a set of matte labels with high contrast text.
- Hold the label against the jar to find the best placement.
- Use tweezers to peel and stick the label for a bubble free finish.
- Smooth out the label from the center to the edges with your thumb.
- Fill the jar with dark ingredients to make the white label pop.
- Line the jars up on your shelf next to your kitchen timer.
38 Horizontal Wine Reserve Rack
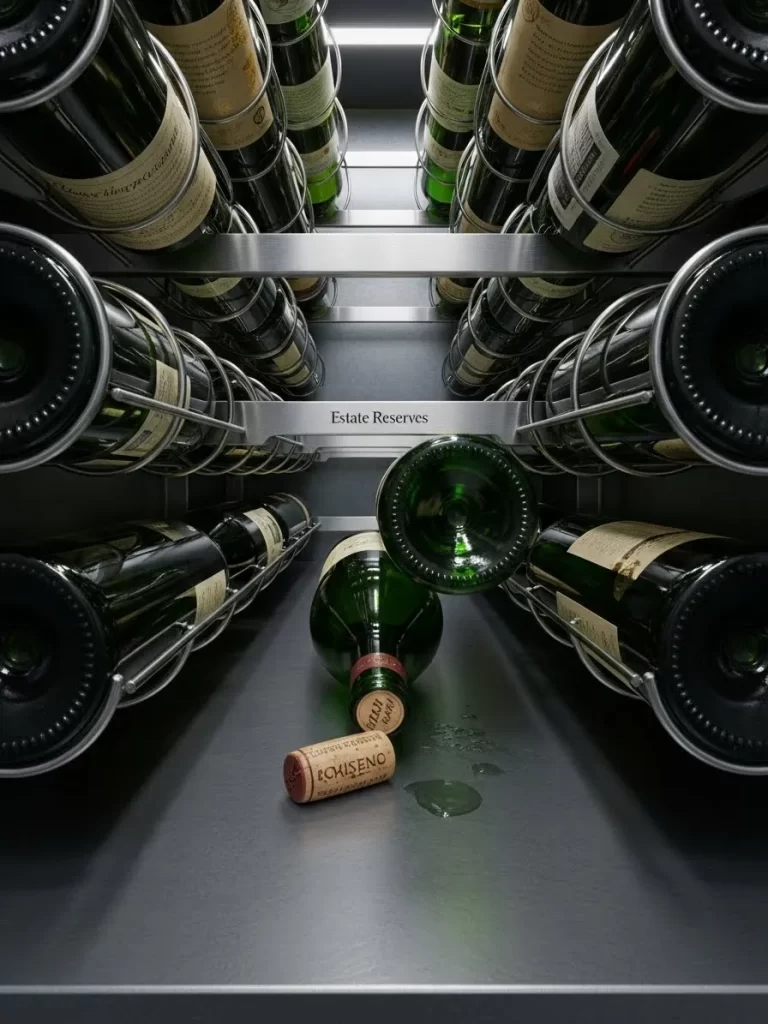
Proper storage is essential for maintaining the flavor of your favorite estate reserves. A horizontal metal rack keeps the corks moist and prevents air from entering the bottles. This system allows you to store a large collection in a very small area.
Silver rails add a sleek and professional look to your wine cellar or pantry. Seeing the labels from the bottom of the bottle helps you find the right year quickly. You will enjoy the organized and sophisticated feel of this dedicated wine zone.
A soft mat on the floor protects any bottles that might accidentally tip during handling. Proper lighting ensures you can read the estate names without any trouble. Your wine collection will be the highlight of your home with this structured storage.
Material Required List
- Metal horizontal wine rack
- Soft gray floor mat
- Assorted wine bottles
- Natural corks for display
Equipment Required List
- Screwdriver set
- Level tool
- Measuring tape
- Flashlight
DIY Instructions Step by Step
- Choose a cool and dark spot in your pantry for the wine rack.
- Assemble the metal frame according to the provided instructions.
- Ensure the rack is level so the bottles do not slide out.
- Secure the rack to the wall if it is a tall unit for safety.
- Lay the wine bottles into the cradles with the necks facing forward.
- Place a soft mat on the floor below the rack for protection.
- Keep a few loose corks nearby for a decorative and rustic touch.
39 Woven Baskets with Fabric Liners
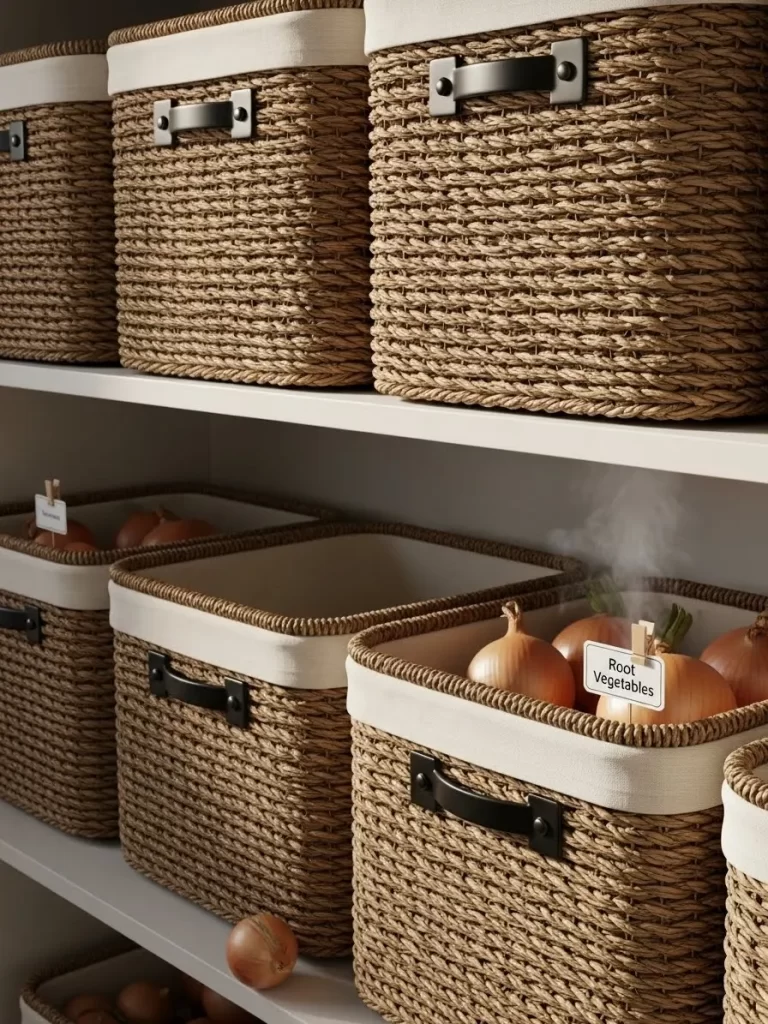
Natural materials bring a sense of comfort and warmth to your storage space. These woven rope baskets feature soft fabric liners that protect your produce from bruising. You can store your root vegetables in a way that looks beautiful and stays tidy.
Metal handles make it easy to pull the baskets off the shelf when you are cooking. Small wooden clips allow you to label each category like Root Vegetables or Onions. You will love how these baskets hide the natural mess of garden produce.
White liners can be removed and washed to keep everything smelling fresh. The thick weave of the baskets ensures they can handle the weight of heavy potatoes. Your pantry will feel much more organic and inviting with these natural textures.
Material Required List
- Woven rope storage baskets
- Removable fabric liners
- Small wooden clothesline clips
- Printed cardstock labels
Equipment Required List
- Washing machine for liners
- Scissors
- Fine tip marker
- Lint roller
DIY Instructions Step by Step
- Wash and dry the fabric liners before placing them in the baskets.
- Fit the liners over the edges of the woven rope containers.
- Write your categories on small pieces of white cardstock clearly.
- Clip the labels onto the front edge of the baskets using wooden clips.
- Place the baskets on your lower pantry shelves for easy access.
- Fill the containers with your onions, potatoes, or other root veggies.
- Vacuum the shelf once a month to remove any loose vegetable skins.
40 Brass Bin Clip and Label
Elevate the look of your simple woven baskets with high quality metal hardware. A brass bin clip provides a sturdy and elegant place to display your category labels. The gold finish adds a touch of luxury to a basic storage container.
Securing the label with a screw ensures it stays in place even with heavy use. Black cards with white text offer a classic and high contrast look that is easy to see. You will appreciate the extra level of detail this adds to your organization.
Natural fibers like wicker or seagrass provide a beautiful contrast to the smooth metal. This simple upgrade makes your pantry look like it was designed by a professional. Small details like these are what truly conquer the kitchen chaos in your home.
Material Required List
- Brass metal bin clips
- Small mounting screws
- Woven seagrass baskets
- Black cardstock labels
Equipment Required List
- Small screwdriver
- Pencil for marking
- Scissors
- White paint pen
DIY Instructions Step by Step
- Choose a flat spot on the front of your woven basket for the clip.
- Slide the brass clip over the top edge of the basket material.
- Mark the screw hole with a pencil if your clip requires mounting.
- Tighten the small screw to secure the metal clip to the fibers.
- Cut a piece of black cardstock to fit the dimensions of the clip.
- Write your label name on the card using a white paint pen.
- Slide the card into the brass holder for a finished and elegant look.
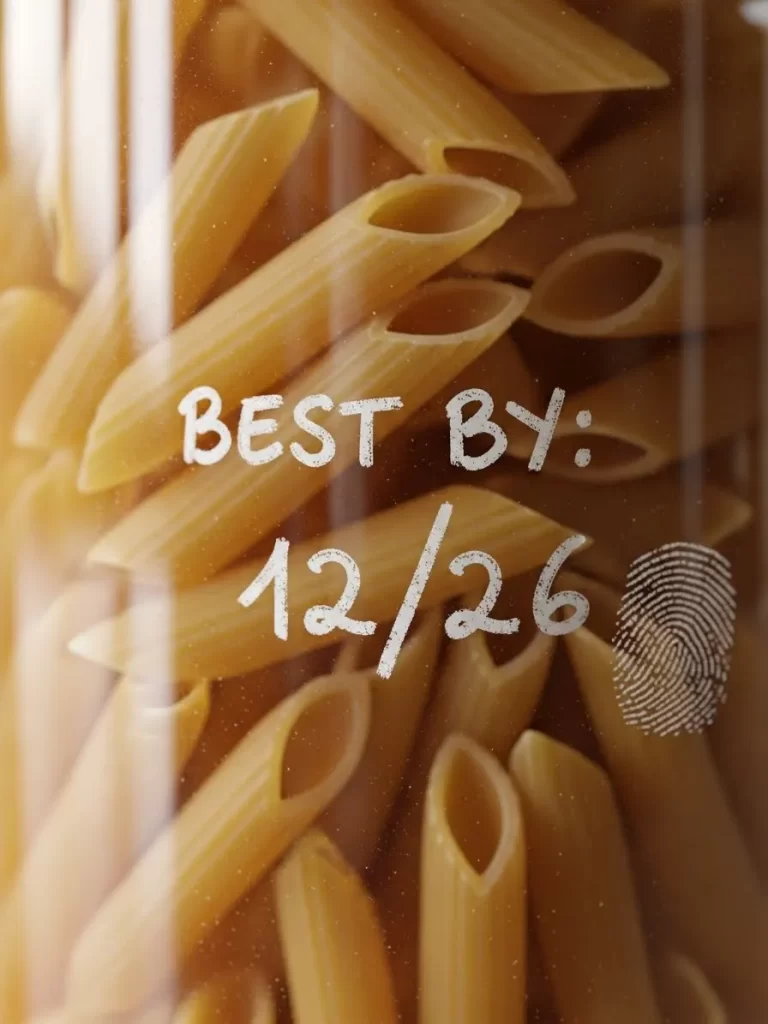
41 Freshness Date Tracking Jar
Writing the expiration date directly on the glass helps stock rotation. A white marker allows you to track freshness without separate labels. You will reduce food waste by using older ingredients before they go bad.
This method looks clean and professional while providing data at a glance. You can easily wipe away the ink when refilling jars today. Tracking dates this way ensures your family always eats fresh food.
Clear walls let you see the texture of your penne pasta. Consistent markings across all your jars create a highly organized appearance. You will feel more in control of your inventory with this.
Material Required List
- Large glass jar with lid
- White liquid chalk marker
- Fresh penne pasta
- Cleaning wipe
Equipment Required List
- Ruler
- Soft cloth
- Glass cleaner
- Paper towel
DIY Instructions Step by Step
- Clean the outside of the glass jar until sparkling.
- Fill the jar with your fresh pasta or grains today.
- Find the best by date on the original food package.
- Use a ruler to guide your writing for straight lines.
- Write the phrase Best By followed by the date clearly.
- Allow the ink to dry for a minute before touching.
- Wipe the text away with a damp cloth when refilling.
42 Stackable Beverage Dispenser Rack
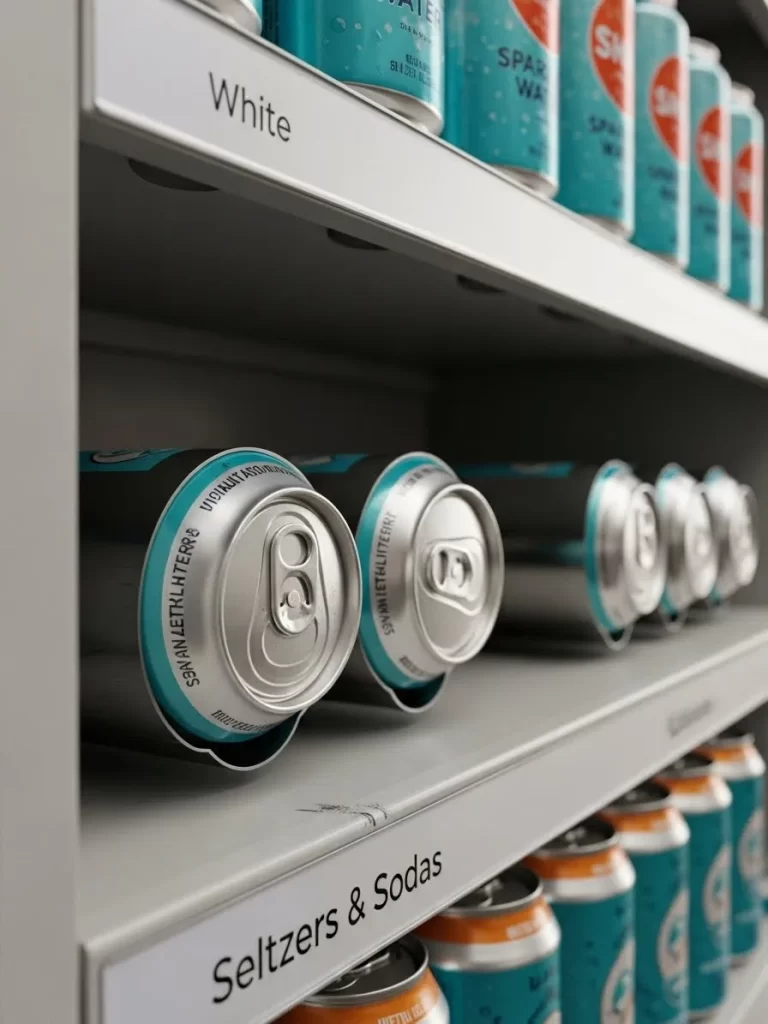
Organizing your seltzers and sodas becomes much easier with this rack. This metal dispenser ensures that fresh drinks are always waiting at the front. You can see your different varieties through the open slots.
Stacking cans horizontally saves a lot of vertical room in the pantry. Gray shelf labels tell you exactly which beverage belongs in each row. This system prevents messy piles of cans from falling over today.
The light gray color matches most modern kitchen interiors perfectly now. You will love how simple it is to restock your supply. Your refreshments stay chilled and ready for any guest you have.
Material Required List
- Metal stackable can dispenser rack
- Printed shelf labels
- Assorted seltzer and soda cans
- Rubber shelf feet
Equipment Required List
- Measuring tape
- Cleaning wipe
- Level
- Pencil
DIY Instructions Step by Step
- Measure your shelf height to ensure the rack fits.
- Clean the shelf area to remove any sticky residue today.
- Attach rubber feet to the bottom of the metal rack.
- Place the dispenser rack onto the shelf and check level.
- Load your soda cans from the back of each slot.
- Apply the gray labels to the front edge of the rack.
- Check that the cans roll forward freely to the front.
43 Small Numbered Snack Jars

Tiny glass jars are the best choice for storing small snacks. These cork toppers keep your ingredients fresh while adding a rustic feel. You will find that numbered labels help track snack types.
Clear walls let you see the different colors and textures today. Grouping these jars on a silicone mat prevents any sliding now. Your snacking routine becomes much more organized with these adorable jars.
Numbers can represent a specific order or a flavor profile now. Small sizes prevent you from overeating during a movie or work. These containers are a smart way to manage your portions.
Material Required List
- Set of small glass jars with corks
- Black adhesive number labels
- Silicone shelf mat
- Assorted nuts and chocolates
Equipment Required List
- Small scoop
- Cleaning cloth
- Tweezers for labels
- Glass cleaner
DIY Instructions Step by Step
- Wash all small glass jars and dry them thoroughly now.
- Place a silicone mat onto your snack shelf area today.
- Use tweezers to apply the number labels to jar fronts.
- Fill each jar with a different type of small snack.
- Press the cork lids down to create a tight seal.
- Arrange the numbered jars in a row on the mat.
- Refill the jars as needed to keep your variety high.
44 Prep Tool Wall Hooks

Moving your measuring cups and aprons to the wall saves space. Sturdy black hooks provide a visible and accessible home for tools. You will enjoy the ease of grabbing what you need.
Simple labels above the hooks help every family member return tools. Hanging these items prevents them from getting tangled in cabinets. This setup makes your kitchen prep area feel professional.
Each hook can hold multiple items if they have hanging loops. The dark metal contrasts beautifully against light colored walls in the kitchen. You will find that cooking prep happens much faster now.
Material Required List
- Set of black metal wall hooks
- Printed Prep Tools label
- Stainless steel measuring cups
- Fabric apron
Equipment Required List
- Power drill
- Spirit level
- Pencil
- Screwdriver
DIY Instructions Step by Step
- Choose a wall space near your main prep counter today.
- Use a level to mark a straight horizontal line now.
- Space your hooks evenly along the line with a pencil.
- Drill pilot holes and insert wall anchors for strength today.
- Screw the black hooks into the wall until they are flush.
- Stick the Prep Tools label above the row of hooks.
- Hang your measuring tools and aprons on the new hooks.
45 Complete Organized Pantry View
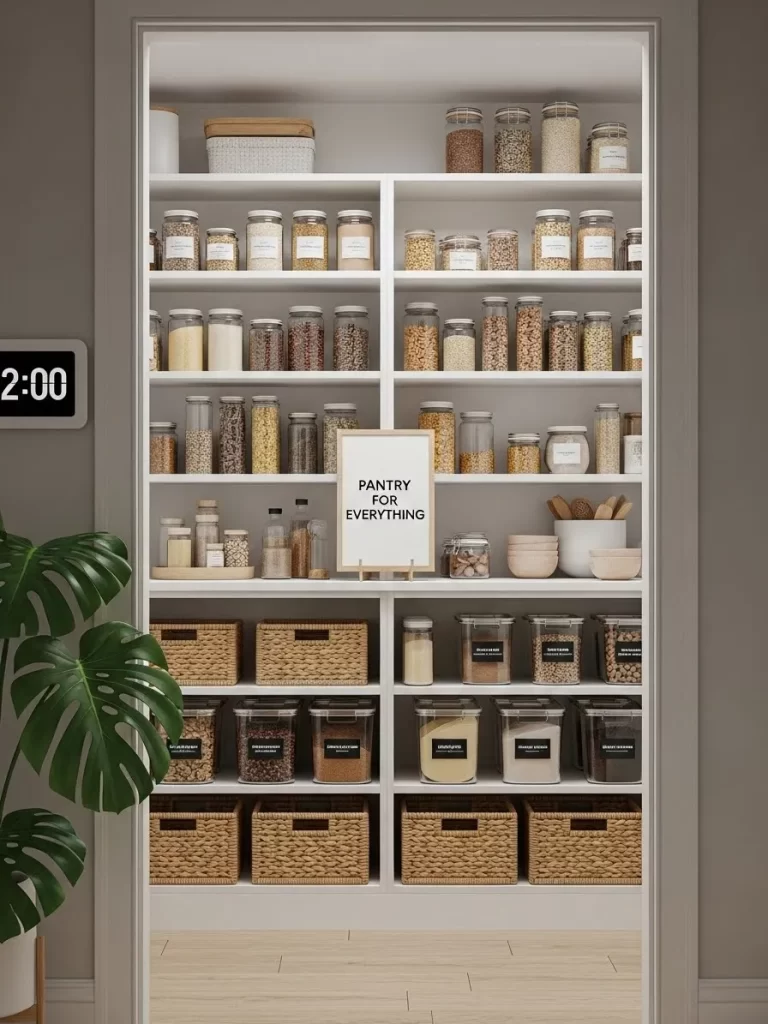
A complete pantry system turns kitchen chaos into a calm space. This final view shows how matching jars and baskets work together. You will find that every item has a specific home.
Using vertical space and clear containers ensures nothing gets lost today. Your grocery shopping becomes simpler when you can see what you own. This organized approach to food storage makes cooking a joyful experience.
A central sign reminds you that this is a pantry today. Keeping the floor clear with bottom shelf baskets is smart now. Your home will feel much more peaceful with this total organization.
Material Required List
- Variety of glass jars with lids
- Large woven baskets with liners
- Printed Pantry for Everything sign
- Modern digital clock
Equipment Required List
- Step ladder
- Label maker
- Cleaning supplies
- Tape measure
DIY Instructions Step by Step
- Empty your entire pantry to start with a clean space.
- Sort your items into categories like grains and snacks today.
- Clean all shelves and walls until they are sparkling now.
- Arrange your large baskets on the bottom shelves for goods.
- Fill your glass jars and place them at eye level.
- Hang your digital clock and the central pantry sign clearly.
- Step back and enjoy the new order in your kitchen.
Key Takeaways
Visibility prevents you from buying duplicate items by mistake. Labels ensure that every container has a fixed home for good. Vertical space provides extra room in even the smallest cabinets. Airflow keeps your fresh produce lasting much longer than before.
Conquering kitchen mess requires a clear plan and steady effort. You can start small by fixing just one shelf tonight. Consistency remains the most important part of any new system. Every family member benefits from a space that is easy to navigate.
These forty five tools provide a solid foundation for your home. Enjoy the calm that comes with a truly organized food supply. Future cooking sessions will feel much faster and more relaxed.