Does the sight of your pantry fill you with dread, rather than culinary inspiration? Most of us start with good intentions, buying beautiful baskets and containers, but somehow the chaos always creeps back in. This time, we are putting an end to the clutter cycle for good.

A messy pantry costs you time and money, leading to duplicate grocery purchases and wasted food hiding in dark corners. Achieving a truly functional and long lasting organized pantry requires more than just tidying up; it demands strategic systems. We need proven hacks and smart storage solutions that are easy to maintain.
We have gathered 45 ultimate organization hacks, from innovative cabinet solutions to simple DIY methods, to help you conquer the mess once and for all. Get ready to transform your pantry from a source of stress into a beautifully efficient food hub.
1. Pantry Shelf Dividers

This organization strategy helps keep upright items like baking sheets, flat packages, and large pouches from tumbling over. Shelf dividers are truly essential for maximizing vertical space and creating specialized sections within a deep cabinet. Notice how neatly the various bags of pasta or flour are standing, separated from the vertical boxes on the left. Keeping these items separated prevents them from becoming a frustrating heap of clutter. This arrangement also makes inventory simple since everything is visible at a glance.
Creating these tailored sections helps maintain order long after you finish organizing your pantry. You won’t struggle to find that one specific bag of lentils anymore. These simple tools instantly make better use of the available space, giving everything a proper home.
DIY Instruction: Creating Simple Tension Rod Dividers
Using tension rods is an easy, damage free way to add vertical division to your pantry shelves, especially for lighter items like cutting boards, serving trays, or food pouches.
Materials Required
- Small spring tension rods (adjustable length to fit your shelf depth)
- Measuring tape
- Cleaning cloth and multipurpose cleaner
Equipment Required
- None
DIY Instructions Step by Step
- Prepare the Shelf: First, fully empty the shelf you plan to organize. Thoroughly wipe down the shelf surface to remove any dust or crumbs using the cleaning cloth and multipurpose cleaner.
- Determine Placement: Decide where you want your vertical dividers to sit. Consider the widths of the items you need to store, such as small boxes or large flat pouches. Use the measuring tape to mark the desired distance between each divider on the shelf.
- Adjust the Rod: Take one tension rod and twist it to adjust its length. You want it to be slightly longer than the depth of your shelf.
- Install the First Divider: Gently squeeze the ends of the tension rod inward, reducing its length enough to fit between the top and bottom of the shelf. Position the rod where your first divider mark is located.
- Tighten the Rod: Slowly release the pressure on the rod, allowing the spring tension to push the ends firmly against the shelf surface. The rod should be held securely in place and stand straight up without wobbling.
- Add Subsequent Dividers: Repeat steps 3 through 5 for all the remaining tension rods, ensuring each one is installed vertically and firmly to create several organized cubbies.
- Restock the Shelf: Now you can place your tall boxes, thin packages, and pouches neatly within the newly created vertical spaces.
2. Adjustable Pegboard Wall System

Tackling a messy pantry means utilizing every square inch, and a pegboard is a phenomenal way to transform the back of a cabinet or a pantry wall. This setup creates instant, customizable storage for kitchen essentials that usually clutter drawer space. Small tools like whisks, scoops, measuring cups, and even writing instruments can hang neatly out of the way. Adding mesh baskets allows you to contain smaller jars of spices or baking items like cocoa powder and extracts.
The beauty of a pegboard lies in its flexibility; you can rearrange hooks and bins instantly whenever your storage needs change. This vertical organization frees up valuable shelf space for bulk ingredients or larger appliances. It is a wonderfully efficient way to organize all those small items that tend to get lost in the shuffle.
DIY Instruction: Installing a Pantry Pegboard
Installing a pegboard maximizes unused wall space, creating vertical storage for small tools and supplies.
Materials Required
- Standard pre cut pegboard panel (appropriate size for your pantry wall)
- Wood furring strips (about one inch thick)
- Pegboard hooks, pegs, and small wire baskets
- Wall anchors and screws
- Primer and paint (optional, if you want a custom color)
Equipment Required
- Electric drill
- Screwdriver (or drill bit set)
- Level
- Stud finder
- Measuring tape
- Pencil or marker
DIY Instructions Step by Step
- Measure and Prepare: Use the measuring tape to find the dimensions of the wall where the pegboard will hang. Cut the pegboard to size if necessary. If painting, apply primer and your chosen color now, letting it dry completely.
- Attach Furring Strips: The pegboard needs space behind it for the hooks to fit. Cut the furring strips to fit the edges of the pegboard (top, bottom, and sides). Place the strips about two inches in from the edge of the pegboard. Secure the strips to the back of the pegboard using small screws, creating a frame.
- Find Studs: Use the stud finder on your pantry wall to locate the wooden studs. Mark the stud locations lightly with a pencil. Attaching the board to studs provides the most secure hold.
- Mark Mounting Holes: Hold the pegboard assembly up to the wall. Use the level to make sure it is straight. Mark the locations on the wall where the screws will go through the furring strips and into the studs.
- Drill Pilot Holes: If you are not hitting a stud, drill pilot holes into the wall and tap in wall anchors for stability. Drill pilot holes into the furring strips where you will secure the board to the studs.
- Mount the Pegboard: Hold the pegboard back up to the wall, lining up the holes. Drive the screws through the furring strips and into the wall studs or anchors. Ensure the board is firmly secured and does not move.
- Organize and Accessorize: Finally, insert the pegboard hooks, pegs, and wire baskets into the holes. Arrange your kitchen utensils, small supplies, and jars to create an easily accessible and organized system.
3. Dedicated Snack Bins

Taking control of chaotic snack foods is incredibly simple with large, matching plastic bins. These containers are essential for preventing the overflow of boxes and bags. Giving snacks a designated home makes it easy for family members to find what they need and, just as importantly, to put items back where they belong. The open lattice design of these bins keeps the food somewhat visible, assisting quick retrieval.
Using sturdy baskets like these stops small bags of chips or granola bars from spilling off the shelf and getting crushed. Stacking items within the container maximizes the vertical space inside the bin itself. This focused approach to organizing ensures your pantry looks tidier, and it helps you keep track of snack inventory for restocking purposes.
DIY Instruction: Creating Simple Labeled Snack Zones
Implementing clear zones for different types of snacks reduces pantry chaos and helps with grocery list preparation.
Materials Required
- Multiple matching, sturdy plastic bins or baskets (four to six works well)
- White contact paper or pre cut label stickers
- Thick permanent marker
Equipment Required
- Scissors
DIY Instructions Step by Step
- Empty and Group: Remove all snack foods from your pantry shelves. Spread them out on a clear surface and group them by type (e.g., chips, crackers, fruit snacks, cookies).
- Assign Bins: Determine which category will go into which bin. Consider the size of the snacks; perhaps taller bins for large chip bags and shorter ones for cookie boxes.
- Prepare Labels: Use the scissors to cut the contact paper or sticker sheets into uniform rectangles for labeling. Make sure the size is appropriate for the front of your bins.
- Write Labels Clearly: Use the permanent marker to write the category name clearly on each label, such as “Salty Snacks,” “Granola Bars,” or “Sweet Treats.” Remember to write legibly since this label will guide everyone.
- Apply Labels: Peel the backing from the labels and press them firmly onto the front center of the corresponding plastic bins. Smooth out any air bubbles.
- Fill and Place: Carefully place the grouped snacks into their newly labeled bins. Arrange the filled bins neatly back onto the designated pantry shelves. The uniformity of the bins and clear labels will instantly create a cleaner, more organized look.
4. Multi Tiered Lazy Susan for Corner Cabinets

The spinning convenience of a multi tiered lazy Susan is an absolute game changer for those deep, awkward corner cabinets. Corner pantries are notoriously difficult to navigate, but this rotating system brings even the smallest jars right to the front. You can store a considerable number of different spices, oils, sauces, and sprinkles, making every item easily reachable. Stacking items vertically saves a huge amount of shelf space.
This turntable design prevents items from being pushed into the dark corners, never to be seen again. You instantly know what you have and what you need to buy, which saves time and stops duplicate purchases. Grouping similar ingredients together on each tier makes cooking and seasoning meals significantly easier.
DIY Instruction: Assembling a Tiered Lazy Susan Organizer
While many tiered lazy Susans are pre made, if you purchase a disassembled one, or want to replicate the look using basic turntables, here are the steps.
Materials Required
- Tiered Lazy Susan organizer kit (includes trays and central column) OR three single turntable trays of varying sizes and a central column structure.
Equipment Required
- Screwdriver (often included or an Allen wrench)
DIY Instructions Step by Step
- Unpack Components: Carefully remove all trays, the central support pole, and any hardware (screws, connectors, bearings) from the packaging. Lay all pieces out to ensure nothing is missing.
- Attach the Base Tray: Locate the base of the central column. Usually, the largest turntable tray connects to the bottom of the pole first. Align the tray with the mounting points on the base. Secure it using the provided screws or connection mechanism.
- Install Mid Trays: Slide the remaining tiers onto the central column. These usually have adjustable heights. Determine the spacing needed based on the height of your tallest jars (like oil or spice bottles) that will sit on the trays. Secure each tray tightly at the desired height.
- Place in Cabinet: Once fully assembled, place the large, sturdy organizer into the corner cabinet. Ensure it sits flat and spins smoothly without hitting the cabinet door or sides.
- Stock and Organize: Arrange your items onto the tiers, grouping them by type. For instance, put cooking oils on the bottom, everyday spices on the middle tier, and baking extracts on the top. Spin it gently to confirm everything is stable.
5. Pull Out Drawer Shelving System

Transforming static, deep shelves into fully accessible storage is possible with a slide out drawer system. These clear drawers allow you to see what is stored inside, simplifying inventory and retrieval. Pull out drawers are especially useful for bulky, heavy items like canned drinks or large bags of flour and sugar. The sheer weight of sodas or sparkling water can be easily handled by the sturdy tracks and rollers, as shown in the lowest bin.
This method completely eliminates the need to kneel or strain to reach items at the back of the pantry. The deeper drawers can be used for things like paper goods, bulk grains, or pantry backup stock. Choosing transparent containers ensures you never lose sight of your food supply again. This type of system is a huge upgrade for any utility or kitchen cabinet.
DIY Instruction: Installing a Pull Out Shelf or Drawer
Installing a commercial slide out drawer system is often easier than building custom drawers, but it requires careful measurement and mounting.
Materials Required
- Pre made slide out drawer kit (with the drawer box, metal tracks, and mounting hardware)
- Measuring tape
- Pencil
Equipment Required
- Electric drill and appropriate drill bits
- Screwdriver (or driver bit for the drill)
- Level
DIY Instructions Step by Step
- Measure the Cabinet: Measure the width, depth, and height of the cabinet opening very precisely. The drawer kit must fit inside the opening, clearing any door hinges or framing. Check the kit instructions for required clearance.
- Separate the Track: The metal track system usually comes in two pieces: one part that attaches to the cabinet wall and one part that attaches to the drawer itself. Separate these two pieces carefully following the kit directions.
- Mount Cabinet Track: Place the inner cabinet track piece inside the cabinet at the desired shelf height. Use the level to ensure it is perfectly straight, both front to back and side to side. Mark the screw hole positions with a pencil.
- Drill and Secure: Drill small pilot holes where you marked the screw positions. Line the track back up and firmly secure it to the cabinet wall using the provided screws. Repeat this for the track on the opposite wall, making sure both are level with each other.
- Attach Drawer Track: Place the other track pieces onto the sides of the drawer box itself. Secure them with the appropriate screws, ensuring they are flush and straight.
- Insert the Drawer: Carefully line up the drawer tracks with the cabinet tracks. Gently slide the drawer into the cabinet until it fully engages and clicks into place. Test the drawer by pulling it in and out to ensure smooth operation.
6. First In, First Out (FIFO) Can Rotator

Using a vertical can dispenser is a sophisticated method for managing canned goods, ensuring the oldest items are used before they expire. This gravity fed system automatically rolls the newest cans placed at the top down to the bottom for easy retrieval. The steel construction of this organizer provides a sturdy, long lasting solution for storing a large quantity of cans. Canned goods often cause visual clutter, but this unit stacks them tightly and neatly within a small footprint.
Finding a specific can becomes effortless when you organize them this way. It helps prevent food waste by making the practice of “first in, first out” completely automatic. This unit maximizes the vertical depth of the cabinet, turning a chaotic mess into a clean, functional stockpile.
DIY Instruction: Setting Up a Simple Wire Can Dispenser
While a large metal unit is a commercial purchase, you can organize cans effectively using simple stacked wire shelves. This DIY focuses on a simplified method for smaller pantries.
Materials Required
- Three to four small, stackable wire shelving units (flat shelves, not slanted)
- Labels and permanent marker
- Canned goods
Equipment Required
- None (optional zip ties if shelves are unstable)
DIY Instructions Step by Step
- Assess and Clean: Clear the pantry shelf area where the cans will go. Sort your canned goods by category (e.g., vegetables, soups, beans).
- Assemble the Shelves: Stack the wire shelf units on top of each other, creating tiers. If they wobble, connect them at the corners with small zip ties to enhance stability.
- Implement FIFO: The critical part is organizing the cans by expiration date. Identify the can that expires soonest.
- Stock the Shelves: Start by placing the cans with the earliest expiration dates at the front of the shelf units. Place the cans with later dates behind them. For the purpose of “rotation,” always place new purchases behind the existing cans.
- Label Categories: Apply clear labels to the front edge of each wire shelf stack indicating the contents, such as “Beans,” “Soup,” or “Tomatoes.” This keeps things tidy and prevents misfiling.
- Maintain Rotation: When you take a can from the front, simply shift the cans behind it forward, or make a habit of grabbing from the front row only. When restocking, lift the front can slightly and place the new one behind it.
7. Over the Door Spice and Supply Organizer

Utilizing the back of the pantry door is one of the most underappreciated organization hacks, immediately providing an entire extra wall of storage. This fabric organizer with its multiple pockets is excellent for containing smaller items like spice jars, baking extracts, and even slim boxes of gelatin or seasoning packets. The fabric pockets, reinforced by metal bars, are sturdy enough to handle a respectable weight.
The best feature of this system is that it requires no installation tools; it simply hangs over the door. This system keeps frequently used items right in your line of sight, which is extremely helpful when cooking. Notice how the bottom pockets are repurposed to hold things other than shoes, proving this item’s versatility for small pantry supplies. It is a brilliant way to reclaim precious shelf space.
DIY Instruction: Repurposing a Shoe Organizer for Pantry Storage
A common hanging shoe organizer is easily adapted to maximize pantry door storage for spices and small packages.
Materials Required
- One over the door fabric shoe organizer (with hooks)
- Cardboard inserts (optional, to stiffen pockets)
- Spices, seasoning packets, and small jars
Equipment Required
- Scissors (if cutting cardboard)
DIY Instructions Step by Step
- Assess the Fit: Hold the shoe organizer up against the pantry door to confirm the hooks fit over the top edge and the length does not interfere with the door handle or the floor.
- Hang the Organizer: Simply place the metal hooks over the top edge of the pantry door. Close the door to check that it shuts smoothly without catching the organizer material.
- Stiffen Pockets (Optional): If the fabric pockets are too flimsy for glass jars, cut small pieces of cardboard to fit snugly into the bottom of each pocket. This provides a flat, stable base for the items.
- Organize Spices: Start at eye level. Dedicate certain rows of pockets to different categories. For example, use the top rows for frequently used spice jars and baking extracts.
- Store Small Boxes: Use the lower, larger pockets for small boxes of pudding, jello mixes, bouillon cubes, or seasoning packets. Roll up bags of dried chilies or herbs and place them in the pockets.
- Create a Label Key (Optional): Since items are visually sorted, you might not need individual labels. However, consider placing a small printed label at the top of the organizer to define the contents of the entire section, such as “Baking Aids” or “Dinner Seasonings.”
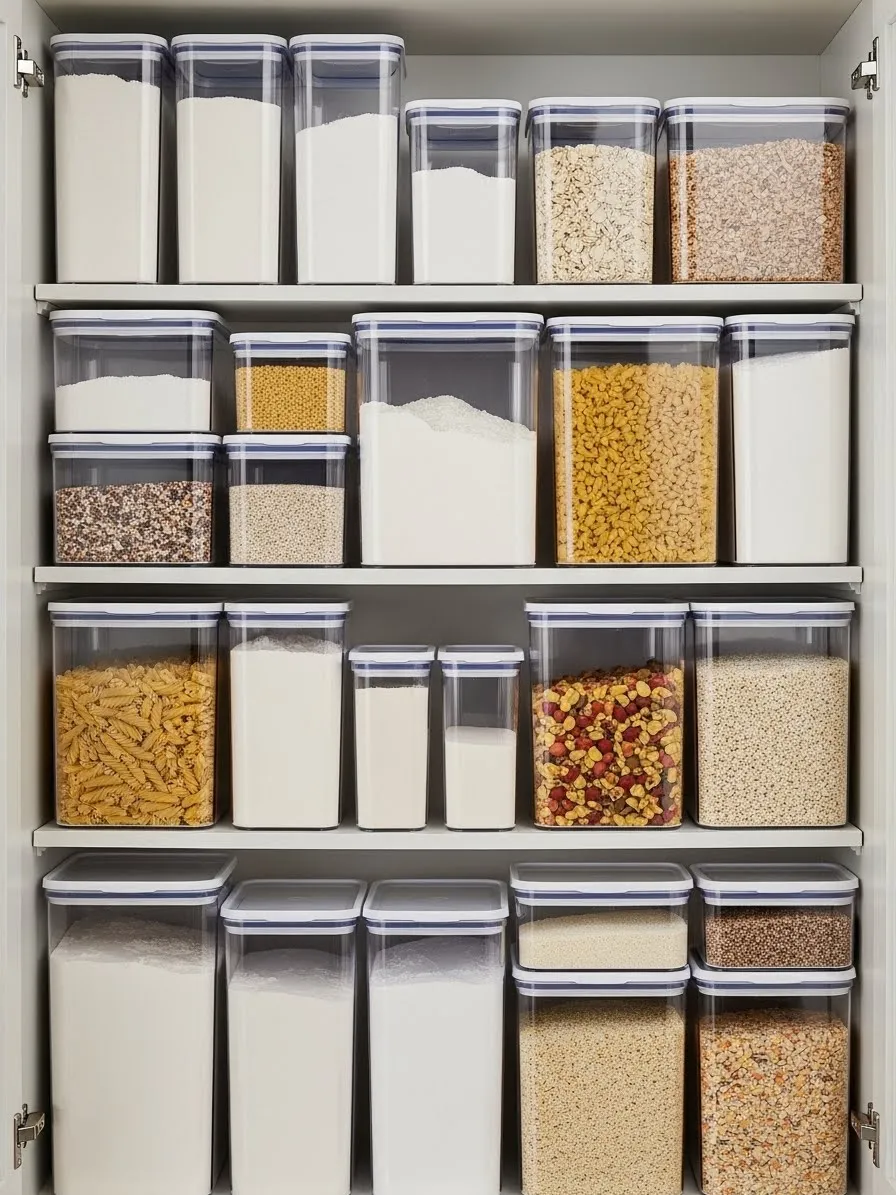
8. Airtight, Uniform Food Storage Containers

Nothing brings immediate visual peace to a pantry quite like switching to matching, airtight storage containers for dry goods. This set up features clear containers of varying sizes, which accommodates everything from flour and sugar to pasta, oats, and cereal. The uniform shape allows them to be stacked and lined up edge to edge, minimizing wasted space on the shelves. Furthermore, the clear material instantly shows how much of an ingredient remains, making inventory exceptionally fast.
Airtight seals are crucial for keeping food fresh, protecting valuable staples from moisture, pests, and staleness. Decanting items from messy original bags into these smart containers creates a cohesive, clean look while extending the shelf life of your ingredients. This practice elevates a pantry from a simple storage area to an organized food supply center.
DIY Instruction: Decanting Dry Goods into Containers
Decanting involves moving ingredients from original packaging into reusable containers, improving both organization and freshness.
Materials Required
- Assortment of high quality, clear, airtight containers (various sizes)
- Dry goods (flour, sugar, pasta, grains, nuts)
- Labels (removable) and permanent marker or label maker
Equipment Required
- Large kitchen funnel or measuring scoop
DIY Instructions Step by Step
- Clean and Dry: Ensure all containers are thoroughly washed and completely dry before use. Any moisture can ruin dry ingredients.
- Label First: Before filling, attach a label to the container indicating the food item (e.g., “All Purpose Flour,” “Lentils”). Importantly, add the expiration date from the original bag to the label. This avoids guesswork later.
- Carefully Decant: Open the original packaging of a dry good. Use the large kitchen funnel or a scoop to carefully pour or transfer the ingredient into the corresponding container. Fill it to a level that allows the lid to seal easily.
- Seal Tightly: Press or clamp the lid onto the container to ensure the airtight seal is fully engaged.
- Remove and Dispose: Dispose of the original packaging responsibly. Only keep the labeled, sealed container.
- Arrange on Shelves: Place the newly filled containers onto the pantry shelves. Arrange them using the height principle: place taller containers on higher shelves and shorter, frequently used items at eye level for easy access.
9. Color Coded Utility Baskets

Using brightly colored utility baskets is a simple, effective technique to make pantry organization fun and highly intuitive for the whole family. The vibrant colors immediately draw the eye and help distinguish between major categories. You can assign one color to “Baking Supplies,” another to “Snacks,” and a third to “Cereal and Breakfast Items.” These bins are perfect for gathering items that are awkward or tend to clutter shelves, like small boxes, bags, and jars.
Adding a simple white label to the front of each basket reinforces the category, eliminating any confusion. This system is exceptionally useful in homes with children, as they can easily grab their designated snack bin and know exactly where to return it. The open lattice design of the plastic keeps the contents partially visible, offering a nice balance between concealment and accessibility.
DIY Instruction: Implementing a Color Coded Categorization System
Using color as a nonverbal cue makes it easier for everyone to find and put things away correctly.
Materials Required
- Plastic utility baskets in three to five different colors
- White label stickers or cardstock and packing tape
- Thick permanent marker
Equipment Required
- None
DIY Instructions Step by Step
- Define Categories: Identify the main categories in your pantry that cause the most clutter. Examples include Snacks, Baking, Breakfast, Condiments, or Grains.
- Assign Colors: Assign a specific color to each category (e.g., Red for Snacks, Blue for Baking, Green for Breakfast). Write down this color key for reference.
- Label Baskets: Write the category name clearly on the white label stickers. If using cardstock, cover the written label with a piece of packing tape to protect it from moisture before attaching it to the bin.
- Sort the Food: Go through your pantry and place all items into the appropriate color coded bins according to your defined categories.
- Stock the Shelves: Place the full bins back onto the pantry shelves. For best visibility and family access, keep the most frequently used categories (like snacks) at eye level.
- Communicate the System: Clearly explain the color key to all family members so they understand where items belong. The visual nature of the colors should make long term maintenance straightforward.
10. Under Shelf Hanging Wire Baskets

Maximizing the vertical space between shelves is easy with these simple, clever hanging wire baskets. They clip securely onto the bottom of a shelf, creating an entire extra layer of storage directly underneath. This is absolutely fantastic for storing light, small items that you need to grab often, such as seasoning packets, granola bars, small boxed foods, or single serving coffee pods. The wire mesh design allows you to see the contents clearly from below.
This hack is especially useful when you have tall, widely spaced shelves that waste valuable vertical room. You instantly double the storage potential in that space without drilling or permanent installation. It is a quick, renter friendly solution for adding accessible storage right where you need it most.
DIY Instruction: Installing Clip On Under Shelf Baskets
This is one of the easiest pantry upgrades, requiring no tools and providing instant added storage.
Materials Required
- Clip on under shelf wire baskets (ensure the clip opening fits your shelf thickness)
- Light weight items for storage (small packets, foil wraps, linen napkins)
Equipment Required
- None
DIY Instructions Step by Step
- Measure Shelf Clearance: Check the height of the items already on the shelf below where you plan to hang the basket. You need enough vertical room for the basket to hang down and still allow the items beneath it to be easily removed.
- Position the Basket: Slide the clip on top of the wire basket onto the front edge of the shelf. Push it backward until the entire clip is fully engaged and the basket hangs securely underneath.
- Check Stability: Gently pull down on the basket to ensure it is firmly attached and does not slip when you load it.
- Load the Basket: Place light weight, small, flat items into the newly installed hanging basket. Avoid putting heavy jars or full cans in here, as the clip is designed for lighter loads.
- Repeat: If you have more than one basket, install the rest on the same shelf, spacing them evenly, or install them on other shelves that have adequate vertical clearance.
11. Tiered Clear Shelf Organizers

Shallow, tiered shelves are extremely useful for organizing cans and jars, making every label easy to read. These clear plastic risers eliminate the frustration of searching blindly behind front row items. The gentle slope allows gravity to assist retrieval while keeping items visible and accessible. Organizing cans of soup or jars of sauces is simple when you arrange them by type and use these space saving steps.
A clear organizer like this allows the pantry to look clean and uniform, regardless of the different labels on the cans. This system provides great visual depth, helping you quickly determine stock levels for both large and small items. Remember that the better you can see your food, the less likely you are to buy duplicates.
DIY Instruction: Building Simple Stacked Riser Shelves
You can easily replicate the effect of tiered organizers using basic materials found at a hardware store. This DIY focuses on creating small, stable platforms.
Materials Required
- Two or three small, identically sized sturdy wooden boxes or blocks (or thick foam board cutouts)
- Non slip shelf liner or small rubber furniture pads
- Spray paint (optional, to match your pantry)
Equipment Required
- Saw (if cutting wooden blocks)
- Sandpaper (if using wood)
- Hot glue gun or strong adhesive
DIY Instructions Step by Step
- Preparation: Determine the width and depth of your pantry shelf where the cans will sit. Ensure your blocks or boxes are small enough to sit two or three deep on the shelf. If using wood, sand the edges smooth and optionally paint them.
- Determine Tier Heights: You need a slightly higher platform for the second and third rows of cans. Decide on two different block heights, for example, two inches and four inches tall.
- Build the Riser: Place the shortest blocks or boxes side by side where your second row of cans will sit. Apply a layer of strong adhesive or hot glue to the top of these blocks.
- Secure the Non slip Base: Place a piece of non slip shelf liner or the small rubber furniture pads onto the bottom of the blocks. This prevents the riser from sliding when cans are removed.
- Create the Top Tier (Optional): If you desire a third tier, glue the taller blocks behind the shorter ones. Alternatively, just place the tallest blocks directly on the shelf behind the first set.
- Organize and Stock: Place your first row of cans directly on the main shelf. Put your second row of cans onto the first set of risers. If you built a third tier, place the final row of cans onto the tallest riser.
12. Tension Spring Dividers for Vertical Storage

These unique tension spring dividers offer an aesthetically pleasing and highly functional way to separate taller, thinner items. The springs attach to the shelf above and the shelf below, maintaining firm pressure to keep items perfectly upright. This design is extremely helpful for organizing things like flat cardboard boxes, rolls of parchment paper, thin cutting boards, or large family size cereal boxes. The tension rod method is completely adjustable and damage free.
They create structured pockets of space, preventing everything from leaning and becoming disorganized. Organizing items this way is a quick solution to the common problem of vertical storage collapse. This method ensures that even when one item is removed, the others stand straight and ready for use.
DIY Instruction: Installing Tension Spring Dividers
While the image shows specific hardware, you can achieve a similar dividing effect using two standard tension rods per dividing line.
Materials Required
- Two small spring tension rods per dividing section
- Measuring tape
- Pencil
Equipment Required
- None
DIY Instructions Step by Step
- Measure Shelf Clearance: Check the space between the shelves. The tension rods must be fully adjustable to fit snugly into this vertical space.
- Determine Placement: Decide on the width of the sections you need. Mark the placement points for the dividers lightly with a pencil on the top and bottom of the shelves.
- Install the First Rod: Take the first tension rod. Adjust its length so it is slightly longer than the space between the shelves. Squeeze the rod to fit it into place at your first placement mark. Release the pressure so the rod secures itself firmly between the shelves, standing vertically.
- Install the Second Rod: Place the second tension rod about an inch or two away from the first rod, creating a narrow, stable wall. Install it the same way you did the first, ensuring both are parallel.
- Repeat for Sections: Continue this two rod process for every vertical divider you wish to create. Using two rods close together provides better stability for holding up boxes than a single, thin rod.
- Organize: Place your flat boxes, trays, or rolled goods neatly into the newly created vertical compartments.
13. Digital Inventory System using QR Codes

Modern organization goes beyond physical containers; incorporating technology like QR codes can drastically reduce food waste and clutter. Attaching a scannable code to a pantry bin links directly to a digital inventory list on your phone. This approach helps you track the contents and quantity of goods inside the bin without even opening it. Knowing precisely what you have prevents those annoying duplicate purchases at the grocery store.
The digital component is particularly useful for hidden storage or bins on high shelves. Quickly scanning the code updates your list in real time, giving you a comprehensive overview of your stock. This smart technique transforms a traditional pantry into an efficient, digitally managed food storage system.
DIY Instruction: Creating a QR Code Inventory System
Implementing a digital inventory system helps manage items stored in deep or non transparent bins.
Materials Required
- Plain white plastic storage bins
- Printable sticker paper or cardstock with adhesive backing
- Small metal rings or string (if using cardstock tags)
- Access to a smartphone and a free QR code generator app (like a spreadsheet or dedicated inventory app)
Equipment Required
- Printer
- Hole punch (if using cardstock)
DIY Instructions Step by Step
- Download Inventory App: Choose a simple inventory or spreadsheet app on your smartphone that allows you to list items, quantities, and ideally, link to a QR code.
- Create the Digital List: For each large storage bin, create a separate digital list in your chosen app. Title the list with the general contents, like “Backup Baking Stock” or “Bulk Grains.” Enter the current items in that bin.
- Generate the QR Code: Use the app or a free online generator to create a QR code that specifically links to that bin’s digital list.
- Print and Prepare Tags: Print the generated QR code onto the sticker paper or cardstock. If using cardstock, cut the tag out and punch a hole in the top.
- Attach the Tag: Securely attach the printed QR code tag to the front handle of the corresponding storage bin using the metal ring or string. If using a sticker, adhere it firmly to the bin.
- Stock and Scan: Fill the bin with the items listed in the corresponding digital list. Before adding new items or taking items out, scan the code with your phone. Update the digital list immediately after you modify the physical contents.
14. Clear Stackable Drawer System

Instead of relying on deep shelves where items disappear, this pantry utilizes clear, stackable drawers for optimized visibility and access. These pull out bins are fantastic for separating different categories of food, making them much easier to see and reach. Items like spices, jars of preserves, single serving snacks, and even fresh bread are neatly contained.
The clear plastic construction helps you locate exactly what you need without rummaging through multiple drawers. Stacking these bins vertically maximizes the use of space within a tall pantry cabinet. This setup is a much more flexible and accessible alternative to traditional fixed shelving, allowing you to pull out an entire category at once.
DIY Instruction: Stacking Clear Containers for Drawer Storage
This method mimics the functionality of a custom drawer system using readily available clear storage boxes.
Materials Required
- Clear, stackable plastic storage containers with flat, sturdy lids (ensure they are all the same size or designed to stack together)
- Non slip shelf liner
- Labels and marker
Equipment Required
- Scissors
DIY Instructions Step by Step
- Measure and Line: Measure the depth and height of your cabinet section. Cut the non slip shelf liner to fit the bottom of the cabinet space and place it down to prevent the bottom containers from shifting.
- Assign Categories: Decide which container will hold which type of item (e.g., Small Jars, Baking Packets, Condiments). Apply a label to the front of each container for quick reference.
- Fill Containers: Place the organized food items into the first layer of clear containers. Fill them carefully, ensuring the items do not extend past the rim.
- Create the Stack: Place the first layer of containers onto the lined shelf. Put the lid securely on top of each container. Then, stack the second layer of containers directly on top of the first layer’s lids. The flat lids provide a stable platform.
- Continue Stacking: Continue this process until you reach the desired height, making sure you can still easily access the top containers. Placing frequently accessed items on the top layers is advisable.
- Access: To access an item in a lower layer, simply lift the containers above it off the shelf.
15. Rolling Bulk Storage Containers

For households that purchase baking staples like flour, sugar, or pet food in large quantities, these wheeled storage containers are a practical space saver. Storing bulk items in their original flimsy bags often leads to spills and wasted space. These large, airtight bins are durable, offer great capacity, and protect ingredients from moisture. The clear sides allow for quick volume assessment.
The inclusion of casters on the bottom is perhaps the most useful feature, allowing you to easily roll the heavy containers out for scooping and back into a corner. The flat top provides extra temporary surface space for smaller bags or scoops. This simple solution makes large scale storage effortless and keeps your floor area clean and tidy.
DIY Instruction: Adding Casters to Simple Storage Totes
If you cannot find commercial rolling bins, you can add casters to sturdy plastic storage totes for easy access to heavy items.
Materials Required
- Sturdy plastic storage tote with a flat bottom (large capacity)
- Four swivel casters (wheels with mounting plates)
- Small machine screws, washers, and nuts (make sure they are not too long for the tote bottom)
- Permanent marker and labels
- Drill and drill bits
Equipment Required
- Screwdriver or wrench
- Measuring tape
DIY Instructions Step by Step
- Mark Placement: Flip the storage tote upside down on a protected surface. Use the measuring tape to mark the location of the four casters, placing them near the corners of the base, but allowing for clearance.
- Drill Pilot Holes: Place the caster mounting plate over the marked spots. Use the drill to carefully bore holes through the plastic tote bottom where the screws will go. Use a drill bit slightly larger than the screw shaft.
- Secure the Casters: Push the machine screws through the holes from the inside of the tote. Place the caster mounting plate over the screws on the outside bottom of the tote. Secure the casters by placing a washer and nut onto each screw and tightening them firmly with the screwdriver and wrench.
- Test and Fill: Flip the tote back over. Test the wheels by rolling the container. Ensure the casters are stable.
- Label and Stock: Label the container clearly (e.g., “Bread Flour”). Fill it with your heavy bulk goods. The wheels now allow easy movement for access and cleaning.
16. Pull Out Vertical Wire Drawers

Using pull out drawers is an excellent way to eliminate the deep cabinet “black hole” problem. This system features multiple wire baskets mounted on metal slides that pull completely out of the cabinet. This allows you to reach items stored at the very back without disturbing the things in the front. The open wire mesh design ensures great visibility for canned goods, boxes, and jars.
These wire drawers are especially suited for heavier items like appliances, bulk ingredients, or pots and pans, as shown in the lower sections. They make organizing and accessing an entire vertical column of pantry goods extremely simple. The strength and durability of the metal construction ensures this solution will last for many years.
DIY Instruction: Installing a Pull Out Wire Drawer System
Installing a system of multiple sliding baskets requires careful alignment but offers a high reward in terms of accessibility.
Materials Required
- Multi tier pull out wire drawer system kit (includes side frames, tracks, and baskets)
- Mounting screws and hardware
- Measuring tape and pencil
Equipment Required
- Electric drill
- Level
- Screwdriver
DIY Instructions Step by Step
- Verify and Measure: Ensure the kit dimensions fit inside your cabinet, clearing the door hinges when fully installed. Measure the height placement for the side frame units.
- Assemble the Frame: Assemble the upright side frames of the pull out system according to the manufacturer’s directions. Attach the sliding tracks to the frames at the desired basket heights.
- Mount the Frame: Place the assembled side frame into the cabinet. Use the level to ensure it is perfectly straight and parallel to the cabinet walls. Mark the screw hole locations on the cabinet floor and/or back wall.
- Secure the Unit: Drill pilot holes and then secure the entire frame unit firmly to the cabinet using the provided screws. Stability is crucial for a smooth sliding action.
- Insert the Baskets: Slide the wire baskets onto the mounted tracks. Test each basket by pulling it in and out to ensure smooth, quiet operation.
- Load the Pantry: Organize your canned goods and kitchen items into the newly accessible baskets, grouping similar items in each drawer.
17. Pastel Handled Caddies

These sweet pastel caddies offer a delightful and very practical way to store small snack packages and grab and go items. Their convenient handle makes it simple to pull the entire category off the shelf and carry it to the counter or table. Using individual containers for different types of small foods prevents them from scattering across the shelves. The opaque colors provide a clean, uniform look, hiding the potentially messy packaging of the contents.
Assigning each color a specific item, like pink for fruit snacks and green for granola bars, makes the system incredibly intuitive. This type of organization is excellent for maintaining order, especially for busy families or small kitchens where quick access is vital.
DIY Instruction: Creating Simple Grab and Go Kits
Using handled caddies makes quick preparation simple and keeps shelves tidy by containing loose items.
Materials Required
- Multiple matching plastic caddies or handled totes in various colors
- Pre cut vinyl or sticker letters/labels (or permanent marker)
- Small packaged snacks (granola bars, fruit snacks, small cookie bags)
Equipment Required
- None
DIY Instructions Step by Step
- Group Snacks: Remove all small packaged snack items from the pantry. Group them into specific categories, such as “Breakfast Bars,” “Salty Snacks,” or “Sweet Treats.”
- Assign Caddies: Match the size of the grouped items to the capacity of the caddies. Assign a category to each colored caddy.
- Label Clearly: Use the sticker letters or the permanent marker to label the front of each caddy with the corresponding category name. Ensure the writing is large and easy to read.
- Fill and Arrange: Place the sorted snacks neatly inside their designated caddies. Arrange the caddies on a pantry shelf that is easily accessible to everyone in the family, like the mid level shelves.
- Maintain: Encourage family members to grab the entire caddy when they want a snack, and to return the caddy to its spot once they are finished choosing. This keeps the remaining contents contained and the shelf tidy.
18. Hanging Mason Jars for Spices

A clever way to use the underside of a shelf is by creating hanging storage for frequently used spices or bulk goods. This system involves securing the jar lids to the shelf bottom, allowing the jars themselves to be screwed on and off. This arrangement frees up valuable vertical shelf space and keeps these ingredients close to the food preparation area. Using glass jars of a consistent size enhances the organized, clean look of the pantry.
Filling the jars with different spices and lentils creates a beautiful, rustic display while keeping everything airtight and fresh. This hack is particularly appealing for small kitchens where every inch of vertical space must be maximized. It is a wonderfully simple and effective DIY solution.
DIY Instruction: Installing Under Shelf Jar Storage
This is a creative and efficient way to store small, dry goods, utilizing space that is usually ignored.
Materials Required
- Standard metal Mason jar lids and bands (one for each jar)
- Matching glass Mason jars
- Short wood screws (must not be longer than the shelf thickness)
- Dry ingredients (spices, lentils, seeds)
Equipment Required
- Electric drill and small drill bit
- Screwdriver (or driver bit)
- Pencil
DIY Instructions Step by Step
- Select the Spot: Choose a shelf that is eye level or above the main countertop area for easy access.
- Mark the Lid: Separate the metal flat lid insert from the jar band. Place the flat metal lid on the underside of the shelf where you want the jar to hang. Use the pencil to mark two or three evenly spaced screw hole locations inside the lid.
- Drill Pilot Holes: Remove the lid and use the drill to make small pilot holes through the lid at your marked spots. Then, hold the lid up to the underside of the shelf and drill shallow pilot holes into the shelf itself. Be very careful not to drill completely through the shelf.
- Secure the Lid: Line up the lid holes with the shelf holes. Use the wood screws to firmly attach the metal lid to the underside of the shelf.
- Fill the Jars: Fill the Mason jars with your spices or dry goods. Screw the metal band securely onto the rim of the filled jar.
- Attach the Jars: Line up the filled jar (with the band screwed on) with the mounted lid, and twist the jar until it is securely screwed onto the lid that is fixed to the shelf.
19. Meal Prep Organization Baskets

The best pantries organize food not just by type, but by use. This clever system utilizes woven baskets and labels to create “kits” for specific meals or cooking activities, such as “Taco Night” or “Dinner.” Grouping all the necessary cans, spices, and mixes for a specific meal simplifies the dinner preparation process. The uniform white baskets provide a clean, classic aesthetic to the shelving.
Keeping the ingredients together in one basket eliminates searching across multiple shelves when starting a recipe. This makes grocery shopping easier, too, because you instantly see what is missing from your “kit.” This strategic organization method saves time and reduces stress, making meal planning much more manageable.
DIY Instruction: Creating Meal Kit Organization Bins
Organizing ingredients by the meal they belong to saves time and reduces clutter.
Materials Required
- Several matching woven or plastic baskets
- Chalkboard labels or adhesive white labels
- Chalk marker or permanent marker
- Ingredients for specific meals (e.g., canned beans, taco seasoning, dinner sauces)
Equipment Required
- None
DIY Instructions Step by Step
- Define Meal Kits: Choose three or four meals you frequently prepare, like “Spaghetti Night,” “Chili Fixings,” or “Quick Breakfast.”
- Gather Ingredients: Collect all the non perishable items that belong to each meal kit. For example, the “Chili Fixings” kit would include chili seasoning, canned tomatoes, and canned beans.
- Label the Baskets: Place the label of your choice on the front of the baskets. Write the meal kit name clearly on the label.
- Fill the Baskets: Neatly arrange the corresponding ingredients into their designated baskets. Ensure the items fit snugly and the basket is not too heavy to lift.
- Place on Shelves: Place the meal kit baskets back onto the pantry shelves. They can be stacked if the baskets are sturdy enough, or lined up neatly.
- Maintain the Kit: After using an item from the basket, write it on your shopping list immediately. When returning from the store, replenish the item directly into its specific meal kit basket.
20. Large Semi Opaque Storage Totes

These substantial, semi opaque storage totes are an excellent solution for corralling items that do not fit neatly onto shelves or for grouping supplies in a way that minimizes visual clutter. The slight opacity hides the messy packaging of the contents, yet the cutout handles allow easy viewing of what is generally inside. This is highly effective for storing items like kitchen linens, bulk paper goods, or backup supplies.
Using matching containers on pull out shelves, as shown, maximizes accessibility, turning a deep cabinet into a functional set of drawers. These large, sturdy containers ensure that items that might otherwise tumble over or get lost are properly contained. The simplicity of the design helps achieve that sought after minimalist and organized look.
DIY Instruction: Using Totes for Discreet Bulk Storage
For items that look messy in their original packaging, large totes provide a clean storage solution.
Materials Required
- Several matching, large plastic storage totes with cutout handles
- White labels and permanent marker
Equipment Required
- None
DIY Instructions Step by Step
- Identify Items: Determine the categories of items that need discreet storage, such as paper towels, plastic cutlery, cleaning supply backups, or small kitchen appliances.
- Assign Totes: Allocate one tote to each category, ensuring the items fit without crushing or bending.
- Label: Apply a clear, readable label to the front of each tote (e.g., “Paper Goods,” “Small Appliances,” “Cleaning Supplies”).
- Load: Place the corresponding items neatly inside the large totes. Use the cutout handles to assess the general contents if you are unsure.
- Place on Shelves: Position the totes on the pantry shelves. If using deep shelves, place a non slip mat underneath to aid in pulling the totes out. If you have pull out shelves, place the totes directly onto them.
- Access: Use the cutout handles to pull the tote forward, grab the needed item, and then slide the container back into place.
21. Built In Corner Pantry Shelving with Lip Rails

This image showcases a beautifully organized corner pantry, demonstrating how custom shelving can make every inch functional. The wooden shelves are equipped with subtle lip rails, a brilliant detail that prevents items from accidentally falling off when reaching into deeper sections. This design is particularly valuable in a corner unit, where items might otherwise be easily knocked over. Varying shelf heights accommodate tall bottles, bags of grains, and smaller spice jars, providing flexibility.
A turntable on the bottom shelf further enhances accessibility in that deep corner, bringing bulky bags of ingredients to the forefront with a simple spin. The use of clear glass jars for decanted items adds to the visual appeal and cleanliness of the entire space. This organized pantry illustrates that even awkward corners can be transformed into highly efficient storage.
DIY Instruction: Adding Lip Rails to Existing Pantry Shelves
Adding a simple lip to your shelves can significantly reduce items falling off, especially in busy or deep pantries.
Materials Required
- Thin wooden trim strips or dowels (quarter inch to half inch thick, length to match shelf width)
- Small finishing nails or wood glue
- Wood filler (optional)
- Sandpaper
- Paint or stain (to match your shelves)
Equipment Required
- Measuring tape
- Saw (if cutting trim strips)
- Hammer (if using nails)
- Clamps (if using glue)
DIY Instructions Step by Step
- Measure and Cut: Measure the exact width of each shelf where you want to add a lip rail. Cut the wooden trim strips to these precise lengths using a saw.
- Prepare the Strips: Lightly sand the cut edges of the trim strips to remove any splinters. If you are painting or staining, do so now and let them dry completely.
- Attach the Rails: Apply a thin bead of wood glue along the back of a trim strip. Position the strip flush with the front edge of a pantry shelf. If using nails, carefully hammer in a few small finishing nails, ensuring they do not protrude through the top of the shelf. If only using glue, use clamps to hold the strip in place while the glue dries, following the manufacturer’s instructions for drying time.
- Fill and Finish (Optional): Once the glue is dry or nails are secure, fill any small nail holes with wood filler. Sand smooth. If you did not paint/stain beforehand, do so now, or touch up any areas.
- Repeat for All Shelves: Continue this process for all the shelves where you want to add a protective lip.
22. Divided Drawer Organizers for Spices and Tools

Drawer organization can revolutionize how you store small jars and kitchen utensils, keeping them out of sight yet instantly accessible. This image showcases a wonderfully organized drawer using multiple white dividers. Individual compartments keep spice jars upright and categorized, preventing them from rolling around. Long, narrow sections are ideal for storing cooking tools like tongs, whisks, and spatulas, ensuring they are always neatly aligned.
The consistent use of white organizers contributes to a clean and harmonious aesthetic within the drawer. Having everything in its place drastically speeds up meal preparation, as you are not digging through a jumbled drawer. This system clearly demonstrates that even small items can achieve a high level of organization.
DIY Instruction: Customizing Drawer Dividers
Creating a customized divider system for your drawers keeps items from shifting and utilizes space efficiently.
Materials Required
- Thin balsa wood strips or sturdy foam board (about quarter inch thick)
- Wood glue or strong adhesive for foam board
- Measuring tape
- Pencil
- Non slip drawer liner (optional)
Equipment Required
- Craft knife or utility knife
- Ruler or straight edge
- Cutting mat
- Sandpaper (if using wood)
DIY Instructions Step by Step
- Measure the Drawer: Empty the drawer completely. Measure the internal width, depth, and height of the drawer.
- Plan the Layout: Determine what items will go into the drawer (e.g., spices, utensils). Sketch out a layout for your dividers on paper, considering the size of each item and the dimensions of the drawer.
- Cut Main Dividers: Cut longer strips of balsa wood or foam board to create the main perpendicular dividers that run front to back in the drawer. The height of these strips should be slightly less than the drawer height.
- Cut Cross Dividers: Cut shorter strips to fit between your main dividers, creating smaller compartments. These will run side to side.
- Assemble with Notches (Advanced): For a more custom fit, you can cut small notches halfway through the height of both the main and cross dividers, allowing them to interlock. This creates a sturdy grid. Alternatively, simply glue the cross dividers to the main dividers.
- Secure in Drawer: Once the glue is dry, place the assembled divider grid into the drawer. If desired, you can secure the entire grid to the bottom of the drawer with small dots of adhesive or place a non slip liner underneath to prevent it from sliding.
- Fill the Drawer: Place your spices, utensils, and other items into their designated compartments.
23. Breathable Wire Baskets for Produce

For fresh produce that requires air circulation, wire baskets are an excellent storage solution within a pantry. The open mesh design allows air to flow freely around items like onions, potatoes, and squash, helping to prolong their freshness. Stacking these sturdy baskets creates vertical storage, preventing produce from rolling around on shelves and getting bruised. This method helps organize bulky vegetables while keeping them visible.
Using these bins also keeps dirt and loose skins contained, making clean up much easier. The uniform appearance of the baskets creates an orderly display, which is much more appealing than scattered produce. This hack is functional and also adds a touch of rustic charm to the pantry space.
DIY Instruction: Labeling Produce Baskets
While the image shows the baskets without labels, adding labels can further enhance organization for different types of produce.
Materials Required
- Metal wire baskets (as shown)
- Chalkboard clip labels or tie on tags
- Chalk marker or permanent marker
Equipment Required
- None
DIY Instructions Step by Step
- Sort Produce: Group your produce by type: onions, potatoes, winter squash, etc.
- Assign Baskets: Decide which basket will hold which type of produce. Ensure not to overfill the baskets, as air circulation is key.
- Prepare Labels: Write the name of the produce clearly on each chalkboard clip label or tie on tag.
- Attach Labels: Clip or tie the labels to the front or side of the corresponding wire baskets. Make sure the labels are easily readable.
- Fill Baskets: Gently place the sorted produce into their designated baskets. Avoid mixing different types of produce in the same basket if they have different storage requirements (e.g., onions and potatoes should be kept separate as onions can make potatoes sprout faster).
- Place on Shelves: Position the baskets on your pantry shelves. If stacking, ensure the top basket sits securely on the one below it.
24. Clip On Hooks and Basket Dividers

Combining shelf dividers with clip on accessories creates a highly modular and flexible pantry system. The white shelf dividers are excellent for keeping items like large containers or flat boxes upright and orderly. Adjacent to this, clever clip on hooks and a small perforated basket are used to hold smaller tools and office supplies. Measuring cups, scissors, and pens are kept off the shelf, freeing up surface space.
This arrangement means that every vertical and horizontal inch is working hard for you. The small basket is handy for corralling those tiny items that easily get lost, such as bag clips or small gadgets. This hack illustrates how even seemingly insignificant spaces can become valuable storage zones with the right accessories.
DIY Instruction: Creating a Clip On Storage Station
You can easily add a clip on storage station to existing shelves for small items without permanent installation.
Materials Required
- Existing shelf dividers (as pictured, or similar)
- Small over the shelf hooks or cup hooks that clip onto the divider
- Small plastic perforated basket (with a handle or rim suitable for hanging)
- Small tools, pens, or bag clips
Equipment Required
- None
DIY Instructions Step by Step
- Place Dividers: First, position your existing shelf dividers on the pantry shelf where you need organization. Ensure they are stable.
- Attach Hooks: Take the over the shelf hooks. These usually have a flat top that slides onto a shelf and a hook that hangs down. Slide these hooks onto the top edge of your shelf divider, facing outward. Alternatively, use cup hooks that directly clip onto the side of the divider.
- Hang Basket: If your basket has a handle, hang it directly onto one of the newly installed hooks. If it has a rim, you might need two hooks to support it evenly.
- Organize Tools: Hang measuring cups, whisks, scissors, or other small, lightweight kitchen tools onto the hooks. Place pens, small notepads, or bag clips into the hanging basket.
- Adjust: Arrange the hooks and basket until everything is easily accessible and balanced on the divider. This system is completely flexible and can be reconfigured as your needs change.
25. Individual Turntables for Bottles

Small, single turntables are incredibly effective for organizing groups of bottles on a pantry shelf, especially those that are frequently accessed. Each turntable allows a cluster of olive oils, vinegars, or sauces to spin freely, bringing any bottle to the front with a gentle push. This eliminates the need to awkwardly reach into the back of a deep shelf or knock over other bottles. The white color of the turntables keeps the shelves looking bright and clean.
This method also groups similar items together, creating mini zones for specific types of ingredients, which simplifies meal preparation. Using these compact spinning trays prevents bottles from getting sticky or leaving rings directly on the shelves. It is a simple yet powerful hack for maintaining order and accessibility in your pantry.
DIY Instruction: Crafting Mini Turntables from Trays
You can create a basic turntable for lighter bottles using simple household items, though a commercial one is always more effective for spinning. This DIY is for a simple, non spinning version to group items.
Materials Required
- Round, shallow plastic or metal trays (one for each group of bottles)
- Non slip shelf liner
- Labels and marker (optional)
Equipment Required
- Scissors
DIY Instructions Step by Step
- Select Trays: Choose trays that are sturdy and have a slight lip to keep bottles contained. Ensure the diameter fits comfortably on your pantry shelves.
- Cut Non slip Liner: Cut a circle of non slip shelf liner to fit snugly inside the bottom of each tray. This prevents bottles from sliding around when you move the tray.
- Group Bottles: Collect similar bottles together, such as all vinegars, all cooking oils, or all Asian sauces.
- Load the Trays: Place the grouped bottles onto their assigned trays. Try not to overcrowd a tray; leave a little space for easy handling.
- Label (Optional): If you wish to specify contents, apply a label to the front of each tray (e.g., “Vinegars,” “Cooking Oils”).
- Place on Shelves: Position the trays neatly on your pantry shelves. When you need a bottle, you can slide the entire tray forward, choose your item, and then slide the tray back, keeping the other bottles in order.
26. Pull Out Shelf for Appliances or Cookbooks

A dedicated pull out shelf is a luxurious addition to any pantry, offering versatile storage for items that benefit from easy access or an occasional temporary surface. This sleek white shelf on smooth gliding tracks can hold a collection of cookbooks, small appliances, or even serve as a temporary workspace for measuring ingredients. It keeps items neatly stored away when not in use, yet brings them forward effortlessly when needed.
The ability to pull this shelf out fully means you avoid rummaging and can see everything at a glance. It is an intelligent way to utilize dead space, especially between two wider shelves. This feature truly enhances the functionality of a pantry, making it more than just a storage unit.
DIY Instruction: Installing a Simple Pull Out Shelf
Adding a single pull out shelf can significantly improve accessibility in a deep pantry cabinet.
Materials Required
- Pre cut wooden or laminate shelf board (to fit your cabinet width and depth)
- Two full extension drawer slides (rated for the weight you intend to store)
- Small wood screws (appropriate length for slides and shelf)
- Measuring tape and pencil
Equipment Required
- Electric drill and drill bits
- Level
- Screwdriver
DIY Instructions Step by Step
- Measure and Cut: Measure the width and depth of your cabinet opening carefully, accounting for hinges. Cut your shelf board to fit snugly within this opening, ensuring enough clearance for the slides.
- Separate Slides: Drawer slides usually come in two pieces: one attaches to the cabinet wall, the other to the shelf. Separate these pieces according to the manufacturer’s instructions.
- Mount Cabinet Slides: Position one part of the slide on the inside of the cabinet wall at your desired shelf height. Use the level to ensure it is perfectly straight. Mark screw holes with a pencil. Repeat for the other side of the cabinet, ensuring both slides are aligned horizontally.
- Drill and Secure: Drill small pilot holes at your marked positions. Screw the cabinet part of the slides firmly into the cabinet walls.
- Mount Shelf Slides: Attach the other parts of the drawer slides to the sides of your shelf board. Position them about one eighth of an inch from the bottom edge of the shelf. Make sure they are aligned evenly from front to back.
- Insert the Shelf: Carefully align the shelf slides with the cabinet slides. Gently push the shelf into the cabinet until it fully engages and clicks into place. Test the shelf by pulling it in and out to ensure smooth operation.
27. Reusable Color Coded Storage Bags with Clips

These reusable, heavy duty storage bags are a game changer for keeping snacks fresh and organized, especially when paired with color coded clips. Each color can represent a different snack category, making it simple to identify contents at a glance. The sturdy clips create a better seal than traditional zip top bags, enhancing freshness and preventing spills. Using these bags reduces reliance on single use plastics, making them an eco friendly option.
The ability to write on the white section of each bag is practical for labeling contents or expiration dates. This hack provides a simple, visual system for managing smaller, loose items within larger bins or on shelves. It is a fantastic method for maintaining order and extending the life of your treats.
DIY Instruction: Setting Up a Color Coded Snack Bag System
This system uses color coding for easy identification and promotes reusability, reducing waste.
Materials Required
- Reusable, heavy duty stand up storage bags (various sizes)
- Color coded bag clips or labels (e.g., red clips for salty, yellow for sweet)
- Permanent marker
- Snack items
Equipment Required
- None
DIY Instructions Step by Step
- Group Snacks: Gather all your small, packaged snacks. Categorize them into groups, such as “Salty Snacks” (chips, pretzels), “Sweet Treats” (cookies, candy), “Healthy Bites” (nuts, dried fruit), and “Breakfast Bars.”
- Assign Colors: Assign a specific clip color to each snack category. For example, red clips for “Salty Snacks,” yellow for “Sweet Treats,” blue for “Healthy Bites,” and so on.
- Load Bags: Place the individual snack packages into the reusable bags. Do not overfill them.
- Seal and Clip: Seal each bag tightly. Then, attach the corresponding color coded clip to the top of the bag. If your bags have a white writeable area, label the contents for extra clarity.
- Store: Place the color coded bags into larger pantry bins, drawers, or directly onto shelves. The consistent system makes it easy to grab the right snack.
- Maintain: When a bag is empty, wash and dry it for reuse. Always refer to your color code when putting new snacks away.
28. Daily Meal Prep Bins

Organizing your pantry with daily bins is a structured way to plan meals, reducing decision fatigue and ensuring you have everything you need for each day. Assigning a bin for “Monday,” “Tuesday,” and so on, means you can batch prep by organizing ingredients for an entire week. These small, sturdy bins prevent items from getting lost or mixed up, especially for smaller ingredients or single serving items.
This system is particularly helpful for busy individuals or families with specific dietary needs. It streamlines grocery shopping and cooking, as all the necessary components for a particular day’s meals are neatly gathered. The uniform white bins provide a clean, organized appearance that promotes a sense of order and control over your meal planning.
DIY Instruction: Creating Daily Meal Planning Bins
This system simplifies meal planning and grocery shopping by pre grouping ingredients by day.
Materials Required
- Seven identical small plastic baskets or bins (one for each day of the week)
- White labels or contact paper
- Permanent marker
Equipment Required
- Scissors
DIY Instructions Step by Step
- Plan Your Week: Sit down and plan your meals for the upcoming week. List out the non perishable ingredients needed for each day’s dinner or lunch.
- Label Bins: Cut out seven labels. Write the days of the week, “Monday” through “Sunday,” clearly on each label. Attach them to the front of the respective bins.
- Gather Ingredients: Collect all the non perishable items (e.g., canned goods, pasta, spices, mixes) for Monday’s meal and place them into the “Monday” bin. Repeat for each day of the week.
- Place on Shelves: Arrange the labeled bins in order on your pantry shelves. Keep them at an accessible height.
- Shopping List: As you fill each bin, note down any perishable ingredients (fresh vegetables, meat) you will need to buy to complete that day’s meal. This forms your detailed grocery list.
- Daily Retrieval: Each day, simply grab the bin corresponding to that day’s meal. When you use an item, note it if you need to replenish it for next week’s meal plan.
29. Deep Pull Out Wooden Drawers for Cookware

Integrating deep wooden pull out drawers into a pantry or kitchen cabinet is a sophisticated and highly functional approach to organizing bulky cookware and serving dishes. These drawers move smoothly on full extension slides, bringing heavy pots, pans, and bowls completely out into view. This eliminates the need to lift or stack, which can often lead to scratches or breakages. The warm wood tone adds a touch of elegance to the kitchen.
Having designated homes for larger items prevents a cluttered cabinet bottom and makes retrieving the right piece of cookware effortless. This type of organization is particularly useful for deep base cabinets where items often get lost in the back. It transforms awkward storage into highly accessible, organized space.
DIY Instruction: Installing a Deep Pull Out Wooden Drawer
Installing a custom pull out wooden drawer requires precision but offers immense storage benefits for heavy items.
Materials Required
- Pre made wooden drawer box (sized to fit your cabinet)
- Two heavy duty full extension drawer slides (rated for substantial weight)
- Small wood screws (appropriate length)
- Measuring tape and pencil
Equipment Required
- Electric drill and drill bits
- Level
- Screwdriver
DIY Instructions Step by Step
- Accurate Measurement: Measure the internal width, depth, and height of your cabinet opening with extreme precision. Account for any hinges or face frame. The wooden drawer box must fit with clearance for the slides.
- Separate Slides: Take the two heavy duty drawer slides and separate them into their two component parts: one for the cabinet, one for the drawer.
- Mount Cabinet Slides: Position the cabinet part of one slide on the inside wall of the cabinet at your desired height. Use the level to ensure it is perfectly straight. Mark screw holes with a pencil. Repeat for the opposite cabinet wall, making sure both slides are precisely parallel and level.
- Drill and Secure: Drill pilot holes at the marked positions. Securely screw the cabinet parts of the slides firmly into the cabinet walls using the appropriate screws. Stability is crucial for a smooth sliding action.
- Mount Drawer Slides: Attach the other parts of the drawer slides to the exterior sides of the wooden drawer box. Position them an eighth to a quarter of an inch from the bottom edge of the drawer. Ensure they are straight and aligned with each other.
- Insert the Drawer: Carefully align the drawer tracks with the cabinet tracks. Slide the wooden drawer into the cabinet until it engages fully. Test the drawer by pulling it in and out, checking for smooth operation and stability.
30. Tall Rotating Spice Tower

A tall, multi tiered rotating spice tower is an ingenious solution for organizing a large collection of spices in a compact footprint. This vertical design takes up minimal counter or shelf space while offering an impressive storage capacity. Each tier rotates independently, bringing any spice jar within easy reach. The uniform jars create a visually cohesive and clean look, making it simple to quickly find the desired seasoning.
This type of organizer is a space saver and a time saver, eliminating the frustration of rummaging through a cluttered spice drawer or cabinet. It keeps all your spices fresh, visible, and readily accessible, streamlining your cooking process. The robust design ensures stability, even when fully loaded with jars.
DIY Instruction: Assembling a Rotating Spice Tower
Most spice towers are purchased as complete units, but if you have a kit or wish to understand how they work, here are the general assembly steps.
Materials Required
- Rotating spice tower kit (includes base, central rod, multiple rotating tiers, and small spice jars)
Equipment Required
- Screwdriver (if any assembly requires screws)
DIY Instructions Step by Step
- Unpack and Identify: Carefully remove all components from the packaging. Lay out the base, central support rod, multiple round tiers, and individual spice jars.
- Assemble the Base: Attach the central support rod securely to the base. This might involve screwing it in or a simple click and lock mechanism.
- Add the Tiers: Slide the rotating tiers onto the central support rod, starting from the bottom. Most designs allow you to adjust the height of each tier, so consider the height of your spice jars and leave enough clearance.
- Secure Tiers: Once the desired height is achieved for each tier, secure it in place. This could involve small clips, screws, or simply tightening a collar around the rod. Ensure each tier can rotate smoothly without snagging.
- Fill Spice Jars: Fill the provided uniform spice jars with your various spices. Label each jar clearly on the lid or side.
- Load the Tower: Arrange the filled spice jars onto the rotating tiers. Group similar spices together, or organize them alphabetically for even easier access. Test the rotation of each tier.
31. Stacking Clear Pantry Bins with Tall Cylinders

This organized pantry illustrates a smart way to store dry goods using a combination of clear, stackable containers and tall, slim cylinders. The rectangular bins, filled with various grains and nuts, stack neatly, maximizing vertical space. Their uniform appearance creates a streamlined look. Alongside these, the slender, clear cylinders are a creative solution for taller items like pasta, breadsticks, or even snacks that are often awkward to store.
The transparency of all these containers is a key feature, allowing for instant identification of contents and easy monitoring of stock levels. This prevents you from overbuying and helps you use older ingredients first. This system is not just about aesthetics; it is deeply functional, maintaining freshness and keeping your pantry clutter free.
DIY Instruction: Decanting into Clear Stackable and Cylindrical Containers
Decanting dry goods into a mix of rectangular and cylindrical containers helps maximize space and visibility.
Materials Required
- Various clear, stackable rectangular containers with airtight lids
- Tall, clear cylindrical containers with airtight lids
- Labels (removable) and permanent marker or label maker
- Dry goods (grains, nuts, pasta, lentils, coffee beans)
Equipment Required
- Funnel or large scoop (for decanting)
DIY Instructions Step by Step
- Clean and Dry: Thoroughly wash and dry all containers before use. This prevents moisture or residue from compromising your dry goods.
- Label First: Before filling, attach a label to each container indicating its contents and the original expiration date. This ensures you keep track of freshness.
- Fill Rectangular Bins: For items like oats, flour, or larger nuts, use the rectangular bins. Use a funnel or scoop to carefully pour the dry goods into these containers. Ensure the lids fit snugly and are airtight. Stack these bins on your shelves.
- Fill Cylindrical Containers: For longer items such as spaghetti, linguine, or items that benefit from a vertical presentation like coffee beans or decorative lentils, use the tall cylindrical containers. Pour the contents in, ensuring the lid provides an airtight seal.
- Strategic Placement: Arrange the filled containers strategically in your pantry. Place the stackable rectangular bins on the main shelves. The tall cylindrical containers can fit into narrower vertical spaces between stacks or at the ends of shelves, maximizing every bit of height.
- Regular Inventory: The transparent nature of these containers makes it easy to see how much product remains, helping you maintain an accurate inventory and plan your grocery runs efficiently.
32. Over the Door Hanging Recycling Bin

An innovative way to add a recycling station without sacrificing floor space is by using an over the door hanging bin. This particular bin, adorned with a recycling symbol, is explicitly designed for convenience. It provides an immediate collection point for cardboard boxes, plastic wrappers, and other pantry related recyclables. The sturdy over the door hooks make installation effortless, requiring no tools or permanent modifications.
Placing the bin inside the pantry door keeps it hidden from view, contributing to a tidy kitchen aesthetic. This hack is especially useful for small kitchens or those aiming to integrate recycling seamlessly into their daily routine. It helps minimize clutter and promotes eco friendly habits right where waste is often generated.
DIY Instruction: Creating a Simple Over the Door Recycle Bin
Repurposing an over the door hanger for a lightweight recycle bin is a quick solution for small spaces.
Materials Required
- Over the door hanger (with hooks designed for interior doors)
- Small, lightweight plastic bin (fits within door dimensions)
- Small trash bags or grocery bags (for lining the bin)
- Recycle symbol sticker (optional)
Equipment Required
- None
DIY Instructions Step by Step
- Check Fit: Ensure the over the door hanger fits securely on your pantry door without interfering with opening or closing. Also, make sure the plastic bin will hang stably from the hanger’s hooks.
- Attach Hanger: Place the over the door hanger hooks over the top edge of your pantry door. Test that it is secure.
- Insert Liner: Line the plastic bin with a small trash bag or repurposed grocery bag.
- Hang the Bin: Place the handle or rim of the plastic bin onto the hooks of the over the door hanger. Make sure it hangs straight and is stable.
- Add Symbol (Optional): If you want to clearly designate it for recycling, apply a recycle symbol sticker to the front of the bin.
- Collect and Empty: Use the bin for lightweight recyclables like cardboard boxes from snacks or dry goods. Regularly empty the bin to prevent it from becoming too heavy for the hanger.
33. Small Snack Bins with Picture Labels

This pantry masterfully uses small, uniform bins with charming picture labels to organize individual snack portions. The visual labels are particularly helpful for children or anyone who prefers a quick glance over reading text. Each bin holds a specific type of snack, preventing a chaotic mix of bags and boxes. The consistent white color of the bins keeps the overall pantry aesthetic clean and harmonious.
This system encourages independence, as family members can easily identify and grab their desired snack. It also assists with inventory; it is simple to see which snacks are running low. This detailed approach to snack organization saves time, reduces waste, and maintains order on the pantry shelves.
DIY Instruction: Making Picture Labeled Snack Bins
Picture labels are wonderful for making a pantry accessible to all ages and simplifying snack time.
Materials Required
- Multiple small, identical white plastic bins
- Printable labels with picture icons (or draw them yourself)
- Clear adhesive tape or laminate sheets
- Snack items
Equipment Required
- Printer (if printing icons)
- Scissors
DIY Instructions Step by Step
- Categorize Snacks: Sort your individual snack items into groups (e.g., crackers, cookies, fruit snacks, small candy bars).
- Create Picture Icons: Find simple, clear clip art images that represent each snack category. Print these icons onto paper. Alternatively, you can hand draw them onto small pieces of cardstock.
- Prepare Labels: Cut out each picture icon. For durability, cover both sides of the paper icon with clear adhesive tape or run it through a laminator.
- Attach Labels: Adhere each picture label to the front of a corresponding white plastic bin. You can use strong double sided tape or glue.
- Fill Bins: Place the sorted snack items into their designated, picture labeled bins.
- Arrange on Shelves: Position the bins on your pantry shelves. Keep them at a height where everyone, including children, can easily see the pictures and access their chosen snack. This system encourages tidiness and helps everyone understand where items belong.
34. Over the Door Vertical Recipe Organizer

A smart way to keep recipes and meal plans accessible without cluttering countertops is to use an over the door vertical organizer. This clear, tiered system displays multiple recipe cards, printouts, or magazine clippings, keeping them visible and protected. It is particularly useful for storing recipes that are frequently used or for weekly meal plans, putting them right where you often prepare food. The transparent pockets ensure quick identification.
This space saving solution works especially well in smaller pantries where flat surface area is limited. It means your favorite dishes are always at your fingertips, organized and ready to inspire your next meal. This simple hack transforms an unused door space into a functional recipe command center.
DIY Instruction: Creating a Door Mounted Recipe Holder
You can make a simple version of this using clear plastic sheet protectors and adhesive hooks.
Materials Required
- Several clear plastic sheet protectors (letter size)
- Strong double sided adhesive hooks or strips
- Your favorite recipes printed on paper or recipe cards
- Labels and permanent marker (optional, for categories)
Equipment Required
- None
DIY Instructions Step by Step
- Select Door Area: Choose a section of your pantry door where the organizer will not interfere with hinges or door closure.
- Prepare Recipes: Insert each recipe into a clear plastic sheet protector.
- Plan Placement: Hold the first sheet protector up to the door. Decide on the vertical spacing between each recipe, allowing enough overlap to maximize space but still read titles.
- Attach Hooks/Strips: Peel the backing from an adhesive hook or strip. Press it firmly onto the back of the top edge of the first sheet protector. Then, press this onto the door.
- Add More Recipes: Repeat the process, positioning subsequent recipe sheets below the first, overlapping slightly so only the top of each sheet protector shows. You can also place hooks directly on the door and hang the sheet protectors from the top hole.
- Organize and Access: Arrange your recipes by category (e.g., “Dinner Ideas,” “Desserts”) or by weekly meal plan. This makes grabbing a recipe quick and effortless.
35. Labeled, Uniform Container Storage

This image perfectly illustrates the power of uniformity and clear labeling in pantry organization. A collection of identical, clear containers, each with a neat white label, creates a harmonious and efficient storage system. The various shapes and sizes of the containers are chosen to accommodate different ingredients, from grains and nuts to dried fruit and baking supplies. The transparency of the material allows for instant identification of contents and quantities.
Each label clearly states the item inside, eliminating guesswork and ensuring everything is returned to its proper place. This level of organization not only looks impressive but also extends the freshness of food by providing airtight storage. This system is truly a foundation for a functional, frustration free pantry.
DIY Instruction: Creating Consistent Labeled Containers
Achieving this look involves careful labeling and consistent container choice.
Materials Required
- Assortment of clear, airtight food storage containers (various sizes, but aiming for a cohesive look)
- White contact paper or printable white labels
- Permanent marker or label maker
- Dry pantry goods (pasta, grains, cereal, baking ingredients)
Equipment Required
- Scissors
- Ruler (for straight labels)
DIY Instructions Step By Step
- Gather Containers: Collect all your chosen clear storage containers. Ensure they are clean and completely dry.
- Decant and Fill: Carefully pour your dry pantry goods into the appropriate sized containers. Choose a container that best fits the quantity of each item, minimizing empty space. Secure the airtight lids firmly.
- Prepare Labels: Cut your white contact paper or printable labels into uniform rectangles. Aim for a consistent size that fits well on the front of each container.
- Write Labels: Using a permanent marker or label maker, write the name of each ingredient clearly on a label. Consistency in font and size enhances the neat appearance. For extra information, you can include the expiration date from the original packaging on a smaller separate label or on the back.
- Apply Labels: Carefully peel and adhere each label to the front of its corresponding container. Use a ruler to ensure the labels are straight and aligned, creating a visually appealing, uniform look.
- Arrange and Maintain: Place the labeled containers back onto your pantry shelves, grouping similar items together. The clear containers make it easy to see when an item is running low.
36. Clear Handled Caddies for Diverse Items

These clear, handled caddies offer an incredibly versatile solution for organizing a wide array of pantry items. From bottled drinks and cooking oils to bags of nuts and fresh produce, these containers keep everything neatly contained. The clear design ensures complete visibility, making it easy to identify contents at a glance. The built in handles are a key feature, allowing you to pull out the entire caddy with ease, especially from deeper shelves.
This method prevents items from toppling over and becoming a jumbled mess. Grouping similar products in each caddy creates logical zones within your pantry, streamlining both retrieval and restocking. Whether for small packages, condiments, or even a collection of fruits, these caddies are a powerful tool for maintaining order.
DIY Instruction: Creating Grab and Go Caddy Kits
Using clear handled caddies is a simple way to group items and make them easily portable.
Materials Required
- Multiple clear plastic caddies with handles (various sizes to fit different items)
- Non slip shelf liner (optional, for placing under caddies)
- Labels and permanent marker (optional, for specific categories)
Equipment Required
- Scissors (if cutting shelf liner)
DIY Instructions Step by Step
- Assess Items: Identify groups of items that could benefit from being contained together. Examples include sauces, bottled drinks, snack bags, or fresh produce (like apples or citrus).
- Choose Caddy Size: Select a caddy size that comfortably fits the items you want to group. Ensure it is not too heavy to lift when full.
- Fill Caddies: Neatly arrange the chosen items into their respective clear caddies. Try not to overfill them, allowing for easy removal of individual items.
- Label (Optional): If you are creating specific categories, like “Condiments” or “Juices,” apply a small, clear label to the front of the caddy.
- Place on Shelves: Position the filled caddies on your pantry shelves. If using the caddies for heavier items, ensure the shelf can support the weight.
- Easy Access: When you need an item, simply pull the entire caddy forward using its handle. Select your item, and then slide the caddy back into place, keeping the rest of the contents organized.
37. Vertical Stacking Test Tube Spice Rack

This striking vertical display of clear test tube like containers filled with various beans, lentils, and candies is both highly decorative and functional. While it appears as a commercial display, the principle applies to creative spice storage. Stacking these slim, transparent tubes allows for a vast collection of small ingredients to be stored in a very compact, space saving manner. The visual appeal of the different colors and textures creates a beautiful, organized mosaic.
This type of vertical storage is extremely useful for small quantities of items, such as specialized spices, baking decorations, or individual portions of nuts. It keeps everything fresh and easily identifiable, while transforming a simple shelf into an artistic showcase of your pantry’s contents.
DIY Instruction: Creating a Vertical Tube Spice/Seed Display
Replicating this look for small amounts of dry goods requires specific tubes and a way to secure them. This DIY focuses on a simpler, stable stacking method.
Materials Required
- Multiple clear, uniform plastic or glass tubes with airtight caps (test tubes or craft storage tubes)
- Labels and permanent marker
- Small, dry ingredients (spices, seeds, sprinkles, decorative lentils)
- Small circular non slip pads (optional, for stacking stability)
Equipment Required
- Funnel (optional, for filling small tubes)
DIY Instructions Step By Step
- Clean and Dry: Ensure all tubes and caps are perfectly clean and dry.
- Fill Tubes: Use a small funnel or a very careful hand to fill each tube with a different spice, seed, or small dry ingredient. Do not overfill; leave a little room for the cap.
- Cap and Label: Securely close each tube with its airtight cap. Apply a small, clear label to the bottom or side of each tube, indicating the contents.
- Prepare for Stacking: If your tubes do not have flat, interlocking tops and bottoms, you can place a tiny circular non slip pad on the top of each cap before stacking. This adds friction and stability.
- Stack Vertically: Carefully stack the tubes vertically, building rows of colors and textures. Ensure the stack is stable. For added stability, you could place the entire collection within a narrow, upright box or a tray with a lip.
- Display and Access: Place your organized collection on a pantry shelf where it is both visible and safe from being accidentally knocked over. When you need a spice, carefully remove the relevant tube.
38. Decanted Staples in Large Glass Jars

This pantry embodies a classic, elegant approach to dry goods storage using large, clear glass jars. Decanting everyday staples like flour, sugar, and various grains into these uniform vessels creates an immediate sense of order and cleanliness. The transparency of the glass allows you to quickly assess quantities, preventing those annoying mid baking surprises. The different sizes of the jars accommodate varying volumes, maintaining a cohesive look.
Using clamp top jars for some items provides an extra layer of airtight freshness. This method not only keeps your ingredients in top condition, protecting them from pests and moisture, but also transforms ordinary food items into a visually appealing display. This traditional hack brings both beauty and practicality to your pantry.
DIY Instruction: Decanting into Glass Jars for Aesthetic and Function
Using matching glass jars for dry goods creates a clean, elegant look and preserves freshness.
Materials Required
- Assortment of clear glass jars with airtight seals (clamp top or screw top)
- Dry ingredients (flour, sugar, pasta, grains, cereals)
- Labels (optional, but recommended for similar looking items) and permanent marker
Equipment Required
- Large scoop or funnel (for filling)
DIY Instructions Step by Step
- Clean and Dry: Ensure all glass jars and their lids are sparkling clean and completely dry before you begin. Moisture is the enemy of dry goods.
- Select Jar Size: Choose a jar size that closely matches the quantity of the ingredient you are decanting. Leaving too much empty space can sometimes affect freshness.
- Fill Jars: Carefully pour or scoop your dry ingredients into the chosen glass jars. If you have a funnel, it helps prevent spills.
- Seal Tightly: Secure the lids firmly, ensuring the airtight seal is properly engaged. For clamp top jars, make sure the clamp mechanism is fully closed.
- Label (Optional but Recommended): While items are visible, some ingredients look similar (e.g., different types of sugar or flour). Apply a discreet label to the back or bottom of the jar with the exact contents and the original expiration date.
- Arrange on Shelves: Place the filled, sealed jars neatly on your pantry shelves. Group similar items together. The clear glass will make your pantry look brighter and much more organized.
39. Slim Vertical Magazine File Holders

These slim, vertical magazine file holders are a genius, often overlooked solution for organizing flat, awkward items in the pantry. Instead of letting thin boxes of foil, plastic wrap, or plastic bags lay flat and get buried, these holders keep them upright and easily accessible. The compact design takes up minimal shelf space, maximizing vertical storage. Their opaque sides hide branding, contributing to a cleaner visual.
This hack is especially useful for items that tend to fall over or get lost in a pile, such as baking liners, small placemats, or even recipe booklets. Labels on the front of each holder ensure you can quickly identify the contents. This simple addition transforms cluttered piles into neat, categorized sections.
DIY Instruction: Repurposing Magazine Files for Pantry Storage
Magazine file holders are versatile and can be repurposed to organize many narrow, upright pantry items.
Materials Required
- Two to four sturdy magazine file holders (cardboard or plastic)
- Labels and permanent marker
- Items for storage (foil boxes, plastic wrap, plastic bags, small bags of chips)
Equipment Required
- None
DIY Instructions Step by Step
- Identify Items: Collect all your thin, tall items that tend to fall over or get messy on shelves. Common examples are boxes of aluminum foil, plastic wrap, wax paper, parchment paper, and even upright bags of snacks like chips or marshmallows.
- Prepare Holders: If your magazine file holders are plain, you can decorate them if you wish. Ensure they are clean and dry.
- Label: Apply a clear label to the front of each magazine file holder. Label them according to the contents, such as “Wraps & Bags,” “Baking Aids,” or “Snack Bags.”
- Fill Vertically: Place the identified items vertically inside the magazine file holders. This keeps them upright and prevents them from getting crushed or lost. For plastic bags, fold them neatly before placing them inside.
- Place on Shelves: Arrange the filled magazine file holders neatly on your pantry shelves. They are particularly effective when placed on deeper shelves, as they bring items to the front.
- Easy Access: When you need an item, simply pull the entire magazine file holder forward slightly, grab what you need, and slide it back into place.
40. Motion Sensor LED Pantry Lighting

Installing motion sensor LED lights inside your pantry is a brilliant hack for better visibility and a more pleasant experience. These battery operated strips illuminate dark corners and deep shelves instantly when you open the door. Good lighting helps you quickly find what you need, prevents items from getting lost, and makes restocking much easier. The slim profile of these lights means they take up no valuable shelf space.
This practical addition eliminates shadows and brightens every shelf, showcasing your organized pantry. It is an especially useful solution for pantries without built in lighting or for those that need a little extra glow. This small improvement makes a huge difference in the functionality and appearance of your pantry.
DIY Instruction: Installing Battery Operated LED Strip Lights
Adding battery operated LED lights is a simple, non permanent way to brighten your pantry.
Materials Required
- Battery operated LED strip lights with motion sensor (usually comes with adhesive backing)
- AA or AAA batteries (check light requirements)
- Rubbing alcohol and a clean cloth
Equipment Required
- Measuring tape
- Scissors (if lights are cuttable)
DIY Instructions Step by Step
- Clean Surfaces: Before applying, clean the underside of your pantry shelves or the inside walls where you plan to install the lights. Use rubbing alcohol on a clean cloth to ensure the surface is free of dust and grease, which helps the adhesive stick better. Allow to dry completely.
- Measure and Plan: Determine where you want the lights to go. You can install them horizontally under each shelf, or vertically along the inside door frame. Measure the lengths needed. Some LED strips are cuttable at marked intervals.
- Insert Batteries: Open the battery compartment of each light unit and insert the required batteries. Test the lights to ensure they work.
- Peel and Stick: Carefully peel the adhesive backing from the LED light strip. Press the strip firmly onto the chosen clean surface. Apply firm, even pressure for a few seconds to ensure good adhesion.
- Position Sensor: If your light has a separate motion sensor, position it where it will detect movement when the pantry door opens. This is often near the front edge of a shelf or just inside the door frame.
- Test and Adjust: Close the pantry door, wait a moment for the lights to turn off, then open it to test the motion sensor activation. Adjust the sensor’s position if necessary to ensure reliable activation.
41. Magnetic Wall Mounted Spice Racks and Shelves

This kitchen corner employs a highly efficient and modern wall mounted organization system. Magnetic spice racks keep frequently used spices right at your fingertips, freeing up drawer and cabinet space. Below these, small hooks provide a convenient spot for hanging measuring spoons, whisks, or even kitchen towels. Clear acrylic shelves with a sleek metal railing offer additional storage for larger spice containers, seasoning packets, or small bottles, keeping them visible and secure.
The textured gray background contrasts beautifully with the transparent organizers, creating a clean and contemporary look. This modular system can be customized to fit any wall space, making it ideal for small kitchens where vertical storage is paramount. It transforms a bare wall into a functional and stylish storage hub.
DIY Instruction: Installing Magnetic Spice Racks and Wall Shelves
This DIY focuses on installing a magnetic strip for spices and small floating shelves for other items.
Materials Required
- Magnetic knife strip (or magnetic spice rack)
- Small floating shelves (with brackets or adhesive backing)
- Wall anchors and screws (if not adhesive)
- Spices in magnetic tins or small jars
- Small hooks (for hanging utensils)
- Measuring tape and pencil
Equipment Required
- Electric drill and drill bits
- Level
- Screwdriver
DIY Instructions Step by Step
- Plan Layout: Decide on the arrangement. Typically, the magnetic spice rack goes at eye level, with shelves above or below. Use your measuring tape and pencil to mark the desired placement for each item.
- Install Magnetic Strip: Hold the magnetic strip against the wall at your marked location. Use a level to ensure it is straight. Mark the screw holes. Drill pilot holes if necessary, insert wall anchors, and then screw the magnetic strip firmly to the wall.
- Install Shelves: For the floating shelves, follow the manufacturer’s instructions. If they have brackets, mark and drill holes, insert anchors, and secure the brackets. Then, attach the shelf. If they are adhesive, clean the wall surface thoroughly with rubbing alcohol, peel the backing, and press firmly into place.
- Add Hooks: If using individual hooks, simply screw them into the wall (with anchors if needed) or attach adhesive hooks in a convenient spot for hanging utensils.
- Organize: Place your spices (in magnetic tins or small jars that can stick to the strip) on the magnetic rack. Arrange other spices or packets on the shelves. Hang small utensils or keys on the hooks.
42. Vertical Tube Storage for Dry Goods

This pantry system embraces verticality with an impressive collection of tall, clear cylindrical containers, transforming a standard shelf into a visually stunning and highly organized display. Each tube holds a different dry ingredient, from pasta and grains to lentils and flours, creating a beautiful mosaic of textures and colors. The uniform design of the containers maximizes storage density, allowing for a large quantity of goods to be stored in a compact space.
The transparency of the containers is key here, providing instant visibility of all contents and helping with quick identification and inventory management. This type of storage is particularly effective for small kitchens or for those who appreciate a clean, minimalist aesthetic. It elevates everyday ingredients into an artful and functional pantry solution.
DIY Instruction: Decanting into Tall Cylindrical Pantry Containers
Using tall, uniform cylindrical containers is ideal for maximizing vertical space and creating a sleek look.
Materials Required
- Numerous clear, tall cylindrical containers with airtight lids (all matching in design)
- Labels (optional, but useful for similar looking items) and permanent marker
- Various dry pantry goods (pasta, rice, lentils, beans, flour, sugar)
Equipment Required
- Funnel or large scoop (for ease of filling)
DIY Instructions Step by Step
- Clean All Containers: Thoroughly wash and completely dry all cylindrical containers and their lids. Any moisture can spoil dry goods.
- Choose Contents: Decide which dry goods will go into each container. These containers are excellent for long pasta, various grains, or smaller bulk items.
- Fill Carefully: Using a funnel or scoop, carefully pour each dry ingredient into its assigned container. Fill to a level that allows the lid to seal without compressing the contents.
- Seal Tightly: Securely attach the airtight lids to each container. Ensure a good seal to maintain freshness and keep pests out.
- Label (Optional): While contents are visible, labeling can be helpful for specific varieties (e.g., “Basmati Rice” vs. “Jasmine Rice”). Place a small, discreet label to the bottom or back of the container, including the original expiration date.
- Arrange on Shelves: Place the filled cylindrical containers side by side on your pantry shelves. Their uniform height and shape create a visually appealing and highly efficient storage solution, maximizing vertical space.
43. Modular Cubby Organizers for Small Items

This pantry utilizes an advanced modular system of cubby organizers to meticulously categorize and contain small items. Each cubby is a clear compartment, perfect for individual snacks, baking decorations, small bags of nuts, or even single serving packets. The stacked units create a cohesive “pigeonhole” effect, allowing for extreme organization and easy visual inventory. The transparency of the containers ensures that every item is visible at a glance.
This system is particularly effective for minimizing clutter and preventing small items from getting lost in a larger bin. By grouping similar items into their own little homes, the pantry becomes incredibly tidy and functional. It is a fantastic solution for those who appreciate micro organization and want to make the most of every inch of shelf space.
DIY Instruction: Creating a Modular Cubby System with Small Clear Boxes
You can create a similar modular cubby system using small, clear, stackable containers.
Materials Required
- Numerous small, clear plastic containers (all matching in size, designed to stack)
- Labels (optional, for specific contents) and permanent marker
- Small snack bags, single serving items, baking sprinkles, nuts, small craft supplies (if applicable)
Equipment Required
- None
DIY Instructions Step by Step
- Identify Small Items: Gather all the small, loose items in your pantry that tend to create clutter. These might be individual snack bags, baking decorations, tea bags, or small packets.
- Categorize and Assign: Group these small items into distinct categories. Decide which group will go into each small clear container.
- Fill Containers: Neatly place the categorized items into their assigned small clear containers. Try not to overfill them to maintain a tidy appearance.
- Label (Optional): If contents are not immediately obvious or if you have many similar items, apply a small, clear label to the front of each container (e.g., “Sprinkles,” “Chocolate Chips,” “Fruit Snacks”).
- Stack and Arrange: Arrange the filled containers into a cubby like structure on your pantry shelves. If they are designed to stack, build vertical columns. If not, simply line them up tightly side by side.
- Maintain: The clear nature of the containers makes it easy to see when an item is running low, prompting you to replenish. The individual compartments keep everything orderly.
44. Strategic Back Stock Storage

This pantry showcases a brilliant strategy for managing dry goods, separating “working stock” from “back stock” using a combination of opaque and clear containers. Large, opaque bins are used for bulk back stock of items like flour or sugar, keeping them out of immediate view. Alongside these, clear, smaller containers hold the “working stock” that is currently in use, allowing for easy monitoring of quantities. This system reduces visual clutter and prevents overbuying.
The labels on the clear containers clearly indicate their purpose, further streamlining the organization process. This approach is highly practical for households that buy in bulk but want to maintain a tidy everyday pantry. It ensures you always know how much you have, when to restock, and where everything belongs.
DIY Instruction: Setting Up a Working and Back Stock System
This system helps prevent overbuying and keeps your everyday pantry tidy by separating current use items from extras.
Materials Required
- Large, opaque storage bins (for back stock)
- Smaller, clear airtight containers (for working stock)
- Labels and permanent marker or label maker
- Bulk dry goods (flour, sugar, rice, pasta)
Equipment Required
- Funnel or scoop
DIY Instructions Step by Step
- Identify Bulk Items: Determine which dry goods you typically buy in bulk (e.g., a 25lb bag of flour, large bags of rice).
- Designate Containers: Assign the large opaque bins for the “back stock” (the bulk reserve). Assign the smaller, clear containers for the “working stock” (the amount you use daily).
- Label All Containers: Label the opaque bins clearly (e.g., “Flour Back Stock,” “Sugar Back Stock”). Label the clear containers “Working Flour,” “Working Sugar,” etc. Also add the original expiration date from the bulk packaging to the back stock containers.
- Fill Working Stock: Pour a manageable amount of the bulk item from its original packaging into the smaller, clear “working stock” container. Seal tightly.
- Store Back Stock: Pour the remaining bulk item into the larger opaque “back stock” bin. Seal tightly. This bin can be placed on a higher shelf or in a less accessible part of the pantry.
- Placement and Refill: Place the “working stock” containers on easily accessible shelves. When the working stock runs low, simply refill it from the back stock container. This way, your main pantry area remains organized, and you know when it is time to buy more bulk.
45. Pull Out Tray for Small Appliances

This clever pull out tray, often found in base cabinets, is an excellent solution for organizing small kitchen appliances. Instead of lifting heavy toasters, kettles, or coffee makers in and out of a dark cabinet, the entire tray slides out, bringing everything into easy reach. The durable slides ensure smooth operation, even with the weight of multiple appliances. The dark mat on the tray surface helps prevent items from sliding around and protects the cabinet base.
This accessibility makes it much more likely that you will use your appliances regularly. It also helps keep countertops clear, creating a cleaner and more spacious kitchen environment. This type of organization turns a deep, potentially awkward cabinet into a highly functional and convenient appliance garage.
DIY Instruction: Installing a Pull Out Tray for Small Appliances
Adding a sturdy pull out tray to a base cabinet makes heavy appliances easily accessible.
Materials Required
- Pre cut shelf board (strong wood or plywood, sized to fit your cabinet width and depth)
- Two heavy duty full extension drawer slides (rated for significant weight, as appliances are heavy)
- Small wood screws (appropriate length)
- Non slip mat (rubber or silicone)
- Measuring tape and pencil
Equipment Required
- Electric drill and drill bits
- Level
- Screwdriver
DIY Instructions Step By Step
- Measure Cabinet: Precisely measure the internal width and depth of your base cabinet, taking into account any door hinges. Cut your shelf board to fit, leaving a small clearance for the slides.
- Separate Slides: Disassemble the heavy duty drawer slides into their two parts: one for the cabinet, one for the shelf.
- Mount Cabinet Slides: Position the cabinet part of one slide on the inside wall of the cabinet, as low as possible for optimal appliance height. Use the level to ensure it is perfectly straight. Mark screw holes. Repeat for the opposite cabinet wall, ensuring both slides are parallel and level.
- Drill and Secure: Drill pilot holes at the marked positions. Securely screw the cabinet parts of the slides into the cabinet walls. Given the weight of appliances, use robust screws and anchors if necessary.
- Mount Shelf Slides: Attach the other parts of the drawer slides to the sides of your shelf board. Position them about one eighth of an inch from the bottom edge. Ensure they are straight and evenly aligned.
- Insert Tray and Mat: Carefully align the shelf slides with the cabinet slides and slide the tray into the cabinet. Test for smooth operation. Finally, cut and place the non slip mat on the tray to prevent appliances from moving.
You have journeyed through 45 powerful, practical strategies to finally conquer the pantry mess. Implementing a few of these focused hacks, whether it is installing pull out drawers or simply using uniform, airtight containers, immediately transforms your kitchen space.
Maintaining a clutter free pantry is not about being spotless; it is about establishing systems that make sense for how your family cooks and shops. You now have the necessary tools to create a functional, beautiful, and long lasting organized pantry. Stop losing ingredients and start enjoying the peace that comes with knowing exactly what you have.
Key Takeaways
- Vertical Space is Valuable: Always look up! Use the vertical depth between shelves with dividers, tiered risers, and over the door organizers to maximize every inch of storage capacity.
- Visibility is Vital: Clear, labeled containers for dry goods and tiered organizers for cans and jars eliminate the mystery of what you own. Seeing what you have stops costly duplicate purchases.
- Containment Controls Chaos: Grouping items into defined bins and caddies—especially for snacks and meal kits—prevents items from scattering and makes restocking simpler for everyone in the family.
- Accessibility Matters Most: Systems like pull out drawers, rolling bulk containers, and lazy Susans are game changers for deep cabinets, ensuring you can reach everything without straining or knocking items over.
- Consistency Simplifies Maintenance: Choosing uniform containers and applying clear, consistent labels creates an aesthetic appeal that encourages you and your family to keep the system organized long after the initial tidy up.