The calendar turns. A new year stretches out, full of clean pages. We often feel a strong urge to make changes. We want to start fresh. This feeling applies to our homes, too.
The space you live in affects your mood. It can make you feel calm and focused. It can also make you feel cluttered and stressed. You do not need a major renovation to feel a change.

You do not need to spend a lot of money.
This list is about simple swaps. It is about small, smart changes that make a big difference. Here are 39 ways to refresh your home. They will help you clear out the old and welcome a new, brighter start.
1. Organize with Natural Baskets

Clutter gathers fast. Remotes, magazines, and charging cords often take over our living spaces. Swapping a messy side table for simple woven baskets is a quick fix. They look clean and bring a natural, earthy feel to your room.
These baskets work hard. They hide the clutter while adding rich texture. This small change makes a big impact. Your space feels calmer and more organized right away. It’s an easy win for a fresh start.
DIY: Create a Rope-Wrapped Basket
You can make a similar basket using a simple cardboard box.
- Find a Box: Choose a sturdy cardboard box. A shoebox or a small shipping box works well.
- Prep the Box: Tape the flaps shut securely. For an open-top basket, you can use a utility knife to carefully cut the top flaps off.
- Get Your Supplies: You will need thick jute or sisal rope. A hardware or craft store will have this. You also need a hot glue gun and plenty of glue sticks.
- Start Gluing: Apply a line of hot glue to one of the bottom corners, starting from the base. Press the end of the rope firmly into the glue.
- Wrap the Box: Work in small sections. Apply a 6-inch line of glue along the box. Tightly wrap the rope around, pressing it into the glue. Make sure each new layer of rope sits snugly against the one below it. Keep the wraps straight.
- Finish the Top: When you reach the top edge, cut the rope. Apply a final bit of glue to secure the cut end neatly, perhaps tucking it slightly inside the rim.
- Optional Handles: Cut two 10-inch pieces of rope. Form each piece into a “U” shape. Attach the ends securely to the inside of the box on opposite sides using a generous amount of hot glue. Let everything dry completely before using it.
2. Layer Your Window Treatments

Old, heavy drapes can make a room feel dark. A simple swap to layered curtains offers flexibility. This image shows a light, airy sheer curtain paired with a solid blackout panel. This combination gives you options.
You can filter light gently during the day. You can also gain full privacy at night. The look is soft, sophisticated, and modern. It makes the window a feature, not just an opening.
DIY: Install a Double Curtain Rod
- Get Supplies: You need a double curtain rod kit. This includes two rods, brackets, and screws. You also need a drill, a level, a tape measure, and a pencil.
- Measure: Decide on the height. A good rule is to place the rod 4-6 inches above the window frame. This makes the window look taller.
- Mark Bracket Spots: Measure 3-4 inches out from each side of the window frame. Use your pencil to mark where the bracket screws will go. Use the level to make sure your marks are even on both sides.
- Drill Holes: Drill small pilot holes on your marks. If you are not drilling into a wall stud (the solid wood frame), gently tap in the wall anchors from your kit.
- Install Brackets: Align the brackets with your holes and screw them in securely.
- Hang Curtains: Thread your sheer curtains (the lighter ones) onto the inner rod (the thinner one). Place this rod onto the inner hooks of the brackets.
- Hang Outer Curtains: Thread your heavier curtains onto the outer, thicker rod. Place this rod onto the outer hooks. Adjust the curtains so they hang evenly.
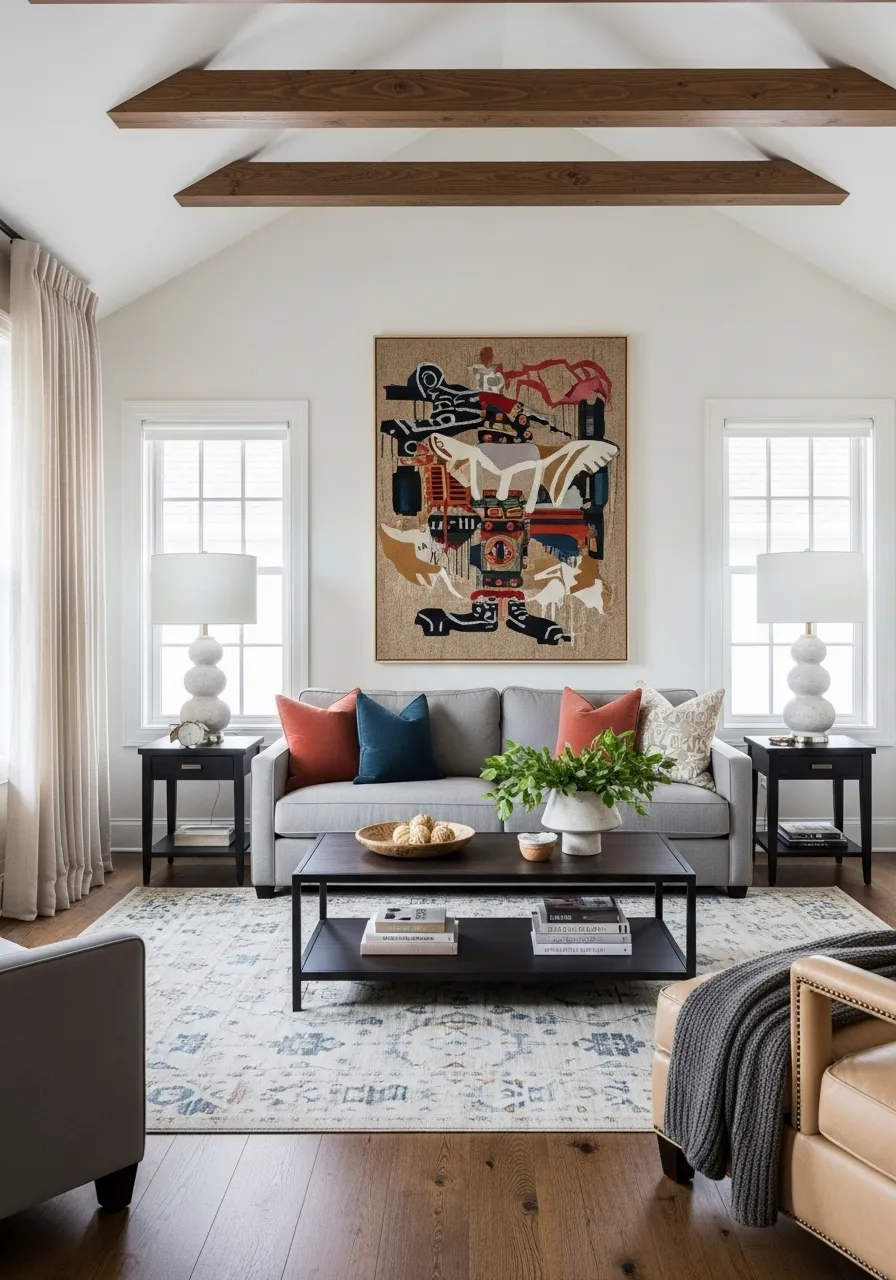
3. Mix Your Textiles

A matching sofa set can feel a bit dated. Break up the monotony with new textures. This image shows how to mix things up. A chunky knit throw, a smooth sequin pillow, and a soft plaid pattern all sit together.
This blend creates visual interest. It makes the sofa feel cozy and inviting. You do not need new furniture. Just swap the accessories. It is a quick way to add depth and personality.
DIY: Make a No-Sew Fleece Throw Blanket
- Get Fabric: Buy two pieces of fleece fabric from a craft store. About 1.5 to 2 yards each is a good size. Choose coordinating colors.
- Lay and Trim: Lay the two pieces of fabric on top of each other on a large, flat surface. Make sure the edges are aligned. Use sharp scissors to trim any uneven edges so they are the same size.
- Cut Corners: Cut a 4×4 inch square from each of the four corners. Make sure you cut through both layers of fabric at the same time.
- Cut Fringe: Begin cutting 1-inch wide, 4-inch long strips along all four sides of the fabric. You will be cutting through both layers.
- Tie the Knots: Take one fringe strip from the top layer and the matching strip from the bottom layer. Tie them together in a simple, tight double-knot.
- Continue Tying: Repeat this process for all the fringe strips around the entire blanket. This creates a warm, handmade throw.
4. Create a Living Wall

A new year is about new life. Bring that feeling inside. If your floor space is full, look up. This setup uses simple wooden ladders as vertical shelves. It turns a blank wall into a green feature.
The varied pots add color and style. Houseplants clean the air. They also bring a sense of peace to a room. This swap exchanges empty wall space for a vibrant, living display.
DIY: Build a Simple Plant Ladder
- Get Supplies: You will need two 1×3 inch boards (about 4-5 feet long) for the sides. You also need a 1-inch wooden dowel (about 6 feet long) for the rungs. Get a drill, a 1-inch spade bit, a saw, wood glue, and sandpaper.
- Mark Rungs: Lay your two 1×3 boards flat and parallel. Use a tape measure and pencil to mark spots for your rungs. Space them evenly, perhaps every 12-15 inches.
- Drill Holes: Use the 1-inch spade bit to drill holes at your marks. Only drill halfway through the wood. Do not go all the way through.
- Cut Rungs: Measure the width you want your ladder (e.g., 18 inches). Cut 3-4 rungs from your wooden dowel to this length.
- Assemble: Sand any rough edges. Squeeze a small amount of wood glue into each hole. Insert the ends of your dowel rungs into the holes on one of the side boards.
- Attach Other Side: Carefully align the holes on the second 1×3 board with the open ends of the dowels. Press it firmly into place. You may need a rubber mallet to tap it gently. Let the glue dry completely before mounting it to the wall.
5. Curate a Personal Gallery Wall

A single, lonely art piece can feel underwhelming. Start the year with a story. Your story. A gallery wall turns memories and interests into a major design moment.
This example mixes family photos, simple text art, and even a map. The matching light wood frames tie everything together. It feels personal and designed. This swap is all about showing who you are.
DIY: Plan and Hang Your Gallery Wall
- Collect Your Pieces: Gather all the frames, photos, and art you want to hang.
- Get Supplies: You will need craft paper (or old wrapping paper), scissors, painter’s tape, a hammer, nails (or picture hooks), a level, and a tape measure.
- Trace Your Frames: Lay each frame on the craft paper and trace its outline. Cut out the paper shape for each frame.
- Plan the Layout: Use painter’s tape to stick the paper cutouts on your wall. You can easily move them around until you find a layout you like. A good starting point is to place the largest piece first, then build around it. Keep spacing between frames consistent (about 2-3 inches).
- Mark Nail Spots: Once you like the layout, use your level to make sure the paper templates are straight. For each template, find where the nail should go on the real frame and mark that spot on the paper.
- Hang: Hammer your nails directly through the marks on the paper. Tear the paper away. Hang your frames on the nails.
6. Add a Statement Mirror

Small rooms can feel confined. A large mirror is a classic solution. It reflects light and tricks the eye, making the space feel larger and brighter. This room uses two.
The tall, arched floor mirror adds height and elegance. The round wall mirror adds a soft, modern touch. Swapping a small, basic mirror for a large, statement piece can change the feel of an entire room.
DIY: Frame a Basic Mirror
- Get a Mirror: Start with a simple, frameless mirror from a big-box store.
- Get Wood: Go to a hardware store and buy “mitered casing” or “trim moulding.” This is the wood you see around door frames.
- Measure: Measure the four sides of your mirror.
- Cut Angles: You need to cut 45-degree angles (miter cuts) on the ends of your wood trim so they fit together like a picture frame. A simple miter box and hand saw will work for this.
- Paint or Stain: Paint or stain your four wood pieces. Let them dry completely.
- Attach: Lay your mirror flat. Apply a strong construction adhesive (like Liquid Nails for mirrors) to the back of your wood trim pieces.
- Assemble: Carefully press the trim pieces onto the front of the mirror, one by one. Make sure the corners line up. Place heavy books on the frame while the glue dries for 24 hours.
7. Define Space with a New Rug

A bare floor can make furniture feel like it is floating. A good area rug pulls everything together. It defines the living area. This textured jute rug adds warmth and a natural feel.
The gray border adds a touch of pattern without being too loud. Rugs add comfort underfoot. They also help absorb sound. Swapping out an old, small rug for a larger one can make your room feel more grounded and complete.
DIY: Paint a Pattern on a Plain Rug
- Get a Rug: Start with a plain, flat-weave or low-pile rug. A simple jute or cotton rug is a good base.
- Get Supplies: You will need painter’s tape, a stencil (optional), a small foam roller, and chalk paint or latex paint.
- Plan Your Design: You can create simple stripes, a border, or a geometric pattern like diamonds.
- Tape Your Design: Use painter’s tape to tape off the sections you do not want to paint. For the border in the photo, you would tape off a large rectangle in the middle and a thin line near the edge.
- Paint: Pour your paint into a tray. Use the foam roller to apply the paint between your tape lines. Use thin coats. A roller works better than a brush, as it presses the paint into the fibers.
- Dry and Remove: Let the first coat dry, then apply a second. Once it is fully dry (wait at least 12-24 hours), carefully peel off the painter’s tape to reveal your custom design.
8. Layer Your Lighting

Relying on one harsh overhead light makes a room feel flat and cold. Good lighting creates a mood. Look at this cozy corner. It uses three types of light. A table lamp provides a warm glow for reading.
A floor lamp directs light onto the chair. A soft ceiling bulb fills the space. This is “layered lighting.” Swapping that single ceiling light for multiple lamps at different heights makes your home feel warmer and more functional.
DIY: Create a Simple Bottle Lamp
- Find a Bottle: Choose a glass bottle with a shape you like. A wine bottle or a thick vinegar bottle works well.
- Get a Kit: Buy a “bottle lamp kit” online or from a craft store. This kit includes a pre-wired socket, a cork or rubber adapter, and a lamp harp (the wire part that holds the shade).
- Assemble: Following the kit’s instructions, choose the right size adapter for your bottle’s opening.
- Insert the Socket: Feed the lamp cord down through the adapter. Push the socket assembly firmly into the bottle opening. It should be a snug fit.
- Add Harp and Shade: Squeeze the bottom of the lamp harp and fit it into the two small loops on the socket.
- Finish: Screw in a lightbulb (an LED bulb is a good choice as it stays cool). Place a lampshade on top of the harp and secure it with the finial (the small cap) from your kit.
9. Go with Crisp White Bedding

Old, mismatched bedding can make a bedroom feel cluttered. A simple switch to all-white linens can transform your space. It looks clean and timeless. It feels like a high-end hotel.
White bedding is a blank canvas. It makes your room feel brighter and more restful. You can easily add a single colored throw pillow or blanket if you want a small pop of color. It is an easy way to make your bedroom a true retreat.
DIY: Revive Old Linens with White Vinegar
- Gather Linens: Collect your white sheets, pillowcases, and duvet cover.
- Add Vinegar: Place your white linens in the washing machine. Add your normal detergent. Then, add 1/2 cup of distilled white vinegar to the fabric softener dispenser.
- Wash: Wash your linens on a hot water setting (if the fabric allows). The vinegar acts as a natural fabric softener and whitener. It helps break down detergent buildup that can make whites look gray.
- Dry: Tumble dry your linens as usual.
- For Stains (Optional): For yellowed pillows, you can pre-soak. Fill a tub or top-load washer with hot water. Add 1/2 cup vinegar and 1/2 cup baking soda. Let the linens soak for at least an hour before washing as normal.
10. Refresh with a New Scent

A new year should smell fresh. We often get used to our home’s scent. Guests notice it right away. Swapping an old, waxy candle for a new scent system is a clean update.
This image shows an ultrasonic diffuser. It mists essential oils into the air. A reed diffuser offers a constant, gentle fragrance. Changing your home’s scent is a powerful, unseen way to make it feel new.
DIY: Make Your Own Reed Diffuser
- Find a Container: You need a small glass or ceramic bottle with a narrow neck. A small vase or an old perfume bottle is a good choice.
- Get Reeds: You need diffuser reeds (rattan sticks). You can find these at craft stores. Bamboo skewers will not work as well, as they do not wick oil properly.
- Choose a Carrier Oil: You need a light oil. Safflower oil or sweet almond oil are great options.
- Add Scent: Fill your container about 3/4 full with the carrier oil.
- Mix: Add 25-30 drops of your favorite essential oil (like lavender, lemon, or peppermint) for every 1/4 cup of carrier oil. Swirl the bottle gently to mix.
- Place Reeds: Place 5-7 reeds into the bottle.
- Flip: After one hour, flip the reeds over to saturate the other end. You should flip the reeds once a week to refresh the scent.
11. Style Your Bookshelves

Bookshelves often become a dumping ground for clutter. Start the year by styling them. This image shows how to create balance. Books are arranged both vertically and horizontally. This breaks up the visual monotony.
Notice the other items. Vases, bowls, and framed art are mixed in. These objects add personality. They also give your eyes a place to rest. You do not need to buy new shelves. Just rearrange what you have.
DIY: Restyle Your Shelf Like a Pro
- Empty Everything: Take every single item off your bookshelf. This gives you a clean slate.
- Sort and Purge: Go through your books and objects. Decide what you truly want to display. This is a good time to donate items you no longer need.
- Rule of Thirds: When you start putting books back, think in thirds. Place a stack of 3-5 books horizontally. Next to it, place a group of books vertically. This creates visual rhythm.
- Add Objects: Place a small vase or bowl on top of your horizontal book stack. This creates a small, styled moment.
- Leave Space: Do not fill every inch of the shelf. White space (empty space) is important. It makes the shelf feel less crowded and more deliberate.
- Layer: Place small, framed pictures or art in front of a few books. This adds depth and a personal touch.
- Step Back: After you style one shelf, step back and look at it. Adjust as needed until it feels balanced.
12. Create a Texture Nook

You do not need to redo a whole room to make it feel new. Focus on a small corner. This image shows a mix of interesting materials. Rough terracotta, smooth glazed ceramic, grainy wood, and woven fabric.
Grouping these different textures creates a small, eye-catching spot. It adds depth and character. Find a small cube shelf or a corner of a table. Gather a few items you love. This simple grouping can refresh a forgotten space.
DIY: Make a Faux Concrete Display Block
- Get a Box: Find a small, sturdy box. A square tissue box (the cube kind) or a small cardboard shipping box is a great start.
- Get Supplies: You will need lightweight spackling compound (pre-mixed), a putty knife or an old credit card, and craft paint (gray and a little black).
- Tape Shut: Securely tape the box shut on all sides.
- Apply Spackle: Use your putty knife to spread a thin layer of spackling compound all over the box. Do not try to make it smooth. You want texture. Drag the knife to create lines and rough patches.
- Dry: Let the spackle dry completely. This might take a few hours or overnight, depending on how thick it is.
- Paint: Mix your gray paint with a tiny drop of black to get a concrete color. Paint the entire box.
- Add Dimension (Optional): While the paint is still wet, you can dab a tiny bit of plain black or white paint in spots and blend it. This gives it a more realistic, uneven concrete look. Let it dry, and you have a modern display block.
13. Tame Entryway Clutter

The entryway is the first and last thing you see. A pile of mail and keys creates stress. Swap that messy pile for a smart organizer. These wall-mounted units are simple and effective.
They provide a clear spot for everything. A hook for keys, a slot for outgoing mail, a small shelf for your wallet. This small change brings instant order to a high-traffic area. It sets a calm tone for your whole home.
DIY: Make a Simple Mail Holder
- Get a Board: You need one piece of wood. A 1×6 inch board, cut to about 12 inches long, is a good size.
- Get Supplies: You will need a piece of 1×4 inch wood (cut to the same 12-inch length), wood glue, small nails, a hammer, sandpaper, and paint or stain. You also need a few small cup hooks.
- Sand: Sand all the wood pieces until they are smooth.
- Attach the Pocket: Take the 1×4 piece (the pocket front). Apply wood glue along the bottom edge and the two short side edges.
- Secure: Press the glued 1×4 piece onto the front of the 1×6 (the backboard). Make sure the bottom edges are flush. This creates a pocket.
- Nail: For extra strength, hammer a few small nails through the back of the 1×6 into the 1×4 pocket front.
- Add Hooks: Screw 2-3 small cup hooks by hand into the bottom edge of the 1×6 backboard. These are for your keys.
- Finish: Paint or stain your new mail holder. Once dry, attach picture-hanging hardware to the back to mount it on your wall.
14. Refresh Kitchen Linens

Kitchen towels work hard. They often end up stained, mismatched, and worn out. This is a very simple swap. Get a new, coordinated set of linens.
This image shows a family of colors: blues and greens. It includes striped towels, solid waffle-weave towels, and matching potholders. This simple update makes your kitchen look cleaner and more put-together. It is a small detail with a big impact.
DIY: Make a No-Sew Stamped Tea Towel
- Get Towels: Start with plain, 100% cotton tea towels. White or light-colored towels work best. Wash and iron them first.
- Get Supplies: You need fabric paint and a “stamp.” A potato is a classic and easy stamp to make. You also need a small knife.
- Make Stamp: Cut a potato in half. The flat, cut side is your stamp. Use your knife to carefully carve a simple shape, like a triangle, a plus sign, or a half-circle.
- Prep: Place a piece of cardboard inside the towel (if it’s two-sided) or under it to prevent paint from bleeding through.
- Stamp: Pour a small amount of fabric paint onto a paper plate. Dip your potato stamp into the paint, blotting any excess.
- Create Pattern: Press the stamp firmly onto the fabric. You can create a grid, a random pattern, or just a border.
- Set Paint: Let the paint dry completely. To make it permanent, follow the instructions on your fabric paint bottle. This usually involves ironing the design (with a cloth over it) or tumbling it in a hot dryer.
15. Upgrade Your WFH Spot

Many of us spend all day in a dining chair. This is bad for your back and your focus. A new year is a good time to invest in your work-from-home space. Swap that hard chair for a real office chair.
An ergonomic chair like this one supports your back. It adjusts to your height. This change is not just about looks. It is about your health and comfort. A good chair can make your workday feel much better.
DIY: Create a Monitor Riser
- Get Supplies: You need one wooden board. A 1×8 inch board, cut to about 20 inches long, is a good top piece. You also need four “furniture legs” from a hardware store. These often come with mounting plates.
- Paint or Stain: Finish your wooden board. You can paint it, stain it, or just use a clear varnish. Let it dry.
- Attach Plates: Flip the board over. Place one mounting plate in each corner, about 1 inch in from the edges.
- Drill: Use a drill to attach the mounting plates to the board with the screws provided.
- Screw in Legs: Once the four plates are secure, simply screw the furniture legs into them by hand.
- Flip Over: Flip your new stand over. This riser lifts your monitor to a more comfortable eye level. It also gives you a place to slide your keyboard underneath when you are done.
16. Set Up a Command Center

Is your fridge covered in notes and reminders? A messy fridge door can make your whole kitchen feel cluttered. Swap the magnet chaos for a clean, wall-mounted memo board.
The image shows a few types. A wire grid is modern and flexible. You can use clips to hang notes and photos. An acrylic board is sleek. You can write on it with dry-erase markers. This swap organizes your to-do lists and gives you a central spot for family info.
DIY: Make a Framed Chicken-Wire Board
- Get a Frame: Find an old, large picture frame. Thrift stores are a great place to look. Remove any glass or backing.
- Get Supplies: You need a roll of chicken wire (or “poultry netting”) from a hardware store. You also need a staple gun and wire cutters.
- Paint Frame: If you want, paint your frame to match your decor. Let it dry.
- Cut Wire: Lay the frame face-down. Roll the chicken wire over the back. Use wire cutters to cut a piece of wire that is slightly larger than the frame’s opening.
- Staple: Pull the wire taut. Use the staple gun to staple the wire to the back of the frame. Start in the corners, then add staples every 2-3 inches, pulling the wire tight as you go.
- Trim: Once it is secure, use your wire cutters to trim any sharp, excess wire from the edges. Hang your new board on the wall and use small clothespins to clip notes and photos.
17. Simplify Your Nightstand

A nightstand can become a clutter magnet. Old water glasses, piles of books, and tangled chargers create a stressful bedside. Start your day fresh by simplifying.
This nightstand is a great example. It has only the essentials: a soft lamp, a clock, and one book. A basket underneath hides extra items. Swapping a cluttered surface for a clean one can make your bedroom feel much more peaceful.
DIY: Make a Faux “Woven” Basket
- Get a Box: Start with a cardboard box. A “banker’s box” or a sturdy shipping box is a good base.
- Get Supplies: You will need lots of hot glue and thick rope (like jute or sisal rope, the same as the first DIY).
- Prep Box: Cut the top flaps off the box so you have an open-top bin.
- Start Gluing: This is the same process as the first DIY. Start at a bottom corner. Apply a line of hot glue and press the end of the rope into it.
- Wrap: Work your way around the box. Apply glue in 6-inch sections and press the rope down firmly. Make sure each new layer of rope is tight against the last one.
- Finish Top: When you get to the top, cut the rope and secure the end with an extra bit of glue on the inside rim. This “rope-wrapped” box looks like a high-end woven basket and is strong enough to hold magazines, shoes, or electronics.
18. Swap Cabinet Hardware

This is a classic, high-impact update. Old, dated hardware can make a whole kitchen or bathroom look tired. Swapping knobs and pulls is easy and changes the entire feel of the room.
The image shows modern options. Simple gold knobs, sleek black-and-metal pulls, and classic brushed-nickel handles. This single swap can make your cabinets look new again. It is a one-hour job that makes a huge difference.
DIY: Install New Cabinet Hardware
- Count: First, count all the knobs and pulls you need.
- Measure: For pulls (handles), you must measure the distance between the centers of the two screw holes. This is a standard size, like “3 inches” or “96mm.” You must buy new pulls that match this exact measurement.
- Buy: Take an old knob and pull with you to the hardware store to ensure you get the right size and the right screws.
- Unscrew: Use a screwdriver to remove the old hardware. The screw is usually on the inside of the door or drawer.
- Clean: Clean the surface of the cabinet where the old hardware was.
- Install New: Hold the new knob or pull in place on the front. From the inside of the door, insert the new screw and tighten it. That’s it. It is one of the easiest DIYs.
19. Introduce a Bold Accent Color

A room full of neutral colors can feel safe, but sometimes boring. A new year is a great time to be a little bolder. This image shows how yellow and blue can liven up a space.
You do not have to paint. Just swap a few accessories. A bright yellow lamp, a few matching pillows, and a single blue vase. These pops of color add energy and personality. If you get tired of it, you can easily swap them out again.
DIY: Paint a “Dipped” Vase
- Get a Vase: Find a clear glass or plain ceramic vase. A thrift store is a great place to find a cheap one with a good shape.
- Get Supplies: You will need painter’s tape and craft paint (or spray paint) in your new, bold color.
- Tape: Clean the vase. Decide where you want your “dipped” line to be. Halfway up? Just the bottom quarter? Wrap a single, straight line of painter’s tape around the vase. Press the edge down firmly.
- Paint: Paint the bottom portion of the vase. If using craft paint, you can use a foam brush. If using spray paint, do it outside in short, light coats.
- Dry: Let the paint dry completely. You may need two coats.
- Peel: Once it is fully dry, very slowly and carefully peel off the painter’s tape. You will have a crisp, clean line and a modern, custom-looking piece.
20. Declutter Kitchen Counters

Kitchen counters are for one thing: prep. But they often become a storage area for appliances, mail, and utensils. This counter is clean and functional.
Utensils are grouped in one crock. Cutting boards are stacked neatly. The small appliance (toaster) is pushed back. Swapping a cluttered counter for a clear one makes your kitchen feel larger and much easier to use.
DIY: Make a Wooden Utensil Riser
- Get a Board: Find a nice piece of wood. A small, thick cutting board or a scrap piece of 2×6 wood works well.
- Clean and Sand: Sand the wood until it is very smooth on all sides and edges.
- Oil: You need to seal the wood. Use a food-safe mineral oil (the kind sold for cutting boards).
- Apply Oil: Pour a generous amount of oil onto a clean, soft cloth. Rub the oil into the wood on all sides. You will see the wood grain pop.
- Let it Soak: Let the board sit for 20-30 minutes to soak in the oil.
- Buff: Use a new, clean cloth to wipe off all the excess oil. Buff the wood until it has a soft sheen.
- Use: Place this simple wooden board on your counter. You can use it to group items, like your utensil crock and a salt pig, or as a stand for your soap dispensers. It groups the clutter and makes it look intentional.
21. Swap to Calming Colors

The colors in your bedroom have a real effect on your mood. A loud or busy pattern can feel chaotic. Swapping your bedding to a single, calming color can transform the space. This light blue feels restful.
It creates a peaceful, hotel-like retreat. A soft, solid color is a backdrop for rest. You can still add texture, like the gray fringed throw. This change helps make your bedroom a true sanctuary.
DIY: Make a No-Sew Tassel Throw
- Get a Blanket: Start with a simple fleece or lightweight knit throw blanket.
- Get Yarn: Choose a thick yarn in a coordinating color (like the cream-colored fringe on the gray blanket).
- Make a Tassel: Cut a piece of cardboard about 4 inches wide. Wrap the yarn around the cardboard 30-40 times.
- Tie Top: Slide a 10-inch piece of yarn under all the loops at the top of the cardboard. Tie a tight double knot. Do not trim these long ends yet.
- Cut Bottom: Cut through all the yarn loops at the bottom of the cardboard.
- Form Head: Cut another 10-inch piece of yarn. About 1 inch down from the top knot, wrap this piece tightly around the “neck” of the tassel. Tie a secure knot.
- Attach: Use the two long-tail ends from the top knot (from Step 4). Thread them through the corner of your blanket and tie a tight knot to secure the tassel.
- Repeat: Make and attach as many tassels as you want along the two shorter edges of the blanket.
22. Add a Statement Plant

Small potted plants are nice. A large statement plant is a living sculpture. It can anchor a whole corner of a room. This fiddle leaf fig adds height and a burst of vibrant green.
Swapping an empty corner for a tall, leafy plant brings life into your home. It makes the room feel more complete. These plants also help purify the air. They are a powerful, living decor piece.
DIY: Repot a New Plant
- Choose a Pot: Find a decorative pot that is 1-2 inches larger in diameter than the plastic nursery pot the plant came in. Make sure it has a drainage hole at the bottom.
- Get Supplies: You will need your new pot, a small drainage tray (to go under the pot), and a bag of fresh potting soil.
- Prep Pot: Place a small piece of mesh or a coffee filter over the drainage hole. This stops soil from falling out but lets water drain.
- Add Soil: Add a 2-3 inch layer of fresh potting soil to the bottom of the new pot.
- Remove Plant: Gently squeeze the sides of the plastic nursery pot to loosen the plant. Tip it sideways, hold the plant by its base, and carefully slide it out.
- Place Plant: Set the plant (with its root ball) into the new pot. Check the height. The top of the root ball should be about 1 inch below the rim of the pot. Add or remove soil from the bottom as needed.
- Backfill: Once the height is right, fill in the space around the root ball with fresh potting soil. Press it down gently.
- Water: Give your plant a good watering. Let the excess water drain out into the tray below.
23. Upgrade Your Pet’s Corner

Our pets are family. Their accessories are part of our home decor. Old, torn pet beds and bright plastic bowls can make a stylish room look messy.
Swap those old items for ones that match your style. These gray, upholstered beds look like small sofas. The raised wood-and-ceramic bowls are clean and modern. This small change makes your pet’s area feel like an intentional part of the design.
DIY: Make a Simple Raised Feeder
- Get Wood: You need one 1×8 inch board. Cut it to about 16 inches long (or long enough to fit two pet bowls side-by-side).
- Get Legs: You need four short furniture legs, about 4-6 inches high. Hardware stores sell them with mounting plates and screws.
- Trace Bowls: Place your two pet bowls upside-down on the board. Space them evenly. Trace around the rim of each bowl with a pencil.
- Cut Holes: Use a compass to draw a second circle inside each trace, about 1/2 inch smaller. This inner line is your cut line. Drill a starting hole, then use a jigsaw to carefully cut out the two circles.
- Sand: Sand all the edges of the board and the new holes until they are very smooth.
- Attach Legs: Flip the board over. Attach the four mounting plates to the corners using a drill. Screw the four legs into the plates.
- Finish: You can stain the wood or seal it with a pet-safe, food-grade oil (like mineral oil). Drop your pet’s bowls into the holes.
24. Update Light Switches

This is a detail you touch every day. Old, yellowing plastic light switches and outlet covers can make a clean wall look dirty. It is an easy and cheap fix.
Swapping that old plastic for a new, modern design is a small upgrade that feels significant. This black-and-white switch is sharp. You can also find them in metallic finishes. It is like jewelry for your walls.
DIY: Safely Replace a Switch Plate
Note: This is only for the plastic cover, not the electrical switch itself.
- Get Supplies: You need a new switch plate (or outlet cover) and a small, flat-head screwdriver.
- Match: Make sure your new plate has the same opening as the old one (e.g., a single switch, a double switch, a duplex outlet).
- Unscrew: Use your screwdriver to remove the small screw (or screws) holding the old plate to the wall. The screws are usually painted.
- Remove: Gently pull the old plate off. You might see a small gap between the electrical box and your drywall. This is normal.
- Clean: Use a damp cloth to wipe the wall around the switch. This is a good time to clean any smudges.
- Attach: Place the new switch plate over the opening. Line it up with the screw holes.
- Secure: Use the new screws that came with your plate. Tighten them until they are snug. Do not overtighten, or you might crack the new plate.
25. Invest in New Towels

Nothing feels less refreshing than a scratchy, thin, mismatched towel. Your bathroom linens get a lot of use. A new year is a good time to replace them.
Swap all your old towels for a new, matching set. Fluffy white towels are a classic choice. They make your bathroom feel like a clean, calm spa. This is a simple swap that you will feel and appreciate every single day.
DIY: Fold Towels Like a Spa
- Lay Flat: Lay your bath towel flat on a clean surface, like your bed.
- First Fold: Fold one of the long sides in toward the center, about one-third of the way.
- Second Fold: Fold the other long side over to meet the first folded edge. Your towel is now a long, narrow rectangle.
- Roll Tightly: Go to one of the short ends. Begin to roll the towel up as tightly as you can.
- Display: When you are finished, you will have a neat, round towel log.
- Store: You can stack these rolled towels in a basket, on a shelf, or in your linen closet. It looks organized and saves space.
26. Hang Textile Art

A blank wall is a big opportunity. A large framed painting can be very expensive. Swapping that empty space for a large textile is a great alternative. This can be a rug, a vintage blanket, or a tapestry.
The abstract design in this image adds color and pattern. The fabric also adds warmth and helps absorb sound. It is a bold move that can become the main focal point of your entire room.
DIY: Hang a Rug on the Wall
- Get Supplies: You need a 1×3 inch piece of wood, cut to be 1 inch shorter than the width of your rug. You also need strong Velcro strips, a staple gun, and screws for your wall.
- Prep Wood: Paint or stain your 1×3 wood board to match your wall color. This helps it disappear.
- Attach Velcro (Rug): Take the “loop” side (the soft side) of the Velcro. Sew it by hand along the entire top edge of the back of your rug.
- Attach Velcro (Wood): Take the “hook” side (the rough side) of the Velcro. Staple it onto your 1×3 wood board.
- Mount Wood: Use a drill and a level to securely screw your 1×3 wood board to the wall where you want the rug to hang.
- Hang: Press the Velcro on your rug onto the Velcro on the wood board. The two strips will grip each other tightly. This lets you hang a heavy rug securely, and you can easily remove it for cleaning.
27. Carve Out a Hobby Nook

Do you have a corner that just collects dust or clutter? A new year is a good time to claim that space for yourself. Swap that “junk corner” for an intentional hobby nook.
These images show small, dedicated spots. A simple desk for writing. A mat and some blocks for yoga. A comfy chair for reading. This swap is not about decor. It is about making room for the things you enjoy.
DIY: Make a “Reading Nook” Kit
- Find a Basket: Get a sturdy, medium-sized basket. A woven one adds nice texture.
- Add Light: Find a small, battery-operated “puck light” or a small reading light. Place it in the basket.
- Add Comfort: Roll up a small, soft throw blanket and tuck it inside.
- Add Essentials: Include a nice coaster for a mug of tea, a good-smelling candle and matches, and a nice bookmark.
- Store: Keep this basket next to your favorite chair. When you have 20 minutes to read, you can grab the basket. Everything you need for a cozy session is in one place.
28. Restyle Your Mantel

The fireplace mantel is the natural focal point of a room. It often gets cluttered with old photos and random objects. For a fresh start, clear it off completely.
Swap the clutter for a few, well-chosen items. This mantel uses a “less is more” approach. Layered art, a few modern vases, and simple wooden bowls. The look is clean, balanced, and stylish. It draws your eye in a good way.
DIY: Make “Faux Pottery” from Old Vases
- Get Vases: Go to a thrift store and buy a few glass or ceramic vases with interesting shapes. They can be any color.
- Get Supplies: You will need matte-finish craft paint in an earthy color (like white, beige, or terracotta) and a box of baking soda. You also need a paintbrush.
- Clean: Wash and dry your vases.
- Mix Paint: Squeeze a good amount of paint onto a paper plate. Sprinkle in baking soda and mix it. Keep adding baking soda until the paint is thick and has a chalky, textured feel.
- For a rougher, “aged stone” look, add craft sand to the paint mix.
- Paint: Use your brush to apply the thick paint all over the vase. Paint in dabbing and sweeping motions to build up texture.
- Dry: Let the first coat dry. It will look like porous, unglazed ceramic. Add a second coat if needed. This is a very cheap way to get the look of high-end pottery.
29. Add Natural Textures

Heavy, dark furniture can weigh a room down. A simple way to lighten the look is to add natural textures. This cabinet uses caning, which is a woven rattan material.
The caning on the doors adds a breezy, natural feel. It also hides what is inside without being a solid, heavy door. Swapping a solid door for a caned one (or just adding caned furniture) brings in warmth and texture.
DIY: Add Cane Webbing to Cabinet Doors
- Get a Door: This works on any cabinet door that has a flat, inset panel (like a Shaker-style door).
- Get Supplies: You need a roll of “cane webbing” (you can buy this online), a staple gun, and scissors.
- Remove Door: Unscrew the cabinet door from its hinges and remove the knob or pull. Lay it face-down.
- Cut Cane: Cut a piece of cane webbing that is 1 inch larger than the inset panel on all sides.
- Soak: Soak the cane webbing in warm water for about 30 minutes. This makes it soft and flexible.
- Staple: Lay the damp, flexible cane over the back of the inset panel. Pull it tight. Use your staple gun to staple the cane to the door, placing staples every 1-2 inches.
- Dry: As the cane dries, it will shrink and become drum-tight.
- Trim: Once it is fully dry, use a utility knife to carefully trim the excess cane from the edges. Re-install your door.
30. Create a Staircase Gallery

The wall along your staircase is one of the largest blank spaces in a home. Many people leave it empty. This is a great opportunity to tell your family’s story.
Swap that blank wall for a “climbing” gallery wall. This example mixes black, white, and wood frames. The key is to follow the angle of the stairs. It turns a simple walkway into a personal, engaging part of your home.
DIY: Plan a Staircase Gallery Wall
- Get Supplies: You need craft paper, scissors, painter’s tape, a hammer, nails, a level, and a tape measure.
- Trace Frames: Trace all your frames onto the craft paper and cut them out.
- Find Your Angle: You want the center of your frames to follow an imaginary line that is parallel to your stair railing.
- Find Your First Spot: Start near the bottom of the stairs. Find a “stud” (the solid wood in the wall) for your heaviest frame. Hang this one first. A good height is about 60 inches up from the stair tread (the part you step on).
- Tape Templates: Use painter’s tape to stick your paper cutouts on the wall. Follow the upward angle of the stairs. Use your tape measure to keep the spacing between frames consistent (about 2-3 inches).
- Use Level: For each paper template, use your level to make sure it is straight.
- Hang: When you like the layout, hammer your nails through the paper templates (mark the nail spot first). Tear the paper away and hang your pictures.
31. Swap Your Bath Mat

A soggy, fabric bath mat can quickly look dingy and even grow mildew. It is not the fresh start you want for your bathroom. Swap that old mat for a slatted wooden one.
This teak bath mat is beautiful and functional. It allows water to drain away. It feels natural and spa-like underfoot. This small switch instantly elevates your bathroom. It feels cleaner and more inviting.
DIY: Make a Cedar Bath Mat
- Get Wood: Buy cedar fence pickets from a hardware store. These are cheap and naturally water-resistant. You will need about 6-8 pickets, depending on how big you want your mat.
- Get Supplies: You also need wood glue (waterproof if possible), a saw, sandpaper, and clamps.
- Cut Slats: Decide on the size of your mat. Cut all your cedar pickets into even slats. For example, if you want a 24-inch wide mat, cut all your slats to 24 inches.
- Cut Support: Cut two shorter pieces of cedar. These will be the “support” pieces that run underneath and hold the slats together. They should be 2 inches shorter than the width of your mat (e.g., 22 inches if your mat is 24 inches wide).
- Assemble: Lay out your long slats, spaced about 1/2 inch apart. Place the two shorter support pieces perpendicularly on top of the slats, about 2 inches in from each end.
- Glue: Apply wood glue to the tops of the support pieces where they meet each slat. Press the slats down onto the supports.
- Clamp and Dry: Use clamps to hold everything together. Let the glue dry completely (at least 24 hours).
- Finish: Sand any rough edges. You can apply a coat of outdoor-grade wood sealer for extra protection.
32. Digitize Your Calendar

Paper calendars are great, but they can get lost or outdated. A new year often means a new calendar system. Swapping a wall calendar for a smart display can streamline your life.
This device shows schedules, weather, and even control your smart home. It is a central hub. You can share calendars with family members. This switch helps keep everyone on the same page. It is a modern way to stay organized.
DIY: Create a Digital Photo Frame Calendar
- Get a Tablet: Find an old tablet you no longer use or buy a cheap one.
- Download App: Download a digital photo frame app or a calendar app that allows for full-screen display. Many apps have options to display a calendar alongside photos.
- Set Up: Connect the tablet to Wi-Fi. Set up your calendar integration (like Google Calendar).
- Choose Photos: Load your favorite family photos onto the tablet.
- Display: Place the tablet in a stand on your counter or mount it on the wall using a tablet wall mount. Keep it plugged in to power. This creates a functional and beautiful digital calendar that doubles as a photo display.
33. Cultivate a Window Seat

A plain window can feel like dead space. Transform it into a cozy retreat. This window seat is a welcoming spot. It has a custom cushion and several pillows.
It invites you to sit and relax. You can read a book or just watch the world outside. Swapping a bare window for a built-in seat adds charm. It also gives you extra seating and storage. It is a beautiful way to enhance your home.
DIY: Make a Simple Window Seat Cushion
- Measure: Measure the length and width of your window seat.
- Get Foam: Buy a piece of high-density foam from a fabric or craft store. Cut it to the exact size of your window seat.
- Get Fabric: Choose a durable upholstery fabric. You will need enough to cover the top, bottom, and all four sides, plus a few extra inches for seams and a zipper.
- Sew Cover:
- Cut one piece of fabric for the top (same size as the foam).
- Cut one piece for the bottom (same size as the foam). You may need to cut this in two pieces if you want a zipper opening.
- Cut four long strips for the sides (length of each side, plus seam allowance; width equal to the foam thickness plus seam allowance).
- Sew the side strips together to form a loop.
- Sew the top piece to the side loop.
- Sew the bottom piece(s) to the side loop, leaving an opening for a zipper (or just leave one end open to hand-stitch closed later).
- Insert Foam: Carefully slide the foam into the fabric cover.
- Close: Zip up the cover or hand-stitch the open end closed.
34. Streamline Your Desk

A messy desk makes focused work nearly impossible. Papers, pens, and clips pile up. Start the new year with an organized workspace.
This image shows a sleek setup. A magazine file holds papers. Pencil holders keep writing tools separate. Small trays organize paper clips and sticky notes. This swap exchanges chaos for calm. It makes your desk a place for productivity.
DIY: Create DIY Desk Organizers
- Get Supplies: Collect small, sturdy cardboard boxes (like shoeboxes, cereal boxes, or empty food boxes). You also need scissors, craft paper (or contact paper), and glue.
- Cut to Size: Decide what each box will hold. For pencils, cut a tall, narrow box. For paper clips, cut a short, wide one.
- Cover Boxes: Wrap each box with decorative craft paper, using glue to secure the edges. Or, apply self-adhesive contact paper for a more durable finish.
- Make a Magazine File: Take a tall cereal box. Cut diagonally from the top front corner down to the midpoint of the long side. This creates the angled opening for magazines. Cover it as above.
- Assemble: Arrange your new, covered boxes on your desk. You now have custom-made organizers for all your office supplies.
35. Add Woven Storage

Plain shelves can look a bit stark. They also show every item you store. A new year is a good time to hide that visual clutter.
These woven baskets are a great solution. They fit perfectly on the shelves. They add texture and warmth. They also conceal anything you put inside. This swap is simple: replace clear bins with woven ones. Your shelves will look instantly tidier.
DIY: Line an Old Box with Fabric
- Get a Box: Find an old cardboard box you want to turn into storage.
- Get Supplies: You need fabric (a thick cotton or canvas works best), fabric glue, scissors, and a tape measure.
- Measure and Cut:
- Measure the bottom of the box. Cut one piece of fabric that size.
- Measure the four inner walls. Cut four pieces of fabric for these walls, making them 1 inch taller than the box and 1/2 inch wider than the wall.
- Glue Bottom: Apply fabric glue to the bottom of the box. Press the fabric piece down firmly.
- Glue Sides: Apply glue to one inner wall of the box. Line up one fabric wall piece. Start by pressing the bottom edge of the fabric against the bottom of the box, then press it up against the wall. Fold the extra 1 inch of fabric over the top edge of the box and glue it down.
- Repeat: Do this for all four inner walls. When you get to the corners, neatly fold and glue down the excess fabric so it looks clean.
36. Revamp the Nightstand

A small, crowded nightstand makes your bedside feel messy. A simple swap is to make sure your nightstand is both functional and stylish. This one uses a floating shelf above it.
The shelf holds extra books, creating a mini library. The lamp and clock are clean and simple. The empty space underneath the table also allows for extra storage. This small redesign makes your bedside a calm and organized space.
DIY: Install a Simple Floating Shelf
- Get a Shelf: Buy a pre-made floating shelf from a hardware or home store. They come with mounting hardware.
- Get Supplies: You need a drill, a level, a tape measure, and a pencil.
- Decide Height: A good height for a shelf above a nightstand is about 20-24 inches above the table surface.
- Mark Studs: Use a stud finder to locate the studs (the solid wood in the wall) behind where you want to hang the shelf. Mark them with a pencil. This is important for heavy items.
- Mark Holes: Hold the shelf’s mounting bracket against the wall. Use your level to make sure it is straight. Mark where the screw holes need to go.
- Drill and Mount: Drill pilot holes. If you are not hitting a stud, use wall anchors. Securely screw the mounting bracket to the wall.
- Attach Shelf: Slide the shelf itself onto the mounted bracket. It should fit snugly.
- Decorate: Now you have an extra surface for small books, a plant, or a tiny framed picture.
37. Organize Kid’s Art

Children’s artwork is special, but it can quickly overwhelm your fridge or countertops. A new year is a great time to give those masterpieces a proper home.
This image shows a brilliant solution: a built-in drawer with dedicated slots for art. You can also see a magnetic panel for displaying current favorites. This swap turns clutter into a curated display. It keeps cherished art organized and celebrated.
DIY: Create a Wall Art Display
- Get Supplies: You need a long piece of string or thin rope, two small screw hooks, and small clothespins.
- Measure: Decide how long you want your display line to be.
- Install Hooks: Screw one hook into the wall at your desired starting point. Go to the other side of the wall and screw in the second hook. Make sure they are level.
- Tie String: Tie one end of the string securely to the first hook. Pull it taut and tie the other end to the second hook.
- Hang Art: Use the small clothespins to clip your children’s artwork onto the string. You can hang multiple pieces on one line.
- Rotate: This is a great way to rotate artwork. When a new piece comes home, you can easily swap out an older one.
38. Conceal Electronics

Cords and visible electronics can make a clean living room look messy. Our devices are part of modern life, but they do not have to be front and center.
This media console offers smart storage. The sliding door hides wires and equipment. The turntable is visible, but the speakers and other components are tucked away. Swapping open shelving for concealed storage makes your tech blend in. It creates a calmer, more refined space.
DIY: Hide Wires with a Cable Box
- Get a Box: Find a decorative box with a lid. A shoebox or a small wooden box works well.
- Get Supplies: You need a power strip, scissors or a utility knife, and tape.
- Cut Openings: Use scissors or a utility knife to cut small openings on two opposite sides of the box. These are for the cables to go in and out.
- Place Power Strip: Put your power strip inside the box.
- Plug In: Plug all your electronics (TV, game console, router, lamps) into the power strip inside the box.
- Feed Cords: Thread the main power strip cord out one hole and all the device cords out the other.
- Close: Put the lid on the box. All the messy wires are now hidden inside, and only the necessary cords are visible.
39. Add Flexible Storage

Homes need storage, but big, bulky furniture can overpower a room. A new year is a great time to think about flexible, lightweight solutions.
These small, modular storage units are versatile. The cube shelf can stand alone or stack. The small stool works as an extra seat or a side table. Swapping heavy pieces for lighter, more adaptable furniture helps your home feel spacious. It makes it easy to rearrange when you need a change.
DIY: Paint an Old Stool
- Find a Stool: Look for a small wooden stool at a thrift store or garage sale.
- Get Supplies: You will need sandpaper (medium and fine grit), painter’s tape, paint primer, paint (chalk paint or latex paint in your chosen color), and a paintbrush.
- Sand: Use medium-grit sandpaper to rough up the entire surface of the stool. This helps the paint stick. Follow with fine-grit sandpaper for a smoother finish.
- Clean: Wipe the stool down with a damp cloth to remove all dust. Let it dry completely.
- Tape (Optional): If you want to paint only certain sections (like the legs a different color), tape off the areas you do not want to paint.
- Prime: Apply a thin, even coat of paint primer to the entire stool. Let it dry according to the instructions on the can.
- Paint: Apply your chosen paint in thin, even coats. Let each coat dry completely before adding the next. Two to three coats are usually enough.
- Seal (Optional): For extra durability, especially if it will be used a lot, apply a clear topcoat (like a polycrylic sealer). Let it dry completely before use.
A new year is a chance to reset. Your home should be a place that supports that fresh start, not a place that holds you back.
You do not need to tackle all 39 of these ideas at once. Start with one. Choose the swap that feels easiest. Maybe it is just swapping your old bath mat or buying a new set of towels.
Small changes build momentum. A single, simple update can refresh a room. It can make your whole home feel lighter. It can help you start the year feeling organized, calm, and ready for what is next.
Key Takeaways
- Small, simple swaps can have a major impact on your home’s feel.
- Focusing on organization and decluttering key areas (like counters and entryways) reduces daily stress.
- Adding new textures, like plants, textiles, and natural materials, creates warmth and visual interest.
- Personalizing your space with gallery walls or hobby nooks makes a house feel more like a home.
- DIY projects are a budget-friendly way to get a custom, high-end look.