Living in a small home often feels like a difficult puzzle. You try to fit your entire life into tiny rooms without losing your mind. Every square inch counts when your floor space is limited and your belongings keep growing.

You do not need a massive mansion to live a comfortable life. Smart furniture choices can change how your house feels and functions daily. Multi functional pieces let one room serve many different purposes throughout the week.
This guide features forty creative solutions for cramped quarters. These items help you stay organized while adding a touch of style to your dwelling. You can build or buy these clever pieces to reclaim your space and enjoy your home again.
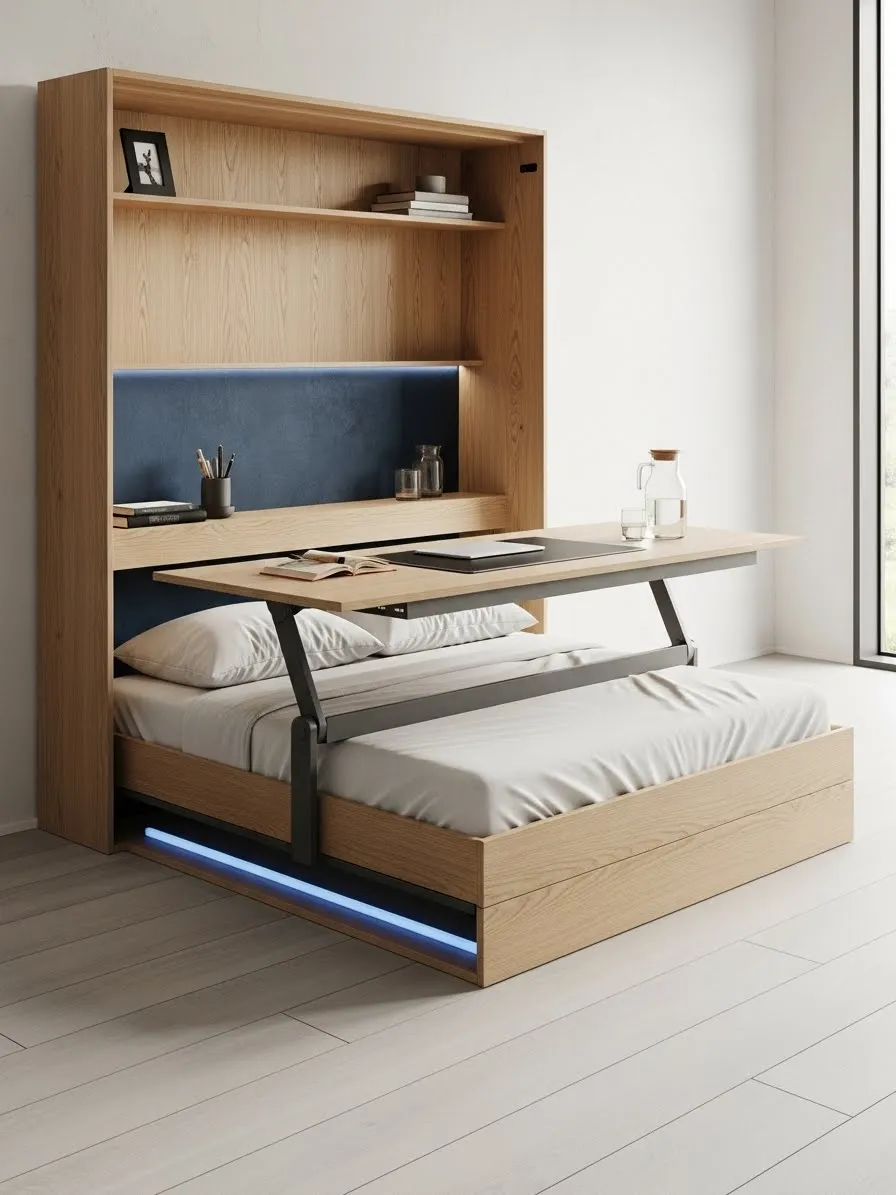
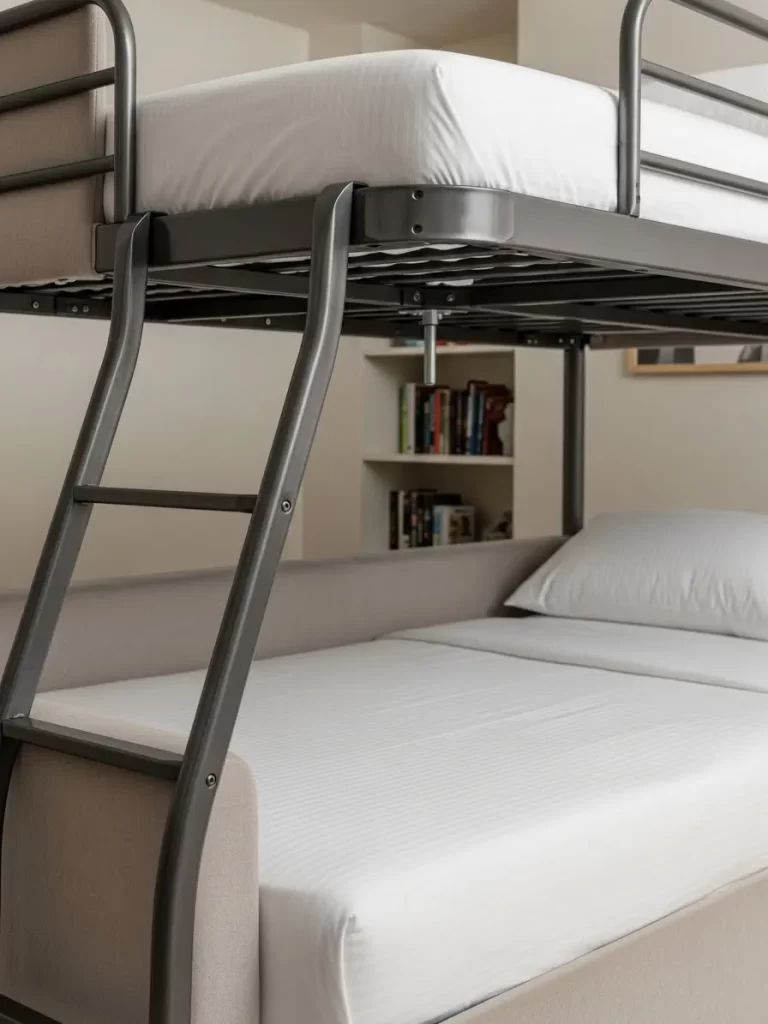
1 Modern Wall Bed With Integrated Lifting Desk

Small apartments often struggle to balance work and rest in a single room. This clever furniture piece solves that problem by combining a comfortable sleeping area with a spacious workstation. The light wood finish keeps the room feeling airy and open.
A sturdy lifting mechanism allows the desk to rise above the mattress without clearing your supplies. You can leave your laptop and notebooks in place while transitioning from office hours to bedtime. Built in shelving above the headboard provides extra storage for books or decorative items.
Soft blue accent lighting adds a contemporary touch and functions as a nightlight. This unit maximizes vertical space while keeping the floor plan clear. It serves as an excellent solution for studio dwellers or anyone needing a guest room that doubles as a home office.
Material Required List
- High quality plywood or MDF panels with wood veneer
- Heavy duty wall bed piston kit
- Parallel lifting desk hardware
- Memory foam or inner spring mattress
- Wood glue and various screw sizes
- LED strip lighting kit with power adapter
- Sandpaper in multiple grits
- Wood stain or clear polyurethane finish
Equipment Required List
- Power drill and driver bits
- Circular saw or table saw
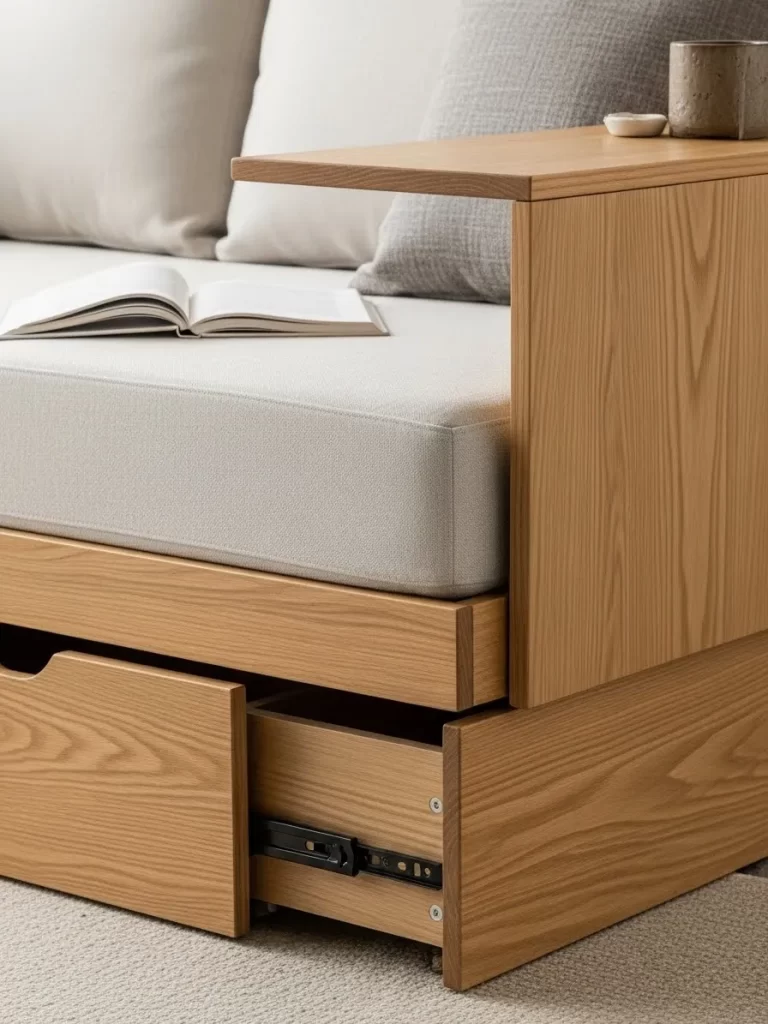
- Level tool
- Measuring tape
- Stud finder
- Clamps
- Paintbrush or foam roller
DIY Instructions Step By Step
- Measure your floor space and ceiling height to ensure the unit will fit when fully extended.
- Cut the large wood panels to create the outer cabinet frame and the inner bed platform according to your mattress size.
- Sand all wood surfaces thoroughly to remove rough edges and apply your chosen finish or stain.
- Assemble the outer cabinet box using wood glue and screws, ensuring all corners are square.
- Locate the wall studs using a stud finder and securely bolt the cabinet frame to the wall for safety.
- Attach the heavy duty wall bed pistons to the cabinet sides following the manufacturer instructions.
- Connect the bed platform to the pistons and test the folding motion to ensure it moves smoothly.
- Install the parallel lifting desk hardware onto the front of the bed platform so it stays level as the bed lowers.
- Mount the desk surface onto the lifting arms and check that it clears the mattress when raised.
- Apply the LED strip lighting along the inner recesses and plug them into a nearby outlet.
- Place your mattress inside the frame and organize your books on the upper shelves to complete the setup.
2 Smart Lift Top Coffee Table With Hidden Stools
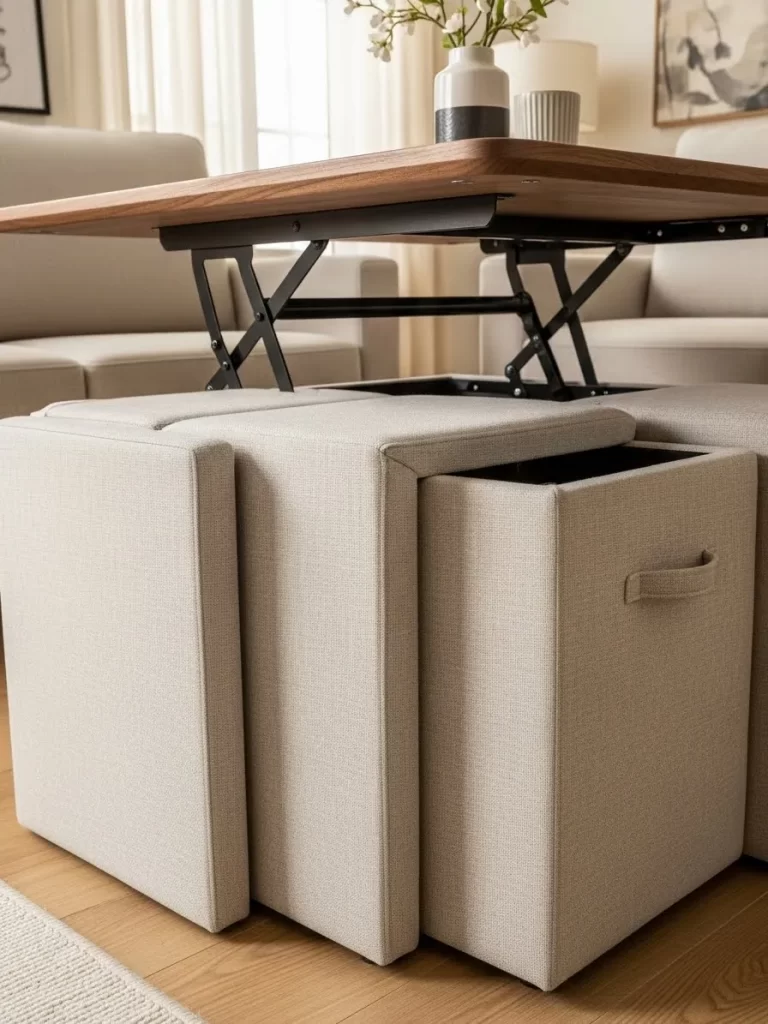
Small living rooms often struggle to provide enough seating for guests. This clever wood table solves that problem by hiding four upholstered stools within its base. You can pull the ottomans out when friends visit and slide them back to clear the floor later.
A metal mechanism allows the tabletop to lift upward and toward the couch. This feature creates a comfortable surface for working on a laptop or eating dinner while watching television. The light fabric and warm wood tones blend well with modern home decor.
Extra storage space sits inside the main table body once you raise the top. You can keep remote controls or magazines tucked away to maintain a tidy look. This piece transforms a simple living area into a functional dining or office zone.
Material Required List
- Plywood sheets for the frame
- Wood veneer or contact paper
- Metal lift top hinge kit
- High density foam padding
- Light gray upholstery fabric
- Wood glue
- Metal screws
Equipment Required List
- Power drill
- Circular saw
- Staple gun
- Measuring tape
- Screwdriver
DIY Instructions Step By Step
- Cut your plywood panels to form a large rectangular box with four open corner slots.
- Apply wood veneer to the exterior surfaces for a clean finish.
- Build four smaller wooden cubes that fit snugly into the corner openings of the main table.
- Glue thick foam pads to the top of each small cube and let them dry completely.
- Wrap the fabric tightly over the foam and secure it with staples on the underside of the wood.
- Mount the metal lift top hinges to the inside walls of the main table frame using a drill.
- Screw the large wooden tabletop onto the top arms of the lifting mechanism.
- Test the movement to ensure the top raises smoothly without hitting the sides.
- Slide the stools into their designated slots to complete the compact setup.
3 Space Saving Wall Mounted Vanity And Desk
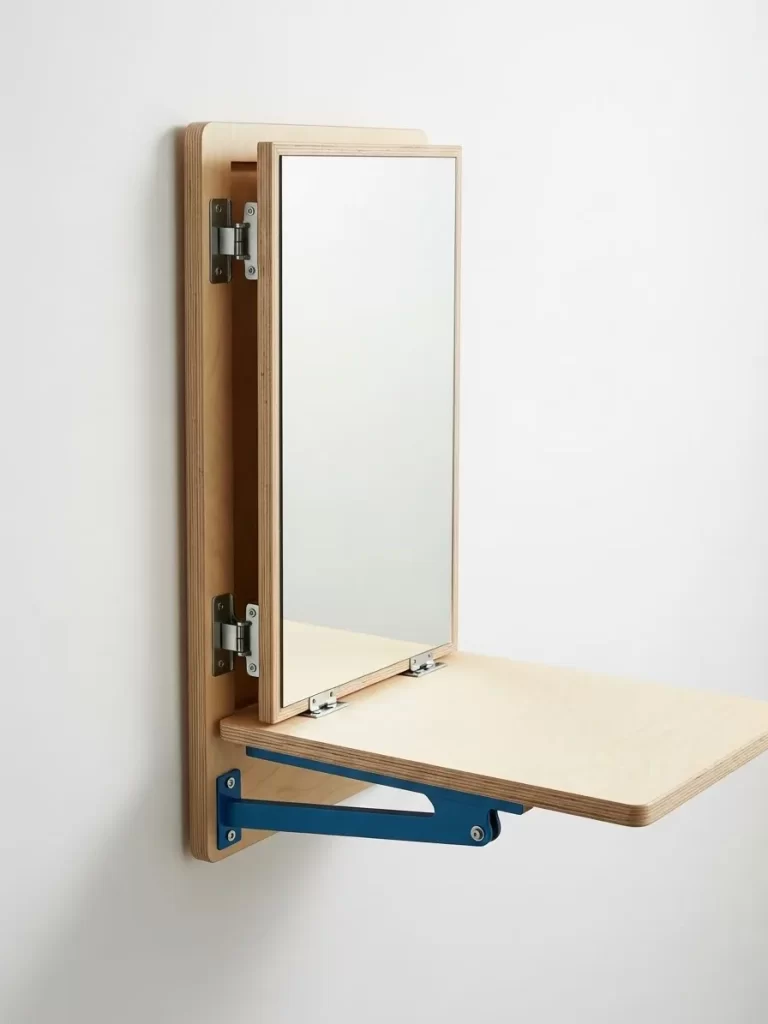
Floor space is a luxury in tiny bedrooms or narrow hallways. This wall mounted unit features a large mirror for your morning routine. A wooden panel below the mirror flips down to create an instant work surface.
Heavy duty blue brackets support the desk and keep it stable while you work. The light wood grain offers a clean look that fits many styles. You can close the desk after use to hide your items and keep the area organized.
This design functions as both a grooming station and a home office. It takes up zero floor space because it bolts directly into the wall. You can install it at any height to suit your favorite chair.
Material Required List
- Thick plywood board
- Rectangular glass mirror
- Piano hinge for folding
- Folding support brackets in blue
- Wall anchors for heavy loads
- Mirror adhesive glue
Equipment Required List
- Power drill
- Level tool
- Stud finder
- Saw
- Measuring tape
DIY Instructions Step By Step
- Cut a large rectangular piece of plywood to serve as the back support for the unit.
- Measure a second smaller piece of wood to act as the fold down desk platform.
- Glue the mirror onto the top half of the back board using strong adhesive.
- Attach the long piano hinge to the bottom edge of the back board and the edge of the desk.
- Use a stud finder to locate the wooden beams behind your wall for a secure hold.
- Drill holes through the back board and into the wall studs to mount the unit safely.
- Install the blue folding brackets underneath the desk to hold it in a horizontal position.
- Check with a level tool to make sure the desk surface is not tilted.
4 Loft Bed With Integrated Staircase Storage
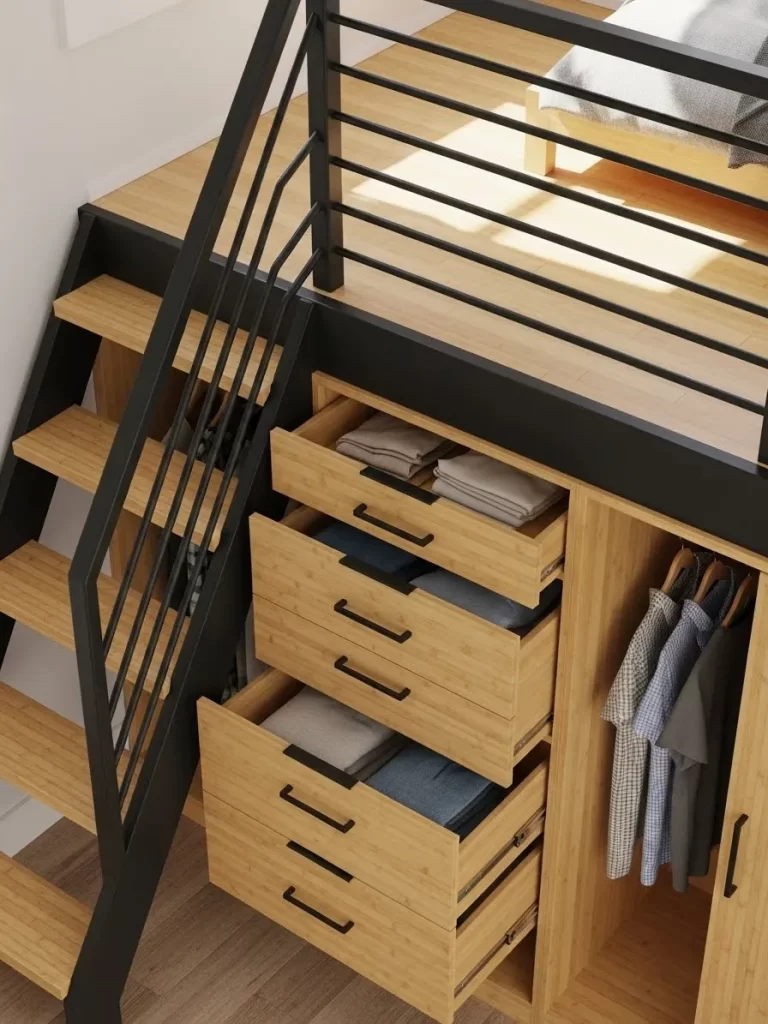
Vertical space offers the best solution for cramped sleeping quarters. This loft bed sits high on sturdy legs to leave the floor open for other furniture. A wooden staircase provides safe access to the top bunk instead of a shaky ladder.
Deep drawers sit inside each step to hold clothes or extra bedding. This clever design uses every inch of the structure for organization. A full wardrobe with hanging rods fits neatly under the mattress area.
Light wood finishes keep the large unit from feeling too heavy in a small room. You can store your entire wardrobe in the stairs and the closet below. This furniture piece acts as a bed and a dresser in one footprint.
Material Required List
- Thick timber posts for the main frame
- Plywood panels for steps and drawers
- Metal drawer slides
- Wooden bed slats
- Long lag bolts
- Metal drawer handles
Equipment Required List
- Miter saw
- Impact driver
- Level
- Sandpaper
- Clamps
DIY Instructions Step By Step
- Build a rectangular bed frame using thick timber posts and long bolts for strength.
- Lay the wooden slats across the frame to support a mattress.
- Construct a side frame for the stairs using large plywood sheets.
- Install the metal drawer slides inside the staircase frame at different heights.
- Build wooden drawer boxes and attach the front panels with handles.
- Slide the drawers into the stairs to ensure they move freely.
- Bolt the entire staircase unit to the side of the bed frame for safety.
- Set up a hanging rod or small desk in the large open space under the bed slats.
5 Convertible Sofa Bunk Bed System
Hosting guests in a studio apartment becomes simple with this transforming couch. A stylish gray sofa sits in your living room during the day. It unfolds into two stacked twin beds within a few minutes.
A built in metal ladder allows the top sleeper to climb up safely. Metal railings surround the upper bunk to prevent any accidental falls. The cushions remain attached or tuck away easily during the transition.
This system provides two separate sleeping spots while using the floor space of one sofa. It works excellently for home offices that double as guest rooms. The sturdy metal frame ensures the beds remain stable throughout the night.
Material Required List
- Sofa bunk bed conversion hardware kit
- Two twin mattresses
- Gray upholstery fabric
- High density foam cushions
- Plywood for the base
- Metal screws and bolts
Equipment Required List
- Wrenches
- Hex keys
- Staple gun
- Screwdriver
- Power drill
DIY Instructions Step By Step
- Assemble the main metal base frame according to the specific hardware kit manual.
- Connect the pivoting metal arms that will lift the top bunk into position.
- Secure the bottom bed platform to the lower half of the frame.
- Attach the safety railings to the top section to ensure a safe sleep environment.
- Wrap your plywood base panels in foam and fabric to create the sofa exterior.
- Use a staple gun to keep the fabric tight around the cushions and frame.
- Bolt the upholstered panels onto the metal structure using the provided screws.
- Test the lifting motion several times to make sure the beds lock into place.
6 Rotating Slatted Wall Room Divider
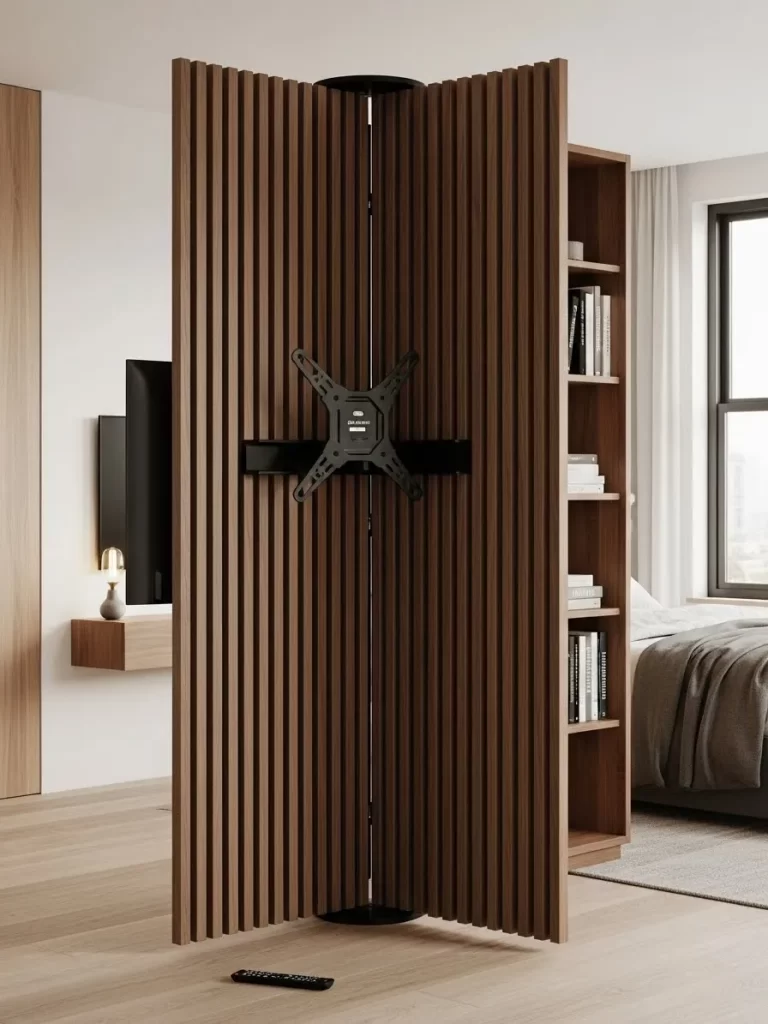
Dividing a large room into separate zones helps create a sense of privacy. This vertical wood slat wall acts as a partition between your bed and the lounge. A central rotating mount holds a television in the middle of the screen.
You can spin the TV 180 degrees to watch a movie from the couch or the bed. This feature eliminates the need for two separate screens in one home. The gaps between the slats allow natural light to flow through the entire space.
Built in shelving on the side provides a spot for books or electronics. The dark wood finish adds a sophisticated touch to the room. It creates a focal point that serves two different living areas at once.
Material Required List
- Long wood slats for the screen
- Heavy duty swivel TV mount
- Metal floor and ceiling plates
- Plywood for the side shelves
- Wood screws
- Dark wood stain
Equipment Required List
- Power drill
- Measuring tape
- Level
- Circular saw
- Paintbrush
DIY Instructions Step By Step
- Measure the height from your floor to the ceiling very accurately.
- Cut the wood slats to the exact height so they fit tightly in the room.
- Install a central metal pole between the floor and ceiling plates to act as the pivot.
- Attach the swivel TV mount to the central pole at eye level.
- Secure the wood slats vertically around the pivot point to build the divider wall.
- Build a narrow shelving unit on one side of the slats using plywood.
- Apply a dark wood stain to all surfaces and let it dry.
- Mount your television to the bracket and run the wires through the hollow center.
7 Folding Wooden Balcony Bar Table
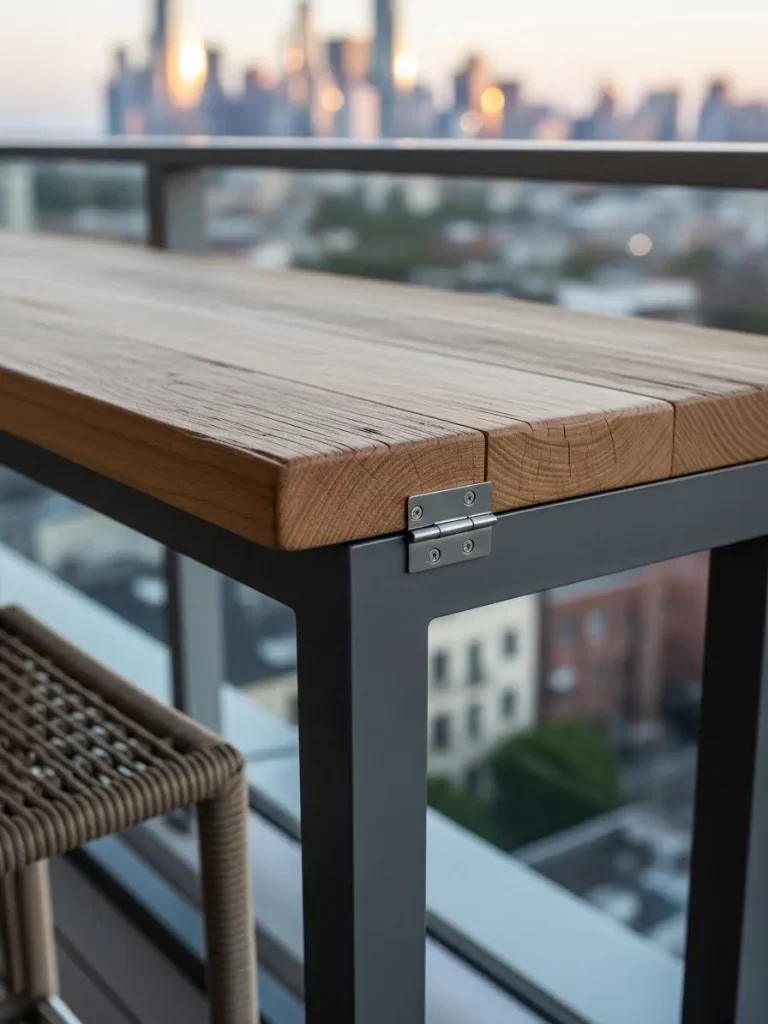
Urban balconies are often too narrow for traditional patio furniture. This rustic wood table attaches directly to your balcony railing. It provides a flat surface for enjoying a coffee or a meal while looking at the view.
Strong metal hinges allow the table to fold flat against the railing when not in use. This feature keeps your outdoor walkway clear and open. The thick wood planks offer a natural look that handles the weather well.
You can pair this table with a tall stool for a bar style experience. It transforms a small outdoor area into a functional dining spot. This project is a great way to maximize your home footprint.
Material Required List
- Cedar or teak wood planks
- Stainless steel hinges
- Metal railing brackets and U bolts
- Waterproof wood sealant
- Outdoor wood glue
Equipment Required List
- Power drill
- Hand saw
- Sandpaper
- Measuring tape
- Clamps
DIY Instructions Step By Step
- Cut the wood planks to the desired length for your bar top.
- Glue the planks together side by side and clamp them until the glue dries.
- Sand the surface until it is smooth to prevent splinters.
- Apply a waterproof sealant to protect the wood from sun and rain damage.
- Attach metal brackets to your balcony railing using strong U bolts.
- Screw the hinges to the brackets and the underside of the wood table.
- Install a folding support leg or arm that holds the table in the up position.
- Test the folding motion to make sure the table sits flat against the railing.
8 Pull Out Sleeper Chair With Textured Fabric
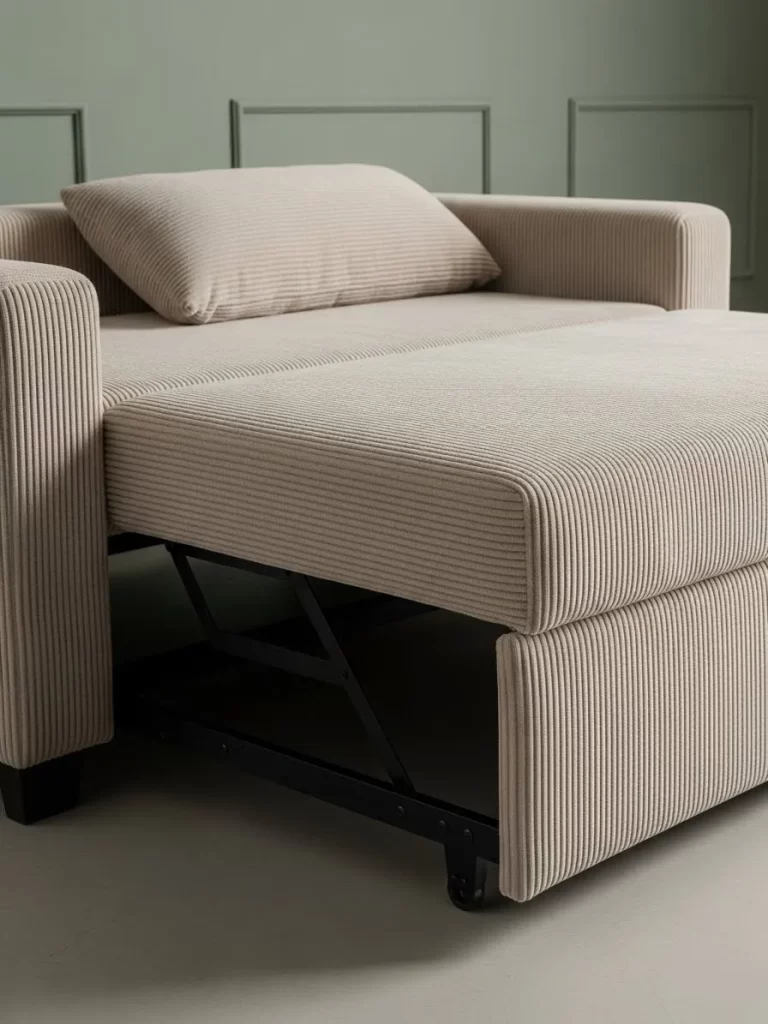
A cozy armchair offers a great place to read during the day. This model contains a hidden metal frame that slides out from the bottom. It extends into a single bed for overnight guests in seconds.
The ribbed beige fabric provides a modern texture and feels soft to the touch. Small wheels under the extension allow it to glide across the floor easily. This piece saves a lot of room compared to keeping a guest bed.
You can use this chair in a nursery or a small office. It provides a comfortable seat without cluttering the floor. The simple transition makes hosting simple and stress free.
Material Required List
- Plywood for the chair frame
- Sliding metal bed mechanism
- High density seat foam
- Ribbed upholstery fabric
- Small caster wheels
- Wood screws
Equipment Required List
- Power drill
- Staple gun
- Saw
- Measuring tape
- Screwdriver
DIY Instructions Step By Step
- Build a wooden chair frame with a large open base at the bottom.
- Assemble a smaller wooden platform that fits inside the chair base.
- Attach caster wheels to the bottom of the inner platform so it can roll.
- Connect the sliding metal mechanism to the chair and the inner platform.
- Cut foam cushions for the seat and the pull out bed section.
- Cover the foam with the ribbed fabric and secure it with staples.
- Fasten the upholstered cushions to the wood frames using screws.
- Pull the handle to test how smoothly the bed extends from the chair.
9 Mobile Kitchen Island With Spice Storage
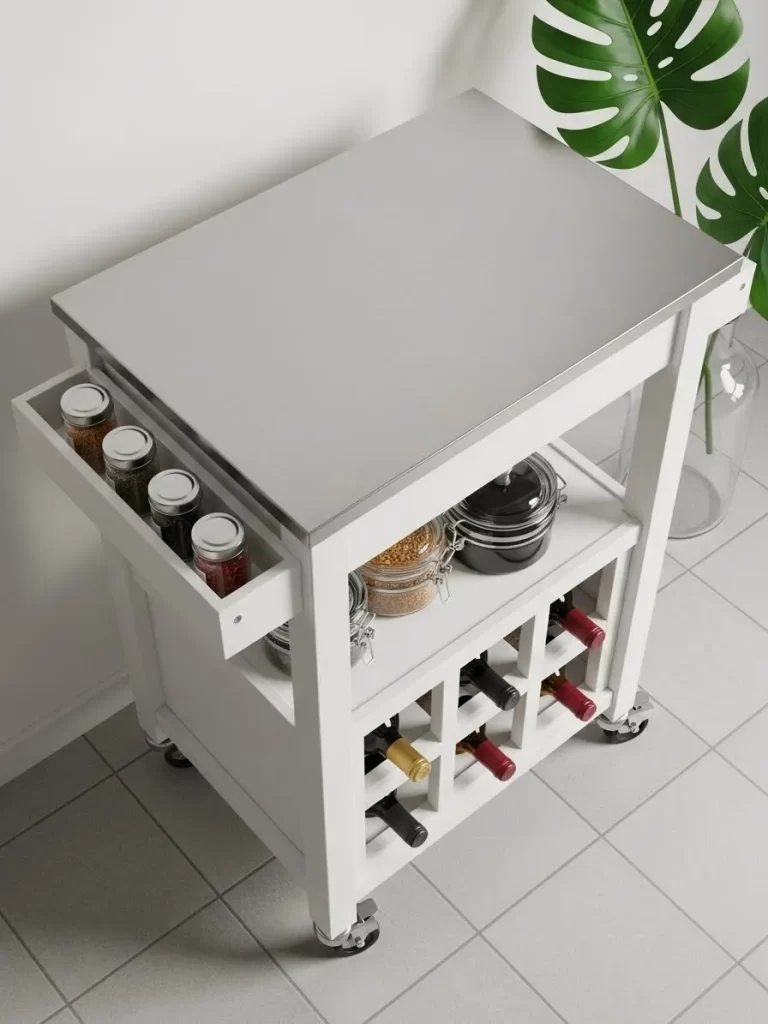
Small kitchens often lack enough counter space for meal preparation. This white wooden cart features a durable stainless steel top for chopping. It includes a narrow side drawer designed specifically for spice jars.
Locking wheels allow you to move the cart wherever you need it most. You can roll it to the center for prep work and back to a corner later. A wine rack at the bottom holds several bottles securely in place.
Middle shelves provide extra room for jars or kitchen appliances. This cart keeps your most used ingredients within reach. It adds utility to your kitchen without a permanent renovation.
Material Required List
- Wood boards for the frame
- Stainless steel sheet for the top
- Locking caster wheels
- Metal drawer slides
- Wood glue
- White paint
Equipment Required List
- Power drill
- Saw
- Paintbrush
- Measuring tape
- Sandpaper
DIY Instructions Step By Step
- Build a rectangular wooden frame with four legs and two interior shelves.
- Cut a plywood top and glue the stainless steel sheet over the surface.
- Install a narrow drawer on the side of the frame using metal slides.
- Create a wooden grid on the bottom shelf to hold wine bottles in place.
- Sand all wooden parts and apply two coats of white paint.
- Screw the locking caster wheels into the bottom of the four legs.
- Attach the metal top to the frame using strong adhesive or screws.
- Place your spice jars in the side drawer and kitchen tools on the shelves.
10 Modular Hexagonal Floor Seating
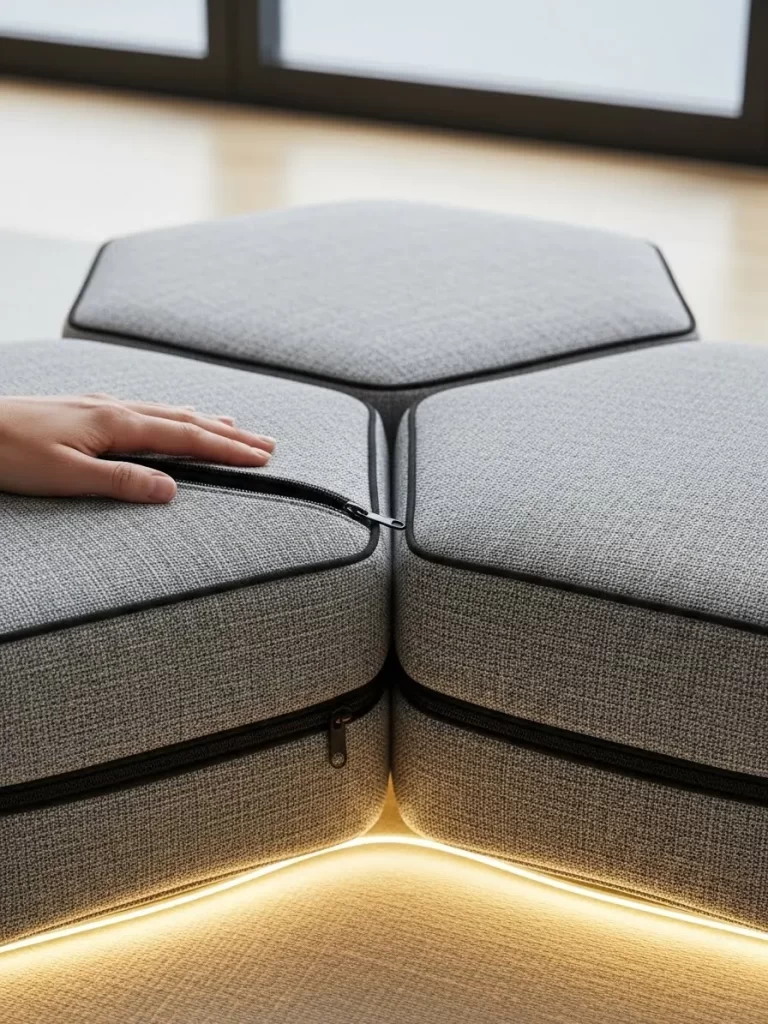
Flexible seating options are essential for homes that enjoy hosting parties. These hexagonal cushions can be arranged in many different shapes on the floor. Heavy duty zippers allow you to connect the pieces together so they stay in place.
A warm LED light glows from the base of the cushions. This feature adds a cozy atmosphere to your living room at night. The gray fabric provides a neutral look that matches any color scheme.
You can stack the cushions in a corner when the party is over. This modular design lets you create a custom lounge area anywhere. It provides a comfortable and stylish alternative to bulky chairs.
Material Required List
- Hexagonal foam blocks
- Durable gray upholstery fabric
- Long metal zippers
- Battery powered LED strips
- Fabric adhesive
Equipment Required List
- Sewing machine
- Scissors
- Measuring tape
- Fabric pins
DIY Instructions Step By Step
- Measure the top and sides of your foam hexagons to plan the fabric cuts.
- Cut two hexagonal fabric pieces for the top and bottom of each cushion.
- Cut six rectangular strips for the side panels of the hexagon.
- Sew the zippers onto the edges of the side panels so cushions can link together.
- Stitch the fabric pieces together inside out and leave one side open.
- Turn the fabric right side out and slide the foam block inside.
- Sew the final edge closed or use a hidden zipper for easy cleaning.
- Stick the LED strips along the bottom edge of the foam using adhesive.
11 Entryway Console Table With Tucked Stools
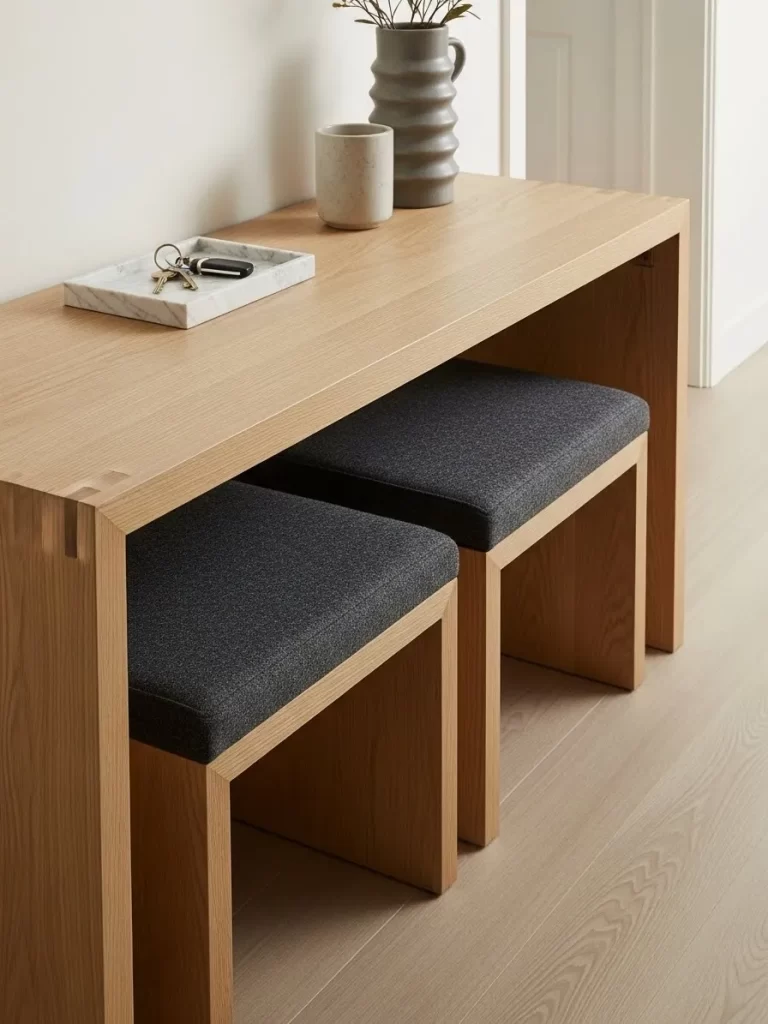
Narrow entryways often stay empty because standard furniture is too wide. This slim wood console table provides a flat surface for your keys and mail. Two matching stools sit neatly underneath the table frame to save floor space.
The stools feature dark gray cushions for a comfortable seat while putting on shoes. Using a nested design keeps the walkway clear when you do not need the seating. The light wood grain looks fresh and inviting near a front door.
This piece works well as a temporary desk in a small apartment. You can pull the stools out for a quick work session and tuck them away later. It maximizes a small area that often goes to waste.
Material Required List
- Oak or pine wood boards
- Dark gray fabric
- High density foam
- Wood glue
- Finish nails
- Clear wood sealant
Equipment Required List
- Table saw or circular saw
- Power drill
- Hammer
- Measuring tape
- Staple gun
DIY Instructions Step By Step
- Cut four long legs and a narrow top board for the console table.
- Build the table frame using wood glue and nails for a clean look.
- Construct two smaller stool frames that are short enough to fit under the table.
- Cut plywood squares for the stool seats and glue foam on top.
- Wrap the dark gray fabric over the foam and staple it to the plywood.
- Attach the upholstered seats to the stool frames with screws from underneath.
- Sand all the wood surfaces and apply a clear sealant to protect the grain.
- Slide the stools under the table to ensure they fit perfectly.
12 Floating Window Desk With Hidden Extension

Natural light makes a workspace much more pleasant for daily tasks. This white floating desk mounts directly below a window for a great view. It features a hidden sliding tray that provides extra room for a keyboard or mouse.
The clean white surface helps a small room feel brighter and more open. Since it has no legs, you can easily clean the floor underneath the unit. It offers a professional office setup without taking up much room.
A cable management slot keeps your laptop wires organized and out of sight. You can pull the extension out when you start work and hide it later. This design is a great solution for studio apartments or bedrooms.
Material Required List
- White laminated plywood or MDF
- Heavy duty wall mounting brackets
- Under desk drawer slides
- Wood screws
- Edge banding tape
Equipment Required List
- Power drill
- Level
- Stud finder
- Saw
- Measuring tape
DIY Instructions Step By Step
- Cut a large rectangular board for the main desk surface.
- Measure a smaller board to act as the hidden sliding keyboard tray.
- Apply white edge banding to all the cut edges for a finished look.
- Install the drawer slides to the bottom of the main desk and the sides of the tray.
- Use a stud finder to locate the wall beams under your window.
- Screw the heavy duty brackets into the wall studs at a comfortable height.
- Place the desk on the brackets and secure it with screws from below.
- Test the sliding tray to make sure it moves smoothly without catching.
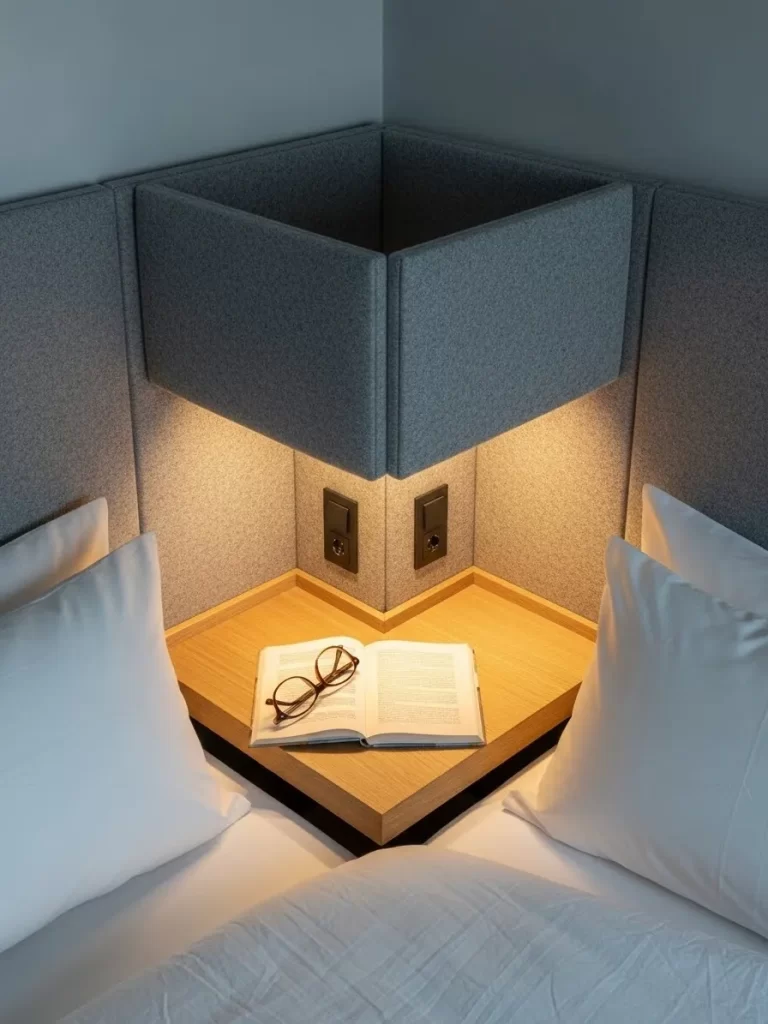
13 Integrated Bed Headboard With Storage Trays
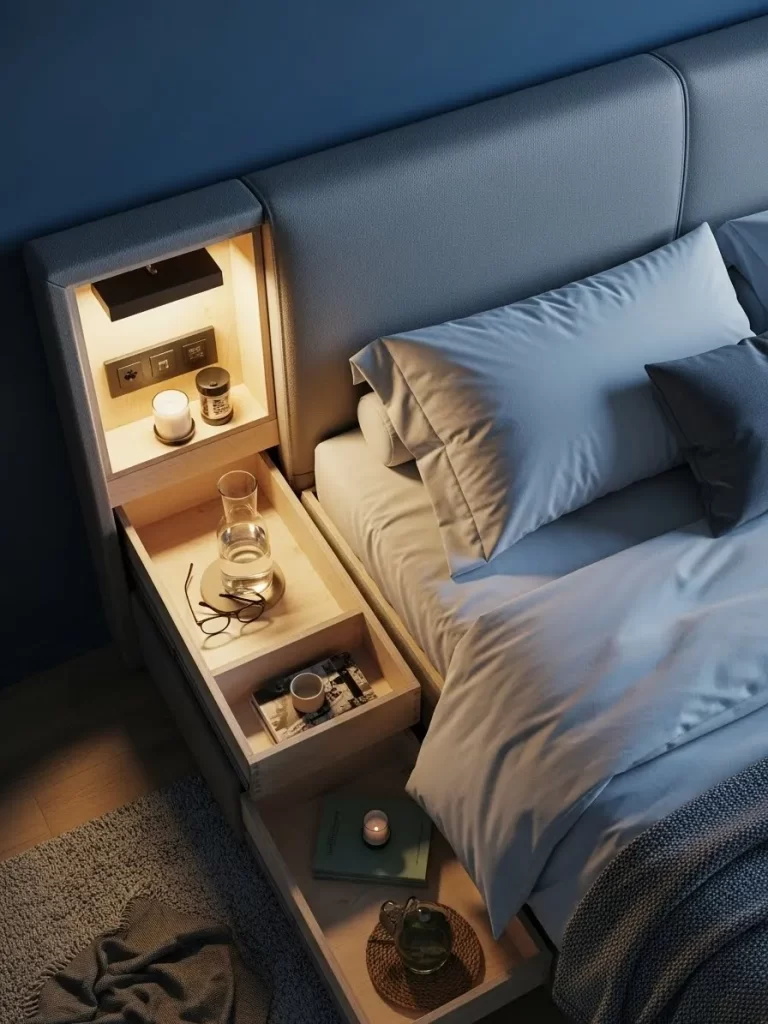
Traditional nightstands can make a small bedroom feel crowded. This padded headboard includes built in shelving and light fixtures. A secret drawer at the base of the headboard slides out to act as a bedside table.
The top section features a recessed light for reading late at night. Power outlets and USB ports are built directly into the side for easy charging. The blue fabric adds a soft and modern feel to your sleeping area.
You can keep your water glass and books on the pull out tray. When you wake up, just slide the tray back into the headboard to keep the room tidy. This unit replaces several pieces of furniture with one smart design.
Material Required List
- Plywood for the headboard frame
- Soft upholstery fabric
- Thin foam padding
- Recessed LED light kit
- Built in power strip
- Metal drawer slides
Equipment Required List
- Power drill
- Staple gun
- Jigsaw
- Screwdriver
- Wire strippers
DIY Instructions Step By Step
- Build a tall rectangular frame using plywood to fit the width of your bed.
- Cut an opening in the side of the frame for the pull out storage tray.
- Install metal drawer slides inside the opening and build a small wooden box to fit.
- Cut a hole in the top section to install the recessed LED light.
- Mount the power strip into the side of the frame and run the cord out the back.
- Glue foam to the front of the headboard and wrap it in the blue fabric.
- Use a staple gun to secure the fabric around the edges and back.
- Bolt the finished headboard to your bed frame or the wall for stability.
14 Modern Extending Dining Table With Center Gap
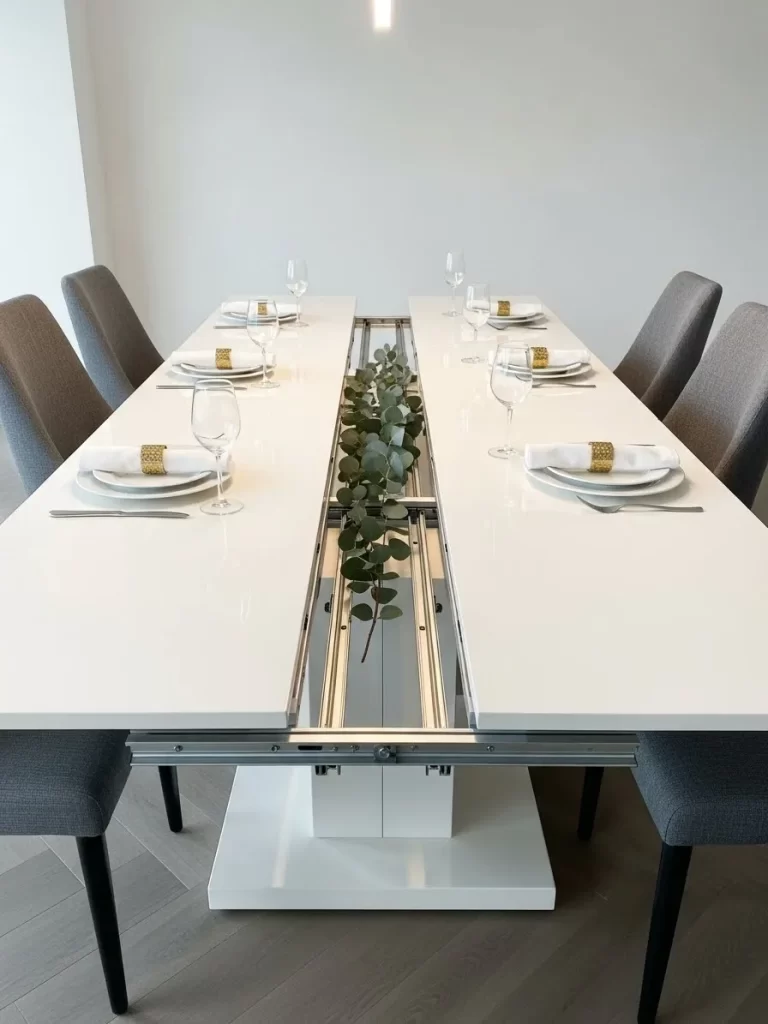
Small dining rooms need a table that can grow for dinner parties. This white minimalist table features a hidden track system in the center. You can pull the two sides apart to insert extra wooden panels.
A decorative gap in the middle can hold a long planter or a runner. This feature adds a touch of nature to your dining experience. The metal rails ensure the table stays level even when fully extended.
The table uses a pedestal base to provide more legroom for your guests. You can keep it compact for daily meals and expand it for holidays. It offers a flexible solution for homes that host groups of different sizes.
Material Required List
- Large MDF or plywood sheets
- Metal extending table slides
- Pedestal base kit
- White gloss paint
- Wood glue
- Metal bolts
Equipment Required List
- Power drill
- Circular saw
- Level
- Paint roller
- Sandpaper
DIY Instructions Step By Step
- Cut two identical rectangular panels for the main tabletop surfaces.
- Build a central support box that will attach to the pedestal base.
- Install the metal extending slides between the central box and the two top panels.
- Paint all the wood surfaces with white gloss paint for a modern finish.
- Bolt the pedestal base to the bottom of the central support box.
- Create an extra leaf panel that fits into the gap when the table is open.
- Ensure the leaf panel has small pins to lock it into the main table sides.
- Test the sliding mechanism to make sure the table opens and closes easily.
15 Curved Side Table With Integrated Pet Bed
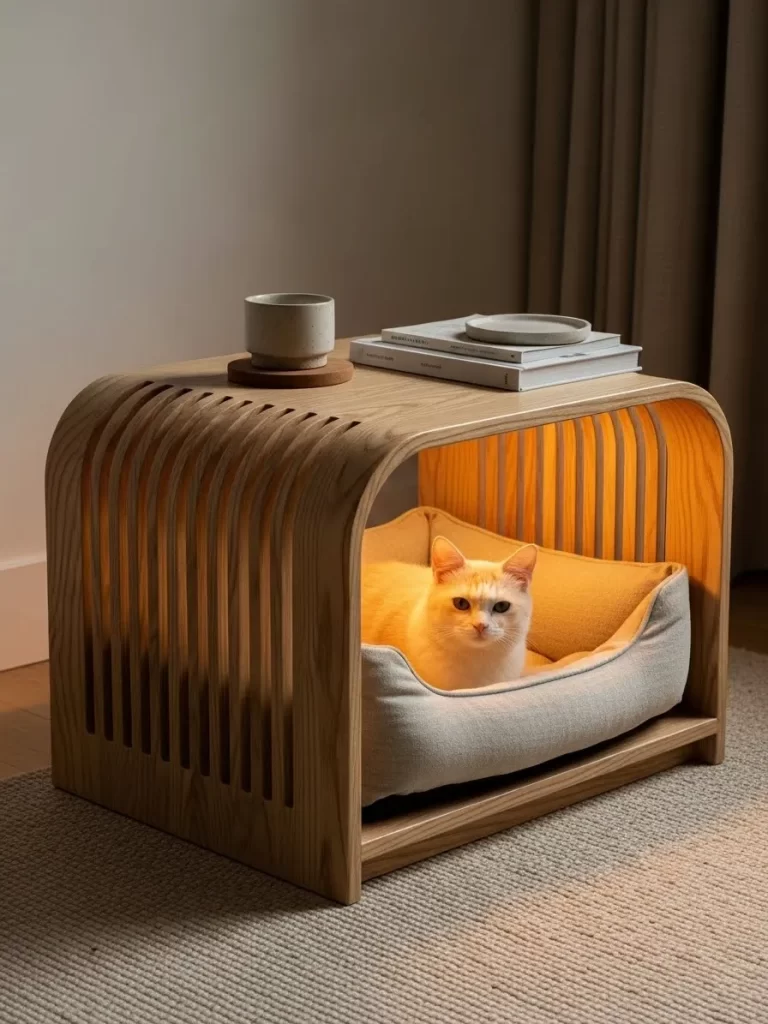
Pet owners often struggle to fit a cat bed into a small living room. This curved wooden side table serves as a surface for your coffee and a cozy home for your pet. The slatted wood design allows for plenty of airflow and visibility.
A warm light inside the unit creates a calm space for your cat to sleep. The smooth wood finish looks great next to a sofa or bed. This piece eliminates the need for a separate pet bed on the floor.
A soft cushion fits perfectly into the bottom of the table. You can use the top surface for books or a lamp. It combines animal care with functional home furniture in a stylish way.
Material Required List
- Flexible plywood or thin wood slats
- Solid wood base and top boards
- Soft pet cushion
- Small battery powered LED puck light
- Wood glue
- Clear varnish
Equipment Required List
- Jigsaw
- Clamps
- Sandpaper
- Paintbrush
- Measuring tape
DIY Instructions Step By Step
- Cut a solid rectangular board for the bottom base and the top surface.
- Use a jigsaw to create two curved side supports from thick plywood.
- Attach thin wood slats vertically between the top and bottom boards along the curves.
- Leave the front of the unit open so your pet can enter easily.
- Sand all the wood slats until they are perfectly smooth to keep your pet safe.
- Apply a clear varnish to protect the wood and give it a nice shine.
- Stick the LED puck light to the underside of the top board.
- Place the soft cushion inside the unit to complete the pet bed.
16 Recessed Bathroom Cabinet With Laundry Rack
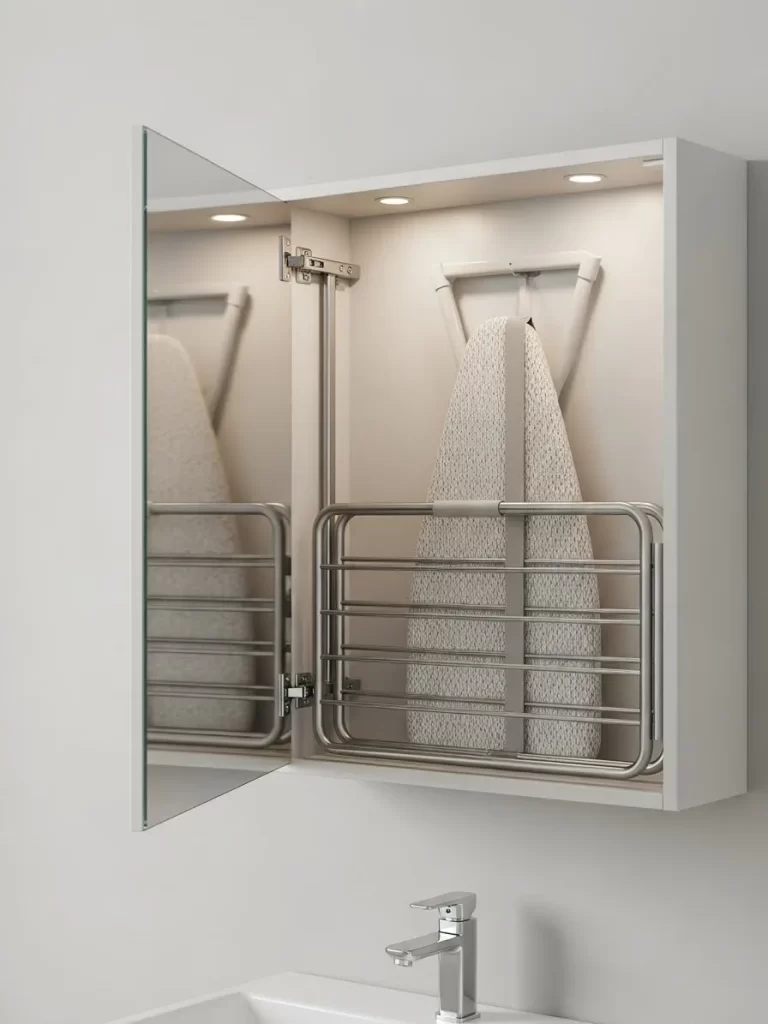
Tiny bathrooms can quickly become cluttered with towels and ironing gear. This wall mounted cabinet hides a full ironing board behind a mirrored door. It also features a pull out metal rack for drying delicate clothes.
Recessed lighting at the top provides a bright glow for the mirror. The white finish keeps the bathroom looking clean and bright. You can hide your laundry tasks behind a sleek and modern cabinet door.
This unit saves a huge amount of space in a laundry room or bathroom. You can iron a shirt and then fold the board back into the wall. It keeps your home organized without showing any mess to your guests.
Material Required List
- Plywood for the cabinet box
- Frameless mirror
- Compact folding ironing board
- Metal drying rack kit
- Piano hinge
- LED light strip
Equipment Required List
- Power drill
- Level
- Jigsaw or circular saw
- Stud finder
- Screwdriver
DIY Instructions Step By Step
- Cut a rectangular opening in your bathroom wall between two studs.
- Build a wooden cabinet box that fits exactly into the wall opening.
- Install the LED light strip at the top of the cabinet box.
- Mount the folding ironing board inside the cabinet using the provided brackets.
- Secure the metal drying rack to the side or bottom of the cabinet.
- Attach the frameless mirror to a plywood door panel using mirror adhesive.
- Use a piano hinge to connect the mirror door to the cabinet frame.
- Add a magnetic catch to keep the door closed when the board is not in use.
17 Wall Mounted Folding Art Desks
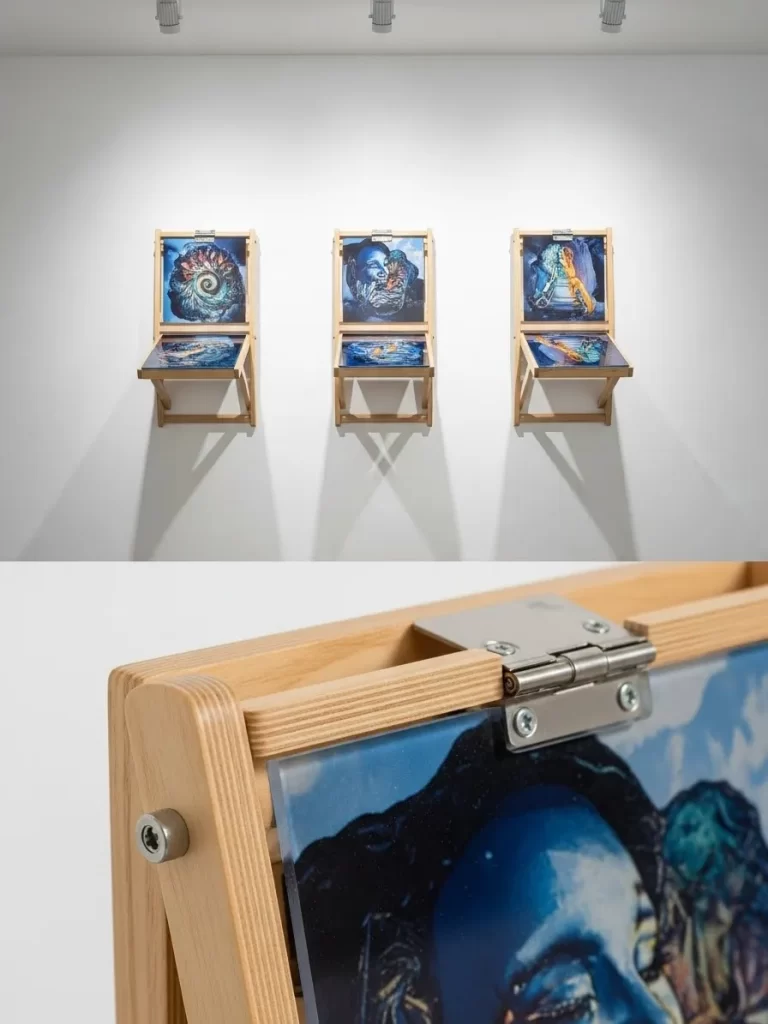
Artists and students often need a large flat surface for their projects. These three wall mounted desks feature colorful art on the underside. When you are not working, the desks fold up to look like framed paintings.
Strong wooden frames hold the desks securely against the wall. Each unit can be lowered independently to create a customized workspace. This design turns a functional office into a beautiful art gallery.
The light wood grain matches the creative and modern style of the room. You can have three people working at once or just use one. It is a smart way to add utility to a plain wall.
Material Required List
- Thick plywood for the desk surfaces
- Wood strips for the frames
- Decorative art posters or paintings
- Strong wall hinges
- Folding support legs
- Clear acrylic sheet
Equipment Required List
- Power drill
- Level
- Saw
- Glue
- Measuring tape
DIY Instructions Step By Step
- Cut three identical rectangular plywood boards for the desk surfaces.
- Build a shallow wooden frame for each board to give it a finished look.
- Glue your chosen art poster to the underside of each desk board.
- Cover the art with a thin acrylic sheet to protect it from damage.
- Mount the desks to the wall using heavy duty hinges at the top.
- Install a folding leg or a wall bracket to support the desk when it is down.
- Use a magnetic latch at the bottom to keep the desk folded against the wall.
- Check that all three desks are level with each other for a clean display.
18 Industrial Pipe Shelf With Integrated Lamps
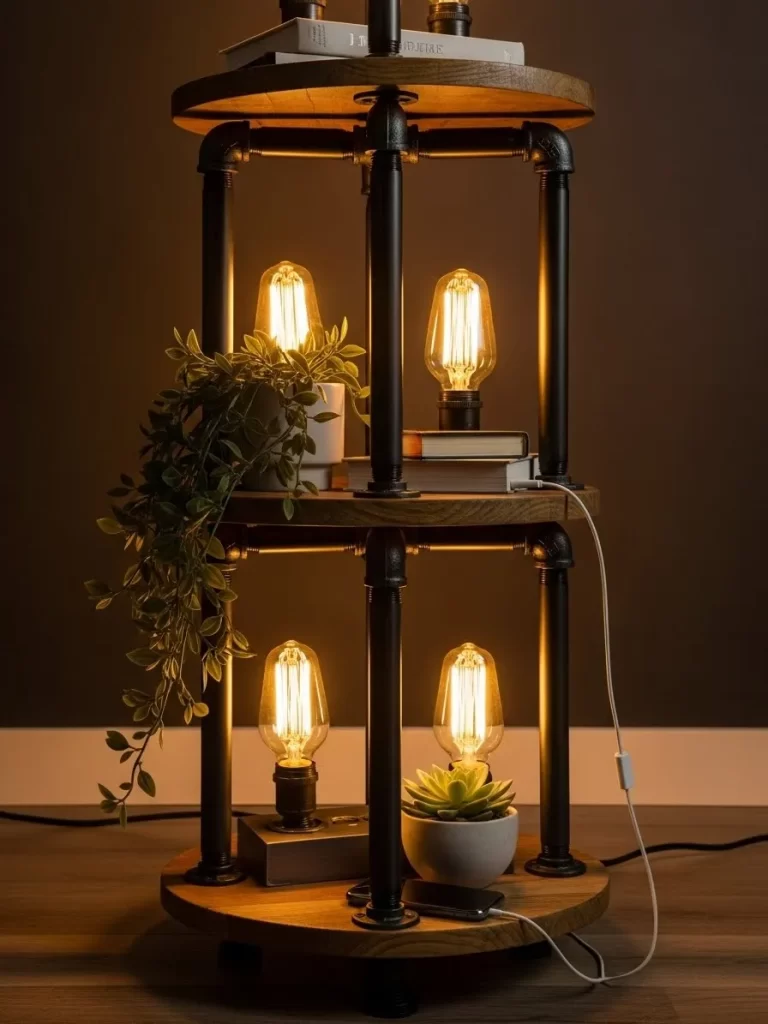
Small rooms need lighting and storage but often lack space for both. This industrial style shelf uses black metal pipes for a sturdy frame. Three round wooden tiers provide space for plants, books, and your phone.
Vintage style light bulbs are built into the pipe structure. They provide a warm and inviting glow for your bedroom or lounge. A charging port at the base allows you to power your electronics overnight.
The combination of wood and metal fits perfectly into a modern or rustic home. This piece acts as a side table, a bookshelf, and a lamp. It saves you from buying three separate items for your room.
Material Required List
- Black metal pipes and elbow joints
- Three circular wood planks
- Light bulb sockets and vintage bulbs
- Electrical wire and a plug
- Wood stain
- Pipe floor flanges
Equipment Required List
- Pipe wrench
- Power drill
- Hole saw
- Wire strippers
- Paintbrush
DIY Instructions Step By Step
- Stain the circular wood planks and let them dry completely.
- Use a hole saw to cut openings in the center of the wood planks for the pipes.
- Assemble the metal pipe frame by screwing the pieces into the elbow joints.
- Slide the wood planks onto the pipes and secure them at different heights.
- Run the electrical wires through the inside of the hollow pipes.
- Attach the light bulb sockets to the ends of the pipes and connect the wires.
- Install the floor flanges to the bottom of the pipes for a stable base.
- Screw a charging port or USB hub into the bottom wooden tier.
19 Deep Under Bed Storage Drawer
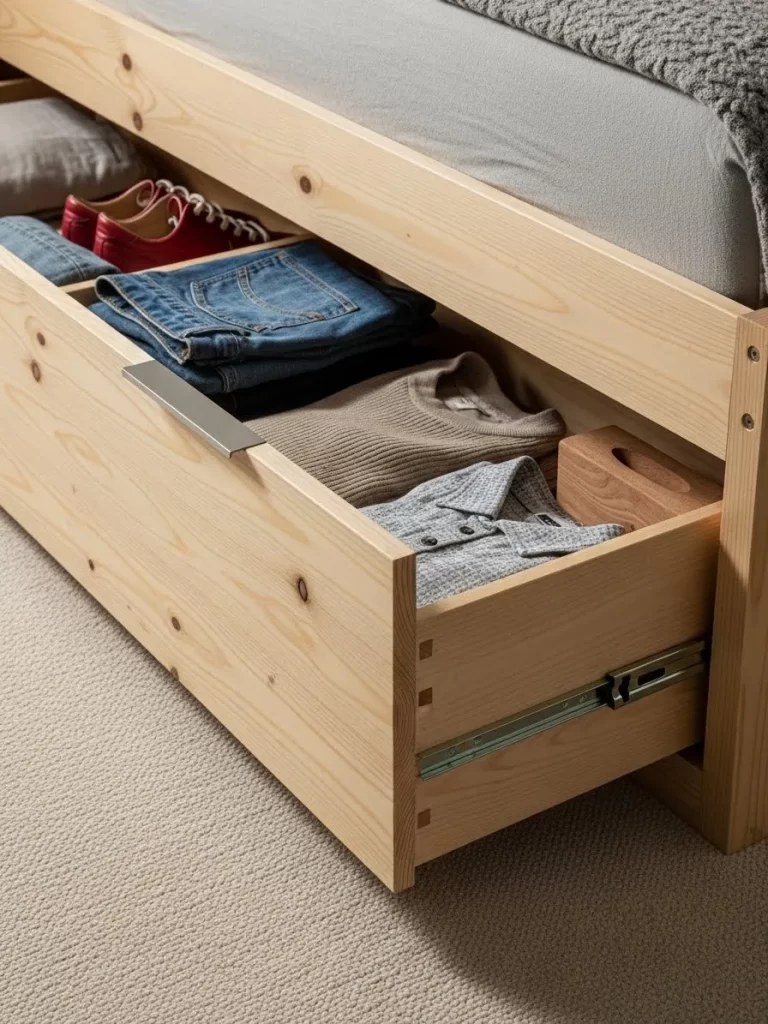
The space under your bed is one of the best places to store extra items. This large wooden drawer features high quality dovetail joints for a strong build. It glides out on metal tracks to give you easy access to your clothes.
A sleek metal handle allows you to pull the drawer open without effort. The light pine wood looks natural and clean in any bedroom. You can store heavy sweaters or shoes in this deep compartment.
Using drawers instead of plastic bins keeps your room looking organized. The wood construction protects your items from dust and pets. This project helps you clear out your closet by using hidden floor space.
Material Required List
- Pine wood boards
- Plywood for the drawer bottom
- Metal drawer handle
- Heavy duty drawer slides
- Wood glue
- Finish nails
Equipment Required List
- Table saw or miter saw
- Router for dovetail joints
- Power drill
- Measuring tape
- Hammer
DIY Instructions Step By Step
- Measure the height and width of the open space under your bed frame.
- Cut the pine boards to the correct length for the drawer sides and front.
- Use a router to create dovetail joints at the corners for a professional look.
- Cut a groove near the bottom of the boards to hold the plywood base.
- Assemble the drawer box using wood glue and a few finish nails.
- Attach the metal drawer slides to the sides of the drawer and the bed frame.
- Screw the metal handle to the center of the front panel.
- Slide the drawer into place to make sure it moves smoothly and clears the floor.
20 Hidden Compartment Coffee Table With Spring Lift
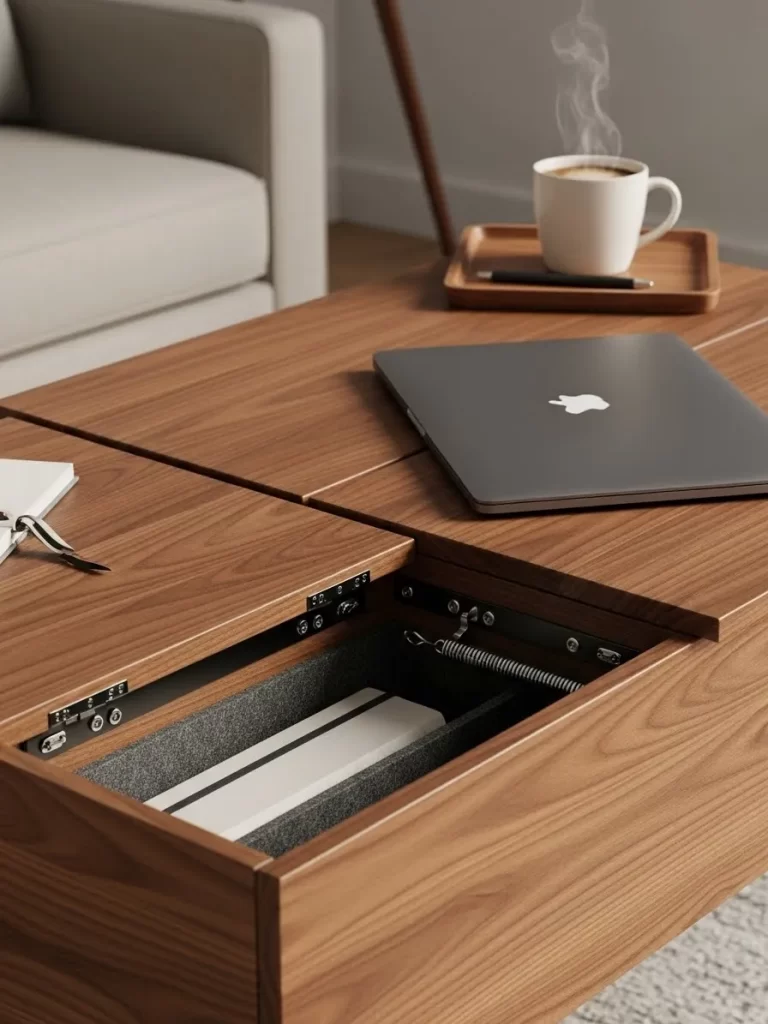
Keeping your living room tidy is easier when you have a place for clutter. This walnut wood coffee table looks like a solid piece of furniture. A hidden spring mechanism allows a section of the top to lift and reveal storage.
You can store your laptop, chargers, or notebooks inside the felt lined box. This keeps your work items close but out of sight when guests arrive. The lifting section also acts as a raised desk for working from the sofa.
The rich wood grain adds a warm and luxurious feel to your home. It provides a clever way to hide your daily mess. This table is a smart addition to any small apartment or home office.
Material Required List
- Walnut wood panels
- Spring loaded lift top hinges
- Gray felt fabric for lining
- Wood glue
- Metal screws
- Furniture wax or oil
Equipment Required List
- Power drill
- Circular saw
- Clamps
- Sandpaper
- Screwdriver
DIY Instructions Step By Step
- Build a rectangular wooden box to serve as the main body of the coffee table.
- Cut the tabletop into two sections so one part can lift independently.
- Line the inside of the wooden box with gray felt using a strong adhesive.
- Install the spring loaded hinges to the interior walls of the table.
- Attach the smaller section of the tabletop to the lifting hinge arms.
- Secure the larger section of the tabletop permanently to the rest of the frame.
- Sand the walnut wood until it is very smooth and apply a coat of furniture oil.
- Test the lift top to ensure it raises and lowers without any gaps.
21 Recessed Jewelry and Makeup Mirror Cabinet

Many bedrooms feel cluttered with too many small bottles and boxes. This recessed wall cabinet provides a dedicated spot for your jewelry. A bright LED frame around the mirror gives you light for your routine.
Internal hooks keep necklaces from tangling in a mess. You can shut the door to hide the clutter and keep a clean room. It fits between standard wall studs to save every inch of space. This design acts as a mirror and a complete storage center.
Material Required List
- Plywood for the cabinet box
- LED framed mirror
- Small wooden drawers
- Metal jewelry hooks
- Piano hinge
- Magnetic door catch
Equipment Required List
- Power drill
- Level
- Jigsaw
- Stud finder
- Tape measure
DIY Instructions Step By Step
- Find the wall studs using your stud finder tool.
- Cut a rectangular hole in the drywall between the studs.
- Build a shallow wooden box to fit inside that wall space.
- Install the metal hooks and small drawers inside the box.
- Attach the LED mirror to a plywood panel for the door.
- Connect the door to the cabinet using a piano hinge.
- Mount the cabinet into the wall hole with long screws.
- Add the magnetic catch to keep the door shut tight.
- Connect the LED mirror wire to a power source nearby.
- Organize your jewelry on the hooks and in the drawers.
22 Industrial Pipe Media Wall with Projector Screen
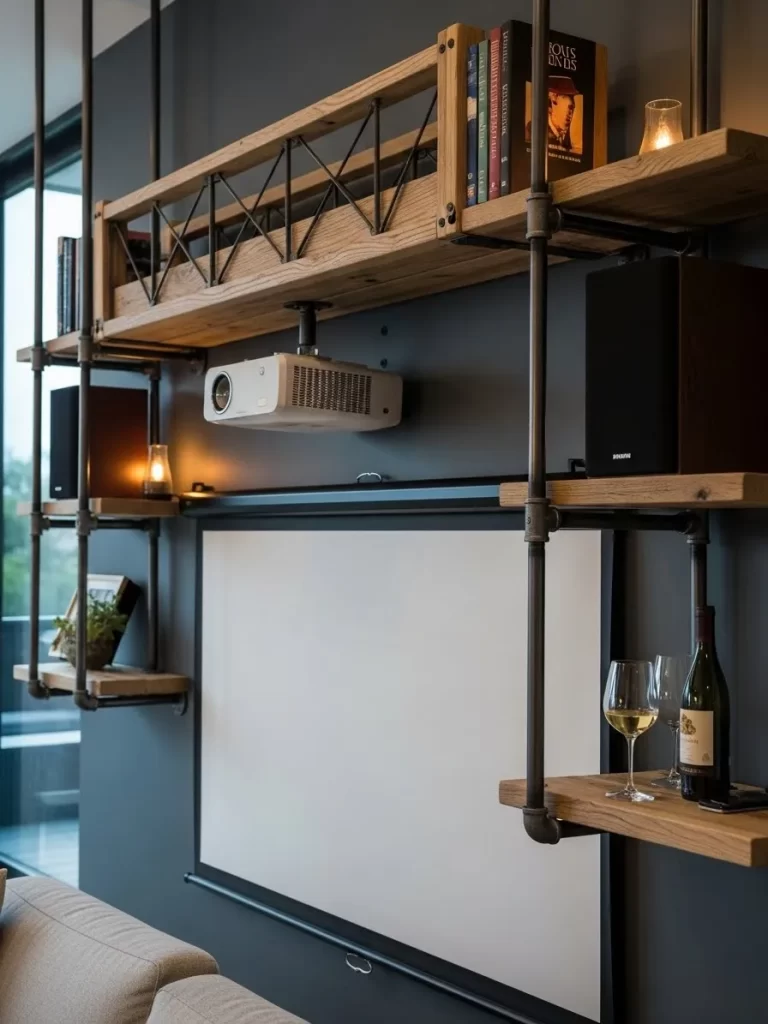
Living rooms often look messy with tangled wires and bulky stands. This industrial shelving unit uses black metal pipes for support. A large projector screen pulls down in front of the shelves for movies.
You can store your speakers and media players on the thick wood planks. The open design keeps the room feeling airy while providing storage. It turns any blank wall into a professional home theater system. The wood and metal look fits any modern house style.
Material Required List
- Black iron pipes and elbows
- Thick wooden planks
- Pull down projector screen
- Pipe floor flanges
- Wood stain
- Wall anchors
Equipment Required List
- Pipe wrench
- Power drill
- Level
- Sandpaper
- Measuring tape
DIY Instructions Step By Step
- Clean the metal pipes to remove any oily residue.
- Stain the wood planks and let them dry for a day.
- Assemble the vertical pipe frames using the elbows and joints.
- Screw the floor flanges into the bottom of the pipe legs.
- Attach the pipes to your wall using heavy duty anchors.
- Lay the wooden planks across the pipe supports for shelves.
- Mount the projector screen to the top of the pipe frame.
- Check with a level to ensure the shelves are not tilted.
- Run your speaker wires behind the vertical metal pipes.
- Pull down the screen to make sure it clears the shelves.
23 Modern Sofa with Integrated Side Table and Drawer
Finding a place for your book while sitting on a couch is tricky. This sofa features a wide wooden armrest that serves as a table. A deep drawer sits at the base to hold your extra blankets.
The warm oak finish contrasts beautifully with the light gray fabric. You can keep your living area organized without adding extra furniture. It provides a stable surface for your snacks while you relax. This unit combines comfort with smart storage in one piece.
Material Required List
- Sofa base frame
- Oak wood boards
- High density foam
- Gray upholstery fabric
- Metal drawer slides
- Wood screws
Equipment Required List
- Power drill
- Saw
- Staple gun
- Measuring tape
- Hammer
DIY Instructions Step By Step
- Build a sturdy wooden box for the wide sofa armrest.
- Construct a drawer that fits into the bottom of the armrest.
- Install metal slides to the drawer and the inner arm box.
- Glue foam to the top of the sofa base for seating.
- Wrap the gray fabric over the foam and use staples.
- Sand the oak boards for the armrest until they are smooth.
- Apply a clear finish to the wood to protect the grain.
- Attach the oak boards to the top of the armrest box.
- Connect the armrest unit to the main sofa base frame.
- Slide the drawer in to check that it moves freely.
24 Pegboard Bike Storage Wall with Entryway Bench
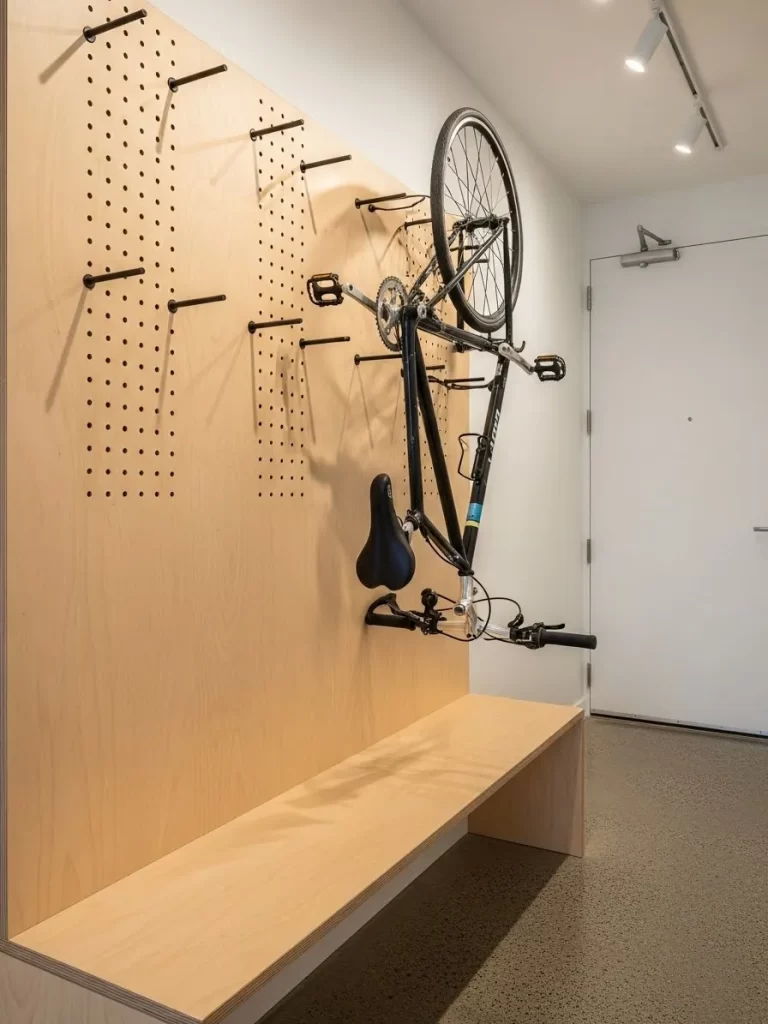
Bicycles often take up too much room in narrow hallways or flats. This large plywood pegboard allows you to hang your bike vertically. A long wooden bench at the bottom provides a spot for shoes.
You can rearrange the pegs to hold your helmet and bags. This system keeps your floor clear and your gear in one place. It adds a modern and functional look to your home entrance. The light wood grain makes the space feel bright.
Material Required List
- Large plywood sheet
- Wooden dowels for pegs
- Wood boards for the bench
- Heavy duty wall anchors
- Wood glue
- Clear sealant
Equipment Required List
- Power drill
- Hole saw bit
- Saw
- Level
- Measuring tape
DIY Instructions Step By Step
- Measure your wall to determine the size of the plywood.
- Drill a grid of holes into the plywood using a hole saw.
- Cut the wooden dowels into short lengths for the pegs.
- Build a simple rectangular bench using the wood boards.
- Sand the plywood and the bench until they are smooth.
- Apply a clear sealant to all the wood surfaces.
- Mount the pegboard to the wall using strong anchors.
- Place the bench directly underneath the pegboard unit.
- Insert the dowels into the holes where you need storage.
- Hang your bicycle vertically to save floor space.
25 Marble Extending Dining and Coffee Table
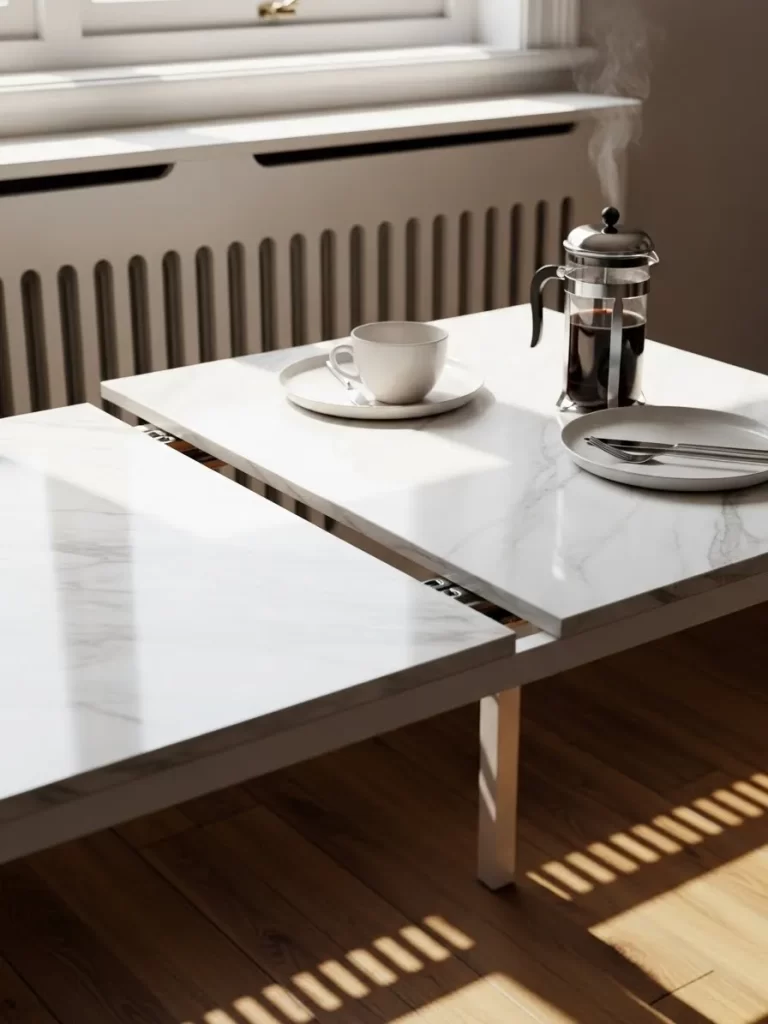
A coffee table that grows into a dining table is a lifesaver. This piece features a sleek marble top that slides open easily. Sturdy white legs provide a clean look that brightens up any room.
You can use it at a low height for relaxing or raise it. The stone surface is easy to clean and durable for daily use. It offers a touch of luxury while remaining extremely practical. This furniture piece is great for hosting dinner in small flats.
Material Required List
- Plywood for the base
- Marble finish contact paper
- Metal extension slides
- Telescoping table legs
- Wood glue
- Metal screws
Equipment Required List
- Power drill
- Circular saw
- Screwdriver
- Measuring tape
- Sandpaper
DIY Instructions Step By Step
- Cut two large rectangular boards for the main table top.
- Apply the marble contact paper to the top of the boards.
- Smooth out any bubbles in the paper with a flat tool.
- Install the metal extension slides between the two boards.
- Build a small wooden frame to hold the table legs.
- Attach the telescoping legs to the bottom of the frame.
- Screw the marble top unit onto the leg frame.
- Test the height adjustment to make sure it stays secure.
- Pull the table apart to check the extension mechanism.
- Clean the surface with a damp cloth to show the shine.
26 Multi Functional Kitchen Island with Hidden Bench
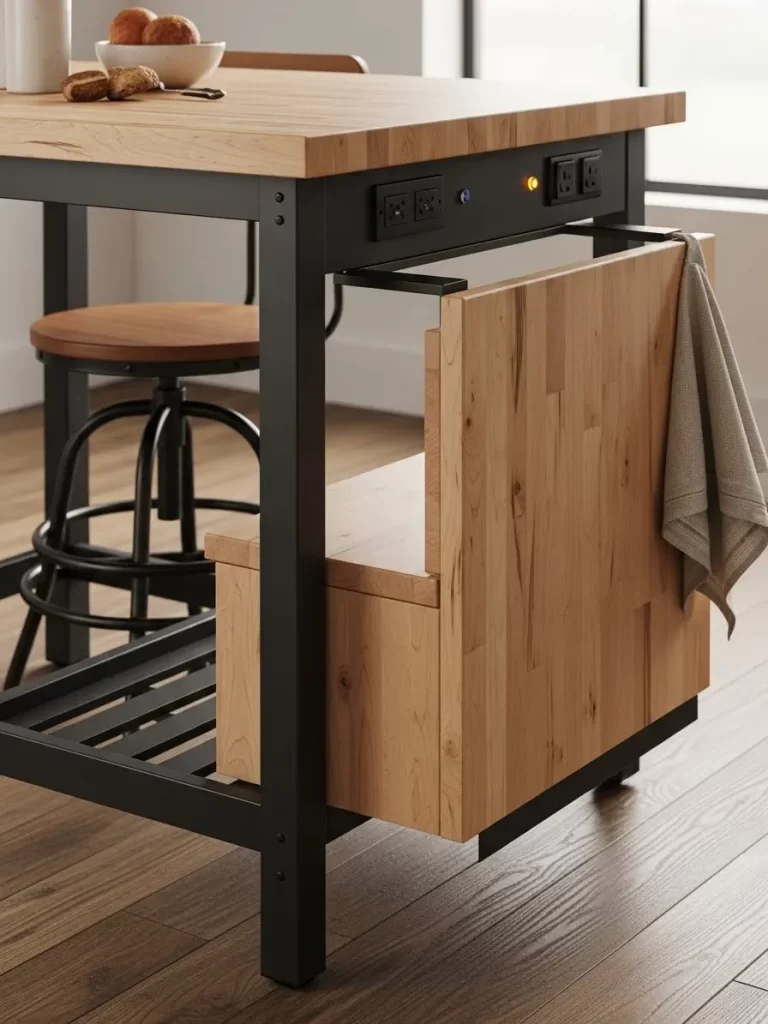
Kitchens are often busy and need smart seating solutions for guests. This black metal and wood island includes a built in power strip. A wooden bench slides out from the base whenever you need a seat.
The island features a thick butcher block top for meal preparation. You can use the outlets to charge your phone or use a blender. It provides a complete workstation that tucks away when you finish. This design helps keep your kitchen floor open and tidy.
Material Required List
- Square metal tubing for the frame
- Thick wood butcher block top
- Built in power strip
- Wood boards for the bench
- Metal drawer slides
- Black paint
Equipment Required List
- Welder or metal screws
- Power drill
- Saw
- Paintbrush
- Measuring tape
DIY Instructions Step By Step
- Build a rectangular metal frame for the island base.
- Paint the metal frame black and let it dry completely.
- Construct a smaller wooden bench that fits inside the frame.
- Install heavy duty slides to the bench and the island base.
- Cut a hole in the side of the frame for the power strip.
- Mount the power strip and run the cord out the bottom.
- Attach the thick butcher block top to the metal frame.
- Secure the wooden bench to the sliding mechanism.
- Sand the wood top and apply a food safe oil finish.
- Slide the bench out to ensure it can support your weight.
27 Hidden Home Gym Cabinet with Mirror Door
Staying fit at home is hard when you have no place for equipment. This tall walnut cabinet hides a full weight system inside. The front door features a full length mirror for checking your form.
Bright LED strips inside the unit help you see your gear. You can close the cabinet to turn your gym back into a room. It organizes your dumbbells and mats without ruining your decor. This smart storage keeps your workout tools ready for use.
Material Required List
- Plywood with walnut veneer
- Full length glass mirror
- Metal weight rack hardware
- LED light strips
- Door hinges
- Magnetic catch
Equipment Required List
- Power drill
- Level
- Saw
- Stud finder
- Tape measure
DIY Instructions Step By Step
- Build a tall and narrow cabinet using walnut plywood.
- Install several horizontal shelves for your smaller weights.
- Attach a metal rod for hanging your resistance bands.
- Glue the full length mirror to the front door panel.
- Mount the door to the cabinet using three strong hinges.
- Place the LED strips along the inside corners of the unit.
- Secure the cabinet to the wall studs for safety.
- Add the magnetic catch to keep the heavy door closed.
- Place your dumbbells and mats inside the organized slots.
- Turn on the LED lights to check the interior visibility.
28 Nesting Side Tables with Tablet Stand
Sometimes you need one table and other times you need three. These wooden nesting tables slide under each other to save space. The smallest table includes a metal stand to hold your tablet.
You can pull them out when you have guests over for snacks. The black metal frames are lightweight and very easy to move. It gives you multiple surfaces for work or meals in a tiny footprint. This set is a great solution for a compact living room.
Material Required List
- Three different sizes of wood tops
- Square metal tubing for frames
- Metal tablet bracket
- Wood screws
- Black spray paint
- Wood stain
Equipment Required List
- Power drill
- Saw
- Metal file
- Measuring tape
- Screwdriver
DIY Instructions Step By Step
- Cut the metal tubing to create three rectangular frames.
- Ensure each frame is slightly smaller than the previous one.
- Spray the metal frames black and let them dry well.
- Cut the wooden tops to match the size of the metal frames.
- Stain the wood tops and apply a protective clear coat.
- Screw the wood tops onto the metal frames from below.
- Attach the tablet bracket to the top of the smallest table.
- Sand any sharp edges on the metal with a file.
- Slide the tables together to check the nesting fit.
- Pull the tables out and test the tablet stand angle.
29 Bamboo Library Desk with Integrated Ladder
Small homes with high ceilings can benefit from vertical storage. This tall bamboo unit combines a wide desk with several shelves. A wooden ladder slides along a metal rail to reach the top.
The light wood grain keeps the piece from feeling too heavy. You can store your entire library and still have room to work. It creates a professional office in a single corner of your home. This unit uses every inch of height to maximize your storage.
Material Required List
- Bamboo boards for shelves and desk
- Metal ladder rail kit
- Wooden ladder kit
- Wall anchors
- Wood glue
- Clear sealant
Equipment Required List
- Power drill
- Circular saw
- Level
- Measuring tape
- Screwdriver
DIY Instructions Step By Step
- Build a wide desk base with two side support cabinets.
- Construct tall vertical frames for the upper shelving unit.
- Attach horizontal bamboo shelves at various heights.
- Secure the shelving unit to the wall studs for stability.
- Install the metal rail at the top of the shelving unit.
- Assemble the wooden ladder according to the kit.
- Attach the ladder wheels to the top of the metal rail.
- Apply a clear sealant to all the bamboo surfaces.
- Test the ladder to ensure it slides smoothly along the rail.
- Organize your books and place your laptop on the desk.
30 Kitchen Pet Feeding Station in Drawer
Pet bowls on the floor can be a tripping hazard in small kitchens. This clever cabinet features a deep bottom drawer for two bowls. You can slide the drawer open for meals and hide it later.
An upper drawer provides a spot to store bags of pet food. This system keeps your kitchen floor clean and free of water spills. It is a smart way to care for your animals in a tight space. Your pet will enjoy having a dedicated and quiet dining spot.
Material Required List
- Cabinet wood panels
- Stainless steel pet bowls
- Heavy duty drawer slides
- Wood glue
- Drawer handle
- Waterproof paint
Equipment Required List
- Jigsaw
- Power drill
- Circular saw
- Measuring tape
- Sandpaper
DIY Instructions Step By Step
- Measure the height and width of your lower cabinet space.
- Build a sturdy wooden drawer box that fits the area.
- Cut two circular holes in the top panel of the drawer.
- Ensure the holes are slightly smaller than the bowl rims.
- Install the heavy duty slides to the drawer and cabinet.
- Apply a waterproof paint to protect the wood from spills.
- Attach the drawer handle to the front of the unit.
- Place the stainless steel bowls into the circular holes.
- Slide the drawer in to make sure it clears the floor.
- Fill the bowls with food and water to test the slides.
31 Modular Square Floor Cushions with Zipper Links

Flexible seating makes a small room feel much more functional for guests. These square cushions feature a soft textured fabric in a neutral beige tone. You can use them as separate seats or zip them together to form a large floor lounge.
A built in light strip sits at the base of each piece to create a warm glow. This lighting helps define the seating area in a dim room during movie nights. The heavy duty zippers ensure the cushions stay connected when people move around.
Sturdy foam inside provides great support for sitting or lying down. You can easily stack these in a corner when the party ends. It is a smart way to add comfort without buying bulky sofas.
Material Required List
- High density square foam blocks
- Durable upholstery fabric in beige
- Long metal zippers with large teeth
- Battery powered LED light strips
- Heavy duty fabric thread
- Fabric adhesive spray
Equipment Required List
- Industrial sewing machine
- Sharp fabric scissors
- Measuring tape
- Fabric pins
- Chalk or fabric marker
DIY Instructions Step By Step
- Measure the height and width of your foam blocks to determine the fabric size.
- Cut two large squares for the top and bottom of each cushion cover.
- Cut four rectangular strips for the side walls of each cushion.
- Sew a zipper onto the outer edge of each side panel before joining them.
- Stitch the four side panels together to form a continuous ring.
- Connect the top fabric square to the side ring using a straight stitch.
- Attach the bottom fabric square but leave one side open for the foam.
- Turn the fabric cover right side out and slide the foam block inside.
- Close the final seam using a hidden stitch or a small zipper.
- Stick the LED light strip along the bottom edge of the fabric using adhesive.
- Test the zipper links by connecting two finished cushions together.
32 Chrome and Glass C Table with Magazine Rack
Narrow living rooms often lack space for a standard side table next to the couch. This sleek C shaped table features a clear glass top and a shiny chrome frame. You can slide the base under your sofa to bring the surface closer to you.
A black metal bin at the bottom holds your magazines and books. This keeping your reading materials organized and off the floor. The transparent top makes the room feel more open and less cluttered.
The light frame is very easy to move whenever you need a temporary desk. It provides a stable place for your coffee or tablet. This design fits well in modern or minimalist homes.
Material Required List
- Square chrome plated steel tubing
- Tempered glass top panel
- Sheet metal for the magazine bin
- Black powder coat paint
- Silicone glass bumpers
- Metal screws
Equipment Required List
- Metal hacksaw or miter saw
- Power drill with metal bits
- Screwdriver set
- Measuring tape
- Sandpaper for metal
DIY Instructions Step By Step
- Cut the chrome tubing into three sections to create the C shaped frame.
- Drill holes at the ends of the tubes where they will connect.
- Screw the vertical post to the top and bottom horizontal bars.
- Bend a piece of sheet metal into a U shape to form the magazine bin.
- Sand the edges of the metal bin and apply black paint to prevent rust.
- Attach the black bin to the bottom horizontal bar of the chrome frame.
- Place silicone bumpers on the four corners of the top chrome bar.
- Set the tempered glass panel onto the bumpers and press down firmly.
- Check that the table does not wobble on your flat floor surface.
- Slide the base under your sofa to ensure it fits the height.
33 Walnut Wall Mounted Jewelry Mirror Cabinet
Organizing small accessories can be a challenge in a cramped bedroom. This vertical cabinet features a rich walnut wood grain and a full length mirror. You can open the door to reveal a dedicated space for all your jewelry.
Internal hooks keep your necklaces from getting tangled in a knot. Small trays at the bottom hold your rings and earrings securely. An integrated light at the top helps you pick the right piece for your outfit.
This unit hangs on the wall to keep your dresser clear of clutter. It acts as both a mirror and a complete storage center. The slim profile ensures it does not stick out too far into the room.
Material Required List
- Walnut wood boards or veneer plywood
- Full length glass mirror
- Small metal jewelry hooks
- Soft felt fabric for the interior
- Piano hinge for the door
- LED puck light
- Wood glue
Equipment Required List
- Power drill
- Circular saw
- Stud finder
- Level
- Staple gun
DIY Instructions Step By Step
- Build a shallow rectangular box using the walnut wood boards.
- Cut a plywood panel for the door that matches the box dimensions.
- Glue the glass mirror to the front of the door panel using adhesive.
- Line the inside of the wooden box with soft felt to protect jewelry.
- Screw rows of metal hooks into the back panel of the cabinet.
- Attach the door to the cabinet frame using a long piano hinge.
- Use a stud finder to locate the wooden beams in your bedroom wall.
- Secure the cabinet to the wall studs using long screws and a drill.
- Mount the LED puck light to the top inside corner of the box.
- Arrange your necklaces and rings in the new organized space.
34 Vertical Indoor Herb Garden Room Divider
Bringing plants into a small kitchen can take up valuable counter space. This tall metal rack holds several terra cotta pots in a vertical line. It works as a fresh room divider between your cooking and dining areas.
Fresh basil and mint grow right where you need them for meals. The open design allows light and air to move through the space easily. A wooden base provides extra storage for watering cans and gardening tools.
This unit adds a touch of nature to your home while remaining practical. You can rearrange the pots to fit different types of herbs. It is a smart way to garden when you have no backyard.
Material Required List
- Vertical metal support posts
- Circular metal pot holders
- Terra cotta herb pots
- Oak wood boards for the base
- Black spray paint for metal
- Wood screws
Equipment Required List
- Power drill
- Saw
- Paintbrush
- Measuring tape
- Screwdriver
DIY Instructions Step By Step
- Build a heavy rectangular base using the oak wood boards for stability.
- Attach two tall metal posts to the wooden base using strong bolts.
- Space the circular metal holders evenly along the height of the posts.
- Screw the holders into the metal posts so they stay level.
- Spray the entire metal frame with black paint and let it dry.
- Sand the wooden base and apply a clear coat of sealant.
- Place your terra cotta pots into the circular metal holders.
- Fill the pots with soil and plant your favorite kitchen herbs.
- Set the unit in a sunny spot to help the plants grow well.
- Use the bottom shelf for your small watering cans and spray bottles.
35 Flip Top Chalkboard Drafting Table

Creative projects often require a large flat surface that takes up room. This drafting table features a dark chalkboard top for sketching ideas. You can use it as a standard desk and then tilt the top for drawing.
A sturdy metal frame provides a modern industrial look for your office. The wood grain edges add a warm touch to the minimalist design. You can wipe the surface clean with a damp cloth when you finish a sketch.
Hinges on the side allow you to adjust the angle of the work surface. This helps prevent back strain during long hours of creative work. It is a versatile piece for students or professional artists.
Material Required List
- Plywood sheet for the tabletop
- Chalkboard paint
- Square metal tubing for legs
- Heavy duty adjustable hinges
- Wood trim strips
- Metal screws
Equipment Required List
- Power drill
- Circular saw
- Paint roller
- Level
- Sandpaper
DIY Instructions Step By Step
- Cut the plywood sheet to your desired desk size.
- Apply three coats of chalkboard paint to the top of the plywood.
- Attach wood trim strips to the edges of the board for a clean look.
- Build a rectangular leg frame using the square metal tubing.
- Install the adjustable hinges to the top of the metal frame.
- Connect the chalkboard tabletop to the other side of the hinges.
- Test the tilting motion to ensure the top stays at different angles.
- Sand all the metal edges to remove any sharp burrs.
- Wipe the chalkboard surface with a damp cloth to prep it for use.
- Check that the desk is stable and level on your floor.
36 Boucle Swivel Armchair with Storage Base
Finding a chair that is both cozy and functional is great for small homes. This armchair features a soft white boucle fabric that feels like a cloud. It sits on a round wooden base that allows you to swivel 360 degrees.
The bottom section of the chair opens to reveal a hidden storage spot. You can keep extra pillows or a warm blanket tucked away inside. This design helps you save closet space in a tiny bedroom or lounge.
The curved backrest provides excellent support for reading or watching TV. Its compact size fits easily into a corner without taking much space. It is a stylish and smart addition to any modern interior.
Material Required List
- Plywood for the internal frame
- High density furniture foam
- White boucle upholstery fabric
- Round wooden swivel base hardware
- Heavy duty hinges
- Wood screws
Equipment Required List
- Staple gun
- Jigsaw
- Screwdriver
- Measuring tape
- Spray adhesive
DIY Instructions Step By Step
- Cut plywood panels to build a circular base and a curved backrest.
- Assemble the base box but leave the top part on a hinge.
- Install the swivel hardware to the bottom of the wooden base box.
- Glue thick foam pads to the seat and the backrest panels.
- Wrap the white boucle fabric over the foam and secure it with staples.
- Ensure the fabric is pulled tight for a professional and smooth look.
- Attach the hinged seat top to the storage base of the chair.
- Connect the backrest panel to the seat using strong metal brackets.
- Test the swivel motion to make sure it rotates without any noise.
- Place a blanket inside the base to test the storage capacity.
37 Acoustic Corner Nook with Integrated Lighting
Loud noises can be distracting when you try to read in a small flat. This corner unit features soft gray felt panels that absorb sound. A built in wooden shelf provides a spot for your book and glasses.
Warm lights glow from the base of the panels to create a cozy nook. You can install this unit above your bed or in a quiet corner of the room. It helps define a private space for relaxation and quiet time.
The felt material adds a soft texture to your wall decor. Two power outlets are built into the shelf for easy phone charging. This project turns a plain corner into a functional retreat.
Material Required List
- Thick acoustic felt panels in gray
- Oak wood boards for the corner shelf
- LED strip light kit
- Built in power outlet module
- Strong wall adhesive
- Wood screws
Equipment Required List
- Level
- Power drill
- Jigsaw
- Measuring tape
- Wire strippers
DIY Instructions Step By Step
- Measure the height of your corner to plan the felt panel placement.
- Cut the acoustic felt into large rectangles to cover both wall sides.
- Use strong adhesive to stick the felt panels firmly to the walls.
- Build a triangular wooden shelf that fits snugly into the corner.
- Cut a hole in the shelf to mount the power outlet module.
- Install the LED strip lights along the back edge of the wooden shelf.
- Screw the shelf into the wall studs through the felt panels.
- Connect the power outlet and lights to a nearby wall socket.
- Use a level to make sure the shelf is not tilted to one side.
- Place your pillows and a book in the nook to enjoy the quiet.
38 Expandable Accordion Bench for Extra Guests
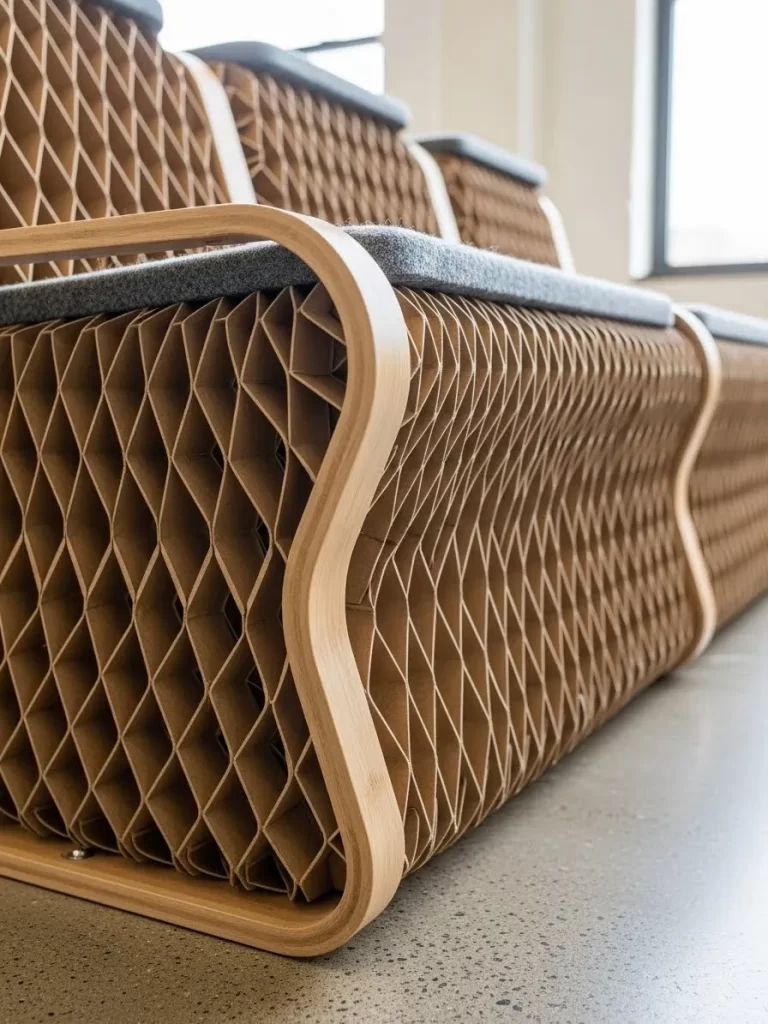
Storing extra chairs for a party can take up too much closet space. This unique bench uses an accordion design made from heavy duty paper. You can stretch it out to seat several people or fold it into a small stool.
The honeycomb structure is surprisingly strong and can hold a lot of weight. It comes with soft gray cushions that sit on top for comfort. The light wood ends provide a handle for easy stretching and moving.
You can curve the bench into different shapes to fit your room layout. When the guests leave, just fold it up and put it on a shelf. This is a brilliant solution for temporary seating in tiny apartments.
Material Required List
- Heavy duty kraft paper or flexible cardboard
- Wood panels for the end handles
- Gray felt or fabric for cushions
- Industrial strength glue
- Strong magnets for the ends
Equipment Required List
- Sharp utility knife
- Clamps
- Measuring tape
- Scissors
DIY Instructions Step By Step
- Stack several hundred sheets of kraft paper together in a neat pile.
- Cut the paper stack into a long rectangular shape using a utility knife.
- Apply glue in a specific honeycomb pattern between each sheet of paper.
- Let the glue dry while the stack is held tightly with heavy clamps.
- Attach two wooden panels to the very first and last sheets of paper.
- Embed strong magnets into the wood so the ends can lock together.
- Stretch the paper out to ensure the honeycomb cells open correctly.
- Cut gray felt into circles or squares to act as the seat cushions.
- Place the cushions on top of the open cells to provide comfort.
- Fold the bench back into a thin book shape for easy storage.
39 Bamboo Folding Lap Desk with Cooling Vents
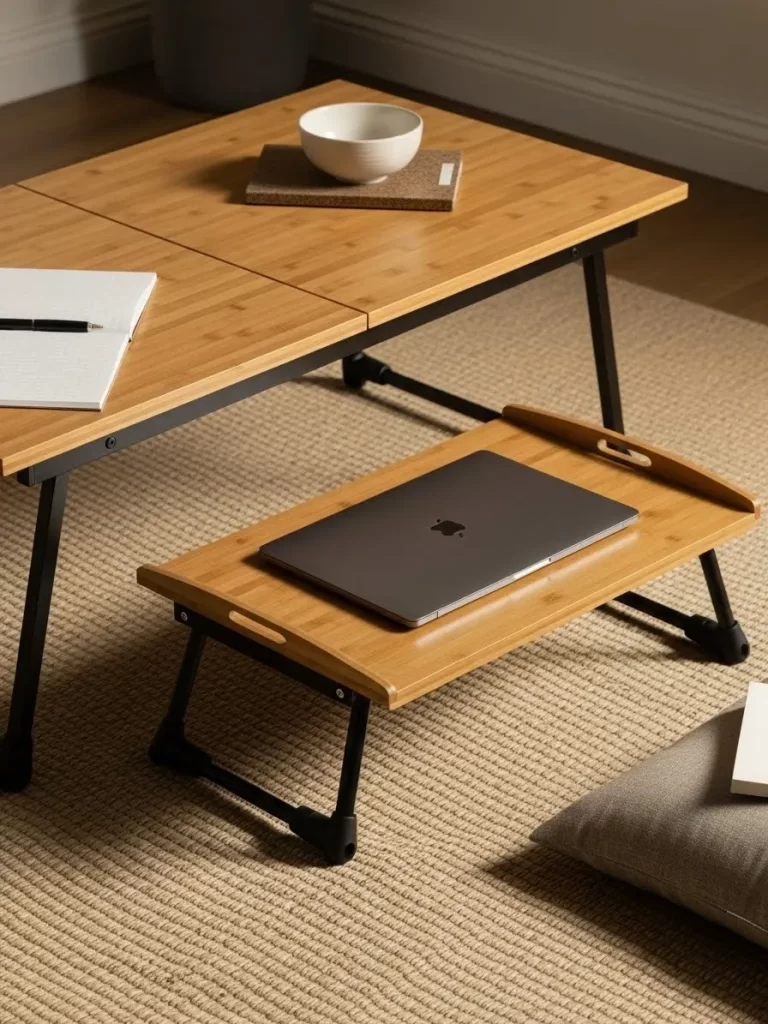
Working from your sofa or bed is much better with a stable surface. This lap desk is made from natural bamboo and features folding legs. A section of the top tilts up so you can see your screen at a better angle.
Integrated cooling holes allow air to flow under your laptop to prevent heat. A small side drawer provides a spot for your pens and flash drives. This desk helps you stay productive without needing a full office setup.
The smooth bamboo finish is durable and easy to clean with a cloth. You can fold the legs flat to store the desk under your bed. It is a light and portable solution for remote workers.
Material Required List
- Bamboo wood boards
- Small metal hinges
- Wood glue
- Metal drawer pull
- Finish nails
- Clear wood varnish
Equipment Required List
- Power drill
- Jigsaw
- Sandpaper
- Screwdriver
- Clamps
DIY Instructions Step By Step
- Cut a large bamboo board to act as the main desk surface.
- Use a jigsaw to cut a rectangular section that will tilt up.
- Drill a series of holes in the tilting section for laptop cooling.
- Attach the tilting section to the main board using small hinges.
- Build two sets of folding legs using narrow bamboo strips.
- Screw the legs to the underside of the desk with pivoting joints.
- Construct a tiny wooden drawer and mount it to the side of the frame.
- Sand all the bamboo surfaces until they are very smooth to touch.
- Apply a coat of clear varnish to protect the wood from spills.
- Test the tilt and the legs to make sure they are stable on a bed.
40 Vintage Trunk File Cabinet and Storage Box
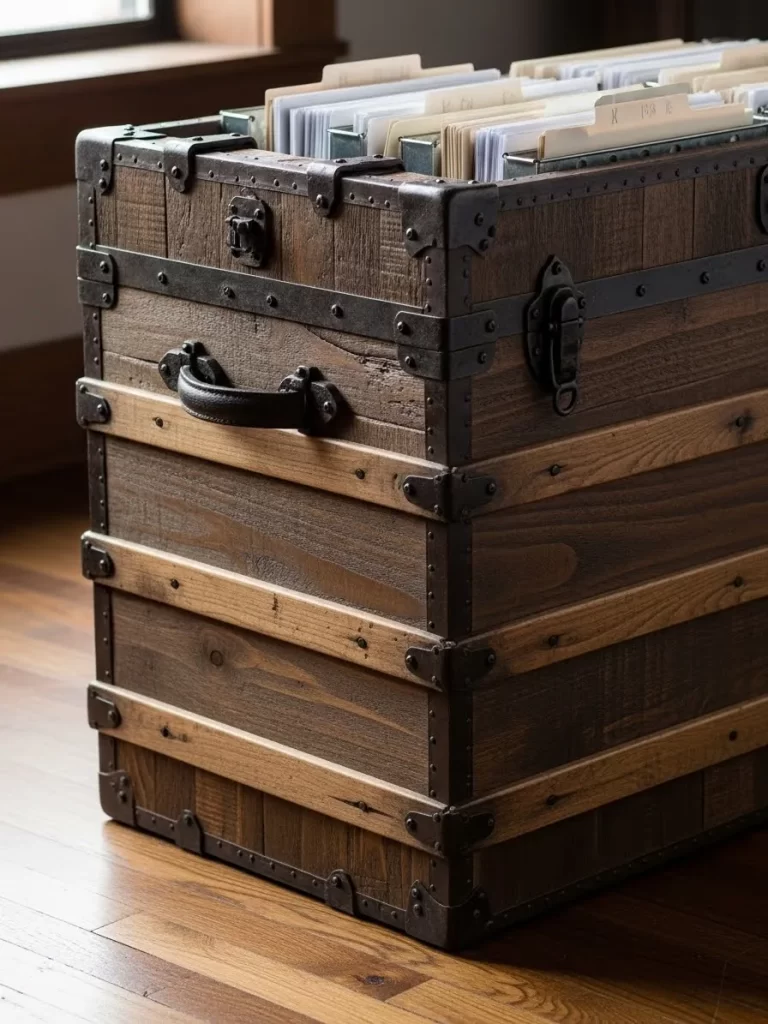
Standard metal file cabinets can look out of place in a cozy home office. This unit uses a rustic wooden trunk with metal bands for a classic look. The inside is fitted with rails to hold your important hanging folders.
A leather handle on the side makes it easy to move the trunk around. You can use the top surface as an extra side table for a lamp or coffee. It hides your paperwork in a piece of furniture that looks like an antique.
The dark wood and metal details fit well with traditional or rustic styles. It is a smart way to keep your documents organized without ruining your decor. This trunk provides a touch of history to your modern home.
Material Required List
- Large wooden trunk or chest
- Metal hanging file rails
- Metal straps and corner protectors
- Leather handle
- Wood stain in a dark tone
- Metal rivets
Equipment Required List
- Power drill
- Hammer
- Screwdriver
- Measuring tape
- Paintbrush
DIY Instructions Step By Step
- Find an old wooden trunk or build a new box from reclaimed wood.
- Sand the entire surface of the trunk to prepare it for staining.
- Apply a dark wood stain to give it a vintage and aged appearance.
- Drill holes into the corners and attach the metal protectors with rivets.
- Hammer the metal straps across the top and sides for a classic look.
- Screw the leather handle onto one side of the wooden chest.
- Measure the inside of the trunk to fit the metal file rails.
- Screw the rails into the side walls of the trunk at the correct height.
- Check that the lid closes fully without hitting the hanging folders.
- Place your organized files inside and set the trunk near your desk.
Transforming a tiny house takes a bit of careful planning and some honest elbow grease. You can make any room feel larger by choosing items that work hard for you. Your home should support your lifestyle regardless of the physical size of your rooms.
Start with one or two pieces that solve your biggest clutter problems right away. You will quickly notice a massive difference in how you move through your living space. True comfort comes from how well your furniture serves your daily needs and habits.
Key Takeaways
- Think vertically to use wall space that usually stays empty and wasted.
- Hidden storage keeps your belongings out of sight to reduce visual noise.
- Folding mechanisms allow you to clear the floor when you finish a daily task.
- Choosing the right materials ensures your DIY projects last for a long time.
- Multi functional items save money by replacing several separate pieces of furniture.