The holiday season arrives with a familiar script. We pull out the same boxes filled with the same red and green decorations. But what if that familiar look no longer feels like you? What if you crave something cleaner, more modern, and more personal?

This year, you can skip the sea of glitter and predictable ornaments. The holidays are a chance to express your unique style, not just follow tradition. A modern, minimalist approach can feel more calming, intentional, and incredibly chic. It’s about celebrating with style that speaks to you.
We have gathered 42 fresh ideas that break free from the holiday clutter. From serene, nature-inspired themes to bold, artistic statements, there is a look for every minimalist. Get ready to find simple DIY projects and styling tips that will transform your home into a sophisticated holiday haven.
1. Serene Eucalyptus Wreath

This holiday look breathes calm and simplicity. Fresh greenery takes center stage, moving away from loud, bright colors. Three eucalyptus wreaths hang on the wall, their soft green leaves adding a touch of nature. The arrangement feels uncluttered and peaceful.
The style uses a light, neutral palette. A real pine tree stands decorated with simple white ornaments and a string of pearls. Below it, small ceramic houses and glowing candles create a tiny, charming village. This setup shows how minimal elements can build a warm and inviting holiday space.
DIY Instructions: Simple Eucalyptus Wreath
What You’ll Need:
- A metal hoop or wire wreath frame (any size you like!)
- A roll of thin, green floral wire
- Fresh eucalyptus branches (you can find these at a flower shop or some grocery stores)
- A pair of scissors or garden clippers
Let’s Make It!
- Get Your Greenery Ready: First, take your big eucalyptus branches and use your scissors to snip them into smaller pieces. You want pieces that are about 6 to 8 inches long.
- Make Mini-Bouquets: Grab 2 or 3 of your small eucalyptus pieces and bunch them together. This will be your first little bundle. Making these small bunches helps the wreath look full and leafy.
- Attach the First Bunch: Place your first mini-bouquet onto the metal hoop. Take your floral wire and wrap it tightly around the stems of the bouquet and the hoop about 3-4 times. Don’t cut the wire yet!
- Cover and Continue: Now, make another mini-bouquet. Place it on the hoop so that its leaves cover the wrapped wire of the first bunch. Keep wrapping the wire around the new stems.
- Go All the Way Around: Keep adding your little bouquets, overlapping them each time, until you’ve covered the entire hoop. When you get back to the start, tuck the last stems under the leaves of the very first bunch to hide them.
- Finishing Touches: Once the hoop is full, snip the wire, leaving a little tail. Twist the tail of the wire at the back of the wreath to secure it. Fluff up the leaves a bit, and you have a beautiful, handmade wreath!
2. Wabi-Sabi Branch Display

This decor finds beauty in imperfection. A simple vase holds bare branches, reaching out like natural sculptures. This style celebrates the quiet, uncluttered moments of the season. A few delicate paper cranes hang from the limbs, adding a touch of handmade artistry.
The look feels intentional and calm. It avoids overwhelming decorations in favor of thoughtful details. Green moss balls and single white flowers complete the arrangement. This approach creates a space that feels both festive and deeply peaceful, drawing on a classic Japanese aesthetic.
DIY Instructions: Paper Crane Branch Centerpiece
What You’ll Need:
- A few interesting bare branches from your yard or a park
- A nice vase to hold them
- Square paper (origami paper is great, but any thin paper works)
- A needle and some thin thread
- Scissors
Let’s Make It!
- Prepare Your Branches: First, clean any dirt off your branches. You can trim any little bits you don’t like. Arrange them in your vase so they stand up nicely.
- Fold a Paper Crane: Take a square piece of paper. Fold it in half to make a triangle, then unfold. Fold it in half the other way to make another triangle, then unfold. Now fold it into a smaller square. From there, you’ll make a few more folds to create the wings, head, and tail. (It’s easiest to look up a “simple paper crane for kids” video online to see the steps!)
- Make a Few More: Create as many paper cranes as you’d like for your branches. Using different colored or patterned paper can look very pretty.
- Get Ready to Hang: Cut a piece of thread about 6 inches long. Use your needle to carefully poke the thread through the center of the crane’s back.
- Tie Them On: Tie the other end of the thread to one of your branches. Let the crane dangle. Do this for all your cranes, hanging them at different heights to make it look interesting. And you’re done!
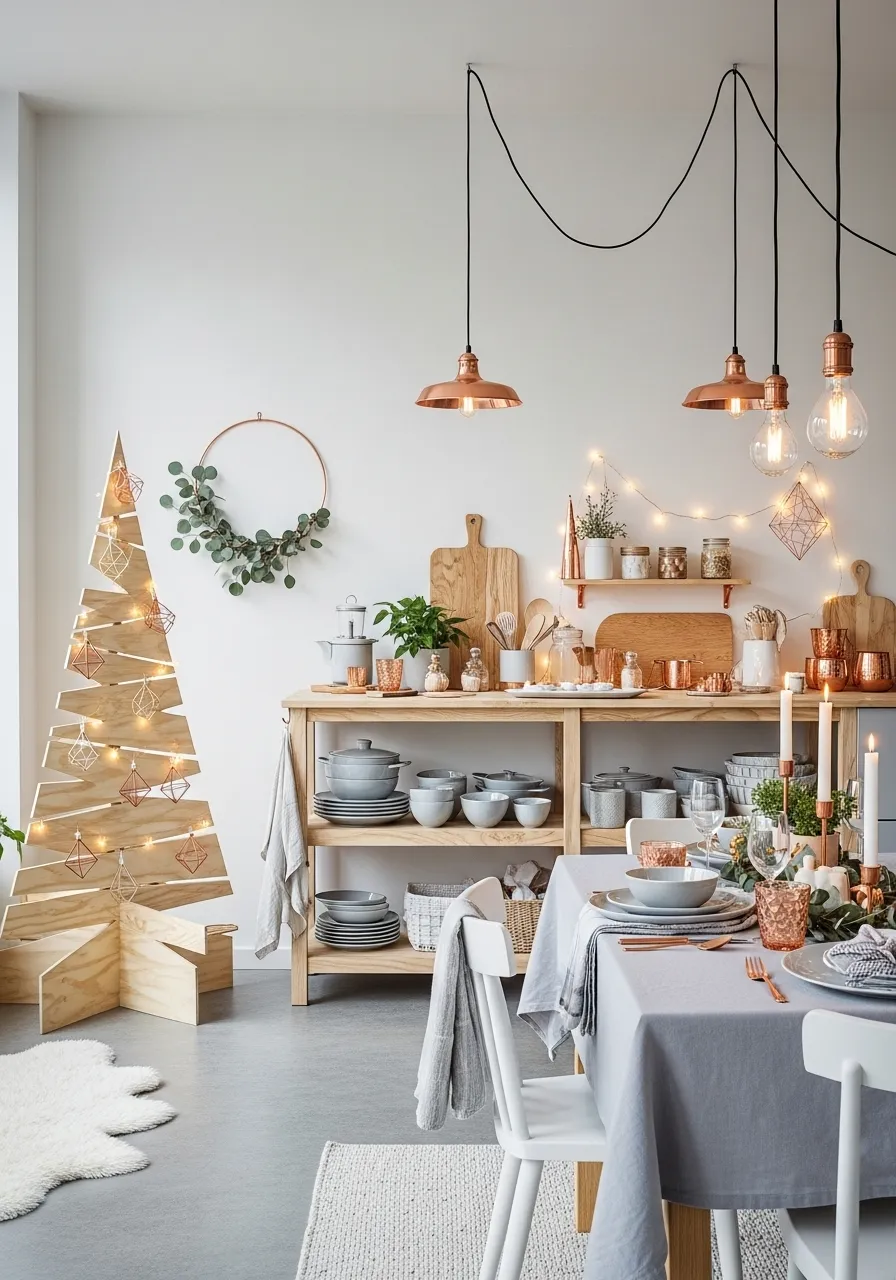
3. Geometric Gold & Black Decor

This style is bold and dramatic. A black Christmas tree provides a striking backdrop for shimmering gold accents. The ornaments are not traditional spheres but geometric shapes, like diamonds and cubes. This creates a sharp, modern, and very chic holiday look.
The entire scene is built on contrast. A metallic silver wreath hangs on the dark wall, and glowing candles sit in tall, slender holders. The tablescape continues the theme with black plates and gold cutlery. It’s a sophisticated take on holiday decorating that feels luxurious and artistic.
DIY Instructions: Geometric Paper Ornaments
What You’ll Need:
- Gold-colored cardstock (paper that’s a little stiff)
- A ruler
- A pencil
- Scissors
- A glue stick or craft glue
- String or thread for hanging
Let’s Make It!
- Find a Template: Search online for a “geometric shape template for paper” or “paper diamond template.” Print it out. This will be your guide.
- Trace the Shape: Place the template on the back of your gold cardstock and carefully trace around it with a pencil. You’ll see lines on the inside of the shape, too. Trace those as well.
- Cut and Score: Carefully cut out the shape along the outside lines. For the inside lines, don’t cut them! Instead, use your ruler and the edge of your scissors (gently!) to press down and make a crease. This is called “scoring” and it makes folding much easier.
- Fold It Up: Fold the paper along all the creased lines. You will start to see the 3D shape come together.
- Glue It Together: The template will have little tabs on it. Put a little bit of glue on these tabs and tuck them inside to hold the shape together. Press the edges for a few seconds to make sure the glue sticks.
- Add a Hanger: Before you glue the last tab, tuck a loop of string inside the top. Then, glue the final tab shut. Now your cool geometric ornament is ready to hang!
4. Frosty Winter Wonderland

This theme creates a magical, frozen world indoors. Everything is white, silver, and clear, like a landscape covered in fresh snow and ice. A flocked Christmas tree is adorned with white and clear baubles, white ribbons, and shimmering snowflakes.
The magic continues throughout the room. Icicle and snowflake ornaments hang from the ceiling, creating a frosty canopy. Fairy lights are placed under glass domes, casting a soft, warm glow that looks like captured starlight. This decor is all about layering textures of white to build an ethereal and dreamy holiday atmosphere.
DIY Instructions: Magical Light-Up Domes
What You’ll Need:
- A clear glass dome with a base (also called a cloche), you can find these at craft stores.
- A string of battery-powered fairy lights (the kind with thin wire are best).
- Faux snow or white glitter.
- Small holiday items like a mini pinecone or a tiny bottle-brush tree (optional).
Let’s Make It!
- Prepare the Base: Take the glass dome off its base. This is where you will build your little scene.
- Add the Snow: Sprinkle a layer of faux snow or white glitter onto the base. Make it a little uneven, like real snowdrifts.
- Arrange the Lights: Turn on your fairy lights to make sure they work. Carefully coil the wire and place it on top of the snow. Hide the battery pack behind the dome or under the table cloth.
- Add Extra Details (If You Want!): If you have a tiny pinecone or a small tree, you can place it in the middle of the lights. This adds a nice little surprise inside.
- Put the Dome On: Carefully place the glass dome back over the base, covering your snowy, light-filled scene. It looks like you’ve captured a piece of winter magic!
5. Living Greenery Holiday

This holiday decor is fresh, vibrant, and alive. Instead of faux garlands, this style uses real plants to create a festive feeling. A small, potted pine tree serves as a miniature Christmas tree, decorated with simple, natural ornaments.
The theme of living decor is everywhere. A stunning wall of green moss is decorated with fairy lights, while a wreath made of succulents and air plants hangs nearby. This approach brings the beauty of the outdoors inside. It’s an eco-conscious way to celebrate that feels both modern and timeless.
DIY Instructions: Simple Moss Wall Art
What You’ll Need:
- An old picture frame of any size.
- A piece of cork board or thin plywood that fits inside the frame.
- A hot glue gun and glue sticks.
- Bags of preserved moss (you can find this at a craft store, it doesn’t need watering!).
- A few small air plants (optional).
Let’s Make It!
- Set Up Your Frame: First, take the glass out of the picture frame. You won’t need it. Place the cork board or plywood securely inside the frame. This will be your canvas.
- Start Gluing: Warm up your hot glue gun. Squeeze a swirl of glue onto a small section of the board. Be careful, the glue is hot!
- Press on the Moss: Take a handful of the preserved moss and press it firmly onto the hot glue. Hold it for a few seconds until it sticks.
- Cover the Board: Keep doing this, working in small sections, until the entire board is covered in a lush, green carpet of moss. Use different types of moss to create interesting textures.
- Add Plants (Optional): If you have air plants, find a nice spot for them on your moss wall. Put a dab of hot glue on the base of the plant and gently press it onto the moss. The glue won’t hurt the air plant!
- Hang It Up: Let everything dry for a few minutes. Then, hang your living wall art. You can even weave in some tiny fairy lights for a magical touch.
6. Bohemian Desert Holiday

This holiday theme is warm, earthy, and relaxed. It trades traditional red and green for a palette of terracotta, sand, and cream. A creative “tree” made of whitewashed branches stands as the centerpiece, adorned with simple copper-colored ornaments.
The vibe is inspired by nature, but with a desert twist. A large vase holds dried pampas grass and palm leaves instead of pine boughs. A live cactus sits among arrangements of eucalyptus and air plants. The soft glow of candles completes this unconventional and calming holiday scene.
DIY Instructions: Dried Orange Garland
What You’ll Need:
- 2-3 large oranges
- A sharp knife
- A baking sheet
- Parchment paper
- A large needle or a skewer
- Twine or string
Let’s Make It!
- Ask for Help with Slicing: Have a grown-up help you carefully slice the oranges. You want the slices to be thin, about 1/4 inch thick. Don’t make them too thick, or they will take a very long time to dry.
- Pat Them Dry: Lay the orange slices on a paper towel. Gently pat them with another paper towel to get some of the extra juice out.
- Bake Them Low and Slow: Place a sheet of parchment paper on your baking sheet and lay the orange slices on it in a single layer. Bake them in the oven at a very low temperature (around 200°F or 100°C) for about 2-3 hours. Flip them over halfway through so they dry evenly. They are done when they are dry to the touch and a little bit see-through.
- Let Them Cool: Take the slices out of the oven and let them cool down completely.
- String Them Up: Use a needle or a skewer to poke two holes in each orange slice, near the top. Thread your twine through the holes to create a beautiful, natural garland that smells amazing!
7. Moody Jewel-Toned Elegance

This holiday look is rich with deep, luxurious color. A dark teal wall creates a dramatic background for a full Christmas tree decorated in jewel tones. Ornaments in shades of burgundy, emerald, and deep purple stand out against the evergreen branches.
The style feels sophisticated and cozy. A simple pine wreath hangs above a wooden console table. The table is draped with a plush, dark green velvet runner, adding a layer of texture. This decor proves that moving away from bright colors can create a festive atmosphere that is both elegant and inviting.
DIY Instructions: Easy Velvet Runner
What You’ll Need:
- A piece of velvet fabric (you can buy this at a fabric store). Get a piece that is about 1 foot wide and a few feet long, depending on your table.
- Fabric scissors.
- Iron-on hem tape (this is like magic tape for fabric!).
- An iron.
Let’s Make It!
- Measure and Cut: Lay your fabric out flat. Measure how long you want your runner to be and cut it to size with your fabric scissors.
- Fold the Edge: Take one of the long edges of the fabric and fold it over about one inch. The “ugly” side of the fabric should be folded inward. Press it down with your fingers to make a crease.
- Use the Magic Tape: Open up the fold you just made. Place a strip of the iron-on hem tape inside the fold.
- Iron It Down: With the help of a grown-up, gently press the hot iron on top of the folded edge for about 5-10 seconds. The heat will melt the tape’s glue and seal the edge, so you don’t have any messy threads.
- Do All Sides: Repeat this process for the other three sides of the runner.
- Drape It: Let it cool down for a minute. Now you have a beautiful, no-sew velvet runner to drape over your table or dresser for a touch of elegance.
8. Coastal Holiday Charm

This decor brings a breath of fresh, seaside air to the holidays. It uses natural elements from the beach to create a light and breezy festive style. A unique Christmas tree made from pieces of driftwood is hung with delicate sea glass and oyster shells.
The color palette is inspired by the coast. Soft blues, sandy whites, and pearly grays are used throughout the display. A grapevine wreath is adorned with starfish and air plants. This theme is a wonderful reminder of sunny beach days, creating a holiday that feels calm, relaxed, and beautifully unconventional.
DIY Instructions: Simple Seashell Ornaments
What You’ll Need:
- Some pretty seashells (scallop shells or sand dollars work great).
- A hot glue gun and glue sticks.
- Thin ribbon or twine.
- Beads or small pearls (optional).
Let’s Make It!
- Clean Your Shells: Make sure your seashells are clean and dry. Gently wipe away any sand or dirt.
- Make a Hanging Loop: Cut a piece of ribbon about 5 inches long. Fold it in half to make a loop.
- Glue the Loop: Turn one of your seashells over to its back. Put a small dab of hot glue near the top edge. Carefully press the two ends of your ribbon loop into the glue. Hold it for a few seconds until it sets.
- Add a Little Bling (Optional): If you want to make it fancier, you can glue a small bead or a faux pearl right on top of where the ribbon is attached. This gives it a nice, finished look.
- Let It Dry: Let the glue dry completely for a few minutes.
- Hang It Up: Now you have a beautiful ornament straight from the sea! You can hang it on your tree, on a wreath, or even on a doorknob.
9. Industrial Concrete & Wood

This holiday style is strong and raw. It uses industrial materials like concrete and dark wood to create a look that is both minimalist and powerful. The Christmas tree itself is an architectural sculpture made of stacked wooden planks, decorated with simple, dark geometric spheres.
The dining table is set with dark linens and heavy, textured concrete candle holders. The focus here is on shape and material, not on sparkle or bright color. This decor is for someone who appreciates clean lines and a modern, urban aesthetic. It turns holiday decorating into a form of art.
DIY Instructions: Faux Concrete Votives
What You’ll Need:
- A few small glass jars or votive candle holders.
- Gray textured spray paint (you can find this at a hardware store).
- Painter’s tape.
- Newspaper or a drop cloth.
- Battery-operated tea lights.
Let’s Make It!
- Tape Your Design: Make sure your glass jars are clean and dry. Use the painter’s tape to create a design. You could wrap one strip around the middle to leave a clear glass stripe, or tape off the top half for a “dipped” look.
- Set Up Your Space: This part is messy, so do it outside or in a garage. Lay down lots of newspaper to protect the area.
- Get Ready to Spray: Shake the can of textured spray paint really, really well for about a minute.
- Spray the Jars: Place your jar upside down on the newspaper. Hold the can about 8-10 inches away and spray in short, even strokes. The special paint will come out with a sandy, concrete-like texture. Cover all the glass that isn’t taped.
- Let It Dry: Let the first coat dry for about 15-20 minutes, then add a second coat to make sure it’s nicely covered. Let it dry completely for at least an hour.
- The Big Reveal: Once it’s totally dry, carefully peel off the painter’s tape. You’ll have a super cool jar that looks like it’s made of concrete! Pop a battery-operated tea light inside and enjoy the glow.
10. Neon & Holographic Future

This holiday decor is electric and playful. It jumps into the future with bright neon lights and shimmering holographic surfaces. A Christmas tree is formed not from branches, but from stacked, glowing cubes or a dazzling projection of light against a wall.
This style is all about fun and energy. Pixel art ornaments glow against a dark backdrop. The dining table is set with iridescent placemats that change color as you move. It’s a bold and imaginative way to celebrate, perfect for anyone who loves video games, technology, and a vibrant burst of color.
DIY Instructions: Holographic Gift Box
What You’ll Need:
- A small cardboard gift box.
- A roll of holographic or iridescent sticky-back vinyl/contact paper.
- Scissors.
- A ruler or a flat edge like a credit card.
Let’s Make It!
- Measure the Top: Place the lid of your box on the back of the holographic paper and trace around it with a pencil. Cut it out and stick it on top of the lid.
- Do the Sides: Measure the height of the box lid’s sides. Then measure all the way around the lid. Cut a long strip of holographic paper that is that height and length.
- Stick the Sides On: Carefully peel back a little bit of the paper backing and stick the strip to one corner of the lid. Slowly pull off the rest of the backing while you press the holographic paper onto the sides. Use a ruler to smooth out any air bubbles as you go.
- Cover the Bottom: Repeat the same steps for the bottom part of the box. Measure the bottom, cut out a square, and stick it on. Then measure and cut a strip for the sides and wrap it around.
- You’re Done!: You now have an amazing, futuristic-looking gift box that shimmers with all the colors of the rainbow.
11. Modern Geometric Play

This holiday look is cheerful and creative, feeling like a modern art class. It replaces a traditional tree with a minimal wooden dowel structure, decorated with colorful geometric shapes. The style is all about clean lines, simple forms, and a playful use of color.
The primary palette of red, blue, and yellow against natural wood and white walls feels fresh and energetic. A hanging mobile and abstract wall art continue the theme of simple shapes. This approach is uncluttered and imaginative, turning holiday decor into a fun design project.
DIY Instructions: Colorful Felt Ornaments
What You’ll Need:
- Felt sheets in red, blue, and yellow
- A pen or marker
- Scissors
- Craft glue or a hot glue gun
- String or thin ribbon for hanging
Let’s Make It!
- Draw Your Shapes: On the felt sheets, draw some simple geometric shapes. You can draw circles, squares, triangles, and half-circles. You can trace around a cup to get a good circle.
- Cut Them Out: Carefully cut out your felt shapes with scissors. Try to make a few of each shape and color.
- Make a Hanging Loop: Cut a piece of string about 4 inches long and fold it in half to make a loop.
- Glue It Together: Take one of your felt shapes, like a red circle. Put a dab of glue on the back at the top. Press the two ends of your string loop into the glue.
- Add a Second Layer (Optional): To make your ornament look neat from both sides, you can glue another red circle right on top of the first one, sandwiching the string in between. Press them together firmly.
- Create More!: Do this for all your shapes. You can hang them on a tree, a branch, or even tape them to the wall.
12. Cozy Farmhouse Gathering

This decor style wraps you in a warm, rustic embrace. The focus is on natural textures and a feeling of abundance from the earth. A large earthenware jug holds sprawling pine branches, acting as a simple, unadorned centerpiece. The look is comforting and classic.
The dining table is set with linen runners and surrounded by chairs draped in cozy wool blankets. Wreaths made of dried yellow berries add a pop of muted color to the wall. Glowing beeswax candles cast a soft, warm light over the entire scene, making it feel welcoming and full of life.
DIY Instructions: Mini Herb Wreath Place Cards
What You’ll Need:
- A few sprigs of fresh rosemary
- Thin, flexible floral wire
- Scissors
- Small strips of paper or cardstock
- A pen
Let’s Make It!
- Shape Your Rosemary: Take a sprig of rosemary. It’s already a bit bendy. Gently bend it into a circle shape, about the size of a cookie.
- Tie It Together: Cut a small piece of floral wire, about 3 inches long. Use it to wrap around the two ends of the rosemary sprig where they meet. Twist the wire to hold the circle shape. Snip off any extra wire.
- Fluff It Up: Gently fluff the little needles on your rosemary wreath to make it look fuller.
- Write the Name: Take one of your small paper strips and write a guest’s name on it.
- Attach the Name Tag: You can either gently tuck the name tag into the wreath, or use another tiny piece of wire to attach it.
- Set the Table: Make one for each person coming to dinner and place it on their plate. It looks beautiful and smells wonderful!
13. Celestial Night Holiday

This holiday theme is pure magic and mystery. It swaps bright daylight for the beauty of a starry winter night. A deep navy blue Christmas tree and matching wall create a cosmic canvas. Shimmering silver moons and stars are hung as ornaments, gleaming against the dark branches.
The decor builds a celestial world. A stunning wreath in the shape of a crescent moon becomes the focal point. Glimmering star garlands are draped across the wall, and clusters of amethyst and quartz crystals sit like frozen starlight. This enchanting style is for dreamers who love the wonder of the night sky.
DIY Instructions: Sparkly Constellation Wall Art
What You’ll Need:
- A piece of black or dark blue construction paper
- A white or silver crayon
- Star-shaped stickers or glitter glue
- A ruler (optional)
Let’s Make It!
- Choose a Constellation: Think of a simple constellation, like the Big Dipper or Orion’s Belt. You can look up a picture of one online to see the shape.
- Mark the Stars: On your dark paper, use your crayon to make small dots where the main stars of the constellation would go.
- Connect the Dots: Use your crayon and a ruler (or just draw it freehand) to connect the dots with straight lines, just like you see in pictures of constellations.
- Make Them Shine: Now for the fun part! Place a star sticker right on top of each dot you drew. If you’re using glitter glue, squeeze a tiny dot of glitter on top of each star point.
- Let it Dry and Display: If you used glitter glue, let it dry completely. Now you have a piece of the night sky to hang on your wall or put on the fridge.
14. Handmade Natural Holiday

This holiday decor celebrates simplicity and handcrafted charm. A small, live tree is decorated with ornaments made from nature, like dried orange slices and unfinished wood rounds. The whole look feels grounded, authentic, and connected to the earth.
The centerpiece of this style is a wooden advent calendar, its little compartments filled with reusable cloth bags. A garland made of popcorn and cinnamon sticks hangs in the background. Every element feels thoughtfully made by hand, creating a warm, personal, and sustainable holiday atmosphere.
DIY Instructions: Simple Wood Slice Ornaments
What You’ll Need:
- Small, thin wood slices (you can buy these at a craft store). They should already have a hole drilled in the top.
- Markers or colored pencils
- Twine or string
Let’s Make It!
- Think of a Design: Before you start drawing, think about what you want on your ornament. It can be a simple snowflake, a little Christmas tree, your initial, or just some colorful stripes.
- Start Drawing: Use your markers to draw your design directly onto the wood slice. The wood is a fun surface to draw on. Don’t worry about making it look just right; the handmade look is what makes it special.
- Decorate Both Sides (Optional): You can leave the back blank, or you can draw a different design on the other side once the first side is done.
- Add the Hanger: Cut a piece of twine about 6 inches long. Push it through the hole at the top of the wood slice.
- Tie a Knot: Bring the two ends of the twine together and tie a knot at the very end. This creates the loop for hanging your ornament. Now it’s ready for the tree!
15. Scandinavian Papercraft Winter

This holiday style is a breathtaking display of patience and artistry. It creates a winter wonderland using just one material: white paper. A frosted Christmas tree is completely covered in intricate, three-dimensional paper ornaments like stars, snowflakes, and geometric globes.
The all-white theme is crisp, clean, and incredibly elegant. The shapes and shadows of the folded paper create all the texture and interest needed. This decor feels both modern and traditional, transforming a humble material into a sophisticated and stunning work of art.
DIY Instructions: Easy Paper Snowflake
What You’ll Need:
- A square piece of white paper (copy paper works well)
- Scissors
Let’s Make It!
- Fold a Triangle: Take your square paper and fold it in half diagonally to make a triangle.
- Fold It Again: Take your big triangle and fold it in half again to make a smaller triangle.
- One More Fold: Fold that triangle in half one last time. It will now be a very small, thick triangle.
- Start Cutting: This is the creative part! Hold the folded triangle by the corner that has all the folds together. With your scissors, carefully cut little shapes out of the two open sides. You can cut small triangles, squares, or curvy lines. Don’t cut all the way across!
- The Grand Opening: Now, very carefully, unfold your paper. First open it once, then twice, then a third time. You’ll see your unique snowflake design appear like magic! Every single one will be different.
16. Raw & Rustic Minimalism

This holiday decor is for those who love quiet and simplicity. It strips the season back to its essential forms and textures. A single, bare branch stands in for a full tree, holding just a few meaningful, rustic ornaments. The look is spare but soulful.
The focus is on natural, unrefined materials. A plain grapevine wreath with a simple linen bow hangs over a rough, concrete fireplace. A single linen stocking completes the scene. This minimalist approach finds its beauty in the honesty of the materials, creating a calm and peaceful holiday setting.
DIY Instructions: A Simple Linen Bow
What You’ll Need:
- A roll of wide linen or burlap ribbon (about 2-3 inches wide)
- Scissors
- A piece of thin twine or floral wire
Let’s Make It!
- Make Two Loops: Cut a long piece of ribbon, about 2 feet long. Find the middle of the ribbon. Take the right side and fold it over to the center to make a loop (like a bunny ear).
- Make the Second Loop: Now take the left side of the ribbon and cross it over the first loop to make a second bunny ear. Adjust them until they are about the same size.
- Pinch the Middle: Pinch the center of the bow, right where the two loops cross over each other. It will look like a figure 8.
- Tie It Tight: While you are still pinching the middle, have a friend help you wrap a piece of twine or wire tightly around the center. Twist it at the back to secure it.
- Trim the Tails: You will have two long pieces of ribbon hanging down, called the tails. You can leave them long, or you can trim them to the length you like. Cutting the ends at an angle looks very nice. Now you have a beautiful, rustic bow to put on a wreath or a gift.
17. Enchanted Forest Feast

This holiday tablescape brings the magic of a forest floor right into your home. It’s a whimsical theme that feels like stepping into a fairy tale. A runner made of real moss winds down the center of the table, creating a bed of green for a miniature woodland scene.
The details are what make this look so special. Charming mushroom ornaments, made from velvet and wood, hang from a mossy branch centerpiece. Small pieces of bark and tiny ferns are scattered about. This decor is imaginative and enchanting, inviting guests to a feast in a magical forest.
DIY Instructions: Easy Pinecone Gnomes
What You’ll Need:
- A small pinecone
- A small wooden bead (for the nose)
- A piece of felt (any color for the hat)
- A cotton ball
- A hot glue gun or craft glue
- Scissors
Let’s Make It!
- Give Him a Beard: Pull a small piece from your cotton ball and gently stretch it out to look like a beard. Use a dab of glue to stick it onto the top, wider part of your pinecone.
- Add a Nose: Put a little dot of glue in the middle of the cotton ball beard and press the wooden bead on top. This will be your gnome’s nose peeking out.
- Make the Hat: Cut a circle out of your felt, about 3 inches across. Cut a line from the edge of the circle to the center point. Overlap the two cut edges and glue them together to make a cone shape. This is the gnome’s pointy hat.
- Put the Hat On: Put a little line of glue around the inside edge of the felt hat. Place the hat on top of the pinecone, right above the beard and nose.
- Meet Your Gnome: Let the glue dry. You now have an adorable little gnome to sit on a shelf or hide among the branches of your tree.
18. Minimalist Nordic Holiday

This decor is a lesson in relaxed sophistication. Based on modern Scandinavian design, it uses a calm and simple color palette of grey, black, and white. The look is warmed up with touches of cognac leather and the green of a real Christmas tree.
The decorations are thoughtful and uncluttered. Two black, minimalist hoop wreaths with a single sprig of eucalyptus hang on the wall like modern art. Ornaments on the tree are simple shapes in black and white paper. This style creates a space that feels peaceful, balanced, and effortlessly chic.
DIY Instructions: Simple Hoop Wreath
What You’ll Need:
- A metal or wooden hoop (craft stores have these)
- Green floral wire
- Scissors or wire cutters
- A few sprigs of greenery (eucalyptus, pine, or rosemary work well)
Let’s Make It!
- Prepare Your Greenery: Take your sprigs of greenery and lay them out. Decide how you want them to look on the hoop. Most people decorate just one side or the bottom of the hoop.
- Attach the First Sprig: Place your first sprig against the hoop. Cut a 4-inch piece of floral wire. Wrap the wire tightly around the stem of the sprig and the hoop.
- Add More Layers: Take your next sprig and lay it on top of the first one, so its leaves cover the wire you just wrapped. Use another piece of wire to attach the second sprig.
- Keep Going: Continue adding your greenery until you are happy with the look. You can make it as full or as sparse as you like.
- Finishing Touches: Once you’re done, make sure all the wire ends are tucked away so they don’t scratch anything. Now you have a simple and beautiful modern wreath to hang on a wall or door.
19. Cozy Neutral Haven

This holiday decor is all about creating a soft and serene sanctuary. It uses a palette of warm, neutral colors like cream, beige, and light brown to make the space feel incredibly calm and inviting. The look is less about bright color and more about comforting textures.
A real tree is decorated simply with a chunky knit garland and subtle ornaments. Soft sheepskin rugs, woolly blankets, and a woven tree collar add layers of touchable texture. The warm, gentle light from pink Himalayan salt lamps casts a peaceful glow, turning the room into a cozy retreat from the cold.
DIY Instructions: No-Knit Yarn Tassels
What You’ll Need:
- A ball of thick, chunky yarn in a neutral color
- A small, stiff piece of cardboard (about 4 inches tall)
- Scissors
Let’s Make It!
- Wrap the Yarn: Hold the end of the yarn against the cardboard. Start wrapping the yarn around and around the cardboard. Don’t wrap too tight! Wrap it about 20 times for a nice, thick tassel.
- Tie the Top: Cut a separate piece of yarn about 8 inches long. Slide it between the yarn bundle and the cardboard at the top. Tie a tight double knot. This piece will be your hanger.
- Slide It Off: Gently slide the whole bundle of wrapped yarn off the cardboard.
- Make the “Neck”: Cut another piece of yarn about 10 inches long. About an inch down from the top knot, wrap this piece of yarn tightly around the bundle several times. Tie a secure knot to create the tassel’s “neck.”
- Snip the Bottom: You’ll see a bunch of loops at the bottom of your tassel. Take your scissors and cut straight through all of them.
- Give It a Haircut: Fluff up the tassel and trim the ends at the bottom so they are all even. Now you have a fluffy tassel to hang on a doorknob, a gift, or your tree.
20. Graphic Folk Art Holiday

This holiday decor is a joyful explosion of color and pattern. It takes inspiration from traditional folk art and gives it a modern, graphic twist. A bold and bright color scheme of red, blue, and yellow is used in high-contrast, stylized designs.
A clever plywood Christmas tree acts as a neutral base for vibrant, flat ornaments. The theme is carried through to framed art prints and textiles, like pillows and napkins, that all feature the same cheerful, block-print style. This look is perfect for those who love art, color, and a fun, energetic atmosphere.
DIY Instructions: Painted Folk Art Rocks
What You’ll Need:
- A few smooth, flat rocks, washed and dried
- Craft paint in red, blue, yellow, and white
- Small paintbrushes
- A cup of water for rinsing brushes
- A paper plate to use as a palette
Let’s Make It!
- Paint a Base Coat (Optional): You can leave the rock its natural color, or you can paint the whole top surface one solid color, like white or blue, and let it dry completely.
- Add Simple Shapes: Squeeze a little bit of each paint color onto your paper plate. Using a small brush, paint simple folk-art shapes. You can do dots, straight lines, wavy lines, simple flower petals (which are just a series of dots around a center dot), or little triangles.
- Layer Your Colors: Let one color dry for a few minutes before you paint another color on top of it. For example, you could paint a red flower, let it dry, then add a yellow dot in the middle.
- Be Creative: There are no rules! Just have fun making patterns with the bright colors. You can paint a whole scene or just a cool design.
- Let Them Dry: Let your rocks dry completely. Once they are dry, you can place them on a windowsill, use them as paperweights, or group them together on a table as a colorful decoration.
21. Eclectic Maximalist Holiday

This holiday decor is rich, personal, and full of life. It layers deep jewel tones with gleaming gold accents for a look that feels both luxurious and curated. The dark teal wall creates a cozy, intimate backdrop for the eclectic mix of art and festive touches.
A small tree on a bar cart shines with colorful glass ornaments, showing that you don’t need a large space to be festive. The scene is lit by the warm glow of many candles and a modern lamp. A lush, vibrant floral arrangement adds a burst of fresh energy, tying all the deep colors together beautifully.
DIY Instructions: Gold-Rimmed Agate Coasters
What You’ll Need:
- Slices of agate stone (you can find these at a craft store or online)
- A gold leafing pen or gold craft paint
- A small paintbrush (if using paint)
- Small clear rubber feet (optional, to prevent scratching)
Let’s Make It!
- Clean Your Slices: Make sure your agate slices are clean and dry. Wipe them with a soft cloth to remove any dust.
- Paint the Edges: Take your gold leafing pen and carefully trace around the rough, natural edge of the agate slice. If you are using paint, squeeze a little onto a paper plate and use a small brush to paint the edge.
- Be Patient: Try to keep a steady hand. Don’t worry if it’s not a perfectly straight line; the natural edge of the stone is uneven, which is part of its beauty.
- Let it Dry: Let the gold paint dry completely. This might take about 20-30 minutes. You can add a second coat if you want it to be extra shiny.
- Add Feet (Optional): Once dry, turn the coaster over and stick four small, clear rubber feet on the bottom, one near each edge. This will protect your table. Now you have a very glamorous coaster!
22. Graphic Black & White Bash

This holiday look is modern, bold, and full of playful energy. It uses a high-contrast palette of black and white, brought to life with graphic patterns. The wrapping paper, table runner, and even some ornaments feature fun, hand-drawn dots and dashes.
The stark black and white is softened by natural textures. Warm terracotta pots and wooden-handled cutlery add an earthy touch. A gallery wall of personal black and white photos makes the space feel unique and lived-in. This decor is a masterclass in using pattern to create a festive and cheerful vibe.
DIY Instructions: Potato-Stamp Wrapping Paper
What You’ll Need:
- A large potato
- A knife (ask a grown-up for help)
- A roll of plain brown or white paper
- Black craft paint
- A paper plate
Let’s Make It!
- Make Your Stamp: Have a grown-up help you cut the potato in half. On the flat, cut side of the potato, they can help you carve a simple shape, like a circle or a simple dash. The part you don’t cut away will be your stamp.
- Pat it Dry: Use a paper towel to pat the potato stamp dry. This helps the paint stick better.
- Get Ready to Paint: Squeeze some black paint onto a paper plate. Roll out a large piece of your plain paper on the floor or a big table.
- Start Stamping: Dip your potato stamp into the paint, making sure it’s evenly coated. Press it firmly onto the paper. Lift it straight up to see your print!
- Create Your Pattern: Keep dipping and stamping to create a fun, repeating pattern all over the paper. You can make polka dots, stripes, or just a random design.
- Let it Dry: Let the paint dry completely. Now you have custom, hand-printed wrapping paper for your gifts!
23. Crystalline Ice Palace

This holiday tablescape is ethereal and magical, creating the feeling of a frosted world. The theme is built entirely on white, silver, and clear materials. It’s a study in texture, with fluffy feather wreaths hanging next to smooth glass and sparkling acrylic.
An icy, transparent tree serves as a stunning centerpiece, hung with clear glass ornaments. The table is covered in glass domes of all sizes, filled with twinkling fairy lights that cast a brilliant glow. This decor is incredibly chic and modern, transforming the space into a luminous, dream-like ice palace.
DIY Instructions: Frosted Glass Luminaries
What You’ll Need:
- A clean, empty glass jar
- White school glue
- A paintbrush
- Epsom salt
- A plate or shallow dish
Let’s Make It!
- Paint with Glue: Use your paintbrush to apply a thin, even layer of white glue all over the outside of the glass jar.
- Get Ready to Sparkle: Pour a generous amount of Epsom salt onto your plate.
- Roll the Jar: While the glue is still wet, roll the jar in the Epsom salt. Pat the salt onto any bare spots to make sure the whole jar is covered.
- Let it Dry: Set the jar aside and let the glue dry completely. This will take about an hour. As it dries, the Epsom salt will stick to the glass and look just like a beautiful layer of frost.
- Add a Light: Once it’s totally dry, place a battery-operated tea light inside. The light will flicker and shine through the “frosty” salt crystals, creating a beautiful wintery glow.
24. Cozy Industrial Loft

This holiday style perfectly balances raw, urban elements with soft, cozy textures. The backdrop of an exposed brick wall and a metal staircase feels industrial and cool. But the space is made warm and inviting with festive, comfortable touches.
A massive, chunky-knit garland is the star of the show, wrapping around the stair railing. This soft texture is echoed in the knit stockings and a faux fur throw. The warm light from Edison bulbs and a traditionally decorated tree makes this industrial space feel like the coziest cabin.
DIY Instructions: Easy No-Knit Yarn Wreath
What You’ll Need:
- A foam wreath form (from a craft store)
- A ball of thick, chunky yarn
- A hot glue gun or craft glue
- Scissors
Let’s Make It!
- Anchor Your Yarn: Put a dab of hot glue on the back of the foam wreath form. Press the end of your yarn into the glue and hold it for a few seconds until it sticks.
- Start Wrapping: Begin wrapping the yarn around and around the foam form. Make sure each new wrap is snug against the last one so none of the green or white foam shows through.
- Keep it Neat: Keep wrapping until you have covered the entire wreath form. This is a great activity to do while watching a holiday movie!
- Finish It Off: When you get back to the beginning, cut the yarn, leaving a small tail. Use another dab of glue to secure the end of the yarn to the back of the wreath.
- Add a Hanger: You can use another piece of yarn to tie a loop at the top for hanging, or just hang the wreath directly on a nail. It’s a simple, soft, and very cozy decoration.
25. Midnight Blue Solstice

This holiday decor is dramatic, intimate, and deeply calming. It commits fully to a monochromatic theme, with walls, linens, and even candles all in a rich, dark navy blue. The effect is like being wrapped in a quiet winter’s night.
The only light comes from the tall, flickering taper candles, whose flames dance in silver holders. Their warm glow creates deep shadows and highlights the simple, elegant place settings. This minimalist approach proves that you don’t need a lot of color or decoration to create a powerful and memorable holiday mood.
DIY Instructions: Simple Wax-Dipped Pinecones
What You’ll Need:
- A few dry pinecones
- Old crayons in a dark blue color, with the paper peeled off
- An old tin can
- A small saucepan
- Wax paper
- Tongs
Let’s Make It!
- Melt the Wax: Fill the saucepan with about an inch of water and place it on the stove. Put the broken crayon pieces into the empty tin can and place the can in the water. With a grown-up’s help, gently heat the water. The crayon wax will slowly melt in the can.
- Prepare for Dipping: While the wax is melting, lay a sheet of wax paper on your work surface.
- Dip the Pinecone: Once the wax is fully melted, use tongs to hold a pinecone by its top. Carefully dip the pinecone into the colored wax. You can dip it all the way or just dip the tips of the “petals.”
- Let it Drip: Lift the pinecone out of the wax and hold it over the can for a few seconds to let the extra wax drip off.
- Cool and Harden: Place the wax-dipped pinecone on the wax paper to cool and harden completely.
- Display Your Work: Once they are hard, you can group your beautiful, colored pinecones in a bowl or place them on a mantelpiece.
26. Pastel Candy-Colored Christmas

This holiday theme is sweet, dreamy, and delightfully retro. It uses a soft and sugary palette of mint green, cotton-candy pink, and creamy white. The effect is cheerful and light, like a vintage candy shop.
The main feature is a forest of bottle brush trees in various pastel shades, arranged across the mantelpiece. The whimsical color scheme is carried through to the ornaments and glassware. Touches of gold on the bar cart and cutlery add just the right amount of holiday sparkle to this sweet scene.
DIY Instructions: Glittery Bottle Brush Trees
What You’ll Need:
- A plain bottle brush tree (you can find these at a craft store, usually in green or white)
- White school glue
- A small paintbrush
- White or iridescent glitter
- A paper plate
Let’s Make It!
- Get Ready for Glitter: Pour some glitter onto a paper plate. This will make it easy to cover your tree and to clean up afterward.
- Paint with Glue: Take your paintbrush and apply a light coat of glue to the tips of the tree’s bristles. You don’t need to cover the whole thing, just the ends where you want the “snow” to be.
- Add the Sparkle: Hold the tree over the paper plate and generously sprinkle the glitter all over the glued parts. Turn the tree as you sprinkle to get all the sides.
- Tap, Tap, Tap: Gently tap the base of the tree to shake off any extra glitter onto the plate.
- Let it Dry: Set your tree aside to dry completely.
- Save the Extra: You can carefully fold the paper plate and pour the extra glitter back into its container to use for another project. Now your tree is ready to sparkle!
27. Literary Dark Academia Holiday

This holiday decor is cozy, smart, and wonderfully unique. It’s inspired by the “dark academia” aesthetic, with a love for books and vintage learning. The decorations are cleverly crafted from the pages of old books, creating a warm, nostalgic atmosphere.
A stunning garland made of folded book pages hangs on the dark green wall. Matching paper stars are used as a table runner and accent pieces. The scene is completed with a classic green banker’s lamp and stacks of old books, making the whole room feel like a festive corner in a grand, old library.
DIY Instructions: Easy Book Page Star
What You’ll Need:
- 5-7 pages from an old, falling-apart book (or you can use sheet music)
- Scissors
- A glue stick
Let’s Make It!
- Make Squares: If your book pages are rectangles, cut them into perfect squares. They should all be the same size.
- Fold and Fold: Take one square. Fold it in half diagonally to make a triangle. Unfold. Fold it in half the other way to make another triangle. Unfold. Now fold it in half like a regular rectangle. Unfold. You should have a bunch of crease lines.
- Make a Cone Shape: Push the two side creases inward. The paper will collapse into a smaller, double-layered triangle shape. This is the trickiest part!
- Create a Point: Take one of the top corners and fold it down to the center bottom point. Do the same with the other corner. It will look like a kite. Now, unfold those last two folds.
- Tuck it In: Using the creases you just made, open up the flap and tuck the corner inside. Repeat on the other side. You’ve now made one point of the star!
- Assemble the Star: Make 5-7 of these points. Use your glue stick to glue the side of one point to the side of the next, until you have a full, beautiful paper star.
28. Warm Terracotta & Olive Grove

This holiday theme is bathed in the warm, earthy glow of a Mediterranean sunset. The decor is built around a beautiful monochromatic palette of terracotta. This single color, used in a variety of shapes and textures, creates a look that is both modern and timeless.
A small, potted olive tree takes the place of a traditional pine, its silvery-green leaves a lovely contrast to the warm orange tones. The table is filled with a collection of matte terracotta vases holding simple dried grasses. The entire scene is lit by the soft flicker of candles, making the room feel incredibly warm and welcoming.
DIY Instructions: Painted Faux Terracotta Vase
What You’ll Need:
- An old glass bottle or jar, clean and dry
- Terracotta-colored acrylic craft paint
- A little bit of baking soda
- A paintbrush
- A small bowl
Let’s Make It!
- Mix Your Paint: Squeeze some of the terracotta paint into your small bowl. Add a spoonful of baking soda and mix it all together. The baking soda will make the paint thick and give it a chalky, matte finish, just like real terracotta!
- Start Painting: Use your paintbrush to apply the paint mixture all over the outside of your glass jar. Paint in dabbing motions or long strokes to create a handmade texture.
- Cover It All: Make sure you cover the entire surface. You might need to do two coats of paint to make sure none of the glass shows through. Let the first coat dry for about 20 minutes before adding the second.
- Let It Dry: Set your painted jar aside to dry completely.
- Display It: Once dry, your jar will look like a beautiful, rustic terracotta vase. You can put some dried flowers or a few pretty twigs inside.
29. Modern Scandinavian Cabin

This holiday style is the definition of “hygge,” the Danish word for a feeling of cozy contentment. The look combines clean, modern lines with warm, rustic textures. The result is a space that feels like a chic, contemporary cabin in the woods.
Simple, undecorated pine trees in metal and woven baskets bring the outdoors in. The real warmth comes from the textures: chunky cable-knit stockings, a roaring fire, and plush faux fur pillows. The decor is minimal but incredibly effective at creating a warm, inviting, and comfortable holiday retreat.
DIY Instructions: Simple Twig Star
What You’ll Need:
- 5 straight twigs of roughly the same length and thickness
- A hot glue gun or strong craft glue
- Twine or string
Let’s Make It!
- Clean Your Twigs: Brush any dirt off your twigs and break off any little side branches so they are mostly straight.
- Make the First “A”: Take two twigs and cross them at the top to make a shape like the letter “A” or a tipi. Use a dot of hot glue to stick them together where they cross.
- Add the Middle Bar: Take a third twig and lay it across the middle of your “A” shape, like the crossbar on the letter. Glue it in place at both ends.
- Weave the Last Two: Now, take your fourth twig. Weave it through your shape: start by laying it over the right leg of the “A,” under the crossbar, and then over the left leg.
- Weave the Final Twig: Take your last twig and do the opposite. Weave it under the right leg, over the crossbar, and under the left leg. Adjust the twigs until you have a star shape you like. You can add more dabs of glue where the twigs cross to make it sturdy.
30. Golden Kintsugi Holiday

This holiday theme is inspired by the ancient Japanese art of Kintsugi, where broken pottery is repaired with gold lacquer. The philosophy is about finding beauty in imperfection. This decor uses that idea to create a look that is artistic, mindful, and incredibly beautiful.
Simple, matte white ceramics are adorned with delicate veins of gold, as if they have been lovingly repaired. The theme extends from bowls and vases to wall art and even ornaments. This minimalist style is deeply meaningful, turning simple objects into works of art and reminding us of the beauty in our own unique histories.
DIY Instructions: Faux Kintsugi Painted Rocks
What You’ll Need:
- A few smooth, light-colored rocks, washed and dried
- A fine-tipped gold paint pen
Let’s Make It!
- Think Like a Crack: Imagine your rock was once broken and glued back together. Where would the crack lines be? They are usually thin and branching, like a lightning bolt or the veins on a leaf.
- Draw Your First Line: Shake your gold paint pen well. Carefully draw a main “crack” line across your rock. It doesn’t have to be perfectly straight. Wobbly lines look more natural.
- Add Branches: Now, draw a few smaller lines branching off from your main line. This will make it look more realistic.
- Fill it In: Go over your lines a second time to make the gold a little thicker and bolder, as if it’s filling the crack.
- Let it Dry: Set the rock aside and let the gold paint dry completely.
- Create a Collection: Do this with a few more rocks. You can then group your beautiful Kintsugi-inspired rocks on a shelf or use them as paperweights. They are a simple and beautiful decoration.
31. Luminous Line Art Holiday

This holiday decor is radically minimalist and futuristic. It strips the Christmas tree down to its most basic form: a glowing outline. Using flexible neon tubes, the decor becomes a form of light installation art. The look is ultra-modern, clean, and graphically striking.
The entire space is a play of light and dark. Glowing lines create abstract shapes on the walls, and the minimal table setting reflects the bright lights. This style is for the true minimalist who loves technology, art, and making a bold, unconventional statement.
DIY Instructions: Glow Stick Wall Art
What You’ll Need:
- A pack of long, flexible glow sticks (the kind for parties)
- Clear wall-safe tape or removable adhesive hooks
- A dark room
Let’s Make It!
- Plan Your Shape: Before you activate the glow sticks, think about what simple shape you want to make on your wall. A star, a simple swirl, or a zigzag line are all great places to start.
- Activate the Glow: Take your glow sticks and bend them until you hear them crack. Shake them well to mix the chemicals inside. They will start to glow brightly!
- Create Your Art: Start at the top of your design. Use a small piece of clear tape or a removable hook to attach the end of a glow stick to the wall.
- Shape the Lines: Gently bend the flexible glow stick to create your shape, adding more pieces of tape to hold it in place as you go. You can connect multiple glow sticks to make longer, continuous lines.
- Turn Off the Lights: Step back and turn off the room lights to see your glowing creation. It’s temporary art that makes a big impact for a holiday party or a fun evening.
32. Color Block Pop Art Holiday

This holiday theme is bold, confident, and artistic. It takes inspiration from modern art, using large blocks of solid, vibrant color as the main decoration. Instead of traditional festive items, the scene is built around abstract shapes and a powerful color story of red, blue, and orange.
There is no tree, only large painted canvases leaning against the wall. Even the gifts are wrapped in solid colors with contrasting ribbons. This approach is for the fearless decorator who sees the holiday season as an opportunity to play with color and form in a big way.
DIY Instructions: Color Block Gift Wrap
What You’ll Need:
- A gift wrapped in plain, solid-colored paper (like red)
- A roll of paper in a contrasting solid color (like blue)
- Scissors
- A glue stick or double-sided tape
Let’s Make It!
- Wrap Your Gift: First, wrap your present neatly in the first color of paper.
- Cut Your Shape: Take your second roll of paper. Cut out a simple, large geometric shape. A rectangle, a wide stripe, or a square works well.
- Create the Block: Use your glue stick or double-sided tape to stick this shape onto the front of your wrapped gift. For example, you could put a big blue rectangle on the front of your red box.
- Add a Ribbon: Choose a ribbon in one of your two colors. Tie a simple, neat bow around the package.
- A Modern Masterpiece: You now have a gift that looks like a piece of modern art. It’s simple, but the bold blocks of color make it look very stylish and intentional.
33. Frosted English Garden Holiday

This holiday decor is a romantic and dreamy vision. It feels like a beautiful flower garden has been kissed by the first winter frost. The Christmas tree is filled not just with ornaments, but with lush hydrangeas, dusty pink roses, and bundles of dried lavender.
The color palette is soft and muted, with shades of lilac, dusty rose, and silvery green. A large floral arrangement in a classic urn is filled with frosted branches and delicate blooms. This style is incredibly elegant and feminine, blending the beauty of a garden with the magic of the holiday season.
DIY Instructions: Simple Dried Lavender Bundles
What You’ll Need:
- A bunch of dried lavender (you can find this at craft stores or farmer’s markets)
- Twine or a simple ribbon
- Scissors
Let’s Make It!
- Gather Your Stems: Take a small handful of your dried lavender, about 10-15 stems.
- Make it Neat: Tap the bottom of the stems gently on a table to make them all even at the bottom.
- Tie it Up: Cut a piece of twine about 12 inches long. Tightly wrap the twine around the stems, about 2 inches from the bottom. Wrap it around several times.
- Make a Knot and a Bow: Tie a secure knot. If you have enough twine left over, you can tie a simple, small bow. If not, just snip the ends of the twine.
- Display Your Bundle: You can tie these little bundles onto the branches of your Christmas tree with their own stems, or group several of them together in a small vase. They look beautiful and smell amazing.
34. Modern Farmhouse Holiday

This holiday style is clean, bright, and incredibly inviting. It blends the crisp lines of modern design with the cozy, rustic feel of a farmhouse. A large, beautiful Christmas tree stands simply decorated with warm white lights, letting its natural beauty shine.
The decor is defined by its neutral palette and use of texture. Black and white buffalo check stockings hang from a simple wooden mantel. A plaid blanket is draped over a chair, ready for cozying up by the fire. This look is timeless and comfortable, creating a perfect backdrop for family gatherings.
DIY Instructions: Easy No-Sew Plaid Napkins
What You’ll Need:
- Plaid flannel fabric (about 1/4 yard per napkin)
- Fabric scissors
- A ruler or measuring tape
- Fray check liquid (a type of fabric glue that stops fraying, found at craft stores)
Let’s Make It!
- Measure and Cut: Using your ruler, measure and cut your fabric into squares. A good size for a napkin is about 18 inches by 18 inches. The lines in the plaid pattern will help you cut straight.
- Fray the Edges: This is the fun part! Gently pull a few of the threads from all four edges of your fabric square. Pull about 1/4 inch of threads out. This will create a soft, frayed edge.
- Stop the Fraying: Open your bottle of fray check. Carefully squeeze a very thin line of the liquid right along the edge of the fabric, just where the fraying stops. This will seal the edge so it doesn’t keep unraveling when you wash it.
- Let it Dry: Let the fray check dry completely. It will dry clear.
- Fold and Use: You now have beautiful, rustic plaid napkins for your holiday table, and you didn’t have to sew a single stitch!
35. Scandinavian Kitchen Holiday

This holiday decor is bright, functional, and effortlessly stylish. It shows how to bring a festive touch into the heart of the home—the kitchen. The look is clean and uncluttered, with a focus on natural materials like light wood and touches of copper.
A minimalist plywood Christmas tree is decorated with geometric copper ornaments. This metallic accent is repeated in the modern pendant lights and kitchen accessories. A simple hoop wreath with eucalyptus adds a touch of fresh greenery. This style proves that holiday decor can be both beautiful and practical.
DIY Instructions: Simple Copper Wire Ornaments
What You’ll Need:
- A spool of 18-gauge copper craft wire
- Wire cutters
- Pliers (needle-nose pliers are best)
- A round object, like a marker or a spice jar
- String for hanging
Let’s Make It!
- Make a Spiral: Cut a piece of wire about 12 inches long. Using your pliers, pinch the very end of the wire and start curling it into a tiny, tight circle. Keep turning the wire with your fingers to create a flat spiral, like a snail shell.
- Create a 3D Shape: To make a geometric cage ornament, wrap the wire around a small object like a salt shaker multiple times, creating a spring-like shape. Gently slide it off and then pinch and shape it into a diamond or sphere.
- Make a Hanger: At the end of your shape, use your pliers to bend the last inch of wire into a small loop. This is where you will tie your string.
- Cut the Wire: Use your wire cutters to snip off any extra wire.
- Hang It Up: Tie a piece of string through the loop you made. Now you have a simple, modern, and very chic copper ornament for your tree.
36. Amber Glow Holiday

This holiday decor is bathed in a warm, golden, honey-colored light. The entire room feels like it’s glowing from within. The style is romantic and glamorous, using a monochromatic palette of amber, gold, and warm wood tones.
A Christmas tree covered in gold ornaments and hundreds of warm white lights is the main feature. The light reflects off a large mirror and the surfaces of amber-colored glassware. A multitude of candles in warm-toned holders adds to the magical, flickering glow, creating an atmosphere that is incredibly cozy and enchanting.
DIY Instructions: Golden Bead Garland
What You’ll Need:
- Round wooden beads in a few different sizes
- Gold acrylic craft paint
- A small paintbrush
- A long piece of twine or string
- A needle with a large eye
- A paper plate
Let’s Make It!
- Paint Your Beads: Squeeze some gold paint onto your paper plate. Paint your wooden beads, turning them to cover all sides. You can stick a toothpick in the bead’s hole to hold it while you paint.
- Let Them Dry: Set the painted beads aside on a piece of wax paper to dry completely.
- String Them Up: Thread your needle with your long piece of twine. Tie a large knot at the other end so the beads won’t fall off.
- Create a Pattern: Start threading your beads onto the twine. You can create a pattern by alternating between different sizes (like big, small, big, small) or just string them on randomly.
- Finish It Off: Once your garland is as long as you want it, tie another big knot after the last bead. You now have a beautiful, gleaming gold garland to drape on your tree or across a mantelpiece.
37. Art Deco Holiday Glamour

This holiday style is elegant, sophisticated, and symmetrical. It draws inspiration from the glamour of the Art Deco period, with its love for bold lines, geometric shapes, and luxurious materials. A deep navy blue wall provides a dramatic backdrop for gleaming gold and white accents.
The decor is balanced and poised. A large, arched gold mirror is flanked by two matching marble lamps. The ornaments on the frosted tree include pink baubles and golden fans, classic Art Deco motifs. This style is polished and chic, bringing a timeless sense of glamour to the holiday season.
DIY Instructions: Art Deco Paper Fans
What You’ll Need:
- A piece of metallic gold paper (a rectangle, about 6×12 inches)
- A ruler
- A glue stick or a stapler
- String for hanging
Let’s Make It!
- Make Accordion Folds: Place your paper on a flat surface with the short side facing you. Fold the bottom edge up about one inch. Flip the paper over and fold it up again. Keep flipping and folding until the entire piece of paper is folded like an accordion or a fan.
- Fold it in Half: Take your folded strip of paper and fold it exactly in half, bringing the two ends together.
- Secure the Middle: Where the two sides meet in the middle, use a stapler or some glue to stick them together.
- Fan it Out: Gently pull the two outer edges apart to fan out your creation. You will have a beautiful semi-circle fan.
- Add a Hanger: You can poke a small hole in the top of one of the folds and thread a piece of string through it to hang it on your tree. These look amazing grouped together!
38. Renaissance Still Life Holiday

This holiday decor is dark, moody, and richly detailed, looking like a classic oil painting from the Renaissance. The style is a dramatic and bountiful celebration of the harvest season. A dark, flowing tablecloth sets the stage for a feast of deep, rich colors.
The beauty is in the details. Juicy red pomegranates, ripe pears, and walnuts are arranged artfully. A single candle casts a warm, flickering light, creating deep shadows just like in a painting. This is a sophisticated and timeless look that finds its festive spirit in the abundance of nature.
DIY Instructions: Simple Dried Orange Slices
What You’ll Need:
- 1-2 navel oranges
- A sharp knife (ask a grown-up for help)
- A baking sheet
- Parchment paper
- An oven
Let’s Make It!
- Slice the Oranges: Have a grown-up help you carefully slice the oranges into thin rounds, about 1/4 inch thick.
- Pat Them Dry: Lay the orange slices in a single layer on a paper towel. Place another paper towel on top and gently press down to soak up some of the extra juice.
- Bake Them: Lay the slices on a baking sheet lined with parchment paper. Bake them in an oven set to a very low temperature (around 200°F or 95°C) for 2 to 3 hours.
- Flip Them: About halfway through the baking time, carefully flip the orange slices over so they can dry out evenly on both sides.
- Cool Them Down: They are done when they feel dry to the touch and are slightly translucent. Let them cool completely on the baking sheet.
- Use Them Everywhere: You can now use these beautiful, jewel-like slices as decorations. Scatter them on a tabletop, put them in a clear bowl, or string them to make a garland.
39. Candy-Colored Pop Holiday

This holiday decor is a pure, unadulterated blast of fun. The theme is all about bright, happy colors and playful shapes. A crisp white tree provides the perfect canvas for a rainbow of round, matte ornaments in shades of pink, yellow, blue, and teal.
The joyful energy is everywhere. A colorful felt ball garland is draped on the tree. The presents underneath are wrapped in bold, solid colors, and even the candle holders are quirky, stacked shapes. This look is a cheerful rejection of traditional holiday palettes, opting for a celebration of pure, vibrant color.
DIY Instructions: Easy Felt Ball Garland
What You’ll Need:
- A bag of colorful felt balls (from a craft store)
- A long piece of string or embroidery floss
- A large needle with a big eye
Let’s Make It!
- Thread Your Needle: Cut your string to the length you want your garland to be. Thread one end through the eye of your needle. Tie a big knot at the other end of the string so the balls won’t slide off.
- Plan Your Pattern: Lay out your felt balls on a table. You can arrange them in a repeating rainbow pattern, or you can just mix up the colors for a random, fun look.
- Start Threading: Carefully push the needle straight through the center of your first felt ball. Pull it all the way down the string until it stops at the knot.
- Keep Going: Thread your next ball onto the string. You can push it right up against the first one, or you can leave a little space (about an inch) between them.
- Finish It Off: Keep adding felt balls until your garland is full. When you’ve added your last ball, take the needle off and tie another big knot so your beads are secure. Now you have a super cheerful garland to hang anywhere!
40. Global Nomad Holiday

This holiday decor gathers treasures from around the world to create a rich, layered, and soulful space. The theme is a celebration of global textiles, patterns, and handcrafted objects. There is no traditional tree, but a feeling of warmth and history in every piece.
The look is built on texture and pattern. Woven tribal rugs are used as a tablecloth and hung on the wall as art. Hand-carved wooden figures and intricately patterned lanterns add to the well-traveled vibe. This is a deeply personal style that tells a story of adventure and appreciation for global craftsmanship.
DIY Instructions: Simple Tassel Wall Hanging
What You’ll Need:
- A straight stick or a piece of wooden dowel
- Several different colors and textures of yarn
- Scissors
Let’s Make It!
- Make a Tassel: We’ll use the same method as the “No-Knit Yarn Tassels.” Wrap yarn around a piece of cardboard about 20 times. Tie a piece of yarn through the top, slide it off, tie the “neck,” and snip the bottom loops.
- Create a Collection: Make about 5-7 tassels using your different yarns. You can make them all the same size or vary the lengths for a more interesting look.
- Attach to the Stick: Take one of your tassels. Use the two long strings you used to tie the top and tie them in a secure knot around your stick.
- Add the Others: Tie on the rest of your tassels, spacing them out however you like along the stick.
- Make a Hanger: Cut one long piece of yarn (about 2 feet long). Tie one end to the left side of the stick and the other end to the right side. This will be your hanger.
- Display Your Art: Hang your new, bohemian-style tassel hanging on the wall. It’s a quick and easy way to add texture and color to a room.
41. Zen Garden Holiday

This holiday approach is the ultimate in peace and tranquility. It swaps festive clutter for the mindful practice of a Japanese Zen garden. The dining table becomes a meditative centerpiece, featuring a tray of raked white sand, carefully placed stones, and patches of green moss.
The rest of the decor follows this serene, minimalist philosophy. A small, elegant bonsai tree takes the place of a Christmas tree. The place settings are simple, with slate placemats and stoneware bowls. This style is about creating a calm, quiet space for reflection during a busy season.
DIY Instructions: Mini Desktop Zen Garden
What You’ll Need:
- A shallow dish or a small wooden tray
- Fine white sand (you can find this at a craft store)
- A few small, smooth stones
- A small rock or a fork to use as a rake
Let’s Make It!
- Pour the Sand: Pour your sand into the tray. You want it to be about half an inch deep. Gently shake the tray to make the sand level and smooth.
- Place Your “Islands”: Carefully place your smooth stones in the sand. These represent islands. You can use three, five, or seven stones—odd numbers often look more natural.
- Rake the Sand: Now for the mindful part. Take your tiny rake (or a fork) and gently drag it through the sand to create patterns. You can make straight lines, or you can rake circles around your stone “islands” to represent ripples in water.
- Find Your Zen: If you don’t like your pattern, you can just gently shake the tray to smooth the sand out and start again. Place your mini Zen garden on your desk or a table as a reminder to find a moment of calm.
42. Immersive Digital Nature

This final holiday concept is a breathtaking leap into the future. It does away with physical decorations entirely and instead uses digital projectors to create an immersive, magical environment. The walls and floor of the room are transformed into a dynamic, glowing forest scene.
This is a multi-sensory experience. A glowing tree made of light particles sheds sparkling leaves that drift across the floor. The scene can change from a spring meadow to an underwater world, all with the click of a button. It is a truly modern and unforgettable way to create holiday magic, blending technology with the beauty of nature.
DIY Instructions: “Firefly” Light Jars
What You’ll Need:
- A clean, empty glass jar with a lid
- A sheet of yellow or glow-in-the-dark cellophane/tissue paper
- Scissors
- A string of battery-powered fairy lights (the kind on a thin wire)
Let’s Make It!
- Create a Glow: Cut your cellophane or tissue paper into small, confetti-like pieces.
- Add the “Bugs”: Open up your jar and drop the paper pieces inside. Don’t fill it up, just put enough to cover the bottom and have some loose pieces.
- Insert the Lights: Turn on your fairy lights. Carefully feed the string of lights into the jar, coiling it around inside among the pieces of paper. Try to hide the battery pack by taping it to the back of the jar or tucking it behind something.
- Screw on the Lid: Put the lid back on the jar.
- Watch it Glow: The light from the fairy lights will shine through the yellow paper, making it look like you’ve captured a jar full of magical, glowing fireflies. It’s a simple way to create an enchanting, digital-like glow.
Decorating for the holidays shouldn’t feel like a chore or a repeat of every other year. It is a chance to create an atmosphere that feels warm, welcoming, and true to your own style. Moving beyond the basics opens up a world of creative possibilities.
Whether you choose the calm of a Zen-inspired table or the playful energy of a candy-colored display, the goal is the same. Create a space that brings you joy. This season, let your home be a reflection of your modern taste and a backdrop for beautiful new memories.
Key Takeaways
- Embrace Natural Materials: Simple elements like bare branches, fresh eucalyptus, dried oranges, and pinecones can make a big impact.
- Think Beyond Red and Green: Don’t be afraid to use a unique color palette, whether it’s moody jewel tones, earthy terracotta, or playful pastels.
- Focus on Texture: In minimalist decor, texture is key. Mix soft knits, raw wood, smooth ceramics, and metallic accents to add warmth and interest.
- DIY Adds Personality: A handmade ornament, garland, or centerpiece makes your decor truly one-of-a-kind and adds a personal story to your space.