When you think of Halloween, your mind might jump to bright orange pumpkins, plastic skeletons, and fake cobwebs. But seasonal decor doesn’t have to be loud or kitschy. This year, consider a more refined approach. A minimalist aesthetic can bring a chic and sophisticated vibe to your home while still celebrating the spooky season.

Minimalist Halloween decor is all about subtlety. It focuses on clean lines, a muted color palette, and the beauty of simple, sculptural forms. It’s about creating a mood and an atmosphere rather than relying on jump scares. The result is a space that feels both festive and stylish.
In this guide, we’ll explore 36 minimalist Halloween decor ideas that prove less can be more. From moody floral arrangements to simple DIY projects, you’ll find plenty of inspiration to create a home that is elegantly eerie and effortlessly cool. Get ready to embrace a new kind of Halloween style.
1. Floating Balloon Ghosts

Create a whimsical and airy display with these floating ghost decorations. This look is all about creating a sense of movement and lightness. The ghosts appear to dance in mid-air, bringing a friendly and ethereal vibe to the room. Their simplicity is what makes them so chic and visually appealing.
By using clear balloons, the top of the ghosts almost disappears, enhancing the illusion of them floating freely. The clean white fabric and simple, hand-drawn faces keep the look modern and minimalist. This is a great way to fill a vertical space and add a playful, spooky touch without any clutter.
DIY Floating Ghost
What You’ll Need:
- A white, helium-quality balloon
- A clear balloon (slightly larger than the white one)
- A piece of lightweight white fabric (like cheesecloth or gauze)
- A black permanent marker
- String or fishing line
Step-by-Step Instructions:
- Inflate the White Balloon: Blow up the white balloon with air or helium. Don’t make it too big, just a nice small-to-medium size for the ghost’s head.
- Add the Clear Layer: Place the white balloon inside the clear balloon. Now, inflate the clear balloon. It should be bigger than the white one, creating a bubble effect. Tie it off.
- Drape the Fabric: Find the center of your white fabric and drape it over the top of the double balloon.
- Draw the Face: Use your black marker to draw two oval eyes and a round mouth on the fabric, right over where the white balloon is.
- Make it Float: Tie a long piece of fishing line to the knot of the balloon. You can tape the other end to the ceiling to let your ghost hang and float in the air.
2. Matte Black Centerpiece

This decor idea is all about drama and sophistication. A collection of pumpkins, all painted in a deep matte black, creates a powerful and uniform look. The lack of shine gives them a modern, sculptural quality. Arranging them on a simple wooden board adds a touch of rustic warmth that contrasts with the stark black.
The scene is made even more dramatic with tall, skinny black candles in minimalist holders. The entire tablescape is a study in texture and form, using a single color to create a moody and elegant atmosphere. It’s a bold choice that feels both timeless and very contemporary.
DIY Matte Black Pumpkin
What You’ll Need:
- A faux pumpkin of any color
- A can of matte black spray paint
- Newspaper or a drop cloth
Step-by-Step Instructions:
- Prepare Your Workspace: Go outside or to a well-ventilated area like an open garage. Lay down your newspaper to protect the ground from paint.
- Clean Your Pumpkin: Wipe your faux pumpkin with a dry cloth to make sure it’s free of dust.
- Apply the First Coat: Place the pumpkin on the newspaper. Shake the can of spray paint very well for about a minute. Hold the can about 8-10 inches away from the pumpkin and spray in a steady, sweeping motion. Cover the top and sides.
- Let it Dry: Let the first coat of paint dry for about 20-30 minutes.
- Paint the Bottom: Carefully turn the pumpkin over and spray the bottom. Let that dry for another 20-30 minutes.
- Apply a Second Coat: For a really solid, even color, apply a second light coat of spray paint all over the pumpkin. Let it dry completely for a few hours before you use it in your display.
3. Painted Arch Pumpkins

Add a pop of modern art to your Halloween decor. This idea treats a simple white pumpkin as a canvas. A bold, colorful arch painted in warm autumn tones creates a graphic and stylish statement. It’s a simple concept, but the result is eye-catching and unique.
This look is perfect for a minimalist space. Paired with sleek black vases and a metallic console table, the pumpkin becomes a small piece of sculpture. It’s a creative way to incorporate traditional autumn colors in a fresh and contemporary way, proving that Halloween decor can be both chic and artistic.
DIY Painted Arch Pumpkin
What You’ll Need:
- A white faux pumpkin
- A few small bottles of acrylic craft paint in autumn colors (like orange, red, and purple)
- A flat-tipped paintbrush
- A pencil
Step-by-Step Instructions:
- Sketch Your Shape: Lightly use your pencil to draw the outline of a wide arch or a rainbow shape on the front of your pumpkin.
- Paint the First Stripe: Dip your paintbrush in the first color. Carefully paint a stripe, following the curve of your arch. Make it about one inch wide.
- Clean Your Brush and Switch Colors: Wipe your paintbrush clean with a paper towel or rinse it with water. Now, dip it in your second color.
- Paint the Next Stripe: Paint another stripe right next to the first one. Try to keep the lines clean, but don’t worry if they are a little bit wavy. That’s part of the handmade charm.
- Continue Painting: Keep painting stripes with your different colors until your arch shape is filled in.
- Let it Dry: Set the pumpkin aside and let the paint dry completely. Now you have a piece of modern art for your shelf!
4. Gilded Pumpkins and Smoked Glass

This tablescape exudes a sense of luxury and warmth. The centerpiece is a large pumpkin covered in shining gold leaf, which beautifully reflects the candlelight. The metallic finish adds a touch of glamour and sophistication to a traditional autumn element.
The golden pumpkin is surrounded by dark, smoked glass vases and votive holders. This contrast between the bright, reflective gold and the dark, moody glass creates a rich and inviting atmosphere. It’s a wonderful way to create a Halloween table setting that feels opulent, warm, and just a little bit mysterious.
DIY Gold Leaf Pumpkin
What You’ll Need:
- A faux pumpkin
- A bottle of adhesive size (a special glue for gold leaf)
- A book of gold leaf sheets
- A soft, small paintbrush
Step-by-Step Instructions:
- Apply the Glue: Use your paintbrush to apply a thin, even layer of the adhesive size glue onto a section of your pumpkin. Don’t do the whole thing at once.
- Wait for it to Get Tacky: Let the glue sit for a few minutes. You want it to be sticky to the touch, but not completely wet.
- Apply the Gold Leaf: Carefully pick up a sheet of gold leaf. It is very delicate! Lay the sheet over the sticky area on the pumpkin.
- Gently Press it Down: Use your dry paintbrush or your finger to gently pat the gold leaf down. It will stick to the glued areas.
- Brush Away the Extra: Once the section is covered, use your soft brush to gently whisk away any loose bits of gold leaf.
- Repeat, Repeat, Repeat: Continue applying glue and gold leaf in sections until your whole pumpkin is covered in a beautiful, crackled gold finish.
5. Whimsical Ghost Tree

Create a simple and charming centerpiece with a “ghost tree.” This decor uses natural elements to create a minimalist and slightly spooky display. Bare branches in a clear vase bring a touch of the outdoors inside, and their stark, sculptural shapes are beautiful on their own.
Small, glowing ghost lights are hung from the branches, adding a whimsical and playful touch. The scene is completed with small paper bats on the wall and a collection of friendly wooden ghosts on the table. It’s a lighthearted and stylish way to decorate a dining table for a fun Halloween get-together.
DIY Ghost Lights Garland
What You’ll Need:
- A string of white or warm white LED fairy lights
- A white ping pong ball for each light on the string
- A craft knife or a drill (an adult’s job!)
- A black permanent marker
Step-by-Step Instructions:
- Prepare the Ghost Heads: This is a step for an adult. Carefully use a craft knife to cut a small “X” shape in each ping pong ball. The hole should be just big enough for an LED light to poke through.
- Draw the Faces: Use your black permanent marker to draw a simple ghost face on each ping pong ball. Two oval eyes and a round mouth work great. Let the marker dry for a minute.
- Assemble the Lights: Take your string of lights. One by one, gently push a single LED bulb through the hole you made in each ping pong ball. The ball is now the “head” of your glowing ghost.
- Continue for All Lights: Keep adding ping pong ball heads to all the lights on your string.
- Hang Them Up: Your glowing ghost garland is now ready! You can hang them on some branches in a vase, drape them over a mantelpiece, or string them along a wall.
6. Minimalist Wireframe Pumpkins

This decor is a great example of minimalist design. It uses the simple outline of a pumpkin, crafted from black wire, to suggest the shape without filling it in. This creates a look that is light, airy, and very modern. The open design allows you to see through the object, making it feel less heavy.
The wireframe pumpkins are paired with other simple, sculptural elements like a bare branch tree and paper bats. The whole scene plays with light and shadow, creating interesting patterns on the wall. It’s a sophisticated and artistic take on Halloween that is all about clean lines and simple forms.
DIY Wire Pumpkin Sculpture
What You’ll Need:
- A roll of thick, black craft wire (12 or 14 gauge works well)
- A roll of thinner black craft wire (20 or 22 gauge)
- Wire cutters
- A round object, like a small bowl or can
Step-by-Step Instructions:
- Make the Frame: Cut two long pieces of the thick wire. Bend both pieces into a half-circle or “C” shape. You can do this by gently bending them around your small bowl.
- Create the Pumpkin Shape: Place the two “C” shapes together to form a circle. Then, turn one of them 90 degrees so they cross in the middle, like the lines on a beach ball. This is the main frame of your pumpkin.
- Secure the Frame: Use a small piece of the thin wire to wrap around the points where the thick wires cross at the top and bottom. This will hold your pumpkin shape together.
- Add More Ribs: Cut more long pieces of the thick wire. Bend them into “C” shapes and add them to your frame to make the pumpkin look fuller. Secure each one at the top and bottom with the thin wire.
- Make a Stem: Cut a short piece of the thick wire. Use your fingers to coil it into a small spiral shape for the stem. Attach it to the top of your pumpkin with a piece of the thin wire.
7. Earthy Witch’s Corner

This decor has a natural, almost rustic feel, suggesting the home of a modern-day kitchen witch. The objects are simple and earthy: a handmade besom broom, ceramic pots, and bundles of dried herbs. The color palette is muted and calm, with touches of natural wood and stone.
A small pumpkin and a bowl of dark river stones with a single tea light add a subtle hint of the season. The focus here is on texture and natural materials. It’s a sophisticated and understated way to bring a touch of gentle magic into your home for Halloween.
DIY Mini Besom Broom
What You’ll Need:
- A straight stick from your yard, about 1 foot long
- A big handful of smaller, twiggy branches or dried ornamental grass
- Natural twine
- Scissors
Step-by-Step Instructions:
- Make the Handle: Your straight stick will be the handle of your little broom. Make sure it’s clean and dry.
- Gather the Bristles: Take your big handful of twigs. This will be the brush part of the broom.
- Attach the Bristles: Arrange the twigs around one end of your handle stick. You want them to surround the stick completely.
- Wrap It Tight: Cut a long piece of twine. Hold the twigs firmly against the handle and start wrapping the twine tightly around the top of the twigs, securing them to the stick.
- Keep Wrapping: Wrap the twine around and around, creating a neat band that is about one inch wide.
- Tie it Off: When the twigs feel very secure, tie the twine in a tight knot. Snip off the extra twine with your scissors. You now have a charming little witch’s broom to lean in a corner or place in a vase.
8. Moody Floral Arrangement

Flowers can be a beautiful and unexpected way to decorate for Halloween. This arrangement uses a dark and moody color palette to feel seasonal and romantic. Deep burgundies, dusky pinks, and dark foliage come together to create a look that is both beautiful and slightly mysterious.
A simple wreath made of dried baby’s breath, sprayed silver or grey, adds a ghostly, textural element to the wall. The flowers are arranged in simple, dark glass vases, which adds to the dramatic feel. It’s a sophisticated and elegant alternative to more traditional Halloween decorations.
DIY Spooky Painted Wreath
What You’ll Need:
- A simple, inexpensive grapevine or twig wreath
- A can of matte black or dark grey spray paint
- Newspaper
- String for hanging
Step-by-Step Instructions:
- Prepare to Paint: Take your wreath outside and lay it on a large piece of newspaper. Make sure you are in a spot with good airflow.
- Shake the Can: Shake your can of spray paint for at least a minute to mix it up well.
- Spray the First Coat: Hold the can about 8-10 inches from the wreath. Spray in short, even bursts, moving back and forth to cover the front and sides of the wreath. Don’t forget to get the paint into all the little crevices.
- Let it Dry: Let the wreath sit for about 30 minutes to an hour until the paint is dry to the touch.
- Flip and Spray Again: Carefully flip the wreath over and spray the back. This ensures it looks good from all angles if it’s hanging in a window. Let it dry completely.
- Add a Hanger: Once the wreath is fully dry, tie a loop of string to the back so you can hang it on your wall or door for a simple, spooky touch.
9. Apothecary Bottle Collection

Create a mysterious display with a collection of old-fashioned apothecary bottles. This look evokes the feeling of a vintage pharmacy or an alchemist’s lab. The amber and clear glass bottles, in various shapes and sizes, look beautiful when grouped together.
The addition of simple, vintage-style labels with strange words makes the display even more intriguing. A small skull under a glass cloche and a few scattered feathers complete the scene. It’s a wonderful way to tell a story and add a touch of intellectual, old-world spookiness to a shelf or table.
DIY Apothecary Jar Labels
What You’ll Need:
- A few empty glass bottles or jars
- A sheet of tan or cream-colored paper
- A printer
- Scissors or a paper trimmer
- A glue stick
Step-by-Step Instructions:
- Design Your Labels: On your computer, open a word processing program. Type out some spooky or mysterious ingredient names like “Wolfsbane,” “Dragon’s Breath,” or “Serpent’s Venom.” Choose a classic, old-fashioned font.
- Print Them Out: Print your list of names onto the tan or cream-colored paper. This will make them look aged.
- Cut Them Out: Use your scissors to carefully cut out each label into a neat rectangle.
- Stick Them On: Take your glue stick and apply a thin layer of glue to the back of one of your paper labels.
- Apply to the Bottle: Carefully press the label onto the front of one of your glass bottles. Smooth it down with your fingers to get rid of any air bubbles.
- Repeat for All Bottles: Continue sticking your spooky labels onto all your different bottles to create your own instant apothecary collection.
10. Terrazzo Style Pumpkins

For a truly unique and modern look, try a terrazzo pattern on your pumpkins. This decor is inspired by the popular composite material known for its colorful, abstract flecks. The playful splotches of orange, black, and grey on a clean white background feel artistic and fun.
This is a great way to tie your Halloween decor in with a modern interior design style. The pattern is repeated on other items like a tray and coasters, creating a cohesive and stylish look. It’s a cheerful and graphic approach to pumpkin decorating that is anything but ordinary.
DIY Painted Terrazzo Pumpkin
What You’ll Need:
- A white faux pumpkin
- Small bottles of acrylic craft paint in 3-4 different colors (like black, grey, and orange)
- A small, slightly stiff paintbrush
- A paper plate
Step-by-Step Instructions:
- Prepare Your Paints: Squeeze a little bit of each of your paint colors onto your paper plate.
- Paint the First Color: Dip your paintbrush in the first color. Use the brush to paint small, irregular, splotchy shapes all over the pumpkin. Think of the shapes you see in a stone or on a sidewalk. Make some small and some a little bigger.
- Switch to the Next Color: Wipe your brush clean. Dip it in your second color and add more splotches, filling in some of the empty spaces. Don’t let the shapes touch too much.
- Add the Final Colors: Continue adding splotches with all your different colors until you are happy with how it looks. You want a random, scattered pattern.
- Let it Dry: Set your pumpkin aside and let the paint dry completely. Now you have a super trendy and artistic pumpkin for your table!
11. Edgy Skull Air Plant Holders

Merge the natural world with a touch of spooky chic. These concrete skull planters offer an unexpected and modern way to display greenery. The rough, industrial texture of the concrete contrasts beautifully with the delicate, living air plants they hold. It’s a subtle nod to Halloween that can easily blend with your year-round decor.
This look is about finding beauty in unexpected places. The skulls act as small, sculptural pieces of art. Grouping them with other concrete and natural elements, like a large bowl and a cozy knit throw, creates a balanced and stylish corner. This is a fresh, life-filled take on classic skull imagery.
DIY Skull Planter
What You’ll Need:
- A small ceramic or plaster skull (from a craft store)
- An air plant (from a nursery or garden center)
- A little bit of moss (optional)
Step-by-Step Instructions:
- Find Your Skull: Start with a hollow skull decoration. You want one that has an opening at the top that’s big enough for a small plant.
- Prepare the Home: Make sure the inside of the skull is clean and empty. If you want, you can place a little bit of dried moss in the bottom. This can help hold the plant in place.
- Place Your Plant: Gently take your air plant and place it inside the opening of the skull. The base of the plant should sit inside, with its green leaves coming out of the top.
- Arrange it Just Right: Wiggle the plant a little so it sits securely. You don’t need any soil because air plants get their nutrients from the air!
- Find a Sunny Spot: Place your new skull planter in a spot that gets bright, indirect sunlight. To water your plant, just take it out once a week and soak it in water for 20-30 minutes, then let it dry before putting it back.
12. Moody Ombré Pumpkins

This decor uses a striking ombré effect to create a sense of artistry and drama. The pumpkins transition from a clean white to a deep, saturated black. This gradual color fade is both beautiful and mysterious. It’s a modern and graphic way to interpret the colors of the season.
Paired with an abstract black and red art print, the display feels curated and intentional. The gradient is mirrored in the table runner and vase, tying the whole look together. This is a great way to make a strong visual statement with just a few carefully chosen pieces.
DIY Ombré Spray-Painted Pumpkin
What You’ll Need:
- A white faux pumpkin
- Matte black spray paint
- Matte white spray paint
- Newspaper or a drop cloth
Step-by-Step Instructions:
- Prepare Your Area: Find a spot outside or in a garage with the doors open. Lay down your newspaper to protect the ground. Place your pumpkin in the center.
- Paint the Bottom: Take the black spray paint. Hold the can about 10 inches from the bottom of the pumpkin. Spray the bottom third of the pumpkin, turning it as you go to get an even coat.
- Create the Fade: Now, move the can a little further away (about 12-15 inches). Lightly spray the middle section of the pumpkin. You want this coat to be lighter so some of the white shows through. Don’t spray the top at all.
- Blend with White: Let the black paint dry for about 15 minutes. Now, take the white spray paint. Hold the can about 12-15 inches away and spray the top of the pumpkin, letting a little bit of the spray drift down over the middle section. This will help blend the black and white together.
- Let It Dry Completely: Leave the pumpkin to dry for a few hours. Once it’s ready, you’ll have a cool pumpkin that fades from one color to another.
13. Soft and Ghostly Glow

Create a serene and slightly spooky corner with the soft light of frosted lanterns. This approach uses light and texture to create a mood, rather than obvious Halloween symbols. The frosted glass holders diffuse the light from the candles, casting a gentle, ethereal glow that feels calm and mysterious.
The decor is simple and uncluttered. A large glass bottle filled with fairy lights adds another layer of soft light. Draped over a comfortable chair, a chunky gray blanket invites you to curl up in the cozy, candlelit space. It’s a grown-up, peaceful way to acknowledge the changing season.
DIY Frosted Glass Votives
What You’ll Need:
- A few simple glass jars or vases
- A can of frosted glass spray paint
- Newspaper
- Battery-operated tea lights or fairy lights
Step-by-Step Instructions:
- Clean Your Jars: Make sure your glass jars are completely clean and dry. Any fingerprints or dust can show up in the paint.
- Set Up Your Painting Spot: Go outside or to a well-ventilated room. Lay down newspaper to protect your work surface.
- Spray the First Coat: Shake the can of frosted glass spray paint very well. Hold the can about 8-10 inches away from the jar. Spray a light, thin coat all around the outside of the jar. It’s better to do a few thin coats than one thick one.
- Let it Dry a Little: Wait about 15 minutes for the first coat to get tacky.
- Spray the Second Coat: Apply a second light coat of the spray paint. This will make the frosted look more even.
- Let It Dry Completely: Let the jars dry for at least an hour. Once they are fully dry, pop a battery-operated tea light inside and watch them glow!
14. Rustic Cabinet of Curiosities

This look creates a story with vintage and rustic finds. It feels like you’ve stumbled upon a forgotten corner of an old farmhouse. A weathered wooden ladder, an old sign, and a crate create a charmingly cluttered scene. The decor relies on the character of aged objects to set a mysterious tone.
A collection of framed, old-fashioned drawings adds to the historic feel. Some of the pictures have a spooky twist, drawing you in for a closer look. Small white pumpkins and uniquely shaped gourds connect the display to the autumn season. It’s a celebration of things that are old, imperfect, and full of character.
DIY Vintage-Style Art
What You’ll Need:
- A printer and plain white paper
- A picture you want to look old (search for “vintage Halloween illustrations” online)
- A shallow dish
- A used black tea bag
- A black picture frame
Step-by-Step Instructions:
- Print Your Picture: Find an image you like and print it out on regular paper.
- Brew Some Tea: Run the used tea bag under warm water for a moment to get it damp.
- Age the Paper: Lay your printed picture flat in the shallow dish. Gently dab the wet tea bag all over the paper. Don’t rub too hard or the paper might tear. The tea will stain the paper, making it look yellow and old.
- Add Character: For some darker spots, let the tea bag sit on the paper for a few seconds in a few places. You can even fold the paper carefully and unfold it to create crease marks.
- Let It Dry: Carefully remove the wet paper from the dish and lay it flat on a paper towel to dry completely. It will wrinkle a bit, which makes it look even more authentic.
- Frame Your Art: Once the paper is totally dry, place it in your black picture frame. Now you have a piece of “antique” art for your wall!
15. Mystical Celestial Celebration

Decorate your space with the magic of the night sky. This celestial theme uses moons, stars, and constellation patterns to create a sense of wonder. A deep, starry blue provides a dramatic backdrop for shining gold and silver accents. It’s a sophisticated and enchanting take on Halloween that feels both mystical and chic.
A golden mobile with hanging moons and stars becomes a beautiful focal point over a table. The theme continues with a constellation table runner and a deep blue pumpkin painted with a silver crescent moon. This decor is about capturing the beauty and mystery of the cosmos for a truly magical celebration.
DIY Moon and Star Garland
What You’ll Need:
- Black, silver, and gold cardstock or craft paper
- A pencil
- Scissors
- A hole punch
- A long piece of string or black thread
Step-by-Step Instructions:
- Draw Your Shapes: On the different colored papers, draw crescent moon shapes and star shapes. Make them in a few different sizes. You can find templates online to trace if you want.
- Cut Them Out: Carefully cut out all of your moon and star shapes. You should have a nice pile of them in black, silver, and gold.
- Punch the Holes: Take your hole punch and make one hole at the top of each shape. For the crescent moons, punch the hole in one of the pointy tips.
- String Them Together: Take your long piece of string. Thread it through the hole on one of your shapes and tie a simple knot to keep it in place.
- Build Your Garland: About 3-4 inches down the string, add another shape. Keep adding moons and stars, mixing up the colors and sizes as you go.
- Hang It Up: Once your string is full, your celestial garland is ready! You can hang it down a doorway or across a wall to bring the night sky inside.
16. Playful Geometric Decor

This style proves that Halloween decor can be clean, graphic, and fun. It uses strong geometric patterns and a simple black, white, and orange color scheme. A large wall hanging made of black paper triangles creates a bold, modern backdrop. The look is crisp and full of personality.
The geometric theme is repeated in a vase and a pillow, which makes the whole space feel connected. Cute, minimalist ghost figures add a touch of Halloween spirit without being scary. This is a great way to decorate if you love modern design and want a look that feels both seasonal and stylish.
DIY Geometric Wall Hanging
What You’ll Need:
- Black cardstock or construction paper
- A ruler and pencil
- Scissors
- A hole punch
- String
- A thin wooden dowel or a straight stick from outside
Step-by-Step Instructions:
- Make a Triangle Template: On a piece of cardstock, use your ruler to draw a triangle. A good size to start with is 2 inches on all three sides. Cut this triangle out. This is your template.
- Trace and Cut: Use your template to trace lots of triangles onto your black paper. You will need many of them! Carefully cut out all the triangles.
- Punch the Holes: Use your hole punch to make two holes in each triangle: one at the top point and one at the bottom point.
- Create Your Strands: Cut several pieces of string, all the same length (about 2-3 feet long). Take one string and tie a triangle to the very bottom. Then, thread the string up through the bottom hole of another triangle and out through the top hole. Keep adding triangles until your string is full. Repeat this to make many strands.
- Assemble the Hanging: Tie the top of each string of triangles onto your wooden dowel. Space them out evenly.
- Add a Hanger: Tie one last piece of string to both ends of the dowel. Now you can hang your cool, geometric artwork on the wall.
17. A Nod to “The Raven”

For the literature lover, this decor creates a dark and academic atmosphere inspired by Edgar Allan Poe. The scene is set with classic, leather-bound books, a stark black raven, and elegant quill feathers. It’s a smart and sophisticated theme that hints at spooky stories and mysterious poems.
A framed excerpt from “The Raven” makes the inspiration clear. The color palette is simple: black, white, and the rich tones of old books. This creates a moody and atmospheric display on a mantelpiece or side table. It’s a timeless look that feels both intelligent and haunting.
DIY Decorative Quill Pen
What You’ll Need:
- A large black feather (from a craft store)
- A small, clear glass bottle or inkwell
- A handful of small pebbles or sand
- Water
Step-by-Step Instructions:
- Choose Your Feather: Pick out a nice, big feather. Make sure the bottom part of the stem (the quill) is clean and strong.
- Prepare the Holder: Take your small glass bottle. This will be the inkwell that holds your feather pen upright.
- Add Some Weight: Carefully fill the bottle about halfway with your small pebbles or sand. This will give it some weight so it doesn’t tip over easily.
- Add Water: Slowly pour a little bit of water into the bottle, just enough to cover the pebbles. The water will make it look like a real inkwell.
- Place Your Quill: Gently stick the pointy end of the feather down into the pebbles inside the bottle. Arrange it so it stands up straight.
- Display it Proudly: Place your decorative quill and inkwell on a stack of books. It’s a simple touch that adds a lot of classic, spooky style.
18. All-White Ossuary Chic

This striking decor commits to a single color for a high-impact, artistic look. Everything in the display is pure white, from the full-sized skeleton to the tiniest pumpkins. This monochromatic choice feels more like a modern art installation than traditional Halloween decor. It’s clean, bright, and undeniably spooky.
The collection includes various bones, skulls, and a string of large wooden beads, creating interesting shapes and textures. A skull serves as an unconventional vase for delicate white baby’s breath. By removing all color, the focus shifts entirely to the form of these classic spooky objects, making them feel new and sculptural.
DIY Faux Bone Garland
What You’ll Need:
- White air-dry clay
- A piece of twine or jute string, cut to your desired length
- A skewer or toothpick
Step-by-Step Instructions:
- Warm Up the Clay: Take a piece of the air-dry clay and roll it around in your hands for a minute to make it soft and easy to work with.
- Shape Your First Bone: Roll the clay into a short, thick log shape, about 2 inches long. Then, gently pinch and roll the ends to make them a little thicker, like the ends of a cartoon bone. Don’t worry about making it perfect; bumpy is better!
- Make a Hole: While the clay is still soft, take your skewer and carefully poke a hole through the middle of the bone from side to side. Make sure the hole is big enough for your string to pass through.
- Make More Bones: Repeat these steps to make a whole pile of clay bones. Try to make them all a little different.
- Let Them Dry: Lay your clay bones on a flat surface to dry. This can take a day or two. Flip them over halfway through so they dry evenly.
- String Your Garland: Once the bones are hard and completely dry, thread them onto your piece of twine. Tie a knot at each end, and your cool bone garland is ready to hang.
19. Jewel-Toned Harvest Feast

This tablescape is rich, elegant, and full of deep, luxurious color. It moves beyond the typical Halloween palette into a sophisticated world of jewel tones. A velvet table runner in deep purple and teal sets a lavish stage for the meal. The colors feel royal and a little mysterious.
Dark pumpkins, gourds, and Indian corn are scattered among tall, brass candlesticks. The metallic shine of the brass adds warmth and contrasts with the soft velvet. A lush floral arrangement with deep red and purple flowers completes the opulent look. This is how you host a truly decadent and moody autumn dinner party.
DIY Easy Velvet Napkin Ties
What You’ll Need:
- A roll of velvet ribbon in a dark color (like purple, blue, or black)
- Scissors
- Small faux gourds or mini pumpkins with stems
Step-by-Step Instructions:
- Roll Your Napkin: Take a cloth napkin and roll it up neatly into a tube shape.
- Cut Your Ribbon: Cut a piece of your velvet ribbon about 12 inches long. This should be plenty to wrap around the napkin and tie a bow.
- Wrap the Napkin: Lay the ribbon flat on the table. Place the rolled-up napkin in the middle of the ribbon.
- Tie the First Knot: Bring the two ends of the ribbon up and around the napkin. Tie them together once, like you’re starting to tie your shoes.
- Add the Gourd: Before you make the bow, take your small gourd. Slip the stem of the gourd underneath the knot you just made.
- Finish the Bow: Now, tie the ribbon into a simple bow right over the stem. The gourd will be held in place by the bow. Trim the ends of the ribbon if they are too long. Repeat for all of your napkins!
20. Graphic Spiderweb Dinner Setting

This place setting is a masterclass in minimalist, high-contrast design. It uses a bold spiderweb graphic to create a chic and spooky look. The theme is carried from the wall to the plates, creating a cohesive and visually striking effect. The simple black and white color scheme keeps it feeling modern and sharp.
A large, dramatic spiderweb on the wall sets the scene. The matching plates become the star of the table. Paired with simple silverware and a classic martini glass, the setting feels elegant and ready for a sophisticated Halloween gathering. It’s a powerful look that uses one simple motif to great effect.
DIY Giant Yarn Spiderweb
What You’ll Need:
- A ball of white yarn
- Removable wall hooks or clear tape
- Scissors
Step-by-Step Instructions:
- Make the Frame: Start by making the main “spokes” of your web. Cut 3 or 4 long pieces of yarn. Stick one end of each piece to the wall in the same center spot. Then, stretch them out like the spokes of a wheel and attach the other ends to the wall, fanning them out. This is the frame of your web.
- Start Weaving: Cut another very long piece of yarn. Tie one end to one of the center spokes, close to the middle of the web.
- Weave the First Circle: Take the long piece of yarn and stretch it to the next spoke over. Wrap it around that spoke once to secure it. Continue doing this, moving from spoke to spoke, until you get back to where you started. This makes the first inner circle of your web.
- Keep Going: Move a few inches down the spokes and start your next circle. Keep weaving your yarn from spoke to spoke, making bigger and bigger circles until your web is the size you want.
- Finish It Off: When your web is done, tie the end of your yarn to one of the spokes and snip off any extra. You can add a fake spider for an extra spooky touch!
21. Boho Terracotta Ghosts

This charming decor blends earthy terracotta with a playful ghost motif for a warm, bohemian feel. The natural, rustic texture of the clay pots provides a lovely contrast to the smooth white pumpkins. It’s a gentle and stylish way to decorate, using natural materials and colors.
Little ghosts made from painted pots add a touch of whimsy. Paired with feathery pampas grass, the whole display feels soft and inviting. This look is great for a space that is bright and airy, proving that Halloween decor can feel cozy and chic rather than dark and spooky.
DIY Terracotta Pot Ghosts
What You’ll Need:
- Small terracotta pots (the kind for tiny plants)
- White craft paint
- A paintbrush
- A black permanent marker
Step-by-Step Instructions:
- Paint Your Pot: Make sure your little terracotta pot is clean and dry. Turn it upside down. Using your paintbrush, paint the entire outside of the pot with white paint. Don’t forget to cover the rim.
- Let It Dry: Set the pot aside to dry completely. This might take about 30 minutes.
- Add a Second Coat: Once the first coat is dry, paint on a second coat of white paint. This will make sure the color is solid and you can’t see the orange pot underneath.
- Let It Dry Again: Let the pot dry completely. This is very important before you draw the face.
- Draw the Ghost’s Face: Take your black permanent marker. Draw two ovals for eyes and a bigger oval for a spooky, open mouth.
- Display Your Ghost: Your little pot ghost is all done! You can make a few of them and group them together on a shelf or table.
22. Mad Scientist’s Laboratory

This decor takes a clinical, minimalist approach to Halloween. The scene is set with scientific glassware, anatomical charts, and abstract art, creating the feel of a very modern and artistic laboratory. The look is clean, crisp, and intellectually spooky.
A single red candle melting over a white plate provides a stark pop of color and a hint of something sinister. The arrangement of objects feels deliberate and curated, like evidence from a strange experiment. It’s a clever and unconventional theme that is both thought-provoking and subtly unsettling.
DIY Bleeding Candle Effect
What You’ll Need:
- A white pillar candle (or a white plate, as shown in the picture)
- A red candle
- A lighter or matches
- A protected, flat surface to work on
Step-by-Step Instructions:
- Get Ready: Place your white pillar candle or your white plate on a surface you don’t mind getting messy. This project involves dripping wax!
- Light the Red Candle: Carefully light your red candle using a lighter or a match.
- Let the Wax Pool: Hold the red candle upright for a minute and let some of the red wax melt and form a little pool around the wick.
- Drip the Wax: Now, carefully tilt the red candle over the top of your white candle or plate. Let the red wax drip down the sides.
- Create Drips: Move the red candle around as you drip, creating different patterns that look like blood running down. Make some long drips and some short ones.
- Let It Cool: Once you are happy with how it looks, blow out the red candle. Let the red wax drips cool and harden completely on the white surface. Now you have a spooky bleeding candle for your display!
23. Haunted Window Silhouettes

Turn your windows into a stage for a spooky story with dramatic silhouettes. This simple technique uses black cutouts to create a scene that looks stunning from both inside and out, especially at night when the lights are on. It’s a classic Halloween decoration that always makes a big impact.
The frosted glass in this image helps to diffuse the light and makes the silhouettes of the witch, haunted house, and gnarled tree stand out even more. You can create any scene you can imagine. This is a highly effective way to add a lot of Halloween atmosphere with very little clutter.
DIY Paper Window Silhouettes
What You’ll Need:
- Black construction paper or cardstock
- A pencil
- Scissors
- Clear tape
- Spooky shape templates (like a bat, witch, or haunted house) that you can find and print online
Step-by-Step Instructions:
- Find and Print Your Shapes: Search online for “Halloween silhouette templates.” Find some you like and print them out.
- Trace onto Black Paper: Place your printed template on top of a piece of black paper. Carefully trace around the shape with a pencil.
- Cut Them Out: Using your scissors, carefully cut out the black shapes. For tricky inside parts (like the windows of a haunted house), you can gently fold the paper to make the first snip.
- Make a Scene: Cut out a few different shapes so you can create a whole scene on your window.
- Stick Them On: Using small, rolled-up pieces of clear tape, stick your silhouettes onto the inside of your window glass.
- Check Your Work: Arrange them however you like to tell a spooky story. Wait until it gets dark and turn on the lights in the room to see your amazing haunted window come to life!
24. Smoky Glass and Candlelight

This decor creates a deeply moody and sophisticated atmosphere using smoked glass and an abundance of candlelight. The dark, translucent vases have a mysterious quality, partially obscuring what’s inside. Grouping several of them together in different shapes and sizes creates a stunning focal point.
The warmth of the candlelight provides a beautiful contrast to the cool, dark glass. Some candles are placed inside the vases, while others stand alone, creating layers of light. One large vase filled with glowing fairy lights adds a touch of modern magic. It’s an elegant and dramatic look, perfect for a chic Halloween evening.
DIY Fairy Light Vase
What You’ll Need:
- A large, clean glass vase (a smoked or colored glass one is great, but clear works too)
- A string of battery-powered fairy lights (the kind with a small battery pack)
Step-by-Step Instructions:
- Prepare Your Lights: Make sure your fairy lights have fresh batteries and are working. Find the end of the light string that is opposite the battery pack.
- Feed the Lights In: Carefully start feeding the string of lights into your vase. Don’t just drop them in a clump. Guide them in so they start to fill the space.
- Arrange Them Loosely: As you put the lights in, try to keep them loose and airy. You want them to be spread out inside the vase, not packed down at the bottom.
- Hide the Battery Pack: Continue feeding the lights in until you get to the battery pack. Neatly tuck the battery pack behind the vase where it can’t be seen.
- Turn It On: Switch the lights on. The vase will instantly fill with a magical, twinkling glow that looks beautiful day or night.
25. Gothic Garden Vibe

Bring the outside in with a gothic garden theme. This style beautifully combines the life of houseplants with spooky, sculptural elements like skulls and crows. It creates a fascinating contrast between growth and decay. The lush green leaves of the plants spilling out of a concrete skull planter is a striking image.
The use of concrete planters and black metal trays gives the look an industrial, modern edge. This decor is perfect for plant lovers who want to give their green friends a seasonal, spooky twist. It’s a living decoration that feels both elegant and a little bit wild.
DIY Mini Pumpkin Plant Topper
What You’ll Need:
- A very small faux pumpkin or gourd
- A wooden skewer or a sturdy toothpick
- Wire cutters or strong scissors (ask an adult for help)
Step-by-Step Instructions:
- Prepare Your Stick: Take your wooden skewer. You need to make it shorter so it won’t stick out too much. Ask an adult to help you use wire cutters or strong scissors to snip the skewer so it’s about 3-4 inches long.
- Find the Bottom of the Pumpkin: Turn your mini pumpkin over. Find the spot in the very center of the bottom.
- Insert the Stick: Carefully push the pointy end of your shortened skewer into the bottom of the pumpkin. Push it in about an inch so it’s nice and secure.
- Add it to Your Plant: Now you have a little pumpkin on a stick! You can gently push the other end of the stick into the soil of one of your houseplants.
- Arrange It: The pumpkin will look like it’s resting on top of the soil among the leaves. It’s a super easy way to add a little Halloween touch to your favorite plants.
26. Rustic Fabric Phantoms

These charming fabric ghosts bring a touch of rustic, homespun style to your Halloween decor. Made from neutral-colored linen or burlap, they have a wonderful texture that feels warm and handmade. Their simple, rounded shapes and hand-drawn eyes give them a sweet and friendly personality.
The ghosts are tied with twine, which adds to their rustic appeal. Grouping them together on a natural linen table runner creates a gentle and inviting scene. This is a delightful DIY project that proves Halloween decorations don’t have to be slick or scary to be effective.
DIY No-Sew Fabric Ghosts
What You’ll Need:
- A few squares of light-colored fabric (like linen, muslin, or even an old bedsheet), about 10×10 inches
- Cotton balls or balled-up newspaper
- Twine or string
- A black marker
- Scissors
Step-by-Step Instructions:
- Make the Head: Take a big handful of cotton balls and roll them into a tight ball. This will be your ghost’s head. If you don’t have cotton balls, you can just crumple up a piece of newspaper into a ball.
- Drape the Fabric: Lay one of your fabric squares flat. Place your cotton ball head right in the center of the square.
- Form the Ghost: Pull the fabric up and around the cotton ball. Pinch the fabric tightly underneath the ball to make the ghost’s neck.
- Tie the Neck: Cut a piece of twine. Wrap it tightly around the ghost’s neck a few times and tie a secure knot or a little bow.
- Give It a Face: Use your black marker to draw two simple dots for eyes on the ghost’s head.
- Create a Family: Repeat the steps to make a few more ghosts. You can make them in different sizes by using bigger or smaller cotton balls for the heads.
27. Modern Alchemist’s Altar

This decor creates a modern, mystical vibe inspired by alchemy and ancient symbols. The look is built with clean lines, geometric shapes, and a sophisticated color palette of black, gold, and white. It feels less like traditional Halloween and more like the sacred space of a modern-day wizard.
The collection includes crystals, a golden pyramid, and framed art of a mystical diagram. Every object feels chosen with purpose. Slate coasters marked with golden symbols add a practical and stylish touch. This is a unique and intriguing theme for those who are drawn to magic, mystery, and modern design.
DIY Golden Sigil Coasters
What You’ll Need:
- A few plain black slate or stone coasters
- A gold permanent marker with a fine tip
- A simple geometric design or symbol printed out (search for “alchemy symbols” or “sigil symbols”)
- A pencil
Step-by-Step Instructions:
- Choose Your Design: Pick a simple symbol that you like. It should have clean, straight lines to make it easier to draw.
- Transfer the Design (A Simple Trick!): Take your pencil and scribble all over the back of the paper where your printed design is. Make sure you cover the whole area behind the lines.
- Position and Trace: Flip the paper over and place it on top of your coaster, with the scribbled side down. Hold it steady and use your pencil to trace firmly over the lines of the printed symbol. When you lift the paper, a faint pencil outline of your symbol will be left on the coaster!
- Trace with Gold Marker: Now, very carefully, use your gold marker to trace over the pencil lines on the coaster. Take your time to make the lines clean and solid.
- Let it Dry: Set the coaster aside and let the gold marker dry completely for at least an hour. Once it’s dry, your mystical coaster is ready to use!
28. Dark Fairy Tale Florals

This stunning arrangement is dramatic, romantic, and a little bit dangerous, like something from a dark fairy tale. It uses a rich palette of deep red and black flowers to create a look of gothic elegance. The flowers feel lush and alive, but the dark colors give them a mysterious, moody edge.
Black painted branches arch over the arrangements, adding a stark, sculptural element. A few silver disco balls hanging from the branches add an unexpected touch of glamour and light. This is a breathtaking way to decorate for an elegant Halloween dinner, showing the beautiful side of the spooky season.
DIY Spooky Black Branches
What You’ll Need:
- A few interesting bare branches from your yard
- A can of matte black spray paint
- Newspaper or a drop cloth
- A tall vase or bucket
Step-by-Step Instructions:
- Clean Your Branches: Find some cool-looking branches outside. Wipe them with a dry cloth to get rid of any dirt or spiderwebs.
- Set Up Your Painting Area: Go outside or to a well-ventilated space. Lay down your newspaper to protect the ground.
- Paint One Side: Lay the branches flat on the newspaper. Shake your can of black spray paint well. Hold the can about 8-10 inches away and spray one side of the branches in long, even strokes.
- Let Them Dry a Little: Let the paint dry for about 20-30 minutes, or until it’s not sticky to the touch.
- Paint the Other Side: Carefully flip the branches over and spray the other side, making sure to get all the little nooks and crannies.
- Let Them Dry Completely: To let them dry without smudging, you can stand the branches up in a tall vase or lean them against a wall. Let them dry for at least an hour. Once they are fully dry, you can add them to a vase to create a dramatic, spooky display.
29. Ghostly Gourd Runner

Make a bold and sculptural statement with a runner made entirely of white gourds. This look is incredibly simple but has a huge visual impact. By using a variety of gourds with different shapes and sizes—all painted a uniform white—you create a piece of living art for your table.
The organic, curving shapes of the gourds are beautiful and interesting. A few with their natural green stripes are left in the mix, adding a touch of color and authenticity. This centerpiece is a celebration of the harvest season’s unique shapes, transformed into something modern, chic, and just a little bit ghostly.
DIY Painted White Gourds
What You’ll Need:
- A collection of small gourds in various shapes
- White acrylic craft paint (or spray paint)
- A paintbrush
- Newspaper or a paper plate
Step-by-Step Instructions:
- Wash and Dry Your Gourds: Gently wash your gourds with soap and water to remove any dirt. Let them dry completely.
- Set Up Your Workspace: Lay down some newspaper. If you’re using craft paint, squeeze some onto a paper plate.
- Paint the First Coat: Use your paintbrush to apply a coat of white paint all over one of your gourds. A good way to do this is to paint the top half, let it dry, and then flip it over to paint the bottom half.
- Let It Dry: Let the first coat of paint dry completely. This might take about 30 minutes.
- Add the Second Coat: Paint a second coat on your gourds to make the white color look solid and bright.
- Dry and Display: Let the gourds dry completely for a few hours. Once they are ready, you can pile them up in a bowl or arrange them down the center of your table to create a beautiful, sculptural display.
30. Minimalist Typographic Art

Sometimes the simplest statement is the most stylish. This decor uses clean, classic typography to add a touch of Halloween fun. A single, playful word like “Eek” framed in a simple black frame is a chic and modern way to decorate. It’s understated, clever, and fits perfectly with a minimalist aesthetic.
This idea can be easily customized with your favorite spooky words like “Boo” or “Spooky.” It pairs well with other black and white decor elements, like letter blocks and a matching mug. This is an excellent way to add a bit of seasonal personality to your office or a small corner of your home.
DIY “Eek” Wall Art
What You’ll Need:
- A computer and a printer
- A piece of white cardstock or thick paper
- A simple black picture frame
Step-by-Step Instructions:
- Open a Word Document: On your computer, open a program like Microsoft Word or Google Docs.
- Choose Your Font: Find a font you like. A classic one with serifs (the little feet on the letters), like Times New Roman, looks great for this. Make the font size very large so it fills up most of the page.
- Type Your Word: Type the word “Eek” (or any other spooky word you like) in the center of the page.
- Print It Out: Place your white cardstock in your printer and print your document. Using thicker paper makes it look much nicer than regular printer paper.
- Frame It: Carefully place your printed art into your black picture frame.
- Hang It Up: That’s it! You have a piece of super stylish, minimalist Halloween art that you made in just a few minutes.
31. Natural Harvest Wheat Sheaves

Embrace the beauty of the harvest season with this simple and elegant decor. This style moves away from spooky themes and focuses on the natural textures of autumn. Dried grasses, wheat, and reeds are gathered into generous bouquets, celebrating the end of summer. The look is warm, organic, and full of rustic charm.
A simple wreath made from wheat adds a beautiful, handcrafted touch. Displayed in clear glass vases, the arrangements feel light and airy. This is a wonderful way to bring the feeling of a golden autumn field into your home, creating a calm and welcoming atmosphere that lasts the whole season.
DIY Simple Wheat Wreath
What You’ll Need:
- A bundle of dried wheat stalks
- A small grapevine wreath base or a sturdy wire loop
- Floral wire or natural twine
- Scissors
Step-by-Step Instructions:
- Make Mini Bunches: Take about 5-6 stalks of wheat and hold them together to create a small bunch.
- Attach the First Bunch: Lay your small bunch of wheat on top of the wreath base. Take a piece of floral wire or twine and wrap it tightly around the stems of the wheat and the wreath form to hold it in place. Don’t cut the wire yet.
- Add the Next Bunch: Make another small bunch of wheat. Lay it on the wreath so it slightly overlaps the stems of the first bunch. This will hide the wire.
- Wrap and Repeat: Use the same piece of wire to wrap the second bunch onto the wreath. Keep making small bunches and attaching them, always overlapping the last one, until you have covered the entire wreath form.
- Secure the End: When you get back to the beginning, tuck the stems of your last bunch under the heads of the very first bunch. Wrap the wire a few more times and then twist it at the back to secure it. Snip any extra wire.
- Hang Your Wreath: Tie a loop of twine to your finished wreath to hang it on a door or wall.
32. Digital Glitch Decor

Step into the future with this ultra-modern, digital-inspired Halloween theme. This look uses holographic materials and a “glitch” effect to create a vibe that is both spooky and futuristic. It’s an artistic and unexpected take on the season, perfect for anyone who loves technology and graphic design.
A clean white pumpkin becomes a piece of modern art with the word “GLITCH” displayed in a distorted, colorful font. Paired with an iridescent vase and glass, the decor plays with light and reflection. It’s a bold, creative choice that feels like a cool art installation.
DIY Glitch Art Pumpkin
What You’ll Need:
- A white pumpkin (real or fake)
- Red and cyan (or light blue) permanent markers with a chisel tip
- A black permanent marker with a fine tip
- A ruler and a pencil
Step-by-Step Instructions:
- Draw Your Word: Lightly use your pencil and ruler to draw a simple, block-letter word like “BOO” on your pumpkin.
- Create the First Glitch: Take your cyan marker. On the left side of each pencil letter, draw the outline of the letter again, but shift it just a tiny bit to the left. Fill in this new shape with the cyan color.
- Create the Second Glitch: Now, take your red marker. On the right side of each pencil letter, draw the outline again, but this time shift it a tiny bit to the right. Fill in this shape with red.
- Add the Black Outline: Use your fine-tipped black marker to trace over your original pencil lines. This will make the word stand out between the two colors.
- Add Glitchy Lines: To make it look even more like a computer glitch, use your ruler and the black marker to draw a few thin, broken horizontal lines through your word.
- Erase and Display: Gently erase any leftover pencil marks. You now have a cool, tech-inspired pumpkin for your modern display!
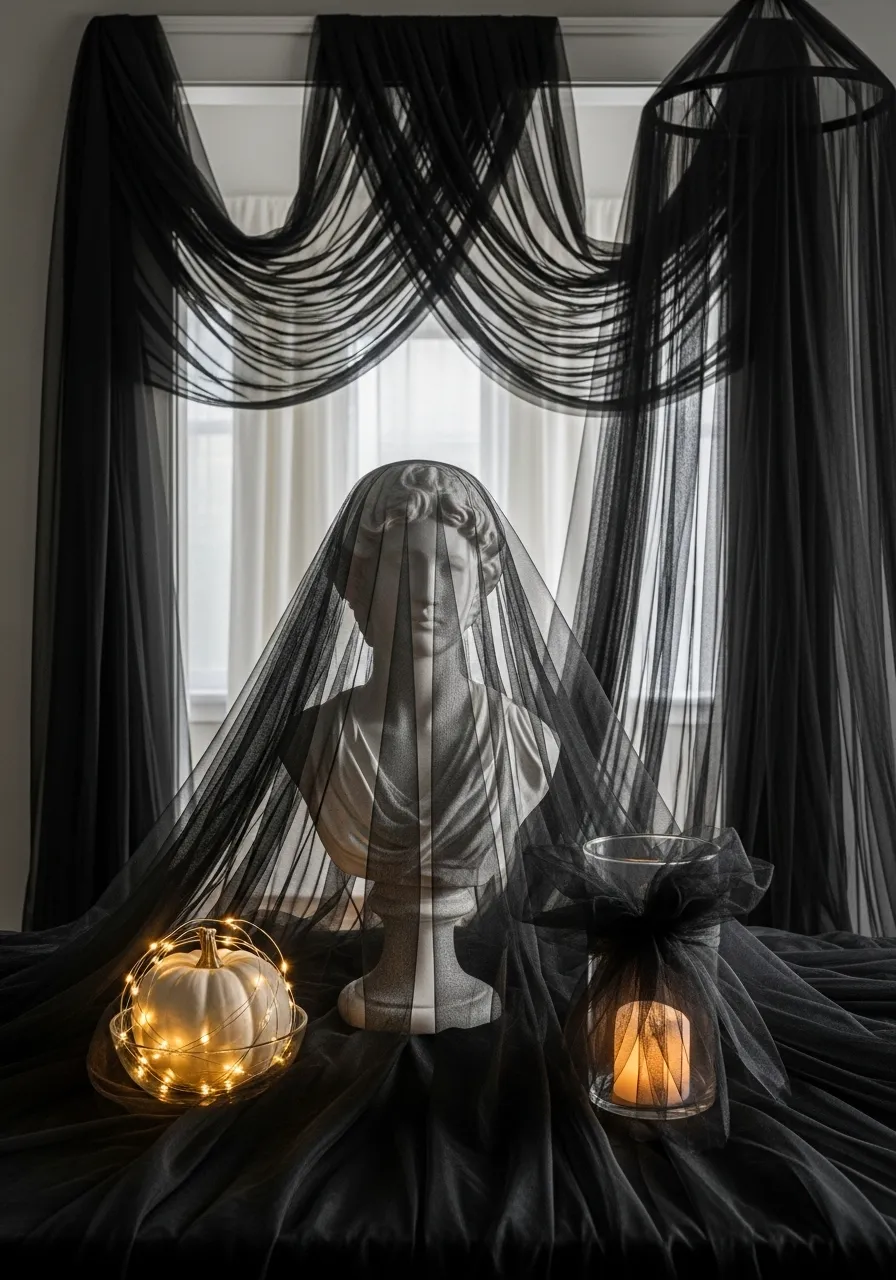
33. Veiled Phantom Bust

This decor is pure gothic drama. A classic statue bust, something you might see in a museum, is transformed into a ghostly figure with a simple piece of black tulle. The semi-transparent fabric drapes over the statue, obscuring its features and creating a mysterious, phantom-like presence.
The scene is set with more flowing black fabric and soft, glowing lights. A small white pumpkin wrapped in fairy lights and a candle veiled in tulle add to the ethereal atmosphere. It’s an incredibly elegant and artistic way to create a haunting mood, relying on shadow and suggestion rather than overt scares.
DIY Veiled Votive Holder
What You’ll Need:
- A simple glass candle holder or a clean glass jar
- A square of black tulle fabric (about 15×15 inches)
- A piece of black ribbon or twine
- Scissors
- A battery-operated candle
Step-by-Step Instructions:
- Place Your Candle: Put your battery-operated candle inside the glass jar or holder. Never use a real flame for this project!
- Center the Fabric: Place the glass jar in the very center of your square of black tulle.
- Gather the Tulle: Carefully pull the sides of the tulle up and around the glass jar, gathering it at the top.
- Tie It Up: Pinch the tulle together above the rim of the jar. Take your piece of black ribbon and tie it tightly around the gathered fabric to hold it in place.
- Make a Bow: You can tie the ribbon into a simple knot or a nice bow.
- Trim if Needed: Let the ends of the tulle stand up over the top. If they are too long, you can use your scissors to trim them a little. Now you have a spooky, veiled light for your table.
34. Charred Wood Accents

This decor idea introduces a powerful, elemental texture with charred wood. The technique, inspired by the Japanese method of shou sugi ban, creates a beautiful, cracked, and blackened surface that is visually stunning. It’s a sophisticated and minimalist look that feels both rustic and modern.
The contrast between the dark, rugged burned sections and the smooth, natural wood is the key to this style. Simple white pumpkins placed on top of the charred wood blocks create a striking visual. It’s a unique way to bring a dramatic, natural element into your home for a subtly spooky feel.
DIY Faux Charred Wood Block
What You’ll Need:
- A block of wood or a small cutting board
- Black acrylic craft paint
- A thick, stiff-bristled paintbrush
- A paper plate
- Paper towels
Step-by-Step Instructions:
- Get Your Paint Ready: Squeeze some black paint onto your paper plate.
- Load Your Brush: Dip the tip of your stiff paintbrush into the black paint. You don’t need a lot.
- Start Dabbing: Hold the wood block steady. Use your brush to dab the paint on in a thick, textured way. Don’t brush it smoothly. Poke and dab the brush up and down to create a bumpy texture that looks like burned wood.
- Create a Pattern: You can cover the whole block, or just parts of it to let some of the natural wood show through. Make the edges of your painted area uneven and organic.
- Let It Dry: Let the paint dry completely. The thick dabs might take a bit longer, so be patient.
- Display Your Work: Once it’s totally dry, your faux charred wood block is ready. It’s a safe and easy way to get this really cool, textured look for your decorations.
35. Natural History Curiosities

This decor is for the collector, the scientist, and the lover of all things vintage. It creates the feeling of a private natural history museum or a Victorian cabinet of curiosities. Beautiful and strange specimens—insects, skulls, and seed pods—are carefully displayed under elegant glass cloches.
The look is intellectual and sophisticated. Each object is treated like a precious artifact, complete with a small, typed label. Paired with vintage anatomical illustrations, the collection tells a story of exploration and the beautiful strangeness of the natural world. It’s spooky in a smart, historical way.
DIY Specimen Display Jar
What You’ll Need:
- A clean glass jar with a lid (a jam jar or mason jar works well)
- A realistic-looking plastic insect or spider
- A small dab of hot glue or a glue dot
- A small piece of tan or cream-colored paper
- A pen
- A handful of dried moss or a small rock
Step-by-Step Instructions:
- Create a Base: Put a little bit of the dried moss or a small rock in the bottom of your jar. This gives your insect something to stand on.
- Secure Your Bug: Take your plastic insect. Put a small dab of hot glue on its feet and carefully place it on top of the moss or rock inside the jar. Hold it for a few seconds until the glue sets.
- Make a Label: Cut a small rectangle from your piece of paper. With your best handwriting, write the “scientific name” of your bug. You can make one up, like “Shadow Scarab” or “Arachnus Nocturnus.”
- Age the Label: To make the label look old, you can carefully tear the edges instead of cutting them.
- Attach the Label: Use a tiny bit of tape or a glue dot to stick the label to the front of the jar.
- Close the Lid: Put the lid on your jar. You now have a very scientific-looking specimen to display on your shelf!
36. Monochromatic Harvest Table

This tablescape takes the traditional harvest theme and gives it a chic, ghostly makeover. By removing all color and focusing on shades of white, cream, and grey, the look becomes serene and sophisticated. The familiar shapes of pumpkins and corn husks feel new and artistic in this monochromatic palette.
A simple grey leaf wreath and tall black candles provide the only contrast. The table is layered with different textures—a smooth tablecloth, rough corn husks, and glossy pumpkins—which keeps the single-color theme from feeling flat. It’s a calm, elegant, and beautifully minimalist way to celebrate the season.
DIY Painted Leaf Wreath
What You’ll Need:
- A simple wreath base (grapevine or foam)
- A few handfuls of faux leaves (like magnolia or bay leaves)
- A hot glue gun
- Grey or white spray paint
Step-by-Step Instructions:
- Glue the Leaves: Heat up your hot glue gun. Take one leaf at a time and put a dab of glue on the back of the stem. Press the leaf firmly onto the wreath base.
- Create a Pattern: Arrange the leaves so they are all pointing in the same direction, overlapping them slightly as you go. Keep adding leaves until the entire front and sides of the wreath base are covered.
- Set Up for Painting: Take your finished leaf wreath outside or to a well-ventilated area and place it on some newspaper.
- Spray Paint Your Wreath: Shake the can of spray paint well. Hold it about 8-10 inches away from the wreath and spray in light, even coats. Make sure to spray from different angles to get the paint in between all the leaves.
- Let It Dry: Let the wreath dry completely for at least an hour.
- Hang It Up: Once dry, your beautiful, single-color wreath is ready to be the centerpiece of your monochromatic display.
Decorating for Halloween doesn’t mean you have to sacrifice your personal style. As these 36 ideas show, a minimalist approach can lead to a home that is both seasonally appropriate and incredibly chic. By focusing on color, texture, and simple forms, you can create a sophisticated and spooky atmosphere.
The beauty of these ideas lies in their simplicity. Many of them rely on easy, accessible DIY projects that anyone can try. Whether you’re painting pumpkins, arranging branches, or crafting paper silhouettes, you can add a personal, handmade touch to your decor.
So this year, step away from the clutter and embrace a more curated Halloween vibe. Choose a few ideas that speak to you, and have fun creating a space that is elegant, mysterious, and uniquely yours.
Key Takeaways
- Embrace a Limited Color Palette: Sticking to black, white, and metallics, or a moody jewel-toned scheme, creates an instantly sophisticated look.
- Focus on Texture and Form: Use natural elements like branches, dried herbs, and rustic fabrics to add interest without adding clutter.
- DIY is Your Friend: Simple, homemade decorations often have more charm and personality than store-bought items and are easier on the budget.
- Think Thematically: Creating a cohesive theme, like a mad scientist’s lab or a celestial celebration, can make your decor feel more intentional and impactful.
- Subtlety is Key: Sometimes a hint of spookiness—a veiled statue, a single skull, or a mysterious label—is more effective than an overtly scary display.