Refreshing your bedroom does not require a massive bank account. You can embrace the timeless charm of mid century modern design through simple creative projects. This style remains popular because it combines clean lines with warm organic textures.

Many people think high end decor is out of reach for average homeowners. This guide proves that you can achieve a designer look using basic supplies. You will find inspiration to transform your sleeping space into a stylish retreat.
Small changes often lead to the biggest visual impact in a room. Whether you want a bold accent wall or a custom headboard, these ideas are easy to follow. Prepare to see your bedroom in a completely new light.
1. Retro Starburst Accent Wall

Transform your sleeping space with a striking focal point. This starburst accent wall captures the atomic age spirit without costing a fortune. Mint green paint provides a soft calming backdrop that makes the room feel airy. Gold decals or stencils add a touch of glamour and movement to the wall behind your bed.
You can achieve this high end look on a tiny budget. These geometric shapes evoke a sense of 1950s optimism. This design choice pairs well with pastel furniture and neutral bedding. It serves as a great alternative to expensive wallpaper or professional murals. Your bedroom will instantly feel like a curated vintage retreat.
Material Required List
- Painters tape
- Gold metallic paint
- Base wall paint in mint green
- Cardboard for stencil
- Drop cloth
Equipment Required List
- Paint roller
- Small stencil brush
- Pencil
- Scissors
- Level
DIY Instructions Step by Step
- Clear the bedroom of furniture or move items to the center of the room.
- Lay down a drop cloth to protect your flooring from any stray paint drips.
- Clean the wall surface with a damp cloth to remove dust and let it dry.
- Apply two coats of mint green paint to the entire wall using a roller and let it dry for 24 hours.
- Draw a starburst shape onto your piece of cardboard and use scissors to cut it out.
- Use a level and a pencil to mark light dots where you want each star to go so they stay straight.
- Position your cardboard stencil over the first mark and secure it with a small piece of painters tape.
- Dip your stencil brush into the gold paint and dab off the excess so the brush is almost dry.
- Lightly tap the brush over the stencil openings until the color is solid.
- Pull the stencil away from the wall slowly to keep the edges of the star sharp.
- Move to the next mark and repeat the painting process until the entire wall is decorated.
2. Terracotta Arched Feature Wall
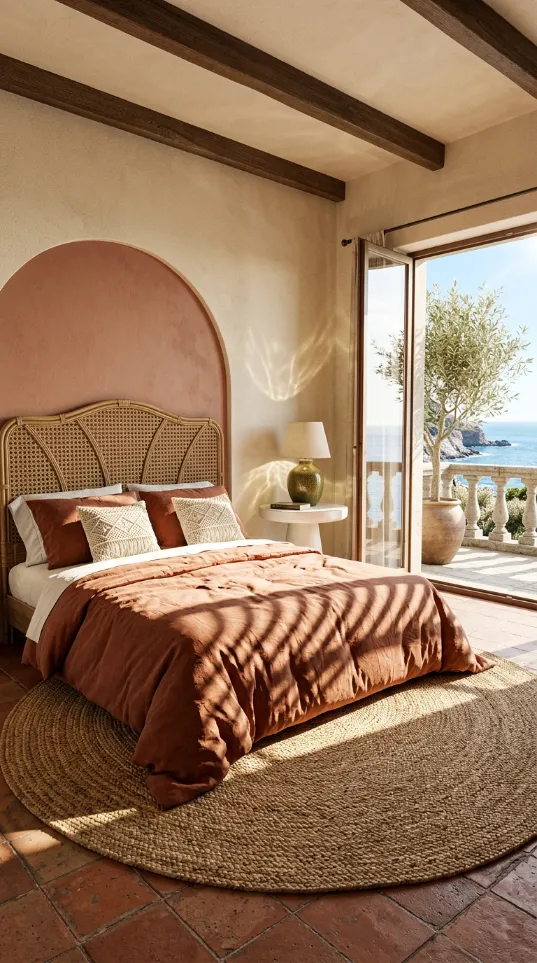
Warm clay tones bring a grounded feel to this retreat. A hand painted arch serves as a soft backdrop for the textured headboard. This design creates a focal point without the need for expensive structural changes. Natural light from the balcony emphasizes the matte finish of the wall.
Wooden beams and tiled floors add to the rustic charm of the space. Linen bedding in a similar hue ties the look together. It feels cozy and high end at once. Every guest will admire the sophisticated contrast of the curved wall against the woven wood. You can achieve this high style look with just a few basic tools. It is a smart way to define your bed as the focal point of the room. Enjoy a peaceful retreat that feels like a boutique hotel.
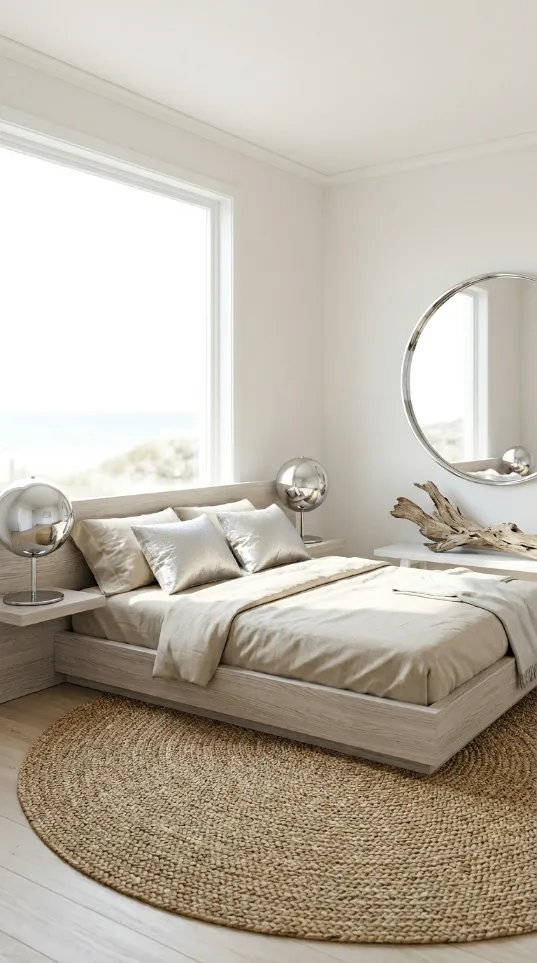
Material Required List
- Terracotta interior paint
- Rattan headboard
- Painters tape
- Drop cloth
- Sandpaper
Equipment Required List
- String and pencil
- Small paint roller
- Angled paintbrush
- Measuring tape
- Level
DIY Instructions Step by Step
- Clear the area behind your bed and place a drop cloth on the floor.
- Find the center point of your bed frame on the wall using a measuring tape.
- Tie one end of a string to a pencil and hold the other end at the center point.
- Swing the pencil in a half circle to draw your arch shape clearly.
- Apply painters tape along the outer edge of your pencil line to keep paint contained.
- Use an angled brush to carefully paint the border of the arch.
- Fill in the rest of the shape with a small roller for a smooth finish.
- Remove the tape while the paint is still slightly damp for a clean line.
- Allow the wall to dry completely for at least six hours.
- Position your rattan headboard against the new painted feature.
- Secure the headboard to the wall or bed frame based on its design.
3. Primary Color Geometric Mural

Bright colors and bold lines define this artistic space. Red blue and yellow shapes create a high contrast look against white walls. A large blue circle on the bedding echoes the geometric theme. This style takes inspiration from classic modern art movements.
The design feels intellectual yet playful. You do not need expensive art when your wall becomes the masterpiece. Minimalist furniture keeps the focus on the wall decor. You can transform a plain room into a gallery with just a few cans of paint. Your bedroom will look like a curated piece of functional art. It is an excellent choice for those who love mid century modern history.
Material Required List
- Black interior paint
- Red yellow and blue paint samples
- Low tack painters tape
- White primer
- Wall sealant
Equipment Required List
- Long metal ruler
- Pencil
- Thin detail brushes
- Small foam rollers
- Level
DIY Instructions Step by Step
- Wipe the wall down with a dry cloth to ensure a clean surface for the tape.
- Use a pencil and a level to sketch out a series of rectangles and squares.
- Draw thick lines between the shapes to mimic the classic grid.
- Apply painters tape to the outside edges of the areas you plan to paint black.
- Paint the grid lines first with a steady hand and a small brush.
- Allow the black paint to dry before taping off the interior of the colorful boxes.
- Fill specific squares with red blue or yellow paint using a foam roller.
- Keep several squares white to provide a rest for the eyes.
- Remove all tape carefully at a forty five degree angle while the paint is tacky.
- Touch up any bleeding edges with a small detail brush and white paint.
- Let the entire mural cure for two days before placing furniture near it.
4. Retro Sunset Rainbow Arch
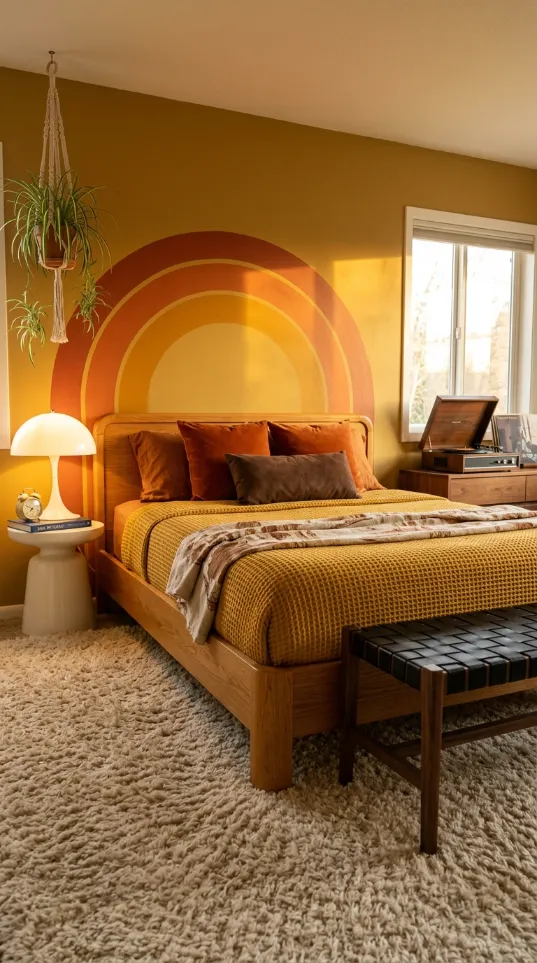
Warm shades of orange and mustard create a nostalgic atmosphere. A large rainbow arch sits directly behind the headboard for a bold effect. This color palette brings a sunny glow to the bedroom even on cloudy days. Waffle knit blankets and shag rugs add cozy textures that invite rest.
Layered colors provide a rich texture that store bought decals cannot match. Wooden furniture and cozy textiles complement these sunset shades beautifully. You will wake up feeling energized by the bright colors every morning. It is an affordable way to add a custom designer touch. This project is a fantastic way to use leftover paint samples for a big impact.
Material Required List
- Dark orange paint
- Mustard yellow paint
- Light gold paint
- Deep brown paint
- Masking tape
Equipment Required List
- Compass or string and pencil
- Multiple paint trays
- Variety of roller sizes
- Step ladder
- Measuring tape
DIY Instructions Step by Step
- Measure the width of your headboard to determine how wide the arch should be.
- Mark the center point on the wall at the height where the rainbow will peak.
- Use the string and pencil method to draw four concentric semi circles.
- Start with the largest outer circle and work your way inward to the smallest.
- Apply tape to the outside of the largest arch and paint it the darkest orange.
- Wait for each layer to dry before taping the next section to avoid smearing.
- Paint the second stripe with the mustard yellow for a bright contrast.
- Fill the third stripe with the light gold paint to create a glowing effect.
- Use the deep brown for the center of the arch to ground the design.
- Peel the tape back slowly to reveal the clean multi colored stripes.
- Arrange your bed directly under the center of the rainbow for a balanced look.
5. Dramatic Sputnik Light Fixture
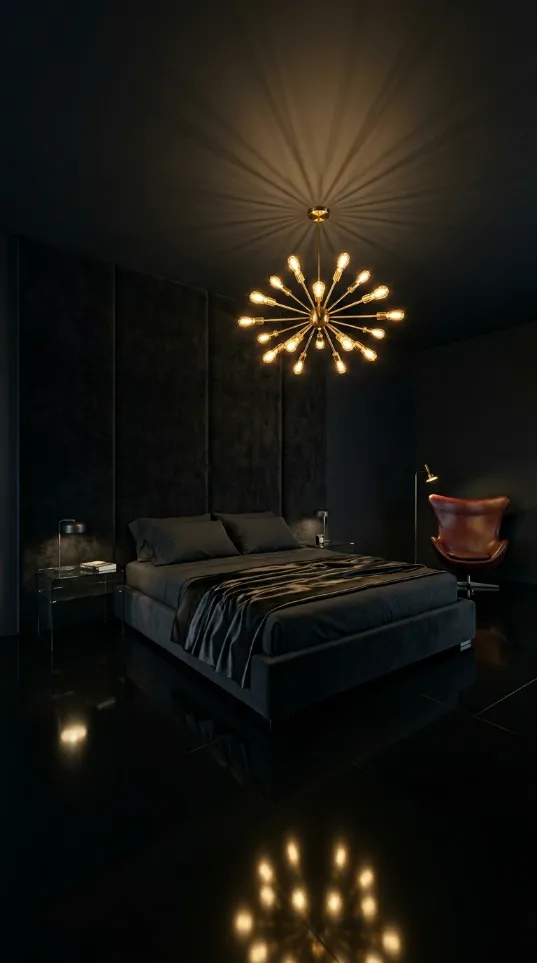
A golden sputnik chandelier hangs from a dark ceiling for maximum drama. The many light bulbs cast a wide and warm glow across the room. This iconic fixture instantly elevates the space into a luxury suite. Dark walls create a moody and intimate setting that highlights the brass finish.
Multiple arms reach out to cast a wide glow across the entire room. It serves as a stunning centerpiece that draws the eye upward. This setup proves that lighting is a vital part of any makeover. You can achieve this high end look by simply swapping out your old fixture. You will feel like a star in your own private lounge every night.
Material Required List
- Sputnik light fixture kit
- LED Edison bulbs
- Wire nuts
- Electrical tape
- Ceiling medallions
Equipment Required List
- Screwdriver
- Wire strippers
- Voltage tester
- Step ladder
- Pliers
DIY Instructions Step by Step
- Turn off the power at the main breaker box to ensure total safety.
- Use a voltage tester on the existing light switch to confirm no electricity is flowing.
- Remove the old light fixture by unscrewing the mounting bracket from the ceiling.
- Disconnect the old wires by twisting off the plastic wire nuts.
- Assemble the arms of your new sputnik chandelier according to the box instructions.
- Attach the new mounting bracket to the electrical box in the ceiling.
- Match the black wire from the light to the black wire in the ceiling.
- Connect the white wires together and the copper ground wire to the green screw.
- Secure the connections with wire nuts and wrap them in electrical tape.
- Tuck the wires into the ceiling box and screw the canopy into place.
- Screw in the Edison bulbs and turn the power back on to test your work.
6. Vertical Oak Slat Panel
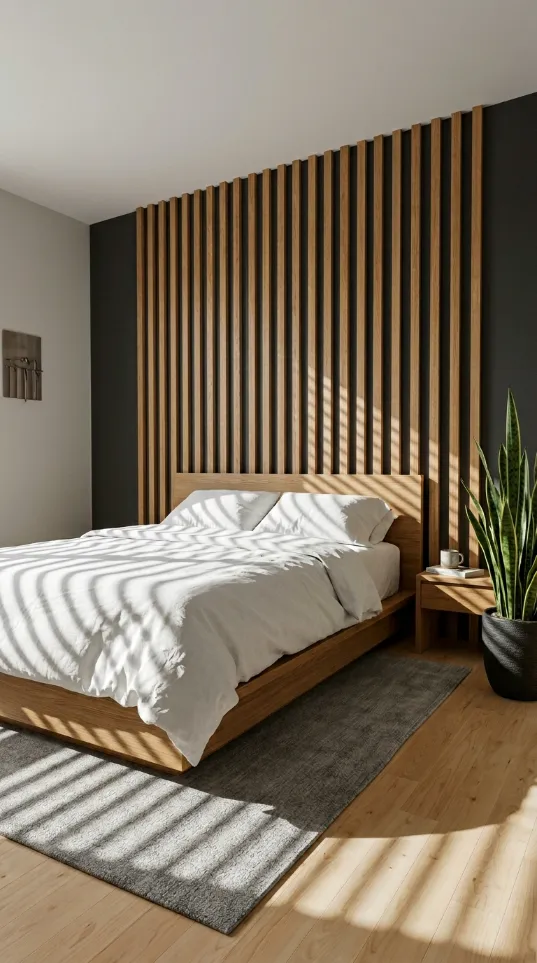
Warm oak slats add texture and height to the bedroom. This feature wall contrasts sharply against a dark grey background. It brings a natural element that feels both modern and timeless. Clean white bedding keeps the space looking crisp and light.
Every board adds a professional look that mimics expensive custom carpentry. Natural wood adds a calming organic element to the sleeping area. This design choice is great for making low ceilings feel higher. You can easily build this yourself with basic wood strips from a hardware store. Your bedroom will feel modern and incredibly high end after this weekend project.
Material Required List
- Pine or oak wood laths
- Wood stain
- Construction adhesive
- Finishing nails
- Dark grey base paint
Equipment Required List
- Miter saw or hand saw
- Level
- Hammer
- Spacers
- Paint roller
DIY Instructions Step by Step
- Paint the entire accent wall in a dark matte grey or charcoal color.
- Measure the height of your wall from the baseboard to the ceiling.
- Cut your wood slats to the exact height using a miter saw for clean ends.
- Sand the edges of each board to remove any rough splinters or burrs.
- Apply a coat of wood stain to the front and sides of every slat.
- Let the boards dry completely in a well ventilated area for several hours.
- Find the center of the wall and draw a vertical line using a level.
- Apply construction adhesive to the back of the first wood slat.
- Press the slat onto the wall and secure it with two small finishing nails.
- Use a spacer board to ensure the gap between slats remains consistent.
- Repeat this process across the wall until the desired width is achieved.
7. Solar Yellow Sunburst Feature
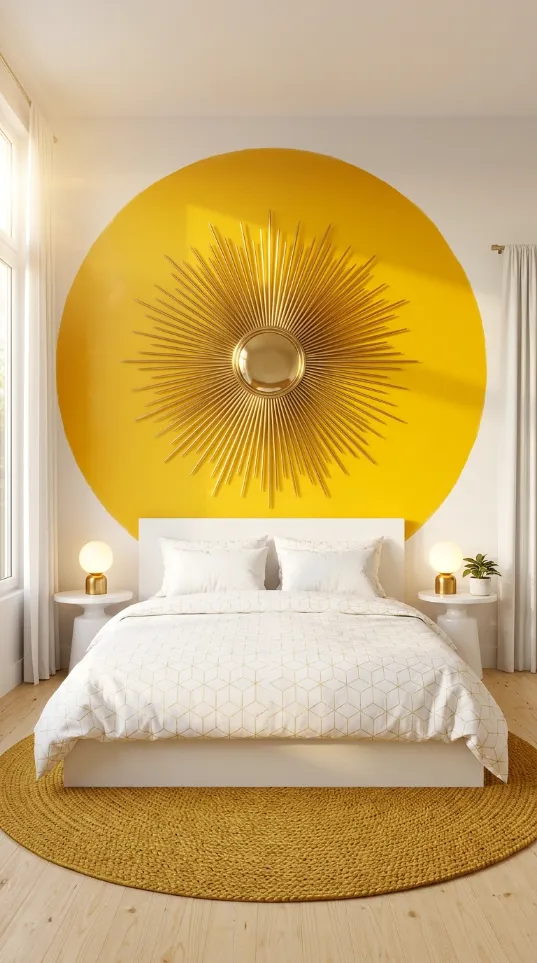
A bright yellow circle creates a cheery focal point behind the bed. A gold sunburst mirror sits at the center to add shine and depth. This combination brings a sense of energy and warmth to the room. White geometric bedding keeps the look balanced and modern.
Round rugs on the floor echo the circular shape on the wall. Small globe lamps on either side provide soft evening lighting. This project is incredibly simple but offers a massive visual impact. It works best on a clean white wall with neutral furniture. You will enjoy the way the light bounces off the gold metallic rays every morning.
Material Required List
- Bright yellow interior paint
- Gold sunburst mirror
- Wall anchor
- Painters tape
- Sandpaper
Equipment Required List
- Pencil and string
- Small paint roller
- Hammer or drill
- Level
- Microfiber cloth
DIY Instructions Step by Step
- Determine the height where you want the center of the mirror to sit.
- Place a small pencil mark at that center point on the wall.
- Tie a string to your pencil and hold the other end at the center mark.
- Draw a large circle by keeping the string tight as you move the pencil.
- Sand the area inside the circle lightly to help the paint stick better.
- Carefully paint the edge of the circle with a small brush for a clean curve.
- Fill the interior of the circle with yellow paint using a foam roller.
- Wait for the paint to dry and apply a second coat if the color looks thin.
- Locate the center mark again and drill a hole for your wall anchor.
- Insert the anchor and screw in the mounting hook until it is firm.
- Hang the sunburst mirror and use a level to ensure it is sitting straight.
8. Industrial Blueprint Wall Art
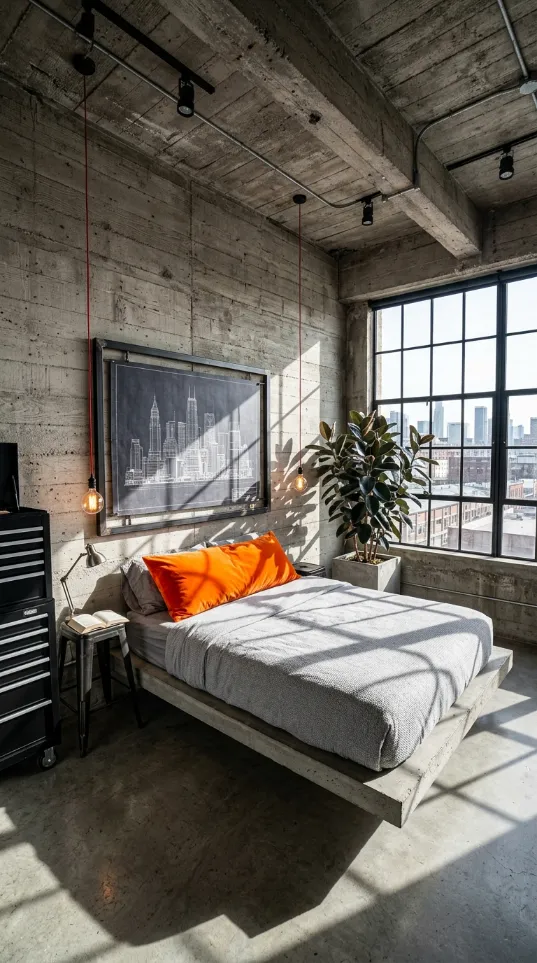
A large architectural blueprint serves as a striking piece of wall decor. This industrial look works well against raw concrete walls. The dark print with white lines adds a professional and intellectual vibe. An orange pillow provides a sharp pop of color in the neutral space.
Hanging Edison bulbs provide focused light for reading in bed. This style is excellent for loft apartments or modern homes. You can create a high end gallery feel with a simple frame and a large print. Every visitor will be impressed by the structure and history this piece adds to the room. It fills a large wall space without the need for multiple small frames.
Material Required List
- Large blueprint print
- Thin wood trim for framing
- Black spray paint
- Mounting tape or clips
- Plexiglass sheet
Equipment Required List
- Measuring tape
- Saw
- Level
- Staple gun
- Scissors
DIY Instructions Step by Step
- Measure your blueprint to determine the size of the frame you need to build.
- Cut four pieces of wood trim to create a simple rectangular border.
- Spray paint the wood trim pieces matte black and let them dry fully.
- Lay the blueprint flat on a clean table and wipe away any dust.
- Place the plexiglass over the print to protect the paper from moisture.
- Align the black wood trim around the edges of the plexiglass and print.
- Use a staple gun on the back side to join the corners of the wood frame.
- Attach mounting clips to the top two corners of the frame for hanging.
- Use a level to mark two spots on the wall where the art will hang.
- Drive nails into the wall at your marks and hang the oversized frame.
- Step back to ensure the art is centered over the bed for a balanced look.
9. Vinyl Record Gallery Wall
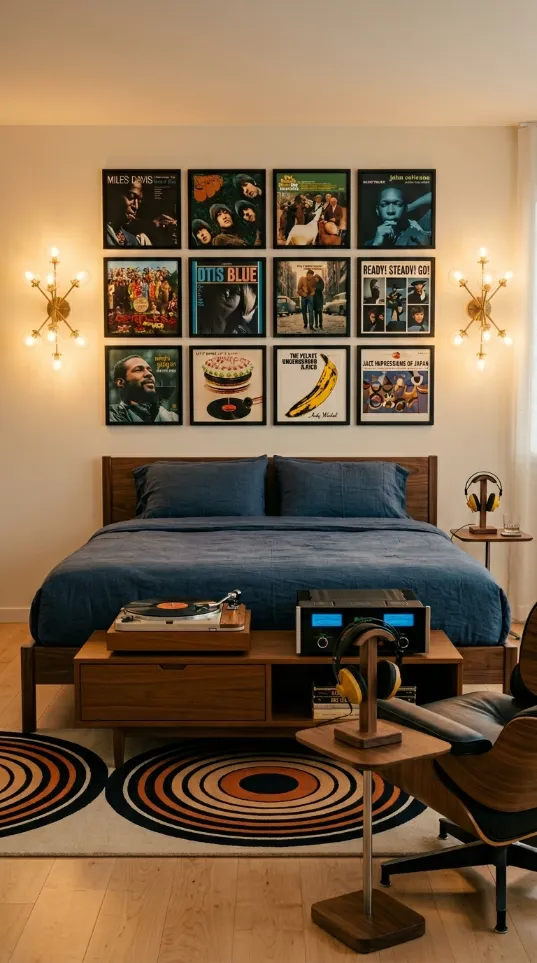
Your favorite music becomes the main decor in this soulful bedroom. Twelve record covers are arranged in a neat grid above the headboard. This display adds color and a personal touch to the space. Brass wall sconces highlight the artwork and provide warm lighting.
The symmetrical arrangement provides a sense of order and professional design. A record player on a mid century credenza completes the musical theme. It is a fantastic way to show off a collection that usually stays hidden. You can swap the covers whenever you want to change the room mood. Enjoy the timeless beauty of your favorite classic artists every day.
Material Required List
- Twelve vinyl record albums
- Record wall mounts
- Two brass wall sconces
- Leveling laser
- Command strips
Equipment Required List
- Measuring tape
- Pencil
- Level
- Screwdriver
- Step ladder
DIY Instructions Step by Step
- Pick twelve album covers that have colors or themes that match your bedroom.
- Use a measuring tape to find the center of the wall above the headboard.
- Mark a grid of twelve points using a pencil and a level for straightness.
- Space the marks about two inches apart in both directions for a clean gap.
- Attach the record mounts to the wall at each marked point using command strips.
- Slide your chosen vinyl albums into the mounts carefully to avoid scratches.
- Measure the distance from the outer edge of the grid to place your sconces.
- Mark the spots for the sconces so they are level with the top row of records.
- Install the wall sconces according to the electrical instructions in the box.
- Turn on the lights to see how they highlight the textures of the album art.
- Adjust any tilted records until the entire grid looks straight and sharp.
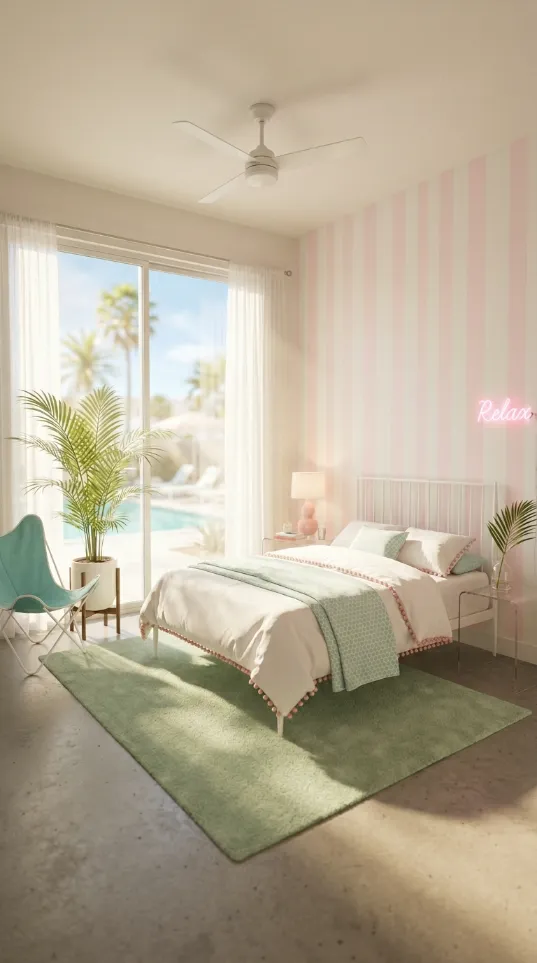
10. Pastel Pink Striped Retreat
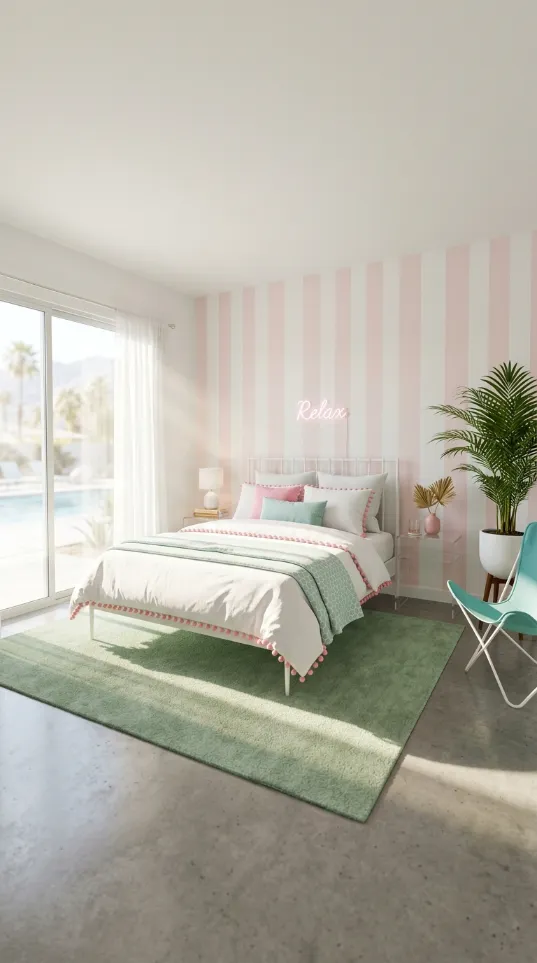
Soft pink and white stripes create a light and airy atmosphere. This vertical pattern makes the walls seem much taller than they are. A neon sign above the bed adds a modern and playful touch. Mint green and white bedding keeps the space feeling cool and fresh.
Stripes make the walls appear taller and the space feel much larger. This look is great for someone who wants a cheerful and feminine space. It pairs well with white furniture and clear acrylic accents. You can achieve this look with just a few rolls of tape and a single can of paint. Your room will feel fresh and full of energy every day.
Material Required List
- Soft pink interior paint
- White base paint
- High quality painters tape
- Small paint tray
- Neon wall sign
Equipment Required List
- Laser level
- Pencil
- Small foam roller
- Paintbrush
- Measuring tape
DIY Instructions Step by Step
- Paint the entire wall with two coats of white base paint and let it dry.
- Decide on the width of your stripes and mark them across the top of the wall.
- Use a laser level to project a straight vertical line from each mark to the floor.
- Apply painters tape along the outside of every other stripe section.
- Press the edges of the tape down firmly with your finger to prevent leaks.
- Use a small brush to paint the edges of the tape with white paint to seal it.
- Fill in the taped off sections with the soft pink paint using a foam roller.
- Remove the tape immediately after you finish the final coat of pink paint.
- Allow the stripes to dry for twenty four hours before touching the wall.
- Center your neon sign on the striped wall and mark the mounting holes.
- Hang the sign and plug it in to complete your colorful mid century look.
11. Vibrant Pink Stripe Accent
Brighten your room with a playful candy stripe design. This look uses soft pink and crisp white to create a cheerful mood. Vertical lines help a small space feel much taller. The neon sign adds a modern touch to the vintage style.
Every stripe contributes to a sense of height and energy. This project costs very little but changes the whole room. It pairs well with light wood and green accents. Your bedroom will feel fresh and full of personality. You can use standard interior paint for a professional finish. Enjoy a space that feels like a private designer lounge.
Material Required List
- Soft pink interior paint
- White base paint
- Painters tape
- Neon wall sign
- Drop cloth
Equipment Required List
- Laser level
- Pencil
- Small foam roller
- Paint tray
- Step ladder
DIY Instructions Step by Step
- Apply two coats of white paint to the wall and let it dry for one day.
- Use a measuring tape to mark your stripe width along the top of the wall.
- Set up your laser level to show a straight vertical line from each mark.
- Place painters tape along the outside of every other section to create the pattern.
- Press the tape edges down with your finger to stop any paint from leaking.
- Use a small roller to fill the taped sections with soft pink paint.
- Pull the tape off while the paint is still wet to get a sharp edge.
- Let the stripes dry fully for twelve hours.
- Choose a center spot on the wall for your neon sign.
- Mark the mounting holes for the sign using a pencil.
- Screw the sign into the wall and plug it in to see the glow.
12. Atomic Age Rocket Room
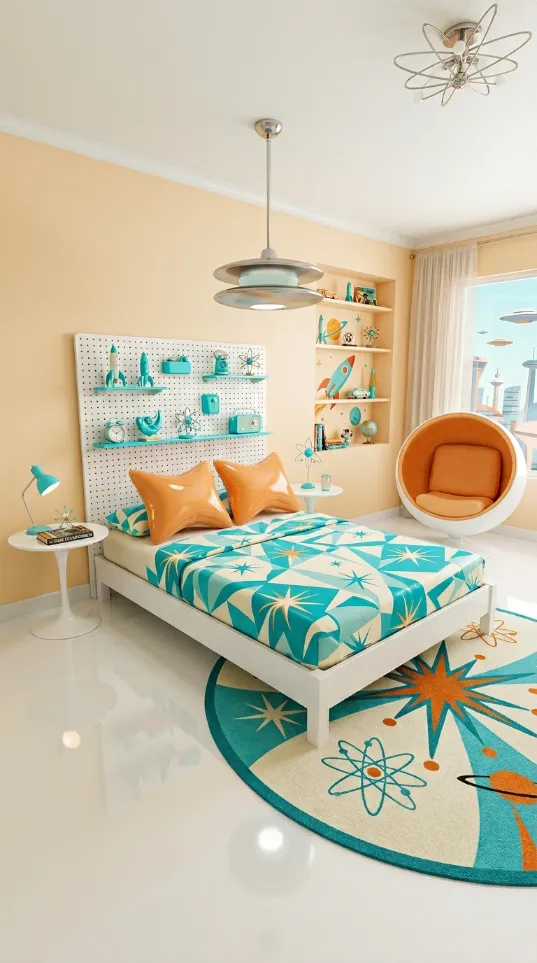
Teal and orange accents bring a playful space age feel to this room. A white pegboard holds a variety of retro toys and rockets. This modular storage keeps the room tidy and fun. Atomic starburst patterns on the bedding and rug tie the theme together.
Orange egg chairs provide a comfortable spot for reading. This design is excellent for a creative person who loves 1950s science fiction. You can customize the shelves to fit your unique collection correctly. Your room will look like a set from a classic cosmic film. It turns your storage into a piece of art.
Material Required List
- Large white pegboard
- Teal spray paint
- Wooden pegboard shelves
- Wall mounting spacers
- Screws
Equipment Required List
- Power drill
- Level
- Screwdriver
- Measuring tape
- Pencil
DIY Instructions Step by Step
- Spray paint your wooden shelves in a bright teal color and let them dry.
- Measure the width of your bed to center the pegboard on the wall.
- Hold the pegboard against the wall and use a level to keep it straight.
- Mark the four corner holes of the board onto the wall with a pencil.
- Drill holes into the wall and insert plastic anchors.
- Place spacers behind the pegboard so there is room for the hooks.
- Screw the pegboard into the anchors until it is very secure.
- Push your shelf brackets into the holes in any pattern you like.
- Slide the teal wooden boards onto the brackets to create shelves.
- Arrange your clocks and decorative items on the new display.
- Step back to ensure the layout looks balanced and adjust as needed.
13. Regency Gold Stripe Wall
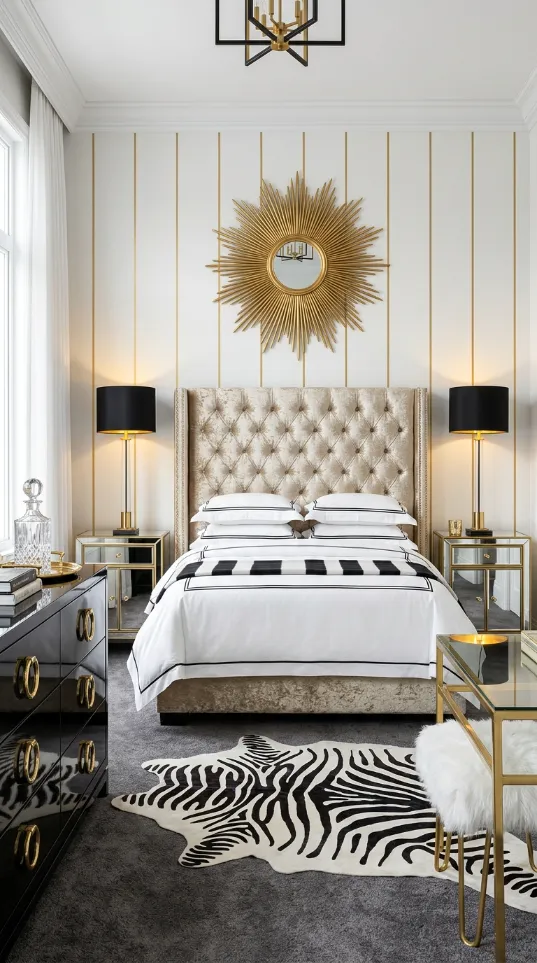
Thin gold lines add a sense of luxury to this white bedroom. A large sunburst mirror is the central focus above the tufted headboard. Zebra print and black furniture create a high contrast and glamorous look. This style feels like a high end boutique hotel room.
Golden lamps and glass tables add sparkle and light to the space. It is a smart way to add a custom look without a full renovation. You will feel like royalty in this elegant and polished retreat. The gold lines catch the light and make the room feel sophisticated. Every detail contributes to a sense of high end living on a budget.
Material Required List
- Gold metallic paint
- White interior paint
- Thin painters tape
- Wall mirror
- Drop cloth
Equipment Required List
- Measuring tape
- Level
- Small artist brush
- Pencil
- Step ladder
DIY Instructions Step by Step
- Paint the wall in a solid white color and allow it to dry.
- Measure the wall width and mark spots every six inches.
- Use a level to draw light pencil lines from the ceiling to the floor.
- Apply thin painters tape on both sides of each pencil line.
- Ensure the tape is stuck down well to keep the lines very straight.
- Paint the narrow gap between the tape using gold metallic paint.
- Apply a second coat of gold if the color looks thin.
- Peel the tape away slowly to reveal the crisp gold stripes.
- Find the center of the wall to hang your sunburst mirror.
- Install a heavy duty hook into the wall for the mirror.
- Hang the mirror and clean it with a soft cloth for extra shine.
14. Deep Navy Blueprint Mural

A detailed architectural drawing spans the entire back wall. The white lines on a navy background create a clean and structured look. Grid patterned bedding and blue nightstands complete the technical aesthetic. This design is great for someone who loves architecture and modern planning.
Dark colors provide a cozy and grounded feeling for sleep. Black lamps provide contrast and functional lighting for reading. You can turn any wall into a conversation piece with this mural idea. Your room will feel like the office of a famous architect. It creates a calm and focused atmosphere in your sleeping space.
Material Required List
- Navy blue matte paint
- White paint pen or chalk
- Projector
- Painters tape
- Drop cloth
Equipment Required List
- Paint roller
- Ladder
- Level
- Pencil
- Microfiber cloth
DIY Instructions Step by Step
- Move furniture away and cover the floor with a drop cloth.
- Paint the entire wall in a deep navy blue and let it dry completely.
- Set up a digital projector to display a blueprint image on the wall.
- Adjust the projector until the image is straight and the size is correct.
- Use a pencil to lightly trace the lines of the house plan onto the wall.
- Use a white paint pen to go over your pencil lines for a permanent look.
- Keep a damp cloth nearby to wipe away any mistakes immediately.
- Add technical notes and measurements in small text for a realistic feel.
- Let the white ink dry for at least four hours.
- Clean off any remaining pencil marks with a soft eraser.
- Move your bed back against the wall to frame the mural.
15. Scandinavian Blue Split Wall
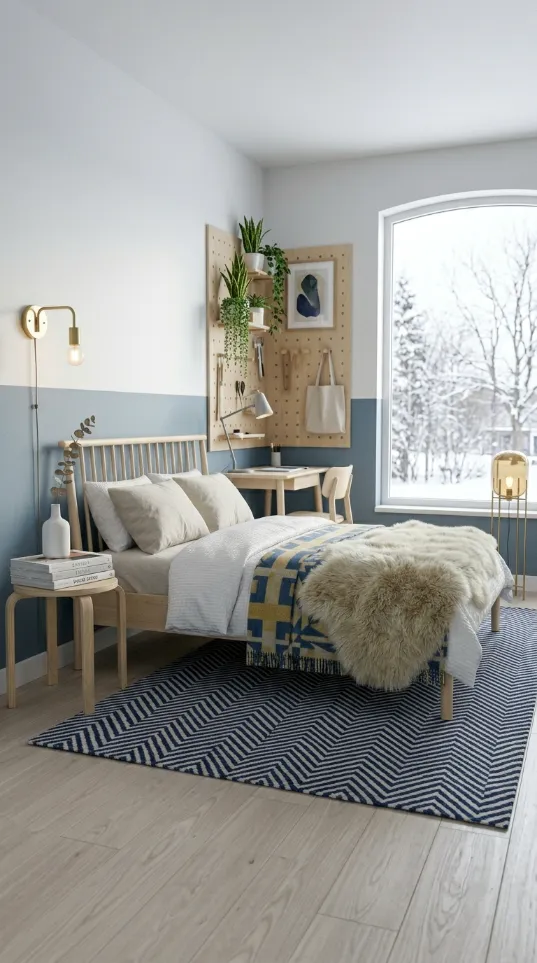
A horizontal split between blue and white creates a balanced look. This design separates the sleeping area from the work space effectively. Natural wood furniture and a sheepskin rug add warmth to the room. A large pegboard above the desk provides ample storage for tools and plants.
This setup is excellent for a small studio or a home office bedroom. It feels organized and calm despite having multiple functions. You can easily paint this two tone effect in just one afternoon. Every corner of the room serves a purpose without feeling cluttered. Enjoy a modern and streamlined environment for both work and rest.
Material Required List
- Medium blue paint
- White paint
- Large pegboard
- Painters tape
- Wood shelves
Equipment Required List
- Laser level
- Paint roller
- Measuring tape
- Power drill
- Pencil
DIY Instructions Step by Step
- Decide on the height for your color split and mark it with a pencil.
- Use a laser level to run a straight line across the entire wall.
- Apply painters tape along the top of your marked line.
- Paint the bottom half of the wall in your chosen blue color.
- Remove the tape while the blue paint is still damp.
- Let the bottom half dry and then tape over the blue edge.
- Paint the top half of the wall in white for a clean contrast.
- Remove the tape to reveal a horizontal line.
- Center the pegboard over your desk area and mark the wall.
- Drill and mount the pegboard using the proper wall anchors.
- Add hooks and shelves to the pegboard to organize your supplies.
16. Macrame and Rattan Boho Feature
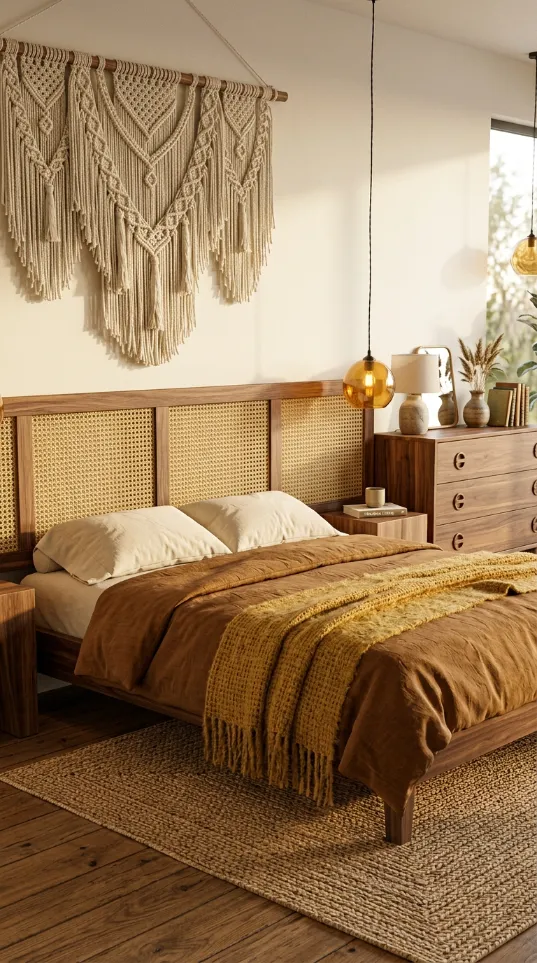
Soft textures and warm wood tones make this room a cozy sanctuary. A large macrame wall hanging adds a bohemian touch above the bed. The rattan headboard and wooden dresser bring natural warmth to the space. Mustard yellow blankets and brown linens create an earthy and inviting palette.
Amber glass pendant lights provide a soft and warm glow in the evening. This look is great for someone who loves a relaxed and organic style. It turns your bedroom into a peaceful escape from the busy world. Woven rugs add layers of texture to the room. You can find these items at craft fairs or vintage shops for a budget friendly makeover.
Material Required List
- Large macrame wall hanging
- Rattan headboard
- Wooden curtain rod
- Wall hooks
- Jute rug
Equipment Required List
- Hammer
- Measuring tape
- Level
- Pencil
- Step ladder
DIY Instructions Step by Step
- Choose a large wall hanging that is wider than your bed.
- Measure the width of the hanging to find the right spot for hooks.
- Mark two points on the wall where the wooden rod will sit.
- Use a hammer to tap the wall hooks into your marked spots.
- Slide the macrame onto the wooden rod and lift it onto the hooks.
- Check that the hanging is level and adjust the hooks if needed.
- Position your rattan headboard against the wall directly below the macrame.
- Secure the headboard to the bed frame to prevent it from moving.
- Lay a large jute rug under the entire bed to ground the furniture.
- Place amber glass lamps on your nightstands for warm evening light.
- Fluff your pillows to complete the cozy bohemian look.
17. Tropical Forest Plant Wall
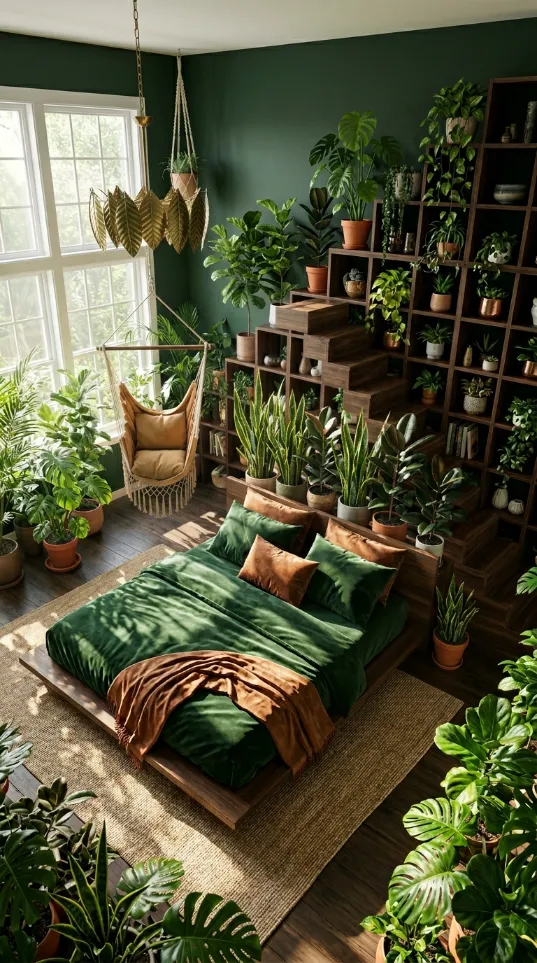
Dark green walls act as a backdrop for a massive collection of plants. Built in wooden shelves hold a variety of species that fill the room with life. A hanging hammock chair provides a unique spot to relax among the leaves. This design brings the beauty of nature directly into your sleeping space.
Every leaf improves air quality and creates a refreshing environment. The combination of green velvet and brown wood feels incredibly rich and lush. You can create your own indoor jungle with just a few sturdy shelves. Natural light from the window makes the greenery look vibrant. Your room will feel like a private garden retreat all year round.
Material Required List
- Deep green interior paint
- Wood shelving units
- Variety of potted plants
- Wall anchors
- Screws
Equipment Required List
- Power drill
- Level
- Measuring tape
- Stud finder
- Pencil
DIY Instructions Step by Step
- Paint the wall in a dark forest green and let it dry for one day.
- Use a stud finder to locate the solid parts of the wall for the shelves.
- Mark the height for each shelf level with a pencil and a level.
- Drill holes into the marks and insert strong wall anchors.
- Screw the shelving brackets into the wall until they are firm.
- Place the wooden boards onto the brackets to form the shelves.
- Group your plants by how much light they need for the best growth.
- Put the largest plants on the bottom shelves for stability.
- Place trailing plants on the top shelves so they can grow downward.
- Add a comfortable chair near the window to enjoy the view.
- Water the plants regularly to keep your wall looking healthy and green.
18. Brutalist Concrete and Lantern Look

Raw concrete walls and a large paper lantern create a minimalist vibe. A simple wood platform bed sits on a grey rug for a grounded feel. This style focuses on honest materials and simple geometric shapes. Breeze block nightstands add a low cost industrial touch to the room.
The soft light from the oversized globe balances the rough textures of the wall. It feels quiet and peaceful in its simplicity. This is a top choice for anyone who loves an edgy and modern look. You will enjoy the calm atmosphere of this structured space. Every element serves a purpose without extra decoration.
Material Required List
- Concrete effect wall plaster
- Large paper globe lantern
- Six concrete breeze blocks
- Light bulb cord kit
- Grey rug
Equipment Required List
- Trowel
- Step ladder
- Level
- Cleaning cloth
- Measuring tape
DIY Instructions Step by Step
- Apply concrete effect plaster to the wall using a trowel for texture.
- Let the wall dry completely and wipe away any loose dust.
- Stack three breeze blocks on each side of the bed to make nightstands.
- Ensure the blocks are level and stable so they do not tip over.
- Assemble the paper globe lantern according to the instructions.
- Hook the light cord onto a ceiling mount above the center of the bed.
- Adjust the height of the lantern so it hangs low but out of the way.
- Screw in a soft white bulb to create a warm and inviting light.
- Place a simple grey rug under the bed to add a little softness.
- Use a small clip light on the breeze blocks for reading at night.
- Keep the bedding simple and neutral to match the raw materials.
19. Misty Forest Ombre Wall
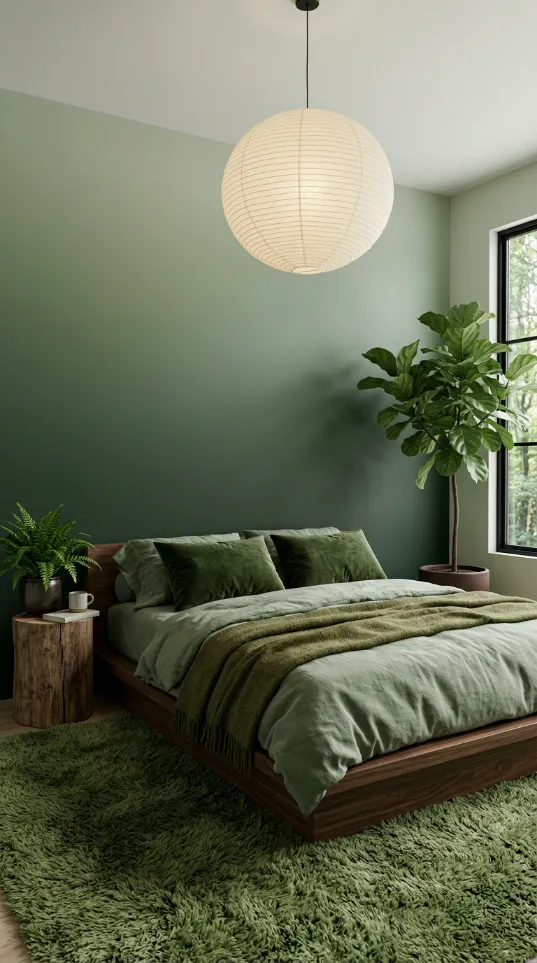
A beautiful gradient of green colors creates a calm and misty atmosphere. The color shifts from deep forest at the floor to light sage at the ceiling. This effect makes the room feel deep and incredibly serene. A shag rug and velvet pillows in matching shades add layers of comfort.
Natural wood furniture and a large fiddle leaf fig tree bring organic warmth. This project is a great way to use multiple shades of a single color. It turns your bedroom wall into a soft and living piece of art. You will love the calm mood this wall creates for sleeping. Every transition between shades looks smooth and professional.
Material Required List
- Dark green paint
- Medium green paint
- Light green paint
- Large blending brushes
- Drop cloth
Equipment Required List
- Three paint rollers
- Three paint trays
- Measuring tape
- Pencil
- Spray bottle with water
DIY Instructions Step by Step
- Divide the wall into three equal horizontal sections with a pencil.
- Paint the bottom section with the darkest green using a roller.
- Paint the top section with the lightest green and leave the middle blank.
- Fill the middle section with the medium green paint.
- Spray the borders between the colors lightly with water to keep them wet.
- Use a dry blending brush to move the paint in a zig zag motion between colors.
- Keep brushing until the lines between the shades disappear.
- Work quickly before the paint dries to get a smooth transition.
- Step back often to check that the gradient looks even across the wall.
- Let the wall dry for twenty four hours before moving furniture.
- Add a tall green plant to the corner to match the natural theme.
20. Sage and Slat Modern Workspace
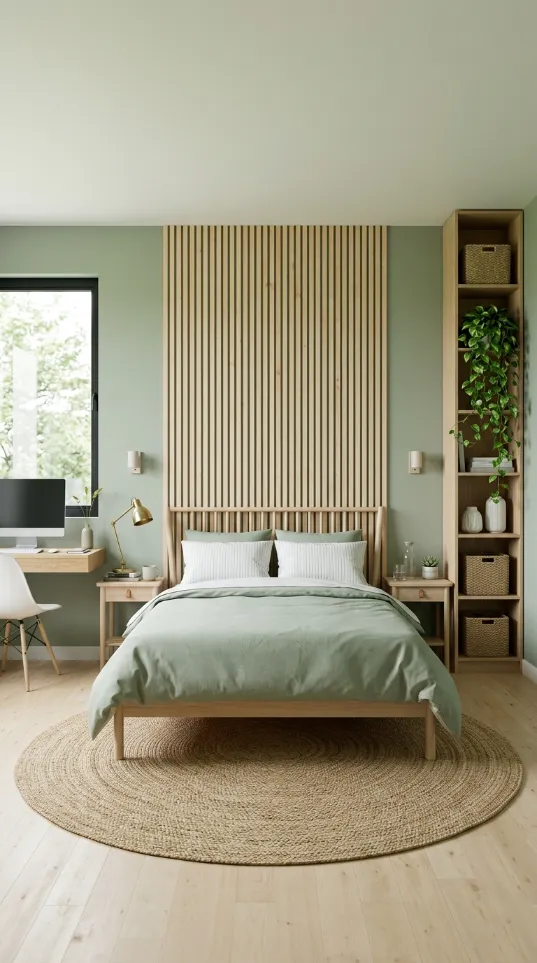
Soft sage green walls pair with a central wood slat feature. This design incorporates a built in desk and shelving for a streamlined look. Natural wood tones and white accents keep the room feeling light and open. A round jute rug grounds the bed and adds a touch of texture.
Vertical slats help a small space feel much taller. This setup is great for a productive yet peaceful home environment. It proves that a bedroom can be functional without losing its cozy charm. You can easily build the slat wall using simple vertical pine strips. Your workspace will feel organized and quiet throughout the day.
Material Required List
- Sage green interior paint
- Pine wood slats
- Wood glue
- Finishing nails
- Clear wood sealer
Equipment Required List
- Miter saw
- Hammer
- Level
- Measuring tape
- Paint roller
DIY Instructions Step by Step
- Paint the entire wall in a soft sage green and let it dry.
- Measure the width of your bed to decide how wide the slat panel should be.
- Cut your wood slats to the height of the wall or just above the bed.
- Sand the slats until they are smooth and apply a clear sealer.
- Find the center of the wall and mark a vertical line.
- Apply a bead of wood glue to the back of the first slat.
- Press the slat onto the center mark and secure it with two nails.
- Use a small scrap piece of wood as a spacer for the next slat.
- Continue adding slats until the panel is the correct width.
- Check every few boards with a level to make sure they are straight.
- Wipe away any extra glue with a damp cloth for a clean finish.
21. Mondrian Bauhaus Geometric Mural
This room features a full wall mural inspired by classic modern art. Bold black lines create a grid of rectangles filled with primary colors. This look is perfect for anyone who wants a strong architectural feel in their bedroom. A simple black metal bed frame keeps the focus on the vibrant wall.
Glass nightstands and chrome lamps add a modern and sleek touch. This project takes time but results in a stunning custom piece of art. You can achieve this look with just tape and a few paint samples. Every rectangle provides a sense of balance and energy. Your bedroom will look like a curated gallery in a modern city.
Material Required List
- Black interior paint
- Red yellow and blue paint samples
- Low tack painters tape
- White primer
- Wall sealant
Equipment Required List
- Long metal ruler
- Pencil
- Thin detail brushes
- Small foam rollers
- Level
DIY Instructions Step by Step
- Wipe the wall down with a dry cloth to ensure a clean surface.
- Use a pencil and a level to sketch out your rectangles and squares.
- Draw thick lines between the shapes to mimic the classic grid.
- Apply painters tape to the outside edges of the areas for black paint.
- Paint the grid lines first with a steady hand and a small brush.
- Allow the black paint to dry before taping off the colorful boxes.
- Fill specific squares with red blue or yellow paint using a foam roller.
- Keep several squares white to provide a rest for the eyes.
- Remove all tape carefully while the paint is still slightly tacky.
- Touch up any bleeding edges with a small detail brush.
- Let the entire mural cure for two days before placing furniture.
22. Hidden TV Art Cabinet and Charging Hub
A wooden cabinet hides your television behind a beautiful piece of art. This clever design keeps the bedroom looking tidy and focused on rest. Warm wood tones in the bed and nightstands create a cozy atmosphere. LED lighting behind the headboard adds a soft glow for a luxury feel.
Built in charging stations on the nightstand keep your tech ready for morning. This project is a great way to blend modern technology with a vintage look. You will enjoy a clutter free space that transitions easily to movie night. It serves as a smart storage solution for a clean bedroom environment. Every detail contributes to a sophisticated and organized retreat.
Material Required List
- Wood cabinet frame
- Large canvas art print
- LED light strip
- Wood stain
- Nightstand with built in charger
Equipment Required List
- Power drill
- Screwdriver
- Level
- Stud finder
- Measuring tape
DIY Instructions Step by Step
- Measure your television to ensure the cabinet frame is the right size.
- Build or buy a shallow wood cabinet that can mount to the wall.
- Attach two cabinet doors to the front using hidden hinges.
- Glue a large mid century art print onto the front of the doors.
- Mount the cabinet to the wall studs using a drill and heavy screws.
- Install an LED light strip behind your headboard for ambient light.
- Hide your television inside the cabinet and run the cords through the back.
- Use a nightstand that has a wireless charging spot on the top surface.
- Stain all the wood pieces in a warm walnut tone for a cohesive look.
- Lay a patterned shag rug under the bed for comfort and style.
- Add a gold lamp to the nightstand to highlight the wood grain.
23. Botanical Sketch Gallery Grid
Twenty five black and white sketches create a massive and elegant display. Simple wooden frames keep the focus on the delicate botanical lines. This grid layout makes the high ceiling feel filled and intentional. A clean white bed and nightstands keep the room looking light and airy.
Track lighting highlights the artwork like a professional gallery in your home. This is an affordable way to decorate a large wall with a big impact. You can use your own sketches or find prints online for a custom look. Every frame adds a layer of sophistication and calm. Your bedroom will feel like a quiet garden retreat in the city.
Material Required List
- Twenty five botanical prints
- Identical wood frames
- Command hanging strips
- Track lighting kit
- White bedding
Equipment Required List
- Laser level
- Measuring tape
- Pencil
- Microfiber cloth
- Step ladder
DIY Instructions Step by Step
- Print twenty five different botanical sketches onto high quality paper.
- Place each print into an identical thin wood frame.
- Find the center of the wall and mark a level line across the middle.
- Measure and mark twenty five spots in a five by five grid pattern.
- Leave exactly two inches of space between every frame for a clean look.
- Use command strips to hang the frames without damaging the wall.
- Install a track lighting bar on the ceiling and point the bulbs at the art.
- Position a low white platform bed in the center of the grid.
- Use white nightstands that blend into the wall color.
- Add a large leafy plant in the corner to bring the art to life.
- Wipe the glass of each frame to ensure there are no fingerprints.
24. Moody Teal and Wood Spindle Retreat

Deep teal walls create a cozy and intimate mood for sleeping. A light wood spindle bed adds a classic mid century touch to the space. White wall sconces provide focused lighting while keeping nightstands clear. A simple striped blanket and grey rug add subtle texture and pattern.
This color choice is excellent for a room with plenty of natural light. It feels sophisticated and grounded without being too dark or heavy. You can easily transform your room with a bold color and minimalist furniture. Every piece of wood pops against the rich blue background. Enjoy a restful night in a room that feels both modern and timeless.
Material Required List
- Deep teal paint
- Wood spindle bed frame
- Two white wall sconces
- Striped navy blanket
- Round wood nightstand
Equipment Required List
- Paint roller
- Power drill
- Level
- Screwdriver
- Painters tape
DIY Instructions Step by Step
- Paint all your bedroom walls a deep matte teal and let them dry.
- Assemble your wood spindle bed frame and place it in the center.
- Mark the spots for your wall sconces about three feet above the bed.
- Drill holes and install the mounting brackets for the lights.
- Connect the white sconces and secure them to the wall.
- Place a small round wooden nightstand next to the bed.
- Add a large plant in a black pot to contrast with the teal wall.
- Lay a textured grey rug under the bed for warmth.
- Use a navy and white striped blanket to add a simple pattern.
- Put a small glass vase with dried flowers on the nightstand.
- Keep the window curtains light and sheer to balance the dark walls.
25. Retro 70s Striped Wood Accent

Warm oranges and browns create a nostalgic 1970s vibe in this bedroom. Horizontal stripes across the wall add a sense of movement and warmth. Dark wood furniture and a deep shag rug complete the retro aesthetic. An arched floor lamp provides soft light for the orange armchair.
This look is great for someone who loves vintage styles and cozy textures. It feels like a warm hug when you enter the room at night. You can create these stripes easily with a level and a few paint colors. Every stripe adds to the sunny and grounded atmosphere. Your bedroom will look like a custom designer space from a classic era.
Material Required List
- Orange yellow and brown paint
- Dark wood bed frame
- Brown shag rug
- Gold arched floor lamp
- Orange corduroy chair
Equipment Required List
- Laser level
- Painters tape
- Pencil
- Paint rollers
- Measuring tape
DIY Instructions Step by Step
- Paint the wall a creamy white base color and let it dry.
- Use a laser level to tape off four horizontal stripes across the wall.
- Paint the top stripe a golden yellow and the next one a bright orange.
- Fill the bottom two stripes with rust red and deep brown colors.
- Peel the tape off to reveal your retro horizontal pattern.
- Position a dark walnut bed frame against the striped wall.
- Place a brown shag rug on the floor for maximum retro texture.
- Set up a gold arched floor lamp in the corner of the room.
- Put an orange corduroy chair under the lamp for a reading spot.
- Add an old fashioned radio on the nightstand to complete the theme.
- Use yellow bedding to tie all the warm colors together.
26. Op Art Monochrome Geometric Mural
A massive black and white mural creates a striking optical illusion. The geometric patterns add energy and a sense of motion to the room. Bright yellow accents in the bedding and chair pop against the monochromatic backdrop. Chrome furniture and white shag rugs add modern glamour.
This look is bold and definitely serves as a conversation starter. It works best in a space with simple lines and high contrast. You can achieve this artistic look with a large stencil or a projector. Every angle provides a new perspective on the intricate design. Your bedroom will feel like a futuristic gallery in the heart of the city.
Material Required List
- Black paint
- White paint
- Chrome metal bed frame
- Yellow velvet chair
- White faux fur rug
Equipment Required List
- Digital projector
- Pencil
- Fine detail brushes
- Small roller
- Step ladder
DIY Instructions Step by Step
- Paint the wall solid white and let it dry for one day.
- Use a projector to display a geometric op art pattern on the wall.
- Trace the lines of the pattern carefully with a pencil.
- Use a small brush to fill in the black sections of the design.
- Take your time to ensure the edges are sharp and clean.
- Assemble a chrome bed frame and place it in front of the mural.
- Put a bright yellow velvet chair in the corner of the room.
- Lay a white faux fur rug on the floor for a luxury feel.
- Use a starburst floor lamp to add more light and energy.
- Dress the bed with yellow silk sheets and black pillows.
- Keep the rest of the walls a simple grey to let the mural stand out.
27. Industrial Loft Daybed Workspace
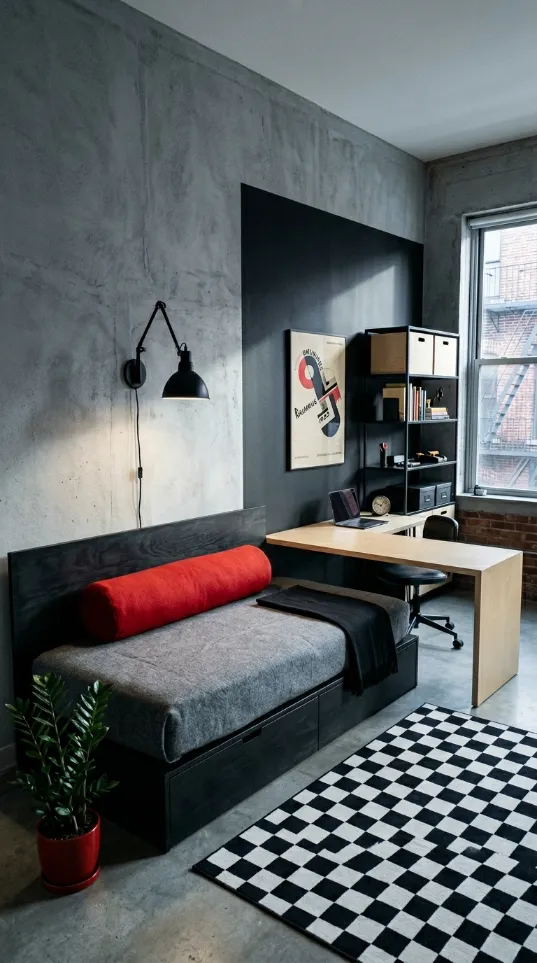
A charcoal grey split wall creates a moody and focused workspace. The daybed with a red bolster pillow provides a cozy spot for reading. Concrete walls and a checkered rug add to the urban industrial aesthetic. A wooden desk and shelving unit keep the space organized and functional.
This layout is excellent for a small room that serves many purposes. It feels modern and creative with a smart use of limited floor space. You can easily paint the dark section to define your desk area. Every corner of this nook invites productivity and relaxation at once. Enjoy a smart and stylish environment that fits your city lifestyle.
Material Required List
- Charcoal grey paint
- Black daybed frame
- Red bolster pillow
- Checkered area rug
- Natural wood desk
Equipment Required List
- Laser level
- Painters tape
- Paint roller and tray
- Measuring tape
- Screwdriver
DIY Instructions Step by Step
- Paint a large charcoal grey rectangle on a section of your concrete wall.
- Use a level to make sure the edges of the rectangle are straight.
- Place a natural wood desk inside the grey painted area.
- Install black metal shelves above the desk for book storage.
- Position a black daybed next to the desk to act as a couch and bed.
- Add a bright red bolster pillow for a pop of bold color.
- Lay a black and white checkered rug on the floor.
- Use a black swing arm lamp for focused task lighting on the desk.
- Place a large green plant in a red pot on the floor.
- Hang a modern art poster within the charcoal grey section.
- Use black storage bins to keep your desk supplies organized.
28. Cream Textured Boucle Panel Wall
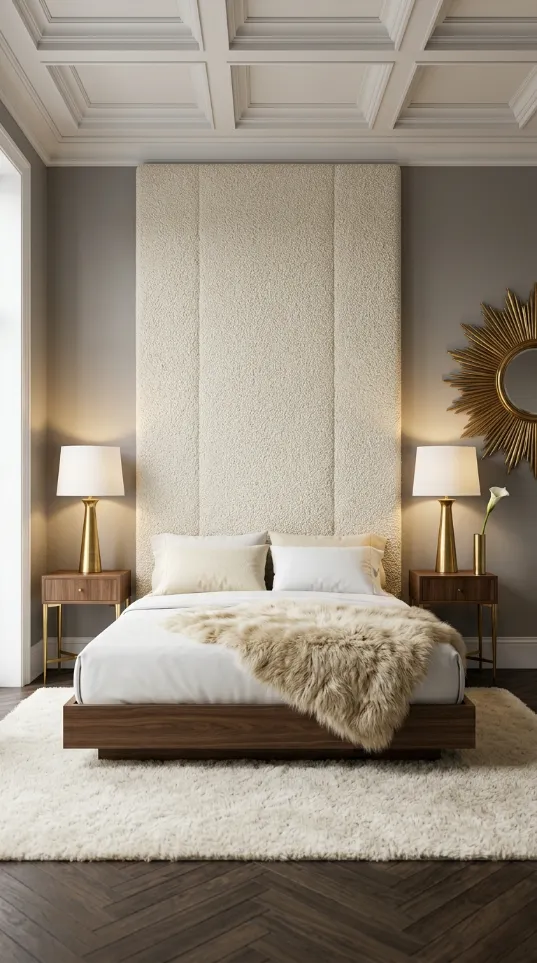
A floor to ceiling textured panel adds soft elegance to this bedroom. This cream colored feature brings warmth and a sense of luxury. Gold lamps and a sunburst mirror add sparkle and mid century charm. A white sheepskin rug and plush bedding invite you to relax and rest.
This style is great for someone who loves neutral tones and rich textures. It makes the room feel like a high end boutique spa retreat. You can build this panel using foam or wood covered in soft fabric. Every layer of cream and white adds to the calming atmosphere. Your bedroom will look polished and expensive after this makeover.
Material Required List
- Cream boucle fabric
- Foam padding
- Large plywood boards
- Gold table lamps
- Sheepskin rug
Equipment Required List
- Staple gun
- Construction adhesive
- Measuring tape
- Level
- Power drill
DIY Instructions Step by Step
- Measure the wall height and cut three plywood boards to fit.
- Glue foam padding to the front of each board and let it dry.
- Wrap the boucle fabric over the foam and staple it to the back.
- Apply heavy adhesive to the wall and press the panels into place.
- Use a few screws at the top and bottom to secure them while the glue dries.
- Place a low walnut bed frame in front of the textured panels.
- Mount a gold sunburst mirror on the wall next to the panels.
- Set up white nightstands with gold base lamps for a luxury look.
- Lay a white sheepskin rug at the foot of the bed.
- Use cream and beige bedding to keep the monochromatic theme.
- Install track lighting on the ceiling to highlight the fabric texture.
29. Rugged Slate Stone Feature Wall

A massive stone wall creates a dramatic and natural backdrop for sleep. The warm wood platform bed and dresser bring organic warmth to the room. Large windows provide a stunning view of the rocky landscape outside. Amber globe lights set into the stone cast a soft and intimate glow.
This design is excellent for a home in a rugged or natural setting. It feels strong and grounded while remaining incredibly cozy and warm. You can mimic this look with high quality stone veneer for a lower cost. Every stone adds texture and history to your private sanctuary. Enjoy a room that feels connected to the beauty of the earth.
Material Required List
- Stone veneer panels
- Stone adhesive
- Low wood platform bed
- Amber globe wall lights
- Grey textured rug
Equipment Required List
- Trowel
- Level
- Measuring tape
- Tile saw
- Cleaning sponge
DIY Instructions Step by Step
- Clean the wall and ensure it is strong enough to hold the stone weight.
- Apply adhesive to the back of each stone veneer panel with a trowel.
- Start from the floor and work your way up to the ceiling in rows.
- Use a level to make sure the stones are sitting straight as you go.
- Cut stones to fit around outlets or at the corners of the wall.
- Install two amber globe lights into the stone for a warm glow.
- Wipe away any extra glue with a damp sponge before it dries.
- Assemble a low profile wood platform bed in the center of the room.
- Place a matching wood dresser against the adjacent wall.
- Lay a thick grey rug on the floor to match the stone colors.
- Use mustard yellow pillows to add a touch of warmth to the bedding.
30. Golden Starburst Decal Feature
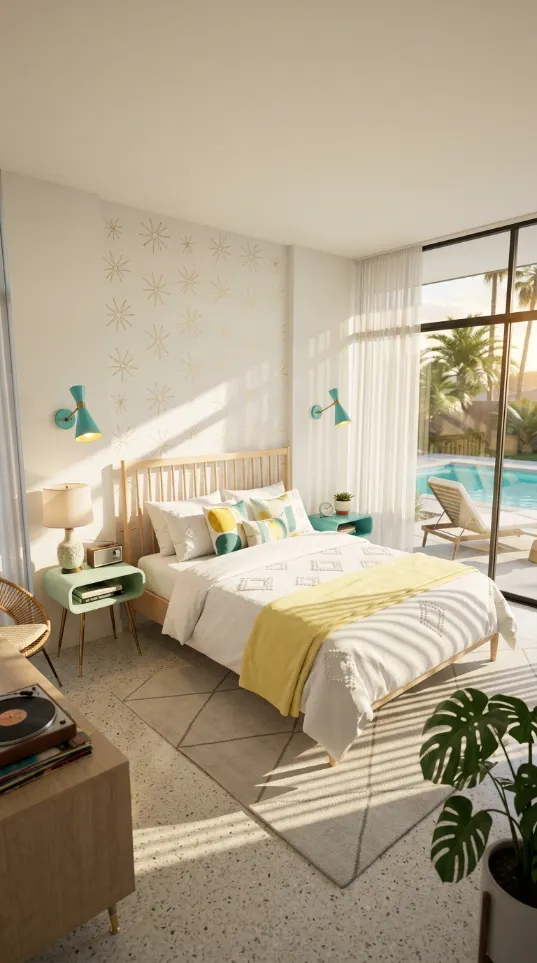
Light wood and teal accents create a bright and airy feel in this room. A subtle starburst pattern on the wall adds a touch of vintage charm. Mid century nightstands and wall sconces complete the retro look. The large window and sliding door let in plenty of natural sunlight.
This room feels like a tropical vacation spot even in the heart of the city. It is a great way to use soft colors to create a spacious atmosphere. You can achieve the starburst pattern with a simple stencil or gold decals. Every morning will feel cheerful and full of light in this beautiful space. Enjoy a fresh and modern retreat that invites relaxation.
Material Required List
- Off white paint
- Gold starburst decals
- Teal wall sconces
- Light wood bed frame
- Teal nightstands
Equipment Required List
- Paint roller
- Level
- Measuring tape
- Pencil
- Cleaning cloth
DIY Instructions Step by Step
- Paint the walls a soft off white or eggshell color and let dry.
- Find the center of the wall and mark points in a random pattern.
- Apply gold starburst decals over your pencil marks.
- Use a level to make sure the larger starbursts are straight.
- Position your light wood bed frame under the starburst pattern.
- Mount two teal wall sconces about five feet from the floor.
- Place teal nightstands on either side of the bed for a pop of color.
- Lay a beige rug with a diamond pattern on the floor.
- Use yellow and teal pillows to match the room accents.
- Add a record player on a low wooden stand for a retro vibe.
- Put a tall plant near the window to highlight the natural light.
31. Midnight Navy and Tufted Velvet Suite
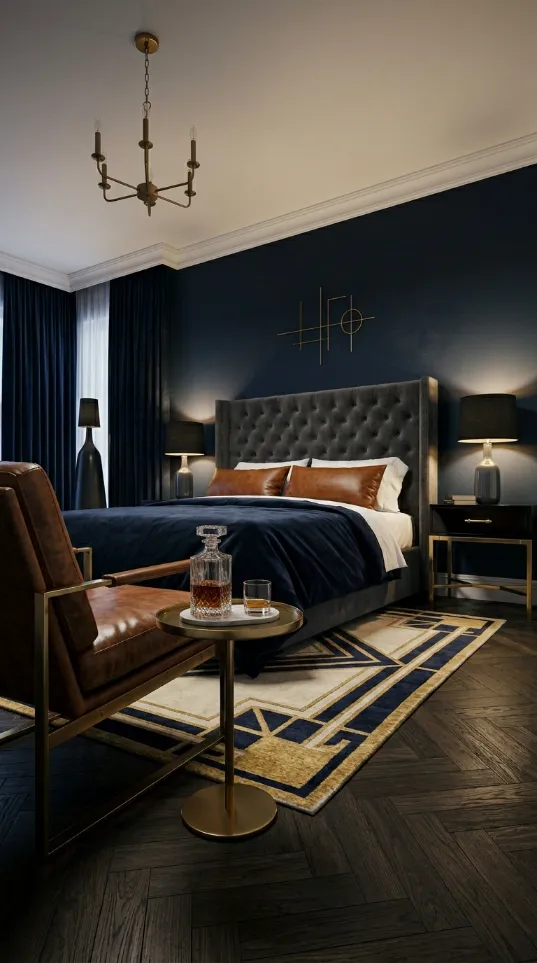
Deep navy walls and a tufted grey headboard create a sense of mystery. An art deco rug with gold and blue patterns grounds the entire room. Black nightstands with gold hardware add a touch of modern luxury. This design is focused on rich colors and high contrast textures.
A gold chandelier with multiple bulbs provides a warm and sophisticated light. This look is perfect for someone who wants a moody and private sanctuary. You can achieve this style by pairing dark paint with metallic accents. Every detail from the leather pillows to the glass decanter feels polished. Your bedroom will look like a set from a classic Hollywood movie.
Material Required List
- Navy blue paint
- Tufted velvet bed frame
- Art deco patterned rug
- Gold chandelier
- Black nightstands
Equipment Required List
- Paint roller
- Power drill
- Screwdriver
- Level
- Measuring tape
DIY Instructions Step by Step
- Paint all your bedroom walls a deep matte navy blue and let them dry.
- Assemble your tufted grey bed frame and place it in the center.
- Install a gold art deco chandelier in the middle of the ceiling.
- Lay a large navy and gold rug under the bed to define the space.
- Place black nightstands with gold handles on either side.
- Use lamps with black shades and gold bases for a luxury feel.
- Add brown leather pillows to the bed for a touch of warmth.
- Hang a gold geometric art piece on the wall above the headboard.
- Use dark navy curtains to keep the room feeling moody and private.
- Place a small gold tray on the nightstand for your watch and keys.
- Keep the bedding a dark navy to match the walls for a seamless look.
32. Walnut Wood Panel and Green Velvet Glow

Rich walnut wood panels cover the walls to create a warm and cozy feel. A deep green velvet bed adds a touch of organic color and luxury. Large amber globe lamps on the nightstands cast a soft and intimate light. This style focuses on natural materials and a mid century modern vibe.
A white shag rug provides a soft contrast against the dark wood floor. This design is excellent for creating a quiet and grounded sleeping environment. You can use wood veneer panels for an affordable way to get this look. Every piece of furniture feels sturdy and built to last in this room. Your bedroom will look like a high end custom wood studio.
Material Required List
- Walnut wood panels
- Green velvet bed frame
- Amber globe table lamps
- White shag rug
- Wood stain
Equipment Required List
- Power drill
- Level
- Measuring tape
- Construction adhesive
- Finishing nails
DIY Instructions Step by Step
- Measure your walls and buy wood panels that fit from floor to ceiling.
- Apply adhesive to the back of the panels and press them onto the wall.
- Use a few finishing nails to hold the panels in place while the glue dries.
- Stain any visible edges to match the walnut color of the wood.
- Assemble your green velvet bed frame and place it against the wood.
- Position large amber globe lamps on your walnut nightstands.
- Lay a white shag rug on the floor to add a bright and soft texture.
- Use deep green and gold pillows to match the velvet bed.
- Place a vintage record player on a wooden credenza in the corner.
- Add a gold wall clock to keep with the mid century theme.
- Keep the lighting low to highlight the rich texture of the wood walls.
33. Minimalist Silver and Sand Retreat
This bedroom uses a palette of light wood and metallic silver for a clean look. A round silver mirror reflects the light from the large windows. Metallic pillows and globe lamps add a futuristic touch to the minimalist space. The low platform bed keeps the room feeling open and peaceful.
A round jute rug adds a touch of natural texture to the light floors. This style is great for someone who wants a modern and uncluttered environment. You can achieve this look with a few key pieces of silver decor. Every element is simple and serves a purpose in this quiet room. Your bedroom will feel like a bright and airy seaside escape.
Material Required List
- Light wood bed frame
- Silver round mirror
- Metallic silver pillows
- Chrome globe lamps
- Round jute rug
Equipment Required List
- Hammer
- Level
- Measuring tape
- Cleaning cloth
- Screwdriver
DIY Instructions Step by Step
- Paint your walls a soft sandy beige or off white color.
- Assemble a light wood platform bed and place it near the window.
- Hang a large silver round mirror on the wall opposite the bed.
- Position chrome globe lamps on small floating wood shelves.
- Lay a round jute rug under the corner of the bed for texture.
- Use silver and beige pillows to create a cohesive color scheme.
- Place a large piece of driftwood on a white table as a natural art piece.
- Use light grey bedding to keep the room feeling calm and airy.
- Install simple white blinds to control the natural light.
- Wipe all metallic surfaces with a cloth to keep them shining bright.
- Add a small white chair in the corner for a minimalist seating area.
34. Rattan Pendant and Shadow Play Decor

A large woven rattan pendant light creates shadow patterns on the walls. The wood slat headboard and earth toned bedding add to the natural feel. A tall fiddle leaf fig plant brings a splash of life to the corner of the room. This design is focused on light and organic textures.
The warm glow from the light makes the room feel incredibly cozy at night. This look is perfect for anyone who wants a relaxed and bohemian atmosphere. You can easily build the slat wall and hang the pendant yourself. Every shadow adds a unique layer to your bedroom decor. Your room will feel like a peaceful retreat in a sunny coastal home.
Material Required List
- Rattan pendant light
- Wood slat headboard kit
- Earth toned linen bedding
- Fiddle leaf fig plant
- Jute rug
Equipment Required List
- Power drill
- Screwdriver
- Level
- Ladder
- Wire strippers
DIY Instructions Step by Step
- Install a wood slat panel to the wall behind your bed to act as a headboard.
- Use a level to make sure the slats are vertical and straight.
- Attach a rattan pendant light to the center of the ceiling.
- Adjust the height of the light so it hangs about four feet above the bed.
- Use a warm white bulb to create the best shadow effects on the walls.
- Lay a large jute rug on the floor to add more natural texture.
- Place a tall fiddle leaf fig plant in a terracotta pot near the bed.
- Dress the bed with tan and rust colored linen sheets.
- Add a small wooden stool to act as a nightstand for your books.
- Use white sheer curtains to let in soft light during the day.
- Keep the room clutter free to let the shadow patterns be the focus.
35. Tropical Palm Leaf Mural and Grid Rug
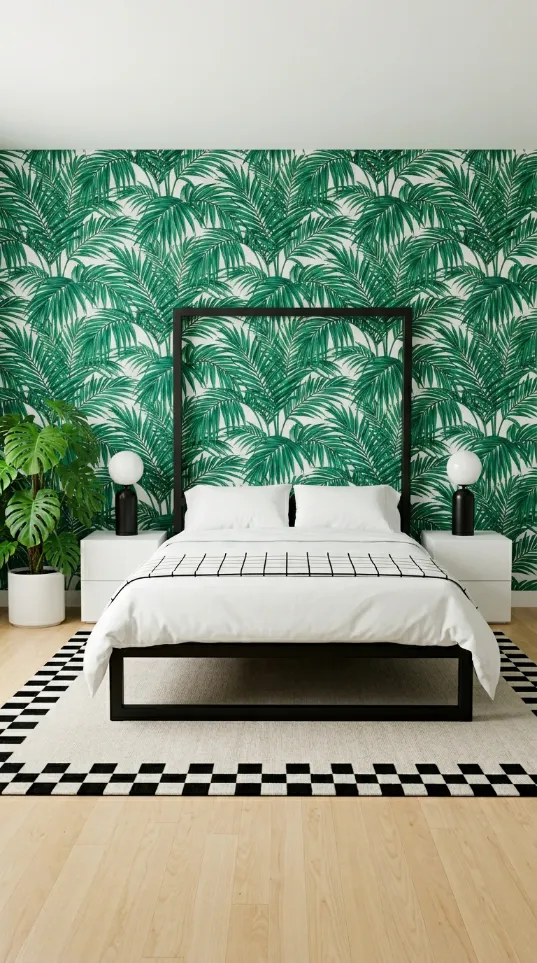
A vibrant green palm leaf mural covers the entire wall for a jungle feel. The black canopy bed frame adds a strong and modern structure to the room. A checkered rug and white nightstands provide a clean contrast to the busy walls. This design brings a bold and refreshing energy to your sleeping space.
A large monstera plant in the corner ties the tropical theme together. This style is excellent for someone who wants to feel connected to nature indoors. You can use high quality wallpaper or a large stencil to create the mural. Every leaf adds a sense of depth and life to the bedroom environment. Your room will feel like a lush private island escape every day.
Material Required List
- Palm leaf mural wallpaper
- Black metal canopy bed
- Checkered area rug
- White nightstands
- Large monstera plant
Equipment Required List
- Wallpaper paste
- Squeegee
- Measuring tape
- Level
- Utility knife
DIY Instructions Step by Step
- Measure your wall and apply palm leaf mural wallpaper from top to bottom.
- Use a squeegee to remove any air bubbles for a smooth green finish.
- Trim any extra paper at the edges using a sharp utility knife.
- Assemble a black metal canopy bed frame in the center of the mural.
- Lay a black and white checkered rug under the bed for a modern touch.
- Place white minimalist nightstands on either side of the bed.
- Install round white globe lamps to provide soft light at night.
- Put a large potted monstera plant in a white pot near the bed.
- Use simple white bedding with a black grid pattern to match the rug.
- Add a green throw pillow to echo the colors in the wall mural.
- Keep the other walls white to keep the room feeling bright and open.
36. Mod Primary Color and Checker Retreat

This bedroom features bold primary colors and a classic checkerboard floor. A large red square painted on the wall serves as a modern headboard. Mod target patterned pillows and a yellow cube nightstand add more retro energy. This design is focused on high contrast and playful geometric shapes.
A colorful abstract mural on the side wall ties all the primary tones together. This look is great for someone who loves the pop art style and bold decor. You can achieve this fun look with a few cans of bright paint and simple furniture. Every color adds a sense of excitement and life to the room. Your bedroom will look like a curated piece of mid century pop art.
Material Required List
- Red yellow and blue paint
- Checkerboard flooring tiles
- Mod target pillows
- Black bed frame
- Yellow cube nightstand
Equipment Required List
- Painters tape
- Level
- Paint roller
- Utility knife
- Measuring tape
DIY Instructions Step by Step
- Paint a large red square on the center of the wall behind your bed.
- Use a level to make sure the edges of the red square are straight.
- Install black and white checkerboard tiles across the entire floor.
- Assemble a simple black bed frame and place it in front of the red square.
- Paint a side wall with a mix of blue circles and yellow geometric shapes.
- Use a bright yellow cube as your nightstand for a pop of color.
- Place a silver desk lamp on the yellow cube for focused light.
- Dress the bed with black sheets to let the colorful pillows stand out.
- Use mod target pillows to add a vintage 1960s touch to the bed.
- Add a white dresser with black and grey drawers to the corner.
- Keep the ceiling white to let the bold colors on the walls and floor pop.
37. Soft Brutalist Concrete and Boucle Nook
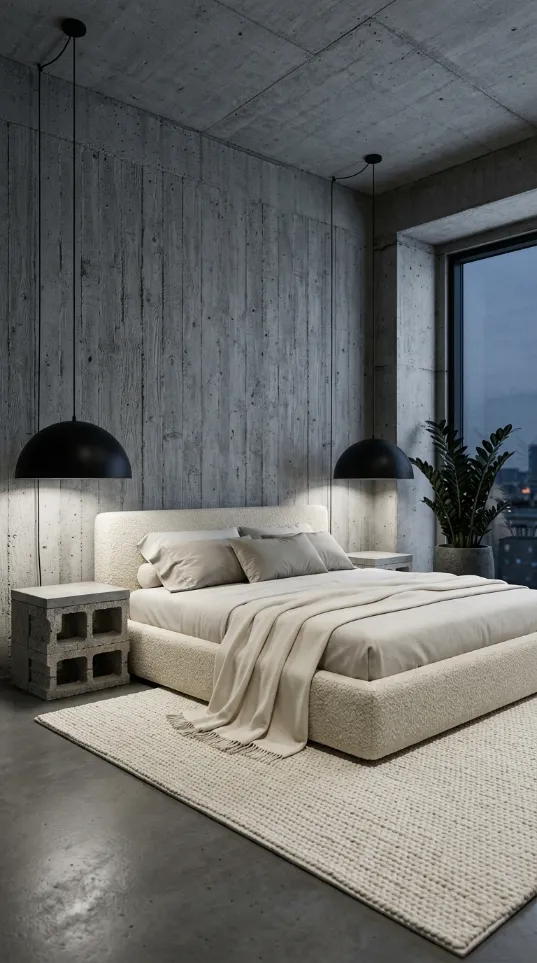
Raw concrete walls and a soft boucle bed create a unique contrast of textures. Black dome pendant lights hang low over the concrete nightstands for a modern feel. A large grey rug and beige blankets keep the color palette neutral and calm. This design focuses on simple shapes and honest industrial materials.
The soft texture of the bed balances the rough and cold look of the concrete. This style is excellent for someone who wants an edgy yet comfortable bedroom. You can use concrete effect plaster to get this look on standard walls. Every element feels solid and well built in this structured space. Your bedroom will feel like a quiet and modern sanctuary in the city.
Material Required List
- Concrete effect wall plaster
- White boucle bed frame
- Two black dome pendant lights
- Concrete breeze blocks
- Grey textured rug
Equipment Required List
- Trowel
- Power drill
- Ladder
- Wire strippers
- Level
DIY Instructions Step by Step
- Apply concrete effect plaster to your walls using a trowel for texture.
- Let the walls dry completely and wipe away any loose dust.
- Assemble a white boucle bed frame and place it in the center.
- Use two concrete breeze blocks on each side of the bed as nightstands.
- Install black dome pendant lights from the ceiling above the blocks.
- Adjust the height so the lights hang just above the nightstand level.
- Lay a large grey textured rug on the floor to add a soft layer.
- Use beige and cream bedding to match the neutral industrial tones.
- Place a large green plant in a concrete pot in the corner of the room.
- Hang a simple black and white sketch on the concrete wall.
- Keep the room tidy and minimalist to highlight the unique wall texture.
38. Burnt Orange Circle and Wood Retreat
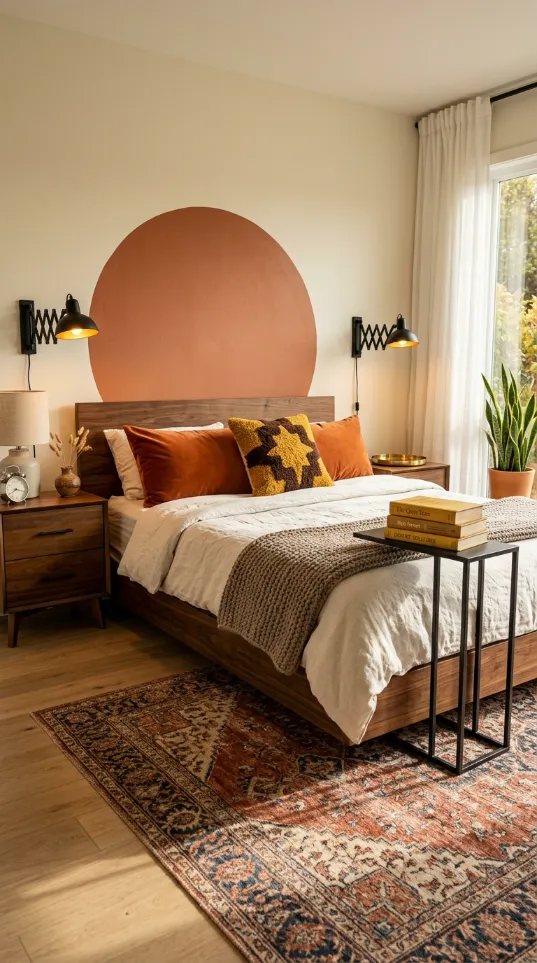
A large burnt orange circle creates a warm and grounded focal point. The dark wood headboard and rust colored pillows add to the earthy palette. Black swing arm lamps provide focused light while keeping the room feeling modern. A detailed vintage rug ties all the warm tones together on the floor.
This design choice makes the room feel incredibly cozy and inviting. You can achieve this look with a simple paint project and a few wooden pieces. It feels like a sunny autumn afternoon inside your bedroom all year round. Every element from the wood nightstand to the orange blanket feels cohesive. Your bedroom will be a peaceful and warm sanctuary for rest.
Material Required List
- Burnt orange paint
- Dark wood headboard
- Two black swing arm lamps
- Vintage patterned rug
- Rust colored pillows
Equipment Required List
- String and pencil
- Small paint roller
- Power drill
- Screwdriver
- Level
DIY Instructions Step by Step
- Find the center of the wall and draw a large circle with a string and pencil.
- Paint the inside of the circle with a warm burnt orange color.
- Position your dark wood headboard directly in front of the orange circle.
- Mount black swing arm lamps on the wall on either side of the headboard.
- Use a level to make sure the lamps are at the same height for balance.
- Place matching wood nightstands on each side of the bed.
- Lay a vintage rug with red and orange tones on the floor.
- Use rust and mustard yellow pillows to match the wall feature.
- Place a small glass vase with dried wheat on the nightstand.
- Add a green snake plant in the corner to provide a color contrast.
- Keep the rest of the walls a soft cream to let the orange circle pop.
39. Tiki Tropical Bamboo Bedroom
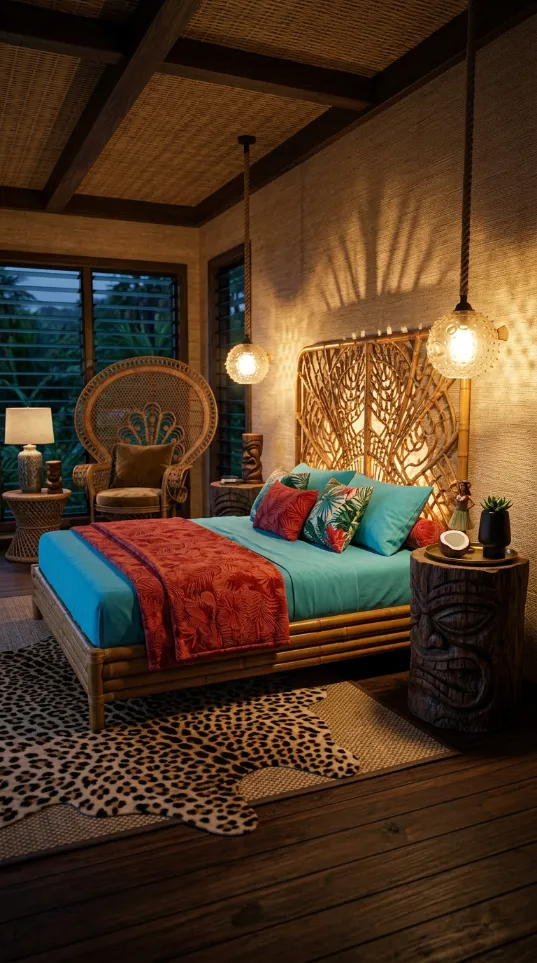
Bamboo walls and a large peacock chair create a fun tiki inspired atmosphere. The bright blue bedding and red palm leaf blankets add a splash of tropical color. Carved wood nightstands and tiki masks bring a sense of history and island charm. This design is focused on fun textures and a vacation vibe.
Woven pendant lights cast a warm glow through the bamboo ceiling. This look is great for someone who loves a playful and exotic bedroom style. You can use bamboo mats to easily cover your walls for this effect. Every detail makes it feel like a resort. Your bedroom will look like a private island getaway in your own home.
Material Required List
- Bamboo wall mats
- Teal blue bedding
- Red palm leaf blanket
- Rattan peacock chair
- Leopard print rug
Equipment Required List
- Staple gun
- Utility knife
- Hammer
- Measuring tape
- Adhesive
DIY Instructions Step by Step
- Apply bamboo mats to your walls using heavy adhesive or a staple gun.
- Trim the mats to fit around your windows and doors with a utility knife.
- Install a bamboo frame around the ceiling to complete the tropical look.
- Assemble a bamboo bed frame and dress it with bright teal sheets.
- Use a red palm leaf blanket to add a bold tropical pattern to the bed.
- Place a large rattan peacock chair in the corner of the room.
- Set up carved wood nightstands on either side of the bed.
- Lay a leopard print rug on top of a larger jute rug for a layered look.
- Hang tiki masks and tropical art on the bamboo walls.
- Install woven globe pendant lights to provide a warm and soft glow.
- Put a small green plant in a coconut shell on the nightstand.
40. Industrial Cork and Copper Bed
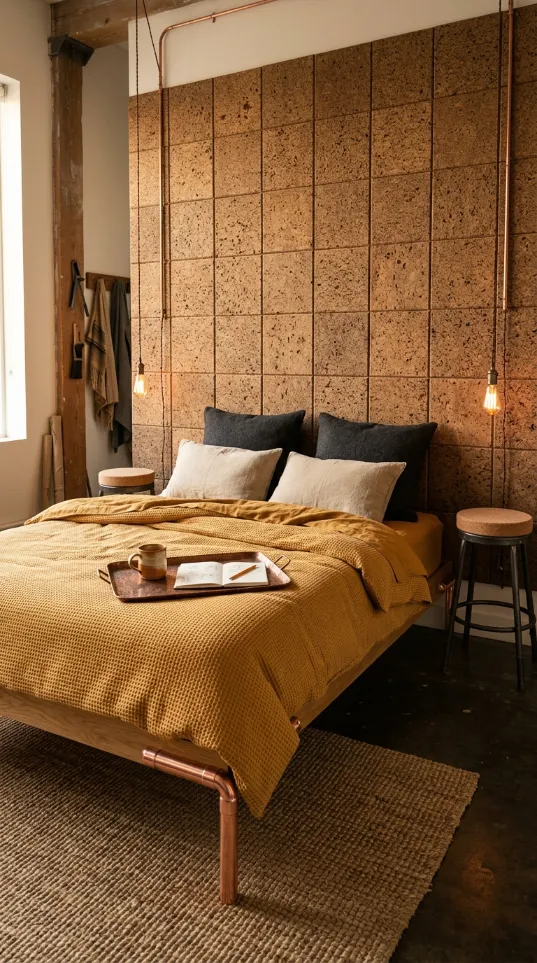
Natural cork panels provide a unique texture and soundproofing for this room. Copper pipe furniture adds a rugged industrial edge to the warm organic wall. Mustard yellow bedding keeps the color palette feeling cohesive and inviting. This design choices focus on raw materials that tell a story.
The grid pattern of the cork creates a sense of order and structure. Small hanging lights provide a soft glow that highlights the textured surface. You can build this headboard using basic materials from a local hardware store. It is a fantastic way to create a quiet and warm sleeping environment. Your bedroom will look like a custom designer loft.
Material Required List
- Cork wall tiles
- Copper pipes and joints
- Industrial adhesive
- Wood platform bed frame
- Mustard yellow bedding
Equipment Required List
- Level
- Pipe cutter
- Caulk gun
- Measuring tape
- Rubber mallet
DIY Instructions Step by Step
- Clean the wall surface thoroughly to ensure the adhesive sticks well.
- Use a level to draw a straight horizontal line where the first row of tiles will sit.
- Apply adhesive to the back of each cork tile using a caulk gun.
- Press the tiles onto the wall starting from the bottom and working upward.
- Use a rubber mallet to tap tiles into place gently so they are flat.
- Cut the copper pipes to your desired length for the bed frame legs.
- Connect the pipes using elbow joints to form a sturdy industrial base.
- Secure the copper frame to a wooden platform to support your mattress.
- Drape mustard yellow bedding over the bed to add a pop of color.
- Install small hanging bulbs from the ceiling to light up the cork texture.
- Arrange your pillows to complete this rustic industrial retreat.
41. Modern Black and Wood Suite
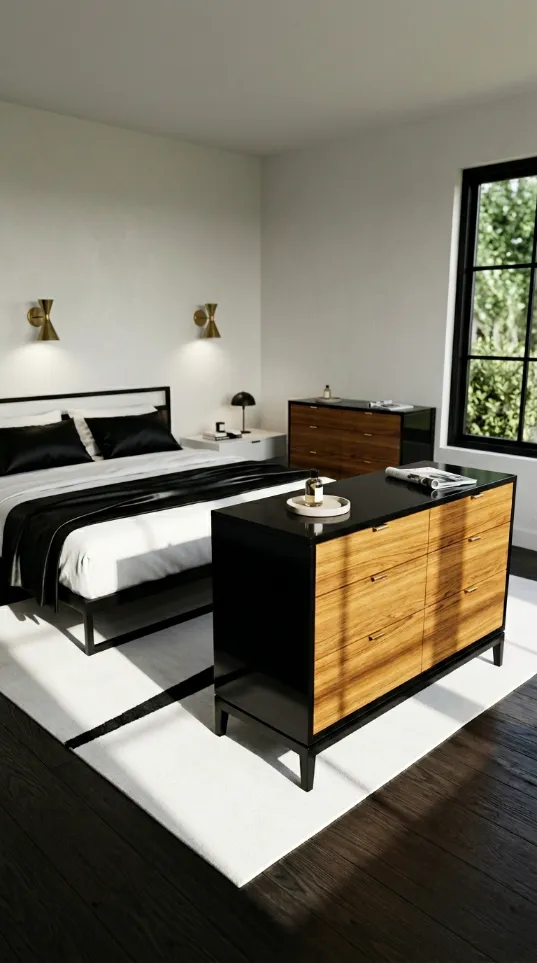
High contrast black and wood furniture creates a sharp look. Golden wall sconces provide elegant lighting above the headboard. The minimalist bed frame sits on a large white rug. This style is excellent for someone who wants a polished room. Natural wood grain adds warmth to the sleek black surfaces.
This design is focused on clean lines and luxury textures. You can achieve this look by refinishing old furniture. Every piece feels functional and stylish in this space. Your bedroom will feel like a modern penthouse in the city.
Material Required List
- Black matte paint
- Wood veneer sheets
- Gold wall sconces
- Large white area rug
- Black metal bed frame
Equipment Required List
- Paintbrush
- Glue
- Screwdriver
- Power drill
- Level
DIY Instructions Step by Step
- Paint your dresser and nightstands in matte black.
- Apply wood veneer to the front of the drawers.
- Install gold handles to match the wall sconces.
- Mark the spots for the sconces on the wall.
- Drill holes and mount the lights with a level.
- Assemble a simple black metal bed frame.
- Lay a large white rug across the entire floor.
- Dress the bed with black silk sheets for luxury.
- Place a glass bottle and glass on the nightstand.
- Add a black desk lamp to the dresser for light.
- Use white curtains to keep the room bright.
42. Zen Mountain Mural Retreat
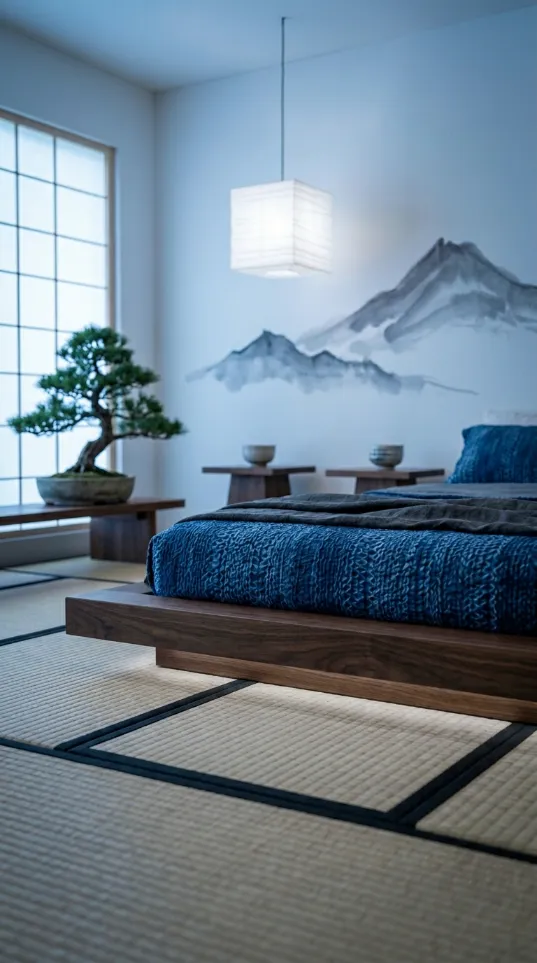
Soft grey mountains create a peaceful atmosphere in this room. This Japanese style bedroom uses natural textures and simple lines. Tatami mats and a low platform bed keep the space grounded. A small bonsai tree adds a touch of nature to the wooden bench.
This look is great for someone who wants a quiet sanctuary. You can paint the mountain mural with a steady hand and grey paint. Every element invites meditation and restful sleep. Your bedroom will feel like a mountain escape in a busy world. Enjoy a calm retreat that is both beautiful and functional.
Material Required List
- Light grey and dark grey paint
- Low wood platform bed
- Tatami floor mats
- Paper lantern light
- Bonsai tree
Equipment Required List
- Wide paintbrush
- Small detail brush
- Pencil
- Paint tray
- Cleaning cloth
DIY Instructions Step by Step
- Paint your back wall a soft off white color.
- Use a pencil to sketch the shape of distant mountains.
- Paint the furthest mountains with your lightest grey.
- Let that layer dry before adding the closer peaks.
- Use a darker grey for the mountains in the front.
- Blend the bottom of the mountains into the wall color.
- Lay tatami mats across the bedroom floor.
- Place a low wood platform bed in the center.
- Hang a square paper lantern light from the ceiling.
- Set a small bonsai tree on a low wooden bench.
- Use blue and grey bedding to match the mountain mural.
Key Takeaways
1 Focus on one major feature like an accent wall to define the room.
2 Use paint to mimic expensive architectural details or vintage patterns.
3 Incorporate natural materials like wood and rattan for an authentic feel.
4 Choose lighting fixtures that serve as a bold artistic centerpiece.
5 Keep the layout simple and uncluttered to respect the minimalist roots of the era.
Your bedroom should be a place where you feel relaxed and inspired. Every project in this guide offers a way to personalize your space with vintage flair. You have the power to create a high end atmosphere without overspending.
Completing a DIY makeover provides a wonderful sense of achievement. These mid century modern ideas bring character and history into your home. Enjoy the process of building a bedroom that reflects your unique taste.
Consistency in your design choices will help the room feel professional. Take your time with each step to ensure a beautiful finish. You now have all the tools to build your dream sleeping area on a budget.