Winter can often make a living room feel dark and confined. The sun hangs low in the sky, and the short days mean less time for natural light.

This dimness can make your main relaxing space feel a little gloomy. You might find yourself turning on lamps in the middle of the afternoon. It’s a common problem that can affect the whole mood of your home.
Many people assume a major renovation is the only way to fix a dark room. But you do not need to tear down walls or install massive new windows.
The real solution is to be smart with the light you already have. You can use simple tricks to capture, reflect, and spread every bit of sunlight.
We have 37 genius strategies to help you. From simple DIYs to smart decor choices, these ideas will make your living room feel bright and open all winter long.
1. Use Large Mirrors

A large mirror is the oldest trick in the book for a reason. It acts like a second window, grabbing any light and bouncing it back.
Place a tall, floor-length mirror on a wall that is adjacent to your window. This means the wall next to the window, not opposite it. This position catches the light as it streams in and reflects it sideways, spreading it across the whole room. A simple, thin frame keeps the look clean.
DIY: The “Second Window” Mirror
What You Need:
- A tall, floor-length mirror
- A soft, clean cloth
- A grown-up
- Optional: A stud finder and wall-mounting hardware (if you don’t want to lean it)
Steps:
- Find Your Spot: Go to your window. Look at the wall right next to it. This is your spot.
- Clean the Mirror: Use your cloth to wipe the mirror. Make sure there are no smudges. A clean mirror reflects more light.
- Lean It: Carefully stand the mirror up against the wall you picked.
- Check the Angle: It should lean just a little bit. Make sure the bottom is sturdy on the floor so it won’t slip.
- Secure It (Optional but Safer): Ask a grown-up to help you secure the top of the mirror to the wall with a safety strap or bracket. This stops it from ever falling over.
2. Hang Sheer Curtains

Heavy, dark curtains will stop sunlight in its tracks. They create a solid wall of fabric that kills any natural light, even when they are open.
Sheer or semi-sheer curtains are a much better choice. They give you privacy during the day, but they are thin enough to let light filter through. The fabric catches the sunlight and “diffuses” it, which means it spreads a soft, even glow all over the room. Always hang them high and wide.
DIY: The “High and Wide” Curtain Trick
What You Need:
- Sheer curtains
- A curtain rod
- A grown-up
- A drill, screws, and brackets (that came with your rod)
- A tape measure
Steps:
- Find Your Height: Measure 4-6 inches above your window frame. Mark the spot with a pencil.
- Find Your Width: Measure 3-6 inches past the window frame on each side. Mark these spots.
- Install Brackets: Ask your grown-up to drill and install the curtain rod brackets on your marks.
- Hang Curtains: Slide your sheer curtains onto the rod.
- Put up the Rod: Place the rod onto the brackets.
- Spread Them Out: When the curtains are “open,” make sure they hang on the wall, not in front of the glass. This makes your window look bigger and lets in every bit of light.
3. Paint the Ceiling Light Blue

A standard white ceiling is fine, but it can feel a little low or boring. A dark ceiling will make a room feel like a cave.
The secret is to paint your ceiling a very pale, light blue. This is an old trick that designers use. Your eye sees the light blue and thinks of the sky. This makes the ceiling feel higher. It adds an open, airy feeling to the room that a plain white ceiling can’t.
DIY: The “Sky” Ceiling
What You Need:
- A grown-up
- A can of very pale blue paint
- Painter’s tape
- A paint roller
- A paint tray
- An extension pole (to reach the ceiling)
- Old sheets or drop cloths
Steps:
- Cover Everything: Put drop cloths over all your furniture and the floor.
- Tape the Edges: Use painter’s tape to make a clean line where the ceiling meets the walls.
- Cut In: Use a small paintbrush to paint the blue paint just in the corners and along the tape line. This is called “cutting in.”
- Roll the Paint: Attach the paint roller to the extension pole.
- Get Ready to Roll: Pour some paint into the paint tray. Roll your roller in the paint until it’s covered.
- Paint the Ceiling: Have your grown-up use the roller to paint the main part of the ceiling.
- Let it Dry: Let it dry completely. You might need two coats.
- Peel the Tape: Once it’s dry, slowly peel off the tape.
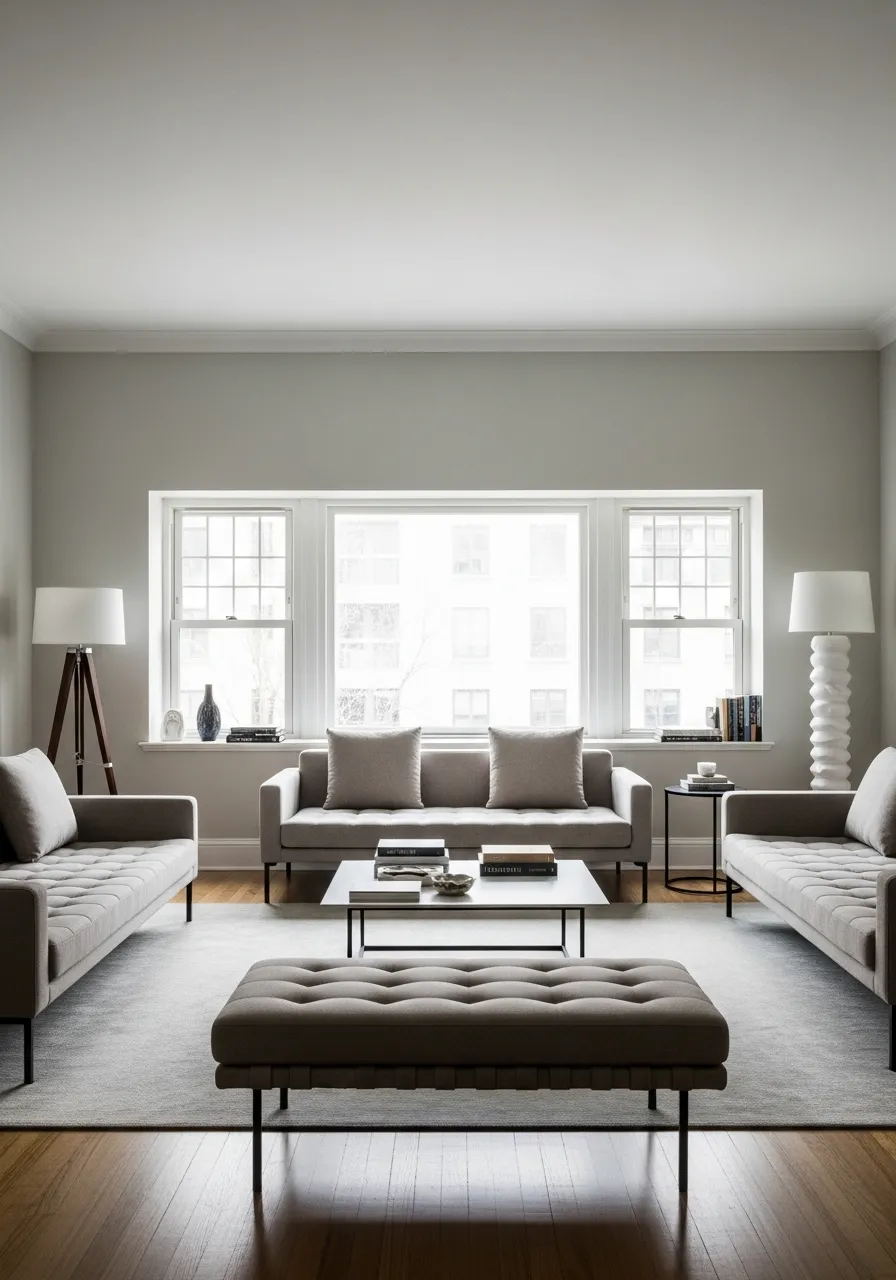
4. Choose Light-Colored Furniture

This seems simple, but it makes a huge difference. A single piece of dark furniture, like a large sofa, can absorb a lot of light. It becomes a big, dark shape in your room.
You don’t need all white furniture. Just choosing items in lighter colors helps. A gray sofa, a white cabinet, and a natural wood table all reflect more light than dark-colored pieces. This keeps the whole room feeling bright and open.
DIY: The “Brighten Your Dark Sofa” Trick
(This is for if you already have a dark sofa and can’t buy a new one.)
What You Need:
- One light-colored throw blanket (like white, cream, or light beige)
- Two or three light-colored throw pillows
Steps:
- Find Your Blanket: Get your light-colored throw blanket.
- Drape It: Don’t fold it. Just casually drape it over one corner of your dark sofa.
- Add Pillows: Place your light-colored pillows on the sofa.
- Balance It: Put one pillow on the opposite side of the sofa from the blanket.
- Step Back: Look at your sofa. The big, dark shape is now broken up by bright spots of white and beige. This makes it look much lighter.
5. Add Crystal “Suncatchers”

This is a fast, easy, and fun trick. Any light that comes directly through a window is good. But you can make that light work harder.
Hang a few crystals, or “suncatchers,” in the window. You can also place faceted glass objects on the windowsill. When the sun hits them, they act like little prisms. They will scatter tiny rainbows and flecks of light all over your living room.
DIY: Make Your Own Suncatcher
What You Need:
- A crystal or glass prism (from a craft store or an old lamp)
- A piece of clear fishing line
- A small suction cup with a hook
Steps:
- Tie Your Line: Cut a piece of fishing line. Make it as long as you want your crystal to hang.
- Attach the Crystal: Tie one end of the fishing line very tightly to the hole in your crystal.
- Attach the Hook: Tie the other end of the line to the suction cup’s hook.
- Clean Your Window: Wipe the spot on your window where you want to hang it. A clean window helps the cup stick.
- Stick It: Press the suction cup firmly onto the window glass.
- Wait for Sun: That’s it! When the sun shines through, your room will fill with little rainbows.
6. Install Transom Windows

Sometimes, the problem isn’t the living room itself. It’s the dark hallways or rooms connected to it. A solid door or wall stops light from being shared.
A transom window is a small window built above a door. It’s a classic feature that lets you “borrow” light. Light from the living room can pass through the transom into the dark hallway. Light from a sunny hallway can pass into the living room. It’s a great way to share light between spaces.
DIY: The “Faux Transom” Mirror
(Installing a real transom is a big construction job. This DIY gives you a similar look.)
What You Need:
- A long, skinny mirror (called a “horizontal” mirror)
- A grown-up
- A level
- A hammer and picture-hanging hooks
Steps:
- Find Your Spot: Choose a spot on your wall that is high up. A good place is right above a doorway or a wide opening.
- Mark Your Line: Have your grown-up hold the mirror against the wall. Use the level to make sure it’s perfectly straight.
- Mark for Hooks: Use a pencil to mark where the hooks need to go.
- Install Hooks: Hammer the hooks into the wall on your pencil marks.
- Hang the Mirror: Carefully hang your horizontal mirror.
- Step Back: It will look like a bright, open window high on the wall, and it will reflect light just like a real transom.
7. Use High-Shine Flooring

The floor is the largest surface in your room. A dark or matte-finish floor (one that isn’t shiny) will absorb light.
A floor with a high-shine or high-gloss finish does the opposite. It acts like a giant mirror for all the light coming in. You can see how the windows are reflected in the floor here. This effect bounces light up and makes the entire room feel brighter and more polished.
DIY: The “Floor Shine” Boost
What YouNeed:
- A broom and dustpan
- A mop
- A floor cleaner made for your type of floor (wood, tile, etc.)
- Optional: A high-gloss floor polish
Steps:
- Clear the Floor: Move any small rugs or furniture out of the way.
- Sweep: Sweep the entire floor. Get all the dust and dirt.
- Mop: Mop the floor with the correct cleaner. A clean floor is the first step to a shiny floor.
- Let it Dry: Let the floor dry completely.
- Get Help for Polish (Optional): If your floor is still dull, ask a grown-up to help you use a high-gloss polish.
- Apply Polish: Following the directions on the bottle, apply a thin, even coat of polish.
- Dry Again: Let the polish dry. You will be amazed at how much more your clean, shiny floor reflects the light.
8. Pick “Ghost” Furniture

This is a fun and very smart trick. “Ghost” furniture is any piece that is made of clear acrylic or lucite.
These pieces are strong and you can sit on them. But because they are totally see-through, they take up zero “visual space.” Light passes right through them. A ghost chair or table is great for a small, dark room because it doesn’t block any light or views. It’s there, but it’s also not.
DIY: Keep Your Ghost Furniture Clear
What You Need:
- A soft, clean microfiber cloth
- A spray bottle with warm water
- A tiny drop of dish soap
Steps:
- Mix Your Cleaner: Fill your spray bottle with warm water. Add one single drop of dish soap. Shake it gently.
- Never Use Windex: Do not use glass cleaner or other harsh chemicals. They can make the acrylic look cloudy.
- Dust First: Gently wipe your chair with a dry microfiber cloth to get the dust off.
- Spray: Lightly mist your cloth with your soap and water spray.
- Wipe Clean: Gently wipe down the chair. Don’t scrub.
- Dry It: Use a second, dry microfiber cloth to buff it dry. This keeps it perfectly clear so the light can shine through.
9. Wash Your Windows

This is the most important trick. It’s not exciting, but it has the biggest impact. Over the winter, your windows get covered in a film of dirt, dust, and grime.
You might not even notice it. But that layer of dirt can block a surprising amount of sunlight. A freshly cleaned window lets in much more light. It makes the light look clearer and sharper. Do this on a cloudy day, not a sunny one.
DIY: The Streak-Free Window Wash
What YouNeed:
- A bucket of cool water
- A few drops of dish soap
- A “squeegee” (the tool with the rubber blade)
- A large sponge
- An old, clean towel
Steps:
- Get Ready: Put your old towel on the floor or windowsill to catch drips.
- Scrub: Dip your sponge in the soapy water. Scrub the whole window. Get all the dirt off.
- Squeegee Time: Take your squeegee. Start at the top left corner.
- Swipe Down: Pull the squeegee straight down, from the top of the window to the bottom.
- Wipe the Blade: This is the secret! Use your towel to wipe the rubber blade of the squeegee after every swipe.
- Overlap: Do your next swipe. Overlap the stripe you just cleaned by about an inch.
- Repeat: Keep going until the whole window is done. No streaks!
10. Choose Warm, Light Paint

Many people think plain white is the best color for a dark room. But a cold, sterile white can end up looking gray and sad, especially in winter.
A better choice is a warm light color. Think of colors like creamy off-white, a very light buttery yellow, or a soft beige. These warm shades have a little bit of yellow or red in them. They reflect just as much light as white, but they also make the room feel cozier and sunnier, even on a cloudy day.
DIY: The “Test Your Paint” Trick
What You Need:
- A few “sample pots” of warm, light paint
- A large white poster board
- Scissors
- Tape
Steps:
- Cut Your Board: Cut your poster board into a few smaller squares.
- Paint Your Samples: Paint each square with a different one of your sample colors. Let them dry.
- Don’t Paint the Wall: Do not paint little spots directly on your wall. The old color will mess up how you see the new color.
- Tape Them Up: Tape your painted squares onto your wall.
- Watch Them: This is the important part. Leave the squares up for a whole day.
- Check Them: Look at them in the morning, at noon, and at night. The color will look different as the light changes. The one you like at all times of day is your winner.
11. Use Open-Backed Shelving

Solid walls and bulky bookcases are light-blockers. An open-backed shelving unit, sometimes called an “ethereal” shelf, is a smart alternative. It works as a room divider, creating a new zone for an office or reading nook.
The open design allows light to pass straight through. It doesn’t cast a giant shadow like a solid piece of furniture. This defines the space while keeping the entire room feeling bright and connected.
DIY: The “Light-Flow” Shelf Style
What You Need:
- Your open-backed bookshelf
- Your books and decorations
- A soft dusting cloth
Steps:
- Clean Your Shelf: Start by wiping down every shelf to make it clean and dust-free.
- Follow the “Thirds” Rule: This is the most important part. Mentally divide your items into three groups: books, objects (like vases or small sculptures), and empty space.
- Fill One Third: Place your books on the shelves. Try stacking some upright and laying some flat.
- Fill the Next Third: Add your decorative objects. Place them in front of or next to the books.
- Leave One Third Empty: This is the secret. You must leave about one-third of your total shelf space completely empty. This is the “breathing room” that lets the light travel through.
- Check Your Work: Step back. Can you see through the shelf to the wall behind it? If so, you did it right.
12. Paint Window Trim Glossy White

We often focus on the wall color, but the window frame itself matters. A dark wood or colored trim can absorb light right at the source. It can make the window look smaller than it is.
A simple fix is to paint the trim a crisp, bright white. This acts like a bright picture frame for the light. Using a “semi-gloss” or “glossy” paint finish is even better. The slight shine will actively bounce the sunlight, reflecting it deeper into the living room.
DIY: Brighten Your Window Frame
What You Need:
- A grown-up
- A roll of painter’s tape
- A small paintbrush
- A can of white “semi-gloss” paint
- Old newspaper or a drop cloth
Steps:
- Get Ready: Have your grown-up help you lay newspaper or a drop cloth on the floor under the window.
- Tape Your Edges: This is the key to clean lines. Carefully place painter’s tape on the wall, right up against the edge of the trim.
- Tape the Glass: Put another line of tape on the window glass, right against the other side of the trim. Press all the tape down firmly.
- Time to Paint: Dip just the tip of your paintbrush into the white paint. Wipe any drips off on the can.
- Paint Smoothly: Use long, smooth strokes to paint the trim. Don’t glop the paint on. A thin coat is best.
- Let it Dry: Let the first coat dry completely.
- Add a Second Coat: A second coat will make it look solid and bright.
- The Big Peel: Before the second coat is totally dry, slowly and carefully peel off all the painter’s tape.
13. Install Frosted Glass Doors

Sometimes you need privacy, but a solid door just makes a room feel like a cave. This is common for home offices or dens that connect to a living room. A clear glass door shows everything, which isn’t always helpful.
Frosted or translucent glass is the solution. This special glass scatters light. It lets all the brightness flow between rooms, but it blocks the view. You get the best of both: privacy and light.
DIY: Easy Frosted Glass Spray
What You Need:
- A grown-up (this is a job for them)
- A can of “Frosted Glass” spray paint
- Painter’s tape
- Newspaper or plastic sheets
Steps:
- Grown-Up Job: This spray is very strong, so this whole project is for a grown-up to do.
- Tape the Frame: Have your grown-up tape off the wood or metal frame of the door’s window. Cover any part you don’t want frosted.
- Cover Everything: Tape newspaper or plastic sheets all over the rest of the door and the floor nearby. The spray can travel.
- Shake the Can: Shake the spray can for at least one full minute.
- Spray a Light Coat: From about one foot away, spray a very thin, even coat over the glass.
- Wait: Let this thin coat dry for 10-15 minutes.
- Spray Again: Add another thin coat. Keep adding thin coats and letting them dry in between.
- Stop When It’s Frosted: Stop when the glass is no longer see-through. Let it dry completely, then peel off all the tape.
14. Adopt a Minimalist Layout

Clutter is the enemy of natural light. Every extra object, every bulky piece of furniture, creates a shadow. These shadows add up and make a room feel dim.
A minimalist layout keeps only the most important furniture. It creates clear, open pathways for light to travel. Low-profile furniture (items that sit lower to the ground) also helps. It leaves more open wall space for light to bounce off. Fewer items mean fewer obstacles and a brighter, calmer room.
DIY: The “Light Path” Tidy-Up
What You Need:
- Your eyes
- A timer
Steps:
- Stand at the Window: Go to your main window and look into your living room.
- Find the Light Path: Imagine the sunlight is a person trying to walk to the opposite wall. What is in their way?
- Identify Blockers: Is there a tall plant, a stack of books, or a big, dark chair blocking the path?
- Set a Timer: Set a timer for 10 minutes.
- Move Three Things: Your only goal is to move three of those “light path blockers.”
- Try a New Spot: Can the tall plant go in a corner next to the window instead of in front of it? Can the books go on a shelf?
- Clear the Floor: Make sure there is nothing on the floor in the middle of the room.
- Look Again: When the timer goes off, stand at the window again. The room should already feel more open.
15. Use Light-Colored Textiles

You might have a dark sofa or armchair that you can’t replace. This large, dark item can feel like it soaks up all the light in the room. But you can fix this easily.
Use light-colored textiles to break up the darkness. A creamy white throw blanket, a few light beige pillows, or a soft gray cushion will do the trick. These light surfaces will catch any available sunlight and reflect it. This balances the dark furniture and brightens the whole area.
DIY: The Sofa “Brighten Up”
What You Need:
- One light-colored throw blanket (white, cream, or light gray)
- Two or three light-colored pillows
Steps:
- Start with the Blanket: Take your throw blanket. Don’t fold it neatly.
- Drape It: Casually toss or “drape” the blanket over one corner of your dark sofa.
- Let it Hang: Let part of it hang down the back and part of it rest on the seat cushion. It should look soft and relaxed.
- Add Pillows: Take your light-colored pillows.
- Place One: Put one pillow in the opposite corner from your blanket.
- Place Another: Put the other one next to your blanket, or in the middle of the sofa.
- Step Back: Look at your sofa. The big, dark shape is now broken up with bright spots that make it feel much lighter.
16. Trim Landscaping Outside

Sometimes the problem is not inside your house at all. It’s growing right outside your window. Overgrown bushes, large shrubs, or low-hanging tree branches can act like a giant green curtain.
These plants can block a huge amount of sun before it even gets to your window. This is a very common issue for first-floor living rooms. Trimming those bushes and branches back is like opening a massive set of blinds you didn’t know you had.
DIY: The “Window View” Pruning Plan
What You Need:
- A grown-up
- Gardening gloves
- Garden shears or clippers
Steps:
- Go Outside: Stand on your lawn and look at your living room window.
- Find the Problem: Are there bushes growing up over the bottom of the window? Are branches hanging down in front of it?
- Get Your Helper: Ask a grown-up to put on the gardening gloves and get the shears.
- Set the Goal: Your goal is to see the entire window frame.
- Trim the Top: Have your grown-up trim all the branches that are growing higher than the bottom of your windowsill.
- Trim the Sides: Next, trim any branches that are growing wider than the window frame.
- Clean Up: Rake up all the trimmed branches.
- Go Inside: Go back into your living room and look out. You will be amazed at how much more light comes in.
17. Choose Mirrored Furniture

A mirror on the wall is a great trick. But furniture that is a mirror is even more powerful. These pieces do two jobs at once.
A wardrobe with mirrored doors, a shiny metal cabinet, or a reflective side table all work. They function as storage or a surface. But they also act as light-bouncing machines. They catch light from any angle and reflect it back into the room. This helps break up dark corners and makes the whole space feel brighter.
DIY: Mirrored Cabinet Knobs
(Since replacing a whole wardrobe is a big job, this small DIY adds a similar sparkle.)
What You Need:
- A grown-up
- A screwdriver
- New “crystal” or “mirrored” knobs (you can buy these at a hardware store)
Steps:
- Find Your Furniture: Pick a piece of furniture to update, like a dresser, TV stand, or cabinet.
- Count the Knobs: Count how many knobs or handles it has. You need to buy that many new ones.
- Open the Drawer: Open the drawer or cabinet door.
- Find the Screw: Look on the inside of the drawer. You will see a screw holding the old knob in place.
- Unscrew It: Have your grown-up use the screwdriver to loosen and remove the screw. The old knob will fall off the front.
- Put the New Knob On: Take the screw for your new crystal knob. Push it through the hole from the inside.
- Twist it On: From the front, twist your new, shiny knob onto the screw until it’s tight.
- Repeat: Do this for all the knobs. This small change adds a lot of new, light-reflecting spots.
18. Install Top-Down, Bottom-Up Shades

Standard window blinds give you only two choices: open or closed. If you need privacy, you have to block all the light. Top-down, bottom-up shades are a smarter tool.
These special shades are not attached at the top. You can pull the top of the shade down. This opens up the top half of your window to let sunlight pour in. At the same time, you can keep the bottom half of the shade pulled up for privacy. It’s a great setup for rooms that face a busy street.
DIY: How to Use Your Top-Down Shade
(Installing these can be tricky, but using them is the real trick.)
What You Need:
- A top-down, bottom-up shade
Steps:
- Find the Handles: Your shade should have two handles or cords. One is attached to the top bar (the one at the top of the window). The other is attached to the bottom bar (the “floating” one).
- Don’t Pull the Bottom: On a sunny day, don’t just pull the whole shade up from the bottom.
- Pull the Top Down: Instead, grab the handle on the top bar. Pull it down about halfway. Light will start to flood the room over the top.
- Set Your Privacy: Now, grab the bottom bar. Lift it up so it covers the bottom one-third or one-half of your window.
- You’re Done: You have now created a “floating” shade. Bright light comes in the top, and no one can see in the bottom.
19. Mix Mirrors into Your Gallery Wall

A “gallery wall” with many pictures can make a wall feel busy and sometimes heavy, especially if the frames are dark. A clever way to fix this is to add mirrors into the mix.
Instead of only hanging art, swap out a few of the pictures for small, decorative mirrors. You can use different shapes and frame styles. Each mirror will become a bright, reflective spot. It catches the light and your eye, making the whole wall feel more dynamic and much less flat.
DIY: Your Own Mirror Gallery Wall
What You Need:
- A grown-up
- A few framed pictures you love
- Two or three small, framed mirrors
- A hammer and picture-hanging hooks
- A pencil
Steps:
- Plan on the Floor: Don’t start on the wall. Lay all your frames (both pictures and mirrors) on the floor.
- Arrange Your Puzzle: Move the frames around until you find a design you like.
- The Secret: Make sure the mirrors are not all clumped together. Spread them out. Try to have one near the top, one near the middle, and one on the other side.
- Find the Center: Place your biggest or favorite piece in the middle, at about eye level.
- Build Around It: Arrange your other frames around the center one.
- Time to Hang: Have your grown-up help you hang the first, center piece.
- Follow Your Plan: One by one, hang the other pieces on the wall, following the design you made on the floor.
20. Paint a Sky on Your Ceiling

This is a very creative trick for a room that feels short or small. Painting your ceiling a solid light blue helps. But painting a sky with clouds makes the room feel endless.
This is a “trompe-l’œil” (a French term that means “trick the eye”). It visually removes the ceiling. Your eye looks up and sees a sky, which makes the brain think the room is open and tall. It’s a playful, bold move that can bring a feeling of airiness to a dark space.
DIY: Easy Sponged-Cloud Ceiling
What You Need:
- A ceiling already painted light blue (see trick #3)
- A grown-up
- A paper plate
- A small can of white paint
- A natural sea sponge (bumpy and random-shaped)
- An old rag
Steps:
- Get Your Paint Ready: Pour a small puddle of white paint onto your paper plate.
- Load the Sponge: Dab your sea sponge into the white paint.
- Get Rid of Extra: Now, dab the sponge on a clean part of the paper plate two or three times. You want it to be “dry,” with very little paint on it.
- Make a Cloud: Gently press and dab the sponge onto your blue ceiling. Don’t push hard!
- Move and Turn: Move your hand and turn the sponge as you dab. This makes a puffy, random cloud shape.
- Soften It: Use your old rag to gently dab the edges of the cloud. This makes it look soft and blurry.
- Make More: Move to another part of the ceiling and make another cloud. Make some big and some small.
21. Install a Sun Tunnel

Sometimes, a living room is dark because it’s in the middle of the house with no access to outside walls. A traditional window or skylight isn’t an option.
This is where a “sun tunnel” or “solar tube” is a great solution. It’s a special reflective tube that runs from your roof, through the attic, and into your ceiling. It acts like a spotlight, capturing sunlight from the roof and pouring it directly into your dark room. It’s a surprising way to get natural light in the most unlikely places.
DIY: Clean Your Sun Tunnel Diffuser
(Since installing a sun tunnel is a big job for a pro, this DIY helps you get the most light from one you already have.)
What You Need:
- A safe step-stool
- A soft microfiber cloth
- A gentle duster with a long handle
Steps:
- Get Your Tools: Grab your duster and cloth. Make sure your step-stool is steady.
- Start with Dust: Before wiping, use the duster to gently remove any loose dust or cobwebs from the round “diffuser” (the part on your ceiling).
- Dampen Your Cloth: Get your microfiber cloth slightly damp with just water. You don’t want it dripping wet.
- Wipe it Clean: Carefully stand on your step-stool. Gently wipe the diffuser in a circular motion. This removes the fine layer of dust that blocks light.
- Let it Dry: Let it air dry for a minute. The light coming through should look much clearer.
22. Lay Down Light-Colored Rugs

Don’t forget the floor. A dark floor can absorb a lot of light, making the whole room feel heavier. While refinishing a floor is a big job, covering it is easy.
A large, light-colored rug can instantly change the feel of a room. A rug in cream, light gray, or a soft beige acts as a new, bright surface. It will reflect light up onto the walls. You don’t even need to cover the whole floor. Using several smaller, light-colored rugs can also work to create bright zones.
DIY: The “Bright Rug” Placement
What You Need:
- A light-colored area rug
- Optional: A smaller, accent rug
Steps:
- Find Your Spot: Your rug should go where you do the most living. The most common spot is under the “conversation area” (your sofa and chairs).
- The “Front Legs” Rule: Unroll your big, light rug. Slide it under your sofa so that at least the front two legs of the sofa are sitting on the rug.
- Add Your Chairs: Do the same for any armchairs. Their front two legs should also be on the rug. This makes the area feel connected.
- Check the Balance: You should have a border of your original dark floor showing all around the rug. This “frames” the new, bright area.
- Optional Layer: If you have a smaller rug, you can place it on top of the big rug, maybe just under the coffee table, to add more texture.
23. Use Glass Blocks for Privacy

What if you have a wall that blocks all the light, but you can’t just tear it down? This is where glass blocks are a clever, retro-style solution.
Glass blocks are not see-through, but they are “translucent.” This means light can pass right through them. Replacing a section of a dark wall with glass blocks lets you “borrow” light from an adjoining room or stairway. It provides total privacy while still brightening up a dark corner.
DIY: Make Your Glass Blocks Sparkle
(Building a glass block wall is a very big job, but cleaning them is easy and makes a big difference.)
What You Need:
- A spray bottle of glass cleaner
- A soft, clean microfiber cloth
- An old, dry towel
Steps:
- Dust First: Use the dry towel or a duster to wipe down the whole glass block wall. Get all the dust off first.
- Spray and Wipe: Work in a small section. Spray a few of the blocks with your glass cleaner.
- Wipe with Cloth: Immediately wipe the blocks clean with your microfiber cloth. Use circular motions to get rid of smudges.
- Clean the Grout: Pay attention to the “grout” (the lines between the blocks). Give them a quick wipe, too.
- Move to the Next Spot: Spray the next section and repeat.
- Don’t Forget the Other Side! If you can, go to the other side of the wall and clean it, too. A clean wall lets much more light through.
24. Brighten Your Hallways

If the hallway leading to your living room is dark, it makes the living room feel darker before you even enter. It’s like walking through a tunnel.
You can fix this by making the hallway a “path of light.” Paint the hallway walls a light, reflective color. Add bright overhead lights. If the hall has windows, like in the picture, make sure they are clean and the trim is painted white. A bright hallway makes the whole home feel connected and open.
DIY: The Hallway “Light Runner”
What YouNeed:
- A long, light-colored “runner” rug
- A roll of double-sided carpet tape
- A grown-up
- Scissors
Steps:
- Clean the Floor: Sweep and mop your hallway floor so it’s clean and dry.
- Unroll the Runner: Unroll your new runner rug down the middle of the hallway.
- Check the Position: Make sure the rug is perfectly straight. You should have an equal amount of your original floor showing on both sides.
- Tape it Down: Ask your grown-up to help you. Carefully roll back one end of the rug.
- Apply Tape: Stick a few long strips of double-sided carpet tape to the floor.
- Press it Down: Slowly and carefully roll the rug back over the tape, pressing down hard so it sticks.
- Do the Other End: Repeat this on the other end of the rug, and add a few pieces in the middle if it’s very long. This keeps it from slipping and brightens the whole path.
25. Decorate with Shiny Metallics

Matte, dark objects tend to absorb light. Shiny, reflective objects do the opposite: they bounce it around the room.
A great, simple trick is to decorate with metallic accessories. You don’t need a lot. A few mercury glass vases, a shiny silver picture frame, or a polished gold bowl on a table can be very effective. These small, bright items will catch any light they can find and sparkle, making the whole room feel more alive.
DIY: Create a “Light-Catcher” Tray
What You Need:
- A serving tray (even better if it’s mirrored or metallic)
- 3 to 5 of your shiniest objects (metallic vases, candle holders, etc.)
- A soft cloth
Steps:
- Find Your Spot: Choose a surface for your display, like a console table, a side table, or a shelf.
- Polish Your Items: Use your soft cloth to wipe down all your shiny objects. Make them as reflective as possible.
- Place the Tray: Put your tray down in the spot you chose.
- Use the “Tall-Medium-Small” Rule: This is a simple design trick.
- Place “Tall”: Put your tallest object on the tray, usually in the back or to one side.
- Place “Medium”: Place your medium-sized object next to it.
- Place “Small”: Group one or two small items near the front.
- Check Your Work: The items should be close together, not spread far apart. This little “cluster” of shiny things will create a beautiful, bright focal point.
26. Choose High-Gloss Finishes

Just like shiny accessories, shiny furniture can be a huge help. This is especially true for large items like built-in cabinets, wardrobes, or media centers.
A high-gloss finish, usually in a light color like white or cream, turns a huge piece of furniture into a giant reflector. It will bounce light all over the room. This makes the furniture feel “lighter” and stops it from weighing down the space. The added LED lights in this picture also help by creating a warm glow.
DIY: Polish Your Glossy Cabinets
What You Need:
- Two clean, soft microfiber cloths
- A bowl of warm water
- A tiny drop of mild dish soap (optional)
Steps:
- Dust First: Use one of your dry microfiber cloths to gently wipe all the dust off the glossy surfaces.
- Get Your Cloth Damp: Get your second cloth slightly damp. You just need a little warm water. If the surface is greasy (like in a kitchen), add one tiny drop of soap to your water.
- Wipe it Down: Gently wipe the glossy cabinet doors. Go in the same direction (for example, all top-to-bottom).
- Buff it Dry: Immediately after wiping a section, use your first (dry) cloth to buff the surface. This is the secret!
- Buff in Circles: Rub in gentle circles until the surface is completely dry and shiny. This prevents water spots and streaks.
27. Use Plants to Frame, Not Block

Plants are great for any room, but in a dark room, where you put them is very important. A big, bushy plant placed right in front of a window will block the light.
The trick is to use plants to frame the window, not cover it. Place tall, skinny plants (like snake plants) in the corners next to the window. Or, use low, spreading plants (like pothos) on a bench below the windowsill. This way, you get the green, leafy feel without sacrificing your main source of light.
DIY: The “Low-Light” Window Planter
What You Need:
- A long, low planter box (like the one in the picture)
- A small bench or table that is lower than your windowsill
- A few plants (a mix of tall and “spilling” plants)
- Potting soil
Steps:
- Set Your Stage: Place your bench or table right in front of your window. It must be shorter than the windowsill.
- Place Your Planter: Put your empty planter box on top of the bench.
- Add Your “Thriller”: Plant your tall, skinny plant (like a snake plant) in the middle of the planter.
- Add Your “Fillers”: Plant your medium-sized, leafy plants on either side of the tall one.
- Add Your “Spillers”: Plant your “spilling” or “vining” plants (like pothos or ivy) near the edges, so they can hang down the sides.
- Fill with Soil: Add potting soil to fill in all the gaps.
- Water It: Give your new planter a good drink of water. Now you have a beautiful display that stays below the light.
28. Use Light, Textured Wallpaper

Plain white walls can sometimes feel flat or boring. If you want to add character without using a dark color, a light-colored, textured wallpaper is a great choice.
Wallpaper made from materials like grasscloth, linen, or even paintable textured paper adds depth. The texture creates tiny, subtle shadows that make the wall more interesting. When you use a light color (like beige, cream, or light gray), the surface still reflects light, but it feels warmer and more sophisticated than plain paint.
DIY: The Peel-and-Stick Wallpaper Panel
(This is a way to try out wallpaper without doing the whole room.)
What You Need:
- A grown-up
- A roll of “peel-and-stick” textured wallpaper
- A level (the tool with the bubble)
- A pencil
- A craft knife or sharp scissors
Steps:
- Find Your Wall: Pick one small, main wall to be your “accent wall.”
- Draw a Line: Have your grown-up use the level and pencil to draw one perfectly straight, vertical (top-to-bottom) line on the wall. This is your guide.
- Peel the Top: Peel back just the top 12 inches of the paper backing from your wallpaper roll.
- Stick the Top: Line up the edge of the wallpaper with your pencil line. Press the sticky top part onto the wall.
- Peel and Smooth: Slowly pull the rest of the paper backing off from behind as you use your other hand to smooth the wallpaper onto the wall.
- Get Bubbles Out: If you see an air bubble, gently peel the paper back and smooth it down again.
- Trim the Edges: Have your grown-up use the craft knife to carefully trim the extra paper at the ceiling and floor.
29. Install an Interior Glass Wall

A solid wall between two rooms creates two dark spaces. If you need to divide a room (like separating a living room from a home office), a full-on wall is the darkest option.
A much brighter solution is an interior glass partition. This can be a full wall of glass or a half-wall. It clearly defines the two spaces. But, it allows light to be shared between them, making both rooms feel larger and brighter. It’s a very modern and open way to divide a space.
DIY: The Streak-Free Glass Wall Clean
What You Need:
- A squeegee
- A spray bottle
- 1 part white vinegar
- 3 parts warm water
- A microfiber cloth
Steps:
- Mix Your Cleaner: Fill your spray bottle with the 1 part vinegar and 3 parts warm water. This is a great, cheap glass cleaner.
- Spray the Glass: Spray a section of the glass wall with your vinegar-water.
- Squeegee Time: Take your squeegee. Start at the top corner.
- Pull Straight Down: Press the squeegee to the glass and pull it straight down, from top to bottom.
- Wipe the Blade: This is the most important step! After every swipe, wipe the squeegee blade clean with your microfiber cloth.
- Overlap Your Swipe: Do your next swipe, overlapping the clean stripe by about one inch.
- Get the Edges: Use your cloth to wipe any drips from the floor or the edges of the frame.
30. Remove Heavy Window Valances

A valance is a short, decorative curtain that only covers the very top of a window. Decades ago, these were very popular. But a heavy, dark, or patterned valance can make a window feel shorter.
This thick “eyebrow” over the window can block the light that comes in from the highest angle. Removing an outdated valance is a fast, free way to “lift” the ceiling. It instantly exposes the entire window glass, maximizing the amount of light that can enter the room.
DIY: How to Remove an Old Valance
What You Need:
- A grown-up
- A step-stool
- A drill or screwdriver
Steps:
- Look Underneath: Ask your grown-up to safely stand on the step-stool and look under the valance.
- Find the Brackets: The valance is probably held up by a few small, L-shaped metal or plastic pieces called brackets.
- Find the Screws: Look for the screws that hold the valance to the brackets. Sometimes they are on the top, front, or bottom.
- Unscrew the Valance: Use your drill or screwdriver to remove these screws. The fabric part of the valance should now come free.
- Remove the Brackets: Now, you should see the screws that hold the brackets to the wall.
- Unscrew the Brackets: Have your grown-up remove these screws, too.
- Patch It Up: You will probably have a few small screw holes left in your wall. You can fill these with a tiny dab of spackle (wall putty).
31. Organize Bookshelves by Color

A large, dark bookshelf filled with books can act like a giant sponge for light. It creates a dark wall that makes a room feel heavy.
A smart trick is to organize your books in a visually lighter way. One method is to arrange them by color, putting all the white and light-colored book spines together. Another is to “reverse” some books so the pages face out. This creates a much lighter and brighter wall of books that reflects light rather than absorbing it.
DIY: The “Bright Bookshelf” Look
What You Need:
- Your bookshelf full of books
- Any light-colored decorative items you own (white vases, cream boxes, small plants)
- A dusting cloth
Steps:
- Dust First: Start by dusting all your shelves and books.
- Sort Your Books: Take all your books out and make piles. Put all the books with white, cream, or very light-colored spines in one pile. Put all the books with very dark spines in another.
- Place the Light Books: Put your light-spined books back on the shelves first. Try to keep them grouped together.
- “Reverse” Some: For some of the darker books, turn them around so the pages are facing out instead of the spine. The pages are usually a lighter color.
- Add Empty Space: Don’t fill every shelf completely. Leave some sections with just a few books, or put a light-colored decorative item there.
- Add Light Decorations: Place your white vases, cream boxes, or small plants on some of the empty spots. These also help break up the heavy look.
32. Use Strategic Uplighting

Dark corners are common in living rooms, even with good windows. These areas tend to absorb light and can make the whole room feel smaller.
Uplighting is a clever solution. This means using a light fixture that points its light upwards. Placing a small spotlight or an “up-light” fixture on the floor, pointing at a plant or a dark corner, works well. The light bounces off the ceiling and walls, pushing shadows away and making the corner feel much more expansive.
DIY: Create Your Own Uplight Feature
What You Need:
- A small, inexpensive “can light” or “puck light” (battery-operated ones are easy)
- A potted plant (even a fake one works)
- A grown-up (if using an electrical light)
Steps:
- Find Your Corner: Choose a dark corner in your living room.
- Place the Plant: Put your potted plant in that corner.
- Position the Light: Place your can light or puck light on the floor, right behind the plant. Make sure it’s pointed up towards the plant and the ceiling.
- Turn it On: If it’s battery-operated, just turn it on. If it plugs in, have a grown-up plug it into the nearest outlet.
- Watch the Magic: The light will shine up through the plant, casting beautiful, soft shadows on the ceiling and walls. This makes the corner feel warm and bright.
33. Paint Accent Walls with Mirrors

An accent wall is meant to stand out, but if it’s painted a deep, dark color, it can sometimes make a room feel smaller or heavier. You want to add interest without blocking light.
The trick is to use that dark accent wall to your advantage. Hang multiple mirrors on it, especially ones with light or ornate frames. The dark wall makes the mirrors stand out. And the mirrors themselves reflect light, turning the accent wall into a light-reflecting feature rather than a light-absorbing one.
DIY: The “Reflective Accent” Wall
What You Need:
- A dark-colored accent wall
- Three to five small to medium-sized mirrors (different shapes and frame styles are good)
- A hammer and picture-hanging hooks
- A pencil
- A grown-up
Steps:
- Lay Out Your Design: On the floor in front of your dark wall, arrange your mirrors. Play around with different layouts until you find one you like.
- Think “Balance”: Try to have a mix of shapes (round, square, oval). Make sure they are spread out and not all in one clump.
- Transfer to Wall: Have your grown-up help you hold each mirror up to the wall, one by one, to mark where the hanging hook should go.
- Hammer the Hooks: Gently hammer your picture hooks into the marked spots.
- Hang the Mirrors: Carefully hang each mirror.
- Step Back and See: The dark wall now acts as a beautiful backdrop for your bright, reflective mirrors. They will catch and bounce any light that comes into the room.
34. Update Interior Doors to Light Colors

Dark interior doors, especially several in a row, can create a sense of heaviness. They absorb light and break up the visual flow of a light-colored wall.
Painting these doors a light color, such as white, light gray, or a soft beige, makes a surprising difference. It blends them more seamlessly with the surrounding walls. This creates a more continuous and open feeling. Even better, consider a semi-gloss finish so they can subtly reflect any ambient light.
DIY: Give Your Door a Light Makeover
What You Need:
- A grown-up
- Painter’s tape
- A small roller and paint tray
- A small paintbrush
- A can of light-colored, semi-gloss paint
- Old sheets or a drop cloth
- A screwdriver (to remove handles)
Steps:
- Prepare the Area: Lay down drop cloths. Have your grown-up use the screwdriver to remove the door handle and any other hardware.
- Tape Off: Carefully apply painter’s tape around the edges of any glass (if your door has it) and the hinges.
- Clean the Door: Wipe down the door with a damp cloth to remove any dust or grime. Let it dry completely.
- First Coat: Dip your paintbrush into the paint. Paint the “panels” (the recessed areas) of the door first. Then, use your small roller for the flat parts.
- Let it Dry: Let the first coat dry. It will look better with two coats.
- Second Coat: Apply a second coat using the same method.
- Remove Tape and Hardware: Once the paint is completely dry, slowly peel off the painter’s tape. Have your grown-up put the hardware back on.
35. Install a Traditional Skylight

The ultimate source of natural light is often from above. A traditional skylight is a window installed directly into your roof.
It pours light directly down into a room, often making it feel like an outdoor space. Unlike a sun tunnel, a skylight offers a direct view of the sky. This is especially helpful for rooms on the top floor that feel perpetually dim. It introduces a flood of overhead light that windows simply cannot provide.
DIY: Clean Your Skylight’s Inner Glass
(Installing a skylight is a very complex job for professionals. This DIY focuses on keeping its inner glass clean for maximum light.)
What You Need:
- A grown-up
- A very tall, safe ladder
- Glass cleaner in a spray bottle
- Two clean microfiber cloths (one damp, one dry)
Steps:
- Safety First: This is a job that must be done by a grown-up, as it involves a tall ladder.
- Set Up Safely: Have your grown-up place the ladder securely under the skylight.
- Spray the Glass: From the ladder, spray the inside of the skylight glass with glass cleaner.
- Wipe Clean: Use the damp microfiber cloth to wipe the glass clean, getting rid of any dust, streaks, or smudges.
- Buff Dry: Immediately use the dry microfiber cloth to buff the glass until it shines. This will prevent streaks.
- Careful Exit: Have your grown-up carefully climb down the ladder. A clean skylight will let the most amount of beautiful light in.
36. Use Large, Reflective Art

Large artwork can be a powerful statement in a living room. But a dark or heavily textured painting can absorb light, especially on a lighter wall.
To maximize light, choose art that is light in color or has reflective qualities. A large piece with metallic accents, a glass frame, or a glossy finish can work wonders. The art itself becomes a light-bouncing element, not just a static decoration. This enhances the room’s brightness while still providing a strong visual focus.
DIY: Make Your Own Glossy Art Piece
What You Need:
- A grown-up
- A plain white canvas (any size you like)
- White or light-colored acrylic paint
- A small sponge or brush
- Glitter paint or a clear, glossy topcoat (available at craft stores)
Steps:
- Prepare Your Canvas: Lay your canvas on a protected surface (like newspaper).
- Base Coat: Paint the entire canvas with your white or light-colored acrylic paint. You might need two coats. Let it dry completely.
- Add Texture (Optional): Use a sponge or brush to add some subtle, light texture. You could dab on a second, slightly different shade of white. Let it dry.
- Shine Time: Now, for the light-reflecting part! Use glitter paint to add some sparkly accents to your design. Or, have a grown-up help you apply a clear, glossy topcoat over the entire canvas.
- Let it Cure: Let the topcoat dry and cure completely.
- Hang it Up: Hang your new, glossy artwork on a prominent wall. It will catch the light and make the room sparkle.
37. Place a Large Mirror in the Fireplace

Many living rooms have a fireplace that isn’t used. This dark, empty space can become a “black hole” in the room, absorbing light.
A clever trick is to place a large mirror inside the unused fireplace opening. This turns a dark, recessed area into a bright feature. The mirror reflects the light from the windows. It also creates an illusion of depth, making the room feel larger. Choose a mirror with an ornate or light-colored frame for an extra touch of brightness.
DIY: The Fireplace Mirror Makeover
What You Need:
- A grown-up
- A large mirror (make sure it’s not too heavy to move)
- A soft cloth
- Glass cleaner
Steps:
- Clean the Fireplace: If your fireplace is unused, it might be dusty. Have your grown-up clean out the inside very well.
- Clean the Mirror: Use glass cleaner and a soft cloth to clean your mirror until it sparkles.
- Position the Mirror: Ask your grown-up to carefully lift the mirror and place it inside the fireplace opening.
- Lean it Safely: Make sure the mirror is leaning safely against the back wall of the fireplace. You don’t want it to tip over.
- Check the View: Stand back and look at your work. The dark opening is now a bright, reflective spot that helps light up your whole room.
You do not have to settle for a dark, dreary living room. A bright and welcoming space is within reach, even during the shorter days of winter.
Making your home feel lighter is not about one single, expensive fix. It is about combining many small, clever actions. Each one works with the others to transform your room.
Start by choosing one or two simple tricks from this list. You will be surprised at how much of a difference a clean window, a new mirror, or a light-colored rug can make.
These methods help you manage the light you have. They reflect it into dark corners, stop it from being absorbed, and invite more of it inside. Your living room will soon feel more spacious, airy, and cheerful.
Key Takeaways
- Reflect Light: Use mirrors, metallic decor, and high-gloss paint or furniture. These surfaces bounce light around the room.
- Choose Light Colors: Paint walls and ceilings in warm, light shades. Use light-colored rugs and textiles to brighten dark furniture.
- Clear the Path: Wash your windows, trim outside bushes, and use sheer curtains. This lets the maximum amount of light enter.
- Be Smart with Furniture: Pick items with raised legs or clear acrylic. Use open-backed shelves instead of solid, bulky pieces.
- Add Mirrors Strategically: A mirror in a gallery wall, on an accent wall, or inside an unused fireplace brightens dark spots.