Does your living room feel more chaotic than calm? You look around and see stacks of magazines, tangled cables, and random items with no real home. It can feel overwhelming. A messy space often makes it hard to relax and truly enjoy your home.

But creating a tidy, organized living room doesn’t mean you have to get rid of half your belongings. The solution isn’t about having less stuff. It’s about having smarter places to put it.
We have gathered 39 clever storage ideas to help you conquer the clutter for good. From multi-functional furniture to creative DIY projects, these solutions will help you create a space that is both beautiful and organized. Get ready to transform your living room into a peaceful retreat.
1. Sleek Wall-Mounted Storage

A floating media console brings a clean, modern feel to your living room. Mounting it to the wall creates an illusion of space, making the entire area feel bigger and more open. This design removes visual weight from the floor. Its long, low profile offers plenty of surface area for a few choice decorations, like a simple vase or a stack of books.
The real benefit lies behind its handle-free doors. All your electronics, messy cables, and video games can be tucked away neatly. This leaves your entertainment area looking calm and organized. The soft lighting underneath adds a warm glow, creating a cozy atmosphere in the evening. It’s a stylish way to achieve a minimalist look.
DIY Floating Console Instructions
Let’s build a simple version of this cool floating shelf. Always have a grown-up help you with tools!
What You’ll Need:
- One long piece of wood for the top (like a 1×12 board)
- Two shorter pieces of the same wood for the sides
- Strong metal “L” brackets (at least 3)
- A drill and screws
- A level (the tool with the bubble)
- A stud finder
- Sandpaper
- Paint or wood stain
- A stick-on LED light strip
Step-by-Step Guide:
- Get Your Wood Ready: First, decide how long you want your console to be. Ask a grown-up to help you cut the long board to that size. Then, cut the two smaller side pieces to be the same height (about 10 inches is good).
- Make it Smooth: Use the sandpaper to smooth out all the cut edges on your three pieces of wood. You don’t want any splinters!
- Build the “U” Shape: Stand the two short side pieces up. Place the long top piece on them to create an upside-down “U” shape. Use your drill and screws to attach the top piece to the side pieces from above.
- Time to Paint: Now, paint or stain your wooden shelf. Choose a color that matches your room. Let it dry completely.
- Find the Strong Spots: Use the stud finder on your wall to locate the wooden studs. These are the strong beams inside the wall that will hold your shelf up safely. Mark their locations with a pencil.
- Attach the Brackets: Use your drill to screw the L-brackets into the wall where you marked the studs. Use the level to make sure the brackets are perfectly straight before you tighten all the screws.
- Put Your Shelf Up: Lift your painted shelf and place it on top of the brackets. From underneath, use your drill and more screws to attach the shelf securely to the brackets.
- Add the Glow: Take your LED light strip and peel off the sticky backing. Press it firmly onto the bottom of your shelf, near the wall. Plug it in, and your new floating console is ready!
2. Art That Hides Your Clutter

At first glance, this is a beautiful gallery wall. It shows off family photos and abstract art. But some of these frames hold a secret. They are actually small, hidden cabinets. The picture swings open or a drawer pulls out, revealing a space for things you need but don’t want to see.
This is a clever way to use wall space. You can store keys, charging cables, or spare remotes right where you need them, without a single messy bowl or basket in sight. It combines personal decoration with practical storage. Your walls become both a reflection of you and a tool for organization.
DIY Hidden Storage Frame Instructions
Let’s make a secret box behind a picture. Make sure a grown-up helps with any cutting or drilling!
What You’ll Need:
- A deep picture frame, like a shadow box.
- A small piece of thin wood or stiff cardboard.
- Four small strips of wood to make a box.
- Two very small hinges.
- A small magnet and a metal washer.
- Wood glue or super glue.
- Your picture.
Step-by-Step Guide:
- Prepare Your Frame: Take the back and the glass out of the picture frame. Put your picture aside for now.
- Build the Secret Box: Take your four wood strips. Glue them together to make a small, shallow box that can fit inside the frame. This will be your hidden compartment. Let the glue dry completely.
- Attach the Box: Glue your new shallow box onto the inside of the frame’s main body. Press it firmly against the back.
- Create the Door: The part of the frame that holds the picture will become your secret door. Take the thin piece of wood or cardboard and attach your picture to it. Then place this into the “door” part of the frame.
- Add the Hinges: With a grown-up’s help, carefully screw the tiny hinges to one side of the frame’s body and the matching side of the picture “door.” Now it can swing open and closed.
- Make it Stay Shut: Glue the magnet to the inside of the frame, opposite the hinges. Glue the metal washer to the inside of the “door” so it lines up with the magnet. This will keep your secret compartment closed.
- Hang it Up: Hang your frame on the wall. No one will know it’s full of your secret stuff!
3. A Multi-Level Perch

This piece of furniture does more than one job. It’s a comfortable seat by the window, a spot for your favorite plant, and a storage powerhouse all in one. The stepped design creates different levels for different uses, which makes it interesting to look at.
The lower section works as a bench with a soft cushion. Underneath, drawers slide out to hold things like shoes or workout gear. The higher section acts as a side table and lifts open to reveal more hidden space. It’s a smart design for a corner or entryway, turning an awkward spot into a useful and attractive nook.
DIY Tiered Storage Bench Instructions
Let’s build a cool stepped bench using wooden crates. Always ask a grown-up for help with tools!
What You’ll Need:
- Three wooden crates. Two of the same size, and one a little smaller.
- A drill and screws.
- Sandpaper.
- Paint in your favorite color.
- A piece of plywood cut to fit the top of one of the big crates.
- A piece of foam and some fabric for a cushion.
- A staple gun.
Step-by-Step Guide:
- Smooth Everything Out: Rub the sandpaper all over the wooden crates until they are nice and smooth. You don’t want any rough spots.
- Arrange Your Crates: Place the two big crates side-by-side on the floor. Now, place the smaller crate on top of one of the big ones. This creates the “steps.”
- Connect Them: Ask a grown-up to help you use the drill and screws to connect the crates. Screw the two bottom crates together first. Then, screw the top crate down onto the one below it so it’s all one solid piece.
- Time to Paint: Paint your new bench. You can make it all one color or use different colors for each crate. Let the paint dry all the way.
- Make the Cushion: Take your piece of plywood. Place the foam on top of it. Drape the fabric over the foam. Flip it all over, pull the fabric tight, and have a grown-up help you use the staple gun to attach the fabric to the back of the plywood.
- Finish Your Bench: Place your new cushion on top of the lower, empty crate. Now you have a seat and storage cubbies for your books and toys!
4. The Tidy TV Setup

This wall-mounted unit keeps the area under your television neat and clear. By floating off the floor, it makes the room feel more spacious. It’s designed with different compartments to keep all your electronics organized and out of sight.
The doors flip down, giving you easy access to your game consoles, streaming devices, and sound system. A dedicated section in the middle keeps all the wires and power strips hidden, solving the biggest source of clutter. A small shelf on the side is just right for your Wi-Fi router. It is a very clean and efficient setup.
DIY Floating Media Box Instructions
We’ll build a simple floating box for under the TV. Get a grown-up to help you hang it on the wall!
What You’ll Need:
- A wooden crate.
- A piece of plywood cut to the same size as the crate’s opening.
- Two hinges.
- A small handle or knob.
- A drill and screws.
- Sandpaper and paint.
- Strong wall brackets (like “L” brackets) to hold it.
Step-by-Step Guide:
- Get Your Crate Ready: Sand the wooden crate so it’s smooth. Paint it a color you like and let it dry.
- Make the Door: Take the piece of plywood and sand and paint it, too. This will be the door for your media box.
- Attach the Door: Ask a grown-up to help you screw the hinges onto the bottom edge of the crate’s opening. Then, screw the other side of the hinges to the bottom edge of your plywood door. Your door should now flip down.
- Add a Handle: Screw the knob or handle onto the front of the door so it’s easy to open.
- Make a Hole for Wires: Have a grown-up drill a large hole in the back of the crate. This is where all the cords for your video games will go through.
- Hang it on the Wall: This is the most important step! A grown-up needs to find the strong studs in the wall and securely screw the “L” brackets into them.
- Place Your Box: Rest your finished media box on the brackets. Screw the box onto the brackets from the top or bottom so it won’t fall. Now you can hide your electronics inside!
5. The Spinning Bookshelf

This bookshelf takes a fun turn. It’s built as a tower that spins around, making it easy to grab what you need. This design is great for smaller rooms or corners because it packs a lot of storage into a small footprint. You don’t need a lot of wall space.
The different-sized cubes are good for more than just books. You can store board games, craft supplies, or display your favorite trinkets. The mix of natural wood and black sections gives it a modern look. It’s a playful piece that is also very useful for staying organized.
DIY Simple Spinning Organizer Instructions
Let’s make a small spinning tower for your desk or floor. Ask a grown-up to help with the spinning part.
What You’ll Need:
- Two small, square pieces of wood.
- A “Lazy Susan” spinner from a hardware store. It’s a flat, metal circle that spins.
- A wooden crate or a sturdy cardboard box.
- A drill or a strong screwdriver.
- Small screws that came with the Lazy Susan.
- Paint or cool stickers for decorating.
Step-by-Step Guide:
- Create the Base: You have two square pieces of wood. One is the very bottom, and the other will be what your box sits on.
- Attach the Spinner: The Lazy Susan has two metal plates with holes in them. With a grown-up’s help, screw one plate to the center of the bottom piece of wood. Then, screw the other plate to the center of the second piece of wood. Now your two wood squares are connected by the spinner. Give it a spin!
- Get Your Box Ready: Take your crate or box and decorate it. You can paint it or cover it with fun stickers.
- Put it all Together: Place your decorated box on top of the spinning wood square. Make sure it’s in the center. Have a grown-up help you put screws through the bottom of the spinning square up into the bottom of your box.
- Start Organizing: Your spinning tower is ready! You can put your favorite books, art supplies, or small toys in it.
6. Seats That Store and Stow

This collection of ottomans offers a smart solution for seating and storage. The larger pieces work as footrests or extra seats, and their lids lift to reveal storage space inside. They are great for stashing away blankets, toys, or board games.
The cleverest part is how they nest together. A smaller ottoman can tuck away under the larger one, or they can be grouped to form a coffee table. When you need more floor space, you can hide the smaller piece completely. This flexibility is useful for living rooms where you need furniture to adapt to different activities.
DIY Storage Stool Instructions
Let’s turn a simple wooden crate into a comfy seat with secret storage.
What You’ll Need:
- A sturdy wooden crate.
- A piece of plywood that fits just on top of the crate.
- A piece of thick foam, the same size as the plywood.
- A piece of fabric that is bigger than the plywood.
- A staple gun (a grown-up’s tool).
- Sandpaper.
- Paint or wood stain.
Step-by-Step Guide:
- Prepare the Crate: Use the sandpaper to make your crate smooth all over. Then, paint or stain it and let it dry. This will be the base of your stool.
- Make the Comfy Top: This will be your lid. Lay your fabric on the floor with the nice side facing down. Put the foam in the middle of the fabric. Place the plywood on top of the foam.
- Upholster the Lid: Have a grown-up help you with this part. Fold the edges of the fabric over the plywood and use the staple gun to staple it down tightly. Do this all the way around so the foam and plywood are covered, making a cushion.
- Finish Your Stool: Place your new cushioned lid on top of the crate. That’s it! Now you have a comfy place to sit, and you can lift the lid to hide your treasures inside the crate.
7. The Sofa-Sidekick Table

That awkward, empty space behind your sofa has a purpose. A thin console table fits there neatly, creating a useful surface without taking up floor space. It’s a good spot to place a lamp for reading, a cup of tea, or your favorite decorations.
This table also adds two extra shelves below for storing books, magazines, or baskets of odds and ends. A very handy feature is the built-in power outlet. You can easily charge your phone or laptop right from the comfort of your couch. It turns a forgotten zone into a functional hub.
DIY Simple Sofa Table Instructions
Let’s build a super easy table to go behind your couch.
What You’ll Need:
- Three wood boards. Ask a grown-up to help you get them cut at the store. You need one long one for the top, and two shorter ones for the legs.
- A drill and wood screws.
- Sandpaper.
- Paint or wood stain.
- A power strip with a long cord.
Step-by-Step Guide:
- Measure Your Couch: First, measure how tall and how long your couch is. You want your table to be a little shorter than the back of the couch, and about the same length.
- Build the Table Shape: Stand the two shorter “leg” boards up. Lay the long “top” board across them, making a simple table shape. Have a grown-up help you drill screws down through the top board into the leg boards to connect them securely.
- Make it Smooth and Pretty: Use sandpaper to smooth any rough edges. Then, paint or stain your new table to match your room. Let it dry completely.
- Add Power: Take your power strip. You can use small clips or even strong tape to attach it to the underside of the tabletop, where no one will see it.
- Set it Up: Carefully slide your new table into the space behind your couch. Run the power strip cord to the nearest wall outlet. Now you have a place for a lamp and a spot to charge your tablet!
8. The Convertible Coffee Table

This coffee table is more than just a place for your feet. Its top lifts up and moves forward, turning into a comfortable surface for working on a laptop or enjoying a snack. This feature is great for small spaces where you don’t have room for a separate desk.
Beneath the lift-top is a large, hidden storage area. It’s deep enough to hold a laptop, books, and controllers, keeping your tabletop clear. The open shelves on the sides offer extra spots for easy-to-reach items. It’s a smart, hardworking piece of furniture.
DIY Storage Coffee Table from Crates
The lift-up part is tricky, so let’s make a cool coffee table with lots of storage cubbies instead.
What You’ll Need:
- Four wooden crates of the same size.
- A large square piece of plywood for the tabletop.
- A drill and screws.
- Sandpaper.
- Paint or wood stain.
- Four small furniture legs (optional).
Step-by-Step Guide:
- Prep Your Crates: Sand all four crates until they are smooth. Then paint or stain them and let them dry.
- Arrange the Base: Lay the crates on their sides on the floor. Arrange them so their openings are all pointing outwards, away from the center. Push them together so they form a bigger square with a small, empty square hole in the very middle.
- Connect the Crates: Use your drill and screws to attach the crates to each other where they touch. This makes the base strong.
- Add Legs (If You Want): If you have furniture legs, ask a grown-up to help you screw one onto each bottom corner of your crate base.
- Attach the Top: Place your big square of plywood on top of the crate base. Make sure it’s centered. Have a grown-up help you drill screws down through the plywood into the walls of the crates below to secure it.
- Fill it Up: Your new coffee table is ready! You have four big cubbies to fill with books, games, and baskets.
9. A Wall of Possibilities

Turn a blank wall into a fully customized storage and display area with a large pegboard. This system is incredibly flexible. You can arrange hooks, shelves, and baskets in any way you like, and change it whenever you want.
It’s strong enough to hold almost anything. Books, plants, art supplies, and even small bicycles can find a home here. A pegboard brings order to a collection of different items, keeping them off the floor and surfaces. It’s a solution that adapts to your life, making it easy to keep your living room organized.
DIY Pegboard Wall Instructions
Let’s put up a pegboard! This is a job where you’ll definitely need a grown-up’s muscles and help with the tools.
What You’ll Need:
- A big sheet of pegboard.
- Four wood strips (like 1×2 boards).
- A drill and screws.
- A level (the tool with the bubble).
- A stud finder.
- Pegboard hooks, baskets, and shelves.
Step-by-Step Guide:
- Build a Frame: You need a little space behind the pegboard for the hooks to go in. Ask a grown-up to make a rectangle frame with the wood strips that is the same size as your pegboard. They should screw this frame onto the back of the pegboard.
- Find the Strong Wall Spots: A grown-up will use the stud finder to find the strong wooden beams inside your wall. They should mark these spots with a pencil. You must hang the pegboard on these strong spots.
- Lift and Level: With your helper, hold the pegboard up against the wall. Place the level on top and wiggle the board until the bubble is exactly in the middle. This means it’s straight.
- Attach it to the Wall: While one person holds the board steady, the other person will use the drill to drive long screws through the front of the pegboard, through the wood frame on the back, and into the strong studs in the wall. Use several screws along the top and bottom.
- Time to Organize: The hard part is over! Now you can have fun putting all the hooks, shelves, and baskets into the holes. Arrange them to hold all your favorite things.
10. The Storybook Wall

Instead of a bulky bookcase, these slim ledges offer a light and airy way to store books. They are often called picture ledges, but they are great for displaying children’s books or your favorite magazines.
Mounting books this way, with the covers facing out, turns them into art. It creates a colorful, inviting wall that encourages reading. You can easily see all your options and grab the one you want. This method saves a lot of floor space and adds a huge amount of personality to a reading nook or any empty wall.
DIY Book Ledge Instructions
Let’s build these simple ledges to show off your books.
What You’ll Need:
- For each shelf, you need three pieces of wood: one wide piece (like a 1×4) and two thinner pieces (like 1x2s).
- Wood glue.
- A drill and screws.
- A level.
- A stud finder.
- Sandpaper and paint.
Step-by-Step Guide:
- Build the “L” Shape: Take the wide 1×4 board. This will be the back of your shelf that goes against the wall. Squeeze a line of wood glue along the long edge of one of the thin 1×2 boards. Press this glued edge onto the face of the wide board, right at the bottom. Have a grown-up help you drill a few screws through the back of the wide board into the thin board to hold it tight.
- Add the Front Lip: Now take your second thin 1×2 board. This will stop the books from sliding off. Squeeze glue along its long edge and press it against the front edge of the bottom piece. Secure it with a few screws from underneath.
- Make it Look Nice: Use sandpaper to smooth your new shelf. Paint it any color you want and let it dry.
- Hang it on the Wall: Ask a grown-up to use the stud finder and level to hang your shelves. They need to be screwed into the strong studs in the wall so they can hold the weight of your books. Make a few shelves and hang them one above the other to create your book wall!
11. The Hidden Space Under Your Couch

The area under your sofa is often forgotten. But with a few rolling bins, it becomes valuable storage space. These low-profile crates and baskets are fitted with wheels, so they slide out easily when you need them.
This is a great place to keep things you don’t use every day. Store extra blankets, board games, or seasonal pillows out of sight but within reach. It keeps your living room floor clear and makes cleaning much simpler. You are using every available inch of your room in a smart way.
DIY Rolling Storage Crate Instructions
Let’s make a simple crate that rolls. Always have a grown-up help you with the drill!
What You’ll Need:
- A shallow wooden crate or a sturdy basket.
- A thin piece of plywood cut to the same size as the bottom of the crate.
- Four small caster wheels.
- A drill and small screws/bolts.
- Sandpaper.
- Paint (optional).
Step-by-Step Guide:
- Prepare Your Crate: If you’re using a wooden crate, sand it down so it’s nice and smooth. You can paint it if you want to.
- Make a Strong Base: If you are using a basket, you need a solid base for the wheels. Place the plywood inside the basket, at the very bottom.
- Attach the Wheels: Turn your crate or basket upside down. Place one caster wheel at each corner of the plywood base.
- Screw Them On: Ask a grown-up to help you use the drill. If you’re using a wooden crate, they can drill screws through the holes in the wheels directly into the bottom of the crate. For a basket, they’ll drill through the wheel, the plywood, and the basket, possibly using a small bolt and nut to hold it tight.
- Ready to Roll: Flip it back over. Your new rolling bin is ready to be filled up and slid under the couch!
12. Carve Out Storage in Your Walls

Built-in wall niches turn a flat wall into a feature. They use the space between the wall studs to create small, recessed shelves. This adds depth and character to a room without taking up any floor space.
These alcoves are a beautiful way to display your favorite things. A single vase, a small stack of books, or a piece of art can be highlighted. Painting the inside of the niche a contrasting color, as seen here, makes it pop even more. It’s an elegant solution that feels custom and thoughtful.
DIY Faux Wall Niche Instructions
Building a real niche is a big job. So let’s make a box that looks like a niche you can hang on the wall.
What You’ll Need:
- A shallow wooden box or crate.
- A piece of thin plywood for the back.
- Wood glue and small nails.
- A saw to cut an arch (a grown-up’s job).
- Sandpaper.
- Two different colors of paint.
- Picture hanging hardware.
Step-by-Step Guide:
- Build the Box: If you don’t have a box, you can make one. You’ll need four pieces of wood. Glue and nail them together to form a rectangle.
- Add the Back: Glue and nail the piece of thin plywood onto the back of your box frame.
- Create the Arch: This is for a grown-up. They will need to draw an arch shape on the front of the box and carefully cut it out with a saw.
- Sand Everything: Use sandpaper to make all the edges of your new niche-box smooth.
- Time to Paint: Paint the outside of the box the same color as your wall. Then, paint the inside of the box a fun, different color. Let it dry completely.
- Hang it Up: Ask a grown-up to help you attach the picture hanging hardware to the back. Then, hang it on your wall. It will look like it’s built right in!
13. A Power-Up Hub in a Drawer

Cables and chargers create visual clutter on any surface. A dedicated charging drawer is the answer. It keeps all your electronics and their messy cords hidden away while they power up.
Inside, dividers keep everything organized. Cords stay untangled and devices are easy to find. A power strip is placed inside the drawer or just behind it, so you only have one main cord running to the wall. This simple idea transforms a messy junk drawer into a highly functional and tidy tech hub.
DIY Charging Drawer Instructions
Let’s turn one of your drawers into a secret spot to charge your gadgets.
What You’ll Need:
- An empty drawer in a desk or cabinet.
- A power strip.
- A drill with a large drill bit (for a grown-up).
- Drawer dividers or small cardboard boxes.
- Zip ties or velcro strips for cables.
Step-by-Step Guide:
- Empty the Drawer: Take everything out of the drawer you want to use.
- Make a Path for the Cord: Ask a grown-up to carefully pull the drawer out of the furniture. They will need to drill a hole in the very back of the drawer, big enough for the power strip’s plug to fit through.
- Set Up the Power: Feed the power strip’s plug through the new hole from the inside. Place the power strip itself inside the drawer. Put the drawer back into the furniture and plug the cord into the wall.
- Get Organized: Place your drawer dividers or small boxes inside the drawer. This will create separate spots for your phone, tablet, and power banks.
- Tidy the Cables: Plug your charging cables into the power strip. Neatly roll up any extra cable length and use a zip tie to keep it tidy. Now you can close the drawer on all that mess!
14. Storage That Embraces Awkward Spots

Radiators can be awkward and unsightly. This clever built-in surrounds a radiator cover with beautiful and useful shelving. It transforms a purely functional part of the room into a stunning focal point.
The tall bookshelves on either side provide plenty of storage for books and decorative items. The surface above the radiator cover becomes a console table, a great spot for lamps and family photos. This design proves that you can build around obstacles to create a seamless and organized look.
DIY Radiator-Area Bookshelves Instructions
A full built-in is for experts. Let’s create the same look using two separate bookcases.
What You’ll Need:
- Two tall, narrow bookshelves that are the same size.
- A small table or bench that is shorter and narrower than the space between the bookshelves.
- Paint to match everything.
- “L” brackets to secure the shelves to the wall.
Step-by-Step Guide:
- Find Your Spot: Find the radiator or the spot on the wall where you want your “built-in” to be.
- Assemble Your Shelves: Build your two bookshelves according to their instructions.
- Paint Everything: If your shelves and table are different colors, now is the time to paint them all the same color. This will make them look like one single piece of furniture. Let the paint dry.
- Place the Pieces: Place the small table or bench against the wall. Then, place one bookshelf on each side of it, pressing them close to the table.
- Make it Safe: Ask a grown-up to use the “L” brackets to attach the top of each bookshelf to the wall. This is very important so they cannot tip over.
- Decorate: Now you can fill your shelves with books and put lamps on the table. It looks like a custom piece!
15. Tidy Storage for Your Furry Friend

Pet supplies can easily take over a corner of the living room. This all-in-one station neatly contains everything your pet needs in one compact piece of furniture. It looks like a stylish end table, so it blends in with your decor.
The top surface has built-in bowls for food and water, keeping them off the floor. The lid lifts up to reveal a storage compartment for toys, leashes, and bags of food. Below, a cozy opening provides a comfortable bed. It’s a smart way to pamper your pet while keeping your space tidy.
DIY Pet Station from a Crate Instructions
Let’s make a simple house and dining spot for your small pet.
What You’ll Need:
- A large, sturdy wooden crate.
- A jigsaw (a tool for a grown-up).
- Sandpaper.
- A small pillow or pet bed that fits inside.
- Your pet’s food and water bowls.
Step-by-Step Guide:
- Make an Entrance: Lay the crate on its side. Ask a grown-up to draw an arch or a circle on one of the side panels. They will use the jigsaw to carefully cut out this shape to make a doorway for your pet.
- Smooth it Out: Use sandpaper on all the edges of the crate, especially the new doorway you just cut. You want it to be very smooth so your pet doesn’t get any splinters.
- Create the Dining Area: Turn the crate so the open side is facing up. This is the top of your pet station. Place your pet’s food and water bowls on top. You can even trace around them and have a grown-up cut holes for the bowls to sit inside.
- Make it Cozy: Put the pillow or pet bed inside the crate through the new doorway.
- All Done: Place the station against a wall. Now your pet has a special spot for eating and sleeping, and you can store their toys inside too!
16. Go Vertical with Your Storage

When floor space is limited, think upwards. A tall, slender cabinet like this one makes excellent use of vertical space. It provides a lot of storage without a large footprint, making it a great choice for smaller rooms or alcoves.
The glass door on the top half allows you to display your favorite glassware or collectibles while keeping them free from dust. An internal light makes them glow. The solid cabinet door at the bottom is for hiding things you need but don’t want to see, like extra linens or serving dishes.
DIY Simple Display Tower Instructions
Let’s upgrade a narrow bookshelf to look like a fancy cabinet.
What You’ll Need:
- A tall, narrow bookshelf.
- A piece of plywood cut to fit the bottom half of the bookshelf’s opening.
- Two hinges.
- A handle or knob.
- A drill and screws.
- Paint.
- A stick-on, battery-powered “puck” light.
Step-by-Step Guide:
- Build Your Bookshelf: Assemble the bookshelf following its directions.
- Make a Door: Take the piece of plywood. Paint it the same color as the bookshelf, or a fun accent color. Let it dry. This will be your door.
- Attach the Door: Ask a grown-up to help you. You are going to put this door on the bottom half of the bookshelf. Screw the hinges to one side of the door, and then to the inside edge of the bookshelf.
- Add the Handle: Screw the knob or handle onto the front of your new door.
- Add a Light: Take the sticky puck light and press it onto the underside of one of the top shelves inside the bookshelf.
- Display Your Things: Put your prettiest items on the open shelves at the top. Hide your other stuff behind the door at the bottom.
17. Weave Storage into Your Wall Decor

This wall arrangement is both art and organization. A collection of flat, woven baskets creates a stunning, textured display. The different patterns and sizes add a warm, natural feel to the room. It’s an interesting alternative to traditional framed pictures.
Mixed in with the decorative plates are a few deeper baskets. These are perfect for dropping mail, magazines, or newspapers into. It keeps paper clutter off your tables while contributing to the overall look. This idea cleverly combines form and function.
DIY Basket Wall Instructions
This DIY is all about arranging, not building. It’s super easy!
What You’ll Need:
- A collection of baskets. Get flat, decorative ones and a few deeper ones for holding things.
- Small nails and a hammer.
- Picture hanging hooks for the heavier baskets.
Step-by-Step Guide:
- Plan Your Layout: Before you hammer any nails, lay all your baskets out on the floor. Move them around until you find an arrangement you love. Start with the biggest basket in the middle and work your way out.
- Start Hanging: Ask a grown-up to help you. Start by hanging your biggest basket in the center of the wall space you want to cover. For lightweight, flat baskets, a small nail through the weave will work.
- Add the Others: One by one, hang the rest of your baskets around the center one, following the pattern you made on the floor.
- Hang the Storage Baskets: For the heavier, deeper baskets you will use for storage, have a grown-up use a proper picture hanging hook to make sure they are secure.
- Fill Them Up: Once everything is on the wall, you can put your mail or a small plant in the deeper baskets. Your wall is now beautiful and useful!
18. A Modern, Modular Approach to Shelving

Modular shelving offers ultimate flexibility. This unit is made of simple cubes that are stacked in a stair-step pattern. This asymmetrical shape is more dynamic than a standard bookcase and can be arranged to fit perfectly under a window or along a sloped ceiling.
The open cubes are great for books, records, and displaying decor. Adding woven baskets to some of the cubes provides concealed storage for smaller, messier items. You get the best of both worlds: open display and hidden organization. The mix of wood and white keeps the look light and modern.
DIY Simple Cube Shelves Instructions
Let’s build a few simple boxes you can stack any way you want.
What You’ll Need:
- Plywood or MDF boards. For each box, you need four pieces of the same size.
- Wood glue.
- A drill and screws.
- Sandpaper and paint.
- Baskets that fit inside your cubes.
Step-by-Step Guide:
- Get Your Wood Cut: The easiest way is to ask a grown-up to have the wood cut into squares at the hardware store. For example, get twelve 12-inch squares to make three boxes.
- Build a Box: Take four of your squares. Stand two of them up on their edges. Put glue on the side edges and press the other two squares against them to form a box with no front or back.
- Make it Strong: Ask a grown-up to help you drill screws through the outside of the box into the edges of the other boards. This makes the box very strong.
- Repeat: Build as many boxes as you want to stack.
- Make them Pretty: Sand all the edges of your boxes until they are smooth. Paint them and let them dry.
- Stack Them Up: Now for the fun part! Stack your boxes on the floor. You can line them up, or make a pyramid, or a stair-step shape like in the picture. For safety, if you stack them high, ask a grown-up to help you screw them to each other and to the wall.
19. Close the Doors on Your Workday

Finding a dedicated workspace in a living room can be tough. This “office in a cabinet” is a brilliant solution. A handsome armoire opens up to reveal a complete, compact workstation inside.
Everything has its place: a shelf for the monitor, a pull-out tray for the laptop, and storage for paper and supplies. The inside of the doors are fitted with cork boards for pinning notes. The best part is that at the end of the day, you can simply close the doors. All the work-related clutter disappears, and your room is a relaxing living space again.
DIY Office Cabinet Instructions
Let’s turn an old wardrobe or cabinet into a secret office.
What You’ll Need:
- An old armoire, wardrobe, or large cabinet.
- A thick, sturdy piece of wood for a desk shelf.
- Strong shelf brackets.
- A drill and screws.
- A hole saw attachment for the drill (for a grown-up).
- Stick-on cork tiles.
Step-by-Step Guide:
- Clean Your Cabinet: First, empty and clean the cabinet you’re going to use.
- Install the “Desk”: Decide how high you want your desk to be (sit in a chair to check). Have a grown-up help you install the strong shelf brackets on the inside of the cabinet. Then, place your sturdy wood shelf on top and screw it into the brackets. Make sure it’s very strong.
- Make a Path for Cords: A grown-up will need to use the hole saw on the drill to cut a round hole in the back of the cabinet. This is where you will pass through all the computer cords.
- Add Note Boards: Peel the back off the sticky cork tiles and press them firmly onto the inside of the cabinet doors. Now you have a place for notes and pictures.
- Set Up Your Office: Place your computer and supplies inside. You can add more small shelves above the desk if you have room. Your secret office is ready!
20. The Tidy Tower for Your Tabletop

Coffee tables and end tables often become magnets for clutter. A tiered tray is a simple and stylish way to bring order to these small items. It uses vertical space to organize things, keeping the tabletop itself from looking crowded.
This galvanized metal tray gathers everything in one place. Remotes, coasters, reading glasses, and keys all find a home on its different levels. Adding a small plant and a candle makes it a decorative centerpiece. It’s an easy trick to make your living room feel more intentional and put-together.
DIY Tiered Tray Instructions
Let’s make a cool tiered tray using stuff from the dollar store.
What You’ll Need:
- Two or three round cake pans or pizza pans in different sizes (small, medium, large).
- Two glass or metal candlesticks.
- Strong glue, like E6000 or super glue (use with a grown-up).
- Spray paint.
Step-by-Step Guide:
- Paint Your Pieces: If you want, spray paint your pans and candlesticks all one color. A metallic or matte black color looks great. Let them dry completely in a well-ventilated area.
- Build the First Layer: Take your biggest pan and place it on the table. Squeeze a circle of strong glue on the bottom of one of your candlesticks. Press it down firmly right in the center of the big pan. Let it sit for a few minutes to get sturdy.
- Add the Next Tier: Now, squeeze a circle of glue on the top of that candlestick. Carefully take your medium-sized pan and place it on top, making sure it’s centered. Press down gently.
- Add the Top Tier (Optional): If you have a third pan and a second candlestick, you can repeat the process to add one more level. Glue the second candlestick to the center of the middle pan, then glue the smallest pan on top.
- Let it Dry: The most important step! Do not touch or move your new tray for at least 24 hours. The glue needs a long time to dry completely and become very strong. After that, it’s ready to organize your stuff!
21. Cozy Corner with Clever Hiding Spots

A built-in window seat is a charming addition to any living room. It offers a comfortable spot to relax and enjoy the view. What makes this design especially useful is the clever storage tucked underneath.
Instead of empty space, you find pull-out drawers and open cubbies for baskets. This makes it an amazing place to store blankets, books, or extra pillows. The cushions lift up to reveal even more space, proving that beauty and utility can coexist. It transforms a sunny nook into a multi-functional area.
DIY Window Seat Storage Box Instructions
Building a full window seat is a big project, but let’s make a great storage box that can sit under a window.
What You’ll Need:
- A large, sturdy wooden box or a strong wooden crate (you might need two if you want it long).
- A piece of plywood cut to fit the top of your box(es).
- Two hinges (if you want the top to open).
- A comfy foam cushion and some fabric.
- A staple gun (for a grown-up).
- Sandpaper and paint.
- Four small caster wheels (optional).
Step-by-Step Guide:
- Prepare the Box: Sand your wooden box until it’s smooth. Paint it a color that matches your room and let it dry.
- Make it Roll (Optional): If you want it to move easily, turn the box upside down. Ask a grown-up to screw a caster wheel onto each corner of the bottom.
- Create the Top: Take your piece of plywood. If you want an opening top, ask a grown-up to screw the hinges onto one long edge of the plywood and then to the top back edge of the box.
- Make the Cushion: Place the foam on the plywood. Drape the fabric over the foam, making sure you have extra on the sides. Flip it over. Pull the fabric tightly around the back of the plywood and have a grown-up use the staple gun to secure it.
- Place it: Put your new storage box under the window. If the top opens, you can easily store toys or blankets inside. If it doesn’t, just lift the cushion off to get to your stuff!
22. Vanishing Shelves for a Light Look

These shelves appear to float on the wall, almost disappearing into the background. Made of clear acrylic or glass, they offer a very modern and minimalist way to display items. They are especially good for small spaces because they don’t add visual bulk.
The clear material allows your books and objects to take center stage, creating an uncluttered feel. They reflect light, making the room feel brighter and more open. These shelves are a chic way to show off your personality without overwhelming the wall.
DIY Clear Floating Shelf Instructions
Making truly clear floating shelves that are super strong is a bit advanced. Let’s make some simple shelves using clear plastic and hidden brackets.
What You’ll Need:
- Clear acrylic or thick clear plastic sheets (ask a grown-up to help you cut them to size).
- Small “L” shaped metal brackets (the kind that are painted white or silver to blend in).
- A drill and screws.
- A level.
- A pencil.
Step-by-Step Guide:
- Plan Your Shelves: Decide how many shelves you want and where they will go on the wall. Mark the spots lightly with a pencil.
- Attach the Brackets: For each shelf, you will need at least two brackets. Have a grown-up use the drill and screws to attach the brackets to the wall. Use the level to make sure they are perfectly straight.
- Place the Clear Shelf: Carefully place one of your clear plastic sheets on top of the brackets. The brackets should be hidden mostly underneath the shelf.
- Secure (Optional): If you want the shelves to be extra secure, you can use a tiny dab of clear super glue (with a grown-up’s help) to glue the plastic shelf to the top of the brackets.
- Display: Now you can put your favorite lightweight books or small decorations on your “floating” shelves!
23. Steps That Hide Your Stuff

The side of a staircase is often wasted space. This brilliant design turns each step into a hidden drawer. It is an amazing way to create a huge amount of storage in a place you might never think of.
Each drawer pulls out smoothly, revealing space for shoes, gloves, keys, or even sports equipment. This keeps your entryway or hallway completely free of clutter. The built-in look makes it seem like a natural part of the stairs, proving that every nook and cranny can be used for organization.
DIY Under-Stair Storage Boxes Instructions
Building drawers into stairs is a very big job for expert builders. Let’s make some cool storage boxes that look like they belong there, using a narrow side table.
What You’ll Need:
- A tall, narrow side table with several open shelves or cubbies.
- Several small wooden boxes or baskets that fit perfectly into the shelves.
- Labels for your boxes.
- Paint (optional).
Step-by-Step Guide:
- Find Your Table: Look for a tall, narrow table with at least three or four open shelves. This will be your “under-stair” storage unit.
- Get Your Boxes: Find small wooden boxes or sturdy baskets that fit snugly into each shelf of your table.
- Paint (Optional): You can paint the table and the boxes the same color to make them look like one piece. Let them dry.
- Place it: Put your table against the wall right next to the stairs.
- Organize and Label: Fill each small box or basket with different things: one for shoes, one for gloves, one for small toys. Put a clear label on the front of each box so you know what’s inside.
- Slide Them In: Slide your labeled boxes into the shelves of the table. Now you have super organized storage right next to your stairs!
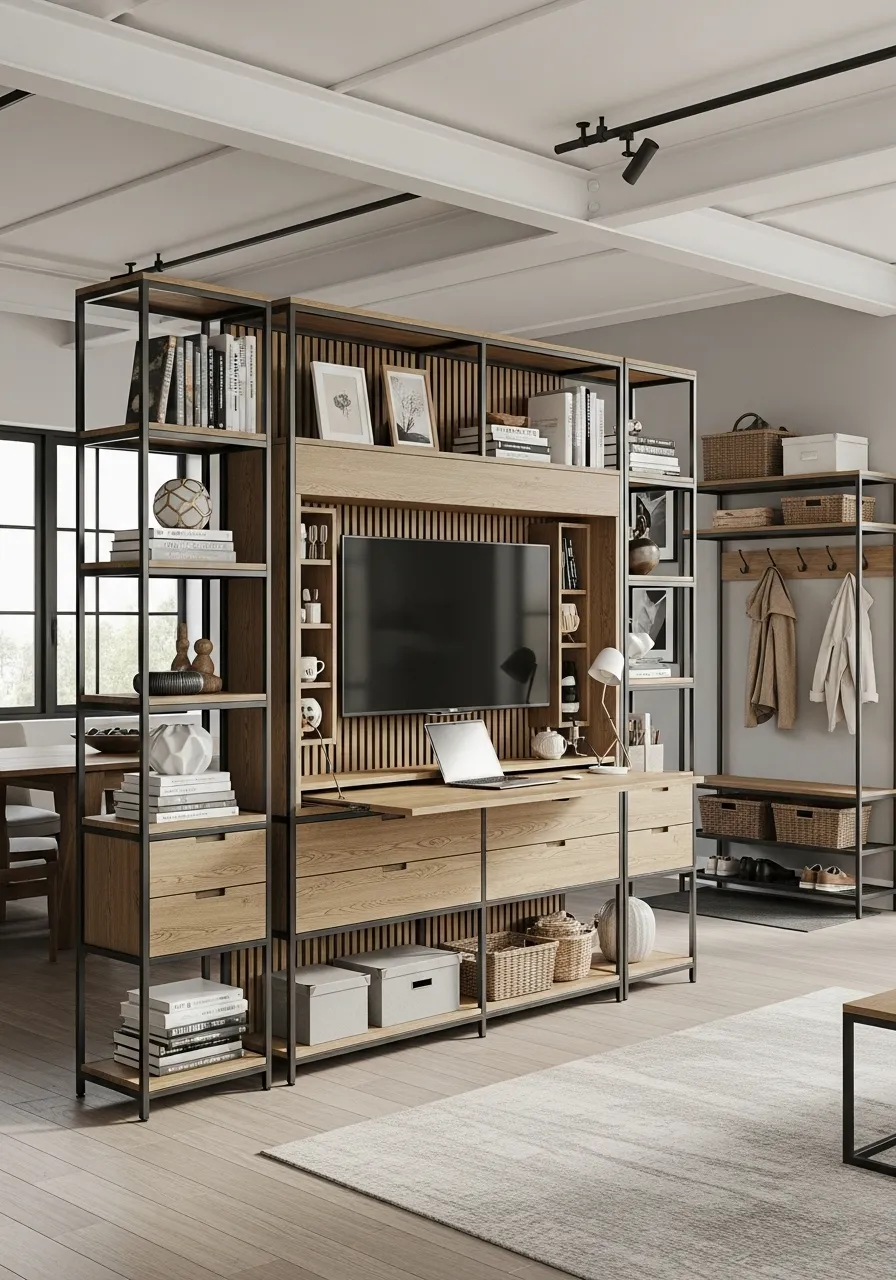
24. The Wall That Does It All

This large, custom-built unit covers an entire wall, providing comprehensive storage for a living room. It’s a true room divider and organizer, with a place for everything from your TV to your coat.
It combines open shelving for books and display items with closed drawers and cabinets for hiding clutter. A central section is dedicated to the television and includes a desk area. On the side, a special nook is designed for an entryway with hooks for coats and a bench for shoes. It’s an impressive, integrated solution that makes the most of every square inch.
DIY Sectional Storage Wall Instructions
Building a unit this big is a pro job. Let’s make a smaller version using a few simple bookshelves and a media console.
What You’ll Need:
- Two tall, open bookshelves (the same size).
- A media console or long, low cabinet.
- A drill and screws.
- “L” brackets to secure to the wall.
- Matching baskets or storage boxes.
Step-by-Step Guide:
- Assemble Furniture: Build your two bookshelves and your media console according to their instructions.
- Arrange the Main Pieces: Place the media console against the wall where you want your TV to go. Then, place one bookshelf on each side of the media console, pushing them close together. This creates your big storage wall.
- Secure to the Wall: This is important for safety! Have a grown-up use the “L” brackets to attach the tops of the bookshelves to the wall. This stops them from tipping over. You can also use small screws to connect the console to the bookshelves if they are the same height.
- Add Storage: Fill the open shelves with books and your favorite things. Put the matching baskets or boxes onto some of the shelves to hide smaller items.
- Create a “Desk” (Optional): If your media console has a flat top, you can use a chair and it can become a temporary desk space.
25. Reflection That Hides Secrets

This elegant mirror is more than just a place to check your reflection. It slides open to reveal a hidden storage cabinet behind it. This makes it a multi-tasking piece of furniture that is especially useful in an entryway or a bedroom.
Inside, you’ll find hooks for keys, shelves for small items, and even places to hang jewelry. It keeps all your everyday essentials neatly tucked away, yet easily accessible. The mirror design means it doesn’t take up visual space, while still providing amazing organization.
DIY Hidden Mirror Cabinet Instructions
Making a mirror slide open is tricky. Let’s make a mirror that looks like it has a secret storage part you can put things on.
What You’ll Need:
- A rectangular mirror with a thick frame.
- A small, shallow wooden box that is narrower than your mirror’s frame.
- Strong glue (like E6000 or construction adhesive).
- Two small cup hooks.
- Two small shelves made from thin wood.
Step-by-Step Guide:
- Prepare the Mirror: Make sure the back of your mirror’s frame is clean.
- Make the Storage Box: Take your small wooden box. This box will sit in front of the mirror, appearing to be a hidden compartment. If it has a lid, take it off.
- Add Shelves and Hooks: Glue the two small shelves inside your box. Screw the two cup hooks into the top inside edge of the box. These hooks are for hanging keys.
- Attach to Mirror: Now, you’re going to glue the back of this storage box to the front of the mirror’s frame. Make sure it’s centered. Put a generous amount of strong glue on the back edges of the box and carefully press it onto the mirror frame.
- Let it Dry: This is important! You need to let the glue dry for at least 24 hours (or even longer, check the glue’s instructions). You can use painter’s tape to hold the box in place while it dries.
- Hang and Organize: Once it’s totally dry, hang your mirror on the wall. Now you have a beautiful mirror with a built-in spot to organize your keys and small items!
26. Floating Farmhouse Style Shelves

These unique shelves hang from the ceiling, giving a strong, industrial-meets-farmhouse vibe. The combination of thick, natural wood and dark metal supports creates a bold statement. Hanging shelves are a clever way to add storage without crowding the walls below.
They provide open display space for books, plants, and decorative objects. The lower metal grid also offers a spot for hooks, making it useful for hanging mugs or notes. These shelves are a creative solution for showcasing your personality and adding a touch of rustic charm.
DIY Hanging Shelf Instructions
Building these shelves safely requires expert help. Let’s make a similar-looking shelf unit that hangs on the wall, not from the ceiling.
What You’ll Need:
- Three pieces of sturdy wood for your shelves.
- Two long metal pipes or thick dowels.
- “L” brackets to hold the shelves to the wall.
- A drill and screws.
- Sandpaper and wood stain.
- A metal grid or small piece of wire rack.
- Small “S” hooks.
Step-by-Step Guide:
- Prepare the Wood: Sand your wooden shelves until they are smooth. Stain them with a wood stain to give them a rustic look. Let them dry.
- Assemble the “Pipes”: This is where you need a grown-up. They will need to drill holes through the shelves so the pipes can pass through, or you can attach the pipes between the shelves using small brackets.
- Attach to Wall: Use the “L” brackets to secure the shelves to the wall. Make sure they are level. The pipes should run vertically between the shelves, making it look like they are hanging.
- Add the Grid: Screw the metal grid to the underside of the lowest shelf.
- Decorate: Now you can put your books and plants on the shelves. Hang your “S” hooks on the grid to hold small items.
27. Secret Storage Disguised as Literature

This charming end table holds a secret. It looks like a stack of classic, leather-bound books, but it’s actually a clever storage cabinet. The top lifts up, and a side door opens to reveal hidden space.
This piece of furniture brings a touch of old-world charm to a living room while offering practical storage. You can hide remote controls, small treasures, or even a secret snack stash inside. It’s a playful and sophisticated way to keep clutter out of sight.
DIY Faux Book Storage Box Instructions
Let’s make a storage box that looks like a stack of big books!
What You’ll Need:
- A sturdy rectangular wooden box with a lid (like a craft box).
- Pictures of old book spines printed out on paper (ask a grown-up to help you find and print them).
- Craft glue or Mod Podge.
- Paint for the “pages” of the books (light yellow or white).
- Small hinges (if your box doesn’t have them).
- A small handle.
Step-by-Step Guide:
- Prepare the Box: Sand your wooden box if it’s rough. Paint the sides of the box a light yellow or white. This will be the “pages” of your books. Let it dry.
- Print Book Spines: Find pictures of old book spines online. Try to find ones that are the right size for the side of your box. Print them out.
- Glue on the Spines: Cut out the individual book spines. Use craft glue to carefully glue them onto the front long side of your box, making them look like a row of books.
- Cover the Lid: You can either glue more book spines onto the top of the lid, or paint it a solid color to look like the top covers of the books.
- Make it Strong: If your box doesn’t have hinges, ask a grown-up to screw two small hinges onto the back of the lid and the back of the box so it opens and closes easily.
- Add a Handle: Screw a small handle onto the front of the lid. Now you have a very cool “book” cabinet to hide your stuff!
28. Maximize That Awkward Corner

Corners are often difficult to furnish. This tall, slender corner unit makes the most of that neglected space. Its triangular shape fits snugly into any corner, providing a lot of storage from floor to ceiling without getting in the way.
It offers a mix of open shelving for displaying plants and decor, along with a closed cabinet at the bottom for hiding bulkier items. This unit makes a small footprint feel very functional. It’s a smart way to add both storage and decorative appeal to a room.
DIY Corner Shelf Unit Instructions
Building a proper corner unit is tough. Let’s make a simple stack of shelves for your corner using individual corner shelves.
What You’ll Need:
- Several individual corner shelves (these are usually triangular).
- A drill and screws.
- A level.
- A pencil.
- Paint (optional).
- A small, simple cabinet to go at the bottom.
Step-by-Step Guide:
- Paint (Optional): If your shelves and cabinet are different colors, paint them all the same color to make them look like one unit. Let them dry.
- Place the Cabinet: Put the small cabinet into the corner of your room. This will be the base of your tower.
- Mark for Shelves: Above the cabinet, decide where you want your shelves to go. Use the pencil to mark the spot for each shelf.
- Install the Shelves: Ask a grown-up to help you use the drill and screws to attach each corner shelf to the wall. Use the level to make sure each shelf is perfectly straight before you tighten the screws.
- Stack Them Up: Continue adding shelves above the first one, making sure they are evenly spaced and straight.
- Decorate: Once all your shelves are up, you can put your coffee maker on the cabinet and fill the shelves with plants, books, and small decorations.
29. Soft Storage for Small Items

Sometimes, the simplest solutions are the best. This fabric wall organizer features multiple pockets of different sizes. It’s a great way to keep small items off your tables and within easy reach.
Each pocket can hold remotes, mail, pens, notebooks, or charging cables. The different colors of fabric add visual interest, making it a decorative piece as well as a functional one. Hanging from a simple dowel, it’s a flexible and space-saving way to tackle everyday clutter.
DIY Fabric Pocket Organizer Instructions
Let’s make a super easy hanging pocket organizer!
What You’ll Need:
- A long piece of sturdy fabric (like canvas or denim).
- Smaller pieces of fabric for the pockets (different colors are fun!).
- A sewing machine or needle and thread (ask a grown-up for help with sewing).
- A wooden dowel or a sturdy stick.
- A piece of rope or string for hanging.
Step-by-Step Guide:
- Cut the Main Piece: Cut your main, long piece of fabric to the size you want your organizer to be.
- Prepare the Pockets: Cut your smaller pieces of fabric for the pockets. Make them different sizes.
- Sew the Pockets: Fold over the top edge of each pocket piece and sew it down to make a nice hem.
- Attach Pockets to Main Fabric: Lay your main fabric flat. Arrange the pockets on it, leaving space between them. Pin them in place. Ask a grown-up to help you sew the pockets onto the main fabric, sewing along the sides and bottom of each pocket. You can sew a line down the middle of big pockets to make two smaller ones.
- Make a Loop for Hanging: Fold over the very top edge of your main fabric (about 2 inches) and sew it down. This creates a loop.
- Add the Dowel and Rope: Slide your wooden dowel through the loop. Tie a piece of rope or string to each end of the dowel.
- Hang and Fill: Hang your new organizer on the wall. Now you can fill the pockets with your pens, mail, and other small treasures!
30. Greenery and Goods in One Spot

If you love plants but also need more storage, this piece combines both. It’s a stylish plant stand with open shelves and a small cabinet at the bottom. This allows you to bring nature indoors while keeping your living room tidy.
The open shelves are perfect for showing off potted plants and a few favorite books. The enclosed cabinet offers hidden storage for cleaning supplies, gardening tools, or other items you want out of sight. It’s a beautiful way to integrate your love for plants with practical home organization.
DIY Plant Stand with Storage Instructions
Let’s make a fun plant stand with a hidden storage box at the bottom.
What You’ll Need:
- A sturdy wooden crate.
- Four tall wooden dowels (these will be the “legs” or posts for your shelves).
- Two smaller pieces of wood for shelves.
- A drill and screws.
- Wood glue.
- Sandpaper and paint.
- Small plants and pots.
Step-by-Step Guide:
- Prepare the Base: Sand your wooden crate and paint it a pretty color. Let it dry. This will be your hidden storage cabinet at the bottom.
- Drill Holes for Dowels: Ask a grown-up to help you drill four holes, one in each corner of the top of the crate. The holes should be just big enough for the wooden dowels to fit into.
- Insert the Dowels: Put some wood glue into each hole, then push the wooden dowels into the holes. These are the main posts for your shelves.
- Add the Shelves: Measure how high you want your shelves. Ask a grown-up to mark these spots on your dowels. They will need to drill small holes through the dowels at these marks, and then screw your small wooden shelves onto the dowels.
- Paint (Optional): You can paint the dowels and shelves after they are attached, or before.
- Decorate: Once everything is dry and sturdy, put your favorite small plants on the shelves and use the crate at the bottom for hidden storage.
31. A Traveler’s Trunk with a Secret

A vintage trunk brings a sense of history and adventure to a room. Used as a coffee table, it offers a large, sturdy surface and a ton of character. The stickers and worn hardware tell a story. Its greatest feature, however, is the massive storage space inside.
The entire top lifts, revealing a deep compartment for blankets, photo albums, or anything you want to hide. This one adds another layer of organization with a rolling drawer underneath. This drawer pulls out to reveal smaller bins, great for sorting vinyl records or magazines.
DIY Rolling Trunk Tray Instructions
Let’s make a simple rolling tray to go underneath your existing trunk or coffee table.
What You’ll Need:
- A piece of plywood cut slightly smaller than the bottom of your trunk.
- Four small caster wheels.
- A drill and screws.
- Sandpaper.
- Paint or wood stain.
- Three small fabric bins or boxes.
Step-by-Step Guide:
- Prepare the Base: Sand the edges of your plywood piece so it’s smooth. Paint or stain it a color that matches your trunk or room. Let it dry.
- Attach the Wheels: Turn the plywood base over. Have a grown-up help you use the drill to screw one caster wheel onto each corner of the board.
- Ready to Roll: Flip your new rolling platform back over.
- Add the Bins: Place your three fabric bins onto the platform. You can use a little bit of strong glue or velcro on the bottom of the bins to keep them from sliding around.
- Slide it Under: Push your new rolling tray under your trunk. Now you can easily pull it out whenever you need to get your things.
32. Hide the Screen with Farmhouse Flair

Sometimes, the big black rectangle of a television can dominate a room. This media console solves that problem with a sliding barn door. It brings a warm, rustic touch to the entertainment center.
When you’re not watching TV, you can slide the wooden door in front of the screen. This hides the electronics and turns your media unit into a simple, attractive piece of furniture. The open shelves around it are great for displaying decor, making the whole wall feel more balanced and less focused on technology.
DIY Sliding Panel for a Bookshelf Instructions
Let’s add a simple sliding cover to an open bookshelf. This is a bit tricky, so have a grown-up help you.
What You’ll Need:
- A piece of thin, lightweight plywood cut to the size of one of the bookshelf’s openings.
- Two small eye hooks.
- A long, thin metal rod or dowel.
- Two hooks or brackets to hold the rod.
- A small handle.
- Paint.
- Curtain rings with clips.
Step-by-Step Guide:
- Prepare the “Door”: Paint your piece of plywood. You can paint a “Z” on it to make it look like a barn door. Let it dry. Screw a small handle onto the front.
- Mount the Rod: Ask a grown-up to install the two brackets above the bookshelf opening. Place the metal rod onto the brackets.
- Attach the Clips: Slide the curtain rings onto the rod.
- Hang the Door: Use the clips on the curtain rings to clip onto the top of your painted plywood “door.”
- Slide Away: Now you can slide your panel back and forth along the rod to cover up the stuff on your shelf!
33. Turn Your Instruments into Wall Art

Guitars and other instruments can take up a lot of floor space in their cases. This wall-mounted holder is a smart way to store them safely while also showing them off. It turns your instruments into a piece of decorative art.
This organizer not only holds the guitars securely by their necks but also includes a small, tiered shelf. This little shelf is a great spot to keep all the necessary accessories together. Tuners, picks, and capos have their own dedicated home, so you’ll never have to search for them again.
DIY Guitar Hanger with Shelf Instructions
Let’s build a simple plaque to hang one guitar and its accessories.
What You’ll Need:
- A nice piece of wood (like a 1×6 board, about 2 feet long).
- A wall-mount guitar hook (you can buy these at a music store).
- A small piece of wood for a shelf.
- Two small “L” brackets.
- A drill and screws.
- Sandpaper and wood stain.
Step-by-Step Guide:
- Prepare the Plaque: Sand your long piece of wood until it’s very smooth. Use wood stain to make it look nice and let it dry. This is your main plaque.
- Attach the Guitar Hook: Following the instructions that came with the guitar hook, have a grown-up help you screw it securely onto the top half of your wooden plaque.
- Add the Shelf: Take your small shelf piece and the two “L” brackets. Screw the brackets to the bottom of the shelf piece. Then, screw the other side of the brackets onto the bottom half of your main plaque.
- Hang it on the Wall: This is the most important part. A grown-up needs to find a strong stud in the wall and use long screws to attach your finished plaque very securely to the wall.
- Hang Your Guitar: Now you can hang your guitar on the hook and put your picks and tuner on the little shelf.
34. The Couch Companion Table

An end table is useful, but a C-table is even better. The base of this table is designed to slide right under your sofa. This allows you to pull the tabletop over the armrest or your lap, bringing your laptop or a cup of coffee closer to you.
What makes this C-table special is the built-in fabric organizer. The soft pockets hang down the side, providing the perfect home for tablets, magazines, and remote controls. It keeps all your couch-side necessities tidy and within arm’s reach.
DIY Couch Arm Organizer Instructions
Let’s make a simple fabric organizer that you can drape over the arm of your sofa.
What You’ll Need:
- A long piece of sturdy fabric (like canvas or felt).
- A few smaller pieces of fabric for pockets.
- A sewing machine or needle and thread.
- A small piece of stiff cardboard (optional).
Step-by-Step Guide:
- Measure Your Couch Arm: Drape your long piece of fabric over the arm of your couch. You want it to hang down on both the inside and the outside. Cut it to the length you want.
- Make the Pockets: Cut out your smaller pieces of fabric for the pockets.
- Sew the Pockets: Hem the top edge of each pocket. Then, ask a grown-up to help you sew the pockets onto the side of the fabric that will hang on the outside of the couch.
- Make a Flat Top (Optional): If you want a flat spot for a drink, you can sew a pocket on the very top of the fabric where it sits on the couch arm. Slide the stiff piece of cardboard into this pocket to create a mini-table.
- Drape and Fill: Drape your finished organizer over the arm of your couch. The weight of the fabric on the inside should hold it in place. Now you can fill the pockets with your remote controls and books!
35. Rustic Storage in an Unused Fireplace

A non-working fireplace can sometimes look like a dark, empty hole in the wall. Filling it with neatly stacked logs turns it into a beautiful, rustic feature. It brings natural texture and a cozy feeling to the room, even without a fire.
Stacking different types of wood, like birch and oak, adds visual interest with their varied colors and bark. This simple idea is a very effective way to make a fireplace feel intentional and decorative. It’s a storage solution that is purely for style.
DIY Faux Firewood Bundle Instructions
Let’s create a bundle of logs that you can place in your fireplace nook.
What You’ll Need:
- A collection of logs or thick branches, cut to the same length.
- A piece of stiff cardboard.
- A hot glue gun (use with a grown-up).
- A piece of rope or twine.
Step-by-Step Guide:
- Measure Your Nook: Measure the inside of your fireplace to see how big your log bundle should be. Cut your piece of cardboard to be the base.
- Glue the First Layer: This is a job for a grown-up. Have them put a line of hot glue on the cardboard base. Press the first row of logs into the glue.
- Build Upwards: Continue adding layers of logs, gluing them to the layer below. You are building a small, sturdy wall of logs.
- Let it Dry: Let the glue cool and harden completely.
- Tie it Up (Optional): For a rustic look, you can wrap the rope or twine around your finished log bundle and tie a knot.
- Place it: Carefully slide your finished firewood bundle into the fireplace. It looks great and you can easily take it out to clean.
36. The Fold-Down Entertainment Station

For those who love to entertain but are short on space, a wall-mounted murphy bar is a great solution. When closed, it looks like a sleek, modern cabinet. It takes up very little room on your wall.
When you open it, it transforms into a complete mini-bar. The door folds down to become a sturdy surface for mixing drinks. Inside, you’ll find custom spots for wine bottles, glassware, and tools. A mirrored back and small lights add a touch of glamour. It’s a sophisticated and space-saving way to store your collection.
DIY Simple Wall-Mounted Cabinet Instructions
Let’s make a simple fold-down shelf.
What You’ll Need:
- A shallow wooden box or crate.
- A piece of plywood cut to the same size as the box’s opening (this is the door).
- Two strong hinges.
- Two lengths of sturdy chain.
- A small latch or hook to keep it closed.
- A drill and screws.
Step-by-Step Guide:
- Prepare the Box and Door: Sand and paint your wooden box and your plywood door. Let them dry.
- Attach the Door: Ask a grown-up to help you. Screw the hinges to the bottom edge of the box and the bottom edge of the door. The door should now be able to fold up and down.
- Add the Chains: Screw one end of each chain to the top corners of the door. Open the door so it’s flat (like a table). Pull the chains up to the inside of the box and screw the other ends in. The chains will hold the door level.
- Add the Latch: Screw the latch onto the top of the door and the box so you can keep it closed.
- Mount it on the Wall: This is important for safety. A grown-up must find the strong studs in the wall and use long screws to attach the back of the box securely to the wall.
37. The Reader’s Side Table

This end table has a cool, mid-century modern style. The clean lines of the wood top and metal frame give it a light, airy feel. It provides a simple surface for a lamp or a drink.
What makes it special is the integrated sling underneath. Made of leather and cane webbing, it creates a V-shaped holder that is great for magazines, newspapers, or a book. It keeps your reading material organized and off the tabletop, blending storage seamlessly into the table’s design.
DIY Magazine Sling Instructions
Let’s make a simple sling you can add to a small bench or table.
What You’ll Need:
- A sturdy piece of fabric (like canvas, denim, or vinyl).
- A sewing machine or strong fabric glue.
- A small bench or a simple four-legged stool.
- A staple gun (a grown-up’s tool).
Step-by-Step Guide:
- Measure Your Fabric: Turn your bench or stool upside down. Drape your piece of fabric between two of the legs, letting it hang down to create a “U” shape. Cut the fabric so you have a few extra inches on each side.
- Hem the Edges: Fold over the edges of your fabric piece and sew them or glue them down. This stops the fabric from fraying.
- Attach the Sling: This part is for a grown-up. They will use the staple gun to attach the fabric sling securely to the inside of the bench’s legs or frame. Use lots of staples to make sure it’s strong enough to hold magazines.
- Flip it Over: Turn your bench right-side up. Your new magazine sling is ready to be filled!
38. Your Living Room’s Command Center

This is not just a coffee table; it’s a piece of technology. This smart table brings incredible convenience and organization to your living room, hiding its many features within a sleek, modern design.
It features multiple drawers for customized storage, including a refrigerated drawer to keep drinks cool. It has built-in USB ports for charging all your devices, and even a wireless charging spot on top. With so many functions packed into one piece, it eliminates the need for extra cables and side tables, keeping your space ultra-organized.
DIY “Smart” Coffee Table Upgrade Instructions
A real smart table is complex. Let’s upgrade a regular coffee table to be a little bit smarter.
What You’ll Need:
- A simple coffee table with a shelf underneath.
- A power strip with USB ports and a long cord.
- A drill (for a grown-up).
- Small hooks or cable clips.
- A basket or box that fits on the bottom shelf.
Step-by-Step Guide:
- Plan Your Power: Decide where you want the power strip to be. Hiding it on the underside of the tabletop is a good spot.
- Mount the Power Strip: Ask a grown-up to help you. They can use small screws or strong double-sided tape to attach the power strip to the bottom of the coffee table, where it can’t be seen.
- Manage the Cord: Use the small hooks or cable clips to run the power strip’s main cord along one of the table legs so it’s neat and tidy on its way to the wall outlet.
- Create a Charging Station: Place your basket on the bottom shelf of the coffee table. Have a grown-up drill a hole in the back of the basket.
- Connect it: Run a few charging cables from the USB ports on your power strip, down to the bottom shelf, and through the hole into the basket. Now you can place your devices in the basket to charge them out of sight.
39. The Casual Catch-All Ladder

A decorative ladder is a stylish and relaxed way to add vertical storage to a room. Leaning against the wall, it takes up very little floor space. It’s a very popular choice for a modern farmhouse or bohemian style.
Instead of just holding blankets, this ladder is fitted with shallow box shelves. This makes it much more versatile. You can use it to hold folded throws, decorative pillows, or even books. It keeps cozy essentials off the sofa and turns them into a tidy, artful display.
DIY Blanket Ladder with Shelves Instructions
Let’s build a simple ladder and add some box shelves to it.
What You’ll Need:
- Two long pieces of wood for the sides of the ladder.
- Three or four wooden dowels for the rungs.
- A drill and wood screws.
- Wood glue.
- Two shallow wooden boxes or crates.
- Sandpaper and paint or stain.
Step-by-Step Guide:
- Build the Ladder: Lay your two long wood pieces on the floor. Decide where you want your dowel “rungs” to go and mark the spots. Have a grown-up help you drill holes for the rungs. Put glue in the holes, insert the dowels, and add a screw from the outside for extra strength.
- Make it Pretty: Sand your new ladder until it’s smooth. Paint or stain it and let it dry.
- Attach the Shelves: Take your two shallow wooden boxes. You can simply rest them on the rungs of the ladder. For more security, have a grown-up help you put a screw through the back of the box and into the ladder rung to hold it in place.
- Lean and Load: Carefully lean your finished ladder against the wall. Now you can drape blankets over the empty rungs and place folded towels or pillows in the box shelves.
Creating a tidy living room is within your reach. You don’t need a bigger space, just smarter solutions. By looking at your room differently—seeing the potential in empty walls, under furniture, and inside existing decor—you can unlock a huge amount of storage.
The key is to find ideas that work for your lifestyle and your home’s unique layout. Start with one small project. Whether you build a simple rolling crate or hang a few shelves, each step will bring you closer to a calm, clutter-free space you love spending time in.
Key Takeaways
- Think Vertically: Use your wall space. Tall, slender cabinets, floating shelves, and hanging organizers draw the eye upward and keep floors clear.
- Choose Multi-Functional Furniture: Look for pieces that do more than one job, like storage ottomans, lift-top coffee tables, and benches with built-in drawers.
- Use Hidden Spaces: The area under your sofa, the empty space behind it, and non-working fireplaces are all potential storage spots.
- Hide Clutter in Plain Sight: Use decorative boxes, baskets, and even faux books to conceal small, messy items while adding style to your room.
- DIY Your Solutions: Many of the most effective storage ideas can be created with simple materials, allowing you to customize a solution that perfectly fits your space and budget.