A messy living room can quickly become a source of stress. This central space, meant for relaxation and unwinding, deserves to be organized and inviting. Achieving a truly tidy space often means looking beyond simply tidying up surfaces.

We need clever solutions that maximize every inch of space, especially those often overlooked vertical or hidden areas. The best storage hacks not only conceal clutter but also enhance the room’s overall style and functionality.
This comprehensive guide explores forty smart, beautiful storage ideas and organization hacks. You will find inventive furniture conversions, easy DIY projects, and architectural tricks to keep your living area clean, comfortable, and clutter-free. Get ready to transform your home with these practical and stylish solutions.
1. Modular Media Wall for Maximum Storage
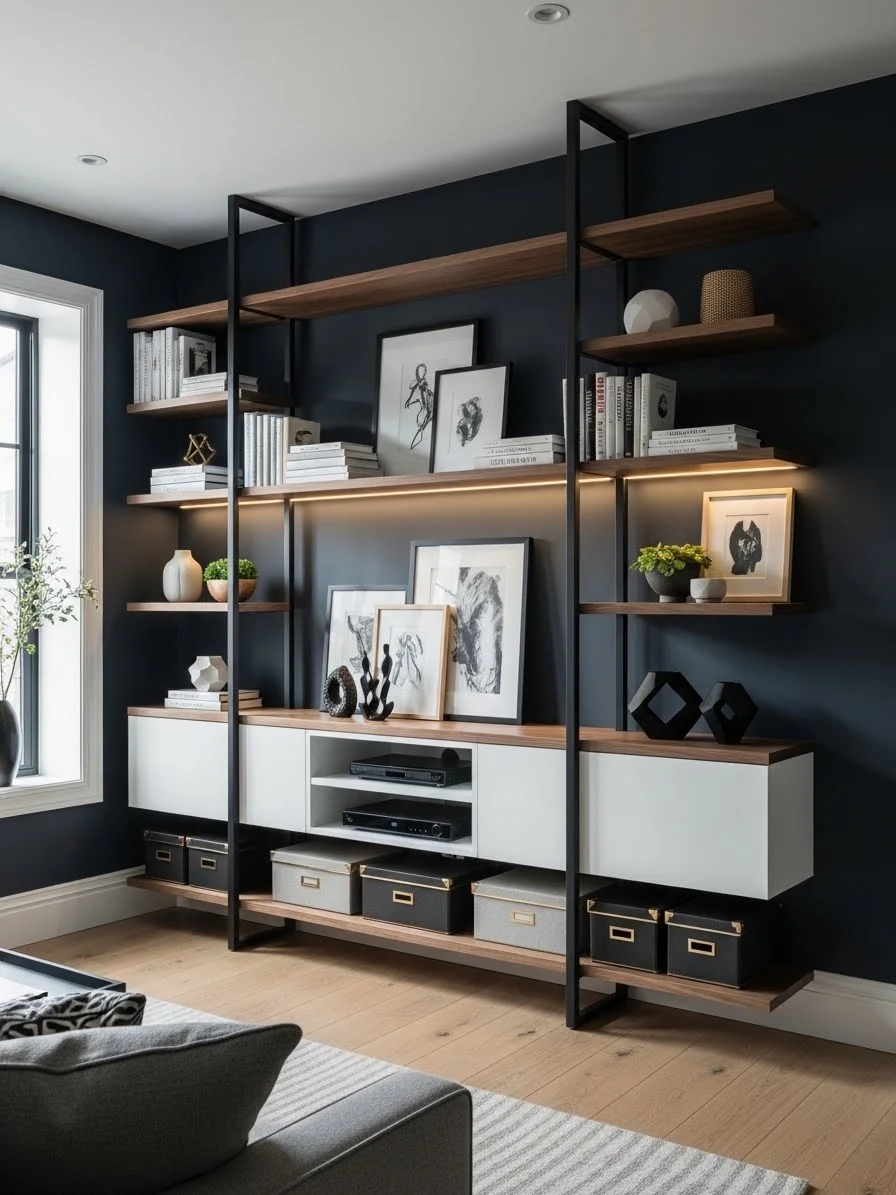
Item Name: Industrial Floating Storage Console

A beautiful living room setup demands functional yet stylish storage, and this custom unit certainly delivers. Featuring a striking design, this piece mixes the warmth of dark wood shelves with a clean, crisp white lower console. The black metal frame provides a strong, modern, and slightly industrial anchor against the deep navy wall color.
Look closer at the many organization options available here. The closed lower cabinets are fantastic for hiding away unsightly items like remote controls, cables, or seldom-used electronics. Several sleek black and gray storage boxes fit neatly beneath the console, offering organized space for toys, magazines, or movie collections.
This sophisticated system cleverly incorporates open shelving above the media center. These shelves beautifully display decorative items, books, and framed art. Subtle, integrated LED strip lighting runs along the bottom of the upper shelves, illuminating the display items and adding wonderful ambient light to the entire space. It’s an elegant solution for keeping a living area organized and visually appealing.
DIY Custom Industrial Console
While building an exact replica requires professional construction, a similar, highly customizable look can be achieved using heavy-duty industrial shelving components combined with prefabricated cabinets. This approach allows you to tailor the unit to your wall dimensions and storage needs.
Materials Required List
- Four heavy-duty steel pipe shelving uprights (floor-to-ceiling height)
- Wooden shelves (4-6 pieces, desired width and depth, stained a dark walnut color)
- One prefabricated two-door or three-drawer floating cabinet (for the central console)
- LED strip lighting kit with adhesive backing
- Various screws and heavy-duty wall anchors (appropriate for your wall type)
- Wood screws (for attaching shelves to uprights)
- Touch-up paint (to match your wall color)
Equipment Required List
- Power drill and various drill bits
- Stud finder
- Level (long construction level is best)
- Measuring tape
- Screwdriver set
- Safety glasses
- Miter saw (if you need to cut shelves to length)
- Pencil
DIY Instruction Step by Step
- Plan and Measure: Carefully decide on the placement of your console on the wall. Use the measuring tape to determine the exact height and width. Use a pencil to mark the locations where the vertical metal uprights will attach to the wall studs or ceiling/floor.
- Install Uprights: Locate the wall studs using the stud finder. Attach the first metal upright securely to the wall, making sure it is perfectly vertical using the level. Repeat this process for the remaining uprights, ensuring the spacing matches your shelf lengths. Use heavy-duty wall anchors if attaching to drywall where studs are not available, following the anchor manufacturer’s instructions exactly.
- Mount Floating Console: Following the cabinet manufacturer’s instructions, mount the prefabricated floating cabinet at your desired height (usually about 24-30 inches from the floor). Use the level to make certain the console hangs perfectly straight and is securely anchored to the wall studs. This forms the base of your media center.
- Install Shelves: Begin adding the wooden shelves to the uprights. Start with the shelf immediately above the console. Use the level to verify the shelf is perfectly horizontal before securing it with wood screws to the metal uprights. Continue attaching the remaining shelves, maintaining consistent spacing between them for a balanced look.
- Add Lighting: Measure the length needed for the LED strips. Peel the adhesive backing and carefully affix the strip lights to the underside of the shelves you wish to illuminate (typically the upper shelves or the shelf directly over the console). Conceal the wires neatly, often by running them along the back of the metal uprights or inside the console unit. Plug in the system and test the lighting.
- Finishing Touches: Fill any exposed screw holes with wood filler or cover them with touch-up paint. Place your storage boxes beneath the console and style your shelves with books, art, and decorative objects.
2. Comprehensive Built-in Entertainment Center
Item Name: Multifunctional Board Game Cabinet

This expertly designed built-in unit demonstrates how to maximize storage while maintaining an elegant appearance. Finished in a sophisticated muted blue-green color, the cabinetry wraps around the television, blending seamlessly into the room’s architecture. The design integrates multiple storage types, ensuring a spot for every living room item.
Notice how the large drawers at the bottom are specifically organized. These deep pull-outs provide easy access and generous space for storing bulky board games, making family game night setup straightforward. The drawers above these feature woven baskets, which are handy for keeping smaller items like remote controls, charging cables, or controllers neatly contained yet easily accessible.
Closed cabinets flank the television, offering concealed shelving for books or media collections, keeping them dust-free. The clever cabinet doors above and beside the TV retract or swing open, revealing a large screen and shallow shelving for easy access to frequently used items. This custom carpentry solution eliminates clutter beautifully, focusing the room on style and organization.
DIY Built-in Look with Standard Cabinets
You can achieve the customized, built-in aesthetic without custom carpentry by carefully assembling and trimming standard stock cabinets. This project focuses on integrating a media center with organized drawers.
Materials Required List
- Two tall stock base cabinets (with doors)
- One wide stock media console base cabinet (designed for electronics, or use drawer bases)
- Two sets of deep drawer slides and hardware (if converting the console cabinet)
- Decorative trim molding (crown molding and baseboard)
- Large sheet of plywood or MDF (for the TV niche/surround)
- White countertop material (butcher block or laminate)
- Paint (Muted blue-green satin finish)
- Primer
- Caulk
- Cabinet knobs and pulls
Equipment Required List
- Power drill and various drill bits
- Miter saw (essential for cutting precise angles on trim)
- Table saw or circular saw (for cutting plywood/MDF)
- Level (long construction level)
- Measuring tape
- Stud finder
- Safety glasses
- Paint brushes and rollers
- Clamps
DIY Instruction Step by Step
- Prepare and Assemble Cabinets: Assemble the base cabinets according to the manufacturer’s directions. Prime and paint all cabinet pieces and the plywood/MDF panels in your chosen blue-green color before installation, applying several thin coats for a smooth finish. Allow plenty of time for drying.
- Position and Secure Bases: Determine the exact center of your wall. Place the wide media console cabinet in the center, flanked by the two tall base cabinets. Use shims to ensure all cabinets are level and plumb (vertically straight). Screw the cabinets into the wall studs through the back mounting rails for security. Screw the cabinets together where they meet.
- Install Countertop: Place the prepared white countertop material over the base cabinets, ensuring it is flush with the front edges. Secure the countertop to the cabinet frames using screws from underneath.
- Build the TV Niche: Measure the exact dimensions of your TV. Construct a frame for the TV niche using the painted plywood or MDF, creating the upper section and the side shelves that will house the TV. This frame should sit directly on top of the installed countertop and align with the flanking base cabinets. Secure this frame to the wall studs and the cabinet below.
- Add Trim Molding: This step is crucial for the built-in look. Cut and attach the decorative crown molding to the top of the entire unit and the baseboard molding along the bottom front edge. Use the miter saw to achieve precise 45-degree angles at all corners. Nail the trim securely.
- Finishing and Touch-ups: Apply a bead of caulk to all seams where the trim meets the walls and the cabinets, giving it a seamless, professional appearance. After the caulk dries, apply touch-up paint where necessary. Install your chosen knobs and pulls on the cabinet doors and drawers.
3. Artistic Floating Display Boxes
Item Name: Transparent Cube Wall Shelves

This image showcases an inventive and modern approach to displaying treasured items. Two distinct arrangements of clear and smoked acrylic boxes create captivating visual interest on a plain white wall. These transparent cubes offer a dust-free and elegant way to highlight small collections or decorative objects.
On the left, a tall, narrow stack of smoked acrylic boxes presents a sleek, uniform look. Each box contains delicate pieces, perhaps jewelry or small figurines, neatly organized one above the other. This vertical arrangement makes a strong, sculptural statement, drawing the eye upwards.
To the right, a more playful and dynamic cluster of clear acrylic cubes forms an asymmetrical pattern. These boxes hold a variety of items, from natural stones and a small potted plant to more refined jewelry displays. The transparency of the cubes allows the wall color to show through, creating a light and airy feel. This creative use of wall space keeps items contained yet visible, preventing clutter while adding a touch of gallery-like sophistication.
DIY Floating Acrylic Display Boxes
Creating your own floating display boxes from acrylic sheets requires precision and specialized adhesive, but the result is a clean, modern look. This project focuses on assembling simple open-front cubes.
Materials Required List
- Acrylic sheets (various thicknesses, at least 1/8 inch or 3mm recommended for rigidity)
- Acrylic solvent cement (like Weld-On #3 or #4, not regular super glue)
- Applicator bottle for solvent cement (often comes with the cement)
- Fine-grit sandpaper (400-600 grit)
- Rubbing alcohol or acrylic cleaner
- Soft, lint-free cloths
- Wall anchors and screws (appropriate for the weight of your finished boxes and contents)
- Small metal L-brackets (optional, for extra secure wall mounting)
Equipment Required List
- Acrylic sheet cutter or scoring tool (for straight cuts) OR access to a laser cutter/plastic fabrication shop
- Clamps or masking tape (for holding pieces while bonding)
- Level
- Measuring tape
- Power drill (for wall mounting)
- Safety glasses and gloves (when working with solvent cement)
DIY Instruction Step by Step
- Cut Acrylic Pieces: Purchase pre-cut acrylic squares and rectangles, or cut your own from larger sheets using an acrylic cutter. For each cube, you will need five pieces: one back, two sides, one top, and one bottom. Ensure all edges are perfectly straight and square. If cutting yourself, score deeply with the cutter and then snap cleanly.
- Edge Preparation: Gently sand the edges of each acrylic piece with fine-grit sandpaper. This creates a slightly rougher surface for better adhesion. Clean all pieces thoroughly with rubbing alcohol and a lint-free cloth to remove any dust or oils.
- Assemble the First Box: Place the back piece flat on a clean, level surface. Apply a thin, even bead of acrylic solvent cement along one edge of a side piece. Carefully press this side piece perpendicular to the back piece, aligning the edges precisely. Hold it firmly in place with clamps or masking tape for a few minutes while the cement begins to bond.
- Complete the Cube: Repeat the bonding process for the other side piece, then the top, and finally the bottom piece. Ensure all joints are square and tight. Allow each joint to cure for at least 15-30 minutes before moving to the next. Let the finished cube cure completely for 24-48 hours before handling it roughly or mounting it.
- Mounting to the Wall: Decide on your desired arrangement for the boxes. Use a level and pencil to mark the precise spot for each box on the wall. For each box, carefully pre-drill pilot holes through the back panel of the acrylic cube. These holes should align with your marked wall positions.
- Secure Boxes: Install appropriate wall anchors into the wall. Position each cube and secure it to the wall using screws. For heavier items or larger boxes, consider using small, clear L-brackets on the inside top corners of the box, screwed into the wall, for added support. Ensure each box is level before fully tightening the screws.
4. Clever Sofa Back Console with Hidden Storage
Item Name: Lift-Top Sofa Caddy and Storage Bench

Here is an ingenious solution for living rooms where space is limited, or you need to zone an open-concept area. This long, narrow console sits neatly behind the sofa, offering a convenient surface for drinks, snacks, or decorative trays. Finished in a light, natural wood tone, the piece maintains a clean, contemporary aesthetic that complements various decor styles.
The true brilliance lies in the hidden storage beneath the lift-up lids. Sections of the top surface hinge upwards, revealing deep, compartmentalized boxes. These compartments are brilliantly organized, featuring removable fabric bins that keep smaller accessories separated. They are absolutely wonderful for storing remote controls, reading materials, office supplies, or even children’s activity materials that often clutter the sofa.
Notice the thoughtful inclusion of built-in power outlets and USB ports along the back wall of the storage compartments. This feature allows you to charge devices discreetly while keeping the cords contained and out of sight. It’s a highly functional piece that eliminates surface mess while adding significant utility to the room.
DIY Lift-Top Sofa Console
Building a simple rectangular sofa console with a lift-top lid is a moderately easy woodworking project, providing highly customized behind-the-sofa storage.
Materials Required List
- Plywood or pre-cut lumber (1×12 or similar width, depending on your sofa height/depth) for the frame and lid
- Piano hinge (long continuous hinge) or 6-8 decorative box hinges (depending on the number of sections)
- Lid supports or stay hinges (to keep the lid open)
- Wood glue
- Wood screws
- Sandpaper (various grits: 80, 150, 220)
- Wood stain or paint (light oak stain is shown)
- Clear polyurethane or varnish (for protection)
- Optional: Drop-in fabric bins or dividers for interior organization
- Optional: Recessed power strip with USB ports
Equipment Required List
- Miter saw or circular saw (for making precise cuts)
- Drill/driver
- Measuring tape
- Clamps
- Level
- Safety glasses
- Orbital sander (optional, but highly recommended)
DIY Instruction Step by Step
- Measure and Cut Wood: Measure the length of the back of your sofa and decide on the width and height of the console. Cut four pieces for the outer frame (two long sides and two short ends). Cut a single piece for the base. Cut the top lid into two or three sections, depending on how many lift-up compartments you desire.
- Assemble the Box Frame: Apply wood glue to the edges and join the two long sides and two short end pieces to form a long rectangular box. Secure the corners with wood screws. Ensure the corners are square using a measuring tool.
- Attach the Base: Place the assembled box frame onto the base piece. Glue and screw the base securely to the bottom edges of the frame.
- Finish the Wood: Fill any visible screw holes or gaps with wood putty and allow it to dry. Sand the entire console thoroughly, starting with coarse grit and finishing with fine-grit sandpaper for a smooth, furniture-quality finish. Apply your chosen wood stain or paint, following the product directions. Once dry, apply 2-3 coats of polyurethane for durability.
- Install the Lids and Hinges: Lay the finished lid sections across the top of the box. Use the piano hinge to connect the lid sections to the back long side of the console frame. Alternatively, use individual decorative hinges for each lid section. Install the lid supports (stay hinges) inside the box, connecting the lid to the side panel, to ensure the lids stay open safely when accessing the storage.
- Add Organization (Optional): If you are installing a power strip, cut a small opening in the back of the console box. Secure the power strip inside the box. Place your fabric bins or custom dividers into the compartments. Place the finished console behind your sofa and enjoy your new clutter-free surface.
5. Bohemian Basket Wall Storage Display
Item Name: Woven and Wire Hanging Organization

This attractive display transforms storage into genuine wall art, making a functional statement in the living area. A curated collection of natural fiber baskets and sleek black wire containers is hung against a simple, pale wall. This arrangement effectively combines varying textures and shapes, resulting in a cohesive, bohemian-inspired look.
Several baskets feature beautiful contrasting materials, pairing chunky, light-colored weaving with dark leather accents on the handles. These containers are used practically, holding items like yarn, macrame cord, and small potted greenery, suggesting a crafter’s corner or a cozy reading nook. The deep woven baskets provide generous capacity for larger supplies or magazines.
Notice the clever inclusion of the flat woven charger and the small decorative macrame hangings mixed among the baskets. These elements add visual depth and prevent the display from looking purely utilitarian. The dark wire baskets at the bottom introduce a modern, industrial touch, creating contrast and offering specialized space for organizing magazines or heavier items. This approach proves that organizing tools can be decorative accents.
DIY Wall-Mounted Basket Organization
This project focuses on adapting various lightweight baskets and wire containers to be securely and decoratively mounted on a wall.
Materials Required List
- Various baskets and wire containers (ensure they have handles or a sturdy top rim)
- Leather strips or strong faux leather material (for creating decorative hanging loops, if needed)
- Small circular wooden discs (optional, for decorative base if baskets lack one)
- Heavy-duty picture hanging hooks or sturdy wall anchors and screws (appropriate for the weight)
- Metal D-rings or strong eye screws (to attach to the basket backs)
- Craft glue or hot glue gun (for securing leather accents)
- Black permanent marker (for blackening screw heads, if desired)
Equipment Required List
- Power drill and drill bits
- Measuring tape
- Level
- Utility knife or sharp scissors
- Sewing needle and heavy-duty thread or riveting tool (for attaching leather)
- Stud finder (for heavy baskets)
DIY Instruction Step by Step
- Prepare the Baskets: Inspect each basket or wire container. If the basket has a sturdy woven handle, this can be used directly for hanging. If not, you need to create a secure hanging point. For woven baskets, attach a metal D-ring or eye screw firmly to the back of the basket, near the top rim, using strong thread or small screws.
- Add Decorative Loops (Optional): To replicate the look in the image, cut leather strips to a length that allows them to loop over the handle and connect to the wall hook. Secure the leather strip to the basket handle using rivets or a strong, clean stitch.
- Plan the Layout: Lay the baskets on the floor first to plan your arrangement. Vary the sizes, shapes, and heights to create visual interest. Use the measuring tape to determine the spacing and the overall footprint of the display.
- Mark the Wall: Starting with a central or anchor piece, mark the spot where the wall hook or anchor needs to be installed. Use the level to ensure baskets are hung straight, unless intentionally angling for an asymmetrical design.
- Install Wall Hardware: Install the wall anchors or picture hanging hooks at your marked points. Always use wall anchors appropriate for the weight of the basket plus the potential contents. Use a stud finder for very large or heavy wire baskets.
- Mount the Display: Carefully hang each basket onto its designated hook. Step back frequently to check the arrangement and spacing. Once all baskets are secure, fill them with your organizational items and decorative greenery to complete the look.
6. Window Seat Bench with Hidden Storage
Item Name: Multi-Purpose Built-in Reading Nook

This image shows a beautifully designed window seat that maximizes a sunlit corner of the living room, transforming it into a cozy reading nook and a superb storage solution. The long bench features a custom upholstered cushion with a soft, tufted pattern, creating a comfortable spot for relaxation. Coordinating throw pillows and bolsters add layers of warmth and style.
The structure beneath the cushion is where the clever organization happens. The base consists of custom-built cabinets or large drawers, offering substantial hidden space. These areas are useful for storing extra blankets, out-of-season items, or children’s toys, keeping the main living space tidy. The classic paneling on the front of the bench elevates the look from simple storage to fine cabinetry.
A delightful detail is the circular opening visible on the right end panel. This creative feature transforms a portion of the storage bench into a cozy pet retreat or a discrete hideaway for a basket. The entire design successfully blends form and function, proving that storage solutions can enhance the room’s overall aesthetic appeal.
DIY Window Seat with Hidden Cabinet Storage
This project creates a structural window bench with accessible storage compartments beneath a comfortable cushion. It requires basic carpentry skills and accurate measurements.
Materials Required List
- Plywood or MDF (Medium-Density Fiberboard) sheets (3/4 inch thickness) for the frame and paneling
- Lumber (2x4s) for the structural base frame
- Wood screws and finishing nails
- Wood glue
- Caulk
- Primer and white semi-gloss paint
- Cabinet hinges or drawer slides (if building pull-out storage)
- Optional: Decorative trim molding (crown molding and baseboard)
Equipment Required List
- Power drill and various drill bits
- Miter saw (essential for cutting precise angles on trim)
- Table saw or circular saw (for cutting plywood/MDF)
- Level (long construction level)
- Measuring tape
- Stud finder
- Safety glasses
- Paint brushes and rollers
- Clamps
DIY Instruction Step by Step
- Build the Base Frame: Determine the height, depth, and length of your bench. Construct a sturdy rectangular frame out of 2×4 lumber. This frame will be the foundation and should be secured directly to the wall studs using wood screws for maximum stability. Use the level to ensure the top of the frame is perfectly horizontal.
- Attach the Bench Face: Cut the plywood or MDF sheets to create the front and side faces of the bench. Secure these pieces to the structural frame using wood glue and finishing nails. If creating the pet cut-out, use a jigsaw to carefully cut the circular opening before attaching the panel.
- Create Storage Divisions: Install vertical plywood dividers inside the bench structure to create separate compartments. These compartments will hold lift-up lids, hinged doors, or drawers. If installing cabinet doors, cut openings in the front face and install hinges and doors now.
- Install Decorative Paneling: Cut and attach thin trim molding to the front faces of the bench sections to create the decorative recessed panel look (shaker style). Use wood glue and small finishing nails to secure the trim. Fill any nail holes with wood putty and caulk all seams where the wood meets the wall or floor.
- Paint and Finish: Apply primer to the entire bench structure. Once dry, apply 2-3 coats of white semi-gloss paint, ensuring a smooth, durable finish that matches your room’s trim.
- Add the Cushion: The bench top will function as a removable lid or be permanently fixed, depending on your storage access. Either way, measure the exact dimensions and order or create a custom upholstered cushion to fit snugly on top. Place the cushion and style the area with pillows to complete your storage nook.
7. Mid-Century Modern Corner Storage Unit
Item Name: Curved Corner Display and Media Cabinet

This beautiful cabinet solves the common problem of utilizing awkward corner spaces, transforming one into a stylish storage centerpiece. It features a striking contrast between the warm, reddish-brown wood trim and the bold, deep teal color of the lower cabinetry. The curved design of both the upper and lower sections adds a sophisticated, mid-century modern flair, making the piece feel custom-made.
The upper portion functions as a sleek display case. It includes three levels of glass shelving, which allow light to pass through and highlight the curated collection of vases, bowls, and books. Small integrated spotlights illuminate the display beautifully, drawing attention to the objects inside. This open arrangement is wonderful for exhibiting decorative items while keeping them dust-free.
Beneath the counter, the closed teal cabinets offer essential concealed storage. This area is perfectly suited for media components like receivers, DVD players, or gaming systems, keeping the equipment tucked away neatly. The curved doors open to reveal easily accessible shelves, proving that even a corner unit can provide generous and attractive living room organization.
DIY Curved Corner Display Cabinet
Replicating a curved, custom corner unit is challenging, but you can build a squared-off corner cabinet frame and add curved trim to achieve a similar sophisticated, space-saving look. This DIY focuses on a basic structure with shelving.
Materials Required List
- Plywood or MDF (3/4 inch thickness) for the frame and shelves
- Thin, bendable plywood or particle board (1/4 inch thickness) for creating the curved front panels
- Lumber (2x2s) for internal support framing
- Wood veneer or wood-look contact paper (for the warm wood finish)
- Semi-gloss paint (deep teal color)
- Glass shelves (cut to size)
- Small surface-mounted spotlights
- Cabinet hinges and knobs
- Primer and caulk
Equipment Required List
- Circular saw or table saw
- Jigsaw (for cutting the curved shapes in the thin wood)
- Power drill and driver
- Level
- Measuring tape
- Clamps
- Sandpaper (various grits)
- Stud finder
DIY Instruction Step by Step
- Plan the Corner Frame: Measure your corner and decide on the depth of the cabinet. Cut two triangular side pieces and a central back corner piece from the thick plywood. Assemble the basic vertical frame, securing it to the corner wall studs using the level and wood screws.
- Build the Base and Counter: Cut and install a sturdy plywood bottom (base) and a plywood top (counter) for the lower cabinet section. Ensure the counter sits flat and level. Cover the counter and the exposed edges of the frame with the wood veneer or contact paper to simulate the warm wood finish.
- Create Curved Doors and Panels: Using the thin, bendable plywood, cut the pieces required for the curved front doors and the lower cabinet trim. To make the wood bend, dampen the wood slightly or use kerfing (making parallel shallow cuts on the inside). Attach these pieces to the frame, gently forcing them into a smooth curve, using glue and small finishing nails.
- Finish the Lower Cabinet: Attach the hinges and hang the cabinet doors on the lower section. Fill all nail holes, prime the lower section, and paint it in the deep teal color, applying multiple coats for a rich finish.
- Install Upper Shelving: Inside the upper display section, install small shelf clips or brackets at your desired heights. Order tempered glass shelves cut to the specific triangular/trapezoidal shape required for your corner unit. Place the glass shelves on the supports.
- Add Lighting: Drill small holes in the top of the upper cabinet sections to run the wires for the spotlights. Screw the small surface-mounted spotlights to the underside of the top panel, directing the light onto the glass shelves. Plug the lights into a hidden outlet.
8. Robust Industrial Pipe Wall Shelving
Item Name: DIY Utility Pipe and Wood Shelves

This image beautifully demonstrates how to blend utility and style using raw, industrial materials for vertical storage. The system features thick, richly stained wood planks supported by dark metal pipes and fittings, creating a striking contrast against the clean white wall. This type of open shelving provides a large amount of easily accessible storage space without feeling heavy or bulky.
The shelves are highly functional, holding a mix of organized items. Storage boxes, books, and decorative pieces are neatly arranged, proving this design is incredibly versatile for various living room needs. The open structure keeps the room feeling spacious, even with a wall-spanning unit.
A particularly clever feature is the integrated hanging bar beneath the lowest shelf. This pipe rail, complete with large S-hooks, offers useful vertical organization for items like headphones, keys, or a throw blanket. The entire assembly maximizes the wall area, providing both display and concealed storage in the form of the olive-green boxes. It is a fantastic, modern solution for keeping clutter off the floor.
DIY Industrial Pipe Shelving
Building this style of shelving is a popular and straightforward DIY project, relying on readily available galvanized or black steel pipe and fittings.
Materials Required List
- Wooden planks (4 pieces, cut to desired length, stained and sealed dark walnut)
- Galvanized or black steel pipe sections (various lengths: vertical uprights, horizontal supports)
- Pipe fittings (T-connectors, elbows, and floor flanges)
- Heavy-duty wall anchors and screws (appropriate for the weight of the shelves and contents)
- Optional: Large S-hooks (for the lower hanging rail)
Equipment Required List
- Power drill and various drill bits
- Stud finder
- Level (at least 24 inches long)
- Measuring tape
- Pipe wrench or strap wrench (for tightening fittings)
- Safety glasses
DIY Instruction Step by Step
- Plan and Measure: Determine the total length and height of your shelves. Lay out the wood planks and pipe sections on the floor to visualize the assembly and confirm the required pipe lengths. Mark the wall precisely where the floor flanges (the circular mounting plates) will be secured.
- Mount the Flanges: Use the stud finder to locate wall studs; always try to secure the heavy vertical pipes into studs. If studs are unavailable, use heavy-duty toggle or drywall anchors. Using the level, drill pilot holes and securely screw the bottom-most floor flanges to the wall.
- Assemble the First Vertical Section: Screw the first vertical pipe section into the flange you just mounted. Attach a T-connector to the top of this pipe. Continue assembling the vertical sections by adding pipes and T-connectors, ensuring they align perfectly with the marks for your shelf heights.
- Install Horizontal Supports: Insert a shorter pipe section into the T-connectors and connect another flange to the end of that short pipe. Repeat this process for all shelf levels and all vertical columns, creating the supportive skeleton. Use the level frequently to ensure all horizontal pieces are perfectly straight before final tightening.
- Place the Wooden Shelves: Lay the finished, stained wooden planks onto the pipe supports. The planks simply rest on the horizontal pipes. For extra stability, especially if shelves are deep, you may want to secure the planks to the pipes using metal strapping or screws driven up from the underside of the pipe into the wood (pre-drill holes in the wood).
- Install the Hanging Rail: At the desired height beneath the bottom shelf, assemble a horizontal pipe section using two flanges, connecting them to the main vertical pipe structure with T-connectors or elbows. Ensure the rail is strong. Hang your S-hooks and style the shelves with your organized items.
9. Velvet Ottoman with Pet Nook and Storage
Item Name: Dual-Function Pet Ottoman and Hidden Storage Bench

This striking piece of furniture serves three fantastic functions in one stylish package, making it an excellent addition to any living room. Upholstered in a rich, jewel-toned teal or emerald velvet, the large ottoman offers extra seating or a comfortable footrest. The square ottoman shown in the foreground features subtle tufting and attractive gold nailhead trim along the base, giving it a luxurious feel.
The larger rectangular piece is the true organizational star. Its hinged top lifts to reveal generous, deep storage compartments, which are extremely useful for stowing away throw blankets, magazines, or extra pillows. The lid opens smoothly, often using gas shocks to stay safely open.
Most creatively, one end of the bench features a charming, arched entrance leading to a dedicated pet bed nook. A pull-out tray containing a soft cushion provides a cozy, dedicated hideaway for a small cat or dog, keeping their sleeping area integrated yet discreetly organized. This unit offers smart storage for humans while remembering our furry companions.
DIY Upholstered Pet Nook Storage Ottoman
Building a storage ottoman that includes a pet nook requires basic woodworking skills and some beginner upholstery techniques. The emphasis here is on the sturdy box frame and the lift-top.
Materials Required List
- Plywood or MDF (3/4 inch thickness) for the frame and lid
- Lumber (2x2s) for internal structural reinforcement
- Upholstery foam (3-4 inch thick) for the lid
- Batting (cotton or polyester)
- Velvet or durable upholstery fabric (rich green color)
- Gas shocks or heavy-duty hinges with lid support (for the lift-top)
- Wood screws and staples
- Glue or spray adhesive (for foam)
- Decorative nailhead trim
- Pet bed cushion and corresponding wooden pull-out tray (or shallow drawer slides)
Equipment Required List
- Circular saw or table saw
- Jigsaw (for cutting the arched pet entrance)
- Power drill and driver
- Heavy-duty staple gun (for upholstery)
- Measuring tape
- Safety glasses
DIY Instruction Step by Step
- Cut and Assemble the Box: Cut the plywood or MDF into four side panels, one bottom panel, and one top lid. Assemble the four sides into a rectangular box using wood glue and screws. Secure the bottom panel to the base of the box. Use the jigsaw to cut the arched opening into one of the short end panels before final assembly.
- Add Internal Dividers: Cut plywood pieces to create the internal storage compartments, including a separate compartment for the pet nook area. Screw these dividers securely into the box frame. If using a pull-out tray, install shallow drawer slides in the pet nook section now.
- Prepare the Lid: Cut the foam to the exact size of the lid. Attach the foam to the top of the lid panel using spray adhesive. Wrap the entire lid with batting, pulling it taut and stapling it securely to the underside edges.
- Upholster the Box and Lid: Lay the upholstery fabric flat. Carefully place the box (with the pet arch cut-out) on the fabric and begin stapling the fabric tautly to the inside top and bottom edges, paying special attention to neat corners. Repeat the process for the lid, stapling the fabric tightly to the underside.
- Install Hinges and Supports: Attach the gas shocks or lid support hinges to the back of the box and the back edge of the lid, following the hinge manufacturer’s instructions. These mechanisms ensure the lid opens and closes safely.
- Add Finishing Touches: Using the decorative nailhead trim, carefully tap the nails into place along the base of the ottoman. If using a strip of trim, cut it to size and secure it. Slide the pet bed tray and cushion into the pet nook compartment.
10. Doorway Shelving Frame Maximizing Vertical Space
Item Name: Built-in Archway Bookshelf Surround

This clever custom cabinetry maximizes storage by utilizing the often-wasted space around a standard doorway. Finished in a sophisticated muted gray color, the bookshelves flank the door, creating a strong, architectural feature that elevates the room’s design. The continuous crown molding running across the top connects the two vertical units, giving the entire structure a cohesive, built-in appearance.
Each narrow bookshelf offers deep, accessible storage for books. The adjustable shelves are styled neatly, using striking gold-toned bookends to support the carefully curated collection. The design takes advantage of vertical height, drawing the eye upwards.
Adding to the refined look, small brass wall sconces are mounted at the top of each bookshelf. These lights provide targeted illumination for reading and enhance the display quality of the shelves. This smart approach transforms a functional necessity (the doorway) into a beautiful and highly efficient storage opportunity, adding character and organization to the living space.
DIY Built-in Door Surround Shelving
Creating a professional-looking built-in unit around a doorway can be achieved using stock bookcases and custom framing/trim work to make them look seamless.
Materials Required List
- Two narrow, tall stock bookcases (ensure the depth is appropriate for your doorway/hallway)
- Plywood or MDF (3/4 inch thickness) for the bridge (piece spanning the top) and for shims
- Lumber (1×4 or 1×6) for facing trim
- Crown molding (to match existing room trim)
- Wood screws and finishing nails
- Wood glue
- Caulk and wood putty
- Primer and paint (to match the gray shelf color)
- Two small wall sconces and wiring (consult an electrician or use plug-in battery-operated lights)
- Heavy-duty shelf pins
Equipment Required List
- Power drill and driver
- Stud finder
- Level (long construction level)
- Measuring tape
- Miter saw (essential for cutting precise angles on crown molding and trim)
- Clamps
- Paint brushes and rollers
DIY Instruction Step by Step
- Prepare the Bookcases: Assemble the two stock bookcases according to the manufacturer’s directions. Prime and paint the bookcases in your chosen gray color, including the adjustable shelves.
- Position and Secure: Place one bookcase on each side of the doorway, ensuring they are equidistant from the door frame and aligned vertically using the level. Shim the bookcases where necessary (often against the wall or floor) to make them perfectly plumb and straight. Screw the bookcases securely into the wall studs through the back mounting rails.
- Install the Bridge Piece: Measure the distance between the two tops of the installed bookcases. Cut a piece of plywood or MDF (the “bridge”) to span this distance and sit flush or slightly recessed between the tops. This piece creates the enclosed space over the door. Screw the bridge piece securely into the tops of the bookcases and into the wall above the door trim.
- Create the Arched Look: Cut and attach a thin piece of plywood or flexible molding to the front of the bridge piece and down the inner sides, creating the desired arched shape around the door frame. Fill the gap between the arch piece and the door frame with caulk or putty for a smooth transition.
- Apply Trim and Molding: Attach facing trim (1×4) to the front edges of the bookcases and the bridge piece. This trim covers seams and gives the unit a weighty, built-in appearance. Cut and install the crown molding along the very top edge of the entire structure, using the miter saw for precise 45-degree corner cuts where the molding meets the wall or ceiling.
- Finish and Light Installation: Caulk all seams and fill nail holes with putty. Once dry, paint the trim and the bridge piece to match the gray bookcases. Install the wall sconces on the top front facing of each bookcase. If you are not comfortable with wiring, choose battery-operated picture lights for a simple DIY solution. Insert the adjustable shelves and style them with your books.
11. Multi-Drawer Mid-Century Coffee Table
Item Name: Hidden Compartment Accent Table

This sleek coffee table is a brilliant example of incorporating maximum functionality into a living room centerpiece. Designed with a rich, warm wood tone and classic mid-century modern tapered legs, it looks sophisticated and unobtrusive. The smooth surface is perfect for holding books, coasters, or decorative trays, keeping essential items close at hand.
The true brilliance lies in the hidden storage beneath the lift-up lids. Sections of the top surface hinge upwards, revealing deep, compartmentalized boxes. These compartments are brilliantly organized, featuring removable fabric bins that keep smaller accessories separated. They are absolutely wonderful for storing remote controls, reading materials, office supplies, or even children’s activity materials that often clutter the sofa.
The true organizational value is revealed when the drawers are opened. Instead of one or two large drawers, this table features numerous shallow, divided compartments. These smaller pull-outs are incredibly useful for organizing the many little items that often lead to surface clutter. Remotes, charging cables, headphones, and small electronic devices can be kept neatly separated and out of sight using specialized organizers within the drawers.
One larger, deeper drawer is included, making it useful for storing a folded throw blanket or magazines. The multi-drawer system transforms the coffee table from a simple surface into a powerful organizational hub, ensuring the living room remains stylish and tidy.
DIY Custom Drawer-Divided Coffee Table
You can upgrade an existing simple coffee table or build a basic rectangular one, then install custom shallow drawers and specialized interior dividers to replicate this look.
Materials Required List
- Plywood or pre-cut lumber (for the table body and drawers)
- Wood veneer or wood stain (to achieve the mid-century walnut look)
- Tapered furniture legs with mounting plates (4 pieces)
- Multiple sets of shallow drawer slides (mini-slides or standard slides)
- Drawer pulls or recessed handles
- Small pieces of plywood or thin lumber for interior drawer dividers
- Felt liner or dedicated plastic/velvet drawer organizers
- Wood glue and wood screws
- Finishing materials (sandpaper, polyurethane)
Equipment Required List
- Circular saw or table saw
- Power drill and driver
- Measuring tape and square
- Level
- Clamps
- Safety glasses
DIY Instruction Step by Step
- Build the Table Box: Cut and assemble the four side panels and the top and bottom panels to create the rectangular body of the table. Use wood glue and screws for a sturdy structure. Apply wood veneer or stain/seal the exterior panels.
- Install Drawer Runners: Mark the interior side panels where your multiple shallow drawers will sit. The key is using many small, shallow drawers instead of few deep ones. Carefully install the drawer slide runners, ensuring they are perfectly parallel and level at each height measurement.
- Construct and Install Drawers: Build the drawer boxes to fit the runners precisely. Construct the drawer fronts separately. Attach the drawer boxes to the runners. Once installed, attach the drawer fronts to the boxes. The drawer fronts should have minimal gaps between them when closed.
- Create Drawer Dividers: Measure the interior of each drawer. Cut small pieces of thin plywood or lumber to create custom compartments for specific items (e.g., a long slot for remotes, small squares for coins or ear buds). Secure these dividers inside the drawers with wood glue. Alternatively, purchase pre-made velvet or plastic organizers and place them inside the drawers.
- Attach Legs and Finish: Screw the mounting plates onto the bottom of the table frame corners. Attach the tapered legs. Apply any final coats of polyurethane for protection. Install the chosen drawer pulls or handles.
12. Mirrored Wall Wardrobes with Utility Nook
Item Name: Reflective Storage Wall System

This expansive built-in storage solution transforms an entire wall into a highly organized and reflective surface. The central feature is the run of floor-to-ceiling mirrored cabinet doors. These reflective panels conceal generous storage, making them perfect for general living room clutter, seasonal items, or even transforming the space into a concealed linen or coat closet. The mirrored surface is also a brilliant space-expanding trick, making the room feel twice as large and enhancing the available light.
Flanking the mirrored doors are integrated open shelving units, finished in a light gray-taupe color. These recesses break up the large mirrored surface and provide a practical mix of organization types. One recess is styled with neatly rolled towels, baskets, and decorative bottles, suggesting a utility or home office function.
The final element adding sophistication is the vertical strip lighting running down the side of the open shelves. This subtle illumination highlights the items on display and adds a modern, ambient glow to the entire wall. The custom design perfectly balances hidden storage with accessible organizational niches.
DIY Mirrored Panel and Recess Storage Wall
This project involves installing a series of large, shallow cabinets and applying mirrors to the doors, creating an integrated, functional storage wall.
Materials Required List
- Stock wall or wardrobe cabinets (shallow depth is often preferred)
- Plywood or MDF (3/4 inch thickness) for custom recess shelving
- Large framed mirrors or custom-cut mirrored panels (to fit the cabinet doors)
- Strong mirror adhesive (designed for safe application to doors)
- LED strip lighting kit with aluminum channel (for clean installation)
- Wood screws, nails, and shims
- Primer and paint (light gray-taupe)
- Crown molding (to match the room)
Equipment Required List
- Power drill and driver
- Level (long construction level)
- Measuring tape
- Stud finder
- Miter saw
- Caulk gun
DIY Instruction Step by Step
- Design and Frame: Map out the layout, ensuring you have the central cabinet run for the mirrored doors and at least one custom-built recess on the end. Build the box frame for the open recess shelving using plywood, ensuring it is flush with the depth of the stock cabinets.
- Install Cabinets and Recess: Install the stock cabinets first, securing them to the wall studs and screwing them to each other. Install the custom recess box next to the cabinets, ensuring the front edges of both units align perfectly. Use shims and the level to make certain the entire structure is plumb and straight.
- Install LED Lighting Channels: Run the vertical aluminum channels for the LED strips inside the front edges of the open recess shelving. Secure them with screws. Once installed, affix the LED strip lights inside the channels. Drill small holes to run the wires discreetly out the back of the cabinet to a power source.
- Attach Mirrors to Doors: Prime and paint the cabinet doors. Once dry, carefully apply the custom-cut mirrored panels to the door fronts using strong mirror adhesive, ensuring a consistent application to prevent warping or falling. Use clamps and allow the adhesive to cure completely before moving the doors.
- Finish the Install: Hang the mirrored doors back onto the cabinets. Install the adjustable shelves inside the open recess. Finally, cut and install the crown molding along the top of the entire unit. Caulk all seams where the unit meets the ceiling and wall. Touch up the paint and organize your items on the shelves.
13. Nautical Hanging Rope and Wood Shelves
Item Name: Suspended Window Display Shelving

This creative shelving unit provides beautiful organization without blocking the natural light from the window. The structure consists of three simple, light-toned wood planks suspended by thick natural fiber rope, giving it a charming, nautical, or rustic feel. The open design prevents the corner from feeling heavy, making the space airy and bright.
The rope is secured to the ceiling using substantial metal hardware and is threaded through pre-drilled holes in the wood planks. Knots are tied beneath each shelf to hold the planks firmly in place. Leather straps attach the rope to the ceiling mounts, adding an unexpected, sophisticated detail and contrast to the rough texture of the rope.
These suspended shelves are styled with a curated collection of small potted succulents, simple white vases, and neatly stacked books, demonstrating their use for both display and essential organization. Positioning the shelves in front of a window is an inventive way to utilize vertical space that is often left empty, providing storage that doubles as art.
DIY Hanging Rope Shelves
Building these suspended shelves is a popular and fun DIY project, requiring careful measuring and secure ceiling mounting.
Materials Required List
- Wooden planks (3 pieces, desired length and depth, sanded smooth)
- Thick natural fiber rope (jute or manila, about 1/2 inch or 1 inch thick, length depends on ceiling height)
- Leather strips or strong faux leather (for straps)
- Metal rings or heavy-duty eye bolts with locking nuts (for mounting to the ceiling)
- Heavy-duty ceiling anchors (toggle bolts or specific ceiling anchor hardware, essential for safety)
- Wood stain or varnish (optional)
Equipment Required List
- Power drill and drill bits (long bit required for boring shelf holes)
- Jigsaw (optional, for shaping ends of planks)
- Level
- Measuring tape
- Utility knife or sharp scissors
- Pencil
DIY Instruction Step by Step
- Prepare the Planks: Sand the wood planks until they are completely smooth. Drill two holes in each corner of all three planks (four holes total per plank). The holes must be large enough for your rope to pass through easily. If cutting yourself, score deeply with the cutter and then snap cleanly. If desired, stain or varnish the planks and allow them to dry fully.
- Measure and Mark the Ceiling: Use the stud finder to locate the ceiling joists; you must mount the shelves into structural framing for safety. Mark four hanging points on the ceiling, ensuring the spacing matches the holes you drilled in the planks.
- Install Ceiling Hardware: Drill pilot holes at your marked points and securely screw the heavy-duty eye bolts (or metal rings attached to heavy anchors) into the ceiling joists. This is the crucial step for holding the weight.
- Cut and Thread Rope: Cut the rope into two long, equal lengths. These two lengths will form the front and back supports. Loop the leather strips through the eye bolts on the ceiling, securing the end of one long rope to each leather loop.
- Tie the Shelves: Thread the two ropes through the corresponding holes in the top plank. Carefully slide the plank down to the desired height. Tie a strong, secure knot (like a simple overhand knot or a figure-eight knot) directly beneath the plank. Ensure the knots are extremely tight and the plank is level.
- Complete the System: Use the measuring tape to determine the distance for the second shelf. Thread the rope through the middle plank and tie another set of knots at the correct height, ensuring the distance from the top shelf is consistent. Repeat for the bottom shelf. Style your new shelves only after confirming all knots and ceiling mounts are secure.
14. Multifunctional Pegboard Organization Wall
Item Name: Customizable Pegboard Utility Station

This large pegboard panel provides an incredibly flexible and stylish way to organize a wide variety of items in a living or creative space. Unlike fixed shelving, this system allows for endless customization, as all components—shelves, hooks, baskets, and bins—can be rearranged instantly to suit evolving needs. The light natural wood tone of the pegboard contrasts beautifully with the colorful accessories.
The display features a cheerful and practical mix of storage options. Small wooden shelves hold plants and framed art, while metal hooks keep keys and tools organized. Brightly colored plastic and wire baskets of varying sizes hold everything from craft supplies and remotes to power strips and scissors, keeping them contained and easily accessible.
The system even cleverly incorporates charging stations, with outlets secured directly onto the board, managing tangled cords. This large-scale, easy-to-customize solution is perfect for a living room that doubles as a creative workspace or a busy family command center, keeping functional items organized and visually engaging.
DIY Large Wall-Mounted Pegboard
Installing a large, sturdy pegboard requires careful attention to ensuring it stands slightly off the wall for hooks and accessories to fit properly.
Materials Required List
- Large sheet of standard pegboard (plywood or composite)
- Lumber (1x2s) for the wall frame/spacers
- Wood screws and wall anchors (appropriate for the weight)
- Primer and paint (optional, if painting the pegboard)
- Various pegboard accessories (hooks, metal baskets, shelf supports, plastic bins)
- Small wooden planks for shelves
Equipment Required List
- Circular saw (for cutting the pegboard and lumber to size)
- Power drill and driver
- Level (long construction level)
- Measuring tape
- Stud finder
- Pencil
DIY Instruction Step by Step
- Prepare the Pegboard and Frame: Cut the pegboard sheet to your desired size. If painting, prime and paint the pegboard now. Cut the 1×2 lumber into pieces to create a frame that will run along the back edges (top, bottom, and sides) of the pegboard. These pieces are crucial; they create the necessary space between the pegboard and the wall for the hooks to lock in place.
- Assemble the Frame and Pegboard: Lay the pegboard face-down. Glue and screw the 1×2 frame pieces to the back edges, ensuring the frame does not cover any peg holes needed for mounting. This creates the spacer frame.
- Find Studs and Mark Wall: Use the stud finder to locate the wall studs where you plan to hang the pegboard. Mark the stud locations on the wall and transfer these marks to the pegboard frame.
- Mount to the Wall: Lift the pegboard and hold it in position. Using the level, ensure the board is perfectly straight. Drill pilot holes through the pegboard and the 1×2 frame, aligning them with the wall studs. Secure the pegboard to the wall studs using long wood screws. Where studs are not available, use heavy-duty wall anchors, ensuring they are strong enough to support the board plus all the accessories and contents.
- Customize the Layout: Insert the pegboard accessories into the holes. Start by placing the supports for the wooden shelves, then attach the baskets and hooks. Rearrange the components until you have an organized and appealing layout for all your items.
15. Attic-Style Ceiling Storage with Ladder Access
Item Name: Concealed Overhead Rafter Storage

This clever hack turns previously unusable ceiling space into discrete, accessible storage compartments, which is fantastic for living areas with high ceilings and decorative beams. The design uses the space above the faux wood rafters to create hidden compartments. Each rectangular compartment is covered by a hinged, flush-mounted plywood panel, maintaining the room’s clean aesthetic when closed.
The panels lift up, revealing space where seasonal decorations, extra blankets, or rarely used items can be safely stowed away. This solution keeps the living room floor and walls clear of clutter, maximizing the feeling of openness. The raw wood of the compartment lids contrasts nicely with the dark wood ceiling beams.
Accessing this high-level storage is made straightforward with a sliding library ladder system. The ladder runs along a track mounted on the beam, allowing the user to easily slide the ladder to the location of the needed compartment. This inventive approach completely utilizes vertical space for organization in a way that is highly functional and visually interesting.
DIY Concealed Rafter Storage with Hinged Lids
Note: This is a highly advanced project involving structural modification or addition of decorative non-structural beams. Always consult a structural engineer or professional contractor before altering ceiling framing. This guide assumes the beams are non-structural or a false framing system has been constructed.
Materials Required List
- Plywood (3/4 inch thickness) for the storage box framing
- Plywood (1/2 inch thickness) for the hinged compartment lids
- Heavy-duty cabinet hinges or continuous piano hinges
- Magnetic catches or latch hardware (to keep lids securely closed)
- Wood screws, nails, and wood glue
- Wood stain (to match existing beams)
- Sliding library ladder hardware kit (including track, wheels, and ladder)
Equipment Required List
- Circular saw or table saw
- Miter saw
- Power drill and driver
- Level
- Measuring tape
- Safety glasses
DIY Instruction Step by Step
- Construct the Storage Boxes: Determine the dimensions of the storage areas between your ceiling joists or decorative beams. Cut and assemble rectangular plywood boxes (without a top) to fit snugly into the ceiling space, resting on the joists or the top of the decorative beams.
- Install the Boxes: Lift and secure the storage boxes into the designated ceiling areas using strong wood screws. The top edges of the box frames should be flush with the bottom edges of the beams, creating a clean, hidden look.
- Prepare the Lids: Cut the thinner plywood pieces to create the lids for the storage boxes. These lids should fit precisely into the opening. Sand and stain the edges of the lids to blend with the dark beams when closed.
- Attach Hinges and Hardware: Attach the hinges (either a continuous piano hinge or two heavy-duty cabinet hinges) to the lid and to one side of the storage box frame. Install the magnetic catches or latch hardware on the opposite side of the box frame and the corresponding area on the underside of the lid to ensure the lid remains securely closed when not in use.
- Install the Ladder Track: Following the manufacturer’s directions, install the sliding library ladder track along the underside of the main decorative beam. Ensure the track is level and anchored into the ceiling framing or studs for safety.
- Assemble the Ladder: Assemble the library ladder and attach the wheels and necessary hardware according to the kit instructions. Test the ladder system, ensuring it slides smoothly and provides safe access to all the hinged storage compartments.
16. Revolving Storage Tower with Mirror
Item Name: 360-Degree Swivel Media and Mirror Cabinet

This clever storage unit makes full use of its vertical orientation by featuring a space-saving swivel design. Resting on a sturdy, circular base, the tall, slender cabinet rotates 360 degrees, allowing access to four different sides of storage. This is an excellent solution for organizing items in a tight corner or apartment.
One side of the cabinet is dedicated to a full-length mirror, which is always useful near an entryway or in the living area, and also enhances the feeling of light and space. The other three sides offer specialized storage niches. One side features deep, dark shelving, wonderful for organizing DVDs or video games. Another side has light-colored, adjustable shelves, suitable for books or baskets holding various accessories.
Two corners of the cabinet feature sturdy hooks, providing convenient hanging spots for keys, light jackets, or bags, increasing the piece’s utility. The sleek white and dark gray color scheme gives it a contemporary and versatile look, proving that high-capacity storage can be both compact and multifaceted.
DIY Swivel Storage Cabinet
Replicating a revolving cabinet requires a sturdy box frame and high-quality swivel hardware to handle the weight when fully loaded.
Materials Required List
- Plywood or MDF (3/4 inch thickness) for the vertical panels and base
- Plywood (1/2 inch thickness) for adjustable shelves
- Heavy-duty ball bearing swivel plate (larger diameter, minimum 12 inches)
- Full-length mirrored panel (or mirror tiles) and strong mirror adhesive
- Closet rod/hooks (for the side hanging area)
- Primer and paint (white and dark gray)
- Wood screws, nails, and wood glue
Equipment Required List
- Circular saw or table saw
- Power drill and driver
- Level
- Measuring tape
- Shelf pin jig and shelf pins
- Screwdriver
DIY Instruction Step by Step
- Build the Base and Frame: Cut two square or rectangular base pieces from thick plywood. Attach the heavy-duty swivel plate to the center of one base piece, ensuring the screws go deep into the wood. This bottom piece will sit on the floor. Cut the four vertical panels and two fixed horizontal shelves (top and bottom of the shelving area) and assemble the basic four-sided box frame.
- Paint and Shelf Preparation: Separate the box frame from the swivel base. Prime and paint the cabinet frame in your two chosen colors (white and dark gray). Use the shelf pin jig to drill uniform holes along the inner sides of the shelving compartments for adjustable shelf placement.
- Install the Mirror: Apply mirror adhesive to one side of the cabinet where the mirror will be. Carefully place the full-length mirrored panel onto the adhesive, pressing firmly. Allow the adhesive to cure fully according to the instructions.
- Attach Hooks and Accessories: Drill small pilot holes and secure the metal hooks into the designated side panels. Insert the shelf pins and place the adjustable shelves inside the unit.
- Final Assembly: Carefully center the finished cabinet box onto the top half of the ball bearing swivel plate (which is already attached to the bottom base piece). Secure the cabinet to the swivel plate using screws. Ensure the cabinet spins smoothly and remains stable.
17. Tech-Tidy Console with Charging Drawer
Item Name: Woven Cane Media Charging Table

This narrow console table, often placed behind a sofa or against a wall, serves as an indispensable charging and organization hub for modern living. The table features a handsome dark walnut finish and attractive woven cane detailing on the drawer front, lending it a touch of natural, breathable texture. It’s an elegant addition to the room, keeping technology out of sight.
The true genius lies inside the deep drawer. It pulls out to reveal custom-fitted compartments designed specifically for electronic devices. Laptops, tablets, and phones fit securely into separate slots, and all are organized around a hidden power strip and coiled cables.
The use of a power strip inside the drawer allows multiple devices to charge simultaneously, eliminating the messy sight of numerous cords trailing across the floor or furniture surfaces. This console is the ultimate solution for keeping the living room surface tidy and creating a dedicated, concealed space for all family electronics and their chargers.
DIY Charging Console Drawer Hack
This project involves modifying a standard console table with a drawer to create a dedicated charging station with internal organization.
Materials Required List
- Standard console table with one deep drawer (or build a simple table box)
- Small power strip (with surge protection)
- Thin plywood or lumber (1/4 inch thickness) for custom drawer dividers
- Thin rubber or felt padding (for protecting devices)
- Wood glue and small nails
- Drill bit (large enough for a plug)
Equipment Required List
- Power drill and driver
- Jigsaw or hole saw (for cutting cord holes)
- Measuring tape
- Wood clamps
- Pencil
DIY Instruction Step by Step
- Prepare the Console: Assemble the console table if needed. Remove the drawer and measure the internal dimensions precisely.
- Create Custom Dividers: Decide on the placement of your power strip and the required size of the compartments for laptops, tablets, and phones. Cut the thin plywood or lumber into small strips for the drawer dividers. Use the wood glue and small nails to assemble these strips into a grid structure that fits snugly inside the drawer.
- Install the Power Strip: Determine the best location for the power strip within one of the compartments. Drill a large hole (large enough for the power strip’s plug to pass through) in the back of the drawer. Secure the power strip into its compartment using heavy-duty double-sided tape or screws, ensuring the cord runs neatly through the hole.
- Finish the Drawer: Apply thin rubber or felt padding to the bottom of the drawer compartments to protect devices from scratching.
- Final Installation: Slide the drawer back into the console. Run the power strip cord through the back of the console table and plug it into the nearest wall outlet. Place your devices and charging cables neatly into their new compartments.
18. Grand Library Wall with Rolling Ladders
Item Name: Custom Mahogany Bookcase with Ladder System

This impressive storage system transforms an entire living room wall into a classic, stately library. The custom cabinetry, finished in a deep, rich mahogany stain, extends floor-to-ceiling and features traditional paneling on the lower section. This design provides maximum vertical storage while adding significant architectural character to the space.
The shelves are expansive and deep, accommodating a vast collection of books, decorative globes, and framed photos. The lower section features closed cabinets, offering essential hidden storage for less attractive items like media components or office supplies. The overall scale of the unit is balanced and commanding.
A highly functional and traditional element is the rolling ladder system. A sturdy metal track runs along the middle of the shelving unit, supporting two handsome wooden ladders. This feature allows easy access to the highest shelves, preventing dust buildup and ensuring every book is within reach. It’s a statement piece that elegantly handles massive storage needs.
DIY Built-in Bookcase with Rolling Ladder Look
Achieving this grand look involves assembling stock bookcases and using extensive trim work to achieve a built-in look, then installing a decorative rolling ladder system.
Materials Required List
- Three or four wide stock bookcases (tallest available, with adjustable shelves)
- Plywood or MDF (3/4 inch thickness) for the bridge and fillers
- Lumber (1×4, 1×6) for facing trim
- Heavy crown molding and baseboard molding
- Rich mahogany-colored stain and polyurethane finish
- Rolling ladder hardware kit (track, wheels, mounting brackets)
- Wooden ladder (pre-built or constructed)
- Wood screws, nails, wood glue
Equipment Required List
- Circular saw or table saw
- Miter saw (crucial for molding angles)
- Power drill and driver
- Level (long construction level)
- Measuring tape
- Stud finder
- Clamps
DIY Instruction Step by Step
- Assemble and Position Bookcases: Assemble the stock bookcases. Arrange them along the wall, ensuring they are perfectly level, plumb, and aligned. Use shims where necessary. Screw the bookcases into the wall studs and screw the units together where they meet.
- Install Bridge and Filler: Fill any gaps between the tops of the bookcases with plywood to create a solid, continuous surface (the bridge). Cut and secure thin plywood fillers between the bookcases to cover the seams and create the look of solid vertical dividers.
- Install Base Cabinets (Optional): If you desire the lower closed cabinet look, place short base cabinets beneath the opening or simply build shaker-style doors to cover the bottom-most shelf openings.
- Apply Trim and Molding: This is the most critical step for the built-in appearance. Attach 1×4 trim to the outer front edges of the entire unit. Install the baseboard molding along the bottom front edge. Cut and secure the heavy crown molding along the top edge, ensuring all mitered corner joints are flawless. Caulk and fill all seams and nail holes.
- Stain and Finish: Apply the deep mahogany stain to all trim pieces, filler pieces, and the front edges of the bookcases to ensure a consistent color. Apply multiple coats of polyurethane for a durable, high-gloss finish.
- Install Ladder Track: Following the rolling ladder kit instructions, securely mount the metal track hardware to the upper face of the vertical dividers, ensuring it is perfectly level and anchored strongly into the unit framing. Assemble the ladder and place it onto the track.
19. Industrial Mesh Cabinetry for Visible Storage
Item Name: Black Wire Mesh and Wood Storage Lockers

This pairing of storage cabinets leans into a raw, industrial aesthetic using black metal mesh and frames contrasted with light wooden tops. The tall locker-style cabinet and the smaller accent cabinet provide excellent opportunities for visible organization. This style is often used to showcase items while keeping them contained.
The tall cabinet features double doors made of hexagonal wire mesh. This material provides both transparency and security, useful for items like a bar collection or media components that need ventilation. The mesh doors close with a latch, offering an organizational advantage for keeping children or pets away from stored items. Colorful storage boxes inside add organized pops of color.
The smaller matching cabinet and wall-mounted unit utilize the same materials. The open shelving on the sides of the tall unit is handy for books or easily grabbed items. This whole system efficiently utilizes vertical and horizontal space, creating a coordinated, edgy look that manages clutter through containment and display.
DIY Industrial Mesh Cabinet
Building a strong, simple box frame and adding mesh panels to the doors and sides creates this industrial locker look.
Materials Required List
- Square steel tubing (or pre-welded metal frames) for the frame and legs
- Thin wooden planks (for the top and shelves, light oak stain)
- Expanded metal mesh or hexagonal chicken wire (for door and side panels)
- Metal hinges and a latch mechanism (padlock compatible)
- Sheet metal screws or self-tapping metal screws
- Black spray paint (matte finish, specifically for metal)
- Primer (for metal)
- Storage boxes (red and blue)
Equipment Required List
- Miter saw (with a blade designed for cutting thin metal, if using steel tubing)
- Welding equipment (optional, for the strongest frame)
- Power drill and driver
- Measuring tape
- Metal snips or cutters (for the mesh)
- Safety glasses and gloves
DIY Instruction Step by Step
- Construct the Frame: If not using a pre-welded frame, cut the steel tubing to create the tall cabinet box frame (front, back, sides, internal shelf supports). Assemble the frame using welding or strong metal joining plates and screws. Ensure the frame is square.
- Cut and Install Shelves: Cut the wooden planks to fit inside the metal frame as shelves. Sand and stain the wood. Place the planks onto the internal shelf supports.
- Build the Doors: Construct two rectangular door frames from the steel tubing, slightly smaller than the cabinet opening. Cut the metal mesh to fit inside the door frames, securing it using sheet metal screws or spot welds.
- Paint the Metal: Disassemble the wooden shelves. Thoroughly clean the metal frame and door components. Apply metal primer, then several coats of matte black metal spray paint. Allow the paint to dry completely.
- Install Doors and Mesh Panels: Secure the painted mesh panels to the sides of the cabinet frame using sheet metal screws or tie wire. Attach the metal hinges to the cabinet frame and mount the doors. Install the latch mechanism and test the closure.
- Final Assembly: Place the stained wooden top onto the frame. Insert the colorful storage boxes and arrange the rest of your items on the shelves.
20. Discreet Behind-the-Sofa Charging Shelf
Item Name: Slim Dual-Level Power Console

This ultra-slim console is designed specifically to tuck neatly behind a sofa, offering essential utility without taking up floor space. Its narrow profile makes it a fantastic organizational piece in smaller living rooms or apartments. The shelves feature a sleek, dark finish, providing a sophisticated backdrop for various functional items.
The two-tiered design maximizes storage and surface area. The top level is the perfect spot for resting drinks, phones, and small decorative items like a vase. The lower shelf provides easily accessible space for tissue boxes or coasters, keeping the main sofa area clear.
A key organizational feature is the clever integration of power. The console includes a cutout or opening for an electrical outlet and cable management clips, ensuring charging cords for phones and devices are contained and neat. Wires drop down to the lower shelf, keeping the top surface tidy. The minimal silver support columns maintain an open, airy feel, proving that organization can be both functional and understated.
DIY Sofa-Back Charging Table
Building this specific dual-level table requires basic carpentry skills and attention to cord management. This plan uses pre-finished boards and metal tubing for a sleek look.
Materials Required List
- Pre-finished MDF or wood boards (2 pieces, long and narrow, dark color)
- Metal tubing (chrome or black, cut into 4-6 identical lengths for vertical supports)
- Metal mounting plates or flange connectors (to attach tubing to shelves)
- Wood screws and bolts (to secure connectors)
- Small metal U-brackets or cable clips
- Optional: Small power strip or USB hub (if installing a dedicated charging box)
Equipment Required List
- Power drill and various drill bits (including a bit large enough for cord access)
- Measuring tape and square
- Level
- Pencil
DIY Instruction Step by Step
- Cut and Finish Boards: Measure the length of your sofa back and cut the two boards to the desired length. If using unfinished wood, sand and stain/paint the boards dark and apply a sealant.
- Mark Support Placement: Decide where the vertical metal supports will be placed (typically one at each end and one or two in the middle). Mark these spots on both the top and bottom boards.
- Attach Supports to Bottom Shelf: Screw the metal mounting plates or flanges onto the bottom shelf at the marked locations. Screw the metal tubing supports into these plates.
- Assemble the Unit: Carefully place the top shelf onto the top of the metal supports. Use screws to secure the supports to the top board from the underside, ensuring the entire unit is straight and square.
- Create Power Access: Determine where the console will sit relative to a wall outlet. Drill a neat hole (large enough for a plug) into the lower shelf where the power strip or outlet will be concealed.
- Cable Management: Secure the console behind the sofa. Use small metal U-brackets or adhesive cable clips on the underside of the shelves and along the back edge to guide and contain all charging cables, leading them neatly down to the outlet.
21. Gallery-Style Magazine Display Ledges
Item Name: Minimalist Floating Display Shelves

This ingenious wall treatment offers a stylish and space-efficient way to organize and display magazines or thin books. Four narrow, light-wood picture ledges are mounted vertically up the wall, transforming magazine covers into rotating artwork. This method solves the problem of stacked clutter beautifully, making titles instantly visible and accessible.
The shelves themselves are minimalist, featuring a simple front lip that securely holds the magazines at a slight tilt. This design allows the publications to overlap slightly while still showcasing the colorful covers. The narrow profile of the ledges prevents them from protruding too far into the room, keeping the space open.
A clever detail is the use of decorative, patterned ceramic tiles as end caps for the ledges. These small accents prevent the magazines from sliding off the ends and introduce a subtle pop of color and texture to the otherwise simple display. This vertical organization scheme is a fantastic use of a blank wall space near a window or reading chair.
DIY Custom Magazine Ledges
Building these simple wall ledges is a straightforward carpentry task that requires precise cutting and mounting for a clean, floating look.
Materials Required List
- Lumber (1×4 or similar size) for the shelf base
- Thin lumber (1×2 or small decorative trim) for the front lip
- Wood glue and finishing nails
- Heavy-duty screws and wall anchors (or stud mounting screws)
- Wood putty
- Light wood stain or clear sealant
- Optional: Small decorative tiles (for end caps)
Equipment Required List
- Miter saw or circular saw
- Power drill and driver
- Level (long construction level)
- Measuring tape
- Sandpaper (various grits)
- Clamps
DIY Instruction Step by Step
- Cut the Wood: Cut the 1×4 (the shelf base) and the 1×2 (the front lip) to the required lengths for all four shelves. Ensure the ends are cut straight or at a clean 90-degree angle.
- Assemble the Shelves: Apply wood glue to the long edge of the 1×2 and attach it to the front long edge of the 1×4, forming a narrow ledge with a raised lip. Use clamps to hold the pieces together while the glue dries, or secure them with small finishing nails.
- Finish the Ledges: Fill any visible nail holes with wood putty and sand all surfaces smooth. Apply the light wood stain or clear sealant to the finished shelves and allow them to dry.
- Mark the Wall: Determine the vertical spacing between the shelves. Use the measuring tape and pencil to mark the mounting location for each shelf on the wall, using the level to ensure each line is perfectly horizontal.
- Mount the Ledges: Hold the first shelf in place. Use the power drill to drive long screws directly through the back of the shelf (the 1×4 piece) into the wall studs, or use appropriate heavy-duty wall anchors. Repeat for all four shelves, checking with the level each time.
- Add End Caps (Optional): Attach the small decorative tiles to the ends of the ledges using strong construction adhesive or tile mastic. Allow the adhesive to cure completely before placing magazines on the shelves.
22. Open-Concept Room Divider Shelving
Item Name: Ceiling-Mounted Plant and Book Display

This striking shelving unit is a fantastic solution for dividing an open-concept living and dining area without blocking light or making the space feel closed off. The design uses thin, black metal poles that extend from the floor to the ceiling, creating an airy, industrial frame. Light wood shelves span the distance, providing multi-functional storage.
The shelves are styled beautifully, primarily serving as a stunning vertical garden with numerous potted plants and trailing vines. This greenery introduces nature and texture into the home, enhancing the relaxed, bohemian feel of the space. The open structure ensures that light flows freely between the rooms.
Lower shelves are used for traditional living room organization, holding stacks of books, a tray with candles, and decorative bottles. The third shelf from the top features a subtle, integrated LED light strip, which illuminates the plants below and adds ambient light to the room. This piece is both an organizational unit and a sophisticated design element.
DIY Floor-to-Ceiling Room Divider Shelves
This project uses metal pipe fittings to create a visually light but structurally sound shelving unit that spans from floor to ceiling.
Materials Required List
- Galvanized or black steel pipe sections (for vertical uprights, ceiling height)
- Pipe fittings (T-connectors, flanges, elbows)
- Wooden planks (5-6 pieces, desired width)
- Wood stain or finish (light oak shown)
- Threaded floor and ceiling mounting plates (essential for stability)
- LED strip lighting kit (optional)
- Screws and toggle bolts/stud mounting hardware
Equipment Required List
- Pipe wrench or strap wrench
- Power drill and driver
- Stud finder
- Level (long construction level)
- Measuring tape
- Safety glasses
DIY Instruction Step by Step
- Plan and Measure: Measure the distance from the floor to the ceiling. Determine the length of the shelves and the spacing for the vertical uprights. The uprights must be securely anchored to ceiling joists for safety.
- Prepare the Pipes: Cut the wooden planks to length and apply the light stain/finish. Purchase pre-threaded pipe sections that, when assembled, are slightly shorter than the ceiling height.
- Install Floor and Ceiling Flanges: Mark the locations on the ceiling where the uprights will land. Use the stud finder and secure the top threaded mounting plates into the ceiling joists. Align the bottom floor flanges directly beneath the top plates and secure them to the floor.
- Assemble the Frame: Assemble the vertical pipe sections, using T-connectors at the desired shelf heights. Screw the entire upright assembly (including T-connectors) into the top and bottom mounting plates. Tighten the assembly securely using a pipe wrench. The tension should hold the uprights firmly in place.
- Add Shelves: Lay the finished wooden planks across the T-connectors. Secure the planks to the T-connectors using small screws driven up from the underside of the pipe fitting into the wood, ensuring the shelves cannot slide or tip.
- Install Lighting (Optional): Affix the LED strip lighting to the underside of your chosen shelf. Conceal the wire by running it along the back of the nearest vertical pipe, down to a hidden floor outlet.
23. Hidden Floor Storage Compartment
Item Name: Concealed Under-Rug Access Panel

This brilliant piece of organization is completely invisible until needed, using previously untapped space beneath the floor. A portion of the area typically covered by a rug has been adapted into a secret storage compartment. This is an incredible way to hide away valuable items, media, or seasonal items while keeping the room floor clutter-free.
The compartment is accessed via a hinged panel cut directly into the floor. The panel lifts easily, often with the assistance of pneumatic or gas hinges that hold it safely open. Small suction cups are used to easily lift the panel from beneath the edge of the rug.
Inside, the compartment features neat dividers, creating dedicated slots for laptops, binders, documents, and maybe even gaming controllers. The floor storage solution is especially useful in living rooms lacking basements or large closets. When the rug is laid back down, the entire organized space disappears, leaving a perfectly tidy room.
DIY Under-Floor Storage Hatch
Note: This is an advanced construction project that requires cutting into existing flooring and subflooring. Always ensure no plumbing, electrical wiring, or structural supports are located in the area before starting.
Materials Required List
- Plywood (3/4 inch thickness) for the frame and lid
- Lumber (2x4s) for framing and support within the floor cavity
- Gas struts or heavy-duty hinges with safety stops
- Divider boards (thin plywood)
- Wood screws, nails, and wood glue
- Wood stain or sealant (to match the floor/lid)
- Two large suction cups with handles (for lifting the lid)
- Carpet padding and adhesive (if matching the floor texture)
Equipment Required List
- Circular saw (for cutting frame)
- Jigsaw (for cutting the existing floor opening)
- Power drill and driver
- Level
- Measuring tape
- Stud finder/wiring locator (essential safety tool)
DIY Instruction Step by Step
- Map and Cut the Opening: Use the wiring locator and stud finder to confirm the area is clear. Mark the size of your desired storage box on the floor. Carefully use the jigsaw to cut through the finished flooring and the subfloor. Do not cut into floor joists.
- Build the Support Frame: Cut 2×4 lumber to frame the perimeter of the new hole inside the floor cavity. Screw this frame securely into the sides of the existing floor joists. This frame supports the edges of the floor and the lid.
- Build the Box and Dividers: Construct a plywood box (without a top) to fit neatly into the framed hole. Build and install the internal plywood dividers now. Stain or seal the inside of the box. Place the box into the hole and secure it to the 2×4 frame with screws.
- Prepare the Lid: Cut the lid from the plywood to fit snugly into the opening. Sand and finish the edges. Attach the gas struts or heavy-duty safety hinges to one side of the box frame and the corresponding area on the underside of the lid. Install the suction cups or small recessed handles on the lid.
- Finalize: Test the lid’s operation, ensuring it opens and closes safely. Place your large area rug over the hatch, leaving one edge slightly exposed for access.
24. Colorful Modular Cube Storage Wall
Item Name: Stackable Cube Organizer with Drawers

This highly versatile storage system is built from a collection of modular cube units, allowing it to be customized into a stepped or pyramid shape that fits various wall sizes. The mix of white modules with vibrant red, yellow, and blue accents creates a visually appealing and modern organizational focal point in the living space.
The system utilizes diverse internal components for specialized organization. Some cubes feature drawers in contrasting colors, perfect for concealing small office supplies or crafting tools. Others include closed cabinet doors in bold primary colors, ideal for hiding clutter completely. Open shelves are great for displaying books, baskets, or decorative objects.
Woven baskets slide into some of the cube openings, adding warmth and texture while keeping larger items, like blankets or toys, contained. The entire unit is based on the concept of combining different storage types—drawers, doors, and open shelves—to tackle diverse clutter challenges within one cohesive piece.
DIY Modular Cube System Customization
Building the cubes is complex, so this DIY focuses on customizing a commercially available modular cube shelf system (like those found at large retail stores) with custom doors and drawers.
Materials Required List
- Modular cube shelving unit (white, pre-built or kit form)
- Wood/MDF panels (for custom drawer/door fronts)
- Paint (red, yellow, blue, or other accent colors)
- Primer
- Small cabinet hinges (for doors)
- Drawer slides and hardware (for installing drawers)
- Woven baskets (sized to fit the cube openings)
- Small knobs and pulls
- Wood screws and glue
Equipment Required List
- Power drill and driver
- Measuring tape
- Sandpaper
- Paint brushes and rollers
DIY Instruction Step by Step
- Assemble the Base Cubes: Assemble the basic cube shelving unit according to the manufacturer’s instructions, determining the final stepped arrangement on the floor first.
- Prep and Paint Custom Fronts: Measure the openings where you want doors and drawers. Cut the wood panels to size. Prime and paint the door and drawer fronts in your accent colors (red, blue, yellow).
- Install Doors: Drill holes and attach the small cabinet hinges to the inside edges of the cube openings where doors are desired. Screw the painted door panels onto the hinges. Attach the knobs/pulls.
- Install Drawers: This is the most complex step. Build simple, square drawer boxes sized to fit the cube opening. Screw the drawer slides inside the cube opening. Attach the drawer boxes to the slides. Finally, screw the painted drawer front onto the assembled drawer box.
- Stack and Secure: Stack the assembled and customized cubes into your desired stepped arrangement. Secure the cubes to each other using small coupling screws or specialized connectors that come with the kit. For safety, always anchor the top portion of the cube wall securely to the room wall studs.
- Accessorize: Place the woven baskets into the designated open slots. Fill the remaining open cubes with books and decorative items.
25. Floating Wide-Span Storage Console
Item Name: Minimalist Long-Drawer Media Credenza

This extra-long, floating console provides substantial storage while maintaining an incredibly clean, minimalist aesthetic. Finished in a light, natural wood veneer, the piece extends almost the entire length of the wall, making a strong but quiet design statement. Lifting the console off the floor contributes to the feeling of openness and space in the room.
The primary organizational feature is the series of numerous wide, deep drawers. These drawers are essential for keeping all media accessories, cables, games, and living room clutter completely concealed, allowing the top surface to remain beautifully uncluttered. The drawer fronts feature no visible hardware, enhancing the sleek, contemporary lines.
A clever detail is visible on the far right end of the console. A subtle, open gap is designed into the end panel, providing a neat channel for running power cords and managing cables discreetly. The top surface, decorated only with framed artwork and small potted plants, shows the power of hidden storage to create visual calm.
DIY Floating Minimalist Console
Building a floating console requires a very sturdy wall mounting system to handle the weight of the drawers and contents. This plan uses a hidden French cleat system.
Materials Required List
- Plywood or MDF (3/4 inch thickness) for the box frame, drawer boxes, and drawer fronts
- Wood veneer (light oak finish) or wood stain
- Long, heavy-duty full-extension drawer slides (6-8 sets)
- Heavy-duty screws and wall anchors (or stud mounting screws)
- Plywood (3/4 inch thickness) for the French cleat mounting system
- Wood glue and finishing nails
Equipment Required List
- Circular saw or table saw
- Miter saw (for clean corners)
- Power drill and driver
- Level (long construction level, essential)
- Measuring tape
- Clamps
DIY Instruction Step by Step
- Build the Outer Box: Cut and assemble the top, bottom, and side panels of the long rectangular console box. Use wood glue and screws for maximum strength. Ensure the box is perfectly square.
- Apply Finish: Apply the wood veneer or stain/seal the entire exterior of the box and the drawer fronts.
- Install Drawer Runners: Mark the interior side panels where the drawer slides will be positioned. Carefully install the heavy-duty, full-extension drawer slides inside the box frame, ensuring they are perfectly level and parallel.
- Construct and Install Drawers: Build the drawer boxes to fit the slides precisely. Attach the drawer boxes to the runners. Once installed, attach the finished drawer fronts to the boxes, checking that the gaps between the fronts are minimal and uniform.
- Build and Install French Cleat: Cut two pieces of thick plywood at a 45-degree angle along one long edge. One piece (the wall piece) will mount directly to the wall studs. The other piece (the cabinet piece) will mount to the back of the console box.
- Mount the Console: Locate all the wall studs where the console will hang. Screw the wall piece of the French cleat securely into the studs, using the level to ensure it is perfectly horizontal. Lift the console box, align the cabinet piece of the cleat with the wall piece, and gently lower the cabinet until it locks into place. Secure the bottom edge of the console to the wall with screws for anti-tip safety.
26. Smoke Acrylic Magazine Container
Item Name: Transparent Minimalist Magazine Holder

This simple, modern piece offers a sophisticated way to manage the clutter of magazines or large, thin books. The container is constructed from a single piece of bent or bonded smoke-tinted acrylic, forming a sleek, open-top cube. The slightly opaque color provides a subtle shield for the contents while still allowing them to be visible.
Designed to hold a substantial stack of publications, the box sits neatly on a coffee table, side table, or shelf. The geometric, clear design ensures it blends seamlessly with any contemporary decor without adding visual weight. This approach elevates the storage of everyday reading materials, transforming a potential pile of mess into a curated, contained stack.
Its functionality lies in its simplicity. By providing a defined boundary for a collection, it prevents the stack from spreading across surfaces, maintaining a sense of order. The acrylic material also ensures the contents are protected from dust and spills, keeping the living room organized and stylish.
DIY Acrylic Magazine Box
Creating a smoke-tinted acrylic box requires acquiring pre-cut pieces and carefully using specialized solvent cement to achieve a clean, seamless look.
Materials Required List
- Smoke-tinted acrylic sheets (five pieces: one base, four sides)
- Acrylic solvent cement (e.g., Weld-On #3)
- Applicator bottle or syringe (for applying cement)
- Masking tape
- Rubbing alcohol and soft, lint-free cloths
Equipment Required List
- Square and ruler
- Safety glasses and gloves
- Clamps (optional)
DIY Instruction Step by Step
- Preparation: Purchase the five acrylic pieces pre-cut to your desired dimensions (base, two long sides, two short ends). Clean all edges with rubbing alcohol to remove any oils or dust.
- Assemble the First Corner: Place the base piece flat. Apply a piece of masking tape to the outside edge of one long side piece, ensuring the tape overhangs slightly. Stand this long side piece upright on the base.
- Bond the First Joint: Use the applicator to run a very thin bead of acrylic solvent cement along the joint where the long side meets the base. The cement wicks into the joint and bonds the pieces chemically. Hold firmly or clamp in place for a few minutes.
- Complete the Box: Repeat the bonding process, adding the short end pieces next, then the final long side piece, ensuring each joint is perfectly square and all edges align. Allow the entire structure to cure for 24 hours before moving it or placing heavy magazines inside.
27. Felt and Wood Sofa Arm Organizer
Item Name: Multi-Pocket Remote and Drink Caddy

This ingenious organizational tool makes clutter management simple and comfortable right at the sofa. It is a dual-function caddy designed to drape over the arm of the couch. Constructed from thick, charcoal-gray felt, it provides a soft, non-slip surface that complements the furniture fabric.
The caddy features multiple generously sized pockets along the side that hangs down. These pockets are incredibly useful for holding remote controls, reading glasses, phones, and small electronic devices, keeping them contained and easily accessible without cluttering the cushions or coffee table.
A clever feature is the small, removable wooden tray insert on the top surface. This tray creates a stable spot for resting a mug, a cup, or a snack, preventing spills on the furniture. The entire unit is secured with attractive leather straps, which provide both decoration and stability. This caddy is a straightforward, portable organizational hack for a tidy living space.
DIY Felt Sofa Arm Caddy
Making a custom sofa arm organizer requires simple sewing and assembly, primarily using thick felt and decorative straps.
Materials Required List
- Thick, durable craft felt (charcoal gray or desired color)
- Leather or faux leather strips (for decorative straps)
- Small, thin wooden cutting board or plank (for the coaster surface)
- Heavy-duty thread (matching felt color)
- Upholstery snaps or rivets (for attaching leather)
- Scissors
Equipment Required List
- Sewing machine (or needle for hand sewing)
- Measuring tape
- Utility knife (for cutting felt)
- Ruler
- Riveting tool (optional, for leather)
DIY Instruction Step by Step
- Measure and Cut Felt: Measure the width of your sofa arm, the length you want to drape down, and the width you want for the pockets. Cut one large piece of felt that covers the top, drapes down the side, and one piece for the pocket panel.
- Create Pockets: Lay the pocket panel over the main felt piece (on the side that drapes down). Mark and sew straight lines vertically to create multiple individual pockets (sized for remotes, phones, etc.). Use the heavy-duty thread and ensure the top edge of the pocket panel is neatly finished.
- Create Coaster Opening: On the top section of the main felt piece (where it rests on the arm), cut a clean hole slightly smaller than your wooden coaster board. This provides a designated, recessed spot for the tray.
- Attach Straps: Cut the leather strips. Fold them into loops or straps that secure the organizer to itself or provide a decorative accent over the top. Use strong thread or a riveting tool to attach the straps securely to the felt.
- Final Assembly: Place the wooden coaster board into its designated felt cutout. Drape the finished caddy over the sofa arm, and secure the straps if needed.
28. Fireplace Hearth Hidden Storage Nook
Item Name: Hearth Appliance and Game Cabinet

This ingenious organization hack reclaims the non-functional space of a fireplace hearth, transforming it into valuable hidden storage. The mantel and hearth remain visually traditional and clean, maintaining the room’s aesthetic. However, the space where a fire would normally burn is entirely enclosed behind a custom-fitted cabinet door.
The cabinet door, painted white to match the surrounding mantel, opens to reveal a deep, dark storage cavity. This space is surprisingly versatile, accommodating a surprising amount of clutter. The image shows it holding an electric fireplace unit (which can be easily moved out for use), stacked board games, and a folded tray table.
This solution is wonderful for living rooms that have an unused fireplace or one with an easily removable insert. It keeps bulky items entirely out of sight but readily accessible, ensuring the room stays organized and free of visual distraction. The subtle integration makes it a truly invisible storage solution.
DIY Fireplace Hearth Cabinet Insert
Note: Only attempt this project on a non-functional or purely decorative fireplace opening. Ensure the area is completely safe and free of gas lines or heat hazards.
Materials Required List
- Plywood or MDF (3/4 inch thickness) for the frame and inner walls
- Cabinet door (pre-made, to match mantel style)
- Cabinet hinges (concealed or traditional)
- Cabinet handle (matching existing room hardware)
- Primer and white paint (to match the mantel)
- Thin lumber or trim (for a seamless look around the door)
- Wood screws and anchors
Equipment Required List
- Power drill and driver
- Measuring tape
- Level
- Circular saw or table saw
- Caulk gun
DIY Instruction Step by Step
- Measure the Opening: Measure the exact height, width, and depth of the fireplace opening (the firebox). Account for the thickness of the frame you will install.
- Build the Inner Frame: Cut and assemble a simple rectangular plywood box (without a front) that fits snugly inside the firebox opening. This interior box protects the contents from any soot residue and provides a clean interior. Slide the box into the opening and secure it with screws into the surrounding masonry (using masonry screws and drill bits).
- Prepare the Door: Purchase a door that is slightly larger than the opening, allowing it to cover the seam. Prime and paint the door white to match the mantel.
- Install the Door: Using a level, install the cabinet hinges onto one side of the inner frame and attach the door. Ensure the door opens smoothly and aligns perfectly with the mantel trim when closed. If necessary, use thin trim lumber to create a neat, seamless border around the door.
- Finishing Touches: Fill any gaps or seams with caulk and touch up the paint. Install the handle. Organize your games, appliances, and accessories inside the new hidden storage space.
29. Ceiling-Recessed Projector Cabinet
Item Name: Concealed Home Theater Console

This highly customized solution tackles the organization of home theater equipment by hiding it completely within the ceiling structure. The design features a shallow cabinet enclosure built down from the ceiling and seamlessly integrated with crown molding, making it appear as a structural element of the room. This dark-painted cabinet contrasts beautifully with the white coffered ceiling.
The primary function is to discreetly house a projector in the large central opening. This placement keeps the projector out of the line of sight and preserves the minimalist aesthetic of the room. Flanking the central opening, smaller recessed niches are designed to hold speakers, effectively integrating the entire sound system into the architecture.
A hidden access panel or hinged bottom conceals the wiring and ventilation needed for the electronics. This method of overhead concealment is extremely effective at removing bulky electronics and their associated cable mess from the visible surfaces of the living room.
DIY Ceiling Speaker and Projector Enclosure
Note: This is an advanced project that requires working overhead and potentially working near electrical wiring. Consult a professional for wiring and structural integrity.
Materials Required List
- Plywood or MDF (3/4 inch thickness) for the box frame
- Lumber (2x4s) for internal structural mounting (into ceiling joists)
- Crown molding and decorative trim (to match the room)
- Paint (deep charcoal gray)
- Wood screws and finishing nails
- Wood glue
- Acoustical foam or liner (for speaker enclosures)
Equipment Required List
- Power drill and driver
- Level
- Measuring tape
- Miter saw
- Circular saw or table saw
- Stud finder/joist finder
DIY Instruction Step by Step
- Design and Measure: Determine the required width and depth of the enclosure based on the projector and speaker dimensions. Locate the ceiling joists; the enclosure must be securely screwed into these joists.
- Build the Box Frame: Construct a rectangular plywood box (without a top) designed to hang from the ceiling. Create internal partitions within the box for the central projector section and the flanking speaker sections.
- Mount the Frame: Secure 2×4 lumber mounting strips to the ceiling joists. Lift the box frame and screw it securely into these mounting strips from the side and back. Use the level to ensure the box hangs perfectly horizontal.
- Finish and Trim: Cut and attach thin plywood to the bottom of the box, leaving the openings for the projector lens and speakers. Caulk all seams. Install the crown molding around the perimeter of the entire hanging box, where it meets the ceiling.
- Paint and Install Speakers: Prime and paint the entire enclosure in the deep charcoal gray color. Once dry, line the speaker cavities with acoustical foam. Install the speakers and the projector into their designated openings. Ensure all wiring is neatly concealed within the structure or run through the ceiling.
30. Mobile Rolling Toy Cart
Item Name: Casters-Equipped Children’s Storage Trolley

This practical and brightly colored storage unit is designed to bring order to children’s items in the living room. The mobile trolley features a simple, light wood frame with smooth handles, making it easy to push between rooms or tuck into a closet when playtime is over. The unit’s mobility is key to keeping the living room organized quickly.
The cart holds several rows of brightly colored plastic bins. These bins are tiered, allowing small hands easy access to their toys, blocks, and art supplies. The top row features shallow, tilted bins for small pieces, while the lower rows contain deeper, pull-out containers. The combination of bins and shelves provides diverse storage capacity.
Labels on the front of the bins help with organizational habits, making clean-up a straightforward task. By providing dedicated, easily movable storage for toys, this unit prevents them from migrating to permanent living room surfaces. It is a highly functional piece that caters directly to family living needs.
DIY Mobile Toy Storage Cart
Building a simple, sturdy wooden cart with integrated shelving for plastic bins is an achievable beginner woodworking project.
Materials Required List
- Plywood (3/4 inch thickness) for the side panels, base, and vertical supports
- Lumber (1x2s) for drawer slides/bin support rails
- Four heavy-duty locking casters (wheels)
- Wood screws and wood glue
- Wood stain or sealant (natural finish)
- Various sizes of plastic storage bins (tilted and rectangular)
- Long dowels or lumber (for the handles)
Equipment Required List
- Circular saw or table saw
- Power drill and driver
- Level
- Measuring tape
- Clamps
DIY Instruction Step by Step
- Cut the Panels: Cut the plywood into two identical side panels (these form the height of the cart) and one large rectangular base piece. Cut smaller plywood pieces for any fixed internal vertical supports or shelves.
- Attach the Handles and Casters: Cut the dowels or lumber for the handles and attach them securely to the top edges of the two side panels. Attach the four locking casters to the bottom of the base piece using wood screws.
- Assemble the Cart: Securely attach the two side panels to the base piece using wood glue and screws. Install any internal fixed supports. Stain or seal the entire wooden frame.
- Install Bin Rails: Measure the plastic bins. Cut the 1×2 lumber into support rails. These rails will be screwed horizontally along the inside of the side panels to hold the plastic bins. Ensure the rails for the tilted bins are angled downwards slightly and all rails are level across from each other.
- Final Assembly: Place the plastic bins onto their support rails. Ensure they slide easily. Place labels on the bins to designate contents, making clean-up easier for everyone.
31. Hallway Bench with Tilt-Out Shoe Storage
Item Name: Built-in Mudroom Bench and Shoe Cabinet

This multi-functional unit demonstrates how to integrate organization seamlessly, especially near an entryway or transitioning from a hallway to the living room. The piece features a classic, crisp white finish with vertical planking (beadboard) on the back panel, giving it a traditional, clean look. A comfortable, patterned cushion sits on top, providing a handy spot to sit down.
The upper section is equipped with dark metal coat hooks, which are essential for hanging coats and bags, keeping them off the floor. A separate, decorative key holder is centered high on the panel. The lower section of the bench is dedicated to shoe storage, which is often the biggest clutter culprit in entry areas.
Instead of messy open shelves, this design uses concealed, tilting compartments. The door fronts hinge outwards and downwards, revealing tiered shoe racks that keep footwear neatly stacked and out of sight. This tilt-out mechanism provides high capacity in a narrow space, ensuring the living area remains tidy.
DIY Tilt-Out Shoe Bench
Building a tilt-out shoe cabinet is a moderately complex project requiring specialized hinge hardware to achieve the angled storage racks.
Materials Required List
- Plywood or MDF (3/4 inch thickness) for the bench frame and top
- Lumber (1x4s) for the back panel (beadboard) and trim
- Two tilt-out shoe storage hinges/hardware kits (includes the plastic or metal dividers)
- Cabinet hinges (for the bench top, if making it liftable)
- Primer and white semi-gloss paint
- Wood screws, nails, and wood glue
- Coat hooks and key holder hardware
- Custom or store-bought cushion
Equipment Required List
- Circular saw or table saw
- Miter saw (for trim)
- Power drill and driver
- Level
- Measuring tape
- Clamps
DIY Instruction Step by Step
- Build the Bench Box: Cut and assemble the base box frame (sides, bottom, and fixed internal dividers) from plywood. This box must be wide enough to accommodate the tilt-out hardware. Secure the box with wood glue and screws.
- Install Tilt-Out Hardware: Follow the shoe hinge kit directions precisely. This hardware usually mounts to the inside of the bench frame. Once the hinges are in place, attach the pre-cut tilt-out door panels to the front of the hardware.
- Build the Back Panel: Construct the back panel (the beadboard section) using 1×4 lumber or a pre-made beadboard panel. Attach this panel to the back of the bench box. Trim the top with decorative molding.
- Finish the Bench: Fill all visible seams and screw holes with putty. Sand everything smooth. Apply primer, then several coats of white semi-gloss paint for a durable, clean finish.
- Add Hardware: Screw the coat hooks and the decorative key holder securely into the beadboard panel. Place the custom cushion on the bench top. Open and close the tilt-out doors to ensure they function smoothly.
32. Illuminated Recessed Display Niches
Item Name: Built-in Accent Wall Shadow Boxes

This creative lighting and display solution transforms an ordinary wall into a showcase area using six recessed niches. The design utilizes the depth of the wall cavity to create functional, aesthetically pleasing shadow boxes, completely eliminating the need for floor space or projecting shelves.
Each square niche is painted a rich, deep berry or purple color, providing a striking backdrop for the displayed objects. The white trim around the opening of each niche ensures the display stands out sharply against the neutral wall.
The entire arrangement is beautifully lit with integrated LED downlights installed in the top of each recess. This subtle, targeted lighting accentuates the decorative items—vases, books, and small sculptures—giving the whole wall a museum-like quality. Grouping the niches in a grid pattern provides structured, symmetrical organization for cherished small collections.
DIY Recessed Wall Niches with Lighting
Note: This project involves cutting into drywall and possibly working near existing wall studs. Ensure your wall is not load-bearing where you plan the recesses.
Materials Required List
- Plywood or MDF (1/2 inch thickness) for the niche boxes
- Lumber (2x4s) for framing the rough openings
- Drywall or joint compound
- Primer and paint (white for trim, deep berry for the interior)
- LED puck lights or thin strip lights (6 pieces)
- Electrical wiring and connectors (consult an electrician)
- Wood screws and finishing nails
Equipment Required List
- Power drill and driver
- Stud finder
- Jigsaw or drywall saw (for cutting wall openings)
- Level
- Measuring tape
- Sandpaper
DIY Instruction Step by Step
- Plan the Layout: Use the stud finder to locate the wall studs. You must build your niches between the studs. Mark the location of your six desired rectangular or square openings on the wall, ensuring they are evenly spaced.
- Cut and Frame Openings: Carefully cut the drywall using the jigsaw to create the six rough openings. Build a simple 2×4 frame around the inside perimeter of each cut-out. Secure the frames to the wall studs and existing wall structure.
- Build and Install Niche Boxes: Cut and assemble six plywood box frames (without a front or back). Paint the interior of these boxes with the deep berry color. Slide the boxes into the framed openings and secure them with screws into the 2×4 frames.
- Install Lighting: Carefully run low-voltage wiring for the LED puck lights from a power source to the top inside of each box. Drill a small hole in the top center of each box and install the LED puck lights or strip lights, ensuring the wiring is concealed behind the drywall.
- Finish the Trim: Apply joint compound and sanding to blend the edges of the box frames seamlessly with the existing drywall. Once smooth, prime and paint the surrounding wall and the niche trim (the front edge of the plywood box) with white paint.
33. Leaning Ladder Book and Display Shelf
Item Name: Tapered Light Wood Blanket and Book Rack

This attractive shelving unit offers vertical storage in a casual, space-saving format. The shelf is designed with a distinctive ladder profile, leaning against the wall and featuring five tiered shelves that gradually increase in depth towards the bottom. The light, natural wood finish keeps the unit feeling airy and modern.
This design is highly effective for visual organization. The open shelves provide fantastic display space for curated items like small framed pictures, potted succulents, and decorative ceramics. Arranging items in small groupings prevents the shelves from looking cluttered.
The bottom shelf, being the deepest, provides ample space for larger items, such as the two woven baskets shown. These baskets are useful for concealing various types of clutter—extra throws, small toys, or magazines—maintaining a tidy appearance while maximizing the shelf’s footprint. The entire piece is both a storage workhorse and a stylish accent.
DIY Leaning Ladder Shelf
Building a ladder shelf is an accessible woodworking project that requires precise angle cuts to ensure the unit leans safely and stands level.
Materials Required List
- Lumber (1x3s or 1x4s) for the side rails and shelf supports
- Plywood or solid wood planks (for the shelves)
- Wood screws and wood glue
- Small pieces of felt or rubber pads (for the contact points with the wall and floor)
- Wood stain or clear sealant (light natural finish)
- Safety straps (for securing the top to the wall)
Equipment Required List
- Miter saw (essential for angle cuts)
- Power drill and driver
- Level
- Measuring tape
- Clamps
- Sandpaper
DIY Instruction Step by Step
- Cut the Side Rails: Determine the desired height and angle of the lean. Cut the two long side rails. The bottom of the rails should be cut flat (90 degrees) to sit on the floor, and the top should be cut at an angle to sit flush against the wall.
- Cut the Shelves and Supports: Cut the shelf planks, making them successively deeper from top to bottom. Cut small support pieces (cleats) from the 1×3 material. These cleats will attach to the inside of the side rails to support the shelves.
- Assemble the Frame: Mark the exact height of each shelf on the side rails. Attach the shelf support cleats to the inside of the rails using wood glue and screws, ensuring they are perfectly level across from each other.
- Attach the Shelves: Place the shelves onto the support cleats. Secure the shelves by screwing through the cleat and up into the shelf plank from beneath.
- Finish and Secure: Sand the entire unit smooth. Apply the light wood stain or clear sealant. Place the shelf against the wall. Use the level to ensure it stands straight. Secure the top of the shelf to the wall with small safety straps screwed into a wall stud. Place felt pads on the bottom of the feet to protect the floor.
34. Custom Office and Bar Armoire
Item Name: Secret Pull-Out Desk and Storage Cabinet

This handsome, tall cabinet offers an outstanding dual-purpose solution for a living room that needs both a home office and entertainment storage. Finished in a rich, dark emerald or forest green, the armoire features traditional molding and hardware, making it look like a stately piece of accent furniture when closed.
When the large double doors swing open, the functionality is revealed. The center section is a workspace, featuring a pull-down desk flap that creates a temporary writing or laptop surface, complete with built-in power and charging ports. Above this desk, glass racks and bottle storage suggest a secondary use as a discreet home bar.
The entire interior is customized with shelves and small compartments, perfect for organizing office supplies, paperwork, and drinkware. The deep closed doors allow clutter to disappear, providing a structured, contained organizational system that blends work and leisure effortlessly.
DIY Home Office/Bar Cabinet Conversion
Converting a large cabinet (or building one) to include a drop-down desk and custom storage requires careful planning of internal compartments and specialized hardware.
Materials Required List
- Large stock cabinet or armoire (or plywood/MDF to build the frame)
- Heavy-duty hinges and lid supports (for the drop-down desk flap)
- Lumber (1x3s) for internal shelf framing
- Wine glass racks and bottle dividers
- Wood screws and wood glue
- Primer and deep green paint (semi-gloss finish)
- Optional: Recessed power strip/USB ports
- Desk handle and cabinet knobs
Equipment Required List
- Circular saw or table saw
- Power drill and driver
- Measuring tape
- Level
- Clamps
- Sandpaper
DIY Instruction Step by Step
- Prepare the Cabinet: Acquire the cabinet or build a simple large box frame from plywood. Remove all internal shelving. Prime and paint the cabinet exterior and the internal back walls in the deep green color.
- Install Fixed Shelves: Measure and install the permanent shelves (top and bottom) and any fixed vertical dividers using wood screws and glue.
- Create the Drop-Down Desk: Cut a piece of plywood (the desk flap) to fit the central opening. Mount this flap using heavy-duty hinges along the bottom edge of the opening. Attach lid supports or folding bracket hardware to the sides of the cabinet interior and the flap to ensure the desk stays level when opened.
- Install Accessories: Install the wine glass racks on the underside of the top shelf. Build and install custom bottle dividers in one of the lower shelf compartments.
- Add Power (Optional): Cut a small hole in the back of the cabinet behind the desk area and install a recessed power strip or grommet for a charging cord.
- Finishing Touches: Install the cabinet door hardware and the desk handle. Load the shelves with your organized bar supplies, office materials, and boxes.
35. Sliding Artwork Wall Concealing Storage
Item Name: Hidden Projector Screen and Display Art Panel

This advanced organizational solution uses large, framed art panels mounted on a sliding track system to completely conceal storage or a hidden media area. This method keeps technology and clutter out of sight, making the living room incredibly tidy and visually calm when not in use.
The large canvas or print of a portrait is mounted on a wooden frame that slides horizontally along a recessed track installed at the floor and ceiling. When closed, the artwork is the sole focal point of the wall, presenting a clean, gallery-like appearance.
The frame slides open to reveal deep recessed storage niches behind the art. In this example, the niches hold large projector screens (white and black, likely for different types of viewing) or perhaps concealed shelving for equipment and clutter. This custom approach is the ultimate high-end hack for managing the visual chaos associated with home theaters and media.
DIY Sliding Art Panel System
Note: This is a complex carpentry project requiring precision and specialized sliding hardware, suitable for advanced DIYers.
Materials Required List
- Plywood or MDF (3/4 inch thickness) for the fixed recessed boxes
- Lumber (2x4s) for framing the wall openings
- Sturdy wooden lumber (for the sliding art frame)
- Heavy-duty sliding barn door or bypass track hardware kit (floor and ceiling tracks)
- Art canvas or printed fabric (to cover the sliding panel)
- Wood glue and wood screws
- Wood stain or veneer (light oak finish)
Equipment Required List
- Circular saw or table saw
- Miter saw
- Power drill and driver
- Level (long construction level)
- Measuring tape
- Stud finder
DIY Instruction Step by Step
- Build and Install Recessed Boxes: Locate wall studs and determine the dimensions of the two fixed recessed storage/screen boxes. Build these boxes from plywood and secure them firmly into the wall studs, ensuring the front edges are perfectly flush with the drywall surface. Apply stain/veneer to the visible front edge of the recessed boxes.
- Install Sliding Track: Install the heavy-duty sliding track hardware (floor and ceiling rails) along the front of the entire wall area where the art panel will slide. The track needs to run the full width of the recessed boxes and the art panel’s travel path.
- Build the Sliding Art Frame: Construct a strong, flat rectangular frame from lumber that will hold the art canvas. This frame must be sized to cover the entire center wall area and overlap the recessed boxes when closed. Apply the light wood stain/veneer to the frame.
- Cover the Frame: Stretch and secure the art canvas or fabric tightly across the front of the frame, stapling it neatly on the back.
- Hang the Panel: Attach the roller hardware from the kit to the top of the art panel frame. Lift the panel and carefully mount the rollers onto the overhead track. Ensure the panel rolls smoothly and covers the recessed boxes completely when slid closed.
36. Window Sill Organized Catch-All
Item Name: Multi-Compartment Windowsill Organizer Caddy

This ingenious organizational piece utilizes a previously overlooked area—the window sill—to store small, everyday items that often scatter across living room tables. The deep wooden window sill is topped with a custom-built, multi-compartment wooden tray, keeping clutter contained and neatly compartmentalized.
The long, narrow caddy features a grid of individual square and rectangular slots. These small divisions are useful for separating items like remote controls, keys, eyeglasses, coins, and small decorative pieces like succulents or candles. The natural wood finish of the caddy complements the window sill, adding a warm, rustic touch.
One section of the caddy is sometimes dedicated to paper or mail, while others hold items needing a specific home, like charging blocks or wallets. By relocating these frequent clutter items to a dedicated windowsill zone, the coffee table and end tables are left clear, contributing significantly to a tidy living area.
DIY Multi-Compartment Organizer Caddy
Building a customized sectional caddy is a relatively simple woodworking project that involves cutting and assembling many small pieces to form the grid.
Materials Required List
- Thin plywood or basswood strips (1/4 inch thickness) for the dividers
- Plywood or lumber (1/2 inch thickness) for the outer box frame
- Wood glue and small brad nails
- Wood stain or clear sealant (natural finish)
- Felt pads (for the bottom of the caddy)
Equipment Required List
- Miter saw (essential for cutting small, consistent pieces)
- Clamps
- Measuring tape
- Sandpaper
- Brad nailer (optional, hand-nailing is fine)
DIY Instruction Step by Step
- Measure and Cut the Outer Box: Measure your window sill depth and length to determine the size of the caddy. Cut the plywood for the long sides, short ends, and the bottom piece of the outer rectangular box. Assemble the outer box using wood glue and brad nails.
- Cut the Dividers: Determine the size of the internal squares and rectangles needed for your specific items (remotes, keys, etc.). Cut the thin plywood or basswood strips to the precise lengths required for the internal grid.
- Assemble the Grid: Mark the bottom of the box where each divider will be placed. Apply wood glue to the edges of the divider strips. Carefully slot and glue the horizontal dividers first, then the vertical dividers, creating the grid. Use clamps to hold the pieces tightly until the glue sets.
- Finish the Caddy: Fill any nail holes with wood putty and sand the entire caddy smooth. Apply the wood stain or clear sealant. Attach small felt pads to the bottom corners of the caddy to protect the window sill.
37. Over-the-Door Canvas Storage Organizer
Item Name: Vertical Multi-Pocket Activity Holder

This highly effective storage solution utilizes the back of a door, turning vertical space into organized, accessible storage without occupying any living room floor space. The organizer is a large sheet of durable canvas or heavy fabric with multiple pockets and straps, hung simply over the top of the door with large metal grommets.
The deep, sturdy pockets are fantastic for organizing various flat or rolled items. Magazines and activity books fit neatly into the open pockets. Clear plastic pockets are also incorporated, providing visibility for smaller, loose items.
A clever feature is the integrated horizontal straps, which are useful for securing bulkier, rolled items like yoga mats, blankets, or picnic rugs, keeping them ready for quick use. By dedicating the back of a door to storage, this organizer frees up shelves and baskets in the main room, contributing significantly to a less cluttered environment.
DIY Heavy-Duty Over-the-Door Organizer
Creating a custom fabric organizer requires a sewing machine and heavy-duty materials to ensure it can support the weight of the contents.
Materials Required List
- Heavy-duty canvas or duck cloth (black or desired color)
- Vinyl or clear plastic sheeting (for clear pockets)
- Webbing or thick straps (for hanging and securing rolled items)
- Large metal grommets (4-6 pieces)
- Heavy-duty thread
- Scissors
Equipment Required List
- Sewing machine (capable of handling heavy fabric)
- Grommet setting tool kit
- Measuring tape
- Iron
DIY Instruction Step by Step
- Cut the Fabric: Cut the main back panel of the canvas fabric to the desired dimensions (door height and width). Cut out rectangular pieces for the pockets and the clear vinyl pockets.
- Sew the Pockets: Hem the top edge of the fabric panels. Fold and press the edges of the pocket pieces. Pin and sew the pocket pieces onto the main back panel, reinforcing the top edge of each pocket. Use vertical stitches to divide larger pockets into smaller sections, as needed.
- Install Straps: Measure and cut the webbing or thick straps. Pin the straps horizontally across the main panel where you want to secure rolled items (like blankets or mats). Sew the straps securely to the panel, ensuring they are strong enough to hold weight.
- Install Grommets: Mark the top edge of the main panel where the hanging hooks will go. Following the kit instructions, use the grommet setting tool to securely install the large metal grommets at the marked spots.
- Hang the Organizer: Loop the hanging straps or hooks through the grommets and hang the organizer over the top of the door.
38. Upholstered Storage Bench with Dividers
Item Name: Lift-Top Tufted Fabric Ottoman Console

This versatile piece of furniture functions as a chic coffee table, extra seating, or a footrest, all while providing substantial hidden organization. The long rectangular bench is upholstered in a neutral, textured fabric, featuring a classic tufted top that adds a tailored, sophisticated look to the living area. The neutral color allows it to blend easily with various decor styles.
The large lid hinges upward, often supported by gas struts, revealing a deep, expansive storage cavity. This space is brilliantly organized with internal dividers, which help separate different types of clutter. Here, the storage is being used to neatly fold and store extra throw blankets and accent pillows, keeping them dust-free and ready for use.
The divided sections are useful for categorizing items, such as seasonal decorations, games, or media accessories, ensuring everything has a defined home. By integrating deep, concealed storage into a frequently used piece of furniture, the ottoman prevents clutter from accumulating on the sofa or side tables.
DIY Large Upholstered Storage Ottoman
Building a large upholstered ottoman with dividers requires a sturdy wooden frame and attention to neat upholstery work.
Materials Required List
- Plywood or MDF (3/4 inch thickness) for the frame and lid
- Lumber (2x2s) for internal structural support
- Upholstery foam (2-3 inch thick) for the lid
- Batting and muslin fabric (for wrapping foam)
- Durable upholstery fabric (neutral color)
- Gas shocks or heavy-duty hinges with lid supports
- Internal plywood dividers
- T-nuts and furniture feet (4 pieces)
- Heavy-duty staples and wood screws
Equipment Required List
- Circular saw or table saw
- Power drill and driver
- Heavy-duty staple gun
- Measuring tape and straight edge
- Button/tufting needle (optional, for tufted look)
DIY Instruction Step by Step
- Build the Box Frame and Base: Cut and assemble the four side panels and the bottom panel of the ottoman box from thick plywood. Use wood glue and screws for strength. Install 2×2 supports inside the box to hold the dividers.
- Create Internal Dividers: Cut plywood pieces to form the internal dividers. Place these into the box and secure them with screws or finishing nails.
- Build and Upholster the Lid: Cut the lid from plywood. Adhere the foam to the lid top, then wrap the foam and lid tightly with batting and a layer of muslin, stapling securely to the underside. For the tufted look, mark the pattern on the lid and use a long needle to pull upholstery buttons through the lid.
- Upholster the Box and Lid: Cover the entire box frame and the pre-wrapped lid with the final upholstery fabric, pulling it tightly and stapling neatly, especially around the corners and along the bottom edge of the box.
- Install Hinges and Feet: Attach the gas shocks or lid support hinges to the back of the ottoman box and the back edge of the lid. Install the furniture feet or small block legs to the bottom corners of the ottoman using T-nuts or heavy-duty screws.
39. Space-Saving Wall-Mounted Bar Cabinet
Item Name: Fold-Down Mirrored Liquor Cabinet

This stylish, wall-mounted cabinet is a fantastic example of maximizing vertical space while providing high-end, concealed storage. The unit is finished in a sleek, dark black or espresso color, contrasting beautifully with the warm, rich red wood stain of the interior. When closed, it looks like a simple, elegant rectangular accent piece.
When opened, the front panel folds down, supported by strong hinges, to create an instant working surface for mixing drinks. The underside of the door is typically mirrored, which further enhances the feeling of light and luxury. The back wall of the cabinet is also mirrored, creating visual depth and showcasing the contents.
The interior is fully customized for bar organization. Glassware hangs neatly from integrated racks, and bottles sit securely on small, mirrored shelves. The cabinet keeps all bar essentials organized, dust-free, and most importantly, completely hidden from view until needed for entertaining.
DIY Wall-Mounted Fold-Down Bar
Building a wall-mounted bar requires precise construction and secure mounting into wall studs due to the weight of liquor and glassware.
Materials Required List
- Plywood or MDF (3/4 inch thickness) for the outer box frame and fold-down door
- Thin veneer or paint (dark black for the exterior, red wood stain for the interior)
- Two mirrors (one for the back interior, one for the door underside) and strong mirror adhesive
- Two heavy-duty folding shelf brackets or specialized bar cabinet hinges/supports
- Metal stemware racks
- Small wooden shelves for bottle display
- Screws and heavy-duty wall anchors (must anchor into studs)
Equipment Required List
- Circular saw or table saw
- Power drill and driver
- Level (essential for mounting)
- Measuring tape
- Clamps
- Caulk gun
DIY Instruction Step by Step
- Build the Outer Box: Cut and assemble the four sides, back, and top/bottom of the rectangular box frame. Secure it with wood glue and screws. Stain the interior sections with the red wood stain and paint the exterior black.
- Mount the Box to the Wall: Locate the wall studs. Drill pilot holes through the back panel of the cabinet. Use a long level and secure the box to the wall studs using heavy-duty screws.
- Install Interior Accessories: Adhere the mirror panel to the back interior wall of the box. Screw the metal stemware racks securely to the underside of the top shelf. Install the small display shelves onto the side walls.
- Install the Fold-Down Door: Attach the heavy-duty folding shelf brackets to the interior of the side walls. Mount the door panel to the brackets. Adhere the second mirror panel to the underside of the door.
- Final Checks: Ensure the door closes flush and the supports hold the door level and stable when opened. The bar should be secured tightly to the wall before loading any contents.
40. Pair of Mobile Utility Carts
Item Name: Yellow and Blue Rolling Side Tables

This vibrant pair of rolling carts offers a flexible and fun solution for small-space organization, acting as movable side tables that can be repositioned easily. The carts feature a brightly colored frame—a cheerful yellow metal—with contrasting blue accents on the shelf railings. This combination adds a playful, contemporary pop of color to the living space.
The three-tiered design provides generous vertical storage and surface area. The top surface acts as a coffee or side table, holding drinks, snacks, or remotes. The lower wooden shelves offer deep capacity for stacking books, storing decorative jars, or holding small baskets.
Equipped with caster wheels, the carts can be easily moved closer to the sofa for serving snacks or rolled out of the way when necessary. The frames include hooks, which are useful for hanging towels or small accessories, maximizing every inch of the cart’s surface. These mobile units are the embodiment of functional, flexible, and space-saving organization.
DIY Colorful Metal and Wood Utility Carts
Building these carts from scratch requires metalworking skills, so this DIY focuses on customizing and assembling a basic, commercially available utility cart kit.
Materials Required List
- Two basic three-tiered utility cart kits (metal frame, wooden shelves)
- Spray paint (bright yellow, durable metal formulation)
- Spray paint (bright blue, durable metal formulation)
- Masking tape and plastic sheeting
- Small metal hooks (S-hooks or specialized clip-on hooks)
- Wood stain or sealant (for shelves)
Equipment Required List
- Power drill and driver
- Measuring tape
- Sandpaper (for wood and light sanding for metal adhesion)
- Safety glasses and respirator (for spray painting)
DIY Instruction Step by Step
- Prepare the Frame: Partially assemble the metal frame sections of the two carts. Lightly sand all metal pieces to ensure paint adhesion. Clean the pieces thoroughly to remove all dust and oil.
- Paint the Frame: Use masking tape to cover any parts you do not want painted. Apply metal primer, then several thin, even coats of bright yellow spray paint to the main frame pieces. Apply the bright blue accent paint to the railings or corner brackets, as desired. Allow the paint to dry and cure completely.
- Finish the Shelves: Sand the wooden shelves smooth. Apply your chosen wood stain or sealant (if desired) and allow them to dry.
- Final Assembly: Once all pieces are completely dry, assemble the two carts according to the kit instructions. Ensure the wheels/casters are attached securely to the base of each cart.
- Accessorize: Clip or hang the small metal hooks onto the side rails of the carts. Place your books and storage containers on the shelves and position the carts near the sofa for easy access.
We have explored forty different ways to tackle clutter, from built-in architectural features to brilliant furniture hacks and DIY projects. The key takeaway is clear: efficient living room organization relies on having a designated home for every single item.
Whether you favor minimalist floating consoles or robust rolling utility carts, using vertical space and multi-functional pieces is crucial. Integrating storage that is tailored to your needs—like charging drawers or pet nooks—ensures functionality without sacrificing design.
Take inspiration from these ideas and apply the smart organizational systems that best suit your lifestyle. You can absolutely achieve a consistently tidy, restful, and beautiful living space.
Key Takeaways
Maximize Vertical Space: Use walls, doors, and ceiling areas for storage, employing tall bookshelves, hanging baskets, and over-the-door organizers to keep floors clear.
Embrace Concealment: Prioritize furniture that hides clutter, such as lift-top storage benches, multi-drawer coffee tables, and cabinets that conceal media equipment and appliances.
Utilize Multipurpose Pieces: Choose items that serve dual functions, like ottomans with hidden storage, sofa caddies with charging ports, or rolling carts that double as movable side tables.
Customize Interiors: Use internal dividers, drawer slides, and specialized hardware in cabinets and drawers to create customized compartments for specific items like remotes, cables, and small devices.
Create Display Zones: Use floating shelves, recessed niches, or acrylic boxes to showcase curated items while keeping them protected and organized, preventing decorative items from creating visual noise.