Your living room should be a place to relax and unwind. It’s where you gather with family, entertain friends, or enjoy a quiet evening. But it’s hard to feel calm when you’re surrounded by clutter.

From remote controls and charging cables to kids’ toys and extra blankets, everyday items can quickly take over the space. Soon, your relaxing retreat starts to feel chaotic and stressful. A messy living room doesn’t just look bad; it can make the whole home feel disorganized.
The good news is that you don’t need a bigger house to have a tidier living room. You just need smarter storage. In this guide, we’ll show you 38 clever hacks to conquer clutter. These ideas, from multi-functional furniture to simple DIY projects, will help you create a stylish and serene space you’ll love coming home to.
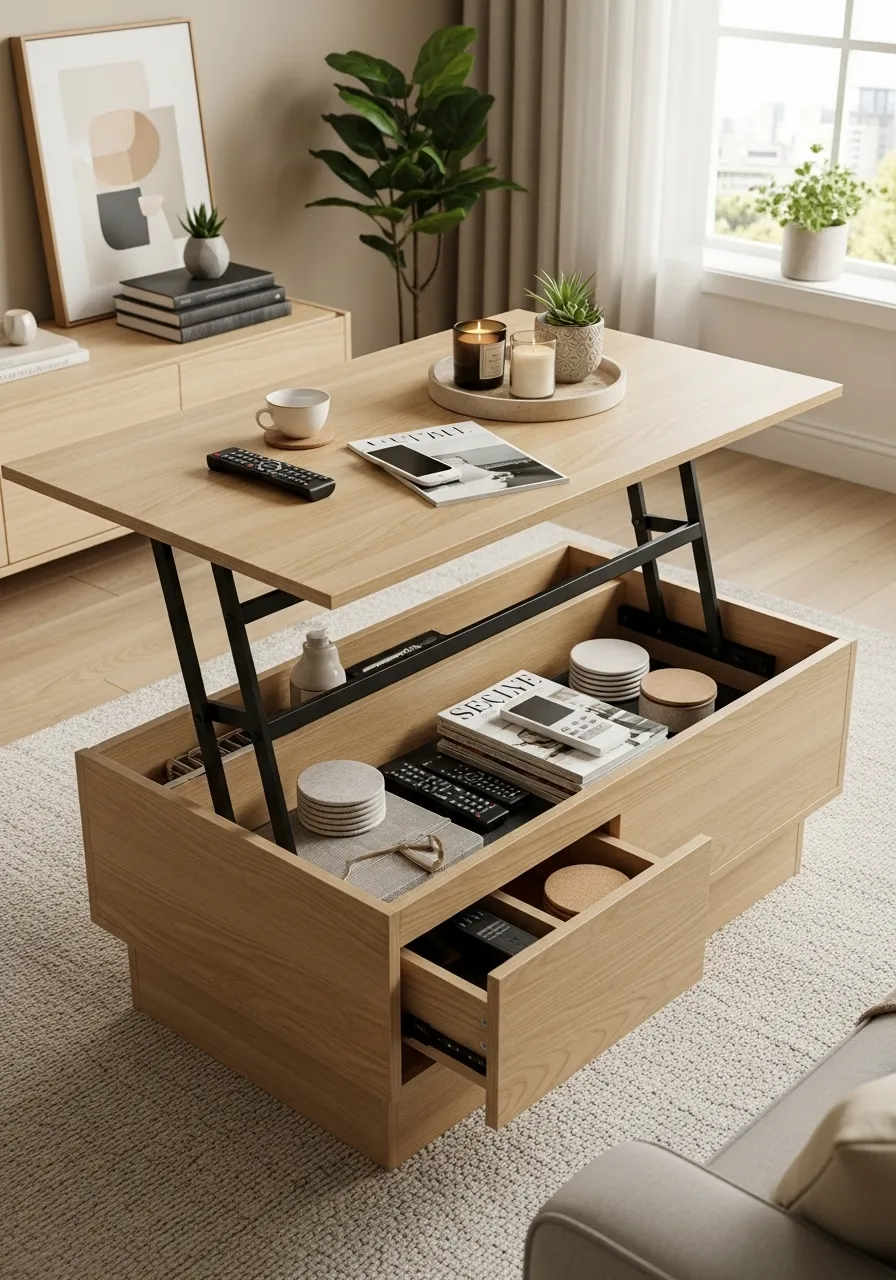
1. The Multi-Tasking Lift-Top Coffee Table

A coffee table can be more than just a spot for your mug. This piece of furniture works hard to keep your living room tidy. It features a top that lifts up, revealing a large hidden space inside. You can easily store magazines, remote controls, and blankets out of sight.
The clever design also brings the tabletop closer to you on the couch. This makes it a comfortable spot for a laptop or a quick meal. A lower drawer provides even more organization for smaller items. This table keeps essentials nearby but neatly tucked away, helping your space feel open and clean.
DIY Simplified Storage Coffee Table
You can build a simple version of this handy table. Ask an adult for help with any cutting or heavy lifting!
What You’ll Need:
- Five pieces of plywood or MDF board for the box (four sides, one bottom)
- One piece of plywood or MDF for the tabletop
- A set of lift-top coffee table hinges
- Wood glue
- Screws
- A screwdriver or drill
- Sandpaper
- Paint or wood stain and brushes
Step-by-Step Instructions:
- Build the Box Frame: Take your four side pieces. Put wood glue along the edges where they will meet to form a rectangle. Gently press them together. Ask an adult to help you drill and screw the sides together to make them strong.
- Add the Bottom: Put glue along the bottom edges of your box frame. Place the bottom piece on top and press down. Secure it with screws from the sides and bottom.
- Smooth Everything Out: Use sandpaper to rub all the wood surfaces and edges. Keep going until it feels smooth and you won’t get any splinters. Wipe away all the dust with a cloth.
- Give it Some Color: Now, paint or stain your coffee table box. Cover the whole outside and inside. Let it dry completely. You might need to add a second coat of paint.
- Attach the Magic Hinges: This is the fun part! Follow the instructions that came with your lift-top hinges. Usually, you attach one part of the hinge mechanism to the inside-back of your box.
- Place the Tabletop: Attach the other part of the hinges to the underside of your tabletop piece. Make sure everything is lined up correctly before you put in the final screws.
- Check Your Work: Slowly lift the top. It should raise up and move forward smoothly. Now you have a cool table with secret storage!
2. Floating Wall Shelves & Media Unit

Mounting your storage on the wall is a smart way to save floor space. This floating media unit makes the room feel bigger because you can see the floor underneath. It provides both open shelves for books and decor, and closed cabinets to hide messy cables or electronics.
The clean lines give the living room a modern and uncluttered look. Placing shelves higher up on the wall also draws your eyes upward, which can make the ceiling feel taller. This setup is a stylish way to organize your entertainment area.
DIY Simple Floating Shelf
A full media unit is a big project, but a simple floating shelf is easy to make.
What You’ll Need:
- A piece of wood (like a pine board)
- Sandpaper
- Paint or wood stain
- Two “L” shaped shelf brackets
- A drill and screws
- A level (a tool to make sure things are straight)
Step-by-Step Instructions:
- Prepare Your Shelf: Rub the sandpaper all over the wood board until it’s nice and smooth. Then, paint or stain it your favorite color and let it dry.
- Find Strong Spots on the Wall: Ask an adult to help you find the wooden beams, called studs, inside the wall. This is where you will attach the brackets to make the shelf strong.
- Mark the Wall: Hold one bracket against the wall and use a pencil to mark where the screw holes are. Use the level to make sure your marks are straight before you mark the spot for the second bracket.
- Attach Brackets to the Wall: Ask an adult to help you drill the screws through the brackets and into the wall where you made your marks.
- Add the Wooden Shelf: Place your painted board on top of the brackets. Use more screws to attach the board to the brackets from underneath. Now your shelf is floating!
3. Decorative Woven Baskets

Controlling clutter can be as simple as using a few good-looking baskets. These woven containers add a warm, natural texture to the room while hiding all sorts of items. Use larger ones for cozy throw blankets and smaller ones for magazines or charging cables.
Because they come in many sizes, you can tuck them into corners, next to the sofa, or on a shelf. They are an easy and flexible way to quickly tidy up a room. Just gather loose items and place them inside for an instantly cleaner space.
DIY Simple Rope Basket
You can make your own stylish basket with just rope and glue.
What You’ll Need:
- A coil of thick cotton rope
- A hot glue gun with plenty of glue sticks
- Scissors
Step-by-Step Instructions:
- Start the Bottom: Take the end of the rope and begin to coil it into a small, flat circle. This will be the center of the basket’s base.
- Glue as You Go: As you coil the rope, add a line of hot glue to the side of the rope that will press against the part you just coiled. Press it together firmly.
- Build the Base: Keep coiling and gluing until the flat circle is as big as you want the bottom of your basket to be.
- Create the Walls: To start building the sides, simply put the next line of glue on top of the outermost rope coil, instead of beside it. Keep coiling and gluing upwards.
- Make Handles (Optional): To make a handle, leave a section of rope unglued from the row below it, creating a loop. Secure it on the other side with plenty of hot glue. Do the same on the opposite side.
- Finish It Off: Once your basket is tall enough, cut the rope. Add a final dab of glue to secure the end so it doesn’t unravel.
4. Modular Wall Shelving System

A modular shelving system lets you be the designer. You can combine different pieces like shelves, cabinets, and drawers to create a storage wall that fits your needs. This unit uses vertical space, stretching from the floor to high up on the wall.
This approach is great for organizing many different kinds of things in one place. Open shelves are good for displaying books and pretty objects. The closed sections can hide clutter. Some systems even have special parts like a wine rack or a fold-down desk.
DIY Stacked Crate Shelves
Create your own simple modular look by stacking wooden crates.
What You’ll Need:
- Three or more wooden crates of the same size
- Sandpaper
- Paint or wood stain
- Wood glue
- Screws (optional, for extra strength)
Step-by-Step Instructions:
- Prep the Crates: Make sure the crates are clean. Use sandpaper to smooth any rough spots, especially around the edges.
- Add Some Color: Paint or stain the crates. You can make them all one color or use different colors for a fun look. Let them dry completely.
- Plan Your Design: Decide how you want to stack them. You can place them straight on top of each other or stagger them for a more playful look.
- Glue Them Together: Put a generous amount of wood glue on the top surface of the bottom crate. Carefully place the next crate on top.
- Secure the Stack: Press the crates together firmly. If you want them to be extra sturdy, ask an adult to help you drill a few screws through the sides where the crates touch.
- Let it Dry: Let the glue dry for several hours before you start putting things on your new shelf.
5. All-in-One Entryway Organizer

Even if it’s in a corner of your living room, having a dedicated spot for entry and exit items is a game-changer. This slim piece of furniture, often called a hall tree, combines several useful things. It has a bench for sitting, a shoe rack underneath, and hooks for keys or bags.
The mirror is handy for a quick check before you leave the house. A small shelf holds mail or sunglasses. By keeping all these daily items in one organized place, you prevent them from cluttering up your coffee table or couch.
DIY Wall Pegboard Organizer
A pegboard is a fun way to create a custom organization station.
What You’ll Need:
- A sheet of pegboard
- Four 1×2 wood strips to make a frame
- A drill and screws
- Paint
- Pegboard hooks, baskets, and small shelves
Step-by-Step Instructions:
- Paint Everything: Paint your pegboard and the four wood strips in any color you like. Let them dry.
- Build the Frame: The frame goes on the back of the pegboard. It creates a space between the board and the wall so the hooks can fit. Arrange the wood strips like a picture frame and screw them into the back of the pegboard.
- Mount it to the Wall: Ask an adult to help you find the wall studs and screw your framed pegboard securely to the wall.
- Get Organized: Now for the fun part! Arrange the hooks, baskets, and shelves on your pegboard. You can create a spot for keys, mail, a small plant, and anything else you need to keep track of.
6. Invisible Floating Bookshelves

These clear acrylic shelves create a stunning effect. They make your books and magazines appear as if they are floating against the wall. Because they are transparent, they don’t look bulky or take up visual room, which helps a small space feel more open.
This type of shelf is excellent for showing off items with interesting covers, like art books or vinyl records. Instead of just storing your books, these shelves turn them into a changing art display for your living room. You can arrange them in a neat line or stack them vertically up a narrow wall.
DIY Picture Ledge Shelf
This simple shelf gives a similar look by letting you display books facing forward.
What You’ll Need:
- Three thin wood boards: one for the back (1×4), one for the bottom (1×3), and one for the front lip (1×2).
- Wood glue
- A few small nails and a hammer
- Sandpaper and paint or stain
Step-by-Step Instructions:
- Sand the Wood: Smooth all three pieces of wood with sandpaper.
- Build the ‘L’ Shape: Apply a line of wood glue along one long edge of the bottom piece (the 1×3). Press this glued edge against the face of the back piece (the 1×4) to form an ‘L’.
- Add the Front Lip: Put glue on the front edge of the bottom piece. Press the smallest board (the 1×2) onto it. This little lip will keep your books from sliding off.
- Make it Strong: Gently tap a few small nails through the back into the bottom piece, and through the front lip into the bottom piece, to hold it all together while the glue dries.
- Paint and Mount: Once the glue is dry, paint or stain your new shelf. Then, ask an adult to help you screw it to the wall by drilling through the back piece.
7. The Hidden Storage Ottoman

This ottoman is a secret storage hero. On the outside, it is a comfy footrest or an extra seat for guests. But when you lift the top, you find a spacious, hidden compartment inside. It’s a wonderful place to stash things you want nearby but not always visible.
Think of it as a home for board games, extra blankets, or your kids’ toys. Some even have reversible lids that double as serving trays. This multi-functional piece of furniture works hard to keep your living room looking neat and feeling comfortable.
DIY Crate Storage Ottoman
Turn a simple wooden crate into a stylish and soft storage ottoman.
What You’ll Need:
- A strong wooden crate
- A piece of plywood cut to fit the top of the crate
- A piece of foam padding, the same size as the plywood
- Fabric
- A staple gun and staples
Step-by-Step Instructions:
- Make the Padded Lid: Lay your fabric on the floor with the pretty side facing down. Place the foam on top of it, in the center. Finally, place the plywood on top of the foam.
- Wrap the Fabric: You should have extra fabric on all four sides. Start on one side, pull the fabric tight, and wrap it around to the back of the plywood. Use the staple gun to secure it.
- Staple All Sides: Do the same thing on the opposite side, pulling the fabric taut. Then do the other two sides. Keep pulling the fabric snug as you add staples.
- Fold the Corners: Neatly fold the corners like you are wrapping a birthday present. Add a few extra staples to hold the corner folds in place.
- Finish Your Ottoman: You can paint the wooden crate if you’d like. Once it’s dry, place your new cushioned lid on top. Now you have a footrest with storage!
8. Stylish Statement Credenza

A credenza, or sideboard, provides a large amount of storage hidden behind closed doors. It’s a great solution for stashing items you don’t use every day, like serving dishes, photo albums, or craft supplies. This keeps them dust-free and out of sight.
The flat top surface gives you a long space to display art, a lamp, or family photos. This particular credenza becomes a centerpiece of the room because of its unique, gradient paint finish. It shows that storage furniture can be both useful and beautiful.
DIY Gradient Paint Makeover
Give an old piece of furniture a fresh, artistic look with paint.
What You’ll Need:
- An old cabinet or dresser with flat doors
- Sandpaper
- Primer
- Three shades of paint in the same color family (e.g., light blue, medium blue, dark blue)
- Paint rollers or brushes
Step-by-Step Instructions:
- Prep the Doors: Take the doors off the cabinet and remove the handles. Lightly rub the doors with sandpaper to help the new paint stick. Wipe off all the dust.
- Prime First: Apply one coat of primer to the doors. This helps the color look even. Let it dry completely.
- Add the Lightest Color: Paint the entire front of the door with your lightest paint color. Let this dry.
- Start Blending: Paint the bottom third of the door with your darkest color. Paint the middle third with the medium color.
- Create the Fade: While the medium and dark paints are still wet, use a clean, slightly damp brush or roller to gently brush back and forth where the two colors meet. This will soften the line and create a blended, gradient look.
- Reassemble: Let the doors dry completely before you put the handles back on and attach them to the cabinet.
9. Breathable Media Console

Tangled wires and a pile of black boxes can quickly make a living room look messy. This media console has a clever design that keeps your electronics organized and hidden. The woven cane doors look stylish and have a special function.
The small holes in the weave allow the signals from your remote controls to pass through to the devices inside. This means you can keep the cabinet doors closed for a clean look. The woven panels also let air circulate, which helps keep your game consoles and players from overheating.
DIY Cane Webbing Doors
Update an old cabinet with this breezy, functional style.
What You’ll Need:
- A cabinet with doors that have a removable center panel
- A roll of cane webbing
- Scissors
- A staple gun
Step-by-Step Instructions:
- Prepare the Cane: Cut a piece of cane webbing that is a little bigger than the panel you will be replacing. Soak the cane in warm water for about 30 minutes. This makes it stretchy and easy to work with.
- Remove the Old Panel: Take the doors off the cabinet. On the back of the door, carefully remove the old center panel. Sometimes they pop out, or they might be held in with small clips or wood trim.
- Attach the New Cane: Take your wet piece of cane webbing and lay it over the opening on the back of the door.
- Stretch and Staple: Pull the cane tight and flat across the opening. Use your staple gun to attach the edge of the cane to the door frame. Start in the center of each side and work your way out, adding staples every inch.
- Trim and Dry: Trim off any extra cane material. As the cane webbing dries, it will shrink and become very tight and flat.
- Finish the Job: Put the updated doors back on your cabinet.
10. Smart Side Table with Charging Station

In our modern world, charging cables are a major source of clutter. This end table offers a brilliant fix by hiding the mess. It features a special drawer with a built-in power strip, creating a dedicated charging station.
You can plug in your phone, tablet, and headphones inside the drawer, keeping the cords completely out of sight while they charge. This leaves the entire tabletop free for more important things, like a reading lamp or your morning coffee. It’s a simple idea that makes a huge impact on keeping your space tidy.
DIY Drawer Charging Station
You can turn almost any side table with a drawer into a hidden charging spot.
What You’ll Need:
- A side table with a drawer
- A small power strip
- A drill with a large, circle-cutting drill bit (a spade bit or hole saw)
Step-by-Step Instructions:
- Empty the Drawer: Remove everything from the drawer and take the drawer completely out of the table.
- Plan the Hole: Decide where you want the cord to go. The middle of the back panel of the drawer is usually the best spot.
- Drill a Hole in the Drawer: Ask an adult to help you drill a large hole in the back of the drawer. The hole needs to be big enough for the plug of your power strip to fit through.
- Drill a Hole in the Table: Now, drill a matching hole in the back panel of the side table itself, so the cord can get out.
- Thread the Cord: Place the power strip inside the drawer. Feed its plug and cord through the hole in the drawer and then through the hole in the table.
- Plug It In: Slide the drawer back into the table. Now you can plug the power strip into the wall and have a secret charging station ready to go.
11. Artistic Cable & Cord Organizer Channel

Visible cables running along the wall can look very messy. This clever solution turns those necessary cords into a piece of art. The flexible, chain-like channel snaps together piece by piece, allowing you to create any shape you want on your wall.
Instead of trying to hide the wire for a lamp or speaker, this system makes it a feature. You can guide the cable from the outlet to your device in a playful loop or a sharp geometric pattern. It’s a modern and creative way to manage wires while adding a unique design element to your room.
DIY Fabric Cord Cover
Hide your cords in a soft, decorative tube that you can make yourself.
What You’ll Need:
- A long strip of fabric
- Needle and thread or a sewing machine
- Scissors
- A safety pin
Step-by-Step Instructions:
- Measure and Cut: Measure the length of the cord you want to cover. Cut a strip of fabric that is that long and about 4 inches wide.
- Sew a Tube: Fold the fabric in half lengthwise, with the pretty side of the fabric on the inside. Sew a straight line all the way down the long edge to create a tube.
- Turn it Right-Side-Out: Attach a safety pin to one end of the tube. Push the safety pin into the tube and guide it all the way through to the other end. This will pull the fabric and turn your tube right-side-out.
- Thread the Cord: Bunch up the fabric tube like a sock. Start feeding your power cord through it until it comes out the other end.
- Straighten It Out: Pull the fabric tube straight to cover the entire length of the cord. Now your ugly wire is hidden inside a nice fabric cover.
12. Floating Cabinets with Textured Doors

Here is another way to use wall space for storage. These floating cabinets provide plenty of room to hide things away, but their design is what makes them special. The doors are covered in a soft, textured material that adds warmth and interest to the room.
This mix of a simple wood cabinet and fabric-like doors creates a high-end look. You can store books, movies, or games inside, keeping your living room clutter-free. Above the cabinets, a colorful acoustic panel doubles as wall art.
DIY Fabric-Covered Cabinet Doors
Give your own boring cabinet doors a fresh, textured look.
What You’ll Need:
- A cabinet with flat doors
- A piece of textured fabric (like felt or tweed)
- Scissors
- Spray adhesive or a staple gun
Step-by-Step Instructions:
- Prepare the Doors: Take the doors off the cabinet and remove the handles. Make sure the doors are clean and dry.
- Cut the Fabric: Lay the fabric flat and place one door on top of it. Cut the fabric so you have about two extra inches on all four sides of the door.
- Attach the Fabric: Spray the front of the door with adhesive. Carefully lay the fabric on top, smoothing it out from the center to get rid of any air bubbles.
- Secure the Edges: Flip the door over. Fold the extra fabric to the back of the door, like you’re wrapping a present. Use a staple gun or more spray adhesive to secure the fabric to the back of the door.
- Finish the Job: Once the adhesive is dry, carefully use a small knife to poke a hole for the handle screw. Re-attach the handle and hang the door back on the cabinet.
13. Rolling Under-Sofa Storage Drawers

The space under your sofa is often forgotten and just collects dust. You can put that area to good use with custom-made rolling drawers. These shallow boxes are designed to slide perfectly under the couch, using that valuable, hidden real estate.
This is an excellent spot for things you don’t need every single day. You can organize shoes, board games, or seasonal decorations in these drawers. The leather handles make them easy to pull out, and they look much nicer than plastic storage bins.
DIY Rolling Under-Couch Box
It’s easy to make your own storage box that rolls.
What You’ll Need:
- A shallow wooden box or crate
- Four small caster wheels (the kind that spin)
- A drill and small screws
- Sandpaper
Step-by-Step Instructions:
- Find a Box: You can build a simple box from plywood, or find a shallow wooden crate from a craft store. Make sure it’s not too tall to fit under your couch.
- Smooth it Out: Use sandpaper to smooth down any rough edges or splinters on your box.
- Attach the Wheels: Flip the box upside down. Place one wheel in each of the four corners.
- Screw Them On: Ask an adult to help you use a drill to screw the wheels onto the bottom of the box.
- Ready to Roll: Flip the box back over. Now it can roll! You can add a handle or a rope pull to the front if you like. Fill it up and slide it under the couch.
14. Vertical Garden and Grid Organizer

Bring life and organization to your walls with a vertical storage system. This setup combines a wire grid panel with wooden slat panels for a beautiful, nature-inspired look. It’s a fantastic way to display houseplants without taking up any floor space.
The system is also very practical. The grid has hooks for keys and tools. Small shelves and hanging boxes hold books, spices, or other trinkets. This turns an empty wall into a living, breathing storage area that is both useful and calming to look at.
DIY Wire Grid Memo Board
Create a simple version of this organizer with a metal grid.
What You’ll Need:
- A wire grid panel (from a hardware or home store)
- Wall hooks or screws to hang it
- Small S-hooks
- Binder clips
Step-by-Step Instructions:
- Hang the Grid: Ask an adult to help you securely hang the wire grid panel on your wall. You can use special hooks that clip onto the grid and then screw into the wall.
- Add Your Hooks: Place S-hooks on the grid wherever you want to hang things. You can use these for keys, scissors, or small bags.
- Use Binder Clips: Binder clips are great for hanging pictures or papers. Just clip the paper with the binder clip, then hang the metal arms of the clip on the grid.
- Add Baskets: You can find small wire baskets that are made to hook onto these grids. They are good for holding mail, pens, or a small plant.
- Customize It: Arrange everything just how you like it. You’ve made a simple and useful wall organizer.
15. Geometric Cube Wall Shelves

Why use a regular shelf when you can create art on your wall? These cube-shaped shelves, also called box shelves, add a playful and modern touch to any room. You can arrange them in any pattern you like, creating a custom look.
The colorful insides give them a surprising pop of color. They are a wonderful way to showcase your favorite small items, like a special book, a small sculpture, or a camera. They provide storage while also acting as a decorative feature in your living room.
DIY Painted Box Shelves
It is easy to add this pop of color to your own shelves.
What You’ll Need:
- Simple wooden cube or box shelves
- Sandpaper
- Two colors of paint (one for the outside, one for the inside)
- Paintbrushes
- Painter’s tape
Step-by-Step Instructions:
- Prep the Shelves: Lightly sand the shelves to make them smooth, then wipe away the dust.
- Paint the Outside: Paint the outside of the box shelves with your first color. Don’t worry about getting paint on the inside just yet. Let it dry completely.
- Tape the Edges: Once the outside paint is dry, carefully apply painter’s tape along the inside top edges of the shelf. This will give you a clean, crisp line.
- Paint the Inside: Now, use your second, brighter color to paint the entire inside of the box.
- Peel the Tape: While the inside paint is still a little bit wet, gently peel off the painter’s tape. This helps to make sure the line is sharp.
- Let it Dry and Hang: Let the shelves dry completely before you hang them on the wall.
16. Slim Magazine and Record Holder

If you have a collection of magazines or vinyl records, don’t hide them away. Show them off with a slim and stylish holder. These holders are designed to display the covers facing forward, turning your collection into a rotating art display.
Because they are so slender, they fit almost anywhere. You can mount one on the wall to save floor space, or use a freestanding version as a small side table. It keeps your favorite reading material or music organized and easy to grab.
DIY Wooden Magazine Holder
Make a simple, V-shaped holder for your magazines.
What You’ll Need:
- Three pieces of wood of the same size (e.g., 1×6 boards, each 2 feet long)
- Wood glue
- A few screws
- Sandpaper and paint or stain
Step-by-Step Instructions:
- Sand the Wood: Make all three wood pieces smooth with sandpaper.
- Form the Base: Lay one piece of wood flat on your work surface. This is the bottom.
- Add the Sides: Apply wood glue along one long edge of the bottom piece. Stand a second piece of wood up on that edge to form an ‘L’ shape. Hold it while the glue gets a little sticky. Do the same for the other side to form a ‘V’ or ‘U’ shape.
- Make it Strong: Ask an adult to help you drill a few screws through the bottom piece up into the side pieces to make it sturdy.
- Give it Color: Let the glue dry. Then, paint or stain your new magazine holder. Once it’s dry, you can set it on the floor and fill it up.
17. Adjustable Tension Pole Shelving Unit

This type of shelving is a great choice if you cannot drill holes in your walls. The system uses tension poles that securely wedge between the floor and the ceiling. No screws are needed to hold the main structure in place.
The best part is how flexible it is. You can adjust the height of the shelves, baskets, and cabinets to fit your things. You can mix and match parts to create a storage system that is just right for your living room, entryway, or home office.
DIY Tension Rod Shelf
Create a super simple extra shelf in a small space.
What You’ll Need:
- A sturdy tension rod (like the kind used for shower curtains)
- A small, lightweight board for the shelf
Step-by-Step Instructions:
- Find a Spot: This works best inside a bookcase, an alcove, or a closet where you have two walls close to each other.
- Install the Rod: Twist the tension rod to make it longer until it fits tightly between the two walls or sides of the bookcase. Make sure it’s level and feels strong.
- Add a Second Rod (Optional): For a more stable shelf, you can install a second tension rod right next to the first one.
- Place Your Shelf: Simply lay your lightweight board on top of the tension rod(s).
- Use It for Light Things: This kind of shelf is not for heavy books. It is good for storing small, light items like hats, small baskets, or extra rolls of paper towels.
18. Fold-Down Console Desk

If you need a workspace in your living room but don’t have a lot of room, a secretary-style desk is a wonderful solution. When it’s closed, it looks like a stylish console table. You can place a lamp and decorations on top.
But the front panel cleverly folds down to become a desk surface. Inside, you’ll find organized compartments for a laptop, pens, and papers. Some even have built-in outlets for charging. This lets you hide your work and maintain a tidy living space.
DIY Wall-Mounted Fold-Down Shelf
Create a simple fold-down surface for working or crafting.
What You’ll Need:
- A piece of plywood for the desk surface
- A 1×4 wood board, the same length as the plywood
- Two strong hinges
- Two lengths of chain and screw hooks
- A simple latch
Step-by-Step Instructions:
- Attach the Support to the Wall: Ask an adult to help you find the studs and securely screw the 1×4 board to the wall at the height you want your desk.
- Connect the Desk: Use the hinges to attach your plywood desk piece to the bottom edge of the board on the wall. The plywood should be able to fold up and down.
- Add the Chains: Screw two screw hooks into the wall, above your desk piece. Screw two more hooks into the outer corners of the plywood.
- Attach the Support Chains: Attach one end of each chain to a wall hook and the other end to a plywood hook. The chains will hold the desk level when it’s open.
- Add a Latch: Attach a simple latch to the wall and the top of the shelf so you can keep it closed when you’re not using it.
19. The Ultimate Pegboard Command Center

A large pegboard can transform an empty wall into the most organized spot in your home. This is more than just a place to hang keys. It’s a full command center that you can customize completely to fit your family’s needs.
With a variety of hooks, shelves, and baskets, you can create a spot for everything. Hang a mirror for last-minute checks, use baskets for mail, and add shelves for plants or your phone. It’s a fun, flexible, and very visual way to keep track of all the little things that can create clutter.
DIY Large Pegboard Wall
This project is easier than it looks and makes a big impact.
What You’ll Need:
- A large sheet of pegboard
- 1×2 wood strips to make a frame for the back
- A drill and screws
- Paint (optional)
- A collection of pegboard hooks, shelves, and baskets
Step-by-Step Instructions:
- Create a Frame: Just like the smaller organizer, you need to build a wooden frame on the back of the pegboard. This gives space for the hooks. Lay the 1×2 strips along the four edges on the back and screw them into the pegboard. Add one or two strips across the middle for extra support on a large board.
- Paint it (Optional): If you want a different color, now is the time to paint your pegboard and frame.
- Mount it on the Wall: This is a two-person job! Ask an adult to help you lift the pegboard and screw it securely to the wall. Make sure you drill the screws through the wooden frame and into the strong studs in your wall.
- Organize Everything: Now you can design your command center. Arrange all your hooks, shelves, and baskets to hold everything you need.
20. Fabric Wall Pocket Organizer

When you don’t have any floor or table space to spare, look to your walls. A hanging wall organizer made of soft materials like felt and leather is a gentle way to add storage. It doesn’t look bulky and adds a nice textural element to your room.
The different-sized pockets are useful for all the small things that get lost easily. Stash your remote controls, eyeglasses, charging cables, and mail in the pockets to keep your surfaces clear. You can hang it by the door or next to your favorite chair.
DIY No-Sew Felt Wall Organizer
You can make this handsome organizer with just felt and glue.
What You’ll Need:
- One large, thick piece of felt for the back
- Smaller pieces of felt in different colors for the pockets
- Fabric glue or a hot glue gun
- Scissors
- A wooden dowel and some string for hanging
Step-by-Step Instructions:
- Design Your Pockets: Cut out pocket shapes from your smaller felt pieces. You can make them squares, rectangles, or any shape you like.
- Glue the Pockets: Take one of your pocket pieces. Apply a thin line of glue along the two sides and the bottom edge. Leave the top edge open.
- Attach to the Backing: Press the glued pocket piece firmly onto your large background piece of felt.
- Add More Pockets: Continue gluing on all of your pockets. You can even layer them by putting smaller pockets on top of bigger ones. Let all the glue dry.
- Create a Hanging Loop: Fold the top edge of the large felt piece over the wooden dowel to create a loop for it to hang from. Secure the flap on the back with a long line of glue.
- Add the String: Tie a piece of string to both ends of the wooden dowel. Now you can hang your new organizer on the wall.
21. Space-Saving Nesting Tables

Nesting tables are a clever trick for small living rooms. You get multiple tables for drinks, snacks, or a book, but they only take up the footprint of one. When guests come over, you can spread them out for everyone to use.
When you need more floor space, they tuck away neatly inside each other. This set features clean lines and visible joinery, adding a touch of craftsmanship to the room. It’s a flexible solution that adapts to your changing needs.
DIY Simple Side Table
Making a full nesting set is tricky, but a single, sturdy side table is a great start.
What You’ll Need:
- One square piece of plywood for the top
- Two rectangular pieces of plywood for the legs (same width as the top)
- Wood glue and screws
- Sandpaper and paint or stain
Step-by-Step Instructions:
- Get Your Pieces Ready: Make sure your leg pieces are the same size. Sand all the wood pieces until they are very smooth.
- Form the Shape: Stand the two leg pieces up on their long edges. You are going to make an upside-down ‘U’ shape.
- Attach the Top: Apply wood glue to the top long edge of each leg piece. Carefully place the tabletop on top of the legs, making sure the edges are all lined up.
- Secure It: Ask an adult to help you drill a few screws down through the tabletop into each leg to make it strong.
- Finish it: Let the glue dry. Now you can paint or stain your new table to match your room.
22. Industrial-Style Hanging Shelves

Look up! Using the space above your furniture is a smart way to add storage without cluttering your walls. These shelves hang from the ceiling, creating an open and airy feeling. The mix of wood, metal, and leather straps gives the room a cool, industrial vibe.
This type of shelving is wonderful for displaying glassware, plants, or your favorite pottery. It keeps items within reach but out of the way. It’s a unique design feature that draws the eye upward and makes the room feel more spacious.
DIY Simple Hanging Shelf
You can create this look with one shelf and some rope.
What You’ll Need:
- A sturdy wooden board
- A drill
- Strong rope
- Two heavy-duty ceiling hooks
- Sandpaper and paint or stain
Step-by-Step Instructions:
- Prepare the Shelf: Sand your wooden board until it is smooth. You can paint or stain it if you like.
- Drill the Holes: Drill one hole in each of the four corners of your board. Make the holes just big enough for your rope to pass through.
- Install the Hooks: Ask an adult to help you find the wooden beams (joists) in your ceiling and screw the two hooks in securely. They should be the same distance apart as the holes on your shelf.
- Hang the Shelf: Cut two long, equal lengths of rope. Thread one rope through the two holes on the left side of the shelf and the other rope through the two holes on the right. Tie big, strong knots underneath each hole so the shelf won’t slip.
- Level It: Hang the rope loops over the ceiling hooks. Adjust the ropes until your shelf is hanging perfectly level.
23. Elegant Fluted Glass Cabinets

If you want to hide clutter but don’t like heavy, solid furniture, ribbed glass is a great choice. The textured glass on these cabinet doors blurs what’s inside. You can see the shapes and colors of your items, but not the messy details.
This keeps the room feeling light and open while still providing hidden storage. The internal lighting adds a soft glow, turning a simple storage cabinet into a beautiful display piece for your best dishes or glassware.
DIY Faux Fluted Glass Door
You can get this stylish look with special window film.
What You’ll Need:
- A cabinet with plain glass doors
- A roll of ribbed or fluted window film
- Scissors or a craft knife
- A spray bottle with water and a tiny drop of soap
- A squeegee or credit card
Step-by-Step Instructions:
- Clean the Glass: Clean your cabinet’s glass doors really well.
- Measure and Cut: Measure the glass part of your door. Cut a piece of the window film that is just a little bit bigger.
- Wet the Glass: Spray the soapy water all over the glass. This lets you slide the film around to get it in the right spot.
- Apply the Film: Peel the backing off the window film and carefully place it onto the wet glass.
- Squeegee It: Use a squeegee or a credit card to smooth the film and push all the water and air bubbles out to the edges.
- Trim the Edges: Ask an adult to help you use a craft knife to carefully trim the extra film from the edges for a clean finish.
24. Multi-Function Radiator Cover Bookcase

Radiators can be awkward and take up valuable wall space. A custom-built cover can transform them into a handsome and useful piece of furniture. This unit hides the radiator behind a breathable cane panel while adding a useful surface on top.
Even better, this design includes bookcases on either side. It turns a single-use object into a full storage and display system. This is a brilliant way to reclaim that space and make it a beautiful focal point of the room.
DIY Simple Radiator Cover
Building the bookshelves is a big job, but a basic cover is much easier.
What You’ll Need:
- MDF or heat-resistant wood for a frame
- A decorative metal or cane screen panel
- A staple gun
- Screws and small brackets
Step-by-Step Instructions:
- Measure Everything: Carefully measure the height, width, and depth of your radiator. Add at least an inch to each measurement so air can circulate.
- Build a Box: Cut wood to make a top piece and two side pieces. Screw them together to make a three-sided box that will slide over the radiator.
- Make the Front: Cut a front panel. Then, draw a large rectangle on the inside of it and have an adult help you cut it out, leaving a solid frame.
- Add the Screen: Cut your decorative screen panel so it’s a little bigger than the hole. Use a staple gun to attach the screen to the inside of the front frame.
- Assemble and Secure: Screw the front panel onto your three-sided box. Slide the whole cover over your radiator and use small brackets to secure it to the wall so it can’t tip over.
25. The Tidy Console Charging Drawer

This console table takes the idea of a charging drawer to the next level. It creates one central place for the whole family to power up their devices. Tucked away inside the drawer is a power strip and organized compartments for phones, tablets, and watches.
Placing this in your entryway or behind the sofa keeps all that electronic clutter off your kitchen counters and end tables. The drawer slides away, hiding everything for a clean, wire-free look. It’s an organized person’s dream.
DIY Simple Drawer Charging Station
You can add this feature to almost any table with a drawer.
What You’ll Need:
- A console or table with a drawer
- A power strip
- A drill with a large, circle-cutting drill bit (a hole saw)
Step-by-Step Instructions:
- Clear the Drawer: Take the drawer completely out of the table.
- Drill a Path for the Cord: Ask an adult to help you drill a large hole in the back of the drawer. Then, drill another hole in the back of the console table itself, right behind where the first hole is.
- Feed the Cord: Put the power strip inside the drawer. Thread its cord through the hole in the drawer and then through the hole in the back of the table.
- Put it Back Together: Slide the drawer back in. Now you can plug in the power strip and use the drawer to charge all your electronics in secret.
26. The All-in-One Hobby Armoire

A tall cabinet or armoire can be a secret powerhouse of storage. From the outside, it is a simple, clean piece of furniture. But when you open the doors, it reveals a world of organized fun. This one is set up as a craft and entertainment station.
With custom dividers for yarn, a fold-out table for a record player, and deep shelves for board games, it holds everything. This “hobby closet” allows you to keep all your supplies in one spot. When you’re done, you just close the doors and the clutter disappears.
DIY Cabinet Organization Station
You can organize the inside of any cabinet to make it more useful.
What You’ll Need:
- An existing cabinet or bookshelf
- Small tension rods
- Small storage bins or boxes
- Stick-on hooks
- Magazine files
Step-by-Step Instructions:
- Divide and Conquer: Use small tension rods placed vertically to create dividers for things like wrapping paper rolls or ribbon spools.
- Group Small Items: Use small boxes or bins to hold little things like pens, buttons, or game pieces. This keeps them from rolling around.
- Use the Doors: Stick hooks on the inside of the cabinet doors to hang tools, scissors, or headphones.
- Store Papers Vertically: Use magazine files to store papers, coloring books, or instruction manuals standing up so they are easy to find.
27. Layered Multi-Level Coffee Tables

Instead of one big coffee table, try using a cluster of smaller ones. This group of tables adds more visual interest to a room because of their different shapes, materials, and heights. They offer more flexibility than a single table.
You can arrange them close together to save space or pull them apart when you have guests. This provides more surfaces for people to put down drinks or plates. The layered look feels modern and allows you to customize the layout of your living room.
DIY Found-Object Side Table
You can make a simple table out of interesting objects.
What You’ll Need:
- A sturdy base, like a stack of heavy books or a small wooden crate
- A flat top, like a slice of wood, a large tile, or a metal tray
- Strong construction adhesive or glue
Step-by-Step Instructions:
- Choose Your Base: Find something solid and stable to be the bottom of your table. Make sure it doesn’t wobble.
- Choose Your Top: Find a flat object to be the tabletop. Make sure it’s bigger than your base.
- Glue it Together: Clean both the top of your base and the bottom of your tabletop. Apply a generous amount of strong glue to the top of the base.
- Set the Top: Carefully place your tabletop onto the glued base. Press down firmly and make sure it’s centered.
- Let it Dry: Let the glue dry completely for at least 24 hours before you put anything on your new, custom-made table.
28. Integrated Pet Station Credenza

Our furry friends come with a lot of stuff. This clever credenza neatly integrates a pet station into a stylish piece of living room furniture. It keeps everything your pet needs in one organized, out-of-the-way spot.
One side has a cozy nook for a pet bed. A pull-out drawer holds food and water bowls, keeping them off the floor so you don’t trip. Another drawer organizes leashes, toys, and treats. It’s a clean look for you and a comfortable space for your pet.
DIY Cabinet Pet Nook
You can modify an old cabinet to create a cozy den for your small pet.
What You’ll Need:
- An old end table or low cabinet with a door
- A jigsaw
- Sandpaper
- A pet bed that fits inside
Step-by-Step Instructions:
- Prepare the Cabinet: Remove the door from the cabinet. You won’t need it.
- Draw an Entrance: On the side or front of the cabinet, draw a fun shape for a doorway, like an arch or a circle.
- Cut the Opening: Ask an adult to help you use a jigsaw to carefully cut out the doorway shape.
- Smooth the Edges: Use sandpaper to smooth all the sharp edges of the new opening so your pet won’t get any splinters.
- Make it Comfy: You can paint the cabinet if you want. Once it’s dry, slide the comfy pet bed inside. Now your pet has its own little room!
29. Playful Corner Cube Shelving

Turn an empty corner into a storage masterpiece with modular cubes. These simple boxes can be stacked and arranged in almost any shape, making them a great fit for awkward spaces. You can create a pyramid shape or a staggered design.
The mix of open cubes and cubes with doors is smart. Use the open boxes to show off books, plants, and favorite toys. Use the closed boxes to hide away the less attractive clutter. It’s a fun and flexible system that grows and changes with you.
DIY Simple Plywood Cube
You can build your own storage cubes to stack.
What You’ll Need:
- Six square pieces of plywood, all the same size
- Wood glue
- A hammer and small nails
- Sandpaper and paint
- Two small hinges and a knob (optional, for a door)
Step-by-Step Instructions:
- Build a Box: Take five of the wood squares. Use wood glue on the edges to form an.
- Make it Strong: Gently tap small nails through the sides to hold the box together while the glue dries.
- Smooth and Paint: Use sandpaper to smooth all the edges. Then, paint your box a fun color.
- Add a Door (Optional): Ask an adult to help you attach the sixth square to the front of the box using two small hinges. Add a knob to the front, and now you have a cube with a door.
- Start Stacking: Build a few more cubes and stack them up!
30. The Leaning Ladder Desk & Shelf

For a home office that doesn’t feel heavy or bulky, a ladder desk is a clever choice. This design leans against the wall, taking up very little floor space. It uses vertical height to its advantage, providing storage without crowding the room.
It combines a compact desk area with multiple shelves above. This gives you room for your laptop, books, supplies, and a few decorative items. The open design feels airy and modern, making it a good fit for a living room or bedroom workspace.
DIY Decorative Blanket Ladder
A full desk is a big project, but a simple ladder for blankets is easy and useful.
What You’ll Need:
- Two long 1×3 boards for the sides (about 5-6 feet long)
- Three or four 1×3 boards for the rungs (about 1.5 feet long)
- A drill and screws
- Sandpaper
Step-by-Step Instructions:
- Smooth Everything: Sand all of your wood pieces so they are smooth and splinter-free.
- Lay Out the Sides: Lay the two long side pieces on the floor. You can keep them parallel or lean them so they are a little closer together at the top.
- Position the Rungs: Place the shorter “rung” pieces across the side pieces. Space them out evenly.
- Screw it Together: Ask an adult to help you drill screws through the outside of the long side pieces and into the ends of each rung.
- Finish It: You can paint or stain your ladder if you like. Once it’s dry, lean it against a wall and use it to hang your cozy throw blankets.
31. Sleek Picture Ledge Shelves

Picture ledges are a stylish and flexible way to display art and photos. Their slim design doesn’t stick out far from the wall, making them a great choice for narrow hallways or the space above a sofa. The little lip on the front keeps your frames secure.
What makes these shelves so useful is how easy it is to change your display. You don’t have to put new holes in the wall every time. Just swap out the pictures, add a small plant, or overlap different-sized frames for a casual, curated gallery look.
DIY Simple Picture Ledge
This is a very easy first woodworking project.
What You’ll Need:
- One 1×4 board for the back
- One 1×3 board for the bottom
- One 1×2 board for the front lip
- Wood glue
- A few small nails and a hammer
Step-by-Step Instructions:
- Sand Your Wood: Lightly sand all three pieces of wood to make them smooth.
- Glue the Bottom: Put a line of wood glue along one long edge of the 1×3 (bottom) piece. Press it firmly against the face of the 1×4 (back) piece to make an “L” shape.
- Attach the Lip: Put wood glue along the other long edge of the 1×3 bottom piece. Press the 1×2 (lip) piece onto it.
- Nail it Together: Gently tap a few small nails through the back into the bottom piece, and through the front lip into the bottom piece, to hold it while the glue dries.
- Finish and Hang: Once the glue is dry, you can paint or stain it. Ask an adult to help you screw the shelf to the wall by drilling through the back piece into the wall studs.
32. The Spine Tower Bookshelf

For book lovers with limited space, a spine bookshelf is a brilliant solution. This vertical tower has a very small footprint, meaning it can tuck into almost any empty corner. It holds a surprising number of books in a neat, stacked pile.
The design makes it look like the books are floating in a column. It’s a modern and eye-catching piece of furniture that turns your book storage into a sculpture. This is a fantastic way to keep your books organized without a big, bulky bookcase.
DIY Simple Spine Shelf
You can create this floating look with a few metal brackets.
What You’ll Need:
- Several small, strong “L” shaped metal brackets
- Screws and a drill
- A level
- Your thickest hardcover book
Step-by-Step Instructions:
- Find a Stud: Ask an adult to help you find a strong wooden stud in the wall where you want to hang your books.
- Attach the First Bracket: Screw the first “L” bracket into the wall, with the shelf part pointing up. This will be hidden.
- Add the First Book: Place your largest hardcover book on the bracket so the bracket is between the back cover and the pages. The bottom cover will hide the bracket.
- Stack More Books: Now, you can simply stack more books on top of that first one.
- Add More Brackets: For a taller “floating” stack, install a few more brackets up the wall, hiding them inside other hardcover books in the stack.
33. The Fold-Away Murphy Bar

Entertaining guests is easier when everything is in one place. A fold-away wall bar, sometimes called a murphy bar, is a compact and stylish way to store your drink supplies. When closed, it looks like a simple, handsome cabinet on the wall.
When you open it, it reveals an entire bar setup. It has racks for wine glasses, shelves for bottles, and a fold-down door that becomes a counter for mixing drinks. It’s a sophisticated piece that saves a lot of space.
DIY Simple Wall-Mounted Wine Rack
This easy project is a great way to store and display a few bottles.
What You’ll Need:
- A sturdy piece of wood (like a 1×6 board)
- A drill with a large hole-saw bit (slightly bigger than a wine bottle neck)
- Sandpaper
Step-by-Step Instructions:
- Sand the Board: Make sure your piece of wood is smooth and splinter-free.
- Mark Your Holes: Measure and mark evenly spaced spots for your holes. Make sure they are far enough from the top edge.
- Drill the Holes: Ask an adult to help you use the hole-saw bit to drill the large holes.
- Cut a Slot: After the holes are drilled, use a regular saw to cut a straight line from the front edge of the board into each hole. This creates the slot for the bottle neck to slide into.
- Mount it: Securely screw the rack to the wall. The bottles will hang by their necks in the slots you created.
34. The Welcoming Hall Tree Bench

A hall tree is the ultimate entryway organizer, even if your “entryway” is just a corner of your living room. It combines multiple storage solutions into one piece of furniture, stopping clutter right at the door.
It features a comfortable bench for putting on shoes. Underneath, there are cubbies and baskets for the shoes themselves. Strong hooks are available for coats, bags, and hats. The top shelf offers even more space for storage boxes or decor. It creates an organized and welcoming first impression.
DIY Simple Entryway Bench
You can build a basic bench with built-in shoe storage.
What You’ll Need:
- Three long boards for the top and shelf
- Four shorter boards for the legs/sides
- Wood glue and screws
Step-by-Step Instructions:
- Build Two Sides: Take two of the shorter leg boards. Use a long board as a shelf between them, about halfway up. Glue and screw it together to make an ‘H’ shape. Do the same with the other two legs and shelf board.
- Connect the Sides: Stand your two ‘H’ shaped sides up.
- Add the Top: Put glue on the top edge of all four legs. Place your last long board on top to be the bench seat.
- Screw it Down: Ask an adult to help you drill screws down through the top into the legs to make the bench sturdy.
- Finish it: Sand everything smooth and you can paint or stain it. Now you have a bench with a built-in shoe shelf.
35. The Patterned Storage Pouf

A storage pouf or ottoman is one of the most versatile pieces you can have. This one adds a splash of color and pattern to the room with its fun, bohemian-style fabric. It can be used as a soft footrest, an extra seat for a friend, or even as a small side table if you put a tray on top.
Of course, its best feature is the hidden storage inside. Just lift the lid to reveal a generous space for stashing away a game controller, a cozy blanket, or magazines. It’s a stylish and comfortable way to hide clutter in plain sight.
DIY No-Sew Storage Cube
You can cover a simple storage cube with your favorite fabric.
What You’ll Need:
- A simple, plain storage ottoman or cube
- Enough fabric to cover it
- Spray adhesive
- Scissors
Step-by-Step Instructions:
- Cut Your Fabric: Lay your fabric out. Cut one piece that is big enough to wrap all the way around the four sides of the cube, with a little extra. Cut another piece that is a few inches bigger than the lid.
- Cover the Sides: Spray the sides of the cube with adhesive. Carefully wrap the fabric around it, smoothing it as you go. Overlap the fabric and glue it down at the back seam.
- Cover the Lid: Spray the top of the lid. Place it in the center of your second piece of fabric.
- Wrap the Edges: Fold the extra fabric up and over the sides of the lid, tucking the corners neatly like you’re wrapping a gift. Use more spray adhesive on the inside of the lid to hold the fabric down.
- Let it Dry: Let the adhesive dry completely. Now you have a custom-designed storage pouf.
36. The Slim Behind-the-Couch Console

The gap between your sofa and the wall is an untapped storage opportunity. A super-slim console table, sometimes called a sofa table, is designed to fit perfectly in that space. It adds a useful surface without taking up any extra floor space in your room.
This is a great place for a pair of reading lamps, which frees up your end tables. It also becomes a handy spot to put down a drink or a book. Many have outlets built right in, creating a convenient and hidden charging station for your devices.
DIY Simple Sofa Table
You can build this simple and effective table in an afternoon.
What You’ll Need:
- One long, narrow board for the tabletop (a 1×8 or 1×10 works well)
- Hairpin legs (you can buy these online or at hardware stores)
- Screws
Step-by-Step Instructions:
- Prepare the Top: Sand the wooden board until it’s perfectly smooth. You can paint it, stain it, or just leave it natural.
- Position the Legs: Flip the tabletop upside down. Place the hairpin legs in the corners. You can place them straight or at a slight angle for a different look.
- Attach the Legs: Use a drill or screwdriver to attach the legs to the underside of the tabletop with screws.
- Add Supports (Optional): If your table is very long, you might want to add a small metal bracket in the middle that can be attached to the back of your sofa to prevent any wobbling.
- Set it Up: Flip your new table over and slide it into place behind your couch.
37. The Upcycled Skateboard Shelf

Give old items a second life by turning them into something new and useful. This project takes old skateboards and turns them into a fun and unique set of shelves. It’s a fantastic way to show off a hobby and add a personal touch to your living room.
The board itself becomes the shelf, held up by simple brackets. It’s a creative and eco-friendly storage idea that is sure to start a conversation. You can use it to hold books, small plants, or a collection of trophies.
DIY Simple Skateboard Shelf
This project is very quick and easy to do.
What You’ll Need:
- An old skateboard deck (without the wheels, or “trucks”)
- Two “L” shaped shelf brackets
- A drill and screws
Step-by-Step Instructions:
- Clean the Deck: Make sure your old skateboard deck is clean.
- Attach Brackets to the Wall: Ask an adult to help you find the studs in the wall. Use a level to make sure they are straight, then screw the two brackets into the wall.
- Place the Skateboard: Set the skateboard deck on top of the two brackets.
- Secure the Shelf: Use two more small screws to attach the skateboard deck to the brackets from underneath. This will keep it from sliding off.
- Decorate: Now you have a cool new shelf for your favorite things.
38. The Digital Family Command Center

In our digital age, even our family organization can be streamlined. This setup uses a collection of smart displays to create a high-tech family command center on the wall. It replaces paper calendars and sticky notes with synced, interactive screens.
You can display a shared family calendar, a digital to-do list, weather forecasts, and a rotating gallery of your favorite family photos. It keeps everyone informed and on the same page. It’s a modern and efficient way to manage family life while beautifully displaying your memories.
DIY Tablet Wall Mount
You can create a simple version of this with an old tablet.
What You’ll Need:
- An old tablet you don’t use much anymore
- Heavy-duty Velcro strips or a special wall-mount holder for tablets
- A charging cable and outlet nearby
Step-by-Step Instructions:
- Choose Your Spot: Find a good spot on the wall for your command center, like in the kitchen or near the front door. Make sure an electrical outlet is close by.
- Set Up Your Tablet: Download some useful apps. You can use a calendar app, a to-do list app, a weather app, and an app that shows a slideshow of your photos. Arrange them on the home screen.
- Attach the Velcro: Stick one side of the heavy-duty Velcro strips to the back of your tablet. Stick the other side to the wall. Make sure they are pressed on very firmly.
- Mount and Plug In: Press your tablet onto the wall. Plug in the charging cable to keep it powered on.
- Start Organizing: Now your family can see the schedule and add to the grocery list right on the wall!
Creating a tidy and stylish living room is within your reach. As we’ve seen, the key isn’t about getting rid of everything you own, but about finding a smart and accessible place for it. By thinking creatively, you can turn unused corners, blank walls, and even the space under your sofa into valuable storage.
Many of these solutions do double duty, serving as both practical storage and a stylish addition to your decor. Whether you choose a clever piece of furniture or try a simple weekend DIY project, each small change adds up to a more peaceful and organized home.
Now you have 38 fresh ideas to get you started. Begin with one or two that feel right for your space, and enjoy the satisfaction of transforming your cluttered living room into the relaxing sanctuary it was meant to be.
Key Takeaways
- Choose Multi-Functional Furniture: Opt for pieces like storage ottomans, lift-top coffee tables, and benches that offer both seating and hidden storage.
- Utilize Vertical Space: Use walls for storage with floating shelves, ladder desks, and hanging organizers to draw the eye upward and free up floor space.
- Think Outside the Box: Turn unconventional items like skateboards into shelves or use modular cubes to create custom storage that fits your unique space.
- Hide Clutter in Plain Sight: Use decorative baskets, cabinets with textured doors, and stylish credenzas to keep everyday mess neatly tucked away.
- Manage Cords and Electronics: Implement smart solutions like charging drawers and decorative cable channels to eliminate the visual clutter of wires.