Are you tired of the same old sofa dominating your space? That bulky, outdated seating can instantly make your entire living room feel heavy and dull. Many people assume they need a massive budget to achieve a fresh, magazine worthy look. That is simply not true.

You can completely transform your living space with smart, affordable changes. Sometimes all it takes is focusing on innovative seating solutions and simple DIY hacks. These swaps save money while maximizing both style and function in your home.
We have compiled 36 brilliant ideas to help you ditch the drab and embrace the fab. From creative upholstery tricks to multi functional furniture, these simple projects will revitalize your room. Get ready to update your seating without breaking the bank.
1. The Light Gray Slipcover Sofa

This living room features a serene, inviting atmosphere. A light gray sofa takes center center, offering comfort and timeless style. Notice how the simple lines of the couch lend a contemporary touch. Accent pillows in soft stripes and a solid cream color add gentle visual interest. A cozy throw blanket could easily elevate this look.
Natural light streams in through a sheer curtain, brightening the space. A warm glow from a floor lamp behind the sofa provides ambient lighting. Hardwood floors and a subtle patterned rug complement the furniture. A small, round side table with a simple white vase holding greenery completes this calm setting. This setup proves elegance does not require a large budget.
Materials Required:
- Cotton duck fabric (pre-washed and ironed)
- Heavy-duty sewing thread
- Measuring tape
- Fabric scissors
- Pins
- Velcro strips (optional, for securing slipcover)
Equipment Required:
- Sewing machine
- Iron and ironing board
- Fabric marker or chalk
DIY Instructions Step by Step:
- Measure Your Sofa: Carefully measure each section of your sofa. This includes the back, seat cushions, armrests (inside and outside), and the front skirt. Add 2-3 inches to each measurement for seams and hemming. This extra fabric ensures a good fit.
- Cut the Fabric Pieces: Using your measurements, cut out all the individual fabric pieces. Label them clearly with chalk (e.g., “back,” “left arm inside,” “seat cushion top”). Remember to cut a separate piece for the main body skirt.
- Sew the Cushion Covers: Start by sewing simple box-style covers for each seat and back cushion. Sew three sides together, then insert the cushion, and hand-stitch the fourth side closed, or add a zipper for easier removal.
- Assemble the Main Body: Pin the armrest pieces to the front and back body panels. Sew these seams carefully, creating the basic shape of the sofa’s body. Press the seams open with an iron for a neat finish.
- Attach the Skirt: Pin the long skirt piece to the bottom edge of the main sofa body. Ensure it hangs evenly around all sides. Sew it into place, leaving an opening at the back if you want a more tailored look. Hem the bottom edge of the skirt for a polished appearance.
- Fit and Adjust: Drape the slipcover over your sofa. Pin any areas that need tightening or adjusting. Make sure it fits snugly but is still removable. You can sew Velcro strips to the underside of the slipcover and the sofa frame in key areas to prevent it from shifting.
- Final Touches: Trim any loose threads. Give the entire slipcover a good press with an iron to remove wrinkles. Now, your sofa has a fresh, new look!
2. Versatile Floor Poufs for Flexible Seating

This arrangement demonstrates a modern, flexible approach to seating. Several chunky floor poufs replace cumbersome armchairs. The varying textures and earthy colors—terracotta, sage green, and natural beige—bring warmth and depth to the room. Poufs are easy to move, making them incredibly functional for small gatherings.
A light beige sofa with simple lines anchors the space. A textured waffle throw draped over the side adds cozy detail. The large central pouf doubles as a soft coffee table, holding a small round wooden tray. Adding indoor plants introduces life and freshness. This setup is easily replicable and very budget conscious.
Materials Required:
- Heavy upholstery fabric (at least 3 yards, depending on pouf size)
- Durable zipper (at least 20 inches long)
- High-density foam chunks or polystyrene beads (filling)
- Scrap batting or thin foam (optional, for smooth sides)
- Heavy-duty sewing thread
Equipment Required:
- Sewing machine (with a heavy needle)
- Measuring tape
- Fabric scissors
- Funnel or large scoop (for filling beads)
DIY Instructions Step by Step:
- Determine Dimensions: Decide on the size and shape for your pouf (e.g., a 24x24x12 inch cube). You will need six squares or rectangles of fabric: one for the top, one for the bottom, and four for the sides.
- Cut and Pin the Sides: Measure and cut your six fabric pieces. Pin the four side pieces together along their edges to form a box shape. Leave a seam allowance of about one inch.
- Install the Zipper: On one of the side seams, stitch the zipper into place before sewing the seam completely. A long zipper makes filling the pouf much easier later. This opening allows for access to the inner filling.
- Sew the Box: Sew the remaining three side seams together firmly. Use a strong, straight stitch. Now you have a four-sided cylinder shape. Press the seams open for a flatter, professional finish.
- Attach the Top and Bottom: Pin the top fabric square to the top edge of the cylinder, matching corners exactly. Sew this piece securely. Repeat this step for the bottom piece. Turn the pouf cover right-side out through the zipper opening.
- Fill the Pouf: Place a large plastic sheet down to catch any spills. Using a funnel or scoop, slowly fill the pouf with your chosen material (foam chunks or beads). Fill it until it is firm enough to sit on, but still comfortable.
- Zip and Finish: Zip the cover closed securely. Gently shake and pat the pouf to evenly distribute the filling. Place it in your living room for instant flexible seating!
3. The Modern Upholstered Reading Chair

A stylish, cozy armchair creates an inviting reading nook here. The high, winged back and button tufting give this chair a sophisticated look without being overly formal. Its light neutral upholstery blends seamlessly with the room’s calm aesthetic. A gray and white patterned throw blanket rests invitingly over the armrest.
The small, round side table offers space for books and a warm drink. Note the thoughtful lighting: a unique, circular wall sconce casts an attractive, warm glow. This arrangement adds extra seating to the living area without taking up much floor space. It serves as a dedicated spot for quiet relaxation.
Materials Required:
- Small, sturdy wooden chair (thrift store find or basic furniture frame)
- Two yards of durable upholstery fabric
- High-density upholstery foam (for seat and back)
- Batting/wadding (for smoothing edges)
- Upholstery tacks or staple gun staples
- Decorative buttons (optional, for tufting)
- Strong adhesive spray
Equipment Required:
- Sewing machine
- Measuring tape
- Staple gun
- Fabric scissors
- Electric drill (for tufting holes, if needed)
- Hammer (for tacks)
DIY Instructions Step by Step:
- Prepare the Frame: If you are using an old chair, remove all existing fabric and padding to expose the bare frame. Sand and clean the wood if necessary. This provides a clean foundation for your project.
- Cut and Attach Foam: Measure and cut the high-density foam to fit the seat and back areas of the chair. Use a strong adhesive spray to secure the foam directly onto the wooden frame. Allow the adhesive to dry fully.
- Add Batting: Wrap the foam with a layer of batting or wadding. Pull it taut and secure it to the back and underside of the frame using the staple gun. This step smooths out the foam edges and adds extra plushness.
- Cut and Place Fabric: Cut your main upholstery fabric pieces, leaving a generous allowance (about 4 inches) on all sides for pulling and stapling. Start by laying the fabric over the back and seat sections.
- Upholster and Staple: Working from the center outward, pull the fabric taut and staple it securely to the underside and back edges of the wooden frame. Take care to create crisp, neat corners, folding and trimming excess fabric as you go.
- Optional Tufting: If you want a tufted look, mark the spots on the foam where you want the buttons. Use an electric drill to create small holes through the foam. Thread a long upholstery needle with strong thread, push it through the back, thread a button on the front, and pull the thread back tightly to create the dimple. Tie the thread off securely on the chair’s backside.
- Final Trimming: Trim all excess fabric from the underside. You may cover the raw edges with a clean piece of black fabric or dust cover attached with tacks or staples for a professional finish.
4. Upgrading Sagging Sofa Cushions with New Foam

This image highlights a crucial, often overlooked, budget fix for old seating: replacing the cushion filling. Sagging seats instantly make a sofa look tired and old. Swapping worn padding with firm, high-density foam completely rejuvenates the furniture. The dark gray cushion covers shown here demonstrate a modern, clean fabric choice.
New foam offers improved support and comfort, extending the life of your couch. You do not need to buy a whole new sofa to get a new feel. This DIY swap is straightforward, requiring only basic tools. This simple refresh makes the entire living space feel clean and updated.
Materials Required:
- High-density upholstery foam (determine thickness and size based on existing cushions)
- Dacron or polyester batting (optional, for softness and loft)
- Spray adhesive (specifically for foam/fabric)
- Old cushion covers (or new fabric for covers)
- Heavy-duty sewing thread (if making new covers)
Equipment Required:
- Electric kitchen knife or sharp utility knife
- Measuring tape
- Marker
- Fabric scissors (if using batting)
DIY Instructions Step by Step:
- Measure and Remove Old Filling: Carefully unzip and remove the old, worn foam or batting from your cushion covers. Measure the exact width, length, and depth of the old foam you are replacing. This ensures a proper fit.
- Mark the New Foam: Transfer these measurements onto your new sheet of high-density foam using a marker. Be precise with your lines to ensure square cuts.
- Cut the Foam: The best tool for cutting thick foam is an electric kitchen knife; it provides a clean, straight cut. If you use a utility knife, use a long, sharp blade and make several passes, following your marked lines exactly. Cut the foam block to the correct dimensions.
- Wrap with Batting (Optional): If you want a softer, fuller look, wrap the cut foam block with a layer or two of Dacron batting. Pull the batting snugly around the foam block, wrapping it like a gift. Secure the batting seams on one side using a few dots of spray adhesive or by hand-stitching.
- Insert into the Cover: Carefully stuff the new, firm foam (with or without batting) into the original cushion cover. Take your time, folding the foam slightly if needed, to avoid ripping the cover seams or bending the foam.
- Zip and Test: Once the foam is fully inside, smooth out any wrinkles in the fabric and zip the cover closed. Place the revitalized cushion back on the sofa. Enjoy the improved firmness and support!
5. The Bold, Tufted Statement Bench

A long, button-tufted bench instantly injects drama and color into this minimalist space. The bright, cheerful yellow upholstery is a showstopper. Rolled ends give the piece a classic, elegant profile. Subtle gold detailing along the bottom edge adds a luxurious touch.
This bench offers flexible seating and can easily be moved. It functions beautifully beneath the large window here. The surrounding elements—a light rug, a modern wood and glass coffee table, and simple white vases—keep the focus on the sunny piece. This is a great way to add high style without needing a full-sized seating arrangement.
Materials Required:
- Flat wooden bench (new or repurposed)
- 4-inch thick upholstery foam cut to bench size
- Batting/wadding
- Three yards of vibrant upholstery fabric (e.g., velvet or linen blend)
- Upholstery thread and extra-long needle
- Upholstery buttons (many, matching the fabric)
- Decorative trim or upholstery tacks (for decorative border)
Equipment Required:
- Electric drill (with small bit)
- Staple gun and staples
- Measuring tape
- Fabric scissors
- Hammer (for tacks, if applicable)
DIY Instructions Step by Step:
- Prep the Bench Top: Remove any existing padding from the bench frame. Drill a grid of holes across the top surface of the wood where you want the tufting buttons to sit. Use a measuring tape to ensure the holes are evenly spaced.
- Attach Foam and Batting: Secure the cut foam to the bench top using spray adhesive. Next, wrap the foam and the sides of the bench with a layer of batting, pulling it taut and stapling it underneath the bench frame.
- Cover with Fabric: Lay your main upholstery fabric over the batting. Start by stapling the fabric securely underneath the bench frame on one long side, pulling firmly as you go. Repeat on the opposite long side, ensuring the fabric remains wrinkle free. Fold and staple the ends neatly.
- Create the Tufting: Thread your extra-long upholstery needle with strong thread. Starting from the underside of the bench, push the needle up through a drilled hole, through the foam, and through the fabric. Thread a button onto the needle on top, and push the needle back down through the same hole.
- Secure the Tuft: On the underside of the bench, pull the thread tightly to create the desired dimple or “tuft.” Secure the thread with a knot or a staple to the wood frame. Repeat this process for every single drilled hole.
- Add Decorative Trim: Measure and cut your chosen decorative trim or fabric border. Secure this piece along the bottom edge of the bench using a staple gun. If using individual upholstery tacks, hammer them in carefully along the border for a custom, embellished look.
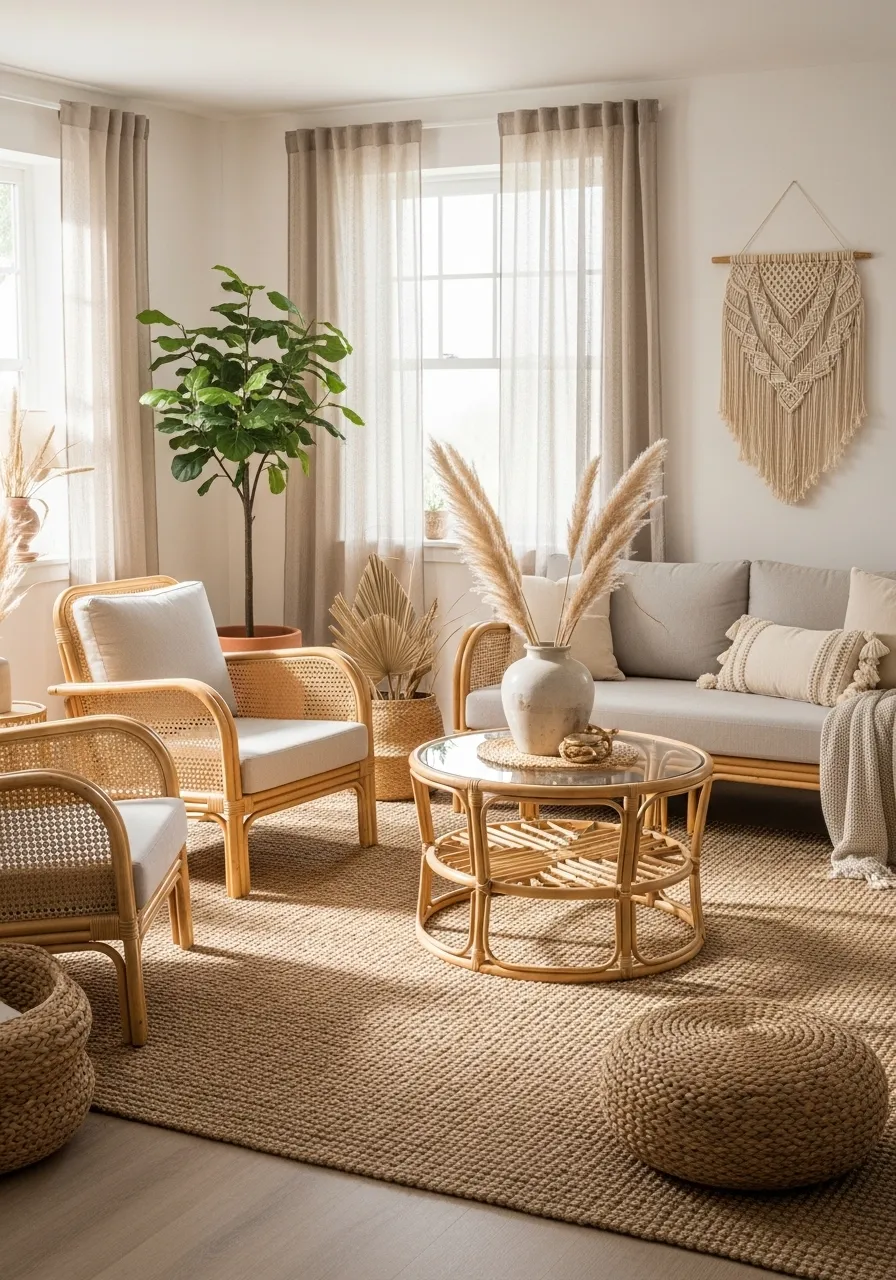
6. Cane and Rattan Chairs for a Boho Refresh

This lovely living room proves you can swap heavy upholstery for light, textural pieces. Rattan frame armchairs and a matching sofa give the space an open, airy feel. The light natural wood tones and cane detailing bring an organic, relaxed style. Simple, thick, light gray cushions provide comfort and contrast against the frame.
The room is grounded by a large woven jute rug, layering texture on the floor. Accessories like the woven coffee table, a wicker footstool, and a macrame wall hanging enhance the bohemian vibe. This style is an excellent budget choice because it often utilizes natural, cost effective materials. This setting feels inviting and bright.
Materials Required:
- Used wooden or metal frame armchair (thrifted or yard sale find)
- Rattan cane webbing roll
- Natural rope or thin rattan reeds (for wrapping)
- Strong wood glue or heavy duty construction adhesive
- Sandpaper (medium and fine grit)
- Stain or paint (optional, for finishing the frame)
Equipment Required:
- Measuring tape
- Utility knife or sharp scissors
- Clamps (small and medium size)
- Hammer and small nails (if securing the frame)
- Basin of water (for soaking cane)
DIY Instructions Step by Step:
- Prepare the Frame: Clean and lightly sand the entire frame of your existing chair. Remove any loose or damaged pieces. If you wish to change the color, apply a fresh coat of paint or stain at this stage and let it dry completely.
- Measure for Cane Inserts: Measure the areas of the chair where you want the cane webbing, such as the back and sides. Add an extra inch all around these measurements. This ensures you have enough material to work with.
- Soak the Cane: Submerge the cut cane webbing pieces completely in a basin of warm water for at least 30 minutes. This makes the cane flexible and easier to pull taut when installing.
- Install the Cane: Apply a generous layer of strong wood glue around the edges of the opening on the chair frame. Center the wet cane webbing over the opening. Start securing the edges with small nails or staples, pulling the cane very tight as you work. The cane will shrink and tighten further as it dries. Use clamps to hold the edges while the glue sets.
- Finish the Edges: Once the cane is dry and tight (about 24 hours), cover the raw edges of the webbing with natural rope or thin rattan reeds. Apply glue to the rope and wrap it tightly around the exposed wood frame where the cane meets the wood. This hides the staples and gives a professional finish.
- Add Cushions: Purchase simple square or rectangle foam cushions and cover them with neutral cotton or linen fabric. Place them on the seat and back for a comfortable, finished chair.
7. Modular Sectionals and Ottomans for Custom Seating

This collection demonstrates the versatility of modular furniture pieces. Instead of one huge, fixed sofa, these individual units can be rearranged instantly. The top image shows a massive U-shaped sectional, great for large families or entertaining. The middle image showcases the same pieces separated into a two-sofa arrangement with an armchair.
Square ottomans are essential to this style, serving multiple purposes. They function as coffee tables, footrests, or extra seating when needed. The light gray fabric keeps the room feeling spacious, despite the amount of furniture. Swapping old, bulky sofas for customizable modular pieces completely updates a living space.
Materials Required:
- Existing large, sturdy ottoman frame or wooden crate (a base unit)
- 4-inch thick upholstery foam, cut to size of the ottoman top
- Two yards of heavy-duty neutral upholstery fabric
- Batting/wadding
- Upholstery tacks or staple gun staples
- Four sturdy, low-profile screw-in furniture legs
- Heavy-duty bolts and brackets (if joining modular units)
Equipment Required:
- Electric drill
- Staple gun
- Measuring tape
- Utility knife (for cutting foam)
- Scissors
DIY Instructions Step by Step (Focusing on a Custom Ottoman):
- Prepare the Base: Ensure your ottoman frame or crate is solid. If using a crate, reinforce the sides and top with small wooden planks for stability. Sand any rough edges.
- Attach Foam and Batting: Place the foam on top of the base. Wrap the foam and the sides of the base with batting. Pull the batting tightly around the edges. Secure the batting to the underside of the base using staples.
- Cut and Place Fabric: Cut your upholstery fabric, leaving a few inches extra on all sides for pulling. Center the fabric over the batting and foam. Begin pulling the fabric taut and stapling it securely to the underside of the wooden base.
- Fold Corners Neatly: At each corner, create a neat fold, similar to wrapping a present. Ensure the corner seam is crisp and straight, then staple the folded fabric down to the underside of the base.
- Install the Legs: Turn the upholstered ottoman upside down. Predrill small pilot holes in the four corners where the legs will attach. Screw the four low-profile furniture legs securely into the base. This raises the piece to a comfortable seating or tabletop height.
- Use as a Modular Unit: Place the new ottoman in the center of your existing seating arrangement. For true modular functionality, you can use heavy-duty brackets to bolt the ottoman securely to the front of a sofa section, instantly transforming it into a chaise lounge.
8. Faux Fur Ottomans for Glamorous Seating

This living area achieves high-end style using simple, fluffy seating alternatives. Several round ottomans covered in luxurious white faux fur replace traditional seating options. This textural swap is hugely impactful, adding softness and a touch of glamour to the room. The ottomans function as footrests or extra seating when guests arrive.
The neutral color palette features warm brown walls and a light gray sofa and rug. A sleek, white armchair is draped with a matching faux fur throw, enhancing the cozy feel. Simple, bright table lamps provide warm lighting. These poufs are an easy way to instantly refresh an outdated space on a manageable budget.
Materials Required:
- Sturdy, round wooden base (or a large, empty tire wrapped in thick rope for structure)
- 2-inch upholstery foam (enough to cover the base top)
- Faux fur fabric (enough to cover the entire base)
- Batting/wadding (for smooth transition)
- Staple gun staples
- Strong adhesive spray
- Heavy-duty sewing thread
Equipment Required:
- Staple gun
- Measuring tape
- Utility knife or strong scissors (for cutting base)
- Razor blade or box cutter (for cutting faux fur backing only)
DIY Instructions Step by Step:
- Prepare the Round Base: If using a wooden base, ensure it is sturdy and smooth. If creating a round shape from scratch, consider using a dense cardboard cylinder or an old cable spool. Attach the 2-inch foam to the top of the base using spray adhesive.
- Add Batting: Wrap the foam and the sides of the base with a layer of batting. Pull it snugly over the top and staple it securely to the underside edge of the base. This provides a soft, rounded shape.
- Cut the Faux Fur: Lay your faux fur fabric face down. Using a razor blade or box cutter, carefully cut the backing fabric only, avoiding cutting the actual fur fibers. This prevents shedding and keeps the edges neat. You will need one large piece to cover the entire ottoman.
- Upholster the Base: Center the faux fur over the batting covered base. Starting on one side, pull the fabric tightly and staple it to the underside edge of the wooden base. Work in sections, moving across the ottoman and constantly pulling the fabric taut to prevent wrinkles.
- Manage the Fluff: The corners and edges of faux fur can be bulky. To reduce bulk, trim the fur fibers slightly from the underside near the staple line. Smooth the remaining fabric fibers over the edge and continue stapling.
- Finishing Touches: Once the fabric is secured all around, trim any excess material from the underside. Give the fur a gentle brush to ensure all the fibers are pointing in the same direction, creating a uniform, luxurious look.
9. Sling Leather Chairs for Industrial Style

This room successfully blends warm wood with cool, industrial concrete textures. Two striking sling chairs are positioned prominently, offering a modern alternative to bulky armchairs. Their slim metal frames and dark leather seats create a minimalist, open aesthetic. The thin profile of the chairs ensures the room feels spacious and uncluttered.
The seating complements the long, light gray sofa and the sleek coffee table. A feature wall clad in vertical wood slats introduces warmth and texture. Large floor plants add organic shapes and color, softening the strong lines of the furniture. Swapping traditional chairs for these modern slings instantly updates a tired space.
Materials Required:
- Metal tube frame (two side pieces, one back piece, one base piece) OR sturdy wooden frame
- Heavy leather hide or canvas fabric (for the sling seats)
- Heavy-duty bolts, nuts, and washers
- Leather hole punch
- Leather sewing machine or strong needle and thread
- Sandpaper and metal primer/paint (if using metal frame)
Equipment Required:
- Electric drill (with metal or wood bits)
- Measuring tape
- Wrench/socket set
- Strong scissors or utility knife
DIY Instructions Step by Step (Focusing on the Sling Seat Swap):
- Prepare the Frame: If you are building a new chair, assemble the metal or wood pieces using strong bolts and brackets to create the basic sling shape. If you are refurbishing an old frame, sand away any rust or peeling paint. Apply a fresh coat of matte black primer and paint for a sleek finish.
- Measure the Sling: Measure the exact length and width required for the seat and back sling, considering how much material will wrap around the frame bars. Add a few inches to the width for a hem and enough length for a secure attachment.
- Cut the Material: Cut your leather or heavy canvas fabric to the measured sling shape. If using leather, use a razor or utility knife. If using canvas, use sharp fabric scissors.
- Finish the Edges: Fold over and stitch a small hem along all edges of the sling material for a clean finish. This prevents fraying (on canvas) and strengthens the edges.
- Attach to the Frame: Wrap one end of the sling around the top crossbar of the chair back. Mark the spot where the material overlaps. Use a leather hole punch to create grommet holes (or pre-drill small holes) through the overlapping material.
- Secure the Sling: Thread small, decorative bolts, nuts, and washers through the holes to securely fasten the leather/canvas to itself around the metal bar. Repeat this process for the seat section, wrapping the front edge of the sling around the front crossbar and securing it tightly. Ensure the material is pulled very taut before securing the final edge for a firm seat.
10. Multi-Functional Storage Ottoman Coffee Table

This single item solves multiple living room problems at once. The large, rectangular piece functions as a coffee table, ottoman, and hidden storage unit. Half of the top is upholstered in a soft gray fabric, serving as seating or a comfortable footrest. The other half features a lift-up wooden tabletop, suitable for drinks and display.
The gray fabric seamlessly coordinates with the sofa and throw blankets. This piece is brilliant for small spaces, keeping clutter out of sight inside its deep cavity. Choosing versatile furniture like this is key to refreshing a space efficiently and affordably. It updates the room immediately while maximizing utility.
Materials Required:
- Large, sturdy wooden box or storage trunk (the base structure)
- Plywood (for the lift-up tabletop section)
- Piano hinge or lift-top hardware mechanism
- 2-inch upholstery foam and batting
- Heavy-duty gray upholstery fabric
- Wooden plank (for the bottom decorative base)
- Wood stain or varnish (for the tabletop)
Equipment Required:
- Electric drill and screws
- Measuring tape
- Staple gun and staples
- Wood saw or circular saw (for cutting plywood)
- Upholstery needle and thread (for handles)
DIY Instructions Step by Step:
- Construct the Base: Ensure your wooden box or trunk is stable. Attach a wide, stained wooden plank around the bottom perimeter of the base. This gives the ottoman a finished, elevated look.
- Divide the Top: Measure and cut the plywood top into two sections: one for the upholstered seating area and one for the wooden tabletop area.
- Upholster the Seat Section: Cover the seating section plywood with foam, then batting, securing the materials to the underside with adhesive and staples. Finally, wrap and staple the gray fabric over the batting, pulling it taut and ensuring neat corners.
- Finish the Tabletop: Sand the plywood tabletop section smooth. Apply your chosen wood stain or varnish and allow it to dry completely, following the product instructions.
- Install the Mechanism: Attach the lift-top hardware or piano hinge to the storage box base and to the underside of the seating section. This allows the seating lid to open easily for access to the storage space.
- Attach the Tabletop: Secure the finished wooden tabletop section to the remaining fixed area of the box using screws. Make sure the tops of both sections align evenly.
- Add Handles: Sew sturdy fabric loops or attach metal pull handles to the sides of the fabric-covered box base. This makes the storage piece easier to move around the room.
11. Refinishing Wooden Dining Chairs

This image shows how easily old wooden chairs can be transformed. Instead of buying new seating, a fresh coat of paint or stain provides an incredible refresh. The black chair features a clean, modern design painted onto the back. The distressed white chair has a cheerful yellow stencil design, adding rustic charm.
Simple fabric seat cushions or woven rush seats further enhance the look and comfort. These chairs are budget conscious solutions for dining rooms or as extra living room seating. This simple update is a powerful way to make your existing furniture feel entirely new. It proves paint is a budget decorating superpower.
Materials Required:
- Wooden chair(s) (salvaged or existing)
- Sandpaper (various grits, 80 to 220)
- Primer (optional, but recommended)
- Chalk paint, acrylic paint, or wood stain
- Clear furniture sealant or varnish
- Stencil or painter’s tape (for designs)
- Rags and drop cloth
Equipment Required:
- Electric sander (optional, for large areas)
- Paintbrushes (various sizes)
- Small foam rollers (optional)
- Clean containers (for mixing paint)
DIY Instructions Step by Step:
- Preparation and Sanding: Lay down a drop cloth in a well ventilated area. Thoroughly clean the chair to remove any dirt or grime. Use a medium grit sandpaper (80 to 120) to smooth any rough areas and remove old paint or varnish. Finish with a fine grit (220) for a silky smooth finish.
- Prime the Surface: Apply a single coat of wood primer. Primer helps the final paint color adhere better and look richer. Allow the primer to dry completely according to the manufacturer’s instructions.
- Apply the Base Coat: Apply a thin, even coat of your chosen paint color. If you are aiming for a distressed look, focus on getting coverage but do not worry about reaching every nook. Allow the first coat to dry, then apply a second coat if needed for full coverage.
- Add Decoration (Stenciling): Once the base coat is dry, position your stencil or use painter’s tape to create a geometric design on the chair back. Use a small brush or foam roller to apply a contrasting paint color over the stencil. Carefully lift the stencil immediately after painting to prevent bleeding. Let the decoration dry fully.
- Distress (Optional): If you want a distressed, vintage look, gently rub a piece of sandpaper over the edges, corners, and areas that would naturally receive wear. Wipe away the dust.
- Seal the Finish: Apply one or two coats of a clear furniture sealant or varnish. This protects your hard work and makes the chair easy to clean. Allow the sealant to cure completely before using the chair.
12. Floor Cushions for Bohemian Lounge Seating

This image offers an imaginative, low-cost way to maximize seating for large groups. Large floor cushions replace traditional sofas and chairs entirely. The arrangement creates a fun, casual atmosphere, blending warm earth tones with deep blues and natural textures. Layering different sizes and patterns gives the space a rich, inviting feel.
Small rattan side tables hold drinks and plants, eliminating the need for a large coffee table. String lights and woven wall art enhance the relaxed, bohemian aesthetic. This swap is supremely budget friendly, focusing on simple fabric and filling rather than costly furniture frames. It encourages socializing and creates a cozy lounge environment.
Materials Required:
- Durable upholstery fabric (canvas, cotton duck, or linen) in various colors/patterns
- High-density foam inserts or shredded foam/fiberfill (cushion filling)
- Heavy-duty zipper (at least 20 inches) or strong Velcro
- Upholstery needle and thread
- Measuring tape
Equipment Required:
- Sewing machine (with a heavy needle)
- Fabric scissors
- Chalk or fabric marker
DIY Instructions Step by Step:
- Measure and Design: Decide on the dimensions for your square or rectangle cushions. You will need six pieces of fabric for each box cushion (top, bottom, and four sides). Mark all pieces clearly on the fabric.
- Cut and Pin Fabric: Cut all six pieces for one cushion, adding a one-inch seam allowance to all edges. Pin the four side pieces together to form a fabric box, then sew them securely along the edges.
- Install the Zipper: On the middle of one of the side panels, install your heavy-duty zipper or secure a strip of Velcro. This opening is necessary for inserting and removing the filling.
- Sew the Top and Bottom: Pin the top fabric piece to the top edge of your fabric box, matching corners precisely. Sew around the perimeter. Repeat this step for the bottom piece. Turn the completed cover right-side out through the zipper opening.
- Fill the Cushion: Insert your foam block or stuff the cover tightly with fiberfill until the cushion is firm. If using fiberfill, make sure you fill it completely to prevent sagging when sat upon.
- Create Tufting (Optional): To achieve the buttoned, tufted look shown, use a very long, strong upholstery needle and thread. Push the needle all the way through the cushion from top to bottom, then back up. Pull the thread tightly and tie it securely to create the signature dimple.
13. Acrylic or Ghost Chairs for Minimalist Seating

This image demonstrates a spectacular way to make a small room feel much larger. Clear acrylic or “ghost” furniture provides the function of seating without the visual weight. These chairs and the matching settee have sleek, modern curves and a minimalist profile. They almost disappear into the gray backdrop.
The see-through quality prevents the room from feeling crowded. This look is incredibly contemporary and airy. Paired with a simple rug and a glass coffee table, the entire arrangement looks high end and uncluttered. This simple swap is a striking way to bring modern design into your outdated space.
Materials Required:
- Simple, old wooden or metal chairs (base for DIY transformation)
- Clear acrylic sheet or panels (at least $1/4$ inch thick)
- Sturdy, clear plastic cable ties or specialty clear bolts
- Clear polyurethane spray coating
- Clear epoxy resin (optional, for bonding)
Equipment Required:
- Measuring tape
- Jigsaw or utility knife (specifically for cutting acrylic/plexiglass)
- Electric drill (with a clear plastic bit)
- Safety goggles and gloves
DIY Instructions Step by Step (Focusing on Acrylic Paneling):
- Measure and Design: Measure the backrest and seat dimensions of your existing chairs. Sketch out the curved shape you want for your acrylic replacement panels. The goal is to maximize the clear surface area.
- Cut the Acrylic: Transfer your measurements and shapes onto the acrylic sheet. Use a jigsaw with a blade designed for plastic, or carefully score the sheet multiple times with a utility knife and snap it cleanly. Wear safety gear during this step.
- Drill Attachment Holes: Hold the cut acrylic piece against the chair frame where it will attach. Mark the location of attachment holes. Use an electric drill with a specialty plastic drill bit to slowly drill holes in the acrylic. Drilling too fast can cause cracking.
- Seal and Finish: Spray the cut acrylic pieces with a clear, UV resistant polyurethane coating. This gives the surface a smooth, polished look and helps prevent scratches.
- Attach the Panels: Using small, clear plastic cable ties or clear acrylic bolts, attach the cut panels to the chair frame. Ensure the connection is very tight so the chair is safe and stable to sit on.
- Final Polish: Wipe down the finished chairs with a soft cloth and a gentle cleaner. The clear surfaces are ready to make your small room look expansive.
14. Maximalist Sofa Styling with Piles of Pillows

This photograph shows that an older, structured sofa can be completely hidden and revived using accessories. An abundance of colorful pillows and a vibrant throw blanket create a lively, maximalist look. The heavy use of florals, animal print, and bright geometric patterns completely distracts from the antique frame beneath.
Pillows in diverse shapes, like the round velvet cushion, add visual excitement. This technique is incredibly budget friendly; simply changing pillow covers offers huge impact. The backdrop of lush, botanical wallpaper enhances the bold, layered style. This is an exciting, warm swap for those who love color.
Materials Required:
- Pillow forms (various sizes and shapes, e.g., square, lumbar, bolster)
- Assorted fabrics (velvet, sequin, cotton, faux fur, animal print)
- Zippers or Velcro strips
- Decorative trim, piping, or tassels (optional)
- Matching sewing thread
Equipment Required:
- Sewing machine
- Fabric scissors
- Measuring tape
- Iron and ironing board
DIY Instructions Step by Step (Focusing on a Custom Pillow Cover):
- Measure and Plan: Measure your pillow form (e.g., 18×18 inches). For a zippered cover, you will need two squares of fabric that are slightly larger (19×19 inches) to allow for seams.
- Cut and Hem: Cut your chosen fabric pieces. On one side of both pieces, fold over a small hem (about $1/2$ inch) and iron it flat. This prepares the edge for the zipper.
- Install the Zipper: Place the two main fabric squares right sides together. Pin the zipper along the two hemmed edges. Sew the zipper into place. When the zipper is closed, the fabric should appear seamless.
- Sew the Remaining Sides: Unzip the zipper halfway. This is crucial for turning the cover right-side out later. Pin the remaining three sides of the fabric pieces together. Sew these three remaining sides using a straight stitch.
- Add Trim (Optional): If adding piping or tassels, pin them along the outside edge of the cover before sewing the final three sides. The trim should face inward so it will stick out once the cover is turned.
- Insert the Form: Clip the corners of the cover to ensure they turn neatly. Turn the finished cover right-side out through the open zipper. Push out the corners carefully. Insert your pillow form and zip the cover closed. Repeat this process with several different fabrics for a bold, eclectic look!
15. The Deep Window Nook Daybed

This picture provides a cozy, custom seating solution for unused corners. An upholstered platform, custom built into the window recess, acts as a luxurious daybed. The deep, tufted cushion serves as the main seating area, surrounded by supportive bolster pillows on the sides.
A variety of textured throw pillows in soft, natural hues (sage, cream, light blue) makes the nook exceptionally comfortable. Sheer curtains filter the natural light beautifully. This setup is a fantastic, semi custom alternative to a love seat, maximizing a small or awkward space. It instantly creates a calm, inviting spot for reading.
Materials Required:
- Plywood or MDF board (for the base frame)
- 4-inch high-density foam (for the mattress pad)
- Fabric (a durable linen or cotton blend)
- Bolster pillow forms or foam cylinders
- Lumber (for framing and support)
- Screws, brackets, and L-joints
Equipment Required:
- Electric drill and screwdriver
- Circular saw or handsaw
- Staple gun and staples
- Measuring tape
- Level and stud finder
DIY Instructions Step by Step:
- Measure and Build the Frame: Measure the exact dimensions of your window recess. Cut the lumber to build a simple, sturdy rectangular base frame that fits snugly into the space. Use screws and L-brackets to assemble the frame securely.
- Install the Base: Use a stud finder to locate wall studs in the recess area. Anchor the wooden base frame securely to the wall studs using long screws. Ensure the frame is level using a spirit level. Cut the plywood or MDF board to fit the top of the frame and screw it down.
- Cut and Cover the Mattress: Cut the high-density foam to fit the platform precisely. Create a box-style cover for the foam using your chosen durable fabric. The cover should fit snugly. Insert the foam and close the cover with a hidden zipper or hand stitching.
- Upholster the Bolsters: Create custom slipcovers for the foam bolster cylinders. These should be sewn tightly to provide back and arm support. Place the mattress on the platform and arrange the bolsters along the sides and back wall.
- Accessorize: Place your finished throw pillows on the daybed for extra comfort and decoration. Finish the look by hanging soft, sheer curtains to filter the light and add a gentle, romantic feel.
16. Industrial Pipe and Wood Armchair

This chair proves that comfortable seating can be crafted from unconventional, budget materials. The frame is constructed entirely from black and galvanized metal piping and fittings. The use of reclaimed or distressed wood slats for the backrest and base adds a rustic, industrial contrast.
A simple white cushion rests on the wooden seat, offering comfort. This chair makes a strong style statement in an urban or loft setting, especially against the exposed brick wall. Building this piece is cheaper than buying high-end furniture. It is a fantastic seating option that adds structural interest to any space.
Materials Required:
- Galvanized or black iron pipe sections (pre cut to size, for legs, arms, and supports)
- Threaded pipe fittings (elbows, tees, crosses)
- Pre cut or reclaimed wooden planks (for seat and back)
- White seat cushion (pre made or custom sewn)
- Wood stain or clear coat (for wood pieces)
Equipment Required:
- Pipe wrench (two, for tightening)
- Electric drill and wood bits
- Measuring tape
- Sandpaper (for wood)
- Screws or bolts
DIY Instructions Step by Step:
- Plan and Source: Determine the chair’s dimensions (height, width, depth). Sketch out the frame and calculate the exact pipe lengths and fittings needed (e.g., eight tees for the corners). Purchase all materials from a hardware store.
- Prepare the Wood: Sand the wooden planks until smooth. Apply a layer of wood stain or clear coat to protect the wood and enhance the grain. Allow the wood to dry completely.
- Assemble the Frame: Following your plan, begin screwing the pipe sections and fittings together, starting with the base rectangle. Build the legs upwards, adding the armrests and the back frame supports. Use two pipe wrenches to firmly tighten all connections.
- Attach the Seat: Measure and cut the wooden plank for the seat base. Place it across the bottom supports. Use an electric drill to pre drill holes through the wood and into the supporting pipe bars. Secure the wood with strong screws or U bolts.
- Attach the Backrest: Fit the wooden backrest slats across the vertical pipe supports at the desired angle. Screw the slats securely to the pipe frame.
- Add the Cushion: Place a thick, comfortable seat cushion on the newly installed wooden base. The unique, self built chair is ready for use.
17. The Boho Patchwork Pillow Sofa Refresh

This image offers another brilliant, color saturated way to camouflage and refresh a drab sofa. The entire backrest and seat are covered in a dense layer of richly patterned, handcrafted pillows. These pillows feature patchwork, embroidery, bright tassels, and various textures. The gray sofa beneath is virtually invisible.
A matching crocheted or woven blanket drapes over the arm, connecting the look to the floor. The round, multicolored braided rug anchors the eclectic design. This swap emphasizes textiles over expensive furniture. Simply stacking beautiful, colorful pillows provides immediate style and comfort.
Materials Required:
- Plain square pillow forms (various sizes)
- Scrap fabric pieces (velvet, denim, embroidered cloth)
- Embroidery floss, yarn, and tassels
- Backing fabric (for the cushion back)
- Zippers or Velcro strips
- Sewing machine thread
Equipment Required:
- Sewing machine
- Fabric scissors
- Measuring tape
- Hand embroidery needle
DIY Instructions Step by Step (Focusing on a Patchwork Pillow):
- Gather Scraps: Collect fabric scraps in varying colors and textures. Cut them into small, manageable squares or rectangles. Plan a random patchwork design for the front of the pillow.
- Assemble the Patchwork: Sew the small fabric scraps together in rows, using a straight stitch, until you have one large square that matches the dimensions of your pillow form. Press all the seams flat with an iron.
- Add Embroidery/Tassels: Use embroidery floss and a hand needle to add decorative stitches, flowers, or abstract designs directly onto the patchwork face. Sew small tassels securely to the four corners of the front panel.
- Prepare the Back: Cut a piece of backing fabric to the same dimensions. Cut the back piece in half to create an envelope closure or sew in a zipper or Velcro strip.
- Sew the Cover: Place the finished patchwork front and the backing piece(s) right sides together. Pin and sew around the entire perimeter, leaving a one inch seam allowance. If you used an envelope back, sew around all four sides. If you used a zipper, ensure the zipper is open before you sew.
- Finish: Clip the corners, turn the cover right-side out, and push out the corners. Insert your pillow form. This colorful, custom pillow adds instant warmth to your sofa.
18. Stackable Cubes for Flexible Seating and Storage

This image presents the ultimate flexible seating arrangement for small or multipurpose rooms. Simple fabric covered storage cubes function as ottomans, side tables, and even backrest chairs. The cubes, in shades of gray, white, and lime green, add cheerful pops of color.
The cubes easily stack to create tall, supportive seats, or they spread out to accommodate several guests. Liftable lids hide blankets, magazines, or remote controls. The trays placed on top transform the cubes into useful serving surfaces. This multi-functional furniture is a supremely practical budget swap.
Materials Required:
- Sturdy storage boxes or MDF cut pieces (for building the base cubes)
- 2-inch upholstery foam and batting
- Durable fabric (e.g., microsuede or linen blend)
- Small pull handles (e.g., fabric loops or metal pulls)
- Screws, hinges, and small magnets (for securing lids)
Equipment Required:
- Electric drill and screws
- Staple gun and staples
- Measuring tape
- Wood glue
DIY Instructions Step by Step (Focusing on a Stackable Cube):
- Build the Cube Base: Cut and assemble five sides of your cube base using MDF board and wood glue, securing the corners with screws. This creates the open box structure for storage.
- Build and Upholster the Lid: Cut the sixth MDF piece to serve as the lid. Attach the foam and batting to the top of the lid using adhesive spray. Wrap the lid in your chosen upholstery fabric, pulling it tight and stapling it neatly to the underside of the lid.
- Attach Handles and Hinges: Screw a pull handle or fabric loop securely onto one side of the upholstered lid. Attach two small hinges to connect the lid to the cube base. Install small magnets to the inside lip of the cube and the underside of the lid to ensure it stays closed firmly.
- Upholster the Sides: Cut fabric panels for the four sides of the cube. Wrap the fabric around each side, pulling it taut and stapling the edges neatly to the inside of the cube’s opening and to the bottom edge.
- Add Handles to Base: If desired, attach two strong fabric loop handles to opposite sides of the cube base. This makes it easy to move the unit when rearranging the seating. The multi functional storage ottoman is complete.
19. The Integrated Pet Nook Seating

This image showcases a creative, thoughtful customization of a modern sofa. A specially designed low platform next to the main seating area is dedicated entirely to a pet bed. The integrated design makes the pet’s space look intentional and built in. A deep, tufted cushion provides comfort for the animal.
A low shelf built into the back of the sofa offers convenient storage for books or decorative objects. This simple extension uses the available space efficiently. Customizing one end of a modular sofa for a pet is a sweet, budget conscious way to update seating and meet a family need. This makes the entire room feel more welcoming.
Materials Required:
- Plywood or MDF board (for the extension frame)
- Matching upholstery fabric (to match the sofa)
- 4-inch foam and batting
- Heavy-duty bolts and brackets (for attaching to sofa frame)
- Tufted pet cushion (store bought or DIY)
Equipment Required:
- Electric drill and screws
- Circular saw or handsaw
- Staple gun
- Measuring tape
DIY Instructions Step by Step:
- Measure and Design: Measure the desired dimensions for the low pet platform extension. Design the extension to sit at the same height as the sofa base, not the cushion height.
- Build the Platform Frame: Cut and assemble the plywood or MDF pieces to create the open box frame for the platform. Reinforce the structure with internal lumber supports.
- Attach to Sofa: Carefully locate the internal wood frame of your existing modular sofa (if possible). Use heavy-duty bolts and L brackets to securely connect the new platform frame to the end of the sofa base. The connection must be extremely stable.
- Upholster the Platform: Apply foam and batting to the top of the platform. Cut and wrap your matching upholstery fabric around the entire platform, pulling it taut and stapling it securely underneath. Ensure the fabric colors and texture blend well with the existing sofa.
- Build the Storage Shelf (Optional): If adding a shelf, build a separate rectangular box unit. Upholster this unit, and then use strong brackets and screws to affix it to the back edge of the new platform and the adjacent sofa back.
- Place the Cushion: Purchase or sew a comfortable, deep tufted cushion for the pet. Place it snugly onto the new platform. The pet seating nook is ready.
20. The Elegant Woven Hanging Chair

This sophisticated hanging chair offers a unique, space saving seating solution. The chair’s frame is woven in a mix of white and pale blue cording, giving it a delicate, airy feel. The canopy design adds an element of whimsical charm. A simple circular cushion and a small back pillow provide comfort.
Hanging chairs are an excellent swap for large armchairs, taking up no floor space. The movement of the swing provides a relaxing, resort like feel. This piece functions as a striking sculptural element in the room. It is a fantastic, unexpected way to update a reading corner.
Materials Required:
- Metal or strong plastic hoop frame (for seat)
- Thick, durable natural cotton or synthetic cording (for weaving)
- Metal chain or strong rope (for hanging)
- Large swivel hook and ceiling anchor (rated for human weight)
- Round cushion and small pillow
Equipment Required:
- Electric drill (with heavy masonry bit, if needed)
- Stud finder
- Measuring tape
- Scissors
DIY Instructions Step by Step:
- Secure the Ceiling Anchor: Use a stud finder to locate a sturdy wooden beam or joist in your ceiling. If the ceiling is concrete, use a masonry bit and a heavy-duty bolt anchor. Drill the pilot hole and securely install the heavy-duty anchor and swivel hook, which must be rated to hold at least 300 pounds. Safety is paramount here.
- Prepare the Frame: If starting from a basic hoop, begin by wrapping the thick cording tightly around the entire metal frame. Secure the beginning and end of the cord with strong knots and glue.
- Weave the Body: Using macrame knotting techniques, begin weaving the body of the chair. Start by creating a tight mesh for the seat and gradually extend the netting upwards to form the sides and back. Use a pattern that ensures the net is taut and supportive.
- Attach the Canopy: If adding a canopy, incorporate another, smaller hoop frame near the top of your weaving. Secure the netting to this top frame. This gives the chair its tent like structure.
- Add Hanging Cords: Attach four equal lengths of thick rope or chain securely to the top edge of the chair structure. Gather these four ropes and attach them to the single swivel hook on the ceiling. Adjust the length until the chair hangs at a comfortable height.
- Finishing Touches: Add a fringe or tassels to the bottom edge of the chair for decorative flair. Place a round cushion and a small pillow inside for maximum comfort.
21. Brightly Painted Distressed Wooden Stools

Simple wooden stools offer budget conscious, movable seating for any living room. These colorful pieces show how a coat of bright paint instantly transforms plain wood. The distressed finish on the blue and pink stools adds character and vintage charm. They function as small side tables, plant stands, or quick extra seating.
The mix of heights and vivid colors—yellow, green, blue, and pink—brings a cheerful energy to the space. Stools are easy to find cheaply at thrift stores or flea markets. This refinishing project is fast, requires minimal materials, and provides a huge style upgrade.
Materials Required:
- Wooden stools (new or old)
- Sandpaper (various grits, 80 to 220)
- Chalk paint or latex paint (in multiple colors)
- Primer (optional)
- Clear wax or polyurethane sealer
- Rag (for applying wax or distressing)
Equipment Required:
- Paintbrushes
- Drop cloth
- Electric sander (optional)
DIY Instructions Step by Step:
- Clean and Sand: Clean the stools thoroughly. Use medium-grit sandpaper to rough up the existing finish slightly; this helps the new paint adhere. Wipe away all dust.
- Paint the Base: Apply a coat of primer if the stools are very dark or heavily finished. Once dry, apply one or two coats of your chosen vibrant chalk or latex paint color to each stool. Ensure the base color is completely dry.
- Add a Second Color (Optional Distress): For a distressed look, paint a contrasting color over the base coat in strategic areas, like the legs and seat edges. Let this second color dry for a short time until tacky.
- Distress the Wood: Use a damp rag or a piece of medium sandpaper to gently rub away some of the paint from the edges and high traffic areas. This reveals the wood or the base coat beneath, creating that worn, vintage look.
- Seal the Finish: Apply a coat of clear finishing wax or polyurethane sealer to the entire stool. If using wax, buff it with a clean cloth once dry. Sealing protects the paint and makes the stool washable.
22. Oversized Cable Knit Sweater Cushions

Refreshing an old sofa can be as simple as changing the cushions. This image highlights the power of texture to create a cozy, autumnal feel. Two oversized square cushions feature a deep green, chunky cable knit design, resembling a cozy sweater. A smaller, patterned lumbar pillow complements the texture.
The thick, fuzzy throw blanket further enhances the inviting warmth of the small sofa. These cushions instantly transform the plain furniture into a snug, comfortable spot. Swapping out thin, worn pillows for thick, luxurious textures is a quick, high impact, and low budget style fix.
Materials Required:
- Chunky wool or acrylic yarn (in your chosen color)
- Fabric (for the cushion backing)
- Zipper or button closure supplies
- Large knitting needles (Size 10 or larger)
- Cushion forms
Equipment Required:
- Knitting needles
- Sewing machine
- Yarn needle
- Measuring tape
DIY Instructions Step by Step:
- Knit the Panels: Measure your cushion form. Knit a large square panel using a chunky cable knit pattern. This panel must be slightly larger than the cushion size to account for stretch and seams. You need one knitted panel for the front of the pillow.
- Cut the Backing: Cut the backing fabric to the exact size of the knitted panel. Decide whether you will sew a zipper or create an envelope closure on the back panel.
- Assemble the Cover: Lay the knitted panel flat. Place the backing panel on top, right sides together (if using a zipper, install it before sewing the perimeter). Pin and sew the panels together around the edges. Use a yarn needle to stitch the knitted front to the fabric back to avoid damaging the yarn.
- Finish and Fill: Turn the finished cover right side out. Insert the cushion form firmly into the cover. The heavy texture of the knit provides immediate visual warmth and comfort to your sofa.
23. Wire Frame Sculptural Chairs

For a truly contemporary and non bulky seating option, these wire frame chairs are a stunning choice. Their open, geometric shapes make a strong modern statement without blocking light or sightlines. These chairs are essentially pieces of functional art. Their light structure allows them to blend seamlessly into the bright, open space.
The wire frames are cheaper and less labor intensive to manufacture than fully upholstered chairs. The lack of visual weight makes them particularly effective in small or crowded rooms. Adding a thin seat cushion would increase comfort while maintaining the minimalist aesthetic.
Materials Required:
- Steel wire (thick gauge, bendable but sturdy) or thin metal rods
- Welding equipment and safety gear (if building from scratch)
- Small rubber feet or plastic caps (for chair legs)
- Metal primer and matte black spray paint
- Thin seat pad or cushion
Equipment Required:
- Measuring tools
- Wire cutters/benders
- Welding torch (or strong metal epoxy)
- Spray paint station
DIY Instructions Step by Step (Focusing on Refurbishing an Existing Metal Chair):
- Source and Clean: Find an existing wire or simple metal chair at a resale shop. Thoroughly clean the chair to remove rust, grime, or old paint. Use a wire brush if necessary.
- Repair and Prime: Repair any loose joints using strong metal epoxy. Apply a thin coat of metal primer to the entire chair frame. Primer helps the paint adhere and prevents future rust.
- Paint the Finish: Apply several thin, even coats of matte black spray paint. Allow each coat to dry fully before applying the next. Aim for a smooth, consistent finish that covers all angles.
- Add Comfort: Apply small rubber feet or plastic caps to the bottom of the legs to protect your floor. Purchase or sew a thin, square cushion cover with non slip backing. This adds comfort without sacrificing the chair’s light, airy look.
24. Sleek Sofa with Brass Leg Accent

This gray sofa demonstrates how simple details can give a piece a high-end, updated look. The clean, modern lines of the sofa are enhanced by the striking brass or gold tone accents on the legs and armrests. Swapping dark wooden legs for metallic ones provides instant sophistication.
The neutral gray fabric is brightened by the accent pillows—one in a bold yellow velvet and another in a geometric blue and gold pattern. This simple upgrade requires no upholstery work. Focus on the sofa’s “jewelry” (the hardware) to achieve a modern refresh.
Materials Required:
- Existing sofa or armchair with removable legs
- Four metallic furniture legs (tapered or angled, purchased online)
- Brass or gold sheeting (optional, for armrest detail)
- Strong adhesive (for metal sheeting)
- Screws
Equipment Required:
- Electric drill and screwdriver
- Measuring tape
- Utility knife (for cutting sheeting)
DIY Instructions Step by Step:
- Remove Old Legs: Turn the sofa upside down. Use a screwdriver or wrench to remove the existing wooden or metal legs. Measure the size of the attachment plate or bolt size used.
- Attach New Legs: Purchase new metallic legs with the correct attachment hardware. If the holes do not align, use a drill to create new pilot holes and screw the new brass or gold colored legs securely into the sofa frame.
- Add Armrest Trim (Optional): Measure the flat face of the sofa arm. Cut a thin sheet of brass or gold colored adhesive metal film to fit. Carefully adhere the film to the armrest face, smoothing out any bubbles with a roller or credit card. This creates the illusion of expensive trim.
- Flip and Style: Turn the sofa right-side up. The metallic accents provide an immediate, inexpensive, and elegant style upgrade.
25. Chunky Knit Modular Sofa Blocks

This image shows a stunning example of custom texture applied to seating. The sofa is constructed from modular blocks completely covered in a chunky, two toned knit or woven material. The varying shades of olive green and natural beige create a warm, tactile look.
The lack of feet means the sofa sits directly on the floor, enhancing the cozy, grounded feel. The large, visible weaving pattern is a fantastic budget friendly way to re-cover worn modular blocks. This DIY approach offers maximum surface texture and modern style.
Materials Required:
- Existing modular foam blocks or MDF cubes
- Several hundred feet of thick, durable rope or chunky yarn (e.g., jute or macrame cord)
- Heavy-duty spray adhesive
- Fabric (to create a base slipcover)
- Strong thread
Equipment Required:
- Scissors
- Large crochet hook (optional, for weaving)
- Measuring tape
DIY Instructions Step by Step:
- Prepare the Blocks: Ensure the foam blocks are clean and smooth. Sew a simple, tight fitting slipcover over the block using a plain fabric. This provides a clean, secure base for the weaving.
- Start the Weave: Begin at the bottom edge of the block. Apply a line of heavy-duty adhesive to the side of the block. Press the end of the rope or yarn securely into the glue.
- Wrap or Weave: If simply wrapping, continue winding the rope tightly around the block, ensuring each row sits flush against the last. If weaving, use a large crochet hook or your hands to weave a chunky pattern directly onto the fabric slipcover, using the rope to create the texture.
- Secure and Finish: Secure the end of the rope with strong glue or hand stitching to the underside of the block. Let the adhesive dry completely. Repeat the process for all modular blocks, alternating between the two rope colors for a checkerboard effect.
26. The Elegant Velvet Chaise Lounge

A chaise lounge provides specialized seating that encourages relaxation and rest. Swapping a standard armchair for this long, emerald green velvet piece instantly elevates the room’s sophistication. The deep color and rich texture of the velvet add a luxurious feel. Its long, clean lines prevent it from feeling heavy.
This piece tucks neatly into a corner or next to a window, creating a dedicated reading spot. The small, round side table with gold accents complements the luxe feel. The chaise is a statement piece that updates the entire aesthetic with a single furniture swap.
Materials Required:
- Old twin bed frame or single sofa frame (the base structure)
- Plywood board (for a firm base)
- High-density foam (long, single piece) and batting
- Rich colored velvet upholstery fabric (e.g., emerald green)
- Screw-in decorative furniture legs (optional, for height)
Equipment Required:
- Electric drill and screws
- Staple gun and staples
- Measuring tape
- Utility knife (for cutting foam)
DIY Instructions Step by Step:
- Build/Modify the Base: If using a twin bed, cut the frame down to the desired chaise length. If using an old sofa, remove the back and one armrest, leaving one arm to create the chaise structure. Secure a plywood board across the length for a firm foundation.
- Attach Foam and Batting: Place the single, long piece of foam across the plywood base. Wrap the foam and the armrest(s) with batting, securing it underneath.
- Upholster with Velvet: Cut the velvet fabric, allowing for plenty of extra material. Begin stapling the velvet tightly to the underside of the chaise base, working from the center outward. Ensure the fabric is pulled taut for a smooth finish, paying special attention to neat folds around the armrest.
- Add Decorative Legs: Flip the chaise over. If desired, attach modern, screw-in furniture legs to the four corners of the base for a polished, elevated look.
27. The Oversized Bean Bag Lounger

Bean bag chairs are no longer just for dorm rooms; they are now available in sophisticated, durable fabrics. This oversized, textured orange bean bag lounger is an incredibly comfortable and casual seating swap. It molds perfectly to the body, offering a cozy alternative to a traditional armchair.
The bright color and unique shape draw attention, adding a playful element to the room. It is light enough to be moved easily, providing flexible seating anywhere. Bean bags are a budget friendly choice for deep, comfortable lounging.
Materials Required:
- Durable upholstery fabric (e.g., woven cotton, twill)
- Heavy-duty zipper (at least 30 inches)
- Strong sewing thread
- Polystyrene bean bag filler (several bags, depending on size)
Equipment Required:
- Sewing machine (with a heavy needle)
- Measuring tape
- Fabric scissors
- Funnel or scoop (for filling)
DIY Instructions Step by Step:
- Cut the Fabric: You will need six panels for a cube shape, or multiple curved panels for a rounded shape (like the image). For a basic square, cut six squares of fabric, adding a one-inch seam allowance.
- Install the Zipper: On one of the seam lines, install the long, heavy-duty zipper. This opening must be large enough to easily refill the beans.
- Sew the Cover: Sew the six panels together to form the cube or sphere, leaving the zipper open halfway. Use strong, double stitching for durability, as the chair will bear significant weight.
- Fill the Cover: Working slowly in a contained area, use a large funnel or scoop to fill the cover with polystyrene bean bag filler. Fill the bag until it is about 75% full; this leaves room for the filler to mold around the body when seated.
- Secure and Finish: Zip the cover securely closed. For added safety, consider sewing a small secondary enclosure or zipper cover flap.
28. Upcycled Tire Outdoor Seating

This provides a unique, highly sustainable, and extremely budget friendly seating swap for a patio or outdoor area. Old tires are repurposed to create a sofa and individual armchairs. The tires are stacked and arranged, then filled with white gravel or sand to provide a firm base and drainage.
The dark black rubber contrasts sharply with the pale stones, creating a modern, textured look. This is a very creative way to transform trash into functional furniture. While shown outdoors, these could be painted and covered for indoor use.
Materials Required:
- Used tires (cleaned thoroughly)
- Wire brush and soap
- Primer (optional, for painting)
- Exterior paint (optional, for color)
- Landscape fabric
- Pea gravel or white decorative stones
- Exterior grade adhesive or sealant
Equipment Required:
- Gloves and safety glasses
- Stiff brush
- Scoop or bucket
DIY Instructions Step by Step:
- Clean the Tires: Scrub the tires vigorously with soap and a stiff brush to remove all dirt and oil. Let them dry completely in the sun.
- Arrange the Structure: Arrange the tires into the desired seating shape (e.g., stacking two tires high for a seat base, and layering several for the backrest). Use a strong exterior grade adhesive or sealant to bond the tires together where they touch, ensuring they are stable.
- Prepare the Seat: Place a piece of landscape fabric over the open center of the top tire to prevent the gravel from falling through. Secure the fabric edges inside the tire rim with adhesive.
- Fill the Seats: Use a scoop to carefully fill the center of each tire seat with your chosen stones or gravel. Fill it to the top rim to create a firm, flat sitting surface.
- Finish the Backrests: If using tires for the backrests, ensure they are tightly adhered to the back of the seat base tires. For comfort, you may add weatherproof cushions to the seat tops.
29. Monochromatic Sofas with Contrast Piping

This stylish room demonstrates how a small, deliberate detail can completely refresh the look of conventional seating. The dark gray sofas and chairs feature clean, modern lines but stand out due to crisp white piping outlining all the edges. This contrast trim adds structure, visual pop, and a custom tailored feel.
The matching round ottomans also feature this piping, connecting the pieces visually. The monochromatic color scheme, including the walls and floating console, emphasizes the furniture’s strong lines. Adding contrast piping is a quick DIY update that gives a high-end, bespoke appearance.
Materials Required:
- Existing sofa or chair (clean and ready)
- Contrast color piping or cording (enough to cover all seams)
- Heavy-duty upholstery adhesive
- Fabric pencil or chalk
- Sharp scissors
- Strong sewing machine thread
Equipment Required:
- Sewing machine (with zipper foot or piping foot)
- Iron and ironing board
- Pins
DIY Instructions Step by Step:
- Measure the Seams: Carefully measure the entire length of every seam you wish to outline with the contrast piping (armrests, cushions, base perimeter). Purchase enough piping, adding 15% extra for error and corners.
- Create the Piping: If you are making the piping, sew the cording inside a long strip of your contrast fabric. Use a piping foot on your machine to sew close to the cord, creating a tight, professional edge.
- Attach to Slipcovers (Safest Method): The simplest way to achieve this look is to sew the piping directly onto custom slipcovers or removable cushion covers. Pin the piping to the fabric pieces before sewing the final seams, ensuring the piping is facing inward. When the cover is turned right side out, the piping will protrude neatly.
- Adhere to Existing Seams (Quick Method): For fixed upholstery, use a strong upholstery adhesive. Run a thin, continuous bead of glue along the top of the existing seam line. Carefully press the contrast piping directly onto the glue line. Use pins to hold it in place temporarily. Allow the glue to cure fully for 24 hours before use.
30. Sofa Back Bolsters for Support

This picture showcases a simple hack to update the look and comfort of a straight backed sofa. A row of large, cylindrical bolster cushions replaces traditional square back cushions. The alternating patterns and textures of the bolsters create a custom, layered look. They provide excellent lumbar and back support.
The light cream and white bolsters contrast beautifully with the darker gray sofa base. This swap is highly customizable; you can create bolsters in any fabric to match your room. This change provides a modern, sophisticated, and comfortable seating solution.
Materials Required:
- Foam bolster cylinders (various lengths and diameters)
- Durable fabric (several patterns/textures)
- Heavy-duty zippers or Velcro strips
- Sewing thread
- Measuring tape
Equipment Required:
- Sewing machine
- Fabric scissors
- Chalk or fabric marker
- Pins
DIY Instructions Step by Step:
- Measure Bolsters: Measure the length and diameter of your foam cylinders. You will need a rectangular piece of fabric that covers the length and the circumference, plus seam allowance. You also need two circles for the end caps.
- Cut and Sew the Rectangle: Cut the fabric rectangles. Along the long edge, install a zipper or Velcro strip. Sew the two short ends together to form a tube.
- Sew the End Caps: Pin the circular end caps to the ends of the fabric tube. Sew the circle securely to the tube perimeter. Use a strong stitch to handle the tension. Turn the cover right side out through the zipper opening.
- Insert Foam: Carefully slide the foam bolster cylinder into the cover. Zip the cover closed.
- Arrange and Secure: Arrange the finished bolsters along the back of the sofa. You can prevent them from slipping by using small rubber non slip pads placed underneath the bolsters where they meet the sofa frame.
31. Deep Tufted Floor Loungers

This setup shows how floor cushions can be combined to create low-profile seating units. Deeply tufted, plush velvet cushions in vibrant royal blue and emerald green create stylish, modular seating. The base cushions are low to the ground, offering a bohemian, relaxed feel. The large backrests stack vertically to create deep, comfortable chairs.
The rich colors and soft texture add a huge visual impact without the cost of a full furniture frame. These pieces are easily separated for casual floor seating or stacked high for reading. The arrangement is highly adaptable and budget conscious.
Materials Required:
- Large foam blocks or dense fiberfill
- Heavy, durable velvet or plush upholstery fabric
- Upholstery needle and extra strong thread
- Buttons (many, for tufting)
- Zippers or Velcro strips (for removable cover)
Equipment Required:
- Sewing machine
- Fabric scissors
- Measuring tape
- Hand upholstery needle
DIY Instructions Step by Step:
- Cut the Foam/Fill: Cut foam blocks to the desired size for the seat and backrest cushions (e.g., 30×30 inches). Alternatively, use dense fiberfill and cut larger fabric panels to allow for stuffing.
- Sew the Cushion Covers: Create simple box-style covers for each piece using the velvet fabric, installing a zipper on one edge. This allows you to insert the foam and perform the tufting.
- Perform Deep Tufting: Mark the spots on the cushion where you want the tufts to appear in a grid pattern. Thread a long upholstery needle with strong thread and tie a button securely at one end.
- Insert the Button: Push the needle all the way through the cushion from the back to the front at a marked spot. Thread a second button onto the needle on the front side, then push the needle back through the cushion to the rear. Pull the thread tightly to compress the foam and create a deep dimple.
- Secure the Tuft: Tie the thread off securely around the button on the back side of the cushion. Repeat this process for every marked spot.
- Assemble the Set: Once all the cushions are tufted, stack the backrest cushions vertically onto the flat base cushions. The weight of the cushions will help keep them in place.
32. Simple Sofa with Subtle Upholstery Piping

This sofa features a subtle, budget friendly update that maximizes its cozy look. The neutral, mauve-toned upholstery is given definition by delicate piping that outlines the shape of the arms and back. This simple contrast trim adds a tailored, high quality finish.
The sofa is grounded by a textured jute rug, providing warmth and depth. Striped throw pillows and a natural wooden side table complete the calm, inviting atmosphere. This demonstrates that minor upholstery details can elevate a basic piece of furniture. It is a timeless, easy refresh.
Materials Required:
- New contrasting piping or cording (subtle tone, matching the sofa color)
- Strong sewing machine thread
- Fabric glue (optional, for securing ends)
- Old cushion covers (if applicable)
Equipment Required:
- Sewing machine (with piping/zipper foot)
- Pins
- Measuring tape
DIY Instructions Step by Step:
- Analyze the Seams: Determine if the sofa cushion covers are removable. If they are, this project is much easier. If the sofa is permanently upholstered, you will focus only on the cushion covers.
- Measure and Cut: Measure the length of the seams you want to outline on the cushion covers. Cut the piping to length.
- Replace Existing Piping: Carefully unpick the existing seam on the cushion cover where the old piping is visible. Pin the new, subtle-toned piping into the seam line.
- Re-Stitch the Seam: Using a piping or zipper foot on your sewing machine, stitch the seam back together, sewing as close to the piping cord as possible.
- Re-Cover Cushions: Insert the cushion forms back into the refreshed covers. The new piping adds a defined, tailored look to the seating, making it appear custom made.
33. Natural Folding Safari Chair

A folding chair provides incredibly flexible seating. This chair features a light, natural wood frame and a softly tufted canvas cushion. The low profile and warm color palette contribute to a relaxed, natural aesthetic. It can be easily folded and stored away when not needed.
The tufting ensures comfort, despite the simple structure. Pairing this chair with a woven rug and soft lighting creates an inviting reading corner. This type of chair is highly affordable and provides a modern, functional swap for a heavy accent chair.
Materials Required:
- Wooden folding chair frame (old or new)
- Durable canvas or thick cotton fabric
- Batting and 2-inch foam (for tufted padding)
- Strong webbing or canvas straps
- Buttons and upholstery thread (for tufting)
Equipment Required:
- Sewing machine
- Drill and screws (for frame repair, if needed)
- Measuring tape
- Staple gun
DIY Instructions Step by Step:
- Prepare the Frame: Ensure the wooden frame is stable and clean. Sand and varnish the wood if needed. Check all hinges and tighten any loose screws.
- Create the Sling: Cut the canvas or thick fabric to create a long sling that will support both the seat and the back. Add 2 inches on all sides for hems and wrapping. Hem all edges.
- Attach Padding: Cut the foam and batting to fit the seat and back areas of the sling. Pin the foam/batting securely to the wrong side of the sling fabric.
- Tuft the Padding: Follow the tufting steps outlined in idea #31. Push the upholstery needle through the canvas and padding, securing a button on both sides to create a soft, padded finish.
- Secure to the Frame: Wrap the top and bottom edges of the sling around the wooden bars of the chair frame. Pull the sling very taut and use a staple gun to secure the fabric firmly to the underside of the wooden bars.
- Test Stability: Test the chair’s stability. When folded and placed against a wall, it takes up almost no space.
34. Bold Geometric Ottoman Cube

An upholstered cube ottoman is a functional and artistic seating swap. This cube is covered in a striking, high contrast black and white geometric pattern. The bold design transforms the simple cube into the room’s main visual focus.
Surrounded by clean, neutral colors—a white sofa, a gray rug, and sheer curtains—the ottoman adds a necessary pop of personality. It serves as extra seating, a footrest, or a side table for trays. This item proves that using a dramatic fabric is the easiest way to refresh a neutral space.
Materials Required:
- MDF or wooden crate base (a cube structure)
- 4-inch upholstery foam and batting
- Boldly patterned, durable cotton or linen fabric (for maximum visual impact)
- Staple gun staples
Equipment Required:
- Electric drill and screws (for the base)
- Staple gun
- Measuring tape
- Utility knife (for cutting foam)
DIY Instructions Step by Step:
- Build the Cube Base: Assemble five pieces of MDF into an open cube structure, securing the corners with wood glue and screws. The bottom edge should be covered or capped for a clean look.
- Attach Foam and Batting: Cut the foam to fit the top of the cube. Use adhesive spray to secure the foam, then wrap the entire cube (including the foam top) in batting. Staple the batting neatly to the underside of the base.
- Cut the Fabric Panels: Cut six panels of the geometric fabric, adding a 1-inch seam allowance. Ensure the pattern aligns correctly across all six faces. This is crucial for a professional look.
- Upholster the Cube: Pin the top fabric panel and the four side panels to the batting, maintaining pattern alignment. Starting on the underside edge, use the staple gun to secure the fabric tightly, working toward the opposite side.
- Finish the Seams: Carefully fold the seams and corners, pulling the fabric taut and stapling neatly to the underside of the cube. Use strong, even staples.
35. Adjustable Floor Seating Cushions

These clever cushions offer adjustable back support for floor seating or can be placed directly on existing benches or sofas. The cushions feature a built-in folding mechanism that allows the backrest to be angled for comfort. They come in various neutral fabrics, making them highly versatile.
This item is an excellent swap for dining bench cushions or flat sofa seats that lack back support. The design means they are also fantastic for creating a movie night space on the floor. Their lightweight nature allows for quick and easy rearrangement.
Materials Required:
- Large foam blocks or memory foam sheets
- Upholstery fabric
- Strong webbing straps or thin wood supports (for backrest structure)
- Heavy-duty ratcheting hinge mechanism (store bought, for adjustability)
- Zippers
Equipment Required:
- Sewing machine
- Drill and screws
- Measuring tape
DIY Instructions Step by Step:
- Cut and Assemble Foam: Cut foam into two main pieces: a seat and a backrest. Sew a simple fabric slipcover for each piece.
- Prepare the Backrest: If using wood supports, embed a thin wooden plank or very strong webbing inside the foam of the backrest piece. This provides the rigidity needed for the hinge.
- Install the Hinge: Attach the ratcheting hinge mechanism to the bottom edge of the backrest and the back edge of the seat cushion using screws. This hinge allows the backrest to click into several upright positions.
- Cover and Secure: Sew a large, single cover that fits over both the seat and the backrest, allowing the piece to move freely. Ensure the cover is durable and fits tightly to hold the mechanism in place.
- Use Anywhere: Place the finished cushion on the floor, a low bench, or an existing sofa for instant, adjustable seating.
36. Modular Leatherette Coffee Table Seating

We have reached 36! This final image provides a sophisticated, multi functional seating solution. The sectional sofa is paired with a matching coffee table made up of four square ottomans. These four pieces can be pulled apart instantly to provide extra seating when company arrives.
The dark gray leatherette material is durable and easy to clean. The modular cubes surrounding the sofa demonstrate clever use of space. This sleek, modern design solves the twin problems of limited seating and coffee table space in one streamlined unit.
Materials Required:
- Four sturdy wooden box frames (for the cube ottomans)
- 2-inch foam and batting
- Durable leatherette or vinyl fabric
- Small, low profile furniture casters (optional, for easy moving)
- Wood glue and screws
Equipment Required:
- Staple gun and staples
- Electric drill
- Measuring tape
- Utility knife
DIY Instructions Step by Step:
- Build the Four Cubes: Construct four identical, sturdy open wooden box frames. Reinforce the corners with wood glue and screws.
- Upholster All Cubes: Cover the top and sides of all four boxes with foam, then batting, securing the batting to the underside.
- Attach Leatherette: Cut the leatherette fabric to cover each box, pulling it extremely taut for a wrinkle free finish (leatherette wrinkles easily). Staple the fabric securely to the underside of each cube base.
- Connect the Cubes (Optional): To keep the coffee table visually unified, you can connect the cubes loosely using heavy-duty Velcro strips applied to their side edges.
- Add Casters (Optional): For easy mobility, flip each cube upside down and install four small, low profile furniture casters on the base. This allows you to slide them apart effortlessly when needed for seating.
Key Takeaways
Updating your living room seating does not mean you must purchase a whole new furniture set. Smart budgeting and creative thinking can transform any outdated piece. Focusing on texture, scale, and multi functionality is key to a modern refresh.
Textile swaps offer the biggest impact for the least money. Simply replacing worn cushion foam or adding boldly patterned throw pillows instantly revives an entire sofa. Always look for ways to repurpose old items like wooden chairs or even tires into functional, stylish new pieces.
Modular and low profile seating maximizes floor space, which makes any room feel larger and more current. These 36 ideas provide the blueprints you need to tackle a furniture update this weekend. Your beautiful, budget friendly living room is waiting.
Your living room should reflect your current style, not a past decade. We hope this extensive guide of 36 budget friendly seating swaps inspires your next project. Remember that small changes often yield the most dramatic results.
Try swapping a heavy armchair for a light, woven chaise lounge, or update an old couch with a crisp slipcover and new metallic legs. Do not be afraid to experiment with bold color and texture. Every solution presented here is achievable without relying on costly professional help.
Choose a few swaps that fit your home’s needs and aesthetic. Roll up your sleeves, follow the detailed DIY instructions, and enjoy the process of crafting a refreshed, personalized, and comfortable living space.