
Is your living room starting to feel tired, perhaps weighed down by a worn out sofa? You do not need to spend a fortune on a brand new sectional to revitalize your space. Old couches often possess great bones and structure; they just require a little creative attention.
Many homeowners feel stuck with dated furniture, but budget friendly makeovers are entirely achievable. A refreshed seating area can completely change the look and feel of your entire home. With some clever DIY tactics and small investments in textiles, your old couch can become a fresh focal point.
We gathered 36 inventive ideas guaranteed to breathe new life into your living room seating. Get ready to explore simple projects, unique reupholstering hacks, and smart styling choices. Discover how easy it is to achieve a custom, engaging look while staying strictly within your budget.
1. Cozy Up with New Throw Pillows
Relevant Item Name: Plush Velvet and Textured Accent Pillows

Adding fresh throw pillows instantly transforms an outdated couch. Notice how the inviting, textured white sofa is elevated by just two carefully chosen cushions. The rusty rose velvet square brings a warm pop of color against the neutral upholstery. A small, charcoal gray pillow provides grounding contrast, ensuring the look remains sophisticated.
You can select fabrics that introduce cozy textures like faux fur, thick knits, or soft velvet. This small change makes an enormous visual impact without needing a large investment. Remember to mix both solid colors and subtle patterns for a layered, designer look that feels welcoming.
DIY Pillow Refresh: Recovering Old Cushions
Do you have existing throw pillows that just need a style update? Instead of buying new inserts, consider making custom covers. This is an incredibly budget friendly way to get the exact color and texture you want for your space.
Material Required List
- Fabric of your choice (consider velvet, linen, or sturdy cotton)
- Thread that matches the chosen fabric
- Pillow inserts (if not reusing old ones)
- Zipper or hook and loop tape (if you want removable covers)
Equipment Required List
- Measuring tape
- Sharp fabric scissors
- Sewing machine (or needle for hand sewing)
- Iron and ironing board
- Straight pins
DIY Instruction Step by Step
- Measure and Cut Fabric: Measure the width and length of your pillow insert. For a basic envelope style cover (which avoids a zipper), you need to cut two main front pieces and two overlapping back pieces.
- Determine Dimensions: For the front piece, cut a square or rectangle adding 1 inch to the insert’s width and length for seam allowances. For the back pieces, take the total length plus the 1 inch seam allowance, then divide that length into two panels, adding an extra 5 inches to one of the panels to create the overlap.
- Hem the Back Panels: Take the two back panels. Along the inner edge (the edge that will overlap), fold the fabric under $1/2$ inch, press it flat with the iron, and then fold it again another $1/2$ inch. Sew a straight seam along this folded edge to create a neat hem.
- Pin the Pieces Together: Lay the front piece right side up. Place the two hemmed back pieces on top, aligning all four outer edges, with the right sides of the fabric facing each other. The hemmed edges of the back panels should overlap in the center. Use straight pins to secure all the edges together.
- Sew the Cover: Using a sewing machine, carefully sew a straight line all the way around the outside edge, leaving a $1/2$ inch seam allowance. Remove the straight pins as you sew.
- Clip Corners and Turn: Clip the excess fabric from the four corners close to the seam, being careful not to cut the stitches. Turn the pillow cover right side out through the overlapping opening on the back.
- Insert Pillow: Gently push your old or new pillow insert into the finished cover, smoothing out the corners. You now have a refreshed look for your seating.
2. Introduce Bold Area Rugs
Relevant Item Name: Midcentury Modern Geometric Area Rug

A colorful area rug anchors the entire seating arrangement, completely changing the room’s mood. Look at how the geometric pattern beneath the mint green sofa ties together the various colors present in this space. The rug’s design pulls in the warm yellows and oranges from the artwork while complementing the bold teal walls.
This strategy instantly refreshes the look of older furniture by framing it within a vibrant, new context. A rug is a large accessory, so choose a pattern or hue that excites you. It works as the living room’s main piece of art, setting the tone for all other accessories and textiles.
DIY Area Rug Cleaning and Refresh
Before replacing an area rug, try giving your current one a deep clean to revive its color and texture. A clean rug can make the whole room feel instantly brighter.
Material Required List
- Warm water
- Dish soap or a specialized carpet cleaning solution
- White vinegar (for deodorizing and brightening)
- Clean white towels or sponges
Equipment Required List
- Vacuum cleaner with an upholstery attachment
- Scrub brush with soft bristles
- Bucket
DIY Instruction Step by Step
- Vacuum Thoroughly: Start by vacuuming the rug completely on both sides to remove surface dirt and trapped debris. Pay extra attention to the fringe and corners.
- Test the Solution: Mix a small amount of warm water with a few drops of dish soap and a splash of white vinegar in the bucket. Always test this solution on a small, inconspicuous corner of the rug first to ensure the colors do not bleed or fade.
- Apply and Scrub: Once you verify the solution is safe, use the soft brush or sponge to gently apply the cleaning mixture to the entire rug surface. Work in small sections, scrubbing softly in the direction of the fibers. Do not soak the rug completely.
- Rinse Out Soap: Use a clean towel dampened with plain warm water to blot the area and lift the soapy residue. You may need to rinse and wring out the towel several times. It is crucial to remove all the soap, as residue attracts dirt.
- Deodorize (Optional): If odors remain, lightly mist the rug with a diluted mixture of water and white vinegar (about one part vinegar to three parts water). Let it sit for a few minutes.
- Dry Completely: Lay the rug flat in a well-ventilated area or hang it up to dry thoroughly. Do not place furniture back on the rug until it is completely dry, which may take up to 24 hours.
3. Lighten Up with Bleached Wood Tones
Relevant Item Name: Coastal White Wood Sofa Frame

A bright, airy feel instantly revitalizes tired seating, and bleached wood is a simple approach to achieving this look. Here, the white cushions are framed by a light, weathered wood exterior, creating a clean, modern aesthetic. Dark piping on the cushions adds a custom touch and highlights the structure’s crisp lines.
This technique works wonderfully for giving traditional furniture a contemporary, beachy vibe. Pairing the light frame with coordinating neutral upholstery and blue accents creates a serene, relaxed atmosphere. The key is to embrace textures that feel natural and calming.
DIY Bleached Wood Effect on Furniture
You can give a darker wood sofa frame or side tables a lighter, more modern finish using a simple whitewash technique. This process simulates the look of bleached or coastal wood.
Material Required List
- White water based paint or wood stain
- Water
- Clean rags or foam brushes
- Fine grit sandpaper (around 120 and 220 grit)
- Clear sealing topcoat (polyurethane or wax)
Equipment Required List
- Mixing container
- Paint stirrer
- Protective gloves and eyewear
DIY Instruction Step by Step
- Prepare the Surface: If the wood has a glossy finish, gently sand the surface using the 120 grit sandpaper. You do not need to remove all the finish, just roughen it up so the new wash adheres better. Wipe away all dust with a rag.
- Mix the Wash: In your container, mix the white paint or stain with water. Start with a ratio of about one part paint to two parts water. The goal is a thin, translucent liquid. Stir thoroughly.
- Apply the Whitewash: Dip a clean rag or foam brush into the mixture. Wipe the wash onto a section of the wood, going with the grain. Work quickly in small areas.
- Wipe Off Excess: Before the wash dries (within 30 seconds), use a separate clean, dry rag to wipe away the excess. This leaves the white pigment in the wood grain, creating the bleached effect. Adjust the amount you wipe off to control the intensity.
- Allow to Dry: Repeat steps 3 and 4 across the entire piece. Let the whitewash dry completely according to the paint or stain manufacturer’s directions.
- Sand for Texture (Optional): Once dry, lightly sand the edges and corners with 220 grit sandpaper for a distressed, weathered look.
- Seal the Finish: Apply a clear sealing topcoat following the product instructions to protect the new finish from wear and moisture.
4. Embrace the Industrial Edge with Metal Frames
Relevant Item Name: Faux Leather and Metal Frame Seating

Swapping out heavy, cushioned sofas for seating with exposed metal frames introduces an exciting industrial vibe. This dark gray, distressed faux leather upholstery paired with a sleek black metal base immediately modernizes the space. The open metal design prevents the furniture from looking bulky, offering a sense of openness.
The use of textured fabrics that mimic aged leather contributes to the rugged, metropolitan aesthetic. Consider updating your living room with a metal-framed bench or matching armchairs to create a dynamic, masculine setting. Accessories like wire cages and exposed bulb lamps reinforce the edgy atmosphere.
DIY Metal Frame Touch-Up and Paint
If you have existing metal furniture with scratched or dated frames, a fresh coat of paint can revive the structure and make the whole piece look brand new.
Material Required List
- Metal primer (specifically for bare metal)
- Metal spray paint in your desired color (e.g., matte black, bronze)
- Painter’s tape
- Drop cloth or old newspaper
Equipment Required List
- Wire brush or fine steel wool
- Cleaning cloth and degreaser or rubbing alcohol
- Protective mask and gloves
DIY Instruction Step by Step
- Disassemble (If Possible): Remove any cushions, fabric, or wooden parts that are attached to the metal frame. If the pieces cannot be removed, cover them completely and securely with painter’s tape.
- Clean and Prepare: Use a wire brush or steel wool to lightly sand any rust or flaking paint. Wipe down the entire frame with a cloth and degreaser or rubbing alcohol. The surface must be perfectly clean and dry for the paint to stick.
- Set Up the Area: Lay down a drop cloth in a well-ventilated outdoor area or garage. Place the frame on top, elevating it slightly with blocks if needed, to ensure you can reach all angles.
- Apply Primer: Shake the metal primer can well. Hold it about 10 to 12 inches away from the frame and apply a thin, even coat. Do not try to achieve full coverage in the first pass. Let the primer dry completely according to the label’s instructions.
- Apply Paint: Shake the spray paint can vigorously. Apply the first coat of paint in the same manner as the primer—thin and even strokes. Allow the first coat to dry fully (usually 15 to 30 minutes).
- Layer Coats: Apply a second and possibly a third coat of spray paint until the finish is opaque and uniform. Allow each coat to dry completely before applying the next.
- Cure Time: Once the final coat is dry to the touch, let the frame cure for 24 to 48 hours before reattaching the cushions or placing it back into the living room.
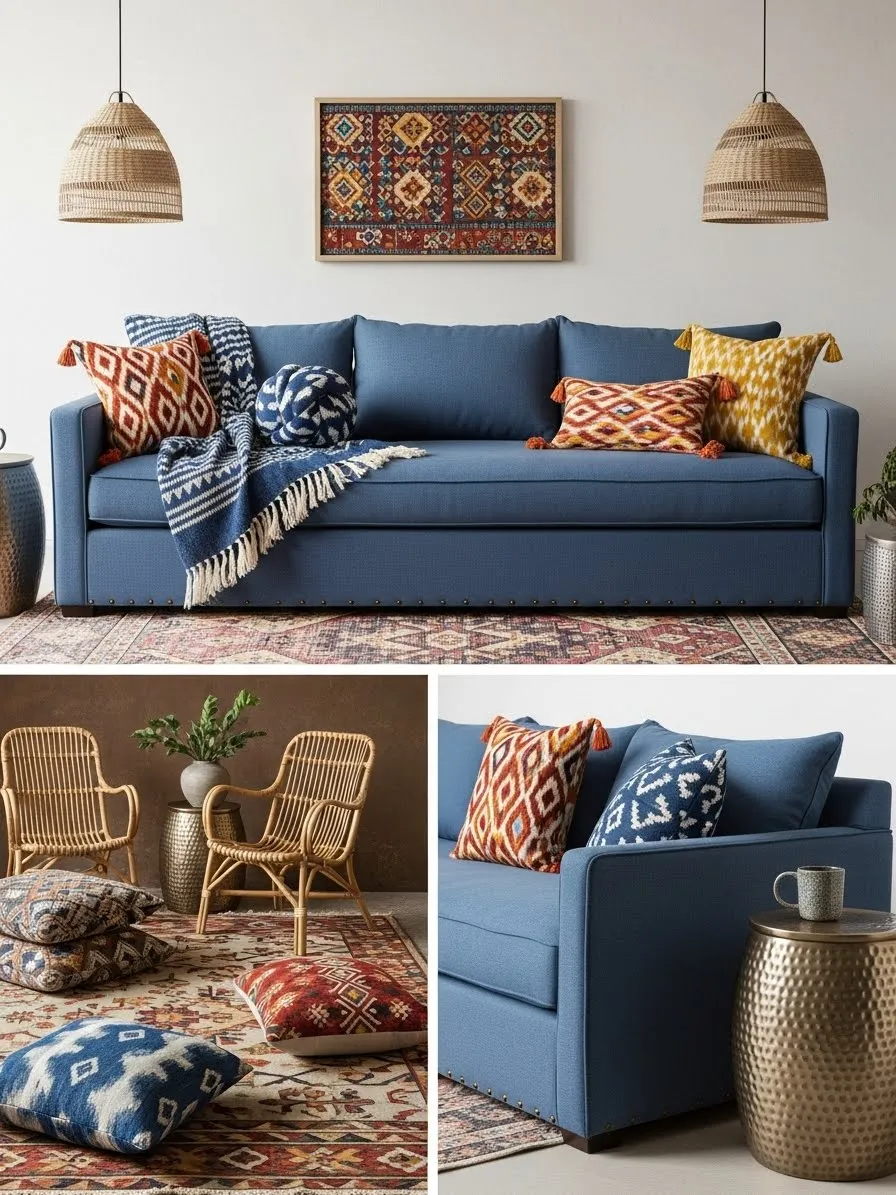
5. Global Inspired Textile Layering
Relevant Item Name: Bohemian Tasseled Throw Pillows and Blanket

Layering richly patterned textiles instantly transports an ordinary sofa into an exotic, collected space. The deep blue couch here serves as a calming base for an explosion of global-inspired patterns. Tasseled pillows featuring ikat and diamond designs provide texture and a splash of color.
You can combine a variety of colors, like the rich yellows, burnt oranges, and deep indigos, creating a vibrant focal point. Drape a chunky woven throw blanket across the back or arm to add a cozy, tactile element. This method relies on maximalism—the more textures and patterns you introduce, the more dynamic the sofa appears.
DIY Tassel Addition to Throw Pillows
Give plain or existing throw pillows a fun, bohemian update by adding decorative tassels to the corners. This is a very quick and impactful sewing project.
Material Required List
- Yarn or embroidery floss in a coordinating color
- Needle with a large eye
- Sharp scissors
- Cardboard scrap (for making the tassels)
Equipment Required List
- Ruler
DIY Instruction Step by Step
- Make the Tassel Form: Take a piece of cardboard scrap and cut it to the desired length of your finished tassel (a 3 to 4 inch piece is typical).
- Wrap the Yarn: Hold the end of the yarn against the cardboard and begin wrapping the yarn around the cardboard, keeping the tension even. Wrap until the tassel reaches your desired fullness (30 to 50 times depending on the yarn thickness).
- Tie the Top Loop: Carefully slide the wrapped yarn off the cardboard. Take a separate 6 inch piece of yarn and slide it through the loop you just removed. Tie this short piece tightly near the top to secure the loops, leaving the ends long; these will be used for sewing.
- Define the Tassel Head: Take another piece of yarn and tie it tightly about $1/2$ inch down from the top knot, wrapping it several times to create the small head of the tassel. Knot it securely and trim the ends.
- Cut the Bottom Loops: Insert your scissors into the bottom loops of the tassel and cut straight across to free the strands. Trim the ends so they are all the same length.
- Attach to Pillow: Using the two long strands left at the top loop, thread one onto the large-eye needle. Hand-sew the tassel securely onto the corner seam of your throw pillow. Repeat for the other three corners.
6. Curvy and Dramatic Reconfiguration
Relevant Item Name: Symmetrical Velvet Curved Sectionals

Change the flow of the entire room by selecting seating with dramatic, rounded shapes. Instead of a standard rectangular layout, these deeply curved velvet sofas immediately create an intimate, conversational space. The rich colors—vibrant fuchsia and deep sapphire—make a magnificent statement against the dark walls.
This type of furniture demands attention and gives an old room a truly luxurious makeover. Placing them facing each other over a patterned rug enhances the symmetry and visual drama. When you cannot replace the couch, introduce smaller, highly stylized curved pieces like ottomans or accent chairs to echo this sophisticated shape.
DIY Glamorous Gold Accent Trim
A small detail like adding a gold trim element can elevate any piece of furniture, giving it a touch of elegance seen on these curved sofas. This is especially effective on wooden bases or exposed legs.
Material Required List
- Metallic gold craft paint or gilding wax
- Small, fine tipped paintbrush or soft cloth
- Painter’s tape
- Clear protective sealer (optional)
Equipment Required List
- Cotton swabs (for detail work)
DIY Instruction Step by Step
- Clean the Area: Thoroughly clean the area of the sofa you wish to accent (like the bottom wooden base or legs). Ensure it is dust and grease free.
- Tape Off: Carefully apply painter’s tape along the edge where the trim should stop. The tape creates a sharp, clean line between the upholstery or main body and the area you are painting gold. Press the tape down firmly.
- Apply Gold Finish: If using paint, apply a thin, even layer using the fine tipped brush. If using gilding wax, apply it sparingly with a soft cloth or a cotton swab, buffing lightly as you go to achieve a shine. Always apply in thin layers.
- Layer Coats: Allow the first layer to dry completely. Apply a second layer if necessary to achieve the richness and coverage you desire.
- Remove Tape: While the final coat is still slightly tacky (not completely dry), carefully peel away the painter’s tape. This prevents the paint from chipping when the tape is removed.
- Seal (Optional): Once the paint is completely dry, you can lightly brush on a clear protective sealer to guard the gold finish against nicks and wear.
7. Modular Seating for Endless Flexibility
Relevant Item Name: Colorful Modular Corduroy Cubes

If your living situation constantly changes, consider switching to modular seating components that can be reconfigured in moments. These brightly colored, individual cubes offer incredible versatility. They can be pushed together to form a sectional, separated as footrests, or used as individual seats.
The ribbed corduroy texture adds a fun, retro feel, while the bold primary colors ensure a playful, modern aesthetic. This approach works exceptionally well in smaller apartments or multi purpose rooms. Clear acrylic side tables enhance the lightness, allowing the vibrant furniture to remain the center of attention.
DIY Modular Cube Covers (No-Sew)
You can easily update plain modular cubes or simple ottomans with fresh, colorful fabric using a simple wrapping technique that requires no sewing.
Material Required List
- Large piece of durable, textured fabric (like corduroy or heavy cotton)
- Fabric glue or heavy-duty permanent fabric tape
- Elastic or strong cord
- Safety pins or upholstery tacks
Equipment Required List
- Scissors
- Measuring tape
DIY Instruction Step by Step
- Measure and Cut: Measure all six sides of your cube and add 6 inches to each dimension. This extra fabric allows for wrapping and securing underneath the cube. Cut the fabric into one large piece.
- Center and Drape: Place your fabric flat on the floor, pattern side down. Center the cube squarely in the middle of the fabric.
- Wrap the Sides: Pull the fabric up tightly on all four sides of the cube and secure it temporarily on the top edge with safety pins. Ensure the corners are snug and smooth, folding the excess fabric neatly at the vertical seams as if wrapping a present.
- Secure the Bottom: Flip the cube over carefully. Pull the excess fabric underneath the cube and gather it in the center. Use fabric glue or heavy-duty fabric tape to secure the raw edges down onto the bottom of the cube, ensuring the top remains smooth and taut.
- Reinforce: For extra security, you can run a piece of strong elastic or cord through the gathered fabric on the bottom and tie it tightly across the center to hold everything in place. You can also use upholstery tacks around the bottom edge if the cube’s base is soft wood.
- Finalize: Flip the cube back over and smooth out the fabric. The no-sew cover is complete, giving the piece a completely new look.
8. Monochromatic Color Story with Texture
Relevant Item Name: Terracotta Boucle Accent Seating

A monochromatic color scheme relying on rich texture is a sophisticated way to refresh seating without introducing new colors. The curved sofa and armchairs here are upholstered in a textured, rust orange boucle fabric. This single, earthy color dominates the space, creating a warm, cozy feeling.
The key is variety in form: the smooth wall contrasts with the chunky upholstery and the woven rug. Different shapes, like the large, round urn and the curved furniture, provide visual interest. A few simple pillows in contrasting materials, like a soft gray velvet, break up the solid color and add depth.
DIY Textured Wall Accent
Since the furniture is monochromatic, updating a surrounding wall with a textured paint effect can significantly enhance the whole living room. This creates the textural contrast needed for this style.
Material Required List
- Wall paint in a matte finish (terracotta or deep earth tone)
- Glaze medium or Venetian plaster (if using a pre made product)
- Water (if making a custom texture mix)
- Plastic sheet or drop cloth
Equipment Required List
- Paint roller and tray
- Large, wide, stiff bristled paintbrush or trowel
- Painter’s tape
DIY Instruction Step by Step
- Prep the Room: Apply painter’s tape along the ceiling, baseboards, and adjacent walls. Lay down a drop cloth completely to protect the floor.
- Mix the Texture: If using a custom texture, mix your wall paint with a glaze medium or add a small amount of water until the paint is thick, but not runny. For a plaster look, follow the product instructions.
- Apply Base Coat (Optional): Apply one layer of the plain wall paint as a base coat and let it dry completely.
- Create the Texture: Load your stiff bristled brush or trowel with the texture mix. Apply it to the wall in short, random, crosshatch, or stippling motions. Do not worry about uniformity; the imperfection creates the texture. You can drag the brush or trowel lightly across the surface to create peaks and valleys.
- Work in Sections: Work quickly in small sections, blending the edges into the next section before it dries to avoid visible seams.
- Allow to Dry: Let the entire wall dry completely, which may take longer than regular paint due to the thickness of the texture.
- Remove Tape: Remove the painter’s tape while the final coat is still slightly wet for the cleanest lines.
9. Strap on Leather Details
Relevant Item Name: Midcentury Wood Slat Sofa with Leather Straps

Sometimes, the smallest details provide the biggest refresh. This wooden-slat daybed style couch gets a rugged, masculine update with simple leather straps. These straps hold the back cushion in place, introducing an organic, industrial element to the otherwise simple design.
The use of materials like natural wood, textured tweed upholstery, and rich brown leather combines Scandinavian minimalism with midcentury flair. When revamping your existing seating, look for opportunities to add small hardware, buckles, or leather accents to give it a custom, sophisticated finish.
DIY Leather Straps for Cushion Security
Adding decorative leather straps not only looks stylish but also helps secure loose cushions to the sofa frame, giving a furniture piece a custom look.
Material Required List
- Leather straps (purchased precut or cut from an old belt)
- Leather hole punch
- Upholstery tacks or small, decorative screws
- Heavy duty needle and thick thread (e.g., upholstery thread)
Equipment Required List
- Ruler or measuring tape
- Scissors
DIY Instruction Step by Step
- Measure and Cut: Determine the length needed for the strap to wrap around the frame and cushion securely, leaving overlap for attachment. Cut your leather to the desired width and length, ensuring all straps are uniform.
- Punch Holes: Use the leather hole punch to create holes at the end of the straps where they will be attached to the back of the sofa frame. For an adjustable look, punch several holes along the length of the strap.
- Prep the Frame: Decide exactly where on the sofa frame the straps will be anchored. The back of the sofa, or the top edge, works best. Mark the spots with a pencil.
- Attach the Strap: Secure one end of the strap to the sofa frame using upholstery tacks or small screws, making sure the attachment is firm.
- Position the Cushion: Place the cushion against the frame. Bring the leather strap around the cushion and connect the loose end to the attached end using the upholstery tacks, or thread a small piece of cord or metal clasp through the punched holes to secure it.
- Sew for Permanence (Optional): For a completely permanent look, you can carefully sew the strap ends together using the heavy duty needle and upholstery thread instead of tacks or cords.
10. Bring the Outdoors In with Natural Wood Frames
Relevant Item Name: Simple Natural Pine Wood Daybed

An easy way to make seating feel instantly fresh and clean is to incorporate natural, unpainted wood frames. This simple daybed design, surrounded by large, leafy houseplants, feels like an oasis. The smooth, light green cushion complements the organic texture of the light pine wood.
This style emphasizes simplicity and natural elements. Even if you cannot replace your sofa, you can echo this theme by flanking it with raw wood side tables and tree stump end tables. The inclusion of woven mats and bolster pillows in earth tones completes the grounded, nature inspired look.
DIY Natural Wood Oil Finish
If you have unpainted wood furniture, applying a natural oil finish rather than a varnish or stain will protect the wood while enhancing its natural grain and giving it a warm, polished appearance.
Material Required List
- Natural wood oil (like Danish oil, tung oil, or linseed oil)
- Clean, lint free rags
- Fine grit sandpaper (220 grit)
Equipment Required List
- Container for oil
- Gloves
DIY Instruction Step by Step
- Sand the Wood: Ensure the wood surface is completely smooth by lightly sanding it with 220 grit sandpaper. This opens the wood grain so it can accept the oil evenly. Wipe away all sawdust thoroughly.
- Apply the First Coat: Put on gloves. Pour a small amount of oil onto a clean rag. Rub the oil into the wood, following the direction of the grain. Apply a generous, even amount, saturating the wood.
- Allow Absorption: Let the oil soak into the wood for about 15 to 30 minutes. Do not let it sit for too long, or it can become sticky.
- Wipe Off Excess: Use a separate, clean rag to wipe off all the excess oil from the surface. The wood should look hydrated, not wet or greasy. Important: Immediately dispose of oil soaked rags in a metal container filled with water to prevent spontaneous combustion.
- Cure Time: Let the first coat cure and dry completely, which may take 12 to 24 hours, depending on the environment.
- Apply Second Coat (Optional): For a deeper, richer finish, lightly sand the surface again with 220 grit sandpaper, wipe it clean, and repeat steps 2, 3, and 4. More coats result in a more durable and richer color.
11. Custom Comfort with Pallet Seating
Relevant Item Name: DIY Rolling Pallet Daybed with Bolsters

You can build a completely new, custom piece of seating using inexpensive wooden pallets. This clever daybed design sits atop a platform of stacked pallets, painted or stained for a clean look. Adding casters underneath makes the whole structure movable, increasing flexibility in your space.
A long, comfortable cushion topped with sleek bolster pillows creates a modern, minimalist lounge area. The rustic texture of the wooden base contrasted with the soft upholstery offers compelling visual interest. This solution provides maximum seating area for minimal cost and effort.
DIY Pallet Sofa Base with Casters
Constructing a sofa base out of pallets is a popular budget-friendly project. Adding casters makes it easier to clean underneath and reconfigure your room layout.
Material Required List
- 2 to 4 Wooden pallets (heat treated, not chemically treated)
- Sandpaper or an electric sander (60 and 120 grit)
- Exterior or interior paint/stain (optional)
- Four Swivel Casters with brakes
- Wood screws (long enough to go through the caster plate and into the pallet wood)
Equipment Required List
- Drill and screwdriver bits
- Measuring tape
- Protective gloves and safety glasses
DIY Instruction Step by Step
- Inspect and Clean Pallets: Thoroughly clean the pallets. Ensure they are marked “HT” (Heat Treated) and not “MB” (Methyl Bromide treated), which is toxic. Check for any protruding nails and remove them.
- Sand Smoothly: Sand the entire pallet surface using the rougher 60 grit paper first, followed by the finer 120 grit paper. You want the surfaces that will touch people and upholstery to be smooth to prevent splinters and snags. Wipe away all sawdust.
- Paint or Stain (Optional): If desired, apply a coat of paint or wood stain to protect the wood and match your decor. Allow it to dry completely.
- Stack and Secure: Stack the pallets to achieve your desired height. Use long wood screws to securely fasten the pallets together where the wooden stringers (the thick inner supports) meet.
- Attach Casters: Flip the pallet base over. Measure and mark the four corners where the casters will be attached, ensuring they are evenly spaced. Use the drill to screw the caster plates securely into the thickest wooden blocks or stringers in the pallet. Make sure the casters with brakes are positioned where you can easily reach them.
- Place Cushion: Flip the finished base upright, lock the brakes, and place your seating cushions on top.
12. Mix and Match Casual Floor Seating
Relevant Item Name: Pop Art Inspired Poufs and Bean Bag Chairs

Create a fun, casual atmosphere by replacing traditional chairs with large, comfortable floor cushions and bean bags. This approach is highly budget conscious and provides flexible seating for guests of all ages. Mixing different shapes—large cubes, round poufs, and oversized bags—adds a dynamic, inviting look.
Look for bold, contrasting colors and graphic prints, such as the comic book style “BAM” print seen here. These playful pieces work beautifully in a den or family room, instantly bringing an energetic and relaxed vibe. The lack of structured frames keeps the room feeling light and open.
DIY Oversized Floor Pillow (Simple Stitch)
Making a massive floor cushion provides affordable extra seating and is a great way to use colorful, remnant fabrics.
Material Required List
- Durable canvas or upholstery fabric (two large squares)
- Fiberfill, old blankets, or Styrofoam beads for stuffing
- Thread that matches the fabric
- Zipper (at least 20 inches long)
Equipment Required List
- Measuring tape
- Scissors
- Sewing machine (highly recommended) or hand sewing needle
- Straight pins
DIY Instruction Step by Step
- Measure and Cut Fabric: Decide on the size of your floor cushion (e.g., 30 inches by 30 inches). Cut two identical squares of fabric, adding $1/2$ inch to all sides for seam allowance.
- Attach Zipper: Take one side of the fabric square. Pin the zipper along one edge, ensuring the right side of the zipper faces the right side of the fabric. Sew the zipper in place. Repeat this process with the other fabric square on the opposite side of the zipper.
- Sew Three Sides: Open the zipper slightly (this is crucial for turning the pillow later). Pin the two fabric squares together with the right sides of the fabric facing each other. Sew along the remaining three open edges using a $1/2$ inch seam allowance.
- Clip Corners and Turn: Clip the excess fabric off the corners close to the stitching, being careful not to cut the stitches. Turn the cushion cover right side out through the partially open zipper.
- Stuff the Cushion: Begin filling the cushion cover with your chosen stuffing material. Pack the corners tightly and ensure the cushion is evenly stuffed to maintain its shape.
- Zip and Fluff: Once filled, close the zipper. You have created a comfy, casual piece of seating.
13. Reupholster with Unique Denim Patchwork
Relevant Item Name: Upcycled Denim Patchwork Sofa

Using upcycled materials is a sustainable and highly creative way to refresh an old sofa. This striking design features a patchwork of denim, using various shades of blue and incorporating details like jean pockets. The result is a bold, textural, and undeniably custom piece of furniture.
The different washes of denim create depth and visual movement. Pockets sewn onto the arms provide clever, accessible storage for remote controls or phones. This treatment is surprisingly versatile, fitting well in both casual and modern spaces, especially when paired with abstract blue and white area rugs.
DIY Denim Patchwork Slipcover Panels
Reviving an old sofa with denim patchwork is a commitment, but you can approach it by creating patchwork panels to cover existing cushions or certain flat areas of the frame.
Material Required List
- Many pairs of old jeans in varying washes (or pre cut denim squares)
- Denim sewing machine needles (thicker than standard)
- Strong thread (topstitching thread looks best)
- Large, durable fabric backing (like canvas or muslin)
Equipment Required List
- Measuring tape
- Scissors
- Sewing machine
- Iron and ironing board
DIY Instruction Step by Step
- Cut Patches: Cut the denim into squares or rectangles of a uniform size (e.g., 6 inches by 6 inches). You can include pockets or seam details for extra texture.
- Plan the Layout: Lay the squares out on the floor to determine the color placement and pattern for the panel you are creating. Measure the area of the sofa piece you want to cover (e.g., a cushion top).
- Sew Patches into Rows: Take the patches for the first row. Pin them together with right sides facing and sew them using a $1/2$ inch seam allowance. Repeat for all rows.
- Join the Rows: Press the seams of each row flat using the iron, alternating the direction of the press (one row seam pressed right, the next pressed left). Pin the rows together, aligning the seams, and sew them to form the large panel.
- Attach Backing: Lay your finished denim patchwork panel on top of the durable backing fabric (muslin or canvas). Pin and sew the two pieces together around the edges.
- Integrate: The finished panel can now be sewn onto an existing slipcover, attached directly to flat cushions, or used as a durable throw to protect the most worn areas of your sofa.
14. Modern Banquette with Builtin Storage
Relevant Item Name: White Builtin Corner Seating with Storage

Transforming a dead corner into functional, structured seating is a smart small space solution. This builtin banquette bench offers a neat, contemporary look with clean white lines and soft gray tufted cushions. The high back provides comfortable support, while the bench structure typically hides large amounts of storage underneath.
Overhead shelves and discreet lighting integrated into the design enhance the modern feel. This style is excellent for adding seating in kitchens, dining nooks, or small living rooms where every inch counts. Folding stools provide flexible seating for groups.
DIY Simple Banquette Bench Top
Building the base of a banquette requires moderate carpentry, but you can refresh an existing bench or create a simple, sturdy wooden top for your storage units.
Material Required List
- Plywood sheet (at least $3/4$ inch thick, cut to the length/depth of your bench)
- Wood primer and paint/stain (optional)
- Wood glue
- Small L brackets or mending plates (to secure to the wall or existing unit)
Equipment Required List
- Circular saw or handsaw (if not having the sheet cut at the store)
- Drill
- Level
- Screws
DIY Instruction Step by Step
- Measure the Space: Precisely measure the length and depth of the area where the bench will sit. If covering a storage unit, measure the unit’s top.
- Cut the Plywood: Cut the plywood sheet to these exact dimensions. Sand all edges smooth.
- Finish the Wood: If painting, prime the plywood and apply two coats of durable paint. If staining, apply a coat of stain and a clear protective finish. Let it dry completely.
- Position the Bench Top: Place the finished plywood top onto your existing storage unit or secured frame. Use a level to ensure it sits straight.
- Secure the Top: If the top is meant to be permanent, drill screws up through the existing bench frame and into the plywood top. If it needs to be removable for storage access, use L brackets to secure the back edge of the plywood to the wall or use heavy duty non slip furniture pads to keep it in place.
- Add Cushion: Place your custom or store bought bench cushion on the secured top.
15. The Luxurious Comfort of Faux Fur
Relevant Item Name: Textured Chenille and Faux Fur Seating

A quick way to make any seating feel incredibly luxurious and warm is by introducing deep, plush textures like faux fur or shaggy chenille. This large sectional is covered in a light beige, highly textured fabric that immediately invites relaxation. The use of crushed velvet pillows adds another layer of sophisticated softness.
Complementing the cozy couch, two round ottomans covered in fluffy, taupe faux fur enhance the warm, inviting atmosphere. The overall effect is soft, decadent, and comfortable. Use salt lamps or warm lighting nearby to emphasize the rich textures and deep tones.
DIY Faux Fur Ottoman Slipcover (Simple Elastic)
Creating a slipcover for a small ottoman or pouf using shaggy fabric instantly turns a boring piece into a cozy, textured accent.
Material Required List
- Faux fur or shaggy fabric (enough to cover the sides and top)
- Heavy elastic band (long enough to go around the base of the ottoman)
- Strong thread
Equipment Required List
- Sewing machine
- Measuring tape
- Scissors
- Straight pins
DIY Instruction Step by Step
- Measure and Cut Fabric: Measure the height of your ottoman and its circumference (distance around the entire perimeter). Cut a rectangle of faux fur with the length equal to the circumference plus 2 inches, and the width equal to the height plus 6 inches (for hemming and tucking).
- Sew the Cylinder: Fold the fabric in half widthwise with the right sides together. Sew the two short edges together using a $1/2$ inch seam allowance to form a cylinder shape.
- Create Elastic Hem: Fold the bottom raw edge of the fabric over $1/2$ inch and press it flat. Fold it over again $1$ inch to create a casing for the elastic. Sew this hem, leaving a small 2 inch opening.
- Insert Elastic: Measure your elastic band to be slightly smaller than the ottoman’s circumference so it gathers the fabric. Thread the elastic through the casing using a safety pin to guide it.
- Secure and Finish: Once the elastic is fully threaded, overlap the two ends and sew them together securely. Pull the fabric tight, sew the small opening closed, and you have your slipcover.
- Place the Cover: Slip the cover over the ottoman, using the elasticated bottom edge to tuck under the base for a snug fit.
16. Fresh Stripes and Piping Details
Relevant Item Name: Cream Woven Sofa with Green and Blue Stripes

Introducing a fresh, tailored pattern like wide stripes can completely modernize a classic sofa shape. This small loveseat and matching armchairs feature a subtle, textured weave with crisp vertical stripes in muted green and blue. The addition of bright green contrast piping along the edges defines the shape and provides a custom, sophisticated finish.
This look feels instantly refined and coordinates well with light, minimalist accessories like acrylic side tables and potted plants. If your existing couch has good bones, consider having it professionally reupholstered in a bold striped or patterned fabric with a contrasting welt cord for this high impact upgrade.
DIY Contrast Piping (Welt Cord) Addition
Adding a contrasting piping or welt cord to existing cushion covers or slipcovers gives a furniture piece a clean, customized, and tailored appearance.
Material Required List
- Pre made piping/welt cord in a contrasting color (or cord and fabric strips to make your own)
- Matching thread
- Sewing pins
Equipment Required List
- Sewing machine with a zipper foot or a piping foot
- Scissors
DIY Instruction Step by Step
- Identify Seams: Pin the piping along the seams of your cushion covers or sofa arms where you want the accent. The piping cord should sit flush against the existing seam line.
- Prepare the Zipper Foot: Attach a zipper foot to your sewing machine. This specialized foot allows you to sew very close to the cord inside the piping, achieving a professional look.
- Sew the Piping: Place the piping flat against the fabric where the seam is located. Start stitching slowly, carefully guiding the piping so the needle lands as close as possible to the cord itself. The existing seam should be your guide.
- Miter Corners: When reaching a corner, make a small snip into the piping fabric (not the cord inside) so the piping can curve smoothly around the corner before continuing to sew.
- Finish the Ends: Overlap the ends of the piping neatly where they meet. For the tidiest finish, unpick the last inch of one end, clip the cord inside, and fold the fabric over the other end before stitching down.
- Reassemble: If you removed covers, put them back on your cushions. The bold color edge will sharply define the furniture’s shape.
17. Terrazzo Pattern Upholstery
Relevant Item Name: Light Blue and Terrazzo Patterned Sofa

For a unique and contemporary refresh, look beyond standard fabrics and embrace graphic patterns like terrazzo. This sofa features a sleek blue seat cushion, but the entire frame is covered in a busy, colorful terrazzo print. The speckled pattern is vibrant and adds movement to the entire seating arrangement.
The clean lines of the furniture and the minimalist setting (white walls, gold accents) ensure the bold pattern feels sophisticated, not overwhelming. This shows that reupholstering even small parts of a piece in an unexpected, fun print can make a huge statement.
DIY Stenciled Terrazzo Effect on Fabric
If reupholstering is too costly, you can create a faux terrazzo effect on a light colored canvas or muslin slipcover using fabric paint and stencils.
Material Required List
- Plain, light colored fabric (for a cushion cover or throw)
- Fabric paint in 3 to 5 complementary colors (black, rust, gold, gray, etc.)
- Cardboard or stencil material
Equipment Required List
- Small, stiff bristled paint brushes or stencil brushes
- Scissors or craft knife
DIY Instruction Step by Step
- Prepare the Fabric: Ensure the fabric is clean, ironed, and laid flat on a protected surface.
- Create Stencils: Cut small, random shapes out of the cardboard or stencil material. Terrazzo chips are typically angular, abstract, and irregular in size.
- Start Painting: Select your first paint color. Place a stencil randomly on the fabric, hold it firmly, and dab the fabric paint lightly inside the shape using the stiff brush. The brush should have very little paint on it (a dry brush technique) to prevent bleeding.
- Vary Shapes and Colors: Move the stencil to a new area and repeat, rotating the stencil to vary the orientation of the shape. Switch between all your chosen colors randomly, ensuring the chips overlap occasionally and are clustered unevenly, just like real stone.
- Set the Paint: Continue painting until the desired coverage is achieved. Allow the paint to dry completely. Most fabric paints require heat setting (check the label), so iron the painted area on a low setting without steam to make the design permanent.
- Integrate: Use the finished fabric to create a new pillow cover or drape it over the arm of your existing sofa.
18. Embrace Soft Pastels and Light Wood
Relevant Item Name: Scandinavian Daybed with Grid Pillows

A serene, bright update is achieved by pairing light wood furniture with a cool, simple color palette. This minimalist daybed features a pale wood frame and a soft gray cushion. The look is completed with pillows in light blue and white featuring simple crosshatch or grid patterns.
The furniture relies on clean, effortless lines characteristic of Scandinavian design. By choosing calming colors and minimizing clutter, you emphasize the natural beauty of the materials. This subtle update keeps your living room feeling open, airy, and truly restful.
DIY Simple Grid Pattern Pillow Painting
A plain pillow can be given a crisp, Scandinavian-inspired update using fabric paint and basic painter’s tape to create simple geometric patterns.
Material Required List
- Plain, light colored cushion cover (cotton or linen works well)
- Fabric paint in your chosen accent color (e.g., light blue, charcoal gray)
- Painter’s tape (thin width is best)
- Cardboard insert
Equipment Required List
- Small paint brush or foam dabber
- Ruler
DIY Instruction Step by Step
- Prepare the Cover: Remove the cushion insert and place a piece of cardboard inside the cover. This prevents paint from bleeding through to the back side. Iron the cover flat.
- Apply Tape: Using the ruler to ensure straight lines, apply strips of painter’s tape to the front of the cover to create your grid or crosshatch pattern. Press the edges of the tape down firmly so paint cannot seep underneath.
- Apply Paint: Use the small brush or foam dabber to apply a thin layer of fabric paint over the exposed areas. Work slowly to avoid pushing the paint under the tape. Apply a second thin coat if necessary for coverage.
- Remove Tape: While the paint is still slightly wet, carefully peel off all the painter’s tape. This prevents the paint from cracking when the tape is pulled off.
- Dry and Set: Allow the paint to dry completely. Follow the fabric paint instructions for heat setting (usually pressing it with a dry iron) to ensure the design is washable and permanent.
- Reinsert Cushion: Put the cushion insert back into the newly patterned cover.
19. Introduce Statement Accent Seating
Relevant Item Name: Emerald Green Velvet Chaise Lounge

When your primary sofa is tired, introducing a dramatic accent chair or chaise lounge can draw all attention away from the old piece. This luxurious chaise is upholstered in deep emerald velvet with elegant channel tufting. The slim, brass hairpin legs and gold contrast piping scream glamour.
An accent chair like this immediately establishes a sense of opulence and style. Choose a statement piece in a jewel tone or unique shape that contrasts strongly with your existing furniture. It provides a striking focal point, giving your entire living room a fresh, expensive feeling without replacing the sofa.
DIY Upholstery Cleaning for a Dramatic Finish
Before deciding to replace or cover a piece, give your velvet or textured upholstery a deep, rejuvenating clean to bring back its original luster.
Material Required List
- Distilled water
- Dish soap or mild liquid detergent
- White vinegar (optional, for odors)
- Clean white micro fiber cloth
- Soft bristled brush (like a toothbrush or soft clothes brush)
Equipment Required List
- Small bucket
DIY Instruction Step by Step
- Vacuum Thoroughly: Use the upholstery brush attachment on your vacuum to remove all surface dust and debris. Go over the fabric several times.
- Make Cleaning Solution: In the bucket, mix warm distilled water with a very small amount of dish soap (too much soap leaves residue). For older pieces, test this solution on an inconspicuous spot first.
- Clean Small Area: Dampen the micro fiber cloth with the solution and wring it out so it is barely damp. Gently blot and wipe a small area of the fabric surface. Avoid soaking the material.
- Address Stains: For specific stains, dab a small amount of the solution directly on the spot. Use the soft bristled brush to gently rub the stain in the direction of the fabric nap (the direction the fibers lie).
- Rinse and Dry: Use a second cloth dampened with plain water to blot away the soap residue. Let the area air dry completely, avoiding direct heat.
- Fluff the Nap: Once dry, use a clean, dry cloth or a soft brush to gently rub the fabric against the nap. This helps lift the fibers and restores the velvet’s plush, dramatic sheen.
20. Simple Iron Frame Daybed with Color Pop
Relevant Item Name: White Metal Frame Sofa with Navy Cushions

Updating a heavy, traditional sofa with a sleek, minimalist metal frame creates a modern contrast. This daybed style features a thin, white iron frame that makes the seating look weightless. The deep navy blue cushions with white contrast piping provide a rich pop of color against the bright white frame.
This clean, contemporary look is very budget-friendly, especially when using outdoor furniture frames indoors, which often feature simple, durable metal construction. The solid colors and crisp lines ensure the look is sophisticated, easily transitioning between casual and formal settings.
DIY Updating an Iron or Metal Frame with Paint
Giving an old metal or wicker frame a fresh coat of white paint is an easy way to achieve this clean, light aesthetic.
Material Required List
- Metal primer (use a rust inhibitor primer if needed)
- High gloss or satin spray paint in white or a light color
- Painter’s tape
- Drop cloth
Equipment Required List
- Wire brush or sandpaper
- Degreaser or mild detergent and water
- Protective mask and gloves
DIY Instruction Step by Step
- Clean and Prep: Clean the entire frame thoroughly using degreaser to remove all dirt and grease. Use the wire brush or sandpaper to scrape away any flaking paint or rust spots. Wipe it down to remove all dust.
- Prime the Metal: In a well-ventilated area, lay the frame on a drop cloth. Shake the primer can well and apply a thin, even coat over all surfaces. Allow the primer to dry completely according to the manufacturer’s directions.
- Apply Top Coat: Shake the spray paint can vigorously. Apply the first coat of your chosen white paint, maintaining a distance of 10 to 12 inches to prevent drips. Keep the coat light.
- Layer Coats: Let the first coat dry to the touch (usually 15 to 30 minutes). Apply a second and possibly a third thin coat until you achieve opaque, even coverage.
- Cure Time: Allow the newly painted frame to cure for 24 to 48 hours before placing the cushions back on or moving it back into position.
21. Crisp Contrast with White Piping
Relevant Item Name: Navy Blue Sofa with White Contrast Welting

A simple yet effective way to refresh a sofa’s look is to add contrasting piping. These navy blue couches are elevated by sharp white piping that outlines their clean, modern silhouette. This small detail provides a crisp, tailored finish, giving the furniture a bespoke appearance.
The white piping works beautifully against the deep blue, drawing the eye to the sofa’s shape and enhancing its structure. Pair this with a graphic area rug and light wood accents to maintain an airy yet sophisticated aesthetic. This technique is especially effective for refreshing solid colored upholstery.
DIY Adding White Piping to Existing Sofa Cushions
You can apply white or contrasting piping to your existing sofa cushion covers to give them a refined, custom look. This works best if your cushion covers have removable zippers.
Material Required List
- Pre made white or contrasting piping (welt cord)
- Thread matching your cushion fabric
- Sewing pins
- Zipper (if replacing an old one)
Equipment Required List
- Sewing machine with a zipper foot
- Scissors
- Seam ripper
DIY Instruction Step by Step
- Remove Covers and Deconstruct: Carefully remove the cushion covers from your sofa. Use a seam ripper to carefully open the existing seams where you want to add the piping. You will typically open the seams on all four sides of the cushion cover panels.
- Attach Piping: Lay the piping along the raw edge of one of the cushion panels, aligning the fabric edge of the piping with the raw edge of the cushion panel. Pin the piping in place.
- Sew Piping to Panel: Using your sewing machine with a zipper foot, sew the piping onto the panel. Position the needle close to the cord within the piping. The zipper foot allows you to get very close to the cord, ensuring a neat finish.
- Reassemble Cover: Once the piping is sewn onto all the relevant edges of your cushion panels, pin the panels back together with right sides facing each other. Sew them together, again using the zipper foot to get close to the piping.
- Finish and Insert: Trim any excess fabric and clip the corners. Turn the cushion cover right side out through the zipper opening. Insert your cushion and zip it up. The sharp lines of the piping will now define your sofa’s shape.
22. Textural Pleating
Relevant Item Name: Blush Pink Velvet Pleated Sofa Skirt

Textural details, like vertical pleating, add sophisticated depth to simple sofa shapes. This blush pink sofa features elegant channel tufting on the backrest, but the most striking element is the pleated skirt along its base. This subtle yet impactful detail elevates the furniture, providing a soft, luxurious appearance.
The combination of velvet upholstery and the gentle folds of the skirt creates a sense of classic elegance. Paired with a simple gold mirror and minimalist lamp, the sofa becomes a refined focal point. This approach shows how adding a custom, pleated detail to the base can completely transform an ordinary piece.
DIY Pleated Sofa Skirt Attachment
Adding a pleated skirt to a boxy sofa can give it a more refined, vintage, or softer appearance, especially if your sofa has a plain base.
Material Required List
- Fabric for the skirt (enough to cover the perimeter, plus extra for pleats)
- Matching thread
- Sewing pins
- Fabric glue or a hot glue gun (for no sew option)
Equipment Required List
- Sewing machine (or needle for hand sewing)
- Measuring tape
- Scissors
- Iron and ironing board
DIY Instruction Step by Step
- Measure and Cut: Measure the perimeter of your sofa’s base (length all the way around) and the desired drop length for the skirt. For pleats, you will need at least twice the perimeter measurement in fabric length (more for fuller pleats). Cut your fabric.
- Hem the Bottom: Fold the bottom edge of the fabric over $1/2$ inch and press. Fold it over again 1 inch and press. Sew this hem to create a neat finished edge for the bottom of the skirt.
- Create Pleats: Start making pleats along the top raw edge of the fabric. Fold a section of fabric over, then fold it back in the opposite direction to create a box pleat or knife pleat (about 1 to 2 inches wide). Pin each pleat in place. Continue this along the entire length of the fabric until the pleated fabric matches the perimeter of your sofa.
- Sew the Pleats: Sew a straight line across the top edge of the pleated fabric to secure all the pleats.
- Attach to Sofa (Sew or No Sew):
- Sewing: If your sofa cushions are removable, you can carefully lift the upholstery fabric at the base and sew the top edge of the pleated skirt directly underneath, then secure the upholstery fabric back down.
- No Sew: For an easier method, use strong fabric glue or a hot glue gun. Apply a continuous bead of glue along the very top edge of the pleated skirt. Carefully press it firmly to the bottom edge of your sofa frame, just below the cushions. Work in small sections to ensure it adheres properly.
23. Rugged Elegance with Leather Sling Chairs
Relevant Item Name: Industrial Leather and Metal Sling Chairs

Replace bulky armchairs with sleek leather sling chairs to introduce a sophisticated, rugged edge. These rich, tan leather chairs feature large metal eyelets and a minimalist black metal frame, exuding an industrial yet comfortable vibe. The low profile and open design make the room feel less cluttered and more modern.
The warmth of the leather contrasts beautifully with the stark metal, creating appealing visual tension. Paired with a simple wooden side table and a subtly patterned rug, these chairs bring a masculine, effortless elegance. They prove that less structure can mean more style.
DIY Leather Conditioner and Shine
To keep leather furniture looking rich and prevent cracking, regular conditioning is vital. You can make a simple, natural leather conditioner at home.
Material Required List
- $1/2$ cup Olive oil
- $1/4$ cup White vinegar
- Small spray bottle or mixing bowl
- Clean, soft cloths (at least two)
Equipment Required List
- Measuring cups
DIY Instruction Step by Step
- Clean the Leather: First, wipe down the leather thoroughly with a clean, dry cloth to remove any dust or loose dirt.
- Mix Conditioner: In the spray bottle or mixing bowl, combine the olive oil and white vinegar. Shake or stir well until fully mixed. The vinegar helps clean and the oil conditions.
- Test in Small Area: Apply a very small amount of the conditioner to an inconspicuous area of the leather. Rub it in and let it sit for a few minutes. Check for any discoloration or adverse reactions before proceeding to the entire piece.
- Apply to Leather: Spray or apply a small amount of the mixture onto a clean, soft cloth. Gently rub the conditioner into the leather in circular motions, covering a small section at a time.
- Buff to Shine: After applying to a section, immediately use a second, clean, dry cloth to buff the leather gently. This removes any excess oil and brings out a subtle sheen.
- Repeat: Continue this process over the entire leather surface. Allow the leather to fully absorb the conditioner and dry for a few hours before use. Regular conditioning will keep your leather soft and looking refreshed.
24. Embrace Earthy Floor Cushions
Relevant Item Name: Tufted Terracotta Floor Pillows

Creating flexible, relaxed seating with large floor cushions in warm, earthy tones is a simple way to refresh your living room. These oversized, tufted floor pillows in rich terracotta and mustard yellow invite casual lounging. They pair beautifully with a simple wooden bench and natural fiber accents like woven lanterns and a jute rug.
This bohemian-inspired approach is budget-friendly and adaptable. You can easily move these cushions around for movie nights or extra guest seating. The deep, warm colors bring a cozy, inviting feel, especially when complemented by a few green plants.
DIY No Sew Floor Cushion Cover
You can easily make oversized floor cushion covers without any sewing, offering a quick and changeable way to update your seating.
Material Required List
- Large, sturdy square of fabric (canvas, heavy cotton)
- Existing floor cushion insert (or old blankets/foam for stuffing)
- Fabric glue or strong fabric tape
- Safety pins or Velcro strips (optional)
Equipment Required List
- Measuring tape
- Scissors
DIY Instruction Step by Step
- Measure and Cut Fabric: Measure your existing floor cushion (length, width, and height). Cut a single piece of fabric that is large enough to cover the top, bottom, and all four sides, plus an additional 6 to 8 inches on all sides for wrapping and securing.
- Center and Drape: Lay the fabric flat, pattern side down. Place your cushion insert directly in the center of the fabric.
- Wrap the Sides: Pull one long side of the fabric up over the cushion. Apply a line of fabric glue or fabric tape along the top edge of the cushion, and firmly press the fabric onto it. Repeat for the opposite long side, overlapping the fabric as needed.
- Fold the Corners: At the short ends of the cushion, neatly fold the fabric in like wrapping a present. Pull the top flap over and secure it to the top of the cushion with glue or tape. Pull the bottom flap under the cushion.
- Secure Underneath: Flip the cushion over carefully. Pull the excess fabric tightly underneath the cushion. Use fabric glue or strong fabric tape to secure all the raw edges to the bottom side of the cushion. Ensure the fabric is taut on the visible sides.
- Reinforce (Optional): For extra security, you can use safety pins or Velcro strips along the underneath edges. Once finished, your cushion has a fresh, new look.
25. The Floating Sofa Illusion
Relevant Item Name: Illuminated Floating Platform Sofa

Create a dramatic, modern statement by making your sofa appear to float. This elegant, light gray sofa sits atop a hidden, recessed platform, illuminated by strip lighting underneath. The hidden base and glow create a striking illusion of weightlessness, instantly modernizing the entire living room.
This sophisticated technique elevates a simple, contemporary sofa into a work of art. The subtle lighting enhances the minimalist aesthetic and provides ambient light, making the room feel larger and more open. This innovative design works with clean lines and understated decor.
DIY Under Sofa LED Strip Lighting
You can create a similar “floating” effect for your existing sofa by adding LED strip lighting to its base. This is a simple and impactful lighting upgrade.
Material Required List
- LED strip lights (self adhesive, with a power adapter)
- Cable clips or small zip ties (optional, for neatness)
Equipment Required List
- Measuring tape
- Scissors (if lights are cuttable)
- Cleaning wipes (rubbing alcohol)
DIY Instruction Step by Step
- Measure the Base: Measure the perimeter of your sofa’s base, or just the front and sides, depending on where you want the light. Ensure you get enough LED strip length.
- Clean the Surface: Clean the underside of your sofa’s frame where you plan to attach the lights. Use rubbing alcohol to remove dust and grease, allowing the adhesive to stick better. Let it dry completely.
- Attach the Lights: Peel off the adhesive backing from the LED strip lights. Carefully press the lights firmly onto the underside of your sofa frame. Position them slightly recessed from the edge so the light glows down rather than directly out. Work in sections, ensuring the strip is straight and secure.
- Route the Wires: Route the power cord discreetly to an outlet. Use cable clips or zip ties to secure any loose wires underneath the sofa, preventing them from being seen or tripped over.
- Test the Lights: Plug in the LED lights and test them. Many sets come with remote controls for adjusting brightness and color. Enjoy your sofa’s new illuminated, floating look.
26. Classic Tufting and Nailhead Trim
Relevant Item Name: Traditional Burgundy Leather Chesterfield Sofa

Bringing in timeless, traditional elements can refresh a living room with classic sophistication. This deep burgundy leather Chesterfield sofa features iconic deep button tufting across its back and arms, combined with elegant nailhead trim. These details scream luxury and enduring style.
The rich color and texture of the leather provide warmth and depth, making the sofa a strong focal point. Paired with a traditional patterned rug and brass accents, this style creates a distinguished, comfortable atmosphere. A Chesterfield never goes out of fashion.
DIY Faux Nailhead Trim Application
You can create the look of classic nailhead trim on a plainer sofa or ottoman using decorative upholstery tacks, achieving a similar refined effect.
Material Required List
- Decorative upholstery tacks or nailhead trim strips
- Upholstery hammer or rubber mallet
- Measuring tape
- Pencil or chalk (for marking)
Equipment Required List
- Small level (optional, for straight lines)
DIY Instruction Step by Step
- Plan the Layout: Decide where you want the nailhead trim (e.g., along the arms, base, or back of the sofa). Measure the length of the chosen area.
- Mark the Placement: Using a pencil or tailor’s chalk, lightly mark a straight line where the center of the nailhead trim will go. For individual tacks, measure and mark each spot for consistent spacing.
- Apply Trim:
- Individual Tacks: Hold an upholstery tack in place on your marked spot. Gently tap it in with an upholstery hammer or rubber mallet until it is secure. Ensure it goes straight into the frame and does not bend. Repeat for all tacks, keeping spacing even.
- Strip Trim: If using nailhead trim strips (which have tacks pre-spaced on a strip), lay the strip along your marked line. Hammer in the individual tacks along the strip to secure it.
- Check Alignment: Periodically step back to check that your line of tacks or trim is straight and evenly spaced.
- Finish the Run: Continue until the entire desired area is covered. If you need to cut a strip, do so carefully with heavy duty scissors. The result is a more elegant, tailored piece of furniture.
27. Integrated Lighting and Sleek Lines
Relevant Item Name: Minimalist Sofa with Integrated LED Lighting

Modern design can be incredibly refreshing, especially when it incorporates clever technology. This sleek gray loveseat features thin strips of LED lighting built directly into the arms, casting a subtle glow. The minimalist shape, clean lines, and slim metal legs create a sophisticated, contemporary aesthetic.
Integrated lighting adds both functionality and ambiance, making the sofa a statement piece, particularly in the evening. Paired with a bold geometric rug and bright accent colors, this design feels current and forward thinking. It is a fantastic way to update a living room with subtle, practical innovation.
DIY Integrated LED Armrest Lighting
While fully integrated lighting can be complex, you can achieve a similar effect by attaching thin, self adhesive LED strips to the underside or inner edge of your sofa’s armrests.
Material Required List
- Thin LED strip lights (with a power adapter and switch)
- Cable clips or small zip ties
- Cleaning wipes (rubbing alcohol)
Equipment Required List
- Scissors (if lights are cuttable)
- Measuring tape
DIY Instruction Step by Step
- Measure and Plan: Measure the length of the underside or inner edge of your sofa arms where you want to add the light. Decide if you want continuous light or shorter segments.
- Clean the Surface: Thoroughly clean the chosen surface of the armrests with rubbing alcohol. This ensures the adhesive on the LED strips will stick firmly. Let it dry completely.
- Attach LED Strips: Carefully peel the adhesive backing from the LED strips. Press the strips firmly along the measured path on the armrest. If placing them on the underside, position them slightly inward so the light casts a gentle glow rather than shining directly into eyes.
- Connect and Conceal Wires: Connect the LED strips to their power adapter. Use cable clips or small zip ties to neatly secure any visible wires along the back of the sofa or under the frame, leading discreetly to an outlet.
- Test and Adjust: Plug in the lights and test the effect. Many LED strips come with a dimmer or color changing options. The subtle glow will add a modern, ambient touch to your seating.
28. Bentwood Curves and Bold Upholstery
Relevant Item Name: Midcentury Bentwood Frame Armchair with Maroon Cushion

Embrace vintage style with a modern twist by pairing classic bentwood frames with bold, colorful cushions. This armchair features a beautifully curved, light wood frame that adds organic elegance. The deep maroon cushion, held in place with simple buttons, provides a rich pop of color and plush comfort.
The design is both light and inviting, typical of midcentury modern aesthetics. Pairing such an armchair with a soft, abstract rug ensures the vibrant color stands out without overwhelming the space. This is a great way to add an accent piece that truly revitalizes your seating arrangement.
DIY Reupholstering a Bentwood Chair Cushion
If you have a chair with removable cushions, reupholstering them in a new fabric is an accessible DIY project that completely changes the chair’s appearance.
Material Required List
- New upholstery fabric (enough for your cushion, plus 2-3 inches extra on all sides)
- Fabric scissors
- Staple gun with staples
- Screwdriver (to remove old cushion)
- Buttons and upholstery needle (if tufting)
Equipment Required List
- Pliers (to remove old staples)
DIY Instruction Step by Step
- Remove Old Cushion: Carefully remove the old cushion from the chair frame. If it is screwed in, use a screwdriver. If stapled, use pliers to remove the staples.
- Disassemble Cushion (If Needed): If you are reusing the cushion foam, gently remove the old fabric. If you are tufting, note the location of the existing buttons.
- Cut New Fabric: Lay your new fabric face down. Place the cushion foam on top of it. Cut the fabric, leaving at least 2 to 3 inches of excess around all edges of the foam.
- Attach Fabric to Cushion Base: Center the foam on the new fabric. Pull the fabric tightly over one edge of the foam and staple it to the underside of the cushion base. Do not staple the top fabric directly to the foam.
- Work Around Edges: Continue pulling the fabric taut and stapling it around all four sides of the cushion base. Pay attention to the corners, folding the fabric neatly like a present to create a smooth, clean corner.
- Tufting (Optional): If adding tufting, use a long upholstery needle to push thread through the cushion at your marked spots. Attach buttons on both sides, pulling the thread tightly to create the dimple, and knotting it securely on the underside.
- Reattach Cushion: Once the new fabric is secure, reattach the cushion to your bentwood chair frame using the original screws or new ones.
29. The Private Alcove Sofa
Relevant Item Name: Forest Green Builtin Sofa Nook

Create a cozy and intimate seating experience by embedding a sofa within a custom built alcove. This dark green structure envelops a cream-colored sofa, creating a private, secluded retreat. Integrated overhead lighting casts a warm glow, emphasizing the inviting nature of the space.
The recessed design not only offers a feeling of security and comfort but also cleverly defines zones within an open floor plan. By choosing contrasting upholstery colors, the sofa itself becomes a soft focal point within its architectural frame. This setup is modern, sophisticated, and incredibly inviting.
DIY Backlit Niche or Alcove Lighting
If you have a recessed area around your sofa, adding LED strip lighting to the back or top can create a dramatic, ambient glow similar to this image.
Material Required List
- Dimmable LED strip lights (with adhesive backing and switch)
- Cable clips or small zip ties
- Wall-safe adhesive hooks (optional)
Equipment Required List
- Measuring tape
- Cleaning wipes (rubbing alcohol)
DIY Instruction Step by Step
- Measure and Plan: Measure the length of the back perimeter or the top edge of your sofa’s alcove where you want the light to emanate from.
- Clean the Surface: Clean the surface where the LED strips will adhere with rubbing alcohol to ensure a strong bond. Let it dry completely.
- Attach LED Strips: Carefully peel the adhesive backing from the LED strips. Starting from one corner, press the strip firmly along the inside top edge or along the back wall of the niche. Ensure the strip is positioned so the light reflects off the back wall rather than shining directly forward.
- Conceal Wires: Route the power cord discreetly down to an outlet. Use small cable clips or adhesive hooks to secure any loose wires along the side of the niche or behind the sofa.
- Test and Adjust: Plug in the LED lights. If your set comes with a dimmer, adjust the brightness to create the desired ambient effect. This simple addition completely changes the mood of your seating area.
30. The Giant Knit Slipcover
Relevant Item Name: Chunky Cable Knit Sofa Slipcover

For an ultimate cozy refresh, consider a slipcover that mimics the look of a giant knitted blanket. This sofa is entirely encased in a slipcover printed with a large, chunky cable knit pattern, creating an illusion of enormous softness and texture. The gray tones keep the look modern and versatile.
This unique slipcover instantly transforms a standard sofa into a piece that feels incredibly inviting and warm. Paired with a vibrant, multicolored floor pillow and a contrasting yellow throw, the cozy atmosphere is enhanced. This demonstrates how a creative slipcover can redefine your entire furniture aesthetic.
DIY No Sew Giant Knit Blanket Throw
While you cannot easily DIY a giant knit slipcover, you can create the effect of a chunky knit blanket as a throw for your sofa using super chunky yarn and your arms as knitting needles.
Material Required List
- Super chunky yarn (several large skeins, e.g., chenille, roving wool)
- Scissors
Equipment Required List
- None (you will use your arms!)
DIY Instruction Step by Step
- Prepare Yarn: Unroll a long section of yarn from your first skein. You will need a lot for each stitch.
- Cast On: Create a slip knot on your right arm. This is your first stitch. Continue to create loops and “cast on” stitches until you have the desired width for your blanket (e.g., 15-20 stitches for a medium throw).
- First Row: Take the last loop on your right arm. Use your left hand to pull a new loop of yarn through it. This new loop is now on your left arm. Continue this for all stitches from your right arm to your left arm. This completes your first row.
- Continue Knitting: Now, with the stitches on your left arm, repeat the process. Take the last loop, pull a new loop of yarn through it with your right hand, transferring the stitch to your right arm. Continue until all stitches are on your right arm.
- Connect New Skeins: When you run out of yarn from a skein, simply tie the end of the old skein to the beginning of a new skein with a secure, small knot. Continue knitting.
- Cast Off: When your blanket reaches the desired length, you need to “cast off” to finish. Knit two stitches onto your working arm. Take the first stitch and pull it over the second stitch and off your arm. You now have one stitch left. Knit another stitch. Pull the previous stitch over this new one. Continue until you have only one loop left. Cut the yarn, leaving a tail, and pull the tail through the last loop to secure.
- Drape: Drape your finished chunky knit blanket over your sofa for instant texture and warmth.
31. Built-in Banquette with Tailored Cushions
Relevant Item Name: Sage Green Custom Banquette with Back Cushions

Custom built-in banquettes offer a sophisticated and space-saving seating solution. This example features a serene sage green base with a long, tailored seat cushion and individual back cushions, all accented with white piping. The clean lines and uniform aesthetic create a calming and organized atmosphere.
Above the banquette, a long shelf provides display space, while small, individual hooks offer support for the back cushions. This design works exceptionally well in dining nooks, hallways, or smaller living areas, maximizing seating and providing a polished, high-end look without needing multiple furniture pieces.
DIY Custom Banquette Cushions
Creating custom cushions for a built-in banquette can be a simple sewing project, even for beginners, and gives a much more professional finish than store bought options.
Material Required List
- High density foam inserts (cut to your desired cushion dimensions)
- Upholstery fabric (enough to cover all sides of the foam, plus seam allowance)
- Heavy-duty zipper (for removable covers)
- Thread matching your fabric
- Piping/welt cord (optional, for a tailored edge)
Equipment Required List
- Sewing machine with a zipper foot
- Scissors
- Measuring tape
- Straight pins
DIY Instruction Step by Step
- Measure and Cut Foam: Measure the exact dimensions of your banquette bench and backrest for each cushion. Have foam cut to these precise sizes.
- Cut Fabric Panels: For each cushion, you will need a top panel, a bottom panel, and side panels. Measure each foam piece and add $1/2$ inch to all edges for seam allowance when cutting your fabric. If adding piping, cut separate fabric strips for the piping cover.
- Attach Piping (Optional): If using piping, sew the piping around the edges of your top and bottom fabric panels using a zipper foot.
- Assemble Side Panels: If your cushion has a zipper, you will need to sew the zipper into one of the side panels. Sew the remaining side panels together to form a continuous strip that will wrap around the foam.
- Sew Top to Sides: Pin the top fabric panel (right sides facing) to the assembled side panels. Sew them together carefully around all edges. Repeat for the bottom panel, leaving the zipper partially open if you included one.
- Insert Foam: Turn the fabric cover right side out. Gently push the foam insert into the cover, working it into the corners. If you included a zipper, close it. The custom cushions will fit snugly, giving your banquette a polished finish.
32. Illuminated Platform Seating
Relevant Item Name: LED Strip Lit Plywood Bench

For a bold, futuristic look, integrate LED strip lighting directly into your seating platform. This plywood bench features bright blue LED strips running along its base, casting a vibrant glow. The raw texture of the plywood contrasts effectively with the sleek, modern lighting and minimalist black and white cushions.
This approach transforms a simple bench into a dynamic focal point, especially effective in a dark room. The colored light adds drama and mood, creating a unique ambiance. It is a striking update for those who appreciate modern, edgy design.
DIY Under-Bench LED Accent Lighting
Adding LED strip lighting to the base of a simple bench or storage unit creates a dramatic, modern, and energy-efficient accent.
Material Required List
- LED strip lights (with adhesive backing, power adapter, and possibly a remote for color/brightness control)
- Cable clips or small zip ties
- Cleaning wipes (rubbing alcohol)
Equipment Required List
- Measuring tape
- Scissors (if lights are cuttable)
DIY Instruction Step by Step
- Measure and Clean: Measure the perimeter of the bench’s base where you want the lights. Clean this surface thoroughly with rubbing alcohol to ensure good adhesion. Let it dry completely.
- Attach LED Strips: Peel off the adhesive backing from the LED strip. Carefully press the strip firmly along the underside edge of the bench, slightly recessed from the front edge. This way, the light shines downward, creating a glow effect rather than shining directly out.
- Connect and Conceal: Route the power cord discreetly to an electrical outlet. Use small cable clips or zip ties to secure any loose wires to the underside of the bench or along its back.
- Test and Adjust: Plug in the LED lights. Use the remote control, if available, to test different colors and brightness settings. The vibrant glow will immediately transform the bench’s appearance.
33. Geometric Light Play with Screens
Relevant Item Name: Laser-Cut Geometric Room Divider Screen

Transform a simple sofa into an artistic statement by pairing it with a screen that casts intricate light patterns. This white loveseat is dramatically enhanced by the shadows of a laser-cut geometric screen placed behind it. The interplay of light and shadow creates an ever-changing, immersive backdrop.
This technique adds a unique visual dimension to a plain space, making the sofa a stage for light art. The screen provides both an aesthetic focal point and a subtle room divider, offering a sense of enclosure without blocking light. It is an innovative way to introduce pattern and drama without permanent changes.
DIY Patterned Shadow Screen (Budget Version)
You can create a similar dramatic shadow effect behind your sofa using a simple wooden frame and a fabric or paper screen with a cut-out pattern.
Material Required List
- Wooden frame (like a large picture frame or thin lumber strips to build one)
- Heavy cardstock or thick fabric (e.g., black felt, dark canvas)
- Craft knife or laser cutter (if available)
- Strong adhesive or staples
- LED spotlight or directional lamp
Equipment Required List
- Ruler
- Cutting mat
DIY Instruction Step by Step
- Build/Acquire Frame: Get a suitable wooden frame. It should be sturdy enough to stand behind your sofa.
- Create Pattern: On your cardstock or fabric, draw or print a geometric pattern. Consider a repeating motif that has open spaces. Use a craft knife to carefully cut out the pattern. For precision, a laser cutter is best, but a steady hand with a craft knife also works.
- Attach Pattern to Frame: Once your patterned sheet is complete, adhere it securely to the back of the wooden frame using strong adhesive or staples. Ensure it is taut and flat.
- Position the Screen: Place the finished screen behind your sofa.
- Set Up Lighting: Position an LED spotlight or a directional lamp on the floor or a side table, aiming it directly at the screen. Adjust the distance and angle to create the desired shadow pattern on the sofa and wall. Experiment with different light sources for varying effects.
34. Textured Boucle and Earth Tones
Relevant Item Name: Warm Terracotta Boucle Sofa with Bolsters

Introduce warmth and inviting texture with a sofa upholstered in a rich, boucle fabric. This terracotta-colored sofa, with its nubby, looped texture, immediately feels cozy and stylish. Button tufting on the back adds a subtle classic detail, while matching bolster pillows and throw cushions enhance the comfort.
The deep, earthy hue of the sofa creates a grounding presence in the room. Paired with a muted, patterned rug, the overall effect is one of comfortable sophistication. This approach focuses on making the sofa itself a textural statement, requiring minimal additional ornamentation.
DIY Tufted Button Bolster Pillows
If your sofa is plain, adding tufted bolster pillows in a complementary color and texture can provide a customized, designer touch.
Material Required List
- Fabric for bolsters (e.g., boucle, velvet, linen)
- Pillow stuffing or foam bolster insert
- Two large upholstery buttons per bolster
- Strong, long upholstery needle
- Heavy duty thread
- Fabric scissors
Equipment Required List
- Measuring tape
DIY Instruction Step by Step
- Cut Fabric: Measure your bolster pillow insert. Cut a rectangle of fabric for the main body and two circles for the ends, adding $1/2$ inch seam allowance to all pieces.
- Sew Bolster Body: Fold the main rectangle in half lengthwise, right sides together. Sew the long edge to form a tube.
- Attach Ends: Pin one fabric circle to one end of the fabric tube (right sides facing). Sew around the circle carefully. Repeat for the other end, but leave a 3 to 4 inch opening to insert the stuffing.
- Stuff and Close: Turn the bolster cover right side out. Stuff it firmly and evenly with pillow stuffing. Hand sew the opening closed.
- Add Tufting Buttons: Thread your long upholstery needle with heavy-duty thread. Push the needle through the center of one button, then straight through the entire bolster to the other side.
- Secure Buttons: Thread the needle through the second button on the opposite side. Pull the thread tightly to create a slight dimple in the bolster. Wrap the thread around the buttons a few times and knot it securely to ensure the tufting holds. You can sew a few stitches on the back of the button for extra security.
35. Bold, Multi-Color Block Seating
Relevant Item Name: Primary Color Block Sectional Sofa

Inject maximum energy into your living room with a sofa featuring bold, contrasting color blocks. This modular sectional uses vibrant primary colors—red, blue, and yellow—separated by crisp black borders and white piping. The dynamic arrangement creates an immediate focal point that is playful and modern.
This approach is about making a strong visual statement. The varied blocks of color allow for creative arrangements and prevent the design from feeling monotonous. Pairing it with abstract art that echoes the color scheme enhances the cohesive, artistic vibe. It is a striking choice for a contemporary space.
DIY Color Block Sofa Throw/Wrap
If reupholstering is not an option, you can create a similar color block effect on your sofa using large fabric pieces as a throw or a custom wrap for cushions.
Material Required List
- Large fabric pieces in 2 to 4 contrasting colors (e.g., red, blue, yellow, black)
- Strong fabric glue or iron-on fusible webbing tape
- Scissors
- Iron and ironing board (if using fusible webbing)
Equipment Required List
- Measuring tape
DIY Instruction Step by Step
- Measure and Cut: Measure the dimensions of your sofa cushions or the area you want to cover. Cut your chosen fabrics into rectangular or square blocks that, when arranged, will fit the area. Add 1 inch to all edges for creating clean seams or hems.
- Hem Edges: For each fabric block, fold over each edge by $1/2$ inch, press, and then fold again by $1/2$ inch. Secure with fabric glue or iron on fusible webbing to create clean, finished edges.
- Arrange and Attach: Lay your prepared fabric blocks out on a large flat surface in your desired color block pattern.
- Join Blocks (No Sew): Apply fabric glue or fusible webbing tape along the finished edges of the blocks where they meet. Press firmly or iron (if using fusible webbing) to join them securely, creating a large, single color-blocked panel.
- Place on Sofa: Once the panel is complete and dry, drape it over your sofa cushions or tuck it around the base of your sofa. You can also create individual cushion covers using this color block method and then place them on your sofa. This method offers a vibrant, changeable update.
36. Japanese-Inspired Shoji Screen Backdrop
Relevant Item Name: Backlit Shoji Screen Room Divider

Create a serene and sophisticated backdrop for your sofa with a Japanese-inspired shoji screen. This room divider, with its clean grid pattern and translucent panels, allows light to softly filter through. When backlit, as seen here, it casts a warm, ambient glow, transforming the entire space.
This technique adds architectural interest and defines the seating area, providing a sense of calm and enclosure. Paired with minimalist sofas and natural wood accents, the screen enhances a tranquil, modern aesthetic. It is a stunning way to introduce subtle light and texture.
DIY Backlit Paper Screen Accent
You can create a custom, simple backlit screen to place behind your sofa using wooden strips and rice paper or translucent fabric, creating a soft, ambient glow.
Material Required List
- Thin wooden strips (e.g., pine lattice or craft wood)
- Rice paper or translucent fabric (e.g., unbleached muslin)
- Wood glue
- LED strip lights (with adhesive backing and power adapter)
- Small nails or staples
Equipment Required List
- Saw (for cutting wood strips)
- Measuring tape
- Ruler
- Paintbrush (for glue)
- Hammer or staple gun
DIY Instruction Step by Step
- Build the Frame: Cut your wooden strips to create a rectangular frame of your desired screen size. Use wood glue and small nails or staples to secure the corners. Add crossbars inside the frame to create a grid pattern, just like a shoji screen.
- Attach Paper/Fabric: Lay your rice paper or translucent fabric over one side of the wooden frame. Trim it to size, leaving a slight overlap. Apply a thin layer of wood glue to the wooden frame and carefully press the paper/fabric onto it, smoothing out any bubbles. Allow to dry.
- Attach LED Lights: On the back side of the screen (the side that will face the wall), carefully attach LED strip lights along the inner perimeter of the wooden frame. Ensure the lights are positioned to cast an even glow through the paper/fabric.
- Route Wires: Route the power cord discreetly down one of the vertical wooden strips and secure it with small cable clips.
- Position the Screen: Place the finished screen behind your sofa. Plug in the LED lights. The soft, diffused light will create a calming and atmospheric backdrop, enhancing your seating area.
Revitalizing your living room seating is simpler and more affordable than you might think. We have demonstrated 36 effective ways to move past furniture fatigue without the expense of buying new. Whether you embrace textural layers, customize a simple frame, or introduce dramatic lighting, a significant transformation awaits.
The key to a successful refresh lies in creativity and focusing on small, high-impact details. By utilizing simple materials like paint, fabric remnants, and even LED strips, you can achieve a sophisticated, personalized look. Do not discard that old sofa; instead, view it as a blank canvas ready for its exciting second act.
Your updated living room seating will not only look fantastic but will also reflect your unique style and ingenuity. Start small with throw pillows, or commit to a structural paint job. Every step you take adds fresh energy to your home.
Key Takeaways
- Prioritize Texture and Color: Changing throw pillows and introducing patterned rugs instantly impacts the mood and sophistication of your seating area for minimal cost.
- Embrace DIY Customization: Simple projects like adding contrast piping, creating a pleated skirt, or making custom cushion covers provide a tailored, high-end look.
- Focus on the Frame: Painting metal bases white or applying a whitewash to wood frames modernizes old furniture and makes the whole room feel brighter and more open.
- Use Flexible Lighting: Integrated or accent lighting beneath sofa bases and in alcoves creates a dramatic “floating” effect and adds sophisticated, ambient light.
- Utilize Upcycled Materials: Old items like wooden pallets and scrap denim can be repurposed into functional, stylish, and highly customized seating elements.