
That old couch. It sits in the middle of your living room, looking tired. You have seen it every day for years. The fabric is worn, or maybe you just hate the color.
Buying a new sofa is a huge expense. It can cost thousands. But you do not have to live with a couch you dislike. You also do not need to spend a lot of money to make a big change.

A few smart updates can completely transform your seating. This might mean a new cover, a simple repair, or just adding new textures.
We found 35 affordable ways to refresh your living room seating. These ideas range from 5-minute fixes to simple weekend projects. You can make that old sofa feel new again.
1. The Snug Fit Waffle Knit Slipcover

A worn out sofa can get a second life. This textured slipcover is the key. It stretches over the entire couch, hiding stains or old fabric. The waffle knit pattern adds subtle style. It creates a fresh, clean base for your room.
A simple blue pillow adds a soft touch of color. The chunky knit throw blanket invites you to get comfortable. This is a very effective way to change your seating without buying a new sofa.
DIY: How to Put on Your New Slipcover
- Prep the Sofa: First, take all the pillows and blankets off your couch. Give it a quick wipe down to get rid of any crumbs or dust.
- Find the Tag: Look inside your new slipcover. You should find a tag that says “Back”. This is your guide.
- Drape and Align: Lift the cover and spread it over your sofa. Make sure the “Back” tag is at the top center of the couch’s back.
- Pull it Down: Gently pull the fabric down over the arms, the back, and the front. Get it to cover everything.
- Tuck the Extra: You will have extra fabric where the seat cushions meet the arms and back. Shove this extra fabric deep into the cracks. This makes the cover look neat and stops it from wiggling around. A wooden spoon or a spatula can help push it in deep.
- Smooth and Finish: Walk around the couch and pull any last wrinkles smooth. Put your pillows and blankets back on. You are done!
2. The Farmhouse Charm Slipcover
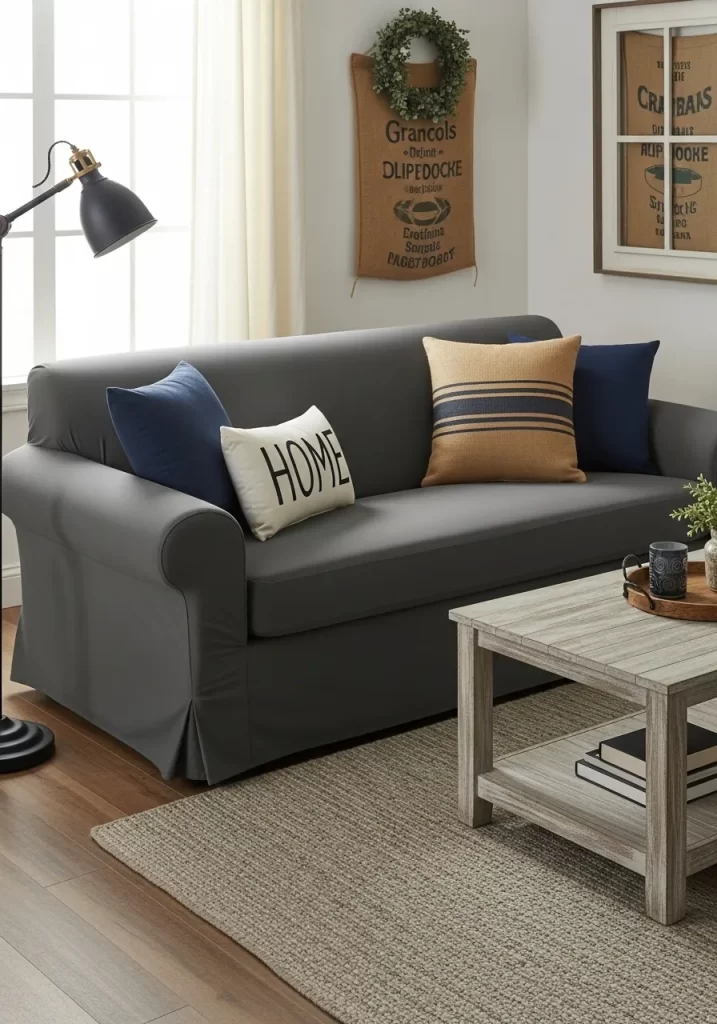
This simple, dark grey slipcover gives an old sofa a new, clean look. It fits neatly, making the couch a solid backdrop. The real change comes from the accessories. They add a strong farmhouse personality.
A pillow with the word “HOME” feels welcoming. Another pillow with rustic stripes adds a country touch. Solid navy pillows ground the look. This combination is a fast way to apply a popular theme to your living room.
DIY: Installing a Skirted Slipcover
- Clear the Couch: Take off all cushions, pillows, and blankets. Set them aside.
- Find the Back: Unfold your new slipcover. Just like the first one, find the tag that says “Back”.
- Drape and Center: Place the cover over the sofa with the “Back” tag at the top-center of the sofa’s backrest.
- Pull and Adjust: Pull the fabric down over the arms and the front. Make sure the skirt at the bottom hangs evenly all the way around.
- Tuck It In: Push all the extra fabric down into the crevices where the arms and back meet the sofa’s base. You want this to be very snug.
- Add Cushions: Put your main seat cushions back on top of the slipcover.
- Final Touches: Add your new farmhouse pillows to finish the look.
3. The Breezy Coastal Slipcover
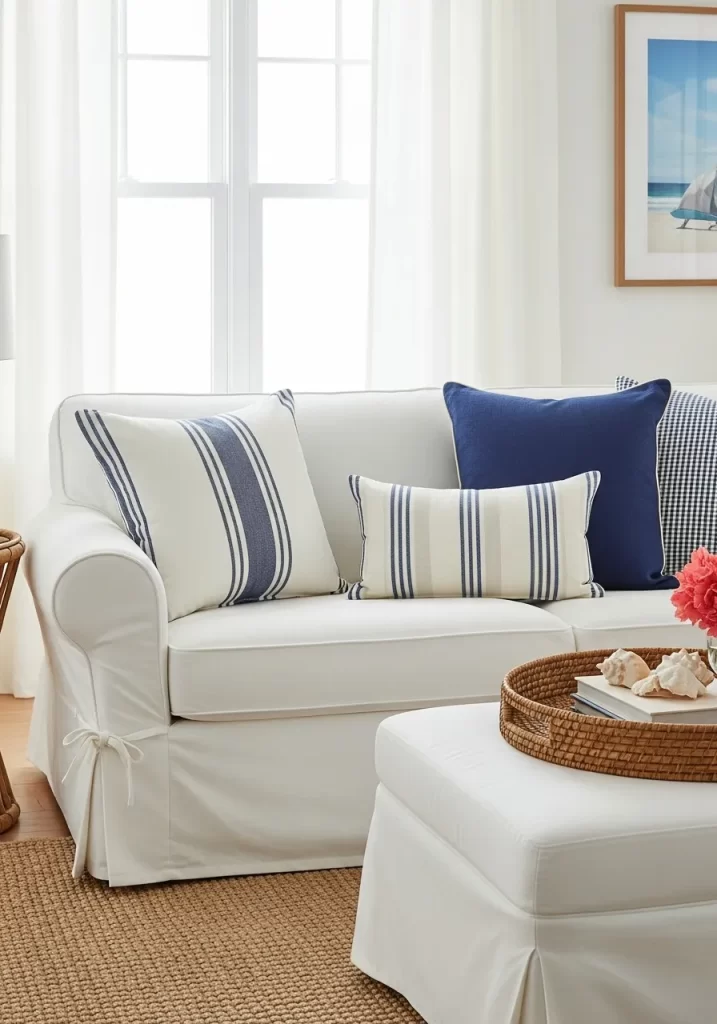
Nothing brightens a room like a clean white slipcover. This one instantly makes the space feel airy and light. It is a great choice for a coastal or beach-themed room. The white fabric makes the sofa look fresh and new.
This cover has special details, like the ties on the arms. These ties add a relaxed, custom-made feel. Paired with pillows in blue and white stripes, the whole setup feels like a vacation home.
DIY: How to Secure a Slipcover with Ties
- Start as Usual: Clear the sofa. Find the “Back” tag and drape the slipcover over the couch, centering it.
- Pull Down Evenly: Gently pull the cover down over the back and arms.
- Tuck the Fabric: Push any loose material deep into the sofa cracks to get a snug fit.
- Find the Ties: Go to the front of one of the sofa arms. You should see two pieces of fabric designed for a bow.
- Make a Simple Bow: Tie them together just like you tie your shoelaces. Make a simple, neat bow. Do not pull it too tight, or the fabric will pucker.
- Repeat on Other Side: Go to the other arm and tie those pieces together as well. This adds a nice decorative touch and helps hold the arm fabric in place.
4. Luxe Faux Fur Pillows
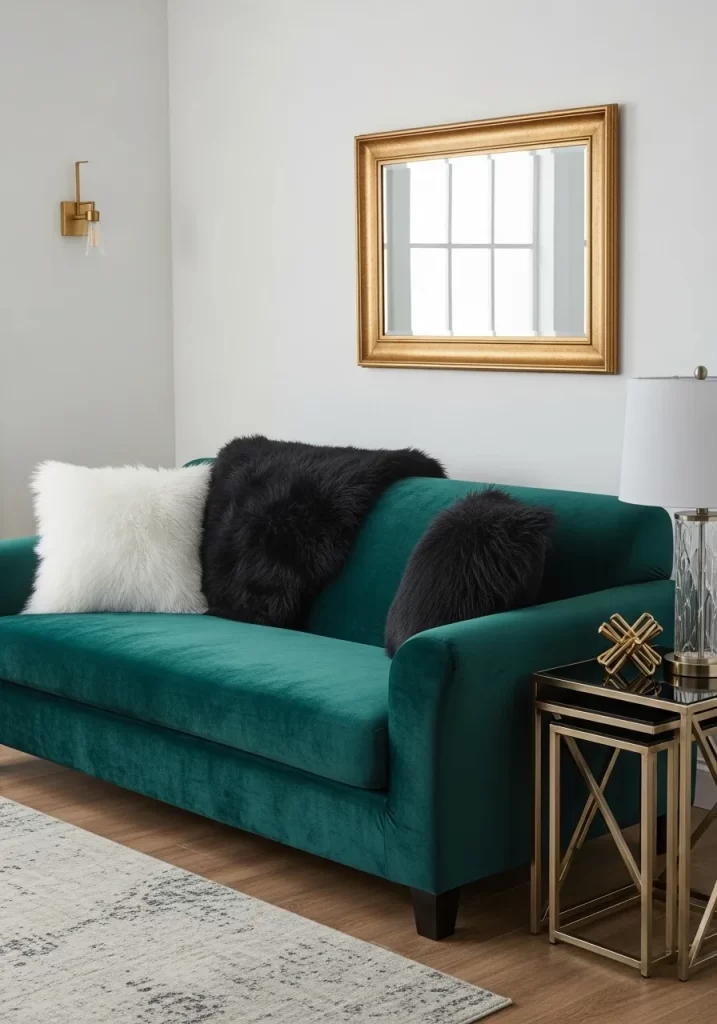
Sometimes the sofa itself is great, but it needs some drama. This rich, emerald green velvet couch is already a statement. The update here is all about texture. Adding faux fur pillows creates a feeling of luxury.
The mix of a fluffy white pillow with two dark, shaggy pillows adds contrast. This makes the seating look more expensive and complex. The different textures invite you to to touch them. It’s a very glam and modern update.
DIY: Arranging High-Texture Pillows
- Get Your Pillows: For this look, you need pillows with very different textures. Think faux fur, velvet, or shag.
- Start with the “Hero”: Take your largest or most interesting pillow (like the fluffy white one) and place it in one corner.
- Add the Contrast: Place your other pillows next to it. Do not just line them up. Try propping one slightly in front of the other.
- The “Karate Chop”: This is a decorator’s trick. Stand back, look at your pillow, and give it a gentle “karate chop” on the top edge.
- Why Chop? This chop creates a V-shape in the pillow. It makes it look softer, more professional, and less like a stiff block. It helps the pillow “sit” nicely on the couch.
5. The Sectional Color-Pop Pillows

A large, neutral sectional sofa is comfortable but can look boring. It is a big sea of one color. The easiest fix is to add small pops of bright color. This gray sectional gets a big lift from just a few pillows.
The bright teal and sunny yellow pillows are not large. They are used sparingly, which makes them stand out more. They draw your eye and break up the solid gray. This is a very affordable way to add energy to a big sofa.
DIY: How to Add “Pop” Pillows to a Sectional
- Choose Your Colors: Pick two or three bright colors that you like. Make sure they look good with your sofa’s color.
- Get Solid Pillows: For this trick, simple, solid-color pillows work best. Avoid busy patterns.
- Focus on the Corners: A sectional has two main spots: the corners. Place a small group of pillows in the main corner where the two parts meet.
- Add to the Ends: Put one or two pillows on the far ends of the sofa (the armrests).
- Don’t Overdo It: The goal is a “pop” of color. You just need a few. Too many will look cluttered and messy. You still need room to sit down!
6. The Textured Boho Pillow Collection

This is how you completely change a sofa’s personality. A plain couch becomes a boho centerpiece with this pillow collection. The look is all about mixing textures and warm, earthy colors.
These pillows use tassels, tufted bits, and woven patterns. The colors—terracotta, olive green, and cream—feel natural and warm. This style is relaxed, global, and very cozy. It makes the sofa the most interesting part of the room.
DIY: How to Layer Lots of Textured Pillows
- Find Your “Family”: Gather pillows that share a color theme (like these warm earth tones) but have different patterns and textures.
- Big Ones in the Back: Start with your largest, simplest pillows. Place two of them in the far corners of the sofa.
- Medium in the Middle: Next, add your medium-sized pillows. These should have the patterns, like the woven stripes or diamonds. Place them in front of the big pillows.
- Fun Ones in the Front: Put your most special pillows in the very front. These are the ones with the tassels or the most interesting shapes (like the long lumbar pillow).
- Mix, Don’t Match: The key is to make it look collected, not like a store-bought set. It is fine if they are all different. That is what makes it look boho.
7. The Modern Waffle-Weave Throw
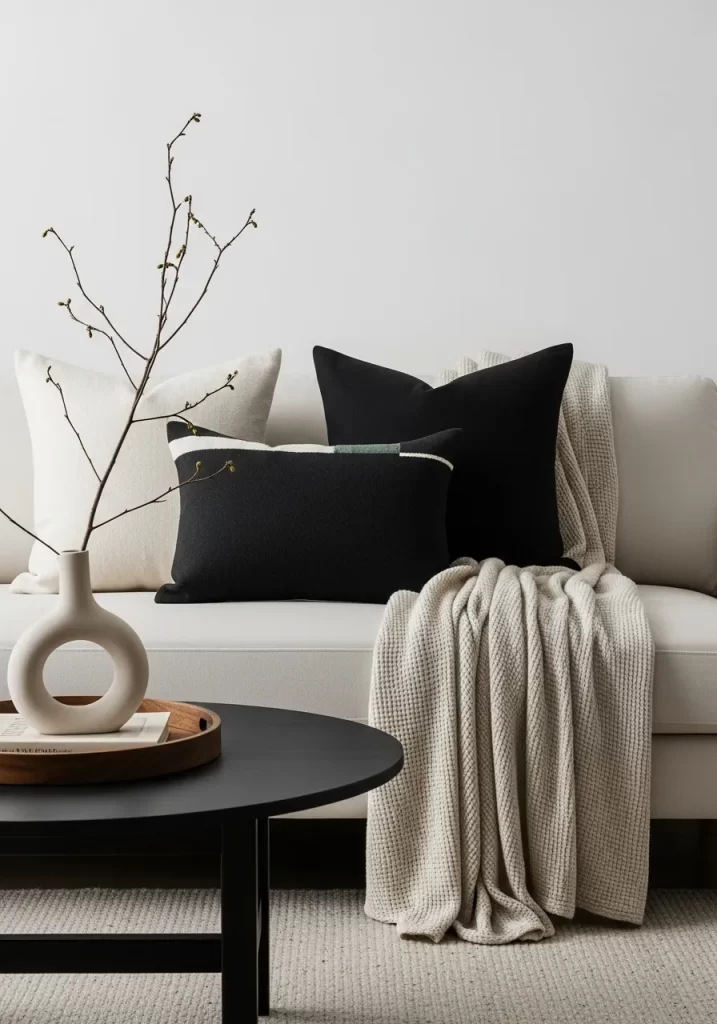
Refreshing your sofa can be very simple. This clean, modern look is achieved with just two items: a throw blanket and a couple of pillows. The key is the texture. The soft beige waffle-weave throw adds warmth to the light-colored sofa.
The black and white pillows add contrast without being loud. This style is not about bright colors. It is about simple lines and touchable fabrics. It makes the sofa look sophisticated and calm.
DIY: The Casual Drape for a Throw Blanket
- Fold it Wrong: Do not fold the blanket into a neat square. That looks too stiff for this style.
- Pinch and Lift: Grab the blanket from the middle, letting the ends hang down. It should look like you are holding a ghost costume.
- Find the Corner: Go to one corner of your sofa.
- Drape and Tuck: Let the blanket fall over the corner, spilling over the back and onto the seat cushion.
- Adjust It: Gently arrange the fabric so it looks effortless, like you just tossed it there. Part of it should be on the backrest and part on the seat. This looks inviting and very stylish.
8. Cottage-Style Ruffled Pillows
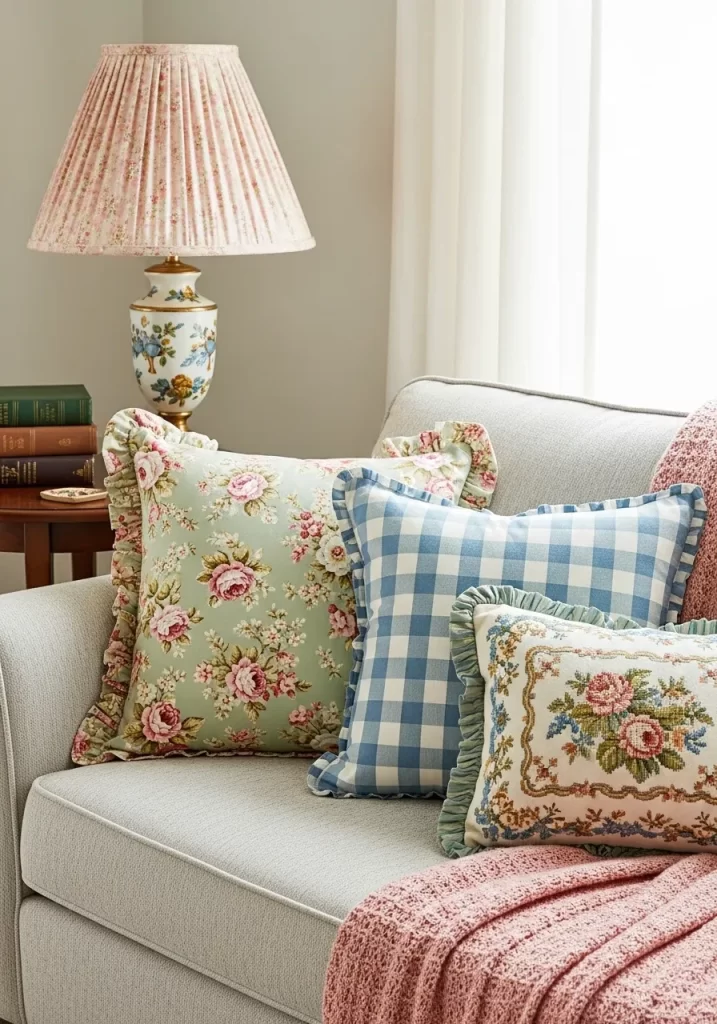
You can make your sofa feel like it belongs in a cozy country cottage. This look uses a mix of traditional patterns and soft details. The pillows are the main story here.
A soft green floral print, a classic blue and white gingham (checkered) pattern, and a needlepoint pillow all work together. The ruffled edges on the pillows are the most important part. They add a sweet, vintage charm. A soft pink throw completes the comfortable style.
DIY: Mixing Cottage-Style Patterns
- Find a Theme: Your patterns need a friend. Here, the floral, gingham, and needlepoint all share a classic, vintage feeling.
- Pick a Main Color: This look is held together by the color blue. It is in the gingham, the floral, and the needlepoint. This stops the patterns from clashing.
- Mix the Scale: Use one big pattern (the floral), one medium pattern (the gingham), and one small, detailed pattern (the needlepoint).
- Place and Fluff: Arrange them on the sofa. Let them look soft and full. The ruffles should be visible. This look is about being comfy, not perfect.
9. Monochromatic Texture Pillows
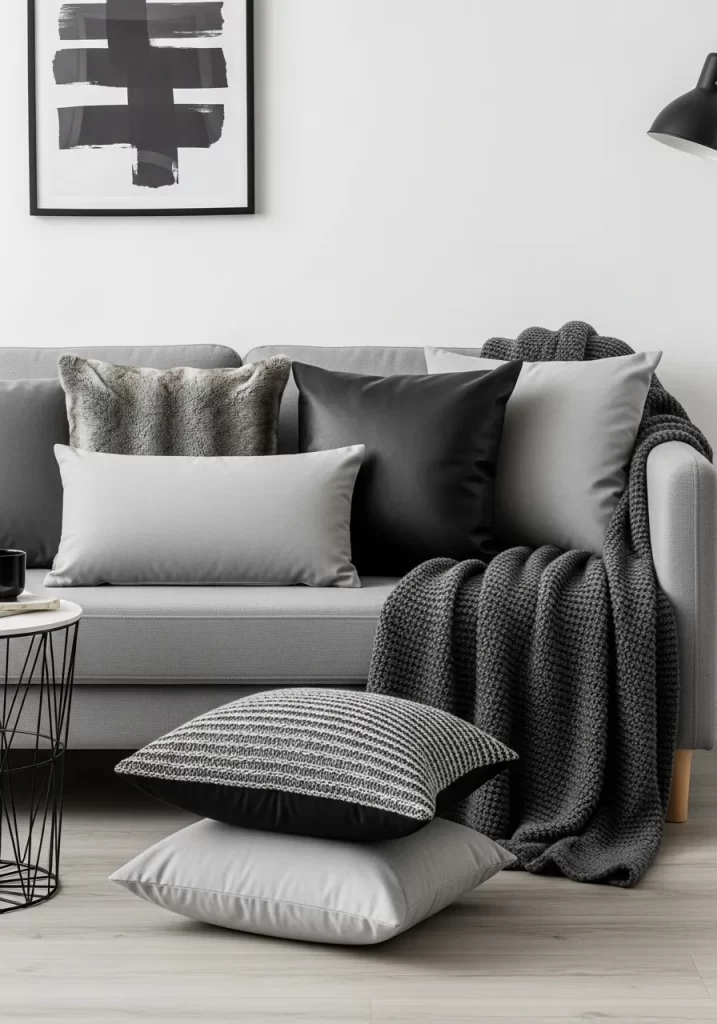
Using only one color family does not have to be boring. This grey sofa update is very powerful. The secret is mixing many different textures, all in shades of grey and black.
This group has a fuzzy grey pillow, a smooth faux-leather black pillow, a simple light grey pillow, and a patterned one on the floor. The different materials create interest for the eye. A heavy, dark grey knit throw blanket adds even more texture.
DIY: Creating a Monochromatic Pillow Mix
- Choose Your Color: Pick one main color, like grey, blue, or beige.
- Gather Materials: Go on a texture hunt. You need to find pillows in your color but in different materials. Look for:
- Something fuzzy (like faux fur or shearling).
- Something smooth (like faux leather or silk).
- Something simple (like plain cotton or linen).
- Something with a pattern (like a knit or a subtle print).
- Arrange for Contrast: Place the pillows on the sofa. Make sure a fuzzy one is next to a smooth one. This contrast is what makes the look work. It stops the colors from blending together.
10. Cozy Cable-Knit Pillows

This look is all about making your sofa the coziest spot in the house. It is perfect for fall or winter. The warmth comes from the chunky cable-knit texture on the pillows.
The bright orange and mustard yellow pillows look like your favorite sweater. They add both color and a feeling of warmth. Mixing them with a simple orange pillow and a thick, creamy-white knit blanket makes the whole couch look soft and inviting.
DIY: How to Get the “Cozy Sweater” Look
- Find Knit Pillows: Look for pillows that have a cable-knit or other chunky knit texture. Warm colors like orange, yellow, or rust work well.
- Add a Solid: Get one or two simple, solid-color pillows that match one of the colors in your knit pillows. This gives the eye a place to rest.
- Get a Chunky Throw: Find a thick blanket. A cable-knit or chenille throw is a great choice.
- Layer Them Up: Place your knit pillows in the corners. Add the solid pillow. Drape the chunky throw blanket over the arm or back. The more soft textures you have, the cozier the sofa will feel.
11. The Eclectic Texture Layers
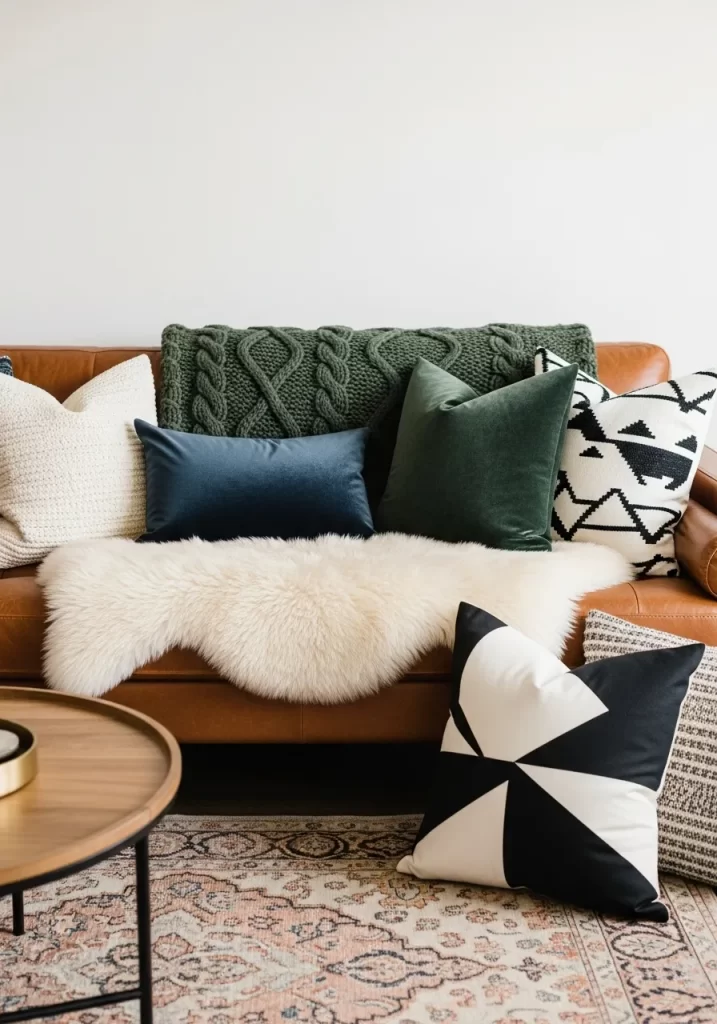
A leather sofa has a strong look. You can soften it by layering many different textures. This brown leather couch is a base for a rich mix of materials.
A fluffy white sheepskin throw makes the slick leather feel cozy. A dark green cable-knit blanket adds warmth. Pillows in velvet, cream-colored knit, and bold black-and-white patterns all join in. The result is a collected, stylish look that feels personal and comfortable.
DIY: Layering Textures on a Leather Sofa
- Start with Softness: Leather can feel cool. Your first layer should be something very soft and warm, like a faux sheepskin rug. Drape it right over the middle of the sofa.
- Add a Warm Knit: Next, add a knit blanket. Fold a cable-knit throw and place it over one of the arms or the back.
- Bring in Velvet: A velvet pillow adds a touch of shine. Place a solid velvet pillow (like the blue or green one) against an arm.
- Add a Pattern: Your final touch is a pattern. A pillow with a bold geometric print (like the black and white ones) will stop the look from being too sleepy.
12. The Long Lumbar Pillow
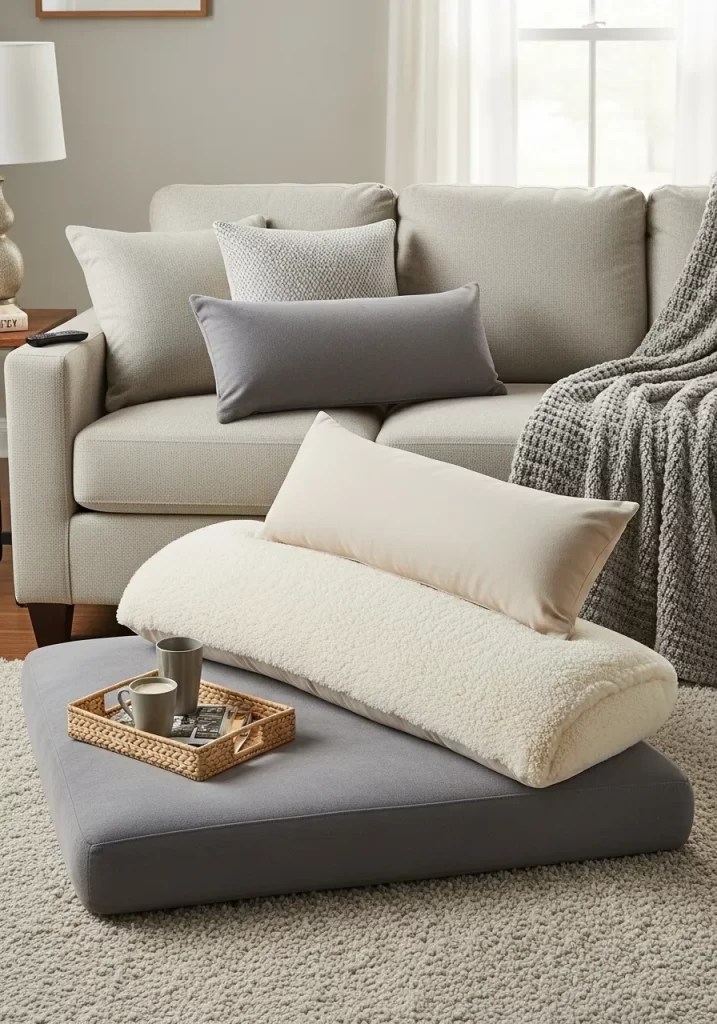
Sometimes one new shape is all you need. This neutral sofa is updated with different types of pillows. The most interesting one is the long, round bolster pillow in a soft, fuzzy sherpa fabric.
This single pillow stretches across the ottoman, but it could also go on the sofa. It breaks up the expected square and rectangle shapes. Mixing it with other simple lumbar pillows in grey and cream creates a calm, modern, and very comfortable-looking arrangement.
DIY: How to Use a Bolster Pillow
- Get Your Bolster: Find a long, tube-shaped or rectangular pillow. One with a nice texture like sherpa, boucle, or velvet works well.
- Clear the Deck: Take all your old square pillows off the sofa.
- Place the Bolster: Put your new long pillow right in the center of the sofa. It should be the main focus.
- Add Simple Supports: Place one or two smaller, simple pillows in the corners, behind the bolster. Plain rectangular pillows are a good choice.
- Check the Look: The goal is to make the sofa look longer and more sleek. The single long pillow does this.
13. The Modern Farmhouse Mix

This wooden-frame sofa gets a cozy, rustic update. The style is built with classic farmhouse patterns and textures. A black and white plaid throw blanket sets a cozy base.
Pillows made from burlap or grain sacks give it an authentic country feel. These are mixed with simple striped pillows in neutral colors. The combination of the wood frame, the plaid, and the rustic textiles feels warm and inviting.
DIY: How to Get the Farmhouse Pillow Look
- Start with Plaid: A plaid throw blanket is a farmhouse staple. Fold one and drape it over the back or arm of your sofa.
- Find Rustic Textures: Look for pillows made of rougher fabrics. Burlap or anything that looks like an old grain sack is a great start.
- Add Simple Stripes: Get one or two pillows with simple, classic stripes. “Ticking stripes” (very thin, like on an old mattress) are a good choice.
- Layer Them: Place the striped pillows in the corners. Put the burlap-style pillows in front of them. The mix of patterns looks thoughtful and stylish.
14. The 5-Minute Tufted Button Fix
Over time, the buttons on a tufted sofa can pop off. This leaves an ugly little thread and a hole. The sofa instantly looks old and broken. Fixing it is much easier than you think.
You do not need to take the sofa apart. You just need a special long needle and a new button. This small repair makes a huge difference. It takes the sofa from “worn out” to “well-kept” in just a few minutes.
DIY: How to Replace a Missing Tuft Button
- Get Your Supplies: You need a new button (try to match the old ones), a long upholstery needle (it looks like a skinny sword), and some strong upholstery thread.
- Thread the Needle: Put your thread through the needle. Do not tie a knot yet.
- Go Through the Back: Push the needle from the back of the sofa (or from underneath the cushion) all the way through the little hole where the button is missing. This is the hardest part.
- Add the Button: Push the needle through the little loop on the back of your new button.
- Go Back Down: Push the needle back through the buttonhole, right next to where it came out.
- Pull and Tie: Go to the back of the sofa again. Pull both ends of the thread very tight. This will pull the button down and create the “tuft”. Have a friend help if you can.
- Secure It: Tie a very, very tight knot. You can even add a small piece of cardboard or a different button at the back to stop the knot from pulling through.
15. The Quick Reupholstery Update
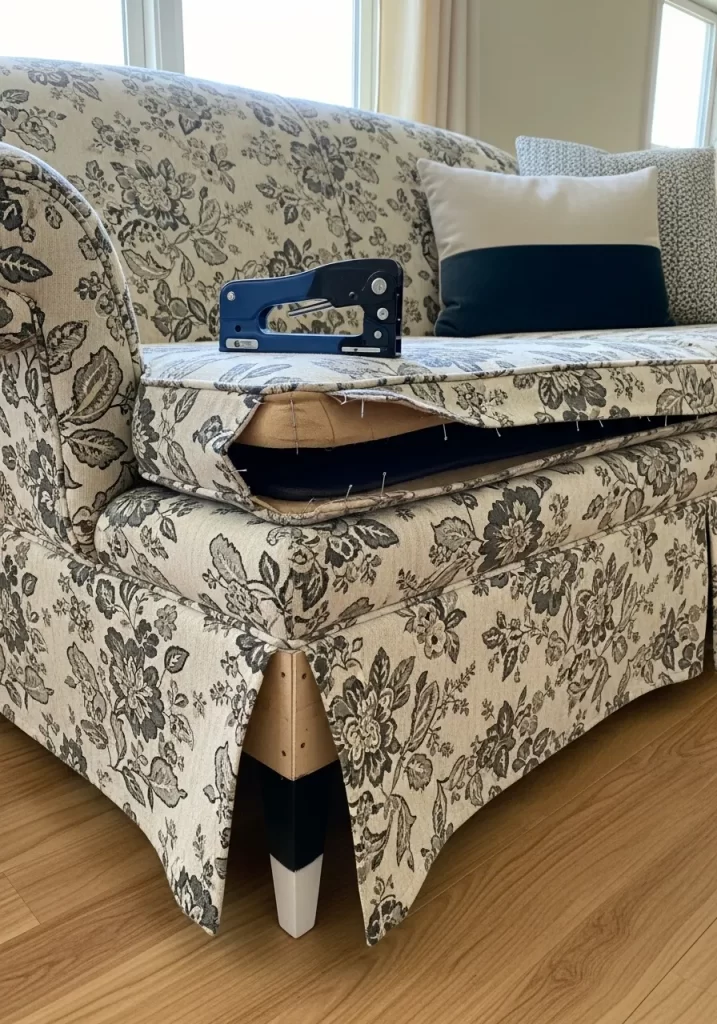
This is a bigger project, but it has a big payoff. If your sofa has a good shape but the fabric is torn or stained, you can fix it. This image shows a sofa in the middle of a change.
The main body of the sofa is being covered with new fabric using a staple gun. This is a common way to give furniture a new life. It lets you pick any fabric you want. The new legs also show a simple swap that can modernize a sofa.
DIY: How to Staple-Gun New Fabric (A Simple Seat Cushion)
- Start Small: Let’s practice on a seat cushion that pops off. Take the cushion off the sofa.
- Get Fabric: Buy a piece of strong fabric (like canvas or upholstery fabric) that is bigger than your cushion.
- Lay it Out: Place your new fabric on a clean floor, with the “pretty” side facing down.
- Center the Cushion: Put your cushion upside down on top of the fabric.
- Pull and Staple: Start on one side. Pull the edge of the fabric tight onto the bottom of the cushion. Use a staple gun to put one staple in the middle.
- Do the Other Side: Go to the opposite side. Pull the fabric very tight. Put one staple in the middle.
- Repeat: Do the same for the other two sides. Now it is held in place.
- Fill it In: Keep pulling and stapling on all four sides, working from the middle out toward the corners.
- Fold the Corners: The corners are tricky. Fold them neatly, like you are wrapping a birthday present. Staple them down flat.
16. The Industrial-Style Swap
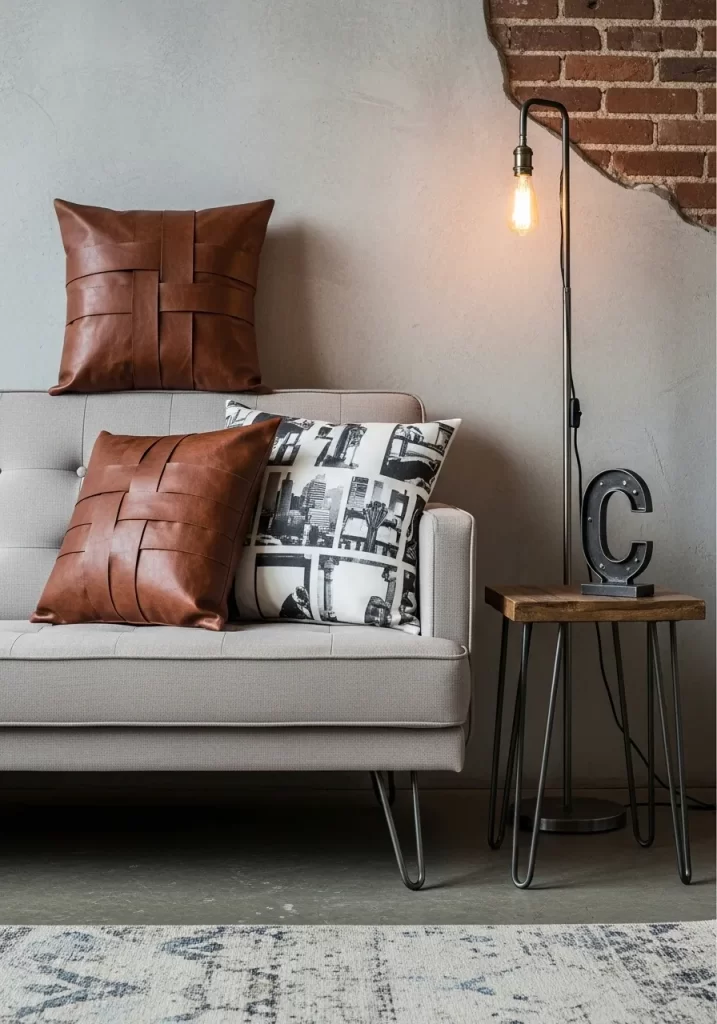
This sofa gets its new look from hairpin legs. Swapping the legs is a fast way to change the entire style of your seating. These thin, metal legs give the couch a mid-century modern or industrial feel.
The accessories follow this theme. Woven leather pillows and a black-and-white city print add to the urban, slightly masculine look. This is a good way to update a simple sofa you might find at a big-box store.
DIY: How to Change Sofa Legs
- Get Help: A sofa is heavy. Ask an adult to help you flip it over.
- Flip the Sofa: Carefully lay the sofa on its back or upside down so you can easily reach the legs.
- Look at the Legs: See how the old legs are attached. Most of the time, they are just screwed in.
- Unscrew Them: Twist the old legs counter-clockwise (to the left) to unscrew them. Take all four legs off.
- Get New Legs: Buy new legs (like these hairpin ones). Make sure they have the same type of screw on top.
- Screw Them In: Take your new leg and screw it into the hole, turning it clockwise (to the right).
- Make Them Tight: Keep twisting until the leg is very snug and does not wobble. Do this for all four legs.
- Flip it Back: Carefully flip your sofa back over and test it to make sure it is steady.
17. The Sagging Cushion Fix (Part 1: The Problem)
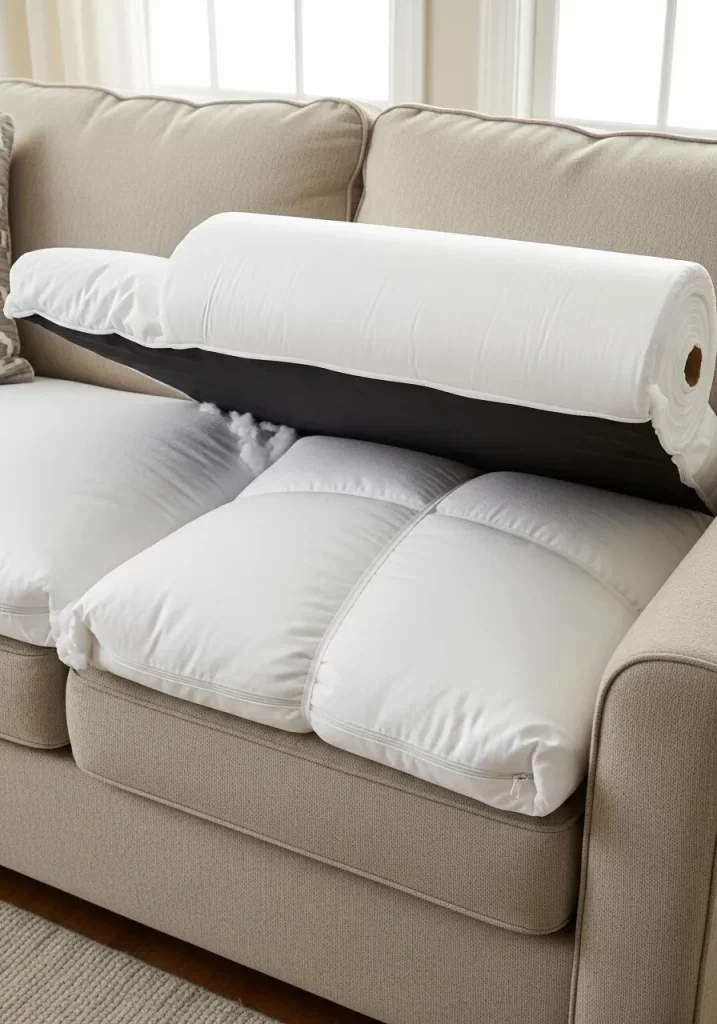
Does your sofa feel like a hammock? Over time, the cushions lose their support and you sink right in. This is a common problem with older sofas.
The image shows what happens when you take the cushions off. The springs or supports underneath are hidden. But the fix is simple. You can add new stuffing (batting) to make the cushions firm again.
DIY: How to Re-Stuff a Sagging Cushion
- Unzip the Cushion: Find the zipper on your saggy seat cushion. It is usually at the back.
- Pull the Inside Out: Reach in and pull out the foam block that is inside. This is called the “insert”.
- Get Batting: Go to a craft store and buy a roll of “high-loft polyester batting”. It looks like fluffy white snow in a blanket.
- Wrap the Insert: Lay your foam insert on the floor. Roll the batting around it, like you are rolling up a sleeping bag.
- Wrap it Again: You want it to be snug. Wrap it around two or three times, until the cushion looks much fatter.
- Trim the Extra: Use scissors to cut the batting from the roll.
- Put it Back: This is the hard part. Squish the newly wrapped insert back into the cushion cover.
- Zip it Up: You may need someone to help you squish it down while you pull the zipper closed. It should be very full.
18. The Sagging Cushion Fix (Part 2: The Result)

Look at the difference! The top sofa has flat, sad cushions. They look sloppy and are not comfortable.
The bottom sofa is the “after.” The cushions have been re-stuffed using the batting trick. They are now plump, firm, and look brand new. This simple fix makes the entire sofa look 10 years younger. It is one of the most effective ways to refresh an old couch.
DIY: How to Re-Plump Your Back Cushions
- Unzip: Find the zipper on your back cushions.
- Check the Stuffing: These cushions are probably not foam. They are likely full of a loose, fluffy stuffing called “polyfill”.
- Break it Up: Reach your hands inside and break up all the old stuffing. It gets lumpy and flat over time. Fluff it up with your fingers.
- Add More: Go to a craft store and buy a bag of new polyfill.
- Stuff it Full: Grab handfuls of the new stuffing and push it deep into the corners of the cushion cover.
- Keep Stuffing: Keep adding new stuffing until the cushion is very full and firm.
- Zip and Fluff: Zip the cushion closed. Give it a few good punches and a “karate chop” to get the stuffing even.
19. The Ultra-Luxe Faux Fur Throws
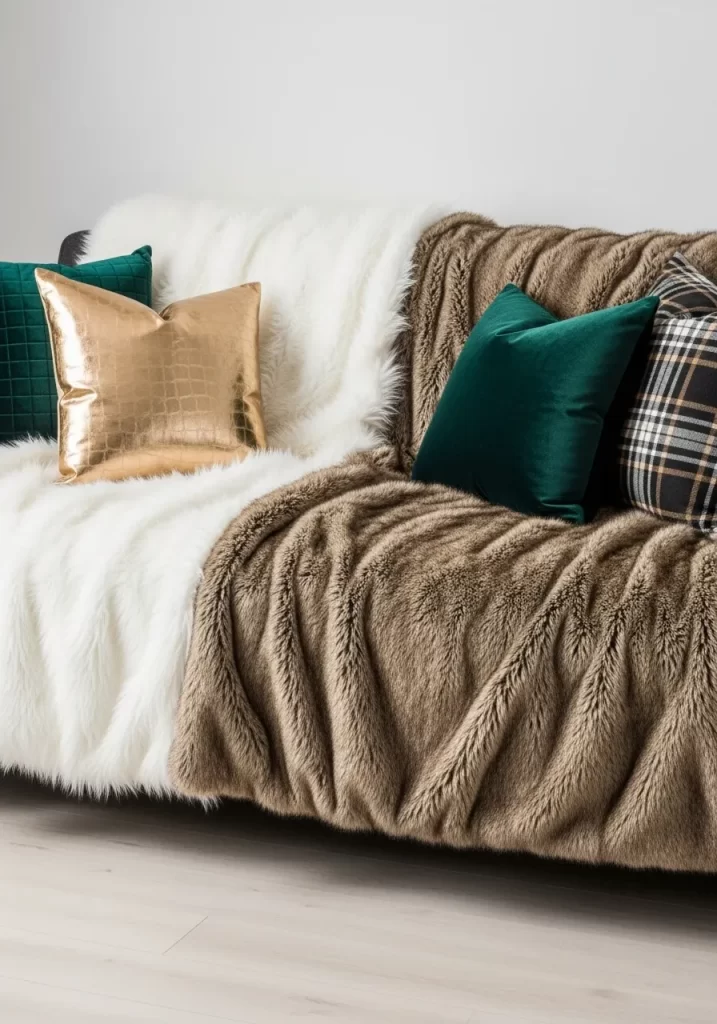
This is a very fast and dramatic change. You can hide an old or boring sofa completely under giant, luxurious throw blankets. This sofa uses two different faux fur throws, one in white and one in brown.
They are not folded neatly. They are draped over the entire sofa. This creates an incredibly soft and high-end look. A few glam pillows in gold and emerald green velvet complete the rich, expensive feel.
DIY: How to Drape Large Throws
- Get Big Throws: This only works if your blankets are large. You need one or two.
- No Folding: Do not fold them. Hold one blanket up by the corners.
- Drape the First One: Lay the first blanket (the white one) over one side of the sofa. Let it cover the back, the arm, and the seat.
- Drape the Second One: Take your second blanket (the brown one) and do the same thing on the other side of the sofa.
- Overlap: Let the two blankets overlap in the middle.
- Tuck and Fluff: Gently tuck the blankets into the seat crack to hold them. Fluff them up so they look soft and inviting, not flat.
- Add Glam Pillows: Place a few shiny or velvet pillows on top.
20. The Bright and Bold Quilted Cover
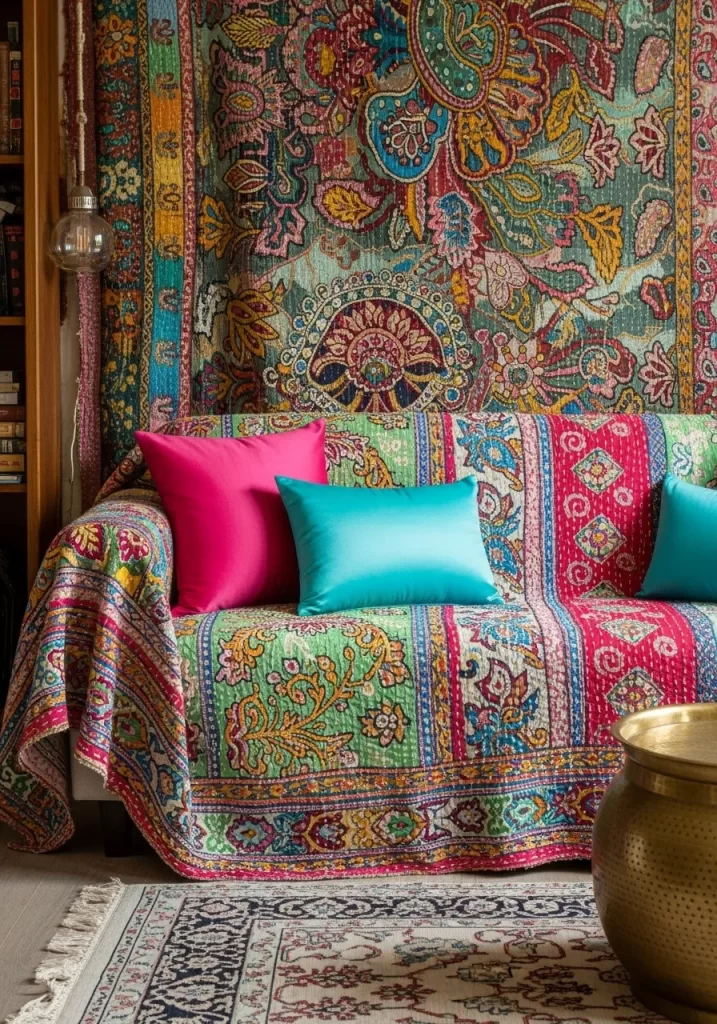
This is a fantastic way to add a lot of color. A large, vibrant quilt is used as a “cover” for the sofa. It is tucked in like a slipcover, but it is much more colorful.
This look is great for a bohemian or eclectic room. The bright pinks, greens, and reds in the quilt hide any stains on the sofa underneath. A few solid-color pillows (like the hot pink and teal) pull colors from the quilt and make it look complete.
DIY: How to Use a Quilt as a Sofa Cover
- Get a Big Quilt: You need a quilt that is large enough to cover your whole sofa. A “Queen” or “King” size quilt is usually best.
- Drape it Evenly: Unfold the quilt and spread it over your sofa. Try to get it as centered as possible.
- Tuck, Tuck, Tuck: This is the most important step. Push the quilt deep into the cracks of the sofa—behind the seat cushions, and down the sides of the arms.
- Tuck it Deep: The more you tuck, the more it will look like a real slipcover and the less it will move around when you sit.
- Smooth the Front: Pull the front of the quilt down so it hangs nicely over the bottom of the sofa.
- Add Solid Pillows: Choose one or two bright colors from the quilt and find simple, solid pillows in those colors. This makes the look feel planned.
21. The “Change the Scenery” Refresh

Your sofa might not be the problem. The room it lives in could be. This simple sofa looks completely different in two settings. The top version feels calm and coastal with a natural jute rug. The bottom version is more bold, thanks to a black and white patterned rug.
A different rug or new pillows can change the whole feel of your seating. You can see how a few accessory changes make the same sofa fit two different styles.
DIY: How to “Change the Scenery”
- Look at Your Rug: The rug under your sofa is like a frame for a picture. Is it boring?
- Try a Swap: Get a new rug with a fun pattern or color. Or, try a natural jute rug for a beachy feel.
- Change Pillows: Take all your pillows off. Add new ones that match your new rug.
- Move the Chair: Do you have an armchair? Try moving it to the other side of the room.
- Look Again: Step back. The whole room, including your sofa, will feel new.
22. The Behind-the-Sofa Console Table

Sometimes the best update is not on the sofa, but behind it. A slim console table creates a great-looking border. It is very useful in an open room where the sofa back is exposed.
It gives you a new place for lamps, plants, or family photos. This simple table adds height and makes the whole sofa area feel more complete and planned.
DIY: How to Add a Sofa Console Table
- Measure Your Sofa: Get a measuring tape. Measure how tall your sofa’s back is.
- Find a Table: Look for a console table that is just shorter than your sofa’s back. It should be very skinny so it does not stick out.
- Push it Back: Slide your sofa forward a few inches.
- Place the Table: Put the new table right behind the sofa, against its back.
- Push Back Again: Gently push the sofa and table back into place.
- Add Your Stuff: Put one or two tall lamps on the table. Add a plant or a tray for remotes.
23. The “Less is More” Declutter

Is your sofa covered in old blankets and too many pillows? Try taking everything off. This sofa looks fresh just by being neat. It has only two matching pillows, one on each end.
This symmetrical, simple look makes the sofa itself look cleaner and more elegant. A clear coffee table with just a few items helps. Sometimes the best refresh is just a good cleaning and decluttering.
DIY: How to Do the “Symmetrical” Look
- Empty the Sofa: Take everything off your sofa. All pillows, all blankets.
- Clean It: Get a vacuum and clean all the cushions and cracks.
- Find Two Pillows: Find two matching pillows. If you do not have any, this is a small thing to buy.
- Place Them: Put one pillow in the far-left corner. Put the other matching pillow in the far-right corner.
- Stop! Do not add anything else. The clean, simple look is the new style.
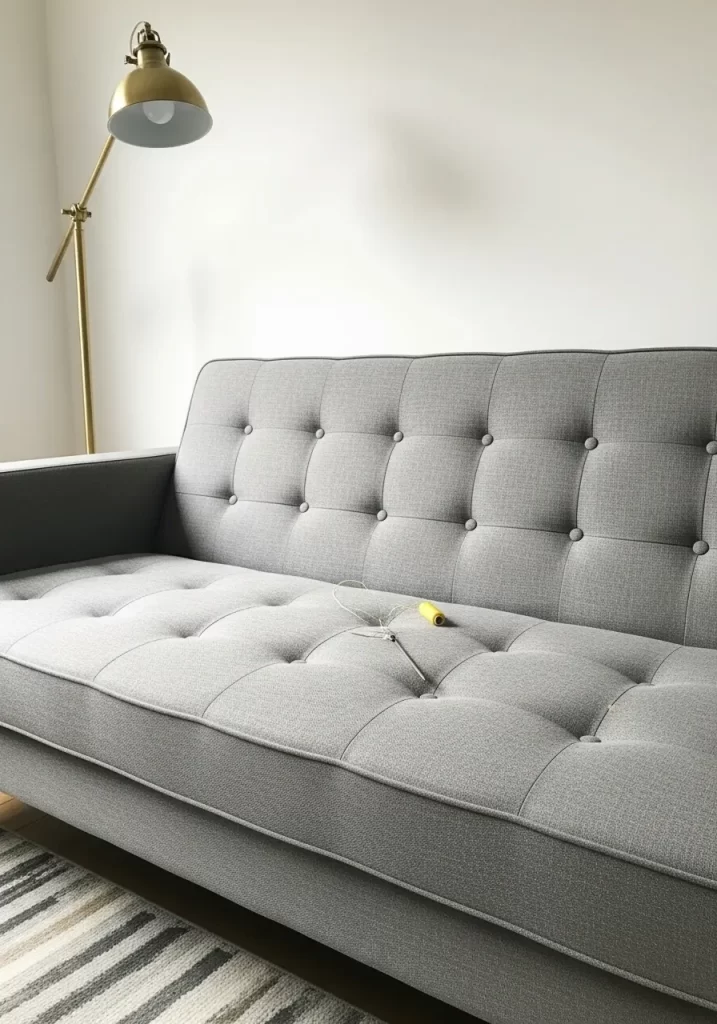
24. The Cozy Reading Nook
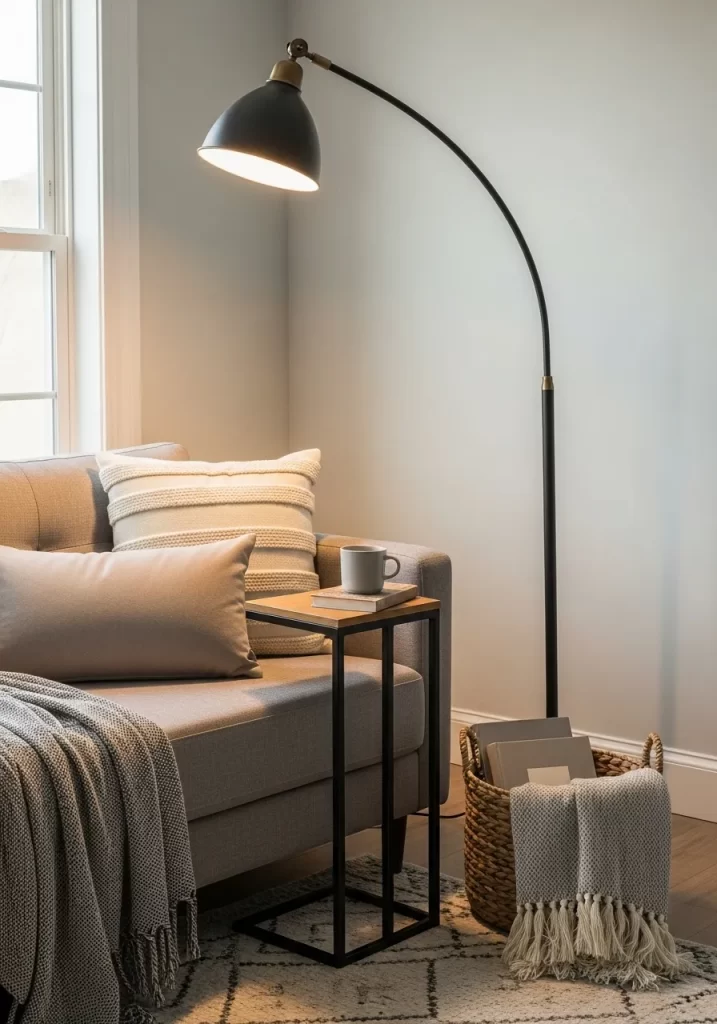
Make one corner of your sofa a special spot. This update is about creating a function. An arc floor lamp brings light right to your book. A “C-table” is a smart little table.
Its base slides under the sofa, so the tabletop floats over your lap. It is just the right size for a mug or a book. Add a textured pillow and a soft throw, and you have a new favorite spot.
DIY: How to Build a Reading Nook
- Pick a Corner: Choose one end of your sofa. This will be your new spot.
- Get a Good Light: Find a floor lamp that can aim light down, like this arc lamp. Place it right behind the sofa corner.
- Find a “C-Table”: Look for a small table shaped like the letter “C”.
- Slide it In: Slide the bottom of the “C” table under the sofa. The top will hang over the cushion.
- Add Comfort: Put your favorite soft pillow and a warm blanket in that corner. Now it is ready for reading.
25. The Coordinated Textile Set
An easy way to get a designer look is to use a matching “set” of textiles. This sofa uses pillows, a throw, and even a floor cushion that all share the same patterns and colors.
The light, neutral-and-orange patterns work together without clashing. This makes the whole arrangement look very intentional and put-together. It is a simple way to add a lot of pattern without the guesswork.
DIY: How to Use a Matching Textile Set
- Find a Set: When you are shopping, look for pillows that have a “matching family.” This means they use the same 2-3 colors in different patterns.
- Get a Throw: Find a throw blanket that also uses those same colors.
- Mix the Patterns: On your sofa, mix the patterns. Put a floral-style one next to a geometric one.
- Add a Solid: If you can, add one plain pillow (like plain white or beige) to give the eye a rest.
- Bonus: Floor Pillow: If you find a floor pillow in the same set, put it on the rug in front of the sofa.
26. The Peeling (Faux) Leather Fix

Faux leather sofas can look great, but many end up peeling and flaking. This large bare patch on the arm makes the whole sofa look terrible. Do not throw it out! You can easily and cheaply fix this spot.
A simple leather repair patch or a bit of special paint can cover the damage. Even a well-placed blanket (like the plaid one shown) can hide it.
DIY: How to Use a Leather Repair Patch
- Clean the Spot: Gently wipe the peeling area with a damp cloth to get any dust or loose bits off. Let it dry.
- Get a Patch: Go online or to a craft store and buy a “peel and stick leather repair patch.” Try to get a color that matches your sofa.
- Cut the Patch: Cut the patch so it is a little bigger than your peeling spot. Try to round the corners with your scissors (rounded corners stick better).
- Peel and Stick: Peel the paper backing off the patch, just like a big sticker.
- Press it Down: Carefully place the sticky patch over the damaged area. Press it down very, very hard, especially on all the edges.
27. The Smart Armrest Caddy

This is a clever two-in-one fix. First, it covers that ugly stain on the sofa arm. Second, it adds storage right where you need it.
This quilted caddy drapes over the arm and has pockets for your remote, glasses, and books. The best part is the flat wooden top. It creates a stable spot for your drink, so you do not even need a side table.
DIY: How to Install an Armrest Caddy
- Get a Caddy: Find one of these armrest organizers online or in a store. Pick one that matches your sofa.
- Unfold It: Take it out of the package and unfold it.
- Drape It: Simply drape the caddy over the arm of your sofa. Make sure the wooden tray part is on top of the armrest.
- Tuck it In: Some caddies have a flat piece of fabric on one side. Tuck this end deep down between the arm and the seat cushion. This stops it from sliding off.
- Fill the Pockets: Put your remote control, your reading glasses, and your favorite magazine in the pockets.
28. The “De-Pilling” Fabric Shave
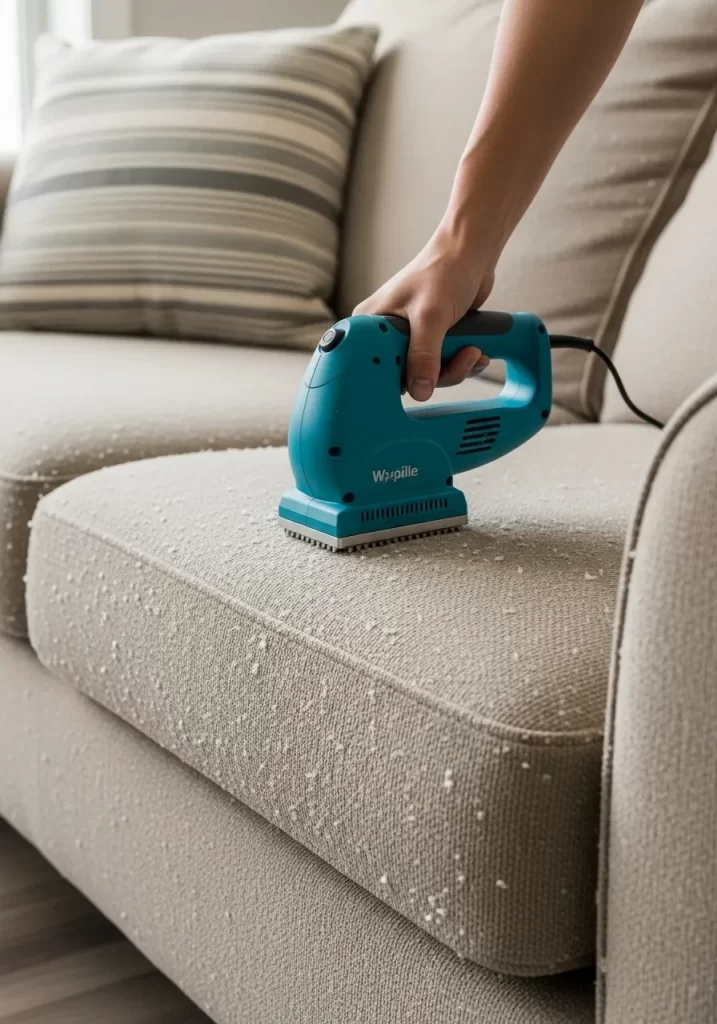
Does your sofa fabric feel rough and look messy? It is probably “pilling.” This is when the fabric fibers roll up into tiny, ugly balls. You can make it look brand new with a simple tool called a fabric shaver.
This little machine safely shaves off all the pills. It leaves the fabric smooth and clean. This is one of the most satisfying ways to refresh your couch.
DIY: How to Shave Your Sofa
- Get a Shaver: Buy a fabric shaver (or “de-piller”). They are small and often use batteries.
- Test a Spot: Start on a spot that is hard to see, like the back of a cushion.
- Turn it On: Turn the shaver on.
- Shave the Fabric: Gently rub the shaver over the fabric in small circles. Do not press too hard. Let the tool do the work.
- Keep Going: You will see all the little pills disappear! Keep going until the cushion is smooth.
- Empty the Fuzz: The shaver has a small container that catches all the fuzz. Do not forget to empty it when it gets full.
29. The Statement Art Throw
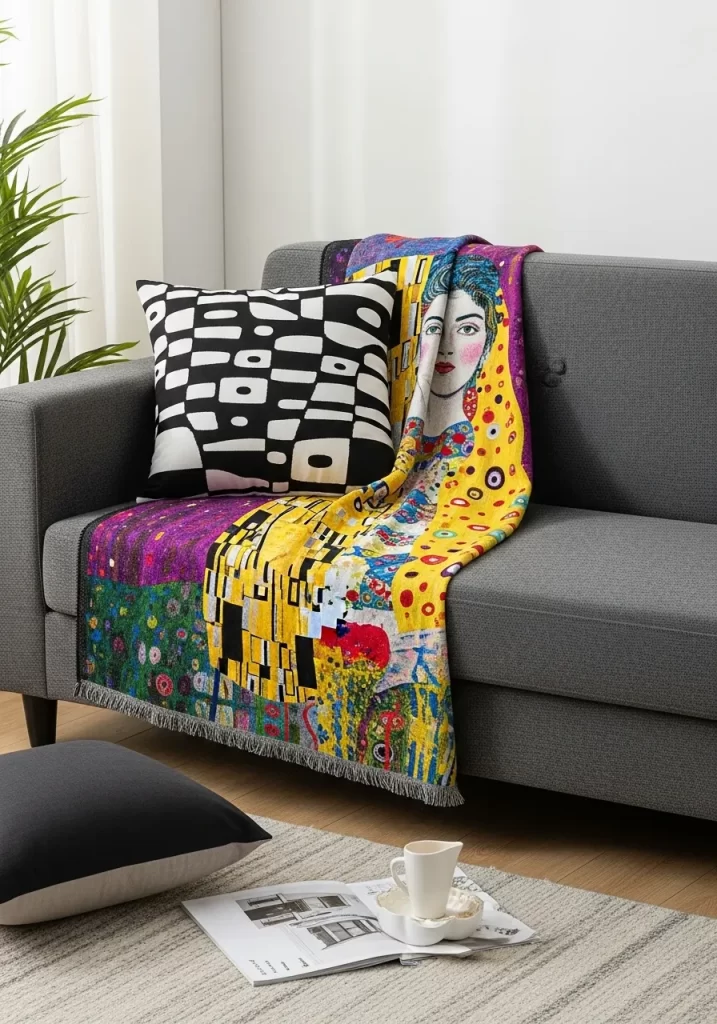
Turn your boring sofa into a piece of art. This plain grey couch is just a canvas. The real star is the colorful, artistic throw blanket.
Using a blanket with a famous painting or a bold, graphic design makes a huge statement. It is like hanging art right on your furniture. A contrasting pillow, like this black and white one, makes the look even more modern and bold.
DIY: How to Use a Statement Throw
- Find Your Art: Look for a throw blanket that is really special. It could be a copy of a famous painting or just a design you love.
- Fold it Simply: Fold the blanket in half, the long way.
- Drape it: Drape the folded blanket over the back of the sofa, off to one side. Let it hang down the back and onto the seat.
- Add a Wildcard: Find one pillow that is not like the blanket. A simple black and white pattern is a great choice.
- Place the Pillow: Put this pillow in the corner, on top of the blanket.
30. DIY Color-Block Pillows

You do not have to buy new pillows. You can make them! These stylish pillows are made from solid-colored fabric. By cutting and sewing different triangles of color together, you get a custom, modern look.
The visible “zig-zag” stitching on the front pillow is a great detail. This is a fun project that lets you choose any colors you want.
DIY: How to Make a Simple Color-Block Pillow (No-Sew)
- Get Supplies: You need a plain, boring pillow. You also need “fabric glue” and a few squares of colored fabric (like felt or cotton).
- Cut Your Shapes: Cut a triangle out of one color of your new fabric. Make it big enough to cover one corner of your pillow.
- Glue it Down: Read the instructions on the fabric glue. Draw a line of glue on the pillow where the triangle will go.
- Press the Fabric: Carefully press your fabric triangle onto the glue. Make sure the edges are flat.
- Add Another Color: Cut another shape from a different color. Glue it onto another part of the pillow.
- Let it Dry: Let the glue dry completely. You just made a new pillow!
31. The Lively Patterned Sofa
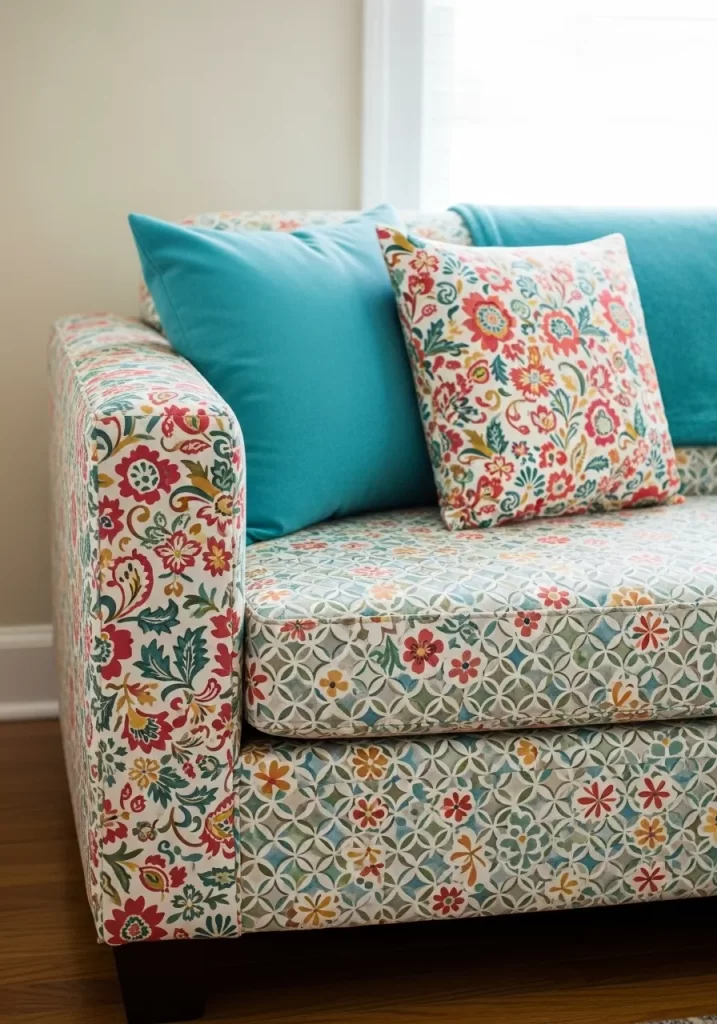
A colorful, patterned sofa makes a big statement. This couch is covered in a lively floral and geometric fabric. It is a bold choice that instantly brings personality to a room.
The bright turquoise pillows add a solid pop of color. They pull one of the hues from the patterned fabric, making the whole look feel put together. This style is for those who love color and want their sofa to be the star.
DIY: How to Choose Pillows for a Patterned Sofa
- Find a Color in the Pattern: Look closely at your patterned sofa. Pick one strong color from the fabric (like the turquoise here).
- Get Solid Pillows: Find pillows in that exact solid color.
- Keep it Simple: Do not add more patterned pillows. Your sofa is already doing all the pattern work.
- Place Sparingly: You do not need a lot of pillows. Just one or two on each end of the sofa will be enough.
- Enjoy the Bold Look: The solid pillows will stand out and make your sofa’s pattern look even better.
32. The “What If” Color Swaps
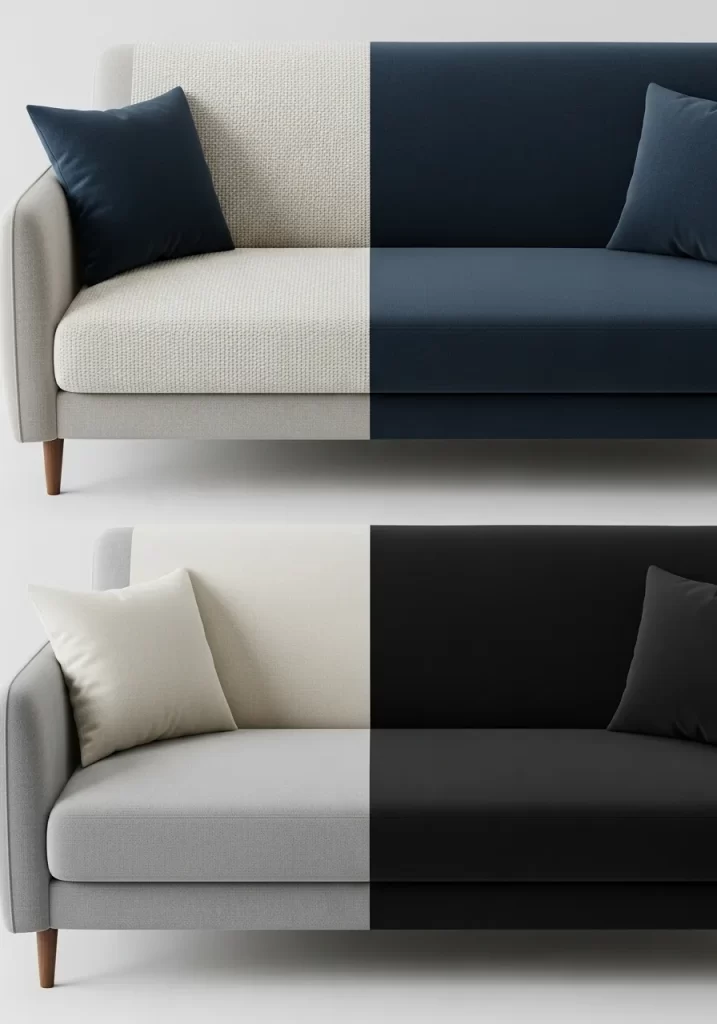
You do not always need to buy something new. Sometimes just imagining a different color helps. This image shows the same sofa in many different colors.
This helps you see how a simple sofa can change its whole mood with a new cover. It could be dark and moody in navy, or light and airy in white. Thinking about color is the first step to a fresh look.
DIY: How to Imagine New Sofa Colors
- Take a Photo: Take a picture of your sofa in your living room.
- Use a Photo App: On your phone or computer, use a simple photo editing app. Many apps let you “draw” or “paint” on pictures.
- Pick a New Color: Pick a color you like.
- Color Your Sofa: Gently “paint” over your sofa in the photo with the new color. Do not worry about it being messy.
- Try Many Colors: Try many different colors. This helps you see what works before you buy anything.
33. The Accent Chair Color Match
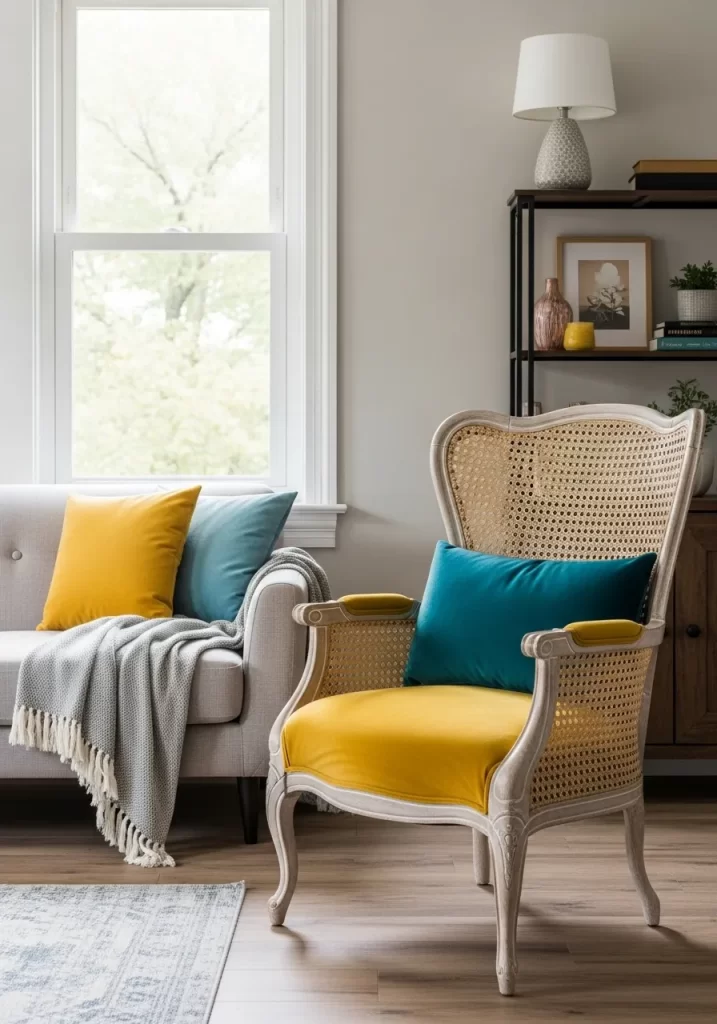
Your sofa and accent chairs are a team. Make them work together by matching colors. This grey sofa has bright yellow and teal pillows. The matching accent chair has the same colors in its cushion and lumbar pillow.
This creates a cohesive look for your whole seating area. It makes the room feel thought-out and stylish. The matching colors create a lively, balanced feeling.
DIY: How to Coordinate Sofa and Chair Colors
- Pick a Color: Look at your sofa. What colors do your pillows have? Choose one or two bright colors.
- Look at Your Chair: Now look at your accent chair. Is it a plain color?
- Get Matching Pillows: Find pillows in those same bright colors for your chair.
- Add a Throw: If your sofa has a throw, try to get a small matching throw for the chair.
- Create Balance: The goal is to spread the colors around the room. This makes everything feel connected.
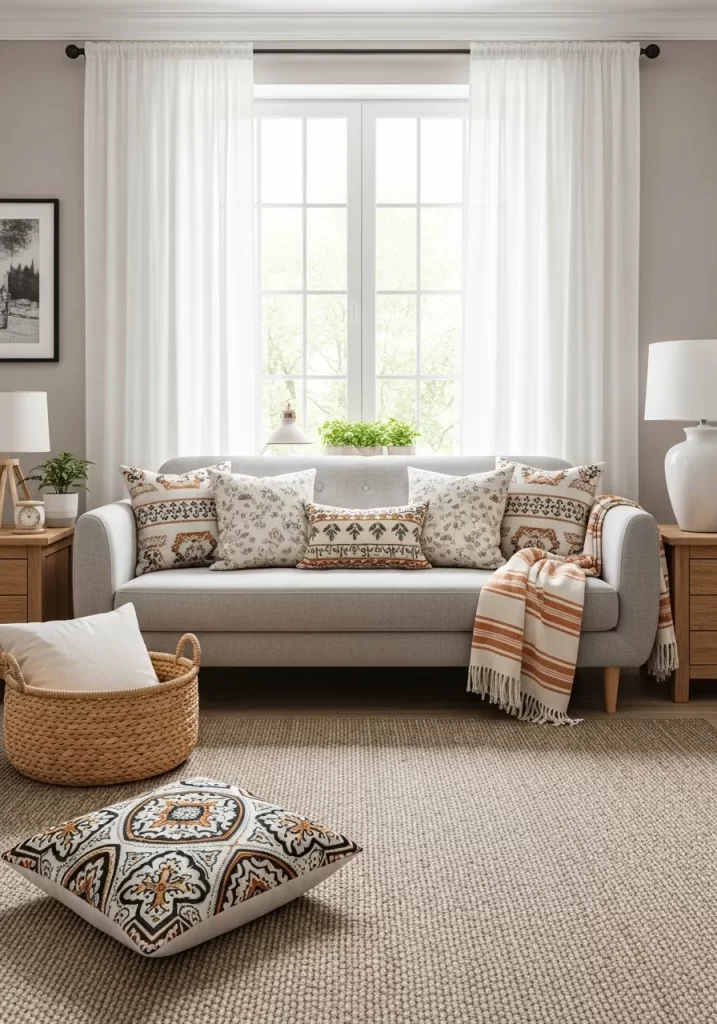
34. The Natural Boho Refresh
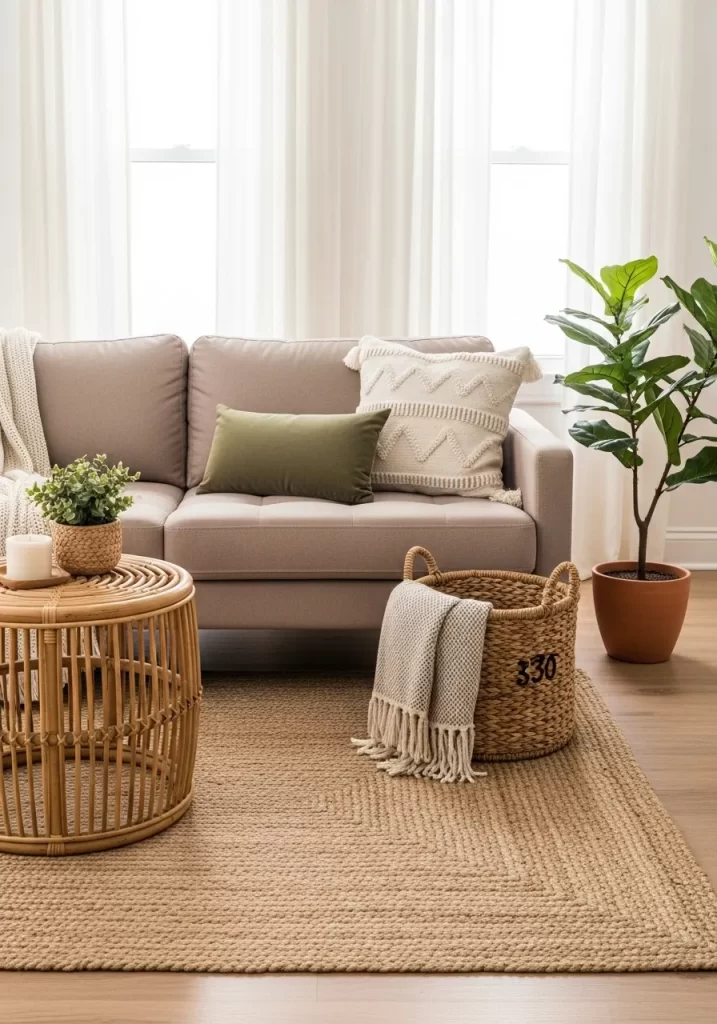
This sofa gets a total refresh using natural textures and a calm, earthy color palette. The light beige sofa is a canvas for woven materials.
A rattan coffee table, a large woven basket, and a soft braided rug all create a relaxed, natural vibe. Pillows with fringe and simple patterns add to the boho charm. This creates a peaceful and grounded living room.
DIY: How to Create a Natural Boho Look
- Start with Neutrals: Your sofa should be a calm color like beige, white, or light grey.
- Add Woven Furniture: Look for a coffee table or side table made of rattan or wicker.
- Find a Jute Rug: Get a rug made of natural jute. It adds a great texture to the floor.
- Get Woven Baskets: Find one or two large woven baskets. You can put blankets in them.
- Textured Pillows: Choose pillows with textures like fringe, tassels, or simple woven patterns in natural colors.
- Add Greenery: A small potted plant adds a fresh, living touch.
35. The Painted Striped Sofa
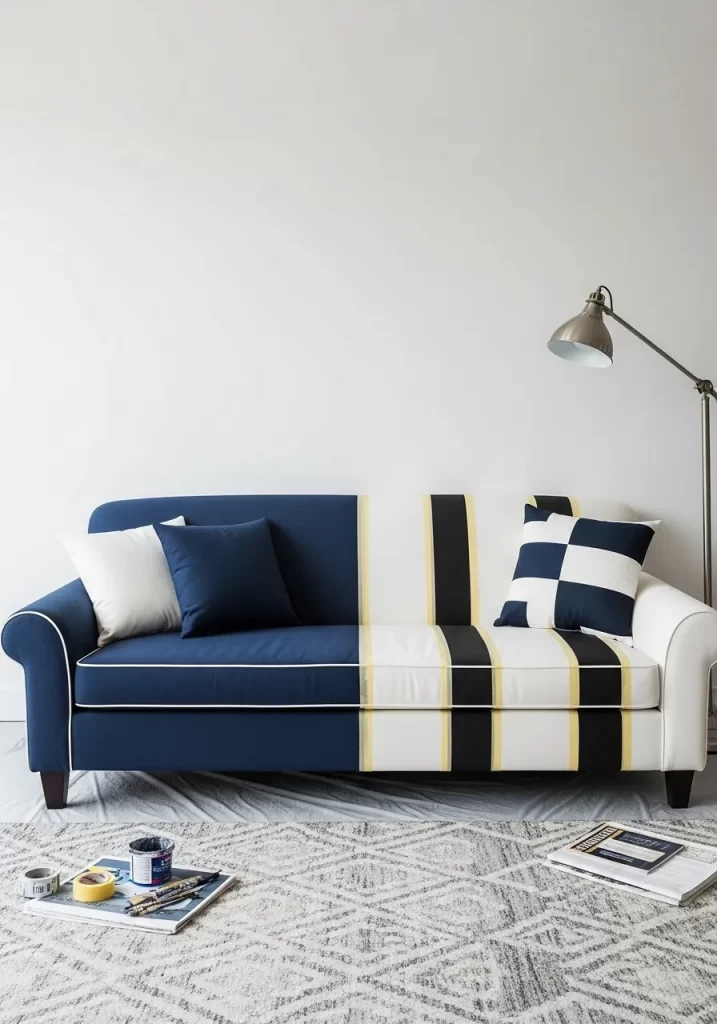
This is a bold, creative project for an old sofa. Instead of a slipcover, you can paint stripes directly onto the fabric. This takes courage, but the result is a completely custom and unique piece.
The image shows a half-painted sofa, with crisp black and white stripes. A thin yellow stripe adds a fun detail. This turns a worn-out sofa into a stunning focal point.
DIY: How to Paint Stripes on Fabric (Practice First!)
- Practice First: Do not start on your sofa! Get an old pillowcase or a piece of spare fabric.
- Get Fabric Paint: Buy special “fabric paint.” Regular paint will crack.
- Clean Your Fabric: Make sure the sofa fabric is clean and dry.
- Tape Your Lines: Use painter’s tape to make the stripes you want. Press the tape down very firmly so paint does not bleed underneath.
- Paint Carefully: Apply thin layers of fabric paint with a brush or sponge. Let each layer dry before adding another.
- Peel the Tape: When the paint is completely dry, carefully peel off the painter’s tape.
- “Set” the Paint: Many fabric paints need to be “heat set” with an iron. Follow the instructions on your paint bottle. This makes the paint permanent.
A tired sofa does not have to mean a trip to the furniture store. Your living room seating has so much potential.
As you have seen, a simple fix can make a big impact. A new slipcover can change the entire color scheme. A few textured pillows can add warmth and style. Even a 10-minute repair, like replacing a button or shaving fabric pills, can make a sofa look new.
You do not need to do everything on this list. Start with one small change.
Choose the project that feels easiest to you. You will be surprised at how a small update to your sofa can refresh your entire living room.
Key Takeaways
- Small Fixes, Big Results: Do not underestimate small repairs. Fixing pilling, replacing buttons, or patching tears can make a sofa look 10 years younger.
- Texture is Key: You can change the entire feel of your couch by adding new textures. Faux fur, chunky knits, velvet, and leather all add depth and interest.
- Pillows and Throws Work: The fastest, most affordable update is a new set of pillows or a well-draped throw blanket. Use them to add new colors or patterns.
- Think Beyond the Sofa: Changing things around your seating also helps. A new rug, a “C-table” for a reading nook, or a console table behind the sofa can redefine the whole area.
- A Slipcover is a Fresh Start: When the fabric is the main problem, a slipcover is a great solution. It hides stains and outdated patterns completely.