Your living room is the heart of your home. It’s where you relax, entertain, and spend time with family. But when your couch starts to look tired, it can bring down the entire feel of the space.

Buying a brand-new sofa is a major expense. The good news is you don’t have to. A complete refresh is possible with a little creativity and some simple, budget-friendly updates. You can fall in love with your living room seating all over again.
This guide will walk you through 36 different ways to transform your old couch. From no-cost furniture rearrangements to simple styling tricks and satisfying DIY projects, there is a solution here for every skill level and budget. Get ready to see your sofa in a whole new light.
1. The Classic Slipcover Makeover

A tailored slipcover can completely transform a tired, old sofa. It offers a clean, uniform look that hides any past spills or dated floral patterns. This simple change brings a fresh feeling to the entire room.
Choosing a neutral color like beige or light gray creates a calm and inviting space. The fabric drapes over the original furniture, giving it a new life without the high cost of reupholstering or buying a new piece. It is a smart and stylish solution for a quick update.
DIY Slipcover Instructions
What You Need:
- Your new slipcover
- A vacuum cleaner with a hose attachment
- A wooden spoon or a ruler (optional, for tucking)
Step-by-Step Guide:
- Prepare Your Couch: First, take all the cushions off your couch. Use the vacuum cleaner to suck up any crumbs, dust, or pet hair from the main part of the sofa. Get into all the little corners!
- Find the Guide Tags: Unfold your new slipcover. Look for little tags on the inside. They often say things like “Center Back,” “Front,” or “Arm.” These tags are your secret map to putting the cover on correctly.
- Drape and Position: Gently lay the slipcover over your couch. Match the “Center Back” tag with the middle of your couch’s back. Drape the parts for the arms over the correct arms of the sofa. It might look like a big, loose sheet right now, and that’s okay.
- Tuck and Tighten: Start tucking the extra fabric into the crevices of the couch—where the back and arms meet the seating area. Push the fabric in deep so it stays put. If you have trouble using your hands, a wooden spoon or a ruler can help you push the fabric in neatly.
- Cover the Cushions: Now, find the separate covers for your seat cushions. Carefully slide each cushion into its cover, just like putting a pillow in a pillowcase. Zip or fasten them securely.
- Final Touches: Place the covered cushions back onto the sofa. Smooth out any remaining wrinkles on the slipcover with your hands. Your couch now has a brand-new look!
2. The Bohemian Textile Drape

Draping colorful, patterned textiles over your couch adds a layer of worldly charm. This approach is great for covering up worn fabric while introducing vibrant energy. You can easily create a cozy, eclectic look.
The beauty of this method lies in its freedom. Mix different patterns and textures to tell a story. This turns your sofa into a canvas for your personal style, making the living room feel more unique and lived-in.
DIY Textile Draping Instructions
What You Need:
- A few large, decorative fabrics (like quilts, thin rugs, or tapestries)
- Safety pins (optional)
Step-by-Step Guide:
- Start with a Base: Choose your largest piece of fabric. This will be your main cover. Lay it over the back and seat of the sofa. Let it hang naturally.
- Center the Pattern: If your fabric has a main design, make sure it’s centered on the back of the sofa where it will be seen most.
- Tuck It In: Just like with a slipcover, tuck the fabric into the cracks around the seat cushions to help it stay in place.
- Layer More Fabrics: Take your other textiles and drape them over the arms or fold one across the back. Don’t worry about making it look too neat; a relaxed drape is part of the charm.
- Secure if Needed: If the fabrics slip around too much, you can use a few safety pins on the backside of the couch to hold them in place.
3. The Textured Pillow Haven

Piling on pillows with different textures is a simple way to add depth and comfort. A mix of cable-knit, woven, and smooth fabrics in a similar color scheme creates a sophisticated feel. It’s an invitation to relax.
This technique works well with neutral colors. The variety in texture keeps the look interesting without making the space feel cluttered. Your sofa instantly becomes a cozy retreat with a high-end designer touch.
DIY Pillow Arrangement Instructions
What You Need:
- A collection of pillows in different textures, sizes, and shapes
- A “karate chop” hand
Step-by-Step Guide:
- Start Big: Place your largest pillows in the back corners of the sofa. This creates a foundation.
- Layer Forward: Place your medium-sized pillows in front of the larger ones. You can use a different texture here.
- Add an Accent: Put a smaller, more interesting pillow in the very front, perhaps a round one or one with a subtle pattern.
- The Centerpiece: If you have a long sofa, you can place a lumbar (long, rectangular) pillow in the center.
- Fluff and Chop: Fluff each pillow up. For a final touch, give the top of each pillow a gentle “karate chop” to create a stylish dent.
4. The Bold Statement Slipcover

An artistic, patterned slipcover turns your sofa into the focal point of the room. It’s a fantastic way to introduce a burst of color and personality into an otherwise simple space. This single change can redefine your entire living area.
A bold pattern shows confidence. It can tie together other colors in the room or stand on its own as a piece of functional art. This choice gives your old sofa a dramatic and exciting new identity.
DIY Patterned Slipcover Instructions
What You Need:
- A patterned slipcover
- A helper (optional, but useful)
Step-by-Step Guide:
- Clean the Couch: Just like before, start by vacuuming your sofa and removing the cushions.
- Find the Center: With a bold pattern, getting it straight is important. Find the visual center of your pattern and line it up with the center of the sofa’s back.
- Drape Evenly: Lay the cover over the couch, making sure the pattern hangs evenly on all sides. Ask a helper to stand back and tell you if it looks straight.
- Tuck Carefully: Begin tucking the fabric into the seams, being careful not to pull the pattern crooked. Smooth the fabric as you go.
- Align Cushion Patterns: Put the covers on your seat cushions. Try to align the pattern on the cushions with the pattern on the main sofa frame for a seamless look.
5. Strategic Furniture Rearrangement

Sometimes the best refresh costs nothing at all. Changing the layout of your seating can completely alter the flow and feeling of your living room. It can make a space feel larger, cozier, or more open.
By simply moving your sofa away from a wall or splitting up a sectional, you create new conversational areas. This fresh perspective might be all your room needs to feel new again. It encourages interaction in a different way.
DIY Room Rearrangement Instructions
What You Need:
- A piece of paper and a pencil
- A tape measure
- Furniture sliders (optional, but very helpful)
Step-by-Step Guide:
- Empty the Room (on Paper): Draw a simple sketch of your living room’s shape. Don’t draw the furniture in it yet.
- Measure Everything: Measure your sofa, chairs, and coffee table. Write down the sizes.
- Sketch New Layouts: On your paper, draw little boxes to represent your furniture. Try moving them around in your drawing. What if the sofa faced the window instead of the TV?
- Clear the Path: Before you move anything, clear the floor of small items you could trip over.
- Move the Big Pieces: Place furniture sliders under the legs of your heavy sofa. This will help you slide it easily without scratching the floor. Move your main seating into its new spot first.
- Add Everything Else: Once the sofa is in place, move the other pieces like the coffee table and side chairs around it.
6. DIY Button Tufting

Adding button tufting gives a plain sofa a touch of classic elegance. This technique creates textured dimples that catch the light, making the furniture look more luxurious and detailed. It is a project that adds significant character.
This update can make a simple, budget-friendly sofa look much more expensive. The repeating pattern of buttons adds a sense of rhythm and sophistication. It’s a rewarding project for a hands-on update.
DIY Tufting Instructions
What You Need:
- Fabric-covered buttons
- A long upholstery needle
- Strong upholstery twine
- A drill with a small drill bit
- A tape measure and a pencil
Step-by-Step Guide:
- Plan Your Pattern: Decide where you want your buttons to go. Use a tape measure to space them out evenly. Mark each spot with a small pencil dot on the back of the sofa.
- Drill Guide Holes: Carefully drill a small hole all the way through the back of the sofa at each pencil mark. This gives your needle a path to follow.
- Thread the Needle: Cut a long piece of twine. Thread it through your long needle and then through the little loop on the back of a button. Slide the button to the middle of the twine, so you have two long tails.
- Push Through: Push the needle from the front of the couch, through a cushion, and out the guide hole in the back. You may need to push hard!
- Secure the Button: Pull the twine tight from the back to create the dimple on the front. Have a helper tell you when it looks right. Staple the twine to the back frame in a zig-zag pattern to hold it securely.
- Repeat: Do this for every button mark until your pattern is complete.
7. A Simple Leg Swap

Changing the legs on your sofa is a surprisingly effective way to update its style. This small adjustment can change the furniture’s height and overall aesthetic. You can shift from a traditional look to a modern one in under an hour.
New legs can lift a bulky sofa off the ground, making it appear lighter and creating a sense of more space in the room. Whether you choose wooden tapered legs for a mid-century vibe or metal ones for an industrial feel, this is a high-impact fix.
DIY Leg Change Instructions
What You Need:
- New sofa legs (make sure the screw fits your sofa)
- A small cloth
Step-by-Step Guide:
- Tip the Sofa: Carefully tip your sofa over onto its back or side so you can easily see the legs. You may need a friend to help you.
- Unscrew the Old Legs: Most sofa legs just screw off by hand. Turn them counter-clockwise (to the left) until they come off. If they are tight, use a cloth to get a better grip.
- Check the Screw: Look at the screw on your old leg. Make sure the screw on your new legs is the same size. If not, you may need a special plate called a mounting plate, which you can buy online.
- Screw on the New Legs: Take your new leg and screw it in clockwise (to the right). Hand-tighten it until it feels snug and secure.
- Repeat for All Legs: Do this for all four (or more) legs on your sofa.
- Set it Upright: Carefully turn your sofa back over. Your couch now has a brand-new stance!
8. Jewel-Toned Velvet Accents

Adding velvet pillows in rich jewel tones can instantly make a neutral sofa feel more luxurious. Deep emeralds, sapphires, and rubies provide a stunning pop of color. The soft texture of velvet also adds a layer of comfort and warmth.
This is an easy and non-permanent way to experiment with bold colors. The rich fabric catches the light beautifully, adding dimension and a touch of glamour to your living space. It makes the whole area feel more curated.
DIY Jewel-Tone Styling Instructions
What You Need:
- 3 to 5 velvet pillows in different jewel-tone colors and shapes
- A cozy throw blanket (optional)
Step-by-Step Guide:
- Choose Your Colors: Pick two or three jewel-tone colors that you like together, for example, dark blue and deep red.
- Start at the Corners: Place one pillow in each corner of the sofa.
- Add a Different Shape: If you have a round or long pillow, place it in front of one of the corner pillows to add variety.
- Create a Color Group: Try putting two different colored pillows together on one side for an interesting look.
- Drape a Throw: If you have a throw blanket, casually drape it over the center of the sofa or off one of the corners before you place the pillows. This adds another layer of texture.
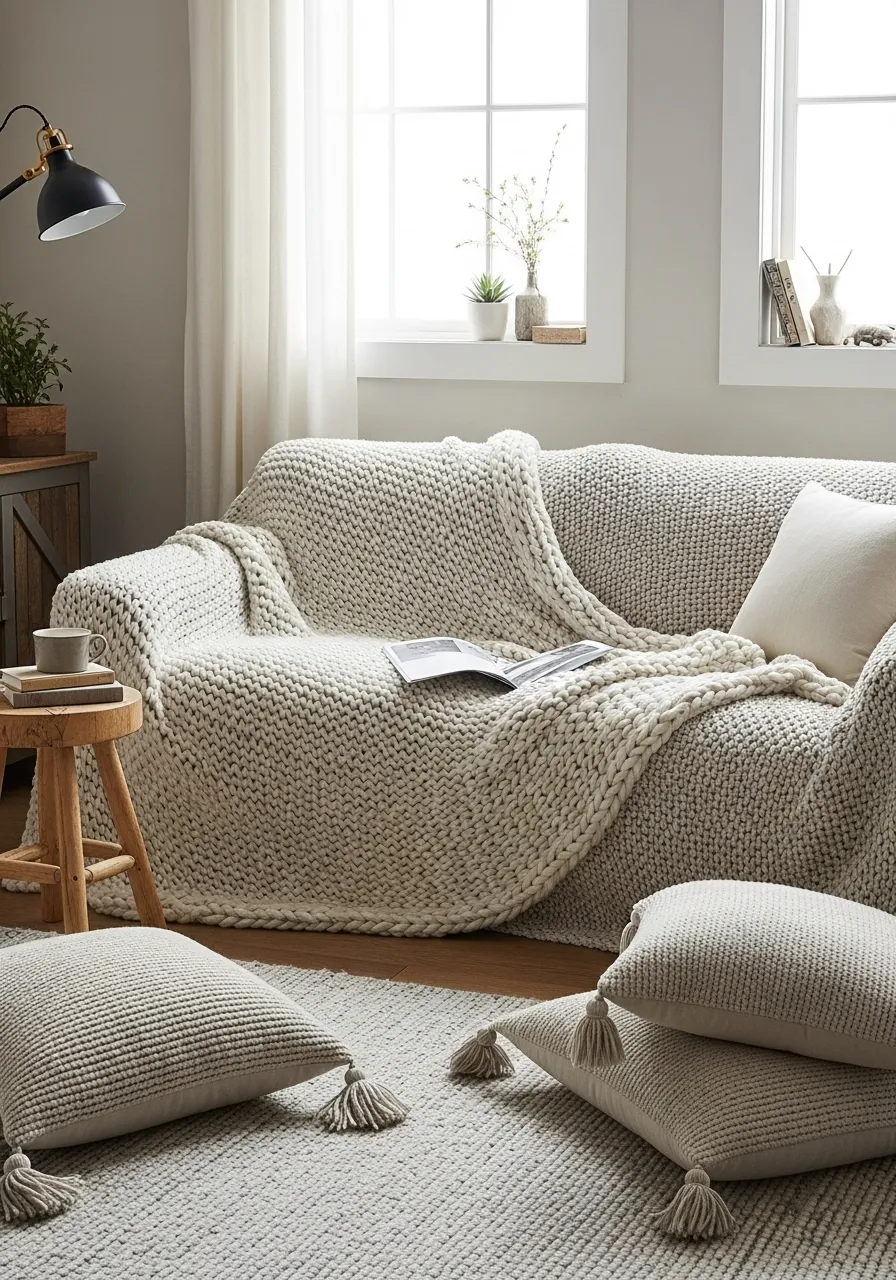
9. The Natural Texture Refresh

Layering your sofa with natural materials creates a calm and inviting atmosphere. A combination of linen, chunky wool knits, and woven fabrics brings an earthy, organic feel to your seating. It’s a simple way to make a room feel more grounded.
This style focuses on how things feel, not just how they look. The different textures make the sofa more interesting to the eye and more comfortable for relaxing. It is a subtle update that speaks of comfort and easy living.
DIY Natural Texture Styling Instructions
What You Need:
- A linen or cotton throw blanket
- Pillows made of natural materials (chunky knit wool, woven jute, rough cotton)
Step-by-Step Guide:
- Lay the Foundation: Start with your largest, softest item. Drape a linen or thin cotton throw blanket over a part of the sofa. Don’t fold it perfectly; let it look relaxed.
- Add the Chunkiest Texture: Place your biggest, most textured pillow, like a chunky knit one, in one of the corners on top of the throw.
- Mix in Other Textures: Layer in your other pillows. Place a woven pillow next to the chunky one. The contrast between the textures is what makes it look good.
- Play with Neutrals: Stick to soft colors like beige, cream, gray, and olive green. This helps the textures stand out more.
- Keep it Simple: With this style, less is often more. You only need a few well-chosen pieces to create a comfortable, natural look.
10. DIY Contrast Piping

Adding a crisp line of contrast piping can make a sofa look custom-made. This simple detail outlines the shape of the furniture, giving it a sharp, tailored appearance. It’s a subtle trick that adds a lot of visual impact.
This is an especially good way to update a light-colored sofa. A dark trim, like navy or black, creates a clean, graphic look. You can even add other small details, like a faux leather accent, to complete the transformation.
DIY No-Sew Piping Instructions
What You Need:
- Pre-made piping in a contrasting color (from a fabric store)
- Fabric glue or iron-on hem tape
- Scissors
- An iron (if using hem tape)
Step-by-Step Guide:
- Measure the Seams: Measure the length of the seams on your sofa cushions where you want to add the piping.
- Cut the Piping: Cut your piping to the lengths you measured.
- Apply the Glue: Squeeze a thin line of fabric glue onto the fabric flap of the piping. Carefully press it onto the seam of your cushion. Follow the line of the seam as closely as you can.
- Or Use an Iron: If you are using hem tape, place the tape on the seam, put the piping on top, and press it with a warm iron according to the tape’s instructions.
- Let it Dry: Let the fabric glue dry completely before you handle the cushions.
- Enjoy the Details: Once dry, your cushions will have a sharp, professional-looking outline.
11. The Sofa-Back Console Table

Placing a narrow console table behind your sofa is a clever way to add function and style. This creates a handsome anchor for the sofa, especially if it floats in the middle of a room. You gain a new surface for lamps, books, or drinks.
This addition helps to define the living area. It can also serve as a subtle room divider in an open-concept space. The table provides a great spot for extra storage baskets or decorative stools tucked underneath.
DIY Console Table Setup
What You Need:
- A console table that is slightly shorter than the height of your sofa’s back
- A tape measure
Step-by-Step Guide:
- Measure Your Sofa: First, measure the height of the back of your sofa. You want your table to be a little bit shorter than this, or the exact same height.
- Measure Your Space: Measure the length of your sofa. Your table should be a little shorter than the sofa’s full length so it looks balanced.
- Place the Table: Carefully slide the table into position behind the sofa.
- Center It: Step back and look. Make sure the table is centered with the sofa, with equal space on both ends.
- Add Your Items: Place your tallest items, like lamps, on the ends of the table first. Then, fill in the middle with shorter things like a stack of books or a small plant.
12. Soften with Throws and Textiles

A leather sofa has a sleek and handsome look, but it can sometimes feel cold. The easiest way to make it more inviting is by adding soft textiles. Draping a few cozy blankets and throws instantly adds warmth.
The contrast between the smooth leather and a soft knit or a plaid wool blanket is visually appealing. It breaks up the large surface of leather and adds layers of texture. This makes the sofa a much more comfortable place to curl up.
DIY Throw Draping Instructions
What You Need:
- A few throw blankets with different textures (like wool, knit, or fleece)
Step-by-Step Guide:
- Choose a Corner: Pick one corner of the sofa to start.
- Fold the First Throw: Take your first blanket and fold it in half the long way.
- Drape It: Casually drape the folded blanket over the corner. Let it hang over the back and onto the seat cushion. Don’t make it too neat.
- Add a Second Throw: Take another blanket and drape it over the arm of the sofa, or fold it and lay it across the middle cushions.
- Toss on a Pillow: Place a pillow or two on top of the blanket in the corner to complete the cozy look.
13. The Minimalist Drape and Lean

For a clean and modern look, sometimes less is more. A single, high-quality throw blanket can make a statement on its own. When paired with simple art leaning against the wall, it creates an effortlessly stylish scene.
This approach is about thoughtful placement, not clutter. The simple drape of the blanket adds a touch of softness to a structured sofa. Leaning artwork instead of hanging it feels more casual and relaxed.
DIY Minimalist Styling Instructions
What You Need:
- One simple, high-quality throw blanket
- One or two pieces of framed art
Step-by-Step Guide:
- Fold with Purpose: Fold your blanket neatly in thirds, the long way.
- Drape Over the Arm: Drape the folded blanket over one arm of the sofa. Let the fringe or edge hang down just a little.
- Position the Art: Instead of hanging your pictures, place them on the floor behind the sofa. Let them lean against the wall.
- Layer the Frames: If you have two pictures, lean the larger one against the wall first. Then, place the smaller one in front of it, slightly off to the side.
- Keep it Clear: The key is to keep the rest of the sofa clear. One or two simple pillows are all you need.
14. The Sag-Free Cushion Refresh

Over time, the foam inside sofa cushions can get squashed and sad. Replacing the filling is a straightforward fix that brings back comfort and makes your sofa look plump again. It is a practical update that you will feel every time you sit down.
New foam can restore the support your sofa once had. You can even choose the firmness you like best. This project is a hidden makeover that makes a huge difference in the life and look of your furniture.
DIY Cushion Foam Replacement
What You Need:
- New foam for your cushions
- A tape measure
- A permanent marker
- An electric carving knife (the kind for Thanksgiving turkey works great!)
- Batting (optional, for extra softness)
- Spray adhesive (optional)
Step-by-Step Guide:
- Unzip and Remove: Unzip your cushion covers and take out the old foam inserts.
- Measure the Old Foam: Measure the length, width, and thickness of the old foam. Write these numbers down.
- Trace onto New Foam: Lay your new foam on a flat surface. Use your measurements and a marker to draw the shape of your cushion onto the new foam.
- Cut the Foam: Carefully cut along the lines you drew using an electric carving knife. This gives you a nice, clean edge.
- Add Batting (Optional): For a softer look, you can wrap your new foam in a layer of batting. Use a little spray adhesive to hold it in place.
- Stuff the Cushion: Carefully slide your new foam insert back into the cushion cover. It might be a tight fit, so you may need to squish it a bit. Zip it up, and you’re done!
15. Frame with Symmetrical Bookshelves

Placing two matching bookshelves on either side of your sofa creates a strong focal point. This technique makes the sofa and the wall behind it look like one complete, built-in unit. It adds a sense of order and elegance to the room.
This is also a very practical update. You gain a lot of vertical storage and display space for books, plants, and photos. The symmetry is pleasing to the eye and makes the whole area feel more organized and intentional.
DIY Symmetrical Bookshelf Setup
What You Need:
- Two identical bookshelves
- A tape measure
- A pencil
- A level
Step-by-Step Guide:
- Center the Sofa: First, make sure your sofa is perfectly centered on the wall where you want it.
- Measure the Space: Measure the space you have on each side of the sofa.
- Place the Bookshelves: Move the bookshelves into place on either side of the sofa. Use your tape measure to make sure the distance between the sofa and each bookshelf is exactly the same.
- Check for Level: Use a level to make sure your bookshelves are standing straight and are not wobbly.
- Style them Symmetrically: Decorate the shelves. For a balanced look, try to mirror your decorations. If you put a plant on the second shelf on the left, put a similar plant on the second shelf on the right.
16. The Macrame and Tassel Takeover

Embrace a full bohemian look by layering your sofa with highly textured pillows. Macrame, tassels, and intricate knots create a cozy, handcrafted feel. This style is all about celebrating natural materials and detailed patterns.
Mixing different but related textures in a neutral color palette keeps the look from becoming overwhelming. The result is a comfortable and visually interesting sofa that invites you to touch and relax. It turns your seating into a true bohemian retreat.
DIY Boho Pillow Styling
What You Need:
- A collection of pillows with lots of texture (macrame, tassels, knots)
- A chunky knit throw blanket
Step-by-Step Guide:
- Start with the Blanket: Drape a big, chunky knit blanket over the back of the sofa as your base layer.
- Anchor the Corners: Place your largest, most detailed pillows in the corners.
- Layer In: Add smaller pillows in front. Don’t be afraid to mix different patterns of macrame and different styles of tassels.
- Add a Lumbar Pillow: A long, rectangular pillow with fringe across the front center can tie the whole look together.
- Don’t Forget the Floor: Add a pouf or a floor cushion next to the sofa to continue the cozy, layered vibe.
17. Create a Wallpaper Feature Wall
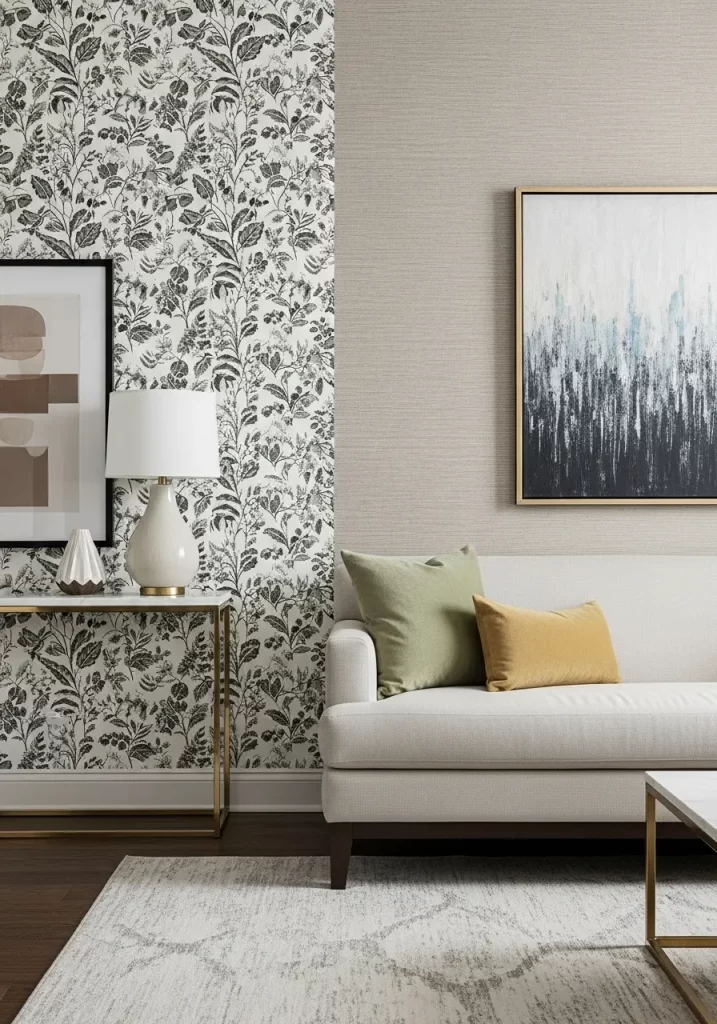
You can dramatically change the look of your seating area without ever touching the sofa itself. Applying a bold wallpaper to the wall directly behind your sofa creates a stunning backdrop. It instantly makes the sofa the star of the room.
This is a great way to add pattern and color to your living space. The wallpaper acts like a piece of art that frames your furniture. Choose a pattern that complements the color of your sofa for a cohesive look.
DIY Peel-and-Stick Wallpaper
What You Need:
- Peel-and-stick wallpaper
- A tape measure
- A craft knife or razor blade
- A smoothing tool or a credit card
Step-by-Step Guide:
- Clean the Wall: Wipe down the wall with a damp cloth to make sure it’s clean and dust-free. Let it dry completely.
- Measure and Cut: Measure the height of your wall. Cut your first piece of wallpaper a few inches longer than you need.
- Peel a Little: Peel back about a foot of the paper backing from the top of your wallpaper strip.
- Stick and Smooth: Starting at the top corner of the wall, press the sticky side of the wallpaper onto the wall. Use your smoothing tool to press out any air bubbles as you go.
- Continue Down: Slowly pull off the rest of the backing as you work your way down the wall, smoothing as you go.
- Match the Pattern: For the next strip, carefully line up the pattern with the first strip before you stick it on.
- Trim the Edges: Once the whole wall is covered, use a craft knife to trim the extra paper at the ceiling and floor.
18. The Classic Blue and White Pillow Mix

The combination of blue and white is timeless and always looks fresh. You can give your sofa a classic update by mixing pillows with different patterns in this color scheme. Florals, stripes, and plaids can all work together beautifully.
The key to mixing patterns is to vary the scale. Use one large pattern, one medium pattern, and one small pattern. As long as they share the same colors, they will look coordinated instead of chaotic.
DIY Pattern Mixing Instructions
What You Need:
- Pillows in blue and white with different patterns (e.g., one floral, one striped)
- One solid blue pillow
- A simple throw blanket
Step-by-Step Guide:
- Start with a Solid: Place a solid navy blue pillow in one corner of the sofa. This is your anchor.
- Add a Large Pattern: Next to the solid pillow, place a pillow with a large floral pattern.
- Bring in a Small Pattern: On the other side of the sofa, use a pillow with a smaller pattern, like a simple stripe.
- Layer with a Throw: Drape a simple plaid or striped throw blanket over the arm of the sofa to add another layer.
- Check the Balance: Step back and look. The different patterns should feel balanced and not like they are fighting each other.
19. The Custom Button Swap

For sofas that have tufted details, swapping out the buttons is a subtle but creative update. Changing the standard fabric-covered buttons for something different, like wood or leather, adds a unique and custom touch.
This small change can completely shift the style of your sofa. Wooden buttons, for example, can give a piece a more rustic or mid-century modern feel. It’s a project that shows attention to detail and adds a lot of personality.
DIY Button Replacement
What You Need:
- New buttons (like wooden ones)
- A seam ripper or small scissors
- A long upholstery needle
- Strong upholstery twine
Step-by-Step Guide:
- Remove the Old Button: Use a seam ripper or small scissors to carefully snip the thread holding the old button in place. Pull the old button out.
- Thread Your Needle: Cut a long piece of upholstery twine. Thread it through your needle.
- Sew on the New Button: Push the needle from the back of the sofa all the way through to the front, right where the old button was. Thread your new button onto the needle and push the needle back through to the back.
- Pull It Tight: Pull the twine tight from the back of the sofa. This will create the little dimple (the tuft) on the front.
- Secure It: Once the button is tight enough, securely tie a knot in the twine on the back of the sofa frame. You can also staple it to the frame for extra security.
- Repeat: Continue this process for all the buttons you want to replace.
20. The Ultimate Chunky Knit Cocoon

For the peak of coziness, consider draping an oversized chunky knit blanket over your entire sofa. This turns your seating into a soft, inviting cloud. It is a bold statement in comfort that completely transforms the look and feel of the furniture.
This method works well for covering up old, worn-out fabric in a stylish way. The thick texture of the knit adds a huge amount of visual warmth to the room. The sofa becomes the ultimate spot for relaxing and unwinding.
DIY Chunky Knit Drape
What You Need:
- One very large chunky knit blanket
Step-by-Step Guide:
- Start at the Top: Stand behind your sofa. Hold the blanket up and drape it over the back, letting it hang down evenly on both sides.
- Cover the Seat: Pull the blanket forward so it covers the entire seating area of the sofa.
- Tuck It In: Gently tuck the blanket into the crevices where the back and arms meet the seats. This will help it stay in place and give it some shape.
- Arrange the Drape: Let the extra blanket spill over the arms and onto the floor for a relaxed, lived-in look.
- Add a Few Pillows: Place a few simple pillows on top to complete your cozy sofa cocoon.
21. The Handy Armrest Organizer

An armrest caddy is a smart way to add storage without taking up floor space. It keeps your remote controls, magazines, and glasses right where you need them. Many models also have a flat wooden top, creating a stable spot for a cup of tea.
This simple accessory helps reduce clutter on your coffee table and end tables. The combination of soft felt and warm wood adds a nice textural element to your sofa. It is a highly functional and stylish upgrade for any couch.
DIY Armrest Caddy Setup
What You Need:
- An armrest caddy
Step-by-Step Guide:
- Clear the Arm: Start with a clear sofa armrest.
- Drape the Caddy: Unfold your armrest caddy. Drape the felt or fabric part over the arm of your sofa. The side with the pockets should hang on the outside of the arm.
- Position the Tray: Make sure the flat tray part sits level on top of the armrest.
- Tuck the Flap: There is usually a flap on the other side that you tuck under the seat cushion. Push this flap down firmly between the arm and the cushion to hold the caddy in place.
- Fill the Pockets: Put your remotes, your favorite magazine, and your reading glasses into the pockets.
22. The Color Block Cushion Update

For a modern and playful look, try using separate cushion covers in bold, solid colors. This color-blocking technique turns your sofa into a piece of pop art. It is a fantastic way to introduce a vibrant palette to your living room.
Using a few strong colors against a neutral sofa frame creates a dynamic and energetic feel. This approach lets you easily change your color scheme whenever you want. It’s a high-impact look that is completely reversible.
DIY Color Block Cushion Covers
What You Need:
- Individual cushion covers in different solid colors
- A tape measure
Step-by-Step Guide:
- Measure Your Cushions: Take your seat cushions off the sofa. Measure the length, width, and thickness of one cushion.
- Order the Right Size: Buy new cushion covers that match your measurements. Choose a few different solid colors that you like together.
- Cover the Cushions: Unzip the new covers. Carefully slide each cushion into a new cover. Make sure the corners of the cushion fit into the corners of the cover.
- Create a Pattern: Arrange the colorful cushions on your sofa. You can make a repeating pattern or arrange them randomly for a fun, surprising look.
23. The Cozy Daybed Transformation

You can make a deep sofa feel like a luxurious daybed with a few simple additions. Laying a patterned textile or a thin rug over the seat cushions creates a single, unified surface. Adding long bolster pillows enhances the look and is great for lounging.
This style makes your sofa the ultimate spot for reading a book or taking a nap. A nearby swing-arm lamp adds to the function, providing focused light without needing a side table. It’s a cozy and practical makeover.
DIY Daybed Styling
What You Need:
- A flatweave rug or thick blanket
- A few bolster (long, tube-shaped) pillows
Step-by-Step Guide:
- Create the Base: Take a thin rug or a folded blanket and lay it smoothly over all of your seat cushions. This will make it look like one big mattress.
- Tuck the Edges: Neatly tuck the edges of the rug into the back and sides of the sofa frame.
- Add Bolster Pillows: Place one or two long bolster pillows against the back of the sofa. These are great for leaning against.
- Layer Other Pillows: Add a few regular square pillows in front of the bolsters to complete the look.
24. Elegant Nailhead Trim Detail

Adding a line of nailhead trim is a classic way to make furniture look more expensive and custom-built. The trim follows the lines of the sofa, highlighting its shape and adding a decorative touch. It’s a detail often found on high-end pieces.
This project gives your sofa a handsome, tailored finish. The metallic sheen of the nailheads adds a bit of glamour. It is a satisfying DIY that gives you a very professional-looking result.
DIY Nailhead Trim Application
What You Need:
- Nailhead trim strips
- A rubber mallet or a small hammer with a cloth over the head
- A tape measure
Step-by-Step Guide:
- Plan Your Line: Decide where you want the trim to go. A popular spot is along the front of the arms and across the bottom of the sofa frame.
- Position the First Strip: Take your first strip of nailheads. Place the first nail of the strip where you want your line to begin and gently tap it in with your mallet.
- Keep it Straight: Hold the strip straight and tap in a nail every few inches to hold it in place. Make sure you are following a straight line.
- Hammer it Home: Once the strip is in position, go back and hammer each nail in firmly.
- Continue the Line: Start the next strip right where the first one ended to create a continuous, straight line of nailheads.
25. The Layered Rug Foundation

Create a warm and eclectic setting for your sofa by layering rugs. Placing a smaller, more colorful rug on top of a larger, neutral one adds depth and texture to the whole room. This approach helps to anchor your furniture and define the seating area.
This look is inspired by global design and creates a cozy, lived-in feel. You can mix patterns and textures for a bohemian vibe. A sheepskin throw draped over the sofa continues the theme of rich, layered materials.
DIY Rug Layering
What You Need:
- One large, neutral rug (like jute or sisal)
- One smaller, patterned rug
- A friend to help lift
Step-by-Step Guide:
- Place the Base Rug: Start by laying down your largest rug. This rug should be big enough that at least the front legs of your sofa and any chairs are sitting on it.
- Position the Top Rug: Now, place your smaller, more colorful rug on top. You can place it in the center, or slightly off-center for a more relaxed look.
- Arrange Your Furniture: Move your sofa so its front two legs are on top of both rugs.
- Check the Angle: Make sure the top rug is straight and aligned with your sofa or your coffee table.
26. The Versatile Chaise Ottoman

Some sofas are designed with a clever, flexible feature. They have a reversible chaise that allows you to move the long cushion to either the left or the right side. This is done with a movable ottoman base and a T-shaped cushion.
This feature is very useful if you move to a new home or simply want to change your room’s layout. It allows your furniture to adapt to your space. You get the comfort of a sectional with much more versatility.
DIY Chaise Reversal
What You Need:
- A sofa with a reversible chaise feature
Step-by-Step Guide:
- Identify the Parts: Look at your sofa. You should have one long chaise cushion (often shaped like a T) and a separate, square ottoman base.
- Move the Ottoman: Pull the square ottoman base away from the sofa. Move it to the other side.
- Slide the Cushions: Take all the regular square seat cushions and slide them down to fill the space where the ottoman used to be.
- Place the Chaise Cushion: Now you will have an empty spot on the other side. Place the long chaise cushion there. It should fit snugly next to the other cushions.
- Flip if Needed: Some chaise cushions need to be flipped over to fit correctly on the other side.
27. The Fluffy Back Cushion Refill

If the back cushions on your sofa have gone flat, you can easily bring them back to life. Re-stuffing them with new polyester fiberfill is a simple fix that makes them plump and comfortable again. This instantly makes your whole sofa look newer.
A simple bag of fiberfill is inexpensive and easy to work with. You can customize how full you want your cushions to be. This is a quick project that restores the comfort of your favorite relaxing spot.
DIY Cushion Re-stuffing
What You Need:
- A bag of polyester fiberfill (like Poly-Fil)
- Cushions with a zipper
Step-by-Step Guide:
- Unzip the Cushion: Find the zipper on your back cushion and open it up.
- Fluff the Old Filling: Reach inside and break up any clumps in the old filling. Pull it apart with your fingers to make it airy again.
- Add New Filling: Take handfuls of the new fiberfill and start stuffing it into the cushion. Pay special attention to the corners to make sure they are full.
- Fill to Your Liking: Keep adding fill until the cushion feels as firm and plump as you want it to be.
- Zip It Up: Once you’re happy with it, carefully zip the cushion cover closed. Make sure not to catch any of the filling in the zipper.
28. The Symmetrical Styling Method

For a look that is calm, classic, and orderly, try styling your sofa with perfect symmetry. This involves creating a mirror image on both sides. Using identical pillows and draping throws in the same way creates a very balanced and formal appearance.
This technique is pleasing to the eye because our brains enjoy order. It is a simple way to make a room feel put-together and intentional. The result is a clean and sophisticated look that never goes out of style.
DIY Symmetrical Styling
What You Need:
- Two matching pillows
- Two matching throw blankets
Step-by-Step Guide:
- Start with a Clean Slate: Take everything off your sofa.
- Place the Pillows: Take your two matching pillows and place one in the far-left corner and the other in the far-right corner.
- Fold the Throws: Take your two matching blankets and fold them both neatly in the exact same way (for example, folded in thirds lengthwise).
- Drape the Throws: Drape one throw over the left arm of the sofa and the other throw over the right arm. Make sure they hang down the same amount.
- Check Your Work: Step back and look. Both sides of your sofa should look like a mirror image of each other.
29. The Artistic Pillow Pop

Turn your sofa into a mini art gallery by using pillows as your artwork. Against a plain white or neutral sofa, a couple of pillows with bold, abstract, or colorful designs can make a huge impact. It’s like adding a statement painting to your couch.
This is a wonderful way to inject personality and color into your room without making a big commitment. You can easily swap the pillows out to change the mood. Let the pillows be the center of attention.
DIY Artistic Pillow Arrangement
What You Need:
- One or two pillows with very bold, artistic designs
- A sofa in a solid, neutral color
Step-by-Step Guide:
- Choose Your Stars: Pick one or two pillows that you really love. They should be interesting and colorful. A long lumbar pillow and a round one make a great pair.
- Clear the Canvas: Start with a plain sofa. This works best if you don’t have a lot of other pillows.
- Place Them Together: Instead of putting one pillow in each corner, group your artistic pillows together on one side of the sofa.
- Let Them Shine: The goal is to make the pillows the main attraction. Don’t add a busy throw blanket that will compete with them.
30. The Fabric Shaver Refresh

Daily use can cause little fuzzballs, also known as pills, to form on your sofa’s fabric. This can make the furniture look old and worn. Using an electric fabric shaver is a quick and satisfying way to remove them.
This simple act of maintenance can make your upholstery look smooth and new again. The shaver gently cuts away the pills without harming the fabric underneath. It is an easy step that can dramatically improve the appearance of your couch.
DIY Fabric Shaving
What You Need:
- An electric fabric shaver (de-piller)
- A clean, dry sofa
Step-by-Step Guide:
- Test a Small Spot: Before you start, test the fabric shaver on a small, hidden part of your sofa (like the back or side) to make sure it works well with your fabric.
- Hold the Fabric Taut: Use one hand to pull the area of fabric you are working on so it is flat and tight.
- Move in Circles: Turn the shaver on. Gently press it against the fabric and move it in small, circular motions. You don’t need to press hard.
- Empty the Collector: The shaver will collect the fuzz it removes. Stop every so often to empty the little container.
- Work in Sections: Continue this process in small sections until you have de-pilled the entire sofa.
31. The Monochromatic Texture Study

A sophisticated way to style a sofa is to use different textures all in the same color. This monochromatic approach creates a look that is calm, clean, and very chic. The interest comes from the mix of smooth pillows, ribbed throws, and soft bolsters.
This method shows that a room does not need bright colors to be visually engaging. The subtle differences in texture create depth and a sense of luxury. It’s a quiet, confident style that feels both modern and timeless.
DIY Monochromatic Styling
What You Need:
- Pillows and blankets in the same color, but with different textures (e.g., a smooth cotton, a chunky knit, a soft velvet)
Step-by-Step Guide:
- Pick Your Color: Choose one main color for your sofa decor, such as gray, beige, or white.
- Start with a Base Layer: Take a throw blanket with a simple texture, like a waffle knit, and fold it neatly over the center of your seat cushions.
- Add Different Shapes: Place a few different shaped pillows on the sofa. Try two square pillows and two long bolster pillows.
- Focus on Texture: Make sure each item has a different feel. The variety of textures is what will make your single-color sofa look interesting and well-designed.
- Arrange Neatly: For a modern look, arrange everything in a neat and orderly way.
32. The Vibrant Fleece Drape

Inject a burst of fun and energy into your living room with brightly colored fleece blankets. Draping a few of these over a neutral sofa is an easy and affordable way to add a playful touch. The bold, solid colors make a strong visual statement.
This is a great way to experiment with color without committing to a new paint color or expensive pillows. The throws are soft, comfortable, and can be easily changed with the seasons or your mood. It’s a cheerful and low-risk design choice.
DIY Bright Throw Styling
What You Need:
- 2 to 4 fleece blankets in bold, different colors (like pink, yellow, and blue)
Step-by-Step Guide:
- Choose Your Colors: Pick a few bright colors that make you happy.
- Fold and Drape: Fold each blanket in half the long way.
- Drape Over the Back: Drape each folded blanket over the back of the sofa, letting it hang down over the cushions.
- Space Them Out: Leave a little space between each color so they look like big, cheerful stripes.
- Add a Solid Pillow: You can add a single, solid pillow in a color that matches one of your throws to tie the look together.
33. The Clever Bookshelf Divider

A tall, narrow bookshelf can be used in a creative way to divide a space or frame your seating. When placed between two chairs or at the end of a sofa, it creates a cozy nook. It also adds a lot of useful storage.
This is a smart solution for small spaces or open-concept rooms. It helps to create different zones without building a wall. You can also add clip-on lamps to the shelves to create a personal reading spot.
DIY Bookshelf Divider Setup
What You Need:
- A tall, narrow bookshelf
- Clip-on reading lights (optional)
Step-by-Step Guide:
- Find the Right Spot: Decide where you want to create a little separation. This works well at the end of a sofa or between two armchairs.
- Position the Bookshelf: Carefully place the bookshelf in your chosen spot. Make sure it is stable and not wobbly.
- Fill it with Books: Arrange your books on the shelves. This will help make the divider feel solid.
- Add Lighting: If you want a reading nook, clip one or two small reading lamps onto the shelves and aim them toward the chairs.
- Create a Cozy Corner: Place a small footstool or a basket for blankets next to the chair to complete your new cozy corner.
34. The Luxurious Sheepskin Layer

Draping a sheepskin rug over your sofa is an instant way to add a layer of luxury and comfort. The soft, fluffy texture is incredibly inviting and creates a cozy spot for relaxing. It works beautifully against a dark, structured sofa.
This single accessory can make a simple sofa look much more high-end. The natural shape of the sheepskin adds an organic and interesting element to the furniture. It is a simple touch that adds a lot of warmth and style.
DIY Sheepskin Styling
What You Need:
- A real or faux sheepskin rug
- A few simple pillows in a neutral color
Step-by-Step Guide:
- Choose Your Spot: Decide where you want the coziest spot to be. This often looks best in the center of the sofa or draped over one side.
- Drape the Sheepskin: Don’t fold the sheepskin. Lay it naturally over the seat cushions. Let it follow the shape of the sofa.
- Let it Spill: It’s okay if part of the rug hangs over the front of the cushion and onto the floor a little bit. This adds to the relaxed, comfortable look.
- Add Simple Pillows: Place one or two simple linen or cotton pillows on top of the sheepskin. The simple pillows will let the texture of the sheepskin be the star.
- Place an Accessory: You can place a small tray with a candle on the sheepskin to complete the cozy scene (just be careful with the flame!).
35. The Upcycled Denim Patchwork

For a truly unique and personal touch, you can create a slipcover from upcycled denim. Patching together different squares of old jeans creates a look that is full of character and history. It’s a sustainable and creative way to give your sofa a new life.
The different shades of blue from the worn jeans create a beautiful pattern. Including the original pockets adds a fun and functional detail—a perfect spot to keep your remote control. This is a bold, eco-friendly statement piece.
DIY No-Sew Denim Patchwork
What You Need:
- Several pairs of old jeans in different shades of blue
- Sharp fabric scissors
- Fabric glue
- A tape measure
Step-by-Step Guide:
- Measure Your Sofa: Measure the main parts of your sofa you want to cover, like the seat cushions and the back.
- Cut Your Denim: Cut your old jeans into large squares and rectangles. Try to make them all a similar size. Carefully cut out a few of the back pockets as well.
- Lay Out Your Pattern: On the floor, arrange your denim squares into a large patchwork pattern that is big enough to cover a cushion. Mix the light and dark blues.
- Glue it Together: One by one, glue the edges of the denim squares together to create a large “fabric.” Let the glue dry completely.
- Drape and Tuck: Drape your new patchwork fabric over your sofa cushions and tuck it in tightly. You can even glue a jean pocket onto the front for a fun detail.
36. The Dramatic Lighting Effect

Changing the lighting around your sofa can completely change the mood of your room. Using focused lighting, like a floor lamp and a small uplight, can turn your seating area into a dramatic focal point. It creates a cozy and intimate atmosphere.
This technique is not about lighting up the whole room, but about creating pools of warm light. An adjustable floor lamp is great for reading, while a small light placed on the floor behind the sofa can create a beautiful glow on the wall. This is how you make a space feel special.
DIY Mood Lighting Setup
What You Need:
- A floor lamp, preferably one with an adjustable arm
- A small uplight (a canister light or a smart bulb you can place on the floor)
Step-by-Step Guide:
- Place Your Main Light: Position your floor lamp at one end of the sofa. This will be your main source of light for reading or tasks.
- Aim the Light: Adjust the arm of the lamp so it shines down onto the sofa or a book you are reading, not out into the room.
- Position the Uplight: Take your small second light and place it on the floor behind the sofa, or behind a nearby plant.
- Aim it Up: Aim this light upwards at the wall behind the sofa. This will create a soft, warm glow and highlight any art or texture on the wall.
- Turn Off the Big Lights: To see the full effect, turn off your main overhead ceiling light. Enjoy your new cozy and dramatic sofa area.
Refreshing your living room doesn’t require a new sofa or a big budget. As these 36 ideas show, a significant transformation can come from small, thoughtful changes. Your current couch holds a lot of potential just waiting to be unlocked.
Whether you choose to add a luxurious throw, swap out the legs for a new style, or simply rearrange your pillows, you have the power to create a space that feels fresh and new. We hope these ideas have inspired you to look at your old sofa not as a problem, but as a canvas for your creativity.
Key Takeaways
- Accessorize Smartly: Simple additions like pillows, throws, and textiles are the quickest and most affordable ways to change the look and feel of your sofa.
- Don’t Underestimate DIY: Small projects like adding nailhead trim, swapping buttons, or changing the legs can give your sofa a high-end, custom look for very little cost.
- Think Beyond the Sofa: How you arrange the space around your couch matters. Rearranging furniture, adding a console table, or using dramatic lighting can have a huge impact.
- Maintenance is Key: Simple upkeep like re-stuffing cushions and removing fabric pills can make an old sofa look and feel years younger.