There is nothing quite as daunting as a vast, empty wall. That big expanse of sheetrock often feels like a giant, expensive problem waiting to happen. Finding artwork large enough to fill the area can easily push your decorating funds past their limits. We often assume that to achieve a grand visual statement, we must spend a fortune on custom frames and massive canvases.

However, that simply is not the case. Getting a high-impact look is actually about prioritizing scale and creativity over cost. Clever techniques can transform everyday materials—like fabric, paper, salvaged wood, or even simple paint—into striking, wall-dominating features.
This guide provides 37 innovative, budget-conscious ways to bring large-scale art into your home. Each solution is focused on turning commonplace supplies into customized focal points. We will show you how to build, paint, suspend, and arrange materials to achieve that expansive, gallery-worthy feeling you desire.
1. The Blueprint Hanger Scroll
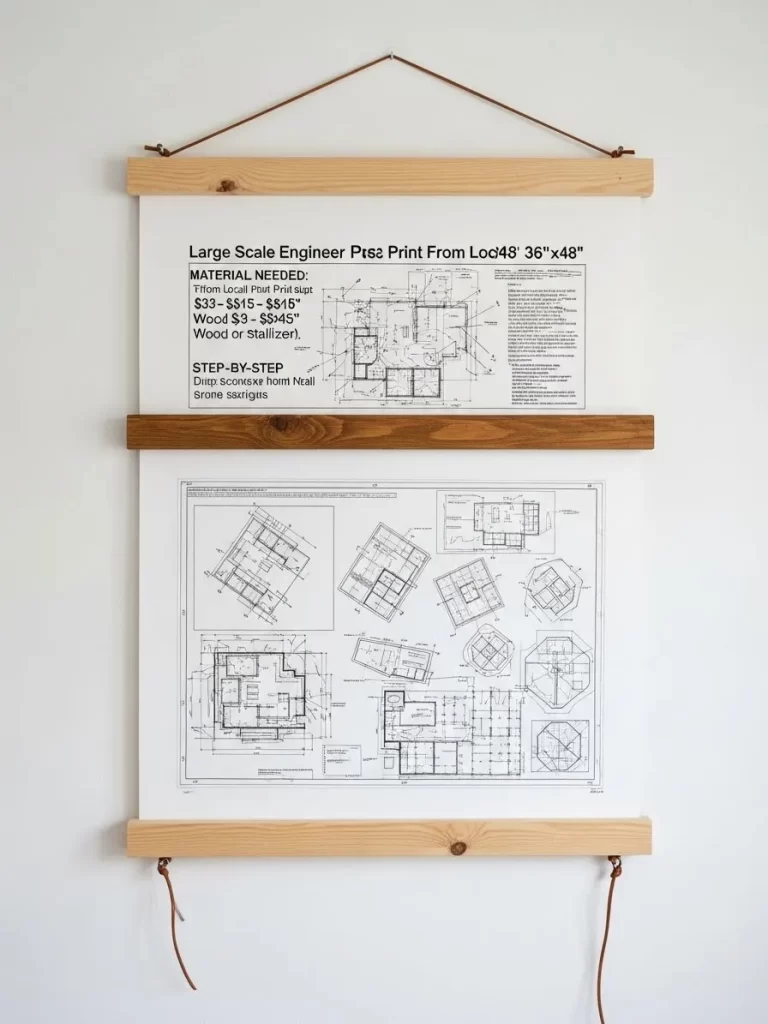
Creative Name: Rustic Blueprint Scroll
Description
Big art can be pricey, but finding interesting prints like engineering schematics or architectural drawings is much easier on your wallet. They often come in large formats, which instantly fills up an empty wall. You can get these impressive large-scale prints done cheaply at local print shops or office supply stores, saving you lots of money compared to framed artwork.
This approach gives off a chic, relaxed vibe, bringing a touch of vintage classroom or minimalist studio style into your home. The simple wooden hangers allow the artwork to be the main focus, avoiding the visual clutter and high expense of traditional framing. This setup is truly effective for displaying oversize paper pieces without needing complicated hardware.
The contrast between the crisp white paper and the natural warmth of the wood accentuates the graphic details in the print. This display technique is also incredibly flexible. You can easily switch out prints based on your mood or the season simply by undoing the cord or magnets, offering effortless, large-scale visual impact.
Material Required List
- Large-scale paper print (e.g., a blueprint, poster, or map).
- Four strips of wood trim (about 1/2 inch thick and 1 inch wide), cut to be slightly wider than your print.
- Wood stain or clear finish (optional).
- Strong adhesive (wood glue or super glue).
- Suede cord, leather strap, or sturdy twine (for hanging).
- Small nails or screws (for securing the wood strips to the wall). If not using hanging string.
Equipment Required List
- Measuring tape or ruler.
- Hand saw or miter box (if you need to cut the wood trim to size).
- Clamps (optional, but helpful for gluing).
- Paintbrush or rag (for applying stain/finish).
- Drill and small drill bit (for threading the cord).
- Hammer or screwdriver.
DIY Instruction Step by Step
1. Prepare the Wood Hangers
- Take your four strips of wood. You will have two pairs: one pair for the top of the print and one pair for the bottom.
- If your wood is unfinished, apply a coat of stain or clear finish using a paintbrush or rag. Let these pieces dry completely according to the product instructions. This step really gives the wood a richer, finished look.
2. Create the Top Hanger
- In the middle of the back edge of the two top wood strips, measure and mark the spots where your hanging cord will thread through. Drill a small hole through each of these two strips. Make sure the hole is just big enough for your chosen cord or twine.
- Lay one top strip flat on your work surface. Apply a thin, even line of strong adhesive along the length of the wood strip where it will meet the paper.
- Carefully position the very top edge of your large print onto the adhesive. Ensure the print is straight and centered.
3. Attach the Top Back Piece
- Apply adhesive to the second top wood strip. Line this strip up exactly over the first strip, sandwiching the top edge of your print between the two pieces of wood.
- Wipe away any glue that squeezes out. Clamp the pieces together, or place heavy objects on top, and let the adhesive cure completely. This creates a secure, flat hanger.
4. Create the Hanging Loop
- Thread your suede cord or twine through the holes you drilled in the top hanger.
- Tie the ends of the cord together securely in a knot. This creates the loop you will use to hang the entire artwork on a wall hook.
5. Create the Bottom Stabilizer
- The bottom hanger acts primarily as a weight to keep the print flat and straight. Repeat the gluing process from steps 2 and 3, using the remaining two wood strips to sandwich the bottom edge of your print. You do not need to drill holes in this bottom piece.
- Allow the glue to dry thoroughly. Once everything is dry, your rustic scroll is ready to be hung on the wall.
2. The Layered Mirror Suspension
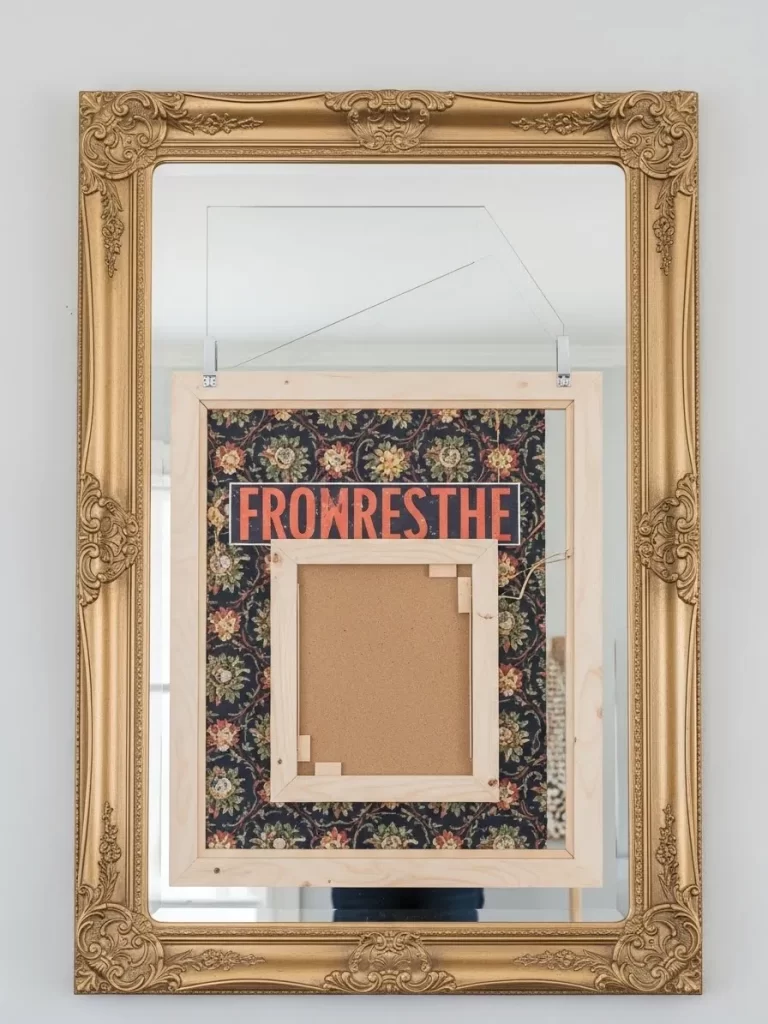
Creative Name: Ornate Frame Layering
Description
Big, decorative mirrors are often inexpensive to find at vintage shops or flea markets. Use an old, oversized mirror with an ornate frame as a stunning backdrop for smaller pieces of art. The reflective surface dramatically increases the visual impact of any object you place in front of it, making a medium-sized frame feel much larger and more significant.
This technique delivers wonderful depth and contrast. The luxurious, gold-toned frame provides a beautiful visual counterpoint to the simpler, raw wood frame suspended within its boundaries. Furthermore, hanging the inner artwork with simple wire or string creates a floating effect, adding a modern, conceptual element to the overall presentation.
By using an old mirror, you solve the problem of displaying big art on a budget and add a layer of intriguing complexity to your wall decor. This display turns a simple framed piece into a compelling, layered installation that immediately captures attention. It is a wonderfully creative way to merge existing decorative elements with new artwork.
Material Required List
- One large mirror with an ornate, sturdy frame (the backdrop).
- One wooden picture frame, slightly smaller than the mirror’s interior dimensions (the suspended art).
- Artwork to place inside the smaller wooden frame (e.g., fabric, a print, or a small canvas).
- Strong, thin wire or fishing line.
- Small wire clips or hooks (two needed).
- Wall anchor and hook (for hanging the main mirror).
- Wood screws and screwdriver (if needing to secure clips to the wood frame).
Equipment Required List
- Measuring tape.
- Wire cutters.
- Pliers (to bend and secure the wire).
- Screwdriver or drill.
- Level (for hanging the mirror straight).
DIY Instruction Step by Step
1. Prepare the Inner Art Frame
- First, assemble your artwork inside the smaller wooden frame. Secure the backing and any necessary hardware.
- Next, attach a small clip or hook to the top of both sides of the wooden frame. You may need to use small wood screws to fasten these securely to the wood structure. These clips will be what the suspension wire connects to.
2. Hang the Mirror Backdrop
- Find the proper spot on your wall and securely mount a wall anchor and hook strong enough to hold the weight of the large mirror.
- Carefully hang the large, ornate mirror. Use a level to ensure it is perfectly straight. This mirror is the foundation of your entire layered display.
3. Measure and Cut the Suspension Wire
- Measure the distance from the two clips on your small frame up to where the wire will anchor behind the top of the large mirror. Add some extra length for tying knots and adjustments. You want the small frame to hang at a visually pleasing height inside the mirror opening.
- Cut two pieces of wire or fishing line to this measured length.
4. Suspend the Inner Frame
- Attach one end of the cut wire securely to one clip on the small wooden frame. Repeat this with the second piece of wire on the second clip.
- Now, carefully drape the two wires up and over the top edge of the ornate mirror. Secure the ends of the wire at the back of the mirror frame using strong tape, small nails, or by tying them to the existing mirror hanging wire. Adjust the length of the wire until the small frame is hanging centered and straight in the mirror’s reflection.
- Step back and check that the artwork is level and the small frame hangs straight, allowing the mirror to act as the stunning, oversized matting.
3. The Grand Abstract Cloth

Creative Name: DIY Oversize Canvas Drop Cloth
Description
Achieving grand, large-scale abstract art does not need to drain your resources. Using a simple canvas drop cloth, which is readily available at hardware stores, provides a massive, inexpensive surface for painting. These cloths are often already sized to make a powerful statement, instantly transforming an empty wall.
Painting an abstract design requires no professional skills; simply blocking out shapes in colors that complement your room is wonderfully effective. The texture of the raw canvas or drop cloth adds a lovely, organic quality to the finished piece. Furthermore, the casual hanging method, such as clipping or tacking the fabric, enhances its relaxed, modern appeal.
This method allows you to experiment with vast blocks of color and shape, dominating the space in an artistic manner. The result is a piece of art that looks like a professionally commissioned abstract work but is entirely customized to your personal color palette and style, all while maintaining an extremely low budget.
Material Required List
- Large canvas drop cloth (choose one that is the desired finished size).
- Acrylic or latex paint in 3-5 colors (samples or mis-tinted paint from the hardware store are budget friendly).
- Wood batten strips or dowels (optional, for the top and bottom edge for stability).
- Large binder clips or grommets and hooks (for hanging).
- Painter’s tape (optional, for clean lines).
Equipment Required List
- Large paintbrushes, foam rollers, or sponges.
- Paint trays or shallow containers.
- Drop sheet or old newspaper (to protect the floor).
- Measuring tape.
- Hammer and nails or drill and screws (for wall mounting).
DIY Instruction Step by Step
1. Prepare Your Painting Surface
- Lay the canvas drop cloth flat on the floor or a large, protected work surface. Make sure the area is well-ventilated.
- If your cloth is very wrinkly, you may choose to lightly iron it first. If you want a more raw look, leave the natural folds.
2. Design and Base Coat (Optional)
- Decide on your general abstract design. You can look at contemporary art for inspiration. The goal is large, interesting shapes and color blocking.
- You can apply a thin, diluted base coat of a neutral color (like a light beige or grey) over the whole cloth if you wish to mute the raw canvas color slightly, or you can skip this step.
3. Block Out the Main Colors
- Using a large brush or small roller, start painting your largest shapes first. Do not worry about achieving straight lines unless that is your goal. Part of the beauty of abstract is the organic, imperfect edges.
- Apply a second color next to the first, overlapping slightly or leaving negative space as desired. Let the first layer dry slightly before introducing a new color close to it to prevent mudding.
- Work across the entire surface, playing with the size and positioning of your color blocks. Stand back frequently to assess the composition and balance of colors.
4. Add Contrast and Definition
- Introduce your darkest and lightest colors last. These contrasting colors will help define the shapes and give the artwork depth.
- Continue building layers until you are satisfied with the look. Let the entire canvas dry completely.
5. Hang the Artwork
- The easiest way to hang this is using large binder clips clipped to the top edge, which can then hook onto nails or screws driven into the wall.
- Optional Finishes: For a slightly more refined look, you can fold the top edge over a wood batten strip and secure it with staples or glue, then hang the batten directly onto the wall.
4. The Grid Panel Gallery
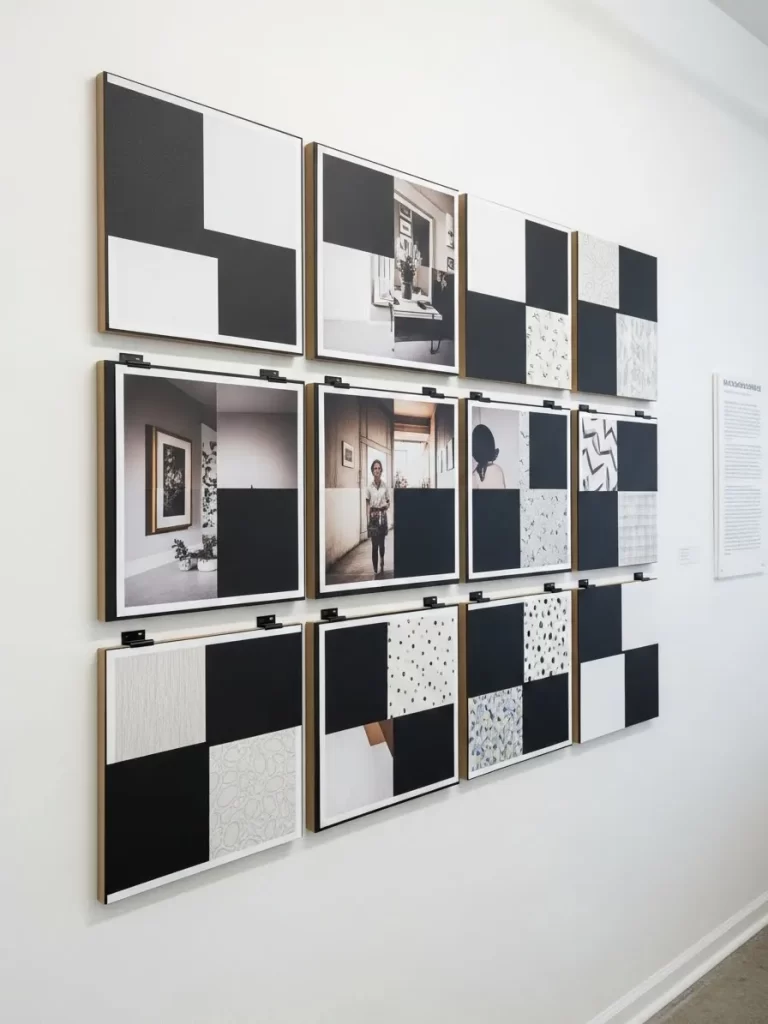
Creative Name: Modular Checkerboard Display
Description
Creating a huge wall display is straightforward when you use small, standardized panels. This modular approach allows you to achieve the size of a large statement artwork by combining many smaller, identically sized pieces. Uniformity in size makes arranging them easy and gives the overall display a clean, contemporary gallery feeling.
The beauty of this method lies in mixing media within the grid. Some panels can hold black and white photos, others can feature graphic black paint, and some can be covered in textured wallpaper or fabric. This blend of simple graphics, photography, and pattern creates a dynamic visual collage that is highly engaging.
By using simple wooden panels or foam boards, this entire large-scale display remains wonderfully affordable. You avoid the high cost of one massive frame and instead use simple clips or small brackets to hang each piece. This strategy is an exceptionally clever, budget-conscious way to fill a huge expanse of wall space with personalized art.
Material Required List
- Multiple lightweight square wood panels, MDF, or foam core boards (all the same size).
- Various media: black and white paint, adhesive-backed wallpaper samples, fabric remnants, and printed photographs.
- Strong spray adhesive or craft glue.
- Small mounting clips, sawtooth hangers, or strong mounting tape for the back of each panel.
Equipment Required List
- Measuring tape and ruler.
- Utility knife (for cutting photo paper and fabric).
- Paintbrush.
- Level (for alignment during hanging).
- Pencil (for marking the wall).
DIY Instruction Step by Step
1. Prepare and Group the Panels
- Decide how many total panels you need to cover your wall space. A grid of 3×4 (12 panels) or 4×4 (16 panels) is generally very impactful.
- Group your panels based on the media you will apply: some for photos, some for patterned paper, and some for solid paint.
2. Create the Visual Elements
- For Photo Panels: Cut your black and white photos to size. Use a strong spray adhesive to mount them smoothly and securely onto the designated panels. You can leave some white space or cover the entire panel.
- For Pattern Panels: Cut wallpaper or fabric samples to fit the panel. Apply craft glue or spray adhesive to mount the pattern firmly onto the surface.
- For Solid Color Panels: Paint the remaining panels with solid black, white, or another contrasting color. Apply a second coat if needed for a deep, even finish.
3. Attach Hanging Hardware
- Once all panels are dry, attach your chosen hanging hardware (small clips or strong mounting tape) to the back of each panel. Ensure all hardware is placed at the exact same position on every single panel. This is critical for achieving a level grid.
4. Plan and Mark the Grid
- Using a measuring tape and pencil, lightly mark the wall where the top edge and sides of your overall grid will be.
- Start with the center panel and work your way out. Measure the space you want to leave between each panel (e.g., 1 inch) and mark the spot for the hanger of the first panel.
5. Hang the Panels
- Hang the first panel. Use a level to ensure it is straight.
- Carefully measure the exact distance (including the 1-inch gap) from the edge of the first panel to the center point of the next panel. Mark and hang the second panel, using the level again.
- Continue this methodical measuring and hanging process row by row. Precise measuring ensures the final, large grid looks polished and professional.
5. The Oversize Inspiration Board
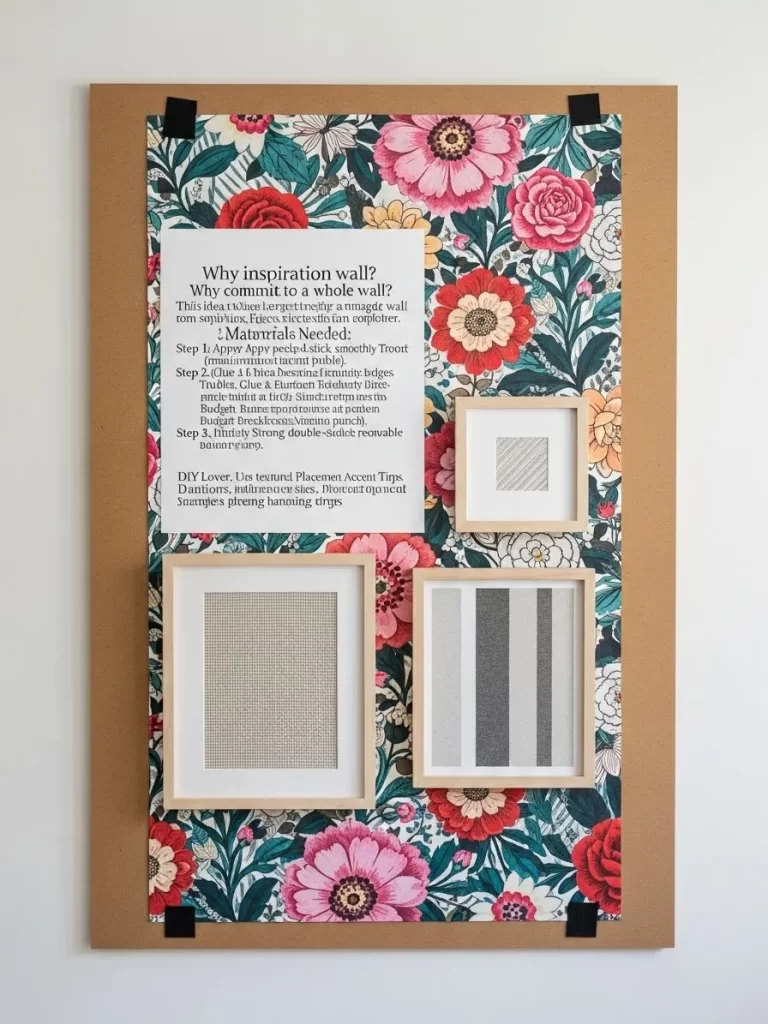
Creative Name: Framed Mood Board Accent
Description
A bulletin board can serve as a massive, colorful piece of abstract art when used creatively. This method begins with a large sheet of affordable cork or foam board, which instantly provides a huge canvas. Covering this backdrop with a bold, beautiful patterned wallpaper or fabric sample creates an eye-catching design that fills the entire space.
The foundation layer of rich florals or striking geometrics acts as your main large artwork. Layering smaller, framed pieces of textured paper or simple artwork on top provides depth and contrast. This approach is much more visually interesting than a standard gallery wall because the patterned background holds the whole composition together.
This type of inspiration board is easily changeable, too. The cork base means you can swap out the smaller framed elements or pin up notes and photos whenever you want. It is a wonderfully flexible and inexpensive way to achieve a vibrant, large-scale design feature in any room.
Material Required List
- One large sheet of cork board, foam core board, or thin MDF panel.
- A large piece of patterned wallpaper, fabric, or wrapping paper (the background art).
- Strong spray adhesive or craft glue.
- 2-3 small, inexpensive picture frames.
- Textured paper, small fabric pieces, or simple art prints (for the small frames).
- Strong double-sided mounting tape or small mounting hardware (for hanging the main board).
Equipment Required List
- Utility knife or scissors.
- Ruler or measuring tape.
- Roller or smooth object (for applying the background paper evenly).
- Pencil.
DIY Instruction Step by Step
1. Prepare the Background Panel
- Lay the large cork or foam board on a clean, flat surface.
- Roll out your wallpaper or fabric. Ensure the pattern is centered and covers the board completely, leaving a slight overhang on all sides.
2. Mount the Background Paper
- Apply a generous, even coating of spray adhesive or craft glue to the surface of the panel. Work in sections if your panel is very large.
- Carefully lay the wallpaper or fabric onto the adhesive, starting at one end and smoothing out any bubbles or wrinkles as you go. Use a roller or your hand to ensure complete contact.
- Once the glue is dry, flip the board over and use a utility knife to trim the excess paper or fabric neatly along the edges of the board.
3. Assemble the Accent Frames
- Put your smaller pieces of textured paper or prints into the small picture frames.
- Arrange these smaller frames on the large patterned board until you find a balanced and appealing composition.
4. Attach the Frames
- Once the arrangement is decided, use a strong adhesive or small wood screws to securely fasten the smaller frames directly onto the surface of the large background board.
5. Hang the Finished Board
- Depending on the weight of your finished board, you can use heavy-duty double-sided mounting tape, French cleat hangers, or strong picture wire to hang the entire inspiration board.
- Mount it centered on your wall. The large, bold background instantly provides the impact of a huge piece of art.
6. The Framed Textile Hanger
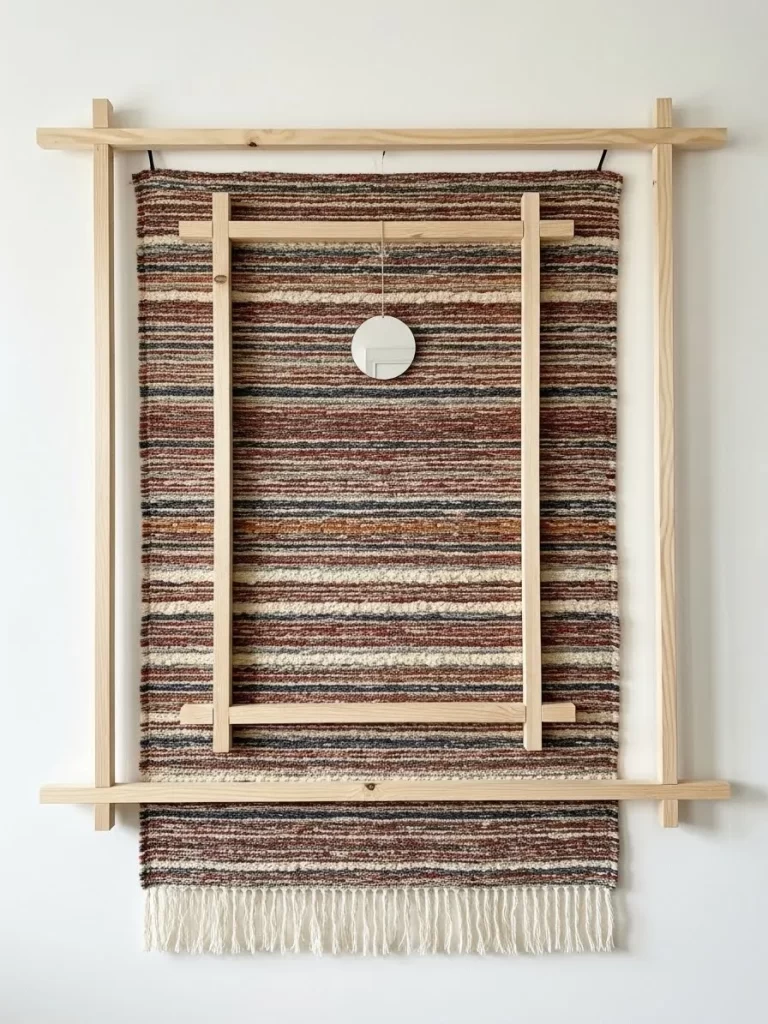
Creative Name: Woven Wall Hanging Enclosure
Description
A large, textured textile, like a runner rug, tapestry, or blanket, is an excellent budget substitute for big artwork. These pieces already possess wonderful color, pattern, and texture, effortlessly filling a substantial amount of wall space. The warm, woven material instantly adds a cozy, grounded feeling to any room.
This unique display elevates the textile by enclosing it within a simple, structural wooden frame. This frame, built from simple wood strips, outlines the woven piece, giving the soft fabric an architectural, finished quality typically reserved for canvas art. The exposed joints and raw wood emphasize the contemporary, handmade nature of the installation.
The addition of a small, centralized decorative element, like the tiny mirror or a bead, creates a focused visual point, preventing the large pattern from feeling overwhelming. This smart layering technique combines softness with structure, offering a very cheap yet extremely sophisticated way to display large, non-traditional artwork.
Material Required List
- One flat, woven textile (rug, blanket, or tapestry) that is the desired finished size.
- Four wood strips/battens cut to the length and width of the textile (for the main outer frame).
- Two shorter wood strips (for the floating inner frame, optional).
- Wood glue and/or small nails/screws.
- Small decorative item (e.g., a small mirror, a shell, a ceramic bead) and thin string.
- Wall mounting hardware (e.g., French cleats or secure picture wire).
Equipment Required List
- Measuring tape.
- Hand saw or miter box (if cutting wood).
- Drill and drill bits.
- Hammer or screwdriver.
- Clamps (optional, for gluing wood joints).
DIY Instruction Step by Step
1. Prepare the Outer Frame Pieces
- Cut your four main wood strips to create a rectangle slightly larger than your chosen textile.
- You can join the pieces using a simple butt joint (gluing the ends together) or a slightly more complex miter joint (cutting 45° angles). Clamping the pieces together while the wood glue dries will give you the strongest bond.
2. Mount the Textile
- Lay the textile face-down on a flat surface.
- Place the assembled wooden frame over the textile. The textile should overhang slightly on all sides.
- Carefully stretch the textile and use small upholstery tacks or a staple gun to secure the edges of the fabric tightly to the back inner edge of the wood frame. Start in the center of each side and work your way out, ensuring the weave remains straight.
3. (Optional) Create the Inner Frame and Accent
- Assemble the two shorter wood strips into a simple cross or open rectangle. Glue or screw these pieces together. This creates the floating inner frame.
- Drill a very small hole in the top center of this inner frame. Thread a piece of thin string through the hole and attach your small decorative item (mirror, bead) to the end of the string.
- Tie the other end of the string to the top inner bar of the outer frame, adjusting the length so the accent hangs in the center of the textile.
4. Hang the Art
- Attach a secure hanging mechanism (like a sturdy wire or two French cleat brackets) to the top back edge of the completed wooden frame.
- Mount the entire piece onto your wall, checking for levelness. The finished result is a structured, large-scale textile artwork.
7. The Digital Art Projection
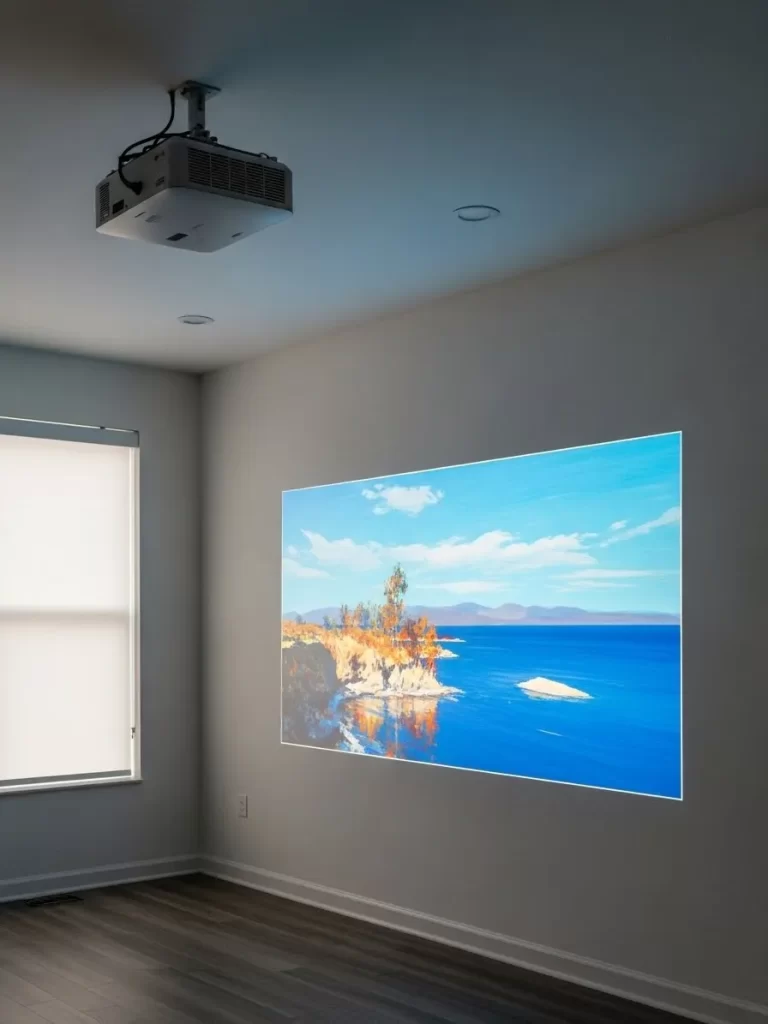
Creative Name: Wall-Sized Light Installation
Description
One of the most dramatic and easiest ways to create a massive piece of art is to use a digital projector. This method allows you to display any image, photograph, or moving abstract pattern instantly and at any size you wish. It is an incredibly adaptable solution because you can change your “artwork” daily simply by switching the image source.
This option is extremely cost-effective for large art because there are no material costs beyond the initial projector investment. You are using the wall itself as your canvas. The luminous quality of the projected light brings a wonderfully modern, glowing ambiance to the room, especially in the evening.
This approach transforms a plain wall into a dynamic feature, making the most of available technology. Whether you project a serene landscape, a vibrant abstract, or even an animation, the impact is undeniably dramatic. It gives you true flexibility and scale that conventional artwork can never match.
Material Required List
- Digital projector (ensure it has sufficient brightness for your room size).
- Streaming device or computer/media player (to supply the image/video).
- Wall outlet access.
- Projector mount (for ceiling or wall attachment, or a sturdy tripod/shelf).
Equipment Required List
- Drill and screws (for permanent mounting).
- Level.
- HDMI or other necessary connection cables.
DIY Instruction Step by Step
1. Determine Projector Placement
- Decide where the projector will live. For the cleanest look, a ceiling mount is usually the best choice, but a high shelf or a strong tripod can also work. The main goal is to have the projector positioned perpendicular to the center of the wall you want to use as your screen.
2. Mount the Projector
- If using a ceiling mount, use your drill and screws to securely attach the mount hardware to the ceiling joists or use heavy-duty anchors.
- Place the projector onto the mount and adjust its angle until the projected light is hitting the wall squarely.
3. Connect and Power Up
- Run the power cord to an outlet, and connect your image source (laptop, streaming stick) to the projector using an HDMI or other required cable.
- Turn on the projector and the source device.
4. Adjust and Focus the Image
- Use the projector’s controls (or remote) to adjust the keystone setting. Keystone correction squares up the image if the projector is angled slightly up or down. You want the projection to look like a true rectangle.
- Finally, adjust the focus ring on the projector lens until the image on the wall is sharp and clear.
- Select a high-resolution landscape, abstract design, or still image from your source to serve as your stunning, temporary wall art.
8. The Dimensional Wood Wall
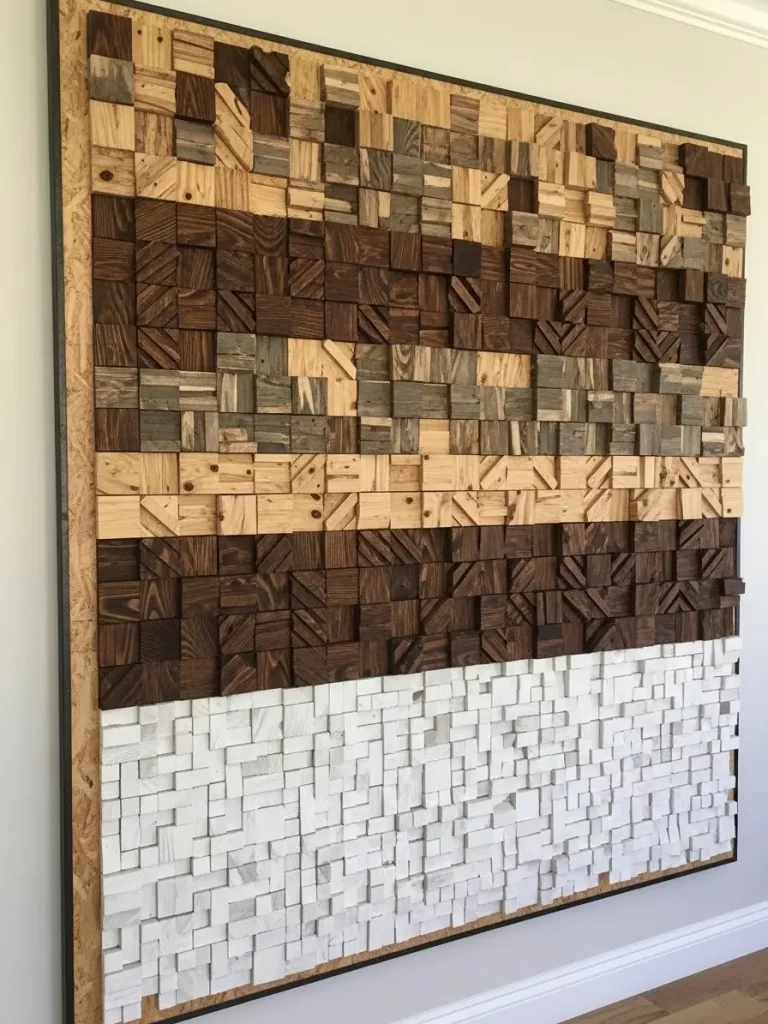
Creative Name: Abstract Wooden Block Mosaic
Description
For a striking, permanent piece of textural wall art, an abstract wood mosaic is an excellent option. This display is created entirely from small wood blocks or scrap wood pieces, making it a sustainable and incredibly affordable way to construct a massive, dimensional artwork. The varying depths and angles of the blocks catch the light beautifully, adding powerful shadows and visual interest.
The random orientation of the blocks and the use of different wood stains create a rich, natural pattern that is immensely satisfying to look at. You can achieve this large scale by starting with an inexpensive sheet of plywood or OSB as the sturdy backing. Furthermore, the abstract design requires no precise planning, encouraging creativity and free-form construction.
This installation brings a warm, rustic, yet modern element into your space. It serves as both a piece of art and a textural focal point, proving that big art does not have to be flat. The entire piece looks substantial and professionally constructed, yet it is merely a clever arrangement of small, salvaged wooden elements.
Material Required List
- One large sheet of plywood or OSB (the backing board).
- Numerous small wood blocks, wood scraps, or wooden dowel cross-sections (all roughly the same thickness).
- Wood glue (heavy-duty construction adhesive is recommended).
- Wood stains in varying shades (light, medium, dark, plus white paint).
- Screws (for attaching the backing board to the wall).
- Black wood trim (optional, for framing the finished piece).
Equipment Required List
- Miter saw or table saw (for cutting the blocks).
- Sandpaper or orbital sander.
- Paintbrushes or rags (for applying stain).
- Caulk gun (for applying adhesive).
- Drill and screws.
DIY Instruction Step by Step
1. Prepare the Wood Blocks
- Cut all your wood scraps or blocks into small squares or rectangles of a uniform thickness.
- Sand the edges of the blocks lightly to remove splinters.
- Separate the blocks into groups for staining. Apply different wood stains (light, dark, grey, natural) to the groups. You can also paint a group white for contrast. Allow all blocks to dry completely.
2. Attach the Backing Board
- If your plywood backing board is large, you may want to assemble a frame around the back edges for stability.
- Attach hanging hardware or drill holes in the backing board for mounting it securely to the wall studs. This board will get heavy.
3. Plan the Design
- Lay the backing board flat on the floor. Lightly sketch a rough outline of your design, perhaps separating it into horizontal bands of color/texture, as shown in the inspiration image.
4. Glue the Blocks in Place
- Starting in one corner or along one edge, apply a strong bead of construction adhesive to the back of the first wood block.
- Press the block firmly onto the backing board.
- Continue gluing blocks, placing them snugly next to each other. Vary the direction of the wood grain and the angle of the block slightly to enhance the dimensionality and play of shadows.
- Follow your planned color bands, ensuring you mix the stains for a mosaic effect.
- Work methodically until the entire backing board is covered.
5. Allow Curing and Hang
- Let the wood glue cure for the time specified on the adhesive label (often 24-48 hours).
- Once the piece is completely dry, mount the entire wooden mosaic onto your wall, checking for levelness.
9. The Painter’s Tape Matting
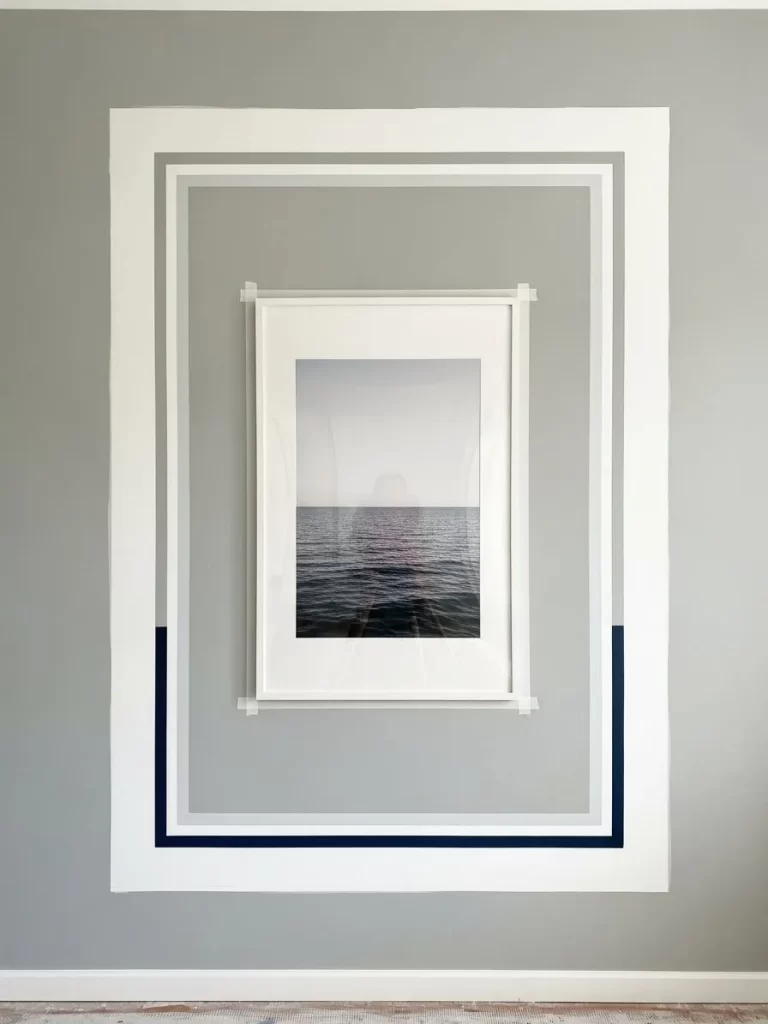
Creative Name: Geometric Border Accent
Description
Achieving the look of enormous, sophisticated matting around a small piece of art is exceptionally easy and cheap with painter’s tape and paint. The small, centered photograph instantly gains a tremendous sense of scale when surrounded by these large, crisp borders. This technique makes a tiny print look like the focal point of a massive, conceptual installation.
By using simple white and varying shades of grey or navy paint, you create a tiered, layered effect that mimics professional matting and framing. The clean lines and geometric structure instantly draw the eye to the small artwork in the center. It is an extremely modern and minimalist way to enlarge the presence of any photograph.
This project is highly customizable, allowing you to match the border colors exactly to your room’s color scheme. The entire display is remarkably affordable, as the only materials needed are the tape, paint, and a small print. It is a stunning, high-impact solution for displaying art on a truly tight budget.
Material Required List
- One small or medium-sized framed print or photo.
- Painter’s tape (high quality, for crisp lines).
- Two or three shades of acrylic or latex wall paint (white, light grey, dark grey, navy).
- Wall mounting hardware (for the small frame).
Equipment Required List
- Long ruler or measuring stick.
- Pencil.
- Level.
- Small paintbrushes or foam rollers.
DIY Instruction Step by Step
1. Hang the Central Frame
- Find the desired wall location and securely hang your small framed photo or print. This will serve as the exact center of your entire large-scale artwork.
2. Mark and Tape the First Layer (Inner Border)
- Decide how wide you want the first (inner) border to be. Use your ruler to measure this exact distance out from the four edges of the central frame. Lightly mark these lines on the wall with a pencil.
- Apply painter’s tape along these pencil marks to define the boundaries of your first border. Ensure the tape is pressed down firmly, especially along the inner edge.
3. Paint the First Layer
- Apply your lightest paint color (e.g., light grey) to the area defined by the painter’s tape. Let the paint dry completely. Apply a second coat if necessary.
- Once the paint is dry to the touch, carefully peel off the tape to reveal the first crisp, painted border.
4. Tape and Paint Subsequent Layers
- Repeat the measuring process, using the outside edge of the newly painted border as your starting point. Measure the desired width for your second border.
- Apply a new set of painter’s tape lines to define this second border.
- Apply your next color (e.g., dark grey) within this taped area. Let it dry completely and remove the tape.
- Repeat this process with white or your final, darkest color (e.g., navy) to create the largest, outermost border, ensuring the whole composition is balanced.
5. Clean Up
- Once all paint layers are fully dry, erase any visible pencil marks. The final result is a dramatically large, geometric matting effect around your small, central piece of art.
10. The Maximalist Circle Gallery
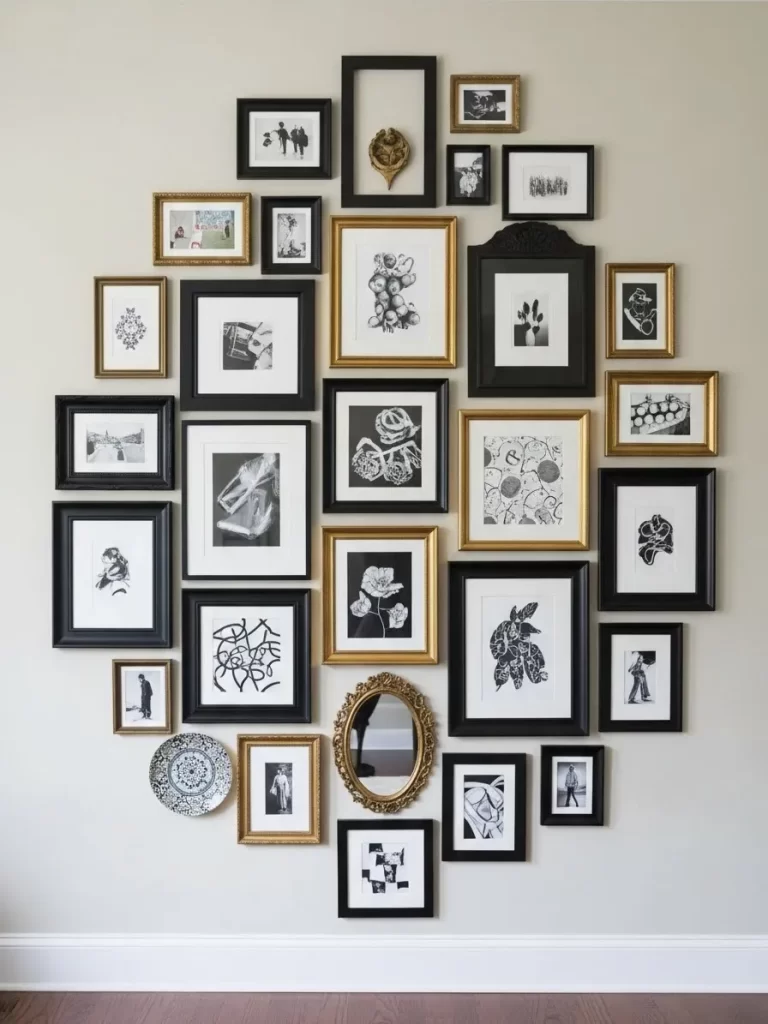
Creative Name: Organic Frame Cluster
Description
Filling a large wall with art does not always mean buying a single huge piece. A gallery wall that expands outward in an organic, circular shape is a wonderfully dynamic way to use many small, inexpensive frames to create one large focal point. This configuration uses the negative space around the cluster to give the whole arrangement a massive visual boundary.
The key to this design is embracing variety in both the art and the frames. By mixing simple black frames with ornate gold accents and adding a mirror or small decorative plate, you achieve immense texture and contrast. The black and white art content within the frames helps unify the diverse collection, maintaining a cohesive look.
This type of arrangement is exceptionally budget friendly because you can collect small, secondhand frames and prints over time. It allows you to build a display that grows with your collection, always feeling substantial and complete. The overall effect is a stunning, traditional look that acts as a single, large-scale piece of artwork.
Material Required List
- Numerous frames of varying sizes, shapes, and materials (black, gold, wood).
- Black and white prints, photographs, or graphic art (to unify the collection).
- One or two small decorative objects (e.g., a small mirror or plate) for added dimension.
- Picture hanging hooks, nails, or adhesive strips (depending on frame weight).
- Paper templates (optional, but highly recommended for planning).
Equipment Required List
- Measuring tape.
- Level.
- Hammer or screwdriver.
- Scissors.
- Pencil.
DIY Instruction Step by Step
1. Create Frame Templates
- Trace the outline of every single frame onto wrapping paper or newspaper. Cut out these paper templates. Write the name of the frame (e.g., “Small Gold Oval”) on each template.
2. Plan the Organic Shape
- On the floor, lay out all your empty frames to decide on the art placement inside each one.
- Now, tape the paper templates onto your wall, starting with the largest frames near the center of the arrangement.
- The goal is to create a large, general circular or oval shape, with the frames clustered more tightly in the center and spacing out slightly toward the edges.
3. Space and Adjust
- Move the templates around until you are satisfied with the balance and spacing. Ensure the gaps between the frames are generally consistent (e.g., 1.5 to 3 inches apart) to maintain cohesion. Remember to strategically place the gold/ornate frames to distribute visual weight evenly.
- The goal is for the entire collection to read as one giant, cohesive piece.
4. Hang the Art
- Once the templates are in their final position, mark the exact spot for the nail or hook directly through the paper template (where the hanging wire/hook on the actual frame is located).
- Remove the paper template and insert the nail or hook.
- Begin hanging the actual framed art, starting with the center pieces and working your way outward.
- Use a level on the frames as you hang them. Step back after every few frames to ensure the entire organic shape is maintaining its balance and flow.
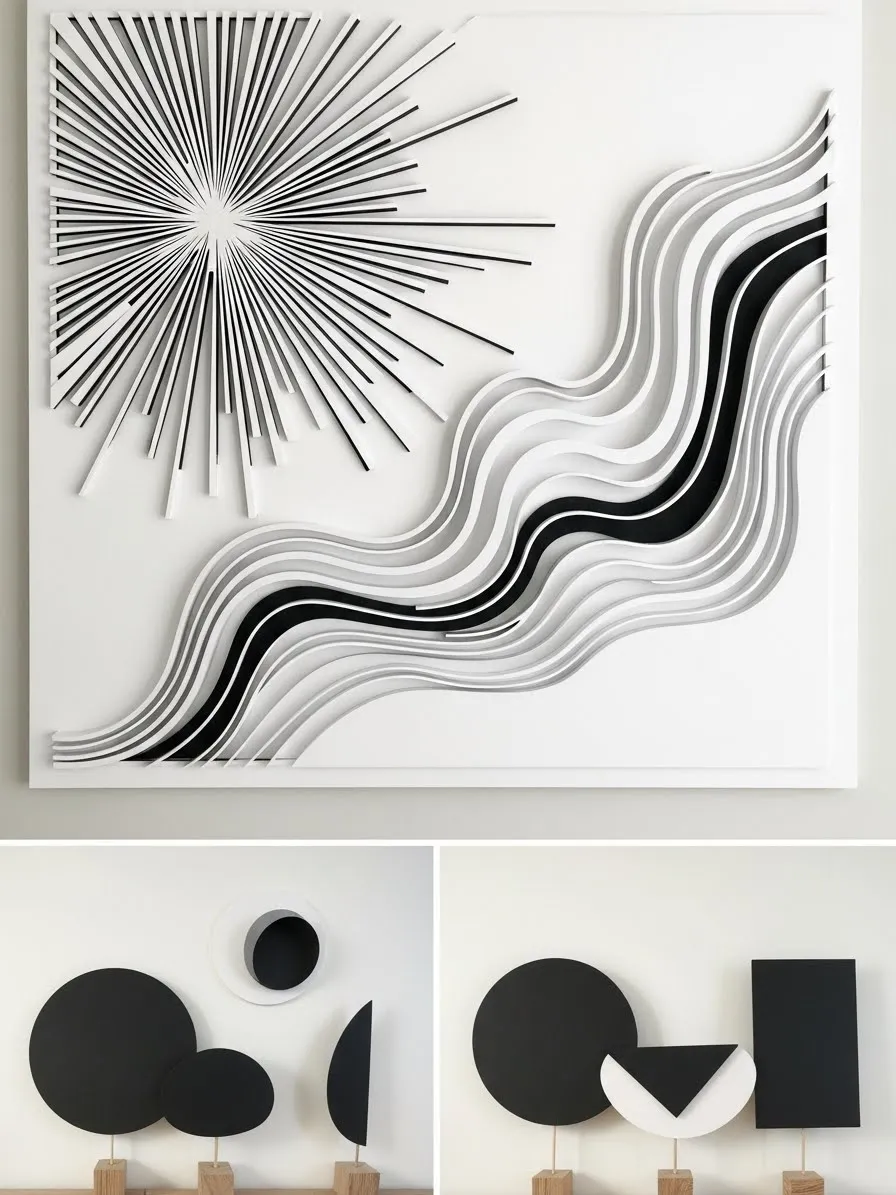
11. The Graphic Roller Blind
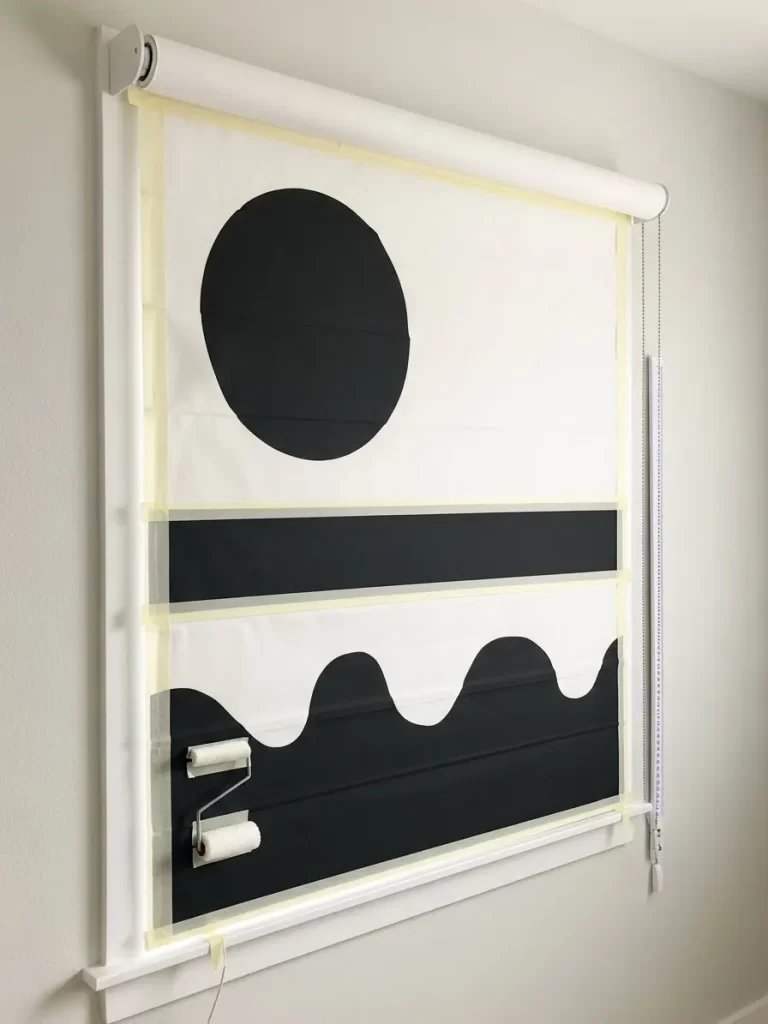
Creative Name: Abstract Window Shade Art
Description
A window shade is an overlooked surface that can become an enormous, functional piece of wall art. Applying a bold, graphic design directly onto a simple white roller blind is an extremely clever way to introduce large-scale modern art without using wall space. When the shade is fully down, it acts as a massive canvas, instantly dominating the room’s visuals.
The simple, two-tone black and white design provides powerful contrast and a minimalist, contemporary aesthetic. Using basic shapes like circles and waves eliminates the need for detailed artistic skill. Even a novice can successfully execute this kind of striking, large-scale abstract pattern with just a little patience and some painter’s tape.
This solution is wonderfully practical because the artwork disappears when the shade is rolled up, offering total flexibility. It saves you money on expensive art materials while achieving a customized, dramatic look that turns a functional window covering into a substantial piece of design.
Material Required List
- One plain, white fabric roller blind (large size).
- Black acrylic or latex paint.
- Painter’s tape (high quality for clean lines).
- Pencil.
- Cardboard or newspaper (to protect the surface underneath the blind).
Equipment Required List
- Small foam roller or paintbrush.
- Measuring tape and long ruler.
- Scissors or utility knife.
DIY Instruction Step by Step
1. Prepare the Blind
- Take the roller blind down from the window and lay it completely flat on a large, protected work surface. Make sure the fabric is smooth and clean.
2. Tape Off the Geometric Shapes
- Decide on your design (e.g., a circle, stripes, or waves). For the straight-line elements, use a measuring tape and ruler to mark where the straight edges will be. Apply painter’s tape firmly along these lines, sealing the edges well to prevent paint bleed.
- To create the curved or wave sections, draw the curve onto the shade first. Then, carefully cut small pieces of painter’s tape and follow the curve precisely, ensuring the tape is tight against the fabric.
- Tape off the entire perimeter of the shade to prevent paint from getting onto the edges that roll up.
3. Paint the Black Areas
- Using a small foam roller or paintbrush, apply the black paint evenly to all the areas that are not covered by painter’s tape. Keep the paint application relatively thin to prevent it from soaking through too much or making the shade too stiff.
- Apply a second coat after the first has dried slightly, if needed, to achieve a deep, opaque black.
4. Reveal the Design
- Once the paint is dry to the touch (but before it is fully cured and hardened), very carefully peel away all the painter’s tape. Pull the tape away slowly, pulling it back on itself at a 45-degree angle for the crispest lines.
- Allow the entire shade to dry completely flat for at least 24 hours before re-installing and rolling it up.
12. The Floating Acrylic Sandwich

Creative Name: Oversize Standoff Print Display
Description
The high-end appearance of a huge piece of artwork protected between two sheets of clear acrylic is surprisingly budget friendly. This technique creates a ‘floating’ effect, making the print appear suspended away from the wall. The frameless presentation gives the art a modern, gallery-worthy polish that instantly elevates the space.
This display method works exceptionally well for high-resolution photography, allowing the color and detail of the image to take center stage without the visual interruption of a traditional frame. The clean, clear edges of the acrylic panels provide subtle definition while maintaining a light and airy feel around the large print.
Using inexpensive, locally sourced acrylic sheets and simple metal standoffs provides this luxurious look without the expense of custom framing. It is a wonderfully minimal and effective way to mount an exceptionally large poster or print, achieving maximum impact with minimal visual hardware.
Material Required List
- Two large, identically sized sheets of clear acrylic (plexiglass), cut to size.
- One large print or photo (slightly smaller than the acrylic sheets).
- Four metal barrel standoffs (hardware used to hold the sandwich together and mount it to the wall).
- Wall anchors and screws.
- Double-sided mounting tape (optional, for positioning the print).
Equipment Required List
- Drill and drill bits (for drilling holes in the acrylic and the wall).
- Level.
- Measuring tape.
- Pencil.
DIY Instruction Step by Step
1. Drill Holes in the Acrylic
- Place the two acrylic sheets together and tape the edges so they do not shift.
- Measure and mark the spots for the four holes in the corners, ensuring they are positioned identically on both sheets and placed a few inches in from the corner edge.
- Carefully drill holes through both sheets at these four marked points. Tip: Drill slowly to prevent the acrylic from cracking.
2. Prepare the Print
- Remove the protective film from the acrylic sheets.
- Place your large print onto one sheet of acrylic (this will be the back piece). Center the print, ensuring the edges are even around the perimeter.
- Use a few small pieces of double-sided mounting tape on the back of the print to lightly secure it to the acrylic so it does not shift when you assemble the sandwich.
3. Assemble the Sandwich
- Place the second piece of acrylic over the print, lining up all four drilled holes.
- Use the standoffs to temporarily hold the sheets together.
4. Mount to the Wall
- Hold the entire assembled art sandwich up to the wall in the desired location.
- Use a level to ensure the piece is perfectly straight.
- Mark the wall through the four corner holes of the acrylic.
- Remove the acrylic and drill guide holes and install wall anchors into your marked wall spots.
- Using the standoff screws, attach the back portion of the standoffs to the wall.
5. Complete the Installation
- Carefully lift the art sandwich (with the print inside) and align the corner holes over the standoff screws protruding from the wall.
- Finally, screw the decorative standoff caps (the front barrels) onto the screws, securing the acrylic sandwich firmly to the wall and achieving the striking floating effect.
13. The Vertical Split Canvas
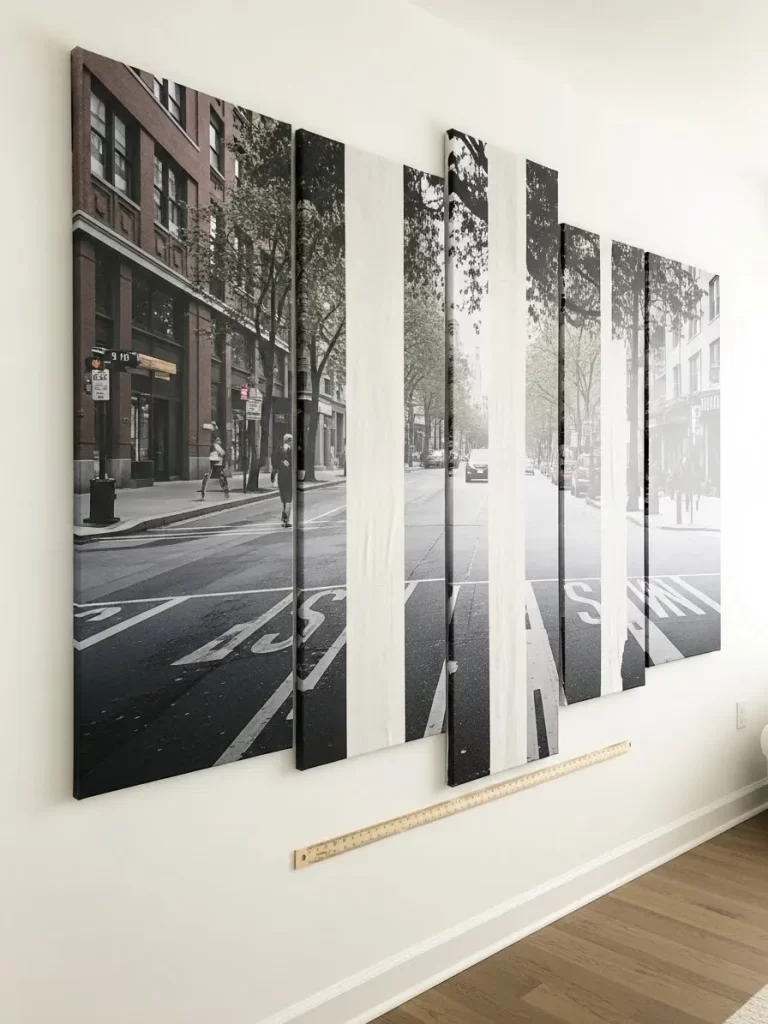
Creative Name: Segmented Photographic Mural
Description
Splitting a single large photograph across several narrow canvas panels is an ingenious, affordable way to create a massive, unique wall display. Instead of one continuous image, the gaps between the panels introduce intentional white space, which breaks up the composition and adds a modern, architectural rhythm to the scene.
This arrangement is particularly effective with streetscapes or landscapes, where the continuous nature of the photo is challenged by the segmentation. The white gaps act like tall columns or windows, providing a visually compelling negative space that emphasizes the verticality and drama of the image. The simple, thin-wrapped canvases keep the focus entirely on the image and the segmentation technique.
This method achieves an incredible sense of large scale without the expense of a single, enormous, custom-stretched canvas. By mounting several standard-sized canvases side-by-side with deliberate spacing, you achieve a customized, high-impact installation that looks like a professionally designed art feature.
Material Required List
- One high-resolution image, sized to cover the total area of all canvases combined.
- Multiple narrow, identical-sized pre-stretched canvases or wood panels (e.g., six to eight panels).
- Digital printing service (to print the image onto the canvases or onto paper/vinyl for mounting).
- Strong spray adhesive (if mounting prints onto canvases).
- Small nails or screws (for wall mounting).
Equipment Required List
- Measuring tape and ruler.
- Level.
- Pencil.
- Scissors or utility knife.
DIY Instruction Step by Step
1. Prepare the Image
- Send your photograph to a digital printer. The print needs to be accurately sized so that when cut into sections, each section will perfectly wrap or cover its corresponding canvas panel.
- If printing directly onto the canvases, skip to step 3. If printing on paper or vinyl, cut the print into the precise number of vertical strips needed for your canvases.
2. Mount the Strips (If Applicable)
- If using printed strips, apply a thin, even coat of strong spray adhesive to the front of the first canvas panel.
- Carefully align the first vertical strip of the image onto the canvas, smoothing out any bubbles or wrinkles as you go. Wrap the edges of the print tightly around the sides of the canvas and secure them to the back.
- Repeat this process for every canvas panel, ensuring the image sequence remains accurate.
3. Plan the Wall Spacing
- Decide on the exact, uniform gap you want to leave between each canvas (e.g., 2 inches). Consistency here is vital for the segmented look.
4. Mark the Wall
- Using a pencil and level, mark the wall to indicate the top and bottom edge of the overall installation.
- Starting with the far-left canvas, measure and mark the hanging point for the first panel.
5. Hang the Panels
- Hang the first canvas, ensuring it is level.
- Measure the chosen gap distance (e.g., 2 inches) from the edge of the first canvas and mark the hanging point for the second canvas.
- Continue this methodical measuring and hanging process until all panels are mounted. The overall result is a single, large, segmented photographic work.
14. The Masked Abstract Canvas

Creative Name: Painter’s Tape Geometric Art
Description
Creating a vast, colorful geometric abstract painting is surprisingly simple when you leverage the power of painter’s tape. The tape acts as your guide, masking off areas and creating sharp, sophisticated lines that define the entire composition. This technique allows a layman to achieve a complex, layered painting that looks professional and precise.
This abstract approach is an excellent choice for a large canvas because it utilizes bold color blocking and dynamic intersecting lines to create immense visual energy. Using an array of contrasting colors, along with metallic accents like gold leaf, gives the artwork a rich, contemporary feeling that commands attention in a large space.
The finished piece provides the huge scale and depth of a high-end abstract expressionist work, yet the entire painting is simply the result of careful taping and patient layering of paint. It is a wonderfully inexpensive way to inject powerful color and geometric structure into a room using a readily available canvas.
Material Required List
- One large, pre-stretched canvas.
- Acrylic or latex paint in 5-8 contrasting colors (e.g., terracotta, navy, red, mustard).
- Painter’s tape (high quality, various widths are useful).
- Small sheet of gold leaf (optional).
- Gold leaf adhesive (optional).
Equipment Required List
- Paintbrushes (small for detail, medium for filling blocks).
- Small foam rollers (optional, for smooth coverage).
- Palette or small paint cups.
- Pencil and ruler.
DIY Instruction Step by Step
1. Sketch and Initial Tape
- Lightly sketch a geometric pattern onto your large canvas using a ruler and pencil. Think about creating intersecting lines and interesting triangles, squares, and rectangles.
- Apply painter’s tape over all the lines that you want to keep white or the original color of the canvas. The tape must be pressed down firmly along the edges to seal them completely.
2. First Layer of Color
- Select the areas you want to paint with your first color. Carefully paint these sections, ensuring the paint covers the tape edge completely but does not seep underneath.
- Let this first color dry completely before moving on.
3. Layering Colors and Retaping
- Now, peel off the tape from the first painted color blocks.
- Apply new tape to mask off areas you have already painted and want to keep that color, as well as any new lines you want to create that intersect the first color. You will repeat the tape-and-paint process multiple times to create the layered effect.
- Select the next group of sections to paint and apply the second color. Allow it to dry.
4. Final Touches (Gold Leaf)
- If using gold leaf, paint the designated section with gold leaf adhesive.
- Wait for the adhesive to get tacky, then carefully press the gold leaf onto the area. Brush away the excess with a soft, dry brush.
5. Reveal the Final Artwork
- Once all paint colors are fully dry, carefully and slowly peel off every piece of painter’s tape. The sharp contrast between the white background and the colored blocks will create the stunning final geometric composition.
15. The Layered Curtain Accent
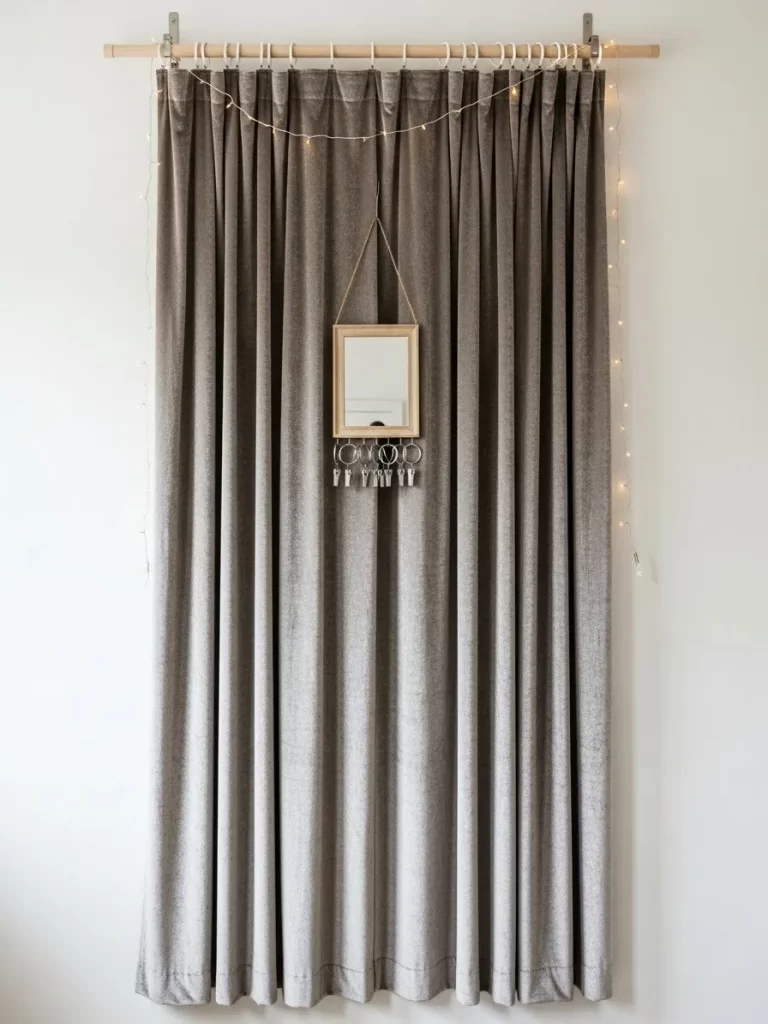
Creative Name: Velvet Backdrop Showcase
Description
A large, velvety curtain panel can serve as a luxurious, textured backdrop, turning a simple wall space into an elegant stage for small artwork. The soft folds and deep color of the fabric provide visual warmth and a sense of vast scale, framing any smaller object placed against it. Using a budget-friendly but large curtain is an easy, immediate way to add a major design element.
Suspending a small, framed mirror or an art print in front of the textile adds a wonderful dimensional contrast. The hard edges of the frame stand out dramatically against the softness of the fabric. The use of simple curtain rings and a wooden rod maintains a casual, accessible vibe while allowing the large textile to hang beautifully.
Adding a delicate string of fairy lights around the perimeter further emphasizes the large scale and adds a lovely, twinkling ambiance. This creative approach transforms a functional window treatment into a decorative feature that acts as a subtle, large-scale piece of artwork.
Material Required List
- One large curtain panel (velvet or heavy fabric works best for texture).
- Wooden curtain rod and brackets.
- Curtain rings with clips (to hang the curtain).
- Small, framed mirror or art print.
- Twine or thin rope (for hanging the mirror/print).
- String of LED fairy lights (optional).
Equipment Required List
- Drill and screws (for mounting the rod brackets).
- Measuring tape and level.
- Scissors.
DIY Instruction Step by Step
1. Mount the Curtain Rod
- Measure and mark the spots where your curtain rod brackets will be mounted. These should be wide enough to support the entire curtain panel when fully extended.
- Drill guide holes, insert anchors if needed, and securely screw the curtain rod brackets into the wall.
- Place the wooden rod through the brackets.
2. Hang the Curtain
- Attach the curtain rings with clips to the top edge of your curtain panel. Space them evenly to ensure the curtain hangs with attractive, uniform folds.
- Slide the curtain rings onto the wooden rod. Adjust the folds so the curtain hangs straight and covers the desired wall area.
3. Suspend the Accent Piece
- Attach twine or thin rope to the back of your small framed mirror or art print.
- Tie the other end of the twine securely around the curtain rod or around one of the curtain rings. Adjust the length so the small frame hangs centered in the middle of the large curtain panel at an appealing height. The size of the curtain makes the small frame look like a detailed piece of jewelry.
4. Add Lighting (Optional)
- Drape the string of LED fairy lights along the top of the curtain rod or weave them down the edges of the curtain folds. Secure the lights with small, discreet clips or pins.
- Plug in the lights to complete the dramatic, layered display.
16. The Oversize Poster Pin-Up
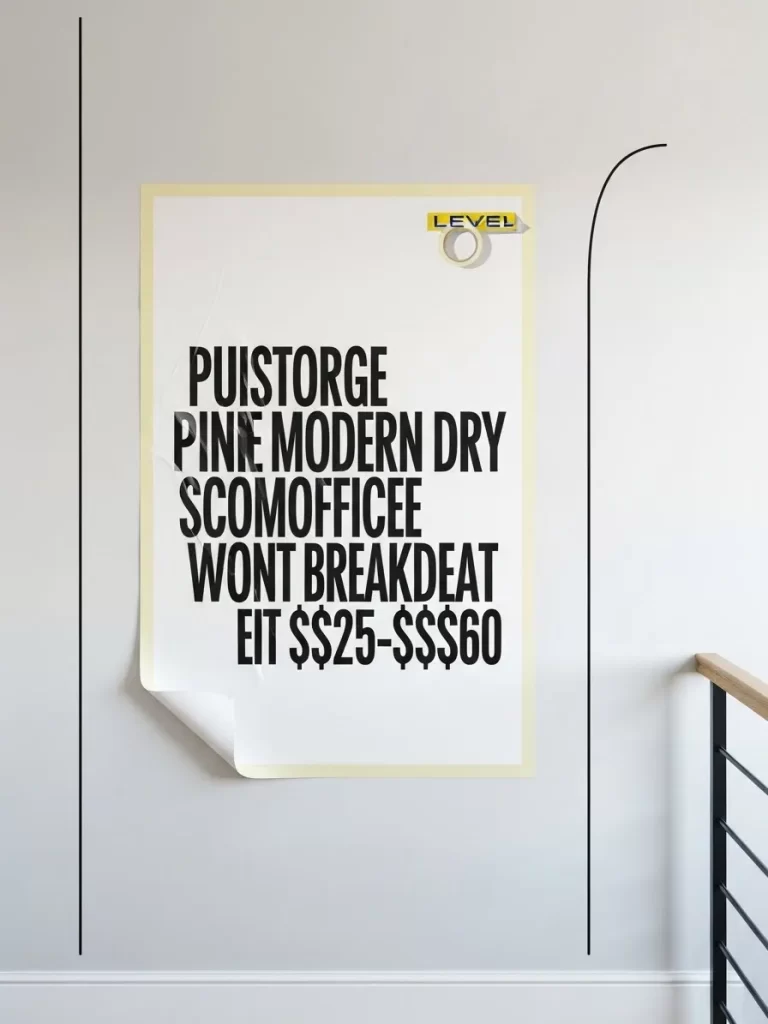
Creative Name: Minimalist Wall-Pinned Graphic
Description
Sometimes the simplest method is the most visually effective for displaying large art on a budget. Printing a massive, text-heavy poster and simply pinning it to the wall achieves an intentionally raw, anti-frame aesthetic. The slightly curled edges and visible hanging hardware emphasize the casual, temporary feel, which perfectly suits modern graphic design.
This technique is wonderful for showcasing large-scale typography or bold, graphic messages that require a huge format to make their statement. It’s an easy way to fill a vast, empty wall quickly and affordably, as printing an engineering print or poster is much cheaper than buying a canvas.
The inclusion of subtle, hand-drawn lines on the wall next to the poster enhances the conceptual, gallery-like feeling. This method proves that a huge, powerful statement can be made without any expensive framing whatsoever, relying purely on the size and content of the print itself.
Material Required List
- One very large poster or graphic print (printed on thick paper or cardstock).
- Four simple push pins, binder clips, or small, decorative tacks.
- Pencil and measuring tape (for planning the wall lines, optional).
- Black fine-point marker or thin paint (for the wall lines, optional).
Equipment Required List
- Straight edge or level.
DIY Instruction Step by Step
1. Prepare the Poster
- Unroll the poster and lay it flat for a few hours with weights on the corners to reduce the curl.
2. Position and Pin
- Hold the poster up to the wall and decide on the exact placement. Use a measuring tape to ensure it is centered both vertically and horizontally in the space.
- Start by pinning the two top corners with your chosen tacks or clips. Gently smooth out any major bubbles, and then pin the bottom corners.
- Leave a slight bit of slack, allowing the poster to curve away from the wall naturally at the edges; this enhances the casual, large-scale graphic look.
3. (Optional) Add Geometric Wall Lines
- If you want to replicate the accent lines, use a ruler and pencil to lightly draw two vertical lines on the wall, one on each side of the poster. These lines should extend from the ceiling down past the baseboard.
- You can also add a curve on one side, as shown, by carefully tracing a large round object or freehanding the line.
- Use a thin marker or thin black paint to make these lines permanent. Wait for the paint/ink to dry, then erase the pencil guide marks. The lines serve to frame the general area without actually framing the poster.
17. The Layered Shelf Display
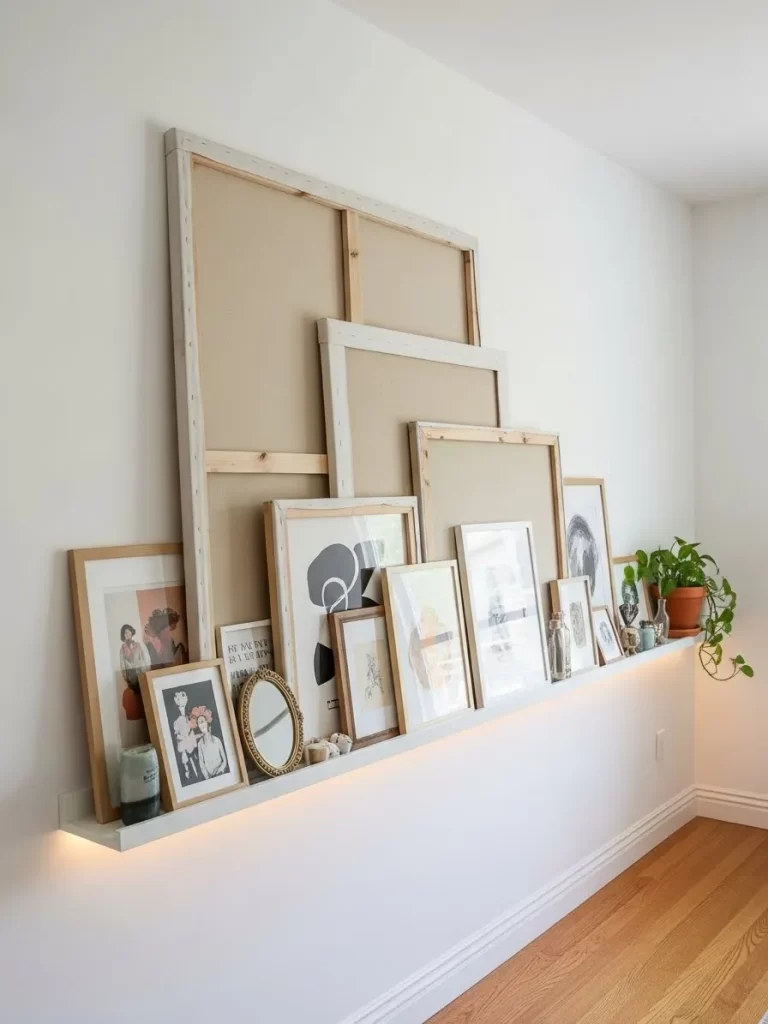
Creative Name: Integrated Ledge Gallery
Description
Using a simple, long picture ledge or floating shelf is an incredible way to create a large-scale art display that is instantly flexible and requires no complicated wall arrangement. Leaning large canvases and prints against the wall on the shelf fills an expansive wall space effortlessly, creating immediate depth and volume.
This display works by layering pieces of various sizes, with the largest canvases forming the substantial backdrop. By simply turning some canvases around to expose the raw stretcher frame, you introduce interesting texture and a hint of a deconstructed, studio aesthetic. This is a wonderfully affordable trick to add visual weight and volume to the display.
The shelf itself, especially when illuminated from beneath with LED strip lighting, becomes an integral part of the art installation. It casts a lovely, subtle glow that highlights the layered artwork above. This approach is highly dynamic, allowing you to continually swap out and rearrange pieces without ever damaging your walls.
Material Required List
- One long, sturdy floating shelf or picture ledge.
- Screws and wall anchors (to mount the shelf).
- Various sized frames, canvases, and prints (larger ones for the back).
- Small decorative items (e.g., plants, candles, sculptures).
- LED strip lighting (optional, for mounting beneath the shelf).
Equipment Required List
- Drill and drill bits.
- Measuring tape and level.
- Screwdriver.
DIY Instruction Step by Step
1. Install the Floating Shelf
- Determine the height and position for your shelf. It should be long enough to cover a significant portion of your wall.
- Use the drill and screws to mount the shelf securely to the wall, making sure it is perfectly level. If the shelf is very long, ensure it is supported properly along its length.
2. Install the Under-Shelf Lighting (Optional)
- If using LED strip lighting, adhere the strip along the underside of the shelf, following the manufacturer’s directions. Run the cord discreetly down to an outlet.
3. Arrange the Back Layer
- Start by placing your largest items (the biggest framed prints and canvases) along the back edge of the shelf, leaning them against the wall.
- To add visual interest and volume cheaply, place some large, blank canvases with the backside facing forward, exposing the wood stretcher bars. This looks intentional and adds texture.
4. Layer the Middle Ground
- Place medium-sized frames and prints in front of the largest pieces. Overlap them slightly to achieve a full, rich layered look. This creates depth in the display.
5. Add the Foreground Details
- Use your smallest framed pieces and decorative objects (like a small plant or ornate mirror) along the very front edge of the shelf. These items act as anchors and add a three-dimensional touch.
- Step back and adjust the spacing and overlap until the entire ledge looks like one cohesive, curated installation.
18. The Oversize Pegboard Organizer
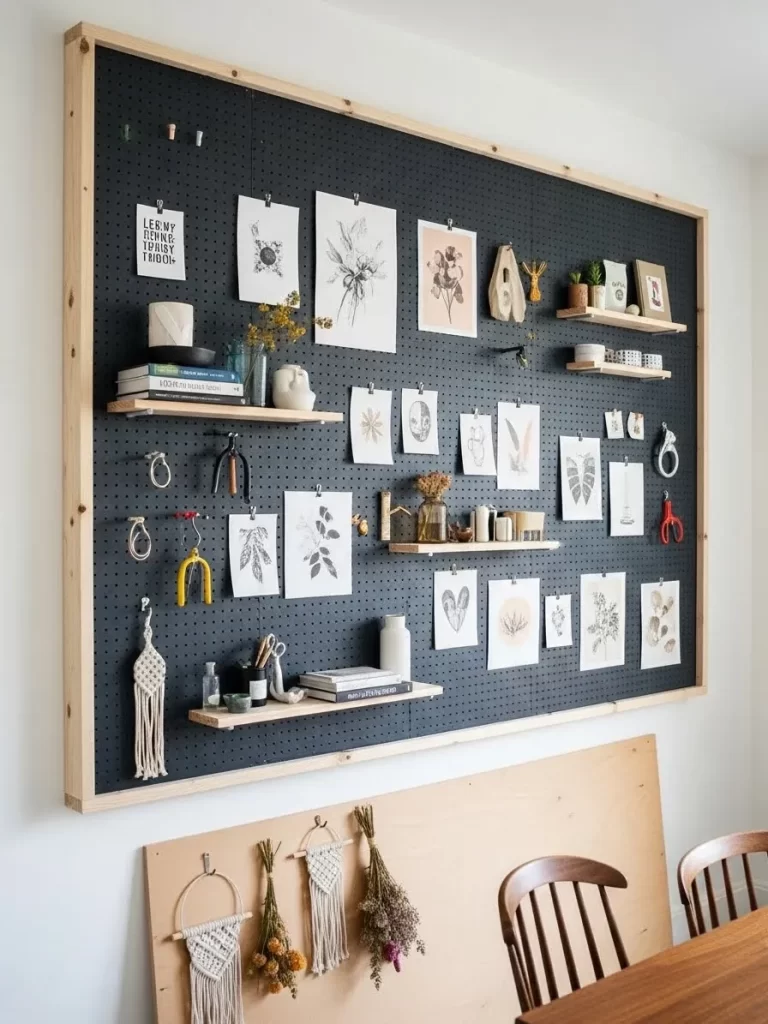
Creative Name: Framed Utility Wall Art
Description
A large, framed pegboard instantly transforms a blank wall into a massive, organized, and constantly evolving art display. This functional wall acts as both a storage solution and an abstract, structured artwork. Painting the pegboard a solid dark color, like black or navy, makes the holes disappear somewhat, giving the piece a chic, contemporary foundation.
The simple wooden frame surrounding the board elevates it from being mere utility to a piece of architecture or design. This display is incredibly flexible, allowing you to use small shelves, hooks, and clips to arrange and rearrange art, photos, and small collectibles continually. The large grid provides an underlying structure that keeps the whole arrangement feeling balanced.
This approach is wonderfully budget conscious for displaying art because you can easily swap out small prints and objects without having to commit to permanent wall placement. It is a stunning, massive focal point that blends organization with personal expression.
Material Required List
- One large sheet of pegboard.
- Wood strips (for the frame).
- Wood glue and nails/screws (for assembling the frame).
- Black or dark-colored paint.
- Various pegboard accessories: small shelves, hooks, and clips.
- Various small prints, sketches, and decorative objects.
- Wall mounting hardware (e.g., French cleats or secure screws).
Equipment Required List
- Drill and screwdriver.
- Saw (for cutting frame pieces).
- Measuring tape and level.
- Paint roller and tray.
DIY Instruction Step by Step
1. Paint the Pegboard
- Place the pegboard on a protected work surface. Use a roller to paint the entire surface of the pegboard in your chosen dark color (e.g., black). Ensure the paint gets into all the small holes for a uniform finish.
- Let the paint dry completely.
2. Build and Attach the Frame
- Measure and cut your wood strips to create a rectangular frame that fits precisely around the painted pegboard.
- Assemble the frame using wood glue and small nails or screws.
- Position the pegboard inside the frame. Secure it from the back using small brackets or screws so it sits flush with the frame.
3. Mount to the Wall
- Attach secure mounting hardware (such as French cleats or a sturdy wire system) to the back of the large, framed pegboard.
- Mount the entire piece securely to the wall, making sure it is level and anchored to wall studs if possible, as the finished piece will be heavy.
4. Arrange the Display
- Insert your pegboard accessories (shelves, hooks) into the holes.
- Arrange your artwork, sketches, and small decorative items onto the shelves and hang them using the clips and hooks. The large size and dark color of the pegboard will make even the simplest items look curated and intentional.
19. The Hinged Display Frame
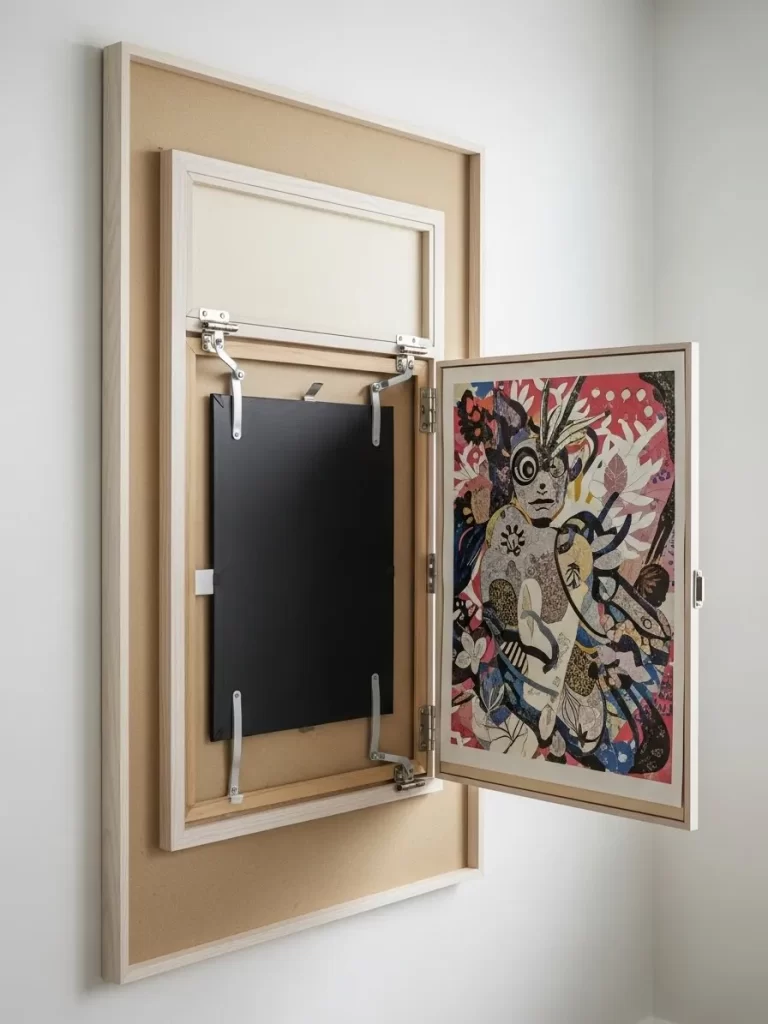
Creative Name: Secret Art Storage Box
Description
A clever way to display large art is to create a substantial, dimensional piece that also doubles as hidden storage. This method involves building a deep frame structure with a hinged cover that opens like a door. The size of the outer frame makes a strong, architectural statement, functioning as the primary, large piece of art.
The hinged design allows you to display a piece of art on the ‘door’ itself while utilizing the space inside to store supplies or to hang another piece of art that remains hidden until opened. This concept gives you wonderful versatility, offering two display options in the space of one. The exposed hinges and raw wood finish emphasize the DIY, utilitarian aesthetic.
This is a remarkably useful and affordable way to solve the problem of displaying a large format while adding depth to the wall. The entire construction is made from simple wood battens and hinges, making it a very attainable woodworking project that delivers an impressive visual reward.
Material Required List
- One large sheet of thin MDF or plywood (the backing board).
- Wood strips (for the main outer frame and the smaller inner frame/door).
- Two small hinges.
- Small latch or magnetic closure.
- Artwork for the door front and artwork for the inside (if desired).
- Wood glue and screws/nails.
- Wall mounting hardware.
Equipment Required List
- Saw (hand or power).
- Drill and various drill bits.
- Measuring tape and level.
- Screwdriver.
DIY Instruction Step by Step
1. Create the Backing and Outer Frame
- Cut the MDF/plywood to the desired final size.
- Build a simple, square or rectangular frame using wood strips. Glue and nail this frame around the perimeter of the backing board. This is your foundation.
2. Build the Inner Frame/Door
- Construct a second, smaller frame that will serve as the hinged door. This frame should be deep enough to create the box-like structure.
- Attach a piece of thin backing material to the front of this door frame (this is where the colorful art will be mounted).
3. Attach the Hinges
- Decide which side your door will open from.
- Attach the two small hinges to the side of the inner frame/door.
- Now, carefully position the inner frame onto the larger backing board. Line it up evenly and screw the other half of the hinges onto the large backing board. Ensure the door opens and closes smoothly.
4. Add Art and Latch
- Mount your main piece of art onto the front of the inner frame/door.
- Install a small latch, hook, or magnetic closure on the side opposite the hinges to keep the door closed securely.
- You can line the inside of the box with felt or cork and hang a second, hidden piece of art inside.
5. Mount the Entire Piece
- Attach a heavy-duty picture wire or French cleat system to the back of the large backing board.
- Mount the entire large, hinged display frame securely to the wall. The size alone makes a powerful artistic statement.
20. The Dowel Rod Tapestry Hanger
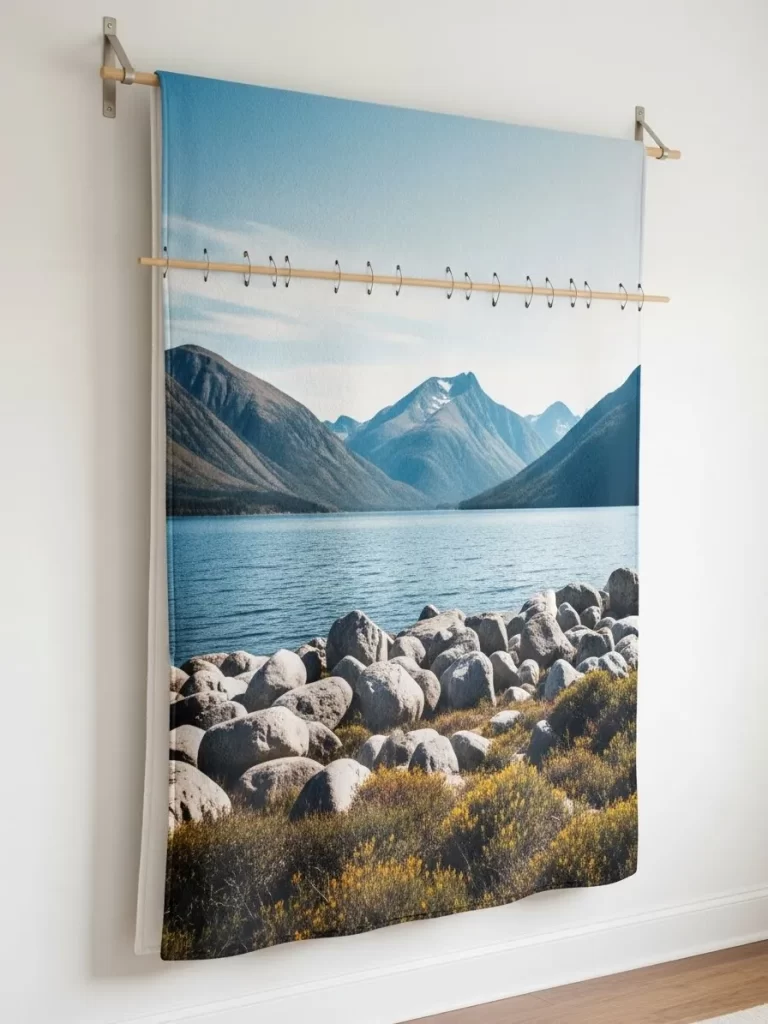
Creative Name: Landscape Fabric Scroll
Description
A large-scale fabric tapestry or blanket is an excellent, low-cost alternative to massive traditional artwork. Textiles often feature rich, detailed images, such as this stunning mountain landscape, which instantly command attention and fill a vast area. The softness of the fabric instantly introduces warmth and texture to the wall.
This simple display method utilizes a wooden dowel rod and basic curtain rings, achieving a clean, structural suspension that does not hide the fabric’s beauty. The use of natural materials like wood and metal clips complements the organic subject matter of the tapestry, enhancing its naturalistic charm.
This method allows for extremely easy changes; you can swap out the tapestry in minutes simply by unclipping the rings. It is an exceptionally effective and affordable way to introduce enormous, vibrant imagery into a space without the expense or complexity of heavy framing.
Material Required List
- One large fabric tapestry, blanket, or printed fabric sheet.
- One wooden dowel rod (must be wider than the fabric).
- Two wall mounting brackets (basic metal or wood).
- Small curtain rings with clips.
- Wall anchors and screws.
Equipment Required List
- Drill and drill bits.
- Measuring tape and level.
- Screwdriver.
DIY Instruction Step by Step
1. Mount the Dowel Brackets
- Measure and mark the spots where your dowel rod brackets will be mounted. These should be placed slightly wider than the tapestry.
- Use a drill to install wall anchors if necessary, and securely screw the mounting brackets into the wall. Ensure they are level.
2. Prepare the Tapestry
- Decide how many curtain rings you need for even support (usually one every 6 to 8 inches).
- Attach the curtain rings with clips along the top edge of your tapestry, spacing them evenly.
3. Install the Tapestry
- Slide the wooden dowel rod through all the curtain rings, making sure the tapestry is facing the front.
- Lift the dowel rod and place it securely into the mounted wall brackets.
4. Adjust and Straighten
- Step back and gently adjust the fabric folds. Ensure the tapestry is hanging straight down and that the image is flat and centered.
- The large scale of the tapestry instantly becomes the primary, stunning focal point in the room.
21. The Illuminated Shadow Box

Creative Name: Backlit Floating Gallery
Description
Turning a simple shadow box or deep shelf into an illuminated art piece is an exceptionally engaging way to display large visuals. Building a deep box frame allows for the addition of hidden LED lighting, which dramatically highlights the artwork and casts a warm, ethereal glow on the surrounding wall. This lighting transforms a simple print into a conceptual, glowing installation.
The depth of the box creates strong shadows and dimensionality, making the entire structure feel more like a piece of contemporary architecture than a simple frame. Placing a graphic pattern or textured material inside the box and running an LED strip along the inner perimeter ensures the piece is beautifully and evenly lit.
By utilizing simple, budget-friendly wood and an inexpensive LED strip, you achieve a massive, striking focal point that works wonderfully in a hallway or living space. The surrounding smaller, simple frames enhance the effect, making the whole wall feel like a curated, layered exhibition of light and shadow.
Material Required List
- Wood strips (for the main, deep box frame).
- Wood glue and small nails/screws.
- Piece of thin plywood or MDF (for the back of the box).
- Artwork or patterned fabric/paper (for the inside).
- LED strip lighting (battery-powered or plug-in).
- Two smaller, shallow frames or shadow boxes (optional, for side accents).
- Wall mounting hardware (e.g., strong wall anchors).
Equipment Required List
- Saw (miter box recommended for clean corners).
- Drill and screwdriver.
- Measuring tape and level.
DIY Instruction Step by Step
1. Construct the Main Shadow Box
- Cut your wood strips to the desired depth and length/width for the large box.
- Assemble the box frame using wood glue and screws/nails. Ensure all corners are square.
- Attach the thin plywood or MDF backing securely to the back of the box.
2. Prepare the Interior
- Mount your chosen art or patterned material onto the inner backing of the box. You can use spray adhesive or small tacks.
3. Install the LED Lighting
- Adhere the LED strip lighting along the entire inner perimeter of the box frame. If using a plug-in strip, make sure the cord exits neatly from the bottom or side. If using battery power, hide the battery pack inside the top edge of the box. The lights should face inward, illuminating the art.
4. Assemble and Mount Side Accents (Optional)
- If using smaller side boxes, paint or finish them as desired.
- Attach the hanging hardware to the large main box.
- Mount the large illuminated box securely to the wall.
- Then, place the two smaller shadow boxes on either side, positioning them slightly offset to create the layered, abstract composition.
5. Adjust the Light
- Turn on the LED strip. The light should spill over the art and wash onto the surrounding wall, creating a large halo effect that dramatically increases the perceived size of the artwork.
22. The Clipboard Grid Wall
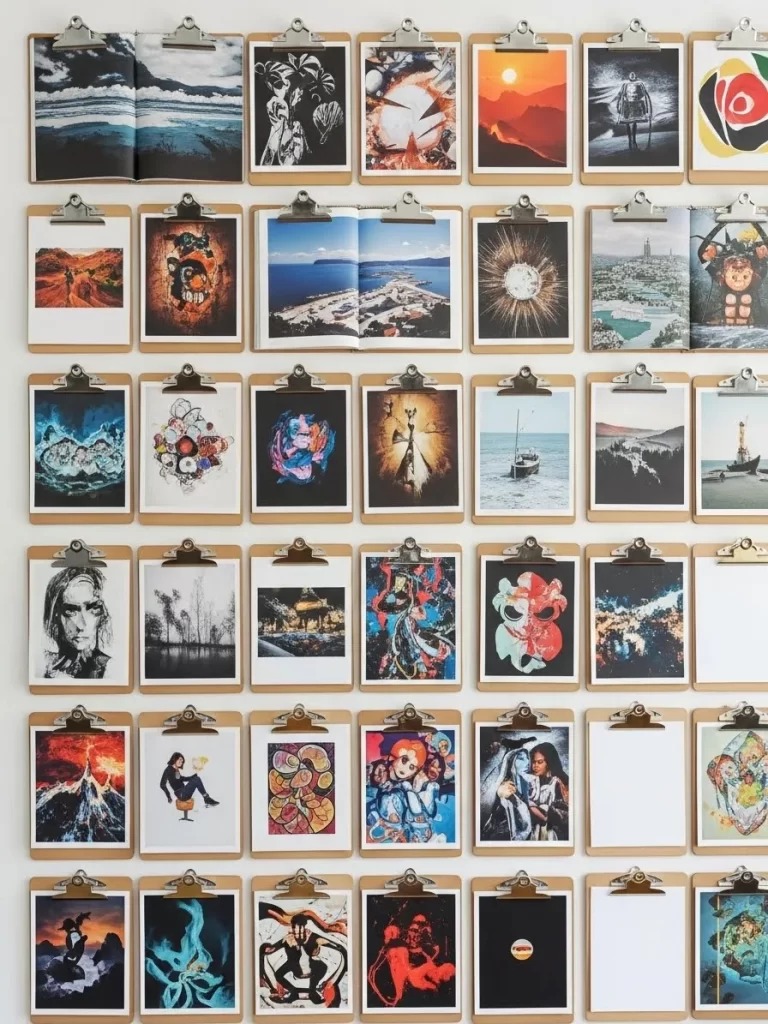
Creative Name: Modular Paper Gallery
Description
Achieving a massive gallery wall that is constantly flexible and affordable is exceptionally easy with standard clipboards. Arranging dozens of identical clipboards in a tight grid provides a large, structured backdrop that immediately creates a massive art installation. The simple metal clips offer a rugged, utilitarian accent that contrasts nicely with the colorful art.
This grid concept works brilliantly because it allows for an extremely diverse collection of prints and photos to be displayed without costly framing. The uniform size of the clipboards ensures the overall composition remains neat and polished, despite the variety of images on display.
This is a very budget-conscious way to cover a huge area. You can instantly swap out prints by simply lifting the metal clip, making it a dream for anyone who likes to update their decor regularly. The large checkerboard of images creates a stunning, graphic focal point that completely transforms an empty wall.
Material Required List
- Numerous clipboards (all the same size and material, e.g., wood or masonite).
- Various prints, photos, or graphic art (sized to fit the clipboards).
- Small nails, tacks, or strong adhesive wall hooks/tape (one for each clipboard).
Equipment Required List
- Measuring tape and ruler.
- Level.
- Pencil.
DIY Instruction Step by Step
1. Plan the Grid Layout
- Lay out all your clipboards on the floor to determine the final grid dimensions (e.g., 6 rows high by 7 columns wide). Decide on the uniform space you want to leave between each clipboard (e.g., 1 inch). This space is vital for a clean, grid look.
2. Insert the Artwork
- Place your chosen artwork under the metal clip of each clipboard. The art should be flush with the bottom edge of the board.
3. Mark and Measure the Wall
- Use a level and measuring tape to lightly mark the wall where the top left corner of the entire grid will begin.
- Measure and mark the exact hanging point for the first clipboard’s clip.
4. Install the Hanging Hardware
- Install the first nail or hook.
- Measure the chosen gap distance (e.g., 1 inch) from the side of the first hanging point to the position of the second hanging point. Mark this and install the second nail/hook.
- Repeat this precise measuring and hanging process for the entire grid, row by row. Accuracy in measuring the spaces between the nails/hooks is key to the grid’s success.
5. Hang the Clipboards
- Hang the clipboards onto the installed hardware.
- Step back and ensure all boards are perfectly aligned and level. The uniformity of the grid achieves the massive artistic impact.
23. The Vinyl Tape Mural
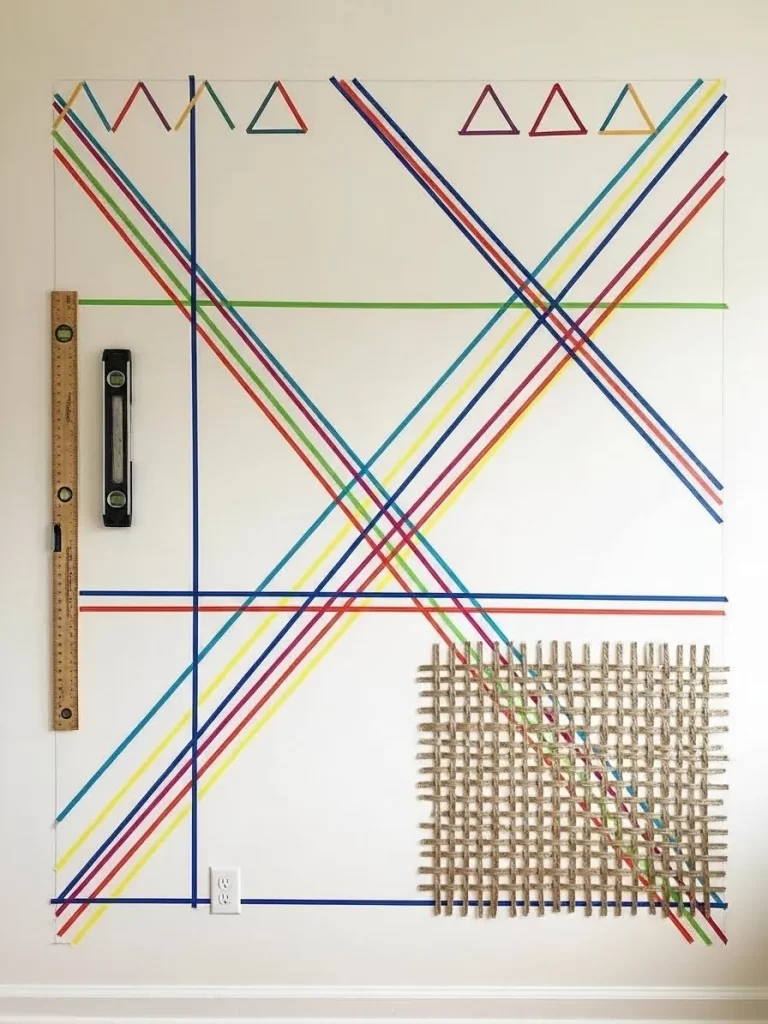
Creative Name: Intersectional Line Composition
Description
Creating an enormous, abstract mural does not require paint, just colorful vinyl or electrical tape. This is an incredibly simple and affordable way to cover a vast wall with a vibrant, geometric design that looks like a high-end graphic installation. The sharp, saturated lines of the tape create intense visual energy.
The beauty of this design lies in the overlapping, intersecting colors, which create new visual tones where they cross. Using multiple narrow strips of tape running at severe angles across the wall achieves a dynamic feeling of movement and complexity that instantly commands the space.
This technique is wonderfully temporary; the mural can be easily removed without damaging the paint underneath, offering immense flexibility. Adding a contrasting element, like a woven texture or ruler, introduces a touch of unexpected material depth and grounding to the otherwise graphic lines.
Material Required List
- Rolls of colorful vinyl or electrical tape (choose 3-5 bold colors).
- Large ruler or straight edge.
- Level.
- Small piece of woven jute or rope mat (optional, for texture).
- Strong spray adhesive (if mounting the woven piece).
Equipment Required List
- Scissors or utility knife.
DIY Instruction Step by Step
1. Plan the Lines
- Decide on the general direction and density of your lines. Begin with the main diagonal lines, as they set the tone for the composition.
2. Apply the First Color
- Start at the top corner of the wall. Using your long ruler and a level, stick the first strip of tape onto the wall. Press the tape down firmly as you unroll it, ensuring it follows a perfectly straight line all the way to the baseboard.
- Use a utility knife to trim the tape neatly at the edges of the wall and baseboard.
3. Layer the Intersections
- Repeat the process with the remaining colors, running them parallel to the first lines or creating new, opposite diagonal lines that cross the initial ones.
- The tape should overlap where the lines cross. This layering technique is what creates visual richness. Step back frequently to ensure the lines look balanced.
4. Add Geometric Accents (Optional)
- Use small pieces of tape to create simple geometric shapes (like the triangles at the top) or to reinforce certain intersections.
5. Add the Texture Element (Optional)
- If using the woven piece, cut it to a simple square or diamond shape.
- Apply spray adhesive to the back of the woven piece and press it firmly onto a section of the finished tape mural. This unexpected texture provides a great contrast to the flat, graphic lines.
24. The Plaster Texture Slab
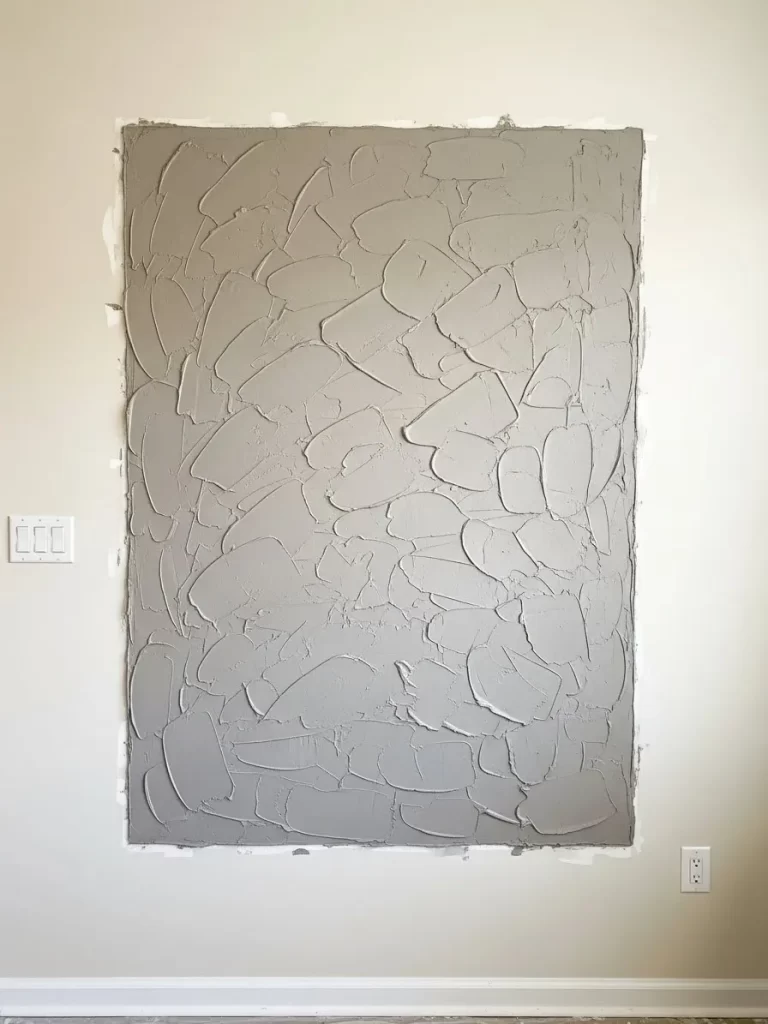
Creative Name: Monochromatic Relief Sculpture
Description
Creating a huge, custom-textured piece of art directly onto the wall provides the monumental presence of sculpture without the expense of a stone or metal slab. By applying simple joint compound or plaster mix directly to a defined rectangle on the wall, you build a massive relief artwork that features beautiful, dramatic textural variation.
The monochromatic grey color ensures the focus remains entirely on the aggressive, sweeping trowel marks. These deep textures create intense shadows and highlights as the light changes, giving the artwork a dynamic, living quality. This technique is an incredibly affordable way to bring rich, dimensional materiality to a large, empty wall space.
This textured slab instantly becomes the architectural focal point of the room. It delivers a raw, hand-hewn aesthetic that is both modern and grounded. Best of all, since it is made from common wall compound, it is a very low-cost project that provides immense visual return.
Material Required List
- Joint compound (pre-mixed or dry mix) or spackle.
- Painter’s tape (high quality).
- Small wall area cleared for the project.
- Primer and paint (matching the compound color or a contrasting one).
Equipment Required List
- Trowel, putty knife, or plastering blade (for applying and texturing the compound).
- Buckets (for mixing, if using dry compound).
- Sandpaper or sanding block.
- Paintbrush or roller.
DIY Instruction Step by Step
1. Define the Art Area
- Use a level and measuring tape to define the exact rectangular area where you want the art slab to be.
- Apply painter’s tape firmly around the entire perimeter of this area. Press the edge of the tape down extremely well, as this is your frame boundary.
2. Apply the Joint Compound
- Mix the joint compound if using a dry mix. The consistency should be thick, like mud.
- Using your trowel or putty knife, start applying a thick layer of compound inside the taped area. Do not worry about making it smooth.
- Apply the compound with aggressive, sweeping, and lifting motions to create deep, random textures and peaks. The goal is depth and variation. Continue until the entire taped rectangle is covered.
3. Remove the Tape
- Crucial Step: While the compound is still wet (immediately after you finish texturing), carefully and slowly peel away the painter’s tape. Pulling the tape now leaves a wonderfully sharp, clean edge between the textured slab and the smooth wall.
4. Dry and Seal
- Allow the textured slab to dry completely. This may take 24 to 48 hours depending on the thickness.
- Once dry, you can lightly sand any extremely sharp edges, but avoid sanding the main texture.
- Finally, seal the entire textured slab with a coat of primer, followed by two coats of your chosen paint color. This protects the surface and unifies the color.
25. The Photo-Mural Roller Blind
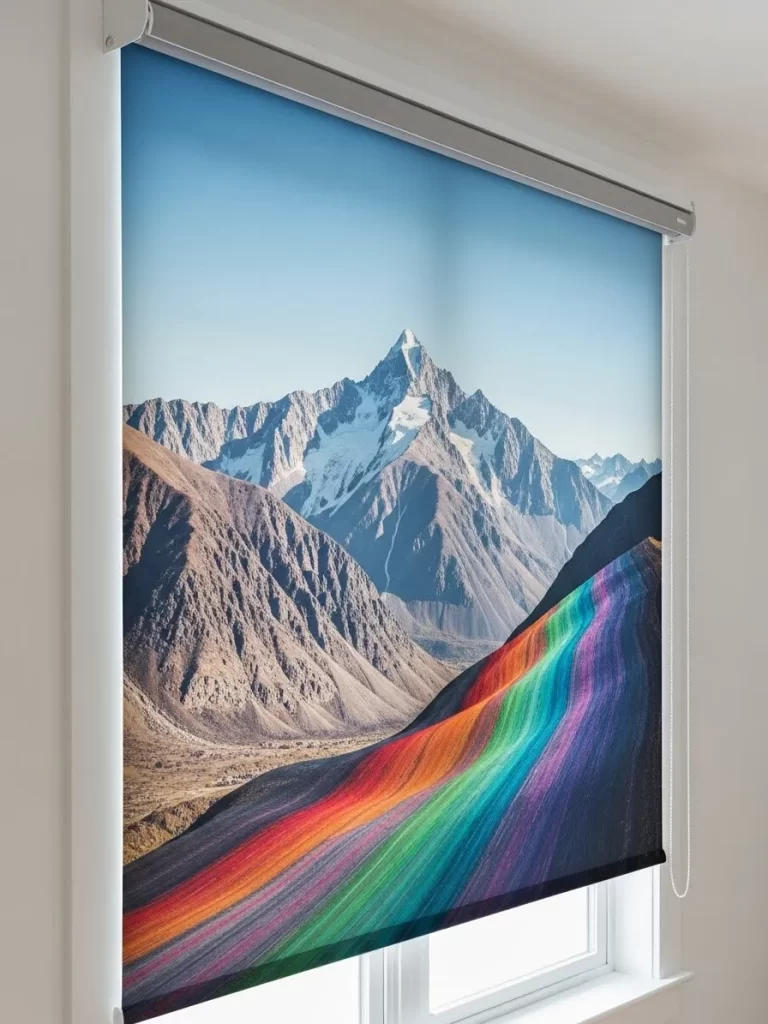
Creative Name: Scenic Window Art Shade
Description
A window shade is easily transformed into a spectacular, wall-sized art display by using a custom-printed photo mural. Choosing a high-resolution landscape, such as this stunning mountain scene, instantly creates a massive visual impact that dominates the room when the shade is drawn. The size and drama of the image fill the wall effortlessly.
The integration of an abstract, colorful element—like the rainbow-striped road—adds a surreal, artistic twist to the natural scene. This customization ensures the functional shade becomes a unique, expressive piece of art that reflects your personal style. The smooth surface of the roller blind is absolutely perfect for showcasing vivid photographic detail.
This solution is wonderfully budget friendly for achieving huge scale, as the cost is comparable to a custom poster but the piece also serves a functional purpose. It is a stunning, creative approach that turns a simple window into a feature wall, delivering a huge, temporary piece of art that rolls away when the light is needed.
Material Required List
- One large, custom-printed roller blind (order the image printed onto the blind fabric).
- Roller blind mounting hardware (included with the blind).
- Wall anchors and screws.
Equipment Required List
- Drill and drill bits.
- Measuring tape and level.
- Screwdriver.
DIY Instruction Step by Step
1. Measure and Plan
- Ensure the window measurements are precise before ordering the custom-printed blind. The art must fit the exact dimensions.
2. Mount the Brackets
- Use the drill to securely attach the roller blind brackets to the top of the window frame or directly to the wall above the window. Follow the manufacturer’s directions exactly, ensuring the brackets are level and spaced correctly to support the blind mechanism.
3. Install the Blind
- Click or slide the roller blind mechanism into the mounted brackets. Ensure the blind is secure and that the image faces the correct direction.
4. Test the Mechanism
- Slowly pull the blind down to ensure it operates smoothly and that the image is aligned correctly.
- When fully extended, the blind creates a breathtaking, floor-to-ceiling piece of custom photographic art.
26. The Salvaged Door Accent
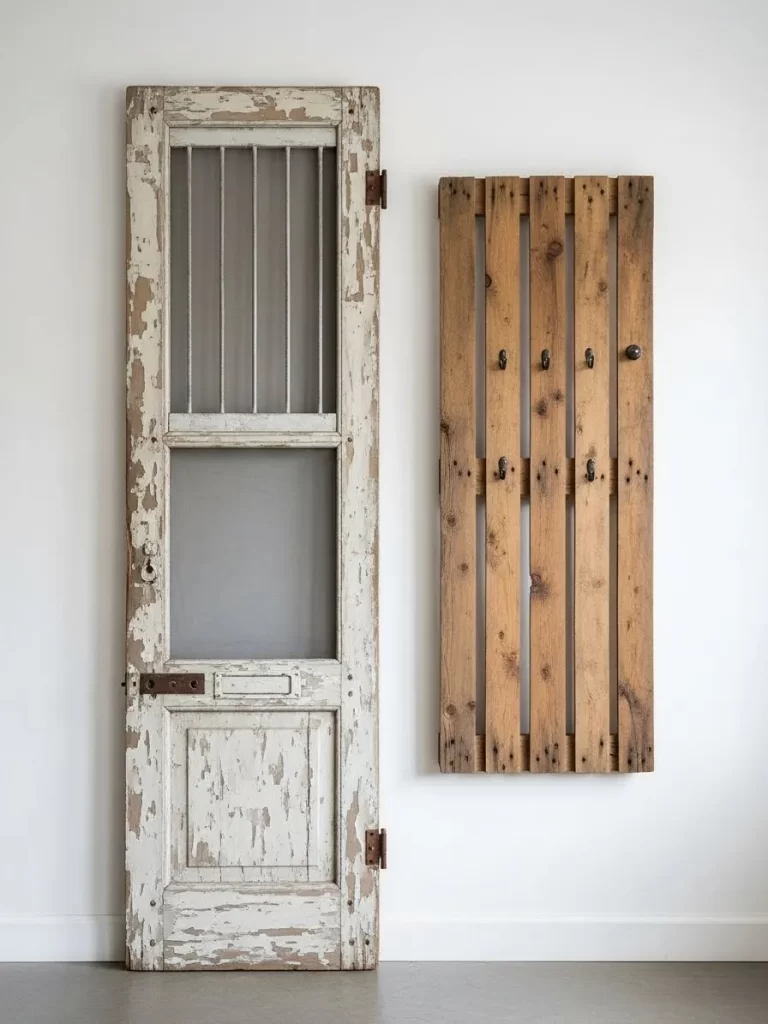
Creative Name: Distressed Architectural Statement
Description
Using a salvaged door as a large, stand-alone piece of wall art is an excellent, inexpensive way to introduce massive architectural character to a room. The weathered wood, peeling paint, and visible hardware of an old door possess a beautiful, distressed texture that immediately captures attention. Its sheer size fills a large wall space with history and visual weight.
The door’s verticality and rigid structure contrast wonderfully with the empty white wall. Leaning the door against the wall, rather than hanging it, creates a casual, sculptural presence. It serves as a striking centerpiece, particularly when paired with another textural element like the simple, rustic coat rack made from wood slats.
This approach is highly affordable, as old doors can often be sourced cheaply or even for free from reclamation yards or demolition sites. It is a bold, unexpected way to achieve a large, textural focal point that feels deeply layered and curated.
Material Required List
- One full-size, salvaged wooden door (with or without glass/hardware).
- Wood cleaner and sealant (optional, to clean and preserve the wood).
- Wall mounting brackets or securing straps (if you choose to secure the top to the wall).
- Companion piece (optional): reclaimed wood slats and coat hooks (for a paired textural piece).
Equipment Required List
- Stiff brush and cleaning cloths.
- Safety gloves.
- Drill and screws (for securing or mounting the companion piece).
DIY Instruction Step by Step
1. Clean and Prepare the Door
- Thoroughly clean the door to remove any dirt or loose debris. Use a stiff brush and mild cleaner.
- If the door is dusty or shedding paint, you may wish to apply a matte sealant to stabilize the finish, preserving its distressed look.
2. Position the Door
- Carefully stand the door up against the wall in your chosen location. Ensure it is centered and sitting flush with the floor.
- Decide if you want to leave it leaning casually or secure it for safety.
3. Secure the Door (Recommended)
- For safety, especially in homes with children or pets, secure the top of the door to the wall. Use a very small, flat metal bracket that screws into the door’s frame and into a wall stud or strong anchor. The bracket should be virtually hidden from view.
4. (Optional) Create the Companion Piece
- If creating the wooden slat coat rack, secure the vertical slats to two horizontal backer pieces. Attach coat hooks to the finished rack.
- Mount this piece next to the door, ensuring the top edges are aligned or deliberately offset for an abstract pairing. The combination of the two architectural elements creates a massive, textural display.
27. The Ombré Macrame Wall
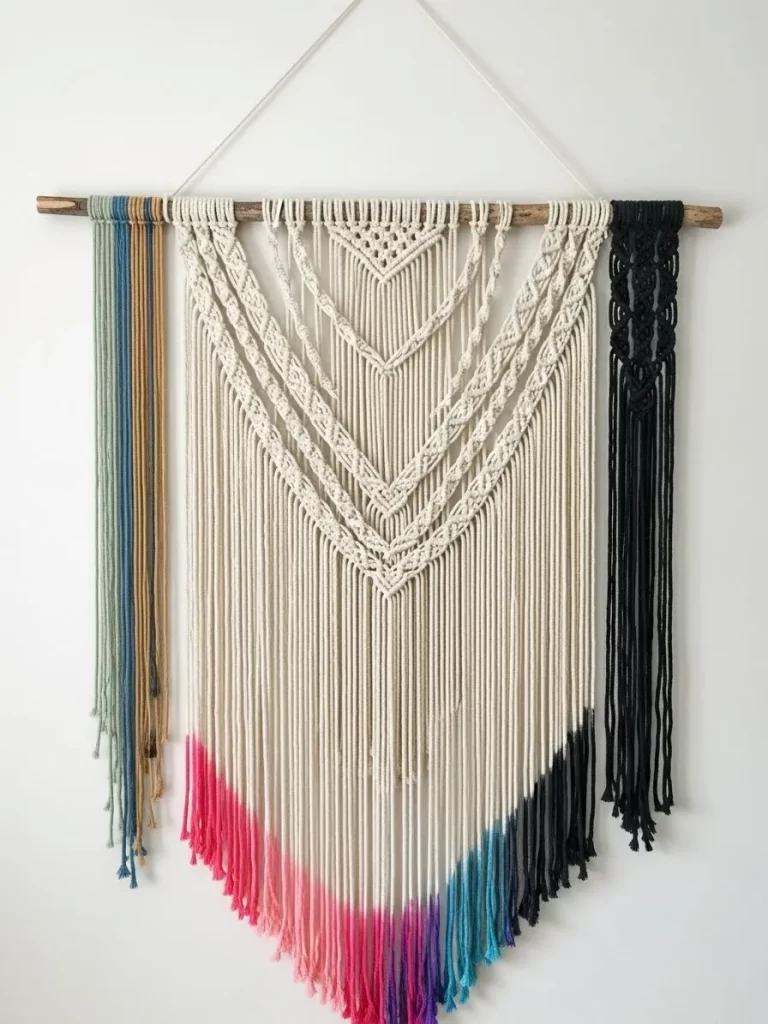
Creative Name: Jumbo Woven Fiber Art
Description
A massive macrame wall hanging is an excellent, textured, and affordable way to command a large section of wall space. The thick cotton rope creates beautiful, complex patterns and volume, providing a rich, three-dimensional surface that absorbs sound and introduces softness to a room. The enormous scale alone makes it a powerful artistic statement.
This particular piece achieves a modern twist by incorporating bright, dip-dyed ombré coloring into the long fringe. The contrast between the natural cream color of the woven knots and the saturated, bright ends of the yarn provides a stunning, vibrant finish that makes the piece feel contemporary and fresh.
By using an inexpensive dowel rod or branch as the hanger, this large artwork remains budget friendly. The overall piece is a handcrafted focal point that blends a bohemian aesthetic with modern color blocking, providing immense texture and color in a large format.
Material Required List
- Large wooden dowel rod or a sturdy, straight natural branch.
- Plenty of macrame cotton rope or thick cotton cording.
- Accent yarns in various bright colors (for the dip-dye effect).
- Fabric dye or acrylic paint (for the ombré effect).
- Strong string or rope (for hanging the dowel).
- Large bucket or container (for dyeing).
Equipment Required List
- Scissors.
- Measuring tape.
- Gloves (for dyeing).
DIY Instruction Step by Step
1. Measure and Cut the Cords
- Measure and cut all the macrame cords to the required length. Remember that knotting uses a significant amount of cord, so estimate long lengths.
- Attach all the cords to the dowel rod using a simple larks head knot, spreading them evenly across the length of the rod.
2. Knot the Design
- Follow a macrame pattern to knot the main body of the hanging, focusing on large, striking knots like the chevron or square knots. Ensure the knots are consistent and tight. The goal is a visually appealing texture across the center mass.
3. Prepare the Dye Bath
- Mix your chosen fabric dye or highly diluted acrylic paint with water in a large bucket, following the product instructions. The mixture should be strong enough to saturate the cotton.
4. Dip Dye the Ombré
- Hold the top of the macrame, ensuring the woven portion stays dry. Carefully dip the bottom fringe into the dye bath.
- For the ombré effect, start by dipping the very tips into the darkest color. Hold it for 10 minutes.
- Next, dip the fringe a little higher into a slightly diluted version of the same color, or a lighter color. Hold for 5 minutes.
- Finally, dip the highest section into the lightest color for a short time. This creates a smooth color transition.
5. Dry and Hang
- Remove the piece and let the excess dye drip off. Hang the macrame piece over a protective surface (like a bathtub or plastic sheet) to dry completely.
- Once dry, attach a strong hanging string to the two ends of the dowel rod.
- Hang the large, vibrant tapestry securely on the wall.
28. The Kraft Paper Collage
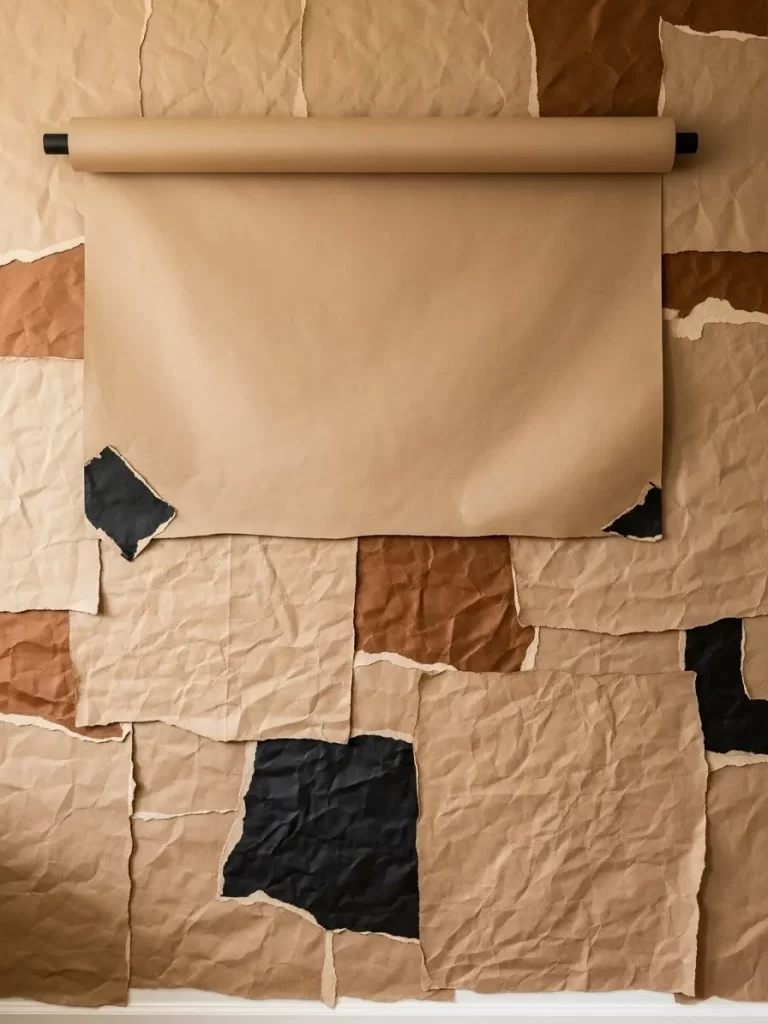
Creative Name: Textured Tonal Backdrop
Description
Creating a huge, richly textured art background is achievable using inexpensive materials like various shades of brown and black kraft or butcher paper. Tearing and crumpling the paper adds immense dimensionality and shadow, giving the entire wall a layered, architectural quality that looks like high-end texture paint.
Overlapping the torn pieces randomly—using different tonal browns and deep black accents—builds a compelling, abstract pattern that is both rustic and sophisticated. The varying depths and angles of the crumpled paper catch the light wonderfully, turning a flat wall into a textural experience.
This colossal paper mosaic is the actual artwork itself. Suspending a simple, blank scroll of paper on a rod over the textured background provides a focused negative space, emphasizing the complex backdrop. This solution is wonderfully cheap, using materials available at any craft or packaging store, yet it produces a stunning, massive statement piece.
Material Required List
- Rolls of kraft paper or butcher paper in various shades of brown (light tan, deep brown).
- Black construction paper or cardstock (for accent pieces).
- Strong, temporary mounting adhesive or painter’s tape (for attaching paper to the wall).
- One wooden or black rod (for the top scroll, optional).
- Blank kraft paper scroll (optional, for the suspended center piece).
Equipment Required List
- Scissors (optional, for starting tears).
- Level (for hanging the top scroll).
DIY Instruction Step by Step
1. Crumple and Tear the Paper
- Tear all the paper into large, irregular pieces. Vary the sizes from large rectangles to smaller pieces.
- Thoroughly crumple each piece of paper into a tight ball. Then, gently unfold them, leaving the creases and wrinkles intact. This is the crucial step for texture.
2. Attach the Backdrop Mosaic
- Starting at the top and working your way down, use strong mounting tape or putty adhesive to attach the largest pieces of crumpled kraft paper to the wall.
- Overlap the pieces generously, allowing the torn edges to create a natural, feathered look. Alternate the light and dark browns to create a tonal checkerboard effect.
- Strategically place the black accent pieces in corners or open patches to create visual depth and contrast. Cover the entire wall area you wish to highlight.
3. Hang the Top Scroll (Optional)
- If using the accent scroll, mount a simple wooden or black rod above the textured paper backdrop.
- Hang the blank paper scroll from the rod, letting it drape over the collage. Pin the bottom corners of the scroll down lightly to hold the shape, letting the raw, torn edges of the paper backdrop peek out.
29. The Continuous Line Mural
Creative Name: Roll-Down Abstract Sketch
Description
A large-scale wall-mounted paper roll provides a massive, blank surface that is exceptionally easy to turn into striking, custom art. Drawing minimalist, continuous-line graphics, like these florals and figures, directly onto the paper roll is an affordable way to create an abstract, mural-sized piece of art. The black ink on the stark white paper ensures maximum contrast and visual pop.
The beauty of continuous line art is its simplicity; it focuses on form and shape, making it feel elegant and contemporary. The inclusion of several designs on the same roll turns the piece into a modular art collection, where the various shapes balance one another across the large vertical canvas.
This display is highly practical and low-commitment because you simply roll up the finished art when you want a change, tear it off, and start a fresh mural. It provides a huge, high-impact focal point that encourages creativity and requires only an inexpensive paper roll and a simple mounting system.
Material Required List
- Wall-mounted butcher paper roll dispenser (rod and brackets).
- Large roll of white butcher or drawing paper.
- Thick black paint marker or permanent marker.
- Wall anchors and screws.
Equipment Required List
- Drill and drill bits.
- Measuring tape and level.
DIY Instruction Step by Step
1. Mount the Paper Roll
- Determine the height and position where you want the art to begin.
- Use the measuring tape and level to mark the spots for the wall brackets of the paper roll dispenser.
- Drill guide holes, install anchors, and securely screw the brackets into the wall.
- Insert the paper roll into the dispenser mechanism.
2. Pull Down the Paper
- Pull the paper down to the desired length (floor to ceiling works well for maximum impact) and secure the bottom edge lightly with tape or clips to keep it flat.
3. Draw the Continuous Lines
- Using your thick black marker, begin drawing your continuous line art directly onto the paper. Continuous line means you try not to lift the marker from the paper, letting the line define the form through overlapping and winding paths.
- Focus on large, bold shapes like faces, flowers, or abstract geometric forms. Use the entire surface, spacing the shapes out to fill the vertical space attractively.
4. Finish the Mural
- Once satisfied with the design, use the integrated cutting edge of the dispenser (or scissors) to cut the finished mural neatly at the bottom edge.
- The large, custom-drawn piece is instantly ready to display. To change the art, simply tear off the old piece and pull down a fresh section of paper.
30. The Nailhead Tapestry Frame
Creative Name: Upholstered Wall Mat
Description
Using a large, heavy-duty piece of black fabric or a small runner rug provides an immense, deep black canvas for a stunning wall accent. Attaching this textile directly to the wall with decorative upholstery nailheads is an exceptionally creative and affordable way to create a huge, visually rich piece of art. The texture of the dark fabric introduces wonderful warmth and contrast.
The strategic placement of the brass and white nailheads forms a stunning, concentric, rectangular design, which acts as a powerful, decorative matting for the textile. The metallic accents catch the light, turning the simple fabric panel into a luxurious, architecturally defined feature piece.
This installation is wonderfully budget friendly, using only fabric and inexpensive nailheads. The addition of a small, floating shelf at the top makes the entire piece functional, providing a spot for decorative objects or art supplies. It is a bold, sophisticated way to achieve a large-scale, custom look.
Material Required List
- Large, sturdy black fabric panel, canvas, or small, flat woven rug.
- Decorative upholstery nailheads (brass, silver, or mixed colors).
- Thin wooden plank and small L-brackets (for the floating shelf, optional).
- Wall mounting hardware (for the shelf).
- Strong mounting adhesive or small tacks (for securing the fabric to the wall).
Equipment Required List
- Hammer (or rubber mallet for nailheads).
- Measuring tape and ruler.
- Level.
- Drill and screws (for the shelf).
DIY Instruction Step by Step
1. Mount the Fabric
- Determine the final size and placement of your fabric panel on the wall.
- Secure the top corners of the fabric to the wall using discreet tacks or a strong adhesive. Use the level to ensure the top edge is perfectly straight.
2. Plan the Nailhead Pattern
- Use a pencil and ruler to lightly mark the spots where each nailhead will go. Start by defining the outside border, marking the placement for the largest, main row of nailheads (e.g., placing one every 1 to 1.5 inches).
- Then, plan the inner row(s), ensuring they are consistently spaced from the outer row to create the framed look.
3. Install the Nailheads
- Starting at the top corner, use your hammer to gently tap the nailheads into the wall through the fabric at your marked spots. Ensure the row is straight and the distance between each nailhead is uniform.
- Continue this process until all rows and colors of nailheads are in place, completing the stunning, geometric border.
4. Install the Shelf (Optional)
- If using the shelf, mount the L-brackets securely to the wall just below the top edge of the fabric.
- Place the wooden plank onto the brackets and screw it in place from underneath. Ensure the shelf is level.
- The shelf acts as a final decorative element and anchor for the large art piece.
31. The Modular Shadow Box Collection
Creative Name: Three-Dimensional Memory Grid
Description
Achieving an extensive, dynamic wall display is simple when you use many small, affordable shadow boxes. Arranging these boxes in a large, asymmetrical cluster turns a collection of small objects and photos into a massive, textured wall sculpture. The varying depths and colors of the boxes create wonderful shadows and visual complexity.
This approach is highly engaging because it encourages a mix of media. Some boxes hold keys or small dried flowers, while others contain vibrant patterned paper or simple mirrors. The alternating black and white frames add a stunning graphic punch, unifying the entire diverse collection into a cohesive, abstract artwork.
This display is an exceptionally creative and budget friendly way to showcase personal collections that might otherwise look cluttered. By enclosing items behind glass, the entire wall display feels curated and intentional, creating a deep, large-scale piece of architectural art.
Material Required List
- Multiple small shadow boxes of varying depths (black and white frames recommended).
- Diverse small objects for display (keys, dried flowers, vintage items).
- Small mirrors, patterned paper, or textured fabric (for background elements).
- Strong wall hanging hardware (small nails or secure wall strips for each box).
Equipment Required List
- Measuring tape.
- Level (optional, for individual boxes; an asymmetrical arrangement can be freehand).
- Hammer or screwdriver.
DIY Instruction Step by Step
1. Prepare the Shadow Boxes
- Open each shadow box. Decide which items or backgrounds will go inside.
- Secure the background paper or fabric to the back panel using glue.
- Carefully position and secure any objects inside the box using small amounts of museum putty or strong adhesive. Close the boxes securely.
2. Plan the Cluster Layout
- Lay the empty boxes out on the floor first. Start with the largest boxes and cluster them in the center, working your way out with smaller pieces.
- The goal is an organic, non-linear arrangement that flows outward, rather than a strict grid. Mix the black and white boxes evenly to distribute contrast.
3. Begin Hanging
- Start with one large, centrally located box. Use a measuring tape to find its center point on the wall and hang it securely.
- Next, hang the surrounding boxes. For an organic look, measure the distance from the edges of the first box to where the next box will be placed, ensuring the gaps are small and varied (e.g., 1 inch to 3 inches).
- Continue adding boxes, ensuring each one is securely fastened to the wall. Do not worry about a perfect level line; the varied arrangement makes slight inconsistencies disappear.
4. Adjust for Flow
- Step back often to check the visual flow. If one side looks too heavy (too many dark boxes or large objects), shift the lighter boxes to balance the weight, completing the massive, dimensional gallery.
32. The Layered Relief Sculpture
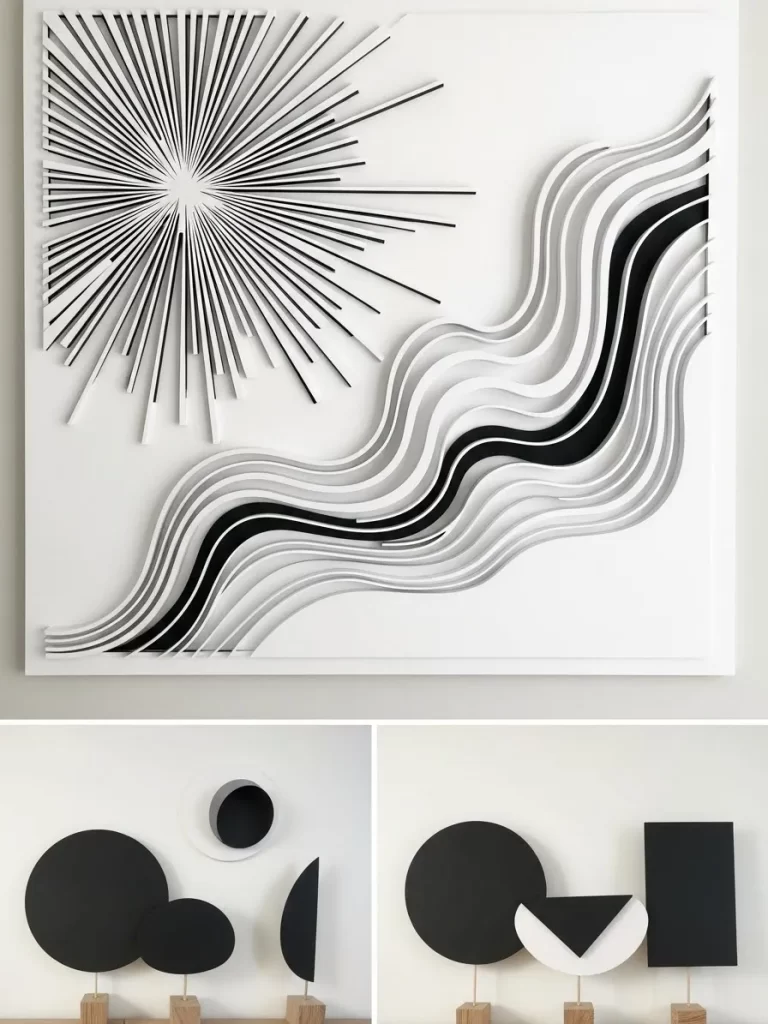
Creative Name: Dimensional Wave Composition
Description
Creating a colossal, layered relief sculpture from simple white paper or foam core is an affordable way to achieve dramatic, museum-quality art. By cutting out repeating wave patterns and mounting them in varying depths, you transform a flat wall into a rich, three-dimensional landscape of light and shadow. The crisp white color ensures the focus remains entirely on the stunning texture.
The central black wave and the starburst element provide powerful visual anchoring and contrast. The deep shadows cast by the layers give the overall piece an immense sense of volume and movement. This approach is highly effective because it makes the artwork interact dynamically with the lighting in the room.
This installation delivers the sophistication and scale of high-end contemporary art without the cost of expensive materials. It uses simple layering techniques and inexpensive materials to create an abstract, architectural statement piece that truly dominates the wall.
Material Required List
- Large backing board (MDF or foam core).
- Multiple sheets of stiff white cardstock or foam core.
- Black cardstock or paper (for the accent lines/shapes).
- Small wooden spacers or foam tape (to create the layers).
- Strong craft glue.
- Primer and white paint (to unify the color of the final piece).
Equipment Required List
- Utility knife or cutting machine (for precise shapes).
- Measuring tape and ruler.
- Pencil.
DIY Instruction Step by Step
1. Create the Wave Shapes
- On the white cardstock, draw or print repeating wave patterns. You need many copies that are slightly offset or varying in length.
- Use a utility knife or cutting tool to carefully cut out all the wave shapes.
2. Construct the Starburst
- Cut numerous long, narrow strips of white and black cardstock.
- Arrange these strips in a radiating pattern, gluing them to a small central point on the backing board to create the starburst effect. Use small pieces of foam tape underneath to lift some strips and add dimension.
3. Build the Wave Layers
- Starting with the bottommost wave shape (the largest), glue the first layer onto the backing board.
- To create the next layer, glue small wooden spacers or pieces of foam tape onto the back of the second wave shape. This lifts it off the first layer.
- Carefully glue the second wave layer down, ensuring it is slightly offset from the first.
- Continue this layering process, alternating between white and grey cardstock layers, and inserting the solid black wave shapes in key areas to create high contrast.
4. Finish and Unify
- Once all layers are dry, paint the entire sculpture (the background and all the layered pieces) with a coat of white primer, followed by a coat of unifying white paint. This makes the separate components look like one seamless, carved piece.
- Mount the entire large backing board securely to the wall.
33. The PVC Frame Structure
Creative Name: Pipe and Thread Geometric Cage
Description
A massive, three-dimensional frame built from inexpensive PVC piping and connectors creates a bold, architectural statement that completely fills a wall. The geometric complexity of the frame, which looks like a deconstructed cube, is incredibly engaging, giving the wall immense depth and structure. The frame itself becomes the abstract artwork.
The addition of brightly colored thread or yarn woven tightly within the triangular sections of the frame introduces stunning graphic color and texture. These colored webs create tension and contrast with the dark, rigid structure of the pipes, turning the display into a large, conceptual string-art installation.
This project is highly affordable and completely customizable. You can spray paint the PVC pipe black or grey to give it a sophisticated, industrial look. The resulting large-scale geometric structure is a striking, contemporary piece that feels substantial and professionally fabricated.
Material Required List
- PVC pipe (many long sections, cut to size).
- PVC elbow and T-connectors (enough to join all pieces).
- PVC cement or strong construction adhesive.
- Black or grey spray paint (optional, to finish the pipe).
- Brightly colored yarn or strong thread (for the weaving).
- Wall mounting hardware (e.g., chains or secure hooks for suspension).
Equipment Required List
- Measuring tape.
- PVC pipe cutter or saw.
DIY Instruction Step by Step
1. Cut and Paint the Pipe
- Plan your structure dimensions. Cut all the PVC pipes to the precise lengths required to build the geometric structure.
- If desired, spray paint all the cut pipes and connectors in your chosen color (black or dark grey) and allow them to dry completely.
2. Assemble the Structure
- Lay out the pipes and connectors on a flat surface.
- Begin assembling the large, three-dimensional structure according to your design. Apply PVC cement or strong adhesive to the inside of the connectors before joining the pipes. This ensures a strong, permanent bond.
- Allow the entire frame structure to cure overnight.
3. Weave the String Art
- Select the inner sections where you want to add the colored weaving.
- Tie the end of the yarn or thread to one corner of the section. Begin pulling the yarn tightly across the section and wrapping it around the pipe at random or repeating intervals. The tension should create a dense, web-like pattern.
- Securely tie off the end of the yarn once the section is filled. Repeat this with different colors in other sections.
4. Mount the Structure
- Attach strong hanging chains or thick picture wire to the top four corners of the finished PVC structure.
- Install sturdy hooks or anchors into the wall and suspend the large geometric frame. Ensure it hangs straight and secure.
34. The Plywood Photo Ledge
Creative Name: Minimalist Wood Panel Accent
Description
An enormous sheet of raw plywood provides a wonderfully textural, neutral backdrop that instantly fills a large wall space. This material is incredibly cheap and, when hung vertically, creates a warm, rustic, but clean statement piece. The natural grain and knotholes of the wood become the artwork’s texture.
Using thin black tape to delineate a large border and a simple central circle transforms the wood panel into a minimalist, abstract canvas. The black line work provides a sophisticated graphic structure that contrasts beautifully with the raw, unfinished wood. This simple addition elevates the material from building supply to intentional art.
The raw panel is highly functional as a large mood board. Taping small photos and notes to the side allows for flexible, changing display without damaging the walls. This is an exceptionally cost-effective way to achieve a massive, visually interesting art panel that is both artistic and useful.
Material Required List
- One large sheet of plywood (sanded lightly).
- Black vinyl or electrical tape (thin roll).
- Strong mounting hardware (e.g., heavy-duty French cleats or Z-bar hangers).
- Small photos, notes, and washi tape (for the side display, optional).
Equipment Required List
- Measuring tape and long ruler.
- Pencil.
- Drill and screws.
DIY Instruction Step by Step
1. Prepare the Plywood
- Sand the edges of the plywood sheet smooth.
- Apply a clear, matte sealant if you wish to protect the wood, or leave it unfinished for a raw look.
2. Create the Graphic Border
- Using a measuring tape and ruler, lightly mark the wall side of the panel with a pencil to plan the border. Ensure the border is uniform in width around the edge.
- Apply the black tape along these pencil lines, pressing it down firmly to create a clean, sharp border around the entire perimeter.
3. Create the Center Circle
- Find the exact center of the plywood panel. Lightly mark it.
- Use a string tied to the center point to guide your pencil and draw a perfectly round circle.
- Carefully apply the black tape over the pencil circle, ensuring it is smooth and even.
4. Mount the Panel
- Attach the heavy-duty mounting hardware (e.g., Z-bar hangers) securely to the back of the large plywood sheet, following the manufacturer’s instructions.
- Install the corresponding hardware onto the wall, ensuring it is level and correctly aligned.
- Carefully lift and mount the large plywood panel onto the wall.
5. Add the Display (Optional)
- Use small strips of washi tape to attach photos and notes along the side edge of the plywood panel. The panel becomes a functional, massive art feature.
35. The Clothespin Photo Grid
Creative Name: Twinkling String Portrait Wall
Description
Achieving an absolutely enormous, casual photo display is simple and cheap by stringing rows of twine across a large wall. Using simple mini-clothespins to hang numerous photos creates a wonderfully dense, layered wall covering that is instantly engaging. This method makes even a small collection of photos feel like a monumental installation.
The uniformity of the small, black and white photos provides an artistic cohesion to the massive grid. Furthermore, the inclusion of several strands of warm-toned fairy lights woven throughout the twine lines transforms the display. The gentle glow turns the photo wall into an atmospheric, massive piece of illuminated art.
This is arguably one of the most budget friendly and flexible ways to fill a huge empty wall. The photos are easy to swap, and the materials (twine, pins, suction cups, and lights) are very inexpensive, creating a magical and constantly evolving photo mural.
Material Required List
- Long strands of jute twine or sturdy string.
- Numerous small photo prints (polaroids, square prints).
- Mini wooden clothespins (one for each photo).
- Small adhesive wall hooks or suction cups (to anchor the twine).
- String of LED fairy lights (warm white is recommended).
Equipment Required List
- Measuring tape and level.
- Scissors.
DIY Instruction Step by Step
1. Mark the Wall Lines
- Determine the number of horizontal rows you want. Use a measuring tape and a level to lightly mark the spots where each line of twine will begin and end. Ensure the spacing between the lines is uniform (e.g., 6 to 8 inches).
2. Install Anchors and String the Twine
- Place your adhesive hooks or suction cups securely onto the marked spots along both sides of the wall. Allow the adhesive to cure if necessary.
- Tie the end of the first piece of twine to the top-left hook. Pull the twine taut across the wall and tie the other end to the top-right hook.
- Repeat this process for every marked line, creating a large, parallel grid of twine lines across the wall.
3. Attach the Fairy Lights
- Starting at the top or bottom, gently weave the string of LED fairy lights around and through the twine grid. The lights should frame the general area and fall along the vertical sides, enhancing the overall size of the display.
4. Clip the Photos
- Use the mini-clothespins to clip your photos onto the twine lines. Overlap them slightly or space them evenly, distributing them across the entire grid for a full, rich look.
- Plug in the lights to activate the atmospheric, large-scale photo wall.
36. The Faux Library Wall
Creative Name: Oversize Printed Bookshelf
Description
Creating the illusion of a massive, fully stocked library wall is surprisingly easy and affordable using custom-printed wallpaper or a large banner. A huge, high-resolution print of books instantly adds academic character and a rich textural backdrop to a space. The sheer size of the print tricks the eye, making the flat wall seem deep and full of volume.
This display is made wonderfully functional by adding a few small, genuine floating shelves over the printed background. These real shelves allow you to showcase actual decorative objects, plants, or a few favorite books, blurring the line between the flat image and the three-dimensional reality.
This is a brilliantly low-cost way to achieve a statement wall that would otherwise require hundreds of books and large, custom carpentry. The blend of the photographic print with real, minimalist wooden shelves creates a unique and compelling trompe-l’oeil effect.
Material Required List
- Large custom-printed wallpaper, vinyl banner, or poster featuring a bookshelf design.
- Wallpaper paste or strong mounting adhesive (depending on the print material).
- Three to four small, thin floating shelves (wood or metal).
- Screws and wall anchors.
- Small decorative objects (for the shelves).
Equipment Required List
- Wallpaper hanging tools (brush, smoothing tool) or utility knife.
- Drill and screwdriver.
- Measuring tape and level.
DIY Instruction Step by Step
1. Mount the Bookshelf Print
- Follow the manufacturer’s directions to apply the large printed bookshelf image to the wall. Ensure the print is level and smooth, trimming any excess neatly at the baseboard and ceiling.
2. Locate and Mark Shelf Placement
- Identify the spots on the printed shelf image where the real floating shelves will be placed. You want the real shelves to sit directly over the horizontal lines of the printed shelves for the most realistic effect.
- Use a level and measuring tape to precisely mark the spot for the mounting hardware for each real shelf.
3. Install the Floating Shelves
- Use the drill to create guide holes through the print and into the wall at your marked spots. Install wall anchors if needed.
- Securely mount the small floating shelves. Make absolutely certain they are level; this is crucial for the illusion.
4. Decorate
- Place a few small, real objects, a plant, or a stack of books onto the newly installed shelves. The interaction between the three-dimensional objects and the two-dimensional background completes the massive, immersive library wall.
37. The Oversize Rainbow Mural

Creative Name: Suspended Color Wheel Wall
Description
A massive circular mural painted directly onto the wall provides the ultimate, affordable way to achieve colossal statement art. Using bold, vibrant colors arranged in a circular, rainbow gradient creates immense visual energy and instantly centers the room. The sheer scale of the shape makes it an undeniable focal point.
This mural is enhanced by the subtle addition of a simple hanging mechanism—thin wires attached to the circumference and pulled to anchor points—which provides a subtle, geometric frame. A small decorative element suspended in the center adds a touch of playful complexity to the expansive color field.
This method delivers maximum visual impact for minimum material cost, requiring only paint and a bit of string. It is a stunning, joyful centerpiece that feels both retro and modern, providing a powerful, budget friendly solution to filling a huge expanse of wall space.
Material Required List
- Latex or acrylic wall paint in 5-6 vibrant colors (red, orange, yellow, green, blue).
- White ceiling paint (optional, for mixing to create lighter shades).
- Thin string and thumb tack (for drawing the circle).
- Thin wire or sturdy fishing line (for the suspension effect).
- Small decorative item (e.g., a bead or pencil) and twine (for the center accent).
- Wall anchors or hooks (for securing the suspension wires).
Equipment Required List
- Paintbrushes and artist tape.
- Measuring tape.
- Level.
DIY Instruction Step by Step
1. Draw the Center Point and Circles
- Find the exact center point on your wall (this should be the center of the sofa or furniture placement). Use a thumb tack to lightly secure one end of a piece of string here.
- Measure the string to the radius of your largest desired circle. Tie a pencil to the end of the string. Keeping the string taut, trace the largest circle onto the wall.
- Shorten the string and repeat the process to trace all the inner circles for the different colors.
2. Paint the Mural
- Start with the center-most circle, which will be your darkest color (blue). Carefully paint inside the lines.
- Once the first color is dry, paint the next circle with the next color in your gradient (e.g., green). Continue outward until the entire circular mural is painted and all colors are dry.
3. Install the Suspension Wires
- Mark four points on the circumference of the circle (top, bottom, left, right).
- Attach a piece of thin wire to each of these points (you may use strong adhesive or small, barely visible tacks).
- Pull the wires taut at a diagonal angle and secure the other end of the wire to wall anchors or hooks placed well outside the perimeter of the circle. This creates the illusion that the circle is suspended.
4. Add the Center Accent
- Tie a small decorative item (like a colorful pencil or bead) to the end of a piece of twine.
- Tie the other end of the twine to the center point of the circle (where the tack was placed) and let it hang down slightly. This little accent completes the massive, graphic composition.
You now have a massive portfolio of creative, high-impact ideas at your fingertips. Decorating large walls does not require a large financial investment; it simply demands a shift in perspective. You can confidently tackle that empty expanse by choosing materials based on texture, volume, and sheer scale, rather than price tag.
Embrace the unconventional by using textiles, salvaged materials, or simple architectural details to provide size and character. Remember that DIY art is often the most engaging because it reflects your unique personality and flair. Go ahead and start that next project; your walls will thank you for the dramatic upgrade!
Key Takeaways
- Scale is Power: Always focus on covering a large area, whether through one piece (like a tapestry or mural) or many small, unified parts (like a grid of clipboards).
- Embrace Texture: Inexpensive materials like wood scraps, joint compound, or macrame rope add instant depth and luxury that flat prints cannot match.
- Layering Creates Depth: Use techniques like stacking canvases, suspending items in front of mirrors, or layering textile panels to make the art feel voluminous.
- Flexibility is Key: Many budget solutions, like paper scrolls or photo grids, allow you to swap out prints easily, keeping your large wall display fresh and interesting.