The kitchen backsplash is often an afterthought. It is a functional wall, meant to catch splashes and splatters. Many are left plain, white, or tiled in a simple, uninspired pattern.
A boring backsplash can make the whole kitchen feel flat. It is a large, visible area that sits at eye level. This is a missed opportunity to add personality.

Your cooking space can be a true reflection of your style. You can add bold color, rich texture, or a graphic pattern. A great backsplash can tie the whole room together.
We found 42 stunning ideas to fix a dull wall. This list will show you how to transform your kitchen. We even include simple DIY steps for many of them.
1. The Modern Vertical Stack

This design takes a classic subway tile and turns it on its head. By stacking the long, thin tiles vertically, the entire wall feels taller. The eye is naturally drawn upward, which creates a sense of space and height.
Using the same sage green tile to wrap the range hood is a clever move. It unifies the cooking area into one seamless, striking feature. This approach feels clean, modern, and very intentional. It pairs well with the crisp white cabinets and bold black hardware.
DIY: Get This Look with Peel-and-Stick Tile
Tiling a range hood is complex. A much simpler way to get this look is by using high-quality peel-and-stick tile sheets.
Step-by-Step Instructions:
- Prepare Your Wall: Your wall must be clean, dry, and smooth. Use a simple degreaser (like dish soap and water, then dry completely) to wipe down the entire area. If your paint is glossy, lightly scuff it with fine-grit sandpaper and wipe away the dust. This helps the adhesive stick.
- Plan Your Layout: Do not peel anything yet. Hold your first tile sheet against the wall. For this vertical look, you’ll start at the bottom, likely in a corner or at the edge of your counter space. Use a level to draw a light pencil line up the wall to ensure your first column is perfectly straight.
- Make Your Cuts: Measure the spaces where you’ll need partial tiles, like around electrical outlets or under cabinets.
- First, turn off the power to your outlets at the breaker box. Remove the faceplates.
- Measure and trace the shape you need onto the tile sheet’s paper backing.
- Use a sharp utility knife and a straight edge (like a metal ruler) to score the line. You can then snap the tile or cut cleanly through.
- Peel and Stick: Peel back only the first few inches of the paper backing from your first sheet. Align the edge of the sheet with your level pencil line.
- Press Firmly: Press the exposed adhesive part onto the wall. Now, slowly pull down the rest of the backing while smoothing the tile sheet with your other hand. Go slowly to avoid air bubbles. Once it’s on, press firmly over the entire sheet.
- Overlap the Grout Lines: Good peel-and-stick tiles are designed to overlap. Line up the “grout” edge of your next tile sheet over the first one. This creates a seamless look. Continue this process, stacking your tiles vertically one column at a time.
- Finishing Touches: Once all tiles are placed, go back and press firmly on every single tile to ensure a strong bond. Re-install your outlet covers. You can caulk the bottom edge where the tile meets the counter for a professional finish.
2. The Dramatic Vein-Matched Slab

This look moves away from small tiles entirely. It uses a single, continuous slab of heavily veined marble. The stone runs from the counter all the way up the wall, even wrapping the range hood.
This “vein matching” is key. The patterns flow uninterrupted, turning the wall into a single piece of art. It creates a bold, luxurious focal point. The high contrast of dark grey veins on white stone feels grand. It’s a statement.
DIY: Faux Marble Panel System
A real slab is costly and needs pro installers. You can get a similar look with large-format peel-and-stick marble panels or high-quality vinyl sheets.
Step-by-Step Instructions:
- Prepare Your Wall: This method shows all bumps. Your wall must be perfectly smooth. Clean it, and fill any holes or dents with spackle. Sand the spackle smooth and wipe away all dust.
- Make a Template: This is the most important step. Tape craft paper or cardboard together to create a full-sized template of your backsplash area. Carefully trace and cut out holes for outlets and the range hood.
- Trace onto Panel: Lay your paper template on the back of your faux marble panel or heavy-duty contact paper. Carefully trace the entire outline and all cutouts.
- Cut the Panel: Use a very sharp utility knife and a long metal straightedge. Go slowly and press firmly. For any curves, use the knife to make several shallow passes.
- Apply (Two People): This is a two-person job. Peel back only the top six inches of the paper backing. Align the top edge of the panel with your wall.
- Smooth It Down: Have one person slowly pull the backing paper down from behind. The other person uses a plastic squeegee to smooth the panel onto the wall, working from the center outward. This pushes out air bubbles.
- Finishing Touches: Turn the power back on and reinstall your outlet covers. Run a bead of clear or white silicone caulk where the panel meets the counter.
3. The Textured Fluted Column

This backsplash is all about texture. It uses fluted or “ribbed” tiles that add deep, vertical lines. This detail creates a striking play of light and shadow.
The two-tone design is smart. A warm, coppery tone sits below, lit by a hidden LED strip. This gives it a warm glow. Cool, white fluted panels above add height. It feels very modern and architectural.
DIY: Paintable Fluted Wall Panels
You can find lightweight, paintable PVC or wood “tambour” panels that have this fluted look.
Step-by-Step Instructions:
- Prep and Paint: Clean your wall. It’s much easier to paint your panels before you install them. Use a paint sprayer or roller to paint your panels your desired colors (e.g., metallic copper for the bottom). Let them dry completely.
- Measure and Cut: Measure the height from your counter to the bottom of your upper cabinets. Cut your bottom (copper) fluted panels to this height using a fine-toothed saw or a miter saw. Repeat for the upper (white) panels.
- Find Center: Find the center of your wall (usually the center of the stove) and lightly mark it. You will install your first panel here and work outward to keep the pattern balanced.
- Install Panels: Apply a strong construction adhesive (like Liquid Nails) to the back of your first panel. Press it onto the wall, aligning it with your center mark. Use a level to make sure it is perfectly vertical.
- Continue: Add the next panel, butting the edges tightly together. Continue working your way out to the corners.
- Install LED (Optional): Attach a self-adhesive LED light strip to the underside of your upper cabinets to create the warm glow effect.
- Caulk: Use a paintable caulk to fill the seam where the backsplash meets the counter.
4. The Luminous Backlit Slab

This backsplash is pure drama. It’s not just a wall, it’s a light source. A panel of translucent stone, like onyx or certain quartzites, is installed in front of a light panel.
When turned on, the entire wall glows from within. This highlights the stone’s natural patterns and veins. It creates a warm, high-end ambiance. This is a focal point that changes the entire mood of the room.
DIY: Faux Backlit Panel
This requires some basic building. It creates a “light box” on your wall.
Step-by-Step Instructions:
- Plan Power: You need a power source. The easiest way is to use an outlet that will be behind the panel. You can plug in your lights and then cover it. Warning: If you plan to hardwire, hire an electrician.
- Build a Frame: Build a thin (1-inch deep) “box” frame out of 1×1 wood strips. This frame will attach to your wall and create a hollow space for the lights.
- Install Lights: Attach peel-and-stick LED light tape to the wall inside the frame. Run the strips back and forth, spacing them 3-4 inches apart to create even light.
- Get Your Panel: Order a sheet of frosted or milky-white acrylic (like Plexiglas) cut to the exact outside dimensions of your frame. This panel will diffuse the light.
- Test the Glow: Plug in your lights and lay the acrylic panel on top to check for “hot spots.” If you see bright dots, add another layer of light-diffusing film (like frosted window film) to the back of the acrylic.
- Attach Panel: Once you have an even glow, attach the acrylic panel to the front of your wood frame.
- Finish: You can frame the edges with simple trim to hide the sides of the acrylic.
5. The Industrial Pro-Kitchen

This backsplash gets serious about cooking. It uses two types of stainless steel. A smooth, flat panel sits high up, acting as a simple, durable shield.
Below it, a sheet of quilted, textured stainless steel covers the main splash zone. This material is common in professional kitchens. It hides fingerprints and minor dings. It’s tough and has a strong, industrial look.
DIY: Peel-and-Stick Metal Panels
You can get this look without heavy-duty metal shears.
Step-by-Step Instructions:
- Prep: Your wall must be very clean. Any grease will stop the panels from sticking.
- Buy Panels: You can buy lightweight, peel-and-stick panels in both “quilted” and “brushed” stainless steel finishes.
- Plan: Decide where you want your two textures to meet. Use a level to draw a straight line across the wall.
- Install Top Panel: Measure and cut your smooth stainless panel. Peel the backing and apply it above your pencil line.
- Install Bottom Panel: Measure and cut your quilted stainless panel. Apply this panel below your pencil line.
- Cut: These panels can be cut. Use a sharp utility knife to score the panel, then snap it. For outlets (power off!), trace the box and cut it out with tin snips or a heavy-duty utility knife.
- Caulk: Use a clear silicone caulk at the counter.
6. The Seamless Plaster

This backsplash moves away from tiles and panels. It’s a continuous, smooth surface of plaster or micro-cement. This creates a soft, minimalist, and very modern look.
The plaster goes from the counter all the way up, wrapping the range hood. This seamlessness feels calm and organic. A small built-in arch adds a custom, handcrafted touch.
DIY: Faux Plaster (Limewash)
True Venetian plaster is difficult. You can get a similar look with limewash or “Roman clay” paint.
Step-by-Step Instructions:
- Prep: Your wall must be clean. This technique can go over existing drywall.
- Prime: Apply the special primer that comes with your limewash or Roman clay kit. This gives the paint something to grip.
- First Coat: Apply your first coat using a wide, flexible putty knife. Spread the material on the wall in thin, overlapping, random strokes. You want to build up light texture.
- Second Coat: Once the first coat is dry, apply a second coat. Move your putty knife in different directions (arches, X-shapes) to create subtle, cloud-like variations in texture.
- Sand (Optional): If you have any sharp edges, you can lightly sand them with very fine-grit sandpaper.
- Seal: This is the most important step for a kitchen. Once the paint is fully cured, apply 2-3 coats of a matte, water-based polycrylic sealer. This makes the surface wipeable and water-resistant.
7. The Playful Hexagon Pop

This backsplash is all about pattern. It uses small hexagon tiles. Most are white, which keeps the look bright.
But a random scattering of dark blue tiles creates a fun, graphic “pop.” It’s like a computerized, abstract design. A few random bright blue, orange, and red tiles add a tiny, playful surprise.
DIY: Peel-and-Stick Hexagons
This is a very fun and easy project.
Step-by-Step Instructions:
- Prep: Clean your wall with a degreaser.
- Buy Your Tiles: Buy sheets of white peel-and-stick hexagon tiles. Then, buy a few sheets of the exact same brand and size in dark blue.
- Plan Your Pattern: Lay your white tile sheets on the floor.
- Pop and Swap: Use your fingers or a small tool to “pop” individual white tiles off the mesh backing. Pop a few blue tiles off their sheet. Place the blue tiles into the empty spots on your white sheets.
- Create Randomness: Do this randomly across all your sheets. There is no wrong way to do it. Add your one or two “surprise” color tiles (like the red one) in the same way.
- Install: Once your custom sheets are ready, start at the bottom corner. Peel the backing and press the first sheet to the wall.
- Interlock: The sheets are designed to interlock. Fit the next sheet tightly against the first.
- Cut: Use a utility knife to cut tiles at the edges and around outlets (power off!).
8. The Colorful Offset Weave

This backsplash proves that subway tiles are not boring. It uses a mix of colors—soft pink, mint green, deep blue, and white—in a standard running bond pattern.
The magic is in the tile itself. Each one has a high-gloss, “zellige” finish. This means the surface is uneven and reflects light differently. It gives the wall a handmade, watery quality. The random color placement feels fun and artistic.
DIY: Mix-and-Match Peel-and-Stick
This is one of the easiest looks to achieve with a big impact.
Step-by-Step Instructions:
- Buy Your Tiles: Find a peel-and-stick subway tile you like. Buy several boxes: mostly white, and one smaller box each of your accent colors (pink, green, blue). Crucial: They must be the exact same brand and size to fit together.
- Prep: Clean the wall with a degreaser.
- Plan: Start at the bottom. Your first row will be all one color (like white). Use a level to draw a light pencil line up the wall to ensure your first column is perfectly straight.
- Install: Start sticking your tiles in a “running bond” (brick) pattern. This means the joint of the tile above sits in the middle of the tile below it.
- Add Color Randomly: As you work your way up, just grab a colored tile instead of a white one. The key is to not overthink it. Just make sure two of the same color don’t touch.
- Make Cuts: Use a utility knife and straightedge to score and snap the tiles needed for edges and outlets (power off, cover removed!).
9. The Rustic Farmhouse Brick

This backsplash brings in natural, rustic texture. It uses reclaimed or “thin brick” veneers. This isn’t a flat, printed pattern; each “brick” is a real, thin slice of brick.
The heavy texture and color variation (from red to charcoal) add a lot of warmth. It feels like an original, exposed brick wall. Paired with dark green cabinets and a black sink, it creates a cozy, modern farmhouse look.
DIY: Faux Brick Wall Panels
Using individual thin bricks is like tiling. A faster way is using 4′ x 8′ faux brick panels from a home improvement store.
Step-by-Step Instructions:
- Prep: Locate the studs in your wall with a stud finder and mark them with a pencil.
- Measure and Cut: Measure your backsplash area. Transfer these measurements to your large panel.
- Cut Panel: Cut the panel to size using a jigsaw or circular saw.
- Outlet Cutouts: Measure the location of your outlets (power off!). Transfer this to the panel and cut out the holes with a jigsaw.
- Dry Fit: Hold the panel against the wall to make sure it fits perfectly.
- Install: Apply construction adhesive (like Liquid Nails) to the back of the panel in a large “S” pattern. Press the panel to the wall.
- Secure: Drive finishing nails or panel screws into the studs you marked earlier. This holds the panel tight while the glue dries.
- Finish: You can buy a “mortar” caulk or grout in a tube to fill the seams between panels for a more realistic finish.
10. The Framed Tile Inlay

This design creates a “picture frame” right on the wall. The main backsplash is a simple, elegant black-and-white cement tile.
But over the stove, a “rug” of colorful, intricate Spanish-style tiles is set apart. A simple wood frame defines this area. It acts like a piece of permanent art. This is a great way to add a bold pattern without overwhelming the whole kitchen.
DIY: Hang a Framed Tile “Mural”
Instead of tiling into the wall, you can create a separate piece of art.
Step-by-Step Instructions:
- Install Main Backsplash: First, install your main, simpler backsplash over the whole wall (e.g., the black and white peel-and-stick tile).
- Create the “Art”:
- Buy a thin, square piece of plywood or backer board (cut to the size you want your mural).
- Buy your fancy, colorful tiles (peel-and-stick are easiest for this).
- Tile this separate board.
- Build a Frame: Measure the outside of your tiled board. Build a simple frame out of 1×2 wood strips. Cut the ends at 45-degree angles for a clean look.
- Assemble: Attach the frame to the edges of your tiled board. You can glue and nail it in from the sides.
- Hang It: Install two heavy-duty picture hangers (like a “D-ring” hanger) on the back of your new, framed mural.
- Mount: Hang your mural on the wall over the stove, just like you would hang a heavy mirror. This gives you the same look, but it’s not permanent.
11. The Glamorous Antique Mirror

This backsplash uses antiqued mirror tiles. It is a very glamorous look. The tiles reflect light and make the space feel larger.
The “aged” or “foxed” finish of the mirror is key. It adds a sense of history and character. This stops the mirror from looking too new or stark. It pairs well with the dark cabinets and white farmhouse sink.
DIY: Peel-and-Stick Mirror Tiles
You can buy peel-and-stick mirror tiles, which are often made of lightweight acrylic.
Step-by-Step Instructions:
- Prepare Your Wall: The wall must be perfectly clean and smooth. Any bump will show. Wear gloves to avoid getting fingerprints on the mirror tiles.
- Plan Layout: Find the center of your wall and mark a vertical and horizontal line with a level. You will start tiling from this center point and work outward.
- Peel and Stick: Peel the backing off your first tile. Align it with your center lines and press firmly.
- Continue Tiling: Place the next tiles directly beside each other, leaving no grout space. Work your way out from the center in a grid.
- Cutting Tiles: To cut acrylic mirror tiles, measure and mark a line. Use a utility knife and a straightedge to score the line deeply (3-4 times). Then, carefully snap the tile over a sharp edge.
- Outlet Cutouts: Turn off power. Remove the cover. Measure and trace the box. Score the lines deeply and cut out the square.
- Caulk: Use a clear silicone caulk where the tiles meet the counter.
12. The Classic Beadboard Panel

This is a classic, cozy look. It uses simple beadboard paneling. This material is defined by its vertical grooves. It’s a staple of cottage and farmhouse kitchens.
The white paint keeps it looking fresh and clean. The thicker vertical planks add a bit of dimension. This is a simple, textured look that pairs well with butcher block counters.
DIY: Install Beadboard Panels and Trim
This is a very approachable DIY project that uses large panels.
Step-by-Step Instructions:
- Prepare Wall: Clean your wall. Find and mark the wall studs with a pencil.
- Measure and Cut Panels: Measure the height of your backsplash area. Cut your large beadboard panels to this height using a circular saw or jigsaw.
- Cut for Outlets: Turn off power and remove covers. Measure the outlet locations and trace them onto your panel. Use a jigsaw to cut the holes.
- Dry Fit: Hold the panel against the wall to check your cuts.
- Install Panel: Apply construction adhesive to the back of the panel. Press it to the wall.
- Nail: Secure the panel by driving finishing nails through the panel and into the wall studs you marked.
- Add Trim (Optional): To add the dimensional look, cut 1×3 boards to the same height. Glue and nail them vertically on top of the beadboard, spacing them evenly.
- Caulk and Paint: Fill all nail holes with wood filler. Caulk all seams. Finish by painting the entire backsplash one uniform color.
13. The Tuscan Tumbled Stone Inlay

This kitchen has a warm, Old-World feel. It uses tumbled stone tiles, which have soft, rounded edges. This gives the wall a rustic texture.
The main feature is the framed inlay over the stove. A decorative border of mosaic tiles frames a “rug” of tiles laid in a diamond pattern. This creates a traditional, European-style focal point.
DIY: Faux Stone and a Mosaic “Rug”
You can get this look without mixing mortar by using peel-and-stick materials.
Step-by-Step Instructions:
- Prep: Clean your wall thoroughly with a degreaser.
- Install Field Tile: Apply your main backsplash. Use a peel-and-stick tile sheet that mimics tumbled stone.
- Plan Your Inlay: Over the stove, measure and mark a rectangle with a pencil and a level.
- Create the Frame: Use peel-and-stick “pencil” or “border” trim tiles. Carefully apply these along the pencil lines to build your frame.
- Install the “Rug”: Buy a sheet of peel-and-stick mosaic tile. Cut it to fit inside the frame you just made.
- Stick: Peel the backing from your mosaic and carefully press it into place inside the frame.
- Caulk: Run a bead of caulk (in a “sandstone” color) where the backsplash meets the counter.
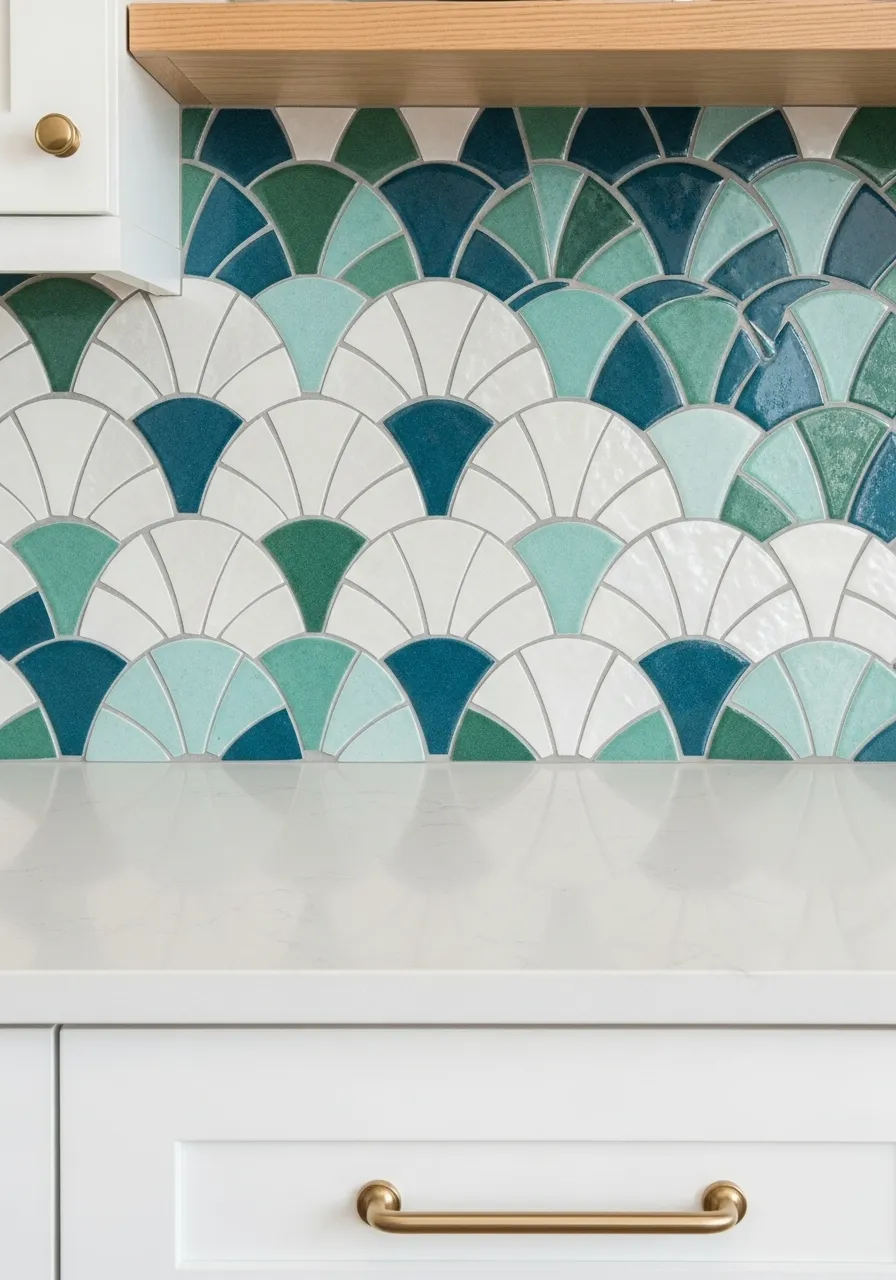
14. The Art Deco Fan Tile

This backsplash uses a “fan” or “scallop” tile. It creates a beautiful, repeating pattern that feels both vintage and modern. It is often called an Art Deco or “mermaid” pattern.
The color mix is key. Using white, light green, and deep teal tiles in a random-yet-balanced way makes the wall feel fresh and watery. It adds a lot of personality and movement.
DIY: Mix-and-Match Scallop Tiles
This pattern is available in easy-to-use peel-and-stick mesh sheets.
Step-by-Step Instructions:
- Prep: Clean your wall.
- Find Center: This pattern must be centered. Find the center of your main wall (usually over the stove) and draw a level, vertical line.
- Dry Fit: Lay out your tile sheets on the floor to plan your color mix.
- First Sheet: Start at the bottom center. Align the center of your first tile sheet with your vertical line. Make sure it is level. Press it on.
- Install: Work your way outward from the center. The sheets are designed to interlock.
- Mix Colors (if not pre-mixed): If your sheets are all white, you can pop off individual white tiles (before sticking) and replace them with colored ones.
- Cut: Cutting these curved shapes is tricky. For peel-and-stick, a sharp utility knife is all you need. Trace your line and cut slowly.
- Caulk: Use a white, mildew-resistant caulk at the counter.
15. The Playful Terrazzo Pop

This backsplash is pure fun. It uses large-format terrazzo tiles. Terrazzo is a composite material with colorful chips of marble, quartz, or glass set in a white or neutral base.
It creates a playful, confetti-like effect. The random pops of pink, yellow, black, and blue are energetic. This is a great way to add color to a kitchen with neutral cabinets.
DIY: Terrazzo-Patterned Panels
Installing real terrazzo tile is a big job. A large-format contact paper or self-adhesive panel is much simpler.
Step-by-Step Instructions:
- Prep: Your wall must be perfectly smooth. Terrazzo patterns are busy, but thin vinyl will show every bump.
- Measure: Measure the full height and width of your backsplash.
- Cut Panel: Roll out your terrazzo-patterned vinyl. Cut it to the size you need, leaving an extra inch on all sides.
- Cut Outlets: Turn off power. Remove covers. Measure and mark outlet locations. Cut them out with a utility knife.
- Apply (Two People): Peel back just the top edge. Align it with the wall.
- Smooth: As one person pulls the backing paper down, the other uses a plastic squeegee to smooth the vinyl onto the wall. Work from the center outward.
- Trim: Use a sharp craft knife to trim the excess vinyl at the counter and cabinets.
- Caulk: A bead of clear caulk at the bottom gives a clean seal.
16. The Painterly Floral Mural

This is a bold, custom statement. A landscape and floral mural is printed directly onto the tiles. The design flows seamlessly from the wall up onto the range hood.
It turns the cooking area into a large-scale piece of art. The soft, painterly style softens the hard lines of the kitchen. It is a striking and personal touch.
DIY: Heat-Resistant Wallpaper or Decals
You can get this look by applying a mural over a simple, existing wall.
Step-by-Step Instructions:
- Prep: You need a smooth surface. This works best over a simple, flat tile, or just a smooth, painted wall. Clean it well.
- Buy a Mural: Order a custom-sized wall mural from a company that prints on heat-resistant, wipeable vinyl. This is critical for a kitchen.
- Plan: Your mural will arrive in panels. Lay them on the floor in the correct order.
- First Panel: Start on one side. Use a level to draw a straight vertical line for your first panel.
- Apply: Peel and stick the first panel, aligning it with your level line. Use a squeegee to smooth it and remove bubbles.
- Match and Continue: Apply subsequent panels, carefully aligning the pattern.
- Trim: Use a very sharp craft knife to trim the mural at the counter, cabinets, and around the range hood. Go slowly.
- Seal (Optional): If you are worried about seams, you can apply a thin coat of clear, matte polycrylic over the top.
17. The Moody, Glossy Subway

This backsplash uses a classic subway tile in a very modern way. The tile has a deep, rich color—a dark emerald or teal. The high-gloss, slightly uneven (“zellige”) finish reflects light.
Paired with dark cabinets and brass hardware, the look is moody, sophisticated, and dramatic. It creates a space that feels cozy and high-end.
DIY: High-Gloss Peel-and-Stick Tile
This is a very achievable look with modern peel-and-stick tiles.
Step-by-Step Instructions:
- Prep: Clean the wall with a degreaser.
- Plan Your Pattern: You will use a “running bond” or “brick” pattern. This means the grout line of one row lines up with the center of the tile in the row below it.
- First Row: Your first row at the counter must be perfectly level. Use a level to check.
- Stagger: To create the pattern, start every other row with a half-tile.
- Cut: Measure and mark your tile. Use a utility knife and a straightedge to score the line, then snap the tile.
- Stick: Peel the backing and stick the tiles. Most are designed to overlap on the “grout” line for a seamless look.
- Outlets: Turn off power. Remove covers. Measure and cut tiles to fit around the box.
- Caulk: Use a black or translucent caulk where the tile meets the counter.
18. The Bohemian Patchwork Wall

This is a vibrant, energetic look. It uses many different “cement tile” patterns, all in a similar color palette of blue, white, and yellow.
The tiles are laid out in a random “patchwork” quilt pattern. This turns the wall into a busy, beautiful focal point. It has a global, bohemian, or Mediterranean feel.
DIY: Patchwork Peel-and-Stick Tiles
Many companies sell “mixed packs” of peel-and-stick tiles for this exact look.
Step-by-Step Instructions:
- Prep: Clean the wall.
- Buy Tiles: Get a “mixed pack” of peel-and-stick tiles. Make sure they are all the same size.
- Dry Layout: This is the most important step. Lay all your tiles out on the floor. Arrange them in a random pattern that you like. Make sure two of the same pattern are not next to each other.
- Take a Photo: Take a picture of your floor layout. This is your map.
- Install: Start at the bottom corner. One by one, pick up your tiles from the floor and stick them to the wall, following your photo map.
- Butt Edges: These tiles are usually placed edge-to-edge, with no grout line.
- Cut: Use a utility knife and straightedge to cut the tiles at the end of the row.
- Caulk: A white caulk at the counter will finish it nicely.
19. The Art Deco Geometric Inlay

This is a very high-end, custom look. It uses a white marble tile base. A complex geometric pattern is inlaid using strips of brass and dark green stone.
The pattern creates sharp, “fan” or “sunburst” shapes. It is very glamorous and recalls the Art Deco period. This is a true statement wall.
DIY: Geometric “Inlay” Decals or Tape
Instead of real inlay, you can create the pattern on top of a simple base.
Step-by-Step Instructions:
- Create a Base: Install a simple, smooth, white backsplash. This could be large white tiles, or even a smooth white panel.
- Plan Your Pattern: Find a geometric pattern you like. Use a pencil, a level, and a yardstick to lightly draw the main lines of your pattern on the wall.
- Buy Your “Inlay”:
- For the “brass”: Buy thin, metallic gold vinyl tape (often used for car detailing).
- For the “stone”: Buy sheets of vinyl in your accent color (dark green) and cut them into the fan shapes you need.
- Apply Tape: Slowly and carefully apply the gold vinyl tape, following your pencil lines.
- Apply Shapes: Peel and stick your custom-cut vinyl “fan” shapes into place.
- Squeegee: Use a soft cloth or squeegee to press all the vinyl tape and decals down firmly.
20. The Colorful Checkerboard

This look takes the classic checkerboard and makes it modern and playful. Instead of just black and white, it uses a random mix of colors.
White, black, grey, sage green, and terra-cotta tiles are laid in a simple grid. The random color placement feels fresh and unexpected. It’s a simple pattern with a lot of personality.
DIY: Multi-Color Peel-and-Stick Squares
This is a very simple and fun DIY project.
Step-by-Step Instructions:
- Prep: Clean your wall.
- Buy Tiles: Buy packs of peel-and-stick square tiles (e.g., 6-inch or 12-inch) in your 4-5 chosen colors.
- Find Center: Find the center of your wall. Mark a vertical and horizontal line with a level.
- Dry Layout: Lay your tiles on the floor. Start at a center point and build your grid, placing colors randomly.
- Take a Photo: Take a picture of your floor layout to use as your guide.
- Install: Start at the center point on your wall. Press your first tile into the corner where your level lines cross.
- Continue: Work your way out from the center, following your photo map. Butt the edges of the tiles tightly together.
- Cut: Use a utility knife and straightedge to cut the tiles that meet the counter and cabinets.
21. The Antiqued Tin Ceiling Tile

This backsplash uses pressed tin tiles, but with an antiqued, metallic finish. The detailed patterns add texture and vintage charm. This particular finish has a lovely, subtle sheen.
It creates a sense of history and warmth. It’s a bold alternative to traditional tiles, offering an old-world elegance. This style works well in both rustic and industrial-leaning kitchens.
DIY: Faux Tin Panels or Peel-and-Stick
You can replicate this style without the expense of real tin.
Step-by-Step Instructions:
- Prep: Ensure your wall is clean and smooth. Remove any existing backsplash.
- Measure and Plan: Measure your wall space carefully. These panels are often square, so plan your layout from the center of the wall outwards to keep it balanced.
- Cut Panels: For faux tin panels (often made of PVC), use heavy-duty scissors or a utility knife to cut. If using peel-and-stick, they will be easier to cut.
- Apply Adhesive (for panels): For larger PVC panels, apply construction adhesive to the back of each panel. Press it firmly onto the wall.
- Peel and Stick (for tiles): If using peel-and-stick, simply remove the backing and press the tile into place.
- Overlap Edges: Many tin-look products have overlapping edges that hide seams, creating a continuous look. Follow manufacturer instructions.
- Outlet Cutouts: Turn off power. Remove outlet covers. Measure and mark the cutouts on the panel, then cut carefully with tin snips or a utility knife.
- Finish: You can use a decorative trim along the top and sides for a more polished appearance.
22. The Horizontal Vein Cut Slab

This backsplash features a large slab of stone with dramatic horizontal veining. It’s often called “vein-cut” stone. The continuous lines create a sense of movement.
This slab covers the entire wall, including the island’s side. This creates a cohesive, high-end look. The muted grey and cream tones are sophisticated and calming. It makes a subtle, yet powerful, statement.
DIY: Horizontal Striped Wallpaper or Panels
Achieving this with real stone is a big undertaking. You can use large-format wallpaper or vinyl panels.
Step-by-Step Instructions:
- Prepare Wall: The wall must be very smooth and clean for wallpaper or thin vinyl. Fill any holes and sand.
- Choose Material: Look for high-quality, peel-and-stick wallpaper or large vinyl panels with a horizontal marble or stone vein pattern.
- Measure and Cut: Measure your backsplash area. Cut the wallpaper or panel, leaving a slight overlap (about 1 inch) on all edges for trimming.
- Plan Layout: Since the pattern is horizontal, ensure you line up the veins perfectly if using multiple panels. Start at one end of the wall.
- Apply (Two People Recommended): Peel back the top few inches of the backing. Align the material with the top edge of your wall. Slowly peel down the rest of the backing while smoothing the material with a squeegee or soft cloth.
- Smooth Bubbles: Work from the center outward to push any air bubbles to the edges.
- Trim Edges: Use a sharp utility knife and a straight edge to carefully trim the excess material at the counter and cabinets.
- Outlet Cutouts: Turn off power. Remove covers. Apply the material over the outlet box. Use a sharp craft knife to cut an “X” from corner to corner over the opening, then trim the edges neatly around the box.
23. The Shimmering Mother-of-Pearl Inlay

This backsplash is luxurious and eye-catching. It features iridescent mother-of-pearl tiles. These tiles reflect light in beautiful, shifting colors.
The main field of the backsplash is small, irregular mother-of-pearl pieces. Over the stove, a contrasting herringbone pattern in the same material creates a stunning focal point. It’s elegant and adds a subtle gleam to the kitchen.
DIY: Peel-and-Stick Mother-of-Pearl Tiles
Real mother-of-pearl is delicate. You can find robust peel-and-stick versions for a similar effect.
Step-by-Step Instructions:
- Prep: Clean your wall very well. The tiles are reflective and will show dirt.
- Measure and Plan: Decide where your herringbone inlay will go. Use a pencil and level to mark its exact boundaries.
- Install Field Tile: Start by applying the irregular-patterned mother-of-pearl peel-and-stick tiles on mesh sheets. Work from the bottom up, cutting sheets as needed for outlets (power off!) and edges with a utility knife.
- Install Herringbone Inlay: Once the field tile is down, cut sheets of herringbone-patterned mother-of-pearl tiles to fit within your marked inlay area. These are often easier to apply as whole sheets.
- Press Firmly: Go over all the tiles with a clean, soft cloth or rubber roller to ensure a strong bond.
- Caulk: Use a very thin bead of clear silicone caulk where the backsplash meets the counter for a clean, water-resistant seal.
24. The Coastal Glass Subway Mix

This backsplash feels fresh and airy, like a beach house. It uses glass subway tiles in a palette of blues and greens. The colors are intentionally varied.
The tiles are laid in a simple running bond pattern. The transparency of the glass allows light to bounce around. It creates a tranquil, refreshing atmosphere. It’s a subtle way to add color without being overwhelming.
DIY: Mixed Color Glass Peel-and-Stick Tiles
You can find peel-and-stick glass-look tiles in various shades.
Step-by-Step Instructions:
- Prep: Clean your wall well. Any imperfections under glass-look tiles will show.
- Buy Tiles: Purchase peel-and-stick glass-look subway tiles in your chosen shades of blue and green. Ensure they are the exact same size and brand.
- Plan Your Mix: Lay out a few sheets on the floor. Decide if you want a random mix or a pattern. For a random look, just pick tiles without overthinking.
- First Row: Start your first row at the counter, ensuring it’s perfectly level.
- Install: Apply the tiles in a running bond (brick) pattern.
- Mix Colors: As you apply, grab different colored tiles to create the varied look.
- Cut Tiles: Use a utility knife and straightedge. For smaller cuts, tin snips can work.
- Outlet Cutouts: Turn off power. Remove the cover. Cut the tiles to fit around the box.
- Caulk: Use a light grey or white caulk at the bottom to blend with the light colors.
25. The Lush Botanical Wallpaper

This backsplash is a bold, artistic choice. It uses a richly colored, large-scale botanical wallpaper. The dark background makes the green foliage and colorful flowers pop.
It transforms the wall into a dramatic feature. Paired with open wooden shelves and hanging plants, it creates a “living wall” feel. This is a very immersive and stylish look.
DIY: Peel-and-Stick Wallpaper
Using high-quality, removable wallpaper is a great way to get this look without permanence.
Step-by-Step Instructions:
- Prepare Wall: The wall must be very clean and smooth. Any texture or dirt will show.
- Choose Wallpaper: Look for peel-and-stick wallpaper with a bold botanical pattern. Ensure it’s listed as “wipeable” or “kitchen appropriate.”
- Measure and Cut: Measure your backsplash area. Cut your wallpaper panels to size, allowing extra for pattern matching and trimming.
- Plan Pattern: Lay out your wallpaper panels on the floor to ensure the pattern matches correctly.
- Install First Panel: Use a level to draw a straight vertical line where your first panel will go. Carefully peel back a few inches of the backing paper and align the panel.
- Smooth as You Go: Slowly peel more backing and use a wallpaper smoother (or soft cloth) to press the paper onto the wall, working from top to bottom and center to edges. This removes air bubbles.
- Match and Continue: Apply subsequent panels, carefully aligning the pattern.
- Trim Edges: Use a sharp utility knife and a straight edge to trim excess paper at the counter, cabinets, and around outlets (power off, covers removed!).
- Finishing: Use a clear caulk at the counter for water protection.
26. The Organic Pebble Mosaic

This backsplash brings the outdoors in. It uses a mosaic of natural, flat river pebbles. The stones are in varied sizes and earthy colors—white, grey, black, and beige.
The irregular shapes and textures are very organic. They create a soothing, spa-like feel. This look pairs well with natural wood cabinets.
DIY: Pebble Tile Sheets
You can buy these pebbles already glued onto mesh sheets.
Step-by-Step Instructions:
- Prep: Clean your wall.
- Measure and Plan: Lay out your mesh sheets on the floor to see how they fit. You might need to cut some sheets to fit odd spaces.
- Cut Sheets: Use heavy-duty scissors or a utility knife to cut the mesh backing. You can even remove individual pebbles from the mesh to fill small gaps.
- Install: Apply a strong tile adhesive or construction adhesive to the back of the mesh sheet. Press the sheet firmly onto the wall.
- Stagger Sheets: When installing the next sheet, try to interlock the pebbles so the seams between sheets are less visible. You might need to adjust a few pebbles.
- Grout (Optional but Recommended): For better water resistance and a finished look, you can grout pebble tiles. Mix a sanded grout (matching a light-colored pebble) and spread it over the tiles, pressing it into all the gaps. Wipe off excess with a sponge.
- Seal: Once dry, apply a stone sealer to protect the pebbles and grout.
27. The Distressed Shiplap

This backsplash uses horizontal wood planks with a distressed, whitewashed finish. It looks like aged shiplap. It gives the kitchen a strong rustic or coastal farmhouse vibe.
The visible wood grain and variations in white add depth and character. The wood runs up the wall and wraps the range hood. This creates a cohesive, earthy feature.
DIY: Peel-and-Stick Wood Planks
You can get this look with lightweight, self-adhesive wood planks.
Step-by-Step Instructions:
- Prep: Clean your wall thoroughly.
- Measure: Measure the height of your backsplash.
- Cut Planks: Cut your peel-and-stick wood planks to this height.
- Start Level: Begin with a plank at one end of your counter. Use a level to ensure it is perfectly horizontal.
- Install: Peel the backing and press the plank firmly onto the wall.
- Stagger Seams: For a realistic look, stagger the ends of your planks. Start the next row with a half plank.
- Butt Edges: Butt the planks tightly together to minimize gaps.
- Outlet Cutouts: Turn off power. Remove covers. Measure and mark the cutout on your plank. Use a jigsaw or craft knife to cut.
- Finish: You can use a clear caulk at the bottom. The wood planks are often wipeable, but avoid excessive water.
28. The Mid-Century Modern Grid

This backsplash uses uniquely shaped tiles to create a bold, graphic pattern. It features squares with rounded, arching cutouts. When placed together, they form a continuous, flowing design.
The earthy colors—terra cotta, soft pink, and cream—feel warm and inviting. The overall look is playful and distinctly mid-century modern. It adds a subtle retro flair.
DIY: Stenciled Geometric Pattern
If you cannot find these exact tiles, stenciling can achieve a similar effect.
Step-by-Step Instructions:
- Prep: Paint your existing backsplash (or a smooth wall) a solid, light base color (like cream). Let it dry completely.
- Find Stencil: Find a reusable stencil with a similar mid-century modern geometric pattern.
- Plan: Start your stencil pattern from the center of your wall. Use a level and painter’s tape to secure the stencil.
- Paint: Use a small foam roller or stencil brush. Dip it lightly in your chosen paint color (terra cotta or pink). Roll off excess paint on a paper towel.
- Apply: Lightly dab or roll the paint onto the stencil. Less paint is better to avoid bleed-through.
- Repeat: Carefully remove the stencil, reposition it, and repeat the process. Clean your stencil often to keep the lines crisp.
- Mix Colors: Use different colors for different parts of the pattern or alternate colors as you go.
- Seal: Once dry, apply 2-3 coats of a clear, wipeable topcoat (like polycrylic) for protection.
29. The Rustic Mediterranean Patchwork

This backsplash is a riot of patterns. It uses small-format tiles, each with a unique, intricate design. The colors are warm—terra cotta, blue, gold, and white.
It’s a beautiful, eclectic mix that evokes a sun-drenched Mediterranean villa. This style brings a lot of personality and a sense of handmade artistry to the kitchen.
DIY: Patchwork Decal Sheets
These intricate patterns are easily found in peel-and-stick tile decals.
Step-by-Step Instructions:
- Prep: Clean your wall. If you have a simple, existing tile backsplash, even better.
- Buy Decals: Purchase a mixed pack of peel-and-stick tile decals in the desired size and patterns.
- Dry Layout: Lay all your decals out on the floor. Arrange them in a random yet pleasing pattern. Avoid putting two identical designs next to each other.
- Take a Photo: Take a picture of your floor layout. This is your guide.
- Apply: Starting at a bottom corner, peel the backing off one decal at a time and press it onto the wall. Follow your photo map.
- Smooth: Use a credit card or squeegee to smooth out any air bubbles.
- Cut: Use a sharp craft knife to trim decals that extend past the counter or cabinets.
- Finish: You can apply a clear, matte sealant over the decals for extra protection and durability, especially in high-splash areas.
30. The Bright White Subway Tile

This is a classic that never goes out of style. The backsplash uses simple, glossy white subway tiles. They are laid in a traditional running bond pattern.
The white reflects light, making the kitchen feel brighter and larger. The clean, straight lines are timeless. It’s a versatile choice that works with almost any cabinet or counter style.
DIY: White Peel-and-Stick Subway Tile
This is one of the easiest and most affordable ways to update a backsplash.
Step-by-Step Instructions:
- Prep: Clean your wall very well with a degreaser. The wall must be dry.
- Measure and Plan: Measure your backsplash area. Consider if you want to extend it all the way up to the cabinets or just a few rows.
- First Row (Crucial): Use a level to draw a perfectly straight horizontal line where the bottom of your first row of tiles will sit. This ensures everything else is straight.
- Install: Peel the backing off your first tile. Align it precisely with your level line and press firmly.
- Running Bond Pattern: For the classic subway tile look, start every other row with a half tile. Measure and cut your half tiles with a utility knife and a straight edge.
- Stagger: Continue applying tiles, staggering them so the vertical “grout” line of one row sits in the middle of the tile below it.
- Cut for Outlets: Turn off power. Remove outlet covers. Measure and cut tiles to fit around the electrical boxes.
- Press and Caulk: Once all tiles are in place, press them firmly over the entire surface. Apply a thin bead of white caulk along the bottom edge where the tile meets the counter.
31. The Functional Pegboard Wall

This isn’t a traditional backsplash, but it’s incredibly clever for a small kitchen or an aspiring chef. The entire wall is covered in a white pegboard.
It provides endless customizable storage for pots, pans, and utensils. This keeps counters clear and everything within easy reach. It’s a practical, industrial-chic solution.
DIY: Install a Pegboard Backsplash
This is a very DIY-friendly project.
Step-by-Step Instructions:
- Measure and Cut: Measure your backsplash area. Cut your pegboard panel(s) to size. You can buy pegboard at any hardware store.
- Install Furring Strips: Pegboard cannot sit directly against the wall, or the hooks won’t fit. Attach thin wood “furring strips” (e.g., 1x2s) horizontally to your wall studs. This creates a gap behind the pegboard.
- Mount Pegboard: Screw the pegboard panel(s) into the furring strips. Ensure the screws go into the strips, not just the drywall.
- Cut for Outlets: Turn off power. Remove covers. Measure and mark the outlet locations on the pegboard. Use a drill with a large drill bit (or a jigsaw) to cut out the holes.
- Paint (Optional): You can paint the pegboard any color you like.
- Add Accessories: Now for the fun part! Add pegboard hooks, shelves, and containers to organize your kitchen essentials.
32. The Bold Color Block Glass Panel

This backsplash is super modern and graphic. It uses large glass panels in two contrasting, vibrant colors: orange and bright turquoise.
The sleek, seamless surface of the glass is easy to clean. The bold color blocking creates an energetic focal point. This is a brave choice for a playful, contemporary kitchen.
DIY: Painted Acrylic Panels
Real back-painted glass is expensive. You can achieve a similar look with back-painted acrylic panels.
Step-by-Step Instructions:
- Measure Panels: Measure your backsplash area precisely. Order sheets of acrylic (Plexiglas) cut to the exact size of your desired color blocks.
- Paint the Back: This is important. You will paint the back side of the acrylic. Use a spray paint suitable for plastic. Apply several thin, even coats of your chosen colors (orange and turquoise). Let dry completely between coats.
- Prepare Wall: Ensure your wall is clean and smooth.
- Install Panels: Apply a strong, clear silicone adhesive (specifically for mirrors or panels) to the back of the painted side of the acrylic panel. Press the panel firmly onto the wall. Use painter’s tape to hold it in place while the adhesive cures.
- Seam: For the seam between the two colors, use a very thin bead of clear or colored silicone caulk.
- Outlet Cutouts: For outlets, you’ll need to cut the acrylic precisely before painting. This requires specialized tools or a professional.
33. The Chalkboard Command Center

This backsplash is not just decorative; it’s a family command center! The wall is painted with chalkboard paint. A large, framed chalkboard is mounted over it.
This provides space for grocery lists, weekly menus, and messages. It’s practical, interactive, and adds a casual, homey touch. The butcher block counters keep it warm.
DIY: Chalkboard Paint Backsplash
This is a fun and easy DIY for a functional backsplash.
Step-by-Step Instructions:
- Prepare Wall: Clean your wall thoroughly. Sand any glossy surfaces to help the paint adhere. Tape off the surrounding areas with painter’s tape.
- Apply Primer: Apply a coat of primer. Let it dry completely.
- Apply Chalkboard Paint: Apply 2-3 thin, even coats of chalkboard paint. Allow proper drying time between coats (check the can).
- Cure: Allow the paint to cure for several days (usually 3-7 days) before writing on it.
- Condition: Before first use, rub the side of a piece of chalk over the entire surface, then wipe it clean with a soft cloth. This “conditions” the board and prevents ghosting.
- Add Frame/Shelf: Install a simple wooden frame around your main chalkboard area, or add a small floating shelf at the bottom to hold chalk.
34. The Playful Penny Tile Mix

This backsplash uses small, round “penny” tiles. The overall look is bright white, but with random splashes of light blue, teal, and navy.
This creates a playful, scattered effect. The small scale of the tiles adds a lot of texture. It’s a whimsical and cheerful choice that’s perfect for a kitchen with personality.
DIY: Penny Tile Sheets with Color Mix
These tiles come on mesh sheets, making installation easier.
Step-by-Step Instructions:
- Prep: Clean your wall.
- Buy Tiles: Purchase sheets of white penny tiles and a few sheets of your accent colors.
- Create Your Mix: Before you install, you can pop off individual white tiles from the mesh sheets and replace them with colored ones to create your desired random pattern.
- Install: Apply a thin-set mortar to the wall using a notched trowel. Press the mesh sheets onto the mortar, ensuring they are level.
- Cut Sheets: Use heavy-duty scissors or a utility knife to cut the mesh backing for edges and outlets (power off!).
- Grout: Once the mortar is dry, apply unsanded grout (white or light grey) over the tiles, pushing it into all the gaps. Wipe off excess with a sponge.
- Seal: Apply a grout sealer for protection.
35. The Organic Wood Grain Tile

This backsplash uses tiles with a distinctive wood-grain pattern. The tiles are laid in a repeating, interlocking design that resembles leaves or feathers.
The warm browns and creams mimic natural wood, but in a durable tile format. The pattern adds organic movement and texture. It’s a sophisticated way to bring natural elements into a modern kitchen.
DIY: Wood Grain Peel-and-Stick Tiles
You can find peel-and-stick tiles with a wood-grain print that mimic this pattern.
Step-by-Step Instructions:
- Prep: Clean your wall thoroughly.
- Buy Tiles: Look for peel-and-stick tiles with a similar interlocking “leaf” or “feather” wood-grain pattern.
- Plan Layout: These patterns are often designed to interlock perfectly. Start from the center of your wall (usually above the stove) to ensure the pattern is balanced.
- Install: Peel the backing and carefully align your first tile. Press firmly.
- Continue: Work outwards, interlocking each new tile with the previous one.
- Cut: Use a sharp utility knife and a straight edge to cut tiles for edges and outlets (power off!).
- Press and Caulk: Once all tiles are in place, press them firmly over the entire surface. Use a clear or brown caulk at the counter for a seamless look.
36. The Mirrored Statement Slab

This backsplash is a grand statement. It uses large, book-matched slabs of highly figured marble. The veining is incredibly dramatic, featuring bold gold, grey, and black lines.
The “book-matching” means two slabs are cut from the same stone and opened like a book, creating a symmetrical, mirror-image pattern. It extends up the wall and around the range hood, making it a powerful focal point.
DIY: Faux Book-Matched Panels
Replicating this with real stone is very expensive. You can achieve a similar visual impact with large-format vinyl or acrylic panels.
Step-by-Step Instructions:
- Prepare Wall: Ensure the wall is perfectly smooth. Any imperfections will show through thin panels.
- Source Material: Look for large-format, high-resolution prints of book-matched marble patterns on peel-and-stick vinyl or lightweight acrylic panels. You might need to order custom sizes.
- Measure and Cut: Measure your backsplash area, including the range hood. Cut your vinyl or acrylic panels to fit precisely.
- Plan the “Book-Match”: If using separate panels for the book-match effect, ensure they are perfectly symmetrical and aligned.
- Apply (Two People): This is a large, tricky application. With two people, carefully peel back the backing from the top edge. Align the panel precisely. Slowly peel down the rest of the backing while smoothing the panel with a squeegee.
- Smooth Bubbles: Work meticulously to remove all air bubbles.
- Trim: Use a very sharp utility knife to trim excess material at the edges.
- Outlet Cutouts: Turn off power. Remove covers. Cut carefully around the outlets after the panel is applied.
- Caulk: Use clear silicone caulk to seal the edges at the counter.
37. The Seamless Black Quartz

This backsplash is sleek and minimalist. It’s a continuous piece of black quartz that matches the countertop. It runs seamlessly up the wall to the bottom of the upper cabinets.
The dark color provides a striking contrast to the white cabinets. The speckled texture of the quartz adds subtle interest. It’s incredibly durable, easy to clean, and creates a sophisticated, understated look.
DIY: Contact Paper or Acrylic Panels
This is easy to achieve with adhesive materials.
Step-by-Step Instructions:
- Prepare Wall: Clean and smooth your wall.
- Measure and Cut: Measure your backsplash area. Cut your contact paper or acrylic panels to fit.
- Apply: Peel the backing from the contact paper or apply adhesive to the acrylic panel. Press firmly onto the wall.
- Smooth: Use a squeegee to remove air bubbles.
- Trim: Trim excess with a sharp utility knife.
- Caulk: Use black silicone caulk to seal the edges.
38. The Gilded Mosaic Grid

This backsplash is pure luxury. It uses tiny square mosaic tiles in varied shades of gold and bronze. The metallic finish catches the light beautifully.
The small scale of the tiles creates a rich, textured surface. The subtle shifts in color make it feel dynamic. This is a glamorous choice that adds warmth and sparkle to a kitchen.
DIY: Gold Peel-and-Stick Mosaic Tiles
You can find peel-and-stick mosaic tiles that mimic this gilded look.
Step-by-Step Instructions:
- Prep: Clean your wall.
- Measure: Measure your backsplash area.
- Install: Peel the backing off the mesh-backed mosaic sheets. Press firmly onto the wall.
- Stagger Sheets: Overlap the edges of the sheets as per manufacturer instructions to hide seams.
- Cut: Use heavy-duty scissors or a utility knife to cut sheets for edges and outlets (power off!).
- Press and Caulk: Once all tiles are in place, press them firmly. Use a clear or dark bronze caulk at the counter.
39. The Industrial Concrete & Stone Mix

This backsplash combines two distinct textures for an industrial-modern look. The upper section is a speckled white stone (like quartz or granite). The lower section is a textured, rust-colored concrete or micro-cement.
The stark contrast between the smooth white and rough, earthy texture is striking. It creates a contemporary, raw aesthetic. The overall design feels robust and unique.
DIY: Textured Paint and Stone-Look Panels
You can combine different DIY techniques for this look.
Step-by-Step Instructions:
- Plan the Divide: Decide where the two textures will meet. Draw a straight, level line with a pencil.
- Upper Section: Install a peel-and-stick stone-look panel or wallpaper for the upper section. Ensure the bottom edge is perfectly aligned with your pencil line.
- Lower Section: For the concrete look, tape off the top edge (just below the stone panel). Apply a textured paint that mimics concrete (often sold as “concrete effect paint”). Use a trowel to apply it in random, short strokes to build texture.
- Blend Seam: Once dry, remove the tape. You can caulk the seam with a paintable caulk that matches the concrete, or leave a slight gap for a raw look.
- Seal Concrete: If using concrete paint, apply a matte sealant for protection in the kitchen.
40. The Elegant Marble Slab & Shelf

This backsplash uses a continuous slab of light marble with subtle veining. It creates a luxurious, seamless look.
What makes it unique is the matching floating shelf, cut from the same marble. This extends across the width of the wall. It provides display space without interrupting the beautiful stone. It’s a sophisticated way to add both beauty and function.
DIY: Marble-Look Panel with Floating Shelf
You can use a large marble-look panel and add a separate floating shelf.
Step-by-Step Instructions:
- Prepare Wall: Ensure your wall is clean and smooth.
- Install Marble Panel: Apply a large peel-and-stick marble-look panel or sheet to your backsplash area. This should run up to the height where your shelf will be.
- Install Floating Shelf: Purchase a simple white floating shelf. To match the marble, you can cover it with a marble-patterned contact paper.
- Mount Shelf: Install the floating shelf securely into wall studs above your marble panel. Ensure it’s perfectly level.
- Caulk: Use a clear or white silicone caulk where the marble panel meets the counter and along the bottom of the floating shelf (if needed for a cleaner look).
41. The Dynamic Sound Wave Art

This backsplash takes a completely artistic approach. Instead of tiles, it features a bold, colorful 3D art piece resembling a sound wave. The textured white panel behind it adds subtle depth.
The vibrant, gradient colors (pink, purple, blue, yellow) against the minimalist white create an energetic focal point. This is a highly contemporary and personalized statement, turning a functional space into an art gallery.
DIY: 3D Wall Panels with Painted Art
You can create a similar textured base and then add your own “sound wave” art.
Step-by-Step Instructions:
- Install 3D Wall Panels: Purchase lightweight, paintable 3D wall panels (often made of PVC or plant fiber). Apply these directly to your clean, smooth wall using construction adhesive. Paint them a crisp white once installed.
- Plan Your Design: Use a pencil and a long ruler to lightly draw the outline of your “sound wave” onto the white 3D panels. You can find sound wave images online for inspiration.
- Paint the Sound Wave: Using acrylic craft paints in your desired gradient colors, carefully paint within your drawn lines. Start with one color (e.g., red), then blend into the next (orange, yellow, green, blue, purple) using a clean brush or sponge. Allow each section to dry before touching it.
- Outline (Optional): For a sharper edge, you can use a thin black permanent marker to outline the bottom of the “sound wave” or any other defining features.
- Seal: Apply a clear, matte or satin protective sealant over the painted area for durability and easy cleaning.
42. The Venetian Plaster Finish

This backsplash isn’t tiled or paneled; it’s a specialty wall finish. Venetian plaster (or a similar lime-wash technique) creates a soft, subtle texture with slight variations in color.
The muted, warm grey tones and matte finish create a serene and sophisticated backdrop. This look is seamless and luxurious, adding an Old-World charm and an organic, tactile quality to the kitchen.
DIY: Faux Venetian Plaster with Glaze
You can achieve a similar soft, mottled effect with specialized paint techniques.
Step-by-Step Instructions:
- Prepare Wall: Clean your wall and repair any imperfections. Apply a coat of primer.
- Base Coat: Paint your wall with a flat or eggshell latex paint in your chosen base color (e.g., a light grey-beige). Let dry.
- Mix Glaze: Mix a translucent glaze with a slightly darker shade of your base paint (or a contrasting but complementary color). The ratio is usually 3-4 parts glaze to 1 part paint, but check your product’s instructions.
- Apply Glaze: Using a special Venetian plaster trowel, a wide putty knife, or even a large, soft brush, apply the glaze in short, overlapping, random strokes. Work in small sections. The goal is to create a subtle, mottled effect, not a solid coat.
- Blend: While the glaze is still wet, use a clean, dry rag or a clean, soft brush to gently blend and soften the edges of your strokes, creating a seamless, natural look.
- Layer (Optional): For more depth, apply a second layer of glaze once the first is dry, using a slightly different shade or a lighter touch.
- Seal: Once completely dry (allow 24-48 hours), apply several coats of a clear, non-yellowing, waterproof sealant (like a water-based polyurethane) to protect the finish in the kitchen.
Your kitchen backsplash does not have to be boring. This list of 42 ideas proves there are many options.
You can use classic tiles in new ways. You can try bold wallpaper, plaster, or metal sheets. You can even create a custom mural that acts as a piece of art.
Many of these looks are achievable with a weekend project. A high-impact change is within your reach.
Do not settle for a dull wall. Choose an idea that fits your style. It is time to make your cooking space feel truly finished and personal.
Key Takeaways
- Think Beyond Tile: Your backsplash can be made from wood, metal, plaster, or even durable wallpaper.
- Texture Adds Depth: Materials like fluted panels, brick veneers, and 3D tiles add character that paint cannot.
- DIY Is Possible: Peel-and-stick options and simple paint techniques make a big change accessible to anyone.
- Create a Focal Point: Use a framed inlay, a bold mural, or a book-matched slab over the stove to create a single, powerful statement.
- Small Changes Matter: Even a simple change, like stacking subway tiles vertically, can have a large impact on the space.